

Page 1
DIGITAL FULL COLOUR
MULTIFUNCTIONAL SYSTEM
OPERATION GUIDE
MODEL: MX-C250E
MX-C250F
MX-C250FE
MX-C300E
MX-C300W
MX-C300WE
Page 2

INTRODUCTION
This manual describes MX-C250E/MX-C250F/MX-C250FE/MX-C300E/MX-C300W/MX-C300WE Digital full colour
multifunctional system.
• Where "MX-XXXX" appears in this manual, please substitute the name of your model for "XXXX". For the
Note
The display screens, messages, and key names shown in the manual may differ from those on the actual machine
due to product improvements and modifications.
name of your model, see p.8.
• The screen images and procedures that appear in this manual are mainly for Windows 7. With other versions
of Windows, some screen images may be different from those in this manual.
• For information on using your operating system, refer to your operating system's manual or online Help.
2
Page 3

CONTENTS
INTRODUCTION ................................................ 2
USING THE MANUAL ....................................... 7
● ABOUT THE MANUALS ...................................7
● CONVENTIONS USED IN THIS MANUAL .......7
DIFFERENCES BETWEEN MODELS............... 8
1 BEFORE USING THE MACHINE
PART NAMES AND FUNCTIONS ..................... 9
● OPERATION PANEL ......................................11
DISPLAY .......................................................... 13
● LEFT MENU AND RIGHT MENU ...................13
● HOW TO USE THE DISPLAY ........................14
POWER ON AND OFF..................................... 15
● POWER ON ....................................................15
● POWER OFF ..................................................15
● POWER SAVE MODES..................................15
● DEFAULT SETTINGS.....................................15
LOADING PAPER............................................ 16
● PAPER............................................................16
● PRINT SIDE FACE UP OR FACE DOWN......17
● LOADING PAPER...........................................19
● TRAY SETTINGS ...........................................22
USER AUTHENTICATION MODE................... 23
● USING USER AUTHENTICATION MODE .....23
ENTERING CHARACTERS............................. 24
● CHARACTERS THAT CAN BE ENTERED ....24
2 COPY FUNCTIONS
NORMAL COPYING ........................................ 26
● PLACING THE ORIGINAL ............................. 27
● MAKING A COPY DARKER OR LIGHTER ... 28
● SELECTING THE TRAY................................ 28
● SETTING THE NUMBER OF COPIES .......... 28
● SELECTING THE ORIGINAL SIZE ............... 29
● USING THE BYPASS TRAY TO COPY A
SPECIAL SIZE ORIGINAL............................. 29
● REDUCING OR ENLARGING A COPY......... 29
● AUTOMATIC DUPLEX COPYING ................. 30
CONVENIENT COPY FUNCTIONS................. 31
● SORT COPY.................................................. 31
● ID CARD COPY ............................................. 32
● RESOLUTION SETTINGS............................. 33
SPECIAL MODES............................................ 34
● COPYING MULTIPLE ORIGINALS ONTO A
SINGLE SHEET OF PAPER (2 IN 1 / 4 IN 1
COPY)............................................................ 34
● CARD SHOT.................................................. 35
● ADJUSTING RED/GREEN/BLUE IN COPIES
(RGB Adjust).................................................. 35
● ADJUSTING THE SHARPNESS OF AN IMAGE
(Sharpness) ................................................... 36
● WHITENING FAINT COLOURS IN COPIES
(Suppress Background) ................................. 36
FREQUENTLY USED SETTINGS (PROGRAMS)
.. 37
3
Page 4

3 PRINTER
4 FAX FUNCTIONS
● PRINTER FUNCTION OF THE MACHINE.....39
PRINTING FROM WINDOWS.......................... 40
●
PRINTER DRIVER PROPERTIES WINDOW
●
BASIC PRINTING PROCEDURE
●
PRINTING WHEN THE USER AUTHENTICATION
FUNCTION IS ENABLED
●
VIEWING PRINTER DRIVER HELP
●
SAVING FREQUENTLY USED PRINT SETTINGS
●
CHANGING THE PRINTER DRIVER DEFAULT
SETTINGS
.......................................................47
.................................43
......................41
..................44
....40
........45
PRINTING FROM A MACINTOSH .................. 48
●
BASIC PRINTING PROCEDURE
●
PRINTING WHEN THE USER AUTHENTICATION
FUNCTION IS ENABLED
.................................51
......................48
FREQUENTLY USED FUNCTION................... 52
●
SELECTING THE COLOUR MODE
●
SELECTING A PRINT MODE SETTING
●
TWO-SIDED PRINTING
●
FITTING THE PRINT IMAGE TO THE PAPER ...... 56
●
PRINTING MULTIPLE PAGES ON ONE PAGE
...................................55
..................52
...........54
....57
CONVENIENT PRINTING FUNCTIONS.......... 59
●
CONVENIENT FUNCTIONS FOR CREATING
PAMPHLETS AND POSTERS
●
FUNCTIONS TO ADJUST THE SIZE AND
ORIENTATION OF THE IMAGE
●
COLOUR MODE ADJUSTMENT FUNCTION
●
FUNCTIONS THAT COMBINE TEXT AND
IMAGES.............................................................. 68
●
PRINT FUNCTIONS FOR SPECIAL PURPOSES .......71
●
CONVENIENT PRINTER FUNCTIONS
PRINTING WITHOUT THE PRINTER DRIVER
●
DIRECTLY PRINTING A FILE IN USB MEMORY .......75
●
DIRECTLY PRINTING FROM A COMPUTER .............76
●
CANCELLING A PRINT JOB FROM THE MACHINE....... 76
●
CHANGE THE MACHINE TO OFFLINE MODE
..........................59
.......................62
....64
.............72
... 74
......76
APPENDIX ....................................................... 77
●
PRINTER DRIVER SPECIFICATION LIST
..............77
TO USE THIS PRODUCT CORRECTLY AS A
FACSIMILE ...................................................... 79
POINTS TO CHECK AND PROGRAM AFTER
INSTALLATION ............................................... 80
● FAX MODE (BASE SCREEN) ....................... 81
ORIGINALS ..................................................... 82
● ORIGINALS THAT CAN BE FAXED.............. 82
CONVENIENT DIALLING METHODS (AUTO-
DIALLING) ....................................................... 83
FAX TRANSMISSION METHODS................... 84
● ADDRESS REVIEW FUNCTION ................... 84
SENDING A FAX ............................................. 85
●
BASIC PROCEDURE FOR SENDING FAXES............ 85
● TRANSMISSION BY AUTO-DIALLING (SPEED
DIALLING AND GROUP DIALLING) ............. 87
● SEARCHING FOR A PROGRAMMED
DESTINATION (USING THE [ADDRESS] KEY
( ))................................................................ 87
● FAXING A TWO-SIDED ORIGINAL............... 88
● HOW TO SELECT THE RESOLUTION......... 92
● CHANGING THE EXPOSURE....................... 92
● CANCELLING A FAX TRANSMISSION ........ 93
RECEIVING FAXES......................................... 95
● RECEIVING A FAX........................................ 95
● MANUAL FAX RECEPTION .......................... 96
FUNCTION KEY .............................................. 97
● FAX PRINT HOLD FUNCTION...................... 97
● AUTOMATIC TRANSMISSION AT A
SPECIFIED TIME .......................................... 98
● SENDING THE SAME DOCUMENT TO
MULTIPLE DESTINATIONS IN A SINGLE
OPERATION.................................................. 99
● SENDING OPTIONS ................................... 100
● POLLING MEMORY .................................... 101
● STORING, EDITING, AND DELETING AUTO-
DIAL NUMBERS (SPEED DIAL NUMBERS,
AND GROUP DIALS)................................... 103
● STORING, EDITING AND DELETING
PROGRAMS ................................................ 107
PRINTING LISTS OF PROGRAMMED
INFORMATION AND SETTINGS .................. 109
● INCLUDING SENDER INFORMATION ON
FAXES (OWN NUMBER SENDING) ........... 109
● FORWARDING FUNCTION......................... 110
● USING THE FORWARDING FUNCTION.... 111
USING SETTINGS STORED AS A PROGRAM 112
● USING A PROGRAM................................... 112
4
Page 5

FORWARDING RECEIVED DATA TO A NETWORK
ADDRESS (INBOUND ROUTING SETTINGS)
● CONFIGURING THE BASIC SETTINGS .....113
● SETTINGS THE DESTINATION...................115
..... 113
SENDING A FAX DIRECTLY FROM A
COMPUTER (PC-Fax) ....................................... 116
CONNECTING AN EXTENSION PHONE.......... 117
● CONNECTING AN EXTENSION PHONE ....117
● USING AN EXTENSION PHONE .................118
WHEN A TRANSACTION REPORT IS PRINTED.. 120
● INFORMATION APPEARING IN THE TYPE/
NOTE COLUMN ...........................................120
REPORT AT REGULAR INTERVALS
(COMMUNICATION ACTIVITY REPORT)..............121
WHEN AN ALARM SOUNDS AND A WARNING
MESSAGE IS DISPLAYED.....................................121
● SELF-DIAGNOSTIC FUNCTION..................122
●
MESSAGES DURING NORMAL OPERATION .... 122
5 SCANNER FUNCTIONS
6 TROUBLESHOOTING
TROUBLESHOOTING................................... 141
● NETWORK PROBLEMS.............................. 143
● MACHINE/COPYING PROBLEMS .............. 143
● PRINTING AND SCANNING PROBLEMS .. 146
● FAX PROBLEMS ......................................... 149
INDICATORS AND DISPLAY MESSAGES .. 151
IF YOUR E-MAIL IS RETURNED .................. 152
MISFEED REMOVAL
● MISFEED IN THE DOCUMENT FEEDER... 153
● MISFEED IN THE BYPASS TRAY .............. 155
● MISFEED IN THE MACHINE....................... 156
● MISFEED IN THE PAPER TRAY 1.............. 159
● MISFEED IN THE PAPER TRAY 2.............. 159
REPLACING THE TONER CARTRIDGE ...... 160
REPLACING THE TONER COLLECTION
CONTAINER .................................................. 161
.......................................... 153
ABOUT THE SCANNER FUNCTIONS.......... 123
●
THE BASE SCREEN OF SCANNER MODE ...125
SENDING AN IMAGE .................................... 126
● BASIC TRANSMISSION PROCEDURE.......126
● SELECTING A DESTINATION (USING THE
[ADDRESS] KEY ( )) ..................................128
●
TRANSMITTING A TWO-SIDED ORIGINAL ...129
STORING SCANNING SETTINGS ................ 130
● SETTING THE SCANNING SIZE .................130
● SELECTING THE RESOLUTION .................130
● SELECTING THE FILE FORMAT.................131
● ADJUSTING THE GREYSCALE OF BLACK &
WHITE MODE...............................................131
●
ADJUSTING THE SCANNING EXPOSURE ....132
● ENABLING SCANNING MARGINS (VOID
AREA) ...........................................................132
● WHITENING FAINT COLOURS IN COPIES
(SUPPRESS BACKGROUND) .....................132
● ADJUSTING THE SHARPNESS OF AN IMAGE
(SHARPNESS) .............................................132
● SCANNING BUSINESS CARDS (BUSINESS
CARD SCAN)................................................133
● IMAGE ORIENTATION AND STANDARD
ORIGINAL PLACEMENT ORIENTATION ....133
● STORING AND EDITING/DELETING A
PROGRAM ...................................................134
● USING STORED SETTINGS (PROGRAM)..134
SCANNING FROM YOUR COMPUTER (PC
SCAN) ............................................................ 135
● SCANNING FROM A TWAIN-COMPLIANT
APPLICATION ..............................................135
USB MEMORY SCAN.................................... 139
●
USING THE USB MEMORY SCAN FUNCTION ..139
7 ROUTINE MAINTENANCE
CHECKING THE TOTAL OUTPUT COUNT AND
TONER REMAINING
ROUTINE MAINTENANCE............................ 163
● CLEANING THE DOCUMENT GLASS AND
DOCUMENT FEEDER................................. 163
● CLEANING THE ORIGINAL SCANNING
GLASS (ONLY WHEN AN DOCUMENT
FEEDER IS INSTALLED) ............................ 164
● CLEANING THE BYPASS TRAY PAPER FEED
ROLLER....................................................... 164
● CLEANING THE AUTOMATIC DOCUMENT
FEEDER ROLLERS..................................... 164
● CLEANING THE MAIN CHARGER OF THE
PHOTOCONDUCTIVE DRUM..................... 165
● CLEANING THE LASER UNIT .................... 166
ADJUSTING THE DISPLAY CONTRAST
...................................... 163
........ 167
5
Page 6

8 SYSTEM SETTINGS
9
WEB FUNCTIONS IN THE MACHINE
PURPOSE OF THE SYSTEM SETTINGS
● PROGRAMS RELATED TO ALL FUNCTIONS
OF THE MACHINE .......................................168
● PROGRAMMING AN ADMINISTRATOR
PASSWORD .................................................168
...... 168
PROGRAMMING AN ADMINISTRATOR
PASSWORD
SYSTEM SETTINGS LIST
USING THE SYSTEM SETTINGS
● Change Admin PW .......................................176
● Default Settings.............................................176
● Network.........................................................176
● User Control..................................................178
● Device Control ..............................................179
● Registration Adjustment................................179
● Energy Save .................................................180
● List Print ........................................................181
● AutoColourCalib............................................181
● Security Settings ...........................................182
● Copier ...........................................................182
● Printer ...........................................................183
● Fax ................................................................183
● Scanner.........................................................189
................................................... 169
.............................. 170
.................. 175
ABOUT THE WEB PAGES
● HOW TO ACCESS THE WEB PAGE .......... 190
ABOUT THE WEB PAGES (FOR USERS)
............................ 190
.... 191
CONFIGURING THE PRINTER CONDITION
SETTINGS
● HOW TO CONFIGURE THE SETTINGS..... 192
● PRINTER CONDITION SETTING MENU .... 193
● PRINTER CONDITION SETTINGS ............. 193
...................................................... 192
CONFIGURING THE SCANNER CONDITION
SETTINGS
● STORING DESTINATIONS ......................... 195
● BASIC SETTINGS FOR NETWORK SCAN
...................................................... 195
(FOR THE ADMINISTRATOR) .................... 201
ABOUT THE WEB PAGES (FOR THE
ADMINISTRATOR)
......................................... 202
CONFIGURING SMTP, DNS AND LDAP
SERVER SETTINGS
...................................... 203
PROTECTING INFORMATION PROGRAMMED
IN THE WEB PAGE ([Passwords])
ADMINISTRATOR SETTINGS
● CONFIGURING A SETTING IN THE
ADMINISTRATOR SETTINGS .................... 205
● ADMINISTRATOR SETTINGS .................... 205
............... 204
....................... 205
E-MAIL STATUS AND E-MAIL ALERT
SETTINGS
● INFORMATION SETUP............................... 206
● SMTP SETUP .............................................. 206
● STATUS MESSAGE SETUP ....................... 207
● ALERTS MESSAGE SETUP ....................... 207
...................................................... 206
TRADEMARK ACKNOWLEDGMENTS
6
......... 209
Page 7
USING THE MANUAL
This machine has been designed to provide convenient copying features in a minimum amount of office space and
with maximum operational ease. To get full use of all machine features, be sure to familiarise yourself with this
manual and the machine. For quick reference during machine use, SHARP recommends printing out this manual
and keep it in a handy location.
ABOUT THE MANUALS
The manuals for the machine are as follows:
Start Guide
This manual explains:
• Specifications
• Cautions for using the machine in safety
Operation Guide (on the accessory CD-ROM)
This manual explains:
How to use the machine and what to do if trouble occurs.
Software Setup Guide (on the accessory CD-ROM)
This manual explains:
How to install software to operate the machine from your computer.
CONVENTIONS USED IN THIS MANUAL
The icons in the manuals indicate the following types of information:
Warning
Caution
Note
Warns the user that injury may result if the contents of the warning are not properly followed.
Cautions the user that damage to the machine or one of its components may result if the contents
of the caution are not properly followed.
Notes provide information relevant to the machine regarding specifications, functions,
performance, operation and such, that may be useful to the user.
7
Page 8

DIFFERENCES BETWEEN MODELS
This manual covers the following models.
Model Copy Speed Wireless LAN FAX Function Document Feeder
MX-C300W
MX-C300WE
MX-C250F
MX-C250FE
MX-C250E 25CPM
MX-C300E 30CPM 2-sided
AB series (metric) and inch series references
Both specifications are quoted where applicable.
For example:
Page 4: A4 and B5 (8-1/2" x 11" and 5-1/2" x 8-1/2")
Start Guide: 50%, 70%, 81%, 86%, 100%, 115%, 122%, 141%, 200% (50%, 64%, 77%, 95%, 100%, 121%, 129%,
141%, 200%)
Although AB series size indications are shown on the operation panel of this manual, inch series indications are
displayed on the inch series machines.
30CPM Yes
25CPM
No
Yes
No
2-sided
1-sided
1-sided
8
Page 9
1
This chapter contains basic information that should be read before using the machine.
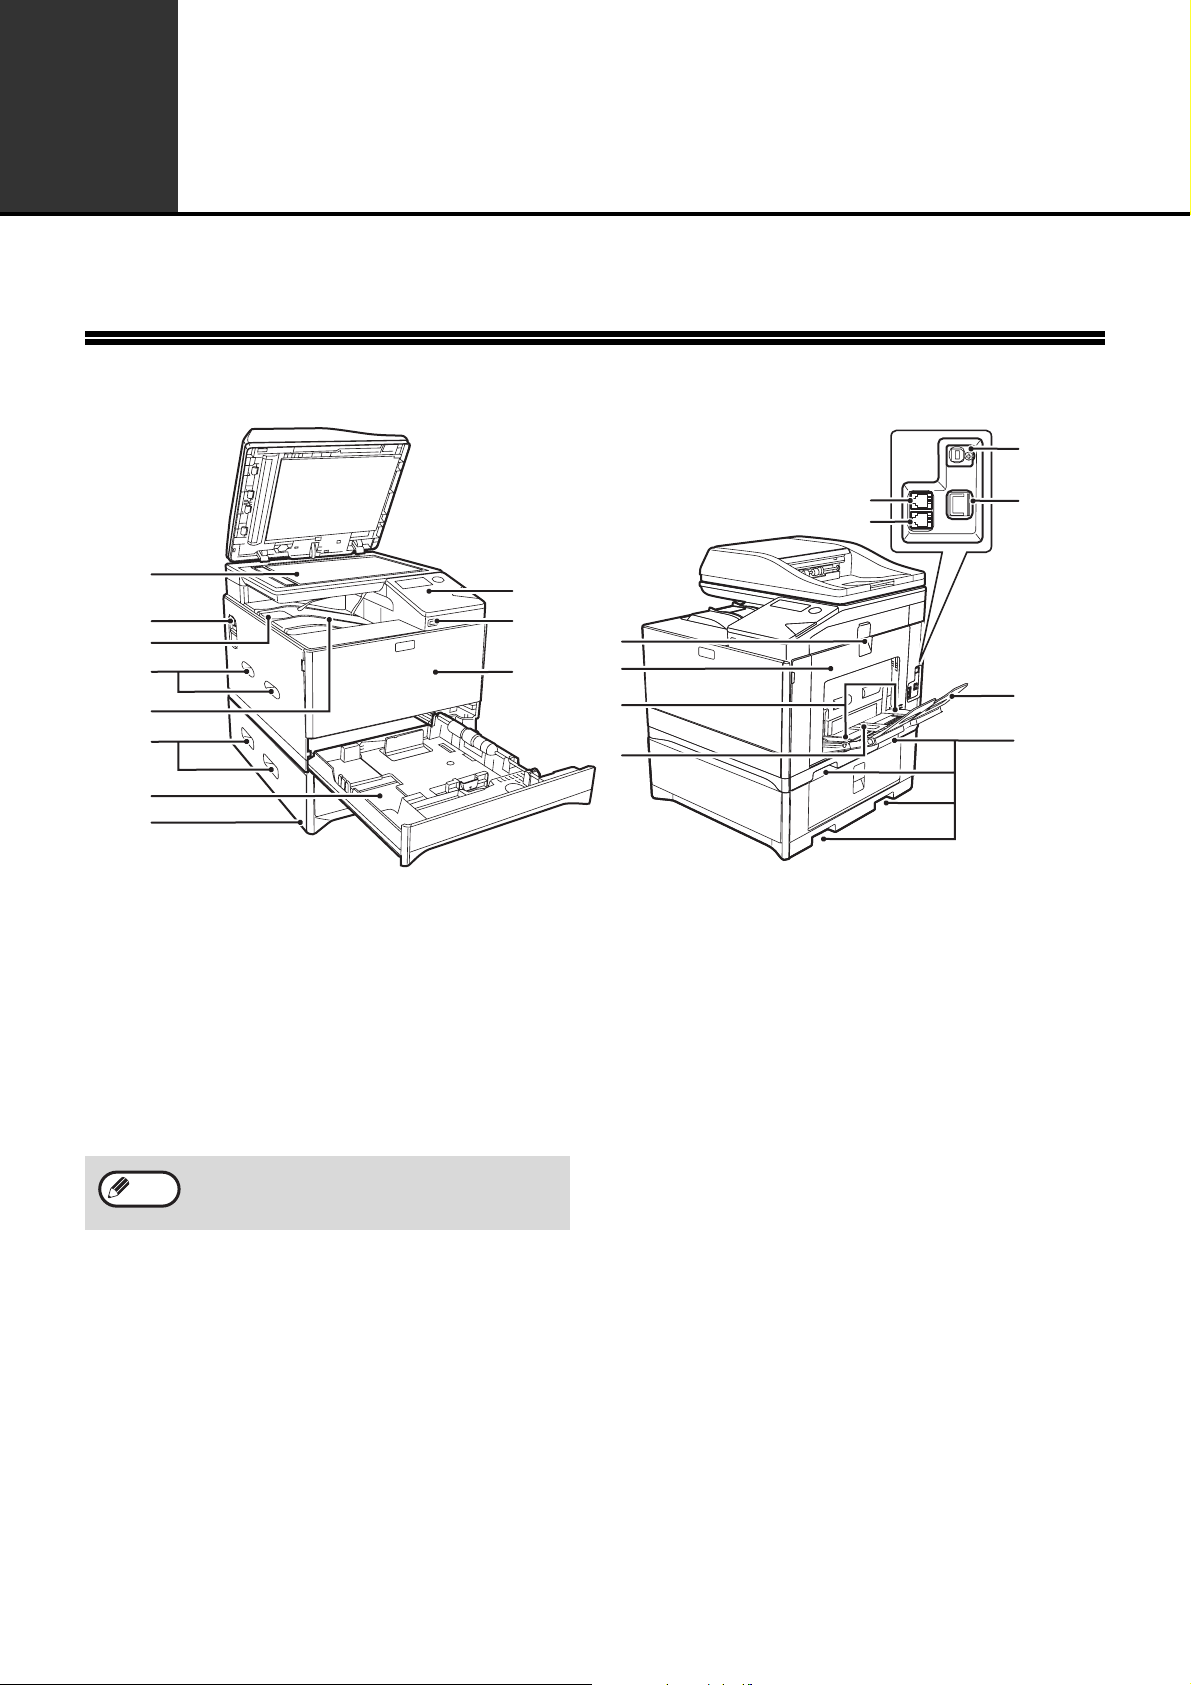
PART NAMES AND FUNCTIONS
BEFORE USING THE MACHINE
(17)
(1)
(2)
(3)
(4)
(5)
(4)
(6)
(7)
(1) Document glass
Place an original that you wish to scan face down
here. (p.27)
(2) Power switch
Press to turn the machine power on and off.
(3) Centre tray extensions
When you eject the paper of A4 size or more,
you can use open to the outside.
(4) Handles
Use to move the machine. When attaching tray
2, use the handle at the bottom.
Note
(5) Centre tray
Copies and printed pages are output to this tray.
(6) Tray 1
Tray 1 can hold approximately 250 sheets of copy
paper (80
types, sizes, and weights, refer to "PAPER" (p.16).
(7) Tray 2 (Option)
Tray 2 can hold approximately 500 sheets of copy
paper (80
types, sizes, and weights, refer to "PAPER" (p.16).
(8) Operation panel
Contains operation keys and indicator lights.
(9) USB 2.0 port (Type A)
This is used to connect a USB device such as
USB memory to the machine.
The main unit is extremely heavy, and thus two
people are required to do the work. When lifting
the main unit, grasp the handles on each side firm
g
/m2 (21 lbs.)). For restrictions on paper
g
/m2 (21 lbs.)). For restrictions on paper
(8)
(9)
(10)
(11)
(12)
(13)
(14)
(10) Front cover
Open to replace the toner cartridge etc.
(11) Side cover handle
Pull to open the side cover.
(12) Side cover
Open to remove misfed paper.
(13) Bypass tray guides
Adjust to the width of the paper when using the
bypass tray.
(14) Bypass tray
Special paper (heavy paper or transparency film)
can be fed from the bypass tray.
(15) Extension phone socket
The line from an extension phone can be
connected to this socket to use the telephone
function.
(16) Telephone line socket
When the fax function of the machine is used,
the telephone line is connected to this socket.
(17) USB 2.0 port (Type B)
Connect to your computer to this port to use the
printer function.
(18) LAN connector
Connect the LAN cable to this connector when
the machine is used on a network.
(19) Bypass tray extension
Open this tray when loading paper in the bypass
tray.
(15)
(16)
(18)
(19)
(4)
9
Page 10
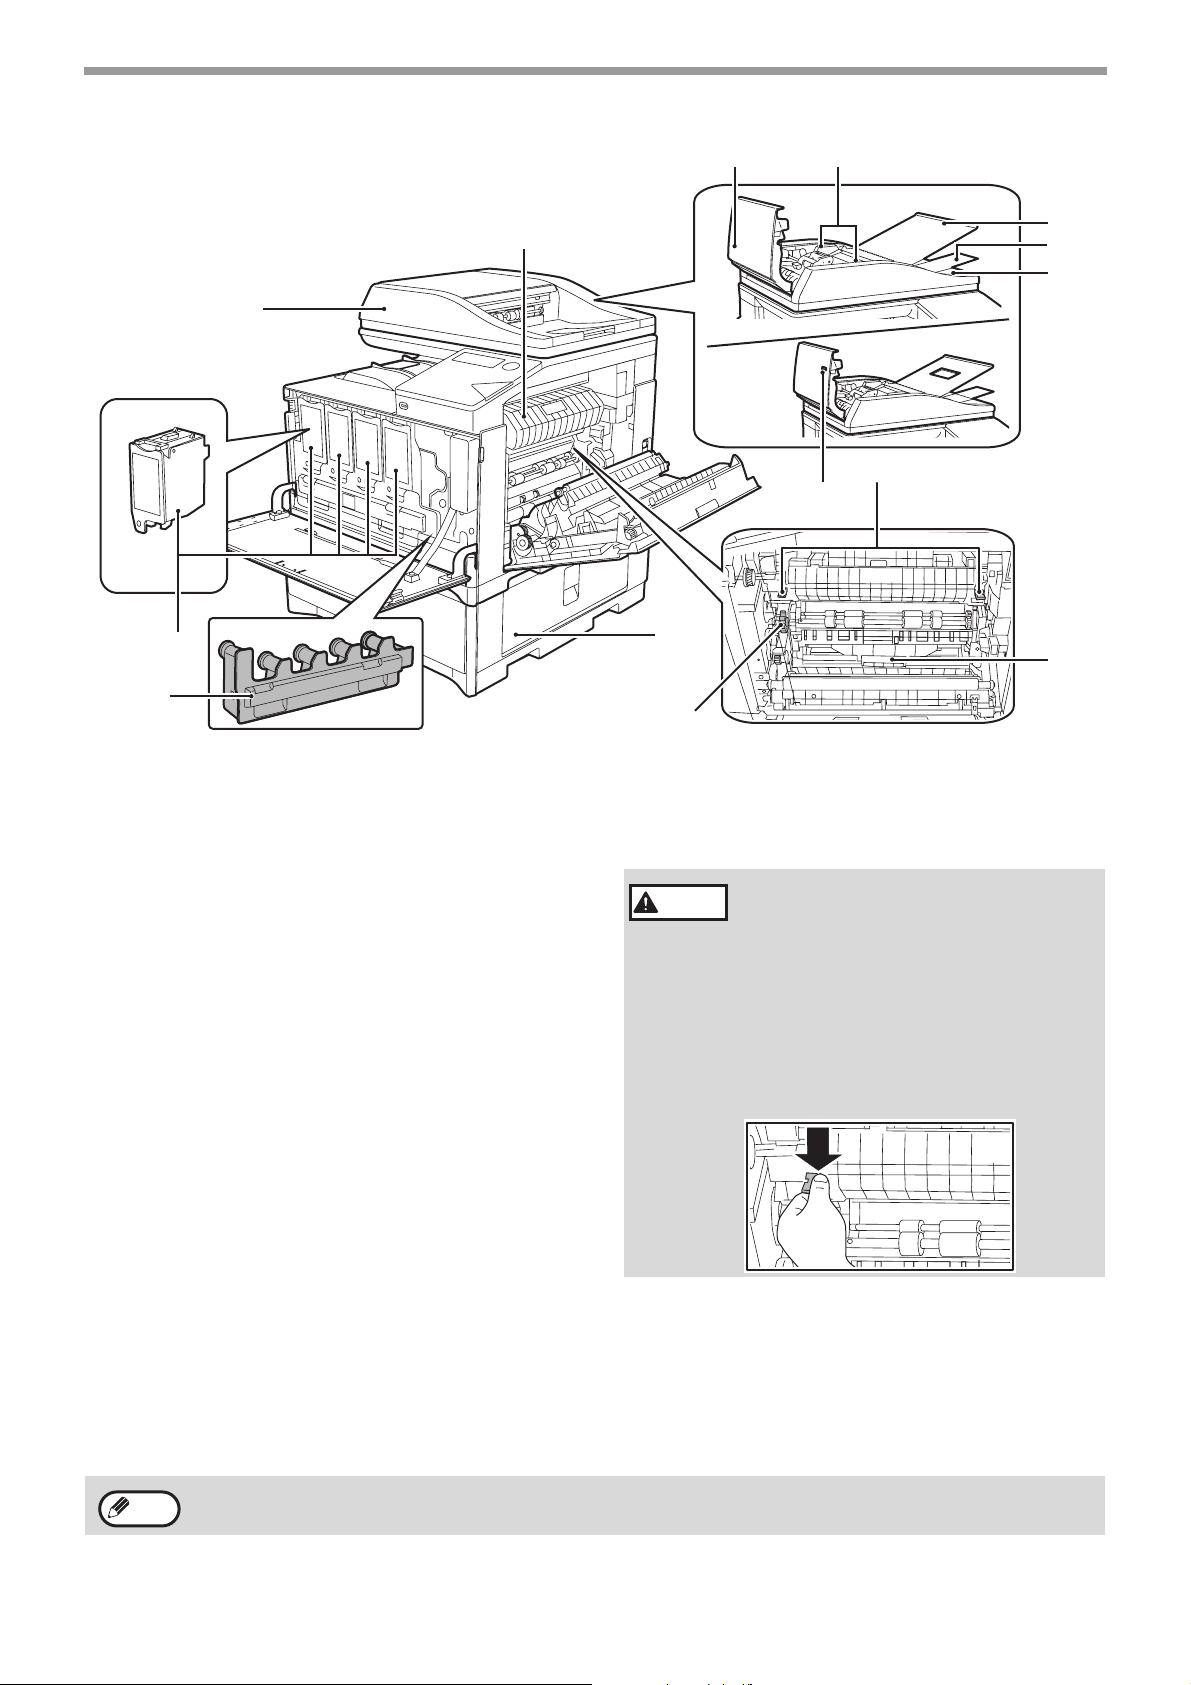
BEFORE USING THE MACHINE
(24)
(25)
(26)
(27)
(30)
(29)
(33)
(22)
(20)
(23)
(28)
(21)
(32)
(31)
(20) Toner cartridge (Y/M/C/Bk)
Contains toner. When the toner runs out in a
cartridge, the cartridge of the colour that ran out
must be replaced.
(21) Document feeder tray
Place the original(s) that you wish to scan face
up here.
(22) Toner collection container
This collects excess toner that remains after
printing.
(23) Feeding roller cover
Open to remove misfed originals.
(24) Original guides
Adjust to the size of the originals.
(25) Feeding roller tray
Open to place the originals.
(26) Extension tray
Open this when you scan a long original.
(27) Exit area
Originals exit the machine here after
copying/scanning when the document feeder is
used.
(28) Fusing unit paper guide
Open to remove misfed paper.
(29) Peep Hole
Use the peep hole (see the illustration at right) to
check the position of the original.
(Models with the one-sided scanning function only)
(30) Fusing unit release levers
Push down these levers to release the pressure
when removing misfed paper from inside the
fusing area or when feeding an envelope from
the bypass tray.
• The fusing unit is hot. Do not touch
Warning
the fusing unit when removing
misfed paper. Doing so may cause
a burn or injury.
• When pushing down the levers,
pinch the levers with your thumb
and index finger while pushing
down slowly. If you push the levers
strongly, the levers may hit your
fingers.
(31) Roller rotating knob
Rotate to remove misfed paper.
(32) Paper tray right side cover
Open this to remove a paper misfeed in trays.
(33) Duplex conveyor cover
Open this cover to remove a misfeed.
Note
Do not to block the exhaust slots of the machine by placing something in front of them or setting the machine closely
attached to the wall.
10
Page 11
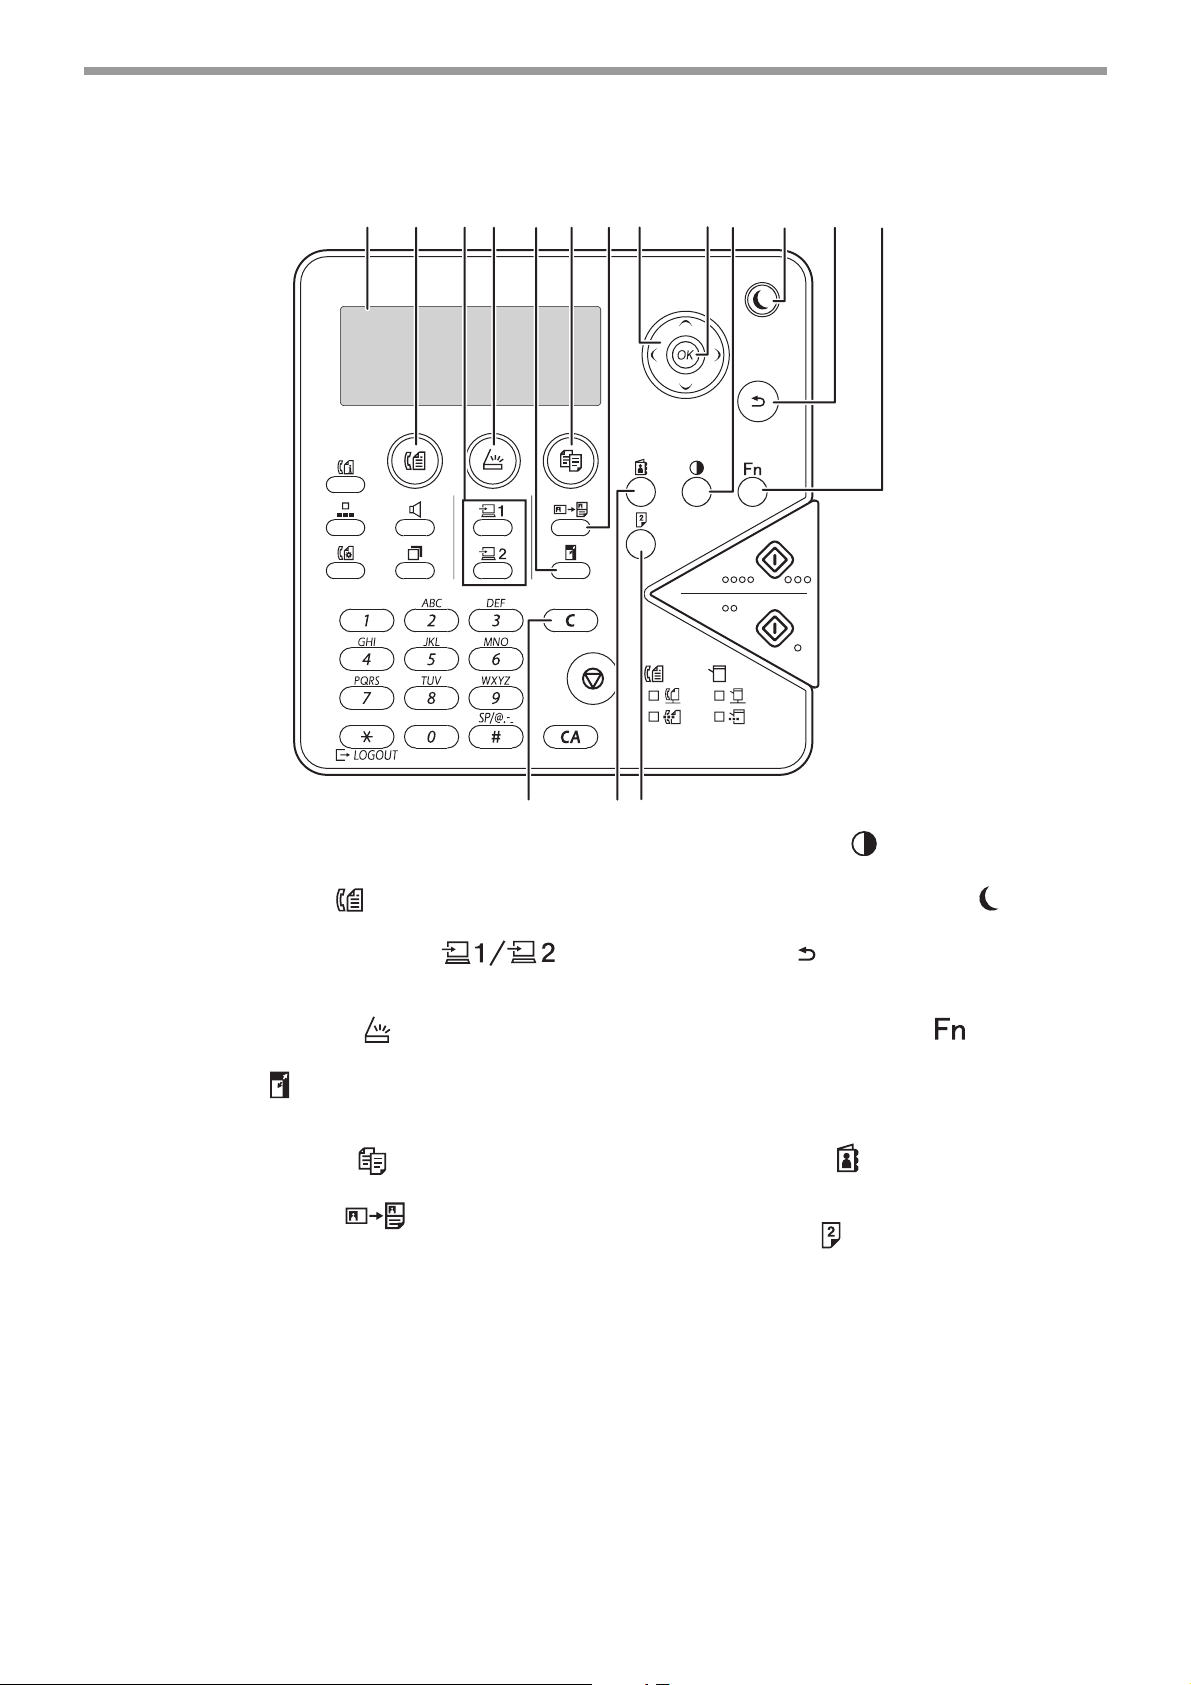
OPERATION PANEL
(1) (2) (3) (4) (5) (6) (7) (8) (9) (10) (11) (12) (13)
BEFORE USING THE MACHINE
(1) Display
Shows various messages. (p.13, 81, 125)
(2) [FAX] key
Press to select fax mode.
(3)
[PROGRAM 1 / PROGRAM 2] key ( )
Press to use the scanner settings already stored.
(p.134)
(4) [SCAN] key / indicator ( )
Press to select scan mode.
(5) [ZOOM] key ( )
Press to select a reduction or enlargement copy
ratio. (p.29)
(6) [COPY] key
Press to select copy mode.
(7) [ID CARD COPY] key ( )
Enable ID Card Copy.
(8) Arrow keys
Press to move the highlighting (which indicates
that an item is selected) in the display.
(9) [OK] key
Press to enter the selected setting.
/ indicator
/ indicator
()
()
(14) (15)(16)
(10) [EXPOSURE] key ( )
(11) [ENERGY SAVE] key
(12) [BACK] key ( )
(13) [SPECIAL FUNCTION] key ( )
(14) [C] key
(15) [ADDRESS] key ( )
(16) [DUPLEX] key ( )
Use to select the exposure mode. (p.28)
/ indicator
Press to enter the energy save mode.
Press to return the display to the previous
screen.
Press to select special functions.
Press to clear the set number of copies or stop a
copy run.
Used to search for address, numbers and other
contact information stored for auto dialling. (p.87)
Select the duplex copy/fax/scan mode.
()
11
Page 12
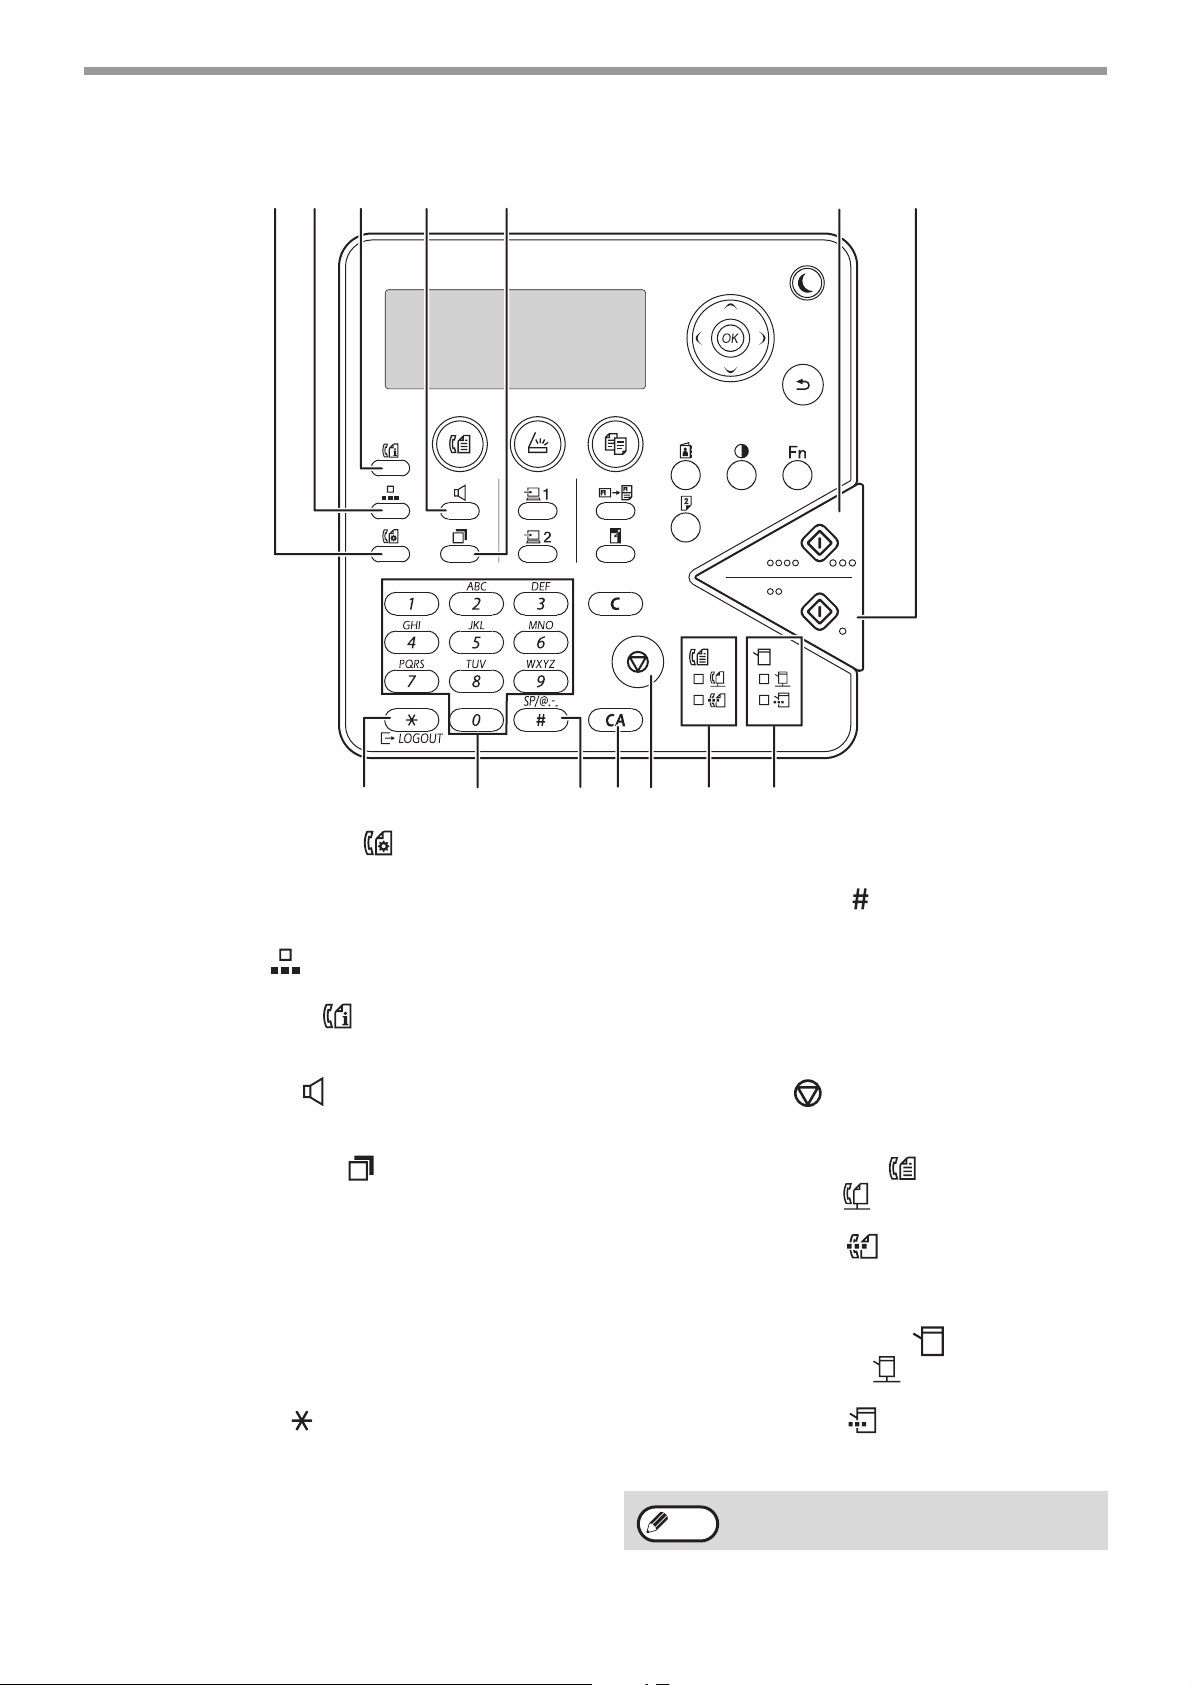
BEFORE USING THE MACHINE
(17) (18) (19) (20) (21) (22) (23)
(24) (25) (26) (27) (29) (30)(28)
(17) [COMM. SETTING] key ( )
This is used to switch between memory
transmission and direct transmission, and to
switch between automatic reception and manual
reception. (p.89)
(18) [SPEED] key ( )
This is used to dial by Speed dialling. (p.83)
(19) [FAX STATUS] key ( )
This is used to cancel a fax transmission or a
stored fax transmission. (p.93)
(20) [SPEAKER] key ( )
This is used to dial without lifting an extension
phone connected to the machine. (p.83)
(21) [REDIAL/PAUSE] key ( )
This is used to redial the last number dialled, and
enter a pause when entering a fax number.
(p.83, p.85)
(22) [COLOUR START] key
Press this key to copy or scan an original in colour.
This key cannot be used for fax.
(23) [BLACK & WHITE START] key
Press this key to copy or scan an original in black and
white. This key is also used to send a fax in fax mode.
(24) [LOGOUT] key ( )
Press this key to log out after you have logged in
and used the machine. When using the fax
function, this key can also be pressed to send
tone signals on a pulse dial line.
/ indicator
/ indicator
(25) Numeric keys
Enter characters/numbers.
(26) [READ-END] key ( )
When copying in sort mode from the document
glass, press this key when you have finished
scanning the original pages and are ready to
start copying.
(27) [CA] key
Clears all selected settings and returns the
machine to the default settings. (p.15)
(28) [STOP] key ( )
Press this key to stop a copy job or scanning of
an original.
(29) FAX mode indicators ( )
• LINE indicator ()
Lights up when a fax is being sent or received.
• DATA indicator ()
Blinks when a fax cannot be printed because
there is no paper or otherwise. Lights steadily
when there is an unsent fax.
(30) Printer mode indicators ( )
• ONLINE indicator ()
Print data can be received when this lamp is lit.
• DATA indicator ()
Blinks when print data is being received. Lights
steadily during printing.
Note
The content of the operation panel varies by
model.
12
Page 13
BEFORE USING THE MACHINE
DISPLAY
This section explains how to use the display.
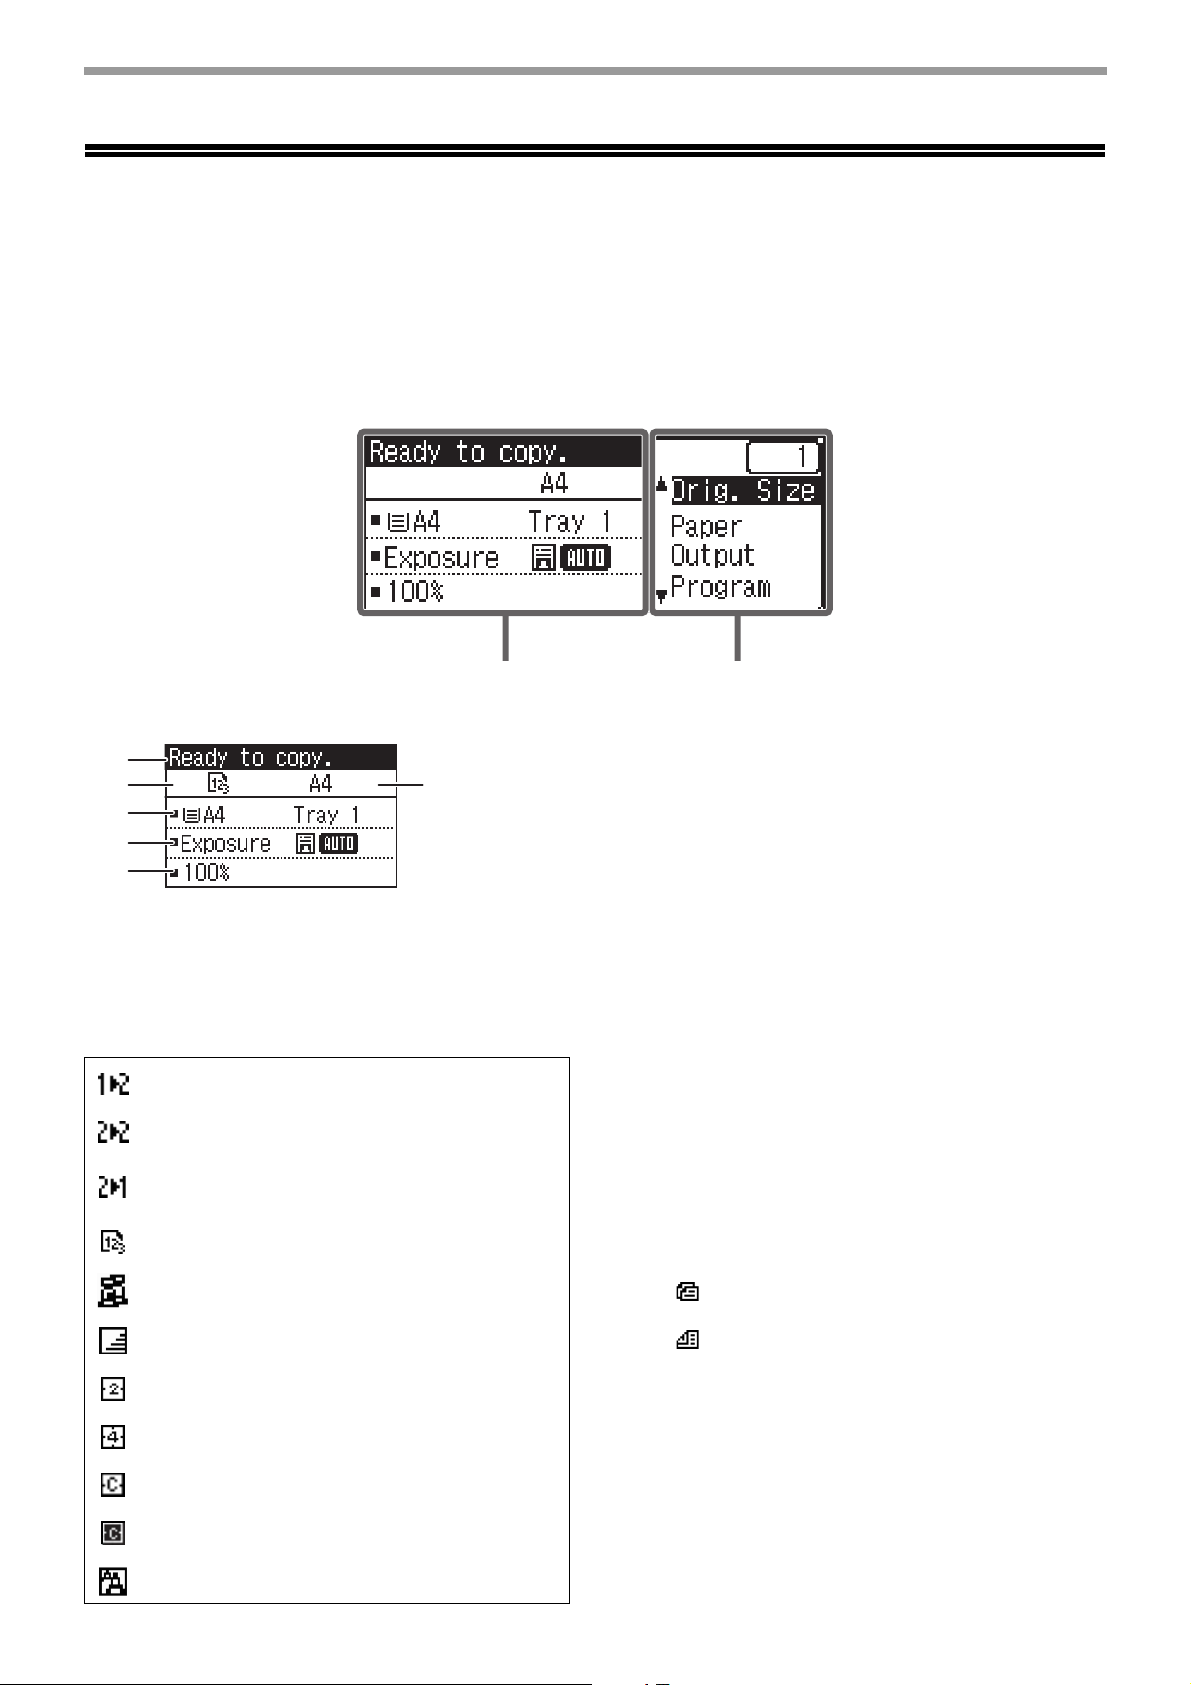
LEFT MENU AND RIGHT MENU
The display on the machine has a right menu containing frequently used settings and a left menu for display of the
settings and setting screens of each function.
Left Menu (Example: Copy mode)
(1)
(3)
(4)
(5)
(1) Message display
Messages are displayed regarding machine
status and operation.
(2) Special function icon display
Icons of enabled special functions will appear.
1-sided to 2-sided
2-sided to 2-sided copy
(
Models with the two-sided scanning function only
2-sided to 1-sided copy
(
Models with the two-sided scanning function only
Sort function
\
RGB Adjust
Suppress BG
2 in 1 copy
4 in 1 copy
copy
Left Menu Right Menu
(6)(2)
(3) Paper size display
Displays the selected paper size.
(4) Exposure display
Indicates the selected exposure mode.
(5) Copy ratio display
Displays the copy ratio for reduction or
enlargement.
(6) Original size display
)
)
When the original size is specified in "Original
Size" in the right menu, this shows the specified
size.
The following icons appear when the original is
placed.
None: Document Glass
: Automatic document feeder (one-sided
: Automatic document feeder (two-sided
scanning)
scanning)
(Models with the two-sided scanning
function)
Card shot
ID card copy
Sharpness
13
Page 14

Right Menu
(7) (8)
(9)
BEFORE USING THE MACHINE
(7) Connection status display
(
Models with the wireless LAN function only
Displayed when wireless LAN is on.
Wireless infrastructure mode:
Connecting
Wireless infrastructure mode:
Not connected
Wired + wireless access point mode:
With handset connected
Wired + wireless access point mode:
Without handset connected
Connection failure of wireless LAN
device inside machine
(8) Number of copies display
Shows the number of copies set.
(9) Function display
Shows the basic functions of each mode.
)
HOW TO USE THE DISPLAY
Selecting an item with the direction keys (up/down)
Use the up/down direction keys (indicated in this manual by [ ] [ ]) to move to and select (highlight) a setting item
in the selection screen. Press the [OK] key to display the screen of the selected setting item. Press [OK] in the
setting screen to save your settings.
The [ ] [ ] icons appear in the selection screen of settings that use the
up/down direction keys.
Selecting an item with the direction keys (left/right)
The left/right direction keys (indicated in this manual by [ ] [ ]) are used to set the exposure and numbers in
setting screens. Press the [OK] key to save your settings.
The [ ] [ ] icons appear in setting screens that use the left/right direction keys.
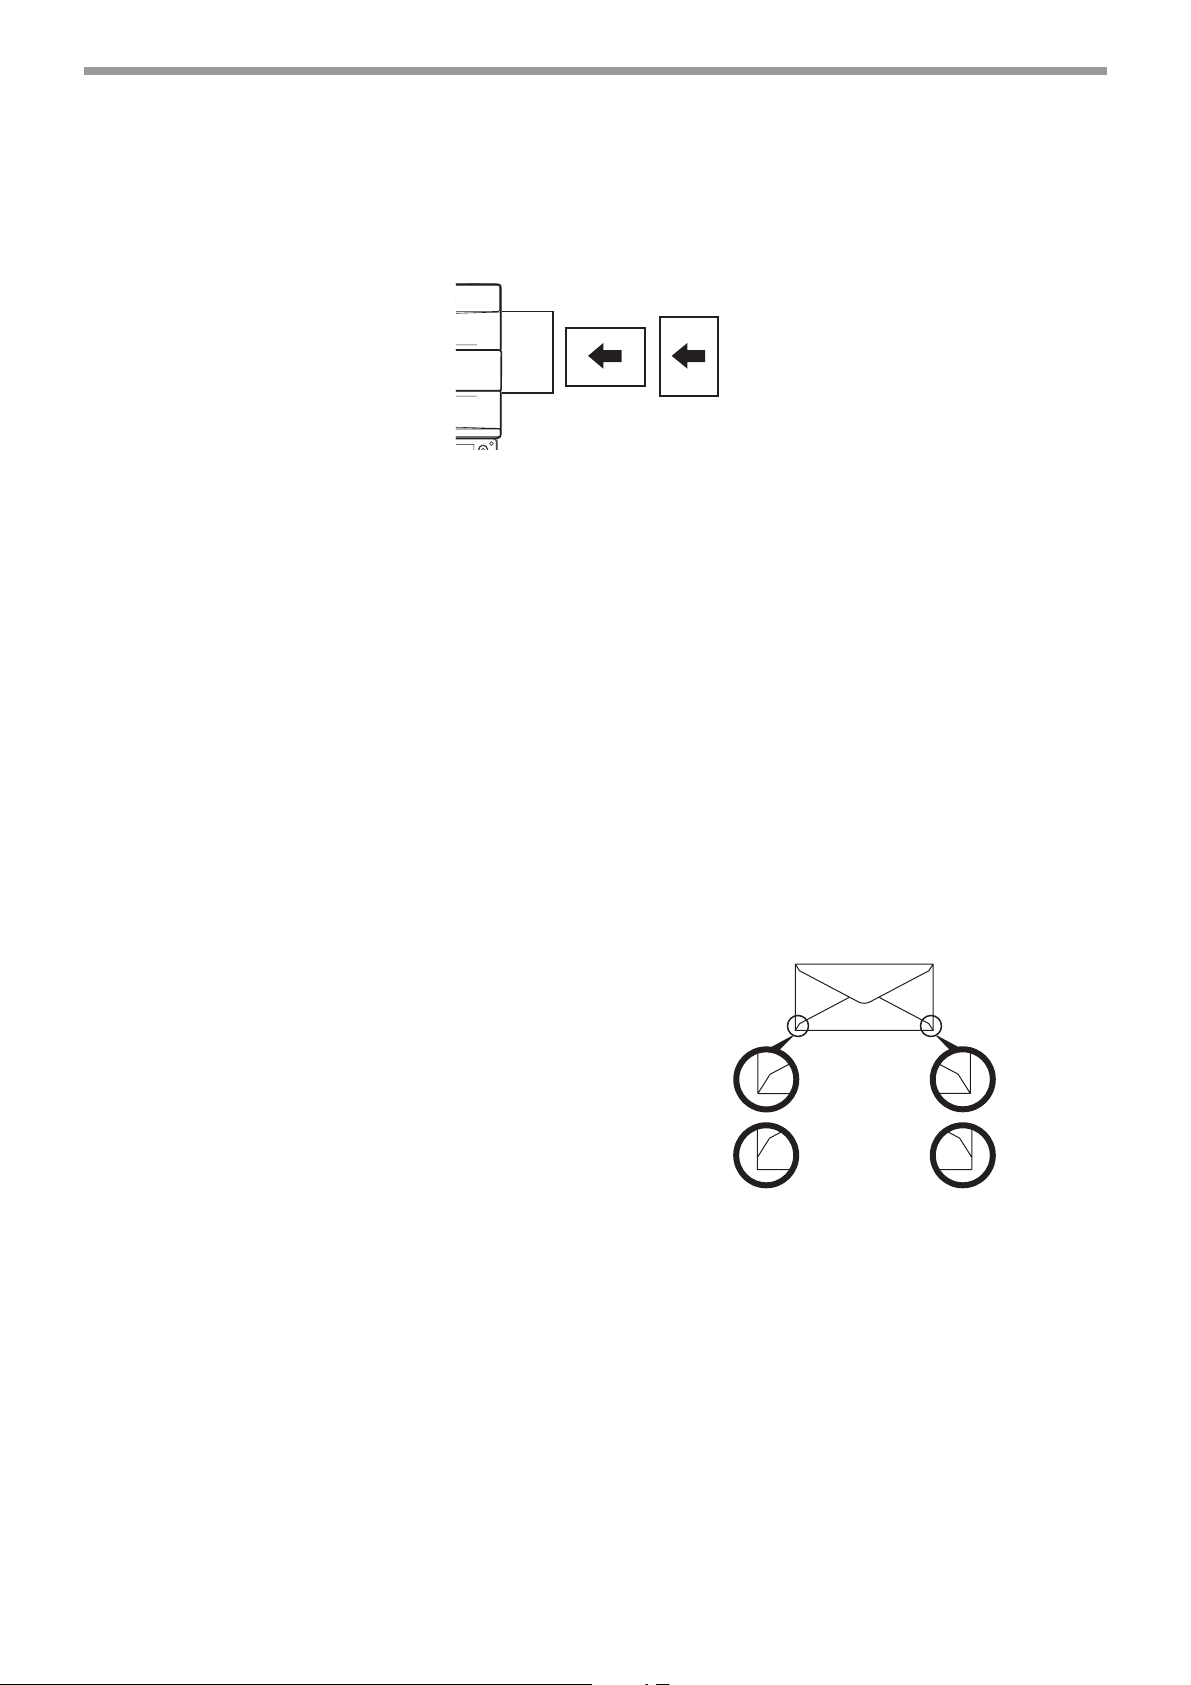
Use the [BACK] key ( ) to return to the previous setting screen.
14
Page 15
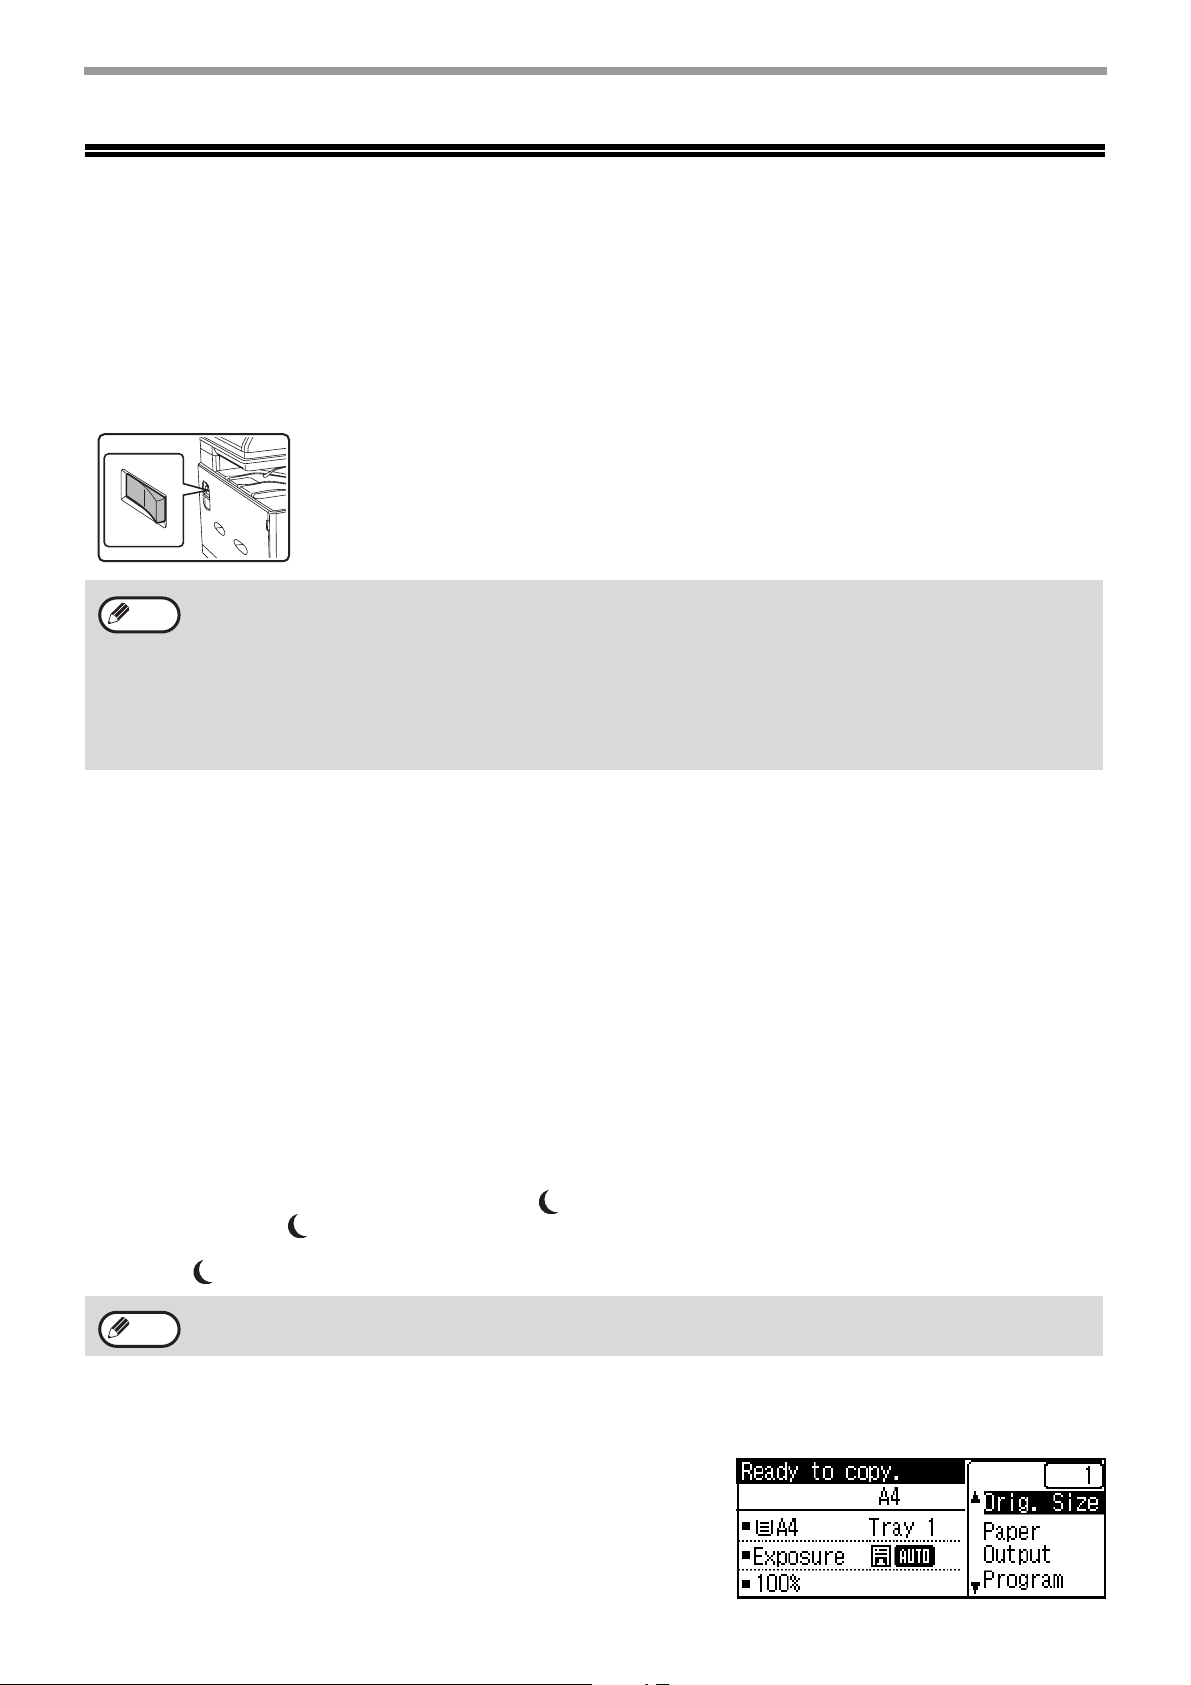
POWER ON AND OFF
The power switch is located on the left side of the machine.
BEFORE USING THE MACHINE
POWER ON
Turn the power switch to the "ON"
position.
POWER OFF
Make sure that the machine is not in
operation and then turn the power switch
to the "OFF" position.
Note
While the machine is warming
up, the message "Warming
Up" will appear in the
message display.
• The machine reverts to the initial settings when it is first turned on, when the [CA] key is pressed, or when no
keys are pressed for the preset "Auto clear" time following the end of a copy job. When the machine reverts to
the initial settings, all settings and functions selected to that point are cancelled. The "Auto clear" time can be
changed in the system settings. (p.179)
• The machine is initially set to automatically enter power save mode if not used for copying or printing, for a
preset period of time. This setting can be changed in the system settings. (p.180)
• Before using fax mode, read the following sections and then turn on the power.
"TO USE THIS PRODUCT CORRECTLY AS A FACSIMILE" (p.79)
"POINTS TO CHECK AND PROGRAM AFTER INSTALLATION" (p.80)
If the power switch is turned off while the machine is in
operation, a misfeed may occur and the job that was in
progress will be cancelled.
POWER SAVE MODES
The machine has two power save modes to reduce overall power consumption thereby reducing the cost of
operation. In addition, these modes conserve natural resources and help reduce environmental pollution. The two
power save modes are "Preheat mode" and "Auto power shut-off mode".
Preheat mode
This function automatically switches the machine to a low power consumption state if the duration of time set in the system
settings elapses without the machine being used when the power is on. In preheat mode the display turns off. Normal operation
automatically resumes when a key on the operation panel is pressed, an original is placed, or a print job or fax is received.
Auto power shut-off mode
This function automatically switches the machine to a state that consumes even less power than preheat mode if the
duration of time set in the system settings elapses without the machine being used when the power is on. During auto
power shut-off, only the [ENERGY SAVE] indicator ( ) blinks. To restore the machine to normal operation, press the
[ENERGY SAVE] key ( ). Normal operation also resumes automatically when a print job or fax is received or
scanning is begun from a computer. While auto power shut-off is in effect, pressing a key other than the [ENERGY
SAVE] key ( ) will have no effect.
Note
The preheat activation time and the "Auto power shut-off timer" can be changed using system settings.
DEFAULT SETTINGS
The machine is set at the factory to return all settings to the default
settings one minute after a copy job is finished (auto clear function) or
when the [CA] key is pressed. When the settings return to the default
settings, any functions that were selected are cancelled.
The auto clear time can be changed in the system settings.
In the default state the display shown below appears. The default state of
the display may vary depending on settings in the system settings.
(p.179)
15
Page 16

BEFORE USING THE MACHINE
LOADING PAPER
The message "TRAY< >:Add paper." will be displayed when there is no copy paper in the selected paper tray.
(< > is the tray number.) Load paper in the indicated paper tray.
PAPER
For best results, use only SHARP recommended paper.
Paper tray type Paper type Size Weight Capacity
Tray 1
Tray 2 (Option)
Bypass tray Plain paper
Plain paper
Recycled paper
Colour
Letter head
Pre-printed
Pre-punched
Recycled paper
Colour
Letter head
Pre-printed
Pre-punched
Labels 106 g/m
Transparency film 10 sheets
Heavy paper 20 sheets
Glossy Paper 1 sheet
Envelopes
Custom Horizontal: 140 to 356 mm
A4, B5, A5, 16K,
8-1/2" x 11",
5-1/2" x 8-1/2",
7-1/4" x 10-1/2"
A4, B5, A5, A6, 16K,
8-1/2" x 11",
5-1/2" x 8-1/2",
7-1/4" x 10-1/2",
8-1/2" x 14",
8-1/2" x 13-1/2",
8-1/2" x 13-2/5",
8-1/2" x 13"
*2
International DL
(110 mm x 220 mm)
International C5
(162 mm x 229 mm)
Monarch
(98 mm x 191 mm)
Commercial 10
(105 mm x 241 mm)
(5-1/2" to 14")
Vertical: 90 to 216 mm
(3-5/8" to 8-1/2")
60 g/m
(16 lbs. to 28 lbs.)
55 g/m
(13 lbs. to 28 lbs.)
(28 lbs. to 80 lbs.)
2
to 105 g/m
2
to 105 g/m
2
to 220 g/m
2
250 sheets
500 sheets
2
50 sheets
2
1 sheet
10 sheets
*1
*1 The number of sheets of the paper which can be set changes with the weight of a paper. The paper must not be
higher than the indicator line.
*2 When feeding an envelope, push down the fusing unit release levers to release the pressure. "Loading the
bypass tray" (p.20)
PLAIN PAPER, SPECIAL MEDIA
Plain paper that can be used
• SHARP standard plain paper (80 g/m2 (21 lbs.)). For paper specifications, see the specifications in the Start
Guide.
• Plain paper other than SHARP standard paper (60 g/m
Recycled paper, coloured paper and pre-punched paper must meet the same specifications as plain paper.
Contact your dealer or nearest authorised service representative for advice on using these types of paper.
* The "g/m
2
" (lbs.) units used in these explanations indicate the weight of the paper.
2
to 105 g/m2 (16 lbs. to 28 lbs.))
16
Page 17
BEFORE USING THE MACHINE
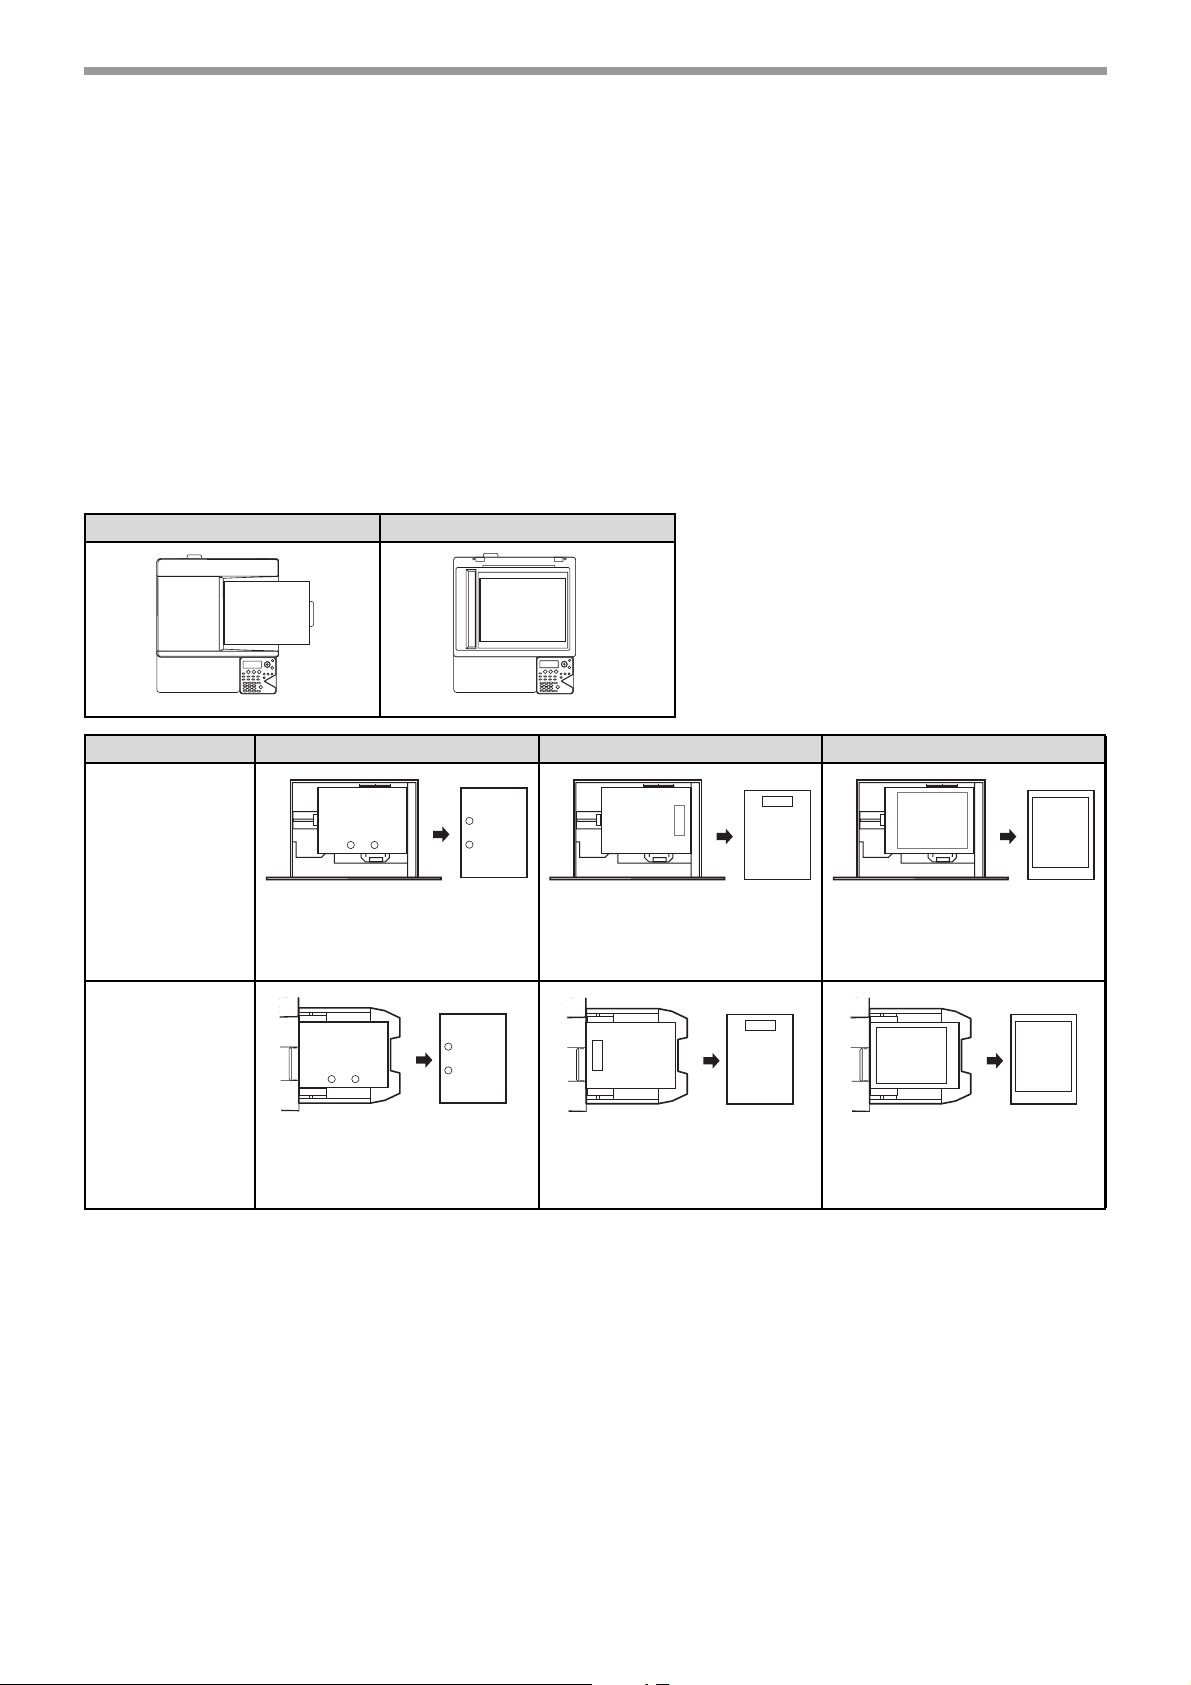
PRINT SIDE FACE UP OR FACE DOWN
Paper is loaded with the print side face up or face down depending on the paper type and tray.
The loading orientation of punched paper, letterhead paper, and pre-printed paper differs from that of other paper.
For details, see "Example: Placement orientations of punched paper, letter head paper, and pre-printed paper" (p.17).
Trays 1 to 2
Load the paper with the print side face up.
However, if the paper type is "Pre-Punched", "Letter Head" or "Pre-Printed", load the paper with the print side face down.
Bypass tray
Load the paper with the print side face down.
However, if the paper type is "Pre-Punched", "Letter Head" or "Pre-Printed", load the paper with the print side face up.
Example: Placement orientations of punched paper, letter head paper, and pre-printed paper
Document feeder tray Original glass
A
A
Tray 1 to 2
Bypass tray
Pre-punched (Left binding) Letter head Pre-printed
ABC
-1-
-1-
A
Load the paper print side
down with the punch holes to
the front and the top edge to
the right.
A
Load the paper print side up
with the punch holes to the
front and the top edge to the
left.
ABC
A
Load the paper print side
down with the letter head (top
edge) to the right.
ABC
ABC
Load the paper print side up
with the letter head (top edge)
to the left.
A
Load the paper print side
(pre-printed side) down with
the top edge to the right.
Load the paper print side
(pre-printed side) up with the
top edge to the left.
A
A
A
-1-
-1-
17
Page 18
Paper that cannot be used
• Special media for inkjet printers (fine paper, glossy
paper, glossy film, etc.)
• Carbon paper or thermal paper
• Pasted paper
• Paper with clips
• Paper with fold marks
• Torn paper
• Oil-feed transparency film
• Thin paper less than 55 g/m
• Paper that is 220 g/m
2
2
(13 lbs.)
(80 lbs. index) or heavier
Non-recommended paper
BEFORE USING THE MACHINE
• Irregularly shaped paper
• Stapled paper
• Damp paper
• Curled paper
• Paper on which either the print side or the reverse
side has been printed on by another printer or
multifunction device.
• Paper with a wave-like pattern due to moisture
absorption
• Iron-on transfer paper
• Japanese paper
• Various types of plain paper and special media are sold. Some types cannot be used with the machine. Contact
Note
your dealer or nearest authorised service representative for advice on using these types of paper.
• The image quality and toner fusibility of paper may change due to ambient conditions, operating conditions, and
paper characteristics, resulting in image quality inferior to that of SHARP standard paper. Contact your dealer or
nearest authorised service representative for advice on using these types of paper.
• The use of non-recommended or prohibited paper may result in skewed feeding, misfeeds, poor toner fusing
(the toner does not adhere to the paper well and can be rubbed off), or machine failure.
• The use of non-recommended paper may result in misfeeds or poor image quality. Before using
non-recommended paper, check if printing can be performed properly.
• Perforated paper
Paper that can be used for automatic 2-sided printing
Paper used for automatic duplex printing must meet the following conditions.
Paper type: Plain paper (special paper cannot be used.)
Paper size: Standard sizes (A4, B5, A5, 16K, 8-1/2" x 14", 8-1/2" x 13", 8-1/2" x 11")
Paper weight: 60 g/m
2
to 105 g/m2 (16 lbs. to 28 lbs.)
Special papers
Follow these guidelines when using special papers.
• Use SHARP recommended transparency film and label sheets. Using other than SHARP recommended paper
may result in misfeeds or smudges on the output. If other than SHARP recommended media must be used, feed
each sheet one at a time using the bypass tray (do not attempt continuous copying or printing).
• There are many varieties of special paper available on the market, and some cannot be used with this machine.
Before using special paper, contact your authorised service representative.
• Before using other than SHARP recommended paper, make a test copy to see if the paper is suitable.
18
Page 19
BEFORE USING THE MACHINE
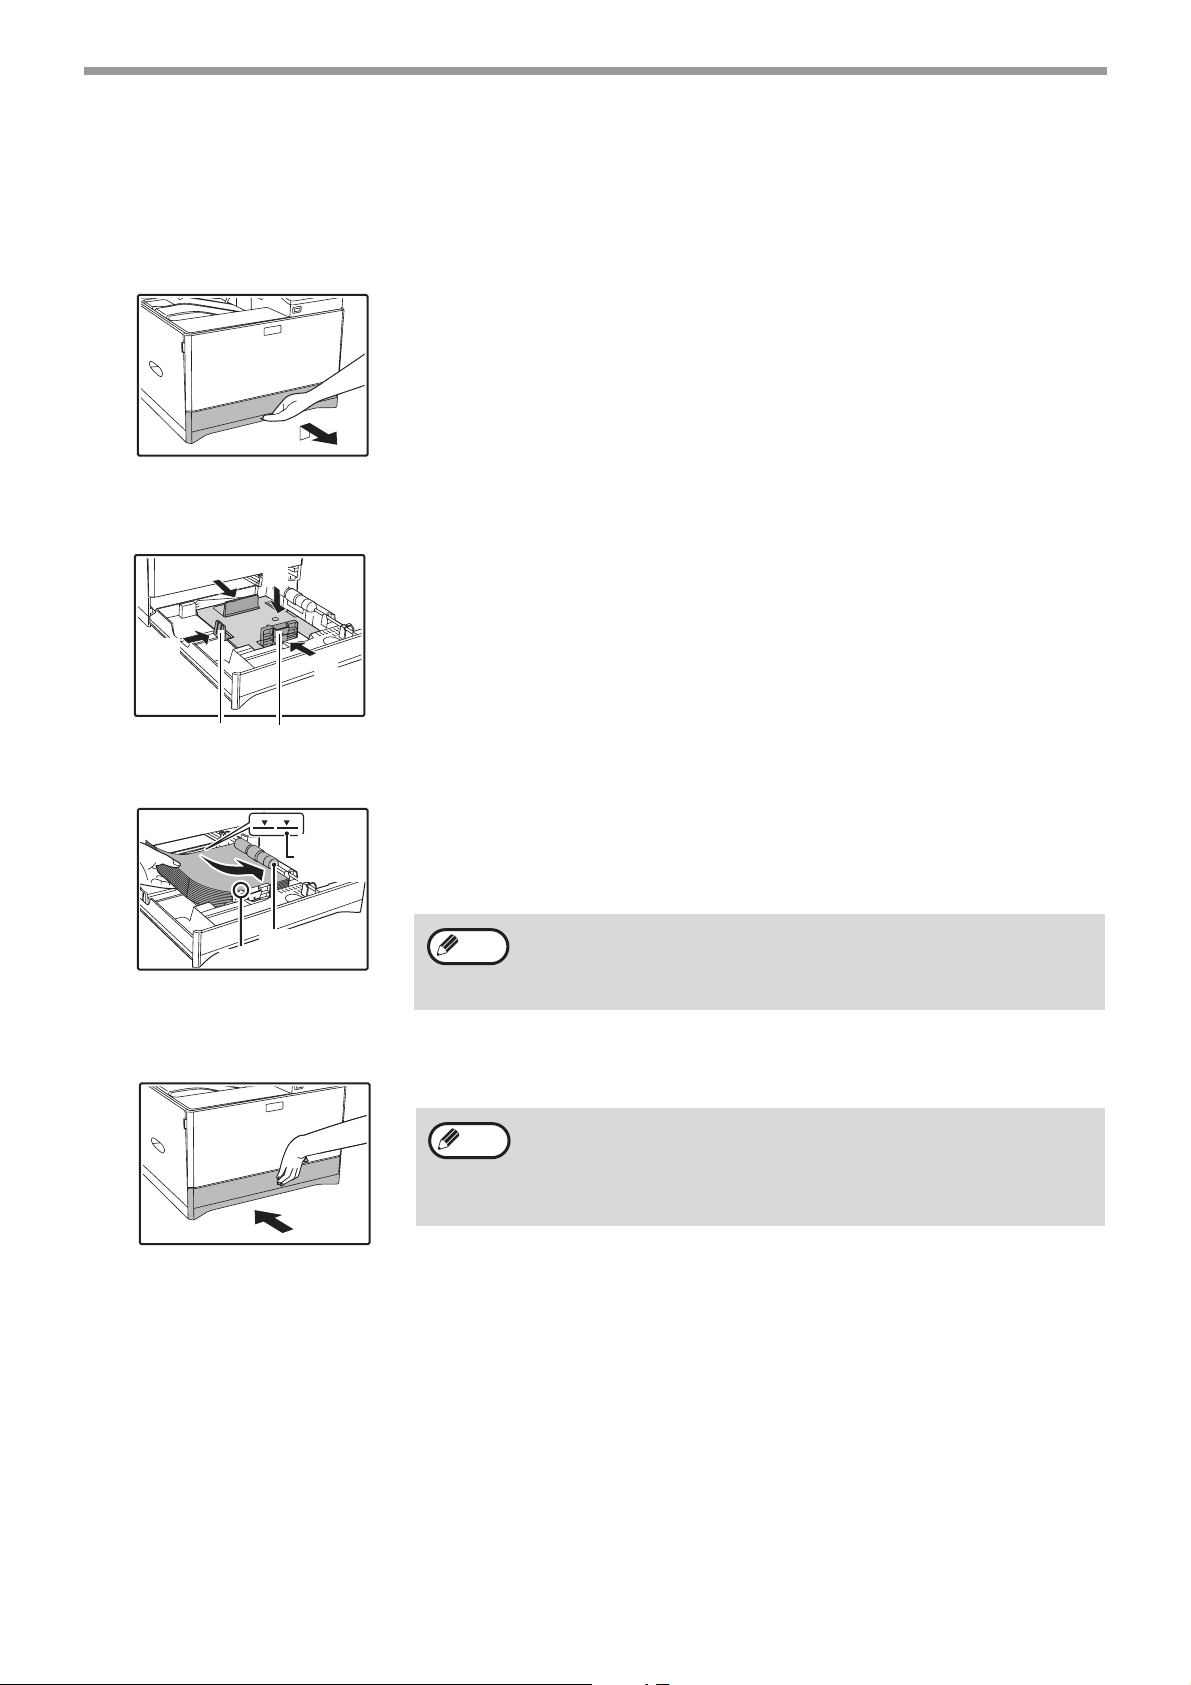
LOADING PAPER
Make sure that the machine is not copying or printing, and then follow these steps to load paper.
Loading the paper tray
Gently lift and pull out the paper tray until it stops.
1
Push the pressure plate down, and adjust the plates in the tray to the length and width
2
of the paper.
(2)
(2)
Plate B
Load paper into the tray.
3
Gently push the paper tray into the machine.
4
(1)
(2)
Plate A
Line on
the guide
Roller
Protrusion
(1) Push the centre of the pressure plate down until it locks into place.
(2) The plate A and B are slide-type guides. Grasp the locking knob on
the guide and slide the guides until the width that the paper can be
loaded properly.
• Open the package of the paper and load it without fanning the paper.
• Make sure the stack of paper is straight before loading it.
• After loading the paper, close the guides to the paper width not to leave the
gap from the guides.
Note
Push the tray in completely.
Note
• Do not load paper higher than the line on the guide (up to 250 sheets).
• Do not add paper to the loaded paper. It may cause multiple feed of
•
• If you loaded a different size of paper than was loaded previously in
• When misfeed occurs, rotate the paper 180 degrees and reload it.
• Straighten curled paper before using it.
paper.
The loaded paper should not go higher than the protrusion of the plate A.
the tray, go to "CHANGING THE PAPER SIZE SETTING OF A TRAY"
(p.22).
19
Page 20
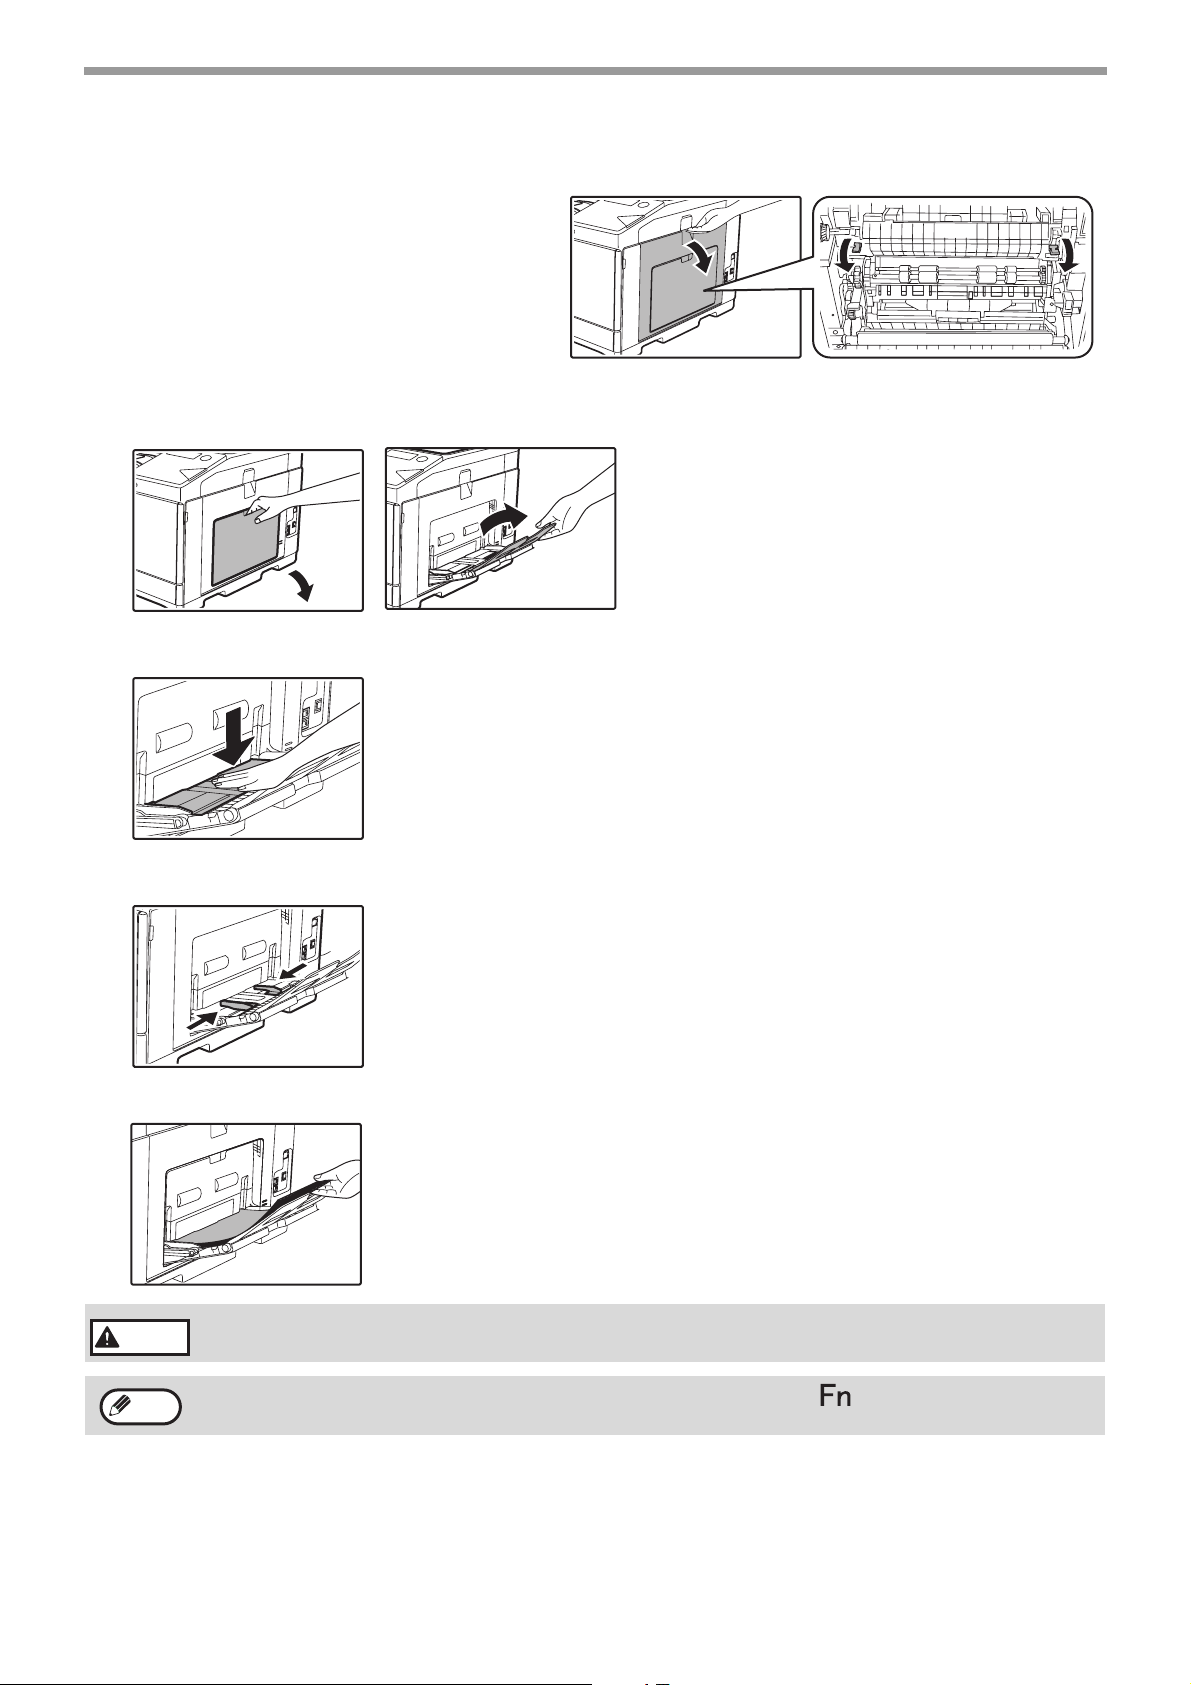
Loading the bypass tray
To feed an envelope, first press down the fixing unit
release levers (2 places) to release the pressure,
and then follow the steps below.
Unfold the bypass tray.
1
BEFORE USING THE MACHINE
Open out the bypass tray extension.
Push the centre of the pressure plate down until it locks into place.
2
Set the paper guides to the copy paper width.
3
Insert the paper (print face down) all the way into the bypass tray.
4
To prevent a misfeed, verify once more that the paper guides are adjusted to
the width of the paper.
Warning
Note
After feeding an envelope, be sure to press up and return the fixing unit release levers
(2 places) to their original positions.
If you loaded paper in the bypass tray, press the [SPECIAL FUNCTION] key () and select "Paper Select" to
select the bypass tray.
20
Page 21
BEFORE USING THE MACHINE
Important points when inserting paper in the bypass tray
• Up to 50 sheets of standard copy paper can be set in the bypass tray.
• Be sure to place A6, B6 or 5-1/2" x 8-1/2" size paper or envelopes horizontally as shown in the following diagram.
(When using the printer: Same as the direction for the A4 size paper, etc)
Available
• When loading envelopes, make sure that they are straight and flat and do not have loosely glued construction flaps
(not the closure flap).
• Special papers except SHARP recommended transparency film, labels, and envelopes must be fed one sheet at a
time through the bypass tray.
• When adding paper, first remove any paper remaining in the tray, combine it with the paper to be added and then
reload as a single stack. The paper to be added must be the same size and type as the paper already in the tray.
• Use SHARP-recommended transparency film.
• Do not use paper that is smaller than the original. This may cause smudges or unclean images.
• Do not use paper that has already been printed on by a laser printer or plain paper fax machine. This may cause
smudges or unclean images.
Not
available
Important points when using envelopes
Envelopes that cannot be used
Do not use the following envelopes. Envelopes misfeed, and smudges may result.
• Envelopes with metal clasps, plastic hooks, or ribbon
hooks
• Envelopes closed with string
• Envelopes with windows or backing
• Envelopes with an uneven front surface due to
embossing
• Double-layer envelopes
• Envelopes with an adhesive for sealing
• Hand-made envelopes
• Envelopes with air inside
• Envelopes with creases, fold marks, torn or
damaged envelopes
• Envelopes with an incorrectly aligned corner gluing
position on the back cannot be used as creasing
may result.
Can be used
Cannot be
used
Print quality on envelopes
• Print quality is not guaranteed in the area 10 mm (13/32") around the edges of the envelope.
• Print quality is not guaranteed on parts of envelopes where there is a large step-like change of thickness, such as
on four-layer parts or parts less than three layers.
• Print quality is not guaranteed on envelopes with adhesive for sealing.
21
Page 22
BEFORE USING THE MACHINE
Inserting transparency film
• Use SHARP-recommended transparency film.
• Do not touch the print side of transparency film.
• When loading multiple sheets of transparency film in the bypass tray, be sure to fan the sheets several times before
loading.
• When printing on transparency film, be sure to remove each sheet as it exits the machine. Allowing sheets to stack
in the output tray may result in curling.
TRAY SETTINGS
These programs are used to change the paper size setting of a tray, and auto tray switching.
CHANGING THE PAPER SIZE SETTING OF A TRAY
If the size of the loaded paper is different from the size shown in the display, follow the steps below to change the
paper size setting of the tray.
The paper size setting cannot be changed during copying, printing, fax printing (when the fax option is installed),
or when a misfeed has occurred. However, if the machine is out of paper or out of toner, the paper size setting can
be changed during copying, printing, and fax printing.
See
"PAPER" (p.16)
paper trays.
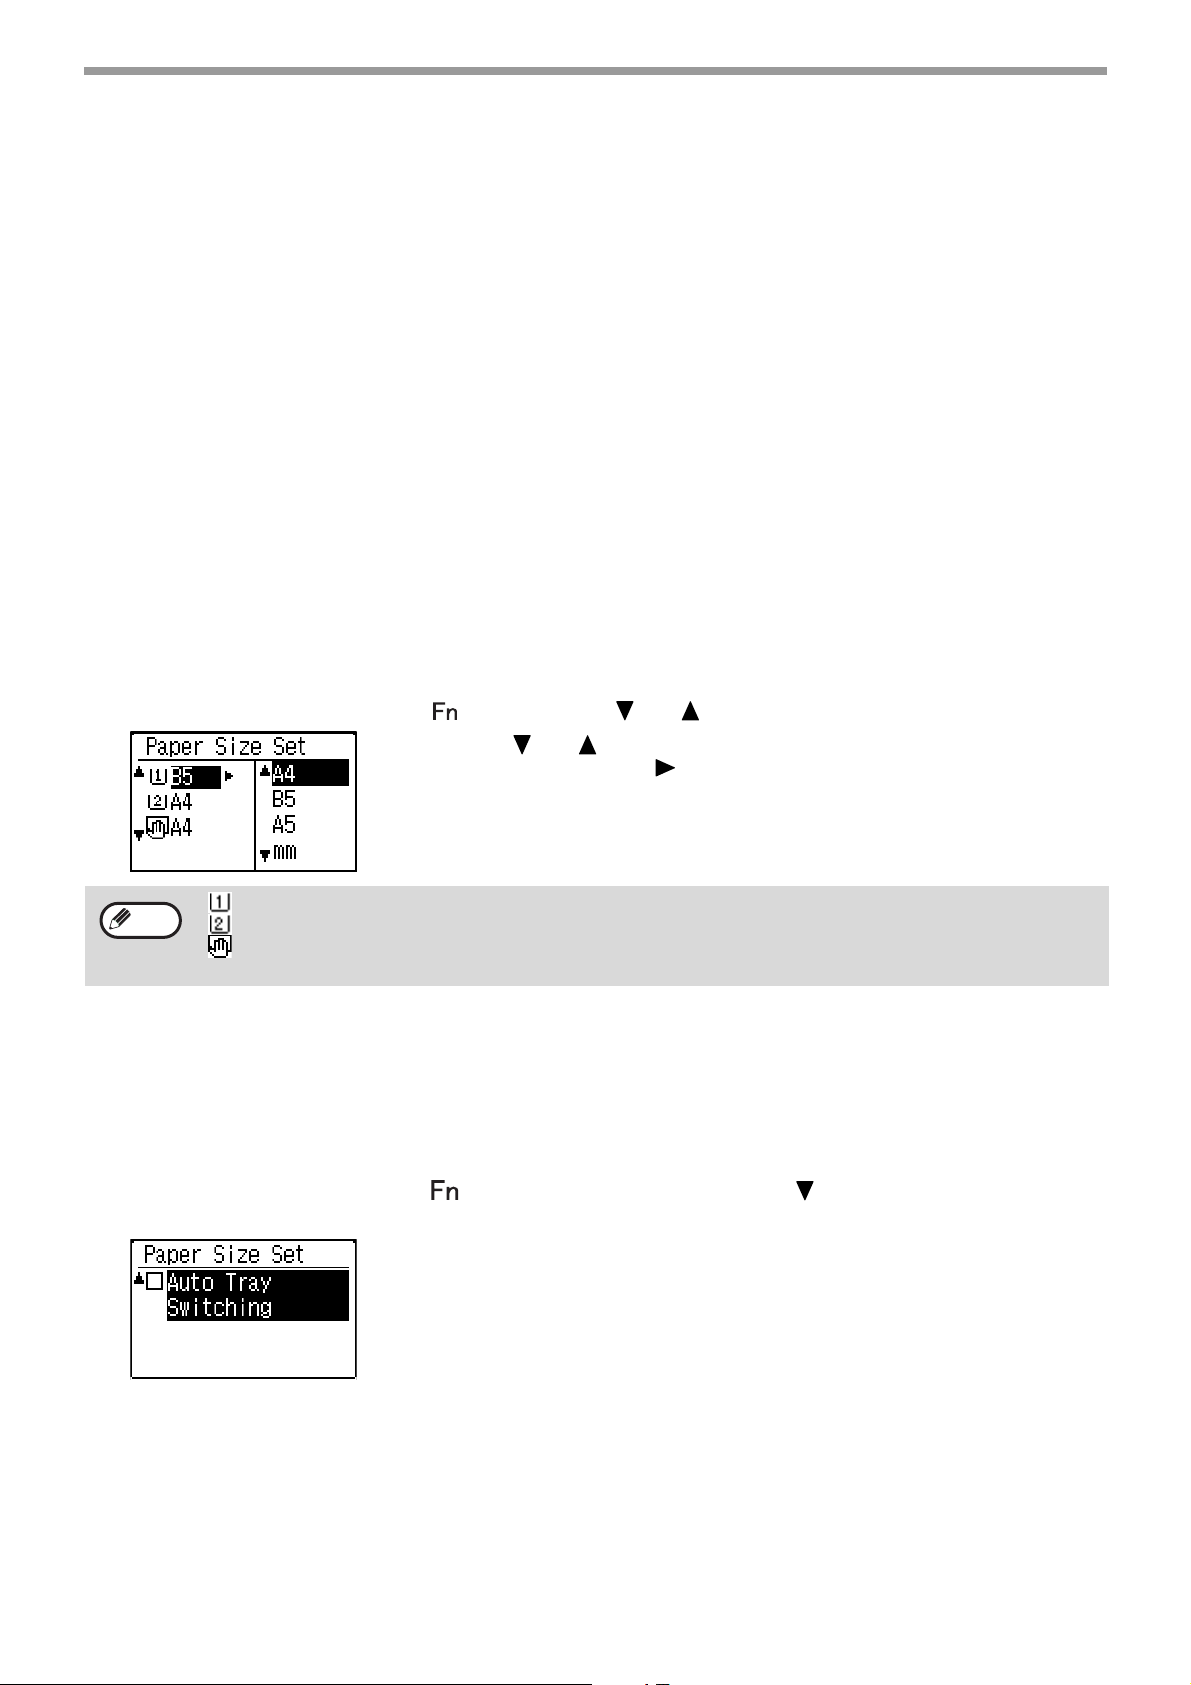
Press the [SPECIAL FUNCTION] key (), and press the [ ] or [ ] key to select "Paper Size Set".
for information on the specifications for the types and sizes of paper that can be loaded in the
Press the [ ] or [ ] key to select the paper tray for which the paper size is
being changed. Press the [ ] key to select the paper size.
Press the [OK] key.
Note
: Shows tray "1".
: Shows tray "2".
: Shows Bypass tray.
For the paper trays and tray numbers,
see "PAPER" (p.16).
DISABLING (ENABLING) AUTO TRAY SWITCHING
When auto tray switching is enabled and paper runs out during copying or printing, the job will continue using paper
from a different tray if that tray has the same size of paper in the same type. (This function does not operate when
using the bypass tray or when a fax is being printed.)
This function has been enabled at the factory. If you prefer to disable the function, follow the steps below.
Press the [SPECIAL FUNCTION] key (), select "Paper Size", and press the [ ] key repeatedly until "Auto Tray
Switching" appears.
To re-enable auto tray switching, press the [OK] key that a checkmark
appears.
22
Page 23
BEFORE USING THE MACHINE
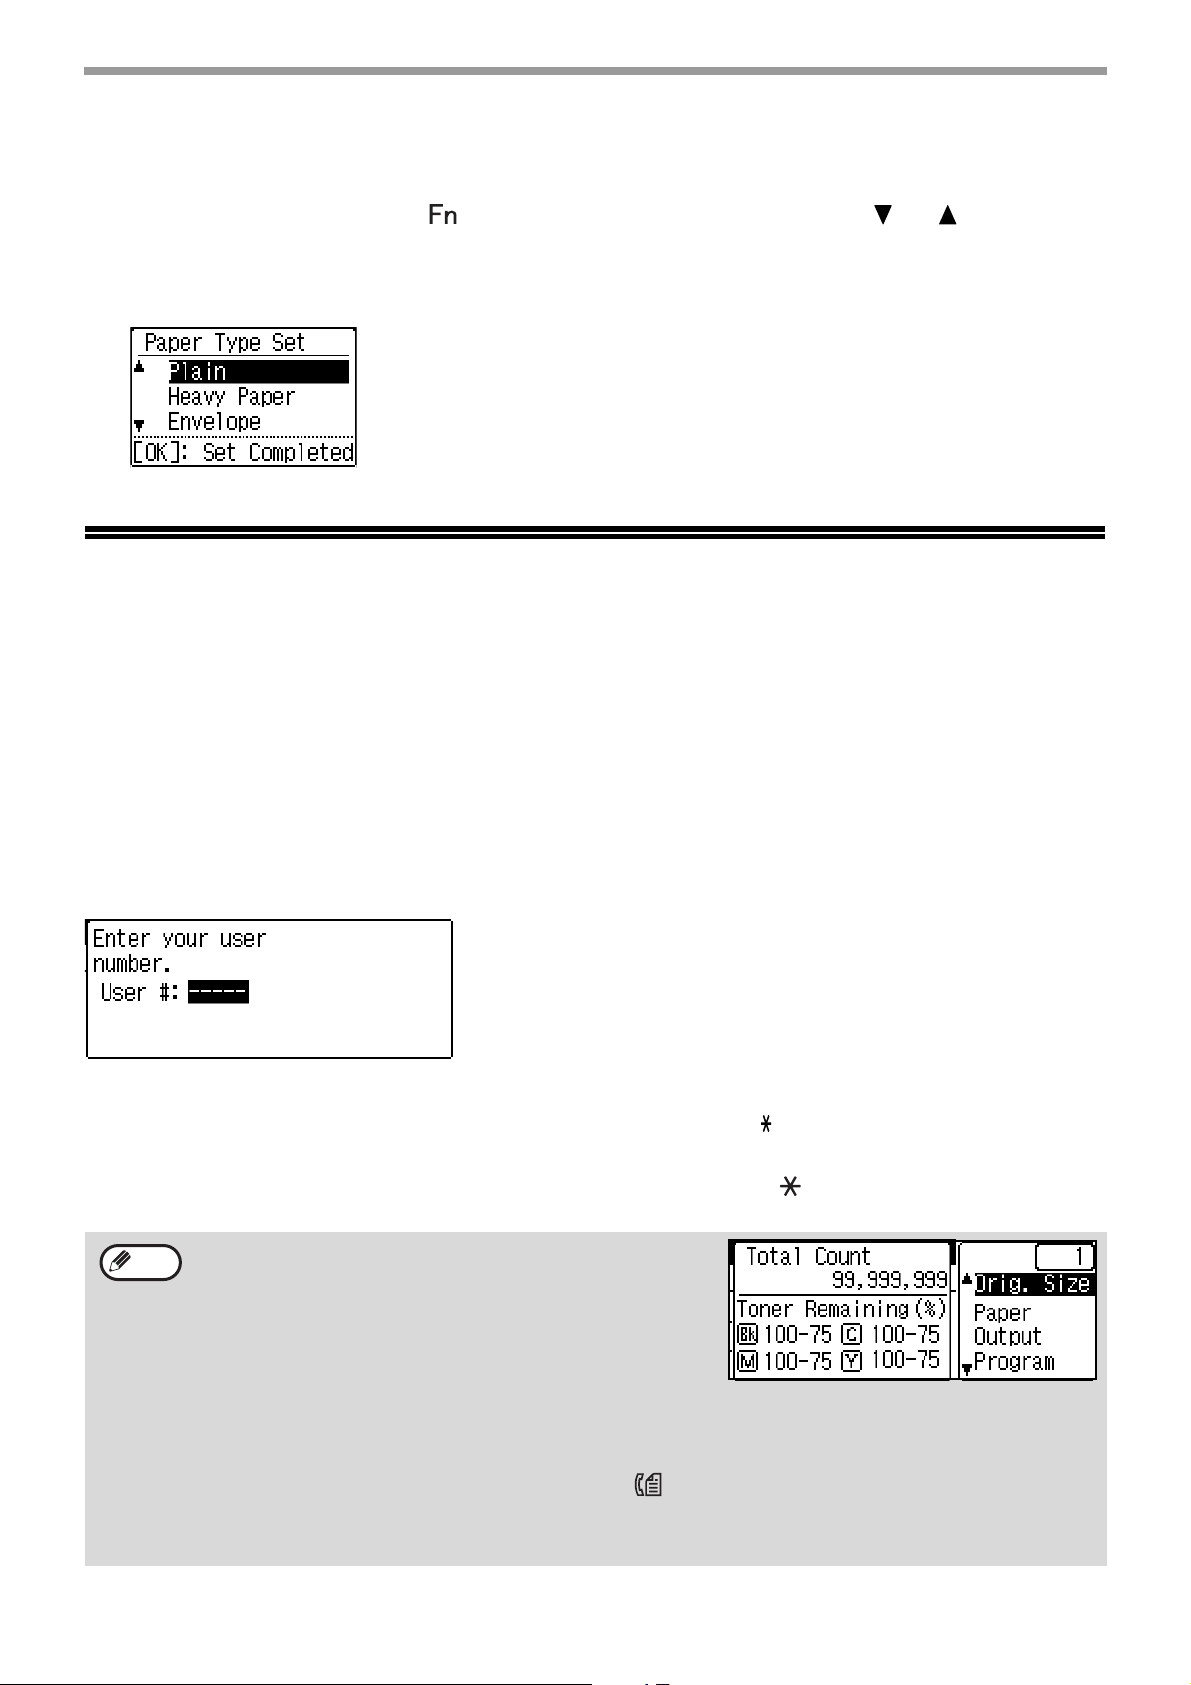
CHANGING THE PAPER TYPE OF A TRAY
To change the paper type setting for a tray, follow the steps below.
Press the [SPECIAL FUNCTION] key ( ), select "Paper Type", select the tray with the [ ] or [ ] key, and press
the [OK] key. Select the desired paper type and press the [OK] key.
See
"PAPER" (p.16)
paper trays.
for information on the specifications for the types and sizes of paper that can be loaded in the
USER AUTHENTICATION MODE
When user authentication mode is enabled, a count is kept of the pages printed by each account. The page counts
can be viewed in the display. Users that can transmit faxes (up to 30) can be established and transmission time and
other information can be tracked for each account. The Acc. Usage List (p.181) can be printed out which shows the
time used for transmission and pages transmitted by each account.
This function is enabled in the system settings. ("User Registration" (p.178))
Up to 30 can be stored.
USING USER AUTHENTICATION MODE
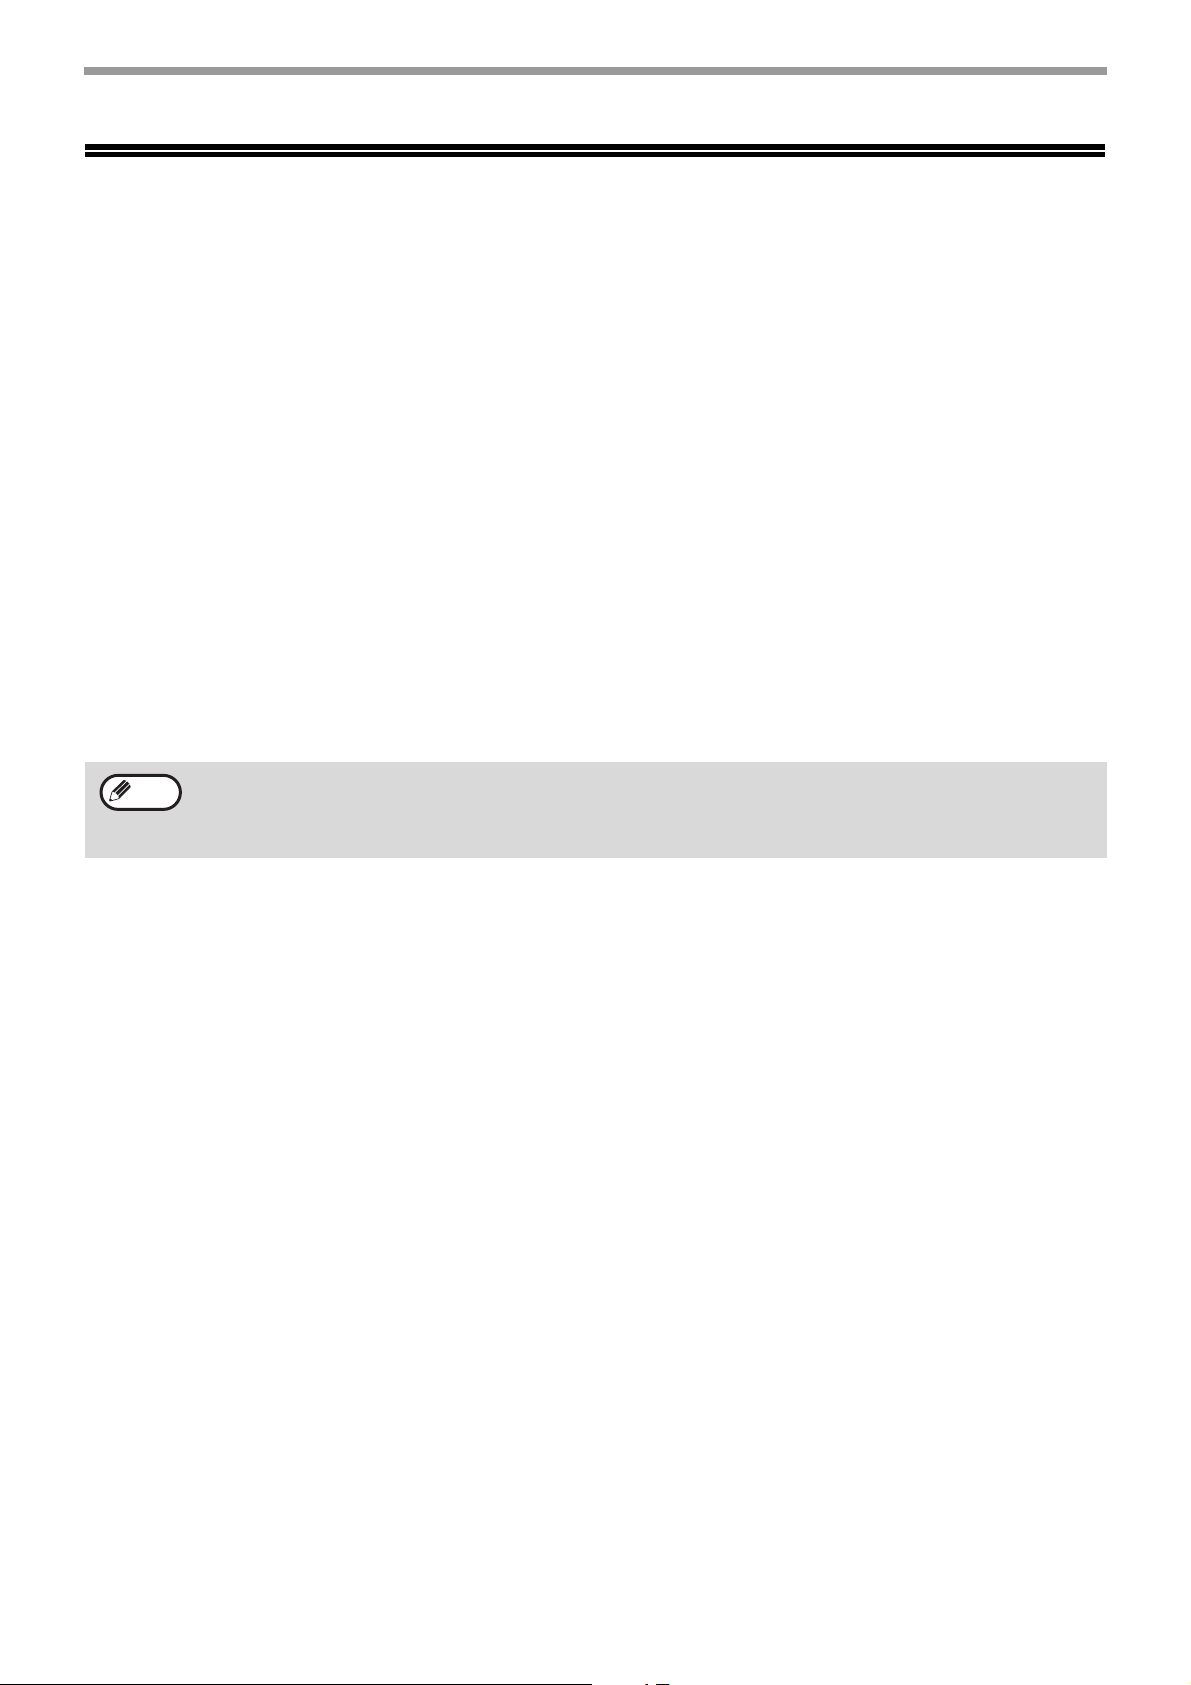
When user authentication mode is turned on, the account number entry screen is displayed. Enter your account
number (five-digit identification number) as explained below before performing a copy, fax, or scan operation.
Enter your account number (five digits) with the numeric keys.
1
As the account number is entered, the hyphens (-) change to asterisks ( ). If you enter an incorrect digit, press
[C] key and re-enter the correct digit.
When the copy job is finished, press the [LOGOUT] key ().
2
Note
• When a valid account number is entered, the current count of
the account will appear in the message display of the base
screen. After 6 seconds
(factory default setting), the base screen appears. (p.15)
* In copy mode, the number of sheets remaining until the limit is
reached is also shown if "Function Limit Setting" (p.178) is
enabled in the system settings.
• If you enter a user number for copy mode has also been programmed for fax mode, you can change to fax
mode after completing the copy operation and continue with the fax operation without re-entering your user
number. If you enter a user number for copy mode that has not been programmed for fax mode, enter your user
number for fax mode after you press the [FAX] key
• If an invalid account number is entered in step 1, the account number entry screen reappears.
•
When
"A Warning when Login Fails" (p.178)
and operation will not be permitted for 1 minute if an invalid account number is entered 3 times in a row.
() to change to fax mode.
in the system settings is enabled, a warning message will appear
23
Page 24
BEFORE USING THE MACHINE
ENTERING CHARACTERS
This section explains how to enter and edit characters for names of rapid dial numbers, Speed Dial numbers, and
group keys, as well as account names, program names, and search characters for the address list.
CHARACTERS THAT CAN BE ENTERED
Characters that can be entered for names
The following characters can be entered:
• Up to 36 characters can be entered for a name.
However, up to 18 characters can be entered for an account name or sender's name.
• Upper case alphabet, lower case alphabet, numbers, special characters, symbols.
Characters that can be used for search characters
The following characters can be used:
• Up to 10 characters can be entered for search characters.
• Upper case alphabet, lower case alphabet, numbers, special characters.
•
Note
Search characters are normally the first 10 characters of the name entered for a destination.
•
Search characters are used when storing and using auto dial keys and numbers.
•
When a destination name includes a symbol, the symbol cannot be stored as a search character.
•
Search characters can be edited.
24
Page 25
BEFORE USING THE MACHINE
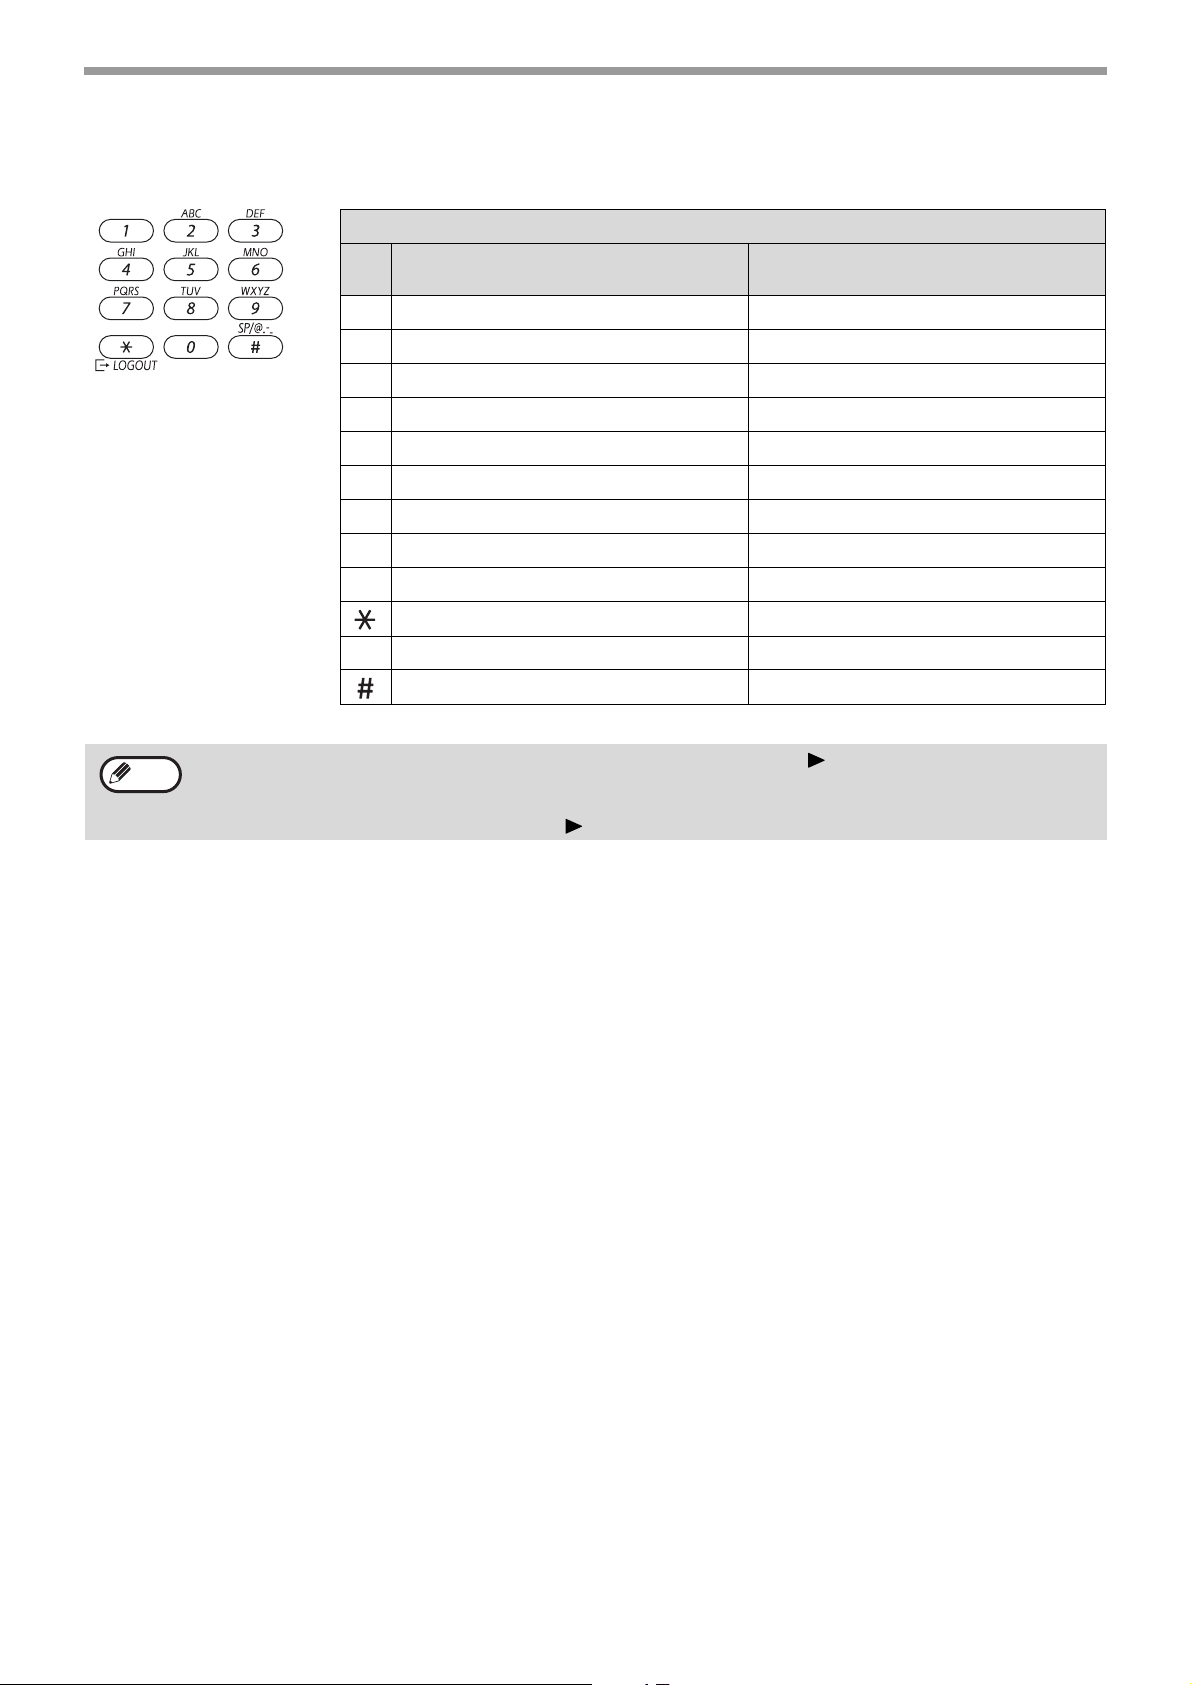
Characters are entered by pressing the numeric keys on the operation panel. The letters entered with each numeric
key are shown below.
Characters that can be entered
Characters that can be entered for
Key
names
1 1 Space - 1 Space 2 A B C 2 a b c A B C 2 a b c
3 D E F 3 d e f D E F 3 d e f
4 G H I 4 g h i G H I 4 g h i
5 J K L 5 j k l J K L 5 j k l
6 M N O 6 m n o M N O 6 m n o
7 P Q R S 7 p q r s P Q R S 7 p q r s
8 T U V 8 t u v T U V 8 t u v
9 W X Y Z 9 w x y z W X Y Z 9 w x y z
*}{][?>=;:,+)('&%$"!/_-.@#
00 0
Characters that can be used for
search characters
Note
Use to enter special characters. Use to enter special characters.
To enter two characters in succession that require the same key, press the [ ] key to move the cursor after
entering the first character.
Example: Entering "ab" (when directly entering an e-mail address)
Press the [2] key once, press the [ ] key once to move the cursor, and then press the [2] key twice.
25
Page 26
2
COPY FUNCTIONS
This chapter explains how to use the copy functions.
NORMAL COPYING
This section explains how to make a regular copy.
If "User authentication" has been enabled (p.178), enter your 5-digit account number.
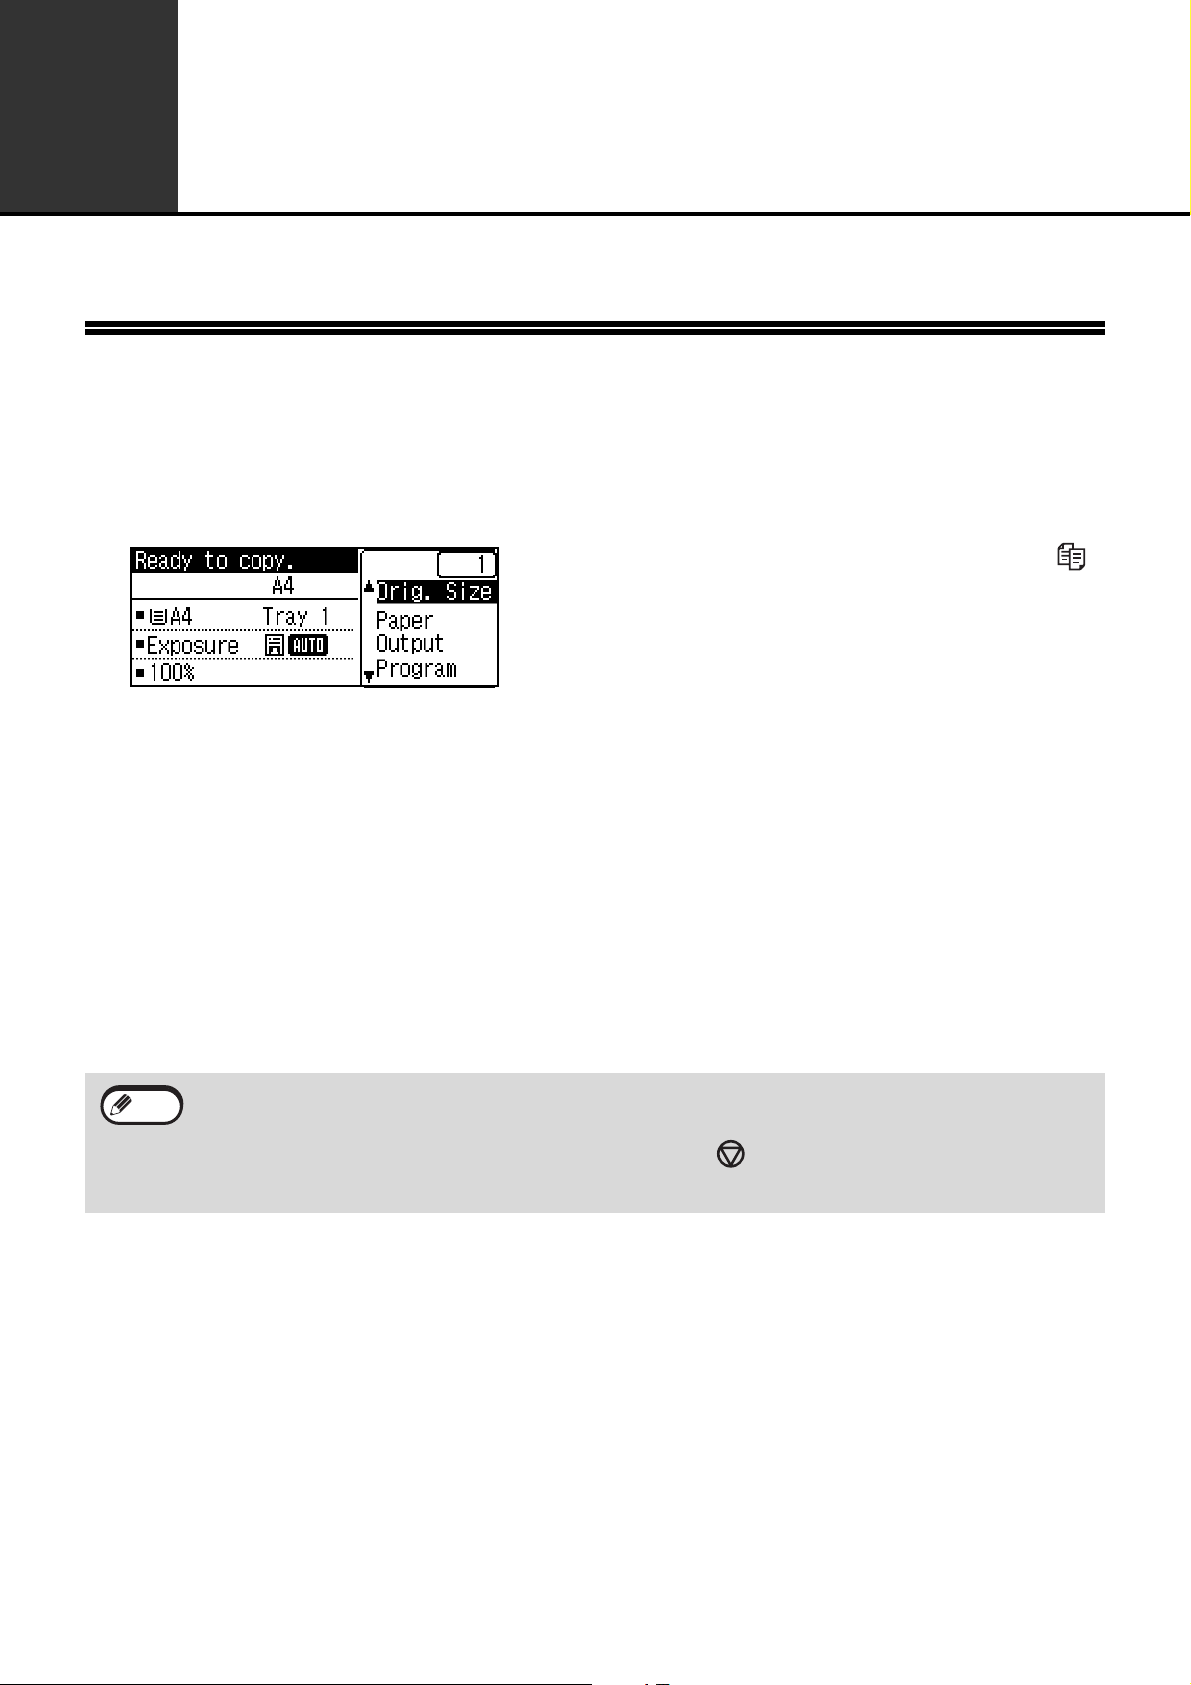
Make sure that the operation panel shows the copy screen.
1
If the machine is not in copy mode, press the [COPY] key ( ).
Place the original on the document glass or in the automatic document feeder.
2
To place the original, see "Place the original on the document glass." (p.27)" or "Place the original in the
automatic document feeder." (p.27).
To specify the original size, see "SELECTING THE ORIGINAL SIZE" (p.29).
Set copy settings for each function as needed.
3
For the functions and settings, see "MAKING A COPY DARKER OR LIGHTER" (p.28) to page "WHITENING
FAINT COLOURS IN COPIES (Suppress Background)" (p.36).
Enter the number of copies with the numeric keys.
4
To make a colour copy, press the [COLOUR START] key. To make a black & white
5
copy, press the [BLACK & WHITE START] key.
Note
Note
• About one minute after copying ends, "Auto Clear" (p.179) activates and restores the copy settings to the
default settings. The setting for "Auto clear" can be changed in the system settings.
• When selecting settings for copying, press the [CA] key if you need to cancel the settings.
• To stop copying in the middle of a run, press the [STOP] key ( ). If you find it difficult to remove the original
from the document feeder tray, open the feeding roller cover before removing the original. If you pull out the
original without opening the feeding roller cover, the original may become dirty.
26
Page 27
PLACING THE ORIGINAL
COPY FUNCTIONS
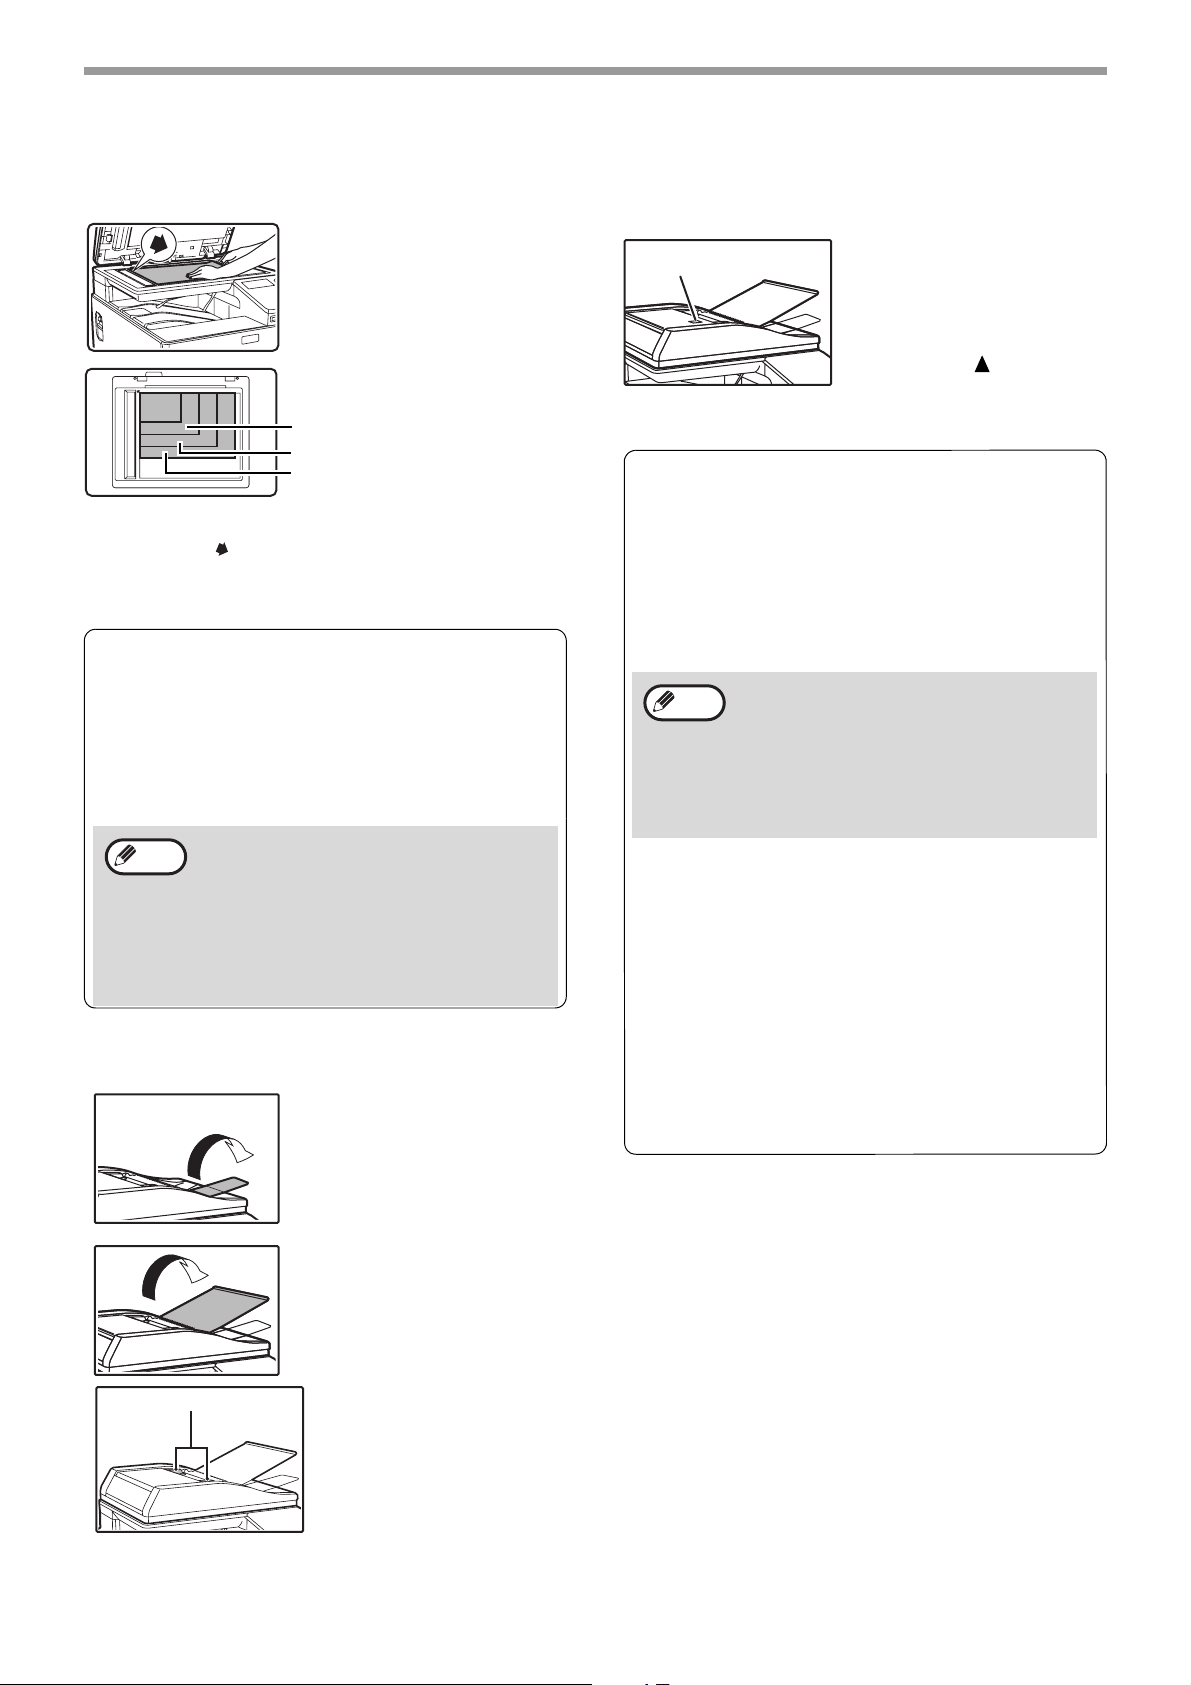
Place the original on the document glass.
Open the document feeder
and place the original face
down on the document glass.
A5 (5-1/2" x 8-1/2")
B5
A4 (8-1/2" x 11")
Align the upper left-hand corner of the original with
the tip of the mark.
* An original up to A4 (8-1/2" x 11") can be placed
on the document glass.
Copying books or originals with folds or
creases
Press down on the document feeder while copying
as shown. If the document feeder is not completely
closed, shadows may appear on the copy or it may
be fuzzy. Straighten originals with folds or creases
well before placing.
• Close the automatic document feeder
Note
slowly. Abruptly closing the automatic
document feeder may damage it.
• Take care that your fingers are not
pinched when closing the automatic
document feeder.
• Do not press hard on the automatic
document feeder. This may cause failure.
Place the original in the automatic document feeder.
Open the extension tray in
the original exit, and open
the original feeder tray.
Models with the one-sided scanning function
Set the originals face up in the document feeder tray.
Peep hole
Use the peep hole (see
the illustration at right) to
check the position of the
original.
There is an original top
edge mark in the peep
hole. Align the top edge of
the original with this mark.
Originals that can be used in the document feeder
Originals that are A5 to A4 (5-1/2" x 8-1/2" to 8-1/2"
x 14") and 50 g/m
can be used. A maximum of 50 pages can be
placed at once.
• Models with the two-sided scanning function
A maximum of 50 page can be placed at once
• Models with the one-sided scanning function
A maximum of 35 page can be placed at once
Note
2
to 105 g/m2 (15 lbs. to 24 lbs.)
• Make sure that there are no paper clips or
staples on the original.
• Straighten curled originals before placing
them in the document feeder tray. Curled
original may cause misfeeds.
• When you set multiple sheets of thick
original, if the original is not fed, reduce
the number of the set originals.
Originals that cannot be used in the
document feeder
The following originals cannot be used. These may
cause misfeeds or smudging and unclear images.
• Transparencies, tracing paper, other transparent or
translucent paper, and photographs.
• Carbon paper, thermal paper.
• Originals that are creased, folded, or torn.
• Glued originals, cut-out originals.
• Original with filing holes other than 2 holes, 3 holes,
4 holes, or 4-hole wide.
•
Originals printed using an ink ribbon (thermal
transfer printing), originals on thermal transfer paper.
Original Guides
Adjust the original guides
to the size of the
original(s).
Set the original(s) face up
in the feeding roller tray.
27
Page 28
COPY FUNCTIONS
Note
Note
• Specify the original size after placing the original. (p.29)
• Do not place originals of different sizes together in the document feeder tray. This may cause misfeeds.
• The following icons appear when the original is placed.
None: Document Glass
: Automatic document feeder (one-sided scanning).
: Automatic document feeder (two-sided scanning) (Models with the two-sided scanning function)
MAKING A COPY DARKER OR LIGHTER
Press the [EXPOSURE] key () on the operation panel to display the copy exposure screen.
The copy exposure can be adjusted as needed to the original.
Three exposure modes are available: "Text", "Text/Print Photo" and "Photo".
Depending on the settings, set "Auto" or one of five levels for the exposure.
Select the original type with the [ ][ ]keys, adjust the exposure if needed with the [ ][ ] keys, and press the
[OK] key.
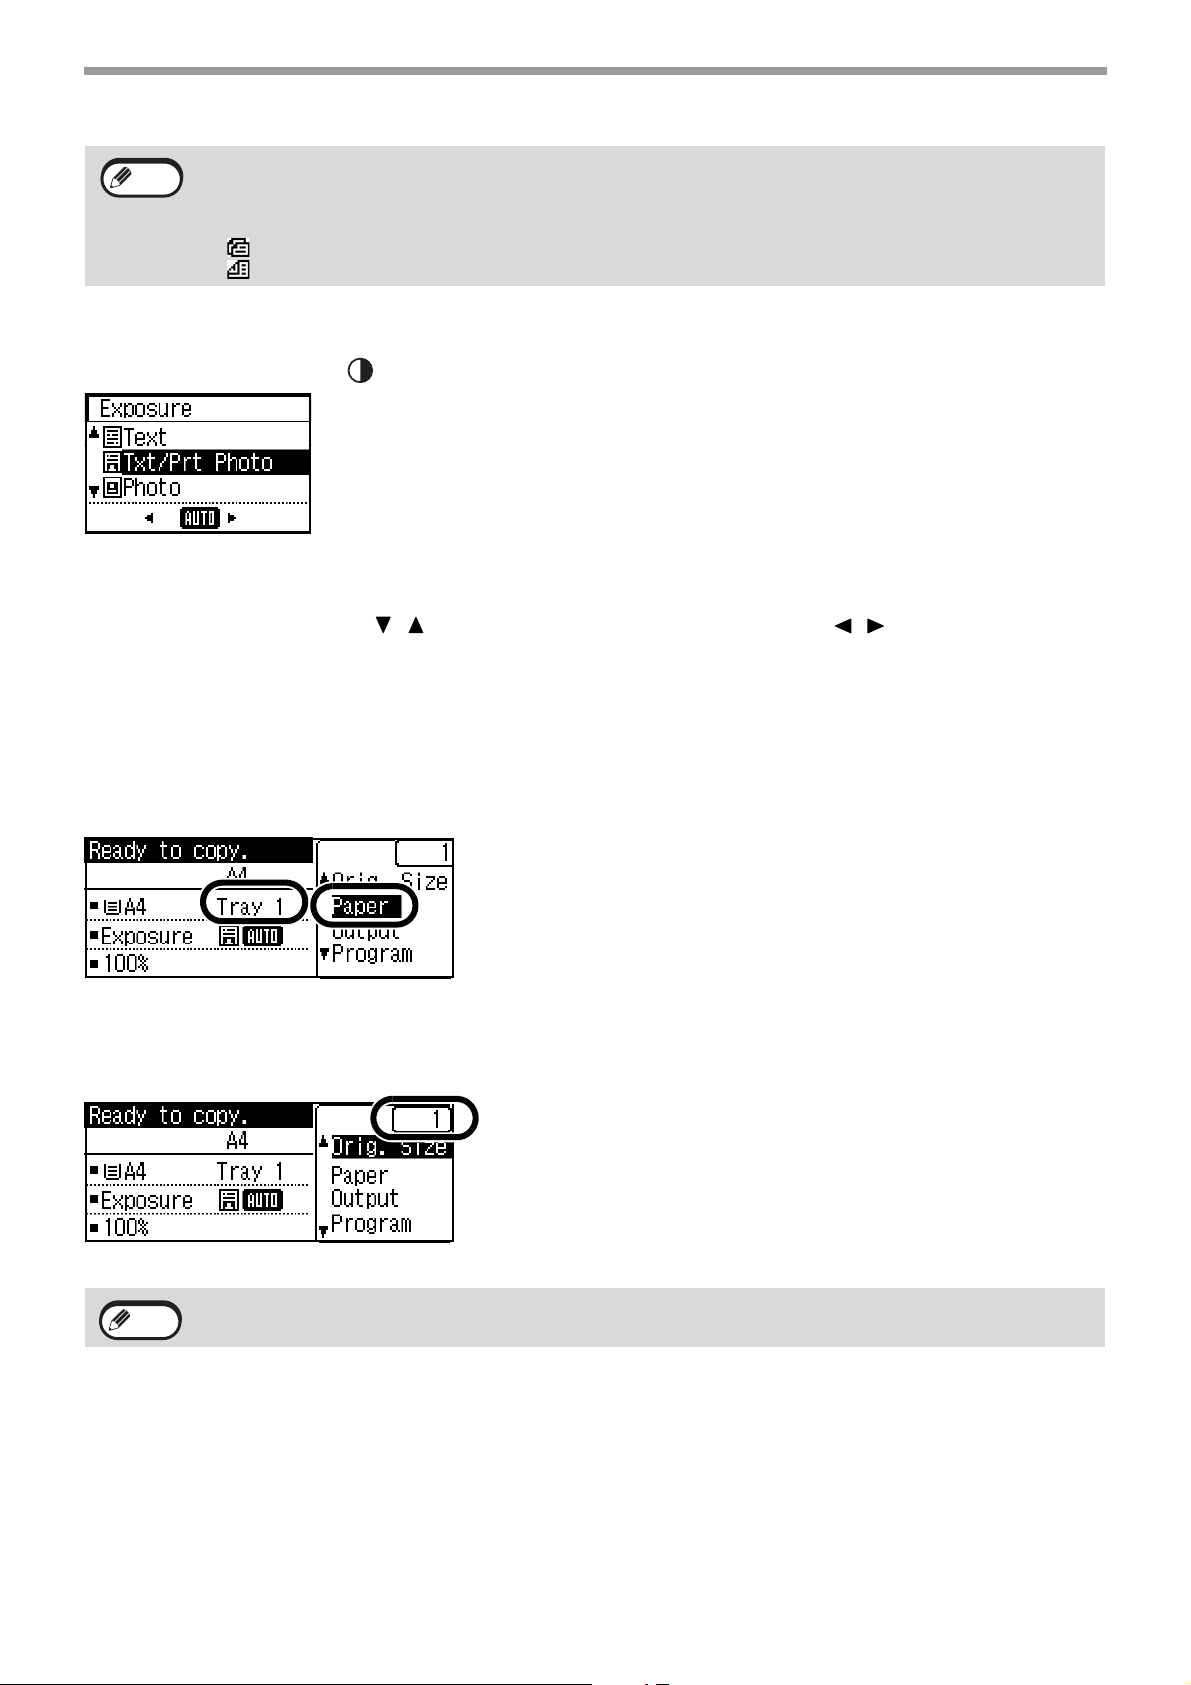
SELECTING THE TRAY
When you want to use the paper in the bypass tray, or tray 2 is installed and you want to change the tray that is
used, select "Paper" in the right menu of the base screen of copy mode and press the [OK] key.
The tray changes each time you press the [OK] key.
SETTING THE NUMBER OF COPIES
Press the numeric keys to set the number of copies.
The set number of copies appears in the display. A maximum of 999 copies (factory default setting) can be set.
Note
Note
• If you enter the wrong number, press the [C] key and enter the correct number.
• The limit for the number of copies can be changed in the system settings. (p.183)
28
Page 29
COPY FUNCTIONS
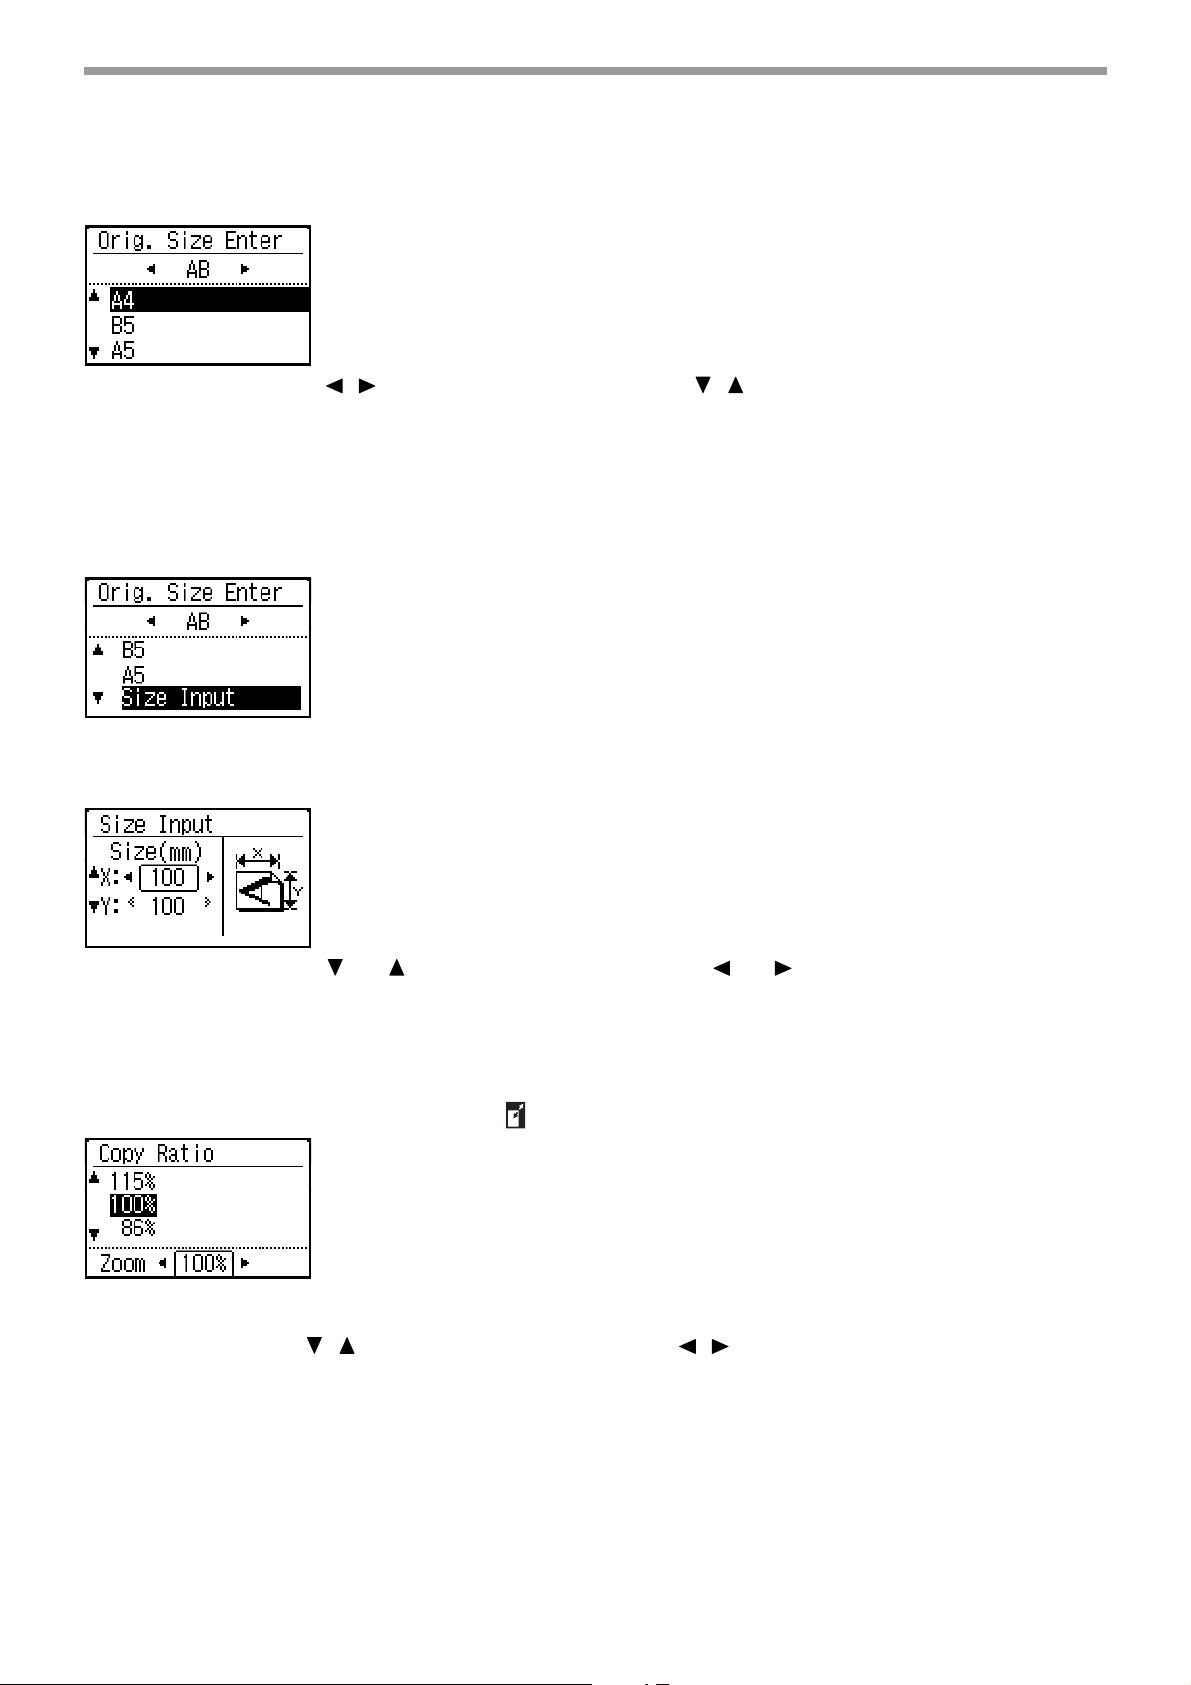
SELECTING THE ORIGINAL SIZE
When you want to change the original size, select "Original Size" on the right menu and press the [OK] key.
Select AB or inch with the [ ][ ] keys, and select the size with the [ ][ ] keys.
Press the [OK] key. You will return to the base copy screen.
USING THE BYPASS TRAY TO COPY A SPECIAL SIZE
ORIGINAL
Select "Original Size" in the right menu of the base screen of copy mode and press the [OK] key.
Select "Size Input" in the original size selection screen and press the [OK] key to display the size entry (mm)
screen.
Select "X" (width) with the [ ] or [ ] key and enter the width with the [ ] or [ ] key, then do the same for the
length (Y), and press the [OK] key.
REDUCING OR ENLARGING A COPY
Place the original, and press the [ZOOM] key ( ) on the operation panel to change to the ratio selection screen.
Specifying a ratio from 25% to 400%: Preset ratios/zoom.
(When the document feeder is being used, the zoom copy ratio range is 25% to 200%.)
Select the ratio with the [ ][ ] keys. You can fine adjust with the [ ][ ] keys (increments of 1%).
Press the [OK] key to enter the ratio.
29
Page 30
COPY FUNCTIONS
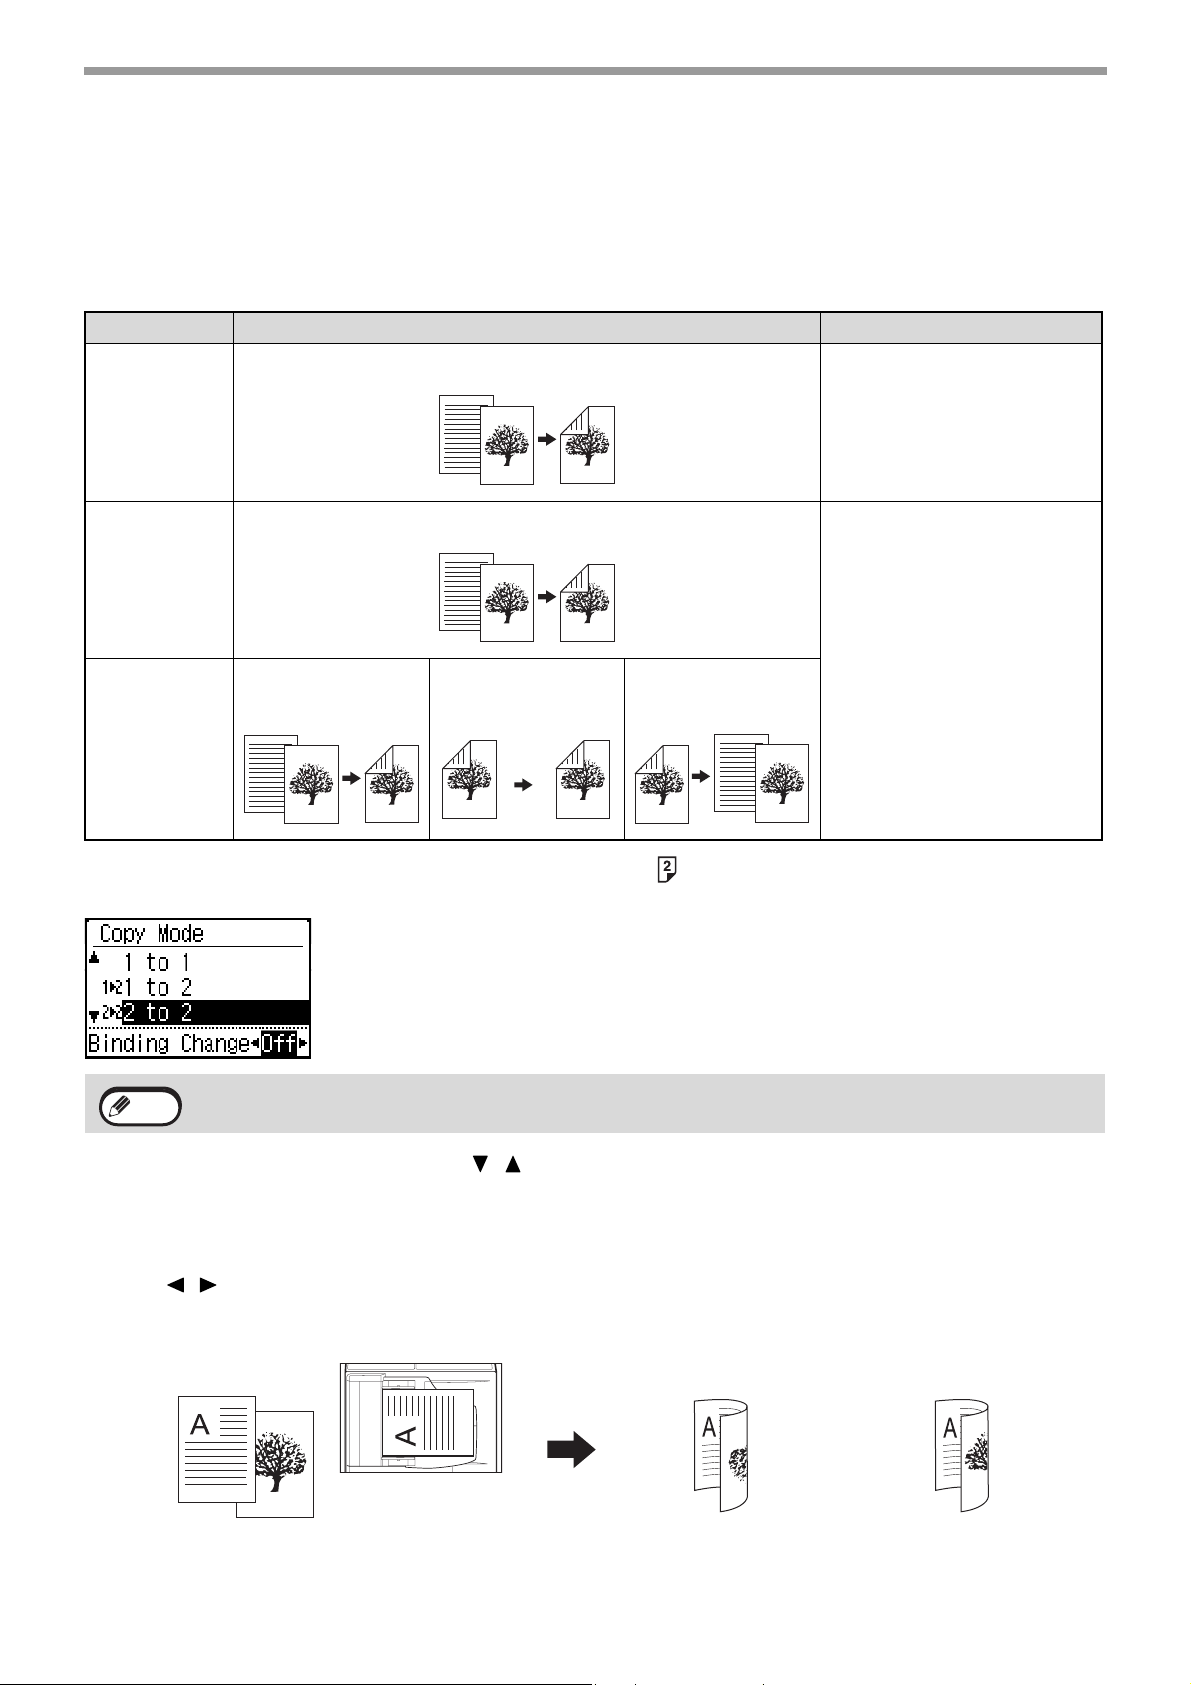
AUTOMATIC DUPLEX COPYING
Two originals placed on the document glass can be copied onto each side of a single sheet of paper. In addition, a
document feeder (Models with the two-sided scanning function) can be used to copy two originals onto one sheet of
paper, or one duplex original onto two sheets of paper, or one duplex original onto each side of one sheet of paper.
This function is convenient for making copies for identification purposes and helps save paper.
Original → Paper Usable paper
One-sided original
→ Two sides
Document
glass
Document
feeder
(Models with
the one-sided
scanning
function)
Document
feeder
(Models with
the two-sided
scanning
function)
To change to the 2-sided copy screen, press the [DUPLEX] key () on the operation panel with the base screen of
copy mode displayed.
One-sided original
→ Two sides
One-sided original
Duplex original
→ Two sides
→ Two sides
Duplex original
→ One side
A4, B5, A5
(8-1/2" x 11", 5-1/2" x 8-1/2")
A4, B5, A5
(8-1/2" x 14", 8-1/2" x 13-1/2",
8-1/2" x 13-2/5", 8-1/2" x 13",
8-1/2" x 11", 5-1/2" x 8-1/2")
Note
Note
Select "1 to 2", "2 to 2", or "2 to 1" with the [ ][ ] keys and press the [OK] key.
When scanning the original on the document glass, press the [START] key after scanning the front side, turn the original
over on the glass, and press the [COLOUR START] key or [BLACK & WHITE START] key. Duplex copying starts.
To change the orientation of the copy image on the front and back sides of the paper, set "Binding Change" to "On"
with the [ ][ ] keys.
There are restrictions on the paper that can be used for automatic duplex copying. See "Paper that can be used
for automatic 2-sided printing" (p.18).
portrait original
1
2
1
Orientation of the
placed original
Normal automatic
duplex copying
2
The top and bottom of
the images on the front
and back are reversed.
If the orientation of
duplex copying is
changed
The top and bottom of
the images on the front
and back are the same.
30
Page 31

COPY FUNCTIONS
CONVENIENT COPY FUNCTIONS
This section explains major convenient copy functions.
SORT COPY
● Copies of multiple original pages can be sorted into sets. (Sort)
● Copies of multiple original pages can be grouped by page. (No Sort)
No SortSort
When the document glass is used, "No Sort" is automatically selected. When the automatic document feeder is
used, "Sort" is automatically selected.
To change the sort setting manually, select "Sort" in the right menu of the base screen of copy mode and press the
[OK] key.
Select "No Sort" or "Sort" with the [ ] [ ] keys and press the [OK] key.
• If the memory becomes full while the originals are being scanned, "Memory is full." will appear in the display.
Note
To start copying the originals that have been scanned to that point, press the [COLOUR START] key or [BLACK
& WHITE START]. To cancel the copy job, press the [CA] key.
• The auto select setting for the sort function of the automatic document feeder can be changed in "Sort Auto
Select" in the system settings (p.183).
31
Page 32

ID CARD COPY
You can copy the front and back sides of ID card onto a page through this function.
The layout of the ID card copy, set the "ID Card Setting" of SYSTEM SETTINGS (p.182).
COPY FUNCTIONS
Original
Front
Back
• Set Horizontally Copies in the horizontal orientation (fixed position), regardless of the paper size.
• Set Vertically Copies in the vertical orientation (fixed position), regardless of the paper size.
Press the [ID CARD COPY] key () on the operation panel.
Place the ID card at the ID card mark on the document glass, and press the [COLOUR START] key or [BLACK &
WHITE START] key.
Turn the ID card over and press the [COLOUR START] key or [BLACK & WHITE START] key.
Copies
Set VerticallySet Horizontally
Note
• The ID card copy function cannot be used at the same time as the 2-sided copy, 2in1/4in1 copy, sort copy,
and card shot functions.
• Paper sizes that can be used with ID Card Copy are standard sizes.
• In ID card copy mode, scan area and scan number (1 page) cannot be changed. Scan area is:
X: 86 + 5 mm (1/4") (margin), Y: 54 + 5mm (1/4") (margin).
• Auto tray switch is invalid in ID card copy mode.
Please select paper and tray manually.
32
Page 33

COPY FUNCTIONS
RESOLUTION SETTINGS
You can adjust the resolution for scanning an original on the document glass or in the auto document feeder, and
select high image quality or high speed as appropriate for your needs.
With the base screen of copy mode displayed, press the [SPECIAL FUNCTION] key (), select "Resolution" with
the [ ][ ] keys, and press the [OK] key to display the resolution screen.
Select "Document glass" or "Document Feeder" with the [ ] [ ] keys and press the
1
[OK] key.
Select "B/W" or "COLOUR" with the [ ][ ] keys, select "600 x 400dpi",
2
"600 x 600dpi" (Document glass) or "600 x 300dpi", "600 x 600dpi" (Document Feeder)
with the [ ][ ] keys, and press the [OK] key.
33
Page 34

COPY FUNCTIONS
SPECIAL MODES
To display the special functions menu, press the [SPECIAL FUNCTION] key () with the base copy screen
displayed, and press the [ ][ ] keys to select "SPECIAL FUNCTIONS".
COPYING MULTIPLE ORIGINALS ONTO A SINGLE
SHEET OF PAPER (2 IN 1 / 4 IN 1 COPY)
Multiple originals can be copied onto a single sheet of paper in a selected layout pattern.
This function is convenient for compiling multi-page reference materials into a compact format, or for providing an
overview of all pages of a document on a single page.
2 IN 1 COPY
Pattern 1
Select "2in1/4in1" with the [ ][ ] keys and press the [OK] key. In the 2in1 / 4in1 screen, select "2in1" or "4in1" with
the [ ][ ] keys and press the [OK] key.
Select the layout with the [ ][ ] keys and press the [OK] key. See above for the layouts that can be selected.
• 2 in 1 / 4 in 1 copy cannot be used in combination with the following functions. The function selected
Note
first will take precedence.
Card shot, ID card copy
• A special paper size cannot be used for 2 in 1 / 4 in 1 copy.
• An appropriate ratio setting will be automatically selected based on the original size, the paper size, and the
selected number of images. When using the document glass, reduction is possible to 25%.
Certain combinations of original size, paper size, and number of images may result in images being cut off.
Pattern 2
4 IN 1 COPY
Pattern 1 Pattern 2 Pattern 3 Pattern 4
34
Page 35

COPY FUNCTIONS
CARD SHOT
When copying a card, this function allows you to print the front and back sides of the card next to each other on a
single sheet of paper.
This function creates 2 in 1 images of the front and back side of the card and centres them on the paper.
Original Copy Original Copy
CARD
CARD
Front of
card
CARD
Front of
card
CARD
Back of
card
Back of
card
Select Card Shot with the [ ][ ] keys and press the [OK] key.
Specify the card size in the Card Shot screen.
Select horizontal (X) or vertical (Y) with the [ ][ ] keys, specify the dimension with the [ ][ ] keys, and press the
[OK] key. Repeat for the other dimension.
• The horizontal and vertical dimensions can each be set to value from 25 to 210 mm.
Note
• Paper cannot be fed from the bypass tray.
• The card shot function cannot be used in combination with 2 in 1 / 4 in 1 copy, and ID card copy.
• The default settings for the horizontal and vertical dimensions in this screen can be set in "Card Shot
Default" (p.182) in the system settings.
ADJUSTING RED/GREEN/BLUE IN COPIES (RGB Adjust)
The feature is used to strengthen or weaken any one of the three colour components R (red), G (green), B (blue).
Select "RGB Adjust" with the [ ][ ] keys and press the [OK] key.
Select "R (Red)", "G (Green)", or "B (Blue)" with the [ ][ ] keys, adjust the shade of the colour with the [ ][ ]
keys, and press the [OK] key.
35
Page 36

COPY FUNCTIONS
ADJUSTING THE SHARPNESS OF AN IMAGE (Sharpness)
This is used to sharpen an image or make it softer.
Select "Sharpness" with the [ ][ ] keys and press the [OK] key.
Select "Off", "Soft", or "Sharp" with the [ ][ ] keys and press the [OK] key.
WHITENING FAINT COLOURS IN COPIES
(Suppress Background)
This feature is used to suppress light background areas.
Select "Suppress BG" with the [ ][ ] keys and press the [OK] key.
: Only light backgrounds are suppressed.
: Light to dark backgrounds are suppressed.
To select, change the level (3 levels are available) with the [ ][ ] keys and press the [OK] key.
Note
When Suppress Background is selected, the copy exposure setting is not applied.
"MAKING A COPY DARKER OR LIGHTER" (p.28)
36
Page 37

COPY FUNCTIONS
FREQUENTLY USED SETTINGS
(PROGRAMS)
A group of copy settings can be stored together as a program. A stored program can be easily invoked.
STORING A PROGRAM
The following copy settings can be stored:
Duplex, Zoom, Exposure, Resolution, Orig. Size Enter, Paper Size, Sort, 2in1/4in1, Card Shot, RGB Adjust,
Sharpness, Suppress BG
With the copy base screen displayed, press the [SPECIAL FUNCTION] key ( ), select "Register Program" with
the [ ][ ] keys, and press the [OK] key. The Register Program screen appears.
To store a new program, select "Enter". To change a stored program, select "Change". To delete a stored program,
select "Delete". Press the [OK] key.
STORING/CHANGING A PROGRAM
Select the number of the program you want to store or change with the [ ][ ] keys
1
and press the [OK] key.
"No Store" appears in locations where a program has not been stored.
"Program 1 - 3" appears in locations where a program is already stored.
Use the [ ][ ] keys to select a setting that you want to store in the program from the
2
list of storable settings, and press the [OK] key.
Refer to "RESOLUTION SETTINGS" (p.33) to "WHITENING FAINT COLOURS IN
3
COPIES (Suppress Background)" (p.36) for information on the settings.
A checkmark appears in front of each setting that you have selected. When you have finished selecting
settings, press the [COLOUR START] key or [BLACK & WHITE START] key.
Note
• Up to three programs can be stored.
• Some setting combinations are not possible.
(For example, 2in1/4in1 and Card Shot)
37
Page 38

COPY FUNCTIONS
DELETING A PROGRAM
Select the number of the program that you want to delete with the [ ][ ] keys and
1
press the [OK] key.
Select "Delete" with the [ ][ ] keys and press the [OK] key.
2
The selected program location changes to "No Store".
USING A PROGRAM
Select "Program" in the right menu of the base screen of copy mode and press the [OK] key.
Select the number of the program you want to use with the [ ][ ] keys and press the [OK] key.
The settings in the selected program are applied to the copy job.
38
Page 39

3
PRINTER
PRINTER FUNCTION OF THE
MACHINE
The machine is equipped standard with a full colour printing function. To enable printing from your computer, a
printer driver must be installed.
See the table below to determine which printer driver to use in your environment.
Environment Printer driver type
Windows
Windows /
Macintosh
Installing the printer driver in a Windows environment
To install the printer driver and configure settings in a Windows environment, see in the Software Setup Guide.
Note
Installing the printer driver in a Macintosh environment
To install the printer driver and configure settings in a Macintosh environment, see in the Software Setup Guide.
The explanations in this manual of printing in a Windows environment generally use the screens of the PCL6
printer driver. The printer driver screens may differ slightly depending on the printer driver that you are using.
PCL6
The machine supports the Hewlett-Packard PCL6 printer control languages.
PS
This printer driver supports the PostScript 3 page description language developed by Adobe
Systems Incorporated, and enables the machine to be used as a PostScript 3 compatible printer.
(A PPD file is available if it is desired to use the Windows standard PS printer driver.)
39
Page 40

PRINTING FROM WINDOWS
PRINTER DRIVER PROPERTIES WINDOW
PRINTER
(1)
(1) Select the printer driver of the machine.
• If the printer drivers appear as icons, click the icon of the printer driver to be used.
• If the printer drivers appear as a list, select the name of the printer driver to be used from the list.
(2) Click the [Preferences] button.
Note
The button that is used to open the printer driver properties window (usually [Properties] or [Printing
Preferences]) may vary depending on the software application.
(2)
40
Page 41

PRINTER
BASIC PRINTING PROCEDURE
The following example explains how to print a document from "WordPad", which is a standard accessory program in
Windows.
Select [Print] from the [File] menu of
1
WordPad.
Open the printer driver properties
2
window.
Select print settings.
3
(1)
(2)
(1) Click the [Paper] tab.
(2) Select the paper size.
To select settings on other tabs, click the desired tab
and then select the settings.
(3) Click the [OK] button.
• Make sure the paper size is the same as
Note
Click the [Print] button.
4
Printing begins.
the paper size set in the software
application.
• Up to nine custom paper sizes can be
stored. Storing a custom paper size
makes it easy to specify that size each
time you need to use it.
To store a paper size, select [Custom
Paper], one of [User1] to [User7] or [Long
Paper] from the pull-down menu and click
the [Custom] button.
(3)
SELECTING THE PAPER
This section explains how to configure the "Paper Selection" setting on the [Paper] tab
of the printer driver properties window.
Before printing, check the paper sizes, paper types, and paper remaining in the
machine's trays. To view the most recent tray information, click the [Tray Status] button.
• When [Auto Select] is selected in "Paper Source"
The tray that has the size and type of paper selected in "Paper Size" and "Paper
Type" on the [Paper] tab is automatically selected.
• When other than [Auto Select] is selected in "Paper Source"
The specified tray is used for printing regardless of the "Paper Size" setting.
• When [Bypass Tray] is selected
The "Paper Type" must also be selected. Check the bypass tray and make sure that the desired type of paper is
loaded, and then select the appropriate "Paper Type" setting.
Note
• When [Auto Select] is selected in "Paper Type"
A tray with plain paper of the size specified in "Paper Size" is automatically selected.
• When other than [Auto Select] is selected in "Paper Type"
A tray with the specified type of paper and the size specified in "Paper Size" is used for printing.
Special media such as envelopes can also be placed in the bypass tray. For the procedure for loading paper and
other media in the bypass tray, see "Loading the bypass tray" (P.20) .
41
Page 42

PRINTER
PRINTING ON ENVELOPES
The bypass tray can be used to print on special media such as envelopes. The procedure for printing on an
envelope from the printer driver properties screen is described below.
For the types of paper that can be used in the bypass tray, see "PAPER" (P.16) in "BEFORE USING THE
MACHINE". For the procedure for loading paper in the bypass tray, see "Loading the bypass tray" (P.20) in
"BEFORE USING THE MACHINE".
Select the envelope size in the appropriate settings of the application ("Page Settings" in many applications) and
then perform the following steps.
Note
(2)(1)
• It is recommended that you do a test print to check the print result before using an envelope.
• In the case of media that can only be loaded in a certain orientation such as an envelope, you can rotate the
image 180 degrees if needed. For more information, see "ROTATING THE PRINT IMAGE 180 DEGREES
(Rotate 180 degrees)".
• When feeding an envelope, push down the fusing unit release levers (see p.10) to release the pressure.
(1) Click the [Paper] tab.
(2) Select the envelope size from the "Paper Size"
menu.
The paper tray and paper type are automatically
selected.
42
Page 43

PRINTER
PRINTING WHEN THE USER AUTHENTICATION
FUNCTION IS ENABLED
When the user authentication function is enabled in the machine's system settings (administrator), your user
information (login name, password, etc.) must be entered in the printer driver properties window before you can
print. The information that must be entered varies depending on the authentication method being used, so check
with the administrator of the machine before printing.
Open the printer driver properties
1
window from the print window of the
software application.
Enter your user number.
2
(1) (2)
(3) Enter the user name and job name as
necessary.
• User Name
Click the [User Name] checkbox and enter
your user name (maximum of 32 characters).
Your entered user name will appear at the top of
the operation panel. If you do not enter a user
name, your computer login name will appear.
• Job Name
Click the [Job Name] checkbox and enter a
job name (maximum of 80 characters). The
entered job name will appear at the top of the
operation panel as a file name.
If you do not enter a job name, the file name set
in the software application will appear.
(4) Click the [OK] button.
To have a confirmation window appear
Note
Start printing.
3
before printing starts, select the [Auto Job
Control Review] checkbox so that a
checkmark appears.
(3)(4)
(1) Click the [Job Handling] tab.
(2) Enter your user number.
When authentication is by user number. Click the [User
Number] checkbox and enter a user number
(5 digits).
When [User Authentication] has been
Note
checked on [Printing Policy] in the
[Configuration] tab, you cannot enter the
user number.
Enter the user information in the dialog box
whenever you print.
Note
• The machine's user authentication
function cannot be used when the PPD
file* is installed and the Windows standard
PS printer driver is used. For this reason,
printing will not be possible if printing by
invalid users is prohibited in the system
settings (administrator).
• The PPD file enables the machine to print
using the standard PS printer driver of the
operating system.
System Setting(Administrator):Disable
Print by Inv. User
“Disable Print by Inv. User” can be
enabled in the machine’s system settings
(Administrator) to prohibit print jobs of
users whose user information is not
stored in the machine. When this function
is enabled, printing is not allowed when
user information is not entered or
incorrect information is entered.
43
Page 44

VIEWING PRINTER DRIVER HELP
When selecting settings in the printer driver, you can display Help to view explanations of the settings.
Open the printer driver properties window from the print window of the software
1
application.
Click the [Help] button.
2
PRINTER
The Help window will open to let you view explanations of the settings on the tab.
To view Help for settings in a dialog box, click the underlined text at the top of the Help window.
Pop-up help
Help can be displayed for a setting by clicking the setting and pressing the [F1] key.
* To view Help for a setting in Windows XP/Server 2003, click the button in the upper right-hand corner of the
printer driver properties window and then click the setting.
Information icon
Some restrictions exist on the combinations of settings that can be selected in the printer driver properties window.
When a restriction exists on a selected setting, an information icon ( ) will appear next to the setting.
Click the icon to view an explanation of the restriction.
44
Page 45

PRINTER
SAVING FREQUENTLY USED PRINT SETTINGS
Settings configured on each of the tabs at the time of printing can be saved as user settings. Saving frequently used
settings or complex colour settings under an assigned name makes it easy to select those settings the next time you
need to use them.
SAVING SETTINGS AT THE TIME OF PRINTING
Settings can be saved from any tab of the printer driver properties window. Settings configured on each tab are
listed at the time of saving, allowing you to check the settings as you save them.
Open the printer driver properties
1
window from the print window of the
software application.
Save the print settings.
2
(2)(1)
(1) Configure print settings on each tab.
(2) Click the [Save] button.
Check and save the settings.
3
(2)(1)
(3)
(1) Check the displayed settings.
(2) Enter a name for the settings (maximum
of 20 characters).
(3) Click the [OK] button.
Note
Click the [OK] button.
4
Start printing.
5
• Up to 30 sets of user settings can be saved.
• The following items cannot be saved in user settings.
• A watermark that you created
• Paper insertion settings
• Overlay file
• The user number, user name, and job name entered in the [Job Handling] tab
45
Page 46

USING SAVED SETTINGS
Open the printer driver properties window from the print window of the software
1
application.
Select the print settings.
2
(1) Select the user settings that you wish to use.
(2) Click the [OK] button.
PRINTER
(2)
Start printing.
3
(1)
Deleting saved settings
Select the user settings that you want to delete in (1) of step 2 above, and click the [Delete] button.
46
Page 47

PRINTER
CHANGING THE PRINTER DRIVER DEFAULT
SETTINGS
The default settings of the printer driver can be changed using the procedure below. The settings selected using this
procedure are saved and become the default settings when printing from a software application. (Settings selected
in the printer driver properties window when printing from an application remain in effect only while the application is
in use.)
Click the [Start] button ( ) and select
1
[Control Panel] and then [View
devices and printers].
• In Windows XP/Server 2003, click the [start]
button and then click [Printers and Faxes].
• In Windows 8/Server 2012, right-click the start
screen (or swipe up from the bottom edge of
the screen), and click [All apps] - [Control
Panel] - [View devices and printers] - [Printer]
on the taskbar.
In Windows XP, if [Printers and Faxes] does
Note
Open the printer properties window.
2
not appear in the [start] menu, select
[Control Panel], select [Printers and Other
Hardware], and then select [Printers and
Faxes].
(1)
Click the [Printing Preferences] button
3
on the [General] tab.
Configure the settings and click the
4
[OK] button.
(2)
(1) Click the icon of the printer driver of the
machine.
(2) Select [Printer properties].
Note
In Windows XP/Server 2003, click the [File]
menu.
For explanations of the settings, see printer driver
Help.
47
Page 48

PRINTER
PRINTING FROM A MACINTOSH
BASIC PRINTING PROCEDURE
The following example explains how to print a document from the standard accessory program "TextEdit" in Mac OS X.
Note
To use the machine as a printer for the Macintosh, the machine must be connected to a network.
To install the PPD file and configure printer driver settings, see Software Setup Guide.
SELECTING PAPER SETTINGS
Select paper settings in the printer driver before selecting the print command.
Select [Page Setup] from the [File]
1
menu of TextEdit.
Select paper settings.
2
(1) Make sure that the correct printer is selected.
(2) Select paper settings.
The paper size, paper orientation, and enlarge/reduce
can be selected.
(3) Click the [OK] button.
(2)
(1)
(3)
PRINTING
Select [Print] from the [File] menu of
1
TextEdit.
Note
The menu used to execute printing may vary
depending on the software application.
48
Make sure that the correct printer is
2
selected.
Depending on the OS, the machine name
Note
that appears in the "Printer" menu is
[MX-xxxx]. ("xxxx" is a sequence of
characters that varies depending on the
machine model.)
Page 49

PRINTER
Select print settings.
3
Click next to [Copies & Pages] and select the
settings that you wish to configure from the
pull-down menu. The corresponding setting
screen will appear.
If the settings do not appear in Mac OS X v10.5,
10.6 and 10.7, click " " next to the printer name.
Click the [Print] button.
4
Printing begins.
SELECTING THE PAPER
This section explains the [Paper Feed] settings in the print settings window.
• When [Auto Select] is selected
A tray with plain paper or recycled paper (the factory default setting is plain paper only) of the size specified in
"Paper Size" in the page settings window is automatically selected.
• When a paper tray is selected
The specified tray is used for printing regardless of the "Paper Size" setting in the page settings window.
For the bypass tray, a paper type can also be specified. Make sure that the paper type setting for the bypass tray
is correct and that the set type of paper is actually loaded in the bypass tray, and then select the appropriate
bypass tray (paper type).
• Special media such as envelopes can also be placed in the bypass tray. For the procedure for loading paper
Note
• When a paper type is selected
A tray with the specified type of paper and the size specified in "Paper Size" in the page settings window is used
for printing.
and other media in the bypass tray, see
MACHINE".
• When "Enable Detected Paper Size in Bypass Tray" (disabled by factory default) or "Enable Selected Paper
Type in Bypass Tray" (enabled by factory default) is enabled in the system settings (administrator), printing will
not take place if the paper size or paper type specified in the printer driver is different from the paper size or
paper type specified in the settings of the bypass tray.
"Loading the bypass tray" (P.20) in "BEFORE USING THE
49
Page 50

PRINTER
PRINTING ON ENVELOPES
The bypass tray can be used to print on special media such as envelopes. The procedure for printing on an
envelope from the printer driver properties screen is described below.
For the types of paper that can be used in the bypass tray, see "PAPER" (P.16). For the procedure for loading paper
in the bypass tray, see "Loading the bypass tray" (P.20).
Select the envelope size in the appropriate settings of the application ("Page Settings" in many applications) and
then perform the following steps.
Select the paper size.
1
Select the envelope size from the "Paper Size" menu on the page setup screen.
In the case of media that can only be loaded in a certain orientation such as an envelope, you can rotate the
Note
Select the bypass tray.
2
image 180 degrees if needed. For more information, see "ROTATING THE PRINT IMAGE 180 DEGREES
(Rotate 180 degrees)" (P.62)".
(1)
(2)
(1) Select [Paper Feed] on the print screen.
(2) Select [Bypass Tray(Envelope)] from the "All pages from" menu.
Set the bypass tray paper type to [Envelope] in the machine’s “Paper Type Setup”, and make sure that an envelope is
loaded in the bypass tray.
Note
It is recommended that you do a test print to check the print result before using an envelope.
50
Page 51

PRINTER
PRINTING WHEN THE USER AUTHENTICATION
FUNCTION IS ENABLED
When the user authentication function is enabled in the machine's system settings (administrator), you must enter
your user number in order to print.
Select [Print] from the application's
1
[File] menu.
Note
Display the job handling screen.
2
(1) Make sure that the machine's printer
(2) Select [Job Handling] and then click the
The menu used to execute printing may vary
depending on the software application.
name is selected.
[Authentication] tab in the screen that
appears.
In Mac OS X v10.4, select [Job Handling].
(1)
(2)
Start printing.
3
(2) (3)(1)
(1) Enter your user information.
When authentication is by user number
Enter your user number (5 digits) in "User
Number".
(2) Enter the user name and job name as
necessary.
• User Name
Enter your user name (maximum of 32
characters). Your entered user name will
appear at the top of the operation panel. If you
do not enter a user name, your computer login
name will appear.
•Job Name
Enter a job name (maximum of 30 characters).
The entered job name will appear at the top of
the operation panel as a file name. If you do not
enter a job name, the file name set in the
software application will appear.
(3) Click the [Print] button.
You can click the (lock) button after
Note
entering your login name and password, or
user number, to simplify operation the next
time you wish to print based on the same
user authentication.
Note
Note
Depending on the OS, the machine name
that appears in the "Printer" menu is
[MX-xxxx]. ("xxxx" is a sequence of
characters that varies depending on the
machine model.)
"
Disable Print by Inv. User
users whose user information is not stored in the machine.
" can be enabled in the machine's system settings (Administrator) to prohibit print jobs of
51
Page 52

FREQUENTLY USED FUNCTION
This section explains frequently used functions.
PRINTER
• "SELECTING THE COLOUR MODE" (P.52)
• "TWO-SIDED PRINTING" (P.55)
The explanations assume that the paper size and other basic settings have already been selected. For the basic
procedure for printing and the steps for opening the printer driver properties window, see the following section:
• Windows : "BASIC PRINTING PROCEDURE" (P.41)
• Macintosh : "BASIC PRINTING PROCEDURE" (P.48)
In Windows, view printer driver Help for details on printer driver settings for each printing function.
• "FITTING THE PRINT IMAGE TO THE PAPER"
(P.56)
• "PRINTING MULTIPLE PAGES ON ONE PAGE"
(P.57)
SELECTING THE COLOUR MODE
This section explains how to select the colour mode in the printer driver properties window. The following three
selections are available for the colour mode:
Automatic: The machine automatically determines whether each page is colour or black and white and prints
the page accordingly. Pages with colours other than black and white are printed using
Y (Yellow), M (Magenta), C (Cyan) and Bk (Black) toner. Pages that are only black and white are
printed using Bk (Black) toner only. This is convenient when printing a document that has both
colour and black and white pages, however, the printing speed is slower.
Color: All pages are printed in colour. Both colour data and black and white data are printed using
Y (Yellow), M (Magenta), C (Cyan) and Bk (Black) toner.
Black and White: All pages are printed in black and white. Colour data such as images or materials for a
presentation are printed using black toner only. This mode helps conserve colour toner when you
do not need to print in colour, such as when proofreading or checking the layout of a document.
When "Color Mode" is set to [Automatic]
Even if the print result is black and white, the following types of print jobs will be counted as 4-colour (Y (Yellow),
M (Magenta), C (Cyan), and Bk (Black)) print jobs. To be always counted as a black and white job, select [Black and
White].
• When the data is created as colour data.
• When the application treats the data as colour data even though the data is black and white.
• When an image is hidden under a black and white image.
.
Windows
(1) (2)
(1) Click the [Color] tab.
(2) Select the "Color Mode" that you wish to use.
52
Page 53

PRINTER
BLACK AND WHITE PRINTING
[Black and White] can be selected on the [Main] tab as well as on the [Color] tab. Click the [Black and White Print]
checkbox on the [Main] tab so that a checkmark appears.
The [Black and White Print] checkbox on the [Main] tab and the "Color Mode" setting on the [Color] tab are linked.
When the [Black and White Print] checkbox is selected on the [Main] tab, [Black and White] is also selected on
the [Color] tab.
Macintosh
(2)
(1)
(1) Select [Color].
(2) Select the "Color Mode" that you wish to use.
53
Page 54

PRINTER
SELECTING A PRINT MODE SETTING
This section explains the procedure for selecting a print mode setting. The "Print Mode Settings" consist of the
following two items:
Normal: This mode is suitable for printing data such as regular text or a table.
High Quality: The print quality of colour photos and text is high.
Windows
(1) (2)
Macintosh
(1) Click the [Advanced] tab.
(2) Select the "Print Mode".
(1)(2)
(1) Select [Color].
(2) Select the "Print Mode".
54
Page 55

PRINTER
TWO-SIDED PRINTING
The machine can print on both sides of the paper. This function is useful for many purposes, and is particularly
convenient when you want to create a simple pamphlet. Two-sided printing also helps conserve paper.
Paper
orientation
Vert ical
Horizontal
Print results
Windows Macintosh Windows Macintosh
2-Sided(Book)
Windows Macintosh Windows Macintosh
2-Sided(Book)
Long-edged binding
(Flip on long edge)
Short-edged binding
(Flip on short edge)
2-Sided(Tablet)
2-Sided(Tablet)
Short-edged binding
(Flip on short edge)
Long-edged binding
(Flip on long edge)
The pages are printed so that they can be
bound at the side.
Windows
(1) (2)
(1) Configure the settings on the [Main] tab.
(2) Select [2-Sided(Book)] or [2-Sided(Tablet)].
The pages are printed so that they can be
bound at the top.
Macintosh
(1)
(1) Select [Layout].
(2) Select [Long-edged binding] or [Short-edged
binding].
(2)
55
Page 56

PRINTER
FITTING THE PRINT IMAGE TO THE PAPER
This function is used to automatically enlarge or reduce the printed image to match the size of the paper loaded in
the machine.
This is convenient for such purposes as enlarging an A5 or letter size document to A4 or ledger size to make it
easier to view, and to print when the same size of paper as the document image is not loaded in the machine.
A5
The following example explains how to print an A5 size document on A4 size paper.
A4
Windows
(1)
(3)
(2)
(4)
(1) Click the [Paper] tab.
(2) Select the size of the print image (for example:
A5).
(3) Select [Fit To Paper Size].
(4) Select the actual paper size to be used for
printing (for example: A4).
Macintosh
(1)
(3) (4)
(2)
(1) Select [Paper Handling].
(2) Check the size of the print image (for example:
A5).
To change the print image size, use the "Paper Size"
menu that appears when [Page Setup] is selected.
(3) Select [Scale to fit paper size].
(4) Select the actual paper size to be used for
printing (for example: A4).
56
Page 57

PRINTER
PRINTING MULTIPLE PAGES ON ONE PAGE
This function can be used to reduce the print image and print multiple pages on a single sheet of paper.
This is convenient when you want to print multiple images such as photos on a single sheet of paper, and when you
want to conserve paper. This function can also be used in combination with two-sided printing for maximum
conservation of paper.
Using the PCL6 printer driver, you can print only the first page in the original size and print multiple reduced pages
on the subsequent sheets.
For example, when [2-Up] (2 pages per sheet) and [4-Up] (4 pages per sheet) are selected, the following print
results will be obtained, depending on the order selected.
Print results
N-Up
(Pages per
sheet)
2-Up
(2 pages per
sheet)
Left To Right Right To Left
Top To Bottom
(When the print
orientation is landscape)
N-Up
(Pages per
sheet)
4-Up
(4 pages per
sheet)
• The page orders for 6-Up, 8-Up, 9-Up, and 16-Up are the same as for 4-Up.
• In a Windows environment, the page order can be viewed in the print image in the printer driver properties window.
In a Macintosh environment, the page orders are displayed as selections.
• In a Macintosh environment, the number of pages that can be printed on a single sheet is 2, 4, 6, 9, or 16.
Right, and Down Down, and Right Left, and Down Down, and Left
57
Page 58

Windows
PRINTER
(1)
(2)
(3)
Macintosh
(4)
(1) (2)
(1) Configure the settings on the [Main] tab.
(2) Select the number of pages per sheet.
(3) If you wish to print borderlines, click the
[Border] checkbox so that a checkmark
appears.
(4) Select the order of the pages.
(1) Select [Layout].
(2) Select the number of pages per sheet.
(3) Select the order of the pages.
(4) If you wish to print borderlines, select the
desired type of borderline.
(3)(4)
58
Page 59

PRINTER
CONVENIENT PRINTING FUNCTIONS
This section explains convenient functions for specific printing objectives.
• "CONVENIENT FUNCTIONS FOR CREATING
PAMPHLETS AND POSTERS" (P.59)
• "FUNCTIONS TO ADJUST THE SIZE AND
ORIENTATION OF THE IMAGE" (P.62)
• "COLOUR MODE ADJUSTMENT FUNCTION"
(P.64)
The explanations assume that the paper size and other basic settings have already been selected. For the basic
procedure for printing and the steps for opening the printer driver properties window, see the following section:
• Windows : "BASIC PRINTING PROCEDURE" (P.41)
• Macintosh : "BASIC PRINTING PROCEDURE" (P.48)
In Windows, view printer driver Help for details on printer driver settings for each printing function.
• "FUNCTIONS THAT COMBINE TEXT AND
IMAGES" (P.68)
• "PRINT FUNCTIONS FOR SPECIAL PURPOSES"
(P.71)
• "CONVENIENT PRINTER FUNCTIONS" (P.72)
CONVENIENT FUNCTIONS FOR CREATING
PAMPHLETS AND POSTERS
CREATING A PAMPHLET (Pamphlet)
The pamphlet function prints on the front and back of
each sheet of paper so that the sheets can be folded
and bound to create a pamphlet. This is convenient
when you wish to compile printed output into a
pamphlet.
Windows
(1) (2) (3)
(1) Configure the settings on the [Main] tab.
(2) Select [Pamphlet Style]
(3) Select the "Binding Edge".
59
Page 60

Macintosh
PRINTER
(1) (2)
(3)
INCREASING THE MARGIN (Margin Shift)
This function is used to shift the print image to
increase the margin at the left, right, or top of the
paper. This is convenient when you wish to staple or
punch the output but the binding area overlaps the
text.
(1) Select [Printer Features].
(2) Select the "Binding Edge".
(3) Select [Tiled Pamphlet] or [2-Up Pamphlet].
Windows
Macintosh
(1) (2)
(2)(1)
(3)
(1) Configure the settings on the [Main] tab.
(2) Select the "Binding Edge".
(3) Select the "Margin Shift".
Select from the "Margin Shift" menu. If you wish to
configure another numeric setting, select the setting
from the pull-down menu and click the [Settings] button.
Click the button or directly enter the number.
(1) Select the "Printer Features".
(2) Select the "Binding Edge".
(3) Select the "Margin Shift".
(3)
60
Page 61

CREATING A LARGE POSTER (Poster Printing)
(This function is only available in Windows.)
One page of print data can be enlarged and printed
using multiple sheets of paper (4 sheets (2 x 2),
9 sheets (3 x 3) or 16 sheets (4 x 4)). The sheets can
then be attached together to create a large poster.
To enable precise alignment of the edges of the sheets
during attachment, borderlines can be printed and
overlapping edges can be created (overlap function).
Windows
PRINTER
(1)
(1) Click the [Paper] tab.
(2) Select the [Poster Printing] checkbox and
click the [Poster Settings] button.
(3) Select poster settings.
Select the number of sheets of paper to be used from
the pull-down menu. If you wish to print borderlines
and/or use the overlap function, select the
corresponding checkboxes .
(2)
(3)
61
Page 62

PRINTER
FUNCTIONS TO ADJUST THE SIZE AND
ORIENTATION OF THE IMAGE
ROTATING THE PRINT IMAGE 180 DEGREES (Rotate 180 degrees)
This feature rotates the image 180 degrees so that it
can be printed correctly on paper that can only be
loaded in one orientation (such as envelopes or paper
with punch holes). (In Mac OS X, a portrait image
cannot be rotated 180 degrees.)
Windows
ABCD
ABCD
(1) (2)
Macintosh
(1) Select the setting on the [Main] tab.
(2) Select the [Rotate 180 degrees] checkbox .
(1) Select [Page Setup] from the [File] menu and
click the button.
(2) Click the [OK] button.
(1)
(2)
62
Page 63

ENLARGING/REDUCING THE PRINT IMAGE (Zoom/XY-Zoom)
This function is used to enlarge or reduce the image to a selected
percentage.
This allows you to enlarge a small image or add margins to the paper
by slightly reducing an image.
When using the PS printer driver (Windows), you can set the width
and length percentages separately to change the proportions of the
image. (XY-Zoom)
Windows
PRINTER
(1)
(2)
(3)
REVERSING THE IMAGE (Mirror Image)
(This function is only available in Windows.)
The image can be reversed to create a mirror image.
This function can be used to conveniently print a
design for a woodblock print or other printing medium.
(1) Click the [Paper] tab.
(2) Select [Zoom] and click the [Settings] button.
The actual paper size to be used for printing can be
selected from the pull-down menu.
(3) Select the zoom ratio.
Directly enter a number (%) or click the button to
change the ratio in increments of 1%. You can also
select [Upper Left] or [Center] for the base point on the
paper.
B
B
Windows
(This function can be used when the PS printer driver is used.)
(1) (2)
63
(1) Click the [Advanced] tab.
(2) Select a mirror image setting.
If you wish to reverse the image horizontally, select
[Horizontal]. If you wish to reverse the image vertically,
select [Vertical].
Page 64

PRINTER
COLOUR MODE ADJUSTMENT FUNCTION
ADJUSTING THE BRIGHTNESS AND CONTRAST OF THE IMAGE (Colour
Adjustment)
The brightness and contrast can be adjusted in the print settings when printing a photo or other image. These
settings can be used for simple corrections when you do not have image editing software installed on your
computer.
Windows
(1)
(1) Click the [Color] tab.
(2) Click the [Color Adjustment] button.
(3) Adjust the colour settings.
To adjust a setting, drag the slide bar or click the
or button.
(3)
(2)
Macintosh
(This function can only be used in Mac OS X v10.4.)
(1)
(2)
(3)
(1) Select [Color].
(2) Click the [Color Adjustment] button.
(3) Select the [Color Adjustment] checkbox
and adjust the colour.
Adjust the settings by dragging the slide bars .
64
Page 65

PRINTING FAINT TEXT AND LINES IN BLACK
(Text To Black/Vector To Black)
PRINTER
(This function is only available in Windows.)
When printing a colour image in greyscale, colour text
and lines that are faint can be printed in black. (Raster
data such as bitmap images cannot be adjusted.) This
allows you to bring out colour text and lines that are
faint and difficult to see when printed in greyscale.
• [Text To Black] can be selected to print all text other
than white text in black.
• [Vector To Black] can be selected to print all vector
graphics other than white lines and areas in black.
Windows
(1)
•
ABCD ABCD
(1) Click the [Color] tab.
(2) Select the [Text To Black] checkbox and/or
the [Vector To Black] checkbox .
(2)
65
Page 66

PRINTER
SELECTING COLOUR SETTINGS TO MATCH THE IMAGE TYPE (Advanced
Colour)
Preset colour settings are available in the machine's printer driver for various uses. These enable printing using the
most suitable colour settings for the colour image type.
Advanced colour settings can also be configured to match the objective of the colour image, such as colour
management settings and the screening setting for adjustment of colour tone expression.
Windows
(3)
(2)(1)
(1) Click the [Color] tab.
(2) Select the "Image Type".
A document type to match the data to be printed can be
selected from the pull-down menu.
• Standard (for data that includes text, photos, graphs,
etc.)
• Graphics (for data with many drawings or illustrations)
• Photo (for photo data or data that uses photos)
• CAD (for engineering drawing data)
• Scan (for data scanned by a scanner)
• Colorimetric (Data which needs to be printed in
almost the same colours as those on the screen)
• Custom (for data to be printed with special settings)
(3) Select advanced colour settings.
If you wish to select advanced settings, click the
[Advanced Color] button.
If you wish to perform colour management using
Windows ICM* in your operating system, select
[Custom] for the image type at step (2) and then select
the [Windows ICM] checkbox . To configure
advanced colour management settings such as "Source
Profile", select the desired settings from the menus.
* Cannot be selected when using the PS printer driver
on Windows 7/Vista/Server 2008/8/Server 2012.
66
Page 67

Macintosh
PRINTER
(1)
(4)
(2)
(3)
(1) Select [Color].
(2) Select colour print settings.
To use the Mac OS Color Management function, select
the [ColorSync] checkbox . When this is done,
"Image Type" cannot be selected.
(3) Select the Image Type.
An image type to match the data to be printed can be
selected from the pull-down menu.
• Standard (for data that includes text, photos, graphs,
etc.)
• Graphics (for data with many drawings or illustrations)
• Photo (for photo data or data that uses photos)
• CAD (for engineering drawing data)
• Scan (for data scanned by a scanner)
• Colorimetric (Data which needs to be printed in
almost the same colours as those on the screen)
• Custom (for data to be printed with special settings)
[Neutral Gray] can be used when [Custom] is selected.
(4) Select advanced colour settings.
If you wish to select detailed settings, click the
[Advanced] tab.
To configure colour management settings, select the
desired settings from the menus. To use "CMYK
Simulation", select the [CMYK Simulation] checkbox
and then select the desired setting.
The following colour management settings are available.
(There may be certain settings that cannot be configured depending on your OS and type of printer driver.)
• Windows ICM checkbox*
1
: Colour management method in a Windows environment
• ColorSync checkbox: Colour management method in a Macintosh environment
• Source Profile: Selection of the input colour profile used for the printed image
• Rendering Intent: Standard value used when converting the colour balance of the image displayed on
the computer screen to a colour balance that can be printed by the machine.
• Output Profile: Selection of the output colour profile used for the printed image
• CMYK Correction*
2
: When printing a CMYK image, you can correct the image to obtain the optimum
result.
• Screening: Select the most suitable image processing method for the image being printed.
• Neutral Gray: Select whether grey halftones are printed with single-colour black toner or 4-colour
CMYK toners.
• Pure Black Print: Select whether black areas are printed with single-colour black toner or 4-colour
CMYK toners.
• Black Overprint: Prevents whitening of the outline of black text.
• CMYK Simulation: The colour can be adjusted to simulate printing using the process colours used by
printing presses.
• Simulation Profile: Selecting a process colour.
*1 Cannot be enabled when using a PS printer driver in Windows 7/Vista/Server 2008/8/Server 2012.
*2 Only the SPDL2-c printer driver can be used.
SPDL is an acronym for Sharp Printer Description Language.
67
Page 68

FUNCTIONS THAT COMBINE TEXT AND IMAGES
ADDING A WATERMARK TO PRINTED PAGES (Watermark)
Faint shadow-like text can be added to the background
of the printed image as a watermark. The size, colour,
density, and angle of the watermark text can be
adjusted. The text can be selected from a pre-stored
list, or entered to create an original watermark.
CONFIDENTIAL
Windows
PRINTER
Macintosh
(1) (2)
(1)(2)
(1) Click the [Watermarks] tab.
(2) Select the watermark settings.
Select a stored water mark from the pull-down menu.
You can click the [Edit] button to edit the font colour and
select other detailed settings.
If you wish to create a new watermark...
Enter the text of the watermark in the "Text" box
and click the [Add] button.
(1) Select [Watermarks].
(2) Click the [Watermark] checkbox and configure
watermark settings.
Detailed watermark settings can be configured such as
selection of the text and editing of the font and colour.
Adjust the size and angle of the text by dragging the
slide bar .
68
Page 69

PRINTING AN IMAGE OVER THE PRINT DATA(Image Stamp)
(This function is only available in Windows.)
A bitmap or JPEG image stored on your computer can
be printed over the print data. The size, position, and
angle of the image can be adjusted. This feature can
be used to "stamp" the print data with a frequently
used image or an icon of your own creation.
MEMO
Windows
PRINTER
MEMO
(1) (2)
(1) Click the [Watermarks] tab.
(2) Select the image stamp setting.
If an image stamp has already been stored, it can be
selected from the pull-down menu.
If you have not stored an image stamp, click the [Image
File], select the file you wish to use for the image stamp,
and click the [Add] button.
69
Page 70

CREATING OVERLAYS FOR PRINT DATA (Overlays)
(This function is only available in Windows.)
PRINTER
The print data can be printed in a previously created
overlay. By creating table rulings or a decorative frame
in an application different from that of the text file and
registering the data as an overlay file, an attractive
print result can be easily obtained without the need for
complex manipulations.
Windows
Create an overlay file.
(1) (2)
XXXX
XXX 1 100
XXXX 10 150
XXX 0 120
XXXX 10 250
Overlay file
XXXX
XXX 1 100
XXXX 10 150
XXX 0 120
XXXX 10 250
(1) Click the [Advanced] tab.
Configure the printer driver settings from the software
application that you wish to use to create the overlay
file.
(2) Click the [Edit] button.
(3) Create an overlay file.
Click the [Create Overlay] button and specify the name
and folder to be used for the overlay file that you wish to
create. The file will be created when the settings are
completed and printing is started.
Printing with an overlay file
(1) (2)
(3)
• When printing is started, a confirmation message
will appear. The overlay file will not be created
until the [Yes] button is clicked.
• To register a previously existing overlay file, click
the [Load Overlay] button.
(1) Click the [Advanced] tab.
Configure the printer driver settings from the application
from which you wish to print using the overlay file.
(2) Select the overlay file.
A previously created or stored overlay file can be
selected from the pull-down menu.
70
Page 71

PRINT FUNCTIONS FOR SPECIAL PURPOSES
PRINTING SPECIFIED PAGES ON DIFFERENT PAPER (Different Paper)
• Using this function in a Windows environment
The front cover can be printed on paper that is
different from the other pages. Use this function
when you wish to print the front cover on heavy
paper, or different paper such as coloured paper.
• Using this function in a Macintosh environment
The front cover and last page can be printed using
paper that is different from the other pages. This
function can be used, for example, when you want
to print only the front cover and last page on heavy
paper.
PRINTER
1
2
3
4
5
Windows
(1)
Macintosh
(2) (3)(1)
(2)
(3)
(1) Select [Printer Features].
(2) Select [Different Paper].
(3) Select cover insertion settings.
Select the print setting, paper tray, and paper type for
the cover page and last page.
(1) Click the [Special Modes] tab.
(2) Select [Different Paper] and click the [Settings]
button.
(3) Select paper insertion settings.
Click the [Insert Cover] checkbox ( ), and select the
feeding method and printing method for the insert paper
from the respective menus. Select the insertion
position, paper source, and printing method from the
corresponding menus.
When [Bypass Tray] is selected in "Paper Source",
be sure to select the "Paper Type" and load that
type of paper in the bypass tray.
71
Page 72

CONVENIENT PRINTER FUNCTIONS
SAVING AND USING PRINT FILES (Retention)
This function is used to store a print job as a file on the
machine, allowing the job to be printed from the
operation panel. The location for storing a file can be
selected to prevent the file from being mixed together
with files of other users.
When printing from a computer, a password
(5 to 8 digits) can be set to maintain the secrecy of
information in a stored file.
When a password is set, the password must be
entered to print a stored file from the machine.
• Print data is erased when the power is turned off.
• Print data that exceeds 5 MB cannot be saved.
• A maximum of 5 files can be saved.
PRINTER
Windows
(1)
(2)
(1) Click the [Job Handling] tab.
(2) Select the retention setting.
Click the [Retention] checkbox . Select the retention
method in "Retention Settings". To enter a password (5
to 8 digit number), click the [Password] checkbox .
Macintosh
(1)(2)
(1) Select [Job Handling].
(2) Select the retention setting.
Click the [Retention] checkbox . To simplify
operation the next time the same password is set, click
the (lock) button after entering the password (5 to 8
digit number).
72
Page 73

Printing a job stored by retention
When retention is performed, the display appears as follows:
Press the [ ] key to display the list of print hold jobs.
1
Select the print job with the [ ][ ] keys.
2
PRINTER
Press the [OK] key.
3
Print or delete the print job with the [ ][ ] keys.
4
Select "Print" to print the job.
Select "Delete" to delete the job without printing it.
Selecting "No Print" returns you to step 1.
Press the [OK] key.
5
The print job is printed or deleted. If a password is set, the job will be printed or deleted after you enter the
password with the numeric keys and press the [OK] key.
73
Page 74

PRINTER
PRINTING WITHOUT THE PRINTER
DRIVER
When you do not have the printer driver installed on your computer, or when the software application used to open a
file that you wish to print is not available, you can print directly to the machine without using the printer driver.
The file types (and corresponding extensions) that can be printed directly are shown below.
File Type
Extension
• Even if the print result is black and white, the following types of print jobs will be counted as 4-colour (Y (Yellow),
M (Magenta), C (Cyan), and Bk (Black)) print jobs. To be always counted as a black and white job, select black and
white printing.
• When the data is created as colour data.
• When the application treats the data as colour data even though the data is black and white
• When an image is hidden under a black and white image.
• The file format of some files may not be printable even if the file is listed in the above table.
• A password-protected PDF file cannot be printed.
TIFF JPEG PCL
tiff, tif
jpeg, jpg,
jpe, jfif
pcl,prn,txt pdf ps
PDF,
Encrypted PDF
.
PS
74
Page 75

PRINTER
DIRECTLY PRINTING A FILE IN USB MEMORY
A file in a USB memory device connected to the machine can be printed from the operation panel of the machine
without using the printer driver. When the printer driver of the machine is not installed on your computer, you can
copy a file into a commercially available USB memory device and connect the device to the machine to print the file
directly.
Connect the USB memory device to the machine.
1
When a USB memory device is inserted and the
machine recognizes the device, the display appears as
follows.
Use a FAT32 USB memory with a capacity of no
more than 32 GB.
Select "Print from the memory device" with [ ] or [ ] key, and select the key of the
2
file that you wish to print.
A name with "/" to its left is the name of a folder in the USB device. To display the files and folders in a folder,
select the folder and press the [OK] key.
• A total of 100 keys of files and folders can be displayed.
• Press the [READ-END] key ( ) to move up one folder level.
Press the [OK] key.
3
Select "Print" with the [ ] or [ ] key and then press the [OK] key.
4
When forwarding of the selected file is completed, printing starts.
Print settings can be selected in the machine’s Web page. However, if a file that includes print settings (PCL,
PS) is selected, the file’s print settings will be applied.
75
Page 76

PRINTER
DIRECTLY PRINTING FROM A COMPUTER
Settings can be configured in the Web pages of the machine to enable direct printing from a computer without using
the printer driver. For the procedure for accessing the Web pages, see "ABOUT THE WEB PAGES" (P.190).
FTP PRINT
You can print a file from your computer by simply dragging and dropping the file onto the FTP server of the machine.
• Configuring settings
To enable FTP Print, click [Application Settings] and then [Setting for Print from the PC] in the Web page menu,
and configure the port number. (Administrator rights are required.)
• Performing FTP Print
Type "ftp://" and then the IP address of the machine in the address bar of your computer's Explorer as shown
below.
(Example)
ftp://192.168.1.28
Drag and drop the file that you wish to print onto the "lp" folder that appears in your Web browser. The file will
automatically begin printing.
• If you printed a file (PCL, PS) that includes print settings, the settings will be applied.
• When user authentication is enabled in the system settings (administrator) of the machine, the print function may be
restricted. For more information, ask your administrator.
CANCELLING A PRINT JOB FROM THE MACHINE
Press the [STOP] key ( ) on the operation panel.
CHANGE THE MACHINE TO OFFLINE MODE
To change the machine to offline mode, follow the steps below.
Press the [SPECIAL FUNCTION] key ( ) and select "Online/Offline" with the [ ] [ ]
1
keys.
Select "Offline" with the [ ] [ ] keys and press the [OK] key.
2
Printing stops and the mode changes to offline mode. To cancel
printing, press the clear key. To resume printing, select "Online"
and press the [OK] key.
76
Page 77

APPENDIX
PRINTER DRIVER SPECIFICATION LIST
Available functions and output results may vary depending on the type of printer driver being used.
PRINTER
Function PCL6 PS
Frequently
used
functions
Paper Paper Size Ye s Ye s Ye s Ye s
Convenient
printer
functions
Copies 1-999 1-999 1-999 1-999
Orientation Ye s Ye s Ye s Ye s
N-Up Number
of pages
Order Ye s Ye s Ye s Ye s
Border Ye s Ye s Ye s Ye s
2-Sided Print Ye s Ye s Ye s Ye s
Fit To Page Ye s Ye s No Ye s
Binding Edge Ye s Ye s No Ye s
Black and White Print Ye s Ye s Ye s Ye s
Custom Paper 8 size 8 size Ye s Ye s
Paper Selection Ye s Ye s Ye s Ye s
Pamphlet Ye s Ye s Ye s Ye s
Margin Shift 0 mm to
2,4,6,8,9,16 2,4,6,8,9,16 2,4,6,9,16 2,4,6,9,16
0 mm to
30 mm
30 mm
Windows
*1
PPD
Ye s Ye s
Macintosh
PPD
*1
Special
functions
Colour
mode
adjusting
function
Functions to
combine
text and
images
Poster Printing Ye s Ye s No No
Rotate 180 degrees Ye s Ye s Ye s Ye s
Zoom/XY-Zoom Ye s *
Mirror Image No Ye s Ye s
Different Paper Ye s Ye s No Ye s
Page Interleave Ye s No No No
Retention Ye s Ye s No Ye s
Colour Adjustment Ye s Ye s No Ye s
Text To Black/
Vector To Black
Advanced Colour Ye s Ye s Ye s Ye s
Watermark Ye s Ye s Ye s Ye s
Image Stamp Ye s Ye s No No
Overlay Ye s Ye s No No
2
Ye s Ye s No No
Ye s Ye s *
2
*5
Ye s *
No
*4
2
*3
77
Page 78

PRINTER
Function PCL6 PS
Image
Quality
Font Resident font 80 fonts 136 fonts 136 fonts 136 fonts
Other
functions
*1 The specifications of each function in Windows PPD and Macintosh PPD vary depending on the operating
system version and the software application.
*2 The horizontal and vertical proportion cannot be set separately.
*3 Only Mac OS X v10.4 can be used.
*4 Only landscape documents are supported.
*5 Horizontal mode only.
Print Mode Normal/
High Quality
Graphics Mode
Selection
Ton er S ave Ye s Ye s Ye s Ye s
Selectable download
font
Auto Configuration Ye s Ye s No Ye s
User Authentication Ye s Ye s No Ye s
Ye s No No No
bitmap,
Tr ue Ty pe ,
Graphics
Normal/
High Quality
bitmap,
Tr ue Ty pe ,
Ty pe 1
Windows
*1
PPD
Normal/
High Quality
bitmap,
Tr ue Ty pe ,
Type1
Macintosh
*1
PPD
Normal/
High Quality
No
78
Page 79

4
FAX FUNCTIONS
TO USE THIS PRODUCT
CORRECTLY AS A FACSIMILE
Several points must be kept in mind when using this product as a facsimile. Please note the following.
Line connection
Be sure to use the provided telephone line cord to connect
the machine to a telephone line jack. Insert one end of the
telephone line cord into the LINE jack on the left side of the
machine as shown. Insert the other end of the telephone
line cord into a telephone line jack.
Insert the plug firmly until you hear a "click".
LINE jack
In some countries, an adapter is required to connect the
telephone line cable to the wall telephone socket, as shown
in the illustration.
Setting the date and time and programming your sender's name and number
Before using the fax function, you must set the date and time and program your sender's name and number in the
machine. This procedure is explained in "POINTS TO CHECK AND PROGRAM AFTER INSTALLATION" (p.80) of
this manual.
For United
Kingdom
For Australia
For New Zealand
Wall socket
Adapter
Lithium battery
The date and time are protected by a lithium battery in the machine.
• When the battery dies, please contact your local Sharp dealer or authorised service representative for assistance
Please note
In the event of a thunderstorm, remove the power cord from the power outlet to ensure safety. Information will be
retained in memory even if the power cord is unplugged.
in disposing of this battery. The machine will not operate once the battery dies.
79
Page 80

FAX FUNCTIONS
POINTS TO CHECK AND PROGRAM
AFTER INSTALLATION
After installing the machine and before using it as a fax machine, check the following points and program the
required information.
Set the date and time
The machine has an internal clock. It is important to set the correct date and time because they are used for such
features as Timer Transmission (p.98).
The date and time are set in the system settings. (p.176)
The date and time appear in the display. Make sure the correct date and time appear. If the date and time are wrong,
please correct them.
Program the sender's name and sender's number
The name and fax number of the user of the machine is programmed in "Own Passcode Set" (p.184) in the system
settings. (Only one name and number can be programmed.)
The programmed name and number are printed at the top of each transmitted fax page. The sender's number is also
used as an identification number when you use the Polling function to request transmission from another fax
machine (see "SENDING OPTIONS" (p.100)).
Note
You can check your programmed name and number by printing out the "Administrator Settings List" in the system
settings. (See
"List Setting" (p.183).)
Paper sizes that can be used for fax mode
The machine can use A4, B5, A5, 8-1/2" x 14", 8-1/2" x 13" and 5-1/2"x 8-1/2" size paper; (If your machine uses
AB-based paper sizes, 8-1/2" x 14", 8-1/2" x 13" and 5-1/2" x 8-1/2" size paper cannot be used in fax mode.
(Among INCH sizes, only 8-1/2" x 11" and 5-1/2"x 8-1/2" can be used.))
For this reason, if only paper sizes that can be used in other modes but not in fax mode are loaded in the machine,
received faxes cannot be printed.
(For other points regarding fax reception, see "RECEIVING FAXES" (p.95).)
Note
For the procedures for loading paper in the trays, "LOADING PAPER" (p.19).
80
Page 81

FAX FUNCTIONS
FAX MODE (BASE SCREEN)
The base screen of fax mode is displayed by pressing the [FAX] key ( ) when the copy mode, or scan mode
screen appears.
The base screen of fax mode
(1)
(2)
(3)
(4)
(5)
Left Menu Right Menu
(1) Message display
Messages appear here to indicate the current
status of the machine.
(2) Date and time display
This shows the date and time.
(3) Transmission mode display (p.89)
There are three transmission modes: memory
transmission, direct transmission, and manual
transmission. This shows the currently selected
transmission mode.
(4) Exposure display
This shows the exposure for scanning the
original.
(5) Resolution display
This shows the resolution for scanning the
original.
(6) Free memory display
This shows the percentage of fax memory that is
free.
(6)
(9)
(7)
(8)
(7) Reception mode display (p.96)
There are two modes for receiving faxes:
automatic reception and manual reception.
This shows the currently selected reception
mode.
(8) Original display (p.27)
This displays an icon to indicate the original
scanning mode when an original has been
placed.
: One-sided original scanning in the
document feeder.
: Two-sided original scanning in the
document feeder (Models with the
two-sided scanning function).
None: Document glass
This also shows the currently selected original
scanning size.
(9) Original Size (p.85)
This is used to set the original scanning size.
(10) Resolution (p.92)
This menu is used to select resolution settings.
(11) Broadcast (p.99)
This is used to perform a broadcast
transmission.
(12) Program (p.107)
Select this menu to use a program.
(10)
(11)
(12)
Note
The following functions also operate when a mode other than fax mode is selected:
• Automatic reception
• Manual reception
• Timer Transmission
• Transmission of stored memory transmission jobs
• Voice calls (when the extension phone is installed)
• Remote reception
81
Page 82

ORIGINALS
ORIGINALS THAT CAN BE FAXED
Original sizes
FAX FUNCTIONS
Using the document
feeder
Using the document
glass
Note
*Long originals
Depending on the resolution setting and the width of the original, there may not be sufficient space in memory to
hold a long original. When a long original cannot be entirely scanned, use direct transmission or manual
transmission (on-hook dialling).
• There are restrictions on originals that can be scanned using the document feeder. For more information, see
"NORMAL COPYING" (p.26).
• When sending a fax, originals of different length can be scanned together from the document feeder, as long
as the widths are the same. (one-sided scanning)
Scanning width is fixed to A4 width (210mm) or 8-1/2" (216mm). Scanning length is
automatically adjusted from 148mm to 500mm.
All are scanned at A4 or 8-1/2" x 11".
82
Page 83

FAX FUNCTIONS
CONVENIENT DIALLING METHODS
(AUTO-DIALLING)
The fax function includes a convenient auto dial feature (Speed dialling and group dialling). By programming
frequently dialled numbers, you can call and send faxes to these locations by means of a simple dialling operation
(p.87). There are two types of auto-dialling: Speed dialling, and group dialling. To program auto-dial numbers, see
p.103.
• Speed dialling (300 stations)
A stored destination can be dialled by pressing the
[SPEED] key ( ), entering a 3-digit number (000
to 299), and pressing the [BLACK & WHITE START]
key. A name (maximum 36 characters) can be stored
for each destination.
• Group dialling
Multiple numbers can be stored in a Speed Dial
number. This is convenient for communicating with a
group of other fax machines.
• REDIALLING
The machine retains the last fax or phone number
dialled. This number can be redialled by simply
pressing the [REDIAL] key ( ) and then the
[BLACK & WHITE START] key.
• If you pressed a numeric key during the previous
call, the [REDIAL] key ( ) may not dial the
correct number.
• Redialling is not possible to broadcast transmission
(p.99), serial polling (p.100), timer transmission
(p.98) or group dialling (p.87) destinations.
• ON-HOOK DIALLING
This feature allows you to dial without lifting an
extension phone connected to the machine.
Press the [SPEAKER] key ( ), listen for the dial
tone through the speaker, and then dial.
• Faxes must be sent manually when using on-hook
dialling. (p.90)
• Up to 100 destinations can be stored in each group dial number, and a combined total of 300 Speed Dial and
Note
group dial numbers can be stored.
• Stored Group dialling and Speed dial destinations can be called up using a search name entered when the key
or destination was stored. (p.87)
• To prevent dialling a wrong number and sending a fax to an incorrect destination, check the message display
carefully when you store the number. You can also check stored numbers by printing out the programmed
information after storing the number. (p.109)
83
Page 84

FAX FUNCTIONS
FAX TRANSMISSION METHODS
There are three basic methods for fax transmission: memory transmission, direct transmission, and manual
transmission. When memory transmission is used, the document is temporarily stored in memory before being
transmitted. When direct transmission or manual transmission is used, the document is transmitted without being
stored in memory.
The default transmission setting can be set to "Memory TX" or "Direct TX" using "Send Mode" (p.186) in the system
settings.
To manually switch between "Memory TX" and "Direct TX", use the [COMM. SETTING] key ( ). (See "Faxing by
direct transmission" (p.89).)
The following explanations generally assume that memory transmission is being used.
ADDRESS REVIEW FUNCTION
The Address Review function allows you to check fax destinations to prevent transmission to an incorrect
destination.
When a fax number is entered with the numeric keys or selected with the [REDIAL] key ( ), a screen appears
after you enter the number prompting you to reenter the number for confirmation.
• When a Speed Dial number (p.87) is used for transmission, a screen appears for confirmation of the stored name
and number.
• When a group dial number (p.87) is used for transmission, a screen appears for confirmation of all numbers
stored in the group.
This function can be set in "Address Review" in the system settings (p.186).
Note
• When the Address Review function is turned on, the [SPEAKER] key ( ) can only be used for manual
reception
a screen appears to confirm whether you want to start reception. The speaker key on a connected extension
phone can be used.
• If the "Only apply to direct entry" checkbox is selected when the Address Review function is turned on, the
Address Review screen only appears when a number is entered with the numeric keys or the [REDIAL] key
().
(p.90). If you press the [SPEAKER] key ( ) when the machine rings to signal an incoming call,
84
Page 85

FAX FUNCTIONS
SENDING A FAX
BASIC PROCEDURE FOR SENDING FAXES
Make sure that the machine is in fax mode.
1
The FAX indicator is lit when the machine is in fax mode. If the indicator is not lit, press the [FAX] key ().
If user authentication has been enabled for the fax function in the system settings, a message will appear
prompting you to enter your user number when you switch to fax mode. Enter your account number (5 digits)
with the numeric keys. (p.178)
Using the document feeder Using the document glass
Place the original(s).
2
Using the document feeder: p.27
Note
Specify the original size.
3
One-side scanning
When the original is placed in the document
feeder, the icon changes to [AUTO]. The original
size cannot be changed by selecting "Orig. Size"
in the right menu.
Note
Two-side scanning
For the procedure for specifying the original size
see "FAXING A TWO-SIDED ORIGINAL" (p.88).
This is a single transmission operation, and therefore originals cannot be scanned in succession from both the
document feeder and the document glass.
Originals up to 500 mm long can be sent
automatically.
Place the original(s) in the document
2
feeder tray or on the document glass.
Using the document glass: p.27
If you are using the document glass to send
multiple pages, place the first page first.
Specify the original size.
3
Select the "Original Size" on the right menu.
The paper size that can be selected is A4 or
8-1/2" x 11".
AUTO: One-sided scanning in the document
feeder.
A4: Two-sided scanning in the document
feeder (Models with the two-sided
scanning function).
A4: Document glass
If needed, adjust the resolution and exposure settings.
4
Dial the fax number.
5
• The entered number appears in the message display. Up to 50 digits can be entered. If you make a mistake,
press the [C] key and then enter the correct number.
• Redialling and automatic dialling can also be used (p.83, p.87).
85
Page 86

FAX FUNCTIONS
Entering a pause
If a pause is necessary when dialling out from a PBX or when dialling an international number, press the [REDIAL]
key ( ). (This key functions as a pause key when entering a number.)
If you press the [PAUSE] key ( ) once, a hyphen ("-") appears and a 2-second pause* is inserted.
After entering a number, you can also press the [PAUSE] key ( ) to enter a hyphen and then enter another
number using the numeric keys. (This connects the numbers together, and is called Chain dialling.)
* The duration of each pause can be changed in the system settings. (See "Pause Time" (p.184).)
Note
Press the [OK] key.
6
When the reenter screen appears, reenter the fax number.
7
• "Address Review" (p.186)
Press the [OK] key.
8
Press the [BLACK & WHITE START]
9
key.
• Scanning begins
• If the line is free, the machine will dial the
• If there is a previously stored job or a job is in
If scanning is completed normally, the following
screen is appears briefly and then the display
returns to the base screen.
Group dials cannot be used for chain dialling.
Using the document feeder Using the document glass
Press the [BLACK & WHITE START]
9
key.
Scanning begins.
receiving machine and begin transmission as
soon as the first page is scanned. ("Quick
On-line" (p.91))
progress, or if the line is being used, all pages
of the original are scanned into memory and
stored as a transmission job. (This is called
memory transmission: the destination is
automatically called and the document
transmitted after previously stored jobs are
completed.)
If you have another page to scan,
10
change pages and then press the
[BLACK & WHITE START] key.
• Repeat this sequence until all pages have been
• You can change the resolution and exposure
After the last page is scanned, press
11
the [READ-END] key ().
Open the document feeder and remove the
original. When the original is removed or any key
operation is performed, the display returns to the
base screen.
The destination is automatically called and the
document transmitted after any previously stored
jobs are completed.
scanned.
settings as needed for each.
Note
• To cancel transmission
To cancel transmission while "Reading" appears or before the [READ-END] key ( ) is pressed, press the [C]
or [CA] key. To cancel a transmission job that is already stored, press the [FAX STATUS] key ( ) and cancel
the job as explained on p.93.
• A job number (3 digits) appears in the display with "Read End" when memory transmission is performed.
If you make a note of this number after performing a broadcast transmission, you can use the number to check
the results of the transmission in the transaction report or activity report.
• If the power is turned off or a power failure occurs while an original is being scanned in the document feeder,
the machine will stop and an original misfeed will occur. After power is restored, remove the original as
explained in "MISFEED IN THE DOCUMENT FEEDER" (p.153).
86
Page 87

FAX FUNCTIONS
TRANSMISSION BY AUTO-DIALLING
(SPEED DIALLING AND GROUP DIALLING)
Instead of entering a full fax number with the numeric keys, you can send a fax by pressing the [SPEED] key ( )
and entering a 3-digit number. To use an automatic dialling, the 3-digit number and name and fax number of the
destination must first be stored. See p.83 for information on auto-dialling and p.103 for information on programming
auto-dial destinations.
Enter the 3-digit number with numeric keys.
1
• Enter the 3-digit number entered when the Speed Dial number or Group Dial was programmed.
• If you make a mistake, press the [C] key and then enter the correct number. If you enter a 3-digit number that
is not programmed in the machine, press the [C] key and then enter the correct number. If you do not know
the Speed Dial number, print out the "Speed # List" or "Group List". (See "PRINTING LISTS OF
PROGRAMMED INFORMATION AND SETTINGS" (p.109).)
Press the [OK] key.
2
Check the destination. If correct, press the [OK] key again.
Note
• To cancel transmission
To cancel transmission while "Reading" appears or before the [READ-END] key ( ) is pressed, press the [C]
or [CA] key. To cancel a transmission job that is already stored, press the [FAX STATUS] key ( ) and cancel
the job as explained on p.93.
• A job number (3 digits) appears in the display with "Read End" when transmission is performed. If you make a
note of this number after performing a broadcast transmission, you can use the number to check the results of
the transmission in the transaction report or activity report.
SEARCHING FOR A PROGRAMMED DESTINATION
(USING THE [ADDRESS] KEY ( ))
At the time of dialling, you can enter letters to search for a destination stored in a Speed Dial number, or Group dial.
Press the [ADDRESS] key ( ) and enter the search letters (you can also skip entry of
1
search letters and go directly to the next step to display the first destination in the
address list).
Up to 10 of the following types of characters can be entered.
Upper case letters, lower case letters, numbers, special characters
(See "ENTERING CHARACTERS" (p.24).)
Press the [OK] key and select the desired destination with the [ ] or [ ] key.
2
• The search results appear in the following order: upper case letters, lower case letters, special characters,
and numbers.
• If not all letters of the destination name appear, press the [READ END] key ( ) to display the full name.
Press the [READ END] key ( ) once again to return to the original screen.
Note
• To cancel transmission
To cancel transmission while "Reading" appears or before the [READ-END] key ( ) is pressed, press the [C]
or [CA] key. To cancel a transmission job that is already stored, press the [FAX STATUS] key ( ) and cancel
the job as explained on p.93.
• A job number (3 digits) appears in the display with "Read End" when transmission is performed. If you make a
note of this number after performing a broadcast transmission, you can use the number to check the results of
the transmission in the transaction report or activity report.
87
Page 88

FAX FUNCTIONS
FAXING A TWO-SIDED ORIGINAL
Follow the steps below to automatically transmit both sides of a two-sided original. (Only on models with the
two-sided scanning function.)
Press the [DUPLEX] key ( ) on the operation panel and select "2-Sided".
1
Select "Portrait-Booklet", "Portrait-Tablet", "Landscape-Booklet", and
2
"Landscape-Tablet" with the [ ] or [ ] key.
Note
Press [OK] key.
3
• Booklets and tablets Two-sided originals that are bound at the side are
booklets, and two-sided originals that are bound at the top are tablets.
• Duplex scanning is cancelled when the transmission is completed, or when the
[CA] key is pressed.
• Duplex scanning of two-sided originals is only possible when a Document
feeder (Models with the two-sided scanning function) is used. Automatic
scanning of both sides of an original is not possible when the document glass is
used.
• The image of the back side of the original is rotated 180 degrees if needed at
the time of transmission, and thus there is no need to change the orientation at the receiving machine.
• To cancel duplex scanning, select "1-Sided" in step 1 and then press the [OK] key.
• Only the following two-sided document sizes can be used:
A4, 8-1/2
"x 14", 8-1/2 "x 13-1/2", 8-1/2 "x 13-2/5", 8-1/2 "x 13", 8-1/2" x 11"
BOOKLET TABLET
88
Page 89

FAX FUNCTIONS
Transmission settings (memory transmission mode and direct transmission
mode)
Transmission modes include memory transmission, where the original is temporarily scanned into memory before
transmission, and direct transmission, where the original is transmitted directly without being scanned into memory.
There are two types of memory transmission: "Storing transmission jobs (memory transmission)" (p.90), where all
pages of the original are scanned into memory before transmission begins, and "Quick On-line" (p.91), where the
destination is dialled after the first page is scanned and the remaining pages are transmitted as they are scanned.
During a memory transmission, it may happen that the memory becomes full while the originals are being scanned.
See "If the memory becomes full during transmission of a stored transmission job" (p.90), and see "If the memory
becomes full during a quick online transmission" (p.91)
If there are too many pages and memory transmission is not possible, you can press the [COMM. SETTING] key
() to switch from memory transmission to direct transmission. When direct transmission is used, transmission
begins after the current job is completed, allowing you to give priority to a transmission job. As such, direct
transmission is a convenient means of performing an interrupt transmission when there are a large number of stored
transmission jobs.
To switch between memory transmission and direct transmission, see the following "Faxing by direct transmission".
Note
Faxing by direct transmission
Press the [COMM.SETTING] key ().
1
The communication settings screen appears.
Select "TX" with the [ ] or [ ] key.
2
Note
Select "Memory TX" with the [ ] or [ ] key and press the [OK] key.
3
When transmission is performed manually using an extension phone connected to the machine or using on-hook
dialling, direct transmission is automatically selected. (Memory transmission is not possible.)
The communication settings screen can also be displayed from the function selection screen.
Press the [SPECIAL FUNCTION] key ( )
Setting" with the [ ] or [ ] key, and press the [OK] key.
to display the special function selection screen, select "Comm.
Dial the fax number and press the [BLACK & WHITE START] key.
4
When using the document glass, multiple original pages cannot be transmitted in a single transmission.
Note
• To change from "Direct Transmission" back to "Memory Transmission", select "Memory TX" in step 3.
• To cancel a direct transmission, press the [C] key.
89
Page 90

FAX FUNCTIONS
Faxing by manual transmission (using the [SPEAKER] key ( ))
Press the [SPEAKER] key ( ).
1
When this key is pressed, a message regarding volume adjustment will appear briefly followed by the dial entry
screen. You can adjust the speaker volume (high, middle, or low) by pressing the
Note that this will not change the volume setting in the system settings. Ringing will be heard from the speaker
on the rear side of the machine when the [SPEAKER] key
Dial the fax number and press the [BLACK & WHITE START] key.
2
() is used for dialling.
[] or [] key.
Note
Select "Send" and press the [OK] key.
3
• When the Address Review function is turned on (p.186), the [SPEAKER] key ( ) cannot be used for
transmission.
• To cancel dialling using the [SPEAKER] key ( ) when you need to redial the number or because transmission
was interrupted, press the [SPEAKER] key ( ) once again.
• As the original is not stored in memory when direct transmission and manual transmission are used, the
following functions cannot be used. Broadcast transmission "SENDING THE SAME DOCUMENT TO
MULTIPLE DESTINATIONS IN A SINGLE OPERATION" (p.99), "AUTOMATIC TRANSMISSION AT A
SPECIFIED TIME" (p.98), "Recall Setting (Busy)" (p.186), duplex scanning, Address Review, and others.
• When a fax is sent by direct transmission or manual transmission, the fax is sent after the connection with the
receiving machine is established.
Storing transmission jobs (memory transmission)
When the line is in use, the transmission job is temporarily stored in memory. When the current job and any previously
stored jobs are completed, transmission begins automatically. (This is called memory transmission.)
This means that transmission jobs can be stored in memory by performing a transmission operation while the machine
is occupied with another transmission/reception operation. A combined total of 50 memory transmission and timer
transmission jobs (p.98) can be stored at once. After transmission, the scanned document data is cleared from memory.
You can check transmission jobs stored in memory in the fax job status screen. (p.93)
Note that depending on the number of pages stored in memory and the transmission settings, it may not be possible to
store 50 jobs in memory.
• The procedure for storing a transmission job is the same as the procedure in "BASIC PROCEDURE FOR
SENDING FAXES" (p.85).
• If you have not yet pressed the [BLACK & WHITE START] key, you can cancel a transmission job by pressing the
[C] key.
• If you have already pressed the [BLACK & WHITE START] key, see "Cancelling a stored transmission job" (p.93).
If the original is still being scanned after the [BLACK & WHITE START] key is pressed, you can press the [C] key to
cancel the transmission.
•
If you store a transmission job in direct transmission mode, you will not be able to store any further transmission jobs.
After transmission, the scanned document data is cleared from memory. You can check transmission jobs stored in
memory in the fax job status screen. (p.93)
If the memory becomes full during transmission of a stored transmission job
If the memory becomes full while scanning the first page of a document, the transmission job is automatically
cancelled.
If the memory becomes full while scanning the second page or a following page, scanning stops. In this case, you
can either press the [C] key to cancel the transmission, or press the [OK] key to transmit only those pages which
were completely scanned.
90
Page 91

FAX FUNCTIONS
Quick On-line
When you use the document feeder to send a multi-page document and there are no previously stored jobs waiting
or in progress (and the line is not being used), the machine dials the destination after the first page is scanned and
begins transmitting scanned pages while the remaining pages are being scanned. This transmission method is
called Quick On-line. When a quick online transmission is being performed, the message display shows "Reading" "Dialling" - "Comm." - "Sending" in that order until scanning of the remaining pages is completed. When all pages
have been scanned, "Read End" appears before the above messages appear.
If the receiving party is busy, the quick online transmission will change into a stored transmission job (memory
transmission). (See "Storing transmission jobs (memory transmission)" (p.90).)
If the memory becomes full during a quick online transmission
If the memory becomes full while scanning the first page of a document, the transmission job is automatically
cancelled. If the memory becomes full while scanning the second page or a following page, those pages which were
completely scanned will be transmitted.
Note
The machine is initially set (factory setting) to perform Quick On-line transmission. If desired, you can disable this
function in the system settings. (See "Quick On Line TX" (p.186).) When an original is transmitted using the
following methods, the job will be stored in memory. (Quick On-line transmission will not be performed.)
• Sending a fax from the document glass.
• "SENDING THE SAME DOCUMENT TO MULTIPLE DESTINATIONS IN A SINGLE OPERATION" (p.99)
• "AUTOMATIC TRANSMISSION AT A SPECIFIED TIME" (p.98)
If the receiving party is busy
If the receiving party is busy, the transmission is temporarily cancelled and then automatically re-attempted after a
brief interval. (Two attempts are made at an interval of 3 minutes.*
If you do not want the machine to re-attempt the transmission, press the [FAX STATUS] key ( ) and cancel the
job. (p.93)
*1 The settings can be changed in the system settings. (See
1
)
"Recall Setting (Busy)" (p.186))
If an error occurs that prevents transmission
If an error occurs that prevents transmission or the receiving machine does not answer the call within 45 seconds*2,
the transmission is stopped and then automatically re-attempted later. One attempt is made at an interval of
1 minute.*
cancel the job. (p.93) This machine also supports error correction mode (ECM) and is set to automatically resend
any part of a fax that is distorted due to noise on the line.*
*2 The settings can be changed in the system settings. (See "Ring Timeout In Auto TX" (p.186) and "Recall Set
(Err)" (p.186).)
*3 If the other fax machine does not support ECM or ECM is not operating, error correction will not take place.
2
) If you do not want the machine to re-attempt the transmission, press the [FAX STATUS] key ( ) and
3
91
Page 92

FAX FUNCTIONS
HOW TO SELECT THE RESOLUTION
The resolution can be changed to match the text size of the original, and the original type, such as a photo. Select
"Resolution" in the right menu of the base screen of fax mode and press the [OK] key.
Standard Select for an original with normal size text.
Fine
Super Fine
Fine / Halftone
Super Fine /
Halftone
Note
Select for an original with small text or detailed diagrams. The original will be scanned at twice
the density of "Standard".
Select for an original with intricate pictures or diagrams. A higher-quality image will be produced
than with the "Fine" setting.
Use for photo or shaded colour originals (colour documents, etc.). Transmits a clearer image
than with "Fine" or "Super Fine" alone.
The transmission time is slightly longer when halftone is selected.
• The factory default settings for the resolution and contrast are "Standard" and "Auto", respectively.
The default settings for the resolution and contrast can be changed in the system settings "Set Res. Con."
(p.186). When using the document glass to scan multiple original pages, you can change the resolution and
contrast each time you change pages. When using the auto document feeder, you cannot change the
resolution and contrast after scanning has started.
• Even if you send a fax at "Fine" or "Super Fine", the receiving fax may not be capable of receiving and printing
the fax at that resolution.
• To cancel a resolution setting, press the "Reset" key.
CHANGING THE EXPOSURE
The exposure can be changed to match the darkness of the original.
Select the [Exposure] key ( ).
1
Adjust the exposure.
2
(1) Select the item.
(2) Adjust the exposure.
To dark the exposure , select the [ ] key, and to lighten the exposure, select the
[] key.
(3) Select the [OK] key.
92
Page 93

FAX FUNCTIONS
CANCELLING A FAX TRANSMISSION
To cancel a transmission that is in progress or a stored transmission job, follow the steps below. A transmission in
progress or a stored transmission job is cancelled from the fax status screen. (Printing of a received fax cannot be
cancelled.)
Note
To cancel a transmission while the original is being scanned ("Reading" appears in the message display) or
before the key is pressed ([READ-END] key ( ) when scanning the original from the document glass), the [C]
or [CA] key can be pressed.
Cancelling a fax transmission
Press the [FAX STATUS] key ( ).
1
• When a transmission is in progress, the job being transmitted is displayed.
• If the displayed job is not the job that you wish to cancel, it is likely that the job to be cancelled is a stored job
waiting for transmission. Press the [BACK] key ( ) to display the fax status selection screen and then follow
the procedure in "Cancelling a stored transmission job" on "Cancelling a stored transmission job" (p.94) to
cancel the job.
Note
Press the [C] key.
2
Press the [OK] key.
3
The transmission is cancelled.
When a transmission is not in progress, the following fax status selection screen appears.
Note
• If you do not wish to cancel the transmission, press the [ ] key in the screen of step 2, select "No", and press
the [OK] key.
• You can check cancelled operations in the Activity Report. "Cancel" will appear in the "Type/Note" column of
the report. Additional information on the display during transmission
(A)
(B)
(C) (D)
(A) Destination name
The name of the destination appears if programmed.
(B) Transmission method name
In the case of a timer transmission, the timer icon " " appears at the beginning of the transmission method
name.
(C) Number of pages currently transmitted
Appears during sending.
(D) Document number
The document number assigned at the time of scanning in memory transmission mode appears.
93
Page 94

FAX FUNCTIONS
Cancelling a stored transmission job
If you do not wish to cancel a stored transmission job and only wish to check its status, press the [BACK] key ( )
instead of the [C] key in step 4 to exit.
Press the [FAX STATUS] key ( ).
1
The fax job status screen is displayed.
Note
Select "TX/RX Reserve" with the [ ] or [ ] key.
2
Press the [OK] key.
3
The first stored transmission job appears.
Press the
Press the [C] key.
4
The transmission cancel confirmation screen appears.
Select "Yes" with the [ ] or [ ] key.
5
Press the [OK] key.
6
The selected transmission job is cancelled.
If you wish to cancel another transmission job, repeat steps 1 through 6.
When a transmission is in progress, the job being transmitted is displayed. Press the [BACK] key () to display
the fax status selection screen.
[] or [] key until the transmission job that you wish to cancel appears.
Note
You can check cancelled recall mode jobs in the Activity Report. "Cancel" will appear in the "Type/Note" column
of the report.
Contents of the stored job screen (screen of step 3)
(A)
(B)
(C)
(D)
(F)
(A) Current status
"Waiting" will appear next to stored transmission jobs and timer transmission jobs. "Recall" will appear next
to recall mode jobs.
(B) Destination
The name of the destination appears if programmed.
(C) Transmission method name
In the case of a timer transmission, the timer icon " " appears at the beginning of the transmission method
name.
(D) Number of pages stored
In the case of a stored transmission job, the document number assigned at the time of scanning appears.
(E) In the case of a timer transmission, the timer job number appears.
(F) In the case of a timer transmission, the specified reservation time appears. "Prepared" will appear for a
stored transmission job.
Status of completed jobs
To check the status of completed jobs, select "TX/RX Completed" in step 2 and press the [OK] key in step 3.
(E)
94
Page 95

FAX FUNCTIONS
RECEIVING FAXES
When another fax machine sends a fax to your machine, your machine will ring*, automatically receive the fax, and
begin printing. (This is called automatic reception.)
If you do not wish to have received faxes printed immediately, use the print hold function to hold received faxes in
memory for printing at your convenience (all received faxes will be printed at once). To enable this function and print
received faxes, see "FAX PRINT HOLD FUNCTION" (p.97).
Note
• You can store a transmission job while fax reception is in progress. (See "Storing transmission jobs (memory
transmission)" (p.90)
• To print received fax pages on both sides of the paper, enable "Duplex Reception" (p.187) in the system
settings.
• If a extension phone is not connected to the machine, use automatic reception.
• If the Address Review function (p.186) is on, you can press the [SPEAKER] key ( ) when the machine rings
to select whether the fax will be received. Select "Yes" to receive the fax or "No" to reject the fax with [ ] [ ] ,
and press the [OK] key.
• In order to receive faxes, paper must be loaded in the paper tray. See "LOADING PAPER" (p.19) to load
appropriate paper.
RECEIVING A FAX
The machine will ring* and reception
1
will automatically begin.
The LINE indicator ( ) lights up.
If an extension phone is connected and the
Note
*Number of rings
The machine has been set to ring twice before
beginning automatic reception. You can change the
number of rings to any number from 0 to 9 in the
system settings.
(See "#Of Rings At. RX" (p.187).)
If the number of rings is set to 0, the machine will
receive faxes without ringing.
other party is sending a fax by manual
transmission (p.119), you can lift the
handset before fax reception starts and
speak to the other party.
Reception ends.
2
• When reception ends, the machine sounds
a beep.
• When the optional job separator tray kit is
installed, received faxes are output to the job
separator.
The job separator has a sensor that detects
Note
when a tray is full. When approximately
100 sheets accumulate in a tray, a message
appears in the display and fax printing stops.
If this happens, remove the sheets. Printing
will resume momentarily.
95
Page 96

FAX FUNCTIONS
If received data cannot be printed
If the machine runs out of paper or toner, or a paper misfeed occurs, or if the machine is printing a print or copy job,
received faxes will be held in memory until printing becomes possible. The received faxes are automatically printed
when printing is possible. When received faxes are held in memory, the FAX [DATA] light ( ) blinks. You can also
use the forwarding function to have another fax machine print the received faxes. (See "FORWARDING
FUNCTION" (p.110).)
In order to receive faxes, paper must be loaded in the paper tray. Load appropriate paper as explained in
Note
"LOADING PAPER" (p.19).
• If you receive a fax that is larger than the loaded paper, the system setting uses "Received Data Print
Condition" (p.187) to print it out in the following manner:
If "Reduction" is set up, the image is automatically reduced before printing.*
If "Division" is set up, the image is split onto multiple sheets of paper and printed on them at actual size.*
If "Actual Size" is set up, the image is printed at actual size without being split.*
*1 If the loaded paper is of the B5 size or less, the received image may not be printed depending upon the
width and length of the image data.
*2 The received image won't be printed until you load the paper larger than the actual size.
• In fax mode, printing is not possible on B5 and A5 sizes. (Among AB sizes, only A4 can be used for printing.)
(If your machine uses AB-based paper sizes, 8-1/2" x 14" size paper cannot be used in fax mode. (Among AB
sizes, only 8-1/2" x 11" and 8-1/2" x 11" can be used for printing.))
• If the paper runs out while a fax is being printed, printing will automatically continue using the closest size of
paper in another tray.
• If you change the size of paper loaded in a tray, change the tray's paper size setting.
• Faxes cannot be printed correctly if the actual paper size is different from the paper size setting. Be sure to set
the tray's paper size setting to the same paper size as the paper loaded in the tray. For example, if you receive
an B4 (11" x 17") size fax when A4 (8-1/2" x 14") paper is loaded in the tray and the tray's paper size setting is
B4 (11" x 17"), the fax will be printed on A4 (8-1/2" x 14") paper and part of the image may be cut off If the
paper loaded in the tray is larger than the paper size setting, paper larger than the recognized fax size will be
used. (A message prompting you to check the tray's paper size setting will appear.)
• Received faxes cannot be printed on paper inserted in the bypass tray.
1
1
2
MANUAL FAX RECEPTION
When the Address Review function (p.186) is turned on, you can decide whether to receive a fax (this is called
"manual reception" in this manual).
SETTING THE RECEPTION MODE
Press the [COMM. SETTING] key () in the initial state of Fax mode.
1
The communication setting screen can also be displayed from the function selection screen.
Note
Select "Manual" and press the [OK] key.
2
Note
Manually receiving a fax
When the machine rings, press the [SPEAKER] key ( ). To receive the fax, select "Yes".
If you do not want to receive the fax, select "No".
Press the [SPECIAL FUNCTION] key ( ) to display the function selection screen, select "Comm. Setting" with
the [ ] [ ] keys, and press the [OK] key.
To return to auto reception, select "Auto" in step 1 above.
96
Page 97

FAX FUNCTIONS
FUNCTION KEY
This is the initial setting that appears when the [SPECIAL FUNCTION] key ( ) is pressed in fax mode.
FAX PRINT HOLD FUNCTION
Faxes are normally printed as soon as they are received.
This function is used to hold received faxes in memory rather than printing them as they are received.
Faxes held in memory are printed manually all at once.
Settings required for fax print hold
If a fax is received when auto power shut-off mode has activated ("POWER ON AND OFF" (p.15)), the machine
returns to normal operation in order to print the fax. For this reason, if faxes are received at regular intervals, auto
power shut-off will repeatedly activate and deactivate and less power will be conserved.
If you wish to maximize the benefit of auto power shut-off at night and other times when printing of received faxes is
not immediately necessary, enable fax print hold. When fax print hold is enabled, receiving faxes when auto power
shut-off has activated will not cause auto power shut-off to deactivate.
It is recommended that you enable and disable fax print hold as needed for your conditions of use; for example, enable fax print
hold during the night and disable it during the day.
• When fax print hold is enabled and received faxes are held in memory, the DATA indicator ( ) above the
Note
[FAX] key ( ) on the operation panel blinks and a message appears in the display. (When the received faxes
are printed, the indicator stops blinking and the message no longer appears.)
• If the remaining free memory reaches 0%, fax reception will no longer be possible. For this reason, it is
important to constantly make sure that sufficient free memory remains and frequently print received faxes.
The percentage of free memory remaining appears in the base screen of fax mode. (p.81)
Select the "Fax Print Hold" function.
Enabling fax print hold
Printing received faxes held in
memory
If fax print hold is prohibited using "Disable
Note
Select "Setting ", and then select "On".
Fax Print Hold" (p.185) in the system
settings, it will not be possible to enable it.
Select "Fax print hold", and then select
"Print".
To disable fax print hold, select "Off".
97
Page 98

FAX FUNCTIONS
AUTOMATIC TRANSMISSION AT A SPECIFIED TIME
This feature enables you to set up a transmission or polling operation to be performed automatically at a specified
time up to a week in advance. This is convenient when you will be out of the office or for transmission at off-peak
nighttime rates. A combined total of 50 timer transmission and memory transmission jobs can be stored.
• After a timer transmission is performed, the information (image, destination, etc.) is automatically cleared from
Note
Select "Timer Mode" and press the [OK] key.
1
If a time has been specified, a checkmark appears in front of "Timer Mode". To cancel a specified time, press
the [LOGOUT] key ( ) in the above display with "Timer Mode" highlighted.
The current time appears in the screen. If the current time is not correct, press the [CA] key to cancel the
operation and see "Daylight Saving Time" (p.176) to correct the time setting.
memory.
• To perform a timer transmission, the original must be scanned into memory. It is not possible to leave the
original in the document feeder or on the document glass and have it scanned at the specified time of
transmission.
• The date and time is set in the machine using the system settings.
(See "Daylight Saving Time" (p.176).)
• Only one polling timer operation can be set up at a time. If you wish to set up multiple timer polling operations,
combine the machines to be polled into one serial polling operation with a timer setting (see "Serial polling
mode" (p.101)).
Select the day of the week with the [ ] or [ ] key.
2
The selected day is highlighted. If you select "No Select Days", the transmission will be performed
as soon as the specified time arrives. To return to the "Time Setting" display, press the [BACK] key ( ).
• To cancel a timer operation after the above procedure has been completed, follow the procedure in
Note
"CANCELLING A FAX TRANSMISSION" (p.93).
• A timer job number is automatically assigned to the operation. This number can be used to cancel a stored job.
(See the note Cancelling a stored transmission job screen (screen of step 3)" on p.94.)
• Other operations can be performed after a timer operation is set up. If another operation is in progress when
the specified time arrives, the timer transmission will begin when the job in progress is completed.
98
Page 99

FAX FUNCTIONS
SENDING THE SAME DOCUMENT TO MULTIPLE
DESTINATIONS IN A SINGLE OPERATION
This feature is used to send a fax to multiple destinations in a single operation. The original to be transmitted is
scanned into memory and then successively transmitted to the selected destinations. This feature is convenient for
such purposes as distributing a report to company branches. Up to 100 destinations can be selected.
When transmission to all destinations has been completed, the document is automatically cleared from memory.
• If you frequently use broadcasting to send faxes to the same group of destinations, it is convenient to program
Note
those destinations into a group dial. The procedure for programming group dials is explained on p.103.
• When a group dial is used to send a fax, the fax is broadcast (transmitted) to the destinations programmed in
the group dial. For example, if five destinations are programmed in a group dial and the key is pressed for a
broadcast transmission, the broadcast transmission will have five destinations.
Beep
Destination A
(recipient)
Sender
Reception
Successive
transmission
Select the broadcast
transmission function.
Enter a full fax number with the numeric keys or press an auto-dial key (Rapid key,
1
The document is scanned
into memory
Beep
Reception
Beep
Reception
Destination B
(recipient)
Destination C
(recipient)
Speed Dial number, or group key) to select the first destination. (p.87)
The destination selection screen appears. To clear a mistake when entering a full number with the numeric
keys, press the [C] key to clear one digit at a time. A destination selected with a Speed Dial number, or group
dial is indicated by an icon and a number. To clear an entry, press the [C] key.
Press the [OK] key and then select the next destination by entering a full fax number
2
or pressing an auto-dial key.
After entering a full number with the numeric keys, press the [OK] key to complete the entry. If you pressed an
auto-dial key in step 1, it is not necessary to press the [OK] key. You can immediately press another auto-dial
key for the next destination. Repeat steps 1 and 2 to select the remaining destinations.
• If you need to delete a number for which entry has already been completed by pressing the [OK] key, use the
Note
Continue from step 7 of "BASIC PROCEDURE FOR SENDING FAXES" (p.85).
3
[ ] or [ ] key to select the number and then press the [C] key.
• If the selected destinations exceed the display range of the message screen, press the [ ] or [ ] key to scroll
through and check the destinations.
• Destinations can also be selected using the address directory and the [REDIAL] key ( ).
Note, however, that the [REDIAL] key ( ) can only be used to select the first destination (it must be used
before any other destinations are selected).
• If you use two group dials that have 50 stations each, the total number of destinations entered will be 100.
To cancel a broadcast transmission
Note
To cancel a broadcast transmission when selecting destinations, press the [CA] key. To cancel transmission after
the transmission procedure has been completed, follow the procedure in "CANCELLING A FAX
TRANSMISSION" (p.93).
99
Page 100

FAX FUNCTIONS
SENDING OPTIONS
This function allows your machine to call another fax machine and initiate reception of a document in that machine.
A timer setting can also be specified to have the operation take place at night or at another specified time.
(See "AUTOMATIC TRANSMISSION AT A SPECIFIED TIME" (p.98).)
The other machineYour machine
(2) Permits polling
(1) Polling (ask other machine
to send document)
(4) Document data is automatically
sent to your machine
Group dials and the "SENDING THE SAME DOCUMENT TO MULTIPLE DESTINATIONS IN A SINGLE
OPERATION" (p.99) can be used to successively poll multiple fax machines in a single operation (this is called
"serial polling"). Up to 100 machines can be polled.
In this case, the sequence of operations in the above diagram is successively repeated for each sending machine
selected.
When using the Public Box function, do not set the fax reception mode to "Manual". (See "MANUAL FAX
RECEPTION" (p.96).)
If the other machine is using polling security (see "Restricting polling access (polling security)" (p.103)), your fax
Note
Select "Sending Options".
1
number (sender's number) must be programmed in the system settings (see "Own Passcode Set" (p.184)) and
your number must also be programmed in the other machine.
(3) Document data previously
scanned into memory
POLLING
Select "Polling".
2
Press the [OK] key and enter the fax number of the other machine with the numeric
3
keys specify a Speed Dial number (a group dial cannot be used).
Press the [OK] key. Press the [BLACK & WHITE START] key. "Polling reservation has
4
been set." appears in the screen. After communicating with the other machine, your
machine prints the received fax.
To cancel the operation
Note
During communication: Cancel as explained in "Cancelling a fax transmission" (p.93).
While the job is stored: Cancel as explained in "Cancelling a stored transmission job" (p.94).
100
 Loading...