


Useful Features
OK
Back
M
End
E
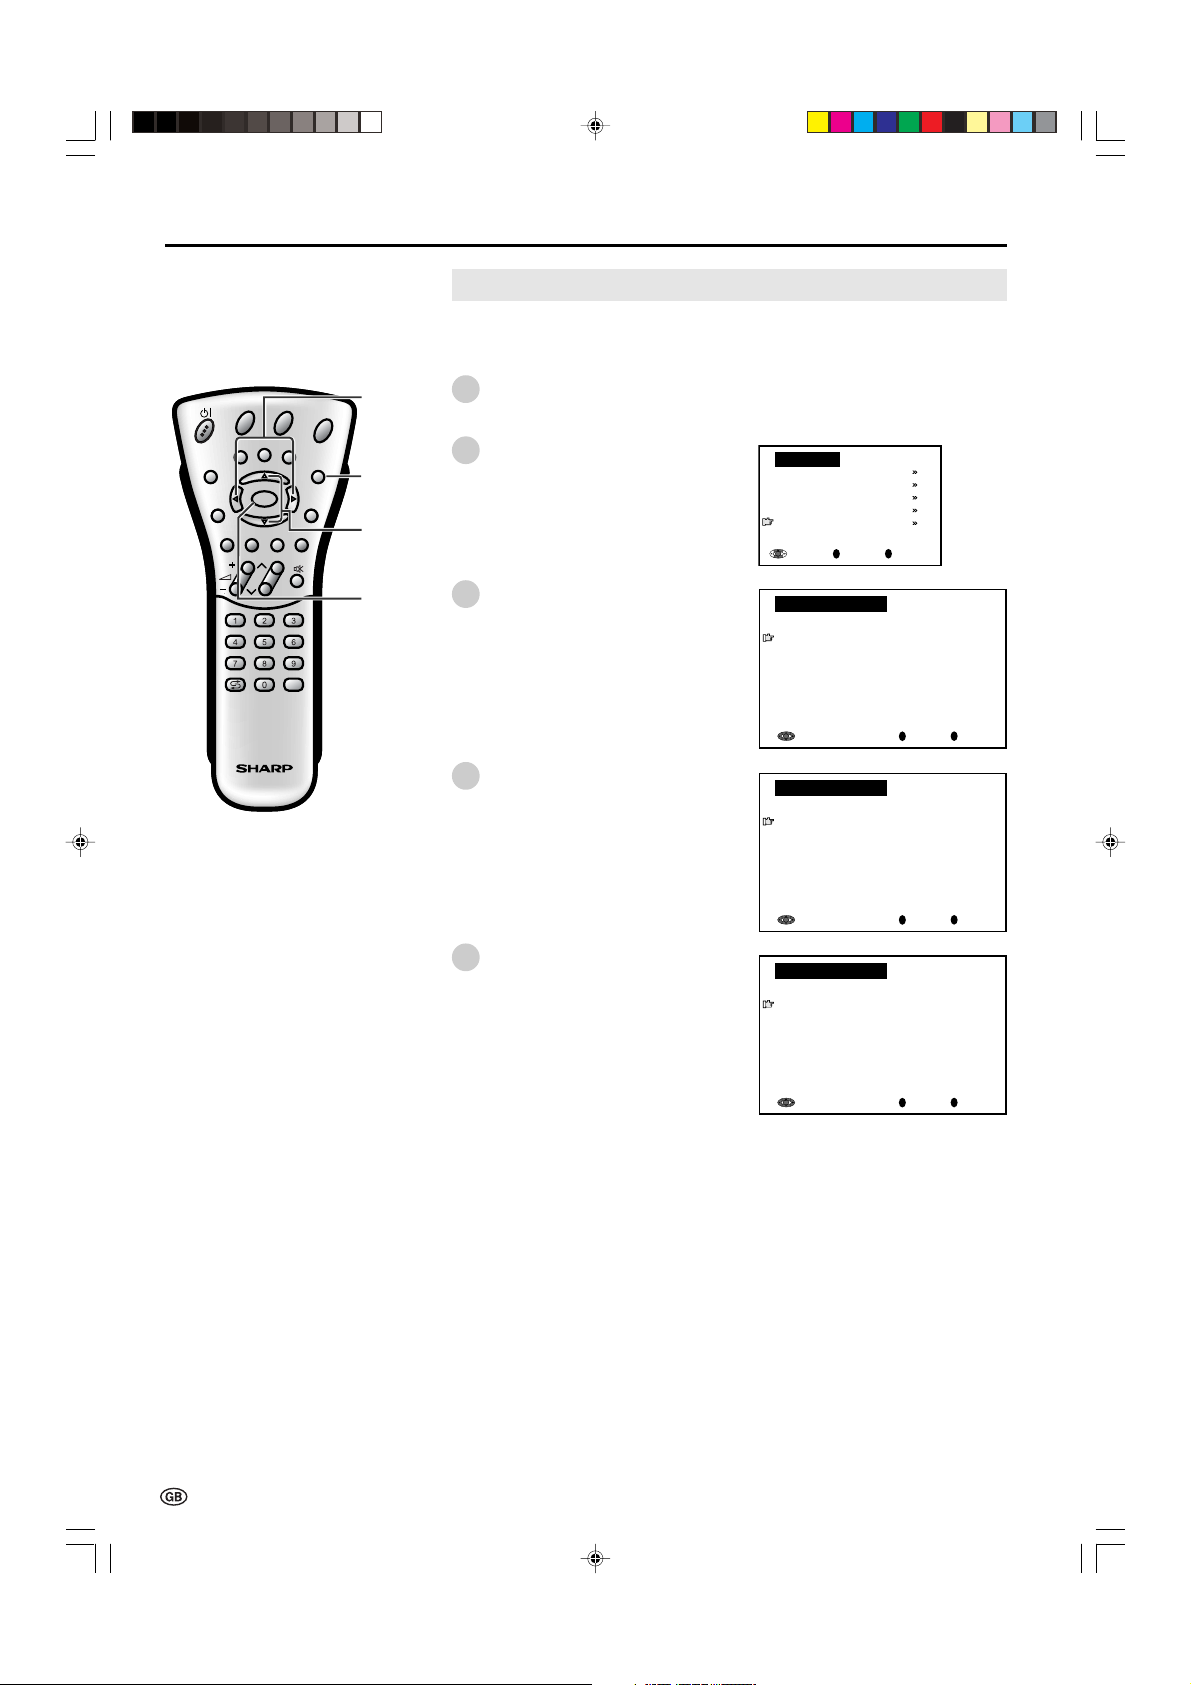
Picture menu
Contrast [ 50
]
Colour [ 0
]
Black level[ 0
]
Sharpness [ 0
]
Tint [ 0
]
Reset
OK
Back
M
End
E
Contrast 50
OK
Back
M
End
E
Headph.vol. 3 0
T
T
T
E
H
E
E
D
G
I
X
X
I
R
W
B
T
T
T
SUBPAGE
SUBPAGE
R
R
EVEAL
EVEAL
D
D
OL
OL
H
H
E
E
L
L
TIT
TIT
B
B
SU
SU
MENU
OK
CH
CH
TV/VIDEO
TV/VIDEO
Adjustment item
Contrast
Colour
Black level
Sharpness
Tint
Reset
T
T
T
E
H
E
E
D
G
I
X
X
I
R
W
B
T
T
T
SUBPAGE
SUBPAGE
R
R
EV
EV
D
D
OL
OL
H
H
E
E
L
L
T
T
I
I
BT
BT
U
U
S
S
MENU
OK
CH
CH
TV/VIDEO
TV/VIDEO
</>
T
T
R
R
O
O
TA
TA
TE
TE
E
E
N
N
D
D
E
E
END
MENUSOUND
MENUSOUND
M
M
]/[
OK
Red
Decrease contrast
Lower colour intensity
Less bright
Soft picture
Towards purple
Adjusting Picture Settings
Press Red to display the Picture
1
menu.
Note:
Note:
• The Picture menu can also be displayed
by selecting “Picture” in the TV menu
(see pages 13 and 14).
2
Press ]/[ to select the desired
adjustment item, and then press OK.
• The next menu appears.
3
Press </> to make the adjustment.
4
Press END to exit.
Press Left (<)
Choice/Value range
0– 60
-30 – 30
-30 – 30
-5 – 5
-30 – 30
Press Right (>)
Increase contrast
Higher colour intensity
More bright
Sharp picture
Towards green
Reset value (Press OK.)
</>
T
T
R
R
O
O
T
T
AT
AT
E
E
EAL
EAL
EN
EN
D
D
E
E
END
MENUSOUND
MENUSOUND
M
M
]/[
OK
Green
Adjusting Sound Settings
1
1 Press Green to display the Sound
menu.
Note:
Note:
• The Sound menu can also be displayed
by selecting “Sound” in the TV menu (see
pages 13 and 14).
2 Press ]/[ to select the desired
2
adjustment item, and then press OK.
• Each item can now be selected or the
next menu appears.
3
3 Press </> to make the adjustment.
4 Press END to exit.
4
Sound menu
Sound via [ TV
Headph. vol. [ 3
Loudsp. sound[ Mono
Headph. sound[ Mono
AV audio sig.[Sound1+2
Sound wide [ off
Balance [
OK
M
Back
E
]
]
0
]
]
]
]
]
0
End
Adjustment item
Sound via
Headph. vol.*
Loudsp. sound
Headph. sound*
AV audio sig.
Sound wide*
Balance*
Press Left (<)
–
Decrease headphones volume
Sound2 Sound1+2 Mono
–
–
(* The choices differ depending on whether
or not a NICAM or IGR signal is received.)
See pages 30 and 31.
Sound1 Sound2 Sound1+2
–
Increase the volume of the left speaker
Choice/Value range
TV Hi-fi
0– 60
Stereo Mono/Sound1
Nicam
Mono/Mono
off on
-15 – 15
Press Right (>)
Increase headphones volume
Increase the volume of the right speaker
* These items are not displayed when the “Sound via” item is set to “Hi-fi”.
Note:
• In the “AV audio sig.” item, mono-video recorders should select “Sound1” or “Sound2”. Stereo-video recorders should select “Sound1+2” so
that the desired sound can be selected when playing back the video.
LC-13B4E(E)#p11_16.p65 03.3.10, 2:53 PM15
–
–
–
–
15

Useful Features (Continued)
Back
M
End
E
Sound menu
OK
Sound via [ Hi-fi
]
Loudsp. sound[ Mono
]
AV audio sig.[Sound1+2
]
Hi-fi Sound Settings
T
T
T
E
H
E
E
ID
X
X
IG
T
T
R
W
B
T
T
T
SUBPAGE
SUBPAGE
R
R
E
E
VE
VE
LD
LD
O
O
H
H
E
E
L
L
IT
IT
T
T
B
B
U
U
S
S
MENU
A
A
L
L
OK
MENUSOUND
MENUSOUND
</>
R
R
O
O
T
T
A
A
TE
TE
E
E
N
N
D
D
E
E
END
M
M
]/[
OK
CH
CH
Volume
(+)/(–)
TV/VIDEO
TV/VIDEO
This programme allows you to enjoy higher sound quality when connecting the
AUDIO OUT terminals to an external amplifier using an audio cord.
1
When switching “Sound via” to “Hifi” in the Sound menu on page 15,
the sound from the built-in speakers
will be turned off.
Press ]/[ to select the desired
2
adjustment item, and then press
OK.
Press </> to select the Sound
3
mode.
Press END to exit.
4
Note:
Note:
• Pressing Volume (+)/(–) will display the volume indicator shown on the right. You can
adjust the volume by pressing + or – on the same button.
Hi-fi Volume
50
* To exit this mode, in the Sound menu, switch “Sound via” from “Hi-fi” to “TV”.
Using Programme Table
The Programme table shows a list of all receivable programmes. They are located
in channels 0 to 199. The currently selected programme is displayed in yellow, and
the child-locked programmes are displayed in red.
16
To select the desired programme
Press OK to display the
1
Programme table.
Press ]/[ and/or </> to select
2
the desired programme.
• To display the next or previous list
of the Programme table, press
]/[ when the cursor is at a
programme in the lower-right or
upper-left position, or press </>
when the cursor is at a programme
in the right or left column.
Press OK to display the selected
3
programme.
Programme table
0
8 E 9 16 E54
1 S 6 9 E1 17 E56
0
2 S 8 1 E11 18 E57
0
3 S1 11 E36 19
0
4 S11 12 E37 2
0
5 E 3 13 E38 21
6 E 5 14 E5 22
0
7 E 6 15 E53 23
0
OK
0
0
0
0
0
E
M
Back
End
LC-13B4E(E)#p11_16.p65 03.3.10, 2:53 PM16

Useful Features (Continued)
OK
Back
M
End
E
Programmes
Automatic search
Manual adjustment
Sort
Erase programme range
Enter/change name
Programmes
[1] Automatic search
Perform the procedure below to search for and store new programmes after the
First Installation routine.
T
T
E
HT
E
E
ID
X
X
IG
T
T
R
W
B
T
T
T
SUBPAGE
SUBPAGE
R
R
EV
EV
E
E
AL
MENU
OK
AL
MENUSOUND
MENUSOUND
HOLD
HOLD
E
E
L
L
IT
IT
T
T
B
B
U
U
S
S
</>
R
R
O
O
T
T
A
A
T
T
E
E
E
E
N
N
D
D
E
E
END
M
M
MENU
1
Press MENU to display the TV menu.
Press ]/[ to select “Programmes”,
2
and then press OK to display the
“Programmes” screen.
TV menu
Picture
Sound
Programmes
Features
AV connections
Timer functions
First installation
Language
OK
M
Back
E
End
]/[
CH
CH
OK
3
Press ]/[ to select “Automatic
search”, and then press OK to
display the “Automatic search”
screen.
TV/VIDEO
TV/VIDEO
4
Press ]/[ to select the desired
item, and then press OK.
Press </> to select the desired item.
Note:
Note:
• You can change “Colour system” and
“Sound system” only when
“Other Countries” is selected in
“Country”.
Press ]/[ to select “Store progr.
5
from”, and then press OK to display
the “Store progr. from” screen.
Automatic search
Country
Colour system
Sound system
Store progr. from
Start search
OK
Store progr. from
0
8 E 9 16 E54
0
1 S 6 9 E1 17 E56
0
2 S 8 1 E11 18 E57
3 S1 11 E36 19
0
4 S11 12 E37 2
0
5 E 3 13 E38 21
0
6 E 5 14 E5 22
0
7 E 6 15 E53 23
OK
M
Back
0
[ UK]
[
PAL
[ I]
E
End
0
0
0
M
Back
]
0
E
End
LC-13B4E(E)#p17_22.p65 03.3.10, 2:53 PM17
Press ]/[ and/or </> to select the
6
programme position from which the
programmes are to be stored, and
then press OK.
7
Press ]/[ to select “Start search”,
and then press OK to begin the
automatic programme search.
Note:
Note:
• See page 7 for details of the search
process.
8
After the search is completed, press
END to exit.
Store progr. from
0
8 E 9 16 E54
0
1 S 6 9 E1 17 E56
0
2 S 8 1 E11 18 E57
3 S1 11 E36 19
0
4 S11 12 E37 2
0
5 E 3 13 E38 21
0
6 E 5 14 E5 22
0
7 E 6 15 E53 23
OK
Automatic search
Country
Colour system
Sound system
Store progr. from
Start search
OK
M
0
Back
0
0
0
M
Back
[ UK]
[
PAL
[ I]
E
End
0
E
End
]
17

Useful Features (Continued)
[2] Manual adjustment
Programmes (Continued)
Individual settings of programmes can be adjusted.
T
T
T
E
H
E
E
ID
X
X
IG
T
T
R
W
B
T
T
T
SUBPAGE
SUBPAGE
R
R
E
E
VE
VE
A
MENU
A
L
L
OK
MENUSOUND
MENUSOUND
M
M
HOLD
HOLD
E
E
L
L
T
T
I
I
BT
BT
U
U
S
S
</>
R
R
O
O
T
T
A
A
T
T
E
E
EN
EN
D
D
E
E
END
Perform steps 1 and 2 in [1] Automatic
1
search to display the “Programmes”
screen.
2
Press ]/[ to select “Manual adjustment”,
and then press OK to display the “Manual
adjustment” screen.
]/[
OK
CH
CH
3
Press ]/[ to select the item, and then
press </> to make the adjustment. (See
the table below for details.)
• You can also use Channel Select to adjust
the “Frequency” items.
• To adjust “Name”, first press OK to active the
text input mode. Press </> to select the input
position and press ]/[ to select the desired
character. When you finish inputting, press
OK to set the name.
4
Press END to exit.
0–199
The channel changes to the higher or lower channel.
Receivable frequencies depending on TV norm, installation
TV/VIDEO
TV/VIDEO
Adjustment item
Channel
Frequency
Channel
Select
Choice/Value range
044 – 859 (MHz)
site, and range.
Name
Colour system
Sound system
Skip
A – Z, +, -, ., !, /, 0 – 9
Auto, PAL, SECAM
B/G, I, D/K, L, Auto*
on off
* This item “Auto” in “Sound system” is only visible when the “Colour system” is set to “Auto”.
Programme name (up to five characters).
Colour norm.
TV norm.
Channel numbers with a “(•) (RED)” mark on the left are set to
SKIP.
Description
Programmes
Automatic search
Manual adjustment
Sort
Erase programme range
Enter/change name
OK
Manual adjustment
Channel
Frequency
Name
Colour system
Sound system
Skip
OK
E
M
Back
[36]
[291 .25MHz]
[
E36
[ PAL]
[ PAI]
[
off
E
M
Back
End
End
]
]
Note:
Note:
• Depending on the settings in the colour system of the channels, switching between channels may be slow. If you want to speed up channel
switching, switch “Auto” in “Colour system” to the current reception system (PAL or SECAM).
18
LC-13B4E(E)#p17_22.p65 03.3.10, 2:54 PM18

Useful Features (Continued)
OK
Back
M
End
E
Programmes
Automatic search
Manual adjustment
Sort
Erase programme range
Enter/change name
OK
Back
M
End
E
Programmes
Automatic search
Manual adjustment
Sort
Erase programme range
Enter/change name
Programmes (Continued)
[3] Sort
The programme positions for individual programmes can be freely changed.
Perform steps 1 and 2 in
T
T
T
E
H
E
E
ID
X
X
IG
T
T
R
W
B
T
T
T
SUBPAGE
SUBPAGE
R
R
EV
EV
E
E
A
MENU
OK
A
L
L
MENUSOUND
MENUSOUND
M
M
HOLD
HOLD
E
E
L
L
IT
IT
T
T
B
B
U
U
S
S
</>
R
R
O
O
T
T
A
A
T
T
E
E
EN
EN
D
D
E
E
END
]/[
CH
CH
OK
TV/VIDEO
TV/VIDEO
1
[1] Automatic search to display
the “Programmes” screen.
2
Press ]/[ to select “Sort,” and
then press OK to display the
“Sort” screen.
3
Press ]/[ and/or </> to select
the desired programme, and then
press OK to sort.
• When OK is pressed, the Move
mode is activated. Press ]/[ to
move the currently marked
programme to the desired
programme position. The marked
programme is swapped with the
programme at the selected
programme position. Press OK to
leave the Move mode.
4
Press END to exit.
Sort
0
8 E 9 16 E54
0
1 S 6 9 E1 17 E56
0
2 S 8 1 E11 18 E57
3 S1 11 E36 19
0
4 S11 12 E37 2
0
5 E 3 13 E38 21
0
6 E 5 14 E5 22
0
7 E 6 15 E53 23
OK
0
0
0
0
0
M
Back
Programmes (Continued)
[4] Erase programme range
The individual programme or programmes in a connected range can be erased.
E
End
1
Perform steps 1 and 2 in
[1] Automatic search to display
the “Programmes” screen.
2
Press ]/[ to select “Erase
programme range”, and then press
OK to display the “Erase
programme range” screen.
3
Press ]/[ and/or </> to select
the programme to be erased, and
then press OK. The selected
programme is shown in yellow.
• If you want to erase programmes in a
connected range, select the programme at the beginning of the
desired range.
4
If you are erasing programmes in a
connected range, press ]/[ and/
or </> to select the programme at
the end of the range. The selected
programmes are shown in yellow.
Press OK to erase the selected
5
programme(s). All the subsequent
programmes move up.
Press END to exit.
6
Erase programme range
0
8 E 9 16 E54
0
1 S 6 9 E1 17 E56
0
2 S 8 1 E11 18 E57
3 S1 11 E36 19
0
4 S11 12 E37 2
0
5 E 3 13 E38 21
0
6 E 5 14 E5 22
0
7 E 6 15 E53 23
OK
Erase programme range
0
8 E 9 16 E54
0
1 S 6 9 E1 17 E56
0
2 S 8 1 E11 18 E57
3 S1 11 E36 19
0
4 S11 12 E37 2
0
5 E 3 13 E38 21
0
6 E 5 14 E5 22
0
7 E 6 15 E53 23
OK
Erase programme range
8 E38 16
0
0
1 E 5 9 E5 17
2 E 6 1 E53 18
0
0
3 E 9 11 E54 19
0
4 E1 12 E56 2
5 E11 13 E57 21
6 E36 14 22
7 E37 15 23
OK
0
0
0
0
0
E
M
0
0
0
Back
End
0
0
E
M
0
0
Back
End
0
E
M
Back
End
LC-13B4E(E)#p17_22.p65 03.3.10, 2:54 PM19
19
Useful Features (Continued)
OK
Back
M
End
E
Programmes
Automatic search
Manual adjustment
Sort
Erase programme range
Enter/change name
[5] Enter/change name
T
T
E
HT
E
E
ID
X
X
IG
T
T
R
W
B
T
T
T
SUBPAGE
SUBPAGE
R
R
E
E
VE
VE
A
MENU
A
L
L
OK
MENUSOUND
MENUSOUND
M
M
HOLD
HOLD
E
E
L
L
IT
IT
T
T
B
B
U
U
S
S
</>
R
R
OT
OT
A
A
T
T
E
E
EN
EN
D
D
E
E
END
1
2
]/[
CH
CH
3
TV/VIDEO
TV/VIDEO
OK
4
Programmes (Continued)
The name of an individual programme can be entered or changed.
Perform steps 1 and 2 in
[1] Automatic search to display
the “Programmes” screen.
Press ]/[ to select “Enter/
change name”, and then press OK
to display the “Enter/change
name” screen.
Press ]/[ and/or </> to select
the desired programme, and then
press OK. The character at the
input position blinks.
Press </> to select the input
position, and then press ]/[ to
select the desired character.
Enter/change name
0
8 E 9 16 E54
0
1 _ 6 9 E1 17 E56
0
2 S 8 1 E11 18 E57
3 S1 11 E36 19
0
4 S11 12 E37 2
0
5 E 3 13 E38 21
0
6 E 5 14 E5 22
0
7 E 6 15 E53 23
OK
Enter/change name
0
8 E 9 16 E54
0
1 S 6 9 E1 17 E56
0
2 S 8 1 E11 18 E57
3 S1 11 E36 19
0
4 S11 12 E37 2
0
5 E 3 13 E38 21
0
6 E 5 14 E5 22
0
7 E 6 15 E53 23
OK
0
0
0
0
0
0
0
E
M
Back
End
0
0
0
E
M
Back
End
20
Press OK to accept the name
5
entered, and then press END to
exit.
Enter/change name
0
8 E 9 16 E54
0
1 S 6 9 E1 17 E56
0
2 S 8 1 E11 18 E57
3 S1 11 E36 19
0
4 S11 12 E37 2
0
5 E 3 13 E38 21
0
6 E 5 14 E5 22
0
7 E 6 15 E53 23
OK
0
0
0
0
0
E
M
Back
End
LC-13B4E(E)#p17_22.p65 03.3.10, 2:54 PM20

Useful Features (Continued)
Features
The Features items can be set by the user.
R
WID
B
LD
LD
O
O
H
H
E
E
L
L
T
T
I
I
T
T
B
B
U
U
S
S
Selected item
Brightness*
IG
E
HT
SUBPAGE
SUBPAGE
MENU
CH
CH
T
T
E
E
X
X
T
T
T
T
T
R
R
E
E
V
V
E
E
A
A
L
L
OK
MENUSOUND
MENUSOUND
M
M
TV/VIDEO
TV/VIDEO
</>
R
R
O
O
TA
TA
T
T
E
E
1
2
E
E
N
N
D
D
E
E
END
MENU
]/[
OK
3
4
5
Factory setting
[bright] Maximum brightness
Press MENU to display the TV menu.
Press ]/[ to select “Features”, and then
press OK to display the “Features” screen.
Press ]/[ to select the desired
adjustment item, and then press OK.
Press </> to make the adjustment.
(Except “On-screen display” and “Child
lock” menu items)
Press END to exit.
Setting change
[medium] Brightness 60% → Suitable for viewing in well-lit
TV menu
Picture
Sound
Programmes
Features
AV connections
Timer functions
First installation
Language
OK
Features
Brightness [bright
Rotate [normal
Auto power off [off
On-screen display
Child lock
OK
M
Back
M
E
Back
End
]
]
]
E
End
areas. Saves energy.
[dark] Brightness 20% → Sufficiently bright when viewing in
dim areas.
Rotate*
[normal] Normal image
[mirror] Mirror image → To display mirror images for special uses.
orientation
ABC
[rotate] Rotate image → To display rotated images for special uses
[upside down] Upside down image → To display upside down
Auto power off
[off] This feature is inactive.
(only TV mode)
* Brightness and Rotate can be switched in one touch using the remote control (See page 22).
[on] The power of the LCD TV set is turned off when there is no
signal for 5 minutes.
ABC
ABC
ABC
ABC
images for special uses.
21
LC-13B4E(E)#p17_22.p65 03.3.10, 2:54 PM21

Useful Features (Continued)
You can change the setting screen of
BRIGHTNESS and ROTATE directly.
BRIGHT
T
T
E
HT
E
E
ID
X
X
IG
T
T
R
W
B
SUBPAGE
SUBPAGE
HOLD
HOLD
E
E
L
L
IT
IT
T
T
B
B
U
U
S
S
MENU
CH
CH
R
R
O
O
T
T
A
A
T
T
E
E
T
T
T
R
R
E
E
VE
VE
A
A
L
L
OK
MENUSOUND
MENUSOUND
M
M
TV/VIDEO
TV/VIDEO
ROTATE
E
E
N
N
D
D
E
E
[1] Directly Setting the BRIGHTNESS
1
2
[2] Directly Setting the ROTATE
1
Features (Continued)
Press BRIGHT to display the Brightness
screen.
Each time you press BRIGHT, the mode
changes as follows. You can select the
desired mode.
bright
medium
Note:
• The Brightness screen automatically disappears after 4 seconds.
• The Brightness is set to “bright” at the factory
setting.
• See the table of page 21 for details of the
each brightness setting.
Press ROTATE to display the Rotate
screen.
dark
Brightness:bright
Brightness:medium
Brightness:dark
2
Each time you press ROTATE, the mode
changes as follows. You can select the
desired mode.
Rotate: normal
(Normal)
Rotate: upside down
(Rotate horizontally
and vertically)
Note:
• The Rotate screen automatically disappears
after 4 seconds.
• The Rotate is set to “Normal” at the factory
setting.
• When changing settings directly made,
settings in the menu can also be changed.
• See the table of page 21 for details of the
each rotate setting.
Rotate: mirror
(Rotate horizontally)
Rotate: rotate
(Rotate vertically)
Rotate:normal
Rotate:mirror
Rotate:rotate
Rotate:upside down
22
LC-13B4E(E)#p17_22.p65 03.3.10, 2:54 PM22

Useful Features (Continued)
WIDE
BRIGHT
SUBPAGE
SUBPAGE
D
D
L
L
O
O
H
H
SUBTITLE
SUBTITLE
MENU
OK
CH
CH
Adjustment item
Position
Sound info
Time
Alarm time
Sleep time
T
T
E
E
X
X
T
T
T
T
T
R
R
E
E
V
V
</>
ROTATE
ROTATE
EA
EA
L
L
END
END
E
E
END
MENUSOUND
MENUSOUND
M
M
]/[
Cyan
OK
TV/VIDEO
TV/VIDEO
Choice/Value range
bottom
no
no
no
no
On-screen Display
You can adjust various settings for on-screen
displays.
Perform steps 1 and 2 in Features to
1
display the “Features” screen.
Press ]/[ to select “On-screen display”
2
and then press OK to display the “Onscreen display” screen.
3
Press ]/[ to select the desired
adjustment item. (See the table below.)
Press </> to make the adjustment.
4
5
Press END to exit.
top
yes
To select the position of the On-screen display.
To select whether or not sound info is to be displayed, when a channel has
been selected.
yes
yes
To select information to be displayed in the On-screen display. To activate
the On-screen display, use the Cyan button.
yes
Description
Features
Brightness [bright
Rotate [normal
Auto power off [off
On-screen display
Child lock
OK
On-screen display
Position [bottom
Sound info [yes
Time [ no
Alarm time [ no
Sleep time [ no
OK
M
Child Lock
Important:
•
Please refer to page 41 for “IMPORTANT NOTE ON DISENGAGING ADVANCED CHILD LOCK”.
The Child Lock function blocks the viewing of any channel for which the child lock
has been set.
To use the Child Lock function, you first need to define your PIN (Personal
Identification Number).
[1] Defining a PIN
Back
M
Back
E
End
]
]
]
E
End
]
]
]
]
]
TEX
TEX
T
T
WIDE
BRIGHT
D
D
L
L
O
O
H
H
SUBTITLE
SUBTITLE
LC-13B4E(E)#p23_29.p65 03.3.10, 2:54 PM23
SUBPAGE
SUBPAGE
MENU
OK
CH
CH
T
T
T
R
R
E
E
TV/VIDEO
TV/VIDEO
ROTATE
ROTATE
VE
VE
A
A
L
L
END
END
E
E
MENUSOUND
MENUSOUND
M
M
OK
END
MENU
]/[
Channel
Select
1
Perform steps 1 and 2 in Features to
display the “Features” screen.
2
Press ]/[ to select “Child lock”.
Press OK to display the PIN input screen.
3
Input the desired four-digit PIN (e.g. 1234)
4
with Channel Select.
:
Note:
• Be sure to make a note of your PIN before
pressing OK.
• The PIN will not be set if MENU or END is
pressed before the fourth digit has been
input.
Press OK to accept the entered PIN.
5
Features
Brightness [bright
Rotate [normal
Auto power off [off
On-screen display
Child lock
OK
Child lock
Please define your PIN.
M
Child lock [????
OK
Child lock
Please define your PIN.
M
Child lock [1234
OK
M
Back
Back
Back
]
]
]
E
End
]
E
End
]
E
End
23

Useful Features (Continued)
[2] Changing/Cancelling a PIN
Child Lock (Continued)
T
T
T
E
E
E
ID
X
X
IGH
T
T
R
W
B
T
T
T
SUBPAGE
SUBPAGE
RE
RE
V
V
EA
MENU
EA
L
L
OK
MENUSOUND
MENUSOUND
HOLD
HOLD
E
E
L
L
IT
IT
T
T
B
B
SU
SU
OK
R
R
O
O
T
T
A
A
T
T
E
E
EN
EN
D
D
E
E
END
M
M
]/[
CH
CH
Channel
TV/VIDEO
TV/VIDEO
Select
To change a PIN
1
Perform steps 1 to 3 in [1] Defining a PIN
to display the PIN input screen.
Enter your four-digit PIN (e.g. 1234) with
2
Channel Select.
Note:
Note:
• Numbers entered are hidden with ????.
• If the PIN has been input incorrectly, “Wrong
PIN!” is displayed.
When the PIN is correctly entered, the
“Child lock” screen appears.
3
Press ]/[ to select “Change PIN”, and
then press OK. The currently defined PIN
is displayed.
4
Input the new four-digit PIN (e.g. 5678)
with Channel Select.
Press END to exit.
5
Child lock
Please enter your PIN:
Back
Back
]
E
End
]
E
End
]
E
End
Child lock [????
OK
Child lock
For all programmes
For individual progr. only
Change PIN [1234
Cancel PIN
OK
Child lock
For all programmes
For individual progr. only
Change PIN [5678
Cancel PIN
OK
M
Back
M
M
To cancel a PIN
| In step 3 above, press ]/[ to select
“Cancel PIN”, and then press OK to cancel
the currently defined PIN.
Child lock
For all programmes
For individual progr. only
Change PIN [1234
Cancel PIN
OK
M
Back
]
E
End
24
LC-13B4E(E)#p23_29.p65 03.3.10, 2:54 PM24

Useful Features (Continued)
Child Lock (Continued)
[3] Setting a Child Lock
There are four different ways of activating a child lock:
1. General child lock for all programmes immediately
2. General child lock for all programmes with daily time limit
3. General child lock for all programmes with single time limit
4. Programme-position related child lock without time limit
The Child Lock comes into effect only after the LCD TV set has entered the
standby mode and is then turned on again.
T
T
T
E
H
E
E
ID
IG
W
BR
T
T
T
SUBPAGE
SUBPAGE
RE
RE
LD
LD
O
O
H
H
E
E
L
L
T
T
I
I
T
T
B
B
U
U
S
S
MENU
OK
CH
CH
TV/VIDEO
TV/VIDEO
Adjustment item
Immediately
Daily
Once
X
X
T
T
V
V
E
E
A
A
L
L
MENUSOUND
MENUSOUND
M
M
</>
R
R
O
O
T
T
A
A
T
T
E
E
E
E
N
N
D
D
E
E
END
]/[
OK
Channel
Select
Choice/Input value
no yes
no HH:MM-HH:MM
no HH:MM-HH:MM
To set a Child Lock for all
programmes with a time limit
Perform steps 1 to 3 in
1
[2] Changing/Cancelling a PIN to
display the “Child lock” screen.
2
Press ]/[ to select “For all
programmes”, and then press OK to
Child lock
For all programmes
For individual progr. only
Change PIN [1234
Cancel PIN
OK
M
Back
E
display the “For all programmes”
screen.
Press ]/[ to select the desired item.
3
(See the table below.)
Press </> to select the desired
4
choice, and, if required, input digits
with Channel Select.
5
Press END to exit.
For all programmes
Immediately [ no
Daily [ no
Once [ no
OK
M
Back
]
]
]
E
End
Note:
• If the current clock time is within the time limit, the Child Lock is activated immediately after
the LCD TV set is turned off and on again. For example, if the current clock time is 9:00 and
the time limit is specified from 22:00 to 14:00, the lock is effective from 9:00 to 14:00.
• When a Child Lock is set for all programmes with a time limit, the “Time” item is not
displayed in the TV menu and cannot be selected.
Description
Select “yes” to activate the Child Lock immediately (after the LCD TV set has
been turned off and on again). The lock remains effective until “no” is selected.
Input the start and end time for a daily-recurring Child Lock. The lock is activated
everyday unless “no” is selected.
Input the start and end time for a once-only Child Lock. The length of the period
should be up to 24 hours.
]
End
Warning:
• The timer takes its clock information from the Teletext broadcast. The teletext broadcast may be in a different time zone and therefore child
lock timer may not activate as expected. Concerning this detail, please refer to page 32.
LC-13B4E(E)#p23_29.p65 03.3.10, 2:54 PM25
25

Useful Features (Continued)
[3] Setting Child Lock (Continued)
T
T
T
E
H
E
E
ID
X
X
IG
T
T
R
W
B
T
T
T
SUBPAGE
SUBPAGE
R
R
E
E
V
V
EA
MENU
EA
L
L
OK
MENUSOUND
MENUSOUND
HOLD
HOLD
E
E
L
L
IT
IT
T
T
B
B
U
U
S
S
</>
R
R
O
O
T
T
AT
AT
E
E
E
E
N
N
D
D
E
E
END
M
M
To set a Child Lock for individual
programmes without time limit
1
2
]/[
CH
CH
OK
3
4
TV/VIDEO
TV/VIDEO
Channel
Select
5
Child Lock (Continued)
Perform steps 1 to 3 in
[2] Changing/Cancelling a PIN
to display the “Child lock” screen.
Press ]/[ to select “For individual
progr. only”, and then press OK to
display the “For individual progr. only”
screen.
Press ]/[ and/or </> to select the
desired programme.
Press OK to lock the programme. The
locked programme is displayed in red.
Note:
• To unlock the programme, select the
programme and press
• The Child Lock remains effective until it is
cancelled.
Press END to exit.
OK.
Child lock
For all programmes
For individual progr. only
Change PIN [1234
Cancel PIN
OK
For individual progr. only
0
8 E 9 16 E54
0
1 S 6 9 E1 17 E56
0
2 S 8 1 E11 18 E57
3 S1 11 E36 19
4 S11 12 E37 2
0
5 E 3 13 E38 21
0
6 E 5 14 E5 22
0
7 E 6 15 E53 23
OK
M
0
0
Back
0
0
0
M
E
End
Back
]
0
E
End
Note:
• When a Child Lock is activated, the “Programmes” and “First installation” items are not
displayed in the TV menu and cannot be selected.
[4] Temporarily cancelling the Child Lock setting
You can view a programme for which a Child Lock has been set by temporarily
cancelling the Child Lock setting. Perform the procedure below to input your
PIN and cancel the Child Lock if you are prompted to do so.
When the PIN input screen
|
appears, input your PIN with
Channel Select. The normal
screen appears when the PIN is
correctly entered.
Note:
• If the PIN has been input incorrectly,
“Wrong PIN!” is displayed.
Child lock
Please enter your PIN:
Child lock [????
OK
M
Back
]
E
End
26
LC-13B4E(E)#p23_29.p65 03.3.10, 2:55 PM26

Useful Features (Continued)
AV Connections
It is possible to manually adjust various settings for connections with external
devices on the “AV connections” screen.
[1] AV1/AV2
Select the appropriate signal type and colour standard for the signals from the
video equipment connected to the AV1or AV2 terminal.
1
T
T
T
E
H
E
E
X
X
IG
T
T
R
WID
B
T
T
T
SUBPAGE
SUBPAGE
R
R
E
E
V
V
E
E
A
MENU
A
L
L
OK
MENUSOUND
MENUSOUND
HOLD
HOLD
E
E
L
L
IT
IT
T
T
B
B
U
U
S
S
</>
R
R
O
O
T
T
AT
AT
E
E
EN
EN
D
D
E
E
END
M
M
MENU
]/[
CH
CH
OK
Press MENU to display the TV menu.
Press ]/[ to select “AV connections”,
2
and then press OK to display the “AV
connections” screen.
3
Press ]/[ to select “AV1”,
“AV2 (Y/C)”, and “AV2(CVBS)”, and then
press OK to display the signal type
selection screen.
TV/VIDEO
TV/VIDEO
4
Press ]/[ to select the desired item, and
then press OK.
TV menu
Picture
Sound
Programmes
Features
AV connections
Timer functions
First installation
Language
OK
AV connections
AV1
)
AV2(Y/C
AV2(CVBS
For programmes
OK
M
Back
AV1
Signal type [ Auto
AFC [ Mode1
Colour system[ Auto
OK
M
)
Back
E
M
Back
End
E
End
E
]
]
]
End
Press </> to select the desired “Signal
5
type”, “AFC” and “Colour system”, and
then press OK.
6
Press END to exit.
Choice/Input valueAdjustment item
Signal type*
AFC
Auto, CVBS, Y/C
Mode1, Mode2
To select the signal type of external equipment.
To select frequency control modes. Mode1 is suitable for DVD players or
decoders, and Mode2 is suitable for VCRs or Camcorders.
Auto, PAL, SECAM,
Colour system
N358 (NTSC 3.58),
N443 (NTSC 4.43),
Colour norm.
PAL60, PAL-M, PAL-N
* The menu function is only visible when the AV1 is selected.
Note:
• If no (colour) image displays, try to change the other signal type.
• Depending on the compatibility with the various types of equipment, the picture may
become skewed. In this case, select the “AFC” (Automatic Frequency Control) mode that
will improve the picture.
• Switching between AV input signals may be slow, depending on the settings in “Colour
system”. If you want to speed up signal switching, switch “Auto” in “Colour System” to the
current reception colour system.
Description
AV1
Signal type [ CVBS
AFC [ Mode2
Colour system[ Auto
OK
M
Back
E
End
]
]
]
LC-13B4E(E)#p23_29.p65 03.3.10, 2:55 PM27
27

Useful Features (Continued)
[2] For programmes
T
T
T
E
H
E
E
ID
X
X
IG
T
T
R
W
B
T
T
T
SUBPAGE
SUBPAGE
R
R
E
E
VE
VE
A
MENU
A
L
L
OK
MENUSOUND
MENUSOUND
M
M
HOLD
HOLD
E
E
L
L
T
T
I
I
BT
BT
U
U
S
S
</>
R
R
O
O
T
T
A
A
T
T
E
E
E
E
N
N
D
D
E
E
END
MENU
1
2
]/[
CH
CH
3
OK
4
TV/VIDEO
TV/VIDEO
5
AV Connections (Continued)
• The influence of the AV control voltage and of fast blank at programme
positions from 0 to 199 can be set.
• When connecting a video device to the AV1 terminal, you need to adjust the
decoder programme settings.
Perform steps 1 and 2 in
[1] AV1/AV2 to display the “AV
connections” screen.
Press ]/[ to select “For
programmes”, and then press OK
to display the “For programmes”
screen.
Press ]/[ to select the “AV
control voltage” or “RGB on-screen
display”.
Press </> to select “yes” or “no”.
Note:
• If the item concerned is set to “yes”,
the appropriate picture is throughconnected at all programme positions
from 0 to 199 when a control voltage/
an RGB signal is applied.
Press ]/[ to select “For decoder
connected to AV1”, and then press
OK to display the decoder
programme selection screen.
AV connections
AV1
)
AV2(Y/C
)
AV2(CVBS
For programmes
OK
For programmes
AV control voltage[ no
RGB on-screen display[ no
For decoder connected to AV1
Sound from AV1[Dec .
OK
For programmes
AV control voltage[no
RGB on-screen display
For decoder connected to AV1
Sound from AV1
OK
M
Back
E
End
]
]
]
E
M
M
Back
Back
[no]
[
Dec .
End
]
]
E
End
28
6
Press ]/[ and/or </> to select
the programme for the decoder,
and then press OK. Repeat the
same procedure if you want to
specify other decoder programmes.
Press MENU to return to the “For
7
programmes” screen.
Press ]/[ to select “Sound from
8
AV1”, and then press </> to select
the desired sound source.
9
Press END to exit.
For decoder connected to AV1
0
8 E 9 16 E54
0
1 S 6 9 E1 17 E56
0
2 S 8 1 E11 18 E57
3 S1 11 E36 19
0
4 S11 12 E37 2
0
5 E 3 13 E38 21
0
6 E 5 14 E5 22
0
7 E 6 15 E53 23
OK
For programmes
AV control voltage[no
RGB on-screen display[no
For decoder connected to AV1
Sound from AV1
OK
0
0
0
0
0
E
M
M
Back
Back
[
Dec .
End
]
]
]
E
End
LC-13B4E(E)#p23_29.p65 03.3.10, 2:55 PM28

Useful Features (Continued)
Timer Functions
Press Yellow to display the “Timer
T
T
T
E
E
IDE
X
X
IGH
T
T
R
W
B
SUBPAGE
SUBPAGE
LD
LD
O
O
H
H
E
E
L
L
T
T
I
I
T
T
B
B
U
U
S
S
MENU
R
R
O
O
T
T
A
A
T
T
E
E
T
T
T
R
R
E
E
V
V
E
E
A
A
L
L
OK
MENUSOUND
MENUSOUND
</>
E
E
N
N
D
D
E
E
END
M
M
]/[
CH
CH
Yellow
OK
1
functions” screen.
Note:
• The “ Timer functions” screen can also be
displayed by selecting “Timer functions” in the
TV menu. (See pages 13 and 14.)
Press ]/[ to select “Time”, and then
2
press OK.
Input the current time (HH:MM:SS) with
3
Channel Select.
Timer functions
Time
Switch off [ no
Alarm [ no
Alarm volume [
OK
M
[
Back
: :
E
End
]
]
]
]
0
TV/VIDEO
TV/VIDEO
Adjustment item
Time
Switch off
Alarm
Alarm volume
Channel
Select
4
Press ]/[ to select the desired item.
(See the table below.)
Press </> to make the adjustment. If you
5
select “00:00” for “Switch off” or “Alarm”,
input the desired time with Channel
Select.
6
Press END to exit.
Choice/Input value/Value range
HH:MM:SS
no HH:MM
no HH:MM
0– 39
Description
The time can be manually set.
The LCD TV set automatically turns off at the specified time
everyday.
The alarm sound turns on at the specified time everyday.
The volume of the alarm sound is selected.
LC-13B4E(E)#p23_29.p65 03.3.10, 2:55 PM29
29

Useful Features (Continued)
This enables the selection of the reception mode when receiving a NICAM-I or
NICAM-B/G signal. To let you enjoy NICAM broadcasting, this LCD TV set
receives NICAM system stereo, bilingual, and monaural broadcasts.
NICAM Broadcast Selection
T
T
T
E
H
E
E
ID
X
X
IG
T
T
R
W
B
SUBPAGE
SUBPAGE
LD
LD
O
O
H
H
E
E
L
L
T
T
I
I
T
T
B
B
U
U
S
S
MENU
R
R
O
O
T
T
A
A
T
T
E
E
T
T
T
R
R
E
E
V
V
E
E
AL
AL
E
E
N
N
D
D
E
E
OK
MENUSOUND
MENUSOUND
M
M
SOUND
CH
CH
Green
Stereo
The LCD TV set is receiving a stereo broadcast.
• Each time you press SOUND, the mode
changes between “Stereo” and “Mono”.
• When “Mono” is selected, the TV sound is
output monaurally.
Bilingual
When the LCD TV set is receiving a bilingual
Stereo
Mo no
programme, the “Sound 1” mode is automatically
selected.
• Each time you press SOUND, the mode
Sound 1
changes as follows:
TV/VIDEO
TV/VIDEO
Sound 1 → Sound 2 → Sound 1+2 → Mono
Sound 2
Sound 1+2
Monaural
The LCD TV set is receiving a monaural
Mo no
broadcast.
• Each time you press SOUND, the mode
changes between “Nicam” and “Mono”.
Nicam
30
LC-13B4E(E)#p30_36.p65 03.3.10, 2:55 PM30
Mono
Note:
Note:
• If approximately 3 seconds pass without a button being pressed, the mode setting is
automatically terminated and the LCD TV set returns to the normal mode.
• The setting can be individually selected for each channel number.
• You can also turn off the NICAM mode by setting the “Loudsp. sound” item to “Mono” in
the Sound screen, which is displayed when you press
Green
(see page 15).

Useful Features (Continued)
IGR (German stereo system) Broadcasts
This enables the selection of the reception mode when receiving an IGR-B/G
signal. To let you enjoy IGR broadcasting, this LCD TV set receives IGR system
stereo and bilingual broadcasts.
T
T
T
E
H
E
E
ID
X
X
IG
T
T
R
W
B
SUBPAGE
SUBPAGE
LD
LD
O
O
H
H
E
E
L
L
IT
IT
T
T
B
B
U
U
S
S
MENU
R
R
O
O
T
T
A
A
T
T
E
E
T
T
T
R
R
E
E
V
V
E
E
AL
AL
E
E
N
N
D
D
E
E
OK
MENUSOUND
MENUSOUND
M
M
SOUND
Green
CH
CH
Stereo
The LCD TV set is receiving a stereo broadcast.
• Each time you press SOUND, the mode
changes between “Stereo” and “Mono”.
• When “Mono” is selected, the TV sound is
output monaurally.
Bilingual
When the LCD TV set is receiving a bilingual
Stereo
Mono
programme, the “Sound 1” mode is automatically
selected.
• Each time you press SOUND, the mode
Sound 1
changes as follows:
TV/VIDEO
TV/VIDEO
Sound 1 → Sound 2 → Sound 1+2
→ Mono
Sound 2
Sound 1+2
Mono
LC-13B4E(E)#p30_36.p65 03.3.10, 2:55 PM31
Note:
Note:
• If approximately 3 seconds pass without a button being pressed, the mode setting is
automatically terminated and the LCD TV set returns to normal mode setting.
• The setting can be selected individually for each channel number.
• You can also turn off the IGR mode by setting the “Loudsp. sound” item to “Mono” in the
Sound screen, which is displayed when you press
Green
(see page 15).
31
 Loading...