


20VM2-LC
SHARP CORPORATION
OSAKA, JAPAN
PRINTED IN JAPAN
IMPRIMÉ AU JAPON
IMPRESO EN JAPÓN
IMPRESSO NO JAPÃO
TINS-6901CEZZ
TXXXX-A
LC-20VM2
LCD AV MONITOR |
|
|
MONITEUR AV À |
ENGLISH |
|
CRISTAUX LIQUIDES |
||
|
||
MONITOR AV LCD |
|
|
MONITOR AV DE TELA |
|
|
|
||
DE CRISTAL LÍQUIDO |
|
|
FRANÇAIS |
||
|
||
|
|
|
|
|
|
OPERATION MANUAL |
|
|
MODE D’EMPLOI |
ESPAÑOL |
|
MANUAL DE MANEJO |
||
|
||
MANUAL DE OPERAÇÃO |
|
|
|
|
PORTUGUÊS |
Important Information
WARNING: TO REDUCE THE RISK OF FIRE OR ELECTRIC SHOCK, DO NOT EXPOSE THIS PRODUCT TO RAIN OR MOISTURE.
CAUTION |
RISK OF ELECTRIC |
SHOCK. DO NOT OPEN |
CAUTION: TO REDUCE THE RISK OF ELECTRIC SHOCK, |
DO NOT REMOVE COVER. |
NO USER-SERVICEABLE PARTS INSIDE. |
REFER SERVICING TO QUALIFIED SERVICE |
PERSONNEL. |
The lightning flash with arrowhead symbol, within an equilateral triangle, is intended to alert the user to the presence of uninsulated “dangerous voltage” within the product’s enclosure that may be of sufficient magnitude to constitute a risk of electric shock to persons.
The exclamation point within a triangle is intended to alert the user to the presence of important operating and maintenance (servicing) instructions in the literature accompanying the product.
WARNING: FCC Regulations state that any unauthorized changes or modifications to this equipment not expressly approved by the manufacturer could void the user’s authority to operate this equipment.
U.S.A. ONLY
INFORMATION
This equipment has been tested and found to comply with the limits for a Class A digital device, pursuant to Part 15 of the FCC Rules. These limits are designed to provide reasonable protection against harmful interference in a residential installation. This equipment generates, uses, and can radiate radio frequency energy and, if not installed and used in accordance with the instructions, may cause harmful interference to radio communications. However, there is no guarantee that interference will not occur in a particular installation. If this equipment does cause harmful interference to radio or television reception, which can be determined by turning the equipment off and on, the user is encouraged to try to correct the interference by one or more of the following measures:
•Relocate or adjust the receiving antenna.
•Increase the separation between the equipment and receiver.
•Connect the equipment into an outlet on a circuit different from that to which the receiver is connected.
•Consult the dealer or an experienced radio/TV technician for help.
U.S.A. ONLY
CAUTION: TO PREVENT ELECTRIC SHOCK, MATCH WIDE BLADE OF PLUG
TO WIDE SLOT, FULLY INSERT.

ENGLISH
OPERATION MANUAL
ENGLISH
Contents
|
Page |
Dear SHARP Customer ................................................. |
2 |
Safety Precautions ........................................................ |
2 |
Supplied Accessories ................................................... |
4 |
Preparation ..................................................................... |
5 |
Example of Application ................................................ |
6 |
Listening with a Headphone .................................... |
6 |
Names of Parts (Main Unit) .......................................... |
7 |
Main Unit (Front View) .............................................. |
7 |
Main Unit (Rear View) ............................................... |
8 |
Names of Parts (Remote Control) ............................... |
9 |
Remote control .......................................................... |
9 |
Basic Operation ........................................................... |
10 |
Turning on POWER ................................................. |
10 |
Switching AV INPUT AV1/AV2/COMPONENT/ |
|
RGB .......................................................................... |
10 |
Sound Volume ......................................................... |
11 |
Power ON/OFF standby .......................................... |
11 |
|
Page |
Adjustment ................................................................... |
12 |
Adjusting the PICTURE settings ........................... |
12 |
Adjusting the SOUND settings .............................. |
14 |
Adjusting the PRESET settings ............................. |
15 |
Adjusting the FINE SYNC Settings |
|
(RGB mode only) ..................................................... |
16 |
Connecting to computer ............................................. |
17 |
Connection Pin Assignments ................................ |
18 |
RGB Input Signals (Recommended Timing) ........ |
18 |
RS232C terminal specifications ............................ |
19 |
Connecting to Video Equipment ............................... |
22 |
Watching TV ............................................................ |
22 |
Connecting with VIDEO Equipment ...................... |
24 |
Troubleshooting .......................................................... |
26 |
Specifications .............................................................. |
27 |
Dimensional Drawings ................................................ |
28 |
Dear SHARP Customer
Thank you for your purchase of the Sharp LCD product. To ensure safety and many years of trouble-free operation of your product, please read the Safety Precautions carefully before using this product.
Safety Precautions
Electricity is used to perform many useful functions, but it can also cause personal injuries and property damage if improperly handled. This product has been engineered and manufactured with the highest priority on safety. However, improper use can result in electric shock and/or fire. In order to prevent potential danger, please observe the following instructions when installing, operating and cleaning the product. To ensure your safety and prolong the service life of your LCD product, please read the following precautions carefully before using the product.
1.Read instructions—All operating instructions must be read and understood before the product is operated.
2.Keep this manual in a safe place—These safety and operating instructions must be kept in a safe place for future reference.
3.Observe warnings—All warnings on the product and in the instructions must be observed closely.
4.Follow instructions—All operating instructions must be followed.
5.Cleaning—Unplug the power cord from the AC outlet before cleaning the product. Use a damp cloth to clean the product. Do not use liquid cleaners or aerosol cleaners.
6.Attachments—Do not use attachments not recommended by the manufacturer. Use of inadequate attachments can result in accidents.
7.Water and moisture—Do not use the product near water, such as bathtub, washbasin, kitchen sink and laundry tub, swimming pool and in a wet basement.
8.Stand—Do not place the product on an unstable cart, stand, tripod or table. Placing the product on an unstable base can cause the product to fall, resulting in serious personal injuries as well as damage to the product. Use only a cart, stand, tripod, bracket or table recommended by the manufacturer or sold with the product. When mounting the product on a wall, be sure to follow the manufacturer’s instructions. Use only the mounting hardware recommended by the manufacturer.
9.When relocating the product placed on a cart, it must be moved with utmost care. Sudden stops, excessive force and uneven floor surface can cause the product to fall from the
cart.
10.Ventilation—The vents and other openings in the cabinet are designed for ventilation. Do not cover or block these vents and openings since insufficient ventilation can cause overheating and/or shorten the life of the product. Do not place the
product on a bed, sofa, rug or other similar surface, since they can block ventilation openings. This product is not designed for built-in installation; do not place the product in an enclosed place such as a bookcase or rack, unless proper ventilation is provided or the manufacturer’s instructions are followed.
US 2
11.Power source—This product must operate on a power source specified on the specification label. If you are not sure of the type of power supply used in your home, consult your dealer or local power company. For units designed to operate on batteries or another power source, refer to the operating instructions.
12.Power cord protection—The power cords must be routed properly to prevent people from stepping on them or objects from resting on them. Check the cords at the plugs and product.
13.Regarding AC adapter and power cord
a.If the AC adapter is misplaced or needs to be replaced, obtain the same type of adapter from a Sharp service center or your dealer.
b.If the product is to be used overseas, contact a Sharp service center or your dealer and obtain a power cord that complies with the applicable safety regulations of the country in which the product will be used.
14.The LCD panel used in this product is made of glass. Therefore, it can break when the product is dropped or applied with impact. Be careful not to be injured by broken glass pieces in case the LCD panel breaks.
15.Overloading—Do not overload AC outlets or extension cords. Overloading can cause fire or electric shock.
16.Entering of objects and liquids—Never insert an object into the product through vents or openings. High voltage flows in the product, and inserting an object can cause electric shock and/or short internal parts. For the same reason, do not spill water or liquid on the product.
17.Servicing—Do not attempt to service the product yourself. Removing covers can expose you to high voltage and other dangerous conditions. Request a qualified service person to perform servicing.
18.Repair—If any of the following conditions occurs, unplug the power cord from the AC outlet, and request a qualified service person to perform repairs.
a.When the power cord or plug is damaged.
b.When a liquid was spilled on the product or when objects have fallen into the product.
c.When the product has been exposed to rain or water.
d.When the product does not operate properly as described in the operating instructions.
Do not touch the controls other than those described in the operating instructions. Improper adjustment of controls not described in the instructions can cause damage, which often requires extensive adjustment work by a qualified technician.
e.When the product has been dropped or damaged.
f.When the product displays an abnormal condition. Any noticeable abnormality in the product indicates that the product needs servicing.
19.Replacement parts—In case the product needs replacement parts, make sure that the service person uses replacement parts specified by the manufacturer, or those with the same characteristics and performance as the original parts. Use of unauthorized parts can result in fire, electric shock and/or other danger.
20.Safety checks—Upon completion of service or repair work, request the service technician to perform safety checks to ensure that the product is in proper operating condition.
21.Wall or ceiling mounting—When mounting the product on a wall or ceiling, be sure to install the product according to the method recommended by the manufacturer.
22.Heat sources—Keep the product away from heat sources such as radiators, heaters, stoves and other heat-generating products (including amplifiers).
The LCD panel is a very high technology product with 921,600 thin film transistors, giving you fine picture details.
Occasionally, a few non-active pixels may appear on the screen as a fixed point of blue, green or red.
Please note that this does not affect the performance of your product.
3 US
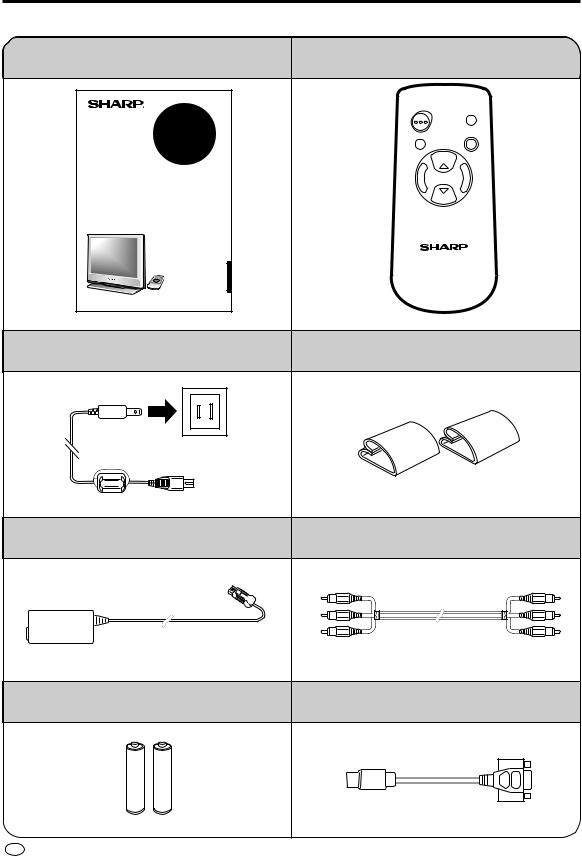
Supplied Accessories
Make sure the following accessories are provided with the product.
Operation Manual (×1)
(TINS-6901CEZZ)
LC-20VM2
LCD AV MONITOR |
|
|
MONITEUR AV À |
ENGLISH |
|
CRISTAUX LIQUIDES |
||
MONITOR AV LCD |
|
|
MONITOR AV DE TELA |
|
|
DE CRISTAL LÍQUIDO |
|
|
FRANÇAIS |
||
|
||
|
|
|
|
|
|
OPERATION MANUAL |
|
|
MODE D’EMPLOI |
ESPAÑOL |
|
MANUAL DE MANEJO |
||
MANUAL DE OPERAÇÃO |
|
|
|
|
PORTUGUÊS |
AC cord (×1) (QACCD3088CEZZ)
78-3/4"
(2m)
*Product shape varies in some countries
AC adapter (×1) (UADP-0214CEZZ)
78-3/4" (2m)
Size AAA dry battery (×2) (UBATU0026GEZZ)
Wireless Remote Control (×1)
(RRMCG1459CESA)
ON/OFF |
MUTE |
|
|
AV INPUT |
MENU |
|
|
SELECT |
|
VOL |
VOL |
– |
+ |
SELECT |
|
Cable clamp (×2) (LHLDW1028CEZZ)
AV cable (×1)
(QCNW-1335TAZZ)
59-1/16" (1.5m)
Din-D/sub RS232C cable (×1)
(QCNW-5288CEZZ)
US 4
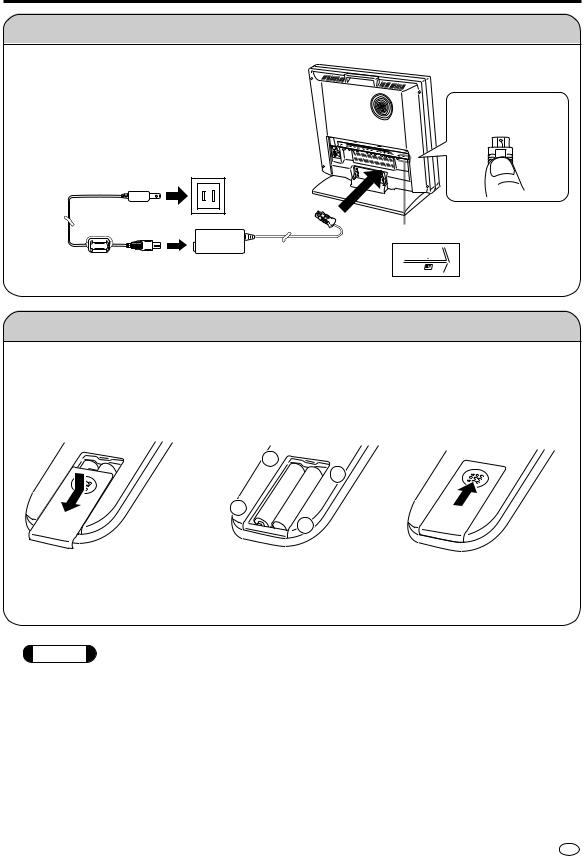
Preparation
Power Connection
Plug into AC outlet.
Household power outlet
*AC cord
AC adapter * Product shape varies in some countries
Connect to DC input terminal of the product.
Press the button before disconnecting the AC adapter from the main unit.
DC input terminal (DC13V)
POWER
INPUT
DC13V
Batteries for Remote Control
If the remote control fails to operate monitor functions, replace the batteries in the remote control.
1 Open the battery |
2 Insert batteries (two |
3 Close the battery |
|||||||||
cover. |
|
size-AAA batteries, |
cover. |
||||||||
|
|
|
supplied with prod- |
|
|||||||
|
|
|
uct). |
|
|||||||
|
|
|
|
|
|
|
|
|
|
|
|
|
|
|
|
|
|
|
|
|
|
|
|
|
|
|
|
|
|
|
|
|
|
|
|
|
|
|
|
|
|
|
|
|
|
|
|
|
|
|
|
|
|
|
|
|
|
|
|
|
|
|
|
|
|
|
|
|
|
|
|
|
|
|
|
|
|
|
|
|
|
|
|
|
|
|
|
|
|
|
|
|
|
|
|
■Slide the cover while pressing down.
■Place batteries with their terminals corresponding to the (+) and (–) indications in the battery compartment.
Caution
Cautions regarding batteries
Improper use of batteries can result in a leakage of chemicals and/or explosion. Be sure to follow the instructions below.
•Place batteries with their terminals corresponding to the (+) and (–) indications.
•Different types of batteries have different characteristics. Do not mix batteries of different types.
•Do not mix old and new batteries. Mixing old and new batteries can shorten the life of new batteries and/or cause old batteries to leak chemicals.
•Remove batteries as soon as they are non-operable.
Chemicals that leak from batteries can cause a rash. If chemical leakage is found, wipe with a cloth.
•The batteries supplied with the product may have a shorter life expectancy due to storage conditions.
•If the remote control is not used for an extended period of time, remove batteries from the remote control.
5 US
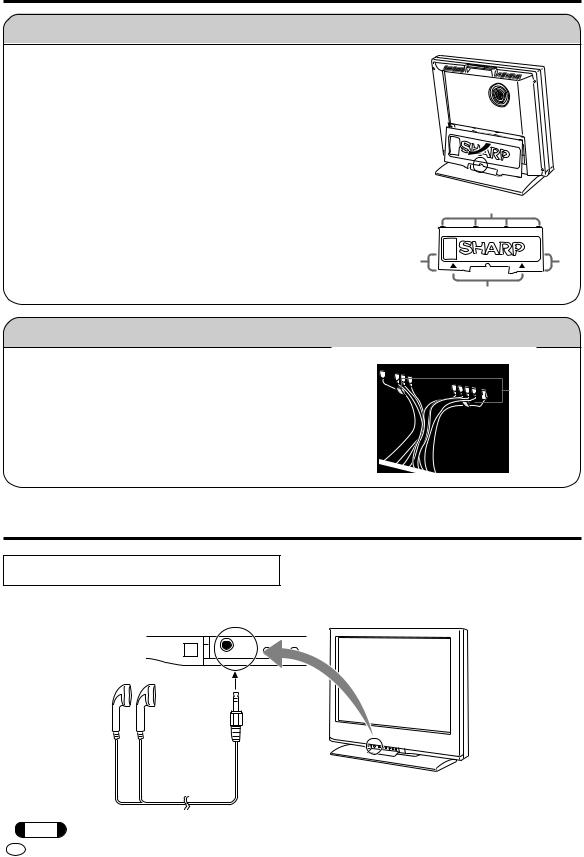
Preparation
Removing and mounting the back cover
■ Removal
• Remove the back cover when inserting the cords into the terminals.
• To remove the back cover, gently pull the part marked  forward.
|
|
|
1 |
■ Mounting |
|
|
|
• |
Insert the four hooks (1) into the cabinet. |
|
|
• |
Making the back cover bulge forward, insert the four hooks (2) into |
|
|
|
the cabinet. |
2 |
2 |
• |
Press on the marked parts (3) until the two hooks on the bottom of |
|
|
|
the cover are locked in place with a click. |
|
3 |
Clamping the connection cords
• |
When mounting the cover, clamp the cords using the included |
|
|
cord holders (cable clamps) so that they do not get caught. |
Cable Clamp |
• |
Stick the two cable clamps near the CONTROL terminal and |
|
|
the DC input terminal, then insert cables into the main unit. |
|
Example of Application
Listening with a Headphone
■ Plug the headphone mini-plug into the headphone jack located on the front side of the set.
MENU —
HEAD
PHONE
Note The headphone is not included in the supplied accessories.
US 6
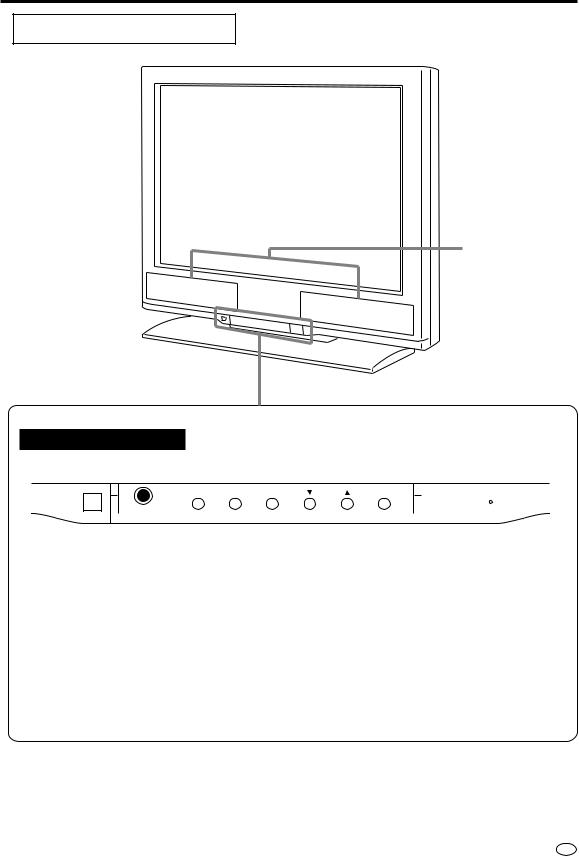
Names of Parts (Main Unit)
Main Unit (Front View)
Speakers
Front Control section
|
|
|
|
HEAD |
MENU |
− VOL + |
|
SELECT |
AV INPUT |
POWER |
POWER |
||||||||
|
|
|
|
|
|
|
|
|
|
|
|
|
|
|
|
|
|
|
|
|
|
|
|
PHONE |
|
|
|
|
|
|
|
|
|
|
|
|
|
|
|
|
|
|
|
|
|
|
|
|
|
|
|
|
|
|
|
|
|
|
|
|
|
|
|
|
|
|
|
|
|
|
|
|
|
|
|
|
|
|
|
|
|
|
|
|
|
|
|
|
|
|
|
|
|
|
|
|
|
|
|
1 |
|
2 |
3 |
4 |
|
5 |
6 |
7 |
8 |
||||||||||
1 Remote sensor window |
|
|
|
|
|
|
5 SELECT buttons |
|
|
|
|
||||||||
2 HEAD PHONE jack |
|
|
|
|
|
|
6 AV INPUT button |
|
|
|
|
||||||||
3 MENU button |
|
|
|
|
|
|
|
|
7 POWER switch |
|
|
|
|
||||||
4 VOL (+)/(–) buttons |
|
|
|
|
|
|
8 POWER indicator |
|
|
|
|
||||||||
*MENU button, VOL (+)/(–) buttons, SELECT buttons and AV INPUT button have the same function as those on the remote control.
This manual describes button functions by referring to the buttons on the remote control.
7 US

Names of Parts (Main Unit)
Main Unit (Rear View)
Rear Speaker (woofer)
Rear terminal section
|
|
NTSC / PAL / SECAM |
|
|
|
|
AV INPUT 1 |
AV INPUT 2 / AV OUT |
|
|
AUDIO |
VIDEO S-VIDEO |
AUDIO |
VIDEO |
CONTROL |
R |
L |
R |
L |
AUDIO
INPUT
RGB
INPUT (VGA60Hz)
NTSC / PAL
COMPONENT(INPUT)
VIDEO |
AUDIO |
|
Y PB(CB) PR(CR) R |
L |
|
POWER INPUT DC13V
1 |
2 |
3 |
4 |
5 6 |
7 |
8 |
9 |
0 |
q |
1 RGB input terminal |
|
|
7 AUDIO input terminal (AV INPUT 2/AV OUT) |
||||||
2 AUDIO input terminal |
|
|
8 VIDEO input terminal (AV INPUT 2/AV OUT) |
||||||
3 CONTROL terminal |
|
|
9 VIDEO input terminal (COMPONENT) |
||||||
4 AUDIO input terminal (AV INPUT 1) |
0 AUDIO input terminal (COMPONENT) |
||||||||
5 VIDEO input terminal (AV INPUT 1) |
q DC input terminal |
|
|
||||||
6 S-VIDEO input terminal (AV INPUT 1) |
* 7 and 8 can also be used as video/audio |
||||||||
output terminals
US 8
 Loading...