

Page 1
Speaker connection
s
des
e
Raccordement des enceintes
MODEL
MODELO
HT-X1
This Quick Start Guide will help you to correctly install and operate your
HOME THEATER WITH DVD
HOME THEATER CON DVD
system.
Esta guía rápida para comenzar le ayudará a instalar y operar
correctamente su sistema.
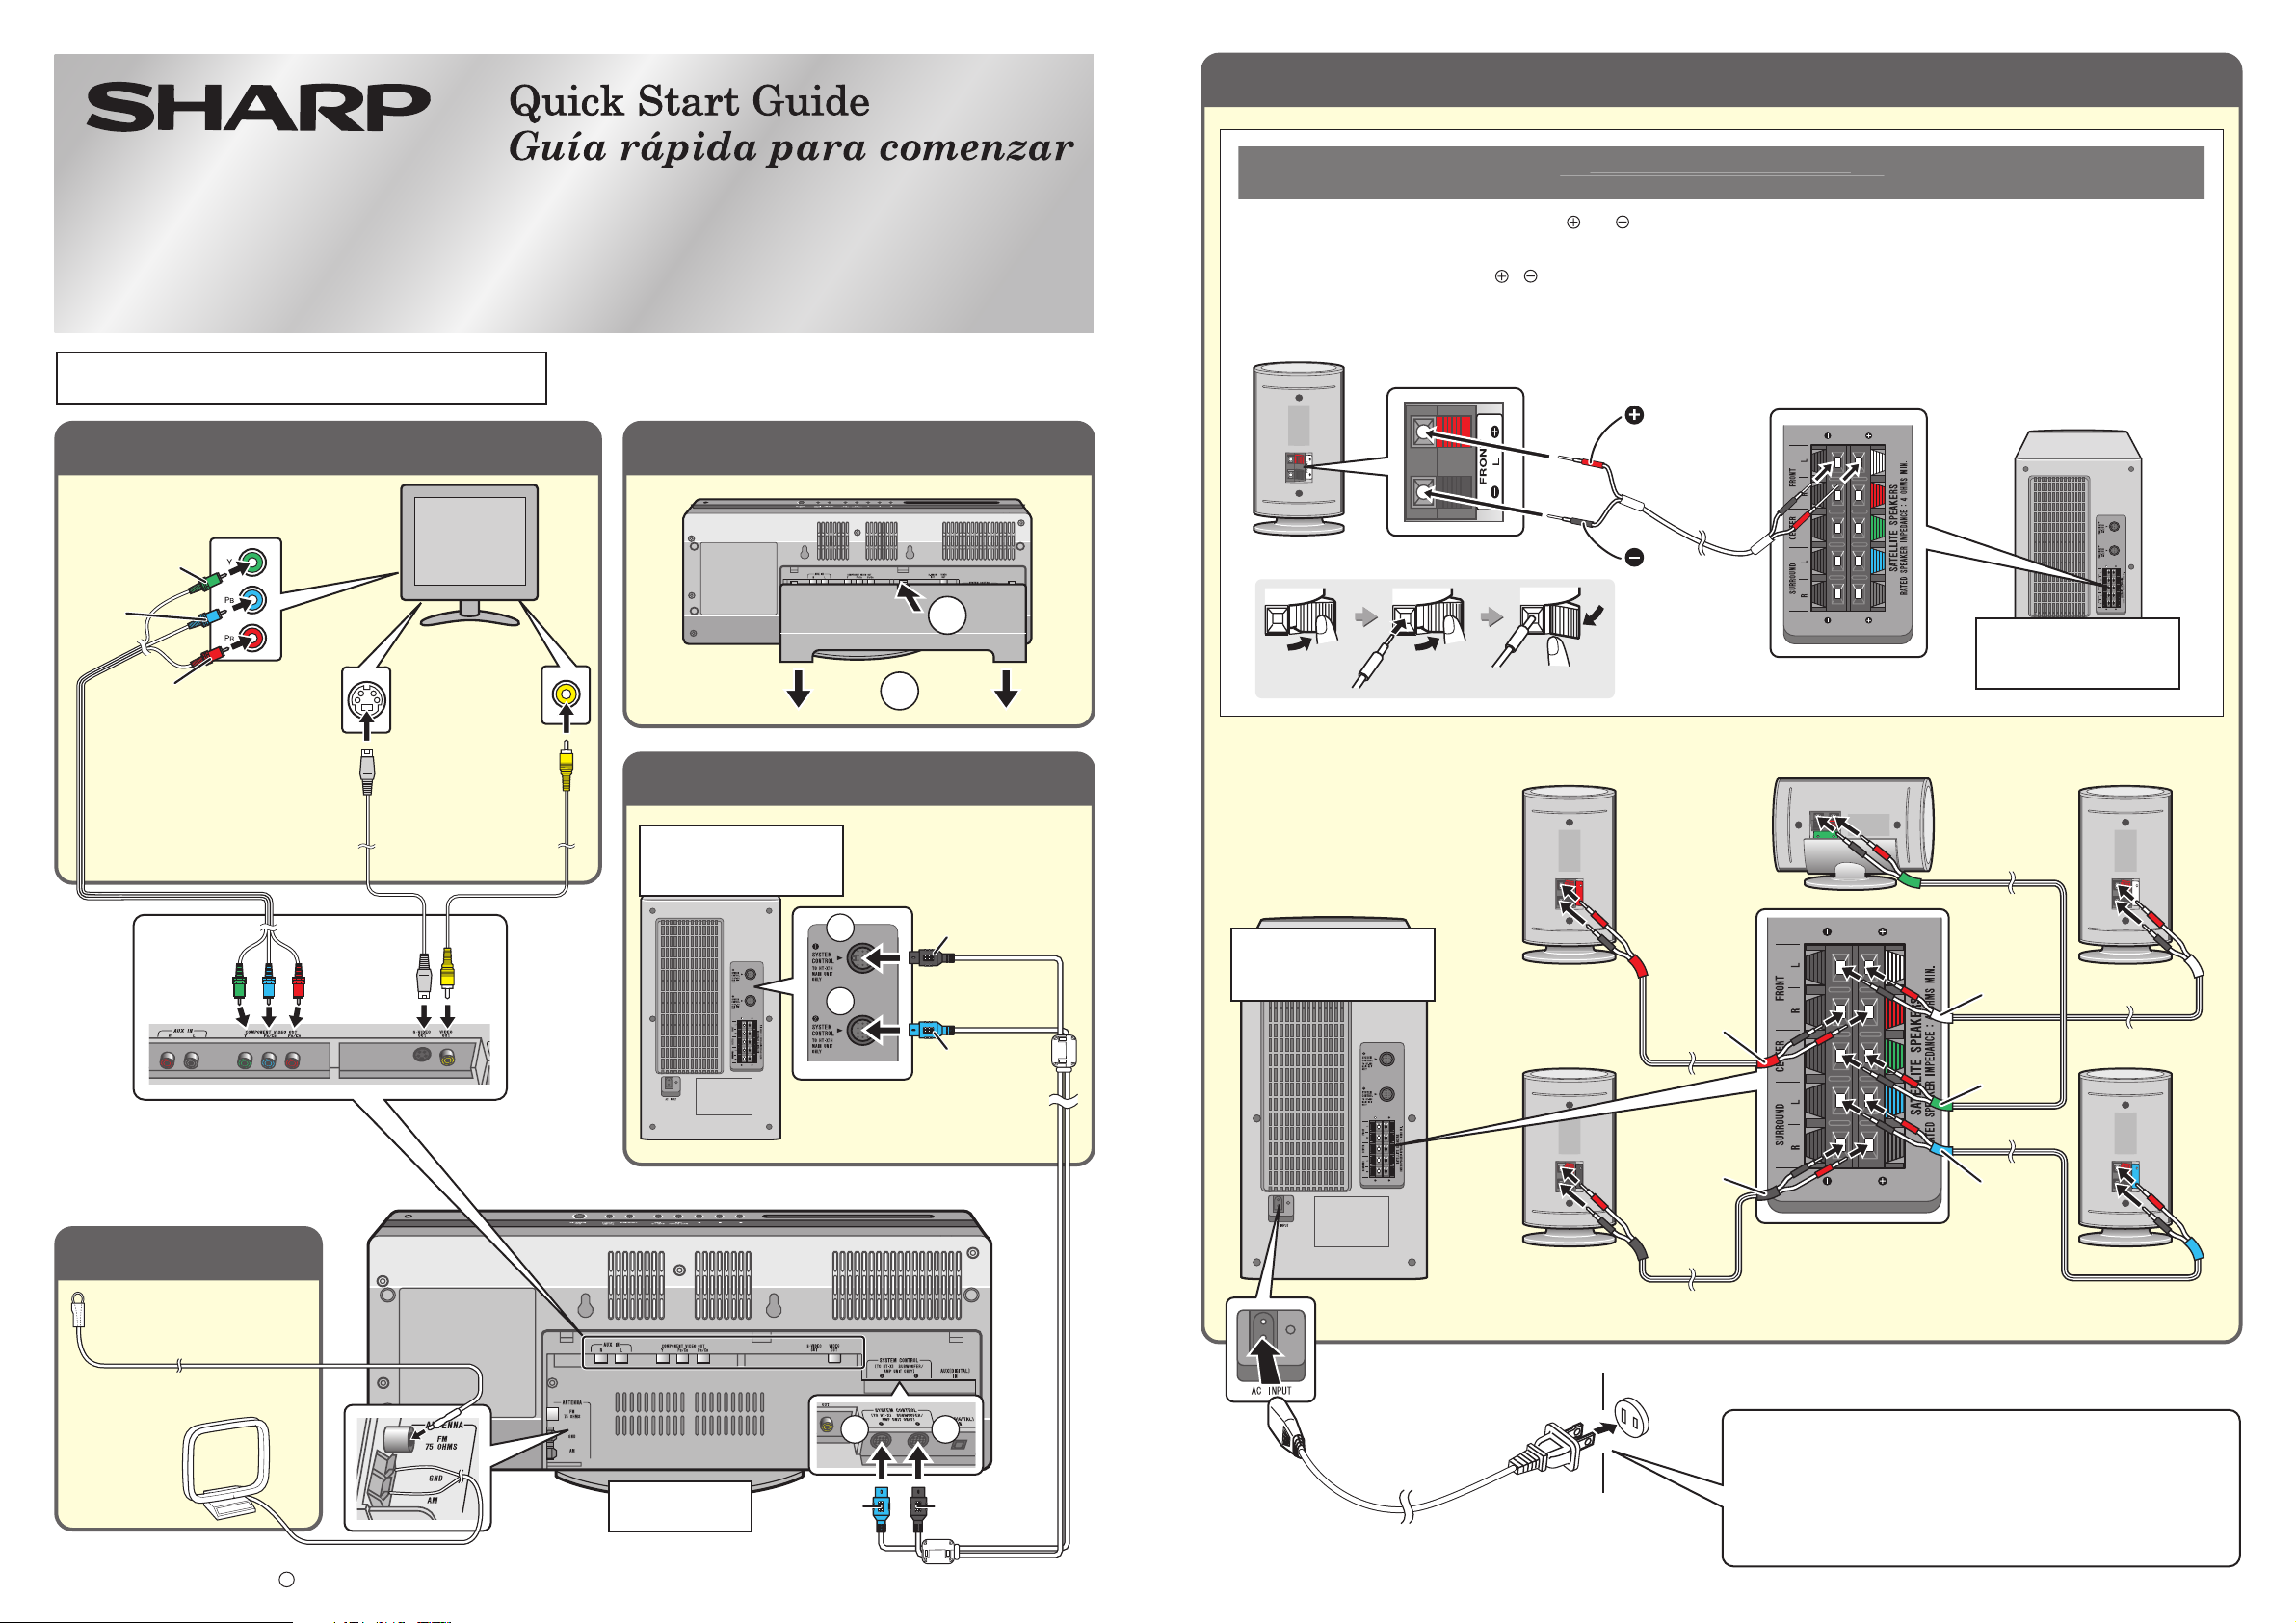
Unplug all equipment before making any connections.
Desenchufe todos los equipos antes de efectuar cualquier conexión.
TV connection
Conexión a un televisor
To component video input jacks
A las tomas de entrada de vídeo de componentes
Green
Verde
Blue
Azul
Red
Rojo
Component
video cable
(commercially
available)
Cable de vídeo
de componente
(de venta en las
tiendas del ramo)
(*)
Use a video cable, S-video cable or
component video cable to connect the
main unit to a TV.
(*)
Emplee un cable de vídeo, cable de S-vídeo
o cable de vídeo de componente para
conectar el unidad principal a un televisor.
To S-video
input jack
A la toma
de entrada
de S-vídeo
S-video cable
(commercially
available)
Cable de S-vídeo
(de venta en las
tiendas del ramo)
To video
input jack
A la toma
de entrada
de vídeo
Video cable
(supplied)
Cable de vídeo
(suministrado)
Removing the back cover of the main unit
Extracción de la cubierta posterior
1
2
System connections
Conexiones del sistema
Subwoofer/amplifier unit
Altavoz de subgraves/
amplificador
Black
1
2
Negro
Blue
Azul
Connecting speaker wire
Branchement
To prevent accidental short-circuits between and terminals, connect the speaker wires to the speakers first and then to the
subwoofer/amplifier unit.
Conecte primero los cables de altavoz a los altavoces, y luego al altavoz de subgraves/amplificador. De este modo se evitarán
cortocircuitos entre los terminales y .
Connect the wires to the speakers.
12
Conecte los cables a los altavoces.
Red
Rojo
Black
Negro
Front speaker (right)
Altavoz delantero (derecho)
Subwoofer/amplifier unit
Altavoz de subgraves/
amplificador
fils d'enceint
Red
Rojo
Gray
Gris
Connect the other end to the subwoofer/amplifier unit.
Conecte el otro extremo al altavoz de subgraves/amplificador.
Subwoofer/amplifier unit
Altavoz de subgraves/
amplificador
Center speaker
Altavoz central
Front speaker (left)
Altavoz delantero (izquierdo)
White
Blanco
Green
Verd e
Blue
Azul
Antenna connection
Conexión de las antenas
FM antenna
Antena de FM
AM loop antenna
Antena de cuadro de AM
Printed in China
Impreso en China
TINSEA051SJZZ
05A N HK 1
Main unit
Unidad principal
Blue
Azul
Surround speaker (right)
Altavoz Surround (derecho)
2
1
Black
Negro
AC outlet
(AC 120 V, 60 Hz)
Toma de corriente de CA
(120 V de CA, 60 Hz)
Do it last!
After checking all the connections have been made correctly, plug the
AC power cord to the subwoofer/amplifier unit, and then to the AC outlet.
Hágalo al final.
Después de haber comprobado que todas las conexiones se han hecho
correctamente, enchufe el cable de alimentación de CA al altavoz de
subgraves/amplificador, y luego a la toma de corriente.
Surround speaker (left)
Altavoz Surround (izquierdo)
Page 2
START
INICIO
Listening to the
Audición del
DVD sound
sonido de DVD
Turn on the TV, and switch the input to the "VIDEO 1", "VIDEO 2",
etc. accordingly.
Conecte la alimentación del televisor, y ajuste la entrada a "VIDEO
1", "VIDEO 2", etc. donde corresponda.
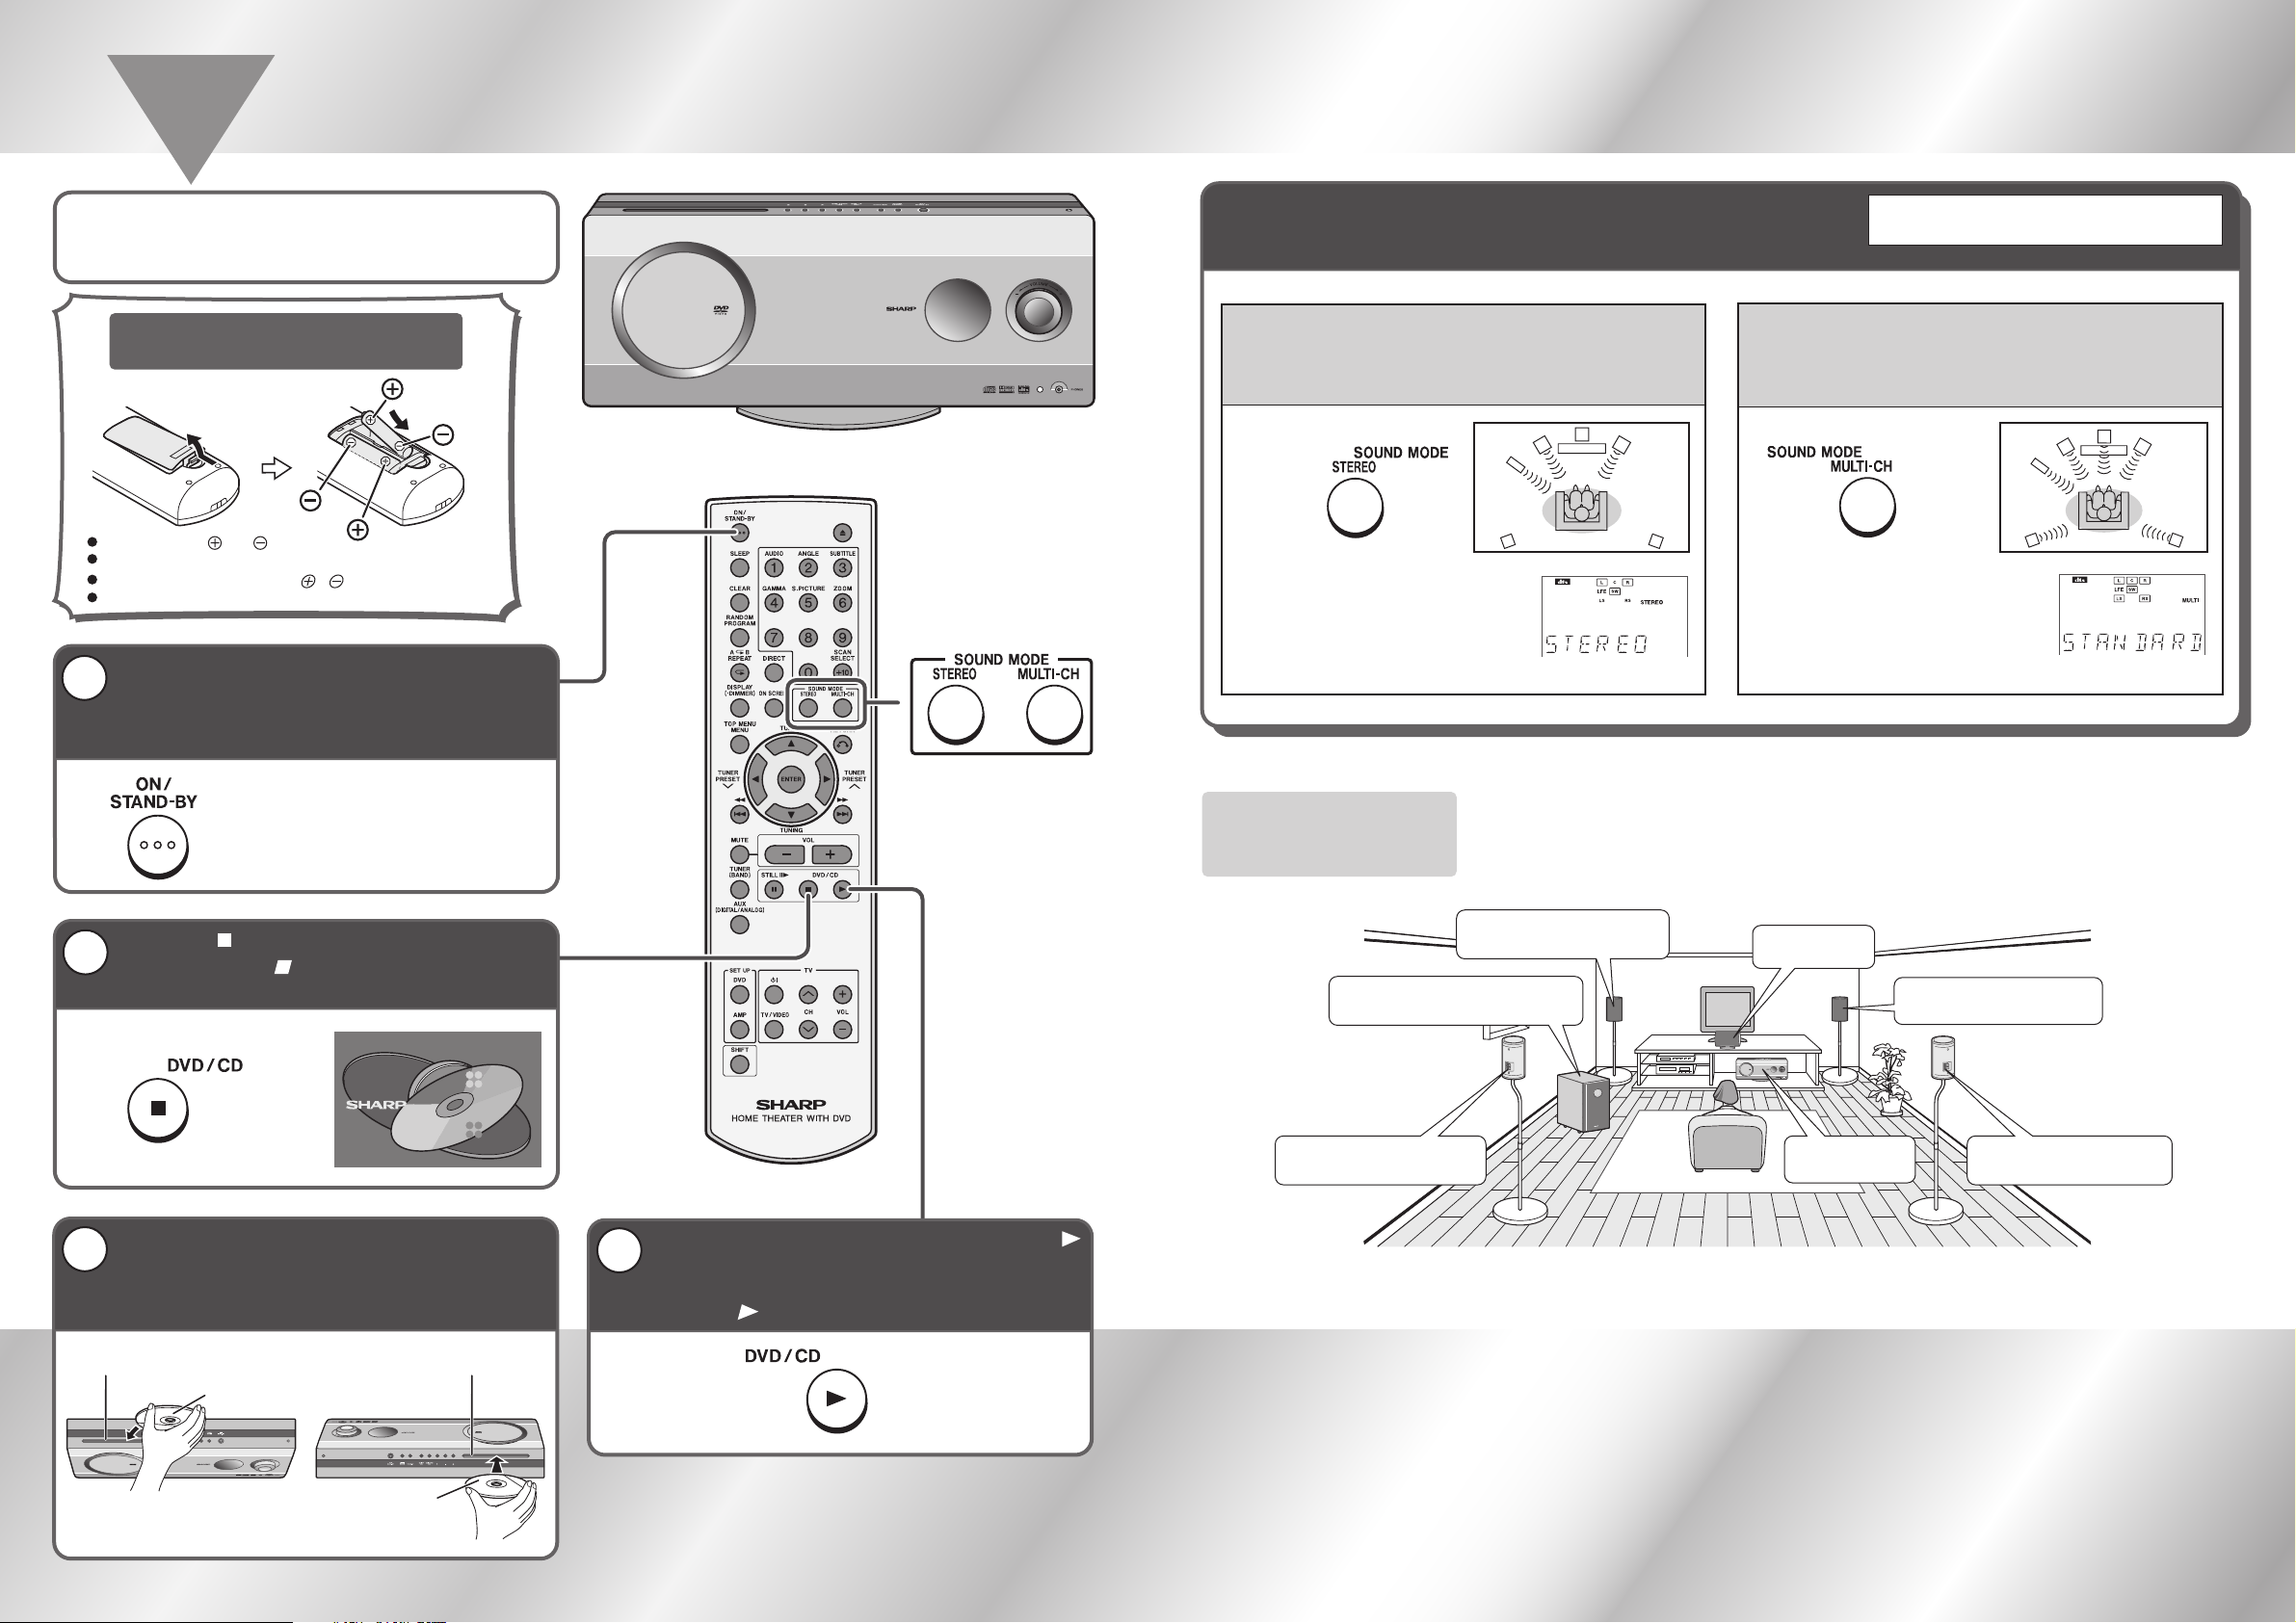
Battery installation
Instalación de las pilas
Do not mistake and .
Batteries are not included.
No confunda las polaridades y .
Las pilas no están incluidas.
Press the ON/STAND-BY button to turn the
1
power on.
Pulse el botón ON/STAND-BY para conectar la
alimentación.
Enjoying various sounds
Audición de diversos sonidos
Listening to 2 channel stereo sounds
Audición de sonido estéreo con dos canales
You can enjoy 2 channel stereo
sound.
Podrá disfrutar del sonido estéreo
de 2 canales.
Refer to the operation manual (pages 48 - 51).
Consulte el manual de manejo (páginas 48 - 51).
Listening to sounds in the multi channel mode
(5.1 ch, etc.)
Audición de sonido con el sistema de canales múltiples
(5.1 ch, etc.)
A maximum of 5.1 ch surround
sound is reproduced to provide
three-dimensional effect.
Se reproduce el máximo del sonido
5.1ch Surround para proporcionar
el efecto tridimensional.
Press the ON/STAND-BY button again to
set the system to the stand-by mode.
Pulse de nuevo el botón ON/STAND-BY
para establecer el aparato en el modo de
reserva.
Press the button to set the input to "DVD".
2
Pulse el botón para ajustar la entrada a
"DVD".
No Disc
Insert a disc into the disc insertion slot with
3
the label side toward you.
Inserte un disco en la ranura de inserción del
disco con la cara de la etiqueta hacia usted.
DVD
CD
Audio Visual
Entertainment
If playback does not start, press the DVD/CD
4
button.
Si no inicia la reproducción, pulse el botón
DVD/CD .
Installation image
(with optional accessories):
Imagen de instalación
(con los accesorios opcionales):
Subwoofer/amplifier unit
Altavoz de subgraves/amplificador
Surround speaker (left)
Altavoz Surround (izquierdo)
The best surround effect will be achieved by placing each speaker at the same distance from the
listening position.
El mejor efecto de sonido Surround se conseguirá poniendo cada uno de los altavoces a la misma
distancia de la posición de audición.
Front speaker (left)
Altavoz delantero (izquierdo)
Center speaker
Altavoz central
Main unit
Unidad principal
Front speaker (right)
Altavoz delantero (derecho)
Surround speaker (right)
Altavoz Surround (derecho)
Disc insertion slot
Ranura de inserción del disco
Label side
Cara de la etiqueta
Some discs play automatically.
Algunos discos se reproducen automáticamente.
TINSEA051SJZZ
Disc insertion slot
Ranura de inserción del disco
Label side
Cara de la etiqueta
 Loading...