

Page 1

.
..
Page 2
The Sharp FO-80 facsimile transceiver is a compact, desktop digital unit.
This manual describes the operating procedures for the FO-80. All of the fea
tures can be easily learned by following the step-by-step instructions on the
following pages.
This manual is divided into indexed sections for quick and easy access to
information.
When a problem cannot be solved using the troubleshooting procedures
described in this manual, please contact an authorized Sharp service center.
The FO-80 facsimile is capable of automatic communication with a CCITT
Group 3 (Subminute) facsimile unit.
Page 3
PART NAMES AND FUNCTIONS. . . . . . . . . . . . . . . . . . . .
4
4
4
5
6
7
INSTALLATION . . . . . . . . . . . .
1. Pre-installationNotes . . . . . . . . ..9...... =. . . . ~. ● . ==
2. Installation
DOCUMENTS
Procedures. . . . . . . . . . . . . . . . . . . . . . ● . . . . ~
FOR TRANSMISSIONORCOPYING. . . . . .
OPERATINGPROCEDURES.
1.
Transmitting. . . . *. . . . =. . . . . . . . .
Selectionof MODE .- ..., . . . . . . . . . . . . . =
2*
Selectionof Document Size . . . . . . . . . . . . . . . . . . . . . . . .
3.
4.
Selectionof Enlargement or Reduction ., . ● . . . c. . . . . . . . . . 14
Selectionof Contrast
5*
How to Receive. . . .
6.
AutomaticReception.
Manual Reception . .
7.
Copying . . . . . . . .
● . =. =. . ● ● . ● ■ . . ~~. =● . .
■ . ● ● . . . . . . . . . . . . . . . . . . .
● . . ● ., ● ., . . ● ., S
■ ~. . ● . . . . .
8
8
8
10
11
11
13
14
14
TRANSMITTERMINALRECORDING. . . . . . . . . . . . . .
How to Register
How to Set Date
How to Register
How to Register
. . . . .
and Time . . . . . . . . . . . . . . . . . . . . . . . . . . . 18
Sender TelephoneNumber. . . . . . . . . . . . . . . . . ZO
Sender Name. . . . . . . . . . . . . . . . . . . . . . . . . 22
.
■ . ● 18
Page 4
TABLE OF CONTENTS
HOW TO INSURE TRANSMITTERMINALRECORDING
3
.
24
.
●
TRANSACTIONREPORT. . . . . . .
MAINTENANCE . . . .
How to Replacethe
1.
Purchasing Recording Paper Rolls. .
2.
3*
Cleaning ., . . . . . . . . . . . . . . .
. . . . . . . . . .
Recording Paper
BEFORECALLING FORSERVICE
1. OperationalProblems . . . . . . . . .
2. Copy (luality Problems. ., . . . . . .
SPECIFICATIONS. . . . . . . m...,.
. . .
. . .
Roll
.m.
● ☛✌
.’.
.*.
,..
.,*
.
.
m
.
.
●
.
.
.
.
.
.
.
.
.
.
.
a
.
●
●
✎
.
☛
.
✎
.
✌
.
✌
.
●
.
✎
.
●
,
✎
,
‘
✎
✎
.
.
m
.
✎
●
.
.
.
✎
.
. .
●
.
✎
.
. .
●
✎
. .
.
.
✎
.
✎
.
.,
.
.
.
.
.
.
.
.
.
.
●
■
.
m
●
.
●
*
.
.
.
✎
.
.
✎
.
.
.
.
.
.
✎
.
.
✎
✎
●
.
.
✎
*
✎
■
.
25
.
.
●
26
●
✎
.
✎
■
✎
26
✎
✎
●
28
✎
☛
●
28
✎
✎
✎
29
✎
✎
✎
29
✎
✎
✎
30
✎
✎
✎
31
Page 5
1. ExternalView
FRONT VIEW
w
1
o
.
@ Open/Closebuttons
Pull both buttons towards the front
to open the compartment cover.
@ Documentcover
@ Documentscanner
@ Documentglass
@l
operation panel
(Refer to page 7.)
@ Receiveddocument exit
\
\
\
\
\
Page 6
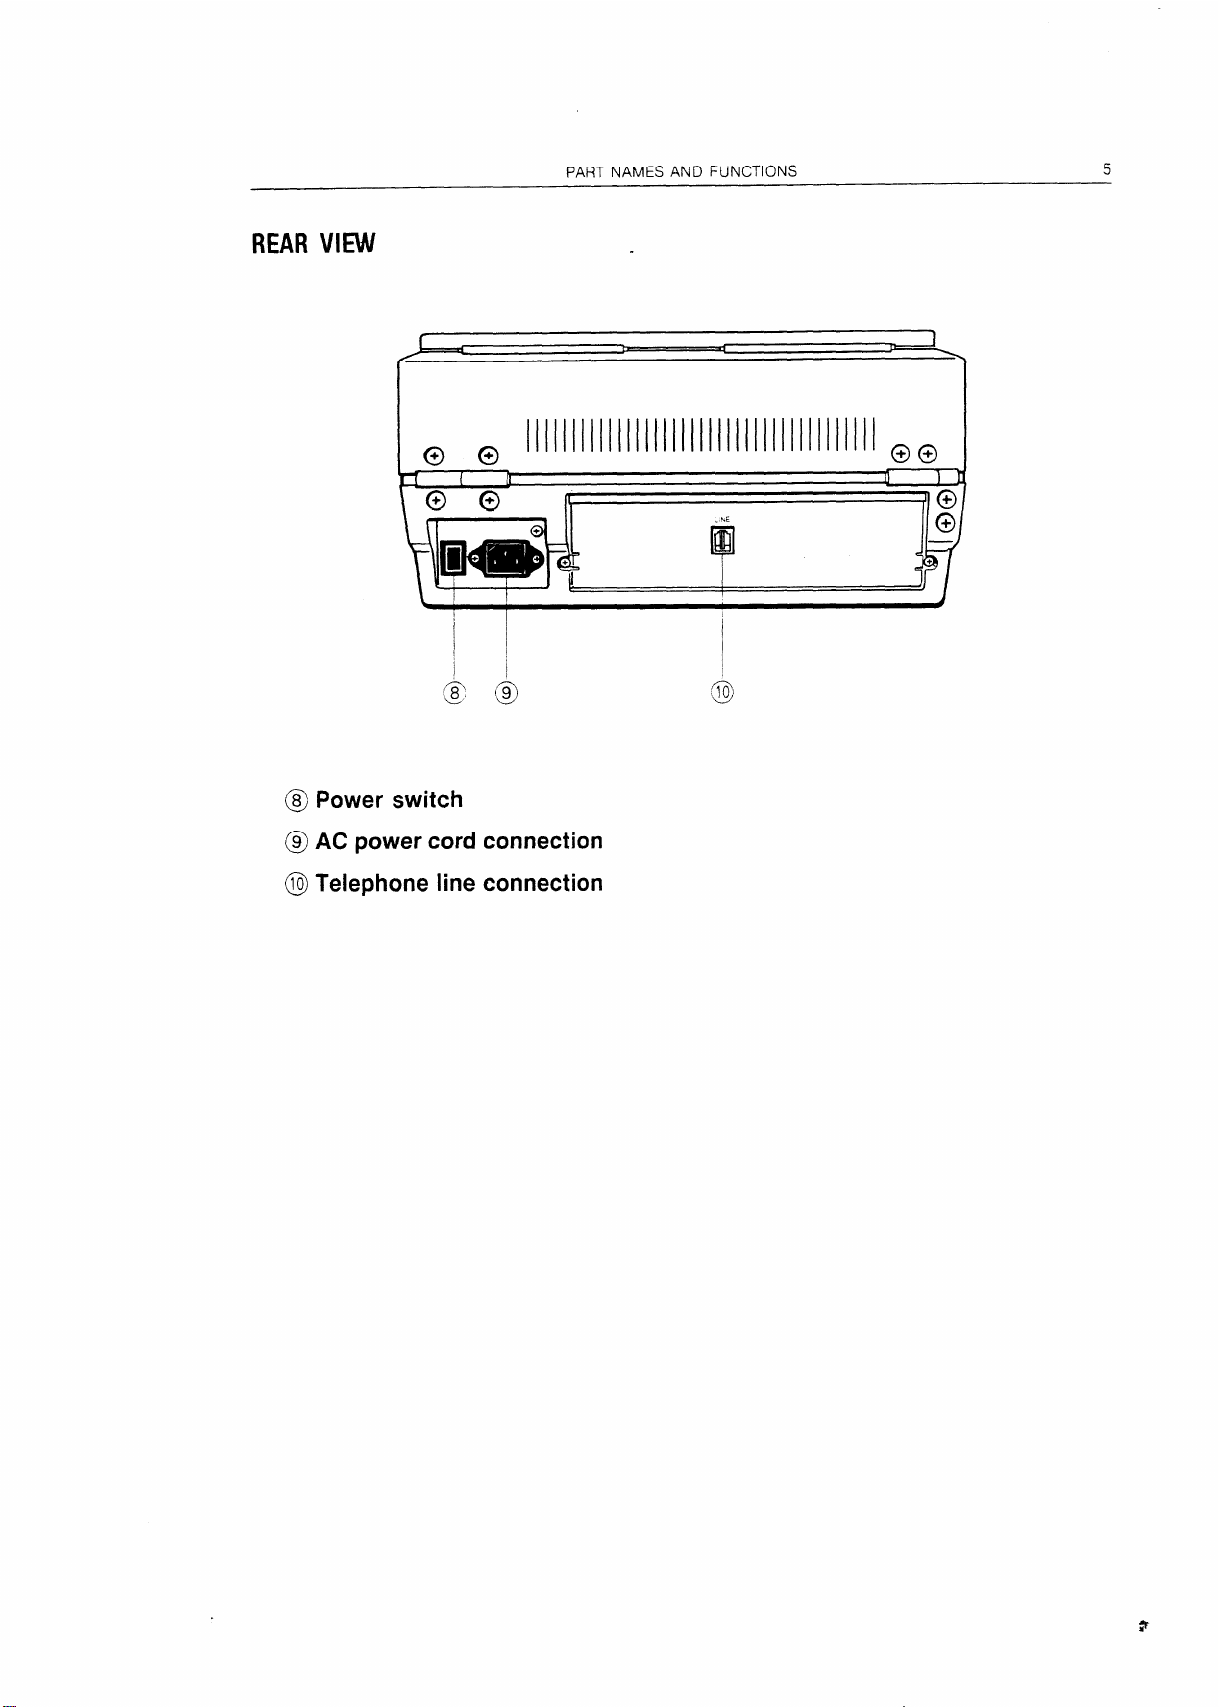
REAR VIEW
PARTNAMES AND FUNCTIONS
5
I
@ Power switch
@AC powercord connection
@ Telephone line connection
,
Page 7
6
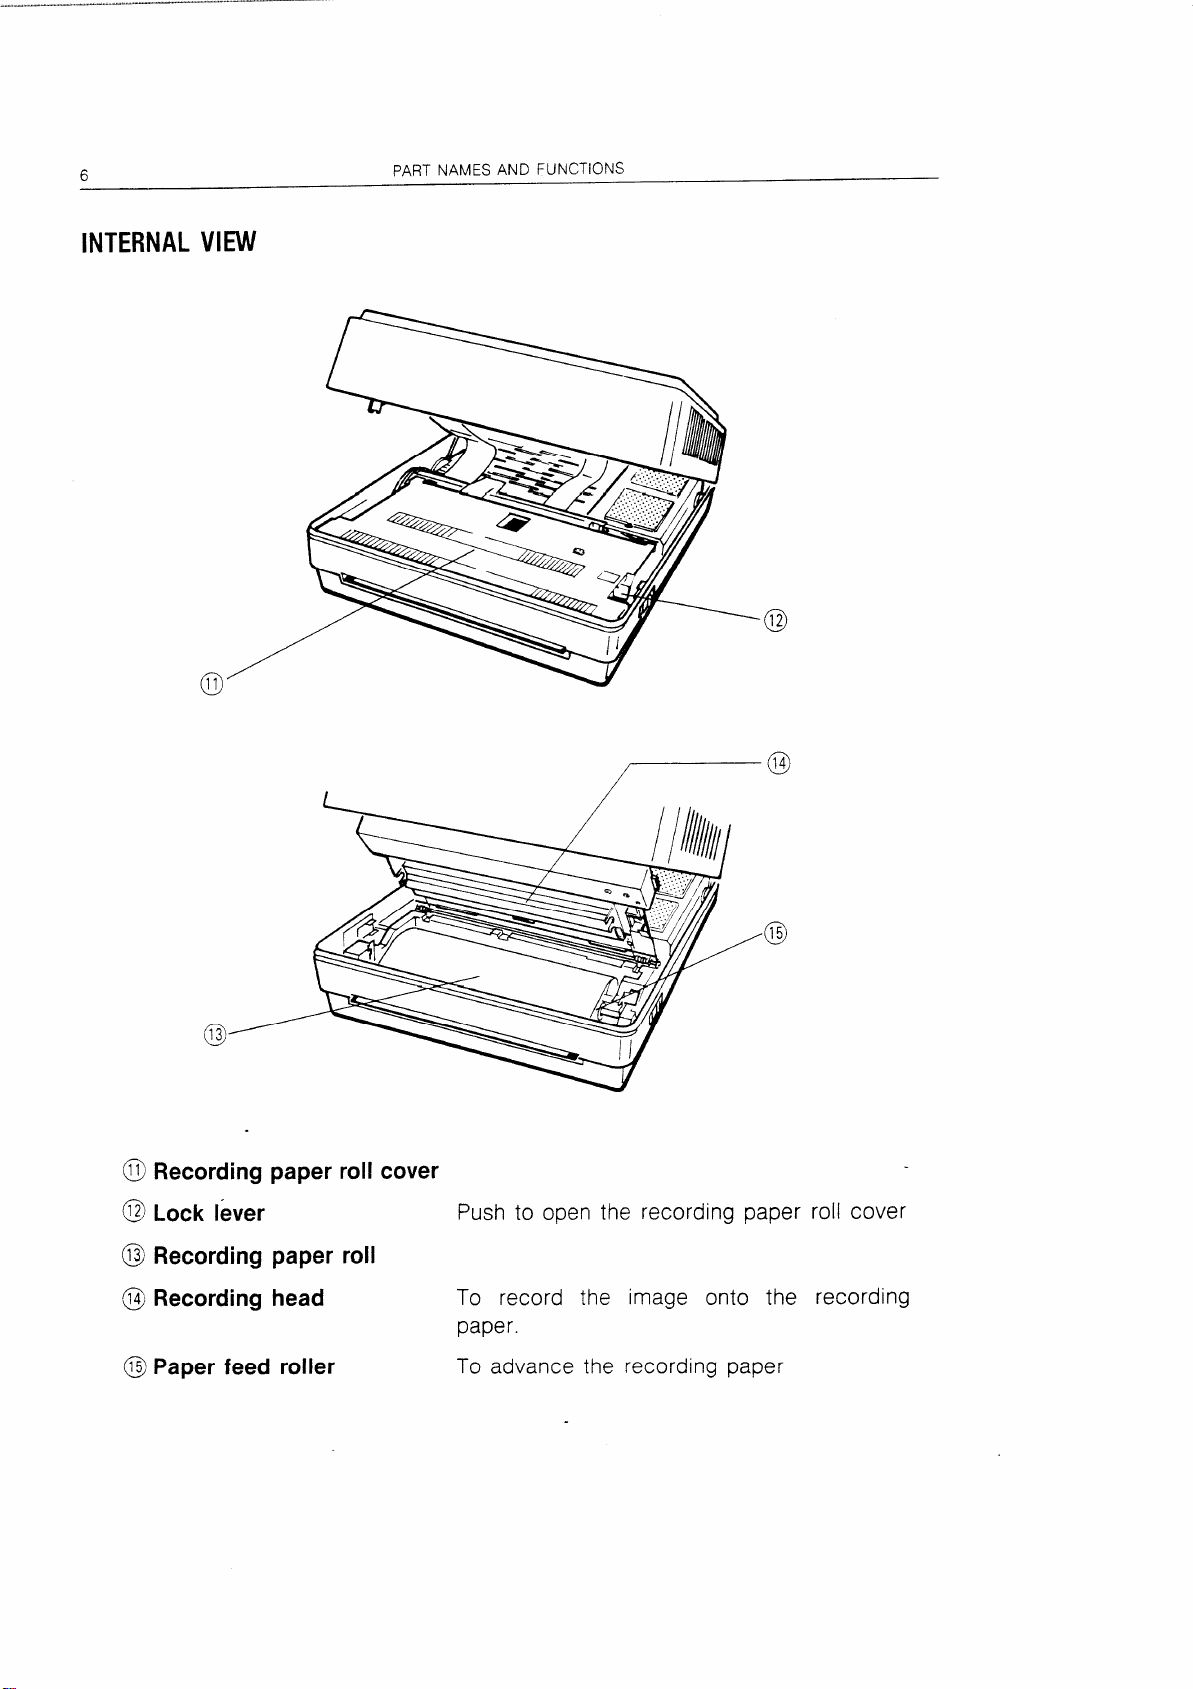
INTERNAL VIEW
11
o
PARTNAMES AND FUNCTIONS
.
@ Recordingpaper roll cover
@ Lock lever
@
Recordingpaper roll
@ Recordinghead
@ Paper feed roller
Push to open the recording paper roll cover
To record the image onto the recording
paper.
To advance the recording paper
Page 8
PARTNAMESAND FUMCTIONS
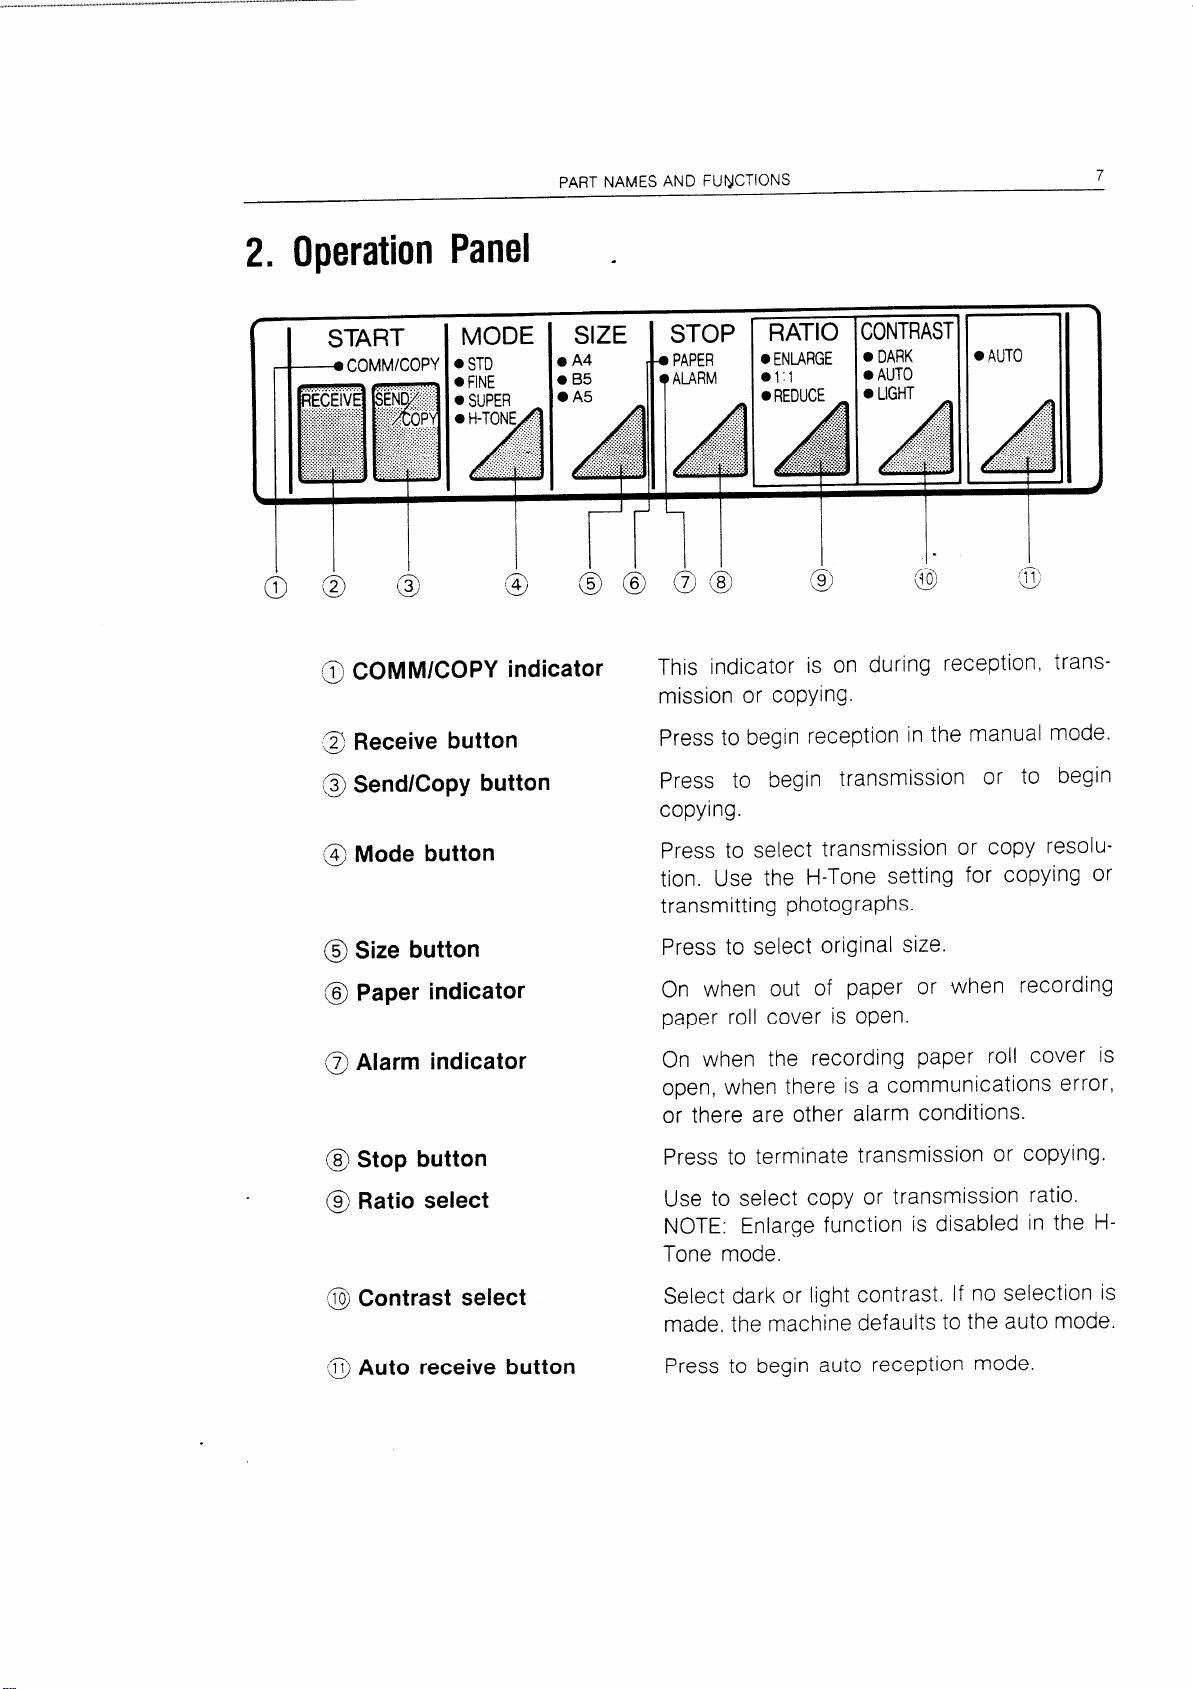
2. Operation Panel .
7
i I I
@
o
‘&
D
5
COMM/COpY indicator
Receive button
Send/Copybutton
Mode button
Size button
Paper indicator
Alarm indicator
This indicator is on during reception, trans-
mission or copying.
Press to begin reception in the manual mode.
Press to begin transmission or to begin
copying.
Press to select transmission or copy resolution. Use the H-Tone setting for copying or
transmitting photographs.
Press to select original size.
On when out of paper or when recording
paper roll cover is open.
On when the recording paper roll cover is
open, when there is a communications error,
or there are other alarm conditions.
Stop button
Ratio select
@ Contrast select
(o Auto
receive button
Press to terminate transmission or copying.
Use to select copy or transmission ratio.
NOTE: Enlarge function is disabled in the H-
Tone mode.
Select dark or light contrast. If no selection is
made, the machine defaults to the auto mode.
Press to begin auto reception mode.
Page 9
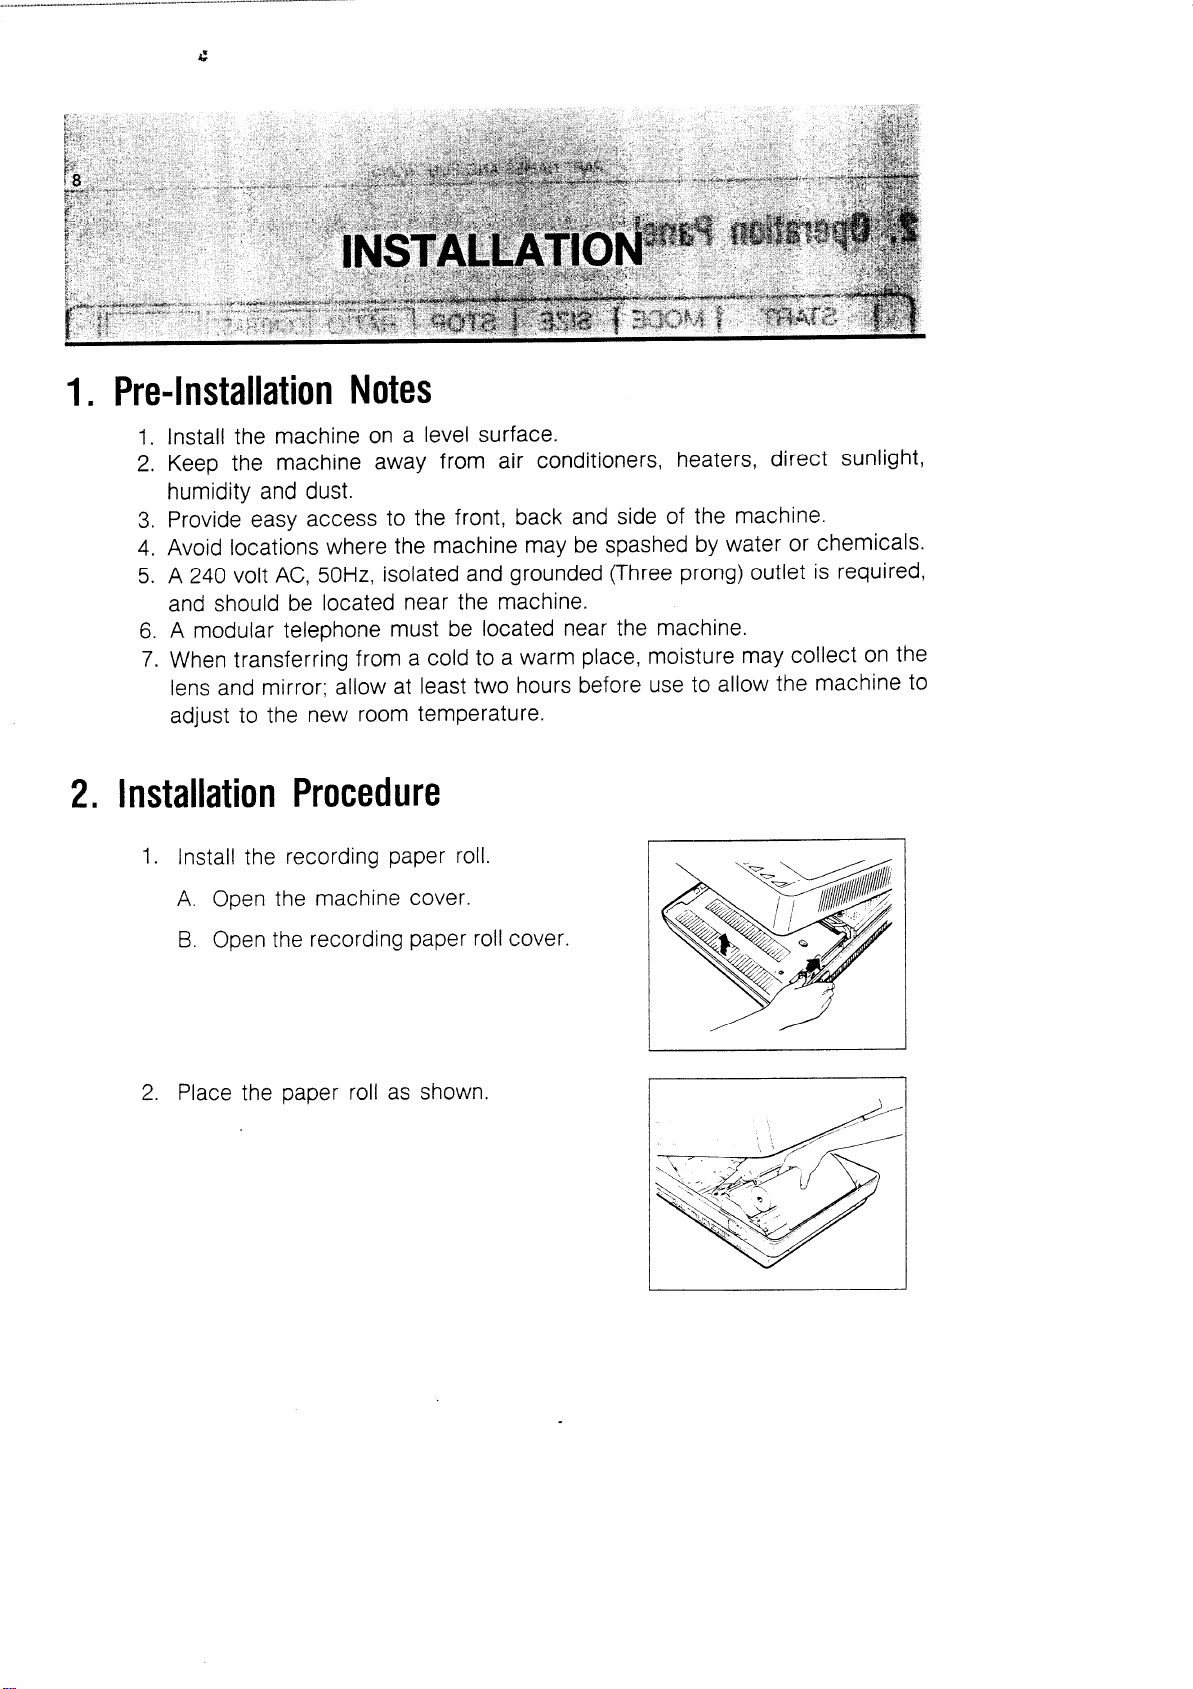
1, Pre-installationNotes
1.
Install the machine on a level surface.
2.
Keep the machine away from air conditioners, heaters, direct sunlight,
humidity and dust.
3.
Provide easy access to the front, back and side of the machine.
4.
Avoid locations where the machine may be spashed by water or chemicals.
5.
A 240 volt AC, 50Hz, isolated and grounded (Three prong) outlet is required,
and should be located near the machine.
6.
A modular telephone must be located near the machine.
7.
When transferring from a cold to a warm place, moisture may collect on the
lens and mirror; allow at least two hours before use to allow the machine to
adjust to the new room temperature.
2. InstallationProcedure
1. Install the recording paper roll.
A. Open the machine cover.
B. Open the recording paper roll cover.
2. Place the paper roll as shown.
I
I 1
Page 10
INSTALLATION
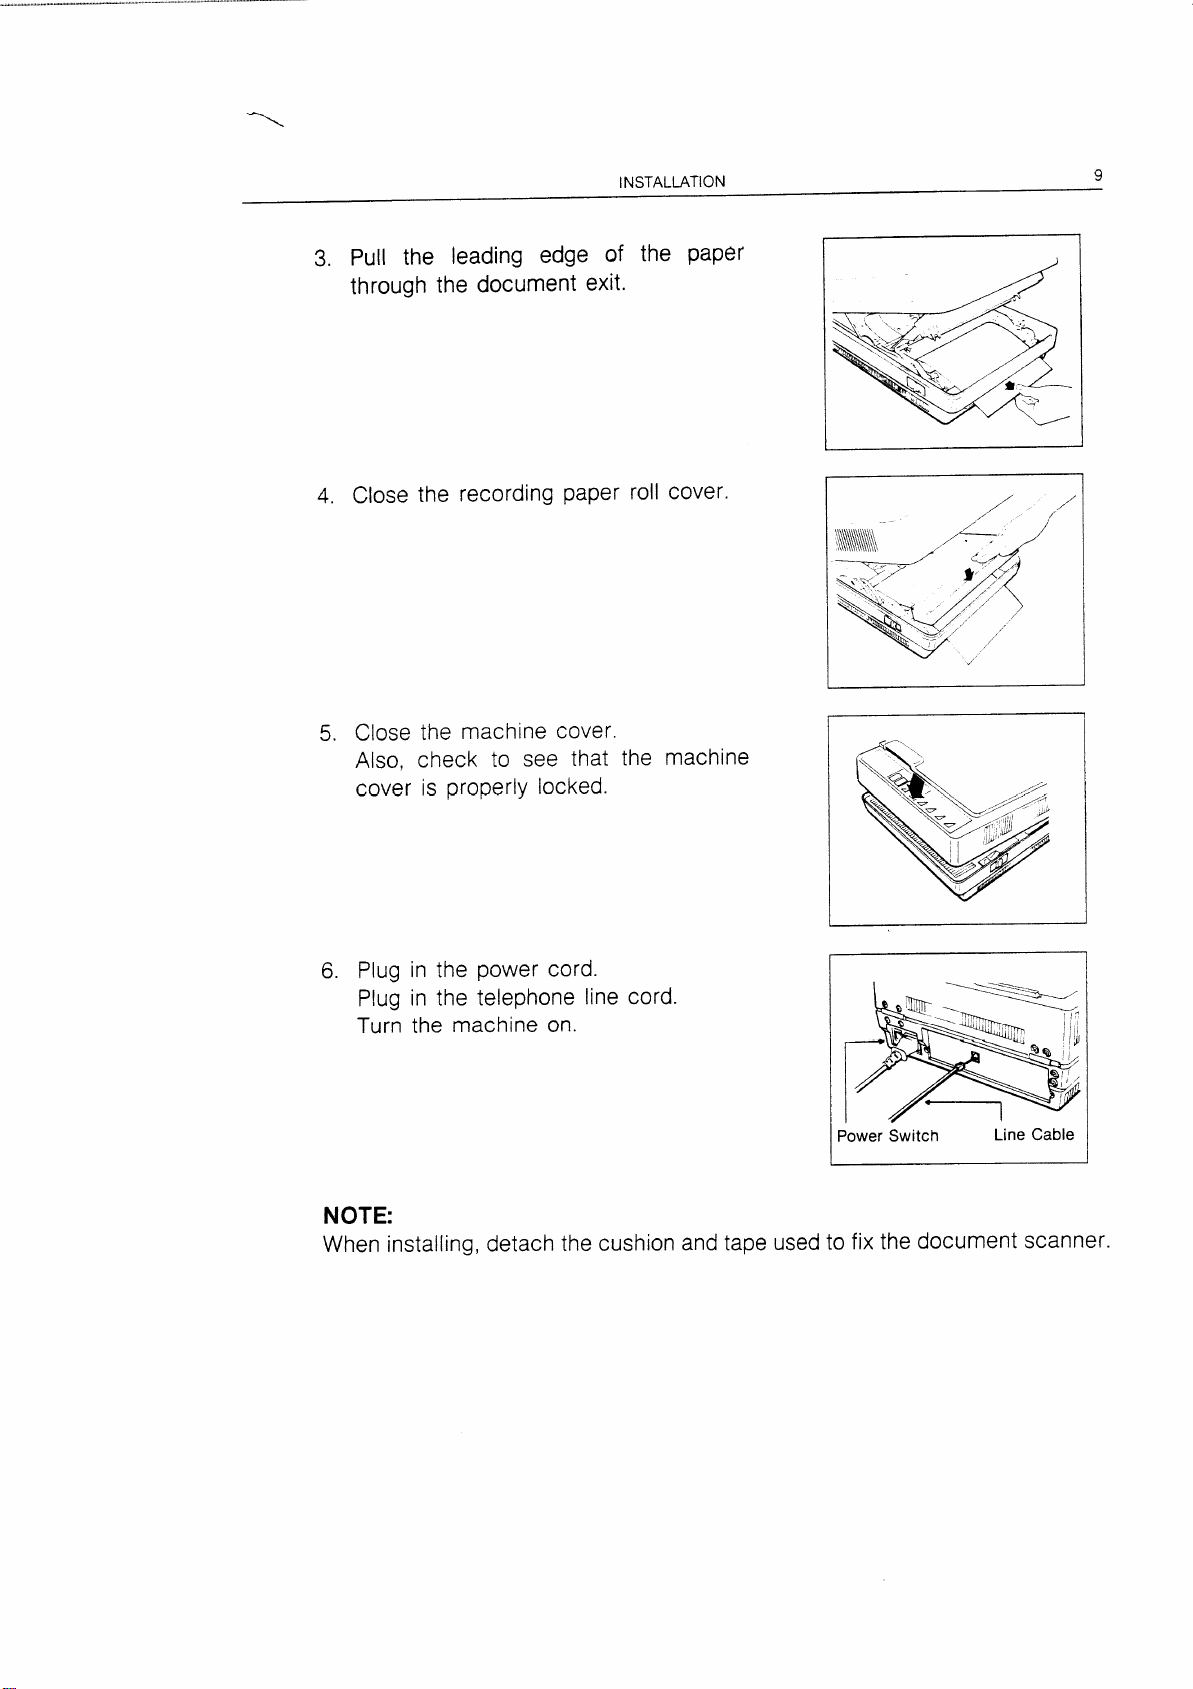
3. Pull the leading edge of the paper
through the document exit.
9
4. Close the recording paper roll cover.
5. Close the machine cover.
Also, check to see that the machine
cover is properly locked.
6. Plug in the power cord.
Plug in the telephone line cord.
Turn the machine on.
/
,
I
,/
/’
Power Switch
Line Cable
I
NOTE:
When installing, detach the cushion and tape used to fix the document scanner.
Page 11

Document Size
Documents up to 210mm x 297mm may be transmitted or copied.
Effective DocumentRead Area
The effective document read area for transmission or copying is slightly less
than 210mm
copied.
x 297mm. Information outside this area cannot be transmitted or
297mm
21Omm
Documentsize
A4 selected
—
Documentsize
selected
B5
Imm
—
+
—
,4mm
[..
-*-
.+_
.-
~
I !4mm
,
7
l–
—
A..
-,--t
4mm
Documentsize
selected
A5
R 1 I
/
/
/
/’
/’/ ,,/,,/ ,“ ‘“,4‘-
/
)
“A5
/
A4
.
,/
/f
/
/’
,/
~
/,,,,‘
NOTES:
Place a sheet of white paper over documents that have a carbon coated
to keep the document cover
Do not attempt to transmit 01
not fully dried.
‘/
—
clean.
copy docum-ents where ink, adhesives, etc.
-i-
I
,
I
L
v
v
/
r,~
~Effective read area
1
:‘1
<
,/
/
/
,,J
J
back
have
4mm
-.
-..
Page 12

1. Transmitting
,.,:,
,,:::
,,:::
.,:J&
..:.:
.:.:.
,.:
,,:
~’<
.::;
1. MAKE SURE THE POWER SWITCH IS ON.
Open the
document
corner.
An A5 size document may also be
transmitted.
2. SELECT THE DOCUMENT SIZE.
Press the [SIZE] button and select the size
of the document on the glass.
3. SELECT THE MODE.
Press [MODE] to select ‘(STD”’, “FINE”,
“SUPER” or “H-TONE” (See page 13).
document cover and place the
face down in the upper right
I
-
~
b
T I MODE I S12
IICOPY ● STD
~ND:::.:,.
k
i;; OP”’
..::::.:.:.::::.::..::.:
..:..,:,:............ . ...:.:..:::.
....... ...............
● B5
,,:,
●4~
● FINE
~~’i:
● SUPER ● A5
H-TONE,,i~
s
● A4
I
1• PAPE
●ALAR
.,::
:.:.
● A4
● B5
I
I
,...,.:
.:::...
,...:.
3E$ .dfl# &
1 A
Page 13

12
OPERATINGPROCEDURE
4. SELECT THE RATlO AND CONTRAST.
Press the [RATIO] button to select
‘(ENLARGE” or “REDUCE”.
Press the [CONTRAST] button to select
RATIO
●ENLARGE
● 1:1 .
● REDUCE
CONTRAST
1
“DARK” or “LIGHT”, depending on the
contrast of the document.
If “H-TONE” is selected using the [MODE]
.-
button, the “ENLARGE” function is
disabled.
Pick up the handset and dial the receiving
machine.
5. WHEN A BEEP IS HEARD, PRESS THE [SEND/COPY] BUTTON.
Place the handset back on the handset
holder.
When the remote unit is set to the manual
receive mode, only the handset line is con-
nected. Ask the remote unit operator to
press [SEND/COPY] to begin facsimile
communication. Press [SEND/COPY] when
you hear the tones from the remote
machine.
START
●COMMICC)PY
......... .........................
REGE!Y... ;Eg”’”%q
..................
............................ ......
............ ..................... ...........
..................
:.:,:.:,:.:,:,:.:.:.::::::::::::,:
..............,, .,., ............ . .......
:.:.:.:.:.:,:.,.,.,...,.....,.....
.................. ::::::::::::::;:::::::::::::::,:;::
..................... .
...................... ............ :.:::::::::::::::::::::::;:::::::
,.,.,,...,,........
...... ............................
.................
.,.,...,.......,.....,..:.:...:.:..:...,.,.,:,....,.......,..,,,,,,.
::::::::::::::.:::::::.:.:.:.:.;.:
...... ................
......... ...
......... .............
....
........
....................
.....:.:<.:.:.:.:...,.,.,........
............,,,...,
......... .........................
................
u~,
● DARK
● AUTO
● LIGHT
.
I
b
●s
::::::::....:
%
..::.:.:.:.::::.:.:.:.:.:.,:.:.:.:
@!’n: @j
:: ,
●H
4
*Transmissionof more than one page
Press [SEND/COPY] during the transmission of the first page. “Comm/Copy”
will begin flashing.
At the end of transmission of the page, an alarm (intermittent beep) will sound
for fifteen (15) seconds. Place the next page on the glass during this 15 second
interval and press [SEND/COPY] again. The alarm will stop and transmission of
the next page will begin. Repeat this for each additional page to be sent.
I ~
START
●COMM/COPY
........... .......................
RECEIV
......... ........... :EN!2$f
..,.,.,,..,...,,..:...:.,.:.,.:.:..:::::::::::..
. ...............................
........ .......................
....... .........................
.:.:.:.:.:.:.:.:.:.:.:..... .....
...... ...............
............ ......................
............ ................
. ............................:.:,,
........ ......................
Un
3!
:.::::::..,,::
:::.:.:..:.:.:..........:.:.:,:.:.
:::::;:;::::::::::;:::::::::::::::
..:....:.:.:.:.:.:.....,:.:.:.:.:.
....... ......................
$: ~“”$:
A
...:.:
J
I L
I
!
1 I
An error alarm sounds when [SEND/COPY] is not pressed within this 15
seconds.
I
START
●COMM/COPY
. .
Page 14

OPERATINGPROCEDURE
13
6. TERMINATION OF TRANSMISSION.
.
A termination alarm sounds for three (3)
seconds.
2. Selectionof MODE
For transmitting or copying, press the
[MODE] button to select a mode according
to the type and quality of the document.
STD = Standard
FINE = Fine
SUPER =
H-TONE = Half-Tone
Super Fine
$
“Y -5,
“ START
rA’<
●COMM/COPY
T i MODE I SIZ ]
.,..,:.:,
,.::::.:;:.,:.::
,,:.::::,:.::::.
..::::::..::::..:
● A4
● B5 ;
●A5 /
,.,
..,...,.
,,:.,
.,:...,.,
.::;.::’:...:
,,::..:
IICOPY
.ND~;~ :;;;ER
l:; .Op::
k
:.:.:.,..:.:.:.:.::::::::
.,’.:.:.:......:.:.,...,.,
::::.::::::::::.:::::::::.
:.::::.::::::::::::::::::
............ .............
....:......:.:.::.:.:.:.:
::::.::::::,:.:....:.:.:.
......... ...............
........... ...........
.;::::,:;::::::::::::::::.:,.:.:.,:,,::,:::
1 A ;
●STD
●H-TONE,,6
....:,...:,....,
..:.,.:......:..:;:,,::,...:
..i”Q :?
~ L
~
STANDARD, FINE AND SUPER FINE
Select “STD” for documents that contain ordinary printings and drawings.
Select “FINE” for documents that contain fine print or small characters. and
select “SUPER” for documents that contain complicated drawings and small
text characters. If the remote unit does not have the Super Fine function, the
machine will automatically change to the fine mode.
The standard mode is used if no selection is made.
HALF-TONE
Select this mode of transmission for documents that have a high contrast (For
example; Photographs and drawings that have a gradation of tone). Half-tone
transmission takes many times longer than other modes.
Page 15

14
..::.:.
..::::
.:.,...
,......:.:..,..
OPERATINGPROCEDURE
3. Selectionof Document Size
Press the [SIZE] button to select B5 or A5,
depending on the size of the document to
be sent or copied.
If no selection is made, the size is automati-
cally set to A4.
i )DE
~.
i ~NE,,.~
...,:.:.,...,.
......... ..
...:..::.::::.:
....:,....:,:.:::.:
......... ............
........ .................
....:....:.::....:..::..,:
.......... .......
.:.:.::.:.:.:...:......:.
..........,..:.,.....
:..,.. .........
‘a ~
Selectionof Enlargementor Reduction
Press the [RATIO] button to select enlargement or reduction of the transmitted or
copied document. When the
lamp is on, the multiplication factor is 1.41
(A5 to A4). When the “REDUCE” lamp
on, the multiplication factor is 0.70 (A4 to
A5).
If no selection is made, the document is
transmitted or copied the same size (1:1).
“ENLARGE”
is
SIZE
● A4
● B5
● A5
............ ....
.&:$n:g
,.:.:..
...... .
RATlO
● ENLARGE
●1:1
●REDUCE ,. ● LIGHT
.&fn#j
~lz
ST(
● PAPEf
●ALAR!
,.,;;
..::.:::.::.,:;
,,:::,::
,.,.,:.:.
.,.,..
,.:.:
..::::::.
,.:.:.:.::::
,.:.:.:.::::.
,.::::::::::::::.::
L
CONTF
● DARK
● AUTO
..::;
,.-.:
...
...........
..............
n
“ENLARGE” cannot be selected in the “H-TONE” mode.
When “ENLARGE” is selected, the effective read area is
Selectionof Contrast
Select “DARK” for low contrast documents. Select “LIGHT” for high contrast
documents. When “AUTO” is selected, the
machine will automatically adjust the
centrast.
If no selection is made, the machine will
transmit or copy in the “AUTO” mode.
148mm wide.
~lo ICONTRAST]~
\RGE
al”allz
● DARK
● AUTO
I
..:.:.:.::.:.:
,.:.:.:.:.::.:
.,~~~”g: ““
● AUT(
II
,.:.:
,.:.::::
,.:.:::::::::
.......
..........
....
,.:::,:;:,::
,.:.:.::::.:
..:.::::::.:.:.
....... .............::;::.
........ ............
Page 16

OPERATINGPROCEDURE
...:
,.:.:.:
,.::
.,:,
,...,.,,
,.:.
15
6. How to Receive
AUTOMATIC RECEPTION (Without an attendant)
Turn the power switch on and press the
[AUTO] button so that the “AUTO” lamp is
on.
MANUAL RECEPTION
The handset may be used like an ordinary
mode is selected.
1. When the “AUTO” lamp is off, the
machine is in the manual receive mode.
If the “AUTO” lamp is on, press the
[AUTO] button and turn it off.
.
telephone when the manual reception
——
rRASTlI
IK
o
{T
....:.:.::::::.:.:.:::::
.:.::::::::...:.:.::::,:.:fl,.,.:.
........ .............
.:...,:,:.:!:..:.,:,:....
:...:....,:.:...,....:.:
,.::::..:::.:.:..<.:.:.,..
dll~
‘RAST
(
)
T
..:.:.:.:.::::::.:
......:.:.:.:..:.:.:.
..:.:.:-.......:.,,....
...... ..........
.:.:.::::.:.:.:.:.::::.:
:.:::::::::::::::::.:.:.
;:;:,;::;:::;::<:;:;::::,
~
J
;+<AuTO
,.::::
.,::::..::
,.:.:::::.::, ,,::::;:;:;:;:
..:’:::::..::::::
,.:.:.:.::::::,:.:, ..:.:.::::::::.:.:.
BAUTO
,.:.:
.,::;:;:;:
,.:.:.:.:.:::
..:.:.:.:.:.::..
,,4;fn”’cg$
,.:,:
,.,:...,.
........... .....
..::;:;:;:;:;::::::::::;:
,,&,n’:;$
::.::::
—
,.:
,.:.,,.:
J,
2. Remove the handset from the handset
holder when the bell rings.
Talk over the handset.
If the remote unit is an auto-dial
machine, beeps are heard from the
handset.
3. Press the [RECEIVE] button.
Place the handset back in its holder.
Reception starts.
START
●CotvtM/COFIY●S
...........,.,.,.,,,.,....,............ ........
RECEIV
::....::”.’:”::.:::.:::.”....,.:..,
::......::..:,..:...:.:.::.:.::::.’
...’..~!::!:!::.:!.:::.
,..:
...,.:,.:,:,:..:.:..:. ,:..,..::....:: ::...
:::;.:,...,,.,.,.,.,.,.,:,:.,.:,,.:,::.: .,:.,:,.
..,..:..”::::”.”:”:”:”:::
.:,.
.... ..........
.:::...,.
jj, ~“’”:::; ;,;,,;,;:.(,:
......
go
...... .....
......
.,...
::::.:,:..:.:.:.
END~;;;;; ::
.:.,...,...,.....::,
k
,,:,,::;,,OP,
..: ,.:..,,
b
●t-
(
Page 17

16
4. Termination of reception.
A termination alarm sounds for three (3)
seconds. To tear off the copy, pull the
page up from one edge as shown.
7. Copying
1. Place the page to be copied face down
on the glass.
against the upper right corner as
shown.
A5 pages are read lengthwise, except in
the enlarge mode.
OPERATINGPROCEDURE
Position the page is
I
2. Press the
page size (either A4, B5, or A5).
3. Press the [MODE] button to select standard, fine, super fine or half-tone mode,
depending on the contrast of the page
to be copied.
[SIZE]button and select the
SIZE
● A4
● B5
● A5
MODE
● STD
● FINE
● SUPER
● H-TONE..<
,.:.::.:.:.::.:,:.
,.,.:.::::.:.:.::.:.:.:
..........::~:::::::,.
.....
,,:,&Q$:::::::
A
n
ST(
PAPEI
E
●ALARI
.....
.,:,:,.
..:::::::;.
,.:.:.:.::::,:
,,:::::::::::.:.:.
L
Slz
● A4
c B5
● A5
.,::::.::,:::::
..::::::.::::::
,.:.:.:
...:
..... ..
..:::::::::
,.::::::;:;;;:;;
......... .........
L
.
Page 18

-Y
,d+:yj
.&+n
..::
..:
OPERATINGPROCED
4. Press the [RATIO] button to select
enlargement or reduction” of the page.
Press ICONTRAS~ to select light or
dark according to the contrast of the
page.
5. Press the [SEND/COPY] button.
Copying more than one page
JRE
17
RATlO
●ENLARGE
●1:1
●REDUCE
~
n4=
CONTRAST
● DARK
● AUTO
● LIGHT
..::;:
..:::::;:;
.......... .
..;:;:;;;;;;:;:;:: ,.:.:::.:.::::::.
START
●COMM/COPY
,.;;:;
...:.::::::
...:.:.:.,..:
......... ..........
............ .........
~
—
The settings of [MODE], [SIZE
minutes after the end of copying. Place another page and press [SEND/COPY]
within these three minutes to continue copying.
6. Termination of copying
A termination alarm sounds for three
seconds.
, [RATIO]and [CONTRAST]are retained for three
Page 19

..
The transmission date and time and name of the sender are printed out on the
reception side, informing the receiver of the sender’s details.
15-
JUL =87 WED 12 : 34 s w m R P s O - e a
THE SLEREXECOMPANYLIMITED
SA?ORS LANE . DOOLE . DORSET . BH 2S J ER
How to Register
The contents of transmit terminal registration are printed out automatically at
the termination of registration. A recording paper roll must be set in the machine
in advance.
HOW TO SET DATE AND TIME
I. press [RECEIVE] and [MODE]
simultaneously.
The three lamps of ICONTRASTl lights,
indicating the machine is ready for
registration of the transmit terminal.
mARP TUT CHART So. i
- - (WS 13) 51617 . n!l.u IZ.U56
-.el
START
●COMM/COPY ●STD
MODE
I
2. Press ICONTRAS~ until only “DARK”
lights
● Repeat pressing ICONTRASTl until
only “DARK” lights. The three lamps
light in the sequence of “DARK”,
“AUTO” and “LIGHT”.
I
~ Tlo lcONTRASTll
~ \RGE
I
.
● DARK
● AUTO
I
II
I
I
●AIJTI
Page 20

.
.
TRANSMITTERMINAL RECORDING
3. Press [SEND/COp’f]
The “DARK” lamp start: flashing and
registration begins.
● 11 digits are registered in the order of
day of the month, month, year, day of
the week, hours and minutes.
START
●COMM/COPY
............. ...........
~cElv,,, .END;:j:j
...... .......
.:.:.:,:.:.:.:.:.::.:.::.
.:.:.:.:.:.:...:.:.:.,...,
........ ....................
:::.:.::.:.:...:.:.:.:::.
::::::::::::::.;:::;:::;:::.
........ ................
.:.:.:.:.:.:.:.:.:......:.:.
.:.:.:.:.:.:.:.:.:.:.:..:.:
,.,.....,.,.,.,.,..:.:,:.,,.
.
...:.:.:.:.:.:.:.:.:..:.:.:
,,,,j,$,j,$;;;::~;”’*’”’;:::
..:.:.:.:.:.::::::::.::::::.,,
IQ
Example:
15 July 1987 (Wed.) 12:34
is registered as follows.
1.5(day of the month) + 0“7 (month)
+ 8.7 (last two
digits Of the year) + s
(day-of-the-week code) + 12 (hours)
+ 3“4 (minutes).
4. Select digits
Select digits using the [MODE] and [SIZE]so that the associated
,.::::::::,:;
.:.:,:...,..,......,,...:.,..
k
~f;:,:,:oP,::
:.::::::::.:.::::::::::.::::,:.:..
.:::.:.:.:.:.:...,:.:.:.:...,...,.
:.:::::::::::::.......:.:...:.:.:
. ...... ,.,:..,
::::::::
.. ....
::::::
:::.:.:
<+ DARK
LEDs light.
19
COPY
MODE
● STD
● FINE
● SUPER
●H-TONE..:.:l
...::::::.::
.:..”:::,.:’,:;.;.
,.:,.:,:.:.::.:’,.”,::.::
......
.. ..........:..,..:,,.,
................:.{:,,,::.
..........:.:,....
,,.:”,:(::,:,::;:::,.....,:,.;:,:.:;.:.
..:.::::.:...:.::.......::.,...
4
SIZE I STOP
● A4
● B5
● PAPER
cALARM
I
RATIO
● ENLARGE
01:1
● REDUCE
........................
,....::::.:.:.::::.:.:.::::..
.....::::.:.;:::::.:.:.:::.,.:.:
..:.::::.:.:.::.:.:.:.:.::..,.:.::
.,.::,:;::,:::::::::::::::::::::::::::...
A
CONT1
● DARK
● AUTO
● LIGHT
,.:.
...,::::
...::::::.:
..............
.....::::.:.:.:....
..:.:.,::.:....::::,:
...:.:....:.:.:....:.
..:::.
,.,.,.,.
..:::::::::
,,:.:.:.:.:,:.
,.:,:,:.:.:.:.:.:
............
L
NOTE:
● For transmit terminal recording, the led indicators on the operation panel
mean the following numerals.
STD
FINE
SUPER : 2
: O B5
: 1 A5
ENLARGE : 7
H-TONE : 3 1:1
A4
:4 REDUCE : 9
. For the day-of-the-week codes enter numerals as follows.
(Sunday: O,Monday: 1, Tuesday: 2, Wednesday: 3, Thursday: 4, Friday: 5,
Saturday: 6)
● A character or numeral entered by mistake in the registration mode can be
erased by pressing [RECEIVE].Enter a correct character or numeral after
erasing misentry.
:5
:6
:8
● Repeat the registration procedures from the start, when it is necessary to
alter the contents of previous registration.
Page 21

20
TRANSMITTERMINAL RECORDING
Press [SEND/COPY]
5.
Select one character
and press
[SEND/COPY] so that the character is
input.
START
● COMM/COPY
6.
HOW TO
1.
●
Repeat Steps 4 and 5 for
the second character to
nput from
the 1Ith
character.
Press [SEND/COpY]
“COMM/COPY” lights at the end of
input of minute codes (low order). The
registration of the day of the month and
time
is
concluded
by pressing
[SEND/COPY]. Then the contents of
registration
are
printed
out
automatically.
REGISTER SENDER’S TELEPHONE NUMBER
press [RECEIVE] and [MODE]
simultaneously.
START
●GOMM/COPY
.......... ....... ,.,...,............::::...:,:,:.:
~~:cOMM/cOpY;;:~~~~y; op.
I
r
●COMM/COPY1• STD
I
............. .................... ............... ::....:::..
RECEIV SEND..;$;~
::.:.:.:.:.:.:.,.:.:::::::,::::::::
::::::::.:::::::::::,:::::::::::::.
................. ...
.:.:.:.:.:............:.::::::::::.
........ ..........
:.:.:.:.,..,:.:.:...:.:.:.,.:.,.:......... .........:.:.:...:...:
.,..:.,.:.::.:.:.:..::::::::::::.:::::.::::::.:;...,..:.,
:::::,::::::::::.:.:::.,.:.:.:.:.:.
:,:.:...:,:.:,,..,...,...........
........ ...,,...,.:.:.:.:.:....
.:,:,:.:,
~$.~~$~ ::$:::?;”’”’
:.:.:.::
mn ~
[. -
n
~EIV SEND:<~~
.................. ...,.,,.,...,.,.,.,:,:.:,:.
;:::;:;::::;;::;:;;
::::;:;;;;;:;::;;;;:::::::::::::::::::::.:.::::::::.:
::.:.:,:,:,:,:.:.::
:,..:.:.:.:.:.:.:..
~c:,:::i:~y~”’!;.
.:.:.:.:.::::::::.:
IF]
$:;,(P:
4
............ ............,:.:
::::::::::.::::..{::,:,...::::
........,...,.....::.::.:..::;:..
.:...,....::
::;::;.;.::::;....::...::.....
/
::;::::{:::;:;::::::~:::;::::::;:i
..,..........,...:.:.:.:....:.:.:.
.......... ::::::::
.......
●FINE
●SUPER
●H-TONE.~.,
,....::.’l:..”.....:.:
,:[O.:,{;;
..
;;:;;{:
,..:....,:.:
.::.;;
,,,,..
1
I
2. Repeat pressing ICONTRASTl until
“AUTO” lights.
3. Press [SEND/COPY].
The “AUTO” lamp flashes and registration starts.
~ ’10 lcONTRASTl~
i RGE
,
● DARK
● AUTO
●AUTO 1
I
Page 22

TRANSMITTERMINAL RECORDING
21
4.
Select numerals
.
Select numerals using [MODE] and [SIZE] so that the associated LEDs light.
(Refer to page 19)
Press [SEND/COPY].
5.
Select one character
and press
[SEND/COPY]. The selected character
is input.
● Repeat Steps 4 and 5 to enter the
second and later characters.
● Up to 20 characters can be input.
● “COMM/COPY” lights at the entry of
START
●COMM/COPY
...................
,::,:,::,:,,::.’.”END:;::<:
;g~y:.:.:::<:::<..,.ip;
:.:.:..:...
:.:.:.:.:.:.:.:.:..
;{;:;::;:::::;;:;::.,......... ..........
...... .............
:::::::::::::::::::
:::~;:::;:;:;:::::.
::::::::::::::::::::
:;::;::;::{:;:::::::
,,,,,;,,2:,~y”’”n”’:i$
IQ
.
A
:+::::.,.:.:
::::::::;::::::::::::.:.:.:.:.:.::
::::::::.:.::::::::::::;:::::::;:.
.:;::::::;;:;.::,.::::::.;.:.;.:.:
;.::::
:..:,:.
:.:.:.
.....
~~COMM/COPY
one character, indicating registration
can be terminated.
Press [SEND/COPY] again.
6.
After entering the last numeral, press
[SEND/COPY] again to terminate registration of the sender’s telephone
number.
●The contents of registration are
printed out automatically at the termi-
START Ml
●COMMICOPY
. ................................
ECEIV
...................
.................................
................,,,.
........... ....................:.. .......
;:::::::::::::::::;::::::::::::::::
....... ...............
...:,:.:.,,...,,...,.....,,,..,,,,
.........
.........,.,,.,...,
.......,:,:....,,,,,,,....,...,,,.,
.......... ...........
..................... .......
.................
::::::::::.:.:.:.:.:.:.:.:.:.:,:.:.;:::::::::.:.. ........
..............
................... ............ :.:.:.:
..........,..,,..,,
.:.:.:.:.::::.:.:.:.:.:.::.:.:.:.:.:.:.:..
........... .,,...,,,,,,,,;,::.:
::::::::::::::::::::::::::::::.:.:.
.................... ..............
Dn
..........
........
......... ..
“END”::,;;:::;;
~:;,,;oP:
d
........... .......,:.......
:.:.:.:..,.:.:.::.:....:,,,,
:::::::::,’:.:..:;::..:...,...
n ;;;; &
;::.:..
n
nation of registration.
●S1
●H-
,
Page 23

.....
....-.” —
...
22
TRANSMITTERMINAL RECORDING
HOW TO REGISTER SENDER’S NAME
I. press [RECEIVE] and [MODE]
simultaneously.
2. Repeat pressing ICONTRASTl until
“LIGHT” lights.
T
1-
1
START
●COMM/COPY ● STD
....... ....... .. ... :....:,,.,
RECEIVk~ND:~~:
.:..
:,::.,.:.:..:...
............... ...
.:.:,::..:
..”:...::::..:.::.:;:.::”..::
...,.::.’:::.........:.::..::.
$f”~”’~~ .:~$$~:i
ND
:“OP
.,.:..::.:::,.........:.:.:::.::::::.:::
.:::;:;;,:::;:;;::;:::::::};;,:.,:;.
......:....:.
.:::.::............
..................
r
TIO CONTRAST
● DARK
● AUTO
‘a ~
,2g””Q:
I
I
\RGE
a
MODE
●FINE
● SUPER
● H-ToNE .;
::..:.
.,.:..
““;;
,,:::@ .
A -
●AUT(
[
...
3. Press [SEND/COPY].
“LIGHT” flashes and registration starts.
START
●COMM/CC)PY
IEiiiv” END’$3
........ : :.............“.
...
d
::’’:.:OP
,.. :. .......
.:..,.,.:..”..”.”.”...........:.::..:...:“.:::
..... . .. ...::...:.:.....:..,,:
.,.. ...
3R
.....::::,::
,: .’nf,i:
..
:$: LIGHT
4. Select and input characters.
Select one character from the Character Code LIs~on page 23 and enter
its code (2 digits). Turn on an LED indicating the first dlgil of the code and
press [SEND/COPY]. Turn on another LED for the second digit of the code
and press [SEND/COPY]. “COMM/COPY” lights, indicating input of one
character. (Refer to Steps 4 and 5 on pages 19 – 21.)
● Repeat Step 4 to enter the second and later characters.
● Use the codes shown in the Character Code List when en
ering numerals
(1,2,3,...) for sender name registration.
. Registration can be terminated at the termination of input of one character.
● Up to 24 characters can be input.
\
\-
Page 24

TRANSMITTERMINAL RECORDING
23
5. Press [SEND/COpy]. .
After entering the last character, press
[SEND/cOPy]again to term
inate regis-
tration of the sender name.
● The center
printed out z
ts of registration are
utomatically at the termi-
nation of registration.
CHARACTER CODE LIST
oI‘ 1 ~2 3 ~4 \ 5 , 6 ~7
I
01 I02 ! 03
00
~lKIL M NIOIPIQ
.
120127 22
d ; e f
I
40141 ~42!43!44
~ Y
60[61 ~62\63\64165
< :=
23
g ~h I i j k
z !
> ~7 ; [ ~y ] “
I
1
04105 !06 ~07
24[25126 127
454647~48~49 I
“
$
#
66167
!
I
80181I82~8318418586 87~88189
8 ~9 c A B~C D
08109
RI SIT u I v iw
28 I29
I ~mIn
& ‘
‘/0
68169
—~ ‘
10\ 11 12 ‘ 13
30
31132
i O ~ P ~q
50~51
(1)1* +
33 34 35 136 37
52 53 54
70 71172173 74 1751?6
I ~ ; ~+
[
•1
I
91 ~92~93 94
90
START M
●COMM/COPY
...............
.................
,::EcEj#::, :;ND’2*3 :
The contents of the transmit terminal record can be insured by printing out the
transmit terminal record table.
How to Print Out Transmit Terminal Recording Table
I. press [RECE VE] AND [MODE]
simultaneously.
2. Press [RECEIVE].
Printing starts.
[Exampleof Print]
0R IGINA TO R PR INT
START
●CC)MM/COPY
............. ....................
.....EQE!Y,:::..:~~”:~~ :~:~ER
......................... ....:.:
................... .. .
...................... :.::::.::
:.:.:.:.:.:.:.:.:.:.......:.:.:.:
......................
..................,.,,,,.
.. ..
............. ....................
............. ..................
............. .....................
............. ...... ..::::::.::.:::.:::
.....................
............. ......,:.,,,,,,,..
~f..n..::;.:; “~:{,;.;::;.:;
QD ~
;:::;;OP:
........,’.,...,.:.:.,
....,...,..,.::..:...:,:.,.:
..,...,...::.,,,
.......:.:,..:,,:.
........
....
.:.:............ .,,
,.:,:.:
..:.:””...
..,.,.... ..... ,.
k
.......... ...
START
●COMMICOPY ● ST
........ ......,,.,,. ........
ECE!V.....~j::;:,;....<::.;<.:
. .........
,:,:,::::..9 ‘“’”END”’:;;’‘~~
......... ......
..
..,.,..,.,...,.,........ ........
........ ...............
,,::.,:,:,:.:.:..
:{::::.::::::.:.,,...,...,...,...
.......... ......................
............. ...................
........ ....................
:,:.:.......:,... ............
...........
......,.,.:.
~:n :<
..::::~
,.:,:.
.
~ D
15- JU
L -8 ~
MODE
●STD
● H-ToNE ,..
k
$;;$.2,:$P.:,.
:.:.::::...:...::..:.:::,.:.::::
:.:.::.::...:.:...............
:,:.::::......;,::.,;;...... .
.:.:,............:..:,::,
.,..”.””....,...,:..,. .:.
;.::.::......,:.:.
.
.:..:,:.:..:.:.:.:.:..:.
..:..:.::.:....:..:.::.::
U
ED 12 :34
...:...,,.,.,
,...:~::::::::::
......:...:.,:,:
...................
.:’”Q :,,,
...:..:::.,:::
M
●H-”
4
..::::::;::
.:..;:,:,:
..,:.
S
ENDE R ‘ S NA ME
SHARP CORP .
SENDER‘ S TEL EF’HONE U
@61234567
OR I GI NRTOR PR
INT
15- JUL -87
WED 12 : 34 SHARf’ CORP .
P.01
Page 26

The transaction report are printed out automatically at the termination of trans-
mission or reception to inform the user.
[Exampleof Print]
TRA t+ 5 A L T I Q14 REF’URT
.—
- JUL-87 WED i2 :34
15
NOTE:
Whenan error occurs duringtransmission,thefollowingwill bedisplayedon the
TRANSA~lON REPO~.
● NO PAPER;
Displayedwhen one of the followingerrors has occured:
1. When the recordingpaper roll has run out.
2. When the recordingpaper roll cover has been opened.
3. When the maximumreceivingvolumepossible has been
exceeded.
. COME-1to 7; Whena transmissionerror has occured.
Page 27

“.,, .-. .“
”... .
“,.
1. How to Replacethe Recording
When the recording paper has run out, it is
When the recording paper has run out during
indicator turns on and an alarm sounds.
1. Turn the power switch off.
2. Open the machine cover by pulling the
two buttons on each side towards you.
Paper Roll
impossible to copy or receive.
reception or copying, the ‘‘Paper”
I
3. Open the recording paper roll cover by
pushing on the lever on the right side.
.
I
!
Page 28

MAINTENANCE
4. Replace the paper roll. .
Place the edge of the paper through the
exit slot.
27
5. Close the recording paper roll cover by
pushing down. Ensure that the cover is
locked.
6. Close the machine cover by pressing
down with both hands until a click is
heard.
Make sure both sides lock.
I
.I
7. Turn the power switch on.
Page 29

28
MAINTENANCE
2. Purchasing RecordingPaper Rolls
Specified Roll: Sharp F020PR6, 216mm x 30m.
Replacement rolls may be ordered through your authorized Sharp dealer or
Sharp authorized business equipment repair station.
Notes on handling recording rolls;
Do not store recording paper in hot and humid areas, or in places exposed to
direct sunshine. This will cause the recording paper to discolor.
Discoloring can occur if adhesive tape or eraser is left on the paper, or if pres-
sure is placed on the paper roll.
Do not unpack the recording paper roll until you are ready to use it.
3. Cleaning
This is a precision machine, always keep it clean.
NOTE:
If the recording head is dirty, the quality of transmission and copying deteri-
orates. The recording head must be cleaned after every three to four rolls of
recording paper have been used.
To Clean the Recording Head
Wet a soft cloth with ethyl alcohol and wipe
gently.
I
To Clean the Document glass and the
Document cover
Wipe with a soft, clean cloth.
If stains do not come off easily, wipe with
a cloth dampened with water, and then
wipe dry.
To Clean the Cabinet
r 1
1
I
f
Wipe the cabinet with a dry cloth. Do not
use solvents like benzene or thinners.
.
Page 30

If you are experiencingproblemswith your facsimile machine, check the following before calling for service.
1. OperationalProblems
No Power
●
Check the power cord for proper connection.
●
Make sure that the power switch is in the
ON position.
●
Connect another electrical device to the
same AC outlet to check if the outlet is live.
Cannot Dial Out
Will Not Auto-Answer
No Printing on the Receive ●
Side
Check the telephone line connections.
Check the telephone line by plugging
another telephone into the jack you are
using for the facsimile machine. If you
cannot dial out,
company for assistance.
●
Check the operation panel for the Auto-
Receive mode.
●
Check to see if your machine has a roll of
recording paper in it.
●
Check to see if your machine has a record-
ing paper jam.
Make sure your documents for transmis-
sion are face down on the platen glass.
●
Make sure that the recording paper roll on
the receiving side is installed properly, and
not upside down.
●
Make a copy using your machine to check
the recording function.
call the telephone
Page 31

..
30
Power ON, But Not Receiving
BEFORECALLING FORSERVICE
. See
if the “paper” indicator is on.
. Make sure the remote transmission unit is
compatible with your facsimile (CCITT
Group 3). If it is not, reception is not
possible.
● Make sure your recording paper roll is
properly installed. Refer to page 26—27.
Recording Paper Does Not
Come Out
. Check to see if the recording paper has
been properly installed. Refer to page 26
—27.
● Check to see if your recording paper is
jammed.
. Make a
copy using your machine to check
the recording paper feed function.
Cannot Communicate
. Retry the transmission, it may have been a
poor quality telephone line.
. Try the transmission with another known
properly functioning machine. The first
machine may not be functioning properly.
. Make a
copy using your machine.
This tests most of your machine for proper
operation.
— — — .- — . .
2. copy QualityProblems
Distortions in Received Copy ●
Spots or Vertical Streaks
Compressed or
Image
Horizontal Streaks
Enlarged
Clean the recording head of the receiving
unit. Refer to page 28.
●
Check the recording paper for damage.
●
Check the original for spots or streaks.
Clean the platen glass and white strip on
the cover. Refer to page 28.
Check to see if reduction or enlargement
●
was selected.
Retry the transmission, it may be a tele-
phone line problem.
Clean the document glass and white strip
on the cover. Refer to page 28.
Retry the transmission, it may be a tele-
phone line problem.
\
\
\
\
‘\
\
\
\
Page 32

MEMO
Page 33

Model Number
Applicable Telephone Line
Configuration
Compression
Communication
Scheme
Mode
Scanning Method
Resolution
Recording System
Modem Speed
Approximate Transmission
Time
Contrast Control
Half Tone
Recording Paper Size
EffectiveRecordingPaperSize
Transmit DocumentSize
EffectiveScanningWidth
Enlargement
Reduction Ratio
Power Requirements
Dimensions
Weight
Operating Conditions
Power Consumption
Ratio
FO-80
Public Switched Telephone Network
Modified Huffman
G3
Flat Bed, Solid State CCD Horizontal = 8 lines/mm
Vertical = 3.85 lines/mm (Standard)
7.7 lines/mm (Fine & Half-Tone)
15.4 lines/mm (Super Fine)
Thermal Recording
4800/2400 BPS, automatic fallback
*4O seconds (4800 BPS)
Automatic/Dark/Light
8 Levels
216mm
x 30m
210mmx 1.5mMaximum
‘Up to 216mm x 297mm
210mm Maximum
1:1.41
1:0.70
240V AC, 50Hz
335mm (W)x 410mm (D)
(excluding protrusions)
Approximately 10.4 Kg
Temperature: 5°C to 35°C (41‘F to 95°F)
Relative Humidity: 30°/0 to 85°/0
23 Watts (standby)/140 Watts (Max. in Operation).
x 160mm (H)
‘With an A4 SHARP standard document at standard resolution does not include
time for protocol signal, i.e., CCITT phase C time only.
Accessories:
● Operation Manual
. AC
power cord
● Recording Paper Roll
Page 34

,
CORPORATIO
.
SHARP CORPORATION
OSAKA, JAPAN
@ 1987 SHAI?P
7F0.856 (TINSE2175SCZZ) 1
Printedin Japan
—-
 Loading...