

Page 1

ELECTRONIC CASH REGISTER
MODEL
ER
INSTRUCTION MANUAL
-A440S
Page 2

CAUTION:
The cash register and the remote drawer should be securely fitted to the supporting
platforms to avoid instability when the drawers are open.
CAUTION:
The socket-outlet shall be installed near the equipment and shall be easily accessible.
VORSICHT:
Die Netzsteckdose muß nahe dem Gerät angebracht und leicht zugänglich sein.
ATTENTION:
La prise de courant murale devra être installée a proximité de l’équipement et devra être
facilement accessible.
AVISO:
El tomacorriente debe estar instalado cerca del equipo y debe quedar bien accesible.
VARNING:
Det matande vägguttaget skall placeras nära apparaten och vara lätt atkomligt.
CAUTION:
For a complete electrical disconnection pull out the mains plug.
VORSICHT:
Zur vollständigen elektrischen Trennung vom Netz den Netzstecker ziehen.
ATTENTION:
Pour obtenir une mise hors-circuit totale, débrancher la prise de courant secteur.
AVISO:
Para una desconexión eléctrica completa, desenchufar el enchufe de tomacorriente.
VARNING:
För att helt koppla fran strömmen, dra ut stickproppen.
Page 3

INTRODUCTION
Thank you very much for your purchase of the SHARP Electronic Cash Register, Model ER-A440S.
Please read this manual carefully before operating your machine in order to gain full understanding of functions
and features.
Please keep this manual for future reference. It will help you, if you encounter any operational problems.
IMPORTANT
• Install your register in a location that is not subject to direct sunlight, unusual temperature changes,
high humidity or exposure to water sources and keep away from heat and magnetic sources.
Installation in such locations could cause damage to the cabinet and the electronic components.
• The register should not be operated by an individual with wet hands.
The water could seep into the interior of the register and cause component failure.
• When cleaning your register, use a dry, soft cloth. Never use solvents, such as benzine and/or thinner.
The use of such chemicals will lead to discoloration or deterioration of the cabinet.
• The register plugs into any standard wall outlet (Official (nominal) voltage).
Other electrical devices on the same electrical circuit could cause the register to malfunction.
• If the register malfunctions, call your local dealer for service - do not try to repair the register yourself.
• For a complete electrical disconnection, pull out the mains plug.
PRECAUTION
This Electronic Cash Register has a built-in memory protection circuit which is operated by rechargeable
batteries.
As you know, all batteries will, in time, dissipate their charge even if not used. Therefore to insure an adequate
initial charge in the protection circuit, and to prevent any possible loss of memory upon installation, it is
recommended that each unit be allowed to recharge for a period of 24 to 48 hours prior to use by the customer.
In order to charge the batteries, the machine must be plugged in. This recharging precaution can prevent
unnecessary initial service calls.
1
Page 4

CONTENTS
INTRODUCTION····················································································································································1
IMPORTANT··························································································································································1
PRECAUTION························································································································································1
CONTENTS····························································································································································2
EXTERNAL VIEW··················································································································································7
Front view···············································································································································7
Rear view················································································································································7
PRINTER································································································································································8
KEYBOARD···························································································································································9
1 Standard keyboard layout··························································································································9
2 Standard key number layout····················································································································10
KEYS AND SWITCHES·······································································································································11
1 Mode switch and mode keys ···················································································································11
2 Drawer lock key·······································································································································11
DISPLAYS ···························································································································································12
Machine state symbols·························································································································12
FOR THE MANAGER
PRIOR TO PROGRAMMING·······························································································································13
1 General instructions·································································································································13
2 How to program alphanumeric characters·······························································································13
Using character keys on the keyboard·································································································13
Entering character codes······················································································································14
PROGRAMMING ·················································································································································16
Preparations for Programming ·············································································································16
Direct Programming···········································································································································16
1 Setting the date and time·························································································································16
Date······················································································································································16
Time······················································································································································17
2 Programming for departments·················································································································17
Unit price ··············································································································································17
Functional selection······························································································································18
3 Price lookup (PLU) programming ············································································································20
Unit price ··············································································································································20
Functional selection······························································································································20
PLU assignment to departments··········································································································22
4 European Article Number(EAN)/Universal Product Code(UPC) programming ·······································23
Unit price ··············································································································································23
Functional selection······························································································································24
EAN assignment to departments··········································································································26
5 Programming for discount keys···············································································································27
Deduction amount (
High amount lockout (HALO) and +/- sign (
6 Programming for percent keys ················································································································29
Percent rate (
Sign (+/-) (
7 Programming for exchange keys·············································································································30
Currency exchange rate (
8 Programming for the
High amount lockout (HALO) (
%
)······································································································································29
%
)························································································································27
-
)···················································································28
-
)·································································································································29
) ··············································································································30
e
Å, r, p, '
and îkeys··············································································30
Å, r, p, '
, and î) ··································································30
2
Page 5

9 Programming the tax rate························································································································31
Tax rate ················································································································································31
Job-Code-Based Programming ························································································································32
1 Setting the date and time·························································································································32
Setting the date (#2610)·······················································································································32
Setting the time (#2611)·······················································································································32
2 Setting the register and consecutive numbers ························································································33
Setting the register number (#2612)·····································································································33
Setting the consecutive number (#2613)······························································································33
3 Programming the tax rate························································································································34
Tax rate (#2711)···································································································································34
4 Programming for departments·················································································································35
Functional programming (#2110) ·········································································································35
Tax status (#2111)································································································································36
A limit amount (HALO) of entry (#2112)·······························································································37
Alphanumeric characters (#2114) ········································································································38
Unit price (#1110)·································································································································38
Commission group assignment (#2115)·······························································································39
Group number (#2116)·························································································································40
Department key positioning (#2119)·····································································································41
5 Price lookup (PLU) programming ············································································································42
Department assignment (#1200, 2230)································································································43
Unit prices (#1210)·······························································································································44
Base quantity (#1211) ··························································································································44
PLU/subdepartment mode (#2210, 2231)····························································································45
Sign (+/-) and tax status (#2211, 2232)································································································46
Alphanumeric characters (#2214) ········································································································47
Assigning of PLUs to commission groups (#2215, 2235)·····································································48
Link PLU (#2220)··································································································································49
Direct PLU key positioning (#2219)······································································································49
6 European Article Number (EAN) or Universal Product Code (UPC) programming·································50
EAN or UPC code·································································································································50
Add-on code·········································································································································52
EAN/UPC programming ·······················································································································52
Department assignment (#1000)··········································································································53
Unit prices (#1010)·······························································································································54
Base quantity (#1011) ··························································································································54
Delete method (#2010)·························································································································55
Sign (+/-) and tax status (#2011)··········································································································56
Alphanumeric characters (#2014) ········································································································57
EAN link (#2030) ··································································································································58
Delete period for non-accessed EAN codes (#2029)···········································································58
Programming Non-PLU code format (#2025)·······················································································59
Press code functional programming (#2035)························································································60
7 Programming for miscellaneous keys······································································································61
Programming the rate (
Programming the number of digits after decimal point for exchange keys (#2330) ·····························62
Currency description text programming (#2334)··················································································62
Assigning the drawer number to the drawer for foreign currency (#2680) ··········································63
A limit amount (HALO) of entry (
+/- sign (
Item % or subtotal % selection (
Percent rate limitation (
Item
%, -
or subtotal âselection (-) (#2316) ······················································································66
â
%, e
) (#2311)····················································································································64
%
, commission) and the deduction (-) (#1310)··································61
-, r, p
) (#2315)·······················································································65
%
) (#2313)·····································································································65
) (#2312)········································································63
3
Page 6

8 Programming for the ;, Å, (through +, and ]through ’keys·············································67
Functional programming (#2320) ·········································································································67
High amount lockout (HALO) for cheque change, cheque cashing, and cash in drawer (#2321)········68
High amount lockout (HALO) of entry for media keys (#2322)·····························································69
9 Programming of function text···················································································································69
Programming (#2314)···························································································································69
List of function texts······························································································································70
10 Cashier and clerk programming ··············································································································71
Cashier code (#1500)···························································································································71
Cashier name (#1514)··························································································································72
Functional programming for cashiers (#2510)······················································································72
Clerk code (#1400)·······························································································································73
Clerk name (#1414)······························································································································73
11 Programming various functions···············································································································74
Programming for optional feature selection (#2616) ············································································74
Programming the limit on the number of times of validation printing and feed line after printing of a
difference subtotal (#2615)···················································································································79
Programming alarm length of time with drawer opening (#2617)·························································79
Programming of print messages (#2614)·····························································································80
Selection of X1/Z1 and X2/Z2 reports to be printed in the stacked report sequence (#2620)··············81
Setting the time range for hourly reports (#2619)·················································································82
RS-232C channel assignment (#2690) ································································································82
Barcode reader programming (#2691)·································································································83
Secret codes to control access to the PGM1 mode, X1/Z1 mode and X2/Z2 mode
(#2630, 2631, 2632)·····························································································································84
Setting the AUTO key - Automatic sequencing key - (#2900)······························································85
12 Reading stored programs························································································································86
Program details and procedures for their reading················································································86
Sample printouts···································································································································87
13 Training mode··········································································································································93
READING (X) AND RESETTING (Z) OF SALES TOTALS·················································································94
1 Summary of reading (X) and resetting (Z) reports and the key operations to obtain the reports ············94
2 Daily sales totals······································································································································97
Full reading and resetting of sales totals······························································································97
Cashier reading and resetting ············································································································101
Clerk reading and resetting ················································································································103
Reading and resetting of hourly sales information ·············································································104
Full department reading ·····················································································································105
Individual group reading·····················································································································106
Full group reading·······························································································································106
Reading and resetting of sales information for a range of PLUs/subdepartments·····························107
Reading of sales information on PLUs/subdepartments associated with an individual department···108
Reading of PLUs/subdepartments whose sales amounts are zeros··················································108
Reading of PLU/subdepartments whose sales amounts are zeros (by associated department)·······108
Reading of sales information for the price amount range of PLUs/subdepartments··························108
Reading and resetting of sales information for EANs·········································································109
Reading and resetting of sales information for EANs associated with an individual department·······110
Reading of EANs whose sales amounts are zero··············································································110
Reading of EANs whose sales amounts are zeros (by associated department)································110
Reading of commission sales information··························································································111
Transaction reading····························································································································111
Total in drawer reading·······················································································································111
Reading and resetting of a stacked report··························································································112
Deleting of non-accessed EANs·········································································································112
4
Page 7

3 Periodic consolidation····························································································································113
Generality···········································································································································113
Reading and resetting of daily net totals ····························································································114
Reading and resetting of a stacked report··························································································114
COMPULSORY CASH/CHEQUE DECLARATION···························································································115
PROGRAMMING FOR EURO ···························································································································117
Automatic modification of register system for introduction of EURO··················································118
Optional programming for the introduction of EURO··········································································119
OVERRIDE ENTRIES········································································································································120
CORRECTION AFTER FINALIZING A TRANSACTION (AFTER GENERATING A RECEIPT)······················121
FOR THE OPERATOR
PRIOR TO ENTRIES ·········································································································································122
1 Preparations for entries ·························································································································122
Receipt and journal paper rolls···········································································································122
Receipt ON/OFF function···················································································································122
Cashier and clerk assignment············································································································122
2 Error warning·········································································································································123
ENTRIES····························································································································································124
1 Item entries············································································································································124
Single item entries······························································································································124
Repeat entries····································································································································125
Multiplication entries···························································································································126
Successive multiplication entries········································································································127
Split-pricing entries·····························································································································128
Single item cash sale (SICS)/single item finalize (SIF) entries···························································129
Link PLU/EAN link entries ··················································································································129
EAN learning function·························································································································130
Price inquiry (view) function (for EANs)······························································································131
Price change function (for EANs)·······································································································132
2 Displaying subtotals·······························································································································134
Normal subtotal ··································································································································134
Difference subtotal (Differ ST)············································································································134
3 Finalization of transaction······················································································································135
Cash or cheque tendering··················································································································135
Mixed tendering (cheque + cash)·······································································································135
Cash or cheque sale that does not need any tender entry·································································135
Credit sale ··········································································································································136
Mixed-tender sale (cash or cheque tendering + credit tendering)······················································136
4 Computation of VAT (Value Add Tax)/tax ·····························································································136
VAT/tax system ··································································································································136
VAT shift entries·································································································································138
5 Auxiliary entries ·····································································································································138
Percent calculations (premium or discount) ·······················································································138
Deduction entries································································································································139
Refund entries····································································································································139
Printing of non-add code numbers ·····································································································140
6 Payment treatment ································································································································140
Currency exchange ····························································································································140
Received on account entries··············································································································141
Paid out entries···································································································································141
No sale (exchange) ····························································································································142
Cashing a cheque·······························································································································142
7 Automatic sequencing key (
key) entries··························································································142
`
5
Page 8

CORRECTION ···················································································································································143
1 Correction of the last entry (direct void)·································································································143
2 Correction of the next-to-last or earlier entries (indirect void)································································144
3 Subtotal void··········································································································································144
4 Correction of incorrect entries not handled by the direct or indirect void function·································144
SPECIAL PRINTING FUNCTIONS····················································································································145
1 Copy receipt printing······························································································································145
2 Guest check copy··································································································································146
3 Validation printing function ····················································································································146
Validation slip setting and printing······································································································146
Validation printing examples···············································································································147
Validation slip specification·················································································································149
4 Printing of the employee arrival and departure times············································································149
OVERLAPPED CASHIER ENTRY ····················································································································150
OPERATOR MAINTENANCE ···························································································································151
1 In case of power failure ·························································································································151
2 In case of printer's motor locking···········································································································151
3 Paper roll near-end sensing function (only for the journal paper) <option>···········································151
4 Installing and removing the paper roll····································································································152
Recording paper specifications ··········································································································152
Installing the paper roll ·······················································································································152
Removing the paper roll ·····················································································································153
Removing a paper jam ·······················································································································154
5 Installing the ink ribbon cassette ···········································································································155
6 Removing the till and the drawer···········································································································156
7 Opening the drawer by hand ·················································································································156
8 Installing the fixing angle bracket ··········································································································157
9 Before calling for service ·······················································································································158
Error code table··································································································································158
LIST OF OPTIONS ············································································································································159
SPECIFICATIONS ·············································································································································160
6
Page 9

EXTERNAL VIEW
Front view
Printer cover
Customer display (Pop-up type)
Receipt paper
Journal window
Drawer lock
Rear view
Operator display
Mode switch
Keyboard
RS-232C connectors
Drawer
Validation opening
7
Page 10

PRINTER
Note
INSTALLING AND REMOVING THE PRINTER COVER
When removing the printer cover, lift up its rear.
When installing the printer cover, hook it on the
pawls on the cabinet and shut it.
Take-up spool
Paper roll location
Paper chute
Receipt paper
release lever
Ink ribbon cassette
• Paper release lever
Used to load or unload the machine with paper roll (receipt and journal paper). Keep the lever down to take in
or out the paper roll.
Do not attempt to take in or out the paper roll without pressing this lever. This may result in
damage to the printer.
Journal paper release lever
8
Page 11

KEYBOARD
Receipt paper feed key
Journal paper feed key
Multiplication/split-pricing key
Decimal point key
Price lookup/subdepartment key
Numeric keys
Clear key
Cashier code entry key
Department keys
Non-add code key
Receipt print key
Discount key
Amount entry key
Automatic sequencing 1 and 2 keys
Percent 1 and 2 keys
No-sale key
Received-on-account key
Paid-out key
Refund key
RF
RECEIPT
JOURNAL
9
00
•
0
CL
20
1
AMT
EAN code entry key
EAN
EAN inquiry key
INQ
#
CASH
#
PLU/
SUB
AUTO
1
AUTO
2
%1
%2
NS
RA
PO
RCPT
Void key
EX1
EX2
Foreign currency exchange
1 and 2 keys
Value added tax key
VAT
Note
1
4
3
2
5
11
12
13
14
15
16
17
18
19
20
0
123
456
789
CL
•
00
CH1
%2
RCPT
6
7
8
9
10
NS
RECEIPT
JOURNAL
%1
RAPO
RF
#
AUTO
1
AUTO
2
CR1
CH2
CR2
TL
ST
CASH
#
EX2
EX1
INQAMT VATEAN
PLU/
SUB
Standard keyboard layout
1
All the keys but the receipt paper feed and journal paper feed keys can be re-positioned. If you
want to change the layout, contact your dealer.
9
Page 12

1
4
3
2
11
12
13
14
16
17
18
19
6
7
8
9
5
15 20
10
Note
AUTO
10
AUTO
3
Percent 3 and 4 keys
Guest check copy key
Cash total 2 key
Received-on-account 2 key
Paid-out 2 key
Automatic sequencing
3 through 10 keys
Subtotal key
Total (cash total) key
Numeric key
4
2
Difference subtotal key
Validation print key
1/2 key
Clerk code entry key
Department keys
50
21
Direct price lookup/subdepartment keys
68
1
Discount 2 through 4 keys
CR1
CR2
CH1
CH2
000
ST
GC
COPY
CR4
CR3
EX3
EX4
CH3
CH4
1/2
VP
DIFFER
ST
CLERK
#
Department code entry key
DEPT
#
Non delete key
NON
DELETE
Price change key
PRICE
CHANGE
Repeat entry key
Cheque 1 and 2 keys
Credit 1 and 2 keys
Foreign currency exchange
3 and 4 keys
Cheque 3 and 4 keys
Credit 3 and 4 keys
CA2
PO2
RA2
%3
%4
TL
Value added tax shift key
VAT
SHIFT
REPEAT
The standard keyboard is not equipped with those keys that are marked with ( ).
Standard key number layout
2
These key numbers are used for positioning of department keys and direct PLU keys. Refer to pages 41 and 49.
This layout can be changed by your dealer.
10
Page 13

KEYS AND SWITCHES
REG
OP
X / Z
MGR
X
1/Z1
X2/Z2
PGM1
PGM2
O
P
M
A
S
M
Operative range
MA
SM OP
• Manager key (MA)
• Submanager key (SM)
• Operator key (OP)
SK1-1
Mode switch and mode keys
1
The mode switch can be operated by inserting one of the three supplied mode keys - manager (MA),
submanager (SM), and operator (OP) keys. These keys can be inserted or removed only when the switch is in
the “REG” or “ ” position.
The mode switch has these settings:
: This mode locks all register operations.
No change occurs to register data.
OP X/Z: This setting allows cashiers/clerks to take X or Z reports for their
sales information. (This setting may be used only when your
register has been programmed for “OP X/Z mode available” in the
PGM2 mode.) It can also be used for displaying the time and printing the employee arrival and
departure times. And it can be used to toggle receipt state “ON” and “OFF” by pressing the
REG: For entering sales
PGM1: To program those items that need to be changed often: e.g., unit prices of departments or PLUs, and
percentages
PGM2: To program all PGM1 items and those items that do not require frequent changes: e.g., date, time, or
a variety of register functions
MGR: For manager's and submanager's entries
The manager can use this mode to make entries that are not permitted to be made by cashiers - for
example, after-transaction voiding and override entry.
X1/Z1: To take the X/Z report for various daily totals
X2/Z2: To take the X/Z report for various periodic (weekly or monthly) consolidation
q
key.
Drawer lock key
2
This key locks and unlocks the drawer. To lock it, turn 90 degrees counterclockwise. To unlock it, turn 90
degrees clockwise.
11
Page 14

DISPLAYS
Operator display Customer display (Pop-up type)
PLU/SUB
DEPT REPEAT
RCPT
OFF
CID sentinel indicator
Amount: Appears in the far-right eight (max.) positions.
Cashier code: Appears in the second and third positions (two digits).
Clerk code: Appears in the second and third positions (two digits) with “C” in the fifth position.
Number of repeats for repetitive registrations:
The number of repeats is displayed, starting at “2” and incremented with each repeat.
When you have registered ten times, the display will show “0.”
Example: (2 → 3 → 4
Receipt function status:
The indicator “_” appears in the ninth position when the receipt function is put in the OFF
status.
Time: Appears in the second to sixth positions (using 24-hour format) in the OP X/Z, REG, or
MGR mode. In the REG, or MGR mode, press the
Cashier/clerk code
.....
9 → 0 → 1 → 2
...
)
key to display the time.
=
Machine state symbols
: Appears in the tenth place during programming.
: Appears in the tenth place when an error is detected.
– (Floating): Appears when a minus department, PLU/subdepartment or EAN entry is made or when a
discount, refund, or void entry is made.
: Appears in the tenth place when the subtotal is displayed or when the amount tendered is smaller
than the sale amount.
: Appears in the tenth place when the
foreign currency.
: Appears in the tenth place when a transaction is finalized by pressing the
, or ]through ’key.
+
: Appears in the tenth place when the change due amount is displayed or when the cash/cheque
declaration is compulsory.
: Appears in the tenth place when the validation printing is compulsory.
: Appears in the tenth place when the
the VOID mode. While your register is in the VOID mode, this symbol continues to be in the
display except when department codes, PLU codes, EAN codes or subtotals are displayed. Also
appears when a subtotal void is made.
: Appears right below the tenth place when the cash in drawer amount exceeds a programmed
sentinel amount. The sentinel check is performed for the total cash in drawer.
Also appears right below the eighth place when the VAT shift is effective.
through ”key is pressed to calculate a subtotal in
[
;, Å, (
key is pressed in the MGR mode, indicating the entry into
?
through
12
Page 15
-
;
Data entry
(Object key)
XXXX
.
≈
;
Data entry
(Job code)
FOR THE MANAGER
PRIOR TO PROGRAMMING
General instructions
1
This chapter illustrates how to program your cash register.
All the programming items can be programmed by the
However, your machine allows you to program some items using the
require you to enter the job code.
Job-Code-Based Programming
Simplified procedure
Direct Programming
Sample procedure
Job-Code-Based Programming described later.
Direct Programming, which does not
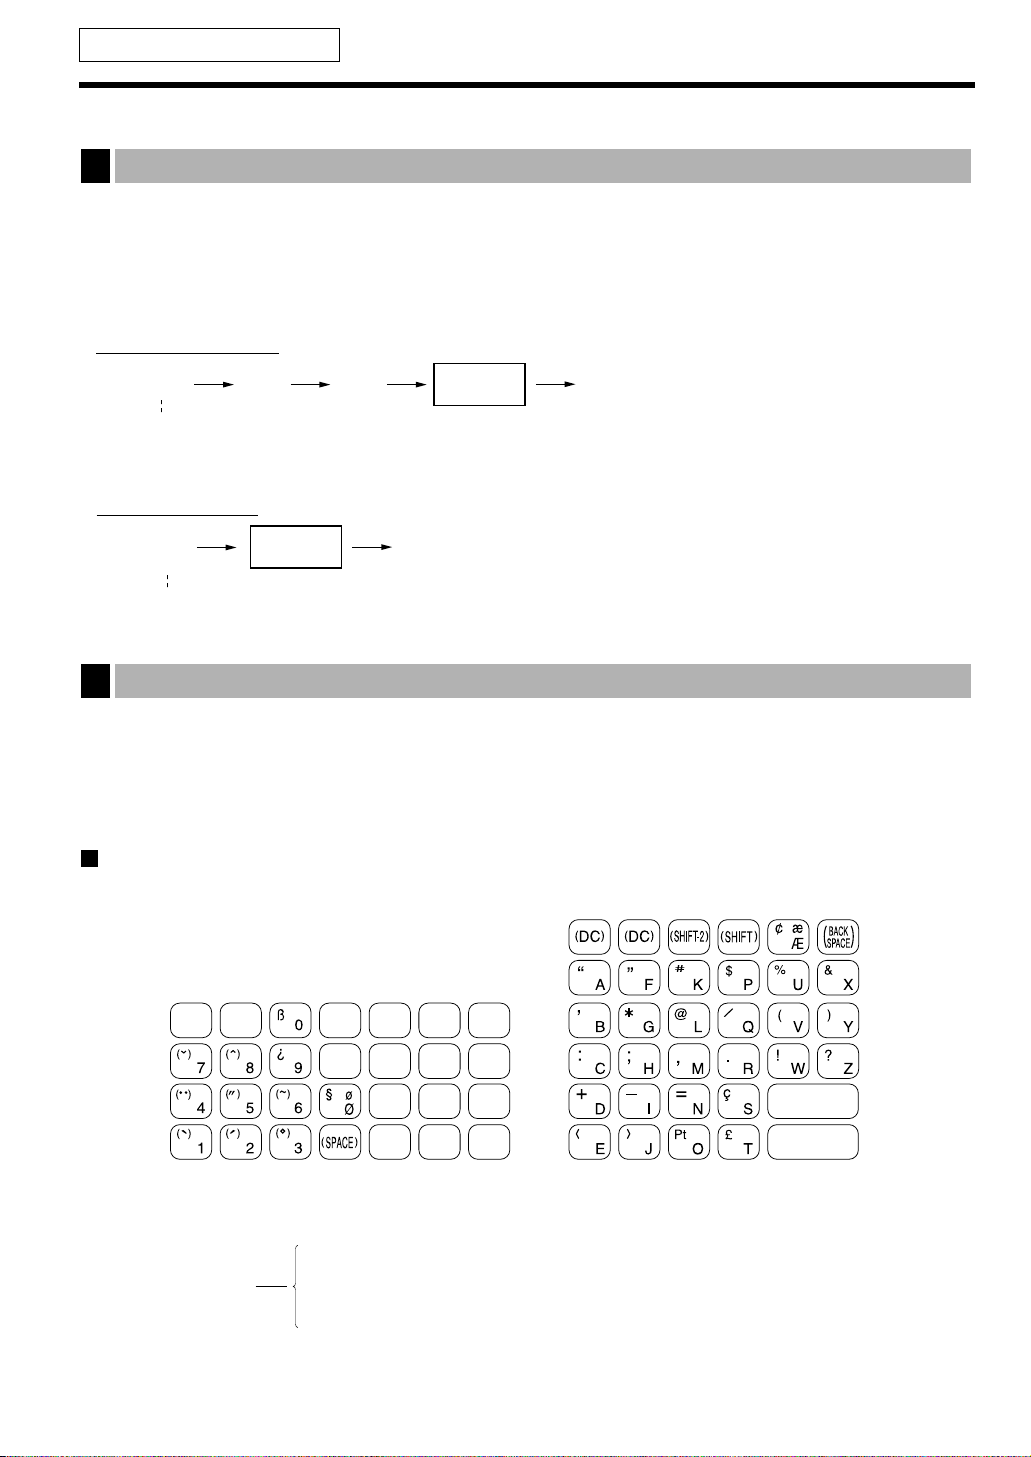
How to program alphanumeric characters
2
You can program alphanumeric characters for departments, PLUs, EANs, functions and so on in the character
entry mode.
There are two ways for programming characters: using character keys on the keyboard and entering character
codes with numeric keys on the keyboard.
Using character keys on the keyboard
Enter a character according to the position of the figure shown below.
[Ex.]
To enter the letter “#”, press
éí
í
To enter the upper-case letter “K”, press í
To enter the lower-case letter “k”, press
Óí
13
Page 16

• Numerals, letters and symbols are programmable simply by pressing the corresponding keys.
253
º
083
º
072
º
065
º
082
º
080
º
S H A R P
Example
XXX
º
• Characters may only be entered in single size or in double size. By default, the single-size character mode
is selected. To enter a character in double size, press the
character.
key before you enter the corresponding
Î
Example
To program the word “SHARP” in double size, do the following key-in.
ÎSÎHÎAÎRÎP
• Letters of alphabets “A” through “Z”, “Ø” and “Æ”are possible to be entered in lower case or in upper case. By
default, the upper-case letter mode is selected. To enter a character in lower case, press the
before you enter the character. To return to the upper-case letter mode, press the
Example
To program the word “Sharp”, do the following key-in.
key again.
Ó
Ó
key
SÓHARP
• Symbols and special letters are programmable by using the
key before you enter the corresponding character.
Example
To program letters “# Ä Å” with the letter “#” being double size
key. To enter a character, press the
é
é
Îé=éêAéëA
Editing the characters
You can edit the characters you entered. Pressing a character key replaces the current character with a new
one. To edit the characters, use the
key.
: Backs up the cursor, erasing the character to the left.
Entering character codes
• Numerals, letters and symbols are programmable by entering character codes and the ºkey. See the
alphanumeric character code table on the next page. In this way, you can program characters other than the
characters on the programming key sheet.
XXX: Character code (3 digits)
• Double-size characters can be made by entering the character code 253.
To program the word “SHARP” with the letter “S” being double size
14
Page 17
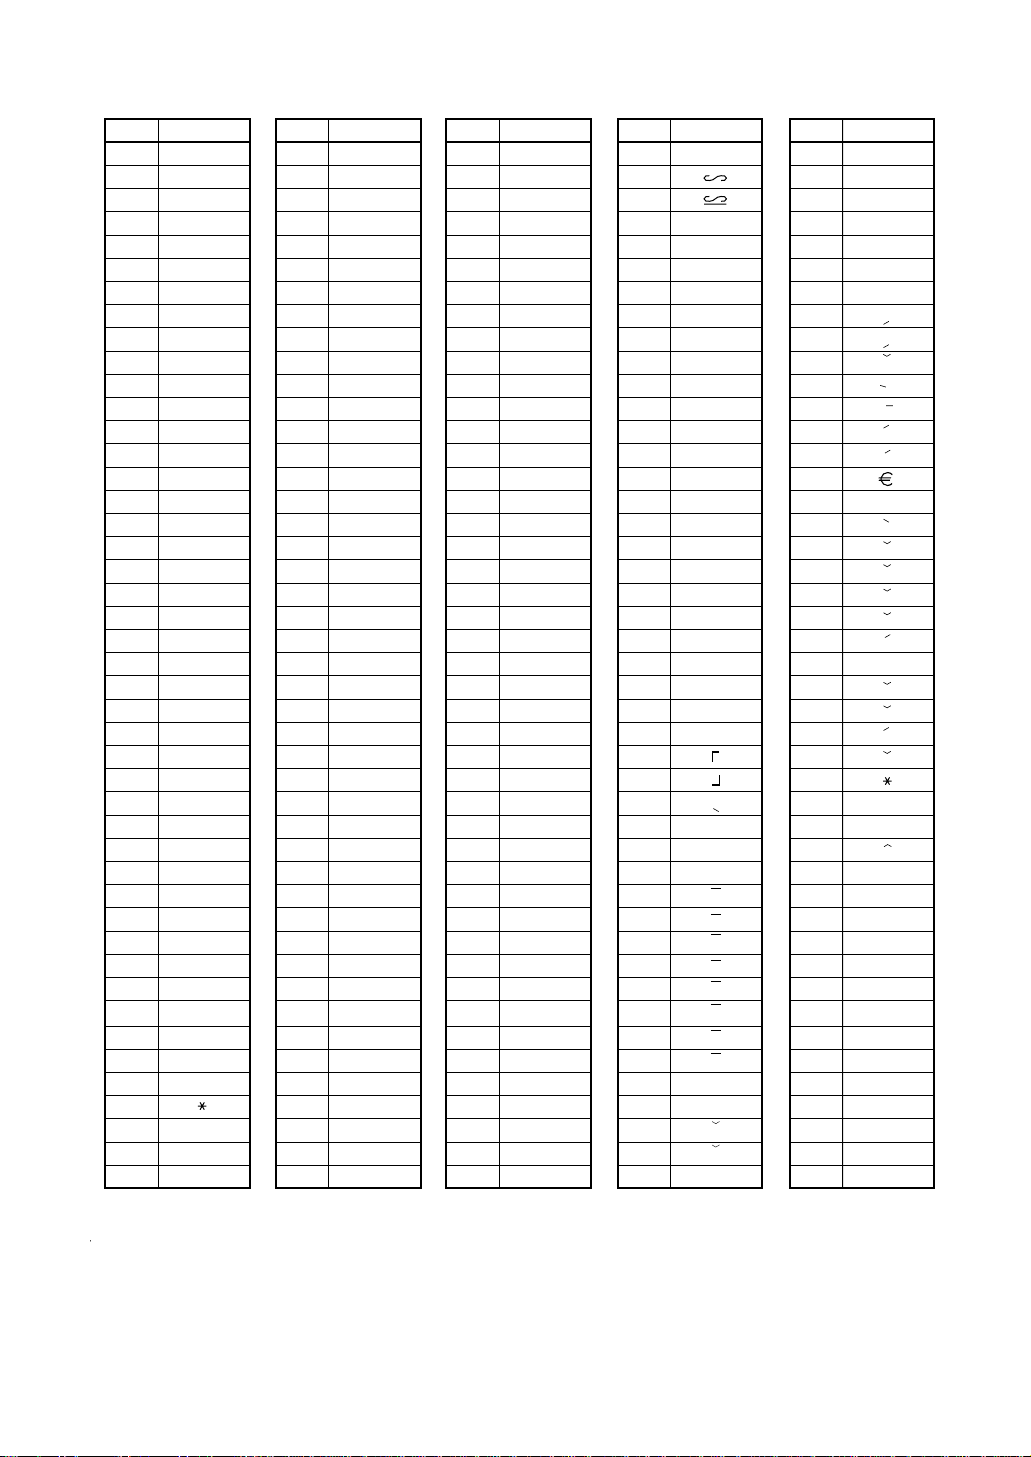
Alphanumeric character code table
✱
✱
Code
001
002
003
004
005
006
007
008
009
010
011
012
013
014
015
016
017
018
019
020
021
022
023
024
025
026
027
028
029
030
031
032
033
034
035
036
037
038
039
040
041
042
043
044
045
Character
á
â
ê
î
ì
í
ô
ó
û
ú
œ
u
ú
o
ó
¨
U
Ú
O
Ó
(space)
!
”
#
$
%
&
’
(
)
+
,
-
Code
046
047
048
049
050
051
052
053
054
055
056
057
058
059
060
061
062
063
064
065
066
067
068
069
070
071
072
073
074
075
076
077
078
079
080
081
082
083
084
085
086
087
088
089
090
Character
.
/
0
1
2
3
4
5
6
7
8
9
:
;
<
=
>
?
@
A
B
C
D
E
F
G
H
I
J
K
L
M
N
O
P
Q
R
S
T
U
V
W
X
Y
Z
Code
091
092
093
094
095
096
097
098
099
100
101
102
103
104
105
106
107
108
109
110
111
112
113
114
115
116
117
118
119
120
121
122
123
124
125
126
127
128
129
130
131
132
133
134
135
Character
Ä
Ö
Ü
^
_
a
b
c
d
e
f
g
h
i
j
k
l
m
n
o
p
q
r
s
t
u
v
w
x
y
z
{
|
}
ß
¢
!!
1
2
3
4
1/2
F/T
←
Code
136
137
138
139
140
141
142
143
144
145
146
147
148
149
150
151
152
153
154
155
156
157
158
159
160
161
162
163
164
165
177
178
180
181
182
183
184
185
186
187
188
189
190
191
192
Character
→
F
T
↓
ç
°
¿
Ù
à
Æ
ø
Å
¤
é
è
Pt
i
Ñ
ò
£
¥
°
Á
Í
A
a
E
e
I
i
U
u
N
n
C
S
C
▲
▲
´´
´´
´´
´´
193
194
195
196
197
198
199
200
201
202
203
204
205
206
207
208
209
210
211
212
213
214
215
216
217
218
219
224
225
226
227
228
229
230
231
232
233
234
235
236
237
238
253
I
G
S
G
g
K
k
L
l
Z
D
d
C
c
P
e
s
c
z
y
u
n
r
§
Ø
↑
]
[
ä
ö
ü
æ
å
É
ñ
*(DC)
’
.
.
.
.
.
.
.
.
.
.
.
.
”
Code
Character
(DC): Double-size character code
15
Page 18

PROGRAMMING
Example
=
Date (five or six digits)
XXXXXX
Procedure
Your machine allows you to program in two modes: PGM1 and PGM2. The PGM1 mode is for programming
those items that need to be changed often: unit prices of departments/PLUs/EANs and percentages. The
PGM2 mode is used for programming all PGM1-mode programs and those items that require less frequent
changes: date, time, tax rate, and the functions of each key. We describe below the programming or setting
procedures of various items.
Program every item necessary for your store following the appropriate procedures.
* To set the mode switch to the PGM1 position, use the manager or submanager key; and to set to the PGM2
position, use the manager key.
Preparations for Programming
Plug your machine into a standard wall outlet.
1.
2. Put the manager or submanager key in the mode switch and turn it to the PGM1 or PGM2 position
depending upon the programming you are about to do.
3. Check to see whether both journal and receipt rolls are present in the machine. If they are missing, install
journal and receipt paper rolls correctly referring to the procedure in “4. Installing and removing the paper
roll” under “OPERATOR MAINTENANCE”.
4. Program necessary items into your machine.
Direct Programming
Setting the date and time
1
Date
Enter the day (one or two digits), month (two digits), and year (two digits) in this sequence.
PGM 2
August 26, 2001
260801
PrintKey operation
=
Date
16
Page 19

Time
Time
Example
=
Time (max. four digits)
XXXX
Procedure
Set the time using the 24-hour format. For example, when the time is set to 2:30 AM, enter 230; and when it is
set to 2:30 PM, enter 1430. Once you set the time, the internal clock unit will continue to run as long as the
built-in battery is alive and update the date (day, month, year) properly.
Programming for departments
2
Your machine is equipped with 20 standard departments and up to 50 optional departments.
Your machine allows you to perform the following programming for each department:
PGM 2
Setting the time as 2:30 PM (14:30)
1430
=
PrintKey operation
Unit price
Procedure
1
*
XX
Dept. code
Department
key
*1Department code: 1 to 50
2
*
Unit price: max. six digits (9999.99)
Example
à
Programming the unit price 10.00 for department 1
1. Press the department 1 key.
• The current unit price will be displayed.
PGM 2PGM 1
To keep the current setting
2
*
Unit price
To program for the following dept.
To program for another dept.
:
1
2. Enter the unit price “1000.” 1000
3. Press the
4. Press the
and generate a programming report.
key to program this setting.
:
key to finalize the programming
;
:
;
;
01 0.00
01 1000
02 0.00
0.00
17
Page 20

≈
;
c
ABCDEFGHIJ
To keep the current setting
To program for the following dept.
To program for
another dept.
àà
XX
Dept. code
à
XX
Dept. code
Department
key
Department
key
Department
key
*
1
*
2
Procedure
Print
Dept. code
Unit price
Functional selection
*1Department code: 1 to 50
*2Item: Selection: Entry:
A Always enter 0. 0
B VAT6 or TAX6 No 0
C VAT5 or TAX5 No 0
D VAT4 or TAX4 No 0
E VAT3 or TAX3 No 0
F VAT2 or TAX2 No 0
G VAT1 or TAX1 No 0
H Normal/SICS (Single Item Cash Sale)/ Normal 0
SIF (Single Item Finalization) SICS 1
I Significant digit for HALO 1 through 9
J Number of zeros to follow the significant digit for HALO 0 through 8
18
PGM 2
Yes 1
Yes 1
Yes 1
Yes 1
Yes 1
Yes 1
SIF 2
Page 21

Tax status
Taxable 1
Normal dept.
HALO limit
Example
Note
• The tax system of your machine has been factory–set to automatic VAT1–6. If you desire to
select any of automatic tax 1–6, manual VAT1–6, manual VAT1, manual tax 1–6, and the
combination of the automatic VAT 1–3 and the automatic tax 4–6, consult your dealer.
• When the combination of the automatic VAT1–3 and automatic tax 4–6 system is selected, one of
the VAT1(G), VAT2(F) and VAT3(E) can be selected in combination with tax 4–6.
Example: BCDEFG= 100100, 110100, 111010
Normal department/SICS (Single Item Cash Sale) / SIF (Single Item Finalization)
• If an entry of a department programmed for SICS is made first, the sale will be finalized as soon
as the department key is pressed. If the entry is made after entering a department not
programmed for SICS, the sale will not be finalized until the
• Whenever a sale is made to a department set for SIF, the sale is finalized as soon as the
department key is pressed.
HALO (High Amount Lockout)
• You can set an upper limit amount (HALO) for each department. The limit is effective for the
REG-mode operations and can be overridden in the MGR mode.
• IJ is the same as I x 10
For example, presetting 14 (100.00) here means that amount entries of up to 100.00 are allowed
in the REG mode. When you preset 18, however, the upper limit amount is 999999.99.
Programming for department 4 as follows: A=0, B=0, C=0, D=0, E=0, F=0, G=1, H=0, I=9 and
J=5.
J
.
1. Press the department 4 key twice.
• The current parameter setting will be displayed.
44
key is pressed.
;
ABCDEFGH I J
0000000018
2. Set the parameters as follows:
• You can change the value at the blinker.
Go to the desired position with the following keys:
.......
.
º
• Enter the figure. 0000001095
3. Press the
4. Press the
and generate a programming report.
Moves the blinker to the right.
.......
Moves the blinker to the left.
key to program this setting.
≈
key to finalize the programming
;
0000000018
0000000018
Print
≈
;
➞
➞
0000000018
0000000018
0000001095
0000000018
0.00
19
Page 22

≈
ß
;
ABCDEFGH
*
c
To keep the current setting
ß
XXXXXX
PLU code
Direct PLU
key
Direct PLU
key
ß
Direct PLU
key
XXXXXX
PLU code
Procedure
Price lookup (PLU) programming
3
A PLU code can be up to six digits (free code).
Unit price
Procedure
Direct PLU
key
XXXXXX
PLU code
*Unit price: max. six digits (9999.99)
Example
ß
Programming the unit price 1.25 for PLU code 1
1. Enter the PLU code “1” and press the
PGM 2PGM 1
To keep the current setting
*
Unit price
ß
:
key. 1
ß
2. Enter the unit price “125.” 125
3. Press the
4. Press the
and generate a programming report.
key to program this setting.
:
key to finalize the programming
;
:
;
Print
;
000001 0.00
000001 125
000002 0.00
0.00
Functional selection
20
PGM 2
PLU code
Unit price
Page 23

* Item: Selection: Entry:
Note
A Sign (plus/minus) Plus 0
Minus 1
B VAT6 or TAX6 No 0
Yes 1
C VAT5 or TAX5 No 0
Yes 1
D VAT4 or TAX4 No 0
Yes 1
E VAT3 or TAX3 No 0
Yes 1
F VAT2 or TAX2 No 0
Yes 1
G VAT1 or TAX1 No 0
Yes 1
H Mode Prohibit mode 0
Subdepartment mode 1
PLU mode 2
PLU/subdepartment mode 3
Delete mode 4
Sign (plus/minus)
The function of every PLU/subdepartment varies according to the combination of its sign and the
sign of its associated department as follows:
Sign Function of PLU/subdepartment
Department PLU/
subdepartment
+ + Serves as a normal plus PLU/subdepartment
– – Serves as a normal minus PLU/subdepartment
+ – Accepts store coupon entries, but not split-pricing entries
– + Not valid; not accepted
Tax status
• The tax system of your machine has been factory–set to automatic VAT1–6. If you desire to
select any of automatic tax 1–6, manual VAT1–6, manual VAT1, manual tax 1–6, and the
combination of the automatic VAT 1–3 and the automatic tax 4–6, consult your dealer.
• When the combination of the automatic VAT1–3 and automatic tax 4–6 system is selected, one of
the VAT1(G), VAT2(F) and VAT3(E) can be selected in combination with tax 4–6.
Example: BCDEFG= 100100, 110100, 111010
• A PLU not programmed for any of these tax statuses is registered depending on the tax status of
the department which the PLU belongs to.
Mode parameter
• PLU mode: Allows a PLU entry to be made by entering an assigned PLU code and depressing
the
ß
• Subdepartment mode: Allows a subdepartment entry to be made by entering a unit price,
pressing the
• PLU/subdepartment mode: Allows PLU entries to be made in both the PLU and subdepartment
modes.
• Delete mode: Deletes program data for each PLU.
• Prohibit mode: Prohibits the entry of any assigned PLU code. This mode does not clear the
PLU/subdepartment program data.
key.
key, assigned PLU code and then pressing the
å
ß
key.
21
Page 24

Programming for PLU code 1 as follows: A=0, B=0, C=0, D=0, E=0, F=0, G=1, and H=2.
Example
ßß
;
?
XXXXXX
*
To delete the entered PLU
or
PLU code
Department key
Direct PLU
key
Direct PLU
key
c
ß
Direct PLU key
XXXXXX
PLU code
ß
Direct PLU
key
Associated dept. code
(1 to 50)
:à
To keep the current setting
1. Enter the PLU code “1”
and press the
ß
key twice. 1
ßß
2. Set the parameters A to H. 00000012
•You can go to the desired position with the
or .key.
3. Press the
4. Press the
and generate a programming report.
key to program this setting.
≈
key to finalize the programming
;
PLU assignment to departments
Procedure
º
≈
;
Print
PGM 2PGM 1
ABCDEFGH
P 00000002
P 00000012
P 00000002
0.00
Taxable 1
PLU mode
*Department key to be associated with the entered PLU
Note
Example
• The following functions of the PLU depend on the programming for its associated department:
• Grouping (Group 1 through 14)
• SICS (Single Item Cash Sale)/SIF (Single Item Finalization)/Normal
• Item validation print compulsory/non-compulsory
• HALO (high amount lockout)
Assigning PLU codes 1 and 2 to department 2
1. Enter the PLU code “1”
and press the
2. Press the department 2 key to assign
22
PLU code 1 to department 2.
ß
key three times. 1
ßßß
2
000001 01
000002 01
Page 25

3. Press the department 2 key to assign
Associated
dept.
PLU code 2 to department 2.
2
000003 01
4. Press the
and generate a programming report.
European Article Number(EAN)/Universal Product Code(UPC) programming
4
Unit price
key to finalize the programming
;
PGM 2PGM 1
;
Print
0.00
Procedure
Scan EAN code
Ä
EAN code
(max.13 digits)
*Unit price: max. six digits (9999.99)
Note
Example
1. Scan the EAN code,
or enter the EAN code “5012345678900” or
and press the
• The entry of a EAN (or UPC) code through the scanner is indicated by
Programming the unit price 2.50 for EAN code 5012345678900.
Û
To keep the current setting
*
Unit price
:Û
Ä
key. 5012345678900
2. Enter the unit price “250.” 250
3. Press the
4. Press the
and generate a programming report.
key to program this setting.
:
key to finalize the programming
;
:
;
;
Û
.
Ä
P 0.00
P 250
P 0.00
0.00
23
Page 26

Note
≈
;
Ä
*ABCDEFGH
Û
To keep the current setting
Û
ÛÛ
Ä
EAN code
(max.13 digits)
EAN code
(max.13 digits)
Scan EAN code
Scan EAN code
Procedure
Print
EAN code
Unit price
Functional selection
* Item: Selection: Entry:
A Sign (plus/minus) Plus 0
B VAT6 or TAX6 No 0
C VAT5 or TAX5 No 0
D VAT4 or TAX4 No 0
E VAT3 or TAX3 No 0
F VAT2 or TAX2 No 0
G VAT1 or TAX1 No 0
H Delete method Delete in X/Z non-accessed EAN 0
(To erase from the EAN file) deleting job (#105 in Z1 mode)
PGM 2
Minus 1
Yes 1
Yes 1
Yes 1
Yes 1
Yes 1
Yes 1
Inhibit to delete in non-accessed 1
EAN deleting job
Delete now 4
24
Sign (plus/minus)
The function of every EAN varies according to the combination of its sign and the sign of its
associated department as follows:
Sign Function of EAN
Department EAN
+ + Serves as a normal plus EAN
– – Serves as a normal minus EAN
+ – Accepts store coupon entries, but not split-pricing entries
– + Not valid; not accepted
Page 27

Tax status
Taxable 1
Delete method
(Inhibit to delete by job#105 in Z1mode)
In case of “delete”, no mark is printed.
When “delete now” is selected:
Example
• The tax system of your machine has been factory–set to automatic VAT1–6. If you desire to
select any of automatic tax 1–6, manual VAT1–6, manual VAT1, manual tax 1–6, and the
combination of the automatic VAT 1–3 and the automatic tax 4–6, consult your dealer.
• When the combination of the automatic VAT1–3 and automatic tax 4–6 system is selected, one of
the VAT1(G), VAT2(F) and VAT3(E) can be selected in combination with tax 4–6.
Example: BCDEFG= 100100, 110100, 111010
• An EAN not programmed for any of these tax statuses is registered depending on the tax status
of the department which the EAN belongs to.
Delete method
• When you select “delete now”, the programmed data of the EAN code you specified is deleted
with this programming.
• When you select “Delete in X/Z non-accessed EAN deleting job”, you can delete EANs that has
not been accessed during the period that is programmed in the job #2029 with the execution of
EAN deleting job (#105 in Z1 mode).
Programming for EAN code 5012345678900 as follows: A=0, B=0, C=0, D=0, E=0, F=0, G=1,
and H=1.
1. Scan the EAN code and press the
or enter the EAN code “5012345678900” or
and press the
key twice. 5012345678900
Û
Û
key,
ÄÛ
2. Set the parameters A to H. 00000011
•You can go to the desired position with the
or .key.
3. Press the
4. Press the
and generate a programming report.
key to program this setting.
≈
key to finalize the programming
;
º
≈
;
Print
ÛÛ
ABCDEFGH
P 00000000
P 00000011
P 0.00
0.00
25
Page 28

EAN assignment to departments
Associated
dept.
Procedure
PGM 2PGM 1
To delete the entered EAN
?
To keep the current setting
Associated dept. code
Scan EAN code
ÛÄ
Û
EAN code
(max.13 digits)
*Department key to be associated with the entered EAN
Note
Example
• The following functions of the EAN depend on the programming for its associated department:
1. Scan the EAN code and press the
or enter the EAN code "5012345678900" or
and press the
Û
ÛÛ
• Grouping (Group 1 through 14)
• SICS (Single Item Cash Sale)/SIF (Single Item Finalization)/Normal
• Item validation print compulsory/non-compulsory
• HALO (high amount lockout)
Assigning EAN code 5012345678900 to department 2
key twice,
Û
key three times. 5012345678900
Û
2. Press the department 2 key to assign
EAN code 5012345678900 to department 2.
(1 to 50)
*
Department key
Scan EAN code
Ä
EAN code
(max.13 digits)
ÄÛÛ
ÛÛÛ
2
:à
Û
or
;
P 01
P 0.00
3. Press the
and generate a programming report.
26
key to finalize the programming
;
Print
;
0.00
Page 29

Deduction
amount
Programming for discount keys
5
Deduction amount (-)
Procedure
To keep the current setting
PGM 2PGM 1
-
*
Deduction amount
: ;
≠
*Deduction amount: 0 - 999999
Example
1. Press the
Assigning “10.00” to the
key.
-
2. Enter the deduction amount “1000.” 1000
3. Press the
4. Press the
and generate a programming report.
key to program this setting.
:
key to finalize the programming
;
-
key
-
:
;
Print
001 0.00
001 1000
001 10.00
0.00
27
Page 30

High amount lockout (HALO) and +/- sign (-)
HALO limit
Example
Note
-
≠
-
≠
≈;
*
ABC
To keep the current setting
Procedure
* Item: Selection: Entry:
A Sign (plus/minus) Plus 0
Minus 1
B Significant digit for HALO 1 through 9
C Number of zeros to follow the significant digit for HALO 0 through 8
PGM 2
1. Press the
HALO (High Amount Lockout)
BC is the same as B x 10
For example, presetting 14 (100.00) here means that amount entries of up to 100.00 are allowed in
the REG mode. When you preset 18, however, the upper limit amount is 999999.99.
Programming for the
key twice.
-
C
.
key as follows: A=1, B=1, and C=3.
-
--
2. Set the parameters A to C. 113
•You can go to the desired position with the
or .key.
3. Press the
4. Press the
and generate a programming report.
key to program this setting.
≈
key to finalize the programming
;
º
≈
;
Print
ABC
001 118
001 113
001 113
0.00
28
Page 31

Discount
Example
∞
•
∞
≈;
*
A
To keep the current setting
•
Procedure
Example
Note
∞
•
:;
*
Percent rate
To keep the current setting
Procedure
Programming for percent keys
6
Percent rate (%)
* Percent rate: 0.00 - 100.00
You must use a decimal point when setting percentage rates that are fractional.
Assigning 10.25% to the
10 .25
∞
PGM 2PGM 1
key
∞
PrintKey operation
:
;
Percent rate
Sign (+/-) (%)
* Item: Selection: Entry:
A Sign (plus/minus) Plus (premium) 0
Programming minus sign for the
PGM 2
Minus (discount) 1
key
∞
PrintKey operation
∞∞1 ≈
;
29
Page 32

HALO limit
Example
≈;
*
ABCorresponding key
To keep the current setting
Procedure
Exchange
rate
Example
Note
[“
:
;
*
Exchange rate
through
To keep the current setting
Procedure
Programming for exchange keys
7
Currency exchange rate (e)
* Currency exchange rate: 0.000000 - 999.999999
You must use a decimal point when setting conversion rates that are fractional.
Assigning 0.6068 to the[key
[0 .
6068
:
;
PGM 2PGM 1
PrintKey operation
Programming for the Å, r, p, 'and îkeys
8
High amount lockout (HALO) (
* AB is the same as A x 10
A: Significant digit (1 through 9)
B: Number of zeros to follow the significant digit (0 through 8)
Programming a HALO limit of 1000.00 (15) for the
B
15
}
Å , r , p , '
≈
;
}
and
key
PGM 2
)
î
PrintKey operation
30
Page 33

Lowest taxable
amount
Tax rate 2
Tax rate : 4%
Programming the tax rate
9
Tax rate
Procedure
◊
* A: Enter a corresponding tax rate number. For example, when you program a tax rate as tax rate 1, enter “1”,
and when you program it as tax rate 6, enter “6”.
** Sign and tax rate: XYYY.YYYY
Note
Example
PGM 2
When the lowest taxable amount is zero
*A
1-6
• The lowest taxable amount is valid only when you select add on tax system. If you select VAT
(Value added tax) system, it is ignored.
• If you make an incorrect entry before pressing the second
cancel it with the
with the
• If you select VAT system, the sign which you program is ignored.
≈ ≈
Sign
:
Programming the tax rate (+4%) as tax rate 2 with lowest taxable income as 0.12.
**Sign and tax rate Lowest taxable amount
max. five digits:
0.00 to 999.99
Tax rate= 0.0001 to 100.0000
-
/+ = 1/0
≈
key; and if you make an error after pressing the second ≈key, cancel it
c
key. Then program again from the beginning.
;
To delete
key in programming a tax rate,
:
1. Press the
◊
key.
◊
2. Enter the tax rate “2”. 2 ≈
3. Enter the tax rate “+4%.” 4
4. Enter the lowest taxable amount “12.”
Press the ;key to finalize the programming
5.
and generate a programming report.
Print
≈
12
;
P 0.00
P 0.00
P 0.00
P 12
0.00
31
Page 34

Job-Code-Based Programming
2611
.
≈
;
Time (max. four digits)
Procedure
Example
2610
.
≈
;
Date (five or six digits)
Procedure
Note
This section illustrates how to program items using job codes. Using job codes allows you to program a wide
variety of items in comparison with direct programming.
Start this programming by entering a corresponding job code as shown below.
2110
All the items which can be programmed by the job-code-based programming are listed on this page and the
following, and those which can also be programmed by the direct programming are marked with the symbol
Direct
“ ” that follows job codes.
.
When setting the parameters for a job code, the digit that is blinking is the one that can be changed.
To go to the position of the parameter that you want to change, press either of the following keys :
.
º
Setting the date and time
1
Setting the date
Enter day (one or two digits), month (two digits), and year (two digits) in this sequence.
≈
Moves the blinker to the right.
Moves the blinker to the left.
PGM 2
Direct2610
PrintKey operation
2610
.≈
260801
Setting the time
Set the time using the 24-hour format. For example, when the time is set to 2:30 AM, enter 230; and when it is
set to 2:30 PM, enter 1430.
32
PGM 2
;
Direct2611
Date
Page 35

.
≈
2613
;
A number (one to four digits) that is one
less than the desired starting number
To begin the count from 0001
Procedure
Example
2612
.
≈
;
Register number
(one to six digits)
To set the register number “0”
Procedure
Time
2611
Example
.≈
1430
;
Setting the register and consecutive numbers
2
PrintKey operation
.≈
123456
PGM 2
;
Setting the register number
When your store has two or more registers, it is practical to set separate register numbers for their identification.
You may set them in a maximum of six digits.
2612
2612
PrintKey operation
Register number
Setting the consecutive number
The consecutive number is increased by one each time a receipt is issued.
Enter a number (one to four digits) that is one less than the desired starting number.
PGM 2
2613
33
Page 36

Consecutive
number
Example
Note
Lowest taxable
amount
Tax rate 2
Tax rate : 4%
Example
2711
*
A
.
≈
≈
≈
;
:
When the lowest taxable amount is zero
To delete
max. five digits:
0.00 to 999.99
1 to 6
Lowest taxable
amount
**Sign and
tax rate
Procedure
Programming the tax rate
3
2613
.≈
1000
PrintKey operation
;
Tax rate
*A: Enter a corresponding tax rate number. For example, when you program a tax rate as tax rate 1, enter 1
and when you program it as tax rate 6, enter 6.
** Sign and tax rate: XYYY.YYYY
PGM 2
Sign -/+ = 1/0
Direct2711
Tax rate= 0.0001 to 100.0000
2711
.≈
2
≈
4
≈
12
;
PrintKey operation
34
• The lowest taxable amount is valid only when you select add on tax system. If you select VAT
(Value added system), it is ignored.
• If you make an incorrect entry before pressing the third
it with the
key. Then program again from the beginning correctly.
• If you select VAT system, the sign which you program is ignored.
key; and if you make an error after pressing the third ≈key, cancel it with the
c
key in programming a tax rate, cancel
≈
:
Page 37

2110
.
≈
≈:
;
c
Dept. code
*ABCDEFG
To program for the dept. other than the following dept.
To keep the current setting
To program for the following dept.
The current
setting
is displayed.
Procedure
Programming for departments
4
Your machine is equipped with 20 standard departments and up to 50 optional departments.
Your machine allows you to perform the following programming for each department:
Functional programming
You can set each department for:
Compulsory item validation print
If item entries must be validated, program corresponding departments for compulsory item validation print.
SICS (Single Item Cash Sale) / SIF (Single Item Finalization)
• SICS
If the first registration is to a department set for SICS, the sale is finalized as soon as the department key is
pressed. If the sale is preceded by registrations to departments not set for SICS, a sale to a department set
for SICS does not finalize and can be repeated until the
• SIF
Whenever a sale is made to a department set for SIF, the sale is finalized as soon as the department key is
pressed.
Type of unit price entry
You may select one of the following four types of unit price entry for each department.
• Open and preset
• Preset only
• Open only
• Inhibit department key
PGM 2
2110
key is pressed.
;
* Item: Selection: Entry:
A Always enter 0. 0
B Item validation print Compulsory 1
Non-compulsory 0
C and D Always enter 0. 0
E SIF/SICS /Normal SIF 2
SICS 1
Normal 0
F Always enter 0. 0
G Type of unit price entry Open and preset 3
Preset only 2
Open only 1
Inhibit department key 0
35
Page 38

Note
2111
.
≈
≈:
;
*ABCDEFG
To keep the current setting
To program for the following dept.
c
To program for the dept. other than the following dept.
The current
setting
is displayed.
Dept. code
Procedure
2110
Example
.≈
3 ≈0000003
PrintKey operation
:
;
A through G
Tax status
Assign a tax status to each department. When entries are made into taxable departments in a transaction, tax is
automatically computed according to the associated tax rate as soon as the transaction is completed.
Item: Selection: Entry:
*
A Always enter 0. 0
B VAT6 or TAX6 Yes 1
C VAT5 or TAX5 Yes 1
D VAT4 or TAX4 Yes 1
E VAT3 or TAX3 Yes 1
F VAT2 or TAX2 Yes 1
G VAT1 or TAX1 Yes 1
PGM 2
Direct2111
No 0
No 0
No 0
No 0
No 0
No 0
36
• The tax system of your machine has been factory–set to automatic VAT1–6. If you desire to
select any of automatic tax 1–6, manual VAT1–6, manual VAT1, manual tax 1–6, and the
combination of the automatic VAT 1–3 and the automatic tax 4–6, consult your dealer.
• When the combination of the automatic VAT1–3 and automatic tax 4–6 system is selected, one of
the VAT1(G), VAT2(F) and VAT3(E) can be selected in combination with tax 4–6.
Example: BCDEFG= 100100, 110100, 111010
Page 39

HALO limit
Example
2112
.
≈
≈:
;
*AB
To keep the current setting
c
The current
setting
is displayed.
Dept. code
Procedure
2111
Example
4 ≈0000110
10 ≈0000101
c
.≈
:
:
;
PrintKey operation
Tax status
A limit amount (HALO) of entry
You can set upper limit amounts (HALO: High Amount Lockout) for each department. The limit is effective for
the REG-mode operations and can be overridden in the MGR mode. HALO limit is represented by two figures
as follows:
* AB is the same as A x 10
A: Significant digit (1 through 9)
B: Number of zeros to follow significant digit (0 through 8)
For example, presetting 14 (100.00) here means that amount entries of up to 100.00 are allowed in the REG
mode. But when you preset 18, the upper limit amount is 999999.99.
B
.
2112
.≈
1 ≈95
PGM 2
:
Direct2112
PrintKey operation
;
37
Page 40

Unit price
Example
1110
.
≈
≈:
;
To keep the current setting
Unit price
(max. six digits)
c
The current
setting
is displayed.
Dept. code
Procedure
2114
Example
2114
.
≈
≈:
;
To program spaces
Character keys
(max. 16 digits)
c
Dept. code
Procedure
FRUITS
PGM 2
.≈
Alphanumeric characters
You can program a maximum of 16 characters (item label) for each department. (However, the default setting is
for a 12-character label.)
Select the characters you want to program, referring to section “2 How to program alphanumeric characters” in
chapter “PRIOR TO PROGRAMMING”.
1
2114
PrintKey operation
≈
:
;
Label
programmed
for dept. 1
Unit price
You can program unit prices up to a maximum of six digits (9999.99). Even if a department is not programmed
to allow the entry of preset unit prices in functional programming (job 2110), the department is automatically
changed to allow the entry of preset unit prices by this programming entry.
PGM 2PGM 1
1110
1 ≈1000
Direct1110
PrintKey operation
.≈
:
;
38
Page 41

Commission group assignment
Commission
group number
Example
2115
.
≈
≈:
;
To keep the current setting
To program for the follwing dept.
The current
setting
is displayed.
Dept. code
c
*A
Procedure
Your machine allows you to assign a commission group (1-9) to each department.
* A: Commission group 0-9 (0 = no commission)
2115
.≈
1
≈1 :
5 ≈2
c
PGM 2
:
2115
PrintKey operation
;
39
Page 42

Group number
Group no.
Example
Note
2116
.
≈
≈:
;
*Group no.
To keep the current setting
(1 through 14)
The current setting
is displayed.
c
Dept. code
Procedure
You can assign departments to a maximum of 14 groups (1 through 14).
This programming enables you to take group department sales reports.
* Group number: Dept. (+) 1 through 9 (groups 1 through 9)
Dept. (–) 10
Hash (+) dept. 11
Hash (–) dept. 12
Bottle return (+) dept. 13
Bottle return (–) dept. 14
The standard model provides no hash dept./bottle return dept. If you need them, please consult
your dealer.
PGM 2
2116
40
2116
.≈
1 ≈1
2
:
:
;
PrintKey operation
Page 43

Key no.
Dept. code
.≈
Example
2119
.
≈
≈:
;
Key no. AB
Cancellation
(1 through 68)
To program for the following key number
To program for the key number other than the following key number
*
1
*
2
Procedure
1 ≈1
2
PGM 2
:
:
Department key positioning
You can assign a department number to each key position. Each key position has a corresponding key number.
Departments may be freely selected for the number of department keys and their positions.
To assign the department to a key position, select the key number of the position.
For key number position, refer to section “2 Standard key number layout” in chapter “KEYBOARD”.
1
*
The key number placement is determined by your local Authorized SHARP Dealer.
2
*
AB is a department code.
2119
2119
PrintKey operation
;
41
Page 44

Dept.
+ Serves as a normal plus PLU/subdept.
– Serves as a normal minus PLU/subdept.
+ Accepts store coupon entries, but not split-pricing entries.
–
PLU/subdept.
Sign
+
–
–
+ Not valid; not accepted.
Function of PLU/subdepartment
Price lookup (PLU) programming
5
Your machine has two kinds of PLU registration methods.
Direct PLU registration: Accomplished by depressing item key (direct PLU key) directly.
Indirect PLU registration: Accomplished by making an entry of PLU code and pressing the
Each PLU requires you to program the following:
PLU code (six digits)
Associated department
When a PLU is associated with a department, the following functions of the PLU depend on the
programming for the corresponding department.
• Grouping (Group 1 through14)
• HALO (only for the subdepartment)
• Single item cash sale/Single item finalization
• Item validation print compulsory/non-compulsory
Unit price (max. six digits)
You will usually have unit prices programmed for individual PLUs as PLU preset unit prices. If you program
unit price “0” for a PLU, you can enter only the selling quantity of the PLU, i.e. the PLU can be used only as
a counter.
Base quantity for split-pricing entries - two digits
Program a base quantity for each PLU/subdepartment dedicated to split-pricing entries.
PLU, subdepartment, PLU/subdepartment, delete, or prohibit mode
• If the PLU mode (i.e. automatic preset unit price entry) is selected, individual PLU entries can be made by
entering the assigned code and depressing the
PLU code entry).
• If the subdepartment mode is selected, the
PLU code entry. The entry is finalized by the
• If the PLU/subdepartment mode is selected, the entries in both the PLU and subdepartment modes are
available.
• If the delete mode is selected, the corresponding program data for each PLU is deleted.
• If the prohibit mode is selected, the assigned PLU code cannot be entered. This mode does not clear the
PLU/subdepartment program data.
Sign (+/-)
The function of every PLU/subdepartment varies according to the combination of its sign and its associate
department's sign as follows:
ß
key must be depressed after the price entry followed by the
å
ß
key (or by depressing a direct PLU key without any
key depressed.
ß
key.
Tax status
Item label (12 characters) (option: max. 16 characters)
Commission group (1 to 9)
Link PLU
Any PLU is able to link to any other PLU (e.g. bottle deposit). However, the number of links is a maximum of
5. Even if more than 5 PLUs are linked, the sixth or higher link is not actualized.
Direct PLU key positioning
42
Page 45

PLU range
Associated dept.
PLU code
Associated dept.
Example
2230
.
≈
≈≈
:
;
End PLU code
*2 *3
AB
*4
The current setting
of start PLU code
is displayed.
To apply the current
setting of start PLU code
to PLUs within the range
Start PLU code
Note
1200
.
≈
≈
c
:
;
PLU code AB
*1 *4
To program for the following PLU
The current
setting
is displayed.
To keep the
current setting
Procedure
Note
For some items, you can program in two ways: programming an individual PLU code and for a
range of sequential PLU codes. The procedure marked “For each PLU” shows individual PLU
programming. “For a range of PLUs” shows sequential range PLU programming.
Department assignment
For each PLU
As soon as the programming is completed for one PLU, the next PLU code appears in the display.
For a range of PLUs
PGM 2PGM 1
Direct22301200
*1, 2, 3: 1 to 999999 (free code)
*4: AB: Associated department code
For each PLU
For a range
of PLUs
1200
.≈
1 ≈2
2
:
:
;
2230
.≈
11 ≈20
≈
3
:
;
PrintKey operation
PrintKey operation
43
Page 46

Unit prices
Base q'ty
Example
1211
.
≈
≈:
;
PLU code
To keep the current setting
Base q'ty
(max. 2 digits)
c
The current
setting
is displayed.
Procedure
Example
1210
.
≈
≈:
;
PLU code
To keep the current setting
Unit price
(max. six digits)
c
The current setting
is displayed.
Procedure
PGM 2PGM 1
1210
.≈
1 ≈125
Direct1210
PrintKey operation
:
;
Unit price
Base quantity
PGM 2PGM 1
1211
2 ≈12
1211
PrintKey operation
.≈
:
;
44
Page 47

PLU/subdepartment mode
PLU range
3: PLU/subdept.
mode
3: PLU/subdept.
mode
Example
2231
.
≈
≈≈
:
;
Start PLU code End PLU code
*2 *3
To apply the current setting of
start PLU code to PLUs within the range
ABC
*4
The current setting
of start PLU code
is displayed.
2210
.
≈
≈:
;
PLU code ABC
*1 *4
To keep the current setting
c
The current
setting is
displayed.
Procedure
For each PLU
For a range of PLUs
*1,2,3: 1 through 999999
*4: Item: Selection: Entry:
A and B Always enter 0. 0
C Mode parameter Prohibit mode 0
PGM 2
Subdept. mode 1
PLU mode 2
PLU/subdept. mode 3
Delete mode 4
Direct22312210
For each PLU
For a range
of PLUs
2210
.≈
1 ≈003
:
;
2231
.≈
11 ≈20
≈
003
:
;
PrintKey operation
PrintKey operation
45
Page 48

Sign (+/-) and tax status
Note
2232
.
≈
≈≈
:
;
Start PLU code End PLU code
*2 *3
To apply the current setting of start
PLU code to PLUs within the range
ABCDEFG
*4
The current setting
of start PLU code
is displayed.
2211
.
≈
≈:
;
PLU code
To keep the current setting
*1
c
The current
setting
is displayed.
ABCDEFG
*4
Procedure
For each PLU
For a range of PLUs
*1,2,3: 1 through 999999
: Item: Selection: Entry:
*4
A Sign (+/-) Minus PLU 1
B VAT6 or TAX6 Yes 1
C VAT5 or TAX5 Yes 1
D VAT4 or TAX4 Yes 1
E VAT3 or TAX3 Yes 1
F VAT2 or TAX2 Yes 1
G VAT1 or TAX1 Yes 1
PGM 2
Plus PLU 0
No 0
No 0
No 0
No 0
No 0
No 0
Direct22322211
• The tax system of your machine has been factory–set to automatic VAT1–6. If you desire to
select any of automatic tax 1–6, manual VAT1–6, manual VAT1, manual tax 1–6, and the
combination of the automatic VAT 1–3 and the automatic tax 4–6, consult your dealer.
• When the combination of the automatic VAT1–3 and automatic tax 4–6 system is selected, one of
the VAT1(G), VAT2(F) and VAT3(E) can be selected in combination with tax 4–6.
Example: BCDEFG= 100100, 110100, 111010
• A PLU not programmed for any of these tax statuses is registered depending on the tax status of
the department which the PLU belongs to.
46
Page 49

For each PLU
Label
programmed
for PLU code 1
Example
2214
.
≈
≈:
;
PLU code
To program spaces
Character keys
(max. 16 digits)
c
Procedure
Taxable 1
Example
2211
.≈
2 ≈0000001
0000000
PrintKey operation
:
:
;
For a range
of PLUs
2232
.≈
11 ≈20
0000001
≈
:
;
Alphanumeric characters
You can program a maximum of 16 characters (item label) for each PLU or subdepartment. (However, the
default setting is for a 12-character label.) Select the characters you want to program, referring to section “2
How to program alphanumeric characters” in chapter “PRIOR TO PROGRAMMING”.
PGM 2
2214
PrintKey operation
PLU range
Taxable 1
PrintKey operation
2214
.≈
1
≈
MILK
:
;
47
Page 50

Assigning of PLUs to commission groups
Commission
group number
PLU range
Commission
group number
Example
2235
.
≈
≈:
;
*3
To apply the current setting of start
PLU code to PLUs within the range
The current
setting
is displayed.
≈
*2
Start PLU code End PLU code
*A
2215
.
≈
≈:
;
*1
To keep the current setting
To program for the follwing PLU
The current
setting
is displayed.
PLU code
c
*A
Procedure
You can assign PLUs (or subdepartments) to commission groups.
For each PLU
For a range of PLUs
PGM 2
22352215
*1,2,3 : 1 through 999999
*A : Commission group 0-9 (0=no commission)
For each PLU
2215
.≈
1 ≈1
:
;
For a range
of PLUs
2235
.≈
12 ≈14
≈
1
:
;
PrintKey operation
PrintKey operation
48
Page 51

Link PLU
PLU code
Key no.
Example
2219
.
≈
≈:
;
Key no.
(1 through 68)
PLU code
To program for the following key number
To program for the key number other than the following key number
Cancellation
*
Procedure
Example
Note
2220
.
≈
≈:
;
PLU code Linked PLU code
Cancellation
To repeat up to 5 times
Procedure
• To program this function, please consult your dealer.
• PLU codes must have already been defined.
PGM 2
2220
2220
.≈
21 ≈25
26
27
:
:
:
;
PrintKey operation
Linked
PLU code
Direct PLU key positioning
You can assign a PLU code to each key position. PLUs may be selected for the number of direct PLU keys and
their positions. For key number positions, refer to section “2 Standard key number layout” in the chapter
“KEYBOARD”.
* The key number placement is determined by your local Authorized SHARP Dealer.
2219
PGM 2
.≈
16
1
2219
PrintKey operation
≈
:
;
49
Page 52

European Article Number (EAN) or Universal Product Code (UPC) programming
0
C
D
Maker code
Number system character
Item code
Check digit
3
C
D
NCD (or HRI) format
2
** ***
C
D
Item code Price
Price check digit
4
C
D
(Free code)
C
D
Maker code
Item codeNation code
2
C
D
(Free format)
0
C
D
(Free code)
Program the format by the job#2025.
6
EAN or UPC code
Your machine can transact the following codes:
• UPC-A (Number system character: 0, 2, 3 ,4) • UPC-E • EAN-8 • EAN-13
For the codes used in-store marking, there are two types of PLU type (treated as a code like PLU code) and
Non-PLU type (price/quantity information is included in the code).
When a code is non-PLU type, the price/quantity in the code is read for sales entry (in case of quantity, “quantity
multiplys preset unit price” is processed to obtain price.)
UPC-A
• Number system character: 0 <used in the source marking>
• Number system character: 3 <used as NDC or HRI>
For entry, a full 12 digits number or 11 digits number (omitting the
check digit) must be entered.
• Number system character: 2 <In-store marking Non-PLU type>
You can program the format by the job #2025.
• Number system character: 4 <In-store marking PLU type>
For entry, a full 12 digits number, 11 digits number (omitting the
check digit), or a leading zero plus 12 digits number must be
entered.(Any numbers are allowed for the digits marked with *, and on the recipt/journal, non-PLU type code is
printed like 2020008**** (****: price information).)
UPC-E
• UPC-E is a zero-surpressed version of UPC-A that conforms to
the UPC-E Standards. This code is used for marking small
package.
For entry, a 6 digits number or a leading zero plus 6 digits number
must be entered.
EAN 8
• Ordinary EAN-8 code (flag: neither 0 nor 2) <used in the source
marking>
For entry, a full 8 digits number must be entered.
• Internal code (flag 2) <in-store marking non-PLU short type>
Program the format by the job #2025.
• Internal code (flag 0) <in-store marking PLU short type>
For entry, a full 8 digits number must be entered. On the
receipt/journal, non-PLU type code is printed like 208**** (****:
price/quantity information)
50
Page 53

EAN-13
Note
Note
C
D
Article code
Prefix code 434 or 439
Price (xx.xx)
(+ Add-on code)
C
D
Article code
Prefix code 414 or 419
Price (xx.xx)
(+ Add-on code)
C
D
Article code
Prefix code 988 or 989
Price (xx.xx)
(+ Add-on code)
378 S
C
D
Article code
Prefix code
Price (xx.xx)
(+ Add-on code)
Supplier code
7388
C
D
Prefix code Price (xxx.x)Article code
(+ Add-on code)
C
D
Maker code
Nation code
Item code
C
D
(Free format)
Program the format by the job #2025.
Flag
02, 20-29
• Ordinary EAN-13 code (used in the source marking)
• Specific EAN-13 code (flag 977, 978, 979) (used in the source
marking: ISBN, ISSN)
.
For entry, you must enter a full of 13 digits number.
• Internal code (used in the in-store marking, the flag character
number: 20 thru 29 and 02) Program the format by the job#
2025.
• EAN press code (used for press articles)
For a press article, you must use a 13 digits number EAN code plus a 2 digit or 3 digit add-on code, though
your register can register 13 digits number EAN code without an add-on code.
The format for press articles is decided unique by each country. For the formats for other
countries than the ones shown below, please ask your dealer.
German type 1
Currency for price is DEM. (The price is not
converted automatically according to EURO
status.)
German type 2
(EURO code - Use this code from January
2002)
Currency for price is EURO.
United Kingdom
Currency for price is GBP
France
Currency for price on the prefix code 378 is
EURO, and 379 is FR. (The price is converted
automatically according to EURO status.)
Sweden
Currency for price is SKR.
• The availability of these press codes on your register depends on the programming (job #2035)
• Since the price in a press code is read for sales entries, and the currency is decided by the
code, note that the code you enter for sales matches your domestic currency.
51
Page 54

Add-on code
Note
Code entry No add-on code 2-digit add-on code 5-digit add-on code
UPC-A 12 14 17
UPC-A w/leading zero 13 15 18
UPC-A w/o check digit 11 ––
UPC-E 6 ––
EAN-8 8 ––
EAN-13 13 15 18
UPC-A and EAN-13 may be followed by a two digits number or a five digits number as add-on code, excepting
UPC-A without a check digit plus two or five digits add-on code.
Therefore, the total number of digits enterable for sales entries are as shown below:
Your register automatically judge the add-on code in an EAN code entered from the total number
of digits and the flag.
EAN/UPC programming
Each EAN or UPC (hereinafter referred to as EAN) requires you to program the following.
• EAN code (max. 13 digits)
• Associated department (1-50)
When an EAN is associated with a department, the following functions of the EAN depend on the
programming for the department.
• Grouping (Group 1 through14)
• HALO (only for the subdepartment)
• Single item cash sale/Single item finalization
• Item validation print compulsory/non-compulsory
EAN code delete method
You can program how you delete EAN codes; deleting in the programming, inhibit deleting, or deleting the
EAN codes that have not been accessed for a certain period, which can be programmed (up to 99 days)
when you execute #105 in Z1 mode.
Unit price (max. six digits)
Base quantity for split-pricing entries
Sign (+/–)
Tax status
If you do not program tax status for a EAN, the tax status of the EAN follows to the status of the associated
department.
Item label (12 characters) (option max. 16 characters)
Commission group (1-9)
EAN link
System programming for EAN function
Delete period for non-accessed EAN codes
Non-PLU code format
Type of press code
Price entry method for press code
Label of record in EAN file
52
Page 55

Department assignment
Associated dept.
EAN code
Example
:≈
Ä
≈
;
.
1000
To keep the current setting
The current setting
is displayed.
Scan EAN code
EAN code
(max.13 digits)
Associated
dept. code
(1 to 50)
Procedure
1000
5012345678900
.≈
≈
2
:
;
PGM 2PGM 1
Direct1000
PrintKey operation
53
Page 56

Unit prices
Base q’ty
Example
:≈
Ä
≈
;
.
1011
To keep the current setting
The current setting
is displayed.
Scan EAN code
EAN code
(max.13 digits)
Base q'ty
(max.2 digits)
Procedure
Unit price
Example
:≈
Ä
≈
;
.
1010
To keep the current setting
The current setting
is displayed.
Scan EAN code
EAN code
(max.13 digits)
Unit price
(max.6 digits)
Procedure
PGM 2PGM 1
1010
.≈
5012345678900
250
Direct1010
PrintKey operation
≈
:
;
Base quantity
PGM 2PGM 1
1011
.≈
5012345678900
1011
≈
5
:
;
PrintKey operation
54
Page 57

Delete method
Delete method
(Inhibit to delete by job#105 in Z1 mode)
In case of “delete”, no mark is printed.
When “delete now” is selected:
Example
*
:≈
Ä
≈
;
.
2010
To keep the current setting
The current setting
is displayed.
Scan EAN code
EAN code
(max.13 digits)
Delete method
Procedure
* Delete method
4: Delete now
1: Inhibit to delete in non-accessed EAN deleting job (#105 in Z1 mode)
0: Delete in non-accessed EAN deleting job (#105 in Z1 mode)
With the execution of<None> EAN deleting job, you can delete EANs that has not been accessed during the
period that is programmed in the job #2029.
PGM 2
5012345678900
2010
2010
.≈
≈
1
:
PrintKey operation
;
55
Page 58

Sign (+/-) and tax status
Taxable 1
Example
Note
*
:≈
Ä
≈
;
.
2011
To keep the current setting
The current setting
is displayed.
Scan EAN code
EAN code
(max.13 digits)
ABCDEFG
Procedure
*: Item: Selection: Entry:
A Sign (+/-) Minus PLU 1
B VAT6 or TAX6 Yes 1
C VAT5 or TAX5 Yes 1
D VAT4 or TAX4 Yes 1
E VAT3 or TAX3 Yes 1
F VAT2 or TAX2 Yes 1
G VAT1 or TAX1 Yes 1
PGM 2
Plus PLU 0
No 0
No 0
No 0
No 0
No 0
No 0
Direct2011
• The tax system of your machine has been factory–set to automatic VAT1–6. If you desire to
select any of automatic tax 1–6, manual VAT1–6, manual VAT1, manual tax 1–6, and the
combination of the automatic VAT 1–3 and the automatic tax 4–6, consult your dealer.
• When the combination of the automatic VAT1–3 and automatic tax 4–6 system is selected, one of
the VAT1(G), VAT2(F) and VAT3(E) can be selected in combination with tax 4–6.
Example: BCDEFG= 100100, 110100, 111010
• An EAN not programmed for any of these tax statuses is registered depending on the tax status
of the department which the EAN belongs to.
PrintKey operation
2011
.≈
5012345678900
0000001
≈
:
;
56
Page 59

Alphanumeric characters
Commission
group number
Example
*
:≈
Ä
≈
;
.
2015
To keep the current setting
The current setting
is displayed.
Scan EAN code
EAN code
(max.13 digits)
A
Procedure
Item label
Example
:≈
Ä
≈
;
.
2014
To keep the current setting
Scan EAN code
EAN code
(max.13 digits)
Character keys
(max. 16 digits)
Procedure
You can program a maximum of 16 characters (item label) for each EAN. (However, the default setting is for a
12-character label.) Select the characters you want to program, referring to section “2 How to program
alphanumeric characters” in chapter “PRIOR TO PROGRAMMING”.
2014
5012345678900
PGM 2
.≈
APPLE
2014
PrintKey operation
≈
:
;
Assigning of EANs to commission groups
You can assign EANs to commission groups.
*A : Commission group 0-9 (0=no commission)
2015
.≈
5012345678900
≈
1
:
;
PGM 2
2015
PrintKey operation
57
Page 60

EAN link
Example
≈;.
Delete period
(1 to 99 days)
2029
To program “00”
Procedure
Linked PLU
Example
Note
*To repeat up to 5 times
:≈
Ä
≈
;
.
2030
Cancellation
Scan EAN code
EAN code
(max.13 digits)
Linked PLU
code
Procedure
* The programed number of link PLUs is shown on the display like “P1”. (Incremented one every time you
program a linked PLU.)
PGM 2
• To program this function, please consult your dealer.
• EAN code and PLU code must have been already defined.
2030
2030
.≈
5012345678900
30
31
32
PrintKey operation
≈
:
:
:
;
Delete period for non-accessed EAN codes
You can delete the EAN codes which have not been accessed during the period you set in this program when
you execute the job #105 in Z1 mode when you set “Delete in X/Z non-accessed EAN deleting job” in the EAN
delete method (#2010).
* When you select “00” for the period, no EAN code is deleted by the X/Z non-accessed EAN deleting job even
if you programmed “Delete in X/Z non-accessed EAN deleting job” in the job #2010.
2029
.≈
60
;
58
PGM 2
2029
PrintKey operation
Page 61

Programming Non-PLU code format
ABCDEF
Flag code
C
D
PLU codeFlag
code
Price
P
D
20
Price check digit (TAB2)
Example
:≈≈
;
.
Flag code
(max. 2 digits)
2025
To delete
ABCDEF
*
2
*
1
Procedure
C
D
Free formatFlag
(02 or 20-29)
Field 2Field 1
Free format area
Price check digit
2
C
D
Free format
Flag
PGM 2
2025
The register allows you to specify the Non-PLU code format (flag code: 2, 02, 20 -29).
The format data is as follows:
1
*
Flag code: 2, 02, 20 - 29
2
*
Item: Selection: Entry:
A Length of field 1 (number of digits) 0 - 9
B Length of field 2 (number of digits) 0 - 9
C Meaning of field 1*
D Meaning of field 2*
E Price check digit used Yes 1
F TAB or decimal point of field 2 (0, 1, 2, 3) 0 - 3
3
4
Free code 2
Dept. code 1
PLU code 0
Quantity 2
Price 0
No 0
*3: When you select Dept. code, the sales are counted up as the sales of the department (associated
department assignment is ignored.), and when you select PLU code, the sales are counted up as the sales of
the PLU code, while they are counted up as EAN sales for sales reports.
4
*
: When you select quantity, the sales amount is calculated as follows: quantity x unit price programmed in
#1010.
PrintKey operation
2025
.≈
20
≈
540012
:
;
59
Page 62

Press code functional programming
ABC
Type of
prefix code
Example
:≈≈
;
.
2035
To keep the current setting
The current
setting
is displayed.
A
*
1
ABC
*
1
Procedure
*1Type of prefix code
1: German type 1 (prefix code: 434/439)
2: U.K. (prefix code: 988/989)
3: French (prefix code: 378/379)
4: Sweden (prefix code: 7388)
5: German type 2 (prefix code: 414/419)
2
*
Item: Selection: Entry:
A Type of code Normal EAN code 0
Press code 1
B Price entry method for press code*
C Label of record in EAN file*3*
3
4
Using the encoded price 0
Using the EAN programmed price 1
in the job #1010
Compulsory 2
Prefix only 0
Prefix + article code 1
PGM 2
2035
*3: This setting is valid only when “press code” is set for item A.
4
*
: Select “prefix only” when you want to summarize the sales of items having press codes by category.
Select “prefix + article code” when you want to summarize the sales of items having press codes by each
item.
2035
.≈
1
≈
111
:
;
60
PrintKey operation
Page 63

Deduction
amount
Percent rate
Currency
exchange rate
Example
Note
1310
.
≈
≈:
;
Function no. Rate or amount
To keep the current setting
*1 *2
The current
setting is
displayed.
Procedure
Programming for miscellaneous keys
7
Only function keys which you have programmed on the keyboard will allow the programming.
Programming the rate (%,
PGM 2
You can program percent rates, currency exchange rates, deduction amounts and commission rates.
*1: Function no.
1: For the
2: For the
3: For the
4: For the
5: For the
6: For the
7: For the
*2: Rate or amount
0 — 999999 (Deduction amount)
0.00 — 100.00 (% rate)
0.000000 — 999.999999 (Currency exchange rate)
0.00 — 999.99 (Commission rate)
Direct1310
key 8: For the •key 78: For the commission sale 4
-
key 52: For the [key 79: For the commission sale 5
–
key 53: For the {key 80: For the commission sale 6
—
key 54: For the “key 81: For the commission sale 7
≠
key 75: For the commission sale 1 82: For the commission sale 8
∞
key 76: For the commission sale 2 83: For the commission sale 9
§
key 77: For the commission sale 3
¶
, commission
e
) and the deduction (
-
)
PGM 1
• When you introduce EURO, set the EURO conversion rate on the
period 2.
• You must use a decimal point when setting percentage rates that are fractional.
1310
.≈
1 ≈1000
5 ≈10 .25
52 ≈0 .6068
:
:
:
key for the period 1 and the
[
PrintKey operation
;
61
Page 64

Programming the number of digits after decimal point for exchange keys
Currency
description text
Example
2334
.
≈
≈
:
;
To program spaces
Character keys
(max. 4 digits)
*Function no.
Procedure
Example
2330
.≈ ≈ : ;
Number of digits after
decimal point (0-3)
*Function no.
Procedure
Note
PGM 2
*: Function no.
2330
When you introduce EURO on your register, this setting for the [is automatically programmed by
execution of Job #800.
52: For the
53: For the
key 54: For the “key
[
key 55: For the ”key
{
2330
.≈
52
≈
2
:
PrintKey operation
;
Number of digits
after decimal point
Currency description text programming
You can program a maximum of 4 characters for each of the [through ”keys.
*: Function no.
52: For the
53: For the
key 54: For the “key
[
key 55: For the ”key
{
//
2334
.≈
52
≈
DM
:
PGM 2
2334
PrintKey operation
;
62
Page 65

Assigning the drawer number to the drawer for foreign currency
2312
.
≈
≈:
;
Function no. AB
To keep the current setting
*1 *2
The current
setting is
displayed.
Procedure
Example
2680
.
≈
;
*Drawer no.
Procedure
You can assign a number of the drawer which opens when one of the following operations is performed.
• One of
• A transaction is completed with a payment entry of foreign currency.
• An X/Z report is issued.
*Drawer no.:
0: Inhibit (No drawer opens.)
1: Drawer no. 1
2: Drawer no. 2
through ”is pressed without any entry.
[
2680
.≈
2
;
PrintKey operation
PGM 2
2680
Note
A limit amount (HALO) of entry (-, r, p)
The HALO limit is in effect for the REG-mode operations but can be overridden in the MGR mode. The HALO
limit is represented by two figures as follows:
*1: Function no.
*2: AB is the same as A x 10
A: Significant digit (0 through 9)
B: Number of zeros to follow significant digit (0 through 8)
To perform this programming, an optional drawer must be connected with your register.
PGM 2
1: For the
2: For the
3: For the
4: For the
key 37: For the rkey
-
key 38: For the ®key
–
key 39: For the pkey
—
key 40: For the πkey
≠
B
.
Direct2312
For example, presetting 13 (10.00) here means that amount entries of up to 10.00 are allowed in the REG mode.
When you press 18, however, the upper limit amount is 999999.99.
63
Page 66

“–”: Discount
Example
2311
.
≈
≈:
;
Function no. ABCDEFG
To keep the current setting
*1 *2
The current
setting is
displayed.
Procedure
2312
Example
.≈
1 ≈13
PrintKey operation
:
;
HALO limit
+/- sign (%, -)
Programming of the +/- sign assigns the premium or discount function for each key.
*1: Function no.
1: For the
2: For the
3: For the
4: For the
*2:
Item: Selection: Entry:
A +/- sign + (premium) sign 0
B to G Always enter 0. 0
key 5: For the ∞key
-
key 6: For the §key
–
key 7: For the ¶key
—
key 8: For the •key
≠
PGM 2
Direct2311
- (discount) sign 1
PrintKey operation
64
2311
.≈
5 ≈0000000
6 ≈1000000
:
:
;
Page 67

Item % or subtotal % selection (%)
Note
2313
.
≈
≈:
;
Function no. Rate
To keep the current setting
*1 *2
The current
setting is
displayed.
Procedure
Example
2315
.
≈
≈:
;
Function no.
A
To keep the current setting
*1
*2
To repeat
The current
setting is
displayed.
Procedure
Item %
Select this when a percent calculation is desired for the individual department and PLU.
Subtotal %
Select this when a percent calculation is desired for subtotals.
*1: Function no. *2: A
5: For the
6: For the
7: For the
8: For the
key 0: Subtotal %
∞
key 1: Item %
§
key
¶
key
•
2315
5 ≈1
6 ≈0
.≈
:
:
PGM 2
2315
PrintKey operation
;
Item %
Percent rate limitation (%)
You can program the upper limit of percent rates for percent entries.
(Percent entries that exceed the upper limit may be overridden in the MGR mode.)
*1: Function no.
5: For the
6: For the
7: For the
8: For the
∞
§
¶
•
10.00% can be entered as
fractional entry.
key
key
key
key
*2: Rate
0.00 – 100.00 (Entering 0.00 inhibits the
PGM 2
10
2313
open percent rate entry.)
or
10.00
. The .key is needed only for
Subtotal %
65
Page 68

Item
Subtotal
Example
2316
.
≈
≈:
;
Function no.
A
To keep the current setting
*1
*2
The current
setting is
displayed.
Procedure
t
2313
Example
.≈
5 ≈15 .00
PrintKey operation
:
;
Percentage limi
Item âor subtotal âselection (-)
Item
â
Select this when a deduction calculation is desired for the individual department and PLU.
Subtotal
*1: Function no. *2: A
â
Select this when a deduction calculation is desired for subtotals.
1: For the
2: For the –key 1: Item
3: For the —key
4: For the
key 0: Subtotal
-
key
≠
â
2316
1 ≈1
2 ≈0
â
.≈
:
:
PGM 2
2316
PrintKey operation
;
66
Page 69

2320
.
≈
≈:
;
Function no. ABCDEFG
To keep the current setting
*1 *2
The current
setting is
displayed.
Procedure
Programming for the ;, Å, ( through +, and ] through ’ keys
8
Functional programming
You can set each media for:
Footer printing
This programming decides whether or not your machine should print a message at the foot of a receipt when
a specified media key is used.
Non-add code compulsory
You can enforce the non-add code entry when a media entry is accepted.
Change enable (over-tender)
Either change enable or disable can be selected for a corresponding media key.
Compulsory validation print
If media entries must be validated, set the corresponding media for compulsory validation print.
Drawer open
You can program each media key to or not to open the drawer.
Amount tendered compulsory
You may select amount tendered compulsory or optional for the
You may select amount tendered compulsory or inhibited for the
PGM 2
2320
;, Å
]
and (through +keys.
through ’keys.
*1: Function no.
42: For the
43: For the
44: For the
45: For the
*2 Item: Selection: Entry:
A Always enter 0. 0
B Footer print Yes 1
C Non-add code Compulsory 1
D Change due Disable 1
E Validation print Compulsory 1
F Drawer open No 1
G Amount tendered entry Compulsory 1
key 46: For the *key 50: For the ‘key
;
key 47: For the +key 51: For the ’key
Å
key 48: For the ]key
(
key 49: For the }key
)
No 0
Non-compulsory 0
Enable 0
Non-compulsory 0
Yes 0
Non-compulsory for TL, CA2 or CH1 through CH4 keys 0
Inhibit for the CR1 through CR4 keys 0
67
Page 70

HALO limit
Example
2321
.
≈
≈:
;
Function no.
Limit
amount
To keep the current setting
*1
*2
The current
setting is
displayed.
Procedure
PrintKey operation
Example
2320
.≈
50 ≈0000001
:
;
High amount lockout (HALO) for cheque change, cheque cashing,
and cash in drawer
You can program the upper limit amounts for cheque change, cheque cashing, and cash in drawer.
PGM 2
2321
A through G
*1: Function no.
41: For cheque cashing
66: For cheque change
63: For cash in drawer (Sentinel)
*2: Limit amount
2321
.≈
41 ≈9999
0 through 999999.99
(Cheque change and cheque cashing)
0 through 9999999.99 (Cash in drawer)
PrintKey operation
:
;
68
Page 71

High amount lockout (HALO) of entry for media keys
Example
2314
.
≈
≈:
;
To program spaces
Character keys
(max. 8 digits)
Function no.
(max. 3 digits)
Procedure
HALO limit
Example
2322
.
≈
≈:
;
Function no. AB
To keep the current setting
*1 *2
The current
setting is
displayed.
Procedure
The HALO limit is in effect for REG-mode operations but can be overridden in the MGR mode. The HALO limit
is represented by two figures as follows:
PGM 2
Direct2322
*1: Function no.
42: For the
43: For the
44: For the
45: For the
46: For the
47: For the
key 48: For the ]key
;
key 49: For the }key
Å
key 50: For the ‘key
(
key 51: For the ’key
)
key
*
key
+
2322
50 ≈15
.≈
:
*2: AB is the same as A x 10B.
A: Significant digit (1 through 9)
B: Number of zeros to follow significant digit
(0 through 8)
When you press 18, however, the upper limit
amount is 999999.99.
PrintKey operation
;
Programming of function text
9
Programming
You can program a maximum of 8 characters for each function key and other functions using the table on the
following pages. Select the characters you want to program referring to section “2 How to program alphanumeric
characters” in chapter “PRIOR TO PROGRAMMING.”
PGM 2
2314
* Function no.: See “List of function texts” on the following pages.
2314
.≈
48 ≈VISA
:
;
PrintKey operation
69
Page 72

List of function texts
Function
no.
Key or function
Default
setting
Function
no.
Key or function
Default
setting
1 1 (–)1
2 2 (–)2
3 3 (–)3
4 4 (–)4
5%1 %1
6%2 %2
7%3 %3
8%4 %4
9 Differ DIFFER
10 Taxable 1 subtotal TAX1 ST
11 Taxable 2 subtotal TAX2 ST
12 Taxable 3 subtotal TAX3 ST
13 Taxable 4 subtotal TAX4 ST
14 Taxable 5 subtotal TAX5 ST
15 Taxable 6 subtotal TAX6 ST
16 VAT/tax 1 VAT 1
17 VAT/tax 2 VAT 2
18 VAT/tax 3 VAT 3
19 VAT/tax 4 VAT 4
20 VAT/tax 5 VAT 5
21 VAT/tax 6 VAT 6
22 Net 1
NET1
23 Net 2 NET2
24 Coupon-like PLU CP PLU
25 Refund REFUND
26 Void
27 Void mode total MODE
28 MGR void MGR
29 Subtotal void SBTL
30 Hash void HASH
31 Hash refund HASH RF
32 VAT shift VAT SFT
33 VAT/tax delete TAX DELE
34 VP counter VP CNT
35 No sale NO SALE
36 Guest check counter G.C. CNT
37 RA RA
38 RA2 RA2
39 PO PO
40 PO2 PO2
41 Cheque cashing CA/CHK
42 Cash
CASH
43 Cash 2
CASH2
44 Cheque 1 CHECK
45 Cheque 2 CHECK2
46 Cheque 3 CHECK3
47 Cheque 4 CHECK4
48 Credit 1 CREDIT1
49 Credit 2 CREDIT2
50 Credit 3 CREDIT3
51 Credit 4 CREDIT4
52 Exchange 1 EXCH1
53 Exchange 2 EXCH2
54 Exchange 3 EXCH3
55 Exchange 4 EXCH4
56 Exchange 1 is EXCH1 IS
57 Exchange 2 is EXCH2 IS
58 Exchange 3 is EXCH3 IS
59 EX1 check sale EX1 CHK
60
Domestic currency for EX1 check sale
DOM.CUR1
61 EX1 credit sale EX1 CR.
62
Domestic currency for EX1 credit sale
DOM. CUR
63 Cash in drawer CID
64 Cash/cheque is CA/CH IS
65 Cash/cheque in drawer CA/CH ID
66 Change for cheque CHK/CG
67 Customer GUEST
68 Order total ORDER TL
69 Paid total PAID TL
70 Domestic currency 1 DOM.CUR1
71 Domestic currency 2 DOM.CUR2
72 Domestic currency 3 DOM.CUR3
73 Domestic currency 4 DOM.CUR4
74 Cheque in drawer CH ID
75 Commission sale 1 COM.SAL1
76 Commission sale 2 COM.SAL2
77 Commission sale 3 COM.SAL3
78 Commission sale 4 COM.SAL4
79 Commission sale 5 COM.SAL5
80 Commission sale 6 COM.SAL6
81 Commission sale 7 COM.SAL7
82 Commission sale 8 COM.SAL8
83 Commission sale 9 COM.SAL9
84 Non commission sale NON.COM
85 (+) Dept total DEPT TL
86 (-) Dept total DEPT (-)
87 Hash (+) total HASH TL
88 Hash (-) total HASH (-)
89 Bottle return (+) total BTTL TL
90 Bottle return (-) total BTTL (-)
91 Net 1 (Taxable 1 - VAT/tax 1) NET 1
92 Net 2 (Taxable 2 - VAT/tax 2) NET 2
93 Net 3 (Taxable 3 - VAT/tax 3) NET 3
94 Net 4 (Taxable 4 - VAT/tax 4) NET 4
70
Page 73

1500
.
≈
≈
:
;
To keep the current setting
Cashier no.
(1 to 99)
*Cashier code
(0 - 99)
The current setting is displayed.
Procedure
Function
no.
Key or function
Default
setting
Function
no.
Key or function
Default
setting
95 Net 5 (Taxable 5 - VAT/tax 5) NET 5
96 Net 6 (Taxable 6 - VAT/tax 6) NET 6
97 Subtotal SUBTOTAL
98 Merchandise subtotal MDSE ST
99 Difference subtotal DIFF ST
100 Total TOTAL
101 Change CHANGE
102 Sales q'ty ITEMS
103
Link PLU and EAN link subtotal
ITEM ST
104 Copy receipt title
COPY
105 Guest check copy title G.C COPY
106 Average AVE.
107 Group 1 for departments
GROUP01
108 Group 2 for departments
GROUP02
109 Group 3 for departments
GROUP03
110 Group 4 for departments
GROUP04
111 Group 5 for departments
GROUP05
112 Group 6 for departments
GROUP06
113 Group 7 for departments
GROUP07
114 Group 8 for departments
GROUP08
115 Group 9 for departments
GROUP09
116 CCD
CCD
117 CCD differ CCD DIF.
118 CCD differ total DIF. TL
119 Order total-Paid total
O - P
120 Total tax TTL TAX
121 Net without tax
NET
122 Commission amount 1 COM.AMT1
123 Commission amount 2 COM.AMT2
124 Commission amount 3 COM.AMT3
125 Commission amount 4 COM.AMT4
126 Commission amount 5 COM.AMT5
127 Commission amount 6 COM.AMT6
128 Commission amount 7 COM.AMT7
129 Commission amount 8 COM.AMT8
130 Commission amount 9 COM.AMT9
131 Commission amount total COM.TTL
132 Department report title
DEPT
133 Group report title GROUP
134 PLU report title
PLU
135 Transaction report title TRANS.
136 Total in drawer report title TL-ID
137 Clerk report title CLERK
138 Cashier report title CASHIER
139 Hourly report title HOURLY
140 Daily net report title DAILY
141 PLU zero sales report title ZERO SAL
142 PLU price category report title CATEGORY
143 Commission sales report title SALES
144 EAN report title
EAN
145 EAN price change PR.CHNG
146
Non accessed EAN report title
NO ACCES
10
You can assign a cashier code to each cashier. (If the cashier's file is upgraded, a maximum of 99 cashiers can
be programmed. Consult your dealer.)
* Programming cashier code “0” inhibits entries of the cashier code.
Cashier and clerk programming
Cashier code
PGM 2PGM 1
1500
71
Page 74

2510
.
≈
≈
:
;
*
**ABCDE
Cashier code
(1 - 99)
To keep the current setting
The current setting is displayed.
Procedure
Example
1514
.
≈
≈
:
;
*
Character keys
(max. 8 digits)
Cashier code
(1 - 99)
To program spaces
Procedure
1500
Example
1 ≈11
4 ≈14
.≈
:
:
;
PrintKey operation
Cashier no.
Cashier code
Cashier name
You can program a maximum of 8 characters (cashier name) for each cashier. Select the characters you want to
program referring to section “2 How to program alphanumeric characters” in chapter “PRIOR TO
PROGRAMMING.”
*: A cashier code you have programmed for the cashier by job code 1500
PGM 2PGM 1
1514
11 ≈MAYER
1514
PrintKey operation
.≈
:
;
Functional programming for cashiers
PGM 2
2510
*: A cashier code you have programmed for the cashier by job code 1500
** Item: Selection: Entry:
A Guest check copy Disable 1
Enable 0
B VAT shift Yes 1
No 0
C and D Always enter 0. 0
72
E Drawer Set the drawer no. 1 or 2 1 or 2
Use no drawer 0
Page 75

Example
1414
.
≈
≈
:
;
To program spaces
Clerk code
(1 - 99)
*
Character keys
(max. 8 digits)
Procedure
Example
1400
.
≈
≈
:
;
To keep the current setting
Clerk no.
(1 to 99)
*Clerk code
(0 - 99)
The current setting is displayed.
Procedure
2510
Example
.≈
11 ≈00001
PrintKey operation
:
;
E(Drawer no.)
A through D
Clerk code
You can assign a clerk code to each of 99 clerks. The standard machine has no clerk function. If you need this
function, consult your dealer.
*: Programming clerk code “0” inhibits entries of the clerk code.
PGM 2PGM 1
1400
1400
.≈
1 ≈11
4 ≈14
:
:
PrintKey operation
Clerk no.
Clerk code
;
Clerk name
You can program a maximum of 8 characters (clerk name) for each clerk. Select the characters you want to
program referring to section “2 How to program alphanumeric characters” in chapter “PRIOR TO
PROGRAMMING.”
PGM 2PGM 1
1414
*: A code you have programmed for the clerk by the job code 1400.
*: A clerk code you have programmed for the clerk by the job code 1400
1414
.≈
11 ≈NILS
:
;
PrintKey operation
73
Page 76

Note
Programming various functions
11
Programming for optional feature selection
OP X/Z mode availability
When a cashier needs to take the cashier/clerk X or Z report, he or she will use the OP X/Z mode. This
programming determines whether he or she will be allowed to use this mode.
You can take cashier/clerk X and Z reports in the X1/Z1 mode regardless of the above
programming.
Paid out in the REG-mode
Refund key in the REG-mode
Direct void in the REG-mode
Indirect void in the REG-mode
Subtotal void in the REG-mode
Refund validation printing
First item direct void
Printing of the number of purchased items
Journal print form
You may choose either of the following forms.
• Detailed journal print that shows the details of all entries - the same information as printed on the receipt.
• Summary journal print that shows information about all entries other than normal department entries
(entries into “+” departments and their associated “+” PLUs).
Item validation print
Validation print for
Zero skip for various reports
VAT/tax amount, taxable amount and net amount printing on the receipt/journal
VAT shift type
VAT shift by cashier: VAT shift is performed by the operation of a cashier who has been assigned to do the
VAT shift by shift key: VAT shift is performed by pressing the VAT shift key.
No sale in REG-mode
Finalization when the subtotal amount is zero in the REG mode
Exchange 1 calculation method (for EURO settings)
When you do not introduce EURO, keep the default setting (multiplication).
When you introduce EURO, this setting is automatically set by the operation of job #800.
The calculation method is as follows:
In case that “Division” is selected for the period 1,
Domestic currency amount (national currency amount) Exchange 1 rate (EURO conversion rate) =
Exchange 1 amount (EURO amount)
In case that “Multiplication” is selected for the period 2,
Domestic currency amount (EURO amount) Exchange 1 rate (EURO conversion rate) = Exchange 1
amount (national currency amount)
Printing of the exchange 1 total amount and change amount on the receipt/journal
Total and change amounts in exchange 1 currency are printed respectively below each of the total and
exchange amounts in domestic currency.
When you introduce EURO, this setting is automatically set by the operation of job #800 as follows:
On the period 1, EURO amount converted from national currency is printed below the national currency, and
on the the period 2, national currency converted from EURO amount is printed.
Validation printing of the exchange 1 total amount
Exchange 1 amount converted from total sales amount can be printed on the validation print for total amount
when cash, cheque or credit amount tender is performed.
When you introduce EURO, this setting is automatically set by the operation of job #800.
entry
â
VAT shift operation (Refer to job# 2510).
PGM 2
2616
74
Page 77

Cash/credit operation for exchange 1
2616
.
≈
≈
:
;
P *ABCDEFGH
(1 to 14)
**
To keep the current setting
The current setting is displayed.
Procedure
You can set whether you receive foreign currency (exchange 1) amount by cheque or credit or not.
Credit counting when received-on-account/paid out finalized with the credit key
Separator line in the report
Link PLU printing on the receipt
EAN learning function
Price change for EAN entry in REG-mode
Treatment of EAN 8 code (200XXXXC/D)
Treatment of EAN 13 code (2XXXXXXXXXXXC/D)
Price entry after ISBN or ISSN
Entry of EAN with add-on code when the EAN ADD-ON file is full
**P: 1
*
Item: Selection: Entry:
A OP X/Z mode Enable 0
Disable 1
B Paid-out in REG-mode Enable 0
Disable 1
C Always enter 0. 0
D Refund key entry in the REG-mode Enable 0
Disable 1
E Direct void in the REG-mode Enable 0
Disable 1
F Indirect void in the REG-mode Enable 0
Disable 1
G Subtotal void in the REG-mode Enable 0
Disable 1
H Refund validation printing Non-compulsory 0
Compulsory 1
75
Page 78

**P: 2
*
Item: Selection: Entry:
A The first item direct void Enable 0
Disable 1
B and C Always enter 0. 0
D Printing of the number of purchased items No 0
Yes 1
E Always enter 0. 0
F Journal print form Detailed 0
Limited 1
G Item validation printing Enable 0
Disable 1
H
**P: 3
validation printing Non-compulsory 0
â
Compulsory 1
*
Item: Selection: Entry:
A Zero skip in EAN report Yes 0
No 1
B Zero skip in clerk report Yes 0
No 1
C Zero skip in cashier report Yes 0
No 1
D Zero skip in transaction report Yes 0
No 1
E Zero skip in department report Yes 0
No 1
F Zero skip in PLU report Yes 0
No 1
G Zero skip in hourly report Yes 0
No 1
H Zero skip in daily net report Yes 0
No 1
P: 4
**
*
Item: Selection: Entry:
A and B Always enter 0. 0
C VAT/tax amount printing on the Yes 0
receipt/journal No 1
D Taxable amount printing on the Yes 0
receipt/journal No 1
E Net amount printing on the receipt/journal Yes 0
No 1
F to H Always enter 0. 0
**
P: 5
*
Item: Selection: Entry:
A to C Always enter 0. 0
D VAT shift type By cashier 0
By shift key 1
E to H Always enter 0. 0
76
Page 79

**P: 6 (ABCDEFGH: Always enter 0.)
Note
**P: 7
*
Item: Selection: Entry:
A and B Always enter 0. 0
C No sale in REG-mode Enable 0
Disable 1
D Finalization in the REG-mode Enable 0
when the subtotal amount is zero Disable 1
E to H Always enter 0. 0
P: 8 (ABCDEFGH: Always enter 0.)
**
**P: 9
*
Item: Selection: Entry:
A Always enter 0. 0
B Exchange 1 calculation method Multiplication 0
Division 1
C Cheque/credit operation for exchange 1 No 0
Yes 1
D Printing exchange 1 total amount and change No 0
amount on receipt and journal Yes 1
E Printing exchange 1 total amount on validation No 0
printing Yes 1
F to H Always enter 0. 0
The items B, D and E are automatically set by the operation of job #800.
**P: 10
*
Item: Selection: Entry:
A and B Always enter 0. 0
C Learning function for EAN entry Yes 0
No 1
D to H Always enter 0. 0
**
P: 11 (ABCDEFGH: Always enter 0.)
**P: 12
*
Item: Selection: Entry:
A to G Always enter 0. 0
H Price change for EAN entry in REG-mode Enable 0
Disable 1
77
Page 80

**P: 13
P: 1 through 14
A through H
Example
*
Item: Selection: Entry:
A Credit counting when received-on-account/paid Yes 1
out is finalized with the credit key No 0
B Separator line in the report Separator line 1
1 line space 0
C Way to print the information for the link PLU/EAN Leading link PLU/EAN with 1
link on the receipt total amount
Detailed information 0
D and E Always enter 0. 0
F Treating the EAN8 code No 1
(200XXXXC/D) as PLU type (XXXX:PLU code) Yes 0
G Treatment of the EAN13 code Dept. code 1
(2XXXXXXXXXXXC/D) PLU code 0
H Price entry after ISBN or ISSN Inhibited 1
Compulsory 0
**P: 14
*
Item: Selection: Entry:
A Always enter 0. 0
B Entry of EAN with add-on code when EAN Continued 0
ADD-ON file is full Inhibited 1
C to H Always enter 0. 0
2616
.≈
3 ≈00000010
PrintKey operation
:
;
78
Page 81

Programming the limit on the number of times of validation printing and
Note
Example
2617
.
≈
;
To disable the alarm function
Time
1 to 255 seconds
Procedure
Example
2615
.
≈
;
*AB
When A and B are zeroes
Procedure
feed line after printing of a difference subtotal
* A: Validation printing counter (1 through 9 times)
To inhibit validation printing, enter 0.
B: Feed lines after printing of difference subtotal (0 through 9)
2615
.≈
10
;
PGM 2
2615
PrintKey operation
Programming alarm length of time with drawer opening
If the drawer still remains open when a specified length of time has elapsed, your machine gives the alarm.
PrintKey operation
2617
.≈
30
;
Your machine starts to monitor how long the drawer is kept open the moment the drawer is opened
at the end of a transaction in the REG/VOID mode. It stops the time monitoring when a valid key
(except the
after that transaction is ended. You can stop the buzzer alarm by closing the drawer. No key entries
can be made while the buzzer is sounding.
∑
and
keys) is pressed for the next transaction. It restarts the time monitoring
q
PGM 2
2617
79
Page 82

Programming of print messages
Example
2614
.
≈
≈
:
;
To program spaces
Character keys
(max. 24 digits)
*Line number
(1 to 6)
Procedure
Your register can print programmed messages for customers on every receipt.
* “Header 3-line message” type: 1 to 3
“Footer 3-line message” type : 4 to 6
“Header 6-line message” type: 1 to 6
“Header 3-line and footer 3-line message” type: 1 to 6 (1 to 3 as header, 4 to 6 as footer)
A maximum of 6 lines are available. The type of printing “header 3-line message” is available for the standard
model. The line numbers you select are according to the four types of printing: default setting, “header 3-line
message” type, “footer 3-line message” type, “header 6-line message” type and “header 3-line and footer 3-line
message” type. If you want to change the type of printing, please consult your dealer.
Select the characters you want to program, referring to section “2 how to program alphanumeric characters” in
chapter “PRIOR TO PROGRAMMING.”
To program the following logo messages by using 3 lines:
===
YOUR
==
STORE
MESSAGE
===
==
PGM 2
2614
80
2614
.≈
1
≈/ / / é= é= é=/
Y ÎO ÎU ÎR
Î
/é= é= é=:
2
≈///é= é=/
S ÎT ÎO ÎR ÎE
Î
/é= é=:
3
≈////
M ÎE ÎS ÎS ÎA ÎG ÎE
Î
:
;
Space key)
(/:
PrintKey operation
Page 83

Selection of X1/Z1 and X2/Z2 reports
Example
Note
00
07
09
10
13
20
27
29
30
31
32
40
50
60
70
Job no. Report Available mode Range parameter
General report
EAN zero sales report X1/X2 mode only
Full EAN report
Full department report X1/X2 mode only
Full department group report X1/X2 mode only
PLU report *3 Start PLU code/end PLU code (1 through 999999)
PLU zero sales report X1/X2 mode only
PLU price category report X1/X2 mode only *3 Start price amount/end price amount
Transaction report X1/X2 mode only
Total in drawer report X1/X2 mode only
Commission sales report
Full clerk report
Full cashier report
Hourly sales information Range report is available *3 Start time/end time (0 through 2330)
only in the X1 mode.
Daily net report X1/X2 mode only
2620
.
≈
≈≈
:
;
Job no.
Start range
parameter
For full reporting (non-range report)
To cancel the stacked report sequence
To repeat*
*1
*2
For individual reporting
End range
parameter
*2
Procedure
to be printed in the stacked report sequence
Your register is equipped with the stacked report printing function that enables multiple X/Z reports to be printed
in sequence with only a single request, up to maximum of 15 reports*. This function continuously prints a
maximum of 15 kinds of reports with a single operation.
*: Maximum 70 steps are programmable. “1 step” means the memory size used for one no-range type job no.
The range type job no. needs “8 steps”.
Job code numbers to be used are as follows.
*1 *2
PGM 2
2620
*3: Both range setting and full setting are allowed.
When Z of stacked report is initiated, X only reports will be skipped.
2620
.≈
10
:
13
:
;
PrintKey operation
81
Page 84

Setting the time range for hourly reports
Note
2690
.
≈
≈:
;
**ABCD
When A through D are all zeroes
1 to 3
*P
Procedure
Example
2619
.
;
ABC
*
When A through C are all zeros
≈
Procedure
You can set the time range for an hourly report
*A: Time range
To set the time range to 30 minutes (in the 24-hour system), enter 0.
To set the time range to 60 minutes (in the 24-hour system), enter 1.
BC: Starting time (hour = 00 to 23)
2619
.
.≈
107
;
PGM 2
2619
PrintKey operation
Note
RS-232C channel assignment
Your machine is equipped with two RS-232C interfaces. If you use the on-line communication function and/or
the barcode reader, the channel number of each RS-232C interface must be programmed by using the following
procedure.
To realize the on-line communication and/or to use the barcode reader, consult your dealer.
*P: 1
** Item: Selection: Entry:
A Channel no. for the ON-LINE Not connected 0
B to D Always enter 0. 0
*P: 2
** Item: Selection: Entry:
A Channel no. for the barcode reader Not connected 0
B to D Always enter 0. 0
To perform this setting, an hourly Z report (# 160) must be done.
PGM 2
communication Standard port 2 1
Standard port 1 8
Standard port 2 1
Standard port 1 8
2690
*P: 3 (ABCD: Not used. Always enter 0.)
Never enter any number other than 0, 1 and 8.
82
Page 85

ABCD
Example
≈
;
.
2691
To program zeros
*ABCD
Procedure
2690
Example
.≈
1
≈:
;
PrintKey operation
P
A through D
Barcode reader programming
* Item: Selection: Entry:
A Data bit 7 bits 1
B Parity bit Non parity 2
C Stop bit 1 bit 1
D Transmission speed 19200 bps 2
2691
1110
PGM 2
8 bits 0
Odd parity 1
Even parity 0
2 bits 0
9600 bps 1
4800 bps 0
.≈
;
2691
PrintKey operation
83
Page 86

Secret codes to control access to PGM1 mode, X1/Z1 mode and X2/Z2
Example
2631
2630
*
2632
.
≈
;
Max. 4 digits
Secret code
No code (zero)
Procedure
Note
;
;
Max. 4 digits
Secret code
Procedure
mode
You must enter a secret code according to the following procedure before performing any PGM1-mode, X1/Z1mode or X2/Z2-mode operation when a secret code has been set for that specific mode operation.
Operating
Programming
* 2630 for the PGM1 mode
2631 for the X1/Z1 mode
2632 for the X2/Z2 mode
PGM 2
Once a secret code is entered, it does not need to be entered again unless the mode switch setting
is changed and any operation, such as a sales registration, reporting, or programming, is
performed.
263226312630
2631
.≈
1234
PrintKey operation
;
84
Page 87

Setting the AUTO key — Automatic sequencing key —
Note
2900 .
≈
2
ß
100
6
¡
7
;
¡
;
AUTO1
setting
AUTO2
setting
£
1
£
1
Example
. ≈
2900
£
¡
™
¢
£;
¡
™
¢
Transaction
Delete
max. 25 times
1 1
10
10
. . . . .
. . . . .
Procedure
If you program frequently performed transactions or report sequences for the AUTO keys, you can call those
transactions and/or reports simply by pressing the corresponding AUTO keys in key operations. This
programming can be done when your machine is in the X2/Z2 mode.
X2/Z2
2900
Programming for
; entering a PLU 2 item (programmed unit price: 1.50) and a dept. 6 item (unit price: 1.00)
~
; selling a dept. 7 item (programmed unit price: 5.00) for cash
¡
When the AUTO key has been programmed to execute a report job function etc., the mode switch
must be in the appropriate position (X1/Z1 or X2/Z2).
key and ¡key as follows:
~
PrintKey operation
85
Page 88

Reading stored programs
Program for:
Mode
switch
position
Key nos. for
departments and
PLUs
Departments
Link PLUs 2220
Clerks
1
Job
code no.
Procedure
2119
;≈
1400
;≈
2
4
3
9
PLUs/
subdepartments
1400
2119
PGM2
PGM2 2220
1100
1200
PGM2 or
PGM1
PGM2 or
PGM1
PGM2 or
PGM1
1110, 2110,
2111, 2112,
2114, 2115,
2116
1200, 1210,
1211, 2210,
2211, 2214,
2215, 2230,
2231, 2232,
2235
2119, 2219
Related PGM1/
PGM2 job
code nos.
2220
;
≈
≈
For individual reading
For reading all codes
1200
;
≈
≈
For individual reading
For reading all codes
1100
;
≈
≈
Start
dept. code
For individual reading
For reading all codes
End
dept. code
Start
PLU code
End
PLU code
Start
PLU code
End
PLU code
1000
;≈
Ä
≈
≈
For reading all codes
To pick up EAN codes
For the last picking list
Scan EAN code
EAN code
Cashiers
1500
;≈
8
1500
PGM2 or
PGM1
1500, 1514,
2510
1400, 1414
EAN link
2030
;≈
7
2030
PGM2
2030
EANs function
2025
;≈
6
2025
PGM2
2025, 2029,
2035
1000, 1010
1011, 2010
2011, 2014
2015
EANs5
PGM1 or
PGM2
1000
Function preset 1
1300
;≈
10
1300
PGM2 or
PGM1
1310, 2311,
2312, 2313,
2314, 2315,
2316, 2320,
2321, 2322,
2330, 2334
2614, 2615,
2616, 2617,
2619, 2620,
2630, 2631,
2632, 2680,
2690, 2691
Function preset 2
2600
;≈
11 2600PGM2
12
Your machine allows you to read every program stored in the PGM1 and PGM2 modes.
Program details and procedures for their reading
86
Page 89

Program for:
Mode
switch
position
Job
code no.
Procedure
Related PGM1/
PGM2 job
code nos.
12
13
Tax rates
Auto keys
PGM2
PGM2
2700
2900
Sample printouts
1 Reading of programmed items for departments
(Reading in the PGM1 and PGM2 modes)
Job code no.
Range
Dept. code
Item label
Mode switch
position*
Tax status
Unit price
Group no.
HALO limit
Commission
group
Function
programming
0000001
2700
2900
;≈
;≈
2 Reading of programmed items for
PLUs/subdepartments
(Reading in the PGM1 and PGM2 modes)
PLU code
Item label
Type of unit
price entry
2711
2900
Mode switch
position*
Range
Associated
dept. code
Unit price
Tax status
Base q'ty
002
Mode
parameter
Commission
group
Type
(SIF/SICS/Normal)
Item validation print
compulsory/noncompulsory
Minus department
* When you take this report in the PGM1 mode, the PGM2 indication is replaced by a “PGM1”.
Link PLU
87
Page 90

Linked
PLU code
Leading
PLU code
Range
EAN code
Tax status
Item label
Mode switch
position*
Unit price
Commission group
Base q’ty
Associated dept. code
Type L: Linked with PLUs
(space): Normal
Delete method
Dept. code
PLU code
Key no.
3 Reading of programmed key nos. for
EAN-13
EAN-8
In-store marking PLU short type
In-store marking Non-PLU short type
UPC-A
UPC-E
Note
departments and PLUs
(Reading in the PGM2 mode)
4 Reading of programmed items for link PLUs
(Reading in the PGM2 mode)
5 Reading of programmed items for EANs (1)
(Reading in the PGM1 and PGM2 modes)
88
* When you take this report in the PGM1 mode, the PGM2
indication is replaced by a “PGM1”.
The EAN codes are printed out in the sequence
shown below.
Page 91

Clerk no.
Clerk name
Clerk code
Mode switch
position*
Non-PLU format
setting
Delete period
Press code
function
6 Reading of programmed items for EANs (2)
Linked PLU
codes
EAN code
Cashier no.
Cashier name
Cashier code
Drawer no.
Mode switch
position*
VAT shift yes/no
Guest check
copy yes/no
(Reading in the PGM2 mode)
8 Reading of programmed items for cashiers
(Reading in the PGM1 and PGM2 modes)
* When you take this report in the PGM1 mode, the PGM2
indication is replaced by a “PGM1”.
7 Reading of programmed items for EAN link
(Reading in the PGM2 mode)
9 Reading of programmed items for clerks
(Reading in the PGM1 and PGM2 mode)
* When you take this report in the PGM1 mode, the PGM2
indication is replaced by a “PGM1”.
89
Page 92

10 Reading of programmed items for functions - 1
Mode switch
position*
To be continued on the next page
(Reading in the PGM1 and PGM2 modes)
* When you take this report in the PGM1 mode,
the PGM2 indication is replaced by a “PGM1”.
90
Page 93

91
Page 94

Tax rate
Lowest taxable
amount
11 Reading of programmed items for functions - 2
Print message
Validation printing counter
Optional feature selection
Line feed for differ ST
Secret code
RS-232C channel data
Hourly report format/start
hour
Drawer open alarm time
Drawer no. for the drawer
for foreign currency
Barcode reader
programming
Stacked report
(Reading in the PGM2 mode)
12 Reading of programmed tax rates
(Reading in the PGM2 mode)
13 Reading of programmed items for auto keys
(Reading in the PGM2 mode)
92
Page 95

Training mode
13
The training mode is used when the operator or the manager practices register operations.
When a cashier set in training is selected, the machine automatically enters the training mode. When a cashier
not set in training is selected, the machine automatically enters the ordinary REG mode. (For programming,
consult your dealer.)
The training operations is valid only in REG, MGR and VOID mode.
The corresponding cashier memory is updated in the training mode. Other memories are not updated.
PrintKey operation
1000
5
3
≈
3
;
93
Page 96

READING (X) AND RESETTING (Z)
Item
Mode switch
position
Full reading and
resetting
Job
code
Key operation
100
200
.≈
;
Reading
Resetting
X1, Z1 X1, Z1
X2, Z2
100
200
Individual cashier
reading and
resetting
151
251
.≈
;
X1, Z1 X1, Z1
X1/Z1 X2/Z2
X2, Z2
151
251
51
.≈
;
<OP X/Z> X, Z 51
Individual clerk
reading and
resetting
141
241
.≈
;
X1, Z1 X1, Z1
X2, Z2
141
241
41
.≈
;
<OP X/Z> X, Z 41
:
key: Sales total
≈
key: Amount of cash in drawer
Dept. key ( 1 to ÿ )
Dept. code
Flash report:
(Only display)
To clear the display,
press the
c
key
or turn the mode
switch to another
position.
X1
—
—
Reading
Resetting
Reading
Resetting
Reading
Resetting
Reading
Resetting
Full department
reading
X1 X1 110
X2 210
110
210
≈
;
112
212
Group no.
≈
;
Full group reading
213
113
213
≈
;
X1 X1 112
X2 212
Individual group
reading
X1 X1 113
X2
140
240
.≈
;
X1, Z1
X2, Z2
140
240
Reading
Resetting
Full clerk
reading and
resetting
X1, Z1
Full cashier reading
and resetting
150
250
.≈
;
X1, Z1 X1, Z1
X2, Z2
150
250
Reading
Resetting
: Department total amount
à
OF SALES TOTALS
• Use the reading function (X) when you need to take a reading of sales information entered since the last
resetting. You can take this reading any number of times. It does not affect the register's memory.
• Use the resetting function (Z) when you need to clear the register's memory. Resetting prints all sales
information and clears the entire memory except for the GT1 through GT3 and training GT, reset count, and
consecutive number.
Summary of reading (X) and resetting (Z) reports and the key operations
1
to obtain the reports
X1 and Z1 reports: Daily sales reports
X2 and Z2 reports: Periodic (monthly) consolidation reports
94
Page 97

Item
Mode switch
position
Job
code
Key operation
X1/Z1 X2/Z2
X1, Z1 X1, Z1
X2, Z2
120
220
Reading and
resetting of sales
information for a
range of PLUs/
subdepartments
. ≈
120
220
Commission sales
report
X1 X1 132
X2 232
132
232
≈
;
X1 X1
X2
121
221
Reading of sales
information of PLUs/
subdepartments
associated with an
individual department
129
229
127
227
≈
;
121
221
Dept. code
≈
;
127
227
Dept. code
≈
;
101
201
Dept. code
≈.
;
X1 X1
X2
127
227
Reading of sales
information on
PLUs/
subdepartments
whose sales
amounts are zeros
X1 X1
X2
127
227
Reading of PLU/
subdepartments
whose sales
amounts are zeros
(by associated
department)
X1 X1
X2
129
229
Reading of sales
information
for the price amount
range of PLUs/sub
department
Start price
amount
All prices
Reading
Resetting
Resetting
Reading
All PLUs
End price
amount
;
≈
≈
End
PLU code
;
Start PLU code
≈
109
209
.
X1, Z1 X1, Z1
X2, Z2
109
209
Reading and
resetting of sales
information for
EANs
X1, Z1 X1, Z1
X2, Z2
101
201
Reading and
resetting of sales
information for
EANs associated
with an individual
department
Reading
Resetting
;≈
Ä
≈
For full reading and resetting
To pick up EAN codes
For the last picking list
Scan EAN code
EAN code
≈
107
207
≈ ;
X1 X1
X2
107
207
Reading of EANs
whose sales
amounts are zeros
95
Page 98

Item
Mode switch
position
Job
code
Key operation
X1/Z1 X2/Z2
Transaction reading
X1 X1 130
X2 230
130
230
≈
;
Total in drawer
≈
;
X1, Z1 X1, Z1
X2, Z2
190
290
Reading and
resetting of a
stacked report
190
290
. ≈
;
X2, Z2 270
Reading and
resetting of the
daily net totals
270
. ≈
;
When Z of stacked report
is initiated, X only reports
will be skipped.
X1 X1 131
X2 231
131
231
Reading
Resetting
Reading
Resetting
.≈
;
Reading and
resetting of hourly
sales information
Reading: 160
(For individual
time range)
* Enter the time in the 24-hour system.
Reading
and
Resetting: 160
X1
X1, Z1
160
;
≈≈
Start*
time
End*
time
Reading
Resetting
107
207
Dept. code
≈ ;
X1 X1
X2
107
207
Reading of EANs
whose sales
amounts are zeros
(by associated
department)
Item
Mode switch
position
Job
code
Key operation
X1/Z1 X2/Z2
105
≈
≈.
;
X1 105 105
Reading of
non-accessed
EANs
Z1 105
Deleting of
non-accessed
EANs
;≈
Ä
≈
For full deleting
To pick up EAN codes
For the last picking list
Scan EAN code
EAN code
Note
Note
Non-accessed EAN deleting
Individual and full clerk reading and resetting are available only in the cashier and clerk system. In
the factory setting, the register provides the “cashier only” system. So, if you want to change the
system, consult your dealer.
96
When you execute the job #105 in Z1 mode, not only the sales data, but also the EAN code(s) (the
related data files) themselves will be deleted.
Page 99

Note
Report no.
Read symbol
To be continued on the next page
Reset symbol
The subsequent printout occurs in the
same format as in the X report.
Reset counter
Net grand total
(GT2 - GT3)
Grand total of
plus registration
Grand total of
minus registration
Grand total of training
mode registration
Dept. code
Group1 sales q'ty
Group1 sales amount
Ratio of dept. group1
sales amount to “+”
department
Sales q'ty
Sales amount
Ratio of dept.1
sales amount to “+”
dept. total
“-” dept. counter
and total
“+” dept. counter
and total
Daily sales totals
2
Full reading and resetting of sales totals
You can take X and Z reports in the X1/Z1 mode. The use of the decimal key (.) determines when the report
will actually reset the sales totals.
• Sample X report • Sample Z report
Not all reports provide the resetting capability. Please refer to the chart on pages 94 through 96.
97
Page 100

“+” hash dept. counter and total
“-” hash dept. counter and total
“-” bottle return dept. counter and total
“+” bottle return dept. counter and total
Item 3 counter and total
Item percent 2 counter and total
Subtotal 1 counter and total
Net sales total
Subtotal percent 1 counter and total
Taxable 1 total
VAT 1 total
To be continued on the next page
Tax total
Net total without tax
VAT shift total
Tax delete total
98
 Loading...