

Page 1

SEKONIC
STUDIO DELUXE II L-398M
Operating Instructions
Page 2

Features........................................................................................................2
Handling Cautions........................................................................................34
Specifications................................................................................................4
Part Designations.........................................................................................5
Accessories..................................................................................................6
Basic Operation of Meter Unit.....................................................................7
1. Stopper Button Operation.............................................................7
2. Zero Position Check and Adjustment...........................................7
Standard Accessory Operation....................................................................8
Incident Light Measurement.........................................................................8
1. Lumisphere ......................................................................................8
2. Lumidisc..........................................................................................11
Reflected Light Measurement......................................................................12
1. Lumigrid..........................................................................................12
Other Operations..........................................................................................13
1. Exposure Value (EV number) Readout..........................................13
2. Employing Cine Scale .....................................................................14
3. Using Exposure Multipliers(-2,-1,+1,+2) .....................................15
Employing Special Accessories..................................................................15
1. Direct Reading Slides.....................................................................15
2. Direct Reading Slide Application...................................................16
Measurement Examples with Various Subjects..........................................17
1. Portrait Photography ......................................................................17
2. Typical Scenery .............................................................................18
3. Observatorial Scenes....................................................................18
4. Snow Scenes..................................................................................20
5. Scenes with Side or Back Lighting ...............................................21
6. Silhouette Photography .................................................................22
Applications Summary..................................................................................23
1. Special Features of the Studio Deluxe ...........................................23
2. Illumination Contrast.......................................................................24
3. Reflected Light Measurement........................................................26
4. Illumination Adjustment....................................................................29
5. Close-ups.........................................................................................31
Page 3

Nearly all photographic subjects combine complex variations of strongly reflecting
surfaces (high reflectivity) and weakly reflecting surfaces (low reflectivity). These
variations delicately influence exposure determination and to which portion the exposure is
set becomes a vital factor that considerably affects the appearance of the finished
photograph.
Although risk of failure can be minimized by taking maximum and minimum readings of all
portions of the subject, then averaging the values, such an approach is both time
consuming and tedious. The Studio Deluxe II is the answer to this problem. It is designed
around a standard reflectivity of 18%, which has been derived through measurements of
various subjects throughout the seasons of the year.
Consequently, high effectiveness is displayed with subjects possessing reflectivities in the
neighborhood of 18% (people, buildings, etc.) and when this can be considered the
average value (street snapshots, trees, forest scenes, etc.).
1. Optimum exposure meter for incident light measuring method (also applicable for
reflected light method).
2. Freely rotatable light sensor section for very easily performed measurements.
3. Meter stopper mechanism allows operation while hand is released from meter.
4. Meter release mechanism is also included which allows the needle to deflect freely.
This provides greater convenience when determining light balance.
5. Memo pointer enables easier light balance setting.
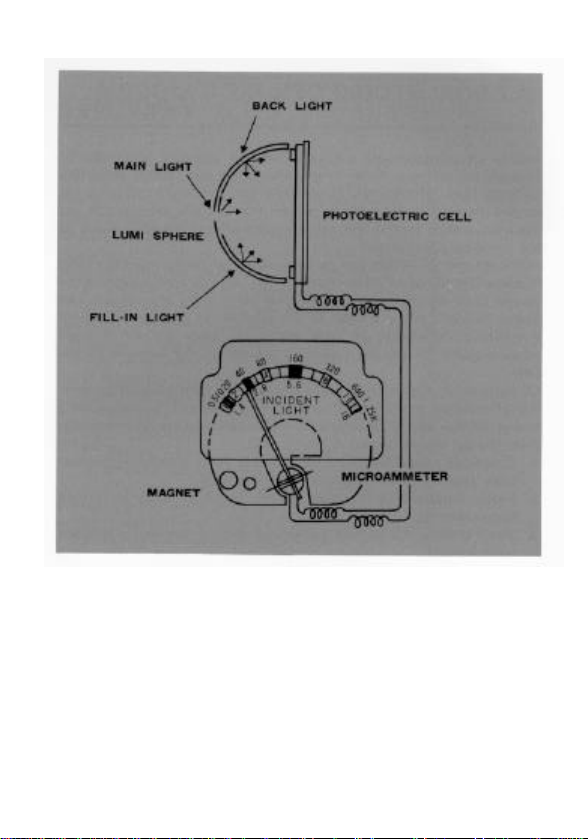
6. Lumisphere detects the same light as strikes the subject. Since subjects are normally
3-dimensional, according to the lighting conditions, brighter surfaces (highlights) and
darker surfaces (shadows) are produced (illumination contrast). The Studio Deluxe II
mechanism automatically takes into account the strength of light from all directions,
causing the meter to indicate a value applicable to photography. It is thus most
convenient for determining typical exposures.
2
Page 4
7. After combining film sensitivity and shutter speed, direct reading slides
(optional) can be used for directly determining the aperture value.
8. Selenium photocell is employed as light sensing element, eliminating need for
battery.
9. Wide selection of available accessories allows numerous photographic
techniques to be enjoyed.
3
Page 5

Measuring System Incident light (reflected light system
also capable)
Measuring Range At ISO 100, EV 4-1 7
Measuring Accuracy Within ± 0.3 EV (1/3f stop)
ISO Scale 6 - 12000
Shutter Scale 60 - 1 /8000 second
Aperture Scale 0.7-128
Cine Scale 8 fps - 128 fps
EV Scale 1 20 (exposure value)
Calibration Constant C = 340 K = 1 2.5
Dimensions 112 x 58 x 34 mm
Weight Approx. 190 grams
(NOTE) The outlooks and specifications described in this booklet shall be
changed without pre -advice, if necessary.
4
Page 6
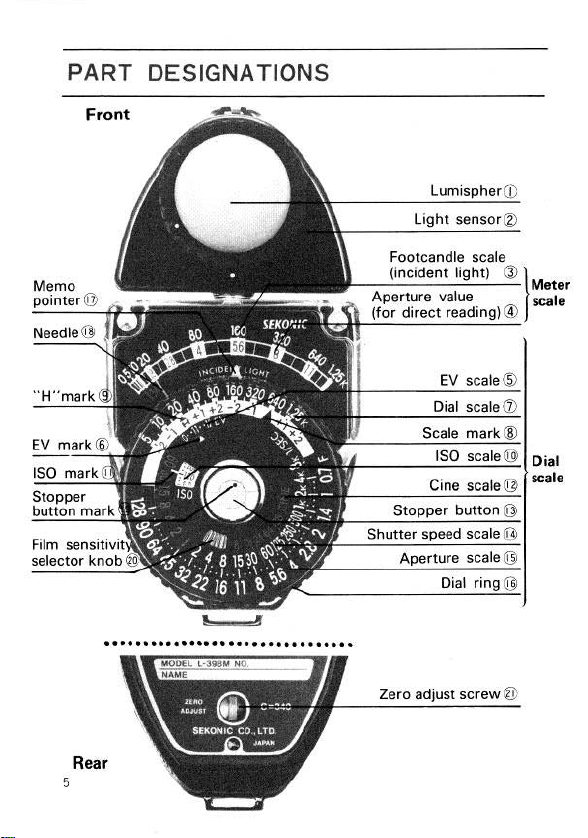
PART DESIGNATIONS
Fror’
pointer
Lumlsphera
Light sensorm
Footcandle scale
1
,;nrirlan+ linb.+\ P \
Aperture value
(for direct reading) @
Meter
scale
-1
xopper
button mat
Rear
5
___ ---. - w ,
wne
A -__...“^
scale 44 I
-
^^^I^ /-
Dial
scale
Page 7
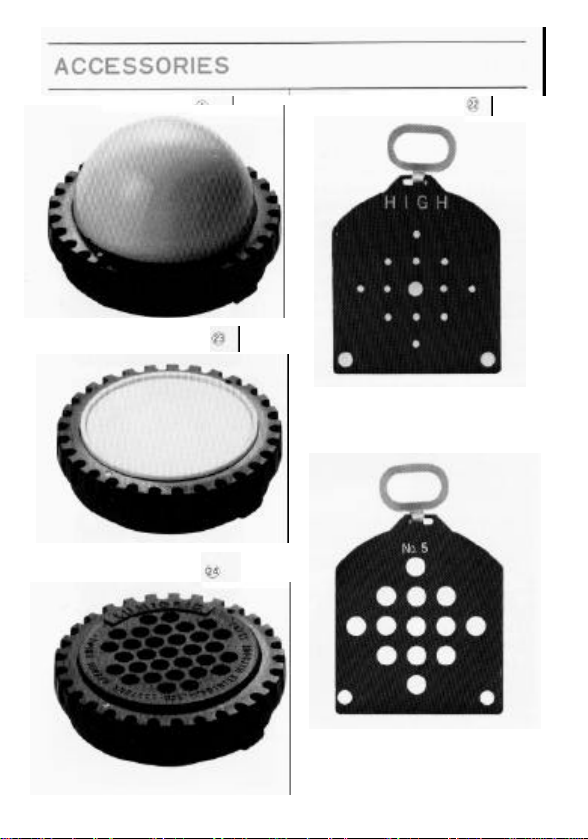
Lumisphere
Lumidisc
Lumigrid
High (H) slide
Optional Accessories
(sold separately).
Direct reading slides.
Total of 11 direct reading slides (set of 11
slides in case). e;
Page 8

1. Stopper Button Operation
If the stopper button
is press-
ed when the stopper button mark
is set to
the meter needle
deflects according to bright -
ness. Then when the button is released,
position becomes
the needle is released.
mark is positioned
With stopper button in released
position, cover light sensor
block light. Check that
meter needle
to turn the
rear zero adjust screw
and
adjust for zero indication.
the needle remains fixed at the indicated
position.
By holding the stopper button depressed
and turning it clockwise so that the mark
At this time, the meter will deflect freely
even if the stopper button is released. To
fix the needle, turn the stopper but ton
counter-clockwise to where the
with hand or black cloth to com pletely
cates zero position. If the indication
deviates from zero, while observing
meter indication, use a coin or similar tool
correctly indi-
Page 9

Incident Light Measurement
To
b. Set film sensitivity knob
side ISO mark
to be measured, point Lumi-
sphere
in direction of
camera. (Light sensor
1. Lumisphere
a. Mount Lumisphere
sensor
white dots of Lumisphere frame and light
sensor, then turn Lumisphere carefully
clockwise to secure.
to sensitivity value of employed film. Set
ISO value to right
Photo shows setting for ISO 100.
c. From position where subject is
be turned freely.)
d. Hold meter erect and press
stopper button Meter
8
Page 10
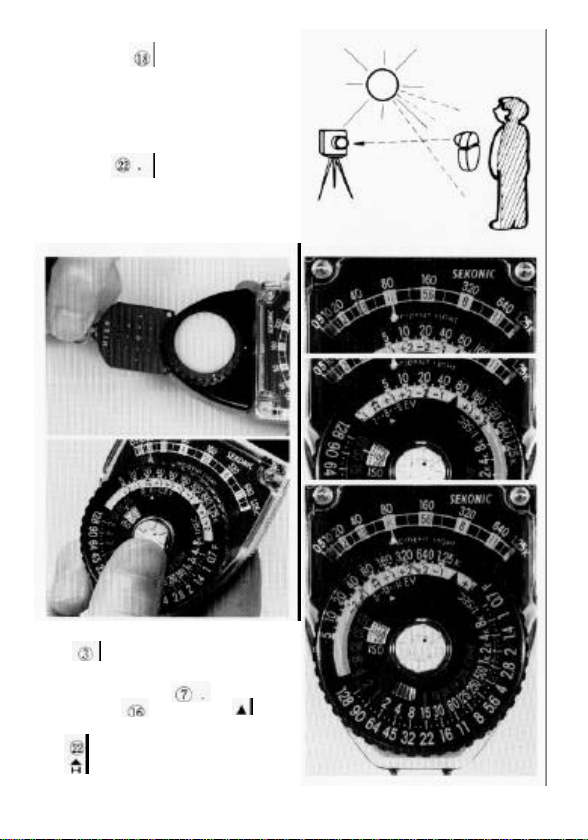
needle
to brightness. When the stopper button is
e. Read the footcandle indication
of the meter needle.
scale mark. If the High slide
released, the meter needle becomes fixed
at the deflected position. If the location is
excessively bright and the meter needle
deflects beyond scale, insert the High
slide
deflects according
f. Transfer footcandle value to
the dial scale
dial ring and set the
has been inserted, set the
mark.
9
Page 11

g. At this time, the shutter speed scale
and aperture scale
combination becomes the correct exposure.
Example: With High slide inserted, meter indicates 80 footcandles At ISO 100, the proper
exposure becomes 1, 250 sec at F 5.6, 1; 30 sec at F!16 and 1 sec at F-90. h. By
changing ISO setting, the set combination of shutter speed and aperture scale is
automatically altered to the appropriate one corresponding to the changed ISO value.
* Meter scale intermediate values
intermediate values for
shutter speed and aperture
scale
* Film sensitivity intermediate values
Note: When no slide is inserted, strong light
directly striking the slide slot may enter
through the slot. Although this does not
seriously affect exposure, if more accurate
exposure is required, cover slot with hand.
1 c'.
Page 12

2. Lumidisc. Employ for illumination contrast
• Contrast measurement
a. Mount Lumidisc
sensor
Install in the same
manner as Lumisphere.
b. Hold meter at subject position
c. Press stopper button
read meter scale footcandle
indication
Adjustment and luminance measurement.
and point Lumidisc
directly toward center of main light.
d. Turn the memo pointer dial and set the
pointer 1 7 at the footcandle value the
needle points to
e. In the same manner, measure the fill-in
light. In this case, use care that light from
main source dose not enter sensor.
f. Read a difference between the
footcandle value the pointer is set (see
above c) and the one for fill-in light (=
needle position.
Ratio between main and fillip light
footcandles becomes the contra st ratio.
Example: With main light at 640
11
footcandles, fill-in light reads
320 footcandles. Illumination
contrast ratio becomes:
640 2
320 1 or 2 : 1
Page 13

•
Luminance (Lux) measurement
a. Mount Lumidisc
Lumisphere.
to light sensor
in the same manner as
b. Place Lumidisc
parallel with the measured surface.
and read meter scale footcandle
c. Press stopper button
indication
d. Multiply this value by 10.76 to obtain lux.
Example: 80 x 10.76 = 860.8 lux
If meter deflects beyond scale, insert High slide
then multiply
footcandle indication by 32.
a. Mount Lumigrid
sensor
in the same manner
as Lumisphere.
measurement.
c. Point Lumigrid
measured.
Example: 80 x 32 = 2560 footcandles
b. Set sensitivity value of employed film.
d. As close as possible to the subject,
2560 x 10.76 = 27545.6 lux
Setting is performed in the same
manner as for incident light
toward 'part of subject to be
measure reflected light from main
point of subject. Use adequate care
at this time that meter shadow etc.
does not interfere.
Page 14

13
e. Press stopper button
read meter scale footcandle
g. At this time, shutter speed
combination becomes the
and
indication
footcandles are units of incident light
only, this value becomes simply a
reference.
f. Transfer indicated value to dial
scale
and set
scale and aperture
correct exposure.
Note: Do not employ slides for reflected
light measurement.
* More accurate results can be obtained for
reflected light measurement by using a
standard reflectance slide (optional
accessory).
Other Operations
1. Exposure Value
(EV) number Readout
Reading this exposure value to perform
setting becomes convenient for cameras
which employ a light value system shutter and
aperture combination.
. However, since
Rotate the dial ring
mark
Page 15

14
Shutter angle and exposure calculation:
cine camera film speed, read the
numerals correspond to
aperture scale
indication that
a. Read meter needle
b. Transfer this number to the
foot -
dial scale
and set
Rotate dial ring
scale mark
If the High slide is inserted, set
the
mark
candle indication
c. EV value indicated by EV
mark becomes the correct
exposure value.
2. Employing Cine Scale
Incident and reflected light
measurements during cine photography are performed in the
same manner as described previously. However, since the cine
scale
pertains to the employed film speed.
Note: Some cine cameras possess faster exposure times due to a narrower
rotating shutter angle (angle of light transmitting portion). It is important to
know the accurate film speed versus shutter angle value for your camera
in order to determine proper exposure. Refer to the camera operating
instructions, maker's catalogue, etc. for shutter speed information.
Note: Standard theatrical cine film speed is 24 fps at 1/50 sec.
This position is indicated by a red line on the scale.
Page 16

3. Using Exposure Multipliers (-2, -1, +1, +2)
EMPLOYING SPECIAL ACCESSORIES
Exposure multiplier indications are provided at both sides of the
marks of the dial scale. Use the -1 or -2 mark when desir
ing to cut the exposure to 1!2 of 1!4 and +1 or +2 mark to multiply the exposure by 2 or 4.
Set the appropriate mark, instead of the or, to the dial scale value.
1. Direct Reading Slides
A total of 11 slides are available, all of which may be used together with the Lumisphere
and Lumidisc. (Note that they cannot be used with Lumigrid.) The High slide, as
mentioned previously, is employed for varying the measuring range in 2 steps (high and
low illumination), however, it can also be used for direct reading. The other slides are
specialized for direct reading and cannot be used for mode selection.
15
Page 17

Note: One set of slides consists of slide numbers 1 - 11 in a case. The High slide
can also be used as a direct reading slide.
2. Direct Reading Slide Application
When photographing, select slide from
the above table according to film
sensitivity and shutter speed. Insert slide
and perform measure ment in the same
manner as for incident light. Read
directly the
aperture value
the meter needle
* Since it is not necessary to rotate the dial when employing direct reading slides,
setting becomes extremely fast and convenient.
16
Page 18

MEASUREMENT EXAMPLES WITH VARIOUS SUBJECTS
1. Portrait Photography
There are various kinds of human subject photography. In a case, for example, of a
skier against a snowy mountain background, the human subject simply becomes a
picture detail and for the purpose of determining the exposure, this cannot be
considered portrait photography. In the final analysis, portrait photography is when
the human subject is in the center of the picture and the exposure adjusted to him.
In addition, camera to subject distance must be considered, whether the picture is to
be one person or a group.
Measurement by incident light (Lumisphere installed) displays high effectiveness in
portrait photography. Perform measurement as described in the section on Incident
Light Meas urement. After setting the proper exposure for the human subject,
lighting conditions do not present a problem and subject detail is preserved even
under back lighting.
Page 19

2. Typical Scenery
In the case of scenery, measure by using the Lumisphere at the camera position (refer to
section on Incident Light Measurement). Although the previously described standard
holding method is adequate, if lighting conditions of subject and camera positions are
dissimilar, move the meter to a position where conditions are the same type as those of the
subject and point in a direction parallel to the camera optical axis. If the subject is
shadowed, either move the measuring position to the same type of location or reproduce
the same conditions with the hand or other means. Portrayals of buildings etc. can be
considered as general middle distance scenery, while main subjects can be treated in the
same manner as described in the section on Portrait Photography.
3. Observatorial Scenes
This refers to the situation where a distant object in the subject field forms an important part
of the pictured scene.
Examples: Observatories, distant views, etc.
18
Page 20

Distant scenes are subject to haze due to atmospheric effects on light and can be
easily overexposed. For this reason, first use the Lumisphere and measure by
standard method from the camera position. Then point the Lumisphere toward the
sun and measure. Determine exposure from the mean of the two obtained values.
Note: To obtain the mean of the two values, perform as follows.
Transfer mean value of the two footcandle indications (aperture
scale) to the dial.
Example: If 320(8) footcandles and 80(4) footcandles are obtained,
the mean value becomes 160(5.61. In the case of 80(4)
and 40(2.8) footcandles, the intermediate becomes the
desired value. Consequently, transfer that value to the
dial.
Transfer each footcandle value to the dial to obtain exposure. In cases of the
same aperture, setting the shutter speed to the average is acceptable.
Memo pointer is useful for memorizing the first measured value.
19
Page 21

4. Snow Scenes
a. Many cases of problems occur with reflected light measuring methods due to snow
Note:2:
surface glare. Using incident light measurement eliminates these concerns. Freshly
fallen snow possesses a reflectivity of approximately 73%, while even after several
days in urban areas, this declines only to about 60%. Compensation must therefore
be performed. Measurement by standard method
is reduced by
Example:
Note 1 : Reduce as much as possible since overexposed snow can
take on a flour -like appearance without luster in the
finished photograph.
flectivity value of snow. This may vary according to snow
quality and soiling.
compensation amount is based on the re-
Page 22

0Note 3:
In situations with direct or top lighting
(sun near zenith), the Lumisphere will
detect reflected light from the snow
surface. Some means of blocking the
light from below becomes required in this
case.
b. In some cases, good results can be obtained with reflected light measurement
under back light conditions, cloudy snow scenes where glare is less and snow
scenes under direct lighting. Install Lumigrid and point light sensor slightly
downward to block light from the sky, then from camera position, aim toward
subject
and measure. Be sure to set the
employ slides.
5. Scenes with Side or Back Lighting
mark at this time and do not
Page 23

In typical cases of back and side lighting, although the surface of a 3-dimensional
without inserting High slide, set to
foreground becomes silhouetted by underexposing the light source.
mark. In this manner, the
subject facing the camera becomes dark, a portion is usually strongly lighted. Even
though standard measurement with the Lumisphere can bring out detail of the
darker portions, on occasion, the brighter portions can become overexposed and
difficult to see. In some instances, this effect can even be enhanced to produce a
special photographic composition, but for a generally more attractive result,
perform as follows. First use the Lumisphere and measure by standard method,
then determine exposure from the mean value (same technique as used for
Observatorial Scenes).
6. Silhouette Photography
In situations such as a silhouette of a person, tree or bridge in the foreground
against the setting sun and brilliantly shining sky as background, remove slide and
point Lumisphere toward the setting
sun to measure (as with Reflected Light Measurement). Then
Page 24

APPLICATIONS SUMMARY
1. Special Features of the Studio Deluxe 11
As the Studio Deluxe ll is a high precision measuring instrument, by fully utilizing its
capabilities, its special functions can be displayed covering an additionally wide range of
applications. Incident light measurement is an extremely practical method in actual
photographic situations and is often employed by professional photographers and
cinematographers. Since proper exposure can be determined even in cases where errors
are easily incurred with reflected light measurement, it is extremely convenient for both
color and monochrome.
The Lumisphere displays its optimum value when used for incident light measurement
during color or monochrome photography of fleshtones (portrait photography in which
fleshtones are considered as the main picture element for determining exposure). Since
good or bad quality portrayals can be discerned even by amateurs, fleshtones become the
only true standard in color photography. (They can also be given a wider range of artistic
expression than visible to the naked eye.)
Well known basic principles form the foundation of the Studio Deluxell, however, plenty of
latitude is provided for obtaining special effects. By allowing variations in exposure to be
performed, exactly the same reproductions become possible as those learned only from
experience. Utilizing the selection of accessories also opens the way to the multitude of
applications described in the preceding pages.
23
Page 25

2. Illumination Contrast
Light balance measurements are the most important application of the Lumidisc. This
consists of measuring the ratio of main light and fill in light in order to perform vital
adjustments when photographing an illuminated subject. The photographer is advised to
record the data obtained for his particular equipment. This will provide ready reference in
the future and allow the same lighting conditions to be reproduced.
When shooting in a studio or similar situation where artificial lighting equipment is used,
more attractive results can be produced by making the main and fill in light ratio 4 : 1 - 2 :
1. Also when using reflectors either indoors or outdoors, determine the exposure after
measuring the illumination ratio.
Normal sunlight becomes the main light source outdoors, while white or silver reflectors are
used to brighten shadow portions of the subject. In this situation, install the Lumidisc, point
it toward the sun and read the indicated value. Turn the memo pointer dial and set the
pointer 17 at the read value. Next, point the Lumidisc toward the reflector (shield with hand
to avoid sunlight) and again read the indicated value. To obtain maximum color effect, this
fill in light source should be 1/2 - 1/4 of the main lignt.
An additional theatrical effect can be produced with monochrome by using a higher
illumination ratio. It is suggested, for example, to use a ratio between fill in light and
sunlight of 1/16 or lower.
If the meter needle deflects beyond scale, use the H slide and as described earlier, multiply
the indicated value by 32. Then calculate main and fill in lighting (see section on *Contrast
measurement).
After completing light balance adjustment, replace Lumisphere and measure exposure by
normal method. At this time, hold the Lumisphere close to the subject to fully detect
sunlight and fill in light.
Page 26

Main light measurement
Use white or silver reflector to brighten
shadow portions of subject.
Fill in light measurement
25
Exposure measurement
Page 27

Illumination ratio can be
Reflected Light Measurement
varied by keeping the main
light fixed and varying the fill
in light.
Reflected light measurement is employed for the following purposes.
a. Luminance range adjustment.
b. Self-lighted subjects such as neon signs which can only be measured by reflected light
method and locations such as show windows where meter cannot be brought into proximity
with subject to allow incident light method.
Measurement in these type situations in described below.
1. Lumin ance range center point
Refers to measuring subject luminance by reflected light method. This luminance varies
somewhat according to incident light strength and surface reflectivity of the subject.
Incident light becomes measured by taking the standard surface reflection as 18%, from
which the exposure value is determined.
To obtain accurate exposures, the Lumisphere is used to measure effective footcandles to
determine the Luminance center point.
26
Page 28

Shown here is an example of using
becomes f 45
this time indicates 20.
the
mark will always indicate the center of luminance range,
regardless of whether or not the High slide is inserted.
If the measured value is set to the dial scale
mark and the
Lumisphere and by normal measuring
method without slide, meter needle
indicates 640 footcandles. With film
sensitivity of ISO 100, exposure
and shutter speed 1 second. mark at
This 20 indicates the exact center point of the luminance range. In the same
condition, install Lumigrid and when standard reflectivity of 18% is measured, this
means that the dial scale will indicate 20. When determining exposure by using the
Lumisphere or Lumidisc,
mark dose not reach the scale, reflected light measurement
with the Lumigrid cannot be performed due to insufficient incident light strength. In
other words, if the incident light is less than 160 footcandles, reflected light
measurement cannot be performed with the Lumigrid.
Page 29

b. Hold meter about 15cm from the subject, point Lumigrid to each surface of the
subject and read the footcandle scale value.
c. To determine the luminance range, it is sufficient to divide the highest meter
indication by the lowest. For example, if the highest value is 80 and the lowest 5, the
luminance range becomes 80/5 = 16/1 or 16 : 1.
Luminance range measurement
3. To obtain superior color photographs, determine upper and lower limits.
a. Adequate color photographs can be obtained with typical color film if within the subject
luminance distribution, the maximum is less than 4 times the center point and minimum
more than 1 /4 times (i.e.: overall luminance range becomes less than 16 : 1).
b. With a luminance center point of 20, if the measured maximum luminance is higher
than 80 (center point 20 x 4 = 80), color of that surface will become faded in the
photograph. Consequently, a slight reduction of incident light to this portion becomes
required.
c. Conversely, a portion with a measured minimum luminance less than 5 (center point
20 / 4 = 5) requires increased illumination in order to obtain an acceptable color
photograph.
28
Page 30

The Studio Deluxe indicates normal color
photograph luminance range limits
corresponding to 2 f stops left and right
of the luminance range center point.
4. Illumination Adjustment
The Studio Deluxe possesses an array of functions for the performance of
illumination adjustments which were nearly unknown in earlier instruments. It
allows the shooting site to be set up quickly and accurately. Described here are set
up procedure and 29
Page 31

examples to provide full control over movie scenes. It would not be erroneous to also apply
these to still photos.
position.
applying fill in light.
Stage 1
Determine overall lighting strength.
a. Set meter to ISO 100 (see film
sensitivity intermediate values).
b. Set 24 red line of cine speed
scale to F/5.6.
c. At this time,
lower than 640 (footcandles). If this is taken as the meter scale position, a value of
500 footcandles (lower than 640 footcandles) becomes the required lighting strength
(see meter intermediate scale values).
Stage 2
Key light setting
a. Turn on key light (main light) and determine direction required for subject illumination.
b. Without installing slide, hold meter at the subject position, point Lumisphere toward
camera and set stopper button to released
c. Adjust main light intensity or distance until meter indicates 400. The indication can
then be increased to the required 500 footcandles (determined in Stage 1c) by
Stage 3
Adjust illumination contrast
a. Install Lumidisc in place of Lumisphere.
b. Measure key light (indication should be 400 footcandles).
c. Turn on fill in light.
d. As described in section on outdoors Illumination Contrast
Adjustment, adjust fill in light to obtain suitable illumination
contrast. (For a contrast ratio of 2 : 1, the fill in light indication
must be 200 footcandles.) Lighting from back affects contrast
only slightly.
mark indication on dial scale becomes slightly
30
Page 32

Adjust luminance range
footcandles.
a. Install Lumisphere.
b. Hold meter at subject position, point Lumisphere toward camera and read needle
indication. With all lights turned on, adjust main light so that indication becomes 500
c. Set
d. Exchange Lumisphere for Lumigrid and check if there are any locations on the subject
Stage 5
Determine correct exposure
Although above Stage 4b includes an exposure value measurement using the Lumisphere,
perform correct exposure measurement as a final check. With the illumination controlled as
described, this should accurately become F/5.6 1/50 sec. This 5 stage procedure allows full
control of all lighting elements.
Closeups
It is essential to increase the exposure value when the subject is closer to the camera than
10 times the camera focal distance. An example of this type of case is with a camera lens
focal distance to 50mm and a subject distance of 40cm. The reason for this is the
increased image magnification as the subject approaches the camera. When light from the
subject passes through the lens and becomes focused on the film, the following
relationship exists among film plane illumination, subject brightness and image
magnification.
31
mark to 500 and read
value becomes 16 to indicate luminance range center point. If by experience the
required results can be obtained with a luminance range of 16 to 1, a maximum
luminance indication of 64 (center point 16 x 4 = 64) becomes the upper limit for
desired color reproduction. In this case, the minimum limit becomes 4 (center point 16
= 4 = 4). This means that attractive color reproduction cannot be obtained unless the
subject luminance distribution is within 4 ^ - 64.
brighter than 64 or dimmer than 4.
Page 33

As can be noted from the above formula, if the subject luminance is fixed and the
Measuring Method
magnification changes, the film plane brightness (illumination) varies in the inverse
proportion (M + 1)
2
. With a large subject distance, M is small and this effect
becomes nearly absent, but as the subject distance decreases, M becomes larger.
In an actual photographic example, with a magnification M of 1, film plane
brightness becomes (M + 1)
2
or 4. This is 1/4th that of a subject distance at infinity
and exposure must be increased 4 times. When the measured exposure value is
1/60 sec shutter speed, this must be compensated to 1/15 sec (1/60 x 4 = 1/15). In
closeup photography, (M + 1)
2
is referred to as the compensation factor.
Hold meter as close as possible to the subject and point Lumisphere toward the
camera. If light source is very close to the subject, temporarily remove the subject
and hold the Lumisphere in the subject position. The light then striking the
Lumisphere becomes exactly the same as that illuminating the subject. To obtain
exposure compensation for closeup:
1. Determine exposure by normal incident light method. 2. Measure
subject and image sizes (groundglass).
3. If the image is larger than the subject, it is enlarged, while a smaller image is
compressed. Divide the larger value by the smaller value.
4. Obtain compensation factor from Table 1.
5. Apply compensation factor to measured exposure value to produce
compensated exposure value.
32
Page 34

Compensation factor = (M + 1)2
Compression
Enlargement .
Subject to Compensation Subject to Compensation
33
image ratio factor image ratio Factor
20 : 1 1.10 1 : 1 4
19 : 1 1.11 1 : 1.25 5
18 : 1 1.11 1 : 1.50 6
17 : 1 1.12 1 : 1.75 7.5
16 : 1 1.13 1 : 2 9
15 : 1 1.14 1 : 2.25 10.5
14 : 1 1.15 1 : 2.5 12
13 : 1 1.16 1 : 2.75 14
12 : 1 1.17 1 : 3 16
11 : 1 1.19 1 : 3.5 20
10 : 1 1.21 1 : 4 25
9 : 1 1.24 1 : 4.5 30
8 : 1 1.27 1 : 5 36
7 : 1 1.31 1 : 6 49
6 : 1 1.36 1 : 7 64
5 : 1 1.44 1 : 8 81
4.5 : 1 1.50 1 : 9 100
4 : 1 1.56 1 : 10 121
3.5 : 1 1.65 1 : 1 1 144
3 : 1 1.78 1 : 12 169
2.75: 1 1.86 1 : 13 196
2.5 : 1 1.96 1 : 14 225
2.25: 1 2.09 1 : 15 256
2 : 1 2.25 1 :16 289
1 .75 : 1 2.47 1 : 17 324
1.5 : 1 2.78 1 :18 361
1 .25 : 1 3.24 1 : 19 400
1 : 1 4.00 1 : 20 441
Page 35

HANDLING CAUTIONS
Since the Studio Deluxe ll is a high precision instrument, use ample
care in regard to the following points.
Avoid dropping or subjecting it to strong shock.
Do not store in high temperature or high humidity locations.
Do not store in areas subject to magnetic fields or where insect repellants are located
(metal cabinets, clothing dressers, etc.).
Keep Lumisphere and Lumidisc clean and protect from scratches. If severely soiled,
these can be washed in a lukewarm solution of mild detergent. Rinse and dry
thoroughly.
In event service is required, contact the nearest authorized service agency. If necessary to
ship the meter, be sure to surround it with at least 3cm (1-1/2") thick insulating material
and pack in a sturdy, crush resistant package.
Page 36

SEKONIC CORPORATION
7-24-14, OIZUMI-GAKUEN-CHO, NERIMA-KU, TOKYO 178-8686, JAPAN TEL: (03) 3978-2335
FAX: (03) 3978-5229
T156270B-A
 Loading...