


FLASHMATE
Operating Manual
■SAFETY PRECAUTIONS
This manual uses the following safety labels for  WARNING and
  CAUTION that you must follow.
WARNING |
Indicates hazards or unsafe practices that can result in severe |
|
|
personal injury or death. |
|
CAUTION |
Indicates hazards or unsafe practices that can result in the personal |
|
injury or damage to your L-308S exposure meter. |
||
|
||
NOTE: |
Indicates a caution or limitation that accompanies operation. Please |
|
|
read the note to avoid incorrect operation. |
|
REFERENCE: |
Provides the reference information and related functions that are |
|
|
useful in operating the L-308S. We recommend that you read these |
|
|
reference. |
 WARNING
 CAUTION
●Please place in a location where an infant cannot reach and accidentally get the strap wrapped around his or her neck. There is danger of strangulation.
●Keep the Lumidisc and synchro terminal cap out of reach of young children, as swallowing such objects can cause suffocation.
●Never place batteries in fire, short disassemble heat or charge them. The batteries might break down, and cause an accident, injury or pollute the environment.
●There is a danger of electric shock if the meter is handled with wet hands, during rain, in areas splashed by water or where there is a lot of moisture, if you use cord flash mode. Also, such action may damage the product.

Table of Contents
Safety Precautions |
|
||
Table of Contents |
|
||
1. |
Parts Designation .......................................................................... |
1 |
|
2. |
Explanation of the Liquid Crystal Display (LCD) .......................... |
2 |
|
3. |
Before Using .................................................................................. |
3 |
|
|
1. |
Attach the strap .......................................................................... |
3 |
|
2. |
Inserting the battery ................................................................... |
3 |
|
3. |
Checking battery capacity .......................................................... |
4 |
|
4. |
Replacing battery during measurement ..................................... |
4 |
|
5. |
Auto Power OFF function ............................................................ |
5 |
|
6. |
Setting ISO film speed ................................................................ |
5 |
4. |
Basic Operation ............................................................................. |
6 |
|
|
1. |
Incident or reflected light measuring .......................................... |
6 |
|
2. |
Setting measuring mode ............................................................ |
6 |
|
3. |
When set for incident light ......................................................... |
8 |
|
4. |
When set for reflected light ........................................................ |
9 |
5. |
Measurement .............................................................................. |
10 |
|
|
1. |
Measuring Ambient Light ......................................................... |
10 |
|
|
1-1 Shutter Speed Priority mode ............................................ |
10 |
|
|
1-2 EV mode .......................................................................... |
11 |
|
|
1-3 Cinematography ............................................................... |
13 |
|
2. |
Measuring Flash Light .............................................................. |
14 |
|
|
2-1 Cord Flash mode .............................................................. |
14 |
|
|
2-2 Auto Reset Cordless Flash mode ..................................... |
16 |
6. |
Advanced Functions .................................................................... |
18 |
|
|
1. |
Measuring Light Contrast ......................................................... |
18 |
|
2. |
How to use an incident illuminance (LUX or FC) meter ............ |
19 |
|
3. |
Custom setting function ........................................................... |
20 |
7. |
Accessories ................................................................................. |
21 |
|
8. |
Technical Data ............................................................................. |
22 |
|
9. |
Safty Guide and Maintenance ..................................................... |
23 |
|

1. Parts Designation
 Power Button(ON/OFF Switch)
 Lens
Lens
Lumisphere
 Lumisphere
 Mode Button
 Measuring
Button
 Liquid Crystal Display (LCD)
 Up Button
 Down Button
ISO Button |
|
|
Strap Eyelet |
Flash Synchro Terminal |
Battery |
|
Compartment Cover |
Synchro Terminal Cap |
|
Lumidisc |
Strap |
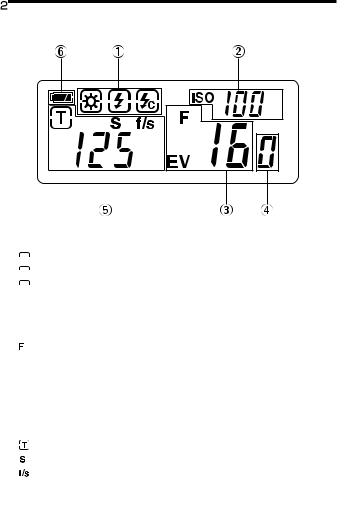
2.Explanation of the Liquid Crystal Display (LCD)
*For explanation purposes, the display illustrated here shows icons and readouts simultaneously. Actual display will never appear like this.
qMeasuring Mode icons
 Ambient (See page 10)
 Auto Reset Cordless Flash (See page 16)
 Cord Flash (See page 14)
wISO Display (See page 5)

 Displays ISO Film setting.
e Aperture/EV display
Appears when aperture value is displayed.
 Appears when using EV mode. (See page 11) r 0.1 step display
Depending on set mode, this displays measurement value at 1/10 aperture or
1/10 EV. (See page 10)
tShutter Priority indicator, Shutter speed display for still photography or frames per second (f/s) for cinematography
Appears when Shutter Priority (T) mode. (See page 10)
Appears when shutter speed is in full seconds. (See page 10) Appears when cine speed is set in frames per seconds. (See page 13)
y Battery Power Indicator (See page 4)
3. Before Using
1. Attach the strap
1) Attach the Strap !5by passing the small end loop through the strap eyelet !2and passing the other end of strap through it.
WARNING |
● Please place in a location where an infant cannot reach and |
|
accidentally get the strap wrapped around his or her neck. |
|
There is danger of strangulation. |
|
|
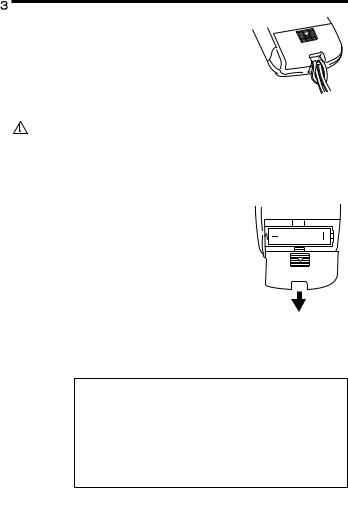
2.Inserting the battery
1)Requires type-AA 1.5-volt manganese dry cell
battery (R6P) or type-AA 1.5-volt alkali dry cell battery (LR6) or type-AA 1.5-volt lithium dry cell battery (FR6).
Do not use any battery other than the designated types.
2)Slide down the battery compartment cover !1in the direction of the arrow to remove.
3)Insert the battery observing the polarity with the
+, - marks in the battery compartment.
4)Align battery compartment cover with main unit and slide shut.
Make sure that the cover is properly in place and closed.
NOTE: ● Nickel and cadmium storage batteries (NiCd) and nickel and hydrogen batteries (NiH) cannot be used.
●Remove battery if meter is not used for an extended period.
Batteries can leak and damage the exposure meter. Dispose of used batteries properly.
●If the LCD does not light, check that the battery capacity is sufficient, and check that the battery positive and negative terminals are not reversed.

3. Before Using
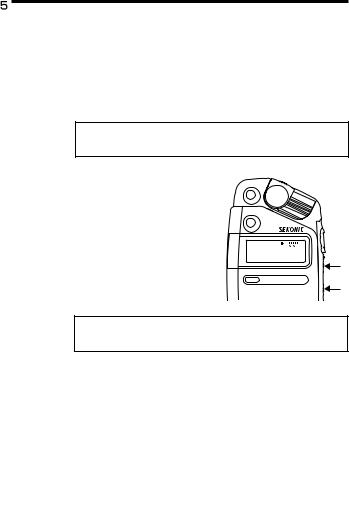
3. Checking battery capacity
When the Power button q is ON, the battery power indicator on the LCD t is displayed.
 (Displayed) Battery power level is good.
 (Displayed) Battery power level is low. Have a spare battery ready.
  (Blinking) Replace battery immediately.
REFERENCE: • If the liquid crystal display extinguishes immediately after the display appears when power is first applied, that is an indication that the battery is dead. Please promptly replace the battery.
•In case of continuous measuring, the battery life of this unit is as below in normal temperature.
Manganese dry cell about 10 hours
Alkali dry cell about 20 hours (according to our test condition)
•The battery accompanying with this unit when you purchased might die with in less than the above battery life because it is for sample-use.
4.Replacing battery during measurement
1)Always turn the power OFF before replacing batteries. If batteries are removed with the power ON, measurements and settings can no longer be recalled.
2)If after replacing the battery, or during measurements, strange screens
(displays that have not been set) appear in the LCD, or nothing happens, no matter what button is pushed, remove the battery and wait at least ten seconds and then replace the battery. This allows the software to automatically reset.
WARNING ● Never place batteries in fire, short, disassemble, heat or charge them. The batteries might break down, and cause an accident,
injury or pollute the environment.
NOTE: ● A three second pause between power ON and OFF is recommended to avoid damage to the meter.
3. Before Using
5.Auto Power OFF function
1)To conserve battery power, the meter will turn OFF about four minutes after last use.
2)Whether the Auto Power OFF function turns the power OFF or the Power button q is pressed, the settings and measured values remain stored in memory. When the Power button is pressed again the last settings are displayed.
REFERENCE: • The power shuts OFF automatically after one minute when the power button is pressed and held.
6. Setting ISO film speed
1) Hold down the ISO button i and press either the Up button y or Down button u to select ISO film speed for the film being used.
2) You can also change the ISO film speed after taking measurements. The new value is automatically displayed.
ISO
REFERENCE: • Setting value will change consecutively if the Up button or Down button is depressed for one second or longer.
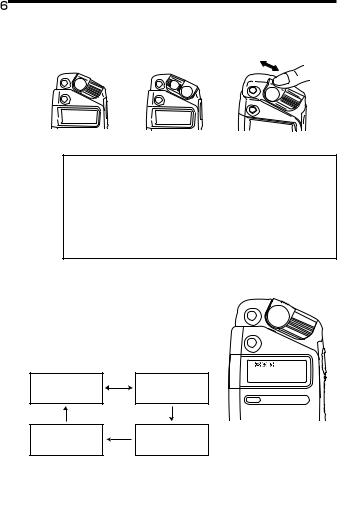
4. Basic Operation
1.Incident or reflected light measuring
1)To set for either incident or reflected light operation, slide the Lumisphere w mounting until it clicks.
Incident light mode Reflected light mode Setting operation
NOTE: ● Always use the Lumisphere mounting for setting. Hand operation of the Lumisphere may cause damage.
●The Lumisphere is an important light receiving unit. Please handle with care and try not to mark or soil.
Wipe Lumisphere with a dry soft cloth if it becomes dirty.
Never use organic cleaners (like thinner or benzene) to clean Lumisphere.
2.Setting measuring mode
1) Press the Mode button e to select a mode.
The mode switching sequence is as follows.
MODE
Shutter Speed Priority mode (ambient light) [see page 10]
Cord Flash [see page 14]
EV mode (ambient light) [see page 11]
Auto Reset Cordless Flash mode
[see page 16]
 Loading...