

Page 1
Page 2

I
nstructionforUse
p (14)
(15)
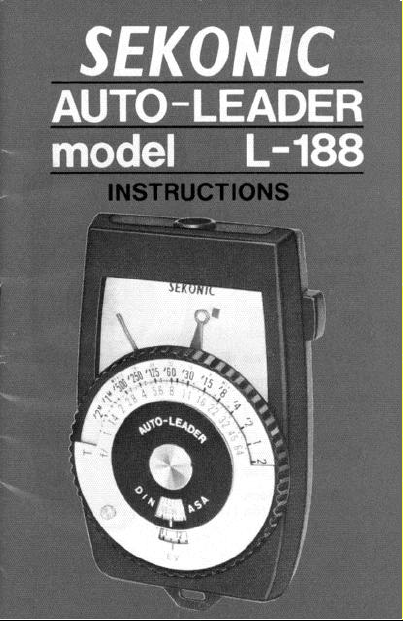
Battery check mark (2)
Guide mark (3)
Switch button (5)
Movie scale (6)
Shutter speed scale (7)
f/number scale (8)
DIN scale (9)
ASA scale (10)
EV scale (11)
ASA set knob (12)
Dial ring (13)
Sensor (1)
Pointer (4)
Battery compartment
ca
Battery check
button
Page 3

The Auto-Leader is a very handy carry around
exposure meter. It allows the exposure to be
measured very easily thanks to its
pointer-tracking system which is based on the
guide mark.
Specifications
Measurement system: Reflected light system
Measurement range: E V3 to 18 (ASA 100)
Angle of incoming light:65°
Scales: * ASA (DIN) . . . 6 (9) to 12000 (42)
* f/number . . . . . . . . . . . 1 to 64
* Shutter speed (T) . . 8 to 1 /2000 sec.
* EV . . . . . . . . . . . . . . -2 to 19
* Movie scale . . 8 to 128 frames/second
Dimensions: 81 x 52 x 19.3mm
Weight: 50 g (incl. battery)
Page 4

Preparing to operate
Battery
Use a 1.5V silver oxide battery (G13 AS designation).
First, use a coin to remove the battery compartment cap
(14) by rotating it to the left.
Now load the silver
oxide battery with
the (+) side face
up. Remove the
battery if you do
not intend to use
the unit for a long
period of time.
Battery check
The exposure meter needle will not point to the
correct value if the voltage of the battery falls below
the rating, and so it is a good idea to check the
voltage before use. Depress the battery check button
(1 5) and if the battery check mark (2) is
not indicated by the
needle (41, replace
the battery with a
new one. De not
depress the switch
button (5) when
checking the battery.
Page 5

(13)
O
peration
Film speed setting
Set the film speed setting which you intend to use.
How to set the film speed
For the correct setting on the ASA scale (10), rotate
the ASA set knob (12) and align the white mark on the
black dial with the red scale unit in the ASA window.
Reading out the exposure
When the sensor (1 ) is pointed in the direction of the
subject, the pointer (4) deflects in accordance with the
brightness of the subject. To read out the exposure,
rotate the dial
that the pointer (4) is aligned
with the center of the guide
mark. The correct exposure
will be the combination of the
shutter speed scale (7) unit
on the dial and the f/number
(8) unit. In the illustrated
example, f/4 will be the
correct exposure at 1 /125
sec. and f/5.6 at 1 /60 sec.
Dial scales
The numbers /2, /4 and /8, etc. on the shutter speed
scale (7) signify 1 /2, 1/4, 1/8 sec. etc., and the
numbers 1, 2 and 4, etc., signify 1, 2, 4 sec., etc. The
numbers 1 .6M, 3.2M, etc. on the ASA scale (10)
signify 1600, 3200, etc.
and set so
Page 6

Movie scale (6)
Measuring the exposure for movie cameras is performed
in exactly the same way as that for ordinary still cameras
except that the number of frames (8, 16, 32, etc.) is
taken into consideration. Read out the value on the
f/number scale (8) which best agrees with the number of
frames of the movie camera and then transfer this setting
to the camera. With a movie camera shutter open
angle of 180°, the standard number of frames is 24,
and this is indicated by the black line. The standard
number of frames with single 8 and super 8 movie
cameras is 18 and this is indicated by the black dot.
EV scale
If your camera has an exposure value type of shutter,
determine the exposure using the exposure value scale
(EV scale). If you are, for instance, using an ASA100 film,
set the EV scale to '10' with an EV10 value. If the
f/number of the camera is set to 5.6 at this value, the
shutter speed will automatically go to 1 /30 sec. and to 1
/8 sec. with an f/11 setting.
Page 7

Interim scale units
The interim units on the dial scales are as follows:
Interim values of the ASA scale (10) [DIN scale
(91)]
Page 8

I I__-
Printed in Japan
 Loading...