

Page 1

SEKONIC
DIGI LITE F L-328
Operating Instructions
Page 2

Parts Designations
Lumisphere
Swivel Head (270° rotatable)
Liquid crystal display
Measuring switch
Power switch
UP/DOWN key
Mode selection switch
ISO key
F/EV key
Synchro terminal
Battery chamber
Carrying strap eyelet
Lumidisc Reflected light filter
Page 3
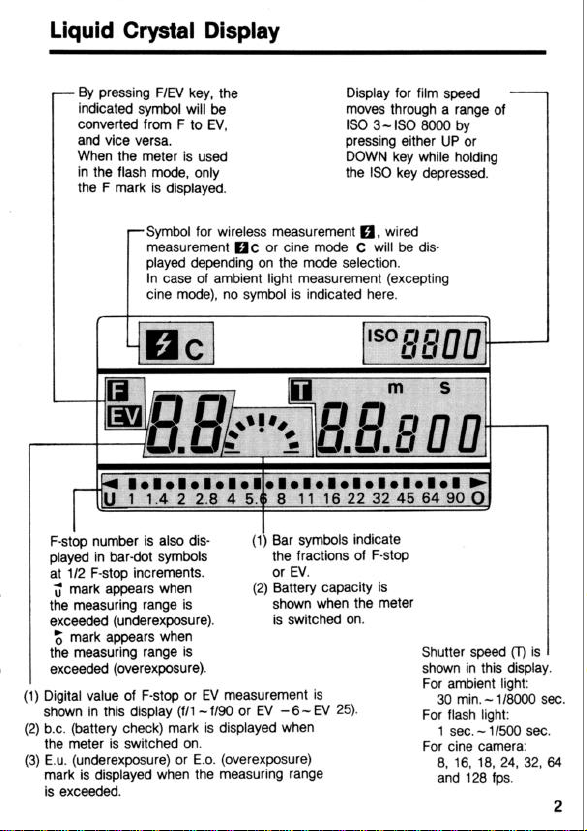
Liquid Crystal Display
- By pressing F/W key, the
indicated symbol will be
converted from F to EV,
and vice versa.
When the meter is used
in the flash mode, only
the F mark is displayed.
Symbol for wireless measurement 01, wired
measurement Ioc or tine mode C will be dis
played depending on the mode selection.
In case of ambient light measurement (excepting
tine mode), no symbol is indicated here.
aoa*a~mea*aoaoa
8 11 1622324564900
F-stop number is also displayed in bar-dot symbols
at 112 F-stop increments.
s mark appears when
the measuring range is
exceeded (underexposure).
5 mark appears when
the measuring range is
exceeded (overexposure).
Digital value of F-stop or EV measurement is
(1)
shown in this display (f/l -f/90 or EV -6- EV 25).
b.c. (battery check) mark is displayed when
(2)
the meter is switched on.
E.u. (underexposure) or E.o. (overexposure)
(3)
mark is displayed when the measuring range
is exceeded.
(1) Bar symbols indicate
the fractions of F-stop
or EV.
(2) Battery capacity is
shown when the meter
is switched on.
Display for film speed
moves through a range of
IS0 3 - IS0 8000 by
pressing either UP or
DOWN key while holding
the IS0 key depressed.
Shutter speed (T) is
shown in this display.
For ambient light:
30 min. - l/8000 sec.
For flash light:
1 sec. - 11500 sec.
For tine camera:
8, 16, 18, 24, 32, 64
and 128 fps.
-
2
Page 4

Preparing the Meter for Operation
g
1. Inserting the battery
The meter uses a single AA size pen-light battery
(1.5h. Open the battery chamber cover by sliding it in
the direction of arrow, and insert the battery carefully
aligning (+) and (-) polarities as indicated inside the
chamber.
Note: When not using the meter for a week or
more, remove the battery from the meter.
This will prevent any internal damage
arising from battery leakage.
2. Checking the battery
Check the battery before using the meter. A weak
battery will not assure the correct light readings.
Slide the power switch to ON position. Then the b.c.
mark and bar symbols will be displayed. Battery
capacity is indicated by the bar symbols (Fig. 1).
After checking battery (for about 0.5 sec.) the display
automatically changes to measuring mode (Fig. 2). If
the battery is too weak to give a correct light
readings, the b.c. mark will flash.
Note: If you switch the meter on while depressing
ISO key, the display of b.c. mark and bar
symbols will keep indicating.
3. Selecting measuring mode
Power on and slide the mode selection
switch to the position you want; wireless
measurement for flash light
measurement for flash li
bient light measurement
3
ht
wired or
am
Page 5
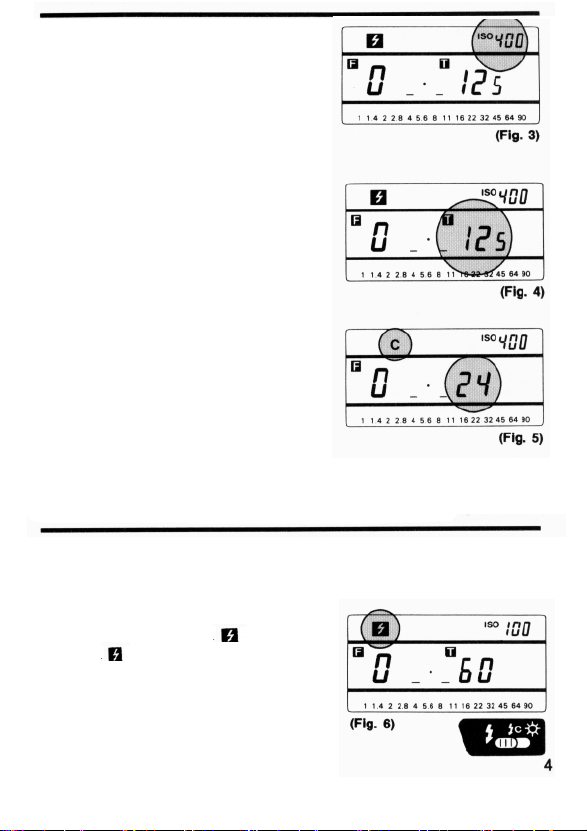
4. Setting ISO sensitivity Press either side of UP/DOWN key while
holding ISO key depressed so that the
ISO number of your film is displayed.
Film speed can be set within the range
of ISO 3 -ISO 8000 (Fig. 3).
5. Setting shutter speed This meter is designed for T (shutter speed) priority use, and the shutter speed should be set first.
Press either side of UP/DOWN key, so the
display of shutter speed can be changed in the
range of 30 min.-1/8000 sec. for ambient light
measurement and 1 sec.-11500 sec. for flash
light measurement (Fig. 4).
After the display of 1/8000 sec. the tine scale
is indicated (8, 16, 18, 24, 32, 64 and 128
fps.). In case of tine mode, the symbol C is
displayed (Fig. 5).
Note: The set figures (ISO, shutter speed and
tine scale) are memorized even after
the meter is switched off.
Wireless Measurement using Electronic Flash Unit
In case the photographed subject is too far away to use a synchro cord, or in case
the synchro cord disturbs photographing, flash light can be measured without
connecting synchro cord.
1. Switch the meter on and set the mode
selection switch at position
bol of
(Fig. B).
4
will be indicated on the display
The sym-
Page 6

2. Set the film speed (ISO) and shutter speed (T)
as shown in the paragraph for "Preparing the
Meter for Operation".
3. Press the measuring switch. The
bol on the display starts flashing.
4. While the symbol is flashing (for about 90 sec.),
fire the flash unit by pressing its test button (Fig.
7).
5. The appropriate F-stop value will be displayed on
the meter. The measured value is indicated in a
dual display by F-stop number with bar symbols
and bar-dot symbol marks (Fig. 8).
sym-
6. It the
meter cannot accept wireless flash measurement.
Press the measuring switch again to make the
meter ready for measurement.
Note:
(1) If the measuring range is exceeded,
the digital F-stop number is replaced
(2) The display will continue t o indicate the
symbol is not flashing, the
with either mark of E.u. (and
underexposure) or E.o. (and for
overexposure) (Fig. 9).
measured value for about 5 minutes after
measurement. After this period of time the
auto-off circuit will operate and turn the
display off.
for
Page 7

Measurement using Flash Unit with Synchro Cord
It is recommended that the meter is used in the wired measurement mode when
the flash light is measured from subject position or when the meter fails to register
flash light from wireless measurement; for example, close to a fluorescent lamp, or
in high ambient conditions etc.
1. Set the mode selection switch to position
The symbol
the display (Fig. 10).
2. Set the film sp eed (ISO) and shutter speed
as shown in the paragraph for "Preparing the
Meter for Operation".
3. Connect the synchro cord to the synchro
terminal of meter and to the flash unit.
4. Press the measuring switch to fire the flash. The
appropriate F-stop value is displayed on the
meter. Press the measuring switch again for
repeat measurements (Fig. 11).
Note: The notes for wireless measurement
are also applicable to wired
measurement.
will be indicated on
(r)
6
Page 8

Ambient Light Measurement
Measuring ambient light, whether it is daylight or standard electric light, is a fairly
simple matter using either incident or reflected light method.
2. Set the film speed (ISO) and shutter speed (T)
as shown in the paragraph for "Preparing the
Meter for Operation".
3. Press the measuring switch. The appropriate
F-stop value is displayed on the meter (Fig. 13).
4. When the measuring switch is kept depressed
in the ambient light mode, the display will give
a continuous reading of the changes in
brightness.
7
Page 9

5. By pressing F/EV key the F/number display will
be changed to the EV/number display, and vice
versa. In case of EV mode the bar-dot symbols
are not indicated on the display (Fig. 14).
Note: The notes for wireless measurement
are also applicabel to ambient light
measurement.
The procedures for taking measurements when using
a movie camera are the same as for taking ambient
light measurements. Keep depressing the UP side of
UP/DOWN key. Then, after the display of 1/8000 sec.,
cine scales for 8, 16, 18, 24, 32, 64 and 128 fps. will
be displayed, one after another. At the same time, the
symbol C will be indicated on the display (Fig. 15).
8
Page 10

Post-Measurement Calculation
1. By changing ISO sensitivity the measured
F-stop value will automatically be altered
to the appropriate one corresponding to
the changed ISO value (Fig. 16)
This post-measurement calculation is ap
plicable to all measuring modes, wireless
and wired flash light measurement, and
ambient light measurement.
2. By changing the shutter speed (l) the
measured F-stop value will automatically
be altered to the appropriate one cor
responding to the changed T value
(Fig. 17).
Post-measurement calculation for shutter
speed (1) is only applicable to the am
bient light measuring mode. If you make
post-measurement calculation for T in
flash light measuring mode, the indicated
F-stop value will turn into 0.
Page 11

Contrast Metering for Lighting Balance
When calculating a desired lighting balance, the meter can be used to measure the
brightness of main and fill-in lightings from the subject position.
t. Mount a Lumidisc instead of Lumisphere for usual incident light measurement.
2. Select the measuring mode, and set the film speed (ISO) and shutter speed (T) as
shown in the paragraph for "Preparing the Meter for Operation".
3. Point the center of Lumidisc accurately toward the center and axis of the main lighting
source from the subject position, and measure the light according to the measuring
method for the respective mode.
4. Using the same procedure, measure the fill-in light. In this case, be sure that the meter
is held so that it is not influenced by the main lighting source.
5. The F-stop difference between the main and fill-in lig hting sources is the lighting
contrast ratio (Fig. 18).
10
Page 12

Illuminance (LUX) Measurement
The meter can be used as a LUX meter when used with the Lumidisc in the ambient light
measuring mode.
1. Mount the Lumidisc, and slide the mode selection switch to position
2. Set the film speed (ISO) to ISO 100 regardless of your film speed.
3. Press the F/EV key and select EV mode.
4. Hold the meter so that the Lumidisc is parallel to the plane to be measured, and press
the measuring switch.
5. The measured EV value can be converted to the corresponding lux value using the
Fig. 19.
Page 13

Accessories
Lumisphere • Use the Lumisphere when you wish to measure incident light for
Lumidisc •Use the Lumidisc to measure illumination contrast or Lux as well as
Reflected Light Filter •Use the reflected light filter to measure the reflectedlight of a
Synchro Cord ( sold • A necessity for wired measurement for flash light.
separately) 5 meters in length, with 3 plugs for the synchro termials of exposure
Viewfinder 5° (sold • By using this viewfinder the 5° spot measurement is
separately) available. It makes you possible to measure the reflected light of
portraits and three-dimensional subjects. In case of incident li ght
measurement, point the Lumi-sphere accurately toward the camera
from the subject position.
exposure of single-dimensional subjects. Measuring position is same
as for Lumisphere.
subject. Point the filter directl y toward the part of subject to be
measured. And measure the reflected light from the main part of
subject as close as possible to the subject. Use adequate care in
this case that the meter shadow does not interfere with the light to
be measured.
meter, flash unit and camera.
distant subject without going up close to the subject, or to check the
reflected light from the small part of subject.
12
Page 14

Specification
Measuring system • Incident and reflected light measurement
Flash light for wireless and wired, and ambient light
measurements
Measuring element • Silicon Photo Diod e
Measuring range • Flash: F/1 .4-F/90+0.9 AV (ISO 100)
Ambient: EV -1-EV 19.9 (ISO 100)
Repeat metering • Within ±0.1 EV
accuracy
Calibration constants • C--340 K=12.5
Film speed • ISO 3-ISO 8000
Shutter speed • Flash: 1 sec.-1/500 sec.
Ambient: 30 min.-1/8000 sec.
F-stop • F/1 .0-F/90 + 0.9 AV (digital and bar symbols)
Analogue display: F/1 - F/90 at 0.5 AV
Movie scale • 8 fps.-124 fps.
EV scale • EV -6-EV 25 + 0.9
Other functions • Mode symbol display, E.u. and E.o. displays, battery
check, memory for the set values, post-measurement
calculation, auto-off.
Power source • 1 xAA pen-light battery (1.5V)
Standard accessories • Lumisphere, Lumidisc, reflected light filter, neck strap, battery and
Dimensions & weight • 121 x64 x23 mm, approx 110 grams (excl. battery)
case.
Page 15

Care of Your Meter
DIGI LITE F meter is a high-precision instrument containing delicate electronic parts and
components, and you are recommended to handle the meter with due care.
1. Avoid dropping or shocking the meter.
2. Do not store the meter in high temperature or high humidity locations.
3. Keep Lumisphere and Lumidiscs clean and free from scratches.
4. To avoid unnecessary battery drain, keep the meter switched off unless actually in use. When no using the
meter for a week or more, it is advisable to r emove the battery from the meter in order to prevent any in ternal
damage arising from battery leakage. However note that the memory settings will be tossed when the battery is
removed.
Page 16

SEKONIC CORPORATION
7-24-14, OIZUMI-GAKUEN-CHO, NERIMA-KU, TOKYO 178-8686, JAPAN
TEL:(03)3978-2335 FAX: (03)3978-5229
T19134OB-A
 Loading...