

Page 1

1ST PRINTING MAY 01
www.seuservice.com
Deluxe Version
OWNER’S MANUAL
SEGA ENTERPRISES, INC. USA
MANUAL NO. 999-1275
Page 2

VISIT OUR WEBSITE!
Page 3

BEFORE USING THE PRODUCT, BE SURE TO READ THE FOLLOWING:
To maintain the safety:
To ensure the safe usage of the product, be sure to read the following before using the product. The following
instructions are intended for the users, operators and the personnel in charge of the operation of the product.
After carefully reading and sufficiently understanding the warning displays and cautions, handle the product
appropriately. Be sure to keep this manual nearby the product or elsewhere convenient for referring to it
when necessary.
Herein, explanations which require special attention are enclosed with dual lines. Depending on the potentially hazardous degrees, the terms of WARNING, CAUTION, etc. are used. Be sure to understand the
contents of the displays before reading the text.
Indicates that mishandling the
product by disregarding this
warning will cause a potentially
hazardous situation which can
result in death or serious injury.
For the sage usage of the product, the following pictographs are used:
Indicates “HANDLE WITH CARE.” In order to protect the human body an equipment, this
display is attached to places where the Owner’s Manual and or Service Manual should be referred
to.
Perform work in accordance with the instructions herein stated.
Instructions for work are explained by paying attention to the aspect of accident prevention. Failing to
perform work as per the instructions can cause accidents. In the case where only those who have technical expertise should perform the work to avoid hazardous situation, the instructions herein state that the
serviceman should perform such work.
Be sure to turn off power before working on the machine.
To prevent electric shock, be sure to turn off power before starting the work in which the worker touches
the interior of the product. If the work is to be performed in the power-on status, the Instruction Manual
herein always states to that effect.
Indicates that mishandling the product
by disregarding this caution will cause
a slight hazardous situation which can
result in personal injury and or material
damage.
Be sure to ground the Earth Terminal (this, however, is not required in the case where a power cord
with earth is used).
This product is equipped with the Earth Terminal. When installing the product, Connect the Earth Terminal to the “accurately grounded indoor earth terminal” by using an earth wire. Unless the product is
grounded appropriately, the user can be subject to electric shock. After performing repair, etc. for the
Control equipment, ensure that the Earth Wire is firmly connected to the Control equipment.
Ensure that the Power Supply used is equipped with an Earth Leakage Breaker.
This product does not incorporate the Earth Leakage Breaker. Using a power supply which is not
equipped with the Earth Leakage Breaker can cause a fire when earth leakage occurs.
Be sure to use fuses which meet the specified rating. (only for the machines which use fuses).
Using fuses exceeding the specified rating can cause a fire and electric shock.
Page 4

Specification changes (removal of equipment, conversion and addition) not designated by SEGA
are not allowed.
The parts of the product include warning labels for safety, covers for personal protection, etc. It is very
hazardous to operate the product by removing parts and or modifying the circuits. Should doors, lids
and protective parts be damaged or lost, refrain from operating the product, and contact where the
product was purchased from or the office herein stated. SEGA shall not be held responsible for any
accidents, compensation for damage to a third party, resulting from the specifications not designated by
SEGA.
Ensure that the product meets the requirements of appropriate Electrical Specifications.
Before installing the product, check for Electrical Specifications. SEGA products have a nameplate on
which Electrical Specifications are described. Ensure that the product is compatible with the power
supply voltage and frequency requirements of the location. Using any Electrical Specifications different
from the designated Specifications can cause a fire and electric shock.
Install and operate the product in places where appropriate lighting is available, allowing warning
labels to be clearly read.
To ensure safety for the customers, labels and printed instructions describing potentially hazardous
situation are applied to places where accidents can be caused. Ensure that where the product is operated
has sufficient lighting allowing the warnings to be read. If any label is peeled off, apply it again immediately. Please place an order with where the product was purchased from or the office herein stated.
When handling the Monitor, be very careful. (Applies only to the product w/monitor.)
Some of the monitor (TV) parts are subject to high tension voltage. Even after running off power, some
portions are still subject to high tension voltage sometimes. Monitor repair and replacement should be
performed only be those technical personnel who have knowledge of electricity and technical expertise.
Be sure to adjust the monitor (projector) properly. (Applies only to the product w/monitor.)
Do not operate the product leaving on-screen flickering or blurring as it is. Using the product with the
monitor not properly adjusted may cause dizziness or a headache to an operator, a player, or the customers.
When transporting or reselling this product, be sure to attach this manual to the product.
In the case where commercially available monitors and printers are used in this product, only the
contents relating to this product are explained herein. Some commercially available equipment has
functions and reactions not stated in this manual. Read this manual together with the specific Instruction Manual of such equipment.
•
Descriptions herein contained may be subject to improvement changes without notice.
•
The contents described herein are fully prepared with due care. However, should any question arise or
errors be found, please contact SEGA.
INSPECTIONS IMMEDIATELY AFTER TRANSPORTING THE PRODUCT TO THE LOCATION.
Normally, at the time of shipment, SEGA products are in a status allowing for usage immediately after
transporting to the location. Nevertheless, an irregular situation may occur during transportation. Before
turning on power, check the following points to ensure that the product has been transported in a satisfactory status.
Are there any dented portions or defects (cuts, etc.) on the external surfaces of the cabinet?
Are Casters and Adjusters, damaged?
Do the power supply voltage and frequency requirements meet with those of the location?
Are all wiring connectors correctly and securely connected? Unless connected in the correct direction,
connector connections can not be made accurately. Do not insert connectors forcibly.
Do power cords have cuts and dents?
Do the fuses used meet specified rating? Is the Circuit Protector in an energized status?
Are all accessories available?
Can all Doors and Lids be opened with the Accessory keys? Can Doors and Lids be firmly closed?
Page 5

TABLE OF CONTENTS
BEFORE USING THE PRODUCT, BE SURE TO READ THE FOLLOWING:
TABLE OF CONTENTS
INTRODUCTION OF THE OWNER’S MANUAL
1. HANDLING PRECAUTIONS ..........................................................................................
2. PRECAUTIONS CONCERNING INSTALLATION LOCATION ...................................
3. OPERATION .....................................................................................................................
4. NAME OF PARTS .............................................................................................................
5. ACCESSORIES .................................................................................................................
6. ASSEMBLING AND INSTALLATION ............................................................................
7. PRECAUTIONS TO BE HEEDED WHEN MOVING THE MACHINE ........................
8. CONTENTS OF GAME ....................................................................................................
9. EXPLANATION OF TEST AND DATA DISPLAY .........................................................
9 - 1 SWITCH UNIT AND COIN METER ............................................................
9 - 2 SYSTEM TEST MODE ..................................................................................
9 - 3 GAME TEST MODE ......................................................................................
10. CONTROL PANEL ..........................................................................................................
10 - 1 ADJUSTING/REPLACING THE V.R. ..........................................................
10 - 2 GREASING ....................................................................................................
11. ACCELERATOR & BRAKE ............................................................................................
11 - 1 ADJUSTING AND REPLACING THE V.R. .................................................
11 -2 GREASING .....................................................................................................
12. PROJECTOR ....................................................................................................................
12 - 1 CLEANING THE SCREEN .........................................................................
12 - 2 ADJUSTMENT OF TOSHIBA PROJECTOR ..............................................
12 - 3 ADJUSTMENT OF MITSUBISHI PROJECTOR ........................................
13. COIN SELECTOR ............................................................................................................
14. REPLACING THE FLOURESCENT LAMP, AND LAMPS ..........................................
15. PERIODIC INSPECTION TABLE ..................................................................................
16. TROUBLESHOOTING ....................................................................................................
17. GAME BOARD ................................................................................................................
17 - 1 REMOVING THE GAME BOARD ..............................................................
18. COMMUNICATION PLAY .............................................................................................
18 - 1 INSTALLATION PRECAUTIONS ..............................................................
18 - 2 CONNECTING THE COMMUNICATION CABLE ...................................
18 - 3 SETTING FOR COMMUNICATION PLAY ...............................................
18 - 4 CAUTIONS TO BE HEEDED DURING COMMUNICATION PLAY ......
19. DESIGN RELATED PARTS ............................................................................................
20. PARTS LIST .....................................................................................................................
21. WIRE COLOR CODE TABLE .........................................................................................
22. WIRING DIAGRAM ........................................................................................................
1
2 - 3
4 - 5
6
7 - 9
10 - 23
24 - 26
27 - 33
34 - 72
36 - 37
38 - 50
51 - 72
73 - 76
73 - 76
76
77 - 78
77 - 78
78
79 - 92
79
80 - 89
90- 92
93 - 97
98 - 99
100 - 101
102 - 104
105 - 107
106 - 107
108 - 115
108 - 109
109 - 113
114 - 115
115
116 - 117
118 - 148
149
150 - 153
Page 6

SPECIFICATIONS
Installation Space : 1,360 mm (W) X 2,610 mm (D)
(53.5 in. X 102.8 in.)
Height : 2,230 mm (87.8 in.)
Weight : 450 kg. (992.1 lbs.)
Power, maximum current : 625 W 6.70 A (AC 120V 60 Hz AREA)
675 W 4.00 A (AC 220V 50 Hz AREA)
640 W 3.80 A (AC 220V 60 Hz AREA0
675 W 3.60 A (AC 240V 50 Hz AREA)
For TAIWAN
Power, current : 750 W 9.20 A (MAX.)
350 W 3.80 A (MIN.)
MONITOR : 50 TYPE PROJECTION DISPLAY
INTRODUCTION OF THE OWNERS MANUAL
This Owner's Manual is intended to provide detailed descriptions together with all
the necessary information covering the general operation of electronic assemblies,
electromechanicals, servicing control, spare parts, etc. as regards the product,
CLUB KART DX TYPE.
This manual is intended for the owners, personnel and managers in charge of
operation of the product. Operate the product after carefully reading and sufficiently
understanding the instructions. If the product fails to function satisfactorily, nontechnical personnel should under no circumstances touch the internal system. Please
contact where the product was purchased from.
Use of this product is unlikely to cause physical injuries or damages to property. However,
where special attention is required this is indicated by a thick line, the word "IMPORTANT"
and its sign in this manual.
STOP
Indicates that mishandling the product by disregarding this display can cause the
product's intrinsic performance not to be obtained, resulting in malfunctioning.
IMPORTANT
SEGA ENTERPRISES, INC. (U.S.A.)/CUSTOMER SERVICE
45133 Industrial Drive, Fremont, California 94538, U.S.A.
Phone : (415) 701-6580
Fax : (415) 701-6594
Page 7

DEFINITION OF LOCATION MAINTENANCE MAN AND SERVICEMAN
Non-technical personnel who do not have technical knowledge and expertise should
refrain from performing such work that this manual requires the location's
maintenance man or a serviceman to carry out, or work which is not explained in
this manual. Failing to comply with this instruction can cause a severe accident
such as electric shock.
Ensure that parts replacement, servicing & inspections, and troubleshooting are performed by the
location's maintenance man or the serviceman. It is instructed herein that particularly hazardous
work should be performed by the serviceman who has technical expertise and knowledge.
The location's maintenance man and serviceman are herein defined as follows:
"Location's Maintenance Man" :
Those who have experience in the maintenance of amusement equipment and vending machines,
etc., and also participate in the servicing and control of the equipment through such routine work
as equipment assembly and installation, servicing and inspections, replacement of units and
consumables, etc. within the Amusement Facilities and or locations under the management of the
Owner and Owner's Operators of the product.
Activities of Location's Maintenance Man :
Assembly & installation, servicing & inspections, and replacement of units & consumables as
regards amusement equipment, vending machines, etc.
Serviceman :
Those who participate in the designing, manufacturing, inspections and maintenance service of
the equipment at an amusement equipment manufacturer.
Those who have technical expertise equivalent to that of technical high school graduates as regards electricity, electronics and or mechanical engineering, and daily take part in the servicing &
control and repair of amusement equipment.
Serviceman's Activities :
Assembly & installation and repair & adjustments of electrical, electronic and mechanical parts of
amusement equipment and vending machines.
LISTED
U
®
L
5K92
AMUSEMENT MACHINE
Page 8

1. HANDLING PRECAUTIONS
When installing or inspecting the machine, be very careful of the following points and pay
attention to ensure that the player can enjoy the game safely.
Non-compliance with the following points or inappropriate handling running counter to the
cautionary matters herein stated can cause personal injury or damage to the machine.
Before performing work, be sure to turn power off. Performing the work
without turning power off can cause an electric shock or short circuit. In the
case work should be performed in the status of power on, this manual always
states to that effect.
To avoid electric shock or short circuit, do not plug in or unplug quickly.
To avoid electric shock, do not plug in or unplug with a wet hand.
Do not expose Power Cords and Earth Wires on the surface, (floor, passage,
etc.). If exposed, the Power Cords and Earth Wires are susceptible to damage.
Damaged cords and wires can cause electric shock or short circuit.
To avoid causing a fire or electric shock, do not put things on or damage
Power Cords.
When or after installing the product, do not unnecessarily pull the power cord.
If damaged, the power cord can cause a fire or electric shock.
In case the power cord is damaged, ask for replacement through where the
product was purchased from or the office herein stated. Using the cord as is
damaged can cause fire, electric shock or leakage.
Be sure to perform grounding appropriately. Inappropriate grounding can
cause an electric shock.
Be sure to use fuses meeting specified rating. Using fuses exceeding the
specified rating can cause a fire or electric shock.
Completely make connector connections for IC BD and others. Insufficient
insertion can cause an electric shock.
Specification changes, removal of equipment, conversion and/or addition, not
designated by SEGA are not permitted.
• Failure to observe this may cause a fire or an electric shock. Non-compliance
with this instruction can have a bad influence upon physical conditions of the
players or the lookers-on, or result in injury during play.
• SEGA shall not be held responsible for damage, compensation for damage to
a third party, caused by specification changes not designated by SEGA.
Be sure to perform periodic maintenance inspections herein stated.
STOP
IMPORTANT
For the IC board circuit inspections, only the logic tester is allowed. The use
of a multiple-purpose tester is not permitted, so be careful in this regard.
The Projector is employed for this machine. The Projector's screen is
susceptible to damage, therefore, be very careful when cleaning the screen.
For details, refer to PROJECTOR.
1
www.seuservice.com
Page 9
2. PRECAUTIONS CONCERNING INSTALLATION
LOCATION
This product is an indoor game machine. Do not install it outside. Even indoors,
avoid installing in places mentioned below so as not to cause a fire, electric shock,
injury and or malfunctioning.
Places subject to rain or water leakage, or places subject to high humidity in
the proximity of an indoor swimming pool and or shower, etc.
Places subject to direct sunlight, or places subject to high temperatures in the
proximity of heating units, etc.
Places filled with inflammable gas or vicinity of highly inflammable/volatile
chemicals or hazardous matter.
Dusty places.
Sloped surfaces.
Places subject to any type of violent impact.
Vicinity of anti-disaster facilities such as fire exits and fire extinguishers.
The operating (ambient) temperature range is from 5 C° to 40 C°.
Only in the case a projector is employed, the temperature range is from 5 C°
to 30 C°.
LIMITATIONS OF USAGE REQUIREMENTS
Be sure to check the Electrical Specifications.
Ensure that this product is compatible with the location's power supply,
voltage and frequency requirements.
A plate describing Electrical Specifications is attached to the product.
Non-compliance with the Electrical Specifications can cause a fire and
electric shock.
This product requires the Breaker and Earth Mechanisms as part of the
location facilities. Using them in a manner not independent can cause a fire
and electric shock.
Ensure that the indoor wiring for the power supply is rated at 15A or higher
(AC single phase 100 ~ 120V area), and 7A or higher (AC 220 ~ 240V area).
Non-compliance with the Electrical Specifications can cause a fire and
electric shock.
Be sure to independently use the power supply equipped with the Earth
Leakage Breaker. Using a power supply without the Earth Leakage Breaker
can cause an outbreak of fire when earth leakage occurs.
Putting many loads on one electrical outlet can cause generation of heat and a
fire resulting from overload.
When using an extension cord, ensure that the cord is rated at 15A or higher
(AC 100 ~ 120V area) and 7A or higher (AC 220 ~ 240V area). Using a cord
rated lower than the specified rating can cause a fire and electric shock.
www.seuservice.com
2
Page 10

OPERATION AREA
For the operation of this machine, secure a minimum area of 2.0m (W) X
2.8m (D). In order to prevent injury resulting from the falling down accident
during game play, be sure to secure the minimum area for operation.
Be sure to provide sufficient space so as to allow this product's ventilation fan
to function efficiently. To avoid machine malfunctioning and a fire, do not
place any obstacles near the ventilation opening.
SEGA shall not be held responsible for damage, compensation for damage to
a third party, resulting from the failure to observe this instruction.
STOP
For transporting the machine into the location's building, the minimum necessary
dimensions of the opening (of doors, etc.) are 1.4m(W) and 1.7m(H).
IMPORTANT
Electric current consumption
MAX. 6.7 A (AC 120V 60 Hz)
MAX. 4.0 A (AC 220V 50 Hz)
MAX. 3.8 A (AC 220V 60 Hz)
MAX. 3.6 A (AC 240V 50 Hz)
MAX. 9.2 A (For TAIWAN)
3
www.seuservice.com
Page 11
3. OPERATION
3
PRECAUTIONS TO BE HEEDED BEFORE STARTING THE OPERATION
To avoid injury and trouble, be sure to constantly give careful attention to the behavior and
manner of the visitors and players.
In order to avoid accidents, check the following before starting the operation:
To ensure maximum safety for the players and the customers, ensure that
where the product is operated has sufficient lighting to allow any warnings to
be read. Operation under insufficient lighting can cause bodily contact with
each other, hitting accident, and or trouble between customers.
Be sure to perform appropriate adjustment of the monitor (projector). For
operation of this machine, do not leave monitor's flickering or deviation as is.
Failure to observe this can have a bad influence upon the players' or the
customers' physical conditions.
It is suggested to ensure a space allowing the players who feel sick while
playing the game to take a rest.
Check if all of the adjusters are in contact with the surface. If they are not, the
Cabinet can move and cause an accident.
Do not put any heavy item on this product. Placing any heavy item on the
product can cause a falling down accident or parts damage.
Do not climb on the product. Climbing on the product can cause falling down
accidents. To check the top portion of the product, use a step.
To avoid electric shock, check to see if door & cover parts are damaged or
omitted.
To avoid electric shock, short circuit and or parts damage, do not put the
following items on or in the periphery of the product.
Flower vases, flowerpots, cups, water tanks, cosmetics, and receptacles/
containers/vessels containing chemicals and water.
www.seuservice.com
23456789012345678901234567890121234567890123456789012
Ensure that all of the
Adjusters are in contact
with the floor.
4
Page 12

To avoid injury, be sure to provide sufficient space by considering the potentially
crowded situation at the installation location. Insufficient installation space can
cause making bodily contact with each other, hitting accidents, and or trouble
between customers.
PRECAUTIONS TO BE HEEDED DURING OPERATION (PAYING ATTENTION TO CUSTOMERS)
To avoid injury and trouble, be sure to constantly give careful attention to the behavior and
manner of the visitors and players.
To avoid injury and accidents, those who fall under the following categories
are not allowed to play the game.
• Those who need assistance such as the use of an apparatus when walking.
• Those who have high blood pressure or a heart problem.
• Those who have experienced muscle convulsion or loss of consciousness when
playing video game, etc.
• Those who have a trouble in the neck and or spinal cord.
• Intoxicated persons.
• Pregnant women or those who are in the likelihood of pregnancy.
• Persons susceptible to motion sickness.
• Persons whose act runs counter to the product's warning displays.
A player who has never been adversely affected by light stimulus might
experience dizziness or headache depending on his physical condition when
playing the game. Especially, small children can be subject to those
conditions. Caution guardians of small children to keep watch on their
children during play.
Instruct those who feel sick during play to have a medical examination.
To avoid injury resulting from falling down and electric shock due to spilled
drinks, instruct the player not to place heavy items or drinks on the product.
To avoid electric shock and short circuit, do not allow customers to put hands
and fingers or extraneous matter in the openings of the product or small
openings in or around the doors.
To avoid falling down and injury resulting from falling down, immediately
stop the customer's leaning against or climbing on the product, etc.
To avoid electric shock and short circuit, do not allow the customers to
unplug the power plug without a justifiable reason.
Immediately stop such violent acts as hitting and kicking the product. Such
violent acts can cause parts damage or falling down, resulting in injury due to
fragments and falling down.
Instruct the Player to adjust the seat before playing the game. Playing the
game in a forcible posture can cause a contingent accident.
5
www.seuservice.com
Page 13

4. NAME OF PARTS
MAIN CABINET
PTV BASE
BILLBOARD
PTV
50 TYPE PROJECTOR
FIG. 4 a
COIN CHUTE DOOR
TABLE 4
CONTROL PANEL
CASHBOX DOOR
ACCELERATOR
BRAKE
FIG. 4 b
Width X Length X Height Weight
PROJECTOR(PTV) 1,140 mm X 555 mm X 1,670 mm 112 kg
PTV BASE 1,160 mm X 545 mm X 235 mm 28 kg
BILLBOARD 1,140 mm X 400 mm X 410 mm 19 kg
MAIN CABINET 1,140 mm X 2,080 mm X 1,590 mm 300 kg
When assembled 1,310 mm X 2,610 mm X 2,230 mm 450 kg
www.seuservice.com
6
Page 14

5. ACCESSORIES
When transporting the machine, make sure that the following parts are supplied.
TABLE 5 ACCESSORIES
DESCRIPTION OWNERS MANUAL
Part No. (Qty.)
420-6588-01 (1)
Note
Figures
If Part No. has no description, the Number has not been
registered or can not be registered. Such a part may not
be obtainable even if the customer desires to purchase it.
Therefore, ensure that the part is in safekeeping with you.
TAMPERPROOF WRENCH
M8 540-0009-01 (1)
TOOL
KEY MASTER
220-5576 (2)
For opening/closing
the doors
AC Cable (Power Cord)
600-7228 (1) TAIWAN
600-6695 (1) USA
600-6618 (1) OTHERS
600-6619 (1) HONG KONG
Used for installation,
see 4 of Section 6.
KEY
(2)
For the CASHBOX DOOR
The Keys are inside the Coin
Chute Door at the time of
shipment from the factory.
7
www.seuservice.com
Page 15

TOSHIBA
Remote Controller used for
adjustment of the projector.
See Section 14.
200-5536(1)
MITSUBISHI
Remote Controller used for
adjustment of the projector.
See Section 14.
200-5532(1)
FLEX TUBE
310-5050-220200 (1)
For communication play,
refer to Section 20.
POSITION
ADJUST
PIC-ADJ
RESET
SELECT
P
SET
TEST
1
R-MUTE
PICTURE
--
MITSUBISHI
R / B
ENTER
89
G-MUTE
B-MUTE
+
POWER
R / G / B
10
TEST MODE WRITING
RBG
One of the above 3 types of
Remote Controllers is used for the
Projector.
The Remote Controller is attached to the Projector at the
time of shipment.
CARTON BOX
601-10642 (1)
Used for transporting the
Game Board.
Refer to Next Page.
ASSY FIBER CABLE
600-6275-0500 (1)
For communication play,
refer to Section 20.
CONN 22
310-5051-22 (2)
For communication play,
refer to Section 20.
CHECK SIDE
www.seuservice.com
8
Page 16

HOW TO USE THE CARTON BOX
STOP
IMPORTANT
When asking for the replacement or repair of the product's Game Board
(NAOMI 2), be sure to put the Game Board together with the Shield Case in a
Carton Box. Otherwise, the request is not acceptable.
Put the Shield Case in the Carton Box by paying attention to the correct
direction as per the following instructions and as shown by the instructions
printed on the Carton Box. Handling in an erroneous manner can damage the
Game Board.
Remove the Shield Case Brackets from the Shield Case and put the Shield Case
in the Carton Box.
SHIELD CASE BRACKETS
The shape depends on the type of product.
"CHECK SIDE" Display
C
H
E
C
K
S
ID
E
FILTER BOARD
Wrap the Shield Case with the packing material and put it in the Carton Box as shown. Putting
it upside down or packing otherwise in the manner not shown can damage the Game Board and
parts.
9
www.seuservice.com
Page 17

6. ASSEMBLING AND INSTALLATION
Perform assembly work by following the procedure herein stated. Failing to
comply with the instructions can cause electric shock hazard.
Perform assembling as per this manual. Since this is a complex machine,
erroneous assembling can cause an electric shock, machine damage and or not
functioning as per specified performance.
When assembling, be sure to use plural persons. Depending on the assembly
work, there are some cases in which working by one person alone can cause
personal injury or parts damage.
Ensure that connectors are accurately connected. Incomplete connections can
cause electric shock hazard.
Be careful so as not to damage wirings. Damaged wiring can cause electric
shock and short circuit hazards.
Do not carelessly push the PTV. Pushing the PTV carelessly can cause the
PTV to fall down.
This work should be performed by the Location's Maintenance Man or
Serviceman. Performing work by non-technical personnel can cause a severe
accident such as electric shock. Failing to comply with this instruction can
cause a severe accident such as electric shock to the player during operation.
Provide sufficient space so that assembling can be performed. Performing
work in places with narrow space or low ceiling may cause an accident and
assembly work to be difficult.
To perform work safely and avoid serious accident such as the cabinet's
falling down, do not perform work in places where step-like grade
differences, a ditch, or slope exist.
Carefully handle the PTV on the PTV base because it is very unstable. If
handled carelessly, it may fall down and eventually cause a serious personal
injury.
To perform work safely and securely, be sure to prepare a step which is in a
secure and stable condition. Performing work without using the step can cause
violent falling down accidents.
www.seuservice.com
10
Page 18

When carrying out the assembling and installation, follow the following 6-item sequence.
ASSEMBLING THE PTV
1
COUPLING THE MAIN CABINET TO THE PTV
2
SECURING IN PLACE (ADJUSTER ADJUSTMENT)
3
POWER SUPPLY CONNECTION
4
TURNING POWER ON
5
ASSEMBLING CHECK
6
The master key (accessories) in addition to the tools such as a Phillips type screwdriver, wrench,
socket wrench and Ratchet Handle are required for the assembly work.
Phillips type screwdriver
24mm
SOCKET WRENCH,(M8 hexagon bolt)
RATCHET HANDLE
WRENCH (for M16 hexagon bolt)
KEY MASTER
11
www.seuservice.com
Page 19

ASSEMBLING THE PTV
1
1
Fix the two mask holders onto the PTV top panel each with the 2 countersunk-head screws.
2
Insert and raise the TV mask as illustrated below, and fix it with the 6 screws.
3
Fix the panel-mounting brackets L and R onto the PTV front each with the 2 screws.
4
Mount the front panel onto the PTV front. Fix it with the 4 trusshead screws.
FLAT HEAD SCREW (2 each)
M4 X 12
TV MASK
SCREW (4)
M5 X 20, w/flat &
spring washers
PTV
MASK HOLDER
TRUSS SCREW(2) black
M5 X 25, flat washer used.
PANEL MOUNT BRACKET L
SCREW (2 each)
M5 X 16, w/flat & spring washers
PANEL MOUNT BRACKET R
TRUSS SCREW(4) black
M5 X 25, flat washer used.
Place the PTV on the PTV base. Minimum 3
5
workers must engage in lifting the PTV while
several other works must hold the PTV base.
www.seuservice.com
FRONT PANEL
FIG. 6. 1 a
When lifting the PTV the minimum 3
workers must cooperate.
FIG. 6. 1 b
12
Page 20

6
Connect the billboard wire's two connectors to the PTV top panel's connectors. For the safety
the 2 workers must hold the billboard while another worker must use a stool when connecting.
SCREW (2)
M5 X 16,
w/flat & spring washers
Place the billboard on the
7
PTV top panel. Engaging
the billboard on the 2
BILLBOARD
mask holders, slide it to
the PTV front. Be careful
not to damage the wires
in this instance.
Connect the Connector.
Fix the billboard with the
8
2 screws.
PTV
When performing work,
be sure to use a step.
PTV BASE
FIG. 6. 1 c
FIG. 6. 1 d
13
www.seuservice.com
Page 21

2
COUPLING THE MAIN CABINET TO THE PTV
1
Move the main cabinet and the PTV closer to each other. Carefully move the PTV on the PTV
base because it is unstable.
2
Take out the 2 wires from the main cabinet; one for the video signals and another for the power.
Connect the wires between the main
3
cabinet and the PTV. The connector
panel of the PTV front provides two
connectors. Into them, insert the 2
wire connectors from the main cabinet; one for the video signals and
another for the power. Each has an
insertion direction. Make sure about
the insertion direction before inserting
the connectors, and do not apply
excessive force when inserting;
otherwise they may be damaged. The
connector for the video signals has
two fixing screws at its both ends.
Tightly fasten them after inserting the
connector.
PHOTO 6. 2 a
MITSUBISHI PROJECTOR
Fasten the screws.
TOSHIBA PROJECTOR
Fasten the screws.
www.seuservice.com
FIG. 6. 2 a
14
Page 22
4
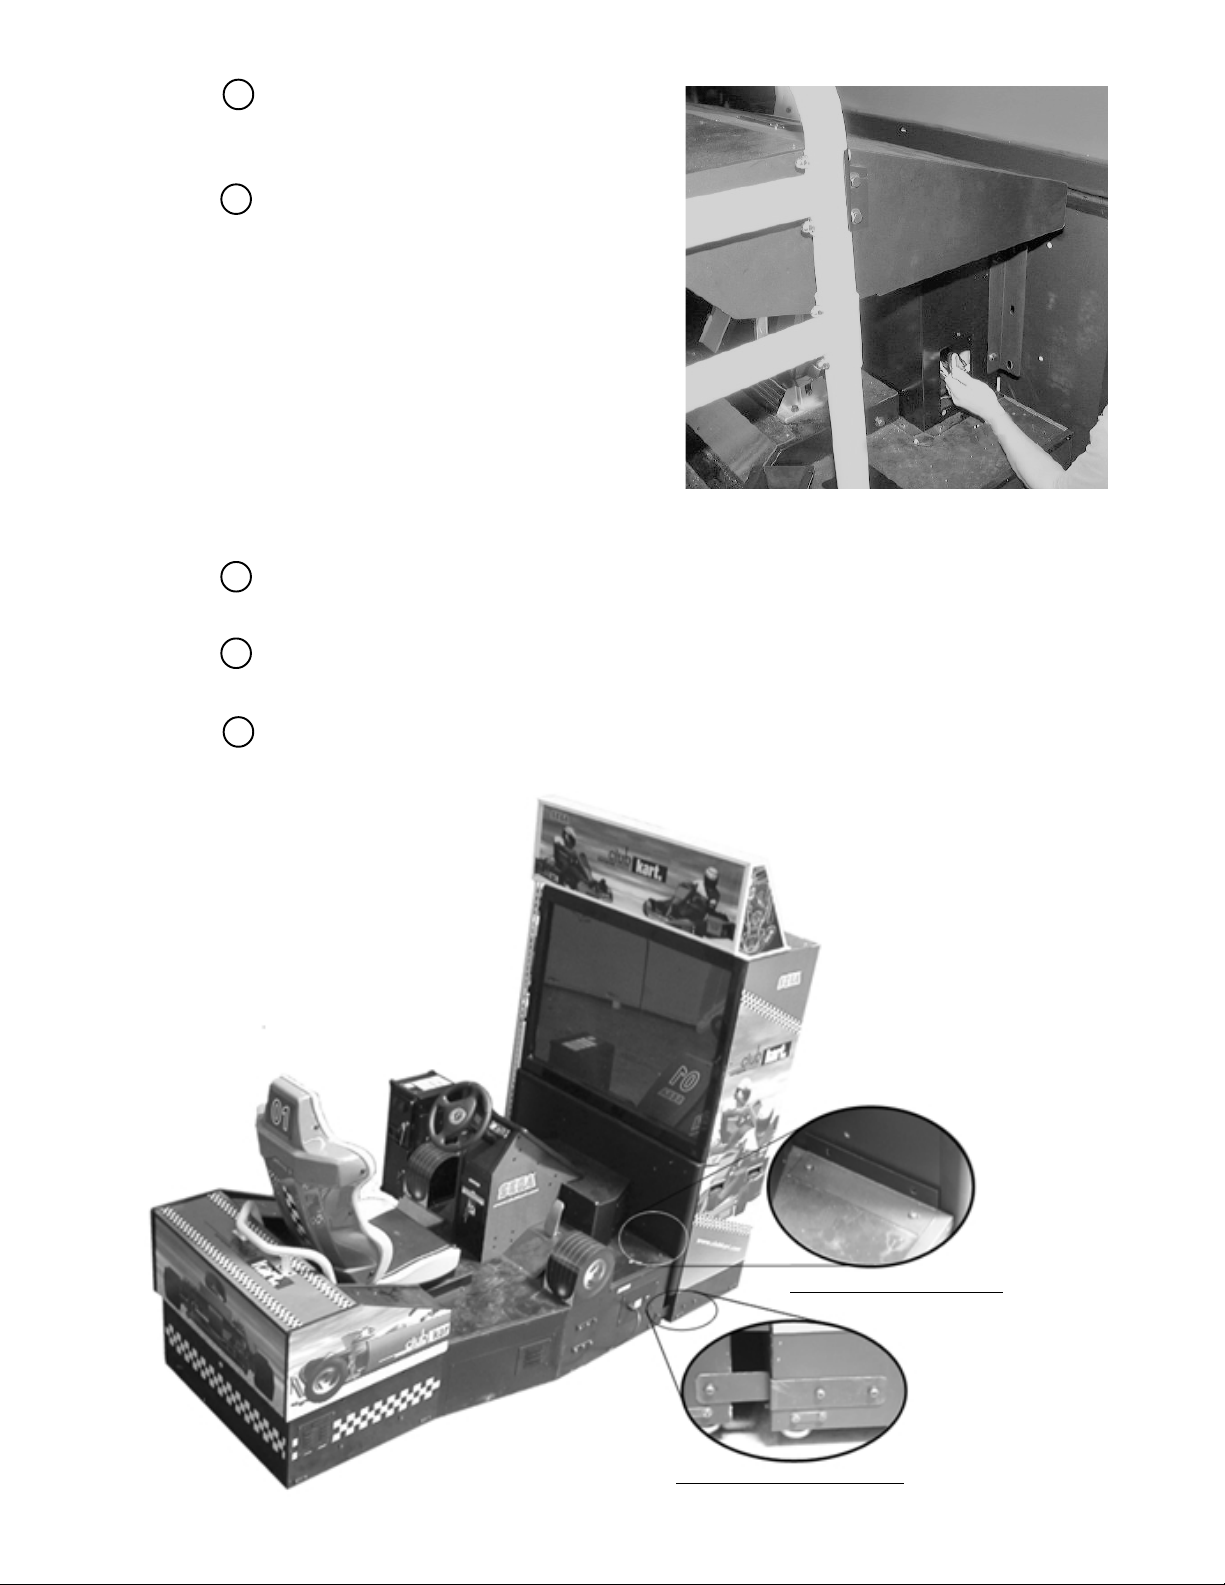
Remove the 3 trusshead screws to detach
the mechanism-side lid from the main
cabinet. A square hole appears.
5
Couple the PTV and the main cabinet
with each other. Before attaching them
closely without a gap, insert a hand into
the square hole and pull the 2 wires into
the main cabinet. This will prevent the
wires from being caught between them.
PHOTO6. 2 b
6
Mount the 2 joint bracket centers onto the PTV and the main cabinet. Fix them each with 4
hexagonal-head bolts.
7
Mount the 2 joint bracket onto the PTV base and the main cabinet. Fix them each with 3
hexagonal-head bolts.
8
Replace the mechanism-side lid to the main cabinet and fix it with the 3 trusshead screws.
JOINT BRACKET CENTER
FIG. 6. 2 b
JOINT BRACKET PTV BASE
15
www.seuservice.com
Page 23

INSTALLING THE POP
1
Peel off the double-sided adhesive tape on the POP reverse and stick the POP Holder.
2
By using the 3 Truss screws, secure the POP Holder to the Billboard ceiling.
POP
Height:320mm
Double-sided adhesive tape
POP HOLDER
TRUSS SCREW (3) black
M4 X 8
FIG. 6. 2 c
www.seuservice.com
16
Page 24

3
SECURING IN PLACE (ADJUSTER ADJUSTMENT)
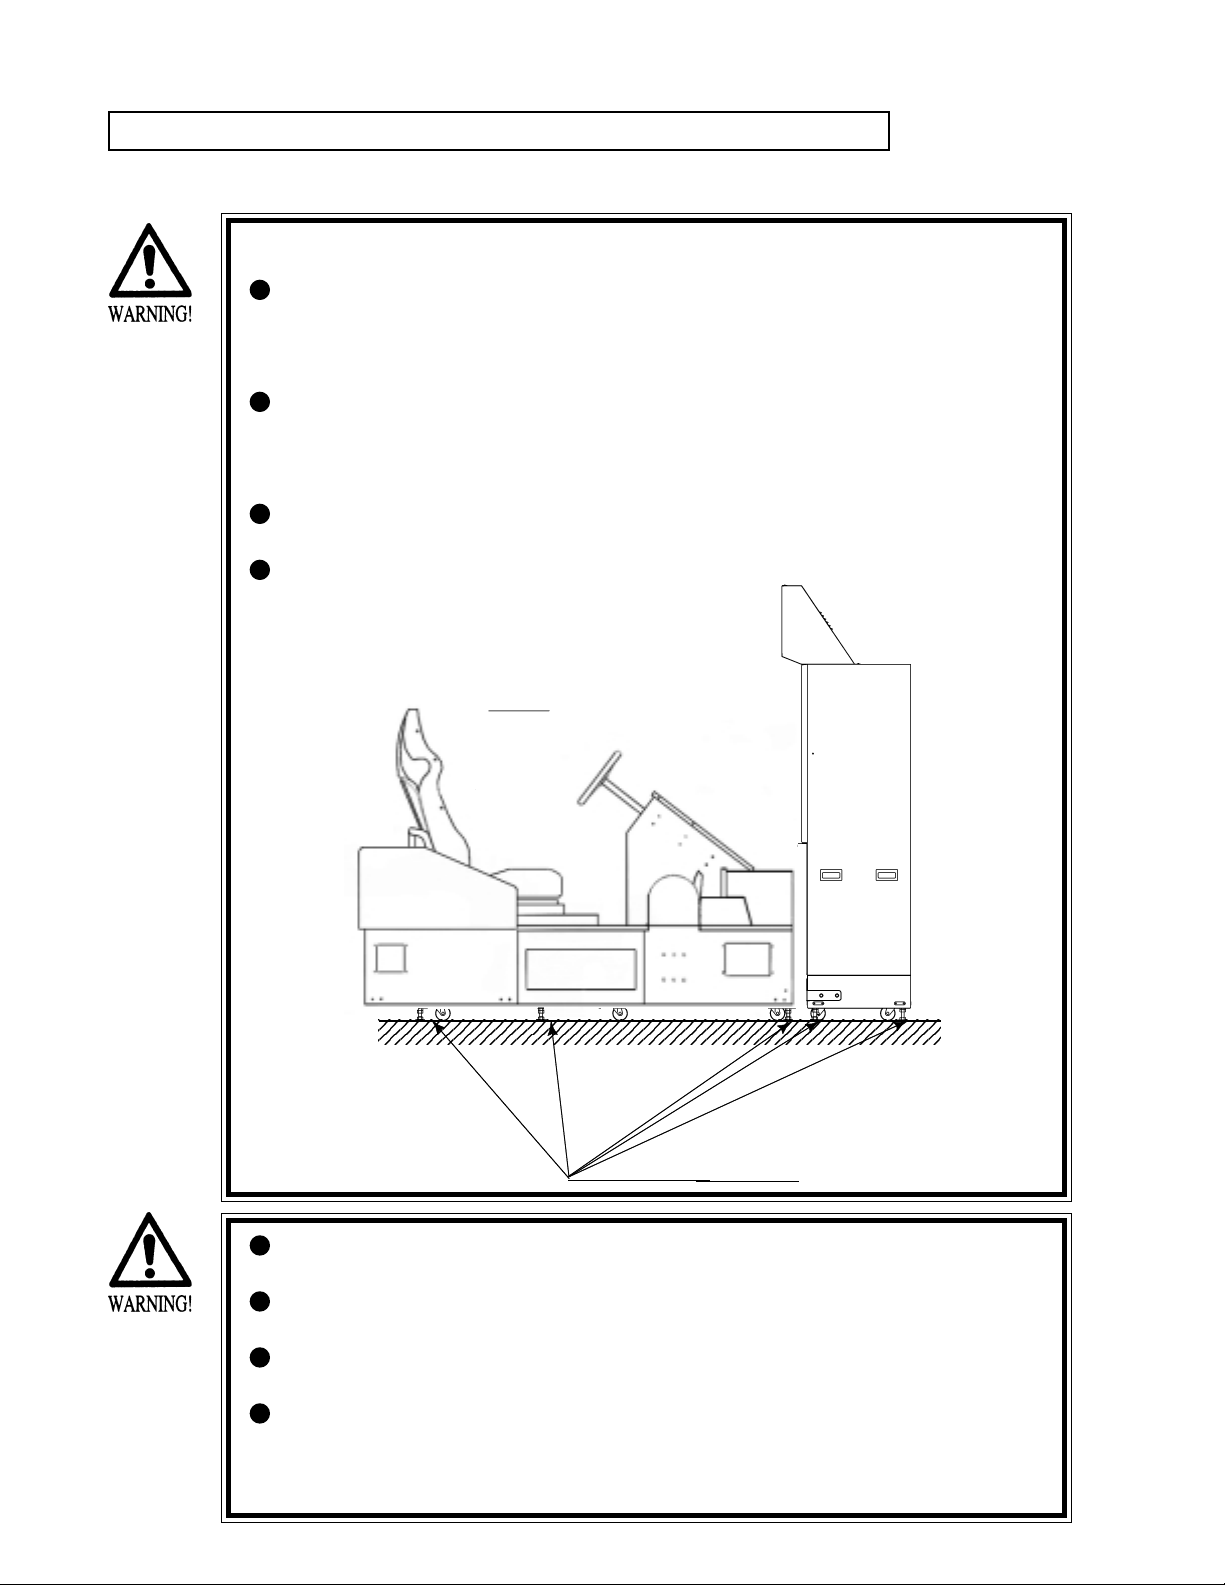
Make sure that all of the adjusters are in contact with the floor. If they are not, the
cabinet can move and cause an accident.
This product has 10 casters (4 for PTV base, 6 for Main Cabinet) and 10 Adjusters
(4 for PTV base, 6 for Main Cabinet). (FIG. 6. 3a) When the installation position is determined,
cause the adjusters to come into contact with the floor directly, make adjustments in a manner
so that the casters will be raised approximately 5mm. from the floor and make sure that the
machine position is level.
1
Transport the product to the
installation position. Be sure to
provide adequate space allowing
the player to get on and off.
2
Have all of the Adjusters make
contact with the floor. Adjust the
Adjuster's height by using a
wrench so that the machine
position is kept level.
CASTER
3
After making adjustment, fasten
the Adjuster Nut upward and
secure the height of Adjuster
(FIG. 6. 3 b).
ADJUSTER
FASTEN UPWARD.
FIG. 6. 3 b ADJUSTER
ADJUSTER
FIG. 6. 3 a BOTTOM VIEW
CASTER
Approx.5mm
ADJUSTER
10cm over
FIG. 6. 3 c
Refer to this Fig. (Scale:1/100)
for the layout of the place of
installation.
2.8m
FIG. 6. 3 d
Be sure to provide space as shown between
the Air Vent and the wall surface.
17
70cm
2.0m
www.seuservice.com
Page 25

4
POWER SUPPLY
Be sure to independently use the power supply socket outlet equipped with an
Earth Leakage Breaker. Using a power supply without an Earth Leakage
Breaker can cause a fire when electric leakage occurs.
Ensure that the "accurately grounded indoor earth terminal" and the earth wire
cable are available (except in the case where a power cord plug with earth is
used). This product is equipped with the earth terminal. Connect the earth
terminal and the indoor earth terminal with the prepared cable. If the
grounding work is not performed appropriately, customers can be subjected to
an electric shock, and the product's functioning may not be stable.
Ensure that the power cord and earth wire are not exposed on the surface
(passage, etc.). If exposed, they can be caught and are susceptible to damage.
If damaged, the cord and wire can cause electric shock and short circuit
accidents. Ensure that the wiring position is not in the customer's passage
way or the wiring has protective covering.
After wiring power cord on the floor, be sure to protect the power cord.
Exposed power cord is susceptible to damage and causes an electric shock
accident.
The AC Unit is mounted on the right side of the machine. The AC Unit has Main SW, Circuit
Protector, Earth Terminal and the Inlet which connects the Power Cord.
1
Ensure that the Main SW is OFF.
MAIN SW
Main SW off
INLET
FIG. 6. 4 a AC unit
AC Cable (Power Cord)
www.seuservice.com
18
Page 26

HOW TO USE THE CORD CLAMP
In case the Power Plug is apt to come out of place, secure the
Power Cord to the periphery of the AC Unit with the Cord
Clamp (an accessory).
19
www.seuservice.com
Page 27

5
TURNING POWER ON
Connect the power by turning on the AC unit's main switch. Then the billboard's fluorescent
light comes on.
The monitor (PTV screen) displays a system power-on message, and then an advertising screen
(a plying-for-hire screen) appears. At the same time the right and left speakers on the control
panel output an advertise sound. The sound is inaudible, however, when you have disabled its
function.
Before an advertising screen appears the system automatically conducts an initialization. Do not
touch the product until the system completes an initialization and the advertising screen appears.
During an initialization the handle (steering wheel) turns counterclockwise and clockwise and
stops at the original center position (for a straight-ahead direction). This corrects the volume
value inside the control panel. Do not touch the handle or play the game before an initialization
is completed (that is, the handle automatically stops at the center position). Failure to observe
this may affect the handle's operability and the handle's force feedback (force feedback against
crashing) during playing the game. If the handle's operability or force feedback is abnormal,
disconnect and reconnect the power for initializing the system again.
When you disconnect the power, the system saves the data for the credit number, ranking, and
latest game's score. Assume that the credits effective for playing a game remain when you
disconnect the power. In this case, when you will reconnect the power a game startup screen
will appear with the start button flashing.
If several machines are interconnected or networked for a communication play, the system
checks the network. A network-checking screen as illustrated below appears before an
advertising screen appears. Usually, checking the network takes 1 to 3 minutes. If the system
detects a problem related with the network, it keeps displaying the network-checking screen or
an error message.
Fluorescent lamps are always lit.
On-screen images are outputted.
Handle turns counterclockwise
and clockwise.
FIG. 6. 5 a
FIG. 6. 5 b NETWORK check screen
Sound is emitted.
www.seuservice.com
20
Page 28

6
ASSEMBLING CHECK
9
9
9
9
9
9
9
9
9
9
9
9
9
9
9
9
9
9
9
In the TEST MODE, ascertain that the assembly has been made correctly and IC BD. is
satisfactory (refer to Section 9).
In the test mode, perform the following test:
(1) MEMORY TEST
RAM TEST
IC15 IC16 IC17S IC18S GOOD
IC22 IC23 IC24S IC25S GOOD
IC28 IC29S GOOD
IC41 GOOD
IC42 GOOD
IC44 IC45S IC46 IC47S GOOD
IC91S IC92S GOOD
IC98 GOOD
OPTIONAL SOUND BOARD:
IC2 GOOD
OPTIONAL COMMUNICATION BOARD:
IC7 IC8 IC9 IC10 GOOD
PRESS TEST BUTTON TO EXIT
(2) C.R.T. TEST
C.R.T. TEST PAGE#1
0 31
RED
GREEN
BLUE
WHITE
PRESS SERVICE BUTTON TO ANOTHER PAGE
PRESS TEST BUTTON TO EXIT
Selecting the RAM TEST on the system test
mode menu screen causes the on-board memory
to be tested automatically. The game board is
satisfactory if the display beside each IC No.
shows GOOD.
In the system test mode menu, selecting C.R.T.
TEST allows the screen (on which the monitor
is tested) to be displayed. Although the monitor
adjustments have been made at the time of
shipment from the factory, color deviation, etc.,
may occur due to the effect caused by
geomagnetism, the location building's steel
frames and other game machines in the
periphery. By watching the test mode screen,
make judgment as to whether an adjustment is
needed. If it is necessary, adjust the monitor by
referring to Section 13.
234567890123456789012345678
234567890123456789012345678
234567890123456789012345678
C.R.T. TEST PAGE#2
234567890123456789012345678
234567890123456789012345678
234567890123456789012345678
234567890123456789012345678
234567890123456789012345678
234567890123456789012345678
234567890123456789012345678
234567890123456789012345678
234567890123456789012345678
234567890123456789012345678
234567890123456789012345678
234567890123456789012345678
234567890123456789012345678
234567890123456789012345678
234567890123456789012345678
PRESS SERVICE BUTTON TO ANOTHER PAGE
234567890123456789012345678
PRESS TEST BUTTON TO EXIT
21
www.seuservice.com
Page 29

(3) SOUND TEST
SOUND TEST
MAIN SPEAKER LEFT
MAIN SPEAKER RIGHT
OPTION SPEAKER LEFT
OPTION SPEAKER RIGHT
> EXIT
SELECT WITH SERVICE BUTTON
AND
PRESS TEST BUTTON
(4) INPUT TEST
INPUT TEST
STEERING WHEEL XXX
GAS PEDAL XXX
BRAKE PEDAL XXX
GEAR POSITION ON
START BUTTON OFF
VIEW CHANGE BUTTON OFF
SERVICE SWITCH OFF
TEST SWITCH OFF
In the system test mode, selecting SOUND
TEST causes the screen (on which sound
related BD and wiring connections are
tested) to be displayed.
Check if the sound is satisfactorily emitted
from each speaker and the sound volume is
appropriate.
Selecting the INPUT TEST on the game test
mode menu screen causes the screen (on
which each switch is tested) to be displayed.
Press each switch. For the coin switch test,
insert a coin from the coin inlet with the coin
chute door open. If the display beside each
switch indicates "ON," the switch and
wiring connections are satisfactory.
PRESS TEST AND SERVICE BUTTON TO EXIT
JVS TEST
> DISPLAY CONFIG
EXIT
NODE 1/1
SWITCH
SYSTEM ________
PLAYER1 _____________
PLAYER2 _____________
COIN
SLOT1 0000 SLOT2 8000
ANALOG
CH1 0000 CH2 0000 CH3 0000 CH4 0000
CH5 0000 CH6 0000 CH7 0000 CH8 0000
SELECT WITH SERVICE BUTTON
AND
PRESS TEST BUTTON
www.seuservice.com
22
Page 30

(5) OUTPUT TEST
OUTPUT TEST
> START BUTTON
VIEW CHANGE BUTTON
BASS SHAKER(FRONT)
BASS SHAKER(FRONT+REAR)
PRESS TEST BUTTON TO EXIT
Perform the above inspections also at the time of monthly inspection.
Select OUTPUT TEST from the Menu
screen in the Game Test Mode to cause the
screen (on which output unit such as lamps
and wiring connections are tested) to appear.
Ensure that the output unit functions
satisfactorily.
23
www.seuservice.com
Page 31

7.
PRECAUTIONS TO BE HEEDED WHEN MOVING THE MACHINE
When moving the machine, be sure to unplug the power plug. Moving the
machine with the plug as is inserted can damage the power cord and cause fire
and electric shock hazards.
When moving the machine on the floor, retract the Adjusters and ensure that
Casters make contact with the floor. During transportation, pay careful
attention so that Casters do not tread power cords and earth wires. Damaging
the power cords can cause electric shock and short circuit hazards.
When lifting the cabinet, be sure to hold the grip portions or bottom part.
Lifting the cabinet by holding other portions can damage parts and installation
portions due to the empty weight of the cabinet, and cause personal injury.
When transporting the product in places with step-like differences in grade,
disassemble into each unit before transporting. Lifting up the product in an
attempt to cross the step-like differences in an as is assembled condition may
damage the unit's joining portions and cause a personal injury resulting from
damage.
When moving the PTV, do not push it from the rear side. Push it from
sideways. Pushing the PTV from the rear side can have the PTV fall down,
causing personal injury etc. In case the floor has slanted surfaces or step-like
differences, be sure to move the machine by 2 or more persons.
Do not insert the fork to places other than designated when using a Forklift to
transport the machine.
Failure to observe this could cause falling down and injury resulting from
falling down.
Carefully handle the PTV on the PTV base because it is very unstable. If
handled carelessly, it may fall down and eventually cause a serious personal
injury.
Do not push the plastic made parts. Failure to observe this may damage parts
and cause injury due to fragments resulting from damage.
Do not use the handle or lever to move the product. Failure to observe this
may cause the parts to be deformed or damaged.
STOP
IMPORTANT
www.seuservice.com
When transporting the product in places with steps, disassemble into each unit
before transporting. Inclining the product in an as is assembled condition or
placing the cabinet in places with steps can damage the unit's joining portions.
To protect surface, do not directly apply a rope to the surfaces of product.
Use protective materials to the places the rope is applied to.
24
Page 32

5
5
5
5
5
5
5
5
Do not push PTV from the back. Pushing the PTV
from the back can cause the PTV to fall down. Push
it from the side.
GRIP
2345678901234567890123456789012123456789012345678901234567890121234567890123456789012345678901212345678901234
2345678901234567890123456789012123456789012345678901234567890121234567890123456789012345678901212345678901234
2345678901234567890123456789012123456789012345678901234567890121234567890123456789012345678901212345678901234
2345678901234567890123456789012123456789012345678901234567890121234567890123456789012345678901212345678901234
2345678901234567890123456789012123456789012345678901234567890121234567890123456789012345678901212345678901234
2345678901234567890123456789012123456789012345678901234567890121234567890123456789012345678901212345678901234
2345678901234567890123456789012123456789012345678901234567890121234567890123456789012345678901212345678901234
2345678901234567890123456789012123456789012345678901234567890121234567890123456789012345678901212345678901234
On level surfaces,move the machine by causing
the Casters to make contact with the surfaces.
When transporting the product in places with steps
or step-like differences in grade, disassemble into
each unit before transporting.
25
www.seuservice.com
Page 33

When moving the product, use its recessions and bottom
parts. Do not hold or push the illustrated parts to move the
product.
SCREEN,TV MASK
HANDLE
GRIP
FIG. 7 c
The PTV on the PTV base is very unstable.
www.seuservice.com
FIG. 7 d
26
Page 34

8. CONTENTS OF GAME
The following explanations apply to the case the product is functioning satisfactorily. Should
there be any moves different from the following contents, some sort of faults may have
occurred. Immediately look into the cause of the fault and eliminate the cause thereof to ensure
satisfactory operation.
Advertising (Plying-for-Hire) Performance
The billboard's fluorescent light is always on when the power is connected.
The monitor displays the demonstration images and ranking data. The ranking data is updated
every week.
The lights (integrated with the two buttons on the control panel) are off.
The right and left speakers on the control panel output an advertise sound. The right and left
speakers on the seat backrest and the bass shaker do not output an advertise sound.
You can activate or deactivate an advertise sound output function on the test mode screen.
Fluorescent lamps are lit.
Coin Inlet
Image output on the monitor.
Emits sounds.
FIG. 8 a
27
www.seuservice.com
Page 35

HOW TO PLAY
Operation of a single machine allows a Single Play. Operation of interconnected machines
allows a Communication Play.
START BUTTON
VIEW CHANGE BUTTON
STEERING WHEEL
HANDLE
BRAKE PEDAL
[Single Play]
In this game, the players make their karts and
enter the race for competing with each other.
GAS (ACCELLETOR) PEDAL
SEAT LOCK LEVER
FIG. 8 b
By achieving a good score in the Championship Race mode, you can step up from “Class Novice” (at start) to
“Class B,” “Class A,” and “Class S.”
When you step up to a higher class, you may get an extended course along which you can drive, or the
performance of the kart with your character may vary. The goal is to win in the race in the environment that
may vary in such a manner.
By selecting “Practice Race,” you can select and run along the course for a series of races, if you desire.
This game allows the data to be retained through the cards system. In addition to the kart’s name, frame,
cowl, suits, helmet, etc., information such as the total time, achievements in a series of races, the highest rank
by class can be recorded on the “Club Kart Card” (hereafter “CARD”).
www.seuservice.com
28
Page 36

How to Play the Game --- If you play the Championship Race for the first time:
• Throw coins into the slot. At this time, the value
converted for the number of credits is displayed at
the bottom right corner of the screen.
When you throw into the slot the number of coins
enabling operation of one play session, you go to
the screen that asks whether you have a card.
• In response to the inquiry, “Do you want to create
a new card?”
• If you answer with “NO,” or you do not insert any
card after you answer with “YES,” Rental Kart is
automatically selected as the type of the kart you
can luse. In this case, you go to Step 1 (creating a
new card). One more credit is required in this case.
• If you throw a card into the slot without making
the selection, you will go to selection of the Race
Mode.
Rental Kart Mode
In the Rental Kart Mode, you select and run along the desired one of four courses for competition in lap time.
You choose either one of two types of karts: for the novice and middle classes. You are required to make the
specified number of circuits of the course within the predetermined time-out time.
• Once you complete the first circuit, the remaining time of the time-out time for the first circuit is added to
the time-out time for the second circuit.
• When you complete the specified number of circuits of the course within the specified time, the finish takes
place. When the time-out time reaches 0, Game Over takes place.
An example where “YES” was selected is described in this document.
29
www.seuservice.com
Page 37

• Create a new card.
After entering the name, select the cowl, frame, and racing suite colors and the helmet design according to the
instructions on the screen.
• After you have entered all the information, you go to the confirmation screen and must make operations
according to the instructions on the screen.
• Select the Race Mode.
You can choose either Championship Race or
Practice Race. (“Communicated Race” is
additionally displayed when two or more
machines are interconnected.) Turn the
steering wheel clockwise or counterclockwise
for selection. Then, determine the selection
by pressing the accelerator pedal.
www.seuservice.com
30
Page 38

Championship Race
• In this mode, you compete with the other players for the total achievement of a Series of Races that are
done, depending on four classes (Novice, B, A, and S). The race in this mode begins after you have created
the feature of creating your own original kart (one of the distinctive features of this game) and the card to save
the running record.
With the card, you can save the data before completion of the series of races; at the next play time, you can
resume the game from the ending point in the previous session of the game.
Practice Race
You can select and run along the desired one of the courses along which you run in a Series of Races.
The number of courses from among which can select depends on the number of racces included in the series,
which varies with the class to which you belong (4 of Novice, 6 for B, 8 for Class, and 10 for S).
• Information about the player’s kart (class, the number fo times won and defeated, the top ranking, the best
time, the number of races in the series, etc.) and the course map are displayed before the race starts.
When you created a card for the first time, the player’s kart starts at the rearmost position.
You are required to make the specified number of circuits of the course within the predetermined time-out
time. Once you complete the first circuit, the remaining time of the time-out time for the first circuit is added
to the time-out time for the second circuit.When you complete the specified number of circuits of the course
within the specified time, the finish takes place. When the time-out time reaches 0, Game Over takes place.
• If your kart touches the wall of the course or another kart or goes outside the course while the game is in
progress, you feel a reaction through the steering wheel.
• While the game is in progress, pressing the Viewpoint Change button changes the viewpoint on the screen.
The button is continually flashing while the game is in progress.
• While the game is in progress, pressing the Start button toggles between the map that shows the player
kart’s and the time display that indicates the other karts’ positions and the best time in the class and that of
your records.
• After each race is completed, the Results Screen appears if you have run along the whole course. After the
Results Screen appears, the Select Sponsor Screen may appear, depending on the results of the series of races.
The number of sponsors, at random, increases or decreases, depending on the achievement. The logo of the
sponsor you selected can be attended to the kart if you desire this.
When Select Sponsor Screen appears for the first time,
you assign the team name to your kart.
31
www.seuservice.com
Page 39

• For a Series of Races, the total achievements
are listed when the predetermined number of
races have been completed for each of the
classes. If you have established good achievement, a screen appears that lets you select
whether to try the next series of races at the
current or upper class.
• If the Practice Race Mode is entered or all the credits have been exhausted after the data is written onto the
card after completion, Game Over takes place. If you are in the Championship Race Mode, you go to the
Continue Screen.
If you still have credits for one or more play sessions at this time in the Championship Race Mode, you can
go to the next course and enjoy one or more play sessions after jumping to the course map display is Step ???.
www.seuservice.com
32
Page 40

[Communicated Play]
Communicated Play differs slightly from Single Play regarding the game starting procedure and how to play
the game.
• When coins you throw into the slot the coins with which you can enjoy a play session, the Entry Screen
appears and, at the same time, the Start button begins to flash.
• If you desire a competitive play, throw the appropriate number of coins into the slot at another seat.
If you desire the single play mode, press the Start button immediately after the Entry Screen appears.
• Once the Entry Screen appears, a countdown starts. If a person who desires to compete with you does not
appear before the count reaches 0 (zero), you have to enjoy the game in the Single Play Mode.
• Once the count in the Entry Screen reaches 0, you are brought to the Select Rental Kart Screen.
Turn the steering wheel clockwise or counterclockwise to choose selection by pressing the accelerator pedal
and Start button.
If you have a card, you will be subsequently able to use your own original kart by inserting the card into the
slot.
The course assignments to the players are determined by majority of the players.
• Once the course assignments are determined, information about the players’ karts (class, the number of
times won and defeated, the top ranking, the best time, the number of races in the series, etc.) and the course
map are displayed before the race starts.
• In the race, the players compete with each other for their ranks.
Each time the first-rank player completes one circuit of the course, the time that remained is added to that of
the next circuit of the course.
When you complete the specified number of circuits of the course within the specified time, the finish takes
place. When the time-out time reaches 0, Game Over takes place.
• STEERING DIR
This is a setting about the cabinet. Basically, you do not need to change it. You should use the factoryadjusted setting.
• CARD SYSTEM
This sets the mode of operation for the card system unit. For usual operation, set ENABLE. If the card
system unit is detached from the system, set DISABLE.
• BONUS GAMES
This sets the count of plays given as a bonus when a new card is created. By setting this, the count can be set
to 0 to 3 times.
33
www.seuservice.com
Page 41

9. EXPLANATION OF TEST AND DATA DISPLAY
By operating the switch unit, periodically perform the tests and data check. When installing the
machine initially or collecting cash, or when the machine does not function correctly, perform
checking in accordance with the explanations given in this section.
The following shows tests and modes that should be utilized as applicable.
SEGA HIKARU GAME BOARD is used for the product. The system of this game board
allows another game to be played by replacing the ROM Board Case mounted on the SEGA
HIKARU CASE. As such, the Test Mode of this system consists of the System Test Mode for
the system to execute SELF-TEST, COIN ASSIGNMENTS, etc. used in common for the
machines employing the SEGA HIKARU BOARD, and the Game Test Mode for the specific
product to execute Input/Output test for the operation equipment, difficulty setting, etc.
STOP
IMPORTANT
The contents of settings changed in the TEST mode are stored when the test
mode is finished from EXIT in the menu mode. If the power is turned off
before the TEST mode is finished, the contents of setting change become
ineffective.
Executing "BACKUP DATA CLEAR" in the SYSTEM TEST MODE does
not clear the BOOKKEEPING data in the GAME TEST mode.
Entering the TEST mode clears fractional number of coins less than one credit
and BONUS ADDER data.
When the 2 or more machines are linked for communication play, be careful
to enter the test mode. If one of the machines linked enters the test mode, all
others display the NETWORK CHECK screen.
www.seuservice.com
34
Page 42

TABLE 9 EXPLANATION OF TEST MODE
ITEMS DESCRIPTION
REFERENCE
SECTIONS
INSTALLATION
OF MACHINE
MEMORY
PERIODIC
SERVICING
CONTROL
SYSTEM
When the machine is installed, perform the following:
1. Check to see that each setting is as per standard setting made at
the time of shipment.
2. In the INPUT TEST mode, check such input devices as each
SW, V.R., etc.
3. In the OUTPUT TEST mode, check such output devices as
lamps, motors, etc.
4. In the SELF-TEST mode, check ICs on the IC Board.
Choose MEMORY TEST in the MENU mode to allow the
MEMORY test to be performed. In this test, PROGRAM RAMs,
ROMs, and ICs on the IC Board are checked.
Periodically perform the following:
1. MEMORY TEST
2. Ascertain each setting.
3. In the INPUT TEST mode, test the CONTROL device
4. In the OUTPUT TEST mode, check such output devices as
lamps, motors, etc.
1. In the INPUT TEST mode, check such input devices as each
SW, V.R., etc.
2. Adjust or replace each SW and VR.
3. If the problem can not be solved yet, check the CONTROL's
moves.
9-2 F,G, 9-3 F
9-2 C, 9-3 B
9-3 C
9-2 B,J
9-2 B,J
9-2 B,J
9-2 F,G, 9-3 F
9-2 C, 9-3 B
9-3 C
9-2 C, 9-3 B
9-3 D,E,
10,11,12
MONITOR
IC BOARD
DATA CHECK
In the MONITOR ADJUSTMENT mode,
check to see if the PROJECTOR adjustment is appropriately
made.
1. MEMORY TEST
2. In the SOUND TEST mode, check the sound related ROMs.
Check such data as game play time and histogram to adjust the
difficulty level, etc.
9-2 E
13
9-2 B,J
9-2 D
9-2 H, 9-3 G
35
www.seuservice.com
Page 43

9 - 1 SWITCH UNIT AND COIN METER
Never touch places other than those specified. Touching places not specified can
cause electric shock and short circuit hazards.
STOP
IMPORTANT
SWITCH UNIT
Open the coin chute door, and the switch unit shown will appear.
The functioning of each SW is as follows:
The sound volumes of the front and rear speakers are adjusted as indicated by the illustration on
the switch unit, at the factory before shipping. This adjustment aims to attain the best output
balance between the front and rear speakers. Remember that carelessly changing this adjustment
may cause the best balance to be lost.
Adjust to the optimum sound volume by considering the environmental
requirements of the installation location.
If the COIN METER and the game board are electrically disconnected, game
play is not possible.
A cover is provided on the bass shaker output adjustment volume in order to
prevent the BASE SHAKER against being carelessly adjusted.
COIN METER
PUSH BUTTON
www.seuservice.com
SOUND VOLUME
FIG. 9. 1 a SWITCH UNIT
36
Page 44

TEST BUTTON : For the handling of the test button, refer to the following pages.
TEST
SERVICE BUTTON : Gives credits without registering on the coin meter.
SERVICE
SOUND VOLUME : Adjusts the sound volume of the left and right speakers on the control panel.
FRONT SPEAKER
SOUND VOLUME : Adjusts the sound volume of the left and right speakers on the seat backrest.
REAR SPEAKER
BASE SHAKER Output Adjustment Volume : Adjusts the vibration output of the base shakers each on
BASS SHEAKER
the seat backrest and the control panel.
COIN METER
Open the Cashbox Door by using the key to
have the Coin Meter appear underneath the
Cashbox.
COIN METER
FIG. 9. 1 b COIN METER
37
www.seuservice.com
Page 45

9 - 2 SYSTEM TEST MODE
STOP
The contents of setting changes in SYSTEM ASSIGNMENTS, COIN
ASSIGNMENTS, and GAME TEST MODE are stored when the test mode is
EXITed. If the power is turned off before EXITing, the contents of setting
IMPORTANT
TEST ITEM SELECT
changes are ineffective. Be very careful of this point.
This test mode mainly allows the IC Board to be checked for accurate functioning, monitor
color to be adjusted as well as COIN ASSIGNMENTS and GAME ASSIGNMENTS to be
adjusted.
After turning power on, press the TEST button to have the following test item menu displayed.
1
SYSTEM MENU
RAM TEST
JVS TEST
SOUND TEST
C.R.T. TEST
SYSTEM ASSIGNMENTS
COIN ASSIGNMENTS
BOOKKEEPING
BACKUP DATA CLEAR
CLOCK SETTING
ROM BOARD TEST
GAME TEST MODE
[XXXXXXXXXXXXXXX]
-> EXIT
SELECT WITH SERVICE BUTTON
AND PRESS TEST BUTTON
2
Press the SERVICE button to move the arrow. Bring the arrow to the desired item and press the
TEST button.
3
Upon finishing the test, bring the arrow to EXIT and press the TEST button to return to the
Game mode.
www.seuservice.com
38
Page 46

A. RAM TEST
This allows for checking the functioning of the RAM on the NAOMI 2 Main BD.
"GOOD" is displayed for satisfactory RAMs, and "BAD" is indicated for irregular RAMs, if
any.
RAM TEST
TESTING NOW
IC29 GOOD
IC35 GOOD
IC09 GOOD IC10 GOOD
IC11 GOOD IC12 GOOD
IC16 GOOD IC18 GOOD
IC20 GOOD IC22 GOOD
IC17 GOOD IC19 GOOD
IC21 GOOD IC23 GOOD
IC106 GOOD IC107 GOOD
IC108 GOOD IC109 GOOD
IC111 GOOD IC113 GOOD
IC115 GOOD IC117 GOOD
IC112 GOOD IC114 GOOD
IC116 GOOD IC118 GOOD
PRESS TEST BUTTON TO EXIT
"TESTING NOW" shows up (flashing) on the screen during the test.
Returns to the menu screen when the TEST button is pressed after the test is over.
39
www.seuservice.com
Page 47

B. JVS TEST
In this test, Specifications of the I/O Board connected to NAOMI 2 can be checked, and INPUT
TEST can be performed. First, I/O Board Specifications are displayed.
JVS TEST
INPUT TEST (A)
NEXT NODE (B)
-> EXIT (C)
NODE 1/1
NAME SEGA ENTERPRISES,LTD.
I/O BD JVS
837-13551
Ver 1.00
CMD VER 1.1
JVS VER 2.0
COM VER 1.0
SWITCH 2PLAYER(S) 13BITS
COIN 2SLOT
ANALOG 8CH
ROTARY 0CH
KEYCODE 0
SCREEN X:0 Y:0 CH:0
CARD OSLOT
HOPPER OUT 0CH
DRIVER OUT 6SLOT
ANALOG OUT 0CH
CHARACTER CHARA:0 LINE:0
BACKUP 0
Name and version of I/O BOARD.
123
SELECT WITH SERVICE BUTTON
AND
PRESS TEST BUTTON
Select with the SERVICE button and press the TEST button.
(A) INPUT TEST : Proceeds to the INPUT TEST of I/O BOARD being displayed.
(B) NEXT NODE : In the case where more than 2 I/O Boards are connected, proceeds to
(C) EXIT : Returns to the menu mode.
INPUT TEST SCREEN
JVS TEST
INPUT TEST
NEXT NODE
-> EXIT
NODE 1/1
SWITCH
SYSTEM 00000000
PLAYER1 00000000
00000000
PLAYER2 00000000
00000000
COIN
0000 0000
ANALOG
0000 0000 0000 0000
0000 0000 0000 0000
SELECT WITH SERVICE BUTTON
AND
PRESS TEST BUTTON
the next I/O Board.
When INPUT is performed for the switches
of Control Panel, etc., the value changes to
1 from 0.
If the Coin SW is inputted, the count starts.
When the TEST MODE is finished, the
count is cleared and returned to[0000].
Analogue values are displayed between
0000 and FF00.
www.seuservice.com
40
Page 48

3
3
3
3
3
3
3
3
3
3
3
3
3
3
3
3
3
C. SOUND TEST
Sound Output test can be performed. Beep sounds can be emitted from each of left/right Speakers.
SOUND TEST
D. C.R.T. TEST
1) RGB COLOR ADJUSTMENT SCREEN
In this page, monitor color can be checked.
RIGHT SPEAKER OFF
LEFT SPEAKER OFF
-> EXIT
SELECT WITH SERVICE BUTTON
AND PRESS TEST BUTTON
C.R.T. TEST 1/2
1 32
RED
GREEN
BLUE
WHITE
Emitted from the right-hand side Speaker.
Emitted from the left-hand side Speaker.
Returns to the menu mode.
Each of red, green, and blue is the darkest at the
leftmost end, and becomes brighter towards the
right-hand end in 31 gradations. Monitor
brightness is satisfactory if the white color bar
is black at the left end and if it is white at the
right end.
Press the TEST button to proceed to the next
page.
PRESS TEST BUTTON TO CONTINUE
2) MONITOR SIZE ADJUSTMENT SCREEN
In this page, monitor size can be checked.
C.R.T. TEST 2/2
234567890123456789012
234567890123456789012
234567890123456789012
234567890123456789012
234567890123456789012
234567890123456789012
234567890123456789012
234567890123456789012
234567890123456789012
234567890123456789012
234567890123456789012
234567890123456789012
234567890123456789012
234567890123456789012
234567890123456789012
234567890123456789012
234567890123456789012
PRESS TEST BUTTON TO EXIT
41
Adjust so that the checkered patterns do not go
beyond the screen.
Press the TEST button to return to the menu
mode.
www.seuservice.com
Page 49

E. SYSTEM ASSIGNMENTS
The settings of cabinet and board can be changed. Game related assignments such as game
difficulty, etc. are performed in K. GAME TEST MODE.
1
Press the SERVICE button to move the arrow. Bring the arrow to the desired item.
Press the TEST button to change the setting.
2
3
Upon finishing the setting, move the arrow to EXIT and press the TEST button.
SYSTEM ASSIGNMENTS
CABINET TYPE 1PLAYER(S) (A)
ADVERTISE SOUND ON (B)
MONITOR TYPE HORIZONTAL (C)
SERVICE TYPE COMMON (D)
-> EXIT
SELECT WITH SERVICE BUTTON
AND
PRESS TEST BUTTON
(A) CABINET TYPE (1PLAYER(S), 2PLAYER(S), 3PLAYER(S), 4PLAYER(S))
Sets the number of players between 1 and 4.
Fix setting to 1 PLAYER(S).
(B) ADVERTISE SOUND (ON, OFF)
Sets whether ADVERTISE sound is to be emitted or not.
(C) MONITOR TYPE (HORIZONTAL, VERTICAL)
Sets the on-screen display to the positional direction of monitor (HORIZONTAL/VERTICAL)
Fix setting to HORIZONTAL.
HORIZONTAL: Normal on-screen display
VERTICAL: On-screen display when the monitor is vertically positioned as against
normal HORIZONTAL position.
(D) SERVICE TYPE (COMMON, INDIVIDUAL)
Sets the functioning of when the SERVICE button is pressed, in case that several SERVICE
buttons exist.
Fix setting to COMMON.
COMMON: By pressing any SERVICE button, Service credit can be obtained for all
Players.
INDIVIDUAL: By pressing SERVICE button, Service credit can be obtained for the Player
corresponding to the SERVICE button pressed.
www.seuservice.com
42
Page 50

F. COIN ASSIGNMENTS
In this mode, the setting of incremental credit increase as against coin insertion can be changed.
1
Press the SERVICE button to move the arrow. Bring the arrow to the desired item.
2
Press the TEST button to change the setting.
Upon finishing the setting, bring the arrow to EXIT and press the TEST button.
3
COIN ASSIGNMENTS
COIN CHUTE TYPE COMMON (A)
COIN/CREDIT SETTING #1 (B)
COIN CHUTE #1
1 COIN 1 CREDIT
COIN CHUTE #2
1 COIN 1 CREDIT
(C)
(G)
MANUAL SETTING
SEQUENCE SETTING
->EXIT
SELECT WITH SERVICE BUTTON
AND PRESS TEST BUTTON
Setting to COMMON Setting to INDIVIDUAL
COIN ASSIGNMENTS
COIN CHUTE TYPE INDIVIDUAL
COIN/CREDIT SETTING #1
COIN CHUTE #1
1 COIN 1 CREDIT
MANUAL SETTING
SEQUENCE SETTING
->EXIT
SELECT WITH SERVICE BUTTON
AND PRESS TEST BUTTON
(A) COIN CHUTE TYPE (COMMON, INDIVIDUAL)
Fix setting to COMMON.
COMMON
This setting is for the cabinet which has a coin chute(s) for common use by plural players. Up
to 2 Coin Chutes (#1 and #2) can be used and also, (B) COIN/CREDIT SETTING ratio can be
set separately for #1 and #2.
INDIVIDUAL
This setting is for the cabinet in which each player uses an independent coin chute. Coins
inserted by each player are handled as the player's credits. Depending on the CABINET TYPE
setting in the SYSTEM ASSIGNMENTS and the functioning of the connected I/O Board, the
number of Coin SW INPUT ports varies between 1 and 4. (B) COIN/CREDIT SETTING ratio
is common for eath Coin Chute.
(B) COIN/CREDIT SETTING ( # 1 ~ # 27)
Sets the credit increase increment per coin insertion. There are 27 settings from #1 to #27,
expressed in
credit(s) as against coins inserted. #27 refers to FREE PLAY.
For details, refer to Table 1 (COMMON) and Table 2 (INDIVIDUAL).
43
www.seuservice.com
Page 51

(C) MANUAL SETTING
The Credit's incremental increase settings as against a coin insertion are shown in further details
than in (B) above (refer to Table 3). Also, note that when this MANUAL SETTING is
performed, (B) COIN CREDIT setting becomes ineffective.
MANUAL SETTING
COIN ASSIGNMENTS
MANUAL SETTING
COIN TO CREDIT 1 (D)
BONUS ADDER NO BONUS ADDER (E)
COIN CHUTE #1 MULTIPLIER
1 COIN COUNT AS 1 COIN
COIN 1 2 3 4 5 6 7 8 9
CREDIT 1 2 3 4 5 6 7 8 9
COIN CHUTE #2 MULTIPLIER
1 COIN COUNT AS 1 COIN
COIN 1 2 3 4 5 6 7 8 9
CREDIT 1 2 3 4 5 6 7 8 9
SEQUENCE SETTING (G)
->EXIT
SELECT WITH SERVICE BUTTON
AND PRESS TEST BUTTON
Setting to COMMON
(D) COIN TO CREDIT
Determines COIN/CREDIT setting.
COIN ASSIGNMENTS
MANUAL SETTING
COIN TO CREDIT 1
BONUS ADDER NO BONUS ADDER
COIN CHUTE MULTIPLIER
1 COIN COUNT AS 1 COIN
COIN 1 2 3 4 5 6 7 8 9
CREDIT 1 2 3 4 5 6 7 8 9
SEQUENCE SETTING
->EXIT
SELECT WITH SERVICE BUTTON
AND
PRESS TEST BUTTON
Setting to INDIVIDUAL
(E) BONUS ADDER
This sets how many coins should be inserted to obtain one SERVICE COIN.
(F) COIN CHUTE ( # 1 / # 2 ) MULTIPLIER
This sets how many tokens one coin represents.
www.seuservice.com
44
Page 52

Table 1: COIN/CREDIT SETTING (COIN CHUTE COMMON TYPE)
NAME OF SETTING COIN CHUTE 1 COIN CHUTE 2
SETTING #1 1 COIN 1 CREDIT 1 COIN 1 CREDIT
SETTING #2 1 COIN 2 CREDITS 1 COIN 1 CREDIT
SETTING #3 1 COIN 3 CREDITS 1 COIN 1 CREDIT
SETTING #4 1 COIN 4 CREDITS 1 COIN 1 CREDIT
SETTING #5 1 COIN 5 CREDITS 1 COIN 1 CREDIT
SETTING #6 1 COIN 2 CREDITS 1 COIN 2 CREDITS
SETTING #7 1 COIN 5 CREDITS 1 COIN 2 CREDITS
SETTING #8 1 COIN 3 CREDITS 1 COIN 3 CREDITS
SETTING #9 1 COIN 4 CREDITS 1 COIN 4 CREDITS
SETTING #10 1 COIN 5 CREDITS 1 COIN 5 CREDITS
SETTING #11 1 COIN 6 CREDITS 1 COIN 6 CREDITS
SETTING #12 2 COINS 1 CREDIT 2 COINS 1 CREDIT
SETTING #13 1 COIN 1 CREDIT 2 COINS 1 CREDIT
SETTING #14 1 COIN 2 CREDITS 2 COINS 1 CREDIT
SETTING #15 1 COIN 1 CREDIT 1 COIN 1 CREDIT
2 COINS 3 CREDITS 2 COINS 3 CREDITS
SETTING #16 1 COIN 3 CREDITS 1 COIN 1 CREDIT
SETTING #17 3 COINS 1 CREDIT 3 COINS 1 CREDIT
SETTING #18 4 COINS 1 CREDIT 4 COINS 1 CREDIT
SETTING #19 1 COIN 1 CREDIT 1 COIN 1 CREDIT
2 COINS 2 CREDITS 2 COINS 2 CREDITS
3 COINS 3 CREDITS 3 COINS 3 CREDITS
4 COINS 5 CREDITS 4 COINS 5 CREDITS
SETTING #20 1 COIN 5 CREDITS 1 COIN 1 CREDIT
SETTING #21 5 COINS 1 CREDIT 5 COINS 1 CREDIT
SETTING #22 1 COIN 2 CREDITS 3 COINS 1 CREDIT
SETTING #23 2 COINS 1 CREDIT 2 COINS 1 CREDIT
4 COINS 2 CREDITS 4 COINS 2 CREDITS
5 COINS 3 CREDITS 5 COINS 3 CREDITS
SETTING #24 1 COIN 3 CREDITS 2 COINS 1 CREDIT
SETTING #25 1 COIN 1 CREDIT 1 COIN 1 CREDIT
2 COINS 2 CREDITS 2 COINS 2 CREDITS
3 COINS 3 CREDITS 3 COINS 3 CREDITS
4 COINS 4 CREDITS 4 COINS 4 CREDITS
5 COINS 6 CREDITS 5 COINS 6 CREDITS
SETTING #26 1 COIN 6 CREDITS 1 COIN 1 CREDIT
SETTING #27 FREE PLAY FREE PLAY
2 COINS 3 CREDITS
2 COINS 2 CREDITS
3 COINS 3 CREDITS
4 COINS 5 CREDITS
5 COINS 2 CREDITS
4 COINS 2 CREDITS
5 COINS 3 CREDITS
2 COINS 2 CREDITS
3 COINS 3 CREDITS
4 COINS 4 CREDITS
5 COINS 6 CREDITS
45
www.seuservice.com
Page 53

Table 2: COIN/CREDIT SETTING (COIN CHUTE INDIVIDUAL TYPE)
NAME OF SETTING
SETTING #1 1 COIN 1 CREDIT
SETTING #2 1 COIN 2 CREDITS
SETTING #3 1 COIN 3 CREDITS
SETTING #4 1 COIN 4 CREDITS
SETTING #5 1 COIN 5 CREDITS
SETTING #11 1 COIN 6 CREDITS
SETTING #12 2 COINS 1 CREDIT
SETTING #15 1 COIN 1 CREDIT
SETTING #17 3 COINS 1 CREDIT
SETTING #18 4 COINS 1 CREDIT
SETTING #19 1 COIN 1 CREDIT
Table 3: MANUAL SETTING
EACH SEAT'S COIN CHUTE
2 COINS 3 CREDITS
2 COINS 2 CREDITS
3 COINS 3 CREDITS
4 COINS 5 CREDITS
NAME OF SETTING
SETTING #21 5 COINS 1 CREDIT
SETTING #23 2 COINS 1 CREDIT
SETTING #25 1 COIN 1 CREDIT
SETTING #27 FREE PLAY
EACH SEAT'S COIN CHUTE
4 COINS 2 CREDITS
5 COINS 3 CREDITS
2 COINS 2 CREDITS
3 COINS 3 CREDITS
4 COINS 4 CREDITS
5 COINS 6 CREDITS
COIN TO CREDIT 1 COIN 1 CREDIT
2 COINS 1 CREDIT
3 COINS 1 CREDIT
4 COINS 1 CREDIT
5 COINS 1 CREDIT
6 COINS 1 CREDIT
7 COINS 1 CREDIT
8 COINS 1 CREDIT
9 COINS 1 CREDIT
BONUS ADDER NO BONUS ADDER
2 COINS GIVE 1 EXTRA COIN
3 COINS GIVE 1 EXTRA COIN
4 COINS GIVE 1 EXTRA COIN
5 COINS GIVE 1 EXTRA COIN
6 COINS GIVE 1 EXTRA COIN
7 COINS GIVE 1 EXTRA COIN
8 COINS GIVE 1 EXTRA COIN
9 COINS GIVE 1 EXTRA COIN
COIN CHUTE (# 1 / # 2) 1 COIN COUNTS AS 1 COIN
MULTIPLIER 1 COIN COUNTS AS 2 COINS
1 COIN COUNTS AS 3 COINS
1 COIN COUNTS AS 4 COINS
1 COIN COUNTS AS 5 COINS
1 COIN COUNTS AS 6 COINS
1 COIN COUNTS AS 7 COINS
1 COIN COUNTS AS 8 COINS
1 COIN COUNTS AS 9 COINS
www.seuservice.com
46
Page 54

(G) SEQUENCE SETTING
Number of credits required for starting game, etc. can be set.
Function varies depending on the specific games. To find out what kind of functions are
allotted to each sequence, or what is the initial value for each sequence, refer to the Instruction
Manual of the game connected. Each sequence can be set between 1 ~ 5 credit(s).
COIN ASSIGNMENTS
SEQUENCE SETTING
SEQUENCE 1 1 CREDIT(S)
SEQUENCE 2 1 CREDIT(S)
SEQUENCE 3 1 CREDIT(S)
SEQUENCE 4 1 CREDIT(S)
SEQUENCE 5 1 CREDIT(S)
SEQUENCE 6 1 CREDIT(S)
SEQUENCE 7 1 CREDIT(S)
SEQUENCE 8 1 CREDIT(S)
-> EXIT
[WILD RIDERS XXXXXXXXXX]
DESCRIPTION OF SEQUENCE
1 CREDIT TO START
2 NO USE
3 NO USE
4 NO USE
5 NO USE
6 NO USE
7 NO USE
8 NO USE
SELECT WITH SERVICE BUTTON
AND
PRESS TEST BUTTON
In cases of video games such as WILD RIDERS. :
SEQUENCE 1 : Number of credits required for game start (initial value=1)
SEQUENCE 2 ~ 8 : NOT USED.
47
www.seuservice.com
Page 55

G. BOOKKEEPING
• BOOKKEEPING 1/2
This allows such data as operating time/No. of coins inserted/ No. of credits to be checked.
BOOKKEEPING 1/2
TOTAL TIME
0D 00H 00M 00S
CREDIT 0
COIN 1 0
COIN 2 0
COIN 3 0
COIN 4 0
TOTAL COIN 0
COIN CREDIT 0
SERVICE CREDIT 0
TOTAL CREDIT 0
PRESS TEST BUTTON TO CONTINUE
Press the TEST button to proceed to BOOKKEEPING 2/2.
• BOOKKEEPING 2/2
Each sequence displays the frequency of functioning.
BOOKKEEPING 2/2
P1 SEQ 1 0
P1 SEQ 2 0
P1 SEQ 3 0
P1 SEQ 4 0
P1 SEQ 5 0
P1 SEQ 6 0
P1 SEQ 7 0
P1 SEQ 8 0
PRESS TEST BUTTON TO EXIT
In cases of video games such as WILD RIDERS. :
P1 SEQ 1 : Play frequency of Player 1
P1 SEQ 2 ~ 8 : NOT USED.
www.seuservice.com
48
Page 56

H. BACKUP DATA CLEAR
Clears the contents of BOOKKEEPING.
BACKUP DATA CLEAR
YES(CLEAR)
-> NO(CANCEL)
SELECT WITH SERVICE BUTTON
AND PRESS TEST BUTTON
When clearing, bring the arrow to YES by using the SERVICE button and press the TEST
button. Bring the arrow to NO and press the TEST button to have the menu mode return
without clearing the data. COMPLETED is displayed when clearing is completed. Press the
TEST button to return to the menu mode.
I. CLOCK SETTING
Set YEAR, MONTH, DAY, HOUR, and MINUTE for NAOMI 2 Main BD.
Select the desired item with the SERVICE button and press the TEST button to increase
the value. Upon finishing the SETTING, bring the arrow to EXIT and press the TEST
button to return to the menu mode.
CLOCK SETTING
1998 12/02 14:30 33 WED
YEAR
MONTH
DAY
HOUR
MINUTE
-> EXIT
SELECT WITH SERVICE BUTTON
AND PRESS TEST BUTTON
49
www.seuservice.com
Page 57

J. ROM BOARD TEST
In this test, on-ROM-BD ROM check is executed.
If GOOD is displayed below RESULT, it is satisfactory.
BYTE and WORD refers to the check sum of each unit.
GAME ROM TEST
[XXXXXX
NO. TYPE RESULT BYTE WORD
IC22 16M ---- 0123 4567
IC1 64M GOOD 0123 4567
IC2 64M GOOD 0123 4567
IC3 64M GOOD 0123 4567
IC4 64M GOOD 0123 4567
IC5 64M GOOD 0123 4567
IC6 64M GOOD 0123 4567
IC7 64M GOOD 0123 4567
IC8 64M GOOD 0123 4567
IC9 64M GOOD 0123 4567
IC10 64M GOOD 0123 4567
:
IC20 64M GOOD 0123 4567
PRESS TEST BUTTON TO EXIT
XXXXXXX
]
Program ROMs (IC22) do not display GOOD or BAD.
Press the TEST button to return to the menu mode.
K. GAME TEST MODE
Enters the TEST mode of the game connected. The TEST mode includes INPUT test, GAME
ASSIGNMENTS such as game difficulty and others, BOOKKEEPING, etc. Depending on
specific games, necessary items are added and unnecessary items removed. As such, the
contents thereof may be changed.
www.seuservice.com
50
Page 58

9 - 3 GAME TEST MODE
A. SETTING THE CARD
Be sure to use dedicated cards available for this product (i.e., 601-11051).
Use of one other than such dedicated cards may cause a malfunction or failure of the
machine.
Be sure to set the specified number of cards in the specified orientation by using the
specified procedure. Wrong setting of the cards may cause the machine to fail.
This machine allows you to set upt ot 100 cards at a time. You must not set over 100
cards at a time. If you do so, a trouble such as card jamming may occur.
Set virgin cards taken out from a container that was unpacked immediately before use.
Use of any deformed or deteriorated card may cause trouble.
Do not include a corrugated, bent, or used card in the card deck.
The card reader/writer is located on the top of the coin chute tower. Place the cards on the card
reader/writer.
• Unlock and open the cover to find the card reader/writer. The dispenser on which you should
place the cards is located at the rear of the reader/writer.
• From the car reader/writer, take out the dispenser upward in a straight line.
• Remove the cover from the back of the dispenser.
• Place the cards into the dispenser according to the instructions on the sticker annexed to the
dispenser. There is no print face on a card of the Club Kart. Determine the card in reference to
the inserting direction mark located at corners of the cards. Do not confuse the top/bottom or
direction.
• Reinstall the cover to the dispenser.
• Insert the dispenser into the card reader/writer. The dispenser can be inserted only in the
predetermined orientation.
• Close and lock the cover.
51
www.seuservice.com
Page 59

B. TURNING ON THE POWER
Turn on th AC unit’s main switch to supply power to the unit. Once power is turned on, the flourescent lamp
in the bill board lights up. The Start System Screen displays after a lapse of several seconds. It is followed
by the screen that indicates that the network is currently being checked if the communication mode has been
set. If there is a bad or improper communication connection, each screen will not proceed to the next,
remaining on the currently network-checked sreen. If this occurs, resolve the error according to the
instructions in this document.
If the communication mode has not been set or the communication check ends normally, the Motor Check
Screen returns. While the Motor Check Screen is on-screen, the steering wheel can move either clockwise or
counterclockwise. If you touch the wheel, the motor check is hindered and the game will not operate
normally. So, you must not touch it at this time. Failures are displayed, if found. Resolve the errors
according to the instructions in this document. Pressing the Start button while a failure is on-screen allows
you to go to the next screen and start the game without reaction.
Next the Check Card Reader/Writer Screen displays. If cleaning is required or a failure is found, this is
indicated on the screen. In this case, resolve the error according to the instructions in this document.
Once all the above steps have been completed, the Advertise Screen displays and voices are output through
the left and right loudspeakers, unless you have set the machine so that no voices are output during the
Advertise mode.
This product retains the number of credits and the ranking data even after the power is turned off. It does not
retain data about the fractional number of coins (i.e., the number of coins not reaching one credit) or the
bonus adder count.
C. CARD READER/WRITER
Take care if you work with the machine, without turning the power, in an attempt to return
to the game. In the alive state, the machine may operate suddenly, causing your finger to
be pinched or cut.
If a trouble such as card jamming occurs on the card reader/writer, you are notified of the trouble
on the screen. You cannot proceed to a play unless you resolve the trouble at this time. First
identify the trouble before you begin to take action.
When all cards are used up, you can no longer issue a new card, with the message “Now new
Club Kart Card” cannot be created” on-screen, instead of a trouble indication.
To obtain the dedicated or cleaning cards, place an order to the contact point or the dealer from
which you purchased the product. In the order form, write down the card name and the amount
of cards.
With each of the following part numbers, you can purchase 200 dedicated and 30 cleaning cards.
Dedicated Card
Cleaning Card
Part number: 601-11051
Name: CARD PACKAGE CKT
Part number: 601-11050
Name: CLEANING KIT
www.seuservice.com
52
Page 60

1) Action in Operation
The game board of this product backs up the data only when the card reader/writer detects a
trouble DURING OPERATION and the Error Screen displays. However, no written data is
backed up in the following cases:
• An action deemed to be illegal was detected while the game or write was in operation.
If backed up data remains when the power is turned on, the Check Card Reader/Writer Screen will
be replaced with the Save Data screen. The backed up data is cleared in the following cases:
• After an action was taken against a trouble, normal write ended.
• The backed up data was cleared in the Game Test Mode.
• Data save taking place at power-on time was canceled, and the succeeding game ended.
If the card reader/writer has not been set as being unused, you will be unable to select any game
mode with use of cards while the game will be in progress.
Thus, for the card reader/writer, deal with the player, paying attention to the following points:
• When a trouble occurs during write operation, the retained data can be written for proceeding to
the game by resolving the trouble without turning on the power. If you resolved the trouble with
power off, write the data according to the instructions on the screen when you attempt to turn on
the power.
• Even if the player request the system for use of cards when you have set the machine so that the
card reader/writer is not used, the request is rejected because of the nature of the system.
2) Setting the Card
Be sure to use dedicated cards available for this product (i.e., 601-11051).
Use of ones other than such dedicated cards may cause a malfunction or failure of the
machine.
Be sure to set the specified number of card in the specified orientation by using the
specified procedure. Wrong setting of the cards may cause the machine to fail.
This machine allows you to set up to 100 cards at a time. You must not set over 100
cards at a time. If you do so, a trouble such as card jamming may occur.
Set virgin cards taken out from a container that was unpacked immediately before use.
Use of any deformed or deteriorated card may cause a trouble.
The card reader/writer is located on the top of the coin chute tower. Place the cards on the card
reader/writer. Card setting is enabled with power either on or off.
• Unlock and open the cover to find the card reader/writer.
The dispenser on which you should place the cards is located at the rear of the reader/writer.
• From the card reader/writer, take out the dispenser upward in a straight line.
• Remove the cover from the back of the dispenser.
• Place the cards into the dispenser according to the instructions on the sticker annexed to the
dispenser. There is no print face on a card of the Club Kart. Determine the card in reference to
the inserting direction mark located at corners of the cards. Do not confuse the top/bottom or
direction.
• Reinstall the cover to the dispenser.
• Insert the dispenser into the card reader/writer. The dispenser can be inserted only in the
predetermined orientation.
• Close and lock the cover.
53
www.seuservice.com
Page 61

3) Head Cleaning
If the head cleaning mode is entered while the power is on, use the head cleaning
procedure according to the instructions on the screen. The head cleaning mode cannot
be quitted for being ready for starting the game unless the head cleaning is completed.
Be sure to use dedicated cleaning cards (i.e., 601-11050). Use of ones other than such
dedicated cleaning cards may cause a malfunction or failure of the machine.
Cleaning cards are disposable. They must not be used more than once.
Use each cleaning card immediately after it is taken out from an unsealed package.
Dried cards are ineffective for cleaning.
Never use a cleaning procedure not described in this document. Use of it may cause a
malfunction or failure of the machine.
This product memorizes the count you use the card reader/writer. When the power is turned off
and on after the count of use exceeds 100, the head cleaning mode is entered while the Check
Card Reader/Writer Screen is on-screen after you turn on the power. At this time, using a dedicated cleaning card, use the cleaning card procedure according to the instructions on the screen.
The head cleaning mode cannot be quitted for being ready for starting the game unless the head
cleaning is completed. You can use the Test Mode to perform the head cleaning mechanism
assembly. For details, see the “Test Mode” section in this document.
Start the cleaning clears the count of use above.
• Insert the cleaning card into the slot according to the instructions on the screen. The card is
retracted automatically.
• A screen displays that shows that cleaning is in progress.
• Once the cleaning is completed, the cleaning card is ejected from the slot. Take out the cleaning
card.
Cleaning Card Reader/Writer Screen
CARD R/W
PLEASE INSERT CLEANING CARD
CLEANING
Insert the cleaning card into the slot.
Now cleaning. Wait for a minute.
Cleaning is complete. Take out the card.
You cannot proceed to the next step until you take it out.
www.seuservice.com
PRESS START TO CANCEL
54
Page 62

4) Takin Action Against Card Jamming
If card jamming occurs, the error is shown on the screen. Use the procedure to take action against
the trouble:
• Unlock and open the cover.
• Unlock the hatch by drawing the green shaft attached to the top cover on the card reader/writer.
While drawing the shaft, open the cover up.
• Remove the card jammed in the card reader/writer.
• While drawing the shaft, close the cover. With the top cover closed, release the green shaft.
Check that the top cover has been locked securely.
Forcible Cleaning
This product memorizes the count you use the card reader/writer. When the power is turned off
and on after the count of use exceeds 100, the head cleaning mode is entered while the Check
Card Reader/Writer Screen is on-screen after you turn on the power. The head cleaning mode
cannot be quitted for being ready for starting the game unless the head cleaning is completed.
When the card reader/writer is subjected to head cleaning, the count of use is cleared and the the
mode ends.
At this time, using a dedicated cleaning card, use the cleaning card procedure according to the
instructions on the screen.
The count of use above is cleared also when the Test Mode is used for head cleaning.
Cleaning Card Reader/Writer Screen
CARD R/W
PLEASE INSERT CLEANING CARD
• Insert the cleaning card into the slot. The card is retracted automatically.
• Now cleaning. Wait for a minute.
• Cleaning is complete. Take out the card. You cannot proceed to the next step until you take it
CLEANING
out.
55
www.seuservice.com
Page 63

D. REWRITING DATA ONTO THE CARD
The game board of this product backs up the data only when the card reader/writer detects a trouble DURING
OPERATION and the Error Screen displays. However, no written data is backed up in the following case:
• An action deemed to be illegal was detected while the game or write was in operation.
If backed up data remains when the power is turned on the Check Card Reader/Writer Screen will be replaced
with the Save Data screen. Once written onto the cord, the backed up data is cleared before the mode ends.
Write the data onto the desired card according to the instructions on the screen.
You can use the Start button to cancel the write.
The backed up data is cleared in the following cases:
• Normal write ended.
• The backed up data was cleared in the Game Test Mode.
• Data save taking place at power-on time was canceled, and the succeeding game ended.
Rewrite Data Onto Card Screen
CARD R/W
PLEASE INSERT CARD
PRESS START TO CANCEL
• Insert the cleaning card into the slot. The card is retracted automatically.
• Now writing data. Wait for a minute.
• Data write is complete. Take out the card. You cannot proceed to the next step until you take it out.
DATA SAVE
www.seuservice.com
56
Page 64

E. CARD LOW LEVEL ADJUSTMENT
• Your game is equipped with a card “Low Level” system. It consists of a screw that moves with the
magazine as cards are dispensed. When the screw gets low enough, the beam is interrupted and the LED is
illuminated.
Added tape creates a flag to break beam sooner.
Low Level LED
• Current configuration provides notification at approximately 10 card (+/- 2). If you feel you need sooner
notification, see the diagram for suggested adjustment method.
57 www.seuservice.com
Page 65

E. TROUBLESHOOTING
Card Reader/Writer Trouble
When a card reader/writer failure is detected while the game is in progress, the error type is shown on the
screen. Take the appropriate error according to the actions listed below.
The game board of this product backs up the data only when the card reader/writer detects a trouble DURING
OPERATION and the Error Screen displays. However, no written data is backed up in the following case:
• An action deemed to be illegal was detected while the game or write was in operation.
If backed up data remains when the power is turned on, the Check Card Reader/Writer Screen will be
replaced with the Save Data screen. The backed up data is cleared in the following cases:
• After an action was taken against a trouble, normal write ended.
• The backed up data was cleared in the Game Test Mode.
• Data save taking place at power-on time was canceled, and the succeeding game ended.
Error
• Error condition • Action
“CONNECTION ERROR”
Reader/ Writer Communication Error - Check the connection cables and then turn on the power again.
“MECHANIC ERROR1”
DC Motor/Encoder Error - Check the connection cables and then turn on the power again. (Note 1)
“MECHANIC ERROR2”
Thermal Head Elevation Error - Check the connection cables and then turn on the power again.
(Note 1)
“CARD STUFFED”
Card Jamming - Remove the card jam. (Note 2)
“MECHANIC ERROR3”
Abnormal Temperature of Thermal Head - Check the connection cables and then turn on the power
again. (Note 1)
“CARD EMPTY”
Hopper Card Not Found - Supply card to the hopper. (Note 2)
“DRAW CARD ERROR”
Error in Taking Out from the Hopper - Remove the card jame and check the hopper. (Note 2)
“CAN’T SAVE”
No Data Can Be Written onto the Card. (Note 3)
“UNKNOWN ERROR”
Error Other Than Above - Check the connection cables and then turn on the power again.
“SCIF ERROR”
SCIF Error - Check the connection cables.
58www.seuservice.com
Page 66

Note 1: If this error reappears frequently, the card reader/writer body may be faulty.
Note 2: After the action has been taken, press the Start button before you follow the instructions on the error
screen. Now you can return to the game.
Note 3: If the same error repeats again and again, clean the card reader/writer. If no data can still be written,
the card reader/writer body may be faulty.
Without entering the Test Mode, turn on the power, again, to the cabinet if the following is included in the
“Action” column in the above table: “turn on the power again.”
If the error is not included in the “Error” column in the above table, merely turn on the power again.
If no improvments result from the appropriate action listed in this document, contact one of the contact points
listed in this document or the dealer from which you purchased the product.
Reaction Motor Trouble
When a failure is detected on the Check Motor Screen, which appears when the power is turned on.
Use the following procedure to take action:
Error Display 1
STEERING DRIVE BD. IS NOT CONNECTED
PRESS START TO CANCEL
PRESS VIEW TO RETRY
OR
This is an error in communication between NAOMI 2 and the motor driver. Check the wiring.
Pressing the Start button starts the game without steering-wheel reaction.
Pressing the View button reinitiates the machine.
Error Display 2
STEERING DRIVE BD. DOES NOT WORK
PRESS START BUTTON TO CONTINUE
WITHOUT REACTION FORCE
59 www.seuservice.com
Page 67

This is an error that occurs when the motor could not be initialized properly. Check the wiring between the
driver motors.
Pressing the start button starts the game without steering-wheel reaction.
When a failure is detected while the game is in progress, it continues to operate until it ends.
After the game ends, you are brought to the same screen as Check Motor that appeared at power-on time. If a
failure is detected at this time, Error Display 2, above, appears. Take action against it. Usually, the encoder
annexed to the motor is used for detection of the steering wheel; however, it will be unavailable if a failure is
detected on the motor. The handle mechanism is provided with a spare volume for this reason. When the
handle center is set with Set Volume Control Screen in the Test Mode, volume center setting, as well as
encoder setting, takes place. However, when you make the machine operate without reaction because of a
motor failure, center the volume control again by way of precaution.
60www.seuservice.com
Page 68

F. GAME MENU
The new settings will not take effect until the Game Test Mode is exited. When
you make change to the settings, exit the Game Test Mode by proper operation.
You must not attempt to demonstrate this game (for the selling purpose) with any
other than those specified in this document. Use of such settings may cause malfunctions or bad operation on the machine.
SYSTEM MENU
RAM TEST
JVS TEST
SOUND TEST
C.R.T. TEST
SYSTEM ASSIGNMENTS
COIN ASSIGNMENTS
BOOKKEEPING
BACKUP DATA CLEAR
CLOCK SETTING
ROM BOARD TEST
GAME TEST MODE
[XXXXXXXXXXXXXXX]
-> EXIT
SELECT WITH SERVICE BUTTON
AND PRESS TEST BUTTON
GAME TEST MENU
INPUT TEST
OUTPUT TEST
GAME SETTING
VOLUME SETTING
CARD R/W TEST
BOOKKEEPING
BACKUP DATA CLEAR
> EXIT
SELECT WITH SERVICE BUTTON
AND
PRESS TEST BUTTON
Pressing the SERVICE button moves the arrow on the screen. Move the arrow to select the
item you want to run. Pressing the TEST button runs the currently selected item. The screen
changes to the one for that item, and you can change or adjust the settings.
Select EXIT and press the TEST button to return to the System Test Menu Screen.
61 www.seuservice.com
Page 69

G. INPUT TEST
By selecting INPUT TEST on the Menu Screen and pressing the Test button, the
steering wheel is centered automatically as done when the machine is started. To
protect persons from accidents make sure that nobody is in contact with the steering
wheel before pressing the TEST button.
To prevent accidents, breakage of parts, and malfunctions, do not touch the
steering wheel until centering of the steering wheel is completed.
INPUT TEST tests the input devices. Using this screen, check the input devices
periodically.
Operate each input device. If the display at the right of the appropriate device changes
from OFF to ON, it is diagnosed as being normal.
Check that each of the indications at the right of STEERING, ACCEL, and BRAKE
change smoothly in response to operations of each of the input devices.
INPUT TEST
STEERING WHEEL: ****
ACCEL. : ****
BRAKE : ****
VIEW SW : OFF
START SW : OFF
PRESS TEST AND SERVICE BUTTON TO EXIT
Pressing the TEST button returns you to the Game Test Menu Screen.
VOLUME CONTROL RECOMMENDED SETTINGS
• Steering wheel: Centered (when traveling in a straight line) 2000H
• Accelerator:
When the pedal is released 30H
When the pedal is pressed fully C0H
• Brake:
When the pedal is released 30H
When the pedal is pressed fully C0H
62www.seuservice.com
Page 70

H. OUTPUT TEST
You can monitor the state of the lights. Use this screen to check the lights periodically.
OUTPUT TEST
START LAMP OFF
VIEW LAMP OFF
> EXIT
SELECT WITH SERVICE BUTTON
PRESS TEST BUTTON
AND
Pressing the SERVICE button moves the arrow. With the arrow aligned with the tested lamp
item, press the TEST button.
If the lamp lights up when the indication at the right of each name is ON and goes out when it is
OFF, this lamp and wiring connections are normal.
By selecting EXIT and pressing the TEST button, you return to the Game Test Menu Screen.
63 www.seuservice.com
Page 71

I. GAME SETTING
You can make the settings about cabinet operations such as the communicated mode or the
reaction force of the steering wheel.
MAKING CHANGE TO THE SETTINGS
1. By pressing the SERVICE button, move the arrow (>) to the desired item to change.
2. Pressing the Test button changes the display at the right of the currently selected item.
Change the item to the desired display.
3. Press the SERVICE button to select EXIT. Then press the TEST button. This returns you
to the Game Test Menu Screen.
GAME SETTING
LINK TYPE: XXXXXX
STEERING POWER: ****************
STEERING DIR. : REVERSE
CARD SYSTEM: ENABLE
BONUS GAMES: 0
> EXIT
AND
PRESS TEST BUTTON
SELECT WITH SERVICE BUTTON
LINK TYPE: Used for settings of communicated play. You have four options:
MASTER, SLAVE, SATELLITE, and STAND-ALONE. If you
want to enjoy the game alone, set to STAND-ALONE. Setting for
communicatedplay, be sure to set MASTER for only one machine,
or seat, and set SLAVE for all the remaining ones. SATELLITE is
a setting for a relay monitor.
STEERING POWER: Sets reaction for the steering wheel. Increase or decrease in the
number of asterisks (*) is reflected to the reaction force. The more
the asterisks, the reaction force the larger.
STEERING DIR.: Sets steering reaction direction. Default for deluxe game is
REVERSE.
CARD SYSTEM: Activates card reader system.
BONUS GAMES: Choose 0-3.
64www.seuservice.com
Page 72

J. VOLUME SETTING
By setting VOLUME SETTING on the Menu Screen and pressing the TEST
button, the steering wheel is centered automatically as done when the machine is
started. To protect persons from accidents, make sure that nobody is in contact with
the steering wheel, before pressing the TEST button.
To prevent accidents, breakage of parts, and malfunctions, do not touch the
steering wheel until centering of the steering wheel is completed.
No normal play is guaranteed unless all the input devices are set properly.
Be sure to makethe proper settings before you begin demonstration for the selling
purpose.
Once you have completed change to the settings, select EXT and press the TEST
button. The new settings will not take effect until this mode is exited.
By setting the VOLUME SETTING on the Menu Screen and pressing the Test button,
centering of the steering wheel in initiated automatically. After the centering is completed, you can use the screen below to make the steering wheel, accelerator, and brake
settings.
If the operability of the steering wheel, accelerator, or brake is poor, use this screen to
make the proper settings for the volume control.
VOLUME SETTING
[2000] 2000
STEER: *---------------------------------------------
[2000]3000 C000
ACCEL: ----*-------------------------*--------------
[8100]3000 C000
BRAKE: ----*-------------------------*-------------
> EXIT
SELECT WITH SERVICE BUTTON
AND
PRESS TEST BUTTON
MIN MID MAX
1. By moving the SERVICE button to move the arrow, select the input device for which you
want to make settings.
2. For either the accelerator or brake, press START without pressing the pedal. Set the value
resulting when you release it.
3. With the pedal pressed fully, press START to set the value resulting when you press it fully.
4. For the steering wheel, press START while supporting it along the straight line.
5. Select EXIT and press the TEST button.
The setting changes are not updated until you select EXIT. After you make change to the
settings, be sure to select EXIT.
By selecting EXIT and pressing the TEST button, you return to the Game Test Menu Screen.
65 www.seuservice.com
Page 73

K. CARD R/W TEST
Check operation of the card reader/writer (R/W) and clean it periodically.
This screen lets you check operation of the card reader/writer (R/W) or clean it.
CARD R/W TEST
CARD R/W STATUS: *******
> EXIT
SELECT WITH SERVICE BUTTON
AND
PRESS TEST BUTTON
INFORMATION
INITIALIZE
CLEANING
CHECK R/W: ---
The arrow can move to the following items:
• INITIALIZE: Initialization
• CLEANING: Cleaning
• CHECK R/W: R/W Operation Check
Depending on the R/W running mode, one of the following is displayed in “ *****” in “CARD
R/W STATUS: *****” :
READY Now waiting (Clear to Send Command)
INITIAL Now initializing (Not Clear to Send Command)
CLEAN Now cleaning (Not Clear to Send Command)
GET Cards are being taken out from the hopper (Not Clear to Send Command)
SAVE Sample data is saved onto the card (Not Clear to Send Command)
LOAD Load card data and compares it with sample data (Not Clear to Send
Command)
OUT Eject cards (Not Clear to Send Command)
ERROR Error ( Clear to Initialize Command Only)
While a status with a note of “Not Clear to Send Command” in parentheses is on-screen, no
operations are accepted. If such a status has occured, wait until the operation in that status stops
automatically and the display comes to READY.
Should you need to cancel the operation forcibly, turn off the power. If you cancel it forcibly,
be sure to select and run INITIALIZE after turning on the power.
Occasionally, the “INFORMATION” field on the screen outputs one of the instructions below,
although it usually contains nothing.
66www.seuservice.com
Page 74

While cleaning is in progress, waiting in the ready mode for inserting a cleaning card:
----- PLEASE INSERT CLEANING CARD -----
After the operation check, waiting for the ready mode for ejecting the card:
----- PLEASE REMOVE CARD -----
When an error occurs, its type is displayed in the “INFORMATION” field:
CONNECTION ERROR Connection Error
MECHANIC ERROR 1 DC Motor / Encoder Error
MECHANIC ERROR 2 Thermal Head Elevation Error
CARD STUFFED Card Jamming
MECHANIC ERROR 3 AbnormalTemperature of Thermal Head
CARD EMPTY Hopper Card Empty
DRAW CARD ERROR Error in Taking Card from Hopper
CAN’T SAVE Data cannot be written onto the card.
UNKNOWN ERROR Unknown Error
SCIF ERROR RC-232C Communication Error
NO ERROR No Error
The “---” field in “CHECK R/W: ---” shows the result of the operation check.
--- Not Checked
OK No Failure
NG Failure
The operation check takes out each card from the hopper, and writes the sample data onto it. The check
whether the read data matches the sample data. Then, the check ejects the card. When you draw out the
card at this time, the entire process of the check is completed.
CHECKING R/W OPERATION
1. Select “CHECK R/W” and press the TEST button.
R/W operates automatically as follows:
2. Takes out the card from the hopper: GET is displayed.
3. Saves the sample data onto the card: SAVE is displayed.
4. Loads the data on the card for comparison with the sample data: LOAD is displayed.
5. Ejects the card: OUT is displayed.
6. Draws out the card. Now the entire process of the check is completed.
If execution of the operation check results in display of NG, check the error condition. If you can take
action against the error, execute the operation check again after you take the proper action. If you cannot
take action against the error, repeat the check several times. If the result of the check is still NG, clean the
R/W.
If the subsequent execution of the operation check still results in NG, the R/W may be faulty.
If an error occurs, it is cleared by executing the INITIALIZE command. Note that when an error has
occured, the R/W only accepts this command (except EXIT).
67 www.seuservice.com
Page 75

CLEANING PROCEDURE
1. Select “CLEANING” and press the TEST button.
The following message appears to show that the R/W is ready for insertion of the cleaning card:
---PLEASE INSERT CLEANING CARD---
2. Insert the cleaning card into the R/W. On the screen, the status display is replaced with “CLEAN”, and
cleaning begins.
3. Once cleaning ends after a lapse of a certain time, the R/W automatically ejects the card. The status
display changes from “CLEAN” to “OUT.”
68www.seuservice.com
Page 76

L. BOOKKEEPING
In four pages, this screen lists the data about the operation status up to now. Pressing the TEST
button brings you to the next page of the screen. When you press the TEST button on Page 4/4
of the screen, you return to the Game Test Menu.
BOOKKEEPING 1/4
NUMBER OF GAMES 0
NUMBER OF CARD GAMES 0
NUMBER OF NEW CARDS 0
PLAY TIME OD OH OM OS
AVERAGE PLAY TIME OH OM OS
LONGEST PLAY TIME OH OM OS
SHORTEST PLAY TIME OH OM OS
SELECT WITH SERVICE BUTTON
AND PRESS TEST BUTTON
NUMBER OF GAMES: Number of games played.
NUMBER OF CARD GAMES: Number of games played with cards.
NUMBER OF NEW CARDS: Number of games played with cards.
PLAY TIME: Time played.
69 www.seuservice.com
Page 77

BOOKKEEPING 2/4
TIME HISTOGRAM
OM00S - OM29S 0
OM30S - OM59S 0
1MOOS - 1M29S 0
1M30S - 1M59S 0
2M00S - 2M29S 0
2M30S - 2M59S 0
3MOOS - 3M29S 0
3M30S - 3M59S 0
4M00S - 4M29S 0
4M30S - 4M59S 0
OVER - 5MOOS 0
SELECT WITH SERVICE BUTTON
AND PRESS TEST BUTTON
T IME HISTOGRAM lists the number of plays for each of the play times.
BOOKKEEPING 3/4
PLAYS/CLASS
RENTAL BEGINNER *
RENTAL NORMAL *
CLASS NOVICE *
CLASS B *
CLASS A *
CLASS S *
CLASS SS *
CLASS SSS *
SELECT WITH SERVICE BUTTON
AND PRESS TEST BUTTON
PLAY/CLASS shows the count of plays by class.
70www.seuservice.com
Page 78

BOOKKEEPING 4/4
PLAYS/COURSE
1-A *
1-B *
1-C *
2-A *
2-B *
2-C *
3-A *
3-B *
3-C *
4-A *
4-B *
4-C *
SELECT WITH SERVICE BUTTON
AND PRESS TEST BUTTON
The PLAYS/COURSE Screen lists the count of plays by course. Pressing the TEST button
returns you to the Game Test Menu Screen.
71 www.seuservice.com
Page 79

M. BACKUP DATA CLEAR
BACKUP DATA CLEAR deletes data on the Bookkeeping Screen. To delete data about the
coins/credits, run BACKUP DATA CLEAR in the System Test Mode. Clearing the data does
not influence any data settings (except the data).
BACKUP DATA CLEAR
YES (CLEAR)
> NO (CANCEL)
SELECT WITH SERVICE BUTTON
AND
PRESS TEST BUTTON
To delete the data, use the SERVICE button to align the arrow with CLEAR and press the
TEST button. Once the data is deleted, this screen displays “COMPLETED.”
Pressing the TEST button again returns you to the Menu Screen. If you choose not to delete the
data, press the TEST button with the arrow aligned with NO. This returns you to the Menu
Screen.
72www.seuservice.com
Page 80

10. CONTROL PANEL (STEERING MOTOR UNIT)
Before starting to work, ensure that the Power SW is OFF. Failure to observe
this can cause electric shock or short circuit.
Use care so as not to damage wirings. Damaged wiring can cause electric
shock or short circuit.
Do not touch undesignated places. Touching places not designated can cause
electric shock or short circuit.
This work should be performed by the Location's Maintenance Man or
Serviceman. Performing work by non-technical personnel can cause electric
shock hazard.
Do not insert hand into the mechanism so as not to cause hand and fingers
pinched in. Failure to observe this can cause a serious injury such as a
fracture.
When performing work such as parts replacement other than those specified in
this manual, be sure to contact where you purchased the product from and
confirm the work procedures and obtain precautions prior to performing work.
Inappropriate parts replacement and/or installing with erroneous adjustment
can cause an overload or the parts to come into contact, resulting in an electric
shock, a short circuit, and a fire.
Carefully handle the PTV on the PTV base because it is very unstable. If
handled carelessly, it may fall down and eventually cause a serious personal
injury.
10 - 1 ADJUSTING OR REPLACING THE V.R.
In cases the Steering operability is poor and the adjustment of VOLUME SETTING in the
TEST mode is ineffective, the causes may be the Volume Gear's mesh failure and or Volume
malfunctioning. By using the following procedure, adjust Volume gear mesh, or replace the
Volume. In this product, when the Steering Wheel is moved fully left/right, if the Volume shaft
is rotating within the movable range, the Volume is not feared to be damaged. Secure the
Volume in the manner the Volume shaft is oriented as shown and the gears are appropriately
engaged when the steering wheel is in the centering position allowing the car to go straight
forward.
ADJUSTING THE VOLUME
Prepare a Phillips screwdriver and a
wrench for M8 hexagonal nut.
1
Turn off power.
Referring to Chapter 6, uncouple the
2
PTV and the main cabinet from each
other. However, leave the wires
connected.
MECH FRONT LID
PHOTO 10. 1 a
73 www.seuservice.com
Page 81

3
The V.R. is on the VR BASE (a white, plastic made part). Loosen the 2 screws which secure
the VR BASE and adjust the angle and appropriateness of gear mesh by moving the VR BASE.
Adjust to an appropriate mesh by securing the Steering Wheel in the direction allowing the car
4
to advance straight forward and ensuring the "D" CUT FACE of the Volume shaft is oriented as
shown.
Tighten the 2 screws to secure the VR BASE.
5
VR BASE
SCREW (2)
M4 X 12, w/flat & spring washers
"D" CUT FACE
FIG. 10. 1 a
6
Turn on power.
7
Set the Center Value of the Volume in the TEST mode.
In the TEST mode, check to see if the Volume Value varies smoothly in accordance with the
8
steering wheel operation.
74www.seuservice.com
Page 82

REPLACING THE VOLUME
1
Disconnect the connector from the
Volume.
2
Take out 2 screws to remove the
Volume together with VR BASE
from the HANDLE MECHA.
SCREW (2)
M4 X 12, w/flat & spring washers
VR BASE
Take out 2 screws from the VR
3
BASE reverse side to remove the
Volume together with VR Bracket
from the VR BASE.
4
Remove the Volume from VR
Bracket and replace.
TRUSS SCREW (2)
M4 X 12
PHOTO 10. 1 b
PHOTO 10. 1 c
75 www.seuservice.com
Page 83

After replacing the Volume, engage the gears at the angular position shown and fix the VR
5
Bracket.
VR BASE
SCREW(2)
M4 X 12, w/flat & spring washers
FIG. 10. 1 b
V.R.
220-5484
220-5373
6
Turn on power.
7
Set the Center Value of the Volume in the TEST mode.
8
In the TEST mode, check to see if the Volume Value varies smoothly in accordance with the
steering wheel operation.
10 - 2 GREASING
STOP
IMPORTANT
Apply greasing to gear mesh
portions once every 3 months.
Use GREASE MATE (SEGA
PART NO. 090-0066).
Be sure to use the designated grease. Using undesignated grease can cause
parts damage.
Do not apply greasing to undesignated places. Failure to observe this can cause
malfunctioning or quality deterioration of parts.
VOLUME GEAR MESH PORTION
PHOTO 10. 2
76www.seuservice.com
Page 84

11. ACCELERATOR & BRAKE
Before starting to work, ensure that the Power SW is OFF. Failure to observe
this can cause electric shock or short circuit.
Use care so as not to damage wirings. Damaged wiring can cause electric
shock or short circuit.
Do not touch undesignated places. Touching places not designated can cause
electric shock or short circuit.
This work should be performed by the Location's Maintenance Man or
Serviceman. Performing work by non-technical personnel can cause electric
shock hazard.
When performing work such as parts replacement other than those specified
in this manual, be sure to contact where you purchased the product from.
Confirm the work procedures and obtain precautions from where you
purchased the product from prior to performing work. Inappropriate parts
replacement and/or installation with erroneous adjustment can cause an
overload or the parts to come into contact, resulting in an electric shock, a
short circuit, and a fire.
If Accel. and Brake operation is not satisfactory, adjustment of Volume installation position or
Volume replacement is needed. Also, be sure to apply greasing to the gear mesh portion once
every 3 months.
11 - 1 ADJUSTING AND REPLACING THE V.R.
The appropriate value for both ACCEL. Volume and Brake Volume is under 30H when released
and over C0H when stepped on. Check Volume values in the TEST mode. Since work is
performed inside the energized cabinet, be very careful so as not to touch undesignated places.
Touching places not specified can cause electric shock or short circuit.
1
Take out the 2 truss screws and
remove the Front Cover from the
Accel. & Brake Unit
Loosen the screw which secure the
2
Potentiobase, and adjust the
Volume value by moving the Base.
(FIG. 11. 1 b)
3
Secure the Potentiobase.
4
Perform Volume setting in the
Volume setting mode.
SCREW
M5 X 12,
w/flat & spring washers
V.R.
220-5484
220-5373
POTENTIOBASE
FIG. 11. 1 b
77 www.seuservice.com
Page 85

REPLACING THE VOLUME
1
Turn the power off.
2
Take out the 2 screws and remove the
Pedal cover (FIG. 11. 1 c).
Disconnect the connector of the
3
Volume to be replaced.
Remove the screw which secures the
4
Pedal base (FIG. 11. 1 b).
5
Remove the Pedal base together with
the Volume as is attached.
(FIG. 11. 1 c)
Remove the Base and Gear to replace
6
the Volume.
Adjust the Volume as per the previous
7
page after replacing.
11 - 2 GREASING
FIG. 11. 1 c
TRUSS SCREW (2)
M4 X 8
PEDAL COVER
STOP
Be sure to use the designated grease. Using undesignated grease can cause parts
damage.
IMPORTANT
Once every 3 months, apply greasing
to the Spring and Gear mesh portion.
For spray greasing, use GREASE
MATE (PART No. 090-0066).
GREASING
FIG. 11. 2
78www.seuservice.com
Page 86

12. PROJECTOR
Since the Projector has been adjusted at the time of shipment, avoid making
further adjustments without good reason.
STOP
IMPORTANT
12 - 1 CLEANING THE SCREEN
The Projector is subject to color deviation due to Convergence deviation caused
by the geomagnetism at the installation location and peripheral magnetic field.
After the installation of machine, and before commencing operation, check for
Convergence deviation and if deviated, make adjustments.
Projector adjustments are stored. Due to distortion or color deviation in the TEST mode, if an
adjustment is necessary, use the Remote Control to make adjustments. There are two Projector
Makers (Toshiba and Mitsubishi) and the adjustment method varies depending on the specific
maker.
Since the Projector screen is susceptible to damage, pay careful attention to its
handling. When cleaning, refrain from using water or volatile chemicals.
When the screen surface
becomes dirty with dust,
etc., clean it by using a
soft cloth such as gauze.
When water, and volatile
chemicals such as
benzine, thinner, etc., spill
on the screen surface, it
may be subject to damage,
therefore, do not use
them. Also, since the
surfaces are susceptible to
damage, refrain from
rubbing them with a hard
material or using a duster.
FIG. 12. 1
79 www.seuservice.com
Page 87

12 - 2 ADJUSTMENT OF TOSHIBA PROJECTOR
SETTING THE INTERFACE
STOP
In this product, set to INPUT LEVEL: 0.7V and IMPEDANCE: 75Ω. Failure to
observe this can cause CRT membrane to burn or Shutdown device to function
resulting in power off.
IMPORTANT
The Projector's Connector Panel contains the Interface setting SW.
REMOTE CONTROL BUTTONS
WINNER
LAMP
AC100-120V
~
RGB IN
AC IN
AC100-120V
~
IMPEDANCE
HIGH
75
INPUT LEVEL
@@
0.7V 1~3V
COM
When adjusting the Projector, direct the Remote Control's light emitting portion towards the
Projector Screen.
REMOTE CONTROL LIGHT EMITTING PORTION
MODE (mode selection)
TEST (adjust/normal shift)
R. G. B. (color selection)
POSITION (to select the position)
ADJUST (adjustment)
TEST MODE WRITING
RBG
POSITION
ADJUST
P
SET
PIC-ADJ
RESET
SELECT
WRITING (storing the data)
P (automatic color matching)
SET (to decide the selection)
PIC - ADJ (item selection)
RESET
SELECT (pattern selection)
80www.seuservice.com
Page 88

AUTOMATIC COLOR MATCHING
The Projector may be subject to color deviations affected by earth magnetism, the building steel
frames, etc. When the Projector is initially installed or the Projector's installation position is
changed, have the color matching performed automatically.
1
Keep pressing the P button (red) for approximately 3 seconds to have
the ensuing movements performed automatically.
The Projector will shift to the color deviation
SET
P
correction mode from the game mode, with
the green cross pattern appearing on the
TEST MODE WRITING
RBG
screen.
POSITION
ADJUST
PIC-ADJ
RESET
SELECT
The cross pattern moves up/down and right/
left to start the movement of searching the correct screen position and inclination.
When the green cross pattern movements are finished, similar detection
is performed sequentially in order of red and then blue cross movements. After detecting by green, red and blue cross movements, the
game mode returns with the color deviation status being corrected.
Although very rarely, the TRY AGAIN error display in red may appear. At this time, press the
P button (red) for approximately 3 seconds.
Even after the above operation is repeated, if the error condition still exists, then the display
shifts to PLEASE ADJ. In this case, the auto color matching function can not be used. Contact
the place of contact herein stated or where the product was purchased from.
If the automatic color matching indicates an error, color matching can manually be performed.
Refer to CONVERGENCE ADJUSTMENT (manual color matching).
81 www.seuservice.com
Page 89

ADJUSTING THE ON-SCREEN CONTRAST
Although the on-screen picture quality has been adjusted at the time of shipment from the
factory, the on-screen contrast can be readjusted if desired. When the Game Board is replaced,
readjustment may be necessary. Changing the CONTRAST causes the light and shade of the
on-screen images to be changed.
1
Press either or PIC - ADJ button.
TEST MODE WRITING
RBG
POSITION
ADJUST
P
SET
PIC-ADJ
RESET
SELECT
Herein,
procedure
is skipped.
2
PIC-ADJ
PIC-ADJ
SET
CONTRAST
BRIGHTNESS
H.POSI
V.POSI
H.SIZE
V.SIZE
EXIT
Choose CONTRAST by using either
2
The on-screen menu will
have one item in purple and
6 items in white.
PIC - ADJ button.
CONTRAST
BRIGHTNESS
H.POSI
V.POSI
H.SIZE
V.SIZE
EXIT
3
Press the SET button (to decide selection).
CONTRAST 230
. . . . . . . . . . . . . . . . . . . .
Have CONTRAST displayed in purple. Since
CONTRAST is selected
initially, no particular
operation is required in this
case.
When the selection of the
CONTRAST adjustment
mode is decided, the
adjustment data scale bar
appears on the screen.
or
Make adjustment by using either or
4
ADJUST
ADJUST button.
As the Cursor is moved, the
adjustment data value
changes. Make adjustment
so as to obtain the desired
on-screen contrast status.
CONTRAST 156
. . . . . . . . . . . . . . . . . . . .
5
WRITING
Press the WRITING button (for storing and finish).
The WRITING display
appears and the adjustment
data is stored.
WRITING
When discontinuing the adjustment, choose EXIT from the menu at the stage of procedure and
2
press the SET button.
2
To continue adjusting other menu items, repeat procedure ~ .
4
Unless the adjustment data is stored, the data in the adjusted status will be erased at the time the power
is turned off and the pre-adjustment status will remain when the power is turned on next time.
82www.seuservice.com
Page 90

ADJUSTING THE SCREEN BRIGHTNESS
Although the on-screen picture quality has been adjusted at the time of shipment from the
factory, readjustment can be made if desired. When the Game Board is replaced, readjustment
may be necessary. Changing the BRIGHTNESS causes the brightness of the on-screen images
of black portions to be changed.
1
Press either or PIC - ADJ button.
TEST MODE WRITING
RBG
POSITION
ADJUST
P
SET
PIC-ADJ
RESET
SELECT
PIC-ADJ
PIC-ADJ
SET
CONTRAST
BRIGHTNESS
H.POSI
V.POSI
H.SIZE
V.SIZE
EXIT
Choose BRIGHTNESS by using either or PIC
2
The on-screen menu will have one
item in purple and 6 items in
white.
- ADJ button.
CONTRAST
BRIGHTNESS
H.POSI
V.POSI
H.SIZE
V.SIZE
EXIT
3
Press the SET button (to decide selection).
Have the BRIGHTNESS displayed
in purple.
When the selection of the
BRIGHTNESS adjustment mode
is decided, the adjustment data
scale bar appears on the screen.
BRIGHTNESS 128
. . . . . . . . . . . . . . . . . . . .
ADJUST
Make adjustment by using either
4
button.
or ADJUST
As the Cursor is moved, the
adjustment data value changes.
Make adjustment so as to obtain
the desired on-screen brightness
status.
BRIGHTNESS 156
. . . . . . . . . . . . . . . . . . . .
WRITING
5
Press the WRITING button (for storing and finish).
The WRITING display appears
and the adjustment data is stored.
WRITING
When discontinuing the adjustment, choose EXIT from the menu at the stage of procedure and
2
press the SET button.
To continue adjusting other menu items, repeat procedure ~ .
2
4
Unless the adjustment data is stored, the data in the adjusted status will be erased at the time the power
is turned off and the pre-adjustment status will remain when the power is turned on next time.
83 www.seuservice.com
Page 91

ADJUSTING THE ON-SCREEN DISPLAY POSITION
Although the on-screen display position (H. POSI, V. POSI) has been adjusted at the time of
shipment from the factory, readjustment can be made if desired. When the Game Board is
replaced, readjustments may be necessary.
1
Press either or PIC - ADJ button.
TEST MODE WRITING
RBG
POSITION
ADJUST
P
SET
PIC-ADJ
RESET
SELECT
PIC-ADJ
PIC-ADJ
SET
CONTRAST
BRIGHTNESS
H.POSI
V.POSI
H.SIZE
V.SIZE
EXIT
Choose H. POSI or V. POSI by using either or
2
The on-screen menu will have
one item in purple and 6 items in
white.
PIC ADJ button.
CONTRAST
BRIGHTNESS
H.POSI
V.POSI
H.SIZE
V.SIZE
EXIT
3
Press the SET button (to decide selection).
Have the H. POSI or V. POSI
displayed in purple. The Figure
shows the status in which H.
POSI is selected.
When the selection of the H.
POSI or V. POSI is decided, the
adjustment data scale bar appears
on the screen.
H.POSI 128
. . . . . . . . . . . . . . . . . . . .
ADJUST
Make adjustment by using either
4
button.
or ADJUST
As the Cursor is moved, the
adjustment data value changes.
When making adjustments
in vertical directions, also
use either
or
ADJUST button.
WRITING
H.POSI 156
. . . . . . . . . . . . . . . . . . . .
5
Press the WRITING button (for storing and finish).
Make adjustment so as to obtain
the desired on-screen position
status.
The WRITING display appears
and the adjustment data is stored.
WRITING
When discontinuing the adjustment, choose EXIT from the menu at the stage of procedure and press
2
the SET button.
To continue adjusting other menu items, repeat procedure ~ .
2
4
Unless the adjustment data is stored, the data in the adjusted status will be erased at the time the power
is turned off and the pre-adjustment status will remain when the power is turned on next time.
84www.seuservice.com
Page 92

ADJUSTING THE SCREEN SIZE
Although the on-screen size (H. SIZE, V. SIZE) has been adjusted at the time of shipment from
the factory, readjustment can be made if desired. When the Game Board is replaced,
readjustments may be necessary.
1
Press either or PIC - ADJ button.
TEST MODE WRITING
RBG
POSITION
ADJUST
P
SET
PIC-ADJ
RESET
SELECT
PIC-ADJ
PIC-ADJ
SET
CONTRAST
BRIGHTNESS
H.POSI
V.POSI
H.SIZE
V.SIZE
EXIT
2
Choose H. SIZE or V. SIZE by using either
The on-screen menu will have one
item in purple and 6 items in
white.
PIC - ADJ button.
CONTRAST
BRIGHTNESS
H.POSI
V.POSI
H.SIZE
V.SIZE
EXIT
3
Press the SET button (to decide selection).
Have the H. SIZE or V. SIZE
displayed in purple. The Figure
shows the status in which H. SIZE
is selected.
When the selection of the H. SIZE
or V. SIZE adjustment mode is
decided, the adjustment data scale
bar appears on the screen.
or
H.SIZE 128
. . . . . . . . . . . . . . . . . . . .
Make adjustment by using either or ADJUST
ADJUST
4
button.
As the Cursor is moved, the
adjustment data value changes.
When making adjustments
in vertical directions, also
use either
or
button.
WRITING
H.SIZE 156
. . . . . . . . . . . . . . . . . . . .
Press the WRITING button (for storing and finish).
5
Make adjustment so as to obtain
the desired on-screen position
status.
The WRITING display appears
and the adjustment data is stored.
WRITING
When discontinuing the adjustment, choose EXIT from the menu at the stage of procedure and press
2
the SET button.
2
To continue adjusting other menu items, repeat procedure ~ .
4
Unless the adjustment data is stored, the data in the adjusted status will be erased at the time the power
is turned off and the pre-adjustment status will remain when the power is turned on next time.
85 www.seuservice.com
Page 93

CONVERGENCE ADJUSTMENT (manual color matching)
To avoid circuitry malfunctioning due to electrical load increase, never utilize
CONVERGENCE ADJUSTMENT (Line Convergence Adjustment in particular)
for adjusting screen size changes.
There is no means to restore the Convergence Adjustment data once stored, to its
original state. To avoid changing the screen size by erroneously using
convergence adjustment, do not perform the green Line Convergence Adjustment.
As such, be sure to perform the adjustment work from this page onward by the
Technical staff and the location's Maintenance Personnel who are well versed in
such adjustment work. In the Static Convergence Adjustments, if satisfactory
adjustments can not be performed, do not make another convergence adjustments
inadvertently. Contact the office herein stated or where the product was
purchased from.
STOP
IMPORTANT
To avoid making the adjustment work ineffective, do not press the RESET
button during adjustment.
To discontinue adjustment work, keep pressing the TEST button for
approximately 3 seconds at the stage before storing the adjustment data by
pressing the WRITING button.
Should the screen be abnormally disturbed by noise due to static electricity,
etc., turn the power off without storing the adjustment data.
Pressing the or PIC - ADJ
button in the Convergence Adjustment
mode status will display the
Adjustment Menu shown right. Do not
utilize this Adjustment Menu as this is
the one applied at the factory.
Adjusting this menu causes the
Customer's adjustment range to be
deviated.
Should the menu shown right be
displayed by mistake, first choose
EXIT by using either or PIC ADJ button and then press the SET
button.
Adjustment menu used in the factory.
86www.seuservice.com
Page 94

STATIC CONVERGENCE ADJUSTMENT
In the static convergence adjustment, each of red and blue images is comprehensively moved to
and superimposed on the green color. If automatic color matching function is not sufficiently
satisfactory, perform this adjustment. Be sure to perform automatic color matching before
starting the above adjustment.
TEST MODE WRITING
RBG
POSITION
P
SET
PIC-ADJ
Keep pressing the TEST button for
approximately 3 seconds.
ADJUST MODE
The screen will change to
ADJUST mode from the Game
mode to cause the green test
pattern to be displayed on the
screen.
DO NOT PUSH THIS.
ADJUST
When either of COLOR SELECT
RESET
SELECT
2
4
buttons (R, B) is pressed, if the color
desired to be adjusted disappears, press
that particular button again. For example,
if the red color needs to be adjusted again
at the stage of , the R button need to
4
be pressed twice.
Press the R button to have the red adjustment
mode.
ADJUST MODE
Make adjustment by using the
The red test pattern is added to
the display. The frame color
turns red and this signifies the
red adjustment mode.
ADJUST buttons.
ADJUST MODE
Make adjustment so as to have
red superimposed on green.
When red is superimposed on
green, the color becomes
yellow.
Press the B button to have the blue adjustment
mode.
ADJUST MODE
Similarly as in the case of red,
adjust the blue color. When
green, red, and blue are superimposed, the color becomes
white.
Press the WRITING button (for storing and finish).
ADJUST MODE
WRITING
The WRITING display appears
and the adjustment data is
stored. After the data is stored,
the Game mode returns.
87 www.seuservice.com
Page 95

POINT CONVERGENCE ADJUSTMENT
In the POINT CONVERGENCE adjustment, each of red, green and blue images is partially
moved for color matching. The adjustment may be necessary when the Game Board is replaced or
changed, or screen size is changed. Be sure to perform automatic color matching before starting
the adjustment.
Keep pressing the TEST button for
1
approximately 3 seconds.
TEST MODE WRITING
RBG
POSITION
ADJUST
P
SET
PIC-ADJ
DO NOT PRESS.
RESET
SELECT
Note 1 When the MODE button is repeatedly
pressed, the adjustment modes will
circulate as follows:
STATIC ADJUSTMENT MODE
MARKER
ADJUST MODE
The screen changes to ADJUST
mode from the Game mode and
displays the green test pattern.
Press the MODE button twice to have the POINT
2
ADJUSTMENT mode.
ADJUST MODE
The crosshatch test pattern appears
Note 1
and the MARKER indicating the
adjustment point is displayed.
Using either R or B button, select the desired
3
color to be adjusted.
Note 2 By using the G
button, the green color can also be selected.
ADJUST MODE
By using the ADJUST buttons,
4
The selected color is displayed by
superimposing on green. The
MARKER will be in the color
selected.
move the MARKER to the position to be adjusted.
ADJUST MODE
The MARKER moves in the
direction of the button's arrow.
However, the movable point is
predetermined.
LINE ADJUSTMENT MODE
POINT ADJUSTMENT MODE
Note 2 When either of the COLOR SELECT
buttons (R, B) is pressed, if the desired
color to be adjusted disappears, press
that particular button again.
Note 3 By repeatedly pressing the SELECT
button, only the Projector's TEST
pattern screen and the screen
superimposing the Game Board Test
pattern can be alternately displayed.
Make adjustment by using the
5
ADJUST buttons.
Although the direct vicinity of the
MARKER's center moves most
conspicuously, make adjustment
by paying attention to the periphery area also. Shown left is the
magnified MARKER periphery.
6
Press the SELECT button as necessary to
superimpose Game Board images.
ADJUST MODE
Press the WRITING button (for storing and finish).
7
ADJUST MODE
WRITING
If the test pattern is not displayed in
the periphery of the screen, adjustments can be made by pressing the
SELECT button to superimpose the
test pattern and the Game Board's
CRT test screen.
WRITING is displayed and the
adjustment data is stored. After the
data is stored, the Game Board
screen returns.
Note 3
88www.seuservice.com
Page 96

LINE CONVERGENCE ADJUSTMENT
In the LINE CONVERGENCE ADJUSTMENT, the adjustment point of the column line (vertical) or row line (horizontal) is comprehensively moved for color matching. It is convenient to
utilize this adjustment when the color of the column line or row line is uniformly deviated.
TEST MODE WRITING
RBG
P
SET
1
Keep pressing the TEST button for approximately
3 seconds.
ADJUST MODE
The screen changes to ADJUST
mode from the Game Board mode
and displays the green test pattern.
POSITION
ADJUST
PIC-ADJ
DO NOT PUSH.
RESET
SELECT
Note 1 When the MODE button is repeatedly
pressed, the adjustment modes will
circulate as follows:
STATIC ADJUSTMENT MODE
LINE ADJUSTMENT MODE
POINT ADJUSTMENT MODE
Note 2 When either of the COLOR SELECT
buttons (R, B) is pressed, if the desired
color to be adjusted disappears, press
that particular button again.
MARKER
2
Press the MODE button once to have the POINT
ADJUSTMENT mode.
ADJUST MODE
Note 1
The crosshatch test pattern appears
and the vertically long MARKER
is shown.
3
Using either R or B button, select the desired color to
be adjusted.
Note 2 Although the green color can also
be selected by using the G button, to avoid the screen
size change adjustment, do not choose green.
ADJUST MODE
By using the POSITION buttons,
4
The selected color is displayed by
superimposing on green. The
MARKER will be in the color
selected.
move the MARKER to the position to be adjusted.
ADJUST MODE
ADJUST MODE
Use the buttons to select
the column line, and the MARKER
moves in the right/left direction.
However, the movable range is
predetermined.
Use the buttons to select
the row line and the MARKER
moves in the up/down direction.
However, the movable range is
predetermined.
Make adjustment by using the
5
ADJUST buttons.
ADJUST MODE
6
Press the WRITING button (for storing and finish).
ADJUST MODE
WRITING
The selected column line or row
line (shown left is the column line)
can be moved in the desired up/
down or right/left directions as
applicable.
WRITING is displayed and the
adjustment data is stored. After
the data is stored, the Game Board
screen returns.
89 www.seuservice.com
Page 97

12 - 3 ADJUSTMENT OF MITSUBISHI PROJECTOR
STOP
IMPORTANT
The Projector has DYNAMIC CONVERGENCE adjustment functions. This manual does not
refer to the functions as the adjustment of DYNAMIC CONVERGENCE is very troublesome
and in addition, visual effects are negligible.
For the operation of Remote Control, use only the Keys of R/B,
(UP shift), (LEFT shift), (DOWN shift), (RIGHT shift),
TEST, -, +, and PICTURE. Do not press keys other than those explained in
this manual.
When operating the Remote Control, have it point the screen.
(UP shift)KEY
R/B KEY
(RIGHT shift)KEY
(LEFT shift)KEY
(DOWN shift)KEY
TEST KEY
- KEY
+ KEY
PICTURE KEY
90www.seuservice.com
Page 98

• POWER KEY......................... This does not have power ON/OFF function.
Does not function even if it is pressed.
• R/B KEY ................................Used to select "R" for red adjustment or "B" for blue adjustment in the
STATIC CONVERGENCE ADJUSTMENT mode.
• (UP shift) KEY................. Used to move the test cross upward in the STATIC CONVERGENCE
ADJUSTMENT mode.
• (LEFT shift) KEY ............ Used to move the test cross to the left in the STATIC CONVERGENCE
ADJUSTMENT mode.
• (DOWN shift)................... Used to move the test cross downward in the STATIC CONVERGENCE
ADJUSTMENT mode.
• (RIGHT shift) KEY.......... Used to move the test cross to the right in the STATIC CONVERGENCE
ADJUSTMENT mode.
• TEST KEY .............................This is the ON/OFF key in the STATIC CONVERGENCE ADJUSTMENT
mode. In the ON status of this key, the test cross pattern appears in the
approximately on-screen center.
• ENTER KEY.......................... Used for DYNAMIC CONVERGENCE.
• - KEY .................................... Used to decrease the adjustment data in the adjustment mode of CON-
TRAST, BRIGHTNESS, HORIZONTAL/VERTICAL POSITIONS and
WIDTH.
• + KEY .................................... Used to increase the adjustment data in the adjustment mode of CON-
TRAST, BRIGHTNESS, HORIZONTAL/VERTICAL POSITIONS and
WIDTH.
• PICTURE KEY ...................... Used for the ADJUSTMENT mode of CONTRAST, BRIGHTNESS, HORI-
ZONTAL/VERTICAL POSITIONS and WIDTH.
Every time this key is pressed, the ADJUSTMENT mode proceeds as
follows:
NORMAL
OPERATION
EXPLANATIONS OF ADJUSTMENT MODES
• CONTRAST................ Used to vary image contrast. Use + and - keys to adjust.
• BRIGHTNESS ............ Used to change image brightness. Use + and - keys to adjust.
CONTRAST
ADJUSTMENT
MODE
V-HEIGHT
ADJUSTMENT
MODE
BRIGHTNESS
ADJUSTMENT
MODE
V-POSI
ADJUSTMENT
MODE
H-POSI
ADJUSTMENT
MODE
H-WIDTH
ADJUSTMENT
MODE
• H-POSI ........................ Used to move the image position in the horizontal direction. Use + and - keys to
adjust.
• H-WIDTH ................... Used to change the horizontal width of image. Use + and - keys to adjust.
• V-POSI ........................ Used to move the image position in the vertical direction. Use + and - keys to
adjust.
• V-HEIGHT.................. Used to change the vertical width of image. Use + and - keys to adjust.
91 www.seuservice.com
Page 99

STATIC CONVERGENCE ADJUSTMENT
Press the TEST KEY to change the screen to Red Line
Adjustment mode.
Superimpose the red line on the green line.
When the red line is superimposed on the green line, the
green line turns to yellow or white.
To MOVE RED LINE:
Use key to move it left.
Use key to move it right.
Use key to move it upward.
Use key to move it downward.
Press the R/B KEY.
Changes to the Blue Line Adjustment screen.
Every time the key is pressed, "from red to blue" and
"from blue to red" are alternated.
RED 31K
H:+75 V:-11
+
R
SUPERIMPOSING BLUE LINE ON GREEN LINE:
Superimposing blue line on green line causes the green
line to turn to white.
TO MOVE BLUE LINE:
Use key to move it left.
Use key to move it right.
Use key to move it upward.
Use key to move it downward.
Press the TEST KEY.
Adjustment is finished.
AUTOMATIC CANCELLATION OF ADJUSTMENT MODE
In each adjustment mode, only in the case where an effective key input (variation of values and
images) is not performed within the time limit indicated below, the adjustment mode is
automatically cancelled and finished, shifting to on-screen normal images.
Approximately 6 seconds CONTRAST
BRIGHTNESS
H-POSI
H-WIDTH
V-POSI
V-HEIGHT
B
Approximately 5 min. STATIC CONVERGENCE
92www.seuservice.com
Page 100

13. COIN SELECTOR
HANDLING THE COIN JAM
If the coin is not rejected when the REJECT button is pressed, open the coin chute door and
open the selector gate. After removing the jammed coin, put a normal coin in and check to see
that the selector correctly functions.
CLEANING THE COIN SELECTOR
STOP
Remove and clean smears by using a
soft cloth dipped in water or diluted
chemical detergent and then
IMPORTANT
squeezed dry.
Never apply machine oil, etc. to the
Coin Selector.
After cleaning the Coin Selector,
insert a regular coin in the normal
working status and ensure that the
Selector correctly functions.
The coin selector should be cleaned once every
3 months. When cleaning, follow the procedure
below:
Turn the power for the machine OFF. Open the
1
coin chute door.
Open the gate and dust off by using a soft brush
2
(made of wool, etc.).
Remove and clean smears by using a soft cloth
3
dipped in water or diluted chemical detergent
and then squeezed dry.
Remove the CRADLE.
4
When removing the retaining ring
(E ring), be very careful so as not to bend the
rotary shaft.
Remove stain from the rotary shaft and shaft
5
receiving portions by wiping off with a soft
cloth, etc.
After wiping off as per above, further apply
6
a dry cloth, etc. to cause the coin selector to dry
completely.
COIN INSERTION TEST
Once every month, when performing the
Coin SW Test, simultaneously check the
following:
Does the Coin Meter count satisfactorily?
Does the coin drop into the Cashbox
correctly?
Is the coin rejected when inserted while
keeping the Reject Button pressed down?
GATE
FIG. 13 a
CRADLE
FIG. 13 b
5
Insert a coin
while keeping the
Reject Button
pressed down and
check if it is
rejected.
COIN METER
FIG. 13 c
93 www.seuservice.com
 Loading...