


seca 103/452
System instructions for
use
Software version 1.0 from Build 3

CONTENTS
For administrators: Setting up and operating
the system . . . . . . . . . . . . . . . . . . . . . . . . . . . . . . 4
1. System description . . . . . . . . . . . . . . . . . . . . . . . . . 4
1.1 Intended use of the seca connect 103
software . . . . . . . . . . . . . . . . . . . . . . . . . . . . . . 4
1.2 Intended use of the interface module
seca 452 . . . . . . . . . . . . . . . . . . . . . . . . . . . . . . 4
1.3 Functional description . . . . . . . . . . . . . . . . . . . . 5
seca connect 103 . . . . . . . . . . . . . . . . . . . . . 5
seca measuring devices with seca 452
interface module . . . . . . . . . . . . . . . . . . . . . . 5
seca measuring devices with an internal
interface module . . . . . . . . . . . . . . . . . . . . . . 5
Connecting to EMR systems . . . . . . . . . . . . . 5
Data storage . . . . . . . . . . . . . . . . . . . . . . . . . 5
Compatibility . . . . . . . . . . . . . . . . . . . . . . . . . 5
Access rights . . . . . . . . . . . . . . . . . . . . . . . . . 6
1.4 User qualification . . . . . . . . . . . . . . . . . . . . . . . . 6
seca connect 103 software . . . . . . . . . . . . . . 6
seca 452 interface module . . . . . . . . . . . . . . . 6
Connected seca measuring devices . . . . . . . 6
2. Safety precautions . . . . . . . . . . . . . . . . . . . . . . . . . . 6
2.1 Safety precautions in these instructions for
use . . . . . . . . . . . . . . . . . . . . . . . . . . . . . . . . . . 6
2.2 Basic safety precautions . . . . . . . . . . . . . . . . . . 7
Using the software . . . . . . . . . . . . . . . . . . . . . 7
Handling the device . . . . . . . . . . . . . . . . . . . . 7
Preventing electric shock . . . . . . . . . . . . . . . . 8
Prevent damage to device . . . . . . . . . . . . . . . 9
Handling measured results . . . . . . . . . . . . . . . 9
Handling packaging material . . . . . . . . . . . . 10
3. Overview . . . . . . . . . . . . . . . . . . . . . . . . . . . . . . . . . 11
3.1 Controls for seca connect 103. . . . . . . . . . . . . 11
Menu bar . . . . . . . . . . . . . . . . . . . . . . . . . . . 11
Device manager: Device list . . . . . . . . . . . . . 11
Device manager: Device settings . . . . . . . . . 12
Connectivity manager . . . . . . . . . . . . . . . . . 14
3.2 Controls for seca 452 interface module . . . . . . 15
3.3 Markings on the type plate (seca 452
interface module) . . . . . . . . . . . . . . . . . . . . . . . 15
3.4 Markings on the packaging (seca 452
interface module) . . . . . . . . . . . . . . . . . . . . . . . 16
4. Setting up the seca connect 103 System . . . . . . 17
4.1 Work steps . . . . . . . . . . . . . . . . . . . . . . . . . . . 17
4.2 System structure . . . . . . . . . . . . . . . . . . . . . . . 18
4.3 System requirements. . . . . . . . . . . . . . . . . . . . 19
4.4 Installing and configuring seca connect 103 . . 19
Installing seca connect 103 . . . . . . . . . . . . . 19
Configuring seca connect 103 . . . . . . . . . . . 20
Preparing the data connection (WiFi/Ethernet)
for seca measuring devices . . . . . . . . . . . . . 24
Configuring the firewall . . . . . . . . . . . . . . . . . 24
Configuring the security program . . . . . . . . . 28
5. Operating seca connect 103 . . . . . . . . . . . . . . . . 30
5.1 Primary functions . . . . . . . . . . . . . . . . . . . . . . . 30
Logging in . . . . . . . . . . . . . . . . . . . . . . . . . . 30
Changing a password . . . . . . . . . . . . . . . . . 30
Querying the version . . . . . . . . . . . . . . . . . . 30
Logging out . . . . . . . . . . . . . . . . . . . . . . . . . 30
5.2 Managing seca measuring devices . . . . . . . . . 31
Preparing a seca measuring device . . . . . . . 31
Adding a seca measuring device . . . . . . . . . 32
Changing a setting of a seca measuring
device . . . . . . . . . . . . . . . . . . . . . . . . . . . . . 34
Exporting the device list . . . . . . . . . . . . . . . . 35
Deleting a device . . . . . . . . . . . . . . . . . . . . . 35
5.3 Managing integration modules. . . . . . . . . . . . . 35
6. Connecting and installing the seca 452
interface module . . . . . . . . . . . . . . . . . . . . . . . . . 37
6.1 Selecting a location . . . . . . . . . . . . . . . . . . . . . 37
6.2 Retrofitting baby scales 757/727 . . . . . . . . . . . 38
Preparing the scale . . . . . . . . . . . . . . . . . . . 39
Connecting a seca 452 interface module . . . 40
6.3 Retrofitting multi-functional scales 635/634,
657/656, 675/674 (models with cabled
remote display) . . . . . . . . . . . . . . . . . . . . . . . . 41
Preparing the scale . . . . . . . . . . . . . . . . . . . 42
Connecting a seca 452 interface module . . . 44
6.4 Retrofitting multi-functional scales 645/644,
665/664, 667, 677/676, 685/684 (models
with mounted display) . . . . . . . . . . . . . . . . . . . 47
Preparing the scale . . . . . . . . . . . . . . . . . . . 48
Connecting a seca 452 interface module . . . 51
6.5 Mounting the seca 452 interface module to
the wall . . . . . . . . . . . . . . . . . . . . . . . . . . . . . . 55
6.6 Retrofitting column scale 704. . . . . . . . . . . . . . 56
Preparing the scale . . . . . . . . . . . . . . . . . . . 57
Mounting the seca 452 interface module . . . 58
Mounting the scanner bracket . . . . . . . . . . . 59
Connecting a seca 452 interface module . . . 59
6.7 Retrofitting measuring stations 285/284, 287/
286 . . . . . . . . . . . . . . . . . . . . . . . . . . . . . . . . . 62
Preparing the measuring station . . . . . . . . . 63
Installing the seca 452 interface module . . . 63
Installing the scanner bracket . . . . . . . . . . . 65
Connecting a seca 452 interface module . . . 66
6.8 Performing final work . . . . . . . . . . . . . . . . . . . . 69
7. Operating connected seca measuring devices . 69
Functional limitations . . . . . . . . . . . . . . . . . . 69
Workflow for measurement procedure . . . . . 70
8. Hygienic treatment of the seca 452 interface
module . . . . . . . . . . . . . . . . . . . . . . . . . . . . . . . . . 72
8.1 Cleaning . . . . . . . . . . . . . . . . . . . . . . . . . . . . . 72
8.2 Disinfecting . . . . . . . . . . . . . . . . . . . . . . . . . . . 72
8.3 Sterilizing . . . . . . . . . . . . . . . . . . . . . . . . . . . . . 72
9. Function check . . . . . . . . . . . . . . . . . . . . . . . . . . . 73
10. Servicing . . . . . . . . . . . . . . . . . . . . . . . . . . . . . . . . 73
11. Troubleshooting . . . . . . . . . . . . . . . . . . . . . . . . . . 74
11.1 Errors in the system. . . . . . . . . . . . . . . . . . . . 74
11.2 Malfunctions during measurement
procedure . . . . . . . . . . . . . . . . . . . . . . . . . . . . 75
12. Technical data . . . . . . . . . . . . . . . . . . . . . . . . . . . 76
12.1 seca connect 103 software . . . . . . . . . . . . . . 76
seca TestModule: Barcodes . . . . . . . . . . . . 76
Integration module Cerner VitalsLink:
Parameter . . . . . . . . . . . . . . . . . . . . . . . . . . 77
2 •

English
12.2 seca 452 interface module. . . . . . . . . . . . . . . 78
13. Compatible seca measuring devices . . . . . . . . . 79
14. Optional accessories and spare parts . . . . . . . . 79
15. Disposal . . . . . . . . . . . . . . . . . . . . . . . . . . . . . . . . 80
15.1 Devices . . . . . . . . . . . . . . . . . . . . . . . . . . . . . 80
15.2 Batteries/rechargeable batteries. . . . . . . . . . . 80
16. Warranty . . . . . . . . . . . . . . . . . . . . . . . . . . . . . . . . 80
16.1 Software . . . . . . . . . . . . . . . . . . . . . . . . . . . . 80
16.2 Device . . . . . . . . . . . . . . . . . . . . . . . . . . . . . . 80
17. Declarations of conformity . . . . . . . . . . . . . . . . . 81
17.1 For Europe. . . . . . . . . . . . . . . . . . . . . . . . . . . 81
17.2 For USA and Canada. . . . . . . . . . . . . . . . . . . 81
18. Annex: Quick reference: Measurement
procedure . . . . . . . . . . . . . . . . . . . . . . . . . . . . . . . 82
For service technicians: Servicing and
repairing the system . . . . . . . . . . . . . . . . . . . . . 84
1. About this document . . . . . . . . . . . . . . . . . . . . . . . 84
2. Retrofitting seca 703 column scale . . . . . . . . . . . 84
2.1 Preparing the scale . . . . . . . . . . . . . . . . . . . . . 85
2.2 Installing the seca 452 interface module. . . . . . 86
2.3 Installing the scanner bracket. . . . . . . . . . . . . . 86
2.4 Connecting a seca 452 interface module . . . . . 87
Contents • 3

FOR ADMINISTRATORS: SETTING UP AND OPERATING THE SYSTEM
English
➔ System description ➔ Servicing
➔ Safety precautions ➔ Troubleshooting
➔ Overview ➔ Technical data
➔ Setting up the seca connect 103
System
➔ Operating seca connect 103 ➔ Warranty
➔ Connecting and installing the
seca 452 interface module
➔ Operating connected seca
measuring devices
➔ Hygienic treatment of the
seca 452 interface module
➔ Function check
Software version: 1.0 from Build 3
Article number of this document: 17-10-01-266-002a/07-2018B
➔ Compatible seca measuring
devices
➔ Declarations of conformity
➔ Annex: Quick reference:
Measurement procedure
➔ For service technicians: Servicing
and repairing the system
1. SYSTEM DESCRIPTION
➔ Intended use of the seca connect 103 software
➔ Intended use of the interface module seca 452
➔ Functional description
➔ User qualification
1.1 Intended use of the seca connect 103 software
The secaconnect 103 software is mainly used in hospitals, medical practices
and inpatient care facilities in accordance with national regulations.
secaconnect 103 software is an accessory product for seca measuring
The
devices. The product is used for automated data transmission (measurement
results, patient ID, user ID) between seca measuring devices and EMR systems from third parties.
secaconnect 103 software can be used to set up and adapt interfaces
The
for automated data transmission.
Operation of the product is not necessary when in measuring mode.
1.2 Intended use of the interface module seca 452
The interface module seca 452 is mainly used in hospitals, medical practices
and inpatient care facilities in accordance with national regulations.
The interface module
devices. In conjunction with the secaconnect 103 software, the product is
used to assign measurement results to patient data (patient ID) and to user
data (user ID) as well as for automated data transmission between seca
measuring devices and EMR systems from third parties.
seca 452 is an accessory product for seca measuring
4 • secaconnect 103/seca 452
17-10-01-266-002a/07-2018B

English
1.3 Functional description
➔ seca connect 103
➔ seca measuring devices with seca 452 interface module
➔ seca measuring devices with an internal interface module
➔ Connecting to EMR systems
➔ Data storage
➔ Compatibility
➔ Access rights
seca connect 103 The secaconnect 103 software is installed on a server. Using the browser-
based user interface of the software, seca measuring devices can be connected with the
connection to an EMR system can be set up.
secaconnect 103 software and can be configured and a
seca measuring devices with
seca
452 interface module
The seca 452 interface module is connected, by a cable, to seca measuring
devices which do not have their own network interface. The
seca 452 inter-
face module transmits the data between the seca measuring device and the
secaconnect 103 software. For each seca measuring device, a separate
seca 452 interface module is required.
The data transmission between the
secaconnect 103 takes place via WiFi or Ethernet. Scanners can be con-
nected to the USB interface of the
seca 452 interface module and
seca 452 interface module.
The operating state and the measurement procedure are indicated using
optical signals.
seca measuring devices with an internal interface module
seca measuring devices with an internal interface module (for example,
seca 336 i) can transfer data directly to the secaconnect 103 software. No
seca 452 interface module is required. Scanners can be connected directly to
seca measuring devices with an internal interface module.
Connecting to EMR systems To connect to EMR systems, integration modules are configured and acti-
vated in the
tive EMR system may be necessary. To ensure a reliable connection, we
recommend having the connection implemented exclusively with support of
the manufacturer of your EMR system.
secaconnect 103 software. Modifications directly to the respec-
Data storage No patient or device data is stored in the secaconnect 103 software. Only the
login credentials for the
Device data is saved on the seca measuring device (devices with internal
interface module) or on the connected
Patient data and measurement results are transmitted to the connected EMR
system and saved there.
secaconnect 103 are saved in the software database.
seca 452 interface module.
Compatibility The system is exclusively compatible with seca measuring devices (seca
scales and length measuring devices) ➔ Compatible seca measuring
devices. seca mbca and seca mvsa cannot be connected.
Measuring devices from third-party manufacturers cannot be connected.
Currently, only EMR systems from Cerner that have a VitalsLink interface are
supported. Integration modules for connection to other EMR systems are in
development and will be provided in later software versions.
17-10-01-266-002a/07-2018B
System description • 5
Access rights The secaconnect 103 software does not manage user accounts. For the soft-
ware installation, an administrator login can be created and secured with a
password. Access to the software is exclusively possible with this administrator login.
1.4 User qualification
➔ seca connect 103 software
➔ seca 452 interface module
➔ Connected seca measuring devices
seca connect 103 software The secaconnect 103 software may only be installed and administered by
experienced administrators or hospital technicians.
seca 452 interface module The device may only be set up and incorporated in a network by experienced
administrators or hospital technicians.
Connected seca measuring devices The local configuration of the system affects the measurement procedure and
the operation of the connected measuring devices. Persons who should
operate the connected measuring devices must be informed about these
effects.
2. SAFETY PRECAUTIONS
➔ Safety precautions in these instructions for use
➔ Basic safety precautions
2.1 Safety precautions in these instructions for use
DANGER!
Used to identify an extremely hazardous situation. If you fail to take
note of this information, serious irreversible or fatal injuries will occur.
WARNING!
Used to identify an extremely hazardous situation. If you fail to take
note of this information, serious irreversible or fatal injuries may result.
CAUTION!
Used to identify a hazardous situation. If you fail to take note of this
information, minor to moderate injuries may result.
NOTICE!
Used to identify possible incorrect usage of the device. If you fail to
take note of this information, you may damage the device, or the
measured results may be incorrect.
NOTE
Includes additional information about use of the device.
6 • secaconnect 103/seca 452
17-10-01-266-002a/07-2018B
English
2.2 Basic safety precautions
➔ Using the software
➔ Handling the device
➔ Preventing electric shock
➔ Prevent damage to device
➔ Handling measured results
➔ Handling packaging material
Using the software ► Please take note of the information in these instructions for use.
► Keep the instructions for use and the declaration of conformity they
include in a safe place. The current version of the instructions for use can
be found at www.seca.com. The instructions for use are a component of
the software and must be available at all times.
CAUTION!
Patient hazard, malfunction
► Only install the secaconnect 103 software on PCs equipped with an
antivirus program. Always keep your antivirus program up to date to
protect your computer system from current and future malware. The
secaconnect 103 software is protected from manipulation and was
checked for malware at the time the software was created.
► Use the
ed use.
► Keep other electrical medical devices, e.g. high-frequency surgical
devices, a minimum distance of approx. 1 meter away to prevent incorrect measurements or wireless transmission interference.
► Keep HF devices such as cell phones and televisions, for example,
a minimum distance of approx. 1 meter away to prevent incorrect
measurements or wireless transmission interference.
► The actual transmission output of HF equipment may require mini-
mum distances of more than 1 meter. Details can be found at
www.seca.com.
secaconnect 103 PC software only for the specified intend-
Handling the device ► Please take note of the information in these instructions for use.
► Keep the instructions for use in a safe place. The instructions for use are a
component of the device and must be available at all times.
DANGER!
Risk of explosion
Do not use the device in an environment in which one of the following
gases has accumulated:
–oxygen
– flammable anesthetics
– other flammable substances/air mixtures
CAUTION!
Patient hazard, damage to device
► Additional devices which are connected to electrical medical devic-
es must provide evidence of compliance with the relevant IEC or ISO
standards (e.g. IEC 60950 for data-processing devices). Furthermore, all configurations must comply with the requirements of standards for medical systems (see IEC 60601-1-1 or Section 16 of the
3rd edition of IEC 60601-1 respectively). Anyone connecting additional devices to electrical medical devices is considered a system
configurer and is therefore responsible for ensuring that the system
17-10-01-266-002a/07-2018B
complies with the requirements of standards for systems. Your at-
Safety precautions • 7

tention is drawn to the fact that local laws take precedence over the
above-mentioned requirements of standards. In the event of any
queries, please contact your local specialist dealer or Technical Service.
► Please have servicing and measuring technology checks performed
every two years.
► Technical modifications may not be made to the device. The device
does not contain any parts for servicing by the user. Only have servicing and repairs performed by an authorized seca Service partner.
You can find service partners in your area at www.seca.com or by
sending an e-mail to service@seca.com.
► Only use original seca accessories and spare parts, otherwise seca
will not grant any warranty.
CAUTION!
Patient hazard, malfunction
► Keep other electrical medical devices, e.g. high-frequency surgical
devices, a minimum distance of approx. 1 meter away to prevent incorrect measurements or wireless transmission interference.
► Keep HF devices such as cell phones a minimum distance of ap-
prox. 1 meter away to prevent incorrect measurements or wireless
transmission interference.
► The actual transmission output of HF equipment may require mini-
mum distances of more than 1 meter. Details can be found at
www.seca.com.
Preventing electric shock WARNING!
Electric shock
► Set up devices which can be operated with the electricity supply so
that the power supply socket is within easy reach and the power
supply can be disconnected quickly.
► Ensure that your local power supply matches the details on the de-
vice.
► Connect this device only to a power supply with a protective earth
facility.
► Do not connect the device to a power supply network if there is any
uncertainty about whether the protective earth is functioning. In this
case, use the device exclusively in rechargeable battery mode.
► Do not connect the device to sockets that are switched by an on/off
switch or a dimmer.
► Never touch the power supply cable with wet hands.
► Do not use extension cables or power strips.
► Make sure that cables are not pinched or damaged by sharp edges.
► Make sure that cables do not come into contact with hot objects.
► Do not operate the device at an altitude of more than 3000 m above
sea level.
8 • secaconnect 103/seca 452
17-10-01-266-002a/07-2018B

English
Prevent damage to device NOTICE!
Damage to device
► Ensure that no liquids enter the device. They can damage the
electronics.
► Switch off the device (if option is provided) before you take the po-
wer supply connector out of the power supply socket.
► If you are not going to use the device for an extended period, dis-
connect the power supply connector from the power supply socket
and remove the rechargeable battery (if present and removable).
Only then is the device de-energized.
► Make sure not to drop the device.
► Do not expose the device to any impacts or vibrations.
► Perform function controls regularly as described in the relevant sec-
tion in this document. Do not operate the device if it is damaged or
not working properly.
► Ensure that the air openings of the device (if present) are not cov-
ered.
► Ensure that there is no heat source in the immediate vicinity. Do not
expose to direct sunlight. The excessive temperature could damage
the electronics.
► Avoid rapid temperature fluctuations. When the device is transpor-
ted so that a temperature difference of more than 20 °C occurs, it
must stay turned off for at least 2 hours before it can be turned on
again. Otherwise, condensation water will form which can damage
the electronics.
► Use the device only in the ambient conditions outlined in "Intended
use".
► Store the device only in the storage conditions outlined in "Intended
use".
► Use only disinfectants free of chlorine and alcohol which are expli-
citly suitable for acrylic sheet and other sensitive surfaces (active ingredient: quaternary ammonium compounds, for example).
► Do not use aggressive or abrasive cleaning agents.
► Do not use organic solvents (e.g. white spirit or petroleum spirit).
Handling measured results CAUTION!
Patient hazard
In order to avoid misinterpretations, test results for medical use must
be displayed and used in SI units (weight: kilogrammes, length:
metres) only. Some devices offer the ability to display test results in
other units. This is only an additional function.
► Use the results exclusively in SI units.
► The use of measurement results in non-SI units is the sole
responsibility of the user.
NOTICE!
Inconsistent measuring results
► Before you electronically save measurement values determined us-
ing this device and use them further (e.g. in seca PC software or in
an EMR system), make sure that the measurement values are plausible.
► If measurement values are transmitted to seca PC software or an
EMR system, make sure prior to further use that the measurement
values are plausible and are assigned to the correct patient.
17-10-01-266-002a/07-2018B
Safety precautions • 9

Handling packaging material WARNING!
Risk of suffocation
Packaging material made of plastic foil (bags) is a choking hazard.
► Keep packaging material out of reach of children.
► In the event that the original packing material may not be available
anymore, only use plastic bags with security holes in order to reduce
the risk of suffocation. Use recyclable materials if possible.
NOTE
Keep the original packing material for future use (e.g. returning for servicing).
10 • secaconnect 103/seca 452
17-10-01-266-002a/07-2018B
English
3. OVERVIEW
12 34 5
1
23
➔ Controls for seca connect 103
➔ Controls for seca 452 interface module
➔ Markings on the type plate (seca 452 interface module)
➔ Markings on the packaging (seca 452 interface module)
3.1 Controls for seca connect 103
➔ Menu bar
➔ Device manager: Device list
➔ Device manager: Device settings
➔ Connectivity manager
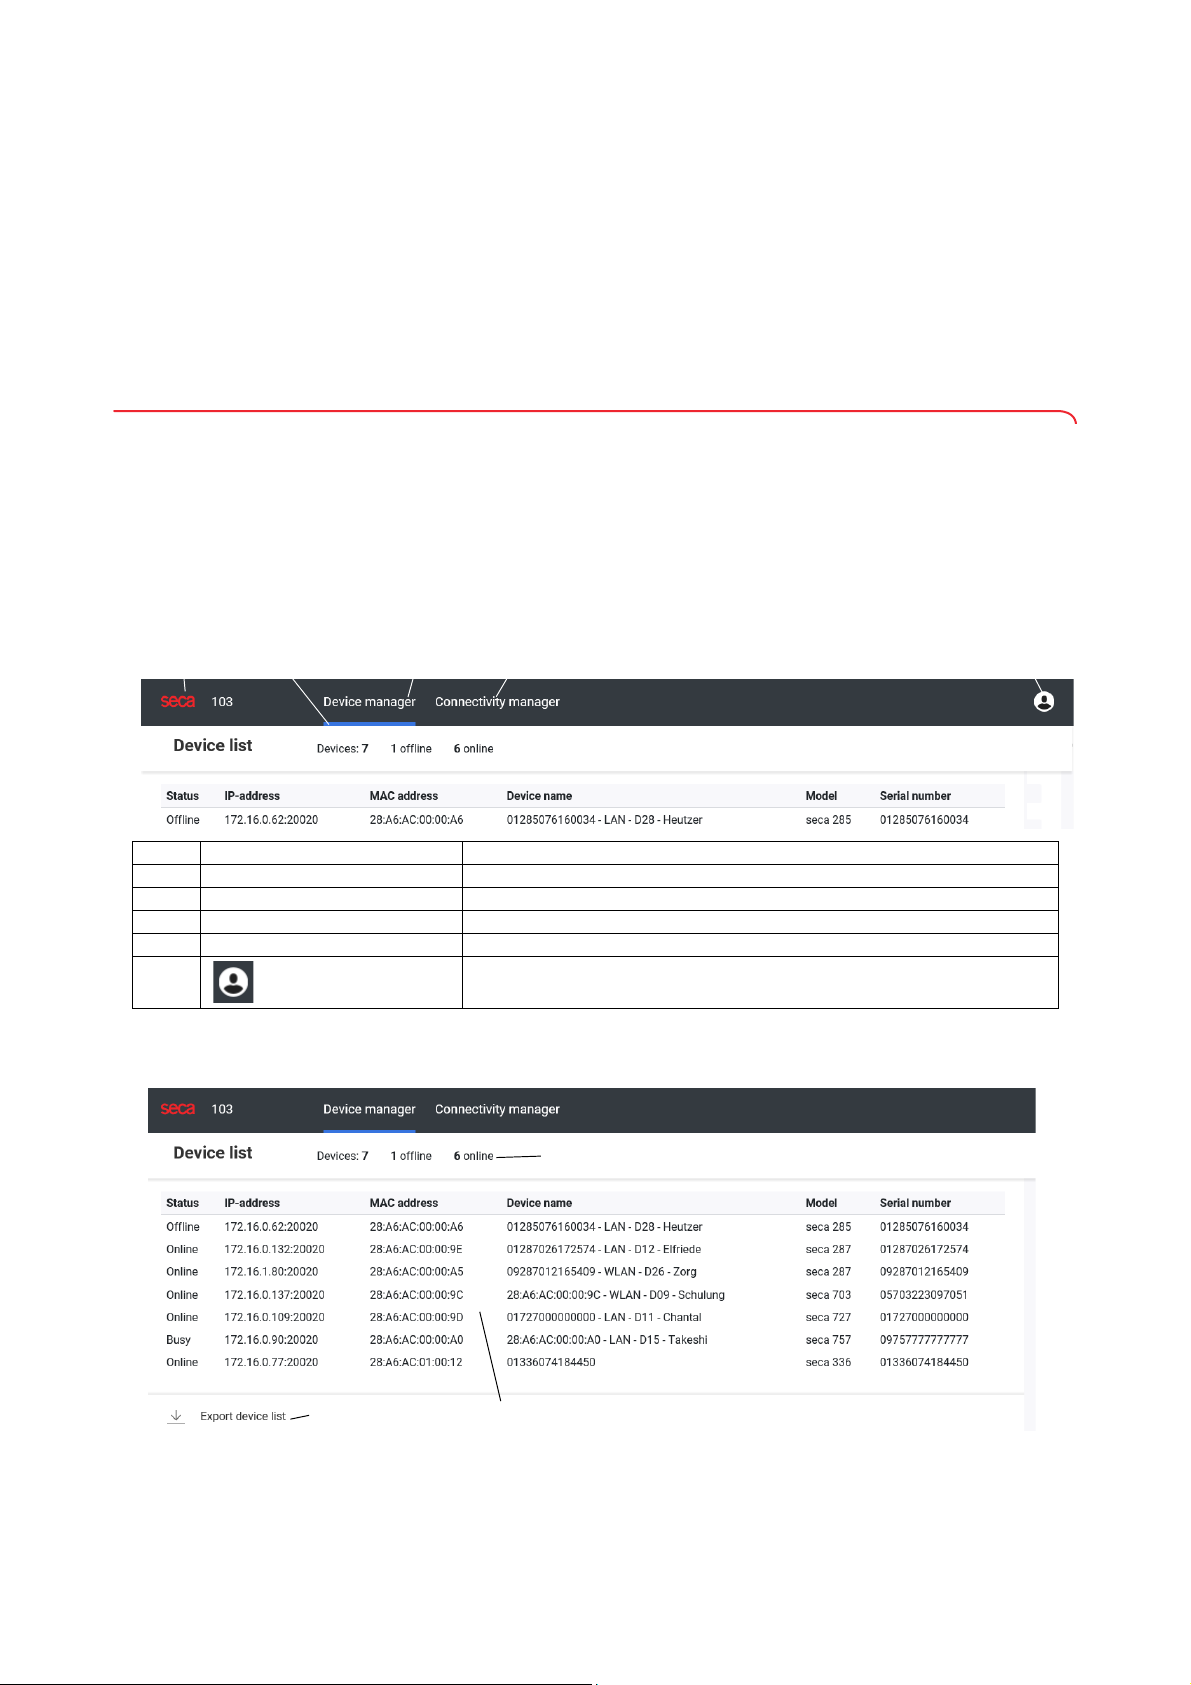
Menu bar
No. Control Function
1 seca Click here to display information about the
2 Selection bar Indicates which tab is active
3 Device manager Connect and manage seca measuring devices
4
Connectivity manager Establish connection to the EMR system of a third-party provider
5
• Login/logout
• Change password
Device manager: Device list
secaconnect 103 software
17-10-01-266-002a/07-2018B
Overview • 11
No. Control Function
1
2
4
5
6
7
8
9
10
12
13
3
14
11
Overview: connected seca
1
measuring devices
Connection data for seca
2
measuring devices
3 Export device list Export device list as .csv file
• Total number of connected seca measuring devices
• Number of seca measuring devices offline
• Number of seca measuring devices online
• Status: Operating condition of the seca measuring device
• IP address: IP address and GPX listening port of the seca measuring
device
• MAC address: MAC address of the seca measuring device
• Device name: Designation of the seca measuring device
• Model: seca model number
• Serial number: Serial number of seca measuring device
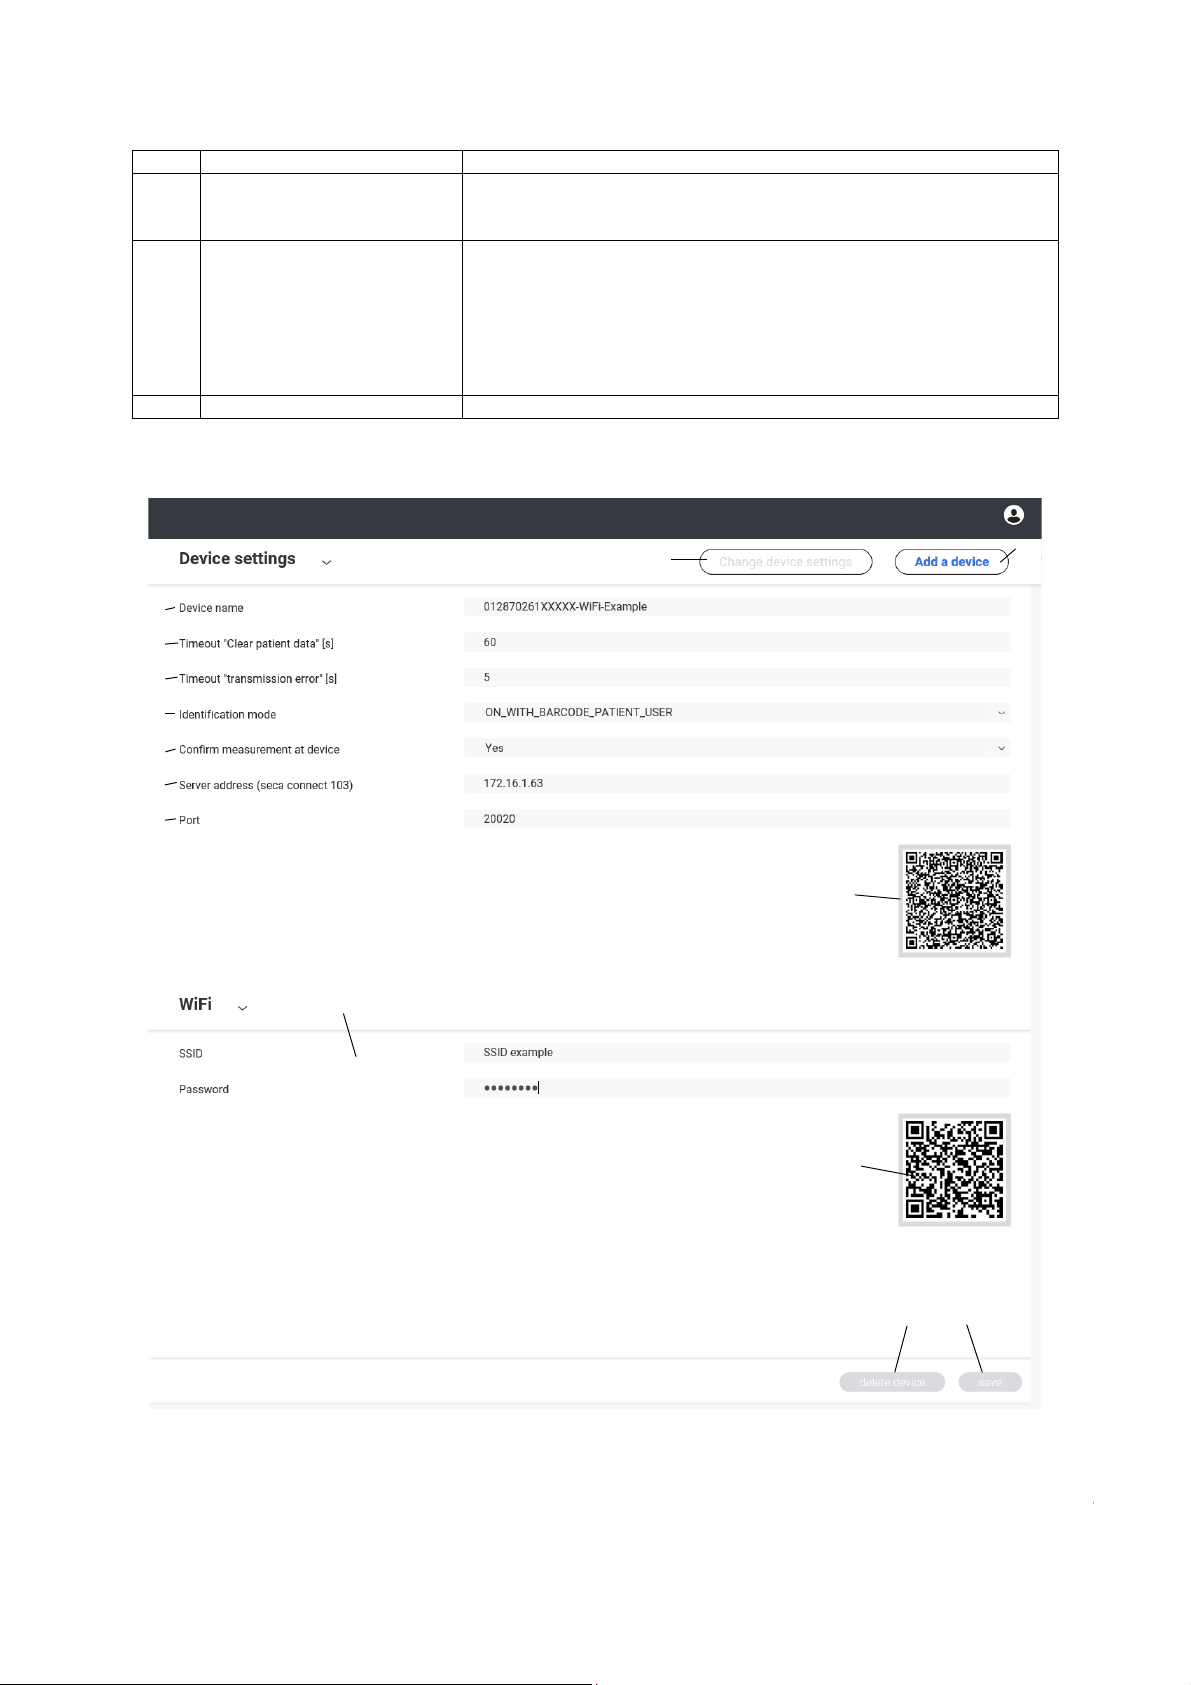
Device manager: Device settings
12 • secaconnect 103/seca 452
17-10-01-266-002a/07-2018B
English
No. Control Function
Change device settings Change settings for operating existing device
1
2
Add a device Define settings for new seca measuring device
3
Device name Specify the designation of the seca measuring device
4
Timeout Clear patient data
5
Timeout Transmisson error
Identification mode Specify patient/user identification
6
Confirm measurement at
7
device
Server address
8
Port
9
10 QR code for device settings
Specify the timeout after which temporarily saved patient data is
discarded.
Specify the timeout after which the secaconnect 103 assumes that there
has been a communication error with the EMR system.
Specify whether a measurement must be confirmed on the seca
measuring device
Enter the address of the server on which the secaconnect 103 software is
installed
Enter port (GPX Listening Port) over which a seca measuring device
should communicate with the secaconnect 103 software
Scan QR code: Transfer settings to seca measuring device or seca 452
interface module
11 WiFi settings Enter WiFi settings for seca measuring devices
12 QR code for WiFi settings
13
save Save settings for the seca measuring device
Scan QR code: Transfer WiFi settings to seca measuring device or
seca 452 interface module
14 delete device Remove seca measuring device from the device list
17-10-01-266-002a/07-2018B
Overview • 13

Connectivity manager
1
2
3
4
No. Control Function
Select integration module for the communication between the
Selection field: Integration
1
module
Parameter of the integration
2
module
3 save Save settings of the integration module (integration module not active)
4 activate Activate integration module (settings are not saved)
secaconnect 103 and your EMR system. Available modules:
• Cerner VitalsLink
• seca TestModule (for testing only)
Set up parameter for the integration of the EMR system (support from the
manufacturer of your EMR system is recommended)
14 • secaconnect 103/seca 452
17-10-01-266-002a/07-2018B
English
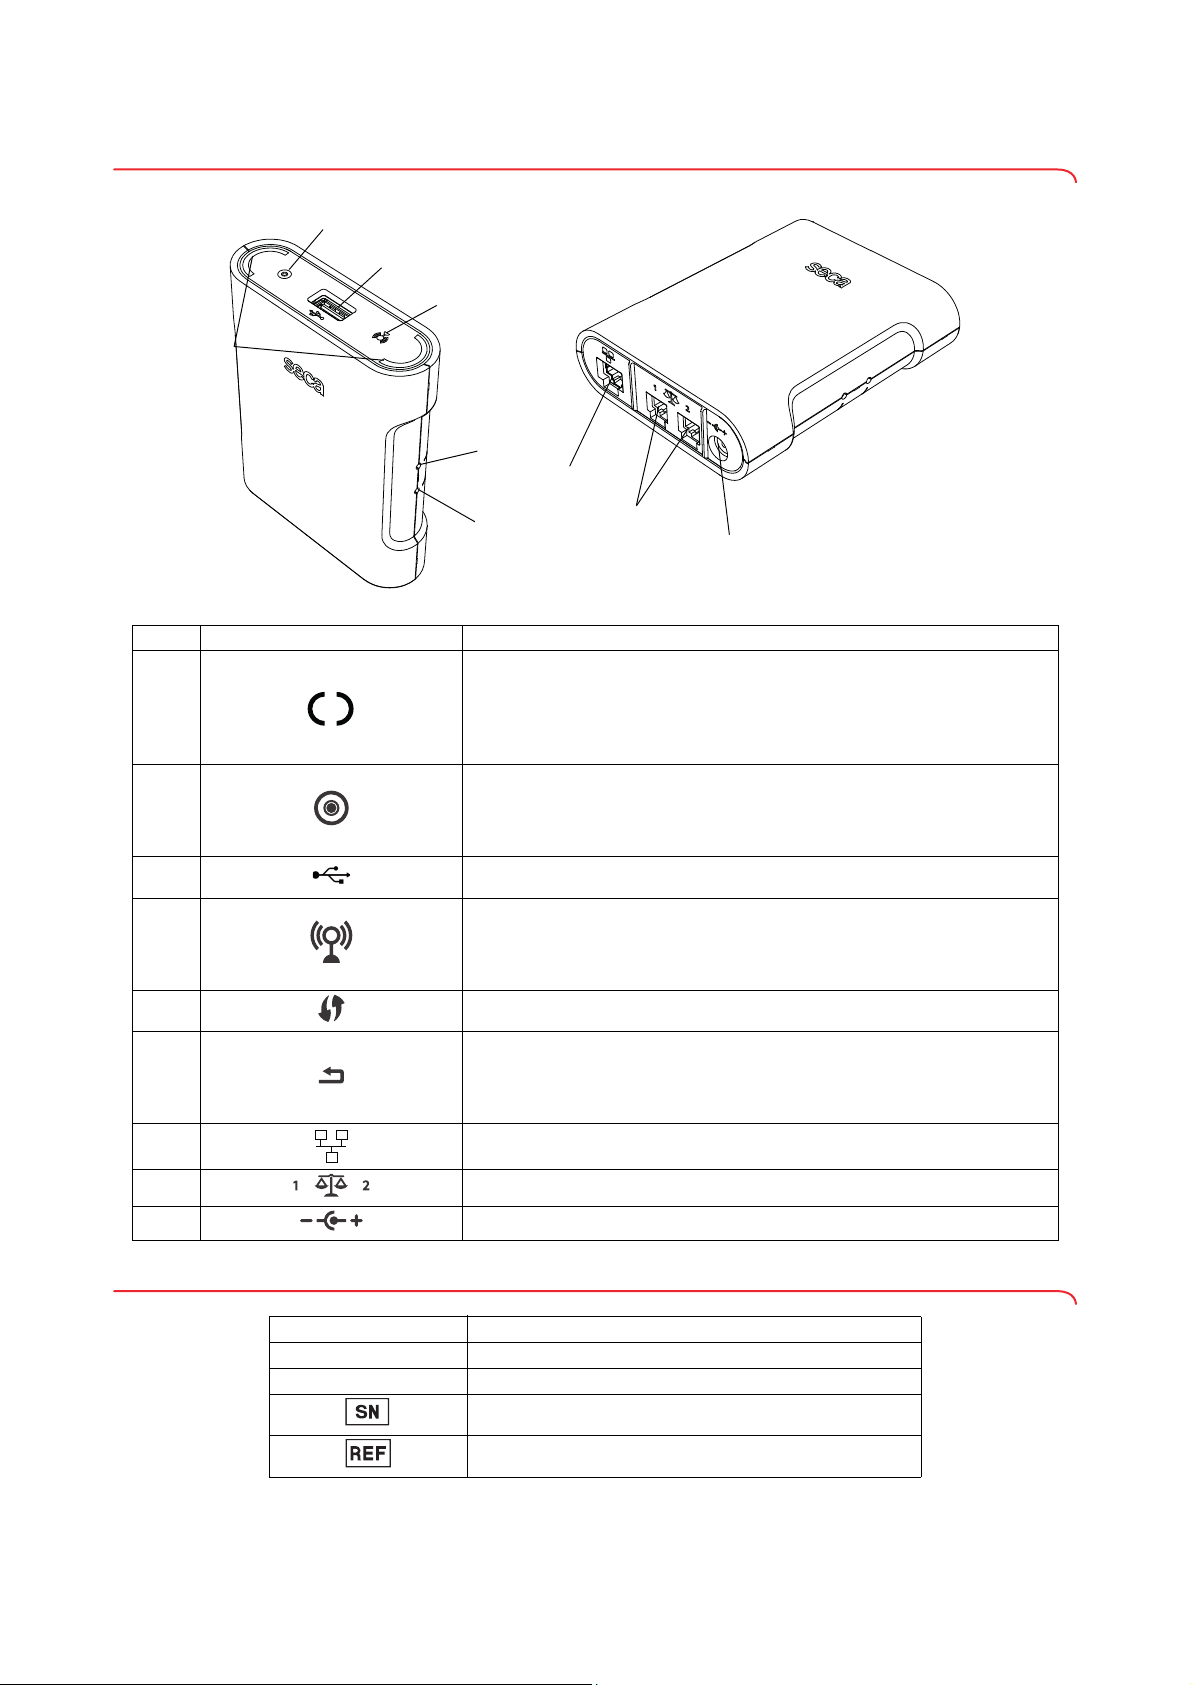
3.2 Controls for seca 452 interface module
B
C
D
E
F
G
H
I
A
No. Symbol Function
Workflow LED
• Turns green: Measurement procedure is active
A
B
C USB interface (only for medical devices)
D
E WPS button: Establish WiFi connection via WPS
F
• Flashes green: Data being transmitted
• Turns green for approx. 5 seconds: Data successfully transmitted
• Turns red: Error in data transmission
Power LED
• Turns green: Device is ready for use
• Turns red: Device is defective
• Flashes green: Device is active as access point
Network LED
• Flashes green: WiFi connection being set up
• Turns green: WiFi connection is set up
• Turns red: WiFi connection is defective
Reset button
• Press and hold (approx. 8 seconds): Reset settings
• Press shortly (approx. 1 second): Activate/deactivate access point
function
G Ethernet interface
H Interface for seca products
I Power supply connection
3.3 Markings on the type plate (seca 452 interface module)
17-10-01-266-002a/07-2018B
Symbol Meaning
ProdID
Mat. no.
Product identification number, consecutive
Variant number
Serial number, consecutive
Model number
Overview • 15
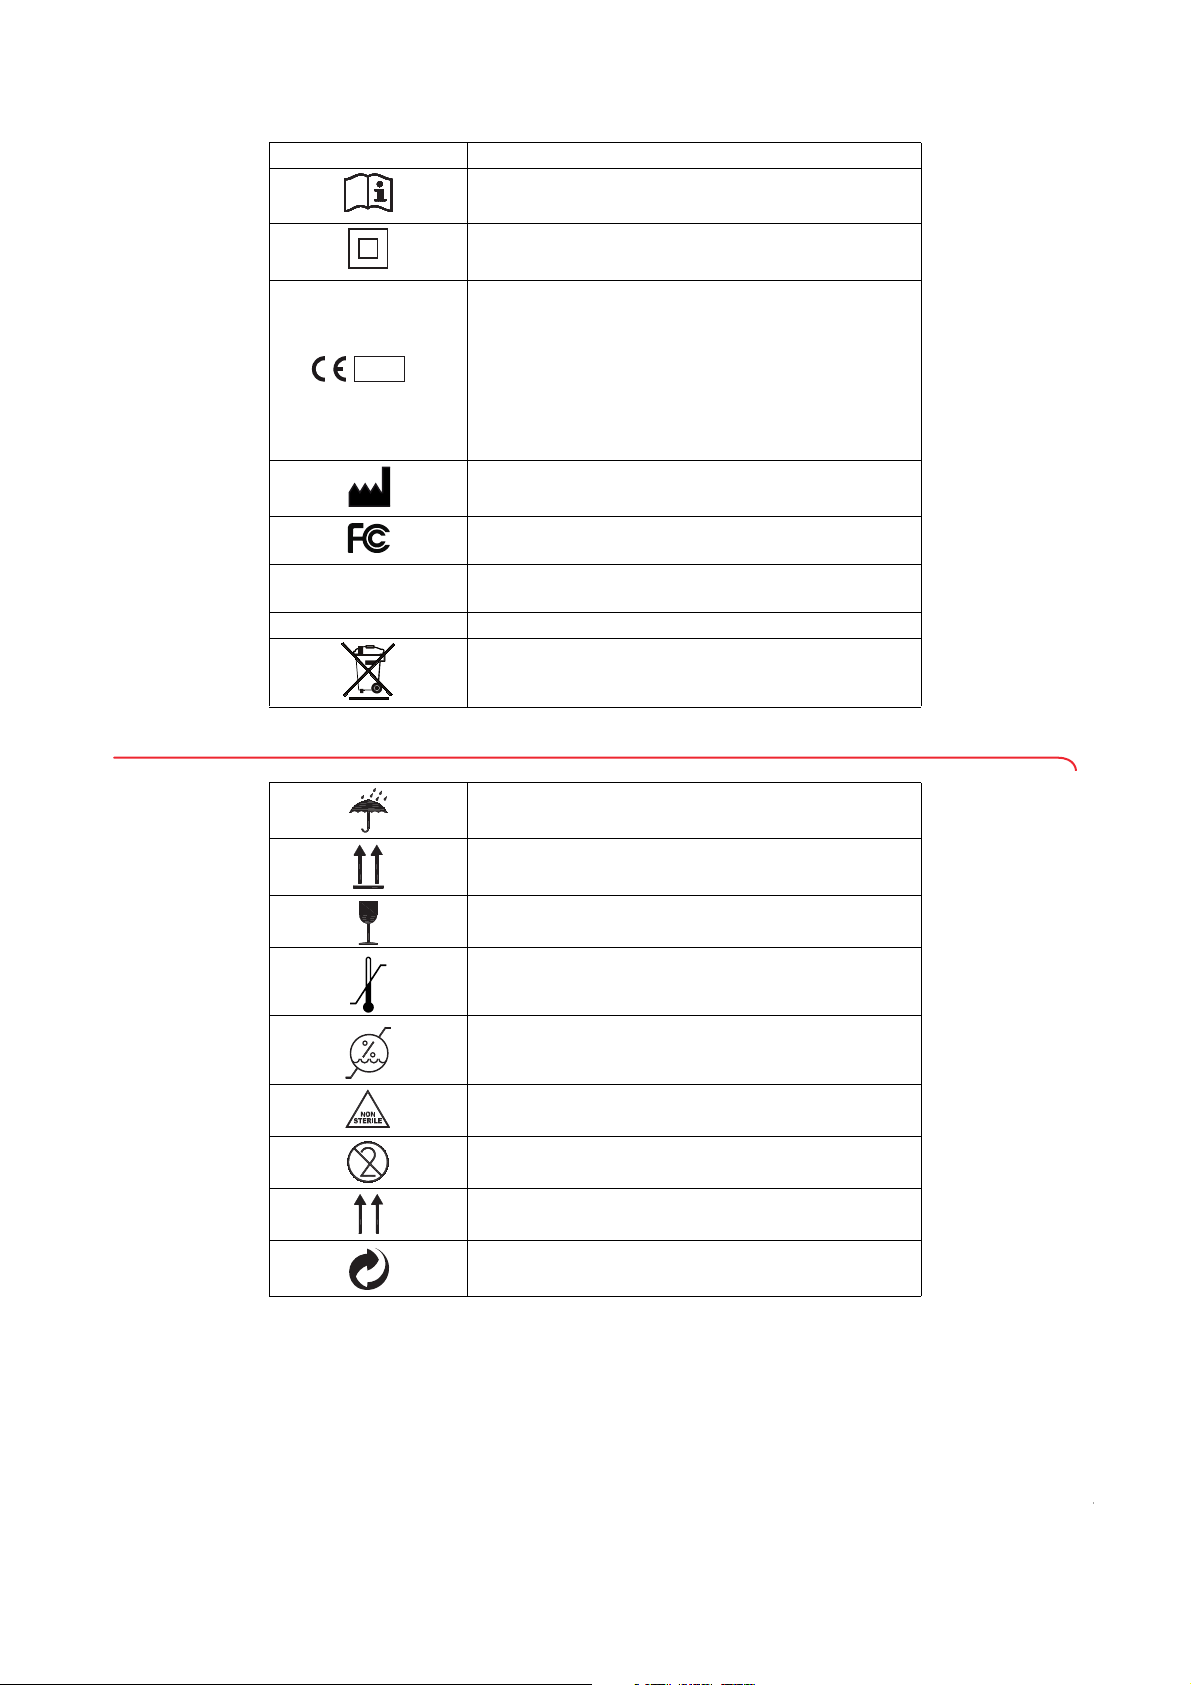
Symbol Meaning
Follow instructions for use
Insulated device, protection class II
Device complies with EC directives.
•
M: Conformity label in compliance with directive 2014/
31/EU for non-automatic scales (verified models)
18: (Example: 2018) Year in which conformity verifica-
M
18
0102
0123
•
tion was performed and the CE label was applied (verified models)
0102: Appointed office for metrology (verified models)
•
0123: Appointed office for medical devices
•
Name and address of manufacturer, date of
manufacture
Symbol of the US Federal Communications
Commission (FCC)
FCC ID
Device license number from the Federal
Communications Commission (FCC)
IC ID Device license number from Industry Canada
Do not dispose of with household waste
3.4 Markings on the packaging (seca 452 interface module)
Protect from moisture
Arrows indicate top of product.
Transport and store in an upright position.
Fragile
Do not throw or drop.
Permitted min. and max. temperature for transport and
storage
Permitted min. and max. moisture for transport and
storage
Not sterile
Do not reuse
Open packaging here
Packaging material can be disposed of through
recycling programs
16 • secaconnect 103/seca 452
17-10-01-266-002a/07-2018B

English
4. SETTING UP THE SECA CONNECT 103 SYSTEM
Link
measuring device
to seca connect 103
Set up
seca connect 103
Configure and activate
corresponding
integration module
of seca connect 103
Connect EMR system
to seca connect 103
Contact your EMR vendor
for assistance
Define
device name(s)
Recommended content:
-seca modell
-location
-Inventory number
-Network type (WiFi/Ethernet)
External
interface module seca 452
Internal
interface module
WiFi
Ethernet
Prepare data for
measuring device(s):
x Location
x
IP address
x
Connection type
Check availability
of
WIFI Network
Install
seca connect 103
to server
Configure
seca connect 103
Attach
interface module 452
to device
Device type
Make settings for device
in seca connect 103
Adjust settings
at device
Connection
type
Patch
network socket(s)
Configure firewall
Configure Lnterface
of EMR system
➔ Work steps
➔ System structure
➔ System requirements
➔ Installing and configuring seca connect 103
4.1 Work steps
This graphic provides an overview of the steps that are needed to set up an
integrated measuring system with the secaconnect 103. Details can be found
on the following pages.
17-10-01-266-002a/07-2018B
Setting up the seca connect 103 System • 17
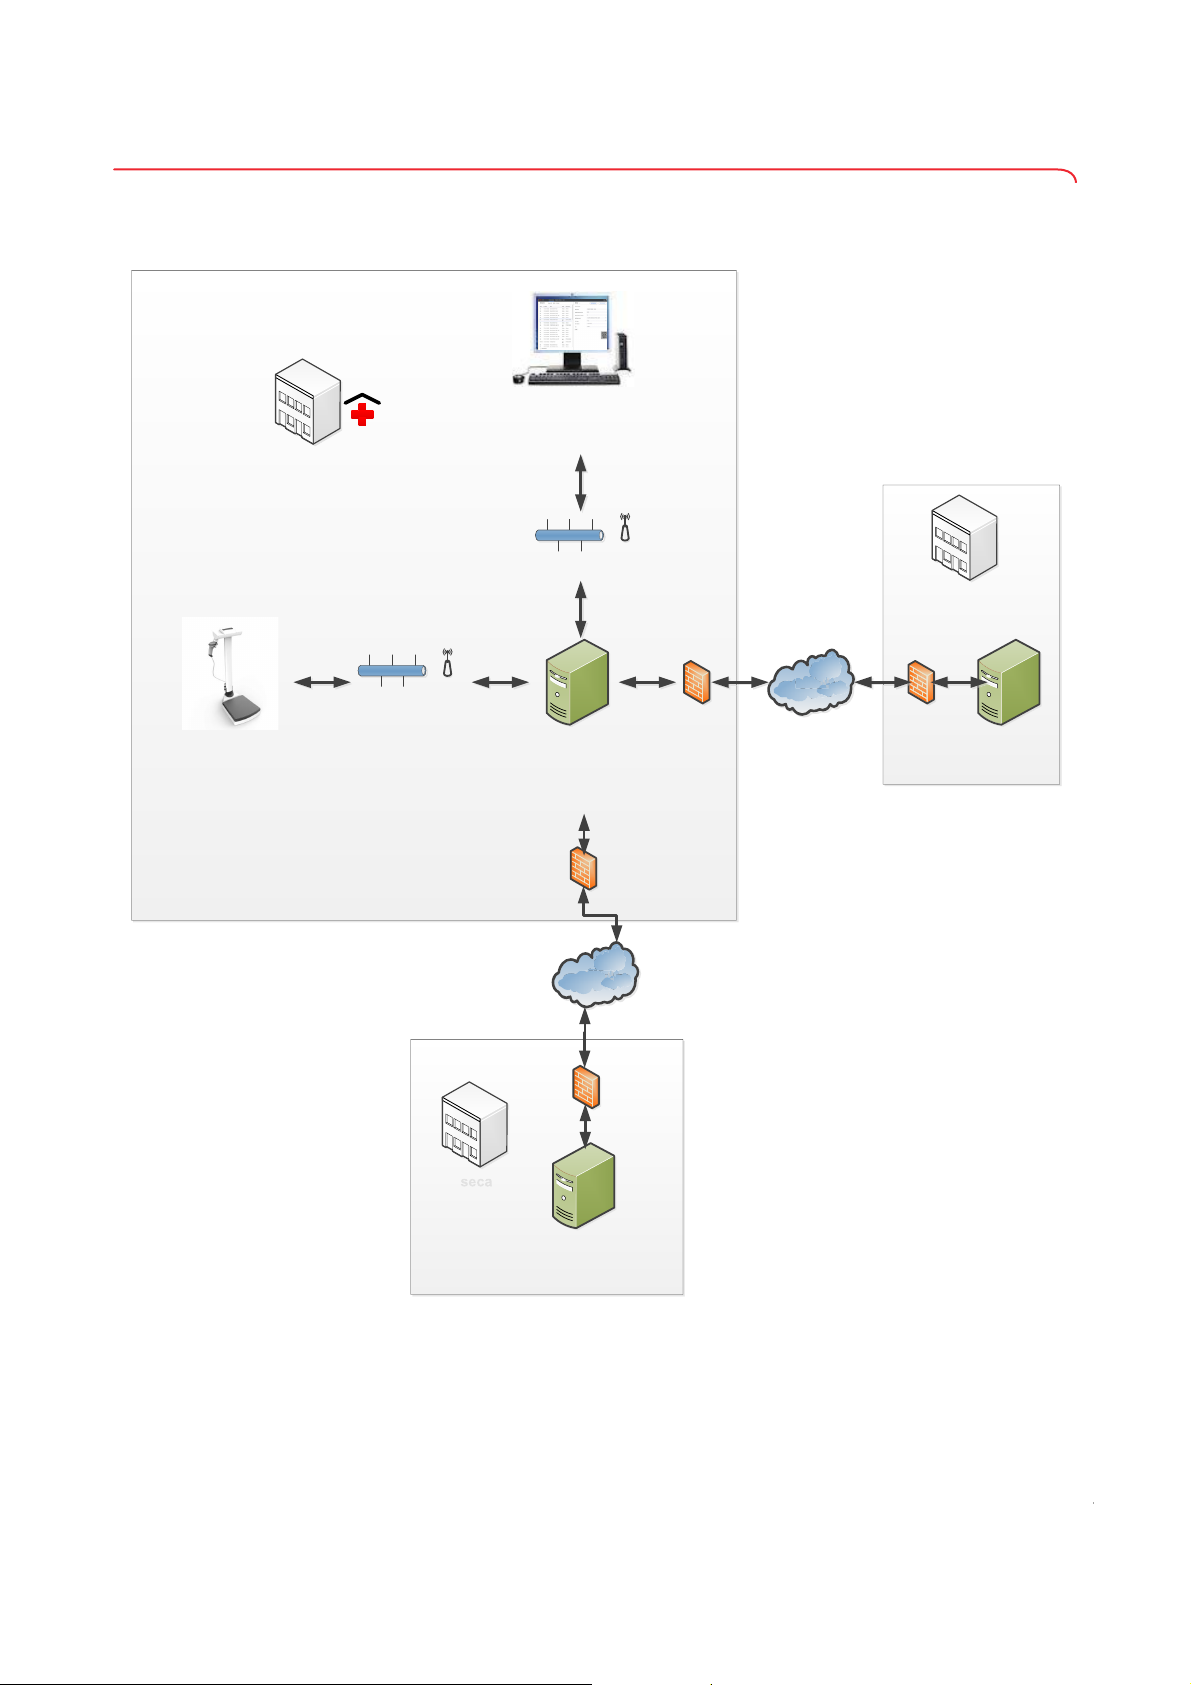
4.2 System structure
Port 8677: Server
x seca connect 103 server
x Veca connect 103 web server
x Mongo database
x Integration modules
Local Area Network
(e.g. Hospital Network)
Ethernet/ WiFi depending
on type of user interface
Ethernet/ WiFi depending on
type of measuring device
Port 9000: seca connect 103
Administration via web browser
Ports 20020, 20021, …: Measuring
x Max. 50 seca devices/port
x Max. 500 seca devices in total
WAN
WAN
WAN
EMR Ɛystem
(Patient data)
Port 9243:
Server for logfiles and
seca remote service
EMR Yendor
seca
The graphic provides an overview of the system structure (here with an
externally hosted EMR system).
17-10-01-266-002a/07-2018B
18 • secaconnect 103/seca 452

English
4.3 System requirements
System component Requirement
Operating system:
•Client
•Server
Windows
®
Server 2016 Datacenter 64-bit
Windows
(32-bit systems not supported)
Server hardware:
•RAM
• Processor
• Free hard disk storage
Intel Xeon CPU Q 2.30 GHz
at least 16 MB
at least 200 GB
Browser Google Chrome Release 64
Remote service Team Viewer
Software
Program for displaying PDF files
Program for extracting zip archives
Ethernet
Data transmission
WiFi: WPA2 with PSK
(WPA Enterprise not supported)
Recommended:
• 8677: Windows Server, seca 103 server,
seca 103 web server, mongo db
• 9000: seca 103 web browser
Ports
• 9243: Logstash Server for log files/remote
service
• 20020, 20021, 20023, ....: GPX listening
ports for seca measuring devices (max.
50 devices/port, max. 10 ports)
EMR systems:
supported interfaces
IP addresses for seca
measuring devices
Static IP addresses recommended
Cerner VitalsLink
Windows®, Windows® 10 and Windows® Server 2016 are registered
trademarks of the Microsoft Corporation.
®
10
4.4 Installing and configuring seca connect 103
➔ Installing seca connect 103
➔ Configuring seca connect 103
➔ Preparing the data connection (WiFi/Ethernet) for seca measuring devices
➔ Configuring the firewall
➔ Configuring the security program
Installing seca connect 103 The secaconnect 103 installation package is exclusively available as a down-
load. The corresponding link is sent as part of the project implementation.
1. Follow the link and download the installation package.
secaconnect 103.
secaconnect 103.
17-10-01-266-002a/07-2018B
2. Provide a separate server for the
3. Extract the zip archive on the server provided for the
The following programs/desktop icons are provided:
•
secaconnect 103 Setup wizard
secaconnect 103 Configurator
•
Setting up the seca connect 103 System • 19

4. Start the setup wizard (here: seca_103_V1_0_2_663) by double clicking
the desktop icon.
5. Follow the on-screen instructions.
After successful installation, the
secaconnect 103 Configurator starts
automatically ➔ Configuring seca connect 103.
Configuring seca connect 103 The secaconnect 103 Configurator performs the configuration for the
secaconnect 103 software. Work through the individual dialog windows and
then click on
1. Double click on the icon of the
Next.
secaconnect 103 Configurator.
20 • secaconnect 103/seca 452
secaconnect 103 Configurator starts (during the initial installation, the
The
Configurator starts automatically).
17-10-01-266-002a/07-2018B

English
2. Set up the GPX listening ports:
a) Use recommended ports ➔ System structure or modify according
to the requirements of the network environment
b) Click “Check Ports” to test the availability of the ports
c) Click “Create Services” to start services (seca 103.dll, seca
logstash.dll, seca MongoDB.dll)
d) In Windows
®
, “Task Manager\Services”, check whether the
services were started
17-10-01-266-002a/07-2018B
3. Have the login credentials ready for the Logstash server.
NOTE
You received the login credentials for the Logstash server with the link
for the
secaconnect 103 installation package.
Setting up the seca connect 103 System • 21

4. Log on to the Logstash server:
a) Enter User name
b) Enter Password
c) Click Save
The secaconnect 103 is connected with the Logstash server. Log files are
saved there. The seca remote service is available.
You have the following options to continue:
► Enter separate login credentials for the individual services of
secaconnect 103: continue with step 5.
► Do not assign separate login credentials: In the
(Re)Start Services and continue with step 6.
Logstash tab, click
5. Enter separate login credentials for the individual services of
secaconnect 103:
a) Enter User name
b) Enter Password
c) Click Apply
d) Click (Re)Start Services
22 • secaconnect 103/seca 452
17-10-01-266-002a/07-2018B

English
6. Create the login credentials for the administration of the Mongo database
(administrator login for the
a) Assign
User name
secaconnect 103):
b) Enter Password
c) Repeat Password
d) Click Generate
With the login credentials (administrator login) you can now open
secaconnect 103 in the browser ([IP address of the secaconnect 103
server]: 9000/login).
7. Click
Finish
17-10-01-266-002a/07-2018B
The configuration is complete.
8. Open secaconnect 103 in your browser:
a) Enter “IP address secaconnect 103 server]: 9000/login”
b) Log in with the administrator login created in step 6.
You have the following options:
►➔ Preparing the data connection (WiFi/Ethernet) for seca measuring
devices
►➔ Managing seca measuring devices
►➔ Managing integration modules
Setting up the seca connect 103 System • 23

Preparing the data connection (WiFi/Ethernet) for seca measuring devices
seca measuring devices can transfer data via WiFi or via Ethernet to the
secaconnect 103. The type of data connection can be selected separately for
each connected seca measuring device.
When preparing the data connection (WiFi/Ethernet), the following factors
must be taken into account:
• seca measuring devices used ➔ Compatible seca measuring devices:
– seca measuring devices with internal interface module (for example,
seca 336 i): Exclusively WiFi
– seca measuring devices with seca 452 interface module (for
example,
seca 704): Ethernet or WiFi
• Technical and structural conditions in your institution:
– Network structure and capability
– Length of the data transmission paths
– Location of the seca measuring device, possible obstacles between
transmitter and receiver, for example, other medical devices,
furniture
– Properties of ceilings and walls
Depending on the data connection, the following preparation work is
necessary:
► Assign IP addresses for seca measuring devices (static IP addresses
recommended)
► WiFi: Network definition/new setup
► Ethernet: Patch network socket at location of seca measuring device
Configuring the firewall The settings in the Windows
text. If you use a different firewall, define the settings accordingly. Work
through the individual dialog windows and then click on
1. Open the firewall dialog window (“Windows Administrative
Tools\Windows Defender Firewall with Advanced Settings”).
2. Create a new rule:
a) Click “Connection Security Rules”
b) Click “New Rule”
3. Under “Rule Type”, click “Custom”.
®
Defender Firewall are described in the following
Next.
24 • secaconnect 103/seca 452
17-10-01-266-002a/07-2018B

English
4. Under “Endpoints”, select the following settings:
• Endpoint 1: “any IP address”
• Endpoint 2: “any IP address”
5. Under “Requirements” select the setting “Request authentication for
inbound and outbound connections”.
17-10-01-266-002a/07-2018B
Setting up the seca connect 103 System • 25
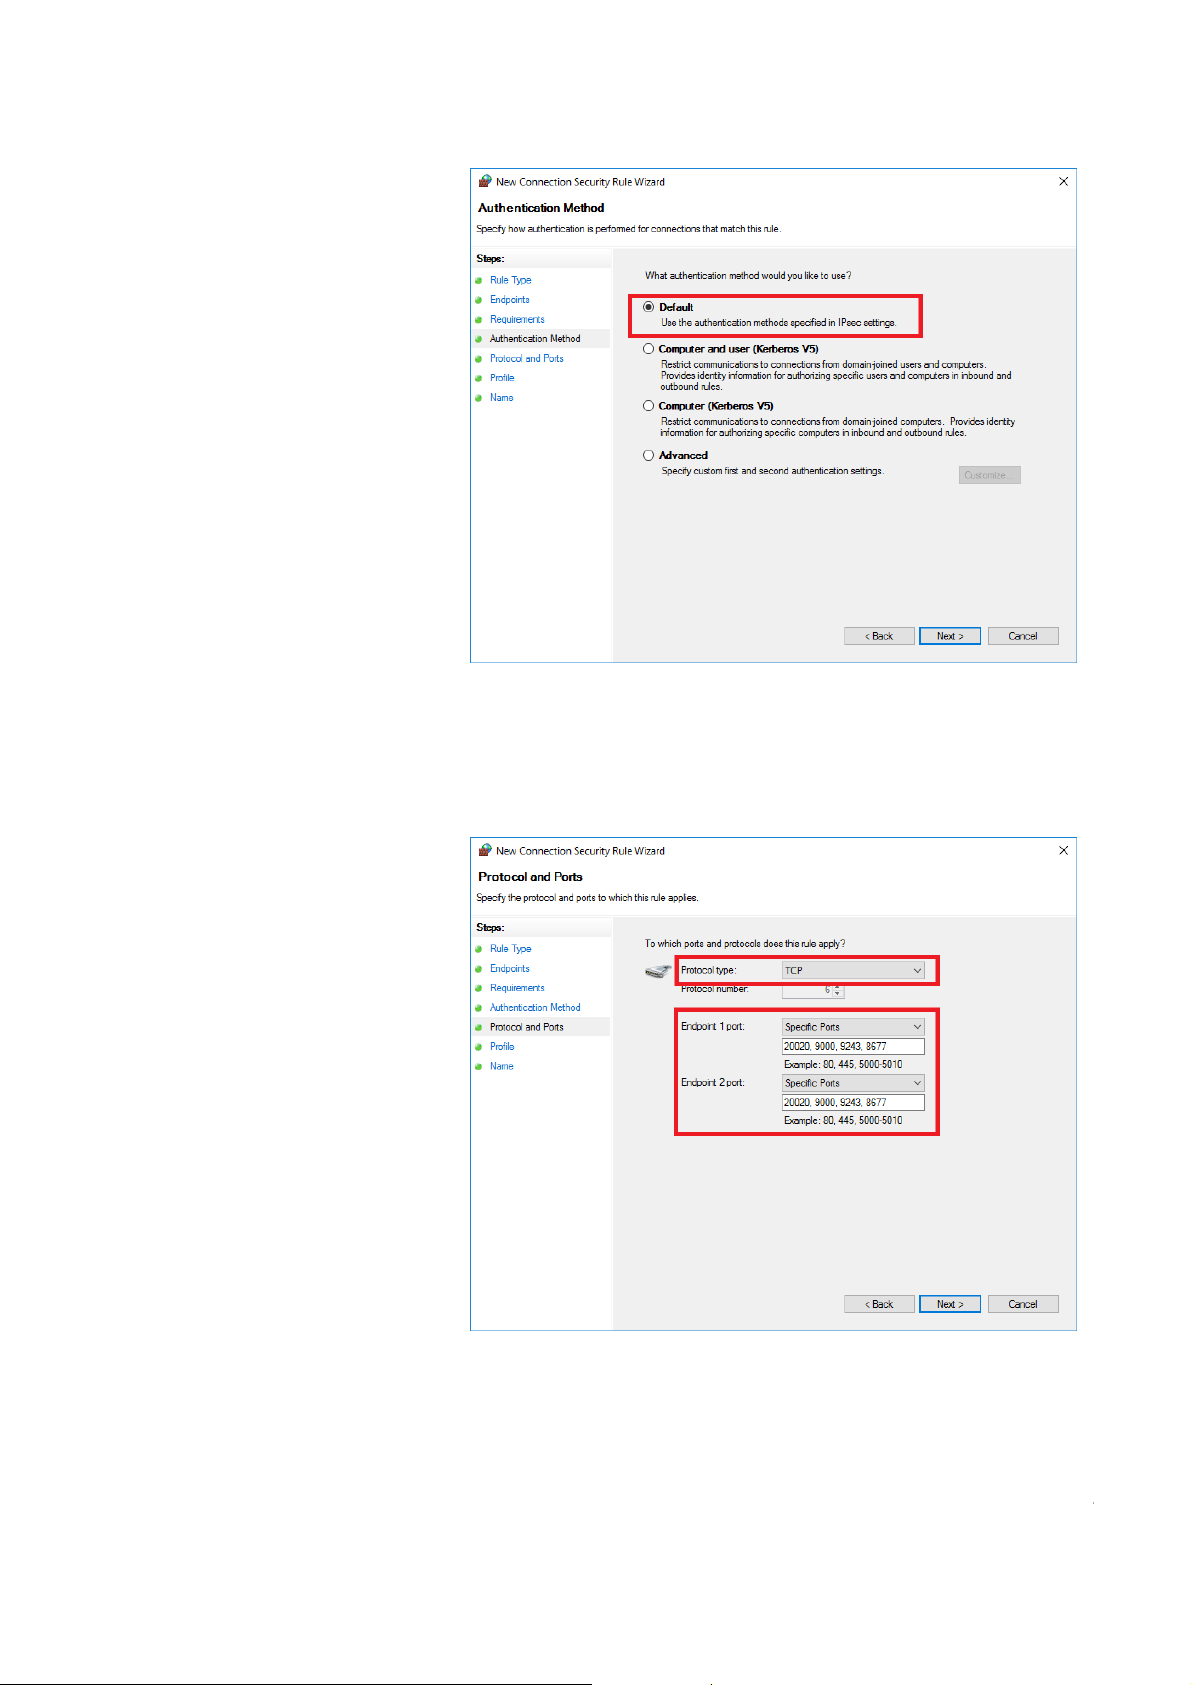
6. Under “Authentication Method”, select the setting “Default”.
7. Under “Protocols and Ports”, enter the following:
a) Protocol type: “TCP”
b) Endpoint port: “Specific Port”
c) Enter all ports that are needed for the data connection of the
secaconnect 103 ➔ System requirements
d) Ensure that the settings for endpoint 1 and 2 are identical
26 • secaconnect 103/seca 452
17-10-01-266-002a/07-2018B

English
8. Under “Where does this rule apply?”, select the settings according to your
network requirements (here: all options selected).
9. Under “Name”, enter a name for the new rule according to the guidelines
of your institution (here: “seca 103 Security Rules").
17-10-01-266-002a/07-2018B
NOTE
If your system is secured by multiple firewalls, define appropriate
settings in
all firewalls.
Setting up the seca connect 103 System • 27
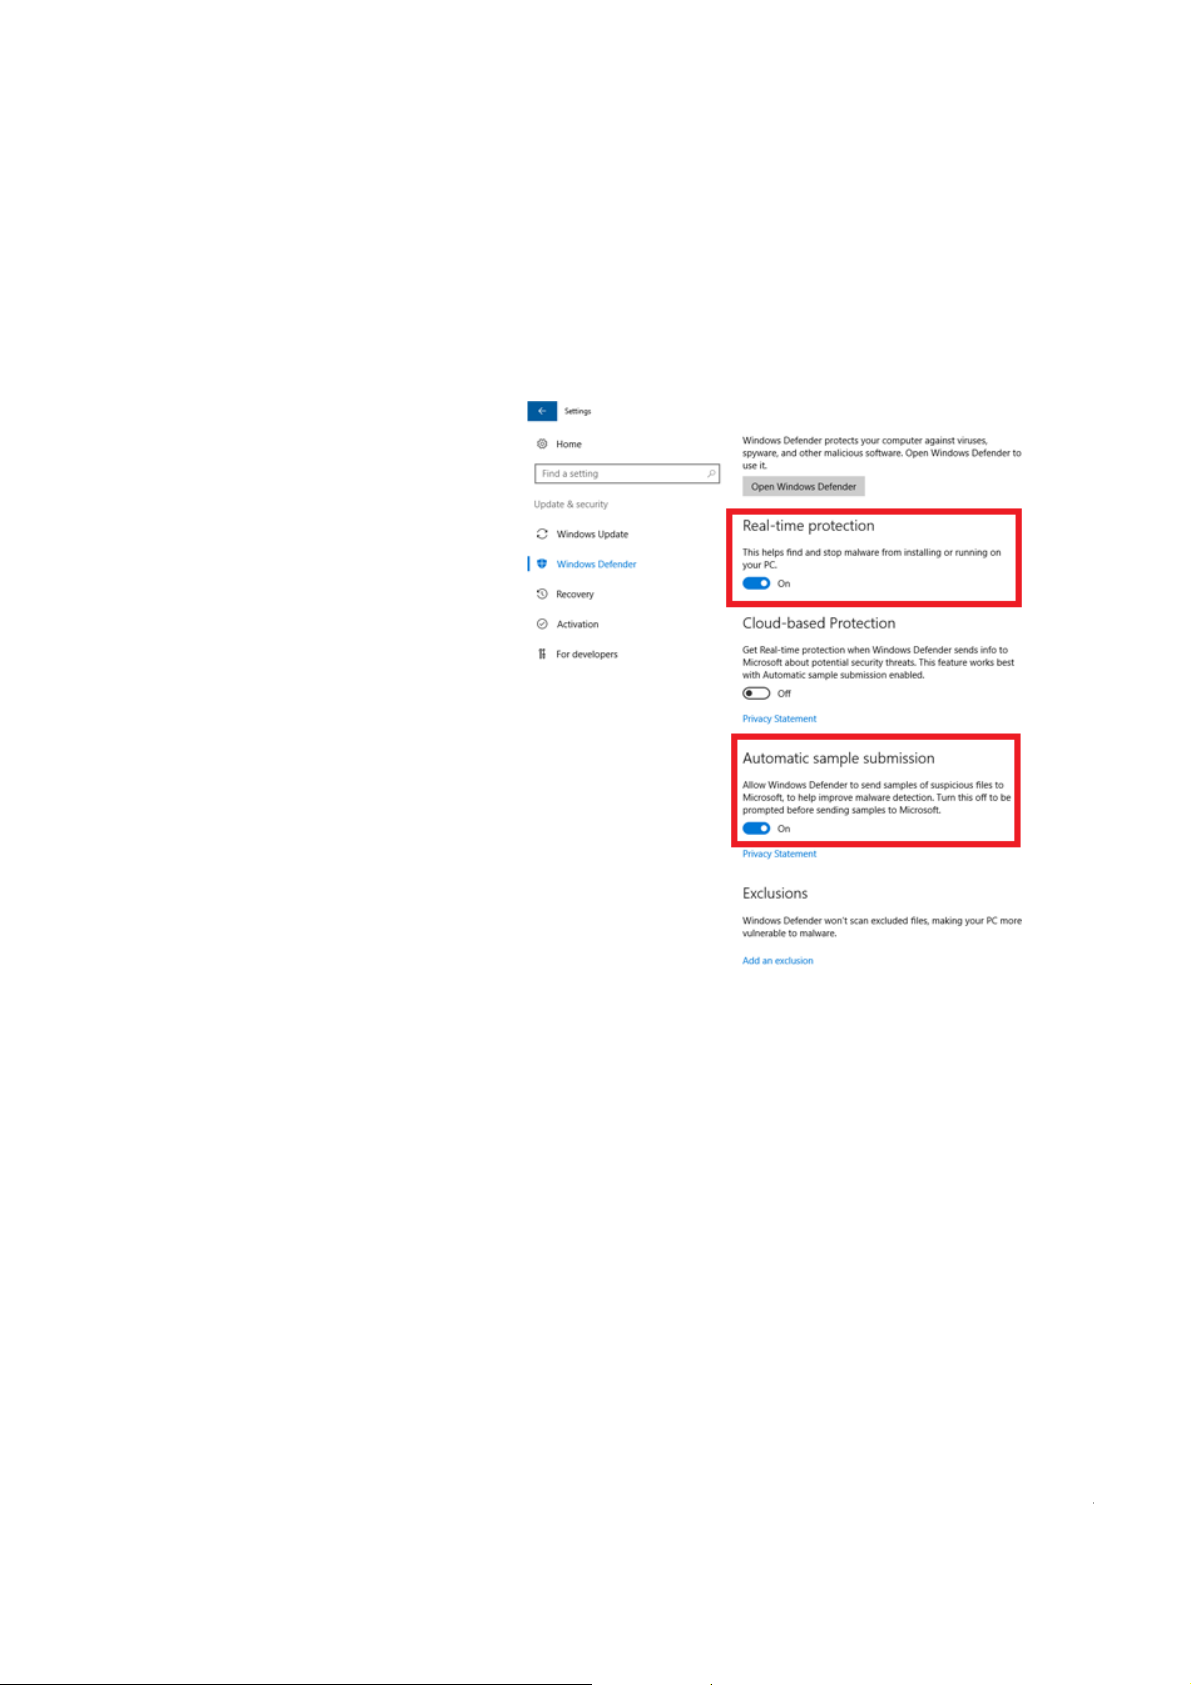
Configuring the security program The following procedure describes the settings in Windows
use a different security program, define the settings accordingly. Work
through the individual dialog windows and then click on
®
1. Open the Windows
Defender (Settings\Update & Security\Windows®
Defender).
2. Ensure that the following settings are in place:
• Realtime protection: on
• Cloud-based protection: off
• Automatic sample submission: on
Next.
®
Defender. If you
3. Under “Exclusions”, click “Add an exclusion”.
17-10-01-266-002a/07-2018B
28 • secaconnect 103/seca 452
 Loading...