

Page 1

Lavante-séchante
Instruction pour l'installation et l'emploi
Waschmachine
Instructies voor het installeren en gebruik
Instructions pour l'installation et l'emploi
MLSE 12 X
Lavante-séchante
Washing machine
Washer-dryer
Instructions for installation and use
Waschvollautomat
Installations- und Bedienungsanleitungen
Instructions for installation and use
Waschtrockner
Installations- und Bedienungsanleitungen
Lavasciuga
Istruzioni per l'installazione e l'uso
Page 2

Lavante-séchante 1
F
Instruction pour l'installation et l'emploi
Washer-dryer 17
GB
Instructions for installation and use
Waschtrockner 33
D
Installations- und Bedienungsanleitungen
Lavasciuga 49
I
Istruzioni per l’installazione e l’uso
Page 3
ARGHERITA
Page 4
Guide rapide
Découvrez ci-dessous les 12 sujets qui seront développés
dans les pages de ce manuel. Lisez, apprenez, amusez-vous:
vous découvrirez un tas de petits secrets pour laver mieux,
avec moins defforts tout en augmentant la longévité de
votre lavante-séchante. Et surtout, en toute sécurité .
1.
Installation et déménagement (page 11)
Pour un bon fonctionnement de la lavante-séchante, lopération la
plus importante après sa livraison ou après un déménagement, est
sans aucun doute son installation. Vérifiez toujours:
1. si linstallation électrique est conforme.
2. si les tuyaux darrivée et de vidange de leau sont bien raccordés
correctement. Ne jamais utiliser des tuyaux usés.
3. si le lavante-séchante est bien de niveau. Cest important: pour
la longévité de votre lavante-séchante et pour la qualité de votre
lavage.
4. que toutes les vis de fixation du tambour, situées à l'arrière du
lavante-séchante, ont bien été enlevées.
2.
Comment charger et mettre
en service votre lavante-séchante (page 2)
Triez correctement votre linge: cest une opération importante dont
la réussite de votre lessive dépend entièrement. Apprenez tous les
trucs et tous les secrets pour bien trier votre lessive: les couleurs, les
textiles, la tendance à produire des peluches, voilà quels sont les
critères les plus importants.
7.
Un tableau facile à consulter pour cerner dun seul coup doeil tous
les programmes, les températures, les produits lessiviels et
additionnels. Utilisez le bon et vous obtiendrez de meilleurs résultats
en économisant du temps, de leau et de lélectricité, jour après jour.
8.
Quelques bons conseils pour obtenir un séchage optimal.
Guide des programmes (page 4)
Comment s'y prendre pour sécher (page 6)
3.
Guide pour comprendre les étiquettes (page 6)
Les symboles reportés sur les étiquettes des vêtements sont très
faciles à comprendre et importants quant à la réussite du lavage. Ce
guide vous aidera à vous y retrouver parmi les températures
conseillées, les types de lavage et de repassage.
4.
Conseils utiles pour ne pas vous tromper (page 7)
Autrefois, on suivait les bons conseils de grand-mère - et les matières
synthétiques nexistaient pas: il était donc facile de laver. Aujourdhui,
votre lavante-séchante vous donne de bons conseils et vous permet
même de laver laine et cachemire aussi bien quune blanchisseuse.
5.
Le tiroir à produits lessiviels (page 8)
Comment utiliser le tiroir à produits lessiviels et le bac à eau de Javel.
6.
Bien maîtriser le bandeau de commandes
(page 3 - 4)
Le bandeau de commandes de la lavante-séchante est très simple.
Quelques commandes essentielles pour choisir les types de lavage,
du plus énergique, pour laver une combinaison de mécanicien,
jusquau plus délicat pour le cachemire. Apprenez à vous en servir,
vous laverez mieux et prolongerez la durée de vie de votre lavanteséchante. Cest facile.
9.
La votre lavante-séchante est une amie: quelques petites attentions
suffisent pour quelle vous rende la pareille en fidélité et dévotion.
Chouchoutez-la, elle lavera pour vous pendant des années et des
années.
10.
Avant dappeler un technicien, lisez ces pages: de nombreux problèmes
peuvent trouver une solution immédiate. Si vous narrivez pas à les
résoudre, appelez alors le numéro de votre SAV et en un rien de temps
la panne sera réparée.
11.
Vous y trouverez les caractéristiques techniques de votre lavanteséchante: sigle du modèle, spécifications électriques et hydrauliques,
dimensions, capacité, vitesse dessorage et conformité aux normes
et aux directives italiennes et européennes.
12.
Vous y trouverez tous les conseils indispensables à votre sécurité et
à celle de votre famille. Cest ce quil y a de plus important.
Soin et entretien (page 14)
Problèmes et solutions (pages 9 et 10)
Caractéristiques techniques (page 10)
Sécurité pour vous et vos enfants (page 15)
Instructions pour l'installation et l'emploi
1
Page 5
Que placer dans votre
lavante-séchante?
Quelques astuces pour mieux laver. Triez votre linge en tenant compte des
textiles et des couleurs. Attention aux étiquettes, suivez leurs indications.
Alternez les petites et les grandes pièces.
Triez votre linge par
type de tissu et
couleur: vous
obtiendrez de
meilleurs résultats
Avant de laver.
Triez votre linge selon le type de
tissu et la résistance des
couleurs: les tissus plus résistants
doivent être séparés des délicats.
Séparez les couleurs claires des
couleurs foncées.
Videz toutes les poches (pièces
de monnaie, papier, argent et
petits objets) et contrôlez les
boutons. Recousez tout de suite
les boutons ballants, vous
éviterez ainsi quils ne se
détachent en cours de lavage.
Les étiquettes vous
disent tout ce quil faut.
Lisez toujours les étiquettes: vous
saurez tout sur vos vêtements et
sur leurs meilleures conditions
de lavage.
Page 6, nous vous dévoilerons
tous les secrets qui se cachent
derrière les symboles reportés sur
les étiquettes des vêtements.
Leurs indications sont
précieuses, elles vous aideront à
conserver la beauté de vos
vêtements.
Dispositif antibalourds.
Ce lavante-séchante est équipé
dun dispositif spécial à contrôle
électronique pour bien équilibrer
le chargement: avant lessorage,
ce dispositif veille à ce que le
linge soit bien réparti à lintérieur
du tambour, compte tenu du type
de linge et de sa disposition
initiale.
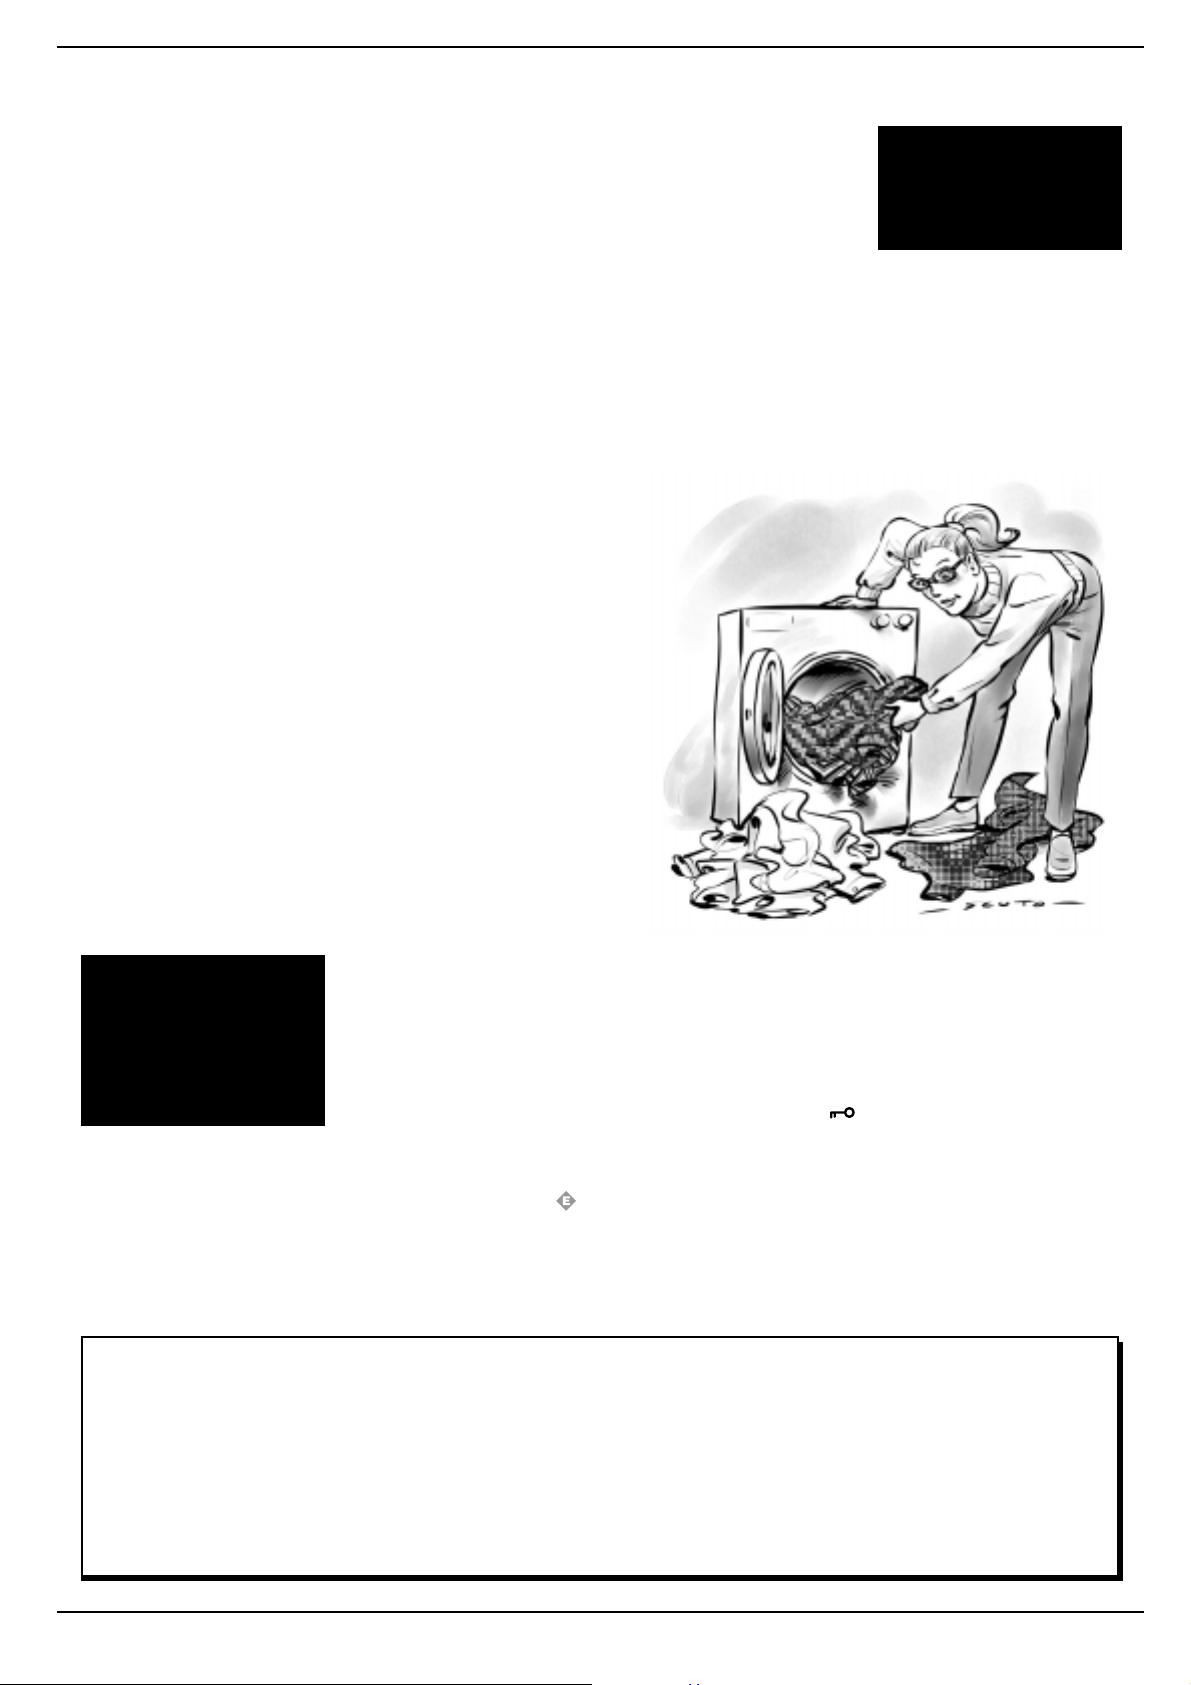
Démarrage de la machine
Dès son installation, démarrez un cycle de lavage
en sélectionnant le programme 1 à 90 degrés.
Une bonne mise en service de la
votre lavante-séchante est primordiale tant pour la qualité du
lavage que pour éviter des
problèmes et augmenter sa
longévité. Après avoir chargé le
linge et dosé les produits
lessiviels, contrôlez toujours si:
1. Le hublot est bien fermé.
2. La fiche est bien branchée dans
la prise.
3. Le robinet de leau est ouvert.
Allumez votre machine
Appuyez sur le bouton B
(position I).
Ainsi le lavante-séchante ne vibre
pas et ne fait pas de bruit même
à une vitesse maximum.
Chouchoutez votre
linge: placez vos
pièces de lingerie, vos
bas et vos vêtements
délicats dans un
sachet en toile pour
les protéger
Choisissez un programme
Choisissez ce programme en
fonction du type de linge à laver.
Pour opérer ce choix, consultez
le tableau page 4. Tournez le
bouton A pour amener le
programme choisi en face du
repère situé sur le tableau de
bord, sélectionnez toutes les
options disponibles
(clignotantes) comme indiqué
pages 3 et 4 (référence
appuyez ensuite sur le bouton C
(Start/Reset).
Si vous désirez interrompre le
programme en cours, appuyez
sur le bouton C (Start/Reset)
pendant 3 secondes minimum.
Une fois le lavage terminé...
Attendez que le symbole
s'éteigne et que l'inscription End
soit affichée.
Eteignez alors la lavante-séchante
),
en appuyant sur la touche marche-arrêt B (position O).
Vous pouvez alors ouvrir le
hublot en toute sécurité. Après
avoir sorti le linge, laissez le
hublot ouvert ou entrouvert pour
que lhumidité à lintérieur puisse
sévaporer.
Fermez toujours le robinet de
leau.
Noubliez pas quen cas de
coupure de courant ou si vous
éteignez le lavante-séchante,
le programme sélectionné
reste mémorisé.
Comment enlever les taches les plus courantes
Encre et stylo à bille Tamponnez avec du coton imbibé dalccol méthylique ou dalcool à 90°.
Goudron Tamponnez avec du beurre frais, passez de la térébenthine puis lavez immédiatement.
Cire Raclez puis repassez avec un fer bien chaud entre deux feuilles de papier buvard. Passez ensuite du coton
imbibé dessence de térébenthine ou dalcool méthylique.
Chewing-gum Passez du solvant pour vernis à ongles puis un chiffon propre.
Moisissure Plongez le coton et le lin blanc dans une solution formée de 5 parties deau, une deau de javel et une
cuillère à soupe de vinaigre, lavez aussitôt. Pour les autres tissus blancs, utilisez de leau oxygénée à 10 volumes
puis lavez aussitôt.
Rouge à lèvres Tamponnez à léther les tissus de laine ou de coton. Pour la soie, utilisez du trichloréthylène.
Vernis à ongles Posez le tissu du côté de la tache contre une feuille de papier buvard, mouillez de solvant, en
déplaçant le vêtement au fur et à mesure que la feuille se colore.
Herbe Tamponnez avec du coton imbibé dalcool méthylique.
Instructions pour l'installation et l'emploi
2
Page 6
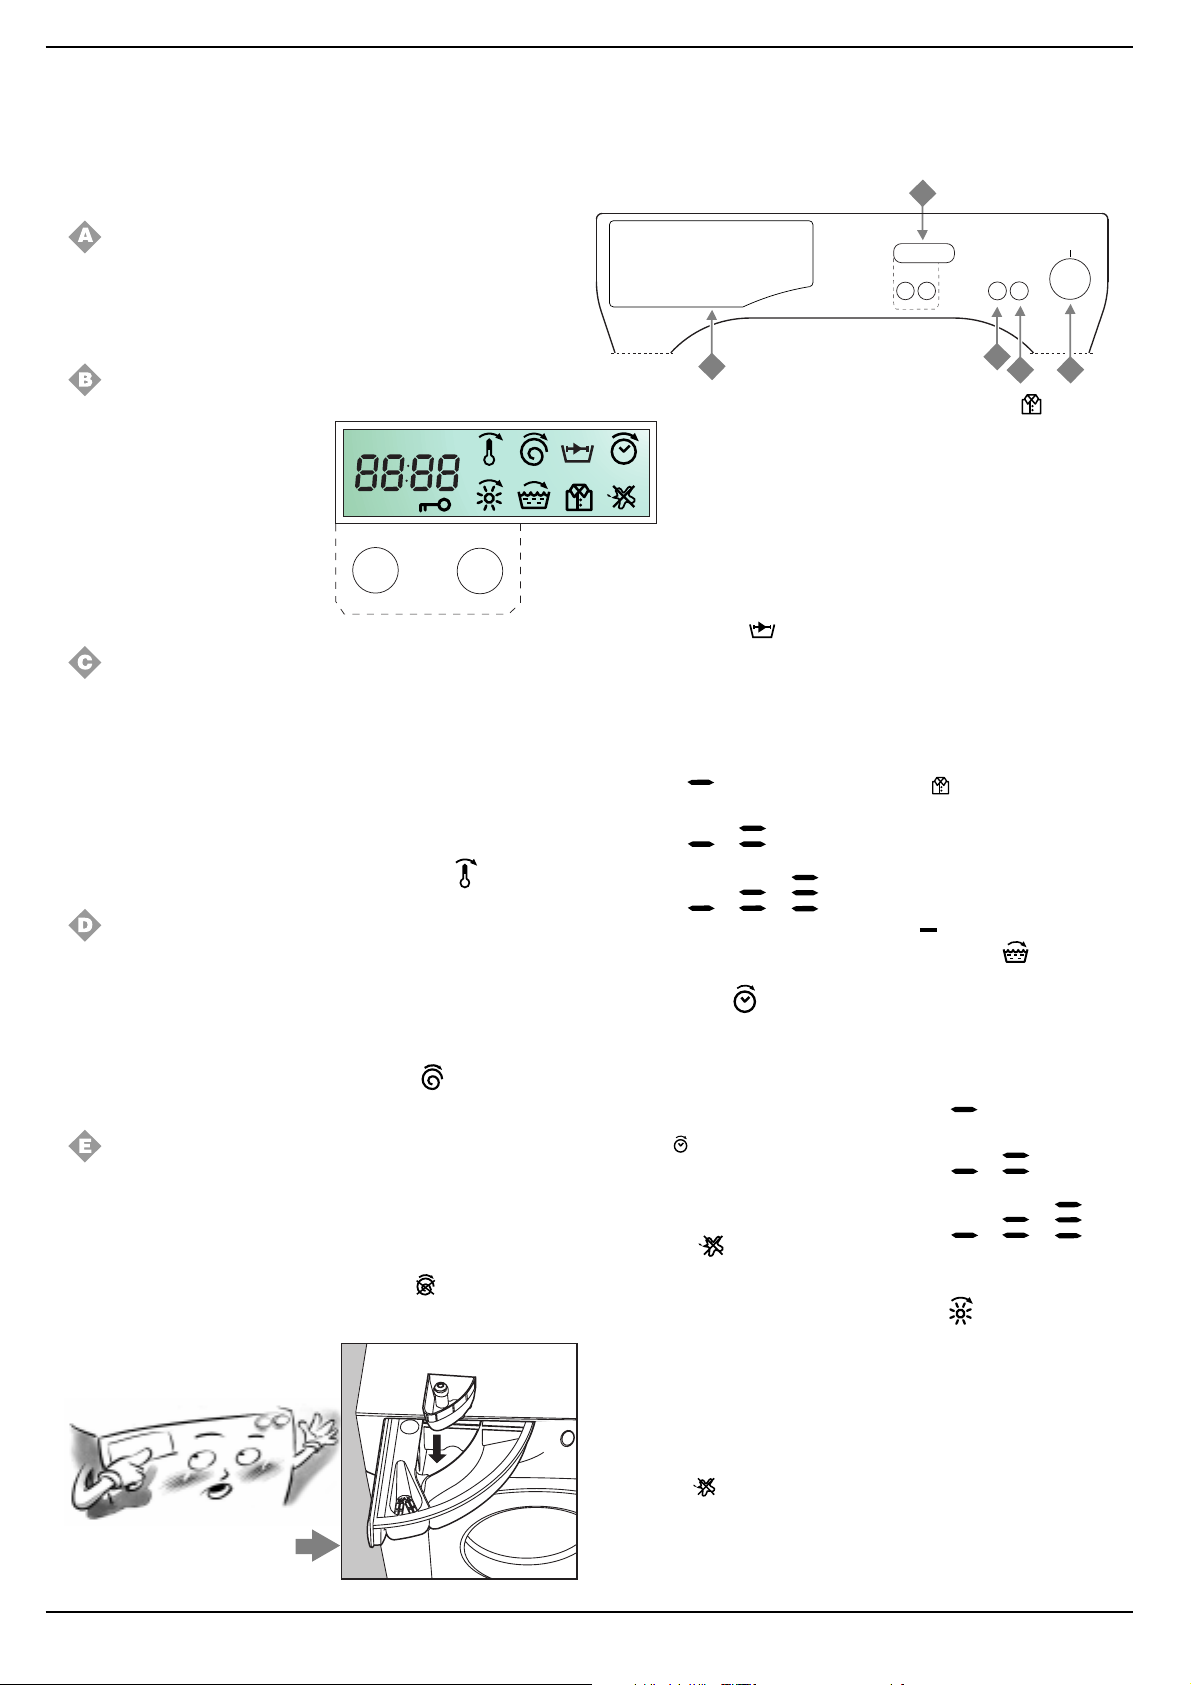
Maîtrise du panneau de commandes
Cest vous qui commandez
Choisir les bons programmes: cest important et cest facile.
Les boutons sont
escamotables. Pour les
Bouton programmes
Pour sélectionner les programmes,
amenez le numéro correspondant
au programme désiré en face du
repère situé sur le tableau de bord.
Marche/Arrêt
Appuyez sur la touche B pour
allumer votre lavante-séchante,
relachez-la pour léteindre.
L'arrêt de la machine n'annule
pas le programme sélectionné.
A l'allumage de la machine, tous
les symboles affichés sur l'écran
s'allument pendant 8 secondes,
ensuite seuls ceux qui peuvent
être sélectionnés continuent de
clignoter.
Start/Reset
Ce bouton permet de démarrer le
programme de lavage sélectionné
ou de l'interrompre. Pour le Start
appuyez légèrement sur le bouton,
pour le Reset appuyez sur le
bouton pendant 3 secondes de
suite minimum.
Après avoir sélectionner Start,
aucune modification du bouton
des programmes n'est possible.
Tiroir à produits lessiviels
Il est à trois bacs:
1. Produit de prélavage;
2. Produit de lavage;
3. Adoucissant.
Le lavante-séchante est aussi
équipé dun bac supplémentaire
4 (fourni) pour leau de Javel, à
insérer dans le compartiment 1.
Display - Ecran
Toutes les options disponibles
sont affichées dans la partie de
droite.
La touche mode sert à
sélectionner l'option désirée dont
le symbole commence à clignoter.
Dans la partie de gauche, il y la
affichage de la valeur ou de l'état
(On-Off) de l'option sélectionnée,
que vous pouvez modifier à l'aide
de la touche select.
Le tiroir à produits lessiviels avec
son bac à eau de javel
supplémentaire est ici.
faire sortir, poussez
légèrement au centre.
mode
select
Pour accéder à l'option suivante,
appuyez sur la touche mode,
autrement appuyez sur la touche
C (Start/Reset) pour démarrer le
cycle de lavage.
Toutes les options disponibles
sont énumérées ci-dessous.
Selon le programme
sélectionné, seules les options
spécifiques seront activées.
Température
L'écran indique la température
maximum correspondant au
programme sélectionné, pour
l'abaisser appuyez sur la touche
select jusqu'au lavage à froid
(Off).
Cette option est activée avec
tous les programmes de lavage.
Essorage
L'écran indique la vitesse maximum
correspondant au programme
sélectionné, pour la réduire appuyez
sur la touche select jusqu'à ce que
l'essorage soit supprimé (Off).
La suppression de l'essorage
ne permet pas de sélectionner
un cycle de séchage.
En cours de lavage, l'allumage du
symbole
indique que la
suppression de l'essorage est
programmée.
4
X
A
M
1
3
2
D
Cette option est active avec tous
les programmes sauf les 6-10-12-
13-16.
Intensité lavage
Sert à modifier les caractéristiques
du programme de lavage choisi,
selon le degré de salissure de votre
linge. Il y a trois niveaux, pour les
sélectionner appuyez sur la touche
select.
Faible
Moyen
Elevé
Cette option est disponible avec
les programmes 1-2-3-5-7-8.
Départ différé
Il permet de différer le
fonctionnement de la machine
d'1 à 24 heures à l'aide de la
touche select.
La sélection du départ différé est
signalée par l'allumage du
symbole
jusqu'au départ du
cycle de lavage.
Cette option n'est pas disponible
avec les programmes 15 et 16.
Anti-tâches
(voir page 8)
Grâce à cette commande la lavante-séchante effectue un
lavage plus intense qui optimise
leffet des addittifs liquides
permettant ainsi déliminer les
taches les plus difficiles.
Pour l'activer, appuyez sur la
touche select jusqu'à ce que
l'inscription On soit affichée.
En cours de lavage, le choix de
l'option est signalé par l'allumage
du symbole
. Cette option est
disponible pour les programmes
2-3-5-7-8-11-14.
Remarque: Elle ne doit pas être
utilisée en même temps que
l'option Repassage facile.
Repassage facile
Grâce à cette fonction, votre linge
ne sera pas froissé et donc
beaucoup plus facile à repasser.
La machine optimise les conditions
de lavage en fonction du type de
tissu.
Elle est disponible avec les
programmes 3-5-7-8-12-14.
Pour l'activer, appuyez sur la touche
select jusqu'à ce que l'inscription
On soit affichée.
Pour les programmes 7-8-12-14, le
cycle de lavage s'interrompt en
laissant le linge tremper dans l'eau
avant la vidange. Pour compléter le
cycle, appuyez sur la touche select.
En cours de lavage, le choix de
l'option est signalé par l'allumage du
symbole
Remarque:
- Elle ne doit pas être utilisée en même
temps que l'option Anti-tâches.
- Si vous voulez aussi effectuer le
séchage, ce fonction agit
uniquement s'il est utilisé avec le
niveau
Niveau rinçage
Il sert à augmenter l'efficacité du
rinçage. Nous vous conseillons de
l'utiliser en cas de pleine charge et de
doses élevées de produit lessiviel. Il y
a trois niveaux, pour les sélectionner
appuyez sur la touche select.
Faible
Moyen
Elevé
Cette option est disponible avec
les programmes 1-2-3-4-5-7-8-14.
Séchage
Pour sélectionner un séchage
automatique en fin de lavage.
Pour une description plus
détaillée, voir page 5.
Attention: Si vous sélectionnez
"suppression essorage", vous ne
pouvez pas sélectionner un cycle
de séchage. Pour effectuer un
séchage, sélectionnez la vitesse
d'essorage disponible la plus élevée
puis, choisissez le type de séchage
souhaité.
E
.
(Repassage).
C
A
B
Instructions pour l'installation et l'emploi
3
Page 7
Affichages particuliers
(partie gauche de display):
Dés que vous allumez votre
machine ....
Vous pouvez afficher le temps
restant pour le dernier programme
de lavage sélectionné.
Quand vous sélectionnez un
nouveau programme.
Il y a affichage de la durée prévue
pour le programme sélectionné.
Durée du programme
Le temps restant est affiché
pendant le cycle de lavage.
Durée du programme de séchage
Il y a affichage de la durée maximale
du programme sélectionné.
Code erreur
En cas d'anomalie, un code est
affiché, il faut le communiquer
au Service Après-vente (par ex.:
F-01).
Fin du programme
Une fois le programme terminé,
l'inscription End est affichée.
En cours de lavage ....
Vous pouvez afficher les
caractéristiques du programme
en cours en appuyant sur la
touche mode et les modifier, au
besoin, en appuyant sur la touche
select.
Hublot bloqué
Le symbole allumé indique
que le hublot est verrouillé pour
éviter toute ouverture
accidentelle. Pour éviter de
causer des dommages, attendez
qu'il s'éteigne et que l'inscription
End soit affichée avant d'ouvrir
le hublot.
Que laver, aujourdhui?
Des programmes pour toutes les saisons
Nature des tissus et degré de
salissure
COTON
Blancs extrêmement sales
(draps, nappes, etc.)
Blancs extrêmement sales
(draps, nappes, etc.)
Blancs et couleurs résistantes
très sales
Blancs et couleurs résistantes
très sales
Blancs peu sales et couleurs
délicates (chemises, pulls, etc.)
Séchage tissus coton
SYNTHÉTIQUES
Synthétiques couleurs résistantes
très sales (linge de bébé, etc.)
Synthétiques couleurs résistantes
(linge de bébé, etc.)
Synthétiques couleurs délicates
(linge en tout genre légèrement sale)
Synthétiques couleurs délicates
(linge en tout genre légèrement sale)
Séchage tissus synthétique
DÉLICATS
Laine
Vêteme nts et tissus particulièrement d élicats (ride aux, soie,
viscose, etc.)
Séchage tissus delicats
PROGRAMMES PARTIAUX
Rinçage délicat
Essorage délicat
Vidange
Program. Températ. Lessive
1
2
3
4
5
90°C
90°C
60°C
40°C
40°C
lavage
◆◆
◆◆
◆◆
◆◆
◆◆
6
50-60°C
7
7
8
9
40°C
40°C
30°C
◆◆
◆◆
◆◆
◆◆
10
11
12
40°C
30°C
◆◆
◆◆
13
14
15
16
Assoupl. Anti-
taches/
Javel
Dél./Trad.
Dél./Trad.
Dél./Trad.
Délicate
Délicate
Délicate
Délicate
◆◆
Durée du
cycle
(minutes)
140
125
130
150
86
89
79
69
30
40
60
Description du cycle de lavage
Prélavage tiède, lavage à 90°C, rinçages,
essorages intermédiaires et final
Lavage à 90°C, rinçages, essorages
intermédiaires et final
Lavage à 60°C, rinçages, essorages
intermédiaires et final
Lavage à 40°C, rinçages, essorages
intermédiaires et final
Lavage à 40°C, rinçages, essorages
intermédiaires et final
Lavage à 50-60°C, rinçages, antifroissement ou essorage délicat
Lavage à 40°C, rinçages, antifroissement ou essorage délicat
Lavage à 40°C, rinçages, antifroissement ou essorage délicat
Lavage à 30°C, rinçages et essorage
délicat
Lavage à 40°C, rinçages et essorage
délicat
Lavage à 30°C, rinçages, antifroissement ou vidange
Rinçage, anti-froissement ou vidange
Vidange et essorage délicat
Vidange
Important: pour annuler le programme de lavage à peine sélectionné, appuyez pendant au moins 3 secondes sur le bouton C (Start/Reset).
Les données reportées dans le tableau sont fournies à titre indicatif, elles peuvent varier selon la quantité et le type de linge,
la température de l'eau d'alimentation et la température ambiante.
Programmes Spéciaux
Classe A à 40°C
basses températures. En choisissant le programme 4 à 40° C, vous obtiendrez les résultats que vous obtenez normalement à 60°C,
grâce aux performances de votre lavante-séchante et au prolongement de la durée de lavage.
Lavage quotidien Votre lavante-séchante dispose dun programme spécial permettant de laver des vêtements peu sales en
un rien de temps. En choisissant le programme 9 à 30°C, vous pouvez laver ensemble des tissus différents (sauf laine et
soie), avec une capacité maximum de 3 kg. Ce programme permet de faire des économies de temps et délectricité, parce
quil ne dure que 30 minutes environ.
Votre lavante-séchante
vous offre un programme spécial vous permettant dobtenir dexcellents résultats même à de
NOUS VOUS CONSEILLONS DUTILISER DES LESSIVES LIQUIDES.
Instructions pour l'installation et l'emploi
4
Page 8
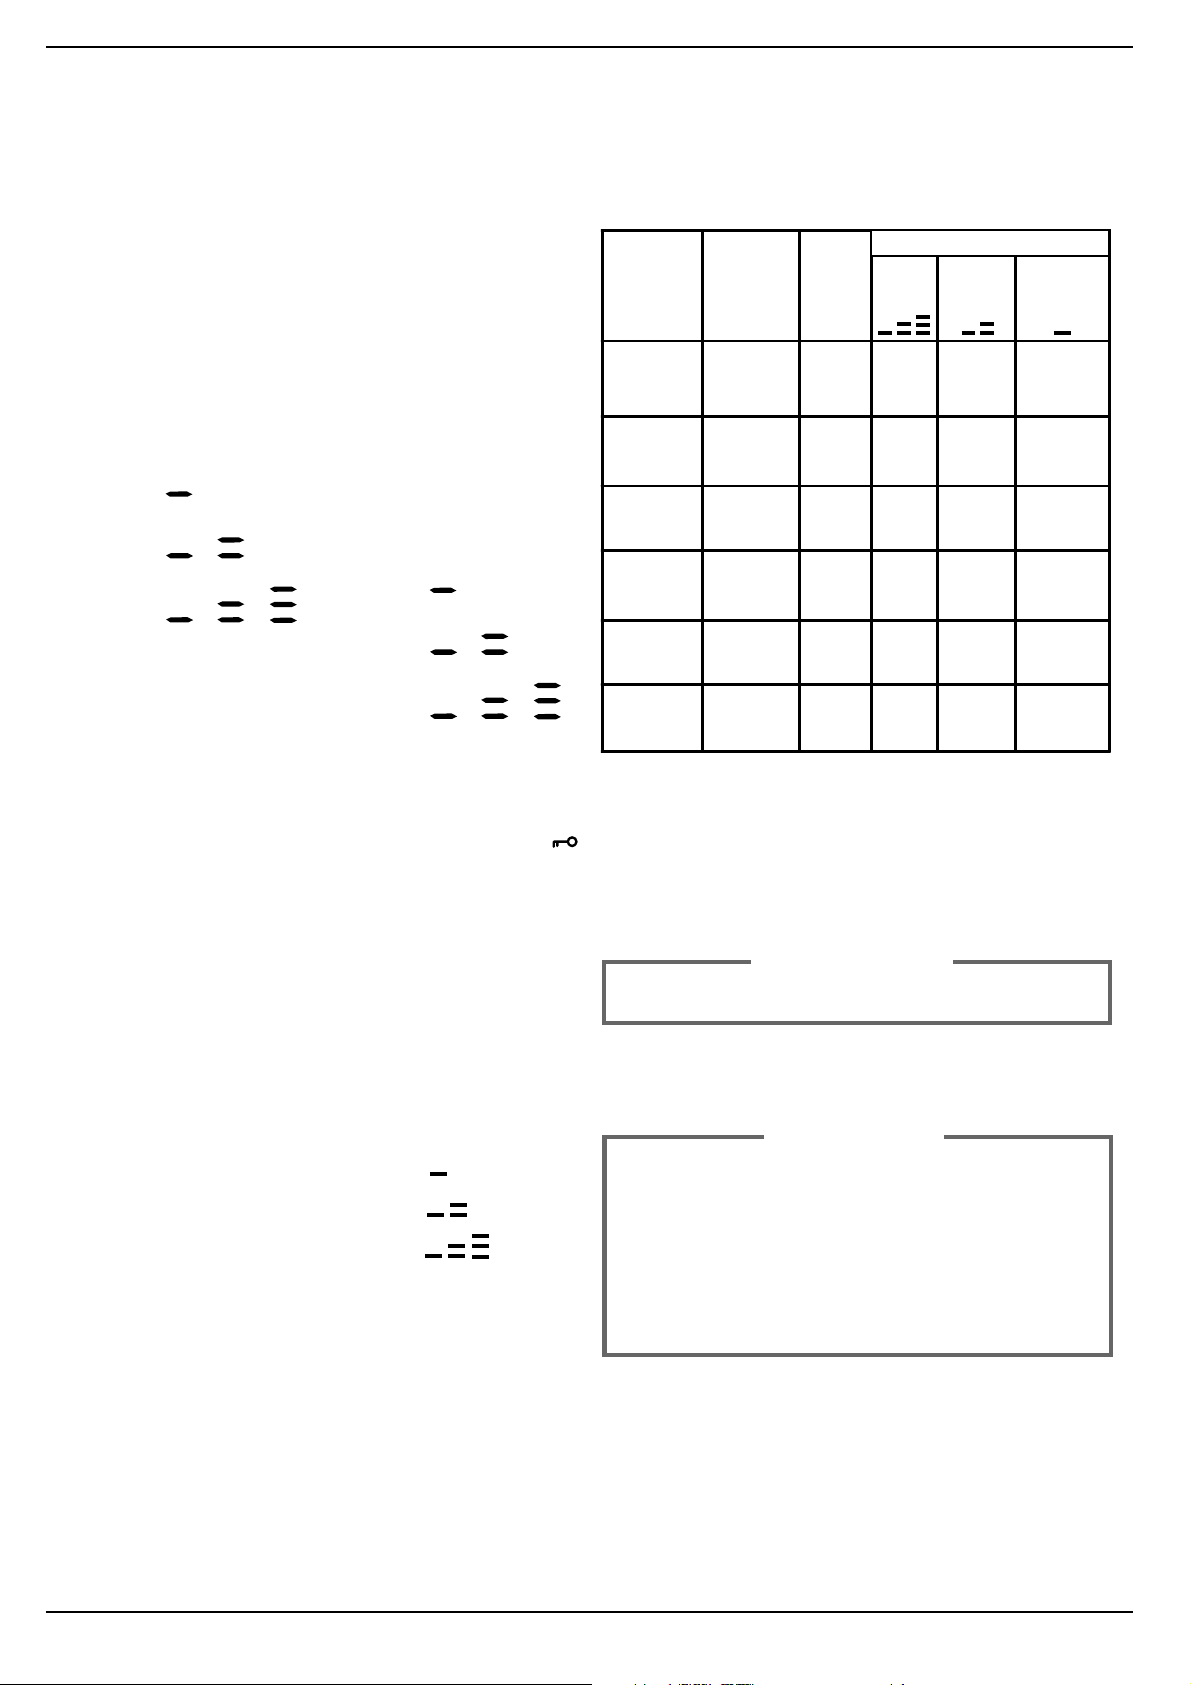
Comment s'y prendre pour sécher
Lavage et séchage
Consultez le tableau A ci-contre
et suivez les indications de charge
MAX pour effectuer le lavage et
le séchage en automatique.
Suivez les instructions pour
lavage seulement (voir page 2
paragraphe "Démarrage de la
machine") et sélectionnez le type
de séchage souhaité comme
indiqué ci-après:
Repassage
Armoire
Extra sec
puis appuyez sur la touche C
(Start/Reset).
Si la charge de linge à laver et à
sécher dépasse exceptionnellement la charge maximum
prévue (voir tableau A), suivez
les instructions fournies pour
lavage seulement (voir page 2
paragraphe "Démarrage de la
machine").
Une fois le programme terminé,
sortez le linge, séparez-le et
replacez-en une partie dans le
tambour.
Suivez à présent les instructions
prévues pour procéder au
séchage seulement.
Procédez de même pour le linge
restant.
Séchage seulement
Après avoir chargé le linge
(4 kg max.) contrôlez que:
- le hublot soit bien fermé;
- la fiche soit bien branchée dans
la prise;
- le robinet de l'eau soit ouvert;
- la touche B ne soit pas enfoncée
(position O).
Choisissez le programme
Tournez le bouton A jusqu'à une
programme de séchage en
fonction du type de tissu,
sélectionnez le type de séchage
souhaité:
Repassage
Armoire
Extra sec
puis appuyez sur la touche C
(Start/Reset).
Une fois le séchage terminé
Attendez que le symbole
s'éteigne et que l'inscription End
soit affichée.
Eteignez alors la lavante-séchante
en appuyant sur la touche marche-arrêt B (position O). Après
avoir sorti le linge, laissez le
hublot ouvert ou entrouvert pour
éviter la formation de mauvaises
odeurs et fermez le robinet de
l'eau.
Types de séchage
Selon vos besoins, vous pouvez
choisir parmi 3 types de séchage.
Repassage
: inge légèrement
humide, facile à repasser.
Armoire : linge sec à
ranger.
Extra sec : linge très
sec, conseillé pour serviettes
éponge et peignoirs.
Un cycle de refroidissement est
prévu quand le séchage est
terminé.
A.
Type de
tissu
Coton, lin Linge de
Coton Serviettes
Térital,
coton
Acryliques Pyjamas,
Nylon Lingerie,
Laine Tricots,
Les données indiquées dans le tableau ont une valeur purement
indicative.
Type de
charge
différentes
dimensions
éponge
Draps,
chemises
chaussettes
etc.
etc.
pull-overs,
etc.
Charge
max.
(kg) Extra
4 155 140 130
4 155 140 130
2,5 110 100 90
16560 60
16560 60
17070 70
Pour des chargements de textiles coton inférieurs à
1 Kg, utilisez le programme de séchage pour textiles
synthétiques.
Temps de séchage (Min.)
Armoire Repassage
sec
IMPORTANT
Pendant le séchage, la machine procède à un essorage
si vous avez programmé un des programmes coton.
ATTENTION
- Pendant le séchage, le hublot a tendance à chauffer.
- Ne mettez pas à sécher du linge lavé avec des
solvants inflammables (trichloréthylène par ex.).
- Ne mettez pas à sécher du caoutchouc-mousse ou
des élastomères du même genre.
- Vérifiez qu'au cours du séchage, le robinet de
l'eau soit bien ouvert.
- Ce lavante-séchante séchant ne peut être utilisé
que pour sécher du linge ayant été lavé à l'eau.
5
Instructions pour l'installation et l'emploi
Page 9
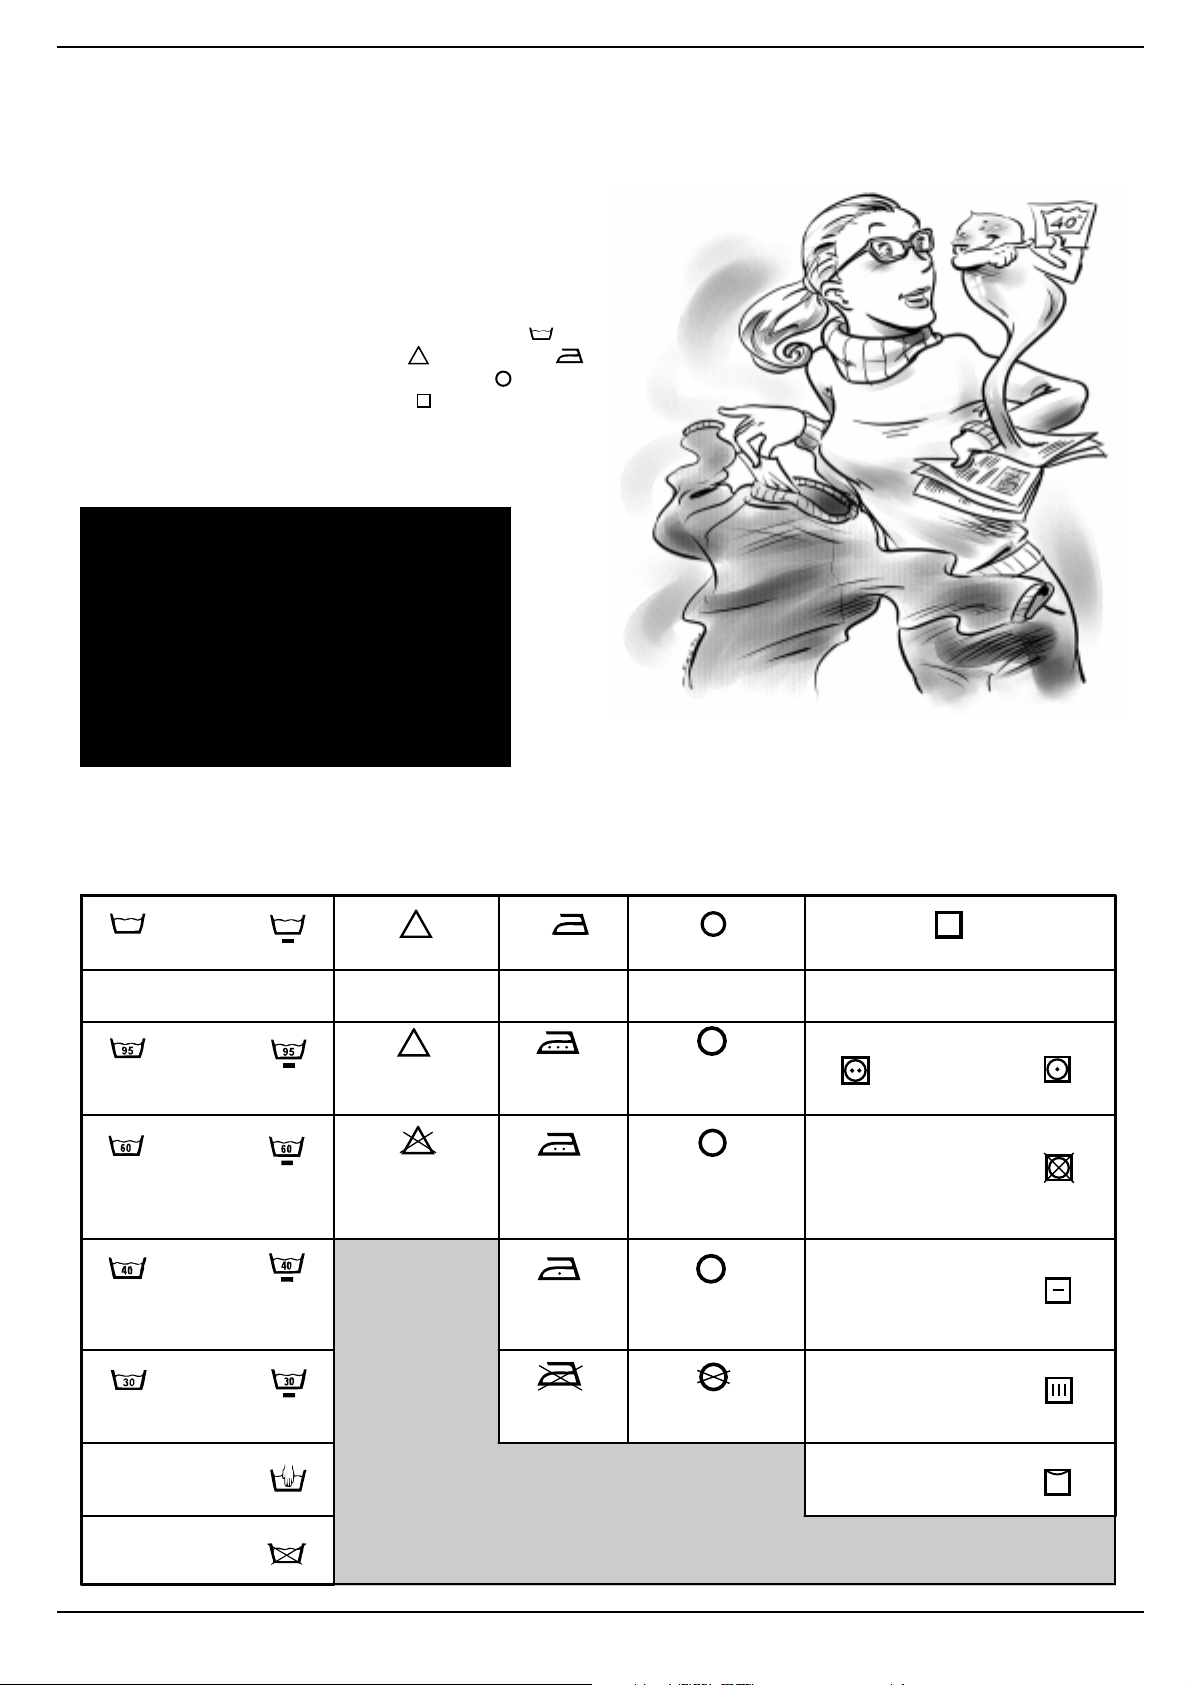
Sachez lire les étiquettes
Apprenez à lire ces symboles, vous laverez mieux,
votre linge durera plus longtemps et votre lavanteséchante ne vous en servira que mieux.
Partout en Europe, les étiquettes
contiennent des messages sous
forme de petits mais très
importants symboles. Il est
primordial dapprendre à les
On compte cinq catégories de
sigles différents: lavage
Javel
, repassage ,
nettoyage à sec
séchage
.
,
et enfin
comprendre pour mieux laver et
traiter vos vêtements.
Conseils Utiles
Retournez les chemises, elles seront mieux
lavées et dureront plus longtemps.
Videz bien les poches.
Lisez les étiquettes: leurs conseils sont
précieux et utiles.
Dans le tambour, alternez grandes et petites
pièces de linge.
Lisez et mémorisez les symboles de ce tableau:
vous apprendrez à mieux laver et traiter votre linge et à augmenter
les performances de votre lavante-séchante.
Attention à ne pas vous tromper
de température....
Action
forte
Lavage Blanchissage Repassage Nettoyage à sec Séchage
Lavage à
95°
Action
délicate
c
l
On peut blanchir
dans l'eau froide
Repassage
fort
max200°C
A
Nettoyage à sec
avec tous les
solvants
Temp.
élevée
Sécher en
machine
P
Nettoyage à sec
Lavage à
60° Ne pas blanchir
Repassage
moyen
max 150°C
avec perchlorure,
benzine, alcool pur,
R111 et R113
Ne pas sécher
en machine
F
Lavage à
40°
Lavage à
30°
Lavage
délicat
à la main
Repassage
max 110°C
Ne pas
repasser
Nettoyage à sec
avec benzine, alcool
pur et R113 Sécher à plat
Ne pas nettoyer à
sec
Sécher étendue
une pièce pas
Sécher sur
essorée
cintre
Temperat.
modérée
Ne pas
lav er
dans l'eau
Instructions pour l'installation et l'emploi
6
Page 10
Quelques conseils pour ne pas vous tromper
Ne lavez jamais à la
machine... du linge non ourlé, ,
effiloché ou déchiré. Si vous
devez absolument le laver,
enfermez-le dans un sac. Du linge
aux couleurs vives avec du linge
blanc.
Attention au poids!
Pour obtenir dexcellents
résultats, ne dépassez jamais les
poids indiqués, se référant à la
capacité maximum de linge sec:
- Tissus résistants:
maximum 5 kg
- Textiles synthétiques:
maximum 2,5 kg
- Textiles délicats:
maximum 2 kg
- Pure laine vierge:
maximum 1 kg
Mais combien pèsent-ils?
1 drap 400-500 g
1 taie doreiller 150-200 g
1 nappe 400-500 g
1 peignoir 900-1.200 g
1 serviette éponge 150-250 g
Les Tee-shirts couleur, les
imprimés et les chemises durent
plus longtemps si vous les lavez à
lenvers. Repassez toujours vos
Tee-shirts et vos sweats imprimés
sur lenvers.
Alarme salopettes.
Elles ont du succès ces
combinaisons genre salopette
mais leurs bretelles ont des
crochets qui peuvent
endommager le tambour ou les
autres vêtements. Pourquoi ne
pas les enfiler dans la poche de
la bavette et les fixer avec des
épingles à nourrice pour
supprimer tout danger!
Vacances: débranchez la
fiche.
Quand vous partez en vacances,
mieux vaut débrancher la fiche,
fermer le robinet darrivée de leau
et laisser le hublot entrouvert ou
ouvert. Ainsi, le tambour et le joint
resteront bien secs et vous
éviterez la formation de
mauvaises odeurs.
CYCLE LAINE
Pour obtenir de meilleurs
résultats, utilisez une
lessive spéciale laine et
ne lavez pas plus d'un
kilo de linge à la fois.
Comment laver presque tout
Les rideaux.
Ils ont tendance à beaucoup se
froisser. Nous vous conseillons:
de bien les plier et de les glisser
dans une taie doreiller ou dans
un sac genre filet. Lavez-les seuls
de manière à ce que leur poids
total ne dépasse pas une demicharge. Noubliez pas de
sélectionner le programme
spécial 12 qui supprime
automatiquement lessorage.
Doudounes et anorak.
Les doudounes et les anoraks
aussi peuvent être lavés à la
machine sils sont en duvet doie
ou de canard. Ce qui compte cest
de ne pas dépasser une charge
de 2-3 kg maximum, de faire faire
deux ou trois rinçages de suite et
un essorage léger.
Chaussures de tennis.
Débarassez les chaussures de tennis de la boue et lavez-les avec
les jeans et les vêtements plus
résistants. Ne les lavez pas avec
du linge blanc.
EXCLUSIF
Cachemire Gold: Délicat comme le lavage à la main
Le premier lavante-séchante recommandé par "The Woolmark Company".
Le programme de lavage
Cachemire Gold est
spécialement conçu pour laver
à la machine vos vêtements en
laine et en Cachemire les plus
délicats et les plus précieux.
Le cycle de lavage spécial laine
des lavante-séchante Merloni
Elettrodomestici a été testé et
approuvé par Woolmark pour le
lavage des vêtements
Woolmark dont l'étiquette
recommande "laver à la main".
Il s'agit du premier cycle de
lavage douceur, effet manuel,
approuvé par Woolmark.
M.00221
Ce résultat est obtenu grâce à
la vitesse de rotation du
tambour, 90 tours minute,
même en phase de rinçage, qui
évite le frottement des fibres.
Sélectionnez toujours le
programme 11 pour tout votre
linge portant le symbole dune
cuvette et dune main.
Prenez soin de vos vêtements en
laine, préférez des lessives
spéciales laine.
Instructions pour l'installation et l'emploi
7
Page 11

Important pour mieux laver
Le secret du tiroir à produits lessiviels
Son premier secret, le plus facile, cest quil faut
le faire pivoter vers la gauche pour louvrir.
4
X
A
Versez les produits lessiviels et
ladditif éventuel en ne dépassant
pas les doses conseillées par le
fabricant: celles-ci sont
généralement indiquées sur les
paquets. Les doses varient en
fonction de la charge, de la dureté
de leau et du degré de salissure.
Lexpérience aidant, vous
apprendrez à doser les quantités
presque automatiquement: ce
sera votre secret.
Avant de verser la lessive pour le
prélavage dans le compartiment
1 contrôlez quil ny ait pas à
lintérieur le bac supplémentaire
à eau de javel 4 .
Quand vous versez lassouplissant
dans le bac 3, attention à ce quil
ne déborde pas de la grille.
Le machine prélève automatiquement lassouplissant lors de
chaque programme de lavage.
Versez la lessive liquide dans le
bac 2 quelques instants avant de
brancher votre machine.
Noubliez pas que la lessive liquide est particulièrment indiquée
pour des lavages à des
températures allant jusquà 60
degrés et pour les programmes de
lavage qui ne prévoient pas de
prélavage.
Vous trouverez dans le commerce
des lessives liquides ou en poudre
avec boule doseuse à placer
directement dans le tambour, leur
mode demploi est indiqué sur le
paquet.
Nutilisez jamais de lessive pour
lavage à la main, leur excès de
mousse risquerait dendommager
votre lavante-séchante.
Les lessives spéciales main et
machine font bien sûr exception.
Encore un petit secret: quand vous
lavez à leau froide, réduisez la
quantité de lessive car cette
dernière sy dissout moins bien
que dans leau chaude et serait en
partie gaspillée.
Cycle blanchissage
Si vous voulez blanchir votre
linge, placez le bac
supplémentaire n°4 (fourni) dans
le compartiment 1 du tiroir à
produits lessiviels.
Lorsque vous versez leau de Javel,
attention à ne pas dépasser le
niveau "max" indiqué sur le pivot
central (voir figure).
Lutilisation du bac supplémentaire à eau de Javel exclut
la possibilité deffectuer un
1
prélavage. Nutilisez de leau de
javel que pour les tissus blancs
résistants et des détachants
délicats pour les couleurs, les
synthétiques et la laine.
Le tiroir à produits lessiviels est
amovible. Pour le laver, sortez-le
en le soulevant et en le tirant vers
2
vous (voir figure) et rincez-le à
l’eau courante.
Des économies sur toute la ligne
CHARGE MAXIMUM
La meilleure façon déviter des gaspillages délectricité, deau, de lessive et de
temps, cest dutiliser votre lavante-séchante au maximum de la charge
conseillée.
Mieux vaut une pleine charge que deux demies, vous pourrez ECONOMISER
jusquà 50% délectricité.
UN PRELAVAGE EST-IL VRAIMENT NECESSAIRE?
Uniquement en cas de linge vraiment sale.
Programmer un lavage SANS prélavage pour du linge peu sale ou
moyennement sale permet dECONOMISER sur la lessive, le temps, leau et
de 5 à 15% délectricité.
Guide pour un emploi
économique et écologique
des électroménagers
M
1
3
2
Bac 1:
Lessive prélavage (en poudre)
Bac 2:
Lessive lavage
(en poudre ou liquide)
Bac 3:
Additifs (assouplissants,
parfums, etc.)
Bac 4:
Javel et détachant délicat.
MAX
MAX
Supprimez-le pour le programme
12 (Soie et voilage) et les
programmes spéciaux (voir
page 4).
Si vous désirez blanchir
séparément versez le produit de
blanchissage dans le bac
supplémentaire 4 et sélectionnez
le programme 14.
Le niveau de rinçage doit être
programmé sur Moyen ou
Elevé (voir page 3).
Quand vous blanchissez pendant
un cycle de lavage normal,
versez le produit lessiviel et les
additifs dans les bacs
correspondants (voir tableau page
4), sélectionnez le programme
désiré et choisissez l'option Anti-
tâches.
UN LAVAGE A LEAU CHAUDE EST-IL VRAIMENT NECESSAIRE?
Avant le lavage, traitez les taches avec un détacheur ou mettez a tremper le
linge taché dans leau, vous pourrez sélectionner un programme de lavage à
leau chaude à une température moins élevée.
Choisissez un programme de lavage à 60° pour ECONOMISER jusquà 50%
délectricité.
AVANT DE SELECTIONNER UN PROGRAMME DE SECHAGE ...
Sélectionnez une vitesse dessorage très élevée pour éliminer le surplus deau
avant de lancer le programme de séchage. Vous ECONOMISEREZ du temps et
de lélectricité.
Instructions pour l'installation et l'emploi
8
Page 12
Problèmes et solutions
Avant de téléphoner, lisez ce qui suit
Il peut arriver que le lavante-séchante ne fonctionne pas bien. Il sagit
très souvent de problèmes faciles à résoudre sans laide dun technicien.
Avant dappeler le SAV, effectuez les contrôles suivants.
Le lavante-séchante
ne démarre pas.
La fiche est-elle bien
branchée dans la prise? Elle
pourrait avoir été déplacée en
faisant le ménage.
Y a-t-il du courant?
Le disjoncteur pourrait sêtre
déclenché parce quil y a trop
délectroménagers branchés en
même temps. Ou bien il peut y
avoir une panne de courant
dans votre quartier.
Le hublot est-il bien fermé?
Par sécurité, le lavante-
A FAIRE
Fermer le robinet
après chaque
lavage.
Cela réduit lusure
de linstallation
hydraulique du
lavante-séchante
et évite le danger
de fuites quand il
ny a personne à la
maison.
Laisser toujours le
hublot entrebaillé.
Pour éviter la
formation de
mauvaises odeurs.
Nettoyer
lextérieur avec
soin.
Pour nettoyer
lextérieur et les
parties en
caoutchouc,
utilisez toujours
un chiffon imbibé
deau et de savon.
séchante ne fonctionne pas si
le hublot est ouvert ou mal
fermé.
La touche Marche-arrêt estelle enfoncée?
Dans ce cas, un départ différé
a été programmé.
La touche Start/Reset estelle enfoncée?
Dans ce cas, un départ différé
a été programmé.
Le robinet de leau est-il
ouvert? Par sécurité, sil ny a
pas darrivée deau, le lavage
ne démarre pas.
A NE PAS F AIRE
Laisser la fiche
branchée pendant le
nettoyage du lavanteséchante.
Même pendant les
travaux dentretien, il
faut toujours
débrancher la fiche.
Utiliser des solvants et
des produits abrasifs
agressifs.
Ne jamais utiliser de
produits solvants ou
abrasifs pour nettoyer
lextérieur et les
parties en caoutchouc.
Négliger le tiroir à
produits lessiviels.
Il est amovible, pour le
laver il suffit de le
laisser un peu sous un
jet deau courante.
Partir en vacances
sans se soucier de lui.
Avant de partir, il faut
toujours contrôler si la
fiche est bien
débranchée et le
robinet de leau fermé.
Mais l'eau, où donc est-elle passée?
C'est très simple: grâce à la nouvelle technologie Scholtes, il en
faut moins que la moitié, pour bien laver le double de linge!
Voilà pourquoi vous ne voyez pas d'eau par le hublot:
parce qu'il y en a peu, très peu, pour protéger l'environnement
sans pour autant renoncer à une propreté éclatante.
Et ce n'est pas tout: vous faites en plus des économies d'électricité.
Le lavante-séchante
Il ny a pas darrivée
deau.
Le tuyau est-il bien
raccordé au robinet?
Panne deau? Ny a-t-il pas des
travaux en cours dans votre
immeuble ou dans la rue?
La pression est-elle
suffisante? La moto-pompe
pourrait être en panne.
Le filtre du robinet est-il
propre? Si leau est très
calcaire, ou suite à des travaux
récents sur la canalisation
deau, le filtre pourrait être
bouché par des détritus.
Le tuyau en caoutchouc
nest-il pas plié? Le parcours
du tuyau en caoutchouc qui
amène leau au lavanteséchante doit être le plus
rectiligne possible. Contrôlez
sil nest pas écrasé ou plié.
prend leau et vidange
continuellement.
Le tuyau est placé trop bas?
Il faut linstaller entre 60 et 100
cm de haut.
Lembouchure du tuyau est
plongée dans leau?
Lévacuation murale a-t-elle
un évent? Si après ces
vérifications, le problème persiste, fermez le robinet de leau,
éteignez la machine et appelez
le SAV.
Si vous habitez en étage, il
pourrait y avoir des
phénomènes de siphonnement.
Pour les résoudre, il faut monter
une soupape spéciale.
Instructions pour l'installation et l'emploi
9
Page 13
Est-ce que la conduite de
linstallation de vidange est
bouchée? Sil y a une rallonge,
est-ce quelle est bien montée
ou empêche-t-elle leau de
passer?
Est-ce que la machine est
coincée entre des meubles
et le mur? A moins que ce soit
un modèle à encastrer, votre
lavante-séchante a besoin
dosciller un peu pendant
lessorage. Prévoyez quelques
cm de libres tout autour.
Votre lavanteséchante ne vidange
pas et nessore pas.
Est-ce que le programme
choisi prévoit la vidange de
leau? Pour certains
programmes de lavage il faut
intervenir pour lancer la
vidange .
Est-ce que la fonction
Repassage facile - est
activé? Complétez le
programme en appuyant sur la
touche select.
Est-ce que le tuyau
dévacuation est plié? Le
parcours du tuyau doit être le
plus rectiligne possible.
Contrôlez sil nest pas écrasé
ou plié.
Ne vous adressez
jamais à des
techniciens non
Votre lavante-séchante
vibre beaucoup en
phase dessorage.
Est-ce que le groupe
oscillant interne a bien été
débloqué lors de
linstallation? La page qui
suit est consacrée à
linstallation.
Est-ce que la machine est
bien de niveau? Contrôlez
régulièrement sa mise à
niveau. A la longue, le lavante-séchante pourrait sêtre
légèrement déplacé. Agissez
sur les pieds et contrôlez à
laide dun niveau.
Le lavante-séchante a
des fuites.
Est-ce que la bague du tuyau
darrivée de leau est bien
vissée? Fermez le robinet,
débranchez la fiche et essayez
de la serrer sans forcer.
Est-ce que le tiroir à
produits lessiviels est
engorgé? Essayez de le sortir
et de le laver à leau courante.
Est-ce que le tuyau de
vidange nest pas bien fixé?
Fermez le robinet, débranchez
la fiche et essayez de mieux le
fixer.
agréés et exigez
toujours lemploi
de pièces
détachées
originales.
Caractéristiques techniques
Modèle
Dimensions
Capacité
Connexions
électriques
Connexions
hydrauliques
Vitesse d'essorage
Programmes de
contrôle suivant
norme IEC 456
MLSE 12 X
largeur cm 59,5
hauteur cm 81,5
profondeur cm 54
de 1 à 5 kg pour le lavage; de 1 à 4 kg pour le séchage
tension à 220/230 Volt 50 Hz
puissance max. absorbée1850 W
pression maximum 1 MPa (10 bar)
pression minimum 0,05 MPa (0,5 bar)
capacité du tambour 46 litres
jusqu' à 1200 tours par minute
lavage
: prog ra mme 3 ; t em pé ra tu re 60 °C ; n iv eau de rinçage ;
in te ns it é lav ag e ; effe ct ué pour une charge de 5, 0 k g.
séchage
sé ch ag e .
Cet appareil est conforme aux Directives Communautaires suivantes:
- 73/23/CEE du 19/02/73 (Basse Tension) et modifications successives
- 89/336/CEE du 03/05/89 (Compatibilité électromagnétique) et
modifications successives
: effectu é a ve c une charge de 2,5 kg en sélectionna nt le ty pe de
Il y a un excès de
mousse.
Est-ce que vous utilisez
bien une lessive machine?
Vérifiez quil y ait bien
linscription: pour lave-linge
ou bien main et machine.
Est-ce que la quantité est
correcte? Un excès de lessive
produit plus de mousse mais
ne lave pas mieux tout en
produisant des incrustations à
lintérieur du lavante-séchante.
Pas de séchage
Contrôlez que:
La fiche soit bien branchée dans
la prise; qu'il n'y ait pas de
coupure de courant; que le
hublot soit bien fermé; que le
départ différé (s'il y en a un de
prévu) ne soit pas sélectionné;
que la fonction séchage a bien
été sélectionnée.
Le lavante-séchante
ne sèche pas
correctement.
Contrôlez que:
l'extrémité du tuyau de
chargement ne soit pas plongée
dans l'eau; que la pompe de
vidage ne soit pas bouchée; que
les conseils concernant les
charges maximum aient bien été
respectés; que le robinet de l'eau
soit bien ouvert.
Si malgré tous ces contrôles,
votre lavante-séchante ne
fonctionne pas et
linconvénient persiste,
appelez le SAV le plus proche
de votre domicile en
précisant:
- le type de panne
- le sigle (Mod. ....)
- le numéro de série (S/N ....)
Vous trouverez tous ces
renseignements sur la
plaquette signalétique située
sur le panneau arrière de
votre lavante-séchante.
Instructions pour l'installation et l'emploi
10
Page 14
Installation et déménagement
Quand la
séchante
Que votre lavante-séchante soit neuf ou que vous veniez juste
de déménager, son bon fonctionnement dépend en grande
partie de son installation.
Après avoir déballé lappareil, vérifiez
sil est en bon état. En cas de doute,
faites appel à un professionnel du
secteur. Pour permettre son
transport, lintérieur du lavanteséchante a été bloqué à laide de
quatre vis sur le panneau arrière
de la machine.
Avant de brancher votre lavanteséchante, enlevez les vis, le
caoutchouc et la cale (conservez
bien toutes ces pièces) et bouchez
les trous à laide des cache-trous en
plastique fournis avec lappareil.
Important: fermez à l'aide du
bouchon (fourni) les 3 trous où était
montée la fiche et qui se trouvent
sur le panneau arrière du lavanteséchante, en bas à droite.
Mise à niveau
Pour bien fonctionner, il est important
que votre lavante-séchante soit bien
posé à plat. Pour bien le niveler, il
suffit dagir sur ses pieds avant; son
angle dinclinaison , mesuré sur le plan
de travail, ne doit pas dépasser 2°. Si
vous avez de la moquette, attention à
ce que la ventilation ne soit pas
bouchée au niveau du socle.
Les pieds avant sont réglables.
Conservez les vis de
Raccordement à la prise
blocage et la cale. En
deau
cas de déménagement
vous pourrez vous en
resservir pour bloquer
les pièces internes du
lavante-séchante et le
protéger ainsi contre
les chocs pendant son
transport.
La pression de leau doit être
comprise entre les valeurs
indiquées sur la plaquette fixée
à larrière de lappareil.
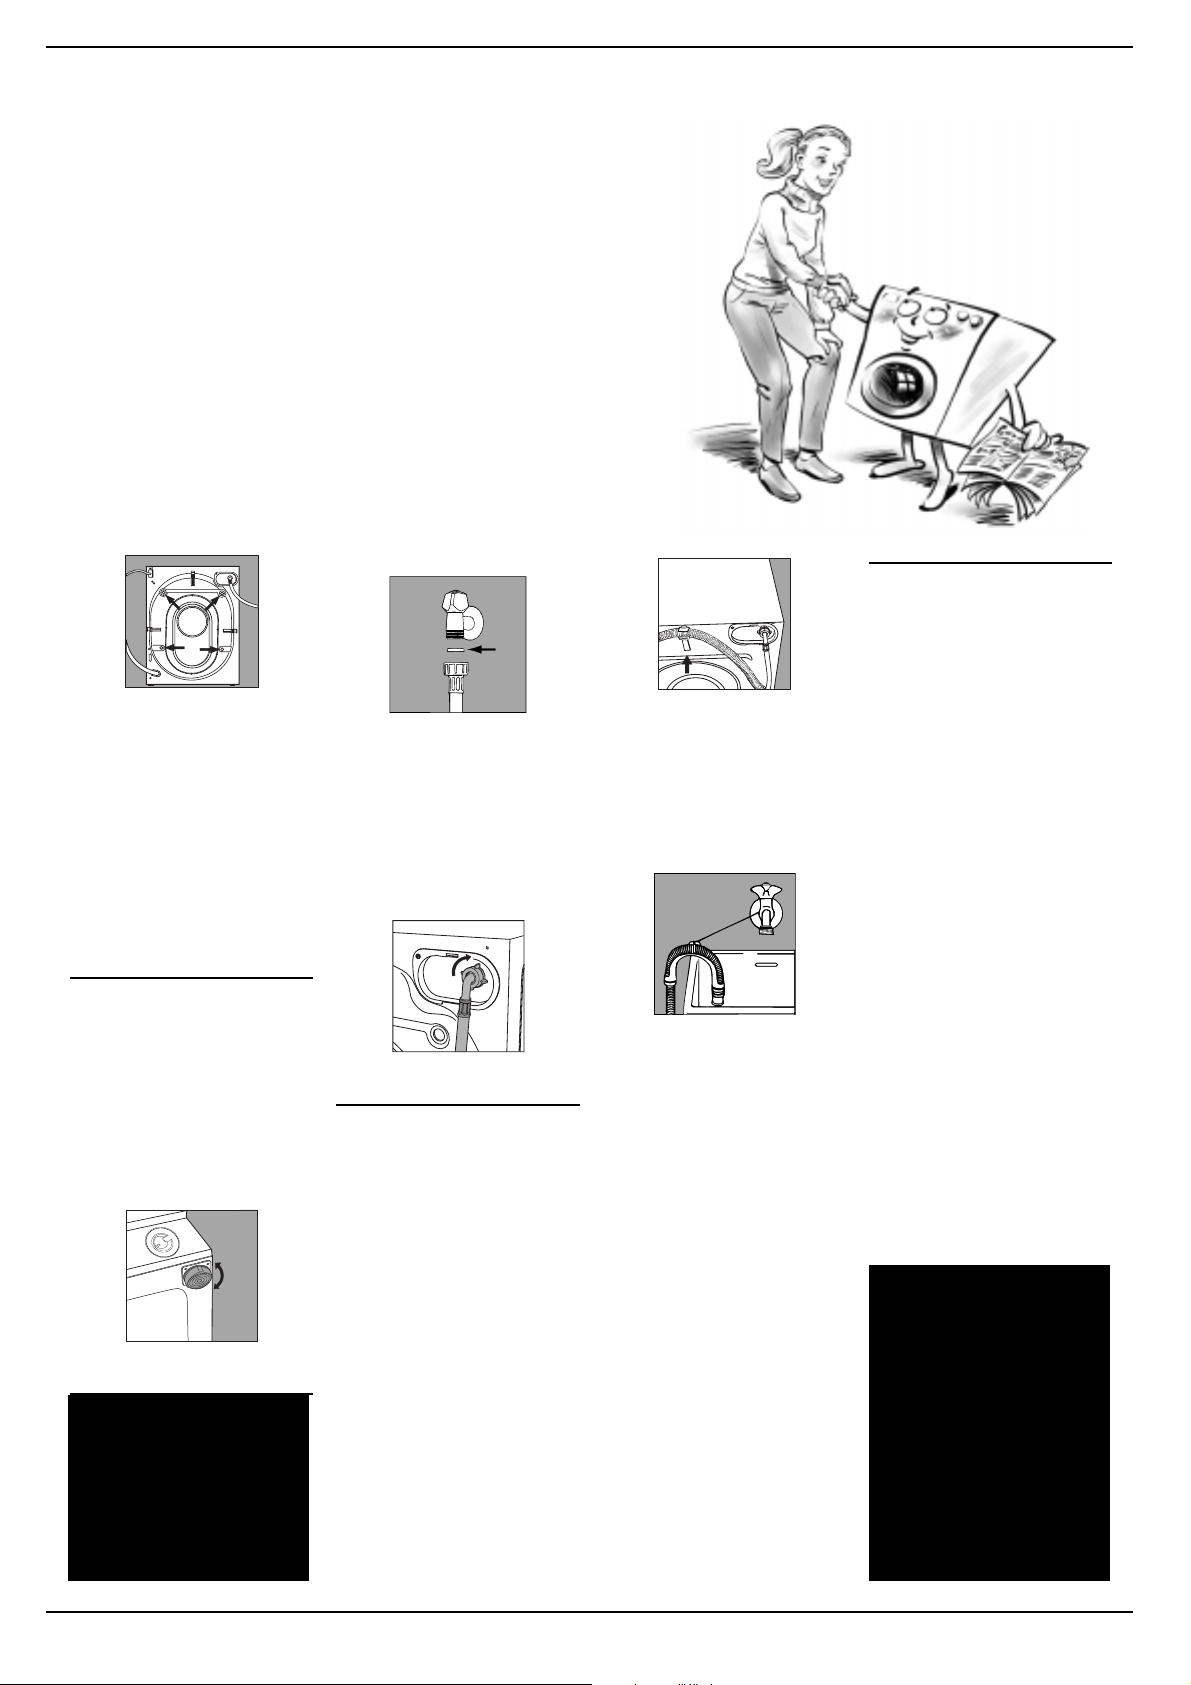
Raccordez le tuyau darrivée à
une prise deau froide à embout
fileté 3/4 gaz ou 20x27 en
interposant le joint en
caoutchouc.
Le joint en caoutchouc.
Si les canalisations deau sont
neuves ou inutilisées depuis
longtemps, faites couler leau
jusquà ce quelle soit limpide et
sans impuretés. Raccordez le tuyau
à la machine, au niveau de la prise
deau prévue en haut, à droite.
Prise d’eau en haut à droite.
Raccordement du tuyau de
vidange
Deux crochets (droit ou gauche)
situés à larrière de la machine
vous permettent de fixer le tuyau
de vidange. Introduisez lautre
extrémité dans un conduit ou
bien accrochez-le à lévier ou à
la baignoire en évitant de
lécraser ou de trop le plier. Il faut
absolument quil débouche entre
60 et 100 cm de haut. Si vous êtes
obligés de fixer lextrémité à
moins de 60 cm au-dessus du sol,
il faut que vous fixiez le tuyau
au crochet prévu dans le haut du
panneau arrière de la machine.
lavante-
arrive
A
Le crochet à utiliser si le tuyau
débouche à moins de 60 cm de
haut.
Si le tuyau évacue dans la
baignoire ou dans le lavabo,
appliquez le support en plastique
et attachez-le au robinet.
Le support pour évacuation dans
une baignoire ou dans un lavabo.
Ne le laissez jamais tremper dans
leau.
Lutilisation de rallonges est
absolument déconseillée. Si vous
ne pouvez vraiment pas vous en
passer, il faut quelle ait le même
diamètre que le tuyau original et
moins de 150 cm de long. En cas
dévacuation murale, faites
vérifier son efficacité par un
professionnel agréé. Si vous
habitez en étage dans un
immeuble, il peut y avoir des
phénomènes de siphonnement qui
font que votre lavante-séchante
prend et évacue leau
continuellement.
Pour supprimer cet inconvénient,
vous pouvez trouver dans le
commerce des valves spéciales
anti-siphonnement.
Branchement électrique
Avant de brancher la machine à
la prise de courant, contrôlez que:
1) la prise de courant est conforme aux normes et que sa
charge électrique est bien apte
à supporter la puissance
maximum de la machine
figurant sur la plaquette des
caractéristiques ;
2) la tension dalimentation est
bien comprise entre les valeurs
figurant sur la plaquette des
caractéristiques;
3) la prise est bien compatible
avec la fiche de la machine.
En cas dincompatibilité,
nutilisez pas dadaptateurs
mais remplacez la prise ou la
fiche;
4) votre installation électrique
dis-pose bien dune mise à la
terre.
Attention!
Nous déclinons toute
responsabilité en cas
de non respect des
normes énumérées
ci-dessus.
Ne laissez pas les
enfants jouer avec les
sachets plastique, le
polystyrène expansé,
les clous et les autres
éléments demballage,
ils pourraient être
dangereux.
Instructions pour l'installation et l'emploi
11
Page 15
Instructions pour l'installateur
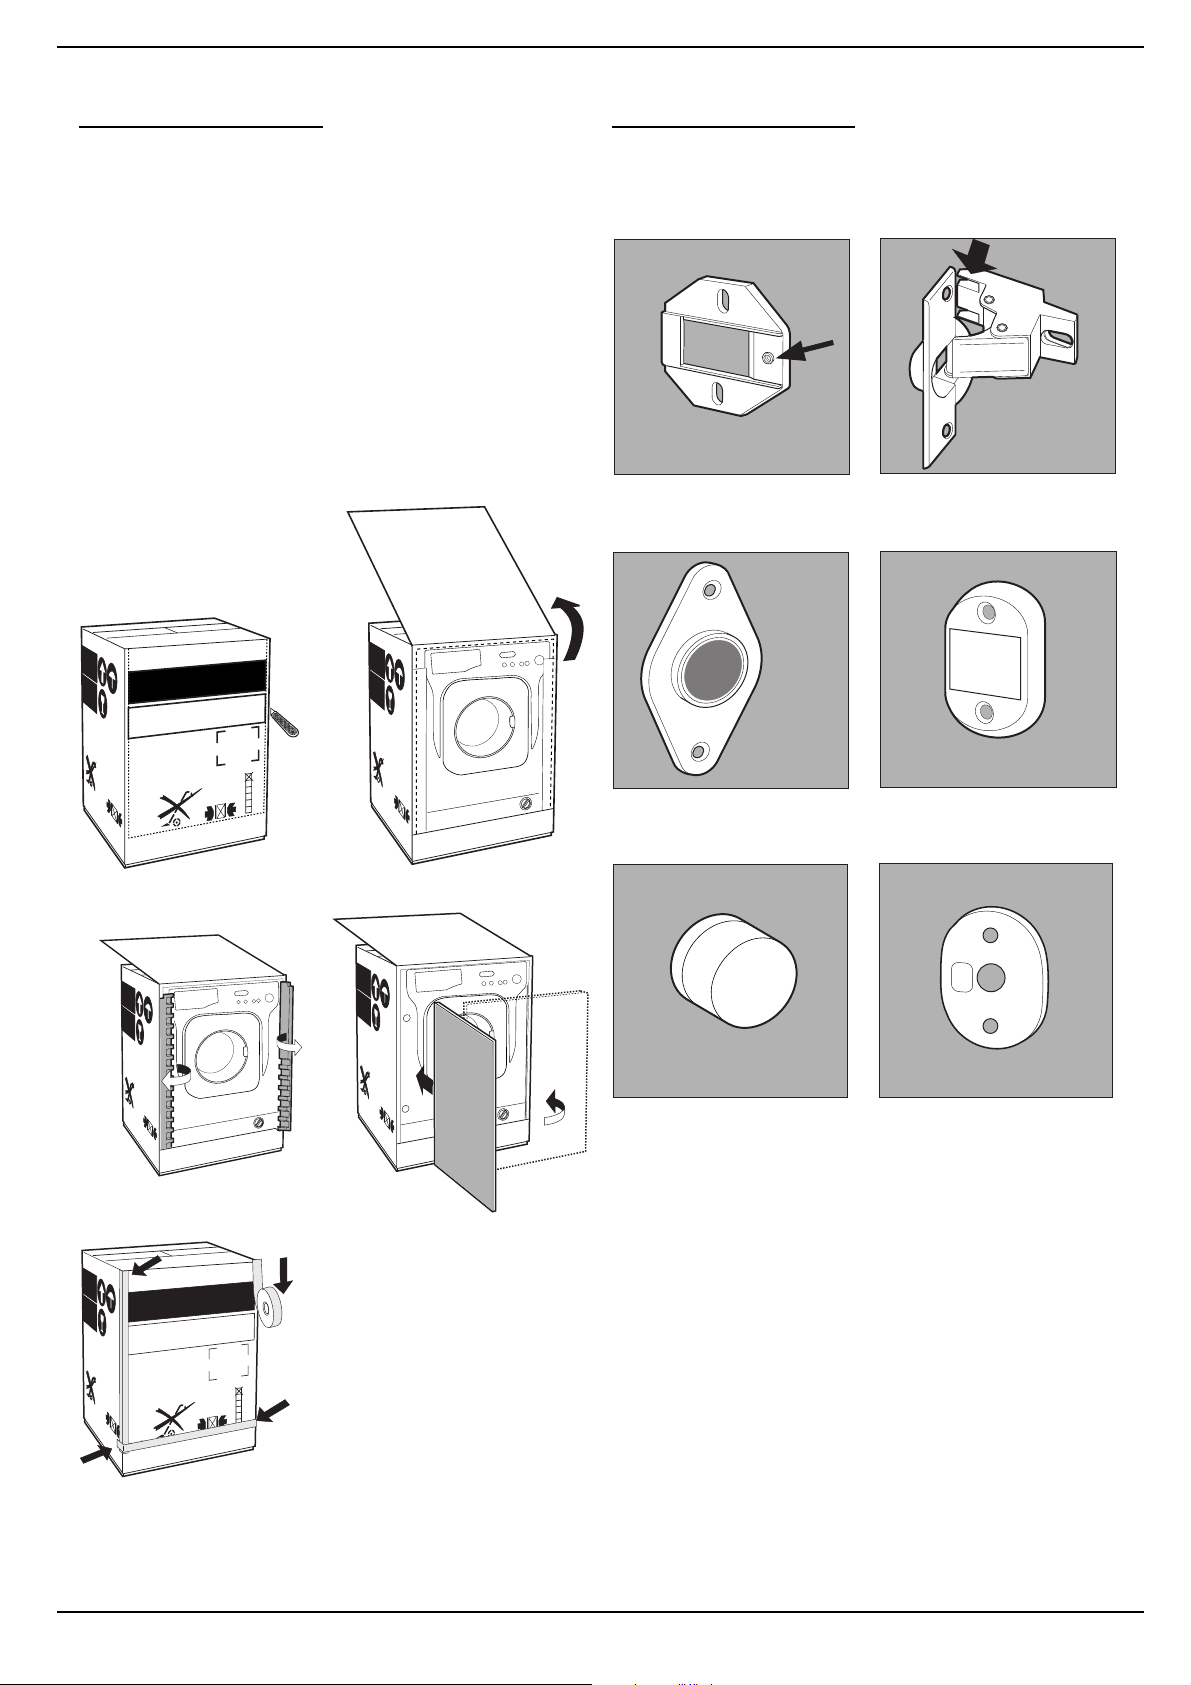
Application du panneau
d'habillage en bois sur la
porte et montage du
lavante-séchante à
l'intérieur des éléments:
Au cas où, après le montage du
panneau en bois, il faudrait
expédier la machine pour son
installation finale, nous vous
conseillons de la laisser dans son
emballage d'origine. L'emballage a
été justement réalisé de manière à
permettre le montage du panneau
en bois sur la machine sans
déballer complètement le produit
(voir figures ci-dessous).
Le panneau en bois couvrant la
façade ne doit pas avoir plus de
18 mm d'épaisseur, il peut être
articulé tant à droite qu'à gauche.
Pour plus de facilité d'emploi,
nous conseillons d'adopter le
même sens d'ouverture que pour
le hublot dont les charnières sont
montées sur le côté gauche.
Accessoires montage
porte (Fig. 1-2-3-4-5)
N° 2 Supports charnière
Fig. 1
N° 2 Charnière
Fig. 2
lavabiancheria
washing machine
achine laver
m
w
ato
L
o
D
o
C
u
T
la
ashing m
w
m
waschmaschine
to
a
L
Door side
Cote porte
r s
u
T
asch
o
p
d
i
s
r
o
r
o
p
e
t
ite
e
r s
a
v
achin
rta
o
p
ite
e
rta
e
e
t
b
m
n
ia
e laver
c
asch
e
h
achine
in
ria
e
A
C
6
5
4
3
2
1
Fig. 3
N° 1 Aimant
N° 1 Butoir aimant
Fig. 4
B
N° 1 Cheville en
caoutchouc
Fig. 5
- 6 vis autotaraudeuses l = 13 mm
D
"type A".
- 2 vis métriques à tête évasée l =
25 mm "type B"; pour fixation du
butoir aimant au meuble.
- 4 vis métriques l = 15 mm "type
C"; pour montage des supports
charnière au meuble.
- 4 vis métriques l = 7 mm "type
6
5
4
3
2
1
D"; pour montage des charnières
aux supports.
N° 1 Entretoise
Fig. 4/B
E
Instructions pour l'installation et l'emploi
12
Page 16
Montage des pièces sur
la façade de la machine
- Montez les supports de
charnière sur la façade en
positionnant le trou indiqué par
la flèche fig. 1 côté interne de la
façade, utilisez les vis de type C.
- Montez le butoir de l'aimant du
côté opposé, en haut, en vous
servant des deux vis B.
- Intercalez entre la façade de la
machine et le berceau de l'aimant,
l'entretoise illustrée fig. 4/B.
Utilisation du gabarit de
forage
- Pour marquer l'emplacement des
trous sur le côté du panneau,
alignez le gabarit de perçage avec
le côté supérieur gauche du
panneau en vous servant des
lignes tracées aux extrémités.
- Pour marquer l'emplacement
des trous sur le côté droit du
panneau, alignez le gabarit de
perçage avec le côté supérieur
droit du panneau.
- Réalisez à l'aide d'une fraise
appropriée les quatre emplacements où devront trouver place les
deux charnières, la cheville en
caoutchouc et l'aimant.
Montage des pièces sur
le panneau en bois (Porte)
- Montez les charnières aux
emplacements prévus (la partie
mobile de la charnière doit se
trouver vers l'extérieur du
panneau) et fixez-les à l'aide de
4 vis type A.
- Montez l'aimant à son
emplacement en haut, à l'opposé
des charnières et fixez-le au
moyen de deux vis type B.
- Montez la cheville en
caoutchouc à sa place en bas.
Le panneau est à présent prêt,
vous pouvez le monter sur la
machine.
Montage du panneau sur
la machine
Introduisez l'ergot de la charnière
indiqué par la flèche fig. 2 dans le
logement du support charnière,
poussez le panneau vers la façade
de la machine et fixez les deux
charnières à l'aide des deux vis
type D.
Fixation du support de la
base
Si la machine est installée à une
extrémité de la cuisine intégrée,
montez une ou les deux glissières
du socle comme illustré fig. 8 en
réglant leur profondeur en
fonction de la position du socle et,
au besoin, fixez-le à ces dernières
fig. 9.
Pour monter le support de la base,
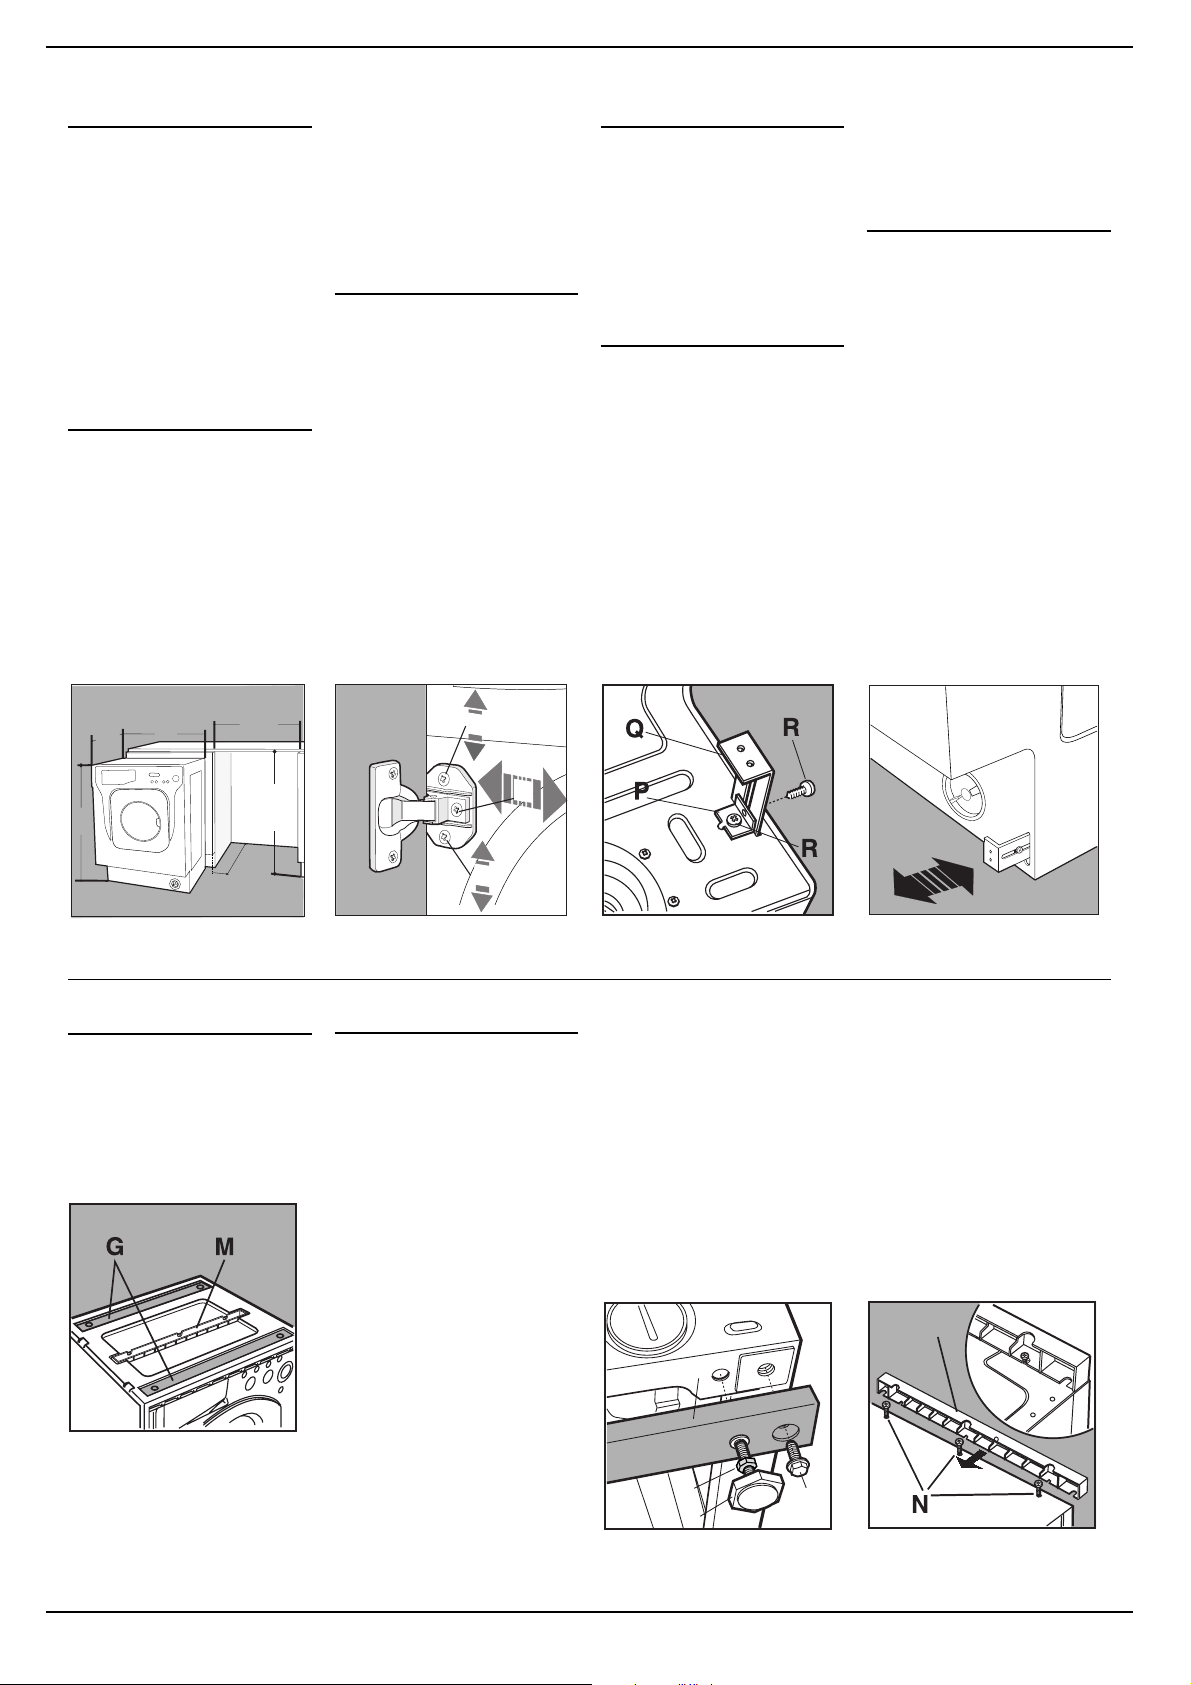
procédez comme suit (fig. 8):
Fixez l'équerre P à l'aide de la vis
R, insérez le support de la base Q
dans la fente prévue et après
l'avoir dûment positionné
bloquez-le à l'aide de l'équerre
d'assemblage P et de la vis R.
Montage de la machine à
l'intérieur des éléments
- Poussez la machine à travers l'ouverture en l'alignant aux autres
meubles (fig. 6).
- Servez-vous des pieds de réglage
pour amener la machine à la
hauteur désirée.
- Pour régler la position du panneau
en bois à la verticale et à
l'horizontale, servez-vous des vis C
et D comme illustré fig. 7.
Important: fermez la partie
inférieure de la façade, la base
touchant au sol.
in
595
40
5
600 m
C
D
815
Fig. 6 Fig. 7 Fig. 9
Accessoires fournis pour
le réglage de la hauteur
Vous trouverez à l'intérieur du
couvercle en polystyrène (fig.
10):
2 traverses (G),
1 listel (M)
Fig. 10
et à l'intérieur du tambour :
4 pieds supplémentaires (H),
4 vis (I),
4 vis (R),
4 écrous (L),
2 supports pour la base (Q)
570
820 ÷ 900
in
m
C
Fig. 8
Réglage de la machine en
hauteur
La machine peut être réglée en
hauteur (de 815 mm à 835 mm)
à l'aide de ses 4 pieds.
Si vous souhaitez l'amener à une
hauteur supérieure à celle qui est
indiquée plus haut, c'est à dire
jusqu'à 870 mm, utilisez les
accessoires suivants :
- les 2 traverses (G)
Procédez de même dans la partie
arrière de la machine.
Vous pouvez alors régler les pieds
H pour élever ou abaisser la
machine de 835 mm à 870 mm.
Après avoir atteint la hauteur
désirée, bloquez les écrous L à
la traverse G.
Pour régler la machine à une
hauteur comprise entre 870 mm
et 900 mm, montez le listel M et
réglez les pieds H jusqu'à la
hauteur souhaitée.
Pour monter le listel, procédez
comme suit :
desserrez les trois vis N situées
dans la partie avant du couvercle,
montez le listel M comme illustré
fig. 12 et serrez les vis N.
- les 4 pieds (H)
- les 4 vis (I)
- les 4 écrous (L)
puis procédez comme suit (fig.
11):
G
démontez les 4 pieds originaux,
positionnez une traverse G dans
la partie avant de la machine,
fixez-la à l'aide des vis I (en les
vissant dans les trous où étaient
fixés les pieds originaux) puis
montez les nouveaux pieds H.
Fig. 11
L
I
H
Fig. 12
M
13
Instructions pour l'installation et l'emploi
Page 17
Soins et Entretien facile
Chouchoutez-le et il vous sera toujours
fidèle
Votre lavante-séchante est conçu
pour durer longtemps sans causer
de problèmes. Quelques astuces
vous permettront de le garder
toujours en forme et daugmenter
sa longévité. En premier lieu,
fermez toujours le robinet de
leau après chaque lavage: la
pression continue de leau peut
provoquer lusure de certains
composants.
Vous éliminerez aussi tout danger
de fuites en votre absence.
Si votre eau est trop dure, utilisez
un produit anticalcaire (une eau
dure laisse des traces blanchâtres
autour des robinets ou bien au
niveau des bondes, notamment
dans la baignoire).
Si vous désirez avoir des
renseignements plus précis à
propos de leau de votre
installation, adressez-vous au
Service des eaux municipal ou
bien à un plombier.
Il faut toujours vider les poches
et enlever les objets durs, les
broches ou les pins par exemple.
Lavez lextérieur du lavanteséchante avec un chiffon, de leau
tiède et du savon.
Votre lavante-séchante est un vrai compagnon de vie et de
travail. Le garder en forme, cest important. Pour vous aussi.
Lavez
périodiquement le
tiroir à produits
lessiviels.
Pour éviter que des
incrustations ne se
forment, placez-le
sous un jet deau
courante.
Nayez pas la main
lourde.
Les lessives normales
contiennent déjà des produits
anticalcaires. Donc, najoutez à
votre lavage un produit
spécifique que si votre eau est
particulièrment dure, cest à dire
très riche en calcaire.
Il peut être utile, de temps en
temps, deffectuer un cycle de
lavage avec une dose de produit
anticalcaire, sans lessive et sans
linge.
Nayez pas la main lourde avec
les produits lessiviels, lexcès de
mousse pourrait causer de
incrustations et abîmer les
composants de votre machine.
Videz toujours les poches: les petits objets peuvent
endommager votre lavante-séchante.
En cas de besoin, inspectez la pompe et le tuyau en caoutchouc.
Votre lavante-séchante est équipée dune pompe autonettoyante qui nexige aucune opération de nettoyage et
dentretien.
Le tuyau en caoutchouc
Contrôlez le tuyau en caoutchouc au moins une fois par an. Remplacez-le dès que vous remarquez des
craquèlements et des fissures qui pourraient entraîner des cassures.
Instructions pour l'installation et l'emploi
14
Page 18
Ce qui compte par dessus tout
Votre sécurité et celle de
Votre lavante-séchante a été
fabriquée selon les normes
internationales de sécurité les plus
vos enfants
Lisez attentivement ces
conseils ainsi que toutes les
informations contenues dans
ce mode demploi: ils vous
fourniront no n seulement des
renseignements utiles mais
aussi des conseils importants
sur la sécurité, lutilisation et
lentretien.
1. Votre lavante-séchante
ne doit pas être installée
dehors, même à labri, car
il est très dangereux de la
laisser exposée à la pluie
et aux orages.
2. Elle ne doit être utilisée
que par des adultes et
exclusivement pour laver du
linge selon les instructions
reportées dans ce mode
demploi.
3. Deux ou trois personnes sont
nécessaires pour la
déplacer en faisant très
attention. Ne jamais la
déplacer seul car la
machine est très lourde
ou utilisez un engin de
manutention (diable).
4. Avant dintroduire votre
linge, contrôlez si le
tambour est bien vide.
5. Ne touchez jamais la
machine pieds nus ou bien
les mains ou les pieds
mouillés ou humides.
6. Nutilisez ni rallonges ni
prises multiples, dange-
reuses surtout dans des
Jexige un
professionnel
qualifié et agréé
et des pièces de
rechange originales
garanties Scholtes!
endroits humides. Le câble
dalimentation ne doit être
ni plié ni écrasé.
7. Nouvrez pas le tiroir à
produits lessiviels
pendant le fonctionnement de la machine;
nutilisez jamais de
sévères. Pour vous protéger ainsi
que votre famille.
lessive pour lavage à la
main sa mousse
abondante pourrait endommager les parties internes
de la machine.
8. Ne tirez jamais sur le
câble ni sur le lavante-
séchante pour débrancher la
fiche de la prise murale: cest
extrêmement dangereux.
9. En cours de
fonctionnement, ne
touchez pas à leau
évacuée, elle peut
atteindre des températures
très élevées. Pendant le
lavage, le hublot a
tendance à se réchauffer;
gardez vos enfants à bonne
distance. Ne forcez jamais
pour ouvrir le hublot
vous risqueriez dendommager le mécanisme de
sécurité prévu pour
prévenir les ouvertures
accidentelles.
10. En cas de panne, fermez
avant tout le robinet de
leau et débranchez la
fiche de la prise murale;
nessayez en aucun cas
daccéder aux mécanismes
internes pour la réparer.
Comment changer le câble dalimentation
Le câble dalimentation de
votre lavante-séchante
est un câble spécial qui
nest disponible
quauprès des SAV
agréés.
Fig. 13
Instructions pour l'installation et l'emploi
15
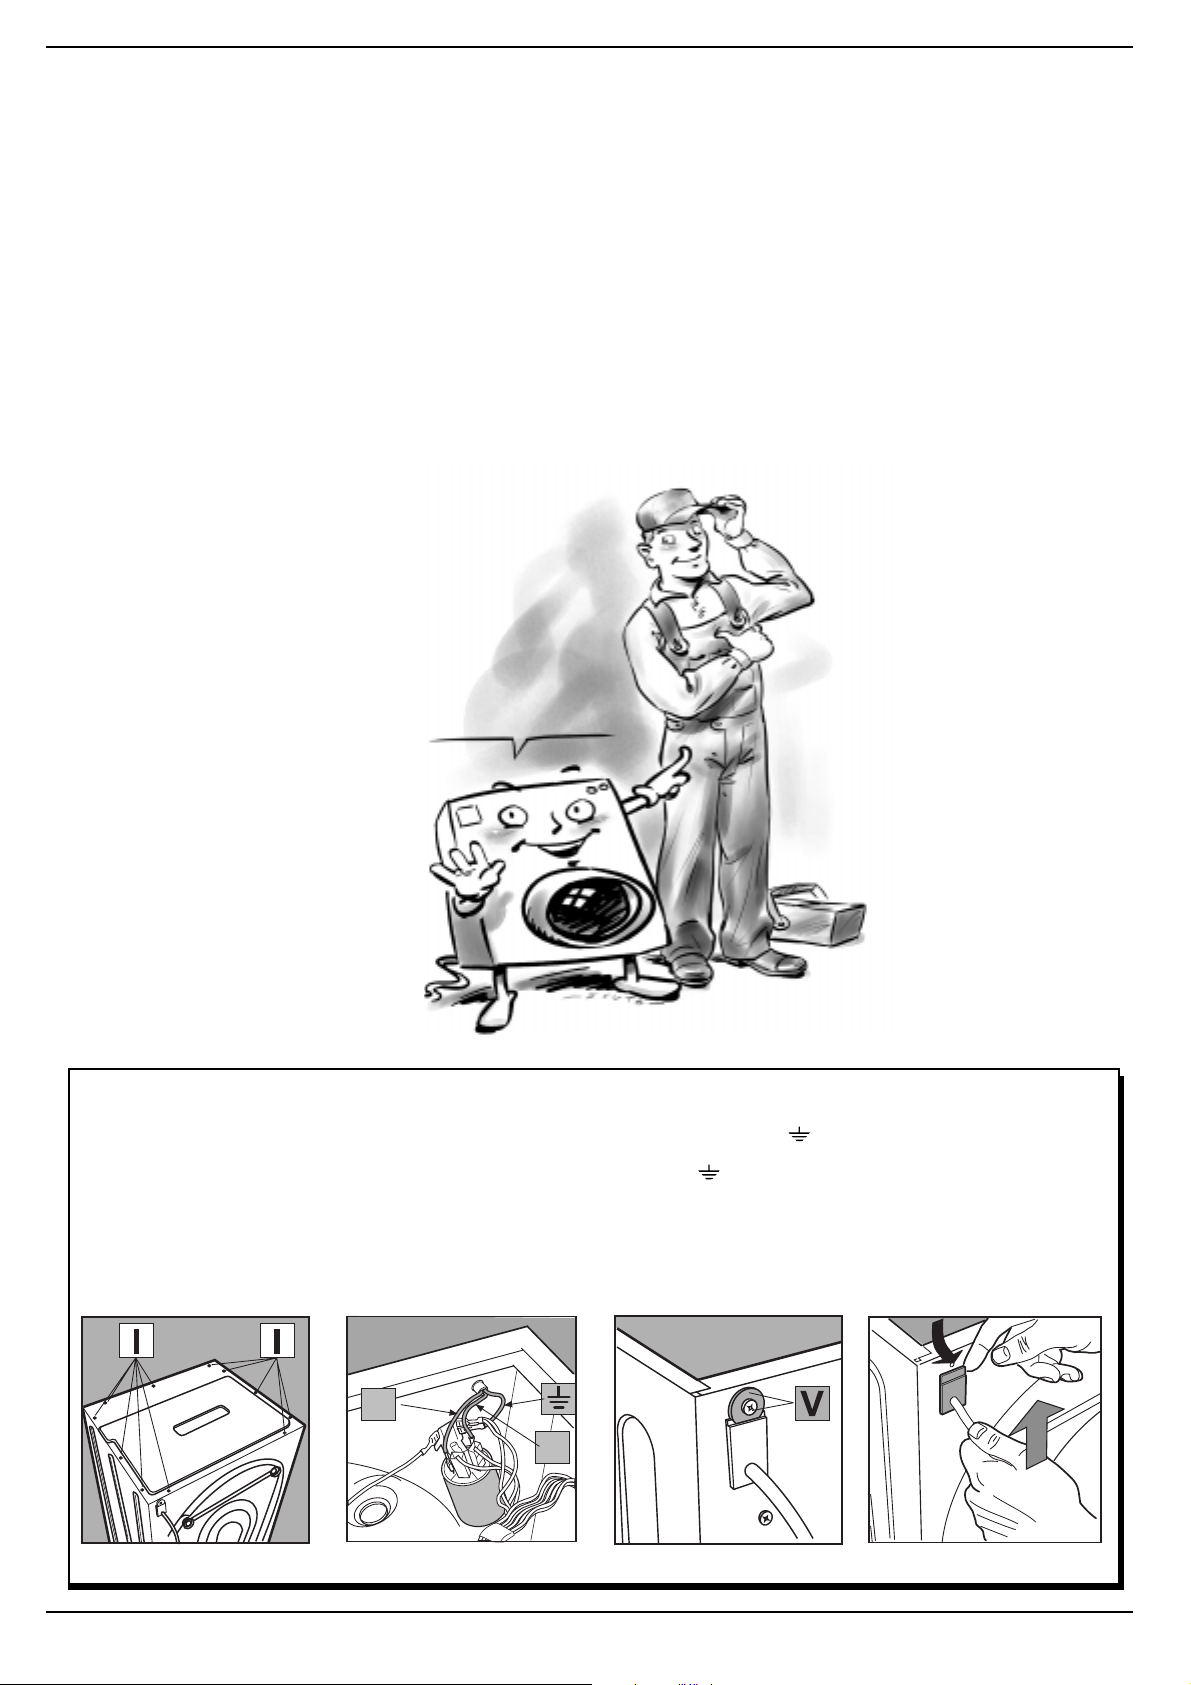
Pour le remplacer, procédez
comme suit:
1. Contrôlez que votre lavante-séchante est bien éteinte
et que la fiche est bien
débranchée.
2. Dévissez les vis I [fig. 13]
pour démonter le couvercle.
3. Déconnectez les câbles du
filtre antiparasite F [fig. 14]
en repérant bien leur
N
F
Fig. 14
emplacement (fil Bleu=N; fil
Marron=L) en laissant en
dernier le fil de terre
Remarque: les lettres L, N et
le symbole
sur le filtre antiparasite.
4. Enlevez la vis et la ron-
delle V [fig. 15] qui servent
d'arrêt pour le passe-fil.
5. Eloignez légèrement la
partie supérieure du passe-
sont reportés
L
Fig. 15 Fig. 16
fil du panneau arrière, tirez
le câble dalimentation vers
le haut, sortez-le [fig. 16].
.
Pour raccorder le nouveau
câble, procédez en sens inverse.
Il importe, pour votre
sécurité, de bien remonter
toutes les pièces et toutes les
vis utilisées.
Page 19

Instructions pour l'installation et l'emploi
16
Page 20
Quick guide
Here are the 12 topics explained in this manual. Read,
learn and have fun: you will discover many secret
ways to get a better wash, more easily and making
your washer-dryer last longer.
1. Installation and removal (p. 27)
Installation, after delivery or transport, is the most important
operation for the correct functioning of your washer-dryer. Always
check:
1. That the electric system conforms to regulations;
2. That the inlet and draining pipes are connected correctly.
Never use pipes that have already been used;
3. That the washer-dryer is levelled properly; something worth
checking to aid the performance of your washer-dryer;
4. That the drum's fixing screws have been removed from the back
of the washer-dryer.
8. How to dry (p. 21)
2. What goes in your washer-dryer and how
to start it (p. 18)
A correct distribution of your laundry is vital to the successful
outcome of the wash and the life of the washer-dryer. Learn all the
tips and secrets to dividing your linen: colour, type of fabric.
A few handy tips to get the best drying cycle from your appliance.
9. Care and maintenance (p. 30)
Your washer-dryer is a true friend. With just a bit of care, it will repay
you with loyalty and devotion.
With the necessary upkeep, it will wash for years and years to come.
3. Guide to understanding labels (p. 22)
The symbols on the labels of your garments are easy to understand
and equally important for the success of your wash. The guide
includes simple instructions to help you choose the right temperature, wash cycles and ironing methods.
10. Problems and solutions (p. 25 and 26)
Before calling a technician, read these pages: immediate solutions
may be found for a number of problems. If the problem persists, call
your local Scholtes customer services who will be pleased to help.
Any failure will be repaired, as soon as possible.
4. Useful tips to avoid mistakes (p. 23)
Years back, our grandmothers were the ones who gave us good advice
- and in those days synthetic fibres did not exist: washing was easy.
Today, your washer-dryer offers you helpful advice allowing you to
wash cashmere and wool even better than an expert laundress would
by hand.
5. The detergent dispenser (p. 24)
How to use the detergent dispenser and the bleach compartment.
11. Technical characteristics (p. 26)
Herein are the technical features of your washer-dryer: model type
number, electric and water specifications, size, capacity, speed of
the spin cycle and compliance with Italian and European regulations.
12. Safety for you and your family (p. 31)
Here you will find the necessary safety guidelines, and it is important
for you to read this section carefully.
6. Understanding the control panel (p. 19 - 20)
Washer-dryer s control panel is very simple. It has only a few essential
buttons to help you choose any type of wash cycle, ranging from the
most energetic, capable of cleaning a mechanics overalls, to the
most delicate for cashmere. Familiarising yourself with it will help
you get the best out of your wash while helping your washer-dryer
last longer. Its easy.
7. Guide to programmes (p. 20)
Herein is an easy table to help you choose the right programme,
temperature, detergents and possible additives. Choose the right
programme and you will get better results with your wash while
saving time, water and energy, day after day.
Instructions for installation and use
17
Page 21
M
What goes in your washer-dryer?
Before washing, you can do a great deal to ensure better results. Divide your
garments according to fabric and colour. Read the labels, follow their guidelines.
Before washing.
Divide your washing according to
the type of fabric and colour
fastness.
Empty all pockets (coins, paper,
money and small obejects) and
ensure all loose buttons are
repaired or removed prior to
loading.
The labels say it all.
Always look at the labels: they
tell you everything about your
garment and how to wash it in
the best possible way.
The table on page 22 shows all
meanings behind these symbols.
Their recommendations are
important to achieve better
wash results
Big and small happily
together.
This washer-dryer has a special
electronic control device for even
distribution: before the spin cycle
starts, this device allows the
garments to positions themselves,
to minimise noise and vibrations
during the spin cycle.
Starting the washer-dryer
After installing your new washer-dryer, start a
wash cycle by setting programme "1" at 90 degrees.
Starting your washer-dryer in the
right way is important for the
quality of your wash, to help
prevent future problems and
enhance life expectancy of your
appliance. Once you have loaded
your washer-dryer and added the
detergent together with any
fabric conditioner, always check
that:
For more delicate
garments:
protect underwear,
tights and stockings
and delicate items by
placing them in a
canvas pouch.
1. The door is closed correctly.
2. The plug is secured in the
socket.
3. The water supply is turned on.
Turn the appliance on
Press button B (position I).
Choose the desired programme
The programme is selected
according to the type of garments
that need to be washed. To
choose a programme, refer to the
table on page 18. Turn knob A
until the selected programme is
aligned with the mark on the
control panel, set all the options
available (flashing) as indicated
on pages 19 and 20 (reference
), then press button C (Start/
Reset).
If you want to interrupt the
programme in progress, press
button C for at least 3 seconds.
At the end of the wash cycle...
Wait for symbol
and the word End to appear.
Then turn the washer-dryer off by
pressing on-off button B (O
position). You can now open the
washer-dryer door safely. After
having removed the freshly
cleaned washing, leave the door
open to allow air circulation
inside the drum.
Always disconnect electricity at
the socket and turn off the water
supply.
to come off
Dividing your
garments according to
fabric and colour, is
very important for
good results.
Remember that, in the event
of a power failure, or should
the washer-dryer switch itself
off, the programme chosen will
remain in its memory.
How to eliminate the most common stains
Ink and biro Dab with a wad of cotton soaked in methyl alcohol or alcohol at 90°.
Tar Dab with fresh butter, rub in turpentine then wash immediately.
Wax Scrape away, then run a hot iron between two sheets of absorbent paper. Then rub in cotton with
turpentine or methyl alcohol.
Chewing gum Rub in nail polish remover and wipe with a clean rag.
Mold Cotton and white linen should be placed in a solution of 5 parts water, one bleach and a spoon of vinegar,
then washed immediately. For other white fabrics, use hydrogen peroxide at 10 volumes and wash immediately.
Lipstick Dab with ether on wool or cotton. Use tricloroetilene for silk.
Nail polish Place a sheet of absorbent paper on the side of the stain, wet it with nail polish remover, shifting the
garment as the sheet gradually changes colour.
Grass Dab with a wad of cotton soaked in methyl alcohol.
Instructions for installation and use
18
Page 22

E
A
B
D
C
Understanding the control panel
Here Im in command
Making the right choice is important. And its easy.
Washer-dryers knobs
are hidden. Just press
Programme selector knob
To select a programme, you should
turn the knob so that the number of
the desired programme is in line
with the pointer on the control
panel.
them lightly in the
middle to extract them.
On-off
When button B is pressed, the
washer-dryer is switched on, when
it is not the machine is switched off.
Turning the appliance off
does not cancel the selected
programme.
When the appliance is switched on,
all the symbols on the display light
up for at least 8 seconds, after
which only the ones that can be
selected will flash.
Start /Reset
This button allows you to start the
selected wash programme or to
interrupt it.
If you press it briefly, the button
functions as Start, if you press it
for at least 3 seconds, then it
functions as Reset.
After the Start of the appliance,
moving the programme selector
knob will have no effect
whatsoever.
Detergent dispenser
It is divided into three compartments:
1. Detergent for pre-wash;
2. Detergent for the main cycle
wash;
3. Fabric conditioner.
The washer-dryer is equipped with
an extra compartment 4 (provided
as an accessory) for the bleach, to
be inserted in compartment 1.
Display
All the options available are
displayed on the right-hand side.
Use the mode button to select the
desired option, and the relative
symbol will begin flashing.
On the left-hand side, the value or
the status (On-Off) of the selected
option is displayed, and you can
modify it using the select button.
The detergent dispenser with
the additional bleach
compartment is here.
mode
select
To access the subsequent option,
press the mode button, otherwise
press button C (Start/Reset) to start
the wash cycle.
All the options available are listed
below.
Only options relevant to the
selected programme will be
displayed.
Temperature
The display indicates the maximum
temperature relating to the
programme set, which can be
reduced by pressing the select
button right down to cold wash (Off).
This option is available on all wash
programmes.
Spin variation
The display indicates the maximum
speed relating to the programme set,
which can be reduced by pressing the
select button right down to its total
exclusion (Off).
You may not select a drying
cycle if you have excluded the
spin cycle.
During a wash cycle, the selection
of the spin cycle exclusion is
indicated by symbol
coming on.
This option is available on all
programmes except for number
6-10-12-13-16.
4
X
A
M
1
3
2
Wash intensity
This allows you to modify the
characteristics of the selected wash
programme, according to how soiled
the washing is. There are three levels;
press the select button to select
them.
Low
Medium
High
This option is available on
programmes 1-2-3-5-7-8.
Delay timer
This allows you to delay the start of
the wash cycle by a minimum of 1
to a maximum of 24 hours by
pressing the select button.
The enabling of the delayed start is
indicated by the symbol
on and staying on until the wash
cycle begins.
This option is not available on the
15 and 16 programmes.
Stain removal (see page 24)
Thanks to this command, the washerdryer will carry out a more intensive
wash that optimises the effectiveness
of the liquid additives, thus allowing
more resistant stains to be removed.
To use this, press the select button
until the On sign comes on.
During a wash cycle, the selectionof
this option is indicated by symbol
coming on.
This option is available on
programmes 2-3-5-7-8-11-14.
Note: It must not be used with the
Easy iron option.
coming
Easy iron
This function allows your washing
to come out of the machine without
creases, making it much easier to
iron.
The appliance optimises the
washing conditions according to the
type of fabrics that are being
washed.
It is enabled with programmes
3-5-7-8-12-14.
To enable it, press the select button
until the On sign comes on.
In programmes 7-8-12-14, the
wash cycle is interrupted and the
washing is left to soak in water
before the appliance is drained. To
complete the cycle, press the
select button.
During a wash cycle, the enabling
of this option is indicated by symbol
coming on.
Note:
- It must not be used with the Stain
removal option.
- If you also want to run the drying
cycle, this button is enabled only
if combined with level (Iron).
Rinse level
This increases the efficiency of the
rinse. We recommend that you use
it when dealing with a full load and
a great amount of detergent.
There are three levels; press the
Select button to select them.
Low
Medium
High
This option is available on
programmes 1-2-3-4-5-7-8-14.
Drying
This allows you to set the automatic
drying at the end of the wash.
For further details, please refer to
page 21.
Warning: If you set "spin cycle
exclusion", you may not select a
drying cycle.
If you wish to run a drying cycle,
select the maximum spin speed
available and then choose the type
of drying required.
Instructions for installation and use
19
Page 23

M
Special displays
(left-hand side of the display):
As soon as you switch the
appliance on.
You can display the remaining
amount of time of the last wash
programme selected.
When you select a new
programme...
The estimated duration of the
selected programme is displayed.
Programme length
During the wash cycle, the amount
of time left is displayed.
Drying cycle duration
The maximum duration of the cycle
selected is displayed.
Error message
In the event of a fault, a message is
displayed, (e.g. F-01), which should
be communicated to the Service
Centre.
End of the programme
At the end of the programme, the
word End is displayed.
During the wash cycle.
You can view the characteristics of
the programme in progress by
pressing the Mode button and also
modify them, if need be, by pressing
the Select button.
Door lock
Symbol on indicates that the
washer-dryer door is locked to
prevent it from being opened
accidentally. To avoid any
damages, you must wait for it to
come off and for the word End to
appear before you open the door.
What are you washing today?
A programme for all seasons
Type of fabric and degree of soil Program-meTemperat-
COTTONS
Exceptionally soiled whites
(sheets, tablecloths, etc.)
Exceptionally soiled whites
(sheets, tablecloths, etc.)
Heavily soiled whites and fast
colours
Heavily soiled whites and fast
colours
Slightly soiled whites and delicate
colours (shirts, jumpe rs, etc.)
Drying cycle for cotton fabrics
SYNTHETICS
Heav ily soiled fast colour
synthetics (baby linen, etc.)
Slightly soiled fast colour synthetics
(all types of slightly soiled ga rment)
Delicate colour synthe tics
(all types of slightly soiled garments)
Delicate colour synthe tics
(all types of slightly soiled garments)
Drying cycle for synthetic fabrics
DELICATES
Wool - Hand wash
Particularly delicate garments and
fabrics (curtains, silk, viscose, etc.)
Drying cycle for delicate fabrics
PARTIAL PROGRAMMES
Light rinse
Light spin
Drain
ure
1 90°C
2 90°C
3 60°C
440°C
540°C
6
750-60°C
740°C
840°C
9 30°C
10
11 40°C
12 30°C
13
14
15
16
Detergent
for wash
Fabric
softener
◆◆
◆◆
◆◆
◆◆
◆◆
◆◆
◆◆
◆◆
◆◆
◆◆
◆◆
◆◆
Stain
Erase /
Bleach
Del./Trad.
Del./Trad.
Del./Trad.
Delicate
Delicate
Delicate
Delicate
Length of
the cycle
(minutes)
140
125
130
150
86
89
79
69
30
40
60
Description of wash cycle
Prewash cycle, wash cycle at 90°C, rinse
cycles, intermediate and final spin cycles
Wash cycle at 90°C, rinse cycles,
intermediate and final spin cycle s
Wash cycle at 60°C, rinse cycles,
intermediate and final spin cycle s
Wash cycle at 40°C, rinse cycles,
intermediate and final spin cycle s
Wash cycle at 40°C, rinse cycles,
intermediate and final spin cycle s
Wash cycle at 50-60°C, rinse cycles,
anti-crease or delicate spin cycle
Wash cycle at 40°C, rinse cycles, anticrease or delicate spin cycle
Wash cycle at 40°C, rinse cycles, anticrease or delicate spin cycle
Wash cycle at 30°C, rinse cycles and
delicate spin cycle
Wash cycle at 40°C, rinse cycles and
delicate spin cycle
Wash cycle at 30°C, rinse cycles, anticrease or draining
Rinse cycles, anti-crease or draining
Draining and delicate spin cycle
Drain no spin
Important: to cancel the wash programme you have just set, press button C for at least 3 seconds (Start/Reset).
The data found in the table is purely indicative, and can vary according to the quantity and type of washing, the water system
temperature and the room temperature.
Special programmes
Class A at 40°C Your washer.dryer has a special programme to allow you to obtain optimum results even at low temperatures.
By setting programme 4 at a temperature of 40° C, the results you will obtain will be the same as you would normally obtain at 60°C
thanks to the washer-dryers action and the length of the wash cycle.
Daily wash Your washer.dryer has a programme available for the washing of lightly soiled garments in a short amount of time.
By setting programme 9 at a temperature of 30°C, you can wash different types of fabrics together (except for wool and silk), with a
maximum load of 3 kg. This programmes allows you to save on both time and energy as it only lasts around 30 minutes.
WE RECOMMEND THE USE LIQUID DETERGENT.
Instructions for installation and use
20
Page 24

How to dry
A combined Washing and
Drying Programme
Look at table A to the side and
follow the instructions provided
for MAX load to have an
automatic washing and drying
cycle.
Follow the instructions for wash
only (see the "Starting the
washer-Dryer" paragraph on page
18) and set the type of drying
desired as indicated below:
Iron
Wardrobe
Extra dry
then press button C (Start/Reset).
If the laundry load to be washed
and dried exceeds the maximum
load foreseen (see table A), then
follow the instructions provided
for wash only (see page 18, the
paragraph entitled "Starting the
washer-Dryer").
When the wash cycle has finished,
remove your washing, divide it
up and replace part of it inside
the drum.
Now follow the instructions
provided for a dry only cycle.
Repeat this procedure for the remainder of the load.
Dry only
Once you have loaded the
washing that needs drying (4 kg
max. for cottons, see table for
other fabrics ), make sure that:
- the door is shut correctly;
- the plug is inserted in the socket;
- the water tap is turned on;
- button B has not been pressed
(O position).
And now set the wash cycle
knob
Set knob A to one of the drying
programmes depending on the
type of fabric, select the type of
drying desired:
Iron
Wardrobe
Extra dry
then press button C (Start/Reset).
At the end of the drying
cycle...
Wait for symbol to come off
and the word End to appear.
Then turn the washer-dryer off by
pressing on-off button B
(O position). Now you can open
the appliance door. Once you
have removed the washing from
the appliance, leave the door
open or ajar to avoid the
formation of bad odours and turn
off the water tap.
A.
Fabric
type
Cotton,
Linen
Cotton Terry
Terital,
Cotton
Acrylics Pyjamas,
Nylon Slips,
Wool Knitwear,
The data contained in the table are purely indicative.
For cotton loads of less than 1 Kg, use the drying programme
designed for synthetic fabrics.
Load type Max. load
Clothing of
differe nt
sizes
towels
Sheets,
Shirts
socks, etc.
tights,
stockings,
etc.
Pullovers,
etc.
(kg)
4 155 140 130
4 155 140 130
2,5 110 100 90
1656060
1656060
1 707070
Drying time (Min.)
Extra
dry
Wardrobe Iron
IMPORTANT
A spin cycle is carried out during the drying if you
have set a cotton programme.
21
Instructions for installation and use
Drying types
You can choose from 3 different
types of drying, depending on
your needs:
Iron : slightly damp clothes,
easy to iron.
Wardrobe : dry clothes to
put away.
Extra dry : very dry
clothes, recommended for
towelling and bathrobes.
A cooling stage is foreseen at the
end of the drying cycle.
WARNING
- During the drying phase, the door tends to get
quite hot.
- Do not use the appliance to dry clothes that have
been washed with flammable solvents (e.g.
trichlorethylene).
- Do not use the appliance to dry foam rubber or
similar elastomers.
- Make sure that the water tap is turned on during
the drying cycles.
- This washer-dryer can only be used to dry clothes
which have been pre-washed in water.
Page 25

Understanding labels
Learn the meaning of these symbols and you will get
better results, your garments will last longer resulting
in an improved wash.
All over Europe, garment labels
contain messages expressed in
small yet important symbols.
Understanding them is very
important if you want to get
better results and treat your
garments the way they deserve to
be treated.
Useful tips
Turn shirts inside out to get better results
and make them last longer.
Always empty pockets of their contents.
Look at the label: it will always give you
useful advice.
These symbols are divided in five
different categories and shapes:
washing
ironing
drying
, bleaching ,
, dry cleaning and
.
M
When loading your washing, try to have a
mixture of large to small items.
Consult and learn the symbols in this table: they will help you
obtain a better wash, treat your clothes properly, and get a
better performance out of your washer-dryer.
Wash Bleaching Ironing Dry cleaning Drying
Strong
action
Wash at
95°C
Wash at
60°C Do not bleach
Wash at
40°C
Delicate action
c
l
Bleaching only in
cold water
Hot iron at
max 200°C
Medium hot
ironing at
max 150°C
Iron at max
110°C
A
Dry clean with any
solvent
P
Dry clean only with
perchloride, benzine
av., pure alcohol,
R111 and R113
F
Dry clean with av.
benzine, pure
alcohol and R113 Spread to dry
High
Temp.
Make sure you select the right
temperature!
Low
Temperat.
Machine
dryable
Do not machine
dry
Wash at
30°C Not ironable Do not dry clean
Hand wash
Not
washable in
water
Hang to dry
without spin
drying
Dry on clothes
hanger
Instructions for installation and use
22
Page 26

Useful tips
Never use your washer-
dryer to wash... torn, fraying or
non-hemmed linen. If it is
absolutely neccessary, place it in
a bag for protection. Do not wash
coloured linen with whites.
Watch the weight!
For best results, do not exceed
the weight limits stated below
(figures show weight of dry
garments):
- Resistant fabrics:
5 kg maximum
- Synthetic fabrics:
2.5 kg maximum
- Delicate fabrics:
2 kg maximum
- Pure new wool:
1 kg maximum
How much does it weigh?
1 sheet 400-500 gr.
1 pillow case 150-200 gr.
1 tablecloth 400-500 gr.
1 bathrobe 900-1,200 gr.
1 towel 150-250 gr.
Coloured T-shirts, printed
ones and shirts last longer if
turned inside out before washing.
Printed T-shirts and sweatshirts
should always be ironed inside
out.
Dungaree alert.
Very popular salopette type
overalls have straps with hooks that
can damage the drum of your
washer-dryer or other garments
during the wash. To minimise the
risk, place hooks in the pocket and
fasten with safety pins.
Holidays: unplug the
appliance.
It is recommended that you
should unplug the machine from
the socket and turn off the water
supply. Leave the door ajar to
allow air circulation to the draw
and the door gasket area. This
will prevent unpleasant odours.
WOOL CYCLE
For best results, we
recommend you use a
specific detergent, taking
care not to wash more
than 1 kg of laundry.
How to wash almost anything
Curtains.
Curtains tend to crease a great
deal. A useful tip to reduce
creasing: fold the curtains and
place them in a pillow case or
mesh bag. Do not load anything
else inside the appliance, this will
ensure that the overall weight
does not exceed the half load.
Remember to use the specific
programme 12 which automatically excludes the spin cycle.
Quilted coats and anorak.
You can wash quilted coats and
wind-cheaters, too, if they are
padded with goose or duck
down. Do not load more than
2-3 kg and never load 5 kg. Repeat
rinse once or twice using the
gentle spin.
Trainers.
Once you have removed mud and
dirt from trainers, you can even
wash them with jeans or any
other tough garments. Do not
wash trainers with whites.
EXCLUSIVE
Cashmere Gold: As gentle as a hand wash
The first Washer to have "The Woolmark Company" recognition.
The Cashmere Gold wash
programme has been studied
for machine washing even the
most delicate and valuable
wool and Cashmere
garments.
The Merloni Elettrodomestici wool wash cycle has been
tested and approved by The
Woolmark Company for
washing Woolmark garments
labelled as hand wash. This
is the first gentle action hand
wash cycle approved by The
Woolmark Company.
M.00221
This has been made possible
thanks to the speed of the
drum at 90 rpm, even during
the rinse cycle, thus
preventing the fibres from
rubbing.
Always use programme 11 with
garments bearing the hand wash
symbol: the washbasin and
hand.
To take care of your woollen
items, we recommend you use
special detergents.
Instructions for installation and use
23
Page 27

Its important for a good wash
M
Useful tips about the detergent dispenser
The first secret is the easiest: the detergent
dispenser is opened by rotating it outwards.
4
X
A
You must follow the dosage
recommendations provided by
the manufacturers when adding
detergent or fabric conditioner.
Doses will vary according to the
wash load, the water hardness and
how soiled the washing is.
Experience will help you select
the right dosage almost
automatically: it will become
your secret.
Before adding detergent for prewashing in compartment 1, make
sure that the extra compartment
for bleach 4 has not been inserted.
Ensure no overfilling when adding
fabric conditioner in compartment 3.
The washer-dryer automa-tically
adds the softener to the wash in
each programme.
Liquid detergent is poured into
compartment 2 just a few
seconds before starting the wash
cycle.
Remember that liquid detergent
is only designed for wash cycles
of up to 60 degrees on non prewash items.
Special containers are sold with
liquid or powder detergents for
placing inside the washer-dryer
drum, these are positioned
according to the instructions
found in the detergent box
Never use hand wash detergent,
because it may form too much
foam, which could damage the
washer-dryer.
Detergents that are specifically
formulated for both hand and
machine wash are an exception.
One last secret: when washing
with cold water, always reduce
the amount of detergent you use:
it dissolves less easily in cold
water than in hot water, so part
of it would be wasted.
Bleach cycle
If bleaching is necessary, the extra case 4 (provided) must be
inserted into compartment 1 of
the detergent dispenser.
When pouring in the bleach, be
careful not to exceed the "max"
level indicated on the central
pivot (see illustration).
The use of the additional bleach
container excludes the
possibility of using the pre-wash
cycle. Traditional bleach can
1
only be used on sturdy white
fabrics, whereas delicate
bleach can be used for
coloured fabrics, synthetics
The detergent dispenser can be
removed and cleaned: just lift it up
and pull it outwards ,as indicated in
the figure. Then leave it under running
water for a few minutes.
2
Cutting costs efficiently
MAXIMISE THE LOAD SIZE
Achieve the best use of energy, water, detergent and time by using the
recommended maximum load size.
SAVE up to 50% energy by washing a full load instead of 2 half loads.
and for wool.
A guide to
environmentally
friendly and economic
use of your appliance.
M
1
3
2
In compartment 1:
Detergent for pre-washing (powder)
In compartment 2:
Detergent for washing
(powder or liquid)
In compartment 3:
Additives (softeners, perfumes, etc.)
In compartment 4:
Bleach and delicate bleach.
X
A
M
X
A
M
You cannot bleach with the 12
Silk programme and with the
special programmes (see page
20).
Should you wish to bleach
separately, pour the bleach into
extra compartment 4 and set the
14 programme.
The rinse level should be set to
Medium or High (see page 19).
When bleaching during a normal
wash cycle, pour in the detergent
and additives into the special
compartments (see table on page
20), set the desired programme and
select the stain removal option.
DO YOU NEED TO PRE-WASH?
For heavily soiled laundry only!
SAVE detergent, time, water and between 5 to 15% energy consumption by
NOT selecting Prewash for slight to normally soiled laundry.
IS A HOT WASH REQUIRED?
Pretreat stains with stain remover or soak dried in stains in water before
washing to reduce the necessity of a hot wash programme.
SAVE up to 50% energy by using a 60°C wash programme.
BEFORE USING A DRYING PROGRAMME ...
SAVE energy and time by selecting a high spin speed to reduce the water
content in laundry before using a drying programme.
Instructions for installation and use
24
Page 28

Troubleshooting
Before calling, read the following
In most cases, when your washer-dryer fails to work, the problems arising
can be easily solved without having to call for a technician. Before calling
for assistance, always check these points.
The washer-dryer
fails to start.
Is the plug correctly
inserted into the socket? It
could have been moved whilst
cleaning.
Is there electricity in the
house?
A circuit breaker may have
switched off as a result of too
many electrical appliances
working at the same time. Or
maybe due to a general failure
in your entire area.
Is the washer-dryer door
closed properly?
For safety reasons, the washer-
RIGHT
Turn off the water
supply after use.
This will eliminate
the possibility of
leakage.
Always leave the
appliance door
ajar to avoid bad
odours.
Clean the
appliances
exteriors gently.
To clean the
exteriors and the
rubber parts of
the appliance,
always use a soft
cloth dipped in
warm and soapy
water.
WRO NG
dryer cannot work if the door
is open or not shut properly.
Is the On/Off button
pressed?
If it is, then a programmed
start has been set.
Is the Start/Reset button
pressed?
If it is, then a programmed
start has been set.
Is the water supply turned
on? For safety reasons, if the
washer-dryer does not load
water, it cannot start a wash
cycle.
Leave the washerdryer plugged in while
cleaning.
Even during maintenance, the appliance
should always be
unplugged.
Use solvents and
aggressive abrasives.
Never use solvents or
abrasives to clean the
external and rubber
parts of the washerdryer.
Neglect the detergent
dispenser.
It is removable and
can easily be cleaned
by leaving it under
running water.
Go on holiday without
thinking about her.
Before leaving, always
make sure that the
washer-dryer is
unplugged and that
the water supply is
turned off.
But where did all the water go?
Simple: with the new Scholtes technology, you need less than
half of it, to get good results on twice as much!
This is why you cannot see the water through the door:
because there is little, very little of it, to respect the
environment yet without renouncing maximum cleanliness.
And, on top of that, you are also saving electricity.
The washer-dryer
fails to fill with water.
Is the hose correctly
connected to the tap?
Is there a water shortage ?
There could be work in
progress in your building or
street.
Is there sufficient water
pressure? The autoclave may
be malfunctioning.
Is the tap filter clean? If the
water is very calcareous, or if
work has recently been carried
out on the water piping, the tap
filter could be clogged with
particles and debris.
Is the rubber hose kinked?
The tract of the rubber hose
bringing water to washer-dryer
must be as straight as possible.
Make sure it is not squashed
or kinked.
The washer-dryer
continuously fills and
drains water.
Is the drain hose
positioned too low? It must
be installed at a height ranging
from 60 to 100 cm.
Is the end of the hose
immersed in water?
Does the wall drainage
system have a breather
pipe? If the problem persists
even after these checks, turn
the water supply off the
machine and call for
assistance.
If you live on an upper floor of
your building, there may be a
problem with your drain trap.
To solve this problem, a special
valve must be installed.
Instructions for installation and use
25
Page 29

M
Is the washer-dryers drain
duct clogged? Is there an
extension of the drain hose? If
so, is it positioned incorrectly,
blocking the water flow?
The washer-dryer
does not drain or spin.
Does the selected
programme incorporates
water draining? Some
programmes stop at the end of
the wash cycles and draining
will have to be selected
manually.
Is the Easy iron" function
-where provided - enabled?
Complete the programme by
pressing the select button.
Is the drain hose kinked?
The tract of the drain hose
must be as straight as possible.
Make sure the drain hose is not
Excessive vibration
during the spin cycle.
Have all transit screws been
removed durind installation? See the following
page on installation
procedures.
Has the washer-dryer been
levelled correctly? The
levelling of the appliance
should be checked
periodically. Adjust the feet
and check them with a level.
The washer-dryer
leaks.
squashed or kinked.
Always get
assistance from
authorised
technicians and
always insist on
original spare
parts.
Technical characteristics
Model
Dimensions
Capacity
Electrical
connections
Water
connections
Spinning speed
MLSE 12 X
width 59,5 cm
height 81,5 cm
depth 54 cm
from 1 to 5 kg for the wash programme; from 1 to 4 kg for the drying
programme
voltage 220/230 Volt 50 Hz
maximum absorbed power 1850 W
maximum pressure 1 MPa (10 bar)
minimum pressure 0,05 MPa (0,5 bar)
drum capacity 46 litre
up to 1200 rpm
Is there space between the
machine and adjacent units?
If it is not a built-in model, the
washer-dryer will oscillate a bit
during the spin cycle. A few cm
of space should therefore be left
around it.
Is the metal ring of the inlet
hose properly attached? Turn
off the water supply, unplug
the appliance and try
tightening its attachment
without forcing it.
Is the detergent dispenser
obstructed? Remove and
wash it under tap water.
Is the drain hose well
attached? Turn off the water
supply, unplug the appliance
and try tightening its
attachment.
Too much foam.
Is the detergent appropriate
for machine washing? Check
whether the definition on its
label reads for machine wash
or hand and machine wash,
or any other similar wording.
Is the correct amount being
used? An excessive amount of
detergent, besides producing
too much foam, does not
guarantee a more effective
wash, and causes scaling in the
internal parts of the appliance.
The washer-dryer
does not dry.
Check whether:
the plug has been correctly
inserted into the socket; there
is electricity in your home; the
appliance door has been shut
properly; a delayed start (if
available) has not been selected;
the drying mode has been
selected.
The washer-dryer
doesn't dry properly.
Check whether:
the end of the drain hose is
underwater; the drain pump is
obstructed; the advice given on
the maximum loads has been
taken; the water tap has been
turned on.
If, despite all checks, the washerdryer fails to function and the
problem persists, call your
nearest authorised Customer
Service Centre, providing the
following information:
- the nature of malfunction
- the model type no. (Mod. ....)
- the serial number (S/N ....)
This information can be found on
the data plate situated at the back
of the washer-dryer.
Control programs
in compliance
with IEC
regulation 456
wash:
programme 3; tem pe ratu re 60 °C ; r inse leve l ;
wash in te ns ity ; ca rr ie d o ut wi th 5 k g l oa d;
drying
: run with a 2.5 kg load, sett ing the ty pe of drying .
This appliance conforms with the following E.E.C. directives:
- 73/23/EEC of 19/02/73 (Low Voltage) and subsequent modifications
- 89/336/EEC of 03/05/89 (Electromagnetic Compatibility) and
subsequent modifications
Instructions for installation and use
26
Page 30

When washerdryer arrives
Whether new or just transported to a new house,
installation is extremely important for the correct
functioning of your washer-dryer.
Installation and removal
After removing the appliance
from its packaging, check that it
is intact. If in doubt, contact a
qualified technician immediately.
The inside of the machine is
supported, for transportation, by
four screws on the back panel.
Before using the washer-dryer,
remove the screws, remove the
spacers together with the rubber
tubes attached to them (keeping
all the parts) and use the plastic
plugs provided to fill in the holes.
Important: Use the cap (provided)
to close the 3 holes which housed
the stop pin, situated in the righthand part of the lower back of the
washer-dryer.
Levelling
The washer-dryer must be
levelled appropriatey in order to
guarantee its correct functioning.
To level the appliance, the front
feet must be adjusted; the angle
of inclination, measured
according to the worktop, must
not exceed 2°. When placed on
carpet, make sure the ventilation
is not reduced.
The front feet are adjustable.
Retain the transit screws,
spacers and washers.
Should you move house
then these should be
replaced to support the
inside of the machine to
prevent damage when
transporting the
machine.
Connection to the water
mains
Water pressure must range within
the values indicated on the data
plate on the rear of your washerdryer. If the water pipes are new
or left unused, then before
connecting the machine run the
water until clear to remove
debris. Connect the inlet hose to
a cold water tap having a ¾ BSP
thread. Ensure that the rubber
sealing washers are fitted at each
end of the inlet hose, with the fitter
washer-dryer at the tap end.
A
The rubber gasket .
Connect the inlet hose to the
threaded connector on the
machine rear.
Water pipe inlet at the top right.
Connecting the drain
hose
There are two hooks (right or
left) on the rear of your washerdryer to which the drain hose is
to be fixed. Insert the other end
in a stand pipe or place it on the
edge of a sink or tub avoiding
excessive kinks and bending. It
should be placed at a height
ranging from 60 to 100 cm. If it
is necessary to fix the end of the
hose at a height below 60 cm
from the ground, it must be fixed
in the appropriate hook placed
on the upper part of the back
panel.
The hook to be used in case the drain
hose ends at a height below 60 cm.
If the drains hose empties into a
tub or sink then fit the plastic
guide and secure it to the tap.
The guide for draining into tubs and
sinks.
The end of the drain hose must
be positioned so that it cannot
become submerged.
Extensions are unadvisable. In
case of absolute need, the
extension must have the same
diameter as the original hose and
must not exceed 150 cm. In case
of wall draining pipes, their
efficiency must be checked by a
qualified technician. If the
dwelling is on one of the upper
floors of a building, there may be
drain trap problems causing the
washer-dryer to load and unload
water continuously.
In order to avoid such an
inconvenience, special anti-drain
trap valves are available in shops.
Electric connection
Before connecting the appliance
to the electric socket, be sure
that:
1) the electric socket is able to
sustain the appliances
maximum power load
indicated on the data plate
and in compliance with the
law;
2) the supply voltage is included
within the values indicated
on the data plate;
3) the socket is compatible with
the appliances plug. If not,
do not use adapters, but
replace either the socket or
the plug;
4) electric household appliances
must be equipped with an
earthing system.
Warning!
The company denies
all liability if and
when these norms are
not respected.
Plastic bags,
expanded styrofoam,
nails and other
packaging parts are
not childrens toys,
and are potentially
dangerous.
Instructions for installation and use
27
Page 31

Instructions for the fitter
M
Mounting the wooden
panel onto the door and
inserting the machine
into cabinets:
In the case where the machine
must be shipped for final
installation after the wooden
panel has been mounted, we
suggest leaving it in its original
packaging. The packaging was
designed to make it possible to
mount the wooden panel onto
the machine without removing it
completely (see figures below).
The wooden panel that covers
the face of the machine must not
be less than 18 mm in thickness
and can be hinged on either the
right or left. For the sake of
practicality when using the
machine, we recommend that the
panel be hinged on the same side
as the door for the machine itself
- the left.
Door Mounting Accessories
(Fig. 1-2-3-4-5)
N° 2 Hinge Supports
Fig. 1
N° 2 Hinges
Fig. 2
lavabiancheria
washing machine
machine laver
waschmaschine
Lato porta
e
d
i
s
r
o
o
D
e
t
r
o
p
e
t
o
C
Tur seite
ria
e
h
c
n
ia
b
va
la
achine
ashing m
w
ine laver
ach
m
aschine
waschm
rta
o
p
ato
L
Door side
Cote porte
eite
r s
u
T
A
C
6
N° 1 Magnet
5
4
3
2
1
Fig. 3
N° 1 Magnet plate
Fig. 4
B
N° 1 Rubber plug
Fig. 5
Fig. 4/B
- No. 6 type A self-threading
D
screws, l =13 mm.
- No. 2 type B metric,
countersunk screws, l =25; for
fastening the magnet plate to the
cabinet.
- No. 4 type C metric screws,
l =15 mm; for mounting the hinge
supports to the cabinet.
6
5
4
3
2
1
- No. 4 type D metric screws,
l =7 mm; for mounting the hinges
on the supports.
N° 1 Spacer
E
Instructions for installation and use
28
Page 32

Mounting the Parts onto
the Face of the Machine
- Mount the hinge supports onto
the face of the machine,
positioning the hole indicated by
the arrow in fig. 1 towards the
inside of the face and using the
type C screws.
- Mount the magnetic plate on
the opposite side, at the top,
using the two type B screws.
- Place the spacer illustrated in
fig. 4/B between the appliance
front and the magnet receiver.
Using the Drilling
Template
- To trace the positions of the
holes on the left-hand side of the
panel, align the drilling template
to the top left side of the panel
using the lines traced on the
extremities as a reference.
- To trace the positions of the
holes on the right-hand side of
the panel, align the drilling
template to the top right side of
the panel.
- Use an appropriately sized router
to mill the holes for the two
hinges, the rubber plug and the
magnet.
Mounding the Parts onto
the Wooden Panel (Door)
- Insert the hinges into the holes
(the movable part of the hinge
must be positioned facing away
from the panel) and fasten them
with the 4 type A screws.
- Insert the magnet into the top
hole on the opposite side of the
hinges and fasten it with the two
type B screws.
- Insert the rubber plug into the
bottom hole.
The panel is now ready to be
mounted onto the machine.
Mounting the Panel into
the machine
Insert the nib of the hinge
(indicated by the arrow in fig. 2)
into the hole for the hinge and
push the panel towards the front
of the machine. Fasten the two
hinges with the type D screws.
Fastening the plinth
guide
If the machine is installed at the
end of a set of modular cabinets,
mount either one or both of the
guides for the base molding (as
shown in fig. 8). Adjust them for
depth based on the position of
the base molding, and, if
necessary, fasten the base to the
guides (fig. 9).
This is how to assemble the
plinth guide (fig.8):
Fasten angle P using screw R,
insert plinth guide Q into the
special slot and once it is in the
desired position, lock it in place
using angle P and screw R.
Inserting the machine
into the Cabinet
- Push the machine into the
opening, aligning it with the
cabinets (fig. 6).
- Regulate the adjustable feet to
raise the machine to the
appropriate height.
- To adjust the position of the
wooden panel in both the vertical
and horizontal directions, use the
C and D screws, as shown in fig. 7.
Important: close the lower part of
the appliance front by ensuring
that the plinth rests against the
floor.
540
595
600 m
C
in
D
815
Fig. 6 Fig. 7 Fig. 9
Accessories provided for
the height adjustment
The following can be found inside
the polystyrene lid (fig. 10):
2 crossbars (G),
1 strip (M)
Fig. 10
the following can be found inside
the appliance drum:
4 additional feet (H),
4 screws (I),
4 screws (R),
4 nuts (L),
2 plinth guides (Q)
570
820 ÷ 900
in
m
C
Fig. 8
Adjusting the appliance
height
The height of the appliance can
be adjusted (from 815 mm to
835 mm), by turning the 4 feet.
Should you require the appliance
to be placed higher than the
above height, you need to use the
following accessories to raise it
to up to 870 mm:
- the two crossbars (G)
Repeat the same operation at the
back of the appliance.
Now adjust feet H to raise or
lower the appliance from 835
mm to 870 mm.
Once you have reached the
desired height, lock nuts L onto
crossbar G.
To adjust the appliance to a
height between 870 mm and 900
mm, you need to mount strip M,
adjusting feet H to the required
height.
Insert the strip as follows:
loosen the three screws N
situated at the front of the Top
cover of the appliance, insert
strip M as shown in fig. 12, then
fasten screws N.
- the 4 feet (H)
- the 4 screws (I)
- the 4 nuts (L)
then perform the following
operations (fig. 11):
G
remove the 4 original feet, place
a crossbar G at the front of the
appliance, fastening it in place
using screws I (screwing them in
where the original feet were) then
insert the new feet H.
L
I
H
Fig. 11
Fig. 12
M
29
Instructions for installation and use
Page 33

Easy Care and Maintenance
M
Treat your machine well and it will provide
many years of trouble free service
Your washer-dryer is a reliable companion in life and on the job. It is just as important for you to keep it
in shape.
Your washer-dryer is designed to
provide reliable service over
many years. A few simple steps
will help to prolong its life and
avoid problems. It is advisable,
to turn off water taps when the
machine is not to be used, this
protects the hoses, etc.
If the water in your area is too
hard, use a deliming product
(water is hard if it often leaves
whitish stains around taps or
drains, especially of bath tubs.
For more accurate information as
to the type of water in your
system, call the local water
works or a local plumber).
Pockets must always be emptied
removing even pins, badges and
any other hard object.
The washer-dryer exterior should
be cleaned with a rag dipped in
lukewarm water and soap.
It is important to
wash the detergent
dispenser regularly.
To prevent dried
washing powder from
accumulating, place
the dispenser under
running water for a
few minutes.
Never exaggerate with
doses.
Normal detergents already
contain deliming agents. Only if
the water is particularly hard,
that is, rich in lime content, do
we recommend the use of a
specific product at every wash.
A periodical wash cycle with a
dose of a deliming product,
without detergents or washing,
may prove useful.
Never use too much detergent or
additives because this could cause an excess amount of foam,
scaling and possible damage to
the component parts of your
washer-dryer.
Do not forget to empty all pockets: small objects can
cause damage to your washer-dryer.
When in need, check the pump and the rubber hose.
Your washer-dryer comes equipped with a self-cleaning pump that does not require any cleaning or maintenance.
The water inlet hose
Check the rubber hose at least once a year. If you see any cracks, replace it immediately. When you use your washerdryer, water pressure is very strong and a cracked tube could easily split open.
Instructions for installation and use
30
Page 34

Important for the safe use of your washer-dryer
Your safety and that of
Your washer-dryer has been built in
compliance with the strictest international
your family
Read these instructions and all
the information in this manual
carefully: they are an
important source, not only of
numerous useful tips, but also
of vital information on safety,
use and maintenance.
1. Your washer-dryer
should not be installed in
an outdoor environment,
not even when a roof
shelters the area, because
it may be very dangerous to
leave it exposed to rain and
thunderstorms.
2. It must only be used by
adults and exclusively for
washing clothes following
the instructions provided in
this manual.
3. Should it have to be moved,
proceed with the help of
two or three people and
handle it with the utmost
care. Never try to do this
alone, because the
appliance is very heavy.
4. Before loading the washer-
dryer, make sure the
drum is empty.
5. Never touch the washerdryer when barefoot or
with wet or damp hands
or feet.
6. Never use extensions or
multiple plugs, which are
particularly dangerous in
humid environments. The
power supply cable must
never be bent or
dangerously compressed.
I only want an
authorised specialised
technician with original
Scholtes spare parts!
7. Never open the
safety regulations. To protect you and all your
family.
8. Never pull on the supply
detergent dispenser
while the appliance is
functioning; do not use
hand wash detergent
because the abundance of
foam could damage its
internal parts.
cable or the washer-dryer
to disconnect it from the
wall socket: it is extremely
dangerous.
9. While the appliance is
functioning, do not touch
the drain water as it
could reach very high
temperatures. The
appliance door, during
wash cycles, tends to
become hot; ensure that
children do no touch it.
Never force the washerdryer door because this
could damage the safety
lock which prevents
accidental opening when
the nachine is working.
Allow a few minutes at the
end of the program for the
lock to release.
10. In case of malfunctio-
ning, first close the
water tap and unplug the
appliance from the wall
socket; do not under any
circumstances touch
internal parts in order to
attempt repairs.
How to change the power supply cable
The washer-dryer power
supply cable is special
and can be purchased
exclusively from
authorised Technical
Service Centres.
To replace the cable:
1. Make sure that washer-
dryer is switched off and
unplugged.
Instructions for installation and use
31
Fig. 13
2. Remove the cover by
unscrewing screws I [fig 13].
3. Disconnect the wires from
the radio interference
suppressor F [fig. 14] noting
as to their position (Blue=N
wire; Brown=L wire) leaving
the earth wire until last
N.B.: letters L, N and the
symbol
radio interference suppressor.
are indicated on the
.
N
L
F
Fig. 14
4. Remove the screw and
washer-dryer V [fig. 15],
which act as a stop for the
cable passageway.
5. Remove the upper part of
the cable slightly from the
back panel of the appliance,
pull the power supply cable
upwards and take it out [fig.
16].
Fig. 15
To connect the new power
supply cable, reverse the procedure.
It is important for your safety
that you reassemble all parts
and screws used.
Fig. 16
Page 35

M
Instructions for installation and use
32
Page 36

Kurzanleitung
Erkunden Sie hier die 12 Argumente, die auf nachfolgenden
Seiten dieses Handbuches näher erklärt werden. Lesen Sie
diese, merken Sie sich diese und haben Sie viel Spaß dabei; Sie
werden viele kleine Geheimnisse entdecken, die Ihnen dazu
verhelfen, besser und müheloser zu waschen und Ihren
Waschtrockner länger zu erhalten.
1.
Installation und Umzug (Seite 43)
Die Installation, sei es die eines neuen Gerätes oder die nach einem
Umzug, ist die wichtigste Voraussetzung für die optimale Betriebsweise Ihrer waschtrockner. In jedem Falle ist sicherzustellen:
1. dass die Elektroanlage den einschlägigen Vorschriften entspricht;
2. dass Versorgungs- und Ablaufschläuche vorschriftsmäßig
angeschlossen wurden. Verwenden Sie niemals bereits
gebrauchte Schläuche;
3. dass der Waschtrockner eben aufgestellt wurde. Es macht
sich belohnt: durch längere Lebensdauer und beste Wasch
wirkung;
4. dass die auf der Rückwand des Waschtrockner befindlichen
Trommel-Befestigungsschrauben abgenommen wurden.
2.
Was kann im Waschtrockner gewaschen
werden und wie wird er in Betrieb gesetzt? (Seite 34)
Ein korrektes Sortieren Ihrer Wäsche ist nicht nur für ein optimales
Waschergebnis von äußerster Wichtigkeit, sondern auch für die Lebensdauer des Gerätes. Lernen Sie die wichtigen Kniffe und Tips,
die beim Wäschesortieren zu beachten sind: Farben, Gewebeart, Neigung zu Flusenbildung sind die wichtigsten Kriterien.
7.
waschtrockner (Seite 36)
Eine einfache, praktische, übersichtliche Tabelle hilft Ihnen bei der
Wahl der Temperaturen, des geeigneten Waschmittels und eventueller Zusätze. Eine korrekte Wahl dieser Komponenten, eine angemessene Dosierung des Waschmittels sind eine Garantie für optimale
Waschergebnisse. Sie sparen Zeit, Wasser und Strom, Tag für Tag.
8.
Einige wertvolle Ratschläge zum optimalen Trocknen.
Leitfaden zur Wahl der Programme Ihrer
Wie trocknet man (Seite 37)
3.
Leitfaden zur Verdeutlichung der Etiketten (Seite 38 )
Die auf den in jedem Kleidungs- bzw. Wäschestück befindlichen Etiketten abgebildeten Symbole sind leicht verständlich und äußerst
wichtig für ein optimales Waschergebnis. In diesem Abschnitt erhalten Sie einige Tips zu den empfohlenen Temperaturen, der Art der
Behandlung, der Bügelweise.
9.
Waschtrockner ist Ihre Freundin: Sie verlangt nur einige kleine Aufmerksamkeiten und dankt Ihnen dafür mit Treue und Zuverlässigkeit.
Pflegen Sie sie, und Sie werden noch lange Freude an Ihrer Maschine
haben.
10.
4.
Praktische Ratschläge um Fehler zu
vermeiden (Seite 39)
Einmal waren es unsere Großmütter, die uns mit guten Ratschlägen
zur Seite standen, außerdem gab es damals noch keine Kunstfasern:
Heute ist es nicht mehr so einfach. Aber es gibt waschtrockner, die
Ihnen mit guten Ratschlägen zur Seite steht. Sie können sogar
Wollwäsche und Kaschmir bedenkenlos in der Maschine waschen.
5.
Die Waschmittelschublade (Seite 40)
Wo und wie werden Reiniger und eventuelle Zusätze eingefüllt?
6.
Machen Sie sich mit der Schalterblende
vertraut (Seite 35 - 36)
Die Schalterblende Ihrer waschtrockner ist klar und übersichtlich.
Rasch übersehen Sie, welches Waschprogramm zu wählen ist und
wie es abgerufen werden kann, vom energischsten Vollwaschprogramm bis hin zum Schonprogramm für Cachemir. Sie werden
sehen, es wird ganz leicht sein.
Bevor Sie den Einsatz eines Technikers anfordern, lesen Sie diesen
Abschnitt: Für vieles findet sich eine einfache, sofortige Lösung. Sollten Sie jedoch keine geeignete Lösung finden, dann fordern Sie den
Scholtes-Kundendienst an, der für eine sofortige Behebung einer jeden
Betriebsstörung sorgen wird.
11.
Hier finden Sie die technischen Daten Ihres Vollwaschautomaten:
Modellkennzeichen, Daten für den Elektro- und Wasseranschluss,
Abmessungen, Kapazität, Schleudertouren und Übereinstimmungserklärung mit den italienischen und europäischen Richtlinien und
Vorschriften.
12.
Hier finden Sie unentbehrliche Ratschläge für Ihre Sicherheit und
die Ihrer Familie. Die wichtigste Voraussetzung!
Reinigung und Pflege (Seite 46)
Probleme und Lösungen (Seite 41 und 42)
Technische Eigenschaften (Seite 42)
Ihre Sicherheit und die Ihrer Kinder (Seite 47)
Installations- und Bedienungsanleitungen
33
Page 37

M
Was darf in die waschtrockner?
Sie können viel dazu beitragen, dass Ihre Wäsche besonders rein wird, noch bevor der
Waschvorgang beginnt. Trennen Sie die Wäsche nach Farben und Material. Kontrollieren
Sie die Wäscheetiketten und befolgen Sie die dort aufgezeichneten Waschanleitungen.
Geben Sie abwechselnd kleine und große Wäschestücke in die Wäschetrommel.
Vor dem Waschen.
Trennen Sie die Wäsche nach
Material und nach Farbfestigkeit:
strapazierfähige Stoffe sollten
nicht gemeinsam mit Feinwäsche
gewaschen werden.
Helle Farben müssen stets von
dunklen getrennt gewaschen
werden.
Entleeren Sie alle Taschen (Kleingeld, Papier, Geldscheine und
Kleingegenstände) und kontrollieren Sie auch die Knöpfe. Wenn ein
Knopf lose ist, nehmen Sie ihn ab
oder nähen Sie ihn fest, denn er
könnte beim Waschen abspringen.
Die Wäscheetiketten
verraten Ihnen alles.
Kontrollieren Sie stets die
Wäscheetiketten: hieraus gehen
alle Informationen zum Wäscheoder Kleidungsstück hervor,
auch wie es am besten
gewaschen wird.
Auf Seite 38 wird die Geheimsprache" aller Wäscheetiketten
entschlüsselt. Die Angaben, die
Sie dort finden, sind überaus
nützlich, um Ihre Wäsche materialgerecht zu waschen und lange Ihre Freude daran zu haben.
Starten des waschtrockner
Gleichmäßige
Gewichtsverteilung.
Dieser Waschtrockner ist mit
einer speziellen elektronisch gesteuerten Vorrichtung ausgestattet, wodurch das Gewicht der
Wäsche stets gleichmäßig verteilt
wird: vor dem Schleudern sorgt
diese Vorrichtung dafür, dass die
Wäsche so gleichmäßig wie
möglich in der Wäschetrommel
Die Wäschestücke
nach Gewebe, Farbe
und Flusenbildung zu
trennen, ist ein
wichtiger Schritt, um
gute Waschergebnisse
zu erzielen.
angeordnet wird, natürlich
immer so weit es der Wäschetyp
und die anfängliche Lage gestatten. Dies ist auch der Grund
dafür, weshalb diese
Waschtrockner auch bei höchster
Drehzahl nicht vibriert und somit
äußerst geräuscharm ist.
Nachdem Sie den waschtrockner installiert haben, führen Sie den
ersten Waschvorgang mit Programm "1" und bei 90° C durch.
Es ist wichtig, dass Sie Ihre
waschtrockner richtig in Betrieb
nehmen, und zwar nicht nur, um
eine gute Waschqualität zu
garantieren, sondern auch um
Probleme am Gerät zu vermeiden
und somit seine Lebensdauer zu
verlängern. Nachdem Sie die
Wäsche, das Waschpulver und
eventuelle Zusätze in den
Waschtrockner gegeben haben,
kontrollieren Sie stets, ob
1. die Tür gut geschlossen ist.
2. der Stecker in der Steckdose
ist.
Für Feinwäsche:
Geben Sie Ihre
Unterwäsche,
Damenstrümpfe und
andere Feinwäsche in
ein Stoffsäckchen, um
sie zu schützen.
3. der Wasserhahn auf ist.
Einschalten der Maschine
Taste B (Position l) drücken.
Das Programm auswählen
Das Programm wird nach dem
Wäschetyp, dem Schmutzgrad und
der Menge ausgewählt. Um das
richtige Programm auszuwählen,
siehe Tabelle auf Seite 36. Drehen
Sie den Schaltknopf A auf die
Nummer des gewünschten
Programms, alle verfügbaren
Optionen (diejenigen, die blinken)
wie auf den Seiten 35 und 36
angegeben (Bezugskerbe
einstellen und dann den Knopf C
(Start/Reset) drücken.
Zur Unterbrechung des laufenden
Programms den Knopf C mindestens
3 Sekunden lang gedrückt halten.
)
Am Ende des Waschganges
Warten Sie, bis das Symbol
erlischt und die Schrift End
erscheint.
Dann schalten Sie Ihre
waschtrockner aus, indem Sie die
Einschalttaste (On/Off) B
drücken, so dass sie auf O steht.
Nun können Sie die Tür ohne
Gefahr öffnen. Lassen Sie die Tür
immer einen Spalt weit offen
stehen, nachdem Sie die Wäsche
herausgenommen haben, so dass
die Feuchtigkeit, die sich
angesammelt hat, verdunsten
kann.
Schließen Sie stets den
Wasserhahn.
Hinweis: Falls es zu einem
Stromausfall kommt oder die
Waschtrockner während des
Waschganges abgeschaltet
wird, bleibt das ausgewählte
Programm gespeichert.
So können Sie die gängigsten Flecken entfernen:
Tinte und Kugelschreiber: Betupfen Sie den Fleck mit einem Wattebausch, den Sie mit Methylalkohol oder mit 90°igem Alkohol getränkt
haben.
Teer: Betupfen Sie den Fleck mit frischer Butter, danach fahren Sie mit Terpentin darüber und waschen das Ganze dann sofort aus.
Wachs: Schaben Sie erst das feste Wachs ab und legen Sie dann den Fleck zwischen zwei Löschblätter: nun bügeln Sie mit dem heißen
Bügeleisen darüber. Daraufhin wischen Sie den Fleck noch mit einem Wattebausch mit Farblösungsmittel oder mit Methylalkohol ab.
Kaugummi: Reiben Sie den Kaugummi mit Nagellackentferner ab und trocknen Sie das Ganze dann mit einem sauberen Lappen nach.
Schimmel: Baumwolle und weißes Leinengewebe geben Sie in eine Lösung von 5 Teilen Wasser, einem Teil Bleichmittel und einem
Esslöffel Essig, danach sofort auswaschen. Für alle übrigen weißen Gewebe verwenden Sie Wasserstoffperoxyd (1:10) und waschen
daraufhin sofort das Gewebe aus.
Lippenstift: Reiben Sie den Fleck mit Äther ab, wenn es sich um Wolle oder Baumwolle handelt. Bei Seide verwenden Sie
Trichloräthylen.
Nagellack: Legen Sie das Gewebe mit dem Fleck nach unten auf ein Löschblatt, tränken Sie das Ganze mit Nagellackentferner und
verschieben Sie den Fleck stets, wenn sich das Löschpapier färbt.
Gras: Betupfen Sie den Fleck mit einem Wattebausch, den Sie mit Methylalkohol getränkt haben.
Installations- und Bedienungsanleitungen
34
Page 38

Machen Sie sich mit der Schalterblende vertraut
Hier bestimmen Sie
Die Wahl des geeigneten Programms ist absolut wichtig - und
leicht.
Programmierscheibe
Für die Programmauswahl muss die
Anzeige auf der Bedienblende mit dem
Symbol bzw. der Zahl des gewünschten
Waschprogramms übereinstimmen.
EIN/AUS
Befindet sich die Taste B gedrückt, ist Ihr
Waschtrockner eingeschaltet, ist diese nicht
gedrückt, ist Ihr Waschtrockner ausgeschaltet.
Ein Ausschalten des Geräts bewirkt
kein Löschen des gewählten
Programms.
Beim Einschalten der Maschine leuchten
alle Symbole des Displays 8 Sekunden lang
auf; danach blinken nur noch diejenigen,
die ausgewählt werden können.
Start /Reset
Mit Hilfe dieser Taste können Sie das
eingestellte Spülprogramm starten oder
unterbrechen. Bei kurzem Drücken wird
die Funktion Start ausgeführt, bei
längerem Drücken von mindestens 3
Sekunden wird die Funktion Reset
ausgeführt.
Nach dem Start hat die
Positionsänderung des Drehknopfes
keinen Einfluss mehr auf den
Spülvorgang.
Waschmittelschublade
Diese ist in 3 Kammern unterteilt:
1. Waschmittel für die Vorwäsche;
2. Waschmittel für den Hauptwaschgang;
3. Weichspüler.
Der Waschtrockner ist außerdem mit
einer zusätzlichen Kammer 4 (als Beipack) für Bleichmittel ausgestattet, die
in die Kammer 1 eingesetzt werden kann.
Display
Auf der rechten Seite können alle
verfügbaren Optionen abgelesen werden.
Mit der Taste mode können Sie die
gewünschte Option wählen; das
entsprechende Symbol beginnt dann zu
blinken.
Auf der linken Seite können Sie sehen,
welche der Optionen ein- und welche
Der Reinigerbehälter mit der
Kammer für Bleichmittelzusätze
befindet sich hier.
Die Programmierscheiben sind komplett
eingelassen. Drücken
Sie ganz leicht darauf,
um sie herauszuziehen.
mode
ausgeschaltet sind (On-Off); mit Hilfe der
Taste select können Sie diese Option
verändern.
Um die nächste Option zu wählen,
drücken Sie die Taste mode; ansonsten
drücken Sie den Knopf C (Start/Reset)
zum Starten des Spülprogramms.
Im Folgenden werden alle möglichen
Optionen aufgelistet.
Je nach gewähltem Programm werden
nur die dazugehörenden Optionen
aktiviert.
Temperatur
Auf dem Display erscheint die maximale
Temperatur des gewählten Programmes;
durch Drücken der Taste select kann
diese Temperatur maximal bis zum
Kaltwaschen (Off) verringert werden.
Diese Option gilt für alle Waschprogramme.
Schleudern
Das Display zeigt die Höchstumdrehungszahl des Schleudervorgangs
für das eingestellte Programm an; durch
Drücken der Taste select kann diese
Umdrehungszahl maximal bis zum
Ausschalten des Schleudervorgangs
(Off) verringert werden.
Wird die Schleuder ausgeschlossen,
kann kein Trockengang gewählt
werden.
Bei laufendem Waschvorgang wird das
Ausschalten der Schleuderfunktion
durch das Aufleuchten des Symbols
angezeigt.
select
4
X
A
M
1
3
2
D
Diese Option ist bei allen Programmen
anwendbar mit Ausnahme der
Programme 6-10-12-13-16.
Waschintensität
Diese Option erlaubt es Ihnen, das
gewählte Waschprogramm dem
Verschmutzungsgrad der Wäsche
anzupassen. Mit Hilfe der Taste select
können drei verschiedene Stufen gewählt
werden.
Niedrig
Mittel
Hoch
Diese Option kann bei den Programmen
1-2-3-5-7-8 gewählt werden.
Einstellung des Starts
Mit Hilfe dieser Option können Sie den
Start der Maschine bis zu 24 Stunden
im voraus programmieren, indem sie die
Taste select betätigen. Die Aktivierung
dieser Option wird durch das
Aufleuchten des Symbols
Start des Waschvorgangs angezeigt.
Diese Option kann für die Programme
15und 16 nicht gewählt werden.
Fleckenstopp
Wird diese Funktion abgerufen, wäscht
Ihre Waschtrockner ganz besonders intensiv, zur Optimierung der Wirkung
der flüssigen Zusätze, wodurch auch die
hartnäckigsten Flecken beseitigt
werden.
Zum Einschalten dieser Funktion
drücken Sie die Taste select solange bis
On angezeigt wird.
Während des Waschvorgangs wird das
Einschalten dieser Option durch das
Aufleuchten des Symbols
Diese Option ist für die Programme
2-3-5-7-8-11-14.
Anmerkung: Diese Option sollte nicht
zusammen mit der Option
Bügelfreundlich gewählt werden.
bis zum
(s. Seite 40)
angezeigt.
E
C
Bügelfreundlich
Wird diese Funktion abgerufen, wird
Ihre Wäsche knitterfrei gewaschen, und
ist somit einfacher zu bügeln.
Je nach Gewebeart kann der passende
Waschvorgang gewählt werden.
Diese Option kann bei den Programmen
3-5-7-8-12-14.
Zum Einschalten dieser Funktion halten
Sie die Taste select solange gedrückt
bis On angezeigt wird.
Bei den Programmen 7-8-12-14 wird
das Waschprogramm unterbrochen und
die Wäsche bleibt bis zum Abpumpen
eingeweicht. Um das Waschprogramm
zu beenden drücken Sie die Taste
select.
Während des Waschvorgangs wird das
Einschalten dieser Option durch das
Aufleuchten des Symbols
Anmerkung:
- Diese Option sollte nicht zusammen
mit Fleckenstopp gewählt werden.
- Wenn Sie Ihre Wäsche auch trocknen
möchten, kann diese Funktion nur
gleichzeitig mit der Trockenstufe
(Bügeltrocken) eingestellt werden.
Spülen
Diese Option dient zur Verstärkung des
Spülvorgangs. Es wird geraten, diese
Option bei voller Waschtrommel und bei
hoher Waschmitteldosis zu verwenden.
Mit Hilfe der Taste select können drei
verschiedene Stufen gewählt werden.
Niedrig
Mittel
Hoch
Diese Option kann bei den Programmen
1-2-3-4-5-7-8-14.
Trocknen
Dieser Knopf ermöglicht die Einstellung
eines automatischen Trockengangs am
Ende des Waschgangs. Hinsichtlich
einer detaillierten Beschreibung
verweisen wir auf den Abschnitt 37.
Achtung: Wird die Funktion
"Ausschluss der Schleuder" eingestellt,
kann kein Trockengang gewählt werden.
Soll die Wäsche getrocknet werden, dann
stellen Sie bitte die höchste zur Verfügung
stehende Schleudergeschwindigkeit ein
und wählen daraufhin den gewünschten
Trocknungsgrad.
B
A
angezeigt.
Installations- und Bedienungsanleitungen
35
Page 39

M
Zusätzliche Anzeigen
(auf der linken Seite des Displays):
Sobald die Maschine
eingeschalten wird....
Können Sie die verbleibende
Waschdauer des eingestellten
Programmes ablesen.
Beim Wählen eines neuen
Programms....
wird die Dauer des gewählten
Programms angezeigt.
Dauer des Programms
Während des Waschvorgangs wird die
verbleibende Wasch-dauer angezeigt.
Dauer des Trockenprogramms
Es wird die maximale Dauer des
gewählten Programms angezeigt.
Fehler-Code
Falls es zu einer Störung kommt wird
ein Code angezeigt, der dem
Kundendienst mitzuteilen ist (z.B.: F-
01).
Ende des Programms
Wenn das Waschprogramm abgelaufen
ist erscheint die Schrift End.
Während des Waschvorgangs....
Können Sie die Einstellungen des
laufenden Programmes durch
Drücken der Taste mode ablesen und
eventuell mit der Taste select
verändern.
Blockierte Türe
Das leuchtende Symbol
zeigt an,
dass die Türe blockiert ist, um zu
frühes Öffnen zu verhindern. Um
Schäden zu vermeiden warten Sie bis
die Schrift End erscheint, bevor Sie
die Türe öffnen.
Was soll heute gewaschen werden?
Waschprogramme für jede Jahreszeit
Gewebeart und Verschmutzungsgrad Programm Temper. Wasch-
BAUMWOLLE
Kochwäsche (Bettücher, Tischdecken
usw.)
Kochwäsche (Bettücher, Tischdecken
usw.)
Widerstandsfähige, stark verschmutzte
Weiß- und Buntwäsche
Widerstandsfähige, stark verschmutzte
Weiß- und Buntwäsche
Leicht verschmutzte Weißwäsche und
empfindliche Buntwäsche
(Oberhemden, Maschenware usw.)
Trocknen für Baumwolle
KUNSTFASERN
Stark verschmutzte, farbechte
Kunstfasergewebe (Babywäsche usw.)
Farbechte Kunstfasergewebe
(Babywäsche usw.)
Zarte bunte Kunstfasergewebe (leicht
verschmutzte Feinwäsche jeglicher Art)
Zarte bunte Kunstfasergewebe (leicht
verschmutzte Feinwäsche jeglicher Art)
Trocknen für Kunstfasern
HAND WASCHEN
Wolle
Sehr zarte Feinwäsche
(Gardinen, Seide, Viskose, usw.)
Trocknen für Wolle
TEILPROGRAMME
Sanfte spülen
Sanftes Schleuder
Ablauf
1
2
3
4
5
6
7
7
8
9
10
11
12
13
14
15
16
90°C
90°C
60°C
40°C
40°C
50-60°C
40°C
40°C
30°C
40°C
30°C
Weich-
mittel
macher
◆◆
◆◆
◆◆
◆◆
◆◆
◆◆
◆◆
◆◆
◆◆
◆◆
◆◆
◆◆
Bleichmittel
u.Fleckenstopp
Schon./
Trad.
Schon./
Trad.
Schon./
Trad.
Schon.
Schon.
Schon.
Schon.
Wasch dauer
(Min.)
140
125
130
150
86
89
79
69
30
40
60
Beschreibung des Waschprogramms
Lauwarme Vorwäsche, waschen bei 90°C,
Spülgänge, Zwischen- und Endschleudern
Waschen bei 90°C, Spülgänge, Zwischenund Endschleudern
Waschen bei 60°C, Spülgänge, Zwischenund Endschleudern
Waschen bei 40°C, Spülgänge, Zwischenund Endschleudern
Waschen bei 40°C, Spülgänge, Zwischenund Endschleudern
Waschen bei 50-60°C, Spülgänge,
Knitterschutz oder sanftes Schleudern
Waschen bei 40°C, Spülgänge,
Knitterschutz oder sanftes Schleudern
Waschen bei 40°C, Spülgänge,
Knitterschutz oder sanftes Schleudern
Waschen bei 30°C, Spülgänge und
sanftes Schleudern
Waschen bei 40°C, Spülgänge und
sanftes Schleudern
Waschen bei 30°C, Spülgänge,
Knitterschutz oder Ablauf
Spülgänge, Knitterschutz oder Ablauf
Ablauf und sanftes Schleudern
Ablauf
Wichtig: Um das gerade eingeschaltete Programm zu stoppen, drücken Sie mindestens 3 Sekunden lang den Knopf C (Start/Reset).
Bei den in der Tabelle angegebenen Daten handelt es sich um Richtwerte, die je nach Menge und Art der Wäsche, der Temperatur
der Wasserzufuhr, der Raumtemperatur usw. variieren.
Spezialprogramme
A-Note auch bei 40°C Die waschtrockner stellt Ihnen ein Spezialprogramm zur Verfügung, dank dessen Sie auch bei niedrigen
Waschtemperaturen beste Waschergebnisse erzielen. Wählen Sie das Programm 4 und eine Waschtemperatur von 40° C, die Ergebnisse
sind die, die Sie normalerweise nur bei 60°C verzeichnen können, dies dank der Effizienz Ihres Waschautomaten sowie der
Verlängerung der Waschdauer.
Die tägliche Wäsche Die waschtrockner stellt Ihnen ein Programm zur Verfügung, das Ihnen ermöglicht, leicht verschmutzte Wäsche in
kurzer Zeit wirtschaftlich zu waschen. Wählen Sie das Programm 9 und eine Temperatur von 30°C. Auch Gewebe unterschiedlicher
Art (mit Ausnahme von Wolle und Seide) können in diesem Programm, bei maximaler Lademenge von 3 kg, zusammen gewaschen
werden. Mit diesem Programm sparen Sie Zeit und Energie, denn die Waschzeit beträgt nur ca. 30 Minuten.
ES IST RATSAM, FLÜSSIGE WASCHMITTEL EINZUSETZEN.
Installations- und Bedienungsanleitungen
36
Page 40

Wie trocknet man
A.
Waschen und Trocknen
Nehmen Sie die nebenstehende
Tabelle A zu Hilfe und befolgen Sie
die Angaben hinsichtlich der
maximalen Lademenge MAX,
wenn Sie Waschen und
nachfolgend automatisch
Trocknen möchten.
Befolgen Sie die Anleitungen für
Nur Waschen (siehe Seite 34,
Abschnitt "Starten des
Waschtrockner") und wählen Sie
dann den gewünschten
Trocknungsgrad:
Bügeltrocken
Schranktrocken
Extra trocken
drücken Sie daraufhin die Taste
C (Start/Reset).
Sollte die Menge der zum Waschen
und Trocknen geladenen Wäsche
die vorgeschriebene Höchstmenge
einmal überschreiten (siehe Tabelle A), sind die unter dem Abschnitt
Nur Waschen (siehe Seite 34,
Abschnitt "Starten des
Waschtrockner") aufgeführten
Anleitungen zu befolgen.
Nach Ablauf des Programms
nehmen Sie die Wäsche aus dem
Waschtrockner, und füllen diesen
erneut mit nur jeweils der Hälfte
der Ladung.
Befolgen Sie zum Trocknen nun die
Anleitungen des Abschnitts Nur
Trocknen.
Wiederholen Sie dasselbe mit der
restlichen Wäschemenge.
Nur Trocknen
Nach Einfüllen der zu trocknenden
Wäsche (max. 4 kg) stellen Sie
sicher, dass:
- das Füllfenster gut geschlossen ist;
- der Stecker in der Steckdose ist;
- der Wasserhahn auf ist;
- die Taste B auch nicht gedrückt
wurde (Einstellung O).
Wählen Sie nun das
Programm
Drehen Sie den Schalterknopf A
auf einen der Trockenprogramms
je nach Gewebe, und wählen Sie
den gewünschten Trocknungsgrad:
Bügeltrocken
Schranktrocken
Extra trocken
drücken Sie daraufhin die Taste
C (Start/Reset).
Am Ende des Trocknungsgangs
Warten Sie, bis das Symbol
erlischt und die Schrift End
erscheint.
Dann schalten Sie Ihre
waschtrockner aus, indem Sie die
Einschalttaste (On/Off) B
drücken, so dass sie auf O steht.
Nun kann die Gerätetür geöffnet
werden. Lassen Sie diese nach
Herausnehmen der Wäsche halb
oder ganz aufstehen, um die
Bildung schlechter Gerüche zu
vermeiden und drehen Sie den
Wasserhahn zu.
Trocknungsgrade
Je nach Ihren Anforderungen
können 3 verschiedene
Trocknungsgrade gewählt
werden.
Bügeltrocken
: noch leicht
feuchte, einfach zu bügelnde
Wäscheteile.
Schranktrocken :
schrankfertige Wäsche.
Extra trocken :
absolut trockene Wäsche,
empfohlen für Frotteetücher,
Badetücher und -mäntel.
Dem Abschluss des Trocknungsvorgangs folgt eine kurze
Abkühlzeit.
Gewebeart
Baumwolle,
Leinen
Baumwolle
Terital,
Baumwolle
Kunstfasern
Nylon Feinwäsche,
Wolle Pullis,
Die in der Tabelle angegebenen Zahlen haben richtungsweisenden Charakter.
Art der
Ladung
Unterschiedlich große
Wäscheteile
Frotteehan-
dtücher
Bettwäsche,
Oberhemden 2,5 110 100 90
Schlafanzüge, Socken
usw.
Damenstrümpfe usw.
Pullover
usw.
Bei Baumwollartikeln bis zu 1 Kg wählen Sie das
Trockenprogramm für synthetische Stoffe.
Während des Trocknens wird ein Schleudergang
zwischengeschaltet, wenn eines der Baum-
wollprogramme.
- Während des Trocknens kann die Gerätetür heiß
werden.
- Trocknen Sie keine Wäsche, die in brennbaren
Lösemitteln (wie Trielin) gewaschen wurde.
- Trocknen Sie weder Schaumgummi noch ähnliche
Elastomer bzw. Gummimaterialien.
- Vergewissern Sie sich, dass der Wasserhahn
während des Trocknens auf ist.
- Dieser Waschtrockner kann nur zum Trocknen
von in Wasser gewaschener Wäsche eingesetzt
werden.
Max.
Lademenge (kg) Extra
4 155 140 130
4 155 140 130
1656060
1656060
1707070
Trockendauer (Min.)
trocken
Schranktrocken
Bügeltrocken
WICHTIG
ACHTUNG
37
Installations- und Bedienungsanleitungen
Page 41

M
Leitfaden zur Verdeutlichung der Wäscheetiketten
Prägen Sie sich diese wenigen Symbole ein. Ihre
Wäsche wird es Ihnen danken, sie wird sauberer, hält
länger, bleibt formschön und auch Ihr Waschtrockner
wird sein Bestes geben.
Innerhalb Europas sprechen die
auf den Wäscheetiketten abgebildeten Symbole "dieselbe Sprache". Versuchen Sie, diese zu verstehen und sich diese zu eigen zu
machen, sie werden Ihnen eine
wertvolle Stütze sein bei der korrekten Behandlung Ihrer Kleider
und Wäscheteile.
Praktische Ratschläge
Ziehen Sie Oberhemden und Blusen auf links.
Entleeren Sie alle Taschen.
Kontrollieren Sie stets die Etiketten.
Sie werden in fünf Kategorien
unterteilt, und beziehen sich auf:
Waschen
geln
Trocknen
, Bleichen , Bü-
, chem. Reinigen und
.
Füllen Sie große und kleine Wäscheteile
abwechselnd in die Wäschetrommel.
Vergleichen Sie die Etiketten mit den Symbolen dieser Tabelle:
Ihre Wäsche wird es Ihnen danken, sie wird sauberer, hält länger, bleibt
formschön und auch Ihre waschtrockner wird ihr Bestes geben.
Chemische
Ener-
gisch
Waschen Chloren Bügeln
Mild
c
l
Waschen
bei 95°
Waschen
bei 60°
Waschen
bei 40°
Chlorbleiche
möglich
Chlorbleiche nicht
möglich
Heiß bügeln
max 200°C
Mäßig heiß
bügeln
max 150°C
Bügeln max
110°C
Reinigung Trocknung
Hohe
temp-
eratur
A
Mit allen
Lösemitteln
P
Mit Perchlorat
Flugbenzin, reinem
Alkohol, R111 und
R113
F
Mit Flugbenzin,
reinem Alkohol,
und R113
Wählen Sie die richtige
T emperatur
Mäßige
temperatur
Trocknen in
Wäsche-
trocknern
möglich
Trocknen in
Wäsche-
trocknern nicht
möglich
Ausgebreitet
trocknen
Waschen
be i 30° Nicht bü geln
Handwäsc-
he
Nicht
waschen
Keine chemische
Reinigung möglich
Aufgehängt
trocknen (nicht
geschleudert)
Auf
Kleiderbügel
trocknen
Installations- und Bedienungsanleitungen
38
Page 42

Praktische Ratschläge um Fehler zu vermeiden
Waschen Sie in der Maschi-
ne keine Wäsche, die unge-
säumt, ausgefranst oder zerrissen
ist. Gegebenenfalls sind solche
Teile in einem Kissenbezug zu
waschen. Waschen Sie Buntwäsche nicht mit Weißwäsche zusammen.
Achten Sie auf das Gewicht!
Das angegebene Gewicht, das
sich auf die maximale Ladung an
Trockenwäsche bezieht, sollte
nicht überschritten werden:
Widerstandsfähige Gewebe:
max. 5 kg
Kunstfasergewebe:
max. 2,5 kg
Feinwäsche:
max. 2 kg
Reine Wolle:
max. 1 kg
Wie schwer ist Wäsche?
1 Bettuch 400-500 gr
1 Kissenbezug 150-00 gr
1 Tischdecke 400-500 gr
1 Bademantel 900-1.200 gr
1 Handtuch 150-250 gr
Farbige T-Shirts, bedruckte
T-Shirts und auch Oberhemden
und Blusen bleiben länger schön,
wenn sie vor dem Waschen auf
links gezogen werden.
T-Shirts und Sweatshirts sollten
stets von links gebügelt werden.
Vorsicht bei Overalls.
Die weit verbreiteten und gern
getragenen Overalls des Typs
"Arbeiteranzug" haben Träger mit
Schnallen und Haken, die nicht
nur die Wäschetrommel, sondern
auch die anderen Wäschestücke
Wie wasche ich
Gardinen.
Da Gardinen sehr leicht knittern,
sollten diese zusammengefaltet
in einem Kissenbezug oder in einem netzartigen Beutel
gewaschen werden. Waschen Sie
diese allein und achten Sie
darauf, dass das Gesamtgewicht
die Hälfte der maximalen
Lademenge nicht übersteigt.
Stellen Sie das Spezialprogramm
12 ein, das ein automatisches
Ausschließen der Schleuder
vorsieht.
Skijacken und Anoraks.
Auch Skijacken und Anoraks
können in der Maschine
gewaschen werden, wenn es sich
um Gänse- oder Entendaunenfedern handelt. Wichtig ist, dass
das Gerät nicht mit einem
Gewicht von 5 kg beladen wird,
sondern höchstens 2/3 kg, und
dass der Spülgang ein oder
zweimal wiederholt wird, und ein
sanfter Schleudergang eingeschaltet wird.
beschädigen könnten. Stecken
Sie sie vor dem Waschen in die
Brusttasche und befestigen Sie
diese mit Sicherheitsnadeln, um
jegliche Gefahr auszuschließen.
Urlaub: Stecker heraus-
ziehen!
Bevor Sie in Urlaub fahren, empfiehlt es sich, den Stecker aus der
Steckdose zu ziehen, den Wasserhahn abzudrehen und die Tür offen, oder zumindest etwas vorstehen zu lassen. Hierdurch bleiben
Wäschetrommel und Gummimanschette trocken, wodurch
die Bildung unangenehmer
Gerüche vermieden wird.
Tennisschuhe.
Entfernen Sie eventuelle
Schlammreste. Tennisschuhe
können zusammen mit Jeans und
ähnlichen widerstandsfähigen
Wäschestücken gewaschen werden. Zusammen mit Weißwäsche
sollten sie jedoch nicht gewaschen werden.
WOLLWASCHGANG
Um bestmögliche
Waschergebnisse zu
erzielen empfiehlt sich
der Einsatz eines
Spezialwaschmittels.
Achten Sie auch darauf,
die Lademenge von 1 kg
Trockenwäsche nicht zu
überschreiten.
EXKLUSIV
Cachemire Gold: So schonend wie Waschen von Hand
Der erste Waschtrockner, dem die Auszeichnung "The Woolmark Company"
zuteil wurde.
Das Cachemir Gold - Waschprogramm wurde geschaffen,
um auch Woll- oder die noch
empfindlicheren und kostbaren Cachemire-Teile in der Maschine waschen zu können.
Das Wollwaschprogramm der
Waschtrocknern, die von der
Firma Merloni
Elettrodomestici hergestellt
werden, wurde von Woolmark
Installations- und Bedienungsanleitungen
39
für Kleidungsstücke der Marke
Woolmark, die laut
Wäschezeichen per Hand
gewaschen werden sollen,
erfolgreich getestet. Es
handelt sich um das erste
schonende Handwaschprogramm, das von Woolmark
akzeptiert wird. (M.00221)
Ein solches Ergebnis konnte
nur dank einer Schleudertour
von 90 U/min erzielt werden, was
eine Faserreibung verhindert.
Verwenden Sie das Programm 11
für all jene Teile, die als Handwäsche (Bottich mit eingetauchter Hand) ausgezeichnet sind.
Zur Pflege von Wollteilen
empfiehlt sich der Einsatz
von Spezialwaschmittel.
Page 43

Wichtige Regeln für ein besseres Waschergebnis
M
Das Geheimnis der Waschmittelschublade
Der erste Geheimtip ist der leichteste: die
Waschmittelschublade öffnet sich, indem Sie sie nach
außen drehen.
Geben Sie das Waschmittel und eventuelle Zusätze gemäß den Mengenangaben des Herstellers in die entsprechende Kammer: normalerweise finden Sie alle Informationen auf
der Verpackung. Die Waschmittelmenge ändert sich je nach Wäschemenge, nach dem Härtegrad des
Wassers und nach der Verschmutzung der Kleider. Mit ein bißchen
Erfahrung werden Sie lernen, die
Mengen fast automatisch zu dosieren: damit werden auch Sie Ihren
Geheimtip haben.
Bevor Sie das Waschmittel für die
Vorwäsche in Kammer 1 geben, ver-
gewissern Sie sich, dass die Zusatzkammer 4, die dem Bleichen vorbehalten ist, nicht darin ist.
Wenn Sie Weichspüler in die Kammer 3 geben, achten Sie darauf, dass
dieser nicht über das Gitter austritt.
Der Waschtrockner entnimmt den
Weichspüler bei jedem Waschprogramm automatisch.
1
Flüssigwaschmittel werden in Kammer 2 gegeben, aber erst kurz vor dem
Einschalten der Waschtrockner.
Vergessen Sie nicht, dass Flüssigwaschmittel besonders geeignet sind
für Waschprogramme bis zu 60 Grad
und für all jene Programme, die keine Vorwäsche benützen.
Sie finden sowohl Flüssigwaschmittel als auch Waschpulver
mit speziellen Dosierbechern im Handel, die direkt in die Wäschetrommel
gegeben werden, so wie auf der
Packung beschrieben.
Verwenden Sie nie Waschmittel für
die Handwäsche, denn sie schäumen
zu stark, was dem Waschtrockner
gegebenenfalls schaden könnte.
Davon ausgenommen sind die
Waschmittel, die speziell sowohl für
die Handwäsche als auch für die
Waschtrockner geeignet sind.
Und nun noch ein letzter Geheimtip: wenn Sie mit kaltem Wasser waschen, reduzieren Sie stets die
Waschmittelmenge; im kalten Wasser löst es sich nämlich schlechter
auf als im warmen, daher wäre ein
Teil verschwendet.
Waschgang zum Bleichen
Falls es nötig sein sollte, Ihre Wäsche
zu bleichen, müssen Sie die Zusatzkammer 4 (liegt dem Waschtrockner
bei) in die Kammer 1 der
Waschmittelschublade einfügen.
Wenn Sie das Bleichmittel hinein gießen, achten Sie darauf, den Höchststand, der auf dem Zentralstift mit
"max" gekennzeichnet ist (siehe Abbildung) nicht zu überschreiten.
Der Einsatz der Zusatzkammer
schließt die Möglichkeit einer
Vorwäsche aus.
Traditionelle Bleichmittel
4
X
A
M
1
3
(Hypochloridlaugen) dürfen aus-
Die Waschmittelschublade ist
ausziehbar. W enn Sie sie reinigen
wollen, brauchen Sie sie nur
herauszuziehen, indem Sie sie leicht
anheben und dann nach außen ziehen,
so wie in der Abbildung dargestellt;
2
daraufhin stellen Sie sie einige Zeit
lang unter fließendes Wasser .
Sparsam und vernünftig
waschen
WÄSCHEKAPAZITÄT VOLL AUSNÜTZEN
Die beste Weise, um weder Strom, Wasser, Waschmittel noch Zeit zu
verschwenden, besteht darin, die Waschtrockner mit der empfohlenen
Höchstwäschemenge zu benützen.
Bei einer vollen Auslastung Ihres Waschtrockner können Sie verglichen mit zwei
halben Auslastungen bis zu 50% Energie SPAREN.
IST DIE VORWÄSCHE TATSÄCHLICH NÖTIG?
Nur wenn die Wäsche wirklich sehr schmutzig ist.
Wählen Sie für wenig oder durchschnittlich schmutzige Wäsche einen Waschgang
OHNE Vorwäsche: auf diese Weise können Sie Waschmittel, Zeit, Wasser und von 5
bis 15% Energie SPAREN.
IST ES WIRKLICH NÖTIG, BEI HEIßEN TEMPERATUREN ZU WASCHEN?
Wenn Sie die Flecken vorab mit einem Fleckenlöser behandeln oder die
angetrockneten Flecken vor der Wäsche einweichen, können Sie in vielen Fällen
auf den Heißwaschgang verzichten.
Wenn Sie ein Waschprogramm mit 60° C benützen, so SPAREN Sie bis zu 50%
Energie.
BEVOR SIE EIN TROCKENPROGRAMM WÄHLEN
Wählen Sie eine hohe Drehzahl für den Schleudergang aus: dadurch wird der
Wassergehalt in der Wäsche herabgesetzt, bevor Sie den Trockengang starten. Auf
diese Weise können Sie Zeit und Energie SPAREN.
schließlich bei strapazierfähigen
weißen Stoffen verwendet
werden, während schonende
Bleichmittel auch für färbige
Wäsche, Feinwäsche und Wolle
verwendet werden können.
Anleitungen zum
wirtschaftlichen und
umweltfreundlichen
Einsatz Ihres
Waschtrockner.
In Kammer 1:
Waschpulver für die V orwäsche
(kein Flüssigwaschmittel)
In Kammer 2:
Waschmittel für die Hauptwäsche
(Waschpulver oder
2
Flüssigwaschmittel)
In Kammer 3:
Zusätze (Weichspüler, Duftstoff e usw.)
In Kammer 4:
Traditionelle und schonende
Bleichmittel.
MAX
MAX
Bitte achten Sie darauf, dass nur resistente Stoffe diesem Vorgang unterworfen werden dürfen. Mit dem
Programm 12 (Seide) und mit den
"Spezialprogram-men" können Sie
nicht bleichen (siehe Seite 36).
Falls Sie die Wäsche separat
bleichen wollen müssen Sie das
Bleichmittel in das zusätzliche Fach
4 geben und Programm 14
einschalten.
Das Spülprogramm muss auf Stufe
Mittel oder Hoch (siehe Seite 35)
eingestellt sein.
Zum Bleichen während des
Waschvorgangs geben Sie das
Waschmittel und die zusätzlichen
Mittel in die dafür vorgesehenen
Fächer (siehe Tabelle S. 36) und
stellen Sie das gewünschte
Programm sowie die Option
Fleckenstopp ein.
Installations- und Bedienungsanleitungen
40
Page 44

Probleme und Lösungen
Bevor Sie telefonieren, lesen Sie bitte Folgendes
Eventuell an Ihrem Waschtrockner auftretende Betriebsstörungen
könnten vielleicht behoben werden, ohne den Kundendienst
anzufordern. Überprüfen Sie demnach zuerst folgende Punkte.
Der Waschtrockner
startet nicht.
Steckt der Stecker fest in der
Steckdose? Bei den Hausarbei-
ten könnte dieser etwas herausgezogen worden sein.
Besteht ein Stromausfall?
Wurde vielleicht durch Überlastung (Einschalten mehrerer Hausgeräte) ein Ansprechen der Sicherung verursacht, oder besteht vielleicht
ein Stromausfall im gesamten
Wohngebiet?
Ist die Tür gut geschlossen?
Aus Sicherheitsgründen wird
ein Start der Maschine ausge-
RICHTIG
Nach dem Waschen
den Hahn wieder
schließen.
Verhindert einen
raschen Verschleiß
der Hydraulikanlage
der Waschtrockner
und verhindert Wasserschäden während Ihrer Abwesenheit.
Tür stets vorstehen
lassen, um Geruchsbildung zu vermeiden.
Sanfte Reinigung
der Außenflächen.
Die äußeren Teile
sowie die Teile aus
Gummi sind mit
einem mit lauwarmer, milder Spüllauge angefeuchteten Tuch zu reinigen.
schlossen, wenn die Tür offenbleibt bzw. nicht richtig
geschlossen wird.
Wurde die ON/OFF-Taste
gedrückt?
Wenn ja, wurde vielleicht ein
Programm mit Startvorwahl
gespeichert.
Sie haben den Knopf Start/
Reset gedrückt? Wenn ja,
wurde vielleicht ein
Programm mit Startvorwahl
gespeichert.
Ist der Wasserhahn aufgedreht? Eine der Sicherheitsvor-
richtungen verhindert den
Start der Maschine, wenn diese kein Wasser lädt.
FALSCH
Den Stecker nicht
herauszuziehen, wenn
die Maschine gereinigt
wird.
Auch während der
Wartungsarbeiten
muss der Stecker herausgezogen werden.
Der Einsatz von Löseund Scheuermitteln.
Diese dürfen zur Reinigung der äußeren Teile
und der Teile aus Gummi
nicht eingesetzt werden.
Die Waschmittelschublade zu vernachlässigen.
Sie kann herausgezogen werden, und kann
demnach unter laufendem Wasser ausgespült werden.
Sich in Urlaub zu begeben, ohne sich um die
Maschine zu kümmern.
Bevor Sie in Urlaub fahren ist sicherzustellen,
dass der Stecker gezogen und der Wasserhahn
abgedreht wurde.
Wo ist denn das ganze Wasser geblieben?
Einfach: mit der neuen Scholtes-Technik, es genügt weniger als
die Hälfte, um die doppelte Wäschemenge gründlich zu waschen!
Deshalb sehen Sie das Wasser nicht durch die Tür hindurch:
weil es wenig ist, äußerst wenig, um die Umwelt zu schonen,
ohne auf höchste Reinigungswirkung verzichten zu müssen.
Und außerdem sparen Sie dabei auch noch Strom.
Der Waschtrockner lädt
Der Waschtrockner
lädt kein Wasser.
Ist der Schlauch korrekt am
Wasserhahn angeschlossen?
Fehlt Wasser? Vielleicht wurde
die Wasserzufuhr aufgrund eventueller Arbeiten in Ihrem Wohnviertel
kurzfristig unterbrochen.
Ist der Druck ausreichend?
Vielleicht eine Störung an der
Druckpumpe.
Ist der Wasserfilter sauber?
Durch sehr kalkhaltiges Wasser,
oder auch nach Arbeiten an der
Leitung könnte das Sieb des
Wasserhahns verstopft worden
sein.
Ist der Gummischlauch eingeklemmt oder geknickt? Der
Wasserzufuhrschlauch muss
möglichst gerade verlegt
werden. Stellen Sie sicher, dass
er weder eingeklemmt noch geknickt wurde.
laufend Wasser und
pumpt es laufend ab.
Liegt der Ablaufschlauch zu
tief? Dieser muss in einer Höhe
von 60 bis 100 cm installiert werden.
Liegt das Schlauchende viel-
leicht unter Wasser?
Wurde der Mauerablauf mit
einer Entlüftungsöffnung
versehen? Sollte die Betriebs-
störung nach diesen Kontrollen
weiterhin bestehen, drehen Sie
bitte den Wasserhahn ab, schalten die Maschine aus und fordern den Kundendienst an.
Wohnen Sie sehr hoch (auf den
letzten Etagen) könnte es sich
auch um einen
Syphonvakuumeffekt handeln.
In diesem Fall ist ein entsprechendes Ventil zu installieren.
Installations- und Bedienungsanleitungen
41
Page 45

M
Der Waschtrockner
pumpt nicht ab und
schleudert nicht.
Sieht das eingestellte Programm den Wasserablauf
vor? Bei einigen Programmen
muss der Ablauf manuell gestartet werden.
Wurde die "Bügelfreundlich"Funktion - bei den Geräten,
die eine solche vorsehen aktiviert? Beenden Sie das
Programm mit der Taste select.
Ist der Ablaufschlauch geknickt? Dieser muss möglichst
gradlinig verlegt werden. Stellen
Sie sicher, dass er weder eingeklemmt noch geknickt wurde.
Wenden Sie sich
ausschließlich an
autorisierte
Fachkräfte und
verlangen Sie den
Einsatz
von OriginalErsatzteilen.
Ist die Ablaufleitung verstopft? Wurde der Ablauf-
schlauch mit einer nicht ordnungsgemäßen Verlängerung
versehen, die den Ablauf
verhindert?
Der Waschtrockner
vibriert zu stark während
des Schleuderns.
Wurde bei der Installation die
innere Schwingergruppe korrekt befreit? Siehe nächste Sei-
te, Abschnitt Installation.
Wurde der Waschtrockner
eben aufgestellt? Dies sollte
regelmäßig kontrolliert werden.
Der Waschtrockner könnte im
Laufe der Zeit unmerklich verrückt sein. Regulieren Sie die
Stellfüße unter Zuhilfenahme einer Wasserwaage.
Wurde der Waschtrockner in
eine Küchenzeile integriert?
Sollte es sich um ein nicht integrierbares, bzw. nicht einbaufähiges Modell handeln, muss
der Waschtrockner während des
Schleuderns etwas oszillieren,
und verlangt demnach an allen
Seiten einige freie Zentimeter.
Der Waschtrockner ist
undicht.
Wurde der Ablaufschlauch
fest aufgeschraubt? Drehen
Sie den Wasserhahn ab, ziehen
Sie den Stecker aus der Steckdose und versuchen Sie, die Nutmutter etwas mehr anzudrehen
(nicht zu fest).
Ist die Waschmittelschublade
verstopft? Versuchen Sie, diese
abzunehmen reinigen Sie sie
unter laufendem Wasser.
Ist der Ablaufschlauch unzureichend befestigt? Drehen Sie
den Wasserhahn ab, ziehen Sie
den Stecker aus der Steckdose
und versuchen Sie, den Schlauch
besser zu befestigen.
Es bildet sich zu viel
Schaum.
Wurde ein maschinengeeignetes Waschmittel eingesetzt? Kontrollieren Sie, was
auf der Verpackung aufgedruckt
ist: "Für Waschtrocknern" oder
"Für Handwäsche" oder Ähnliches.
Wurde mit zuviel Waschmittel gewaschen? Eine zu hohe
Reinigermenge, die außerdem
zuviel Schaum erzeugen würde,
führt nur zu Verkrustungen im
Innern des Waschtrockner, der
Reinigungseffekt wird dadurch
nicht erhöht.
Der Waschtrockner
trocknet nicht.
Stellen Sie sicher, dass:
der Stecker fest in der Steckdose
steckt; kein Stromausfall
besteht; die Gerätetür
ordnungsgemäß geschlossen
wurde; keine Startzeit-Vorwahl
(falls vorhanden) erfolgte; die
Funktion Trocknen auch
eingestellt wurde.
Technische Daten
Modell
Abmessungen
Fassun gsvermögen
Stromanschluß
Wasseranschluße
Schle uder-
geschwindigkeit
Kon trollprogramm gemäß
der Norm IEC 456
MLSE 12 X
Breite cm 59,5
Höhe cm 81,5
Tiefe cm 54
1 bis 5 kg pro Waschvorgang; 1 bis 4 kg pro Trockenvorgang
Spannung 220/230 Volt 50 Hz
Höchstleistungsaufnahme 1850 W
Höchstdruck 1 MPa (10 bar)
Mindestdruck 0,05 MPa (0,5 bar)
Fassungsvermögen der Tromme 46 liter
Bis 1200 U/min
Waschen: Programm 3; Temperatur 60°C;; Spülen ;
Wa sc hintensit ät ; Bei eine r Wäscheladung von 5,0 kg.
Trocknen: Durchgeführt bei einer Wäscheladung von 2,5 kg und
Trocknun gsgra d .
Dieses Gerät entspricht den folgenden EG-Richtlinien:
- 73/23/EWG vom 19.02.73 (Niederspannung) und nachfolgenden
Änderungen
- 89/336/EWG vom 03.05.89 (elektromagnetische Verträglichkeit) und
nachfolgenden Änderungen
Der Waschtrockner
trocknet nur
unzureichend.
Stellen Sie sicher, dass:
das Ablaufschlauchende nicht in
Wasser getaucht ist; die
Ablaufpumpe nicht verstopft ist;
die Anleitungen hinsichtlich der
maximalen Lademenge auch
eingehalten wurden; der
Wasserhahn auf ist.
Sollte trotz all dieser Kontrollen die
Betriebsstörung an Ihrem
Waschtrockner weiter bestehen
bleiben, dann wenden Sie sich an
die nächstgelegene autorisierte
Kundendienststelle und geben Sie
hierbei folgende Daten an:
- Art der Störung
- Modell-Kennzeichen
(Mod. ....)
- Seriennummer (S/N ....)
Diese Daten entnehmen Sie bitte
dem auf der Rückseite der Maschine befindlichen Typenschild.
Installations- und Bedienungsanleitungen
42
Page 46

Installation und Umzug
Waschtrockner zieht
in Ihr Haus ein
Egal, ob Sie Ihren Waschtrockner neu kaufen oder ob Sie ihn aufgrund
eines Umzugs neu anschließen müssen, die Installation ist ein
überaus wichtiger Vorgang für eine einwandfreie Funktion der
Waschtrockner.
Nachdem Sie das Gerät ausgepackt
haben, vergewissern Sie sich in erster
Linie, dass es keinen Schaden erlitten
hat. Falls Sie irgendwelche Zweifel diesbezüglich haben, rufen Sie sofort einen
Fachmann zu Hilfe. Die Wäschetrommel
wird während des Transportes mit vier
Schrauben an der Rückwand des
Waschtrockner befestigt.
Bevor Sie den ersten Waschgang starten, nehmen Sie die Schrauben und
auch die Gummiringe sowie das
Distanzstück ab (bewahren Sie alles gut
auf) und verschließen Sie die Löcher
mit den Plastikstöpseln, die mit der
Waschtrockner mitgeliefert werden.
Wichtig: Die unten rechts auf der
Rückseite des Waschtrockner
befindlichen 3 Löcher, in denen der
Stecker untergebracht war, müssen
mit beiliegendem Stöpsel geschlossen
werden.
Standfläche
Wenn Ihr Waschtrockner gut funktionieren soll, ist es wichtig, dass er
vollkommen gerade steht. Um dem
Gerät einen perfekten Stand zu verleihen, brauchen Sie nur die vorderen Füße entsprechend einzustellen;
der Neigungswinkel der
Waschtrockner, der auf der Arbeitsfläche gemessen wird, darf nicht
mehr als 2% betragen. Falls Sie als
Unterlage einen Teppichboden
haben, vergewissern Sie sich, dass
die Belüftung auf der Standfläche
nicht beeinträchtigt wird.
Bewahren Sie die
Schrauben und das
Distanzstück, mit dem Sie
den Innenteil der
Waschtrockner blockieren
können, auf.
Falls Sie umziehen sollten,
werden sie Ihnen dienlich
sein, um die
Wäschetrommel erneut zu
blockieren, wodurch sie
während des Transportes
gegen Schläge geschützt ist.
Die vorderen Füße sind regulierbar .
Wasseranschluss
Der Wasserdruck muss den Werten
entsprechen, die auf dem Typenschild auf dem Rückteil des
Waschtrockner angegeben sind.
Schließen Sie den Wasserschlauch an
einen Kaltwasserhahn mit einem
Gewindeanschluss zu ¾ Gas an und
geben Sie die Gummidichtung zwischen den Anschluss.
A
Die Gummidichtung.
Wenn die Wasserleitungen neu sein
sollten oder längere Zeit unbenutzt
waren, lassen Sie das Wasser so lange laufen, bis es klar und frei von
allen Verunreinigungen ist, bevor
Sie den Schlauch anschließen. Daraufhin schließen Sie den Schlauch
an den Wasserhahn an, der sich auf
dem Rückteil der Waschtrockner
oben rechts befindet.
Wasserhahn oben rechts.
Anschluss des Ablaufs
Auf der Rückseite des
Waschtrockner befinden sich zwei
Anschlüsse (rechts oder links), an
die Sie den Ablaufschlauch anschließen können. Führen Sie das
andere Ende in eine Abwasserleitung ein oder legen Sie es
auf ein Waschbecken oder eine Badewanne. Achten Sie hierbei jedoch darauf, dass der Schlauch
nicht allzu stark gebogen wird. Es
ist wichtig, dass der Schlauch auf
einer Höhe von 60 bis 100 cm endet. Falls es unumgänglich ist, den
Schlauch auf einer geringeren Höhe
als 60 cm über dem Boden anzuschließen, so müssen Sie ihn in den
Haken einfügen, der auf dem
oberen Teil der Rückseite angebracht ist.
Dieser Haken muss verwendet
werden, wenn der Ablauf weniger
als 60 cm über dem Boden liegt.
Wenn der Ablaufschlauch in eine
Wanne oder ein Waschbecken geführt wird, so bringen Sie den
Kunststoffbogen an und binden
den Schlauch am Wasserhahn fest.
Der Kunststoffbogen für den W asserablauf in W annen oder Waschbec ken.
Der Schlauch darf nie im Wasser
liegen.Es sollten keine
Verlängerungsschläuche verwendet werden. Falls dies absolut unvermeidlich ist, so sollte die Verlängerung denselben Durchmesser
haben wie der Originalschlauch
und er darf in keinem Fall länger
als 150 cm sein. Falls Sie über einen Wandablauf verfügen, lassen
Sie bitte von einem Experten kontrollieren, ob dieser auch geeignet
ist. Falls Sie in einer der obersten
Etagen eines Gebäudes wohnen,
kann es passieren, dass sich im
Syphon ein Vakuum bildet,
wodurch der Waschtrockner ständig Wasser ansaugt und wieder
abpumpt. Um dieses Problem zu
lösen, finden Sie im Handel spezielle Syphonventile.
Stromanschluss
Bevor Sie die Waschtrockner ans
Stromnetz anschließen, vergewissern Sie sich, dass folgende Voraussetzungen gegeben sind:
1) die Steckdose muss die Höchstleistung, die auf dem Typenschild
auf der Rückseite der
Waschtrockner angegeben
ist,vertragen und den gesetzlichen Sicherheitsvorschriften entsprechen;
2) die Stromspannung muss den
Angaben entsprechen, die auf
dem Typenschild der
Waschtrockner vermerkt sind;
3) der Stecker muss in die Steckdose passen. Falls dies nicht der
Fall ist, benützen Sie keine Zwischenstecker, sondern lassen den
Stecker oder die Steckdose
austauschen;
4) die elektrischen Haushaltsgeräte
müssen über eine Erdung
verfügen.
Achtung!
Der Hersteller lehnt
jede Verantwortung
ab, falls diese
Vorschriften nicht
eingehalten werden
sollten.
Plastiktüten,
Schaumgummi, Nägel
und andere
Verpackungsmaterialien
sind kein Spielzeug für
Kinder: sie können
eine ernsthafte Gefahr
darstellen.
Installations- und Bedienungsanleitungen
43
Page 47

Anleitungen für den Installateur
M
Montage des Holzpaneels
auf die Tür und Einfügen
der maschine in die
Möbel:
Falls nach der Montage des
Holzpaneels eine Versendung zur
End-Installation der Maschine
notwendig ist, empfehlen wir, die
Maschine in ihrer ursprünglichen
Verpackung zu belassen. Die
Verpackung ist deshalb so
beschaffen, daß eine Anbringung des
Holzpaneels auf die Maschine
möglich ist, ohne dabei die
Verpackung ganz entfernen zu
müssen (siehe untere Abbildung).
Die Stärke des die Frontseite
bedeckenden Holzpaneels darf 18
mm nicht unterschreiten und das
Paneel kann sowohl auf der rechten
als auch auf der linken Seite montiert
werden. Aus praktischen Gründen
empfehlen wir eine Montage in
derselben Öffnungsrichtung wie die
des Einfüllfensters, d.h. mit auf der
linken Seite montierten Scharnieren.
Montagezubehör für die
Tür (Abb. 1-2-3-4-5)
N° 2 Scharnierhalterung
Abb. 1
N° 2 Scharnier
Abb. 2
lavabiancheria
washing machine
achine laver
m
w
ato
L
o
D
o
C
u
T
lavabiancheria
washing machine
machine laver
waschmaschine
Lato porta
oor side
D
ote porte
C
Tur seite
asch
p
s
r
o
p
e
t
r seite
in
asch
m
rta
o
e
d
i
e
t
r
o
e
A
C
6
5
4
3
2
1
Abb. 3
N° 1 Magnet
N° 1 Magnetanschlag
Abb. 4
B
N° 1 Gummidübel
Abb. 5
- 6 selbsteinschneidende Schrauben
D
l = 13 mm Typ A.
- 2 metrische Senkkopfschrauben
l = 25 mm Typ B; zur
Befestigung des Magnetanschlags am Gehäuse.
- 4 metrische Schrauben l = 15
mm Typ C; zur Anbringung der
Scharnierhalterungen am
6
5
4
3
2
1
Gehäuse.
- 4 metrische Schrauben l = 7 mm
Typ D; zur Anbringung der
Scharniere an den Halterungen.
N° 1 Distanzstück
Abb. 4/B
E
Installations- und Bedienungsanleitungen
44
Page 48

Montage der Einzelteile
auf die Maschinenvorderseite
- Montieren Sie die Scharnierhalterungen auf die Vorderseite mit
den Schrauben C, indem Sie das in
der abb.1 von einem Pfeil angezeigte
Loch in Richtung Innenseite der
Vorderfront anbringen.
- Den Magnetanschlag mit den
beiden Schrauben B von der
entgegengesetzten Seite oben
montieren.
- Zwischen Maschinenfront und
Magnetanschlag ist das auf abb.
4/B veranschaulichte Distanzstück
einzusetzen.
Gebrauch der
Bohrschablone
- Zur Positionsmarkierung der
Bohrungen auf der linken Seite
des Paneels, legen Sie die
Bohrmaske oben links am Paneel
an und halten Sie sich an die an
den Enden markierten Linien.
- Zur Positionsmarkierung der
Bohrungen auf der rechten Seite
des Paneels, legen Sie die
Bohrmaske oben rechts am
Paneel an.
- Mit einem Fräser von
entsprechender Größe die vier
Sitze fräsen, die die zwei
Scharniere, den Gummidübel und
den Magnet aufnehmen sollen.
Montage der Einzelteile
auf das Holzpaneel (Tür)
- Setzen Sie die Scharniere in die
vorgesehenen Sitze ein (das
bewegliche Scharnierteil muß
auf die Außenseite des
Scharniers weisen) und
befestigen Sie sie mit den 4
Schrauben des Typs A.
- Setzen Sie den Magnet in den
Sitz ein, und zwar oben von der
den Scharnieren entgegensetzten
Seite und befestigen Sie ihn mit
zwei Schrauben den Typs B.
- Setzen Sie den Gummidübel in
den Sitz unten ein.
Das Paneel kann nun auf die
maschine montiert werden.
Montage des Paneels auf
die maschine
Setzen Sie die von dem Pfeil in abb.
2 angegebene Scharniernase in den
Sitz der Scharnierhalterung ein,
drücken Sie das Paneel gegen die
Frontseite der maschine und
befestigen Sie die beiden Scharniere
mit den Schrauben des Typs D.
Befestigung der
Sockelführung
Wenn die maschine am Ende einer
Küchenzeile installiert werden soll,
montieren Sie eine oder beide
Sockelführungen wie in abb.
8angegeben, passen Sie deren
Tiefe der Sockelposition an und
wenn nötig, befestigen Sie den
Sockel an denselben (abb. 9).
Zur Montage der Sockelführung
verfahren Sie wie folgt (Abb. 8):
Befestigen Sie das Winkelstück P
mittels der Schraube R, setzen Sie
die Sockelführung Q in den
entsprechenden Schlitz ein, bringen
Sie diese in die gewünschte Lage
und befestigen Sie sie daraufhin
mittels der Schraube R an dem
Winkelstück P.
Einfügen der maschine in
das Möbel
- Schieben Sie die maschine in die
Öffnung und passen Sie sie der
Möbelfront an (abb. 6).
- Regulieren Sie die verstellbaren
Füße auf die gewünschte Höhe der
maschine.
- Drehen Sie die Schrauben C und
D wie in abb. 7 angegeben, um die
Position des Holzpaneels in
vertikaler und horizontaler
Richtung einzustellen.
Wichtig: Schließen Sie den
unteren Teil der Frontseite durch
den Sockel, und zwar so, dass
letzterer mit dem Boden abschließt.
in
595
0
4
5
600 m
C
D
815
Abb. 6 Abb. 7 Abb. 9
Beiliegendes Zubehör zur
Höhenregulierung
Im Polystyroldeckel (Abb. 10)
befinden sich folgende Teile:
2 Querstreben (G),
1 Leiste (M)
Abb. 10
In der Wäschetrommel befinden
sich:
4 zusätzliche Stellfüße (H),
4 Schrauben (I),
4 Schrauben (R),
4 Schraubenmuttern (L),
2 Sockelführungen (Q)
570
820 ÷ 900
in
m
C
Abb. 8
Höhenregulierung des
Waschtrockner
Mit Hilfe der 4 Stellfüße kann die
Höhe des Gerätes reguliert werden
(von 815 mm bis 835 mm).
Sollte diese Höhe jedoch nicht
ausreichen, kann das Gerät durch
Einsatz nachfolgenden Zubehörs
bis auf eine Höhe von 870 mm
gebracht werden:
- 2 Querstreben (G)
- 4 Stellfüße (H)
- 4 Schrauben (I)
- 4 Schraubenmuttern (L)
Verfahren Sie auf gleiche Weise
am hinteren Teil des Gerätes.
Durch Einstellen der Füße H
kann das Gerät nun auf eine
Höhe von 835 mm bis 870 mm
gebracht werden.
Nach Erreichen der gewünschten
Höhe befestigen Sie die
Schraubenmuttern L an der
Querstrebe G.
Zur Einstellung des Gerätes auf
eine Höhe von 870 mm bis 900
mm ist die Leiste M anzubringen,
regulieren Sie daraufhin die
Stellfüße H bis auf die
gewünschte Höhe.
Die Leiste wird wie folgt
eingesetzt:
Lösen Sie die drei an der vorderen
Deckelblende befindlichen
Schrauben N, setzen Sie die
Leiste M so wie auf Abb. 12
veranschaulicht ein und ziehen
Sie die Schrauben N wieder an.
Verfahren Sie hierzu wie folgt
(Abb. 11):
Nehmen Sie die 4 ursprünglich
montierten Stellfüße ab, legen Sie
G
eine Querstrebe G am Vorderteil
des Gerätes an und befestigen Sie
dieses mittels der Schrauben I
(schrauben Sie diese in die Löcher
ein, in denen sich die ursprünglich
montierten Stellfüße befanden),
setzen Sie daraufhin die neuen
Stellfüße H ein.
Abb. 11
L
I
H
Abb. 12
M
45
Installations- und Bedienungsanleitungen
Page 49

Leichte Pflege und Wartung
M
Behandeln Sie Ihre Waschtrockner gut und
Sie werden in ihr eine treue Freundin haben
Ihre Waschtrockner ist ein verlässlicher Lebens- und Arbeitspartner. Es
Der waschtrockner ist so gebaut
worden, dass Sie problemlos viele Jahre lang Ihre Freude daran
haben können. Einige einfache
Vorkehrungen aber helfen Ihnen,
Ihr Gerät stets fit zu halten und
seine Lebensdauer zusätzlich zu
verlängern. In erster Linie müssen Sie nach jeder Wäsche immer
den Wasserhahn schließen: der
ständige Wasserdruck kann einigen Bestandteilen schaden. Außerdem vermeiden Sie auf diese
Weise eventuelle Wasseraustritte,
wenn niemand im Hause ist.
Wenn das Wasser in Ihrer Gegend
allzu hart ist, benützen Sie ein
Entkalkungsmittel (das Wasser
ist hart, wenn es um den Wasserhahn oder den Ablauf herum
leicht weiße Spuren hinterlässt,
was Sie vor allem in der
Badewanne feststellen können.
Um genauere Informationen zum
Wassertyp in Ihrer Sanitäranlage
zu erhalten, können Sie sich an
das Wasseramt Ihrer Gemeinde
oder an Ihren Klempner wenden.
Leeren Sie stets alle Taschen,
nehmen Sie auch Broschen, Abzeichen und alle übrigen harten
Gegenstände ab.
Die Außenwände des
Waschtrockner werden mit einem
weichen Tuch und einer lauwarmem Seifenlauge gereinigt.
Nie mit der
Waschmittelmenge
übertreiben.
Normale Waschmittel enthalten
bereits einen Kalklöser. Nur wenn
das Wasser ganz besonders hart
ist, das heißt, wenn es besonders
kalkreich ist, empfehlen wir Ihnen, bei jeder Wäsche ein Spezialprodukt zu verwenden.
Gelegentlich können Sie auch einen Waschgang mit einem
Kalklöser durchführen, ohne
Waschmittel und ohne Wäsche.
Verwenden Sie nie allzu große
Mengen Waschmittel oder Zusätze, denn dies könnte zu starken
Schaumbildungen führen, was
Ablagerungen und Schaden an
einigen Bestandteilen der
Waschtrockner zur Folge haben
kann.
ist daher wichtig, sie fit zu halten. Auch für Sie.
Es ist wichtig, die
ausziehbare
Waschmittelschublade
regelmäßig zu
reinigen. Um
Ablagerungen
entgegenzuwirken,
brauchen Sie die
Schublade nur einige
Zeit lang unter
fließendem Wasser zu
lassen.
Leeren Sie stets alle T aschen: kleine Gegenstände können
Ihrer waschtrockner schaden.
Bei Bedarf kontrollieren Sie die Pumpe und den Gummischlauch.
Waschtrockner verfügt über eine selbstreinigende Pumpe, die keinerlei Reinigung oder Wartung erfordert.
Der Gummischlauch
Kontrollieren Sie den Gummischlauch mindestens einmal im Jahr. Wenn er Risse oder Verschleißstellen
aufweist, muss er unmittelbar ausgetauscht werden, denn während der Wäsche muss er einen starken Druck
aushalten, der ein plötzliches Reißen zur Folge haben könnte.
Installations- und Bedienungsanleitungen
46
Page 50

Absolut vorrangig
Ihre Sicherheit und die
Waschtrockner wurde nach den strengsten
internationalen Sicherheitsvorschriften gebaut - zu
Ihrer Kinder
Ihrer Sicherheit und der Ihrer Familie.
Lesen Sie bitte aufmerksam die
nachstehenden Hinweise, sowie die
des gesamten Handbuches. Sie
liefern nicht nur zahlreiche
praktische Hinweise, sondern
wichtige Informationen hinsichtlich
der Sicherheit, dem Gebrauch und
der Wartung.
1. Waschtrockner darf nicht im
Freien installiert werden,
auch nicht, wenn es sich um
einen geschützten und
überdachten Platz handelt. Es
ist gefährlich, Ihren
Vollwaschautomaten Gewittern
und Unwettern auszusetzen.
2. Ihr Waschtrockner ist nur
von Erwachsenen zu
gebrauchen und ausschließ-
lich zum Waschen Ihrer Wäsche
gemäß den in diesem
Handbuch enthaltenen Anweisungen.
3. Muß er versetzt werden, sollten
hierfür mindestens 3 Personen
verfügbar sein. (Vorsichtig
vorgehen). Versuchen Sie es
niemals allein, der
Waschtrockner ist äußerst
schwer.
4. Bevor Sie die Wäsche einfüllen,
stellen Sie bitte sicher, dass die
Trommel auch leer ist.
5. Bedienen Sie die Maschine
nicht barfuß, oder mit nassen
bzw. feuchten Händen, oder
wenn Sie auf feuchtem
Boden stehen.
Wenden Sie sich nur
an autorisiertes
Fachpersonal und
verlangen Sie nur
mit Garantie
versehene ScholtesOriginal-Ersatzteile!
6. Verwenden Sie keine Verlängerungen und Mehrfachstecker, die besonders in
feuchten Räumlichkeiten sehr
gefährlich sind.
7. Öffnen Sie die Waschmittelschublade nicht, wenn
die Maschine in Betrieb ist;
verwenden Sie keine Waschmittel für Handwäsche, diese
schäumen zu sehr und könnten
die inneren Teile Ihrer Maschine beschädigen.
8. Ziehen Sie niemals den
Stecker am Versorgungskabel, oder am Gerät selbst aus
der Steckdose: dies ist zu
gefährlich.
9. Das Ablaufwasser kann äußerst
heiß werden, berühren Sie
dieses demnach nicht. Auch
die Tür kann heiß werden,
halten Sie deshalb Kinder fern.
Versuchen Sie niemals, die
Tür mit Kraft zu öffnen, dies
könnte den Sicherheitsmechanismus beschädigen, der vor unabsichtlichem Öffnen der Tür
bei laufender Maschine schützt.
10. Drehen Sie im Falle einer
Betriebsstörung den Wasserhahn ab und ziehen Sie
den Stecker aus der Steckdose, versuchen Sie nicht,
Schäden an inneren
Maschinenteilen selbst zu
beheben.
Austausch des Versorgungskabels
Beim Versorgungskabel
Ihrer waschtrockner
handelt es sich um ein
Spezialkabel, das nur bei
den autorisierten Ariston
Kundendienstzentren
erhältlich ist.
Dieses ist wie folgt auszutauschen:
1. Vergewissern Sie sich,
dass Ihre waschtrockner
ausgeschaltet, und der Stek-
Abb. 13
Installations- und Bedienungsanleitungen
47
ker herausgezogen ist.
2. Nehmen Sie den Deckel
durch herausdrehen der
Schrauben I ab. [Abb. 13].
3. Nehmen Sie die Drähte vom
Entstörer F [Abb. 14] ab, ach-
ten Sie hierbei auf die korrekten Anschlussstellen (Blauer
Draht =N; Brauner Draht =L)
und lassen Sie den Erdleiter
bis zum Schluss.
N
L
F
. 14
Abb
Anmerkung: die Buchstabe L,
N und das Symbol
dem Entstörer abgebildet.
4. Nehmen Sie die zur
Befestigung der
Kabelführung dienende
Schraube und die Unterlegscheibe V ab. [Abb. 15].
5. Drücken Sie den oberen Teil
der Kabeldurchführung leicht
von der Rückwand weg,
sind auf
Abb
. 15
ziehen Sie daraufhin das
Versorgungskabel nach oben hin
heraus [Abb. 16].
Gehen Sie in umgekehrter Reihenfolge vor, um das neue Kabel
anzuschließen.
Zu Ihrer Sicherheit ist es
absolut wichtig, sämtliche
Teile und sämtliche
verwendeten Schrauben
wieder anzubringen.
Abb
. 16
Page 51

M
Installations- und Bedienungsanleitungen
48
Page 52

Guida rapida
Scopri qui i 12 argomenti che vengono spiegati nelle
pagine di questo manuale. Leggi, impara, divertiti:
scoprirai tanti piccoli segreti per lavare meglio, con
meno fatica e facendo durare di più la tua lavasciuga.
Soprattutto, con un occhio di riguardo alla sicurezza.
1.
Installazione e trasloco (p. 59)
Linstallazione, dopo la consegna o dopo un trasloco, è loperazione
più importante per il buon funzionamento della lavasciuga. Verifica
sempre:
1. Che limpianto elettrico sia a norma;
2. Che i tubi di carico e scarico dellacqua siano collegati
correttamente. Non utilizzare mai tubi già usati;
3. Che la lavasciuga sia a livello. Ne vale la pena: per la
durata della lavasciuga e per la qualità del tuo bucato;
4. Che siano state rimosse le viti di fissaggio del cestello, poste
sullo schienale della lavasciuga.
8.
Come si asciuga (p. 53)
2.
Cosa va in lavasciuga e come avviarla (p. 50)
Suddividere correttamente la biancheria è unoperazione importante sia per la riuscita del bucato, sia per la durata della lavasciuga.
Impara tutti i trucchi e i segreti per dividere il bucato: colori, tipo di
tessuto, tendenza a produrre lanugine sono i criteri più importanti.
3.
Guida per capire le etichette (p. 54)
I simboli contenuti nelle etichette dei capi dabbigliamento sono
molto facili da capire e altrettanto importanti per la riuscita del lavaggio. Qui trovi una facile guida per destreggiarti fra temperature
consigliate, tipi di trattamento, modalità di stiratura.
4.
Consigli utili per non sbagliare (p. 55)
Una volta cerano le nonne a dare buoni consigli - e i tessuti sintetici
non esistevano: per forza era facile lavare. Oggi la tua lavasciuga ti
dà molti buoni consigli e ti permette persino di lavare lana e cachemire
come potrebbe fare unesperta lavandaia a mano.
5.
Il cassetto dei detersivi (p. 56)
Come utilizzare il cassetto dei detersivi e la vaschetta della
candeggina.
6.
Capire il pannello dei comandi (p. 51 - 52)
Alcune valide indicazioni per poter effettuare unasciugatura ottimale.
9.
La tua lavasciuga è unamica: bastano poche, piccole attenzioni per
ripagarti con tanta fedeltà e dedizione.
Curala con sollecitudine e laverà per te per anni e anni.
10.
Prima di chiamare il tecnico, guarda qui: moltissimi problemi possono avere una soluzione immediata. Se poi non riesci a risolvere chiama il numero dellassistenza Scholtes e in poco tempo qualsiasi guasto sarà riparato.
11.
Qui trovi le caratteristiche tecniche della tua lavasciuga: sigla del
modello, specifiche elettriche ed idriche, dimensioni, capacità, velocità della centrifuga e conformità alle norme e alle direttive italiane
ed europee.
12.
Qui trovi consigli indispensabili per la sicurezza tua e di tutta la famiglia. Perché è la cosa più importante che cè.
Cura e manutenzione (p. 62)
Problemi e soluzioni (p. 57 e 58)
Caratteristiche tecniche (p. 58)
Sicurezza per te e i bambini (p. 63)
Il pannello dei comandi è molto semplice. Pochi comandi essenziali
per decidere ogni tipo di lavaggio, dal più energico, capace di pulire
la tuta di un meccanico, fino a quello delicatissimo per il cachemire.
Prendici confidenza e laverai meglio, facendo durare di più la tua
lavasciuga. È facile.
7.
Guida ai programmi (p. 52)
Una facile tabella per decidere a colpo docchio tutti i programmi, le
temperature, i detersivi ed eventuali additivi. Usa quello giusto e
avrai un bucato migliore, risparmiando tempo, acqua ed energia, giorno dopo giorno.
49
Istruzioni per linstallazione e luso
Page 53

Cosa va in lavasciuga?
Prima di lavare, puoi fare molto per lavare meglio. Suddividi i capi secondo
tessuto e colori. Guarda le etichette e segui le indicazioni. Alterna capi piccoli e
capi grandi.
M
Separare i capi per tipo
di tessuto e colore, è
importante per avere
buoni risultati
Prima di lavare.
Suddividi la biancheria secondo
il tipo di tessuto e la solidità dei
colori: i tessuti robusti vanno separati da quelli delicati.
I colori chiari vanno separati da
quelli scuri.
Vuota tutte le tasche (monetine,
carta, denaro e piccoli oggetti) e
controlla i bottoni. Ripara subito oppure togli i bottoni pericolanti perché potrebbero staccarsi durante il lavaggio.
Le etichette ti dicono
tutto.
Guarda sempre le etichette: ti dicono tutto sul capo di abbigliamento e su come lavare nel
modo migliore.
A pagina 54 trovi tutti i segreti
dei simboli riportati sulle etichette dei capi dabbigliamento.
Le loro indicazioni sono preziose per lavare meglio e far durare
di più i capi.
Avviare la lavasciuga
Appena installata, fai un ciclo di lavaggio
impostando il programma "1" a 90 gradi.
Avviare la lavasciuga nel modo
giusto è importante sia per la qualità del lavaggio, sia per prevenire problemi e aumentare la durata della lavasciuga. Dopo aver caricato la biancheria, versato il detersivo e gli eventuali additivi
controlla sempre che:
Per i capi più delicati:
chiudi biancheria
intima, calze femminili
e capi delicati
in un sacchetto
di tela per
proteggerli
1. Loblò sia ben chiuso.
2. La spina sia inserita nella presa.
3. Il rubinetto dellacqua sia aperto.
Accendere la macchina
Premere il pulsante B (posizione I).
Scegliere il programma
Il programma si sceglie in base
al tipo di indumenti da lavare.
Per scegliere il programma, consulta la tabella a pagina 52. Ruota la manopola A finché il programma prescelto non coincide
con l'indice posto sul cruscotto,
imposta tutte le opzioni disponibili (lampeggianti) come indicato a pag. 51 e 52 (riferimento
quindi premi il pulsante C (Start/
Reset).
),
Dispositivo
antisbilanciamento.
Questa lavasciuga è dotata di uno
speciale dispositivo di controllo
elettronico per bilanciare bene il
carico: prima della centrifuga,
questo dispositivo garantisce che
la biancheria si disponga nel
modo più uniforme possibile nel
cestello, compatibilmente con il
Se vuoi interrompere il programma in corso, premi il pulsante C
(Start/Reset) per almeno 3 secondi.
Alla fine del lavaggio...
Attendi che il simbolo
spento e compaia la scitta End.
Poi spegni la lavasciuga premendo il pulsante di acceso-spento
B (posizione O). A questo punto
puoi aprire con sicurezza loblò.
Dopo aver tolto la biancheria ap-
sia
tipo di biancheria e con la sua disposizione iniziale. È per questo
che la macchina, anche al massimo dei giri, non vibra e non produce rumori.
pena lavata, lascia sempre loblò
aperto o semiaperto in modo che
lumidità rimasta allinterno possa evaporare.
Chiudi sempre il rubinetto dell'acqua.
Ricordati che in caso di mancanza di alimentazione o di
spegnimento della lavabiancheria, il programma selezionato ripartirà dal punto in cui
è stato interrotto.
Come eliminare le macchie più frequenti
Inchiostro e biro Tamponare con cotone imbevuto di alcol metilico o alcol a 90°.
Catrame Tamponare con burro fresco, passare della trementina a poi lavare immediatamente.
Cera Raschiare e poi passare con il ferro ben caldo fra due fogli di carta assorbente. Poi passare cotone con
acquaragia o alcol metilico.
Gomma americana Passare il solvente dello smalto per unghie e poi uno straccio pulito.
Muffa Cotone e lino bianco vanno messi in una soluzione di 5 parti dacqua, una di candeggina e un cucchiaio di aceto, poi
lavare subito. Per gli altri tessuti bianchi acqua ossigenata a 10 volumi e poi lavare immediatamente.
Rossetto Tamponare con etere se il tessuto è lana o cotone. Per la seta usare la trielina.
Smalto per unghie Poggiare il tessuto dalla parte della macchia su un foglio di carta assorbente, bagnare con il
solvente, spostando il capo man mano che il foglio si colora.
Erba Tamponare con il cotone imbevuto di alcol metilico.
Istruzioni per linstallazione e luso
50
Page 54

Capire il pannello dei comandi
Qui comandi tu
Scegliere i programmi giusti è importante. Ed è facile.
La manopola è del tipo
a scomparsa. Per
Manopola programmi
Per selezionare i programmi devi
far coincidere lindice posto sul
cruscotto con il numero corrispondente al programma desiderato.
estrarla basta
premerla leggermente
al centro.
D
E
C
A
B
Acceso-spento
Quando il pulsante B è premuto,
la lavasciuga è accesa, quando
non è premuto è spenta.
Lo spegnimento della macchina non annulla il programma
selezionato.
Allaccensione della macchina
tutti i simboli presenti nel
display si illuminano per 8 secondi, dopodichè lampeggiano
solo quelli selezionabili.
Start /Reset
Questo pulsante consente di far
iniziare il programma di lavaggio
impostato o di interromperlo.
Con una breve pressione il pulsante effettua lo Start, con una pressione di almeno 3 secondi il pulsante effettua il Reset.
Dop lo Start lo spostamento della
manopola programmi non ha più
alcuna influenza.
Cassetto detersivi
È diviso in tre scomparti:
1. Detersivo per il prelavaggio;
2. Detersivo per il lavaggio;
3. Ammorbidenti.
La lavasciuga è provvista inoltre
della vaschetta aggiuntiva 4 (in
dotazione) per la candeggina, da
inserire nello scomparto 1.
Display
Nella parte destra vengono
visualizzate tutte le opzioni disponibili.
Con il tasto mode puoi selezionare lopzione desiderata il cui
simbolo inzia a lampeggiare.
Nella parte sinistra viene
visualizzato il valore o lo stato
(On-Off) dellopzione seleziona-
Il cassetto dei detersivi con
la vaschetta aggiuntiva per la
candeggina è qui.
mode
select
ta, che puoi modificare con il tasto select.
Per accedere allopzione successiva premi il tasto mode, altrimenti premi il pulsante C (Start/
Reset) per iniziare il ciclo di lavaggio.
Di seguito si elencano tutte le opzioni disponibili.
A seconda del programma impostato, saranno attive solo le
opzioni specifiche.
Temperatura
Il display indica la temperatura
massima relativa al programma
impostato, essa può essere ridotta premendo il tasto select fino
al lavaggio a freddo (Off).
Questa opzione è attiva con tutti
i programmi di lavaggio.
Centrifuga
Il display indica la velocità massima relativa al programma impostato, essa può essere ridotta
premendo il tasto select fino allesclusione della stessa (Off).
L'esclusione della centrifuga
non permette di selezionare
un ciclo di asciugatura.
A lavaggio in corso, lattivazione
dellesclusione della centrifuga
viene segnalata dallaccensione
del simbolo
.
4
X
A
M
1
3
2
Questa opzione è attiva con tutti
i programmi tranne: 6-10-12-13-
16.
Rapido
Ti permette di modificare le caratteristiche del programma di lavaggio scelto, in base al grado di sporco del bucato.
I livelli sono tre, per selezionarli
premi il tasto select.
Basso
Medio
Alto
Questa opzione è attiva con i programmi 1-2-3-5-7-8.
Delay Timer
Consente di ritardare il funzionamento della macchina da 1 a 24
ore agendo sul tasto select.
Lattivazione della partenza ritardata viene segnalata dallaccensione del simbolo
fino alla partenza del ciclo di lavaggio.
Questa opzione non è attiva con i
programmi 15 e 16.
Antimacchia (vedi pag. 56)
Con questo comando la lavabiancheria effettua un lavaggio più intenso che ottimizza l'efficacia degli additivi liquidi, permettendo
di eliminare le macchie più resistenti.
Per attivarla premi il tasto select
fino a far comparire la scritta On.
A lavaggio in corso, lattivazione
dellopzione viene segnalata dallaccensione del simbolo
.
Questa opzione è attiva con i programmi 2-3-5-7-8-11-14.
Nota: Non deve essere utilizzata con lopzione Stira meno.
Stira meno
Questa funzione consente di ottenere un bucato non spiegazzato, quindi più facile da stirare.
A seconda del tipo di tessuto la
macchina ottimizza le condizioni di lavaggio.
E attiva con i programmi 3-5-7-
8-12-14.
Per attivarla premi il tasto select
fino a far comparire la scritta On.
Nei programmi 7-8-12-14, il ciclo di lavaggio si interrompe mantenendo la biancheria in ammollo nell'acqua prima dello scarico.
Per completare il ciclo premi il
tasto select.
A lavaggio in corso, lattivazione
dellopzione viene segnalata dallaccensione del simbolo
.
Nota:
- non deve essere utilizzata con
lopzione Antimacchia.
- se vuoi effettuare anche
l'asciugatura, questo pulsante è
attivo solo se abbinato al livello
(Stiro).
Livello di risciacquo
Serve per aumentare lefficacia del
risciacquo. Ti consigliamo di utilizzarlo quando la lavabian-cheria
è a pieno carico e con dosi elevate
di detersivo. I livelli sono tre, per
selezionarli premi il tasto select.
Basso
Medio
Alto
Questa opzione è attiva con i programmi 1-2-3-4-5-7-8-14.
Asciugatura
Consente di impostare
l'asciugatura automatica alla fine
del lavaggio. Per la descrizione
particolareggiata vedi pag . 53.
Attenzione: Se imposti "l'esclusione centrifuga" non puoi selezionare un ciclo di asciugatura.
Se vuoi effettuare un'asciugatura,
seleziona la massima velocità di
centrifuga disponibile e poi scegli
il tipo di asciugatura desiderato.
51
Istruzioni per linstallazione e luso
Page 55

M
Visualizzazioni particolari
(parte sinistra del display):
Appena accendi la macchina....
Puoi visualizzare il tempo residuo dellultimo programma di lavaggio impostato.
Quando selezioni un nuovo
programma....
Appare il tempo stimato per il
programma scelto.
Durata del programma
Durante il ciclo di lavaggio viene
visualizzato il tempo residuo.
Durata del programma
d'asciugatura
Viene visualizzata la durata massima del programma selezionato.
Codice di errore
In caso di anomalia viene visualizzato
un codice, da trasmettere allAssisten-
Fine del programma
Alla fine del programma viene
visualizzata la scritta End.
Durante il lavaggio....
Puoi visualizzare le caratteristiche del programma in corso premendo il tasto mode ed
eventulamente modificarle agendo sul tasto select.
Apertura oblò
Il simbolo acceso indica che
l'oblò è bloccato per impedire
aperture accidentali. Per evitare
danni è necessario attendere che
si spenga e compaia la scritta
End, prima di aprire l'oblò.
za Tecnica (es: F-01).
Cosa vuoi lavare, oggi?
I programmi per tutte le stagioni
Natura dei tessuti e dello sporco Program-miTempe-
COTONE
Bianchi eccezionalmente sporchi
(lenzuola, tovaglie, ecc.)
Bianchi eccezionalmente sporchi
(lenzuola, tovaglie, ecc.)
Bianchi e colorati resistenti molto
sporchi
Bianchi e colorati resistenti molto
sporchi
Bianchi poco sporchi e colori delicati
(camice, maglie, ecc.)
Asciugatura per tessuti di cotone
SINTETICI
Sintetici con colori resistenti molto
sporchi (biancheria per neonati, ecc).
Sintetici con colori resistenti (biancheria
di tutti i tipi leggermente sporca)
Sintetici con colori delicati (biancheria
di tutti i tipi leggermente sporca)
Sintetici con colori delicati (biancheria
di tutti i tipi leggermente sporca)
Asciugatura per tessuti sintetici
DELICATI
Lana
Capi e tessuti particolarmente delicati
(tende, seta, viscosa, ecc.)
Asciugatura per tessuti delicati
PROGRAMMI PARZIALI
Risciacqui leggeri
Centrifuga leggera
Scarico
1
2
3
4
5
6
7
7
8
9
10
11
12
13
14
15
16
ratura
90°C
90°C
60°C
40°C
40°C
50-60°C
40°C
40°C
30°C
40°C
30°C
Detersivo
lavaggio
A m mo r b . Antim acchia/
◆◆
◆◆
◆◆
◆◆
◆◆
◆◆
◆◆
◆◆
◆◆
◆◆
◆◆
◆◆
Candeggina
Delicata/
Tradiz.
Delicata/
Tradiz.
Delicata/
Tradiz.
Delicata
Delicata
Delicata
Delicata
Durata
del ciclo
(minuti)
140
125
130
150
86
89
79
69
30
40
60
Descrizione del ciclo di lavaggio
Prelavaggio, lavaggio a 90°C, risciacqui,
centrifughe intermedie e finale
Lavaggio a 90°C, risciacqui,
centrifughe intermedie e finale
Lavaggio a 60°C, risciacqui,
centrifughe intermedie e finale
Lavaggio a 40°C, risciacqui,
centrifughe intermedie e finale
Lavaggio a 40°C, risciacqui,
centrifughe intermedie e finale
Lavaggio a 50-60°C, risciacqui,
antipiega o centrifuga delicata
Lavaggio a 40°C, risciacqui, antipiega
o centrifuga delicata
Lavaggio a 40°C, risciacqui, antipiega
o centrifuga delicata
Lavaggio a 30°C, risciacqui e
centrifuga delicata
Lavaggio a 40°C, risciacqui e
centrifuga delicata
Lavaggio a 30°C, risciacqui, antipiega
o scarico
Risciacqui, antipiega o scarico
Scarico e centrifuga delicata
Scarico
Importante: per annullare il programma di lavaggio appena impostato, premere per almeno 3 secondi il pulsante C (Start/Reset).
I dati riportati nella tabella hanno valore indicativo, possono variare a seconda della quantità e del tipo di biancheria, della
temperatura dellacqua di rete e della temperatura dellambiente.
Programmi Speciali
Classe A a 40°C La tua lavasciuga ha un programma speciale per darti ottimi risultati di lavaggio anche a basse temperature.
Impostando il programma 4 alla temperatura di 40° C, i risultati sono gli stessi che normalmente hai a 60°C, grazie
all'azione della lavasciuga e all'aumento della durata del lavaggio.
Lavaggio giornaliero La tua lavasciuga ha un programma studiato per lavare indumenti leggermente sporchi in poco tempo.
Impostando il programma 9 alla temperatura di 30°C è possibile lavare insieme tessuti di diversa natura (esclusi lana e
seta), con un carico massimo di 3 kg. Questo programma permette di risparmiare tempo ed energia, perché dura solo 30
minuti circa.
TI CONSIGLIAMO LUSO DI DETERSIVO LIQUIDO.
Istruzioni per linstallazione e luso
52
Page 56

Come si asciuga
A.
Lavaggio e asciugatura
Guarda la tabella A qui accanto
e segui le indicazioni di carico
MAX per effettuare il lavaggio e
unasciugatura in automatico.
Esegui le istruzioni per il solo la-
vaggio (vedi a pag. 50 il paragrafo Avviare la lavasciuga) e imposta il tipo d'asciugatura desiderato come sotto indicato:
Stiro
Armadio
Extra secco
quindi premi il pulsante C (Start/
Reset).
Se eccezionalmente il carico di
biancheria da lavare ed asciugare è superiore al massimo previsto (vedi tabella A), occorre seguire le istruzioni indicate per il
solo lavaggio (vedi a pag. 50 il
paragrafo Avviare la lavasciuga).
A programma ultimato estrai la
biancheria, dividi il carico e rimettine una parte nel cestello.
Segui a questo punto le istruzioni previste per effettuare solo
l'asciugatura.
Ripeti le stesse operazioni per il
carico rimanente.
Solo asciugatura
Dopo aver caricato la biancheria
da asciugare (max. 4 Kg) controlla che:
- loblò sia ben chiuso
- la spina sia inserita nella presa
- il rubinetto dellacqua sia aperto
- il pulsante B non sia premuto
(posizione O).
Ed ora scegli il programma
Ruota la manopola A su uno dei
programmi di asciugatura in base
al tipo di tessuto, quindi seleziona il tipo d'asciugatura desiderato:
Stiro
Armadio
Extra secco
quindi premi il pulsante C (Start/
Reset).
Alla fine dell'asciugatura...
Attendi che il simbolo sia
spento e compaia la scitta End.
Poi spegni la lavasciuga premendo il pulsante di acceso-spento
B (posizione O), a questo punto
puoi aprire l'oblò. Dopo aver
estratto la biancheria lascia loblò
aperto o semiaperto in modo che
non si formino cattivi odori e
chiudi il rubinetto dellacqua.
Tipo di
tessuto
Cotone,
Lino
Cotone Asciuga-
Terital,
Cotone
Acrilici Pigiami,
Nylon Sottoveste,
Lana Maglie,
I dati riportati nella tabella hanno valore indicativo.
Tipo di
carico
Biancheria
di diverse
dimensioni
mani in
spugna
Lenzuola,
Camice
calzini,
ecc.
calze, ecc.
Maglioni,
ecc.
Carico
max
(Kg) Extra
Per carichi di cotone inferiori ad 1 Kg, utilizza il
programma di asciugatura relativo ai tessuti sintetici.
IMPORTANTE
Durante lasciugatura viene effettuata una centrifuga se hai impostato uno dei programmi cotone.
Tempo di asciugatura (Min.)
Armadio Stiro
secco
4 155 140 130
4 155 140 130
2,5 110 100 90
1656060
1656060
1707070
53
Istruzioni per linstallazione e luso
Tipi di asciugatura
In base alle tue esigenze, puoi
scegliere 3 diversi tipi di
asciugatura.
Stiro
: capi leggermente umidi, facili da stirare.
Armadio : capi asciutti da
riporre.
Extra secco : capi
molto asciutti, consigliato per
spugne e accappatoi.
Alla fine dellasciugatura viene
effettuato un periodo di raffreddamento.
ATTENZIONE
- Loblò durante lasciugatura tende a scaldarsi.
- Non asciugare biancheria lavata con solventi infiammabili (es. trielina).
- Non asciugare gommapiuma o elastomeri analoghi.
- Assicurati che durante le fasi di asciugatura il rubinetto dell'acqua sia aperto.
- Questa lavasciuga può essere impiegata soltanto per
asciugare biancheria prelavata in acqua.
Page 57

Capire le etichette
Impara questi simboli e laverai meglio, i tuoi capi
dureranno di più e la tua lavasciuga ricambierà la tua
attenzione lavando meglio.
M
In tutta Europa ogni etichetta
contiene un messaggio, affidato
a piccoli ma importanti simboli.
Imparare a comprenderli è importante per lavare meglio e trattare
Si dividono in cinque categorie,
rappresentate da forme diverse:
lavaggio
ratura
infine asciugatura
, candeggio , sti-
, pulitura a secco e
.
i propri capi di vestiario nel modo
giusto.
Consigli Utili
Rivolta le camicie per lavarle meglio
e farle durare di più.
Togli sempre gli oggetti dalle tasche.
Guarda le etichette: ti danno indicazioni
utili e preziose.
Nel cestello, alterna capi grandi con capi piccoli.
Consulta e impara i simboli di questa tabella:
ti aiuteranno a lavare meglio, trattare meglio i tuoi capi,
far rendere di più la tua lavasciuga.
Attenta a non sbagliare
temperatura....
Azione
forte
Lavaggio Candeggio Stiratura Pulitura a secco Asciugatura
Azione
delicata
c
l
Lavaggio
a 95°C
Lavaggio
a 60°C Non candeggiare
Si può candeggiare
in acqua fredda
Stiratura forte
max 200°C
Stiratura media
max 150°C
A
Pulitura a secco
con tutti i solventi
P
Pulitura a secco con
percloro, benzina
avio, alcool puro,
R111 e R113
Temp.
alta
Asciugabile
in macchine
asciuga-
biancheria
Non asciugabile
in macchine
asciuga-
biancheria
F
Lavaggio
a 40°C
Lavaggio
a 30°C Non stirare Non pulire a secco
Lavaggio
delicato
a mano
Stiratura
max 110°C
Pulitura a secco con
benzina avio, alcool
puro e R113
Asciugare
disteso
Asciugare
appeso
un capo non
centrifugato
Asciugare su
appendiabiti
Temp.
moderata
Non lavare
in acqua
Istruzioni per linstallazione e luso
54
Page 58

Consigli utili per non sbagliare
Non lavare mai in la-
vasciuga... biancheria non orla-
ta, sfilacciata o stracciata. Se è
necessario lavarla, chiuderla in
un sacchetto. Biancheria con colori forti insieme a quella bianca.
Attenti al peso!
Per ottenere i migliori risultati,
non superare i pesi indicati, riferiti al carico massimo di biancheria asciutta:
- Tessuti resistenti:
massimo 5 kg
- Tessuti sintetici:
massimo 2,5 kg
- Tessuti delicati:
massimo 2 kg
- Pura lana vergine:
massimo 1 kg
Ma quanto pesi?
1 lenzuolo 400-500 gr.
1 federa 150-200 gr.
1 tovaglia 400-500 gr.
1 accappatoio 900-1.200 gr.
1 asciugamano 150-250 gr.
Le T-shirt colorate, quelle
stampate e le camicie durano di
più se lavate alla rovescia.
Le T-shirt e le felpe stampate vanno sempre stirate alla rovescia.
Allarme salopette.
Le diffusissime tute tipo salopette
hanno delle bretelle con ganci che
possono danneggiare il cestello o
gli altri capi durante il lavaggio. Se
infili i ganci nella tasca della
pettorina e li fissi con spille da balia
elimini ogni pericolo.
Vacanze: staccare la spina.
Quando vai in vacanza, è
consigliabile staccare la spina,
chiudere il rubinetto di ingresso
dellacqua e lasciare aperto o socchiuso loblò. Così facendo, il
cestello e la guarnizione resteranno ben asciutte e allinterno non
si formeranno odori sgradevoli.
Per ottenere i migliori
risultati utilizza un de-
tersivo specifico, facen-
do attenzione a non su-
perare 1kg di carico.
Come lavare quasi tutto
CICLO LANA
Le tende.
Tendono a spiegazzarsi moltissimo. Per limitare questo effetto
ecco un consiglio: piegale bene
e sistemale dentro una federa o
un sacchetto a rete. Lavale da
sole e in modo che il peso complessivo non superi il mezzo carico. Ricordati di utilizzare il programma specifico 12 che prevede in automatico l'esclusione
della centrifuga.
Piumini e giacche a vento.
Anche i piumini e le giacche a
vento, se limbottitura è doca o
di anatra, possono essere lavate
in lavasciuga. Limportante è non
fare un carico di 5 kg. ma al massimo di 2-3 kg. ripetendo il risciacquo una o due volte utilizzando la centrifuga delicata.
Scarpe da tennis.
Le scarpe da tennis devono essere prima pulite dal fango e si possono lavare anche insieme ai
jeans e ai capi più resistenti. Non
lavarle insieme a capi bianchi.
ESCLUSIVO
Cachemire Gold: Delicato come il lavaggio a mano
La prima Lavasciuga con il riconoscimento "The Woolmark Company".
Il programma di lavaggio
Cachemire Gold è studiato
per lavare in lavatrice anche i
capi in lana e Cachemire più
delicati e preziosi.
Il programma LanaCachemire di Merloni Elettrodomestici è stato approvato da The Woolmark
Company per il lavaggio dei
capi in lana etichettati lava-
re a mano che recano i Marchi The Woolmark Company.
Questo è il primo ciclo delicato lavare a mano di una
lavasciuga approvata da The
Woolmark Company.
(M.00221).
Questo risultato è possibile
grazie ad una velocità del
cestello di 90 rotazioni al minuto, anche durante la fase di
risciacquo, che evita lo
sfregamento delle fibre.
Usa sempre il programma 11 con
tutti i capi con il simbolo del lavaggio a mano: la vaschetta con
la manina.
Per la cura dei tuoi capi in lana
è preferibile utilizzare detergenti specifici.
55
Istruzioni per linstallazione e luso
Page 59

M
Importante per lavare meglio
Il segreto del cassetto dei detersivi
Il primo segreto è il più facile: il cassetto dei detersivi si apre ruotandolo verso l'esterno.
4
X
A
Devi versare i detersivi e l'eventuale additivo seguendo le dosi
indicate dai fabbricanti: in genere trovi tutte le informazioni sulla confezione. Le dosi variano in
funzione del carico di biancheria, della durezza dell'acqua e del
grado di sporco.
Con l'esperienza, imparerai a dosare le quantità in modo quasi automatico: diventeranno il tuo segreto.
Prima di versare il detersivo per
il prelavaggio nello scomparto 1
verifica che non sia inserita la
vaschetta aggiuntiva 4 riservata
al candeggio.
Quando versi lammorbidente
nello scomparto 3 evita che questi fuoriescano dalla griglia.
La lavasciuga è in grado di prelevare automaticamente lammorbidente ad ogni programma di lavaggio.
1
Il detersivo liquido va versato nello scomparto 2 e solo pochi
istanti prima dell'avvio della macchina.
Ricorda che il detersivo liquido
è particolarmente adatto per lavaggi con temperature fino a 60
gradi e per i programmi di lavaggio che non prevedano la fase di
prelavaggio.
Sono in vendita detersivi liquidi
o in polvere con contenitori speciali che vanno messi direttamente dentro il cestello, secondo le
istruzioni scritte sulla confezione.
Non usare mai detersivi per il lavaggio a mano, perché formano
troppa schiuma, potenzialmente
dannosa per la lavsciuga.
Fanno eccezione i detersivi specificamente studiati per il lavaggio a mano e per quello in lavatrice.
Un ultimo segreto: quando lavi
con acqua fredda, riduci sempre
la quantità di detersivo: nell'acqua fredda si scioglie meno che
nell'acqua calda, e quindi andrebbe in parte sprecato.
Ciclo candeggio
Qualora sia necessario
candeggiare, devi inserire la
vaschetta aggiuntiva 4 (in dotazione) nello scomparto 1 del cassetto dei detersivi.
Quando versi la candeggina, fai attenzione a non superare il livello
"max" indicato sul perno centrale
(vedi figura).
L'utilizzo della vaschetta
aggiuntiva per la candeggina esclude la possibilità di effettuare il
prelavaggio. La candeggina tra-
dizionale va utilizzata esclusivamente per i tessuti resistenti bianchi, mentre quella delicata va utilizzata per i tessuti
Il cassetto dei detersivi è estraibile e per
lavarlo basta sfilarlo, sollevandolo e
tirandolo verso l’esterno come indica la
2
figura e lasciarlo per un po’ di tempo
sotto l’acqua corrente.
Risparmio ben gestito
MASSIMO CARICO
Il modo migliore per non sprecare energia, acqua, detersivo e tempo è quello di
utilizzare la lavasciuga con il massimo carico consigliato.
Un pieno carico al posto di due mezzi carichi permette di RISPARMIARE fino al 50% di
energia.
colorati, sintetici e per la lana.
Una guida per un uso
economico ed ecologico
degli elettrodomestici
M
1
3
2
Nello scomparto 1:
Detersivo per prelavaggio (polvere)
Nello scomparto 2:
Detersivo per lavaggio
(polvere o liquido)
Nello scomparto 3:
Additivi (ammorbidenti,
profumi, ecc.)
Nello scomparto 4:
Candeggina e candeggina delicata.
MAX
MAX
Non puoi effettuare il candeggio
con il programma 12 (Seta) e con
i programmi speciali (vedi pag.
52).
Nel caso tu voglia candeggiare
separatamente devi versare la
candeggina nella vaschetta
aggiuntiva 4 e impostare il pro-
gramma 14.
Il livello di risciacquo deve essere impostato su Medio o Alto
(vedi pag. 51).
Quando candeggi durante il nor-
male ciclo di lavaggio, versa il
detersivo e gli additivi negli appositi scomparti (vedi tabella a
pag. 52), imposta il programma
desiderato e attiva lopzione
Antimacchia.
IL PRELAVAGGIO È PROPRIO NECESSARIO?
Solamente per biancheria davvero sporca.
Programmare un lavaggio SENZA prelavaggio per biancheria poco sporca o
mediamente sporca permette di RISPARMIARE detersivo, tempo, acqua e tra il 5 e il
15% di energia.
IL LAVAGGIO CON ACQUA CALDA È DAVVERO NECESSARIO?
Trattare le macchie con uno smacchiatore o immergere le macchie asciutte in acqua
prima del lavaggio permette di ridurre la necessità di programmare un lavaggio con
acqua calda.
Utilizzare un programma di lavaggio a 60° per RISPARMIARE fino al 50% di energia.
PRIMA DI UTILIZZARE UN PROGRAMMA DI ASCIUGATURA ...
Selezionare un'alta velocità di centrifuga se il bucato deve essere asciugato
in un asciugatore. Un ridotto contenuto di acqua nel bucato consente di
RISPARMIARE tempo ed energia nel programma di asciugatura.
Istruzioni per linstallazione e luso
56
Page 60

Problemi e soluzioni
Prima di telefonare, leggi qui
Può accadere che la lavasciuga non funzioni. In molti casi si tratta di
problemi facilmente risolvibili senza dover chiamare il tecnico. Prima di
telefonare allassistenza, controlla sempre questi punti.
La Lavasciuga non
parte.
La spina è ben inserita nella presa? Facendo le pulizie
potrebbe essersi mossa.
Cè corrente in casa?
Potrebbe essere scattato il
salvavita, magari perché ci
sono troppi elettrodomestici
accesi. Oppure cè un blackout generale nella tua zona.
Loblò è ben chiuso?
Per motivi di sicurezza, la lavasciuga non può funzionare
GIUSTO
Chiudere il
rubinetto dopo
ogni lavaggio.
Limita lusura
dellimpianto
idraulico della
lavasciuga ed
elimina il pericolo
di perdite quando
in casa non cè
nessuno.
Lasciare sempre
socchiuso loblò.
In questo modo
non si creano
cattivi odori.
Pulire
delicatamente
lesterno.
Per pulire
lesterno e le parti
in gomma della
lavasciuga, usa
sempre un panno
imbevuto di acqua
tiepida e sapone.
se loblò è aperto oppure è
chiuso male.
Il pulsante di Acceso/Spento è premuto?
Se si, è stata impostata una
partenza programmata.
Il pulsante di Start/
Reset è premuto?
Se si, è stata impostata una
partenza programmata.
Il rubinetto dellacqua è
aperto? Per motivi di sicurezza,
se la lavasciuga non carica acqua non può partire con il lavaggio.
SBAGLIA TO
Lasciare attaccata la
spina mentre pulisci la
lavasciuga.
Anche durante i lavori
di manutenzione, la
spina va sempre
staccata.
Usare solventi e
abrasivi aggressivi.
Mai usare prodotti
solventi o abrasivi per
pulire lesterno e le
parti in gomma della
lavasciuga.
Trascurare il cassetto
dei detersivi.
È estraibile e per
lavarlo basta lasciarlo
un po di tempo sotto
lacqua corrente.
Andare in vacanza
senza pensare a lei.
Prima di andare in
vacanza, controlla
sempre che la spina
sia staccata e il
rubinetto dellacqua
sia chiuso.
Ma dovè finita tutta lacqua?
Semplice: con la nuova tecnologia Scholtes,
ne basta meno della metà, per lavare bene il doppio!
È per questo che non vedi lacqua nelloblò:
perché è poca, pochissima, per rispettare lambiente ma
senza rinunciare al massimo pulito.
E in più, risparmi anche energia elettrica.
La lavasciuga non
carica acqua.
Il tubo è ben collegato
al rubinetto ?
Manca lacqua? Potrebbero
essere in corso dei lavori nel
condominio o nella via.
Cè sufficiente pressione?
Potrebbe esserci un guasto
allautoclave.
Il filtro del rubinetto è pulito? Se lacqua è molto calca-
rea, oppure se recentemente
sono stati fatti lavori allacquedotto, il filtro del rubinetto
potrebbe essere ostruito da
frammenti e detriti.
Il tubo di gomma è piegato?
Il percorso del tubo di gomma
che porta lacqua alla lavasciuga deve essere il più rettilineo possibile. Controlla che
non sia schiacciato o piegato.
La lavasciuga carica
e scarica acqua di
continuo.
Il tubo è posto troppo in
basso? Deve essere installato
ad unaltezza variabile fra 60 e
100 cm.
La bocca del tubo è immer-
sa nellacqua?
Lo scarico a muro ha lo
sfiato daria? Se dopo queste
verifiche il problema non si risolve, chiudi il rubinetto dellacqua, spegni la lavasciuga e
chiama lassistenza.
Se abiti a un piano alto, potrebbero essersi innescati fenomeni di sifonaggio.
Per risolverli occorre installare una valvola apposita.
57
Istruzioni per linstallazione e luso
Page 61

M
La conduttura dellimpianto di scarico è ostruita?
Leventuale prolunga del tubo
di scarico è irregolare e impedisce il passaggio dellacqua?
La lavasciuga non
scarica o non
centrifuga.
Il programma scelto prevede lo scarico dellacqua? Con
alcuni programmi di lavaggio
occorre azionare lo scarico manualmente.
La funzione Stira meno" è attiva? Completa il pro-
gramma premendo il tasto
select.
Il tubo di scarico è piegato?
Il percorso del tubo di scarico
deve essere il più rettilineo possibile. Controlla che non sia
schiacciato o piegato.
La lavasciuga vibra
molto durante la fase
di centrifuga.
Il gruppo oscillante interno,
al momento dellinstallazione, è stato sbloccato correttamente? Vedi la pagina
successiva dedicata allinstallazione.
La lavasciuga è ben livellata? Il livellamento dellappa-
recchio va controllato periodicamente. Col tempo la lavasciuga potrebbe essersi spostata in modo impercettibile.
Agire sui piedini controllando
con una livella.
Non ricorrere mai
a tecnici non
autorizzati e
rifiuta sempre
linstallazione di
pezzi di ricambio
non originali.
Caratteristiche tecniche
Modello
Dimensioni
Capacità
Collegamenti
elettrici
Collegamenti
idrici
Velocità di
centrifuga
Programmi di
controllo secondo
la norma IEC456
MLSE 12 X
larghezza cm 59,5
altezza cm 81,5
profondità cm 54
da 1 a 5 kg per il lavaggio; da 1 a 4,0 kg per l'asciugatura.
tensione a 220/230 Volt 50 Hz
potenza massima assorbita 1850 W
pressione massima 1 MPa (10 bar)
pressione minima 0,05 MPa (0,5 bar)
capacità del cesto 46 litri
sino a 1200 giri al minuto
lavaggio: progra mm a 3; temperatura 6 0° C; live llo d i risciacquo ;
in te nsità d i lav aggi o ; e ffet tu ato con 5,0 kg di ca rico.
asciugatura: effettuato con 2,5 kg di carico impostando il tipo di
as ciugatura .
Questa apparecchiatura è conforme alle seguenti Direttive Comunitarie:
- 73/23/CEE del 19/02/73 (Bassa Tensione) e successive modificazioni
- 89/336/CEE del 03/05/89 (Compatibilità Elettromagnetica) e successive
modificazioni
È stretta tra mobili e muro?
Se non è un modello da incasso, durante il ciclo di
centrifugazione la lavasciuga
ha bisogno di oscillare un po.
È opportuno che intorno ad
essa ci siano alcuni cm liberi.
La lavasciuga perde
acqua.
La ghiera del tubo di carico
è ben avvitata? Chiudi il ru-
binetto, stacca la spina e prova a stringerla senza forzare.
Il cassetto dei detersivi è
intasato? Prova ad estrarlo e
lavarlo sotto lacqua corrente.
Il tubo di scarico non è ben
fissato? Chiudi il rubinetto,
stacca la spina e prova a fissarlo meglio.
Si forma troppa
schiuma.
Il detersivo è adatto per
luso in lavatrice? Verifica
che contenga la definizione
per lavatrice oppure a mano
e in lavatrice, o simile.
La quantità è quella giusta?
Un eccesso di detersivo, oltre
a produrre troppa schiuma,
non lava in modo più efficace
e contribuisce a produrre
incrostazioni nelle parti interne della lavasciuga.
La Lavasciuga non
asciuga.
Controlla che:
La spina sia ben inserita nella
presa; ci sia corrente in casa;
l'oblò sia ben chiuso; la partenza programmata (se disponibile) non sia stata selezionata; la
funzione asciugatura sia stata
selezionata.
La Lavasciuga non
asciuga bene.
Controlla che:
l'estremità del tubo di scarico
non sia immersa in acqua; la pompa di scarico non sia ostruita; i
consigli riguardanti i carichi massimi siano stati seguiti; il rubinetto dell'acqua sia aperto.
Se, nonostante tutti i controlli, la
lavasciuga non funziona e linconveniente rilevato continua a manifestarsi, chiama il Centro Assistenza autorizzato più vicino, comunicando queste informazioni:
- il tipo di guasto
- la sigla (Mod. ....)
- il numero di serie (S/N ....)
Trovi queste informazioni sulla
targhetta applicata nella parte
posteriore della lavasciuga.
Istruzioni per linstallazione e luso
58
Page 62

Quando arriva la
lavasciuga
Che sia nuova oppure appena trasferita da una casa
allaltra, linstallazione è un momento importantissimo
per il buon funzionamento della lavasciuga.
Installazione e trasloco
Dopo aver tolto limballaggio assicurati dellintegrità dellapparecchio. In caso di dubbio, chiama subito un tecnico qualificato. Linterno della lavasciuga vie-
ne bloccato, per il trasporto, da
quattro viti sullo schienale.
Prima di mettere in funzione la
lavasciuga, rimuovi le viti, to-
gli il gommino con il relativo distanziale (conserva tutti i pezzi)
e chiudi i fori con i tappi di plastica forniti in dotazione.
Importante: Chiudi con il tappo (in dotazione), i 3 fori nei quali era alloggiata la spina, situati
nella parte posteriore in basso a
destra della lavasciuga.
Livellamento
Per il buon funzionamento della
lavasciuga è importante che questa sia bene in piano. Per effettuare il livellamento basta agire
sui piedini anteriori; langolo di
inclinazione, misurato sul piano
di lavoro, non deve superare i 2°.
In caso di moquette, assicurarsi
che non venga ostruita la ventilazione nellarea di appoggio.
I piedini anteriori sono regolabili.
Conserva le viti di
bloccaggio e i distanziali.
In caso di trasloco ti
saranno utili per
bloccare nuovamente le
parti interne della
lavasciuga che sarà così
protetta dagli urti
durante il trasporto.
Collegamento alla presa
dacqua
La pressione idrica deve essere
compresa tra i valori indicati nella targhetta posta sul retro. Allacciare il tubo di carico a una
presa dacqua fredda con bocca
filettata da 3/4 gas interponendo
la guarnizione in gomma.
A
La guarnizione in gomma.
Se la tubazione dellacqua è nuova o è rimasta inattiva, prima di
allacciare far scorrere lacqua finché non è limpida e priva di impurità. Collegare il tubo alla macchina, in corrispondenza dellapposita presa dacqua in alto a destra.
Presa d’acqua in alto a destra.
Collegamento del tubo
di scarico
Sul retro della macchina ci sono
due agganci (destro o sinistro) ai
quali fissare il tubo di scarico. Inserire laltra estremità in una
conduttura oppure appoggiarlo
al lavandino o alla vasca evitando strozzature e curvature eccessive. È importante che termini
ad unaltezza tra 60 e 100 cm. Nel
caso in cui sia indispensabile fissare lestremità del tubo a una
altezza dal pavimento inferiore ai
60 cm è necessario che il tubo
venga fissato nellapposito gancio posto sulla parte alta dello
schienale.
Il
gancio da utilizzare se il tubo di
scarico termina a meno di 60 cm di
altezza.
Se il tubo scarica nella vasca o
nel lavabo, applicare la guida in
plastica e legare al rubinetto.
La guida per lo scarico in vasche e
lavabi.
Non deve mai rimanere immerso
nellacqua.
Sono sconsigliati tubi di prolunga. Nel caso sia assolutamente
indispensabile, la prolunga deve
avere lo stesso diametro del tubo
originale e non deve superare i
150 cm. In caso di scarico a muro, far verificare la sua efficienza da un tecnico abilitato. Se
labitazione si trova negli ultimi
piani di un edificio, è possibile
che si verifichino fenomeni di
sifonaggio per cui la lavasciuga
carica e scarica acqua di continuo.
Per eliminare questo inconveniente sono disponibili in commercio apposite valvole antisifonaggio.
Collegamento elettrico
Prima di collegare la macchina
alla presa elettrica accertarsi che:
1) la presa elettrica sia in grado
di sopportare il carico massimo di potenza della macchina indicato nella targhetta
caratteristiche e che sia a norma di legge;
2) la tensione di alimentazione
sia compresa nei valori indicati nella targhetta caratteristiche;
3) la presa sia compatibile con
la spina della macchina. In
caso contrario non utilizzare
adattatori ma procedere invece alla sostituzione della presa o della spina;
4) gli impianti elettrici domestici devono essere dotati di
messa a terra.
Attenzione!
Lazienda declina ogni
responsabilità qualora
queste norme non
vengano rispettate.
Sacchetti in plastica,
polistirolo espanso,
chiodi e gli altri elementi
dellimballo non sono
giochi per bambini in
quanto potenziali fonti di
pericolo.
59
Istruzioni per linstallazione e luso
Page 63

Istruzioni per linstallatore
M
Applicazione del pannello
in legno alla porta e
inserimento della
macchina nei mobili:
Nel caso in cui, dopo il montaggio del pannello in legno, sia necessario spedire la macchina per
l'installazione finale, consigliamo
di lasciarla nel suo imballo originale. A questo scopo l'imballo è
stato realizzato in modo da permettere il montaggio del pannello di legno sulla macchina senza
disimballare completamente il
prodotto (vedi figure sottostanti).
Il pannello di legno che copre la
facciata non deve essere di spessore inferiore a 18 mm e può essere incernierato sia sul lato destro che sinistro. Per ragioni di
praticità d'uso della macchina
consigliamo lo stesso senso di
apertura dell'oblò con le cerniere applicate sul lato sinistro.
Accessori montaggio
portina (Fig. 1-2-3-4-5)
N° 2 Supporti cerniera
Fig. 1
N° 2 cerniere
Fig. 2
lavabiancheria
washing machine
achine laver
m
asch
m
asch
w
a
t
r
o
p
o
t
a
L
e
id
s
r
o
o
D
e
t
r
o
p
e
t
o
C
e
it
e
s
r
u
T
ria
e
h
c
n
ia
b
a
v
la
achine
ashing m
w
e laver
in
ach
m
waschmaschine
rta
o
p
to
a
L
Door side
Cote porte
ite
e
r s
u
T
ine
A
C
6
5
4
3
2
1
Fig. 3
N° 1 Magnete
N° 1 Riscontro magnete
Fig. 4
B
N° 1 Tassello in gomma
Fig. 5
- n° 6 viti autofilettanti l = 13 mm
D
"tipo A".
- n° 2 viti metriche testa svasata
l = 25 mm "tipo B"; per il fissaggio del riscontro magnete al mobile.
- n° 4 viti metriche l = 15 mm
"tipo C"; per il montaggio dei
supporti cerniera al mobile.
6
5
4
3
2
1
- n° 4 viti metriche l = 7 mm "tipo
D"; per il montaggio delle cerniere ai supporti.
N° 1 Distanziale
Fig. 4/B
E
Istruzioni per linstallazione e luso
60
Page 64

Montaggio dei particolari
sulla facciata della
macchina
- Montare i supporti cerniera alla
facciata posizionando il foro indicato da una freccia nella fig. 1
verso linterno della facciata, utilizzando le viti tipo C.
- Montare il riscontro magnete
dalla parte opposta in alto utilizzando le due viti tipo B.
- Interporre tra la facciata della
macchina e il riscontro magnete,
il distanziale indicato in fig. 4/B.
Uso della maschera di
foratura
- Per tracciare le posizioni dei fori
sul lato sinistro del pannello,
allinerare la maschera di foratura
al lato superiore e sinistro del pannello facendo riferimento alle linee tracciate alle estremità.
in
595
0
54
600 m
- Per tracciare le posizioni dei fori
sul lato destro del pannello,
allinerare la maschera di foratura
al lato superiore e destro del pannello.
- Con una fresa di adeguate dimensioni realizzare le quattro sedi che
dovranno alloggiare le due cerniere, il tassello di gomma e il magnete.
Montaggio dei particolari
sul pannello di legno
(Antina)
- Inserire le cerniere nelle sedi
predisposte (la parte mobile della cerniera deve trovarsi verso
lesterno del pannello) e fissarle
con 4 viti del tipo A.
- Inserire il magnete nella sede
in alto dalla parte opposta alle
cerniere e fissarlo con due viti
tipo B.
C
- Inserire il tassello in gomma
nella sede in basso.
Il pannello è ora pronto per essere montato sulla macchina.
Montaggio del pannello
alla macchina
Inserire il nasello della cerniera indicato dalla freccia nella fig. 2 nella sede del supporto cerniera spingere il pannello verso la facciata
della macchina e fissare le due
cerniere con le due viti tipo D.
Fissaggio della guida
zoccolo
Se la macchina è installata ad una
estremità della cucina componibile montare una o entrambe le guide zoccolo come indicato in fig. 8,
regolandone la profondità in funzione della posizione dello zoccolo e se necessario fissarlo alle stesse (fig. 9).
Per montare la guida zoccolo
agire cone segue (fig. 8):
Fissare la squadretta P con la vite
R, infilare la guida zoccolo Q nellapposita asola e una volta posizionata nel punto desiderato bloccarla alla squadretta P con la vite
R.
Inserimento della
macchina nei mobili
- Spingere l'apparecchio nellaper-
tura allineandola con gli altri mobili (fig. 6).
- Agire sui piedini di regolazione
per portare la macchina allaltezza
desiderata.
- Per regolare la posizione del pan-
nello in legno in senso verticale ed
orizzontale, agire sulle viti C e D
come indicato in fig. 7.
Importante: chiudere la parte inferiore della facciata con lo zoccolo a battuta sul pavimento.
D
815
Fig. 6 Fig. 7 Fig. 9
Accessori in dotazione
per la regolazione in
altezza
Alloggiate nel coperchio di polistirolo (fig. 10) si trovano:
2 traverse (G)
1 listello (M)
Fig. 10
allinterno del cestello si trovano:
4 piedini supplementari (H)
4 viti (I)
4 viti (R)
4 dadi (L)
2 guide zoccolo (Q)
570
820 ÷ 900
in
m
C
Fig. 8
Regolazione in altezza
della macchina
La macchina può essere regolata
in altezza (da 815 mm a 835 mm)
agendo sui 4 piedini.
Se si desidera portarla ad unaltezza superiore a quella
sopraindicata, arrivando fino a
870 mm, occorre utilizzare i seguenti accessori:
- le 2 traverse (G)
- i 4 piedini (H)
Ripetere la stessa operazione nella parte posteriore della macchina.
A questo punto regolando i piedini H la macchina può essere abbassata o alzata da 835 mm a 870
mm.
Una volta raggiunta laltezza desiderata bloccare i dadi L alla traversa G.
Per regolare la macchina ad
unaltezza compresa tra 870 mm
e 900 mm occorre montare il
listello M regolando i piedini H
fino allaltezza desiderata.
Per inserire il listello agire come
segue:
allentare le tre viti N poste nella
parte anteriore della copertura
Top, inserire il listello M come
indicato nella fig. 12, quindi bloccare le viti N.
- le 4 viti (I)
- i 4 dadi (L)
quindi agire come segue (fig. 11):
togliere i 4 piedini originali, po-
G
sizionare una traversa G nella
parte anteriore della macchina,
fissarla con le viti I (avvitandole
nei fori dove erano montati i piedini originali) quindi inserire i
nuovi pedini H.
Fig. 11
L
I
H
Fig. 12
M
61
Istruzioni per linstallazione e luso
Page 65

Cura e Manutenzione facile
Trattala bene e sarà sempre
La tua lavasciuga è unaffidabile compagna di vita e di lavoro.
M
amica tua
Tenerla in forma è importante. Anche per te.
La tua lavasciuga progettata per
durare molti anni senza problemi. Qualche semplice accorgimento aiuta a tenerla in forma e
farla durare ancora di più. Prima
di tutto, devi chiudere sempre il
rubinetto dellacqua dopo ogni lavaggio: la continua pressione dellacqua può usurare alcuni componenti.
Inoltre, così facendo, elimini il
pericolo di perdite quando in casa
non cè nessuno.
Se lacqua della tua zona è troppo dura, usa un prodotto
anticalcare (lacqua è dura se lascia facilmente tracce biancastre
intorno ai rubinetti oppure intorno agli scarichi, specialmente
della vasca da bagno.
Per avere informazioni più precise sul tipo di acqua del tuo impianto, puoi rivolgerti allAcquedotto locale oppure a un idraulico di zona).
Occorre vuotare sempre le tasche, togliendo anche spille, distintivi e qualsiasi oggetto duro.
Lesterno della lavasciuga va lavato con un panno imbevuto di
acqua tiepida e sapone.
È importante lavare
periodicamente il
cassetto estraibile
dei detersivi.
Per prevenire
incrostazioni basta
tenerlo qualche tempo
sotto il rubinetto
dellacqua corrente.
Mai esagerare con le
dosi.
Il normale detersivo contiene già
prodotti anticalcare. Solo se lacqua è particolarmente dura, cioè
molto ricca di calcio, ti consigliamo di utilizzare ad ogni lavaggio
un prodotto specifico.
Saltuariamente può essere utile
un ciclo di lavaggio con una dose
di prodotto anti-calcare, senza
detersivo e senza biancheria.
Non utilizzare nessun detersivo o
additivo in dosi troppo abbondanti perché potrebbero causare
uneccessiva produzione di schiuma, con produzione di incrostazioni e possibili danni ai componenti della tua lavasciuga.
Vuota sempre le tasche: i piccoli oggetti possono
danneggiare la tua lavasciuga.
Quando serve, unispezione alla pompa e al tubo di gomma.
La lavasciuga è dotata di una pompa autopulente che non ha bisogno di operazioni di pulizia e manutenzione.
Il tubo di gomma
Controlla il tubo di gomma almeno una volta allanno. Va sostituito subito se presenta screpolature e fessure
poichè durante i lavaggi deve sopportare forti pressioni che potrebbero provocare improvvise spaccature.
Istruzioni per linstallazione e luso
62
Page 66

È sempre più importante
La sicurezza per te
La tua lavasciuga è costruita secondo le più severe norme interna-
e i tuoi bambini
zionali di sicurezza. Per tutelare te
e tutta la tua famiglia
Leggi attentamente queste avvertenze e tutte le informazioni
contenute in questo libretto: è
importante perché, oltre a
numerose notizie utili, forniscono importanti informazioni su
sicurezza, uso e manutenzione.
1. La lavasciuga non va installata allaperto, nem-
meno se lo spazio è riparato da una tettoia, perché è
molto pericoloso lasciarla
esposta alla pioggia e ai
temporali.
2. Deve essere usata soltanto da adulti ed
esclusivamente per lavare
la biancheria secondo le
istruzioni scritte in questo
manuale.
3. Se devessere spostata, lavorare in due o tre persone
con la massima attenzione.
Mai da soli perché la mac-
china è molto pesante.
4. Prima di introdurre la bian-
cheria controlla che il
cestello sia vuoto.
5. Non toccare la macchina
a piedi nudi oppure con le
mani o i piedi bagnati o
umidi.
6. Non usare prolunghe e
multiple, pericolose so-
prattutto in ambienti umidi.
Il cavo di alimentazione non
deve subire piegature o
compressioni pericolose.
Voglio solo un tecnico
specializzato e autorizzato
con ricambi originali
garantiti Scholtes!
7. Non aprire il cassetto dei
detersivi mentre la macchina è in funzione; non
usare detersivo per il lavaggio a mano poiché la
sua schiuma abbondante
potrebbe danneggiare le
parti interne.
8. Non tirare mai il cavo né
la lavasciuga per staccare
la spina dalla presa a muro:
è molto pericoloso.
9. Durante il funzionamento
della lavasciuga non toc-
care lacqua di scarico
perché può raggiungere
temperature elevate.
Loblò, durante il lavaggio tende a scaldarsi; tie-
ni lontani i bambini. Non
forzare mai loblò perché
questo potrebbe danneggiare il meccanismo di sicurezza posto sullapertura
che ha il compito di proteggere da aperture accidentali.
10. In caso di guasto, chiudi
prima di tutto il rubinetto dellacqua e stacca la
spina dalla presa a muro;
in nessun caso accedere ai
meccanismi interni per tentare di ripararla.
Come cambiare il cavo di alimentazione
Il cavo di alimentazione
della lavasciuga è speciale e può essere acquistato
esclusivamente presso i
Centri di Assistenza Tecnica autorizzati.
63
Istruzioni per linstallazione e luso
Fig. 13
Per sostituirlo occorre fare
così:
1. Assicurati che la
lavasciuga sia spenta e la
presa sia scollegata.
2. Togli la copertura svitan-
do le viti I [fig 13].
3. Scollega i cavetti dal filtro
antidisturbo F [fig. 14] facendo attenzione alla loro posizione (cavetto Blu=N; cavet-
N
L
F
Fig. 14
to Marrone=L) lasciando per
ultimo il cavetto di terra
Nota: le lettere L, N e il sim-
sono riportati sul fil-
bolo
tro antidisturbo.
4. Togli la vite e la rondella
V [fig. 15], che servono da
fermo al passacavo.
5. Allontana leggermente la
parte superiore del passacavo
dallo schienale, tira il cavo di
Fig. 15
alimentazione verso l'alto e
.
quindi estrailo [fig. 16].
Per collegare il nuovo cavo
agisci in senso inverso.
E importante, per la tua
sicurezza, rimontare tutti i
particolari e tutte le viti
utilizzate.
Fig. 16
Page 67

M
Istruzioni per linstallazione e luso
64
Page 68

Merloni Electroménager S.A.
CUISSON - AÉRATION - CONSERVATION - LAVAGE
SOCIÉTÉ ANONYME AU CAPITAL DE 110 000 000 F
RC THIONVILLE B 335 075 404 000 12 - APE 297 A
http://www.scholtes.fr
Xerox Business Service - Docutech - 03/2002 - 195033970.00 -
Conformément à nos conditions de vente, nous réservons la faculté de modifier nos modèles sans préavis; et cette brochure ne
peut être considérée comme un document contractuel.
In conformity with our general conditions of sale, we reserve the right to modify our models without notice and this booklet
can in no way be considered as a binding document.
Gemäß unsered allgemeinen Verkaufsbedingungen behalten wir uns die Möglichkeit vor unsere Modelle unangekündigt
abzuändem: die vortiegende Broschüre kann daher nicht als ein vertraglich bindendes Dokument angeschen werden.
Conformemente alle nostre condizioni generali di vendita, ci riserviamo la facoltà di modificare i nostri modelli senza preavviso. Questo opuscolo non può essere considerato come un documento contrattuale.
 Loading...