

Scania AUS4 Original Instructions Manual
19
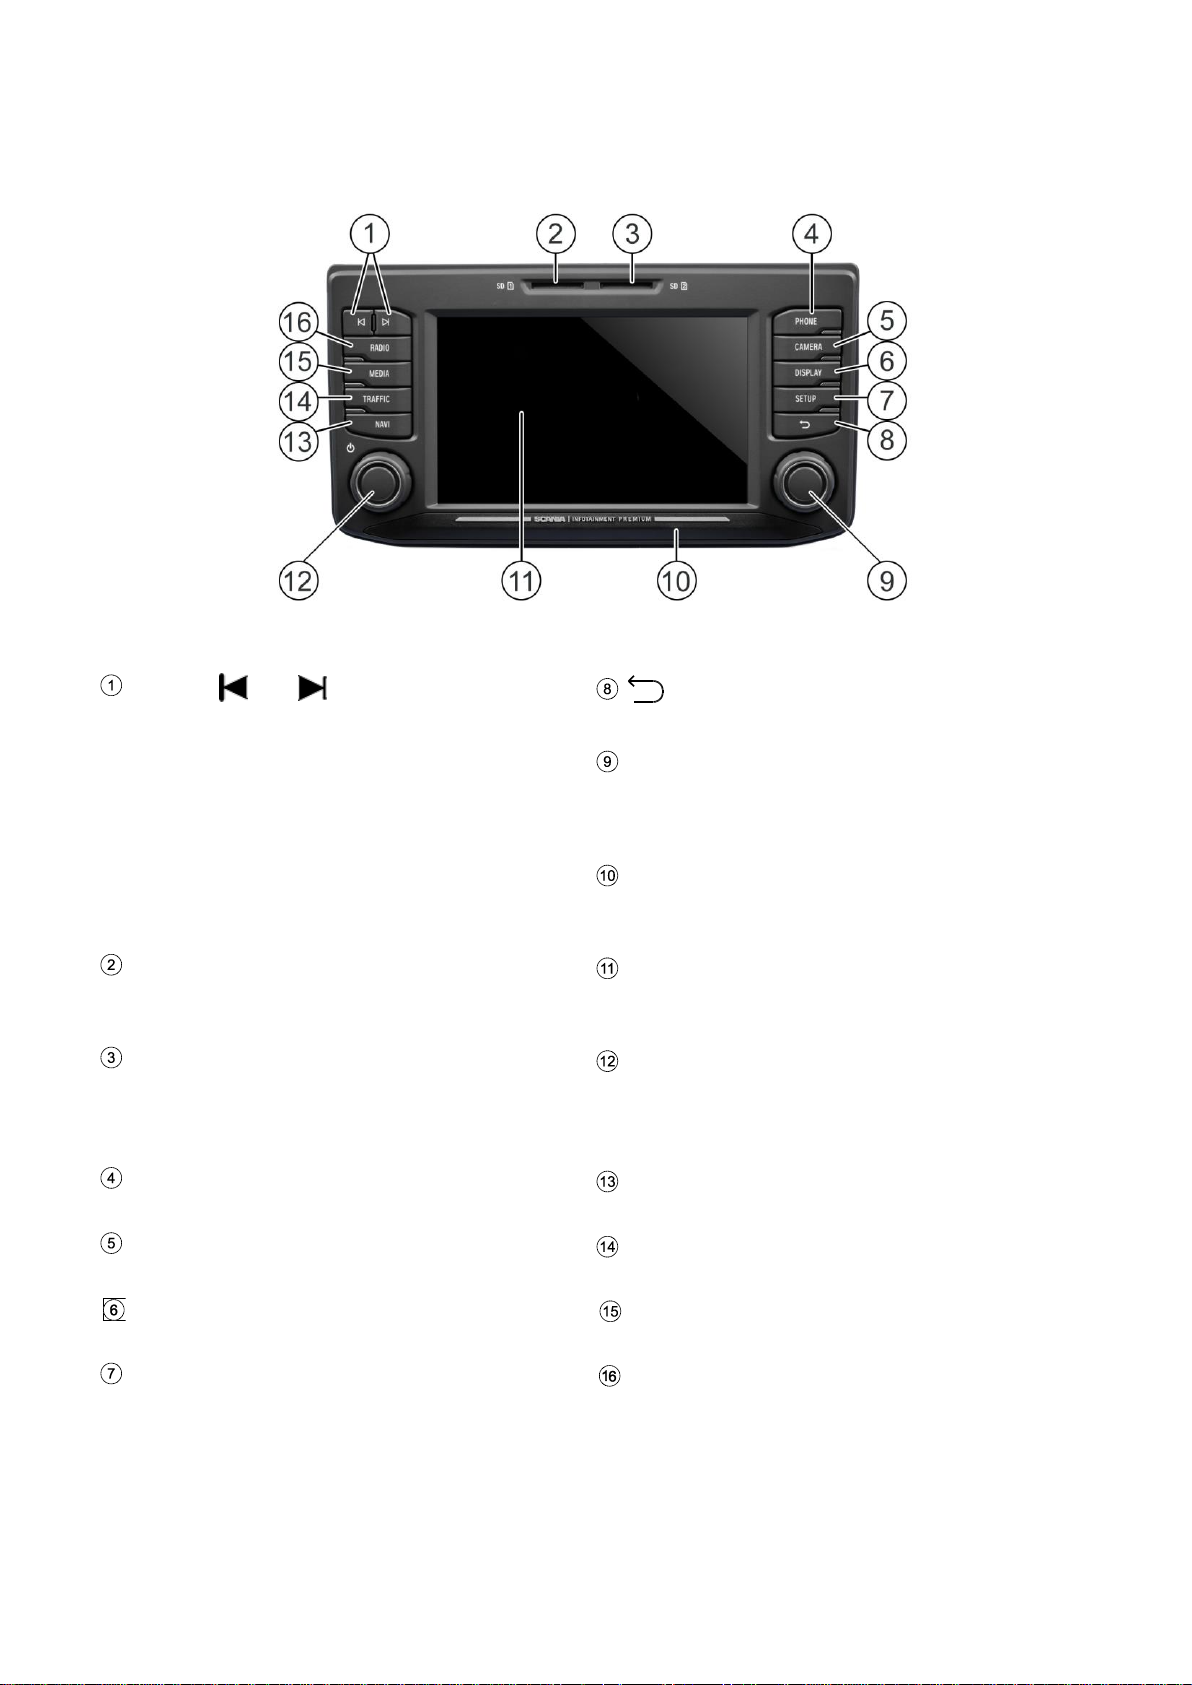
BUTTONS AND CONTROLS
Buttons
and
In radio mode:
Short press: Switch to next/previous
preset (radio)
Long press: Switch to next/previous
station on station list (radio)
In media mode:
Next/previous track (press)
Start quick scan (long press)
Button
Return to previous view
Right rotary encoder
Select menu item, change setting (rotate);
Confirm setting (press)
Approach Sensor
If function is activated, approaching the
sensor will activate and deactivate display.
SD slot 1:
Navigation data, Media, audio, video
playlists, POI import
Display/touch screen
SD slot 2
Media, audio, video playlists, POI import
Left rotary encoder
Adjust volume (rotate)
Mute audio signals (press)
Turn system on/off (long press)
TELEPHONE button
Telephone functions
NAVI button
Navigation function
CAMERA button
Camera functions
TRAFFIC button
Traffic information
DISPLAY button
Settings for the illumination of the display
MEDIA button
Media mode
SETUP button
General settings for the system
RADIO button
Radio mode

3 *) Optional features/ settings
CONTENT
Buttons and controls ................................................ 2
Important information ............................................... 5
This must be observed! ............................................... 5
Notes on handling SD cards ....................................... 6
Usable navigation SD cards ........................................ 6
Notes on these instructions ......................................... 6
Formatting conventions .......................................... 7
Introduction ............................................................... 8
Feature List ................................................................. 8
Radio reception ........................................................... 9
Operating modes ......................................................... 9
Radio settings ........................................................ 9
Media settings ........................................................ 9
Navigation settings ................................................. 9
Telephone settings ................................................. 9
Operation ..................................................................... 9
Controls .................................................................. 9
Multifunction knob ................................................ 10
Scroll through a list of menu items ....................... 11
Home icon ............................................................ 11
Turning on the infotainment system ..................... 11
Adjust the volume ................................................. 11
Customise settings .................................................... 12
Sound settings ..................................................... 12
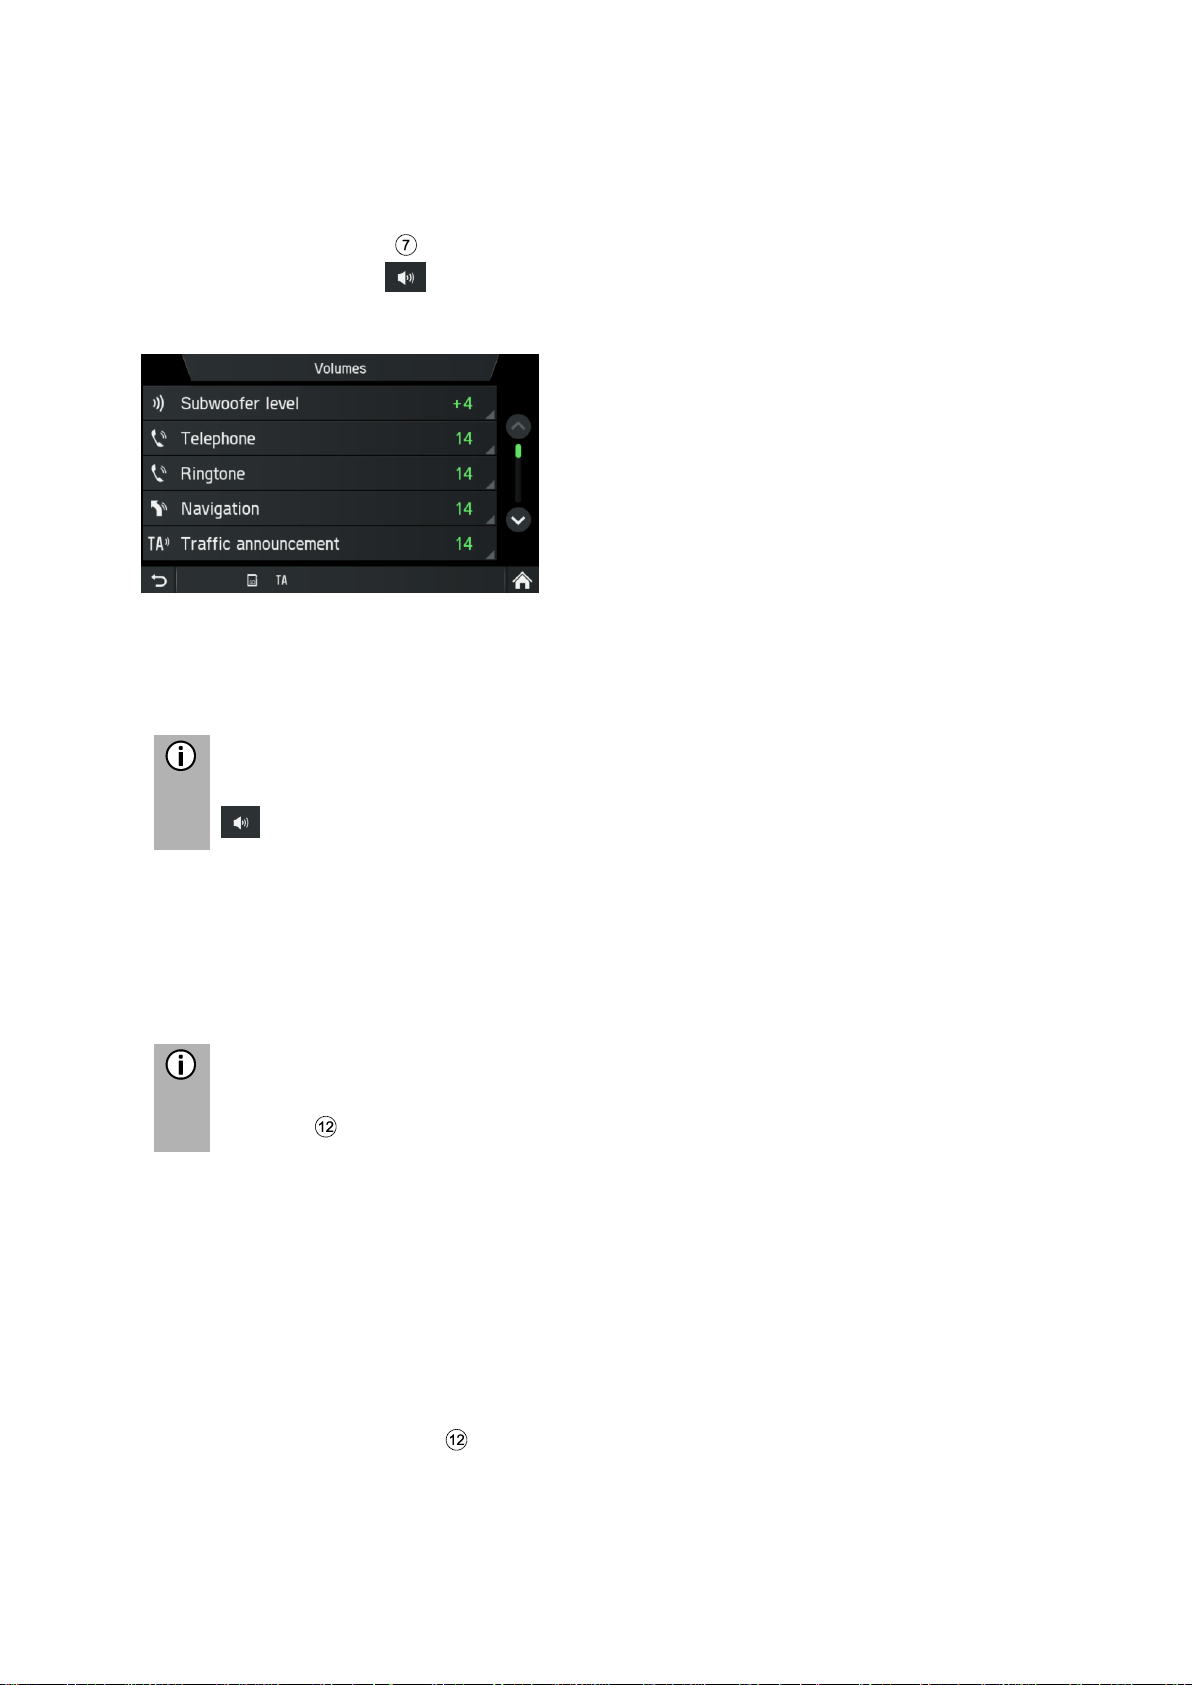
Volume settings ......................................................... 15
Adjusting volumes ................................................ 15
System settings ......................................................... 17
Select the language ............................................. 17
Units ..................................................................... 18
Automatic text scrolling ........................................ 18
Bluetooth and phone ................................................. 19
Display settings ......................................................... 20
Customising the display ....................................... 20
Driver Profiles ............................................................ 21
Theft protection ......................................................... 21
Speech Dialoge System – SDS* ............................... 21
Supported commands .......................................... 22
Dialog session ...................................................... 23
Radio ........................................................................ 26
Activating the radio .................................................... 26
Select waveband ....................................................... 26
Traffic announcements (TA) ...................................... 27
Priority for traffic announcements ........................ 27
Station search ........................................................... 28
Display available radio stations ............................ 29
Automatic station search ...................................... 29
Manual station tuning (AM/FM) ............................ 30
Store radio stations ................................................... 30
Retrieving radio stations ............................................ 30
Radio settings............................................................ 31
Media ........................................................................ 32
General information .................................................. 32
Important information ................................................ 32
Media sources........................................................... 33
Audio files of an MP3 player, USB drive.............. 33
Playing audio files from an SD card .................... 33
Playing files from USB mass storage device ....... 33
Connecting a TV/EXT device on AUX 2*............. 33
Media Player ........................................................ 34
Bluetooth audio connection ...................................... 35
Important information ........................................... 35
Connecting a Bluetooth device ............................ 36
Bluetooth music mode .............................................. 37
Aux port ..................................................................... 39
Media settings ........................................................... 40
Telephone* ............................................................... 41
General information .................................................. 41
Bluetooth profiles ................................................. 41
Bluetooth connection ........................................... 42
Pairing a Bluetooth device ................................... 42
Connection to another paired device ................... 43
Handling of two telephones ................................. 44
Deleting a paired device ...................................... 44
Emergency call ......................................................... 45
Making an emergency call ................................... 45
Operation .................................................................. 46
Control elements on the control panel ................. 46
Hands-free mode ...................................................... 46
Activate hands-free mode .................................... 46
Using the phone book .......................................... 47
Search for a telephone number ........................... 47
Using call lists ...................................................... 48
Select a telephone number again ........................ 48
Enter a telephone number ................................... 49
Access to the voice mailbox ................................ 49
Incoming call ........................................................ 49
Functions during the call ........................................... 51
Temporarily deactivate hands-free mode ............ 51
Temporarily deactivate the microphone .............. 51
Add call - Teleconference .................................... 51
Ending call ........................................................... 52
Phone book setup ..................................................... 52
Update the phone book ....................................... 52
Sort the phone book ............................................ 52
Phone book on the SIM / telephone memory ...... 53
Add favourites ...................................................... 53
Delete favourites .................................................. 53
Display text messages ......................................... 54
Read text messages ............................................ 54
Telephone settings ................................................... 55
Navigation* .............................................................. 56
Functions of the navigation system .......................... 56
Traffic information system and dynamic navigation.. 56
Advantages of TMC/TPEG .................................. 57
Current coverage ................................................. 57
Map data ................................................................... 57

4 *) Optional features/ settings
Information on the map display ................................. 58
NAVI button and menu navigation ............................ 60
Destination entry .................................................. 60
Enter address ....................................................... 60
Confirm route menu ............................................. 63
Alternative route ................................................... 64
POI - Point of Interest........................................... 65
Geo Coordinates .................................................. 67
Home address ...................................................... 68
Emergency ........................................................... 68
Contacts ............................................................... 69
Search in map ........................................................... 69
Select a point on map ............................................... 70
Display location information ................................. 70
Save position information ..................................... 70
Map view when route guidance is inactive .......... 70
Recent destinations ................................................... 71
Saved destinations .................................................... 72
Saved routes ............................................................. 72
Received destinations ............................................... 72
Options whilst route guidance ................................... 73
Stop guidance ...................................................... 74
Add stopover ........................................................ 74
Vehicle profiles ..................................................... 75
Avoid options ........................................................ 77
Block ahead ......................................................... 78
Voice guidance ..................................................... 79
Manoeuvre list ...................................................... 80
Manage route ....................................................... 81
Setup button and menu Navigation and Traffic ......... 82
Traffic Settings ..................................................... 82
Map settings ......................................................... 82
Route Guidance ................................................... 83
Vehicle profiles ..................................................... 84
Imported POIs ...................................................... 84
Map Version ......................................................... 86
Navigation Database ................................................. 86
Navigation SD card .............................................. 86
Replacing a navigation SD card ........................... 87
Traffic information Menu* .......................................... 88
Camera ..................................................................... 90
Select camera ...................................................... 91
Camera settings ................................................... 91
Steering wheel remote control* ............................. 92
Functions of the steering wheel remote control ........ 92
MirrorLink ................................................................. 94
Turn on MirrorLink ..................................................... 94
Start MirrorLink application ....................................... 95
CARPLAY® .............................................................. 96
Turn on CARPLAY .................................................... 96
LAUNCH CARPLAY APPS ....................................... 97
Launch voice recognition (Siri) .................................. 97
Eyes Free Function (Siri) ..................................... 97
Appendix .................................................................. 98
END USER LICENSE AGREEMENT ....................... 98
Certification Information ...................................... 101

5
IMPORTANT INFORMATION
The infotainment system was manufactured according to the current state of the art
and recognised safety regulations. However, there may be hazards if you do not
observe the safety information in these instructions.
Note
- Read these instructions carefully and completely before first use.
- Keep these instructions where they will be accessible for all users at all
times.
THIS MUST BE OBSERVED!
The infotainment system is designed to operate in a commercial vehicle with a 24 V
vehicle system voltage and for installation in a 2-DIN slot.
Traffic guidance accompanying the navigation SD card is designed for commercial
vehicles. The navigation SD card contains specific information about the navigation
of commercial vehicles, such as height restrictions or maximum permitted road load.
Traffic safety
The traffic safety is of highest priority. Inattentive driving or not observing
traffic situations can cause serious accidents.
- Familiarise yourself with the device before driving.
- Only operate your device if the traffic situation permits. Stop at a suitable
location before entering a new navigation destination or changing system
settings.
- The infotainment system gives driving recommendations during route
guidance. Only follow these if you do not disobey any traffic regulations!
- Traffic signs and traffic regulations always have priority over the driving
recommendations.
You must always be able to hear audible warnings of police, fire and rescue
services in the vehicle in a timely manner.
- Therefore, listen to your program at appropriate volumes while driving.
Risk of injury
You must not open or modify the device!
Refrain from repairing the device.
Trained personnel should only perform repairs and maintenance.
Risk to the device
We accept no liability for damage to the SD slots caused by inappropriate
SD cards.

6
Cleaning
Do not use solvents or abrasives, as these may attack and damage the surface of the
device.
- Clean the device with a dry or slightly damp cloth and, if necessary, with suitable
cleaning or maintenance products.
Disposal of old infotainment systems (EU countries only)
- Do not dispose of your old device in the household waste!
- Take advantage of the available return and collection systems.
NOTES ON HANDLING SD CARDS
To ensure proper functioning, use clean SD cards that are not damaged.
Contamination or damage of an SD card may cause reading difficulties.
We recommend that you handle SD cards carefully.
Notes
- Do not expose the SD card to strong magnetic or electric fields.
- Do not expose to direct sunlight or high humidity.
- Do not expose to dirt, water or other liquids.
- Always insert the SD card into the correct position.
- Only insert or remove the SD card when the infotainment system is off.
This may cause data loss or destruction of the SD card.
USABLE NAVIGATION SD CARDS
This infotainment system may only be operated with original SCANIA data storage
media.
Note
The infotainment system is not designed for the use of self-generated
navigation SD cards. The resultant functional limitations of navigation are
not covered by warranty.
NOTES ON THESE INSTRUCTIONS
These instructions will familiarise you with the functions of the infotainment system
and enable safe and successful operation for you.
Note
- Read these instructions carefully and completely before first use.
- Keep these instructions where they will be accessible for all users at all
times.

7
Formatting conventions
Safety instructions are highlighted with a grey bar and the symbol:
Helpful hints are highlighted with a grey bar and the symbol:
You will also find items in these instructions, clearly marked as illustrated here:
Action steps:
• Press ...
Device buttons:
e.g.
SETUP
button
Buttons:
e.g. Navigation
Note
The order and availability of the menu items are dependent on the inserted
navigation SD card and may therefore differ from the illustrations in these
instructions.

8
INTRODUCTION
FEATURE LIST
Mode
Feature
Radio
FM (18 stations)
AM (18 stations)
LW (6 stations)
MW (6 stations)
SW (6 stations)
DAB (18 stations)*
*) DAB is not receivable in each region.
USB port
2 USB ports:
- Media data
- Charging external media
USB port 1:
Provides current up to 1.5 A
USB port 2 (optional):
Provides current up to 0.5 A
SD slot
SD slot 1:
- Navigation/media data
SD slot 2:
- Media data
Connection
to external
(storage)
media
- MP3 player
- USB flash memory
- 2 Video-In
- External audio sources via AUX-In
Navigation
system
Dynamic directions to avoid traffic jams or
other traffic problems.
Phone
link
Connection with Bluetooth-enabled mobile
phones
Notes
- The infotainment system must be used so that the vehicle can be driven in
a safe manner at all times.
If in doubt, stop your vehicle and operate the infotainment system while the
vehicle is at a standstill.
- The use of the navigation system does not release the driver from proper
and attentive driving behaviour in traffic. Traffic regulations must always be
followed. If you have to deal with the system (e.g. for entering addresses),
stop your vehicle at a safe location and then perform the necessary
function.
- Some areas where entrance is forbidden, such as one-way streets,
entrances and other pedestrian areas may not be marked on the navigation
map. The navigation system will not issue a warning message in such
areas. The traffic regulations should be followed here.

9
RADIO RECEPTION
Radio reception can be degraded by atmospheric interference, noise, distortion or
other reception interference, such as:
- Change in distance from the transmitter
- Multipath reception due to reflection or shadowing
In such conditions the radio reception is disturbed. However this is not a faulty
behaviour of the infotainment system.
OPERATING MODES
Setting options in main menus are displayed by tapping the icon .
Radio settings
• Press the
RADIO
button to change to RADIO function.
See chapter "Radio" on page 26 for further details.
Media settings
• Press the
MEDIA
button to start an SD card, USB, BLUETOOTH AUDIO or
AUX function.
See chapter "Media" on page 32 for further details.
Navigation settings
• Press the
NAVI
button to start the NAVIGATION function.
See chapter "Navigation*" on page 56 for further details.
Telephone settings
• Press the
TELEPHONE
button to start the telephone function.
See chapter "Telephone*" on page 41 for further details.
OPERATION
Controls
The infotainment system can be operated via rotary encoder/knob, buttons and
menus displayed on the touch screen.

10
Touch screen
Risk of damage to the touch screen
The infotainment system is equipped with a capacitive touch display. Only
use your fingers. Do not use sharp or hard objects such as pens or pencils
for the operation of the touch screen.
The screen of the infotainment system has a sensor interface that enables direct
selection of displayed menu options. For example, it is possible to activate a menu
option on the screen by tapping the button with a finger or to change the position of
the sliding element on the screen by sliding with a finger.
In menus with several views (several buttons in the upper part of the menu), you can
change from left-to-right or right-to-left between views by swiping with your finger.
Note
- Before a system function is executed, you are often asked via a message
to confirm whether the selected system function should really be executed.
You can also direct the message to
complete the function.
- Press the button
if you want to suppress such a message without
triggering a system function.
Multifunction knob
To navigate through the menu options:
• Rotate the right rotary encoder clockwise or counter-clockwise.
To activate the selected menu item:
• Press the right rotary encoder .
The corresponding system function is activated or a message or a view with
additional options is displayed.
Note
In the main menus for audio and telephone, only the screen switch in the
lower part of the menu can be selected/activated via the touch screen.
11
Scroll through a list of menu items
With the touch screen:
• Tap on the button at the top or bottom of the slider.
or
• Move the slider of the slider bar up or down with your finger.
or
• Swipe your finger up or down to scroll through the list of menu items.
With the right rotary encoder :
• Rotate the right rotary encoder clockwise or counter-clockwise to scroll
through the list of menu items.
Home icon
When the Home icon is tapped, the last active tab of the home screen is shown.
If a last active tab is not available, the 2nd tab is shown. As soon as the user
navigates to another tab of the home screen, a back button is available in the
bottom left corner.
Note
Home screen layout can be set via
SETUP
button and tapping on the icon
.
For more details, see chapter “Introduction; System settings”.
Turning on the infotainment system
• Switch on the ignition of the vehicle.
The infotainment system turns on automatically.
Note
If the infotainment system is turned off manually with left rotary encoder it
needs to be turned on again by pressing the left rotary encoder .
Automatic shut down
If the infotainment system is turned on while the vehicle ignition is turned off, the
infotainment system will turn off automatically after one hour.
Adjust the volume
• Rotate the left rotary encoder .
The current setting is displayed.
When the infotainment system is turned on, the last selected volume is set.
• Press the left rotary encoder to mute the infotainment system or return to
the original volume.
If the volume is muted, the icon is displayed on the screen.

12
CUSTOMISE SETTINGS
The following examples describe a method to change the settings available in the
different menus using the menu options on the screen or the right rotary encoder .
Sound settings
• Press the
SETUP
button.
• Tap on the icon .
The AUDIO SETTINGS menu is displayed.
Two options are possible:
- Simple Equalizer for Bass/ Mid/ Treble settings (standard)
- Advanced Equalizer for advanced sound settings
Note
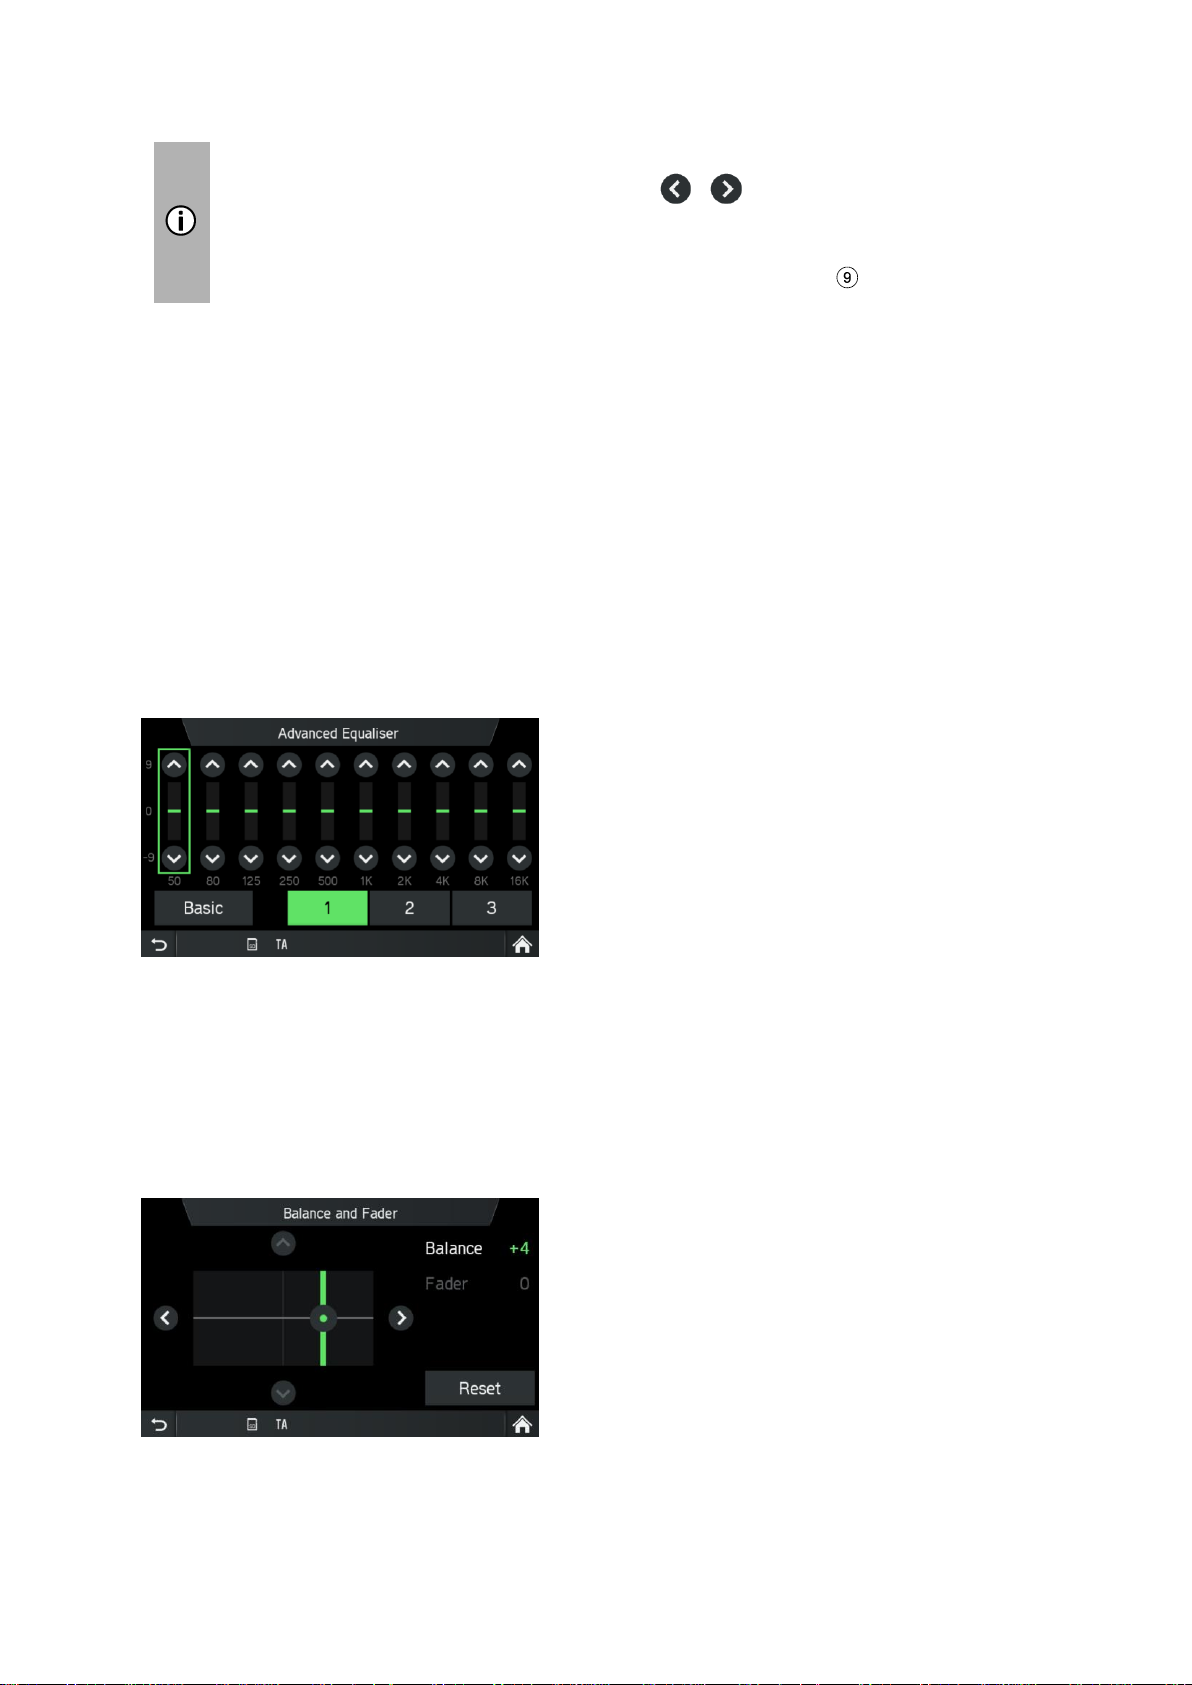
13
To change the settings you can proceed as follow:
• Tap on one of the screen buttons ( / ) to change the audio
settings.
• Move the slider via touch screen.
• Move the slider by rotating the right rotary encoder .
Bass:
Use this setting to modify the low frequencies of your audio source.
Mid:
Use this setting to modify the middle frequencies of the audio source.
Treble:
Use this setting to modify the high frequencies of the audio source.
• Tap on Advanced to open the Advanced Equalizer.
Advanced Equalizer:
The Advanced Equalizer includes ten sliders (-9 to 9) to edit audio frequency ranges.
Customized settings can be stored in three different presets.
Balance:
Use this setting to adjust the volume balance between the left and right speakers of
the vehicle.
Fader (optional):
Use this setting to adjust the volume balance between the front and rear speakers of

14
the vehicle.
Change settings
Via touch screen:
• Tap with your finger on the intersection of both lines and then hold and move
the finger to the desired position.
Values for Balance and Fader change according to the position of the
intersection.
Setting range: -9 to 9
Note
Tap on Reset, to align the intersection centrally.
I.e. Balance = 0, Fader = 0
Adjusting the system sounds
You can activate or deactivate the system sounds for different actions.
You can activate or deactivate the complete system sounds or select between Touch
clicks, System notifications (e.g. information about a connected/disconnected
telephone), SMS notifications
Adjusting the speed-dependent volume
If speed-dependent volume is activated, the volume is adjusted automatically to
compensate for road and wind noise while driving.
Note
- If the setting for the speed-dependent value is "Off", the volume does not
increase at higher vehicle speeds.
- If the setting for the speed-dependent value is "High", the volume is
increased to the maximum at higher vehicle speeds.
Adjusting the Turn instructions during calls
Use this setting to select if during active calls the turn instructions are played. With
active function the turn instructions are played.
Adjusting the Media mix during calls
Use this setting to select if during active calls media will be played. If the option is
switched to Off no media is played during a call.
If the option is switched to On media will be mixed with phone calls according to the
settings at Media mix. See “Adjust the volume” on page 11.
15
VOLUME SETTINGS
Adjusting volumes
• Press the
SETUP
button.
• Tap on the icon .
• Tap on Volumes.
• Select the list entry you want to modify.
• Adjust the Volume to the desired level.
The selected volumes are adjusted.
Note
For some settings you can test the selected volume by pressing the button
.
Subwoofer level:
Use this setting to modify the subwoofer level of the audio source.
Adjusting the Telephone volume
Note
The telephone volume can also be adjusted during a call using the left rotary
encoder .
Once the volume is set, the customised setting is saved by the infotainment system
and is used as a default for all future calls until the setting is changed again.
Adjusting the Ringtone volume
The volume of the ringtone played back by the system in case of an
incoming call can be adjusted.
Modifying the volume of the voice guidance (Navigation)
The volume of the voice prompts can be adjusted during the guidance messages
using the left rotary encoder or via the NAVIGATION SETUP menu.
The setting is saved by the infotainment system and is used automatically for all
future voice prompts until the setting is changed again.
Adjusting the volume of the traffic announcements (TA)

16
The volume of the traffic announcements can be adjusted during the message using
the left rotary encoder . When the message has been completed or is cancelled,
the volume is reset to the original volume setting automatically.
Adjusting the volume of voice (SDS)
The volume of voice announcements can be adjusted, when Speech Dialogue
System - SDS is available.
Adjusting the volume of System sounds
The volume of the System sounds can be adjusted. This is only possible when the
System sounds are activated in system settings.
Adjusting the Media mix
Sets the relative background volume of all audio sources (radio or media) during
voice guidance, ongoing call, traffic announcement, system notification or speech
recognition dependent on vehicle speed.
- If the value set „off“, then radio/ media sounds are quiet during other sound events.
- If the value is set to „max“, radio/ media volume will still be reduced.
17
SYSTEM SETTINGS
The default settings for the infotainment system can be changed via the menu
SYSTEM SETTINGS.
• Press the
SETUP
button and tap on the icon .
With the touch screen:
• Tap on a menu item to change the setting.
With the right rotary encoder :
• Rotate the right rotary encoder clockwise or counter-clockwise to select a
menu item.
• Press the right rotary encoder to change the setting.
Select the language
Different languages can be selected for the menu display. Voice output (optional)
also occurs in this language.
• Select the menu item Language.
A list of the languages is displayed.
• Select the desired language.
You have successfully performed the language setting.
Note
If Automatic is selected. The language is set via instrument cluster.
Note
Voice recognition is not available for each language and every region. To
activate voice recognition feature, see chapter “Steering wheel remote
control*” sub item „Button “ on page 92.

18
Units
• Select the menu item Units.
A list of the Units is displayed.
• Select the desired system of units:
Automatic
Metric (km, m, t, kmh)
Imperial (mi, yd, ft, t, mph)
Note
If Automatic is selected. The Units are set via instrument cluster.
Automatic text scrolling
• Activating or deactivating automatic text scrolling (touch-click):
If the option is activated, list entries which are too long to fit on the current screen will
first be displayed with three dots at the end and afterwards they will be scrolled
automatically from the right to the left side, so that the user can read the rest of text
on the respective entries.
Note
In some regions, this function is not available due to legal restrictions.
Home screen layout
• Select the menu item Home screen layout.
A list of possible layouts is displayed.
• Select the desired layout.
Media - Navi - Phone
Media - Navi
Media - Phone

19
Factory reset
This menu entry provides option to either delete all personal data of individual driver
or settings common to all the vehicle driver ID holders.
• Select the menu item Factory reset.
A screen is asking for user’s acknowledgement.
- Factory reset, present user = Deleting all personal data.
After choosing yes in the “factory reset, present user” pop up, “All personal
data will be deleted and system will be restarted” pop up will be shown during
data deletion process.
Another popup informs the user that personal data has been deleted
- Factory reset, all users = Deleting personal data of current user and also all
other users
- After choosing yes in the “factory reset, all user” pop up, “All personal data
will be deleted and system will be restarted” pop up will be shown during data
deletion process
SW vers.
This menu entry displays you the current installed software version.
BLUETOOTH AND PHONE
For details, see the chapter "Media", sub-chapter "Bluetooth audio connection" on
page 35 or the chapter "Telephone*", sub-chapter "General information" on page 41.
20
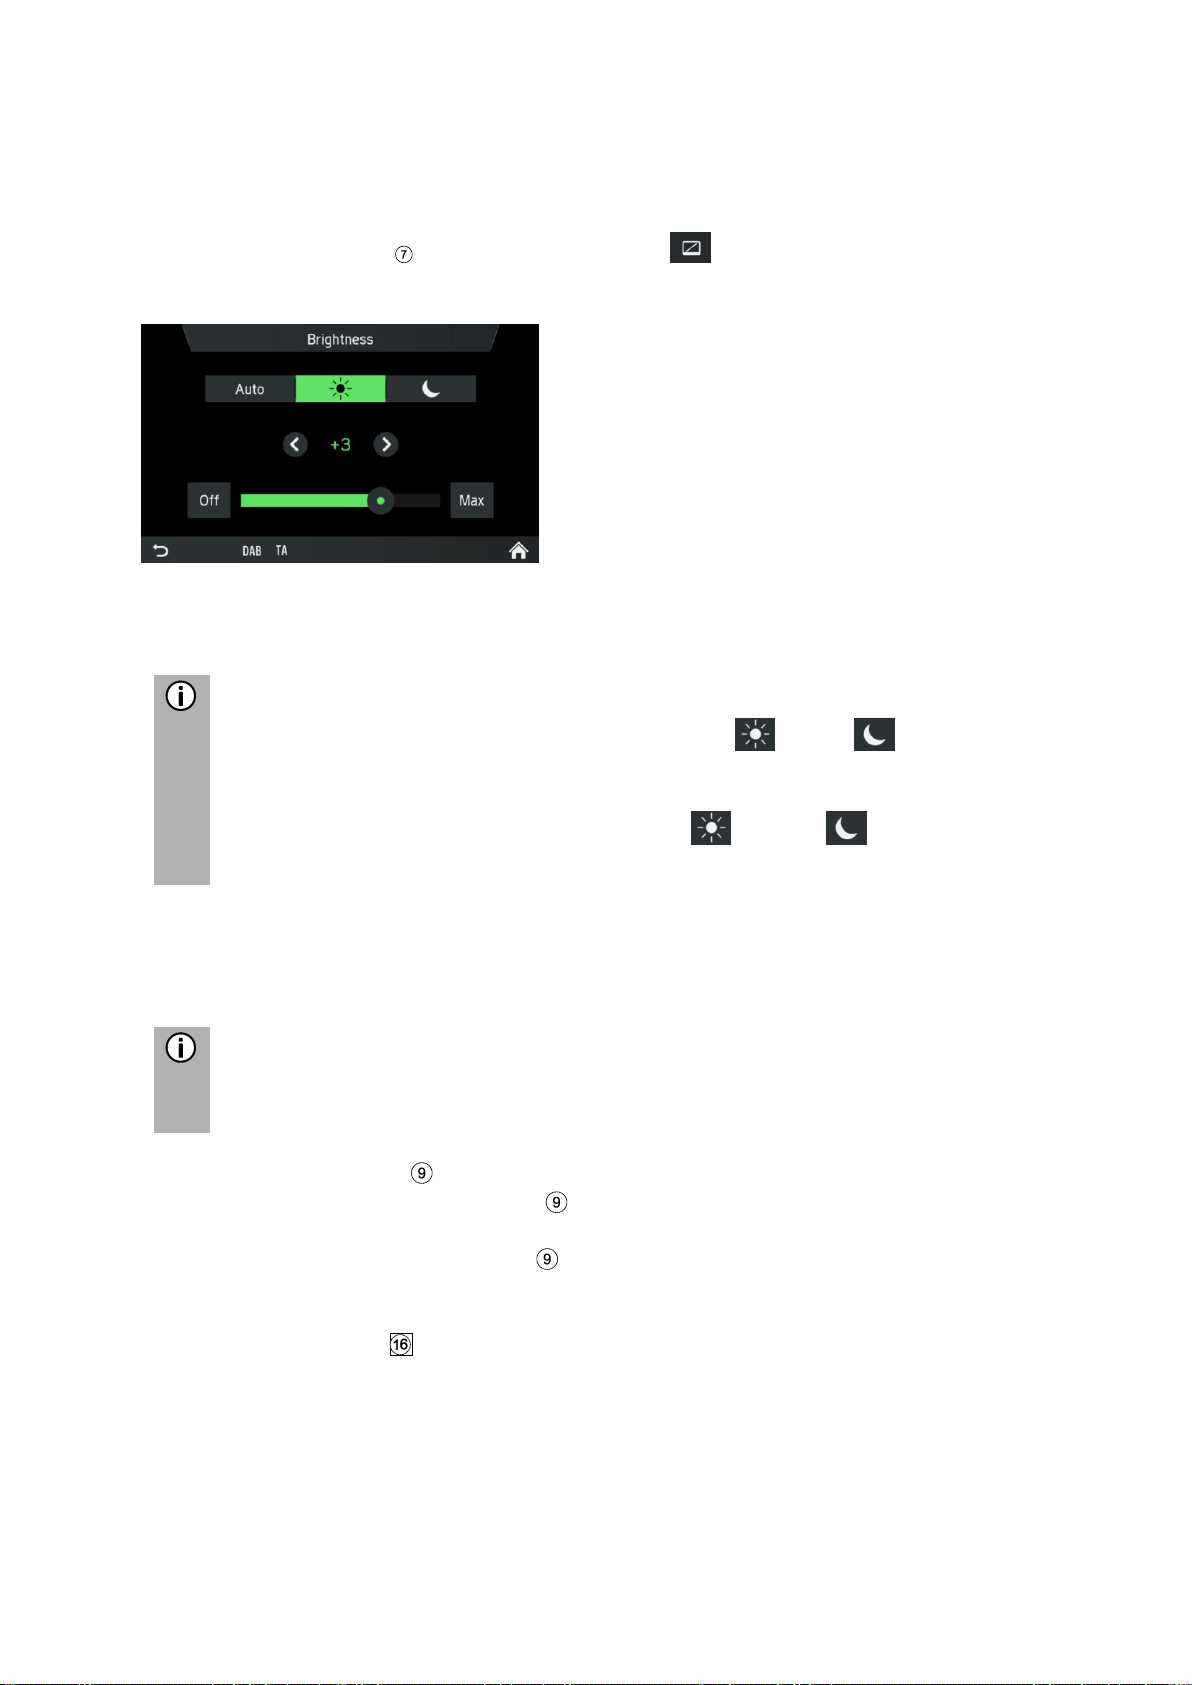
DISPLAY SETTINGS
Customising the display
• Press the
SETUP
button and tap the icon .
• Tap on Brightness.
• Select the appropriate option to adjust the Brightness of the screen and to
adjust the display to match the light conditions of your surroundings.
Note
There is one automatic and two manual modes ( day or night) in
system.
If you select Auto, the infotainment system will follow the brightness level for
the complete instrument panel. If you select (day) or (night) you can
set your own brightness level.
• Select the appropriate option to activate/deactivate a Screen saver.
• Select the appropriate option to activate/deactivate the Approach sensor
feature.
Note
The points under a setting indicate that additional options are still available.
Press on the dots to see the other options.
With right rotary encoder
• Rotate the right rotary encoder clockwise or counter-clockwise to select a
menu item.
• Press the right rotary encoder to change the setting.
Approach Sensor Feature
If the approach sensor feature has been enabled. When a screensaver or Display
off is currently shown, approaching the screen turns the display temporarily on. When
the approach sensor is not detecting something anymore, the display will be turned
off again after an assigned time.

21
DRIVER PROFILES
The ID from your Driver ID card (if a Tachograph is used) will be used to identify you
as a user of the infotainment system, this to store basic settings and restore them
next time you enter the same vehicle again.
If the infotainment system is used standalone (ignition off), changes will always be
applied to the last used Driver ID.
THEFT PROTECTION
Please contact your local SCANIA dealer.
SPEECH DIALOGE SYSTEM – SDS*
*) Voice recognition feature is dependent on vehicle configuration, the language
which is used and region the vehicle is sold.
Note
Speech Dialogue System - SDS is not available in all regions.
The on board voice recognition system is designed to achieve complex tasks by
voice commands.
• Press the Push to Talk button on steering wheel to initiate the voice
recognition
A beep is played. The speech session has started.
• The user may utter a command after the beep. For more details, see Example
2.

22
Supported commands
Navigation, Media, Telephone and Radio are the four major domains supported by
the speech dialog system. Below is the list of major commands supported by the
Voice Recognition system on board.
Europe:
Following commands are supported by the on board voice recognition system:
Commands
Album <Name>
Genre <Name>
Artist <Name>
Playlist <Name>
Song <Name>
Play <Artist> <Album or
song>
Search for music
Dial by number
Dial <Phone Number>
Call <name>
Redial
Enter Country < Country
name >
Enter state < State name >
Enter city < city name >
Enter ZIP Code <ZIP code>
Enter Street <Street Name>
Enter house number <house
number>
Favorite < Name>
Find Next <POI Brand>
New destination
Repeat instructions
Show map
Station <Name>
23
Other regions (out of Europe):
Following commands are supported by the on board voice recognition system:
Commands
Tune to < Frequency >
Seek Up
Seek Down
Next preset
Previous preset
FM/AM
Next Track
Previous Track
Album <Name>
Genre <Name>
Artist <Name>
Playlist <Name>
Song <Name>
Play <Artist> <Album or
song>
Search for music
Dial by number
Dial <Phone Number>
Call <name>
Redial
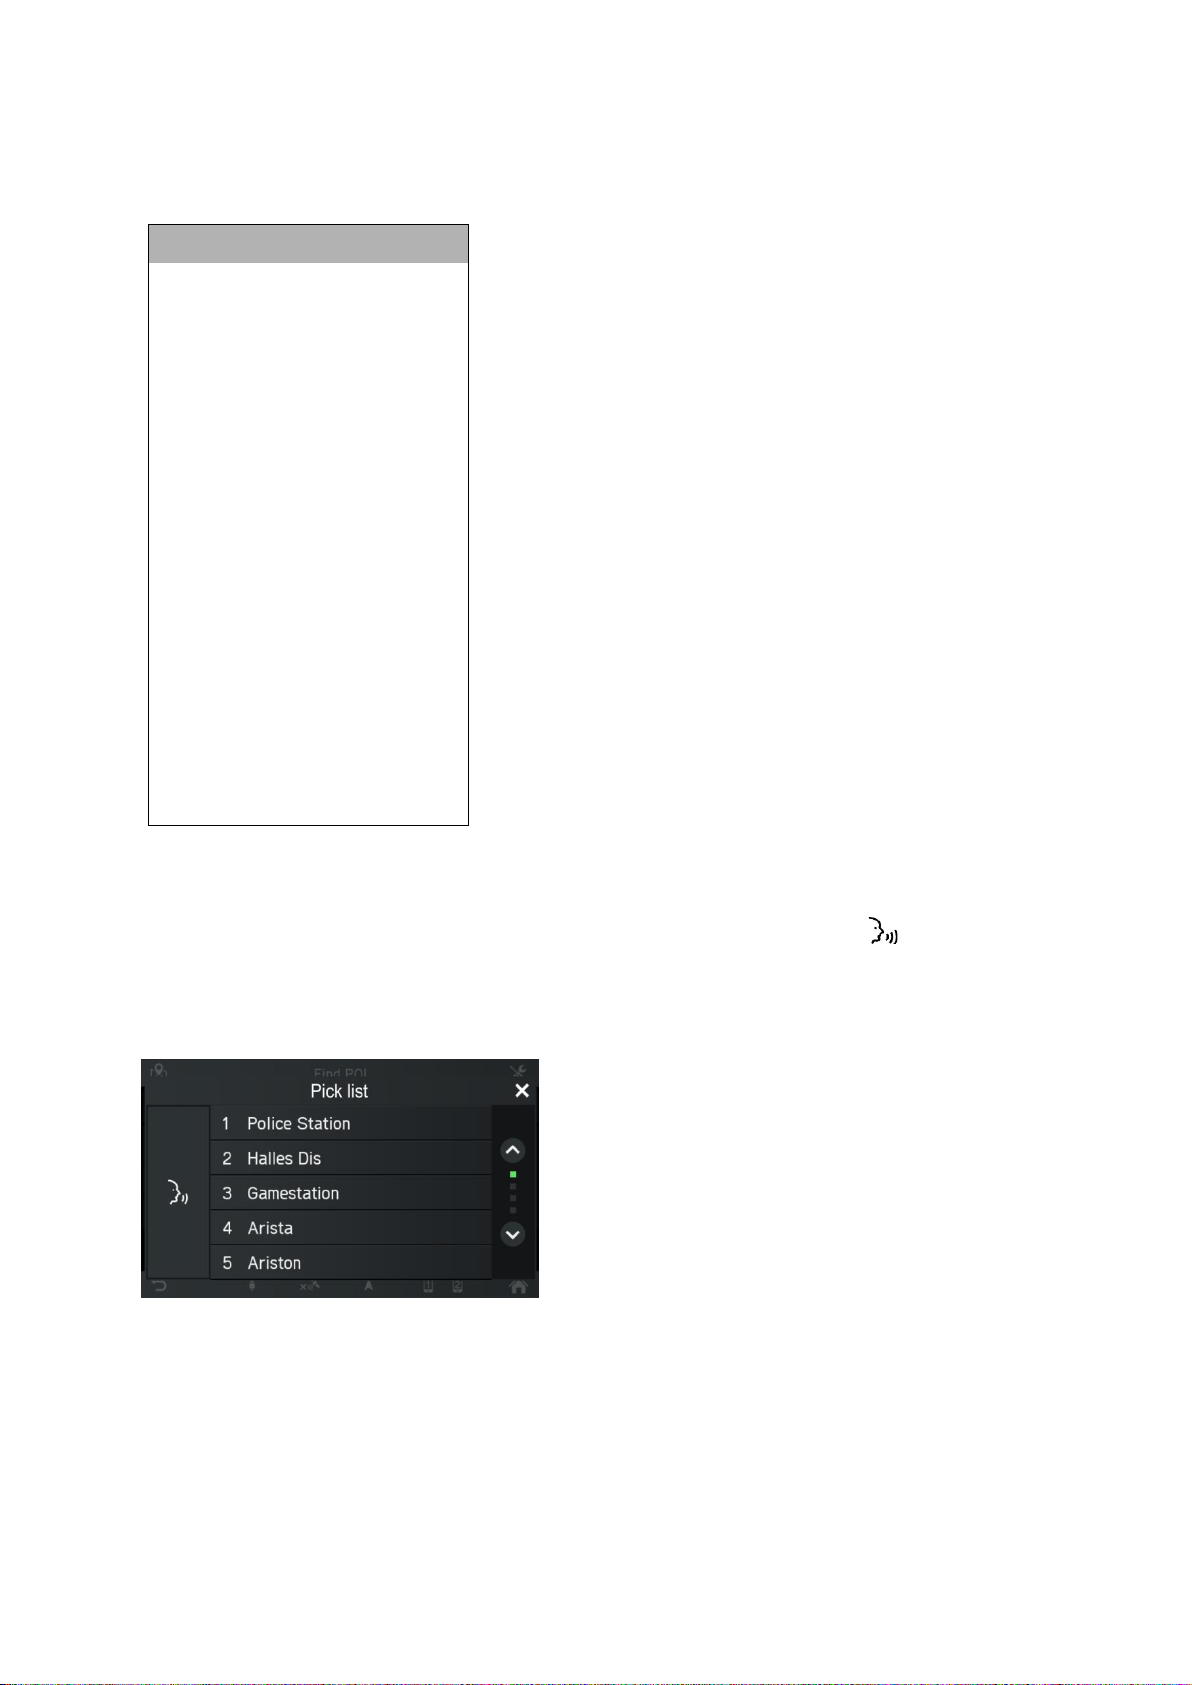
Dialog session
A dialog session starts with a short press of the Push to Talk button and
terminates in a system action or cancellation based on system state. During an active
dialog session, there could be multiple speech interactions between the user and the
head unit.
In order to assist the user, some information is displayed on the screen. This is
particularly useful when there is a need for disambiguation of user utterance.
24
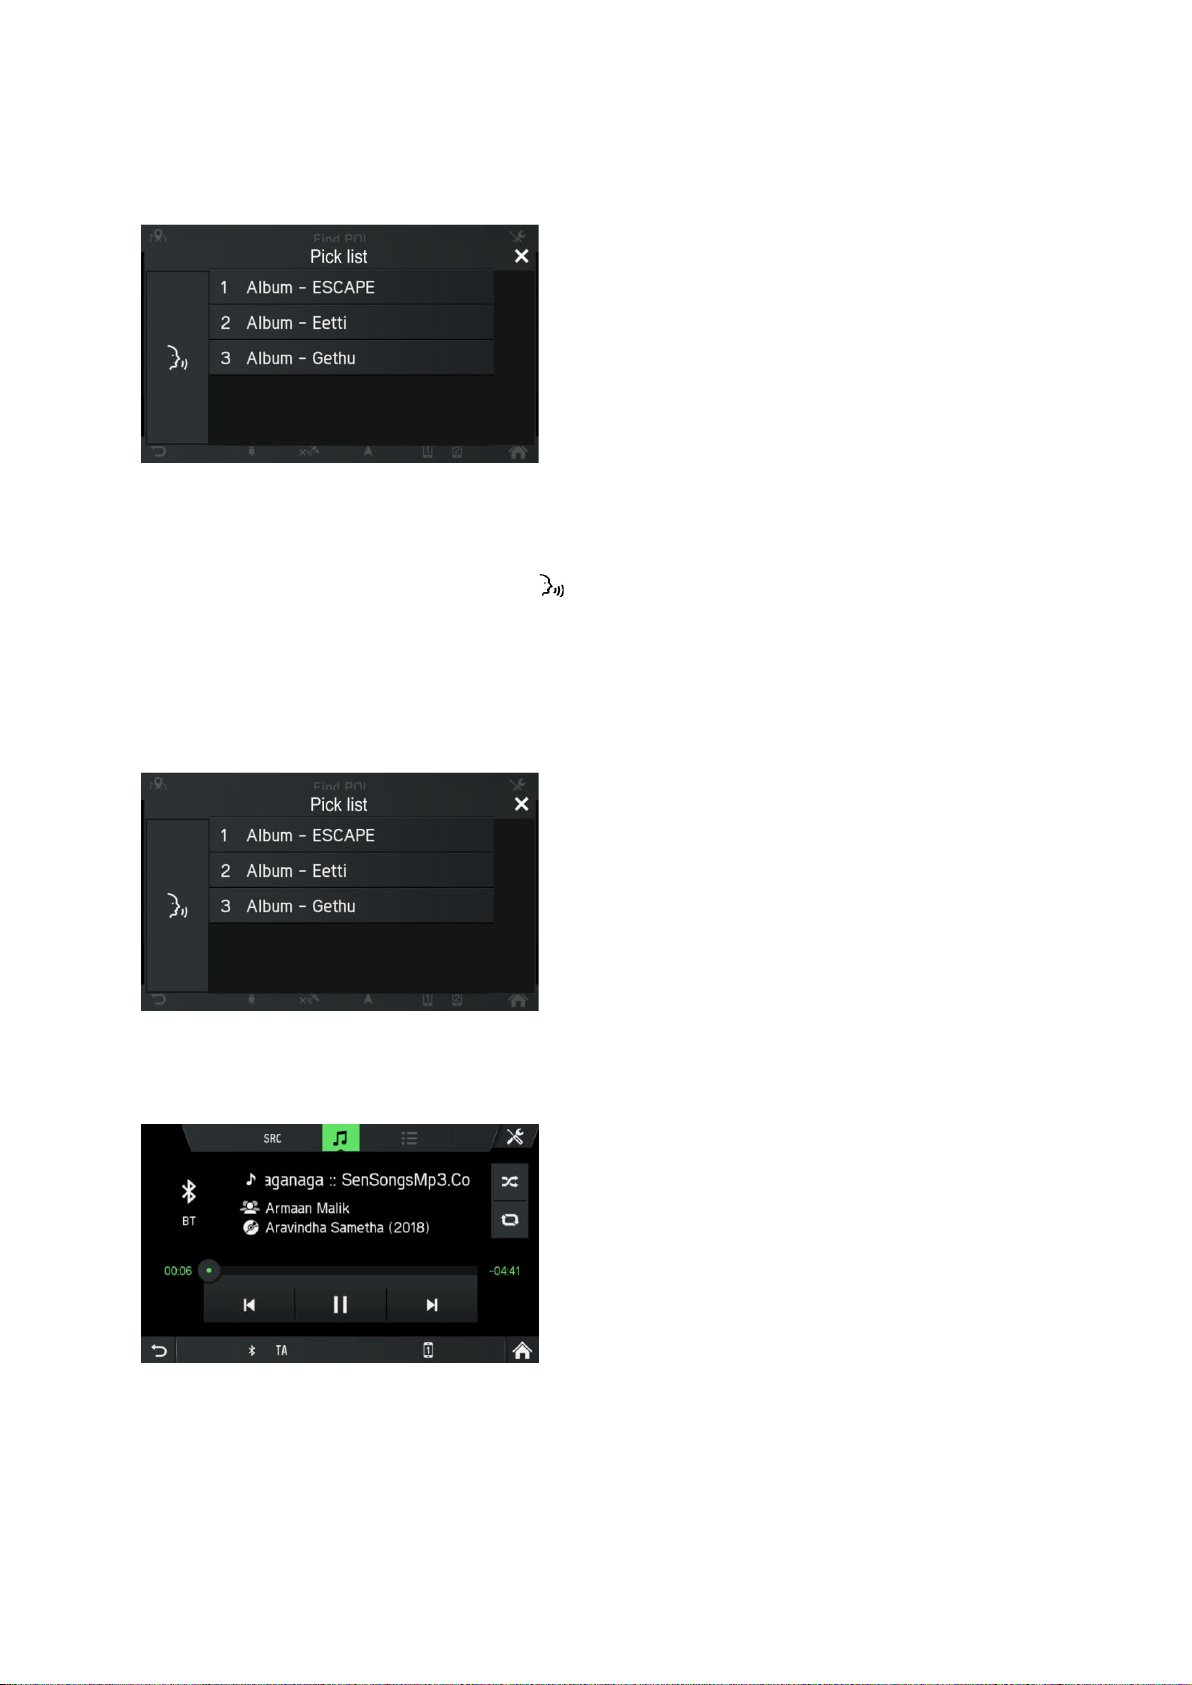
Example 1:
Disambiguation between two similar artists:
Example 2:
Select an album and play it:
• Press the Push to Talk button on steering wheel to initiate the voice
recognition
A beep is played. The speech session has started.
Speak the album title of the songs which should be played.
A pop-up appears with a list of albums the system associates with the users
command. The list is arranged in the order of recognition confidence.
• Recite the wanted list entry e.g. “Line one” or select it via touch screen.
The infotainment system plays the selected title.

25
Help system
The voice recognition solution comes with an on board help system. If no command
is uttered, the help dialog is initiated in which the system reads out some of the
supported commands. You could also utter "more commands" or "all commands" to
trigger a help dialog.
26
RADIO
You can only use the touch screen to select or activate the menu items in the Radio
menu.
ACTIVATING THE RADIO
• Turn on the infotainment system.
•
Press the button
RADIO .
The radio function is activated.
The last station you listened to is played after activating the radio.
Note
If an RDS station is being played, the information about the station name
and the program will be displayed.
SELECT WAVEBAND
• Press the button
RADIO
.
• Tap on the button.
• Select the desired waveband.
FM, AM or DAB*
*) DAB is not receivable in each region.
The last station of the selected waveband is played.

27
Note
- If the waveband is changed from FM to DAB, to AM or vice versa, the
currently received station remains activated.
- There is an FM waveband menu. You can store 18 FM stations.
- There is an AM waveband menu. You can store 6 AM stations for each
waveband:
LW, MW and SW
- If DAB is available, you can store 18 DAB stations.
TRAFFIC ANNOUNCEMENTS (TA)
A message is displayed and the announcement is heard.
During the announcement, the volume can only be changed using the left rotary
encoder .The traffic announcement can be cancelled by tapping on Skip. When the
traffic announcement is finished or is cancelled, the volume is reset to the original
setting automatically.
Note
- If traffic announcements are activated, the radio is enabled in the
background, even if Media or the Navigation is activated.
- If you have previously selected a radio station that does not disseminate
traffic announcements, the infotainment system automatically tunes to a
radio station that disseminates traffic announcements.
The traffic announcements are activated even if the AM waveband has
been selected beforehand. This ensures that local traffic announcements
can be received at any time, regardless of the selected operating mode.
Priority for traffic announcements
Activating or deactivating (TA)
The TA function is available only in FM radio mode.
If the TA function is activated and the infotainment system receives a traffic
announcement from an RDS station, the currently active audio source is interrupted.
To activate/deactivate traffic announcements (TA) see "Radio", sub-chapter "Radio
settings”.

28
STATION SEARCH
You can set the desired radio station either automatically or manually.
Via touch screen:
Switch to the previous DAB station
within the currently set DAB
ensemble.
Switch to the previous station in the
station memory (AM/FM).
Press for a longer time:
Automatic search for previously
available radio station (AM/FM).
Switch to the next DAB station
within
the currently set DAB ensemble.
Switch to the next station in the
station memory (AM/FM).
Press for a longer time: Automatic
search for next available radio
station (AM/FM).
Manual tune to previous frequency
by specific step (AM/FM).
Manual tune to next frequency by
specific step (AM/FM).
Switch to the previously available
DAB ensemble.
Switch to the next available DAB
ensemble.
Via hard keys :
- Short press:
Switch to next / previous preset in the station memory
- Long press:
Switch to next/ previous station on station list
29
Display available radio stations
• Press the button
RADIO
.
• Tap on the icon .
The available radio stations will be displayed for the selected waveband and
can be selected.
Note
The first time that the AM is used, you need to click on the update button
at the top left in order to update the station list.
Automatic station search
• Tap on the icon .
A frequency scale is displayed.
• Press on the or button
The next available station is received and played back automatically.
Note
If no other receivable station is found, the last received station is set again.
30
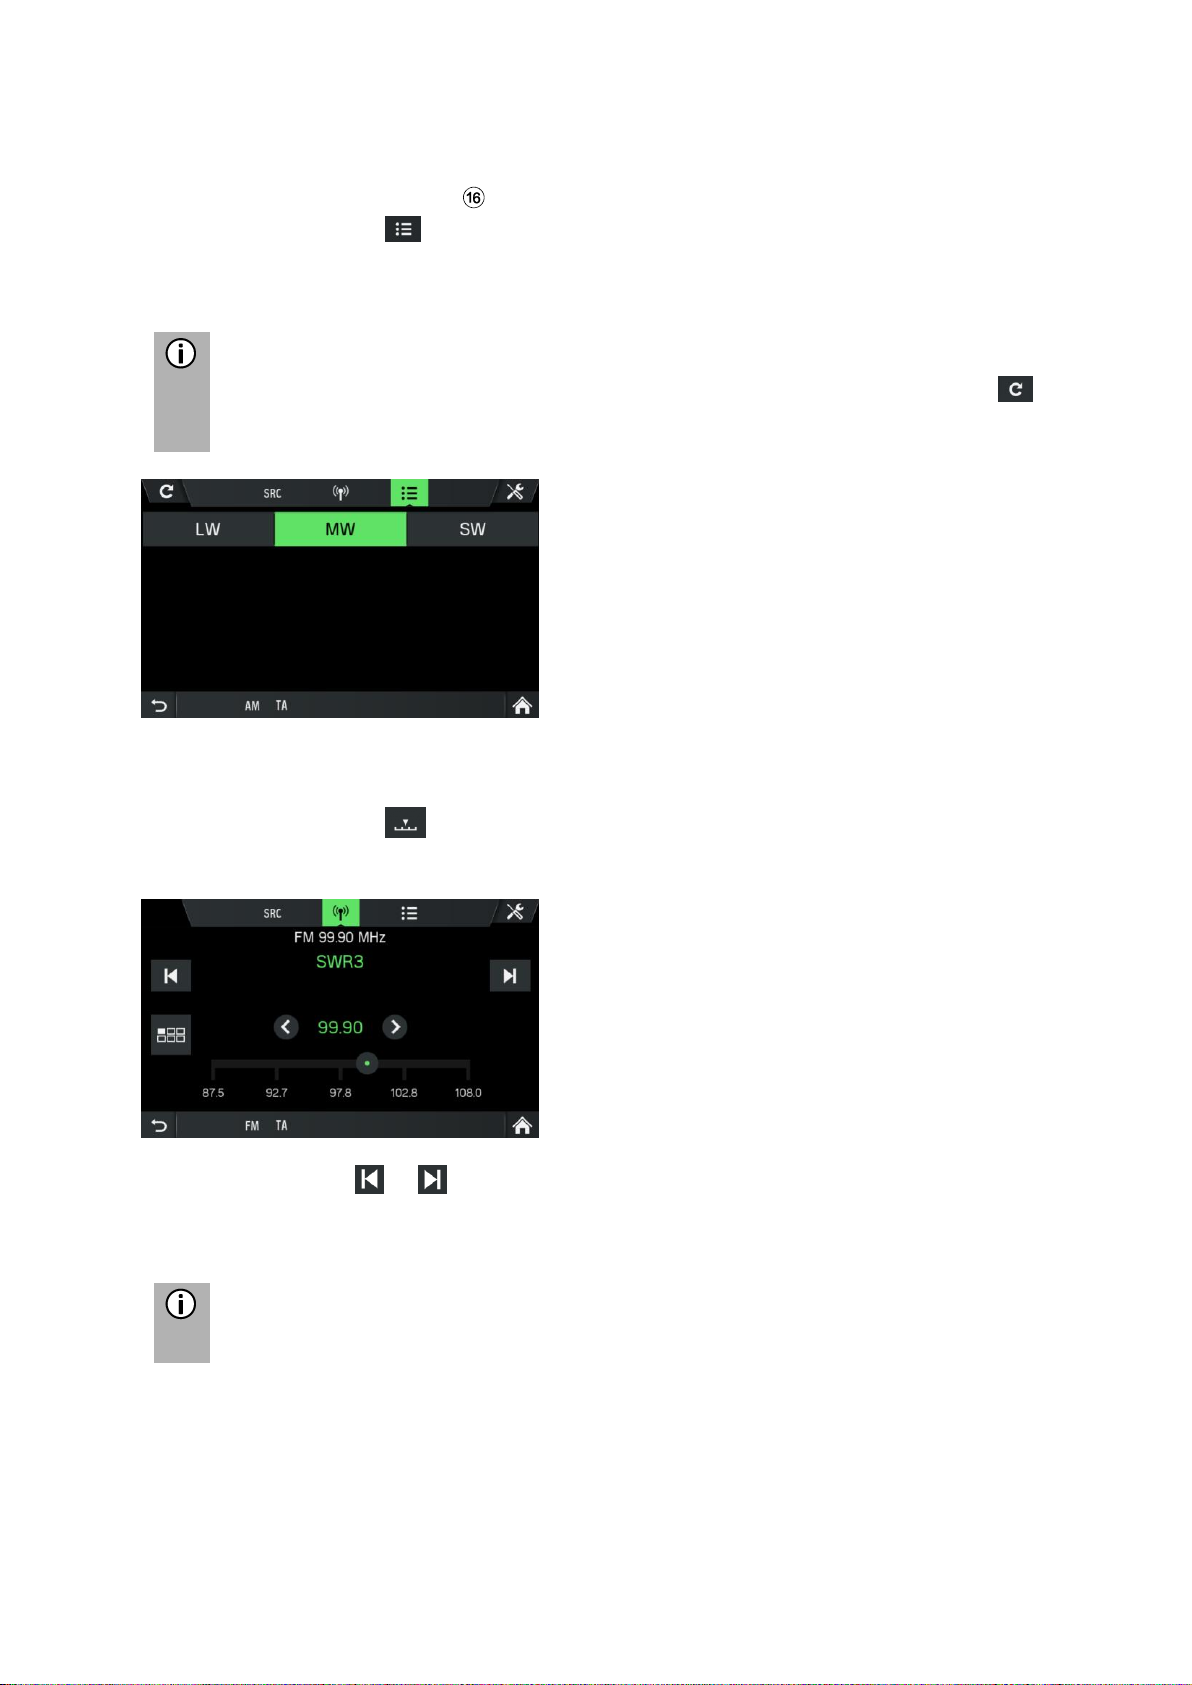
Manual station tuning (AM/FM)
Using the right rotary encoder :
• In the radio menu, turn the rotary encoder clockwise or counter-clockwise to
change the reception frequency.
Using the frequency display:
• Tap on the icon .
A frequency scale is displayed.
Perform one of the following to set the desired station manually.
• Tap the frequency scale.
• Tap on or .
• Turn the right rotary encoder clockwise or counter-clockwise.
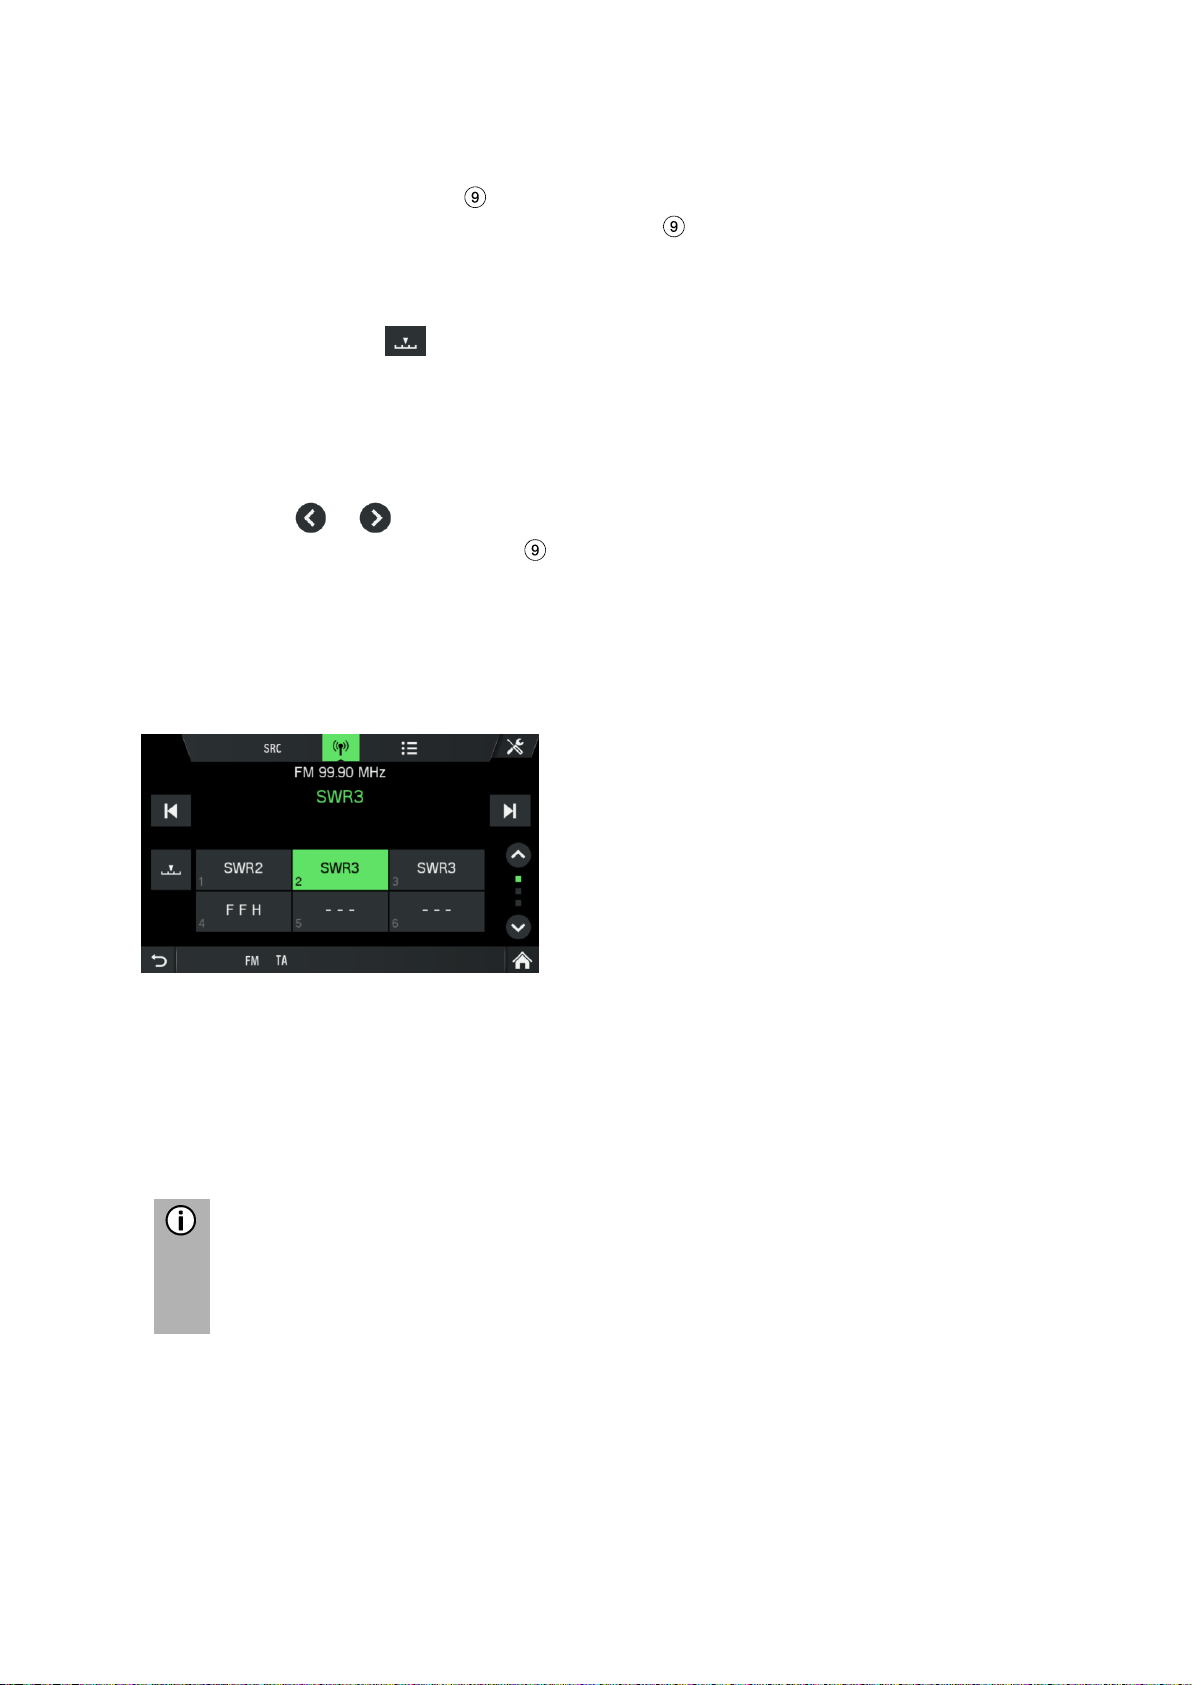
STORE RADIO STATIONS
Radio stations can be stored on each waveband (AM, FM and DAB) using the station
buttons.
• Select the desired waveband.
• Set the desired station.
• Press and hold one of the station buttons until you hear a beep (if sound
settings for beep is set to ON).
Pressing the corresponding station button retrieves the station from the station
memory.
Note
If you do not hear a beep when saving the radio station, it may be that the
system sounds are deactivated. To activate the system sounds, see the
chapter "Introduction", sub-chapter "Customise settings" on page 12.
RETRIEVING RADIO STATIONS
• Select the desired waveband.
• Press a station button.
The corresponding radio station is played.
 Loading...