

Page 1
Dealer
Date:
Name:
Initials:
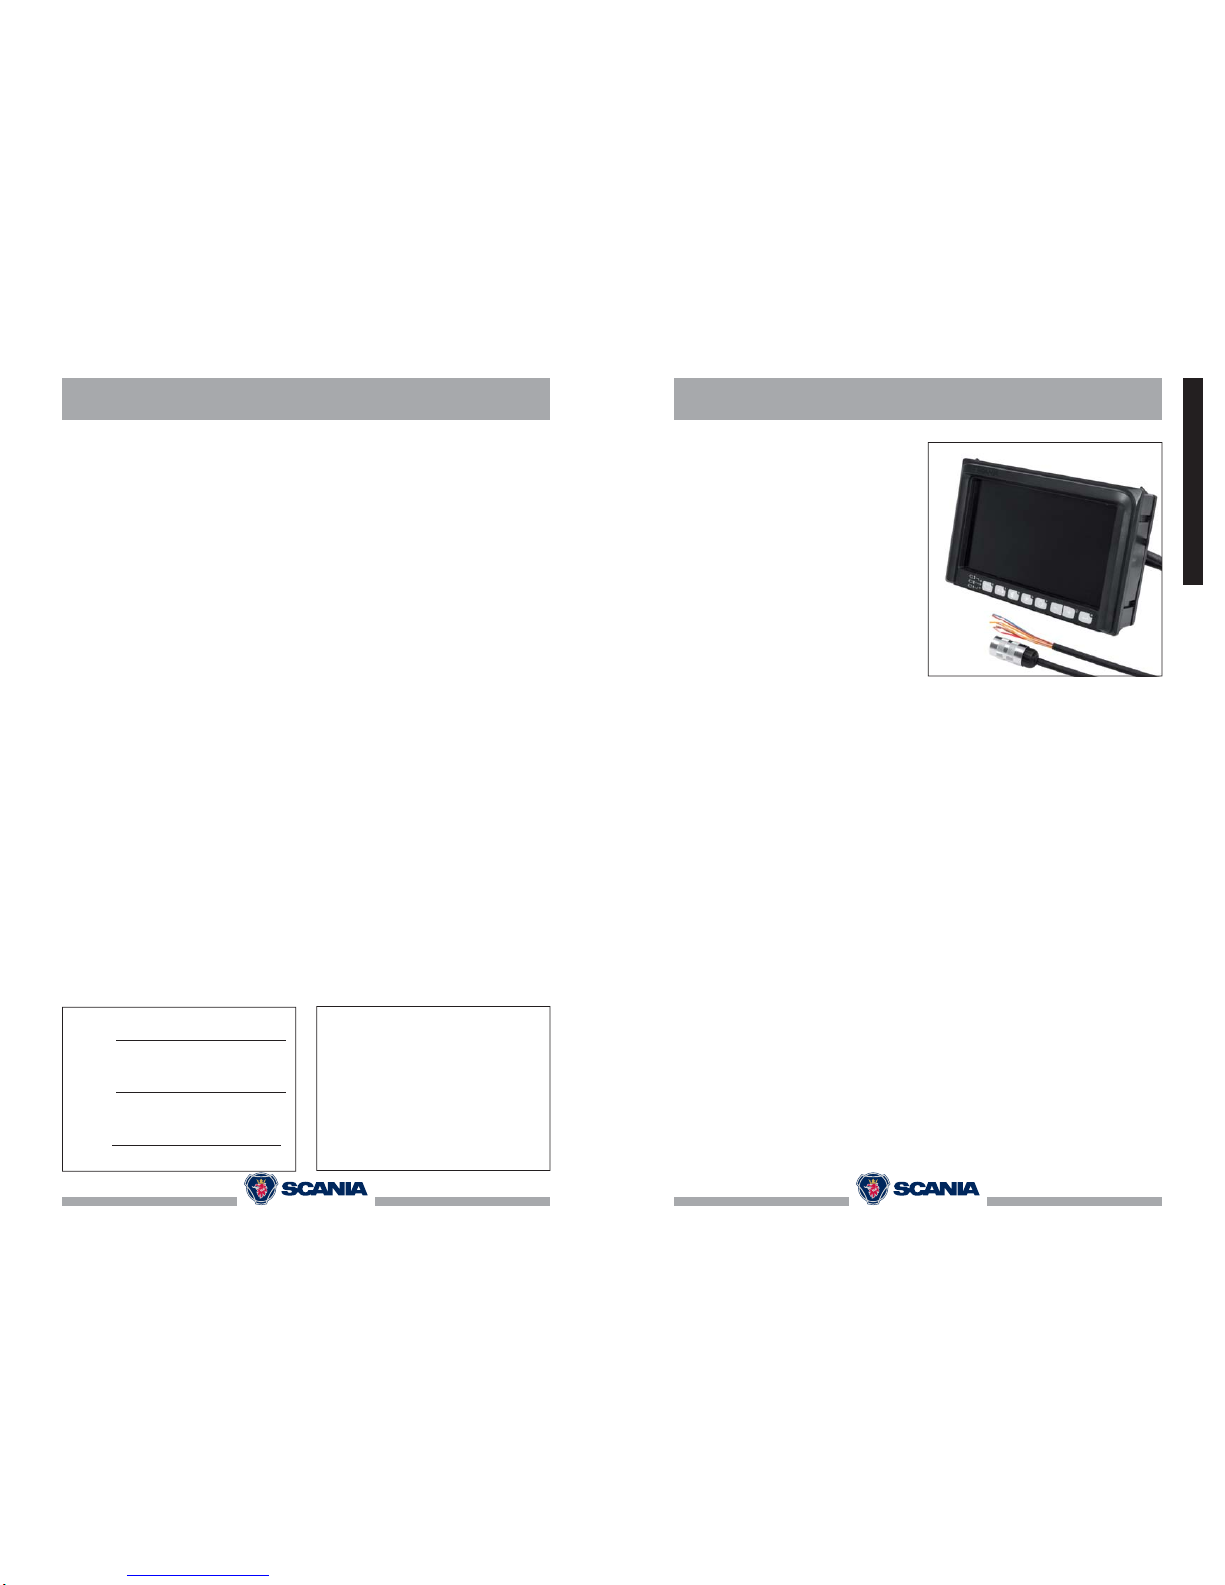
User Manual
Display 7" LEDD
2060534 R2-0
ENGLISH
Page 2
2060534 V2.02
Contents
Contents
1. Operation keyboard 3
2. Operator menu operation 5
3. Service menu operation 6
4. Systems settings 8
5. Disassembling of the display 7" LEDD. 11
2060534 V2.0 11
Disassembling
ENGLISH
Attention: How can we back out of the “Front Cam”
menu in case we accidentally activated this?
Answer: There are 2 possibilities:
1. By activating the yellow wire (which is used as an
handbrake signal in a frontcam setup) or activated blue
wire (which is used to activate the rear camera) you can
be able to get into the menu’s again and disable the
frontcam setting.
2. Alternatively you can press the option button (5) for
more then 15 second to de-activate the frontcam setting.
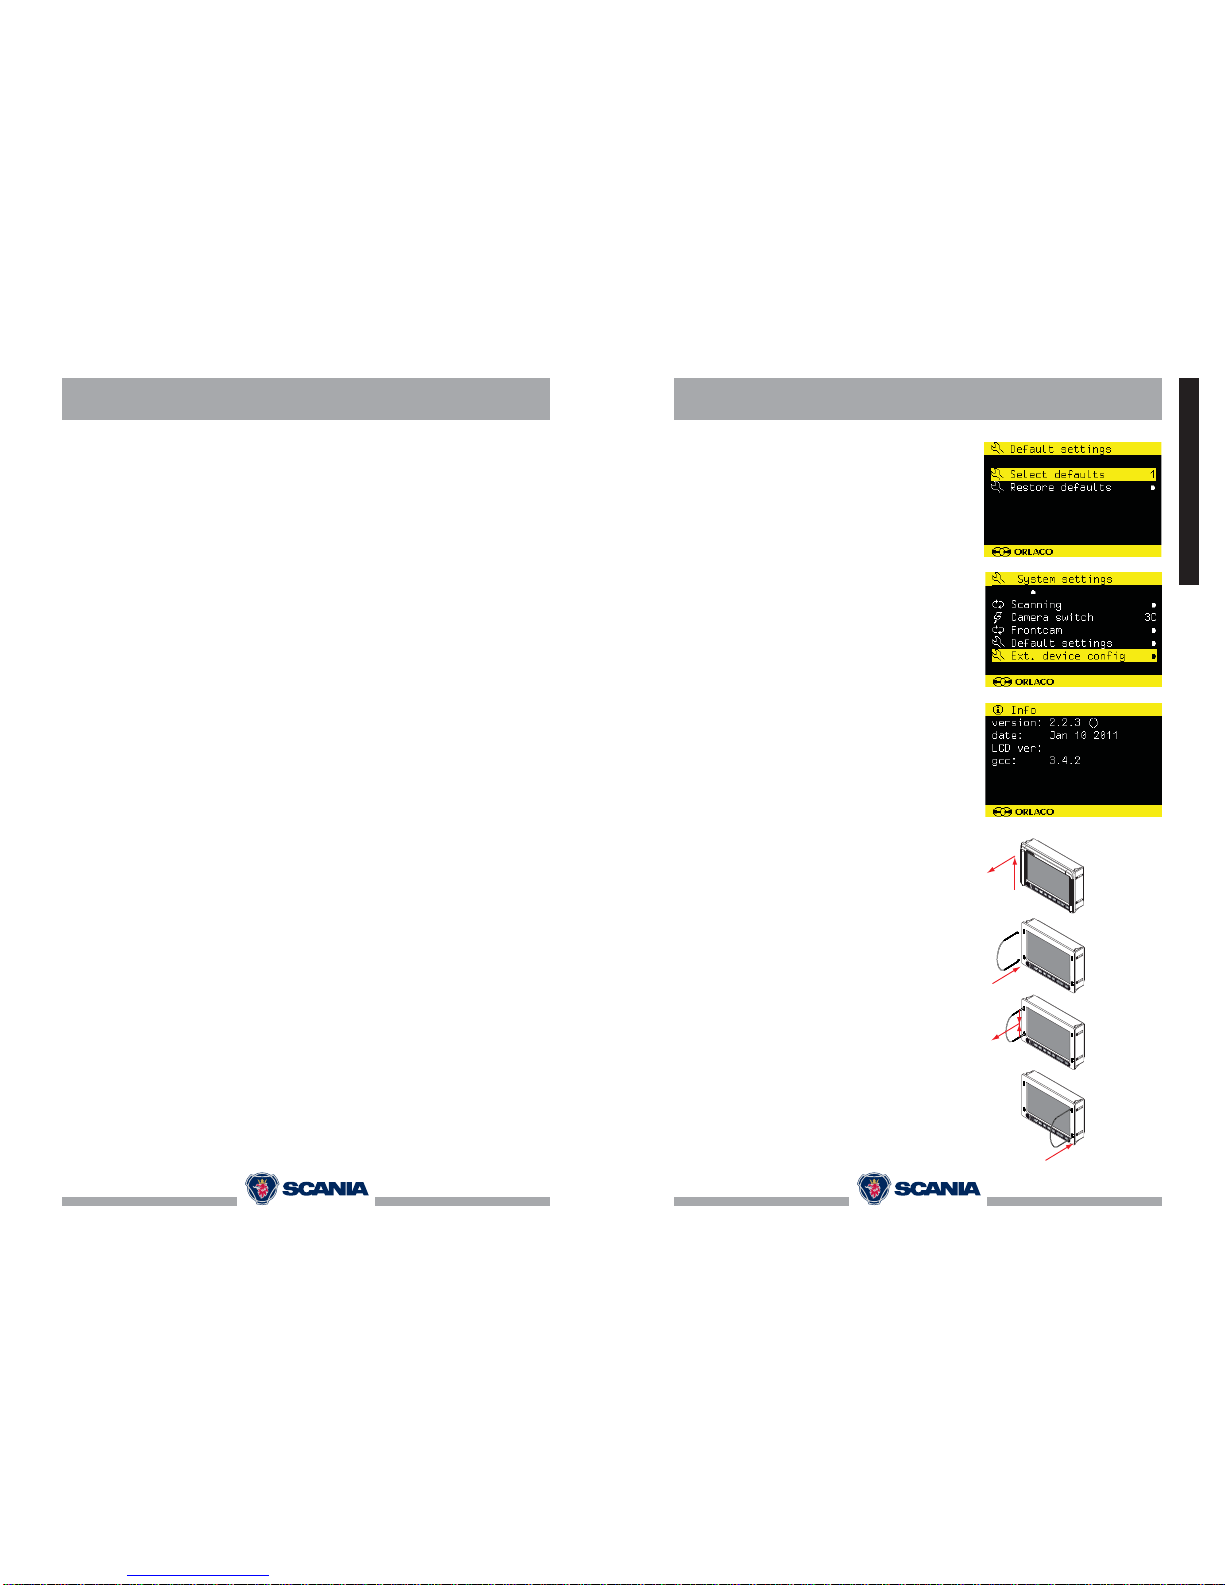
Default settings
This option opens the factory defaults menu. Choose the
number of the desired factory settings (1 = standard).
There are 15 possible default settings. If the option ‘reset
default settings’ is selected, the factory settings will be
reset.
Warning: All user settings will be lost when the factory
defaults are reset.
External device confi guration
This option opens the confi guration menu of an external
device (if possible).
Info
Check in this screen your software version which is
described in this manual.
5. Disassembling of the display 7" LEDD
Step 1
- Remove the suncover by sliding it
upwards in the arrow direction and then forwards.
Step 2
- Insert the U shaped demounting tool into the holes as
shown;
Step 3
- Tweak the dismounting tool in both holes & pull the
screen slightly out of the dash board;
- Pay attention to step 4 before completely removing the
screen from the dashboard:
Step 4
- Do the same thing on the other side;
Page 3

2060534 V2.010
Camera switch
This option confi gures the
type of video switch that
is used.
‘OFF’ if no camera switch
is used 1 camera
system.
‘3C’ for an external camera switch 3 camera
system.
‘2C’ if a 2-4 camera cable is used 2 camera system.
‘4C’ if a combination of internal and external switch is used and a 2-4 camera cable
4 camera system.
‘QUA’ for a quad system, only in combination with the multi view box.
Front camera
(See Frontcam Manual 0993850)
This option opens the front
camera sub menu of the Display
7” LEDD. This offers the next
options:
Enable Frontcam
Activate the front camera functionality (compulsory by law).
After enabling this option you will be able to open a
menu if the speed is higher than 35 km/h, or equal to 0
km/h, whilst the hand brake is activated (yellow wire) or
if the rear camera is activated (blue wire).
‘OFF’ Frontcamera off
‘3C’ for an external camera switch 3 camera system.
‘2C’ if a 2-4 camera cable is used 2 camera system.
‘1C’ if no camera switch is used 1 camera system.
Invert Handbrake
Set the polarity of the switching wire that is connected
to the hand brake switch (AUX2, yellow). Enable this
option if the handbrake signal on the yellow wire is
inverted.
Pulses per metre
Set the amount of pulses per metre that is sent to the
monitor of the tacho switching wire (AUX1, grey).
Function AUX wire
Defi nes the function of the AUX1 & AUX2 switching
wires (grey and yellow). Select TCH for the tachometer
function (Tacho to AUX1 and hand brake to AUX2) or
ZOO for thecamera zoom function (only available in
combination with an auto focus camera). Use in this
case the AUX1 & AUX2 switching wires to zoom in and
out.
System settings
ENGLISH
2060534 V2.0 3
Operator functions
This section describes the basic Display 7” LEDD
operation using the front panel buttons. All settings made
on the front panel can also be adjusted in the service
menu.
1. Operation keyboard
1. Camera selection
Press the camera button once. The camera LED will
blink, indicating that the manual camera override is
active. Use the plus and minus buttons to select the
camera. It is possible to use the other controls (brightness, contrast and saturation) and to tune these settings
with the plus and minus button. You can select a different
camera by switching off this function by pushing the plus
and minus. The manual camera selection has priority
over the scan function and the switching wires. The button function can be disabled by selecting the option ‘system settings keyboard keyboard lock.’ See System
settings, for further explanation; Chapter 4, page 8.
2. Auto LCD Backlight Control/Day/Night settings
Push this button to switch between the ABC modes, the
LCD backlight day and the LCD backlight night settings.
The ABC mode controls the backlight settings between
minimum settings (adjustable, see service menu) and
100%, depen-ding on the amount of available ambient
light. The day and night modes brightness settings can
be manually adjusted by pushing the plus or minus button (settings will be saved). This setting is not camera
specifi c and will therefore function on all cameras.
TIC camera short-cuts
When in normal viewing mode, the following direct
access short-cuts are possible:
When a TIC camera is selected (camera 1 in example
right), pressing button 2 activate Color LUT and DDE
shortcut setting (indicated by lit button 2 indicator),
pressing button - (6) will cycle through all possible
Color LUT settings (WHO, BHO, FUS, RB, I&F).
pressing button + (7) will cycle through all possible
DDE settings (OFF, LOW, MED, HI).
Pressing button 2 for more than 3 seconds will force
the TIC camera to do a FFC (Flat Field Correction)
cycle.
Just to be complete, when an AFZ camera is selected
this key is used to activate/de-activate the Zero-lux and
Backlight function of the AFZ camera and when a CCC
is selected this key will toggle through the (system wide)
backlight modes (DAY, NIT, ABC).
ENGLISH
Buttons 1 2 3 4 5 6 7 8
Button No. 1 = Camera selection
Button No. 2 = Auto LCD Backlight
Control/Day/Night settings
Button No. 3 = Contrast
Button No. 4 = Brightness
Button No. 5 = Option
Button No. 6 = Selection/setting Button No. 7 = Selection/setting +
Button No. 8 = Enter
Page 4

2060534 V2.04
Operator menu
ENGLISH
3. Contrast adjustment
Press contrast once to enter contrast adjustment mode.
Now use the plus and minus buttons to select the image
contrast.
4. Brightness adjustment
Press brightness once to enter brightness adjustment
mode. Now use the plus and minus buttons to select the
image brightness.
3. and 4. Saturation adjustment
Press contrast(3) and brightness(4) at the same time to
enter saturation adjustment mode. Now use the plus and
minus buttons to select the image saturation.
Blocking of 2.3.4.
The operation of these buttons can be disabled in the
service settings menu.
5. Single sequence scan
When pushed button 5 ‘option’ the Display 7" LEDD
generates a single sequence scan (not continuous) of
the attached cameras (using whatever dwell time was
programmed), see page 9 chapter Scanning.
TIC camera short-cuts
When in normal viewing mode, the following direct
access short-cuts are possible:
Pressing option key (button 5) will activate zoom mode
(indicated by lit key indicator) and + and – keys will
change the zoom factor, possible zoom factors for TIC
are: 1x (normal view), 2x and 4x.
When zooming back to 1x the pan/tilt function will be
set to center.
When pan/tilt is activated additional presses on option
key (button 5) will cycle through ZOOM, PAN, TILT
mode, where + and – key will activate the ZOOM, PAN
or TILT action (PAN and TILT will only work when the
digital zoom is 2x or 4x).
The TIC camera video standard and spot meter setting
are only accessible via the camera menu’s, there are no
direct keys to access these settings.
Buttons 1 2 3 4 5 6 7 8
Button No. 1 = Camera selection
Button No. 2 = Auto LCD Backlight
Control/Day/Night settings
Button No. 3 = Contrast
Button No. 4 = Brightness
Button No. 5 = Option
Button No. 6 = Selection/setting Button No. 7 = Selection/setting +
Button No. 8 = Enter
2060534 V2.0 9
Power settings
This menu has the following 2 options:
Standby mode
This option has three possible choices:
MNU = Choose standby mode by pushing the button 8.
IMM = Direct in Standby.
2S = Standby after 2 seconds delay.
Standby, camera off
When set, camera power is off during
standby otherwise camera stays powered.
CAN bus
This option selects the CAN bus submenu.
This menu has the following options:
CAN protocol
This option selects the CAN protocol to
use on the CAN bus. The CAN speed will
be automatically adjusted, but can also be
manually adjusted by selecting the protocol. CAN
speed
This option selects the bit rate of the CAN bus. Valid
options are 100, 125, 200, 250, 500 and 1000 kbit.
LCD Back light
This option opens the back light submenu. The back
light menu has the following four options:
LCD back light mode
This option enables the automatic back light control
(ABC). The display will adapt its brightness to the
amount of light in the environment Alternatively, a
manual day or night brightness adjustment can be
chosen.
ABC minimum level
These settings defi ne the minimal brightness levels to
the point where the ABC adjustment can adjust down
the levels when there is little ambient light available.
LCD-Backlight day
This option can manually adjust the brightness settings for the day settings (50 – 100%).
LCD-backlight night
This option can manually adjust the brightness settings for the night settings (0 –50%).
Scanning
This option opens the camera scanning submenu. This
menu has the following options:
Scan sequence
This option selects the cameras which will be enabled
in the scanning sequence.
Scan interval
This option sets the interval between camera scans.
System settings
ENGLISH
Page 5

2060534 V2.08
System settings
Brightness
Adjust the brightness of the image.
Contrast
Adjust the contrast of the image.
Saturation
Adjust the saturation (colour intensity) of the image.
Camera tags
In this menu the text-labels for the camera inputs can
be defi ned. The number of the tags is depending on the
camera switch option, see page 10.
4. System settings
Language
This option opens the language selection menu. The
selected language will be used for all OSD menus. The
OSD menu is available in English, Dutch, German,
French, Italian, Polish, Portuguese, Spanish, Turkish,
Swedish, Finnish, Danish and Norwegian.
On screen display
This option opens the OSD (On Screen Display) settings
menu. This menu has the following options:
OSD time-out
Adjust the number of seconds the OSD is visible. Set
to OFF to disable OSD or ON to always show OSD.
OSD position
Used to fi ne-tune the horizontal position of the OSD
text.
Info transparency
Change the transparency of the camera label etc.
Menu transparency.
Change the transparency of the menu system.
Disclaimer transp.
Disclaimer transparency; Change the transparency of
the disclaimer during start up.
OSD menu help
Enable or disable the automatic help text in OSD
menus. If enabled, an automatic help text will appear
after 5 seconds of inactivity in any menu.
Keyboard
This option opens the keyboard settings menu with 3
options.
Keyboard lock
This option opens the keyboard-lock menu. It is possible here to lock the operation of several functions in
order to avoid any unwanted changes.
The functions, keyboard sound and beeper volume
are not available in all displays.
ENGLISH
2060534 V2.0 5
Operator menu
2. Operator menu operation
Press the plus and minus buttons at the same time to
open the operator menu. The following keys are used to
navigate through the menus:
5 - Option/previous menu Return to the previous menu
6 - Minus Go to the next menu option
7 - Plus Go to the previous menu option
8 - Enter button Select or activate the selected option
Language
This option opens the language selection menu. The
selected language will be used for all OSD menus. The
OSD menu is available in English, Dutch, German,
French, Italian, Polish, Portuguese, Spanish, Turkish,
Swedish, Finnish, Danish and Norwegian.
Camera settings
Horizontal Marker
Enable this option to switch the marker on. The marker is
displayed as a horizontal green line.
Marker position
Adjust the horizontal position of the marker. 0 is top of
screen, 100 is bottom of screen.
Vertical marker
Activate this option in order to display a reference line.
The reference line will be displayed as a vertical green
line. This option is not available on all Display 7” LEDD
models.
Marker position
Adjust the vertical position of the marker. Adjustable between 38 and 63. Left and right changes with the camera
mirror function.
Graticule
This option shows a grid on the display for a rear
mounted camera.
Video channel
This option sets the video channel as it is
used by the Spectrum scannner. Selections
can be made from CH0 = channel 0 to CH7 =
channel 7 and AUT = automatic. See Installation manual Spectrum Scanner IM0004060
for the description of these channels.
ENGLISH
Page 6

2060534 V2.06
Service menu
ENGLISH
3. Service menu operation
To open the service menu, press the plus, minus and
camera buttons at the same time. The screen (as shown
on the right) will be visible. The following buttons can be
used to navigate through the menu:
5 - Option/previous menu: Return to the previous menu
6 - Minus: Go to the next menu option
7 - Plus: Go to the previous menu option
8 - Enter button: Select or activate the selected option
Push the enter button to activate the ‘Camera settings’
menu. When entering the menu, use the minus and plus
buttons to select the camera to confi gure and press the
enter button. The yellow cursor now jumps to the list of
items. Use the minus and plus buttons to select the item
to adjust, and press the enter button. If the selection option is an on/off switch, it will toggle between on and off. If
the option is a numeric value, it is now possible to change
the value with the minus and plus buttons, press the enter
button to store the new setting.
Camera settings
Mirror
Enable this option to mirror the image (left/right).
Upside down
This option invert the image (fl ip over).
Switch delay
Enable this option if the switch wire is controlled by an
intermittent signal, e.g. from an indicator light.
Horizontal Marker
Enable this option to switch the marker on. The marker is
displayed as a horizontal green line.
Marker position
Adjust the horizontal position of the marker. 0 is top of
screen, 100 is bottom of screen.
Vertical marker
Activate this option in order to display a reference line.
The reference line will be displayed as a vertical green
line. This option is not available on all Display 7” LEDD
models.
Marker position
Adjust the vertical position of the marker. Adjustable between 38 and 63. Left and right changes with the camera
mirror function.
Graticule
This option shows a grid on the display for a rear
mounted camera.
Cinema mode
When enabled the camera image is displayed in wide
screen cinema mode.
Buttons 1 2 3 4 5 6 7 8
Button No. 1 = Camera selection
Button No. 2 = Auto LCD Backlight
Control/Day/Night settings
Button No. 3 = Contrast
Button No. 4 = Brightness
Button No. 5 = Option
Button No. 6 = Selection/setting Button No. 7 = Selection/setting +
Button No. 8 = Enter
2060534 V2.0 7
Service menu
Camera type
Select the connected camera type which will also enable
special features applicable to the selected type. Selections are: AFZ = Zoom camera, TIC = Thermal Image
Camera and
CCC = Compact Colour Camera.
When AFZ is activated, Backlight, Zero Lux and Stabilizer options become active. When TIC is activated,
the Video stndrd, Color LUT, TIC DDE and Spot meter
options become active.
Video stndrd
Video standard; Camera type must be set to TIC. Select
the cameras output video standard: PAL or NTSC
(NTS).
Back light
Back light compensation is used for an enhanced picture
when looking at dark objects in a light environment. Only
available with an AFZ camera and a display Display 7”
LEDD serial.
Zero-lux
Enable the zero-lux option to increase light sensitivity
in low-light environments. Only available with an AFZ
camera and a display Display 7” LEDD serial.
Stabilizer
This option activates the stabilizer function (if the camera has this option). Only available with an AFZ camera
and a display Display 7” LEDD serial.
Color LUT (Color Look Up Table)
Camera type must be set to TIC. Select the (false)
colour palette that should be used to map the temperature. Selections are; WHO(White hot), BHO(Black hot),
FUS(Fusion), RB(Rainbow), I&F(Ice and fi re). AGC
(Automatic gain control) will be set to automatic for the
WHO, BHO, FUS and RB modes and set to autobright
for the I&F mode.
TIC DDE
Camera type must be set to TIC. TIC DDE (Digital Detail
Enhancement) can be set to OFF, LOW, MED, HI.
Select which strength of image enhancement should be
used.
Spot meter
Camera type must be set to TIC. Spot meter can be set
to OFF, B_C (Bar in Celcius), B_F(Bar in Fahrenheit),
N_C (Number in Celcius), N_F(Number in Fahrenheit),
BNC (Bar + Number in Celcius) and BNF (Bar + Number
in Fahrenheit).
Pan/tilt
Pan/Tilt can be activated and will enable the normal pan and tilt controls (option key) and it is
possible to do a digital pan and tilt when the TIC image is 2x or 4x zoomed in.
ENGLISH
 Loading...