

Page 1
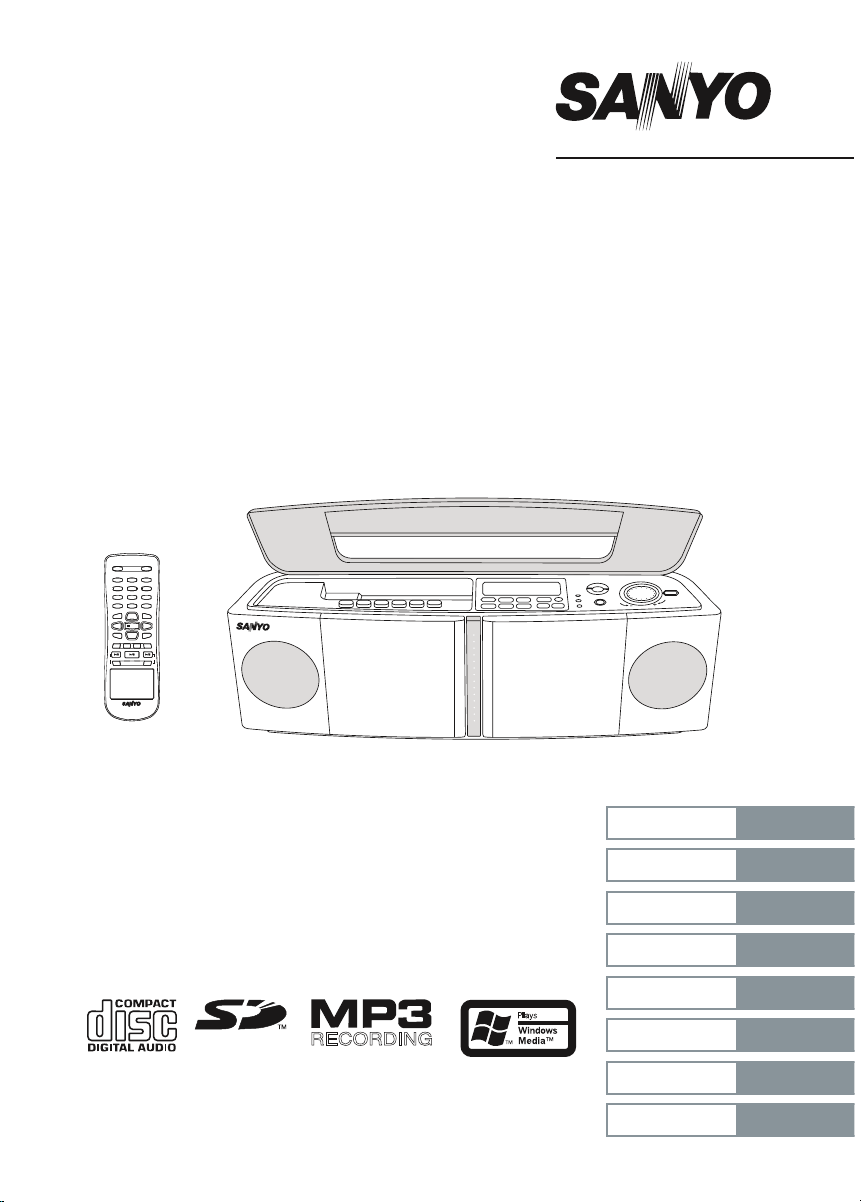
MAJ-U02
INSTRUCTION MANUAL
Digital Audio System
ISTRUZIONI PER LʼUSO
1
4
7
0
2
5
8
3
6
9
z/ON
MEMORY
DISPLAY
TUNING/FILE-TUNING/FILE
+
VOL
SLEEP
STOP
FOLDER/
PRESET
OVER
FUNCTION
REPEAT/
FM MODE
RANDOM
RB-U02
CD
USB
SOUND BASS
SD
e
j j
f
+
VOL
_
1
4
7
0
2
5
8
3
6
9
z/ON
MEMORY
DISPLAY
TUNING/FILE
-
TU BAND
TUNING/FILE
+
VOL
STOP
FOLDER/
PRESET
OVER
FUNCTION
REPEAT/
FM MODE
RANDOM
RB-
CD
USB
SOUND BASS
SD
e
j j
f
+
VOL
_
ENGLISH
DEUTSCH
FRANÇAIS
NEDERLANDS
SVENSKA
ITALIANO
ESPAÑOL
PORTUGUÊS
10 - 36
37 - 63
64 - 90
91 - 117
118 - 144
145 - 172
173 - 199
200 - 226
ENGLISH
DEUTSCH
FRANÇAIS
NEDERLANDS
SVENSKA
ITALIANO
ESPAÑOL
PORTUGUÊS
ENGLISH
DEUTSCH
FRANÇAIS
NEDERLANDS
SVENSKA
ITALIANO
ESPAÑOL
PORTUGUÊS
8 - 34
Sistema audio digitale
RECORDING
Page 2
1
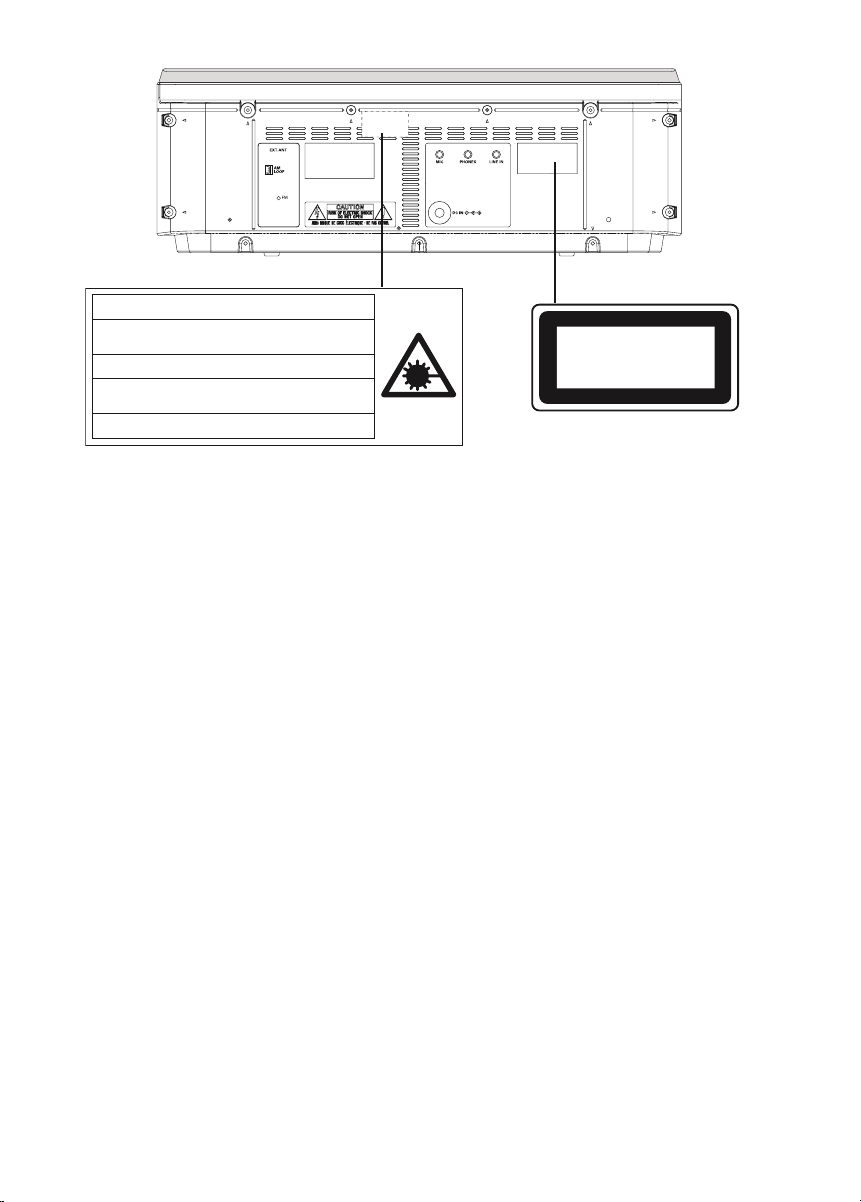
CAUTION – I NVISIBLE LASER RADIATION W HEN OPEN AND
INTERLOCKS DEFEATED. AVOID EXPOSU RE TO BEAM
.
ADVARSEL – USYNLIG L ASER STRÅLING VED ÅBN ING, NÅ
R
SIKKERHEDSA FBRYDERE ER UDE AF FUNKTIO N, UNDGÅ UDS ÆTTELS
E
FOR STRÅLIN G
.
VARNING – OSYNLIG LASER STRÅLNING NÄR DENNA DEL ÄR ÖPPNAD
OCH SPÄRR Ä R URKOPPLAD. STRÅLEN Ä R FARLIG
.
VORSICHT – U NSICHTBARE LASERSTRAHL UNG TRITT
AUS, WENN
DECKEL GEÖF FNET UND WENN SICHERHE ITSVERRIEGELUN
G
ÜBERBRÜC KT IST. NICH T, DEM STR AHL AUSSETZEN.
VARO – AVATTAESSA JA SUOJALUKITUS OHI TETTA
ESSA OLET ALTTIINA
NÄKYMÄTTÖMÄ LLE LASERSÄTEILYLLE. ÄLÄ K ATSO SÄTEES EEN.
CLASS 1 L ASER PROD UCT
LUOKAN 1 LASERLAIT
E
KLASS 1 L ASERAPPARA
T
CAUTION - USE OF CONTROLS OR ADJUSTMENTS OR PERFORMANCE OF PROCDURES
OTHER THAN THOSE SPECIFIED HEREIN MAY RESULT IN HAZARDOUS RADIATION EXPOSURE.
ACHTUNG – WENN ANDERE ALS DIE HIER SPEZIFIZIERTEN BEDIENUNGS- ODER
JUSTIEREINRICHTUNGEN BENÜTZT ODER ANDERE VERFAHRENS-WEISEN AUSGEFÜHRT
WERRDEN, KANN DIES ZU GEFÄHRLICHER STRAHLUNGSEXPOSITION FÜHREN.
ATTENTION – LʼEMPLOI DʼORGANES DE COMMANDE OU DE RÉGLAGE, OU LʼEXÉCUTION
DE PROCÉDURES, AUTRES QUE CEUX SPÉCIFIÉS DANS LE MODE DʼEMPLOI, PEUT PROVOQUER UNE EXPOSITION DANGEREUSE AU RAYONNEMENT.
OPGELET – HET GEBRUIK VAN REGELAARS OF HET MAKEN VAN AFSTELLINGEN E.D. DIE
NIET IN DEZE GEBRUIKSAANWIJZING ZIJN BESCHREVEN KAN LEIDEN TOT SCHADELIJKE
STRALINGEN.
VARNING! OM APPARATEN ANVÄNDS PÅ ANNAT SÄTT ÄN VAD SOM BESKEIV I DENNA BRUKSANVISNING, KAN ANVÄNDAREN UTSÄTTAS FÖR OSYNLIG LASERSTRÅLNING, SOM ÖV-
ERSKRIDER GRÄNSEN FÖR LASERKLASS 1.
VAROITUS! LAITTEEN KÄYTTÄMINEN MUULLA KUIN TÄSSÄ KÄYTTÖOHJEESSA MAINITULLA
TAVALLA SAATTAA ALTISTAA KÄYTTÄJÄN TURVALLISUUSLUOKAN 1 YLITTÄVÄLLE NÄKYMÄTTÖMÄLLE LASERSÄTEILYLLE.
CAUTELA – LʼUSO DI COMANDI, AGGIUSTAMENTI O PROCEDIMENTI DIVERSO DA QUELLO
QUI SPECIFICATO PUÒ DAR LUOGO AD ESPOSIZIONE A RADIAZIONI PERICOLOSE.
PRECAUCION – EL USO DE CONTROLES O AJUSTES, O PROCEDIMIENTOS DE OPERACION DIFERENTES DE LOS ESPECIFICADOS EN ESTE DOCUMENTO RESULTARAN EN EXPOSICION PELIGROSA A LA RADIACION.
CUIDADO – O USO DOS CONTROLOS OU AJUSTES OU DESEMPENHOS DE PROCEDIMENTOS OUTROS QUE NÃO OS ESPECIFICADOS NAS INSTRUÇÕES DE OPERAÇÃO PODEM
RESULTAR EM PERIGOSAS EXPOSIÇÕES À RADIAÇÃO.
ANT
Page 3

2
[ENGLISH]
Your SANYO product is designed and
manufactured with high quality materials and
components which can be recycled and reused.
This symbol means that electrical and electronic
equipment, at their end-of-life, should be disposed
of separately from your household waste.
Please dispose of this equipment at your local
community waste collection/recycling centre.
In the European Union there are separate
collection systems for used electrical and
electronic products.
Please help us to conserve the environment we
live in!
[DEUTSCH]
Ihr SANYO Produkt wurde entworfen und
hergestellt mit qualitativ hochwertigen
Materialien und Komponenten, die recycelt und
wiederverwendet werden können.
Dieses Symbol bedeutet, daß elektrische
und elektronische Geräte am Ende ihrer
Nutzungsdauer von Hausmüll getrennt entsorgt
werden sollen.
Bitte entsorgen Sie dieses Gerät bei Ihrer
örtlichen kommunalen Sammelstelle oder im
Recycling Centre.
In der Europäischen Union gibt es
unterschiedliche Sammelsysteme für Elektrik- und
Elektronikgeräte.
Helfen Sie uns bitte, die Umwelt zu erhalten, in
der wir leben!
[FRANÇAIS]
Votre produit Sanyo est conçu et fabriqué avec
des matèriels et des composants de qualité
supérieure qui peuvent être recyclés et réutilisés.
Ce symbole signifie que les équipements
électriques et électroniques en fin de vie doivent
être éliminés séparément des ordures ménagères.
Nous vous prions donc de confier cet équipement
à votre centre local de collecte/recyclage.
Dans lʼUnion Européenne, il existe des systèmes
sélectifs de collecte pour les produits électriques
et électroniques usagés.
Aidez-nous à conserver lʼenvironnement dans
lequel nous vivons !
Les machines ou appareils électriques et
électroniques contiennent fréquemment des
matières qui, si elles sont traitées ou éliminées
de manière inappropriée, peuvent sʼavérer
potentiellement dangereuses pour la santé
humaine et pour lʼenvironnement.
Cependant, ces matières sont nécessaires au
bon fonctionnement de votre appareil ou de votre
machine. Pour cette raison, il vous est demandé
de ne pas vous débarrasser de votre appareil ou
machine usagé avec vos ordures ménagères.
[NEDERLANDS]
Sanyo producten zijn ontwikkeld en gefabriceerd
uit eerste kwaliteit materialen, de onderdelen
kunnen worden gerecycled en weer worden
gebruikt.
Het symbool betekent dat de elektrische en
elektronische onderdelen wanneer deze vernietigd
gaan worden, dit separaat gebeurt van het
normale huisafval.
Zorg ervoor dat het verwijderen van de apparatuur
bij de lokaal erkende instanties gaat gebeuren.
In de Europese Unie wordt de gebruikte
elektrische en elektronische apparatuur bij de
daarvoor wettelijke instanties aangeboden.
Alstublieft help allen mee om het milieu te
beschermen.
Page 4

3
[SVENSKA]
Din SANYO produkt är designad och tillverkad av
material och komponenter med hög kvalitet som
kan återvinnas och återanvändas.
Denna symbol betyder att elektriska och
elektroniska produkter, efter slutanvändande,
skall sorteras och lämnas separat från Ditt
hushållsavfall.
Vänligen, lämna denna produkt hos Din lokala
mottagningstation för avfall/återvinningsstation.
Inom den Europeiska Unionen finns det separata
återvinningssystem för begagnade elektriska och
elektroniska produkter.
Vänligen, hjälp oss att bevara miljön vi lever i!
[ITALIANO]
Il vostro prodotto SANYO è stato costruito da
materiali e componenti di alta qualità, che sono
riutilizzabili o riciclabili.
Prodotti elettrici ed elettronici portando questo
simbolo alla fine dellʼuso devono essere smaltiti
separatamente dai rifiuti casalinghi.
Vi preghiamo di smaltire questo apparecchio al
deposito comunale.
NellʼUnione Europea esistono sistemi di raccolta
differenziata per prodotti elettrici ed elettronici.
Aiutateci a conservare lʼambiente in cui viviamo!
[ESPAÑOL]
Los productos SANYO están diseñados y
fabricados con materiales y componentes de alta
calidad, que pueden ser reciclados y reutilizados.
Este símbolo significa que el equipo eléctrico y
electrónico, al final de su ciclo de vida, no se debe
desechar con el resto de residuos domésticos.
Por favor, deposite su viejo “televisor” en el
punto de recogida de residuos o contacte con su
administración local.
En la Unión Europea existen sistemas de
recogida específicos para residuos de aparatos
eléctricos y electrónicos.
Por favor, ayúdenos a conservar el medio
ambiente!
[PORTUGUÊS]
O seu produto SANYO foi concebido e produzido
com materiais e componentes de alta qualidade
que podem ser reciclados e reutilizados.
Este símbolo significa que o equipamento
eléctrico e electrónico no final da sua vida útil
deverá ser descartado separadamente do seu lixo
doméstico.
Por favor, entregue este equipamento no seu
ponto local de recolha/reciclagem.
Na União Europeia existem sistemas de recolha
separados para produtos eléctricos e electrónicos
usados.
Por favor, ajude-nos a conservar o ambiente em
que vivemos!
[SUOMI]
SANYO-tuotteesi on suunniteltu ja valmistettu
korkealaatuisista materiaaleista ja osista, joita
voidaan kierrättää ja käyttää uudelleen.
Tämä symboli tarkoittaa, että sähkölaitteet ja -osat
on niiden käyttöiän päättyessä hävitettävä erillään
kotitalouden jätteistä.
Toimita laite paikalliseen jätteenkeräys/
kierrätyskeskukseen.
Euroopan unionin alueella on erilliset
keräysjärjestelmät käytetyille sähkölaitteille ja
-osille.
Auta meitä suojelemaan ympäristöä jossa
elämme!
Page 5
4
ANT
1 2
3
Polarità presa DC IN: positivo al centro
DC IN socketPolarity: Centre positive
Polarität des DC IN-Steckers:
Mitte positiv
Polarité de la prise dʼentrée CC :
positif au centre
Polariteit van de DC IN-aansluiting:
Midden-positief
Likströmsingång, polaritet: Centrum positiv
Polaridad DC IN enchufe: Centro positivo
Polarização da tomada de DC IN: central positiva
Video/Auxiliary equipment
Video/zusätzliche Ausrüstung
Équipement vidéo/auxiliaire
Video/overige apparatuur
Video/extra utrustning
Apparecchi Video/Ausiliari
Equipo auxiliar de video
Video/Equipmento Auxiliar
FM aerial
FM Zimmerantenne
Antenne intérieure FM
Headphones
Kopfhörer
Écouteurs
Koptelefoon
Hörlurar
Cuffie
Auriculares
Auscultadores
Interne FM-raadantenne
FM inomhusantenn
Antenna FM per interni
Antena aérea interior de FM
Antena interna
FM
This set complies with the EMC Directive 89/336 and with the LVD Directive 73/23.
Dieses Gerät entspricht der EMC-Direktive 89/336 und der LVD-Direktive 73/23.
Cet appareil est en conformité avec la directive EMC 89/336 et avec la directive BT 73/23.
Dit toestel is in overeenstemming met EMC-richtlijn 89/336 en met LVD-richtlijn 73/23.
Detta set uppfyller EMC-direktivet 89/336 och Lågspänningsdirektivet 73/23.
Questo set aderisce alle direttive EMC 89/336 e alle direttive LVD 73/23.
Este aparato cumple con la Directiva EMC 89/336 y con la Directiva LVD 73/23.
Este conjunto satisfaz a Directiva EMC 89/336 e a Directiva LVD 73/23.
Fig./Abb./Afb. 1a
AM loop aerial
MW-Rahmenantenne
Antenne-cadre AM
AM-raamantenne
Ramantenn för AMmottagning
Antena AM a telaio
Antena AM de cuadro
Antena AM de quadro
Page 6
5
Removing the SD card
Entfernen der SD-Karte
Retrait de la carte SD
De SD-kaart verwijderen
Ta ut SD-kortet
Rimuovere la scheda SD
Cómo sacar la tarjeta SD
Retirar o cartão SD
Fig./Abb./Afb. 1b
Less than 30 cm
Weniger als 30 cm
Moins de 30 cm
Korter als 30 cm
Kortare än 30 cm
Menos di 30 cm
Menos de 30 cm
Menos que 30 cm
USB memory device
USB-Speicher-Gerät
Dispositif de mémoire
USB
USB-opslagapparaat
USB minnesenhet
Dispositivo di memoria
USB
Dispositivo de memoria
USB
Dispositivo de memória
USB
Page 7
6
TA
PE
C
D
�
1
4
7
0
2
5
8
3
6
9
z/ON
MEMORY
DISPLAY
TUNING/FILE
-
TU BAND
TUNING/FILE
+
VOL
SLEEP
STOP
FOLDER/
PRESET
OVER
FUNCTION
REPEAT/
FM MOD
E
RANDOM
RB-U02
CD
US
B
SOUND BAS
S
SD
e
j j
f
+
VOL
_
Fig./Abb./Afb. 2a
Fig./Abb./Afb. 2b
1 2
3
4
5
6 7
8
910111213
1
2
3
4
5
6
7
9
10
11
8
12
13
14
15
16
17
18
19
20
14
15
Page 8
7
1.
2.
Two R03/AAA batteries
(not supplied)
Zwei R03/AAA Batterien
(nicht mitgeliefert)
Deux piles de format R03/AAA
(non fournies)
Twee R03/AAA batterijen
(niet bijgeleverd)
Två batterier typ R03/AAA
(medföljer ej)
Due batterie R03/AAA
(non in dotazione)
Dos pilas R03/AAA(no incluidas)
Duas pilhas R03/AAA
(não fornecidas)
Fig./Abb./Afb. 3
T
A
P
E
C
D
Fig./Abb./Afb. 4
Fig./Abb./Afb. 5
Fig./Abb./Afb. 6
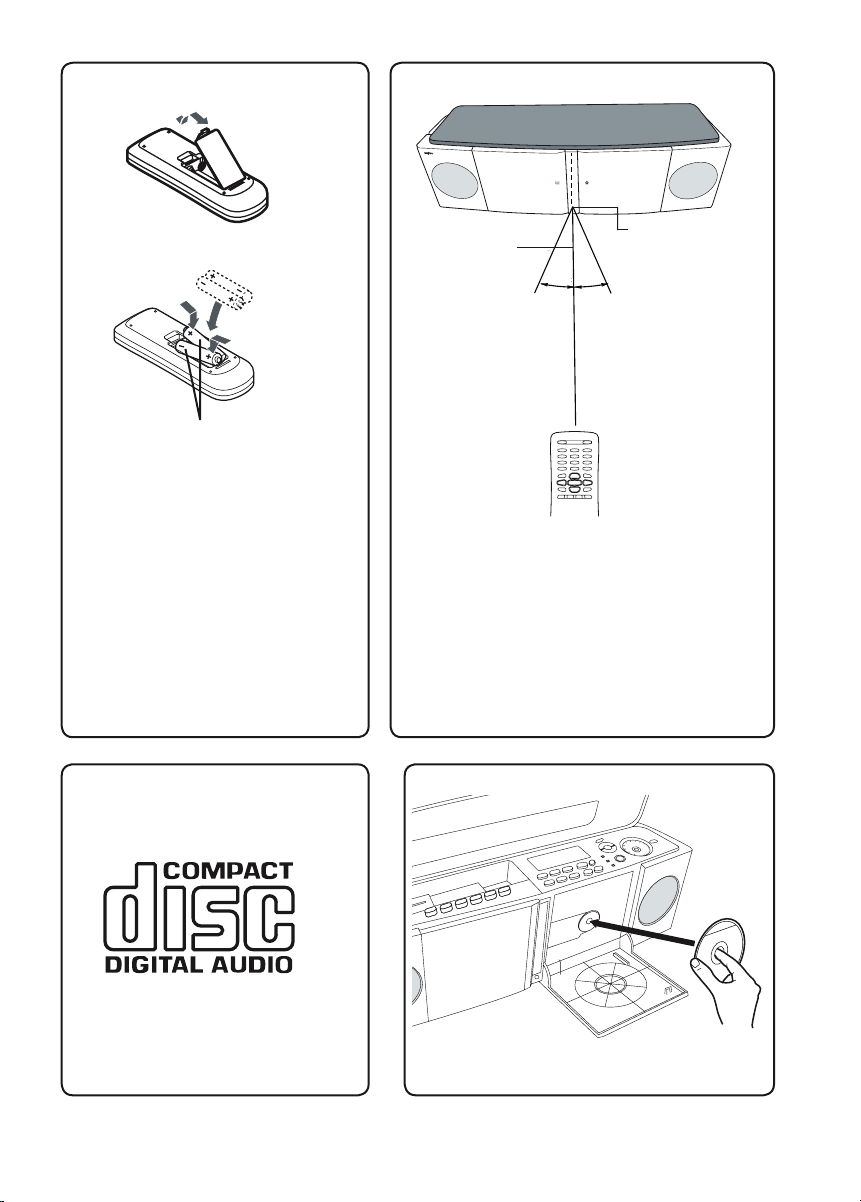
Within approx.
7 meters
Innerhalb von
ungefähr 7 Metern
Environ 7 mètres
Binnen ong. 7 meter
Icom cirka sju meter
Entro 7 metri circa
Dentro de approximadamente 7 metros
Dentro de 7 metros
aprox.
Remote sensor
Fernbedienungssensor
Détecteur de télécommande
Afstandsbedieningssensor
FjärrkontrollsensoSensore a distanzaSensor remoto
Sensor remoto
Page 9
8
Break out tab A for side A.
Herausbrechen der Löschutzlasche A für Seite A.
Briser la languette A pour la face A.
Breek nokje A af voor kant A.
Bryt av flik A för A-sidan
.
Spezzate la linguetta A per il lato
A.
Romper lengüeta A del lado A.
Parta a patilha A para o lado A.
Break out tab B for side B.
Herausbrechen der Löschutzlasche B für Seite B.
Briser la languette B pour la face B.
Breek nokje B af voor kant B.
Bryt av flik B för B-sidan
.
Spezzate la linguetta B per il lato B.
Romper lengüeta B del lado B.
Parta a patilha B para o lado B.
Side
A Seite A
Face
A Kant A
A-side A Lato
A
Lado
A Lado A
Side B Seite
B
Face B Kant
B
A-side B Lato
B
Lado B Lado
B
Fig./Abb./Afb. 7
Fig./Abb./Afb. 8
Fig./Abb./Afb. 9
1. Cotton swab
2. Capstan
3. Pinch roller
4, 5. Heads
1. Bomullspinne
2. Kapstan
3. Tryckrulle
4, 5. Tonhuvud
1
2
3
4
5
1. Wattestäbchen
2. Tonwelle
3. Andruckrolle
4, 5.Tonkopf
1. Bastoncino di cotone
2. Capstan
3. Premirullo
4, 5.Testina
1. Coton-tige
2. Cabestan
3. Galet presseur
4, 5. Téte
1. Bastoncillo
2. Cabrestante
3. Rodillo de presión
4, 5. Cabeza
1. Wattenstokje
2. Kaapstander
3. Aandrukrol
4, 5. Kop
1. Cotonete
2. Rolete
3. Rolete de arrasto
4, 5. Cabeça
Page 10
9
Fig./Abb./Afb. 10
Page 11
10
PRECAUTIONS
- The apparatus shall not be exposed to dripping or splashing.
- Do not use where there are extremes of
temperature (below 5 °C or exceeding 35 °C),
or direct sunlight may strike it.
- Because of the CD playerʼs extremely low
noise and wide dynamic range, there might be
a tendency to set the volume on the amplifier
unnecessarily high. Doing so may produce an
excessively large output from the amplifier
which could damage your speakers.
- Sudden changes in the ambient temperature
may cause condensation to form on the optical lens inside the unit. If this happens, take
out the disc, leave the unit for about 1 hour,
and then proceed to operate.
- When carrying the unit, be sure to remove any
disc which may be inside and turn the power
off. Wait at least 10 seconds, then unplug the
AC adaptor from the AC outlet. Otherwise,
may damage the disc and/or the unit.
- Do not place time-pieces, credit cards,
cassette tapes or video tapes, etc. near the
speakers.
- Do not install this equipment in a confined
space, such as a bookcase or built in cabinet.
- No object filled with liquids, such as vase shall
be placed on the apparatus.
- Where the mains plug or an appliance
coupler is used as the disconnect device,
the disconnect device shall remain readily
operable.
CONNECTION
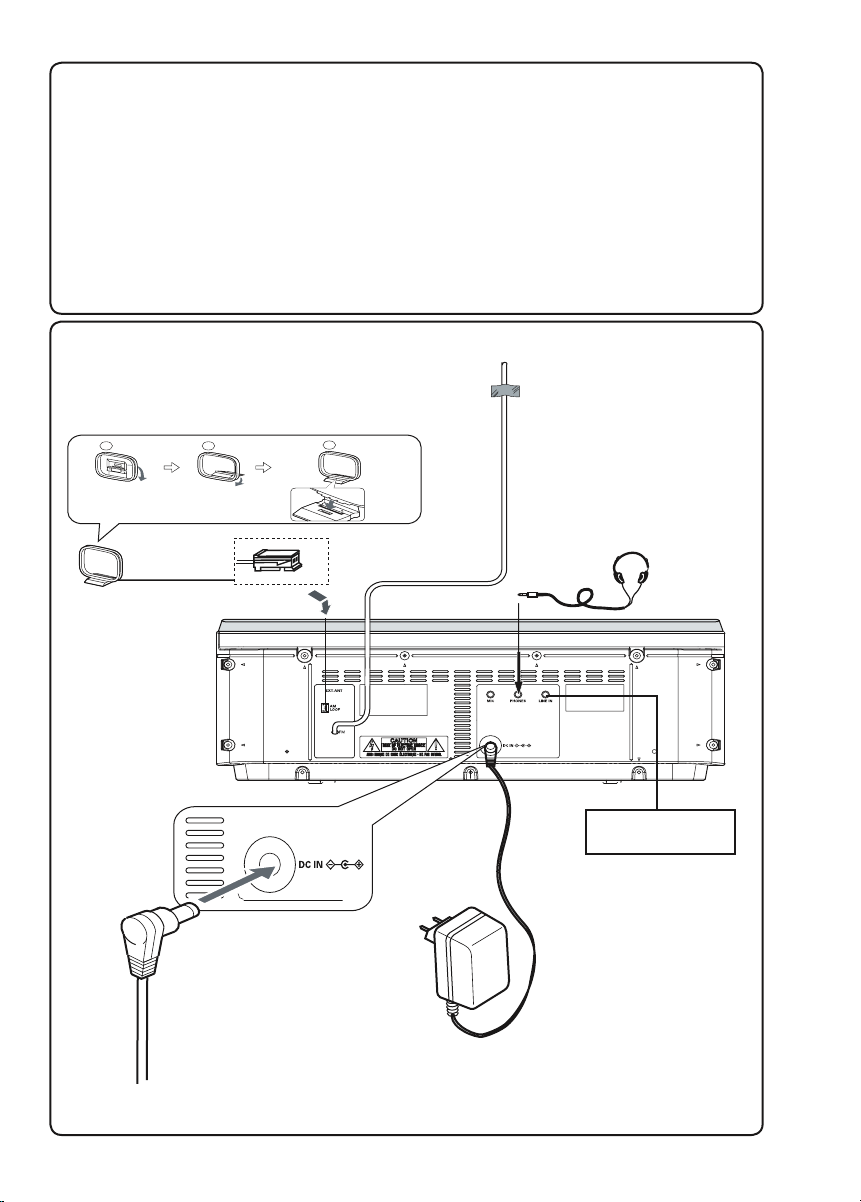
Power supply
Connect one end of supplied AC adaptor (Sanyo
Model No. AD48-0046) to DC IN socket of the
mains unit and other end to an AC 230V, 50Hz
wall outlet. (Fig.1a).
Note:
- If the unit will not be used for a long time,
disconnect the AC adaptor from the AC
outlet.
- During use the AC adaptor becomes warm.
This is not a malfunction.
Caution:
- Use only the supplied AC adaptor. Use with
other AC adaptors could damage the unit.
- Do not touch the AC adaptor with wet hands.
Doing so is dangerous, as this could result in
an electric shock.
- Do not use with a voltage other than the
power voltage displayed. This could cause
fire, electrical shock, or damage.
- If you need to replace the supplied AC adaptor,
the specified one is requested. In this case,
please contact a Sanyo Authorized Service
Station.
Aerials
FM aerial
In areas close to a transmitter, the simple indoor
aerial is sufficient to receive broadcasts. Unwind
the aerial wire, then extend it as straight as possible and while listening to the sound from the
system, secure it in a position where the best FM
reception is found.
AM loop aerial
Assemble the loop aerial as shown in Fig.1a.
Unwind the aerial wire, then connect it to the AM
LOOP terminal. Place the loop aerial in a position
which yields the best AM reception, or attach it to
a wall or other surface as shown in Fig.1a.
If you have difficulty inserting the AM loop cable
connector, turn it over and reinsert it.
Headphones
Connect the stereo headphones (not supplied) to
the PHONES socket for monitoring or for private
listening.
ENGLISH
IMPORTANT INFORMATION:
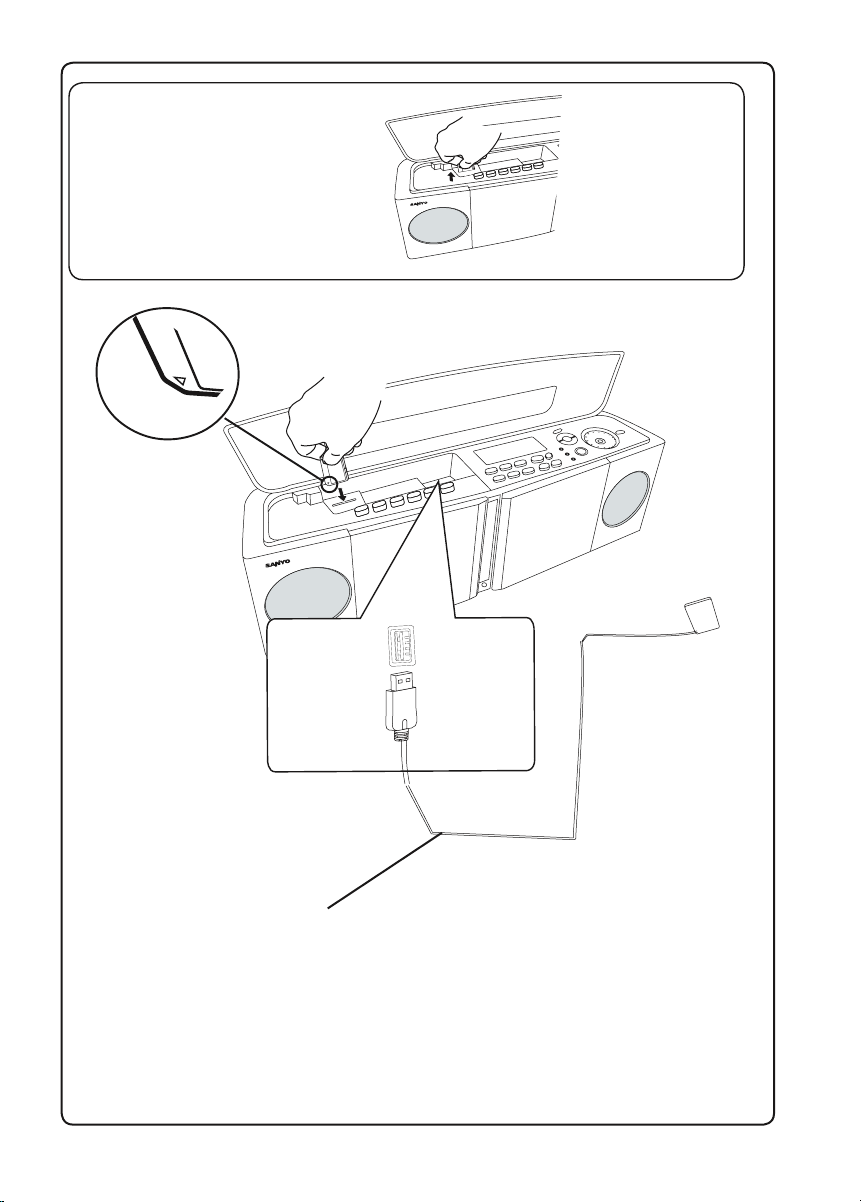
Before using all buttons and USB and
SD socket on the mains unit open the
top lid of the mains unit at first.
Page 12

11
Video/Auxiliary equipment
Connect the audio cable (not supplied) from the
audio output socket of a video/auxiliary equipment to the LINE IN socket. (Stereo Mini Plug:
ø3.5)
USB memory device (Fig. 1b)
Connect the USB memory device (such as Digital
voice recorder, etc.) into the USB port. When a
memory device, e.g. a card reader is connected
to the USB port via long USB cable, it may interfere to other devices. Please use a cable shorter
than 30 cm.
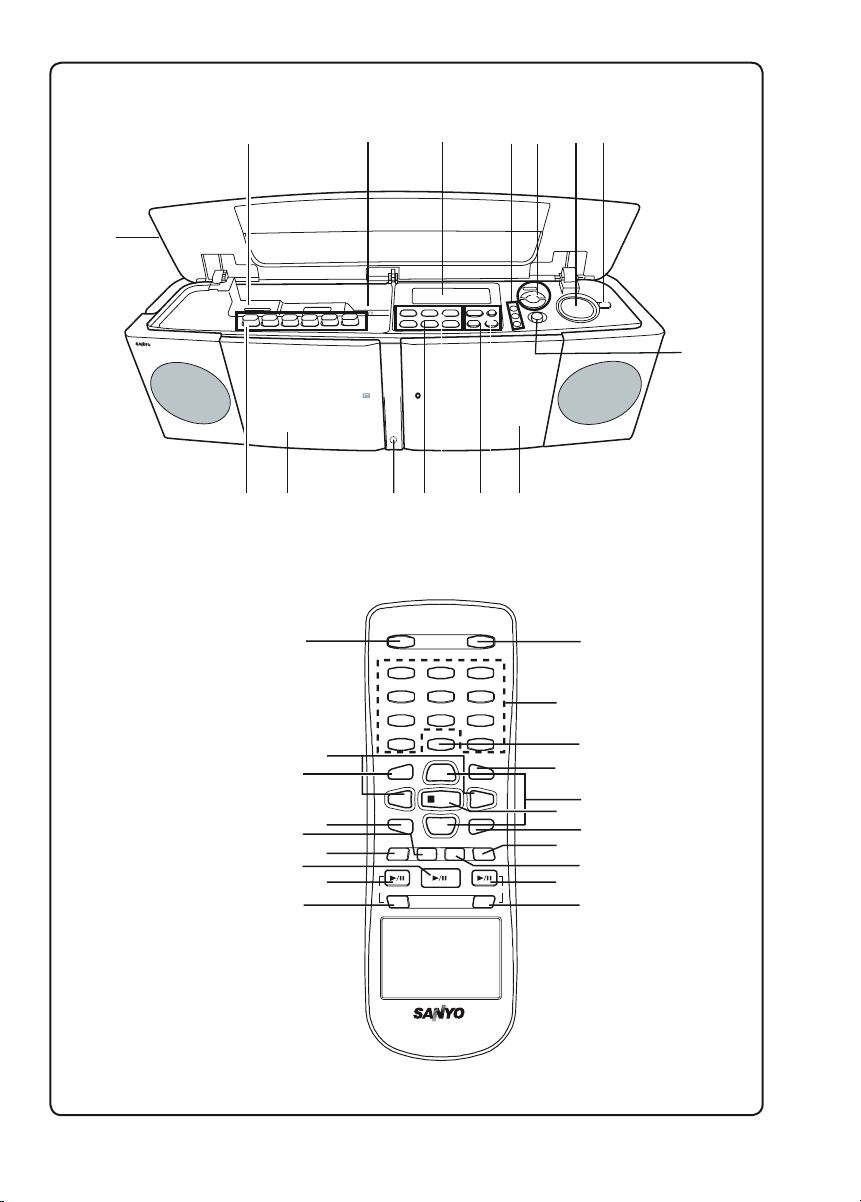
CONTROLS (Fig. 2a)
1. SD card loading slot (SD)
2. USB port (USB)
3. Display
4. Mode button (MODE)
Memory button (MEMORY)
Clock/Timer button (CLOCK/TIMER)
5. USB Record/Record pause button (m USB)
SD card Record/Record pause button
(m SD)
6. Volume control (-VOLUME +)
7. Power button (z/ON)
8. Disc compartment open button (CD OPEN)
9. CD compartment
10. CD•USB•SD control button
Play/Pause button (i)
Stop/Clear button (n)
Skip/Search/Tuning/File/Folder select buttons
(d, c )
11. Function select button
CD function select button (CD)
USB function select button (USB)
SD function select button (SD)
Tuner function select button (FM•AM)
Tape function select button (TAPE)
Line in function select button (LINE)
12. Remote sensor (IR)
13. Cassette holder
14. Cassette control button
Pause button (PAUSE)
Stop/Eject button (STOP/EJECT)
Fast forward button (FFWD)
Rewind button (REW)
Play button (PLAY)
Record button (REC)
15. Top lid
REMOTE CONTROLLER
Controls (Fig. 2b)
1. Power button (z/ON)
2. Function button (FUNCTION)
3. Number buttons (1-9, 0, OVER)
4. Memory button (MEMORY)
5. Folder select/Preset button
(FOLDER/PRESET)
6. Volume buttons (VOL +, -)
7. Stop button (n STOP)
8. Sleep button (SLEEP)
9. Bass expander button (BASS)
10. Sound mode select button (SOUND)
11. SD card Play/Pause button (SD i)
12. SD card Record/Record pause button
(SD j)
13. USB Record/Record pause button
(USB j)
14. USB Play/Pause buttons (USB i)
15. CD Play/Pause buttons (CD i)
16. Repeat/FM mode button
(REPEAT/FM MODE)
17. Random play button (RANDOM)
18. Tuner function/Band select buttons
(TU BAND)
19. Display button (DISPLAY)
20. Skip/Search/Tuning/File select buttons
(f e, TUNING/FILE-, TUNING/FILE+)
Number buttons (1-9, 0, OVER)
Example:
To select No.3, press 3.
To select No.10,
Tuner/Audio CD: press OVER, 1, then 0.
MP3/WMA: press OVER, 0, 1, then 0.
To select No.125, press OVER, 1, 2, then 5.
Inserting batteries (Fig. 3)
Note:
Always remove batteries if the remote controller
is not to be used for a month or more. Batteries
left in it may leak and cause damage.
Remote control range (Fig. 4)
The buttons on the remote controller perform
similar function to similarly marked buttons on
the mains unit.
Page 13

12
ADJUSTING THE CLOCK
(Using the main unit)
The clock can be set on either power on or standby mode.
1. Press the CLOCK/TIMER button in the power
on mode. Current time appears.
- If in the standby mode, skip step 1.
2. Press the MEMORY button until the “hour”
section blinks.
3. Turn the VOLUME control to set the “hour”
section.
4. Press the MEMORY button. The “minute”
section blinks.
5. Turn the VOLUME control to set the “minute”
section.
6. Press the MEMORY button. The clock
starts.
Note:
- To display the clock during operation, press
the CLOCK/TIMER button briefly. After a few
seconds, the original display returns.
- If a power failure occurs or the AC adaptor is
disconnected, the clock display blinks. Reset
the clock again.
Changing the clock to the 12-hour display
(Using the main unit)
Example: 13:30 vPM1:30.
While holding down the c button on the mains
unit, press the CLOCK/TIMER button.
To return to the original setting, repeat the steps
above.
BEFORE OPERATION
Turning the power on and off
- Press the z/ON button to turn on the power,
the display lits up.
- To turn the power off, press the z/ON button
again.
- When supplied AC adaptor is connected to the
AC outlet and main unit, the unit will respond
to commands from remote controller.
Direct start function
If the following buttons are pressed when the
unit is in the standby mode, the unit turns on
automatically and the function is set.
Main unit: CD, USB, SD, FM•AM, TAPE,
LINE
Remote controller: TU BAND, USB i,
CD i, SD i
Auto power off function
Note:
When the unit is shipped from the factory, this
function is off.
1. Turn on the power. (In stop mode of all function
except Tuner and LINE IN function)
2. Press the MODE button.
3. Rotate the VOLUME control to select “AUTO
POWER OFF”.
4. Press the MEMORY button. “AUTO P.OFF”
appears on the display.
5. Rotate the VOLUME control to select “10” or
“30”.
6. Press the MEMORY button .
- Original display returns.
- The power turns off automatically when “10”
or “30” minutes has been elapsed.
Note:
You can select “AUTO P.OFF-- --” to cancel the
auto power off function.
Page 14

13
Selecting the function
Press the FUNCTION button repeatedly on the
remote controller to select the desired function.
Each time the button is pressed, the display
changes as follows:
CD FUNCTION v USB FUNCTION v
SD FUNCTION v TUNER FUNCTION v
TAPE FUNCTION v LINE FUNCTION v
CD FUNCTION v ...
The function is automatically selected when CD,
TAPE, SD card or USB memory device playback is started or the TU BAND button has been
pressed.
When the function selection is changed, CD,
TAPE, SD cards or USB memory device playback is automatically stopped.
Using the main unit:
Press each FUNCTION select button (CD, USB,
SD, FM•AM, TAPE, LINE) to select according
function.
Adjusting the volume
Turn the VOLUME control (or press the VOL – or
VOL + button on the remote controller), the volume level appears on the display (VOL MIN ~
MAX).
Bass expander system
Press the BASS button on the remote controller
to select the desired bass boost effect.
BASS ON BASS OFF
Using the main unit:
1. Press the MODE button, then rotate the
VOLUME control until “BASS” appears on the
display.
2. Press the MEMORY button.
3. Rotate the VOLUME control to select “BASS
ON” or “BASS OFF”.
4. Press the MEMORY button.
Selecting the sound preset
Press the SOUND button repeatedly on the remote controller to select the sound mode matching the music to be listened to:
SOUND POP: Pops, etc.
SOUND CLASSIC: Classical music, etc.
SOUND ROCK: Rock music, etc.
SOUND JAZZ: Jazz, etc.
Using the main unit:
1. Press the MODE button, then rotate the
VOLUME control until “SOUND” appears on
the display.
2. Press the MEMORY button.
3. Rotate the VOLUME control to select the desired
sound mode.
4. Press the MEMORY button.
WHAT TO DO IF...
If the operation of the unit or display is not normal, follow the steps as shown below.
1. Disconnect the AC adaptor and replug it
again.
2. Within 5 seconds, while holding down the c
button on the main unit, press the MEMORY
button.
3. Resume operations.
Note:
The LCD display cannot show small alphabets and the accented letters (For example:
“Á”, “À”,“Ô, “”, “Å” and “Ä”).
Page 15

14
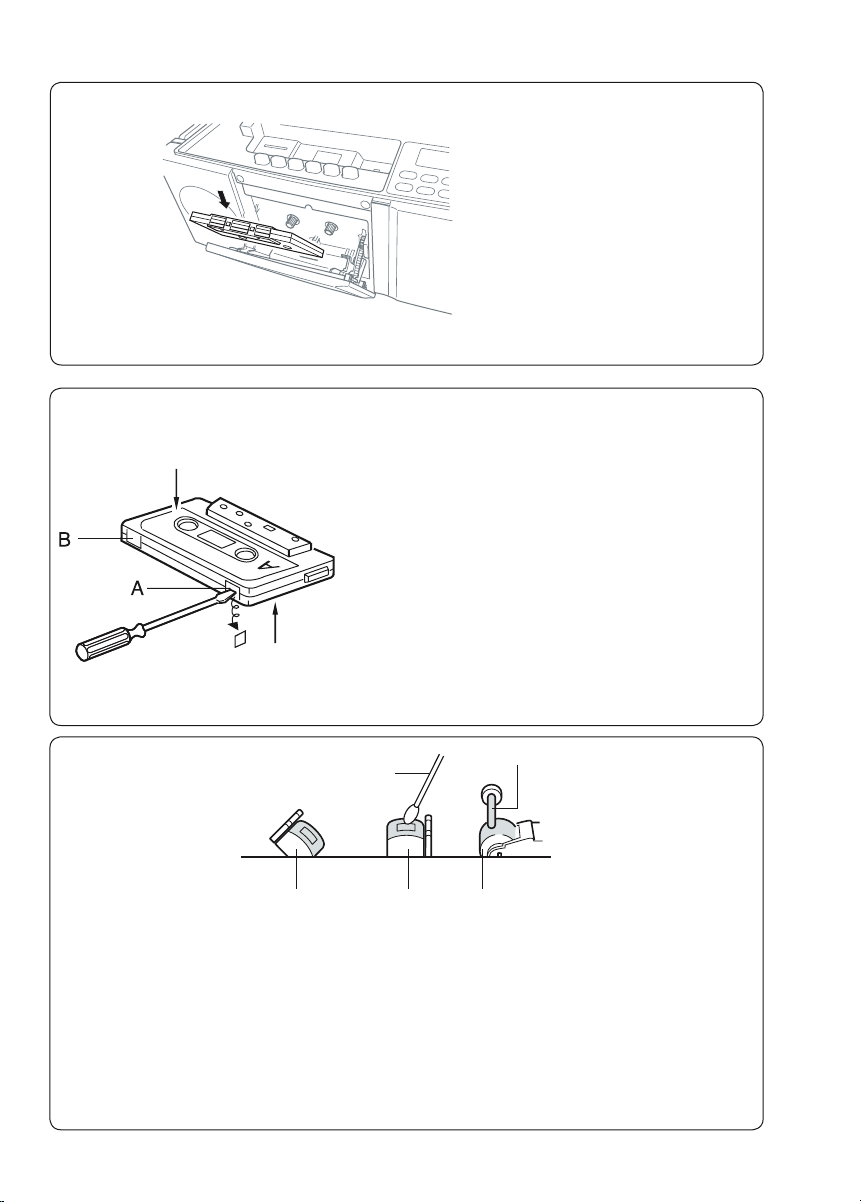
AUDIO CD OPERATION
Use compact discs bearing the symbol shown in
Fig. 5. In addition to conventional 12 cm CDs,
this unit can be used to play 8 cm CDs without
an adapter.
Basic playback
1. Open the top lid.
2. Press the CD button (or press the FUNCTION
button repeatedly on the remote controller) to
select “CD FUNCTION”.
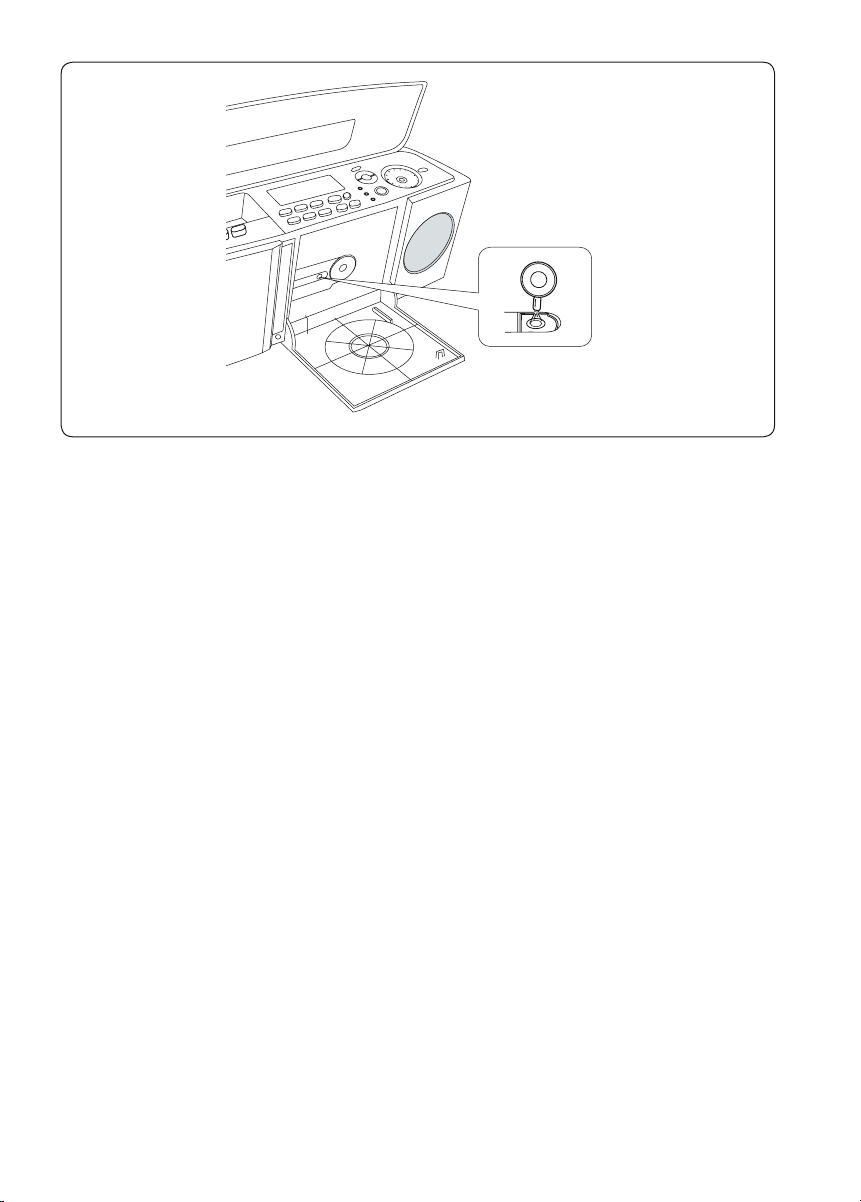
3. Press the CD OPEN button, CD compartment
door open, “OPEN” appears on the dispaly.
4. Place the disc with the label facing up on the
disc turntable (Fig. 6). (Place only one disc at
a time.)
5. Push the CD compartment door back into
position to close the disc compartment.
“READING” appears briefly, then the total
number of tracks and total playing time on the
disc appear.
Note:
If the disc is loaded with the label side downward, or if a badly scratched disc is loaded, “NO
DISC” or “NO PLAY” appears on the display. If
this occurs, load the disc correctly or replace the
disc.
6. Press the i button (or the CD i button
on the remote controller). Playback starts from
the first track. The current track number and
elapsed playing time are displayed.
Total track number
Total playing time
7. Press the n button (or the n STOP button on
the remote controller) to stop disc playback at
any time. When the last track has been played,
it stops automatically.
Notes on handling compact discs
- Do not expose the disc to direct sunlight, high
humidity or high temperatures for extended
periods of time.
- Discs should be returned to their cases after
use.
- Do not apply paper or write anything on the
disc surface.
- Handle the disc by its edge. Do not touch the
playing surface (glossy side).
- Fingerprints and dust should be carefully wiped
off the playing surface of the disc with a soft
cloth.
Wipe in a straight motion from the centre to
the outside of the disc.
- Never use chemicals such as record cleaning
sprays, antistatic sprays or fluids, benzene or
thinner to clean compact discs.
To start playback from the desired
track
Select the track by using d or c button, then
press the i button (or the CD i button on
the remote controller).
The number buttons on the remote controller can
also be used.
Temporarily stopping playback
Press the i button (or the CD i button on
the remote controller). “a” blinks. To resume
playback, press the button again.
Skip playback
During playback, press the d or c button repeatedly to select the desired track. It will start
from the beginning of the track.
- The number buttons on the remote controller
can also be used for skip playback.
Page 16

15
Search playback (forward/reverse)
Press and holding down the d or c button
during playback, it will search at high speed in
the forward or reverse direction.
When the button is released, normal play will
continue.
Repeat playback
(Remote controller only)
Press the REPEAT/FM MODE button repeatedly
before or during playback to select the repeat
playback mode.
- Press the button once, “U” appears, the unit
will repeat single track.
- Press the button again, “U ALL” appears, the
unit will repeat all tracks and all programmed
tracks.
Random playback
(Remote controller only)
Press the RANDOM button on the remote controller in playing or stop mode. “RND” appears on
the display. All tracks are played in random order
during playback.
- Random play does not function during
programmed playback.
Programmed playback
Up to 40 tracks can be programmed for playback in any order.
- First, select “CD FUNCTION” and load a disc
that you want to programme.
- The same track can be programmed more
than once.
- The tracks must be programmed in the stop
mode.
1. Press the MEMORY button, “PROG.”
appears.
2. Press the d or c button to select a
track.
- The number buttons on the remote controller
can also be used. In this example, press 6
directly.
3. Press the MEMORY button.
4. Repeat steps 2~3 above to programme
additional tracks.
5. Press the i button (or the CD i button
on the remote controller) to start programmed
playback.
- When all programmed tracks have been
played, it stops automatically.
- If you try to enter more than 40 tracks, “FULL”
appears on the display.
The selected track number
Page 17

16
Checking the programme
Each time the MEMORY button is pressed in the
stop mode, the programmed details sequentially
appear on the display.
Changing a programme
To change a track
1. In the stop mode, press the MEMORY button
repeatedly until the track number to be replaced
is displayed.
2. Press the d or c button to select a track
as described above.
3. Press the MEMORY button.
To add a new track to a programme
1. In the stop mode, press the MEMORY button
repeatedly until “0” on the track number part
appears.
Example:
2. Press the d or c button to select a track
as described above.
3. Press the MEMORY button.
Note:
Programmed details cannot be partially deleted
or inserted.
Cancel programme
- Press the n button (or the n STOP button on
the remote controller) once in the stop mode
to cancel programmed playback.
- The programmes is released when the function
is changed, or after the disc compartment door
is opened, or after the power is turned off.
“0” appears.
Page 18

17
MP3/WMA CD OPERATION
MP3/WMA CD information
The unit can play back the CD-R/RW that has
recorded music data or MP3/WMA files. Before
playing back MP3/WMA CD, please read the following.
- MP3/WMA CD is the disc that standardized by
ISO9660, its file name must have the extension
letters “.MP3”, “.mp3”, “WMA” or “.wma”.
- Sampling frequency and the bit rate:
MP3 files:
16 kHz ~ 44.1 kHz
16 kbps ~ 192 kbps
WMA (Window Media Audio) files:
16 kHz ~ 44.1 kHz
32 kbps ~ 160 kbps
WMA9 profession files, WMA9 lossless files
or DRM (copyright protection) files cannot be
played back.
- In this unit, recommend recording setting is
44.1kHz of the sampling frequency and 128
kbps of constant bit rate.
If files are recorded in other bit rate (for
example: 320 kbps) or in variable bit rate,
track-jump may sometimes happen according
to recording conditions.
- The directory and file names of the MP3/
WMA CD must be corresponded to the ISO
standardized files.
- Single-session disc can be played back.
- This unit can recognized up to 8 directory trees
per disc.
- This unit can recognized up to 640 MP3/WMA
files and/or 255 folders per disc. However, it
cannot recognize by depending on the folder
structure.
- MP3/WMA CD may not be played in the
recorded order.
- Music section in “CD Extra” can be played
back, not data section.
Notes on disc writing method
There are three basic methods for writing to a
CD: “Track-at-Once”, “Disc-at-Once”, and “Packet Writing”.
Music files recorded by “Track-at-once” or “Discat-Once” can be played back on the unit. (Note:
The unit cannot play back the music files added
with “Track-at-Once”.)
Music files recorded by “Packet Writing” cannot
be played back.
Limitations on display
Available letters for display are the following:
capital alphabets of A through Z, numbers of 0
through 9 and _ (underline).
Example: MP3 CD directory sample
Playback order:
song01 v song02 v ... v song14
MP3 CD
Note:
- Some MP3/WMA CDs cannot be played back
depending on the recording conditions.
- The CD-R/RW that has no music data or nonMP3/WMA files cannot be played back.
- Do not make an empty folder. It may not work
correctly.
albumF01
F01
song01.mp3
song02.mp3
song03.mp3
song04.mp3
song05.mp3
Folder number F01
There is no MP3 file.
The unit skips it.
song06.mp3
song07.mp3
song08.mp3
song09.mp3
song10.mp3
albumF02
song11.mp3
song12.mp3
F02
song13.mp3
song14.mp3
albumF04
F04
albumF03
F03
IMPORTANT INFORMATIONS:
- Copyright protection files cannot be played
back.
- Copyright protection files on a disc are
skipped automatically when played back.
Page 19

18
Basic playback
1. Turn the power on and choose “CD FUNCTION”.
2. Load the MP3/WMA CD. The total number
of tracks appear on the display.
3. Press the FOLDER/ PRESET button on the
remote controller repeatedly to select the
desired folder.
4. Press the d or c button to select a
track.
5. Press the i button (or the CD i button
on the remote controller) to start playback.
- The folder name and track name will
scroll on the display, then the original
display resume.
Repeat playback
(Remote controller only)
Press the REPEAT/FM MODE button before or
during playback to select the repeat playback
mode.
Note:
Other various playback operations, please refer
to the related description of “AUDIO CD OPERATION” (page 14~16).
Display selection (Remote control only)
The ID3-Tag is an information field for MP3/
WMA. Music title, artist name and album name
can be stored into the tag. The unit shows these
information. Press the DISPLAY button during
playback.
- Each time the button is pressed, the display
scrolls in the following sequence.
Folder name (Album name)/File name (Music
name)
TITLE (Music title)
ARTIST (Artist name)
ALBUM Album name and version number
(MP3 only)
- If no music information is stored, “NO INFO”
appears. Press the button again, the track
number and elapsed playing time appear.
Note:
ID3-Tag Ver.2 is not supported.
Folder/File selection
In the stop mode, press the FOLDER/PRESET
button on the remote controller. The folder number appears. If there is no folder, the file number
appears.
Press the d or c button to select the desired
file.
The total number of trac ks
First Track number in selected folder
The selected track number
Elapsed playing time
Folder name
Track name
Display Operation
U
Repeat the selected single track.
Repeat all tracks in the
folder.
U
F
U ALL
Repeat all tracks or all
pregrammed tracks.
Page 20

19
When desired file is selected in the stop mode,
press the i button (or the CD i button on
the remote controller) to start playback.
In the playback mode, press the FOLDER/PRESET button on the remote controller, playback
starts automatically from the first track of the
selected folder.
USB MEM O RY DEV I CE
OPERATION
Before use
Connect the USB memory device to the USB
port of the mains unit correctly.
See “CONNECTION”.
- The USB device in which the USB charge
function is provided enters “Charge” mode
when connected with the unit in the SD
mode.
- Some USB memory devices cannot be
used.
- This unit can recognize only MP3 or WMA
(Window Media Audio) files.
- This unit can recognize up to 999 files or folders
in USB memory device.
However, some cannot be recognized
depending on the folder structure.
- It may take more time for the reading operation depending on the recording condition.
- Please refer to “MP3/WMA CD information”
on the page 17.
Basic playback
1. Press the USB button (or press the FUNCTION
button repeatedly on the remote controller)
to select “USB FUNCTION”.
The last track number in the USB memory device
appears.
- If the connection of the USB memory device
is failed or the unit cannot recognize the USB
memory device. “NO DEV” appears.
- If thereʼs no track in the USB memory device,
or just some empty folders in the USB memory
device, “NO DATA” appears.
2. Press the FOLDER/PRESET button to select
the desired folder.
The folder name and first track name scroll on
the display, then the first track number in the
folder appears.
3. Press the d or c button to select the
desired track.
IMPORTANT INFORMATIONS:
- Copyright protection files cannot be played
back.
- Copyright protection files on the USB memory
device are skipped automatically when
played back.
- Recommended use:
Flash memory type USB memory player
Not recommended:
Hard Disc Memory type USB player
- Some flash memory player does not play
successfully with this unit.
Last track number
Page 21

20
4. Press the i button ( or the USB i button
on the remote controller) to start playback.
- The folder name and track name will
scroll on the display, then the track number and elapsed playing time appear.
5. Press the n button (or the n STOP button on
the remote controller) to stop the USB memory
device playback at any time.
Temporarily stopping playback
Press the i button (or the USB i button on
the remote controller), “a” blinks.
To resume playback, press the button again.
Programmed playback
Up to 40 tracks can be programmed for playback in any order.
- First, select “USB FUNCTION” and connect
the USB memory device you want programme
to the USB port of the unit correctly.
- The same track can be programmed more
than once.
1. Press the MEMORY button in the stop mode,
“PROG.” appears.
2. Press the d or c button to select a
track.
- The number buttons on the remote con-
troller can also be used. In this example,
press 6 directly.
3. Press the MEMORY button.
4. Repeat steps 2~3 above to programme
additional tracks.
track name
Folder name
Elapsed playing time
Page 22

21
5. Press the i button (or the USB i button
on the remote controller) to start programmed
playback.
- When all programmed tracks have been
played, it stops automatically.
- If you try to enter more than 40 tracks,
“FULL” appears on the display.
Checking the programme
Each time the MEMORY button is pressed in the
stop mode, the programmed details sequentially
appear on the display.
Changing a programme
To change a track
1. In the stop mode, press the MEMORY button
repeatedly until the track number to be replaced
is displayed.
2. Press the d or c button to select a track
as described above.
3. Press the MEMORY button.
To add a new track to a programme
1. In the stop mode, press the MEMORY button
repeatedly until “000” appears.
Example:
2. Press the d or c button to select a track
as described above.
3. Press the MEMORY button.
Note:
Programmed details cannot be partially deleted
or inserted.
Repeat playback
(Remote controller only)
Press the REPEAT/FM MODE button before or
during playback to select the repeat playback
mode.
Note:
Other various playback operations, please refer
to the related description of “AUDIO CD OPERATION” (page 14~16).
Display selection (Remote control only)
Refer to the same description of “MP3/WMA CD
operation” on page 18.
Folder/File selection
Refer to the same description of “MP3/WMA CD
operation” on page 18.
Removing the USB memory device
Do one of the followings:
- Press the n button (or the n STOP button on
the remote controller) until “STOP” appears.
- To change to other functions.
- Turn off the power.
Note:
Do not disconnect the USB memory device during playback. If do, the data may be damaged.
“000” appears.
Display Operation
U
Repeat the selected single track.
Repeat all tracks in the
folder.
U
F
U ALL
Repeat all tracks or all
pregrammed tracks.
Page 23

22
IMPORTANT INFORMATIONS
- Copyright protection files cannot be played
back.
- Copyright protection files on a SD card are
skipped automatically when played back.
SD CARD OPERATION
3. Press the i button (or the SD i button
on the remote controller) to start playback.
4. Press the n button (or the n STOP button on
the remote controller) to stop SD card playback
at any time.
Temporarily stopping playback
Press the i button (or the SD i button
on the remote controller), “a” blinks.To resume
playback, press the button again.
Programmed playback
Up to 40 tracks can be programmed for playback in any order.
- First, select “SD FUNCTION” and insert the
SD card you want programme to the SD card
slot of the unit correctly.
- The same track can be programmed more
than once.
1. Press the MEMORY button in the stop mode,
“PROG.” appears.
2. Press the d or c button to select a
track.
- The number buttons on the remote con-
troller can also be used. In this example,
press 6 directly.
3. Press the MEMORY button.
Before use
- Load an SD card (not supplied) with the music
files (MP3 or WMA). (See Fig.1b.)
- Do not try to load a RS-MMC card (not supplied) into the SD card slot.
- Down load the music files (MP3 or WMA or
WAV) into the SD card (not supplied) from
your PC.
Note:
Some cards cannot be used depending on its
structure.
Basic playback
1. Press the SD button (or press the FUNCTION
button repeatedly on the remote controller) to
select “SD FUNCTION”.
Note:
- If the connection of the SD card is failed
or the unit cannot recognize the the SD
card. “NO DEV” appears.
- If thereʼs no file in the SD card, or just
some empty folders in the SD card, “NO
DATA” appears.
2. Press the d or c button to select the
desired file.
Page 24

23
4. Repeat steps 2~3 above to programme additional tracks.
5. Press the i button (or the SD i button
on the remote controller) to start programmed
playback.
- When all programmed tracks have been
played, it stops automatically.
- If you try to enter more than 40 tracks,
“FULL” appears on the display.
Checking the programme
Each time the MEMORY button is pressed in the
stop mode, the programmed details sequentially
appear on the display.
Changing a programme
To change a track
1. In the stop mode, press the MEMORY button
repeatedly until the track number to be replaced
is displayed.
2. Press the d or c button to select a track
as described above.
3. Press the MEMORY button.
To add a new track to a programme
1. In the stop mode, press the MEMORY button
repeatedly until “000” appears.
Example:
2. Press the d or c button to select a track
as described above.
3. Press the MEMORY button.
Note:
Programmed details cannot be partially deleted
or inserted.
Repeat playback(Remote controller only)
Press the REPEAT/FM MODE button before or
during playback to select the repeat playback
mode.
Note:
Other various playback operations, please refer
to the related description of “AUDIO CD OPERATION” (page 14~16).
Display selection (Remote control only)
Refer to the same description of “MP3/WMA CD
operation” on page 18.
Folder/File selection
Refer to the same description of “MP3/WMA CD
operation” on page 18.
“000” appears.
Display Operation
U
Repeat the selected single track.
Repeat all tracks in the
folder.
U
F
U ALL
Repeat all tracks or all
pregrammed tracks.
Page 25

24
Removing the SD card
1. Press the n button (or the n STOP button on
the remote controller), then switch to other
function.
2. Pull it out.(See Fig.1b)
Notes on handling SD cards
- Do not expose the SD card to direct sunlight,
humidity or high temperatures for extended
periods of time.
- SD cards should be returned to their cases
after use.
- Do not try to decompose the SD cards.
- Keep the original SD label and never try to
apply any new paper on it.
- Do not touch the metal terminal part of the SD
card.
Metal terminal part
(Back)
USE MICROPHONE
You can enjoy sound from a microphone (not
supplied).
1. Before connecting the AC adaptor connect
a microphone to MIC socket (back of main
unit).
2. Connect the AC adaptor and turn on the
power.
Note:
- The sound of MIC with other sound can be
recorded to TAPE, USB memory device and
SD card.
- The volume of MIC can be adjusted by turning
the VOLUME control on the main unit.
Page 26

25
LISTENING TO THE RADIO
Before use (main unit only)
When the unit is shipped from the factory, its AM
frequency band is set to “522~1,611 kHz (in 9
kHz steps)”.
If your local AM broadcast system is organized
in 10 kHz steps, change the frequency band to
“520~1,610 kHz (in 10 kHz steps)”.
While holding down the n button on the mains
unit, press the z/ON button, “AM 10k” appears,
the frequency band have been changed to “AM
9 kHz steps”.
Note:
To return to the original setting, repeat steps
above.
Automatic/Manual tuning
1. Press the FM•AM button (or press the TU
BAND button on the remote control) to select
FM or AM. The radio frequency appears on
the display.
2. Automatic tuning
Press the d or c button for at least 1
second to tune in a station.
The unit will scan up or down the band and
receive the next receivable station. Press the
button to continue.
Manual tuning
Press the d or c button briefly until the
desired frequency is displayed.
To preset stations
Up to 20 FM and 20 AM stations can be preset.
1. Tune in the station to be preset as described
above.
2. Press the MEMORY button.
3. While “PROG.” is blinking, press the FOLDER/PRESET button on the remote controller
to select the channel number to be preset.
4. While “PROG.” is blinking, press the MEMORY
button.
- The number button(s) on the remote con-
troller can be used to preset the stations
directly. In this example, press 9 after the
step 2 above. Skip step 4.
5. Repeat steps above to add more preset stations.
- When presetting a new station, the previous
preset station is cleared.
Page 27

26
Listening to preset stations
1. Press the FM•AM button (or press the TU BAND
button on the remote controller) to select FM
or AM.
2. Press the FOLDER/PRESET button on the
remote controller to select the desired channel number.
- The number button(s) on the remote
controller can also be used.
To receive FM stereo broadcasts
Press the REPEAT/FM MODE button on the remote controller to select “STEREO”.
If the signal from an FM stereo broadcast is weak
and reception is poor, press the REPEAT/FM
MODE button on the remote contrller to select
“MONO”. The reception may be improved, but
the sound is monaural.
Using the main unit
1. In the FM mode press the MODE button, then
turn the VOLUME control to select the “FM
MODE”.
2. Press the MEMORY button.
3. Turn the VOLUME control to select the
“STEREO” or “MONO”.
4. Press the MEMORY button.
When beat is heard (Main unit only)
Beat (a high-pitched noise) may sometimes be
heard during radio broadcasting. If this occurs,
while holding down the n button on the mains
unit, press CLOCK/TIMER button to select “BCA” or “BC-B”. Select the setting that gives the
best result.
LISTENING TO TAPES
1. Open the top lid.
2. Press the TAPE button (or the FUNCTION
button repeatedly on the remote controller)
to select “TAPE FUNCTION”.
3. Press the STOP/EJECT button to open the
cassette holder.
4. Load the cassette (Fig.7). After loading the
cassette, push the cassette holder back into
position.
5. Press the PLAY button to begin playback.
6. Press the STOP/EJECT button to stop
playback at any time. Press it again to
remove the cassette. When the end of the
tape has been reached, automatic stop will
be activated.
Note:
- Use the normal tape (TYPE 1).
- Endless tapes cannot be used.
- Do not use C-100 (or longer) tapes. They may
jam in the mechanism.
Pause
Press the PAUSE button to temporarily stop
playback or recording. Pressit again to resume
operation.
Fast forward and rewind
Press the FFWD or REW button. When the
desired location has been reached, press the
STOP/EJECT button.
The tape stops automatically at the end of the
tape.
LIST E NIN G T O OTH E R
SOURCES
1. Press the LINE button (or press the FUNCTION
button repeatedly on the remote controller) to
select “LINE FUNCTION”.
2. Follow the instructions supplied with the other
equipment.
Page 28

27
RECORDING
Recording to USB Memory device or SD card
Preparation
Recording bit rate setting
If the reading source is not a MP3/WMA file, you can select the recording bit rate to get a good sound.
1. Press the MODE button, then rotate the VOLUME control until “REC BIT RATE” appears.
2. Press the MEMORY button.
3. Rotate the VOLUME control to select it as desired:
NORM: 128 kbps 44.1KHz, stereo (Standard recording)
LP: 96 kbps, 44.1 KHz, stereo (Long time recording)
AUTO: Automatic setting (for Tuner and TAPE: 96 kpbs, 44.1KHz, stereo; for other: 128 kpbs,
44.1KHz, stereo)
HI: 160 kbps, 44.1 KHz, stereo (High-Quality recording)
Note:
Please refer to the recording time table as shown below.
REC BIT RATE
( R e c o r d i n g b i t r a t e )
USB memory device and SD card capacity
128MB 256MB 512MB 1GB 2GB
NORM: 128 kbps 2 hr. 4 hr. 8 hr. 16 hr. 32 hr.
LP: 96 kbps 2 hr. 40 min. 5 hr. 20 min. 10 hr. 30 min. 21 hr. 42 hr.
HI: 160 kbps 1 hr. 30 min. 3 hr. 20 min. 6 hr. 30 min. 13 hr. 26 hr.
AUTO
for Tuner and TAPE 2 hr. 40 min. 5 hr. 20 min. 10 hr. 30min. 21 hr. 42 hr.
others 2 hr. 4 hr. 8 hr. 16 hr. 32 hr.
Note:
Generally, the high bit rate creates a much clear and better sound, but the created MP3 file may
be large also.
4. Press the MEMORY button.
Note:
When using Audio CD, select the desired track or programmed the material in advance, if necessary.
Recording copyright material without permission of the copyright owners is usually an infrigerment.If you wish to re-record copyright material, permission from the copyright owner is necessary.
SANYO does not approve of, and cannot be held responsible for, any unlawful use of this unit.
1. Press each function button (CD, FM•AM, TAPE,
LINE) on the mains unit (or press the FUNCTION
button on the remote controller) to select the
playback function.
(“CD FUNCTION”, “TUNER FUNCTION”, “TAPE
FUNCTION”, “LINE FUNCTION”)
Note:
It cannot record from MP3/WMA CD to USB memory
device/SD card.
2. Insert the SD card or connect the USB memory
device.
3. Press the REC m USB or REC mSD button to
select “USB” or “SD” recording.
Example:
“TUNE” to “USB”.
Playback function information
To USB
Recording time (Approx.)
Remaining recording time of
USB (If more than 10 hours,
display as “--:XX:XX” format.)
Page 29

28
Recording
1. Press the REC m USB or REC m SD button
to start recording. “RECORD TO USB” or
“RECORD TO SD” appears briefly then “REC”
appears on the display. Remain contain time
of “USB” or “SD” decreased running.
Using the remote controller:
- To USB memory device:
Press the USB j button.
- To SD card device:
Press the SD j button
2. Press the n button (or the n STOP button on
the remote controller) to stop recording at any
time. “REC” disappears.
Temperarily stopping recording
Press the REC m USB or REC m SD button
while in recording mode, it enters the record
pause mode. “REC” blinks on the display and the
remain contain time does not change.
Use the remote controller:
- To USB memory device:
Press the USB j button.
- To SD card device:
Press the SD j button.
Note:
When CD is used, however, CD playback continues.
Press the button again to continue recording.
Precaution in recording to SD card
- The maxinum recording contain number of
tracks in an SD card is 999. However, it may be
difference depending on the actural recording
case.
- Do not take off the SD card while in recording
or other advanced operations.
Folders and files structure in the USB
memory device or SD card
Four folders will be created automatically under
the root-directory, when the USB memory device
or the SD card is readed or be recorded use this
unit.
[CD] folder:
Files recorded from audio CD are stored here
with the name “CDXXXTXX.MP3”.
Example: CD001T01.MP3
[LINE] folder:
Files recorded from Video/Auxiliary equipment
are stored here with the name “LINEXXX.MP3”.
Example: LINE001.MP3
Recording mode
LOCK
L
O
C
K
- Setting the writing
protection chip
to the location
“LOCK” can
prevent mis-writing
on the card.
Before recording or doing advanced operations,
assure the chip is not in locked.
Disc Number
(sequence)
(1 ~ 999)
Track Number
Number of times of recording
(sequence)
(1 ~ 999)
[TAPE] folder:
Files recorded from tape are stored here with
the name “TAPEXXX.MP3”.
Example: TAPE001.MP3
Number of times of recording
(sequence)
(1 ~ 999)
Page 30

29
[TUNER] folder:
Files recorded from Tuner are stored here
with the name“TUNERXXX.MP3”.
Example: TUNER001.MP3
If you finished recording operation, you can see
a tree structure on your USB memory device or
SD card as below case.
Example:
Number of times of recording
(sequence)
(1 ~ 999)
Root
MUSIC
CDOO1
CD001T01.MP3
CD001T02.MP3
CDOO2
CD002T01.MP3
TUNE
TUNER001.MP3
TUNER002.MP3
LINE
LINE001.MP3
LINE002.MP3
TAPE
TAPE001.MP3
TAPE002.MP3
Recording to TAPE
Recording from USB Memory device or
SD card (Synchronous recording)
1. Load a blank cassette.
2. Select the USB or SD function.
3. Connect a USB memory device or insert a SD
card.
- Select the track number if required.
- For programmed recording, programme
the material in advance.
4. Press the REC button. The PLAY button
is engaged simultaneously and recording
starts.
5. Press the STOP/EJECT button to stop
recording at any time. When the end of the
tape is reached, deck stop automatically and
the playback of USB memory device or SD
card enters pause mode.
Recording from discs (Synchronous
recording)
1. Load a blank cassette.
2. Select “CD” function.
3. Load the disc to be recorded.
- Select the track number if required.
- For programmed recording, programme
the material in advance(as described under “Programmed play”).
4. Press the REC button. The PLAY button is
engaged simultaneouslyand CD recording
starts.
5. Press the STOP/EJECT button to stop
recording.When the end of the tape is reached,
deck stop automatically and CD playback
enters pause mode.
Recording from the tuner
1. Load a blank cassette.
2. Tune in the radio button to be recorded.
3. Press the REC button to start recording.
4. Press the STOP/EJECT button to stop
recording.
Page 31

30
ADVANCED OPERATION FOR
MUSIC FILES IN THE USB
MEMORY DEVICE OR SD
CARD
While the USB memory device and/or SD card is
correctly connected or inserted, and corresponding function is selected, you can do following advanced operation in stop mode.
Rename folder or file [USB] [SD]
1. Press the MODE button. “EDIT” appears.
2. Press the MEMORY button.
3. Select the desired rename file or folder. The
folder or file name appears on the display.
- Press the d button to select the previ-
ous higher level folder.
- Press the c button to select the next
lower level subfolder.
- Rotate the VOLUME control to select the
track or sub-folder in the same folder.
4. Press the MEMORY button. “RENAME”
appears.
5. Press the MEMORY button. The first character
of the trackʼs (or folderʼs) name blinks.
When beat is heard
Beat (a high-pitched noise) may sometimes be
heard during the recording of radio broadcasts. If
this occurs, while holding down the n button on
the mains unit, press MEMORY button to select
“BC-1” or “BC-2”. Select the setting that gives the
best result.
Safeguards against accidental erasure
Accidental erasure can be prevented by breaking out the tabs on the end of the cassette tape
(where the tape is not exposed) using a screwdriver or similar implement (Fig. 8). If a tab is
broken out in error and you wish to re-record
the tape, simply block the tab hole using adhesive tape and the tape can be used for recording
again.
Page 32

31
Copy [USB]S [SD]
This operation can copy the files from the USB
memoy device to SD card or from the SD card to
the USB memory device. Before copy you have
to read the target device at first (example: You
want copy a file from USB memory device to SD
card. You must select SD function and read SD
card) then proceed following operation.
Each operation can copy one file only.
Folders cannot be copied.
Make sure the SD card or USB memory device you want to copy to is unlocked, and have
enough contain space and no same file name. Or
“CANNOT COPY” will display.
1. Repeat step1~4 as “Rename” paragraph described on the previous page to select the file
to be copied.
2. Rotate the VOLUME control until “COPY”
appears.
3. Press the MEMORY button. “COPY TO”
appears.
After a few seconds, the folder or file name
under the root directory in the target device (SD
- in this example) will appear on the disply.
4. Do following operation to select the folder in
the target device where you want to place the
new created MP3/WMA file in.
- Press the d button to select the previ-
ous higher level folder.
- Press the c button to select the next
lower level subfolder.
- Rotate the VOLUME control to select the
track or sub-folder in the same folder.
4. Press the MEMORY button. “COPYING”
appears and copying percent changes from
00%.
- After the copying is completed, “COMPLETE”
appears briefly, then the orginal display
returns.
- The bit rate of the MP3/WMA file keeps the
same value as itʼs original.
6. Do rename editing operations according to
your desire:
Limitations on display
- Available letters for display are the fol-
lowing: capital of A through Z, and numbers of 0 through 9 and “_”.
- Other letters than those above are re-
placed in “_” (Underline).
- The maximum length of the file (or fold-
er) name is 30 characters.
7. After all characters editing operation is finished,
press the MEMORY button. “RENAMING”
appears.
- After the renaming is completed, the
orginal display returns.
Note:
If the new track (or folder) name is more than
8 characters, or a double-bit code characters
named, or the file (or folder) is a write protect
one, “CANNOT RENAME” appears.
Editing contents
Operation
Select the desired replace character “A~Z,
_, 0~9”.
Press the c or d
button
Go the next/previous
editing character of the
original track name.
Rotate the VOLUME
control.
Add a character in the
file (or folder) name.
Press the REC m SD
button.
Delete a character in
the track (or folder)
name.
Press the REC m USB
button.
Page 33

32
Delete file [USB] [SD]
1. Repeat step1~4 as “Rename” paragraph description on the previous page to select the
file to be deleted.
2. Rotate the VOLUME control until “DELETE”
appears.
3. Press the MEMORYbutton.
“DELETE?” appears.
- If you want to cancel it, press the n but-
ton to return to the original display.
4. Press the MEMORY button.
“YES ?” appears.
- If you want to cancel it, press the n but-
ton to return to the original display.
5. Press the MEMORY button. “DELETING”
appears.
- After the deleting is completed, “COMPLETE”
appears breifly, then the orginal display
returns.
Format [SD] only
1. In SD function stop mode, press the MODE
button.
“EDIT” appears.
2. Rotate the VOLUME control until “FORMAT”
appears.
3. Press the MEMORY button.
“FORMAT?” appears.
- If you want to cancel it, press the n button to return to the original display.
4. Press the MEMORY button.
“YES?” appears.
- If you want cancel it, press the n button
to return to the original display.
5. Pr ess the ME M O RY bu t t on again.
“FORMATTING” appears.
- After the formatting is completed, “NODATA” appears.
Page 34

33
TIMER OPERATION
Wake-up timer (Main unit only)
Set the on and off-time, and functions to be used.
Operation will start with the selected function at
the on-time.
Note:
To USB, SD and TUNER/LINE IN recording operation will start at 2 minutes in advance of the
on-time. During the 2 minutes the main unit is in
mute mode.
The power will be switched off at the off-time.
The timer will function every day unless it is released.
Preparations
Make absolutely sure that the clock is set to the
correct time before setting the timer.
- Prepare the source to be used.
- Adjust the tuner or band of radio if choosing
“TUNER FUNCTION”.
- Place the disc in advance if choosing “CD
FUNCTION”.
- Connect the USB memory device in advance
if choosing “USB FUNCTION” or want record
to it.
- Insert the SD card if choosing “SD FUNCTION”
or want record to it.
- Load a cassette and press the PLAY button
down if you choose “TAPE FUNCTION”.
- If you want to record using a tape at the ontime, please load a blank cassette and press
the REC button down.
- Adjust the volume level as desired.
Example:
Waking up 7:30 everyday, listening to the radio
and record to the USB memory device at the
same time until 8:15.
1. Turn on the power and press the CLOCK/
TIMER button. Current time and previous used
function sign appears.
2. Press the CLOCK/TIMER button again, “ ”
blinks. The preset timer on-time appears.
3. Press the MEMORY button, the “hour” section
blinks.
4. Turn the VOLUME control to set the “hour”
section.
5. Press the MEMORY button, the “minute”
section blinks.
6. Turn the VOLUME control to set the
“minute”.
7. Press the MEMORY button, then press the
CLOCK/TIMER button while “ ” is blinking.
The previous timer off-time appears.
8. Repeat steps 3-7 above. This completes the
setting of the timer off-time.
9. Press the CLOCK/TIMER button, “ ” appears and blinks. Original preset function
appears.
Page 35

34
10. Press the MEMORY button. Preset function
blinks.
11. Turn the VOLUME control to set the desired
function:
Functions for selection appears:
CD FUNCTION v USB FUNCTION v
SD FUNCTION v TUNER FUNCTION
TAPE FUNCTION v LINE FUNCTION
In this example, “TUNER FUNCTION” is se-
lected.
12. Press the MEMORY button, the desired
function remains.
Note:
If the selected playback function is “USB”,
“SD”, “CD” or “TAPE” go to step17 directly.
13. Press the CLOCK/TIMER button.
Previous recording target setting appears.
14. Press the MEMORY button.
Previous recording target setting blinks.
15. Rotate the VOLUME control to select the
recording target source.
Options about recording appears:
NO REC vREC TO USB vREC TO SD
In this example, select “REC TO USB”.
16. Press the MEMORY button, “ ” keeps blinking
for about 8 seconds. Then the origi-nal display
returns.
17. Press the CLOCK/TIMER button until “ ” appears. Then press the z/ON button to switch
off the power.
Note:
- Only Tuner function and LINE IN function can
record to USB memory device and SD card at
the on-time.
- When the timer on-time arrives, the power is
turned on automatically and start the preset
function.
- “ ” remains lit while timer operation is engaged.
- When the timer off-time arrives, the power turns
off and the timer is set to the standby mode.
Timer operation repeats this cycle everyday.
To check the timer settings
Turn on the power.
Press the CLOCK/TIMER button.
The timer setting are displayed in the followingorder.
- Current time
- Timer on-time
- Timer off-time
- Original preset function
- Original recording target setting
- Original display returns.
Page 36

35
To change the timer settings
1. Press the CLOCK/TIMER button twice to select
the setting to be changed.
2. Press the MEMORY button, the display
blinks.
3. Change the setting as described above.
To release the timer
Press and hold down the CLOCK/TIMER button
until “ ” disappears.
To set the timer again with the same setting
1. Press the CLOCK/TIMER button until “ ”
appears.
2. Press the z/ON button to turn off the power.
Sleep timer (Remote control only)
The sleep timer automatically switches off the
power after a preset time has elapsed. There are
9 time periods available: 90, 80, 70, 60, 50, 40,
30, 20, and 10 minutes.
Example: Select the sleep time of 40 minutes.
Press and hold down the SLEEP button until the
desired sleep time — 40 minutes appears.
Release the SLEEP button.
After several seconds, the original display returns, “SLEEP” remains lit on the display.
To release the sleep timer
Do one of the followings:
- Press the SLEEP button, “SLEEP” disappears.
- Turn off the power.
Timer priorities
The sleep timer has priority over the wake-up
timer. The power is switched off by the sleep
timer.
MAINTENANCE
Warning:
For your personal safety, be sure to disconnect the AC adaptor before processing with
any maintenance or cleanning.
Cleaning the unit
Clean the outside of the unit with a clean soft
cloth, moistened with lukewarm water. Do not
use benzene, thinner or alcohol since they will
mar the finish of the surface.
Cleaning the tape heads
To ensure continued high performance, use cotton swab to clean the heads, pinch roller and
capstan of the decks after about every 10 hours
of use. If the dirt persists, soak the swab in a little
methylated spirit or head cleaning fluid and then
clean.
Cleaning the CD player lens
The lens should never be touched. If dust is on
the lens, blow it off using a camera lens blower.
(Consult your dealer.) (Fig. 10)
Microsoft, Windows MediaTM,
and Windows® Logo are
trade-marks or registered
trademarks of Microsoft Corporation in both the
United States and/or other countries.
SDTM is registered trademark of SD Association.
Page 37

36
TROUBLE SHOOTING GUIDE
SYMPTOM
POSSIBLE CAUSE
CORRECTIVE ACTION
No power.
The supplied AC adaptor is not connected to
the unit.
Connect the AC adaptor to the DC IN
socket of the unit.
No sound.
Volume control is set to minium.
Turn up the volume.
The wrong function is selected.
Select the correct function.
The CD player does not start playback.
No disc is loaded.
Loaded a disc.
An unplayable disc is loaded.
Load a playable disc.
The disc is not loaded correctly.
Load the disc with the label facing up on
the disc tray.
The disc is dirty.
Clean the disc or replace it.
SYMPTOM
POSSIBLE CAUSE
CORRECTIVE ACTION
The operation of the unit or display is not normal.
The unit must be reset.
1. Disconnect the supplied AC adaptor
and replug again.
2. Within 5 seconds, while holding
down the c button on the main
unit, press the MEMORY button.
3. Resume operations.
The file in USB or SD card cannot play back.
USB device is not connected.
Connect the USB device.
SD card is not loaded.
Load the SD card.
The file is copyright protection file.
Select the correct playable files.
FM stereo broadcast is hard to hear due to much
noise.
Weak signal.
Press the REPEAT/FM MODE button on
the remote control to display “MONO”.
Reorient the FM aerial wire.
The remote controller does not work properly.
The batteries in the remote controller are weak,
or installed incorrectly.
Check the battery polarity (+ or -).
Replace the battery.
The remote controller is not aimed at the remote
sensor window.
Aim the remote controller at the remote
sensor window.
Note:
This handling description is printed prior to product development.
When a part of the product specification must be changed to improve operability or other functions,
priority is given to the product specification itself. In such instances, the instruction manual may not
entirely match all the functions of the actual product.
Therefore, the actual product and packaging, as well as the name and illustration, may differ from
the manual.
The LCD display shown as an example in this manual may be different from the actual LCD display.
Page 38

SPECIFICATIONS
CD Player
Channels:
2-channel stereo
Sampling frequency:
44.1 kHz
Pick-up :
Semiconductor laser
Laser output:
0.6 mW (Continuous wave max.)
Wave length:
790 nm
Wow/flutter:
Below measurable limits
Radio
Reception frequency:
FM: 87.5 - 108 MHz
AM: 522 - 1611 kHz (9 steps)
520 - 1610 kHz (10 steps)
Cassette deck
Track system:
4-track, 2- channel stereo
Erasing system:
Magnet erase
Tape speed:
4.75 cm/sec.
Frequency response:
80 - 12,000 Hz
Fast forward/rewind time:
General
Output power :
AC: 4.0 W (2.0 W/ch) JEITA
Inputs:
LINE: 1V/50KΩ
USB: For USB memory device
SD: For SD card
Speakers:
8 cm x 2
Terminal:
PHONES: 32 ohms
Power source:
DC IN (AC adaptor, Sanyo Model No. AD48-
0046, supplied)
Dimensions:
473(W) x 165(H) x 110(D) mm
Weight:
Approx. 2.9 kg (not including batteries)
Specifications subject to change without notice.
SI DICHIARA CHE:
Lʼapparecchio Sistema a microcomponenti, marca SANYO, modello
MAJ-U02, risponde alle prescrizioni dellʼarticolo 2 comma 1 del
D.M.28 agosto 1995 n°548.
fatto a München
28 marzo 2006
SANYO Electric Co., Ltd.
SANYO FISHER Sales (Europe) GmbH
Stahlgruberring 4, D-81829
München, Germany
(XE) 1AD6P1P2171-A
 Loading...