

Page 1
SANYO
STEREO RADIO
CASSETTE RECORDER
INSTRUCTION BOOK
M4515KG
Page 2
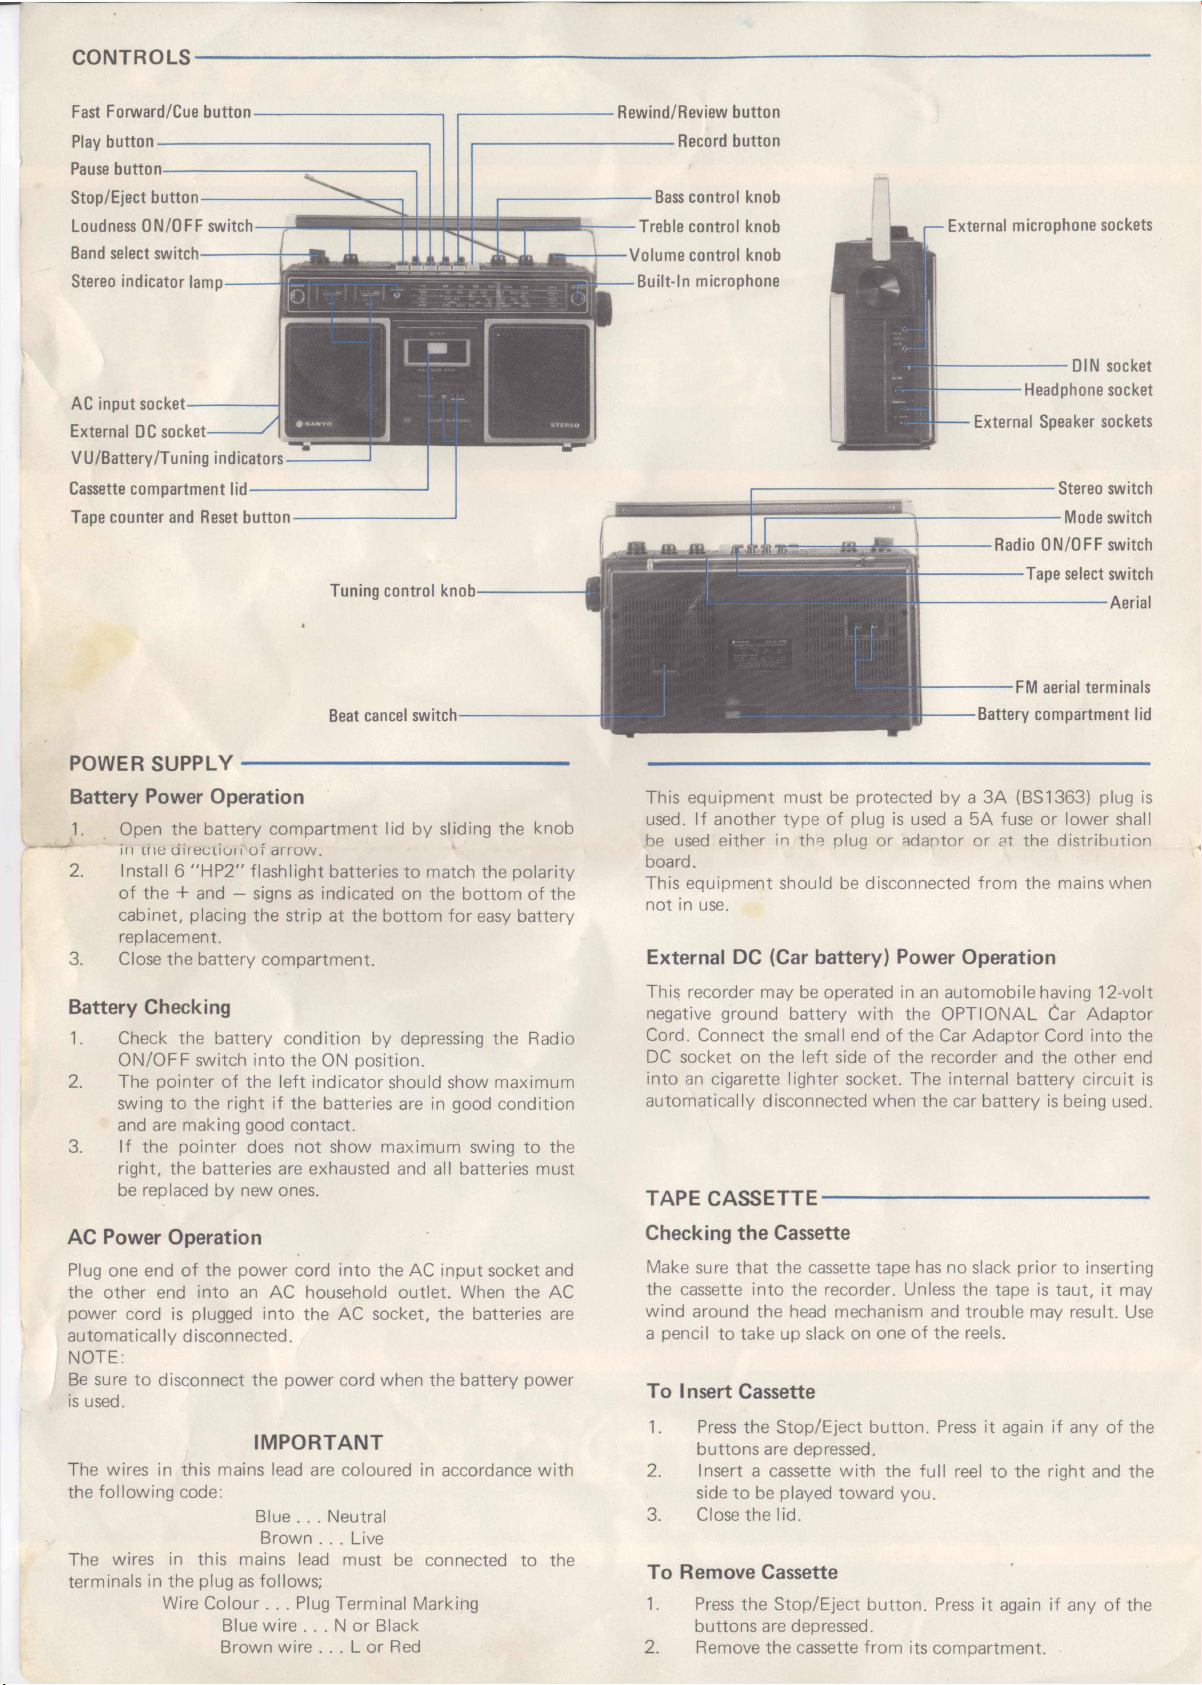
CONTR O LS
Fast Fo rwa rd/ Cue bu tton
Play bu tto n
Pause bu tton
Stop /E jec t bu tto n
Loudness ON /O FF switch
Band select switch
Stereo ind icato r lamp
AC inpu t s ock et
Ex tern al DC socke t
V U/ Batter y/ Tu nin g indicato rs
Cassette co mp artment lid
Tape c ou nte r and Reset bu tto n
Tu nin g co ntr ol knob
Beat cancel switch
Re wind/Review b ut ton
Record bu tto n
Bass c on trol knob
Treble c on tro l knob
Vo lume c ontro l knob
Built-In mi cro pho ne
Extern al m icro ph one sockets
DIN socket
Hea dpho ne socket
Ex tern al Speaker sock ets
Stereo switch
Mode s witch
Radio ON/O FF sw itch
Tape select switch
Ae rial
FM aerial ter min als
Ba ttery co mp artment lid
POWER S UPPLY
Ba ttery Power Operation
1. Open the ba ttery co m pa rtme nt lid by sliding th e kn ob
in trie d ir e ct io n 'o f arr ow .
2. Ins tall 6 "H P2" flashlight b atterie s to ma tch the po la rity
o f the + and — signs as indicated on the b otto m of th e
ca bin et, placing th e strip at the bo tto m fo r easy battery
rep lacement.
3. Close the battery co m pa rtm ent .
Battery Checking
1. Check the b atte ry co nditio n by depressing th e Radio
O N/O FF sw itch in to the ON po sition .
2. Th e poin te r o f the le ft indica tor should show maximu m
swing to the rig ht if the batterie s are in good cond ition
and are making good co ntact.
3. If the poin te r does no t s how m aximu m sw ing to th e
righ t, the batteries are exha usted and all batteries must
be replaced by new ones.
AC Power Operation
Plug one end o f th e po wer cord int o the AC inpu t socket and
the othe r end in to an AC house hold o ut le t. When the AC
power cord is plugged into the AC socket, th e batterie s are
auto m atica lly disc onn ected.
NOTE:
Be sure to discon ne ct the po wer cord when the ba tte ry power
is used.
IM PO RTA N T
The wires in th is mains lead are colou red in accord ance w ith
the follo w in g code:
Blue . . . Ne utral
Brown . . . Live
The wires in this mains lead m ust be connecte d to the
terminals in the plug as fo llo ws;
Wire Co lo ur . . . Plug Terminal Markin g
Blue w ire . . . N or Black
Brown wire . . . L o r Red
Th is e qu ipment m ust be protected by a 3A (BS1363) p lug is
used. If another typ e o f plug is used a 5A fuse or lower shall
be used e ith er in th e plug o r adantor or at the di st ribu tion
board.
Th is eq uipm en t sho uld be discon nec ted from the mains wh en
not in use.
External DC (Car battery) Power Ope ration
Th is re cor der may be operated in an au tomo bile havin g 12 -vo lt
negative ground ba tte ry w ith the O PT IO N AL Car Ad a ptor
Co rd. Con nect the small end of the Car Ada ptor Cord into the
DC socket on th e left side of the recorder and the othe r end
in to an cigarette lighter socket. The internal ba tte ry circ uit is
auto m atica lly disconnected when the car batte ry is being used.
TA PE CASS ETT E
Checking the Cassette
Make sure that the cassette tape has no slack pr io r to inserting
the cassette into the reco rder. Unless th e tape is ta ut, i t may
wind around the head mechanism and tr oub le may result. Use
a pe ncil to take up slack on one of the reels.
To Insert Cassette
1. Press the Stop /E je ct b ut to n. Press it again if any of the
button s are depressed.
2. Insert a cassette w ith the fu ll reel to th e right and the
side to be played tow ard yo u.
3. Close th e lid.
To Remove Cassette
1. Press the Sto p/Eject but to n. Press it again if any o f the
butt on s are depressed.
2. Remove the cassette fro m its co mpartm ent. •
Page 3

Safeguard Against Accidental Erasure
To safeguard valuable
recordings against acciden tal
erasing, break out the flaps at
the rear o f the cassette. Use a
screwdriver f or this purpose.
Rem ove flap A a t the rig ht t o
preserve soun d on Side 1 and
fla p B to do th esa m e for Side
Cover th e o pen ing h ole with adhesive tape if re-recording is
necessary.
NOTE:
The R ECORD bu tton ca nn ot be depressed when a cassette
which has these prote ctive flaps removed is inserted.
B
O PER A T IO N
Radio Reception
1. Depress th e R adio ON /O FF switch in to the ON
po sitio n, then set th e Band select sw itch to y our desired
rad io band.
2. Fo r FM or SW2 re ce ption, pull o ut the aerial and
de termine the d irec tio n, length and angle for the best
recep tion. F or MW or SW1 recep tio n, the aerial inside
the uni t is somew hat directio na l. So th e rece ption fro m
dista nt statio ns may sometimes be improved by ro tating
the unit.
3. Tu ne in a desired statio n by turnin g the Tun ing contro l
unt il the ri gh t in dica to r p ointe r shows ma ximum swing
to the rig ht. A ft e r tuning in an FM sta tio n, set the Band
select sw itch to the FM -AFC po sition to keep the
station on tune.
4. F or MW, SW1 o r SW2 reception, set the Mode s witch to
MO NO . F or reciving an FM stereo b roadcast s ta tio n, set
the s witch to STEREO. T he stereo ind icato r lamp w ill
ligh t w hen stereo bro adc ast is being received.
Set the STEREO s witch to the W IDE po sit ion to ob tain
the maximu m stereo separation.
5. A djus t the V O LU ME, BASS and T REB LE c on trols fo r
you r desired volu me and tonal qu ality and set the
Loudness sw itch to ON or OFF acco rdin g to yo ur
personal liking.
6. T o tu rn o ff th e R adio, set the Radio ON/OF F switch to
the OFF po sition .
Recording from Built-In Radio
1. Depress the Ra dio O N/O FF s witch into the ON
po sition .
2. Insert a cassette with th e fu ll reel to the righ t and then
set the TA PE select switch to the type of ta pe being
used.
C r0 2
Normal
3. Select th e desired band, then tun e in a desired radio
progra mme. F ollo w the in structions as described und er
the "R ad io Re ce ption ".
4. Press the Tape Counte r Reset bu tton to reset the
co un te r at " 0 0 0 ". The Tape Counter w ill be very useful
to playback a pa rticular selection, the refore, make a
note of th e c ou nter numbers at the beginning o f each
selection w hile recording. Depress the Record and Play
button s sim ultan eo usly. Now y ou are recording.
5. Since y ou can m on it or thro ug h the speakers regardless
o f the volu me control s etting, adjust the V OL U M E,
BASS and TRE BLE contr ols to y our desired volum e and
tonal qua lit y.
......................................
.......................................................
Chro mium diox ide tape
Standard tape
6. When recording a MW radio programm e on tape , an
ir rit at in g beat sound may som etim es appear, caused by
in teraction between th e reco rding bias frequ en cy and
the radio frequency. In such a case, sim ply set the BE AT
CAN CEL sw itc h, located on the back of the un it, to the
othe r positio n.
7. To s tar t and stop th e tape m ovement in stan tly during
recording, depress the PAUSE bu tton . T o start it again,
re-press the PAUSE button.
8. Press the S top/Eject b utto n and push th e Radio
ON/ OFF sw itch to stop the rec ording comp letely .
When the tape is wound co mple tely w hile rec ord ing , the
RE CO RD and PLA Y button s w ill be released
autom atically, ho wever, the radio section w ill remain in
the ON positio n.
Recording from Bu ilt-In Condenser Microphone
1. Press th e S top/Eject bu tto n and insert a cassette in to the
co m pa rtme nt , then close the lid.
2. Be sure n othin g is plugged into the M IC and REC /PB
sockets, and Radio O N /O FF switch is in the OFF
po sition.
3. Set the TAPE select switc h to the typ e of the tape being
used.
C r0 2
Normal
4. Press the Tape C ou nte r Reset button to reset the
co un ter a t "0 0 0 " and then depress the R EC ORD and
PLA Y bu tton s sim ultaneously.
5. Speak in a normal voice at a distance of a ppro xima tely 1
fo ot away f ro m the unit. When the indic ator p oin ters do
not show swings to the righ t, fu ll recording levels are no t
being achieved and the m icrop ho ne should be moved
closer to the person speaking.
6. T his u n it has an a utom atic level c ontrol (AL C) circ uit
and does n ot require any adju stm ent of VO LU M E ,
BASS and TRE BLE controls w hile recording.
7. Press the PAUSE button to stop rec ord ing at any
positio n. To stop recording c om ple tely, press the
Stop/E je ct bu tton .
When the tape is w ound com plete ly w hile reco rding, the
RE CO RD and P LA Y b utton s w il l be released
au to m atica lly .
..........................................
.......................................................
Chro mium dioxide tape
Standard tape
Recording from External Micropho ne
1. Press the Stop /E ject bu tton and insert a cassette in to the
co mpa rtm ent, then close the lid.
2. Make sure noth ing is plugged into the REC/PB socket ,
and R adio ON/OF F switch is in the O FF position.
3. C onnec t op tio nal extern al micro phone s into the MIC
sockets. The Mode sw itch should be set to the STERE O
po sition when you make stereo recording.
Fo r monaural re cordin g, con nect one m icrop ho ne into
one of the MIC sockets w ith th e Mode s witch in th e
MO NO position.
4. Set th e Tape select sw itch to th e ty pe o f the tape being
used.
C r0 2
No rmal
5. Press the Tape Co un ter Reset b utto n to reset the
co un ter at " 0 0 0 ” and th en depress the RE CO RD and
PLA Y bu tto ns sim ultaneously.
6. If yo u wish to m o ni to r th e sound q uality w hile
recording, p lug an optional hea dphone into the
Headphone s ock et on the rig ht side of the
recorder.
7. Press the Pause b utt on to s top recording at any po sition .
To stop recording comple te ly, press the S to p/ Ejec t
button .
When the tap e is wound co m ple te ly wh ile recording, the
RE CORD and PLA Y button s w ill be released
auto m atica lly .
..........................................
.......................................................
Chro mium diox id e tape
Standard tape
Page 4

Recording from External Sound Source
1. Press the S to p/Ejec t b ut to n and inse rt a cassette in to the
co m pa rtme nt , the n close the lid.
2. Conn ect optional D IN cord f ro m the out put of you r
playe r, tu ner, am plifie r o r other signal source to the
REC/PB socket o f the unit .
3. Set the TAPE select s witch to the type o f the tape being
used.
C r0 2
No rmal
4. Press the Tape Coun ter Reset bu tton to reset the
co unte r at ''0 0 0 '' and then depress the RECOR D and
PLA Y bu tton s sim ultaneously.
5. Since this un it has a varia ble mo nito rin g circ uitr y, you
can adju st the V O LUM E, BASS and TR E BL E co ntrols
to y o ur desired volu me and to nal q u al ity w hile
recording.
NOTE:
The Mo de sw itch should be set to the S TEREO position
when you make stereo record ing.
6. Press the PAUSE but to n to stop re cording at any
po sitio n. To stop re cording c om ple tely, press the
Stop/E je ct bu tton .
When the tape is w ound com ple tely w hile recording, the
RE CORD and PLA Y button s w ill be released
au to matica lly .
..........................................
.......................................................
Chro mium diox id e tape
Sta ndard tape
Playback
1. Press the S to p/Ejec t button and insert the recorded
cassette in to the un it and then close the lid.
2. When using the Stereo tape, set the Mode switch to the
ST ER EO and the Stereo sw itch to the WID E positio n to
ob ta in th e maximu m stereo separation. For the
mo nau ral tape, set th e Mode sw itch to the MO NO
po sition.
O 4- u ~ t a n r - - 1^ ->+ - .: o - - u -«-- „ j. . _ _ c .u — . — j __ i
4. Adju st the V OLU ME , BASS and T REB LE c on tro ls to
5. To p layback the tape t hrough y our a mplifie r, connect
6. To stop th e ta pe movement in stan tly du rin g p lay back,
u LI ICJ I /—VI l_ O CI CO I O W iLC l I LU LI 1C Ly pC U; LI 1C LdpC LU UC
used, the n depress th e P LAY butto n and yo ur u n it w ill
begin to playba ck.
you r desired sound and tona l q uality . Set the Loudness
sw itch to the ON position to get loud sound.
an o ptional D IN cord from the REC/PB socket o f
this un it t o yo u r amp lifier.
depress the PAUSE b utto n. Release the bu tt on to start
it again. To stop th e tape c om plet ely, press the
Stop/Eje ct bu tt on .
When the tape is wo un d co m ple te ly du rin g playb ac k,
the P LA Y button will be released automa tic ally.
Cue & Fast Forward
When pushing the CUE button w ith the PLA Y b ut to n pressed
dow n, the tape runs fa st fo rw ar d and th e recorded po rtion
produces ''cu e '' sound. Thus, the recorded and unrecorded
portion o f the tape can be easily distinguishe d. When the Cue
button is released, the playba ck mode will be resumed.
Fo r normal fast fo rw ard, press th e STOP bu tt on to release the
PLA Y bu tto n and then depress the CUE (F.F/C ue ) button.
Push the S top button to stop the tape.
Review & Rewind
Tape is rewound by pushing the REV IEW b u tto n after having
depressed the P LAY button. Release th e RE VIEW bu tton
when the tape is rewound fo r a desired tape p os itio n. F rom
th at po sitio n, the tape w ill be p laye d back. The RE VIEW
button is useful fo r playing back the same section repe atedely.
Fo r norm al rew indin g, press the STOP bu tt on t o release the
PLA Y b utto n and then press the R EVIEW (R EW /RE V)
butt on . Push the STOP b utt on again to release the RE VIEW
butt on .
M A INTENANCE
1. Cle aning of heads and pinch roller .
To assure co ntinu ed high p erform ance fr om y ou r
rec ord er, pe rio dica lly clean heads, pinch roller and capstan
wh enever an accu mula tio n of d ust and red-bro wn oxide
particles is noticed . These particles may be cleaned w ith a
cott on swab moistened in isop ropyl a lcohol or special
hea d-cleaning fl uid. T o do this prope rly , depress the
ST OP /EJ EC T bu tt on to open the c om par tm en t. Depress the
PLA Y bu tto n , causing the heads to projec t from the housing.
Care fully rub th e face o f the heads and also the surface of the
capstan and pinch ro ller.
2. Cleaning of oth er parts.
Use a clean so ft cloth, moistened w ith plain lukew arm
wa ter. Never use be nzol, benzine, alcoh ol or other strong
chemical cleaner since th is could damage the finish of y ou r
unit. It is im porta nt th at no liq uid reaches the inside of the
un it.
SPE CIFICAT IO NS
Recording System
Erasing System
Tape Speed
Fast Fo rward Time
Re wind T i m e 130 sec (C-60)
Wow & Flut te r
Frequency Response:
No rmal
C h r o m e
Signal to Noise R a t i o
Tuning Range
O ut pu t Power
L o u d sp e a k e r
Power s o u r c e
Te rminal Impedance
S e m ic on d u c to rs 25 tran sistors
Dim ensions . 40 3 x 233 x 115 mm appro x.
Weight
— Specific ations subject to change w itho ut notice —
........................................................
........................................................
..................
-----------------------------------------------------
........................................................
.............................................................
..........................................
.........................
........................................................
............................................................
..........................................
.......................................
...........................................
.............................................................
DC: 9 -volt w ith 6 ''H P2'' size cells
........................
5.0 kg app rox. (w/o Ba ttery)
1-7/8 ips. (4.75 cm/sec)
130 sec (C-60)
8 0 -10, 0 0 0 Hz
5 0 -12 ,0 00 Hz
MW: 5 25 - 1605 kHz
SW 1: 2.3 - 7.3 MHz
SW2: 7 .3 -2 3.0 M Hz
FM : 88 - 108 MHz
2 ,500 mW x 2 (Max.)
120mm dia. 4 ohm x 2
MIC: 3.3 kohm
DIN IN: 3.3 koh m
DIN OUT : 47 0 koh m
HEADP HON E: 4 - 16 ohm
SPEAKER : 4 ohm
AC bias
AC erase
0.25% rms.
45 dB
AC : 24 0 V
6 ICs.
2 therm isto rs
26 diodes
1 rec tifire
1 L.E .D.
SANYO ELECTRIC CO., LTD.
Osaka, Japan.
Printed in Jap an.
 Loading...