

Page 1

INSTRUCTION MANUAL
Dual Dock Music System for iPod and iPhone
DMP- 690P
iPhone, iPod are trademarks of Apple Inc.,
registered in the U.S. and other countries.
iPhone, iPod shown are not included.
“”“ ”Made for iPod , and Made for iPhone , mean that an electronic accessory has been designed to connect specifically to iPod or iPhone,
respectively, and has been certified by the developer to meetApple performance standards.Apple is not responsible for the operation of
this device or its compliance with safety and regulatory standards.
Page 2

TABLE OF CONTENTS
INTRODUCTION ..........................................................................................................1
IMPORTANT SAFETY INSTRUCTIONS ........................................................................2
PREPARATION FOR USE ............................................................................................4
MAINTENANCE ............................................................................................................4
BATTERY BACK-UP SYSTEM ......................................................................................5
LOCATION OF CONTROLS & INDICATORS .................................................................7
REMOTE CONTROL .....................................................................................................9
OPERATING INSTRUCTIONS .....................................................................................10
CONNECTING EXTERNAL DEVICES ..........................................................................10
SETTING & BASIC OPERATIONS ...............................................................................11
RADIO OPERATION ....................................................................................................14
PRESETTING STATIONS IN THE TUNER MEMORY ...................................................16
SLEEP TIMER ............................................................................................................18
ALARM SETTING .......................................................................................................19
iPod / iPhone OPERATION ..........................................................................................21
DOCK ADAPTOR COMPATIBILITY ..............................................................................24
iPod / iPhone OPERATION CONTROLS ......................................................................25
TROUBLESHOOTING GUIDE .....................................................................................27
TECHNICAL SPECIFICATION ...................................................................................28
THE UNIT SUPPORTS THE LISTED iPods / iPhones ..................................................29
INTRODUCTION
Thank-you for choosing SANYO. This very compact digital music system comes with dual
playing and charge your iPhone/iPod. It also has an AM/FM stereo digital tuner with 40 presets,
dual alarm clock function with wake to iPhone/iPod/radio/buzzer, backlit LCD display with six
level dimmer control, two 2.0” speakers with oversize magnets for amazing sound and a full
function remote control.
1
Page 3

IMPORTANT SAFETY INSTRUCTIONS
Read these instructions. Keep these instructions. Follow all instructions. Heed all
1.)
warnings.
2.)
Install this unit in accordance with the manufacturer’s instructions.
3.)
Only use attachments / accessories specified by the manufacturer.
4.)
Use only with the cart, stand, tripod, bracket, or table specified by the manufacturer, or
sold with the unit. When a cart is used, use caution when moving the cart/unit
combination to avoid injury from tip-over.
5.)
Use replacement parts as specified by the manufacturer.
6.)
Do not install this unit near any heat sources such as radiators, heat registers, stoves, or
other apparatus (including amplifiers) that produce heat.
The unit shall not be exposed to dripping or splashing water and no object filled with
7.)
liquids, such as vases, shall be placed on the apparatus.
Do not use this apparatus near water and clean the unit with dry cloth only.
8.)
Disconnect the unit from the power source when cleaning.
9.)
No naked flame sources, such as lighted candles, should be placed on the unit.
10.)
Keep the player clean and never store it next to a heat source or in dirty, humid or wet
11.)
places. Keep it out of direct sunlight.
12.)
Do not block any ventilation openings; the ventilation should not be impeded by covering
the ventilation openings with items, such as newspapers, table-cloths, curtains, etc.
Give minimum 100 mm distances around the apparatus for sufficient ventilation.
13.)
To prevent fire or shock hazard, do not expose this unit to rain or moisture.
14.)
Do not subject the product to harsh impacts. Do not drop the appliance. This may result
in damage to the product and loss of data.
Care required with the use of this apparatus in moderate climates.
15.)
Do not use this apparatus in an extremely dry environment, as this can lead to static
16.)
discharge which can damage the player.
When the unit experienced a crash due to a strong electromagnetic field or other
17.)
interference. Please first switch off the mains and disconnect the main unit with the main
power supply for a few minutes. Reconnect the unit with the power supply to reset the
unit software, the unit will return to normal opeation.
18.)
To prevent fire or shock hazard, do not use this plug with an extension cord, receptacle
or other outlet unless the blades can be fully inserted to prevent blade exposure.
Unplug this unit during lightning storms or when unused for long periods of time.
19.)
Where the MAINS plug is used as the disconnect device, the disconnect device shall
20.)
remain readily operable.
2
Page 4

IMPORTANT SAFETY INSTRUCTIONS
Do not destruct the safety purpose of the polarized or grounding-type plug. A polarized
21.)
plug has two blades with one wider than the other. A grounding type plug has two blades
and a third grounding prong. The wide blade or the third prong is provided for your
safety. If the provided plug does not fit into your outlet, consult an electrician for
replacement of the obsolete outlet.
22.)
Protect the power cord from being walked on or pinched particularly at plugs,
convenience receptacles, and the point where they exit from the apparatus.
23.)
Do not overload wall outlet. Use only power source as indicated.
24.)
Upon completion of any service or repairs to this product, ask the service technician to
perform safety checks.
25.)
Refer all servicing to qualified service personnel. Servicing is required when the unit has
been damaged in any way, such as power-supply cord of plug is damaged. Liquid has
been spilled of objects have fallen into the unit, the unit has been exposed to rain or
moisture, or has been dropped, does not operate normally.
26.)
Batteries shall not be exposed to excessive heat such as sunshine, fire or the like.
27.)
Attention should be drawn to the environmental aspects or battery disposal.
28.)
This product is not intended for commercial use. Household use only.
29.)
Do not install this apparatus in a confined space, such as a book case or built-in cabinet.
Minimum distance (about 10cm) around the apparatus for sufficient ventilation.
30.)
To be completely disconnected the power input, the mains plug of apparatus shall be
disconnected from the mains.
31.)
The nameplate is located at the bottom cabinet of the apparatus.
Servicing:
•
This unit contains no user serviceable parts. Refer to qualified personnel.
•
Consult your dealer if you are ever in doubt about the installation, operation or safety
of this product.
3
Page 5

PREPARATION FOR USE
Unpacking And Set Up
• Remove the main unit, the AC adaptor, the 6 iPod adaptors and the external AM loop
antenna from the carton, and remove all packing material from the main unit. We
recommend that you save the carton and packing material in the event that the unit
ever needs to be returned for service.
• Remove any descriptive labels or stickers from the top or front panels of the unit but
do not remove any labels or stickers from the back or bottom panels.
MAINTENANCE
Cleaning The Unit
• To prevent fire or shock hazard, disconnect your unit from the main power source when
cleaning.
• If the cabinet becomes dusty wipe it with a soft dry cloth. Do not use any wax or polish
sprays on the cabinet.
• If the cabinet becomes dirty or smudged with fingerprints, it may be cleaned with a soft
cloth slightly dampened with a mild soap and water solution. Never use abrasive cloths
or polishes, which will damage the finish of your unit.
Caution: Never allow any water or other liquids to get inside the unit while cleaning.
4
Page 6
BATTERY BACK-UP SYSTEM
This system includes a battery back-up circuit that will maintain the time and alarm
settings, and the preset tuner memories, in the event of a temporary power
interruption. The battery back-up system requires two “AAA”(UM-4) batteries(not
included). If the back-up battery is not installed, or the battery is exhausted, and the
AC power supply is interrupted, the time, alarm, and preset memory stations will be
lost. It will be necessary to reset the unit when the power is restored.
The battery back-up compartment is located on the bottom cabinet.
Installing The Back-Up Battery
1. Turn the unit upside down on a soft surface such as a cloth or towel to avoid
scratching the front cabinet surface.
2. Open the battery compartment cover as shown in the illustration.
3. Insert two fresh “AAA”(UM-4) batteries into the battery compartment. We
recommend that you use a well-known brand of alkaline batteries for longest life
and best performance. Be sure to follow the polarity (+/-) markings inside the
battery compartment. If the batteries are inserted incorrectly the battery back-up
system will not work.
4. Replace the battery compartment cover and turn the unit right side up.
Replacing The Back-Up Battery
When it’s time to replace the battery the Low Battery lcon( ) will be shown in the
lower right corner of the display. Insert two fresh “AAA”(UM-4) batteries following the
same procedure described above, however leave the unit connected to the AC
adaptor while replacing the battery to avoid losing all of your settings.
5
Page 7
BATTERY BACK-UP SYSTEM
Battery Precautions
Follow these precautions when using a battery in this device.
1. Warning - Danger of explosion if battery is incorrectly replaced. Replace only with
the same or equivalent type
2. Use only the size and type of battery specified.
3. Be sure to follow the correct polarity when installing the battery as indicated in the
battery compartment. A reversed battery may cause damage to the device.
4. If the device is not to be used for a long period of time, remove the battery to prevent
damage or injury from possible battery leakage.
5. Do not try to recharge a battery not intended to be recharged; it can overheat and
rupture.(Follow battery manufacturer’s directions.)
6. Battery shall not be exposed to excessive heat such as sunshine, fire or the like.
Using The AC Adaptor
Connect the small female plug of the AC adaptor to the DC IN Jack on the back panel.
Connect the housing of the AC adaptor to the 240V AC outlet.
FM ANT
AM ANT
AUX IN
DC IN 10 V
NOTES:
• The housing of the AC adaptor may become warm during operation. This is normal.
• To reduce the risk of electric shock never connect or disconnect the AC adaptor while
your hands are wet.
• Please use original AC adaptor supplied with the unit, otherwise, will damage the unit.
6
Page 8
LOCATION OF CONTROLS & INDICATORS
1 2 3 4 5
VOLUM E
STANDB Y / ON
MODE
ALM1 ALM2
PRESE T
SNOO ZE / DIMM ER
DOCK SE LECT
TIME SY NC.
TIME
SET
MEMOR Y
DOCK RDOCK L
SLEE P
TUNE / SK IP
18
6 7 8 9 10 11 12 13 14 15 16 17
FM ANT
AUX IN
AM ANT
DC IN 10V
19 20 21 22
1 . DOCK L Indicator
2 . Universal Dock for iPod / iPhone
3 . DOCK SELECT / TIME SYNC. Control
4 . Universal Dock for iPod / iPhone
5 . DOCK R Indicator
6 . VOLUME + / - Control
7 . STANDBY/ON Button
8 . MODE Control
9 . ALM 1 / PRESET - Control
10. Display
11. SNOOZE / DIMMER Control
12. ALM 2 / PRESET + Control
23
13. TIME SET / MEMORY Control
14. SLEEP Control
15. Remote Sensor
16. PLAY / PAUSE Control
/
17. TUNE / SKIP / Control
18. Backup Battery Compartment
(On Bottom Cabinet)
19. FM ANTENNA Wire
20. AM ANTENNA Socket
21. AUX IN Jack
22. DC IN Jack
23. iPod Holders (6 inserts)
7
Page 9
LOCATION OF CONTROLS & INDICATORS
LCD DISPLAY
Wake To Indicator;
iPod, Radio, Buzzer.
Alarm 1 / 2 ‘On’
Indicator
Daylight
Savings Time
TIME AM /
PM Indicator
Left iPod Indicator
FM / AM Indicator
AUX / Radio Frequency / Volume /
EQ / DBBS Indicator
Right iPod Indicator
STEREO
Indicator
SLEEP,SNOOZE
Indicator
Time / Alarm DisplayLow Battery Indicator
8
Page 10
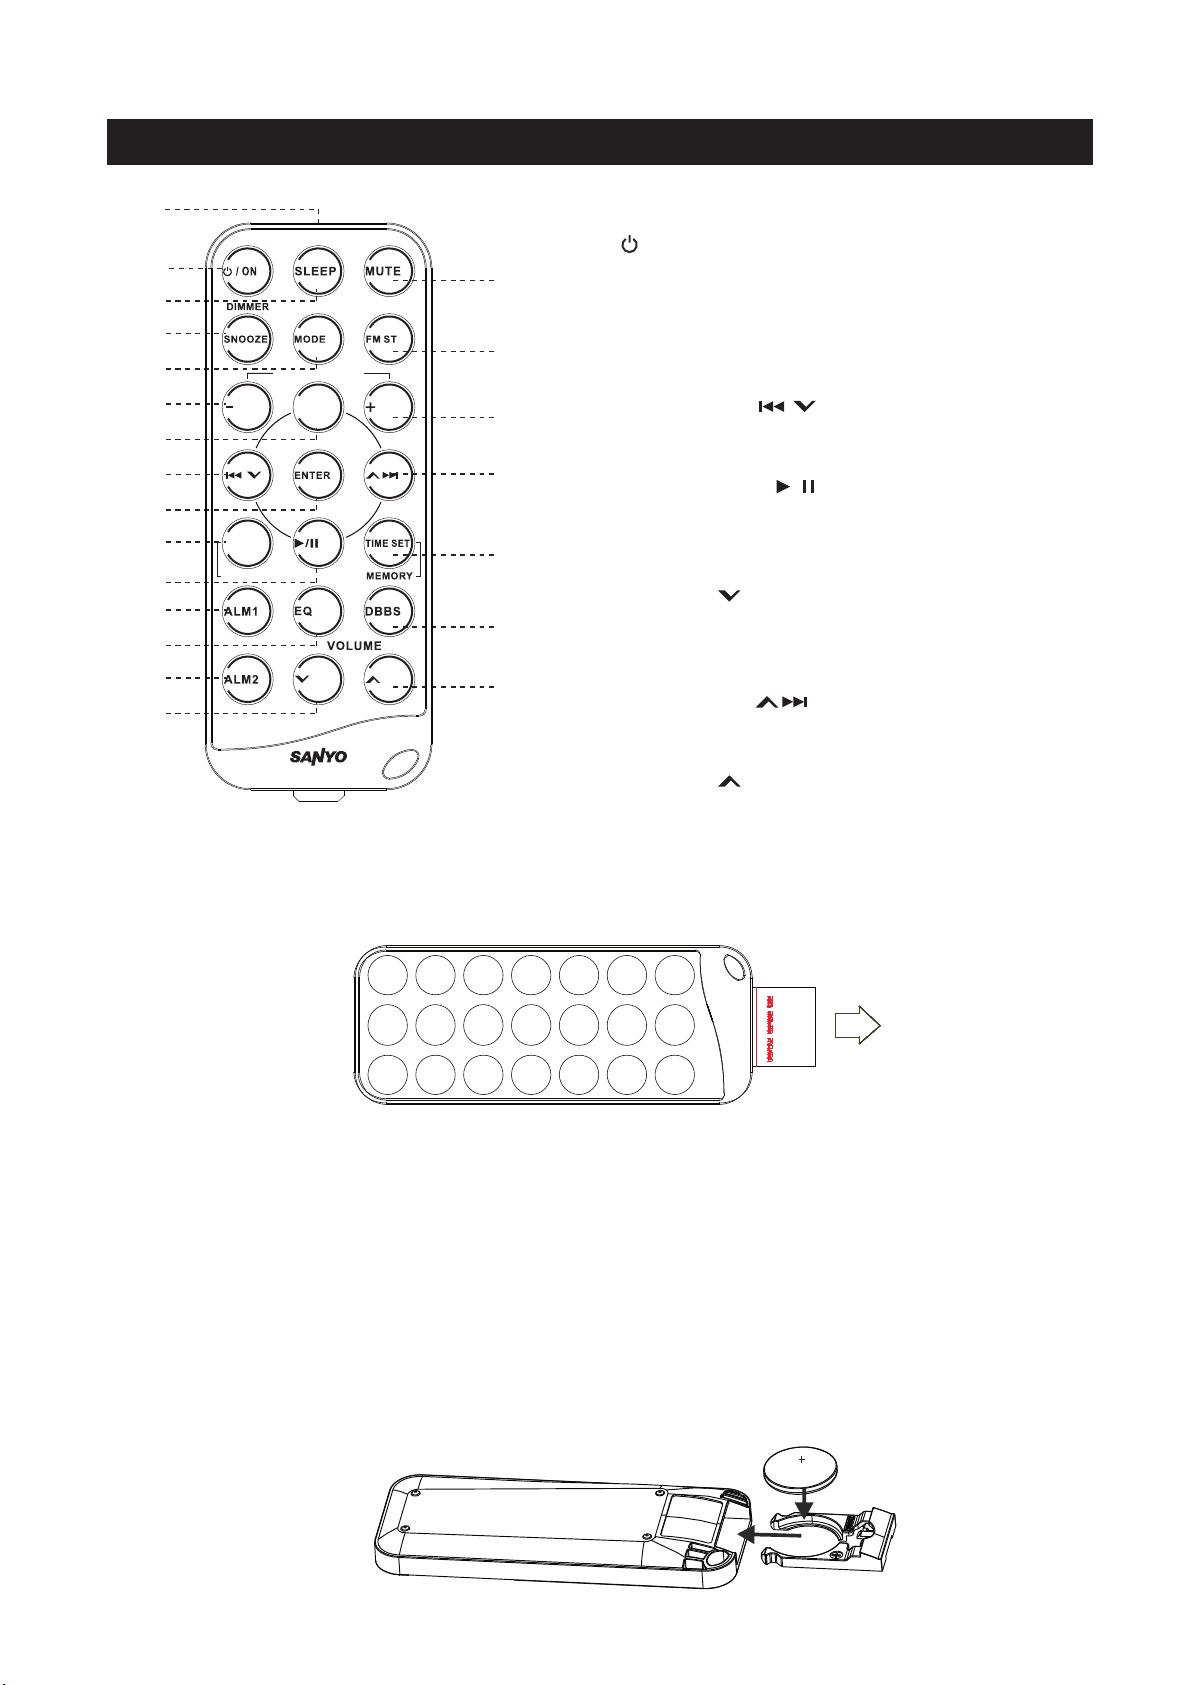
REMOTE CONTROL
10
11
12
13
14
15
1
1. Remote Control Transmitter
2. STANDBY / ON Button
2
3
4
5
6
7
8
9
PRE SET / MEN U
MEN U
DOCK SEL
TIM E SYNC
16
17
18
19
20
3. SLEEP Button
4. SNOOZE / DIMMER Button
5. MODE Button
6. PRESET / MENU - Button
7. MENU Button
8. TUNE / SKIP Button
9. ENTER Button
10. DOCK SELECT / TIME SYNC Button
11. PLAY / PAUSE Button
/
12. ALM1 Button
13. EQ Button
14. ALM2 Button
15. VOLUME Button
21
16. MUTE Button
17. FM ST Button
22
18. PRESET / MENU + Button
19. TUNE / SKIP Button
20. TIME SET / MEMORY Button
21. DBBS Button
DMP - 69 0P
22. VOLUME Button
Using The Remote Control
The CR2032 lithium battery is already installed in the remote control. Pull out the
small mylar insulation tab as shown in the illustration to begin using the remote
control.
PULL
To use the remote controller, point the remote control transmitter on the remote
control toward the remote control receiver on the front panel of the main unit and
press the desired button. Th e effective range of th e rem ote cont roller is
approximately 20 feet. Please note that bright sunlight or artificial light may interfere
with the proper operation of the remote control.
Battery Replacement
When the remote operation becomes weak or intermittent, it is time to replace the
remote control battery. Pull out the battery holder, remove the old battery and install a
new CR2032 battery in the holder as shown in the illustration. Slide the holder back
into the remote control.
NOTE: If the battery is installed incorrectly the remote control will not work.
0
2
3
R
2
C
9
Page 11

OPERATING INSTRUCTIONS
lMake sure that you have fully extended the FM antenna wire.
lBe sure to connect the external AM loop antenna to the AM ANT Jack on the back
panel if you are planning to listen to AM radio stations (refer to page 15 for
connection information) .
lMake sure you have removed the mylar insulation tab from the remote control.
lMake sure that the system is connected to an AC outlet that is always “live”.
lDo not connect the system to an AC outlet controlled by a wall switch.
General Controls
Most of the main functions of this system can be operated by the controls on the top panel of the
main unit, or by the buttons on the remote control. If a specific function can only be operated by
the remote control, or by the top panel controls, this will be clearly indicated in the instructions.
When operating this system with the remote control, make sure that the IR (Infrared) transmitter
on the front of the remote control is pointed at the remote sensor on the front panel of the main
unit.
The effective operating range of the remote control is approximately 20 feet. Please note that
bright sunlight or room lighting may interfere with the remote control operation. If the remote
control is not operating properly, try reducing the brightness of the room or moving closer to the
main unit. If this does not solve the problem, it may be time to change the remote control battery.
CONNECTING EXTERNAL DEVICES
Auxiliary Input Jack
This system includes an AUX IN Jack to allow you to connect external audio equipment
and listen to the sound from the external equipment through the speakers of this system.
To listen to the external audio source:
• Connect the external audio equipment to AUX IN jack on the rear panel of the system
as shown below. The connection cable is not included.
Select the AUX mode by repeatedly pressing the MODE button
on the top panel or by repeatedly pressing the MODE
button on the remote control until the “AUX” indicator appears
above the time display.
FM ANT
AM ANT
AUX IN
DC IN 10V
Signal c ord (not incl ude d)
plug
10
Extern al au dio sourc e
Page 12

SETTING & BASIC OPERATION
Sensor-Touch Control Information
All of the controls on the top panel of the main unit, with the exception of the STANDBY /
ON control, are special ‘Sensor-Touch’ controls. There are no buttons to push’. When you
softly touch one of these ‘buttons’, it will flash 3 times to confirm it understood the
command, and then the system will react accordingly.
Daylight Saving / Standard Time Selection
Note: This adjustment can only be made when the system is in the standby mode.
If you are currently observing Daylight Saving Time you should make this adjustment
before you set the actual time. If you are currently observing Standard Time you do not
need to make this adjustment now. Wait until the beginning of Daylight Saving Time.
1. With the system in the standby mode, touch and hold the
MODE button on the top panel or press and hold the
MODE button on the remote control until the number “1”
will briefly appear above the time display and the DST
indicator also appears. The display will advance by one
hour. After a few seconds the number “1” indicator
disappears but the DST indicator remains in the display to
confirm that the clock is showing Daylight Saving Time.
2. At the end of Daylight Saving Time touch and hold the
MODE button on the top panel or press and hold the
MODE button on the remote control. Until the number “0”
will briefly appear above the time display. The display will
back-up by one hour. After a few seconds the number “0”
indicator and the DST disappears to confirm that the clock
is showing Standard Time.
11
Page 13

SETTING & BASIC OPERATION
Setting The Clock
When the system is connected to the AC 240V 50Hz
Outlet for the first time, “AM 12:00”will flash on the display.
Important: Do not press the STANDBY/ON button to turn the system ‘On’. The clock
can only be set when the system is in the Standby Mode.
1.) Touch and hold the TIME SET button on the top panel, or depress and hold the
TIME SET button on the remote control until only the “Hour” digits are flashing.
2.) Touch the TUNE/SKIP / buttons on the top panel, or
press the / buttons on the remote control to set
the correct hour. Be sure to observe the word to confirm
that the hour is set correctly.
3.) Touch the TIME SET button on the top panel or depress
the TIME SET button on the remote control then the
“Minute” digits are flashing. Press the / buttons
on the remote control or press the TUNE/SKIP /
buttons on the top panel to set the correct minute.
4.) When the correct time appears on the display, touch the
TIME SET button on the top panel or press the TIME SET
button on the remote control once more. The display
stops flashing and the clock begins to run.
12
Page 14

SETTING & BASIC OPERATION
Volume Controls
To increase or decrease the system volume, press the VOLUME or button on the
remote control or VOLUME + or - on the top panel. The Volume Level Indicator will appear
on the display when you change the volume level.
The level indicator ranges from “00” (Minimum) to “30”
(Maximum).
If the volume level is less than VOL 24, the system remembers
the volume level when the power is switched ‘off’ and
automatically returns to the same level when the power is switched ‘on’ again. If the
volume level over VOL 24, when the power is switched ‘off’ volume automatically returns to
the default level(VOL 15) when the power is switched ‘on’ again.
EQ (ELECTRONIC Preset Equalizer)(On Remote Control Only)
The preset equalizer allows you to adjust the sound
characteristic for the most popular types music.
Press the EQ button on the remote control to cycle through
the following equalization modes:
→ EQ1(FLAT) → EQ2(CLASSIC) → EQ3(ROCK) → EQ4(POP) → EQ5(JAZZ)
The appropriate EQ indicator briefly appears in the display to confirm your selection.
The system remembers the EQ setting when the power is switched ‘Off’ and returns to
the same setting when the power is switched ‘On’ again.
DBBS (Dynamic Bass Boost) Control(On Remote Control only)
Press the DBBS button on the remote control to increase the bass response. Press
again to cancel the Bass Boost function.
MUTE Button (On Remote Control Only)
Press the MUTE button on the remote control to shut off the
speakers temporarily, for example, to answer the telephone.
The sound stops and the Volume Level indicator begins
flashing on the display.
Press the MUTE button again to cancel the mute function and restore the sound.
The mute function will also be cancelled automatically by pressing the VOLUME or
button on the remote control or touch the VOLUME + or - on the top panel.
13
Page 15

RADIO OPERATION
1.) Press the STANDBY/ON button on the top panel or /ON
button on the remote control to turn the system ‘On’. The
initial default mode for this system is the iPod function.
The “iPod” indicator will flash above the time display.
2.) Touch the MODE button on the top panel or press the
MODE on the remote control until a FM or AM frequency
appears above the time display.
3.) Tune to the desired station as follows:
• Automatic Tuning
Press and hold the / buttons on the remote control or touch and hold the
TUNE/ SKIP / buttons on the top panel until the frequency display starts to
change, then release the buttons. The tuner will search down or up the band for the
next strong signal and stop on that station.
• Manual Tuning
Repeatedly press the / buttons on the remote control or touch the TUNE/
SKIP / buttons on the top panel until the display shows the frequency of the
desired station. Note: Use the Manual Tuning method to tune to stations with weaker
signals that may be bypassed during Automatic Tuning.
4.) If you tuned to a FM stereo station the stereo (ST)
indicator will appear in the display. If FM stereo
reception is noisy or weak, press the FM ST button
on the remote control to select the FM Mono mode.
This will usually improve the reception but the sound
will no longer be in stereo.
5.) When you finished listening press the STANDBY/ON button on the top panel or
/ON button on the remote control to turn the system ‘Off’. The radio station
frequency disappears from the display.
14
Page 16

RADIO OPERATION
Hints For Better Reception
FM: The FM lead wire antenna on the back panel should be extended to its full length.
You may also have to vary the direction of this antenna until you find the position
that provides the best reception.
FM ANT
AM ANT
AUX IN
DC IN 10 V
FM ANT
AM: Insert the small black plug at the end of the AM loop antenna wire into the AM
ANT jack on the back panel as shown in the illustration.
AM ANT
AM ANT
To connect the AM loop antenna
15
Page 17

PRESETTING STATIONS IN THE TUNER MEMORY
Up to 40 stations (20 AM / 20 FM) can be stored in the tuner memory for easy recall at
any time. Use either the Automatic or Manual tuning methods described on page 14
to tune to the first station to be stored in memory. (Example “FM 103.50 MHz”)
1.) When the desired station frequency appears in the
display, press and release the TIME SET / MEMORY
button on the remote control or touch TIME SET /
MEMORY on the top panel. The P – 01(Preset Memory
#1) indicator will begin flashing in place of the radio
frequency display.
To enter your station in Preset Memory #1, press the
TIME SET / MEMORY button on the remote control or
touch TIME SET / MEMORY on the top panel again.
The P – 01 will stop flashing and remain on the display
for 5 seconds, and then the display will return to the
selected radio frequency. Your selected station has
now been entered in Preset Memory #1.
Note: You must press the TIME SET / MEMORY button while the memory indicator is
flashing in order to enter the station in memory. If the memory indicator stops flashing
the station will not be entered in the memory.
2.) Tune to the next station that you want to memorize and
when that station appears in the display press the TIME
SET / MEMORY once. The P – 01 indicator begins
flashing. Press the PRESET / MENU + or - button on
the remote control or touch the ALM1 / PRESET - or
ALM2 / PRESET + control on the top panel to select a
different preset memory number, and then press the
TIME SET / MEMORY button once more to enter your
station in the selected preset memory number.
3.) Repeat step 2, choosing a different preset memory
number each time until you have entered up to 20
stations on one band. You may then select the AM band
and follow the same procedure to preset up to 20 AM
stations in the tuner memory.
16
Page 18

PRESETTING STATIONS IN THE TUNER MEMORY
Recalling Preset Stations
Simply press the PRESET / MENU + or - buttons on the remote control or touch the
ALM2 / PRESET + or ALM1 / PRESET - button on the top panel to scroll forward or
backward through the preset station memories.
Changing Preset Stations
Tune to the new station you want to memorize, press the TIME SET / MEMORY button
on the remote control or touch the TIME SET / MEMORY control on the top panel, then
press the PRESET / MENU + or - buttons on the remote control or touch the ALM1 /
PRESET - or ALM2 / PRESET + control on the top panel to select the memory number
you wish to change. When that memory number is flashing in the display, press the
TIME SET / MEMORY button once. The new station is entered in the memory and the
previously memorized station is erased.
Important: The back-up batteries will maintain the preset tuner memories in the event
of a power interruption. However if the back-up batteries are not installed, or
exhausted, and the adaptor is disconnected from the wall outlet or the plug is removed
from the back of this system, the preset tuner memories will be erased. It will be
necessary to re-enter the stations in the preset tuner memories when power is
restored.
17
Page 19

SLEEP TIMER
This system includes a programmable Sleep Timer that allows you to fall asleep to
between 10 and 120 minutes of music and then turns the unit to standby automatically.
To operate the sleep timer:
1.) Turn the system ‘On’ and operate the TUNER function as usual.
2.) Press the SLEEP button on the remote control or touch the SLEEP control on the
top panel.
3.) The display will show “SLEEP 120”indicating that the
sleep timer will shut the power off after 120 minutes.
Repeatedly press the SLEEP button to decrease the amount of sleep timer operation.
4.) After a few seconds the Sleep Time display disappears
and the normal TUNER display returns, but the small
SLEEP indicator remains in the display. When the Sleep
Timer counts down to“00”, the unit returns to the Standby
(Power ‘Off”) mode automatically.
Note:
• You can shut the unit off manually before the Sleep Timer counts down to “00" by
pressing the STANDBY/ON button at any time.
18
Page 20

ALARM SETTING
NOTES:
• Use the remote control, you can set the alarms in standby mode or operation
mode. (The ALM1 / PRESET - and ALM2 / PRESET + on the top panel can only be
set when the system is in the standby mode.)
• When setting the alarm be sure to observe to confirm that you have set the wake-
up hour correctly.
• The procedure for setting Alarm 1 and Alarm 2 is the same. The example below is
for Alarm 1.
1.) Press and hold the ALM 1 button on remote control or
touch and hold the ALM1 control on the top panel, while
the system is in the standby mode, the default alarm time
(6:00) and the default alarm mode (iPod) begin flashing in
the display. Continue holding the ALM 1 button until only
the HOUR digits are flashing.
2.) Press the or buttons on the remote control or
touch the TUNE/SKIP or control on the top panel
repeatedly to set the display to the desired wake-up hour.
3.) Press the ALM 1 button again. The hour digits stop
flashing and the minute digits begin flashing.
4.) Press the or buttons on the remote control or
touch the TUNE/SKIP or control on the top panel
repeatedly to set the display to the desired wake up
minutes.
5.) Press the ALM 1 button once more to select the wake-up
Alarm Mode (iPod, Radio or Buzzer). One of the 3 Alarm
Mode indicators will be flashing in the display. Press the
or buttons on the remote control or touch the
TUNE/SKIP or control on the top panel repeatedly to
select the desired wake up mode, iPod, Radio, or Buzzer
(BUZZ).
6.) Press the ALM 1 button once more. If you selected either
the iPod or Radio Alarm Mode, the Volume Level indicator
begins flashing. Press the or buttons on the
remote control or touch the TUNE/SKIP or control on
the top panel – not the VOLUME + / - buttons, repeatedly
to set the desired wake up volume level. Note: if you
selected the wake up to Buzzer alarm mode the volume
level is fixed and cannot be adjusted.
7.) When all settings are completed press the ALM 1 button
once more to exit the setting mode and activate Alarm 1.
The display will continue to show all of your alarm settings
for a few seconds and then return to the current time.
However the Alarm 1 indicator ( ) will remain in the
display to confirm that the alarm is active.
19
Page 21

ALARM SETTING
8). At the selected wake-up time the system will turn on to the mode you selected. The
alarm will continue for 1 hour and then shut off automatically and reset itself for the
same time on the following day. Note: If you selected the wake to iPod mode but there
is no iPod docked at the wake up time, the system will default to the wake to Buzzer
mode automatically.
NOTE: If you selected the RADIO alarm mode, at the selected wake-up time the
system will turn on to the last station you have listened. If you selected the wake to
iPod or radio mode, and the system is in iPod or radio operation mode at the wake up
time, the system will default to the wake to Buzzer mode automatically.
9.) To shut the alarm off sooner, press the STANDBY/ON (Power “Off’) button at any
time.
To check the alarm settings at any time, press the appropriate
ALM 1 or ALM 2 button. The display will briefly show the current
alarm settings for a few seconds and then return to the correct
time, but the Alarm indicator will remain in the display indicating
that the alarm is active. To deactivate the alarm press the
appropriate ALM 1 or ALM 2 button once more. The Alarm
indicator disappears and the alarm is cancelled.
Snooze / Display Dimmer Control
When the alarm turns the system ‘On’ to wake you, touch the SNOOZE / DIMMER button on
the top panel or press the SNOOZE / DIMMER button on the remote control. The alarm will
stop for 9 minutes and then turn ‘On’ again. This action can be repeated continuously, but if
you don’t press SNOOZE / DIMMER button again, after one hour the alarm will not turn ‘On’
again. The SNOOZE indicator appears in the display during Snooze Timer operation. To
switch SNOOZE function off, you can press STANDBY/ON button.
During normal operation touch the SNOOZE / DIMMER button on the top panel or press the
SNOOZE / DIMMER button on the remote control to control the brightness of the display.
There are 6 levels of brightness that you can select. If you continue to press this button the
display will return to full brightness.
NOTE:
1.
The default of the brightness of the display is dim.
2.
In order to save power, after pressing STANDBY / ON button to turn off the unit, the
brightness of the display becomes dim.
20
Page 22

iPod/iPhone OPERATION
This SANYO system includes two docking station so that you can dock and charge two
separate iPod or iPhone models, or one iPod and one iPhone model simultaneously.
Since this model is ‘Works With iPhone’ certified it is not necessary to place your
iPhone in the Airplane mode to avoid audio interference. You will be able to make and
receive calls, without interference, while the system is in operation.
IMPORTANT NOTES:
A. If you are playing an iPod or iPhone in the left side dock ‘DOCK L’ and you insert an
iPod or iPhone in the right side dock ‘DOCK R’ , the system will automatically switch
to the ‘DOCK R’ and playing iPhone or iPod in the right side dock ‘DOCK R’. If you are
playing an iPod or iPhone in the right side dock ‘DOCK R’ and you insert an iPod or
iPhone in the left side dock ‘DOCK L’, the system will automatically switch to the
‘DOCK L’ and playing iPhone or iPod in the left side dock ‘DOCK L’.
B. When you dock an iPhone or certain newer iPod models in either dock there may
be a delay of several seconds before the system recognizes the device and the main
menu is displayed. This is because the system and the docked device must go
through an ‘Authentication Process’ before the docked device can accept any
commands. THIS IS NORMAL AND NOT AN INDICATION OF ANY PROBLEM WITH
YOUR SYSTEM.
The system is supplied with 6 different iPod adaptor/inserts intended to insure that
older iPod models fit properly in the docking area. If your iPod was supplied with a
docking adaptor at the time of purchase, that adaptor will fit properly into the docking
area of this system. If you have an older iPod model that was not supplied with a
docking adaptor, please select the appropriate adaptor from the chart below. Each
adaptor is identified by the letters “A” through “F” on the bottom of the adaptor. Select
the adaptor with the letter that corresponds to your iPod model. Position the adaptor in
the docking area as shown and make sure that it ‘locks’ in place, then place your iPod
into the adaptor and make sure that the iPod connector on this system is fully inserted
into the slot on the bottom of your iPod , When properly docked your iPod should be
‘leaning backward’ slightly on a 15 degree angle. DO NOT ATTEMPT TO
“STRAIGHTEN” YOUR IPOD . THIS COULD RESULT IN DAMAGE TO THE DOCKING
CONNECTOR OR DAMAGE TO YOUR IPOD .
To remove your correct adaptor from the dock
of main unit, press its inside rear suface and
pull it upward.
21
Page 23

iPod/iPhone OPERATION
Choosing The Correct Adaptor
When connecting an iPod / iPhone to this iPod Dock, please ensure that
the correct adaptor plate is used. FAILURE TO DO SO MAY RESULT IN
DAMAGE TO THE iPod / iPhone.
The iPod dock comes with 6 removable dock adaptors. Using the correct adaptor
ensures the proper fit for your iPod / iPhone and helps to reduce the stress on the
connector when operating the iPod / iPhone.
To place a dock adaptor:
1. Refer to the compatibility table below and select the
correct dock adaptor for the iPod / iPhone.
2. Place the proper adaptor into the dock and press it into
position. The adaptor will only go in one way. The iPod
dock connector should fit through the opening in the
bottom of the adaptor.
3. Carefully align and then gently insert the iPod / iPhone
into the dock.(The iPod/iPhone must not be in a case or
“SKIN”)
4. To remove/replace a dock adaptor, first remove the
iPod/iPhone, then grip the adaptor and pull gently upwards.
Charging your iPod / iPhone
Note: Please make sure you are using the correct insert and
that it is properly docked into this unit.
FAILURE TO DO SO MAY DAMAGE THE iPod / iPhone.
When an iPod / iPhone is inserted into the dock, it will go to standby mode then turn
off. While the iPod / iPhone is docked in the system, it will recharge (until fully
charged). Please note that older 3rd generation iPod cannot be charged by this unit.
from your iPod / iPhone
NOTE: In order to avoid interfering with the reception, the iPod / iPhone will not be
charged in the TUNER mode(FM / AM).
22
Page 24

iPod/iPhone OPERATION
TIME SYNC Control
To set the time on your Main Unit Clock Radio, first dock your iPod or your iPhone device. Then,
press and hold the DOCK SEL / TIME SYNC button on the remote control or touching and hold
the DOCK SELECT / TIME SNYC. control on the top panel. The time on the Clock Radio will be
updated to the time set on your iPod or iPhone device.
NOTE : An iPod/iPhone cannot sync to exact seconds, so it’s possible to have up to 59 seconds
difference between the Main Unit and synced iPod/iPhone.
iPhone 3G / iPhone 3GS / iPhone / iPod touch(1st/2nd generation) / iPod Classic /
iPod nano(1st/2nd/3rd/4th/5th generation) / 5G iPod video(5th generation)
23
Page 25

DOCK ADAPTOR COMPATIBILITY
3G iPhone
3GS iPhone
iPhone
1G/2G
iPod touch
4G/5G nano
8GB
16GB
16GB
32GB
4GB
8GB
16GB
16GB
32GB
8GB
16GB
A B C D E F
A B
C
D E F
iPod nano
5G iPod
4G iPod
3G iPod
iPod mini
iPod classic
iPod photo
120GB
160GB
24
Page 26

iPod/iPhone OPERATION CONTROLS
/
(Play/Pause) – touch this area on the top panel or press this button on the remote
control to begin playback on your iPod/iPhone. Press again to Pause playback.
/ TUNE/SKIP buttons on the Main Unit – During playback press to skip forward or
backward to the next or previous track.
/ Skip Forward/Back buttons on Remote Control - During playback press to
skip forward or backward to the next or previous track.
MENU button(Remote control only) - Press this button to access the Menu of the iPod
or iPhone which is playing. This button operates exactly like the MENU button on the
iPod itself.
+ / - (Plug/Minus)buttons on Remote Control - After pressing the MENU button to
access the iPod/iPhone Menu, press the + / - buttons to move up(+) or down(-) within
the Menu display.
ENTER button (Remote Control Only) - After selecting the desired Genre, Album,
Song, etc. in the Menu display using the + or - buttons. Press the ENTER button to
open or to begin playback of the selected song.
1.) If necessary, press the STANDBY/ON button on the top panel or /ON button on
the remote control to turn the system ‘On’.
2.) If necessary, touch the MODE control on the top panel or press the MODE button on
the remote control to select the iPod mode. The word “iPod” begins flashing above
the time display and the “R” (right) iPod indicator appears.
3.) Make sure that you have inserted the correct adaptor into the right dock ‘DOCK R’
and then insert your iPod or iPhone into the adaptor. The word “iPod” stops flashing
and remains ‘On’’. Your iPod/iPhone display will come on. If you were playing
music on your iPod/iPhone before inserting in the dock your iPod/iPhone may
change to pause mode, but it may take several seconds for your iPod or iPhone to
go through the authentication process. If your iPod or iPhone was in the pause
mode when inserted into the dock it may remain in the pause mode. In that case
press the Play/Pause ( ) button on the top panel or on the remote control to
release the pause mode and resume playback.
4.) To skip forward or backward to different tracks, press the TUNE/SKIP / button
on the top panel or press the / buttons on the remote control.
/
25
Page 27

iPod/iPhone OPERATION CONTROLS
5.) The MENU button on the remote control works the same way as the MENU button on
your iPod. Press the MENU button repeatedly to access the Main Menu of your iPod.
Press the + / - buttons on the remote control to navigate Up or Down through the
displayed Menu list. When the desired Genre, Artist, Album, or Song is ‘highlighted’
on your iPod Menu display, press the ENTER button on the remote control to ‘Enter’
or Select’ the highlighted item. If the highlighted item is a specific song, pressing the
ENTER button will begin playback of the song.
6.) If you have two iPod models, or an iPod and iPhone docked at the same time you
can switch between the two devices by touching the DOCK SELECT control on the
top panel or press the DOCK SEL button on the remote control.
7.) To pause iPod playback touch the control on the top panel or press the button
on the remote control. Press again to release pause and resume iPod playback.
8.) To stop iPod playback touch and hold the control on the top panel or depress the
button on the remote control until your iPod shuts off and enters the ‘Charging’
9.) To shut the system ‘Off’ completely, press the STANDBY/ON button on the top panel
/
mode. However please note that the system power remains ‘On’.
or /ON button on the remote control. The LCD display backlight becomes dim and
any iPod or iPhone in the docking area will shut off and enter the charging mode.
/
/
/
26
Page 28

TROUBLESHOOTING GUIDE
Symptom
Radio
Noise or sound
distorted on FM or
AM broadcasts
FM STEREO indicator
does not light.
AM or FM, no sound.
iPod Player
Unit does not respond
(no power)
Possible Cause
Station not tuned properly
for FM or AM.
FM: Wire aerial is not
positioned correctly.
Loop aerial is not positioned
correctly.
FM station is mono or station
signal is weak.
Function is not set to Tuner.
Volume at minimum.
AC adaptor is not plugged into a
wall outlet or the connector is not
plugged into the DC IN jack on
the back of the unit.
Using no or wrong iPod insert
Solution
Retune FM or AM broadcast
station.
Extend FM wire aerial.
Reposition so that the best
reception is obtained.
Extend FM aerial. Try other
strong stations.
Press MODE button to select
Tuner function.
Increase Volume.
Plug the AC adaptor into a wall
outlet and plug the connector
into the DC IN jack on the unit.
Make sure the dock insert is
the proper fit for the iPod.
iPod does not dock
properly
iPod does not
respond to the unit
iPod did not
charge up
iPod did not install properly
iPod is not installed properly
iPod is locked up
Using first or second generation
iPod, iPod shuffle or other
devices.
iPod is not installed properly
iPod is locked up/frozen
iPod battery has problem
Remove the iPod from the dock
and check for obstruction on the
connections in the dock and on the
iPod. Then reseat it in the dock.
Remove the iPod from the dock
and check for obstruction on the
connections in the dock and on the
iPod. Then reseat it in the dock.
Please make sure your iPod is
working properly before docking
into the unit. Please refer to the
iPod manual for details.
This unit cannot control those
iPod or other devices.
Remove the iPod from the dock
and check for obstruction on the
connections in the dock and on the
iPod. Then reseat it in the dock.
Please make sure your iPod is
working properly before docking
into the unit. Please refer to the
iPod manual for details.
Remarks:
If troubleshooting(see above)does not eliminate the problem, disconnect the unit from
the mains power and re-connect after a few seconds. Resetting causes the unit to
restore its factory default setting and results in all the setting made by the user being
deleted.
27
Page 29

TECHNICAL SPECIFICATION
1. General
Power requirements
Main unit backup
Power consumption
Dimensions of main unit
Weight of main unit
2. Amplifier
Power Output
3. Tuner
AM Tuning range
FM Tuning range
4. Speaker system
Impedance
5. AUX IN
Input
Max voltage
Impedance
AC Adaptor Input: AC 100-240V ~ 50/60Hz
Output: DC 10V 2.4A
2 AAA (UM-4)batteries (Purchase separately)
21W
295mm(L) x 186mm(W) x 85mm(H)
Approx. 1.5 Kg (not including batteries)
5W x 2 THD 10%
522 KHz to 1620 KHz (9kHz step)
87.50 MHz to 108.00 MHz (50 kHz step)
8 Ω 2.0” Speaker x2
Φ
3.5mm
1 V
47 KΩ
Specifications subject to change without notice.
28
Page 30

THE UNIT SUPPORTS THE LISTED iPods/iPhones
*iPods/iPhones charge and operation only*
***iPods/iPhones shown are not included***
iPod with color
iPod mini
(4GB,6GB only)
iPod
(4th generation)
(20GB,40GB only)
display
(4th generation)
(20GB,30GB,40GB,
60GB only)
iPod with video
(5th generation)
(30GB,60GB,80GB
only)
iPod nano
(3rd generation)
(video)
(4GB,8GB only)
iPod classic
(2nd generation)
(120GB only)
iPod nano
(1st generation)
(1GB,2GB,4GB only)
iPod nano
(4th/5th generation)
(8GB,16GB only)
iPod touch
(1st/2nd generation)
(8GB,16GB,32GB only)
iPod nano
(2nd generation)
(aluminum)
(2GB,4GB,8GB only)
iPod classic
(80GB,160GB only)
iPhone
(4GB,8GB,16GB only)
3G iPhone
(8GB,16GB only)
3GS iPhone
(16GB,32GB only)
29
Page 31

CODE NO.: 116421166
Printed in China
 Loading...