

Page 1

Page 2

TABLE OF CONTENTS
IMPORTANT SAFETY INSTRUCTION........................................................................1
PREPARATION FOR USE...........................................................................................3
NAMES AND CONTROLS...........................................................................................5
GENERAL FUNCTIONS..............................................................................................7
TUNER MODE..........................................................................................................9
iPod MODE…………………………….......................................................................10
AUX-IN MODE..........................................................................................................11
CLEANING AND MAINTENANCE.............................................................................11
TECHNICAL INFORMATION.....................................................................................12
INFORMATION..........................................................................................................12
Page 3

IMPORTANT SAFETY INSTRUCTIONS
1.) Read these instructions. Keep these instructions. Follow all instructions. Heed all
warnings.
2.) Install this unit in accordance with the manufacturer’s instructions.
3.) Only use attachments / accessories specified by the manufacturer.
4.) Us e on ly wit h the cart, st and, trip od, brack et, or tab le spe cif ied by the
manufacturer, or sold with the unit. When a cart is used, use caution when
moving the cart/unit combination to avoid injury from tip-over.
5.) Use replacement parts as specified by the manufacturer.
6.) Do not install this unit near any heat sources such as radiators, heat registers,
stoves, or other apparatus (including amplifiers) that produce heat.
7.) The unit shall not be exposed to dripping or splashing water and no object filled
with liquids, such as vases, shall be placed on the apparatus.
8.) Do not use this apparatus near water and clean the unit with dry cloth only.
9.) Disconnect the unit from the power source when cleaning.
10.)No naked flame sources, such as lighted candles, should be placed on the unit.
11.)Keep the player clean and never store it next to a heat source or in dirty, humid
or wet places. Keep it out of direct sunlight.
12.)Do not block any ventilation openings; the ventilation should not be impeded
by covering the ventilation openings with items, such as newspapers, tablecloths, curtains, etc. Give minimum 100 mm distances around the apparatus for
sufficient ventilation.
13.)To prevent fire or shock hazard, do not expose this unit to rain or moisture.
14.)Do not subject the product to harsh impacts. Do not drop the appliance. This
may result in damage to the product and loss of data.
15.)Care required with the use of this apparatus in tropical and/o r modera te
climates.
16.)Press the player’s buttons gently. Pressing the buttons or the screen too hard
can damage the unit.
17.)Do not use the player in an extremely dry environment, as this can lead to static
discharge which can damage the player.
18.)When the unit experienced a crash due to a strong electromagnetic field or by
others interference. Please first switch off the mains and disconnect the main
unit with the main power supply for a few minutes. Reconnect the unit with the
power supply to reset the unit software, the unit will return to normal operation.
19.)To prevent fire or shock hazard, do not use this plug with an extension cord,
receptacle or other outlet unless the blades can be fully inserted to prevent
blade exposure.
20.) Unplug this unit during lightning storms or when unused for long periods of
time.
21.)Where the MAINS plug is used as the disconnect device, the disconnect device
shall remain readily operable.
-1-
Page 4

IMPORTANT SAFETY INSTRUCTIONS
22.) Do not destruct the safety purpose of the polarized or grounding-type plug. A
polarized plug has two blades with one wider than the other. A grounding type
plug has two blades and a third grounding prong. The wide blade or the third
prong is provided for your safety. If the provided plug does not fit into your
outlet, consult an electrician for replacement of the obsolete outlet.
23.) Protect the power cord from being walked on or pinched particularly at plugs,
convenience receptacles, and the point where they exit from the apparatus.
24.) Do not overload wall outlet. Use only power source as indicated.
25.) Upon completion of any service or repairs to this product, ask the service
technician to perform safety checks.
26.) Refer all servicing to qualified service personnel. Servicing is required when
the unit has been damaged in any way, such as power-supply cord or plug is
damaged, liquid has been spilled or objects have fallen into the unit, the unit
has been exposed to rain or moisture, or has been dropped, does not operate
normally.
27.) Batteries shall not be exposed to excessive heat such as sunshine, fire or the
like.
28.) Attention should be drawn to the environmental aspects of battery disposal.
29.) This product is not intended for commercial use. Household use only.
30.) Do not install this apparatus in a confined space, such as a book case or built-
in cabinet. Minimum distance(about 100mm) around the apparatus for sufficient
ventilation.
31.) To be completely disconnected the power input, the mains plug of apparatus
shall be disconnected from the mains.
-2-
Page 5

PREPARATION FOR USE
Before Setting Up The Unit
• Operate controls and switches as described in the manual.
• Before turning on the power, make certain that the power cord is properly
installed.
• When moving the unit, be sure to rst disconnect the AC power cord.
• Avoid installing this unit in places exposed to direct sunlight or close to heat
radiating appliances such as electric heaters, on top of other stereo equipment
that radiates too much heat, places lacking ventilation or dusty areas, places
subject to constant vibration and/or humid or moist areas.
Unpacking And Setting Up
• Remove the product from the carton and remove all packing material from the
unit. We suggest that you save the packing material, if possible, in the unlikely
event that your unit ever needs to be returned for service. The original carton
and packing material is the only safe way to pack your product to protect it from
damage in transit.
• Remove any descriptive labels or stickers on the front or top of the cabinet. Do
not remove any labels or stickers from the back or bottom of the cabinet.
• Place your unit on a level surface such as a table, desk or shelf, convenient to
an AC outlet, out of direct sunlight, and away from sources of excess heat, dirt,
dust, moisture, humidity, or vibration.
• Unwind the FM antenna and extend it to its full length. It must be fully extended
to provide the best FM reception.
Protect Your Furniture
This model is equipped with non-skid rubber 'feet' at the bottom of the unit to
prevent the product from moving when you operate the controls. These 'feet' are
made from non-migrating rubber material specially formulated to avoid leaving
any marks or stains on your furniture. However certain types of oil based furniture
polishes, wood preservatives, or cleaning sprays may cause the rubber 'feet' to
soften, and leave marks or a rubber residue on the furniture. To prevent any damage
to your furniture we strongly recommend that you purchase small self-adhesive felt
pads, available at hardware stores and home improvement centers everywhere, and
apply these pads to the bottom of the rubber 'feet' before you place the product on
fine wooden furniture.
-3-
Page 6
PREPARATION FOR USE
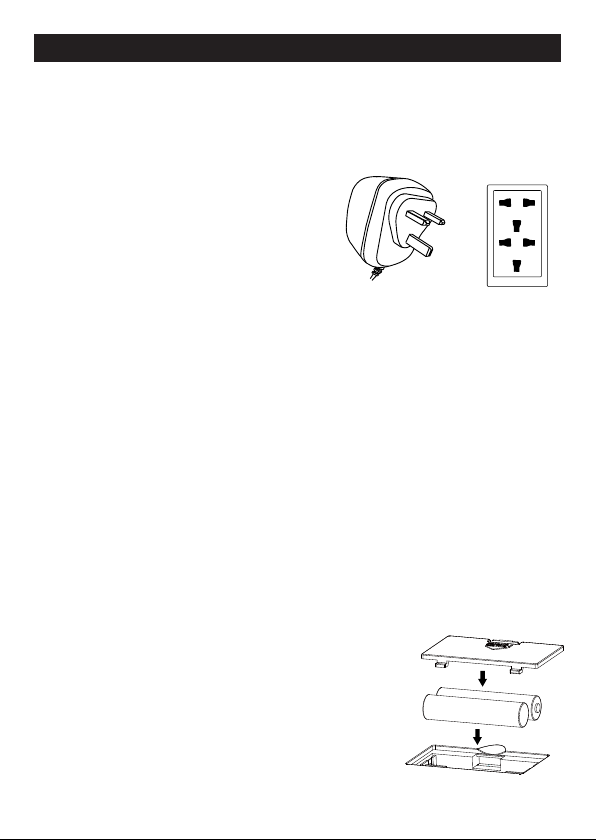
Power Source
This product is designed to operate on normal 230V 50Hz AC power only. Do not
attempt to operate the unit on any other power source. You could cause damage to
the product that is not covered by your warranty.
AC Plug AC Outlet
AC Power Supply Connection
1. Check that the mains voltage on the external AC adaptor rating label corresponds
to your local mains supply.
2. Insert the external AC adaptor cable tip into the AC~9V jack located at the back
of the unit.
3. Make sure the wall socket is switched off, and then plug the AC adaptor plug into
the wall socket.
4. Switch on the wall socket.
Caut ion: The device is conn ected to the main s with the AC exter nal adaptor.
Dis con nec t th e ex ter nal AC adaptor with the unit if you wan t to com ple tely
disconnect the device from the mains. Pull out the mains plug to disconnect the
device from the m ains . Make sure the power plug is e asil y accessible during
operation and not hindered by other objects.
Use only the AC adaptor supplied with this unit.Using another AC adaptor may
damage the unit.
DC Backup Battery
Install Battery
1. Open the battery compartment door.
2. Insta ll 2 x AA A size batteries (not included) i nto the
battery compartment (Alkaline batteries is recommended
for longer life time.) according to the polarity markings
which are engraved inside the battery compa rtment,
then close the battery compartment cover.
3. In the event of AC Power cut off, the time and alarm
setting, radio preset stations are mainta ined by the
backup batteries.
-4-
Page 7
PREPARATION FOR USE
Battery Precautions
Follow these precautions when using batteries in this device:
1. Use only the size and type of batteries specified.
2. Be sure to follow the correct polarity when installing the batteries as indicated in
the battery compartment. Reversed batteries may cause damage to the device.
3. Do not mix different types of batteries together(e.g.Alkaline and Carton-Zinc) or
old batteries with fresh ones.
4. If the device is not to be used for a long period of time, remove the batteries to
prevent damage or injury from possible battery leakage.
5. Do not try to recharge batteries not intended to be recharged; they can overheat
and rupture.(Follow battery manufacturer’s directions.)
6. Do not disassembly it.Do not dispose of the old battery in a fire.
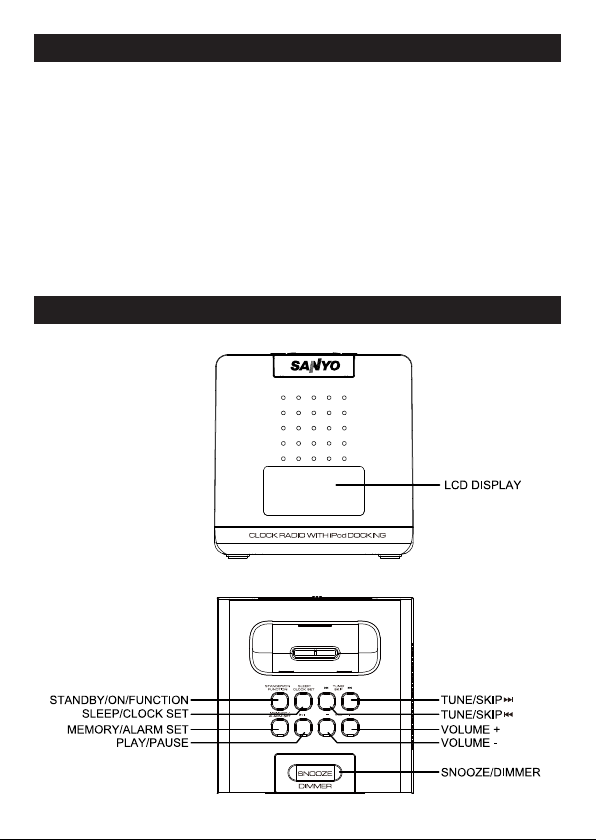
NAMES AND CONTROLS
FRONT VIEW
TOP VIEW
-5-
Page 8
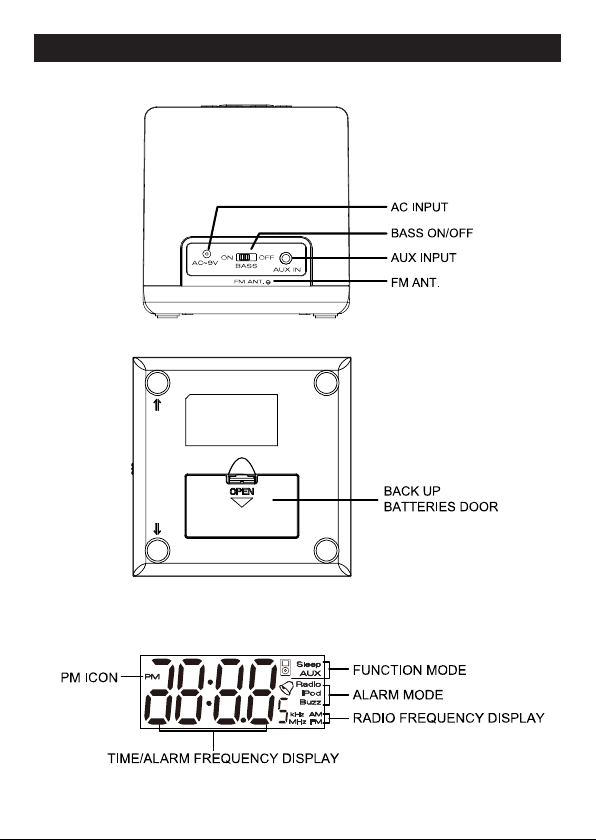
REAR VIEW
BOTTOM VIEW
LCD DISPLAY
NAMES AND CONTROLS
-6-
Page 9
GENERAL FUNCTIONS
Switching On and Off
1. The unit will automatically switch to standby mode once the AC power source is
connected
2. Switch on the device fro m st andby mode by pressi ng the STANDBY/ON/
FUNCTION button.
3. Switch the device to standby mode by pressing and holding the STANDBY/ON/
FUNCTION button. The display backlight of LCD will become dim and show the
current time in standby mode.
Selecting the Input Source
1. Having switched on the unit, press the STANDBY/ ON/FU NCTION button to
select the desired audio source. The sequence is FM, AM, iPod and AUX.
2. The default mode i s in FM, and the last input source used is automaticall y
selected.
Adjusting the Volume
1. The volume can be adjusted by pressing the VOL +/-
buttons.
2. Press the VOLUME + to increase the volume.
3. Press the VOLUME - to decrease the volume.
4. The volume level range from level 00 – 32.
5. BASS ON/OFF switch is located at the back of the unit; switch on the BASS to
enhance the bass sound.
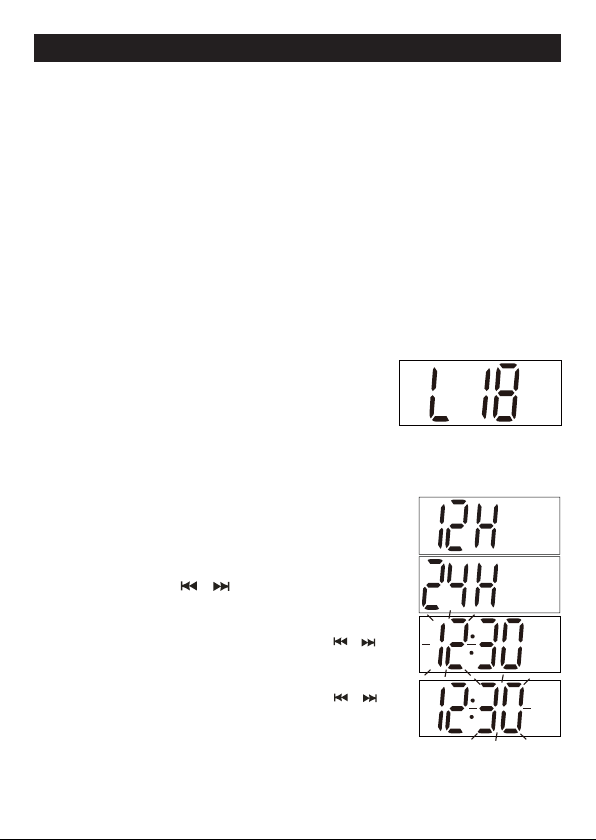
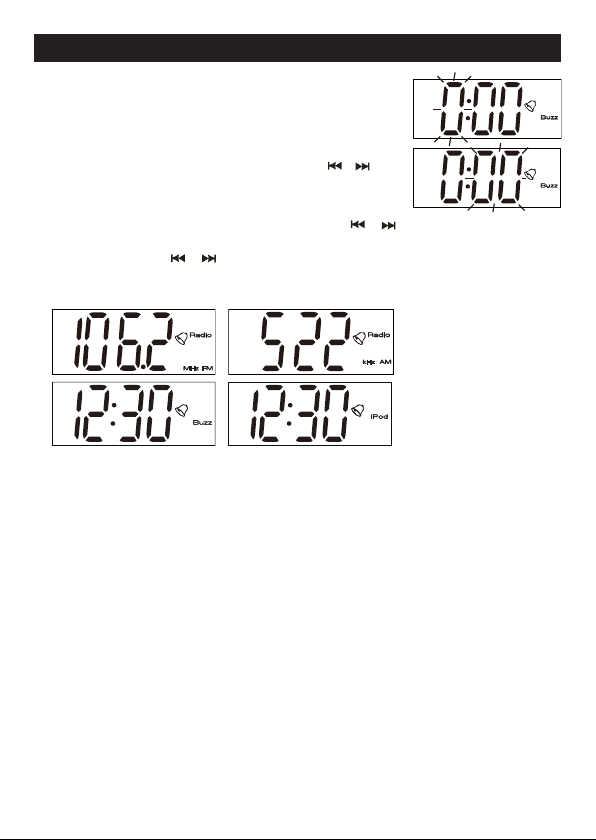
Setting Clock
1. In standby mode, press and hold SLEEP / CLOCK SET
button until “12H” flashes.
2. Press TUNE / SKIP or button to select 12H or 24H,
press SLEEP / CLOCK SET button to confirm the hour
system setting.
3. The HOUR start to flash, press TUNE / SKIP or button
to set the HOUR and press SLEEP / CLOCK SET button
to confirm the HOUR.
4. The Minute start to flash, press TUNE / SKIP or button
to set the MINUTE and press SLEEP / CLOCK SET button
to confirm the MINUTE.
5. At any stage, if no key is pressed for approx. 5 seconds, the last selected value is
automatically saved.
-7-
Page 10
GENERAL FUNCTIONS
Setting Alarm
1. In standby mode, press and hold the MEMORY/ALARM
SET button, the alarm icon will appear and flash on the
LCD display.
2.The HOUR digits will flash, press TUNE/SKIP or button
on the unit to set the HOUR, press MEMORY/ALARM
SET button to confirm the HOUR.
3. The MINUTE starts to flash, press TUNE/SKIP or button to set the MINUTE
and press MEMORY/ALARM SET button to confirm the MINUTE.
4. Press TUNE/SKIP or button to select one of FM Radio, AM Radio, iPod or
buzz as the wake-up alarm. Press MEMORY/ALARM SET button to confirm the
setting.
5. When the wake-up alarm is set to FM radio or AM radio, the radio frequency last
used will be used as the wake-up alarm radio frequency.
6. At any stage, if no key is pressed for approx. 5 seconds, the last selected value is
automatically saved.
7. If in case the iPod wake-up mode is selected and no iPod was plugged in. The
buzzer will sound instead.
8. After setting, the ALARM and the ALARM MODE ICON will appear on the display
when the alarm is turned on.
9. When the alarm time is reached, the ALARM and the ALARM MODE ICON will
flash.
10.Depends on your prior selection, the radio, buzzer or the iPod will sound.
11.Press STANDYBY/ON/FUNCTION button to cancel the alarm and the ALARM
and the ALARM MODE ICON will remain on the LCD display and the alarm will
sound again on the next day at the same time.
12.Press MEMORY/AL ARM SET button again to canc el the a larm setting. The
ALARM and the ALARM MODE ICON will disappear on the LCD display.
-8-
Page 11

GENERAL FUNCTIONS
Snooze Function
Press SNOOZE/DIMMER button to silence the ALARM sound (iPod / radio / buzzer)
temporarily for approximately 9 minutes,the alarm will active again after 9 minutes
lapse. The ALARM and the ALARM MODE ICON will flash. The snooze function is
repeatable for 60 minutes,. To switch it off, you can press MEMORY/ALARM SET
button.
Dimmer Function
Press SNOOZE / DIMMER button once in operation mode to dim the display. Press
the SNOOZE / DIMMER button again to resume to normal brightness.
Sleep Function
This function switches the unit from operation mode to STANDBY mode after the
specified time.
1. Press the SLEEP / CLOCK SET button to select the sleep time in operation
mode.
2. The sl ee p time cy cl es by pre ss ing the SLE EP /
CLOCK SET button repeatedly. The cycle goes 120
-> 90 -> 60 -> 30 -> 15 -> 10 -> 5 -> off. Select “OFF”
means no sleep function.
3. After the SLEEP mode is activated, press the SLEEP / CLOCK SET button to
display the remaining time before STANDBY mode is activated.
4. Further pressing the SLEEP / CLOCK SET button to set another sleep time.
TUNER MODE
Radio Antenna
The FM antenna is located at the back of the unit. If FM reception signal is weak,
extend the FM antenna to its full length or try to change the position and direction of
the FM antenna until you find the strongest signal.
The AM bar antenna is installed inside the unit. If AM reception is weak, change the
position and direction of the unit until the internal antenna picks up the strongest
signal.
Listening to Radio
1. Press STANDBY/ON/FUNCTION to turn on the unit, and then select the FM or
AM function by pressing the STANDBY/ON/FUNCTION button.
2. Tune to the desired radio station by pressing the TUNE/SKIP or button.
-9-
Page 12

TUNER MODE
3. Press and hold the TUNE/SKIP or button will begin to automatically scan
until a strong signal is found.
4. To turn off the radio, press and hold the STANDBY/ON/FUNCTION button to
switch the unit to standby mode.
Tuning and Storing Radio Stations
This device can store up to 10 preset stations for FM and 10 preset stations for AM.
1. In FM or AM mode, tune to the desired radio station.
2. Press and hold the MEMORY/ALARM SET button
until the pre set ch ann el beg in to flas h to enter
memory mode.
3. Choose the desired channel to store in by pressing the TUNE/SKIP or button,
press the MEMORY/ALARM SET button to confirm and store the radio station.
4. Repeat steps 1 – 3 to store more stations.
5. In radio mode, press and hold the MEMORY/ALARM SET button until the preset
channel appears on the display to enter into preset mode and press the TUNE/
SKIP or button to select the preset stations.
Note: The saved preset stations will be lost if the AC power is interrupted and the
backup battery is not installed.
iPod MODE
iPod Universal Dock Adaptor
1. Select the iPod universal dock adaptor (not
included, check your iPod packaging if it match
with this adaptor) that fits with your iPod model.
2. Install the adaptor with the 2 tabs facing the
front, by pushing it down in the universal dock
on top of the unit.
3. To remove t he adaptor, press i ts inside rear
surface and pull it upward.
Note: Make sure you use the correct adaptor for
your iPod to prevent damage due to insecure iPod
seating.
-10-
Page 13

iPod MODE
Listen to iPod
1. With the correct iPod universal dock adaptor installed, gently dock the iPod into
the unit’s universal dock.
2. When docked, the iPod battery will b e charged automatically until it is fully
charged. For charging period, follow your iPod’s instruction manual.
3. Press STANDBY/ON/FUNCTION repeatedly until the
iPod icon appears.
4. Press the button to playback or pause the music
in your iPod.
5. Press the TUNE/SKIP or button to select previons or next song.
Note: This unit display cannot show any music information of your iPod. Please
view the music information through your iPod display.
AUX-IN MODE
Connect the Audio Output jacks of your auxiliary sound source (TV, VCR, DVD
Player, Cassette Deck, Mini Disc player, etc., etc.,) to the AUX IN jack on the back
panel of the unit.
The auxilia ry funct ion will only act ivate when the aux in jack is fitted with
connection cable.
Note: The connection cables are not included.
1. Press STANDBY/ON/FUNCTION button to select AUX mode.
2. Plug-in one end of the Aux Line Cord into the AUX
IN socket located at the back of the unit and the
other en d to the hea dphon e jack of th e music
device.
3. Devices connected via AUX IN can only be controlled via the devices’ controls.
4. The volume level can be adjusted by pressing the VOL +/- button or adjust the
volume level on the external music device.
CLEANING AND MAINTENANCE
1. If the cabinet becomes dusty, wipe it with a soft cloth.
2. If the cabinet becomes dirty, clean it with a soft, slightly dampened cloth.
3. Never allow water or any liquid to get inside the cabinet.
4. Never use any abrasive cleaners or cleaning pads as these will damage the finish
of your unit.
-11-
Page 14

TECHNICAL INFORMATION
AC Adaptor Input :
Output :
AM : 522 - 1620 kHz
FM: 87.5 - 108 MHz
DC Backup : 3V (2 x “AAA” Size Batteries)
Unit Output Power : 2 x 1 Watts RMS
Power Consumption : 11 W
230 V ~ 50 Hz
9V~1200 mA
INFORMATION
Troubleshooting
If a fault occurs, first refer to this information before you take the device for repair.
If you are unable to rectify the f ault using the information given here, contact
Customer Support for advice.
Under no circumstances should you attempt to repair the device yourself, as this
would invalidate the warranty.
PROBLEM POSSIBLE CAUSE REMEDY
No Sound Volume is too low.
The device does not
respond to button
commands
Poor radio reception Weak radio signal Extend the FM antenna to its
Design and specifications are subject to change without prior notice
Power cord incorrectly
connected.
Electrical static discharge. Switch off the
Interference from
electrical devices such as
televisions,video recorders,
computers,neon lamps,etc.
-12-
Increase volume
Connect power cord correctly.
device,disconnect the mains
cable and plug it in again after
a few seconds.
full length or try to change the
postion and direction of the
FM antenna.
Change the position of the
unit until it picks up the
strongest signal.
Move the unit away
from the other operating
electrical equipments such
as motorized appliances,
televisions, and microwave
ovens.
Page 15

Compatible iPods chart – DMP-P1
Model Compatible Format
iPod 1st & 2nd Gen Audio
iPod 3rd Gen Audio
iPod 4th Gen Audio
iPod 4th Gen Photo Audio
iPod 4th Gen Color Audio
iPod 5th Gen & iPod Classic Audio
Mini 1st & 2nd Gen Audio
Nano 1st & 2nd Gen Audio
Nano 3rd Gen Audio
Nano 4th Gen Audio
iPod Touch 1st Gen Audio
iPod Touch 2nd Gen Audio
Thank-you for choosing the SANYO DMP-P1 Single alarm clock PLL radio with
iPod.
Designed specifically to work with your docking iPod, this system provides high
quality audio and radio performance that brings out the best in your music. An
auxiliary input enables connection of a non-iPod. Please read this instruction book
carefully before operating the DMP-P1, and keep it for future reference.
-13-
Page 16

Page 17

Page 18

-13-
DMP-P1 前,请仔细阅读本说明书,并妥善保管,以备日後参考。
质的 音频和 收音机性能。辅助输入插孔 能连接 非 iPod 音乐设 备。操作
专门设计用於与您的 iPod 对接,本系统提供能将您的音乐发挥到最佳品
感谢您选择带 iPod 基座的三洋 DMP-P1 单闹钟 PLL 收音机。
iPod Touch 第 2 代 音频
iPod Touch 第 1 代 音频
Nano 第 4 代 音频
Nano 第 3 代 音频
Nano 第 1 和第 2 代 音频
Mini 第 1 和第 2 代 音频
iPod 第 5 代和 iPod Classic 音频
iPod 第 4 代(color) 音频
iPod 第 4 代(photo) 音频
iPod 第 4 代 音频
iPod 第 3 代 音频
iPod 第 1 和第 2 代 音频
型号 兼容格式
相容 iPod 列表 —— DMP-P1
Page 19

-12-
设计和规格如有变更,恕不另行通知。
地方。
它正在运行的电子设备的
置、电视机和微波炉等其
将装置移到远离机动化装
到最强信号。
变更装置位置,直到接收
的位置和方向。
长度或尝试变更 FM 天线
数秒后再次插入插头。
正确连接电源线。
提高音量
信息
技术资讯
置的干扰
计算机、氖灯等电子装
受到电视机、录像机、
电源线连接不正确。
9V~1200 mA
230 V ~ 50 Hz
广播接收效果差 广播信号弱 将 FM 天线伸展至其最大
裝置不回应键指令。释放静电。 关闭装置,断开电源线,
没有声音 声音太小。
问题 可能原因 纠正方法
无论何种情况下,都不能自行维修装置,否则保修将无效。
故障时,请联络客户支援部门寻求帮助。
如果出现故障,维修装置前请先参考以下资讯。使用此处的资讯无法修复
故障排除
功耗: 11 W
裝置输出电源 : 2 x 1 Watts RMS
直流备用电池 : 3V(2 個 AAA 尺寸的電池)
FM: 87.5 - 108 MHz
AM : 522 - 1620 kHz
输出 :
交流适配器输入:
Page 20

-11-
4. 切勿使用任何擦洗剂或清洁垫,否则将损坏装置的表面。
3. 切勿让水或其他液体进入机壳内。
2. 如果机壳变脏,请使用微湿的软布进行清洁。
1. 如果机壳上有灰尘,请使用软布擦拭
清洁和维护
4. 可通过按 VOL(音量)+/- 键或者调整外部音乐设备调节音量级别。
3. 仅能使用设备的控制键控制通过 AUX IN(AUX 输入)连接的设备。
耳机插孔中。
IN(AUX 输入)插孔,另一端插入音乐设备的
2. 将 Aux 线缆的一端插入位於装置背面的 AUX
STANDBY/ON/FUNCTION(待机 / 开启/ 功能)
键选择 AUX 模式。
1. 按
注:
未附配连接线缆。
仅当 AUX IN(AUX 输入)插孔与连接线缆相匹配时,辅助功能启用。
的音频输入插孔连接到装置背面板的 AUX IN(AUX 输入)插孔。
将您的辅助音源(TV、VCR、DVD、播放器、磁带答录机、迷你光碟播放器等)
AUX 输入模式
资讯。
注:本装置显示幕不能显示 iPod 音乐资讯。请通过 iPod 显示幕查看音乐
TUNE/SKIP(调频 / 跳过)
或 键选择上一首或下一首歌曲。
键,直到显示 iPod 图示。
STANDBY/ON/FUNCTION( 待机 /
5. 按
4. 按 键播放或暂停 iPod 中的音乐。
开启 / 功能)
3. 重复 按
请参考 iPod 使用说明书。
2. 对接後,iPod 电池将自动充电,直到充满。关於充电时间的详细资讯,
座中。
1. 安装正确的 iPod 通用基座适配器後,轻轻将 iPod 对接到装置的通用基
收听 iPod
iPod 模式
Page 21

键,
-10-
iPod 模式
TUNE/SKIP(调频 / 跳
键确认并存储无线电台。
或 键 选 择 要 存 储 的 频 道, 按
以避免因不安全的 iPod 底座导致的损坏。
注:
确保您使用的是适合您的 iPod 的适配器,
上拉。
3. 若要移除适配器,按住其内侧後表面并向
装适配器,其 2 个拨片朝向前方。
2. 将适配器推入装置顶部的通用基座,以安
是否匹配该适配器)。
适配器(未附配;请检查您的 iPod 包装
1. 选择适用於您 iPod 型号的 iPod 通用基座
iPod 通用基座适配器
注:
如果交流电源中断且未安装备用电池,则已存储的预设电台将丢失。
过)
或 键选择预设电台。
MEMORY/ALARM SET(记忆 / 闹钟设置)
直到显示幕上显示预设频道并进入预设模式,按
5. 在收音机模式下,按住
4. 重复步骤 1 ~ 3 存储更多电台。
MEMORY/ALARM SET(记忆 / 闹钟设置)
TUNE/SKIP( 调 频 / 跳 过 )
3. 按
置)
键,直到预设频道开始闪烁并进入记忆模式。
MEMORY/ALARM SET(记忆 / 闹钟设
2. 按住
1. 在 FM 或 AM 模式下,调频道所需广播电台。
本装置最多能存储 10 个 FM 预设电台和 10 个 AM 预设电台。
调频并保存广播电台
STANDBY/ON/FUNCTION(待机 / 开启 / 功能)
或 键,将自动开始扫描,直到检
键将装置切换到待机模式。
4. 关闭收音机,按住
测到强信号。
TUNE/SKIP(调频 / 跳过)
3. 按住
调频器模式
Page 22

-9-
或 键调频到所需的广播电台。
TUNE/SKIP(调频 / 跳过)
2. 按
键选 择
STANDBY/ON/FUNCTION( 待 机 / 开 启 / 功 能)
键打开装置,然
後通 过 按
STANDBY/ON/FUNCTION(待机 / 开启 / 功能)
1. 按
收听广播
置和方向,直到内部天线接收到最强信号。
AM 棒状天线内置於装置内部。如果 AM 接收效果较差,请变更天线的位
最大长度或尝试变更 FM 天线的位置和方向,直到找到最强的信号。
FM 天线位於装置背面。如果 FM 接收信号较弱,请将 FM 天线伸展至其
收音机天线
FM 或 AM 功能。
键设置其他休眠时间。
SLEEP/CLOCK SET(休眠 / 时钟设置)
4. 继续按
键显示 STANDBY(待机)模式启动前的剩余时间。
SLEEP/CLOCK SET(休眠 / 时钟设置)
3. 启动 SLEEP(休眠)模式后,按
“OFF”(关闭)表示关闭休眠功能。
-> 60 -> 30 -> 15 -> 10 -> 5 -> 关闭。选择
键设置休眠时间周 期。周期依次为 120 -> 90
SLEEP/CLOCK SET(休眠 / 时钟设置)
键选择运行模式下的休眠时间。
2. 重复按
SLEEP/CLOCK SET(休眠 / 时钟设置)
1. 按
该功能可在指定的时间後将运行模式切换到待机模式。
休眠功能
SNOOZE/DIMMER(贪睡 / 调光器)
键将恢复正常亮度。
键一次可调暗显示幕。
SNOOZE/DIMMER(贪睡 / 调光器)
再次按
在运行模式下按
调光器功能
MEMORY/ALARM
键将其关闭。
闹钟
闹钟模
和
键暂时关闭闹铃声(iPod/ 收音
SET(记忆 / 闹钟设置)
式图示
将闪烁。贪睡功能可重复 60 分钟。您可以按
机 / 蜂鸣器)约 9 分钟,闹铃停止 9 分钟之後将再次响起。
SNOOZE/DIMMER(贪睡 / 调光器)
按
贪睡功能
一般功能
Page 23

-8-
钟
闹钟模式图示
闹
键取消闹钟设置。
将不显示在 LCD 显示幕上。
和
MEMORY/ALARM SET(记忆 / 闹钟设置)
12. 按
再次响铃。
钟
闹钟模式图示
闹
键取消闹钟,
将持续显示在 LCD 显示幕上,且第二天的同一时间将
和
STANDBY/ON/FUNCTION(待机 / 开启 / 功能)
11. 按
10. 根据您之前的选择,将响起收音、蜂鸣声或播放 iPod。
闹钟
闹钟模式图示
将闪烁
闹钟
闹钟模式图示
。
和
和
9. 达到闹钟时间时,
8. 设置後,闹钟开启时,显示幕上将显示
7. 如果选择了 iPod 唤醒模式但是未插入 iPod,则发出蜂鸣声作为代替。
6. 在任何步骤中,如果您在 5 秒内未按任何键,则自动保存最後选择的值。
醒闹钟的收音频率。
5. 唤醒闹钟设置为 FM 收音或 AM 收音时,上次使用的收音频率将用作唤
设置)
键确认设置。
iPod 或蜂鸣声作为唤醒闹钟。按
TUNE/SKIP(调 频 / 跳过)
4. 按
置分钟,然後按
3. MINUTE(分钟)开始闪烁,按
键确认分钟。
或 键设
MEMORY/ALARM SET(记忆 / 闹钟
或 键选择 FM 收音、AM 收音、
MEMORY/ALARM SET(记忆 / 闹钟设置)
TUNE/SKIP(调频 / 跳过)
认小时。
键确
或 键设置小时,然後按
TUNE/
MEMORY/ALARM SET(记忆 / 闹钟设置)
SKIP(调频 / 跳过)
2.HOUR(小 时) 数位将 闪烁。按装置上的
钟图示。
键,LCD 显示幕上将显示并闪烁闹
MEMORY/ALARM SET(记
忆 / 闹钟设置)
1. 在待机模式下,按住
设置闹钟
一般功能
Page 24

-7-
5. 在任何步骤中,如果您在 5 秒内未按任何键,则自动保存最後选择的值。
或 键设置小时,然後按
SET(休眠 / 时钟设置)
/ 跳过)
4. MINUTE(分钟)开始闪烁,按
SET(休眠 / 时钟设置)
跳过)
3. HOUR(小时)开始闪烁。按
/ 时钟设置)
小时或 24 小时格式,按
TUNE/SKIP(调频 / 跳过)
2. 按
时钟设置)
1. 在待机模式下, 按住
SLEEP/CLOCK
或 键设置分钟,然後按
TUNE/SKIP(调频
键确认小时。
SLEEP/CLOCK
TUNE/SKIP(调频 /
键确认小时系统的设置。
SLEEP/CLOCK SET(休眠
或 键选择 12
键直到 “12H” 开始闪烁。
SLEEP/CLOCK SET( 休 眠 /
键确认分钟。
设置时钟
5. BASS ON/OFF(低音开 / 关)开关位於装置底部,开启低音将加强低音。
4. 音量水准范围为 00 ~ 32。
3. 按 VOLUME(音量)- 键降低音量。
2. 按 VOLUME(音量)+ 键提高音量。
1. 按 VOL(音量)+/- 键可调节音量。
调节音量
2. 默认模式为 FM,并自动选择最近一次使用的输入源。
选择所需音频来源。其顺序依次为 FM、AM、iPod 和 AUX。
键
STANDBY/ON/FUNCTION(待机 / 开启 / 功能)
1. 开启装置後,按
选择输入源
到待机模式。LCD 显示幕背光将变暗,并将在待机模式下显示当前时间。
STANDBY/ON/FUNCTION(待机 / 开启 / 功能)
键将装置切换
3. 按住
动装置。
STANDBY/ON/FUNCTION(待机 / 开启 / 功能)
键从待机模式启
2. 按
1. 连接交流电源後,装置将自动切换为待机模式。
打开和关闭装置
一般功能
Page 25

-6-
LCD 显示屏
底视图
组件名称及功能
后视图
Page 26

-5-
组件名称及功能
頂視圖
前視圖
6. 请勿分解电池,也勿将废旧电池投入火中。
池制造商的使用说明。)
5. 请勿对非充电电池进行充电,否则会导致电池过热和破裂。(请遵循电
或损害。
4. 如果长时间不使用装置,请取出电池,以避免电池泄漏可能造成的损坏
3. 请勿将不同类型的电池(例如,碱性和碳锌电池)或新旧电池混合使用
损坏。
2. 务必按照电池舱内指示的正确电极安装电池。极性装反可能会导致装置
1. 仅使用指定型号和类型的电池。
在本装置中使用电池时,请遵循以下注意事项:
电池注意事项
使用前的准备工作
Page 27

-4-
闹钟设置及收音机预设电台。
3. 一旦交流电源被切断,则由备用电池维持时间和
舱盖。
碱性电池,因其使用寿命更长),然後合上电池
型号的电池(未附配)装入电池舱中(推荐使用
2. 按照刻印在电池舱内侧的极性标记,将两节 AAA
1. 打开电池舱盖。
安装电池
直流备用电池
仅可使用本装置附带的交流适配器,否则可能导致装置损坏。
体的阻挡。
电源。请确保在操作过程中电源插头位於易於插拔的位置且未受到其他物
请断开外部交流适配器与本装置间的连接。拔出电源插头,即可断开装置
注意:
本装置通过交流外部适配器连接到电源。如果您想完全断开设备电源,
4. 打开壁装插座电源。
3. 确保已关闭壁装电源插座,然後将交流适配器插头插入电源插座。
2. 将外部交流适配器电缆末端插入位於装置背面的交流 9V 插孔中。
1. 确保外部交流适配器额定标签上的电压符合您当地的电源。
交流电源连接
电源插头、电源插座
源下使用本装置,否则由此引起的产品损坏不在保修范围之内。
本产品设计用於在 230V、50Hz 交流电源下运行。请勿尝试在任何其他电
电源
使用前的准备工作
Page 28

-3-
将其粘在橡胶“支脚”底部,以保护精致的木质家俱。
三洋强烈建议您将购买小型自粘毡垫(各五金店和家俱装修中心有售),
软化,并在家俱上留下痕迹或橡胶残留。为避免对您的家俱造成任何损坏,
但是,某些油基家俱的上光蜡、木材防腐剂或清洁剂可能会导致橡胶“支脚”
由非移动性橡胶材料制成,旨在避免在家俱上留下痕迹或污点。
本机型配备防滑橡胶“支脚”,以防止操作控制键时产品移动。这些“支脚”
保护您的家具
FM 接收效果。
• 拉开 FM 天线并将其伸展到最大长度。天线必须完全展开才能提供最佳
不受阳光直射并远离过热热源、脏污、灰尘、水分、湿气和震动。
• 将本装置放在桌子、椅子或搁板等水准表面上,且应便於连接电源插座、
的任何标签。
• 撕下机壳正面或顶端的所有说明标签或贴纸。请勿撕下机壳背面或底部
产品是防止运输途中受损的唯一安全方式。
管包装材料,以备日後装置返修时使用。使用原包装盒和包装材料包装
• 从包装盒中取出产品,拆除装置上的所有包装材料。三洋建议您妥善保
打开包装和进行设定
使用前的准备工作
方和 / 或潮湿的地方。
过多热量的其他音响设备顶端、通风不良或多尘的地方、持续震动的地
• 避免将本装置安装在受阳光直射或靠近电热器等散热装置的地方、散发
• 移动装置前,请务必先拔下交流电源线。
• 打开电源前,确保电源线连接正确。
• 按照本手册中的说明操作控制键和开关。
设定装置前
Page 29

-2-
重要安全说明
31.)若要完全断开电源输入,应从电源插座上拔掉本装置的电源插头。
四周至少应留有 100 mm 的间隙,以保证足够的通风。
30.)请勿将本装置安放在书橱、壁橱等空间狭窄、通风不良的地方。装置
29.)本产品仅供家庭使用,不适用於商业用途。
28.)处置电池时,应注意环保。
27.)请勿将电池放置在受阳光直射或者靠近火焰等过热热源的地方。
受潮、或者装置跌落、无法正常操作,必须进行维修。
时,如电源线或插头受损、液体或其他物体进入装置内、装置淋雨或
26.)请务必委托专业维修人员处理维修事宜。当装置受到任何形式的损坏
25.)完成产品保养和维修後,请要求维修技术人员进行安全检查。
24.)请勿使壁装电源插座超负荷工作,须使用所示额定值范围内的电源。
出的部分。
23.)请避免踩踏或挤压电源线,尤其是插头和插座部分以及从本装置中伸
您的电源插座,请谘询电工更换插座。
片和接地型插头的接地插脚具有保护作用。如果随附的插头不适用於
插片;而接地型插头有两个插片和一个接地插脚。极化插头较宽的插
22.)请勿破坏极化或接地型插头的安全作用。极化插头有两个宽度不等的
Page 30

-1-
重要安全說明
21.)电源插头用作切断装置时,应保持切断装置随时可操作。
20.)遭遇雷雨天气或长时间不使用本装置时,请拔下电源插头。
的插头,除非插片可完全插入插口中。
19.)为了防止火灾或触电危险,请勿使用带延长线、电源插座或其他插座
将重置,本装置即可恢复正常运行。
机与主电源的连接数分钟。重新将本装置连接到电源上时,装置软体
18.)如果因强电磁场或其他干扰造成装置死机,请先关闭电源,并断开主
播放器。
17.)请勿在极端干燥的环境中使用本播放器,否则产生的静电可能会损坏
16.)请轻按播放器的按键。按键或触摸萤幕时用力过大可能会损坏装置。
15.)在热带和 / 或温和气候下使用本装置时,须谨慎操作。
失。
14.)请勿猛烈碰撞本产品或使其跌落,否则可能会导致产品损坏和资料丢
13.)为了防止火灾或触电危险,请勿使本装置淋雨或受潮。
通风。
以免妨碍通风。装置四周至少应留有 100 mm 的间隙,以保证足够的
12.)请勿堵塞本装置的通风口,避免用报纸、台布、窗帘等物品遮盖通风口,
并避免阳光直射。
请保持播放器干净清洁,切勿将其存放在靠近热源或脏污、潮湿的地方,
11.)
10.)
请勿在本装置上摆放任何明火源(如点燃的蜡烛)。
9.) 清洁之前,请先断开装置电源。
8.) 请勿在靠近水源的地方使用本装置,请仅使用干抹布清洁本装置。
有液体物品。
7.) 请勿将本装置置於滴水或溅水环境中,也勿在本装置上放置花瓶等装
括放大器)等热源的地方。
6.) 请勿将本装置安装在靠近散热器、电热器、火炉、其他产生热量的设备(包
5.) 请使用制造商指定的更换用部件。
谨慎操作,以免因倾翻而造成人身伤害。
架或桌子配套使用。如果使用的是推车,移动推车 / 装置组合时请务必
4.) 请仅与制造商指定的或与本装置一同出售的推车、台架、三脚架、支
3.) 请仅使用制造商指定的附件 / 配件。
2.) 请按照制造商的说明安装本装置。
日后查阅。
1.) 请仔细阅读并严格遵循所有使用说明和警告事项,并妥善保管,以备
Page 31

目录
信息 ..........................................................................................................................12
技术资讯 ..................................................................................................................12
清洁和维护..............................................................................................................11
AUX输入模式.........................................................................................................11
iPod 模 式 .........……………………….......................................................................10
调频器模式 ................................................................................................................9
一般功能 ....................................................................................................................7
组件名称及功能 ........................................................................................................5
使用前的准备工作....................................................................................................3
重要安全说明 ............................................................................................................1
Page 32

 Loading...