

Page 1
Digital Memory Player
DMP-M600
DMP-M700
Version 1.01
Instruction Manual
-1-
Page 2
Contents
Accessories ..................................................................................................................................................................... 2
Precautions ..................................................................................................................................................................... 3
Controls ........................................................................................................................................................................... 4
Recommended PC environment ..................................................................................................................................... 4
How to connect the player to your PC.............................................................................................................................5
How to install the MusicFileMaster software ................................................................................................................... 6
How to open the instruction manual ................................................................................................................................ 7
Disconnecting the player from your PC...........................................................................................................................8
How to check whether the player has recognised correctly or not .................................................................................. 8
Removable Disk display .................................................................................................................................................. 9
Starting up the MusicFileMaster....................................................................................................................................10
Transferring data by MusicFileMaster ........................................................................................................................... 11
Copying data by using Explorer .................................................................................................................................... 11
Transferring data using the Media Player ..................................................................................................................... 12
Designating the playback order (Playlist) ...................................................................................................................... 12
Formatting the player’s data ......................................................................................................................................... 12
Before operation............................................................................................................................................................13
Playback........................................................................................................................................................................14
Examples of playback mode selection display .............................................................................................................. 16
Recording voice ............................................................................................................................................................ 17
Listening to the FM radio...............................................................................................................................................18
Erasing .......................................................................................................................................................................... 19
Menu setting..................................................................................................................................................................20
Troubleshooting guide...................................................................................................................................................22
Cleaning the cabinet ..................................................................................................................................................... 23
Specifications ................................................................................................................................................................23
Accessories
USB cable
Headphones
Strap
Your SANYO product is designed and manufactured with high quality materials and components which
can be recycled and reused.
This symbol means that electrical and electronic equipment, at their end-of-life, should be disposed of
separately from your household waste.
Please dispose of this equipment at your local community waste collection/recycling centre.
In the European Union there are separate collection systems for used electrical and electronic products.
Please help us to conserve the environment we live in!
-2-
Page 3

Precautions
- The apparatus shall not be exposed to dripping or
splashing.
- Do not drop the player or subject it to strong shocks.
- Do not use where there are extremes of temperature
(below 5°C or exceeding 35°C).
- IBM and PC/AT are registered trademarks of
International Business Machines Corporation.
- Microsoft, Windows MediaTM, and the Windows® Logo
are trademarks or registered trademarks of Microsoft
Corporation in the United States and/or other countries.
- Windows MediaTM Player is trademark
or registered trademark of Microsoft
Corporation.
- Adobe (Acrobat) Reader is a registered trademark of
Adobe Systems Incorporated.
- Other system and product names generally are the
registered trademarks or trademarks of the respective
development manufacturers. The symbols TM and ® are
not shown in this manual.
- High volume levels can create potentially dangerous
situations by drowning out surrounding sounds. Use
caution when driving while operating the player, and
obey all applicable laws.
Do not play your headphones at a high volume level.
Hearing experts advise against continuous extended
play.
If you experience a ringing in your ears, reduce the
volume or discontinue use.
- SANYO takes no responsibility for data loss due to
power cuts or damage to the player.
- To avoid potential risk of data loss caused by accidental
operation or malfunction of the player, we recommend
that you save a backup copy of your data on a PC, etc.
- Recording copyright material without permission of the
copyright owners is usually an infringement. If you
wish to re-record copyright material, permission from
the copyright owner is necessary. SANYO does not
approve of, and cannot be held responsible for, any
unlawful use of this machine.
Note:
This handling description is created prior to product
development.
When a part of the product specification must be changed
to improve operability or other functions, priority is given to
the product specification itself. In such instances, the
instruction manual may not entirely match all the functions
of the actual product.
Therefore, the actual product and packaging, as well as
the name and illustration, may differ from the manual.
The screen/LCD display shown as an example in this
manual may be different from the actual screen/LCD
display.
- This player contains an internal Lithium Ion Battery.
The battery or the player should not be disposed of in
a fire.
The battery or the player should not be thrown in the
trash.
The battery or the player may require recycling in
accordance with local laws. Contact your local
regulatory authorities for more information.
- This battery is an articles of consumption. As it is
charged and used, the amount of time it lasts will
eventually get shorter and shorter. Consult your dealer
when replacing the battery.
-3-
Page 4

Controls
I/O
8
7
6
5
4
3
2
1
1. Built-in microphone
2. Necklace connection hole
3. Headphones socket ( )
4. Power, Play/Stop, Skip/Search, Select/Set button
(f, a, e POWER)
5. Volume buttons (+ VOL –)
9
10
6. Mode/Menu button (MODE)
7. Reset switch (RESET)
8. Hold switch (b HOLD)
9. USB terminal
10. LCD display
Recommended PC environment
Supported PCs
IBM PC/AT compatible
Supported OS
Windows XP Professional
Windows XP Home Edition
Windows 2000 Professional
Windows Millennium Edition(Me)
Windows 98 Second Edition
USB port
One required for connection
Sound board
16-bit Windows-compatible sound board supported
Other
Speakers or headphones required
Note:
- Operation is not guaranteed for Macintosh PCs.
- Operation is not guaranteed for the following
environments.
Upgraded Windows environments
Windows 95, 98, NT
Dual-boot Windows environments
- Standby, suspend, and other modes may not work
properly with your particular environment. If this is the
case, do not use those modes.
If you are using Windows 98SE, you need to install the
USB driver.
-4-
Page 5
How to connect the player to your PC
Pay attention to the
direction of the terminal
O/I
I/O
Original USB cable
(supplied)
Note:
- Do not use an USB hub or USB extension cable
(Operation is not guaranteed). Use only the supplied
USB cable for connection.
- When you connect the player to the PC for the first
time, it sometimes may not be recognised as a
Removable Disk. In this case, disconnect the player
and reconnect it again.
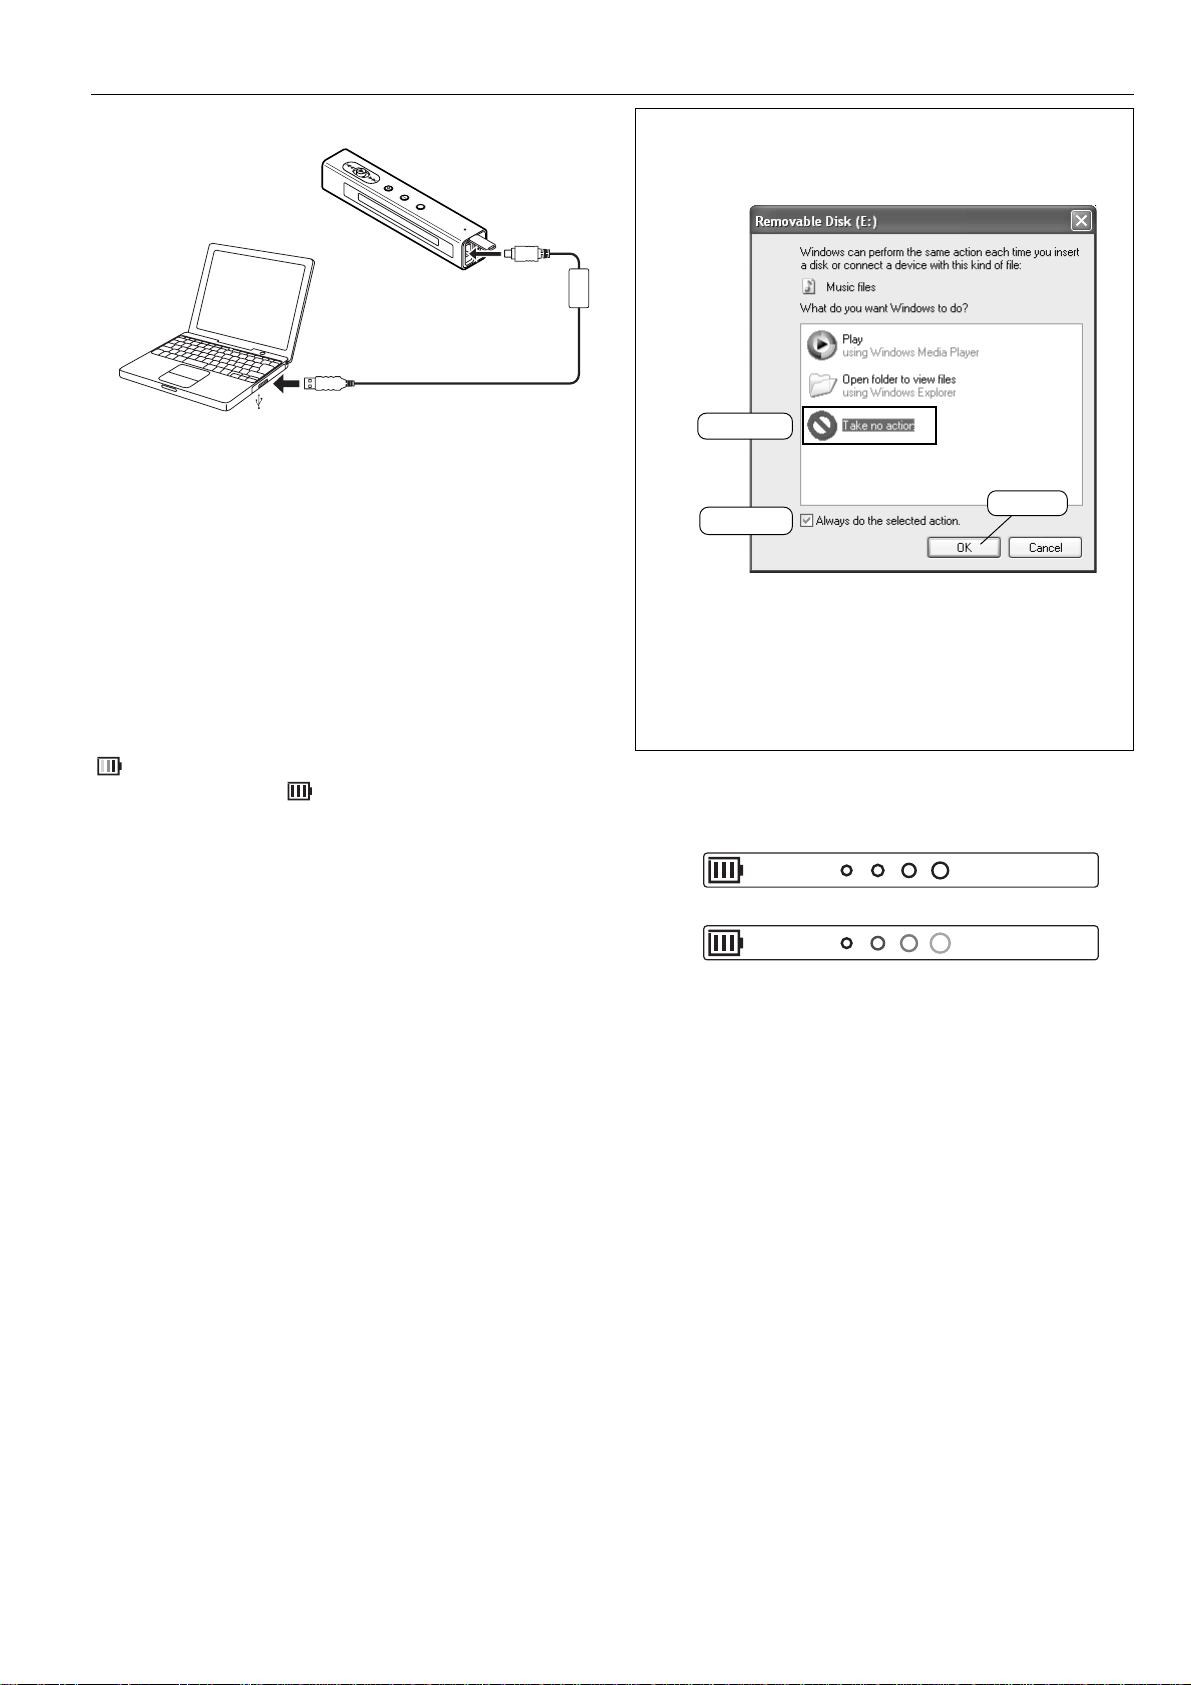
1. Turn on your PC and Windows is started.
2. Connect the player to the PC with the USB cable.
When the player is connected to the PC, it automatically
enters to the battery charging mode.
“ ” is displayed on the display while charging. When the
charge is completed, “ ” appears.
- Fully charge the battery before using the player for the
first time.
- The battery is fully charged approximately 2 hours.
Selecting the action Windows is to take (Windows
XP only)
After connection, the following screen will appear.
Example:
1) Select
3) Click
2) Check
Adjust your settings to match your PC’s environment.
In this manual, [Take no action] is selected, [Always do
the selected action] is checked, and [OK] is clicked. This
completes the connection to the PC.
- For Windows 98SE/Me/2000, this operation is not
needed.
When connected to the PC, the player display will be as
shown below and none of the operating buttons will work.
Connected to PC
PC
Transmitting to/from PC
ACCESS
Moving
Before disconnecting the player from the PC, be sure to
follow the steps on page 8. Do not disconnect during data
transfer.
-5-
Page 6
How to install the MusicFileMaster software
- Reproduction of this software is forbidden.
- This software shall not be copied and reprinted.
- SANYO shall not be liable for any damages arising out
of the use of this software.
- The screen shots are of Windows XP.
- The screens displayed on your PC may not exactly
correspond to those shown in this manual depending
on the OS version and manufacturer.
Connect the player to your PC (refer to page 5).
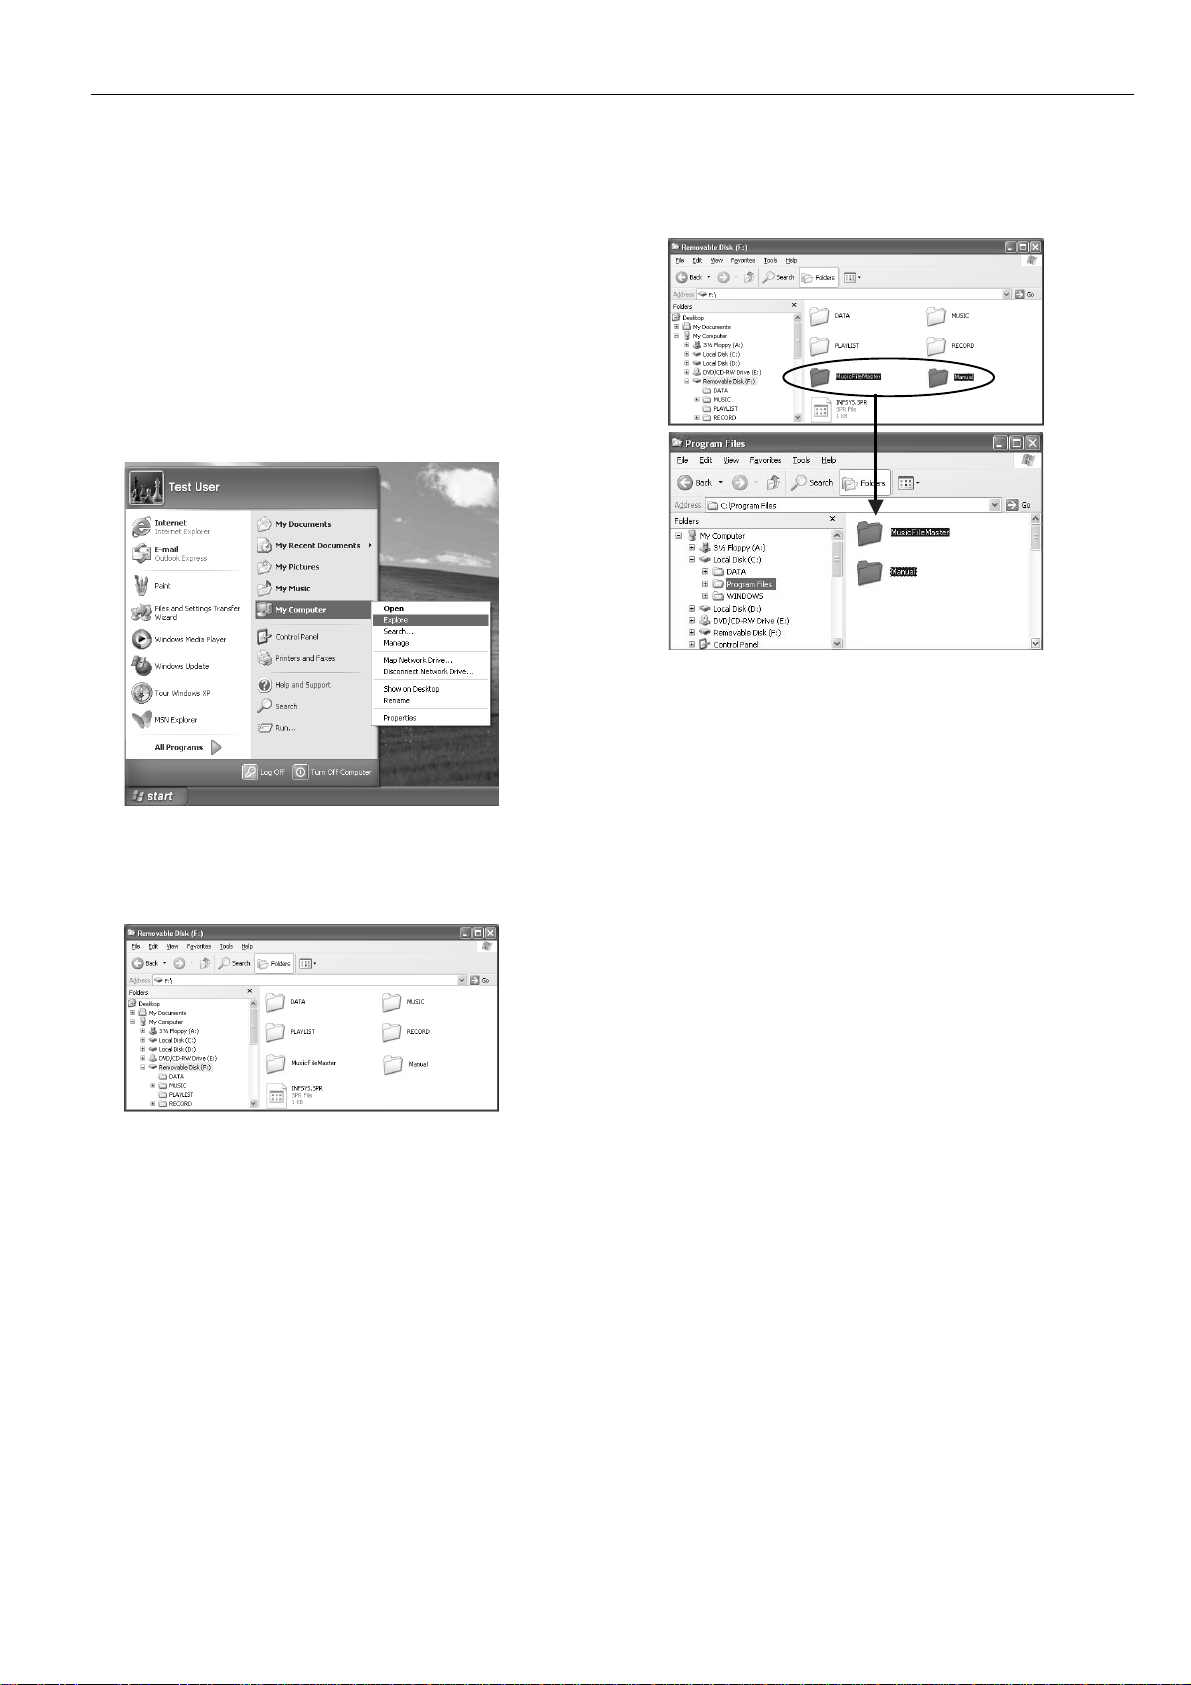
To start up Explorer
1. Click [start], then right-click [My Computer], and select
[Explore] from the menu that appears.
Copying [MusicFileMaster] and [Manual] folders to
your PC for backup
Click [Removable Disk (F:)]. Select [MusicFileMaster] and
[Manual] folders, and drag and drop them into a folder of
your choice on your PC.
Explorer will start up.
2. [Removable Disk (F:)] icon will appear in My Computer
in Windows.
“F” (drive letter) is replaced by your drive letter.
-6-
Page 7
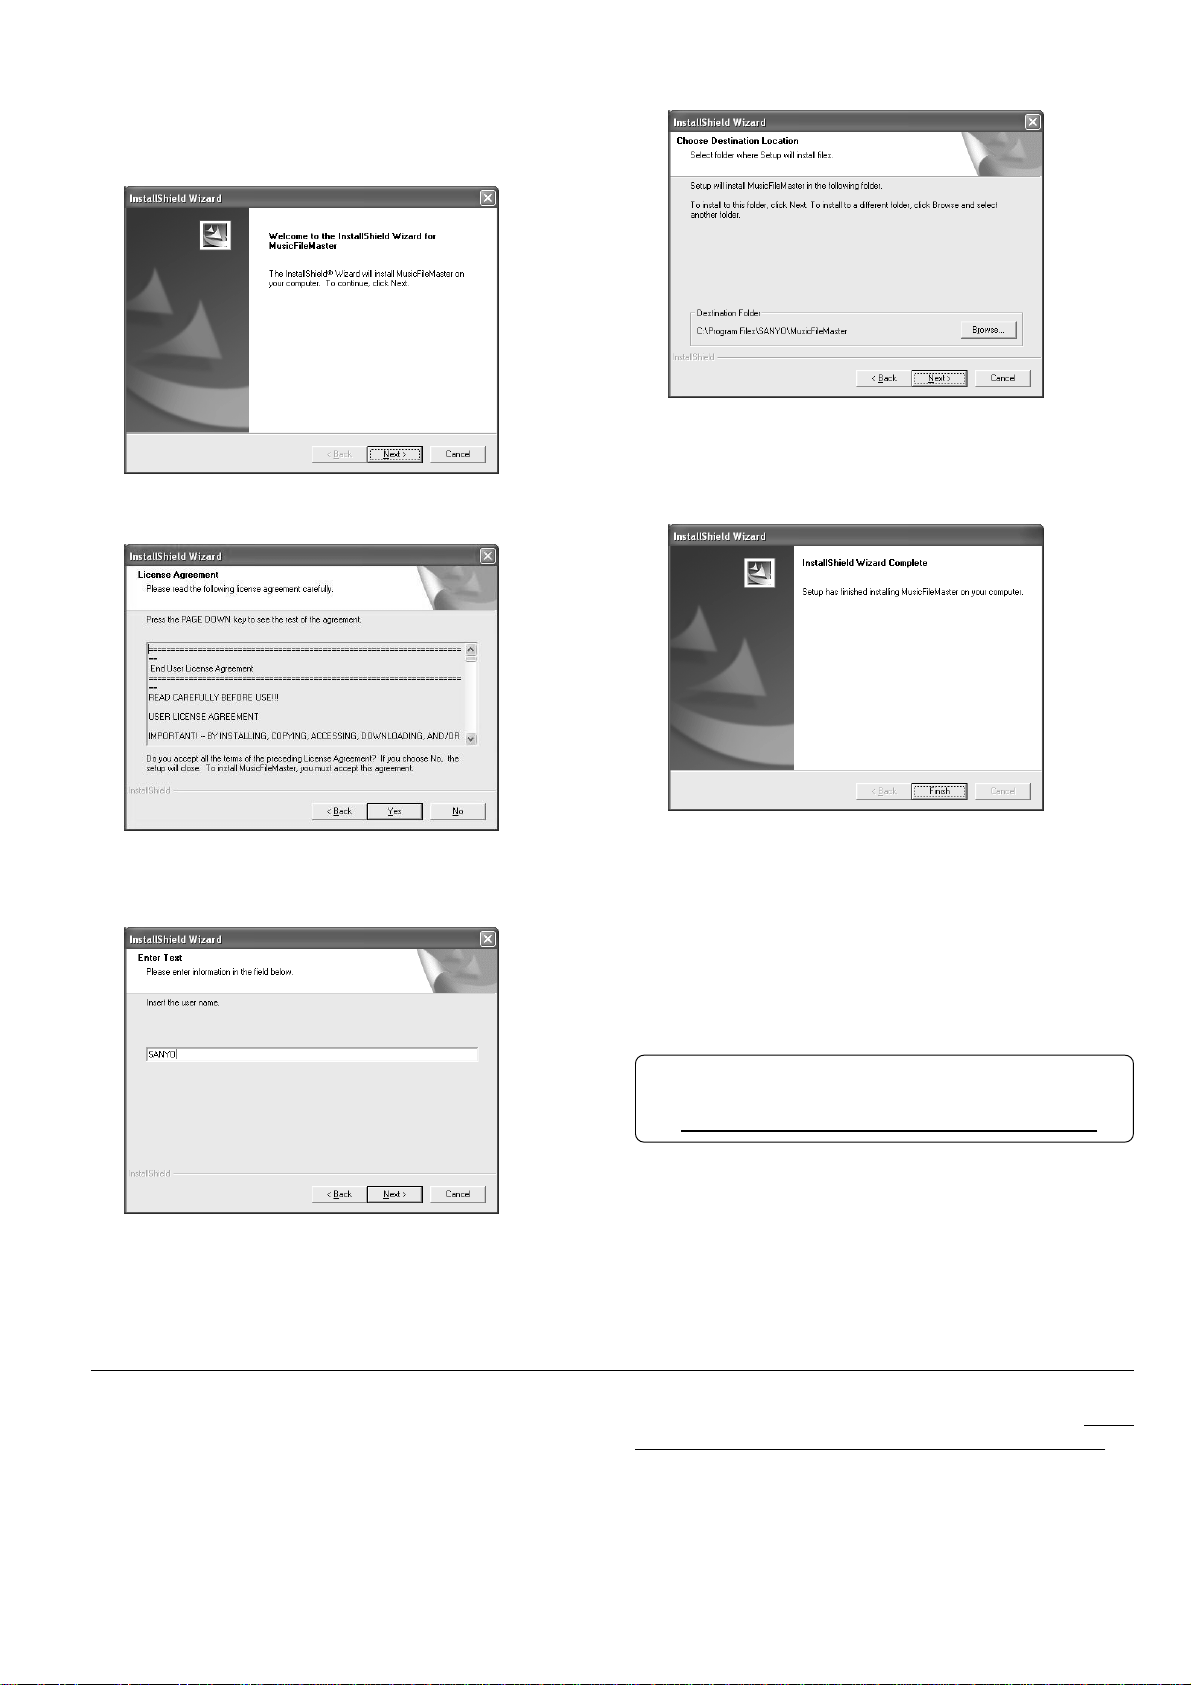
Installing the MusicFileMaster software
1. In the step 2 on the previous page, click [Removable
Disk (F:)] > [MusicFileMaster] folder.
2. Double click [Setup.exe] in [MusicFileMaster] folder.
[InstallShield Wizard] screen appears.
Click [Next].
3. Check “License Agreement” then click [Yes].
5. Select a folder where setup will install the files. Check
“Destination Folder” then click [Next].
To install to a different folder, click [Browse...] and
select another folder.
6. After the setup has finished installing MusicFileMaster
software, click [Finish].
MusicFileMaster is not installed if you do not agree to
the license agreement.
4. Enter the user name then click [Next].
How to open the instruction manual
1. In the step 2 on the previous page, click [Removable
Disk (F:)] > [Manual] folder.
or
Open the [Manual] folder below:
C:\Program Files\SANYO\Manual (in this example)
2. Double click the desired file (Example: [Instruction
Manual English.pdf]).
[MusicFileMaster] and [SANYO HDP DMP support]
icons appear on the desktop.
Also Manual folder is installed to “C:\Program
Files\SANYO\Manual” (in this example) when the
installation of MusicFileMaster is performed.
Note:
Do not delete, move, or modify the installed folders/files.
[SANYO HDP DMP support]: For downloading the USB
driver or the latest software, etc. from our web site.
http://www.sanyo-audio.com/english/index.html
Adobe (Acrobat) Reader is necessary to view the PDF file.
If you have not the Adobe Reader installed, see http://
www.adobe.com/products/acrobat/readermain.html to
download the Adobe Reader.
-7-
Page 8

Disconnecting the player from your PC
Before disconnecting, make sure no data is being
transferred.
For Windows 98SE: Disconnect the player from your PC.
For Windows XP/2000/Me:
1. Right-click the Task tray icon at the bottom right of the
Windows screen.
If the icon is not displayed, refer to the Windows help.
2. Click [Safely Remove Hardware] displayed.
3. Select [USB Mass Storage Device] and click [Stop].
4. Check that [SANYO MEMORY PLAYER USB Device]
is in the list, select [USB Mass Storage Device] and
click [OK].
5. Disconnect the player from your PC.
How to check whether the player has recognised correctly or not
1. Connect the player to your PC (refer to page 5).
2. [start] menu > right-click [My Computer] > select
[Properties] to open [System Properties] > click [Device
Manager] in [Hardware] tab to open [Device Manager].
3. Double click [Disk drives] > double click [Universal
Serial Bus controllers]. If the following screen is
displayed, it means the player has recognised correctly.
-8-
Page 9

Removable Disk display
An icon [Removable Disk] will appear in My Computer in
Windows when the player is connected to your PC.
[MUSIC] folder
Files transferred from your PC are stored in this folder.
- There is no set format for file names for files which are
transferred, but they must be MP3 or WMA files.
- The playback order will change if the files in MUSIC
folder are added. Also the same is said of the case of
the directly created folder in the MUSIC folder.
- You can create a folder in the MUSIC folder and move
files to that folder.
Files in subfolders up to two levels below the MUSIC
folder can be played.
- The player can recognise up to 999 files in the MUSIC
folder.
[DATA] folder
This folder stores data files (Excel, Word, etc.) as a
Removable Disk.
[PLAYLIST] folder
This folder stores playlist files.
- The player can recognise up to 999 files in the PLAYLIST
folder.
[MusicFileMaster] folder
This folder is for installing MusicFileMaster.
[Manual] folder
This folder stores instruction manual files.
[USERPSET.ICR]
This file stores FM user preset information.
[INFSYS.SPR]
Hidden file containing the player information reads by the
PC application. Do not delete.
[RECORD] - [VOICE]/[FM] folder
Files recorded using the player are stored here.
- Files recorded from the microphone are stored in the
VOICE folder with the name “IC_V_XXX (file
number).MP3”.
- Files recorded from the FM are stored in the FM folder
with the name “IC_R_XXX (file number).MP3”.
- The VOICE and FM folders can hold up to 255 files
each.
- Only those files in the VOICE and FM folder which
comply with the file name rules set can be played.
Also, keep in mind that changing a file’s name will
prevent that file from being played on the player.
-9-
Page 10

Starting up the MusicFileMaster
MusicFileMaster
You can select music files on your hard disk and manage
them using MusicFileMaster, by reading them into the
application. MusicFileMaster enables you to transfer music
files to your portable device, and manage the transferred
music files.
MusicFileMaster has two modes.
Library mode: In this mode you can play and manage
music files and create playlists.
Portable device mode: In this mode, you can transfer
music files to your portable device, manage them, and
play music files which are on your portable device.
Starting up the MusicFileMaster
Connect the player to your PC (refer to page 5).
Double click [MusicFileMaster] icon created on the desk
top to start up the MusicFileMaster.
Note:
It is recommended to end all Windows applications before
start-up.
Controls in the MusicFileMaster window
For details, please refer to the on-line help.
5. Library
Music file list in your PC is displayed.
The list is displayed in [Library] mode. [All Songs],
[Artist/Album], [Album], [Genre] and [Format] can be
displayed individually.
6. Playlist
Playlists in your PC are displayed.
7. Library in portable device
List of music information in portable device is displayed.
8. Music information in your PC
9. Music information in device
10. List control buttons
11. End button
This button is used to end the MusicFileMaster.
How to use on-line help
Start up the MusicFileMaster and select the [Table of
Contents] in the [Help] menu. Refer to detailed information
on the menu.
1. Menu bar
Menus for operations are displayed.
2. Mode selection buttons
3. Music file information
4. Spectrum analyser
-10-
Page 11

Transferring data by MusicFileMaster
Start up the MusicFileMaster (refer to page 10).
Transferring data to the player
After selecting [Help] menu > [Table of Contents], click
[Basic operations] > [Transferring music files to portable
device] of the [Portable device]. Then, transfer files
according to the instruction displayed on the screen.
Storing data in your PC
Use [Backup Record Folder ...] function in MusicFileMaster’s
[Tools] menu. Then, store files according to the instruction
displayed on the screen.
Copying data by using Explorer
Start up Explorer (refer to page 6).
(1) Copying files to the player
Select the music files to copy and drag and drop them to
[MUSIC] folder in [Removable Disk].
Note:
- Registration of too many pieces of music may make
the player action slower.
The player may not work depending on the environment
of your PC.
- Only the files of MP3 and WMA (without copyright)
formats can be transferred to the device and played
back by MusicFileMaster. However, a file which has
the extension of RMP (Riff MP3) can not be played
back. All files of MP3 and WMA formats including
variable bit rate can be transferred, but may not be
played back correctly.
(2) Copying files to your PC
Select the music files you wish to copy inside [MUSIC]
folder in [Removable Disk] and drag and drop them into a
folder of your choice on your PC.
Note:
- Place files you wish to play either in the MUSIC folder
or any subfolders two levels below the MUSIC folder.
- Some MP3/WMA files may not be able to be played on
this player.
- Any MP3 or WMA files that you transfer and that are
not for your own personal enjoyment may not be used
without permission from the copyright holder, as
stipulated by intellectual copyright law.
2
1
- You can search for music files transferred using Explorer
or Windows Media Player. Use [Remake Management
File of Device] function in MusicFileMaster’s [Tools]
menu.
-11-
Page 12

Transferring data using the Media Player
If you have the Microsoft Windows Media Player installed,
you can transfer WMA files to the player and listen to them.
See the Windows Media Player on-line help for details on
how to do this.
Note:
- Never disconnect the player from your PC during
transfer.
- Files in subfolders up to two levels below the MUSIC
folder can be transferred.
Precaution when copying WMA files to the player:
Transfer from your PC to the player and/or playback are
impossible in the following cases.
- Music files which are copyright protected
- Music files purchased over the Internet may not transfer
and/or play back.
Note when ripping a CD (transferring CD music files to
your PC as WMA files)
Be sure to remove the copyright protection as described
below before ripping a CD using Windows Media Player.
1. Start up Windows Media Player.
2. Select [Tools] > [Options].
3. Open [Copy Music] or [Rip Music] in tab.
Make sure that [Copy protect music] is not checked.
4. Click [Apply] then [OK].
Designating the playback order (Playlist)
It is possible to designate the playback order of music.
Create a playlist on your PC and transfer it to the player to
play your music in that order.
It is also possible to transfer two or more playlists to the
player.
1. Start up the MusicFileMaster (refer to page 10).
2. After selecting [Table of Contents] in [Help] menu,
click [Basic operations] > [Creating / deleting portable
device playlists] of [Portable device]. Then, store the
data according to the instruction displayed on the
screen.
Formatting the player’s data
Always format data using the player itself (refer to page
19).
Note:
- If you select the format function from the menu, the
memory will be initialised and all files will be erased.
Use only when you need it. Save a backup copy of your
data on a PC, etc.
- The player might not operate normally if formatting the
player with your PC.
- If you accidentally formatted using your PC, reformat
it using the player.
-12-
Page 13

Before operation
Using the headphones
Connect the headphones to the socket.
Turning the power on and off
POWER
Press [a POWER]. “HELLO!” appears briefly on the display
and the power turns on.
The last selected status appears (Resume function).
Example:
Sweet
Press [a POWER] (for at least 2 seconds). “SEE YOU!”
appears and the power turns off.
Auto power off function
Leaving the player on for 15 minutes without using it
automatically turns off the power. (except during an FM
broadcast reception)
1-23
Battery indicator
“ ” indicates that the battery is full and the power in
battery will be come less when using.
“ ” indicates low battery power and the battery should be
charged.
Selecting the function
1. In the stop mode, press [MODE] (for at least 2 seconds).
The first stage menu appears.
MODE
Function
2. Press [a], then move [a] right (e) or left (f) to
select the desired function (“ ”, “ ” or “ ”) and
press [a] again.
Example:
: Music function
Sweet
: FM function
103.25 MHz
: Voice function
REM 6H29M48S
To adjust the volume
Press [VOL] + or –. The volume level appears.
VOL
VOLUME 16
(VOLUME 0 to 20)
1-23
P01
1-23
Hold function
This prevents operation from stopping by accidentally
pressing a button.
Set [b HOLD] to the left. “HOLD ON” appears briefly and
the hold function is engaged.
b HOLD
- If an operation button is pressed while the hold function
is engaged, “HOLD ON” will appear and nothing else
happens.
Set [b HOLD] to the right. “HOLD OFF” appears briefly
and the hold function is disengaged.
HOLD ON
Setting up the beep sound (refer to page 21)
Adjusting the contrast of LCD display (refer to page 21)
Setting up the backlight colour (refer to page 21)
Setting up the backlight time (refer to page 21)
Selecting the language (refer to page 21)
-13-
Page 14

Playback
Play music
First, select “Music” function (refer to the previous
page).
1. In the stop mode, press [MODE] (for at least 2 seconds).
The first stage menu appears.
Function
2. Move [a] right or left to select “Music Setting”.
Music Setting
3. Press [a]. “SOUND EQ” appears.
SOUND EQ
4. Move [a] right or left to select “PLAY SELECT”.
PLAY SELECT
5. Press [a]. Playback mode selection display appears.
FOLDER ALL ab LIST
6. Move [a] right or left to select the desired mode
(FOLDER, ALL, ARTIST, ALBUM, GENRE or PLAY
LIST), then press [a].
- For details of the playback mode, please refer to
“Examples of playback mode selection display” in
page 16.
- When searching the item for more detail, repeat
step 6.
When the desired mode has been selected, “PLAY
SELECT” returns.
PLAY SELECT
MUSIC
MUSIC
MUSIC
MUSIC
8. Move [a] right or left to select the music file you want
to playback.
Love
9. Press [a]. Playback begins.
Love
3-23
3-23
Play voice file
Recording voice v Refer to page 17.
First, select “Voice” function (refer to the previous
page).
Press [a]. “PLAY VOICE” appears, then press [a] again.
Playback begins.
HQ
0M02S
3-23
Play FM radio file
Recording FM radio v Refer to page 18.
First, select “FM” function (refer to the previous page).
1. Press [a]. “REC FM” appears.
2. Move [a] right or left to select “PLAY FM”, then press
[a]. Playback begins.
9
0M02S
3-23
To stop playback
Press [a].
Example:
7. Press [MODE] twice to quit the menu setting mode.
Sweet
For Playlists playback: Create a playlist on the
MusicFileMaster and transfer it to the player before starting
playback.
Press [MODE] during play mode. The display mode
changes.
Example:
Love
9
0M45S
1-23
3-23
3-23
3-23
Love
Press [a] again (Music function) or press [a] twice (Voice/
FM function) to resume playback.
Press [MODE] (for at least 2 seconds) during playback
(only for files in the MUSIC (or FM) folder). The player
enters to the menu setting mode.
Example:
“SOUND EQ” “BASS” or “REPEAT” (refer to page 21)
“NO FILE” appears if no file is in the folder.
3-23
Setting up the sound equalizer (refer to page 21)
Setting up the bass boost (refer to page 21)
-14-
Page 15

Note:
- A few seconds may be required to start playback for
large files or an extremely large number of files.
- Depending on the MP3/WMA file, the displayed playing
time may be at variance with the actual playing time.
- Some MP3/WMA files may not be able to be played on
this player.
Selecting the repeat/random playback
Only for files in the MUSIC (or FM) folder:
1. In the stop mode, press [MODE] (for at least 2 seconds).
The first stage menu appears.
Function
2. Move [a] right or left to select “Music Setting”.
Fast forward play
Move [a] right (e) during playback and hold it.
Release [a] to resume normal playback.
Fast reverse play
Move [a] left (f) during playback and hold it.
Release [a] to resume normal playback.
To skip to the next or previous file
Move [a] right or left during playback or stop.
Music Setting
3. Press [a]. “SOUND EQ” appears.
SOUND EQ
4. Move [a] right or left to select “REPEAT”, then press
[a].
ALL RANDOMONE
5. Move [a] right or left to select the desired mode. Then
press [a]. “REPEAT” returns.
ALL: Plays all files (or all files in the selected ARTIST,
ALBUM or GENRE) repeatedly.
RANDOM: Plays all files (or all files in the selected
ARTIST, ALBUM or GENRE) randomly.
ONE: Repeats the current file only.
6. Press [MODE] repeatedly until the original display
returns.
MUSIC
MUSIC
-15-
Page 16

Examples of playback mode selection display
(Valid only for music files transferred by MusicFileMaster.)
ALL: Selects all the music files.
ARTIST: Selects the music files by artist name.
ALBUM: Selects the music files by album name.
GENRE: Selects the music files by genre name.
PLAYLIST: Plays the music files in the playlist.
FOLDER: (For the case when files are transferred by Explorer and Windows Media Player)
Selects all the folders in [FOLDER].
Selects all the subfolders in the selected folder.
Selects all the music files in the selected folder.
Selects all the music files in [FOLDER].
Note:
Use of the [Remake Management File of Device] function of the [Tools] menu of the Music File Master enables you to
search for the piece of music which has been transferred by Explorer or Windows Media Player.
-16-
Page 17

Recording voice
First, select “Voice” function (refer to page 13).
Recording time
The recording time differs as shown below.
(When [MusicFileMaster] and [Manual] folders are deleted)
Recording mode Recording time (approx.)
DMP-M600
HQ: High-quality 8 hr. 50 min.
SP: Standard 35 hr. 30 min.
DMP-M700
HQ: High-quality 17 hr. 40 min.
SP: Standard 71 hr. 00 min.
Built-in microphone: Monaural recording
FM radio: Stereo recording
Selecting the recording mode
1. In the stop mode, press [MODE] (for at least 2 seconds).
The first stage menu appears.
Function
2. Move [a] right or left to select “Voice Setting”.
Voice Setting
Starting a recording
1. Press [a]. “PLAY VOICE” appears.
2. Move [a] right or left to select “REC VOICE”, then
press [a]. Recording begins.
REM 6H29M46S
24-24
To stop recording
Press [a].
REM 6H28M48S
Note:
The player can record up to 255 files. “FILE FULL” appears
when attempting to record the 256th file.
24-24
3. Press [a].
REC MODE
4. Press [a].
REC MODE
5. Move [a] right or left to select the recording mode.
Then press [a]. “REC MODE” returns.
6. Press [MODE] repeatedly until the original display
returns.
HQ SP
VoICE
VoICE
-17-
Page 18

Listening to the FM radio
Important note:
When listening to the radio, you must connect the
headphones. The headphones serve as an FM aerial.
First, select “FM” function (refer to page 13).
103.25 MHz
- If a radio frequency is not displayed;
press [a], then move [a] right or left to select “LISTEN
FM” and press [a].
P01
Automatic/Manual tuning
Automatic tuning
Move [a] right or left for at least 1 second.
105.15 MHz
The automatic station scanning mode is set. The nearest
station will be automatically scanned and scanning will be
stopped.
Manual tuning
In the automatic tuning, move [a] right or left. The manual
tuning mode is set. Move [a] right or left briefly until the
desired frequency is displayed.
MANUAL
Listening to preset stations
Move [a] right or left to select the preset number.
Recording FM radio
1. Tune in the station to be recorded.
2. Press [a], then move [a] right or left to select “REC
FM”.
3. Press [a]. Recording begins.
“HQ” recording mode is automatically selected.
REM 6H28M46S
To stop recording
Press [a].
16-16
- Press [MODE]. The preset tuning mode returns.
User preset tuning
To preset stations
Up to 24 FM stations can be preset.
1. Tune in the station to be preset (refer to “Automatic/
Manual tuning”).
2. Press [a]. “PRESET” appears.
3. Press [a] again within 5 seconds. The preset tuning
mode is set and the first of an empty preset number is
blinking.
PRESET
103.25 MHz
Note:
Move [a] right or left to select the desired preset
number if required.
4. Press [a] within 10 seconds to preset the station.
103.25 MHz
- In this example, “103.25 MHz” is preset on the
preset number 12.
5. Repeat steps above to add more stations.
ModE
P12
P12
Setting up the FM mode (refer to page 21)
Setting up the preset stations (refer to page 21)
-18-
Page 19

Erasing
Erasing a file
First, select the function (Music, FM or Voice) which has
the file to be erased.
1. In the stop mode, press [MODE] (for at least 2 seconds).
The first stage menu appears.
Function
2. Move [a] right or left to select “CommonSetting”.
CommonSetting
3. Press [a].
FILE ERASE
4. Press [a].
ERASE - CANCEL
5. Move [a] right or left to select “FILE”.
ERASE - FILE
Note:
If you do not want to erase, select “CANCEL”.
6. Press [a]. Erasing file name appears.
IC_V_001.MP3
7. Move [a] right or left to select the file to be erased.
IC_V_002.MP3
8. Press [a] (for at least 2 seconds). The selected file is
erased.
9. Press [MODE] repeatedly until the original display
returns.
CoMMoN
CoMMoN
CoMMoN
1-17
2-17
Note:
Only MP3/WMA files playable on this unit can be erased.
Erasing files in other formats is not possible. Nothing is
erased if there are no MP3/WMA files in the playable
folders.
Formatting (Erasing all files in all folders)
If you select the format function from the menu, the
memory will be initialised and all files will be erased. Use
only when you need it. Save a backup copy of your
recorded messages on a PC, etc.
1. In the stop mode, press [MODE] (for at least 2 seconds).
The first stage menu appears.
2. Move [a] right or left to select “CommonSetting”.
3. Press [a]. “FILE ERASE” appears.
4. Move [a] right or left to select “FORMAT”.
FORMAT
5. Press [a].
FORMAT - CANCEL
6. Move [a] right or left to select “MEMORY”.
FORMAT - MEMORY
Note:
If you do not want to format, select “CANCEL”.
7. Press [a ]. “FORMATTING”, then “FORMAT
COMPLETE” appears and all files are erased.
8. Press [MODE] repeatedly until the original display
returns.
CoMMoN
CoMMoN
CoMMoN
Erasing all files in the selected folder
First, select the function (Music, FM or Voice) which has
the folder to be erased.
1. Select “FOLDER” in the step 5 above.
ERASE - FOLDER
Note:
If you do not want to erase, select “CANCEL”.
2. Press [a]. Erasing folder name appears.
VOICE FOLDER
3. Press [a] (for at least 2 seconds). All the files in the
selected folder are erased.
4. Press [MODE] repeatedly until the original display
returns.
CoMMoN
CoMMoN
-19-
Page 20

Menu setting
Common procedures of menu setting
1. In the stop mode, press [MODE] (for at least 2 seconds).
The first stage menu appears.
2. Move [a] right or left to select the first stage menu, then
press [a] to confirm the menu.
“Function”
wv
“Voice Setting”
The second stage menu appears.
3. Move [a] right or left to select the second stage menu,
then press [a] to confirm the menu.
Menu function table
Stage 1 Stage 2 Item
Function : (Music), : (FM), : (Voice)
Music Setting SOUND EQ POP, ROCK, JAZZ, NOR
Tuner Setting FM MODE FM MODE (STEREO, MONO)
Voice Setting REC MODE REC MODE (HQ, SP)
wv
“Music Setting”
wv
“CommonSetting”
BASS ON, OFF
REPEAT ALL, RANDOM, ONE
PLAY SELECT FOLDER, ALL, ARTIST, ALBUM, GENRE, PLAY LIST
PRESET XE, USER, CLEAR
wv
“Tuner Setting”
wv
...
4. To change the setting of the selected menu, move [a]
right or left. Then press [a].
When the setting is completed, the second stage menu
returns.
- Press [MODE] once during the menu setting. The
setting is cancelled and the previous menu returns.
5. Press [MODE] repeatedly to quit the menu setting
mode.
CommonSetting FILE ERASE ERASE (CANCEL, FILE, FOLDER)
BEEP BEEP (ON, OFF)
FORMAT FORMAT (CANCEL, MEMORY)
LCD CONTRAST CONTRAST (1 to 10)
LIGHT COLOR COLOR (NORMAL, RED, BLUE, GREEN, YELLOW, MAGENTA, CYAN, WHITE,
RANDOM, OFF)
LIGHT TIME TIME (2 Sec, 5 Sec)
LANGUAGE ENGLISH, FRENCH, GERMAN, SPANISH, RUSSIAN, ITALIAN
VERSION Ver 1.00
-20-
Page 21

Function
Selecting the function
FUNC
: Music function
: FM function
: Voice function
Music Setting
SOUND EQ: Setting up the sound equalizer
JAZZ NORPOP ROCK
POP: Pop
ROCK: Rock
JAZZ: Jazz
NOR: Normal (Deactivates the Equalizer function)
MUSIC
Voice Setting
REC MODE: Selecting the recording mode (refer to page
17)
CommonSetting
FILE ERASE: Erasing files or folders (refer to page 19)
BEEP: Setting up the beep sound
Turning on and off the beep when buttons are pressed or
moved.
BEEP - ON
ON: Beep on
OFF: Off
FORMAT: Formatting (refer to page 19)
CoMMoN
BASS: Setting up the bass boost
BASS
ON: On
OFF: Off
REPEAT: Selecting the repeat/random mode (refer to
page 15)
PLAY SELECT: Selecting the play mode
(Displayed in the “Music” mode only.)
FOLDER: Selects all the files in the selected folder.
ALL: Selects all the files.
ARTIST: Selects the files by artist name.
ALBUM: Selects the files by album name.
GENRE: Selects the files by genre name.
PLAY LIST: Plays the files in the playlist.
ON OFF
FOLDER ALL ab LIST
MUSIC
MUSIC
Tuner Setting
FM MODE: Setting up the FM mode.
FM MODE - STEREO
STEREO: Stereo
MONO: Monaural
PRESET: Setting up the preset stations.
FM
LCD CONTRAST: Adjusting the contrast of LCD display
CONTRAST 5
1 - 10
LIGHT COLOR: Setting up the backlight colour
COLOR - NORMAL
NORMAL, RED, BLUE, GREEN, YELLOW, MAGENTA,
CYAN, WHITE, RANDOM, OFF
Note:
NORMAL: The light colour is selected by the operation
mode.
RANDOM: The light colour is randomly selected.
LIGHT TIME: Setting up the backlight time
TIME - 2 Sec
2 Sec: Turns off the backlight after 2 seconds.
5 Sec: Turns off the backlight after 5 seconds.
LANGUAGE: Selecting the language for Artist, Title
name, etc.
ENGLISH
ENGLISH: English FRENCH: French
GERMAN: German SPANISH: Spanish
RUSSIAN: Russian ITALIAN: Italian
CoMMoN
CoMMoN
CoMMoN
CoMMoN
XE
XE: Selects initial preset stations.
USER: Selects user preset stations.
“NO DATA” appears when user preset has not been
set.
CLEAR: Clears user preset stations.
FM
VERSION: Checking the version number
Ver 1.00
-21-
CoMMoN
Page 22

Troubleshooting guide
Symptom
Possible cause
Corrective action
The player does not start.
Charging battery has run down.
Charge the built-in battery.
Playback/Recording is not normal.
Internal memory error.
Format (initialize) the internal memory.
Buttons do not respond.
The hold function is set.
Turn off the function.
The USB cable is still connected.
Disconnect the USB cable.
No sound.
The volume is turned down too low.
Adjust the volume.
Files in the VOICE or FM folder cannot be played.
The file name is wrong.
Changing files names using your PC will render
files unplayable. Return the file name to “IC_V (or
R)_XXX (file number).MP3”.
Files cannot be played (correctly or at all).
The file is not in a playable format.
Use MP3/WMA-format files.
Files on the PC were not transferred to the MUSIC
folder.
Transfer them to the MUSIC folder on [Removable
Disk].
This is data which cannot be played on the player.
Create a file using different encoder (MP3/WMA
conversion) software.
In selection of music piece, it is impossible to make a
search for artist, album and genre.
The database of the transferred musics is not created.
Create the database of the pieces of music
transferred by [MusicFileMaster].
For detailed information of recreation of database,
please refer to the on-line help of [MusicFileMaster].
Symptom
Possible cause
Corrective action
The Removable Disk is not displayed when the player is
connected to the PC.
The PC and the player are not connected correctly.
Make sure the connect is corrected.
Disconnect the USB cable from the PC and
reconnect it again.
Sufficient power is not being supplied from the PC.
If a USB hub is being used, reconnect the player
directly to the USB port on the PC. If the PC is
equipped with several different USB ports, try
another port.
A network drive has been assigned.
If a network drive has been assigned, the drive
letter (the letters used as drive names) is already
taken, so the Removable Disk cannot be created.
Change the network drive assignments and
reconnect. Talk to your network administrator about
reassigning network drives.
A file can't be erased.
The attribute of the file is set up only for reading.
Please erase a file whether connects this to a PC
and changes file attribute. Or please do format of
internal memory (initialization).
FM broadcast cannot be received (recorded).
The headphones are not connected.
Connect the headphones.
Player is not recognised correctly by MusicFileMaster.
MusicFileMaster was started up immediately after
formatting the player by PC.
Format it by player and connect the player to your
PC before starting up the MusicFileMaster. (Refer
to page 19)
“ ” blinks.
The battery is not charged normally.
Consult your dealer.
WHAT TO DO IF...
If the operation of the player or display is not normal,
1. Press [RESET] using a clip, etc.
2. Resume operation.
This operation should not be performed under ordinary
circumstances.
I/O
-22-
Page 23

Cleaning the cabinet
Clean the outside of the player with a clean soft cloth, moistened with lukewarm water. Do not use benzene, thinner or
alcohol since they will mar the finish of the surfaces.
Specifications
Internal memory: 512MB (DMP-M600), 1GB (DMP-M700)
Frequency response (playback): 20Hz - 20kHz
Music playback capability:
MP3 [MPEG 1, 2 Layer3], [MPEG 2.5] (16 - 44.1kHz, 16 - 192kbps)
WMA [Windows Media Audio] (16 - 44.1kHz, 32 - 160kbps)
Tuner reception frequency: FM: 87.5 - 108 MHz
Terminals: USB, (Headphones)
Output power: 10mW + 10mW
Power source: Lithium Ion battery
Full charging time: Approx. 2 hours
Battery life (playback): 10 hours
Dimensions (W x H x D): Approx. 15.6 x 87 x 15.6 mm
Weight: Approx. 23 g
Specifications subject to change without notice.
You can download the USB driver or the latest software, if available, from our web site.
http://www.sanyo-audio.com/english/index.html
The optional AC adaptor is available.
Model No.: D-5V-USB
Note:
This adaptor is available only in EU
countries.
This set complies with the EMC Directive 89/336 and with the LVD Directive 73/23.
-23-
SANYO Electric Co., Ltd.
 Loading...