


USER MANUAL
CAR CD/MP3 PLAYER/FM-AM RADIO /Bluetooth For SA-CD102 Only MODEL: SA-CD100/ SA-CD102
Take the time to read this user manual. Familiarity with the manual will help you to obtain the best performance from your new device. The descriptions and features in this manual only serve as general information and do not represent a guarantee. In order to offer you a product of the highest quality, we reserve the right to make possible improvements or changes without prior notification.
1
Copyright Information
©2009 All rights reserved. This document may not in whole or in part be reproduced, stored in a retrieval system, transmitted in any form or by any means, electronic, mechanical, photocopying, recording, or otherwise, or reduced to any electronic medium or machine-readable form without prior consent, in writing, from [COMPANY].
[PRODUCT] and [BRAND] are registered trademarks of [COMPANY]. The logo’s, standards, software, and/or product names mentioned herein are manufacturer and publisher trademarks and are used only for the purpose of identification.
Disclaimer
The publishers and author assume no responsibility whatsoever for the uses made of this material or for decisions based on its use. Further, [COMPANY] makes no warranties, either expressed or implied, regarding the contents of this product, its completeness, accuracy, merchantability, or fitness for any particular purpose. Neither the publisher nor anyone else who has been involved with the creating, production, or delivery of the material shall be liable for any reason.
All brand and product names used throughout this document are trademarks or registered trademarks of their respective companies. The brand and product names are used in editorial fashion only and for the benefit of such companies.
Product specifications are subject to change without prior notice
www.sansui-caraudio.com
WEEE (Waste Electrical and Electronic Equipment Directive)
Waste electrical products should not be disposed of with household waste. Please
recycle where facilities exist. Check with your Local Authority or retailer for recycling advice.
Safety instructions
This user manual contains important safety instructions and information for proper use of the device. Please follow the instructions in this manual carefully.
A Please keep the device away from places with high temperatures, high humidity or dust. B Do not give your car radio and especially the accessories to children.
C Avoid shocks and do not let the device fall, as that may cause damage to the device.
D We are not responsible for data losses that are caused by damage to the product, repairs or any other reasons.
E Do not disassemble the device. Doing so will void your warranty claims.
F Do not use alcohol, thinners or petrol to clean the display. Use only a dry cloth.
Accessories
Package contains the following accessories for installation and operation the unit.
Washer, spring |
1 |
|
Rubber |
1 |
|
Washer, M5 Nut |
|
cushion |
|
||
|
|
|
|
||
|
|
|
|
|
|
2
Mounting Strap |
|
1 |
|
Screw |
4 |
|
|
|
|
|
|
|
|
|
|
Bolt |
|
1 |
|
key |
2 |
|
|
|
|
|
|
|
|
|
|
Screw |
|
1 |
|
sleeve |
1 |
|
|
|
|
|
|
|
|
|
|
ISO Cable |
|
2 |
|
Manual |
1 |
|
|
|
|
|
|
|
|
|
|
|
Installation in Dashboard |
|
|
|
|
|
|
If your car is fitted with a one (1x) DIN size opening for a car audio system, you can install the Car Radio
according these steps.
Note: Unit should be installed horizontally in an angle less than 30°.
1X DIN SLOT
1)Insert the mounting bracket into the 1X DIN opening of your dashboard.
2)Bend the mounting tabs outwards with a screwdriver, to tighten and fix the mounting bracket in its place.
3)Connect the M5 Bolt to the rear of the unit.
4) Check electrical connections as described earlier (either an ISO connection or separate wiring)
5)Insert the ISO connector into the unit.
6)Push the unit into the mounting bracket until you hear a click
7)Move the assemble bar (metal strip with holes) over the M5 bolt. And use the M5 nut to tighten the assemble bar.
8)Use the screw Bt5x20 to fix the other side of the assemble bar to the car body.
9)Place the front rim over the unit to finish the installation.
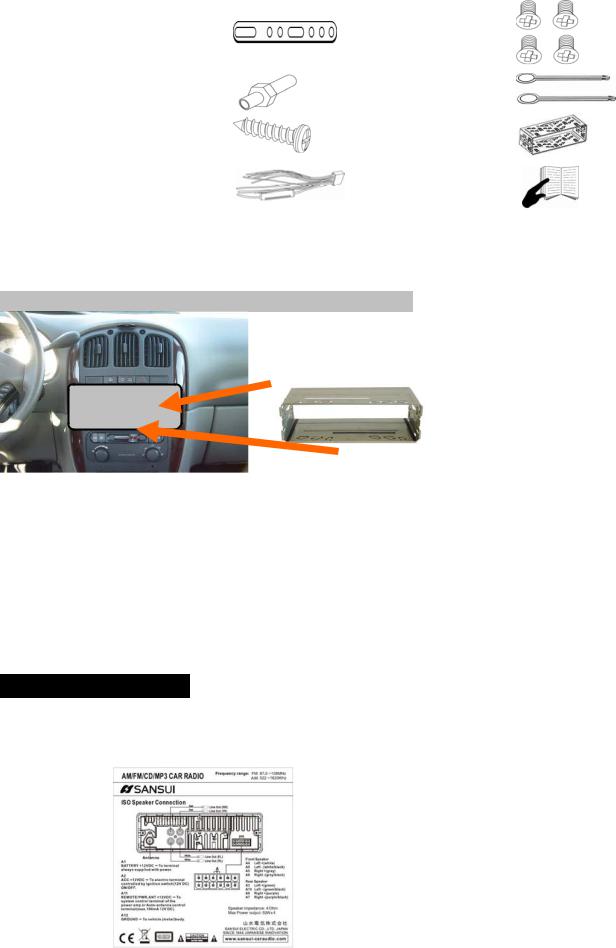
Wiring Connections
Note: Never connect cable to the system while it is connected to the battery power. Whenever the unit is disconnected from the battery, the preset memory will be erased and the unit will go back to its factory defaults.
3
 Loading...