

Samsung SV-L12K, SV-L10K User Manual
Accessories
You have just purchased a Video Cassette Recorder.
Together with your VCR, you will find the following accessories in the box.
1
.5V
1
.5
V
R
E
P
E
A
T
S
T
A
N
D
B
Y
/O
N
D
IS
P
L
A
Y
C
N
T
.R
ES
E
T
IIP
/S
S
LO
W
TR
K
REC
ME
N
U
REMOTE CONTROL BA
TTERIES “AA”
COAXIAL CABLE
ENGLISH
OWNER’S MANUAL
Video Cassette Recorder (VCR)
- Line Recorder
SV-L10K/SV-L12K/SV-L23KS
AC68-02005A
Only cassettes marked can be used with the
VCR.
The unit is not disconnected from the AC power
source as long as it is connected to the wall outlet,
even if the unit itself has been turned off.
WARNING:
TO PREVENT FIRE OR SHOCK HAZARD, DO NOT
EXPOSE THIS APPLIANCE TO RAIN OR MOISTURE.
TO PREVENT ELECTRIC SHOCK, DO NOT OPEN
THE CABINET. REFER SERVICING TO QUALIFIED
PERSONNEL ONLY.
1
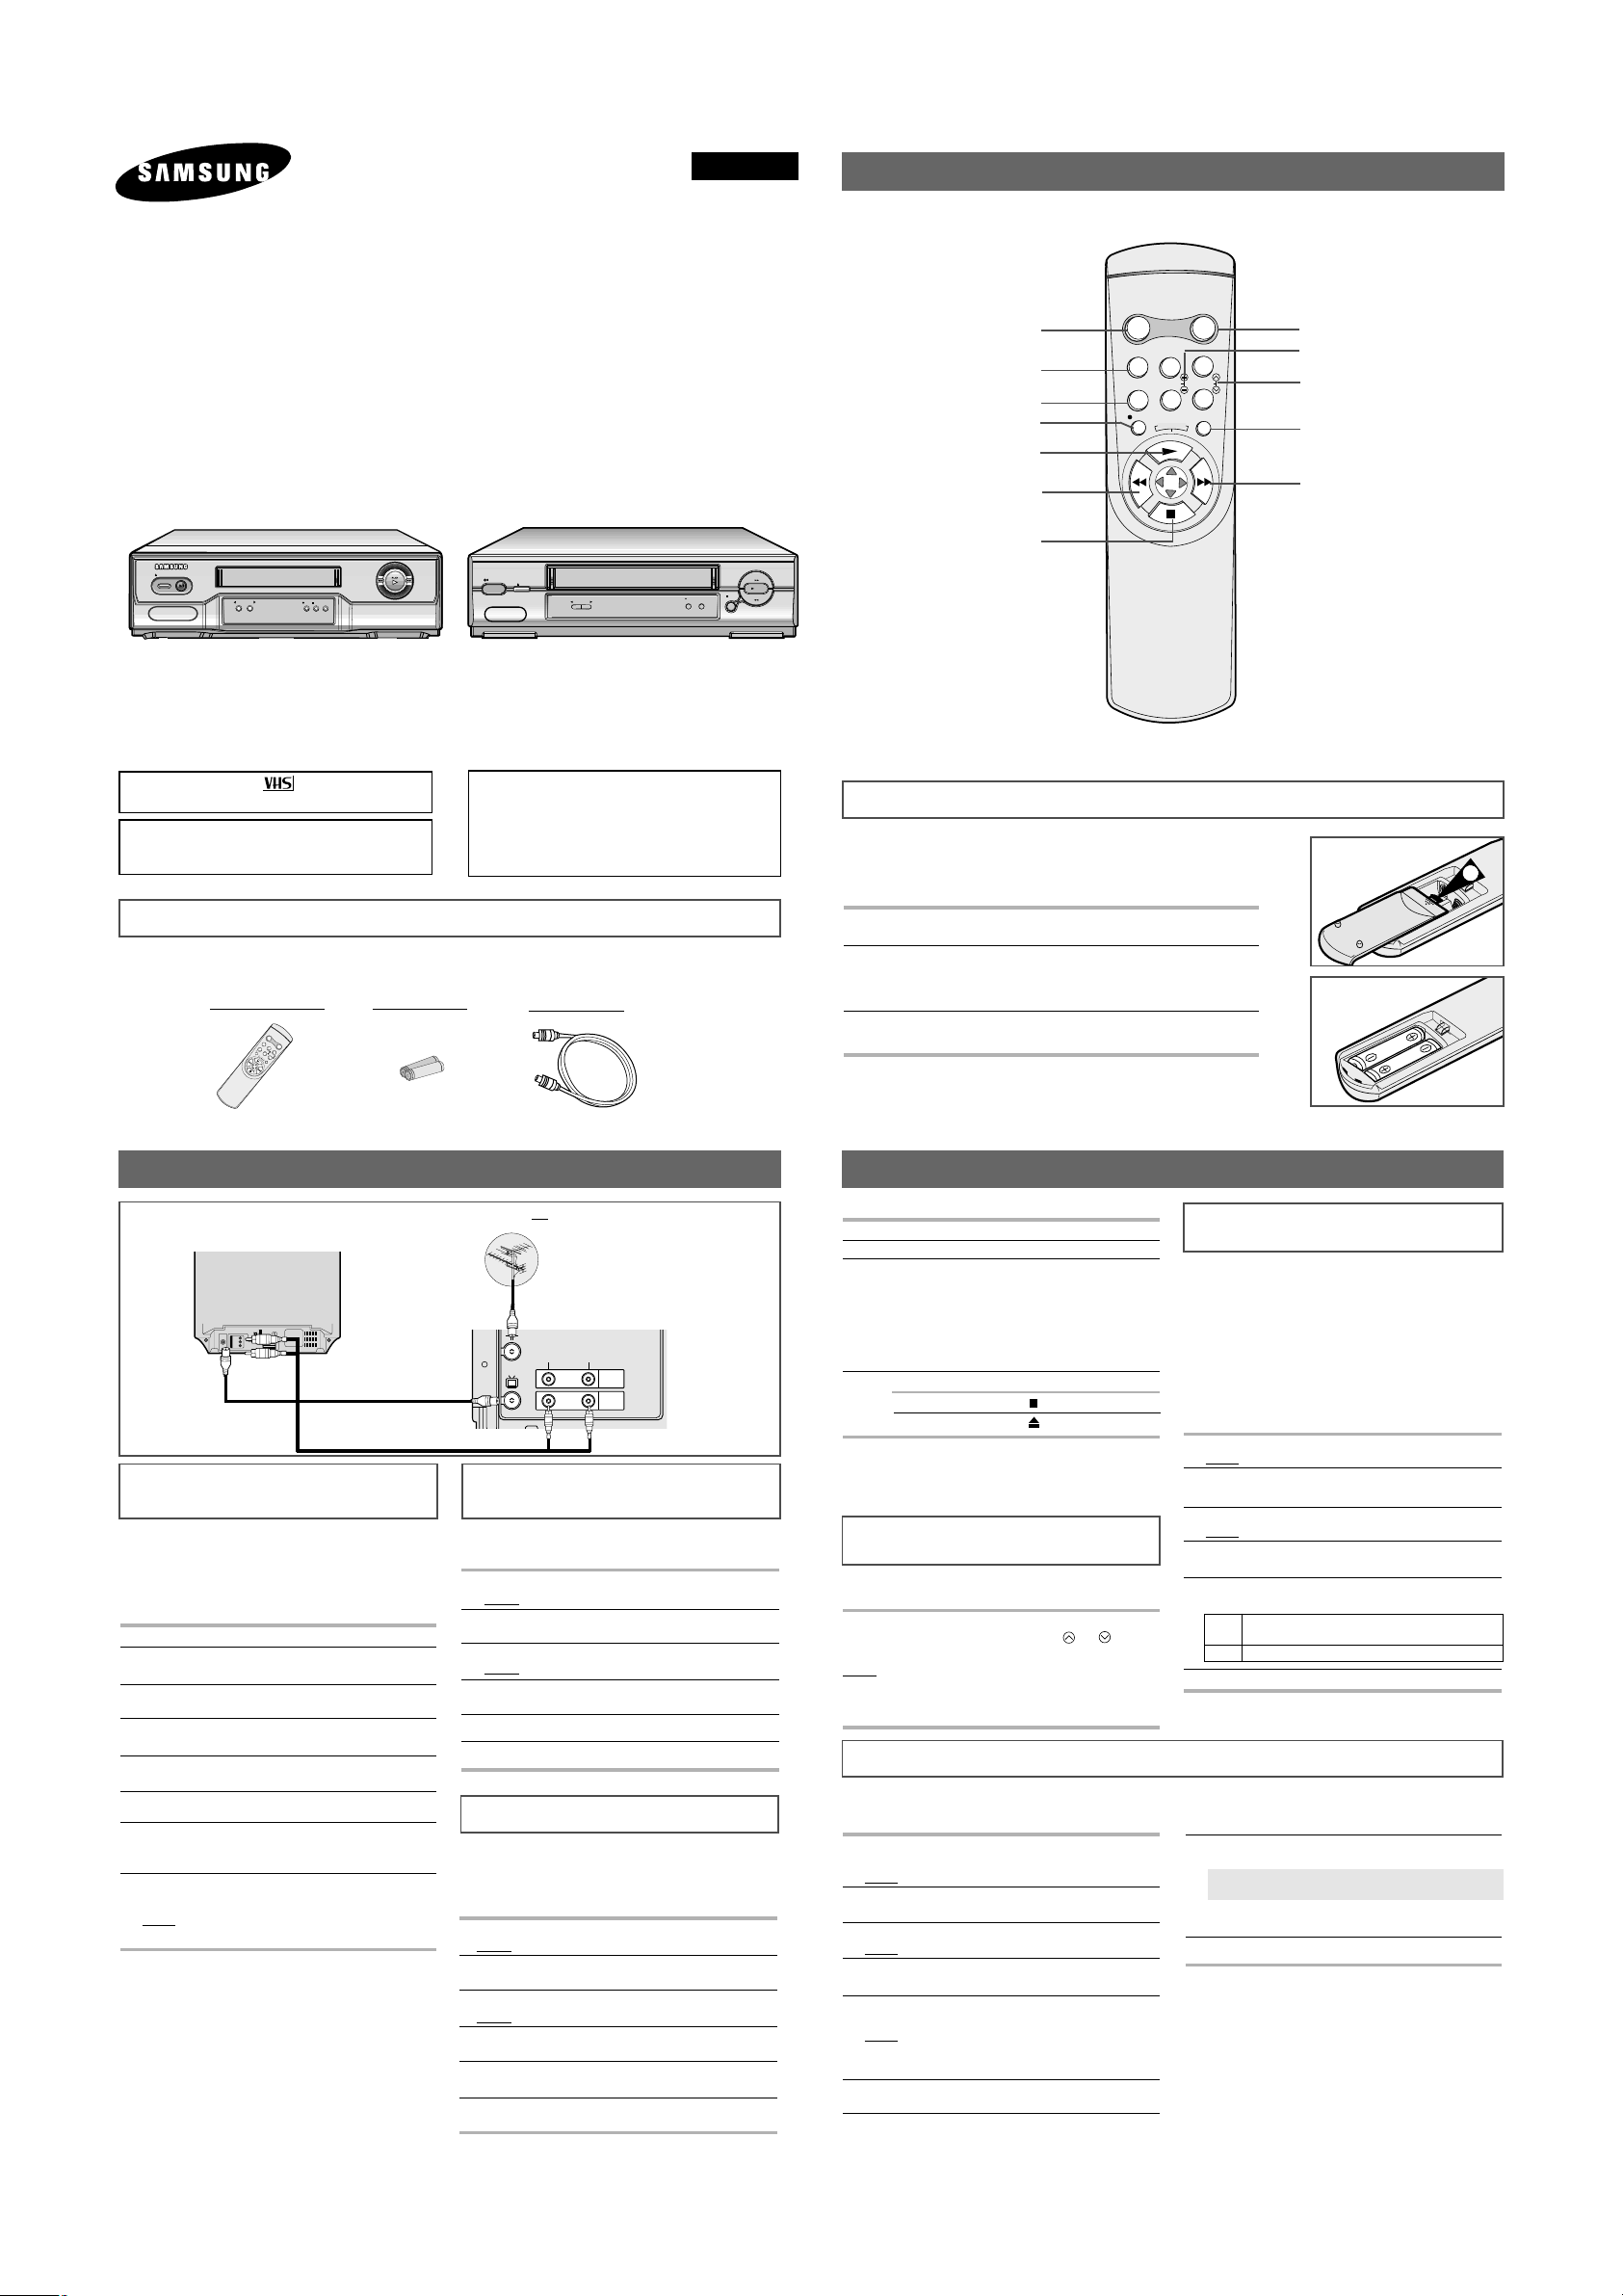
You must insert or replace the batteries in the remote control when
you:
◆ Purchase the video cassette Recorder
◆ Find that the remote control is no longer working correctly
1 Push the tab in the direction of the arrow to release the battery
compartment cover on the rear of the remote control.
2 Insert two AA, R6 or equivalent batteries, taking care to respect the
polarities:
◆ + on the battery with + on the remote control
◆ – on the battery with – on the remote control
3 Replace the cover by aligning it with the base of the remote
control and pushing it back into place.
➢ Do not mix different battery types (manganese and alkaline for
example).
Infrared Remote Control
Inserting Batteries in the Remote Control
◆ Make sure that both the television and the VCR are switched of
f before connecting the cables.
Connecting Your VCR to the TV
Tuning Your Television for the
VCR
Selecting the RF OUT Sound
Mode
You must tune your television for the VCR only if
you are not using a RCA cable.
➢ To view pictures from your VCR when a RCA
cable is used, the television must be set to the
audio/video mode (AV).
1 Switch on the television.
2
Switch on the VCR by pressing STANDBY/ON on the
front of the VCR or STANDBY/ON on the remote control.
3 Select a programme position on the television to be
reserved for use with your VCR.
4
Insert the video cassette in the VCR. Check that the
VCR starts reading the cassette; if not, press ❿
button
.
5 Start a scan on your television or set the television to
UHF channel 36.
6 Fine tune the television until the pictures and sound
are obtained clearly.
7
If you cannot find the pictures and sound, or there is
interference from nearby channels, change the VCR
OUTPUT CHANNEL to adjust the frequency.
8
When the picture and sound are perfectly clear store this
channel at the desired programme position on the television.
Result: That programme is now reserved for use with
your VCR.
Your VCR output channel may need to be changed
if the pictures suffer from interference or if your TV
cannot find the pictures. Also, you can change the
VCR output channel to adjust the frequency in
which information is displayed on the screen.
1 Press MENU on the remote control.
Result: The programming menu is displayed.
2 Press the corresponding
➛
or ❿buttons to select the
INSTALLATION option.
3 Press the
❷
button to select this option.
Result: The INSTALLATION menu is displayed.
4 Press the corresponding
or❷
buttons, until the VCR
OUTPUT CH option is selected.
5 Select the required output channel (CH21~CH69) by
pressing the ➛or ❿buttons.
6 On completion, press MENU twice to exit the menu.
Then tune your television again.
Setting the VCR Output Channel
Playing a Cassette
Selecting the Appropriate
System Standard
This function allows you to play back any pre-recorded cassette.
1
Switch on both the television and your VCR.
2
Select the AV input on the television for use with your VCR.
3
Insert the video cassette to be played. If the safety tab on
the cassette is intact, press ❿ button.
Otherwise, the cassette is played automatically.
➢ When a cassette is loaded, the tape position is
optimized automatically to reduce disturbance
(Digital Auto Tracking). When playing a cassette, if
the end of the tape is reached, the cassette is
rewound automatically.
4
To... Then press...
Stop the playback (STOP).
Eject the cassette (EJECT).
Adjusting Picture Alignment
Manually
The Fine Adjustment feature allows you to adjust the
alignment manually to obtain the best possible picture.
When noise bars or streaks appear during playback, adjust
alignment manually by pressing the TRK ( or ) buttons
until the picture is clear and stable.
Result: ◆ The tracking bar appears.
◆ The image is adjusted.
◆ The tracking bar disappears when you
release the button.
Intelligent Picture Control
Before recording a cassette, you can select the
required system standard. Otherwise, the system
automatically selects the reception standard when
you select AUTO.
➢
◆ When playing back a cassette, the standard is
automatically selected by the VCR.
◆
When you playback an NTSC-recorded tape on this
VCR make a setting on the color system according
to your TV. If your TV is a PAL system only TV, set
NTPB. If your TV is Multi System TV (NTSC 4.43
compatible), set NT4.43 and you can record NT4.43.
1 Press MENU on the remote control.
Result: The programming menu is displayed.
2 Press the corresponding
➛
or ❿buttons to select the
USER SET option.
3
Press the ❷button to select this option.
Result: The USER SET menu is displayed.
4
Press the corresponding or ❷buttons, until the
COLOUR SYSTEM option is selected.
5
Press the ❿button to select AUTO ➞ PAL ➞ SECAM
➞ MESECAM ➞ B/W or NT4.43 ➞ NTPB.
AUTO When playing back a cassette, the system
standard is automatically selected by the VCR.
B/W Black and White
6
On completion, press MENU twice to exit the menu.
Intelligent picture control feature allows you to
adjust the sharpness of the image automatically
according to your own preferences.
1
During playback, press the MENU button on the remote
control.
Result: The menu is displayed.
2 Press the corresponding
➛
or ❿buttons to select the
USER SET option.
3
Press the ❷button to select this option.
Result: The USER SET menu is displayed.
4
Press the corresponding or ❷buttons, until the
IPC option is selected.
5
Press the ❿button to select the IPC (intelligent picture
control) option.
Result
: The
PICTURE menu appears on the display.
➢When intelligent picture control mode is ON, the
sharpness of the image is adjusted automatically.
6
To adjust the sharpness manually, press the
❷
button
to turn the IPC mode OFF.
R
E
P
E
A
T
STANDBY/ON DISPLAY
CNT.RESET
IIP/S
SLOW TRK
REC MENU
STANDBY/ON BUTTON
COUNTER RESET BUTTON
PAUSE/STILL BUTTON
RECORD BUTTON
PLAYBUTTON
(INTERVALREPEAT BUTTON)
(MENU SELECTION UP BUTTON)
REWIND/REVERSE PICTURE SEARCH
BUTTON
(MENU SELECTION BUTTON)
STOP BUTTON
(MENU SELECTION DOWN BUTTON)
DISPLAYBUTTON
SLOW BUTTONS
TRACKING BUTTONS
MENU BUTTON
FAST-FORWARD/FORWARD
SEARCH BUTTON
(MENU SELECTION BUTTON)
7
Press the ➛or ❿buttons until the picture is displayed
according to your preferences.
To adjust the sharpness manually press the
SHARPNESS▲or▼button on the front of the VCR.
➢ If you do not press a button within ten seconds, the
PICTURE menu disappears automatically.
8
On completion, press the MENU button again.
You can choose the sound mode (G or K) according
to the TV set connected to your VCR.
1 Press MENU on the remote control.
Result
: The programming menu is displayed.
2 Press the corresponding
➛
or ❿buttons to select the
INSTALLATION option.
3 Press the
❷
button to select this option.
Result
: The INSTALLATION menu is displayed.
4 Press the corresponding
or❷
buttons, until the TV
SYSTEM
option is selected.
5
Press the ➛or ❿button to select G or K.
6 On completion, press MENU twice to exit the menu.
TV
LINE IN 1
VIDEO AUDIO
LINE OUT
AV Output
Aerial (Not supplied)
TV Set (Not supplied)
➀ Aerial Connector
Aerial input
➀ Coaxial Cable
➁ RCA Cable (Not supplied)
AV input
II
II
REC STOP
II P/S
EJECT
STANDBY/ON
REW
F.F
SHARPNESS
II
II
REC
EJECT
STANDBY/ON
II P/S
STOP
REW
F.F
PLAY
SHARPNESS
SV-L10K/SV-L12K
SV-L23KS

Playing a Sequence Frame by Frame
You can:
◆ Stop the cassette at a given frame (image)
◆ Advance one frame at a time
➢
No sound is heard when playing back frame by
frame.
1
Press:
◆ ❿ to start playing the cassette
◆
IIP/S
to stop the tape at a given frame
◆
IIP/S
to advance frame by frame
2
To return to normal playback, press ❿.
➢ Vertical stability: When playing back frame by
frame, interference may be seen on the screen.
Press the TRK ( or ) buttons to minimize this
effect.
Playing a Cassette in Slow Motion
You can play a cassette in slow motion.
➢
No sound is heard when playing back a cassette in
slow motion.
1
Press:
◆ ❿ to start playing the cassette
◆ SLOW ( or ) as many times as required to
decrease or increase the speed respectively
◆ ❿ to return to the normal speed
2
When playing back in slow motion, picture interference
may occur. Press the TRK ( or ) buttons to
minimize this effect.
☛
When you have been using the Slow Motion
function for more than about two minutes, the VCR
will automatically play to protect the:
◆ Cassette
◆ Video heads
Using the Tape Counter
The tape counter:
◆ Indicates the elapsed time in the play and record
modes
◆ Is reset when a cassette is inserted in the VCR
◆
Allows you to find the beginning of a sequence easily
☛
If the remaining time is to be calculated correctly,
you must indicate the type of cassette being used.
1 Insert a cassette in your VCR.
2 Press DISPLAY.
➢
The tape counter does not necessarily start from
zero at the beginning of the tape.
3 To set the tape counter to zero at the beginning of a
sequence:
◆ Press DISPLAY twice to display the counter
◆ Press CNT.RESET when you want to set the tape
counter to zero
4
When you are ready,
◆
Start playback or Recording.
◆
Press the ■button.
◆
To fast-froward or rewind to the sequence at which
the counter was set to zero, press ➛➛or ❿❿.
Result: The VCR stops automatically when the counter
reaches zero.
➢Some VCR information, such as the counter, can
be displayed on the television screen.
Press DISPLAY:
◆ Once to display the current function and counter
◆ Twice to display the counter only
◆ Three times to display the time remaining on the
cassette
◆ Four times to clear the display
Selecting the Cassette Type
If you wish to use the tape counter to display the time
remaining on a cassette, you must indicate the type of
cassette inserted.
1 Press MENU on the remote control.
Result
: The menu is displayed.
2
Press the corresponding ➛or ❿buttons to select the
USER SET option.
3 Press the
❷
button to select this option.
4
Press the corresponding or❷buttons, until the
TAPE SELECT option is selected.
5 Press the
➛
or ❿buttons as many times as required,
until the correct cassette length is displayed.
E180 E240
E 300 E260
6 Press MENU twice to exit the menu.
Auto Power Off
The Auto Power Off feature automatically turns off your
VCR if no signal is received and you do not press any
button for the selected time.
1
Press MENU on the remote control.
Result: The menu is displayed.
2 Press the corresponding
➛
or ❿buttons to select the
EASY OPERATION option.
3
Press the ❷button to select this option.
Result: The
EASY OPERATION
menu is displayed.
4
Press the corresponding or ❷buttons, until the
AUTO POWER OFF option is selected.
5
Press the ❿button, until you select the time of Auto
Power off interval.
OFF 2HOUR 3HOUR
6 On completion, press MENU twice to exit the menu.
Interval Repeat Play
You can set interval repeat play to repeat the cassette
several times for special interval.
1
Press MENU on the remote control.
Result
: The menu is displayed.
2 Press the corresponding
➛
or ❿buttons to select the
EASY OPERATION option.
3
Press the ❷button to select this option.
Result: The
EASY OPERATION
menu is displayed.
4
Press the corresponding or ❷buttons, until the
NO. OF INTERVAL REPEAT option is selected.
5
To... Press
❿
, until...
Interval repeat play 5, 10, 15, off is displayed.
(choose repeat time 5 times,
10 times, 15 times)
Cancel interval OFF is displayed.
repeat play
6
On completion, press MENU twice to exit the menu.
7
To select interval during playback, press the REPEAT
button at the desired start point.
Result: “INTERVAL REPEAT SETTING” is displayed.
Press the REPEAT button one more time at the desired
end point.
Result
: The tape is automatically rewound to the start
point. “INTERVAL REPEAT” is displayed.
Displaying/Hiding On-Screen
Information
Your VCR displays most information both on the VCR
and the television.
You can choose to display or hide this information on the
television screen.
1
Press MENU on the remote control.
Result
: The programming menu is displayed.
2 Press the corresponding
➛
or ❿buttons to select the
USER SET option.
3
Press the ❷button to select this option.
Result
: The USER SET menu is displayed.
4
Press the corresponding or ❷buttons, until the
OSD option is selected.
5
To... Press ➛or❿, until...
Display on-screen ON is displayed.
information
Hide on-screen OFF is displayed.
information
6
On completion, press MENU twice to exit the menu.
Auto Repeat Play
You can set repeat play to repeat the tape continuously
from beginning to end.
1
Press MENU on the remote control.
Result
: The programming menu is displayed.
2 Press the corresponding
➛
or ❿buttons to select the
EASY OPERATION option.
3
Press the ❷button to select this option.
Result: The
EASY OPERATION
menu is displayed.
4
Press the corresponding or ❷buttons, until the
REPEAT PLAY option is selected.
5
To... Press ➛or❿, until...
Repeat play ON is displayed.
Do not wish to OFF is displayed.
repeat play
6
On completion, press MENU twice to exit the menu.
Recording From TV
Recording from Another VCR
1
Turn on the TV. Tune your TV channel.
2
Connect your VCR to the TV by A/V cable
as above figure.
3
Hold down the REC (●) button to start line
recording.
4
Press the STOP (■) button to end line
recording.
➢ Line recording is not available for
the TV which has no A/V
OUTPUT JACK.
1
Turn on the TV.
2
Connect the playback side VCR’s A/V cable to the recording side VCR’s video and audio in (rear panel).
3
Begin playback on the playback side VCR and hold down REC (
●
) button.
4
Press the STOP (■) button to end line recording.
You can copy a cassette to your VCR from another video source, such as another VCR.
☛
It is an infringement of copyright laws to copy prerecorded cassettes or to re-record them in any
form without the permission of the owners of the corresponding copyright.
➢ Video cassettes have a safety tab to prevent accidental erasure. When this tab has been
removed, you cannot record on the tape.
◆ If you wish to protect a cassette, break off the tab using a small screwdriver.
◆ To re-record over a protected cassette (safety tab broken), cover the hole with adhesive tape.
Format VHS PAL/SECAM standard
Heads Video: 2 rotary heads / Audio/Control: 1 stationary head
Erase: 1 full track erase head
Television system STANDARD G, K
Luminance FM azimuth recording
Colour system PAL/MESECAM/NT4.43: Down converted subcarrier phase
shifted direct recording
SECAM: 1/4 counted down subcarrier direct recording
NTSC PB on PALTV
Tape speed (PAL/MESECAM/SECAM) (NTSC)
23.39 mm/sec 33.35 mm/sec
Recording/playback time 3 hours (E-180 Tape)
REW time About 60 sec in REW with E-180
VIDEO
Input 0.5 to 2.0 Vp-p; 75 ohm unbalanced
Output 1.0 ± 0.2 Vp-p; 75 ohm unbalanced
AUDIO
Input -8 dBm, 47 Kohm unbalanced
Output -8 ± 3 dBm, 1 Kohm unbalanced
Frequency response 100Hz - 8KHz
Power requirement 110-240V~, 50/60 Hz
Power consumption Approx. 10 watts
Operation temperature 41°F-104°F (5°C-40°C)
Operation humidity 10%-75%
Weight 2.8 Kg (net)
Dimensions (WxHxD) 360 x 94 x 240 mm
Design and specifications are subject to change without notice.
Technical Specifications
TV
LINE IN 1
VIDEO AUDIO
LINE OUT
AUDIO OUT
VIDEO OUT
RF OUT
VIDEO IN AUDIO IN
ANTENNA IN
TV
LINE IN 1
VIDEO AUDIO
LINE OUT
L H
ON
OFF
ON
OFF
OUT TO TV
V IDEO OUT
TEST
AUDIO OUT
IN FROM ANT.
ATT
VCR
RF OUT
VIDEO IN AUDIO IN
VIDEO OUT AUDIO OUT
ANTENNA IN
 Loading...