

Samsung SC-DC564, SC-DC565, SC-DC563 User Manual
[ ENGLISH ]
[ ESPAI_OL ]
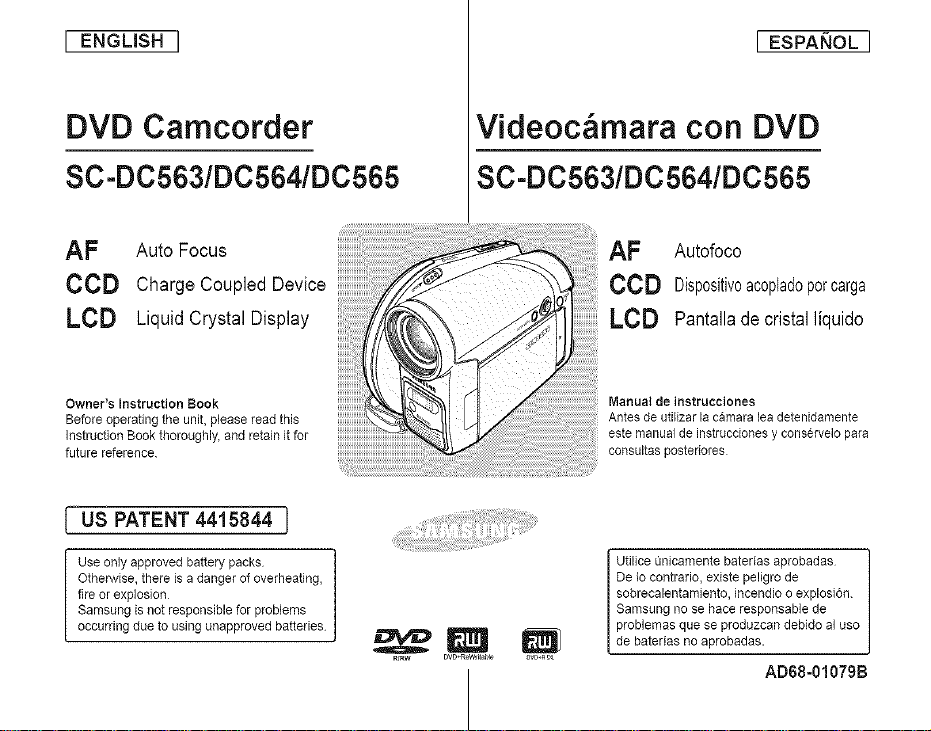
DVD Camcorder
SC-DC563/DC564/DC565
AF Auto Focus
CCD Charge Coupled Device
LCD Liquid Crystal Display
Owner's Instruction Book
Before operating the unit, please read this
instruction Book thoroughly, and retain it for
future reference.
[ US PATENT 4415844 J
Use only approved battery packs
Otherwise, there is a danger of overheating,
fire or explosion
Samsung is not responsible for problems
occurring due to using unapproved batteries.
Videoc mara con DVD
SC-DC563/DC564/DC565
r_w Dvg÷R_W_it_b_e OVD÷rDL
AF Autofoco
CCD Dispositivoacopladoporcarga
LCD Pantallade cristalliquido
Manual de instrucciones
Antes de utilizar la camara leadetenidamente
este manual de instrucdones y conservelo para
consultas posteriores
Utilice Qnicamente baterias aprobadas
De Iocontrario, existe peligro de
sobrecalentamiento, incendio o explosi6n.
Samsung no se hace responsable de
problemas que se produzcan debido al uso
de baterias no aprobadas.
AD68-01079B
[ ENGLISH ]
[ ESPANOL ]
Contents
o - _ + - _ • + +
- o + _ + _ + [I | + • +-
Features .............................................................................. 11
Usable Discs ...................................................................... 12
DiscType Description ......................................................... 13
Howto use the DVD Camcorder easily .............................. 14
Accessories Supplied with the DVD Camcorder ................ 15
Front & Left View ................................................................ 16
LeftSide View..................................................................... 17
Right & TopView ................................................................ 18
Rear & Bottom View ........................................................... 19
Remote Control (SC-DC564/DC565 only) .......................... 20
D -o+ + Q
Usingthe Hand Strap & Lens Cover .................................. 21
Lithium Battery Installation ................................................. 22
Usingthe Lithium Ion Battery Pack .................................... 23
Connecting a Power Source ............................................... 27
About the Operating Modes ............................................... 28
Usingthe Joystick .............................................................. 28
Usingthe QUICK MENU .................................................... 29
OSD (On Screen Display) inCamera Mode/Player Mode ..30
OSD (On Screen Display)in MCam Mode/M Player Mode.. 31
Turning the OSD (On Screen Display) On/Off .................... 31
Contents
00 + . . _Q . + + • II I
Caracteristicas .................................................................... 11
Discos utitizables................................................................ 12
Descripci6n det tipode disco .............................................. 13
C6mo utitizar laVideocamara con DVD ............................. 14
Accesorios incluidos con la Videocamara con DVD ........... 15
Vistas frontal y laterat izquierda.......................................... 16
Vista lateral izquierda ......................................................... 17
Vistas superior y lateral derecha ........................................ 18
Vistas posterior e inferior .................................................... 19
Mando a distancia (s61oSC-DC564/DC565) ...................... 20
+++ + +
Utilizaci6n de la empuSadura y la tapa del objetivo ...........21
lnstaiaci6n de la pita de Iitio ............................................... 22
Utiiizaci6n de la bateria de Jonesde litio ............................ 23
Conexi6n a una fuente de atimentaci6n ............................. 27
lnformaci6n sobre los modos de funcionamiento ............... 28
Utilizaci6n del Joystick ....................................................... 28
Uso de QUICK MENU ........................................................ 29
OSD(Presentaci6nenpantalla)enCameraMode/PlayerMode.. 30
OSD(Presentaci6nenpantalla)enM.OamMode/M.PlayerMode..31
Encendido / apagado de OSD (presentaci6n en pantalta). 31
A
[ ENGLISH ]
[ ESPANOL ]
Contents
Setting the Clock (Clock Set) ............................................. 32
Setting the Wire{essRemote ControlAcceptance
(Remote) (SC-DC564/DC565 on{y).................................... 33
Setting the Beep Sound (Beep Sound) .............................. 34
Setting the Shutter Sound (Shutter Sound) ........................ 35
Selecting the OSD Language (Language) ......................... 36
Viewing the Demonstration (Demonstration)...................... 37
• - a I o . - - o
Adjusting the LCD Screen (LCD Bright/LCD Color) ........... 38
Displaying the Date/Time (Date/Time)................................ 39
Usingthe Viewfinder ........................................................... 40
Various Recording Techniques ........................................... 41
Inserting and Removing a Disc .......................................... 42
Selecting the Record Mode (Rec Mode) ............................ 44
It II . • e- ._. °- • _ * ................... ,..t
Makingyour First Recording .............................................. 45
Recording with Ease for Beginners (EASY.QMode)..........46
Using External Microphone ................................................ 47
Zooming Inand Out ............................................................ 47
Usingthe Fade Inand Out (FADE) .................................... 48
Using Back LightCompensation Mode (BLC) .................... 49
Usingthe Color Nite ........................................................... 50
Contents
i : - . i - o- - -
Ajuste de{ reloj (Clock Set) ................................................. 32
Ajuste de aceptaci6n de control remoto inalambrico
(Remote) (s61oSC-DC564/DC565) .................................... 33
Ajuste de{ sonido Beep (Beep Sound) ............................... 34
Ajuste de{ sonido del obturador (Shutter Sound) ............... 35
Selecci6n de{idioma de OSD (Language) ......................... 36
Visualizaci6n de la demostraci6n (Demonstration) ............ 37
Ajuste de la pantalla LCD (LCD Bright/LCD Color) ............ 38
Visualizaci6n de la fecha y hera (Date/Time) ..................... 39
Use del Visor ...................................................................... 40
Tecnicas diversas de grabaci6n ......................................... 41
lnserci6n y extracci6n de discos ........................................ 42
Selecci6n detmodo de grabaci6n (Rec Mode) .................. 44
o-o . . . • I I _o. o_ _. .
Primera grabaci6n .............................................................. 45
Grabaci6nconborrado para principiantes(Mode EASYQ)_. 46
Utilizaci6n del micr6fono externo ....................................... 47
Acercamiento y alejamiento de las imagenes .................... 47
Utilizaci6n de aparici6n y desaparici6n gradual (FADE) ....48
Utilizacbndelmododecompensaci6ndelaluzdefondo(BLC)...49
Utilizaci6n de Color Nite ..................................................... 50
A
[ ENGLISH ]
[ ESPANOL ]
Contents
| D . o _ _o . -_ D o o e
Cutting Off Wind Noise (WindCut) ..................................... 51
Setting the Shutter Speed & Exposure
(Shutter/Exposure) ............................................................. 52
Auto Focus / Manuat Focus................................................ 53
Programmed Automatic Exposure Modes (Program AE) ... 54
Setting the WhiteBatance (White Balance) ....................... 56
Applying Digital Effects (Digital Effect) ............................... 56
Setting the 16:9Wide mode (16:9 Wide) ........................... 60
Setting the Digital Image Stabilizer (DIS) ........................... 61
Zooming Inand Out with Digital Zoom (Digital Zoom) .......62
| D . • o- o . o- . 0" . _
What is the thumbnail index? ............................................. 63
What's a Playlist? ............................................................... 63
| | . • o- . .................................. _,
Playing title scenes ............................................................. 64
Adjusting the Volume.......................................................... 64
Various Functionswhile in Player Mode ............................. 65
Zooming during Playback (PB ZOOM) ............................... 67
Deleting a title scene (Delete) ............................................ 68
Deleting a Section of a Title Scenes (Partial Delete) .........69
| | . o 0- " . - 0
Creating a New Playiist (New Playlist) ............................... 70
Playing the Playlist ............................................................. 71
Deleting a Playlist (Delete) ................................................. 72
_ Scenesto Playlist (Edit Playlist-Add) ..................... 73
Indice
Corte de ruido de{ viento (Wind Cut) .................................. 51
Ajuste de la exposici6n y la velocidad del obturador
(Shutter/Exposure) ............................................................. 52
Enfoque autom. / Enfoque manual ..................................... 53
Modode exploraci6nautomatica programada(ProgramAE).. 54
Ajuste de balance de btanco (White Balance) .................... 56
Aplicaci6n de efectos digitales (Digital Effect).................... 58
Ajuste del mode 16:9 Wide (16:9 Wide) ............................. 60
Ajuste det Estabitizadordigital de la imagen (DIS)............. 61
AcercamientoyalejamientodelzoomconZoomDigital(DigitalZoom).. 62
o-= , , , _ | | o - o- , . _ _- -g _ Ij •
,Que es el indice de miniaturas?....................................... 63
Descripci6n de lista de reproducci6n ................................. 63
e-o -- . • I I ........................... o,
Reproducci6n de escenas del tituto ................................... 64
Ajuste del volumen ............................................................. 64
Diversas funciones en mode Player................................... 65
Aplicaci6n del zoom durante la reproducci6n (PB ZOOM). 67
Eliminaci6n de un titulo (Delete) ........................................ 68
Eliminaci6n de la secci6n de un titulo (Partial Delete) ...... 69
_ . _ IP . o- -o 00 o S
Creaci6nde una nueva lista dereproducci6n (New Playlist). 70
Reproducci6n de la {ista de reproducci6n .......................... 71
Eliminaci6n de una lista de reproducci6n (Delete) ............. 72
Adici6ndeescenasala listadereproducci6n(EditPlaylist-Add)..73
[ ENGLISH ]
[ ESPAI_OL ]
Contents
Changing the Order of Scene Playingwithin a Playlist
(Edit PIaytist-Move) ............................................................ 75
Deleting Scenes from Playlist (Edit Playiist-Delete) ........... 77
Deletinga Sectionof a Playlist(EditPlaylist- PartialDelete)..78
D | _ Q e_ --e- -*J
Disc Information (Disc Info) ................................................ 80
Editing the Disc Name (Disc Info-Rename) ........................ 81
Formatting a Disc (Disc Format)......................................... 82
Finalizing a Disc (Disc Finalize) ......................................... 83
Playing Back on a PC with DVD drive................................ 84
Playing back a finalized discon a DVD Player/Recorder... 84
Unfinalizing a Disc (Disc Unfinatize) .................................. 85
II | . Q o- _ • ..................... _,
Setting theAV In/Out (SC-DC565 only) .............................. 86
Viewing Recordings on TV ................................................. 87
Copying a Disc onto a Tape................................................ 89
Recording(Copying)aTV Programor VideoTapeontoa Disc
(SC-DC565only).................................................................. 90
Do -- - . co-
UsingaMemoryCard (UsableMemoryCard)(not supplied)..91
Memory Card Functions ............................................... 91
Inserting a Memory Card .............................................. 91
Ejecting a Memory Card ............................................... 91
Indice
Cambio del orden de reproducci0n de escenas dentro de
una listade reproducci6n (Edit Playlist-Move) ................... 75
Biminaci6ndeescenasdelalistadereproducci6n(EditPhylist-Delete).. 77
Eliminaci0nde la secci6ndeuna listade reproducci6n
(Edit Playlist-PartialDelete)....................................................78
lnformaci0n de disco (Disc Info)......................................... 80
Edici6n del hombre del disco (Disc Info-Rename) ............. 81
Formate de un disco (Disc Format).................................... 82
Finalizaci6n de un disco (Disc Finalize) ............................. 83
Reproducci6n en un PC con unidad de DVD ..................... 84
Reproducci6n de un discofinalizado en un Reproductor/
Grabadora de DVD............................................................. 84
Anulaci6n de finalizaci6n de un disco (Disc Unfinaiize) _.. 85
Ajuste de AVIn/Out (s6lo SC-DC165) ................................ 86
Visualizaci6n de grabaciones en el TV ............................... 87
Copia de un disco en una cinta .......................................... 89
Grabaci6n(Copia)de un programadeTVo cinta devideoen
undisco (s61o$0-DC565) .................................................... 90
Utilizaci6n de la tarjeta de rnemoria
(Tarjetade memoria utilizable) (no suministrada) .............. 91
Funciones de la tarjeta de memoria ............................. 91
lnserci6n de una tarjeta de memoria ............................ 91
Expulsi6n de una tarjeta de memoria ........................... 91
[ ENGLBH ]
[ ESPAI_OL ]
Contents
Structure of Folders and Files on the Memory Card ..........92
Selecting the Photo Quality (Photo Quality) ....................... 93
Selecting the Photo Size (Photo Size) ............................... 94
Setting the File Number (File No.) ...................................... 95
Usingthe Built-In Flash (SC-DC564/DC565 only) ..............96
Taking a Photo Image (JPEG) on a Memory Card ............. 97
Viewing Photo Images (JPEG) ........................................... 98
Protection from accidental Erasure (Protect) ................... 100
Deleting Photo images and Moving images (Delete) ....... 101
Formatting the Memory Card (Format) ............................. 103
Recording Movingimages (MPEG) ona Memory Card 104
PlayingMoving Images(MPEG)on a Memory Card.......... 105
Recording Still images onto a Memory Card during DVD
playback ........................................................................... 106
Marking images for Printing (Print Mark) .......................... 107
Printing Your Pictures-Using the PictBridge TM .................. 109
Connecting To a Printer (USB Connect) ..................... 109
Setting the Number of Prints........................................ 110
Setting the Date/Time ImprintOption...........................110
Printing images ............................................................ 110
Canceling the Printing.................................................. 110
Using USB Interface .......................................................... 111
Selecting the USB Device (USB Connect) ........................113
installing DV Media PRO Program ....................................114
Indice
Estructuradecarpetasy archivosen la tarjeta de memoria .. 92
Selecci6n de la calidad fotografica (Photo Quality) ............ 93
Selecci6n del tamafio de foto con (Photo Size) ................. 94
Ajuste det n0mero de archive (File No.) ............................. 95
Utilizaci6n delflash incorporado (s61oSC-DC564/DC565).. 96
Capturade imagendefete (JPEG) en latarjeta de memoria_ 97
Visualizaci6n de imageries fotograficas (JPEG)................. 98
Protecci6n frente a borrado accidental (Protect) .............. 100
Biminaci6ndeimagenesfotograficasy secuenciasdevideo(Delete)..101
Formato de la tarjeta de memoria (Format) ..................... 103
Grabaci6ndesecuenciasdevideo(MPEG)enlatarjetadememoria.104
Reproducd6ndesecuenciasdevideo(MPEG)enlatarjetadememoda105
Grabaci6n defotografias en una tarjeta de memoria durante
la reproducci6n de DVD ................................................... 106
Marcaci6n de imageries para impresi6n (Print Mark)....... 107
lmpresi6n de imagenes: Use de PictBridgeTM .................. 109
Conexi6n a una impresora (USB Connect) ................ 109
Ajuste del n0mero de copias ....................................... 110
Ajuste de laopci6n Date/Time Imprint ......................... 110
lmpresi6n de imagenes ............................................... 110
Cancelaci6n de laimpresi6n ........................................ 110
Utilizaci6n de la interfaz USB ............................................ 111
Seleaci6n de{dispositivo USB (USB Connect) ..................113
lnstataci6n del programa DV Media PRO ......................... 114
A
[ ENGLISH ]
[ ESPAI_OL ]
Contents
Ulead Video Studio............................................................ 115
Connecting to a PC ........................................................... 116
Disconnecting the USB Cable ..................................... 116
Using the PC Camera Function ................................... 117
Using the USB Streaming Function ............................. 118
Using the removable Disk Function ............................. 118
UsingYour DVD Camcorder Abroad ................................. 119
Q - Qo _ ................. J
Troubleshooting ................................................................ 120
Setting menu items........................................................... 125
o- • ®
Indice
Ulead Video Studio............................................................ 335
Conexi6n a un PC ............................................................. 116
Desconexi6n del cabte USB ........................................ 336
Dtilizaci6n de la funci6n PC Camera ...........................137
Utiiizaci6n de la funci6n USB Streaming .....................118
Utilizaci6n de la funci6n de disco extraible ..................118
Utilizaci6n de la Videocamara con DVD en etextranjero_ 119
=-_o • _- Ha - _ ................... 0
ResoIuci6n de probtemas ................................................. 120
Ajuste de opciones de menO............................................ 125
A
[ ENGLISH ]
[ ESPANOL ]
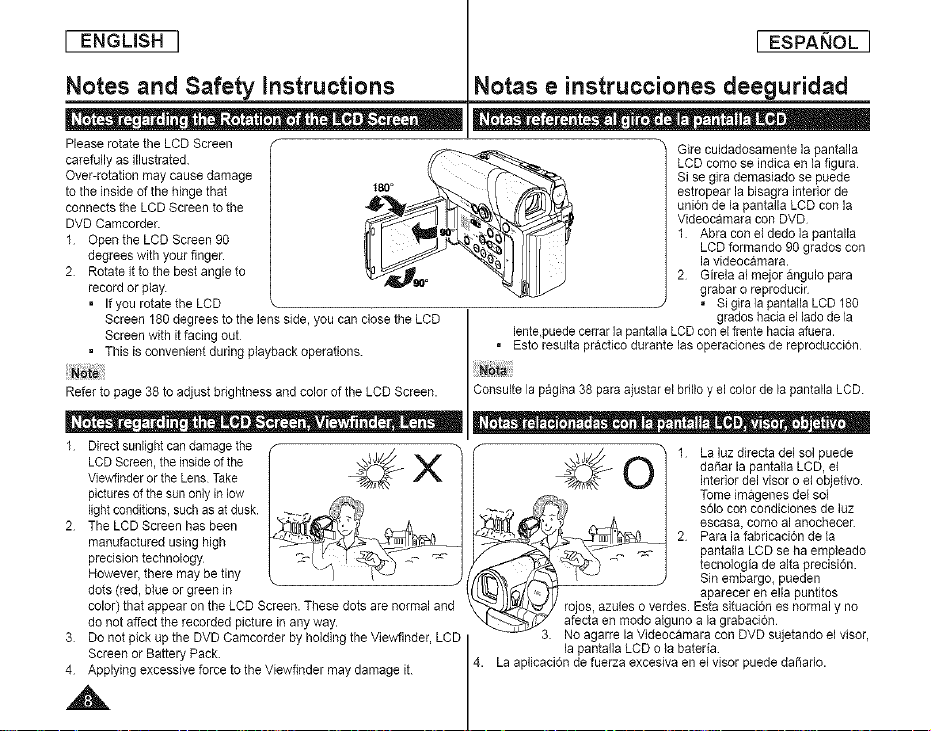
Notes and Safety instructions
+ - -_. o o - +o . + • - | --
Please rotate the LCD Screen
carefully as illustrated.
Over-rotation may cause damage
to the inside of the hinge that
connects the LCD Screen to the
DVD Camcorder.
1 Openthe LCD Screen 90
degrees with your finger.
2 Rotate it to the best angle to
record or play.
• If you rotatethe LCD
Screen 180 degrees to the lens side, you canclose the LCD grades hacia elladedela
Screen with it facing out I lente+puedecerrarla pantalla LCD conelfrente hacia afuera.
• This is convenient during playback operations. • Esto resulta practico durante las operaciones de reproduccion
Refer to page 38 to adjust brightness and color of the LCD Screen. Consulte la pagina 38 para ajustar el brillo y elcolor de la pantalla LCD
+ - +_+ o o - J -- - ++ -j + _ --_. . . | -+ o+ - o
1 Directsunlightcandamagethe
LCDScreen,the inside of the
Vlewfinderor the Lens Take
picturesof the sunonly in low
lightconditions,such asat dusk.
2 The LCD Screen has been
manufactured using high
precision technology
However, there may be tiny
dots (red, blue or green in
color) that appear onthe LCD Screen. These dots are normal and
do not affect the recorded picture in any way.
3 Do not pick up the DVD Camcorder by holding the Viewfinder, LCD
Screen or Battery Pack.
4 Applying excessive force to the Viewfinder may damage it.
Notas e instrucciones deeguridad
+ ._ - - - -_ . _ • +- . +. . . |
Gire cuidadosamente la pantalla
LCD como se indica en la figura
Si se gira demasiado se puede
estropear la blsagra interior de
union de la pantalla LCD con la
Videocamara con DVD
1 Abra con eldedo la pantalla
LCD formando 90grados con
la videocamara.
2 Girela ai mejor angulo para
grabar o reproducir
. Si gira la pantalla LCD 180
._/,///'J&// _ 1 La luzdirecta del sol puede
_'r_t_,_ _ | interior.del visor o et objetivo.
f_.. _ Tome _magenesdel sol
-..- ( F'_ + • s61ocon condiciones de luz
_+ ,_ / escasa, como a, anochecer.
_")4_-x__ 2 Para lafabricacion de la
" _'_.-"_,_'z_--_ _ I pantalla LCD seha empleado
._ _._T_ _ I tecnologia de alta precision.
_/f_ i "_ ) Sin embargo, pueden
/t_/('k+ _) aparecer en ella puntitos
,1.___'_/ rojos, azules o verdes. Esta situacion ee normal y no
_--..._"_._[.7 afecta en mode alguno a la grabacion
3.__No agarre la Videocamara con DVD sujetando el visor,
La aplicaciOn de fuerza excesiva en el visor puede da_arlo.
4. lapantalla LCD o la bateria
_ | daOar la pantalta LOD, el

[ ENGLISH ]
[ ESPAI_OL ]
Notes and Safety instructions
= Take care not to touch the recording side (therainbow colored side)
ofthe disc with your fingers. Discs contaminated by fingerprints or
foreign substances may not play propedy.
= Use asoft cloth to clean the disc.
Clean lightly from the center of a disc to the
outside edge. Circling or cleaning too hard may
create scratches onthe disc and further cause
the disc to play abnormally.
Do not use benzene, thinner, detergent, alcohol
or anti-static spray when cleaning the disc.
it may cause a malfunction.
=
Press the supporting holder in the center of the
disc case for easy removal of the disc
=
Handle discs by theedges and the center hole to
avoid finger marks on the recording side.
=
Do not bend or apply heat to the disc.
=
Always store discs vertically in their plastic cases
when not in use.
=
Store discs away from direct sunlight, heating
elements, moisture or dust
Notas e instrucciones de seguridad
• Tenga cuidado de no tocar con los dedos e{ lado degrabad6n (el
lade con colores del arco iris)del disco. Los discos marcados con
huellas dactilares o sustancias extraSas pueden impedir que los
discos se reproduzcan correctamente.
Utilice un paso suave para limpiar los discos.
Limpielos levemente desde el centre del disco
hacia el borde exterior. Limpiar en circulo o con
demasiada fuerza puede rayar eldisco e impedir
que sereproduzca con normalidad.
No utilice benceno, disolvente, detergente,
alcohol ni pulverizadores antiestaticos allimpiar
el disco.
Puede hacer que el disco funcione de forma
defectuosa
Presione el soporte de sujecion del centre de la
caja del disco para extraer el disco con facilidad.
Sujete los discos por losbordes y e! orificio
central para evitar marcas de dedos en el lado
de grabacion del disco
No doble niaplique calor al disco
Guarde siempre losdiscos verticalmente en sus
fundas de plastico cuando no se utilicen
Guarde los discos fuera del alcance de la luz
directa de! sol, de generadores de calor,de la
humedad y del polvo
A
[ ENGLISH ]
[ ESPAI_OL ]
Notes and Safety instructions
_ - -_. a o | II . • o-
, Do not leave the DVD Camcorder exposed to high temperatures
(above 60 °C or 140 °F).
For example, in aparked car in the sun or exposed to direct
sunlight.
• Do not let the DVD Camcorder get wet. Keep the DVD Camcorder
away from rain, sea water, and any other form of moisture.
The DVD Camcorder may get damaged if it gets wet. Sometimes a
malfunction due to exposure to liquids cannot be repaired
• Asudden rise inatmospherictemperature may cause condensation
toform inside the DVD Camcorder.
- When you move the DVD Camcorder from a cold location to a
warm location (e.g. from outside to inside during the winter.)
- When you move the DVD Camcorder from a cool location to a
hot location (e.g. from inside to outside during the summer.)
• - -o. e _ o_ o | • •
Television programs, video tapes, DVD titles, films, and other program
materials may be copyrighted.
Unauthorized copying of copyrighted materialmay be against the law.
All the trade names and registered trademarks mentioned inthis
manual or other documentation provided with your Samsung product
are trademarks or registered trademarks of their respective holders.
, Do not attempt to service this DVD Camcorder yourself.
• Opening or removing covers may expose you to dangerous voltage
or other hazards.
, Refer all servicing to qualified service personnel.
• When replacement parts arerequired, be sure the service technician
has used replacement parts specified by the manufacturer that have
the same characteristics as theoriginal parts.
• Unauthorized substitutions may result in fire, electric shock or other
hazards
Notas e instrucciones de seguridad
• ._ - - - -_ . . =-_ . . • | |
NOdeje la Videocamara con DVD expueeta aaitas temperaturas
(por encima de 60°C o 140 °F)
Por ejemplo, en un vehiculo aparcado al solo expueeto a la luz
directa del sol
No permita que la Videocamara con DVD se moje. Mantenga la
Videocamara con DVD alejada de la Iluvia, del agua de mary de
caalquier otro tipo de humedad.
Si la Videocamara con DVD se moja puede estropearse. En
algunas ocasionee, losdaSos causados por liquides no pueden
repararse.
Una subida repentina de la temperatura puede producir
condensaci6n en el interior de la Videocamara con DVD
- Cuando traslade la Videocamara con DVDdesde unlugar frio a
uno calido (p. ej. desde el exterior at interior en invierno.)
- Cuando se traslada la Videocamara con DVD de unsitio
temp_ado a uno caliente (por ejemplo, de un espacio irrterior a
uno exterior en verano).
6 _ e .Oe _ e= O t • _ ,
Es probable que los programas de television, las cintas de video, los
DVD, las peliculas y otros materiales audiovisuales tengan registrados
sus derechos de reproduccion.
La copia no autorizada de material protegido por dichos derechos
puede quebrantar la ley.
Todos los nombree de marcas y marcas comerciales registradas
mencionados eneste manual o el resto de documentacion facilitada
con el producto Samsung son marcas comerciales o mamas
registradas de sus respectivos propietarios.
- t 6 - . o- -6 - •
No intente reparar la Videocamara con DVD pot si solo.
La apertura o retirada de cubiertas puede exponerle a sedos
voitajee u ofros peligros.
Confie las reparaciones a personal tecrico califlcado.
Cuando se neceeiten piezas de repueeto, aseg_rese deque el
tecnico utiliza piezas especificadas por el fabricante o que tengan
las mismas caractertsticas que la pieza original.
Los repuestos no autorizados pueden producir incendios,
descargas electricas u otros peligros
[ ENGLISH ]
[ ESPANOL ]
Getting to Know Your DVD Camcorder
= DVD Disc Camcorder
DVD-VIDEO Recording with 3 I/2inches (8cm) DVD-RW/+RW/-R/+R DL
(Dual Layer) discs
• High Power Zoom Lens
Offers you 26x High Power Zoom Lens.
• UBB Interface for Digital Image Data Transfer
You can transfer images to a PC using the USB interface without an add-on
card
• Photo Capture
The Photo Capturefunctionlets you capture thescene you want while the disc is
in play, and save as astill image on a MemoryCard
• 12O0x Digital Zoom
Allows you to magnify an image up to 1200 times itsodginal size.
= Color TFT LCD
Ahigh-resolution color TFT LCD gives you clean, sharp images as well as the
ability to review your recordings immediately
• Digital Image Stabilizer (DIS}
The DIS compensates for any handshake, reducing unstable images,
particularly at high magnification.
= Various Digital Bffects
The Digital Effects allow you to give your recordings a special look.
• Back Light Compensation (BLC)
The BLC function compensates for the bright background behind asubject
youre recording
• Program AE
The Program AE enables you to alter the shutter speed and aperture to suit
thetype of scene/action to be recorded
• Digital Still Camera Function
- Using a Memory Card, you can easily record and playback standard photo
images
- You can transfer standard photo images on aMemory Card to your PC
using the USB interface
• Moving Image Recording
Moving image recording makes it possible to record video onto a Memory
Card.
• Multi Memory Card Slot
Multi Memory Card slot that is compatible with Memory Stick (Duo),
Memory Stick PRO, MMC and SD
• Multi OSD Language
You can select the desired OSD language from OSD list
Introduccibn a la Videoc_,mara con DVD
Videoc_mara con disco DVD
Produccion de tituDs DVD-VIDEO con discos DVD-RW/+RW/-R/+R DL
(Doble capa) de 3 1/2puig (8cm).
Objetivo con zoom de gran potencia
Ofrece una ]ente de zoom de gran potencia de 26x
Interfaz USB para transferencia de datos de imageries digitales
Es posib]e transferir imageries al ordenador pot medic de la interfaz USB
sin necesidad de una tarjeta adicionaL
Captura de foto
La funci6n Photo Capture permite capturar la escena que desee mientras
se reproduce el disco y guardaba como una imagen fotografica en la tarjeta
de memoria.
Zoom digital 1200x
Permite ampliar la imagen hasta 1200 veces su tamaSo original
LCD TFT en color
El sistema de color de alta reso]uci6n TFT de la pantalla LCD proporciona
imagenes claras y nitidas a la vez que permite ver Ins grabaciones
inmediatamente
Estabilizador digital de la imagen (DIS)
El DIS compensa los movimientos de la mano reduciendo la inestabilidad
de ins imagenes, especialmente cuando estas Qltimas se graban con una
gran ampliaci6n
Efectos digitales diversos
Los efectos digitales permiten dara la grabaci6n un aspecto especial al
permifir aSadir diversos efectos especiales.
Compensaci6n de luz de fondo (BLC)
La funci6n BLC compensa el bbllo que puede aparecer detras del objeto
que se graba.
Program AE
El programa AE permite modificar ]avelocidad y la apertura del obturador
para que se ajuste a la escena que se vaya a grabar
Funcion de camara fotogr&fica digital
- Con la tarjeta de memoba, puede f&cilmente grabar y reproducir
fotografias estandar
- Puede transferir imagenes fijas est&ndar de su tarjeta de memoria a su
PC utilizando ]a interfaz USB
Grabaci6n de secuencias de video
La grabacion de secuencias de video posibilita la grabacion de video en
una tarjeta de memoria.
Ranura para diversas tarjetas de memoria
Ranura para varias tarjetas de memoria compatible con Memory Stick (Duo),
Memory Stick PRO MMC y SD.
OSD en varios idiomas
Puede seleccionar el idioma de la OSD en la fista de OSD _.
[ ENGLISH ]
[ ESPANOL ]
Getting to Know Your DVD Camcorder
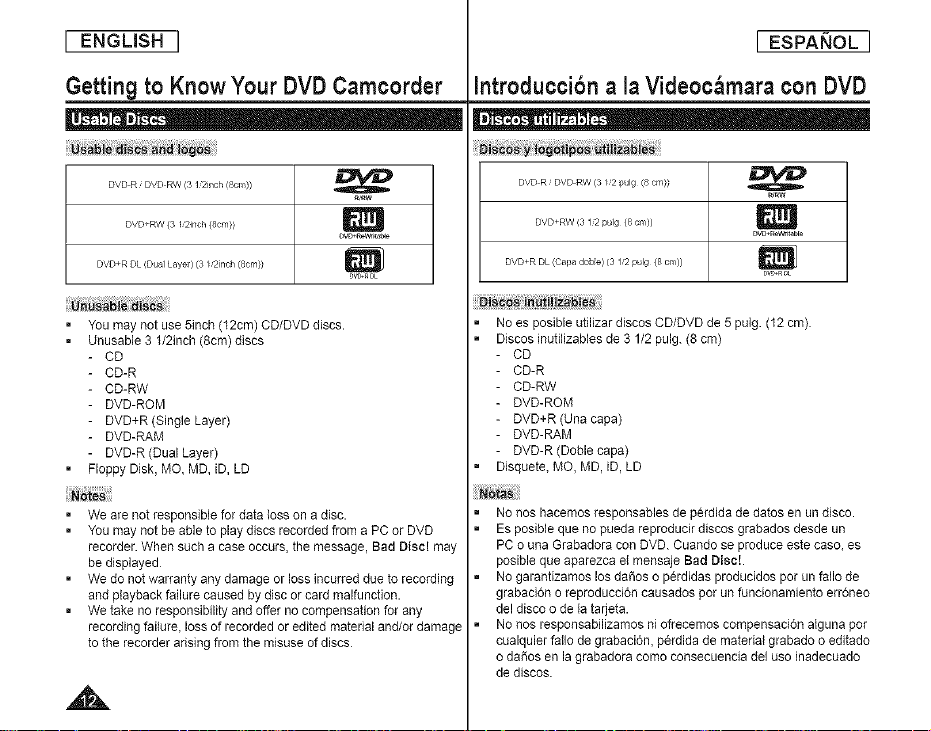
DVD R _DVD RW (3/Qinch (Scll))
D//D+RW (3 E2inch (Scm))
DVD+R DL (Dua] Layel) (3 _2inch (Scm))
You may not use 5inch (12cm) CD/DVD discs.
Unusable 3 1/2inch (8cm) discs
CD
CD-R
CD-RW
DVD-ROM
DVD+R (Single Layer)
DVD-RAM
DVD-R (Dual Layer)
Floppy Disk, MO, MD, iD, LD
• We are not responsible for data loss on a disc.
You may not be able to play discs recorded from a PC or DVD
recorder. When such a case occurs, the message, Bad Disc! may
be displayed
We do not warranty any damage or loss incurred due to recording
and playback failure caused by disc or card malfunction.
We take noresponsibility and offer no compensation for any
recording failure, loss of recorded or edited material and/or damage
tothe recorder arising from the misuse of discs
_w
_vg+r_w_r_'le
D_+r DE
IntroducciSn a la Videoc_,mara con DVD
| • ._ -
DVD R _DVD RW (3 _2 pulg (8 cm))
DVD+RW (31 '2 pullg (8 ca))
DVD+R DL (Calla dobie) (31 '2 pulg (8 cn/))
No es posible utilizar discos CD/DVD de 5 pulg. (12cm)
Discos inutilizables de 31/2 pulg. (8 cm)
CD
CD-R
CD-RW
DVD-ROM
DVD+R (Una capa)
DVD-RAM
DVD-R (Doble capa)
Disquete, MO, MD, iD, LD
No nos hacemos responsables de perdida de datos en un disco.
Es posible que no pueda reproducir discos grabados desde un
PC o una Grabadora con DVD. Cuando se produce este caso, es
posible que aparezca el mensaje Bad Disc!.
No garantizamos los dafios o perdidas producidos porun fallo de
grabaci6n o reproduccion causados por un funcionamiento erroneo
del disco o de la tarjeta.
No nos responsabilizamos ni ofrecemos compensacion alguna por
cualquier fallo de grabacion, perdida de material grabado o editado
o daSos en lagrabadora corno consecuencia del uso inadecuado
de discos.
_rw
Dw_r_w_i_ar,_
DVD+_L
[ ENGLBH ]
[ ESPAKIOL ]
Getting to Know Your DVD Camcorder
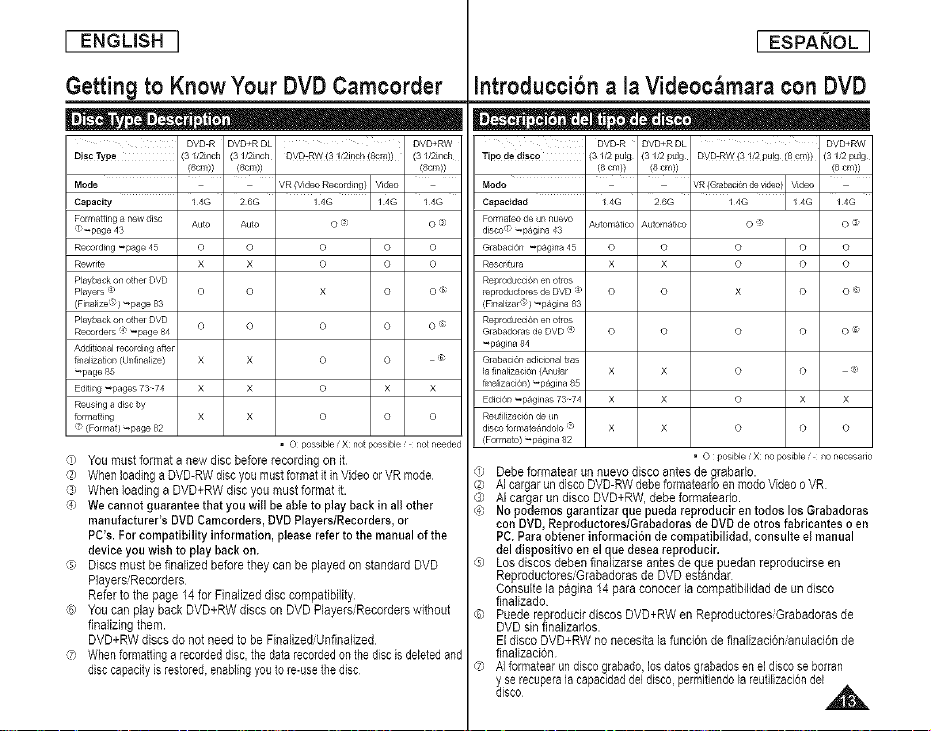
II _ _ |- • •
Disc Type (3 1/2inch (3//2inch DVD:RW (3 1/2inch _Scm)) (3//2inch
Mode ' ' I
Capacity I 4G 2 6G / 4G I / ,1G
Formatting a new disc ALrtu Auto O ('
I) _F_age 43
Recording _page 45
Rewr te
Playback on o;her DVD
Players 4 O
(Finalize _!) _page 83
P_ayl_ck on othe_ DVD
Recorders 4 _page 84 O
Addit onal Tecordil7g after
fi_Talization(U_Tfinaiize) X
_page 85
Editing _pages 73 74 X
Reus ng a dsc by
turmaaing X
<: (Format} _page 82
,_) YOU must format a new disc before recording on it
O) WhenloadingaDVD-RWdiscyoumustformatit inVideoorVR mode
@ When loadingaDVD+RWdisc you must format it.
_) We cannot guarantee that you will he able to play back in all other
manufacturer's DVD Camcorders, DVD Players/Recorders, or
PC's. For compatibility information, please refer to the manual of the
device you wish to play back on.
g) Discs must be finalized before they can be played on standard DVD
Players/Recorders
Refer to the page 14 for Finalized disc compatibility
(G) You can play back DVD+RW discs on DVD Players/Recorderswithout
finalizingthem.
DVD+RW discs do not need to be FinalizediUnfinalized
_? When formattinga recorded disc, the data recorded on the disc is deleted and
disccapacityis restored, enablingyou to re-use the disc
DVD R DVD+RDL DVD+RW
(8cm)) (8cm)) (8cm))
VR (Video Recording) Video
o
o o o o o
x x o o o
o x o o®
o o o o _
x o o ®
x o x x
x o o o
, O uoss}ble / X not Possible / not needed
Introducci6n a la Videoc_,mara con DVD
|- _ i o- _o ®- a •
Tipo de disco (3112 pulg {31/2 pulg DVD RW (31/2 Pu!g (8 cln)) (31/2 pulg
Fo_mateo de un nuevo At tomatico Automatico O ; O :_
disco_'_ _pagina 43
G_baci0n _pagina 45 O O O O O
Rescritu_ X X O O O
Reproducci6n en otis
_p_ducto_s de DVD _ O O X O O @
(Finalizar@) _pagina 83
Reproducci6n en otis
G_badoms de DVD ® O O O O O ®
_pagina 84
Gl_baci6rt adicional tras
la finalizaci0n (Anu_r X X O O @
finalizaci0n) _pagina 85
Edici6n _ p_gil7as 73¸-74 X X O X X
Reutilizaci6n de un
disco _rmateandolo @ X X O O O
(Forma_) _pagina 82
@ Debeformatearunnuevodiscoantesdegrabarlo.
@ AIcergarun disco DVD-RWdebeformateadoen modoVideooVR
@ N cergar an discoDVD+RW,debe formatearlo.
@ No podemos garantizar que pueda reproducir en todos los Grabadoras
con DVD, Reproductores/Grabadoras de DVD de otros fabricantes o en
PC. Pare obtener informacion de compatibilidad, consulte el manual
del dispositivo en el que desea reproducir.
@ Los discos deben finalizarse antes de quepuedan reproducirse en
Reproductores,Grabadorasde DVD estandar
Consulte la pagine14 pare canocer le compatibilidadde un disco
finalizado
¢_) Puedereproducirdiscos DVD+RWen ReproductoresGrabadorasde
DVD sin finalizarlos.
El disco DVD+RW no necesita la funcion de finalizeci0nianulaci6n de
finalizeci0n
,z) A] formatear un disco grebade,los datos grabedosen el disco se borran
t serecupera la capacidaddel disco permitiendola reutilizacion del
isco
DVD R DVD+R DL DVD÷RW
(8 cm)) (8 cm)) (8 cm))
, O posible/X no posib_e / no necesano
[ ENGUSH ]
[ ESPAI_OL ]
Getting to Know Your DVD Camcorder
Q • - - i | . • a- -.
YOUcan record any desired image and edit and playback the disc on a
DVD Camcorder most DVD players, and PCs after finalizing the disc.
Selecting the desired disc and discformatting _page 43
You may edit only in DVD-RW (VR Mode) '-,page 69
Discs must be finalized before they can be played
on standard DVD Players/Recorders.
You may play back DVD+RW discs on other
devices without finalizing them.
DVD-RW(VR mode): You may play back only on DVD
Recorders that support DVD-RW VR mode "-page 84
PlayedReeorder
DVD Player DVD Recolder
DVD Prayer DVD Recolder
DVD Recolder that supports DVD RW VR mode
=P]aybackisnotguaranteedin allDVDPlayers/RecordersForcompatibility
details referto yourDVDPlayers/Recorder'sowner'smanual.
=YoucanplaybackDVD+RWdiscsonotherDVDPlayers/Recorderswithout
finalizingthem.
Introducci6n a la Videoc_,mara con DVD
• • . . o-o . . . Q m |
Puede grabar la imagen que desee asi come editar y reproducir el
disco en una Videocamara con DVD, en la mayoria de reproductores
de EVD yen PCs tras finalizar el disco
Selecci6n del disco que desea y formateo del disco
_pagina 43
S61opuede editar en DVD-RW (mode VR). _pagina 69
Los discos deben finalizarse antes de que puedan
reproducirse en Reproductores/Grabadoras de DVD
estandar.
Puede reproducir discos DVD+RW en otros
dispositivos sin finalizarlos.
DVD-RW (modo VR): Puede reproducir s61oen
Grabadoras deDVD que admitan e! modo DVD-RW VR
=pagina 84
Tipo dedisco Modo
DVDR_+RDL //RDVDRW l/l/leo
• La reproducci6n no esta garantizada en todos los Reproductores/Grabadoras
de DVD Para obtener informaci6n sobre compatibilidad, consulte el manual de
instrucciones del Reproductor/Grabadora de DVD
• Puede reproducir discos DVD+RW en otros Reproductores/Grabadoras de DVD
sin finalizarlos
[ ENGLBH ]
[ ESPANOL ]
Getting to Know Your DVD Camcorder
- • - ,_g _ L l - | D . ® a-
Make surethat the following basic accessories are supplied with your
DVD Camcorder.
Basic Accessories (SB-LSM80)
1 Lithium Ion Battery Pack
(SB-LSM80)
2 AC Power Adapter
(AA-E8 TYPE)
3. AC Cord
4 Multi-AV Cable
5 instruction Book/
Quick Guide
6 Lithium Batteries for
Remote Control (SC-
DC564/DC565 only) and
Clock (TYPE: CR2025)
7 Remote Control
(SC-DC564/DC565 only)
8. USB Cable
9 Software CD (DV Media
PRO, Ulead Video Studio)
10. Lens Cover
11. Lens Cover Strap
12. 3 1/2inch (8cm) DVD-RW
Disc (SC-DC565 only)
Optional Accessory
13. Carrying Case
Parts and accessories
are available at your local
Samsung dealer
I I Lithium bn Battery Pack ] 2_ J3AC_
Introducci6n a la Videoc_,mara con DVD
- • • ot • . _-Q . . . • | |
Asegurese de que los siguientes accesorios basicos le hayan side
entregados junto con la Videocamara con DVD
Accesorios b&sicos
1. Bateria deiones de litie
(SB-LSM80)
2. Adaptader de CA
(TIPO AA-E8)
3. Cable de CA
4. Cable Multi-AV
5. Manual de instrucciones
6. Bateria delitie para el
mando a distancia (solo
SC-DC564/DC565) y
reioj. (TIPO: CR2025)
7. Mando a distancia
(sdlo SC-DC564/DC565)
8. Cable USB
9. CD de software
(DV Media PRO,
Ulead Video Studio)
10. Tapa del objetivo
11. Correa de tapa del
objetivo
12. Disco DVD-RW de
3 l/2pulg. (Scrn)
(s61oSC-DC565)
Accesorios ojocionales
13. Funda de transporte
Los componentes y
acceeorios se encuentran
disponibles en e! Servicio
tecnico de Samsung.
[ ENGLISH ]
[ ESPAi_OL ]
Getting to Know Your DVD Camcorder
1.ACCESS Indicator
2. OPEN Switch
3. Lens
4. Built-In F_ash
(
5. Remote Sensor
(SC-DC5641DC565 only)
6. Internal MIC
1. ACCESS Indicator =page42
2. OPEN Switch =page 42
3. Lens
4. Built-M Flash (SC-DC564/DC565 only) _page 96
5. Remote Sensor (SC-DC564/DC565 only)
6. Internal MIC
7. QUICK MENU Button =page 29
8. Joystick(Up/Down/Left/Right/OK) =page 28
9. EASY,Q Button =page 46
10. TFT LCD Screen
Introduccibn a la Videoc_mara con DVD
- . • . . _ e - 6.
7. QUICK MENU Button
8. Joystick (UplDownlLefllRightlOK)
g. EASY.Q Button
10, TFT LCD Screen
1. MdicadorACCESS =p_gina 42
2. Interruptor OPEN =p_gina 42
3. Objetivo
4. Flash incorporade (s61o SC-DC564/DC565) -,p_gina 96
5. Sensor de mando a distancia (sSIo SC-DC564/DC565}
6. MIC interno
7. BotSn QUICK MENU =p_gina 29
8. Joystick(arriba/abajo/izquierda/dereehalOK) =p_gina 28
9. Bot6n EASY.Q _p_gina 46
10. Pantalia LCD TFT
[ ENGLISH ]
[ ESPAI_OL 1
Getting to Know Your DVD Camcorder
- 0- -
1. MENU Sutton
2. DISPLAY Sutton
3. Mode Switch (DISC/CARD)
4. Built-In Speaker
5. MF/AFIMULTI DISP. button
6. C.NITE/z_ (SC-DC564/DC565 only) _;_
6. COLOR NITE (SC-DC563 only) --
MENU Sutton 9. USB Jack 1. Bot6n MENU 5.
Mode Switch (DISC/BARD) 11. BB iN Jack Interruptor de Mode 6.
DISPLAY Sutton _page 31 10. Multi cabte Jack 12' Bot6n DISPLAY'.=pagina 31
Built-In Speaker 12. VOL (-/+) Sutton (DISC/BARB)
MF/AF/MULT] DISP. Sutton 13. Function Buttons Aitavoz incorporado
_pages 53/98 6.
6. C.NITE/_ • M Player Mode: Memory Player Mode 7,
(SC-DC564/DD565 only) _Mode Mode <PJayerMode> <CameraMode> <M.PlayerMode>
"page 50 B._on _ Photoimage #,bvirlgirr/age 8.
61 COLOR NITE f,_,q BackwardSearchSkip Backw_rrdSkip
(SC-DC563 onZy) _,page 50 Search 10.
7. Charging Indicator _1_i FolwardSearchSkp Fo_,_ardSkp ForwardSearch 11.
8. Jack Cover 12.
B Stop BLC Stop
it;t:::; _UTIDISP.
!!'=![}!!
Play'Sti_l FADE SS_-0WfSLIOES0_, Play'StII
Introduccibn a la Videoc_mara con DVD
-- 7. Charging Indicator
--8. Jack Cover
-- 10. Multi cable Jack
i 11.DO IN Jack
-- g. USB Jack
_13. Function Buttons (below)
Backward 9.
i 13.
12.VOL (-/+) Button
Boton MF/AF/MULTI DISE
_pagina 53/98
C.N]TE/_
(s6io SC-DC564/DC565)
_pagina 50
COLOR NITE
(s6Zo SB-DC563) _pagina 50
Indicador de carga
Tapa de terminales
Terminal USB
Terrninal de cable mt_ltiple
Terminal DC IN
Soton VOL (-/+)
Botones de funciones _
[ ENGLISH ]
[ ESPANOL 1
Getting to Know Your DVD Camcorder
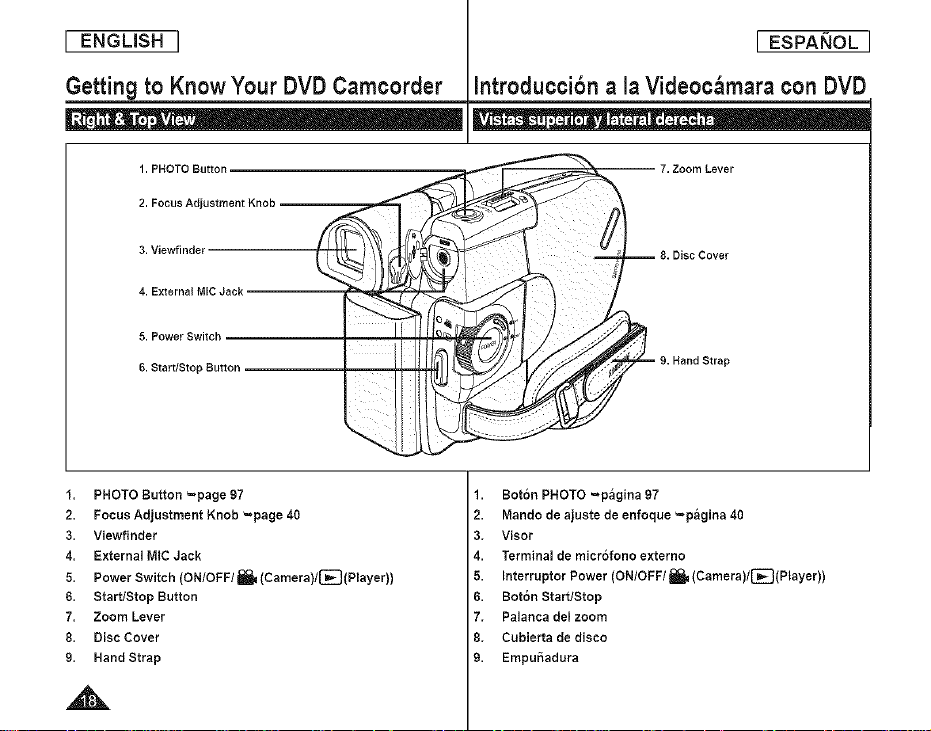
1. PHOTO Button,
2. Focus Adjustment Knob
3. Viewfinder
4. External M[C Jack
5. Power Switch
6. Start/Stop Button
1. PHOTO Button =page 97
2. Focus Adjustment Knob =page 40
3. Viewfinder
4. External MID Jack
5. Power Switch (ON/OFF/I_ (Camera)/_(Player))
6. Start/Stop Button
7. Zoom Lever
8. Disc Cover
9. Hand Strap
Introduccibn a la Videoc_,mara con DVD
= 9. Hand Strap
1. Bot6n PHOTO _p_gina 97
2. Mando de ajuste de enfoque _p_gina 40
3. Visor
4. Terminal de micr6fono externo
5. Interrupter Power (ON/OFF/_(Camera)/_(Player))
6. Bot6n StartlStop
7. Palanca delzoom
8. Cubierta de disco
9. Empui_adura
[ ENGLISH ]
[ ESPAI_OL ]
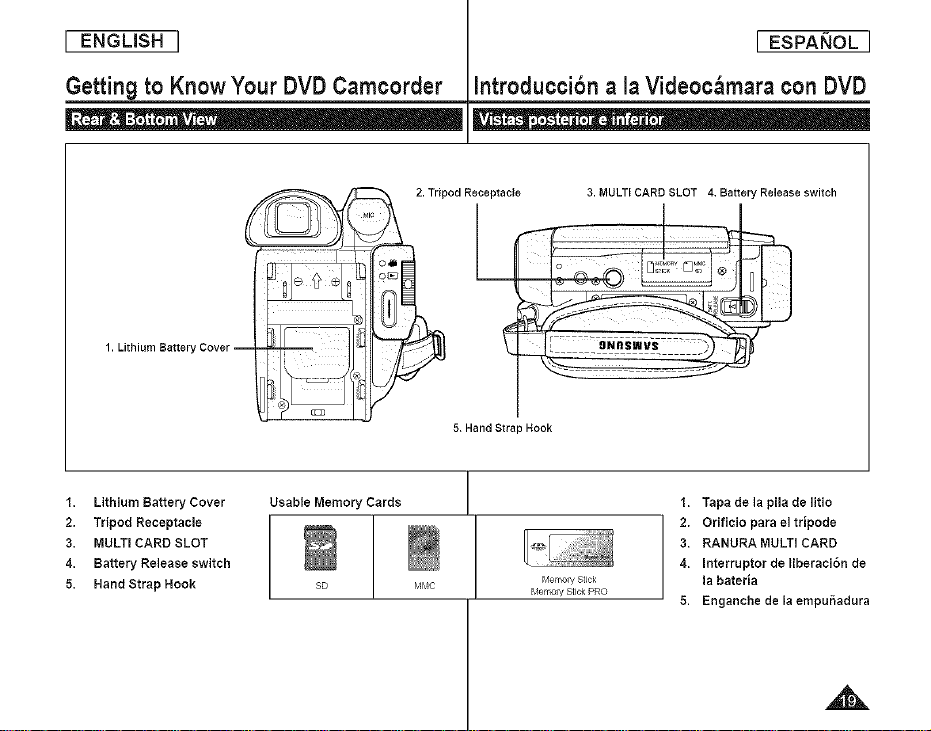
Getting to Know Your DVD Camcorder
°_ ; :Q •
1. Lithium Batter
1. Lithium Battery Cover
2. Tripod Receptacle
3. MULTi CARD SLOT
4. Battery Release switch
5. Hand Strap Hook
Usable Memory Cards
SD r_lr_lc Memo_'J Stick
Introduccibn a la Videoc_mara con DVD
- . g_ - • - - •
2.Tripod Receptacle
3.MULTICARDSLOT 4. Batter r Releaseswitch
L
5.HandStra_Hook
1. Tapa de la pila de litio
2. Orificio para el tripode
3. RANURA MULTi CARD
4. Interruptor de liberaoi6n de
_,lemo_ Stick PRO
la bateria
5. Enganche de la empu5adura
[ ENGUSH ]
[ ESPANOL 1
Getting to Know Your DVD Camcorder
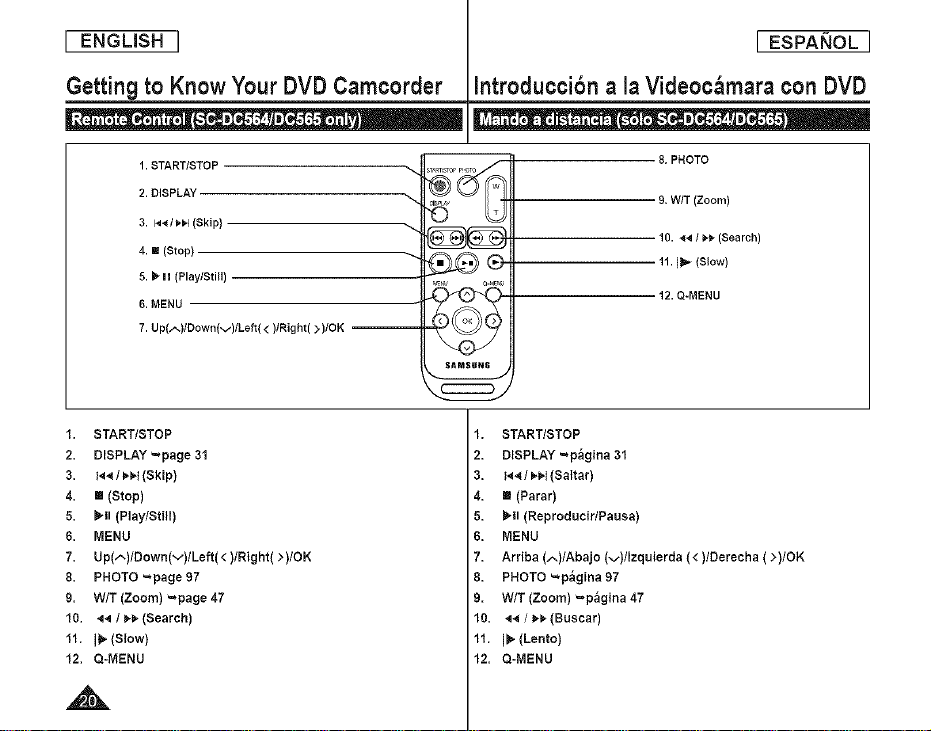
_- • - • • | ,, | o •
1. START/STOP
2. DISPLAY
3. i_1_/_1_1(Skip)
4. ! (Stop)
5. _ H (Play/Still)
6. MENU
7. Up(,,--)/Down(v)/Lef_( < )lRight( >)/OK --
1. START/STOP
2. DISPLAY -page 31
3. t_ / _t,t(Skip)
4. m (Stop)
5. I_ll (Play/Still)
6. MENU
7. Up(^)lDown(v)lLeft( < )/Right( >)/OK
8. PHOTO -page 97
9. W/T (Zoom) -page 47
10. ,_.q/ _-I,, (Search)
11. It_(Slow)
12. Q-MENU
Introduccibn a la Videoc_mara con DVD
• oo . o . . _e o II o,_| o
8. PHOTO
9. WIT (Zoom)
10. _l_ / _-1,(Search)
11. I11"(Slow)
12. Q-MENU
SAMSUNG
1. START/STOP
2. DISPLAY -p_gina 31
3. t_ Il_l,,I(Saltar)
4. Ill (Parar)
5. I,II (Reproducir/Pausa)
6. MENU
7. ArNba (^)/Abajo (v)/Izquierda (<)/Derecha ( >)/OK
8. PHOTO -p_gina {)7
9. WIT(Zoom) =p_gina47
10. ,_._/ I,,_(Buscar)
11. I1_(Lento)
12. Q-MENU
[ ENGLISH ]
[ ESPAI_OL ]
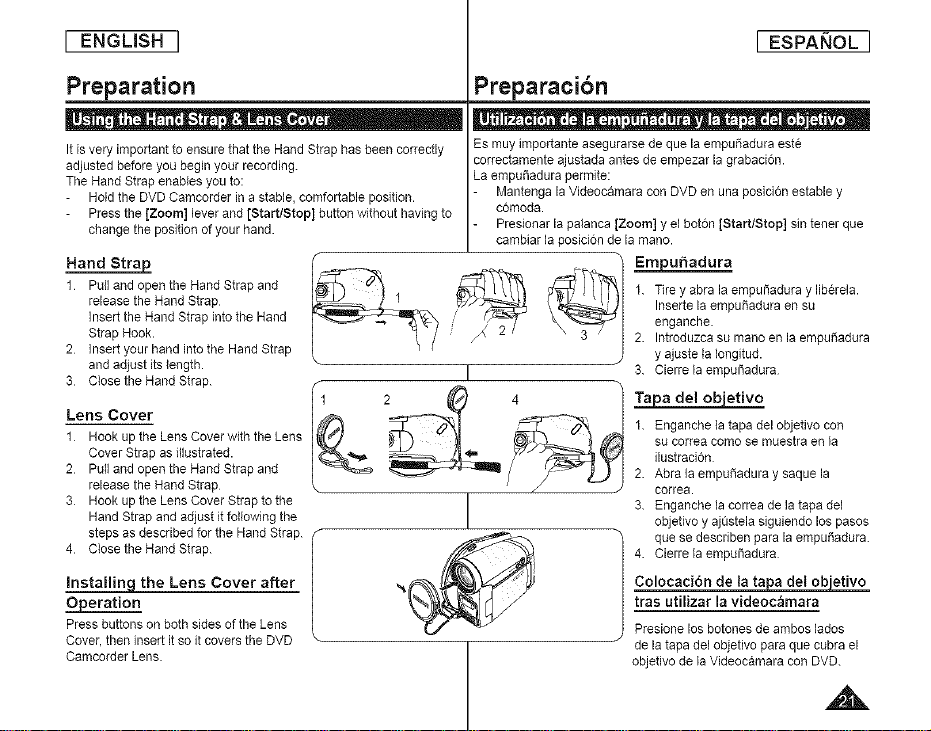
Preparation
It is very important to ensure that the Hand Strap has been correctly
adjusted before you begin your recording.
The Hand Strap enables you to:
Hold the DVD Camcorder in a stable, comfortable position.
Press the [Zoom] lever and [Start/Stop] button without having to
change the position of your hand.
Hand Strap
1 Pull and open the Hand Strap and
release the Hand Strap
Insert the Hand Strap into the Hand
Strap Hook.
2 Insert your hand into the Hand Strap
and adjust its length.
3 Closethe Hand Strap.
Lens Cover
1 Hook up the Lens Cover with the Lens
Cover Strap as illustrated.
2 Pull and open the Hand Strap and
release the Hand Strap
3 Hook up the Lens Cover Strap to the
Hand Strap and adjust it following the
steps as described for the Hand Strap.
4 Closethe Hand Strap.
_the Lens Cover after
O__[oeration
Press buttons on both sides of the Lens
Cover, then insert itso it covers the DVD
Camcorder Lens.
r '_ _1 Em_u_adura
Preparacibn
• a o- . - e .o . . .=. ®- Qo - •
Es muyimportanteasegurarse de que la empu_adura este
correctamente ajustada antes de empezar la grabacion.
La empuSadura permite:
Mantenga laVideocamara con DVD en una posicidn estable y
comoda.
Presionar lapatanca [Zoom] y el boton [Start/Stop] sin tenet que
cambiar la posicion de la mano.
Inserte la empuSadura en su
_' 2/ 1. Tire y abra la empu_adura y liberela.
I
enganche.
2. Introduzca su mano en la empuSadura
y ajuste taIongitud.
3. Cierre la empu_adura
Ta a de1 o_Yetivo
1. Enganche la tapa del objetivo con
su correa como se muestra en la
ilustraci6n
2. Abra la empuSadura y saque la
t
correa.
3. Enganche ta correa de la tapa del
objetivo yajustela siguiendo los pasos
que se descdben para la empu5adura.
4. Cierre Faempu_adura
Colocaci6n de la ta_
tras utilizar lavideoc_mara
Presione losbotones de ambos lades
de latapa del objetivo para que cubra el
objetivo de la Videocamara con DVD.
A
[ ENGLISH ]
[ ESPAI_OL ]
Preparation
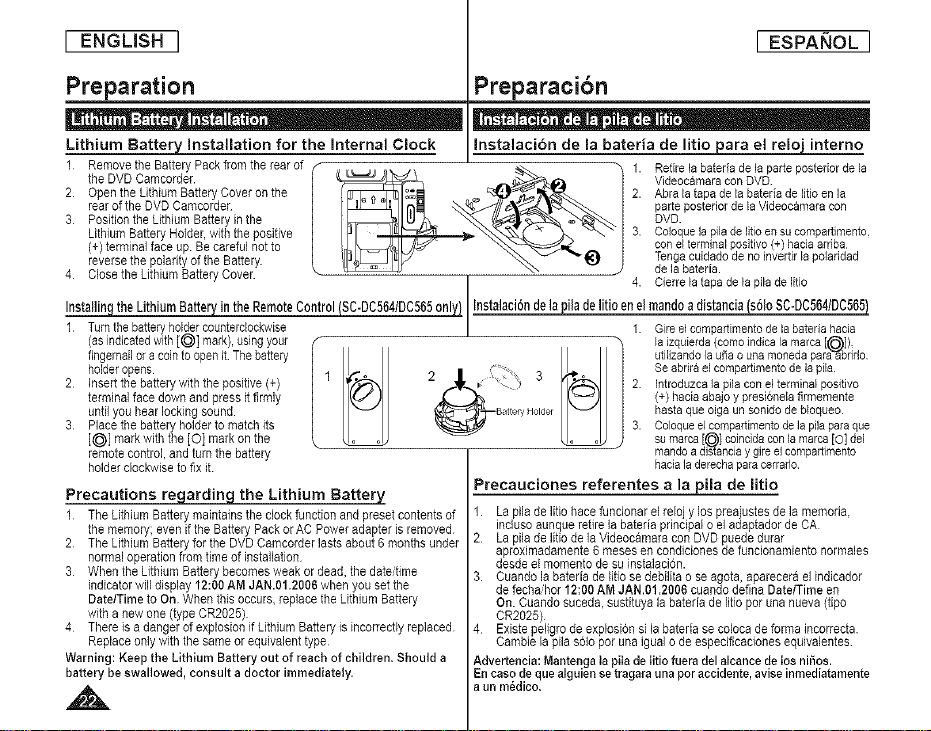
Lithium Battery Installation for the internal Clock
2 Open the Lithium Battery Cover on the 2. Abra la tape de la bateria de litio en la
rear of the DVD Camcorder parte posterior de la Videocamara con
3 Position the Lithium Battery in the DVD.
Lithium Battery Holder, with the positive 3. Coloque la pila de fltio en su cornpartimento,
f theRem°VeDvDthecamcorder.BatteryPack from the rear of ___ \ _ _ 1. VideocamaraRetirela bateriacondeDVDlaparte posterior de la
(+) terminal face up Be careful not to con el terminal posifivo (+) hacia arriba
reverse the poIadty of the Battery. _ x Tenga cuidado de no invertir la poladdad
4 Close the Lithium Battery Cover. de la bateria.
Preparacibn
• . • o- . o . o- •
Instalacion de la bateria de litio joara el relo_ interno
4. Cierre la tape de la pila de litio
InstallingtheLithiumBatteryintheRemoteControl(SC-DC564/DC565only} _ila delitioenelmandoadistancias61oSC-DC564/DC565
f Turn the battery holder counterclockwise 1. Gire el compartirnento de la bateria hacia
(as indicated with [_] mark), using your la izquierda (como indica la marca [_]),
fingernail or a coin to open it The battery utilizando la usa o una moneda pard-_brido
holderopens
2 Insertthe batterywith the positive (+)
terminalface downand press itfirmly
untilyouhearlockingsound.
3 Placethe batteryholder to matchits
[_] markwiththe [O] markon the
remotecontrol, and turnthe battery
holderclockwise to fixit
Precautions regarding the Lithium Battery
f The Lithium Battery maintains the clock function and preset contents of
the memory; even if the Battery Pack or AC Power adapter is removed
2 The Lithium Battery for the DVD Camcorder lasts about 6 months under
normal operation from time of installation
3 When the Lithium Battery becomes weak ordead, the date/time
indicator will display 12:00 AM JAN.01.2006 when you set the
Date/Time to On When this occurs, replace the Lithium Battery
with a new one (type CR2025)
4 There is a danger of explosion if Lithium Battery is incorrectEy replaced
Replace only with the same or equivalent type
Warning: Keep the Lithium Battery out of reach of children, Should a
battery be swallowed, consult a doctor immediately.
f 2. Introduzca la pila con el terminal positivo
I Se abrira el compartimento de la pila
(+) hacia abajo y presionela firmemente
haste qua oiga un sonido de b{oqueo
3. Coloqua el compartimento de la pila pare qua
su marca [_] coincide con la marca [O] del
mando a dis_ancia ygire elcompartimento
hacialaderechapareoerrado
Precauciones referentes a la pile de litio
1 Lapilade litiohacefuncionarelrelojy los preajustesdela memoria.
induso aunquaretirelabateriaprincipalo eladaptadordeCA
2 Lapilade litio de la Videocamerecon DVD puededurer
aproximadamente6 meses en condiciones defuncionemiento normales
desdeel momento de suinstalacion.
3 Cuandolabetariadelitiosedebifltao se egota, eparaceraelindicador
de fecha hor 12:00AM JAN.01.2006 cuando define Date/Timeen
On. Cuandosucede,sustituya la beteria delitio por una nueva (tipo
CR2025)
4 Existepeligro de explosicnsi la bateria se colocade forma incorrecta
Cambie la pilesolo pot une iguel o de espacificeciones equivelentes
Advertencia: Mantengata piIa de Iitio fuera del alcance de Ios nii_os.
Encaso de que alguiensetragaraunapor accidente,arise inmediatamente
aun m_dico,
[ ENGLISH ]
[ ESPAI_OL ]
Preparation
÷;o Use SB-LSM80 or SB-LSM160(not supplied) Battery Pack only.
+ The Battery Pack may be charged a littleat the time of purchase.
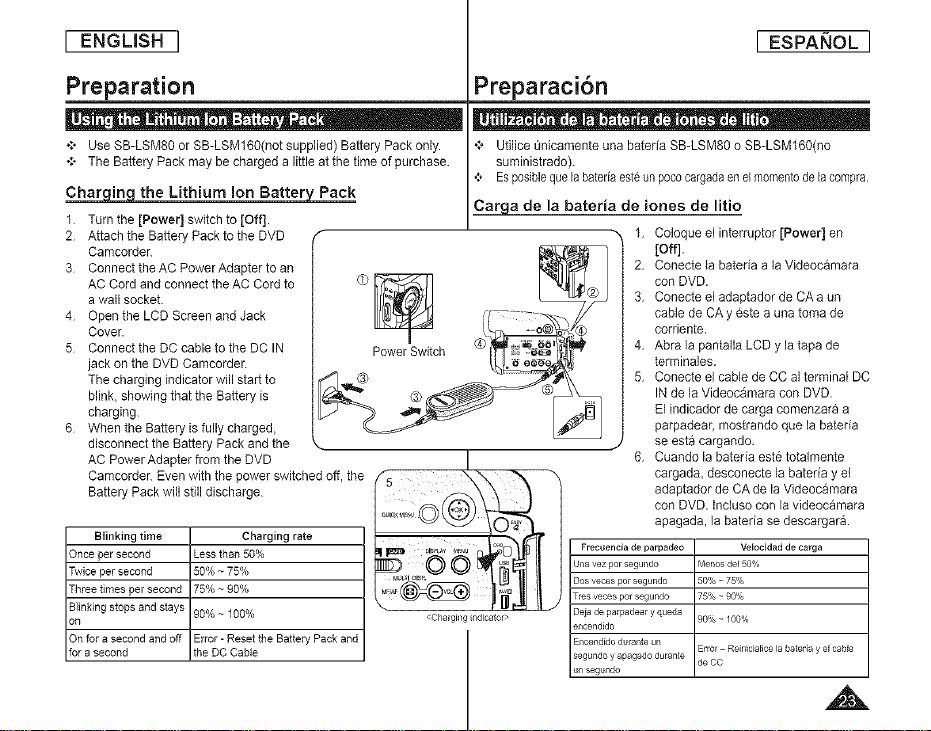
Char in the Lithium ion Batter Pack
1 Turn the [Power] switch to [Off].
2 Attach the Battery Pack to the DVD
CamcordeL
3 Connect the AC Power Adapter to an
AC Cord and connect the AC Cordto
f
Preparaci6n
•;, Uti]ice _nicamente una bateria SB-LSM80 o SB-LSM160(no
suministrado).
,;, Esposiblequeb baterbesteun pococargadaenelmomentode b compra,
Carga de la bateria de iones de litio
a wall socket.
4 Open the LCD Screen and Jack
Cover.
5 Connect the DC cable to the DC IN
jack onthe DVD Camcorder.
The charging indicator will start to
blink showing that the Battery is
charging.
6 When the Battery is fully charged,
disconnect the Battery Pack and the k
AC PowerAdapter from the DVD I
Camcorder. Even with the power switched off, the _._ _'_-\ _ "_
Battery Pack will still discharge, oi0__
Oncepersecond Lessthan50%
Twicepersecond 50% ~75%
Threetimes persecond 75% ~90%
Blinkingstopsandstays 90%~ 100% <Chagi_/gndicator>
on
Onfora secondandoff Error-ResettheBatteryPackand
ora second theDOCable
• e e" , e_ = , _= e = e = e
1, Coloque el interruptor [Power] en
[Off].
2, Conecte ia bateria a la Videocamara
con DVD,
3, Conecte el adaptador de CAa un
cable de CA y este a una toma de
corriente.
4, Abra la pantalla LCD y la _apade
_erminales.
5, Conecte el cable de CC al terminal DC
INde la Videocamara con DVD.
El indicador de carga comenzara a
parpadear, mostrando que la bateBa
se esta cargando,
J
6, Cuando la bateBa este totalmente
cargada, desconecte la bateria y el
adaptador de CA de la Videocamara
con DVD. Incluso con la videocamara
apagada, la bateria se descargar&
Una vez por segundo Menos de150%
Dos veces po_ segundo 50% _ 75%
Tres veces pc1 segundo 75% _ 90%
Deia de palpadear y queda 90% _ 100%
e_lcendido
Frecuencia de parpadeo de CC VeJocidad de carga
u_lsegundo
Encendido du_a_te un Error - Reinicialice la batefia y el cable
segundo y apagado durante
[ ENGLISH ]
[ ESPANOL ]
Preparation
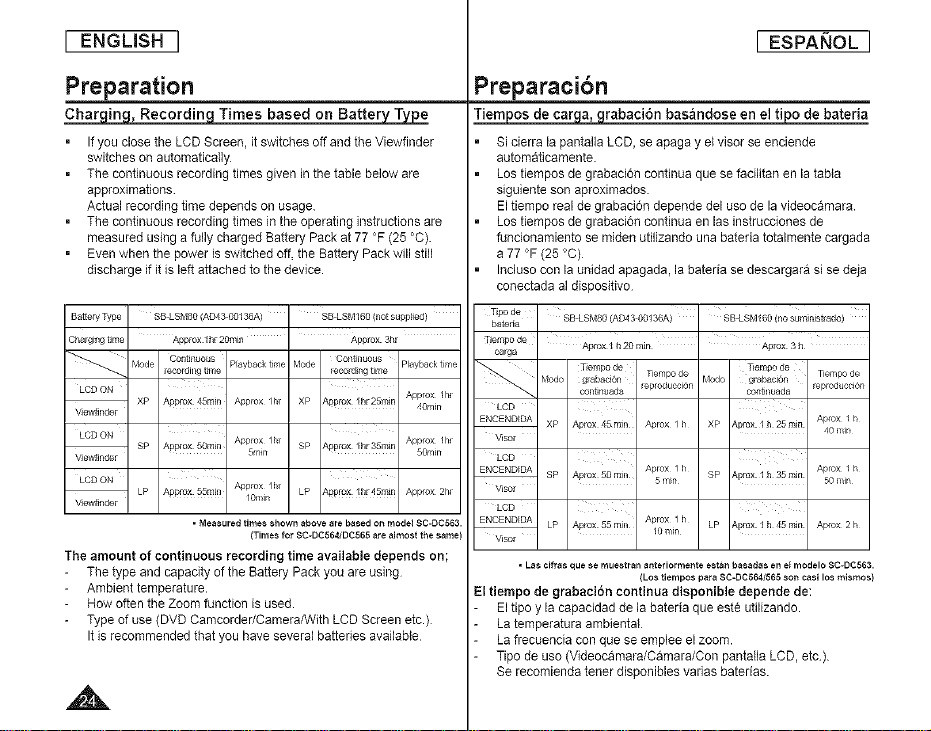
Charging, Recording Times based on Battery Type
Ifyou close the LCD Screen, it switches off and the Viewfinder
switches on automatically
=
The continuous recording times given in the table below are
approximations
Actual recording time depends on usage.
=
The continuous recording times in the operating instructions are
measured using a fully charged Battery Pack at 77 °F (25 °C).
Even when the power is switched off, the Battery Pack will still
discharge if it isleft attached to the device.
Ba_e_,Type SB LSMS0 (AD43 00136A)
Charging time Approx I hr 20rain
Mode O,,nti_uous
LCD ON
ViewfJnder
LCD ON
ViewfJnder 5min
LCD ON
Vie_nder /0n/in
recording t_me
XP Appro× 45rain A_prox /hr
SP Applo× 50min A_prox lhr
LP Approx 55mil/ Approx lhr
Playback time
• Measured times shown above are based on model SC-D0563.
(Times for SC-DC564/DC565 are almost the same)
The amount of continuous recording time available depends on;
The type and capacity of the Battery Pack you are using
Ambient temperature.
How often the Zoom function isused.
Type of use (DVD Camcorder/Camera/With LCD Screen etc.)
Itis recommended that you have several batteries available
SB LSMI6O (not supplied)
Approx 3hr
Mode Playback time
XP Appro× Ihr25min
SP Appro× Ihr35mJn
LP Approx Ihr45min Approx 2h_
Preparacibn
Tiempos de carga, grabaci6n bas_ndose en el tipo de bateda
Si cierra lapantalla LCD, se apaga y elvisor se enciende
automaticamente.
Los tiempos de grabaci,Sn continua que se facilitan en la tabta
siguiente son aproximados.
El tiempo real de grabaddn depende del uso de lavideocamara.
Los tiempos de grabacion continua en las instruccionesde
funcionamiento se miden utilizando una bateria totalmente cargada
a 77 °F (25 °C)
Induso con la unidad apagada, la bateda se descargara si se deja
conectada aldispositivo
_pode
bateda
_empo de
ca_a
LeD
ENCENDIDA
Visor
LeD
ENCENDIDA
Visor
LeD
ENCENDIDA
Visor
= Las cifras que se rnuestran anteriorme_tte est,_tt basadas en el modelo 8C-DC563.
El tiempo de grabaci6n continua disponible depende de:
- El tipo y la capacidad de la bateria que este utilizando.
La temperatura ambienta{
ha frecuencia conque se emplee el zoom.
Tipo de uso (Videocamara/Camara/Con pantalla LCD, etc).
Se recomienda tener disponibles varias batedas.
Apro× 1 h 20 mn
Tiempo de Tiempo de
[_lodo glabaci0n Fempo de Modo grabact0n Tiempo de
cont_t_uada _eproducci0n contin_ada _eproduccl0n
XP Aplo× 45 mln Aprox / h XP Aprox _ h 25 rain Aprox / h
SP Aplo× 50 mln 5 rain SP Aprox _h 35 rain 50 rain
LP Aptox 55 mill LP Aprox :l h 45 mJn Aprox 2h
Aprox 1h Aprox / h
(Los tiempos para SC-DC564/565 sot_ casi los mismos)
40 rain
[ ENGLISH ]
[ ESPANOL ]
Preparation
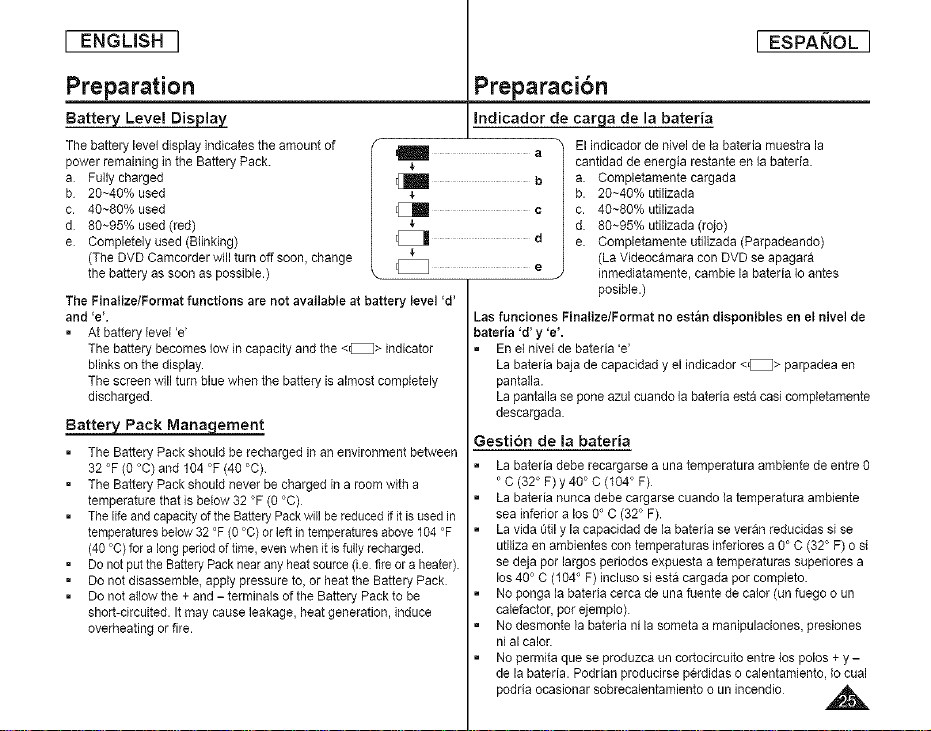
Battery Level Display
The battery level display indicates the amount of
power remaining in the Battery Pack.
a Fully charged
b 20~40% used
c. 40~80% used
d 80~95% used(red)
e Completely used (Blinking)
(The DVD Camcorder will turn off soon, change
the battery as soon as possible.)
The Finalize/Format functions are not available at battery level 'd'
and _e_,
• At battery level 'e'
The battery becomes lowin capacity and the <_> indicator
blinks on the display.
The screen will turn blue when the battery is almost completely
discharged.
Batter_ernent
= The Battery Pack should be recharged in anenvironment between
32 °F (0 °C) and 104 °F (40 °C).
= The Battery Pack should never be charged ina room with a
temperature that is below 32 °F (0 °C)
= The life andcapacity of the BatteryPack will be reduced if it isused in
temperaturesbelow 32 °F (0°C) or leftin temperaturesabove 104°F
(40 °C) for a long period oftime, even when it is fully recharged.
= Donot put the BatteryPack near any heat source (i.s fire ora heater).
= Do notdisassemble, apply pressure to,or heatthe Battery Pack
= Do notallow the + and - terminals of the Battery Pack to be
short-circuited. It may cause leakage, heat generation, induce
overheating or fire.
I a
$
Preparacibn
Indicador de carqa de la bateria
El indicador de nivel de la bateria muestra la
cantidad de energia restante en la bateda.
a. Completamente cargada
b
b. 20~40% utilizada
c. 40~80% utilizada
d. 80~95% utilizada (rojo)
e. Completamente utilizada (Parpadeando)
(La Videocamara con DVD se apagara
inmediatamente, cambie la baterta Io antes
posible.)
Las funciones Finalize/Format no est_n disponibles en el nivel de
bateria 'd' y 'e',
En el nivet de bateria 'e'
La bateria baja de capaddad y el indicador<_> parpadea en
pantalla.
La pantalla se pone azul cuando la baterta esta casi comptetamente
descargada
Gestibn de la bateria
La bateria debe recargarse a una temperatura ambiente de entre 0
' C (32°F)y 40 ° C (104°F)
La bateria nunca debe cargarse cuando la temperatura ambiente
sea inferior a los 0° C (32° F).
La vida t3tily lacapacidad de la bateria se veran reducidas si se
utitiza enambientes con temperaturas inferiores a 0° C (32° F) o si
se deja por largos periodos expuesta a temperaturas superiores a
los 40 ° C (104 ° F) incluso si esta cargada per compieto.
No ponga labateria cerca de una fuente de calor (un fuego o un
catefactor, pot ejempto).
No desmonte la bateria ni lasometa a manipulaciones, presiones
ni al calor.
No permita que se produzca un cortocircuito entre los polos + y -
de labateria. Podrtan producirse pcrdidas o calentamiento, Io cual
podria ocasionar sobrecalentamiento o un incendio A_
[ ENGLISH ]
[ ESPAI_OL ]
Preparation
Maintaining the Battery Pack
, Please refer to the Table on page 24 for approximate continuous
recording time.
, The recording time is affected by temperature and environmental
conditions.
. The recording time shortens dramatically in a cold environment.
The continuous recording times in the operating instructions are
measured using a fully charged Battery Pack at 77 °F (25 ' C)
The remaining battery time may differ from the approximate
continuous recording times given in the instructions.
• When replacing the battery pack, only use the same type as is
supplied with this camcorder and is available from your SAk4SUNG
retailer When the Battery reaches the end of its life, please contact
your local dealer.
The batteries have to be dealt with as chemical waste.
• Make sure that the Battery Pack is fully charged before starting to
record.
• Abrand new Battery Pack is not charged. Before using the Battery
Pack, you need to charge it completely.
• Fully discharging a Lithium ion Battery damages the internal cells.
The Battery Pack may be prone to leakage when fully discharged.
• Topreserve battery power, keep your DVD Camcorder turned off
when you are not operating it.
• if your DVD Camcorder is in Camera Mode, and it is left in STBY
mode without being operated for more than 5 minutes with a
disc inserted, itwill automatically turn itself offto protect against
unnecessary battery discharge.
, Make sure that the Battery Pack is fitted firmly into place
Do not drop the Battery Pack. Dropping the Battery Pack may
damage it,
Preparacibn
MantenimJento de la bateria
Consulte latabla de la pagina 24 para obtener informaci6n sobre
el tiempo aproximado degrabacion continua.
El tiempo degrabaci6n seve afectado por lascondiciones
ambientales y la temperatura
El tiempo degrabaci6n se acorta enormemente en un ambiente
frio. Los tiempos de grabacion continuada que sedan en este
manual de instrucciones estan medidos empleando una bateria
completamente cargada a 25°C (77° F)
El tiempo de labaterta restante puede difedr de lostiempos de
grabaci6n continuos facilitados en lasinstrucciones.
AI sustituir labateria, utilice unicamente el mismo tipo que se
suministra con esta videocamara, disponible en los distribuidores
de SAMSUNG Cuando se termine la vida util de la bateria,
pongase en contacto con su proveedor habitual
Para desechar lasbaterias gastadas, estas deben tratarse como
residuos quimicos.
Aseg_:lresede que la baterta este completamente cargada antes
de empezar a grabar.
Las baterias nuevas no vienen cargadas. Antes de utilizar la
bateria es necesado cargarla por completo.
Descargar completamente la bateda de polimero de litio da_a las
c¢tulas internas
La bateria puede ser mas propensa a fugas cuando se deja
totalmente descargada.
Para ahorrar energia de la bateda mantenga la Videocamara con
DVD apagada cuando nose este usando
Si la Videocamara con DVD esta en la Camera Mode con undisco
cotocado y se deja en el modo STBY sin haceda funcionar durante
mas de cinco minutos, se apagara automaticamente para ahorrar
energia de la baterta.
AsegOresede que la baterta este colocada correctamente en su
sitio.
No deje caer la bateria. Si se Ilegara acaer, podria estropearse.

[ ENGLISH ]
[ ESPANOL ]
Preparation
*-*oThere are two types of power source that can be connected to your
DVD Camcorder.
- The AC Power adapter and AC Cord: used for indoor recording.
- The Battery Pack: used for outdoor recording.
Using a Household Power Source
Connectto ahousehold
power source to use the DVD
Camcorder without having to
worry about the battery power
You can keep the Battery Pack
attached; the battery power will
not be consurned.
1 ConnecttheAC Power
adapter (AA-E8 Type] to
the AC Cord.
2 Connect the AC Cord to a
wall socket.
The plug and wan socket type may differ according to your resident
country.
3 Open the LCD Screen and Jack Cover.
4 Connect the DC cable to the DC INjack of the DVD Camcorder.
5 Set the DVDCamcorder to each mode by holding down the Green
Tabon the [Power] switch and turning it to [On] or [Off].
Preparacibn
• - • . . - - o- . - . •
+ Hay dos tJposdefuentes de alimentacion alas que se puede
conectar la VJdeocamara con DVD
- El adaptador deCA yel cable de CA: se emplean para
grabaciones en interiores
- La bateria: se emplea para grabaciones en exterJores.
UtJlizaci6n de una fuente de alimentacJ6n domestJca
Conecte unafuente de
alimentaci6n casera para utHizar
la Videocamara con DVD sin
preocuparse sobre laenergia
de la bated& Puede mantener
la bateda conectada; la energia
de la bateria no se consumir&
1. Conecte el adaptador deCA
(Tipo AA-E8) al cable de CA.
2. Conecte el cable de CA a
Es posible que la clavija y latoma de cordente sean de distinto
tipo, dependiendo desu lugar de residencia.
3. Abra la pantaila LCD y la tapa de terminales
4. Conecte el cable de CC al terminal DC IN dela Videocamara con
DVD
5. Ajuste la videocamara en cada modo manteniendo presionada la
pestaSa verde del interruptor [Power] y girandoio a [On] o [Off].
una tomade cordente.
A
[ ENGLISH ]
[ ESPAI_IOL ]
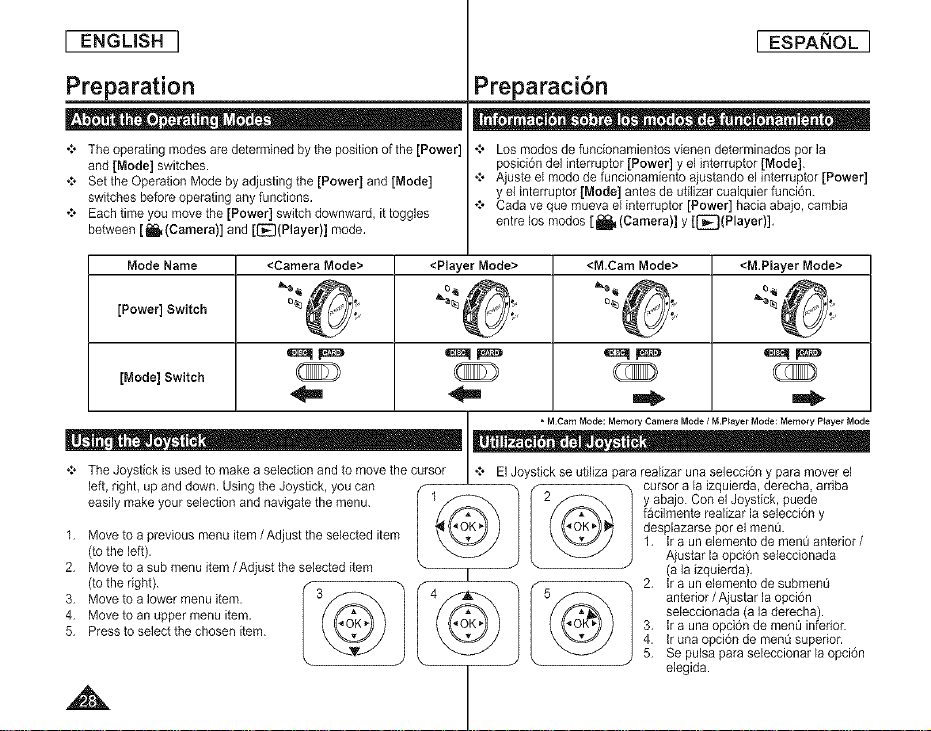
Preparation
+ The operating modes are determined by the position of the [Power]
and [Mode] switches.
+ Set the Operation Mode by adjusting the [Power] and [Mode]
switches before operating any functions.
+ Each time you movethe [Power] switch downward, ittoggles
between [l_(Camera)] and [[_(Player}] mode,
Mode Name <Camera Mode> <Player Mode> <M,Cam Mode> <M.Player Mode>
Switch
[Power]
[Mode] Switch
+ The Joystick is used to make a selection and to move the cursor
left, right, up and down. Using the Joystick, you can
easily make your selection and navigate the menu.
1. Move to aprevious menu item / Adjust the selected item
(tothe left).
2, Move to a sub menu item / Adjust the selected item
(tothe right).
3. Move to a lower menu item.
4. Move to an upper menu item.
5. Press to select the chosen item.
,A
Preparaci6n
e , = e_ = o Qe_ 0- e , - o
+ Los modos de funcionamientos vienen determinados per la
posici6n del interruptor [Power] y el interruptor [Mode].
+ Ajuste el modo de funcionamiento ajustando el interruptor [Power]
y el intermptor [Mode] antes de utilizar cualquier funci6n.
+ Cada ve que mueva el interruptor [Power] hacia abajo, cambia
entre los modes [ _ (Camera)] y [l_(Player)].
t,
=MCam Mode: Memory Camera Mode / M.Pteyer Mode: Memory Prayer Mode
+ El Joystick se utiliza para realizar una selecci6n y para mover el
facilmente realizar la selecci6n y
2_ y abajo. Con el Joystick, puede
5_ anterior / Ajastar la opci6n
desplazarse por el men&
1, tra unelemento de menOanterior /
i cursor a la izquierda,derecha, arriba
Ajustar la opcion seleccionada
(a la izqaierda).
seleccionada (a laderecha).
3, tra una opci6n de menQ inferior.
i 2, tr a un elemento de subment_
4. tr una opci6n de menO superior.
5. Se pulsa para seleccionar la opci6n
elegida.
[ ENGLBH ]
[ ESPAI_IOL ]
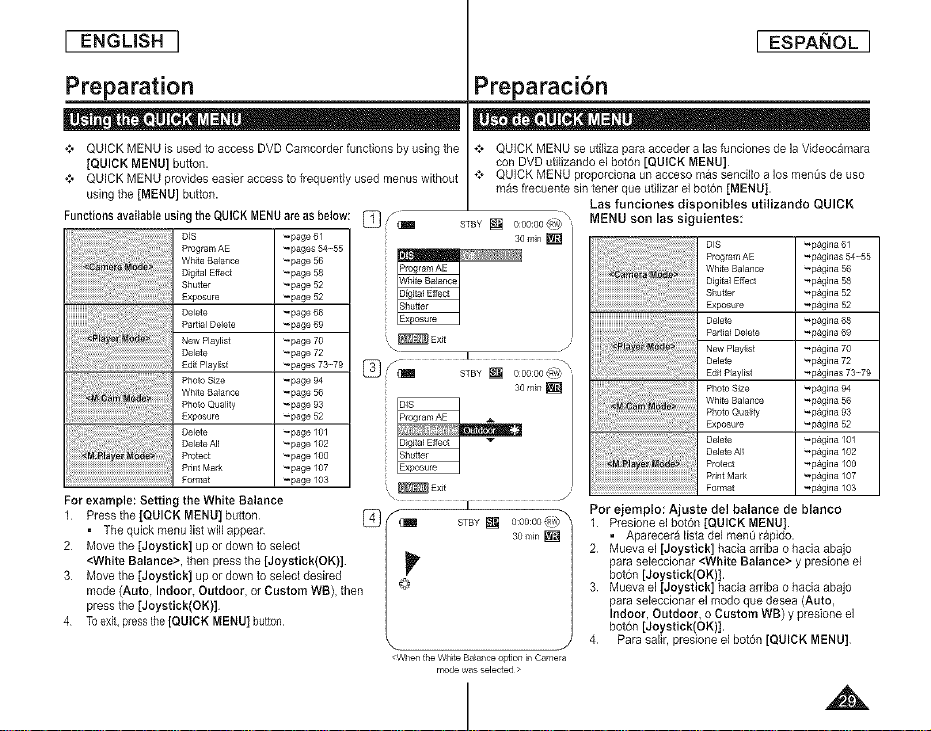
Preparation
+ QUICK MENU is used to access DVD Camcorder functions by using the
[QUICK MENU] button.
+ QUICK MENU provides easier access to frequently used menus without
using the [MENU] button.
Functions available using the QUICK MENU are as below:
i
For example: Setting the White Balance
1.
Press the ]QUICK MENU] button FT_/-
• The quick menu list will appear LZJ r|_!1
2
Move the [Joystick] up or down to select |
<White Balance>, then press the [Joystick(OK)] |
3 Move the [Joystick] up or down to select desired |
mode (Auto, Indoor, Outdoor, or Custom WB), then |Q
press the [Joystick(OK)] |
4 To exit, press the [QUICK MENU] button |
D_S
Program AE
White Balance
Digital Effect
Shutter
Ex£osure
Delete
Part_al Delete
New Playlist
Delete
Edit Playlist
Photo Size
WNte Ba]ance
Photo Quality
Exposure
Delete
Delete A,
Protect
Pnnt Mark
Fomlat
_page61 mm [] I
_pases 54-55
page56
_pase 58 ProgramAE
_page 52
_page 68
_page 52
_page 69
_page 70
_Paee72 I
_pages 73-79 @ /" ,_
-page 94 30rain [] I
_page 56
_Pase52
_Paee93
_paee01
-page 00
-p_geg2 | _
_Paee 07
_page 103 _ Ext
' E! STBY [] 0:O0:O0(,/v_ i
' _ STBY [] 00ooo(_e,
x /
v
\ J
<WhentheWhte BalanceoptioninCamera
Preparaci6n
÷t* QUICK MENU se utilize pare acceder alas funciones de la Videoc&mara
con DVD utilizando el boton [QUICK MENU]
÷to QUICK MENU proporciona un acceso mas sencillo a los menQs de uso
m_s frecuente sin tener que utilizar el bo{dn [MENU].
Las funciones disponibles utilizando QUICK
MENU son las siguientes:
I
.................... Exposure
D,sProgramAE
W_ite3al_,_o_
Dgtal Effect
Shutter
Po,,ia,DeleteOeeto
New Pie)4 st
Delete
EditPayist
Wh, eOaP ° °s, e.....
::P o oOua,N
E_p......
Oe,e,o
DeleteAll
P,oteot
PrintMark
Format
STBY [] 0:00:00(RI_)"_
30Ilir []
modewasselected>
Por ejemplo: Ajuate del balance de
1 Presione el botdn [QUICK MENU].
• Aparecer_ lista del men0 rapido.
2 Mueva el [Joystick] hacia arriba o hacia abajo
para seleccionar <White Balance> y presione el
boton [Joystick(OK)].
3 Mueva el [Joystick] hacia ardba o hacia abajo
para seleccionar el modo que desea (Auto,
Indoor, Outdoor, o Custom WB) y presione el
boton [Joystick(OK)].
4 Para salir, presione el botdn [QUICK MENU]
_pAgina 61
_p&ginas 54_-55
_pAgina 56
_p&gina 58
_pAgina 52
_p_gina 52
_p&gina 68
_p_gina 69
_p_gina 70
_p&gina 72
_p_gmas 73-79
_p&gina g4
_p_gina 56
_p_eina 93
_p&gina 52
_p_gina I01
_p&glna 102
_p_gina 100
_p&gma 107
_p_gma 103
blanco
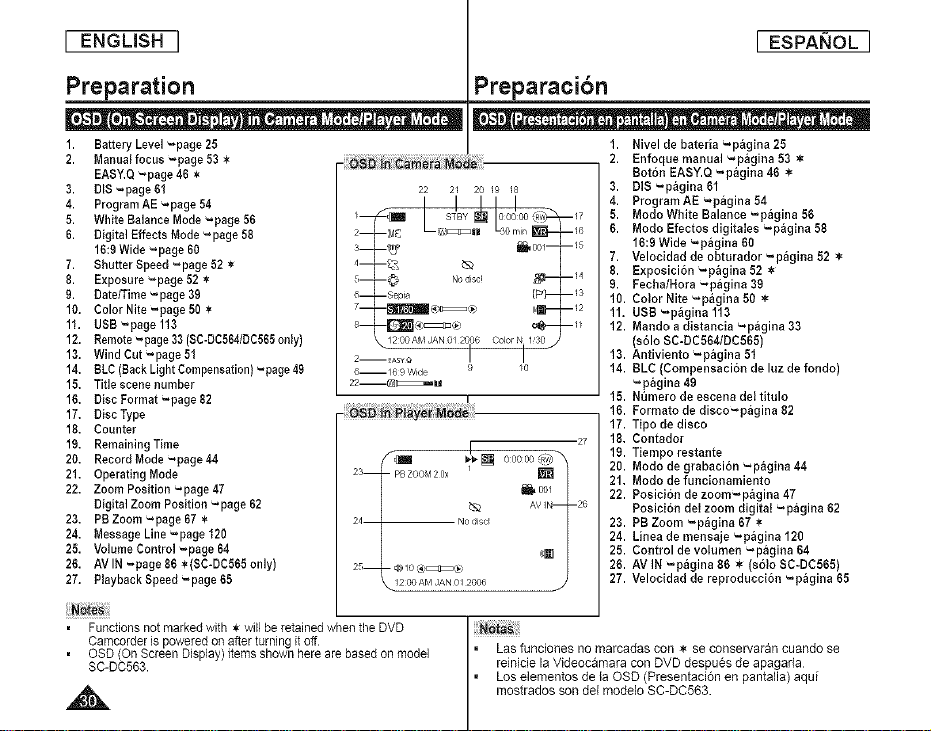
[ ENGLISH ] [ ESPANOL]
Preparation Preparaci6n
O | _ -- | _ . . _ oo _ . - co- O | " - - = 0 - ,-- . - . _ e,- " . - o,-
1. Battery Level _page 25 1. Nivel de bateria _p&gina 25
2. Manua{ focus _page 53
EASY.Q _page 46
3. DIS _page 61
4. Program AE -page 54
5. White Balance Mode -page 56
6. Digital Effects Mode -page 58
16:9 Wide _page 66
7. Shutter Speed _page 52
8. Exposure _page 52
9. DatelTime _page 36
10. Color Nite _page 50
11. USB _page 113
12. Remote _page 33 (SC-DC564/DC565 onty)
13. Wind Cut _page 51
14. SLC (Back Light Compensation) _page 49
15. Title scene number
16. Disc Format _page 82
17. Disc Type
18. Counter
16. Remaining Time
20. Record Mode _page44
21. Operating Mode
22. Zoom Position-page 47
Digital Zoom Position -page 62
23. PB Zoom _page 67 ,_
24. Message Line _page 120
25. Volume Control-page 64
26. AVlN _page86 _(SC-DC565only)
27. Playback Speed _page 65
6 Sepia [ /3
6--/69 Wide 9 _0
22--_=::::::::::::]g_
25 4_10_;_i 2006
22 2/ 20 19 18
_ 12 00A[/IJAN 0/ 2006 Color N 1'30_
2. Enfoque manual -p_gina 53
Bot6n EASY.Q _p_gina 46
3. DIS -p_gina 61
4. ProgramAE _pagina 54
5. Mode White Balance _pagina 56
6. Mode Efectos digitaZes _pagina 58
16:9 Wide -pagina 60
7. Velocidad de obturador _pagina 52
8. Exposici6n _pagina 52
9. Fecha/Hora _pagina 39
10. Color Nite -p_gina 50
11. USB -pagina 113
12. Mando a distancia _pagina 33
(s61o SC-DCBB4/DCSBS)
13. Antiviento _pagina 51
14. BLC (Compensaci6n de luz de fondo)
_pagina 46
15. NQmero de escena de! titulo
16. Forrnato de disco_pagina 62
17. Tipo de disco
18. Contador
19. Tiempo restante
20. Mode de grabaci6n _pagina 44
21, Mode de funcionarniento
22. Position de zoom-p_gina 47
Posicion deI zoom digitat _pagina 62
23. PB Zoom _p_gina 67
24. Linea de mensaje _p_gina 120
25. Control de volumen _pagina 64
26. AM IN _pagina 86 _ (s6lo SC-DC565)
27. Velocidad de reproducci6n _pagina 65
" Functions not marked with * will be retained when tile DVD
Camcorder is powered on after turning it off.
. OSD/On Screen Display) items shown here are based on model
SC-DC563.
,,&
• Las funciones nomarcadas con * se conservaran cuando ee
reiricie laVideocamara con DVD deepucs de apagada
• Los elementos de la OSD (Presentacion en pantalla) aqui
rues rados son de modeo SC-DC563.
 Loading...