

Page 1
SC-HMX10
SC-HMX10A
SC-HMX10C
SC-HMX10N
SC-HMX10CN
SC-HMX10ED
High Definition Digital
Camcorder
user manual
imagine the possibilities
Thank you for purchasing this Samsung product.
To receive more complete service, please register your
product at
www.samsung.com/global/register
高清数码摄像机
用户说明书
无穷想象 , 无限可能
感谢您 购买三 星产品 , 预享受更加 全面的 服务 ,
请到以下网站注册您的产品 .
www.samsung.com/global/register
Page 2
key features of your HD
camcorder
The HD camcorder is capable of recording and playing back both High
Definition (HD: 1280x720p) and Standard Definition (SD: 720x480p)
image quality. Select the recording image quality, HD (high definition) or
SD (standard definition), before recording.
ENJOYING IMAGES WITH HIGH DEFINITION (HD) QUALITY
You can view movies with the HD (high definition) image quality.
●
This HD camcorder adopts the advanced 720p effective scanning lines to
reproduce a sharper image than the old SD camcorder (480i) and supports the
widescreen view in the aspect ratio of 16:9.
●
The movies recorded in the HD (high definition) image quality will best fit the
wide (16:9) HDTV. If your TV is not a high definition TV, movies with HD (high
definition) image quality will be displayed with SD (standard definition) image
quality.
- To enjoy HD-quality images, you need a TV supporting 1280x720p input.
Check you have a high definition TV (HDTV). (Refer to your TV user
manual.)
- To enjoy the HD-quality images, use the component cable or HDMI cable.
The multi-AV cable does not support HD-quality images so it down-converts
them to SD-quality images.
●
The image is recorded in 720x480p when the quality is set to SD in the HD
camcorder. The movies recorded with SD (standard definition) image quality
cannot be converted to HD (high definition) image quality.
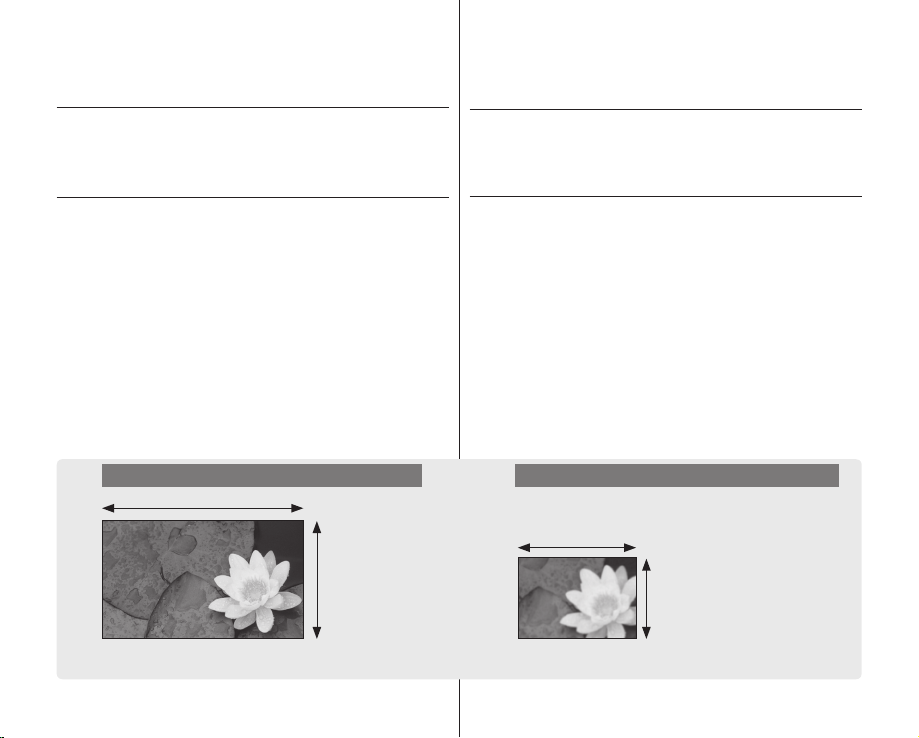
HD (high definition) image quality : 60p (Progressive) SD (standard definition) image quality : 60i (interlaced)
1280
主要特点
本高清数码摄像机支持使用高清晰度(HD:
720x480p
) 图像质量进行录制和播放。在录制之前,请选择录制图像质量,
HD
( 高清晰度 ) 或SD ( 标准清晰度 )。
使用高清晰度质量 (HD) 欣赏图像
您可以使用HD( 高清晰度 ) 质量观看图像
•
本高清数码摄像机采取先进的
支持更锐化的图像并且支持
使用HD(高清晰度)画质录制的影音将更适合宽屏(
•
如果您的电视机不是高清晰度电视,则使用HD(高清晰度)画质录
制的图像将以SD(标准清晰度)画质显示。
- 预欣赏HD质量图像,您需要一台支持
检查您的高清晰度电视(
- 预享受HD质量图像,使用分量电缆或者
multi-AV
电缆不支持HD质量图像因此图像将被转换为SD质量。
将高清数码摄像机设置到SD质量以
•
的影音为SD(标准清晰度)画质,不能够转换为HD(高清晰度)画质。
720
720p
逐行扫描比老的SD摄像机(
16
9
高宽比屏幕显示。
:
HDTV
)(参考您的电视使用说明书)。
720x480p
1280x720p
1280x720p
HDMI
)和标准清晰度(
16:9
输入的电视机。
电缆。
分辨率录制。被录制
SD:
480i
)高清电视机。
)
720
<720p / 16:9 high definition camcorder> <480i / normal digital camcorder>
Image resolution: about 5 times that of the old SD camcorder(480i).
ii_ English
480
中文 _ii
Page 3
FEATURES OF YOUR NEW HD CAMCORDER
POWER
POWER
150
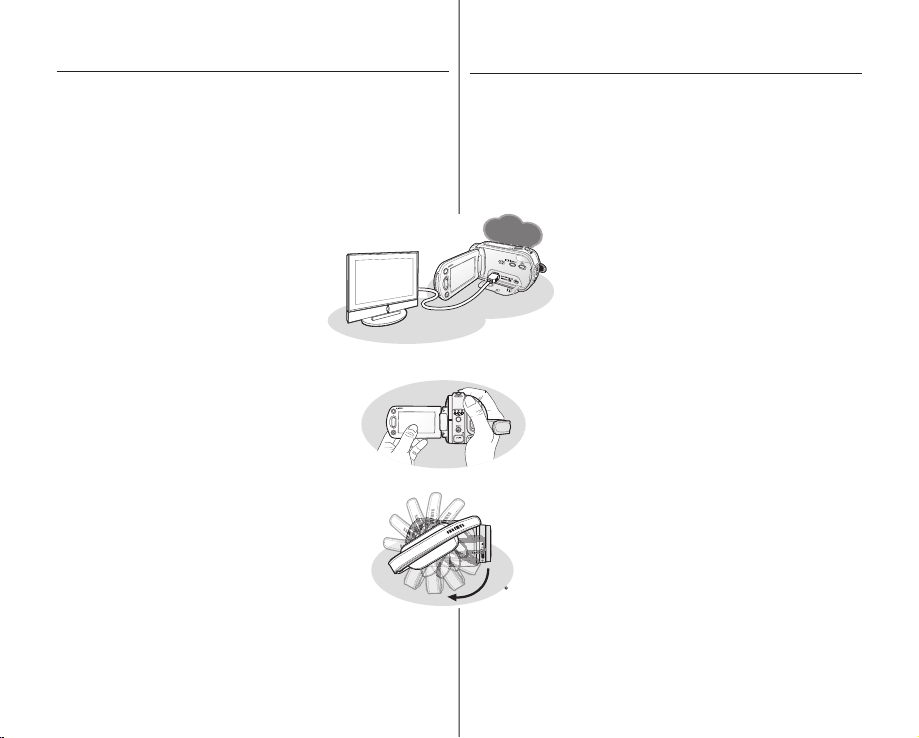
Anynet+
supported
Anynet+
supported
1.61 Mega pixel (Gross) CMOS sensor
1/4.5” CMOS sensor provides stunning detail and clarity with exceptional
video (1280 lines of resolution-HD mode or 720 lines of horizontal
resolution-SD mode) and still image performance (3.0 mega pixels).
Unlike traditional CCD imagers, CMOS sensors require less power,
providing better battery performance.
High-capacity embedded fl ash memory (SC-HMX10A/HMX10C/
HMX10CN/HMX10ED only)
The HD camcorder has built-in high capacity fl ash
memory that allows you to record movie or photo
images.
H.264 (MPEG4 part10/AVC) encoding
The latest video compression technology, H.264
uses a high compression rate to sharply increase
the recordable time for the same size storage.
HDMI interface (Anynet+ supported)
●
If you have an HDTV featuring the HDMI jack, you
can enjoy a clearer and sharper image than ever on
a normal TV.
●
This HD camcorder supports Anynet+.
Anynet+ is an AV network system that enables you
to control all connected Samsung AV devices with
Anynet+ supported Samsung TV’s remote control.
Refer to the corresponding TV’s user manual for
more details.
2.7” wide (16:9) touch panel LCD screen
(230K pixels)
The 2.7” wide (16:9) LCD screen provides
excellent viewing clarity with improved resolution.
The 230K pixel LCD screen rotates up to 270
degrees for multiple viewing angles providing
sharp, detailed images for monitoring or playback,
and the widescreen format makes shooting in
16:9 mode and composing shots even easier.
Touch panel adopted
You can play recorded images and set the functions by simply tapping on
the LCD screen without sophisticated button operation.
Swivel handle for free style shooting
You can adjust the swivel handle’s angle depending on the recording
situation because the swivel handle rotates upto 150°.
iii_ English
本高清数码摄像机的特点
1.61
百万像素 ( 总的 )
CMOS
1/4.5
”
1280
模式
行或标准清晰度SD模式
不同于传统
高质量嵌入闪存 ( 仅限
本高清数码摄像机内置了可让您录制影音图像和拍摄照片的高容量闪存。
CCD, CMOS
CMOS
传感器为您提供超乎寻常清晰质量的视频(高清晰度
传感器
720
传感器需要的电量较少,更加节省电池电量。
行)和静态图像(
3.0
百万像素)。
SC-HMX10A/HMX10C/HMX10CN/HMX10ED
H.264(MPEG4 part10/AVC
最新的视频压缩技术,
的存储介质增加可录制时间。
HDMI
接口 ( 支持
•
如果您有具备 HDMI 的高清电视机,您可以欣赏较
普通电视更加清晰的画面。
•
本高清数码摄像机支持
Anynet+
是一种AV网络系统,它可以通过支持
Anynet+
的三星电视机遥控器,控制所有被连接的
Anynet+三星AV
支持
应的电视机使用说明书。
2.7
2.7
清晰的画面。
270
供清晰、详尽的图像。
采用触感控制板
您可以播放录制的图像和设置一些功能,仅需简单地轻
触在
旋转手柄
您可以根据录制情况调整旋转手柄,调整角度最大可到
150°
16:9
”宽屏幕 (
(16:9)LCD
”宽屏幕
230K
度以实现灵活的观看角度。同时可为监视和播放提
LCD
显示屏的一些功能操作按钮。
。
) 编码
H.264
使用高压缩率在同样大小
Anynet+
)
Anynet+
。
设备。欲知详情,请参见相
LCD
) 触感
显示屏提供高分辨率以便观看
LCD
像素的
230K
控制板 (
显示屏最多可旋转到
像素 )
HD
)
中文 _iii
Page 4
safety warnings
What the icons and signs in this user manual mean:
安全警告
本说明书中图示和符号的意思 :
WARNING
CAUTION
CAUTION
These warning signs are here to prevent injury to you and others.
Please follow them explicitly. After reading this section, keep it in a safe place for
future reference.
Means that death or serious personal injury is a risk.
Means that there is a potential risk for personal injury or
material damage.
To reduce the risk of fire, explosion, electric shock, or
personal injury when using your HD camcorder, follow
these basic safety precautions:
Means hints or referential pages that may be helpful when
operating the HD camcorder.
precautions
This camcorder should always be connected to an AC outlet with a protective
•
grounding connection.
Batteries shall not be exposed to excessive heat such as sunshine, fire or the
•
like.
Danger of explosion if battery is incorrectly replaced.
Replace only with the same or equivalent type.
If this power supply is used at 240V ac, a suitable plug adapter should
iv_ English
Warning!
Caution
be used.
意味着有死亡或者会受到严重人身伤害的危险。
警告
意味着有受到人身伤害或者损失财产的潜在危险。
注意
当使用数码摄像机时,为了减少火灾、爆炸、电击、或人
身伤害的危险,请遵守以下基本安全预防措施:
小心
对于操作数码摄像机有用的提示或是参考页。
为了您和其他人不受到伤害,请注意并且遵照这些警示符号以及提示信
息。请务必遵照以上内容执行。仔细阅读之后,请将此内容另行保存,
以供日后参考。
安全预防措施
!
警告
本摄像机应长期连接电源防护地接线。
•
电池组不应该暴露于过热的地方。譬如有阳光,火等类似的地方。
•
如果电池组更换不正确会有爆炸的危险。
仅更换使用同样或等效型的电池组。
如果您使用交流电源
240V
注意
的电源供应器,请使用适合的插头适配器。
中文 _iv
Page 5

important information on use
BEFORE USING THIS CAMCORDER
●
This HD camcorder records video in H.264 (MPEG4 part10/AVC)
format and at High Resolution (HD-VIDEO) and at Standard
Resolution (SD-VIDEO).
●
Please note that this HD camcorder is not compatible with other
digital video formats.
●
Before recording important video, make a trial recording.
Play back your trial recording to make sure the video and audio have
been recorded properly.
●
The recorded contents cannot be compensated for:
- Samsung cannot compensate for any damage caused when a
recording cannot be played back because of a defect in the HD
camcorder or memory card.
Samsung cannot be responsible for your recorded video and
audio.
- Recorded contents may be lost due to a mistake when handling
this HD camcorder or memory card, etc. Samsung shall not be
responsible for compensation for damages due to the loss of
recorded contents.
●
Make a backup of important recorded data
Protect your important recorded data by copying the files to PC. We
also recommend you copy it from your PC to other recording media
for storage. Refer to the software installation and USB connection
guide.
●
Copyright: Please note that this HD camcorder is intended for
individual use only.
Data recorded on the storage media in this HD camcorder using
other digital/analogue media or devices is protected by the copyright
act and cannot be used without permission of the owner of copyright,
except for personal enjoyment. Even if you record an event such as a
show, performance or exhibition for personal enjoyment, it is strongly
recommended that you obtain permission beforehand.
有关使用的重要信息
在使用本摄像机之前
本高清数码摄像机以
•
(HD-VIDEO)
质量
•
请注意本高清数码摄像机不与其它数字式视频格式兼容。
请在录制重要影音之前,进行试录制。
•
播放您试录制的图像,确定视频和音频被录制了下来。
•
录制的内容不能补偿:
- 因为高清数码摄像机或者存储卡有瑕疵而造成的录制内容无法播
放,三星公司无法补偿任何损失。
对您录制的视频和音频三星公司概不负责。
- 操作本高清数码摄像机或者存储卡等时,录制的内容也许会丢失。
三星公司不会对录制的内容损坏负责。
备份重要的录制数据
•
将文件复制到电脑,保护您重要的录制数据。推荐您将文件从电脑
复制到其它存储介质保存。请参见软件安装和
版权:请注意本高清数码摄像机仅为个人使用。
•
使用其他模拟 / 数字媒体或设备在本高清数码摄像机的存储介质上录
制的数据受版权法保护,未经版权所有者允许不得使用。个人欣赏
除外。即使您录制诸如展览、表演或展示等活动进行个人欣赏,也
强烈建议您事先获得允许。
H.264 (MPEG4 part10/AVC)
以及标准清晰度质量
(SD-VIDEO)
格式和高清晰度
录制影音。
USB
连接指南。
v_ English
中文 _v
Page 6

important information on use
ABOUT THIS USER MANUAL
●
This user manual covers models SC-HMX10, SC-HMX10A, SC-
HMX10C, SC-HMX10N, SC-HMX10CN, and SC-HMX10ED.
The SC-HMX10A, SC-HMX10C/HMX10CN, and SC-HMX10ED
have a 4GB, 8GB, and 16GB built-in flash memory respectively but
also use memory cards. The SC-HMX10/HMX10N does not have
built-in flash memory and uses memory cards exclusively.
Although some features of SC-HMX10, SC-HMX10A, SC-HMX10C,
SC-HMX10N, SC-HMX10CN and SC-HMX10ED are different, they
operate in the same way.
●
Illustrations of model SC-HMX10A are used in this user manual.
●
The displays in this user manual may not be exactly the same as
those you see on the LCD screen.
●
Designs and specifications of the camcorder and other accessories
are subject to change without any notice.
有关使用的重要信息
关于本用户手册
本用户手册适用于
•
HMX10N, SC-HMX10CN,
SC-HMX10A,SC-HMX10C/HMX10CN,
4GB,8GB
SC-HMX10/HMX10N
C-HMX10, SC-HMX10A, SC-HMX10C, SC-HMX10N, SC-
尽管
HMX10CN,
样的。
•
在本用户说明书中使用
本用户手册中的显示可能不如您在
•
•
存储介质和其他附件的设计和规格若有变更,恕不另行通知。
SC-HMX10, SC-HMX10A, SC-HMX10C, SC-
SC-HMX10ED
和
16GB
和
内置闪存,但是也可使用存储卡。
没有内置闪存但是可以使用专门的存储卡。
SC-HMX10ED
和
有所不同,但是它们的操作方式是一
SC-HMX10A
SC-HMX10ED
和
型号的图例说明。
LCD
屏幕上看到的那样准确。
的完整系列。
分别拥有
NOTES REGARDING TRADEMARK
●
All the trade names and registered trademarks mentioned in this
manual or other documentation provided with your Samsung product
are trademarks or registered trademarks of their respective holders.
●
Windows® is registered trademark or trademark of Microsoft
Corporation, registered in the United States and other countries.
●
Macintosh is the trademark of Apple Computer, Inc.
●
All the other product names mentioned herein may be the trademark
or registered trademarks of their respective companies.
●
Farther more, “TM” and “R” are not mentioned in each case in this
manual.
vi_ English
关于商标的注意事项
此手册或其他
•
商标是其各自所有者的商标或注册商标。
•
Windows®
标或商标。
•
Macintosh
此处提及的所有其他产品名称可能是其各个公司的商标或注册商标。
•
•
此外,本手册中的各项示例均未提及
Samsung
产品说明文件中提及的所有产品名称和注册
Microsoft Corporation
是
Apple Computer, Inc.
是
在美国或其他国家注册的注册商
的商标。
“TM” 和“R”
。
中文 _vi
Page 7

precautions when using
IMPORTANT NOTE
●
Handle the liquid crystal display (LCD) with care:
- The LCD is a very delicate display device: Do not press its surface with
force, hit it or prick it with a sharp object.
- If you push the LCD surface, unevenness in display may occur. If
unevenness does not disappear, turn the camcorder off, wait for a few
moments, and then turn it on again.
- Do not place the camcorder with the open LCD screen down.
- Close the LCD screen when not using the camcorder.
Liquid crystal display:
- The LCD screen the product of highly precise technology. Among the total
number of pixels (approx. 230,000 pixels for LCD screen), 0.01% or less
pixels may be missing (black dots) or may remain lit as colored dots (red,
blue, green). This shows the limitations of the current technology, and does
not indicate a fault that will interfere with recording.
- The LCD screen will be slightly dimmer than usual when the camcorder is
at low temperature, as in cold areas, or immediately after power is turned
on. Normal brightness will be restored when the temperature inside the
camcorder rises. This has no effect on the images in the storage media, so
there is no cause for concern.
●
Hold the HD camcorder correctly:
Do not hold the HD camcorder by the LCD screen when lifting it: the LCD screen
could detach and the HD camcorder may fall.
●
Do not subject the HD camcorder to impact:
-
This HD camcorder is a precision machine. Take great care that you do
not strike it against a hard object or let it fall.
- Do not use the HD camcorder on a tripod (not supplied) in a place where it
is subject to severe vibrations or impact.
●
No sand or dust!
Fine sand or dust entering the HD camcorder or AC power adaptor could cause
malfunctions or defects.
●
No water or oil!
Water or oil entering the HD camcorder or AC power adaptor could cause
electric shock, malfunctions or defects.
●
Heat on surface of product:
The surface of the HD camcorder will be slightly warm when in use, but this does
not indicate a fault.
●
Be careful of ambient temperature:
- Using the HD camcorder in a place where the temperature is over 60°C
(140°F) or under 0°C (32°F) will result in abnormal recording/playback.
- Do not leave the HD camcorder on a beach or in a closed vehicle
where the temperature is very high for a long time: This could cause a
malfunction.
vii_ English
使用须知
重要注意事项
细心处理液晶显示器
•
LCD
-
是非常精密的显示设备:切勿用力压其表面,或使用尖锐的
物体击打或刺戳。
- 如果您按压
现象不消失,请关闭摄像机,等待片刻后再次打开。
- 切勿使打开的
- 在不使用摄像机时关闭
液晶显示:
LCD
-
屏幕是采用高精密技术制造的产品。在总像素(
的大约
点),或可能以彩色(红、蓝和绿色)的点亮起。
术的局限性,但不表示是影响录制的故障。
- 当摄像机在温度较低的环境(如在寒冷地区)时,
正常时稍暗,或在打开电源后显示正常。当摄像机内部的温度上
升时,会恢复到原来的亮度。注意,上述现象对存储介质中的图
像没有什么影响,因此无需顾虑。
•
正确把持数码摄像机:
- 不要握住数码摄像机的
拆离,从而导致数码摄像机跌落。
•
切勿撞击数码摄像机:
- 本数码摄像机是精密机器。
- 切勿在严重振动或撞击的地方将数码摄像机放在三脚架上使用。
•
要避免沙尘!
- 细沙或灰尘进入数码摄像机或交流电源适配器会引起故障。
•
要避免水或油!
- 水或油进入数码摄像机或交流电源适配器会引起触电或故障。
•
产品表面变热:
- 在使用时,数码摄像机表面会轻微变热,但这并不表示有故障。
•
注意异常的环境温度:
- 在温度高于
机,可能会导致录制
- 切勿将数码摄像机放在沙滩上或温度长时间会很热的封闭车辆中:
这样可能会导致发生故障。
(LCD)
:
LCD
表面,可能会在显示时出现不平现象。如果不平
LCD
屏幕向下放置摄像机。
LCD
显示器。
230,000
像素)中,
0.01%
或更少的像素可能会损失(黑
LCD
显示器来提起它:
要特别小心,不要让其撞击硬物或摔落。
60°C (140°F)
/ 播放不正常。
或低于
0°C(32°F)
的地方使用数码摄像
LCD
显示器
这表明了当前技
LCD
屏幕会比
LCD
显示器可能会
中文 _vii
Page 8

precautions when using
●
Do not point directly at the sun:
- If direct sunlight strikes the lens, the HD camcorder could malfunction or a
fire could occur.
- Do not leave the HD camcorder with the LCD screen exposed to direct
sunlight: This could cause a malfunction.
●
Do not use the HD camcorder near TV or radio:
This could cause noise to appear on the TV screen or in radio broadcasts.
●
Do not use the HD camcorder near strong radio waves or magnetism:
If the HD camcorder is used near strong radio waves or magnetism, such as
near a radio transmitter or electric appliances, noise could enter video and audio
that are being recorded. During playback of normally recorded video and audio,
noise may also be present in picture and sound. At worst the HD camcorder
could malfunction.
●
Do not expose the HD camcorder to soot or steam:
Thick soot or steam could damage the HD camcorder case or cause a
malfunction.
●
Do not use the HD camcorder near corrosive gas:
If the HD camcorder is used in a place where there is dense exhaust gas
generated by gasoline or diesel engines, or corrosive gas such as hydrogen
sulfide, the external or internal terminals could corrode, disabling normal
operation, or the battery connecting terminals could corrode, so that power will
not turn on.
●
Do not wipe the HD camcorder body with benzene or a thinner:
- The coating of exterior could peel off or the case surface could deteriorate.
●
Keep the memory card out of reach of children to prevent swallowing.
使用须知
切勿直接对着太阳:
•
- 如果阳光直射镜头,数码摄像机可能会出现故障或发生火灾。
- 在放置数码摄像机时,切勿让阳光直射
LCD
屏幕:这样可能会导
致发生故障。
切勿在电视或收音机旁边使用本数码摄像机:
•
这样可能会导致在电视屏幕或收音机中出现噪音。
切勿在靠近强无线电波或强磁力的地方使用数码摄像机:
•
如果在靠近强无线电波或强磁力的地方使用数码摄像机,如无线电
转播塔或电器设备,则在录制的视频和音频中可能会夹杂有噪音。 在
播放正常录制的视频和音频时,在画面和声音中也可能会出现噪音。
在最坏的情况下,数码摄像机可能会出现故障。
切勿让数码摄像机接触烟灰或蒸汽:
•
浓厚的烟灰或蒸汽会损坏数码摄像机外壳或导致出现故障。
切勿在腐蚀性气体旁边使用数码摄像机:
•
如果在由汽油或柴油机产生的废气或腐蚀性气体(如硫化氢)很浓
的地方使用数码摄像机,外部或内容终端会被腐蚀,无法进行正常
的操作,或电池连接终端会被腐蚀,致使无法打开电源。
切勿使用苯或稀释剂清洁数码摄像机机体:
•
- 外层会脱落或外壳表面会被损坏。
将存储卡放在儿童接触不到的地方,以防其吞下。
•
viii_ English
中文 _viii
Page 9
contents
目录
INTRODUCTION TO
BASIC FEATURES
GETTING TO
KNOW YOUR HD
CAMCORDER
06
PREPARATION
10
BEFORE RECORD-
ING
26
01_ English
05
06
What is included with your HD cam-
07
corder
08
Front & left view
09
Right & top view
Rear & bottom view
10
Using the remote control
11
Installing the button-type battery
11
Using the cradle
12
Holding the HD camcorder
13
Charging the battery pack
17
Basic HD camcorder operation
18
Screen indicators
22
Using the display (
22
Using the LCD enhancer ( )
23
Using the LCD screen
24
Initial setting: OSD language & date
and time
26
Selecting the storage media
(SC-HMX10A/HMX10C/HMX10CN/
HMX10ED only)
27
Inserting/ejecting a memory card
28
Recordable time and number of images
29
Selecting a suitable memory card
)/iCHECK button
基本特点
了解您的高清数码
摄像机
06
准备
10
录制之前
26
05
06
您的高清数码摄像机包括哪些配件
07
08
09
10
11
11
12
13
17
18
22
22
23
24
26
27
28
29
&
前视图
左视图
&
右视图
顶视图
&
后视图
使用遥控器
安装钮扣电池
使用多功能支架
握住高清数码摄像机
为电池组充电
高清数码摄像机的基本操作
显示屏指示图标
使用屏幕显示
LCD
使用
LCD
使用
初次设置 :
选择存储介质
( 仅限
HMX10CN/HMX10ED
/
插入
可录制的时间和图像数量
选择适当的存储卡
底视图
(
( )
增强器
显示屏
OSD
语言
SC-HMX10A/HMX10C/
取出存储卡
/iCHECK
)
&
日期和时间
)
中文 _01
按钮
Page 10

contents
目录
RECORDING
31
PLAYBACK
38
CONNECTION
USING THE MENU
ITEMS
47
02_ English
Recording movie images
31
Taking photo images
33
Recording with ease for beginners
34
(EASY Q mode
35
Capturing still images during movie
image playback
Using the external microphone
36
Zooming
36
Self record using the remote control
37
Changing the playback mode
38
Playing movie images
39
Viewing photo images
41
4346Connecting to a TV
Dubbing images on VCR or DVD/HDD
recorder
47
Handling menus and quick menus
Menu items
49
Quick menu items
51
Recording menu items
52
Playback menu items
64
Setting menu items
66
)
录制
31
播放
38
连接
使用菜单选项
47
31
录制影音图像
33
捕获照片图像
34
方便初学者录制 (
35
在播放影音的时候捕捉静态图像
36
使用外置麦克风
36
变焦
37
使用遥控器自拍
38
切换到播放模式
39
播放影音图像
41
查看照片图像
43
与电视机连接
46
VCR
通过
图像
47
操作菜单和快捷菜单
49
菜单选项
51
快捷菜单选项
52
录制菜单选项
64
播放菜单选项
66
设置菜单选项
DVD/HDD
或
EASY Q
模式 )
刻录机复制
中文 _02
Page 11

contents
目录
EDITING MOVIE
IMAGES
72
IMAGE MANAGE-
MENT
78
PRINTING PHOTO
IMAGES
CONNECTING
TO A PC
85
03_ English
Deleting a section of a movie image
72
Dividing a movie image
73
Combining two movie images
74
Playlist
75
Protection from accidental erasure
78
Deleting images
79
Copying images
80
HMX10C/HMX10CN/HMX10ED only)
81
Moving images
HMX10CN/HMX10ED only
8283DPOF print setting
Direct printing with a PictBridge printer
85
System requirements
86
Installing the Cyberlink DVD Suite
88
Connecting the USB cable
89
Viewing the contents of storage media
91
Transferring files from the HD cam
corder to your PC
(SC-HMX10A/
(SC-HMX10A/HMX10C/
)
72
编辑影音图像
72
图像管理
78
打印照片图像
连接至电脑
85
-
删除被选的影音图像
73
分割影音图像
74
合并两个影音图像
75
78
79
80
81
82
83
85
86
88
89
91
播放列表
保护图像
删除图像
复制图像
(仅限SC-HMX10A/HMX10C/HMX10CN)
移动图像
(仅限SC-HMX10A/HMX10C/HMX10CN)
DPOF
通过
系统要求
安装
连接
查看存储介质内容
从高清数码摄像机转移文件至电脑
打印设置
PictBridge
Cyberlink DVD Suite
USB
打印机直接打印
数据线
中文 _03
Page 12

contents
目录
MAINTENANCE
& ADDITIONAL
INFORMATION
TROUBLE-SHOOT-
SPECIFICATIONS
04_ English
92
93
95
96 Troubleshooting
ING
109
Maintenance
Additional information
Using your HD camcorder abroad
维护和其他信息
故障处理
规格
92
维护
93
其他信息
95
在国外使用您的高清数码摄像机
96
故障处理
109
中文 _04
Page 13
introduction to basic fea-
INSERT
BATTERY
PACK
INSERT
BATTERY
PACK
tures
基本特点
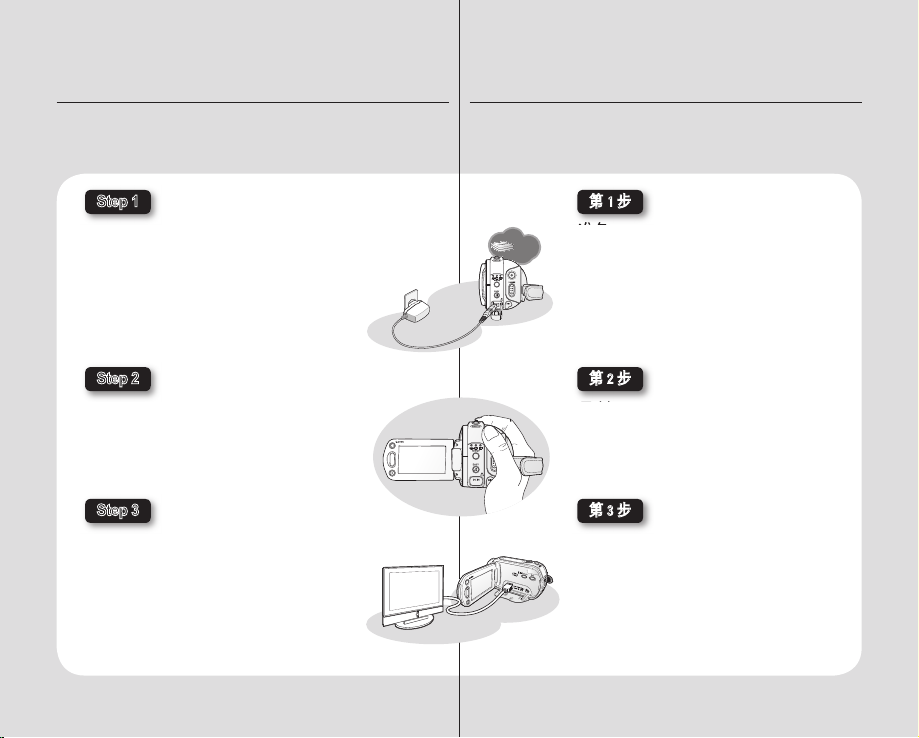
This chapter introduces you to the basic features of your HD camcorder.
See the reference pages below for more information.
Step
1
Preparation
●
Charging the battery pack page 13
●
Setting the date/time and OSD language
page 24-25
●
Setting the storage media (built-in memory or
memory card) page 26
(SC-HMX10A/HMX10C/HMX10CN/HMX10ED only)
Step
2
Recording
●
Recording the movie or photo images
pages 31,33
Step
3
Playing back
●
Selecting an image to play back from the
thumbnail index views pages 39, 41
●
Viewing playback from your HD camcorder on your
PC or TV pages 43, 88
05_ English
本章节为您介绍高清数码摄像机的基本特点。
更多内容请参见向后页。
第 1 步
准备
为电池组充电第13页
•
•
设置日期 / 时间和
•
设置存储介质 ( 内置存储器或存储卡 )。
第26页
HMX10CN/HMX10ED)
OSD
(仅限SC-HMX10A/HMX10C/
第 2 步
录制
录制影音图像或拍照。第
•
第 3 步
播放
在索引画面中选择要播放的图像。
•
39, 41
第
•
通过连接到电脑或电视上查看、播放来自数码摄
像机的图像。
页
第
43, 88
语言。
页
31,33
24-25
第
页
中文 _05
页
Page 14
getting to know your HD
camcorder
WHAT IS INCLUDED WITH YOUR HD CAMCORDER
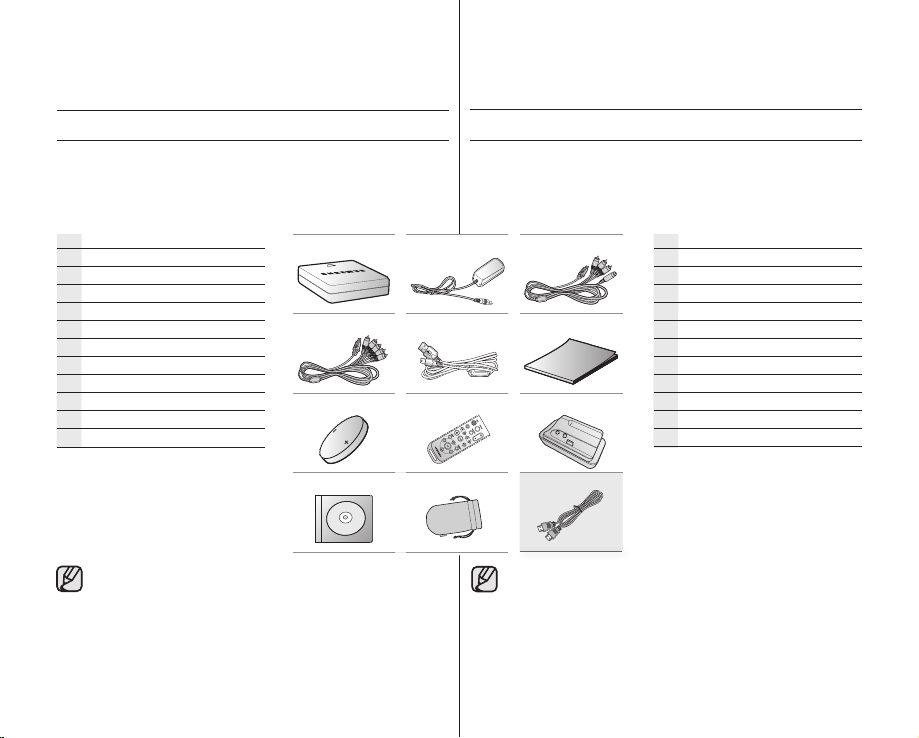
Your new HD camcorder comes with the following accessories. If any
of these items is missing from your box, call Samsung’s Customer Care
Center.
✪ The exact appearance of each item may vary by model.
Battery pack (IA-BP85ST)
AC power adaptor (AA-E9 type)
Multi-AV cable
Component cable
USB cable
User manual
Button-type battery
Remote control
Cradle
Software CD
Pouch
HDMI cable*
●
The contents may vary depending on the sales region.
●
Parts and accessories are available at your local Samsung
dealer.
●
* : Not included with your camcorder. To buy the optional
accessory, contact your nearest Samsung dealer.
●
A memory card is not included. See page 29 for memory cards
compatible with your HD camcorder.
了解您的高清数码摄像机
您的高清数码摄像机包括哪些配件
新的高清数码摄像机配有以下部品。
如果缺少任一部品,请联系三星客服中心。
提供的配件情形视产品型号的不同而有所变化。
✪
提供配件视销售地区的不同而有所不同。
Samsung
当地
* :
您的摄像机没有提供。要购买可选购的配件,请联络
与您最近的
配件不包括存储卡。参见第29页选择合适本高清摄像机
经销商可以提供产品零件和配件。
Samsung
的存储卡。
电池组 (IA-BP85ST)
交流电源适配器 (AA-E9 type)
AV连接电缆
分量电缆
USB 数据线
用户说明书
钮扣电池
遥控器
多功能支架
CD光盘
摄像机袋
HDMI电缆*
经销商。
06_ English
中文 _06
Page 15
FRONT & LEFT VIEW
前视图 & 左视图
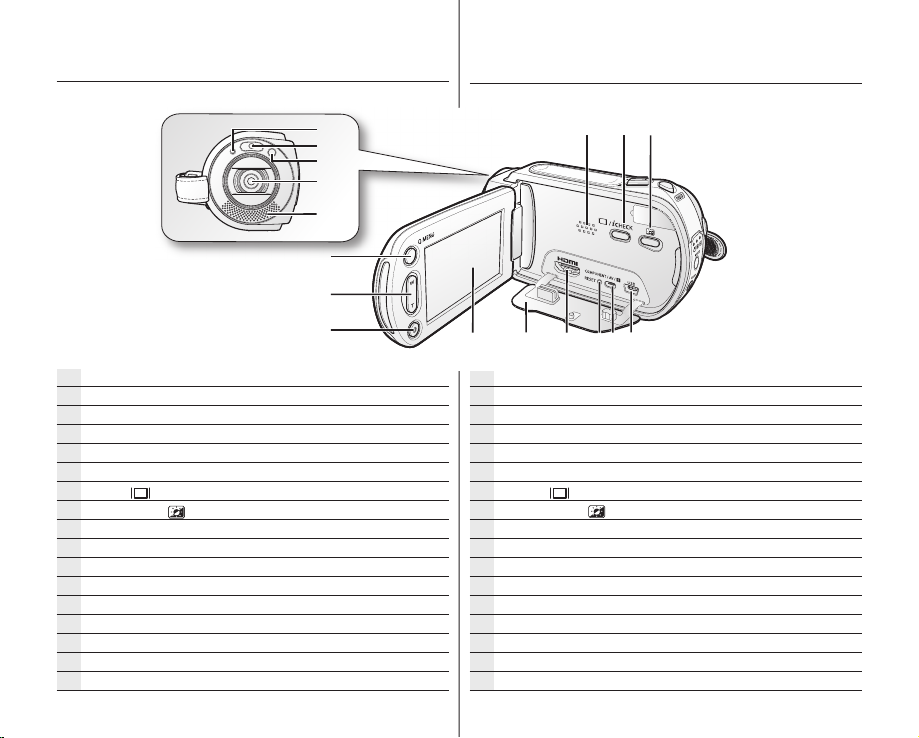
Recording indicator
LED Light
Remote sensor
Lens
Internal microphone
Built-in speaker
Display (
LCD enhancer (
USB jack
COMPONENT / AV / S-Video (
RESET button
HDMI jack
Jack cover
TFT LCD screen (Touch panel)
Recording start/stop button
Zoom (W/T) button
Q.MENU button
) / iCHECK button
) button
07_ English
) jack
录制指示灯
LED灯
遥感器
镜头
内置麦克风
内置扬声器
显示按钮( ) /iCHECK
LCD增强器按钮 ( )
USB接口
COMPONENT / AV / S-Video()接口
RESET按钮
HDMI接口
接口盖
TFT LCD显示屏 (触感控制板)
录制开始/停止按钮
变焦按钮(W/T)
Q.MENU按钮
中文 _07
Page 16
getting to know your HD
POWER
camcorder
RIGHT & TOP VIEW
了解您的高清数码摄像机
&
顶视图
右视图
PHOTO button
Zoom (W/T) lever
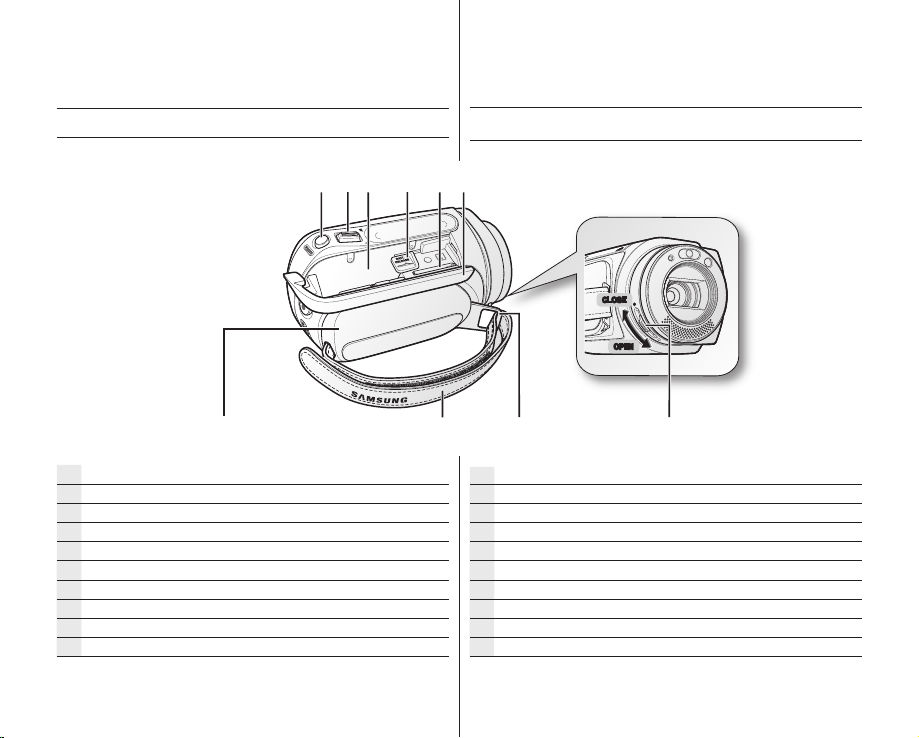
Battery pack slot
BATT. RELEASE switch
Memory card slot
Battery pack / Memory card cover
Grip belt hook
Grip belt
Swivel handle
Lens open / close switch
08_ English
PHOTO
变焦控制杆
电池组插槽
电池组卡扣
存储卡插槽
/
电池组
手带挂钩
手带
旋转手柄
/
镜头开
CLOSE
OPEN
按钮
(W/T)
存储卡盖
关转换器
中文 _08
Page 17
REAR & BOTTOM VIEW
后视图
&
底视图
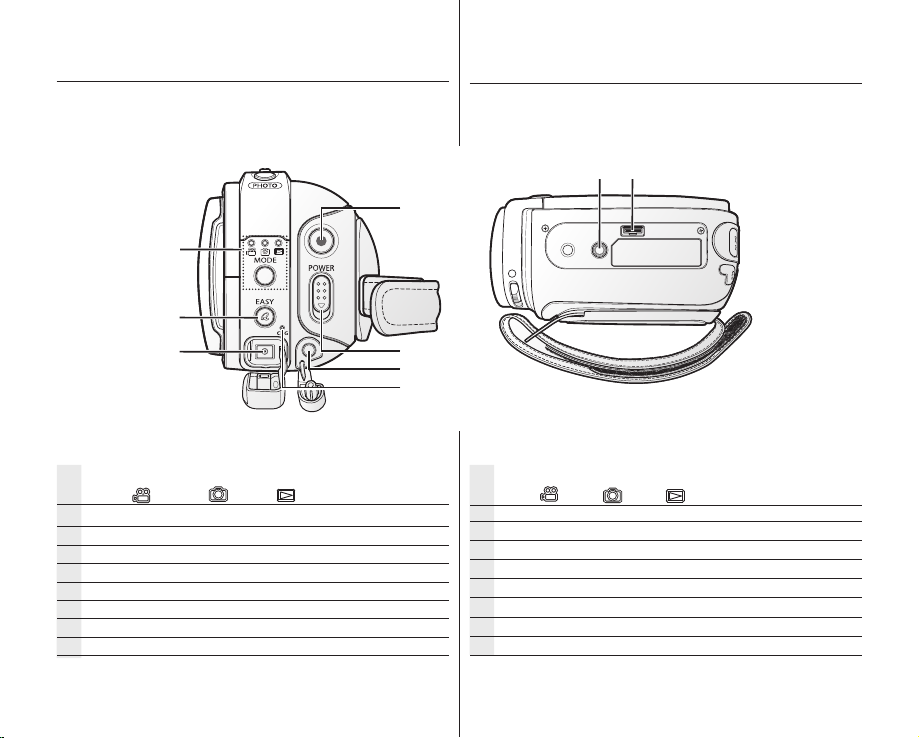
MODE button / Mode indicator
(Movie (
EASY Q button
DC IN jack
Recording start/stop button
POWER switch
External microphone (MIC) jack
Charging (CHG) indicator
Tripod receptacle
Cradle receptacle
) / Photo ( ) / Play ( ) mode)
09_ English
MODE按钮/
(
( 影音
EASY Q
DC IN
接口
录制开始 / 停止按钮
电源开关
外置麦克风接口
充电指示(
三脚架插孔
支架插座
模式指示灯
)/照片 ( )/播放( )
按钮
CHG
)
模式 )
中文 _09
Page 18
preparation
准备
This section provides information on using this HD camcorder; such as
how to use the provided accessories, how to charge the battery, how to
set up the operation mode and initial set up.
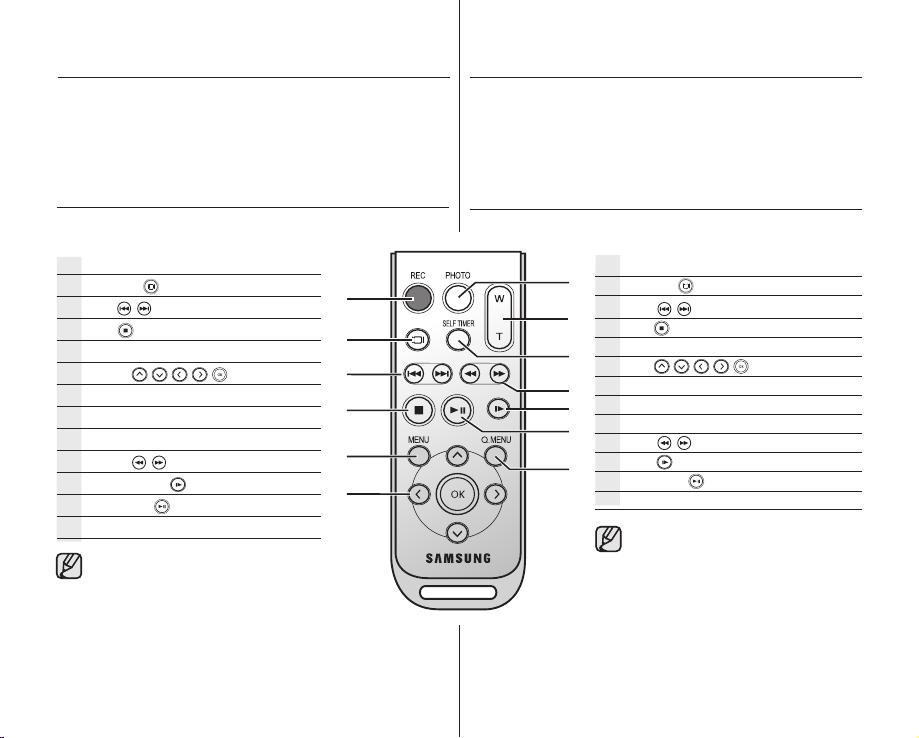
USING THE REMOTE CONTROL
REC button
DISPLAY (
Skip (
Stop (
MENU button
Control (
PHOTO button
Zoom (W/T) button
SELF TIMER button
Search (
Slow playback (
Play/Pause (
Q.MENU button
The buttons on the remote control function
the same as those on HD camcorder.
) button
/ ) button
) button
/ / / / ) buttons
/ ) button
) button
) button
本部分为您介绍在使用高清数码摄像机之前如何使用提供的配件,如何
给电池组充电,如何设定操作模式等信息。
使用遥控器
REC
按键
DISPLAY
跳过
停止
MENU
控制
PHOTO
变焦
SELF TIMER
搜索
慢放
播放
Q.MENU
遥控器上的按键与高清数码摄像机上的按
钮功能相同。
( )
( / )
( )
按键
按键
/ / / / )
(
按键
(W/T)
按键
( / )
( )
按键
/
( )
暂停
按键
按键
按键
按键
按键
按键
按键
10_ English
中文 _10
Page 19
INSTALLING THE BUTTON-TYPE BATTERY
安装遥控器内的钮扣电池。
有关钮扣电池的安全防备措施
加平稳或连接其它外部设备的连接板材 ( 电视、
个人计算机 , 等 )
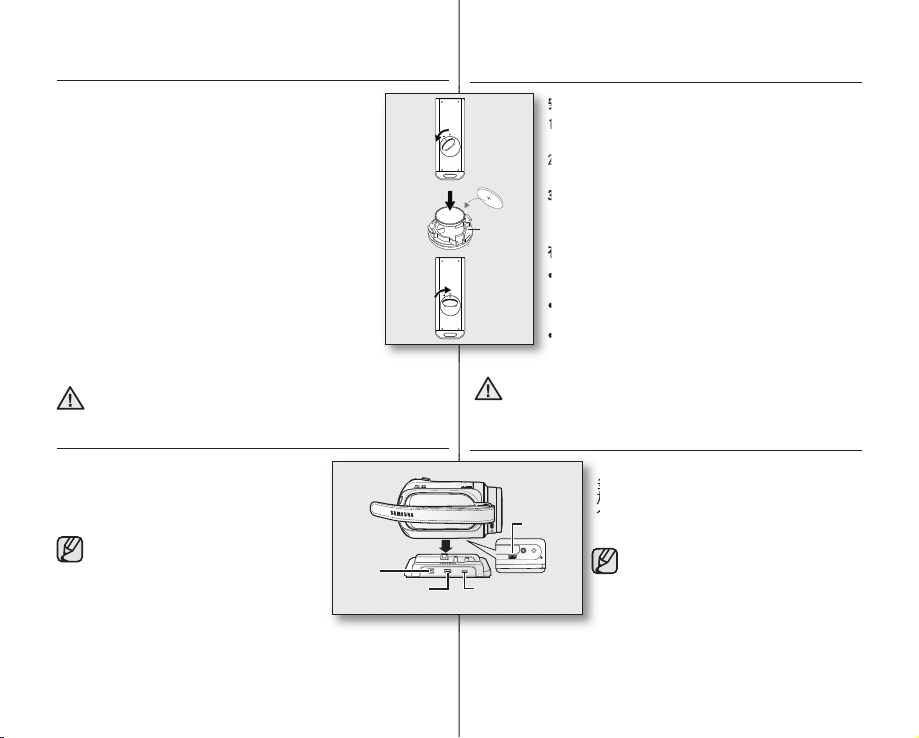
Installing the button-type battery in the remote control
1. Turn the battery holder counterclockwise (as indicated with
() mark) using your fi ngernail or a coin to open it. The
battery holder opens.
2. Insert the battery into the battery holder while the positive
(+) terminal facing down and press it fi rmly until you hear a
locking sound.
3. Place the battery holder back in the remote, match its (
mark with the (
battery holder clockwise to lock it.
) mark on the remote control, and turn the
)
Precautions regarding the button-type battery
●
There is a danger of explosion if button-type battery
is incorrectly replaced. Replace only with the same or
equivalent type.
●
Do not pick up the battery using tweezers or other metal
tools. This will cause a short circuit.
●
Do not recharge, disassemble, heat or immerse the battery
in water to avoid the risk of explosion.
Keep the button-type battery out of the reach of the children.
Should any battery be swallowed, consult a doctor immediately.
WARNING
USING THE CRADLE
The cradle is a connection plate which can be used
to make the camcorder more stable when charging
the battery, or connecting to an external device (TV,
PC, etc.).
●
If you connect your HD camcorder to the
provided cradle using more than one type
of cable to output image, the order of
priority of the output signal is as follows:
USB cable
●
Do not connect the connection cables
at the same time, it may cause confl ict
and may not work properly. If this occurs,
remove all the connected cables and try
the connection again.
Component /Multi-AV cable.
DC IN jack
USB jack
1
2
3
安装钮扣电池
安装遥控器内的钮扣电池。
1. 用指甲或硬币向左转动电池舱盖 ( 按照标识的标记
())。
2. 电池正面朝下 (+) 插入电池插槽并且轻轻按下直到听
到电池被锁住的声音。
3. 将电池安装在遥控,将遥控器上的标记 (
仓盖上的标记 (
Battery
holder
警告
将其锁住。
有关钮扣电池的安全防备措施
•
如果更换错误的电池的类型会有爆炸的危险。仅可使
用同样或等效型的电池。
•
不要用镊子 或者 其它金属工 具取 放电池。因 为这样
做,会导致电池短路。
•
不要击打,拆卸,加热或者将电池放在水中以免发生
爆炸。
将钮扣电池存放在孩子触及不到的地方。
万一吞下电池,请立刻咨询医生。
使用多功能支架
多功能支架是一种让摄像机在充电的时候摆放更
加平稳或连接其它外部设备的连接板材 ( 电视、
Cradle
receptacle
Component/Multi-AV jack
个人计算机 , 等 )
) 对齐,然后顺时针转动电池舱盖
如果您将摄像机与提供的多功能支架连
•
接,并且使用多种类型的电缆连接用来
输出图像,则输出信号的顺序为:
USB数据线
不要同时连接多条电缆,这样做可能会
•
导致冲突,从而不能正常工作。如果发
生此类事情,请将所有连接的电缆拔掉
然后再次尝试连接。
分量/Multi-AV电缆
) 与电池
11_ English
中文 _11
Page 20
preparation
您可以将它向下转动
150
10
准备
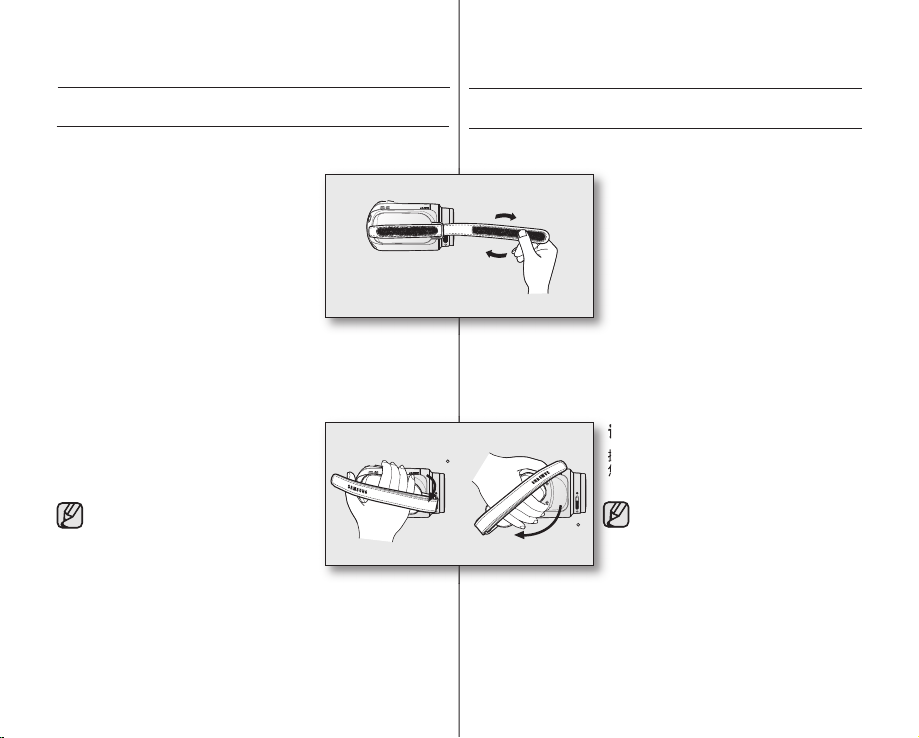
HOLDING THE HD CAMCORDER
Attaching the grip belt
Insert your right hand from the bottom of the HD
camcorder up to the base of your thumb.
Put your hand in a position where you can
easily operate the Recording start/stop button,
PHOTO button, and the Zoom lever.
Adjust the length of grip belt so that the HD
camcorder is stable when you press the
Recording start/stop button with your thumb.
1. Detach the belt.
2. Adjust the length of grip belt and attach it.
Angle Adjustment
Rotate the swivel handle at the most convenient
angle.
You can rotate it downward from 10° to 150°.
Please be careful not to turn the swivel
handle backward as it may cause
damage.
握住高清数码摄像机
手带
将手从摄像机底部插入手带并将手指放在基本
操作位置。
将手放在可以轻松出碰到录制开始
PHOTO
钮,
调整手带长度以便您在利用手指操作录制开始
/ 停止按钮的时候,高清数码摄像机处于稳定
状态。
1. 解开手带。
2. 调整手带长度,然后将其粘合。
按钮和变焦控制杆的位置。
/ 停止按
调整角度
掀动镜头至使用起来最方便的角度。
您可以将它向下转动
请注意不要向后旋转接头,以免造成损坏。
10°
150°
到
。
12_ English
中文 _12
Page 21
CHARGING THE BATTERY PACK
●
Use IA-BP85ST battery pack only.
●
The battery pack may be charged a little at the time of purchase.
●
Be sure to charge the battery pack before you start using your HD
camcorder.
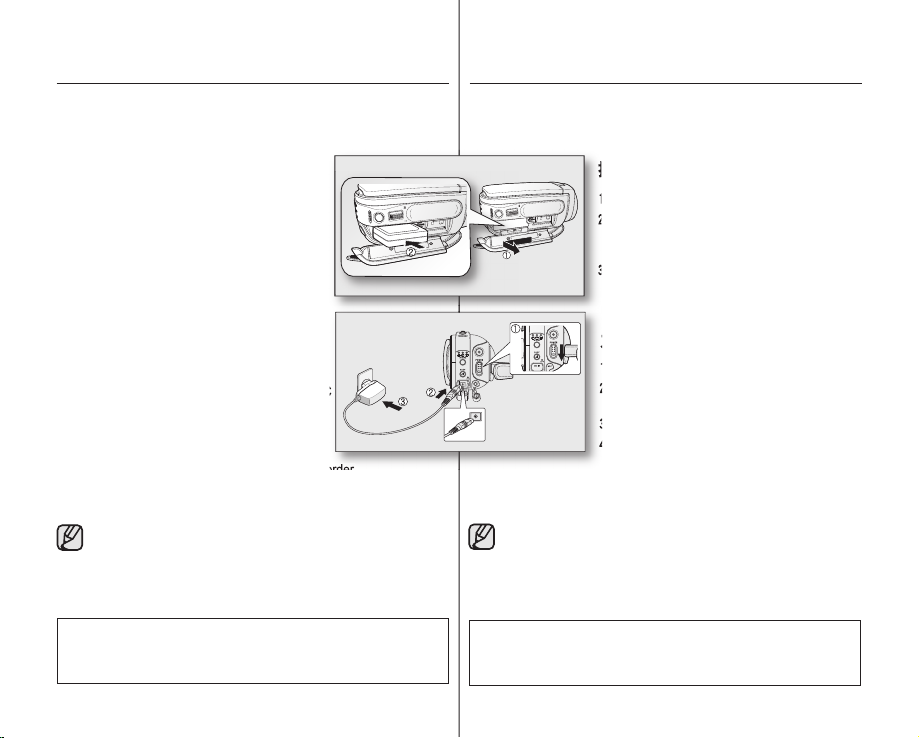
Inserting the battery pack
1. Slide and open the battery pack cover as
shown in the diagram.
2. Insert the battery pack into the battery pack
slot until it softly clicks.
●
Make sure that word mark (SAMSUNG)
is facing down while the set is placed as
shown in the diagram.
3. Slide and close the battery pack cover.
Charging the battery pack
1. Slide the POWER switch downwards to turn
off the power.
2. Open the DC IN jack cover and connect the AC
power adaptor to the DC IN jack.
3. Connect the AC power adaptor to a wall
socket.
4. Once charged, disconnect the AC power
adaptor from the DC IN jack on your HD camcorder.
●
Even with the power switched off, the battery pack will still
discharge if it is left inserted in the HD camcorder.
●
You can also charge with the cradle. page 11
●
It is recommended you purchase one or more additional
battery packs to allow continuous use of your HD camcorder.
为电池组充电
仅可使用 IA-BP85ST电池组。
•
•
在购买的时候电池组也许存有一些电量。
•
请您务必在开始使用高清数码摄像机之前为电池组充电。
插入电池组
1. 依照图中所示,打开电池组插槽。
2. 将电池组插入电池组插槽,直到被轻轻扣住。
•
插入电池组时,请将(SAMSUNG)文字
标志面朝下,如图所示。
3. 关闭电池组插槽盖。
为电池组充电
1. 向下滑动
2. 打开
3. 将交流电源适配器的插销插入墙壁的插座上。
4. 充电后,请将交流电源适配器从高清数码摄
您还可以通过多功能支架充电。第11页
•
•
为了保证您能够持续使用摄像机,建议您另外购买一块或多
块电池组备用。
POWER
电源开关关闭电源。
DC IN
接口盖并且将交流电源适配器连
DC IN
接至
像机上的
即使电源为关闭状态,如果电池组仍然
•
接口。
DC IN
接口拔出。
保留在摄像机内,那么电池组也仍然会
释放能量。
Use only Samsung-approved battery packs. Do not use batteries from
other manufacturers. Otherwise, there is a danger of overheating, fi re
or explosion. Samsung is not responsible for problems occurring due to
using unapproved batteries.
13_ English
仅使用通过三星验证的电池组。不要使用其他厂商的电池组。
否则,有引起过热,起火或者爆炸的危险。
由于使用未经许可的电池组而引发的事故,三星公司概不负责。
中文 _13
Page 22
preparation
准备
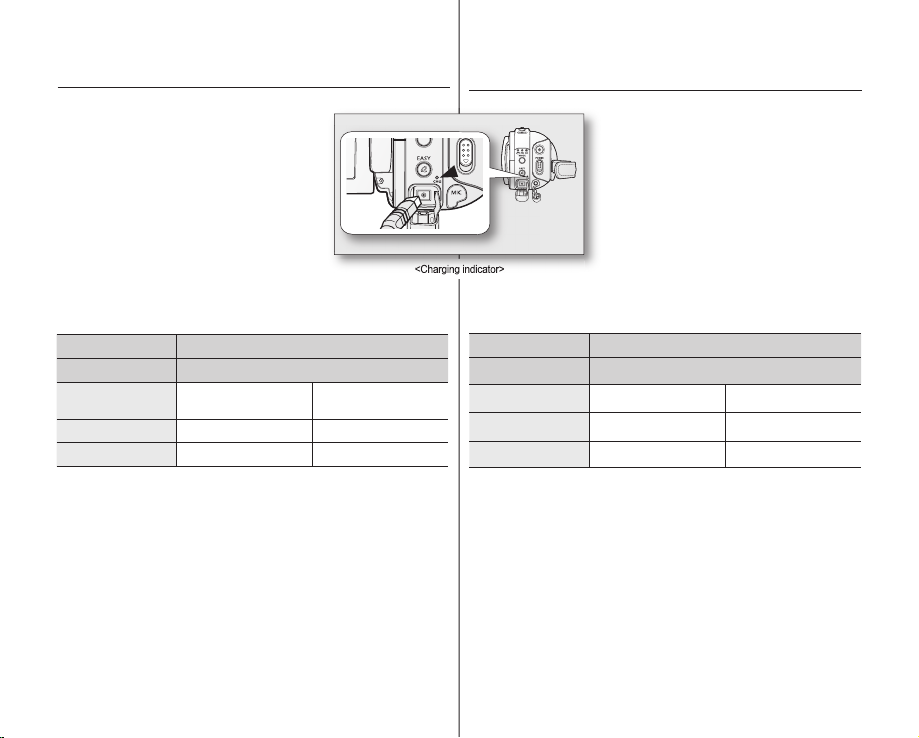
Charging indicator
The color of the LED indicates the power or
charging state.
● If the battery pack has been fully charged, the
charge indicator is green.
● If you are charging the battery, the color of the
charge indicator is orange.
● If an error occurs while the battery pack in
charging, the charging indicator blinks green.
<Charging indicator>
Charging, recording and playback times with a fully charged
battery pack (with no zoom operation, LCD open, etc.)
Bettery type IA-BP85ST
Charging time approx. 80 min
Recording format
HD approx. 80 min approx. 100 min
SD approx. 85 min approx. 110 min
● Measured times shown above are based on model SC-HMX10A.
(Times for SC-HMX10/HMX10C/HMX10N/HMX10CN/HMX10ED are
almost the same)
● The time is only for reference. Figures shown above are measured
under Samsung’s test environment, and may differ from your actual
use.
●
The recording time shortens dramatically in a cold environment.
The continuous recording times in the operating instructions are
measured using a fully charged battery pack at 25 °C (77 °F). As the
environmental temperature and conditions vary, the remaining battery
time may differ from the approximate continuous recording times
given in the instructions.
Continuous recording
time
Playback time
充电指示灯
LED
指示灯的颜色表示电量或充电的状态。
•
如果电池组已经充满电,充电指示灯显示为
绿色。
•
如果电池组为充电中,充电指示灯的颜色为
橙色。
如果电池组在充电过程中出现异常,充
•
电指示灯为绿色并且闪烁。
基于使用满电电池组的充电时间,录制时间和播放的时间
( 无调焦,打开
电池组种类
充电时间
录制格式 连续录制时间 播放时间
以上显示的测试时间是基于型号为SC-HMX10A的基础上测出的。
•
(SC-HMX10/HMX10C/HMX10N/HMX10CN/HMX10ED支持的时间
与之几乎相同。
此时间值仅作为参考。以上表中的测试结果是在三星的测试环
•
境下测出的,用户的实际使用情况也许会与其不同
在寒冷的环境温度下,录制时间会急速缩短。操作说明中提供的连
•
续录制时间是根据在25 °C (77 °F)温度下使用完全充电的电池组所测
得的结果。当环境温度和周围条件有变化时,实际的时间可能会与
测试的近似时间有所不同。
HD
SD
LCD
显示屏等操作。)
)
80
约
分钟 约
85
约
分钟 约
IA-BP85ST
80
约
分钟
100
110
分钟
分钟
。
14_ English
中文 _14
Page 23
Continuous recording (without zoom)
The times shown in the table refl ect the available recording time when the
HD camcorder is in the recording mode without using any other functions.
In actual recording, the battery pack may discharge 2-3 times faster than
this reference since the Record start/stop and Zoom are being operated,
and playback is performed. Assume that the recordable time with a fully
charged battery pack is between 1/2 and 1/3 of the time in the table, and
enough battery packs to allow for the time you are planning to record on
the HD camcorder.
Note that the battery pack discharges faster in a cold environment.
● The charging time will vary depending on the remaining
battery level.
● To check the remaining battery charge, press and hold the
Display (
)/iCHECK button. page 22
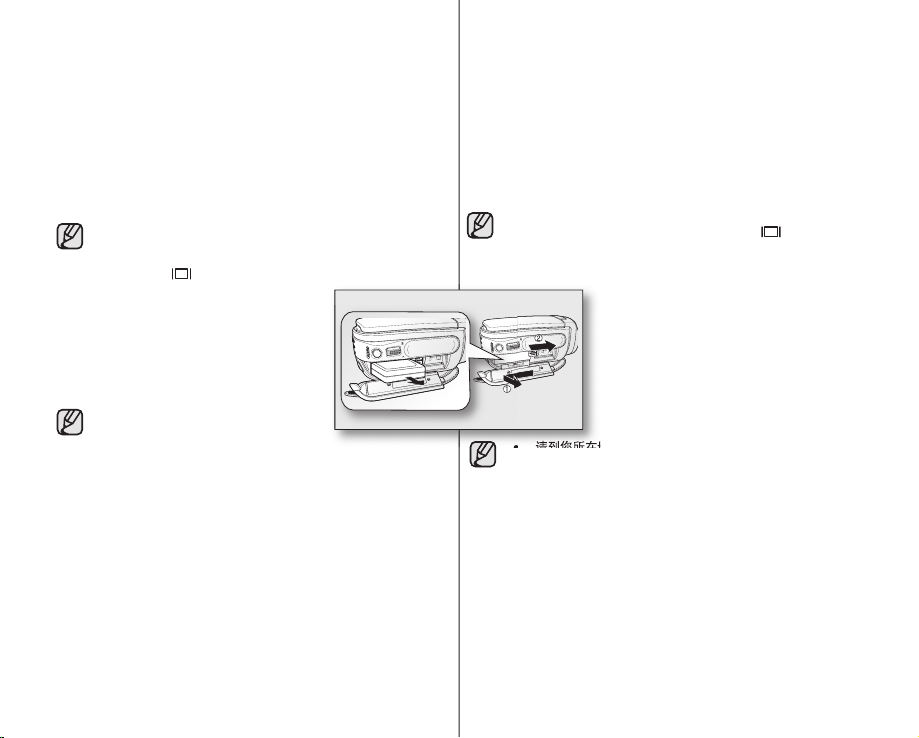
Ejecting the battery pack
1. Slide and open the battery pack cover.
2. Slide the BATT. RELEASE switch and pull
out the battery pack.
●
Gently slide the BATT. RELEASE switch
in the direction as shown in the diagram.
3. Slide and close the battery pack cover.
● Additional battery packs are available
at your local Samsung dealer.
● If the HD camcorder will not be in use
for a while, remove the battery pack
from the HD camcorder.
About battery packs
●
The battery pack should be recharged in an environment that is
between 32°F (0°C) and 104°F (40°C). However, when it is exposed
to cold temperatures (below 32°F (0°C)), its usage time becomes
reduced and it may cease to function. If this happens, place the
battery pack in your pocket or other warm, protected place for a short
time, then re-insert in the HD camcorder.
●
Do not put the battery pack near any heat source
(i.e. fi re or a heater).
●
Do not disassemble, apply pressure to, or heat the battery pack.
●
Do not allow battery pack terminals to be short-circuited. It may cause
leakage, heat generation, induce overheating or fi re.
15_ English
连续录制 ( 无调焦操作 )
以上表中列出的连续录制时间是当高清数码摄像机在录制模式下启动录
制功能,并且没有任何其他操作的情况下测出的结果。在实际录制时,
因为操作录制开始 / 停止和变焦,并且一直执行播放,电池组释放能量
2-3
次,实际时间也许比参考值短。假设一块充电完全的电池组的可录制
1/2
时间是表中
时间。注意在寒冷的环境中,电池组会更快地消耗电量。
•
•
1/3
和
之间的时间,电池组的备用种类和组数决定录制的
实际充电时间会根据电池组剩余电量的不同而有所变化。
检查 电池组的残余电量,请按显示按钮(
第22页
)/iCHECK 。
取出电池组
1. 打开电池组插槽盖。
2. 滑动电池组卡扣,拉出电池组。
●
依照图中所示的方向,柔和地滑动电池
组卡扣
3. 关闭电池组插槽盖。
请到您所在地区的三星经销商另外购买可使用的电池组。
•
•
如果一段时间不使用高清数码摄像机,请将电池组从摄像机
中取出。
有关电池组
电池组的优点:电池组体积虽小但却拥有很大的电量。电池
•
组的充电环境应介于32°F(0°C)
果将电池组暴露在温度很低的环境(低于32°F(0°C)
使用寿命将会减少并且可能停止工作。如果出现此事,请将
电池组放入您的衣服口袋或者其他温暖的地方一段时间,然
后再把电池组重新安装回高清数码摄像机。
•
请勿将电池组放在任何热源附近。(例如火或者加热器。)
禁止拆卸,挤压或者加热电池组。
•
•
请勿使电池组终端短路。这可能会导致电池组漏液,发热,
引起过热或者火灾。
。
和104°F(40°C)之间。从而,如
)中,它的
中文 _15
Page 24

preparation
Maintaining the battery pack
●
The recording time is affected by temperature and environmental conditions.
●
We recommend only using the original battery pack that is available from your
Samsung retailer. When the battery reaches the end of its life, please contact
your local dealer. The batteries have to be treated as chemical waste.
●
Make sure that the battery pack is fully charged before starting to record.
●
To preserve battery power, keep your HD camcorder turned off when you are
not operating it.
●
Even when the power is switched off, the battery pack will still discharge if it is
left inserted to the HD camcorder. When not using the HD camcorder for an
extended time period, preserve it with the battery completely separated.
●
For power saving purposes, the HD camcorder will automatically turn off after
5 minutes in standby mode. (Only if you set “Auto Power Off” from the menu
to on (“ 5 min ”).)
●
When fully discharged, a battery pack damages the internal cells. The battery
pack may be prone to leakage when fully discharged. Charge the battery
pack at least once every 6 months to prevent complete discharge of the
battery pack.
About the battery life
Battery capacity decreases over time and through repeated use. If decreased
usage time between charges becomes significant, it is probably time to replace it
with a new one.
Each battery’s life is affected by storage, operating and environmental conditions.
Using the HD camcorder with the AC power adaptor
It is recommended that you use the AC power adaptor to power the HD
camcorder from a household AC outlet when you perform settings on it,
play back, or edit images, or use it indoors.
● Before detaching the power source, make sure that the HD
camcorder’s power is turned off. Failure to do so can result in
CAUTION
camcorder malfunction.
● Use a nearby wall outlet when using the AC power adaptor.
Disconnect the AC power adaptor from the wall outlet
immediately if any malfunction occurs while using your HD
camcorder.
● Do not use the AC power adaptor in a narrow space, such as
between a wall and furniture.
page 13
准备
保养电池组
录制时间会受温度和环境条件的影响。
•
建议您使用购买高清数码摄像机的销售商售卖的原厂
•
Samsung电池组。当电池组的使用寿命接近尾声的的时候,
请您与当地经销商联系。废弃的电池组必须当作化学制品废物
处理。
•
请确保在开始录制之前电池组为充满电的状态。
•
当您不使用数码摄像机时请关闭电源,以保存电池组电量。
即使电源已经关闭,如果电池组继续保留在摄像机内,电池组
•
也仍然会释放电量。当一段时间不使用数码摄像机时,请将电
池组取出。
为节约电量,在待机模式下高清数码摄像机会在5分钟之内自动
•
关闭。(仅当您在菜单处设置“Auto power off”
(5分钟时)。
“5 min”
过分释放能量容易损坏电池组内部结构。过分释放能量也许会
•
导致电池组漏液。
将电池组电量完全消耗殆尽。
建议您至少每6个月为电池组充一次电,并
关于电池组的使用寿命
电池组随着时间的推移和反复地使用,如果可以使用的时间明显大大地
减少,那么大概是时候需要更新一块新的电池组了。每一块电池的使用
寿命取决于存放,使用,以及环境条件。
使用有交流电源适配器的高清数码摄像机
当您在高清数码摄像机上进行设置、播放或在室内使用时,建议您使用
交流电源适配器从室内交流电插座为其供电。
在拔出电源之前,请确保高清数码摄像机的电源已经关
•
闭。疏忽此问题,很可能会导致摄像机出现故障。
注意
•
请使用附近的壁装电源插座,如果发生故障,请立刻将
交流电源适配器从墙壁的插座上拔出。
•
不要在狭小的空间内使用交流电源适配器,例如家具与
墙壁之间的空隙。
(自动断电) 为
第13页
16_ English
中文 _16
Page 25
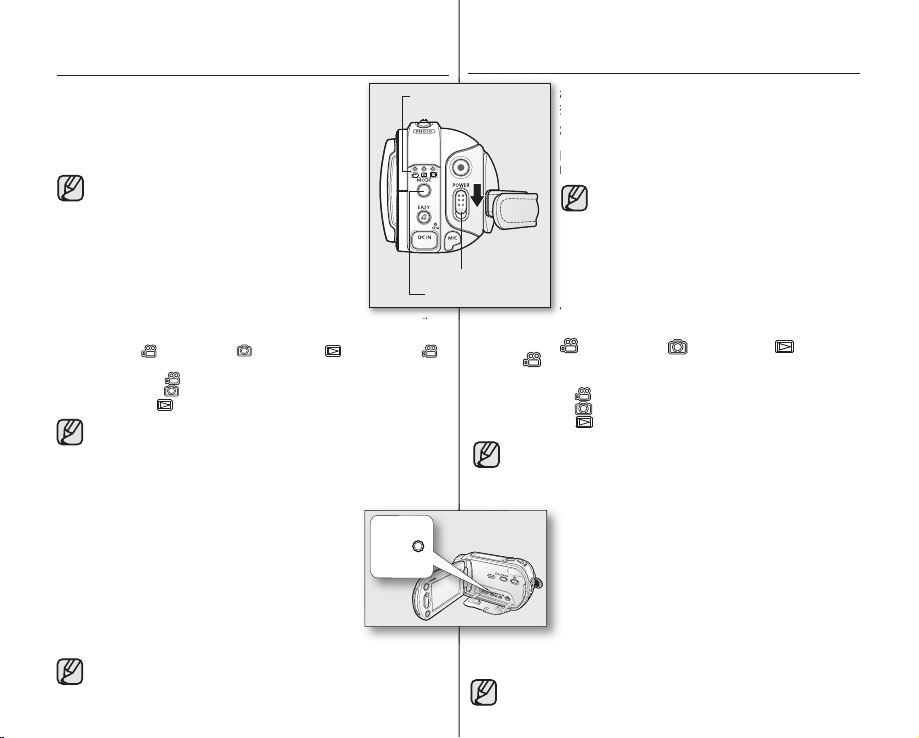
BASIC HD CAMCORDER OPERATION
择适当的操作方式。
Set the appropriate operation mode according to your
preference using the POWER switch and MODE button.
Turning the HD camcorder on and off
You can turn the camcorder on or off by sliding the POWER
switch downward.
●
Set the date and time when using your HD
camcorder for the fi rst time.
●
When you use your HD camcorder for the fi rst
time or you reset it, you will see the “Date/Time
Set” menu for the startup display. If you do not
set the date and time, the date and time setting
screen appears every time you turn on your
camcorder.
Setting the operating modes
●
You can switch the operating mode in the following order each time you press the
MODE button.
Movie mode (
●
Each time the operational mode changes, the respective mode indicator lights up.
- Movie mode (
- Photo mode (
- Play mode (
●
●
) Photo mode ( ) Play mode ( ) Movie mode ( )
): To record movie images. page 31
): To record photo images. page 33
When the HD camcorder is turned on, the self-diagnosis function
Movie mode is set by default with the power on.
): To play movie or photo images, or edit them. page 38
operates and a message may appear. In this case, refer to
“Warning indicators and messages” (on pages 96-99) and take
corrective action.
System Reset
If the HD camcorder does not operate normally, perform
“System Reset”: The HD camcorder may recover to normal.
“System Reset” will reset all settings to factory defaults. The
date and time will also be reset: Set the date and time again
before using the HD camcorder.
1. Turn the HD camcorder off.
●
Remove the battery pack or AC adaptor.
2. Use a fi ne tipped pen to hold down the RESET button.
●
All settings will be reset.
Do not press the RESET button with undue force.
17_ English
page 25
高清数码摄像机的基本操作
Mode indicator
POWER switch
MODE button
●
每次按下
影音模式 ( )
式 (
每次切换操作模式,它们各自的指示灯便会亮起。
•
- 影音模式
- 照片模式
-
•
•
根据您的需求使用
择适当的操作方式。
POWER
电源开关和
MODE
模式按钮选
打开或关闭高清数码摄像机
向下滑动电源开关
电源。
POWER
能够打开或者关闭数码摄像机
初次使用您的高清数码摄像机时请设置日期
•
和时间。
当您初次使用或者重新设置您的数码摄像机
•
时,您会在开机后的画面上看到“Date/Time
Set”
期和时间,那么当您每次打开摄像机时,屏
幕上都会出现日期和时间设置。
第25页
(日期/时间设置) 菜单。如果您不设置日
设置操作模式
MODE
模式按钮将会按顺序切换操作模式。
照片模式 ( ) 播放模式 ( ) 影音模
)
( ):
录制影音图像。
( ):
播放模式 ( ): 播放影音或照片图像,或编辑它们。第 38 页
当高清数码摄像机打开时,自我诊断功能开启并且可能出现
一条消息。在这种情况下,参考“警告显示和信息”
(第96-99页)获得解决方法。
影音模式为电源开启后的默认模式
捕获照片图像。
第31页
第 33 页
。
系统重新设置
如果不能正常使用高清数码摄像机,执行“系统重新
设置”:高清数码摄像机也许会恢复正常。“系统重新
设置”会将所有设置还原到出厂设置。日期和时间也
会被重新设置:在使用高清数码摄像机之前请再次设
置日期和时间。
1. 关闭高清数码摄像机。
取出电池组或拔掉电源。
•
2. 用一支完好的圆珠笔向下按住
•
所有设置将被重置。
不要用力过猛按下
RESET
按钮。
RESET
按钮。
中文 _17
Page 26
preparation
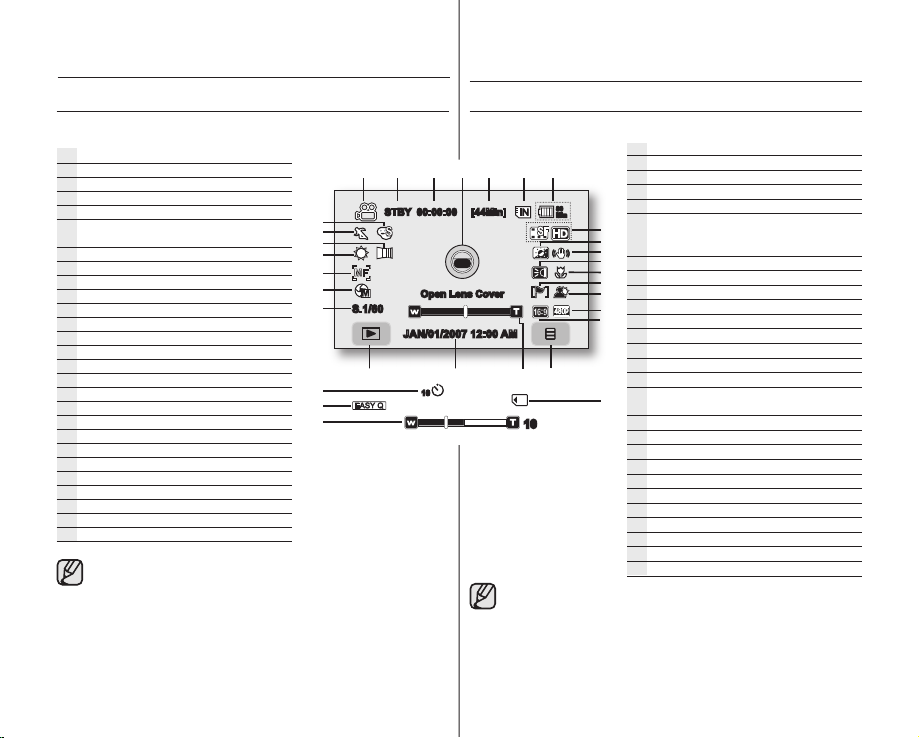
SCREEN INDICATORS
Movie record mode
Movie record mode
Operating mode (STBY (standby) or (recording))
Time counter (movie recording time) / Self timer*
Warning indicators and messages
Remaining recordable time
Storage media
HMX10C/HMX10CN/HMX10ED only) or memory card)
Battery info.(remaining battery level/time)
Movie image quality
LCD enhancer
Anti-Shake (EIS)
LED light*
Tele macro
Wind cut
Back light
Component out (when component cable is connected.)
TV type (when component or Multi-AV cable is connected.)
Menu tab
Zoom / Digital zoom position*
Date/Time
Record/Play mode tab
Shutter speed*
Manual exposure*
Manual focus*
White balance
Fader*
Scene mode (AE) / EASY Q
Digital effect*
● The OSD indicators are based on memory capacity of 4GB (built-in memory).
● The above screen is an example for explanation: It is different from the actual
display.
● Functions marked with * will not be retained when the HD camcorder is powered
on after turning it off.
● For enhanced performance, the display indications and the order are subject to
change without prior notice.
() The maximum available recording time displayed is 999 minutes even though
the actual available recording time exceeds 999 minutes. However, the actual
available recording time is not affected by the count displayed. page 28
For example, when the actual available recording time is “1,066” minutes, “999”
will be displayed on the screen.
18_ English
()
(built-in memory (SC-HMX10A/
S.1/60
准备
显示屏指示图标
影音录制模式
STBY 00:00:00 [44Min]
Open Lens Cover
JAN/01/2007 12:00 AM
10
10
以上的OSD指示图标是基于4GB的存储容量。
•
(内置存储器)。
以上的屏幕显示仅为举例:实际显示情况可能有所不同。
•
标记有*符号功能项的预先设置在高清数码摄像机重新启动之后将不
•
予保留。
为使性能更好,显示的指示图标和顺序会随时改变,恕不另行通知。
•
()
即使实际可录制的时间超过了999分钟,出现在屏幕上的可录制时间也仅
能够显示到999分钟。 然而,屏幕上显示的数字并不代表就是实际可录
制的时间。
例如:当实际可录制的时间为“1066”分钟时,在屏幕上却仍然只显示
到“999”分钟。
影音录制模式
➥第28页
80
Min
(STBY(
操作模式
计时器 ( 影音录制时间
警示图标和信息
剩余可录制时间
存储介质
( 内置存储器
HMX10C/HMX10CN/HMX10ED)
电池组信息(剩余电池电量 / 时间)
影音图像质量
LCD
增强器
(EIS)
防震动
LED灯*
远程微距
风声消除
背光补偿
分量输出 ( 当分量电缆连接 )
电视类型(当连接了分量视频线或
AV
线时。)
菜单导航
变焦 / 数字变焦指示条
日期 / 时间
录制 / 播放模式导航
*
快门速度
*
手动曝光
*
手动聚焦
白平衡
*
淡化器
(AE) / EASY Q
场景模式
*
数字特效
待机)或
()
( 仅限
(录制))
)
/ 自动计秒表
SC-HMX10A/
*
*
或存储卡)
Multi-
中文 _18
Page 27
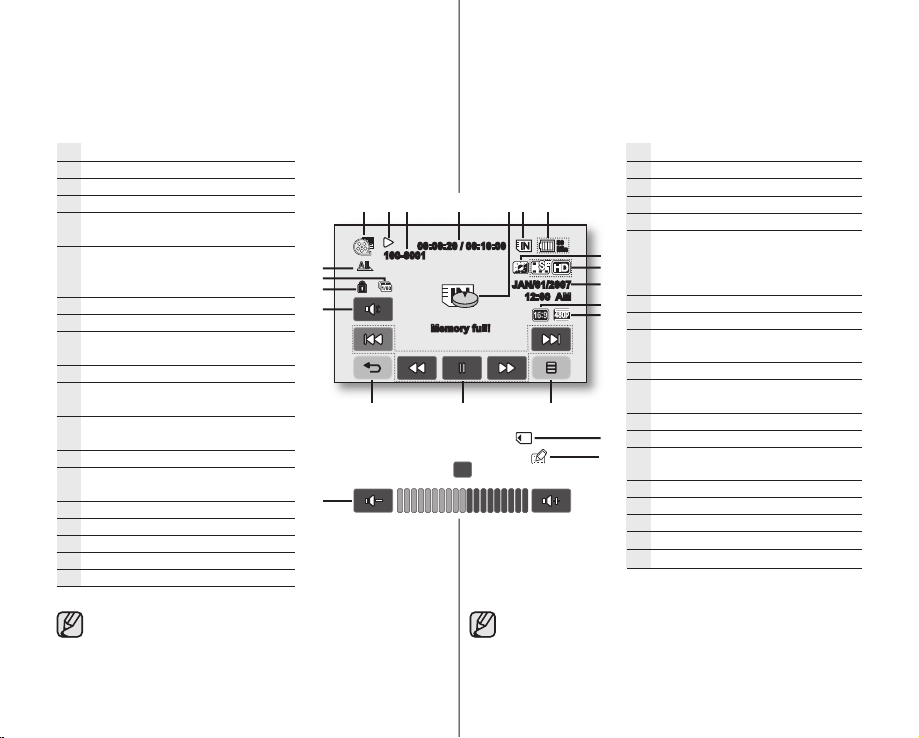
Movie play mode
Movie play mode
Operating status (Play/Pause)
File name (fi le number)
Time code (elapsed time / recorded time)
Warning indicators and messages/Volume
control
Storage media (built-in memory (SC-
HMX10A/HMX10C/HMX10CN/HMX10ED
only) or memory card)
Battery info. (remaining battery level/time)
LCD enhancer
Movie image quality / Edited movie image
indicator (partial delete, divide, combine)
Date/Time
TV type (when component or Multi-AV
cable is connected.)
Component out (when component cable
is connected.)
Menu tab
Movie play-related function
(Skip / Search / Play / Pause / Slow Playback)
Return tab
Volume tab
Erase protection
Cont. Capture
Play option
00:00:20 / 00:10:00
100-0001
Memory full!
影音播放模式
JAN/01/2007
12:00 AM
10
影音播放模式
操作状态 ( 播放 / 暂停 )
文件名 ( 文件编码 )
计时器 ( 过去的时间 / 录制的时间 )
警示图标和信息 / 容量控制
存储介质
80
Min
( 内置存储器 ( 仅限
HMX10C/HMX10CN/HMX10ED)
储卡 )
电池组信息 ( 剩余电池电量 / 时间 )
LCD
增强器
影音图像质量 / 已编辑影片图像指示符
(部分删除、分割、合并)
日期 / 时间
电视类型(当连接了分量视频线或
Multi-AV
线时。)
分量输出 ( 当分量电缆被连接 )
菜单导航
与影音播放有关的功能
( 跳过 / 搜索 / 播放 / 暂停 / 慢速播放 )
返回导航
音量导航
删除保护
连续捕捉
播放选项
SC-HMX10A/
或存
The tabs disappear from the screen after about 3 seconds.
They reappear when you touch any point on the screen.
19_ English
3
秒种之后屏幕上显示的导航键消失。
大约
当您再次按下屏幕上的任何一点时,它们将会再次出现。
中文 _19
Page 28
preparation
准备
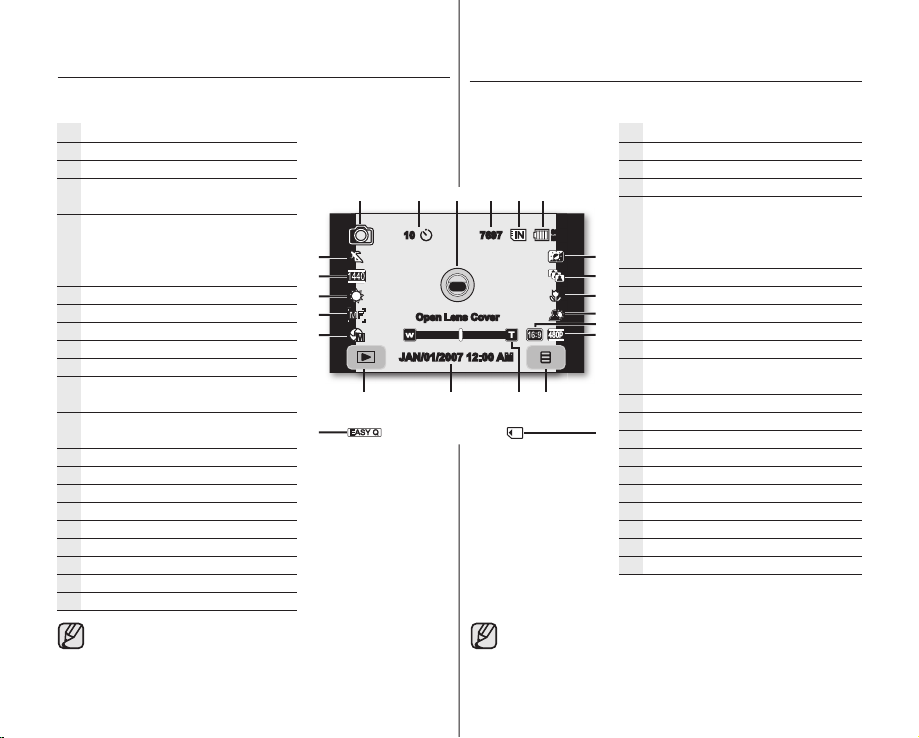
Photo record mode
Photo record mode
Self timer*
Warning indicators and messages
Image counter (total number of
recordable photo images)
Storage media
(built-in memory (SC-HMX10A/
HMX10C/HMX10CN/HMX10ED only)
or memory card)
Battery info. (remaining battery level/time)
LCD enhancer
Cont. shot
Tele macro
Back light
TV type (when component or Multi-AV
cable is connected.)
Component out (when component
cable is connected.)
Menu tab
Zoom position*
Date/Time
Record/Play mode tab
Manual exposure*
Manual focus*
White balance
Resolution
Scene mode (AE) / EASY Q
()
The maximum number of recordable images displayed is 99,999 even though
the actual number of recordable images exceeds 99,999. However, the actual
number of recordable images is not affected by the count displayed. page 28
For example, when the actual number of recordable images is “156,242,”
“99,999” will be displayed on the screen.
()
10
Open Lens Cover
JAN/01/2007 12:00 AM
拍照模式
7697
()
拍照模式
自拍延时器
警示图标和信息
图像计数器 ( 可拍照片总数 )
存储介质
80
Min
即使实际可拍摄的照片图像超过了99,999张,出现在屏幕上的可拍摄照
片图像的数量也仅能够显示到99,999张。 然而,屏幕上显示的数字并不
代表就是实际可拍摄照片图像的数量。
例如:当实际可拍摄照片图像的数量为“156,242”张时,屏幕上却仍然只显
示到“99,999”张。
( 内置存储器 ( 仅限
HMX10C/HMX10CN/HMX10ED
储卡 )
电池组信息 ( 剩余电池电量 / 时间 )
LCD
连续拍摄
远程微距
背光补偿
电视类型(当连接了分量视频线或
AV
分量输出 ( 当分量电缆连接时 )
菜单导航
变焦指示条
日期 / 时间
录制 / 播放模式导航
手动曝光
手动聚焦
白平衡
分辨率
场景模式
*
()
SC-HMX10A/
) 或存
增强器
Multi-
线时。)
*
*
*
(AE) / EASY Q
➥第28页
20_ English
中文 _20
Page 29
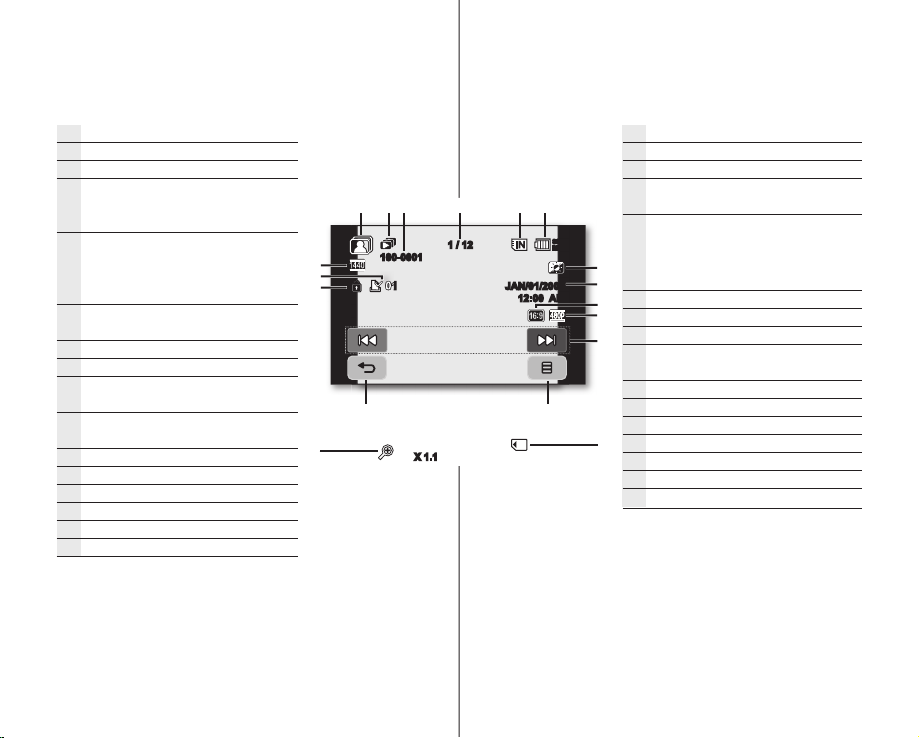
Photo play mode
Photo play mode
Slide show / Playback zoom
File name (fi le number)
Image counter
(current image / total number of
recorded images)
Storage media
(built-in memory (SC-HMX10A/
HMX10C/HMX10CN/HMX10ED only)
or memory card)
Battery info.
(remaining battery level/time)
LCD enhancer
Date/Time
TV type (when component or Multi-AV
cable is connected.)
Component out (when component
cable is connected.)
Previous image/Next image
Menu tab
Return tab
Erase protection
Print mark (DPOF)
Resolution
100-0001
01
X 1.1
照片查看模式
1 / 12
JAN/01/2007
12:00 AM
照片查看模式
幻灯放映 / 播放变焦
文件名 ( 文件编号 )
图像计数器
( 当前图像 / 拍摄的图像总数 )
存储介质
80
Min
( 内置存储器 ( 仅限
HMX10C/HMX10CN/HMX10ED
存储卡 )
电池组信息 .( 剩余电池电量 / 时间 )
LCD
增强器
日期 / 时间
电视类型(当连接了分量视频线或
Multi-AV
线时。)
分量输出 ( 当分量电缆连接时 )
上一个图像 / 下一个图像导航
菜单导航
返回导航
删除保护
(DPOF)
打印标记
分辨率
SC-HMX10A/
) 或
21_ English
中文 _21
Page 30
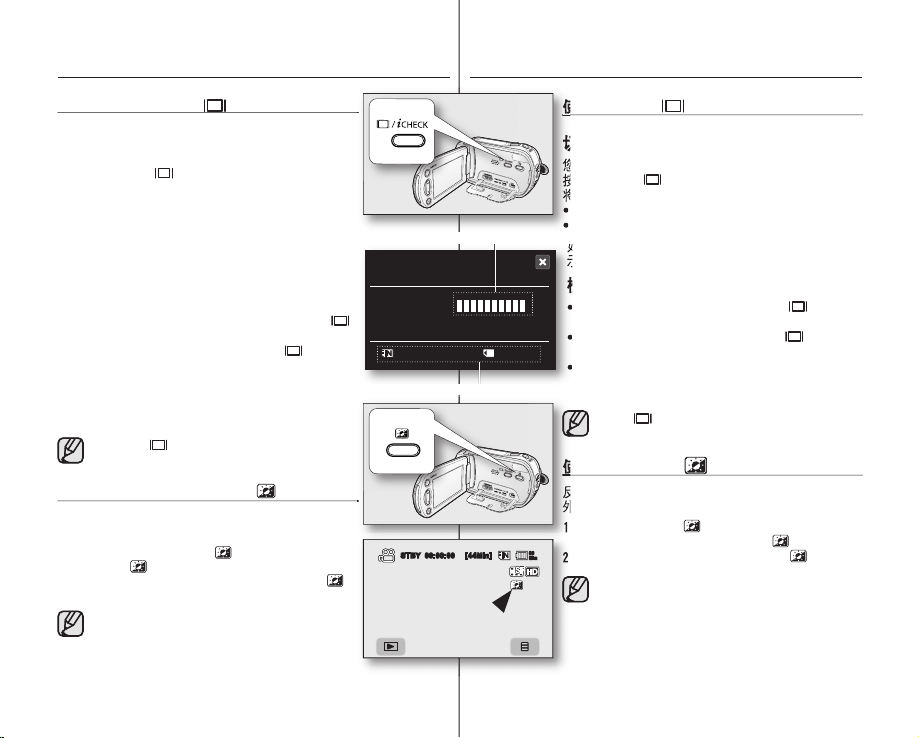
preparation
使用屏幕显示 (
您可以切换屏幕信息的显示模式:
使用
USING THE DISPLAY
Switching the information display mode
You can switch between the on-screen information display
modes:
Press the Display
The full and minimum display modes will alternate.
●
Full display mode: All information will appear.
●
Minimum display mode: Only operating status indicator
will appear.
If the HD camcorder has warning information, a warning
message will appear.
Checking the remaining battery and recording
capacity
●
When the power is on, press and hold the Display ( )
/iCHECK
●
●
button.
When the power is off, press the Display ( )
button.
After a while, the battery time and approximate recordable
time according to the storage and quality appear for about
10 seconds. If a storage media is not inserted, its icon
does not appear.
Display ( )/iCHECK
the menu or quick menu screen.
USING THE LCD ENHANCER
Contrast is enhanced for a clear and bright image. This
effect is also implemented outdoors in bright daylight.
1. Press the LCD enhancer ( ) button.
●
The ( ) indicator is displayed.
2. To exit LCD enhancer, press the LCD enhancer (
button again.
●
LCD enhancer function does not affect the
quality of the image being recorded.
●
When LCD enhancer works at the low
illumination, some stripes may occur on the
LCD screen. It is not a malfunction.
( )
/iCHECK BUTTON
( )/iCHECK button.
button does not work in
/iCHECK
( )
)
准备
Remaining battery (approx.)
Battery
80 Min
Memory (Super Fine)
Recordable memory capacity (approx.)
0%
044 Min
STBY 00:00:00 [44Min]
50% 100%
022 Min
CHECK
使用屏幕显示 ( )/
按钮
i
切换到信息显示模式
您可以切换屏幕信息的显示模式:
按下屏幕显示
将交替显示完全显示模式和最小显示模式。
•
•
如果高清摄像机有预警信息,则屏幕上会显示一条警
示消息。
( )/iCHECK按钮。
完全显示模式:将出现所有类型的信息。
最小显示模式:将仅显示操作状态指示灯。
检查剩余的电池电量和录制容量
当电源为开启状态时,按住屏幕显示( )/iCHECK
•
按钮。
在电源已关闭的情况下,按下显示( )/iCHECK
•
按钮。
•
一小会后,根据存储器和质量,电池时间和大
约可录制时间将显示约10秒钟。
如果未插入存储介质,则其图标将不会出现。
显示( )/
iCHECK
幕中不起作用
LCD
使用
反差增强,得到清晰明亮的图像。该作用也被运用于户
外的白天。
1. 按下
80
Min
2. 退出
增强器 ( )
LCD
增强器( )按钮。
•
屏幕上显示该功能的指示图标(
LCD
增强,再次按下
使用LCD增强功能并不影响录制的图像
•
质量。
•
在低照度环境下使用LCD增强器时,
LCD显示屏上会出现一些条纹。
这并不是故障。
按钮在菜单或快捷菜单屏
。
LCD
增强器( )按钮。
)。
22_ English
中文 _22
Page 31
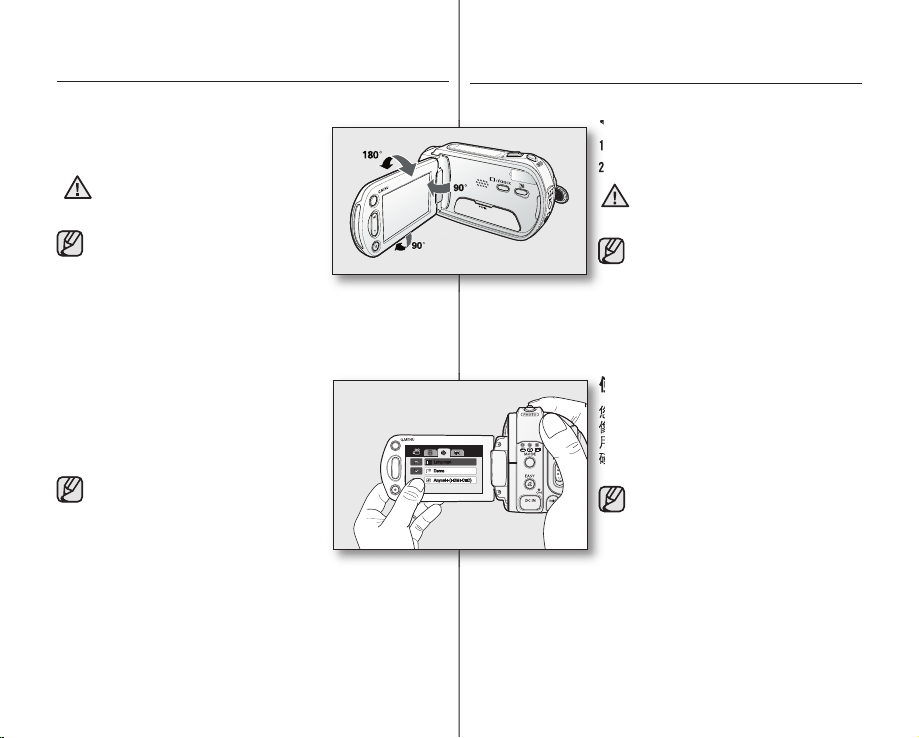
USING THE LCD SCREEN
您可以 通过使用触感控制 板进行播放录制的 图
像,以及设置一些功能项。
碰屏幕上显示的选项。
A
가
使用
LCD
显示屏
Adjusting the LCD screen
1. Open up the LCD screen 90° with your fi nger.
2. Rotate it to the best angle to record or play.
Do not lift the HD camcorder by holding
the LCD screen.
WARNING
● Over-rotation may cause damage to
the inside of the hinge that connects
the LCD screen to the HD camcorder.
● See page 67 to adjust brightness and
contrast of the LCD screen.
Using the touch panel
You can play recorded images and set the
functions by using the touch panel.
Place your hand on the rear side of the LCD panel
to support it. Then, touch the items displayed on
the screen.
● Be careful not to press the buttons
nearby the LCD panel accidentally
while using the touch panel.
● The tabs and indicators that appear
on the LCD panel depend on the
recording/playback status of your HD
camcorder at the time.
● The touch screen may malfunction
because of the LCD protection fi lm is
that is adhered to it when purchasing
the product. Remove and discard the
protection fi lm before using.
调整LCD显示屏
1. 呈90°打开LCD显示屏。
2. 转动到最佳角度进行录制或者播放。
不要握着LCD显示屏举起数码摄像机
警告
转动一周会导致内部连接LCD显示屏
•
和高清数码摄像机之间的铰链损坏。
参见第67页,调整
•
和颜色。
LCD
。
显示屏的亮度
使用触感控制板
您可以 通过使用触感控制 板进行 播放录制的图
像,以及设置一些功能项。
Language
Demo
5 / 5
Anynet+ (HDMI-CEC)
用手在LCD控制板的后面支撑,然后再用手指触
碰屏幕上显示的选项。
请注意当使用触感控制板的时候
•
不要偶然地触碰
按钮。
在
LCD
•
示图标取决于当时您的高清数码摄
像机所处的录制/播放状态。
触摸屏可能会因
•
产品时贴上去的)而功能异常。
请在使用之前撕下保护膜。
LCD
控制板区的
控制板上显示的导航键和指
LCD
保护膜(购买
23_ English
中文 _23
Page 32

preparation
设置
设置日期/时间,在录制的过程中保留下日 期和时
您可以选择您所需要的语言显示菜单和信息。
4.
A
가
准备
INITIAL SETTING: OSD LANGUAGE & DATE AND TIME
To read the menus or messages in your desired
language, set the OSD language. To store the date
STBY 00:00:00 [44Min]
and time during record, set the date/time.
Selecting the OSD language
You can select the desired language to display the
menu screen and the messages.
1. Touch the Menu (
2. Touch the Settings (
3. Touch the up (
“Language” is displayed.
4. Touch the“Language”, then touch the desired
OSD language.
5. To exit, touch the Exit (
tab repeatedly until menu disappears.
●
The OSD language is refreshed in the
selected language.
● Even if the battery pack or AC power are
removed, the language setting will be
preserved.
● “Language” options may be changed
without prior notice.
) tab.
) tab.
)/down ( ) tab until
) tab or Return ( )
1 / 5
5 / 5
初次设置 :
Date/Time Set
Date/Time
File No.
LCD Control
Language
Demo
Anynet+ (HDMI-CEC)
OSD
&
日期和时间
语言
设置OSD语言,用您需要的语言阅读菜单和信息。
80
Min
设置日期/时间,在录制的过程中保留下日 期和时
间。
选择OSD显示语言
您可以选择您所需要的语言显示菜单和信息。
1. 触摸菜单导航(
2. 触摸设置导航(
3. 触摸上(
示"Language"选项。
4. 触摸"Language"选项,然后触摸选择需要的
OSD语言。
5. 退出设置,触摸退出导航(
回导航(
OSD语言被刷新为所选的语言。
•
•
•
)。
)。
)/下( )移动导航,直到显
)直到菜单消失。
即使取出电池组或拔掉电源适配器, 语
言设置也会被保存。
“Language” 选项也许改变,恕不另行
通知。
) 或者反复触摸返
24_ English
中文 _24
Page 33

Setting the date and time
8.
OK
Set the date and time when using this HD
camcorder for the fi rst time.
1. Touch the Menu ( ) tab.
2. Touch the Settings (
3. Touch the up (
Time Set” is displayed.
4. Touch “Date/Time Set.
5. Touch the up (
month, then touch day fi eld.
6. Set values for day, year, hour, minute, and AM/PM
as in setting the month.
7. Touch the OK
setting is completed.
●
The message “Date/Time Changed” appears,
the set date/time is applied.
8.
To exit, Return ( ) tab repeatedly until menu
disappears.
●
On charging the built-in rechargeable battery
Your camcorder has a built-in rechargeable
battery to retain the date, time, and other
settings even when the power is off. The builtin rechargeable battery is always charged while
your camcorder is connected to the wall outlet
via the AC power adaptor or while the battery
pack is attached. The rechargeable battery will
be fully discharged in about 6 months if you
do not use your camcorder at all. Use your
camcorder after charging the pre-installed
rechargeable battery. If the built-in rechargeable
battery is not charged, any input data will not
be backed up and the date/time appears on
the screen as “JAN/01/2007 12:00 AM” (when
“Date/Time” display to On).
●
You can set the year up to 2037.
) tab.
)/down ( ) tab until “Date/
”
)/down ( ) tab to set current
(OK) tab when the date and time
Turning the date and time display on/off
To switch the date and time display on or off, access the menu and change the
date/time display mode. page 66
25_ English
STBY 00:00:00 [44Min]
Date/Time Set
Date/Time
1 / 5
File No.
LCD Control
Date/Time Set
JAN1201002007
设置日期和时间
当您第一次使用本摄像机时请设置日期和时间。
80
Min
1. 触摸菜单导航 (
)。
2. 触摸设置导航( )。
( )/下( ) 导航直到显示 "Date/Time
3. 触摸上
Set"
(日期/时间设置)。
4. 触摸"Date/Time Set"
5. 触摸向上 (
份, 然后触摸选择
6. 与设置月份的方法相同,分别设置日、年、小
时、分钟和上午/下午。
7. 日期和时间设置完成后,触摸
确认。
日期/时间设置完成后,屏幕显示 "Date/
•
Time changed."
信息。
8. 要退出,重复按返回( )直到菜单消失为
止。
为内置蓄电池充电
•
您的摄像机拥有内置可再充电电池用来
在关闭电源后保存日期,时间以及一些
其它的设置。在摄像机通过交流电源适
配器连接到壁装插座或者安装了电池
组后, 内置可再充电电池处于一直被动
充电的状态。如果您长时间不使用摄像
机, 该可再充电电池的电量在大约
AM
月的时候就会消耗完。请在将可再充电
电池充满电之后再使用您的摄像机。如
果内置可再充电电池没有电量, 一些保
留的数据便会消失并且日期和时间便
会显示为
“Date/Time”(日期/时间) 显示功能为打
开状态
•
您可以设置的最高年份是2037年。
(日期/时间设置)。
)/向下( )导航以设置当前月
日份。
(OK)OK导航
(日期/时间已更改) 的
“01/01/2007 12:00 上午” (当
)。
6个
关闭日期和时间显示
进行切换日期和时间显示开或关,请访问菜单并且更改日期/时间显示
第66页
模式。
中文 _25
Page 34

before recording
您可以将录制的文件存储在内置存储器或者存储
High Capacity)
SELECTING THE STORAGE MEDIA (SC-HMX10A/
HMX10C/HMX10CN/HMX10ED only)
You can record movie and photo images on the built-in
memory or a memory card, so you should select the desired
storage media before starting recording or playback.
Using the built-in memory
●
Because this HD camcorder has an embedded memory,
you do not need to buy any extra storage media. So you
can take or playback movie/photo images conveniently.
●
If you use a built-in memory to make a recording, touch
the Menu (
“Memory.”
) tab
Storage (
or ) tab
Using a memory card (not supplied)
●
This HD camcorder has multi card-slot for access to
SDHC (Secure Digital High Capacity) and MMCplus
cards.
●
You can use SDHC and MMCplus cards on your HD
camcorder. (Some cards are not compatible depending
on the memory card manufacturer and memory card
type.)
●
Before inserting or ejecting the memory card, turn the HD camcorder off.
●
If you use a memory card to make a record, touch the Menu ( ) tab
Storage (
or ) tab
●
Never format the built-in memory or memory card using a PC.
●
When you insert a memory card, play thumbnail mode or menu display
mode, the storage media setup menu appears.
Touch “Yes” if you want to use a memory card, or “No” if not.
●
Do not remove the power (battery pack or AC power adaptor) during
accessing storage media such as recording, playback, format, delete,
etc. The storage media and its data may be damaged.
●
Do not eject a memory card during accessing memory card such as
recording, playback, format, delete etc. The memory card and its data
may be damaged.
“Card.
”
1 / 1
1 / 1
录制之前
选择存储介质 ( 仅限
HMX10ED
Memory
Card
Memory
Card
•
)
如果选择适用存储卡进行录制,请触摸菜单导航(
航(
或 )"Card"
(存储卡)。
不要使用电脑格式化内置存储器和存储卡。
•
•
插入存储卡时,播放缩略图模式或菜单显示模式,存储媒体
设置菜单就会出现。如果选择使用存储卡触摸 “Yes”(
则触摸 “No”(
•
在进行录制,播放,格式化,删除等操作时请不要切断电源(电池
组或交流电源适配器),否则存储介质和存储的数据将会损坏。
•
在使用存储卡录制,播放,格式化,删除等操作时,取出存储卡会
造成存储卡本身和存储数据的损坏。
SC-HMX10A/HMX10C/HMX10CN/
您可以将录制的文件存储在内置存储器或者存储
卡上,所以请在开始录制或者播放前选择您要存储
文件的存储介质。
使用内置存储器
由于此高清数码摄像机本身具备存储容量, 所
•
以您不需要额外购买任何存储介质。
您可以更方便地记录或者播放移动/录制。
如果选择使用内置存储器进行录制,请触摸
•
菜单导航(
"Memory"
使用存储卡(未提供)
该高清数码摄像机备有SDHC(Secure Digital
•
High Capacity)
您的高清数码摄像机可以使用SDHC
•
MMCplus存储卡。(根据存储卡的制造商和类型
的不同,有些存储卡是不能够使用的。)
请在插入或者取出存储卡之前关闭您的数码摄
•
像机。
否)。
如此,
)存储介质导航( 或 )
(内置存储器)。
和MMCplus存储卡插槽。
和
)存储介质导
是), 否
26_ English
中文 _26
Page 35
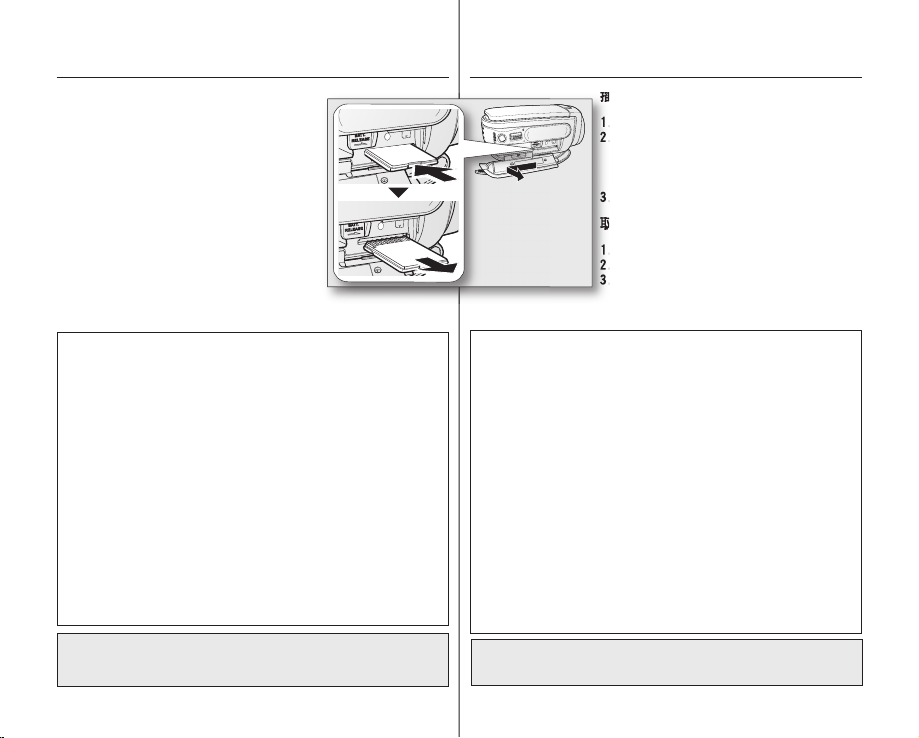
INSERTING/EJECTING A MEMORY CARD
Inserting a memory card
1. Slide and open the memory card cover.
2. Insert the memory card into the slot until it softly
clicks.
●
Make sure that the terminal part portion is facing
up and the camcorder is placed as shown in the
diagram.
3. Slide and close the memory card cover.
Ejecting a memory card
1. Slide and open the memory card cover.
2. Slightly push the memory card inwards to pop it out.
3. Pull the memory card out of the slot and slide and
close the memory card cover.
插入 / 取出存储卡
插入存储卡
1. 打开存储卡插槽盖。
2. 将存储卡插入存储卡插槽直到存储卡被
轻轻地扣住。
依图所示的摄像机摆放位置,确保终端
•
部分朝上。
3. 关闭存储卡插槽盖。
取出存储卡
1. 打开存储卡插槽盖。
2. 轻轻向内推挤存储卡,存储卡弹出。
3. 拉出存储卡并且关闭存储卡插槽盖。
The HD camcorder supports SDHC and MMCplus memory cards for data
storage.
The data storage speed may differ, according to the manufacturer and production
system.
●
SLC (single-level cell) system: faster write speed is enabled.
●
MLC (multi-level cell) system: only lower write speed is supported.
For best results, we recommend using a memory card that supports faster write
speed.
Using a lower write speed memory card for recording a movie may cause
diffi culties with storing the movie on the memory card. You may even lose your
movie data during the recording.
In an attempt to preserve any bit of the recorded movie, the HD camcorder forcibly
stores the movie on the memory card and displays a warning: “Low Speed Card.
Please record a Lower quality”
If you are unavoidably using a low speed memory card, lower the recording quality
by one level “[HD] Fine,” “[HD] Normal.”
You have fi ve quality options to record a movie with the HD camcorder : “[HD]
Super Fine,” “[HD]Fine,” “[HD] Normal,” “[SD] Standard,” and “[SD] Economy.”
However, the higher the quality, the more memory that will be used.
Actual formatted capacity may be less as the internal fi rmware uses
a portion of the memory.
27_ English
本高清数码摄像机支持使用SDHC和MMCplus存储卡进行数据
保存。
根据制造商和生产系统的不同,数据存储速度也许会有所不同。
SLC (单层式存储单元) 系统:可实现较快的写入速度。
•
•
MLC (多层式存储单元) 系统:仅支持较慢的写入速度。
为达到最好的效果,我们建议您选用写入速度较快的存储卡。
使用更低写入速度的存储卡保存录制的影音也许会有困难。在
录制的过程中可能会丢失一些影音数据。
当试图保存已录制影音的一些字节时,高清数码摄像机会强行
将影音文件存储在存储卡上,并显示一则警告:
"Low speed card. Please record a lower quality."(卡速度低。
请以较低质量录制。
若不得以而使用慢速存储卡,最好将录制质量降低一级"[HD]
Fine"([HD] 清晰) "[HD] Normal"([HD]
本高清数码摄像机为您提供五个质量级别进行录制影音:
Super Fine"([HD]高清晰)"[HD] Fine"([HD] 清晰)"[HD]
Normal"([HD]
Economy"([SD]经济)
然而,文件的质量级别越高,占用的存储空间越大。
实际格式化后容量可能会小一些,因为内部固件使用了一小部
分存储容量。
)
标准)。
标准)"[SD] Standard"([SD]标准)和 "[SD]
"[HD]
中文 _27
Page 36
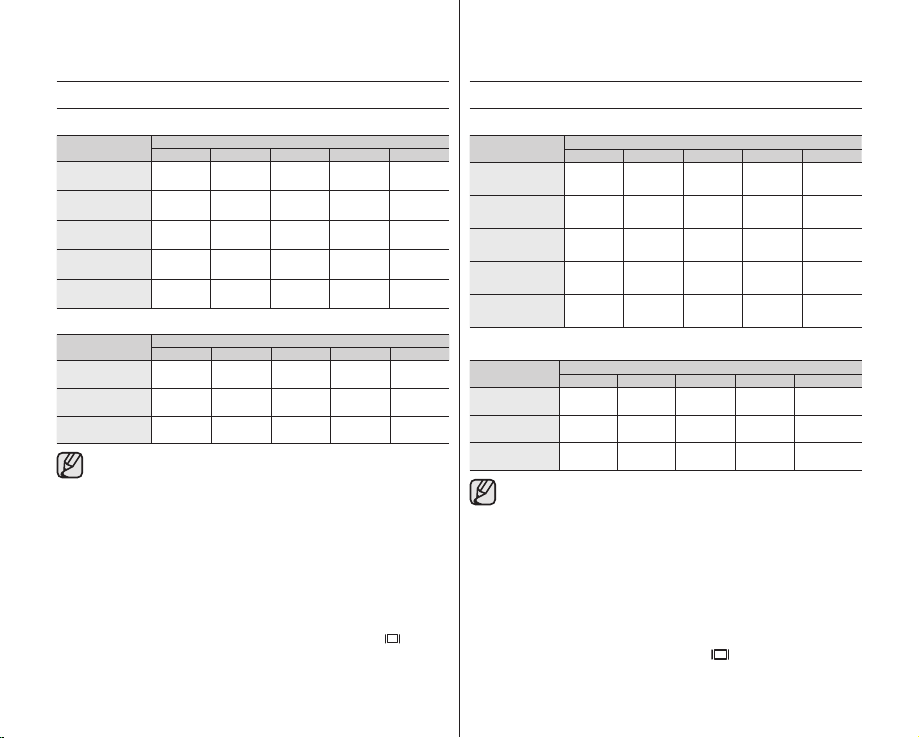
before recording
RECORDABLE TIME AND NUMBER OF IMAGES
Recordable time for movie images
Movie quality
[HD] Super Fine
[HD] Fine
[HD] Normal
[SD] Standard
[SD] Economy
1GB 2GB 4GB 8GB 16GB
Approx.
11min
Approx.
14min
Approx.
22min
Approx.
33min
Approx.
67min
Recordable number of photo images
Photo resolution
2048x1536
1440x1080
640x480
●
The above figures are measured under Samsung’s standard recording
●
The HD camcorder provides five quality options for movie recordings:
●
The compression rate increases when choosing lower quality settings.
●
The bit rate automatically adjusts to the recording image, and the
●
Memory cards of bigger than 32GB in capacity may not work properly.
●
●
To check the remaining memory capacity, press Display ( )/iCHECK
●
The maximum available recording time displayed is 999 minutes and
1GB 2GB 4GB 8GB 16GB
Approx.
953
Approx.
1929
Approx.
9765
test conditions and may differ depending on actual use.
“[HD] Super Fine,” “[HD] Fine,” “[HD] Normal,” “[SD] Standard,”
“[SD] Economy.”
The higher the quality setting, the more memory is used.
The higher the compression rate is, the longer the recording time will be.
However, the image quality will be lower.
recording time may vary accordingly.
The maximum size of a movie file that can be recorded at one time is 2GB.
page 22
button.
the maximum number of recordable images displayed is 99,999.
28_ English
Storage media (Capacity)
Approx.
22min
Approx.
29min
Approx.
44min
Approx.
67min
Approx.
133min
Storage media (Capacity)
Approx.
1906
Approx.
3859
Approx.
19530
Approx.
44min
Approx.
59min
Approx.
88min
Approx.
133min
Approx.
267min
Approx.
3813
Approx.
7719
Approx.
39060
Approx.
88min
Approx.
118min
Approx.
177min
Approx.
266min
Approx.
533min
Approx.
7627
Approx.
15439
Approx.
78121
Approx.
176min
Approx.
236min
Approx.
354min
Approx.
532min
Approx.
1066min
Approx.
15254
Approx.
30878
Approx.
156242
录制之前
影音录制时间和数量
影音录制时间
影音质量
[HD]
高清晰
[HD]
清晰
[HD]
标准
[SD]
标准
[SD]
经济
照片拍摄数量
照片分辨率
2048 × 1536
1440 x 1080
640 × 480
•
•
•
•
•
•
•
•
1 GB 2 GB 4 GB 8 GB 16 GB
约
分钟
约
分钟
约
分钟
约
分钟
约
分钟
1 GB 2 GB 4 GB 8 GB 16 GB
953约 1906约 3813约 7627约 15254
约
1929约 3859约 7719约 15439约 30878
约
9765约 19530约 39060约 78121约 156242
约
以上测试结果产生在三星的标准测试条件下,根据环境或者实际
使用的情况差异可能会有所不同。
为您提供五个质量选项录制影音:
“[HD] Fine”([HD] 清晰), “[HD] Normal”([HD] 标准),
清晰),
[SD] Standard”([SD]标准), “[SD] Economy”([SD]经济)
设置的质量越高,占用的存储空间越大。
降低质量,压缩率会增加。更高的压缩率是,图片的质量降低,
但是录制时间增加。
比特率根据录制影音自动调整,而且录制的时间也许会有相应
的变化。
大于32GB的存储卡可能无法正常工作。
一次录制的影音文件最大为2GB
要检查剩余存储器容量,按下显示 (
第22页
在屏幕上,能够显示出的可录制时间可达999分钟,可拍摄照片图
像的数量可达99,999张。
14
22
33
67
11
存储介质 ( 容量 )
22
约
分钟
29
约
分钟
44
约
分钟
67
约
分钟
133
约
分钟
存储介质 ( 容量 )
44
约
分钟
59
约
分钟
88
约
分钟
133
约
分钟
267
约
分钟
”[HD] Super Fine”([HD]高
。
88
约
分钟
118
约
分钟
177
约
分钟
266
约
分钟
533
约
分钟
)/iCHECK 按钮。
约
中文 _28
约
约
约
约
176
分钟
236
分钟
354
分钟
532
分钟
1066
分钟
。”
Page 37

SELECTING A SUITABLE MEMORY CARD
●
You can use a SDHC memory card and MMCplus cards.
- You can also use a SD memory card, but it is recommended that you use
a SDHC memory card and MMCplus with your HD camcorder. (SD card
supports upto 2GB.)
●
MultiMediaCards (MMC) are not supported.
●
On this HD camcorder, you can use memory cards of the
following capacity: 128MB ~ 32GB.
●
Compatible recording media
The following recording media have been guaranteed to work with
this HD camcorder. Others are not guaranteed to work, so buy such
products with caution.
- SDHC or SD memory cards: By Panasonic, SanDisk, and TOSHIBA.
- MMCplus: By Transcend.
●
If other media are used, they may fail to record data correctly, or they
may lose data that has already been recorded.
●
For movie recording, use a memory card that supports faster write
speed (at least 2MB/s).
SDHC (Secure Digital High Capacity) memory card
●
SDHC memory card complies with the new SD
specifi cation Ver.2.00. This latest specifi cation was
established by the SD Card Association to realize
data capacity over 2GB.
●
The SDHC memory card supports a mechanical
write-protection switch. Setting the switch prevents
accidental erasure of fi les recorded on the SDHC
memory card. To enable writing, move the switch
up to the direction of terminals. To set write
protection, move the switch down.
●
SDHC memory cards cannot be used with current
SD enabled host devices.
MMCplus (Multi Media Card plus)
●
In the case of MMCplus, they have no protection
tab, so please use the protect function in the
page 78
menu.
<MMCplus>
<SDHC memory card>
<Usable memory cards>
选择适合的存储卡
您可以使用SDHC和MMCplus存储卡。
•
- 您也可以使用SD存储卡,但是仍然推荐您在该高清数码摄
像机上使用
(支持最大为2GB的存储卡。)
不支持MultiMediaCards (MMC)存储卡。
•
使用本高清数码摄像机您可以选择的存储卡存储容量范围值
•
为:128MB ~ 32GB
兼容的介质:
•
列出的介质可以保证本高清数码摄像机的正常运行。
其他存储介质不能保证及其的正常运行使用,所以请慎重购买
存储介质。
-
SDHC或SD
-
和
如果使用其他存储介质,可能会导致录制的文件丢失或者损坏。
•
建议在录制影音的时候使用写入速度较快的存储卡。(最少2MB/s).
•
SDHC(Secure Digital High Capacity)
Terminals
Protection
tab
SDHC和MMCplus
.
存储卡:由
MMCplus
存储卡:由
•
•
•
MMCplus (Multi Media Card plus)
•
Panasonic, SanDisk, 和 TOSHIBA
Transcend
SDHC存储卡相当于规格为Ver.2.00的新SD卡。
该最新的规格已经由SD卡协会证实数据容量在
。
2GB
SDHC存储卡具备写保护开关。设置SDHC存储卡
的写保护开关以防止文件被偶然删除。设置为可以
擦写,由终端向上移动开关。设置写保护,则向
下移动开关。
SDHC存储卡无法被使用在当前可以使用SD卡的
设备上。
MMCplus存储卡没有写保护片,请在菜单选项设置
保护功能。
存储卡。
。
。
存储卡
存储卡
第78页
29_ English
中文 _29
Page 38

before recording
Common cautions for memory card
●
Damaged data may not be recovered. It is recommended you back-up
important recordings separately on your PC’s hard disk.
●
After you modify the name of a file or folder stored in the memory card using
your PC, your camcorder may not recognise the modified file.
Handling a memory card
●
It is recommended that you switch off before inserting or removing the
memory card to avoid data loss.
●
It is not guaranteed that you can use a memory card formatted by other
devices. Be sure to format your memory card using this camcorder.
●
Memory cards need to be formatted on this camcorder before use.
●
If you cannot use a memory card that has been previously used with
another device, format it on your HD camcorder. Note that formatting erases
all information on the memory card.
●
A memory card has a certain life span. If you cannot record new data, you
have to purchase a new memory card.
●
Do not bend, drop, or cause a strong impact to your memory card.
●
Do not use or store in a place that has a high temperature and humidity or
a dusty environment.
●
Do not place foreign substances on the memory card terminals. Use a soft
dry cloth to clean the terminals if required.
●
Do not put any additional labels on the memory card.
●
Be careful to keep the memory card out of the reach of children who might
swallow it.
Note on use
●
Samsung is not responsible for data loss due to misuse.
●
We recommend using a memory card case to avoid losing data from
moving and static electricity.
●
After a period of use, the memory card may become warm. This is normal,
not a malfunction.
录制之前
有关存储卡的注意事项
损坏的数据不可以恢复。推荐您将重要的数据另外在电脑上进行备
•
份。
•
如果使用电脑修改文件或者文件夹的名称,数码摄像机也许不能识
别被修改后的文件。
存储卡的操作事宜
建议您在插入或取出存储卡之前将电源关闭,以免保存的数据丢
•
失。
•
使用其他设备可能无法格式化存储卡。请务必使用本数码摄像机对
您的存储卡进行格式化。
•
在使用之前,请使用本数码摄像机对存储卡进行格式化。
•
如果不能使用在其他设备上已经被格式化的存储卡,请使用本数码
摄像机对存储卡进行格式化。注意该格式化操作将会删除存储卡上
的所有数据。
存储卡具有特定的寿命。如果您长时间使用它,您可能无法录
•
制新的资料。在此情况下,您需要购买新的存储卡。
请勿将存储卡弯折,掉落或者使它受到强烈的撞击
•
•
请勿在炎热,多尘或者潮湿的环境中使用或储存。
•
切勿让存储卡的终端堆积异物。如有必要,请用干燥的软布来清洁
终端。
•
除了标签,不要在标签粘贴处粘贴其他任何东西。
•
请将存储卡放在儿童触及不到的地方,以免被儿童误吞。
注意
由于操作错误导致的数据丢失,三星公司概不负责。
•
•
为了防止由于挪动存储卡以及静电造成的数据丢失,我们建议您适
用存储卡盒。
•
使用过一段时间之后,存储卡可能会发热。这是正常现象,不是故
障。
30_ English
中文 _30
Page 39

recording
Basic procedures to record a movie or photo image are described below
and on the following pages.
RECORDING MOVIE IMAGES
● You can record movie images in Movie mode only.
● This HD camcorder provides two Recording
start/stop buttons. One is on the rear side of the
camcorder and the other is on the LCD panel.
Select the Recording start/stop button that
works best for you.
1. Turn the HD camcorder on.
● Connect a power source to the HD
camcorder. (A battery pack or an AC power
page 13,16
adaptor)
● Slide the POWER switch downward to turn
the HD camcorder on.
● Set the appropriate storage media.
(SC-HMX10A/HMX10C/HMX10CN/
HMX10ED only)
(If you want to record on a memory card,
insert the memory card.)
2. Check the subject on the LCD screen.
● Set the Lens open/close switch to open
(). page 8
3. Press the Recording start/stop button.
● The recording (
recording will start.
● To stop recording, press the Recording
start/stop button again.
4. When recording is fi nished, turn the HD
camcorder off.
page 26
) indicator will display, and
page 17
00:00:10 [44Min]
00:00:10 [44Min]
录制
以下为您介绍录制影音文件的基本操作步骤。
录制影音文件
仅可以在影音模式下录制影音图像。第17页
•
80
MIN
•
本高清数码摄像机为您提供两个录制开始/停
止按钮。一个在数码摄像机的背面,另一个在
LCD控制板上。根据用途选择适合操作的录制
开始/停止按钮。
1. 开启高清数码摄像机。
连接电源至高清数码摄像机。
•
(安装电池组或连接交流电源适配器)
第13,16页
•
向下滑动POWER电源开关开启高清数码
摄像机。
•
选择适当的存储介质。
(仅限SC-HMX10A/HMX10C/HMX10CN/
HMX10ED)
卡记录文件,请插入存储卡。)
2. 对准想要录制的主题。
将镜头开/关转换器切换到打开状态()。
•
第8页
3. 按下录制开始/停止按钮。
屏幕上显示正在录制的指示图标(),并且
•
开始进行录制。
•
80
Min
再次按下录制开始/停止按钮,停止录影。
4. 完成录制,关闭数码摄像机。
第26页 (如果您想使用存储
31_ English
中文 _31
Page 40

recording
录制
● Movie images are compressed in H.264 (MPEG-4.AVC)
format.
● Eject the battery pack when you have finished recording to
prevent unnecessary battery power consumption.
● For on-screen information display, see page 18.
● For approximate recording time, see page 28.
● You can record movie images using the remote control.
● Sound is recorded from the internal stereo microphone on the
front of the HD camcorder. Take care that this microphone is
not blocked.
● Before recording an important movie, make sure to test the
recording function by checking if there is any problem with the
audio and video recording.
● For various functions available during recording, see
“RECORDING MENU ITEMS” on pages 52-64.
● Do not operate the power switch or remove the memory card
while accessing the storage media. Doing so may damage
the storage media or the data on storage media.
● If the power cable/battery is disconnected or recording is
disabled during recording, the system is switched to the data
recovery mode. While data is being recovered, no other
function is enabled. After data recovery, the system will be
switched to the STBY mode. When the recording time is
short, the data may fail to be recovered.
● Settings and Storage menu are not available during
recording.
影音图像被压缩在H.264(MPEG-4.AVC)格式。
•
为防止电池电量的耗费,建议您在完成录制之后将电池
•
组取出。
•
屏幕上显示信息。请参见第18页。
•
录制时间的近似值。请参见第28页。
•
您可以使用遥控器录制影音图像。
•
高清数码摄像机的内置麦克风记录声音。请注意麦克风
前面不要有任何遮挡。
•
录制一段重要的影音文件之前,请对录制功能进行测
试。确保音频和视频录制没有任何问题。
•
在录制影音文件的时候可使用的功能。参见第52-64页的
“录制菜单选项”。
在访问存储介质的时候不要开关电源或者移动存储卡。
•
那样做会损坏存储卡中的数据或者对存储卡本身造成损
坏。
如果在录制期间拔下电源线/拆下电池或不能进行录制,
•
系统就会切换到数据恢复模式。在恢复数据的过程中,
其它功能不可使用。在数据恢复后,系统将会切换到待
机模式。如果录制时间很短,则可能无法转换数据。
•
设置和存储菜单在录制的过程中不起作用。
32_ English
中文 _32
Page 41
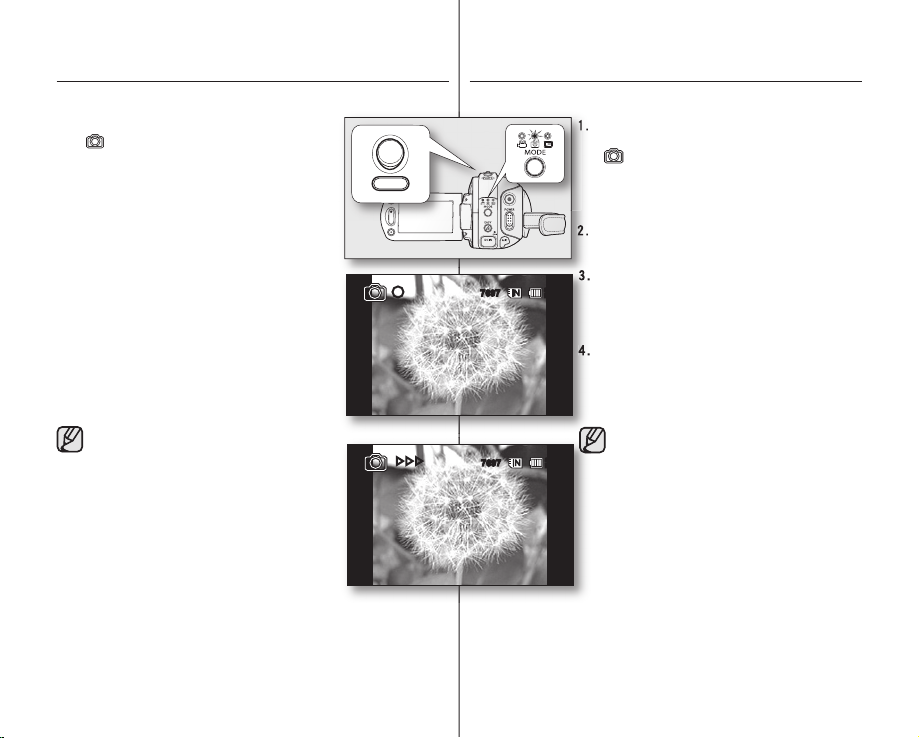
TAKING PHOTO IMAGES
●
You can take photo images in Photo mode only. page 17
1. Slide the POWER switch downwards to turn on the
power and press the MODE button to set Photo
( ). page 17
●
Set the appropriate storage media.
(SC-HMX10A/HMX10C/HMX10CN/HMX10ED
only) page 26
(If you want to record on a memory card, insert
the memory card.)
2. Check the subject on the LCD screen.
●
Set the Lens open/close switch to open (
page 8
3.
Press the PHOTO button halfway down (half press).
●
The HD camcorder automatically focuses on
the subject at the center of screen (when auto
focus is selected).
●
When the image is in focus, the (
displayed in green.
4. Press the PHOTO button fully down (full press).
●
A shutter sound is heard. When the (
indicator disappears, the photo image has been
recorded.
●
While saving the photo image on the storage
media, you cannot proceed with the next
recording.
●
The number of photo images that can be stored
depending on the image quality or the image
size. For details, see page 28.
●
The photo image is taken only in the 4:3 aspect
ratio as shown in the right illustration.
●
Audio will not be recorded with the photo image
on the storage media.
●
If focussing is diffi cult, use the manual focus
function.
page 56
the memory card while accessing the storage
media. Doing so may damage the storage
media or the data on storage media.
camcorder conform to the “DCF (Design rule
for Camera File system)” universal standard
established by the JEITA (Japan Electronics and
Information Technology Industries Association).
cameras: Image fi les can be used on all digital
devices conforming to DCF.
●
Do not operate the POWER switch or remove
●
Photo image fi les recorded by your HD
●
DCF is an integrated image-fi le format for digital
33_ English
) indicator is
拍摄照片
仅可以在拍照模式下拍摄照片图像。第17页
•
1. 向下滑动POWER电源开关,打开电源并且
按下MODE模式按钮设置到照片模式
( )。第17页
选择适当的存储介质。
•
(仅限SC-HMX10A/HMX10C/HMX10CN/
HMX10ED)
卡记录文件,请插入存储卡。)
).
7697
)
2. 对准想要拍摄的主题。
将镜头开/关转换器切换到打开状态().
•
第8页
3. 半按PHOTO按钮。(按下一半)
80
Min
高清数码摄像机自动在显示屏的中心位置聚
•
焦要拍摄的主题。(当选择自动聚焦时).
•
聚焦图像成功时,屏幕上的指示图标 (
示为绿色。
4. 完全按下PHOTO按钮。(完全按下)
可以听到快门音。当屏幕上显示指示图标
•
(
•
在保存照片图像期间,您不能够进行下一次
的拍摄。
•
►► ►
7697
80
Min
•
摄照片图像。
•
•
•
•
•
第26页 (
如果您想使用存储
)显
)时,照片图像被记录。
根据图像的质量或图像大小确定可存储
的照片图像数量。详情请参见第28页。
依照正确的图示,仅可在4:3高宽比下拍
存储介质上,照片文件不会记录下声音。
如果聚焦困难,请使用手动聚焦。
第56页
在访问存储介质的过程中,请不要操作
POWER
电源开关或移除存储卡。以
免造成存储卡本身或保存在卡上的数
据损坏。
高清数码摄像机拍摄的照片图像文件符
合 JEITA(日本电子与信息产业协会)
创立的 “ DCF(相机文件系统设计规
则)”通用标准。
DCF是数码相机的联合图像文件格式:
图像文件可以使用在所有符合DCF通用
标准的数码设备上。
中文 _33
Page 42
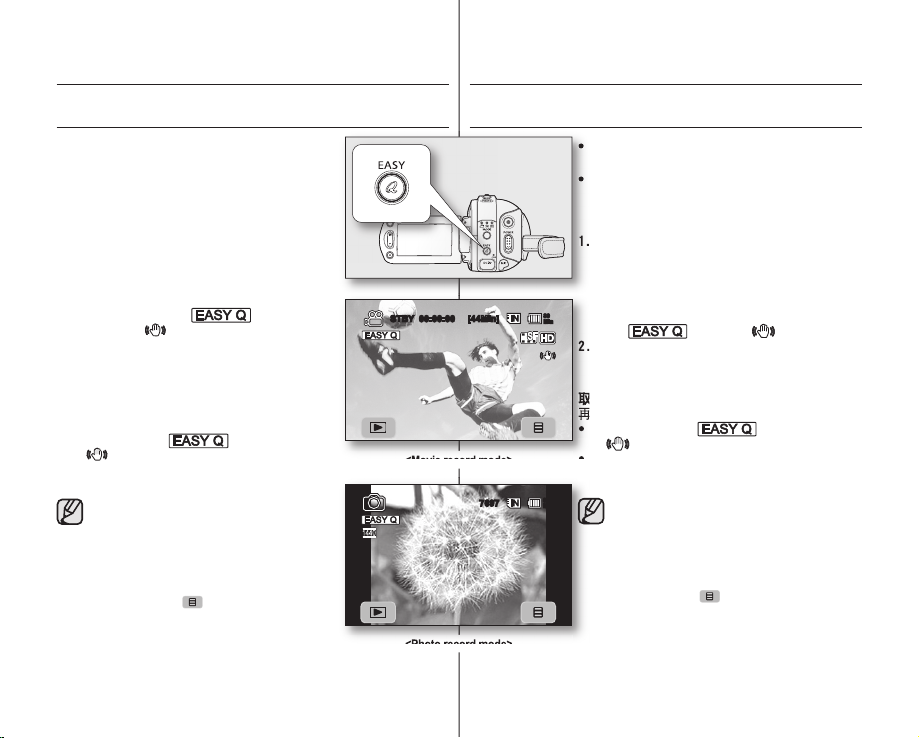
recording
(
前的设定。
RECORDING WITH EASE FOR BEGINNERS
(EASY Q MODE)
●
The EASY Q function is only available with the
Movie and Photo modes.
●
With the EASY Q function, most of the HD
camcorder settings are automatically adjusted,
which relieves you of detailed adjustments.
1. Press the EASY Q button.
●
When you press the EASY Q button, most
functions become off and the following
functions are set to “Auto.”
(scene mode(AE), White Balance,
Exposure, Anti-Shake, Focus, Shutter).
●
The EASY Q "(" ")" and Anti-
shake (
screen at the same time.
2. To record movie images, press the Recording
start/stop button. To take photo images, press
the PHOTO button.
To cancel the EASY Q mode
Press the EASY Q button again.
●
The EASY Q "(" ")" and Anti-shake
( ) indicators disappear from the screen.
●
Almost all the settings will return to the settings
that were set prior to activating EASY Q mode.
● Buttons unavailable during EASY Q
The following buttons and control are
● Cancel EASY Q function if you want to
● Anti-shake is available only in the movie
34_ English
) indicators appear on the
operation
unavailable because the items are
automatically set. The “Release the
Easy.Q” messages may appear if
unavailable operations are attempted.
-
MENU ( ) tab / Q.MENU button / etc.
- See page 108 for the list of
unavailable functions.
add any effect or settings to the images.
record mode.
page 17
录制
方便初学者录制(EASY Q模式)
STBY 00:00:00 [44Min]
<Movie record mode>
7697
<Photo record mode>
EASY Q功能仅可在影音模式和照片模式使用。
•
第17页
•
使用EASY Q功能,高清数码摄像机的大多数
拍摄设定都自动被调节,这将让您免去繁琐的
调节步骤。
1. 按下
EASY Q
当您按EASY Q按钮,多数功能将被关闭并且
•
80
•
Min
80
Min
同时,屏幕上显示 EASY Q
"("
2. 录制影音图像,按下录制开始/停止按钮。
拍摄照片图像,按下
取消
EASY Q
再次按下
屏幕上EASY Q "(" ")" 和防震动
•
(
•
几乎所有的设置将返回到使用EASY Q模式之
前的设定。
按钮。
列出的功能将被设置为
(场景模式 (AE
焦,快门)。
模式
EASY Q
按钮。
“Auto.”(自动)。
), 白平衡,曝光,防震动,聚
PHOTO
按钮。
")"和防震动( )指示图标。
)指示图标消失。
在EASY Q模式下,不可使用的按钮。
•
因为一些项目被自动设置,所以下列按钮
和菜单操作会不起作用。
如果尝试不可用的操作,可能会出现相应
“Release the EASY.Q”
的消息
(
))
EASY.Q
( 请退出
MENU ( )
-
- 参见第
•
置,请取消EASY Q功能。
•
108
如果您想要为图像增加任何效果或设
防震动功能只能在影音录制模式下使用。
Q.MENU
导航 /
页故障列表。
按钮 / 等
中文 _34
Page 43
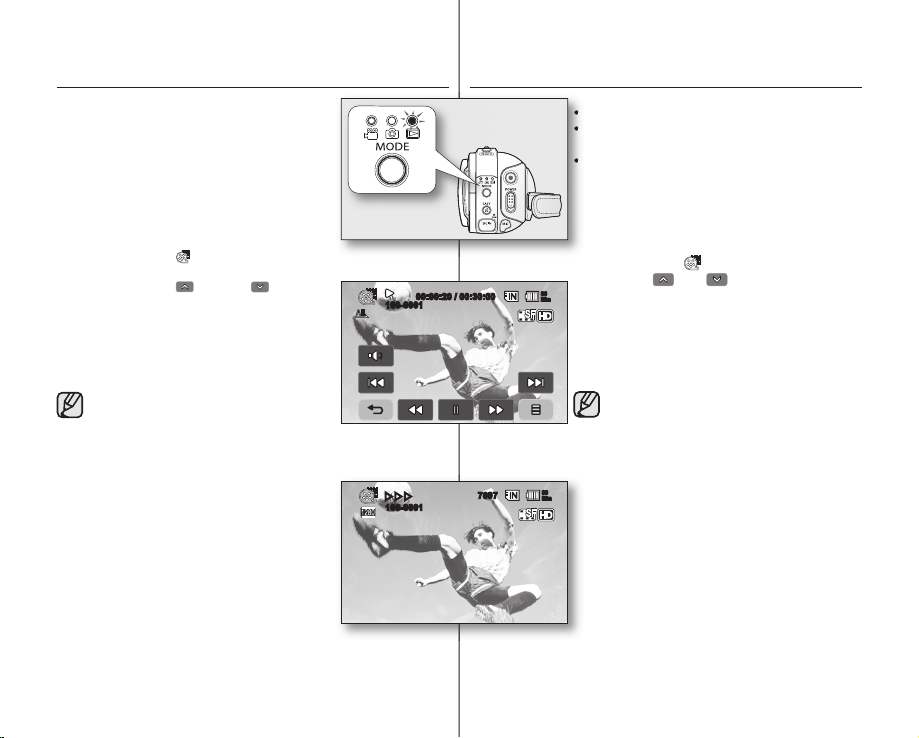
CAPTURING STILL IMAGES DURING MOVIE IMAGE
PLAYBACK
●
This function works only in the Play mode.
page 17
●
If you press the PHOTO button during playback,
it stops playing and saves one image of the
current movie scene that is paused.
●
Set the appropriate storage media.
(SC-HMX10A/HMX10C/HMX10CN/HMX10ED
page 26 (If you want to record on a
only)
memory card, insert the memory card.)
1. Touch the Movie (
●
To change the current thumbnail page,
touch the up (
2. Touch the movie image you want.
3. Press the PHOTO button halfway down.
●
The Playback screen is paused.
4. Press the PHOTO button fully down.
●
The playback screen is paused and the still
image is recorded on the storage media.
● The still images copied from the movie
images to the storage media are saved.
(HD format is saved in 1280x720, SD
format is saved in 720x480)
● Photo images are compressed in JPEG
(Joint Photographic Experts Group)
format.
) tab.
) or down ( ) tab.
00:00:20 / 00:30:00
100-0001
►► ►
100-0001
播放影音图像过程中捕捉静态图像
此功能仅可以在播放模式下使用。第17页
•
如果在播放期间按下PHOTO按钮,图像将会暂
•
停播放并且保存这个当前停留的影音画面。
设置适当的存储介质。
•
(仅限SC-HMX10A/HMX10C/HMX10CN/
7697
HMX10ED)
(如果您想使用存储卡记录文件,请插入存储卡。)
1. 触摸影音导航( )
触摸上( )或下( )导航,切换当前的索
•
80
Min
引图页面。
2. 触摸您想要播放的影音图像。
3. 半按下
将暂停播放屏幕。
•
4. 完全按下
暂停播放并且将静态图像记录在存储介质。
•
80
Min
第26页
PHOTO
PHOTO
从影音图像上复制的静态图像被保存在
•
存储介质。
(HD格式以1280x720保存, SD格式以
720x480保存)
•
照片图像是JPEG (Joint Photographic
Experts Group)压缩格式。
按钮。
按钮。
35_ English
中文 _35
Page 44

recording
您可以通过
使用外置麦克风
连接外置麦克风(假如用户选择)至本高清数码
摄像机的外置麦克风接口。
USING THE EXTERNAL MICROPHONE
Connect external microphone (optional-user provided) to
the external microphone jack of this HD camcorder. Clearer
sound can be recorded. Turn on the switch on microphone
and start recording. Clearer sound can be recorded.
●
This HD camcorder cannot use a plug-in
power type microphone (power supplied from
camcorder).
● The external 3.5 Ø microphone jack can only be
connected to the HD camcorder.
● “Wind Cut” function is not available when using
the external microphone.
ZOOMING
This HD camcorder allows you to record using optical 10x
power zoom and digital zoom with the Zoom lever or the
Zoom button on the LCD panel.
To zoom in
Slide the Zoom lever towards
(Or press the
To zoom out
Slide the Zoom lever towards
(Or press the
●
●
T (zoom) button on the LCD panel.)
W (zoom) button on the LCD panel.)
The farther you slide the Zoom lever, the quicker the
zoom action.
Zoom magnifi cation over 10x is done through digital
image processing, and is, therefore, called digital zoom.
You can achieve up to 20x magnifi cation by using digital
zooming. Set “Digital Zoom” to “On.”
●
Focussing may become unstable during
zooming. In the case, set the zoom before
recording and lock the focus by using the
manual focus. page 56
●
During digital zoom, the image quality may
suffer.
●
Macro shooting is possible as close as approx.
3 cm (1.2”) to the subject when the Zoom lever
is set all the way to
●
When you zoom into a subject close to the lens,
the HD camcorder may automatically zoom out
depending on the distance to the subject. In this
case, set “Tele Macro” to “On.” page 59
T (telephoto).
W (wide-angle).
page 62
W.
录制
To external microphone jack
W : Wide angle T : Telephoto
STBY 00:00:00 [44Min]
80
Min
使用外置麦克风
连接外置麦克风(假如用户选择)至本高清数码
摄像机的外置麦克风接口。
可以录制清晰的声音。打开麦克风然后开始录
制。可以录制清晰的声音。
本高清数码摄像机不能使用外接电源类型的麦克风。
•
(摄像机提供电源)
仅3.5 Ø的麦克风接口能够与本高清数码
•
摄像机连接。
•
当使用外置麦克风的时候,
“Wind Cut”(风声消除)功能不起作用。
变焦
您可以通过变焦控制杆或是LCD控制板上的
变焦按钮选择10x光学变焦和数字变焦进行
录制。
推近
将变焦控制杆滑向T端(远距)。
(或者按动LCD控制板上的
拉远
将变焦控制杆滑向W端(广角)。
(或者按动LCD控制板上的
使用变焦控制杆,更快地进行变焦控制。
•
•
数字变焦是通过数字图像处理来完成超过
10x
变焦放大率的。使用数字变焦最多可
放大20倍。设置
为“On”(打开)。第62页
焦)
在变焦的过程中聚焦也许不会稳定。
•
在这种情况下,建议您在录制和锁定聚焦之前进
行手动聚焦。
•
如果使用数字变焦则会对影音文件的质量造成
一定的影响。
当变焦控制杆始终设置在W端,近拍对焦到被摄
•
主题的距离可能会缩小至大约3 cm (1.2”)
•
当您将镜头迅速推近被摄主题时,本高清数
码摄像机也许自动拉远与被摄主题的距离。
在这种情况下,设置“Tele Macro”(远程微
为“On”(打开)。第59页
距)
T(变焦)按钮)
W(变焦)按钮)
“Digital Zoom”(数字变
第 56页
。
36_ English
中文 _36
Page 45

SELF RECORD USING THE REMOTE CONTROL
从
●
The SELF TIMER function works only in Movie
and Photo modes.
●
When you use the SELF TIMER function on the
remote control, recording begins automatically in
10 seconds.
1. Press the SELF TIMER button.
●
The (10) indicator is displayed.
2. To record movie images, press the REC button.
To take photo images, press the PHOTO button.
●
Self timer starts counting down from 10. At
this moment, recording indicator blinks with
beep sound.
●
At the last second of the countdown,
recording starts automatically.
●
If you want to cancel the self timer function
before recording, press the SELF TIMER,
REC or PHOTO button again.
● Do not obstruct the remote control
sensor by putting obstacles between the
remote control and HD camcorder.
● The remote control range is 4 to 5 m
(13 to 17 ft).
●
The effective remote control angle is up to
30 degrees left /right from the center line.
● Using a tripod (not supplied) is
recommended during self record.
page 17
使用遥控器进行自拍
[44Min]10
<Movie record mode>
769710
<Photo record mode>
自拍延时功能仅可在影音和照片模式下使用。
•
第17页
•
当您使用遥控器上的自拍延时功能,录制将自动
从10秒钟后开始。
1. 按下SELF TIMER按键。
屏幕上显示(
•
2. 按下REC按键,录制影音图像。
按下PHOTO按键,拍摄照片图像。
自拍延时从10开始倒数。此时,录制指示图
•
标闪烁并且伴有蜂鸣音。
•
倒数一秒后,录制自动开始。
•
80
Min
80
Min
如果要在开始录制之前停止自拍定时功能,
再次按下SELF TIMER
钮。
•
•
•
左/右30度。
•
供)。
10
)指示图标。
在遥控器和高清数码摄像机之前不要有任
何障碍阻挡遥控传感器。
遥控器的使用范围是
遥控器的有效遥控角度是从中心线向
推荐您在自拍的时候使用三脚架(未提
、REC或PHOTO 按
4到5 m (13到17ft).
37_ English
中文 _37
Page 46
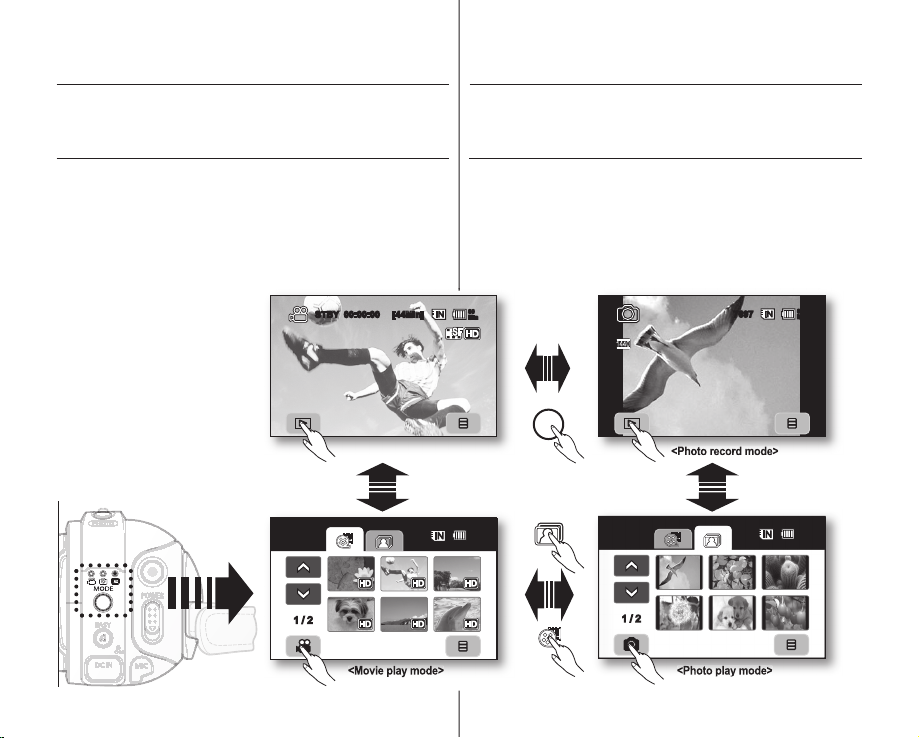
playback
You can view recorded movie and photo images in the thumbnail index
view and play them in various ways.
CHANGING THE PLAYBACK MODE
●
You can set the movie recording, the photo recording and the
play mode in turn with MODE button.
●
You can switch the play mode to the recording mode in turn by
touching the tab on the lower left of the LCD screen.
●
The recorded movie and photo images are displayed in the
thumbnail index view.
播放
您可以通过索引画面查看录制的影音以及照片图像,并且通过各
种方式播放它们。
切换到播放模式
您可以通过MODE模式按钮设置为影音录制模式,拍照模式以及播
•
放模式。
•
触摸LCD屏幕左下角中的导航键可从播放模式切换回录制模式。
录制的影音和照片图像以索引图的形式显示。
•
38_ English
STBY 00:00:00 [44Min]
<Movie record mode>
1 / 2
<Movie play mode>
80
Min
MODE
<Photo record mode>
80
Min
1 / 2
7697
<Photo play mode>
80
Min
80
Min
中文 _38
Page 47

PLAYING MOVIE IMAGES
按钮设置到播放模式(
触摸影音导航(
触摸选择想要观看的影音文件。
触摸影音导航(
●
This function works only in the Play mode. page 17
●
You can fi nd a desired movie image quickly using thumbnail
index views.
●
You can also use the playback-related buttons on the remote
page 40
control.
1. Slide the POWER switch downwards to turn on the power and
press the MODE button to set Play (
●
Set the appropriate storage media. (SC-HMX10A/
HMX10C/HMX10CN/HMX10ED only)
want to play from a memory card, insert the memory
card.)
2. Touch the Movie ( ) tab.
●
The thumbnail index view appears.
●
To change the current thumbnail page, touch the up
( ) or down ( ) tab.
3. Touch a desired movie image.
●
The selected movie image is played according to Play
Option setting.
●
Drag your fi nger from left to right to select the previous
image on the LCD screen, reverse to select the next
image.
●
To stop playback and return to thumbnail index view,
touch the Return ( ) tab.
● The play related tabs disappear on the screen a few
● Depending on the amount of data to be played back,
● Movies edited on a PC cannot be displayed on this
● Movies recorded on another camcorder may not be
● The play is paused when you touch the menu
page 64
seconds after the image play back. They reappear
when you touch any point on the screen.
it may take some time for the playback images to
appear.
HD camcorder.
played on this HD camcorder.
( ) tab during playing.
Adjusting the volume
●
Touch the Volume ( ) tab on the LCD screen.
- You can control the volume by using decrease ( ) or
increase ( ) tab on the LCD screen.
- The level can be adjusted anywhere between 00 and 19.
- You can perform the same operation by using the
remote control. (
● You can hear the recorded sound from the built-in
speaker.
● If you close the LCD screen while playing, you will
39_ English
not hear the sound from the speaker.
)
/
).
page 26 (If you
1 / 2
00:00:20 / 00:30:00
100-0001
00:00:20 / 00:30:00
100-0001
播放影音图像
10
本功能仅可在播放模式下使用。第17页
•
您可以通过索引画面迅速地找到想要观看的影音文件。
•
•
您还可以使用遥控器上的与播放有关的按键。
1.
向下滑动POWER电源开关,打开电源并且按MODE模式
按钮设置到播放模式(
选择适当的存储介质(仅限SC-HMX10A/HMX10C/
•
HMX10CN/HMX10ED) 第26页(如果您想使用存储卡
记录文件,请插入存储卡。)
2. 触摸影音导航( )。
屏幕上显示索引画面。
•
80
Min
触摸上( )或下( )导航,切换当前的索引图
•
页面。
3. 触摸选择想要观看的影音文件。
根据播放选项设置播放所选的影音图像。第64页
•
用手指在LCD屏幕上从左向右拖动选择上一个图
•
像,反之则选择下一个图像。
想要停止播放并且返回索引画面,触摸返回导航
•
(
)。
播放开始几秒钟之后,屏幕上与播放有关的导航键便会
80
Min
80
Min
•
消失。当您触摸屏幕上任一点时,导航键会再次显示。
根据播放文件的总数,也许会需要一段反应
•
时间屏幕上才会开始播放。
在电脑上编辑的影音文件在本高清数码摄像
•
机上也许不会正常显示。
在本高清数码摄像机上不能播放使用其它摄
•
像机录制的影音文件。
在播放的过程中,当您触摸菜单导航
•
( )的时候,暂停播放。
调节音量
触摸
LCD
•
显示屏上的音量导航( )。
- 您可以使用
增大音量 (
- 可以在
- 您可以使用遥控器进行相同的操作
您能够通过内置扬声器听到录制的声音。
•
如果在播放的过程中关闭LCD显示屏,您将
•
不会从扬声器听到任何声音。
)。
LCD
显示屏上的减小音量 ( ) 或
) 导航键。
00
至19的范围内任意调节。
第40页
( / )
中文 _39
。
Page 48
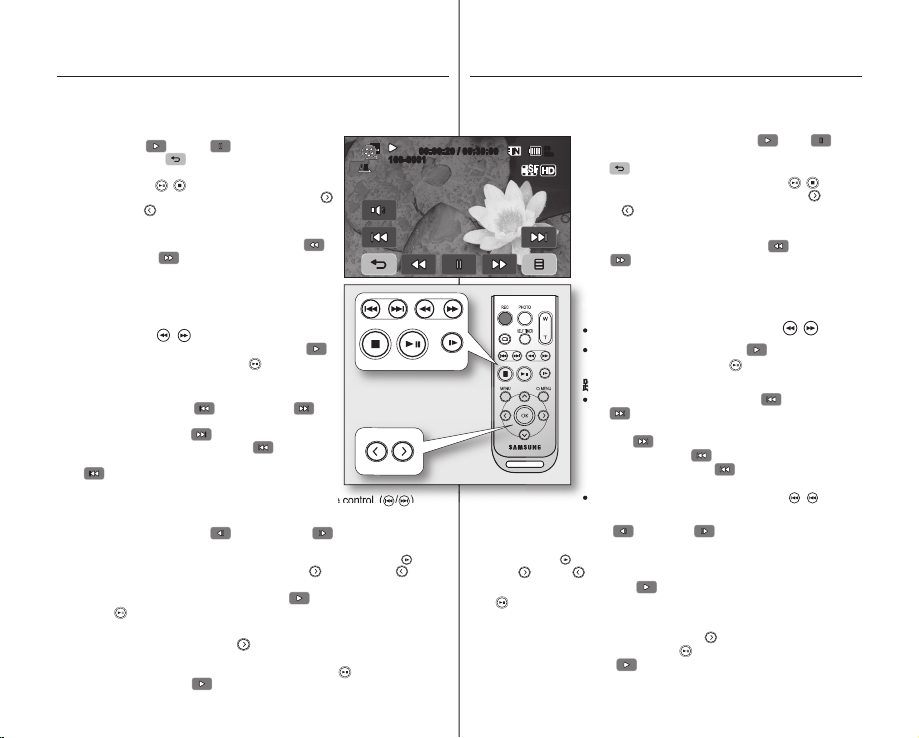
playback
-
跳过播放
Various playback operations
Playback / Pause / Stop
●
Play and Pause functions alternate when you touch
the Playback (
Touch the Return (
●
You can perform the same operation by using the
remote control. (
●
You can change playback direction by using Forward ( )
and Reverse (
Search playback
●
During playback, each touch of Reverse search ( ) /
Forward search (
- RPS (Reverse Playback Search) rate:
x2
- FPS (Forward Playback Search) rate:
x2
●
You can perform the same operation by using the
remote control. (
●
To resume normal playback, touch the Playback ( )
tab or press Playback/Pause button ( ) on the remote
control.
Skip playback
●
Touch the Reverse skip ( ) / Forward skip ( ) tab
during playback.When playing the selected movie, if you
touch the Forward skip (
movie. If you touch the Reverse skip (
the beginning of the movie If you touch the Reverse skip
( ), within 3 seconds from the start of a movie, it
moves to the beginning of the previous movie.
●
You can perform the same operation by using the remote control. ( / )
Slow playback
●
Touching the Reverse slow ( ) / Forward slow ( ) tab while paused will
play the movie forward or reverse at the 1/2x and 1/4x speed.
●
You can play the movie at the 1/2x and 1/4x speed by using the Slow ( ) button
and change playback direction by using Forward (
on the remote control.
●
To resume normal playback, touch Playback ( ) tab or press the Playback/
Pause ( ) button on the remote control.
Frame by frame playback
●
During pause, press the Forward ( ) button on the remote control to begin the
forward frame advance.
●
To resume normal playback, press the Playback/Pause ( ) button.
(Or touch the Playback (
40_ English
)/Pause ( ) tab during playback.
) tab to stop playback.
/ )
) on the remote control during playback.
) tab increases the play speed.
x4 x8 x16 x32 x2
x4 x8 x16 x32 x2
/ )
) tab, it moves to the next
) tab on the screen.)
), it moves to
) and Reverse ( ) button
00:00:20 / 00:30:00
100-0001
播放
各种播放操作
播放/暂停/停止
在播放的过程中,当您触摸播放( )/暂停( )导航
•
80
Min
慢放
暂停播放,触摸向后慢放( ) / 向前慢放( )导航将会以1/2x和1/4x 的速度
•
向前或向后播放。
可以使用慢速(
•
•
逐帧播放
•
•
)和向后( ) 按钮更改播放方向。
向前(
要 继续正常播放,触模 播放 (
( )。
在暂停播放期间,按动遥控器上的控制按键( )开始向前逐帧播放。。
恢复一般播放模式,按下播放/暂停按键(
(或者触摸显示屏上的播放(
时会在播放和暂停功能之间转换。触摸返回导航键
( )停止播放。
•
您还可以使用遥控器进行相同的操作。(
在播放期间,可以使用遥控器上的向前( )和向
•
后( )更改播放方向。
搜索播放
在播放过程中,每次触摸向后搜索( )/向前搜索
•
)导航加快播放速度。
(
- RPS (后退播放搜索)速率:x2 x4 x8 x16
x32 x2
- FPS (前进播放搜索)速率:x2
x32 x2
您可以使用遥控器进行相同的操作。( / )
•
要继续正常播放,触模播放( ) 导航键或按下遥
•
控器上的播放/暂停按钮 ( )
跳过播放
在播放过程中,触摸向后跳过( ) / 向前跳过
•
( )导航。
当正在播放一个存储介质的文件,如果您触摸向前
跳过(
)导航,将会跳到下一个影音文件。如果
您触摸向后跳过(
如果您触摸向前跳过(
点跳到上一个影音文件的起点。
您还可以使用遥控器进行相同的操作。( / )
•
) 按钮来以 1/2 或 1/4 倍速度播放视频,并可使用遥控器上的
)导航。)
),将从此文件的起点开始。
)导 航键 或按 下遥 控器上的播放/暂停 按钮
) 。
x4 x8 x16
。
),三秒钟之内从某一起
/ )
中文 _40
Page 49

VIEWING PHOTO IMAGES
5.
式按钮设置到播放模式(
(
设置幻灯放映功能进行连续显示。
●
This function works only in the Play mode. page 17
●
You can play back and view photo images recorded on the
storage media.
1. Slide the POWER switch downwards to turn on the power and
press the MODE button to set Play ( ).
●
Set the appropriate storage media. (SC-HMX10A/
HMX10C/HMX10CN/HMX10ED only)
want to playback images in a memory card, insert the
memory card.)
2. Touch the Photo (
●
The thumbnail index view appears.
●
To change the current thumbnail page, touch the up
( ) or down ( ) tab.
3. Touch a desired photo image.
4. Touch previous image (
for the desired photo image.
●
To view the previous image, touch the previous image
( ) tab.
●
To view the next image, touch the next image ( ) tab.
●
Drag your fi nger from left to right to select the previous
image on the LCD screen, reverse to select the next image.
●
Place and hold your fi nger at previous image ( )/
next image (
Actually the image number is changed during search
with images not changed.
5.
To return to the thumbnail index view, touch the Return ( ) tab.
● The play-related tabs disappear from the screen a
● Loading time may vary depending on the image size.
● Photo(JPEG) fi les created in the other devices cannot
To view a slide show
Set the slide show function for continuous display.
1. Touch the Menu (
single-image display mode.
●
The menu will appear.
2. Touch “Slide Show.
●
The ( ) indicator is displayed. The slide show will
start from the current image.
●
All images will be played back consecutively for 2~3
seconds each.
●
To stop the slide show, touch the Return ( ) tab.
Slide show is available also in the quick menu. page 51
41_ English
) tab.
)/next image ( ) tab, search
) tab to search for an image quickly.
few seconds after play starts. They reappear when
you touch any point on the screen.
be played back in this HD camcorder.
) tab in the thumbnail index view or
”
page 26 (If you
1 / 2
100-0001
100-0005
查看照片图像
1 / 12
5 / 12
<Slide show>
本功能仅适用于播放模式。第17页
•
您可以播放和查看记录在存储介质上的照片图像。
•
1. 向下滑动POWER电源开关打开电源并且按动MODE模
式按钮设置到播放模式(
设置适当的存储介质。(仅限SC-HMX10A/HMX10C/
•
HMX10CN/HMX10ED)
卡记录文件,请插入存储卡。)
2. 触摸照片导航( )。
屏幕上显示索引画面。
•
•
触摸上(
80
Min
80
Min
页面。
3. 触摸想要查看的照片图像。
4. 触摸上一个图像(
想要查看的照片图像。
触摸上一个图像( )导航,查看上一个图像。
•
•
触摸下一个图像(
用手指在LCD屏幕上从左向右拖动选择上一个图
•
像,反之则选择下一个图像。
用手指按住上一个图像( )/下一个图像( )导
•
航,更快地搜索想要查看的图像。实际上,在搜索期
间,文件编号更改,而图像不变。
5. 想要返回到索引画面,触摸返回导航( )。
播放开始几秒钟之后屏幕上与播放有关的导航
•
键便会消失。当您再次触摸屏幕上的任意点
时,这些导航键即会再次显示。
根据图像的大小确定需要加载的时间。
•
•
使用其他设备拍摄的照片(JPEG)文件不能通
过本高清数码摄像机进行查看。
)。
第26页 (如果您想使用存储
)或下( )导航,切换当前的索引图
)/下一个图像( )导航,搜索
)导航,查看下一个图像。
幻灯放映
设置幻灯放映功能进行连续显示。
80
1. 在索引画面显示或单画面显示模式下,触摸菜单
Min
(
)导航。
屏幕上显示菜单。
•
2. 触摸“Slide Show”(幻灯放映)
屏幕上显示指示图标( )。从当前的图像开始幻
•
灯放映。
间隔2~3秒钟连续播放所有图像。
•
想要停止幻灯放映,触摸返回导航( )。
•
也可以通过快捷菜单使用幻灯放映功能。第51页
中文 _41
Page 50
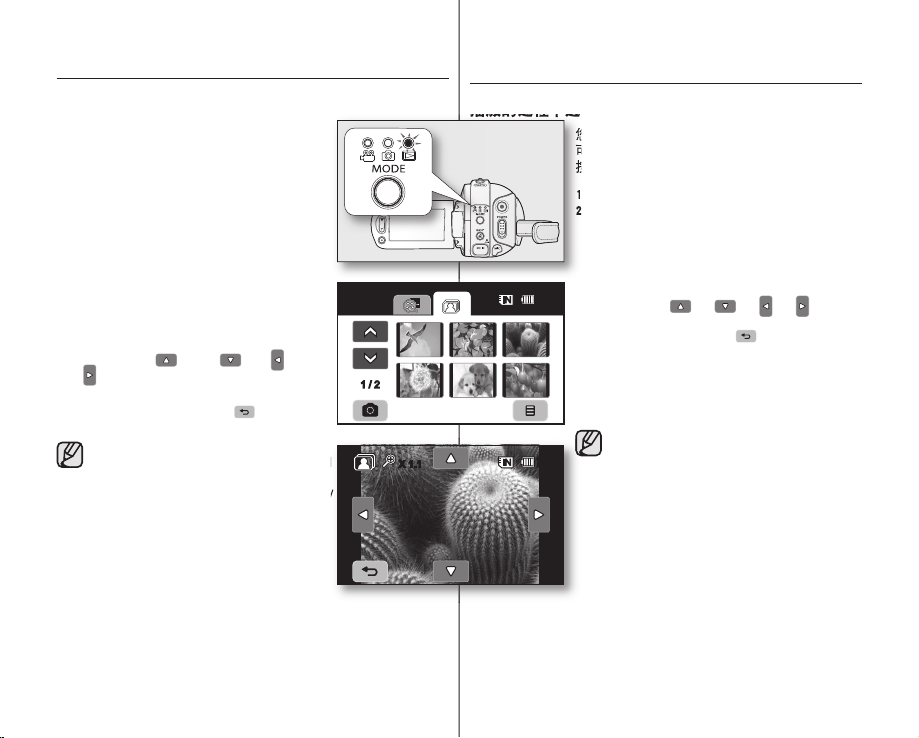
playback
您可以放大图像至原始尺寸的
播放
Zooming during playback
You can magnify the playback image from about
1.1 to 8 times the original size.
Magnifi cation can be adjusted with the Zoom
lever or the Zoom button on LCD panel.
1. Touch the image you want to magnify.
2. Adjust the magnifi cation with
T (Telephoto).
●
The screen is framed and the image
is magnifi ed starting from the center of
image.
●
You can zoom in from X1.1 to X8.0 by
sliding the Zoom lever.
●
While the playback zoom is acting, you
cannot select any previous/next image.
3. Touch the up (
( ) tab to get the part you want in the center
of the screen.
)/down ( )/left ( )/right
W (Wide angle)/
4. To cancel, touch the Return (
● You cannot apply the playback zoom
function to the images that are recorded
on other devices.
● Playback zoom function is available only
in the photo play mode.
) tab.
1 / 2
X 1.1
播放的过程中进行变焦
您可以放大图像至原始尺寸的1.1到8倍。
可以通过调节变焦控制杆或者LCD控制板上的变焦
按钮进行放大。
1. 选择触摸您想要放大的图像。
2. 使用
从图像的中心开始放大。
•
您可以拨动变焦控制杆在X1.1
•
内进行变焦。
在开始播放变焦的过程中,您不能进行选
•
80
Min
80
Min
择上一个/下一
3. 触摸屏幕的上( )/下( )/左( )/右( )导航,
选择想要显示的框架中心点。
4. 想要退出,触摸返回导航(
W (广角)/ T (远距)调节放大。
到X8.0范围
个图像。
)。
使用其它设备拍摄的图像不能进行播放
•
变焦操作。
•
播放变焦功能只能在照片查看模式下
使用。
42_ English
中文 _42
Page 51
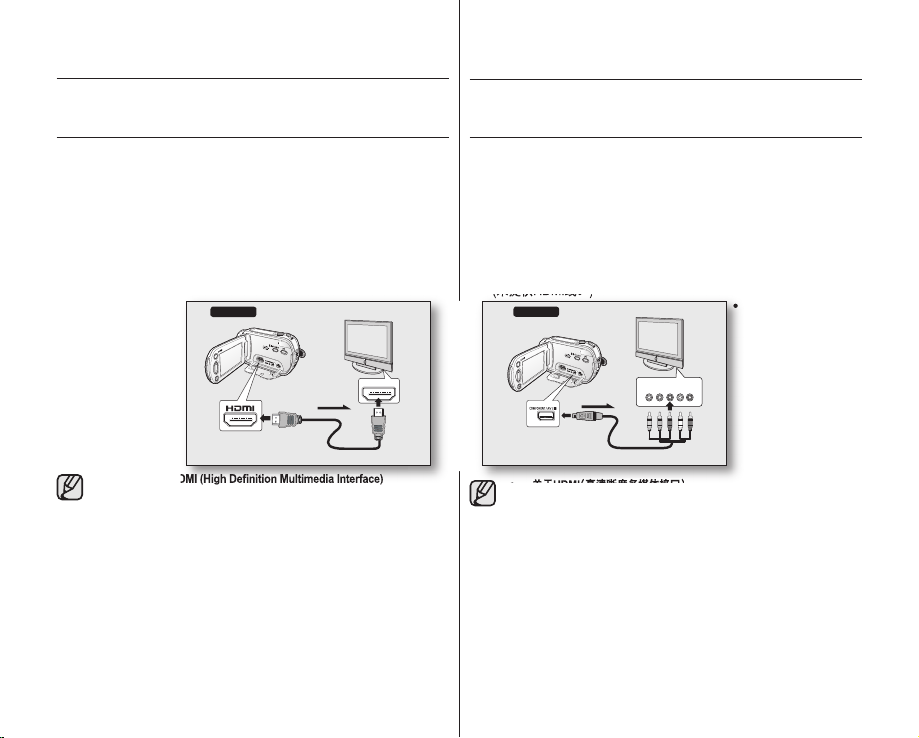
connection
HDMI IN
COMPONENT IN
Y Pb Pr L R
AUDIO IN
COMPONENT IN
Y Pb Pr L R
AUDIO IN
You can view the recorded movie and photo images on a large screen by connecting the HD
camcorder to an HDTV or normal TV.
CONNECTING TO A TV
Before connecting to TV
●
According to TV and cables that are used, the connection method and resolution
can differ.
●
For more information about the connection, refer to the TV user manual.
●
Use the supplied AC power adaptor as the power source. page 16
Connecting to a high defi nition TV
●
To play back the HD-quality (1280x720) movie images, you need a high
defi nition TV (HDTV).
●
Method 1: Connect your HD camcorder to a TV with an HDMI cable. (HDMI
cable is not supplied.)
●
Method 2: Tune
the output signal
for TV using the
“Component Out”
page 71
function.
Method 1
HD camcorder
HD TV
Signal fl ow
连接
您可以将高清数码摄像机连接至高清电视或普通电视观看录制的
影音以及查看照片图像。
与电视机连接
与电视机连接之前
根据电视机以及电缆的使用情况,连接方法和清晰度会有所不同。
•
•
关于连接的相关信息,请参考电视机用户说明书。
•
使用提供的交流电源适配器连接电源。
与高清电视机连接
预播放高清质量(1280x720)的影音图像,您需要一台高清电视机。
•
(HDTV)
•
用HDMI线将高清数码摄像机连接到电视。
方法1:
(未提供HDMI线。)
Method 2
HD camcorder
Signal fl ow
HD TV
第16页
•
方法2: 将电视机的
输出信号调整为使
用“Component
Out”(分量输出)
第71页
功能。
●
About the HDMI (High Defi nition Multimedia Interface)
HDMI jack is an interface to both video/audio signals. HDMI connection
supplies high quality images and sounds.
●
The HDMI jack on your HD camcorder is for output use only.
●
You can use Anynet+ function by connecting the HD camcorder to
Anynet+ supported TV with the HDMI cable. Refer to the corresponding
TV user manual for more details.
●
When the HD camcorder connected to the Anynet+ supported TV with
an HDMI cable turns on, TV automatically turns on. (It is one of the
Anynet+ functions.) If you do not want to use Anynet+ function, set
“Anynet+ (HDMI-CEC)” to “Off.”
●
The Camcorder’s output is fi xed to 480p when a DVI cable is
connected. To hear audio, the audio cable of Component or Multi-AV
cable must be connected.
●
●
When an HDMI cable is connected. it will override all other connections.
HDMI feature can recognize the TV type automatically and adjust the
video output resolution. Manual setting is not necessary.
page 70
43_ English
HDMI cable
Component cable
关于HDMI(高清晰度多媒体接口)
•
HDMI是集合视频/音频信号的接口。HDMI连接为您提供高品质图像
和声音。
高清数码摄像机上的HDMI接口仅为输出信号使用。
•
•
您可以通过HDMI电缆将高清数码摄像机连接至提供Anynet+的电视机,
使用Anynet+功能。详情参考相应的电视机使用说明书。
当在将HDMI电缆连接至提供Anynet+功能的电视机期间开启数
•
码摄像机时,电视机会自动打开(这是Anynet+的功能之一)。如
果不想使用 Anynet+功能,则将“Anynet+ (HDMI-CEC)”设置
为“
Off
”(关闭)。第70页
如果连接了DVI线,则摄像机的输出将固定为480p。要聆听音频,必
•
须连接分量电缆或Multi-AV电缆线。
如果连接了HDMI线,则它会替换所有其他连接。
•
HDMI
功能可自动识别电视类型并调整视频输出分辨率。不需要进行
•
手动设置。
中文 _43
Page 52

connection
COMPONENT IN
Y Pb Pr L R
AUDIO IN
连接至电视机之前,
机的输出信号调整为
COMPONENT IN
Y Pb Pr L R
AUDIO IN
S-VIDEO IN
L R
AUDIO INVIDEO IN
Connecting to a normal TV (16:9/4:3)
●
Even if the movie image is recorded in HD quality, it is played back in
SD quality on the normal TV not HDTV.
●
When playing back the HD-quality (1280x720) movie images on an
SDTV, the images are down-converted to a low quality of 720x480.
●
The multi-AV cable does not support HD-quality images so it down-
converts them to
SD-quality images.
●
Before connecting
your HD camcorder
to a TV, set the same
aspect ratio on your
HD camcorder as on
your TV.
●
Method 1: Tune
the output signal
for TV using the
“Component Out”
function.
●
Method 2: When connecting with Multi -AV cable.
page 70
page 71
● If only a mono audio input is available on the TV set, use the audio
cable with the white jack (Audio L).
● You may use an S-Video jack on the cable to obtain better quality
images if you have an S-Video jack on your TV.
● Even if you use an S-Video jack, you need to connect an audio cable.
● When connecting HDMI, component and multi-AV cables at the
same time, the video output priorities are as follows: HDMI output
Component output
● When connecting your HD camcorder to TV through HDMI, component,
or multi-AV cable, check whether the connections are correctly made.
● When inserting/removing the HDMI, component, and multi-AV cables,
do not apply excessive force.
● When handling the multi-AV cable and component cable, connect it to
have the same colors connected between the cable connectors and TV
jacks.
● It is recommended to use the AC power adaptor as the power source.
● When the HD camcorder is connected to a TV, you cannot control the
volume of the TV from the camcorder.
Method 1
HD camcorder
S-Video output Video output
Normal TV
Signal fl ow
Component cable
连接
与普通电视机连接
即使视频图像是以HD质量录制的,在连接了普通电视时也只能以
•
SD质量播放。
•
当在SD电视机上播放HD质量 (1280x720) 的影音图像时,画面会降
低质量为720x480
•
multi-AV电缆不支持HD画质,因此使用它将会将画质降低为SD画质
Method 2
•
方法
(16:9/4:3)
。
的图像。
•
在将高清数码摄像机
连接至电视机之前,
请将电视机与高清数
码摄像机调整为相同
的高宽比。
第70页
1:将电视
•
方法
机的输出信号调整为
“Component
使用
Out”(分量输出)
第71页
能。
Signal fl ow
Normal TV
or
Multi-AV cable
HD camcorder
2:通过Multi–AV电缆连接。
如果电视机上仅有一个单音音频输入,请使用音频电缆与白
•
色接口连接(AUDIO L)
•
如果您的电视机拥有S-Video接口,您可以将电缆与
S-Video接口相连以获得更好的图像质量。
•
即使您使用S-Video接口,也仍然需要连接音频电缆。
当与HDMI,分量,multi-AV电缆一起连接,视频输出的顺序
•
是: HDMI输出
•
当您的高清数码摄像机通过HDMI,分量,或multi-AV电缆与
电视机连接时,请检查连接的方式是否正确。
•
•
电视机上同样颜色的接口。
•
•
/移除HDMI,分量和multi-AV电缆时,不要用力过大。
当插入
当使用multi-AV电缆和分量电缆时,用同样颜色的数据线连接
建议您使用交流电源适配器提供电能。
当高清数码摄像机与电视机相连,不能使用摄像机控制音
量。您可以通过电视机控制音量
。
分量输出 S-Video 输出 视频输出。
功
44_ English
中文 _44
Page 53
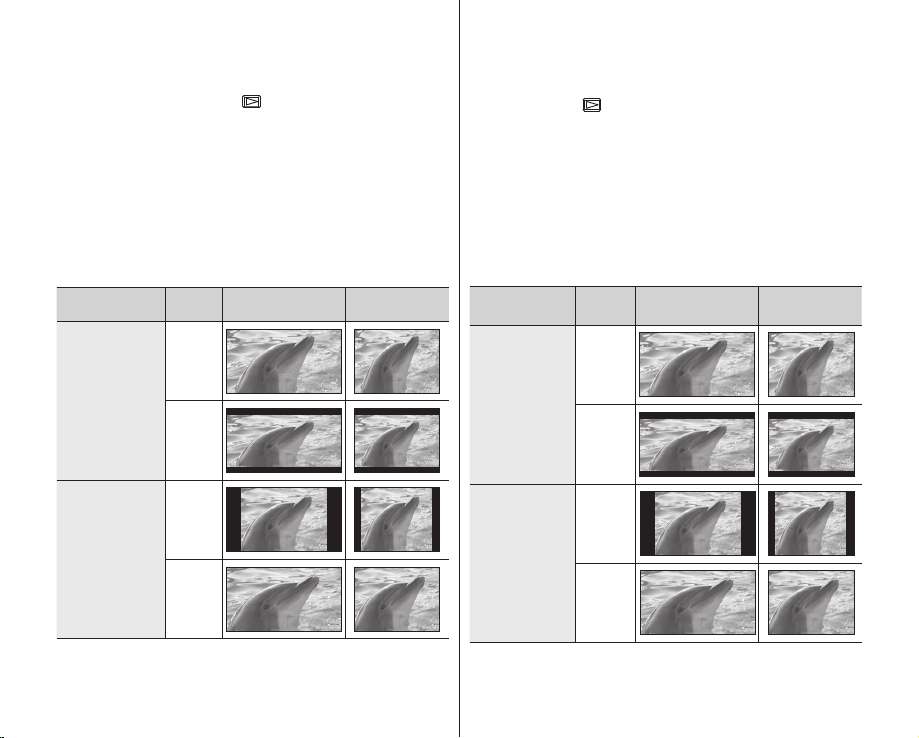
Viewing on TV screen
1. Slide the POWER switch downwards to turn on the power and press
the MODE button to set Play (
2. Turn on the TV and set the input source to the input connection the
HD camcorder is connected to.
●
Refer to TV instruction manual for how to switch the TV input.
3. Perform playback.
●
The image on HD camcorder appears on the TV screen.
●
You can also monitor the image on the LCD screen of the HD
camcorder.
●
You can also perform play, recording or editing in play mode
while viewing on TV screen.
page 39, 41
Image display depending on TV screen ratio
Recording ratio
TV Type
setting
). page 17
Wide (16:9) TV 4:3 TV
在电视上查看
1. 向下滑动POWER电源开关开启摄像机电源并且按动MODE模式按钮
设置到播放模式
2. 打开电视机,然后将输入选择器设置为连接数码摄像机的输入连
接处。
请参阅电视机说明书以了解如何切换电视输入。
•
3. 执行播放。 第39,41页
电视屏幕上显示高清数码摄像机上的图像。
•
•
您还可以通过高清数码摄像机的LCD显示屏同步观看图像。
•
在连接了电视机时,您也可以进行播放,录制或在播放模式下
进行编辑。
根据不同的电视机屏幕高宽比的图像显示
录制的高宽比
( )。第17页
电视机类
宽屏幕(16:9)电视 4:3电视
型设置
Images recorded
in the 16:9 ratio
● Movie images
● Photo capture
images
16:9
4:3
16:9
Photo images
recorded in the
4:3 ratio
4:3
●
Refer to page 70 for “TV Type” setting.
45_ English
Continued
以16:9高宽比录
制图像
影音图像
•
照片捕捉图像
•
以4:3高宽比拍摄
照片图像
参照第70页进行“TV Type”(TV 类型)设置。
•
16:9
4:3
16:9
4:3
继续
中文 _45
Page 54
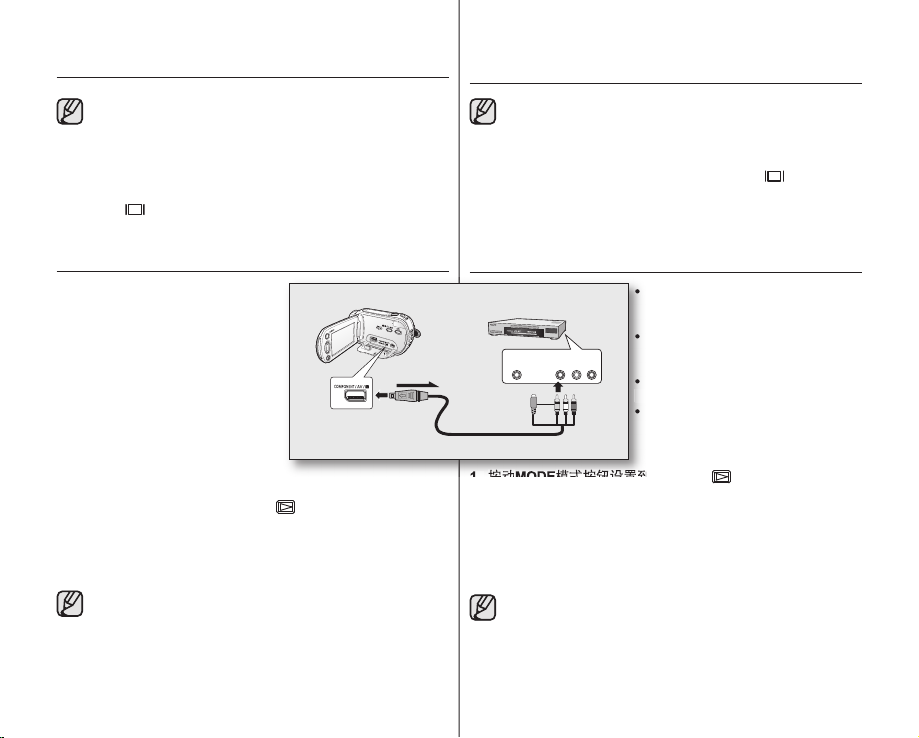
connection
接至其它
S-VIDEO IN
L R
AUDIO INVIDEO IN
● Adjust the sound volume on TV.
● The remote control is useful when operating the HD
camcorder while viewing an image on TV screen.
● Information that the HD camcorder is recording will appear
on the TV screen: You can switch between the on-screen
information display modes. Refer to “Switching the
information display mode” and press the Display
( )/i
CHECK button to switch the display status. page 22
连接
请调节电视机的音量。
•
•
当正在通过电视屏幕进行观看的过程中操作高清数码摄像机
时,遥控器可以使用。
•
高清数码摄像机录制的信息将出现在电视机屏幕上:您也可
以仅显示部分信息或关闭显示。
请参阅“切换信息显示模式”并按下显示
钮以切换显示状态。
第22页
( )/iCHECK 按
DUBBING IMAGES ONTO VCR OR DVD/HDD RECORDER
●
You can dub images played back
on this HD camcorder, onto VCR or
DVD/HDD recorder.
●
Refer to “Editing chapter” to create a
playlist by selecting desired scenes
from those recorded on this HD
camcorder.
●
Use the provided cable to connect
the HD camcorder to the other AV
device
●
If you are using the connected AV
device that has an S-Video output
jack, you can connect the S-Video jack of the Multi-AV Cable.
1. Press the MODE button to set Play (
2. Choose the desired image to be dubbed, then press the record
button on the connected device.
●
page 75
.
).
The HD camcorder will start playback and the recording device
will dub it.
● Using S-Video will deliver clear images.
● Be sure to use the AC power adaptor to power the HD
camcorder to prevent battery power from shutting off during
recording on another video device.
46_ English
HD Camcorder
Signal fl ow
通过VCR或DVD/HDD刻录机复制图像
您可以将在本高清数码摄像机上播放
VCR or DVD/HDD
Multi-AV cable
recorder
or
•
的图像通过VCR
进行图像复制。
请参考“编辑章节”,由本摄像机录制
•
的影音图像中选择想要的场景,进行
创建播放列表。
•
使用提供的电缆将高清数码摄像机连
接至其它AV设备
如果被连接的AV设备有S-Video端
•
子,您可以使用Multi-AV电缆与该
S-Video端子连接。
或DVD/HDD刻录机
第75页
。
1. 按动MODE模式按钮设置到播放模式( )。
2. 选择想要复制的图像,然后按下连接设备上的录制按钮。
高清数码摄像机将开始播放并且刻录设备启动复制。
•
使用S-Video将传递更清晰的图像。
•
•
请务必使用交流电源适配器从家用交流电源插座为数码摄像机
提供电源,以防在其他视频设备上录制时出现因电池电量低
导致断电现象。
中文 _46
Page 55
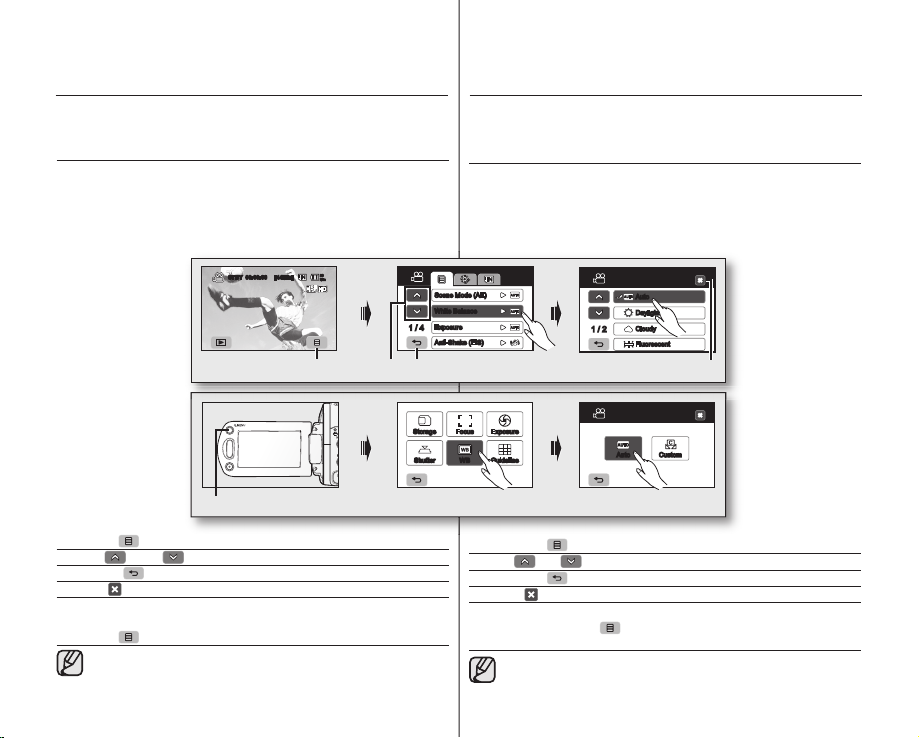
using the menu items
WB
You can use the HD camcorder more usefully by setting menus related to
recording, playback and setting.
HANDLING MENUS AND QUICK MENUS
●
You can change the menu settings to customise your HD camcorder.
Access the desired menu screen by following the steps below and
change the various settings.
●
Using the touch panel, you can easily make your selection and
navigate the menu.
使用菜单选项
您可以通过设置菜单使用更多有关录制,播放和设置的功能。
操作菜单和快捷菜单
•
您可以更改菜单,个性化设置您的高清数码摄像机。按照如下步骤
访问菜单屏幕以及更改各种设置。
•
使用触感控制板,使您更加方便地使用菜单进行选择。
Menu ( ) tab: Use it to enter the menu.
Up (
Return (
Exit (
Q.MENU button: Use it to enter the quick menu.
47_ English
)/down ( ) tab: Use it to change the previous or next page.
) tab: Use it to move to the previous menu or exit from the menu.
) tab: Use it to exit from the menu.
Quick menu provides easier access to frequently used menus without using the
Menu ( ) tab.
●
Menu and quick menu cannot be used in EASY Q mode.
●
Accessible items in menu and quick menu vary depending on the
operation mode. For the accessible items, see pages 49-51.
STBY 00:00:00 [44Min]
80
Min
Scene Mode (AE)
White Balance
Exposure
1 / 4
Anti-Shake (EIS)
Storage Focus Exposure
Shutter WB Guideline
( )
菜单导航
上( )/下( )
( )
返回导航
退出(
)
导航:通过退出导航离开菜单。
Q.MENU
按钮:通过
可以不使用菜单导航
White Balance
Auto
Daylight
Cloudy
1 / 2
Fluorescent
White Balance
Auto Custom
:通过菜单导航进入菜单。
导航:通过上下导航更换上一页或下一页。
:通过返回导航移动到上一级菜单或者退出菜单。
Q.MENU
按钮进入快捷菜单。
( )
,利用快捷菜单更加方便地进入一些经常使用的功
能菜单。
在EASY Q模式下菜单和快捷菜单不能使用。
•
根据操作模式的变化,菜单选项和快捷菜单选项也会有相应的变化。
•
详细的内容,请见第49-51页。
中文 _47
Page 56

using the menu items
2.
上不再显示菜单,退出菜单。
WB
4.
上不再显示菜单,退出菜单。
例如:在影音录制模式下设置白平衡。
2.
✪
Follow the instruction below to use each of
the menu items listed on this page.
For example: setting the White Balance in
movie mode
When using Menu (
1. Touch the Menu (
2. Touch “White Balance.
●
If the item is not on the screen, touch the
up (
down to the next group of options.
3. Touch the desired option.
●
If the item is not on the screen, touch the
up (
down to the next group of options.
4. To exit, touch the Exit (
tab until the menu disappears.
When using the Q.MENU button;
1. Press the Q.MENU button to enter the quick
menu.
2. Touch “WB.”
3. Touch the desired option.
4. To exit, touch the Exit (
tab until the menu disappears.
There are some functions you cannot activate
simultaneously, when using Menu (
or Q.MENU button. You cannot select the
grey menu items on the screen. Refer to the
troubleshooting for examples of unworkable
combinations of functions and menu items.
page 108
) tab;
) tab.
”
) or down ( ) tab to scroll up or
) or down ( ) tab to scroll up or
) tab or Return ( )
) tab or Return ( )
) tab
使用菜单选项
STBY 00:00:00 [44Min]
White Balance
Auto
Daylight
1 / 2
Storage Focus Exposure
Shutter WB Guideline
Cloudy
Fluorescent
White Balance
Auto Custom
80
Min
✪
以下内容为您介绍使用每个菜单项。
例如:在影音录制模式下设置白平衡。
当使用菜单导航(
触摸菜单导航( )。
1.
触摸“White Balance”(白平衡)。
2.
如果屏幕上没有想要的选项,触摸上
•
( )或下( )导航向上或向下滚动至下一
组选项。
3. 触摸想要的选项。
如果屏幕上没有想要的选项,触摸上
•
( )或下( )导航向上或向下滚动至下一
组选项。
4. 触摸退出导航(
上不再显示菜单,退出菜单。
);
)或返回导航( )直到屏幕
当使用Q.MENU按钮;
按Q.MENU按钮进入快捷菜单。
1.
触摸“WB”(白平衡)。
2.
选择想要的选项。
3.
触摸退出导航(
4.
上不再显示菜单,退出菜单。
当使用菜单导航( )或Q.MENU按钮
时,有一些功能不可以同时使用。
不能选择的菜单选项在屏幕上显示为灰
色。详情请参见故障处理。
)或返回导航( )直到屏幕
第108页
48_ English
中文 _48
Page 57

MENU ITEMS
●
Accessible items in menu vary depending on the operation mode.
●
For operation details, see the corresponding page.
Recording menu items ( )
Operating mode
Scene Mode (AE)
Resolution
Cont. Shot
White Balance
Exposure
Anti-Shake (EIS)
Digital Effect
Focus
Shutter
Tele Macro
Quality
Wind Cut
Back Light
Fader
Digital Zoom
Movie (
X
X
)
Photo (
X Off 55
X Off 56
X Auto 58
X
X Off 60
X Off 61
X Off 62
X : Not possible
Default value Page
)
1440x1080 63
(HD) Super
Playback menu items ( )
Operating mode
Play Option
Slide Show
Delete
Protect
Copy*
Move*
Partial Delete
Divide (thumbnail
index view only)
Edit
Combine
(thumbnail index
view only)
Cont. Capture
Print Mark (DPOF)
(Memory card only)
File Info (single display
mode only)
Movie (
X
X
)
Photo (
)
X Play All 64
X - 72
X - 73
X - 74
X Off 64
49_ English
: Possible
Auto 52
Off 63
Auto 53
Auto 54
Auto 56
Off 59
Fine
Off 61
Default
Page
value
- 41
- 79
- 78
- 80
- 81
- 82
- 65
菜单选项
•
•
录制菜单选项 ( )
60
播放菜单选项 ( )
根据操作模式的变化,菜单选项也会有相应的变化。
详细的操作细节,请参看对应页的内容。
影音 (
操作模式
Scene Mode (AE)
(
场景模式
Resolution(
Cont. Shot(
连续拍摄
White Balance(
Exposure(曝光)
Anti-Shake (EIS)
(
防震动
Digital Effect(
Focus(聚焦)
Shutter(快门)
Tele Macro(
远程微距
Quality(质量)
Wind Cut(
风声消除
Back Light(
背光补偿
Fader(
淡化器
Digital Zoom(
操作模式
Play Option(
播放选项
Slide Show(
幻灯放映
Delete(删除)
Protect(保护)
Copy(复制)*
Move(移动)*
Partial Delete
(
Edit
Divide(分割)
(编辑)
(
仅限索引画面
Combine(合并)
(
仅限索引画面
Cont. Capture(
Print Mark (DPOF)
(
打印标识
(仅适用于存储卡)
File Info(
文件信息
(
仅限单画面显示模式
(AE))
分辨率
白平衡
(EIS))
数字特效
)
数字变焦
部分删除
连续捕捉
(DPOF))
)
)
)
)
)
)
)
)
)
)
)
)
)
)
)
)
)
X
X
影音 ( )
X
X
)
照片 (
X
X
X
X
X
X
X
)
照片 (
X
X - 72
X - 73
X - 74
X
:
可能
X : 不可能
默认参数 页码
Auto(自动)
1440x1080
Off(关闭)
Auto(自动)
Auto(自动)
Off(关闭)
Off(关闭)
Auto(自动)
Auto(自动)
Off(关闭)
[HD] Super
Fine
([HD]
)
高清晰
Off(关闭)
Off(关闭)
Off(关闭)
Off(关闭)
默认参数 页码
Play All
( 全部播放 )
- 41
- 79
- 78
- 80
- 81
Off
( 关闭 )
- 82
- 65
中文 _49
52
63
63
53
54
55
56
56
58
59
60
60
61
61
62
64
64
Page 58
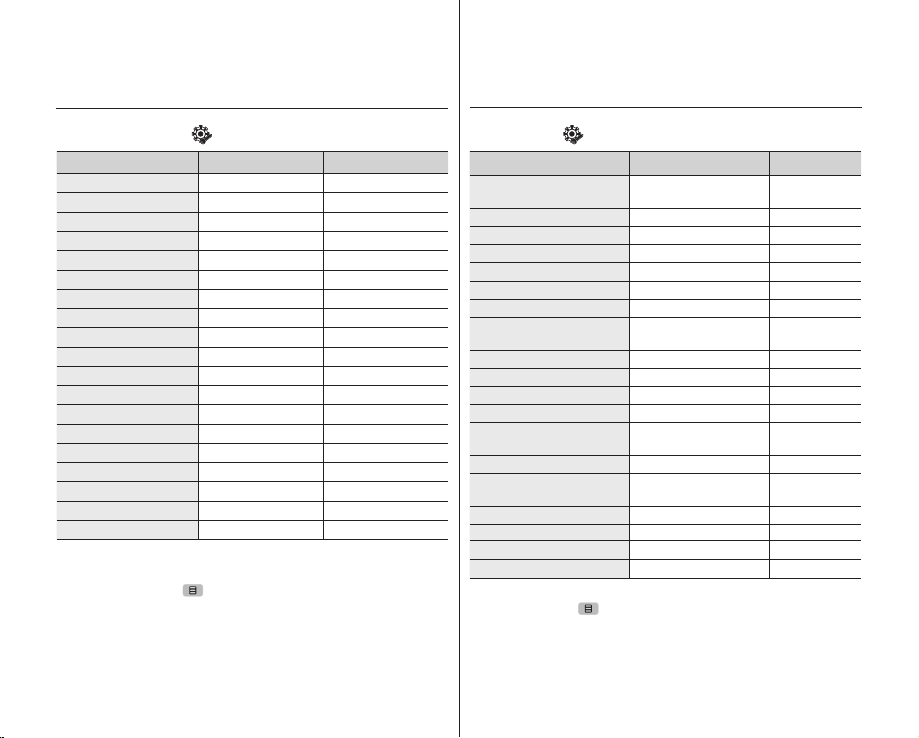
using the menu items
使用菜单选项
Setting menu items ( )
Operating mode Default value Page
Date/Time Set - 66
Date/Time Off 66
File No. Series 66
LCD Control Bright 18 / Contrast 18 67
Storage Info
Format
Beep Sound On 68
Shutter Sound On 68
Auto Power Off 5 min 69
LED Light Off 69
Rec Lamp On 69
Remote On 70
USB Connect Mass Storage 70
TV Type 16:9 70
Component Out Auto 71
Default Set
Language
Demo Off 71
Anynet+ (HDMI-CEC) On 70
●
Some items will not appear depending on the storage media type.
●
There are some functions you cannot activate simultaneously,
when using Menu (
select the menu items that are greyed out on the screen. Refer to
the troubleshooting for examples of unworkable combinations of
functions and menu items.
●
*: only for SC-HMX10A/HMX10C/HMX10CN/HMX10ED.
- 67
- 68
- 71
- 71
) tab or Q.MENU button. You cannot
page 108
50_ English
设置菜单选项 ( )
操作模式 默认参数 页码
Date/Time Set
(日期/
Date/Time (
File No. (
LCD Control (LCD
Storage Info (
Format (
Beep Sound (
Shutter Sound (
Auto Power Off (
LED Light (LED
Rec Lamp (
Remote (
USB Connect (USB
TV Type (TV
Component Out (
Default Set (
Language
Demo(
Anynet+ (HDMI-CEC)
根据存储介质的类型一些选项不会显示。
•
当使用菜单导航( )或Q.MENU按钮时,有一些功能不可以同时使
•
用。不能选择的菜单选项在屏幕上显示为灰色。详情请参见故障处
第108页
理。
*: 仅限SC-HMX10A/HMX10C/HMX10CN/HMX10ED
•
)
时间设置
/时间) Off(关闭)
日期
)
文件编号
格式化
录制指示灯
)
控制
)
存储信息
)
) On(打开)
蜂鸣音
) On(打开)
快门音
) 5 min(5 分钟)
自动断电
) Off(关闭)
灯
) On(打开)
) On(打开)
遥控
) Mass Storage(
连接
)
类型
) Auto(自动)
分量输出
)
默认设置
) Off(关闭)
演示
- 66
Series(连续
18 /
亮度
对比度
- 67
- 68
海量存储
16:9 70
- 71
- 71
)
On(
打开
) 66
18
)
。
中文 _50
66
67
68
68
69
69
69
70
70
71
71
70
Page 59
QUICK MENU ITEMS
●
Accessible items in the quick menu vary depending on the operation
mode.
●
For operation details, see the corresponding page.
Recording menu items
Operating mode
Storage*
Focus
Exposure
Shutter
WB
Guideline
Movie (
)
Photo (
X
: Possible
X : Not possible
Default
)
value
Memory 26
Auto 56
Auto 54
Auto 58
Auto 53
Off 64
Page
Playback menu items
Operating mode
Storage*
Copy*
Delete
Edit
Playlist
Highlight
Slide
●
Some items will not appear depending on the storage media type.
●
There are some functions you cannot activate simultaneously,
when using Menu (
select the menu items that are greyed out on the screen. Refer to
the troubleshooting for examples of unworkable combinations of
functions and menu items.
●
*: only for SC-HMX10A/HMX10C/HMX10CN/HMX10ED.
Movie (
)
Photo ( )
X
) tab or Q.MENU button. You cannot
page 108
Default
Memory 26
X
X
X
value
- 80
- 79
- 72-74
- 76-77
- 65
- 41
Page
快捷菜单选项
根据操作模式的变化,快捷菜单选项也会有相应的变化。
•
•
详细的操作细节,请参看对应页的内容。
录制菜单选项
操作模式
Storage(
存储器
Focus(
聚焦
Exposure(
曝光
Shutter(
快门
WB(
白平衡
Guideline(
指南
)
)
)
)*
)
)
影音 (
)
照片 ( )
X
: 可能
X : 不可能
默认参数 页码
Memory
(内置存储器)
Auto
( 自动 )
Auto
( 自动 )
Auto
( 自动 )
Auto
( 自动 )
Off (关闭) 64
播放菜单选项
X
X
X
默认参数 页码
Memory
(内置存储器)
- 80
- 79
- 72-74
- 76-77
- 65
- 41
。
操作模式
Storage(
Copy(复制)*
Delete(
Edit(
Playlist(
Highlight(
Slide(
根据存储介质的类型一些选项不会显示。
•
当使用菜单导航( )或Q.MENU按钮时,有一些功能不可以同时使
•
用。不能选择的菜单选项在屏幕上显示为灰色。详情请参见故障处
理。
•
*: 仅限SC-HMX10A/HMX10C/HMX10CN/HMX10ED
存储器
删除
编辑
播放列表
突出显示
幻灯片
第108页
)*
)
)
)
)
)
影音 (
X
)
照片( )
26
56
54
58
53
26
51_ English
中文 _51
Page 60

using the menu items
RECORDING MENU ITEMS
You can set up the menu items for movie and photo images recording.
Scene Mode (AE)
This HD camcorder automatically sets the shutter speed and aperture according to
the subject brightness for optimum recording: You can also specify one of five modes
depending on conditions, recording environment or purpose of filming.
Settings Contents
- Auto balance between the subject and the
background.
- To be used in normal conditions.
Auto
- The shutter speed is automatically adjusted from
1/60 to 1/250 per second, depending on the
scene.
- Reduces blurring when recording rapidly moving
subjects such as in golf or tennis.
If the Sports mode is used under a fluorescent
Sports
Portrait
Spotlight
Beach/
Snow
light, the image may flicker. In this case, use the
Auto mode for recording.
- Creates a shallow depth of field so that the
person or subject appears against a softened
background.
- The portrait mode is most effective when used
outdoors.
- The shutter speed is automatically adjusted from
1/60 to 1/1000 per second.
- Prevents overexposure of subject’s face, etc.,
when strong light strikes the subject, as in a
wedding or on stage.
-
Prevents underexposure of subject’s face, etc., in
a place where reflection of light is intense, such
as at the beach in midsummer or on a ski slope.
●
You can check the selected Scene mode on the on-screen information
display. However, nothing will appear in Auto mode.
●
This function will be set to “Auto” in the EASY Q mode.
Onscreen
display
None
使用菜单选项
录制菜单选项
您可以为录制影音以及拍摄照片图像设置菜单选项。
场景模式
为了达到比较好的拍摄效果,根据被拍摄主题的亮度,本高清数码摄像机自动设
置快门速度和光圈:您也可以根据具体情况,录制的环境或目的选择五种模式中
的一种。
(AE)
设置 内容 屏幕显示
-
自动在被摄主题和背景之间平衡。
-
在一般情况下使用。
)
Auto(
自动
-
快门速度在每秒
换,视场景而定。
-
Sports
(运动)
Portrait
(肖像)
Spotlight
(聚光)
Beach/Snow
(海滩/雪地)
•
为自动设置时,屏幕上没有相应的指示图标。
•
用于录制移动着的主题,例如高尔夫球或者网
球。
如果在荧光灯下使用运动模式,图像可能会闪
烁。在这种情况下,请使用自动模式录制。
-
用于突出被摄人物或主题模糊背景。
-
适宜在户外使用。
-
快门速度被自动调节为每秒
-
补偿直接出现在强光下过亮的物体。例如婚礼
或者其他场所。
-
用于反光很强烈的地方。例如盛夏的海边或者
滑雪场。
您可以通过屏幕显示查看当前的场景模式。但是,场景模式
在EASY Q模式下,此功能将被自动设置为“
1/60
1/250
到
的范围内自动变
1/1000
1/60
到
Auto
。
(自动)”。
无
52_ English
中文 _52
Page 61

White Balance
OK
2.
幕上全是白色。
This HD camcorder automatically adjusts the color of subject.
Change the white balance setting depending on the recording conditions.
Settings Contents
Auto
Daylight
Cloudy
Fluorescent
Tungsten
Custom WB
Setting white balance manually;
1. Touch “Custom WB.
●
The “ Set White Balance” indicator is
2. Frame a white object such as a piece of white
paper so that it fi lls the screen.
●
Use an object that is not transparent.
●
If the object that fi lls the screen is not
3. Touch the OK (
●
The white balance setting will be applied and
This option is generally used to control the
white balance automatically.
This controls the white balance according
to the outdoor ambience, especially for
close up and when the subject is of one
dominant color.
This option is used when you make a
recording in cloudy weather.
This option is used when you make a
recording under white fl uorescent lights.
This option is used when the surroundings
are less than 3200K of tungsten lights.
You can manually adjust white balance to
match the light source or situation
”
displayed.
focussed, correct the focus using “Manual
page 56
Focus.”
) tab.
( ) indicator is displayed.
Onscreen
display
None
STBY 00:00:00 [44Min]
白平衡
本高清数码摄像机会自动调整被摄主题的颜色。
您可以根据录制条件更改白平衡设置。
设置 内容
Auto
(自动)
自动控制白平衡。
Daylight
(日光)
Cloudy(阴天)
Fluorescent
(
荧光灯
Tungsten
(
钨丝灯
Custom WB
(
自定义白平衡
White thick
paper
根据室外环境,尤其是接近被摄主题的地
方,适当地调整颜色。
适合在阴天的条件下使用。
适合在荧光灯照明的环境下使用。
)
适合在达不到钨丝灯
下使用。譬如荧光灯。
)
您还可以根据光源等情况手动调节白平
衡。
)
3200K
手动设置白平衡:
“Custom WB(自定义白平衡)”
1. 触摸
显示指示图标“ Set White Balance
•
(设置白平衡)”
2. 将镜头对准一个白色的物体,譬如白纸,使屏
幕上全是白色。
对准的物体不可以是透明的。
•
•
如果不能聚焦该物体,请使用
“
Manual Focus
3. 触摸OK导航键(OK)。
设置的白平衡被启用,并且显示指示图
•
80
Min
标
( )。
。
”(聚焦:手动)。第56页
色温的环境
屏幕显示
Keine
53_ English
中文 _53
Page 62
using the menu items
通过
大
●
A subject can be shot under various types of lighting conditions
indoors (natural, fl uorescent, candlelight, etc.). Because the color
temperature is different depending on the light source, the subject
tint will differ depending on the white balance settings. Use this
function for a more natural result.
●
It is recommended that you specify “Digital Zoom: Off” (page
62) before setting white balance.
●
Do not use a colored object when setting white balance: The
appropriate tint cannot be set.
●
This function will be set to “Auto” in the EASY Q mode.
●
Reset the white balance if lighting conditions change.
●
During normal outdoor recording, setting to auto may provide
better results.
Exposure
The HD camcorder usually adjusts the exposure automatically. You can
also manually adjust the exposure depending on the recording conditions.
Settings Contents
This option automatically adjusts image brightness
Auto
according to the environmental light conditions.
You can adjust the brightness of an image
Manual
manually. Adjust the brightness when the subject
is too bright or too dark.
Setting the exposure manually:
When manually setting the exposure, the default
setting appears as the value is automatically
adjusted according to the environmental light
conditions.
Touch decrease (
adjust the exposure while viewing the image on the
LCD screen.
●
Exposure value can be set between “0” and “29.”
) or increase ( ) tab to
On-
screen
display
None
Exposure
使用菜单选项
录制一个主题可以在室内各种照明设备的环境下进行。(自然
•
光,荧光灯,钨丝灯灯。)。因为在不同光源下的色温有所不
同,所以白平衡设置后会有不同的色彩。使用本功能会得到
更自然的效果。
•
在设置白平衡之前,请将
(第62页).
关闭)
•
不用使用带有颜色的物体设置白平衡。否则设置的色彩将会
不自然。
在EASY Q模式下,此功能将被设置为“
•
•
如果照明条件被改变,请重新设置白平衡。
•
一般的户外录制,设置到自动也许会获得更好的效果。
曝光
本高清数码摄像机通常会自动调节曝光。根据录制的条件,您还可以手
动调节曝光。
设置 内容 屏幕显示
Auto
Manual
26
根据照明环境,会自动调节图像亮度。 无
(自动)
您可以手动调节图像亮度。当被摄主题过
亮或者过暗的时候调整亮度。
(手动)
手动设置曝光:
当手动设置曝光时,根据周围环境的亮度,默认设
置的参数会自动显示在屏幕上。
通过LCD显示屏查看图像时,触摸减小
大( )导航进行调整曝光。
可以设置的曝光参数为从“0”至“29”。
•
“
Digital Zoom: Off
”(数字变焦:
Auto
”(自动)。
( )或增
54_ English
中文 _54
Page 63
Manual exposure is recommended in situations listed below:
●
When shooting using reverse lighting or when the background is too
bright.
●
When shooting on a reflective natural background such as at the
beach or when skiing.
●
When the background is overly dark or the subject is bright.
● If you manually change the exposure value when “Scene
Mode (AE)” function is selected, manual changes are applied
first.
● This function will be set to “Auto” in the EASY Q mode.
Anti-Shake (EIS: Electronic Image Stabilizer)
When you use zoom to record a magnified subject image, it will correct
fuzziness in the recorded image.
Settings Contents
Off Disables the function. None
Compensates for unstable images caused
On
by camcorder-shake, particularly at high
magnification.
● EASY Q mode automatically sets the “Anti-Shake” to “On.”
● When “Anti-Shake: On” is set, there will be a slight difference
between the actual movement and the movement on screen.
● Gross camcorder shake may not be entirely corrected even if
“Anti-Shake: On” is set. Firmly hold the HD camcorder with
both hands.
● It is recommended that you specify “Anti-Shake: Off” when
using the HD camcorder on a desk or tripod (not supplied).
● When you record images with high magnification and the
“Anti-Shake” is set to “On” in dark locations, after-images
may stand out. In this case, we recommend using a tripod
(not supplied) and turning the “Anti-Shake” to “Off.
● The Anti-Shake function will work only in Movie mode.
screen
display
”
On-
推荐在所列出的条件下使用手动曝光:
当使用反向照明设备发射光源或者当背景太明亮的时候。
•
•
当自然背景反射出强光的时候。譬如在沙滩或是滑雪场。
•
当背景过暗或是被摄主题比较明亮的时候。
当在选择了“Scene Mode (AE)”(场景模式 (AE))时,如果您
•
手动更改曝光参数,手动更改内容会首先被应用。
在EASY Q模式下,此功能将被设置为“Auto(自动)”。
•
防震动
(EIS:
电子防震稳定器
)
当您录制通过变焦扩大了的主题图像,它可以改变录制结果模糊的情况
设置 内容 屏幕显示
Off
On
( 关闭 )
( 打开 )
不使用此项功能。
应用改善由摄像机震动或者是高倍放大时
录制到不稳定的图像。
EASY Q模式下,“Anti-Shake”(防震动) 自动设置为
•
“On”(打开)。
当
“Anti-Shake: On”(防震动:打开), 屏幕上移动和相对移动
•
的物体会有轻微的区别。
即使“Anti-Shake: On”(防震动:打开),也不能完全改善由于
•
摄像机震动造成的影响。建议您还是用双手牢固地握住高清
数码摄像机。
当
“Anti-Shake: Off”(防震动:关闭) 时,建议您还是使用三
•
脚架(未提供)或者将数码摄像机放在桌 子上使用。
当在阴暗位置用高放大率并在
•
为“On”(打开) 的情况下录制图像时,背景图像可能会突出。
在这种情况下,建议您使用三脚架或者将
(防震动)调节至
防震动功能仅使用在录制影音的过程中。
•
“Off”(关闭) 的状态。
“Anti-Shake”(防震动) 设置
“Anti-Shake”
无
。
55_ English
中文 _55
Page 64

using the menu items
Digital Effect
The digital effect enables you to give a creative look to your recording. Select the
appropriate digital effect for the type of picture that you wish to record and the effect
you wish to create. There are 4 different digital effect options.
Settings Contents
Off Disables the function. None
Black & White
Sepia
Negative
Art
This mode changes the images to black
and white.
This mode gives the images a reddish brown
pigment.
This mode reverses the colors, creating a
negative image.
This mode gives the images a coarse effect.
This function will be set to “Off” in the EASY Q mode.
Onscreen
display
使用菜单选项
数字特效
数字特效为您录制的影音提供创造性的视觉效果。
有四种不同的数字特效可供选择。
设置 内容 屏幕显示
Off
Black&White
(黑白
Sepia(仿旧)
Negative
(底片
Art(艺术)
在EASY Q模式下,此功能将设置为
不使用此功能。
(关闭)
将图像变为黑白的。
)
图像以深褐色显示,产生类似旧照片的效果。
将颜色倒置,产生如底片的效果。
)
为影音文件增加艺术效果。
“Off”(关闭)
无
。
Focus
The HD camcorder usually focusses on a subject automatically (auto focus). When
the HD camcorder is turned on, auto focus will always be set.You can also manually
focus a subject depending on the recording conditions.
Settings Contents
In most situations, it is better to use the automatic
Auto
focus feature, as it enables you to concentrate on the
creative side of your recording.
Manual focussing may be necessary under certain
conditions that make automatic focussing difficult or
Manual
unreliable.
Onscreen
display
None
56_ English
聚焦
高清数码摄像机通常会自动聚焦被摄的主题(自动聚焦)。
根据录制的条件,您还可以对被摄主题进行手动聚焦。
设置 内容 屏幕显示
Auto
( 自动 )
Manual
( 手动 )
多数情况下,最好使用自动聚焦,这样能
够更好的聚焦在您想要录制的部分。
在自动聚焦遇到困难的时候,也许您可以
选择使用手动聚焦。
无
中文 _56
Page 65
Focussing manually during recording
This HD camcorder automatically focusses a subject
from close-up to infi nity.
However, the correct focus may not be obtained
depending on the recording condition. In this case,
use the manual focus mode.
1. Touch “Focus”
●
The manual focus adjustment indicator
appears.
2. Touch the nearer subject (
subject (
viewing the subject on the LCD screen.
Focussing on a farther subject
To focus on a farther subject, touch the
farther subject (
Focussing in a nearer subject
To focus on a nearer subject, touch the
nearer subject (
In the following situations, you may obtain better results by
adjusting the focus manually.
●
A picture containing several objects, some close to the HD
camcorder, others farther away.
●
A person enveloped in fog or surrounded by snow.
●
Very shiny or glossy surfaces like a car.
●
People or objects moving constantly or quickly like an athlete or a
crowd.
●
“Focus” function will alternate between manual focus and auto
●
Be sure to zoom in on your subject before manually focussing on
●
If you are inexperienced in the use of HD camcorders, we
●
This function will be set to “Auto” in the EASY Q mode.
●
The nearer or farther icon ( / ) appears in the center when
●
The adjusted value is applied right after touching the
“Manual.”
) tab to adjust the focus, while
) or farther
) tab.
) tab.
focus. With auto focus, no indication will appear on the screen.
it. If you bring the subject into focus at the “
will be faulty when you turn the zoom lever to the “
to zoom in on the subject.
recommend that you use auto focus.
focus adjustment reaches the end.
( or ) tab.
W” control side, focus
Focus
0
m
<Nearer subject> <Farther subject>
T” control side
录制的过程中手动聚焦
本高清数码摄像机自动聚焦特写至无限大的被
摄主题。然而,根据录制的情况也许不能够正
确地聚焦。在这种情况下,建议您使用手动聚
焦模式。
“
Focus
OO
为了得到更好的效果,建议您在以下情况使用手动聚焦:
一个画面内存在很多物体,一些离数码摄像机较近,一些距离
•
得比较远。
人被包围在雾气里或者周围是一片雪。
•
•
如同汽车一样很亮或者表面非常光滑。
•
犹如运动员或者人群一样经常快速移动。
您可以交替使用手动聚焦和自动聚焦。但当使用自动聚焦
•
时,屏幕上不会有相应的指示图标。
请务必在手动聚焦之前推近到您想要录制的主题。如果在您
•
捕捉被摄主题的时候聚焦指示条在
杆拨到
•
如果您没有使用高清数码摄像机的经验,我们建议您使用自
动聚焦功能。
在EASY Q模式下,此功能被设置为
•
当调整聚焦到尽头的时候,较近主题图标或较远主题图标
( / )会出现在屏幕的中心位置。
•
触摸
1. 触摸
屏幕上显示手动聚焦调整指示图标。
•
2.
通过LCD显示屏观察被摄主题,触摸较近主题
( )或较远主题 ( )导航,调整聚焦。
聚焦一个较远的主题
聚焦一个较远的主题,触摸较远主题导航
( )。
聚焦一个较近的主题
聚焦一个较近的主题,触摸较近主题导航
( )。
“T”端时,原来聚焦的焦点将会被破坏。
( )或( )导航键调整到应用的参数值。
”(聚焦) “
Manual
”(手动)
“W”端,则当您将变焦控制
“
Auto
”(自动)
。
57_ English
中文 _57
Page 66
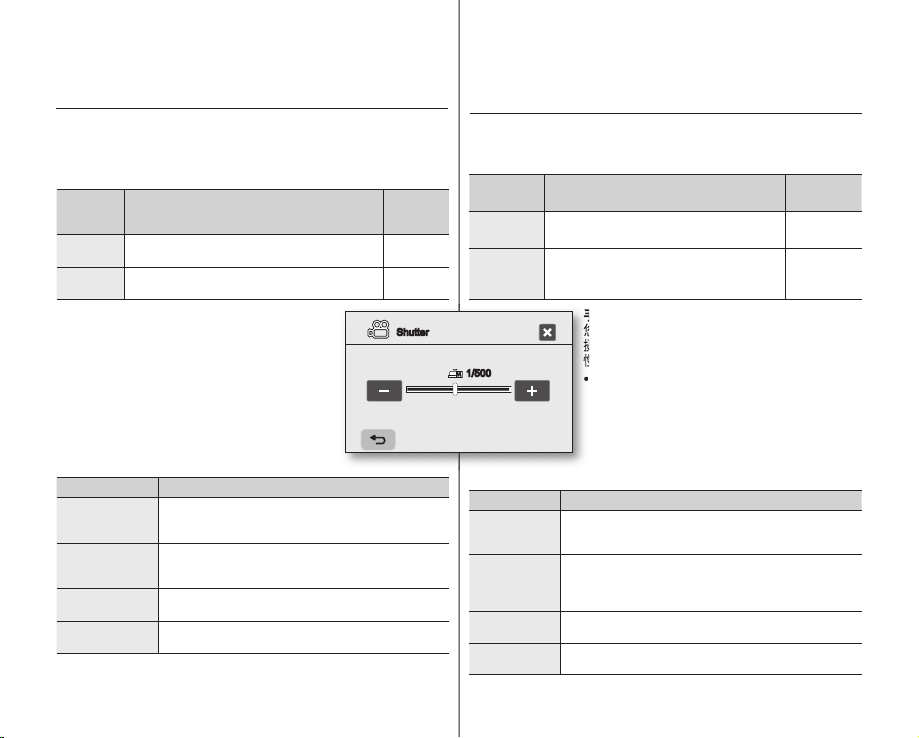
using the menu items
您可以手动设置快门速度。使用高速的快门速度拍
摄一个快速移动的主题会导致图像不连贯,使用较
慢的快门速度会使画面模糊。
Shutter
The HD camcorder automatically sets the shutter speed depending on the subject
brightness. You can also manually adjust the shutter speed according to the scene
conditions.
Settings Contents
The HD camcorder automatically sets the
Auto
appropriate aperture value.
Manual
Setting the shutter speed manually
You can set the shutter speed manually. A fast shutter speed
can freeze the motion of a fast moving subject and a slow
shutter speed can blur the subject to give the impression
of motion.
●
Fast shutter speed allows a fast-moving subject to be
Recommended shutter speed when recording
1/2000, 1/4000,
Shutter speed can be set to 1/60, 1/100, 1/250,
1/500, 1/1000, 1/2000, 1/4000, or 1/10000.
captured one frame at a time vividly.
Use these settings when an automatic adjustment does
not work well with “Sports” mode in “Scene Mode
(AE).”
page 52
Shutter speed conditions
1/60
1/100
1/250, 1/500,
1/1000
1/10000
The shutter speed is fi xed at 1/60 second. Black bands
that usually appear when shooting a TV screen become
narrower.
The shutter speed is fi xed at 1/100 second. Indoor sports
such as basketball. The fl ickering that occurs when shooting
under a fl orescent light or mercury-vapor lamp is reduced.
Moving cars, trains or other rapidly moving vehicles such
as roller coasters
Outdoor sports such as golf and tennis.
On-
screen
display
None
S.1/XXX
Shutter
使用菜单选项
快门
根据被摄主题周围的亮度,本高清数码摄像机自动调节快门速度。您也
可以根据场景情况手动调节快门速度。
设置
Auto
本高清数码摄像机自动设置适当的光圈
值。
快门速度可以设置到
1/500, 1/1000, 1/2000, 1/4000,
1/10000.
手动设置快门速度
您可以手动设置快门速度。使用高速的快门速度拍
摄一个快速移动的主题会导致图像不连贯,使用较
慢的快门速度会使画面模糊。
•
1/500
( 自动 )
Manual
( 手动 )
在录制期间建议您使用的快门速度
快门速度 内容
1/60
1/100
1/250, 1/500,
1/1000
1/2000, 1/4000,
1/10000
快门速度固定在
屏幕通常显示黑带。
快门速度固定在
当在强光源下或水银蒸汽灯下进行拍摄时会闪烁。
移动的汽车,火车以及运动的过山车。
户外运动例如高尔夫球或者网球。
内容 屏幕显示
无
1/60, 1/100, 1/250,
或者
可以使用高速的快门速度捕捉快速移动主题的
精彩一瞬。
在“Scene Mode (AE)”(场景模式
的“Sports”(运动)模式下,当不能自
(AE))
动调整到最佳状态时,建议您使用这些设置。
第52页
1/60
每秒。当拍摄一个精密的电视
1/100
每秒。室内运动例如篮球。
S.1/XXX
58_ English
中文 _58
Page 67

● If you manually change the shutter speed value when “Scene
Mode (AE)” function is selected, manual changes are applied
first.
● The image may not seem smooth when a slow shutter speed
is set.
● This function will be set to “Auto” in the EASY Q mode.
● When recording with a shutter speed of 1/1000 or slower,
make sure the sun is not directly shining into the lens.
● The shutter speed will work only in Movie mode.
Tele Macro
●
This function is used to record a distant subject that is approaching.
●
The effective focal distance in the Tele macro mode is between 50
Cm (19.7 inches) and 100 Cm (39.4 inches).
Settings Contents
Off Disables the function. None
On Tele macro is executed.
● When recording in Tele macro mode, the focus speed may be
lowered.
● When you operate the zoom function in the Tele macro mode,
the recording subject may get out of focus.
● Use a tripod (not supplied) to prevent hand shake in the Tele
macro mode.
● Avoid shadows when recording in the Tele macro mode.
● As the distance to the subject decreases, focussing area
narrows.
● When you can not get proper focus, move the Zoom lever to
adjust focus.
● This function will be set to “Off” in the EASY Q mode.
On-
screen
display
如果选定了“Scene Mode (AE)” (场景模式(AE))功能时,手
•
动改变快门速度,那么手动改变值将首先生效。
当设置成慢速快门时,图像可能不连续。
•
在EASY Q模式下,此功能设置成“Auto”(自动)。
•
使用1/1000或更低的快门速度进行摄像时,确认镜头没有被
•
阳光直射。
仅可以在影音模式下设置快门速度。
•
远程微距
此功能用于接近录制一个遥远的主题。
•
•
在远程微距模式下,有效的聚焦范围在50Cm (19.7英寸
)之间。
(39.4英寸
设置
Off
On
( 关闭 )
( 打开 )
•
•
•
•
•
•
•
不使用此功能。
启用远程微距。
当使用远程微距模式进行录制的时候,聚焦速度可能会变
慢。
当您在远程微距模式下使用变焦功能,录制的主题可能会偏
离聚焦的位置。
在使用远程微距模式的时候,为了避免震动建议您使用三脚
架(未提供)。
当使用远程微距模式录制的时候避免阴影。
当距离被摄主题的距离减小,聚焦的区域变窄。
当您不能合适地聚焦时,建议您使用变焦控制杆调整聚焦。
在EASY Q模式下,此功能设置为“Off”(关闭)。
内容 屏幕显示
)和100Cm
无
59_ English
中文 _59
Page 68

using the menu items
Quality
●
You can select the quality of a movie to be recorded.
●
Regarding detailed image capacity, see page 28.
Settings Contents
[HD] Super Fine
[HD] Fine
[HD] Normal
[SD] Standard
[SD] Economy
●
The movie can be recorded in 1280x720 (HD) or 720x480 (SD) depending
on the quality.
●
Recorded files are encoded with Variable Bit Rate (VBR).
VBR is an encoding system that automatically adjusts the bit rate
according to the recording image.
●
The recording times shown above are approximate and depend on the
recording environment (i.e. lighting conditions).
Wind Cut
You can reduce wind noise when recording sound from the built-in microphone.
If “Wind Cut: On” is set, the low-frequency components in the sound picked up by
the microphone will be cut off during recording: This makes it easier to hear voice and
sound during playback.
●
Use the Wind Cut when recording in windy places such as a beach.
Settings Contents
Off Disables the function.
On Minimises wind noise or other noise while recording.
●
When the “Wind Cut” is “On,” some low frequency sound is eliminated
●
Make sure the “Wind Cut” is set to “Off” when you want the microphone
●
The Wind Cut function will work only during movie recording.
●
The Wind Cut function works only with the built-in microphone.
Records in the HD format the highest
quality mode. (Approx. 12Mbps)
Records in the HD format high quality
mode. (Approx. 9Mbps)
Records in the HD format normal quality
mode. (Approx. 6Mbps)
Records in the SD format standard quality
mode. (Approx. 4Mbps)
Records in the SD format economy quality
mode. (Approx. 2Mbps)
along with the sound of the wind.
to be sensitive as possible.
60_ English
On-screen
display
On-screen
display
None
使用菜单选项
质量
您可以选择录制影音图像的质量。
•
•
有关可录制的图像容量,请参见第28
设置 内容 屏幕显示
[HD] Super Fine
( [HD]
高清晰
[HD] Fine
( [HD]
清晰
[HD] Normal
( [HD]
标准
[SD] Standard
( [SD]
标准
[SD] Economy
( [SD]
经济
•
•
•
风声消除
当通过内置麦克风录制声音的时候可以减少风声噪音。如果"Wind Cut:
On"(风声消除:打开),录制过程中有麦克风传入 的低频率噪声将被消
除:使得在播放的时候能够更容易地听到录制的声音。
在录制环境有风的地方使用风声消除功能,譬如海滩。
•
以HD格式最高质量模式录制。
)
(
12Mbps)
约
以HD格式高质量模式录制。
)
(
9Mbps)
约
以HD格式标准质量模式录制。
)
(
6Mbps)
约
以SD格式标准质量模式录制。
)
(
4Mbps)
约
以SD格式经济质量模式录制。
)
(
2Mbps)
约
根据选择质量情况,影音会以1280x720 (HD)或 720x480 (SD) 格式进
行录制。
将用可变比特率 (VBR) 对已录制的文件进行编码。VBR是一种编码
系统,它根据录制的图像自动调整比特率。
上面显示的录制时间是近似时间,视录制环境(即光照条件)而定。
设置 内容 屏幕显示
Off( 关闭 ) 不使用此功能。
On( 打开 )
•
•
•
•
当录制的时候将风声或者其它噪声减
到最小。
当 "
Wind Cut
”(
的声音会与风声一起被消除。
若您欲使麦克风尽可能敏感的时候,请确保 “
声消除) 被设置为
风声消除功能仅可在影音录制期间使用。
风声消除功能仅能在使用内置麦克风进行录制的时候起作用。
风声消除) 设置为 “On”(打开),某些低频率
“Off”
页
(关闭)。
无
Wind Cut”(
风
中文 _60
Page 69
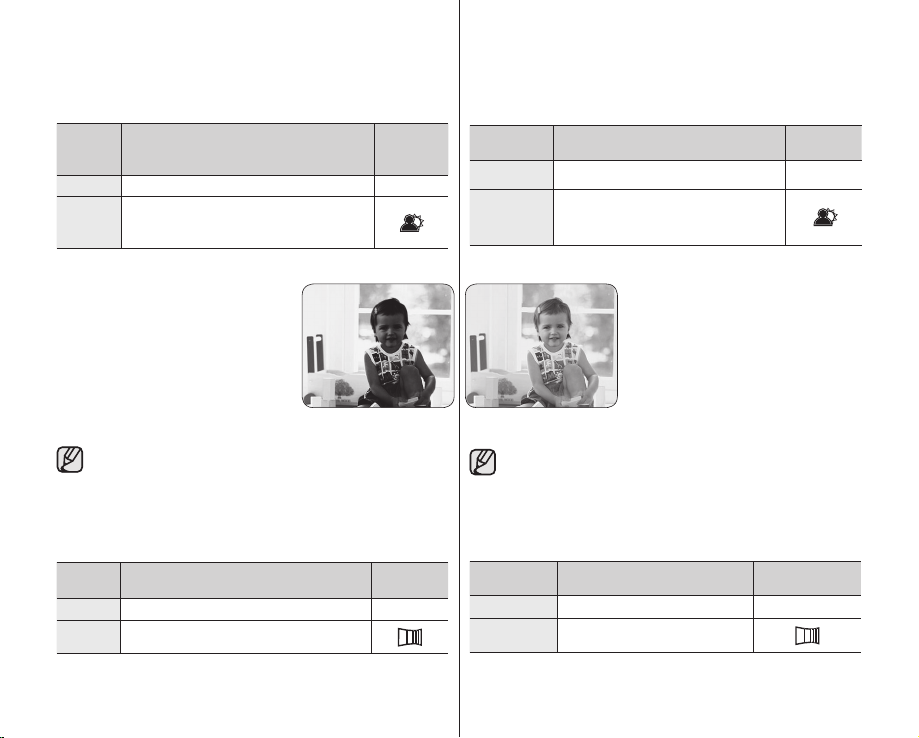
Back Light
When subject is lit from behind, this function will compensate for lighting
so that the subject is not too dark.
Settings Contents
Off Disables the function. None
- Backlight compensation is executed.
On
- Backlight compensation brightens the
subject quickly.
Back lighting influences recording when the subject is darker than
the background:
- The subject is in front of a window.
- The person to be recorded is wearing
white or shiny clothes and is placed
against a bright background; the person’s
face is too dark to distinguish his/her
features.
- The subject is outdoors and the
background is overcast.
- The light sources are too bright.
- The subject is against a snowy
background.
This function will be set to “Off” in the EASY Q mode.
<Back light off>
On-
screen
display
背光补偿
当光源从被摄主题的后面照过来的时候,此功能可以增加被摄主题亮
度,以至于被摄主题不会太暗。
设置
Off
( 关闭 )
On
( 打开 )
当被摄主题比背景暗时,从后面照过来的光源会影响录制:
不使用此功能。
- 启用背光补偿。
- 背光补偿快速使被摄主题亮起来。
<Back light on>
在EASY Q模式下,此功能设置为
内容 屏幕显示
无
- 被摄主题在窗户前。
- 被摄人物穿着白色或者明亮的衣服并且
所处的位置背景光明亮;
人物的脸色太暗以致于不能够很好地辨
别他/她的容貌。
- 被摄主题在户外并且背景较暗。
- 照明光源过于明亮。
- 以雪地为背景。
“Off”(关闭)
。
Fader
You can give your recording a professional look by using special effects
such as fade in at the beginning of a sequence or fade out at the end of
a sequence.
Settings Contents
Off Disables the function. None
On Fader is executed.
On-screen
display
61_ English
淡化器
为了使您拍摄的内容具有专业色彩,可以使用一些特殊的效果。例如在
一个片段的开始使用淡入的手法,而在结束的时候使用淡出的手法。
Off
On
设置
( 关闭 )
( 打开 )
不使用此功能。
启用淡化器。
内容 屏幕显示
无
中文 _61
Page 70
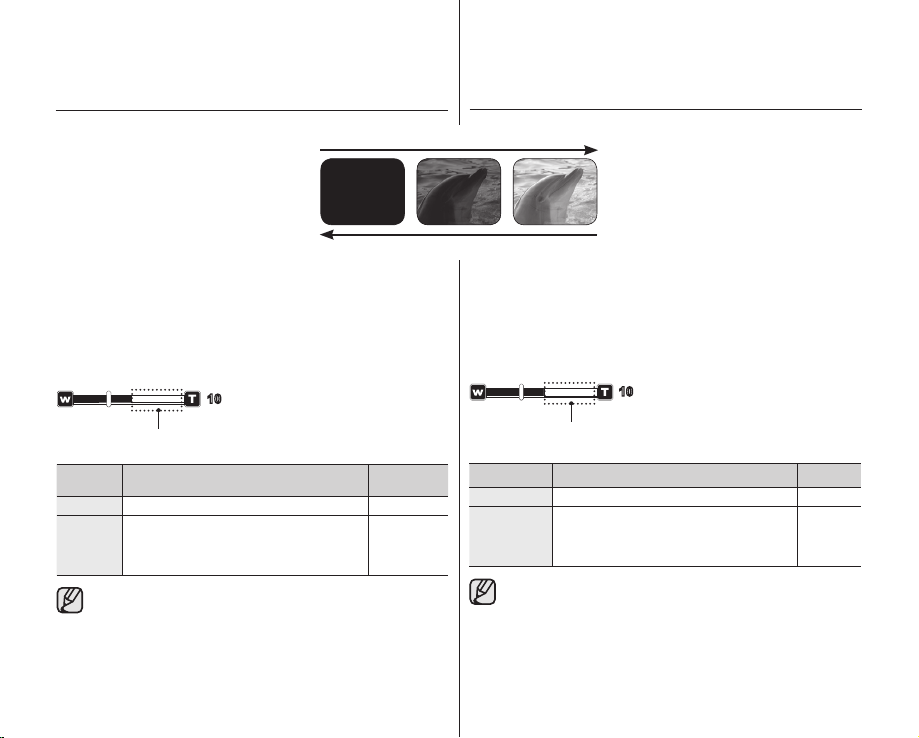
using the menu items
Fade in
Press the Recording start/stop button when
“Fader” is set to “On.” Recording starts with a
dark screen and then the image and sound are
faded in. (fade in).
Fade out
When you want to stop recording with fade out,
set “Fader” to “On” again during recording.
Press the Recording start/stop button.
Recording stops as the image and sound are faded out. (fade out).
Fade in (approx. 3 seconds)
使用菜单选项
淡入
当“
Fader
时候,按下录制开始/停止按钮。
录制在黑屏的情况下开始,然后图像以及声音
逐渐出现。(淡入)
淡出
Fade out (approx. 3 seconds)
录制结束,图像以及声音逐渐消失。(淡出)
如果您想要使用淡出效果退出录制,在录制
的过程中再次将
“On”(打开)。按下录制开始/停止按钮。
”(淡化器)设置为“On”(打开)的
“
Fader
”(淡化器)设置为
Digital Zoom
You can select the maximum zoom level in case you want to zoom to a
level greater than 10X (the default setting) during recording. Note that the
image quality decreases when you use the digital zoom.
10
This right side of the bar shows the digital zooming factor.
The zooming zone appears when you select the zooming level.
Settings Contents
Up to 10X zoom is performed optically.
Off
Up to 10X zoom is performed optically, and after
that, up to 2X zoom is performed digitally.
On
(Zooming more than 10x is achieved digitally, up
to 20x when combined with optical zoom.)
● The image quality may deteriorate depending on how much you zoom
in on the subject.
● Maximum zooming may result in lower image quality.
● This function will be set to “Off” in the EASY Q mode.
● Digital Zoom function is not available when “Anti-Shake (EIS)” is “On.”
But, when setting “Anti-Shake (EIS)” to “On” with Digital Zoom on,
Digital Zoom is released automatically.
● Digital Zoom is released automatically when Component or HDMI cable
is connected.
On-screen
display
None
None
62_ English
数字变焦
在录制的过程中,如果预得到大于10x(默认设置)的变焦值,您可以
通过变焦控制杆选择更大的变焦。注意当您使用数字变焦的时候会影响
到录制图像的质量。
10
该指示条的右端显示数字变焦区域。当您选择该变焦操作的时候屏
幕上显示变焦区域。
设置 内容 屏幕显示
Off( 关闭 )
On( 打开 )
根据您对被摄主题放大的倍数,图像质量也许会有所下降。
•
最大变焦也许会降低图像质量。
•
在EASY Q模式下,此功能设置为“Off”(关闭)。
•
当将“Anti-Shake (EIS)” (防震动 (EIS))设置为“On”
•
(打开)
情况下将 “Anti-Shake (EIS)” (防震动 (EIS))设置为 “On”
(打开)
在连接分量或 HDMI电缆线时,会自动退出数字变焦。
•
10x
仅使用
不仅使用
可以使用达到2x的数字变焦。
(运用
数字变焦与光学变焦配合使用可放大
的光学变焦。
10x
的光学变焦,在此之外,还
10x
光学变焦以后可以使用数字变焦,
时,数字变焦功能不可用。但是,当在数字变焦打开的
时,将会自动退出数字变焦。
20x
无
无
。)
中文 _62
Page 71
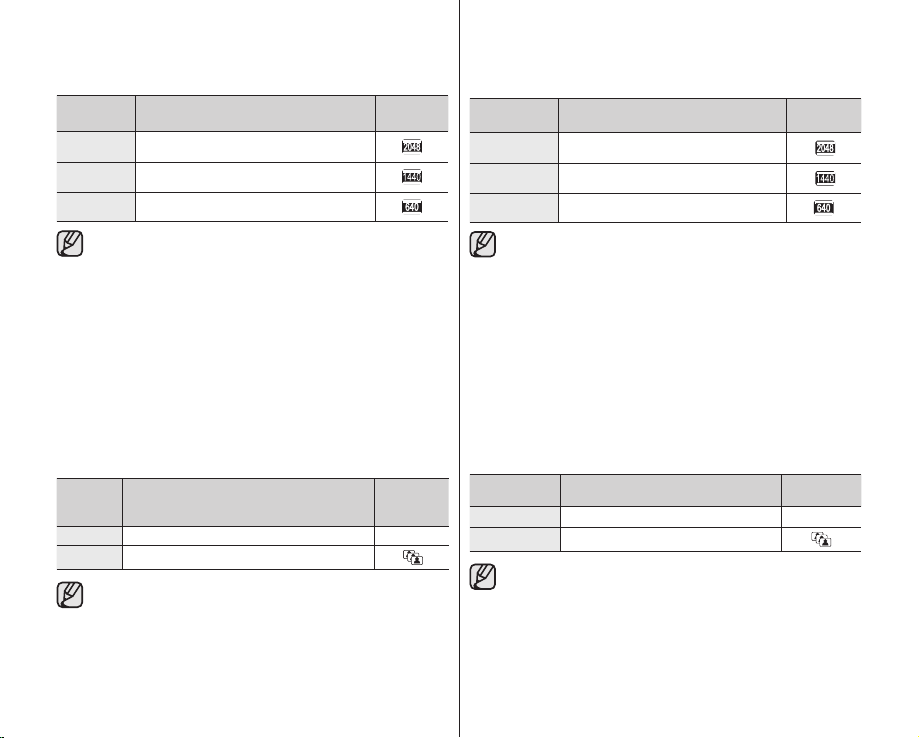
Resolution
You can select the resolution of photo images to record.
Settings Contents
2048x1536 Select to record at high resolution.
1440x1080 Select to record at medium resolution.
640x480 Select to record at low resolution.
● Regarding detailed image capacity, see page 28.
● For photo development, the higher the resolution, the finer the
image quality.
● The number of recordable images varies depending on the
recording environment.
● Photo images that are recorded on your HD camcorder may
not play back properly on other digital devices that do not
support this photo size.
● High resolution images use more memory than lower
resolution images. Therefore the higher the resolution
selected, the less memory will be available to take photos.
Cont. Shot
●
Continuous shot allows the user to take consecutive images of a
moving object.
●
Records images continuously up to the storage capacity.
Settings Contents
Off Disable the function. None
On Continuous shot is executed.
● When an error (such as memory full) occurs during
continuous recording, recording is ended and an error
message is displayed.
● When pressing PHOTO button, it records continuously to a
maximum number (15) of photo images at about 0.3 seconds
intervals.
On-screen
display
On-screen
display
分辨率
您可以选择拍摄照片的分辨率。
设置 内容 屏幕显示
2048x1536
1440x1080
640×480
选择使用高分辨率拍摄。
选择使用中等分辨率拍摄。
选择使用低分辨率拍摄。
有关可拍摄图像容量的详细内容,请参见第28页。
•
更高分辨率的图像具有更好的图像质量。
•
根据录制的具体情况,可记录的图像数量可能有所变化。
•
使用其他不支持此分辨率的设备拍摄的照片也许不能在本高清
•
数码摄像机上查看。
高分辨率图像会比低分辨率图像占用更多的存储空间。所以选
•
择高分辨率将会减少可拍摄照片的数量。
连续拍摄
连续拍摄允许用户对一个移动着的对象拍摄连贯的图像。
•
•
由存储容量决定连续拍摄图像的数量。
设置 内容 屏幕显示
Off
On
( 关闭 )
( 打开 )
•
•
不使用此功能。
启用连续拍摄功能。
当在连续拍摄的期间发生错误(譬如存储器已满)时,拍摄
结束并且显示错误提示信息。
当按下PHOTO按钮时,它将以约0.3秒的时间间隔连续拍摄
最大数目(15)的照片图像。
无
63_ English
中文 _63
Page 72
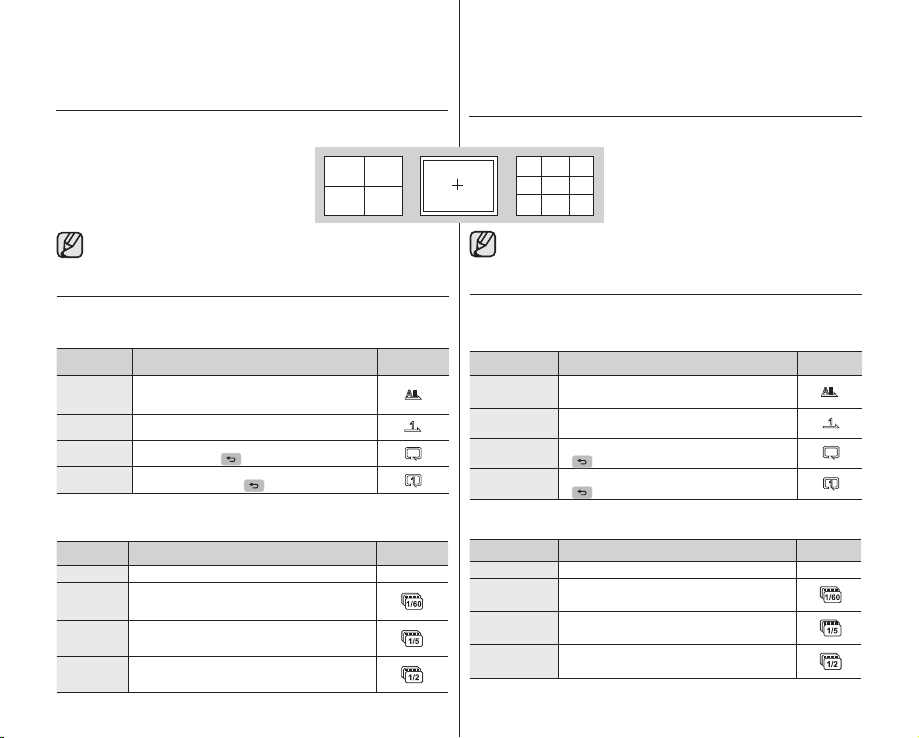
using the menu items
Guideline
●
Guideline displays a certain pattern on the
LCD screen so that the user can easily design
the image composition when recording movie
or photo images.
●
The HD camcorder provides 3 types of
guidelines.
●
Positioning the subject at the cross point of the guideline makes a
balanced composition.
●
This function works only in the quick menu.
●
Guideline cannot be recorded on the images being recorded.
PLAYBACK MENU ITEMS
You can set up these menu items for playing movies.
Play Option
You can set up play options for movie image playback.
Settings Contents
Play All
Play One
Repeat All
Repeat One
Cont. Capture
You can consecutively capture still images while playing a movie image by pressing
the PHOTO button.
Settings Contents
60 Copies /
1 sec
5 Copies /
1 sec
2 Copies /
1 sec
Plays movie images continuously starting from
the selected one to the last and
returns to the thumbnail index view.
Plays the selected movie image only and returns
to the thumbnail index view.
Plays all the movie images repeatedly until
touching Return ( ) tab.
Plays the selected movie image repeatedly until
you touch the Return ( ) tab.
Off Captures only one still image. None
When plays movie images, a maximum of 60
still images per second are captured while the
PHOTO button is pressed.
When plays movie images, 5 still images per
second are captured while the PHOTO button
is pressed.
When plays movie images, 2 still images per
second are captured while the PHOTO button
is pressed.
64_ English
On-screen
display
On-screen
display
使用菜单选项
指南
放置主题在指南的交叉点做平衡的构成。
•
•
此功能仅在快捷菜单使用。
•
录制图像的过程中不会将指南同时记录下来。
播放菜单选项
您可以设置播放影音的菜单选项。
播放选项
您可以设置播放影音图像的菜单选项。
设置 内容 屏幕显示
Play All
( 全部播放 )
Play One
( 播放一个 )
Repeat All
( 全部重复 )
Repeat One
( 重复一个 )
连续捕捉
在播放影音图像的过程中按下PHOTO按钮连续捕捉静态图像。
设置 内容 屏幕显示
Off
( 关闭 )
60 Copies / 1
sec(60
5 Copies / 1
sec(5
2 Copies / 1
sec(2
连续播放影音图像(从所选图像开始到最
后一幅图像),然后返回到索引画面。
仅播放所选的影音图像,然后返回到索引
画面。
重复播放所有的影音图像直到触摸返回
( )
重复播放所选的影音图像直到触摸返回
( )
仅捕捉一幅静态图像。
播放影音图像时,若按住
/ 1
幅
)
可每秒捕捉到最多 60 幅静止图像。
播放影音图像时,若按住
/ 1
幅
)
可每秒捕捉到 5 幅静止图像。
播放影音图像时,若按住
/ 1
幅
)
可每秒捕捉到 2 幅静止图像。
在LCD显示屏显示某一样式的指南,以便
•
用户能够在录制影音或照片图像时更加容
易地设计图像构成。
•
本高清数码摄像机为您提供
导航键。
导航键。
PHOTO
PHOTO
PHOTO
3种类型指南。
按钮,
按钮,
按钮,
无
中文 _64
Page 73
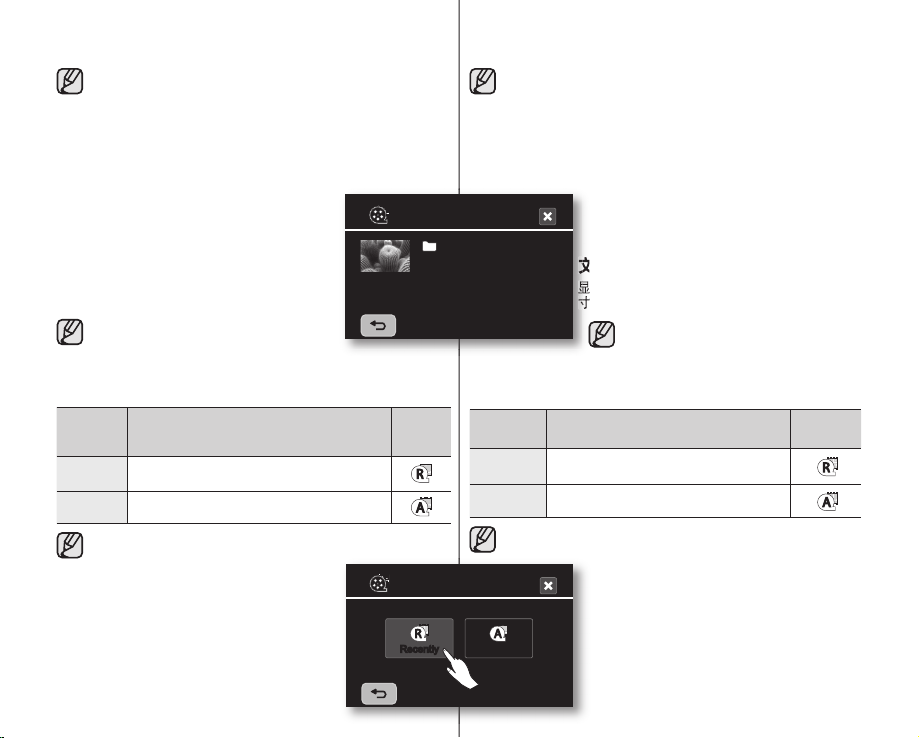
● The images are captured continuously while the PHOTO button
is pressed.
- The number of the captured images varies depending on how
long the PHOTO button is pressed.
- The interval that the images are captured continuously varies
according to the continuous capture option.
● When an error (such as memory full) occurs during continuous
capturing, capturing is ended and an error message is displayed.
● The captured images during playback are
stored in the storage media in use.
●
1 second mentioned on the previous page
is not the required time to capture the
photo but the amount of 1 second (60 frames)
File Info
It shows you the image information. You can view the
fi le name, creation date and size, etc.
that is divided into “copies” for capturing.
This function is available only in the single
image display mode.
File Info
Highlight
Shows a section of recorded movie images at random according to the
total play time and number of fi les.
Settings Contents
Recently
Shows a section of a movie image(s) that was
created within 24 hours of the most recent one.
All Days Shows a section of all movie images.
This function can be set only in the quick menu.
On-
screen
display
Highlight
Recently All Days
若按下了
PHOTO
•
- 捕捉图像的数目视按下
- 连续捕捉图像的间隔因连续捕捉选项而异。
•
当在连续捕捉的期间发生错误(譬如存储器已满)时,则连
续捕捉结束并且显示错误提示信息。
•
播放过程中捕捉的图像被保存在存储介质内。
•
上一页中提到的1秒并非捕捉静态图像所需的时间,而是把
1秒(60帧)的影音图像用连续捕捉的方式分为多少“幅”。
100VIDEO
HDV_0001.MP4
Date: 2007.01.01
Duration: 00:20:00
Size: 1886025 KB
Quality: Super Fine
按钮,则会连续捕捉图像。
PHOTO
按钮的时间长短而定。
文件信息
显示图像信息。您可以查看文件名、创建日期和尺
寸等等。
此功能仅支持在单画面全屏显示图像的模
式下使用。
突出显示
根据文件的总播放时间和数量,随机显示部分录制的影音图像。
设置 内容 屏幕显示
Recently
( 最近 )
All Days
( 所有日期)
此功能仅可以在快捷菜单进行设置。
24
显示
小时内创建的最新影音图像的一
部分。
显示所有影音图像中的一段。
65_ English
中文 _65
Page 74
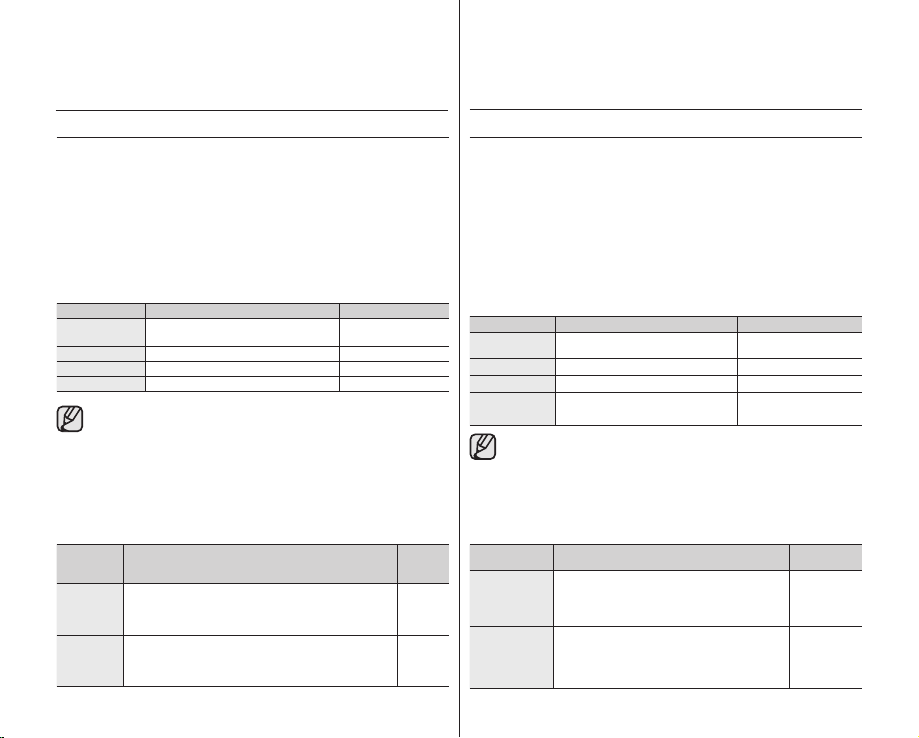
using the menu items
SETTING MENU ITEMS
You can set up the date/time, OSD language, video output, and display settings
of the HD camcorder.
Date/Time Set
Set the current date and time so they can be recorded correctly. page 25
Date/Time
You can set the date and time to display on the LCD screen.
●
Before you use the “Date/Time” function, you must set the date and time.
page 25
Settings Contents On-screen display
Off Current date and time information is not
Date Displays the current date.
Time Displays the current time.
Date & Time Displays the current date and time.
displayed.
●
The date/time will read “JAN/01/2007 12:00 AM” in the following
conditions.
- If the movie or photo recording was made before setting the
date/time in the HD camcorder.
- When the built-in rechargeable battery becomes weak or dead.
●
The time and date when the movie or photo images are recorded are
displayed in play mode.
File No.
File numbers are assigned to images in the order they were recorded.
Settings Contents
Assigns file numbers in sequence even if the memory card
is replaced with another one or after formatting, or after
Series
deleting all files.
The file number is reset when a new folder is created.
Resets the file number to 0001 even after formatting, deleting
all or inserting a new memory card. Use “Reset” when the
Reset
folder and files cannot be created anymore because the
number of the folders and files reaches the limit.
66_ English
None
JAN/01/2007
12:00 AM
JAN/01/2007 12:00 AM
Onscreen
display
None
None
使用菜单选项
设置菜单选项
您可以设置日期/时间,OSD语言,视频输出,以及其它高清数码摄像
机的显示设置。
日期/时间设置
设置当前的日期和时间以便它们可以被准确地记录下来。 第25页
日期/时间
您可以设置LCD屏幕上显示的日期/时间。
在使用“
第25页
“Date/Time”
•
设置
Off(关闭)
Date(日期)
Time(时间)
Date & Time
(
文件编号
按照顺序编排录制的影音文件的编号。
Series
Reset
)
日期和时间
在以下情况,日期/时间显示为“01/01/2007 12:00 上午”。
•
- 在进行录制影音或拍照之前,未设置高清数码摄像机的日期/时间。
- 当内置充电电池电量低或无电量时。
当录制影音或拍照时记录下时间和日期,在播放的时候则会显示日期
•
和时间。
设置 内容
( 连续 )
( 重置 )
(日期/时间)功能之前,必须设置日期和时间。
内容 屏幕显示
不显示当前日期和时间信息。 无
显示当前日期。
显示当前时间。
显示当前日期和时间。
按顺序分配文件编号,即使换用了另一块存储
卡、格式化后或删除所有文件后,亦是如此。
创建新文件夹时将复位文件编号。
在格式化,删除全部或插入一个新存储卡后,
重新设置文件编号到
当因为文件夹和文件的数量到达极限,文件夹
和文件无法继续创建时,使用“
0001
。
Reset
01/01/2007
12:00 上午
01/01/2007 12:00 上午
”( 重置 )。
屏幕显示
无
无
中文 _66
Page 75
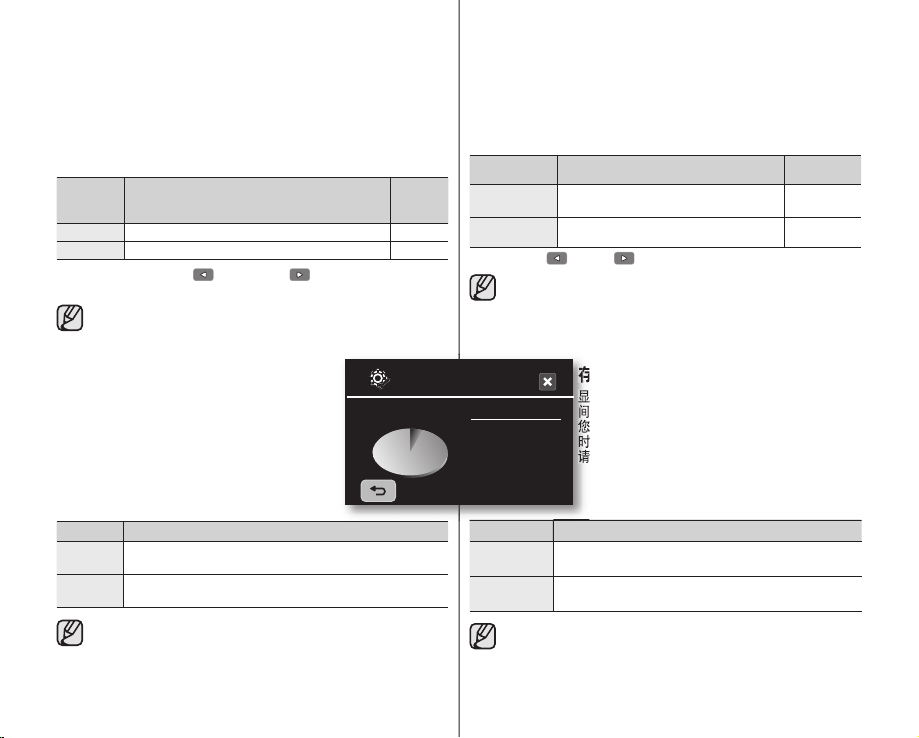
您可以通过查看存储信息找到您还可以录制多长
LCD Control
●
Your HD camcorder is equipped with a 2.7 inch wide color Liquid Crystal
Display (LCD) screen, which enables you to view what you are recording
or playing back directly.
●
Depending on the conditions under which you are using the HD
camcorder (indoors or outdoors for example), you can adjust LCD bright
and LCD contrast.
Settings Contents
Bright Adjusts the brightness of the LCD screen.
Contrast Adjusts the contrast of the LCD screen.
●
Touch the decrease ( ) or increase ( ) tab to increase or
decrease the value of a desired item.
●
You can set values for LCD bright and LCD contrast between 0 and 35.
●
Adjusting the LCD screen does not affect the brightness and
contrast of the image to be recorded.
On-
screen
display
None
None
LCD
控制
您的高清数码摄像机备有2.7英寸彩色液晶显示屏(LCD),以便可
•
以进行直接录制或播放。
•
根据您的高清数码摄像机四周的环境(例如室内或室外),您可以
调节LCD亮度和LCD对比度。
设置 内容 屏幕显示
Bright
( 亮度 )
Contrast
( 对比度 )
触摸减小( )或增大( )导航键进行增大或减小适当的值。
•
您可以调节LCD亮度和LCD对比度的范围是0至35。
•
•
调整LCD显 示屏的亮度和对比 度不会对录 制的图 像造成影
响。
LCD
调节
显示屏的亮度。 无
LCD
调节
显示屏的对比度。
无
Storage Info
It shows you the storage information (the
storage media, used space and available space,
recordable time according to the quality). So you
can fi nd out how long you will be able to record
on the storage media.
Make sure to set the appropriate storage media.
Settings Contents
Memory You can view the used space, available space, and the
recordable time on the built-in memory.
Card You can view the used space, available space, and the
recordable time on the memory card.
The information of the memory card appears by touching
“Storage Info.” (SC-HMX10/HMX10N only)
67_ English
Memory
• Used : 0 MB • Free : 3823 MB
Super Fine : 044 Min
Fine : 059 Min
Normal : 089 Min
Standard : 133 Min
Economy : 267 Min
设置 内容
Memory
(内置存储器)
Card
(存储卡)
触摸
“Storage Info.”
(仅限SC-HMX10/HMX10N)
存储信息
显示存储介质信息(存储介质,已用空间和可用空
间,以及根据录制质量的录制时间)。
您可以通过查看存储信息找到您还可以录制多长
时间。
请确认设置到适当的存储介质。
您可以查看内置存储器上的已使用空间、可用空间和
可录制时间。
您可以查看存储卡上的已使用空间、可用空间和可录
制时间。
(存储信息),显示存储卡信息。
中文 _67
Page 76

using the menu items
Format
You can use the “Format” function to completely delete all files and
options on the storage media, including protected files.
Settings Contents
Memory You can format the built-in memory. None
Card You can format the memory card. None
●
If you execute the format function, all files will be deleted
completely and the erased files cannot be recovered.
●
Formatting the storage media using a different device will cause
“Read errors.”
●
A memory card with the protection tab set to lock will not be
formatted. page 29
●
Format does not perform at the low battery.
●
The memory card format is executed by touching “Format.”
(SC-HMX10/HMX10N only)
Beep Sound
You can turn the beep sound on or off.
Settings Contents
Off Cancels the beep sound. None
When on, a beep will sound every time a button
On
is pressed.
Beep sound is off while recording movie.
On-screen
display
On-screen
display
None
使用菜单选项
格式化
您可以通过
包括被保护的文件。
(内置存储器)
蜂鸣音
您可以选择打开或关闭蜂鸣音。
“Format”
(格式化)功能删除存储介质中的所有文件和选项,
设置 内容 屏幕显示
Memory
(存储卡)
格式化内置存储器。
Card
格式化存储卡。
如果您执行格式化, 所有文件将完全被删除并且删掉的文件
•
无法恢复。
•
使用其它设备格式化存储卡会导致“Read Error”
•
存储卡的写保护片设置为锁定的时候,则不能进行格式化。
第29页
•
当电池电量低时不能执行格式化
•
格式化存储卡通过触摸
(仅限SC-HMX10/HMX10N)
“Format.”
(格式化)
来执行。
设置 内容 屏幕显示
Off( 关闭 )
On( 打开 )
取消蜂鸣音。
开启状态下,每次按下按钮都可以听到蜂
鸣音。
在录制影音的过程中蜂鸣音为关闭。
无
无
(读取错误)。
无
无
Shutter Sound
You can turn the shutter sound on or off.
Settings Contents
Off Cancels the shutter sound. None
When on, the shutter will sound with each press
On
of the PHOTO button.
68_ English
On-screen
display
None
快门音
您可以选择打开或关闭快门音。
设置 内容 屏幕显示
Off( 关闭 ) 取消快门音。
On( 打开 )
开启状态下,每次按下
以听到快门音。
PHOTO
按钮都可
无
无
中文 _68
Page 77
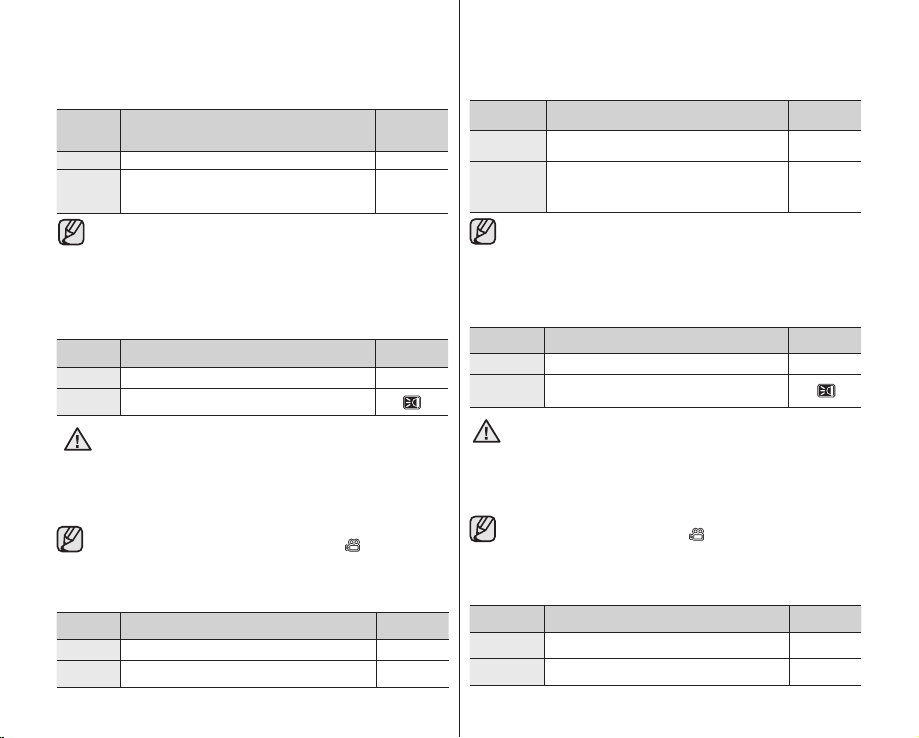
Auto Power Off
You can set the HD camcorder to automatically turn off when there is no
operation for 5 minutes.
Settings Contents
Off The HD camcorder does not turn off automatically. None
For power saving purposes, the HD camcorder will
5 min
automatically turn off if there is no operation for 5
minutes only in standby mode.
● Auto Power Off function does not work when a USB cable is
connected.
●
When the Demo function is set to on, the Demo function works with
priority rather than Auto Power Off function. If you want to turn off
the HD camcorder automatically after 5 minutes, release the Demo
page 71
function.
On-screen
display
None
LED Light
The LED light enables you to record a subject in dark places.
Settings Contents
Off Disable the function. None
Record a clear image in the dark place without
On
sacrificing color with LED light.
●
The LED light can become extremely hot.
●
Do not touch it while in operation or soon after turning it off,
WARNING
otherwise serious injury may result.
●
Do not place the HD camcorder into the carrying case immediately
after using the LED light, since it remains extremely hot for some
time.
●
Do not use near flammable or explosive materials.
●
The range of the LED light is limited. (Up to 6.6ft (2m))
●
The LED light function will work only in Movie( ) mode.
On-screen
display
Rec Lamp
You can turn the recording indicator on the front of the camcorder on or off
during movie or photo recording.
Settings Contents
Off Disable the function. None
Turn on the recording indicator of the HD camcorder
On
during record.
On-screen
display
None
69_ English
自动断电
您可以设置高清数码摄像机5分钟没有任何操作的情况下自动断电。
设置 内容 屏幕显示
Off( 关闭 )
5 min
(5
LED
当您在一个黑暗的地方录制一个主题的时候可以选择,可以选择使用
LED灯。
不使用自动断电功能。
出于省电目的,在待机模式下,如果长达
5
分钟)
分钟没有操作,高清数码摄像机将自动
关闭。
•
如果连接了
•
如果将
于“自动断电”功能。如果希望在 5 分钟后自动关闭 HD 摄录
机,请退出
USB
电缆,则“自动断电”功能不可用。
“演示”功能设置为打开,则“演示”功能的优先级高
“演示”功能。第 71 页
灯
无
无
设置 内容 屏幕显示
Off( 关闭 )
On( 打开 )
警告
不使用此功能。
LED
灯,在一个黑暗的地方录制一个
开启
颜色不失真色清晰图像。
LED灯会发热。
•
•
不要在 使用的 过程中 触摸LED灯或是关闭它之后马上触碰
LED灯,否则会被烫伤。
•
刚使用过的LED灯仍有余热,不要在使用LED灯之后马上将
高清数码摄像机放入便携包。
•
不要在易燃或易爆材料附近使用。
LED 灯的照明范围是有限的(最大值为6.6ft(2m))
•
•
LED 指示灯只能在影音录制
( ) 模式下工作。
无
录制指示灯
您可以在录制影音或拍摄照片的时候,打开或者关闭摄像机前面的录制
指示灯。
设置 内容 屏幕显示
Off( 关闭 )
On( 打开 )
不使用此功能。
在录制过程中,录制指示灯亮起。
无
无
中文 _69
Page 78

using the menu items
Remote
This function allows you to enable or disable the remote control for use
with the HD camcorder.
Settings Contents
Disable the function.
Off
The ( ) indicator appears when you use the
remote control.
You can control the HD camcorder with the
On
remote control.
USB Connect
Using the USB cable, you can connect your HD camcorder to a PC to
copy your movie images and photo images from the storage media, or to
a printer to print your photo images.
Settings Contents
Mass
Storage
PictBridge Connect to a PicBridge printer. None
TV Type
You can select the aspect ratio during playback on TV.
Settings Contents
Anynet+ (HDMI-CEC)
Anynet+ is an AV network system that enables you to control all
connected Samsung AV devices with Anynet+ supported Samsung TV’
s remote control. You can use Anynet+ function by connecting the HD
camcorder to Anynet+ supported TV with HDMI cable and set “Anynet+
(HDMI-CEC)” to “On.” For more details, refer to TV’s user manual.
Connect to a PC. None
16:9 Select 16:9 to use the wide screen TV mode.
4:3
Select 4:3 to use the standard display aspect ratio of 4:3.
●
This function is available when the HD camcorder is connected
to a TV.
●
TV type is set to on automatically when an HDMI cable is
connected, so this function is deactivated.
70_ English
On-screen
display
None
None
On-screen
display
On-screen
display
使用菜单选项
遥控
开启此功能,通过遥控器使用高清数码摄像机。
设置 内容 屏幕显示
Off( 关闭 )
On( 打开 )
USB
通过
影音图像以及照片图像,或连接至打印机打印照片图像。
Mass Storage
( 海量存储 )
PictBridge
TV
类型
您可以选择电视机的高宽比用于播放。
Anynet+ (HDMI-CEC)
Anynet+
电视的遥控器控制所有已连接的
可通过用
“Anynet+ (HDMI-CEC)”
将
有关详细信息,请参阅电视的用户手册。
不使用此功能。
当您使用遥控器的时候,屏幕上显示
( )
指示图标。
使用遥控器控制高清数码摄像机。
连接
USB
数据线连接您的高清数码摄像机至电脑,从存储介质中复制
设置 内容 屏幕显示
连接至电脑。
PicBridge
连接到
设置 内容 屏幕显示
16:9
选择
16:9
4:3
选择
4:3
当高清数码摄像机连接至电视机的时候使用本功能
•
当连接 HDMI 电缆时将自动设置电视类型,因此将取消激
•
活此功能
。
是一种AV网络系统,它使您能够用支持
HDMI
电缆线将高清数码摄像机连接到支持
打印机。
宽屏幕TV模式。
标准高宽比显示模式。
Samsung AV
“On.”
设置为
( 打开 ) 来使用
Anynet+的Samsung
设备。
Anynet+
Anynet+
无
无
无
无
。
的电视并
功能。
中文 _70
Page 79
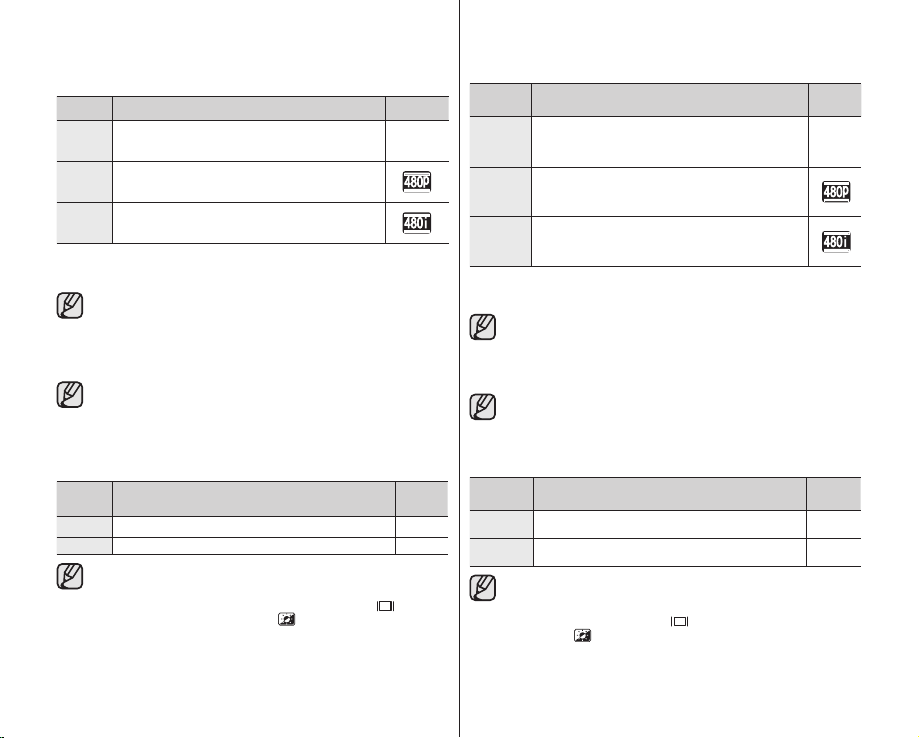
Component Out
You can select the type of component video signal that is compatible with the
connected TV.
Settings Contents
The video signals are issued with the same format of the
Auto
recorded file. Please use it only for connecting to HDTV. When
the “Auto” is selected, indicator does not appear on the screen.
The recorded file is displayed with 480P format. Select it only
SD 480P
when the TV to connect is for SD quality and it supports the
progressive scan.
The recorded file is displayed with 720x480i format. Select
SD 480i
it to connect to an SD-quality TV that does not support
progressive scan.
Default Set
You can restore menu settings to default (initial settings at the factory) pages 49-51
Initializing the HD camcorder settings to factory defaults does not affect
recorded images.
Language
You can select a desired language to display the menu and messages.
“Language” options may be changed without prior notice.
On-screen
display
None
分量输出
您可以选择分量视频信号的类型用于连接电视机。
设置 内容
视频信号使用与录制的文件相同的格式。请仅在
Auto
HDTV
( 自动 )
SD
480P
SD 480i
连接
的时候,屏幕上不显示任何指示图标。
录制的文件以
为SD质量标准并且支持逐行扫描的时候请选择
使用此功能。
录制的文件以
机为SD质量标准并且不支持逐行扫描的时候请
选择使用此功能。
的时候使用此功能。当选择“自动
480P
格式显示。当连接的电视机
720x480i
格式显示。当连接的电视
屏幕显
示
”
无
默认设置
您可以将菜单设置项重置为默认设置(出厂初始设置)。第49-51页
对高清数码摄像机进行初始化到出厂默认设置不会对录制的图像
造成影响。
Language
您可以选择适当的显示菜单和信息的语言种类。
“Language”选项可能会更改,恕不另行通知。
Demo
Demonstration automatically shows you the major functions that are included with
your HD camcorder so that you may use them more easily.
Settings Contents
Off
Disables the function
On
Activates demonstration mode and shows various features.
●
Demo function works after 5 minutes pass in STBY mode of movie mode.
●
You can release Demo function as follows.
- Touching any point on LCD screen / changing mode / pressing the
button (Recording start/stop, Q.MENU, Display (
EASY Q, or LCD enhancer (
●
Demo function does not work when the Multi-AV or component cable
(only when “Component Out” is set to 480p or 480i) is connected to
TV. Also Demo stops and it returns to STBY mode once above cables
are connected.
))
Onscreen
display
None
None
)/iCHECK,
71_ English
演示
自动为您演示数码摄像机的大部分功能,方便您能够更加容易地使用数
码摄像机。
设置 内容
Off
( 关闭 )
( 打开 )
不使用此功能。
On
激活演示模式,为您演示各种特点。
在影音模式下待机5分钟以后演示功能启动。
•
您可以按照如下方法取消演示功能:
•
- 触摸LCD显示屏上的任意点
止,Q.MENU, 屏幕显示
强器
( ))
如果将 Multi-AV 或分量视频电缆(仅当将
•
量输出)设置为 480p或 480i时)连接到电视,则“演示”功能不起
作用。 一旦连接了上述电缆之一,“演示”功能将会停止并返回到
待机
模式。
/更改模式/ 按下按钮(录制开始/停
( )/iCHECK, EASY Q, 或LCD增
”Component Out”(
屏幕显
示
无
无
分
中文 _71
Page 80

2.
4.
editing movie images
You can edit recorded movie images in various ways. To use Partial Delete, Divide,
Combine, extra space more than at least 10MB is needed on the storage media.
Movie image editing cannot be performed at the low battery.
DELETING A SECTION OF A MOVIE IMAGE
●
This function works only in the Play mode. page 17
●
A movie image can be partially deleted.
1. Touch the Menu (
●
If the item is not on the screen, touch the up
( )/down ( ) tab to scroll up or down to the
next group of options.
2. Touch a desired movie image.
●
The selected movie image will be paused.
3. Search the start point of deletion by touching playback
related (
4. Touch the “
●
The start point of deletion will be marked with “.”
5. Touch the playback related (
or
) tab to search the end point of deletion.
6. Touch the “
●
The end point of deletion will be marked with “.”
7. Touch the Cutting (
●
The message “Partial Delete? Selected part of a
fi le will be deleted.” will appear.
8. Touch the “Yes.
● The selected part of the movie image will be deleted.
● It operates identically in the full image display
(single-image displayed on the screen).
● The protect ( ) indicator will blink if you try
to delete a movie image that was previously
protected.
function to delete it. page 78
● A deleted part of the movie image cannot be
recovered.
● If you want to edit from the fi rst, touch the
Return ( ) tab.
● Partial deletion is not available when the
recording is less than 3 seconds.
● Partial deletion is not available within 3
seconds section of the movie image and also
isn`t available within 3 seconds section of the
remaining time.
● When partial deletion is executed, related movie
images in the playlist are partially deleted.
72_ English
) tab “Edit” “Partial Delete.”
, , , , or ) tab.
” tab at the start point.
, , , ,
” tab at the end point
) tab.
”
You must fi rst release the protect
2 / 2
Edit
1 / 1
100-0001
Partial Delete
编辑影音图像
您可以通过各种方法编辑录制的影音图像。要使用“部分删除”,“分
割”或“合并”,存储介质上至少需要10MB额外的空间。
电池电量低时不能进行编辑影音图像。
删除被选的影音图像
Move
Edit
Cont. Capture
Partial Delete
Divide
Combine
00:00:20 / 00:30:00
此功能仅可在播放模式使用。第17页
•
•
影音图像会被删除一部分。
1. 触摸菜单导航( ) “Edit”(编辑) “Partial
2. 触摸想要编辑的影音图像。
3. 触摸播放影音图像,搜索要删除部分的开始点。
4. 在开始点触摸“
5. 触摸播放( , , , , 或 )导航搜
6. 在结束点触摸 “
7. 触摸剪切( )导航键。
8. 触摸“Yes”(是)
80
Min
(部分删除)
Delete”
如果屏幕上没有想要的选项,触摸上( )/下
•
( )导航向上或向下滚动到下一组选项。
被选的影音图像暂停播放。
•
( , , , , 或 )导航键。
在要删除部分的开始点将会出现标记“”.
•
索要删除部分的结束点。
再要删除部分的结束点将会出现标记“”.
•
屏幕上出现提示信息“Partial Delete?
•
Selected part of a fi le will be deleted
(部分删除?将删除文件的选定部分)。
影音图像被选中的部分将被删除。
•
•
•
•
•
•
•
•
”导航键。
”导航键。
同样的操作在全屏显示的情况下。
(屏幕上单画面显示)
如果您试图删除一个被保护的影音图像,保护
指示图标( )会闪烁。
您必须先解除保护功能才能删除它。
被删除的影音图像不能恢复。
如果您想重新编辑,请触摸返回导航(
当录制内容不足 3 秒时不能进行部分删除。
3秒钟之内不能进行部分删除,同样在
播放影音
影音播放的剩余时间少于
够进行部分删除操作。
当执行部分删除功能时,播放列表中的影音图
像部分也被删除。
.
”
第78页
)。
3秒钟的时候,也不能
中文 _72
Page 81

2.
DIVIDING A MOVIE IMAGE
●
This function works only in the Play mode. page 17
●
You can divide a movie image as many times as you want in order to
delete a section you no longer need. The movie images will be divided in
groups of two.
1. Touch the Menu (
●
If the movie image thumbnail you want to edit
is not on the screen, touch up (
( ) tab to change the page.
2. Touch a desired movie image.
●
The selected movie image will be paused.
3. Search the point of division by touching playback
related (
4. Touch the pause (
then touch the Cutting (
●
The message “Divide a fi le at this point?” will
appear.
5. Touch the “Yes.
●
After division, the original movie image is
divided into the two movie images.
●
After dividing, you can delete the unnecessary
movies or combine with other desired movies.
pages 74, 79
●
The second image is placed in the last of
thumbnail index view.
●
The protect ( ) indicator will blink if you try
to divide a movie image that was previously
protected. You must fi rst release the protect
function to divide it.
●
Search and slow playback are useful when
designating division points.
●
The division point may drift before or after the
designated point by approximately 0.5 seconds.
●
A movie image whose recording time is
3 seconds or less cannot be divided.
●
Photo images cannot be divided.
●
The divide function will work only in the thumbnail index view.
●
When the movie image is divided, the fi rst image of the divided
images is stored in the playlist again.
●
You can also access it by using the Q.MENU button.
Press Q.MENU button. → Touch “Edit.” → Touch “Divide.”
) tab “Edit” “Divide.”
, , , , or ) tab.
) tab at the point of division,
”
73_ English
) tab.
page 78
) or down
2 / 2
1 / 1
Divide
Edit
00:00:20 / 00:30:00
100-0001
分割影音图像
此功能仅可在播放模式下使用。第17页
•
可以将视频图像分割多次,以删除不再需要的部分。视频图像
•
将以一分为二的方式分割。
1. 触 摸菜单导航 ( )“Edit”(编辑)“Divide”
(分割)。
如果您想要编辑的影音图像不在当前屏幕的
Move
Edit
Cont. Capture
Partial Delete
Divide
Combine
•
索引画面上,触摸上 (
更换页面。
2. 触摸选择想要分割的影音图像。
被选择的影音文件暂停播放。
•
3. 触摸与播放相关的导航键 ( , , , ,
或 ),搜索分割点。
4. 在分割点触摸暂停
( )导航键,然后触摸剪切
( )导航键。
屏幕上显示提示信息“Divide a fi le at this
•
point?”
(在此点分割文件吗?)
5. 触摸“Yes”(是)
分割之后,原来的影音图像被分割成两个影
•
音图像。
分割之后,您可以删除多余的影音图像或者
•
与其它想要拼接的影音图像合并。
第
74, 79
第二个图像被放置在索引画面的最后。
•
80
Min
页
如果您试图分割被保护的影音图像,
•
则保护指示图标
您必须先将保护功能取消才能对影音
图像执行分割。
搜索和慢速播放在指定分割点时非常有用
•
分割点也许会偏离选定的点前后大约0.5秒
•
录制时间少于等于3秒的图像无法被分割。
•
照片图像不能分割。
•
分割功能只能通过索引画面的菜单使用。
•
当分割视频图像时,分割出来的第一幅
•
图像将再次存储在播放列表中。
您也可以通过使用
•
按下
Q.MENU 按钮。→ 触摸“编辑”。→
触摸
“分割”。
) 或下( )导航
( )会闪烁。
第78页
Q.MENU 按钮访问它。
中文 _73
。
。
Page 82
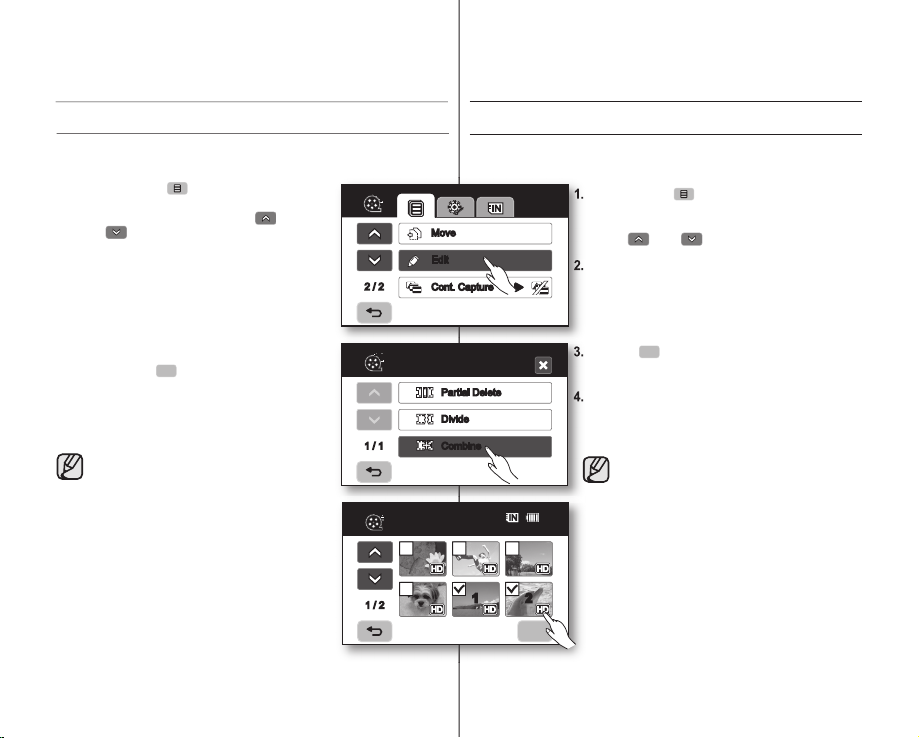
4.
OK
OK
editing movie images
COMBINING TWO MOVIE IMAGES
●
This function works only in the Play mode.
●
You can combine two different movie images.
1. Touch the Menu (
●
If the movie image thumbnail you want to edit
is not on the screen, touch up (
( ) tab to scroll to the next group of
options.
2. Touch the movie images to be combined.
●
The (
selected movie images.
●
Touching the movie thumbnail image toggles
between the movie thumbnail image being
selected for combining(the (
appears on image) or not (the (
removed from image).
3. Touch the OK (
The message “Combine selected two fi les?” will
appear.
4. Touch the “Yes.”
●
The thumbnail of the fi rst movie image will
appear in the combined movie image.
●
It is not possible to combine two fi les that have
different recording format (HD/SD).
●
You can not combine the protected images.
You must fi rst release the protect function to
paste it.
●
The two movie images are combined in the
selected order and restored as a movie image.
●
The original movie images will not be preserved.
●
Photo images cannot be combined.
●
You can also access it by using the Q.MENU
button.
Press Q.MENU button
Touch “Combine.”
●
A maximum of 2 movie images can be
combined at a time.
) tab
“Edit”
) indicator is displayed on the
) tab.
page 78
“Combine.”
) or down
) indicator
) indicator is
Touch “Edit.”
page 17
2 / 2
1 / 1
1 / 2
Edit
Combine
编辑影音图像
合并两个影音图像
此功能仅可以在播放模式下使用 第17页
•
•
您不能合并两幅不同质量的影音图像。
Move
Edit
Cont. Capture
Partial Delete
Divide
Combine
80
Min
1 2
1. 触摸菜单导航 ( ) “Edit”(编辑)
“Combine”
•
2. 触摸想要合并的影音图像。
•
•
3. 触摸OK(OK)导航。
屏幕上显示提示信息“Combine selected two
fi les?”
4. 触摸“Yes”
•
(合并)
如果屏幕上没有显示想要编辑的影音图像,触摸
上( )或下( ) 导航键滑动到下一组选项。
选中的影音图像上显示指示图标( )。
触摸影音索引画面被选的需要合并的图像
像上显示指示图标(
)消失)。
图标(
(合并选择的两个文件?)
(是)。
第一幅视频图像的缩略图将出现在合并的视
频图像中。
两个录制格式不相同的文件无法进行合
•
并 (HD/SD)。
您不能合并受保护的图像。必须先解
•
除保护功能才能进行合并。第78页
将以所选顺序合并两幅影音图像并存储
•
为一幅影音图像。
将不会保存原始影音图像。
•
不能合并照片图像。
•
您也可以通过使用 Q.MENU 按钮访
•
问它。
按下 Q.MENU 按钮触摸
辑)触摸
一次最多只能合并 2 幅图像。
•
)) 或不选(图像上的指示
“Combine”(合并)
“Edit”(编
(图
。
74_ English
中文 _74
Page 83
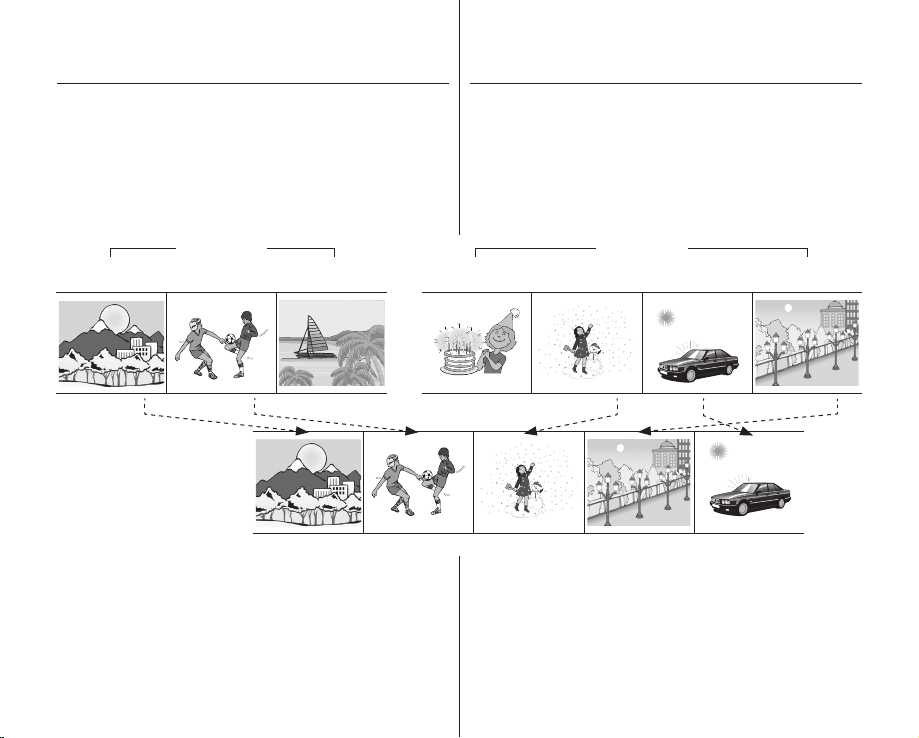
PLAYLIST
What’s the “Playlist?”
The playlist is created by only the data on movie images so it will
consume less storage capacity. When creating or deleting a playlist, the
original movie image will not be erased. Moreover adding or deleting
movie images from a playlist does not affect the original movie images.
播放列表
什么是
“Playlist?”
播放列表仅是由影音图像的数据创建的,因此它仅占用较少的存储容
量。当创建或删除播放列表时,原始的影音图像并不会被删除,而且从
播放列表增加或删除影音图像的时候并不会影响到原始的影音图像。
(播放列表)
?
JAN.12.2007 JAN.30.2007
Movie image 1 Movie image 2 Movie image 3 Movie image 4 Movie image 5 Movie image 6 Movie image 7
10:00 10:30 11:30 14:00 16:10 18:20 20:00
Playlist
75_ English
中文 _75
Page 84
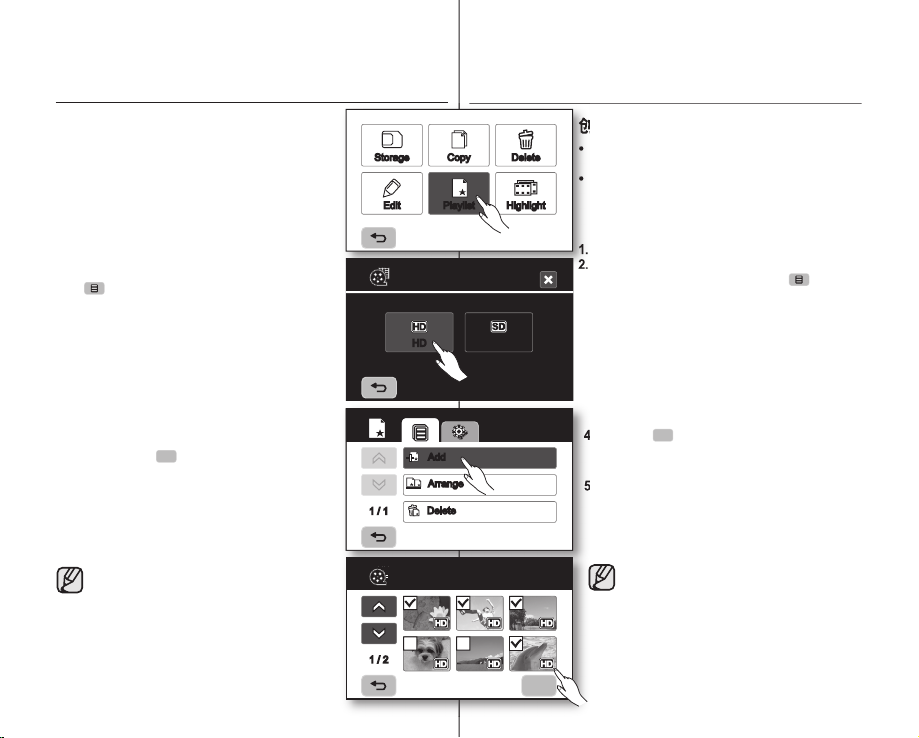
OK
editing movie images
80
Min
OK
Creating the playlist
●
This function works only in Play mode using
the Q.MENU button.
●
You can create a playlist on this HD camcorder
by gathering your favorites from the recorded
movie images. Since the playlist is not created
by copying data, you will consume less storage
capacity by making a playlist.
1. Press the Q.MENU button.
2. Touch the “Playlist”
playlist according to movie quality)
( ) tab “Add.”
3. Select and touch the movie images to add to the
playlist.
●
The (
movie images.
●
Touching the movie thumbnail image toggles
between the movie thumbnail image being
selected for creating a playlist (the (
appears on image) or not (the (
removed from image).
●
You can not select the different quality (HD/SD)
movie image with the image being selected.
4. Touch the OK (
●
The message “Add selected fi les to
Playlist?” will appear.
5. Touch the “Yes.
●
When creation of a playlist is complete, the
thumbnail view of the playlist will appear.
●
You can play a playlist in the same manner as
you play a movie image.
●
If free space available on the storage is
insuffi cient, creation of new playlist may
not be possible. Delete unnecessary
movie images.
●
Up to 64 movie images can be included in
playlist.
●
When playing back the playlist, the
counter refers to total counter of the
playlist.
●
You can add a movie image to the playlist
as the same manner above.
76_ English
page 47
“HD” or “SD” (creating
) indicator is displayed on the selected
) tab.
”
page 39
Menu
) indicator is
) indicator
编辑影音图像
Storage Copy Delete
Edit Playlist Highlight
Playlist
SDHD
Add
Arrange
Delete
1 / 1
Add
1 / 2
创建播放列表
本功能仅可在播放模式下通过Q.MENU按钮使
•
第47页
用。
您可以从录制的影音图像中挑选喜爱的影音
•
图像在本高清数码摄像机上创建播放列表。
因为创建播放列表只是复制数据,所以只会
占用较少的存储容量。
1. 按下Q.MENU按钮。
2. 触摸“Playlist”
据影音质量创建播放列表)
“Add”
3. 选择并且触摸影音图像添加到播放列表。
被选的影音图像上显示指示图标( )
•
•
触摸影音索引画面中想要添加到播放列表
的图像
(图像上显示指示图标( )) 或不选(图像上的
指示图标(
在选择了图像的情况下,您不能选择另一质量
•
(HD/SD)的影音图像。
4. 触摸OK(OK)导航。
屏幕上显示提示信息“Add selected fi les to
•
Playlist?” (将选择的文件添加至播放列表?)
5. 触摸“Yes”(是)。
当完成创建播放列表,屏幕上将显示播放列表
•
的索引画面。
•
与播放一个影音图像同样的方式打开一个播放
列表。
80
Min
(播放列表) “HD”或“SD” (根
(添加)”
)消失)。
第39页
如果空余存储空间不足,不可能创建
•
一个新的播放列表。请删除多余的影
音图像。
•
播放列表最多可以容纳64个影音图
像。
•
当播放播放列表时,播放的文件数是
根据播放列表的总文件数编排的。
•
按照以上同样的方式添加一个影音图
像至播放列表。
菜单 ( )导航
。
中文 _76
Page 85

2.
OK
您能删除播放列表内不想要的影音图像。
OK
Arranging the order of movie images within a playlist
OK
OK
You can arrange movie images within a playlist by moving them to
desired positions.
1. Touch the “Playlist”
playlist according to movie quality)
( ) tab
2. Touch the movie image to be moved.
●
The (
movie images.
●
Touching the movie thumbnail image toggles
between the movie thumbnail image being
selected for arranging(the
(
) indicator appears on image) or not
(the (
●
A bar will also appear next to the movie image.
3.
Touch the previous ( ) or next ( ) tab to
move the bar to the position of your choice, then touch the OK (
●
The selected movie image will be moved to the new position.
“HD” or “SD” (arranging
“Arrange.”
) indicator is displayed on the selected
) indicator is removed from image).
Menu
1 / 1
Deleting movie images from a playlist
You can delete undesired movie images within
playlist.
1. Touch the “Playlist”
playlist according to movie quality)
( ) tab
2. Touch the movie image to be deleted.
●
The ( ) indicator is displayed on the selected
movie images.
●
Touching the movie thumbnail image toggles
between the movie thumbnail image being selected
for deletion(the ( ) indicator appears on image) or not (the ( ) indicator
is removed from image).
3. Touch the OK (
●
The message “Delete selected fi les from Playlist? Original fi le is not
deleted.” will appear.
4. Touch the “Yes.”
●
The selected playlists will be deleted.
“Delete.”
“HD” or “SD” (deleting
Menu
) tab.
1 / 1
Arrange
Delete
在播放列表内排列影音图像
您可以在播放列表内排列影音图像。
1. 触摸“Playlist”(播放列表)
80
Min
) tab.
从播放列表删除影音图像
80
Min
屏幕上显示提示信息“Delete selected fi les from Playlist?
•
Original fi le is not deleted.
会删除原始文件。)
4. 触摸“Yes”(是)
播放列表中被选的影音图像将被删除。
•
“HD”或“SD” (根据影音质量排列播放列表)
菜单 ( )导航 “Arrange”(排列)。
2. 触摸想要移动的影音图像。
被选的影音图像上显示指示图标( )。
•
•
触摸影音索引画面中想要排列的图像
显示指示图标(
)消失)。
(
•
影音图像的旁边会出现一个竖条。
3. 触摸向后( )或向前( )导航移动竖条到您想
要选择的位置,然后触摸OK
被选的影音图像将会移动到一个新的位置。
•
)) 或不选(图像上的指示图标
(图像上
(OK)导航。
您能删除播放列表内不想要的影音图像。
1. 触摸“Playlist”
影音质量删除播放列表)
“Delete”
2. 触摸想要删除的影音图像。
被选的影音图像上显示指示图标( )。
•
•
触摸影音索引画面中想要删除的图像(图像上
(播放列表) “HD”或“SD” (根据
(删除)”
显示指示图标(
)消失)。
标(
)) 或不选(图像上的指示图
菜单 ( )导航
3. 触摸OK(OK)导航。
”(从播放列表中删除选择的文件? 不
77_ English
中文 _77
Page 86
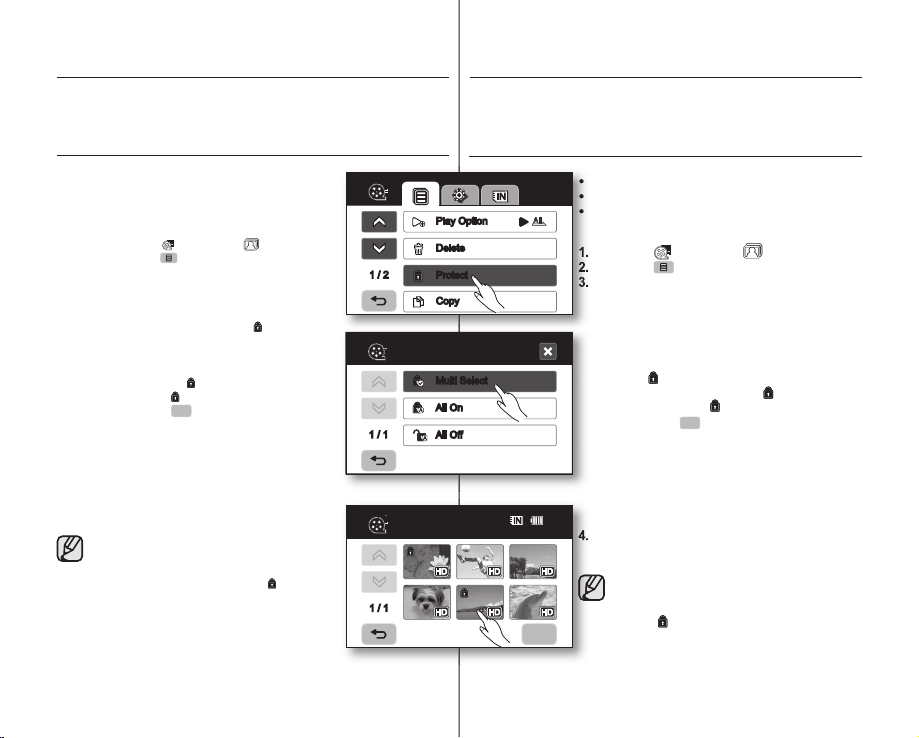
4.
OK
OK
image management
This chapter describes information about movie or photo fi le management tools such
as protection, deletion, copy, and move. Image management cannot be performed at
the low battery.
PROTECTION FROM ACCIDENTAL ERASURE
●
This function works only in the Play mode. page 17
●
You can protect important images from accidental
erasure.
●
If you execute formatting, all fi les including protected
fi les will be erased. page 68
1. Touch the Movie (
2. Touch the Menu (
3. Touch the desired option tab on the screen
(“Multi Select,” “All On” or “All Off”).
●
“Multi Select”: Protects individual images.
-
●
“All On”: Protects all images.
-
●
“All Off”: Releases the protected images all at
once.
4. The message according to the selected option will
appear. Touch the “Yes.”
●
After completing, the selected images will be
protected.
●
This function operates identically in the full
●
●
If the write protection tab on the memory card is
) tab or Photo ( ) tab.
) tab “Protect.”
To protect individual images, touch image to
select images to protect. The (
is displayed on the selected movie images.
Touching the thumbnail image toggles between
the thumbnail image being selected for
protection(the (
or not (the (
Touch OK (
To protect all images, simply touch the “All On.”
image display mode (single-image displayed on
the screen).
Protected images will show the ( ) indicator
when they are displayed.
set to lock, you cannot set image protection.
page 29
) indicator appears on image)
) indicator is removed from image).
) tab.
) indicator
1 / 2
Protect
1 / 1
Protect
1 / 1
图像管理
本章节为您介绍有关影音或照片文件管理工具的信息。譬如保护、删
除、复制和移动。电池电量低时不能执行图像管理。
保护图像
此功能仅可在播放模式下使用。 第17页
•
•
您可以保护重要的图像免受偶然删除。
•
Play Option
Delete
Protect
Copy
Multi Select
All On
All Off
如果您执行格式化,所有的文件包括被保护的文
件将被删除。
1. 触摸影音( )导航或照片( )导航。
2. 触摸菜单
3. 触摸屏幕上想要选择的选项 (“Multi Select”(
项选择)
关闭)).
“Multi Select”(多项选择)
•
- 预保护个别的影音图像,触摸该图像选择
“All On”(全部打开)
•
- 保护全部图像,仅需简单地触摸
“All Off”(全部关闭)
•
80
Min
像。
4. 屏幕上显示提示信息。触摸“Yes”(是)。
完成后,所选的图像即被保护。
•
第68页
( )导航 “Protect”(保护)
“All On”(全部打开)或 “All Off”(全部
保护。屏幕上被选定的图像上显示指示图
标( )。触摸影音索引画面中想要保护的图
像(图像上显示指示图标( )) 或不选(图像
上的指示图标
触摸OK
( )消失)。
(OK) 导航键。
: 保护全部图像。
“All On”(全部打开)
。
: 取消保护全部影音图
在全屏显示模式下,也有相同的操作。
•
屏幕上显示单画面)。
•
受保护的影音图像上显示相应的指示图
)。
标(
•
如果存储卡上的写保护片被锁上,您将
无法设置保护图像。
: 保护个别的图像。
第29页
多
78_ English
中文 _78
Page 87
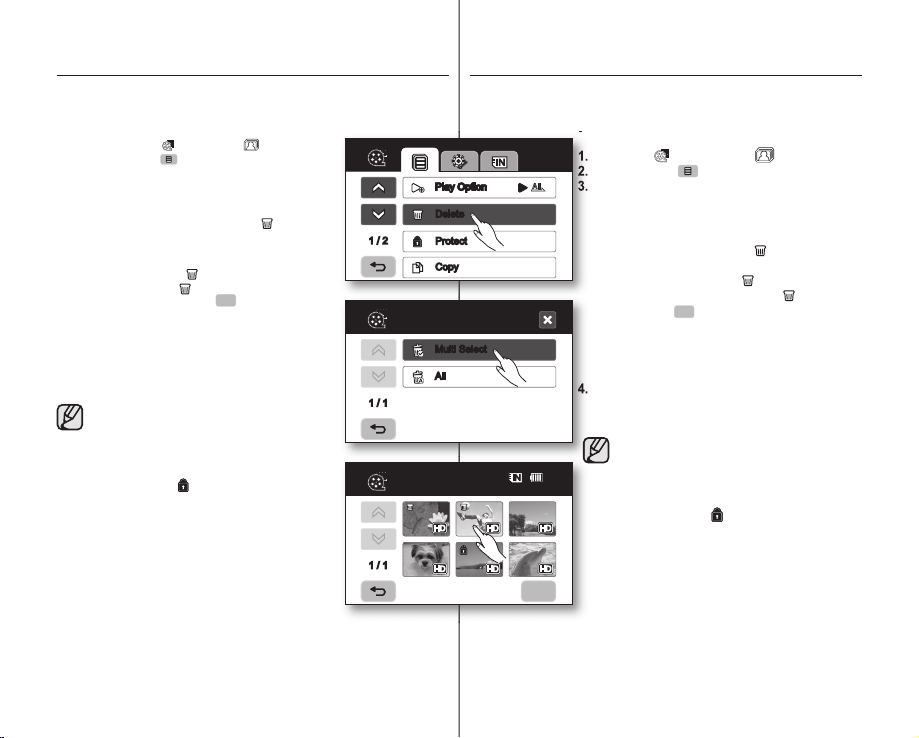
2.
4.
OK
DELETING IMAGES
OK
●
This function works only in the Play mode. page 17
●
You can erase the images recorded on the storage media.
●
An image that has been deleted cannot be recovered.
1. Touch the Movie
2. Touch the Menu
3. Touch the desired option tab on the screen (“Multi
Select” or “All”).
●
“Multi Select”: Deletes individual images.
●
“All”: Deletes all images.
4. The message according to the selected option will
appear. Touch the “Yes.”
●
After completion, selected images will be deleted.
●
●
●
●
●
●
( ) tab or Photo ( ) tab.
( ) tab “Delete.”
- To delete individual images, touch image to
select images to delete. The (
displayed on the selected images. Touching
the thumbnail image toggles between
the thumbnail image being selected for
deletion(the (
or not (the (
image). Touch OK (
- To delete all images, simply touch the “All.
(Accordingly the deleted fi les also disappear in
playlist.
This function operates identically in the full
image display mode (single-image displayed on
the screen).
To protect important images from accidental
deletion, activate the image protection.
page 78
The protect ( ) indicator will blink if you try to
delete a image that was previously protected.
page 78
You must release the protect function to delete
the image.
If the write protection tab on the memory card is
set to lock, you cannot delete.
You can also format the storage media to delete
all the images at once.
Be aware that all fi les and data including
protected fi les will be erased. page 68
In the quick menu, you can delete all fi les only
(you cannot delete a fi le individually.).
) indicator appears on image)
) indicator is removed from
page 76)
) tab.
) indicator is
page 29
删除图像
此功能仅可以在播放模式下使用。 第17页
•
•
您可以删除记录在存储介质上的图像。
Play Option
Play Option
Delete
1 / 2
”
1 / 1
1 / 1
Protect
Copy
Delete
Multi Select
All
Delete
•
被删除的图像无法恢复。
1. 触摸影音( )导航或者照片( )导航。
2. 触摸菜单导航
3. 触摸屏幕上想要选择的选项导航
Select”
•
- 触摸想要删除的图像。
•
- 删除全部图像,仅需简单地触摸
4. 根据所选项显示提示信息。触摸“Yes”(是)。
完成后,所选图像即被删除。(被删除的文件
•
80
Min
( ) “Delete”(删除)。
(多项选择)或“All”(全部)).
“Multi Select”(多项选择)
被选择的图像上显示
触摸影音索引画面中想要删除的图像
像上显示指示图标
(图像上的指示图标( )消失)。触
或不选
摸OK(OK) 导航键。
“All”(全部)
部)
。
: 删除全部图像。
也将消失在播放列表。
在全屏显示模式下,也有相同的操作。
•
屏幕上显示单画面)。
•
保护重要的图像以免被偶然删除,激活
图像保护功能。
•
如果您试图删除一个被保护的图像,保
护指示图标
您必须在删除图像之前解除该图像的保
护功能。
•
如果存储卡的写保护片锁定,则不能删
除存储卡上的文件。
•
您也可以格式化存储介质来立即删除全
部图像。
注意,所有文件和数据包括被保护的数
据也将被删除。
•
通过Q.MENU,您仅可以选择删除全部
(无法删除单独的一个文件)。
文件
: 删除选择的图像。
( )指示图标。
( ))
第76页)
第78页
( )便会闪烁。第78页
第68页
(“Multi
(图
“All”(全
第29页
79_ English
中文 _79
Page 88
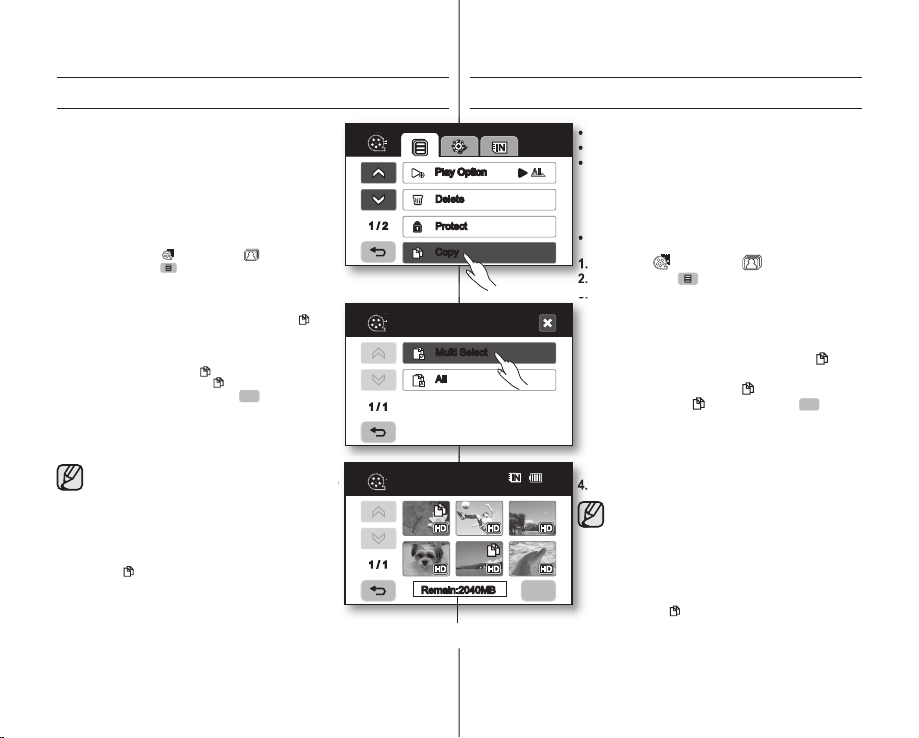
OK
image management
4.
OK
COPYING IMAGES
●
This function works only in the Play mode. page 17
●
You can copy images between built-in memory and
memory card.
●
Images are copied to the destination storage while
leaving original images in the source storage.
(It copies from the currently-used storage to another.
For example, if the built-in memory is used, it copies to
a memory card.)
●
Make sure that the memory card has been inserted.
1. Touch the Movie (
2. Touch the Menu (
3. Touch the desired option tab on the screen (“Multi
Select” or “All”).
●
“Multi Select”: Copy individual images.
- Touch images you want to copy. The (
●
“All”: Copy all images.
- To copy all images, simply touch the “All.
4. The message according to the selected option will
appear. Touch the “Yes.”
●
If free space available on the storage is
insuffi cient, copying may not be possible. Delete
unnecessary images.
●
Be sure to connect AC power adaptor when
using copy function.
●
In the quick menu, all the movie thumbnail
images are selected. Touch the movie
thumbnail image you don’t want to copy. The
( ) indicator disappears from the image. Also,
if there is insuffi cient space in the destination
storage to copy, fi les are selected in the order
from the fi rst as long as the space allows.
(SC-HMX10A/HMX10C/HMX10CN/HMX10ED ONLY)
) tab or Photo ( ) tab.
) tab “Copy.”
indicator is displayed on the selected movie
images. Touching the thumbnail image toggles
between the thumbnail image being selected
for copying(the (
image) or not (the (
from image). Touch OK (
) indicator appears on
) indicator is removed
page 79
)
) tab.
”
图像管理
复制图像 ( 仅限
Play Option
Play Option
Delete
1 / 2
1 / 1
1 / 1
Remaining capacity of destination storage
Copy
Copy
Remain:2040MB
Protect
Copy
Multi Select
All
80
Min
SC-HMX10A/HMX10C/HMX10CN/HMX10ED)
此功能仅可以在播放模式下使用。第17页
•
•
您可以在内置存储器和存储卡之间复制图像。
图像被复制到另一个存储介质上,而原始图像仍
•
保留在原来存储的位置。
(它可以将文件从当前的存储介质复制到另一个
存储介质。例如,将文件从内置存储器复制到
)
存储卡。
•
请确保已经插入存储卡。
1. 触摸影音( )导航或照片( )导航。
2. 触摸菜单导航
3. 触摸屏幕上的选项导航。
择)
•
- 触摸您想要复制的图像。
•
- 复制全部图像,仅需简单地触摸
根据所选项显示提示信息。触摸“Yes”(是)。
4.
( ) “Copy”(复制)。
或“All”(全部)).
“Multi Select”(多项选择)
被选的影音图像上显示指示图标
触摸影音索引画面中想要复制的图像
像上显示指示图标
指示图标
导航键。
“All”(全部)
(全部)
。
如果存储空间不足,则不可能进行复制
•
操作。请删除一些多余的图像。
第79页
•
在使用复制功能的的时候请务必连接交
流电源适配器。
在Q.MENU中,所有影音索引图像都处于
•
选中状态。触摸不想复制的影音索引图
( ) 指示符就会从图像中消失。而
像。
且,如果目的地存储介质的存储空间不
足,在存储空间允许的条件下文件将按
照被选择的顺序开始复制。
(“Multi Select”(多项选
: 复制所选的图像。
( )) 或不选(图像上的
( )消失)。触摸OK(OK)
:复制全部图像。
( )。
“All”
(图
80_ English
中文 _80
Page 89
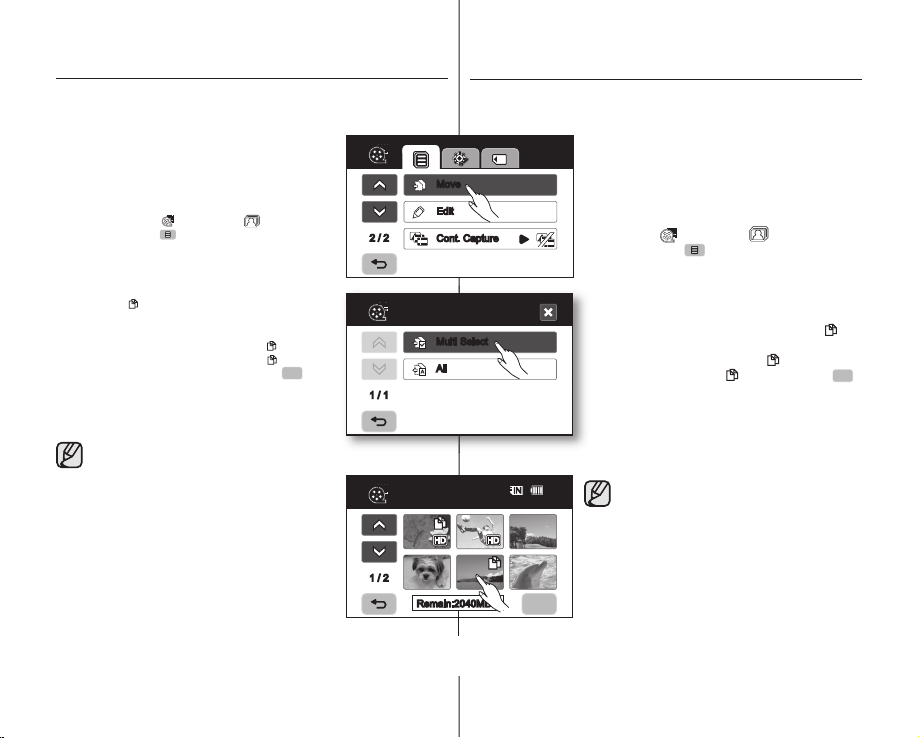
OK
OK
MOVING IMAGES (
OK
●
This function works only in the Play mode. page 17
●
You can move images between built-in memory and memory card.
●
Images are moved to the destination storage. The original images (except read
only fi les) in the source storage are deleted. (It moves
from the currently-used storage to another. For example,
if the built-in memory is used, it moves to a memory
card.)
●
Make sure that memory card has been inserted.
1. Touch the Movie (
2. Touch the Menu (
3. Touch the desired option tab on the screen (“Multi
Select” or “All”).
●
“Multi Select”: Moves individual images.
- Touch images you want to move. The
●
“All”: Moves all images.
- To mode all images, simply touch the “All.
4. The message according to the selected option will
appear. Touch the “Yes.”
●
Protected images could not be moved. You must
●
If the write protection tab on the memory card is
●
If free space available on the storage is
●
Be sure to connect AC power adaptor when
SC-HMX10A/HMX10C/HMX10CN/HMX10ED ONLY
) tab or Photo ( ) tab.
) tab “Move.”
( ) indicator is displayed on the selected
movie images. Touching the thumbnail
image toggles between the thumbnail image
being selected for moving(the ( ) indicator
appears on image) or not (the (
removed from image). Touch OK (
release the protect function to move the image.
page 78
set to lock, you cannot move.
insuffi cient, moving images may not be possible.
Delete unnecessary images.
using the move function.
page 79
) indicator is
) tab.
”
2 / 2
Move
1 / 1
Move
1 / 2
Remaining capacity of destination storage
)
移动图像 ( 仅限
•
•
Move
Edit
Cont. Capture
Multi Select
All
Remain:2040MB
SC-HMX10A/HMX10C/HMX10CN/HMX10ED)
此功能仅可以在播放模式下使用。第17页
您可以在内置存储器和存储卡之间移动图像。
80
Min
您可以将图像移至目标存储器。将删除原存储
•
器中的原始图像(只读文件除外)。
前的存储介质移动到另一个存储介质。例如,
如果当前使用的是内置存储器,则它被移动到
存储卡。)
•
请确保已经插入了存储卡。
1. 触摸影音( )导航或照片( )导航。
2. 触摸菜单导航
3. 触摸屏幕上的选项导航。 (“Multi Select”
选择)
•
- 触摸想要移动的图像。
•
( ) “Move”(移动)。
或“All”(全部))。
“Multi Select”(多项选择): 移动所选的图像。
被选的影音图像上显示指示图标
触摸影音索引画面中想要移动的图像
(图像上显示指示图标( )) 或不选(图像
上的指示图标
) 导航键。
“All”(全部)
- 移动全部图像,仅需简单地触
摸
“All”(全部)
( )消失)。触摸OK(
: 移动全部图像。
。
4. 根据所选项显示提示信息。触摸“Yes”(是)。
被保护的文件不可以移动。您必须在进
•
行移动操作之前解除该文件的保护功
第78页
能。
•
如果存储卡的写保护片锁定,则不能使
用移动功能。
如果存储空间不足,则不可能进行移
•
动操作。请删除一些多余的图像。
第79页
•
当使用移动功能时,请确保连接交流电
源适配器。
(它从当
(多项
( )。
81_ English
中文 _81
Page 90
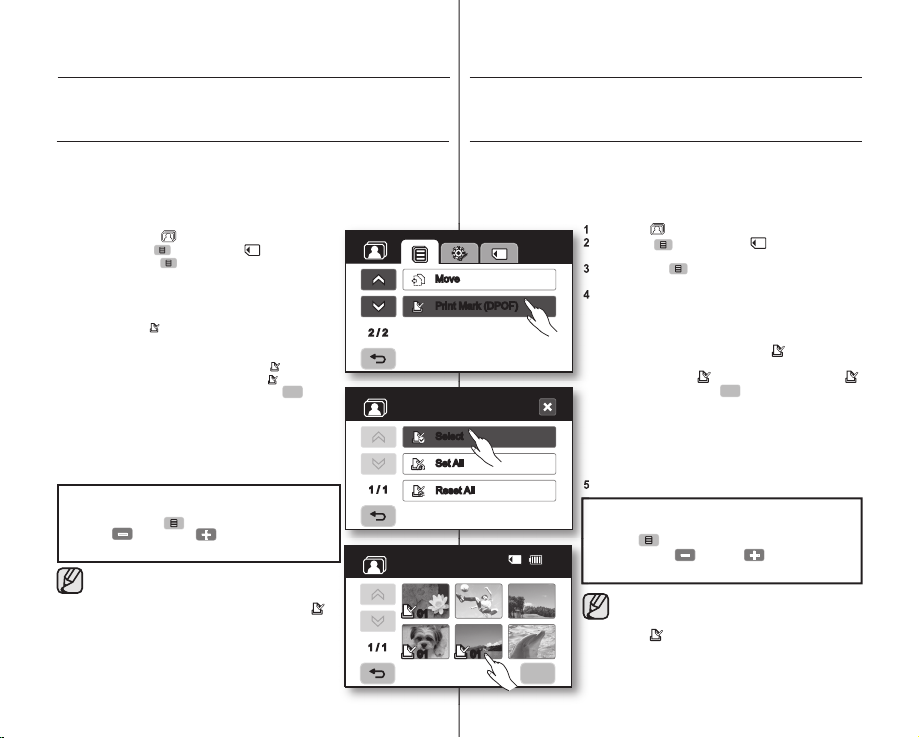
2.
3.
4.
OK
OK
printing photo images
You can print photo images by inserting the DPOF setting card to the DPOFcompatible printer or connecting the HD camcorder to the PictBridge printer.
DPOF PRINT SETTING
●
Print Mark (DPOF) can be set only on photo images stored in the memory card.
●
This function works only in the Play mode. page 17
●
This HD camcorder is compatible with DPOF (Digital Print Order Format).
You can set which images to be printed and the number of prints with this HD
camcorder. This feature is useful to print with a DPOF-compatible printer or when
bringing storage media to a photo lab for printing.
1. Touch the Photo (
2.
Touch the Menu ( ) tab Storage ( ) tab "Card."
3. Touch the Menu ( ) tab “Print Mark (DPOF).”
4. Touch the desired option tab on the screen (“Select,”
“Set All” or “Reset All”).
●
“Select”: Print-marks individual images.
- Touch image to select images to print.
●
“Set All”: Print-marks all images.
- Simply touch the “Set All.
●
“Reset All”: Removes the print mark.
- Touch the “Reset All.”
5. The message according to the selected option will
appear and touch the “Yes.”
You can set the number of prints in the single display view
only. Select the photo image to print in the single display mode,
and touch the Menu (
decrease (
printing). Up to 99 copies can be set to print of each image.
●
This function operates identically in the full
●
Print marked photo images will show the ( )
●
The “Reset All” and “Set All” options may take
82_ English
) tab.
) indicator is displayed on the selected
The (
images. Touching the photo thumbnail image
toggles between the photo thumbnail image
being selected for printing (the ( ) indicator
appears on image) or not (the (
removed from image). Touch OK (
”
) tab “Print Mark (DPOF)”
) or increase ( ) tab (select the number of
image display mode (single-image displayed on
the screen).
indicator when they are displayed.
a long time depending on the number of stored
images.
) indicator is
) tab.
打印照片图像
可通过将DPOF设置卡插入到与DPOF兼容的打印机中或将高清数码摄
像机连接到PictBridge打印机来打印照片图像。
DPOF
打印设置
只能对存储在存储卡上的照片图像设置打印标记 (DPOF)
•
此功能仅可以在播放模式下使用。
•
本高清数码摄像机兼容DPOF(数字打印命令格式)。您可以通过本高清数码摄
•
像机设定打印的图像并且设置打印的数量。它的特点是您可以直接与DPOF兼容
打印机连接后直接打印或者将存储卡带到冲印店来打印照片。
1. 触摸照片( )导航。
2. 触摸菜单 ( ) 导航
2 / 2
1 / 1
1 / 1
Move
Print Mark (DPOF)
Print Mark (DPOF)
Select
Set All
Reset All
Print Mark (DPOF)
01
01 01
3. 触摸菜单导航
4. 触摸屏幕上的选项导航
5. 根据所选项显示提示信息。触摸“是”。
您仅可以在单画面显示的情况下设置打印数量。
在单画面显示模式选择要打印的照片图像,并且触摸
菜单导航
80
(DPOF)
Min
量)每张图像可以最多设置打印99张。
第17页
“Card”(存储卡)。
识(DPOF)。
全部)
或“Reset All”(重设全部))。
“Select”(选择)
•
- 触摸选择要打印的图像。
被选的图像上显示指示图标
触摸影音索引画面中想要打印的图像
示指示图标
)消失)。触摸OK(OK) 导航键。
“Set All”(设置全部)
•
- 简单地触摸
“Reset All”(重设全部)
•
- 触摸
( )
减少 ( ) 或增加 ( )导航(选择打印数
在全屏显示模式下,也有相同的操作。(屏幕
•
上显示单画面)。
当它们显示的时候,打印标识的指示图标
•
( )将出现在照片图像上。
“Reset All”(重设全部)
•
部)
的数量而定。
存储器( )导航
( ) “Print Mark (DPOF)”(打印标
(“Select”(选择) “Set All”(设置
: 打印标识在个别的图像。
( )。
( )) 或不选(图像上的指示图标(
: 打印标识在全部图像。
“Set All”(设置全部)
“Reset All”(重设全部)
: 重设打印标识。
。
“Print Mark (DPOF)”(打印标识
和
选项可能需要很长时间,视已存储 图像
“Set All”(设置全
(图像上显
。
中文 _82
Page 91
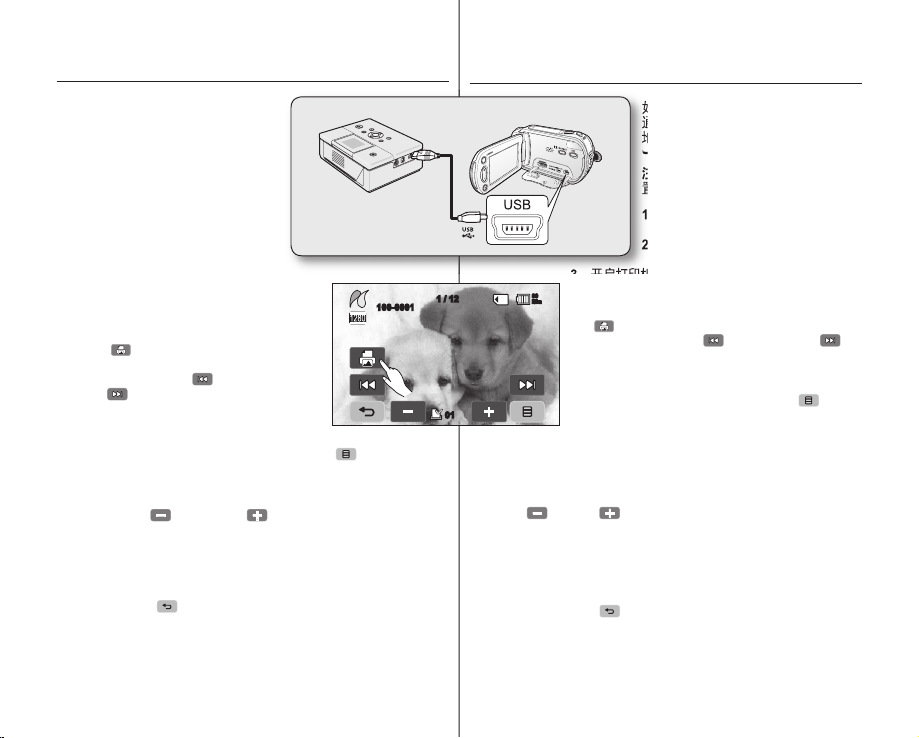
DIRECT PRINTING WITH A PICTBRIDGE PRINTER
通过
If your printer is compatible with
PictBridge, photo images can be printed
easily by connecting the camcorder with
the USB cable directly to the printer.
DPOF setting can also be used.
page 82
NOTICE: After selecting “PictBridge” in
the menu, connect the USB cable.
1. Set the “USB Connect” to
“PictBridge”. page 70
2. Connect your HD camcorder to the
printer using the provided USB cable.
3. Turn your printer power on.
●
The thumbnail index view of the photo
image will appear.
4. Touch a photo image to print, then touch the
) tab.
Print (
●
To search photo image, touch the
previous image (
( ) tab.
●
The selected photo image will be printed.
●
After the connection, the easy printing
menu will display on the LCD screen. To
display the PictBridge menu, touch the Menu (
information about the PictBridge menu, refer to page 84.
) or next image
Setting the number of copies to print
Touch decrease ( ) or increase ( ) tab to select the number of
prints.
●
If the image moves to the previous or next, the number of copies is
reset.
To cancel print setting
Touch the Return ( ) tab on the screen.
To stop printing after printing starts
The confi rmation screen appears while printing.
Touch the “Cancel” on the screen.
83_ English
PictBridge
100-0001
) tab. For more
PICTBRIDGE
通过
HD camcorder
1 / 12
01
打印机直接打印
如果您的打印机兼容PictBridge,便可以
通过USB数据线连接至打印机更方便
地打印照片。DPOF设置也可以使用。
第82页
注意:请在菜单中选择设
置“PictBridge”后连接USB数据线。
1. 设置“USB Connect”
接)到“PictBridge”. 第70页
2. 使用提供的USB数据线将您的高清
3. 开启打印机。
显示照片图像索引画面。
80
Min
•
4. 触摸要打印的照片图像,然后触摸打印导航
( )。
触摸上一个图像( )或者下一个图像( )导
•
•
打印被选的照片图像。
•
连接后,LCD显示屏上会出现打印菜单。显
数码摄像机连接至打印机。
航键,搜索要打印的照片图像。
示PictBridge菜单,触摸菜单导航 ( )。有
关 PictBridge 菜单更详细的信息,请参见第
84页。
设置打印份数
触摸减少( )或增加( )导航以选择打印份数。
如果图像移至前一个或下一个图像,则会重置份数。
•
取消打印设置。
触摸屏幕上的返回导航( )。
打印开始后停止打印
在打印的过程中将会显示确认信息。
触摸屏幕上的"Cancel"
(取消)。
(USB连
中文 _83
Page 92

printing photo images
PictBridge menu
Setting the date/time imprint option
Touch the Menu ( ) tab “Date/Time” “Off,” “Date,” “Time”, or “Date &
Time”
Return ( ) tab.
To print using the DPOF setting
If the printer is compatible with DPOF, you can use the DPOF setting. page 82
● If the printer is not recognised, or to print again
after direct printing with a PictBridge printer,
remove the USB cable, select “PictBridge” in the
menu again, and then reconnect the cable.
● If the “USB Connect” menu is set to “Mass
Storage” you cannot connect a PictBridge
compatible printer to the camcorder and a
“Fail USB Connecting” message will appear.
You must touch the “Switch Mode” tab
“PictBridge” tab on the screen, and the
“Connecting as Printer Mode” message will
appear.
● In some instances the HD camcorder may
not connect to the printer. If connection fails,
disconnect the USB cable and turn off the printer
and back on. Then, connect the USB cable and
set the HD camcorder to “PictBridge.”
● The date/time option may not be supported by all
printers. Check with your printer manufacturer.
The “Date/Time” menu cannot be set up if the
printer does not support this option.
● PictBridge™ is a registered trademark of CIPA
(Camera & Imaging Products Association), an
image transfer standard developed by Canon,
Fuji, HP, Olympus, Seiko Epson, and Sony.
● Use the USB cable provided with the HD camcorder.
● Use the AC power adaptor for your HD camcorder during
PictBridge direct printing. Turning your HD camcorder off during
printing might damage data on the storage media.
● Movie images are not available for printing.
● You can set various printing options depending on the printer.
Please refer to the user manual of the printer for details.
● Do not remove USB cable or memory card during printing.
● You may not print photo images recorded on other devices.
84_ English
1 / 1
Date/Time
1 / 1
打印照片图像
PictBridge菜单
设置印于照片上的日期/时间
触摸菜单导航( ) “Date/Time”(日期/时间) “Off”(关闭) “Date”(日
“Time”(时间),或“Date & Time”(日期和时间) 返回导航( )
期)
使用DPOF设置打印
如果打印机兼容DPOF,您可以使用DPOF设置。
如果打印机不被认可,或使用
•
Date/Time
Off
Date
Time
Date & Time
并非所有的打印机都支持日期/时间打印。请查看您的打印机使用说明书。如
•
果打印机不支持此功能,则
PictBridgeTM是CIPA(Camera & Imaging Products Association),
•
公司的注册商标,照片传输标准是由Canon
Seiko Epson
使用高清数码摄像机随附的USB数据线。
•
在PictBridge直接打印期间,请在您的高清数码摄像机上使用交
•
流电源适配器。打印期间关闭高清数码摄像机电源可能会损坏存
储卡上的数据。
不能够打印影音图像。
•
依照打印机的不同,您可以有其他的打印功能。请参考打印机的
•
操作说明。
在打印期间不要拔掉USB数据线或取出存储卡。
•
在其他设备上拍摄的照片图像不能通过本高清数码摄像机打印。
•
和Sony所发展的。
PictBridge打印机直接打印之后再次
打印,请拔掉USB数据线,在菜单
内再次选择
USB数据线。
如果将
•
单设置为“Mass Storage”(海量存储)
则您不能与 PictBridge兼容的打印机
连接到摄像机,并且将显示
Connecting”
必须触摸屏幕上的
换模式) 导航
就会显示“Connecting as Printer
Mode”(以打印机模式连接)消息。
•
在某些情况下,高清数码摄像机可能不
能连接到打印机。如果连接失败,则拔
下USB线,关闭打印机,然后重新打开
打印机。然后,将高清数码摄像机设置
为
“PictBridge”
“Date/Time”(日期/时间)菜单不能设置。
第82页
“PictBridge”然后再连接
“USB Connect”(USB连接)
(USB连接失败)消息。
“Switch Mode”
“PictBridge”导航
后连接USB数据线。
,Fuji,HP,Olympus,
。
菜
“Fail USB
(切
,
中文 _84
,
Page 93

connecting to a PC
连接到电脑
This chapter explains how to connect the camcorder to a PC using the
USB cable for various functions.
✪ When connecting a USB cable to a PC, refer to the software
installation instructions and PC specifications below.
SYSTEM REQUIREMENTS
CyberLink DVD Suite
Following requirements must be satisfied to use CyberLink DVD Suite.
OS Windows Vista or XP (Windows XP Service Pack 2)
CPU
RAM 512 MB (1 GB and above recommended)
USB USB2.0
Display 1024 x 768, 16-bit color or higher
Miscellaneous Internet Explorer 5.5 or later
Supported
media
Video card
Intel® Pentium® 4, 3.2 GHz / AMD Athlon 64FX,
2.6GHz recommended
DVD-R/-RW, DVD+R/+RW, DVD-RAM, CD-R/RW
For the compatible DVD/CD burners, refer to
CyberLink web site:
http://www.cyberlink.com/english/products/
powerproducer/4/comp_dvd_drive.jsp
nVIDIA Geforce 7600GT or higher
ATi X1600 series or higher
●
DVD Suite is optimized for Intel Core 2 Duo processors and
CPUs with MMX, SSE, SSE2, 3DNow!, and Intel Hyper
Threading technology.
●
The system requirements information above is not a
guarantee that the provided software will work on all personal
computers meeting those requirements.
●
If you have a Unified Codec previously installed on your PC,
this may cause an error from Cyberlink DVD Suite.
Please remove the existing Codec before proceeding with the
installation of the suite.
●
If you experience corrupted screen or abnormal color display,
you must update the existing video driver to the latest. You
can download the latest driver for your monitor from the
applicable maker’s customer service web page.
85_ English
本章节为您介绍怎样使用USB数据线将高清数码摄像机连接至电脑实现
各种功能。
✪
连接USB数据线至电脑,请参见软件安装指南以及如下电脑规格。
系统要求
CyberLink DVD Suite
使用 CyberLink DVD Suite必须满足下列要求。
OS Windows Vista
Intel® Pentium® 4, 3.2 GHz / AMD Athlon 64FX,
CPU
RAM
USB USB 2.0
显示
其他
支持的介质
视频卡
推荐
2.6GHz
512 MB (推荐1 GB
1024 x 768, 16
Internet Explorer 5.5
DVD-R/-RW, DVD+R/+RW, DVD-RAM, CD-R/RW
DVD/CD烧结, 参见CyberLink
兼容
http://www.cyberlink.com/english/products/
powerproducer/4/comp_dvd_drive.jsp
nVIDIA Geforce 7600GT
ATi X1600
DVD Suite是誉为完美的Intel Core 2 Duo处理器和MMX,
•
SSE, SSE2, 3DNow! CPUs
不能保证所有满足以上系统要求信息的软件会在所有符合这
•
些要求的个人电脑上正常工作。
如果您的电脑以前安装过Unified Codec(统一的编解码
•
器),可能会导致Cyberlink DVD Suite出现错误。请在继续
安装本软件之前删除现有的Codec(编解码器)。
•
如果屏幕上的画面损坏或颜色失真,请您将当前的视频驱动
程序更新为最新版本。您可以到制造商的客服网页中下载最
新的显示器驱动程序。
XP (Windows XP Service Pack 2)
或
或更大的内存
位颜色或更高
或更高版本
系列或更高
和Intel HyperThreading 技术。
)
或更高
网站:
中文 _85
Page 94

connecting to a PC
4.
4.
3.
3.
退出您正在实用的其它软件。
标在任务栏
2.
INSTALLING THE CyberLink DVD Suite
DVD Suite is software for easily editing MPEG, AVI, and other video fi les,
still images, and other contents for creating a movie.
Before you begin:
Quit any other software you are using. (Check that there
are no other application icons on the status bar.)
连接到电脑
安装CYBERLINK DVD SUITE
DVD Suite是一款可以让您更容易地编辑MPEG,AVI,和其它视频文
件,静态图像以及创建其它内容影音的软件。
开始之前:
退出您正在实用的其它软件。
标在任务栏
)
(检查是否有其他应用图
1. Load the provided CD-ROM into the PC.
●
Set up screen appears within several seconds.
If the set up screen does not appear, doubleclick
the CD-ROM icon in the “My Computer” window.
●
Click “Install Now.”
2. Select the desired language and click “OK”
3. “CyberLink DVD suite install Shield Wizard” screen
appears.
●
Click “Next”.
4. “License Agreement” screen appears.
●
Click “Yes”.
86_ English
1. 将提供的CD-ROM放入电脑。
几秒钟后屏幕上显示设置画面。
•
如果没有显示设置画面,请双击
脑”窗口中的CD-ROM图像。
“
Install Now
•
点击
2. 选择所需的语言,然后单击“OK”
3. “CyberLink DVD suite install Shield Wizard”屏幕将
出现。
单击“Next”
•
4. “License Agreement”屏幕将出现。
单击“Yes”
•
”。
“我的电
中文 _86
Page 95

7.
8.
5.
6.
5. “Customer Information” screen appears.
●
Click “Next.”
5. “Customer Information”屏幕将出现。
单击“Next”
•
6. “Choose Destination Location” screen appears.
●
Choose the destination location which you want
to install.
●
Click “Next.”
7. “Setup status” screen appears.
●
The installation progresses in order as follows
“Power Starter”
Director”
“Power Producer Template.”
●
Wait for a moment until the installation is
"Power DVD” “Power
“Menus” “Power Producer”
fi nished and “Setup Complete” screen appears.
8. “Setup Complete” appears.
●
Click “Finish.”
●
The icon of “CyberLink DVD Suite” is created on
the desktop.
●
If you perform installation of software that is
already installed, uninstallation will start. In
this case, perform the installation again after
uninstallation is fi nished.
●
This manual only refers to software installation
and PC connection. For more details on
software, refer to the “Online help/Read me”
on the CyberLink DVD Suite CD.
●
Frame drop may occur in preview screen
while you are using Power Producer.
However, this does not affect any burned
image on DVD title.
87_ English
6. “Choose Destination Location”屏幕将出现。
选择想要安装的目标位置。
•
单击“Next”
•
7. “Setup status”屏幕将出现。
安装进度按如下所示顺序进
•
行:“Power Starter”
“Power Director” “Menus” “Power
Producer”
plate”
等待一小会,直到安装完成,“Setup
•
。
“Power DVD”
“Power Producer Tem-
Complete”屏幕出现。
8. “Setup Complete”出现。
单击“Finish”。
•
将在桌面上创建“CyberLink DVD
•
Suite”的图标。
如果您已经进行软件安装,则会开始卸载。
•
在这种情况下,在卸载完成后才会开始再一
次安装本软件。
•
本手册只包括软件安装和计算机连接。有关
软件s的详细信息,请参阅 CyberLink DVD
Suite CD 上的“Online help/Read me”
使用 Power Producer 时在预览屏幕中可能会
•
出现丢帧现象。但是,这不影响 DVD上烧录
的任何图像。
中文 _87
。
Page 96
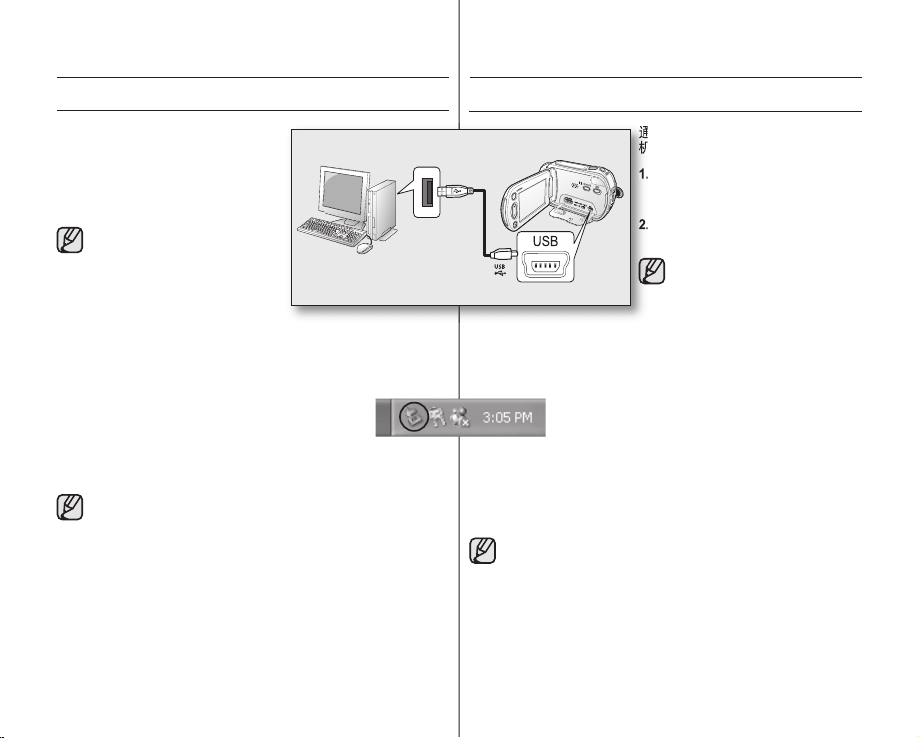
通过
机至电脑,复制影音文件和照片文件。
2.
connecting to a PC
CONNECTING THE USB CABLE
To copy the movie fi les and photo fi les to your
PC, connect your HD camcorder to the PC with
a USB cable.
1. Set the “USB Connect” to “Mass Storage.”
page 70
2. Connect the HD camcorder to the PC with a
USB cable.
●
Don’t apply excessive force when
inserting or extracting a USB cable
into/from a USB jack.
●
Insert a USB after checking the
direction of its insertion is correct.
●
Use the provided USB cable.
Disconnecting the USB cable
First disconnect the USB cable and turn off the HD camcorder.
After completing the data transmission, you must disconnect the
cable in the following way:
1. Click the “Unplug or eject hardware” icon on the task tray.
2. Select “USB Mass Storage Device” or “USB Disk,” and then
click “Stop.”
3. Click “OK.”
4. Disconnect the USB cable from the HD camcorder and PC.
●
We recommend using the AC power adaptor as the power supply
instead of the battery pack.
●
When the USB cable is connected, turning the camcorder on or off the
camcorder may cause the PC to malfunction.
●
If you disconnect the USB cable from the PC or the HD camcorder
while transferring, the data transmission will stop and the data may be
damaged.
●
If you connect the USB cable to a PC via a USB HUB or simultaneously
connect the USB cable along with other USB devices, the HD
camcorder may not work properly. If this occurs, remove all USB
devices from the PC and reconnect the HD camcorder.
PC
连接到电脑
连接USB数据线
HD camcorder
断开
USB
数据线
先拔掉 USB 线,再关闭高清数码摄像机。
在完成传输数据之后,您必须按照以下方法断开USB
据线:
1. 点击任务栏上
“安全删除硬件”图标。
2. 选择“USB Mass Storage Device”
3. 点击“确定”
4. 断开高清数码摄像机与电脑的连接。
建议您使用交流电源适配器代替电池组为数码摄像机供电。
•
•
当USB数据线连接,开启或关闭高清数码摄像机会导致电
脑故障。
如果在转移数据的过程中从高清数码摄像机或者电脑上断开
•
USB数据线,数据传输将会停止并且数据可能损坏。
如果您通过USB HUB将USB数据线与电脑相连或者同时连
•
接其他的USB设备,数码摄像机可能不会正常工作。如果发
生这种情况,请您从电脑上拔下USB设备,重新连接高清数
码摄像机。
通过USB数据线连接您的高清数码摄像
机至电脑,复制影音文件和照片文件。
1. 设置“USB Connect”
接)
第70页
2. 通过USB数据线将高清数码摄像机连
接至电脑。
或“USB Disk,”然后点击“停止”。
到“Mass Storage”(海量存储)
在插入或拔出USB端子的时候
•
不要用力过猛。
•
请在插入USB端子之前检查插
入的方向是否正确。
•
请使用厂家提供的USB
据线。
(USB连
数
数
88_ English
中文 _88
Page 97

VIDEO
VIEWING THE CONTENTS OF STORAGE MEDIA
1. Slide the POWER switch downward to turn the
HD camcorder on.
●
Set the “USB Connect” to “Mass
Storage.”
page 70 (It is set to “Mass
Storage” by default when you purchase the
HD camcorder.)
●
Set the appropriate storage media. (SC-
HMX10A/HMX10C/HMX10CN/HMX10ED
only)
page 26 (If you want to record on a
memory card, insert the memory card.)
2. Connect the HD camcorder to the PC with a
USB cable.
●
●
●
3. The folders in the storage media appear.
●
The “Removable Disk” window appears on
Select “Open folders to view fi les using
Different fi le types are stored in different
page 88
the PC’s screen after a moment.
Two removable disks appear when
connecting a USB. (SC-HMX10A/HMX10C/
HMX10CN/HMX10ED only).
The built-in memory is the fi rst recognized
drive of two removable discs newly
registered in the ‘My Computer’. For
example, when (F:) drive and (G:) drive are
recognized in the PC, (F:) drive and (G:)
drive are the built-in memory and memory
card, respectively.
You can select the desired memory type.
Windows Explorer” and click “OK.”
folders.
●
If the “Removable Disk” window does not
appear, confi rm the connection (page 88)
or perform the steps 1 and 2.
●
When the removable disk does
not appear automatically, open the
removable disk folder of My Computer.
89_ English
查看存储介质信息
Photo images Movie image
setting data
1. 将 POWER 开关向下滑动以打开 高清数码摄
像机。
将
“USB Connect”(USB连接)
•
为
“Mass Storage”(海量存储)
(默认情况下,购买高清数码摄像机时它就
设置
。第70页
设置为“Mass Storage”(海量存储)。)
设置适当的存储介质。
•
(仅适用于SC-HMX10A/HMX10C/
HMX10CN/HMX10ED
)第26页
( 如果要在存储卡上进行录制,则插入存
储卡。)
2. 通过USB数据线连接高清数码摄像机至电脑。
第88页
过一小会儿之后电脑屏幕上显示“可移
•
动磁盘
”。
•
连接 USB 时将出现两个可移动磁盘。
(仅适用于 SC-HMX10A/HMX10C/
HMX10CN/HMX10ED)。 内置存储器
是在“我的电脑”中新登记的两个可移
动磁盘中先识别的驱动器。例如,若在
计算机中识别 (F:) 盘和 (G:) 盘,则
(F:) 盘和 (G:) 盘分别是内置存储器
和存储卡。
您可以选择所需的存储器类型。
选择
“通过Windows Explorer 浏览器打开
•
并查看文件夹
”并且点击“确定”。
3. 显示存储介质中的文件夹。
不同的文件存储在不同类型的文件夹内。
•
如果未显示“可移动磁盘”窗口,请
•
确认第
1,2步骤得连接和执行操作
(第88页)。
如果可移动磁盘没有自动显示,则
•
从“我的电脑”打开可移动磁盘文
件夹。
中文 _89
Page 98
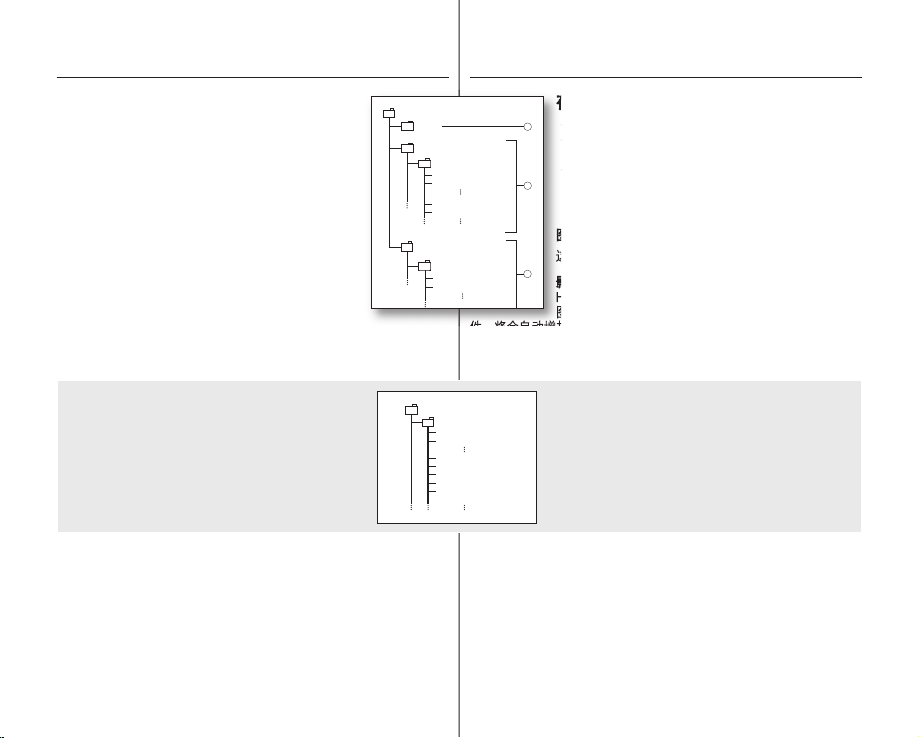
这是存放照片文件譬如
SDV_0001.MP4
DCIM
VIDEO
100PHOTO
SDV_0002.MP4
HDV_0001.MP4
HD010001.MP4
CAM_0001.JPG
CAM_0002.JPG
100VIDEO
MISC
2
1
3
SDV_0001.MP4
VIDEO
SDV_0002.MP4
HDV_0001.MP4
HD010001.MP4
HD010002.MP4
HD010003.MP4
HDV_0002.MP4
100VIDEO
connecting to a PC
Structure of folders and fi les on the storage
media
●
The folder and fi le structure for storage media is as follows:
●
Don’t arbitrarily change or remove the folder or fi le name. It
may not be playable.
●
The fi le naming follows DCF (Design rule for Camera File
System).
Image confi guration fi le
This is where data for photo fi les such as DPOF is stored.
Movie image fi le (H.264)
The HD-quality movie images have HDV_####.MP4 format and
the SD-quality movie images have SDV_####.MP4 format. The
fi le number automatically increases when a new movie image fi le
is created. Up to 999 fi les are created in one folder. New folder is created when more
than 999 fi les are created.
连接到电脑
存储介质上的文件夹和文件的结构
存储介质上的文件夹和文件结构如下所示:
•
•
不要任意移动或者更改文件夹或者文件名称。这样做
很可能导致文件不能正常播放。
•
文件名由DCF (相机文件系统的设计规则
图像配置文件
这是存放照片文件譬如DPOF文件的地方。
影音图像文件(H.264)
HD质量影音图像有HDV_####.MP4格式,SD质量影音
件,将会自动增加一个文件编号。一个文件夹最多可以创建999个文件,
当文件超过了999个就要新建一个新的文件夹。
图像有SDV_####.MP4格式。当录制了一个新的影音文
)规定。
For example: If the size of one recording is over 2GB (more than
22 minutes in HD Super
Finemode) fi le HDV_0001.MP4 is closed, and the fi le, HD010001.
MP4 is created.
Photo image fi le
As in movie image fi les, the fi le number automatically increases when a new image
fi le is created. The maximum fi le number allowed is the same as in movie image fi les.
A new folder stores fi les from CAM_0001.JPG. The folder name increases in the
order of 100PHOTO 101PHOTO etc.
Up to 999 fi les are created in one folder. New folder is created when more than 999
fi les are created.
90_ English
例如:如果一个录制内容的大小超过 2GB(在
HD 高清晰模式下超过 22 分钟),则会关闭文件
HDV_0001.MP4,并创建文件 HD010001.MP4
。
照片图像文件
如同影音图像文件一样,当创建一个新的图像文件时便会自动增加一个
文件编号。与影音图像文件允许的最多文件数量是相同的。一个新的
文件夹存放文件从CAM_0001.JPG开始。文件夹名称按照100PHOTO
101PHOTO……的顺序创建。
一个文件夹内可以创建999个文件。当文件超过999时,便会创建一个新
的文件夹。
中文 _90
Page 99
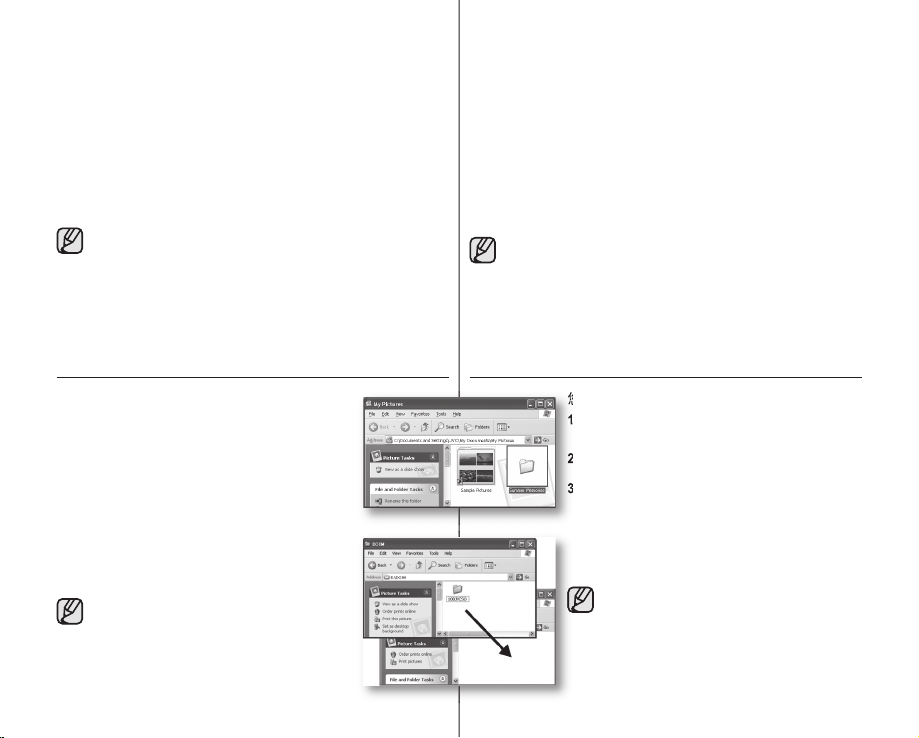
您可以复制影音图像至电脑并且进行播放。
Image format
Movie image
●
Movie images are compressed in H.264 format. The fi le extension is
“.MP4.”
●
The image size is 1280x720 (HD) or 720x480 (SD). page 60
Photo image
●
Photo images are compressed in JPEG (Joint Photographic Experts
Group) format. The fi le extension is “.JPG.
●
The image size is 2048x1536, 1440x1080, or 640x480. page 63
● When the 999th fi le is created in the 999th folder (i.e.
HDV_0999.MP4 is created in the 999VIDEO folder), a new
folder cannot be created anymore. Set “File No.” to “Reset”
at this time.
● You may modify the name of a fi le/folder stored in the storage
media using a PC. This HD camcorder may not recognise
modifi ed fi les.
”
TRANSFERRING FILES FROM THE HD CAMCORDER
TO YOUR PC
You can copy the movie and photo images to your PC
and play them back.
1. Execute the procedure in “Viewing the contents of
storage media.”
●
The folders in the storage media appear.
2. Create a new folder, enter the folder name, then
doubleclick it.
3. Select the folder to copy, then drag and drop it into
the destination folder.
●
The folder is copied from the storage media (memory
card (all models) or built-in memory (SC-HMX10A/
HMX10C/HMX10CN/HMX10ED)) to the PC.
To playback the movie image copied to PC
Use the provided software to playback the movie
images in the PC. The movie images recorded
on your HD camcorder may not be played back
in other software.
page 89
图像格式
影音图像
•
影音文件的压缩格式为H.264。文件的扩展名为
•
图像文件的大小是 1280x720 (HD)
照片图像
•
照片图像的压缩格式为JPEG (摄影专业人员联合组织
“.JPG.”。
名为
•
图像文件大小是2048x1536, 1440x1080,
当第999个文件被创建在第999个文件夹时(例如 HDV_0999.
•
MP4被创建在 999VIDEO文件夹),则无法再创建一个新的文
件夹。这个时候,请设置 “File No.
。
置)
•
您可以通过电脑修改存储卡中的文件
清数码摄像机可能无法识别修改后的文件。
从高清数码摄像机转移文件至电脑
您可以复制影音图像至电脑并且进行播放。
“查看存储介质内容”程序。 第89页
1. 执行
显示存储介质内的文件夹。
•
2. 创建一个新的文件夹,输入文件夹名称,然后双
击它。
3. 选择要复制的文件夹, 然后将它拖放到目的地文
件夹
复制存储介质中的文件夹到(存储卡(所
•
有型号
HMX10C/HMX10CN/HMX10ED))电脑。
播放复制到计算机的影音图像
使用提供的软件通过电脑播放影音图像。使用
其它软件不能播放通过本高清数码摄像机录制
的影音图像。
或720x480 (SD). 第60页
或640x480. 第63页
)或者内置存储器(SC-HMX10A/
“.MP4.”。
)。文件的扩展
”(文件编号)到“Reset”(重
/文件夹名称。但是本高
91_ English
中文 _91
Page 100

maintenance &
additional information
MAINTENANCE
Your HD camcorder is a product of superior design and craftsmanship and should be
treated with care. The suggestions below will help you fulfill any warranty obligations
and allow you to enjoy this product for many years.
●
For safekeeping of the HD camcorder, turn off the HD camcorder.
- Remove the battery pack and AC power adaptor.
- Remove the memory card.
page 27
Cautions when storing
●
Do not leave the HD camcorder in a place where the temperature is very
high for a long period of time: The temperature inside a closed vehicle or trunk
can become very high in a hot season. If you leave the HD camcorder in such a
place, it could malfunction or the case could be damaged. Do not expose the HD
camcorder to direct sunlight or place it near a heater.
●
Do not store the HD camcorder in a place where the humidity is high or
in a dusty place: Dust entering the HD camcorder could cause malfunctions.
If humidity is high, the lens could become moldy, and the HD camcorder could
become inoperative. It is recommended that you put the HD camcorder in a box
together with a small silica bag when storing it in a closet, etc.
●
Do not store the HD camcorder in a place subject to strong magnetism or
intense vibration: This could cause malfunctions.
●
Detach the battery pack from the HD camcorder and store it in a cool
place: Leaving the battery pack attached or storing it at high temperature could
shorten its life.
Cleaning the HD camcorder
Before cleaning, turn off the HD camcorder and remove the battery pack and
AC power adaptor.
●
To clean the exterior
- Wipe gently with a soft dry cloth. Do not apply excessive force when
cleaning, gently rub the surface.
- Do not use benzene or thinner to clean the camcorder. The coating of
exterior could peel off or the case could deteriorate.
●
To clean the LCD screen
Wipe gently with a soft dry cloth. Be careful not to damage the monitor.
●
To clean the lens
Use an optional air blower to blow out dirt and other small objects. Do not wipe
the lens with cloth or your fingers. If necessary, wipe gently with lens cleaning
paper.
- Mould may form if the lens is left dirty.
- If the lens looks dimmer, turn off the HD camcorder and leave it for about
1 hour.
page 13,16
维护&其他信息
维护
您的高清数码摄像机是具有超级设计和工艺的产品,应该小心对待。下面的
建议将帮助履行所有担保义务,并让您多年使用本产品。
为了保护高清数码摄像机,要关闭高清数码摄像机。
•
- 卸下电池组和交流电源适配器。
- 取出存储卡。
第27页
有关保存的注意事项
切勿将高清数码摄像机放在温度过高的地方很长时间:
•
封闭的车辆或卡车在炎热的季节会变得很热。如果您将高清数码摄
像机留在此类地方,可能会出现故障或损坏外壳。切勿将高清数码
摄像机直接暴露在阳光下或放在靠近热源的地方。
切勿将高清数码摄像机存放在湿度很高的地方:
•
灰尘进入高清数码摄像机可能会造成故障。如果湿度很高,镜头会
发霉,而高清数码摄像机可能会导致不能正常工作。将高清数码摄
像机存放在壁橱中时,建议您将其与干燥剂一起放入盒子中。
•
切勿将高清数码摄像机保存在磁性很强或强烈震动的地方:
这可能导致故障。
从高清数码摄像机卸下电池组,并将其存放在阴凉得地方:
•
将连接的电池组存放在温度很高的地方可能会缩短其寿命。
清洁高清数码摄像机
在清洁之前,关闭高清数码摄像机,然后卸下电池组和交流电源适配器。
清洁外部
•
- 用柔软的干布轻轻擦拭。清洁时请勿过度用力,轻轻擦拭表面即
可。
- 切勿使用苯或稀释剂清洁摄像机。外层会脱落或外壳会被损坏。
清洁LCD显示屏
•
用柔软的干布轻轻擦拭,注意不要损坏显示屏。
•
清洁镜头
使用可选购的吹风机将灰尘和其它小物体吹走。切勿用布或手
指擦拭镜头。如果必要,使用镜头清洁纸轻轻擦拭。
- 如果镜头很脏,可能会发霉。
- 如果镜头看起来较暗,请关闭高清数码摄像机
第13,16页
1小时左右。
92_ English
中文 _92
 Loading...