

Samsung SC-DC173U-XAA User Manual [en, es]

ENGLISH
PHOTO
DVD+ReWritable
DVD+R DL
ESPAÑOL
DVD Camcorder
SC-DC171/DC173(U)/DC175/DC575
Auto Focus
AF
Charge Coupled
CCD
Videocámara con DVD
SC-DC171/DC173(U)/DC175/DC575
Device
Liquid Crystal Display
LCD
Owner’s Instruction Book
Before operating the unit, please read this
Instruction Book thoroughly, and retain it for
future reference.
Use only approved battery packs.
Otherwise, there is a danger of overheating,
fire or explosion.
Samsung is not responsible for problems
occurring due to using unapproved batteries.
Autofoco
AF
Dispositivo acoplado
CCD
por carga
Pantalla de cristal
LCD
líquido
Para prevenir cualquier mal funcionamiento
y/o evitar daños, lea detalladamente este
manual de instrucciones antes de conectar
y operar este aparato. Conserve el manual
para referencias futuras.
Utilice únicamente baterías aprobadas.
De lo contrario, existe peligro de
sobrecalentamiento, incendio o explosión.
Samsung no se hace responsable de
problemas que se produzcan debido al uso
de baterías no aprobadas..
AD68-01230C

ENGLISH
ESPAÑOL
Contents
Notes and Safety Instructions ................................................................. 6
Getting to Know Your
Features .................................................................................................................9
Learning available Discs and Their Features .......................................................
How to use the DVD Camcorder easily ................................................................ 12
Accessories Supplied with the DVD Camcorder .................................................. 13
Front & Left View ..................................................................................................
Left Side View .......................................................................................................
Right & Top View ..................................................................................................
Rear & Bottom View .............................................................................................
Remote Control (SC-DC175/DC575 only) ............................................................ 18
Preparation .............................................................................................. 19
Using the Hand Strap & Lens Cover ....................................................................19
Lithium Battery Installation ...................................................................................20
Using the Lithium Ion Battery Pack ......................................................................21
Connecting a Power Source ................................................................................. 25
About the Operating Modes ................................................................................. 26
Using the Joystick ................................................................................................ 26
Using the Q.MENU ............................................................................................... 27
OSD (On Screen Display) in Camera Mode/Player Mode ................................... 28
OSD (On Screen Display) in M.Cam Mode/M.Player Mode
(SC-DC173(U)/DC175/DC575 only) ..................................................................... 29
Turning the OSD (On Screen Display) On/Off ......................................................
Initial Setting : System Menu Setting .................................................... 30
Setting the Clock (Clock Set) ............................................................................... 30
Setting the Wireless Remote Control Acceptance
(Remote) (SC-DC175/DC575 only) ...................................................................... 31
Setting the Beep Sound (Beep Sound) ................................................................32
Setting the Shutter Sound (Shutter Sound)
(SC-DC173(U)/DC175/DC575 only) ..................................................................... 33
Selecting the OSD Language (Language) ........................................................... 34
Viewing the Demonstration (Demonstration) ........................................................
Initial Setting : Display Menu Setting .................................................... 36
Adjusting the LCD Screen (LCD Bright/LCD Color) ............................................. 36
Displaying the Date/Time (Date/Time) ..................................................................
DVD Camcorder .................................................. 9
10
14
15
16
17
29
35
37
Índice
Notas e instrucciones de seguridad .......................................................6
Introducción a la Vid
Características .......................................................................................................9
Discos disponibles y características ..................................................................... 10
Cómo utilizar la Videocámara con DVD ...............................................................
Accesorios incluidos con la Videocámara con DVD .............................................
Vistas frontal y lateral izquierda ............................................................................
Vista lateral izquierda ...........................................................................................
Vistas superior y lateral derecha ..........................................................................
Vistas posterior e inferior .....................................................................................
Mando a distancia (sólo SC-DC175/DC575) ........................................................ 18
Preparación ............................................................................................. 19
Utilización de la empuñadura y la tapa del objetivo .............................................19
Instalación de la pila de litio ................................................................................. 20
Utilización de la batería de iones de litio .............................................................. 21
Conexión a una fuente de alimentación ............................................................... 25
Información sobre los modos de funcionamiento ................................................. 26
Utilización del Joystick ........................................................................................ 26
Uso de Q.MENU ................................................................................................... 27
OSD (Presentación en pantalla) en Camera Mode/Player Mode ......................... 28
OSD (Presentación en pantalla) en M.Cam Mode/M.Player Mode
(sólo SC-DC173(U)/DC175/DC575) .................................................................... 29
Encendido / apagado de OSD (presentación en pantalla) ................................... 29
Ajuste inicial: Ajuste del menú System ............................................... 30
Ajuste del reloj (Clock Set) ................................................................................... 30
Ajuste de aceptación de control remoto inalámbrico (Remote)
(sólo SC-DC175/DC575) ...................................................................................... 31
Ajuste del sonido Beep (Beep Sound) ................................................................ 32
Ajuste del sonido del obturador (Shutter Sound)
(sólo SC-DC173(U)/DC175/DC575) ..................................................................... 33
Selección del idioma de OSD (Language) ..........................................................34
Visualización de la demostración (Demonstration) ..............................................
Ajuste inicial: Ajuste del menú Display ................................................ 36
Ajuste de la pantalla LCD (LCD Bright/LCD Color) ............................................. 36
Visualización de la fecha y hora (Date/Time) ....................................................... 37
eocámara con DVD ................................................9
12
13
14
15
16
17
35
2

ENGLISH
ESPAÑOL
Contents
Setting the TV Display (TV Display) .....................................................................38
DVD Camcorder: Before Recording ......................................................39
Using the Viewfinder .............................................................................................39
Using the LCD ENHANCER ................................................................................. 39
Various Recording Techniques .............................................................................
Inserting and Removing a Disc ............................................................................41
Selecting the Record Mode (Rec Mode) ..............................................................43
DVD Camcorder: Basic Recording ........................................................44
Making your First Recording ................................................................................44
Recording with Ease for Beginners (EASY.Q Mode) ............................................
Zooming In and Out ..............................................................................................46
Using the Fade In and Out (FA
Using Back Light Compensation Mode (BLC) ...................................................... 48
Using the Color Nite .............................................................................................49
Using the LIGHT (SC-DC173U/DC175/DC575 only) ...........................................50
DE) ......................................................................47
DVD Camcorder: Advanced Recording ................................................ 51
Cutting Off Wind Noise (Wind Cut) .......................................................................51
Setting the Shutter Speed & Exposure (Shutter/Exposure) .................................52
Auto Focus / Manual Focus ..................................................................................53
Programed Automatic Exposure Modes (Program AE) ........................................54
Setting the White Balance (White Balance) .........................................................56
Applying Digital Effects (Digital Effect) .................................................................
Setting the 16:9 Wide mode (16:9 Wide) .............................................................60
Setting the Digital Image Stabilizer (DIS) .............................................................61
Zooming In and Out with Digital Zoom (Digital Zoom) .........................................62
DVD Camcorder: Thumbnail index and Playlist ..................................63
What is the Thumbnail Index? .............................................................................. 63
What’s a Playlist? .................................................................................................
DVD Camcorder ......................................................................................64
Playing Title Scenes ............................................................................................ 64
Adjusting the Volume ...........................................................................................64
Various Functions while in Player Mode ..............................................................
Deleting a Title Scene (Delete) ............................................................................67
Deleting a Section of a Title Scene (Partial Delete) ............................................68
40
45
58
63
65
Índice
Ajuste de la pantalla de TV (TV Display) .............................................................. 38
Videocámara con DVD: Antes de grabar ..............................................39
Uso del Visor ........................................................................................................39
Uso de LCD ENHANCER .....................................................................................39
Técnicas diversas de grabación ........................................................................... 40
Inserción y extracción de discos ..........................................................................41
Selección del modo de grabación (Rec Mode) ....................................................43
Videocámara con DVD: Grabación básica ...........................................44
Primera grabación ................................................................................................ 44
Grabación con borrado para principiantes (Modo EASY.Q) ................................
Acercamiento y alejamiento de las imágenes ...................................................... 46
Utilización de aparición y desaparición gradual (FA
Utilización del modo de compensación de la luz de fondo (BLC) ........................48
Utilización de Color Nite ....................................................................................... 49
Utilización de LIGHT (sólo SC-DC173U/DC175/DC575) ..................................... 50
DE) ...................................... 47
Videocámara con DVD: Grabación avanzada ......................................51
Corte de ruido del viento (Wind Cut) ....................................................................51
Ajuste de la exposición y la velocidad del obturador (Shutter/Exposure) ............52
Enfoque autom. / Enfoque manual ....................................................................... 53
Modo de exploración automática programada (Program AE) ..............................
Ajuste de balance de blanco (White Balance) ......................................................56
Aplicación de efectos digitales (Digital Effect) ......................................................
Ajuste del modo 16:9 Wide (16:9 Wide) ............................................................... 60
Ajuste del Estabilizador digital de la imagen (DIS) ...............................................61
Acercamiento y alejamiento del zoom con Zoom Digital (Digital Zoom) ..............62
Videocámara con DVD: Índice de miniaturas y lista de reproducción .... 63
¿Qué es el índice de miniaturas? ......................................................................... 63
Descripción de lista de reproducción ................................................................... 63
Videocámara con DVD ...........................................................................64
Reproducción de listas de títulos .........................................................................64
Ajuste del volumen ..............................................................................................64
Diversas funciones en modo Player .................................................................... 65
Eliminación de un título (Delete) .........................................................................67
Eliminación de la sección de un título (Partial Delete) .........................................68
45
54
58
3

ENGLISH
ESPAÑOL
Contents
DVD Camcorder: Playlist .......................................................................69
Creating a New Playlist (New Playlist) ................................................................69
Playing the Playlist ..............................................................................................70
Deleting a Playlist (Delete) ..................................................................................71
Adding Scenes to Playlist (Scene-Add) ...............................................................72
Changing the Order of Scene Playing within a Playlist (Scene-Move) ................73
Deleting Scenes from Playlist (Scene-Delete) ....................................................74
Deleting a Section of a Playlist (Scene - Partial Delete) .....................................75
DVD Camcorder: Disc Manager .............................................................77
Disc Information (Disc Info) .................................................................................77
Editing the Disc Name (Disc Info-Rename) .........................................................78
Formatting a Disc (Disc Format) ..........................................................................79
Finalizing a Disc (Disc Finalize) ..........................................................................80
Playing Back on a PC with DVD drive .................................................................. 81
Playing back a finalized disc on a DVD Player/Recorder .................................... 81
Unfinalizing a Disc (Disc Unfinalize) ....................................................................82
DVD Camcorder: Connection ................................................................83
Setting the AV In/Out (SC-DC175/DC575 only) ....................................................83
Viewing Recordings on TV ...................................................................................
Copying a Disc onto a Tape ..................................................................................86
Using the Voice Plus ............................................................................................87
Recording (Copying) a TV Program or Video Tape onto a Disc
(SC-DC175/DC575 only) ...................................................................................... 88
Digital Still Camera Mode (SC-DC173(U)/DC175/DC575 only) ............ 89
Using a Memory Card (Usable Memory Card) (not supplied) ..............................89
Memory Card Functions ................................................................................89
Inserting a Memory Card ..............................................................................89
Ejecting a Memory Card ...............................................................................89
Structure of Folders and Files on the Memory Card ............................................90
Selecting the Photo Quality (Photo Quality) .........................................................91
Setting the Photo Size (Photo Size) (SC-DC575 only) .........................................92
Setting the File Number (File No.) ........................................................................ 93
Photo Image (JPEG) on a Memory Card ...............................................94
Taking a
Photo Images (JPEG) .............................................................................95
Viewing
Protection from accidental Erasure (Protect) .......................................................96
4
84
Índice
Videocámara con DVD: Lista de reproducción ....................................69
Creación de una nueva lista de reproducción (New Playlist) ............................... 69
Reproducción de la lista de reproducción ............................................................70
Eliminación de una lista de reproducción (Delete) ............................................... 71
Adición de escenas a la lista de reproducción (Escena-Add) ..............................72
Cambio del orden de reproducción de escenas dentro de una lista de reproducción (Escena-Move) ...73
Eliminación de escenas de la lista de reproducción (Escena-Delete) .................. 74
Eliminación de la sección de una lista de reproducción (Escena - Partial Delete) .. 75
Videocámara con DVD: Administrador de discos ............................... 77
Información de disco (Disc Info) .......................................................................... 77
Edición del nombre del disco (Disc Info-Rename) ...............................................78
Formato de un disco (Disc Format) ..................................................................... 79
Finalización de un disco (Disc Finalize) ..............................................................80
Reproducción en un PC con unidad de DVD .......................................................81
Reproducción de un disco finalizado en un Reproductor/Grabadora de DVD .....81
Anulación de finalización de un d
Videocámara con DVD: Conexión .........................................................83
Ajuste de AV In/Out (sólo SC-DC175/DC575) .....................................................83
Visualización de grabaciones en el TV .................................................................
Copia de un disco en una cinta ............................................................................86
Utilización de Voice Plus ......................................................................................87
Grabación (Copia) de un programa de TV o cinta de video en un disco
(sólo SC-DC175/DC575) ...................................................................................... 88
Modo de cámara fotográfica digital (sólo SC-DC173(U)/DC175/DC575) ..89
Utilización de la tarjeta de memoria (Tarjeta de memoria utilizable) (no suministrada)
Funciones de la tarjeta de memoria .............................................................. 89
Inserción de una tarjeta de memoria ............................................................89
Expulsión de una tarjeta de memoria ...........................................................89
Estructura de carpetas y archivos en la tarjeta de memoria ................................90
Selección de la calidad fotográfica (
Ajuste del tamaño de foto (Photo Size) (sólo SC-DC575) ................................... 92
Ajuste del número de archivo (File No.) ............................................................... 93
Captura de imagen de foto (JPEG) en la tarjeta de memoria ..............................94
Visualización de imágenes fotográficas (JPEG) ...................................................
Protección frente a borrado accidental (Protect) .................................................. 96
isco (Disc Unfinalize) ......................................82
84
.. 89
Photo Quality) .............................................. 91
95

ENGLISH
ESPAÑOL
Contents
Deleting Photo Images and Moving Images (Delete) ........................................... 97
Formatting the Memory Card (Format) .................................................................99
Recording Moving Images (MPEG) on a Memory Card ..................................... 100
Playing the Moving Images (MPEG) on a Memory Card ...................................101
Recording Still images onto a Memory Card during DVD playback ..................102
Marking Images for Printing (Print Mark) ............................................................103
PictBridge™ (SC-DC173(U)/DC175/DC575 only) ................................105
Printing Your Pictures-Using PictBridge™ ..........................................................105
Connecting To a Printer (USB Connect) .....................................................
Setting the Number of Prints ....................................................................... 106
Setting the Date/Time Imprint Option ..........................................................106
Printing Images ........................................................................................... 106
Canceling the Printing ................................................................................. 106
USB Interface (SC-DC173(U)/DC175/DC575 only) ..............................107
Using USB Interface ........................................................................................... 107
Selecting the USB Device (USB Connect) .........................................................109
Installing DV Media PRO Program ..................................................................... 110
Connecting to a PC ............................................................................................112
Disconnecting the USB Cable ..................................................................... 112
Using the PC Camera Function ..................................................................113
Using the USB Streaming Function ............................................................114
Using the removable Disk Function ............................................................114
Maintenance .......................................................................................... 115
Using Your DVD Camcorder Abroad .................................................................. 115
Troubleshooting ....................................................................................116
Troubleshooting .................................................................................................. 116
Setting menu items .............................................................................................121
Miscellaneous Information ..................................................................123
Disc Type Description .........................................................................................123
Specifications .......................................................................................124
Index ......................................................................................................125
105
Índice
Eliminación de imágenes fotográficas y secuencias de video (Delete) ................97
Formato de la tarjeta de memoria (Format) .........................................................99
Grabación de secuencias de video (MPEG) en la tarjeta de memoria ..............100
Reproducción de secuencias de video (MPEG) en la tarjeta de memoria ......... 101
Grabación de fotografías en una tarjeta de memoria durante la reproducción de DVD
Marcación de imágenes para impresión (Print Mark) .........................................103
PictBridge™(sólo SC-DC173(U)/DC175/DC575) .................................105
Impresión de imágenes: Uso de PictBridge™ ....................................................105
Conexión a una impresora (USB Connect) .................................................105
Ajuste del número de copias .......................................................................106
Ajuste de la opción Date/Time Imprint ........................................................
Impresión de imágenes ...............................................................................106
Cancelación de la impresión ....................................................................... 106
Interfaz USB (sólo SC-DC173(U)/DC175/DC575) ................................107
Utilización de la interfaz USB .............................................................................107
Selección del dispositivo USB (USB Connect) ...................................................109
Instalación del programa DV Media PRO .......................................................... 110
Conexión a un PC ..............................................................................................112
Desconexión del cable USB .......................................................................112
Utilización de la función PC Camera ..........................................................113
Utilización de la función USB Streaming ....................................................114
Utilización de la función de disco extraíble ................................................. 114
Mantenimiento ......................................................................................115
Utilización de la Videocámara con DVD en el extranjero ................................... 115
Resolución de problemas .................................................................... 116
Resolución de problemas ................................................................................... 116
Ajuste de opciones de menú ..............................................................................121
Información diversa ..............................................................................123
Descripción del tipo de disco ..............................................................................123
Especificaciones ...................................................................................124
Índice alfabético ....................................................................................125
..102
106
5
ENGLISH
PH
O
T
O
P
H
O
T
O
ESPAÑOL
Notes and Safety Instructions
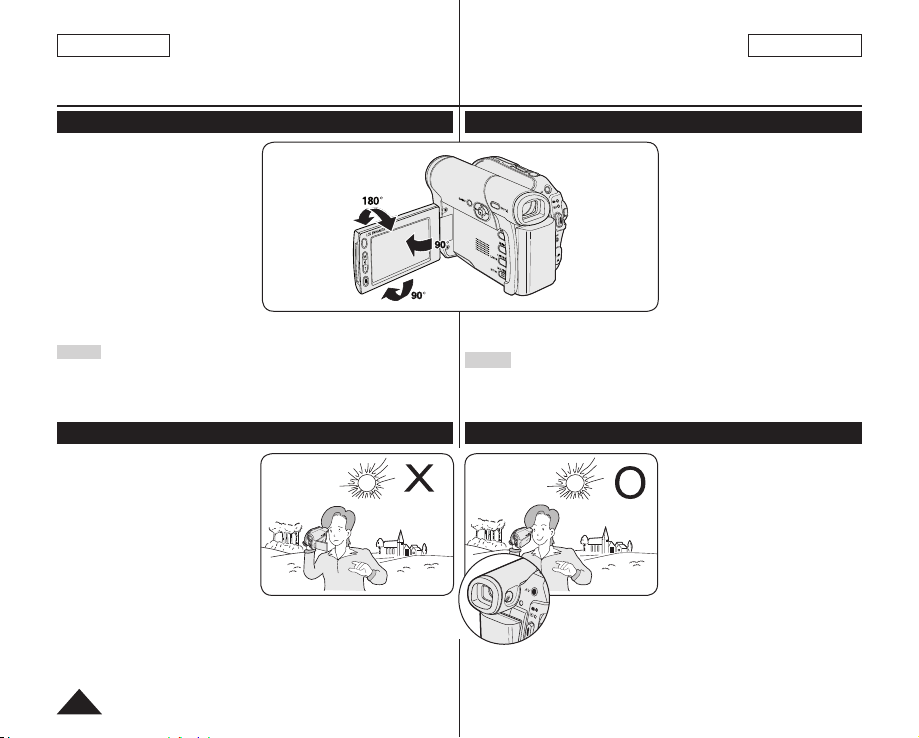
Notes regarding the Rotation of the LCD Screen
Please rotate the LCD Screen
carefully as illustrated.
Over-rotation may cause damage
to the inside of the hinge that
connects the LCD Screen to the DVD
Camcorder.
1. Open the LCD Screen 90
degrees with your finger.
2. Rotate it to the best angle to
record or play.
If you rotate the LCD Screen
180 degrees to the lens side,
you can close the LCD Screen
with it facing out.
This is convenient during playback operations.
Notes
Refer to page 36 to adjust brightness and color of the LCD Screen.
Make sure not to contact the magnetic stripe of your credit card near the
LCD panel. Your credit card information may be removed.
Notes regarding the LCD Screen, Viewfinder, Lens
1. Direct sunlight can damage the
LCD Screen, the inside of the
Viewfinder or the Lens. Take
pictures of the sun only in low
light conditions, such as at dusk.
2. The LCD Screen has been
manufactured using high
precision technology.
However, there may be tiny dots
(red, blue or green in color) that
appear on the LCD Screen.
These dots are normal and do
not affect the recorded picture in any way.
3. Do not pick up the DVD Camcorder by holding the Viewfinder, LCD
Screen or Battery Pack.
4. Applying excessive force to the Viewfinder may damage it.
6
Notas e instrucciones de seguridad
Notas referentes al giro de la pantalla LCD
Gire cuidadosamente la pantalla
LCD como se indica en la figura.
Si se gira demasiado se puede
estropear la bisagra interior de
unión de la pantalla LCD con la
Videocámara con DVD.
1. Abra con el dedo la pantalla
LCD formando 90 grados con la
videocámara.
2. Gírela al mejor ángulo para
grabar o reproducir.
Si gira la pantalla LCD 180 grados
hacia el lado de lalente,puede
cerrar la pantalla LCD con el
Esto resulta práctico durante las operaciones de reproducción.
Notas
Consulte la página 36 para ajustar el brillo y el color de la pantalla LCD.
Asegúrese de no pasar la banda magnética de la tarjeta de crédito cerca de la
pantalla LCD. Se borrará la información de la tarjeta de crédito.
Notas relacionadas con la pantalla LCD, visor, objetivo
3. No agarre la Videocámara con DVD sujetando el
visor, la pantalla LCD o la batería.
4. La aplicación de fuerza excesiva en el visor puede
dañarlo.
frente hacia afuera.
1. La luz directa del sol puede
dañar la pantalla LCD, el
interior del visor o el objetivo.
Tome imágenes del sol sólo
con condiciones de luz escasa,
como al anochecer.
2. Para la fabricación de la pantalla
LCD se ha empleado tecnología
de alta precisión.
Sin embargo, pueden aparecer
en ella puntitos rojos, azules o
verdes. Esta situación es normal
y no afecta en modo alguno a la
grabación.
ENGLISH
ESPAÑOL
Notes and Safety Instructions
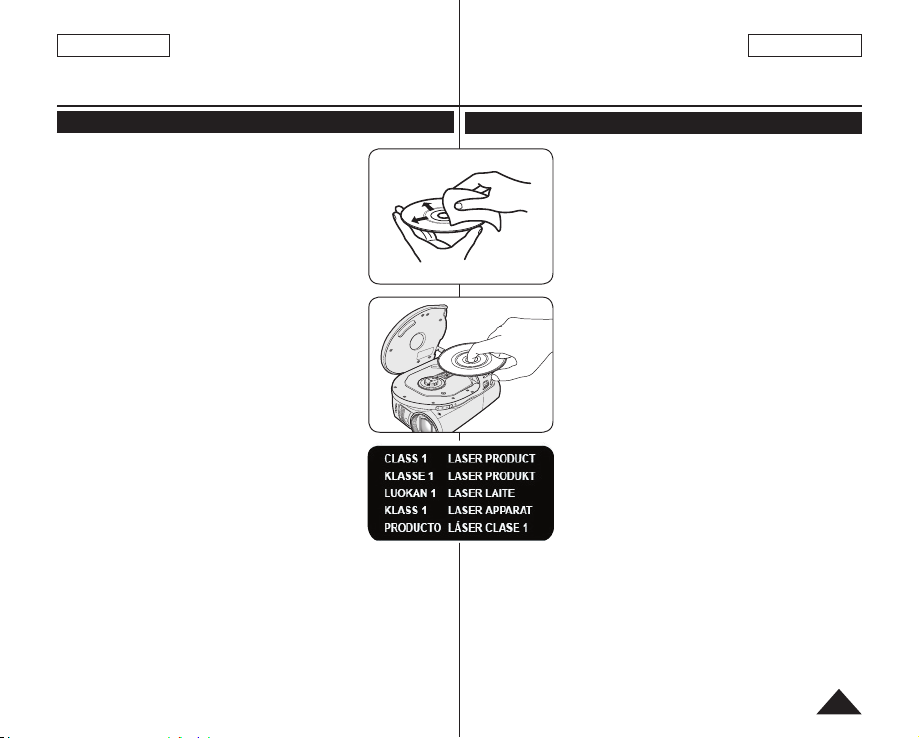
Notes regarding Disc Cleaning and Handling
Take care not to touch the recording side (the rainbow
colored side) of the disc with your fingers. Discs
contaminated by fingerprints or foreign substances
may not play properly.
Use a soft cloth to clean the disc.
Clean lightly from the center of a disc to the outside
edge. Circling or cleaning too hard may create
scratches on the disc and further cause the disc to
play abnormally.
Do not use benzene, thinner, detergent, alcohol or
anti-static spray when cleaning the disc.
It may cause a malfunction.
Press the supporting holder in the center of the disc
case for easy removal of the disc.
Handle discs by the edges and the center hole to
avoid finger marks on the recording side.
Do not bend or apply heat to the disc.
Always store discs vertically in their plastic cases
when not in use.
Store discs away from direct sunlight, heating
elements, moisture or dust.
Notas e instrucciones de seguridad
Notas relacionadas con la limpieza y manipulación de discos
Tenga cuidado de no tocar con los dedos el
lado de grabación (el lado con colores del arco
iris) del disco. Los discos marcados con huellas
dactilares o sustancias extrañas pueden impedir
que los discos se reproduzcan correctamente.
Utilice un paño suave para limpiar los discos.
Límpielos levemente desde el centro del disco
hacia el borde exterior. Limpiar en círculo o con
demasiada fuerza puede rayar el disco e impedir
que se reproduzca con normalidad.
No utilice benceno, disolvente, detergente,
alcohol ni pulverizadores antiestáticos al limpiar
el disco.
Puede hacer que el disco funcione de forma
defectuosa.
Presione el soporte de sujeción del centro de la
caja del disco para extraer el disco con facilidad.
Sujete los discos por los bordes y el orificio
central para evitar marcas de dedos en el lado
de grabación del disco.
No doble ni aplique calor al disco.
Guarde siempre los discos verticalmente en sus
fundas de plástico cuando no se utilicen.
Guarde los discos fuera del alcance de la luz
directa del sol, de generadores de calor, de la
humedad y del polvo.
7

ENGLISH
ESPAÑOL
Notes and Safety Instructions
Notes regarding DVD Camcorder
Do not leave the DVD Camcorder exposed to high temperatures (above
60 °C or 140 °F).
For example, in a parked car in the sun or exposed to direct sunlight.
Do not let the DVD Camcorder get wet. Keep the DVD Camcorder away
from rain, sea water, and any other form of moisture.
The DVD Camcorder may get damaged if it gets wet. Sometimes a
malfunction due to exposure to liquids cannot be repaired.
A sudden rise in atmospheric temperature may cause condensation to
form inside the DVD Camcorder.
- When you move the DVD Camcorder from a cold location to a warm
location (e.g. from outside to inside during the winter.)
- When you move the DVD Camcorder from a cool location to a hot
location (e.g. from inside to outside during the summer.)
Notices regarding Copyright (SC-DC175/DC575 only)
Television programs, video tapes, DVD titles, films, and other program
materials may be copyrighted.
Unauthorized copying of copyrighted material may be against the law.
All the trade names and registered trademarks mentioned in this manual or
other documentation provided with your Samsung product are trademarks or
registered trademarks of their respective holders.
Servicing & Replacement Parts
Do not attempt to service this DVD Camcorder yourself.
Opening or removing covers may expose you to dangerous voltage or
other hazards.
Refer all servicing to qualified service personnel.
When replacement parts are required, be sure the service technician
has used replacement parts specified by the manufacturer that have the
same characteristics as the original parts.
Unauthorized substitutions may result in fire, electric shock or other
hazards.
Notas e instrucciones de seguridad
Notas referentes a la Videocámara con DVD
Avisos relacionados con el Copyright (sólo SC-DC175/DC575)
Es probable que los programas de televisión, las cintas de video, los DVD,
las películas y otros materiales audiovisuales tengan registrados sus
derechos de reproducción.La copia no autorizada de material protegido por
dichos derechos puede quebrantar la ley.Todos los nombres de marcas y
marcas comerciales registradas mencionados en este manual o el resto de
documentación facilitada con el producto Samsung son marcas comerciales
o marcas registradas de sus respectivos propietarios.
Servicio y piezas de repuesto
No deje la Videocámara con DVD expuesta a altas temperaturas (por
encima de 60 °C o 140 °F).
Por ejemplo, en un vehículo aparcado al sol o expuesto a la luz directa
del sol.
No permita que la Videocámara con DVD se moje. Mantenga la
Videocámara con DVD alejada de la lluvia, del agua de mar y de
cualquier otro tipo de humedad.
Si la Videocámara con DVD se moja puede estropearse. En algunas
ocasiones, los daños causados por líquidos no pueden repararse.
Una subida repentina de la temperatura puede producir condensación
en el interior de la Videocámara con DVD.
- Cuando traslade la Videocámara con DVD desde un lugar frío a uno
cálido (p. ej. desde el exterior al interior en invierno.)
- Cuando se traslada la Videocámara con DVD de un sitio templado
a uno caliente (por ejemplo, de un espacio interior a uno exterior en
verano).
No intente reparar la Videocámara con DVD por sí solo.
La apertura o retirada de cubiertas puede exponerle a serios
voltajes u otros peligros.
Confíe las reparaciones a personal técnico calificado.
Cuando se necesiten piezas de repuesto, asegúrese de que el
técnico utiliza piezas especificadas por el fabricante o que tengan
las mismas características que la pieza original.
Los repuestos no autorizados pueden producir incendios,
descargas eléctricas u otros peligros.
8

ENGLISH
ESPAÑOL
Getting to Know Your DVD Camcorder
Features
DVD Disc Camcorder
DVD-VIDEO recording with 3 1/2 inch (8cm) DVD-RW/+RW/DVD-R/+R DL(Dual
Layer) discs.
High Power Zoom Lens
Offers you High Power Zoom Lens with 34x (SC-DC171/DC173(U)/DC175
only) Zoom Lens, 26x Zoom Lens (SC-DC575 only).
USB Interface for Digital Image Data Transfer
(SC-DC173(U)/DC175/DC575 only)
You can transfer images to a PC using the USB interface without an add-on card.
Photo Capture (SC-DC173(U)/DC175/DC575 only)
The Photo Capture function lets you capture the scene you want while the disc is
in play, and save as a still image on a Memory Card.
1200x Digital Zoom
Allows you to magnify an image up to 1200 times its original size.
Color TFT LCD
A high-resolution color TFT LCD gives you clean, sharp images as well as the
ability to review your recordings immediately. Also 2.7 inch Wide LCD.
(SC-DC173(U)/DC175/DC575 only).
LCD Enhancer
It can give you a clear quality image on LCD Screen even in the outdoors with
bright daylight.
Mega-pixel CCD (SC-DC575 only)
Your DVD Camcorder incorporates a 1.0 mega-pixel CCD. High-resolution photo
images can be recorded to a Memory Card.
Digital Image Stabilizer (DIS)
The DIS compensates for any handshake, reducing unstable images particularly
at high magnification.
Various Digital Effects
The Digital Effects allow you to give your recordings a special look.
Digital Still Camera Function (SC-DC173(U)/DC175/DC575 only)
- Using a Memory Card, you can easily record and playback standard photo
images.
- You can transfer standard photo images on a
Memory Card to your PC using the USB interface.
Moving Image Recording (SC-DC173(U)/DC175/DC575 only)
Moving image recording makes it possible to record video onto a Memory Card.
MMC/SD Card Slot (SC-DC173(U)/DC175/DC575 only)
MMC/SD card slot can use MMC (Multi Media Cards) and SD cards.
Multi OSD Language
You can select the desired OSD language from OSD list.
Introducción a la Videocámara con DVD
Características
Videocámara con disco DVD
Producción de títulos DVD-VIDEO con discos
capa) de 3 1/2pulg. (8cm).
Objetivo con zoom de gran potencia
Le ofrece un objetivo con zoom de gran potencia con un zoom 34x
(sólo SC-DC171/DC173(U)/DC175), y zoom 26x (sólo SC-DC575).
Interfaz USB para transferencia de datos de imágenes digitales
(sólo SC-DC173(U)/DC175/DC5750)
Es posible transferir imágenes al ordenador por medio de la interfaz USB sin
necesidad de una tarjeta adicional.
Captura de foto (sólo SC-DC173(U)/DC175/DC575)
La función Photo Capture permite capturar la escena que desee mientras se
reproduce el disco y guardarla como una imagen fotográfica en la tarjeta de
memoria.
Zoom digital 1200x
Permite ampliar la imagen hasta 1200 veces su tamaño original.
LCD TFT en color
El sistema de color de alta resolución TFT de la pantalla LCD proporciona
imágenes claras y nítidas a la vez que permite ver las grabaciones
inmediatamente. (sólo SC-DC173(U)/DC175/DC575)
LCD Enhancer
Le proporciona una imagen de gran calidad en la pantalla LCD incluso en
exteriores con luz brillante del día.
CCD Megapíxel (sólo SC-DC575)
La videocámara con DVD incorpora CCD de 1,0 megapíxeles. Puede grabar
imágenes fotográficas de alta resolución en una tarjeta de memoria.
Estabilizador digital de la imagen (DIS)
El DIS compensa los movimientos de la mano reduciendo la inestabilidad de
las imágenes, especialmente cuando estas últimas se graban con una gran
ampliación.
Efectos digitales diversos
Los efectos digitales permiten dar a la grabación un aspecto especial al
permitir añadir diversos efectos especiales.
Función de cámara fotográfica digital (sólo SC-DC173(U)/DC175/DC575)
- Con la tarjeta de memoria, puede fácilmente grabar y reproducir
fotografías estándar.
- Puede transferir imágenes fijas estándar de su tarjeta de memoria a su PC
utilizando la interfaz USB.
Grabación de secuencias de video (sólo SC-DC173(U)/DC175/DC575)
La grabación de secuencias de video posibilita la grabación de video en una
tarjeta de memoria.
Ranura de tarjeta MMC/SD (Sólo SC-DC173(U)/DC175/DC575)
La ranura para la tarjeta MMC/SD puede utilizarse para tarjetas MMC (Tarjetas
MultiMedia) y SD.
OSD en varios idiomas
Puede seleccionar el idioma de la OSD en la lista de OSD.
DVD-RW/+RW/-R/+R DL
(Doble
9

ENGLISH
DVD+ReWritable
DVD+R DL
DVD+R DL
DVD+ReWritable
DVD+R DL
DVD+ReWritable
DVD+R DL
DVD+ReWritable
DVD+R DL
DVD+R DL
DVD+ReWritable
DVD+R DL
DVD+ReWritable
DVD+R DL
ESPAÑOL
Getting to Know Your DVD Camcorder
Introducción a la Videocámara con DVD
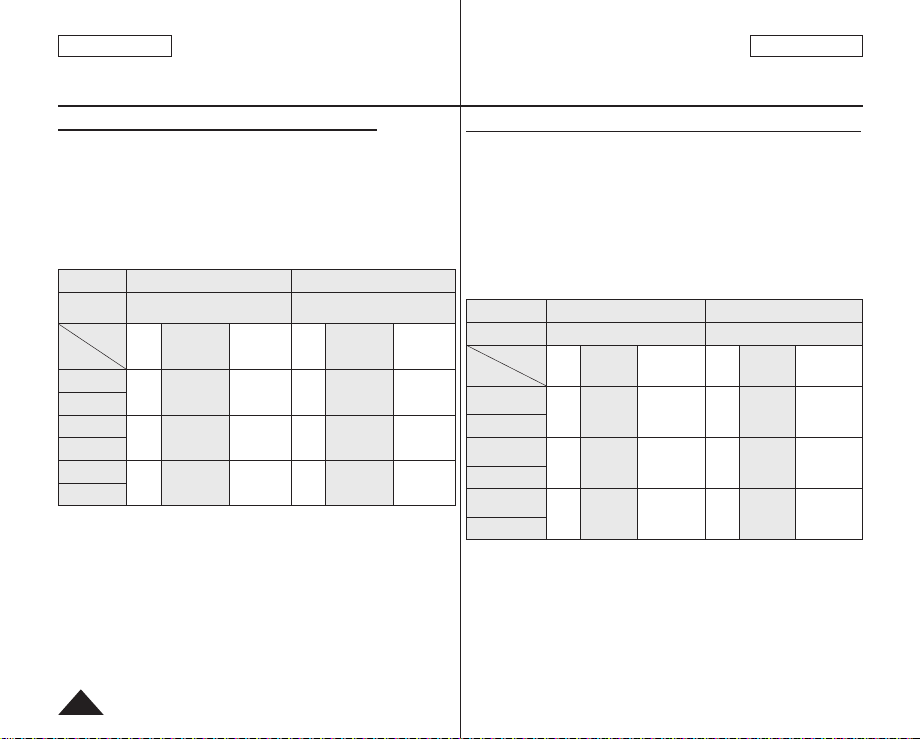
Learning available Discs and Their Features
This DVD Camcorder can record or play back by using only the 3 1/2 inch
(8cm) DVD-R/+R DL/-RW/+RW disc (not supplied). Please check whether
your disc is proper for use.
Esta Videocámara con DVD puede grabar o reproducir utilizando
únicamente el disco DVD-R/+R DL/-RW/+RW de 3 1/2pulg. (8cm) (no se
suministra). Compruebe si el disco es adecuado para el uso.
Which discs are available?
DVD-R
DVD+R DL
You can record it
only once.
You cannot delete or
edit the recordings.
After finalized a
disc, you canplay
back the recordings
inmost common
DVD players.
You cannot
use the
following
discs.
DVD-RW
You can record and
edit it many times.
(You can delete recorded
image files or format the
disc and reuse it again.)
Format the disc in
the mode you want
according to your
needs.
Video mode:
finalized, the recordings on
the disc will play in most
common DVD player.
VR (Video Record)
mode:
the recordings on your
DVD camcorders. But
you can play the disc only
on a DVD Recorder that
supports VR mode.)
You may not use 5 inch (12cm) CD/DVD discs.
Unusable 3 1/2inch (8cm) discs.
CD/CD-R/CD-RW/DVD-ROM/DVD+R (Single
Floppy Disk, MO, MD, iD, LD
Once
You can easily edit
Layer)/DVD-RAM/DVD-R (Dual Layer)
DVD+RW
You can record it
many times.
You can delete or
format but cannot edit
the recordings.
You can play back
the DVD+RW disc on
other DVD players
without finalizing it.
Discos disponibles y características
¿Qué discos están disponibles?
DVD-R
DVD+R DL
Puede grabarlo
sólo una vez.
No puede borrar
ni editar las
grabaciones.
Tras finalizar
un disco, puede
reproducir las
grabaciones en los
reproductores de
DVD más comunes.
No es posible
utilizar los
siguientes
discos:
DVD-RW
Puede grabarlo y editarlo
muchas veces.
(Puede borrar los archivos
de imágenes grabados
o formatear el disco y
reutilizarlo de nuevo.)
Puede formatear para
elegir el tipo adecuado del
disco que va a utilizar.
Video mode (Modo
vídeo): una vez finalizado,
las grabaciones del disco
se reproducirán en los
reproductores de DVD más
comunes.
VR Mode (Modo VR,
grabación de vídeo):
puede editar fácilmente
las grabaciones en sus
videocámaras con DVD. Pero
sólo puede reproducir el disco
en un Grabador de DVD que
admita el modo VR.)
No es posible utilizar discos CD/DVD de
(12 cm)
.
Discos inutilizables de 3 ½ pulg. (8 cm).
CD/CD-R/CD-RW/DVD-ROM/DVD+R
(Una capa)/DVD-RAM/DVD-R (Dos capas)
Disquete, MO, MD, iD, LD
Puede grabarlo
muchas veces.
Puede borrar o
formatear, pero no
puede editar las
grabaciones.
Puede reproducir
discos DVD+RW en
otros Reproductores
de DVD sin finalizarlo.
DVD+RW
5 pulg.
10
ENGLISH
DVD+ReWritable
DVD+R DL
DVD+ReWritable
DVD+R DL
DVD+ReWritable
DVD+R DL
DVD+ReWritable
DVD+R DL
DVD+ReWritable
DVD+R DL
DVD+R DL
DVD+ReWritable
DVD+R DL
DVD+ReWritable
DVD+R DL
ESPAÑOL
Getting to Know Your DVD Camcorder
Introducción a la Videocámara con DVD
Which discs recorded on the DVD
Camcorder can be played in DVD
players/recorders/drives?
Discs must be finalized before they can be played
on common DVD player/recorders.
Finalizing is a process required to make the DVD discs
you recorded playable on common DVD players.
DVD-R
DVD+R DL
DVD player
DVD recorder
DVD drive-
equipped PC
Notes
We are not responsible for data loss on a disc.
You may not be able to play discs recorded from a PC or DVD recorder.
When such a case occurs, the message Bad Disc! may be displayed.
We do not warranty any damage or loss incurred due to recording and
playback failure caused by disc or card malfunction.
We take no responsibility and offer no compensation for any recording
failure, loss of recorded or edited material and/or damage to the recorder
arising from the misuse of discs.
For stable and perpetual recording and playback, use the TDK, MKM,
Verbatim disks that have the sign “for VIDEO CAMERA TM” If you don’t use
them, operations for recording and playback may not work properly or you
may not eject the inserted disk from the DVD Camcorder.
You cannot overwrite, edit, or format the finalized disc. If needed, unfinalize
the disc. (DVD-RW only)page 82
It is not guaranteed that all players can play back the disc. For compatibility
details, refer to the manual of the player where you want to play back the
disc.
For more information about the categories of available disks, see page 123.
DVD-RW
In case of Video mode
DVD player
DVD recorder
DVD drive-equipped
PC
In case of VR mode
DVD recorder that
supports DVD-RW
VR mode.
DVD+RW
DVD player
DVD recorder
DVD drive-equipped
PC
You can play back
DVD+RW discs on
other DVD players
or DVD recorders
without finalizing
them.
¿Qué discos grabados en la Grabadora de
DVD puede reproducirse en reproductores/
grabadoras/unidades de DVD?
Los discos deben finalizarse antes de que puedan
reproducirse en reproductores/grabadores de DVD comunes.
La finalización es un proceso necesario para hacer que
los discos de DVD grabados puedan reproducirse en
los reproductores más comunes.
DVD-R
DVD+R DL
Reproductor de DVD
Grabador de DVD
PC equipado con
unidad de DVD
DVD-RW
En caso de modo video
Reproductor de DVD
Grabador de DVD
PC equipado con
unidad de DVD
En caso de modo VR
Grabador de DVD
que admite el modo
VR de DVD-RW.
Notas
No nos hacemos responsables de pérdida de datos en un disco.
Es posible que no pueda reproducir discos grabados desde un PC o un Grabador con
DVD. Cuando se produce este caso, es posible que aparezca el mensaje Bad Disc!.
No garantizamos los daños o pérdidas producidos por un fallo de grabación o
reproducción causado por un funcionamiento erróneo del disco o de la tarjeta.
No nos responsabilizamos ni ofrecemos compensación alguna por cualquier fallo
de grabación, pérdida de material grabado o editado, ni daños en el grabador como
consecuencia del uso inadecuado de discos.
Para una grabación y reproducción estable y perpetua, utilice los discos TDK, MKM,
Verbatim que tengan el signo “
que no se ejecuten correctamente las operaciones de grabación y reproducción o que
no pueda expulsar el disco insertado de la Videocámara con DVD.
No es posible sobrescribir, editar ni formatear el disco finalizado. En caso necesario,
anule la finalización del disco. (Sólo DVD-RW.)
No se garantiza que todos los reproductores puedan reproducir el disco. Para obtener
información sobre compatibilidad, consulte el manual del reproductor con el que
desee reproducir el disco.
Para obtener información adicional sobre las categorías de discos disponibles,
consulte la página 123.
for
VIDEO CAMERA TM”. Si no los utiliza, es posible
página 82
DVD+RW
Reproductor de DVD
Grabador de DVD
PC equipado con
unidad de DVD
Puede reproducir
discos DVD+RW en
otros reproductores
o grabadores de
DVD sin finalizarlos.
11
ENGLISH
P
H
O
TO
P
H
O
TO
ESPAÑOL
Getting to Know Your DVD Camcorder
How to use the DVD Camcorder easily
You can record any desired image and edit and playback the disc on a DVD
Camcorder, most common DVD players, and PCs after finalizing the disc.
Introducción a la Videocámara con DVD
Cómo utilizar la Videocámara con DVD
Puede grabar la imagen que desee así como editar y reproducir el disco en una Videocámara
con DVD, en la mayoría de reproductores de EVD y en PCs tras finalizar el disco.
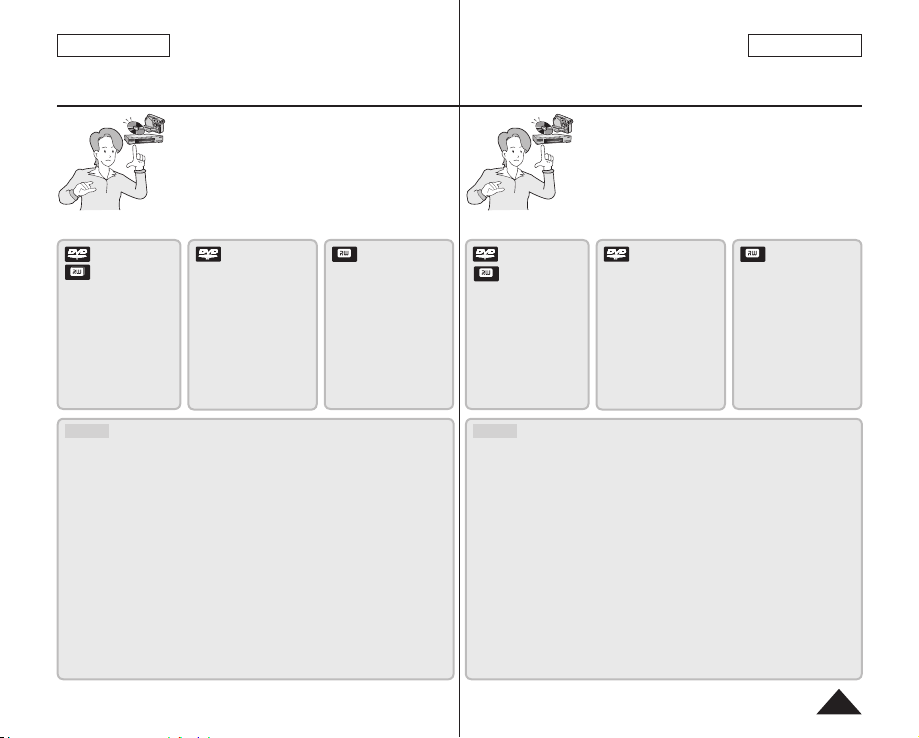
Recording
Selecting the desired disc and disc formatting
page 42
Recording the desired Images page 44
Playing Back
Selecting a scene to play back from the thumbnail
index screen page 64
Editing
You may edit only in DVD-RW (VR Mode).
page 68
Finalizing
Discs must be finalized before they can be played
on standard DVD player/recorders.
You may play back DVD+RW discs on other
devices without finalizing them.
Grabación
Selección y formateo del disco deseado
página 42
Grabación de las imágenes deseadas
página 44
Reproducción
Selección de una escena para reproducir desde
una pantalla de índice de miniaturas página 64
Edición
Sólo puede editar en DVD-RW (modo VR).
página 68
Finalización
Los discos deben finalizarse antes de que puedan
reproducirse en reproductores/grabadores de
DVD estándar.
Puede reproducir discos DVD+RW en otros
dispositivos sin finalizarlos.
12

ENGLISH
ESPAÑOL
Getting to Know Your DVD Camcorder
Accessories Supplied with the DVD Camcorder
Make sure that the following basic accessories are supplied with your DVD
Camcorder.
Basic Accessories
1. Lithium Ion Battery Pack
(SB-LSM80)
2. AC Power Adapter
(AA-E9 TYPE)
3. AV Cable
4. Instruction Book
5. Lithium Batteries for Remote
Control (SC-DC175/DC575
only) and Clock.
(TYPE: CR2025)
6. Remote Control
(SC-DC175/DC575 only)
7. USB Cable (SC-DC173(U)/
DC175/DC575 only)
8. Software CD (DV Media
PRO) (SC-DC173(U)/DC175/
DC575 only)
9. Lens Cover
10. Lens Cover Strap
1. Lithium Ion Battery Pack
(SB-LSM80)
4. Instruction Book 5. Lithium Batteries (CR2025) 6. Remote Control
7. USB Cable 8. Software CD 9. Lens Cover
10. Lens Cover Strap 11. 3 1/2inch (8cm)
2. AC Power Adapter
Introducción a la Videocámara con DVD
Accesorios incluidos con la Videocámara con DVD
Asegúrese de que los siguientes accesorios básicos le hayan sido
entregados junto con la Videocámara con DVD.
(AA-E9 TYPE)
DVD-RW Disc
Optional Accessories
11. 3 1/2inch (8cm) DVD-RW
Disc
12. Carrying Case
Notes
The contents can vary depending on the sales region.
Parts and accessories are available at your local Samsung dealer.
Notas
3. AV Cable
12. Carrying Case
Accesorios básicos
1. Batería de iones de litio
(SB-LSM80)
2. Adaptador de CA
(TIPO AA-E9)
3. Cable AV
4. Manual de instrucciones
5. Batería de litio para el
mando a distancia (sólo
SC-DC175/DC575) y reloj.
(TIPO: CR2025)
6. Mando a distancia
(sólo SC-DC175/DC575)
7. Cable USB (sólo SCDC173(U)/DC175/DC575)
8. CD de software
(DV Media PRO)
(sólo SC-DC173(U)/
DC175/DC575)
9. Tapa del objetivo
10. Correa de tapa del
objetivo
Accesorios opcionales
11. Disco DVD-RW de
3 1/2pulg. (8cm)
12. Funda de transporte
El contenido puede variar dependiendo de la región de ventas.
Los componentes y accesorios se encuentran disponibles en el
Servicio técnico de Samsung.
13
ENGLISH
PHOTO
ESPAÑOL
Getting to Know Your DVD Camcorder
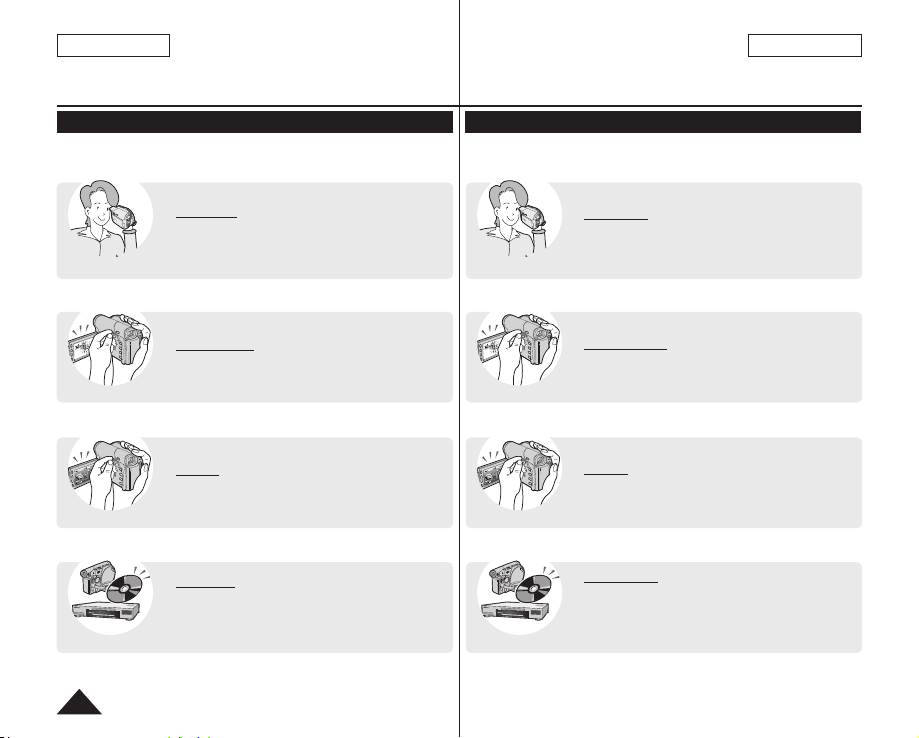
Front & Left View
Introducción a la Videocámara con DVD
Vistas frontal y lateral izquierda
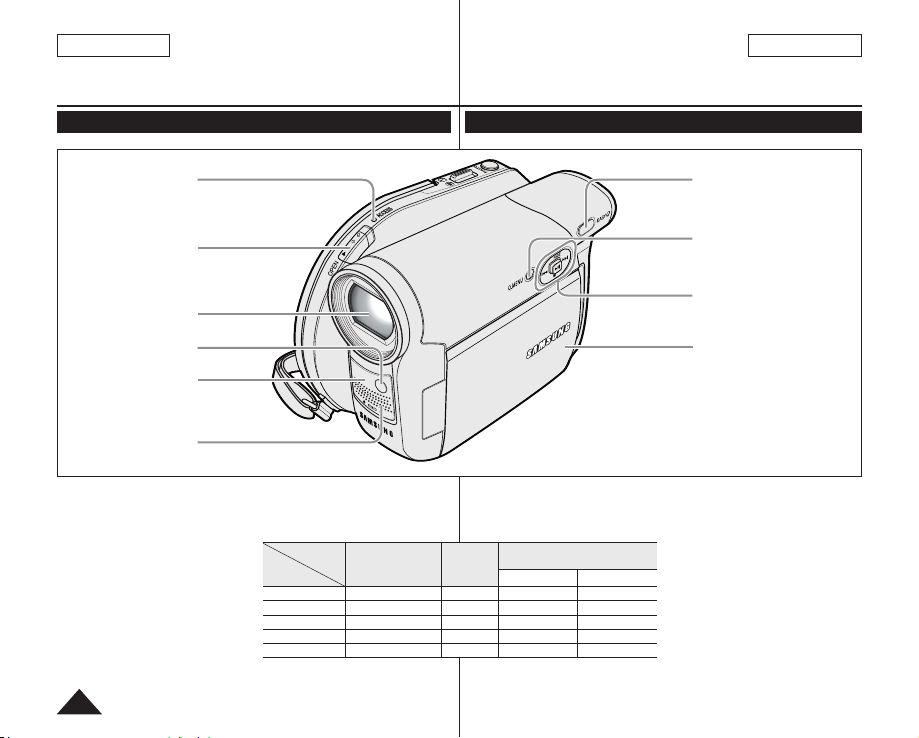
1
2
3
4
5
6
1. ACCESS Indicator page 41
2. OPEN Switch
3. Lens
4. LIGHT (SC-DC173U/DC175/
DC575 only) page 50
5. Remote Sensor (SC-DC175/
DC575 only)
6. Internal MIC
7. EASY.Q Button
8. Q.MENU Button
page 41
page 45
page 27
9. Joystick (Up/Down/Left/
Right/OK)/FADE (page 47)/
///
Mode
Joystick
Down ()
Left ()
Right ()
OK (
10. TFT LCD Screen
<Player Mode>
Up - FADE - -
) Play/Still - -
Stop - - Stop
Backward Search/ Skip
Forward Search/ Skip
1. Indicador ACCESS página 41
2. Interruptor OPEN página 41
<Camera
Mode>
- Backward Skip Backward Search
- Forward Skip Forward Search
Illustrations of model SC-DC175 are used
in this owner’s instructions. Although
the models covered in this manual look
different, they all operate in a similar way.
3. Objetivo
<M.Player Mode> : Memory Player Mode
<M.Player Mode>
(SC-DC173(U)/DC175/DC575 only)
Photo image Moving image
Play/Still
4. LIGHT (sólo SC-DC173U/
5. Sensor de mando a distancia
6. MIC interno
7. Botón EASY.Q
8. Botón Q.MENU página 27
9. Joystick (Arriba/Abajo/
10. Pantalla LCD TFT
7
8
9
10
DC175/DC575) página 50
(sólo SC-DC175/DC575)
página. 45
Izquierda/Derecha/OK)/FADE
(página 47)////
14

ENGLISH
ESPAÑOL
Getting to Know Your DVD Camcorder
Left Side View
Introducción a la Videocámara con DVD
Vista lateral izquierda
1
2
3
4
1. Built-In Speaker
2. LCD ENHANCER Button
page 39
3. Zoom (W/T)/VOL (
Button page 46/64
4. Start/Stop Button page 44
5. MENU Button
6. DISPLAY Button
/
page 29
7. C.NITE/LIGHT/S.SHOW
)
Button (SC-DC173U/DC175/
DC575 only) page 49/50/95
C.NITE/S.SHOW Button
(SC-DC173 only)
page 49/95
C.NITE Button (SC-DC171
only) page 49
8. MULTI DISP./MF/AF Button
page 95/53
1. Parlante incorporado
2. Botón LCD ENHANCER
3. Botón Zoom (W/T)/
4. Botón Start/Stop
5. Botón MENU
6. Botón DISPLAY página 29
página 39
VOL (
/)
página 46/64
página 44
5
6
7
8
7. Botón C.NITE/LIGHT/S.SHOW
(Sólo SC-DC173U/DC175/
DC575) página 49/50/95
Botón C.NITE/S.SHOW
(sólo SC-DC173)
página 49/95
Botón C.NITE (sólo SC-DC171)
página 49
8. Botón MULTI DISP./MF/AF
página 95/53
15
ENGLISH
ESPAÑOL
Getting to Know Your DVD Camcorder
Right & Top View
Introducción a la Videocámara con DVD
Vistas superior y lateral derecha
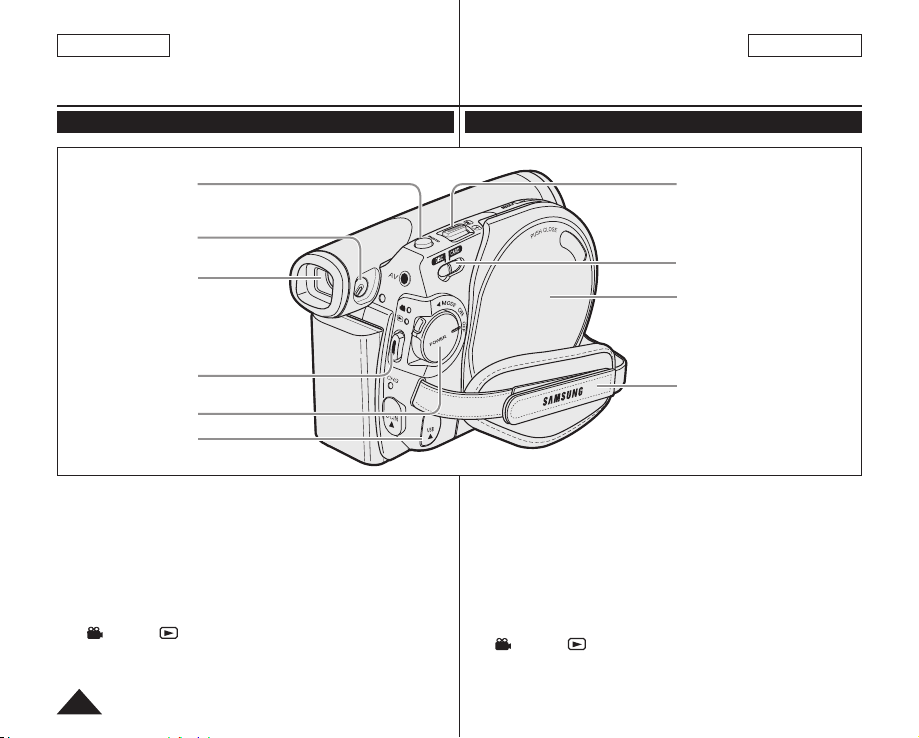
1
2
3
4
5
6
1. PHOTO Button
(SC-DC173(U)/DC175/DC575
only) page 94
2. Focus Adjustment Knob
page 39
3. Viewfinder
4. Start/Stop Button
5. Power Switch (ON/OFF/
(Camera)/ (Player))
page 44
6. USB Jack (SC-DC173(U)/
DC175/DC575 only)
7. Zoom (W/T) Lever page 46
8. Mode Switch (DISC/CARD)
(SC-DC173(U)/DC175/DC575
only)
9. Disc Cover
10. Hand Strap
1. Botón PHOTO (Sólo SC-
2. Botón de ajuste de enfoque
3. Visor
4. Botón Start/Stop
5. Interruptor Power (ON/OFF/
DC173(U)/DC175/DC575)
página 94
página 39
página 44
(Camera)/ (Player))
7
8
9
10
6. Conector USB
Sólo
(
DC575)
7. Palanca Zoom (W/T)
página 46
8. Interruptor Mode (DISC/
CARD) (Sólo SC-DC173(U)/
DC175/DC575)
9. Tapa del disco
10. Empuñadura
SC-DC173(U)/DC175/
16

ENGLISH
ESPAÑOL
Getting to Know Your DVD Camcorder
Rear & Bottom View
Introducción a la Videocámara con DVD
Vistas posterior e inferior
3
1
2
4
5
1. Charging Indicator
2. Lithium Battery Cover
3. AV Jack
4. DC IN Jack
5. Hand Strap Hook
6. Tripod Receptacle
7. Memory Card Slot
(SC-DC173(U)/DC175/DC575 only)
8. BATT. RELEASE Switch
Usable Memory Cards (2GB Max)
(SC-DC173(U)/DC175/DC575 only)
SD MMC
7 86
1. Indicador de carga
2. Tapa de la pila de litio
3. Terminal de AV
4. Toma DC IN
5. Enganche de la correa
6. Orificio para el trípode
7. Ranura de tarjeta de memoria
(Sólo SC-DC173(U)/DC175/DC575.)
8. Interruptor BATT. RELEASE
17
ENGLISH
ESPAÑOL
Getting to Know Your DVD Camcorder
Remote Control (SC-DC175/DC575 only)
Introducción a la Videocámara con DVD
Mando a distancia (sólo SC-DC175/DC575)
1
2
3
4
5
6
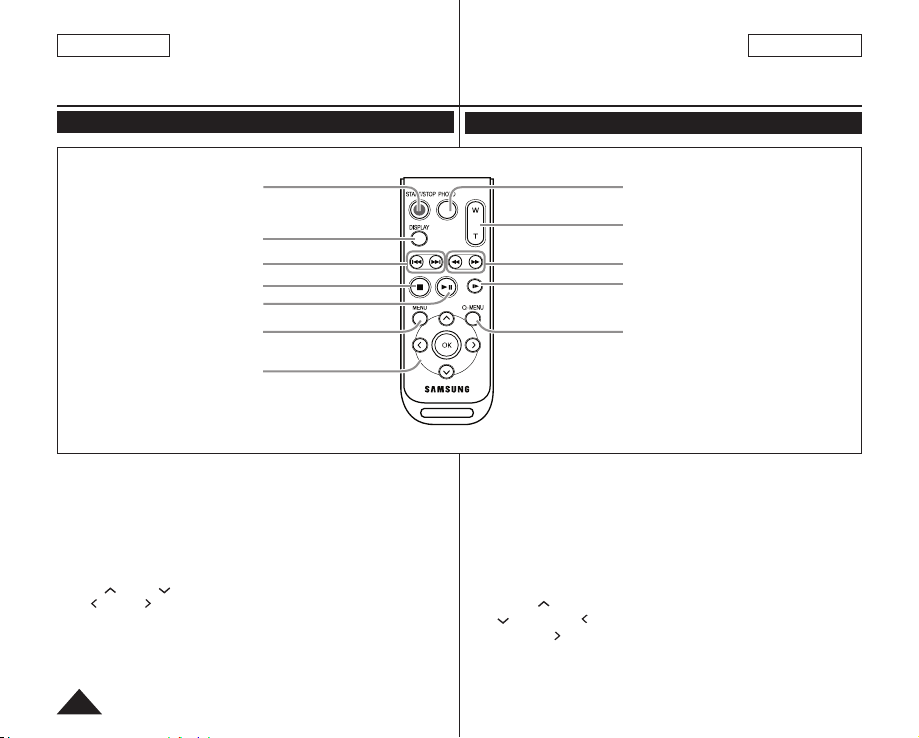
7
1. START/STOP
2. DISPLAY
3. /(Skip)
4. (Stop)
5.
6. MENU
7. Up( )/Down( )/Left
( )/Right( )/OK
(Play/Still)
page 29
8. PHOTO
9. W/T (Zoom)
10. /(Search)
11. |
12. Q-MENU
(Slow)
page 94
page 46
1. START/STOP
2. DISPLAY
3. /(Saltar)
4. (Parar)
5.
6. MENU
7. Arriba (
8. PHOTO
página 29
(Reproducir/Pausa)
)/Abajo
( )/Izquierda ( )/
Derecha ( )/OK
página 94
8
9
10
11
12
9. W/T (Zoom) página 46
10. /(Buscar)
(Lento)
11. |
12. Q-MENU
18
ENGLISH
PHOTO
ESPAÑOL
Preparation
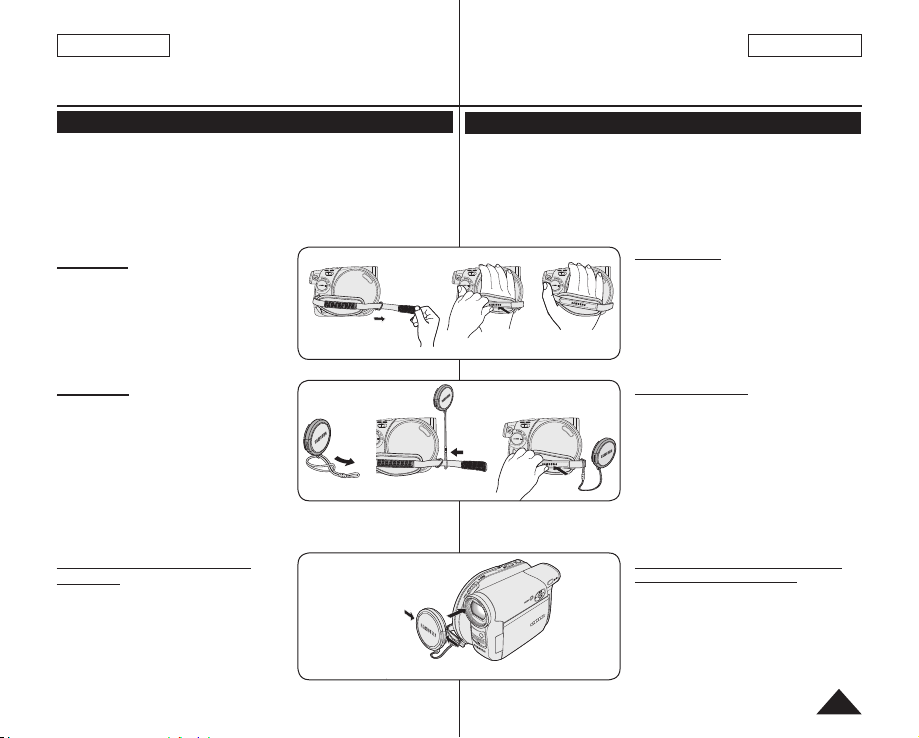
Using the Hand Strap & Lens Cover
It is very important to ensure that the Hand Strap has been correctly
adjusted before you begin your recording.
The Hand Strap enables you to:
- Hold the DVD Camcorder in a stable, comfortable position.
- Press the [Zoom] lever and [Start/Stop] button without having to
change the position of your hand.
Hand Strap
1. Pull and open the Hand Strap and
release the Hand Strap.
Insert the Hand Strap into the Hand
Strap Hook.
2. Insert your hand into the Hand Strap
and adjust its length.
3. Close the Hand Strap.
Lens Cover
1. Hook up the Lens Cover with the Lens
Cover Strap as illustrated.
2. Pull and open the Hand Strap and
release the Hand Strap.
3. Hook up the Lens Cover Strap to the
Hand Strap and adjust it following the
steps as described for the Hand Strap.
4. Close the Hand Strap.
Installing the Lens Cover after
Operation
Press buttons on both sides of the Lens
Cover, then insert it so it covers the DVD
Camcorder Lens.
1 2 4
1
Preparación
Utilización de la empuñadura y la tapa del objetivo
Es muy importante asegurarse de que la empuñadura esté
correctamente ajustada antes de empezar la grabación.
La empuñadura permite:
- Mantenga la Videocámara con DVD en una posición estable y
cómoda.
- Presionar la palanca [Zoom] y el botón [Start/Stop] sin tener que
cambiar la posición de la mano.
2 3
Empuñadura
1. Tire y abra la empuñadura y libérela.
Inserte la empuñadura en su
enganche.
2. Introduzca su mano en la
empuñadura y ajuste la longitud.
3. Cierre la empuñadura.
Tapa del objetivo
1. Enganche la tapa del objetivo con
su correa como se muestra en la
ilustración.
2. Abra la empuñadura y saque la
correa.
3. Enganche la correa de la tapa del
objetivo y ajústela siguiendo los
pasos que se describen para la
empuñadura.
4. Cierre la empuñadura.
Colocación de la tapa del objetivo
tras utilizar la videocámara
Presione los botones de ambos lados
de la tapa del objetivo para que cubra el
objetivo de la Videocámara con DVD.
19

ENGLISH
ESPAÑOL
Preparation
Lithium Battery Installation
Lithium Battery Installation for the Internal Clock
1. Remove the Battery Pack from the rear
of the DVD Camcorder.
2. Open the Lithium Battery Cover on the
rear of the DVD Camcorder.
3. Position the Lithium Battery in the Lithium
Battery Holder, with the positive (+)
terminal face up.
Be careful not to reverse the polarity of
the Battery.
4. Close the Lithium Battery Cover.
Installing the Lithium Battery in the Remote Control (SC-DC175/DC575 only)
1. Turn the battery holder counterclockwise
(as indicated with [ ] mark), using your
fingernail or a coin to open it. The battery
holder opens.
2. Insert the battery while the positive (+)
terminal faces down and press it firmly
until you hear locking sound.
3. Place the battery holder to match its
[ ] mark with the [] mark on the
remote control, and turn the battery
holder clockwise to fix it.
1 2 3
Preparación
Instalación de la pila de litio
Instalación de la batería de litio para el reloj interno
Instalación de la pila de litio en el mando a distancia (sólo SC-DC175/DC575)
Battery
Holder
Precautions regarding the Lithium Battery
1. The Lithium Battery maintains the clock function and preset contents of
the memory; even if the Battery Pack or AC Power adapter is removed.
2. The Lithium Battery for the DVD Camcorder lasts about 6 months under
normal operation from time of installation.
3. When the Lithium Battery becomes weak or dead, the date/time
indicator will display 12:00 AM JAN.01.2007 when you set the Date/
Time to On. When this occurs, replace the Lithium Battery with a new
one (type CR2025).
4. There is a danger of explosion if Lithium Battery is incorrectly replaced.
Replace only with the same or equivalent type.
Warning: Keep the Lithium Battery out of reach of children. Should a
battery be swallowed, consult a doctor immediately.
20
Precauciones referentes a la pila de litio
1. La pila de litio hace funcionar el reloj y los preajustes de la memoria,
incluso aunque retire la batería principal o el adaptador de CA.
2. La pila de litio de la Videocámara con DVD puede durar
aproximadamente 6 meses en condiciones de funcionamiento normales
desde el momento de su instalación.
3.
Cuando la batería de litio se debilita o se agota, aparecerá el indicador
de fecha/hor 12:00 AM JAN.01.2007 cuando defina Date/Time en On.
Cuando suceda, sustituya la batería de litio por una nueva (tipo CR2025).
4. Existe peligro de explosión si la batería se coloca de forma incorrecta.
Cambie la pila sólo por una igual o de especificaciones equivalentes.
Advertencia: Mantenga la pila de litio fuera del alcance de los niños.
En caso de que alguien se tragara una por accidente, avise inmediatamente
a un médico.
1. Retire la batería de la parte posterior de la
Videocámara con DVD.
2. Abra la tapa de la batería de litio en la
parte posterior de la Videocámara con
DVD.
3. Coloque la pila de litio en su
compartimento, con el terminal positivo (+)
hacia arriba.
Tenga cuidado de no invertir la polaridad
de la batería.
4. Cierre la tapa de la pila de litio.
1. Gire el compartimento de la batería hacia
la izquierda (como indica la marca
[ ]), utilizando la uña o una moneda para
abrirlo. Se abrirá el compartimento de la
pila.
2. Introduzca la pila con el terminal positivo
(+) hacia abajo y presiónela firmemente
hasta que oiga un sonido de bloqueo.
3. Coloque el compartimento de la pila
para que su marca [
] del mando a distancia y gire
marca [
el compartimento hacia la derecha para
cerrarlo.
] coincida con la

ENGLISH
ESPAÑOL
Preparation
Using the Lithium Ion Battery Pack
Use SB-LSM80 or SB-LSM160 (not supplied) Battery Pack only.
The Battery Pack may be charged a little at the time of purchase.
Charging the Lithium Ion Battery Pack
1. Turn the [Power] switch to [OFF].
2. Attach the Battery Pack to the DVD
Camcorder.
3. Connect the AC Power adapter(AA-E9
TYPE) to a wall socket.
4. Open the DC IN Jack Cover.
5. Connect the DC cable to the DC IN
jack on the DVD Camcorder.
The charging indicator will start to
blink, showing that the Battery is
charging.
6. When the Battery is fully charged,
disconnect the Battery Pack and the
AC Power Adapter from the DVD
Camcorder. Even with the Power
switched off, the Battery Pack will still
discharge.
Blinking time Charging rate
Once per second Less than 50%
Twice per second 50% ~ 75%
Three times per second 75% ~ 90%
Blinking stops and stays on 90% ~ 100%
On for a second and off for a
second
Error - Reset the Battery
Pack and the DC Cable
5
<Charging indicator>
Preparación
Utilización de la batería de iones de litio
Utilice únicamente una batería SB-LSM80 o SB-LSM160(no
suministrado).
Es posible que la batería esté un poco cargada en el momento de la
compra.
Power Switch
Una vez por segundo Menos del 50%
Dos veces por segundo 50% ~ 75%
Tres veces por segundo
Deja de parpadear y queda
encendido
Encendido durante un
segundo y apagado durante
un segundo
Carga de la batería de iones de litio
1. Coloque el interruptor [Power] en [OFF]
2. Conecte la batería a la Videocámara con
DVD.
3. Conecte el adaptador de CA (TIPO
AA-E9) a la toma de corriente.
4. Abra la tapa del terminal DC IN.
5. Conecte el cable de CC al terminal
DC IN de la Videocámara con DVD.
El indicador de carga comenzará a
parpadear, mostrando que la batería
se está cargando.
6. Cuando la batería esté totalmente
cargada, desconecte la batería y el
adaptador de CA de la Videocámara
con DVD. Incluso con la videocámara
apagada, la batería se descargará.
Frecuencia de parpadeo Velocidad de carga
75% ~ 90%
90% ~ 100%
Error – Reinicialice la batería y el cable
de CC
21
ENGLISH
ESPAÑOL
Preparation
Charging, Recording Times based on Battery Type
If you close the LCD Screen, it switches off and the Viewfinder switches
on automatically.
The continuous recording times given in the table below are
approximations.
Actual recording time depends on usage.
The continuous recording times in the operating instructions are
measured using a fully charged Battery Pack at 77 °F (25 °C).
Even when the power is switched off, the Battery Pack will still discharge
if it is left attached to the device.
Battery Type SB-LSM80 SB-LSM160 (not supplied)
Charging
time
LCD ON
Viewfinder
LCD ON
Viewfinder
LCD ON
Viewfinder
The amount of continuous recording time available depends on;
- The type and capacity of the Battery Pack you are using.
- Ambient temperature.
- How often the Zoom function is used.
- Type of use (DVD Camcorder/Camera/With LCD Screen etc.).
It is recommended that you have several batteries available.
Approx.1hr 30min Approx. 3hr
Continuous
Mode
recording
Approx.
XP
Approx.
SP
Approx.
LP
1hr 5min
Measured times shown above are based on model SC-DC175
time
55min
1hr
Playback
time
Approx.
1hr
Approx.
1hr 5min
Approx.
1hr 10min
Mode
XP
SP
LP
Continuous
recording
time
Approx.
1hr 50min
Approx.
2hr
Approx.
2hr 10min
Playback
time
Approx.
1hr 55min
Approx.
2hr 5min
Approx.
2hr 15min
Preparación
Tiempos de carga, grabación basándose en el tipo de batería
Si cierra la pantalla LCD, se apaga y el visor se enciende
automáticamente.
Los tiempos de grabación continua que se facilitan en la tabla
siguiente son aproximados.
El tiempo real de grabación depende del uso de la videocámara.
Los tiempos de grabación continua en las instrucciones de
funcionamiento se miden utilizando una batería totalmente cargada
a 77 °F (25 °C).
Incluso con la unidad apagada, la batería se descargará si se deja
conectada al dispositivo.
Tipo de batería SB-LSM80 (AD43-00136A) SB-LSM160 (no suministrado)
Tiempo de carga
LCD
ENCENDIDA
Visor
LCD
ENCENDIDA
Visor
LCD
ENCENDIDA
Visor
Las cifras que se muestran anteriormente están basadas en el modelo SC-DC175
El tiempo de grabación continua disponible depende de:
- El tipo y la capacidad de la batería que esté utilizando.
- La temperatura ambiental.
- La frecuencia con que se emplee el zoom.
- Tipo de uso (Videocámara/Cámara/Con pantalla LCD, etc.).
Se recomienda tener disponibles varias baterías.
Aprox.1 h. 30 min. Aprox. 3 h.
Modo
XP
SP
LP
Tiempo de
grabación
continuada
1 h. 5 min.
Aprox.
55 min.
Aprox.
1 h.
Aprox.
Tiempo de
reproducción
Aprox.
1 h.
Aprox.
1 h. 5 min.
Aprox.
1 h. 10 min.
Modo
XP
SP
LP
Tiempo de
grabación
continuada
Aprox.
1 h. 50 min.
Aprox.
2 h.
Aprox.
2 h. 10 min.
Tiempo de
reproducción
Aprox.
1 h. 55 min.
Aprox.
2 h. 5 min.
Aprox.
2 h. 15 min.
22

ENGLISH
ESPAÑOL
Preparation
Battery Level Display
The battery level display indicates the amount of power
remaining in the Battery Pack.
a. Fully charged
b. 20~40% used
c. 40~80% used
d. 80~95% used (red)
e. Completely used (Blinking)
(The DVD Camcorder will turn off soon, change the
battery as soon as possible.)
The Finalize/Format functions are not available at battery level ‘d’ and
‘e’.
At battery level ‘e’
The battery becomes low in capacity and the <
the display.
The screen will turn blue when the battery is almost completely
discharged.
Battery Pack Management
The Battery Pack should be recharged in an environment between 32 °
F (0 °C) and 104 °F (40 °C).
The Battery Pack should never be charged in a room with a temperature
that is below 32 °F (0 °C).
The life and capacity of the Battery Pack will be reduced if it is used in
temperatures below 32 °F (0 °C) or left in temperatures above 104 °F (40
°C) for a long period of time, even when it is fully recharged.
Do not put the Battery Pack near any heat source (i.e. fire or a heater).
Do not disassemble, apply pressure to, or heat the Battery Pack.
Do not allow the + and – terminals of the Battery Pack to be short-
circuited. It may cause leakage, heat generation, induce overheating or
fire.
> indicator blinks on
Preparación
Indicador de carga de la batería
El indicador de nivel de la batería muestra la cantidad de
energía restante en la batería.
a. Completamente cargada
b. 20~40% utilizada
c. 40~80% utilizada
d. 80~95% utilizada (rojo)
e. Completamente utilizada (Parpadeando)
(La Videocámara con DVD se apagará inmediatamente,
Las funciones Finalize / Format no están disponibles en el nivel de
batería ‘d’ y ‘e’.
En el nivel de batería ‘e’
La batería baja de capacidad y el indicador < > parpadea en
pantalla.
La pantalla se pone azul cuando la batería está casi completamente
descargada.
Gestión de la batería
La batería debe recargarse a una temperatura ambiente de entre 0° C
(32° F) y 40° C (104° F).
La batería nunca debe cargarse cuando la temperatura ambiente sea
inferior a los 0° C (32° F).
La vida útil y la capacidad de la batería se verán reducidas si se utiliza
en ambientes con temperaturas inferiores a 0° C (32° F) o si se deja
por largos periodos expuesta a temperaturas superiores a los 40° C (104
° F) incluso si está cargada por completo.
No ponga la batería cerca de una fuente de calor (un fuego o un
calefactor, por ejemplo).
No desmonte la batería ni la someta a manipulaciones, presiones ni al
calor.
No permita que se produzca un cortocircuito entre los polos + y – de
la batería. Podrían producirse pérdidas o calentamiento, lo cual podría
ocasionar sobrecalentamiento o un incendio.
cambie la batería lo antes posible.)
23

ENGLISH
ESPAÑOL
Preparation
Maintaining the Battery Pack
Please refer to the Table on page 22 for approximate continuous
recording time.
The recording time is affected by temperature and environmental
conditions.
The recording time shortens dramatically in a cold environment.
The continuous recording times in the operating instructions are measured
using a fully charged Battery Pack at 77 °F (25 ° C). The remaining
battery time may differ from the approximate continuous recording times
given in the instructions.
When replacing the battery pack, only use the same type as is supplied
with this camcorder and is available from your SAMSUNG retailer.
When the Battery reaches the end of its life, please contact your local
dealer.
The batteries have to be dealt with as chemical waste.
Make sure that the Battery Pack is fully charged before starting to
record.
A brand new Battery Pack is not charged. Before using the Battery
Pack, you need to charge it completely.
Fully discharging a Lithium Ion Battery damages the internal cells.
The Battery Pack may be prone to leakage when fully discharged.
To preserve battery power, keep your DVD Camcorder turned off when
you are not operating it.
If your DVD Camcorder is in Camera Mode, and it is left in STBY mode
without being operated for more than 5 minutes with a disc inserted, it
will automatically turn itself off to protect against unnecessary battery
discharge.
Make sure that the Battery Pack is fitted firmly into place.
Do not drop the Battery Pack. Dropping the Battery Pack may
damage it.
Preparación
Mantenimiento de la batería
Consulte la tabla de la página 22 para obtener información sobre el
tiempo aproximado de grabación continua.
El tiempo de grabación se ve afectado por las condiciones ambientales
y la temperatura.
El tiempo de grabación se acorta enormemente en un ambiente frío.
Los tiempos de grabación continuada que se dan en este manual de
instrucciones están medidos empleando una batería completamente
cargada a 25° C (77° F).
El tiempo de la batería restante puede diferir de los tiempos de
grabación continuos facilitados en las instrucciones.
Al sustituir la batería, utilice únicamente el mismo tipo que se suministra
con esta videocámara, disponible en los distribuidores de SAMSUNG.
Cuando se termine la vida útil de la batería, póngase en contacto con
su proveedor habitual.
Para desechar las baterías gastadas, éstas deben tratarse como
residuos químicos.
Asegúrese de que la batería esté completamente cargada antes de
empezar a grabar.
Las baterías nuevas no vienen cargadas. Antes de utilizar la batería es
necesario cargarla por completo.
Descargar completamente la batería de polímero de litio daña las
células internas.
La batería puede ser más propensa a fugas cuando se deja totalmente
descargada.
Para ahorrar energía de la batería mantenga la Videocámara con DVD
apagada cuando no se esté usando.
Si la Videocámara con DVD está en la Camera Mode con un disco
colocado y se deja en el modo STBY sin hacerla funcionar durante más
de cinco minutos, se apagará automáticamente para ahorrar energía de
la batería.
Asegúrese de que la batería esté colocada correctamente en su sitio.
No deje caer la batería. Si se llegara a caer, podría estropearse
.
24
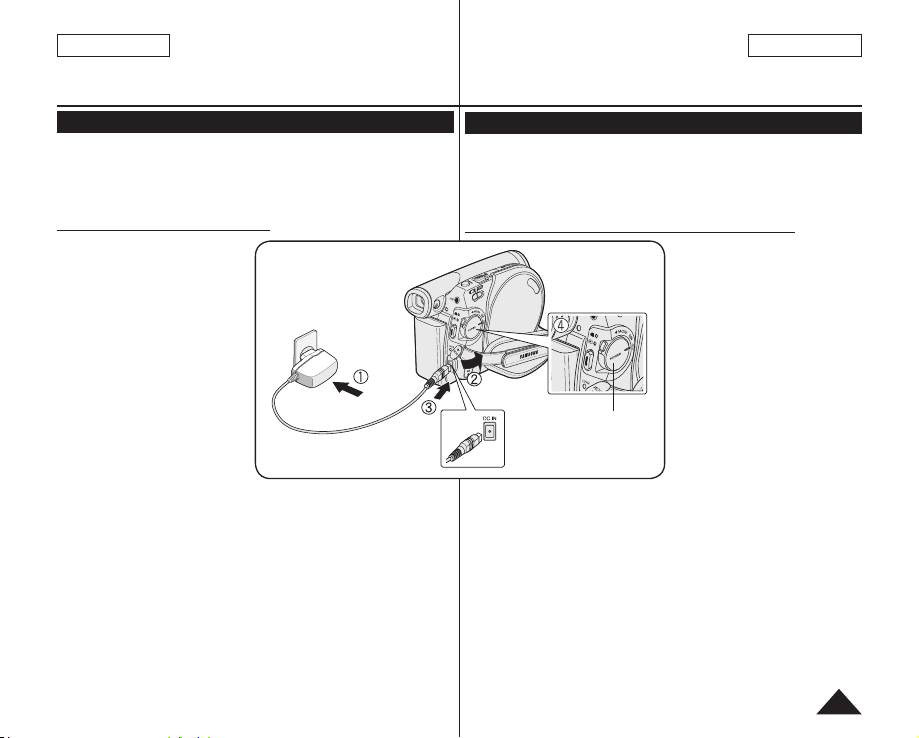
ENGLISH
ESPAÑOL
Preparation
Connecting a Power Source
There are two types of power source that can be connected to your DVD
Camcorder.
- The AC Power adapter: used for indoor recording.
- The Battery Pack: used for outdoor recording.
Using a Household Power Source
Connect to a household power
source to use the DVD Camcorder
without having to worry about the
battery power. You can keep the
Battery Pack attached; the battery
power will not be consumed.
1. Connect the AC Power adapter
(AA-E9 TYPE) to a wall socket.
The plug and wall socket type
may differ according to your
resident country.
2. Open the DC IN Jack Cover.
3. Connect the DC cable to
the DC IN jack of the DVD
Camcorder.
4. Set the DVD Camcorder to
each mode by holding down
the Green Tab on the [Power] switch and turning the [Power] switch to
[ON] or [OFF].
Preparación
Conexión a una fuente de alimentación
Hay dos tipos de fuentes de alimentación a las que se puede conectar
la Videocámara con DVD.
- El adaptador de CA y el cable de CA: se emplean para grabaciones
en interiores.
- La batería: se emplea para grabaciones en exteriores.
Utilización de una fuente de alimentación doméstica
Power Switch
4. Ajuste la videocámara en cada modo manteniendo presionada la
pestaña verde del interruptor [Power] y girándolo a [ON] o [OFF].
Conecte una fuente de
alimentación casera para utilizar
la Videocámara con DVD sin
preocuparse sobre la energía de la
batería. Puede mantener la batería
conectada; la energía de la batería
no se consumirá.
1.
Conecte el adaptador de CA
(TIPO AA-E9) a la toma de
corriente.
Es posible que la clavija y la
toma de corriente sean de
distinto tipo, dependiendo de
su lugar de residencia.
2. Abra la tapa del terminal DC
IN.
3. Conecte el cable de CC
al terminal DC IN de la
Videocámara con DVD.
25

ENGLISH
ESPAÑOL
Preparation
About the Operating Modes
The operating modes are determined by the position of the [Power] and
(SC-DC173(U)/DC175/DC575 only)
[Mode]
Set the Operation Mode by adjusting the [Power] and [Mode] (SC-
DC173(U)/DC175/DC575 only) switches before operating any functions.
Each time you move the [Power] switch downward, it toggles between
[ (Camera)] and [ (Player)] mode.
Mode Name <Camera Mode> <Player Mode> <M.Cam Mode> <M.Player Mode>
[Power] Switch
[Mode] Switch
(SC-DC173(U)/DC175/DC575 only)
Using the Joystick
The Joystick is used to make a selection and to move the
cursor left, right, up and down. Using the Joystick, you can
easily make your selection and navigate the menu.
1. Move to a previous menu item / Adjust the selected item
(to the left).
2. Move to a sub menu item / Adjust the selected item
(to the right).
3. Move to a lower menu item.
4. Move to an upper menu item.
5. Press to select the chosen item (OK).
26
switch.
The <M.Cam Mode> and the <M.Player Mode> are only available on SC-DC173(U)/DC175/DC575.
1
43 5
Preparación
Información sobre los modos de funcionamiento
Los modos de funcionamientos vienen determinados por la posición del interruptor
[Power] y el interruptor [Mode]. (sólo SC-DC173(U)/DC175/DC575)
Ajuste el modo de funcionamiento ajustando el interruptor
[Mode] (sólo SC-DC173(U)/DC175/DC575) antes de utilizar cualquier función.
Cada ve que mueva el interruptor
[ (Camera)] y [ (Player)].
M.Cam Mode : Memory Camera Mode / M.Player Mode : Memory Player Mode
[Power] hacia abajo, cambia entre los modos
Utilización del Joystick
El Joystick se utiliza para realizar una
2
selección y para mover el cursor a
la izquierda, derecha, arriba y abajo.
Con el Joystick, puede fácilmente
realizar la selección y desplazarse
por el menú.
1. Ir a un elemento de menú anterior /
Ajustar la opción seleccionada
(a la izquierda).
2. Ir a un elemento de submenú anterior
/ Ajustar la opción seleccionada (a la
derecha).
3. Ir a una opción de menú inferior.
4. Ir una opción de menú superior.
5. Se pulsa para seleccionar la opción
elegida (OK).
[Power] y el interruptor

ENGLISH
ESPAÑOL
Preparation
Using the Q.MENU
Q.MENU is used to access DVD Camcorder functions by using the
[Q.MENU] button.
Q.MENU provides easier access to frequently used menus without using
the [MENU] button.
Functions available using the Q.MENU are as below:
DIS
Program AE
<Camera Mode>
<Player Mode>
<M.Cam Mode>
(SC-DC173(U)/
DC175/DC575 only)
<M.Player Mode>
(SC-DC173(U)/
DC175/DC575 only)
For example: Setting the White Balance
1. Press the [Q.MENU] button.
The quick menu list will appear.
2. Move the [Joystick] up or down to select <White
Balance>, then press the [Joystick].
3. Move the [Joystick] up or down to select desired
mode (Auto, Indoor, Outdoor, or Custom WB),
then press the [Joystick].
4. To exit, press the [
White Balance
BLC
Shutter
Exposure
Delete
Partial Delete
New Playlist
Delete
BLC
Photo Size
(SC-DC575 only)
White Balance
Photo Quality
Exposure
Delete
Delete All
Protect
Print Mark
Format
Q.MENU
] button.
page 61
page 54
page 56
page 48
page 52
page 52
page 67
page 68
page 69
page 71
page 48
page 92
page 56
page 91
page 52
page 97
page 98
page 96
page 103
page 99
1
DIS
Program AE
White Balance
BLC
Shutter
Exposure
Q.MENU
3
DIS
Program AE
White Balance
BLC
Shutter
Exposure
Q.MENU
4
16:9 Wide
<When the White Balance option in
STBY
Off
Exit
STBY
Outdoor
Exit
STBY
Camera mode was selected.>
Preparación
Uso de Q.MENU
Q.MENU se utiliza para acceder a las funciones de la Videocámara con
DVD utilizando el botón [Q.MENU].
Q.MENU proporciona un acceso más sencillo a los menús de uso más
frecuente sin tener que utilizar el botón [MENU].
Las funciones disponibles utilizando Q.MENU
-
SP
RW
0:00:00
30 min
SP
0:00:00
30 min
0:00:00
SP
30 min
son las siguientes:
VR
<Camera Mode>
<Player Mode>
-
RW
VR
<M.Cam Mode>
(sólo SC-DC173(U)/
DC175/DC575)
<M.Player Mode>
(sólo SC-DC173(U)/
DC175/DC575)
-
RW
Por ejemplo: Ajuste del balance de blanco
VR
1. Presione el botón [Q.MENU].
Aparecerá lista del menú rápido.
2. Mueva el [Joystick] hacia arriba o hacia abajo
para seleccionar <White Balance> y presione el
botón [Joystick].
3. Mueva el [Joystick] hacia arriba o hacia abajo
para seleccionar el modo que desea (Auto,
Indoor, Outdoor, o Custom WB) y presione el
botón [Joystick].
4. Para salir, presione el botón [Q.MENU].
DIS
Program AE
White Balance
BLC
Shutter
Exposure
Delete
Partial Delete
New Playlist
Delete
BLC
Photo Size
(sólo SC-DC575)
White Balance
Photo Quality
Exposure
Delete
Delete All
Protect
Print Mark
Format
página 61
página 54
página 56
página 48
página 52
página 52
página 67
página 68
página 69
página 71
página 48
página 92
página 56
página 91
página 52
página 97
página 98
página 96
página 103
página 99
27

ENGLISH
ESPAÑOL
Preparation
OSD (On Screen Display) in Camera Mode/Player Mode
1. Battery Level page 23
2. Manual focus page 53
EASY.Q
3. DIS
4. Program AE page 54
5. White Balance Mode page 56
6. Digital Effects Mode page 58
16:9 Wide page 60
7. Shutter Speed page 52
8. Exposure
9. Date/Time
10. Color Nite pages 49~50
11. USB (SC-DC173(U)/DC175/DC575 only)
12. Remote (SC-DC175/DC575 only) page 31
13. Wind Cut page 51
14. BLC (Back Light Compensation) page 48
15. LIGHT (SC-DC173U/DC175/DC575 only)
16. Title scene number
17. Disc Format page 79
18. Disc Type
19. Counter
20. Remaining Time
21. Record Mode page 43
22. Operating Mode
23. Zoom Position page 46
24. LCD Enhancer page 39
25. Volume Control page 64
26. Message Line
27. Voice Plus Indicator page 87
28. AV IN (SC-DC175/DC575 only) page 83
29. Playback Speed
Notes
page 45
page 61
page 52
page 37
page 109
page 50
Digital Zoom Position page 62
Functions not marked with will be retained
when the DVD Camcorder is powered on after
turning it off.
OSD (On Screen Display) items shown here are
based on model SC-DC175.
page 117
page 66
28
OSD in Camera Mode
1
2
3
4
5
6
7
8
2
6
23
OSD in Player Mode
25
23
24 22 21 20 19
STBY
W T
Sepia
S.1/60
20
12:00 AM JAN.01.2007
16:9 Wide
W T
10
12:00 AM JAN.01.2007
No disc!
►►
No disc!
Preparación
OSD (Presentación en pantalla) en Camera Mode/Player Mode
1. Nivel de batería página 23
2. Enfoque manual página 53
Botón EASY.Q página 45
3. DIS página 61
-
SP
SP
1
1
RW
0:00:00
30 min
VR
001
Color N. 1/30
109
-
RW
0:00:00
VR
001
AV IN
26 27
Notas
Las funciones no marcadas con se conservarán cuando se reinicie la
Videocámara con DVD después de apagarla.
Los elementos de la OSD (Presentación en pantalla) aquí mostrados
son del modelo SC-DC175.
4. Program AE página 54
18
5. Modo White Balance página 56
17
6. Modo Efectos digitales página 58
16
16:9 Wide página 60
15
7. Velocidad de obturador página 52
14
8. Exposición página 52
9. Fecha/Hora página 37
13
10. Color Nite páginas 49~50
12
11. USB (sólo SC-DC173(U)/DC175/DC575)
11
página 109
12. Mando a distancia (sólo SC-DC175/DC575)
página 31
13. Antiviento página 51
14. BLC (Compensación de luz de fondo)
página 48
15. LIGHT (sólo SC-DC173U/DC175/DC575)
página 50
16. Número de escena del título
17. Formato de discopágina 79
29
18. Tipo de disco
19. Contador
20. Tiempo restante
21. Modo de grabación página 43
22. Modo de funcionamiento
28
23. Posición de zoom página 46
Posición del zoom digital página 62
24. LCD Enhancer página 39
25. Control de volumen página 64
26. Línea de mensaje
27. Indicador de Voice Plus
28.
AV IN (sólo SC-DC175/DC575) página 83
29. Velocidad de reproducción página 66
página 117
página 87

ENGLISH
ESPAÑOL
Preparation
OSD (On Screen Display) in M.Cam Mode/M.Player Mode
(SC-DC173(U)/DC175/DC575 only)
1. Photo Quality
page 91
2. Photo Size
3. Remaining Time
4. CARD (Memory
5. Image Counter
6. Slide Show
(SC-DC575 only)
page 92
(Recordable time
of moving images)
Card) Indicator
(Total number of
recordable photo
images)
page 95
7. Erase Protection Indicator page 96
8. Print Mark
9. Folder Number-File Number
File number of the moving image
10. Image Counter (Current Image/Total number of recorded images)
Turning the OSD (On Screen Display) On/Off
Turning OSD On/Off
Press the [DISPLAY] button on the left side control panel.
Each press of the button toggles the OSD function on and off.
Turning the Date/Time On/Off
To turn the Date/Time on or off, access the menu and change the Date/Time
mode. page 37
OSD in M.Cam Mode
1
2
page 103
W T
No memory card!
1152
20
12:00 AM JAN.01.2007
page 93
600
8 min
5
4
3
Preparación
OSD (Presentación en pantalla) en M.Cam Mode/
M.Player Mode (sólo SC-DC173(U)/DC175/DC575)
10
2
9
9
página 93
1. Calidad de foto
página 91
2. Tamaño de foto
(sólo SC-DC575)
página 92
3. Tiempo restante
(tiempo grabable
de imágenes en
movimiento)
4. Indicador CARD
(Tarjeta de
memoria)
5. Contador de
imágenes (Número
total de imágenes
fotográficas
grabables)
OSD in M.Player Mode
6
Slide
7
5
8
6. Presentación
7. Indicador de protección contra borrado página 96
8. Marca de impresión página 103
9. Número de carpeta-Número de archivo
Número de archivo de la secuencia de imágenes
10. Contador de imágenes
(Imagen actual/Número total de imágenes grabadas)
No memory card!
12:00 AM JAN.01.2007
página 95
5/10
1152X864
100-0005
SMOV001
Encendido / apagado de OSD (presentación en pantalla)
Encendido/apagado de OSD
Presione el botón [DISPLAY] en el panel de control del lado izquierdo.
Al pulsar repetidas veces el botón, la función OSD cambiará
alternativamente entre activada y desactivada (On/Off).
Activación/desactivación de la fecha y hora
Para activar o desactivar la fecha/hora, acceda al menú y cambie el modo
Date/Time. página 37
29

ENGLISH
ESPAÑOL
Initial Setting : System Menu Setting
Setting the Clock (Clock Set)
Clock setup works in Camera Mode/Player Mode/M.Cam Mode/
M.Player Mode. page 26
The date/time is automatically recorded onto a disc. Before recording,
please set the date/time.
[Mode] switch to [DISC] or [CARD].
1. Set the
(SC-DC173(U)/DC175/DC575 only)
2. Set the
[Power] switch to [ (Camera)] or
[ (Player)].
3. Press the
4. Move the [Joystick] up or down to select
5. Move the [Joystick] up or down to select
6. Move the [Joystick] up or down to set current
7. You can set the day, year, hour, minute, and AM/PM
8. Press the [Joystick] after setting minute.
9. To exit, press the [MENU] button.
Notes
[MENU] button.
The menu list will appear.
<System>, then press the [Joystick].
<Clock Set>, then press the [Joystick].
The month will be highlight first.
month, then press the [Joystick].
The day will be highlighted.
To adjust the clock, select the Year, Month, Day,
Hour, Min, or AM/PM by pressing the [Joystick],
then move the [Joystick] up or down to set
respective values.
following the same procedure after setting the
month.
A message <Complete!> is displayed.
After the Lithium Battery loses its charge (after
about 6 months), the date/time appears on the
screen as 12:00 AM JAN.01.2007.
You can set the year up to 2040.
If the Lithium Battery is not installed, data inputted
will not be backed up.
Display illustrations in this manual
OSD illustrations of SC-DC175 are used in this
manual. Some of the OSD items shown in this
manual may differ slightly from the actual items on your DVD Camcorder
4
5
8
Ajuste inicial: Ajuste del menú System
Ajuste del reloj (Clock Set)
La configuración del reloj está operativa en los
M.Cam Mode/M.Player Mode. página 26
La fecha y hora se graba automáticamente en un disco. Antes de grabar, ajuste
la fecha y la hora.
Camera Mode
►System
Clock Set
Beep Sound
Language
Demonstration
Move OK Select
Camera Mode
►System
Clock Set
Beep Sound
Language
Demonstration
Adjust OK Select
Camera Mode
►System
Clock Set
Beep Sound
Language
Demonstration
Move OK Select
►On
►English
►On
JAN 01 2007
12 : 00 AM
JAN 01 2007
12 : 00 AM
30
MENU
MENU
Complete!
MENU
Camera Mode/Player Mode/
1. Coloque el interruptor [Mode] en [DISC] o [CARD].
(sólo SC-DC173(U)/DC175/DC575)
2. Coloque el interruptor [Power] en
[ (Camera)] o [ (Player)].
3. Presione el botón
Aparece la lista del menú.
4. Mueva el [Joystick] hacia arriba o hacia abajo para
seleccionar <System> y presione el botón [Joystick].
5. Mueva el [Joystick] hacia arriba o hacia abajo
para seleccionar <Clock Set> y presione el botón
Exit
Exit
Exit
[Joystick].
Primero se resalta el mes.
6. Mueva el [Joystick] hacia arriba o hacia abajo para
fijar el mes actual y presione el botón [Joystick].
Se resalta el día.
Para ajustar el reloj, seleccione Year, Month, Day,
Hour, Min o AM/PM pulsando el botón
y mueva el [Joystick] hacia arriba o hacia abajo
para ajustar los respectivos valores.
7. Fije el mes, día, año, hora, minutos y AM/PM siguiendo
el mismo procedimiento tras ajustar el mes.
8. Presione el botón [Joystick] tras ajustar AM/PM.
Aparece el mensaje <Complete!>.
9. Para salir, presione el botón [MENU].
Notas
Una vez que la batería de litio pierda su carga (después
de 6 meses aproximadamente), la fecha y hora
aparecen en pantalla como 12:00 AM JAN.01.2007
Puede fijar el año hasta 2040.
Si no está instalada la batería de litio, no se realizará
ninguna copia de seguridad de los datos de entrada.
Pantallas de este manual
En este manual se utilizan las ilustraciones de la OSD
del modelo SC-DC175. Algunas partes de la OSD
de este manual podrían diferir ligeramente de los
elementos reales de su Videocámara con DVD.
[MENU].
[Joystick]
 Loading...