

Samsung SC-D590 User Manual
FRANÇAISENGLISH
AD68-00510C
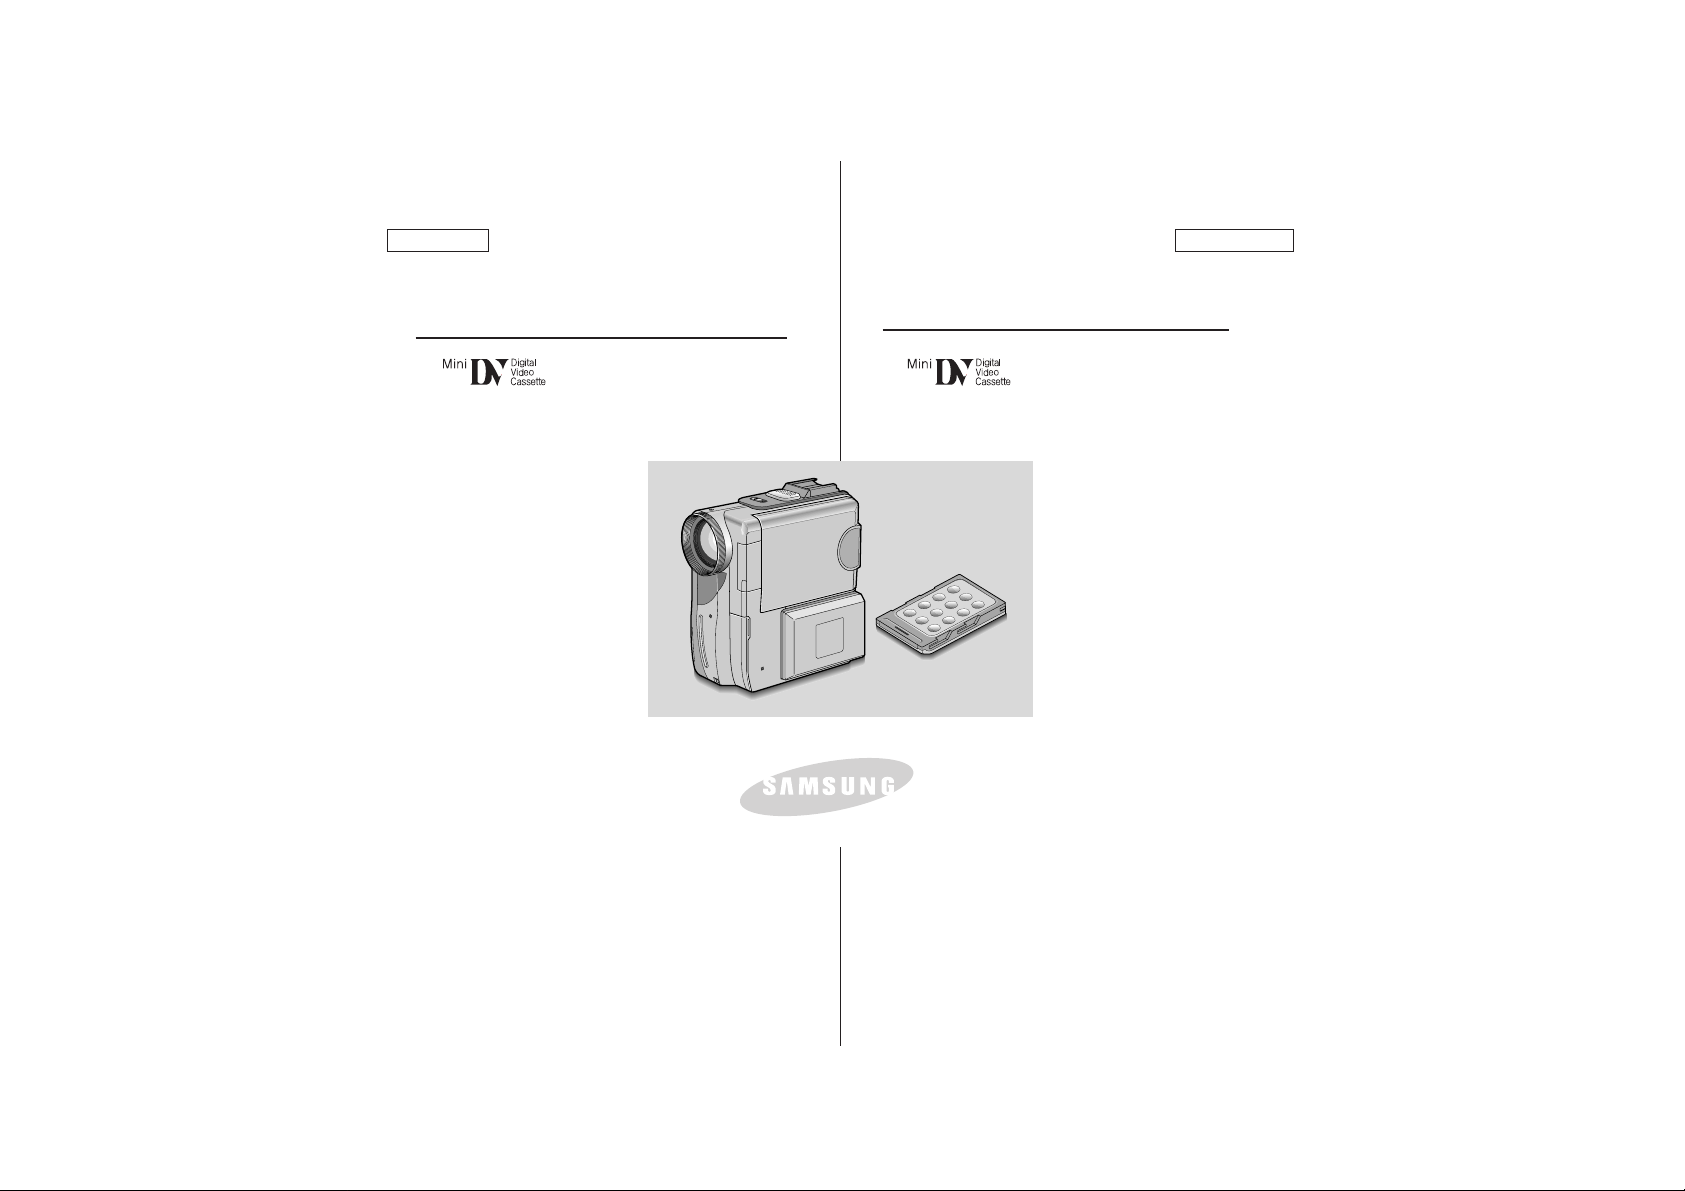
Digital Video Camcorder
Owner’s Instruction Book
Before operating the unit, please read this
instruction book thoroughly, and retain it for
future reference.
Manuel d’instructions
Avant d'utiliser l'appareil, lisez soigneusement
ce manuel d'instructions et conservez-le afin
de pouvoir le consulter par la suite.
AF Auto Focus
CCD Charge Coupled Device
LCD Liquid Crystal Display
AF Auto Focus
<Mise au point automatique>
CCD Charge Coupled Device
<Dispositif à transfert de
charge>
LCD Liquid Crystal Display
<Ecran à cristaux liquides>
SCD530/D590
SCD530T/D590T
ELECTRONICS
Caméscope numérique
SCD530/D590
SCD530T/D590T

ENGLISH FRANÇAIS
Tables des matières
22
Notes regarding the rotation of the LCD screen.............................................................6
Notes regarding moisture condensation........................................................................ 7
Notes regarding Camcorder............................................................................................7
Notes regarding the battery pack................................................................................... 8
Notes regarding the Video Head Cleaning.................................................................... 8
Note regarding the LENS .............................................................................................. 9
Notes regarding viewfinder ........................................................................................... 9
Notes regarding ‘Record’or ‘Playback’using the LCD ................................................. 9
Notes regarding the hand grip ......................................................................................9
Precautions regarding the Lithium battery .................................................................. 10
Features .......................................................................................................................11
Accessories Supplied with camcorder ........................................................................ 12
Basic Accessories ................................................................................................12
Front & Left View .........................................................................................................13
Right & Top View .........................................................................................................14
Rear & Bottom View .................................................................................................... 15
Remote control ............................................................................................................16
OSD (On Screen Display in CAMERA and PLAYER modes) ................................... 17
OSD (On Screen Display in M.REC and M.PLAY modes) ........................................ 18
Turning the OSD on/off (On Screen Display)....................................................... 18
Connecting a Power Source .......................................................................................19
To use the AC Power adapter and the DC Cable................................................. 19
To select the CAMCORDER mode(SCD590/D590T only)....................................19
Using the Lithium Ion Battery Pack..............................................................................20
Charging the Lithium Ion Battery Pack ................................................................ 20
Table of continuous recording time based on model and battery type................21
Battery level display ..............................................................................................22
Inserting and Ejecting a Cassette................................................................................23
Adjusting the Hand Grip ............................................................................................... 24
Attaching the Hand Grip........................................................................................ 24
Removing the Hand Grip........................................................................................24
Ejecting the tape when the Hand Grip is attached................................................25
Using the Neck Strap..............................................................................................25
How to use the Remote Control...................................................................................26
Battery Installation for the Remote Control .......................................................... 26
Using the Remocon Strap......................................................................................26
Keeping the Remote Control..................................................................................26
Making your First Recording ....................................................................................... 27
REC Search........................................................................................................... 28
Contents
Notes and Safety Instructions ........................................ 6
Getting to Know Your Camcorder ............................... 11
Preparation .................................................................. 19
Basic Recording ........................................................... 27
Remarques concernant la rotation de l’écran LCD......................................................................... 6
Remarques concernant la buée ..................................................................................................... 7
Remarques concernant le caméscope ........................................................................................... 7
Remarques concernant le bloc-batterie. ..........................................................................................8
Remarques concernant le nettoyage des têtes vidéo .................................................................... 8
Remarques concernant l’OBJECTIF .............................................................................................. 9
Remarques concernant le viseur ................................................................................................... 9
Remarques concernant l’enregistrement et la lecture à l’aide de l’écran LCD.............................. 9
Remarques concernant la poignée .................................................................................................9
Précautions concernant la batterie au lithium .............................................................................. 10
Fonctions ....................................................................................................................................... 11
Accessoires fournis avec le caméscope ...................................................................................... 12
Accessoires de base .......................................................................................................... 12
Vues de face et de gauche ........................................................................................................... 13
Vues de droite et de dessus ......................................................................................................... 14
Vues de derrière et de dessous ................................................................................................... 15
Télécommande ............................................................................................................................. 16
OSD (On Screen Display <Affichage à l’écran> dans les modes
CAMERA et PLAYER <LECTEUR>) ................................................................................. 17
OSD (On Screen Display <Affichage à l'écran> dans les modes
M.REC <ENREGISTREMENT MEMOIRE> et M.PLAY <LECTURE MEMOIRE>) ......... 18
Activation/désactivation de l'OSD (On Screen Display <Affichage à ................................ 18
Raccordement à une source d’alimentation ................................................................................ 19
Pour utiliser l’adaptateur secteur CA et le câble CC ......................................................... 19
Pour sélectionner le mode CAMCORDER <CAMESCOPE>
(SCD590/D590T uniquement) ............................................................................................ 19
Utilisation du bloc-batterie au lithium ............................................................................................ 20
Chargement du bloc-batterie au lithium ............................................................................. 20
Tableau des durées d’enregistrement en continu suivant le modèle et le type de batterie .....21
Affichage du niveau de charge de la batterie .................................................................... 22
Introduction et éjection d’une cassette ......................................................................................... 23
Réglage de la poignée .................................................................................................................. 24
Fixation de la poignée ........................................................................................................ 24
Retrait de la poignée ...........................................................................................................24
Ejection de la cassette lorsque la poignée est fixée........................................................... 25
Utilisation de la bandoulière ............................................................................................... 25
Utilisation de la télécommande .................................................................................................... 26
Installation de la pile de la télécommande ......................................................................... 26
Utilisation du cordon de télécommande.............................................................................. 26
Rangement de la télécommande........................................................................................ 26
Votre premier enregistrement .................................................................................................. ..... 27
REC Search <RECHERCHE D’ENREGISTREMENT> .................................................... 28
Remarques et consignes de sécurité ......................................6
Pour vous familiariser avec votre caméscope......................11
Préparatifs ..........................................................................19
Enregistrement de base ......................................................27

Astuces pour obtenir des images stables à l’enregistrement ...................................................... 29
Enregistrement avec l’écran LCD ...................................................................................... 29
Enregistrement avec le viseur............................................................................................. 29
Réglage de l'écran LCD ............................................................................................................... 30
Utilisation du VISEUR ......................................................................................................... .......... 31
Réglage de la mise au point .............................................................................................. 31
Lecture d’une cassette enregistrée avec l’écran LCD ................................................................. 32
Réglage de l’écran LCD pendant la LECTURE ................................................................. 33
Réglage du volume du haut-parleur ............................................................................................. 33
Réglage des éléments de menu .................................................................................................. 34
Réglez le caméscope en mode CAMERA ou PLAYER <LECTEUR> et en mode .................... 34
M.REC <ENREGISTREMENT MEMOIRE> ou M.PLAY <LECTURE MEMOIRE>
(SCD590/D590T uniquement) ............................................................................................ 34
Disponibilité des fonctions dans chaque mode ................................................................. 35
RESET <REINITIALISATION> ........................................................................................... 35
CLOCK SET <REGLAGE DE L’HORLOGE> .................................................................... 36
REMOCON <TELECOMMANDE> .................................................................................... 37
REC LAMP <VOYANT ENREGISTREMENT> .................................................................. 38
BEEP SOUND <BIP> ......................................................................................................... 39
SHUTTER SOUND <BRUIT D’OBTURATEUR> (SCD590/D590T uniquement) .............. 40
DEMONSTRATION ............................................................................................................ 41
PROGRAM AE <PROGRAMME AE> ............................................................................... 42
Réglage du PROGRAM AE <PROGRAMME AE> ............................................................ 43
WHT. BALANCE <EQUILIBRAGE DES BLANCS> .......................................................... 44
Zoom avant et zoom arrière avec DIGITAL ZOOM <ZOOM NUMERIQUE> ................... 45
Zoom avant et zoom arrière ............................................................................................... 45
Zoom numérique ................................................................................................................ 46
EIS (Electronic Image Stabilizer <Stabilisateur d’image électronique>) ........................... 47
DSE SELECT (<SELECTION D'EFFETS SPECIAUX NUMERIQUES>) ........................ 48
Sélection d’un effet ............................................................................................................. 49
FLASH SELECT <SELECTION FLASH> .......................................................................... 50
CUSTOM.Q ......................................................................................................................... 51
REC MODE <MODE ENREGISTREMENT> ..................................................................... 52
LINE IN SELECT <SELECTION ENTREE LIGNE> ............................................................... 53
AUDIO MODE <MODE AUDIO>......................................................................................... 54
WIND CUT <REDUCTION DES BRUITS DE FOND>....................................................... 55
DATE/TIME <DATE/HEURE>.............................................................................................. 56
DISPLAY <AFFICHAGE> ................................................................................................... 57
Utilisation du Quick menu <Menu rapide> ................................................................................... 58
Réglage du Quick menu <Menu rapide> ........................................................................... 59
SHUTTER SPEED <VITESSE D’OBTURATEUR>&EXPOSURE <EXPOSITION> ........ 60
Mode EASY <FACILE> (pour les débutants) ............................................................................... 61
Mode CUSTOM <PERSONNALISE> .......................................................................................... 62
MF/AF (Mise au point manuelle/Mise au point automatique) ...................................................... 63
Mise au point automatique ................................................................................................. 63
Mise au point manuelle ...................................................................................................... 63
Contents
FRANÇAIS
Tables des matières
ENGLISH
33
Hints for Stable Image Recording ............................................................................... 29
Recording with the LCD monitor ......................................................................... 29
Recording with the Viewfinder .............................................................................29
Adjusting the LCD ......................................................................................................30
Using the VIEWFINDER ............................................................................................31
Adjusting the Focus .............................................................................................. 31
Playing back a tape you have recorded on the LCD .................................................. 32
Adjusting the LCD during PLAY ........................................................................... 33
Controlling Sound from the Speaker ......................................................................... 33
Use of various Functions ............................................................................................ 34
Setting menu items................................................................................................ 34
Set the camcorder to CAMERA or PLAYER mode and
M.REC or M.PLAY mode (SCD590/D590T only) ................................................34
Availability of functions in each mode .................................................................. 35
RESET ................................................................................................................... 35
CLOCK SET .........................................................................................................36
REMOCON ............................................................................................................ 37
REC LAMP............................................................................................................38
BEEP SOUND ...................................................................................................... 39
SHUTTER SOUND (SCD590/D590T only)..........................................................40
DEMONSTRATION...............................................................................................41
PROGRAM AE......................................................................................................42
Setting the PROGRAM AE ................................................................................... 43
WHT. BALANCE (WHITE BALANCE) ................................................................. 44
Zooming In and Out with DIGITAL ZOOM ........................................................... 45
Zooming In and Out ............................................................................................. 45
Digital Zoom...........................................................................................................46
EIS (Electronic Image Stabilizer) .........................................................................47
DSE (Digital Special Effects) SELECT ................................................................ 48
Selecting an effect ................................................................................................ 49
FLASH SELECT.................................................................................................... 50
CUSTOM.Q ...........................................................................................................51
REC MODE .........................................................................................................52
LINE IN SELECT................................................................................................... 53
AUDIO MODE .....................................................................................................54
WIND CUT............................................................................................................. 55
DATE/TIME .......................................................................................................... 56
DISPLAY .............................................................................................................. 57
Using Quick Menu ........................................................................................................ 58
Setting the Quick menu ........................................................................................ 59
SHUTTER SPEED & EXPOSURE ....................................................................... 60
EASY Mode (for Beginners)......................................................................................... 61
CUSTOM Mode............................................................................................................ 62
MF/AF (Manual Focus/Auto Focus).............................................................................63
Auto Focusing ....................................................................................................... 63
Manual Focusing ..................................................................................................63
Advanced Recording ................................................... 34
Utilisation de fonctions variées ......................................... 34

ENGLISH FRANÇAIS
Contents Tables des matières
44
BLC (Back Light Compensation) ................................................................................ 64
Fade In and Out ..........................................................................................................65
To Start Recording ............................................................................................... 65
To Stop Recording (use FADE IN / FADE OUT) ................................................. 65
Audio dubbing .............................................................................................................66
Dubbing sound ...................................................................................................... 66
Dubbed Audio Playback .......................................................................................67
PHOTO Image Recording ........................................................................................... 68
Searching for a PHOTO picture ...........................................................................68
NITE PIX........................................................................................................................69
Setting the Self-Timer...................................................................................................70
Various Recording Techniques ....................................................................................71
Tape Playback .............................................................................................................72
Playback on the LCD ............................................................................................72
Playback on a TV monitor ....................................................................................72
Connecting to a TV which has Audio Video input jacks ...................................... 72
Connecting to a VCR ..................................................................................................73
Playback.................................................................................................................73
Various Functions while in PLAYER mode ................................................................. 74
Playback pause ....................................................................................................74
Picture search (Forward/Reverse) ....................................................................... 74
Slow playback (Forward/Reverse) ........................................................................74
Frame advance (To play back frame by frame)....................................................75
Reverse playback .................................................................................................. 75
ZERO MEMORY..........................................................................................................76
Recording in PLAYER mode........................................................................................ 77
Transferring IEEE1394 (i.LINK)-DV standard data connections.................................. 78
Connecting to a DV device.................................................................................... 78
Connecting to a PC...............................................................................................78
System requirements ........................................................................................... 79
Recording with a DV connection cable.................................................................79
Transferring a Digital Image through a USB Connection ........................................... 80
System Requirements ................................................................................................. 80
Installing DVC Media 3.0 Program (SCD530/D530T only)...........................................81
Installing DVC Media 4.0 Program (SCD590/D590T only)...........................................83
Connecting to a PC ..................................................................................................... 85
Memory Stick ....................................................................................................... 86
Memory Stick Functions ...................................................................................... 86
Playing back a Tape ..................................................... 72
Recording in PLAYER mode ......................................... 77
IEEE 1394 Data Transfer............................................... 78
USB interface ............................................................... 80
Digital Still Camera mode (SCD590/D590T only) ....... 86
BLC (Compensation de contre-jour) ............................................................................................ 64
Fade In and Out <Ouverture/fermeture en fondu> ...................................................................... 65
Pour démarrer l'enregistrement .......................................................................................... 65
Pour arrêter l'enregistrement (utilisez FADE IN /
FADE OUT <OUVERTURE/FERMETURE EN FONDU>) ................................................ 65
Doublage audio.............................................................................................................................. 66
Doublage du son ................................................................................................................ 66
Lecture d’un doublage audio .............................................................................................. 67
Enregistrement d’une image PHOTO ........................................................................................... 68
Recherche d’une image PHOTO ....................................................................................... 68
NITE PIX ....................................................................................................................................... 69
Réglage du retardateur.................................................................................................................. 70
Techniques d’enregistrement variées ........................................................................................... 71
Lecture de cassettes ..................................................................................................................... 72
Lecture sur l’écran LCD ...................................................................................................... 72
Lecture sur un téléviseur .................................................................................................... 72
Branchement à un téléviseur muni de prises d’entrée audio et vidéo .............................. 72
Connexion à un magnétoscope .................................................................................................... 73
Lecture ................................................................................................................................ 73
Fonctions variées en mode PLAYER <LECTEUR> .................................................................... 74
Pause .................................................................................................................................. 74
Recherche d’image (avant/arrière) ..................................................................................... 74
Lecture lente (avant/arrière) ............................................................................................... 74
Avance image (Pour une lecture image par image) .......................................................... 75
Lecture arrière .................................................................................................................... 75
ZERO MEMORY <ETAT DE BANDE> ......................................................................................... 76
Enregistrement en mode PLAYER <LECTEUR>........................................................................ 77
Transfert IEEE 1394 (i.LINK)- Commutations de données standard numériques (DV)............... 78
Branchement sur un appareil numérique (DV) ............................................................................ 78
Branchement sur un PC ............................................................................................................... 78
Configuration du système ............................................................................................................. 79
Enregistrement à l'aide d'un câble de liaison vidéo numérique .................................................. 79
Transfert d’une image numérique via une liaison USB ................................................................ 80
Configuration du système ............................................................................................................. 80
Installation du programme DVC Media 3.0 (SCD530/D530T uniquement).................................. 81
Installation du programme DVC Media 4.0 (SCD590/D590T uniquement).................................. 83
Branchement sur un PC ............................................................................................................... 85
Memory Stick ................................................................................................................................. 86
Fonctions du Memory Stick .......................................................................................................... 86
Lecture d'une cassette ....................................................... 72
Enregistrement en mode PLAYER <LECTEUR>..................... 77
Transfert de données IEEE 1394 ........................................ 78
Interface USB .................................................................... 80
Mode Digital Still Camera <Appareil photo numérique>
(SCD590/D590T uniquement)
.......................... 86

Contents
FRANÇAIS
Tables des matières
ENGLISH
55
Inserting and Removing the Memory Stick ................................................................ 87
Inserting the Memory Stick .................................................................................. 87
Removing the Memory Stick ................................................................................ 87
Structure of folders and files on the Memory Stick ............................................. 88
Image Format .......................................................................................................88
Selecting the image quality .........................................................................................89
Select the image quality ...................................................................................... 89
Number of images on the Memory Stick...............................................................89
Recording Still images to a Memory Stick................................................................... 90
Recording images to a Memory Stick................................................................... 90
Recording an image from a cassette as a still image.......................................... 91
Viewing Still images ............................................................................................92
To view a Single image ........................................................................................92
To view a slide show .............................................................................................92
To view a Multi Screen..........................................................................................93
Copying still images from a cassette to Memory Stick ...............................................94
Marking images for printing ......................................................................................... 95
Protection from accidental erasure..............................................................................96
Deleting Still images..................................................................................................... 97
Formatting a Memory Stick..........................................................................................98
Attention................................................................................................................. 98
After finishing a recording ...........................................................................................99
After completing a recording session ................................................................... 99
Cleaning and Maintaining the Camcorder.................................................................100
Cleaning the VIEWFINDER ...............................................................................100
Cleaning the Video Heads .................................................................................100
Using Your Camcorder Abroad ................................................................................. 101
Power sources..................................................................................................... 101
Color system........................................................................................................ 101
Using the Smart Shoe.................................................................................................102
Using the VL-S1FL Video Light/Flash(optional)..........................................................102
Troubleshooting ......................................................................................................... 104
Self Diagnosis Display ........................................................................................104
Moisture Condensation ......................................................................................104
Self Diagnosis Display in M.REC, M.PLAY mode (SCD590/D590T only)......... 105
Maintenance ................................................................ 99
Smart Shoe ................................................................ 102
Troubleshooting.......................................................... 104
Specifications ............................................................. 107
INDEX ........................................................................ 108
Warranty (Canada Users Only) .................................. 109
Insertion et éjection du Memory Stick...........................................................................................87
Insertion du Memory Stick ................................................................................................. 87
Ejection du Memory Stick ................................................................................................... 87
Structure des dossiers et des fichiers sur le Memory Stick .............................................. 88
Format d’image ................................................................................................................ ... 88
Sélection de la qualité d'image ..................................................................................................... 89
Sélection de la qualité d'image .......................................................................................... 89
Nombre d'images sur le Memory Stick............................................................................... 89
Enregistrement d'images fixes sur un Memory Stick.................................................................... 90
Enregistrement d'images sur un Memory Stick.................................................................. 90
Enregistrement d’une image issue d’une cassette en tant qu’image fixe. ........................ 91
Visualisation d’images fixes ................................................................................................ 92
Pour visualiser une seule image ........................................................................................ 92
Pour visualiser un diaporama ............................................................................................. 92
Pour visualiser un multi-écran ............................................................................................ 93
Copie d'images fixes d’une cassette vers un Memory Stick ....................................................... 94
Marquage des images à imprimer ............................................................................................... 95
Protection contre un effacement accidentel ................................................................................. 96
Suppression d’images fixes .......................................................................................................... 97
Formatage d'un Memory Stick ..................................................................................................... 98
Attention............................................................................................................................... 98
Après avoir terminé un enregistrement ........................................................................................ 99
Après avoir terminé une session d’enregistrement ........................................................... 99
Nettoyage et entretien du caméscope ....................................................................................... 100
Nettoyage du VISEUR ...................................................................................................... 100
Nettoyage des têtes vidéo ................................................................................................ 100
Utilisation du caméscope à l’étranger ........................................................................................ 101
Alimentations .................................................................................................................... 101
Codage couleur ................................................................................................................ 101
Utilisation de la griffe.................................................................................................................... 102
Utilisation de la lampe vidéo/flash VL-S1FL (en option)............................................................. 102
Pannes ........................................................................................................................................ 104
Affichage de l’autodiagnostic ............................................................................................ 104
Buée ..................................................................................................................................104
Affichage de l’autodiagnostic en mode M.REC, M.PLAY <ENREGISTREMENT
MEMOIRE/LECTURE MEMOIRE> (SCD590/D590T uniquement) ................................ 105
Entretien ............................................................................. 99
Griffe ............................................................................... 102
Pannes ..............................................................................104
Spécifications ................................................................... 107
INDEX .............................................................................. 108
Pour la France uniquement (Garantie pour le Canada).... 109

Remarques concernant la rotation de l’écran LCD
Tournez l’écran LCD délicatement comme le montre l’illustration.
Une rotation excessive peut endommager l'intérieur de
l'articulation qui relie l’écran LCD au caméscope.
1. Ecran LCD fermé.
2. Enregistrement normal avec
l’écran LCD.
3. Enregistrement avec l’écran
LCD vu de dessus.
4. Enregistrement avec l’écran
LCD vu de face.
5. Enregistrement avec l’écran
LCD fermé.
ENGLISH FRANÇAIS
Notes and Safety Instructions Remarques et consignes de sécurité
66
Notes regarding the rotation of the LCD screen
Please rotate the LCD screen carefully as illustrated.
Over rotation may cause damage to the inside of the hinge that
connects the LCD screen to the Camcorder.
1. LCD screen closed.
2. Standard recording using the LCD
screen.
3. Recording when looking at the
LCD screen from the top.
4. Recording when looking at the
LCD screen from the front.
5. Recording with the LCD screen
closed.
90
90
90
1
2
3
4
5
9090

Les émissions de télévision, les cassettes vidéo, les titres DVD, les
films et autres programmes peuvent être protégés par des droits
d’auteur.
La copie non autorisée de documents protégés par des droits
d’auteurs peut entrer en contradiction avec la législation.
1. Une hausse soudaine de la température de l’air peut entraîner
la formation de buée à l'intérieur du caméscope.
Par exemple :
- Quand le caméscope passe d'un lieu froid à un lieu chaud
(par exemple de l'extérieur à l'intérieur en hiver.)
- Quand le caméscope passe d'un lieu frais à un lieu très
chaud (par exemple de l'intérieur à l'extérieur en été.)
2. Si la fonction de protection (DEW <BUEE>) est activée,
laissez le caméscope pendant au moins deux heures dans
une pièce chaude et sèche, le compartiment cassette ouvert
et la batterie enlevée.
1. N’exposez pas la caméscope à des températures élevées
(supérieures à 60°C).
Par exemple, ne le laissez pas dans une voiture stationnée au
soleil ou à la lumière directe du soleil.
2. Protégez le caméscope de l’humidité.
N’exposez pas le caméscope à la pluie, à l’eau de mer ou à
toute autre forme d’humidité.
L’humidité risque d’endommager le caméscope.
Certaines défaillances dues à l’humidité sont irrémédiables.
Remarques concernant la buée
Remarques concernant le CAMESCOPE
Remarques concernant les DROITS D’AUTEURS
Television programs, video tapes, DVD titles, films, and other
program materials may be copyrighted.
Unauthorized copying of copyrighted material may be against the
law.
1. A sudden rise in atmospheric temperature may cause
condensation to form inside the camcorder.
for example:
- When you move the camcorder from a cold location to a warm
location (e.g. from outside to inside during winter.)
- When you move the camcorder from a cool location to a hot
location (e.g. from inside to outside during the summer.)
2. If the (DEW) protection feature is activated, leave the
camcorder for at least two hours in a dry, warm room with the
cassette compartment opened and the battery pack removed.
1. Do not leave the camcorder exposed to high temperature
(above 60°C or 140°F).
For example, in a parked car in the sun or exposed to direct
sunlight.
2. Do not let the camcorder get wet.
Keep the camcorder away from rain, sea water, and any other
form of moisture.If the camcorder gets wet, it may get
damaged. Sometimes a malfunction due to exposure to liquids
cannot be repaired.
Notes and Safety Instructions
FRANÇAIS
Remarques et consignes de sécurité
ENGLISH
77
Notes regarding moisture condensation
Notes regarding CAMCORDER
Notes regarding COPYRIGHT
- Vérifiez que le bloc-batterie est complètement
chargé avant de commencer l’enregistrement.
- Pour économiser la batterie, éteignez votre
caméscope quand vous ne l'utilisez pas.
- Quand votre caméscope est en mode CAMERA
et que vous le laissez en mode STBY <VEILLE>
sans l'utiliser pendant plus de 5 minutes avec
une cassette dans le compartiment, il s'éteint
automatiquement afin d'éviter que la batterie ne
se décharge inutilement.
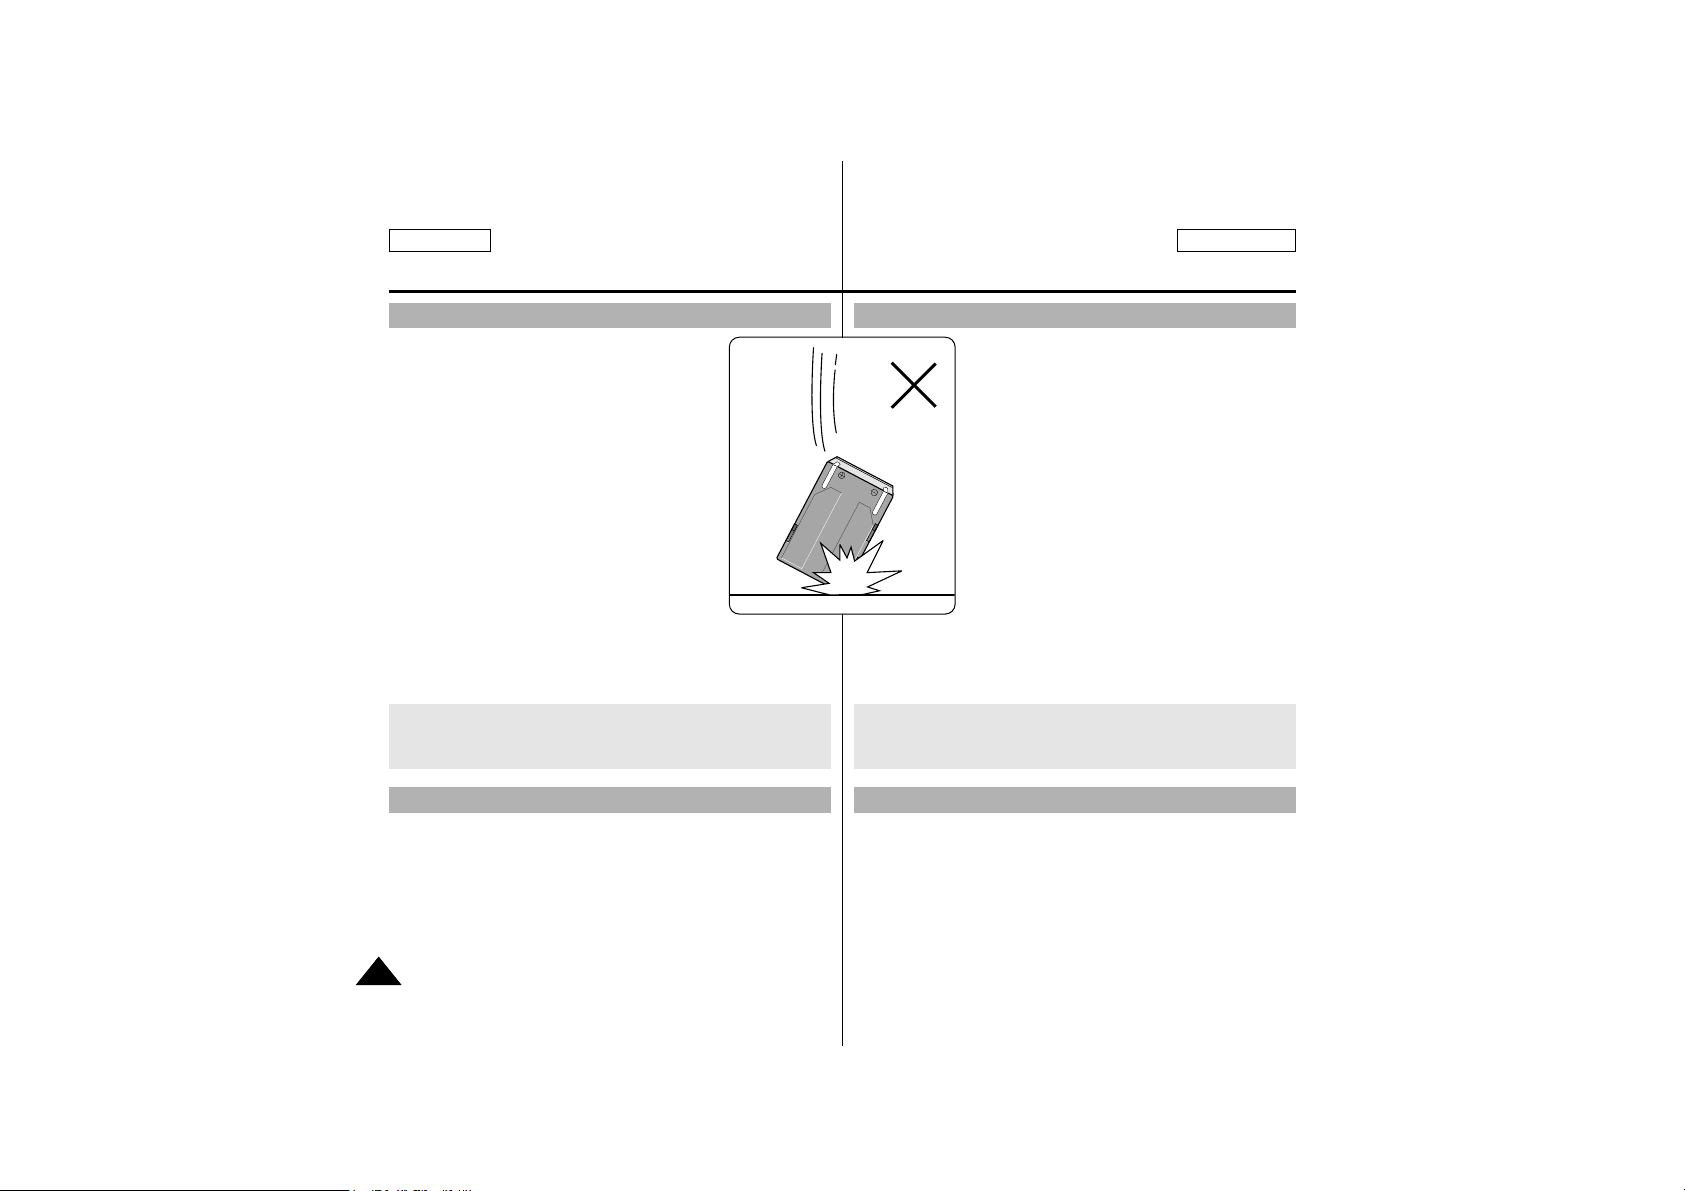
- Vérifiez que le bloc-batterie est bien en place.
Le bloc-batterie peut être endommagé en cas
de chute.
- Un bloc-batterie neuf n'est pas chargé.
Avant d'utiliser le bloc-batterie, chargez-le
complètement.
- Pour des enregistrements de longue durée, il peut s'avérer
judicieux d'utiliser le viseur au lieu de l'écran LCD,
car celui-ci consomme plus d'énergie.
* Quand la batterie arrive en fin de vie, contactez votre revendeur
local. Les batteries doivent être traitées comme des déchets
chimiques.
- Pour que l'enregistrement s'effectue correctement et que les
images soient nettes, nettoyez régulièrement les têtes vidéo.
Si des distorsions carrées se forment sur les images au cours de
la lecture ou s'il n'apparaît qu'un écran bleu, il se peut que les têtes
vidéo soient sales.
Si c'est le cas, nettoyez les têtes vidéo à l'aide d'une cassette de
nettoyage de type sec.
- N'utilisez pas de cassette de nettoyage de type humide.
Les têtes vidéo pourraient être endommagées.
Remarques concernant le bloc-batterie
Remarques concernant le nettoyage des têtes vidéo
ENGLISH FRANÇAIS
Notes and Safety Instructions Remarques et consignes de sécurité
88
- Make sure that the battery pack is fully charged
before starting to record.
- To preserve battery power, keep your camcorder
turned off when you are not operating it.
- If your camcorder is in CAMERA mode, and it is
left in STBY mode without being operated for
more than 5 minutes with a tape installed, it will
automatically turn itself off to protect against
unnecessary battery discharge.
- Make sure that the battery pack is fitted firmly
into place.
Dropping the battery pack may damage it.
- A brand new battery pack is not charged.
Before using the battery pack, you need to
charge it completely.
- It is a good idea to use the viewfinder rather than the LCD when
making a long recording, because the LCD uses up more battery
power.
* When the battery reaches the end of its life, please contact your
local dealer.
The batteries have to be dealt with as chemical waste.
- To ensure normal recording and a clear picture, clean the video
heads regularly. If a square block-shape distorts playback,
or only a blue screen is displayed, the video heads may be dirty.
If this happens, clean the video heads with a dry type cleaning
cassette.
- Do not use a wet-type cleaning cassette. It may damage the video
heads.
Notes regarding the battery pack
Notes regarding the Video Head Cleaning
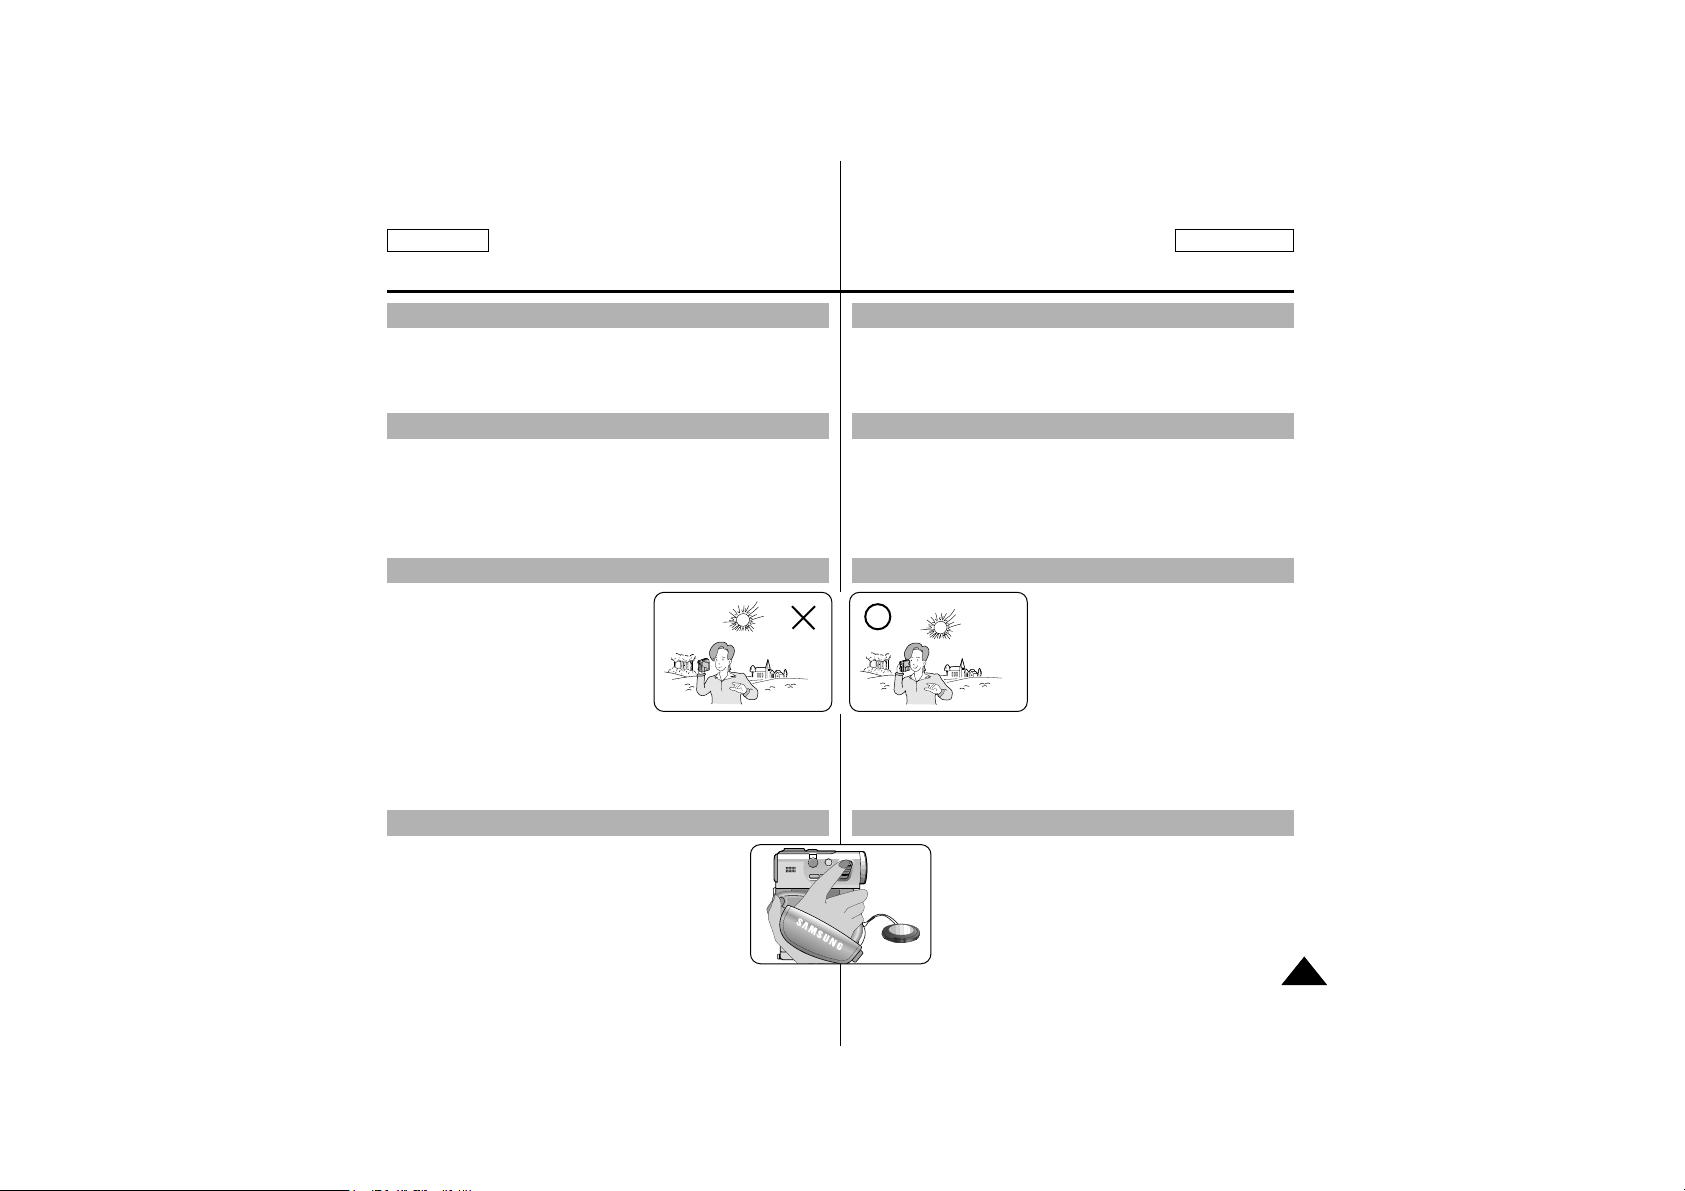
- Pendant que vous filmez, n'orientez pas l'objectif de la caméra
directement vers le soleil.
La lumière directe du soleil risque d'endommager le CCD (Charge
Coupled Device <Dispositif à transfert de charge>).
1. N'orientez pas le viseur du caméscope vers le soleil.
La lumière directe du soleil risque d'endommager l'intérieur du viseur.
Faites attention lorsque vous placez le caméscope au soleil ou près
d'une fenêtre exposée au soleil.
2. Ne prenez pas le caméscope par le viseur.
3. Le viseur pourrait être endommagé par une manipulation excessive.
1. La fabrication de l’écran LCD fait
intervenir une technologie de haute
précision.Toutefois, des points
minuscules (rouges, bleus ou verts)
peuvent apparaître sur l'écran LCD.
Ce phénomène est normal et n'influe
aucunement sur l'image enregistrée.
2. Lorsque vous utilisez l'écran LCD à l'extérieur ou à la lumière directe
du soleil, il se peut que vous ayez du mal à voir l'image.
En l’occurrence, nous vous conseillons d’utiliser le viseur.
3. La lumière directe du soleil peut endommager l'écran LCD.
- Afin d'obtenir une image stable lors de
l'enregistrement, vérifiez que la poignée est réglée
correctement.
- Ne glissez pas de force votre main dans la poignée,
vous risqueriez de l'endommager.
Remarques concernant l’OBJECTIF
Remarques concernant le viseur
Remarques concernant l’enregistrement et la lecture à l’aide de l’écran LCD
Remarques concernant la poignée
Notes and Safety Instructions
FRANÇAIS
Remarques et consignes de sécurité
ENGLISH
99
- Do not film with the camera lens pointing directly at the sun.
Direct sunlight can damage the CCD(Charge Coupled Device).
1. Do not position the camcorder such that the viewfinder is pointing
towards the sun.Direct sunlight can damage the inside of the
viewfinder.Be careful when placing the camcorder under sunlight or
near a window exposed to sunlight.
2. Do not pick up the camcorder from the viewfinder.
3. Over pulling of the viewfinder may damage it.
1. The LCD display has been
manufactured using high precision
technology. However, there may be tiny
dots (red, blue or green in color) that
appear on the LCD display.
These dots are normal and do not affect
the recorded picture in any way.
2. When you use the LCD display under
direct sunlight or outdoors,
it maybe difficult to see the picture clearly.
If this occurs, we recommend using the viewfinder.
3. Direct sunlight can damage the LCD monitor.
- To ensure a steady picture during filming,
check that the hand grip is properly adjusted.
- Do not force your hand into the hand grip as you could
damage it.
SAMSUNG
SAMSUNG
SAMSUNG
SAMSUNG
Note regarding the LENS
Notes regarding viewfinder
Notes regarding ‘Record’ or ‘Playback’ using the LCD
Notes regarding the hand grip

ENGLISH FRANÇAIS
Notes and Safety Instructions
Remarques et consignes de sécurité
1010
1. The camcorder’s built-in lithium battery maintains the clock
function and user settings, even if the battery pack or AC
adapter is removed.
2. The lithium battery for the camcorder lasts about a week
under normal operation from the time of installation.
3. When the lithium battery becomes weak or is dead, the
date/time indicator will display “– – –” when you set the
DATE/TIME to ON.
When this occurs, connect the camcorder to power to fully
recharge the built-in lithium battery.If the same problem
occurs with a fully recharged battery, contact a Samsung
authorized Service Center to replace the battery.
Precautions regarding the external lithium battery
for the remote control
W
arning:
■
Keep the LITHIUM BATTERY(Remote Control) out of reach
of children.
Should a battery be swallowed, consult a doctor
immediately.
■
Danger of explosion if battery is incorrectly replaced.
Replace only with the same or equivalent type.
Precautions regarding the Lithium battery
1. La batterie au lithium sert à garder en mémoire la fonction
horloge et les paramètres utilisateur, y compris lorsque le
bloc-batterie est retiré ou l’adaptateur CA débranché.
2. La batterie au lithium du caméscope dure une semaine
environ à partir de son installation dans le cadre d’une
utilisation normale.
3. Lorsque la batterie au lithium devient faible ou inutilisable,
l'indicateur date/time <date/heure> affiche “– – –” lorsque vous
réglez la fonction DATE/TIME <DATE/HEURE> sur ON
<ACTIVE>.
Dans ce cas, connectez le caméscope au secteur pour
recharger entièrement la batterie au lithium intégrée.
Si le même problème se produit avec une batterie
complètement rechargée, contactez un centre de service
agréé par Samsung pour remplacer la batterie.
Précautions concernant la batterie au
lithium externe pour la télécommande
A
vertissement:
■
Ne laissez pas la BATTERIE AU LITHIUM (Télécommande)
à portée des enfants.
En cas d’ingestion, consultez un médecin immédiatement.
■
Risque d’explosion si la batterie n’est pas remplacée
correctement.
Remplacez-la uniquement par une batterie identique ou
de type équivalent.
Précautions concernant la batterie au lithium

Getting to Know Your Camcorder
FRANÇAIS
Pour vous familiariser avec votre caméscope
ENGLISH
1111
• Digital data transfer function with IEEE1394
By incorporating the IEEE 1394 (i.LINK™ : i.LINK is a serial data
transfer protocol and interconnectivity system, used to transmit DV
data) high speed data transport port, both moving and still images can
be transferred to a PC, making it possible to produce or edit various
images.
• USB interface for digital image data transfer
You can transfer still images to a PC using the USB interface without an
add-on card.
• PHOTO
The PHOTO function lets you capture an object as a still along with
sound, while in Camera mode.
• 400x Digital zoom
Allows you to magnify an image up to 400 times its original size.
• Color TFT LCD
A high-resolution color TFT LCD (with 211,000 pixels) gives you clean,
sharp images as well as the ability to review your recordings
immediately.
• Electronic Image Stabilizer (EIS)
The EIS compensates for any handshake, reducing unstable images
particularly at high magnification.
• Various digital effects
The DSE (Digital Special Effects) allows you to give your films a special
look by adding various special effects.
• Back Light Compensation (BLC)
The BLC function compensates for the bright background behind a
subject you're recording.
• Program AE
The Program AE enables you to alter the shutter speed and aperture to
suit the type of scene/action to be filmed.
• NITE PIX
The NITE PIX function enables you to record a subject in a dark place.
• Digital Still Camera function (SCD590/D590T only)
■
Using Memory Stick, you can easily record and play back standard
still images.
■
You can transfer standard still images on the Memory Stick to your
PC by using the USB interface.
Features
• Fonction de transfert de données numériques avec IEEE1394
Grâce au port de transfert de données à grande vitesse IEEE 1394
(i.LINK™ : i.LINK est un protocole de transfert et d'interconnexion de
données en série, utilisé pour transférer des données vidéo numériques),
il est possible de transférer des images animées et des images fixes vers
un PC, et ainsi de produire et modifier des images variées.
• Interface USB pour le transfert de données d'images numériques
Vous pouvez transférer des images fixes vers un PC à l'aide de l'interface
USB sans aucune carte supplémentaire.
• PHOTO
La fonction PHOTO permet d’enregistrer un objet fixe et du son, en mode
Camera.
• Zoom numérique 400x
Permet d’agrandir une image jusqu’à 400 fois sa taille d’origine.
• Ecran LCD couleur TFT
L’écran LCD couleur TFT haute résolution (211 000 pixels) vous offre des
images claires, nettes, ainsi que la possibilité de visionner vos
enregistrements sur-le-champ.
• Stabilisateur d’image électronique (EIS)
L’EIS compense les tremblements de la main et améliore les images
instables, particulièrement en cas de fort grossissement.
• Effets numériques variés
Les DSE (Digital Special Effects <Effets spéciaux numériques>) vous
permettent de donner un caractère particulier à vos films en y ajoutant des
effets spéciaux.
• Compensation de contre-jour (BLC)
Lorsque vous filmez un sujet à contre-jour ou avec un éclairage en fond,
la fonction BLC <COMPENSATION DE CONTRE-JOUR> compense la
brillance de l’arrière plan.
• Program AE <Programme AE>
Le Program AE <Programme AE> permet de modifier la vitesse d’obturation
et d’ouverture en fonction du type de scène ou d’action à filmer.
• NITE PIX
La fonction NITE PIX vous permet de filmer un sujet dans un endroit à
faible luminosité.
• Fonction Digital Still Camera <Appareil photo numérique>
(SCD590/D590T uniquement)
■
A l’aide d’un Memory Stick, vous pouvez enregistrer et lire aisément
des images fixes standard.
■
Vous pouvez transférer les images fixes standard d’un Memory Stick
vers un PC à l’aide d’une interface USB.
Fonctions
Vérifiez que votre caméscope numérique est accompagné des
accessoires de base ci-après.
Accessoires de base
1. Bloc-batterie au lithium
2. Adaptateur secteur CA
3. Cordon d’alimentation CA
4. Câble Multi-AV
(AUDIO/VIDEO/S-VIDEO)
5. Manuel d’instructions
6. Pile au lithium pour
la télécommande
(TYPE: CR2025, 1 EA)
7. Télécommande
8. Cordon de télécommande
9. Poignée
10. Capuchon
11. Bandoulière
12. Câble USB
13. CD du logiciel
■
SCD530/D530T:
DVC Media 3.0
■
SCD590/D590T:
DVC Media 4.0
14. Câble audio pour USB
(SCD530/D530T
uniquement)
15. Memory Stick
(SCD590/D590T
uniquement)
16. Couvre-objectif
Accessoires fournis avec le caméscope
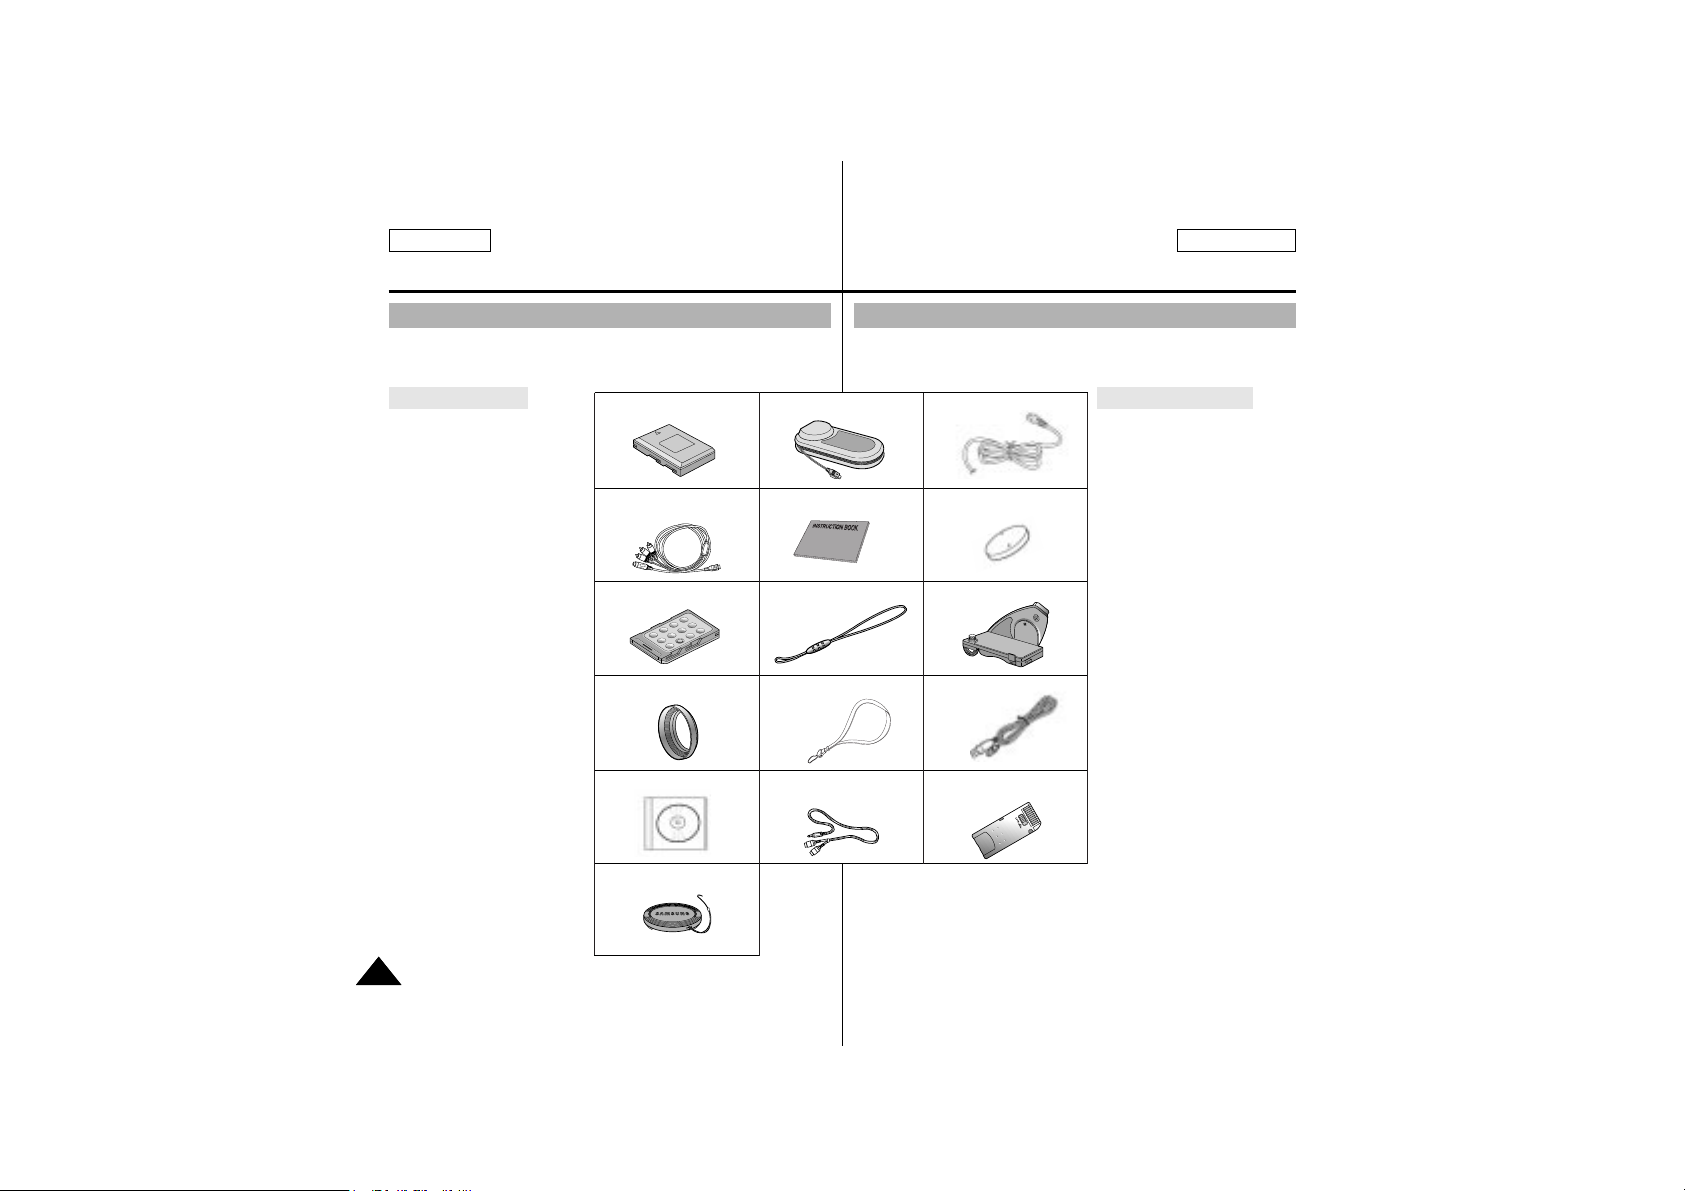
Make sure that the following basic accessories are supplied with your
digital video camera.
Basic Accessories
1. Lithium Ion Battery pack
2. AC Power Adapter
3. AC Cord
4. Multi-AV cable
(AUDIO/VIDEO/S-VIDEO)
5. Instr uction Book
6. Lithium battery for
Remote Control
(TYPE: CR2025, 1 EA)
7. Remote Control
8. Remocon Strap
9. Hand Gr ip
10. Ring Hood
11. Neck Strap
12. USB cable
13. Software CD
■
SCD530/D530T:
DVC Media 3.0
■
SCD590/D590T:
DVC Media 4.0
14. USB Audio Cable
(SCD530/D530T only)
15. Memory Stick
(SCD590/D590T only)
16. Lens Cover
ENGLISH FRANÇAIS
Getting to Know Your Camcorder
Pour vous familiariser avec votre caméscope
1212
Accessories Supplied with camcorder
1. Lithium Ion Battery pack 3. AC cord
4.Multi-AV cable
(AUDIO/VIDEO/S-VIDEO)
7. Remote Control
2. AC Power Adapter
5. Instruction Book
8. Remocon Strap
11. Neck Strap
14. USB Audio Cable
(SCD530/D530T only)
10. Ring Hood
13. Software CD
9. Hand Grip
12. USB cable
15. Memory Stick
(SCD590/D590T only)
16. Lens Cover
6. Lithium battery (1EA)
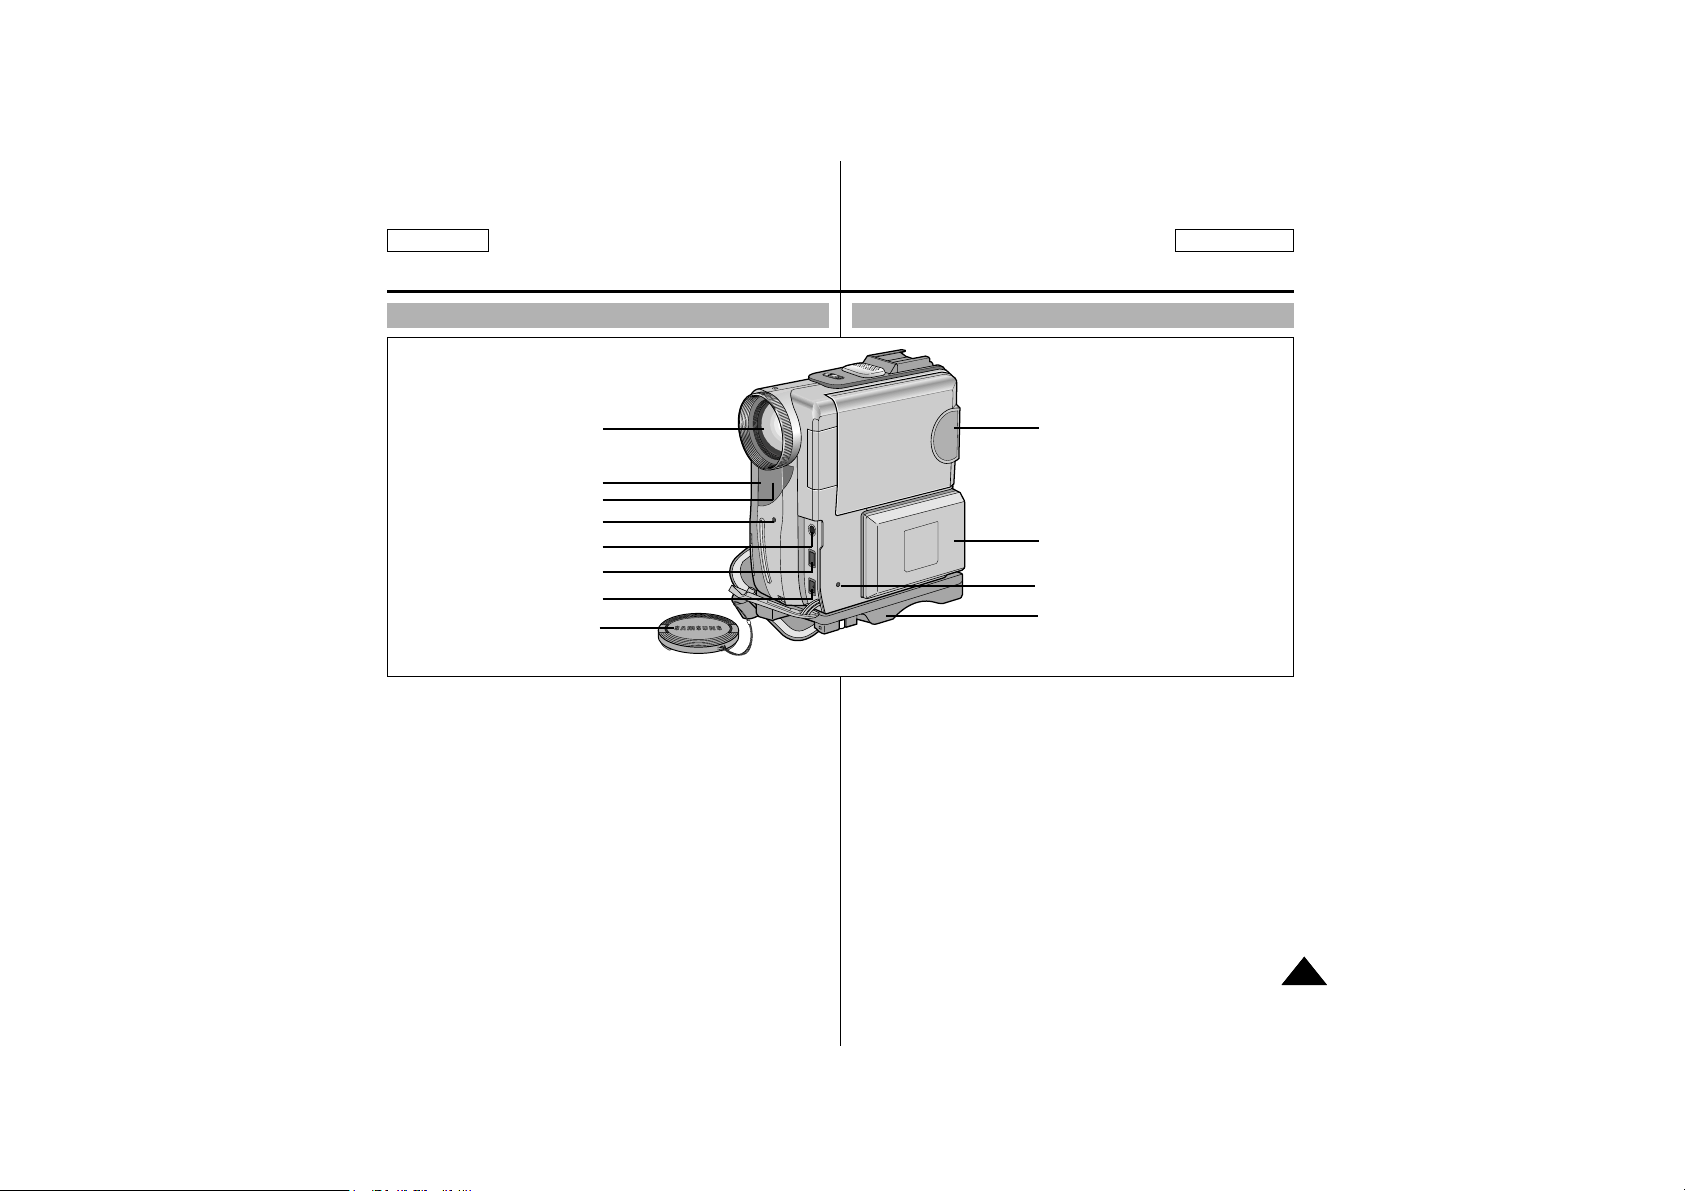
1. Objectif
2. Couvre-objectif
3. Capteur
4. Crochet pour la poignée
(voir page 24)
5. Ecran LCD
6. Bloc-batterie
(voir page 20)
7. Voyant REC
<ENREGISTREMENT>
(voir page 38)
8. Témoin de charge
9. Prise écouteur
10.Prise Multi-AV
(voir page 72)
11.Prise CC (voir page 19)
12.Lumière infrarouge
(voir page 69)
Vues de face et de gauche
Getting to Know Your Camcorder
FRANÇAIS
Pour vous familiariser avec votre caméscope
ENGLISH
1313
1. Lens
2. Lens Cover
3. Remote Sensor
4. Hand grip (see page 24)
5. LCD monitor
6. Battery Pack
(see page 20)
7. REC Lamp (see page 38)
8. Charging Indicator
9. Earphone Jack
10. Multi-AV Jack
(see page 72)
11. DC Jack (see page 19)
12. Infrared light
(see page 69)
1. Lens
3. Remote Sensor
12. Infrared light
7. REC Lamp
9. Earphone Jack
10. Multi-AV Jack
11. DC Jack
2. Lens Cover
5. LCD monitor
6. Battery Pack
8. Charging Indicator
4. Hand grip
Front & Left View
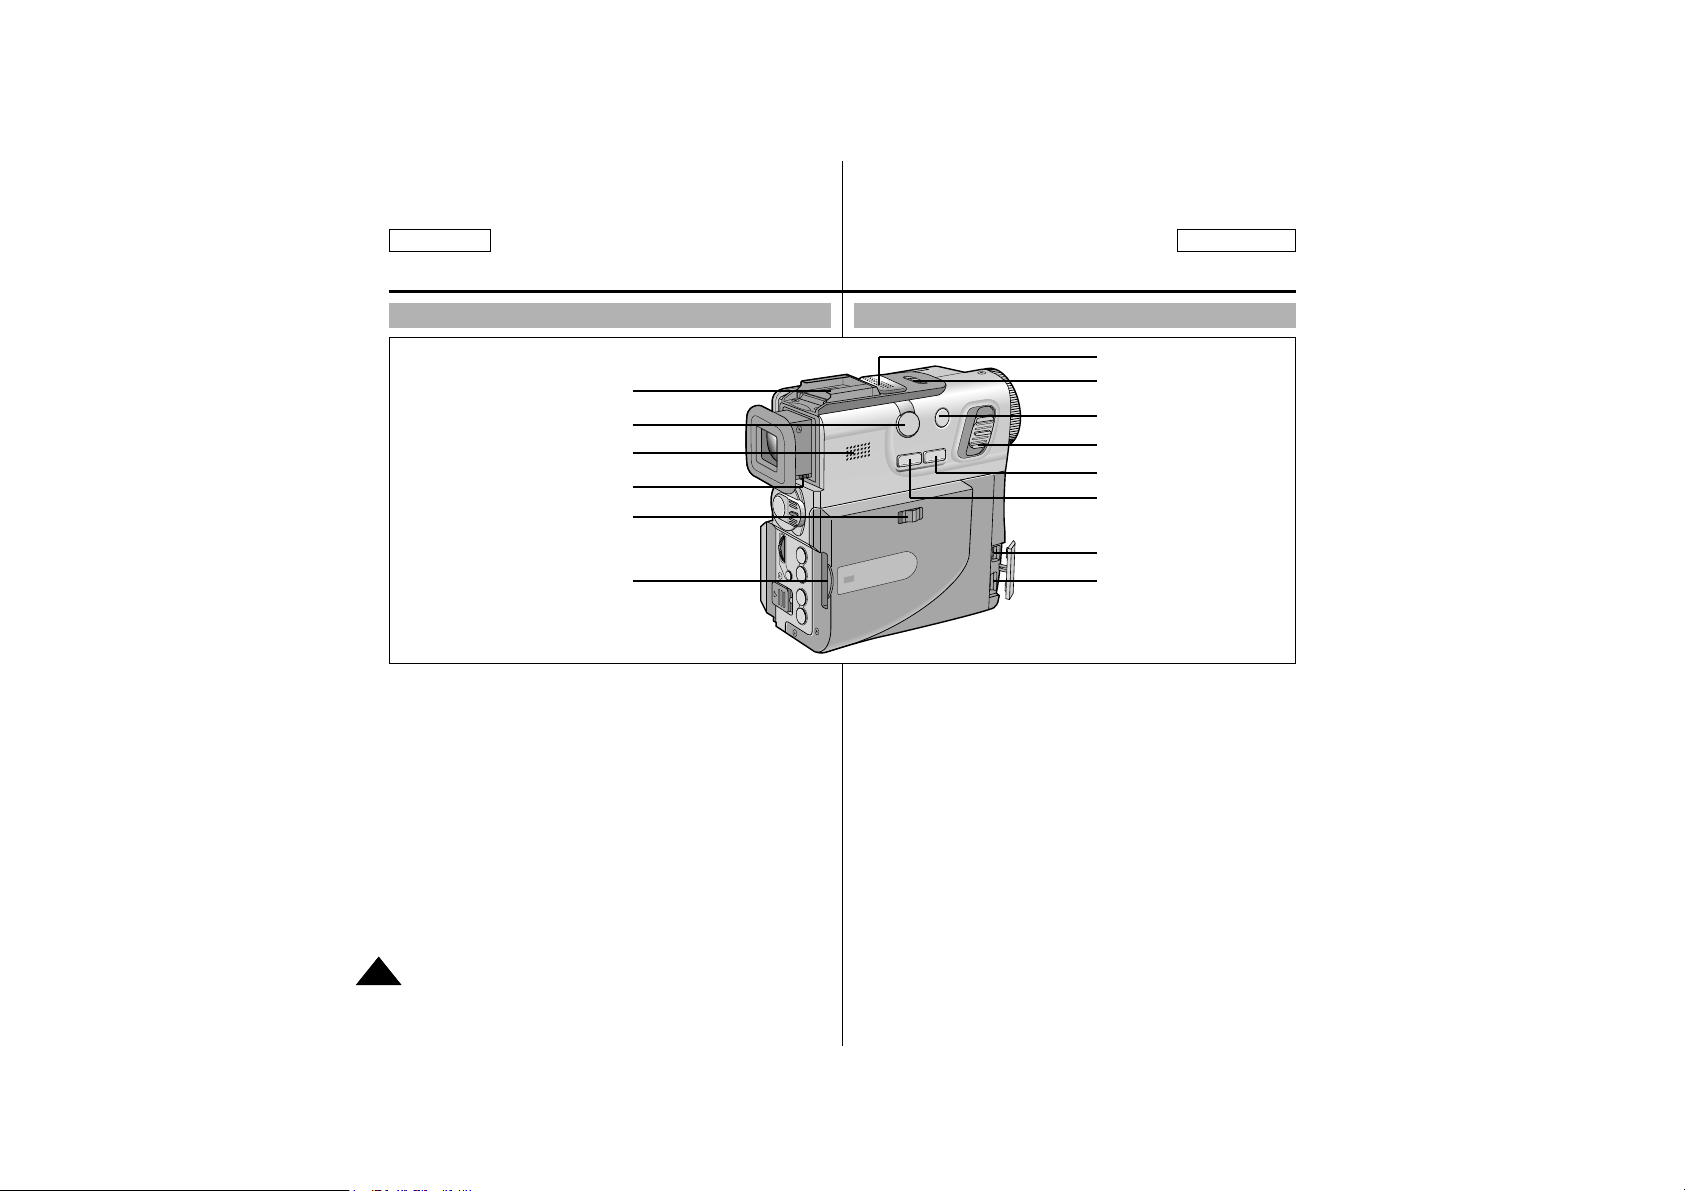
1. HAUT-PARLEUR
2. Entrée micro externe
3. Bouton Custom.Q
(voir page 62)
4. Bouton Easy.Q
(voir page 61)
5. Bouton Photo
(voir page 68)
6. Commande du zoom
(voir page 45)
7. Interrupteur NITE PIX
(voir page 69)
8. Micro intégré
9. Griffe (voir page 102)
10.Sélecteur MEMORY
STICK/TAPE <MEMORY
STICK/CASSETTE>
(SCD590/D590T
uniquement)
11. Logement pour Memory
Stick (SCD590/D590T
uniquement)
12.Sortie vidéo numérique
(voir page 78, 79)
13.Prise USB (voir page 85)
14.Bouton de réglage de la
mise au point (voir page 31)
Vues de droite et de dessus
ENGLISH FRANÇAIS
Getting to Know Your Camcorder
Pour vous familiariser avec votre caméscope
1414
1. SPEAKER
2. External MIC in
3. Custom.Q button
(see page 62)
4. Easy.Q button
(see page 61)
5. Photo button
(see page 68)
6. Zoom lever
(see page 45)
7. NITE PIX switch
(see page 69)
8. Internal MIC
9. Smart Shoe
(see page 102)
10. MEMORY STICK/TAPE
select switch
(SCD590/D590T only)
11. Memory Stick slot
(SCD590/D590T only)
12. DV in/out
(see pages 78, 79)
13. USB Jack (see page 85)
14. Focus Adjustment Knob
(see page 31)
Right & Top View
9. Smart Shoe
2. External MIC in
1. SPEAKER
14. Focus Adjustment Knob
10. MEMORY STICK/
TAPE select switch
(SCD590/D590T only)
11. Memory Stick slot
(SCD590/D590T only)
8. Internal MIC
7. NITE PIX switch
5. Photo button
6. Zoom lever
4. Easy.Q button
3. Custom.Q button
12. DV in/out
13. USB Jack
PLAYER M.PLAY <LECTURE MEMOIRE>
<LECTEUR>
CAMERA
(SCD590/D590T uniquement)
(PLAY/STILL<LECTURE/ FADE <FONDU> S.SHOW <DIAPORAMA>
ARRET SUR IMAGE>) (voir page 65) (voir page 92)
(STOP <ARRET>) BLC <COMPENSATION DE DELETE <SUPPRIMER>
CONTRE-JOUR> (voir page 64) (voir page 97)
(FF <AVANCE>) REC SEARCH + <RECHERCHE FWD <AVANCE>
D’ENREGISTREMENT+> (voir page 92)
(voir page 28)
(REW <RETOUR>) REC SEARCH – <RECHERCHE REV <LECTURE ARRIERE>
D’ENREGISTREMENT –>
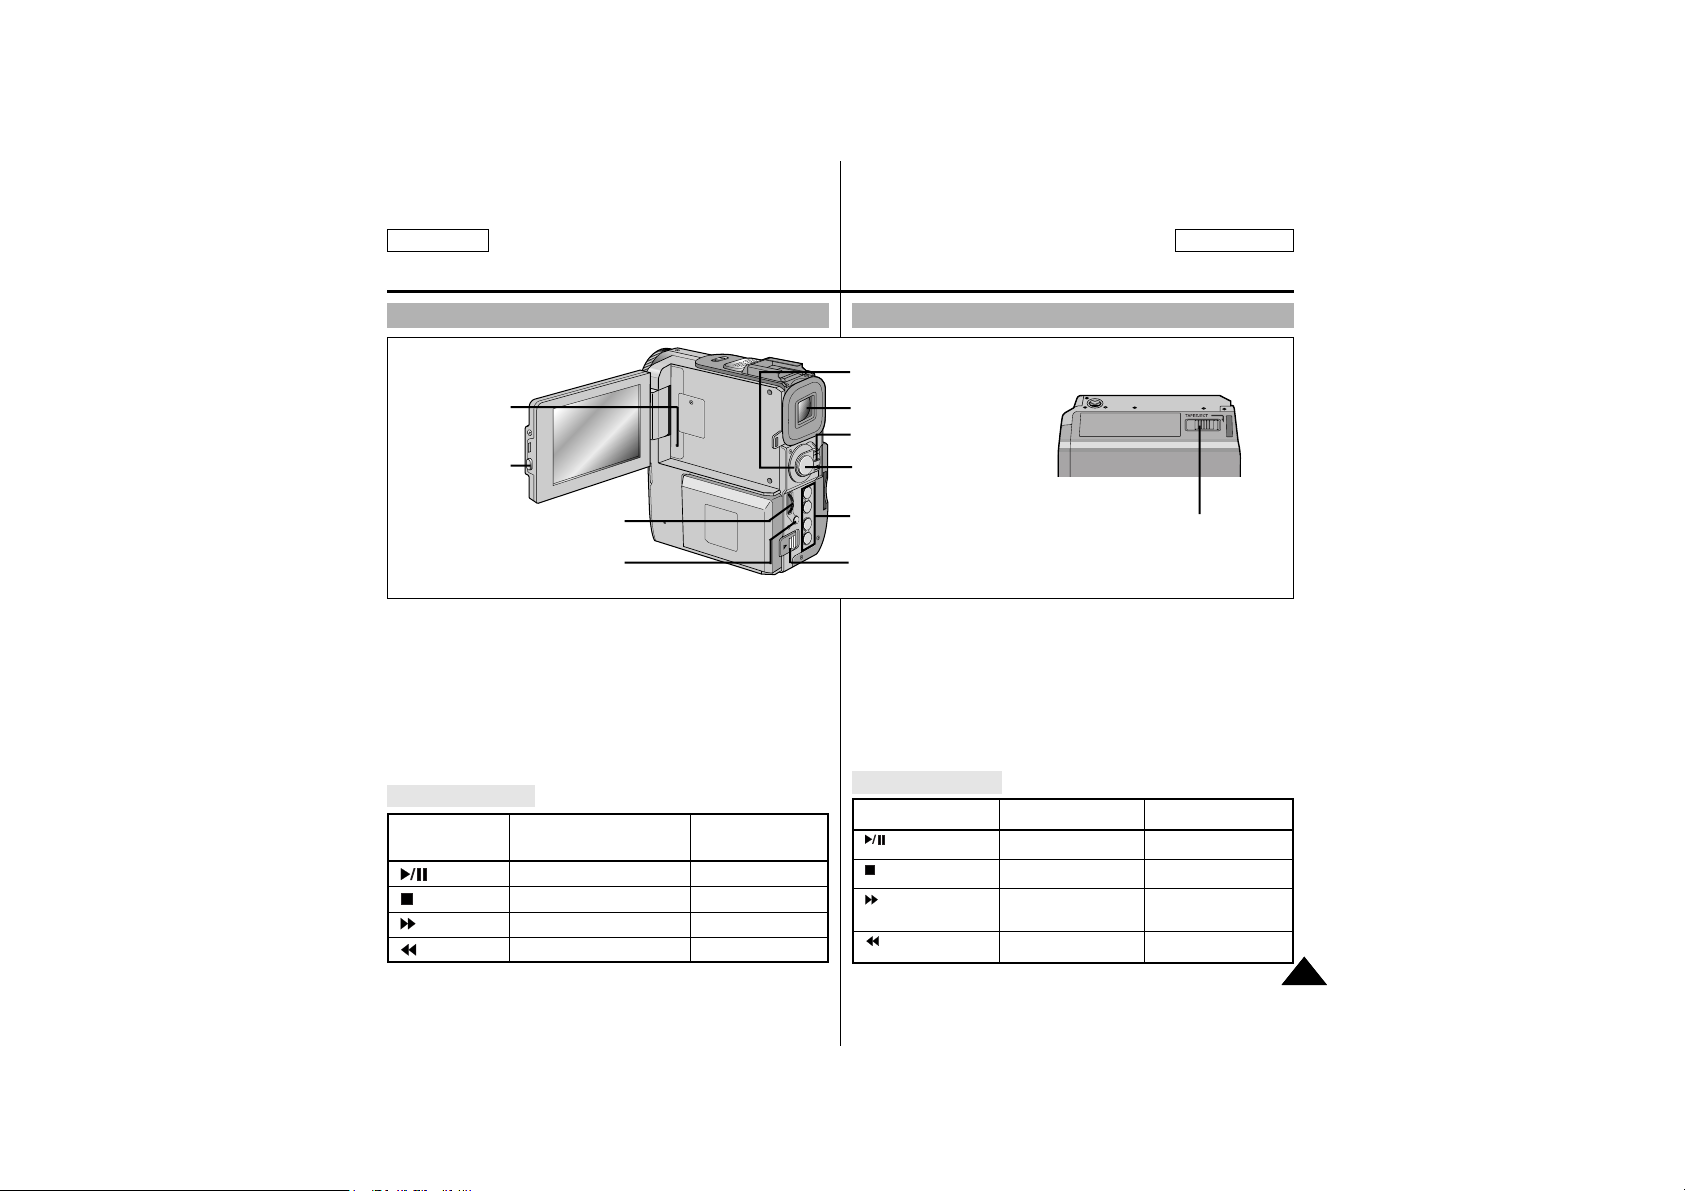
1. Ouverture de l’écran LCD
2. Bouton MENU (voir page 34)
3. MENU selector <Sélecteur de
MENU> (MENU SELECT/
VOLUME <SELECTION
MENU/VOLUME>) (voir page 34)
4. Bouton de libération de la
batterie (voir page 99)
5. Touches de fonction
6. Bouton START/STOP
<DEMARRAGE/ARRET>
7. Interrupteur d’alimentation
(voir page 27)
8. Témoin d’alimentation
9. Viseur (voir page 31)
10. RESET <REINITIALISER>
(voir page 35)
11. Bouton TAPE EJECT
<EJECTION CASSETTE>
Vues de derrière et de dessous
Touches de fonction
Getting to Know Your Camcorder
FRANÇAIS
Pour vous familiariser avec votre caméscope
ENGLISH
1515
1. LCD open
2. MENU button
(see page 34)
3. MENU selector (MENU
SELECT/VOLUME)
(see page 34)
4. Battery Release button (see
page 99)
5. Function Buttons
6. START/STOP button
7. Power switch
(see page 27)
8. Power indicator
9. Viewfinder (see page 31)
10. RESET (see page 35)
11.TAPE Eject Switch
PLAYER CAMERA
M.PLA Y
(SCD590/D590T only)
(PLAY/STILL) FADE
(see page 65)
S.SHOW
(see page 92)
(STOP) BLC
(see page 64) DELETE (see page 97)
(FF) REC SEARCH
+
(see page 28)
FWD
(see page 92)
(REW) REC SEARCH
_
REV
Rear & Bottom View
Function Buttons
3. MENU selector
(MENU SELECT/VOLUME)
2. MENU button
10. RESET
1. LCD open
8. Power indicator
9.Viewfinder
7. Power switch
6. START/STOP
button
5. Function Buttons
4. Battery Release button
11.TAPE Eject
Switch

ENGLISH FRANÇAIS
Getting to Know Your Camcorder
Pour vous familiariser avec votre caméscope
1616
1. START/STOP
2. PHOTO
3. (STILL)
4. (REW/RPS)
5. (PLAY)
6. AUDIO DUBBING
(see page 66)
7. (STOP)
8. SELF TIMER (CAMERA
mode) (see page 70) /
SLOW (PLAYER mode)
9. (FF/FPS)
10. ZERO MEMORY
(see page 76)
11. Zoom WIDE (CAMERA
mode) / F.ADV ( )
(PLAYER mode)
12. Zoom TELE (CAMERA
mode) / F.ADV ( )
(PLAYER mode)
1. START/STOP
2. PHOTO
3. (STILL)
4. (REW/RPS)
5. (PLAY)
6. A.DUB
7. (STOP)
12. Zoom TELE (CAMERA mode) /
F.ADV( ) (PLAYER mode)
11. Zoom WIDE (CAMERA mode) /
F.ADV( ) (PLAYER mode)
10. ZERO MEMORY
9. (FF/FPS)
8. SELF TIMER (CAMERA mode) /
SLOW (PLAYER mode)
Remote control
1. START/STOP
<DEMARRAGE/ARRET>
2. PHOTO
3. (STILL <ARRET SUR
IMAGE>)
4. (REW/RPS
<RETOUR/RPS>)
5. (PLAY <LECTURE>)
6. AUDIO DUBBING
<DOUBLAGE AUDIO>
(voir page 66)
7. (STOP <ARRET>)
8. SELF TIMER
<RETARDATEUR> (mode
CAMERA) (voir page 70)
/SLOW <RALENTI> (mode
PLAYER <LECTEUR>)
9. (FF/FPS <AVANCE
RAPIDE/FPS>)
10. ZERO MEMORY
<ETAT DE BANDE>
(voir page 76)
11. Zoom WIDE <LARGE>
(mode CAMERA) /
F.ADV( ) (mode
PLAYER <LECTEUR>)
12. Zoom TELE (mode
CAMERA) / F.ADV ( )
(mode PLAYER
<LECTEUR>)
Télécommande
CRM-D3E
1. Niveau de charge de la batterie (voir page 22)
2. Mode Custom <Personnalisé> ou Easy <Facile> (voir pages 61,62)
3. Mode DSE (Digital Special Effects <Effets
spéciaux numériques>) (voir page 48)
4. Program AE <Programme AE> (voir page 42)
5. BLC (Back Light Compensation
<Compensation de contre-jour>) (voir page 64)
6. Mode White Balance <Equilibrage des blancs>
(voir page 44)
7. Mise au point manuelle (voir page 63)
8. Vitesse d’obturateur et EXPOSURE
<EXPOSITION> (voir page 60)
9. Position du zoom (voir page 45)
10. DATE/TIME <DATE/HEURE> (voir page 56)
11. USB
12. REMOCON <TELECOMMANDE>
13. WIND CUT <REDUCTION DES BRUITS DE
FOND> (voir page 55)
14. Mode d’enregistrement audio (voir page 54)
15. Bande restante (mesurée en minutes)
16. Compteur de bande
17. Témoin d’état de bande (voir page 76)
18. Mode de fonctionnement
19. Mode de vitesse d’enregistrement
20. Mode PHOTO
21. Enregistrement automatique et retardateur
(voir page 70)
22. EIS (Stabilisateur d’image électronique)
(voir page 47)
23. NITE PIX (voir page 69)
24. Mode FLASH (voir page 50)
25. Réglage du volume (voir page 33)
26. Canal de lecture audio
27. DV IN <ENTREE VIDEO NUMERIQUE>
(mode de transfert de données vidéo numériques) (voir page 79)
28. DEW <BUEE> (voir page 7)
29. Ligne de message
OSD (On Screen Display <Affichage à l’écran> dans les modes CAMERA et PLAYER <LECTEUR>)
Getting to Know Your Camcorder
FRANÇAIS
Pour vous familiariser avec votre caméscope
ENGLISH
1717
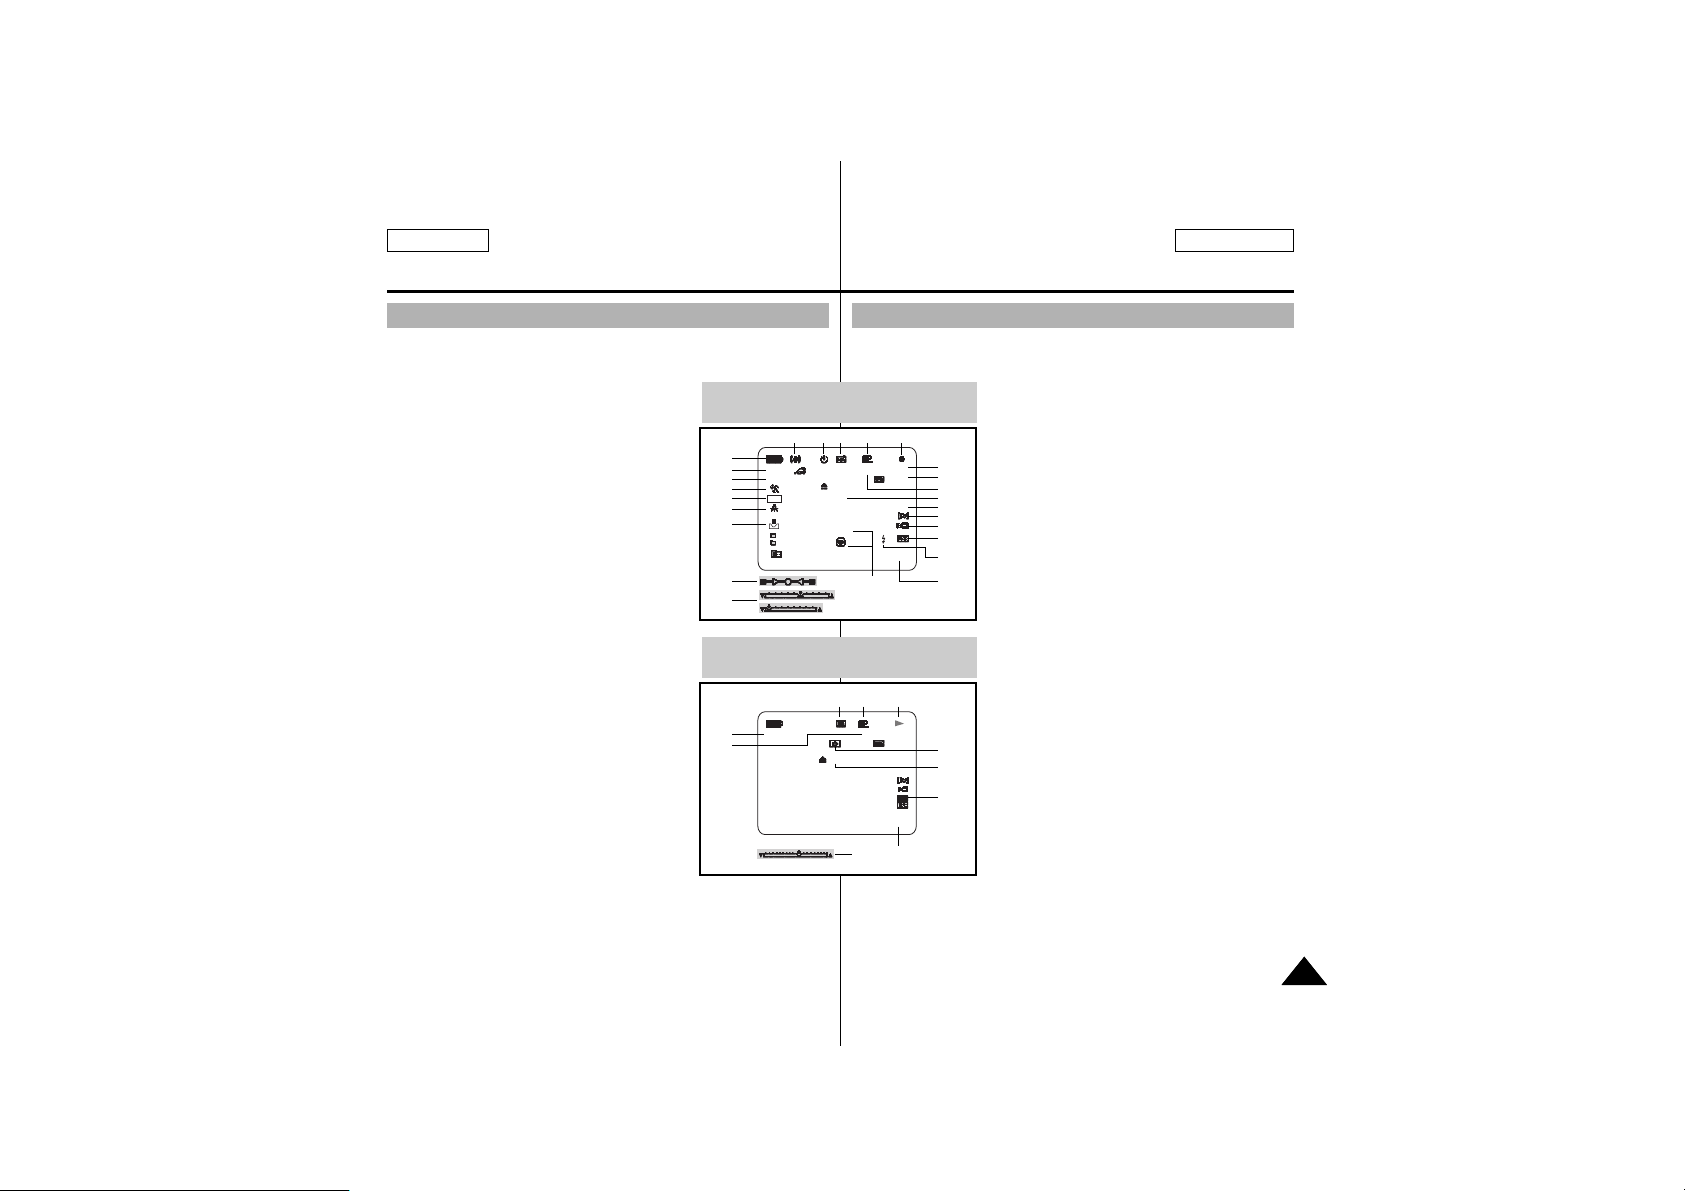
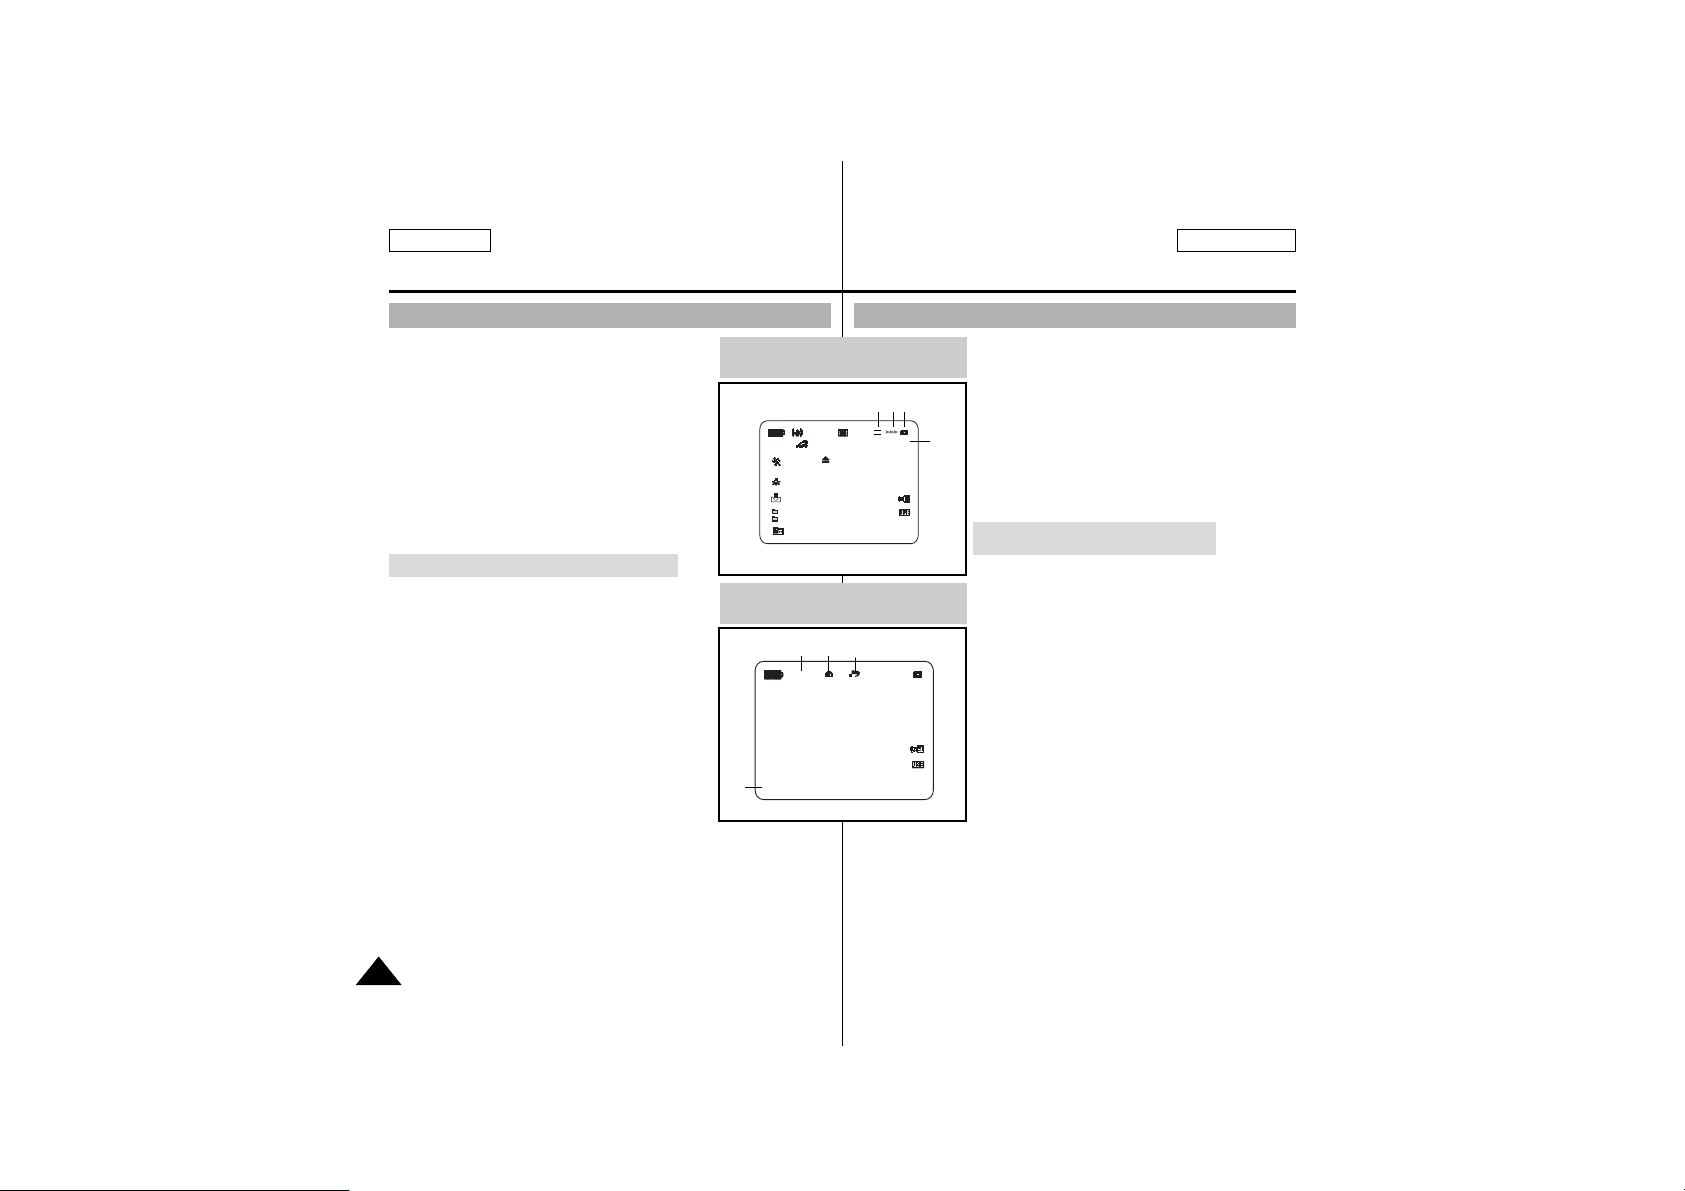
1. Battery level (see page 22)
2. Custom or Easy mode (see pages 61, 62)
3. DSE (Digital Special Effects) mode
(see page 48)
4. Program AE (see page 42)
5. BLC (Back Light Compensation)
(see page 64)
6. White Balance mode (see page 44)
7. Manual focus (see page 63)
8. Shutter speed and EXPOSURE
(see page 60)
9. Zoom position (see page 45)
10. DATE/TIME (see page 56)
11. USB
12. REMOCON
13. WIND CUT (see page 55)
14. Audio recording mode (see page 54)
15. Remaining Tape (measured in minutes)
16. Tape counter
17. Zero memory indicator (see page 76)
18. Operating mode
19. Record speed mode
20. PHOTO mode
21. Self recording and waiting timer
(see page 70)
22. EIS (see page 47)
23. NITE PIX (see page 69)
24. FLASH mode (see page 50)
25. Volume control (see page 33)
26. Audio playback channel
27. DV IN (DV data transfer mode) (see page 79)
28. DEW (see page 7)
29. Message Line
OSD in CAMERA mode
1
2
3
4
5
6
7
9
8
22 21 20 19 18
16
15
17
14
13
12
11
24
10
23
29
OSD (On Screen Display in CAMERA and PLAYER modes)
OSD in PLAYER mode
20 19 18
27
25
10
26
17
28
29
CUSTOM
MIRROR
BLC
SHUTTER
EXPOSURE
VOL. [ 1 1 ]
TAPE !
NITE PIX
ZOOM
SHUTTER
EXPOSURE
REC
M - 0 : 0 0 : 0 0
5 5 min
1 6 bit
10:00 PM
JAN. 1, 2002
. . . C
M - 0 : 0 0 : 0 0 SOUND [ 2 ]
5 5 min
1 6 bit
10:00 PM
JAN. 1, 2002
DV
✤ Ces éléments sont disponibles pour le modèle
SCD590/D590T uniquement.
30. Numéro de répertoire-numéro de fichier (voir page 88)
31. Compteur d’images
- Nombre actuel d’images fixes/Nombre total d’images
fixes enregistrables.
32. Témoin MEMORY STICK
33. Témoin d’enregistrement et de chargement d’images
34. Qualité (voir page 89)
35. Témoin ERASE PROTECTION <PROTECTION
CONTRE L’EFFACEMENT> (voir page 96)
36. Marque d'impression (voir page 95)
37. SLIDE SHOW <DIAPORAMA>
Activation/désactivation de l'OSD
(On Screen Display <Affichage à l'écran>)
✤ Vous pouvez activer/désactiver l’OSD
<AFFICHAGE A L’ECRAN> en réglant la fonction
DISPLAY <AFFICHAGE> du menu.
✤ L’OSD <AFFICHAGE A L’ECRAN> apparaît dans le
viseur et sur l’écran LCD.
✤ Lorsque vous placez l'interrupteur d'alimentation sur la
position CAMERA ou PLAYER <LECTEUR>, l'OSD
<AFFICHAGE A L’ECRAN> est activé automatiquement.
✤ Voir page 57.
●
Activation/désactivation de l’OSD
<AFFICHAGE A L’ECRAN>
- Lorsque vous désactivez l’OSD
<AFFICHAGE A L’ECRAN>,
En mode CAMERA: Les modes STBY <VEILLE>,
REC <ENREGISTREMENT>, EASY.Q et CUSTOM.Q
apparaissent toujours sur l’OSD <AFFICHAGE A
L’ECRAN>, même lorsque celui-ci est désactivé et la touche
d’entrée s’affiche pendant 3 secondes puis disparaît.
En mode PLAYER <LECTEUR>: Lorsque vous appuyez sur des touches telles
que la touche de fonction, relatives au fonctionnement du magnétoscope, la
fonction s’affiche sur l’OSD <AFFICHAGE A L’ECRAN> pendant 3 secondes
avant de disparaître.
●
Activation/désactivation de DATE/TIME <DATE/HEURE>
- La fonction OSD <AFFICHAGE A L’ECRAN> n’a aucun effet sur la fonction
DATE/TIME <DATE/HEURE>.
- Pour activer/désactiver la fonction DATE/TIME <DATE/HEURE>, allez dans
le menu et modifiez le mode DATE/TIME <DATE/HEURE>.(voir page 56)
- Vous pouvez également utiliser le sélecteur Dial Navigator pour activer ou
désactiver le paramètre DATE/TIME <DATE/HEURE>. (uniquement en
mode CAMERA/M. REC <CAMERA/ENREGISTREMENT MEMOIRE>)
OSD (On Screen Display <Affichage à l’écran> en mode M.REC/M.PLAY <ENREGISTREMENT MEMOIRE/LECTURE MEMOIRE>)
ENGLISH FRANÇAIS
Getting to Know Your Camcorder
Pour vous familiariser avec votre caméscope
1818
✤ These items are available on model
SCD590/D590T only.
30. Folder number-file number (see page 88)
31. Image counter
- Current still image/Total number of recordable still
images.
32. MEMORY STICK indicator
33. Image recording and loading indicator
34. Quality (see page 89)
35. ERASE PROTECTION indicator (see page 96)
36. Print Mark(see page 95)
37. SLIDE SHOW
Turning the OSD on/off (On Screen Display)
✤ You can turn the OSD on/off by setting the menu’s
DISPLAY function.
✤ The OSD is displayed in the viewfinder and the
LCD monitor.
✤ When you set the power switch to CAMERA or
PLAYER, the OSD is automatically turned on.
✤ Refer to page 57.
●
Turning OSD on/off
- When you turn the OSD off,
In CAMERA mode:The STBY, REC, EASY.Q and
CUSTOM.Q modes are always displayed on the
OSD, even when the OSD is turned OFF and the
key input is displayed for 3 seconds then turned off.
In PLAYER mode:When you press any Function
button, the function is displayed on the OSD for 3
seconds before it turns off.
●
Turning on/off the DATE/TIME
- The DATE/TIME is not affected when the OSD function is switched
ON or OFF.
- To turn the DATE/TIME on or off, access the menu and change the
DATE/TIME mode. (see page 56)
- You may also use the Dial Navigator to turn the DATE/TIME ON or
OFF.(only in CAMERA / M.REC mode)
OSD in M.REC mode
(SCD590/D590T only)
OSD in M.PLAY mode
(SCD590/D590T only)
34313332
3537
30
36
OSD (On Screen Display in M.REC/M.PLAY modes)
S.Q
MEMORY STICK !
[ 2 2 / 2 4 0 ]
10:00 PM
JAN. 1, 2002
CUSTOM
MIRROR
SHUTTER
EXPOSURE
SLIDE
1 0 0 - 0 0 2 2
0 0 1
[ 2 2 / 2 2 ]
MEMORY STICK !
JAN. 1, 2002
10:00 PM
Deux types d’alimentation peuvent être branchés à votre caméscope.
- L’adaptateur secteur CA et le cordon d’alimentation CA:
utilisés pour l’enregistrement en intérieur.
- Le bloc-batterie: utilisé pour l’enregistrement en extérieur.
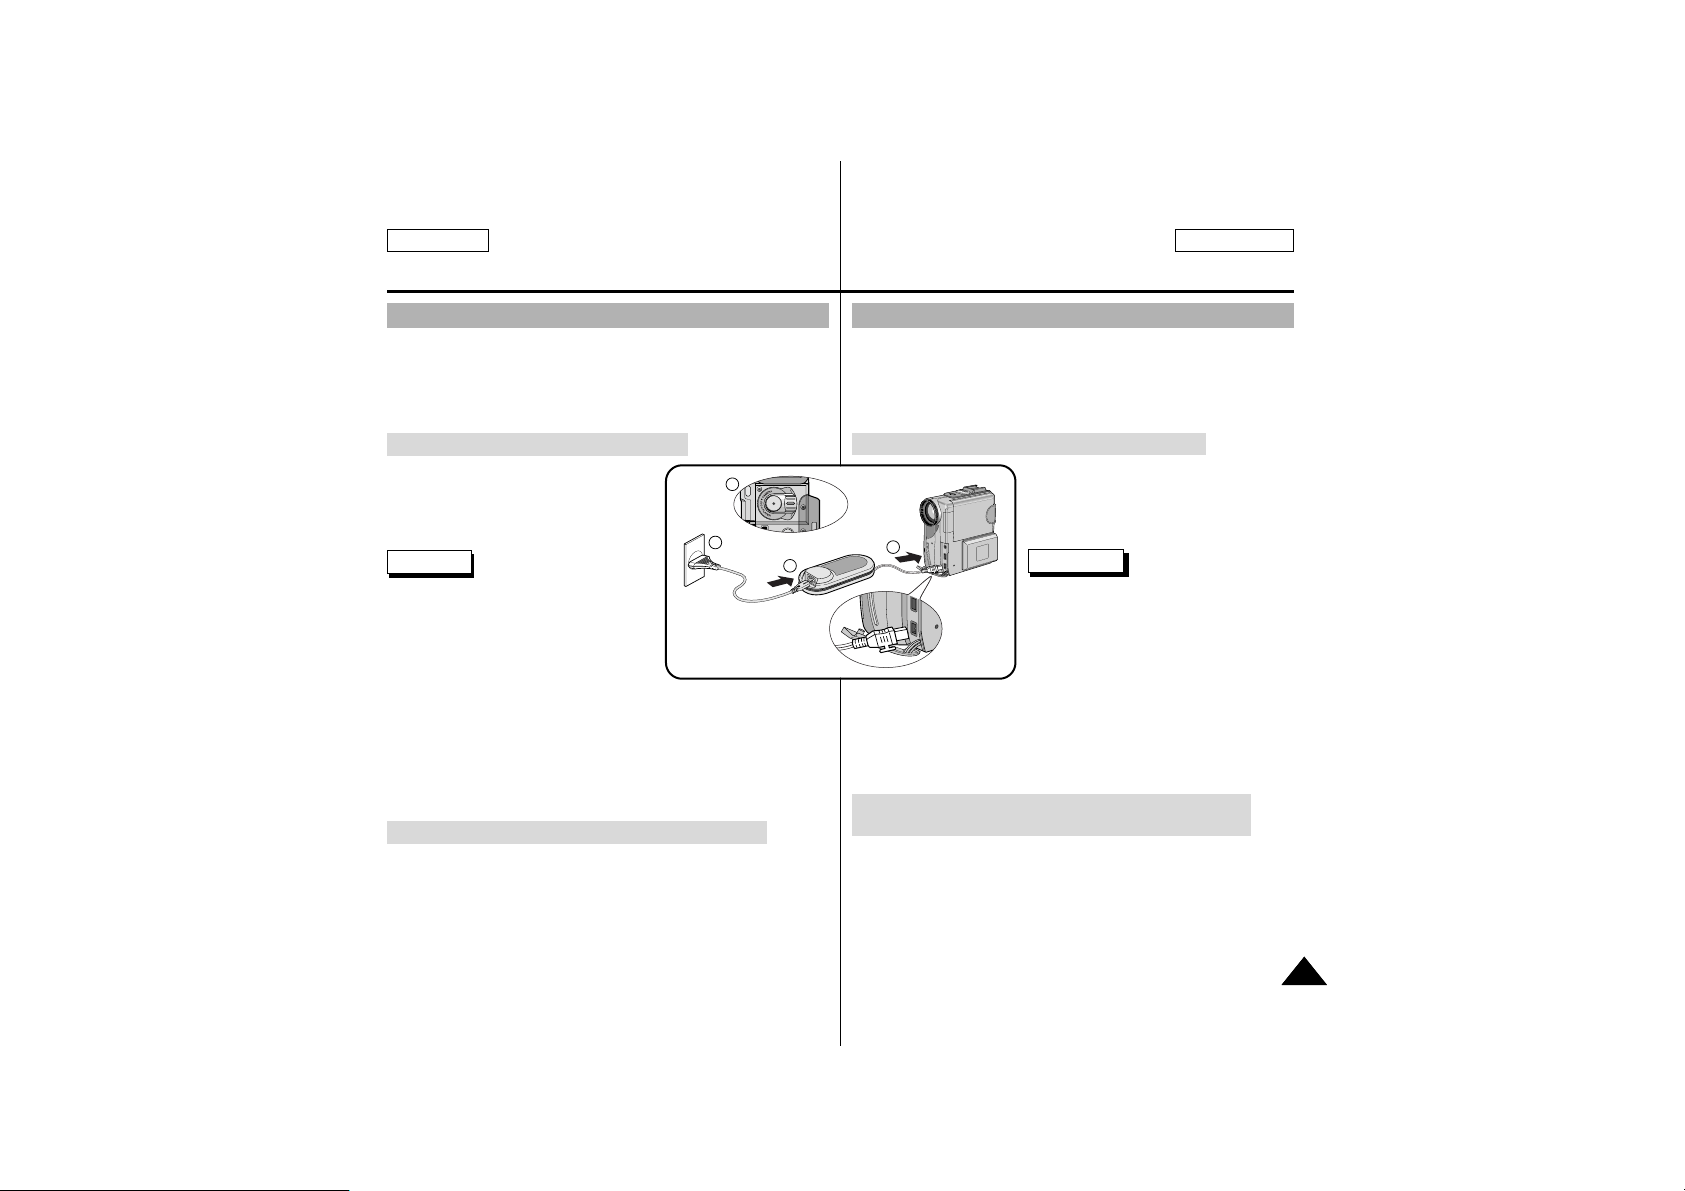
Pour utiliser l’adaptateur secteur CA et le câble CC
1. Raccordez l’adaptateur secteur CA au
cordon d’alimentation CA.
2. Branchez le cordon d’alimentation CA
à une prise murale.
Remarque
■
Le type de fiche et de prise murale
peut varier en fonction du pays où
vous vous trouvez.
3. Raccordez le câble CC à la prise CC
du caméscope.
4. Pour régler le caméscope dans chaque mode, maintenez votre
action sur la languette de l’interrupteur d’alimentation et placez ce
dernier sur le mode CAMERA, PLAYER <LECTEUR>, M.REC
<ENREGISTREMENT MEMOIRE>, M.PLAY <LECTURE
MEMOIRE>.
Pour sélectionner le mode CAMCORDER <CAMESCOPE>
(SCD590/D590T uniquement)
✤
Si vous souhaitez utiliser cet appareil en tant que caméscope,
placez le sélecteur de mode sur la position TAPE
<CASSETTE>. (CAMERA, PLAYER <LECTEUR>)
✤
Si vous souhaitez utiliser ce caméscope en tant que DSC
(Digital Still Camera <Appareil photo numérique>), placez le
sélecteur de mode sur la position MEMORY STICK.(M.REC
<ENREGISTREMENT MEMOIRE>, M.PLAY <LECTURE
MEMOIRE>)
Raccordement à une source d'alimentation
There are two types of power source that can be connected to your
camcorder.
- The AC Power Adapter and AC cord:used for indoor recording.
- The Battery Pack : used for outdoor recording.
To use the AC Power adapter and DC Cable
1. Connect the AC Power adapter to the
AC cord.
2. Connect the AC cord to a wall socket.
Note
■
The plug and wall socket type may
differ according to your resident country.
3. Connect the DC cable to the DC jack
socket of the camcorder.
4. Set the camcorder to each mode by holding down the tab
on the power switch and turning it to the CAMERA, PLAYER,
M.REC, M.PLAY mode.
To select the CAMCORDER mode (SCD590/D590T only)
✤ If you want to use this unit as a camcorder, set the mode
switch to TAPE position. (CAMERA, PLAYER)
✤ If you want to use this unit as a DSC (Digital Still Camera), set
the mode switch to MEMORY STICK position.
(M.REC, M.PLAY)
Connecting a Power Source
FRANÇAIS
Preparation Préparatifs
ENGLISH
1919
Power
Switch
S.S
1
2
3
4
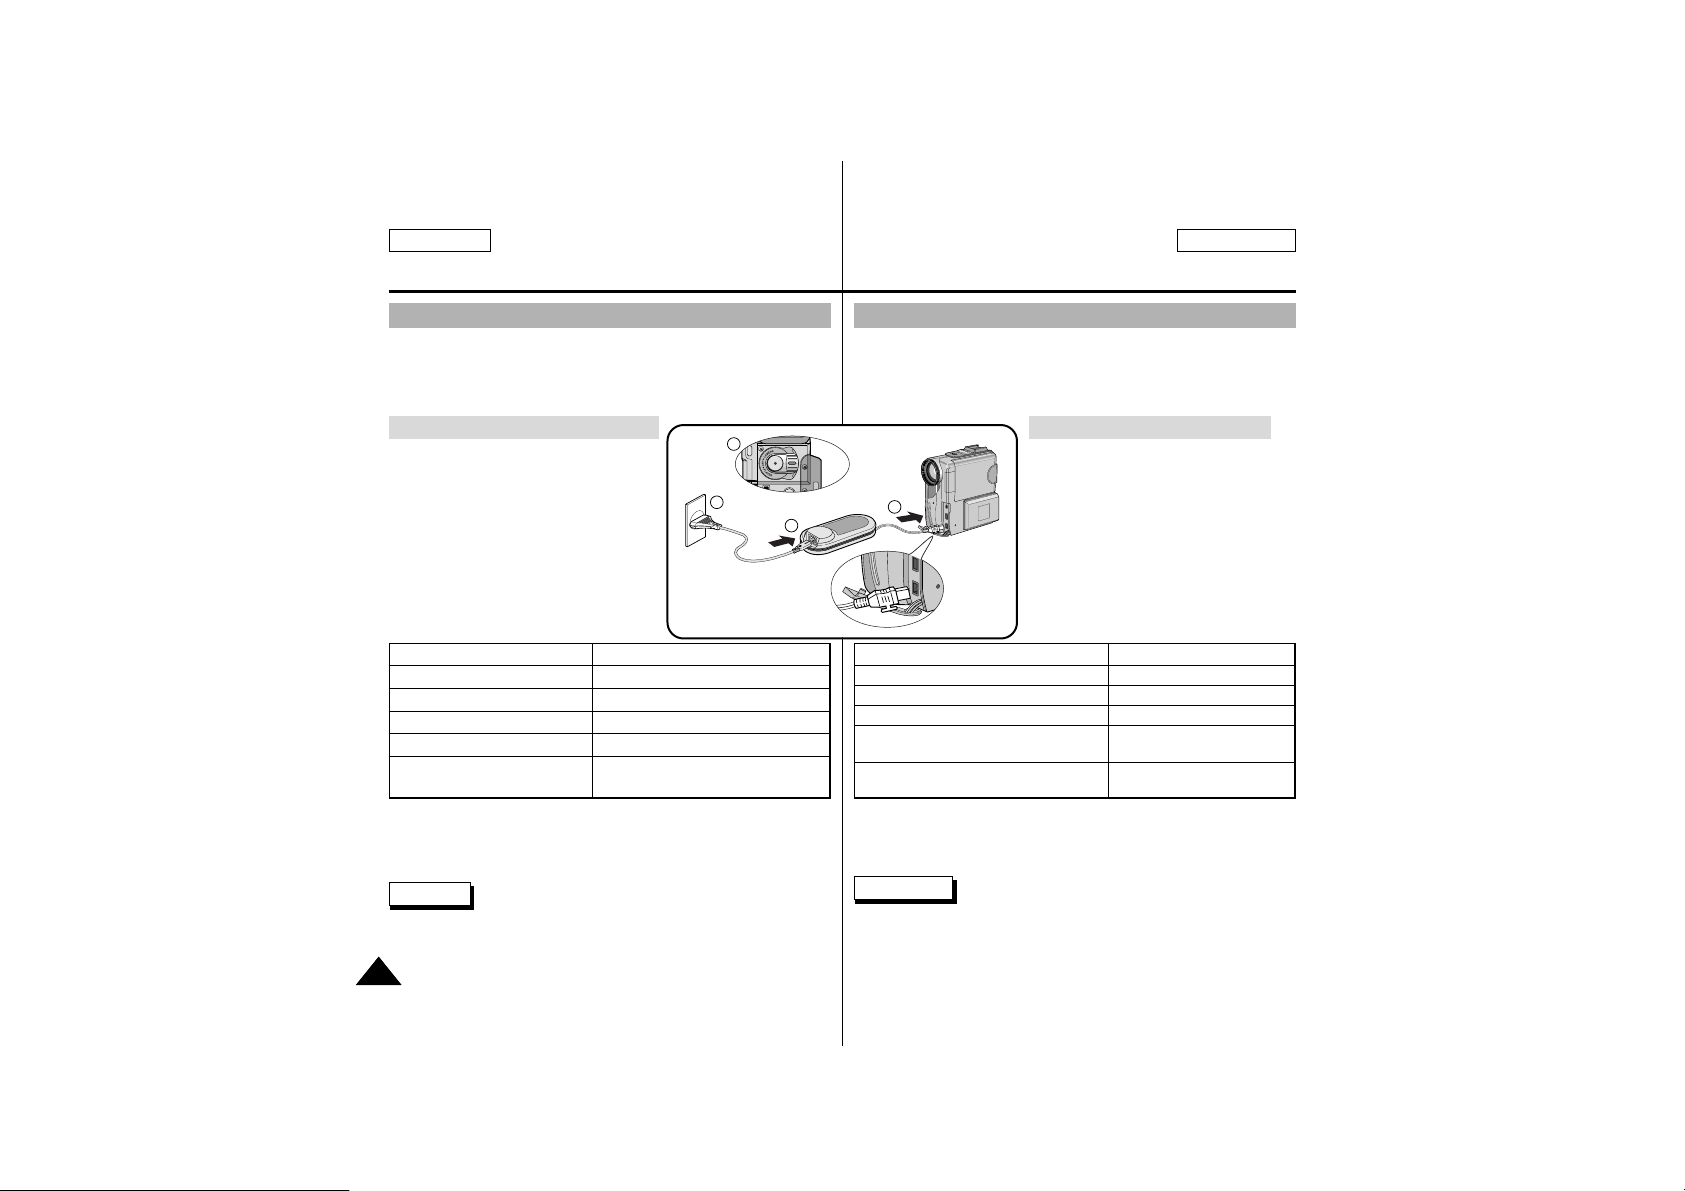
✤
La durée possible d’enregistrement en continu dépend:
- Du type et de la capacité du bloc-batterie utilisé.
- De la fréquence d’utilisation de la fonction Zoom.
Nous vous conseillons d’avoir plusieurs batteries à disposition.
Charge du bloc-batterie au lithium
1. Fixez le bloc-batterie au caméscope.
2. Raccordez l’adaptateur secteur CA à
un cordon CA et branchez ce dernier
à une prise murale.
3. Raccordez le câble CC à la prise CC
du caméscope.
4. Placez l’interrupteur d’alimentation de
la caméra sur arrêt (off), le témoin de
charge se met alors à clignoter pour
indiquer que la batterie est en
charge.
5. Lorsque la batterie est complètement chargée, débranchez la
batterie et l’adaptateur secteur CA du caméscope.
■
Même quand l’alimentation est coupée, la batterie continue de
se décharger si elle reste branchée au caméscope.
Remarques
■
Il se peut que le bloc-batterie soit partiellement chargé au
moment de l’achat.
■
Pour éviter une réduction de la durée et de la capacité du
bloc-batterie, retirez-le systématiquement du caméscope une fois
qu’il est complètement chargé.
Utilisation du bloc-batterie au lithium
Fréquence de clignotement Niveau de charge
Une fois par seconde Inférieur à 50%
Deux fois par seconde 50% ~ 75%
Trois fois par seconde 75% ~ 90%
Le clignotement s’arrête et le témoin 90 ~ 100%
reste allumé
Allumé pendant une seconde et éteint Erreur - Réinstallez la
pendant une seconde batterie et le câble CC
ENGLISH FRANÇAIS
Preparation Préparatifs
2020
✤
The amount of continuous recording time available depends on :
- The type and capacity of the battery pack you are using.
- How often the Zoom function is used.
It is recommended that you have several batteries available.
Charging the Lithium Ion Battery Pack
1. Attach the battery pack to the
camcorder.
2. Connect the AC Power adapter to an
AC cord and
connect the AC cord to a wall socket.
3. Connect the DC cable to the DC jack
socket on the camcorder.
4. Turn the Camera power switch to off,
and the charging indicator will start to
flash, showing that the battery is
charging.
5. When the battery is fully charged, disconnect the battery pack and
the AC Power adapter from the camcorder.
■
Even with the power switched off, the battery will still
discharge if it is left connected to the camcorder.
Notes
■
The battery pack may be charged a little at the time of purchase.
■
To prevent reduction in the life and capacity of the battery pack,
always remove it from the camcorder after it is fully charged.
Blinking time Charging rate
Once per second Less than 50%
Twice per second 50% ~ 75%
Three times per second 75% ~ 90%
Blinking stops and stays on 90 ~ 100%
On for a second and Error - Reset the battery pack and
off for a second the DC cable
OFF
1
2
3
4
S.S
Using the Lithium Ion Battery Pack
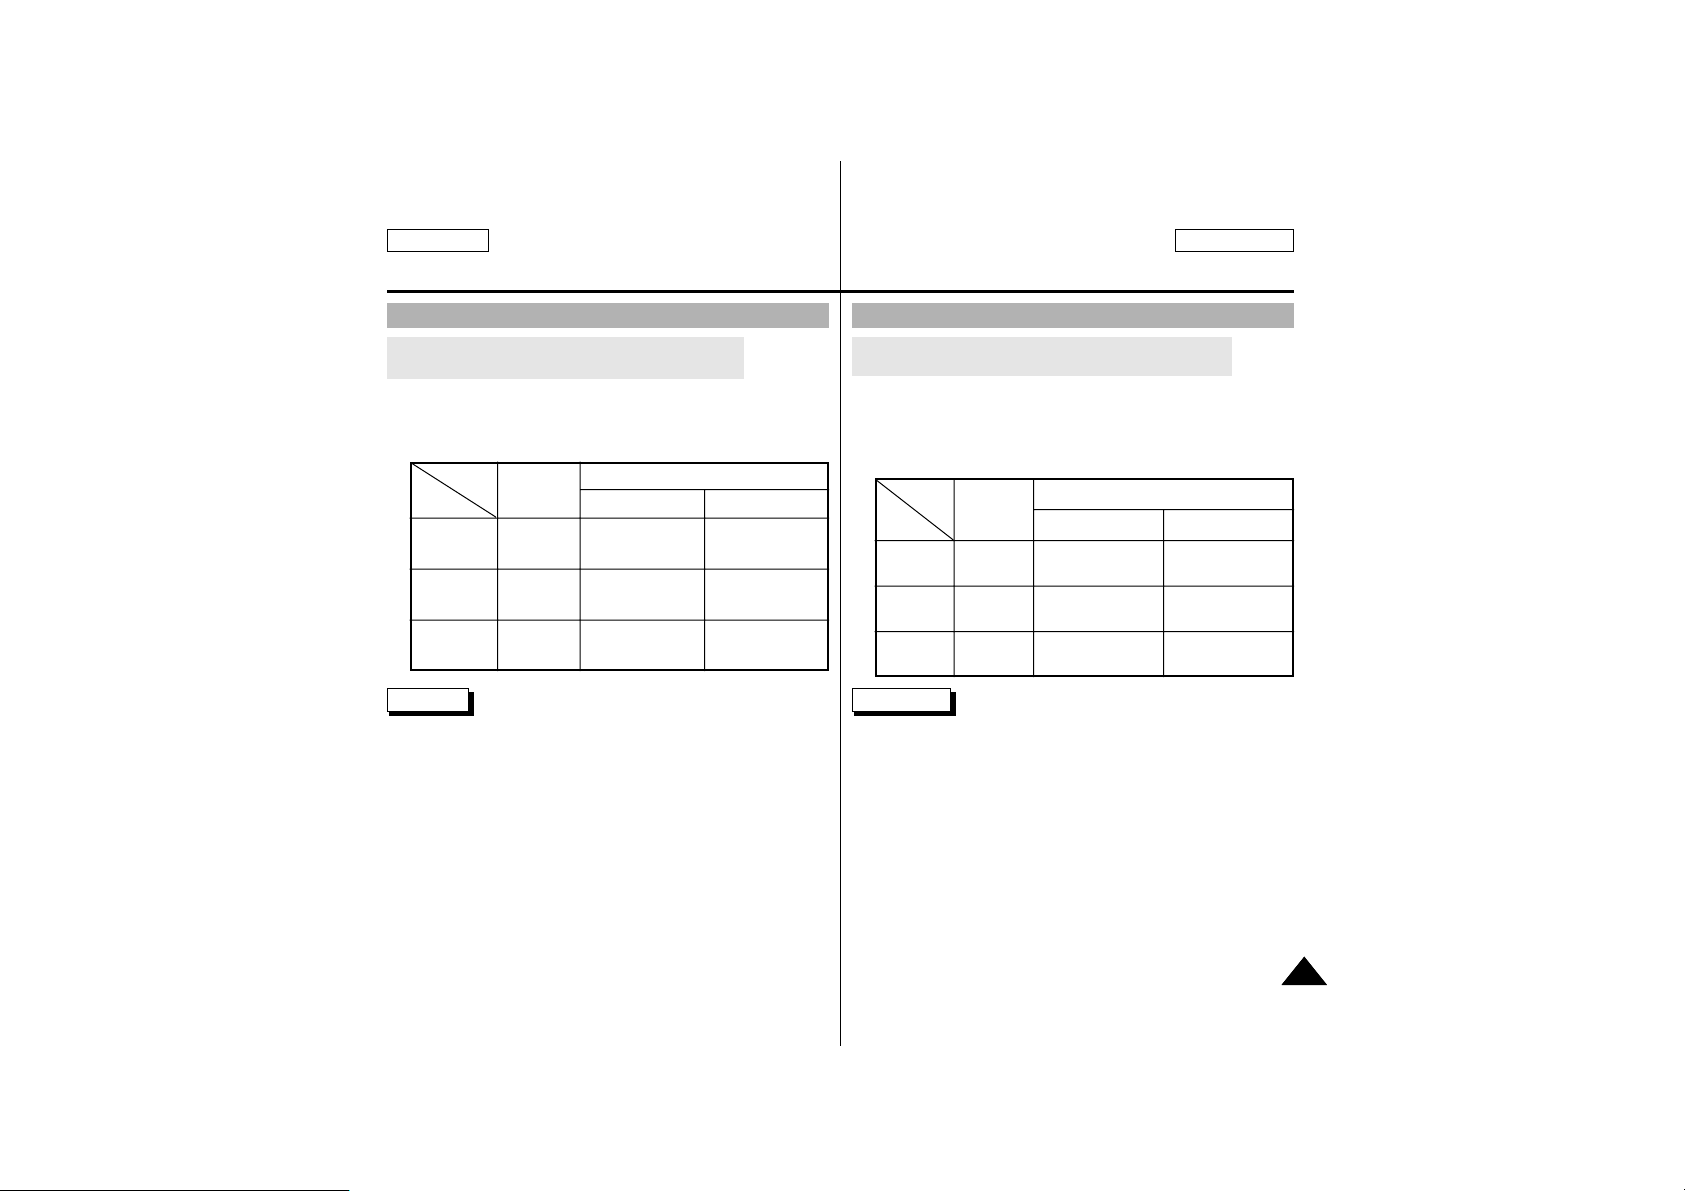
Tableau des durées d’enregistrement en continu suivant le
modèle et le type de batterie.
✤ Si vous fermez l’écran LCD, il s’éteint et le viseur s’allume
automatiquement.
✤ Les durées d'enregistrement en continu indiquées dans le
tableau sont approximatives.
La durée d'enregistrement effective dépend de l'utilisation.
Remarques
■
Le bloc-batterie doit être rechargé à une température ambiante
comprise entre 0°C et 40°C.
■
Le bloc-batterie ne doit jamais être rechargé à une température
ambiante inférieure à 0°C.
■
La durée et la capacité du bloc-batterie se trouvent réduites s’il
est utilisé à des températures inférieures à 0°C ou s’il est exposé
à des températures supérieures à 40°C pendant une longue
période, même s’il est complètement rechargé.
■
Ne laissez pas le bloc-batterie près d'une source de chaleur
(feu ou flammes, par exemple).
■
Vous ne devez en aucun cas démonter, transformer,
comprimer ou chauffer le bloc-batterie.
■
Veillez à ce que les pôles + et - du bloc-batterie ne soient pas en
court-circuit. Il pourrait en résulter une fuite, la production de
chaleur, le déclenchement d'un incendie ou une surchauffe.
Utilisation du bloc-batterie au lithium
Batterie
SB-L70A
SB-L110
SB-L220
Durée de
la charge
environ
1 h 30 mn
environ
1 h 40 mn
environ
3 h 20 mn
Ecran LCD allumé Viseur allumé
Durée d’enregistrement en continu
Durée
environ
1 h
environ
1 h 30mn
environ
3 h 10mn
environ
1 h 30mn
environ
2 h
environ
4 h 10mn
Table of continuous recording time based on model
and battery type.
✤ If you close the LCD screen, it switches off and the CVF
switches on automatically.
✤ The continuous recording times given in the table above are
approximations.Actual recording time depends on usage.
Notes
■
The battery pack should be recharged in an environment of
between 32°F (0°C) and 104°F (40°C).
■
The battery pack should never be charged in a room temperature
that is below 32°F (0°C).
■
The life and capacity of the battery pack will be reduced if it is used
in temperatures below 32°F (0°C) or left in temperatures above
104°F (40°C) for a long period, even when it is fully recharged.
■
Do not put the battery pack near any heat source (fire or flames, for
example).
■
Do not disassemble, process, pressure, or heat the Battery Pack.
■
Do not allow the + and - terminals of the battery pack to be shortcircuited. It may cause leakage, heat generation, induce fire and
overheating.
Battery
SB-L70A
SB-L110
SB-L220
Charging
time
Approx.
1hr 30min
Approx.
1hr 40min
Approx.
3hr 20min
LCD ON CVF ON
Continuous recording time
Time
Approx.
1hr
Approx.
1hr 30min
Approx.
3hr 10min
Approx.
1hr 30min
Approx.
2hr
Approx.
4hr 10min
Using the Lithium Ion Battery Pack
FRANÇAIS
Preparation Préparatifs
ENGLISH
2121

Affichage du niveau de charge de la batterie
•
L’affichage du niveau de charge de la batterie indique la
quantité d’énergie dont dispose le bloc-batterie.
a. Complètement chargé
b. Déchargé entre 20 et 40 %
c. Déchargé entre 40 et 80 %
d. Déchargé entre 80 et 95 %
e. Complètement déchargé (clignote)
(Le caméscope va bientôt s’éteindre, vous
devez remplacer la batterie dès que
possible)
✤ Consultez le tableau de la page 21 pour connaître les durées
approximatives d’enregistrement en continu.
✤ Les conditions et la température ambiantes influent sur la
durée d’enregistrement.
La durée d’enregistrement se trouve considérablement
écourtée dans un milieu froid.
Les durées d’enregistrement en continu figurant dans les
instructions d’utilisation ont été mesurées à l’aide d’un blocbatterie complètement chargé et à une température de 25°C.
Etant donné que la température et les conditions ambiantes
peuvent varier quand vous utilisez effectivement le
caméscope, la durée restante de la batterie peut différer des
durées approximatives d'enregistrement en continu figurant
dans ces instructions.
ENGLISH FRANÇAIS
Preparation Préparatifs
2222
Battery level display
•
The battery level display indicates the amount of power
remaining in the battery pack.
a. Fully charged
b. 20~40% used
c. 40~80% used
d. 80~95% used
e. Completely used (flickers)
(The camcorder will turn off soon,
change the battery as soon as possible)
✤ Please refer to the table on page 21 for approximate
continuous recording times.
✤ The recording time is affected by environmental temperature
and conditions.
The recording time becomes very short in a cold environment.
The continuous recording times in the operating instructions
are measured using a fully charged battery pack at
77°F(25°C). As the environmental temperature and conditions
may differ when you actually use the camcorder, the
remaining battery time may not be the same as the
approximate continuous recording times given in these
instructions.
a
b
c
d
e
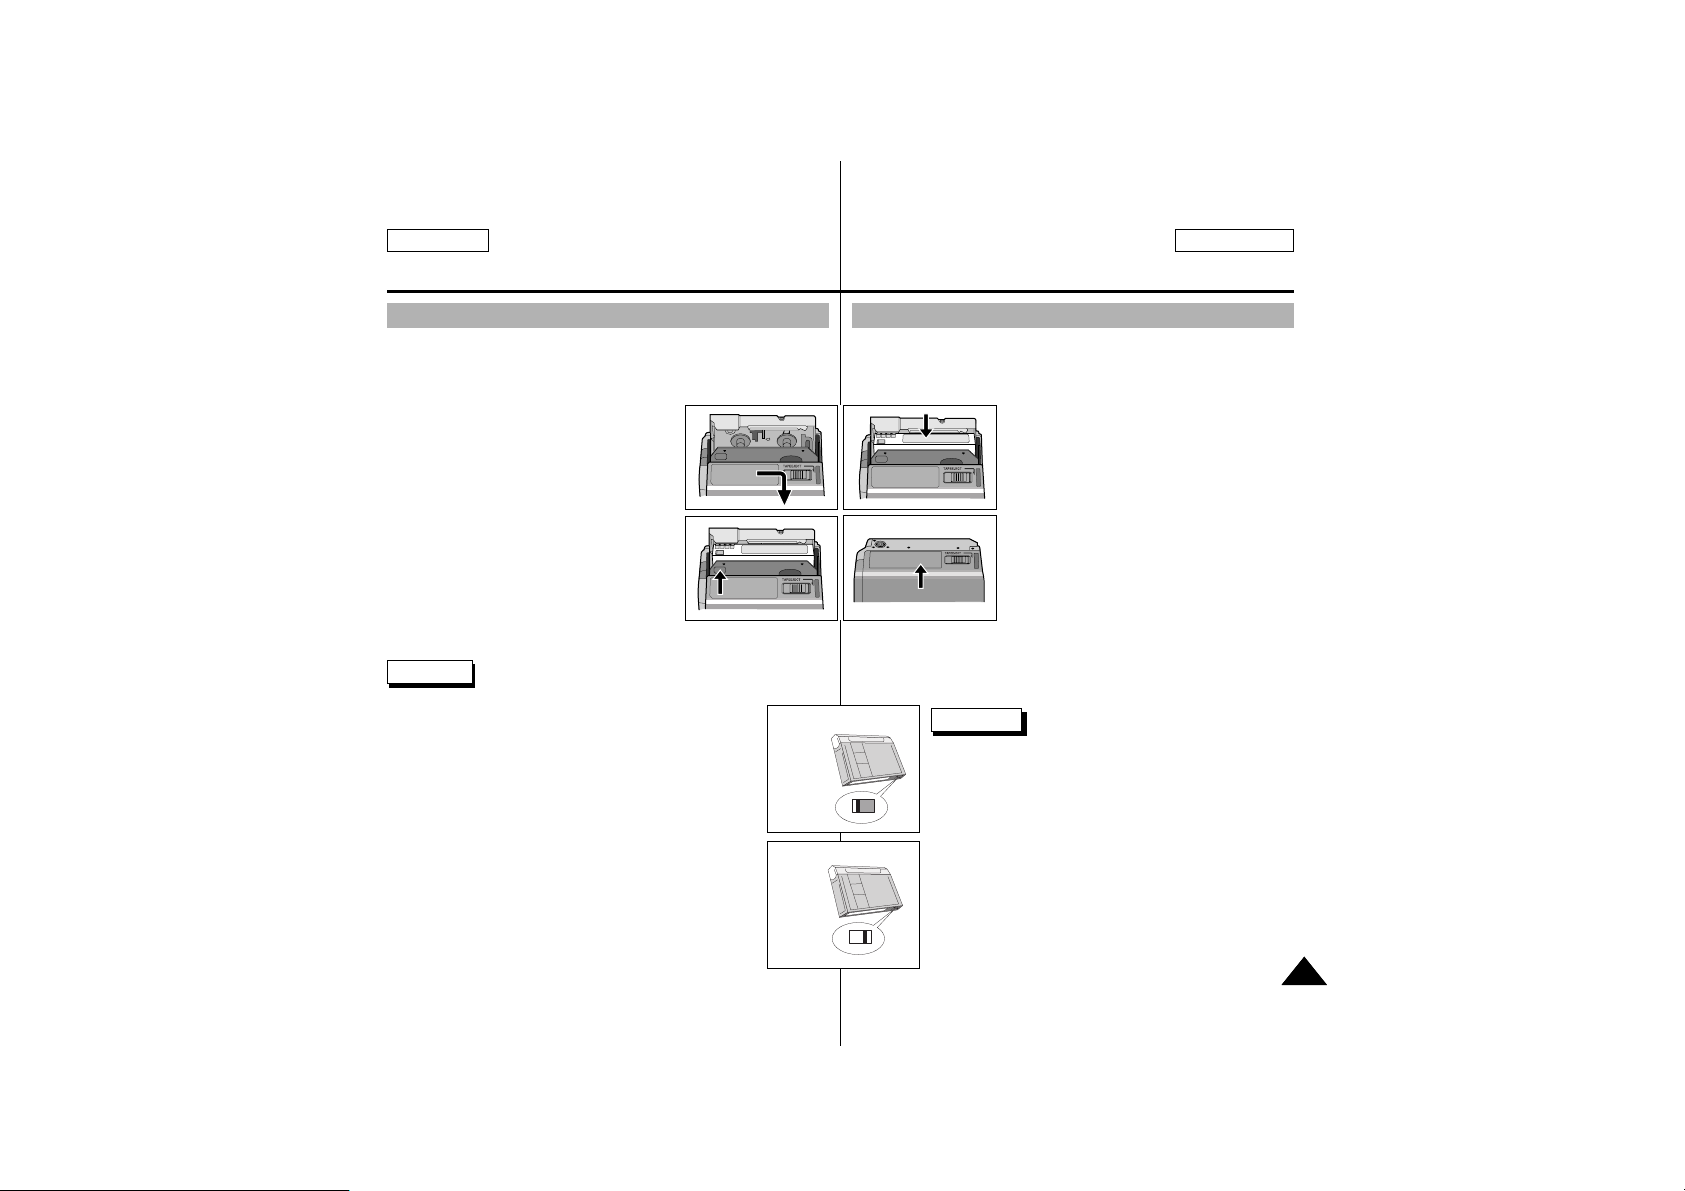
✤ N’exercez pas de pression excessive lorsque vous introduisez une
cassette ou que vous fermez la porte du compartiment.
Il peut en résulter une défaillance.
✤ N’utilisez que des cassettes de type Mini DV.
1. Branchez l’alimentation, poussez le bouton
TAPE EJECT <EJECTION CASSETTE> (situé
sous le caméscope), puis ouvrez la porte du
compartiment cassette.
- Le mécanisme de maintien de la cassette
monte automatiquement.
2. Introduisez une cassette dans le compartiment
en veillant à ce que la fenêtre de la cassette soit
tournée vers l’extérieur et que la languette de
sûreté soit orientée vers le haut.
3. Appuyez sur la zone où il est gravé PUSH
<POUSSER> sur le mécanisme de maintien
de la cassette jusqu’à ce qu’un clic indique
qu’elle est bien en place.
- La cassette se charge automatiquement.
4. Fermez la porte du compartiment cassette.
- Fermez complètement la por te du compartiment jusqu’à entendre un
“clic” à l’intér ieur. Sinon, elle pourrait s’ouvrir en cours de
fonctionnement et causer une panne.
Remarque
■
Lorsque vous souhaitez conserver un enregistrement,
vous pouvez le protéger de sorte qu’il ne soit pas effacé
accidentellement.
a. Protection d’une cassette:
Poussez la languette de protection de la cassette de sorte
que l'orifice soit visible.
b. Retrait de la protection d’une cassette:
Si vous ne souhaitez pas conserver un enregistrement sur
une cassette, poussez la languette de protection en
écriture de sorte qu’elle recouvre l’or ifice.
• Pour conserver une cassette
a. Tenez-la à l’écart des aimants et autres sources magnétiques.
b. Evitez les endroits poussiéreux et humides.
c. Veillez à la conserver en position verticale, à l'écart de la
lumière directe du soleil.
d. Evitez de la faire tomber ou de lui faire subir des chocs.
Introduction et éjection d’une cassette
✤ When inser ting a tape or closing a cassette holder, do not apply
excessive force.This may cause a malfunction.
✤ Do not use any tapes other than Mini DV CASSETTES.
1. Connect a power source and slide the TAPE
EJECT switch (on the bottom of the
camcorder) and open the cassette door.
- The cassette holding mechanism rises
automatically.
2. Insert a tape into the holder with the tape
window facing outward and the protection tab
toward the top.
3. Press the area labelled PUSH on the
cassette holding mechanism until it clicks
into place.
- The cassette is loaded automatically.
4. Close the cassette door.
- Close the door completely until you can hear a “click”.
Note
■
When you have recorded something that you wish to keep,
you can protect it so that it will not be accidentally erased.
a. Protecting a tape :
Push the safety tab on the cassette so that the hole is
uncovered.
b. Removing the tape protection :
If you no longer wish to keep the recording on the cassette,
push the write-protect tab back so that
it covers the hole.
• How to keep a tape
a. Avoid places with magnets or magnetic interference.
b. Avoid humidity and dust prone places.
c. Keep the tape in an upright position and avoid storing it in
direct sunlight.
d. Avoid dropping or knocking your tapes.
1
3
2
4
a. SAVE
push
b. REC
Inserting and Ejecting a Cassette
FRANÇAIS
Preparation Préparatifs
ENGLISH
2323
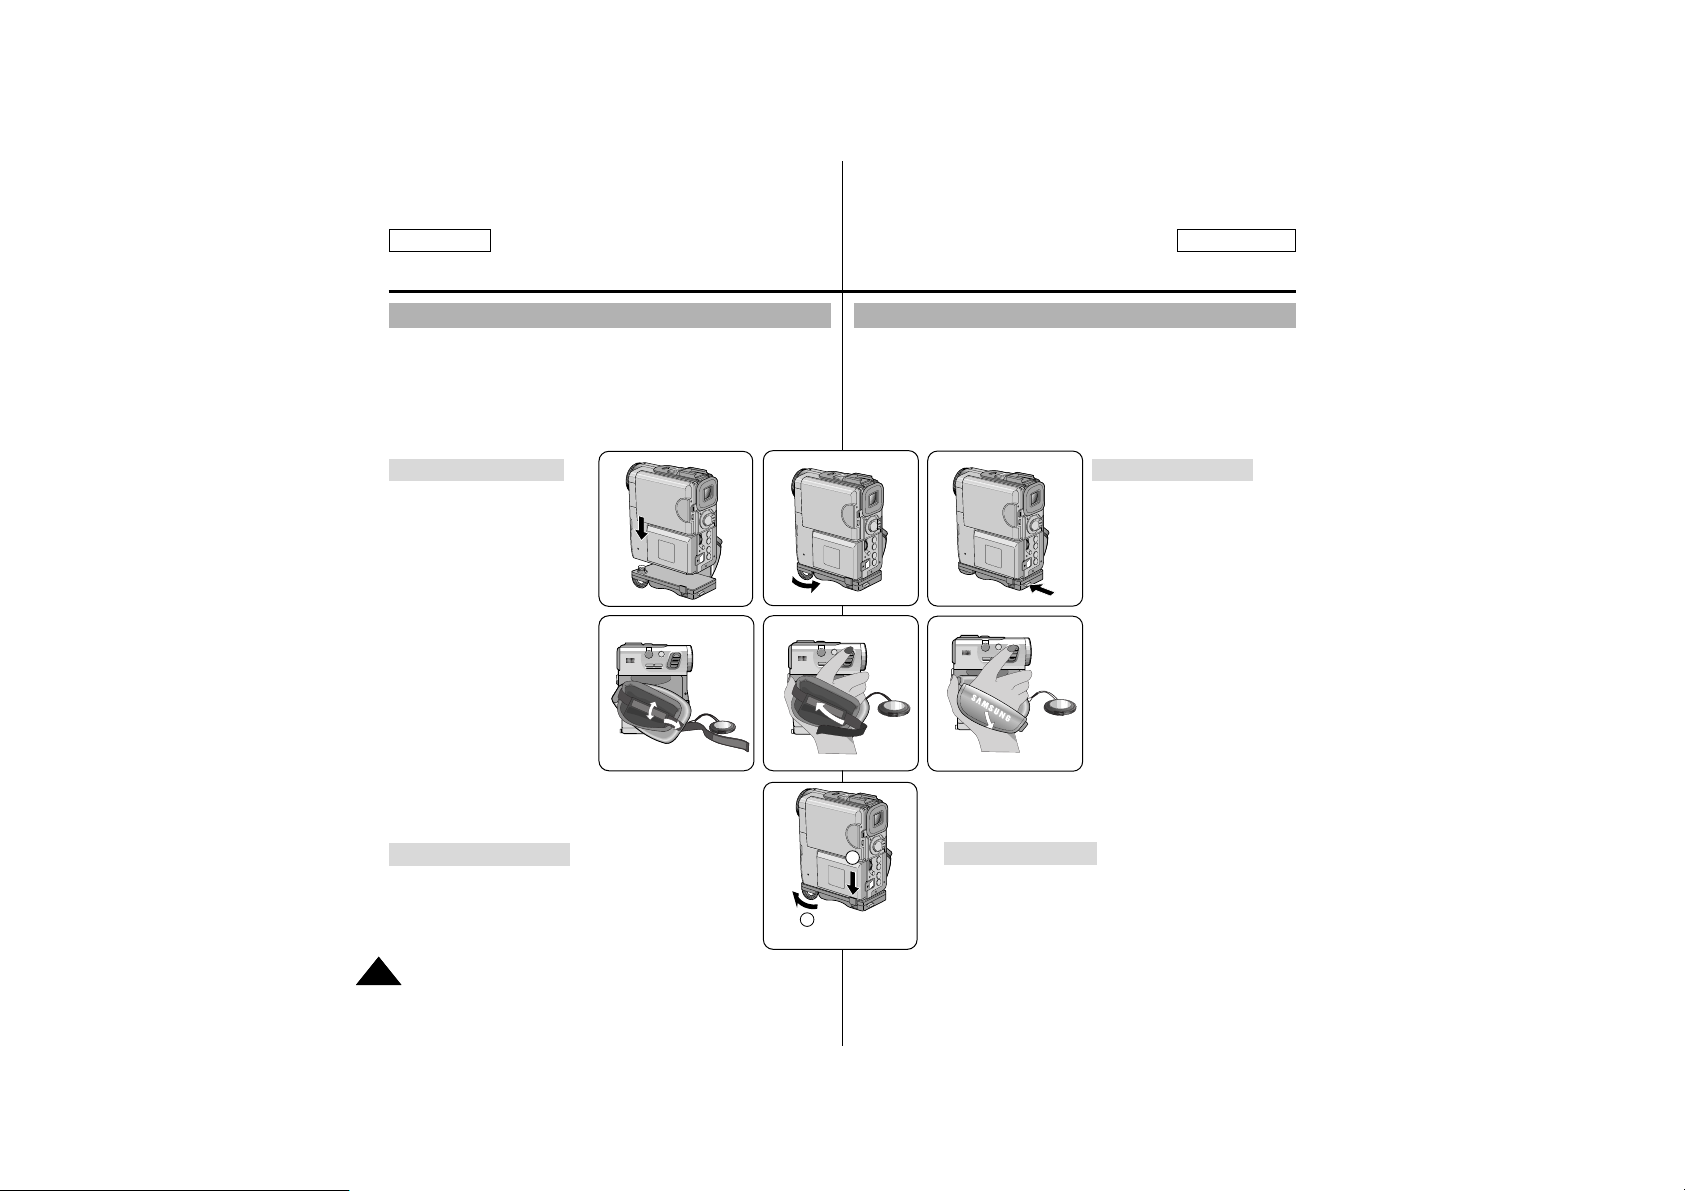
Il est très important de vérifier que la poignée est réglée correctement
avant de commencer un enregistrement.
La poignée permet de :
- Maintenir le caméscope dans une position stable et confortable.
- Appuyer sur les boutons Zoom et START/STOP
<DEPART/ARRET> sans devoir changer la position de votre main.
Fixation de la poignée
1. Mettez le caméscope sur la
poignée.
2. Placez la vis dans le trou de
la poignée (trépied) et serrez
la vis.
■
Après le serrage de la vis,
couchez l’anneau de la
vis pour le verrouillage.
3. Pour fixer solidement le
caméscope à la poignée,
appuyez sur le bouton
support.
■
Vérifiez que le caméscope
est fixé solidement.
4. Ouvrez le cache de la
dragonne et libérez la
dragonne.
5. Réglez sa longueur et replacez-la sous le cache.
6. Refermez le cache.
Retrait de la poignée
1. Appuyez vers le bas sur le levier du support pour
libérer ce dernier.
2. Desserrez la vis qui réunit le caméscope et la
poignée.
3. Retirez la poignée.
Réglage de la poignée
FRANÇAIS
Préparatifs
ENGLISH
2424
Preparation
It is very important to ensure that the Hand Grip has been correctly
adjusted before you begin your recording.
The hand grip enables you to :
- Hold the camcorder in a stable, comfortable position.
- Press the Zoom and START/STOP button without having to
change the position of your hand.
Attaching the Hand Grip
1. Put the camcorder on the
Hand Grip.
2. Put the screw in the Hand
Grip (Tripod) hole, and fasten
the screw.
■
After fastening the screw,
lay the screw lever for the
locking.
3. To firmly attach the
camcorder to the Hand Grip,
push the holder button.
■
Please confirm that the
camcorder is firmly fixed.
4. Pull open the Hand Strap
cover and release the Hand
Strap.
5. Adjust its length and stick it
back onto the Hand Strap cover.
6. Close the Hand Strap cover again.
Removing the Hand Grip
1. Press the holder lever down to release the holder.
2. Loosen the screw holding the camcorder to the
Hand Grip.
3. Remove the Hand Grip.
1
2
1
SAMSUNG
SAMSUNG
SAMSUNG
SAMSUNG
SAMSUNG
SAMSUNG
SAMSUNG
SAMSUNG
SAMSUNG
SAMSUNG
SAMSUNG
SAMSUNG
SAMSUNG
SAMSUNG
SAMSUNG
SAMSUNG
456
23
Adjusting the Hand Grip
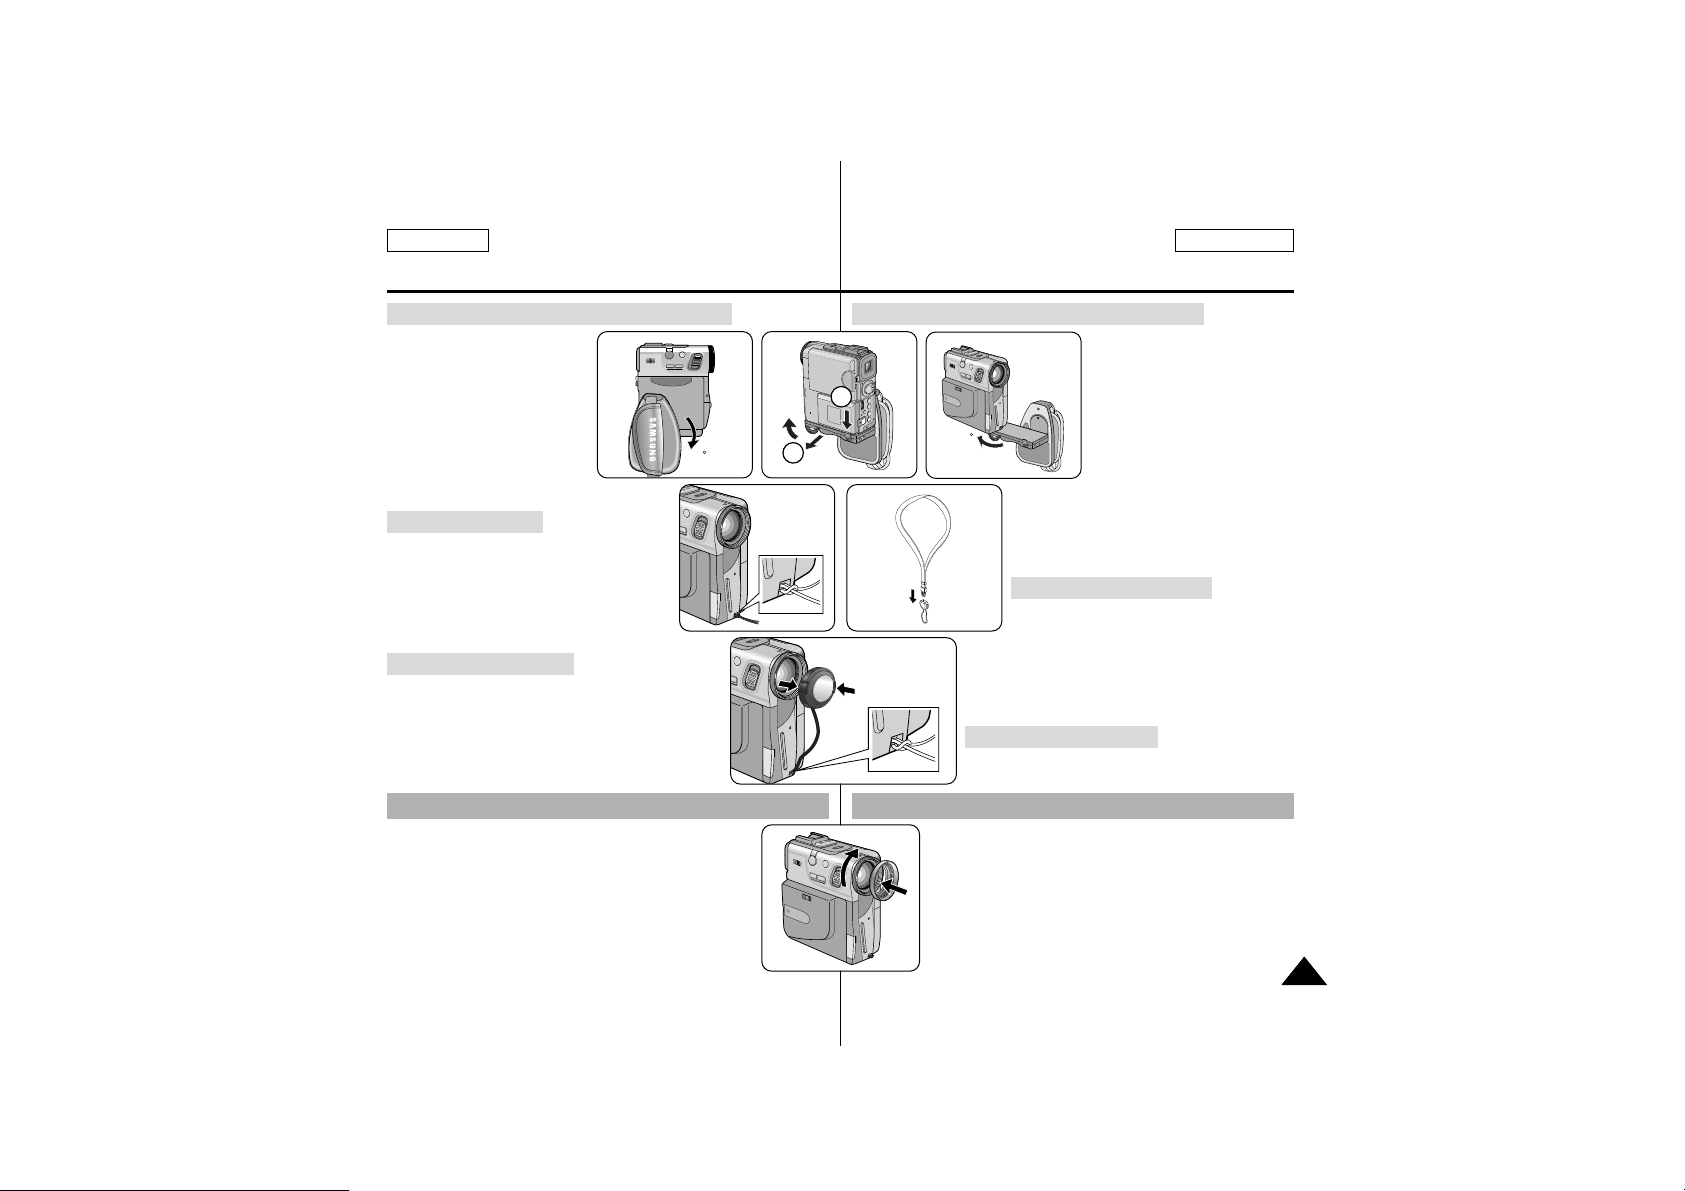
Ejection de la cassette quand la poignée est fixée
1. Tournez le cache de la
poignée vers le bas.
2. Appuyez vers le bas sur le
levier du support pour
libérer ce dernier.
3. Relevez l’anneau de la vis
pour le déverrouillage et
desserrez un peu la vis.
4. Tournez le caméscope dans
le sens de la flèche.
5. Poussez le bouton TAPE EJECT
<EJECTION CASSETTE> et ouvrez la
porte du compartiment cassette.
Utilisation de la bandoulière
✤ Pour une sécurité et une facilité de
transport accrues, fixez la bandoulière
avant d’utiliser le caméscope.
✤ Vérifiez que la bandoulière est correctement
fixée au caméscope avant de l’utiliser pour
porter le caméscope.
Fixation du couvre-objectif
✤ Le capuchon arrête les lumières parasites
susceptibles d’entraîner des images résiduelles et
des images parasites et protège l’objectif, vérifiez
par conséquent que le capuchon est fixé lorsque
vous enregistrez.
✤ Vérifiez que le capuchon est fixé horizontalement.
Fixation du capuchon
FRANÇAIS
Preparation Préparatifs
ENGLISH
2525
Ejecting the tape when the Hand Grip is attached
1. Turn the Grip Cover down.
2. Press the holder lever down
to release the holder.
3. Stand the screw lever for the
unlocking, and loose the
screw a little.
4. Turn the camcorder in the
direction of the arrow.
5. Slide the TAPE EJECT
switch and open the cassette door.
Using the Neck Strap
✤ For extra security and portability, attach
the Neck Strap
before using the camcorder.
✤ Be sure to test the strap to check that it is
properly attached
before using it to carry the camcorder.
Attaching the Lens Cover
✤ Since the ring hood cuts stray light that may cause
flare and ghost images and protects the lens,
be sure to attach the hood when you are recording.
✤ Make sure attach the hood to the camcorder
horizontally.
90
2
3
180
14
Attaching the Ring Hood
SAMSUNG
SAMSUNG
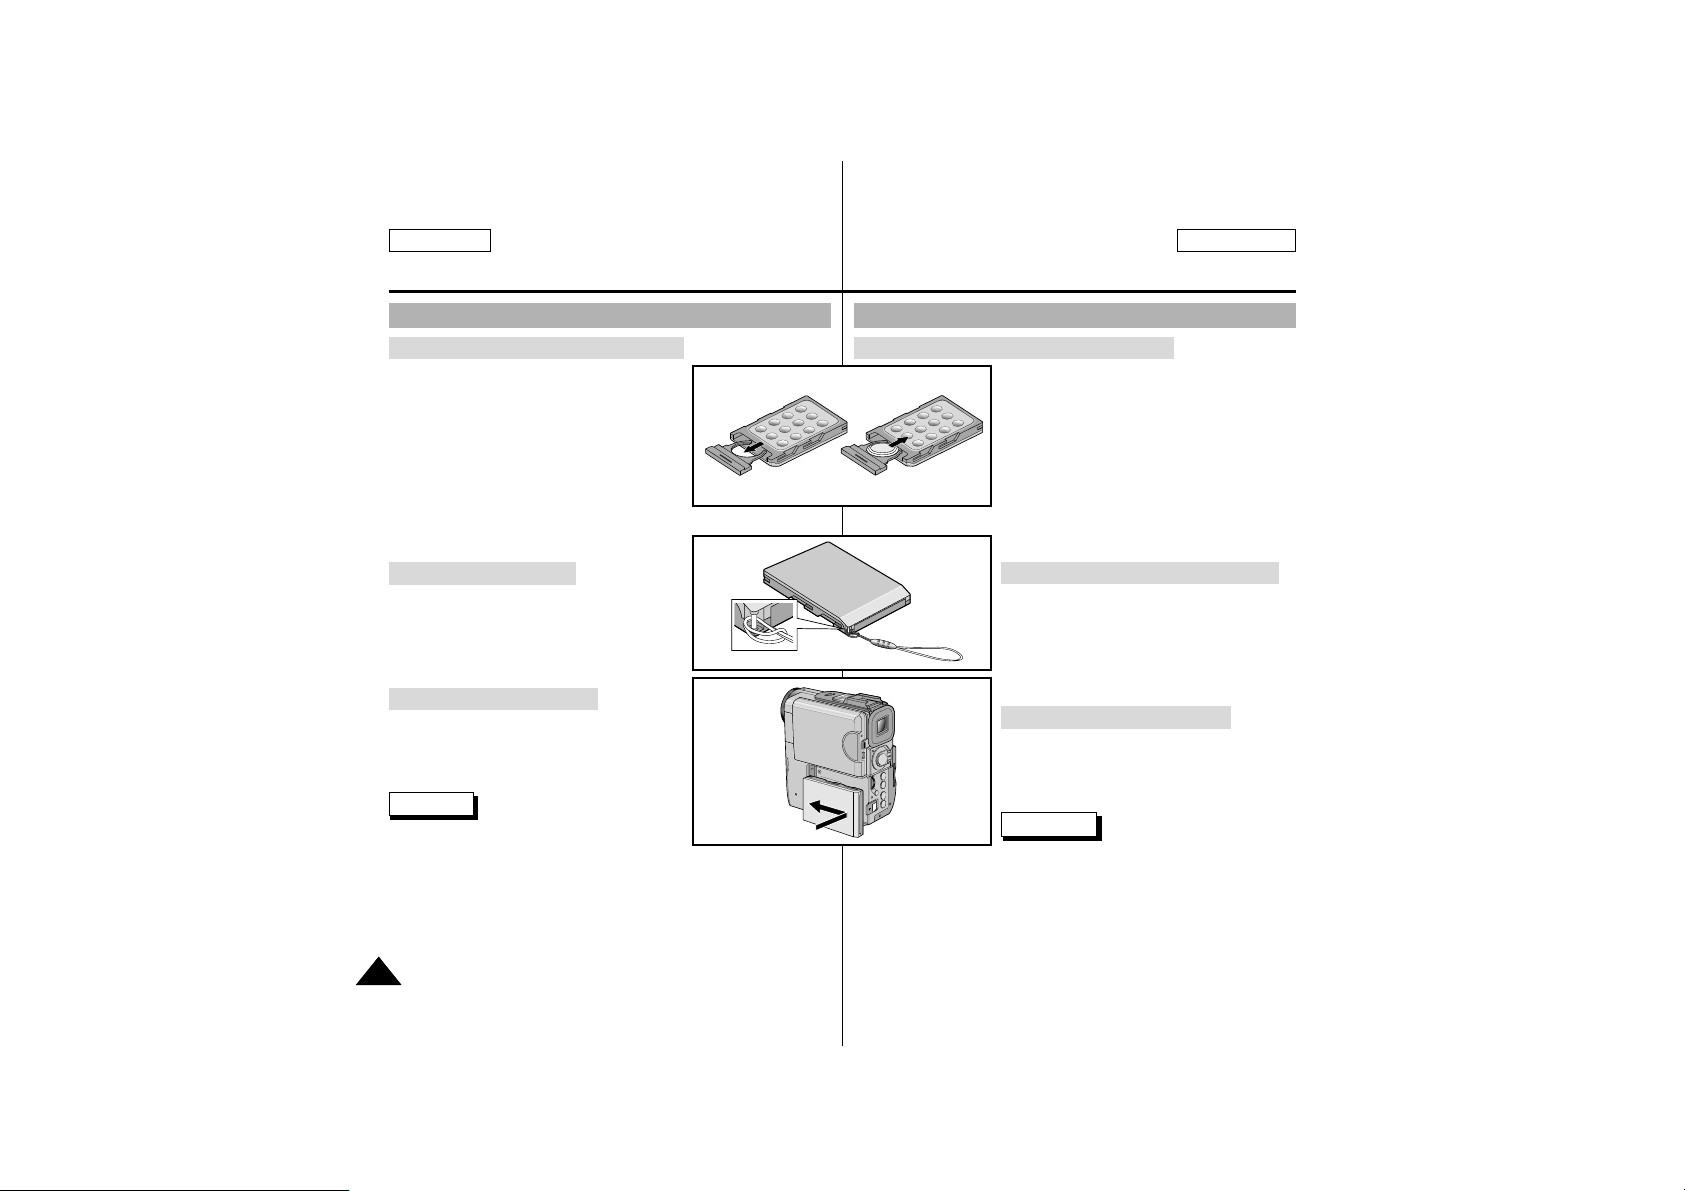
Installation de la batterie de la télécommande
✤ Vous devez insérer ou remplacer la
batterie au lithium si :
- Vous venez d’acheter le caméscope.
- La télécommande ne fonctionne pas.
✤ Vérifiez que vous avez inséré la batterie
au lithium correctement, en respectant les
indications + et –.
✤ Attention de ne pas inverser la polarité de
la batterie.
Utilisation du cordon de télécommande
✤ La télécommande comporte un
cordon pratique.
Rangement de la télécommande
✤ Vous pouvez fixer la télécommande
sur le caméscope dans le but de ne
pas l’égarer.
Remarque
■
Lorsque l’adaptateur secteur CA est relié
au caméscope, ne fixez pas la
télécommande sur le caméscope.
■
Ne maniez pas votre caméscope par le
cordon de la télécommande lorsque
celle-ci est fixée sur le caméscope.
Utilisation de la télécommande
ENGLISH FRANÇAIS
Preparation Préparatifs
2626
Battery Installation for the Remote Control
✤ You need to insert or replace the lithium
battery when :
- You purchase the camcorder.
- The remote control doesn’t work.
✤ Ensure that you insert the lithium cell
correctly,
following the + and – markings.
✤ Be careful not to reverse the polarity of
the battery.
Using the Remocon Strap
✤ The Remote comes with a
convenient strap.
Attaching the Remote Control
✤ You can attach the Remote Control
to the camcorder so it is not
misplaced.
Note
■
When the AC power adapter is connected
to the camcorder, do not attach the Remote
Control to the camcorder.
■
When the Remote Control is attached the camcorder,
do not pick up the camcorder from the Remocon Strap.
How to use the Remote Control
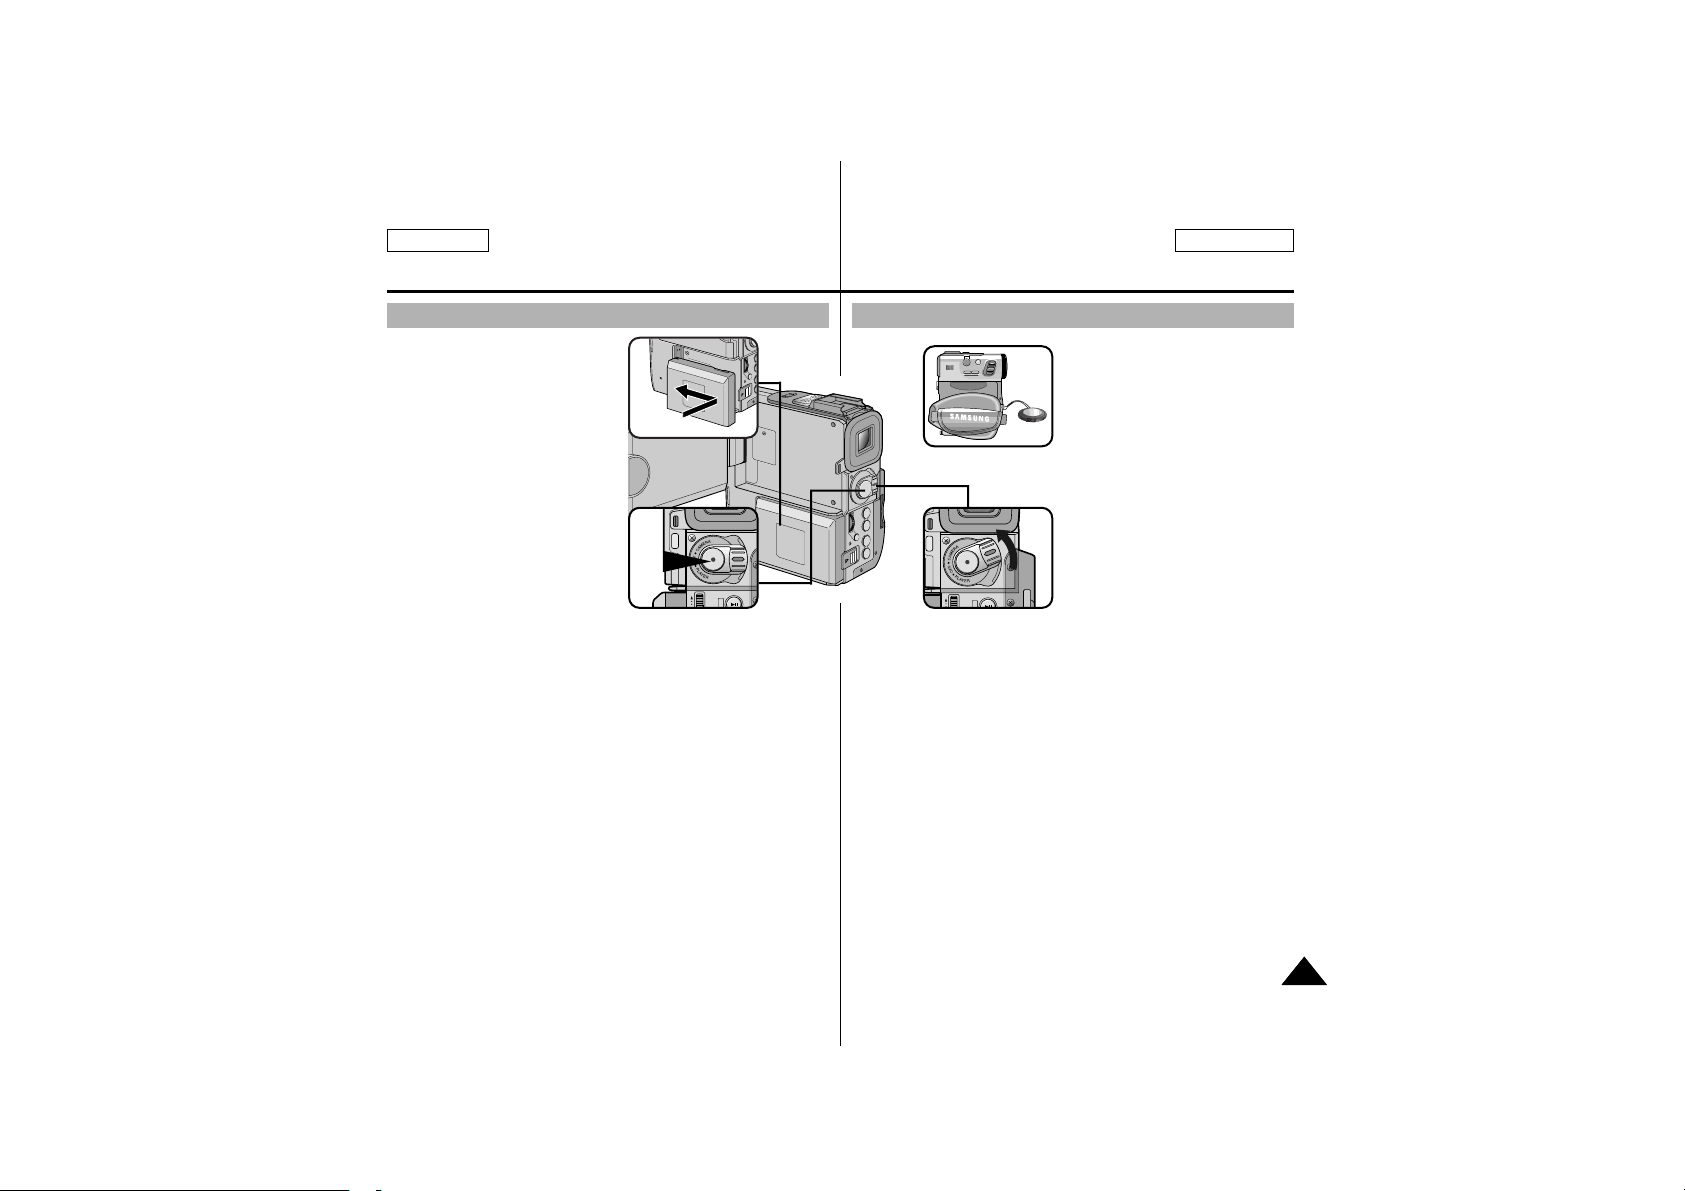
1. Branchez une source
d'alimentation au caméscope.
(voir page 19)
(Bloc-batterie ou adaptateur
secteur CA)
■
Introduisez une cassette.
(voir page 23)
2. Retirez le protège-objectif et
accrochez-le à la poignée.
3. Placez l’interr upteur
d’alimentation en position
CAMERA.
■
Ouvrez l’écran LCD et
vérifiez que STBY
<VEILLE> est affiché.
■
Le témoin rouge d’alimentation du caméscope s’allume.
■
Le bip de confirmation retentit.
■
Si la languette de protection de la cassette est ouverte,
le message STOP and PROTECTION <ARRET et
PROTECTION> s’affiche.
■
Vérifiez que l’image que vous voulez enregistrer apparaît sur
l’écran LCD ou dans le viseur.
■
Vérifiez que le niveau de charge de la batterie est suffisant
pour le temps d’enregistrement prévu.
4. Pour démarrer l’enregistrement, appuyez sur le bouton
START/STOP <DEPART/ARRET>.
■
Le message REC <ENREGISTREMENT> s'affiche sur l’écran
LCD.
Pour arrêter l’enregistrement, appuyez de nouveau sur le
bouton START/STOP <DEPART/ARRET>.
■
Le message STBY <VEILLE> s'affiche sur l’écran LCD.
Votre premier enregistrement
Basic Recording
FRANÇAIS
Enregistrement de base
ENGLISH
2727
1. Connect a Power source to the
camcorder.(see page 19)
(A battery pack or a AC power
adapter)
■
Insert a cassette.
(see page 23)
2. Remove the LENS COVER and
hook it onto the hand grip.
3. Set the power switch to the
CAMERA position.
■
Open the LCD monitor and
make sure that STBY is
displayed.
■
The camcorder power indicator lights up red.
■
The confirmation beep sounds.
■
If the protection tab of the cassette is open,
STOP and PROTECTION! will be displayed.
■
Make sure the image you want to record appears
in the LCD monitor or viewfinder.
■
Make sure the battery level indicates that there is enough
remaining power for your expected recording time.
4. To start recording, press the START/STOP button.
■
REC is displayed in the LCD.
To stop recording, press the START/STOP button again.
■
STBY is displayed in the LCD.
FAD
S.SHO
SAMSUNG
SAMSUNG
SAMSUNG
SAMSUNG
S.SH
FAD
4
3
2
1
Making your First Recording
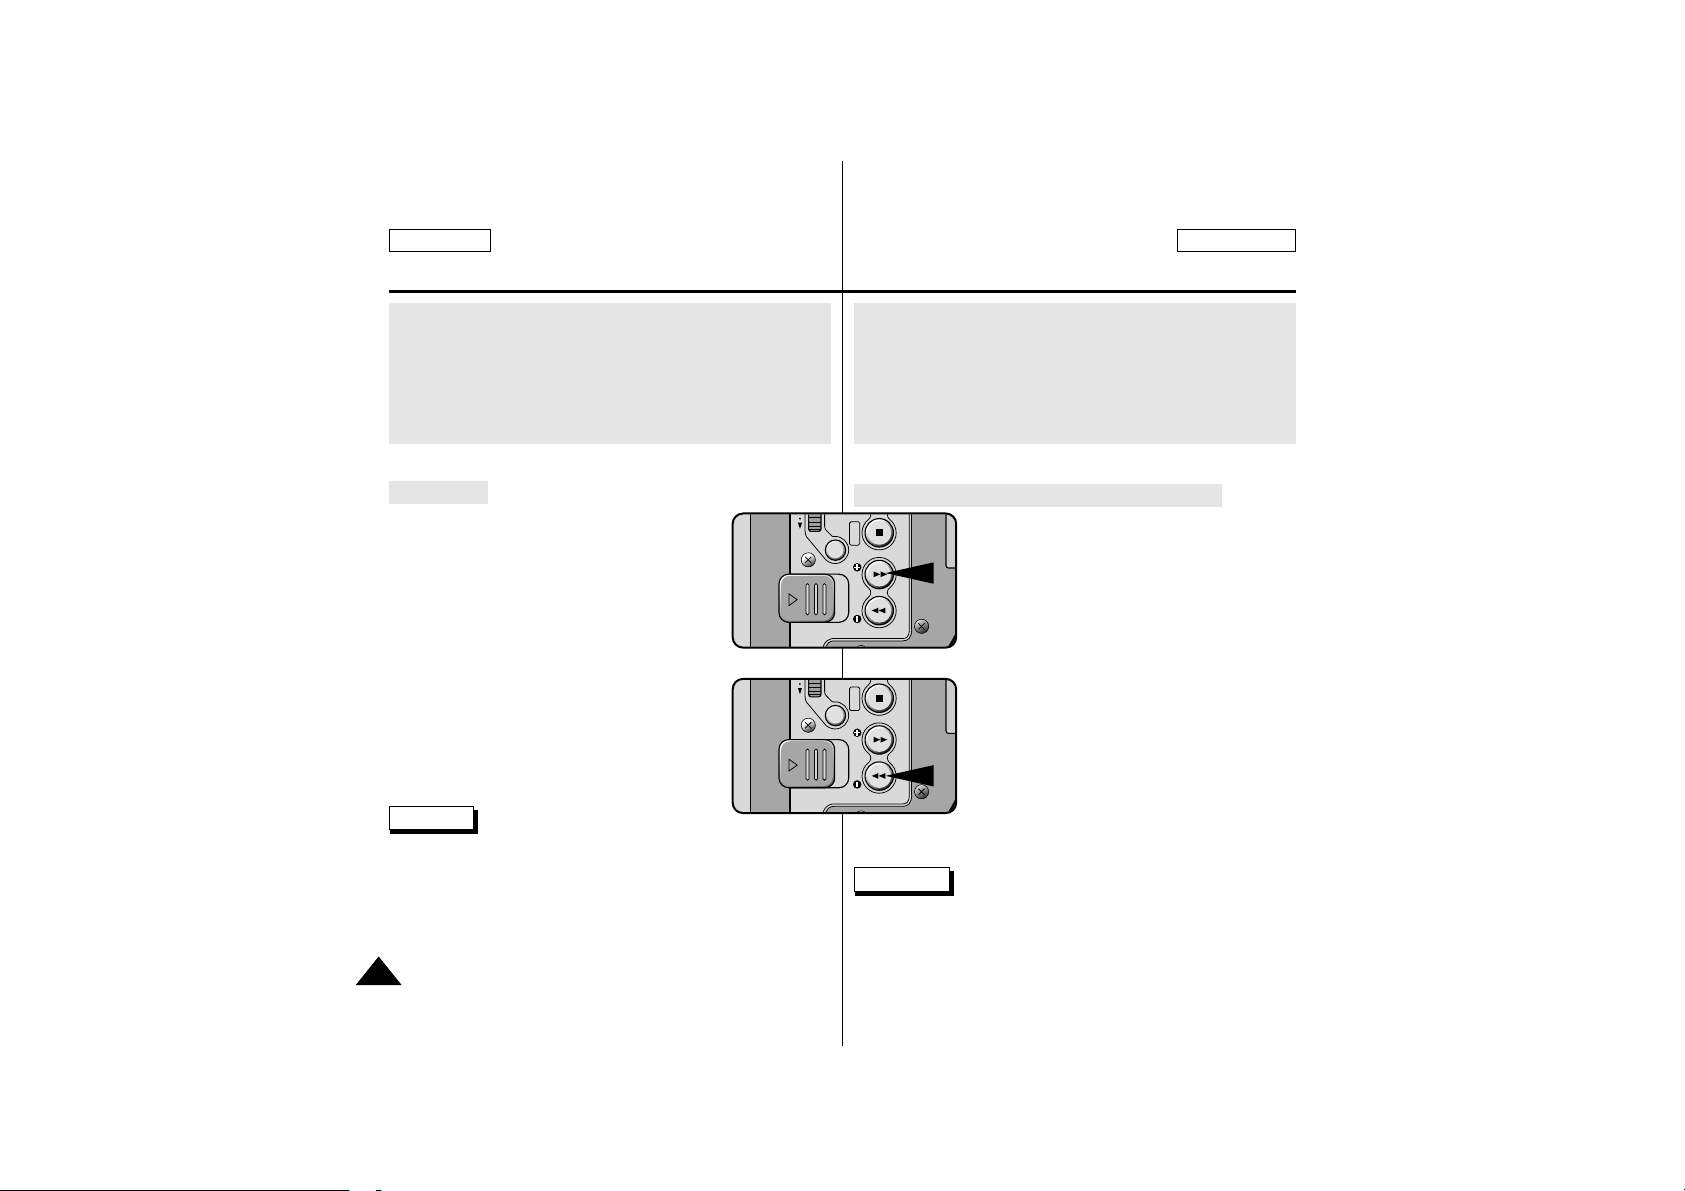
Quand une cassette est chargée et que le caméscope reste en
mode STBY <VEILLE> pendant plus de 5 minutes sans être utilisé,
il s’éteint automatiquement. Pour l’utiliser de nouveau, appuyez sur
le bouton START/STOP <DEPART/ARRET> ou placez l’interrupteur
d’alimentation sur OFF <DESACTIVE>, puis de nouveau sur
CAMERA. Cette fonction de coupure automatique de l’alimentation
est destinée à économiser l’énergie de la batterie.
REC SEARCH <RECHERCHE D’ENREGISTREMENT>
✤ Lorsque le caméscope est en mode STBY
<VEILLE>, vous pouvez utiliser la recherche
d’enregistrement pour lire la cassette en avant ou
en arrière afin de trouver l’endroit où vous voulez
commencer ou reprendre l’enregistrement.
REC SEARCH – <RECHERCHE
D’ENREGISTREMENT –> vous permet de lire
l’enregistrement en marche arrière tandis que
REC SEARCH+ <RECHERCHE
D’ENREGISTREMENT +> vous permet de le
lire en marche avant, tant que vous maintenez
votre pression sur le bouton.
✤ Si vous appuyez rapidement sur le bouton
REC SEARCH – <RECHERCHE
D’ENREGISTREMENT –> en mode STBY
<VEILLE>, le caméscope effectue une lecture
inverse pendant 3 secondes, puis il revient
automatiquement en position initiale.
Remarque
■
Des distorsions de type mosaïque peuvent apparaître à l'écran en
mode recherche d’enregistrement.
2828
ENGLISH FRANÇAIS
Basic Recording
Enregistrement de base
When a cassette is loaded and the camcorder is left in the
STBY mode for more than 5 minutes without being used,
it will switch off automatically.
To use it again, push the START/STOP button or set the
Power switch to OFF and then back to CAMERA.
This Auto Power off feature is designed to save battery power.
REC Search
✤ When the camcorder is in STBY mode, you
can use record search to play the tape
forwards or backwards to find the point where
you want to start or resume recording. REC
SEARCH -- enables you
to play the recording backwards and
REC SEARCH + enables you to play it
forwards, for as long as you keep each button pressed down.
✤ If you press the REC SEARCH -- button in
STBY mode, your camcorder will play in
reverse for 3 seconds and return to the
original position automatically.
Note
■
Mosaic shaped distortion may appear on the screen while in
REC SEARCH mode.
DELETE FWD REV
BLC
MENU
SEARCH
BATT.RELEASE
DELETE FWD REV
BLC
MENU
SEARCH
BATT.RELEASE
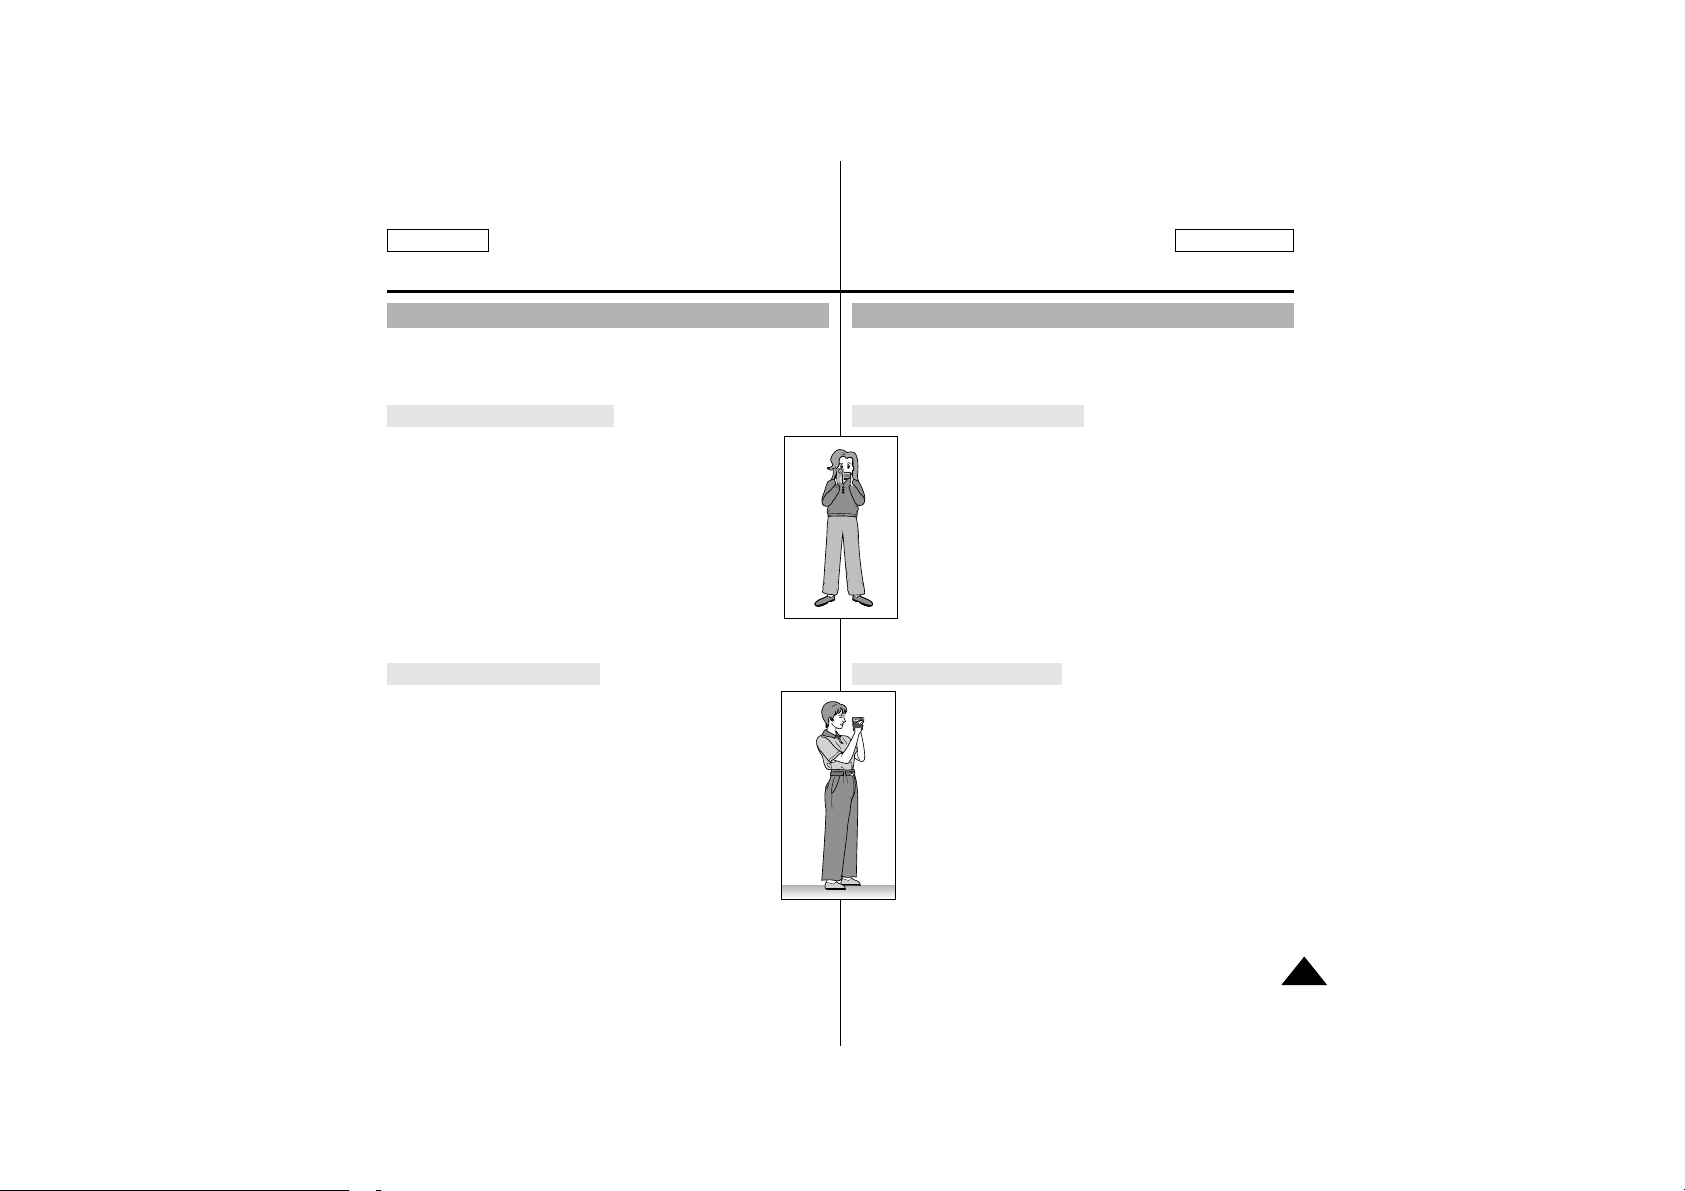
■
Lors de l’enregistrement, il est très important de tenir correctement
le caméscope.
■
Fixez solidement le protège-objectif à la poignée.(voir le schéma)
Enregistrement avec l’écran LCD
1. Tenez fermement le caméscope à l’aide de la poignée.
2. Tenez votre coude droit près du corps.
3. Placez votre main gauche sous ou sur le côté de l’écran
LCD pour le soutenir et le régler.
Ne touchez pas le micro intégré.
4. Adoptez une position confortable et stable lorsque vous
effectuez une prise de vue.
Vous pouvez vous appuyer contre un mur ou sur une
table pour plus de stabilité.Pensez à respirer doucement.
5. Utilisez le cadre de l’écran LCD comme guide pour
déterminer le plan horizontal.
6. Si possible, utilisez un trépied.
Enregistrement avec le viseur
1. Tenez fermement le caméscope à l’aide de la poignée.
2. Tenez votre coude droit près du corps.
3. Placez votre main gauche sous le caméscope pour le
soutenir.
Assurez-vous de ne pas toucher le micro intégré.
4. Adoptez une position confortable et stable lorsque vous
effectuez une prise de vue.
Vous pouvez vous appuyer contre un mur ou sur une
table pour plus de stabilité.Pensez à respirer doucement.
5. Pour visualiser un objet à travers le viseur, relevez celui-ci
jusqu’à entendre un “clic”.
Une force excessive peut endommager le viseur.
6. Appuyez fermement votre œil contre l’œilleton du viseur.
7. Utilisez le cadre du viseur comme guide pour déterminer
le plan horizontal.
8. Si possible, utilisez un trépied.
Astuces pour obtenir des images stables à l’enregistrement
2929
FRANÇAIS
Basic Recording
Enregistrement de base
ENGLISH
■
While recording, it is very important to hold the camcorder correctly.
■
Fix the LENS cover firmly by clipping it to the hand grip.
(refer to the figure)
Recording with the LCD monitor
1. Hold the camcorder firmly using the hand grip.
2. Place your right elbow against your side.
3. Place your left hand under or beside the LCD to support
and adjust it.
Do not touch the built-in microphone.
4. Choose a comfortable, stable position for the shots that
you are taking.
You can lean against a wall or on a table for greater
stability. Do not forget to breathe gently.
5. Use the LCD frame as a guide to determine the horizontal
plane.
6. Whenever possible, use a tripod.
Recording with the Viewfinder
1. Hold the camcorder firmly using the hand grip.
2. Place your right elbow against your side.
3. Place your left hand under the camcorder to support it.
Be sure not to touch the built-in microphone.
4. Choose a comfortable, stable position for the shots that
you are taking.
You can lean against a wall or on a table for greater
stability. Do not forget to breathe gently.
5. To view an object through the viewfinder,
pull it out until you hear the ‘click’sound.
Excessive force may cause damage to the viewfinder.
6. Place your eye firmly against the viewfinder eyecup.
7. Use the viewfinder frame as a guide to determine
the horizontal plane.
8. Whenever possible, use a tripod.
Hints for Stable Image Recording
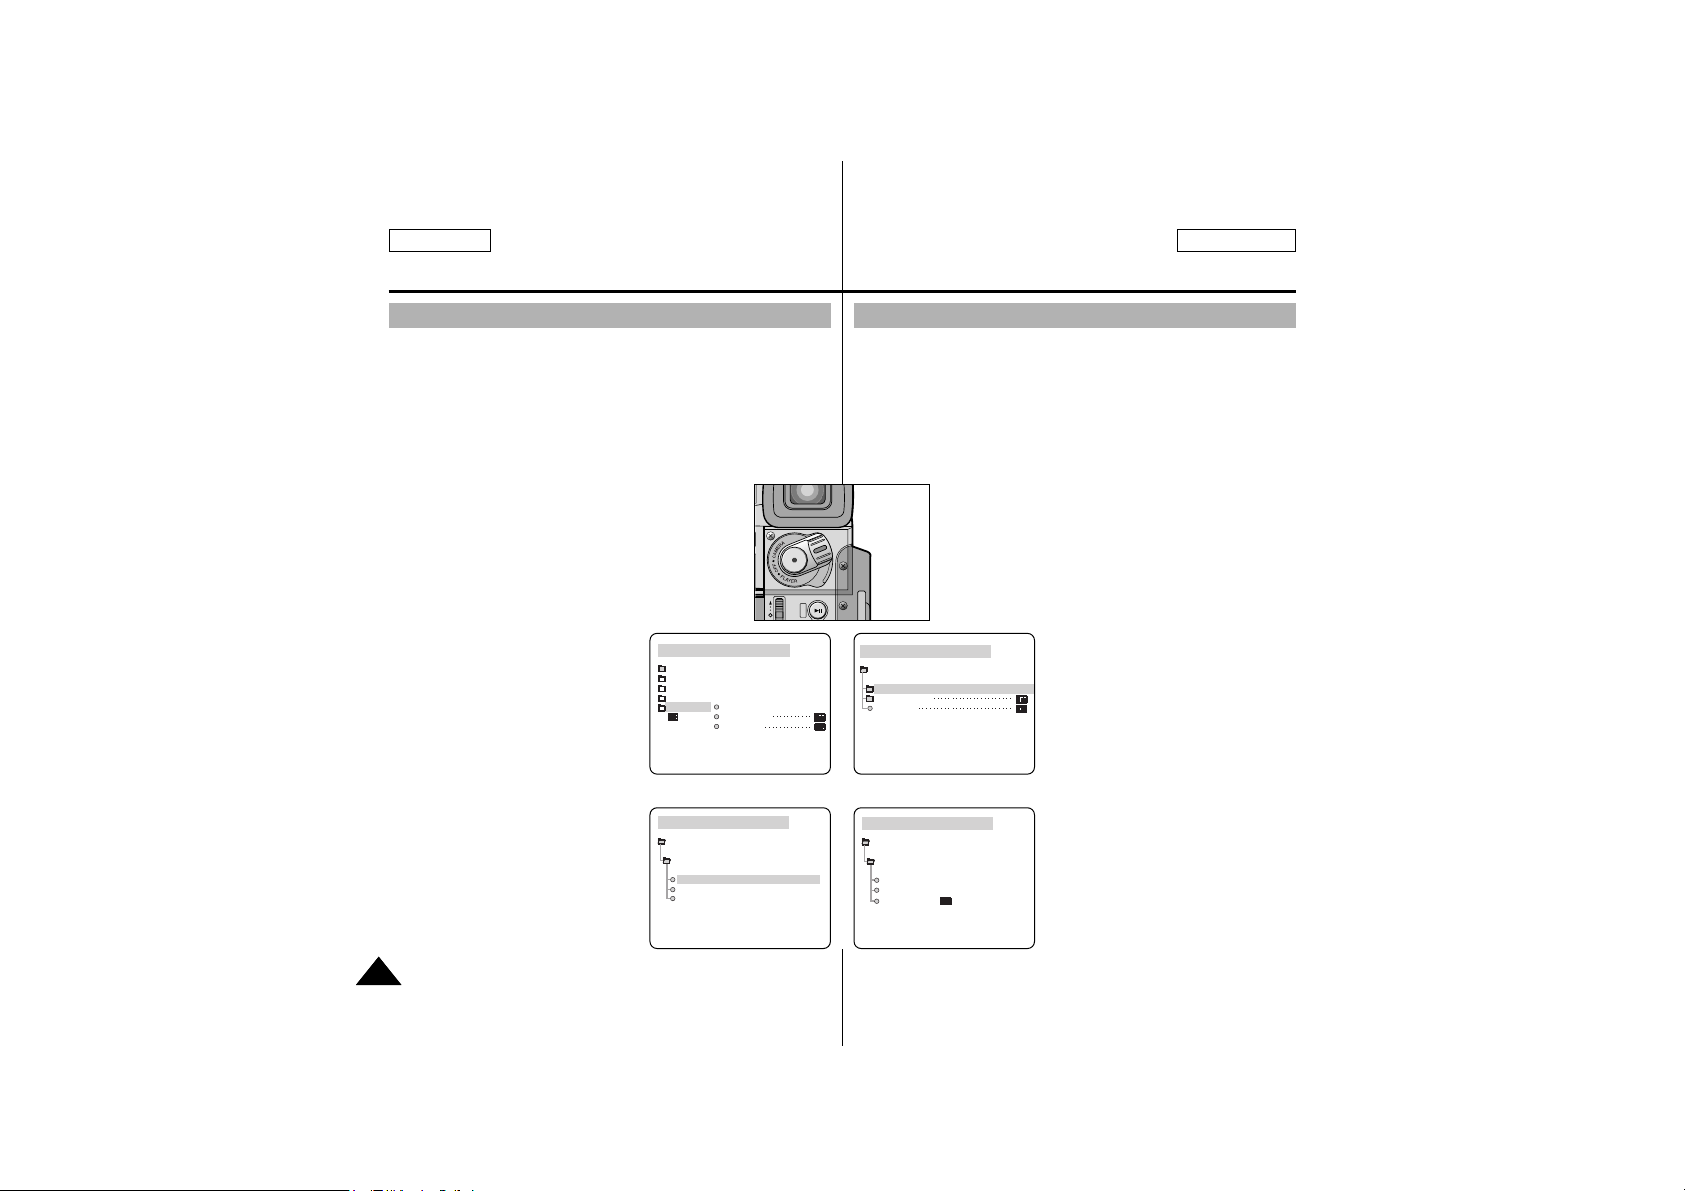
✤ Votre caméscope est équipé d'un écran couleur à cristaux liquides
(LCD) de 2,5 pouces, qui vous permet de voir ce que vous êtes en train
d'enregistrer ou de lire.
✤ Suivant les conditions dans lesquelles vous utilisez le caméscope
(en intérieur ou en extérieur par exemple), vous pouvez régler ;
■
BRIGHT SELECT <SELECTION DE LUMINOSITE>
■
BRIGHT ADJUST <REGLAGE DE LUMINOSITE>
■
COLOR ADJUST <REGLAGE DES COULEURS>
1. Placez l’interrupteur d’alimentation en position CAMERA.
■
En mode PLAYER <LECTEUR>, vous pouvez
régler l’écran LCD uniquement en cours de lecture
de cassette.
2. Ouvrez l’écran LCD, qui s’allume.
3. Appuyez sur le bouton MENU.
4. Déplacez le MENU SELECTOR <SELECTEUR DE
MENU> de manière à mettre VIEWER
<VISIONNEUSE> en surbrillance et
appuyez sur le MENU SELECTOR
<SELECTEUR DE MENU>.
5. Déplacez le MENU SELECTOR
<SELECTEUR DE MENU> de manière
à mettre LCD ADJUST <REGLAGE DE
L’ECRAN LCD> en surbrillance.
6. Appuyez sur le MENU SELECTOR
<SELECTEUR DE MENU> pour
entrer dans le sous-menu.
7. Déplacez le MENU SELECTOR
<SELECTEUR DE MENU> de sorte
qu’il place l’élément de menu que vous
souhaitez régler en surbrillance
(BRIGHT SELECT <SELECTION DE
LUMINOSITE>, BRIGHT ADJUST
<REGLAGE DE LUMINOSITE>,
COLOR ADJUST <REGLAGE DES
COULEURS>).
Réglage de l’écran LCD
3030
ENGLISH FRANÇAIS
Basic Recording
Enregistrement de base
✤ Your camcorder is equipped with a 2.5 inch color Liquid Crystal
Display(LCD) screen, which enables you to view what you are
recording or playing back directly.
✤ Depending on the conditions under which you are using the camcorder
(indoors or outdoors for example), you can adjust ;
■
BRIGHT SELECT
■
BRIGHT ADJUST
■
COLOR ADJUST
1. Set the POWER switch to CAMERA position.
■
In the PLAYER mode, you may only setup the LCD
while the tape is playing.
2. Open the LCD screen, and the LCD switches on.
3. Press the MENU button.
4. Move the MENU SELECTOR so that
VIEWER is highlighted and
then push the MENU SELECTOR.
5. Move the MENU SELECTOR so that
LCD ADJUST is highlighted.
6. Push the MENU SELECTOR to enter
the sub-menu.
7. Move the MENU SELECTOR so that it
highlights the menu item
you want to adjust (BRIGHT SELECT,
BRIGHT ADJUST,
COLOR ADJUST).
CAM MODE
VIEWER SET
LCD ADJUST
DATE / TIME
DISPLAY
CAM MODE
INITIAL
LCD ADJUST
DATE/TIME
DISPLAY
CAMERA
A/V
MEMORY (SCD590/D590T only)
VIEWER
CAM MODE
LCD ADJUST
VIEWER SET
BRIGHT SELECT . . . . NORMAL
BRIGHT ADJUST . . . . . . [ 1 8 ]
COLOR ADJUST . . . . . . [ 1 8 ]
CAM MODE
BRIGHT SELECT
LCD ADJUST
NORMAL
SUPER
BACK LIGHT
CAMERA
Mode
Adjusting the LCD
✽ SCD530/D590 only
S.SHOW
FADE
 Loading...