

Page 1

Alignment and Adjustmens
Samsung Electronics
Service Manual
6-1
6
6
6. Alignment and Adjustments
This chapter describes some of the main service procedures including:
Using the Tech mode; Clearing paper jam and test patterns.
Much of this chapter is also included in the user's guide.
6.1 Control Panel
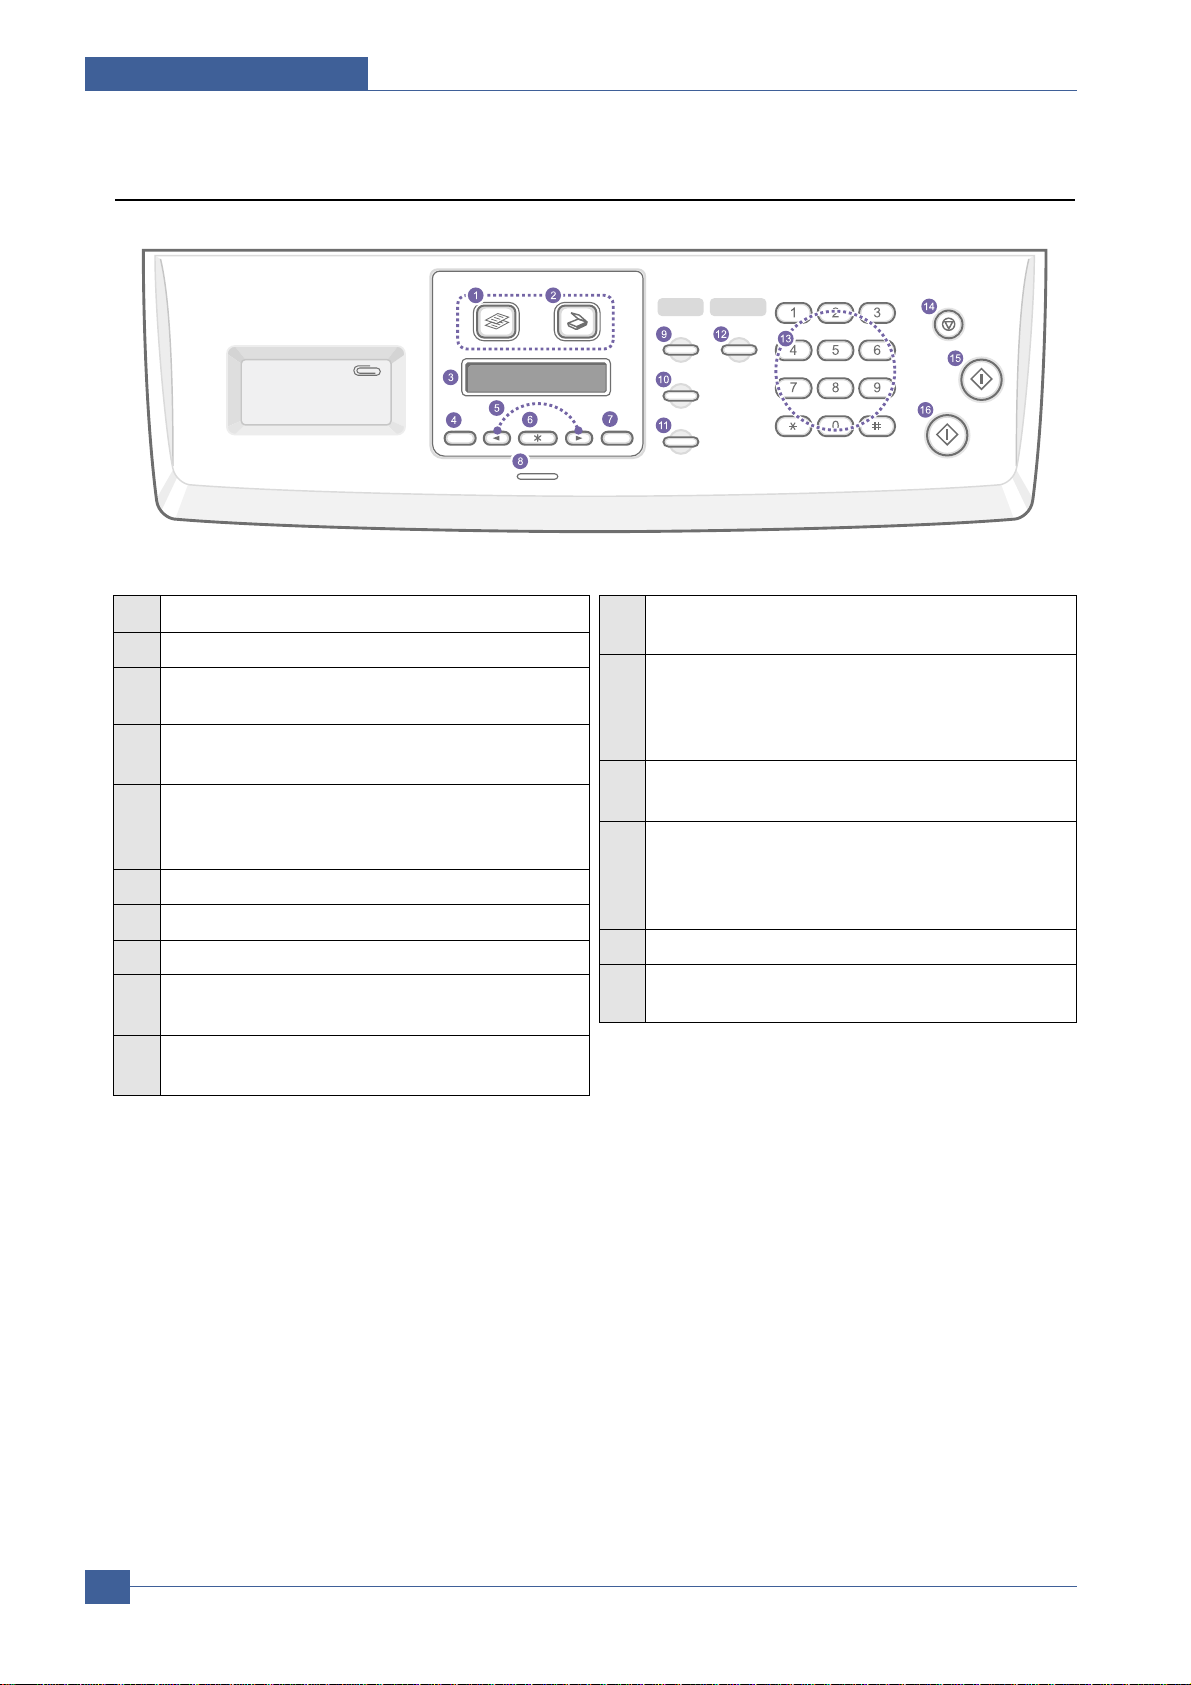
6.1.1 CLX-3160FN
1 Speed buttons: Allows you to store frequently-
dialed fax numbers and enter them with the touch
of a few buttons.
2 Shift: Allows you to shift the speed buttons to
access numbers 16 through 30.
3 Phone Book: Allows you to store frequently used
fax numbers in memory or search for stored fax
numbers. Also allows you to print an Phone Book list.
4 Resolution: Adjusts the document resolution for
the current fax job.
5 Redial/Pause: In Standby mode, redials the last
number, or in Edit mode, inserts a pause into a fax
number.
6 Fax: Activates Fax mode.
7 Copy: Activates Copy mode.
8 Scan: Activates Scan mode.
9 Display: Shows the current status and prompts
during an operation.
10 Menu: Enters Menu mode and scrolls through the
available menus.
11 Scroll buttons: Scroll through the options
available in the selected menu, and increase or
decrease values.
12 OK: Confirms the selection on the screen.
13 Back: Sends you back to the upper menu level.
14 Status: Shows the status of your machine.
15 Darkness: Adjusts the document brightness for
the current copy job.
16 Original Type: Selects the document type for the
current copy job.
17 Reduce/Enlarge: Makes a copy smaller or larger
than the original.
18 USB Print: Allows you to directly print files stored
on a USB Memory device when it is inserted into
the USB memory port on the front of your
machine.
19 Number keypad: dials a number or enters
alphanumeric characters.
20 On Hook Dial: Engages the telephone line.
21 Stop/Clear: Stops an operation at any time. In
Standby mode, clears/cancels the copy options,
such as the darkness, the document type setting,
the copy size, and the number of copies.
22 Color Start: Starts a job in Color mode.
23 Black Start: Starts a job in Black and White mode.
Page 2
Samsung Electronics
Service Manual
Alignment and Adjustmens
6-2
6.1.2 CLX-3160N
1 Copy: Activates Copy mode.
2 Scan: Activates Scan mode.
3 Display: Shows the current status and prompts
during an operation.
4 Menu: Enters Menu mode and scrolls through the
available menus.
5 Scroll buttons: Scroll through the options avail-
able in the selected menu, and increase or
decrease values.
6 OK: Confirms the selection on the screen.
7 Back: Sends you back to the upper menu level.
8 Status: Shows the status of your machine.
9 Darkness: Adjusts the document brightness for
the current copy job.
10 Original Type: Selects the document type for the
current copy job.
11 Reduce/Enlarge: Makes a copy smaller or larger
than the original.
12 USB Print: Allows you to directly print files stored
on a USB Memory device when it is inserted into
the USB memory port on the front of your
machine.
13 Number keypad: Dials a number or enters
alphanumeric characters.
14 Stop/Clear: Stops an operation at any time. In
Standby mode, clears/cancels the copy options,
such as the resolution, the document type setting,
the copy size, and the number of copies.
15 Color Start: Starts a job in Color mode.
16 Black Start: Starts a job in Black and White
mode.
Page 3

Alignment and Adjustmens
Samsung Electronics
Service Manual
6-3
6.2 LED Function
The Status LED on the control panel shows the status of your machine.
See the table below to know your machine's status.
Status” LED Description
Off The machine is off-line.
The machine is in Power Save mode. When data is received, or any button
is pressed, it switches to on-line automatically.
Green On The machine is on-line and can be used.
Blink When the backlight slowly blinks, the machine is receiving data from the
computer.
When the backlight fast blinks, the machine is printing data.
Red On The toner cartridge is totally exhausted. Remove the old toner cartridge
and install a new one.
A paper jam has occurred. To solve the problem.
The front cover is open. Close the front cover.
There is no paper in the tray . Load paper in the tray .
The machine has stopped due to a major error. Check the display message.
Blink A minor error occurs and the machine is waiting an error to be cleared.
Check the display message. When the problem is cleared, the machine
resumes.
The toner cartridge is low. Order a new toner cartridge. Y ou can temporarily
improve print quality by redistributing the toner .
Page 4

Samsung Electronics
Service Manual
Alignment and Adjustmens
6-4
6.3 Jam Removal
6.3.1 Clearing document jams
When an original jams while passing through the ADF, Document Jam appears on the display.
1. Remove any remaining pages from the ADF.
2. Open the ADF cover.
3. Pull the jammed paper gently out of the ADF.
4. Close the ADF cover. Then load the removed
pages, if any, back into the ADF.
Page 5
Alignment and Adjustmens
Samsung Electronics
Service Manual
6-5
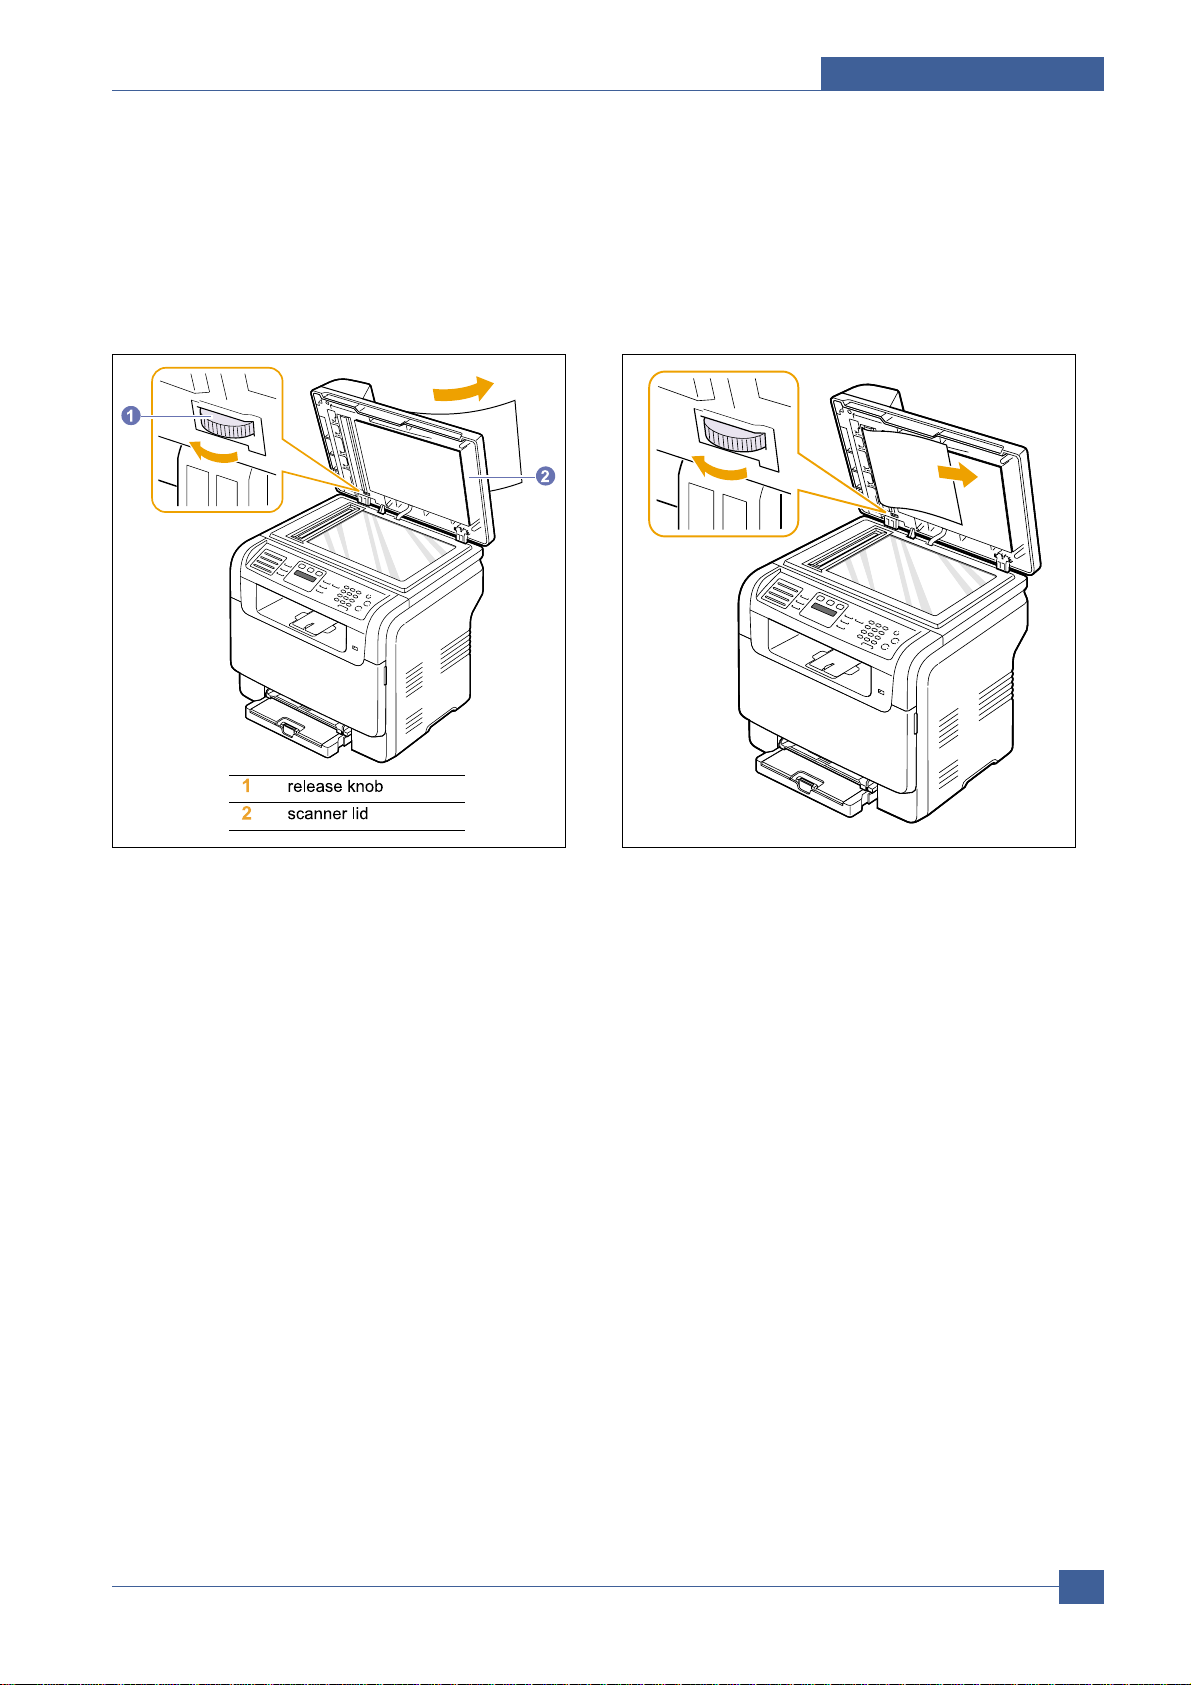
6.3.1.1 Exit misfeed
1. Open the scanner lid.
2. Turn the release knob to the direction as shown
to remove the misfed paper from the document
output tray.
3. Close the scanner lid. Then load the removed
pages back into the ADF.
6.3.1.2 Roller misfeed
1. Open the scanner lid.
2. Seize the misfed paper, and remove the paper
from the feed area by carefully pulling it to the
right using both hands.
3. Close the scanner lid. Then load the removed
pages back into the ADF.
Page 6

Samsung Electronics
Service Manual
Alignment and Adjustmens
6-6
6.3.2 Clearing paper jams
When a paper jam occurs, Paper Jam appears on the display. Refer to the table below to locate and clear
the paper jam.
6.3.2.1 In the tray 1
1. Open and close the front cover. The jammed
paper is automatically ejected from the
machine.
If the paper does not exit, go to the next step.
2. Pull the tray 1 open.
3. Remove the jammed paper by gently pulling it
straight out.
If the paper does not move when you pull, or if
you do not see the paper in this area, check the
paper exit area.
4. Insert the tray 1 into the machine until it snaps
into place. Printing automatically resumes.
Page 7

Alignment and Adjustmens
Samsung Electronics
Service Manual
6-7
6.3.2.2 In the optional tray 2
1. Pull the optional tray 2 open.
2. Remove the jammed paper from the machine.
If the paper does not move when you pull, or if
you do not see the paper in this area, go to the
next step.
3. Open the jam cover in the optional tray 2.
4. Pull the jammed paper out in the direction
shown.
5. Close the jam cover. Printing automatically
resumes.
Page 8

Samsung Electronics
Service Manual
Alignment and Adjustmens
6-8
6.3.2.3 In the mamual tray
1. Pull the tray 1 out.
2. Push the manual tray tab down.
3. Pull the Jammed paper out of the manual tray.
4. Insert the tray 1 into the machine until it snaps
into place. Printing automatically resumes.
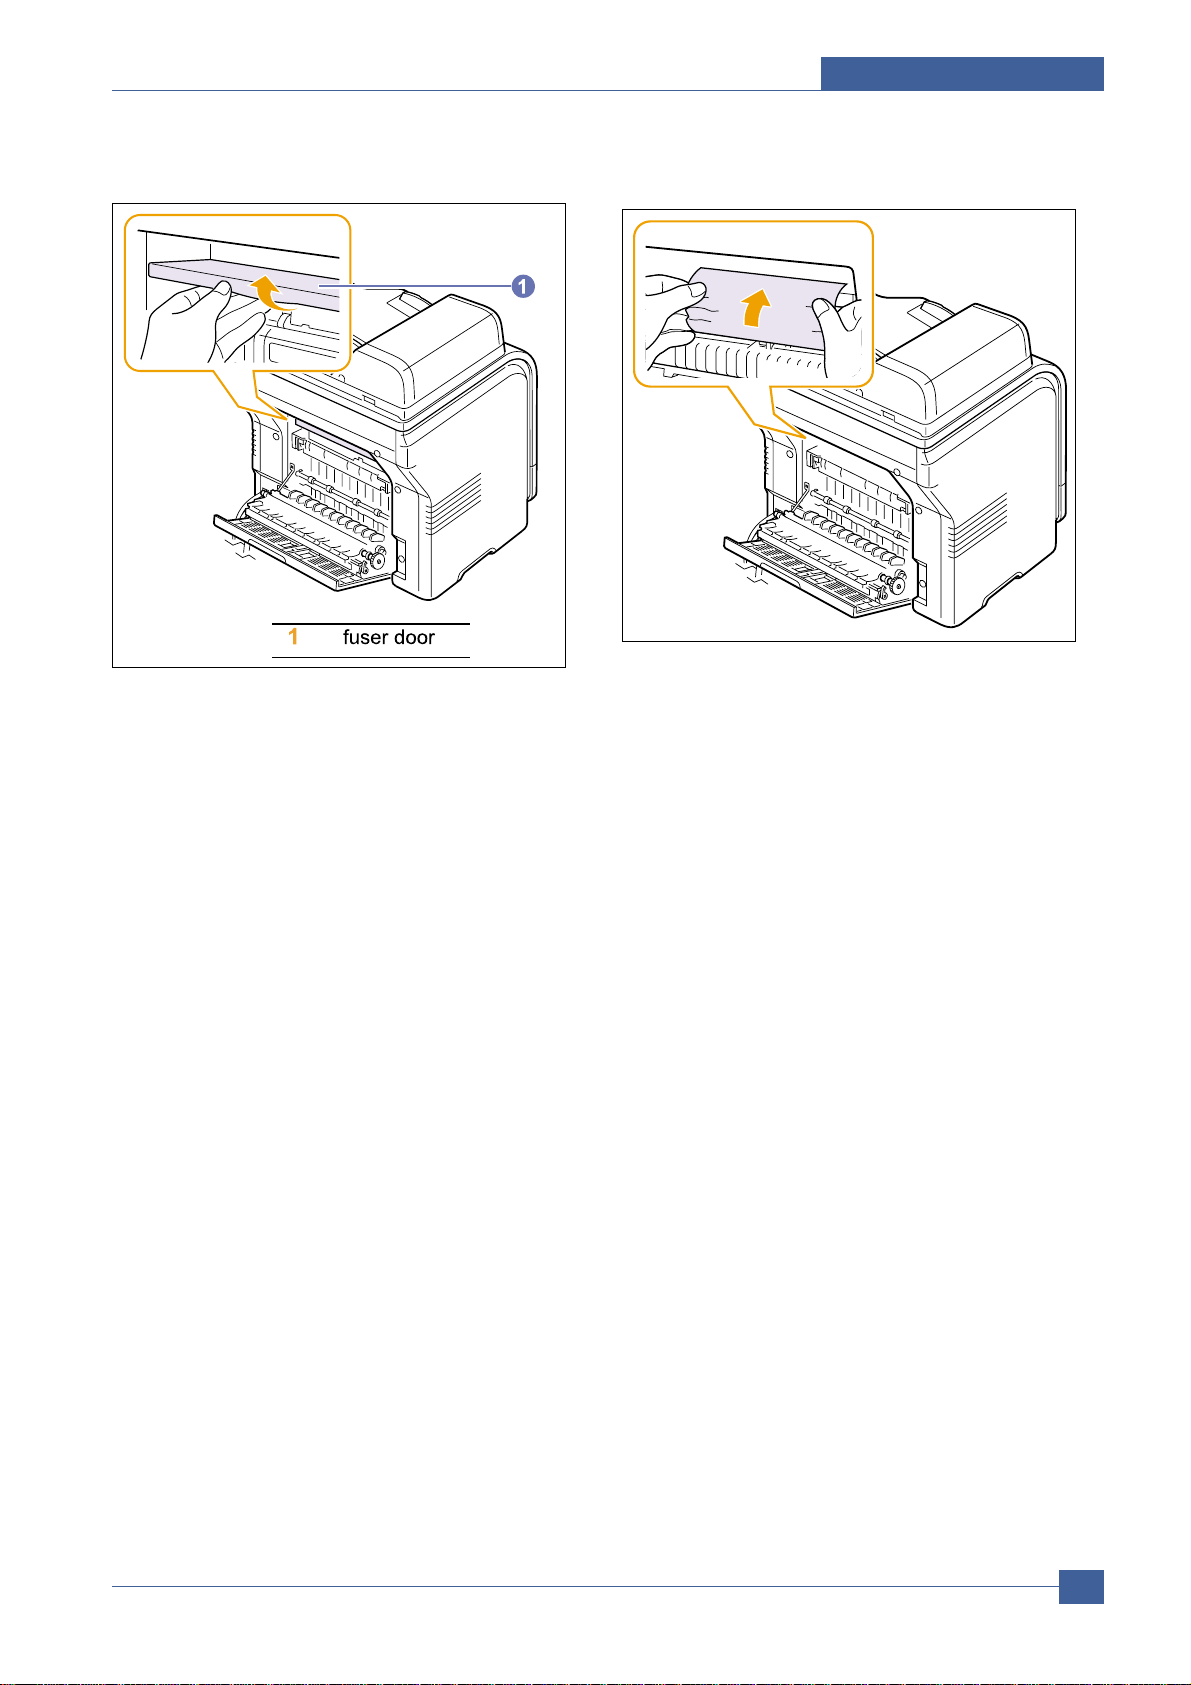
6.3.2.4 In the paper exit area
1. Open and close the front cover. The jammed
paper is automatically ejected from the
machine.
2. Gently pull the paper out of the output tray.
If you do not see the jammed paper or if there
is any resistance when you pull, stop and go to
the next step.
3. Open the rear cover.
4. If you see the jammed paper, pull it straight up.
Skip to step 8.
If you still do not see the paper, go to the next
step.
Page 9
Alignment and Adjustmens
Samsung Electronics
Service Manual
6-9
5. Open the fuser door. 6. Locate the jammed paper and pull it out.
Page 10

Samsung Electronics
Service Manual
Alignment and Adjustmens
6-10
6.4 System setup
6.4.1 Menu overview
The control panel provides access to various menus to set up the machine or use the machine's functions.
These menus can be accessed by pressing Menu. Refer to the following diagram. Menus available in
Fax, Copy, or Scan mode vary.
6.4.2 Changing the display language
To change the language that appears on the control panel, follow these steps:
1. Press Menu until System Setup appears on the bottom line of the display and press OK.
2. Press OK when Machine Setup appears.
3. Press the Scroll buttons until Language appears and press OK.
4. Press the Scroll buttons until the language you want appears and press OK.
5. Press Stop/Clear to return to Standby mode.
Page 11

Alignment and Adjustmens
Samsung Electronics
Service Manual
6-11
6.4.3 Setting the date and time
The current date and time are shown on the display when your machine is on and ready to work. For the
CLX-3160FN, all of your faxes will have the date and time printed on them.
Note : If power to the machine is cut off, you need to reset the correct time and date once the power has
been restored.
1. Press Menu until System Setup appears on the bottom line of the display and press OK.
2. Press OK when Machine Setup appears.
3. Press the Scroll buttons until Date & Time appears and press OK.
4. Enter the correct time and date using the number keypad.
Month = 01 to 12
Day = 01 to 31
Year = requires four digits
Hour = 01 to 12 (12-hour mode)
00 to 23 (24-hour mode)
Minute = 00 to 59
Note : The date format may differ from country to country
You can also use the Scroll buttons to move the cursor under the digit you want to correct and enter a new
number.
5. To select AM or PM for 12-hour format, press the or # button or any number button.
When the cursor is not under the AM or PM indicator, pressing the or # button immediately moves the
cursor to the indicator.
You can change the clock mode to 24-hour format (e.g. 01:00 PM as 13:00). For details, see the next
section.
6. Press OK to save the time and date.
When you enter a wrong number, Out of Range appears and the machine does not proceed to the next
step. If this happens, simply reenter the correct number.
7. Press Stop/Clear to return to Standby mode.
Changing the clock mode
You can set your machine to display the current time using either a 12-hour or 24-hour format.
1. Press Menu until System Setup appears on the bottom line of the display and press OK.
2. Press OK when Machine Setup appears.
3. Press the Scroll buttons until Clock Mode appears and press OK.
4. Press the Scroll buttons to select the other mode and press OK.
5. Press Stop/Clear to return to Standby mode.
Page 12

Samsung Electronics
Service Manual
Alignment and Adjustmens
6-12
6.4.4 Changing the default mode (CLX-3160FN only)
Your machine is preset to Fax mode. You can switch this default mode between Fax mode and Copy mode.
1. Press Menu until System Setup appears on the bottom line of the display and press OK.
2. Press OK when Machine Setup appears.
3. Press the Scroll buttons until Default Mode appears and press OK.
4. Press the Scroll buttons until the default mode you want appears and press OK.
5. Press Stop/Clear to return to Standby mode.
6.4.5 Setting sounds
You can control the following sounds:
Key Sound: Turns the key sound on or off. With this option set to On, a tone sounds each time a key is
pressed.
Alarm Sound: Turns the alarm sound on or off. With this option set to On, an alarm tone sounds when an
error occurs or fax communication ends.
Speaker (CLX-3160FN only): Turns on or off the sounds from the telephone line through the speaker,
such as a dial tone or a fax tone.
With this option set to Comm. which means "Common," the speaker is on until the remote machine
answers.
You can adjust the volume level using On Hook Dial.
Ringer (CLX-3160FN only): Adjusts the ringer volume. For the ringer volume, you can select Off, Low,
Mid, and High.
Speaker, ringer, key sound, and alarm sound
1. Press Menu until System Setup appears on the bottom line of the display and press OK.
2. Press the Scroll buttons until Sound/Volume appears and press OK.
3. Press the Scroll buttons until the sound option you want appears and press OK.
4. Press the Scroll buttons until the desired status or volume for the sound you have selected appears and
press OK.
5. If necessary, repeat steps 3 through 5 to set other sounds.
6. Press Stop/Clear to return to Standby mode.
Speaker volume
1. Press On Hook Dial. A dial tone sounds from the speaker.
2. Press the Scroll buttons until you hear the volume you want.
3. Press On Hook Dial to save the change and return to Standby mode.
Note : You can adjust the speaker volume only when the telephone line is connected.
Page 13

Alignment and Adjustmens
Samsung Electronics
Service Manual
6-13
6.4.6 Entering characters using the number keypad
As you perform various tasks, you may need to enter names and numbers. For example, when you set up
your machine, you enter your name or your company's name, and the fax number. When you store fax
numbers in memory, you may also enter the corresponding names.
Entering alphanumeric characters
1. When you are prompted to enter a letter, locate the button labeled with the character you want. Press the
button until the correct letter appears on the display.
For example, to enter the letter O, press 6, labeled with MNO.
Each time you press 6, the display shows a different letter, M, N, O, and finally 6.
You can enter special characters, such as space, plus sign, and etc. For details, see the below section.
2. To enter additional letters, repeat step 1.
If the next letter is printed on the same button, move the cursor by pressing the right Scroll button and
then press the button labeled with the letter you want. The cursor will move to the right and the next letter will appear on the display.
You can enter a space by pressing 1 twice.
3. When you have finished entering letters, press OK.
Keypad letters and numbers
Correcting numbers or names
If you make a mistake while entering a number or name, press the left Scroll button to delete the last digit
or character. Then enter the correct number or character.
Page 14

Samsung Electronics
Service Manual
Alignment and Adjustmens
6-14
Inserting a pause
With some telephone systems, you must dial an access code (9, for example) and listen for a second dial
tone. In such cases, you must insert a pause in the telephone number. You can insert a pause while you
are setting up speed buttons or speed dial numbers.
To insert a pause, press Redial/Pause at the appropriate place while entering the telephone number.
A - appears on the display at the corresponding location.
6.4.7 Using the save modes
Power Save mode
Power Save mode allows your machine to reduce power consumption when it is not in actual use. You can
turn this mode on and select a length of time for which the machine waits after a job is printed before it
switches to a reduced power state.
1. Press Menu until System Setup appears on the bottom line of the display and press OK.
2. Press OK when Machine Setup appears.
3. Press the Scroll buttons until Power Save appears and press OK.
4. Press the Scroll buttons until On appears and press OK.
5. Press the Scroll buttons until the time setting you want appears and press OK.
6. Press Stop/Clear to return to Standby mode.
Scan Power Save mode
Scan Power Save mode allows you to save power by turning off the scan lamp. The scan lamp under the
scanner glass automatically turns off when it is not in actual use to reduce power consumption and extend
the life of the lamp. The lamp automatically wakes up after some warm-up time when you start scanning.
You can set the length of time for which the scan lamp waits after a scan job is completed before it
switches to the power save mode.
1. Press Menu until System Setup appears on the bottom line of the display and press OK.
2. Press OK when Machine Setup appears.
3. Press the Scroll buttons until Scan PWR Save appears and press OK.
4. Press the Scroll buttons until the time setting you want appears and press OK.
5. Press Stop/Clear to return to Standby mode.
Page 15

Alignment and Adjustmens
Samsung Electronics
Service Manual
6-15
6.4.8 Setting print job timeout
You can set the amount of time a single print job is active before it must print.
The machine handles incoming data as a single job if it comes in within the specified time. When an error
occurs while processing data from the computer and the data flow stops, the machine waits the specified
time and then cancels printing if data flow does not resume.
1. Press Menu until System Setup appears on the bottom line of the display and press OK.
2. Press OK when Machine Setup appears.
3. Press the Scroll buttons until Job Timeout appears and press OK.
4. Press the Scroll buttons until the time setting you want appears and press OK.
5. Press Stop/Clear to return to Standby mode.
Page 16

Samsung Electronics
Service Manual
Alignment and Adjustmens
6-16
6.5 Network setup
This chapter gives you step-by-step instructions for setting up your machine for network connections.
This chapter includes:
Introduction
Supported operating systems
Configuring TCP/IP
Setting Ethernet speed
Restoring the network configuration
Printing a network configuration page
6.5.1 Introduction
Once you have connected your machine to a network with an RJ-45 Ethernet cable, you can share the
machine with other network users.
You need to set up the network protocols on the machine to use it as your network printer. Protocols can be
set up by the following two methods:
Via network administration programs
You can configure your machine's print server settings and manage the machine via the following programs
that came with your machine:
SyncThruTMWeb Admin Service: Aweb-based printer management solution for network administrators.
SyncThruTMWeb Admin Service provides you with an efficient way of managing network devices and lets
you remotely monitor and troubleshoot network printers from any site with corporate intranet access.
SyncThruTMWeb Service: A web server embedded to your network print server, which allows you to:
- Configure the network parameters necessary for the machine to connect to various network
environments.
- Customize printer, copy, and fax settings.
SetIP: A utility program allowing you to select a network interface and manually configure the addresses
for use with the TCP/IP protocol.
For further details, refer to the user's guide on the network utilities CD that came with your machine.
Via the control panel
You can set up the following basic network parameters through the machine's control panel:
Configure TCP/IP
Configure EtherTalk
Page 17

Alignment and Adjustmens
Samsung Electronics
Service Manual
6-17
6.5.2 Supported operating systems
The following table shows the network environments supported by the machine:
TCP/IP: Transmission Control Protocol/Internet Protocol
IPP: Internet Printing Protocol
SNMP: Simple Network Management Protocol
DHCP: Dynamic Host Configuration Protocol
BOOTP: Bootstrap Protocol
6.5.3 Configuring TCP/IP
Your machine can be set up with a variety of TCP/IP network information, such as an IP address, a subnet
mask, a gateway, and DNS addresses.
There are several ways in which your machine can be assigned a TCP/IP address, depending on your network.
Static addressing: A TCP/IP address is assigned manually by the system administrator.
Dynamic addressing via BOOTP/DHCP (default): A TCP/IP address is assigned automatically by the
server.
Note : Before configuring TCP/IP, you need to set the network protocol to TCP/IP.
Static addressing
To enter a TCP/IP address from your machine's control panel, take the following steps:
1. Press Menu until Network appears on the bottom line of the display and press OK.
2. Press OK when TCP/IP appears.
3. Press the Scroll buttons until Static appears and press OK.
4. Press OK when IP Address appears.
5. Enter a byte between 0 and 255 using the number keypad and press the Scroll buttons to move between
bytes.
Repeat this to complete the address from the 1st byte to the 4th byte.
6. When you have finished, press OK.
7. Repeat steps 5 and 6 to configure the other TCP/IP parameters:
subnet mask and gateway address.
8. Press the Scroll buttons until Primary DNS appears and press OK.
Page 18

Samsung Electronics
Service Manual
Alignment and Adjustmens
6-18
9. Enter each byte of the address and press OK.
10. Press the Scroll buttons until Secondary DNS appears and press OK.
11. Enter each byte of the address and press OK.
12. Press Stop/Clear to return to Standby mode.
Dynamic addressing (BOOTP/DHCP)
To have a TCP/IP address assigned automatically by the server, take the following steps:
1. Press Menu until Network appears on the bottom line of the display.
2. Press OK when TCP/IP appears.
3. Press the Scroll buttons until DHCP or BOOTP appears and press OK.
4. Press Stop/Clear to return to Standby mode.
6.5.4 Setting Ethernet speed
You can select the communication speed for Ethernet connections.
1. Press Menu until Network appears on the bottom line of the display and press OK.
2. Press the Scroll buttons until Ethernet Speed appears and press OK.
3. Press the Scroll buttons until the speed you want appears and press OK.
4. Press Stop/Clear to return to Standby mode.
Page 19

Alignment and Adjustmens
Samsung Electronics
Service Manual
6-19
6.5.5 Restoring the network configuration
You can return the network configuration to its default settings.
1. Press Menu until Network appears on the bottom line of the display and press OK.
2. Press the Scroll buttons until Clear Setting appears and press OK.
3. Press OK when Yes appears to restore the network configuration.
4. Power the machine off and back on.
6.5.6 Printing a network configuration page
The Network Configuration page shows how the network interface card on your machine is configured.
1. Press Menu until Network appears on the bottom line of the display and press OK.
2. Press the Scroll buttons until Network Info appears and press OK.
3. Press OK when Yes appears.
The Network Configuration page prints out.
Page 20

Samsung Electronics
Service Manual
Alignment and Adjustmens
6-20
6.6 Sample Pattern
This product provides several printable test patterns for maintenance purposes. These patterns can be used to aid the
diagnosis of print quality problems.
6.6.1 Printing a report
[Printing a Document in Windows]
1. Click the Windows Start menu.
2. For Windows 98/Me/NT 4.0/2000, select Settings and then Printers.
For Windows XP , select Printers and Faxes.
3. Select the Samsung MFP CLX-3160 Series printer.
4. Click the right mouse button on the printer icon and:
For Windows 98/Me, select Properties.
For Windows 2000/XP , select Printing Preferences.
For Windows NT 4.0, select Document Default.
5. Change the settings on each tab and click OK.
6. Now “PRINTING”
Page 21

Alignment and Adjustmens
Samsung Electronics
Service Manual
6-21
6.6.2 Printing a Configuration Page
Y ou can print a configuration page from the printer’s control panel. Use the configuration page to view the current
settings, to help troubleshoot problems.
To print a configuration page: In ready mode, press and hold the Stop button on the control panel for 5 seconds.
A configuration page prints out.
Page 22

Samsung Electronics
Service Manual
Alignment and Adjustmens
6-22
6.7 Periodic Defective Image
If an image defects appears at regular intervals on the printed-paper, it is due to a faulty or damaged roller.
Refer to the table below and check the condition of the appropriate roller.
No Roller Period Phenomenon
1 OPC Drum 188.5 mm White and Black Spots
2 Charge Roller 37.7mm Black Spot and line and Periodic Band
3 Supply Roller 47.5mm Periodic Band by little difference of density
4
Developing Roller
26.0mm White Spot, Horizontal black band
5
1stTransfer Roller
32.7mm Ghost, Damaged Image by abnormal tranfer
6
2ndTransfer Roller
57.5mm Ghost, Damaged Image by abnormal tranfer
7 86.6mm Black Spots or Vertical Black BandHeat Roller
8 86.6mm BackgroundPressure Roller
Page 23

Alignment and Adjustmens
Samsung Electronics
Service Manual
6-23
6.8 Tech Mode
6.8.1 How to Enter Tech Mode
In service (tech) mode, the technician can check the machine and perform various test to isolate the cause
of a malfunction.
While in Tech mode, the machine still performs all normal operations.
To enter the Tech mode
To enter the Tech mode, press in sequence, and the
LCD briefly displays ‘TECH’, the machine has entered service (tech) mode.
Page 24

Samsung Electronics
Service Manual
Alignment and Adjustmens
6-24
6.8.2 Setting-up System in Tech Mode
Page 25

Alignment and Adjustmens
Samsung Electronics
Service Manual
6-25
6.8.3 Data Setup
SEND LEVEL
Y ou can set the level of the transmission signal. T ypically, the Tx level should be under -12 dBm.
Caution : The Send Fax Level is set at the best condition in the shipment from factory. Never change settings
arbitrarily .
DIAL MODE
This function can choose dial method.
*Default : Dial(Dial/Pulse)
MODEM SPEED
Y ou can set the maximum modem speed.
Communication is done with modem speed automatically set at lower speed when communicating with a slower speed modem since communication is done on the standard of the side where modem speed is low for
transmission/reception. It is best set 33.6Kbps as default setting.
ERROR RATE
When the error rate is about exceed the set value, the Baud rate automatically adjusts to 2400 bps.
This ensures that the error rate remains below the set value.
Y ou can select the rate between 5% and 10%.
CLEAR ALL MEMORY
The function resets the system to factory default settings.
This function is used to reset the system to the initial value when the product is functioning abnormally . All the values are returned to the default values, and all the information, which was set by
the user, will be erased.
< Method >
1. Select the [MEMORY CLEAR] at the TECH MODE.
2. Push the ENTER button.
3. Select you country. (There are four country groups. Refer to the table below.)
4. Push the ENTER button then it will clear all memory.
NOTICE : Always perform a memory clear after replacing the main board. Otherwise, the system
may not operate properly.
Country Group USA/Canada UK Russia Southafrica
USA/Canada UK Russia South Africa
Mexico Germany India
Brazil France Oman
Italy Poland
Spain Bangladesh
Austria Kuwait
Netherlands Moroco
Belgium Algeria
Country Portugal Pakistan
Sweden UAE
Norway Bahrain
Denmark Srilanka
Finland Saudi Arabia
Switzerland Chile
Greece Peru
Ireland Argentina
Turkey Hungary
Romania
Bulgaria
Czech
Page 26

Samsung Electronics
Service Manual
Alignment and Adjustmens
6-26
Flash Upgrade
The Firmware Upgrade function and has two methods, Local and Remote.
1)Local Machine Upgrade
• RCP(Remote Control Panel) mode
This method is for Parallel Port.or USB Port Connect to PC and activate RCP(Remote Control Panel) to upgrade the
Firmware.
< Method >
How to Update Firmware using RCP
1. Connect PC and Printer with Parallel Cable or USB Cable.
2. Execute RCP and select Firmware Update.
3. Search Firmware file to update with Browse Icon.
4. Click Update icon, firmware file is transmitted to Printer automatically and printer is initialized when it finished.
5. Click Refresh icon and check what is updated.
• DOS Command mode
This method is just for Parallel Port. Connect to PC with Parallel cable and enter DOS Command to upgrade the
Firmware
< Method >
1. The first of all, need the files : down.bat, down_com.bin, fprt.exe, and Rom File:
file name for upgrade.Save the files in the same folder .
2. In the DOS, input as below and push the enter key. Then, it will be automatically upgraded.
3. There are two commands for the conditions of product.
* When the product is in idle condition down "rom file"
* When the product is in Ready condition (TECH MODE DA TASETUP FLASH UPGRADE LOCAL) copy/b
"rom file" lpt1
4. Do not turn off the power while upgrading process.
2) Remote Upgrade
This is a function that a fax with the latest firmware sends files to a fax in long distance through telephone line.
< Method >
1. Before remote upgrade, the latest firmware should be loaded into the machine.
(TECH MODE DAT A SETUP FLASH UPGRADE REMOTE)
2. Input the fax number, which needs to be upgraded. (Several faxes can be upgraded at the same time. In this case,
enter the each fax number.)
3. After push the enter button, send the firmware file by calling to the appointed number . (Around 10~15 minutes needs
to send the file.)
< Caution >
1. sending and receiving fax must be the same model.
2. A sending fax must be set up as ECM mode, and a receiving memory must be set up as 100%. If not, the function
operates abnormally
Page 27

Alignment and Adjustmens
Samsung Electronics
Service Manual
6-27
S/W of Maintenance
1. Clearing the Memory
Y ou can selectively clear information stored in your machine s memory .
1) Press Menu on the control panel until Maintenance appears on the top line of the display.
2) Press the scroll button (left-key or right-key) until you see Clear Memory on the bottom line and press Enter
- The first available menu item, Clear All Mem. displays on the bottom line.
- See next page - There are some item to display on the LCD.
3) Press the scroll button (left-key or right-key) until you see the item you want to clear .
4) Press Enter. The selected memory is cleared and the display asks you to continue clearing the next item.
5) To clear another item, press Enter and repeat steps 3 and 4
- To return to Standby mode, press Stop/Clear.
- As below item you can selectively clear information stored in your machine s memory .
Clear All Mem.:
- Clears all of the data stored in the memory and resets all of your settings to the factory default.
Paper Setting:
- Restores all of the Paper Setting options to the factory default.
Copy Setup:
- Restores all of the Copy Setup options to the factory default.
Fax Setup:
- Restores all of the Fax Setup options to the factory default.
Fax Feature:
- Cancels all of the scheduled fax jobs in the machine s memory .
- As below item you can selectively clear information stored in your machine s memory .
Advanced Fax:
- Restores all of the Advanced Fax setting options to the factory default.
Sound/Volume:
- Resets the sound and volume settings to the factory default.
Machine Setup:
- Resets all of the system settings, such as the machine ID, date and time, display language and save modes, to the
factory default.
Sent Report:
- Clears all of records of your faxes sent.
RCV Report:
- Clears all of records of your faxes received.
Phone Book:
- Clears the one-touch, speed and group dial numbers stored in the memory.
2. Adjust shading
When the scan unit becomes dirty, it can alter the shading value.
If your copy has black lines or is blurred, adjust the shading setting.
1) Load a sheet of white paper into the ADF.
2) Make machine Tech mode.
3) Press Menu on the control panel and scroll until Machine Test displays.
4) Scroll to Shading Test and Enter .
5) Select Shading&Print appears on the bottom line and press Enter.
6) Y our machine picks up the paper and adjusts the shading value.
7) After adjusting, shading value will be printed with graphic image.
Page 28

Samsung Electronics
Service Manual
Alignment and Adjustmens
6-28
3. Flash Upgrade
The Firmware Upgrade function and has two methods, Local and Remote.
3.1 Local Machine
• RCP(Remote Control Panel) mode
This method is for Parallel Port.or USB Port Connect to PC and activate RCP(Remote Control Panel) to upgrade the
Firmware.
< Method >
How to Update Firmware using RCP
1. Connect PC and Printer with Parallel Cable or USB Cable.
2. Execute RCP and select Firmware Update.
3. Search Firmware file to update with Browse Icon.
4. Click Update icon, firmware file is transmitted to Printer automatically and printer is initialized when it finished.
5. Click Refresh icon and check what is updated.
• DOS Command mode
This method is just for Parallel Port. Connect to PC with Parallel cable and enter DOS Command to upgrade the
Firmware
< Method >
1. The first of all, need the files : down.bat, down_com.bin, fprt.exe, and Rom File: file name for upgrade.Save the files in
the same folder.
2. In the DOS, input as below and push the enter key. Then, it will be automatically upgraded.
3. There are two commands for the conditions of product.
* When the product is in idle condition down "rom file"
* When the product is in Ready condition (TECH MODE DA T A SETUP FLASH UPGRADE LOCAL) copy/b "rom
file lpt1
4. Do not turn off the power while upgrading process.
3.2 Remote Upgrade
This is a function that a fax with the latest firmware sends files to a fax in long distance through telephone line.
< Method >
1. Before remote upgrade, the latest firmware should be loaded into the machine.(TECH MODE DAT ASETUP
FLASH UPGRADE REMOTE)
2. Input the fax number, which needs to be upgraded. (Several faxes can be upgraded at the same time. In this case,
enter the each fax number.)
3. After push the enter button, send the firmware file by calling to the appointed number . (Around 10~15 minutes needs
to send the file.)
< Caution >
1. sending and receiving fax must be the same model.
2. A sending fax must be set up as ECM mode, and a receiving memory must be set up as 100%.
If not, the function operates abnormally
Page 29

Alignment and Adjustmens
Samsung Electronics
Service Manual
6-29
4. Remote Diagnostic System(RDS)
RDS and FT-EGTAutomatic Ordering System, will enhance the quality and the speed of after sales service and monitor the performance of the MFP at the customer site.
MFP Should be connected by MFP Server.
4.1 Required components of RDS
RDS for MFP system consists of the following three components that communicate with each other
1. Main RDS Server connected to F AX-MODEM.
2. RDS Client Application.
3. RDS on MFP.
4.2 Enable of RDS on MFP
This value is in Tech Mode.
The factory default for Consumables Status Update / Error Proactive value is Disabled.
< Method >
1. MFP Should be connected by RDS Server.
2. Service numbers should have the proper values.
: TECH MODE DAT A SETUP NOTIFY TONER 2.RDS Service Number.
3. Machine Serial No. should have the proper values.
: TECH MODE DAT A SETUP NOTIFY TONER 1.T oner Serial No.
4. Criter value input is optional, default is set to 1000-page.
: TECH MODE DAT A SETUP NOTIFY TONER 2.RDS Criter.Value.
5. Remote T est should be On
: Maintenance Remote Test On
6. Change the password : if you forgot the Notify T oner password, enter the new password.
: TECH MODE DAT A SETUP NOTIFY TONER RDS RDS Password.
7. If you are to enable the RDS system, Notify T oner option should be [Off].
4.3 Call setup & Release
In order to perform any RDS activity on a Customer MFP, the SVC will have to setup a call to it.
On successful completion of call setup, one or more RDS functions can be executed before call release is manually
initiated.
When connecting to a device, RDS will query the MFP for serial no. If Serial No. is a zero-length string / invalid string,
user will be prompted to enter a valid serial no. for the device. If the user chooses not to enter the serial number at
that point, he can enter/edit it later also; Serial number will be configurable just like any other MFP parameter
Following successful connection, following details of the MFP will be displayed :
Tel. No, Model, Server Port (that is connected to), Status, Serial Number, Firmware V ersion, Engine Version,
Emulation Version
In case the established call is dropped due to an error condition, RDS Client Application will notify the user . It will then
be necessary to manually request for another call setup to the desired MFP before any RDS function can be reattempted.
If no activity is detected on a connected call for a maximum duration of 5 minutes (300 seconds), the call will be
released / disconnected from the MFP-side.
Page 30

Samsung Electronics
Service Manual
Alignment and Adjustmens
6-30
6.8.4 Machine Test
SWITCH TEST
Use this feature to test all keys on the operation control panel. The result is displayed on the LCD
window each time you press a key.
MODEM TEST
Use this feature to hear various transmission signals to the telephone line from the modem and to
check the modem. If no transmission signal sound is heard, it means the modem part of the main
board malfunctioned.
DRAM TEST
Use this feature to test the machine's DRAM. The result appears in the LCD display.
If all memory is working normally, the LCD shows << O K >>
ROM TEST
Use this feature to test the machine'S ROM. The result and the software version appear in the LCD
display.
• FLASH VER : 1.00 V
• ENGINE VER :1.00V
PATTERN TEST
Using this pattern printout, you can check if the printer mechanism is functioning properly.
It is needed in the production progress. Service person doesn't need to use it.
SHADING TEST
The function is to get the optimum scan quality by the specific character of the CCD(Charge
Coupled Device). If the copy image quality is poor, perform this function to check the condition
CCD unit.
< Method >
1. Select the [ADJUST SHADING] at the
TECH MODE.
2. Push the SET UP button then an image
will be scanned.
3. After the scan, CCD SHADING PROFILE will be print out.
4. If the printed image is different to the
image, the CCD is defect.
NOTICE : When you test CCD, make sure
that the cover is closed.
Page 31

Alignment and Adjustmens
Samsung Electronics
Service Manual
6-31
6.8.5 Report
PROTOCOL LIST
This list shows the sequence of the CCITT group 3 T.30 protocol during the most recent sending or receiving
operation. Use this list to check for send and receive errors. If a communication error occurs while the machine
is in TECH mode, the protocol list will print automatically.
OTHER ITEM
This list provides a list of the user system data settings and tech mode settings.
Component Check
Page 32

Samsung Electronics
Service Manual
Alignment and Adjustmens
6-32
6.8.6 Detail Description
Function Name Description Display
01.Motor Test The main motor keeps running after the execution key is Main Motor On(Off)
chosen and stops when the stop key is chosen.
02.Pick Up T est automatically Tray 1,2 Solenoid On/Off
stops, when the execution is chosen.
03.Fan Test The fan keeps running after the execution key is chosen Fan On(Off)
and stops when the stop key is chosen.
04.Manual Clutch T est The tray2,3 clutch is on for 1sec and then it automatically Tray 2,3 Clutch On/Off
stops, when the execution is chosen.On this function,
the main motor runs before 2sec from the point of the clutch
on in order to check the clutch state.
1 1.LSU Motor T est The laser motor keeps running after the execution key Laser Motor On(Off)
is chosen and stops when the stop key is chosen.
12.LSU Hsync T est “Laser Leady” is displayed, When the Laser Scanning Laser Leady On(Off)
Unit is ready to print. On the other case “Laser Error”
13.LD Test “Diode On” is displayed, when the laser diode is on. Diode On(Off)
On the other case “Diode Off” is displayed.
21.Feed Sen T est These Functions are considered to check the present
"Sensor Off"to “ Sensor On ”
22.Exit Sen T est state (normal or not)of the Sensors.
23.Cover Sen T est After the cover is open, touch the sensor and confirm
"Cover Open" to "Cover Close"
the message changed “Cover Open” to “ Cover Close”
24.Empty Sen T est These Functions are considered to check the present
"Sensor Off"to “ Sensor On ”
25.Manual Sen T est state (normal or not)of the Sensors.
31.Them ADC 180 “current value"is displayed on the upper line of the panel, Input and output value are
32.Them ADC 140 and “target value"on the bottom line. ADC value.(refer to the
33.Them ADC 120 Target value is limited from “191˚C” to “80˚C” ADC table)
34.Them ADC 100
41.MHV Test These Functions are considered to check whether the MHV On(Off)
42.Dev Bias T est control for HVPS is normal or not. Dev Bias On(Off)
43.THV EN/NEG T est THV EN/NEG On(Off)
44.THV ON(1300V) THV On(Off)
45.THV ADC 1300V ADC value displayed.
46.THV ADC 600V~3500 ADC value displayed.
Page 33

Alignment and Adjustmens
Samsung Electronics
Service Manual
6-33
6.8.7 Identify Sale Date
This function confirms the date that consumer bought product and used the product for the first time.
When the consumer first operate the machine, it will start a scan and page count.
The time the machine was first used is remembered.
These settings are are remembered after memory delete (Clear All Memory).
< Method >
Press MENU, #, 1, 9, 3, # in sequence.Firmware version is displayed on LCD.
Press 1( in the number keypad) : The LCD display shows "Updated date"
Press 2( in the number keypad) : The LCD display shows "Product first use date"
< Display >
OS 1 . 00 . 86 . 07
11-31-2005
Service Data
2004-1-11
Page 34

Samsung Electronics
Service Manual
Alignment and Adjustmens
6-34
6.9 Error Message
Messages in the colored cells are available only with CLX-3160FN.
[Color] Toner Empty
[Color] Toner Low
[COMM. Error]
[Incompatible]
[Line Error]
[No Answer]
[No Paper] Add Paper
[Stop Pressed]
ADC Not Confirm Error
Cancel?
1:Yes 2:No
Deve Home Sensor Error
Document Jam
Door Open
Enter Again
Fuser Fan Locked
Group Not Available
The color toner cartridge has run out. The
machine stops printing.
The corresponding color toner cartridge is
almost empty.
The machine has a communication
problem.
The remote machine does not have the
requested feature, such as polling.
This message also occurs if the remote
machine does not have enough memory
space to complete the operation you are
attempting.
Your machine cannot connect with the
receiving fax machine or has lost contact
because of a problem with the phone line.
The receiving fax machine has not
answered after several redial attempts.
The paper in the tray has run out.
Stop/Clear has been pressed during an
operation.
A problem has occurred in the ADC in the
machine.
Your machine's memory has become full
while trying to store an original into mem
ory.
There is a problem in the fuser unit.
The loaded original has jammed in the
ADF.
The front cover or rear cover is not
securely latched.
You entered an unavailable item.
There is a problem in the cooling fan of
the machine.
You have tried to select a group location
number where only a single location
number can be used, such as when
adding locations for a Multiple Send
operation.
Replace the color toner cartridge with a
new one.
Take out the toner cartridge and thoroughly
shake it. By doing this, you can tem
porarily reestablish printing operations.
Ask the sender to try again.
Reconfirm the remote machine's features.
Try again. If the problem persists, wait an
hour or so for the line to clear and try
again. Or, turn the ECM mode on.
Try again. Make sure that the receiving
machine is operational.
Load paper in the tray.
Try again.
Replace to the Main board.
To cancel the fax job, press the 1 button to
accept Yes. If you want to send those
pages that have been successfully stored,
press the 2 button to accept No. You
should send the remaining pages later,
when memory is available.
Unplug the power cord and plug it back in.
If the problem persists, Replace to the
Main board.
Clear the jam.
Close the cover until it locks into place.
Enter the correct item again.
Open and then close the front cover.
Use a speed dial number or dial a number
manually using the number keypad.
Display Meaning Suggested solutions
Page 35

Alignment and Adjustmens
Samsung Electronics
Service Manual
6-35
Install [Color] Toner
Install [Part]
Invalid [Color] Toner
Invalid [Part]
Line Busy
Low Heat Error Cycle
Power
LSU Hsync Error Cycle
Power
LSU Motor Error Cycle
Power
Main Motor Locked
Memory Dial Full
Memory Full
MP Tray Paper Empty
Not Assigned
Open Heat Error
Cycle Power
Operation Not Assigned
Out Bin Full
Paper Jam 0
Open/Close Door
Paper Jam 1
Open/Close Door
Power Failure
The color toner cartridge is not installed.
The corresponding part of the machine is
not installed.
The color toner cartridge you have
installed is not for your machine.
The color part of the machine is not for
your machine.
The receiving fax machine did not answer
or the line is already engaged.
There is a problem in the fuser unit.
A problem has occurred in the LSU (Laser
Scanning Unit).
A problem has occurred in the LSU (Laser
Scanning Unit).
There is a problem in the main motor.
You are trying to schedule a fax job when
memory for storing fax jobs is full.
The memory is full.
There is no paper in the multi-purpose
tray.
The speed button or speed dial number
you tried to use has no number assigned
to it.
There is a problem in the fuser unit.
You are in the Add Page/Cancel Job
operation, but there are no jobs stored.
The output tray of the machine is full of
paper.
Paper has jammed in the feeding area of
the tray.
Paper has jammed in the paper exit area.
Power has turned off then on and the
machine's memory has not been back up.
Install the color toner cartridge.
Install the part into your machine.
Install the a Samsung-genuine color toner
cartridge designed for your machine.
Install the a Samsung-genuine part
designed for your machine.
Try again after a few minutes.
Unplug the power cord and plug it back in.
If the problem persists, Replace to the
Toner Cartridge.
Unplug the power cord and plug it back in.
If the problem persists, Replace to the
Toner Cartridge.
Unplug the power cord and plug it back in.
If the problem persists, Replace to the
LSU Unit.
Open and then close the front cover.
Wait until a scheduled job is complete.
Delete unnecessary fax jobs and
retransmit after more memory becomes
available.
Alternatively, split the transmission into
more than one operation.
Load paper in the multi-purpose tray.
Enter the number manually using the
number keypad or store the number or
address.
Unplug the power cord and plug it back in.
If the problem persists, Replace to the
Fuser Unit.
Check the display to see if there are any
scheduled jobs.
Remove paper.
Clear the jam.
Clear the jam.
The job which you were trying to do before
the power failure must be completely
re-done.
Display Meaning Suggested solutions
Page 36

Samsung Electronics
Service Manual
Alignment and Adjustmens
6-36
Replace [Color]
Toner
Replace [Part]
Replace [Part]
Soon
Retry Redial?
Scanner locked
SCF Cover Open
SCF Paper Jam
Self Diagnostic...
Transfer Belt Error
Tray 1
Paper Empty
Tray 2
Paper Empty
This message appears between Toner
Empty and Toner Low status.
The life of the part expires totally.
The life of the part expires soon.
The machine is waiting for a specified time
interval to redial a previously busy station.
The scanner module is locked
The jam cover in the optional tray 2 is
open.
Paper has jammed in the optional tray 2.
The engine in your machine is checking
some problems detected.
A problem has occurred in the transfer belt
in the machine.
There is no paper in the tray 1.
There is no paper in the optional tray 2.
Replace the toner cartridge with a new
one.
Replace the part with a new one. Call for
service.
Replace to maintenance part.
You can press OK to immediately redial, or
Stop/Clear to cancel the redial operation.
Unlock the scanner and press Stop/Clear.
Close the jam cover in the optional tray 2.
Clear the jam.
Please wait a few minutes.
Unplug the power cord and plug it back in.
If the problem persists, please call for
service.
Load paper in the tray 1.
Load paper in the optional tray 2.
Display Meaning Suggested solutions
 Loading...