

Samsung CLP680DW Users Manual

Clearing paper jams
CLP-68xND Series/CLP-68xDW Series
Click this link to open an animation about clearing a jam.
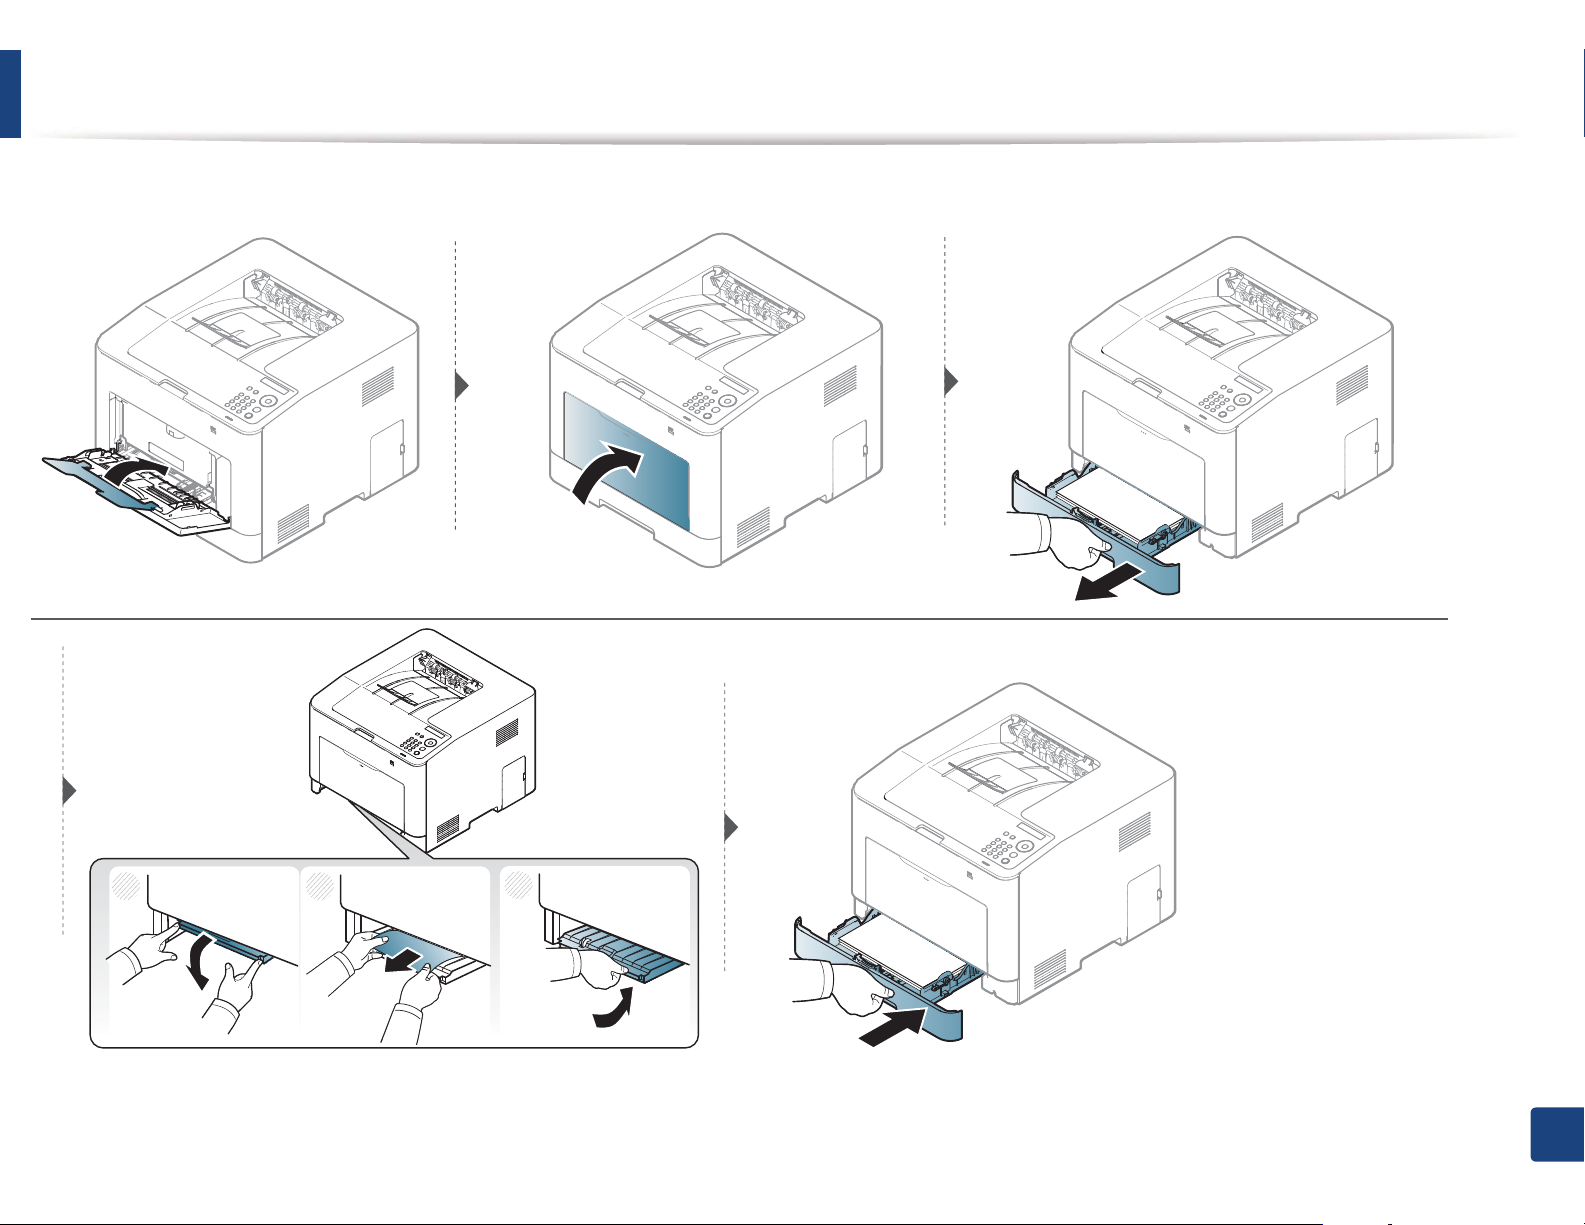
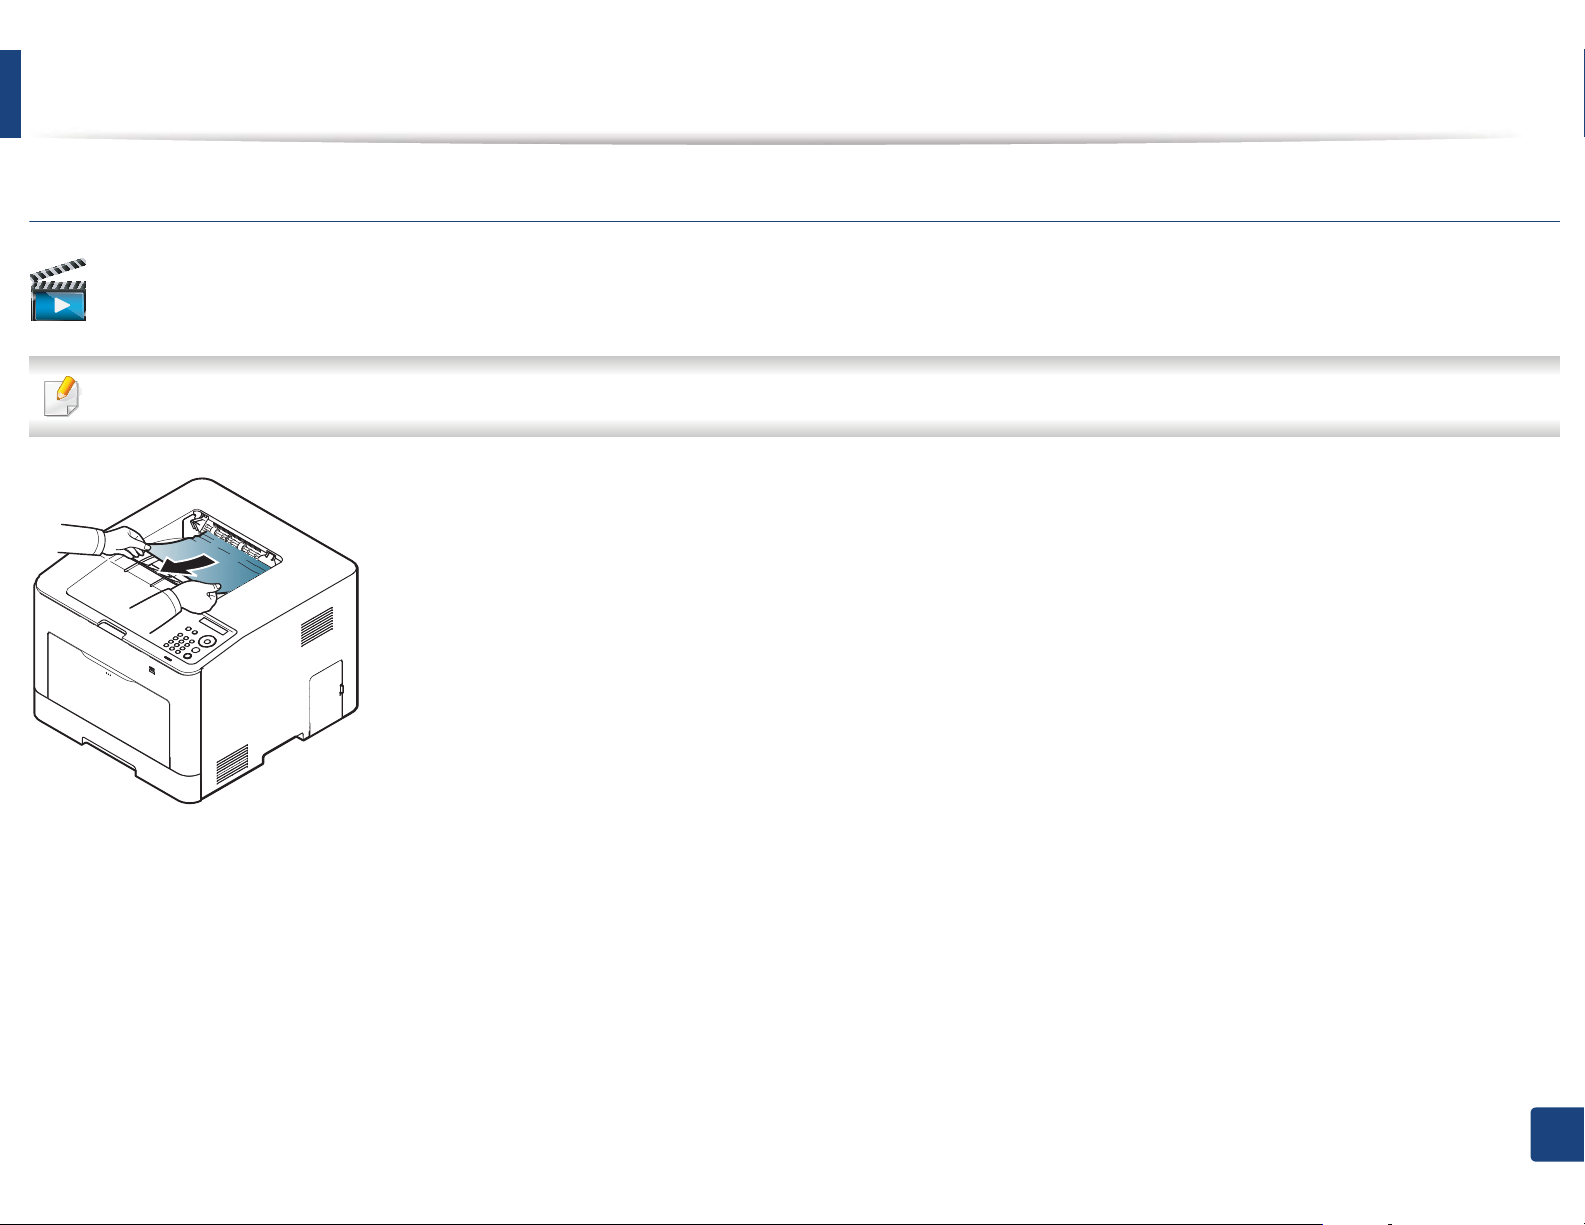
When you print using the multi-purpose tray and the machine detects that there is either no paper or that the paper has been improperly loaded, follow the next
steps to release the jammed paper.
4. Troubleshooting
86
Clearing paper jams
If you do not see the paper in this area, stop and go to next step:
1
2
3
4. Troubleshooting
87
Clearing paper jams
4
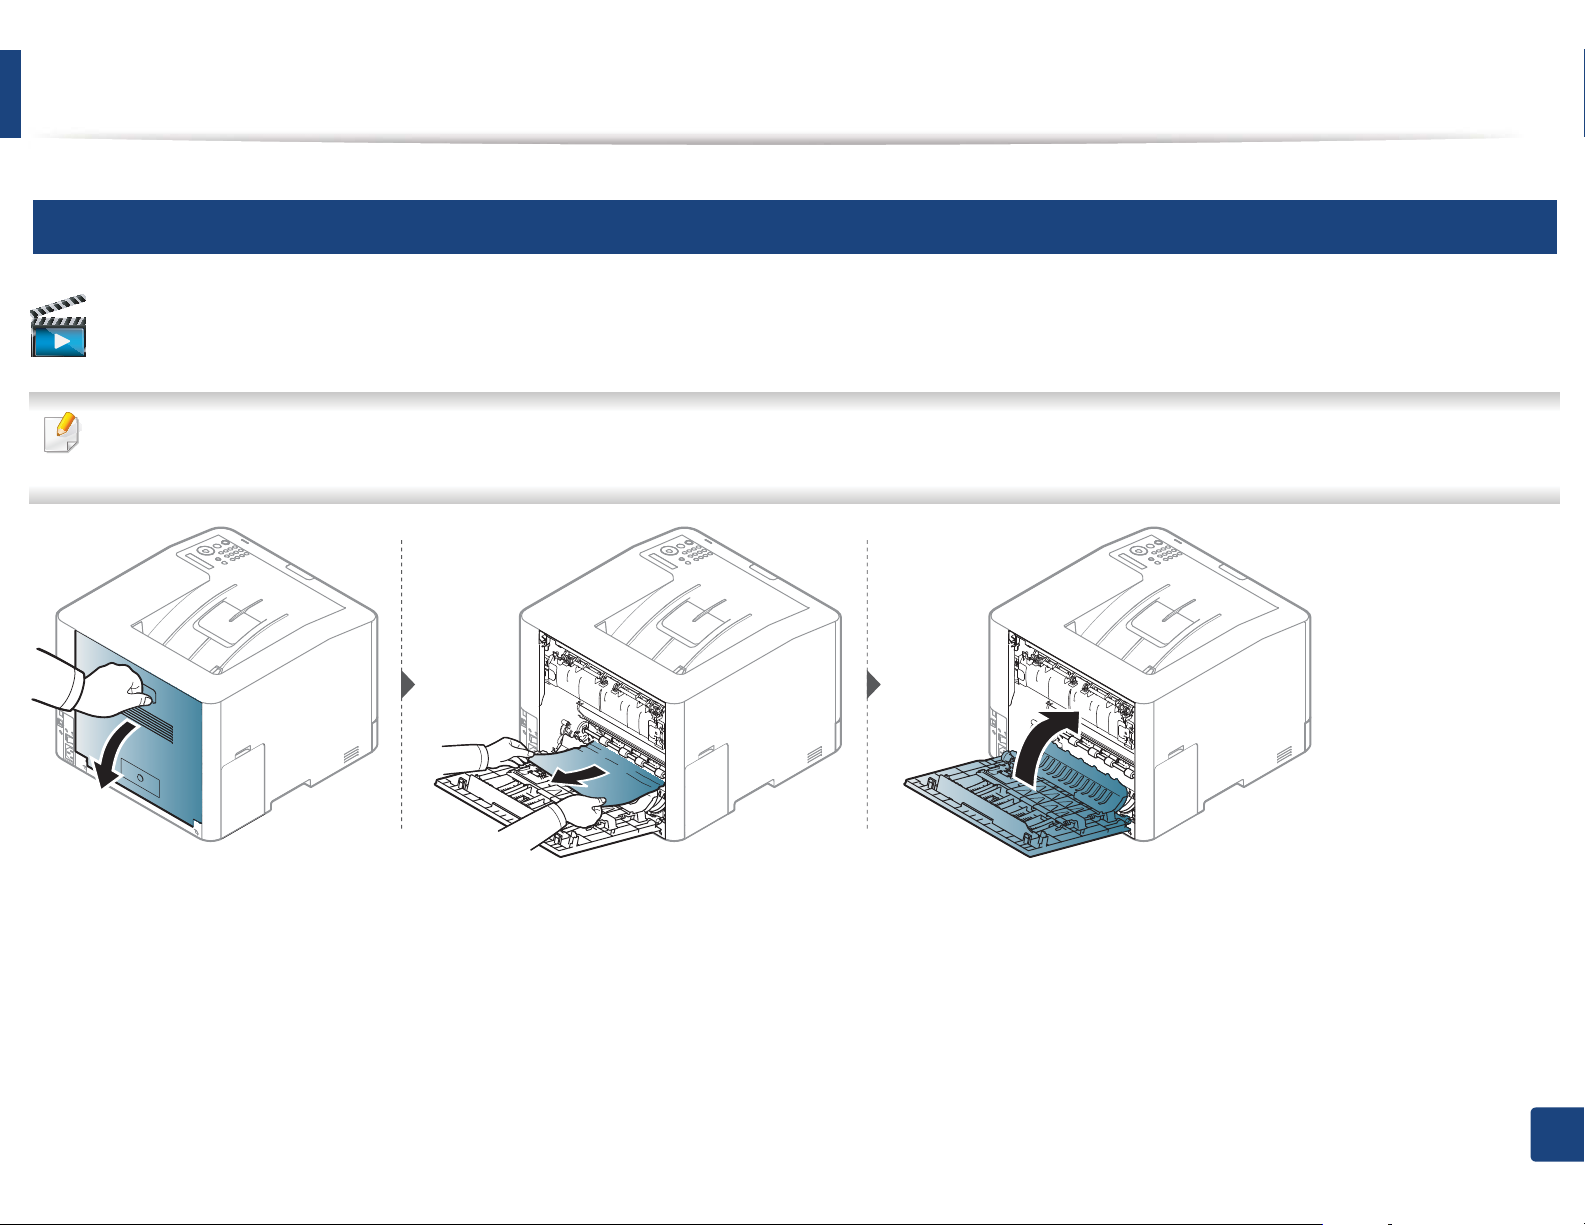
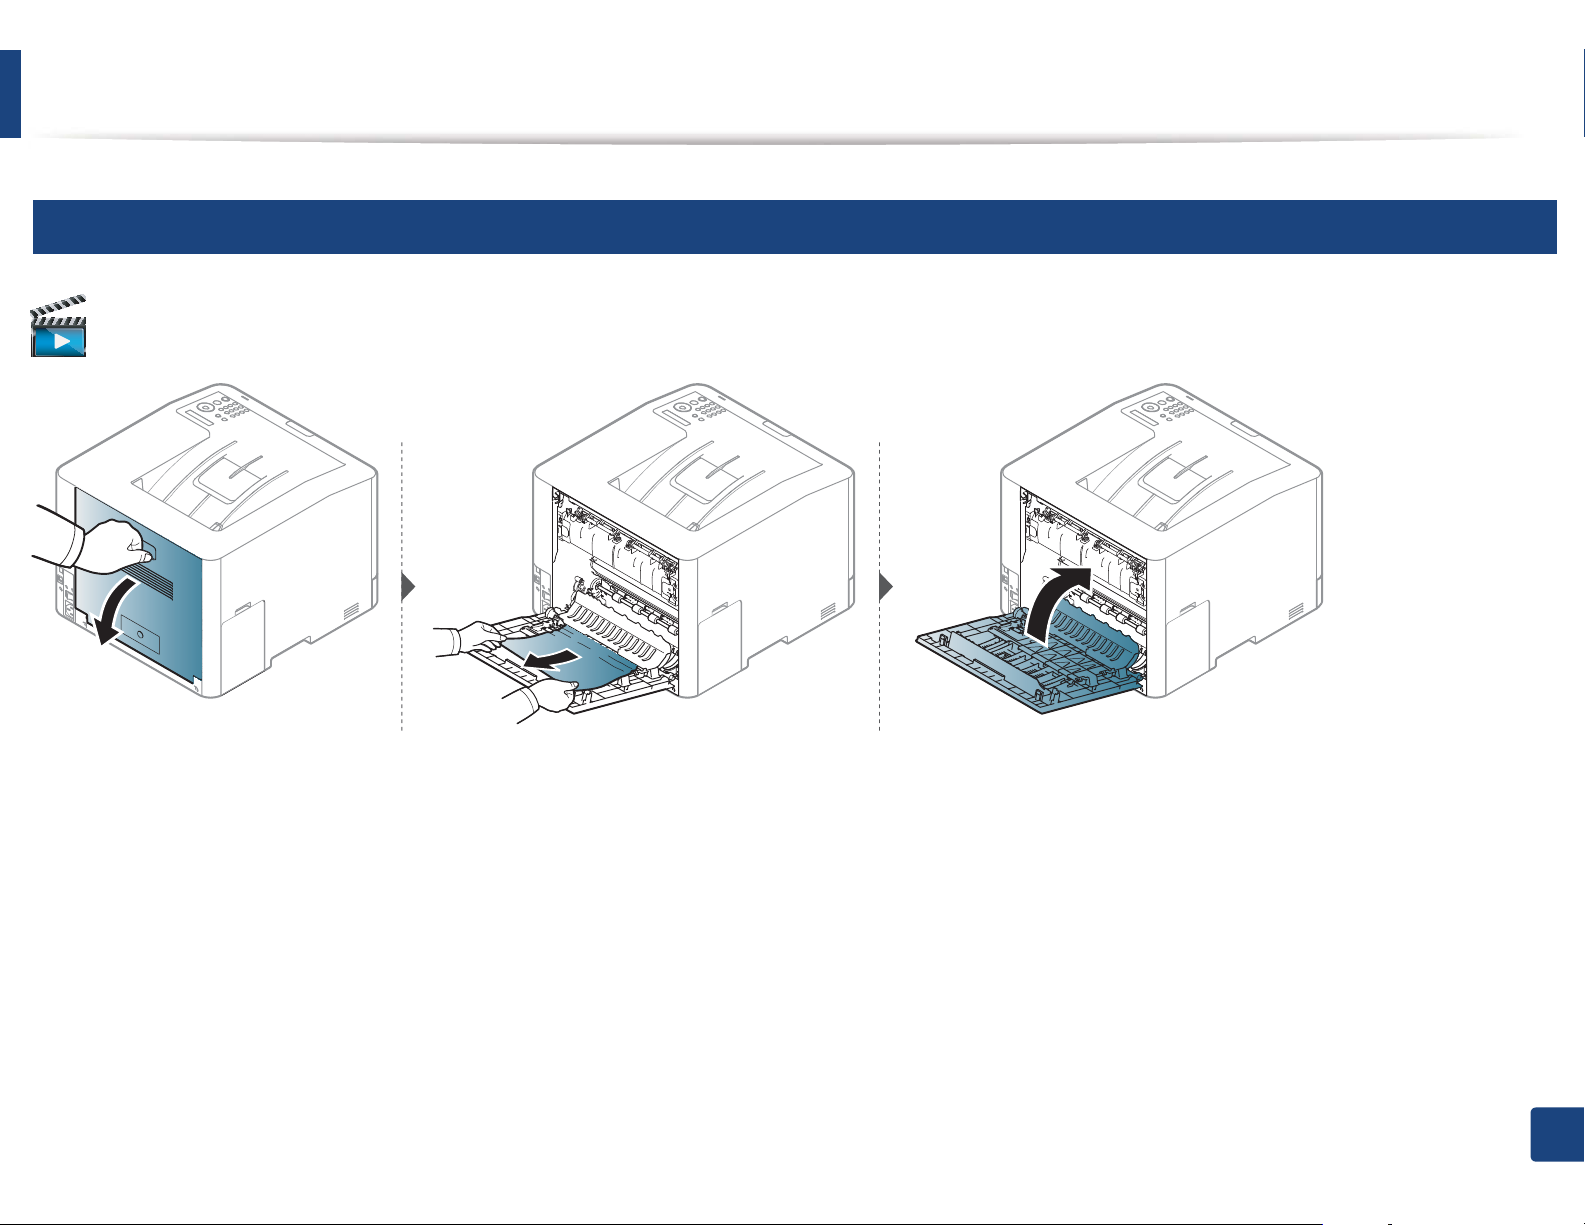
Inside the machine
Click this link to open an animation about clearing a jam.
• The fuser area is hot. Take care when removing paper from the machine.
• Illustrations on this user’s guide may differ from your machine depending on its options or models. Check your machine type (see "Front view" on page 17).
4. Troubleshooting
88
Clearing paper jams
5
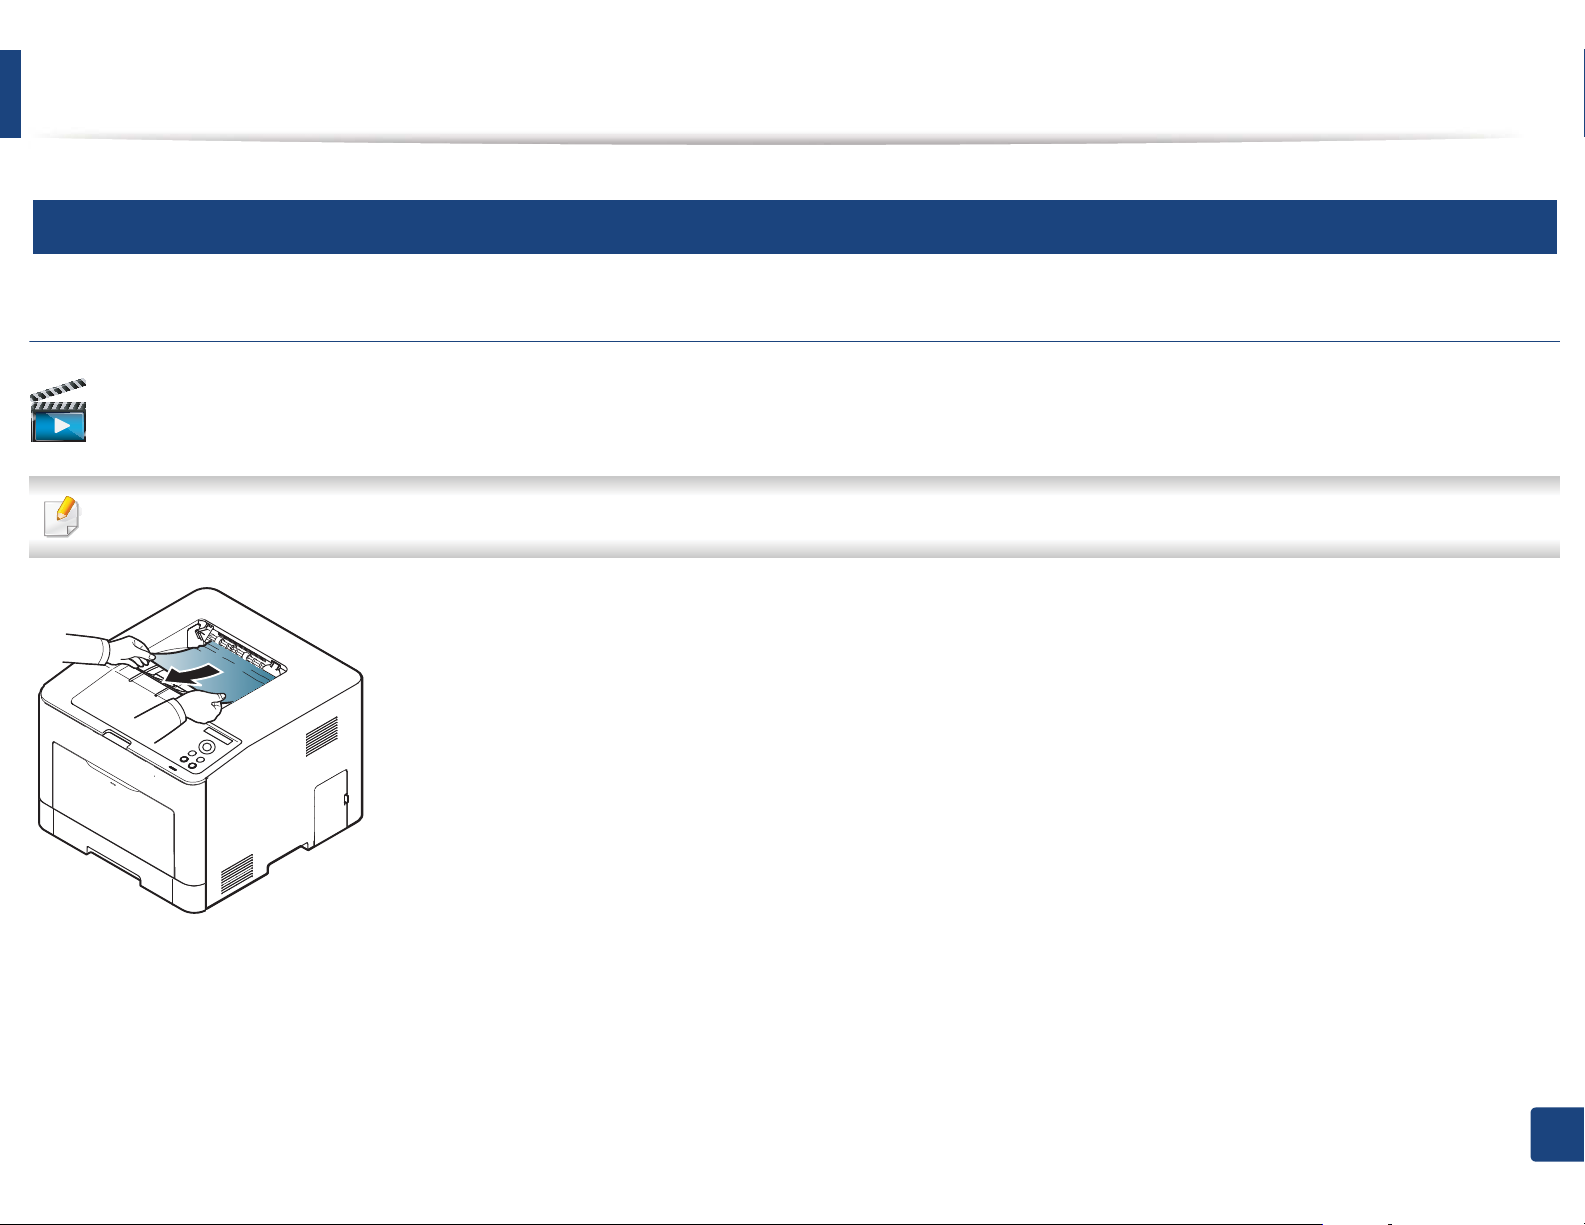
In exit area
CLP-41xN Series/CLP-41xNW Series
Click this link to open an animation about clearing a jam.
The fuser area is hot. Take care when removing paper from the machine.
4. Troubleshooting
89
Clearing paper jams
If you do not see the paper in this area, stop and go to next step:
4. Troubleshooting
90
Clearing paper jams
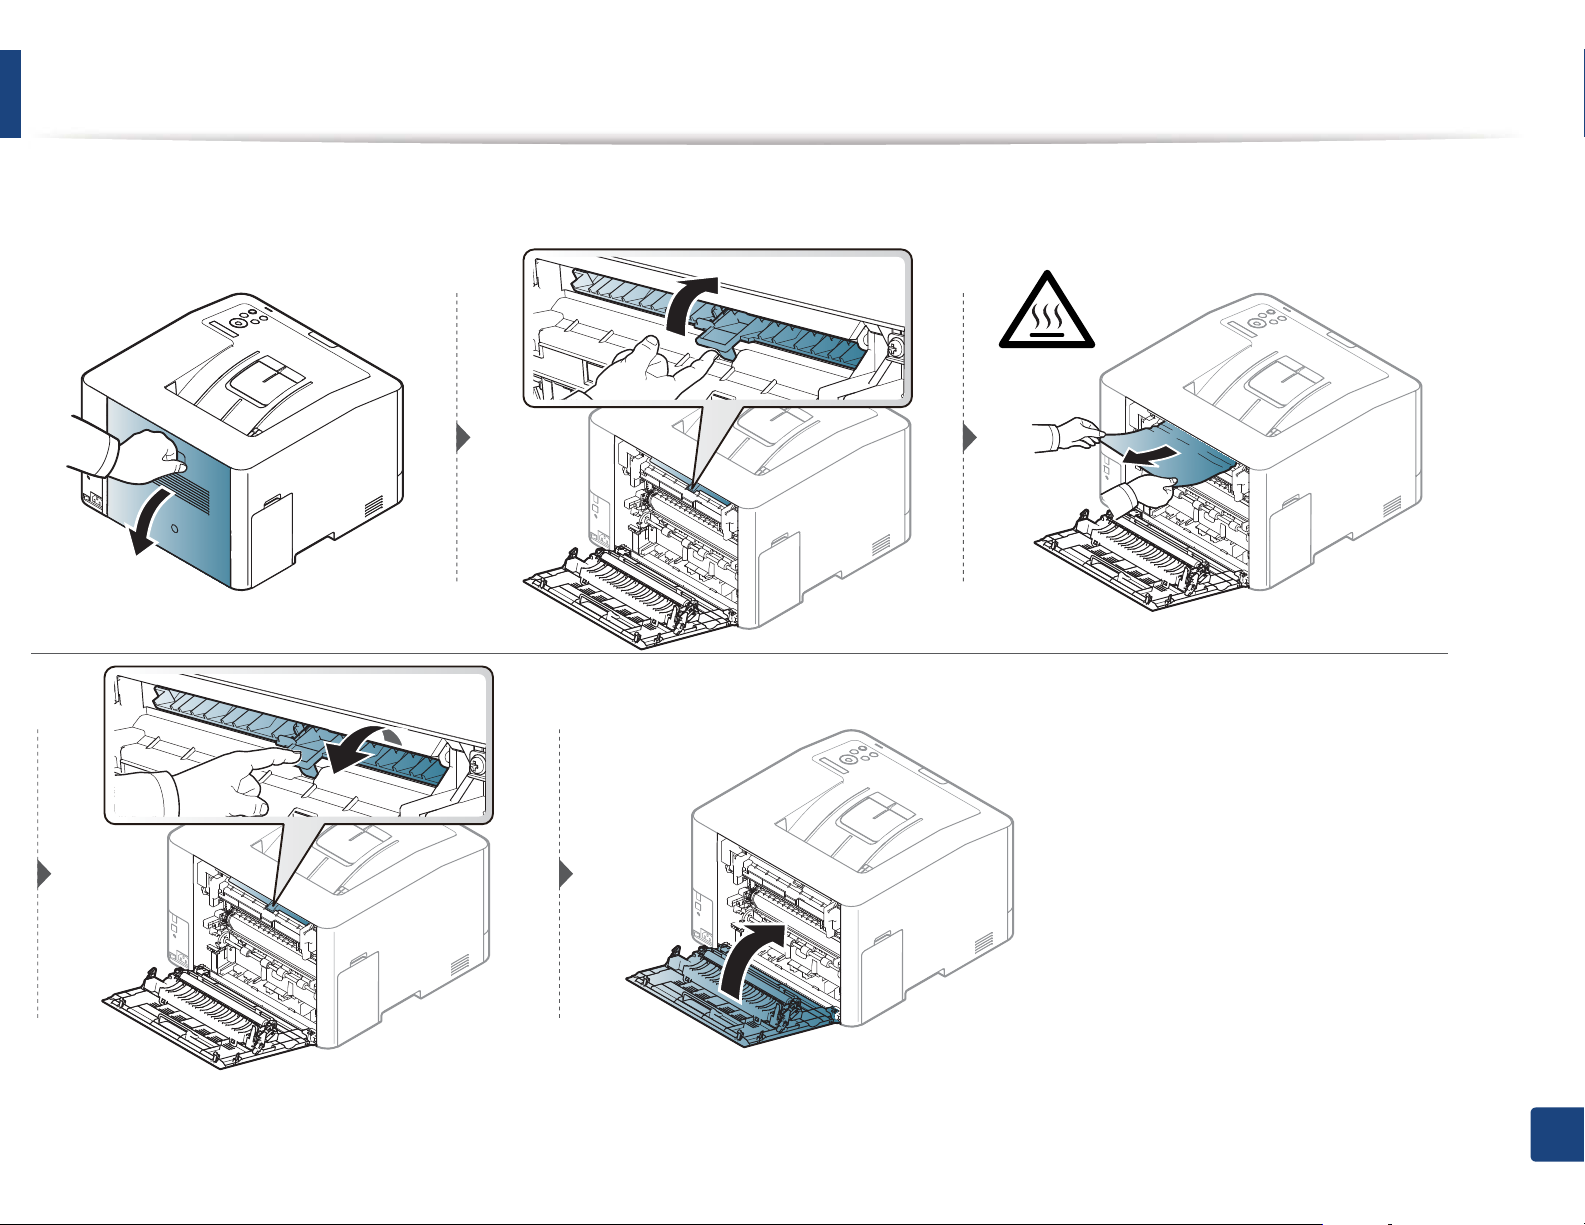
CLP-68xND Series/CLP-68xDW Series
Click this link to open an animation about clearing a jam.
The fuser area is hot. Take care when removing paper from the machine.
4. Troubleshooting
91

Clearing paper jams
If you do not see the paper in this area, stop and go to next step:
4. Troubleshooting
92
Clearing paper jams
6
In the duplex unit area (CLP-68xND Series/CLP-68xDW Series only)
Click this link to open an animation about clearing a jam.
4. Troubleshooting
93

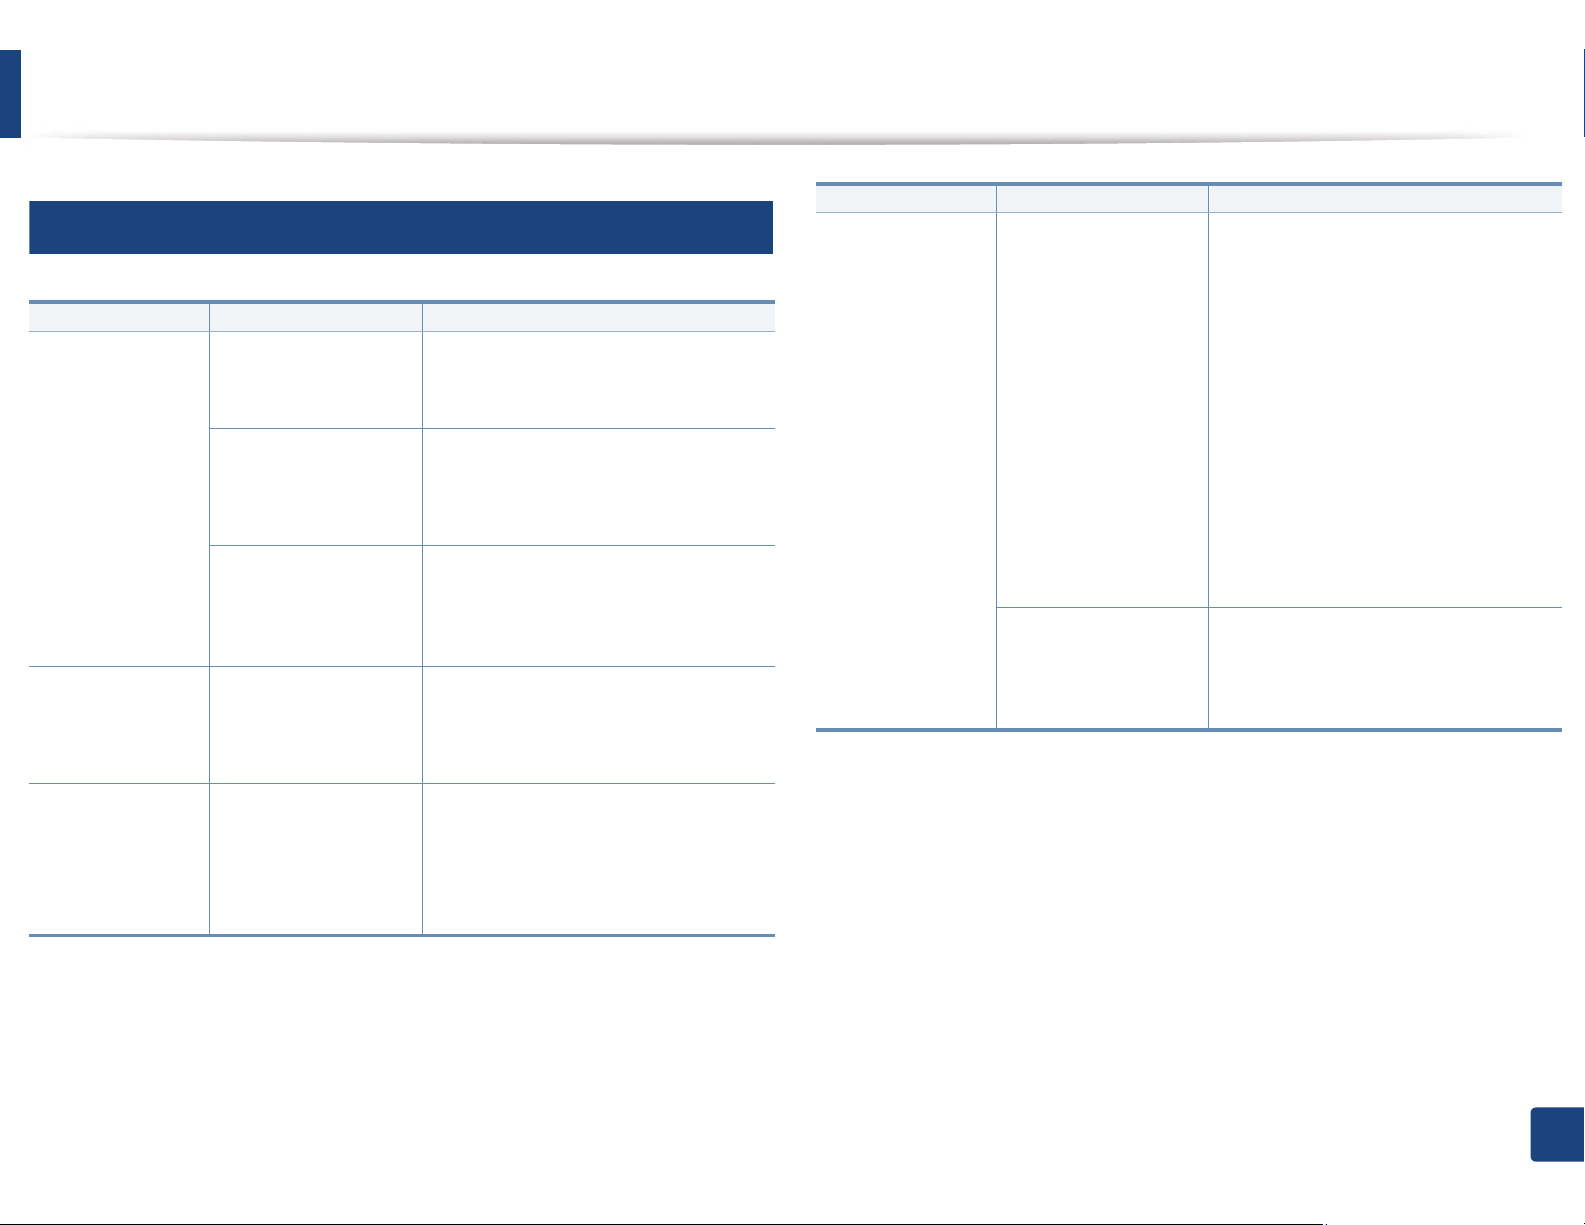
Understanding the status LED
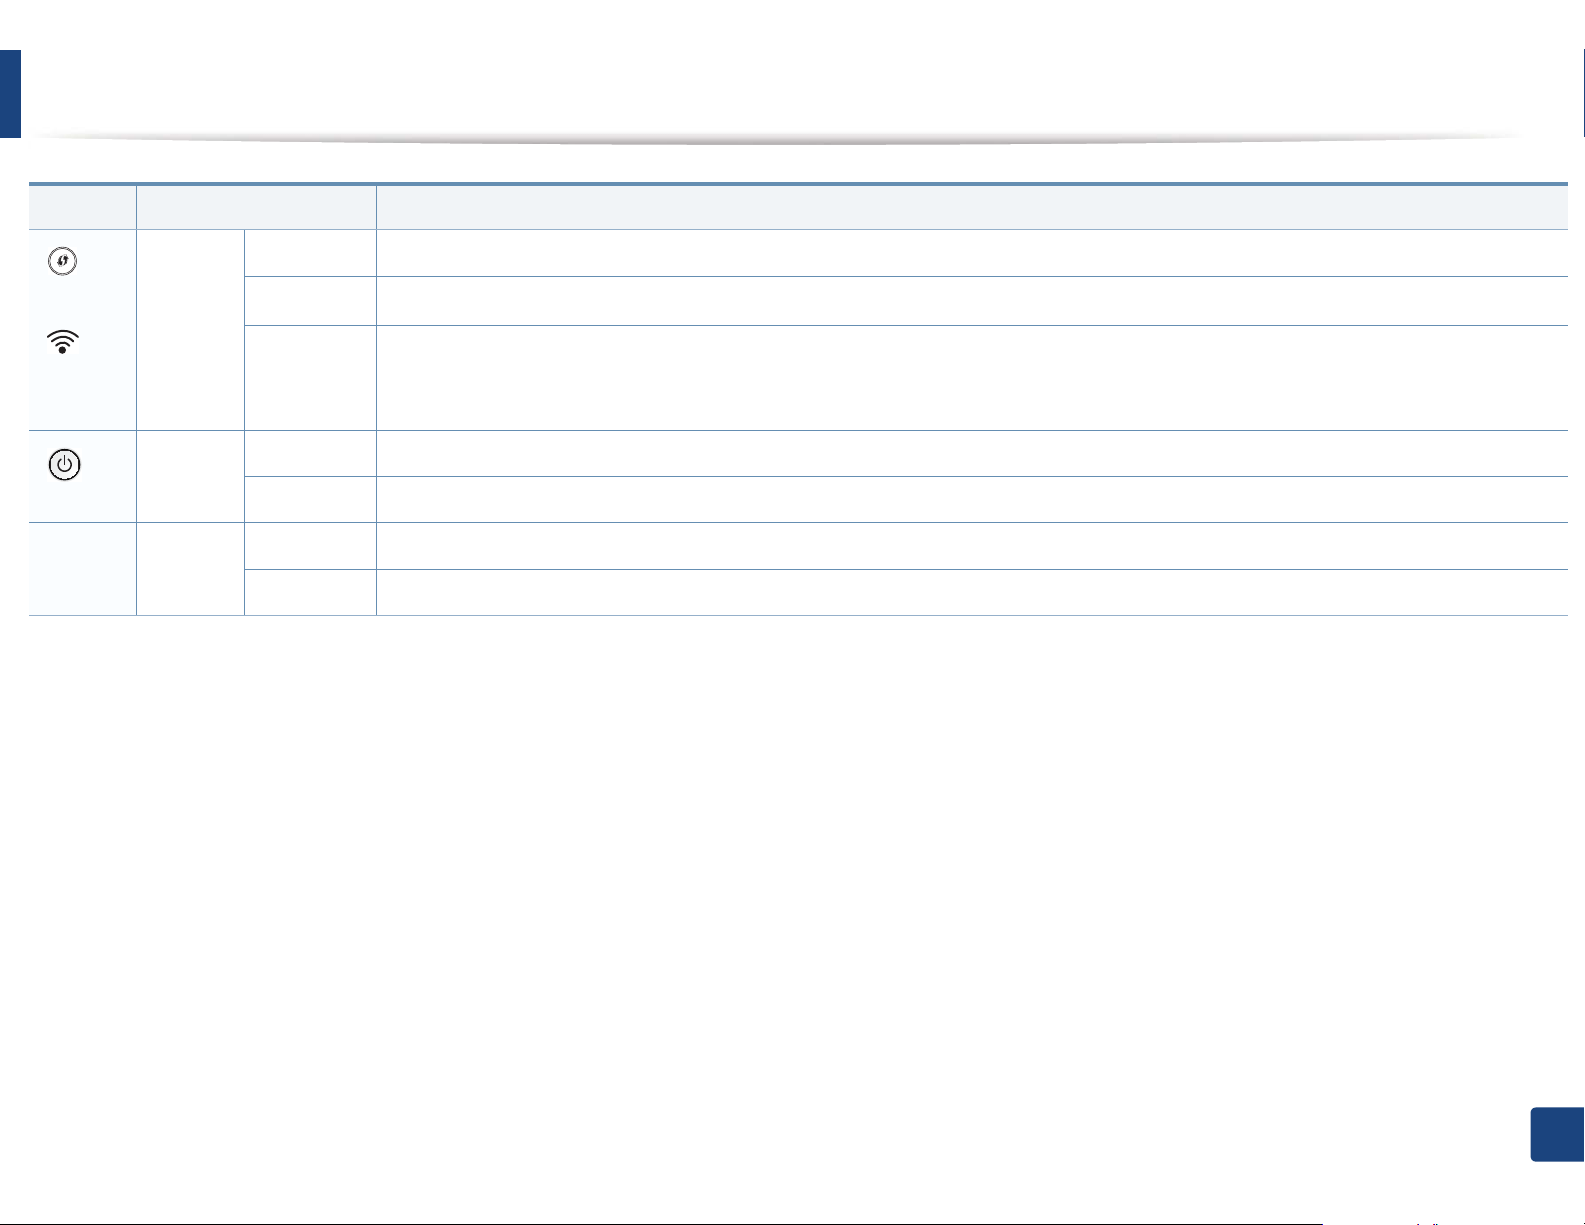
The color of the LED indicates the machine's current status.
• Some LEDs may not be available depending on model or country (see "Control panel overview" on page 19).
• To resolve the error, look at the error message and its instructions from the troubleshooting part (see "Understanding display messages" on page 96).
• You also can resolve the error with the guideline from the computers’s Samsung Printing Status program window (see "Using Samsung Printer Status" on page
235).
• If the problem persists, call a service representative.
LED Status Description
Off The machine is off-line.
Blinking When the backlight blinks, the machine is receiving or printing data.
Green
On • The machine is on-line and can be used.
()
Status
Red
Blinking
On
• A minor error has occurred and the machine is waiting for the error to be cleared. Check the display message. When the problem
is cleared, the machine resumes.
• Small amount of toner is left in the cartridge. The estimated cartridge life
a
of toner is close. Prepare a new cartridge for
replacement. You may temporarily increase the printing quality by redistributing the toner (see "Redistributing toner" on page
b
62).
• A toner cartridge has almost reached its estimated cartridge life
a
. It is recommended to replace the toner cartridge (see
"Replacing the toner cartridge" on page 64).
• The cover is opened. Close the cover.
• There is no paper in the tray when receiving or printing data. Load paper in the tray.
• The machine has stopped due to a major error. Check the display message (see "Understanding display messages" on page 96).
• A paper jam has occurred (see "Clearing paper jams" on page 82).
4. Troubleshooting
94
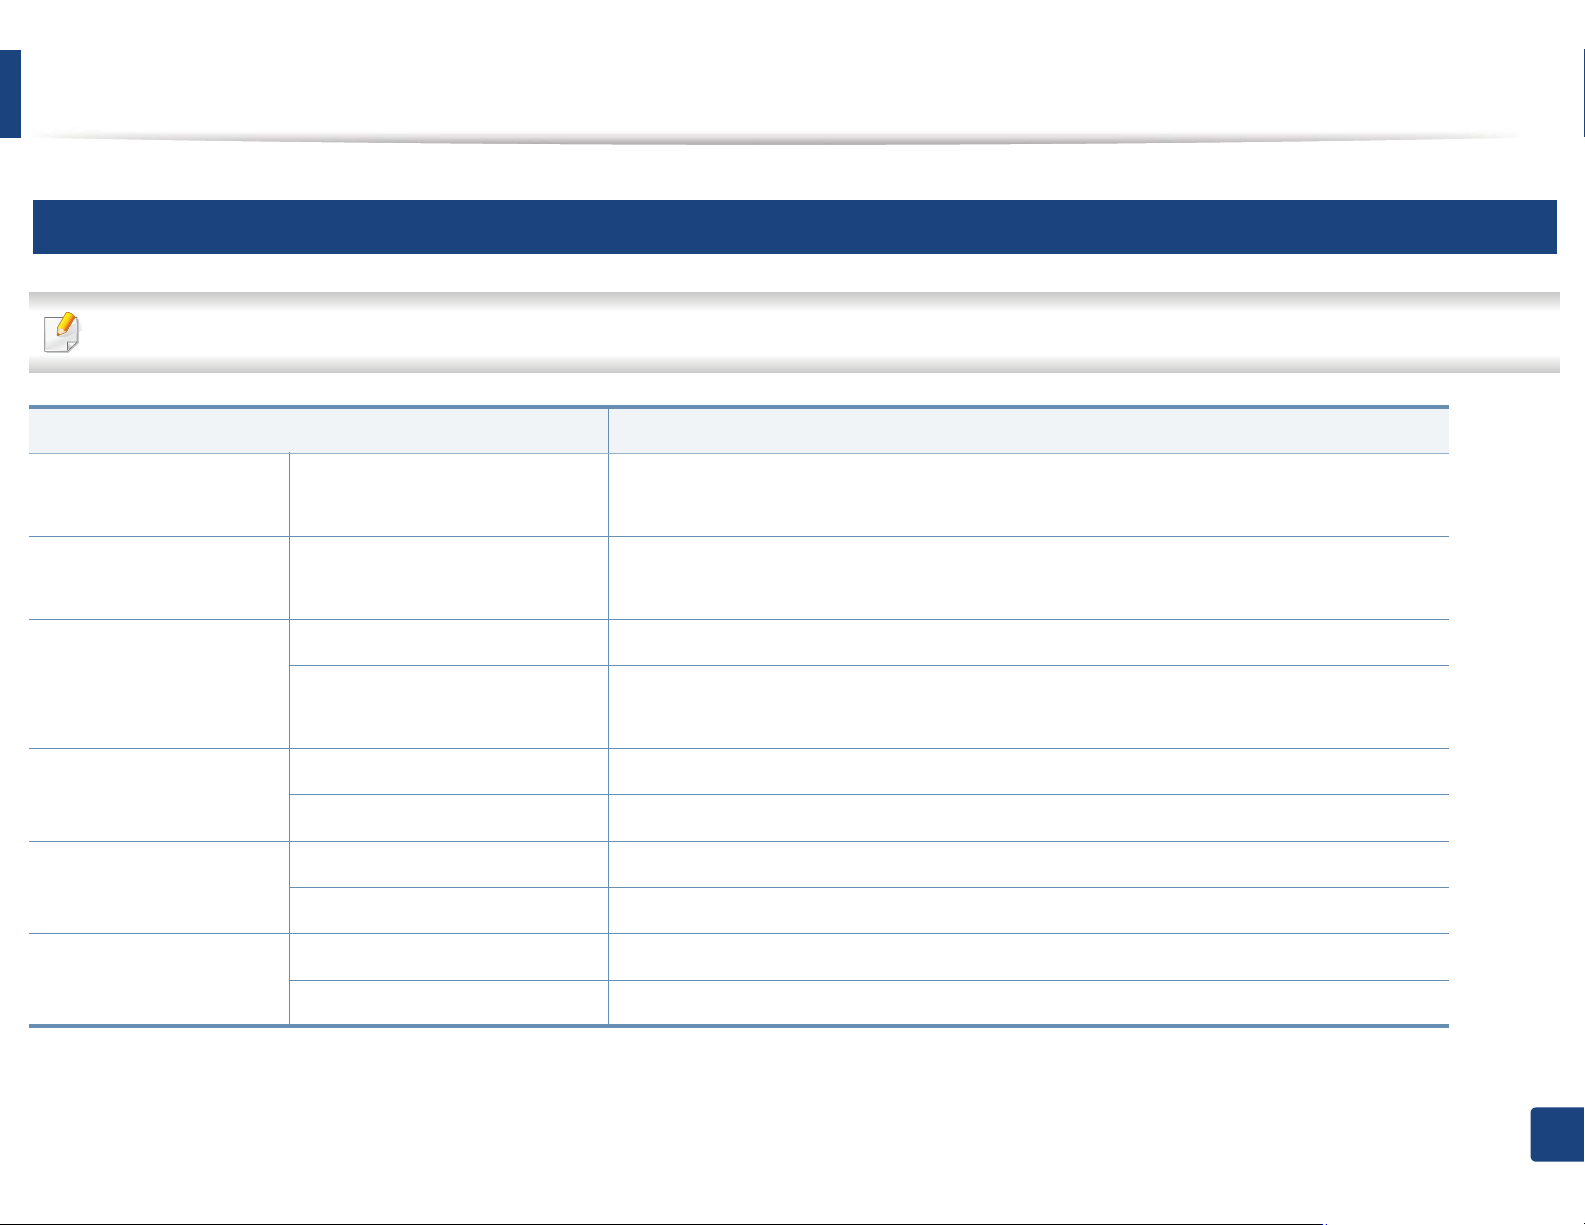
Understanding the status LED
LED Status Description
()
b
WPS
()
Wireless
b
()
Power
Eco Green
a. Estimated cartridge life means the expected or estimated toner cartridge life, which indicates the average capacity of print-outs and is designed pursuant to ISO/IEC 19798. The number of pages
may be affected by operating environment, percentage of image area, printing interval, graphics, media and media size. Some amount of toner may remain in the cartridge even when red LED is
on and the printer stops printing.
b. Some LEDs may not be available depending on model or country (see "Control panel overview" on page 19).
Blue
Blue
Blinking The machine is connecting to a wireless network.
On
Off
On The machine is in power save mode.
Off The machine is in ready mode or machine’s power is off.
On Eco mode is on (see "Eco printing" on page 48).
Off Eco mode is off.
The machine is connected to a wireless networkG(see "Wireless network setup" on page 150).
The machine is disconnected from a wireless network.
4. Troubleshooting
95
Understanding display messages
Messages appear on the control panel display to indicate the machine’s status
or errors. Refer to the tables below to understand the messages’ and their
meaning, and correct the problem, if necessary.
• You can resolve the error with the guideline from the computers’s
Printing Status program window (see "Using Samsung Printer Status" on
page 235).
• If a message is not in the table, reboot the power and try the printing job
again. If the problem persists, call a service representative.
• When you call for service, provide the service representative with the
contents of display message.
• Some messages may not appear on the display depending on the
options or models.
• [error number] indicates the error number.
• [tray type] indicates the tray number.
• [media type] indicates the media type.
• [media size] indicates the media size.
• [color] indicates the color of toner.
7
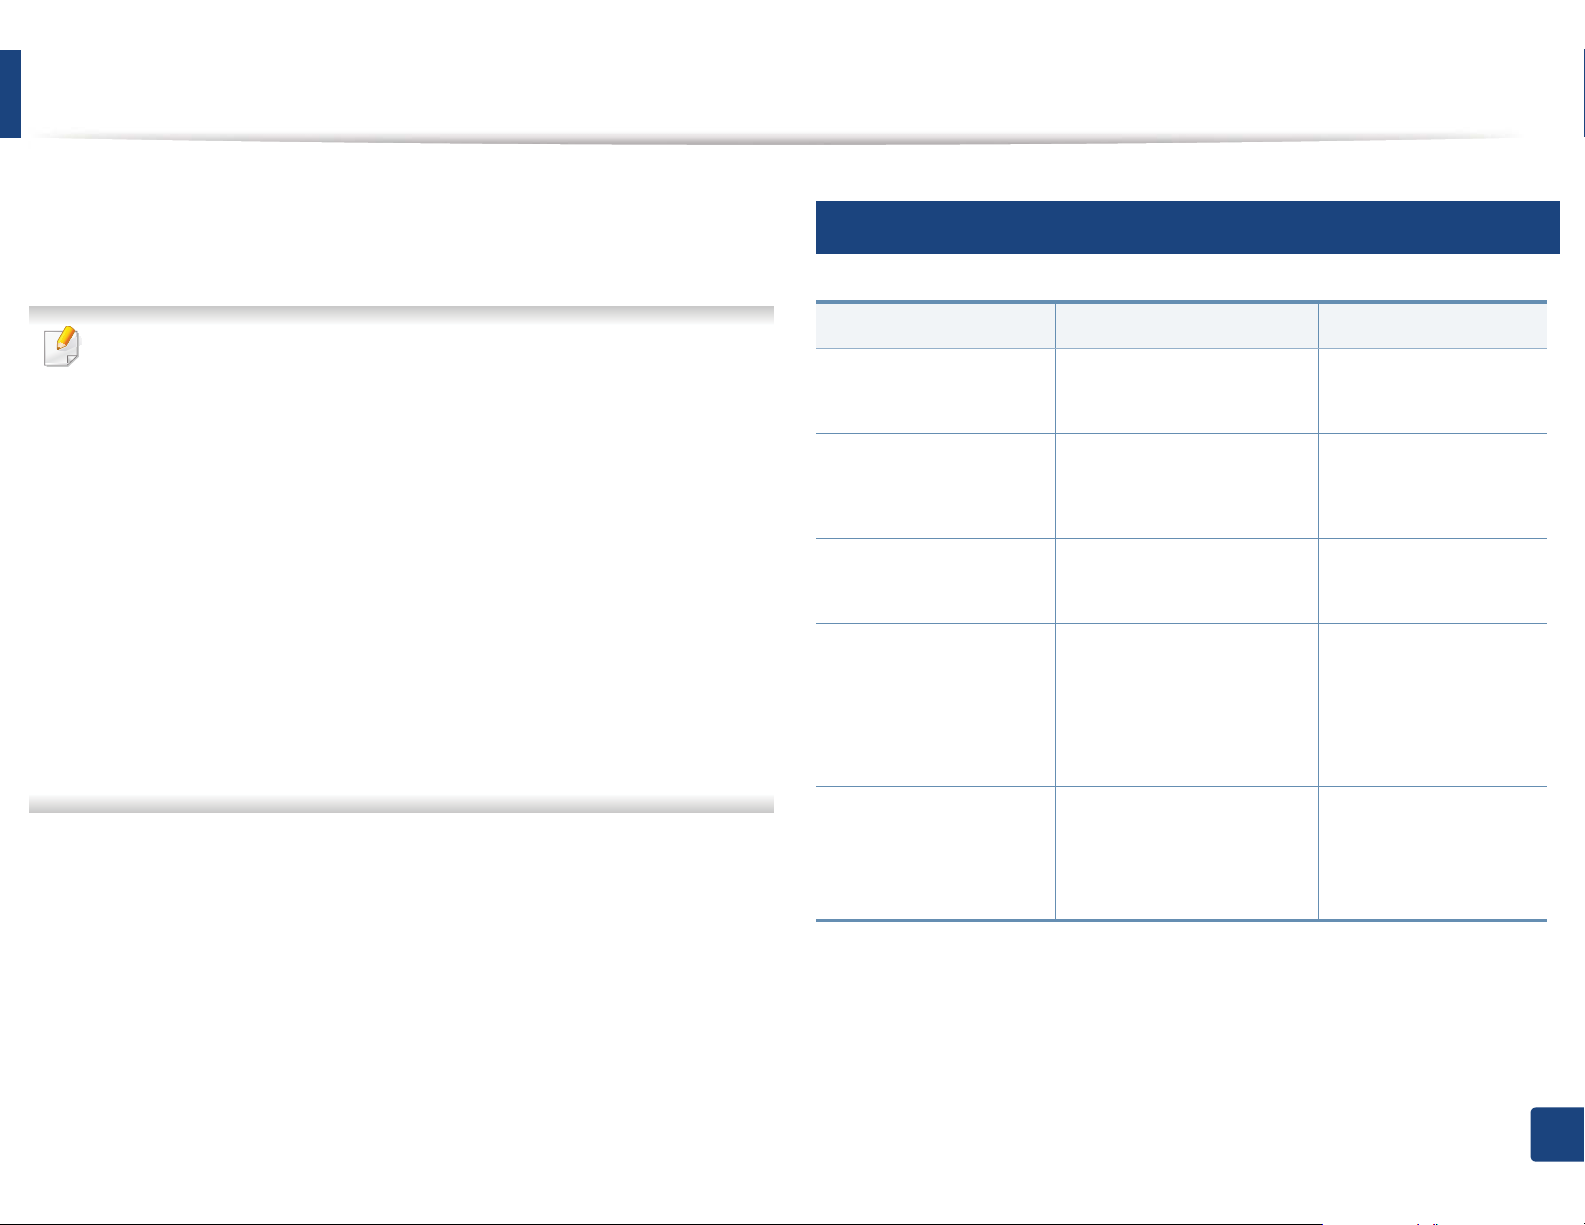
Paper Jam-related messages
Message Meaning Suggested solutions
Paper Jam
in exit area
Paper Jam
inside machine
Paper Jam
in Tray1
Paper Jam
in Tray2
Paper has jammed in the
exit area.
Paper has jammed in the
inside machine.
Paper has jammed in the
tray.
Paper has jammed in the
optional tray.
Clear the jam (see "In
exit area" on page 89).
Clear the jam (see
"Inside the machine"
on page 88).
Clear the jam (see "In
tray 1" on page 82).
Clear the jam (see "In
optional tray (CLP68xND Series/CLP68xDW Series only)" on
page 83).
Paper Jam
in MP tray
Paper has jammed in the
multi-purpose tray.
Clear the jam (see "In
the manual feeder/
multi-purpose tray" on
page 85).
4. Troubleshooting
96

Understanding display messages
Message Meaning Suggested solutions
Paper Jam
or empty in tray
Paper Jam
bottom of duplex
• Paper has jammed in
manual feeder.
• There is no paper in tray.
Paper has jammed during
duplex printing. This is
applicable only to
machines with this feature.
• Clear the jam (see
"CLP-41xN Series/
CLP-41xNW Series"
on page 85).
• Load paper in tray
(see "Multi-purpose
(or Manual feeder )
tray" on page 35).
Clear the jam (see "In
the duplex unit area
(CLP-68xND Series/
CLP-68xDW Series
only)" on page 93).
4. Troubleshooting
97
Understanding display messages
8
Toner-related messages
Message Meaning Suggested solutions
Install [color]
toner cartridge
Not Compatible
[color] toner cart.
Prepare Toner
ź
A toner cartridge is not
installed.
A toner cartridge is not
being detected
Not remove protective
film from toner.
The indicated toner
cartridge is not
suitable for your
machine.
Small amount of toner
is left in the indicated
cartridge. The
estimated cartridge
a
of toner is close.
life
Reinstall the toner cartridge.
Reinstall the toner cartridge two or
three times to confirm it is seated
properly. If the problem persists,
contact the service representatives.
Remove the protective film from the
toner cartridge. Refer to
Installation Guide
machine.
Install the corresponding toner
cartridge with a Samsung-genuine
cartridge (see "Replacing the toner
cartridge" on page 64).
Prepare a new cartridge for a
replacement. You may temporarily
increase the printing quality by
redistributing the toner (see
"Redistributing toner" on page 62).
Quick
provided with your
Message Meaning Suggested solutions
Replace Toner
ź
a. Estimated cartridge life means the expected or estimated toner cartridge life, which indicates
the average capacity of print-outs and is designed pursuant to ISO/IEC 19798 (see "Available
consumables" on page 56). The number of pages may be affected by operating environment,
percentage of image area, printing interval, media, percentage of image area, and media size.
Some amount of toner may remain in the cartridge even when replace new cartridge appears
and the machine stops printing.
The indicated toner
cartridge has almost
reached its estimated
a
cartridge life
The indicated toner
cartridge has reached
its estimated cartridge
a
.
life
.
• You can choose Stop or Continue
as shown on the control panel. If
you select Stop, the printer stops
printing. If you select Continue, the
printer keeps printing but the
printing quality cannot be
guaranteed.
• Replace the toner cartridge for the
best print quality when this
message appears. Using a cartridge
beyond this stage can result in
printing quality issues (see
"Replacing the toner cartridge" on
page 64).
Replace the toner cartridge (see
"Replacing the toner cartridge" on
page 64).
4. Troubleshooting
98

Understanding display messages
Samsung does not recommend using a non-genuine Samsung toner
cartridge such as refilled or remanufactured. Samsung cannot guarantee a
non-genuine Samsung toner cartridge's quality. Service or repair required
as a result of using non-genuine Samsung toner cartridges will not be
covered under the machine warranty.
9
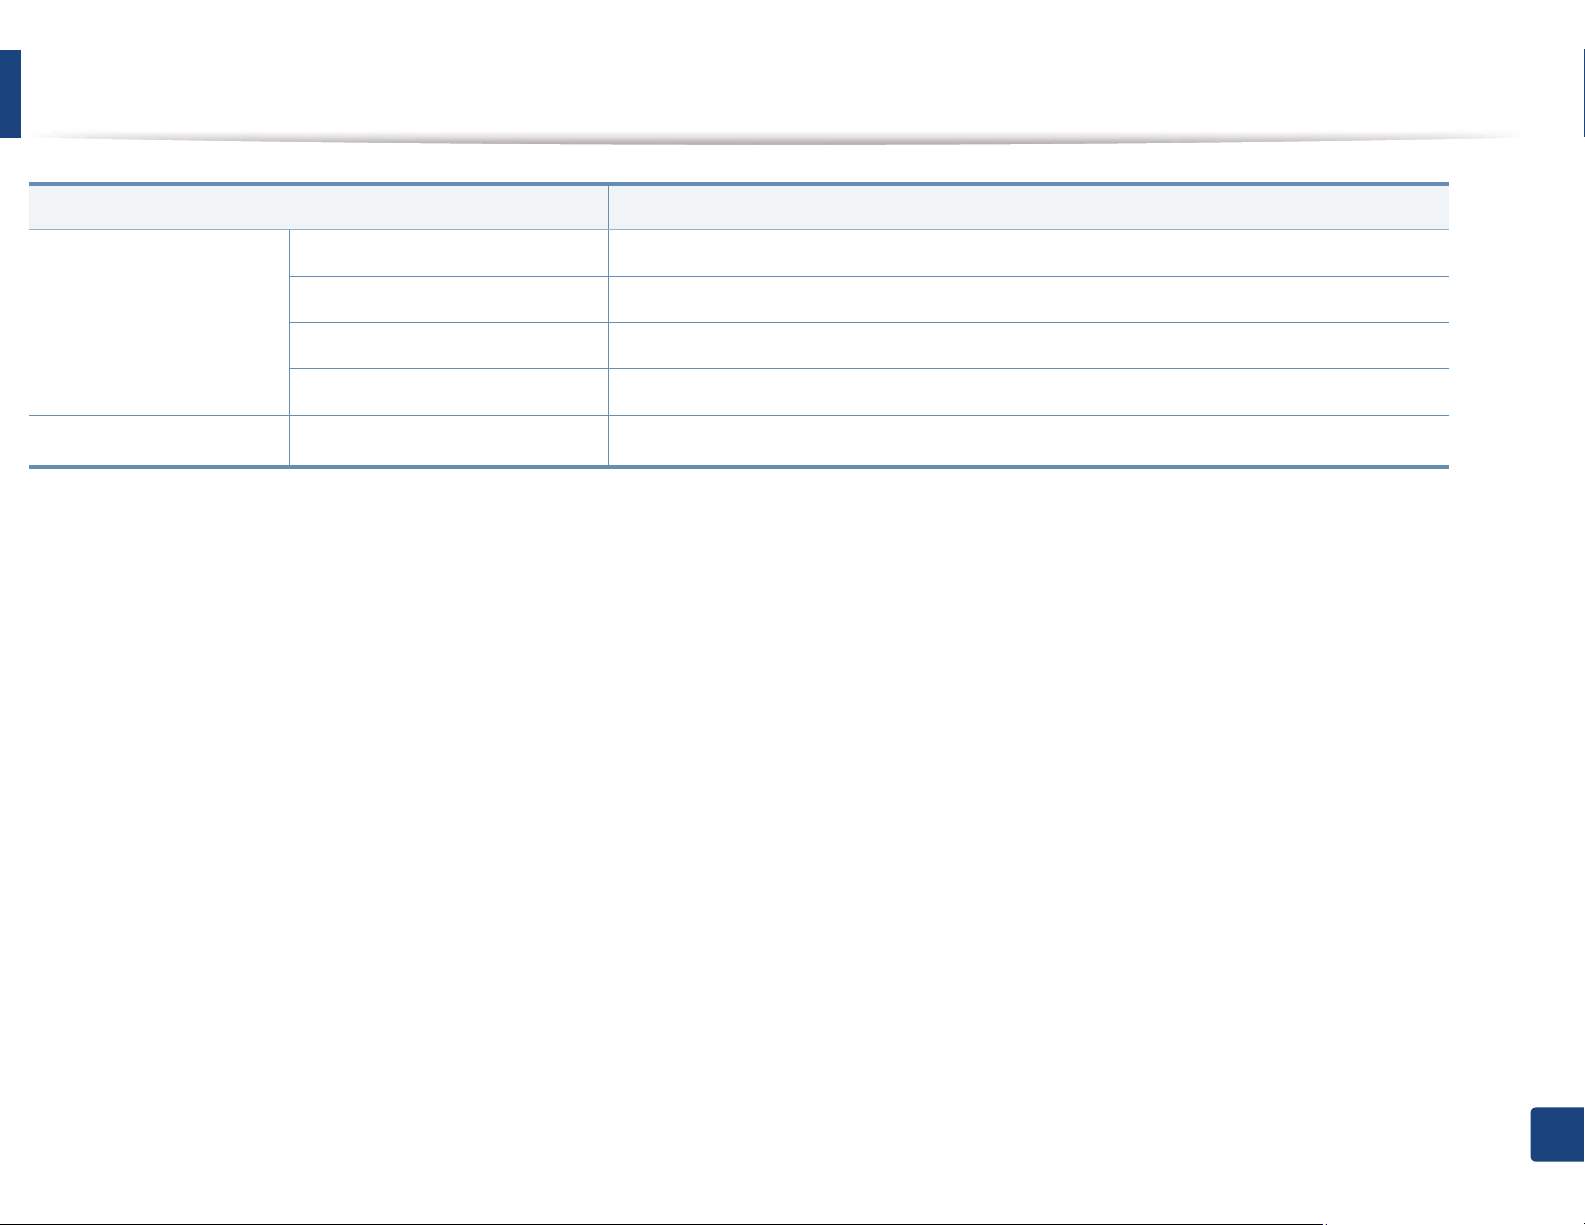
Tray-related messages
Message Meaning Suggested solutions
Paper Empty
in [tray number]
Paper Jam
or empty in tray
There is no paper in the
indicated tray.
• Paper has jammed
• There is no paper in
in manual feeder.
tray.
Load paper in the tray (see
"Loading paper in the tray"
on page 33).
• Clear the jam (see "CLP41xN Series/CLP-41xNW
Series" on page 85).
• Load paper in tray (see
"Multi-purpose (or
Manual feeder ) tray" on
page 35).
10
Network-related messages
Message Meaning Suggested solutions
Network Problem:
IP Conflict
Wireless
Network Error
• BOOTP problem:
Auto IP Run
• DHCP problem:
Auto IP Run
• BOOTP problem:
Reconfigure BOOTP
• DHCP problem:
Reconfigure DHCP
The IP address is used
elsewhere.
Wireless module is not
installed.
There is a problem with
the network.
The IP address
assignment is failed.
This happens, when IP
for BOOTP/DHCP is set
in SyncThru™ Web
Service.
Check the IP address or
obtain a new IP address.
Reboot the power and try
the printing job again. If the
problem persists, please call
for service.
Change the Auto IPU
Change the IP address
assignment method to
DHCP/BOOTP or Static. If
you do not change this
option, the BOOTP/DHCP
server continually asks to
assign the IP Address.
4. Troubleshooting
99

Understanding display messages
Message Meaning Suggested solutions
Fail to authenticate. Check the network
802.1x
Network Error
11
authentication protocol. If
the problem persists,
contact your network
administrator.
Misc. messages
Message Meaning Suggested solutions
Adjusting Color
Registration
Calibrating
image density…
Door Open
Close it
Error [error
number]
Install [color]
toner
The machine is adjusting
the color registration.
The machine is calibrating
the image density.
The cover is not securely
latched.
The indicated toner
cartridge is installed
improperly, or the
connector is polluted.
Wait a few minutes.
Wait a few minutes.
Close the cover until it locks
into place.
Reinstall the Samsunggenuine toner cartridge two
or three times to confirm it is
seated properly. If the
problem persists, contact the
service representatives.
Message Meaning Suggested solutions
Error [error
number]
Turn off then on
Error [error
number]
Call for service
Install TR.
belt unit.
Not compatible
transfer belt
Not installed
Waste tank
Not proper room
temp. Move set
Output bin Full
Remove paper
The machine unit cannot
be controlled.
The transfer belt is not
installed.
The transfer belt of the
machine is not for your
machine.
The is waste toner
container not installed.
The machine is in a room
with improper room
temperature.
The output tray is full. Or
the sensor is not facing
down.
Reboot the power and try the
printing job again. If the
problem persists, please call
for service.
Install a Samsung-genuine
transfer belt.
Install the a Samsunggenuine part designed for
your machine.
Install a Samsung-genuine
waste toner container.
Move the machine to a room
with proper roomG
temperature.
Remove papers from the
output tray, the machine
resumes printing. Or make
sure the sensor is facing
down. If the problem persists,
call for service.
4. Troubleshooting
100

Understanding display messages
Message Meaning Suggested solutions
Prepare new
Transfer belt
Replace new
Transfer belt
Replace
Fuser Soon
Replace new
Fuser unit
• Replace new
Tray1 roller
• Replace new
Tray2 roller
Transfer Belt
Error
The life of the transfer belt
will expired soon.
The life of the transfer belt
has expired.
The life of the fuser unit will
be expired soon.
The life of the fuser unit will
be expired.
The life of the tray pick-up
roller will expired soon.
The life of the tray pick-up
roller will expired.
The transfer belt cannot be
controlled.
Replace the transfer belt with
a new one. Contact the
service representatives.
Replace the fuser unit with a
new one. If the problem
persists, please call for
service.
Replace the tray pick-up roller
with a new one. If the
problem persists, please call
for service.
Reboot the power and try the
printing job again. If the
problem persists, please call
for service.
Waste toner Full
Replace new one
The waste toner container
is full.
Replace the waste toner
container.
4. Troubleshooting
101

5. Appendix
This chapter provides product specifications and information concerning applicable regulations.
• Specifications 103
• Regulatory information 114
• Copyright 125
Specifications
1
General specifications
The specification values listed below are subject to change without notice. See www.samsung.com for possible changes in information.
Items Description
Dimension Width x Length x Height • CLP-41xN Series/CLP-41xNW Series: 389 x 274 x 249 mm (15.31 x 10.79 x 9.80 inches)
• CLP-68xND Series/CLP-68xDW Series: 389 x 274 x 249 mm (15.31 x 10.79 x 9.80 inches)
Weight Machine with consumables • CLP-41xN Series/CLP-41xNW Series: 6.65 Kg (14.66 lbs)
• CLP-68xND Series/CLP-68xDW Series: 6.65 Kg (14.66 lbs)
Noise Level
a
Ready mode Less than 37 dB (A)
Print mode • CLP-41xN Series/CLP-41xNW Series: Less than 50 dB (A)
• CLP-68xND Series/CLP-68xDW Series: Less than 52 dB (A)
Temperature Operation 15 to 30 °C (59 to 86 °F)
Storage (packed) -20 to 50 °C (-4 to 122 °F)
Humidity Operation 20 to 80% RH
Storage (packed) 10 to 90% RH
Power rating
b
110 volt models AC 110 - 127 V
220 volt models AC 220 - 240 V
5. Appendix
103
Specifications
Items Description
Power consumption Average operating mode Less than 850 W
Ready mode Less than 12 W
Power save mode Less than 1.0 W
Power off mode Less than 0.1 W
Wireless
a. Sound Pressure Level, ISO 7779. Configuration tested: basic machine installation, A4 paper, simplex printing.
b. See the rating label on the machine for the correct voltage (V), frequency (hertz) and of current (A) for your machine.
c. Wireless models only (see "Features by models" on page 7).
c
Module SPW-B4319U
5. Appendix
104
Specifications
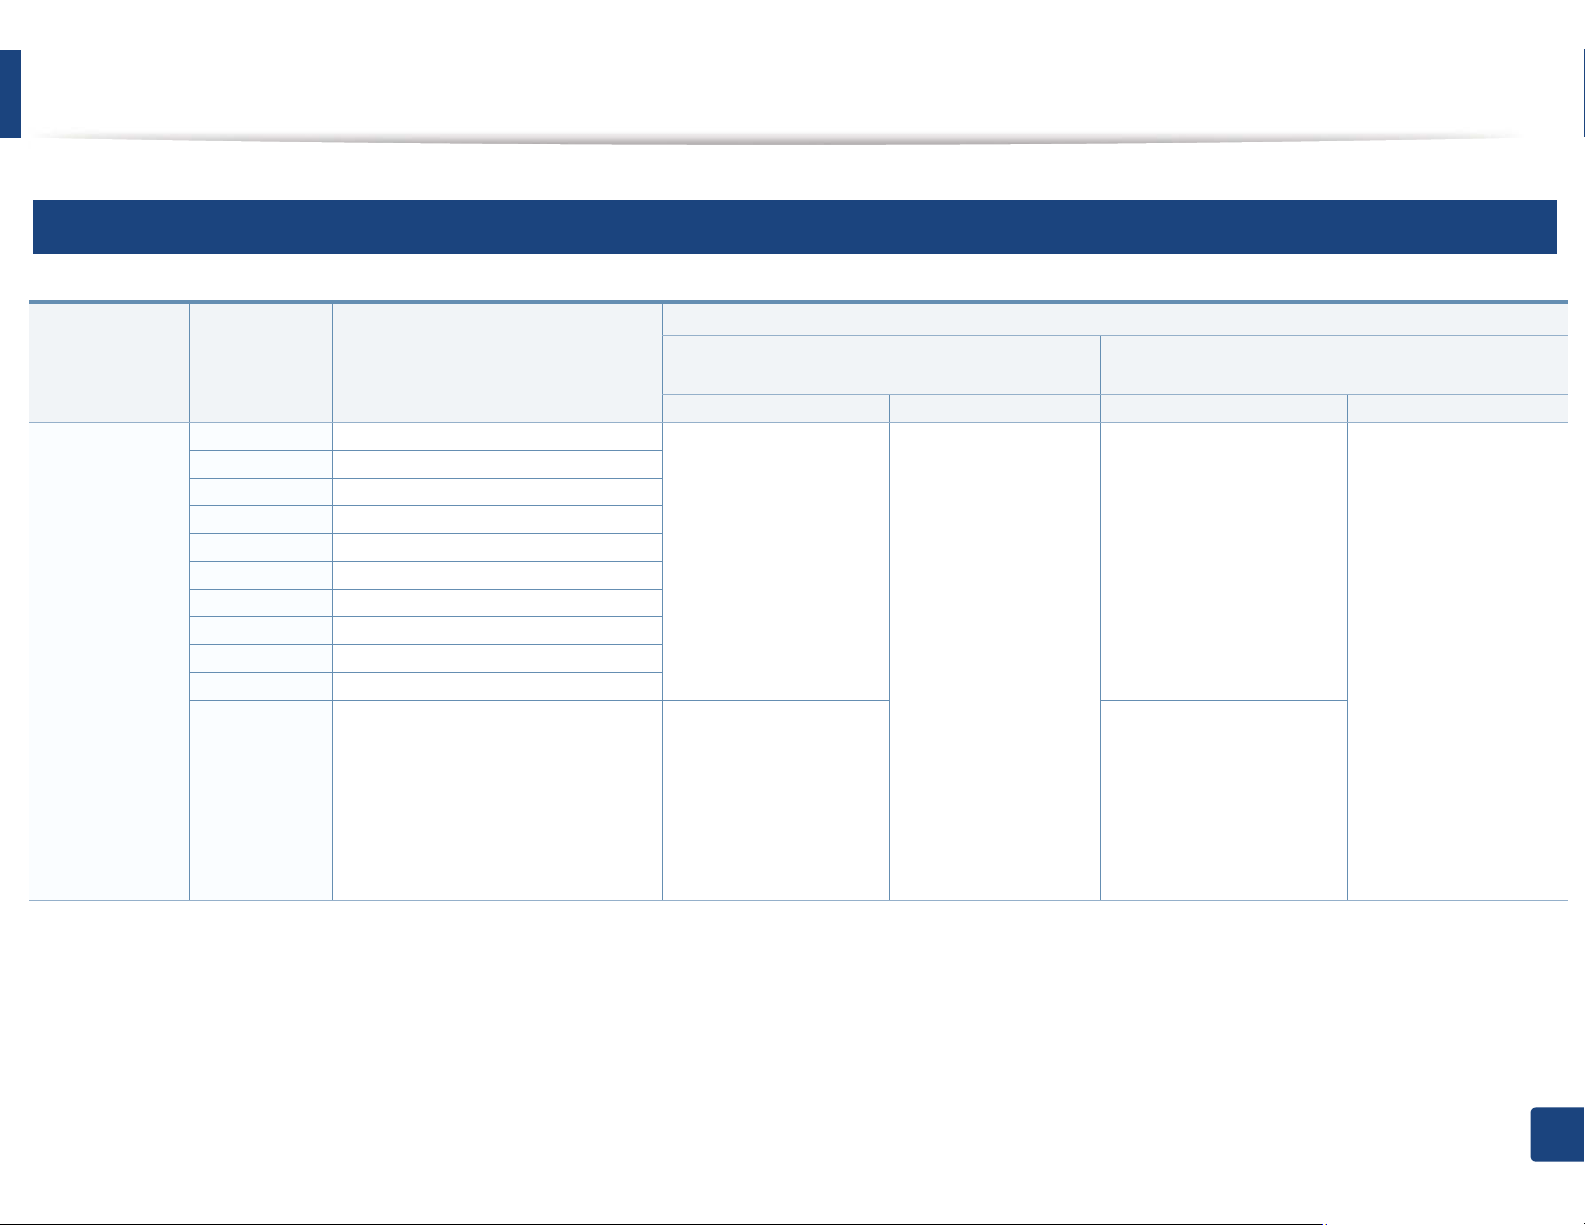
2
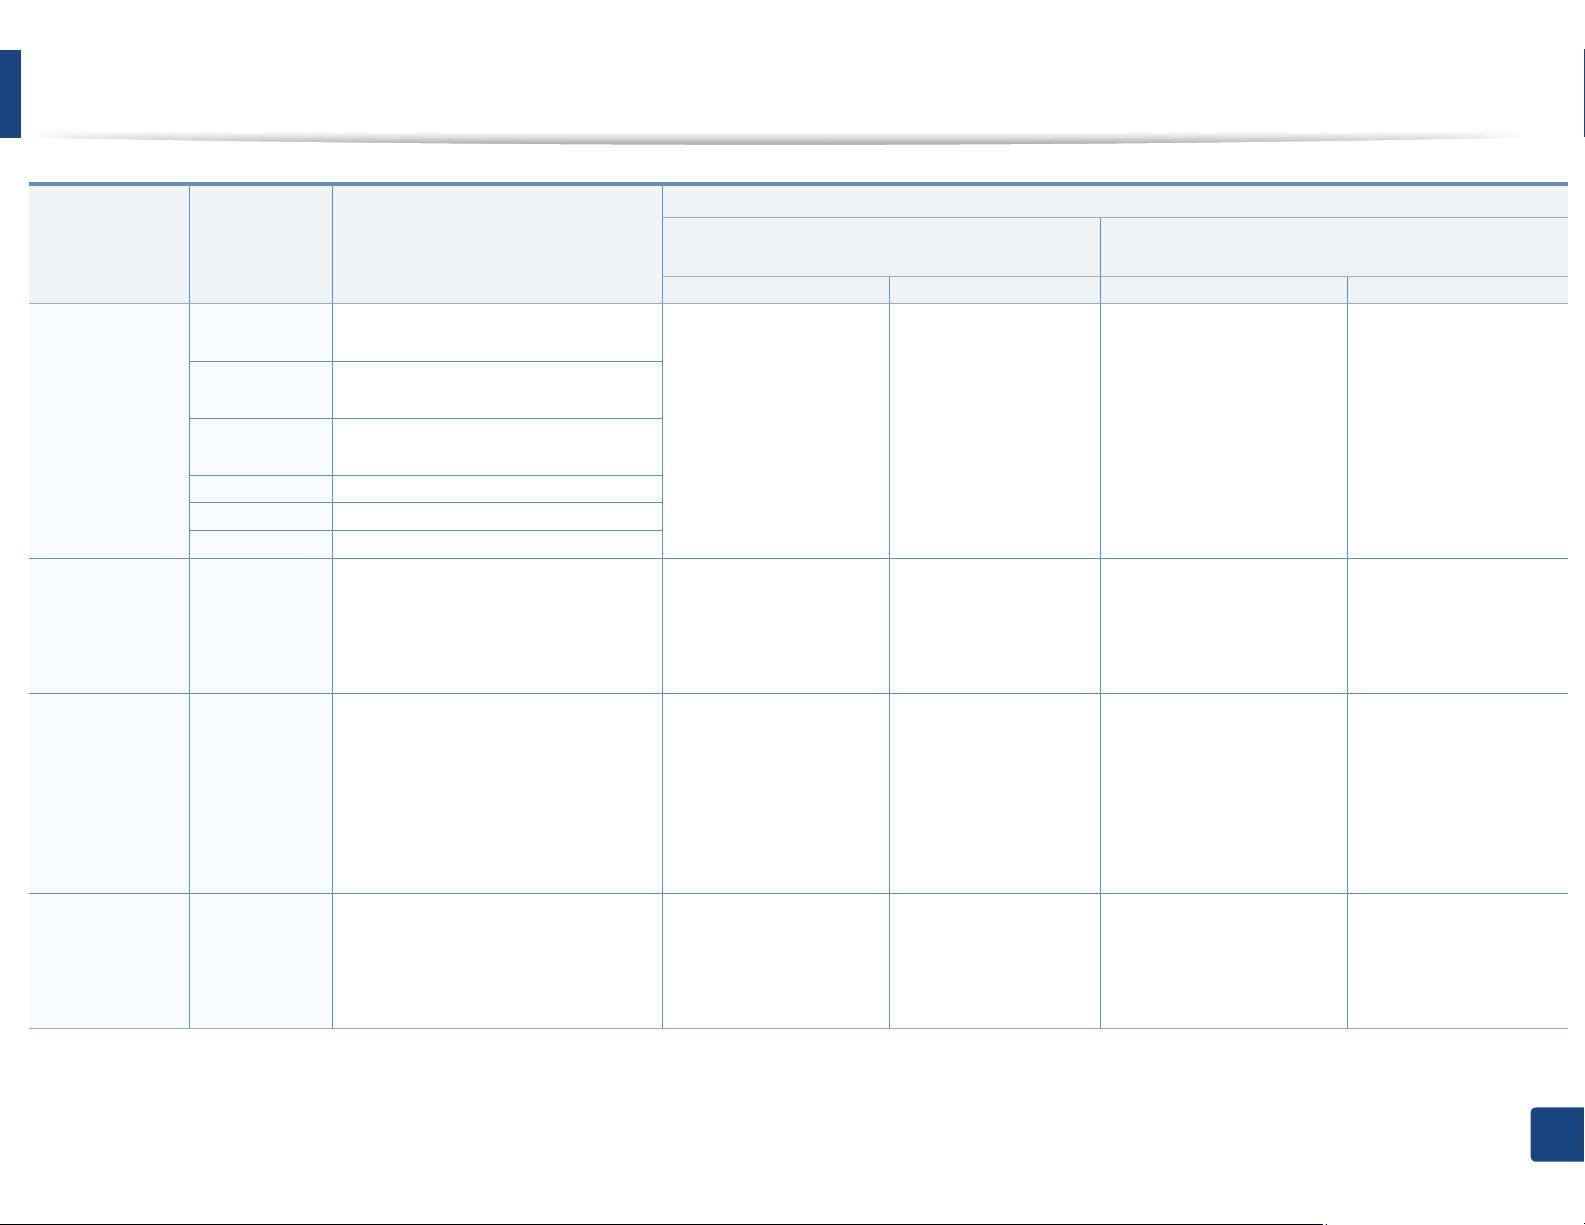
Print media specifications
Type Size Dimensions
b
Plain paper
Letter
Legal
US Folio
A4
Oficio
JIS B5
ISO B5
Executive
Statement
A5
216 x 279 mm (8.5 x 11 inches)
216 x 356 mm (8.5 x 14 inches)
216 x 330 mm (8.5 x 13 inches)
210 x 297 mm (8.27 x 11.69 inches)
216 x 343 mm (8.5 x 13.5 inches)
182 x 257 mm (7.17 x 10.12 inches)
176 x 250 mm (6.93 x 9.84 inches)
184 x 267 mm (7.25 x 10.5 inches)
140 x 216 mm (5.5 x 8.5 inches)
148 x 210 mm (5.83 x 8.27 inches)
105 x 148 mm (4.13 x 5.83 inches)
CLP-41xN Series
CLP-41xNW Series
Tray1 Manual feeder Tray1/ Optional tray Multi-purpose tray
70 to 89 g/m
2
(19 to
24 lbs bond)
• 250 sheets of 80 g/
2
(21 lbs bond)
m
70 to 89 g/m
2
(19 to
24 lbs bond)
70 to 89 g/m
24 lbs bond)
• 1 sheet
Weight/Capacity
2
(19 to
70 to 90 g/m
bond)
• Tray1: 250 sheets of
• Optional tray: 500
70 to 90 g/m
bond)
a
CLP-68xND Series
CLP-68xDW Series
2
(19 to 24 lbs
2
80 g/m
(21 lbs bond)
sheets of 80 g/m
(20 lbs bond)
2
(19 to 24 lbs
2
70 to 90 g/m
(20 to
24 lbs bond)
• 50 sheets
2
A6
• 150 sheets of 80 g/
2
(21 lbs bond)
m
• 150 sheets of 80 g/m
(21 lbs bond)
Not available in optional
tray.
2
5. Appendix
105
Specifications
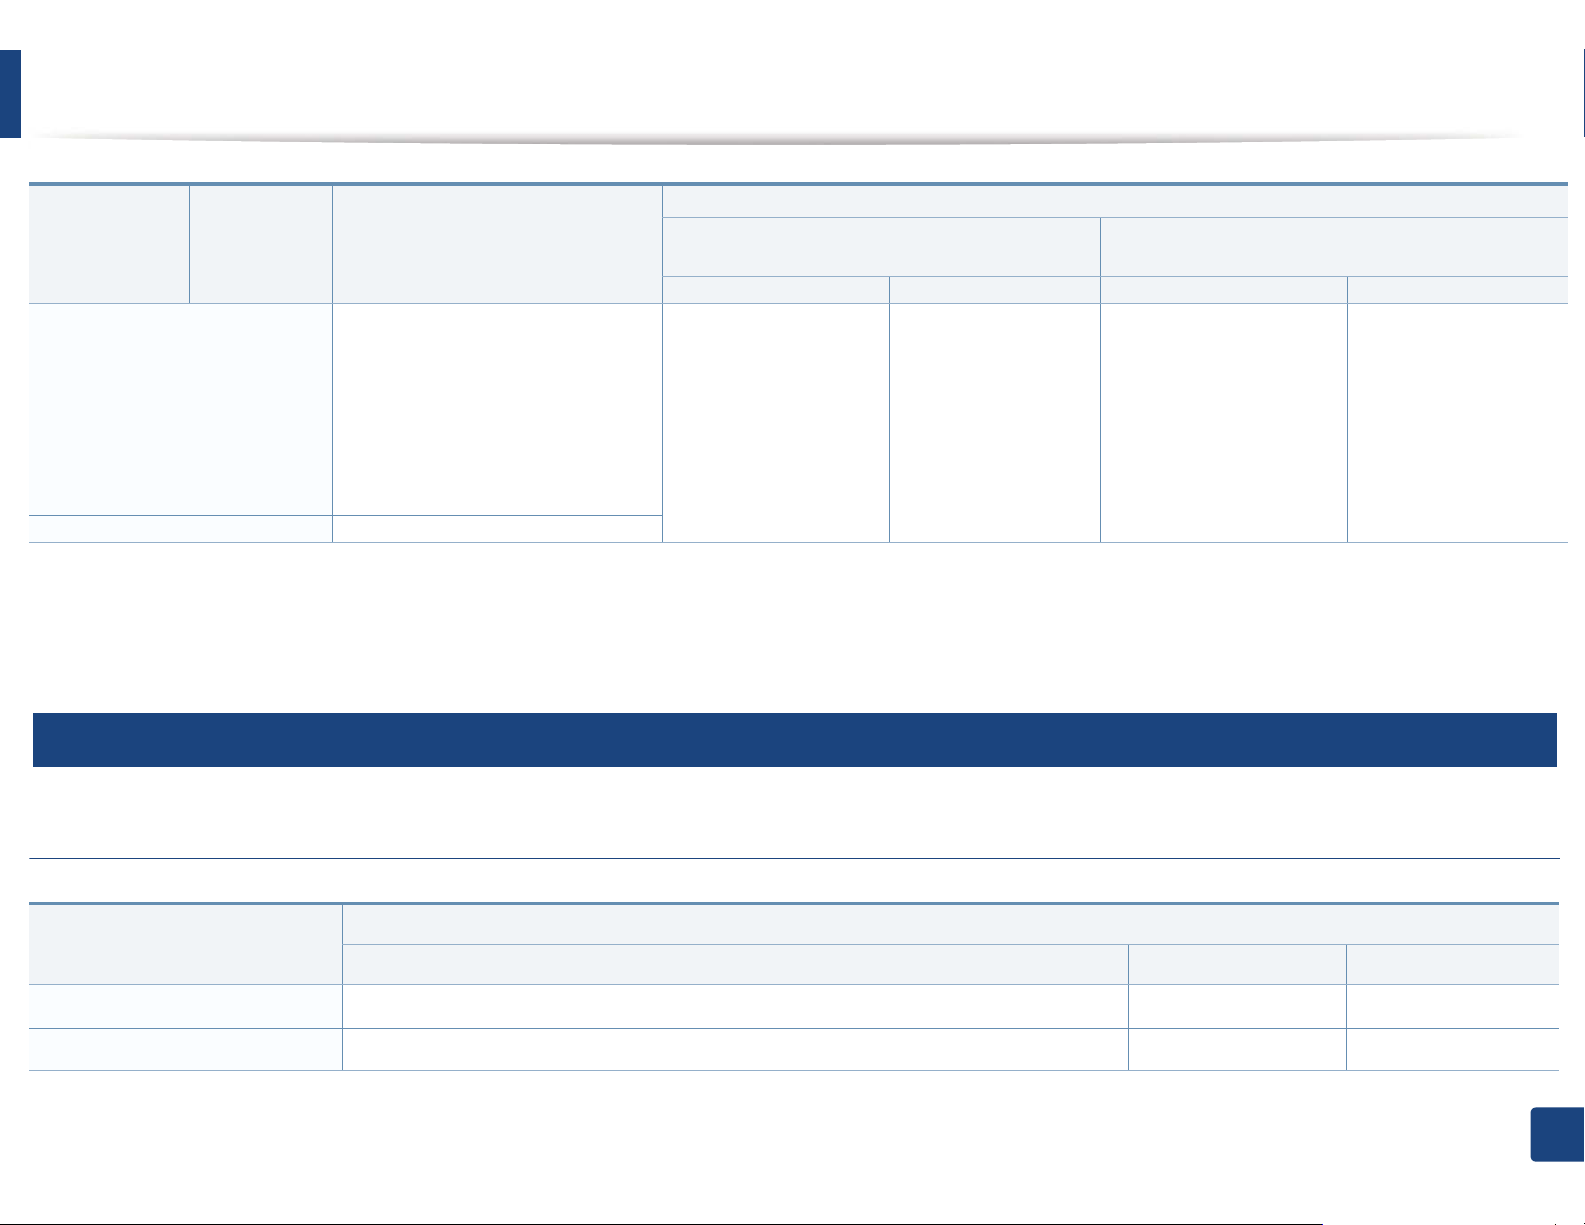
Type Size Dimensions
Envelope Envelope
98 x 191 mm (3.87 x 7.5 inches)
Monarch
Envelope No. 10105 x 241 mm (4.12 x 9.5 inches)
Envelope No. 998 x 225 mm (3.87 x 8.87 inches)
Thick paper
Envelope DL
Envelope C5
Envelope C6
b
110 x 220 mm (4.33 x 8.66 inches)
162 x 229 mm (6.38 x 9.02 inches)
114 x 162 mm (4.49 x 6.38 inches)
Refer to the Plain paper section
Refer to the
Plain paper
section
Thicker paper
Refer to the
Refer to the Plain paper section
b
Plain paper
section
CLP-41xN Series
CLP-41xNW Series
Tray1 Manual feeder Tray1/ Optional tray Multi-purpose tray
75 to 90 g/m
2
(20 to
24 lbs bond)
• 20 sheets
90 to 105 g/m
2
(24 to 28
lbs bond)
• 50 sheets of 105 g/
2
(28 lbs bond)
m
164 to 220 g/m
2
(43 to
59 lbs bond)
• 50 sheets of 220 g/
2
(59 lbs bond)
m
75 to 90 g/m
2
24 lbs bond)
• 1 sheet
90 to 105 g/m
28 lbs bond)
• 1 sheet
164 to 220 g/m
59 lbs bond)
• 1 sheet
Weight/Capacity
(20 to
75 to 90 g/m
bond)
• 20 sheets
Not available in optional
tray.
2
(24 to
91 to 105 g/m
lbs bond)
• 50 sheets of 105 g/m
(28 lbs bond)
2
(43 to
164 to 220 g/m
lbs bond)
• 50 sheets of 220 g/m
(59 lbs bond)
a
2
(20 to 24 lbs
2
(24 to 28
2
CLP-68xND Series
CLP-68xDW Series
75 to 90 g/m
24 lbs bond)
• 5 sheets
91 to 105 g/m
lbs bond)
2
• 10 sheets
(43 to 59
164 to 220 g/m
59 lbs bond)
2
• 10 sheets)
2
(20 to
2
(24to 28
2
(43 to
Thin paper Refer to the
Plain paper
section
Refer to the Plain paper section
60 to 69 g/m
2
(16 to 19
lbs bond)
• 250 sheets of 70 g/
2
(19 lbs bond)
m
60 to 69 g/m
lbs bond)
• 1 sheet
2
(16 to 19
Not available in optional
tray.
2
60 to 70 g/m
(16 to 19 lbs
bond)
G
•250
sheets of 70 g/m2
(19 lbs bond)
60 to 70 g/m
lbs bond)
• 50 sheets
5. Appendix
2
(16 to 19
106

Specifications
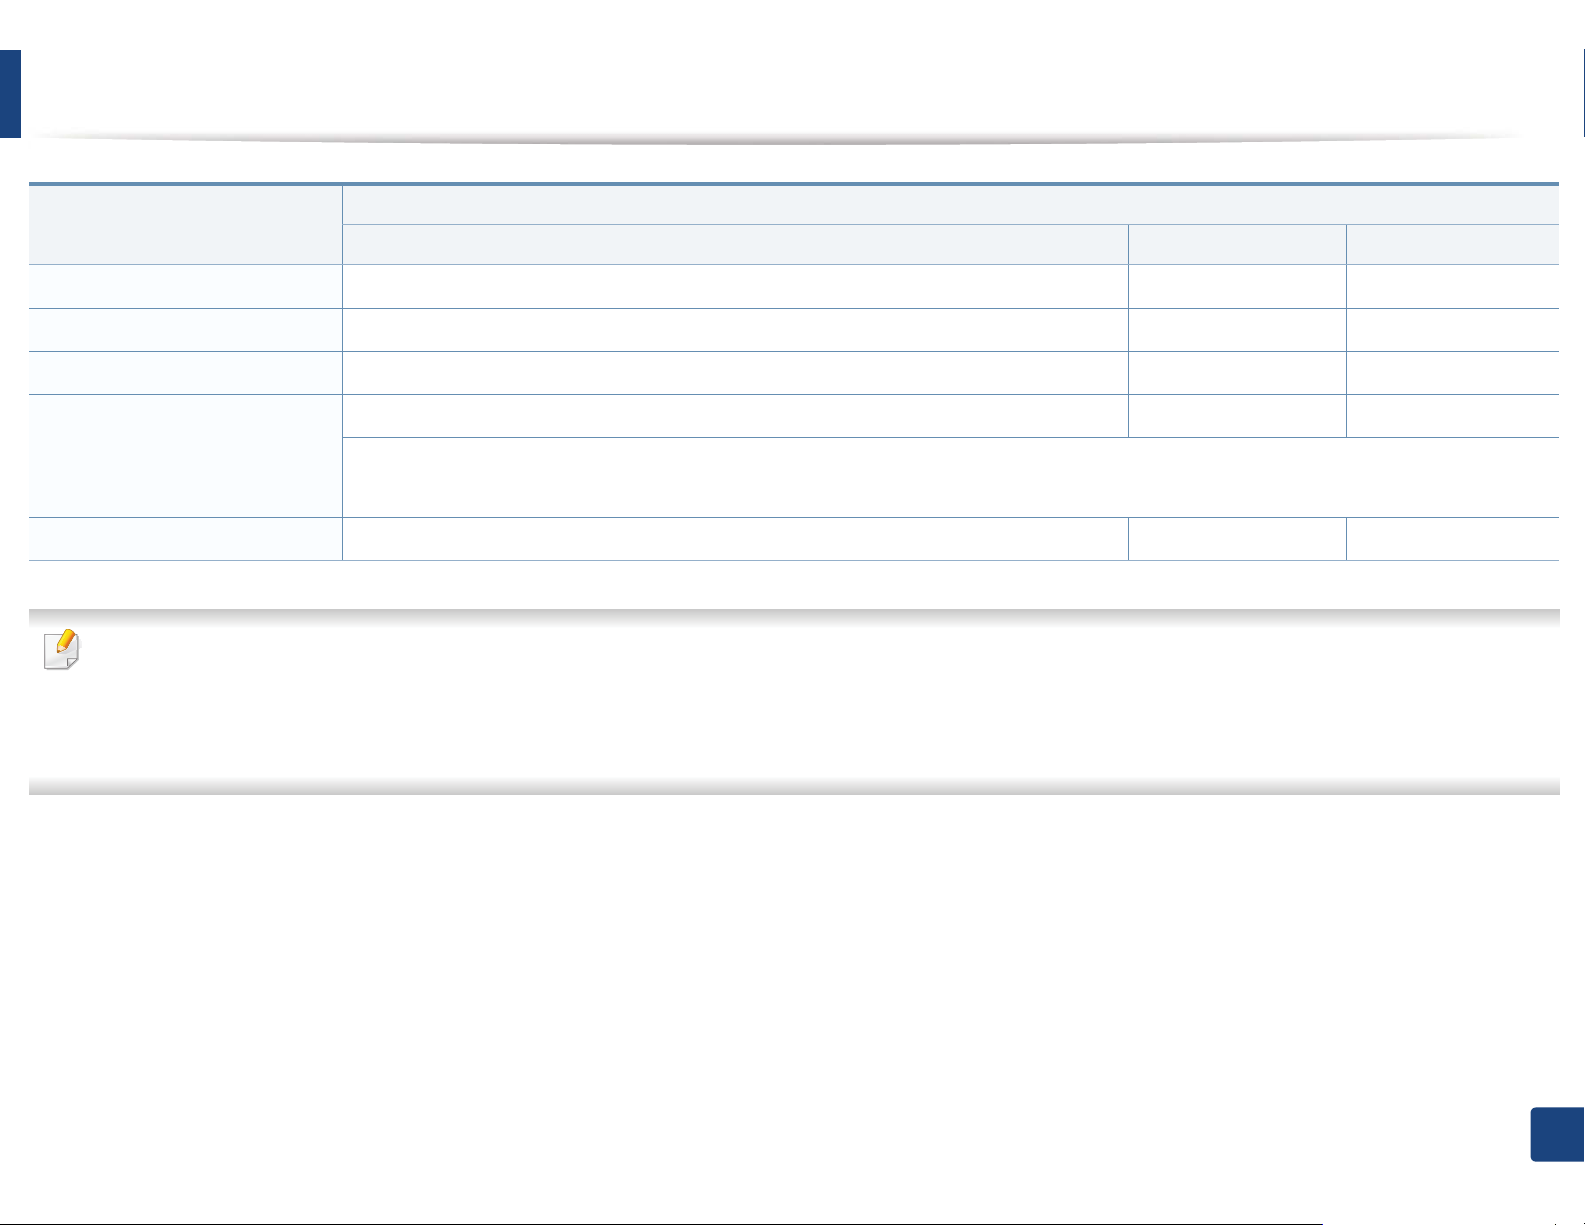
Type Size Dimensions
Cotton, Color,
Pre-printed
Refer to the
Plain paper
Refer to the Plain paper section
section
Recycled Refer to the
Refer to the Plain paper section
Plain paper
section
Transparency Letter, Legal, A4Refer to the Plain paper section
Labels
c
Letter, Legal,
Refer to the Plain paper section
US Folio, A4,
JIS B5, ISO
B5,
Executive, A5
CLP-41xN Series
CLP-41xNW Series
Tray1 Manual feeder Tray1/ Optional tray Multi-purpose tray
75 to 90 g/m
2
(20 to 24
lbs bond)
• 250 sheets of 80 g/
2
(21 lbs bond)
m
70 to 90 g/m
2
(19 to 24
lbs bond)
• 250 sheets of 80 g/
2
(21 lbs bond)
m
138 to 146 g/m
2
(35 to
39 lbs bond)
• 50 sheets
120 to 150 g/m
2
(32 to
40 lbs bond)
• 50 sheets
Weight/Capacity
2
75 to 90 g/m
(20 to 24
lbs bond)
• 1 sheet
2
70 to 90 g/m
(19 to 24
lbs bond)
• 1 sheet
2
138 to 146 g/m
(35 to
39 lbs bond)
• 1 sheet
120 to 150 g/m2 (32 to
40 lbs bond)
• 1 sheet
a
CLP-68xND Series
CLP-68xDW Series
2
75 to 90 g/m
(20 to 24 lbs
bond)
• 250 sheets of 80 g/m
2
(21 lbs bond)
Not available in optional
tray.
2
70 to 90 g/m
(19 to 24 lbs
bond)
• 250 sheets of 80 g/m
2
(21 lbs bond)
2
138 to 146 g/m
(35 to 39
lbs bond)
• 50 sheets
Not available in optional
tray.
120 to 150 g/m2 (32 to 40
lbs bond)
• 50 sheets
Not available in optional
tray.
75 to 90 g/m
2
lbs bond)
• 50 sheets
70 to 90 g/m
2
lbs bond)
• 50 sheets
138 to 146 g/m
39 lbs bond)
• 10 sheets
120 to 150 g/m2 (32 to
40 lbs bond)
• 10 sheets
(20 to 24
(19 to 24
2
(35 to
5. Appendix
107

Specifications
Type Size Dimensions
Card stock
Letter, Legal,
Refer to the Plain paper section
b
US Folio, A4,
JIS B5, ISO
B5,
Executive, A5
Bond paper Refer to the
Refer to the Plain paper section
Plain paper
section
Archive,
Punched
paper,
Refer to the
Plain paper
section
Refer to the Plain paper section • 250 sheets • 1 sheet • 250 sheets • 50 sheets
Letterhead
Glossy Photo
Letter, A4,
Refer to the Plain paper section
b
Postcard 4x6
Tray1 Manual feeder Tray1/ Optional tray Multi-purpose tray
121 to 163 g/m
43 lbs bond)
• 50 sheets
105 to 120 g/m
32 lbs bond)
• 50 sheets
111 to 130 g/m
35 lbs bond)
• 30 sheets
CLP-41xN Series
CLP-41xNW Series
2
(32 to
121 to 163 g/m
43 lbs bond)
• 1 sheet
2
(28 to
105 to 120 g/m
32 lbs bond)
• 1 sheet
2
(30 to
111 to 130 g/m
35 lbs bond)
• 1 sheet
Weight/Capacity
2
(32 to
121 to 163 g/m
lbs bond)
• 50 sheets
2
(28 to
105 to 120 g/m
lbs bond)
• 50 sheets
2
(30 to
111 to 130 g/m
lbs bond) for tray1
• Tray1: 30 sheets
a
CLP-68xND Series
CLP-68xDW Series
2
(32 to 43
121 to 163 g/m
2
(32 to
43 lbs bond)
• 10 sheets
2
(28 to 32
105 to 120 g/m
2
(28 to
32 lbs bond)
• 10 sheets
2
(30 to 35
111 to 130 g/m
2
(30 to
35 lbs bond)
• 5 sheets
Refer to the Plain paper section
Refer to the Plain paper section
131 to 175 g/m
47 lbs bond)
• 30 sheets
176 to 220 g/m
59 lbs bond)
• 30 sheets
2
(35 to
2
(47 to
131 to 175 g/m2 (35 to
47 lbs bond)
• 1 sheet
176 to 220 g/m2 (47 to
59 lbs bond)
• 1 sheet
• Optional tray: 50 sheets
131 to 175 g/m2 (35 to 47
lbs bond)
• Tray1: 30 sheets
• Optional tray: 50 sheets
176 to 220 g/m2 (47 to 59
lbs bond)
• Tray1: 30 sheets
• Optional tray: 50 sheets
131 to 175 g/m2 (35 to
47 lbs bond)
• 5 sheets
176 to 220 g/m2 (47 to
59 lbs bond)
• 5 sheets
5. Appendix
108
Specifications
Type Size Dimensions
CLP-41xN Series
CLP-41xNW Series
Tray1 Manual feeder Tray1/ Optional tray Multi-purpose tray
Minimum size (custom)
•
Tray1:
98 x 127 mm (3.86 x 5
inches)
Optional tray:
•
60 to 220 g/m
lb bond)
148.5 x 210 mm
2
( 16 to 59
60 to 220 g/m2 ( 16 to
59 lb bond)
(5.85 x 8.27inches)
Multi-Purpose tray/ Manual
•
Feeder:
76 x 127 mm (3 x 5
inches)
Maximum size (custom)
a. Maximum capacity may differ depending on media weight, thickness, and environmental conditions.
b. Post card 4 x 6 is supported for tray1
c. The smoothness of the labels used in this machine is 100 to 250 (sheffield). This means the numeric level of smoothness.
3
216 x 356 mm (8.5 x 14 inches)
SG
Manual feeder, or Multi-purpose tray.
System requirements
Weight/Capacity
• 60 to 220 g/m2 ( 16 to
59 lb bond) for tray1
• 60 to 163 g/m
43 lb bond) for optional
tray.
a
CLP-68xND Series
CLP-68xDW Series
2
60 to 220 g/m
( 16 to
59 lb bond)
2
( 16 to
Microsoft® Windows
®
Operating system
CPU RAM free HDD space
Windows® 2000 Intel® Pentium® II 400 MHz (Pentium III 933 MHz)
Windows® XP Intel® Pentium® III 933 MHz (Pentium IV 1 GHz)
Requirement (recommended)
64 MB (128 MB) 600 MB
128 MB (256 MB) 1.5 GB
5. Appendix
109
Specifications
Operating system
Requirement (recommended)
CPU RAM free HDD space
Windows Server® 2003 Intel® Pentium® III 933 MHz (Pentium IV 1 GHz)
Windows Server® 2008 Intel® Pentium® IV 1 GHz (Pentium IV 2 GHz)
Windows Vista
®
Intel® Pentium® IV 3 GHz
Windows® 7 Intel® Pentium® IV 1 GHz 32-bit or 64-bit processor or higher
®
• Support for DirectX
9 graphics with 128 MB memory (to enable the Aero theme).
• DVD-R/W Drive
Windows Server® 2008 R2 Intel® Pentium® IV 1 GHz (x86) or 1.4 GHz (x64) processors (2 GHz or faster)
• Internet Explorer 6.0 or higher is the minimum requirement for all Windows operating systems.
• Users who have administrator rights can install the software.
• Windows Terminal Services is compatible with your machine.
•For Windows 2000, Services Pack 4 or higher is required.
128 MB (512 MB) 1.25 GB to 2 GB
512 MB (2 GB) 10 GB
512 MB (1 GB) 15 GB
1 GB (2 GB) 16 GB
512 MB (2 GB) 10 GB
5. Appendix
110
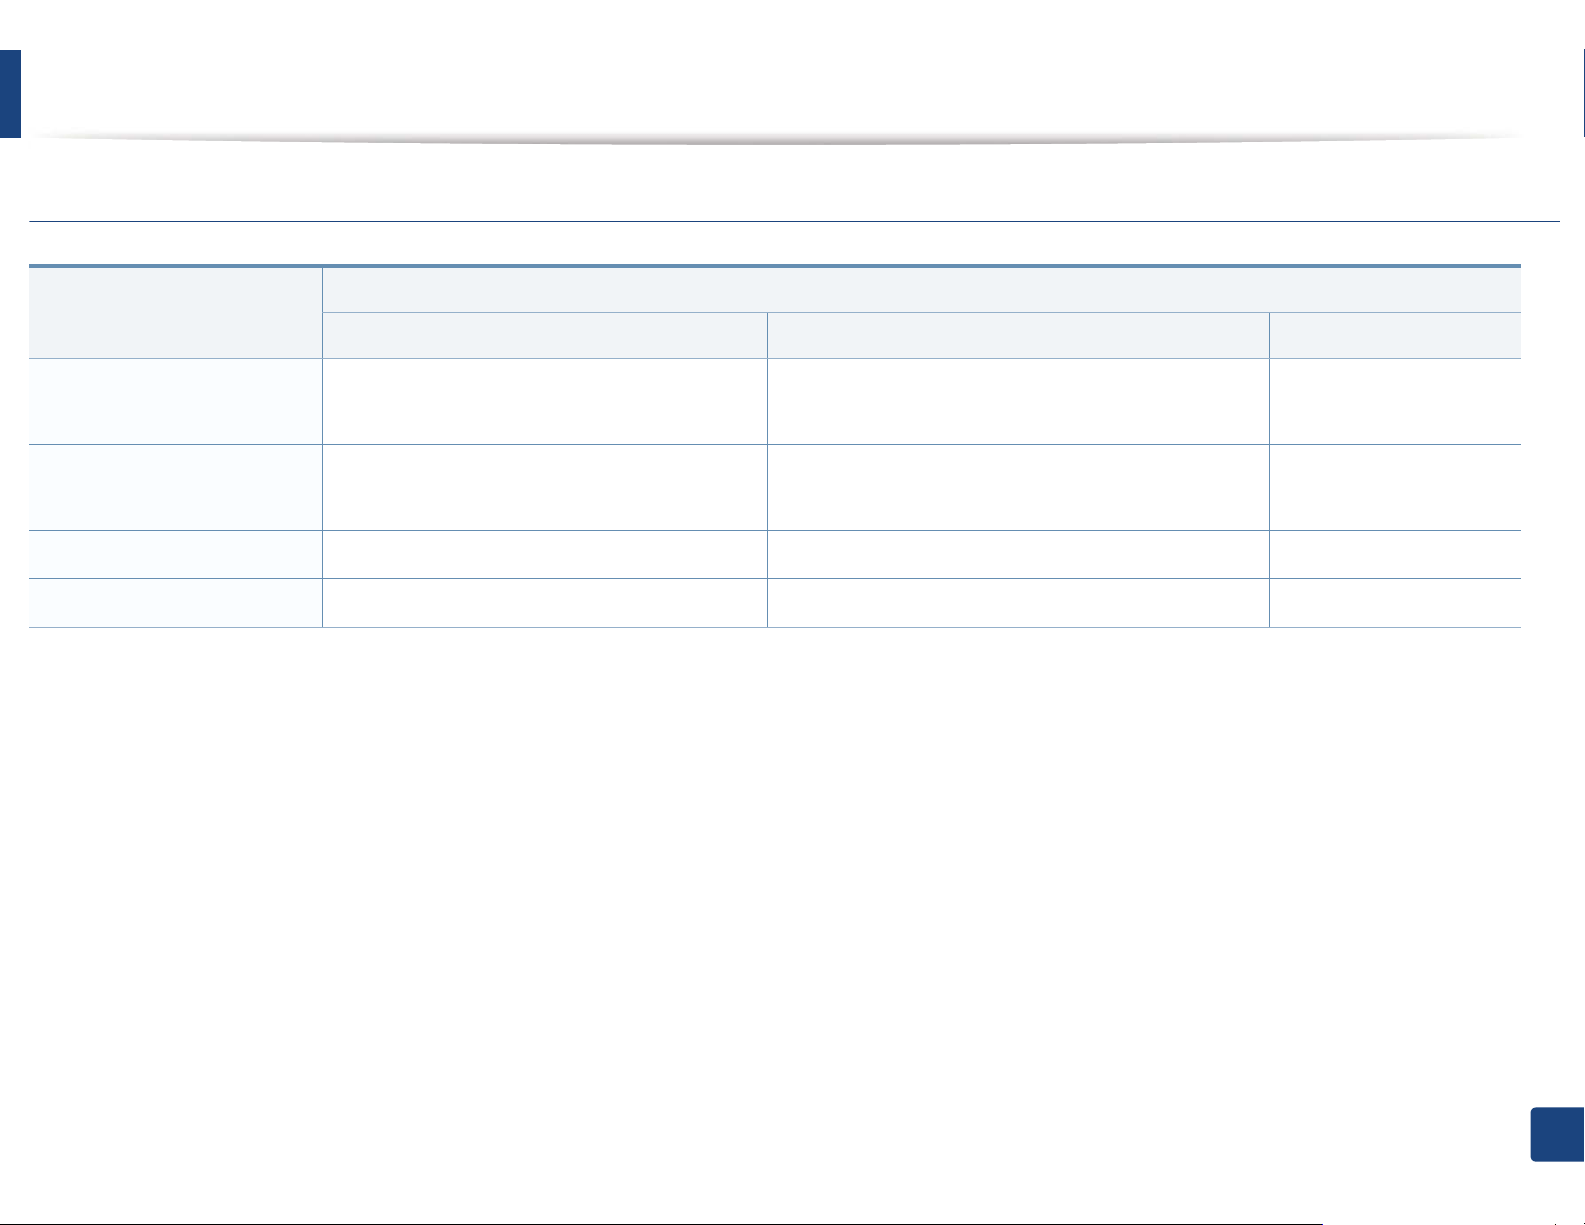
Specifications
Macintosh
Operating system
Requirements (Recommended)
CPU RAM Free HDD space
Mac OS X 10.4
Mac OS X 10.5
Mac OS X 10.6
Mac OS X 10.7
•Intel
• PowerPC G4/G5
•Intel
• 867 MHz or faster Power PC G4/G5
•Intel
•Intel
®
processors
®
processors
®
processors
®
processors
• 128 MB for a powerPC based Mac (512 MB)
• 512 MB for an Intel-based Mac (1 GB)
512 MB (1 GB) 1 GB
1 GB (2 GB) 1 GB
2 GB 4 GB
1 GB
5. Appendix
111

Specifications
Linux
Items Requirements
Operating system
CPU Pentium IV 2.4GHz (Intel Core™2)
RAM 512 MB (1 GB)
Free HDD space 1 GB (2 GB)
Redhat
Fedora 5 ~ 13 (32/64 bit)
SuSE Linux 10.1 (32 bit)
OpenSuSE
Mandriva 2007, 2008, 2009, 2009.1, 2010 (32/64 bit)
Ubuntu 6.06, 6.10, 7.04, 7.10, 8.04, 8.10, 9.04, 9.10, 10.04 (32/64 bit)
SuSE Linux Enterprise Desktop 10, 11 (32/64 bit)
Debian 4.0, 5.0 (32/64 bit)
®
Enterprise Linux WS 4, 5 (32/64 bit)
®
10.2, 10.3, 11.0, 11.1, 11.2 (32/64 bit)
Unix
Items Requirements
Sun Solaris 9, 10 (x86, SPARC)
Operating system
Free HDD space Up to 100 MB
HP-UX 11.0, 11i v1, 11i v2, 11i v3 (PA-RISC, Itanium)
IBM AIX 5.1, 5.2, 5.3, 5.4
5. Appendix
112
Specifications
4
Network environment
Network and wireless models only (see "Features by models" on page 7).
You need to set up the network protocols on the machine to use it as your network machine. The following table shows the network environments supported by the
machine.
Items Specifications
Network interface • Ethernet 10/100/1000 Base-TX Wired Lan
• 802.11b/g/n Wireless LAN
Network operating system
• Windows
Server
• Various Linux OS
®
2000, Windows® XP, Windows Server® 2003, Windows Vista®, Windows® 7, Windows
®
2008 R2
• Mac OS X 10.4 ~10.7
• UNIX OS
Network protocols • TCP/IPv4
• DHCP, BOOTP
• DNS, WINS, Bonjour, SLP, UPnP
• Standard TCP/IP Printing (RAW), LPR, IPP, WSD
• SNMPv 1/2/3, HTTP, IPSec
• TCP/IPv6 (DHCP, DNS, RAW, LPR, SNMPv 1/2/3, HTTP, IPSec)
Wireless security • Authentication: Open System, Shared Key, WPA Personal, WPA2 Personal (PSK)
• Encryption: WEP64, WEP128, TKIP, AES
5. Appendix
113

Regulatory information
Regulatory information
This machine is designed for a normal work environment and certified with several regulatory statements.
5
Laser safety statement
The printer is certified in the U.S. to conform to the requirements of DHHS 21 CFR, chapter 1 Subchapter J for Class I(1) laser products, and elsewhere is certified as a
Class I laser product conforming to the requirements of IEC 60825-1 : 2007.
Class I laser products are not considered to be hazardous. The laser system and printer are designed so there is never any human access to laser radiation above a
Class I level during normal operation, user maintenance or prescribed service condition.
Warning
Never operate or service the printer with the protective cover removed from laser/scanner assembly. The reflected beam, although invisible, can damage your eyes.
5. Appendix
114

When using this product, these basic safety precautions should always be followed to reduce risk of fire, electric shock, and injury to persons:
6
Ozone safety
This product’s ozone emission rate is under 0.1 ppm. Because
ozone is heavier than air, keep the product in a place with good
ventilation.
7
Power saver
This printer contains advanced energy conservation technology that
reduces power consumption when it is not in active use.
When the printer does not receive data for an extended period of
time, power consumption is automatically lowered.
ENERGY STAR and the ENERGY STAR mark are registered U.S. marks.
For more information on the ENERGY STAR program see http://
www.energystar.gov
For ENERGY STAR certified models, the ENRGY STAR label will be on
your machine. Check if your machine is ENERGY STAR certified.
5. Appendix
115
 Loading...