

SAM4S Printer Series
Windows Driver & Installer
User Guide v7.1
All specifications are subject to change without notice

Contents
Programming
Part 1
CHAPTER 1. Getting Started ······························4
1.1. Overview ·········································5
1.2. Operation Environment ····························6
1.3. Requirements ·····································6
1.4. Preparations ······································6
CHAPTER 2. Installation of SAM4S printer ················· 9
2.1. Verify interface type of SAM4S printer ············10
2.2. Installing a Serial printer ··························12
2.3. Installing a Parallel printer ························14
2.4. Installing an USB printer ··························16
2.5. Installing an USB to Serial printer (Win 7) ·········19
2.6. Installing an USB to Serial printer (Win 10) ········21
2.7. Installing an Ethernet printer ·····················23
2.8. Checking installed printer ························25
CHAPTER 3. Uninstallation of SAM4S printer ·············27
3.1. Uninstalling printer(s) ····························28
3.2. Remain information ······························30
CHAPTER 4. Specifications of SAM4S printer ·············31
4.1. Printer fonts ·····································32
4.2. Printer resolutions & Paper sizes ·················35
CHAPTER 5. Properties of SAM4S Printer ················36
5.1. Layout ···········································37
5.2. Feed and Cut ····································38
5.3. Dithering ·········································40
5.4. Custom Paper Size ·······························41
5.5. Device Control ···································42
5.6. Barcode ··········································43
5.7. Advanced Settings ·······························44

Contents
Programming
Part 2
CHAPTER 6. Troubleshooting ····························50
6.1. Installation troubleshooting ·······················51
6.2. Uninstallation troubleshooting ····················56
6.3. Printing troubleshooting ··························58

CHAPTER 1.
Getting Started
1.1. Overview
1.2. Operating Environment
1.3. Requirements
1.4. Preparations

CHAPTER
CHAPTER 1
1
Getting Started
1.1. Overview
This document contains how to install/uninstall a SAM4S printer with an
interface and contains how to configure a SAM4S printer.
See below on installing SAM4S printer:
1. Verify interface of SAM4S printer (p.10)
2. Install proper SAM4S printer driver
1) In case of a serial printer. (p.12)
2) In case of a parallel printer. (p.14)
3) In case of an USB printer. (p.16)
4) In case of an USB to Serial printer (Windows 7). (p.19)
5) In case of an USB to Serial printer (Windows 10). (p.21)
6) In case of an Ethernet printer. (p.23)
3. Make sure installed printer is properly works (p.25)
4. Refer to uninstall a printer (p.27)
The SAM4S printer driver installer (V3.0.0 or above) supports following models:
1. ELLIX30/30III/40 (32bit / 64bit)
2. ELLIX35/35III/45 (32bit / 64bit)
3. ELLIX32/42/37 (32bit / 64bit)
4. GIANT-100 (32bit / 64bit)
5. GIANT-150 (32bit / 64bit)
6. GIANT PRO (32bit / 64bit)
The SAM4S printer driver installer supports English and Korean.
>>
Refer to 1.2. Operating Environment
5
1.2. Operation Environment
CHAPTER 1
x86 (32bit)
x64 (64bit)
POSReady7, Windows Embedded 8/8.1 Pro Industry
Windows 10 IoT Enterprise, Windows 7, Windows 8/8.1, Windows 10
POSReady7, Windows Embedded 8/8.1 Pro Industry
Windows 10 IoT Enterprise, Windows 7, Windows 8/8.1, Windows 10
1.3. Requirements
Warning : This requirement should be satisfied for using an SAM4S printer.
· To install/uninstall a printer, ‘.net Framework 3.5’ or above should have installed.
· To install an SAM4S printer properly, please make sure any related hardware works
fine and interface of printer is well connected.
1.4. Preparations
Warning : Restart PC before printer driver installation.
Preparations for using the SAM4S windows driver installer:
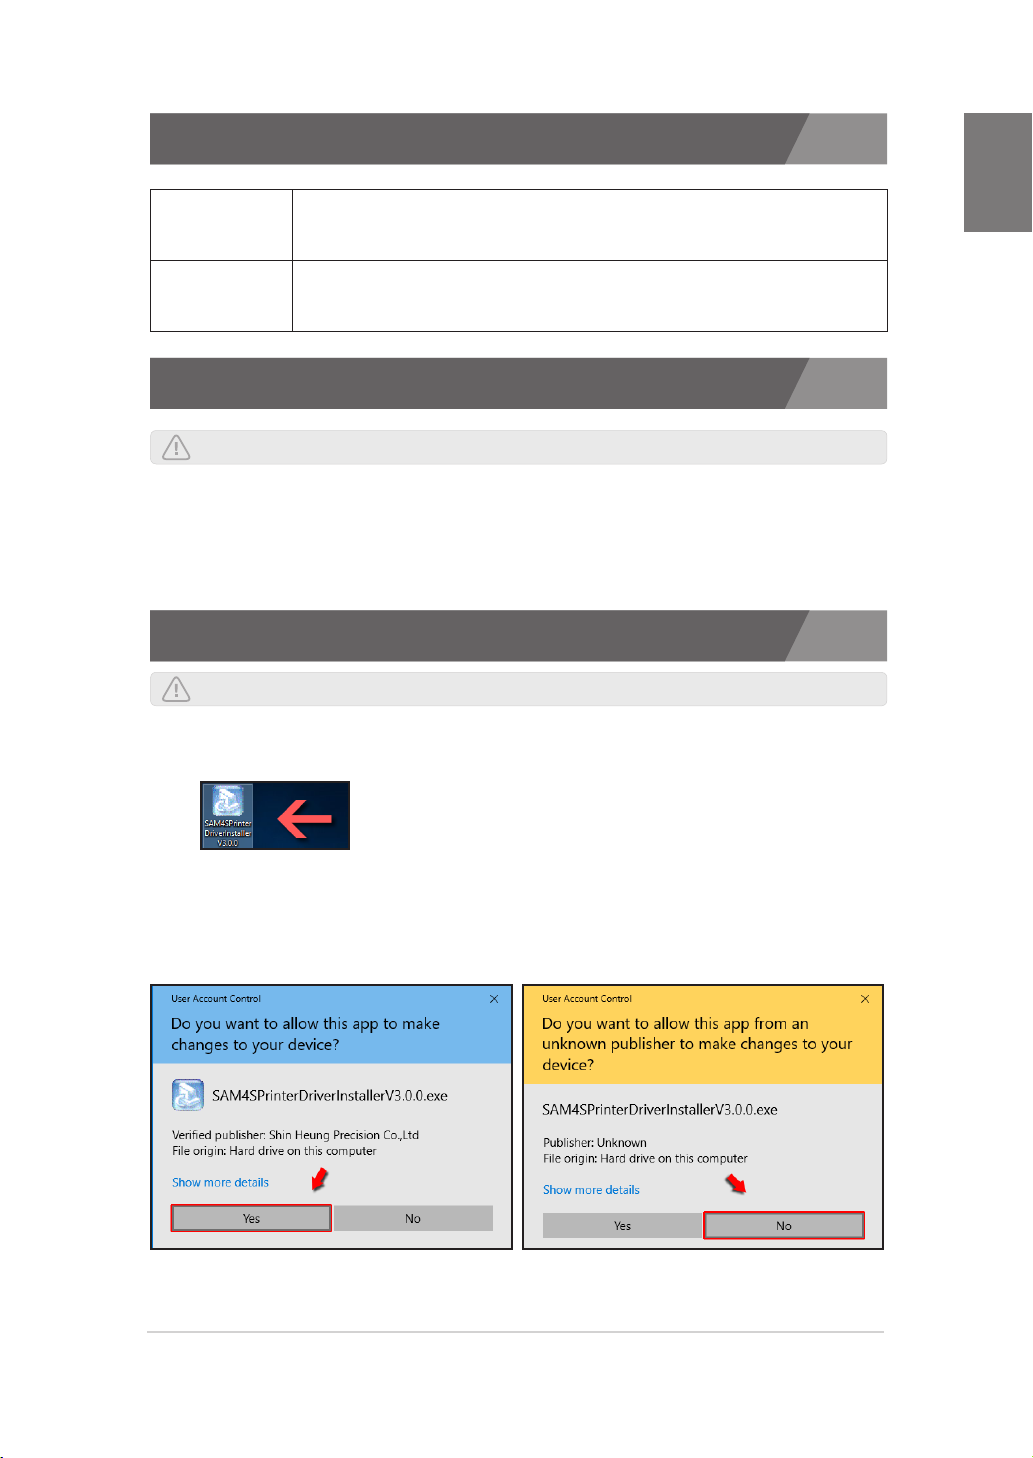
1. Double click the provided EXE file.
In Windows 7 or above OS, 'User Account Control (UAC)' alerts
window appear. Confirm that the verified publisher is 'Shin Heung
Precision Co, .Ltd'. If not, or if it is 'unknown', stop installation
immediately and download new one from SAM4S homepage.
6

1.4. Preparations
2. SAM4S Windows Driver folder will be automatically installed in the following path.
- 32bit OS : 'Program Files\SAM4S PrinterDriver' folder
- 64bit OS : 'Program Files (x86)\SAM4S PrinterDriver' folder
3. This EXE file is the ‘WinRAR
32bit executable-extracting’ file
so compatibility message can be
displayed on a 64bit OS.
CHAPTER 1
If following message is shown,
click ‘This program installed
correctly’ to progress. This
will not affect any program or
system.
4. The SAM4S windows driver installer will be started automatically after
extracting files.
7
1.4. Preparations
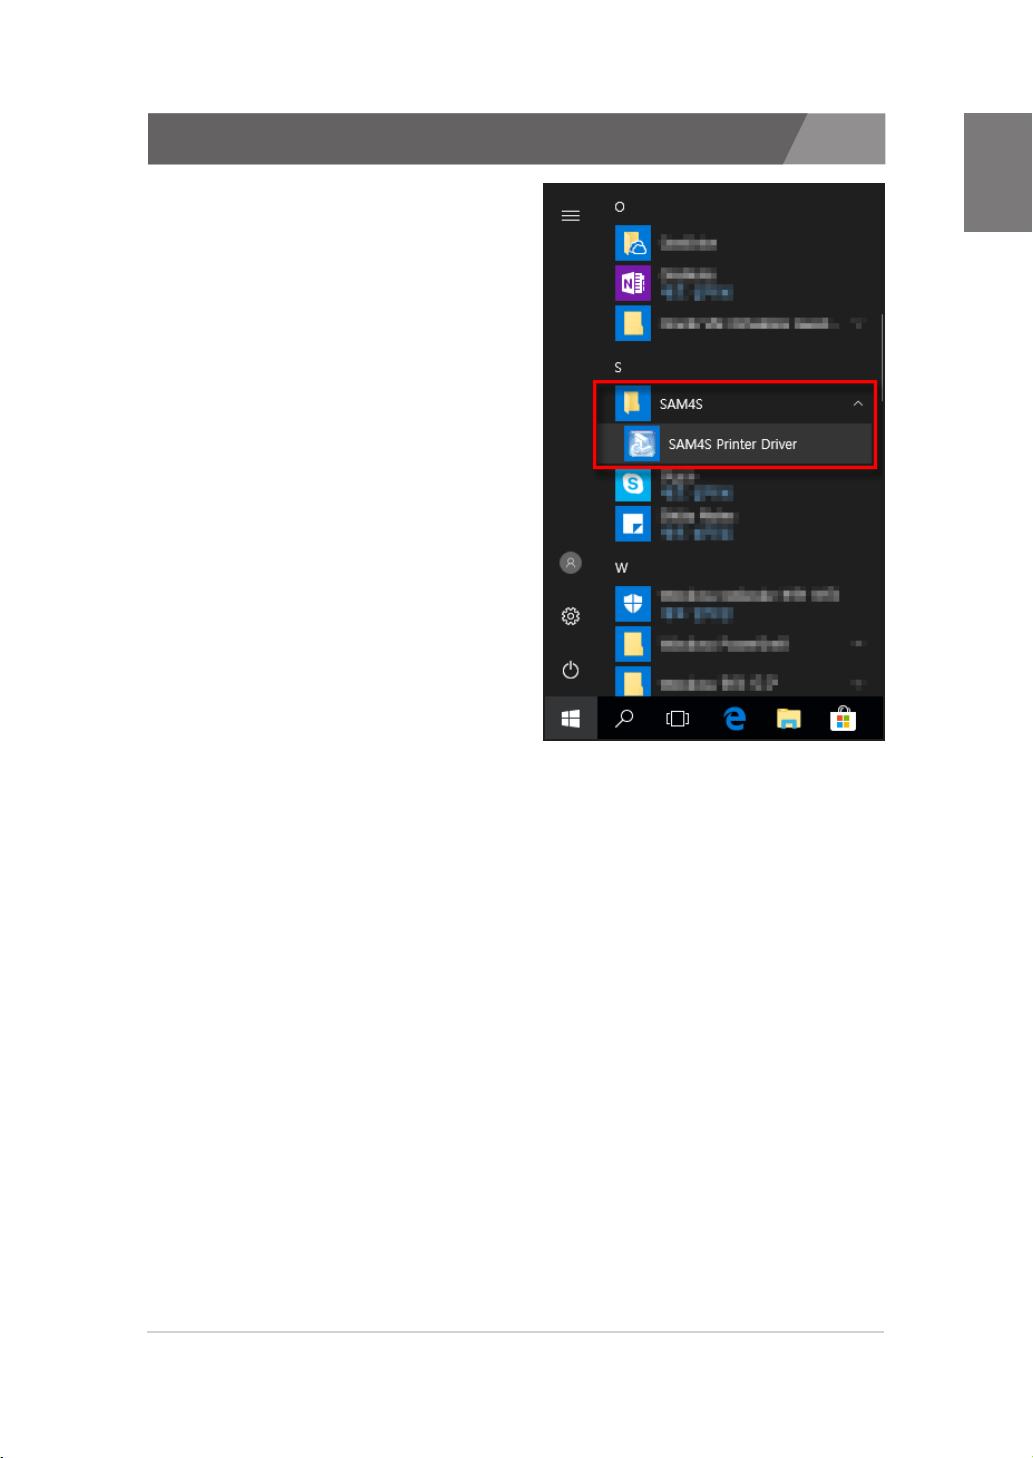
5. You can execute the SAM4S
printer driver installer through
shortcut that is on the ‘Program
Menu’. Please refer ‘Chapter 2.
Installation of SAM4S printer'
for detail.
CHAPTER 1
8
CHAPTER 2.
Installation of SAM4S
printer
2.1. Verify interface type of SAM4S printer
2.2. Installing a Serial printer
2.3. Installing a Parallel printer
2.4. Installing an USB printer
2.5. Installing an USB to serial printer (Windows 7)
2.6. Installing an USB to serial printer (Windows 10)
2.7. Installing an Ethernet printer
2.8. Checking installed printer
CHAPTER
Installation of
2
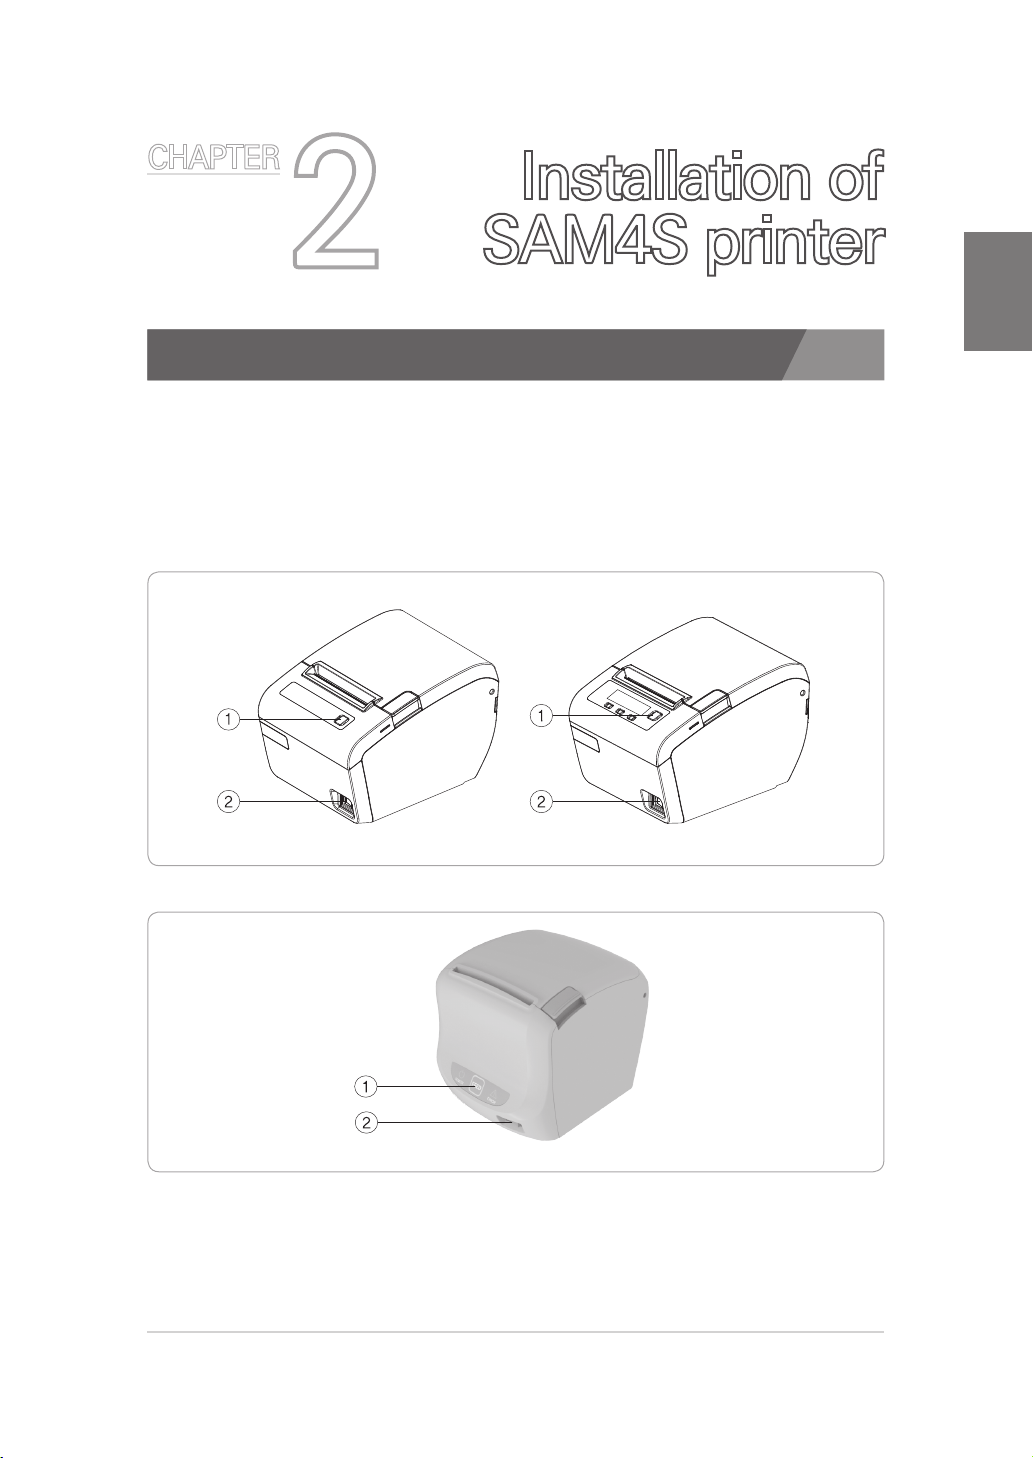
2.1. Verify interface type of SAM4S printer
Check the interface of printer from the ‘Self-Test’. The self-test checks the
following:
1. Make sure paper roll has been installed properly.
2. ② Turn on the power while ① holding down the FEED button.
The self-test begins.
SAM4S printer
CHAPTER 2
pic1)
ELLIX30/30III/35/35III Series, ELLIX40/45 Series
GIANT-100 / GIANT-150 / GIANT PRO
pic2)
10
2.1. Verify interface type of SAM4S printer
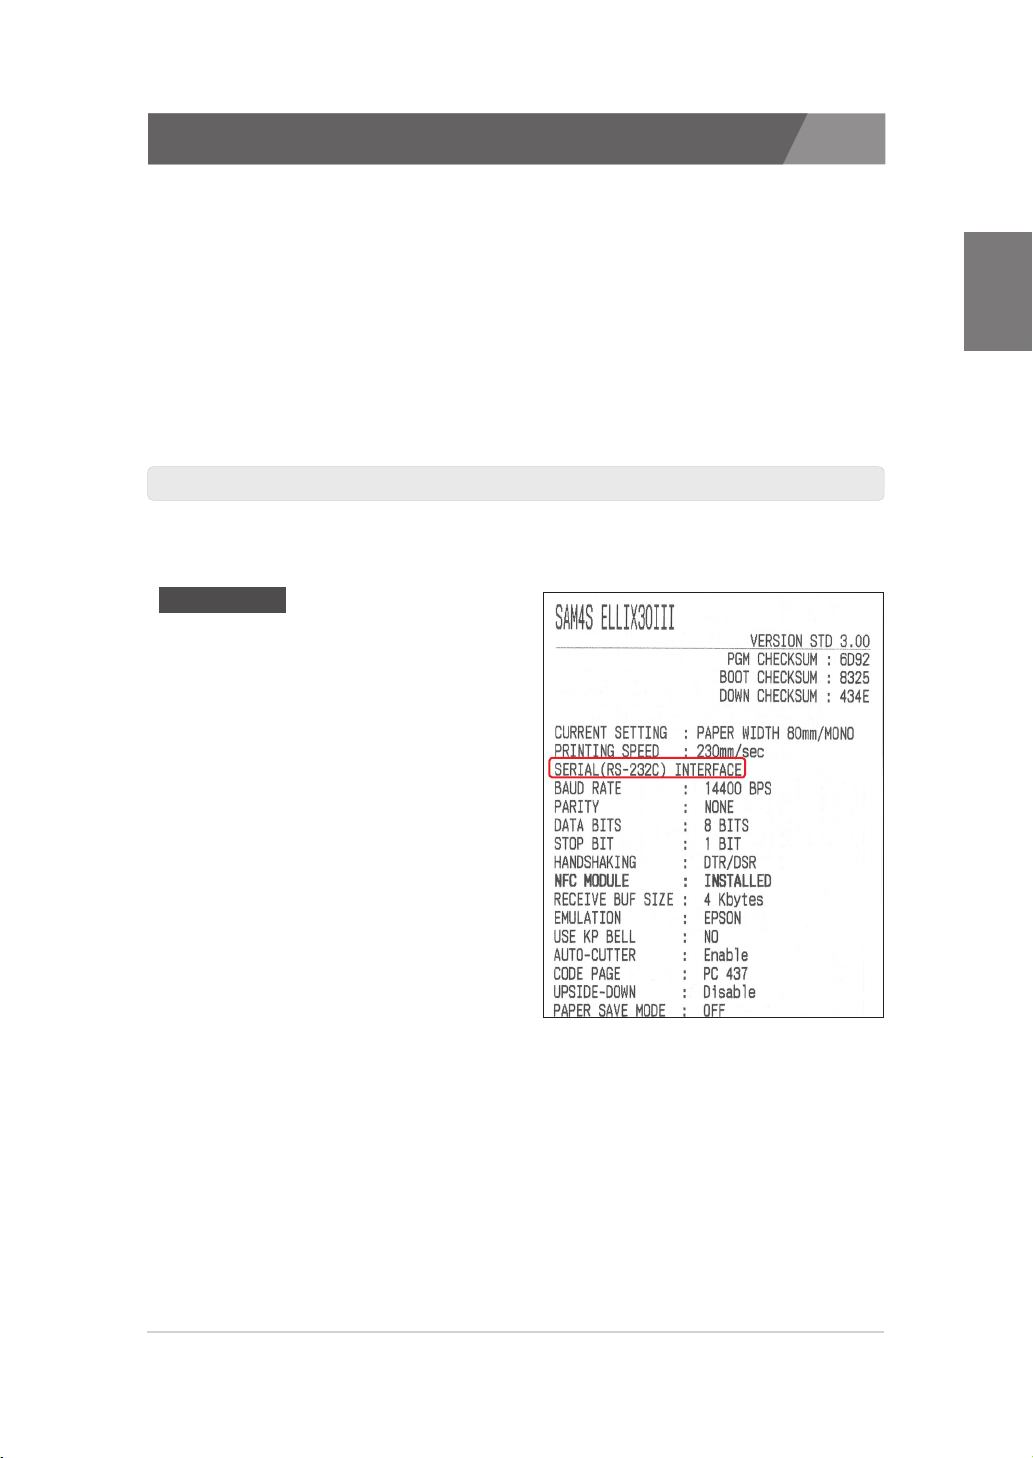
3. The self-test prints the current printer status, which provides the
control firmware version and the printer setting.
4. The printer will be paused temporarily after printing the current printer
status. (The 'No Paper' LED or the LCD light blinks) The GIANT Series
printer will automatically execute 'Step 5' after 2 seconds.
5. Press the FEED button to continue printing. The printer prints a pattern
using the built-in character set.
6. The self-test automatically ends and cuts the paper after printing the
following.
** Completed **
7. The printer is ready to receive data as soon as it completes the self-test.
8. You can find interface type of SAM4S printer from the self-test as follow.
Interface list
· USB-I INTERFACE for
‘SERIAL / V-COM CONNECTION’
· USB-II INTERFACE for
‘USB CONNECTION’
· PARALLEL INTERFACE for
‘PARALLEL CONNECTION’
· Ethernet-II INTERFACE for
‘ETHERNET CONNECTION’
· WIRELESS LAN (WLAN) INTERFACE for
‘ETHERNET CONNECTION’
· SERIAL (RS-232C) INTERFACE - 25 pin
for ‘SERIAL / VCOM CONNECTION’
· SERIAL/WIRELESS INTERFACE - 9 pin
for ‘SERIAL / VCOM CONNECTION’
CHAPTER 2
11
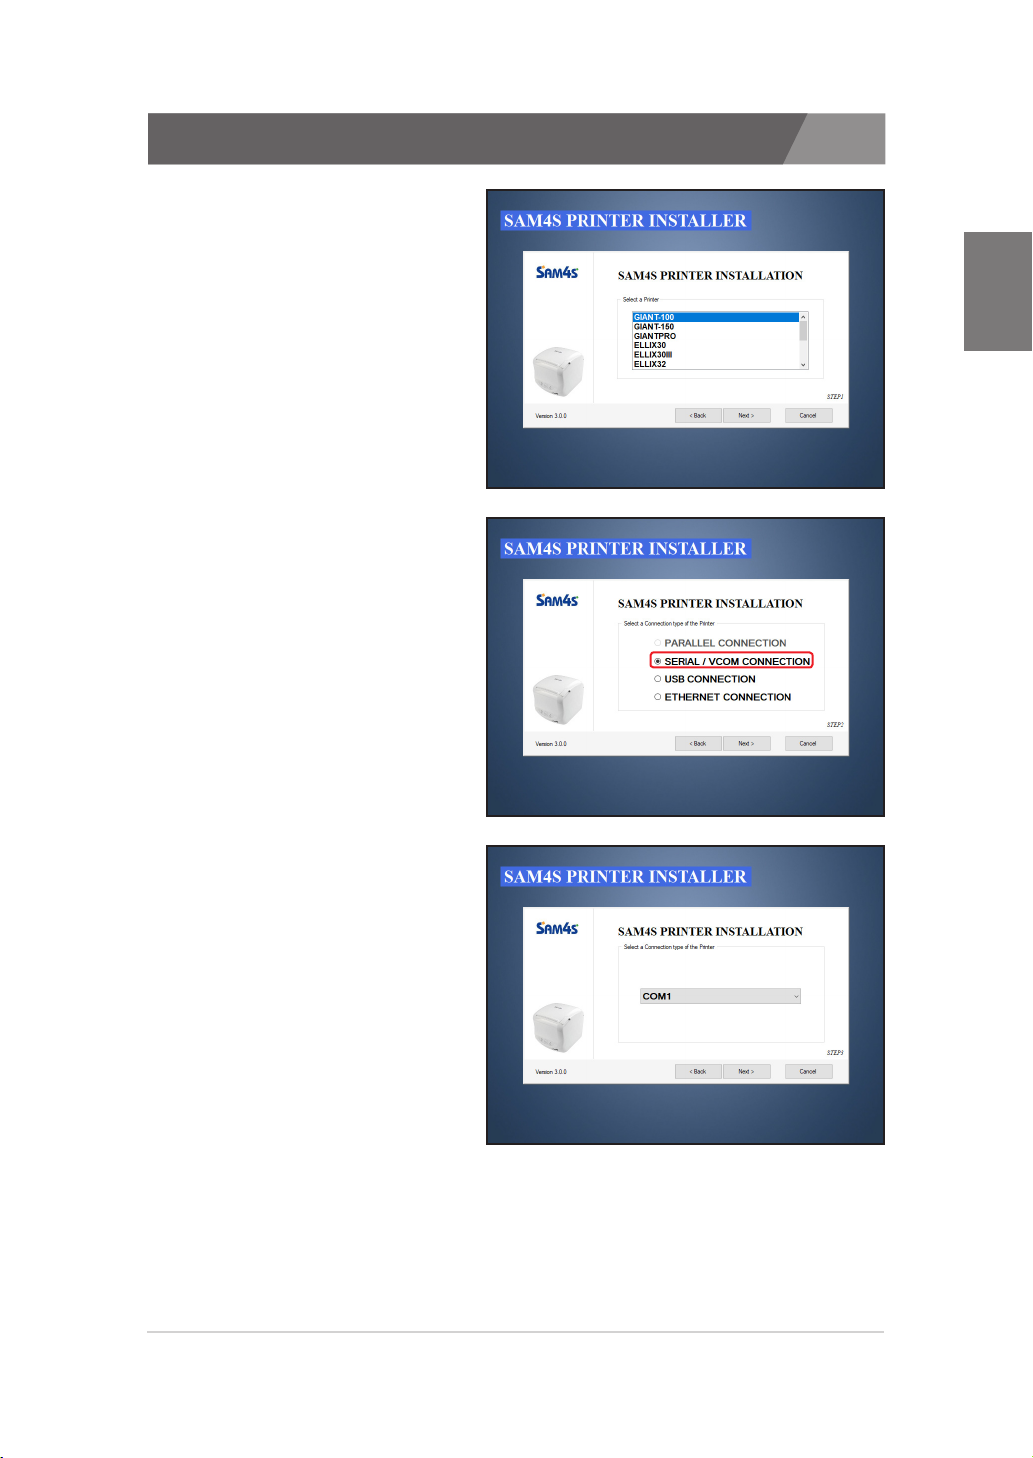
2.2. Installing a Serial printer
1. Selecting a printer that will
be installed.
2. Selecting the ‘SERIAL /
VCOM CONNECTION’.
CHAPTER 2
3. Selecting a port.
· If you don’t have a serial port
on your system, you can’t
progress further.
· For solution of this issue, please
refer p.51.
12
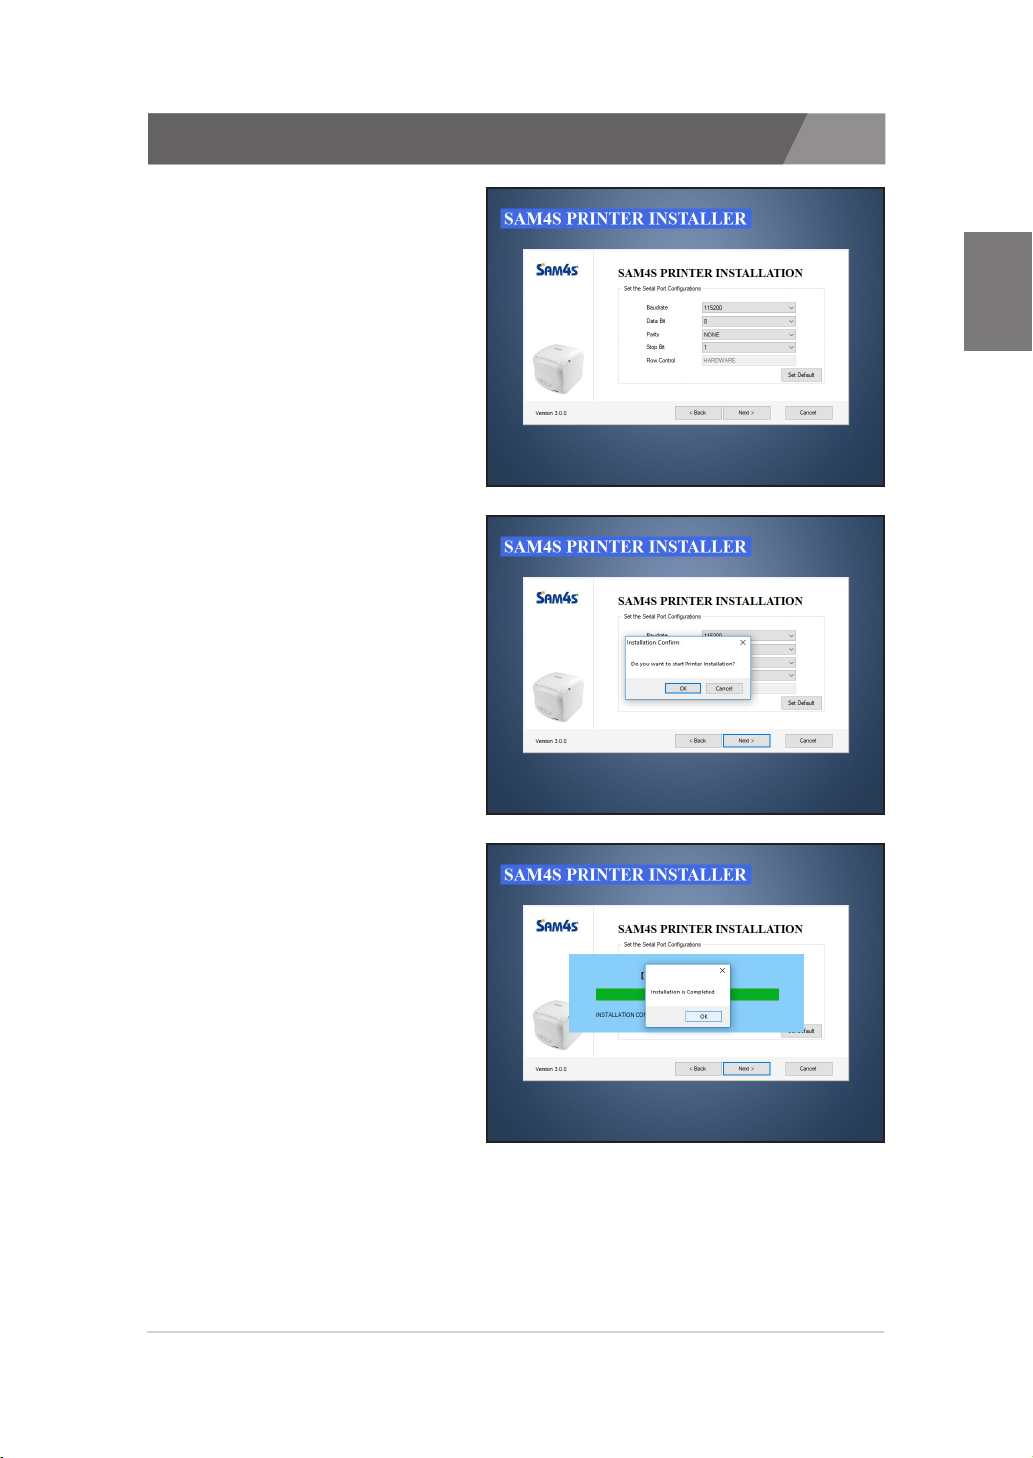
2.2. Installing a Serial printer
4. Configuring the selected port.
5. Confirming installation.
CHAPTER 2
6. Installation completed.
13
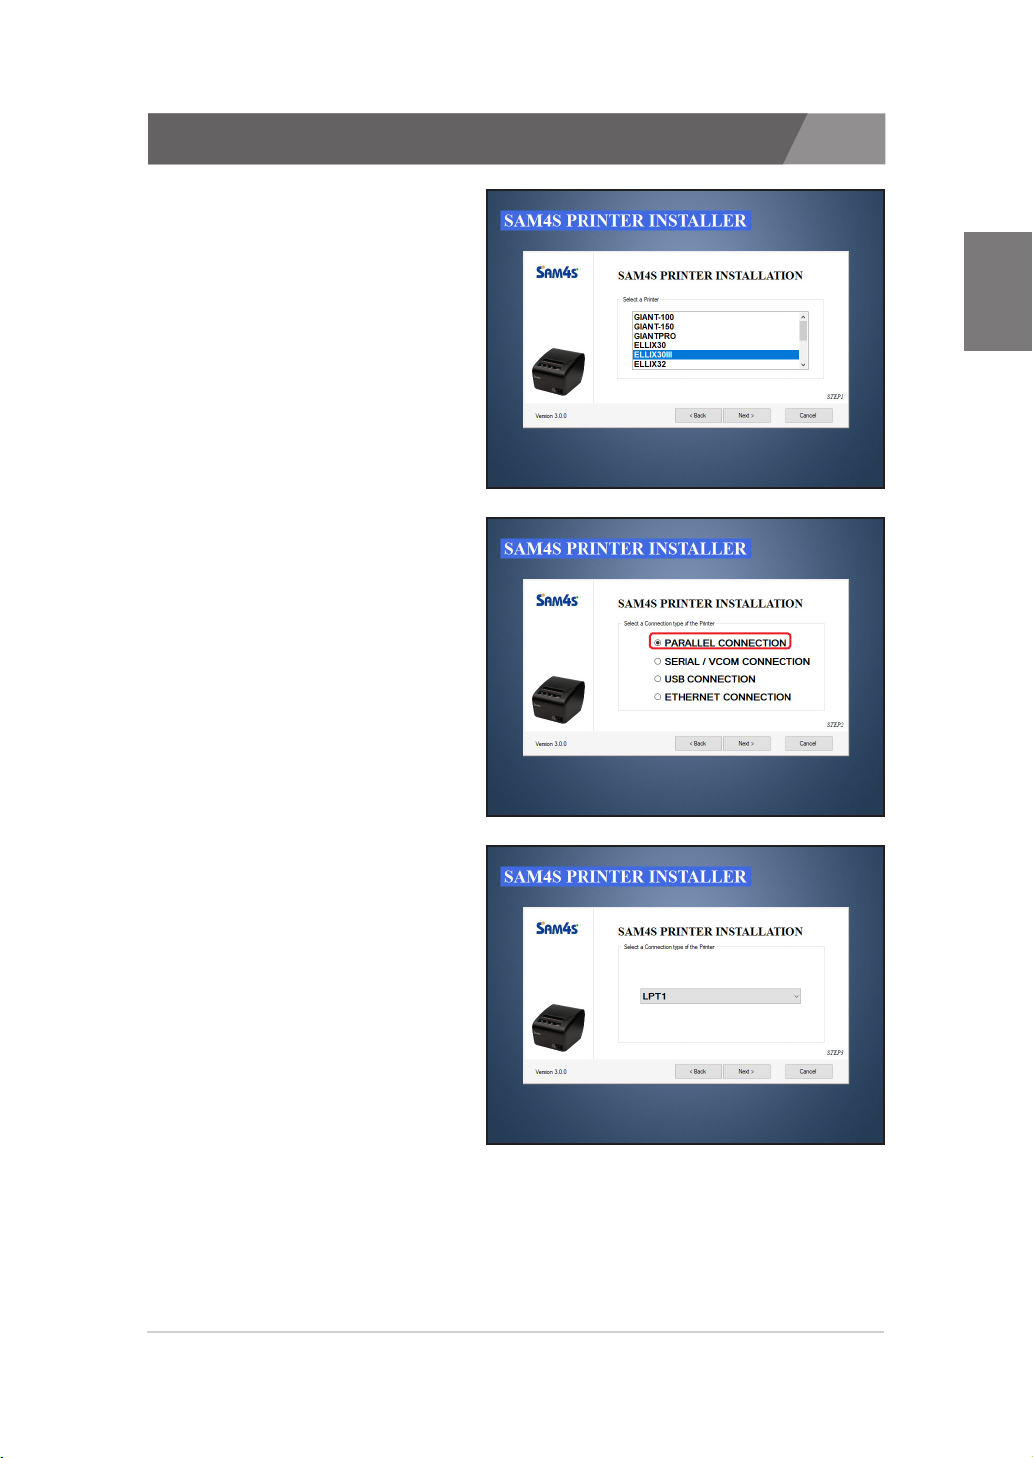
2.3. Installing a Parallel printer
1. Selecting a printer that will
be installed.
2. Selecting the ‘PARALLEL
CONNECTION’.
CHAPTER 2
3. Selecting a port.
· If you don’t have a parallel
port on your system, you can’t
progress further.
· For solution of this issue, please
refer p.54.
14
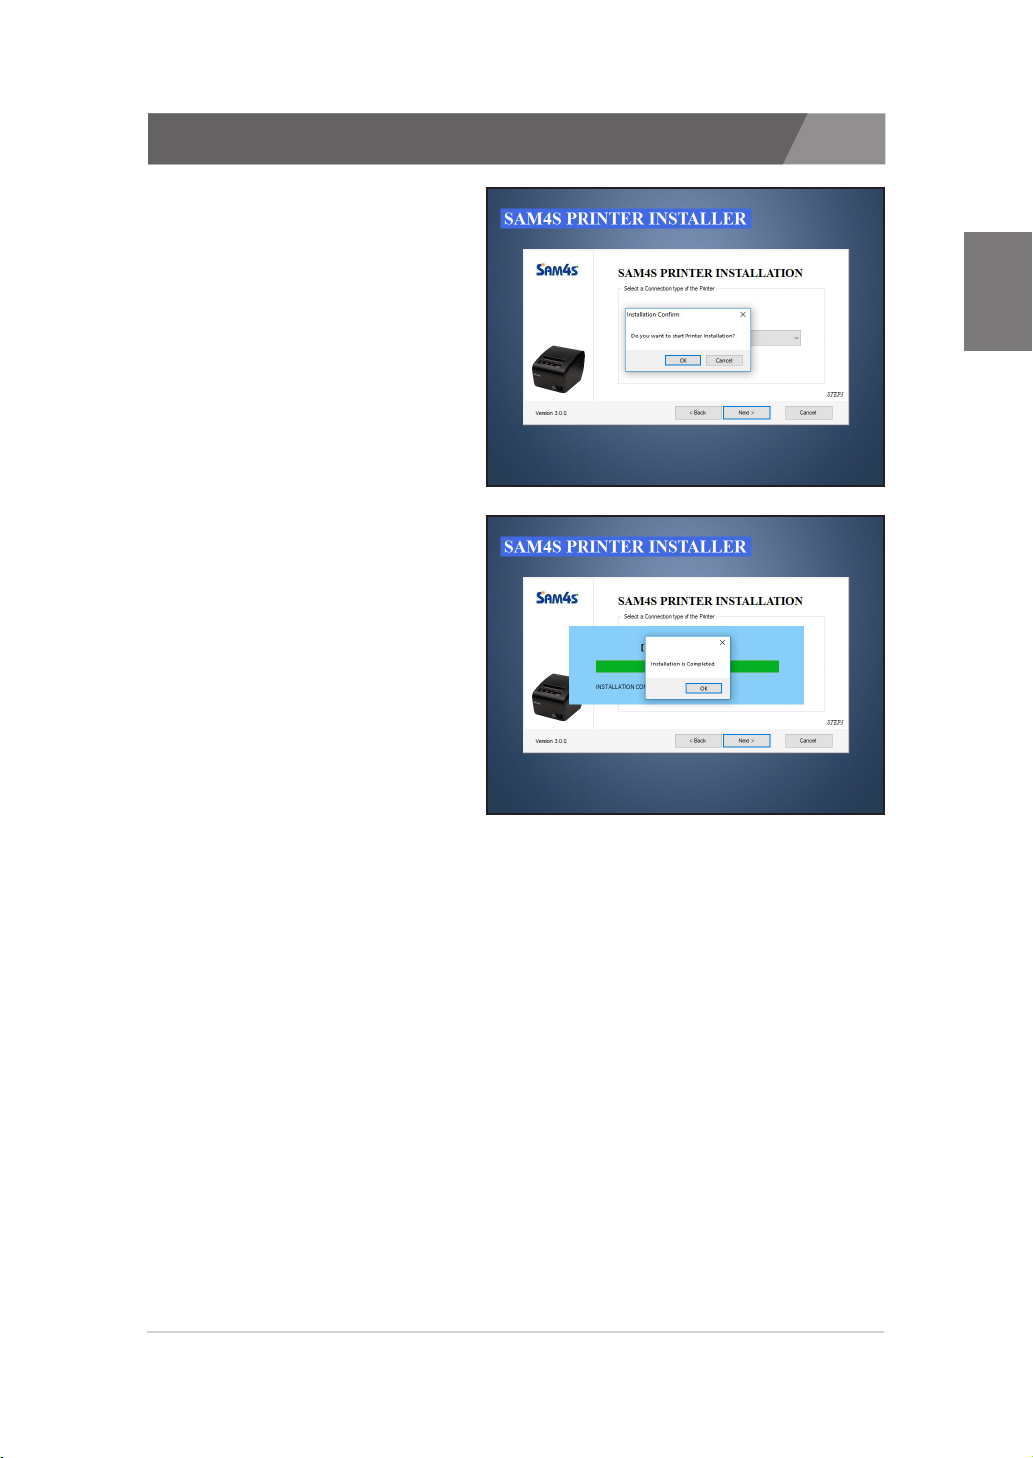
2.3. Installing a Parallel printer
4. Confirming installation.
5. Installation completed.
CHAPTER 2
15
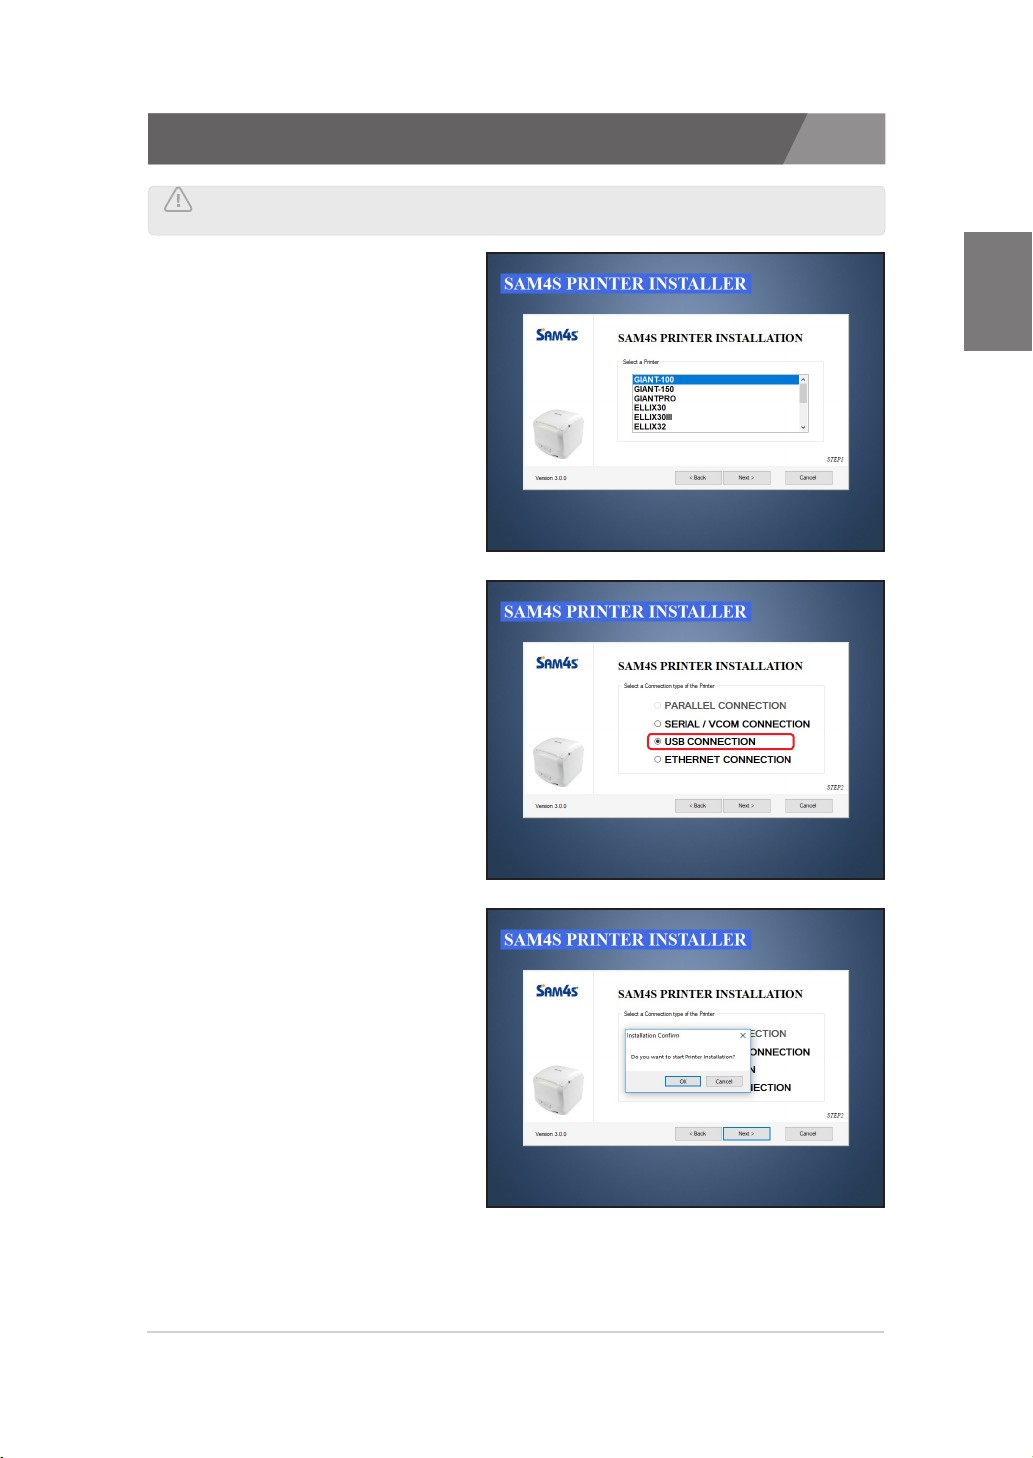
2.4. Installing an USB printer
Warning: Before finishing installation of USB printer, printer should not be
connected with PC
1. Selecting the printer for install.
2. Selecting the ‘USB
CONNECTION’.
CHAPTER 2
3. Confirming installation.
16
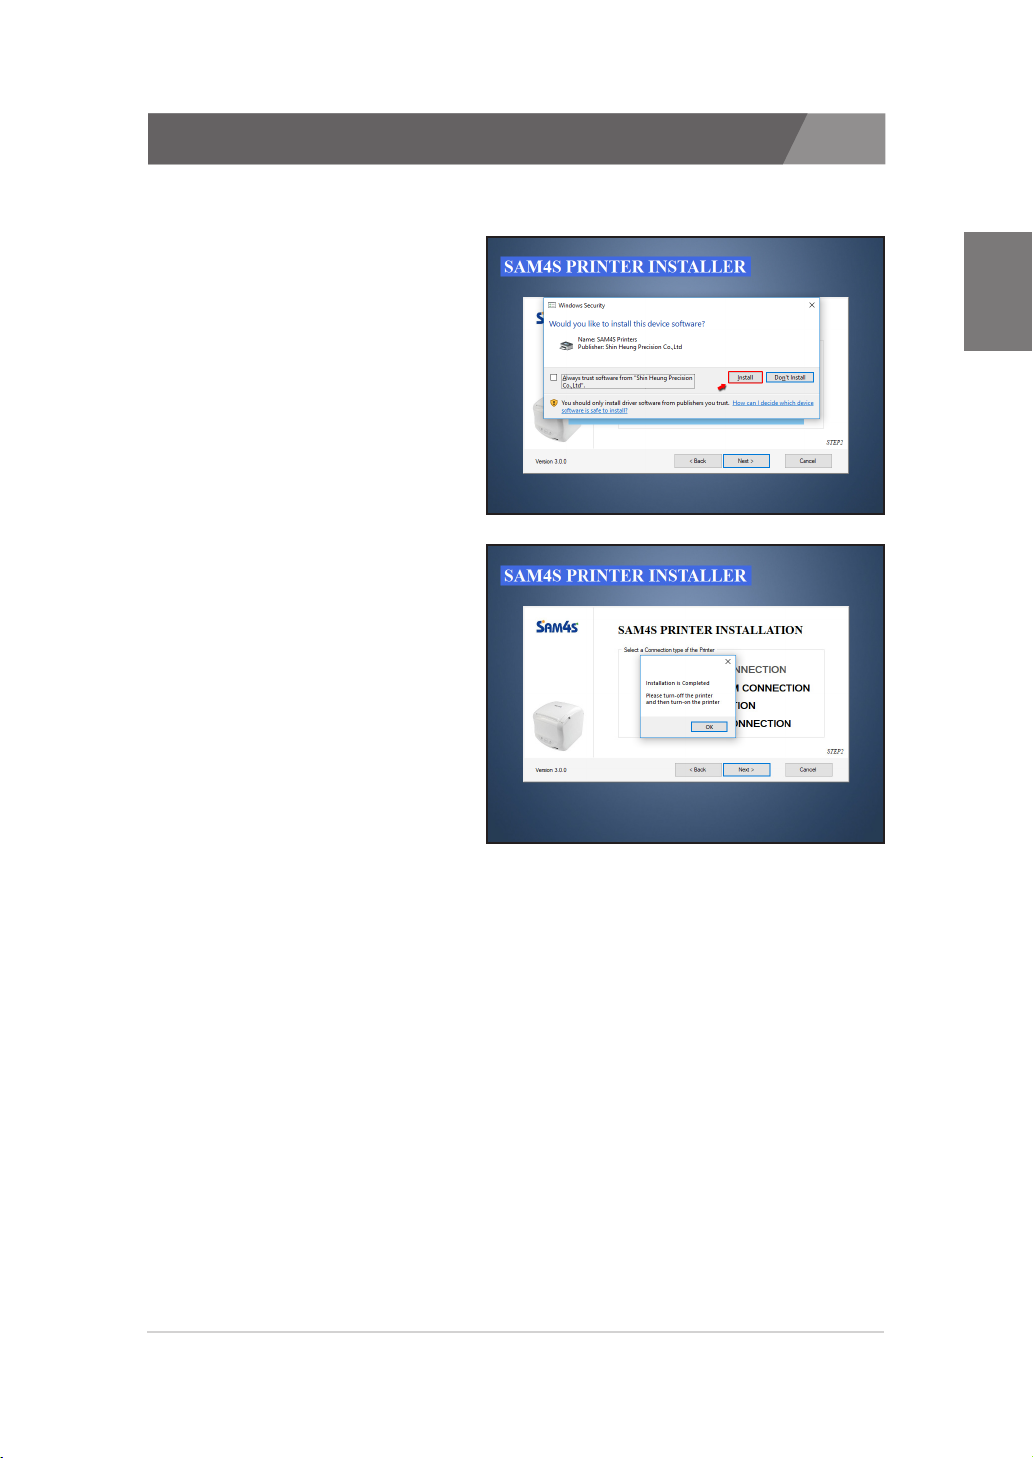
2.4. Installing an USB printer
4. Confirming security check.
· In case of Windows 7 / 8 / 8.1 / 10
>>
Once you check the ‘Always
trust software …’ and click the
install, the Windows Security
message will not display any
more.
5. Installation completed.
CHAPTER 2
17

2.4. Installing an USB printer
6. Connecting printer so that the printer is installing.
· In case of Windows 7
>>
Notification of connection.
OS will setup the printer
automatically.
>>
Installation completed.
· In case of Windows 8 / 8.1 / 10
>>
Notification of connection.
OS will setup the printer
automatically.
>>
Automatically detect the
printer, installation is complete
in a few moments.
CHAPTER 2
18

2.5. Installing an USB to Serial printer (Win 7)
1. Run the installer. Click the 'Cancel' button and close the window, when
the 'SAM4S Printer Installer' window displayed.
2. Connect the printer that has been changed to 'USB to Serial(VCOM)
mode' to PC and turn on the power.
3. Open 'Device Manager'
4. 'Printer model name' + CDC
or 'Printer model name'
will be displayed in 'Other
devices'.
Click the right mouse button
and click 'Update Driver
Software'.
5. Click the 'Browse my
computer for driver
software(R)'.
CHAPTER 2
6. Select the 'ParallelInf' folder
in the 'SAM4S Printer driver'
folder. And click the 'Next'
button in bottom.
19

2.5. Installing an USB to Serial printer (Win 7)
7. The driver installation
'Security Alert' window will
appear. Click the 'Install'
button.
8. The driver has been
successfully installed. If
the installation fails or an
error code is displayed,
contact your dealer or our
investigator.
CHAPTER 2
9. Check the VCOM port
is displayed in 'Device
Manager'
10. Proceed in the same way as 'Installing an USB printer'.
20

2.6. Installing an USB to Serial printer (Win 10)
1. Run the installer. Click the 'Cancel' button and close the window, when
the 'SAM4S Printer Installer' window displayed.
2. Connect the printer that has been changed to 'USB to Serial(VCOM)
mode' to PC and turn on the power.
3. Open 'Device Manager'.
4. It should be recognized as
'USB Serial Device'. Proceed
with driver installation for
normal communication and
COM port distinction. Click
the 'Update Driver' button.
5. Click the 'Browse my
computer for driver
software(R)'.
CHAPTER 2
6. Select the 'ParallelInf' folder
in the 'SAM4S Printer driver'
folder. And click the 'Next'
button in bottom.
21

2.6. Installing an USB to Serial printer (Win 10)
7. The driver installation
'Security Alert' window will
appear. Click the 'Install'
button.
8. The driver has been
successfully installed. If
the installation fails or an
error code is displayed,
contact your dealer or our
investigator.
CHAPTER 2
9. Check the VCOM port
is displayed in 'Device
Manager'.
10. Proceed in the same way as 'Installing an USB printer'.
22

2.7. Installing an Ethernet printer
1. Selecting a printer that will
be installed.
2. Selecting the ‘ETHERNET
CONNECTION’.
CHAPTER 2
3. Configuration for TCP/IP.
· Enter the IP Address and Port.
- Confirm the currently set
IP address and PORT number
using Self-Test
· Default Port of SAM4S printer:
6001
23

2.7. Installing an Ethernet printer
4. Confirming installation.
5. Installation completed.
CHAPTER 2
24

2.8. Checking installed printer
1. Checking installed printer.
· In case of Windows 7.
· In case of Windows 8 / 8.1 / 10.
CHAPTER 2
25

2.8. Checking installed printer
2. Verifying properties that are
‘Driver’ and ‘Print Processor’
of installed printer from the
Advance tap.
CHAPTER 2
3. Printing test page from the
General tap and checking
the printed paper.
26

CHAPTER 3.
Uninstallation of SAM4S
printer
3.1. Uninstalling printer(s)
3.2. Remain information

CHAPTER
Uninstallation of
3
SAM4S printer
3.1. Uninstalling printer(s)
1. There are two ways to start uninstallation.
1) Starting from ‘Add or Remove Program’.
2) Starting from ‘Program Menu’.
2. Selecting the ‘SAM4S
Printer Uninstall’.
If printer were installed,
you can see Installation /
Uninstallation options.
‘SAM4S Printer Uninstall’ is
selected as the default setting
if you have an installed SAM4S
printer.
If the SAM4S printer installer
doesn’t show the dialog
despite you have an installed
printer, please refer p.56.
CHAPTER 3
3. Selecting one or more
Printer.
· Multiple selections are possible
Using the 'Shift' of 'Ctrl' keys on
keyboard.
· Selected printer that will be
uninstalled.
28

3.1. Uninstalling printer(s)
4. Confirming uninstallation.
5. Uninstallation completed.
CHAPTER 3
29

3.2. Remain information
Even though every installed printer is uninstalled, files and registry key
are remained on your system as below:
1. Remain files
1) SAM4S printer driver
installer files
32bit : SAM4S PrinterDriver of
Program Files folder
64bit : SAM4S PrinterDriver of
Program Files (x86) folder
2) Driver files
32bit : w32x86 of drivers folder
64bit : x64 of drivers folder
CHAPTER 3
2. Remain registry keys
1) V3.0.0 or above
- DriverData
2) V2.1.3 or below
- Copies
- CopiesCut
- CopiesDrawer
- CutMode
- EndDoc
- MISC
- StartDoc
· Path : HKEY_CURRENT_USER\SOFTWARE\SAM4S\
· Path : HKEY_CURRENT_USER\SOFTWARE\SAM4S\
30

CHAPTER 4.
Specifications of SAM4S
printer
4.1. Printer fonts
4.2. Printer resolutions & Paper size

CHAPTER
Specifications of
4
SAM4S printer
4.1. Printer fonts
These drivers support pre-installed fonts as well as Windows fonts. Use the
pre-installed fonts allow you faster printing. Available printer fonts are listed
below.
“Built-in fonts of a printer” can be specified with the application programs.
The “built-in fonts” are as follows.
- Printer Font (type A, Large)
- Printer Font (type B, Small)
The font that user can choose in to the application are as follows. 2 types
of character-height can be chosen in each font. They are two kinds of the
FontAXxX (Ext.) font and the FontAXxX. The character code of 128 bytes of
80H - FFH varies in the difference in these printer fonts.
A FontAXxX font supports ANSI character code (Code Page 2: 850). And,
a FontAXxX (Ext.) font supports IBM expansion character code (Code Page
0: 437). A FontAXxX (255) font supports space page. (Code Page: 255).
CHAPTER 4
32

4.1. Printer fonts
CHAPTER 4
33

4.1. Printer fonts
SAM4S Printer can be used to execute a variety of special non-printing
functions, as indicated in the table below. You can execute these functions
by selecting the printer’s special “FontControl” font and then sending the
appropriate character code to the driver.
(Note that you cannot use the “FontControl” font to print normal characters)
Character Special Function
5 HT is output
6 LF is output
7 CR is output
a Open Drawer 2 (50ms drive pulse width)
b Open Drawer 2 (100ms drive pulse width)
c Open Drawer 2 (150ms driver pulse width)
d Open Drawer 2 (200ms drive pulse width)
e Open Drawer 2 (250ms drive pulse width)
g Cut Receipt (partial cut) without paper feeding
p HRI characters are not added to the bar code
q HRI character are added at the top of the bar code using Font A
r HRI characters are added at the bottom of the bar code using Font A
s HRI characters are added at the top of the bar code using Font B
t HRI characters are added at the bottom of the bar code using Font B
w Text is aligned left
x Text is centered
y Text is aligned right
A Open Drawer 1 (50ms drive pulse width)
B Open Drawer 1 (100ms drive pulse width)
C Open Drawer 1 (150ms driver pulse width)
D Open Drawer 1 (200ms drive pulse width)
E Open Drawer 1 (250ms drive pulse width)
G NV bit image No 1 is printed in the Normal mode
H NV bit image No 2 is printed in the Normal mode
I NV bit image No 3 is printed in the Normal mode
J NV bit image No 4 is printed in the Normal mode
K NV bit image No 5 is printed in the Normal mode
P Cut Receipt (partial cut)
[ NV bit image No 1 is printed in the Double Height Double Width mode
] NV bit image No 2 is printed in the Double Height Double Width mode
^ NV bit image No 3 is printed in the Double Height Double Width mode
_ NV bit image No 4 is printed in the Double Height Double Width mode
` NV bit image No 5 is printed in the Double Height Double Width mode
CHAPTER 4
34

4.2. Printer resolutions & Paper sizes
· Resolutions
The resolution setting supported by the SAM4S printer are as follows. Please refer to
the specifications of the printer for the correct resolution.
- 180 x 180 DPI
- 203 x 203 DPI
· Paper sizes
The paper sizes supported by SAM4S printer are as follow.
- 80 × 3276 mm
- 80 × 297 mm
- 80 × 200 mm
- 80 × 160 mm
- 80 × 120 mm
- 80 × 80 mm
- 80 × 40 mm
- 58 × 3276 mm
- 58 × 297 mm
The following table shows the recommended margins for SAM4S printer. Refer to
this table when setting margins from your printing applications.
CHAPTER 4
Printer
Margins Printer Area
Left[mm] Right[mm] Top[mm] Bottom[mm] Width[mm]
SAM4S 0 0 0 0 80
35

CHAPTER 5.
Properties of SAM4S
Printer
5.1. Layout
5.2. Feed and Cut
5.3. Dithering
5.4. Custom Paper Size
5.5. Device Control
5.6. Barcode
5.7. Advanced Settings

CHAPTER
Properties of
5
5.1. Layout
1. You can set the print
direction of the document
- Portrait : Print in portrait.
- Landscape : Print in landscape.
2. Prints can be rotated 180
degrees
3. You can set the print mode
- Receipt mode : This is the normal
receipt printing mode.
Paper cutting according to the data
to be printed.
- Page mode : This mode cut the
paper in page units when printing
2 or more pages of Word or PDF
Document.
Prints to fit the set paper size.
SAM4S Printer
CHAPTER 5
37

5.2. Feed and Cut
SAM4S Printer Drivers provides 8 paper feed and cut options.
1) Document - Feed - Cut
>>
When two or more pages of a document are printed, they are printed continuously.
>>
At the last page, The document are printed in order of 'Print' - 'Feed' - 'Paper Cut'.
CHAPTER 5
2) Document - Feed - No cut
>>
When two or more pages of a document are printed, they are printed continuously.
>>
At the last page, The document are printed in order of 'Print' - 'Feed'.
3) Document - No feed - Cut
>>
When two or more pages of a document are printed, they are printed continuously.
>>
At the last page, The document are printed in order of 'Print' - 'Cut'.
4) Document - No feed - No cut
>>
When two or more pages of a document are printed, they are printed continuously.
>>
At the last page, The document are printed in order of 'Print' - 'Print Stop'.
5) Page - Feed - Cut
>>
When two or more pages of a document are printed, Printer performs the 'Cut'
operation at the end of each page.
38

5.2. Feed and Cut
6) Page - Feed - No cut
>>
When printing two or more pages, Printer performs the 'Feed' operation at the end of
each page.
>>
At the end of the page, because the paper is not cut, It may look similar to 'Document
Option'.
7) Page - No feed - Cut
>>
When printing two or more pages, Printer performs the 'Cut' operation at the end of
each page.
>>
At the end of the page, because the paper is cut without 'Feed', Part of the last page
may be cut off.
8) Custom setting
>>
In addition to the seven options, you can set the options you want.
>>
You can set the 'Cutting' or 'Feed' option in 'Start of Document', 'Start of Page', 'End of
Page' or 'End of Document'.
You can manually set the ‘Cut’ or ‘Feed’ according to the option selected in
the Detail Option.
1) Start of Document
>>
This setting is applied at the start of document printing.
>>
This setting is available only if the 'Option' is 'Custom Setting'.
CHAPTER 5
2) Start of Page
>>
This setting is applied at the start of page printing.
>>
This setting is available only if the 'Option' is 'Custom Setting'.
3) End of Page
>>
This setting is applied at the end of the page printing.
>>
'Feed' can be set when a setting containing 'Page' and 'Feed' is selected in 'Option'.
4) End of Document
>>
This setting is applied at the end of the document printing.
>>
'Feed' can be set when a setting containing 'Document' and 'Feed' is selected in
'Option'.
39

5.3. Dithering
SAM4S Printer Drivers provide intuitive dithering settings. The dithering
setting applied when printing.
1) Dithering Algorithm
>>
Three options are available.
>>
Dithering quality is 'Floyd Steinberg < Sierra < Sierra Ex'. Choosing a good dithering quality
option increases the image quality, But it takes more time to start printing.
CHAPTER 5
2) Preview
>>
You can check the set options in real time.
3) Control bar
>>
You can adjust the brightness to the preview image. Moving the control bar from left to
right darkens the Image. The settings are reflected in the output of the actual image.
4) Dithering Option
>>
There are Three option, 'Sharpen', 'More Sharpen' and 'Blur'.
5) Bitmap
>>
You can apply the dithering setting to the image (picture, logo) you want to print.
6) Print
>>
You can print preview image to printer.
7) Reset
>>
You can restore the dithering options to the defaults.
40

5.4. Custom Paper Size
The SAM4S Printer Drivers can add, modify and delete the paper size you want.
1) List of paper sizes
>>
Nine paper sizes have been added to the printer driver for the first time.
CHAPTER 5
2) Add / Modify Paper
>>
Add Paper
- In the Paper Properties list, you can enter a non-existent 'Form Name' in '4', and the width
and length size within the range in '5'.
- Then click the 'Add / Modify paper' button. Add Paper is completed.
>>
Modify Paper
- In '1', after select the paper already registered, modify the paper name or size.
And click the 'Add/Modify Paper' button. The paper size has been modified.
- The default paper size can't be modified.
3) Delete Paper
>>
In '1', after select the paper you want to delete, click the 'Delete' button.
When the notification window appears, click "Yes". The paper erase is complete.
>>
The default paper size can't be deleted.
4) Form Name
>>
This option indicates the name of the form.
5) Paper Size
>>
This option indicates the width and length of the paper.
41

5.5. Device Control
The SAM4S Printer Drivers can add special command at the beginning and
end of documents and pages and control the cash drawer.
CHAPTER 5
Special commands must be entered in the following form:
(\ + 'x' + 2byte HEX value)
ex) - Line Feed : \x0A / - Cutting : \x1D\x56\x42\x00
1) Start of Document
>>
You can set to carry out special command or cash drawer control at the start of
document output.
>>
If an invalid command is entered, the command is ignored.
2) Start of Page
>>
Set to carry out special command or cash drawer control at the start of page output.
>>
If an invalid command is entered, the command is ignored.
3) End of Page
>>
Set to carry out special command or cash drawer control at the end of page output.
>>
If an invalid command is entered, the command is ignored.
4) End of Document
>>
Set to carry out special command or cash drawer control at the end of document output.
>>
If an invalid command is entered, the command is ignored.
42

5.6. Barcode
The preview image may differ from the barcode printed as a sample image
The SAM4S printer supports a wide range of 1D barcodes and 2D barcode
output. You can test barcodes with various options.
CHAPTER 5
1) Font
(Barcode Type)
>>
The following barcodes are supported.
- 1D Barcode : Code 39, Code 93, Code 128, ITF, Codabar, JAN8/EAN8, JAN13/EAN13,
UPC-A, UPC-E
- 2D Barcode : QR Code, PDF-417
2) Option
>>
You can set the width and height of the barcode.
>>
You can set the printing position of HRI(Human Readable Interpretation).
3) Test Print
>>
You can print barcode data with options set in '1' and '2'.
4) Preview
>>
You can preview the barcode image with the barcode type set in '1'.
>>
The preview image may differ from the barcode printed as a sample image.
43

5.7. Advanced Settings
NOTE: Depending on the printer type, menu display and support may differ.
CHAPTER 5
NOTE: You can set the advanced functions only in printers connected to
a Serial or USB interface.
The SAM4S printer offers a variety of setting options such as logo and print settings.
1) Logo Setup
>>
You can set the top or bottom logo, or test the image.
2) Sample Print
>>
You can print receipts, images and samples of barcode.
3) User Setup - Printing
>>
You can set print-related functions such as print speed and density.
4) User Setup - Peripheral
>>
You can set peripheral functions such as kitchen bell and cash drawer control.
5) User Setup - Others
>>
You can set other features such as code page and emulation.
44

5.7.1. Advanced Settings (Logo Setup)
A description of the logo settings follows.
1) List of images
>>
When you add an image, the file name appears in the list. Afterwards, you can save
the image to the printer by clicking the 'DownLoad' button.
2) Preview
>>
You can see the images added to the list. Changes made in the dithering options are
not show.
3) Print Image
>>
You can print image stored in the printer by doubling the width or height.
4) Dithering options
>>
You can set the Contrast, Half tone and sharpen options.
5) Top Logo Options
>>
You can set the image and justification of the top logo.
6) Bottom Logo Options
>>
You can set the image and justification of the bottom logo.
7) Set Logo Option / Logo Test Print
>>
After setting the above options, click the 'Set Logo Options' button to complete the
setup. and, To test what has been set up, click the 'Logo Test Print' button.
CHAPTER 5
45

5.7.2. Advanced Settings (Sample Print)
A description of sample printing follows.
1) Receipt
>>
Receipt samples can be printed.
>>
There are three receipt samples. If you select the cut, receipt sample will be cut.
2) Image
>>
Image samples can be printed.
>>
There are three image samples. If you select the cut, image sample will be cut.
3) Barcode
>>
Barcode samples can be printed.
>>
There are ten barcode samples. If you select the cut, barcode sample will be cut.
CHAPTER 5
46

5.7.3. Advanced Settings (User Setup-Printing)
NOTE : Printing speed may be slow depending on paper width, type and density.
A description of the print items in the user settings is as follows.
1) Paper Width
>>
You can select 3inch mode(80mm) or 2inch mode(58mm).
2) Printing Speed
>>
You can select Printing Speed.
CHAPTER 5
3) Paper Color
>>
You can select Paper Color. - Black or 2 color.
4) Density
>>
You can select the paper density. The default value is LV 2, The highest values is LV 4.
5) Water Mark
>>
You can select the water mark. This applies only to font printing, and the watermark
setting is ignored when printing images.
You can not set the Water Mark function when Two Color mode is set.
6) Left Margin
>>
You can set the left margin. Up to 255 characters can be specified. (Only ELLIX40 is
up to 512) It is the same as the value of 12 per one alphanumeric characters. It is the
same as the value of 24 characters per korean / Chinese characters.
7) Auto Cutter
>>
You can select 'Auto Cut' - enabled or disabled.
8) Cutting Mode
>>
You can select Cutting mode - Full cut or partial cut.
9) Cutting Position
>>
You can set the action that the paper is cut after it is fed by the value entered in the 'Lines'.
47

5.7.4. Advanced Settings (User Setup-Peripheral)
A description of the peripherals in the user settings is as follows:.
1) Kitchen Bell
>>
You can set the bell action using External(Internal KB) or Inner bell(Board Buzzer).
>>
Since the Inner bell operates as a buzzer, the volume may be lower than the External
Bell.
2) Type / Times
>>
Set the Type, Times and Max Play Time of the kitchen bell.
>>
If you set the Max Play Time to '0 sec', it will play to the end.
3) Drawer
>>
You can set the behavior of the cash drawer.
>>
In Self-Test, The cash drawer opening operation should only be activated in an
emergency. We recommend setting it to "Disabled" for security.
>>
You can set the cash drawer behavior in the cutting operation after printing.
4) ETC
>>
You can set the operation mode of USB.
- USB : Printer operates in Printer Class Mode. It is recognized as 'USB printing support'.
- VCOM : Printer operates in Virtual Class Mode. It is recognized as 'COM port'.
>>
You can set the stop bit related to serial communication. The default value is '1 bit'.
CHAPTER 5
48

5.7.5. Advanced Settings (User Setup-Others)
A description of the peripherals in the user settings is as follows:
1) Code Page
>>
You can set up code Page. But Korean/Japanese/Chinese are not changed.
2) Emulation
>>
You can set up emulation. We support EPSON(ESC/POS) and STAR emulation.
3) Self-Test
>>
You can set up Self-Test.
- Self Test : The information of the printer is printed when the power is turned on while the
FEED button is pressed.
- Hexa Dump : The information of the printer is printed when the power is turned on while
the FEED button is pressed. At this time, when data is transferred to the printer, it is
printeas a hexadecimal value. Press the Feed button 3 times to exit.
4) Memory
>>
You can change the size of the built-in memory.
5) Paper Save
>>
The default value is 'LV0', and the maximum value is 'LV2'.
6) Sleep Mode
>>
You can set the printer's sleep mode. When set to '0 minutes', the sleep mode is canceled.
7) Korean Bold
>>
It makes bold text when printing Korean. This option can set when Korean font is
built-in printer.
CHAPTER 5
8) Upside-Down Print
>>
You can print the printer upside down. Generally, this option is used for Wall-Mount.
But you can’t use this option, When 'Water Mark', 'Two Color' or 'Top&Bottom logo'
is selected.
49

CHAPTER 6.
Troubleshooting
6.1. Installation troubleshooting
6.2. Uninstallation troubleshooting
6.3. Printing troubleshooting

CHAPTER
6
Troubleshooting
6.1. Installation troubleshooting
1. Not found a serial port.
If you don’t have a serial port
on your system, Installation
for serial port is not possible.
What you need to do is
make sure whether system
has a serial port or not from
the ‘Device Manager’.
CHAPTER 6
1) Scanning hardware to
make sure all of hardware
is installed.
51

6.1. Installation troubleshooting
2) Checking
‘COM (Communications)
Port’ on the list.
3) If you don’t have any ‘COM Port’ on the list, please ask assistance to
hardware engineer of your system.
2. Not found a USB to Serial port.
If you don’t have a serial port
including USB to serial port
on your system, Installation
for serial port is not possible.
CHAPTER 6
What you need to do is make
sure whether system has a
USB to serial port or not from
the ‘Device Manager’.
1) Scanning for hardware to
make sure all of hardware
is installed.
52

6.1. Installation troubleshooting
2) Checking ‘COM (communications) Port’ on the list.
· In case of Windows 7
· In case of Windows 8 / 8.1 / 10
CHAPTER 6
3) If you don’t have any ‘USB Serial Port’ on the list, please refer
'Installing USB to serial printer’ (p.19 or 21) to install an USB to Serial
printer.
4) If you have ‘USB Serial Port’ on the list but the SAM4S printer installer
doesn’t show the port when you install a SAM4S printer, please re-boot
your system to apply changes completely and try again.
53

6.1. Installation troubleshooting
3. Not found a parallel port.
If you don’t have a parallel
port on your system,
Installation for parallel port is
not possible.
What you need to do is
make sure whether system
has a parallel port or not from
the ‘Device Manager’.
1) Scanning for hardware to
make sure all of hardware
is installed.
CHAPTER 6
2) Checking ‘LPT Port
(Parallel Port)’ on the list.
3) If you don’t have any ‘Printer Port’ on the list, please ask assistance to
hardware engineer of your system.
54

6.1. Installation troubleshooting
4. Installed a Windows printer driver. However, It is not shown on my
computer turning ON/OFF the printer.
Solve the problem by manually removing the printer driver installed
on the system.
1) Click 'View' and 'Show
hidden devices' on the
Device Manager.
2) Uninstall the printer.
CHAPTER 6
3) Check the 'Delete the driver
software for this device' and
proceed to remove.
4) After uninstallation, retry to install the Windows printer driver.
55

6.2. Uninstallation troubleshooting
1. Unable to uninstall.
1) Make sure that the SAM4S printer is not removed from the ‘Devices and
Printers’.
Name of the installed SAM4S printer should be form as ‘SAM4S ELLIXxx’ or ‘SAM4S GIANT-xxx’.
Click the right mouse button and delete the printer.
· In case of Windows 7 / 8 / 8.1 / 10
- Right-Click the printer and select
'Remove device'
If the list of ‘Devices and Printers’ is not shown, execute ‘net start
※
spooler’ from the ‘Run’.
To open ‘Run’ dialog, press the ‘Windows Key’ with ‘R Key’.
CHAPTER 6
56

6.2. Uninstallation troubleshooting
2. Uninstalling the SAM4S Printer Driver Installer.
1) Delete the installer files:
32bit OS - Root\Program Files\
SAM4S PrinterDriver
64bit OS - Root\Program
Files(x86)\SAM4S PrinterDriver
2) Delete the shortcut of the
installer.
CHAPTER 6
57

6.3. Printing troubleshooting
1. The document is printed, but the paper is not cut properly.
Click the 'Printer properties' and check the 'Print Processor'.
· In case of Windows 7 / 8 / 8.1 / 10
- Click the 'Printer properties'
If the list of ‘Devices and Printers’ is not shown, execute ‘net start
※
spooler’ from the ‘Run’.
To open ‘Run’ dialog, press the ‘Windows Key’ with ‘R Key’.
CHAPTER 6
58

6.3. Printing troubleshooting
2. Verifying properties that are
‘Driver’ and ‘Print Processor’
of installed printer from the
‘Advance’ tap.
If the Print Processor is
assigning the ‘winprint’,
select the ‘SAM4S ELLIXxx’
or ‘SAM4S GIANT-xxx’.
CHAPTER 6
3. After that, go to the 'General' tab and click the 'Print Test Page' button.
Make sure the printer prints normally.
59

SAM4S Printer Series
Windows Driver & Installer
User Guide v7.1
 Loading...