

Page 1

User guide
Livret utilisateur
Bedienungsanleitung
Manual del usuario
Manuale dell'utente
Gebruiksaanwijzing
Page 2

1WELCOME 1
2DISCOVER YOUR PHOTO EASY 150 PRINTER 2
3PREPARE YOUR PHOTO EASY 150 PRINTER 3
Connect the mains supply 3
Insert a film cartridge 4
Loading paper 5
4PRINTING FROM A MEMORY CARD 6
Insert a memory card 6
5USER INTERFACE 8
Print your photographs 9
Rapid printing 9
Example of rapid printing from a memory card 10
Create a contact sheet (index) 11
Prepare a series of photographs for printing
(shopping trolley mode)
Print in DPOF (Digital Print Order Format) mode 15
Printing from a GSM mobile phone camera 15
13
6PRINT FROM A PC (PERSONAL COMPUTER) 18
Install the software 18
Connect your printer 19
7REPLACEMENT OF CONSUMABLES 20
8MAINTENANCE 21
Cleaning the print head 21
Paper jam 22
Problems 22
Error messages 23
Technical data 24
ENGLISH
FRANÇAIS
DEUTSCH
ESPAÑOL
9GARANTEE 25
- I -
ITALIANO
NEDERLANDS
Page 3

- II -
Page 4
1WELCOME
You have just acquired a SAGEM PHOTO EASY 150 printer, and we thank you for choosing our
product. With this high quality printer you can get the most out of your digital photos. In a few
simple steps you can produce photo prints identical to those from a professional developer, for
your personal use or to share with friends and family.
The easy-to-follow steps in this user guide will walk you through:
1. Switching on your PHOTO EASY 150 printer
2. Printing photographs stored on a memory card
3. Printing photographs transferred from a camera in a GSM mobile phone
4. Installing the image processing software and printer driver on a PC
5. Maintenance and troubleshooting of your PHOTO EASY 150 printer
The CD-ROM included with your kit contains an additional guide with instructions for using the
image processing software and printer driver on your PC.
Safety instructions and recommendations
• Do not install your PHOTO EASY 150 printer in a humid room (bathroom, laundry, kitchen, etc.), or within 1.50 m of a tap or water source, or outside. The printer should be operated within an ambient temperature range of 10 °C to 35 °C.
• Do not install your printer in a location where there is a noticeable amount of dust floating
in the air. Such dust can degrade the print quality of your photos.
• Only the power supply provided with the printer should be used. Connect this to the mains
in accordance with the installation instructions in this user guide and the information on the
identification label affixed to the power supply (voltage, current, mains frequency)
ENGLISH
FRANÇAIS
DEUTSCH
ESPAÑOL
1
.
• Never open the cover of the film cartridge compartment during printing. This could
break the film and cause printer malfunction.
• Only use SAGEM consumables, if not you are likely to damage the equipment and invalidate the guarantee. To obtain the references of the consumables (Refer to paragraph Repla-
cement of consumables, page -20).
• The EC marking certifies that the product meets the main requirements of the European Parliament and Council directive 1999/5/CE on telecommunications terminal equipment,
regarding safety and health of users, and regarding electromagnetic interference.
1. Excluding isolated neutral-type network installations as defined in the EN60950 standard.
- 1 -
ITALIANO
NEDERLANDS
Page 5
2DISCOVER YOUR PHOTO EASY 150 PRINTER
5
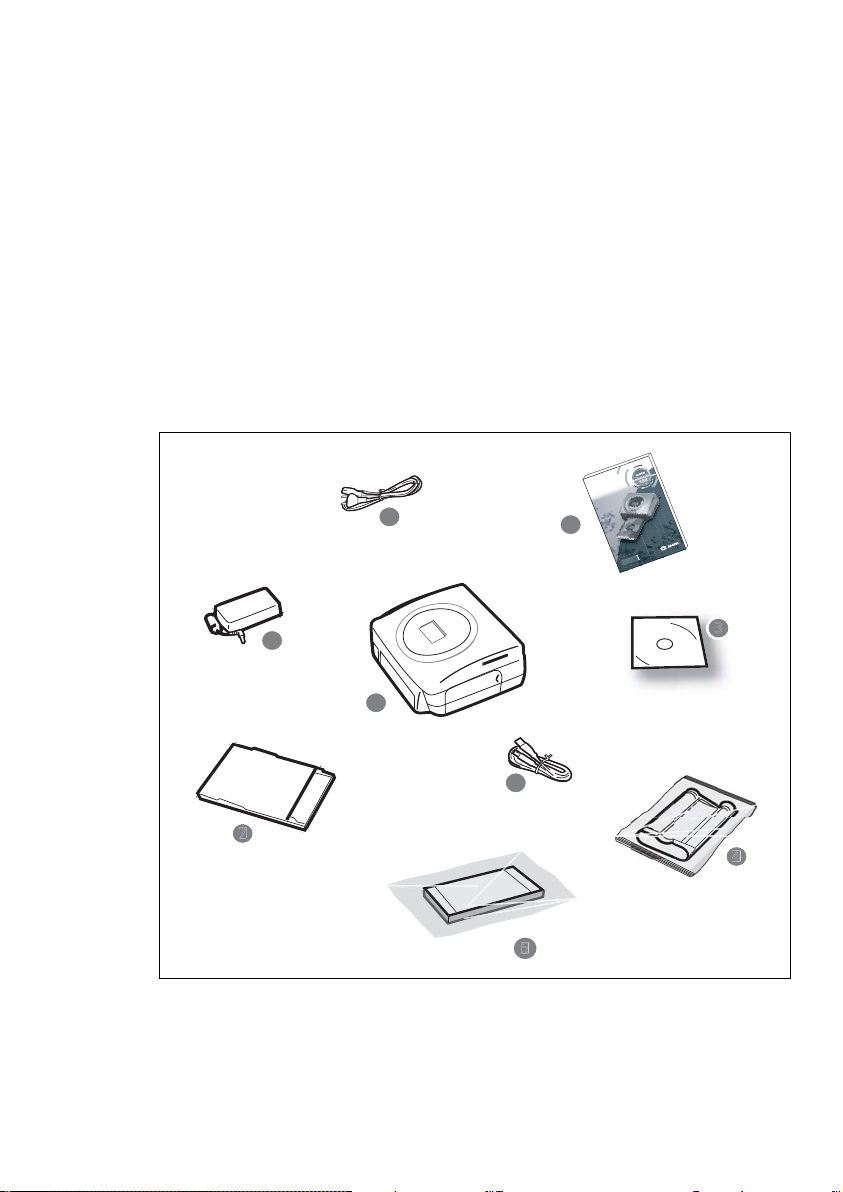
3
Place the box in front of you, open the packaging and check that you have received the items listed
below:
1 PHOTO EASY 150 printer
2 User manual
3 CD-ROM with its applications
4 Film cartridge *
5 Photo paper (2 packs of 20 sheets)*
6USB cable
7 Paper tray
8 Power supply unit
9 Mains cable
ur
ur
te
te
a
a
t utilis
t utilis
re
re
iv
iv
g
L
g
L
n
de
n
de
i
itu
itu
Gui
Gu
r
nle
r
e
nle
e
Us
gsa
Us
gsa
te
n
nte
te
te
u
'
u
'
ll
Bedienun
e
Bedienun
dell
d
o
o
le
ri
le
ri
a
a
a
a
u
u
s
s
l u
Manu
l u
Manu
de
g
de
l
l
a
a
wijzing
wijzin
n
n
a
Manu
a
Manu
a
a
ks
i
ks
i
Gebru
9
8
Gebru
2
1
6
depending on model
*
- 2 -
Page 6

3PREPARE YOUR PHOTO EASY 150 PRINTER
CONNECT THE MAINS SUPPLY
ENGLISH
Remark: When installing your printer near a wall or some other object, keep an open space of at least 4 inches at the
back of the printer, to make sure the movement of the sheet of paper being printed is not obstructed.
Please refer to the safety instructions at the beginning of this user guide before making any
connections.
Insert one end of the mains lead into the corresponding socket of the power supply.
Connect the power supply to the printer as shown in the illustration below.
A
Plug the other end of the power supply mains lead into a wall socket.
Switch on the printer by pressing the " I " on the on/off switch located at the back of the
printer. The green light on the upper cover of the printer and segments on the LCD screen
blink during the initialisation phase.
Your printer has a Master USB, Mass storage SCSI connector (A). To obtain the list of
peripherals compatible with this USB port, please visit our site www.sagem.com.
FRANÇAIS
DEUTSCH
ESPAÑOL
ITALIANO
- 3 -
NEDERLANDS
Page 7
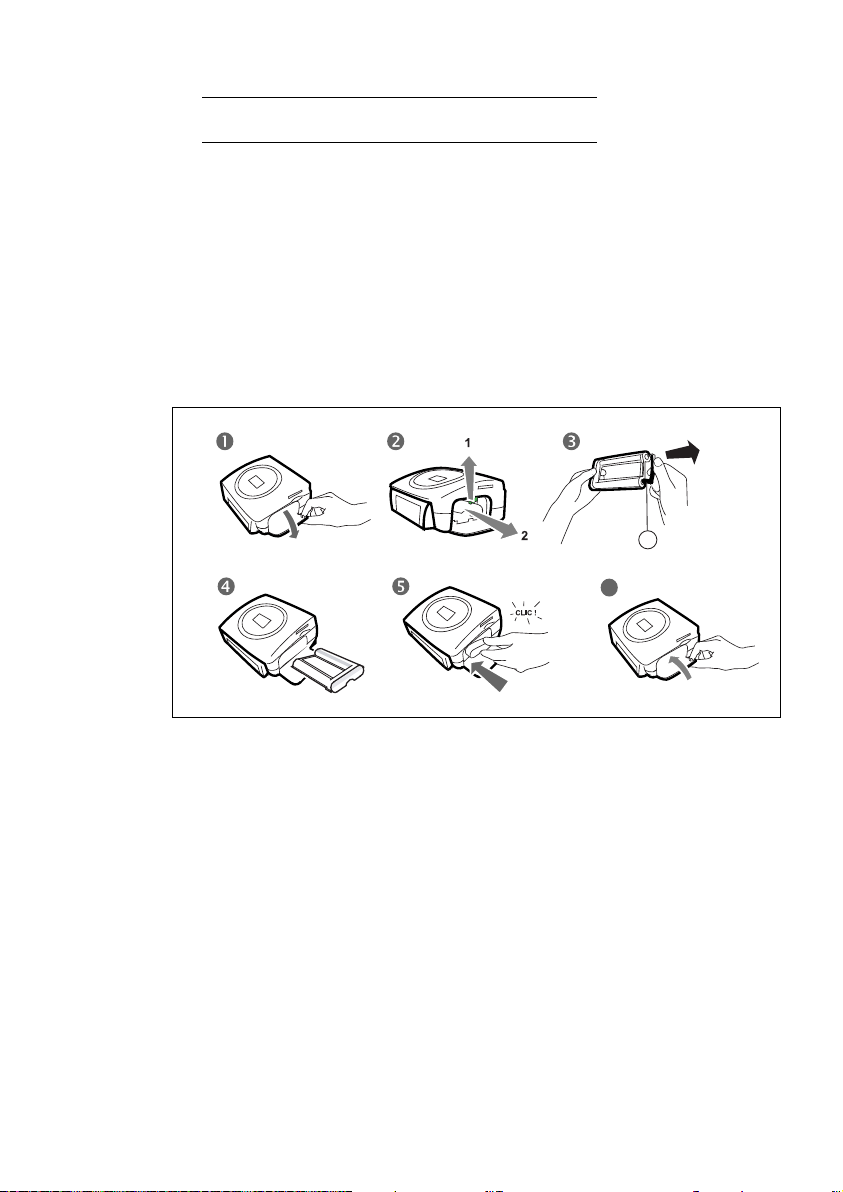
INSERT A FILM CARTRIDGE
Switch on the printer. Wait 10 seconds for the printhead to lift, then:
1 - Open the external flap located on the right-hand side of the printer.
2 - Remove the protective foam.
3 - Take the new ribbon out of its packaging and make sure that the film is stretched after removing the
card (A).
4 - Install the ribbon in the position shown in the illustration below.
5 - Lift the locking lever and push in the film cartridge until it touches the back of the compartment the
locking lever must be locked after insertion.
6 - Close the external flap.
A
6
Warning - Never touch the film cartridge with your fingers. Make sure the cartridge is completely
inserted into the printer. Check that the green locking lever is correctly lowered.
Remark: In the event of any difficulty, check that there are no foreign objects in the film cartridge compartment.
- 4 -
Page 8

LOADING PAPER
ENGLISH
Protection sheet
Tab
1 - Pull the paper tray out of the printer.
2 - Open a pack of paper with the protection sheet on the top, insert it in the paper tray, making
sure the rectangle reserved for postage stamps is on the outside of the tray, that is, towards you.
Make sure that the package of sheets that you have inserted in the paper tray is held down
under the plastic tab located at the front left of the tray (see illustration after).
3 - Remove the protection sheet.
4 - Line up the tray with its compartment and push it in slowly until the locking system clicks.
Warning - handle paper sheets by their pre-cut edges, never allow your fingers to come into
contact with the shiny surface before printing.
FRANÇAIS
DEUTSCH
ESPAÑOL
Your SAGEM PHOTO EASY 150 printer is now ready to print your digital photographs.
Warning - protect consumable items against prolonged exposure to light, humidly, heat and
dust. Respect the operation conditions set out (Refer to paragraph Technical data,
page -24).Only use SAGEM brand consumable items designed for this printer. Make sure that a
previously printed photograph has not been slipped inadvertently into a packet of blank pages;
this could damage the ribbon of your printer.
Warning - Make sure that a previously printed photograph has not been slipped inadvertently
into a packet of blank pages; this could damage the ribbon of your printer.
- 5 -
ITALIANO
NEDERLANDS
Page 9

4PRINTING FROM A MEMORY CARD
Your SAGEM PHOTO EASY 150 printer is designed to be used with or without a computer. This
chapter describes printer operation without a computer.
Refer to the technical data table at the end of thi user manual to check whether your memory card is
compatible with the printer. In the event of incompatibility, use a computer and the image processing
software supplied on the CD-ROM.
Warning - Small sized images, less than 80,000 pixels, cannot be printed from memory cards (for
example: an image size 320 x 240, equivalent to 76,800 pixels, will not be included in the index). On
the other hand, these photographs may be printed from a PC or by means of a wireless IR link.
INSERT A MEMORY CARD
Insert your memory card into the corresponding slot, as shown in the illustrations below.
Warning - SmartMedia, CONTACTS FACING UPWARDS.
Warning - The memory cards do not enter fully in the reader slot.
DO NOT USE FORCE UNDER ANY CIRCUMSTANCES.
If a card does not enter properly, remove it and check that you are introducing it in the correct
slot and with the right orientation.
Slot compatible with
Smart Media (SM),
Memory Stick (MS),
Standard Digital (SD)
Multi Media Card (MMC) formats
or
- 6 -
Slot compatible with
Compact Flash format
Page 10

CARD SLOT LOCATION
Smart Media
(SM)
Left
ENGLISH
Memory Stick
(MS)
Standard
Digital
(SD)
Multi Media
Card
(MMC)
CompactFlash Right
Left
Left
Left
FRANÇAIS
DEUTSCH
ESPAÑOL
- 7 -
ITALIANO
NEDERLANDS
Page 11

5USER INTERFACE
1 - Add a selection to the shopping trolley
1
2 - Select the number of copies per photograph (between 1 and 20)
3 - Go to the previous photograph number (…, 3, 2, 1)
4 - Start printing
5 - Go to the next photograph number (1, 2, 3…)
6 - Select the print format
7-Cancel
A - Number of copies to be printed
B - Number of the active photo
C - Number of sheets that will be printed
D - Print format
E - Shopping trolley mode
F - Active photograph in the shopping trolley
G - Paper error
H - Ribbon error
I - Memory card icon
A
F
B
C
E
D
H
G
I
1
s
2
P
h
o
t
o
E
a
s
y
1
5
0
n
-
o
P
s
r
e
3
1. Shopping trolley: depending on the choice of photographs to be printed.
- 8 -
e
t
n
i
r
P
o
t
o
h
P
l
a
4
7
C
6
r
5
Page 12
PRINT YOUR PHOTOGRAPHS
Your printer is switched on, and you have inserted a memory card, or you have transferred
photographs from a GSM mobile phone camera using the IR (infrared) link.
The green light blinks while data are being transferred to the printer. After a few seconds, the
number of photographs found on the memory card or in the digital camera, or transferred from
the GSM mobile phone camera, is displayed on the screen. The light stops blinking.
Your photos are printed in four stages. The printer first prints the three colours: yellow, magenta
and cyan in that order, then deposits a protective film on the sheet of papier, and finally ejects the
photo.
The colour of the light shows the printer status:
Steady green: printer ready, on standby,
Blinking green: data being tranferred,
Steady red: incident: refer to the end of this user guide.
ENGLISH
FRANÇAIS
Remark: To enable you to handle your photographs under the right conditions, the size of the sheets of paper is
greater than the printed surface and the two lateral edges are pre-cut.
After printing, do not tear these edges abruptly, fold along the dotted line several times and then
gently tear off the edges.
Tips - The edges can be removed on a number of photos at a time by superimposing them on
each other.
RAPID PRINTING
Select the number of the photograph required using the or keys.
Press the key to set the number of copies.
Press the key to select print format.
You may select a predefined format to print the photographs:
· Print your photograph in format 10 x 15 cm full page, no border .
· Print your photograph in format 10 x 15 cm with a white border .
· Print your photograph in format 10 x 13 cm .
· Print 2 photographs per page.
· Print 4 photographs per page.
· Print 20 photographs per page (contact sheet or index).
- 9 -
DEUTSCH
ESPAÑOL
ITALIANO
NEDERLANDS
Page 13

Once the selection is made, press the key to start printing.
If printing is interrupted due to a lack of paper, paper jam or empty film cartridge, the printing
operation may be restarted where it was interrupted by pressing the key after the
necessary replacement or defect correction is performed.
Idea - Using the pre-printed reverse side postcard you can quickly send your photograph to friends,
family, etc.
Tips - Hold the key down for 3 seconds to reinitialise the printer and return to the default
status, such as when inserting a card.
C
EXAMPLE OF RAPID PRINTING FROM A MEMORY CARD
The memory card contains 23 photographs. We want to print photograph number 3, 4 times on the same
sheet of paper.
Put the On/Off switch to " I ".
Insert the memory card into the correct printer slot.
After the analysis and recognition phase, the number of valid photographs is displayed on screen and
the memory card icon and green LED stop blinking.
Select photograph 3, using the key.
- 10 -
Page 14
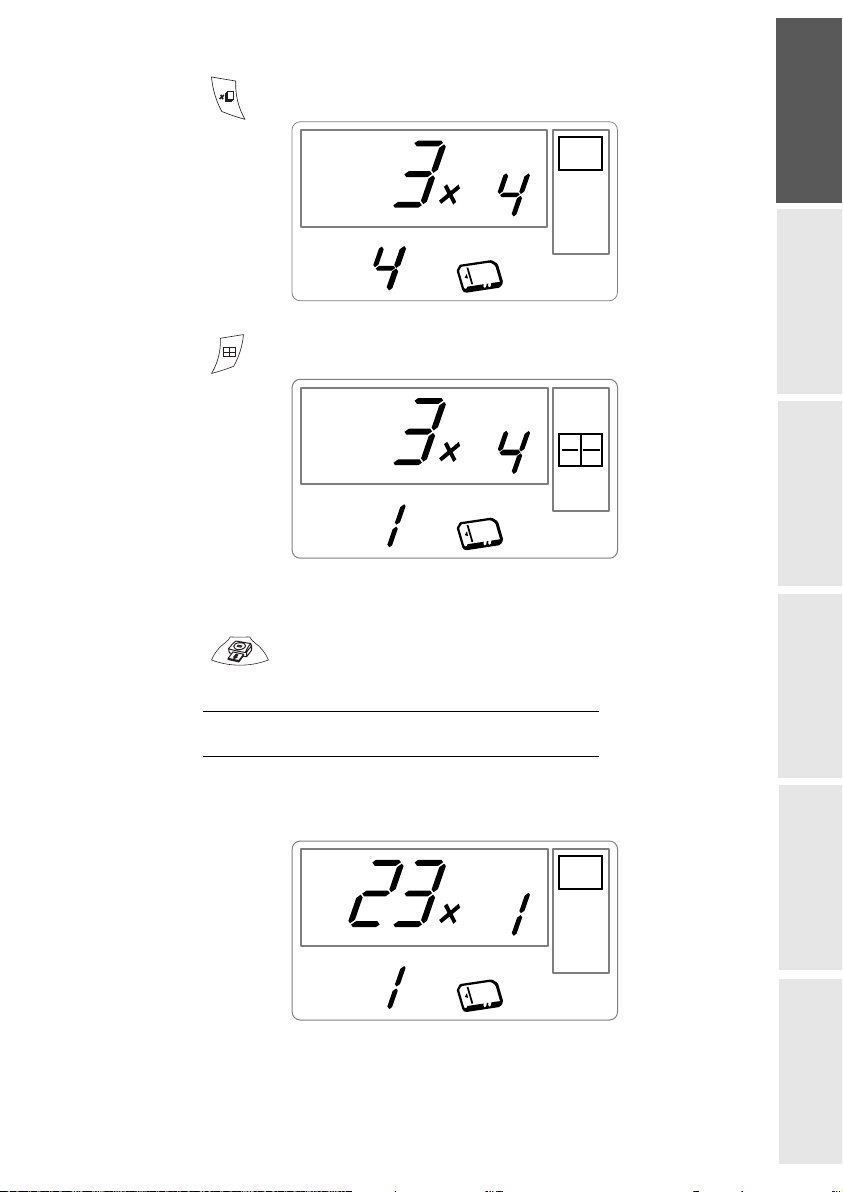
Press the key until the figure 4 is displayed (that is 4 copies).
ENGLISH
Press the key until the 4 images/page graphic is selected.
The figure 1 should be displayed as the number of sheets necessary for the printing operation.
Press the key to start printing.
CREATE A CONTACT SHEET (INDEX)
After inserting the memory card, the number of valid photographs is displayed on screen and the
icon representing the memory card stops blinking.
FRANÇAIS
DEUTSCH
ESPAÑOL
ITALIANO
- 11 -
NEDERLANDS
Page 15
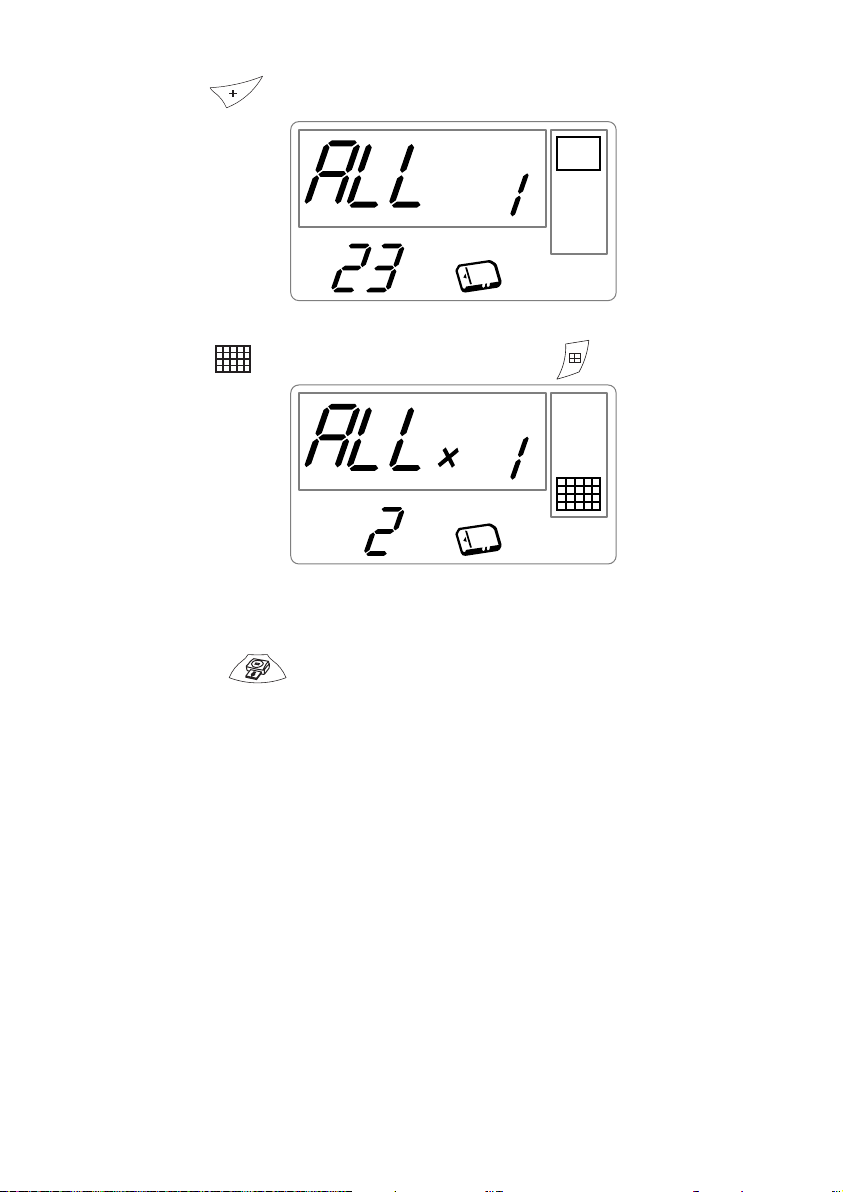
Press the key until ALL is displayed on screen.
Select the format photographs per sheet format using the key.
In the example provided above, 2 sheets will be necessary to print 23 photographs.
Press the he key to initiate printing.
Idea - The contact plate is a simple way of displaying all the photographs on your memory card;
choose those to be printed using the number assigned to each of them
- 12 -
Page 16
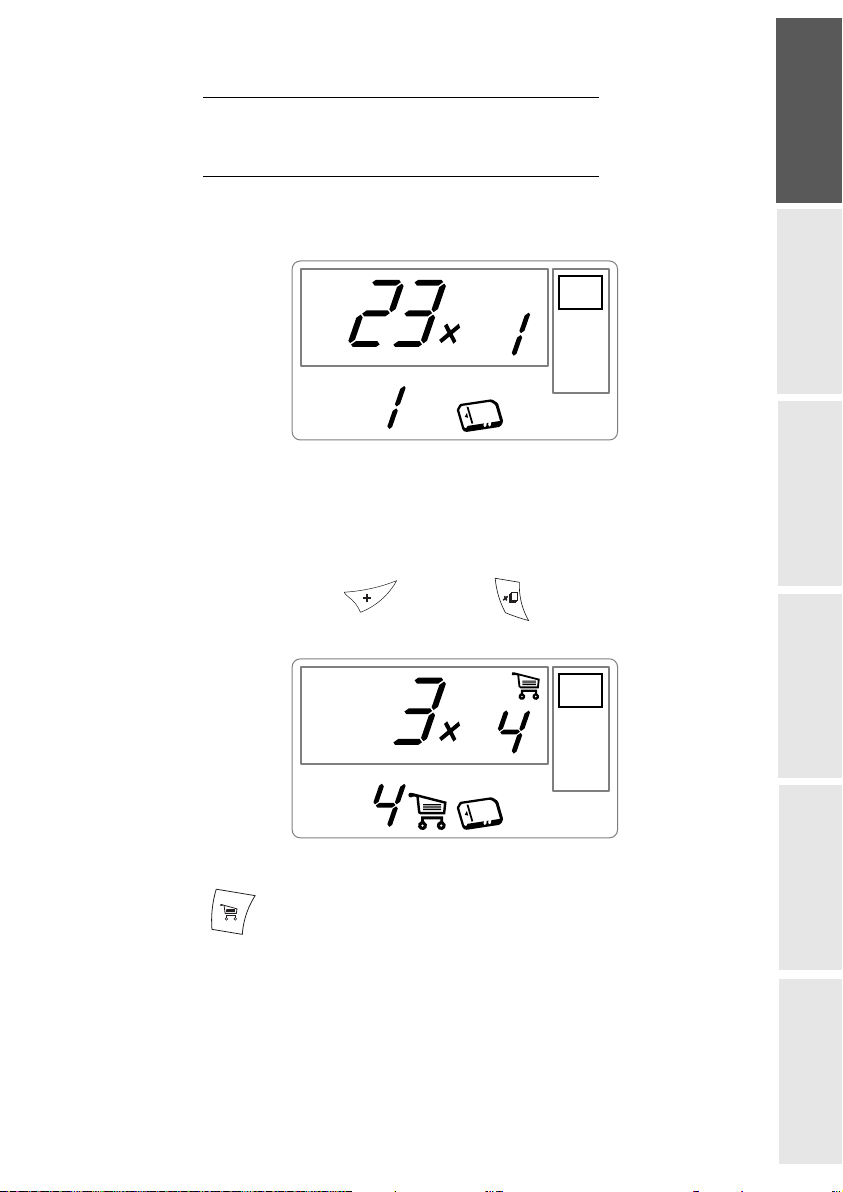
PREPARE A SERIES OF PHOTOGRAPHS FOR PRINTING
(SHOPPING TROLLEY MODE)
After inserting the memory card, the number of valid photographs is displayed on screen and the
icon representing the memory card is lit up steadily.
This example describes how to print 4 copies of photograph 3, 1 copy of photograph 8 and 2
copies of photograph 16.
Remark: Printing format remains fixed for series printing.
Select photograph 3, using the , key; press the key until the figure 4, corresponding
to the quantity desired, is displayed.
ENGLISH
FRANÇAIS
DEUTSCH
Press the key to add the photograph to the "shopping trolley" (the series). The icon
indicating that the active photograph is in the shopping trolley is displayed, as well as the
shopping trolley mode icon to indicate the presence of photographs in the shopping trolley.
- 13 -
ESPAÑOL
ITALIANO
NEDERLANDS
Page 17
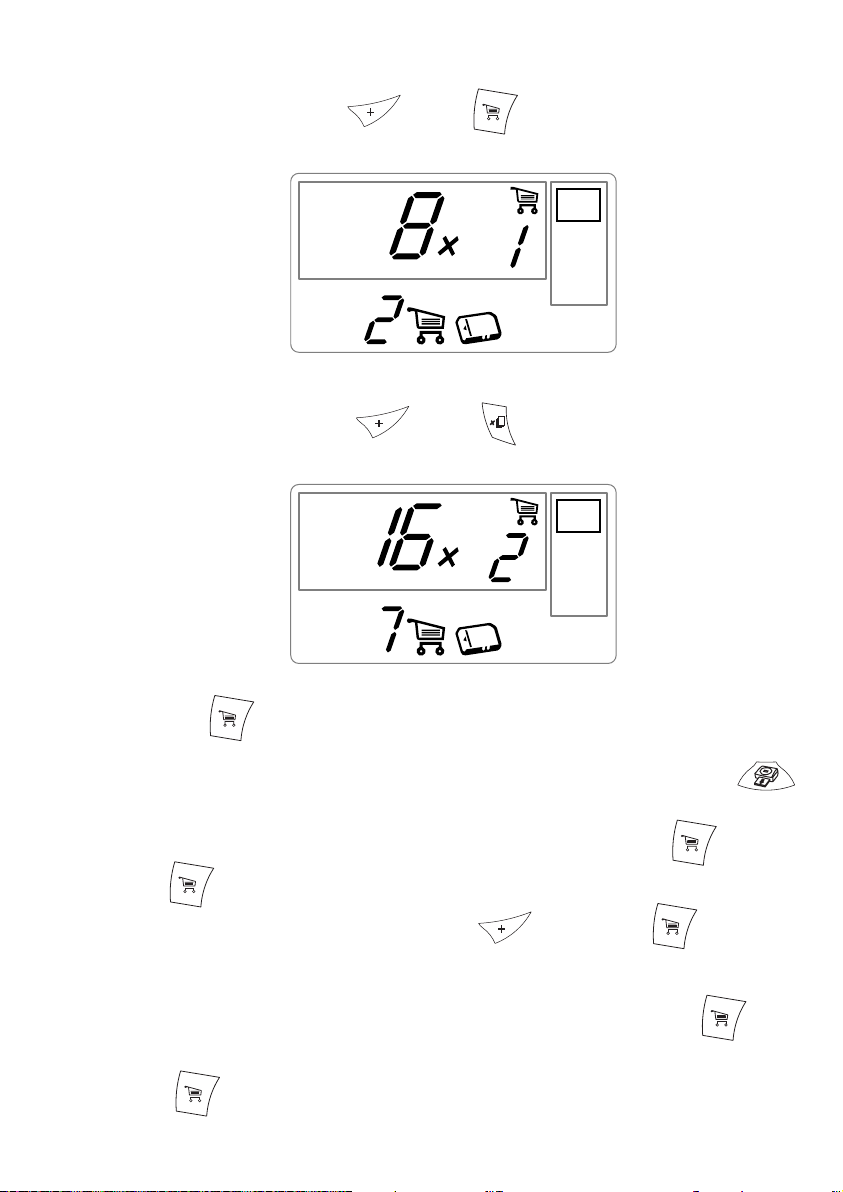
Select photograph 8, using the key, press key to add this to the shopping trolley (the
default number of copies is 1).
Select photograph 16, using the key, press key until the figure 2, corresponding to the
desired number of copies, is displayed.
Press the key to add this to the shopping trolley.
The number of sheets required is displayed to the left of the shopping trolley icon. Press the
key to start printing.
Remark: If you notice that you have made an error after having validated the selection with the key, press the
key again to cancel and redo the selection. This cancels only the most recent selection. It is also possible
to deselect all photographs by selecting ALL using the key and pressing the key twice.
Tips - To rapidly add a series of consecutive photographs to the shopping trolley, select the
photograph with the lowest number and press and hold down the shopping trolley key .
Photographs will be automatically added to the shopping trolley one by one until the shopping trolley
key is released.
- 14 -
Page 18

PRINT IN DPOF (DIGITAL PRINT ORDER FORMAT) MODE
This function lets you select the photographs to be printed on your camera, then print them on the
SAGEM PHOTO EASY 150 printer from a memory card. Your camera must comply with the
DPOF (Digital Print Order Format) standard. Refer to your camera documentation to find out if
it is compatible with this standard.
Select the required photographs on the camera (follow the instructions in the documentation of
your camera).
Remove the memory card from the camera and insert it into the correct slot of your SAGEM
PHOTO EASY 150 printer. This starts the data transfer. The DPOF logo on the printer screen is
activated and the number of printable photographs is displayed in the lower left-hand corner of
the screen.
Warning - Example: memory card that contains 15 photographs selected for printing.
Start printing by pressing the key.
ENGLISH
FRANÇAIS
DEUTSCH
To exit DPOF mode, press the key.
To switch back to DPOF mode, press and hold the key down for 3 seconds.
C
C
PRINTING FROM A GSM MOBILE PHONE CAMERA
Photographs taken with a GSM mobile phone equipped with a camera can be printed on the
SAGEM PHOTO EASY 150 printer. To do this, the photographs need to be transferred to the
printer via an IR (infrared) link between the 2 devices.
Switch on the SAGEM PHOTO EASY 150 printer (press " I " on the on/off switch).
Tips - GSM mobile phones with cameras work on low definition ; for a better quality of print
we suggest you print 2 or 4 photos per sheet.
Place your GSM mobile phone opposite the SAGEM PHOTO EASY 150 printer so that the IR
"windows" are facing each other and are not more than 30 centimetres apartPlace your GSM.
- 15 -
ESPAÑOL
ITALIANO
NEDERLANDS
Page 19
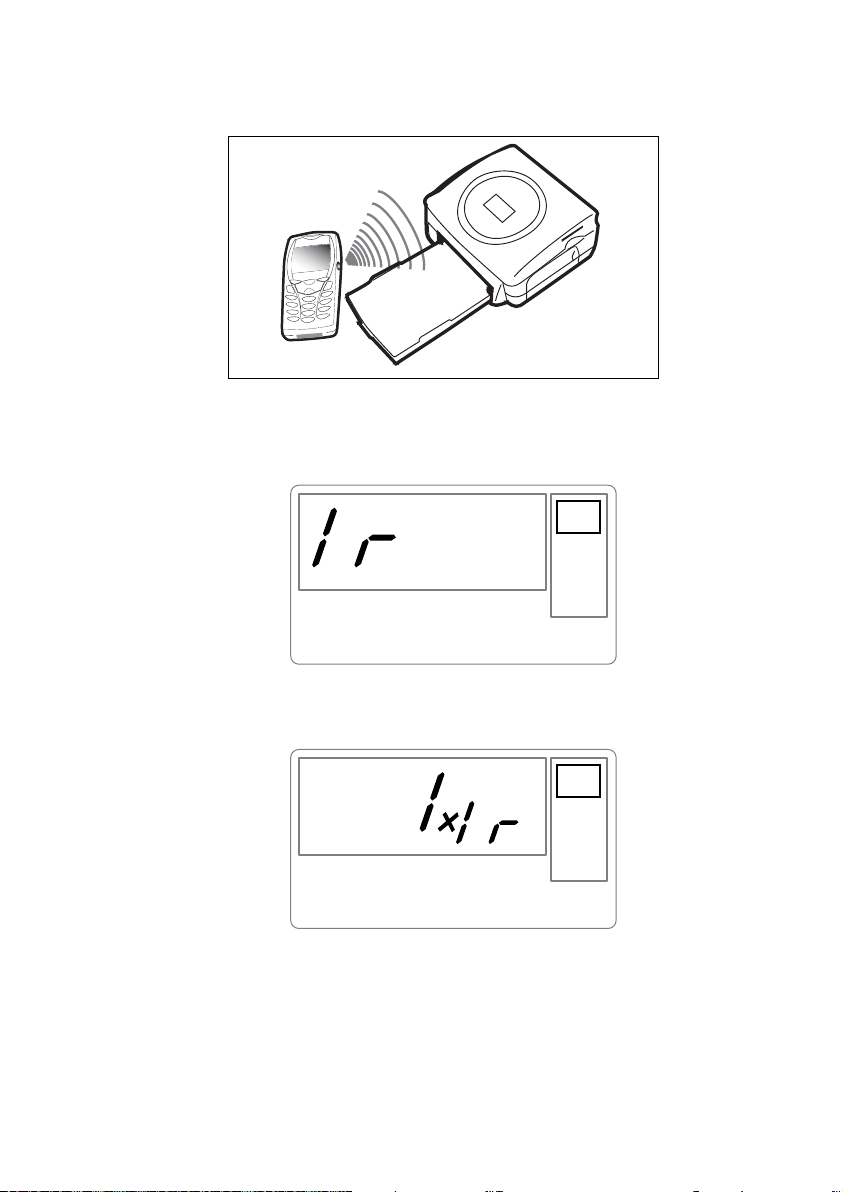
Warning - In an environment exposed to intense light, a distance of not more 10 centimetres
between the two infrared windows is recommended.
Select a photograph on your GSM mobile phone and start the IR ink transfer.
The message " Ir " blinks on the printer screen throughout the transfer operation.
When the transfer is complete, the following information is displayed on the screen:
You can now:
• Start printing the transferred photograph, after setting the print format and number of copies if
required.
• Transfer another photograph from your GSM mobile phone camera, which will be added to those
already stored in the printer. At the end of each transfer, the total number of photographs stored is
displayed on the printer screen (the one with the highest number being the last one transferred).
- 16 -
Page 20

• The same operations as described in the previous chapters can now be performed before
starting to print the photographs: (selecting the photographs to be printed, selecting the format, selecting the number of copies).
After all photographs transferred from your GSM mobile phone camera have been printed, the
SAGEM PHOTO EASY 150 printer screen displays the information that was on the screen just
before you started the print job.
You can now:
• Start another print job, after selecting different parameters (photograph number, format,
number of copies) if required.
• End the transferred photograph processing. To do this, hold the key down for 2
seconds.
C
ENGLISH
FRANÇAIS
DEUTSCH
- 17 -
ESPAÑOL
ITALIANO
NEDERLANDS
Page 21

6PRINT FROM A PC (PERSONAL COMPUTER)
Your kit includes an installation CD-ROM containing a printer driver, image processing software.
Make sure that your PC is compatible with the requirements as specified (Refer to paragraph Technical
data, page -24).
PC configuration required:
Pentium or equivalent,
OS : Windows 98 SE / 2000 / Me / XP,
128 MB DRAM or more,
150 MB available on hard disk,
USB port available.
INSTALL THE SOFTWARE
The SAGEM PHOTO EASY 150 software is installed in three steps: running the Install program,
restarting the computer, and performing the final printer installation.
Do not connect the printer to the PC before installing the printer driver. After you have installed
the software, a message will be displayed asking you to restart the PC. After restarting you can
connect the printer to the PC.
Insert the CD-ROM in the drive to start installation. A command window appears. Follow the
instructions displayed on the screen.
If the installation program does not start automatically, you can start it by double-clicking on the
"setup.exe" file located in the CD-ROM root directory.
The CD-ROM contains an installation manual which includes detailed operating instructions for the
printer driver. Refer to this manual for further information.
Remark: The B/W print option is not available in Windows 98.
- 18 -
Page 22
CONNECT YOUR PRINTER
Make sure that both the PC and the printer are switched on. Never apply force when plugging in
connectors into the equipment as this could damage both the cable and the connector.
Connect the USB cable to a USB port on your PC.
Connect the other end of the USB cable to the SAGEM PHOTO EASY 150 printer.
Recognition between the two devices is automatic.
ENGLISH
FRANÇAIS
DEUTSCH
- 19 -
ESPAÑOL
ITALIANO
NEDERLANDS
Page 23

7REPLACEMENT OF CONSUMABLES
The consumable items used with the SAGEM PHOTO EASY 150 printer (film cartridge, paper)
are SAGEM (PLC) brand products. Consumables may be purchased in all big stores in the
photography or printer sections but also on out internet site www.sagem.com or by using the
consumables order form supplied with your printer.
Use of any consumable items other than SAGEM (PLC) brand products may result in the loss of
the printer's guarantee.
SAGEM consumable item kit references:
• Film cartridge (ribbon + paper for 40 photos): ref. 251 300 334
• Film cartridges (3 ribbons + paper for 120 photos): ref. 251 300 336
- 20 -
Page 24
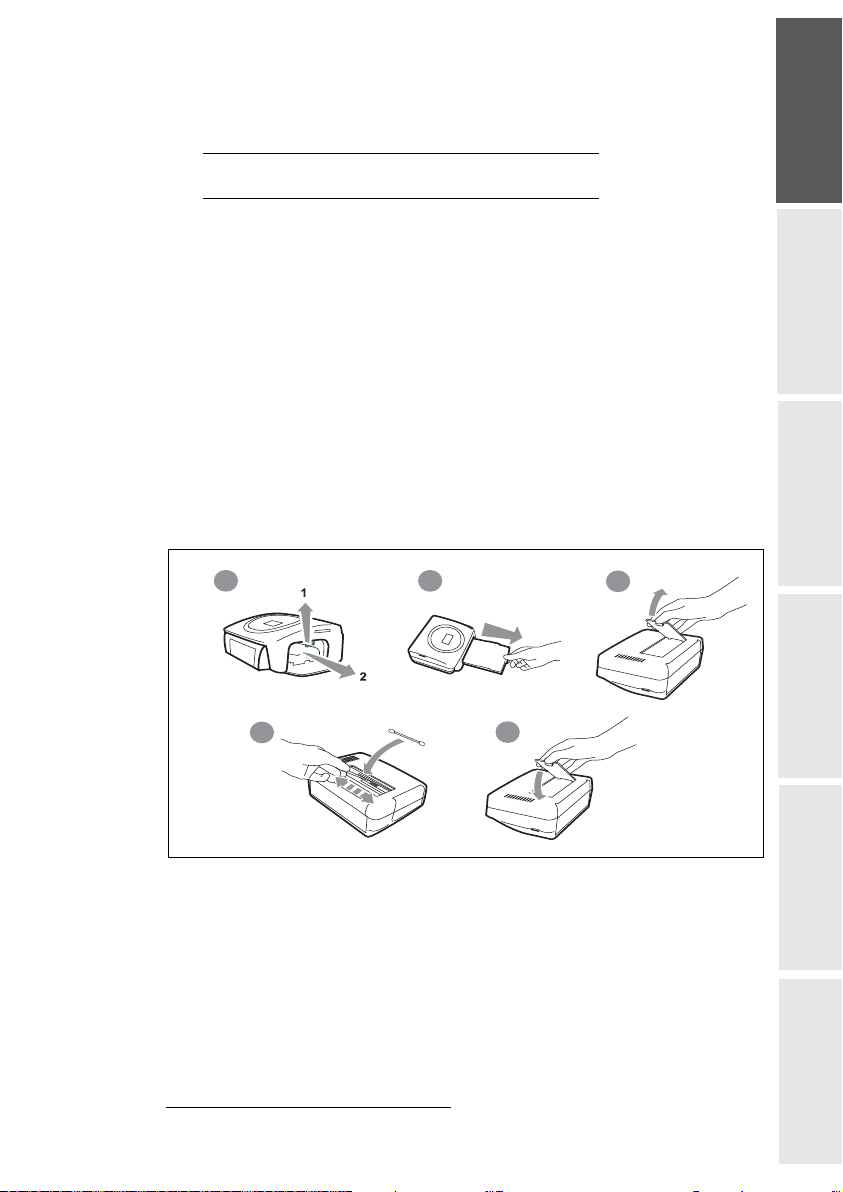
8MAINTENANCE
CLEANING THE PRINT HEAD
Continuous lines across the length of your photographs may be caused by dirt particles stuck to
the printhead.
You will need a methylated alcohol
tips ("Q-tips").
Switch off your printer, disconnect the main cables and wait for five minutes; since the
print head operates at a high temperature, there is a risk of burning if you touch it.
1 - Open the cartridge flap. Press on the locking lever and pull out the film cartridge.
2 - Pull out the paper tray.
3 - Turn the printer upside down to remove the lower hatch.
4 - Clean the heating line of the print head carefully using a cotton bud.
5 - Replace the lower hatch, turn the printer right side up, connect the mains cable and switch
on the printer.
Warning -
Never touch the print head with your fingers or any object that might scratch it.
1
based cleaning product and some off-the-shelf cotton
ENGLISH
FRANÇAIS
DEUTSCH
1
4
2
3
5
Replace the film cartridge. Take care that the film is taut before inserting the cartridge into
its compartment. Check that the locking lever is pushed down correctly and close the flap.
Push the paper tray back into place until the locking system clicks.
1. Do not use corrosive chemicals, they may damage your printer.
- 21 -
ESPAÑOL
ITALIANO
NEDERLANDS
Page 25
PAPER JAM
Follow this procedure if a sheet becomes stuck in the printer and cannot simply be pulled out:
Switch off your printer by pressing " O " on the switch behind the printer and disconnect the
mains cable .
Turn the printer upside down.
Remove the lower cover.
Gently and carefully remove the sheet causing the jam. Under no circumstances touch the
printhead.
Replace the lower cover and turn the printer right side up.
Switch on the printer and reconnect the mains cable.
Warning - Never use objects that could damage the printer (scissors, screwdriver, paper cutter, etc.)
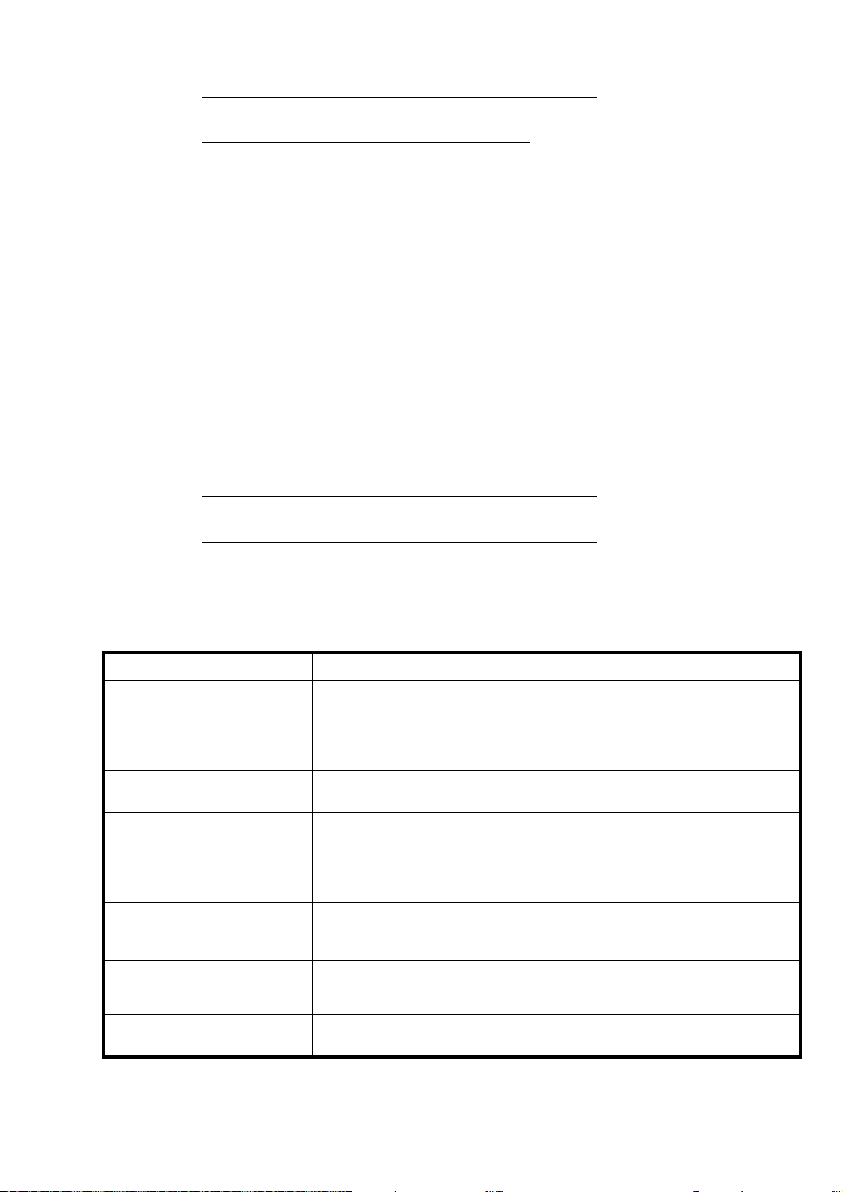
PROBLEMS
Remark: The printer is fitted with an automatic time-out to prevent overheating, this can be tripped when performing large
print jobs. The printer automatically restarts the current print job as soon as the temperature drops back to normal.
PROBLEMS SOLUTIONS
No mains supply
(indicator lamp off)
The light (indicator lamp red) • Refer to the error table below (Refer to paragraph Error messages,
The printer was unplugged
during a print job
No photograph is printed on
a sheet
The photograph is marked
with a continuous line or a
lot of spots
No PC printing • Check that the USB cable is correctly connected.
• Check that the power supply block is correctly plugged into the mains.
• Check that the power supply connector is correctly plugged into the
printer.
• Checkthat the mains socket is live (check fuses and/or circuit breakers of
your installation as necessary).
page -23).
• Set the printer on/off switch to "o" and then reconnect the mains lead.
• Switch on the printer and wait for the initialisation phase to be completed.
• If a sheet of paper is jammed, carry out the procedure (Refer to paragraph
Paper jam, page -22).
• Restart printing.
• Are you using sheets that meet the technical specifications (Refer to
paragraph Technical data, page -24)
• Have the sheets been inserted shiny face up?
• Clean the printhead (Refer to paragraph Cleaning the print head, page -21).
• Is the printer driver installed?
- 22 -
Page 26

ERROR MESSAGES
After any intervention on your printer, do not forget to press the
key to restart the current print job.
ENGLISH
Error
displayed
Err 01
Err 02
Err 11
Err 12
Err 13
Err 14
Err 21
Err 22
Err 23
Err 27
Icon
displayed
Error
Type
Paper No paper Check that the paper has been correctly inserted
Paper Paper jam Remove any paper jammed in printer (do not
Film
cartridge
Film
cartridge
Film
cartridge
Film
cartridge
Memory
card
Memory
card
Memory
card
Memory
card
Description Action
in the loading tray.
reuse this sheet of paper)
No film
cartridge
End of film
cartridge
Film cartridge
error
Film cartridge
missing or
incorrectly
inserted
File damaged
or incorrect
JPEG
decompression
error
Unsupported
JPEG feature
Read error The card or file are illegible.
Insert a new film cartridge or repl ace the current
one.
Replace the film cartridge with a new one.
Check that the film cartridge is correctly inserted.
If error persists: replace the c artridge.
Check that the cartridge is correctly inserted and
that the locking lever is locked.
File illegible. Try to print others. If error persists:
check the file source, or try with a different
source.
The file cannot be read. Try printing the others. If
the error persists, check the source of the file or
try with another source.
The JPEG file contains an unsupported feature.
Check the card source or try with another source
FRANÇAIS
DEUTSCH
ESPAÑOL
Err 72
Err 75
Err 76
Other
error
number
None IR link transfer
None IR link Not enough
None IR link File format not
None
Other
error
space to store
photograph
supported
System error Switch off printer, wait 30 seconds and restart. If
- 23 -
Error during transfer of photographs from GSM
mobile phone camera. Restart transfer from the
GSM phone. Check that both devices are facing
each other.
Photograph to be transferred too big or
insufficient space to store photograph in printer.
Photograph to be transferred is not in JPEG
format.
error persists, contact your retailer.
ITALIANO
NEDERLANDS
Page 27

TECHNICAL DATA
PC configuration required:
Pentium or equivalent,
OS : Windows 98 SE / 2000 / Me / XP,
128 MB DRAM or more,
150 MB available on hard disk
USB port available.
-------------------------------------------------------------------------------------------------------------------
Device name : SAGEM PHOTO EASY 150
Print method : Dye-diffusion thermal transfer
Resolution : 300 x 300 dpi
Colours : 16.7 million continuous
Print speed : Less than 120 seconds per photo (not including data
Interface : Memory cards, type Compact Flash (support type I & II),
Storage of photographs
transferred from a GSM
phone camera : Up to 500 kilobytes
Image resolution supported : Up to 12 million pixels
Consumable items : Photo-quality paper. Film cartridge with three colours
Paper tray : By automatic loader, capacity 20 sheets
Mains supply : 230 V AC 50/60 Hz
Approval : EC
Operating conditions : 10 °C to 35 °C, 30 % to 85 % humidity
Size : 201 x 174 x 94 mm excluding paper tray
Weight : 1.5 kg
Power consumption : in standby: 7,6 W
transfer)
SM / MS / MMC / SD. USB port version 1.1
(yellow, magenta, cyan) and protective coating,
40 print operations per cartridge.
Paper size: 101 x 152.4 mm, available in packets of
20 sheets
in print mode: 60 W
All data are provided for reference purposes only. SAGEM (PLC) reserves the right to make any
changes without prior notice.
- 24 -
Page 28

9GARANTEE
GUARANTEE (UK Terms and Conditions)
In order to apply the guarantee, you should contact your dealer. Proof of purchase will be required. Should malfunctioning arise, the dealer will advise you
what to do.
If you bought your equipment from SAGEM directly, the following shall apply :
A SAGEM undertakes to remedy by repair, free of charge for labour and replacement parts, any defects in the equipment
during a period of twelve (12) months from the date of original delivery of the Equipment, where those defects are a result
of faulty workmanship.
During this twelve mo nth guar an tee pe rio d, the defect ive eq uip m ent w ill be repa ir ed free of c har ge; the
customer must however return the defec tive equipme nt at his/her own exp ense, to the add ress given by
SAGEM After Sales Department, the phone numbe r of which c an be f ound on t he del iver y slip. Unless
the customer has concluded with SAGEM a maintenance contract in respect of the equipment which
specifically provides for repairs to be carried out at the customer’ s premises, the repairs will not be carried
out on the equipment at the cu st o mer’s premises.
The following sentence applies to purchases of equipment for the customer’s trade, business or
profession. Except as otherwise expressly provided in this Document and to the extent permitted by law,
SAGEM makes no representations or warr an ti es, ex press or implied, statutory or otherwise, and to such
extent, all terms and condit ions implied by law are hereby excluded.
This guarantee does not affect the Cus tomer’s statutory rights.
B Exclusions From Guarantee
SAGEM shall have no liability under the guarantee in respect of :
• damage, defects breakdown or malfuncti on due to :
- failure to properly follow the installation proc e s s and instructions for use; or
- an external ca use to the equipment (incl uding but not limited to , lightening, fire, shoc k or
water damage of any nature); or
- modifications made without the written approval of SAGEM SA; or
- a failure or neglect to maintain the equipme nt or inappropriate mainte nance; or
- unsuitable operating conditions, particularly of temperature and humidity; or
- repair or maintenance of the equipment by persons not authori sed by SAGEM; or
• wear and tear from normal daily use of the equipmen t and i ts ac c essori e s
• damag e due to insufficient or bad packagin g of eq ui p men t whe n returned to SAGEM
• supply of new versions of software
• work on any equipment or software modified or ad ded without the prior written consent of
SAGEM
• malfunctions not resulting from the Equipment or from software installed in user workstations for
the purpose of use of the equipm e nt
• communication problems related to an unsuitable environment, including :
- problems relate d to access and/ or connectio n to the Inte rnet such as in terruption s by access
networks or malfunction of the line used by the subscriber or his correspondent
- transmission faults (for example poor geographical coverage by radio transmitters,
interference or poor line quality)
- the local network fault (wiring, servers, workstations) or the failure of the transmission
network
• the normal servicing (as defined in the user guide supplied with the equipment) as well as
malfunctioning due to servicing not being carr ied out, servicing costs are in any event always
C In the cases set forth in § B) as well as after expiry of the twelve month guarantee period, the customer must ask SAGEM
borne by the customer.
for an estimate, and he/she must accept the estimate and agree to pay the charges mentioned in it before ret urning the
equipment to SAGEM. The repair and delivery costs will be invoiced to the customer.
The foregoing shall apply unless othe rwise a greed in w riting with t he c ustomer and o nly for the UK. If
any provision of this gu arantee shall be held to be in wh ole or in part invalid or illegal d ue to an
obligatory rule applicable to consumers pursuant to their national legislation, such invalidity or
illegality shall not impair or affect the r emaining provisions or parts of this guarantee .
ENGLISH
FRANÇAIS
DEUTSCH
ESPAÑOL
ITALIANO
- 25 -
NEDERLANDS
Page 29

- 26 -
Page 30

1BIENVENUE 1
2DÉCOUVREZ VOTRE IMPRIMANTE PHOTO EASY 150 2
3PRÉPAREZ VOTRE IMPRIMANTE PHOTO EASY 150 3
Alimentation secteur 3
Insérez un ruban 4
Chargement du papier 5
4IMPRIMEZ DEPUIS UNE CARTE MÉMOIRE 6
Insérez une carte mémoire 6
5INTERFACE UTILISATEUR 8
Imprimez vos photos 9
Impression rapide 9
Exemple d'impression rapide depuis
une carte mémoire
Créez une planche contact (index) 11
Préparez une série photos pour l'impression
(mode panier)
Imprimez en mode DPOF 15
Imprimez à partir d'un GSM photo 15
10
13
6IMPRIMEZ DEPUIS UN PC (PERSONAL COMPUTER) 18
Installez le logiciel 18
Connectez votre imprimante 19
7REMPLACEMENT DES CONSOMMABLES 20
8ENTRETIEN 21
Nettoyage de la tête d'impression 21
Bourrage papier 22
Incidents 22
Messages d’erreurs 23
Caractéristiques techniques 24
ENGLISH
FRANÇAIS
DEUTSCH
ESPAÑOL
9CONDITIONS DE GARANTIE 25
- I -
ITALIANO
NEDERLANDS
Page 31

- II -
Page 32

1BIENVENUE
Vous venez d'acquérir une imprimante PHOTO EASY 150 SAGEM et nous vous remercions de
la confiance que vous nous accordez. Avec cette imprimante de haute qualité vous pourrez
profiter pleinement de vos photos numériques, par des étapes très simples vous produirez des
impressions de qualité identique aux laboratoires spécialisés de vos photos numériques pour votre
utilisation personnelle ou pour les partager avec votre famille, vos amis ou vos collègues.
Ce présent livret d'utilisation vous guidera par des étapes simples :
1. Mettez en marche votre imprimante PHOTO EASY 150
2. Imprimez les photos stockées sur une carte mémoire
3. Imprimer les photos transférées depuis un GSM photo
4. Installez le logiciel de traitement d'image et le pilote d'impression sur un PC
5. Entretenez et résolvez vos problèmes sur l'imprimante PHOTO EASY 150
Une documentation additionnelle concernant l'utilisation du logiciel de traitement d'image et le
pilote d'impression PC est disponible sur le CD-Rom fourni dans votre coffret, reportez-vous à
cette documentation.
Recommandations et consignes de sécurité
• Ne pas installer votre imprimante PHOTO EASY 150 SAGEM ni dans une pièce humide
(salle d'eau, salle de bain, buanderie, cuisine, etc..) à moins de 1,50 m d'un point d'eau ni en
extérieur. Votre imprimante doit être utilisée à une température ambiante comprise entre
10 °C et 35 °C.
• Ne pas installer votre imprimante dans un endroit où il y aurait des poussières en sustentation dans l’air, ces poussières pourraient dégrader la qualité d’impression de vos photos.
ENGLISH
FRANÇAIS
DEUTSCH
• Utilisez exclusivement le bloc secteur fourni, raccordez celui-ci sur le secteur conformément aux instructions d'installation de ce livret et aux indications portées sur l'étiquette
d'identification apposée sur celui-ci (tension, courant, fréquence du réseau électrique)
• Ne jamais ouvrir la trappe du ruban en cours d'impression, vous risquez la rupture du
film et par la suite un dysfonctionnement de votre imprimante.
• Utilisez seulement les consommables de marque SAGEM et exclusivement ceux-ci sinon
vous risquez d'endommager l'appareil et de perdre la garantie, pour connaître les références
des consommables (reportez-vous au paragraphe Remplacement des consommables,
page -20).
• Le marquage CE atteste de la conformité du produit aux exigences essentielles de la directive 1999/5/CE du Parlement et du Conseil Européen concernant les équipements terminaux
de télécommunication, pour la sécurité et la santé des usagers, pour les perturbations électromagnétiques.
1. A l’exclusion des installations à schéma IT définies dans la norme EN60950
- 1 -
1
.
ESPAÑOL
ITALIANO
NEDERLANDS
Page 33

2DÉCOUVREZ VOTRE IMPRIMANTE PHOTO EASY 150
5
3
Placez votre coffret devant vous, ouvrez l'emballage et vérifiez que les éléments présentés ci-dessous
s'y trouvent :
1 Imprimante PHOTO EASY 150
2 Livret d'utilisation
3 CD ROM avec ses applications
4Ruban *
5 Papier photo (2 paquets de 20 feuilles)*
6 Cordon USB
7 Tiroir papier
8 Bloc alimentation secteur
9 Cordon d'alimentation secteur
r
r
u
u
e
t
e
t
a
a
s
i
is
il
l
t
i
t
u
u
t
t
e
e
r
r
iv
iv
g
L
g
L
n
de
i
n
de
u
i
t
u
i
it
Gu
e
Gu
r
nl
r
e
nle
a
e
s
a
s
s
U
g
Us
g
e
e
nt
nun
nt
e
e
t
e
t
'u
l
'u
l
l
l
Bedi
Bedienun
de
de
o
i
o
le
e
r
l
ri
a
a
a
a
u
u
u
u
s
s
u
u
l
Man
l
Man
g
de
g
de
l
l
in
a
a
nwijzin
nwijz
a
Manu
a
Manu
a
a
ks
i
ks
i
u
br
Ge
9
8
Gebru
2
1
6
Fourniture selon modèle
*
- 2 -
Page 34

3PRÉPAREZ VOTRE IMPRIMANTE PHOTO EASY 150
ALIMENTATION SECTEUR
ENGLISH
Remarque : Si lors de l’installation un mur ou tout objet se trouve à proximité, veillez à ce que celui-ci soit éloigné
d’au moins 10 centimètres par rapport à l’arière de votre imprimante, ceci afin de garantir la bonne circulation de la feuille de papier en cours d’impression.
Avant d'effectuer les connexions, veuillez consulter les consignes de sécurité placées en
début du présent livret d'utilisation.
Branchez l'une des extrémités du cordon secteur sur le connecteur du bloc alimentation
prévu à cet effet.
Raccordez la prise du bloc alimentation sur l'imprimante comme indiqué sur l'illustration
ci-dessous.
A
FRANÇAIS
DEUTSCH
ESPAÑOL
Branchez l'autre extrémité du cordon secteur du bloc alimentation sur une prise secteur
murale.
Appuyez sur le " I " de l'interrupteur Marche/Arrêt situé à l'arrière de la machine, le voyant
vert et l’écran d’affichage LCD s’allument.
Votre imprimante possède un connecteur USB maître Mass storage SCSI (A), pour
connaître la liste des périphériques compatibles avec ce port USB consulter le site
www.sagem.com.
- 3 -
ITALIANO
NEDERLANDS
Page 35

INSÉREZ UN RUBAN
Mettez l'imprimante sous tension. Attendez 10 secondes que la tête d'impression se relève et procédez
de la façon suivante :
1 - Ouvrez la trappe extérieure située sur la partie droite de l'imprimante.
2 - Retirez la mousse de protection.
3 - Sortez le ruban neuf de son emballage et assurez-vous que le film est tendu après avoir retiré la pièce
cartonnée (A).
4 - Présentez le ruban en respectant bien sa position conformément à l’illustration ci-dessous.
5 - Soulevez le loquet de fermeture vert, insérez le ruban jusqu'au fond de son logement, le loquet de
fermeture doit impérativement être fermé après insertion.
6 - Refermez la trappe extérieure.
A
6
Attention - ne jamais toucher le film du ruban avec les doigts. Bien insérer le ruban complètement
dans l'imprimante. Vérifiez que le loquet de fermeture vert est bien abaissé.
Remarque : en cas de problème, vérifier qu'aucun corps étranger n'est présent dans le logement du ruban.
- 4 -
Page 36

CHARGEMENT DU PAPIER
Ergot
ENGLISH
Feuille de protection
FRANÇAIS
1 - Retirez le tiroir de l'imprimante.
2 - Ouvrez un paquet de feuilles avec sa feuille de protection sur le dessus, insérez ce dernier dans
le tiroir papier en vérifiant que l’emplacement du rectangle prévu pour recevoir un timbre
postal se situe bien vers l’extérieur du tiroir papier à savoir vers vous.
Veillez à ce que le paquet de feuilles une fois inséré, se trouve en dessous de l'ergot en
plastique situé à l'avant gauche du tiroir papier (voir illustration ci-après).
3 - Retirez la feuille de protection sitée sur le dessus du paquet de feuilles.
4 - Présentez le tiroir devant son logement de l'imprimante. Insérez le lentement jusqu'au
déclenchement du système de blocage.
Attention - Manipuler les feuilles de papier par les extrémités prédécoupées, ne mettez jamais
de doigts sur la face brillante avant l'impression.
Votre imprimante PHOTO EASY 150 SAGEM est maintenant prête à imprimer vos photos
numériques.
Attention - Protéger les consommables contre une exposition prolongée à la lumière, contre
l'humidité, la chaleur et les poussières. Respectez les conditions d'utilisation (reportez-vous au
paragraphe Caractéristiques techniques, page -24). N'utilisez que les consommables de marque
SAGEM, prévus pour cette imprimante. Ne mettez qu'un paquet de 20 feuilles à la fois dans le
bac papier.
Attention - Vérifier qu’une photo déjà imprimée ne se soit pas glissée par inadvertance dans
un paquet de feuilles vierges, cela pourrait endommager le ruban de votre imprimante.
- 5 -
DEUTSCH
ESPAÑOL
ITALIANO
NEDERLANDS
Page 37

4IMPRIMEZ DEPUIS UNE CARTE MÉMOIRE
Votre imprimante PHOTO EASY 150 SAGEM est prévue pour être utilisée avec ou sans ordinateur.
Dans ce chapitre nous décrivons l'utilisation de l'imprimante sans ordinateur.
Consultez le tableau des caractéristiques techniques en fin de livret utilisation pour connaître la
compatibilité de votre carte mémoire avec l'imprimante, en cas d'incompatibilité utilisez un ordinateur
et le logiciel de traitement d'image fourni sur le CD-Rom.
Attention - Les images de faibles tailles, inférieure à 80 000 pixels ne sont pas imprimables à partir
des cartes mémoires (exemple : une image de taille 320 x 240 équivalent à 76 800 pixels ne sera pas
retenue dans l'index). En revanche ces photos peuvent être imprimées à partir d'un PC ou par un lien
direct infrarouge.
INSÉREZ UNE CARTE MÉMOIRE
En fonction du format de votre carte mémoire, introduisez-la dans la fente correspondante, comme
indiqué sur les illustrations ci-dessous.
Attention - SmartMedia CONTACTS VERS LE HAUT.
Attention - Les cartes mémoires ne rentrent pas complètement dans la fente de lecture.
NE FORCEZ EN AUCUN CAS.
Retirez la carte et vérifiez que vous la présentez dans la bonne fente et dans le bon sens
d’introduction.
Fente de gauche prévue
pour les formats
Smart Media (SM),
Memory Stick (MS)
Standard Digital (SD)
ou
Multi Media Card (MMC
Fente de droite prévue
pour le format
CompactFlash
)
- 6 -
Page 38

CARTE FENTE REPRÉSENTATION
Smart Media
(SM)
Gauche
ENGLISH
Memory Stick
(MS)
Standard
Digital
(SD)
Multi Media
Card
(MMC)
CompactFlash Droite
Gauche
Gauche
Gauche
FRANÇAIS
DEUTSCH
ESPAÑOL
- 7 -
ITALIANO
NEDERLANDS
Page 39

5INTERFACE UTILISATEUR
1 - Ajoute la sélection dans le panier1 (chariot)
2 - Sélectionne le nombre de copies par photo (de 1 à 20)
3 - Va au numéro de photo précédent (…, 3, 2, 1)
4 - Lance l'impression
5 - Va au numéro de photo suivant (1, 2, 3…)
6 - Sélectionne le format d'impression
7- Annule
A - Nombre d’exemplaires à imprimer
B - Numéro de la photo active
C - Nombre de feuilles qui vont être imprimées
D- Format imprimé
E - Mode panier
F - Photo active dans le panier
G - Erreur papier
H - Erreur ruban
I - Icône carte mémoire
A
F
B
C
1
s
2
P
h
o
t
o
E
3
1. Panier : fonction choix de photos à imprimer.
- 8 -
D
H
G
E
I
7
C
6
r
e
t
n
i
r
P
a
s
y
1
5
0
-
o
t
o
h
P
l
a
n
o
P
s
r
e
5
4
Page 40

IMPRIMEZ VOS PHOTOS
Votre imprimante est sous tension, vous avez installé une carte mémoire, ou vous avez transféré
des photos depuis un GSM photo en utilisant la liaison sans fil infrarouge.
La LED verte clignote pendant que l'imprimante charge les données. Après quelques secondes,
le nombre de photos lues sur la carte mémoire, l'appareil photo numérique ou transférées depuis
le GSM photo est affiché à l'écran, la LED devient fixe.
L’impression de vos photos se déroule en 4 phases, l’imprimante imprime d’abord le jaune
ensuite le magenta puis le cyan et enfin dépose un film protecteur sur la feuille de papier avant de
sortir définitivement la photo.
La couleur de la LED s'allume en fonction de l'état de votre imprimante :
Vert fixe : imprimante prête en attente.
Vert clignotant : chargement des données.
Rouge fixe : incidents, reportez-vous à la fin du présent livret d’utilisation.
ENGLISH
FRANÇAIS
Remarque : pour vous permettre de manipuler vos photos dans de bonnes conditions, la taille des feuilles de papier est
supérieure à la surface imprimée et les deux bords latéraux sont prédécoupés.
Après l’impression, ne déchirez pas ces bords d'un seul coup, effectuez plusieurs fois le pliage sur
les pointillés, afin de détacher délicatement les bords.
Astuce - Les bords peuvent être découpés par petits paquets en superposant plusieurs feuilles.
IMPRESSION RAPIDE
Sélectionnez le numéro de la photo voulue avec les touches ou .
Appuyez sur la touche pour définir la quantité de copies.
Appuyez sur la touche pour choisir le format d'impression.
Vous pouvez imprimer vos photos depuis des formats prédéfinis :
• Imprimez votre photo au format 10 x 15 cm pleine page, sans bord .
• Imprimez votre photo au format 10 x 15 cm avec bords blanc .
• Imprimez votre photo au format 10 x 13 cm .
• Imprimez 2 photos par page.
• Imprimez 4 photos par page.
• Imprimez 20 photos par page (planche contact ou d'index).
- 9 -
DEUTSCH
ESPAÑOL
ITALIANO
NEDERLANDS
Page 41

En fin de sélection, appuyez sur la touche pour démarrer l'impression.
Si l'impression est interrompue par un manque de papier, un bourrage papier ou un tiroir papier
vide, après avoir effectué le remplacement ou corrigé le défaut, vous pouvez reprendre
l'opération d'impression, où elle s'est arrêté en appuyant sur la touche .
Idée - Le dos pré-imprimé carte postale, vous permet d'envoyer rapidement votre photo à des amis,
de la famille...
Astuce - L'appui sur la touche pendant 3 secondes permet de réinitialiser l'imprimante et de
revenir à son état par défaut lors de l'insertion d'une carte.
C
EXEMPLE D'IMPRESSION RAPIDE DEPUIS
UNE CARTE MÉMOIRE
La carte mémoire contient 23 photos. Nous voulons imprimer la photo 3, 4 fois sur la même feuille de
papier.
Mettez l'interrupteur Marche/Arrêt sur " I ".
Insérez la carte mémoire dans la fente adéquate de l'imprimante.
Après une phase d'analyse et de reconnaissance, la quantité de photos valide s'affiche à l'écran et l'icône
de la carte mémoire et la LED verte deviennent fixe.
Sélectionnez la photo 3, à l'aide de la touche .
- 10 -
Page 42

Appuyez sur la touche jusqu'à l'affichage du chiffre 4 (soit 4 exemplaires).
Appuyez sur la touche jusqu'à l'obtention du graphisme 4 images/page.
Vous devez obtenir le chiffre 1 en quantité de feuille nécessaire à l'impression.
Appuyez sur la touche pour lancer l'impression.
ENGLISH
FRANÇAIS
DEUTSCH
CRÉEZ UNE PLANCHE CONTACT (INDEX)
Après introduction de la carte mémoire, la quantité de photos valides s'affiche à l'écran et l'icône
représentant la carte mémoire est fixe.
- 11 -
ESPAÑOL
ITALIANO
NEDERLANDS
Page 43

Appuyez sur la touche , jusqu'à l'apparition de ALL à l'écran.
Sélectionnez le format par feuille à l'aide de la touche touche .
Dans l'exemple illustré ci-dessus, vous utiliserez 2 feuilles pour 23 photos imprimables.
Appuyez sur la touche
pour lancer l'impression.
Idée - La planche contact est un moyen simple pour visualiser l'ensemble des photos stockées sur
votre carte mémoire, choisissez les photos à imprimer en fonction du numéro attribué à chacune d’entre
elles.
- 12 -
Page 44

PRÉPAREZ UNE SÉRIE PHOTOS POUR L'IMPRESSION
(MODE PANIER)
Après introduction de la carte mémoire, la quantité de photos valides s'affiche à l'écran et l'icône
représentant la carte mémoire est fixe.
Nous voulons imprimer la photo 3 en 4 exemplaires, la photo 8 en 1 exemplaire et la photo 16 en
2 exemplaires.
Remarque : les impressions en série se feront toutes avec le même format d'impression.
Sélectionnez la photo 3, à l'aide de la touche , appuyez sur la touche jusqu'à
l'apparition du chiffre 4, qui correspond à la quantité désirée.
ENGLISH
FRANÇAIS
DEUTSCH
Appuyez sur la touche pour l'ajouter au panier. L'icône indiquant que la photo active est
dans le panier s'allume, ainsi que l'icône mode panier pour indiquer la présence de photos dans le
panier.
- 13 -
ESPAÑOL
ITALIANO
NEDERLANDS
Page 45

Sélectionnez la photo 8, à l'aide de la touche , appuyez sur la touche pour l'ajouter au
panier (la quantité par défaut est 1).
Sélectionnez la photo 16, à l'aide de la touche , appuyez sur la touche jusqu'à l'apparition
du chiffre 2, quantité désirée.
Appuyez sur la touche pour l'ajouter au panier.
La quantité nécessaire de feuille est inscrite à gauche de l'icône panier. Appuyez sur la touche
pour lancer l'impression.
Remarque : en cas d'erreur de sélection, après votre validation par la touche , vous pouvez revenir en arrière par un
nouvel appui sur la touche
pouvez aussi désélectionner toutes les photos présentes dans le panier, en sélectionnant ALL à l'aide de la touche
et en appuyant 2 fois sur la touche .
. Vous désélectionnez ainsi votre choix précédent et seulement celui-ci. Vous
Astuce - Pour ajouter rapidement une série de photos consécutives dans le panier, placez vous sur la
photo de plus petit numéro, et faites un appui long sur la touche , les photos s'ajouteront
automatiquement dans le panier jusqu'au relâchement de la touche .
- 14 -
Page 46

IMPRIMEZ EN MODE DPOF
Cette fonction vous permet de sélectionner les photos que vous voulez imprimer sur votre
imprimante PHOTO EASY 150 SAGEM depuis votre carte mémoire. Votre appareil photo doit
répondre à la norme DPOF (Digital Print Order Format), consultez la documentation de votre
équipement photo pour savoir s'il est compatible avec cette norme.
Procédez à la sélection des photos désirées sur l'appareil photo en utilisant les explications
fournies dans la notice de votre appareil photo.
Placez la carte mémoire dans la fente adéquate, le transfert de données dans votre imprimante
PHOTO EASY 150 SAGEM est lancé, le logo DPOF est activé sur l'écran de l'imprimante et le
nombre de photos imprimables apparaît sur le côté inférieur gauche de l'écran.
Attention - Exemple : carte mémoire qui contient 15 photos sélectionnées pour être
imprimées.
Lancer l’impression en appuyant sur la touche .
ENGLISH
FRANÇAIS
DEUTSCH
Pour sortir du mode DPOF appuyez sur la touche .
Pour revenir en mode DPOF appuyez et maintenez enfoncée la touche , pendant 3 secondes.
C
C
IMPRIMEZ À PARTIR D'UN GSM PHOTO
Avec l'imprimante PHOTO EASY 150 SAGEM, vous pouvez imprimer les photos prises avec un
GSM photo. Pour cela, vous devez les transférer dans l'imprimante en utilisant la liaison sans fil
infrarouge entre les 2 appareils.
Sur l'imprimante PHOTO EASY 150 SAGEM, mettre l'interrupteur sur " I ".
Astuce - Les GSM appareil photo travaillent en basse résolution, pour un rendu de bonne
qualité nous vous conseillons d’imprimer 2 ou 4 photos par feuille.
- 15 -
ESPAÑOL
ITALIANO
NEDERLANDS
Page 47

Placer votre GSM face à l'imprimante PHOTO EASY 150 SAGEM de manière à ce que les fenêtres
infrarouge soient face à face et à une distance ne dépassant pas 30 centimètres.
Attention - Dans le cas d’un environnement exposé à une lumière intense, une distance de
10 centimètres maximum entre les deux fenêtres infrarouge est préconisée.
Sur votre GSM, sélectionner une photo et déclencher son transfert par liaison infrarouge.
Le transfert démarre et pendant toute sa durée, le message " Ir " clignote sur l'écran de l'imprimante.
A la fin du transfert, les informations suivantes sont affichées à l'écran :
Vous pouvez :
• Soit déclencher l'impression de la photo transférée, après avoir éventuellement modifié le format
d'impression et le nombre de copies.
• Soit transférer depuis votre GSM une autre photo, celle-ci venant s'ajouter à celle(s) déjà stockée(s) dans l'imprimante. A la fin de chaque transfert, le nombre total de photos stockées est indiqué sur l'écran de l'imprimante (celle ayant le numéro le plus élevé étant la dernière transférée).
- 16 -
Page 48

• Vous pouvez à ce moment effectuer les opérations décrites dans les chapitres précédents
avant de lancer l'impression de ces photos (sélection des numéros de photos à imprimer,
sélection du format, sélection du nombre de copies).
A la fin de l'impression de photos transférées depuis votre GSM photo, l'écran de l'imprimante
PHOTO EASY 150 affiche des informations présentes juste avant de démarrer l'impression.
Vous pouvez :
• Soit déclencher une nouvelle impression, après avoir éventuellement sélectionné d'autres
paramètres (numéro de photo, format, nombre de copies).
• Soit terminer la phase de traitement des photos transférées. Pour cela, pressez la touche
C
pendant 2 secondes.
ENGLISH
FRANÇAIS
DEUTSCH
- 17 -
ESPAÑOL
ITALIANO
NEDERLANDS
Page 49

6IMPRIMEZ DEPUIS UN PC (PERSONAL COMPUTER)
Votre kit comprend un CD-Rom d'installation du pilote de l'imprimante, un logiciel de traitement
d'images ainsi qu'une notice d'utilisation.
Assurez-vous que votre PC est compatible avec les conditions décrites dans les spécifications
(reportez-vous au paragraphe Caractéristiques techniques, page -24).
Configuration PC requise :
Pentium ou équivalent,
OS : Windows 98 SE / 2000 / Me / XP,
128 MB DRAM ou plus,
150 MB disque dur disponible,
Port USB disponible.
INSTALLEZ LE LOGICIEL
L'installation du logiciel SAGEM PHOTO EASY 150 se déroule en trois phases : l'exécution du
programme d'installation, le redémarrage de l'ordinateur puis l'installation finale de l'imprimante.
Ne connectez pas l'imprimante au PC, avant l'installation du pilote d'impression. En fin
d'installation un message vous demandera de redémarrer le PC, après le redémarrage vous
pourrez connecter l'imprimante au PC.
Pour commencer l'installation, insérez le CD-Rom dans le lecteur, une fenêtre de commande apparaît,
suivez les instructions qui s'affichent à l'écran.
Si le programme d'installation ne démarre pas automatiquement : lancez l'exécution du programme
d'installation, en cliquant deux fois sur le fichier "setup.exe" situé à la racine du CD-Rom.
Le CD-Rom contient un manuel d'installation et d'utilisation détaillé du pilote d'impression.
Reportez-vous à ce manuel pour l'utilisation du pilote.
Remarque : L'option "impression N/B" proposée par le pilote d'impression de windows 98 est non fonctionnelle.
- 18 -
Page 50

CONNECTEZ VOTRE IMPRIMANTE
Assurez-vous que les équipements sont sous tension. Ne forcez jamais à la mise en place des
connecteurs sur les équipements, vous risquez à la fois de détériorer le câble et le connecteur.
Reliez le câble USB sur un port USB de votre PC.
Reliez l'autre extrémité du câble USB sur l'imprimante PHOTO EASY 150 SAGEM.
La reconnaissance entre les équipements est automatique.
ENGLISH
FRANÇAIS
DEUTSCH
- 19 -
ESPAÑOL
ITALIANO
NEDERLANDS
Page 51

7REMPLACEMENT DES CONSOMMABLES
Les consommables employés sur l'imprimante PHOTO EASY 150 SAGEM, le ruban et le papier
sont des produits de marque SAGEM. Vous pouvez vous en procurer dans les magasins grand
public aux rayons photos ou imprimantes, mais également sur notre site internet
www.sagem.com ou utilisez le bon de commande consommables fourni avec votre imprimante.
Utilisez seulement les consommables de marque SAGEM et exclusivement ceux-ci sinon vous
risquez de perdre la garantie de l'appareil.
Référence kit consommables (ruban + papier 40 photos) : 251 300 344
Référence kit consommables (3 rubans + papier 120 photos) : 251 300 336
- 20 -
Page 52

8ENTRETIEN
NETTOYAGE DE LA TÊTE D'IMPRESSION
Si vos photos présentent une marque constante sur toute la longueur de la feuille, des impuretés
sont peut être collées sur la tête d'impression.
Préparez un produit nettoyant à base d'alcool dénaturé
Mettez votre imprimante hors tension, débranchez le cordon secteur et attendez cinq
minutes, la tête d'impression étant montée à une température élevée, vous pourriez vous
blesser en la touchant.
1 - Ouvrez la trappe ruban, appuyez sur le loquet de maintien et retirez le ruban.
2 - Retirez le tiroir papier.
3 - Retournez l'appareil pour retirer la trappe inférieure.
4 - Nettoyez avec précautions la ligne de chauffage de la tête d'impression, à l’aide du coton
tige.
5 - Replacez la trappe inférieure, retournez l'imprimante, rebranchez le cordon secteur et
remettez votre imprimante sous tension à l’aide de l’interrupteur.
Attention - Ne jamais toucher la tête d'impression avec les doigts ou des objets pouvant
la rayer.
1
et des cotons tige du commerce.
ENGLISH
FRANÇAIS
DEUTSCH
1
4
2
3
5
Replacez le ruban en faisant attention de bien tendre ce dernier avant l'insertion dans son
logement, vérifiez que le loquet de maintien est bien en position et fermez la trappe.
Repositionnez le tiroir papier dans son logement jusqu'au déclenchement du système de
blocage.
1. Ne pas utiliser de produits corrosifs, ces derniers pourraient endommagés votre appareil.
- 21 -
ESPAÑOL
ITALIANO
NEDERLANDS
Page 53

BOURRAGE PAPIER
Si une feuille est coincée dans l'imprimante et ne peut être extraite simplement de l'appareil, procédez
comme suit :
Mettez votre imprimante hors tension en appuyant sur le " O " de l'interrupteur situé à l'arrière
de votre appareil et débranchez le cordon secteur.
Retournez l'appareil pour accéder au dessous de l'imprimante.
Enlevez le couvercle inférieur.
Retirez délicatement la feuille coincée, ne touchez en aucun cas la tête d'impression.
Replacez le couvercle inférieur et retournez l'imprimante.
Rebranchez le cordon secteur et remettez votre imprimante sous tension.
Attention - Ne jamais utiliser d'objets pouvant détériorer l'imprimante (ciseaux, tournevis, coupe
papier,…).
INCIDENTS
Remarque : Si vous réalisez des grandes séries d'impression sur votre appareil, celui-ci est équipé d'un dispositif de tempori-
sation automatique pour éviter une surchauffe de l'appareil. L'imprimante redémarre automatiquement l'impression en cours dès que la température a suffisament diminuée.
INCIDENTS REMÈDES
Pas d’alimentation secteur
(voyant éteint)
La LED (voya nt
rouge)
L’appareil a été débranché
pendant une impression
Aucune photo n'est
imprimée sur la feuille
La photo est imprimée avec
un trait sur la longueur ou
beaucoup des tâches
Pas d'impression PC • Vérifiez que le câble USB est bien branché.
• Vérifiez que le bloc secteur est correctement relié à une prise secteur.
• Vérifiez que le connecteur secteur est correctement branché à
l’imprimante.
• Vérifiez que votre fusible et disjoncteur de votre installation électrique sont
en état de marche et que la prise de courant est bien alimentée.
• Reportez vous au tableau des messages d’erreurs (reportez-vous au
paragraphe Messages d’erreurs, page -23).
• Placer l’interrupteur secteur sur O puis, reconnectez le câbl e d’a limen taio n
secteur.
• Mettez l'imprimante sous tension et attendez que la phase d'initialisation
soit terminée.
• Si une feuille de papier est bloquée, (reportez-vous au paragraphe Bourrage
papier, page -22).
• Relancez l'impression.
• Utilisez-vous des feuilles conformes aux spécifications techniques ?
(reportez-vous au paragraphe Caractéri stiques techniques, page -24
• Avez-vous placé les feuilles faces brillantes dessus ?
• Procédez à un nettoyage de la tête d'impression (reportez-vous au
paragraphe Nettoyage de la tête d'impression, page -21).
• Avez-vous installé le pilote d'impression ?
- 22 -
Page 54

MESSAGES D’ERREURS
Après chaque intervention sur votre imprimante n’oubliez pas
d’appuyer sur la touche pour relancer l’impression en cours.
ENGLISH
Erreur
affiché
Err 01
Err 02
Err 11
Err 12
Err 13
Err 14
Err 21
Err 22
Err 23
Err 27
Err 72
Err 75
Err 76
Autre n°
d’erreur
Icone
affichée
Aucune Liaison
Aucune Liaison
Aucune Liaison
Aucune Autres Erreur système Eteignez votre imprimante 30s et rallumez-la. Si
Type
d’erreur
Papier Papier absent Vérifiez qu'il y a du papier correctement placé
Papier Bourrage
Ruban Ruban absent Mettez un nouveau ruban ou remplacez le ruban
Ruban Fin de ruban Changez le ruban par un neuf.
Ruban Erreur ruban Vérifiez la bonne insertion du ruban, si l'erreur
Ruban Ruban absent
Carte
mémoire
Carte
mémoire
Carte
mémoire
Carte
mémoire
infrarouge
infrarouge
infrarouge
Désignation Action
dans le bac chargeur.
papier
ou mal inséré
Fichier
endommagé ou
incorrect
Erreur de
décompression
JPEG
Caractéristique
JPEG non
supportée
Erreur de
lecture
Erreur de
transfert
Pas assez de
place pour
stocker la
photo
Format de
fichier non
supporté
Retirez le papier bloqué dans l'imprimante (ne
pas réutiliser cette feuille de papier).
actuel.
persiste, remplacez-le.
Vérifiez que le ruban est correctement inséré et
que le loquet de fermeture est verrouillé.
Le fichier est illisible. Essayez d'imprimez les
autres. Si l'erreur persiste vérifiez la source du
fichier, ou essayez avec une autre source.
Le fichier est illisible. Essayez d'imprimer les
autres. Si l'erreur persiste vérifiez la source du
fichier, ou essayez avec une autre source.
Le fichier JPEG contient une caractéristique non
supportée.
La carte ou le fichier sont illisibles. Vérifiez la
source de la carte, ou essayez avec une autre
source.
Erreur durant le transfert d'une photo depuis un
GSM photo. Redémarrez le transfert depuis le
GSM. Vérifiez que les 2 appareils sont face à
face.
Photo à transférer trop grosse ou plus assez de
place pour stocker la photo dans l'imprimante.
La photo à transférer n'est pas au format JPEG.
l'erreur p ersiste co ntactez votre revendeur.
FRANÇAIS
DEUTSCH
ESPAÑOL
ITALIANO
- 23 -
NEDERLANDS
Page 55

CARACTÉRISTIQUES TECHNIQUES
Configuration PC requise :
Pentium ou équivalent,
OS : Windows 98 SE / 2000 / Me / XP,
128 MB DRAM ou plus,
150 MB disque dur disponible,
1 port USB disponible.
------------------------------------------------------------------------------------------------------
Nom de l'appareil : PHOTO EASY 150 SAGEM
Méthode d'impression : transfert thermique
Résolution : 300 x 300 dpi
Couleur : 16,7 Millions en continu
Vitesse d'impression : inférieur à 120 secondes par photo (hors transfert
Interface : carte mémoire du type : Compact Flash Card (support type I &
Stockage de photos transférées
depuis un GSM photo : jusqu'à 500 Kilo-octets
Résolution d'image supportée : jusqu'à 12 Millions de pixels
Consommables : papier photo, ruban trois couleurs (jaune, magenta, cyan)
Alimentation papier : par chargeur automatique de capacité 20 feuilles
Alimentation secteur : 230 V AC 50/60 Hz
Approbation : CE
Plage d'utilisation : 10 à 35 °C et 30 à 85 % d'humidité
Dimensions en mm : 201 x 174 x 94 hors bac papier
Poids en kg : 1,5
Consommation énergétique : en mode repos : 7,6 W
informatique)
II), SM / MS / MMC / SD. Port USB Version 1.1
et un vernis, 40 impressions par ruban
Taille papier : 101 x 152,4 mm conditionnés en paquets de
20 feuilles
en mode impression : 60 W
Toutes ces données vous sont fournies à titre indicatif. SAGEM se réserve le droit d'apporter toutes
modifications sans aucun préavis.
- 24 -
Page 56

9CONDITIONS DE GARANTIE
G
ARAN
Pour toute mise en oeuvre de la garantie, vous devez vous adresser à votre vendeur et lui
présenter le justificatif d'achat qu'il vous a remis.
En cas de panne, c'est lui qui vous conseillera.
Si vous avez acheté directement votre matériel auprès de SAGEM, celui-ci est garanti par SAGEM (pièces et main d'oeuvre), contre
tout défaut de matière et tout vice de fabrication pendant une durée d'un an à compter de la date de livraison. Durant cette période,
tout matériel défectueux sera remplacé ou réparé gratuitement, le client devant retourner à ses frais le matériel défectueux à l'adresse
qui lui sera indiqué par le Service Après-Vente SAGEM dont le numéro de téléphone figure sur le bordereau de livraison. En l'absence
de contrat d'entretien spécifique souscrit par le client, la réparation ou l'échange ne sera en aucun cas effectué dans les locaux du client.
Sont exclus de la garantie :
a) Les pannes ou dysfonctionnements dus au non-respect des consignes d'installation et d'utilisation, à une cause extérieure au
matériel (foudre, incendie, choc...), à des modifications de matériels effectués sans accord écrit de SAGEM, à un défaut
d'entretien courant, de surveillance ou de soins de matériel, ou encore une réparation ou un entretien effectués par des
personnes non agréées par SAGEM.
b) L'usure normale du matériel ainsi que l'usure des accessoires.
c) Les détériorations consécutives à une insuffisance d'emballage et/ou à un mauvais conditionnement du matériel réexpédié à
SAGEM. Dans les cas ci-dessus ainsi qu'à l'expiration de la garantie, le client demandera à SAGEM un devis qu'il devra
accepter avant tout retour du matériel au Service Après-Vente SAGEM. Les frais de réparation et de port (aller et retour) seront
facturés au client. Ces conditions relatives à la garantie sont applicables en France Métropolitaine.
TIE
ENGLISH
FRANÇAIS
DEUTSCH
Votre matériel est, en tout état de cause,
soumis à la garantie légale contre les conséquences
des défauts ou vices cachés conformément
aux articles 1641 et suivants du Code Civil
- 25 -
ESPAÑOL
ITALIANO
NEDERLANDS
Page 57

- 26 -
Page 58

1WILLKOMMEN 1
2DEN DRUCKER PHOTO EASY 150 ENTDECKEN 2
3DEN DRUCKER PHOTO EASY 150 VORBEREITEN 3
Netzversorgung 3
Ein Farbband einlegen 4
Laden des Papiers 5
4AUF EINER SPEICHERKARTE GESPEICHERTE
F
OTOS AUSDRUCKEN 6
Führen Sie eine Speicherkarte ein 6
5 BENUTZERSCHNITTSTELLE 8
Ihre Fotos ausdrucken 9
Schnelldruck 9
Beispiel für den Schnelldruck von einer
Speicherkarte aus
Einen Übersichtsbogen bzw. Indexprint erzeugen 11
Eine Fotoserie für den Ausdruck vorbereiten (Warenkorb-Modus) 13
Im DPOF-Modus ausdrucken 15
Von einem Foto-Handy aus ausdrucken 15
10
6VON EINEM PC (PERSONAL COMPUTER) AUS DRUCKEN 18
Die Software installieren 18
Ihren Drucker anschließen 19
7VERBRAUCHSMATERIALIEN 20
8 WARTUNG 21
Reinigung des Druckerkopfs 21
Papierstau 22
Störungen 22
Fehlermeldungen 23
Technische Daten 24
ENGLISH
FRANÇAIS
DEUTSCH
ESPAÑOL
9GARANTIE 25
- I -
ITALIANO
NEDERLANDS
Page 59

- II -
Page 60

1WILLKOMMEN
Wir beglückwünschen Sie zum Erwerb des Druckers PHOTO EASY 150 von SAGEM und
danken Ihnen für Ihr Vertrauen. Mit diesem hochwertigen Drucker können Sie ihre digitalen
Fotos in vollen Zügen geniessen ; auf einfachste Weise Ausdrücke herstellen, die der Qualität der
in digitalen Fotos spezialisierten Labors entsprechen, und diese für Ihren Eigenbedarf verwenden
oder auch mit Ihrer Familie, Ihren Freunden oder Ihren Kollegen teilen.
Die vorliegende Bedienungsanleitung macht Sie in einfachen Schritten mit der Bedienung
vertraut:
1. Den Drucker PHOTO EASY 150 einschalten
2. Auf einer Speicherkarte gespeicherte Fotos ausdrucken
3. Von einem Foto-Handy übertragene Fotos ausdrucken
4. Die Bildbearbeitungs-Software und den Druckertreiber auf einem PC installieren.
5. Den Drucker PHOTO EASY 150 pflegen und Probleme beheben
Eine zusätzliche Dokumentation über die Verwendung der Bildbearbeitungs-Software und den
PC-Druckertreiber gibt es auf der in der Lieferung enthaltenen CD-ROM.
Empfehlungen und Sicherheitsvorkehrungen
• Installieren Sie Ihren Drucker PHOTO EASY 150 nicht in einem feuchten Raum (WC,
Badezimmer, Waschküche, Küche usw.), weniger als 1,50 m von einer Wasserstelle entfernt
oder im Außenbereich. Ihr Drucker muss bei Raumtemperatur zwischen 10 °C und 35 °C
betrieben werden.
• Installieren Sie den Drucker nicht an einem Ort, an dem es in der Luft schwebenden Staub
geben könnte. Dieser Staub könnte die Druckqualität Ihrer Fotos verschlechtern.
• Verwenden Sie ausschließlich das mitgelieferte Netzteil und schließen Sie dieses gemäß den
Installationsanweisungen in dieser Anleitung und den Hinweisen auf seinem Typenetikett
(Spannung, Strom, Frequenz des Stromnetzes) an das Netz an
ENGLISH
FRANÇAIS
DEUTSCH
ESPAÑOL
1
.
• Öffnen Sie während des Ausdrucks niemals die Klappe zum Farbband. Dies kann zum
Reißen des Films und anschließend zu Funktionsstörungen Ihres Druckers führen.
• Verwenden Sie nur und ausschließlich Verbrauchsgüter der Marke SAGEM, da Sie andern-
falls riskieren, das Gerät zu beschädigen und die Garantie zu verlieren. Für die Bestellnummern der Verbrauchsgüter s (siehe Abschnitt Verbrauchsmaterialien, Seite -20).
• Die CE-Markierung bescheinigt die Konformität des Produkts mit den wesentlichen Anfor-
derungen der Richtlinie 1999/5/CE des europäischen Parlaments und Rates bezüglich
Telekommunikationsendgeräten, der Sicherheit und Gesundheit der Benutzer, der elektromagnetischen Störungen.
1. Ausgenommen sind Installationen nach IT-Schema gemäß der Definition in Norm EN60950.
- 1 -
ITALIANO
NEDERLANDS
Page 61

2DEN DRUCKER PHOTO EASY 150 ENTDECKEN
5
3
Öffnen Sie die Verpackung und überprüfen Sie, ob alle nachfolgend aufgeführten Elemente vorhanden
sind:
1 Drucker PHOTO EASY 150
2 Bedienungsanleitung
3 CD-ROM mit Treiber & Anwendungen
4 Farbband*
5 Photopapier (2 Pakete a 20 Blatt)*
6 USB-Kabel
7 Papierfach
8 Netzleitung
9 Netzteil
e
Livret utilisateur
Livret utilisateur
ser Guide
User Guid
U
te
n
edienungsanleitung
Bedienungsanleitung
B
anuale dell'utente
anuale dell'ute
M
M
ng
nual del usuario
a
M
Manual del usuario
Gebruiksaanwijzing
9
8
1
Gebruiksaanwijzi
2
6
4
Starterpaket
*
- 2 -
Page 62

3DEN DRUCKER PHOTO EASY 150 VORBEREITEN
NETZVERSORGUNG
ENGLISH
Anmerkung: Sollte sich bei der Installation eine Wand bzw. ein anderer Gegenstand in der Nähe befinden, achten Sie
bitte darauf, dass hinter Ihrem Drucker mindestens 10 cm Raum zur Verfügung steht, damit sich das Blatt
während des Druckvorgangs ungehindert bewegen kann.
Bitte lesen Sie die Sicherheitsvorkehrungen zu Anfang der vorliegenden
Bedienungsanleitung, bevor Sie die Verbindungen zum Drucker herstellen.
Stecken Sie das passende Ende der 230 V Netzleitung in den dafür vorgesehenen
Anschluss des Netzteils.
Stecken Sie den Stecker des Netzteils in den Drucker, wie auf der nachfolgenden
Abbildung gezeigt.
A
Stecken Sie den 230 V Eurostecker in eine Netzsteckdose
Stellung " I " des Ein-/Aus-Schalters auf der Rückseite des Druckers. Die grüne LED und
das LCD-Display auf.
Ihr Drucker besitzt einen USB-Anschluss Master Massenspeicher SCSI (A). Für das
Anschließen der Liste von Peripheriegeräten an diesen USB-Anschluss konsultieren Sie
bitte die Site www.sagem.com.
FRANÇAIS
DEUTSCH
ESPAÑOL
ITALIANO
- 3 -
NEDERLANDS
Page 63

EIN FARBBAND EINLEGEN
Schalten Sie den Drucker ein. Warten Sie 10 Sekunden, (bis sich der Druckkopf anhebt), und gehen Sie
folgendermaßen vor:
1 - Öffnen Sie die äußere Klappe auf der rechten Seite des Druckers.
2 - Entfernen Sie den Schaumstoffschutz.
3 - Nehmen Sie das neue Farbband aus seiner Verpackung und Stellen Sie sicher, dass der Film
gespannt ist, nachdem Sie das Pappteil (A) entfernt haben.
4 - Beachten Sie die Position des Bandes gemäß der unten abgebildeten Darstellung.
5 - Heben Sie den Sperrhebel an und legen Sie das Farbband ganz in die Aufnahme ein. Der Sperrhebel
muss nach dem Einlegen wieder geschlossen werden.
6 - Schließen Sie die Außenklappe.
A
6
Achtung - Berühren Sie den Film des Farbbands niemals mit den Fingern. Die Kassette muss
vollständig in den Drucker eingeführt werden. Achten Sie darauf, dass der grüne Sperrhebel nach dem
Einlegen des Farbbandes heruntergedrückt worden ist.
Anmerkung: Überprüfen Sie bei Problemen, ob sich kein Fremdkörper in der Aufnahme des Farbbands befindet.
- 4 -
Page 64

Anschlag
LADEN DES PAPIERS
ENGLISH
Schutzfolie
FRANÇAIS
1 - Entfernen Sie das Papierfach.
2 - Öffnen Sie die Papierpackung, so dass das Schutzblatt oben auf ist, legen Sie letzteres in die
Papierkassetteein. Überprüfen Sie, dass sich das für eine Briefmarke vorgesehene Rechteck
an der Aussenseite der Papierkassette d.h. zu Ihnen gerichtet befindet.
Achten Sie nach dem Einlegen des Bogenpakets darauf, dass dieses unter dem vorne links im
Papierfach befindlichen Kunststoffstift liegt (siehe folgende Abbildung).
3 - Entfernen Sie die Schutzfolie.
4 - Bringen Sie die Papierkassette mit der offenen Kante voran vor die Aufnahme in den Drucker.
Führen Sie die Kassette langsam bis zum Einrasten in den dafür vorgesehenen Schacht des
Druckers.
Achtung - Fassen Sie die Papierbögen an den perforierten Rändern an. Berühren Sie die
glänzende Seite vor dem Druck niemals mit den Fingern. Es besteht die Gefahr einer
verminderten Druckqualität.
Ihr Drucker SAGEM PHOTO EASY 150 ist jetzt bereit zum Ausdrucken Ihrer digitalen Fotos.
Achtung - Schützen Sie die Verbrauchsmaterialien gegen zu lange Lichteinwirkung, gegen
Feuchtigkeit, Hitze und Staub. Halten Sie die im Abschnitt (siehe Abschnitt Technische Daten,
Seite -24). angegebenen Verwendungsbedingungen ein. Verwenden Sie nur
Verbrauchsmaterialien der Marke SAGEM, die für diesen Drucker vorgesehen sind. Legen Sie
immer nur jeweils ein Paket mit 20 Bögen des Fotopapiers in das Papierfach ein.
Achtung - Stellen Sie sicher, dass ein bereits ausgedrucktes Foto nicht aus Versehen in ein
Paket neuer Blätter gerät. Dies könnte das Band Ihres Druckers beschädigen.
- 5 -
DEUTSCH
ESPAÑOL
ITALIANO
NEDERLANDS
Page 65

4AUF EINER SPEICHERKARTE GESPEICHERTE FOTOS
AUSDRUCKEN
Ihr Drucker SAGEM PHOTO EASY 150 kann mit oder ohne Computer verwendet werden. In diesem
Kapitel beschreiben wir die Verwendung des Druckers ohne Computer.
Der Tabelle mit den technischen Daten am Ende der Bedienungsanleitung können Sie entnehmen, ob
Ihre Speicherkarte mit dem Drucker kompatibel ist. Bitte verwenden Sie einen Rechner und die auf der
CD-ROM mitgelieferte Bildbearbeitungssoftware, falls die Speicherkarte nicht kompatibel ist.
Achtung - Kleine Bilder mit weniger als 80 000 Pixel können nicht direkt von der Speicherkarte aus
gedruckt werden (Beispiel: ein Bild der Größe 320 x 240 hat 76 800 Pixel und kann nicht im Index
verzeichnet werden). Diese Fotos können jedoch über einen PC oder über eine direkte
Infrarotverbindung ausgedruckt werden.
FÜHREN SIE EINE SPEICHERKARTE EIN
Führen Sie Ihre Speicherkarte je nach Format in den entsprechenden Spalt ein, wie auf der unten
abgebildeten Graphik dargeste.
Achtung - SmartMedia NACH OBEN EINSCHIEBEN.
Achtung - Die Speicherkarte lässt sich nicht vollständig in den Einschub einführen.
BITTE VERSUCHEN SIE ES AUF KEINEN FALL MIT GEWALT.
Ziehen Sie die Karte wieder heraus und stellen Sie sicher, dass Sie den richtigen Einschub wählen und
die Karte in der korrekten Richtung einführen.
Linker Schlitz für die
Formate Smart Media (SM),
Memory Stick (MS),
Standard Digital (SD)
oder Multi Media Card (MMC)
- 6 -
Rechter Schlitz für das
Format CompactFlash
Page 66

KARTE EINSCHUB LAGE
Smart Media
(SM)
Links
ENGLISH
Memory Stick
(MS)
Standard
Digital
(SD)
Multi Media
Card
(MMC)
CompactFlash Rechts
Links
Links
Links
FRANÇAIS
DEUTSCH
ESPAÑOL
- 7 -
ITALIANO
NEDERLANDS
Page 67

5 BENUTZERSCHNITTSTELLE
1 - Auswahl im Warenkorbablegen
1
2 - Kopienanzahl pro Foto auswählen (1 bis 20)
3 - Zur vorherigen Fotonummer wechseln (…, 3, 2, 1)
4 - Den Ausdruck starten
5 - Zur nächsten Fotonummer wechseln (1, 2, 3…)
6 - Das Druckformat auswählen
7 - Abbrechen
A - Anzahl der zu druckenden Exemplare
B - Nummer des aktiven Fotos
C - Anzahl der Fotoausdrucke, die ausgedruckt werden
D - Druckformat
E - Warenkorb -Modus
F - Foto im Warenkorbaktiv
G - Papierstörung
H - Farbbandstörung
I - Speicherkartensymbol
A
B
C
E
F
D
H
G
I
1
s
2
P
h
o
t
o
E
a
s
y
1
5
0
n
-
o
P
s
r
e
3
4
1. Warenkorbablegen: Funktion zur Wahl der Fotos, die gedruckt werden sollen.
- 8 -
r
e
t
n
i
r
P
o
t
o
h
P
l
a
7
C
6
5
Page 68

IHRE FOTOS AUSDRUCKEN
Der Drucker ist eingeschaltet, Sie haben eine Speicherkarte eingesetzt oder Sie haben die Fotos
über die schnurlose Infrarotverbindung von einem Foto-Handy übertragen.
Die grüne LED blinkt, während der Drucker die Daten lädt. Nach einigen Sekunden wird die auf
der Speicherkarte oder in der Digitalkamera vorhandene bzw. die vom Foto-Handy übertragene
Fotoanzahl auf dem Display angezeigt. Die LED leuchtet nun permanent.
Der Ausdruck Ihrer Fotos erfolgt in 4 Phasen. Der Drucker druckt zuerst das gelb , dann das
magenta und anschließend das cyan. Abschließend beschichtet er den Papierbogen mit einem
Schutzfilm, bevor er das Foto endgültig ausgibt.
Die LED leuchtet in Abhängigkeit vom Status Ihres Druckers unterschiedlich auf:
Grün permanent: Drucker bereit im Wartemodus.
Grün blinkend: Laden der Daten.
Rot permanent: Störung, bitte sehen Sie am Ende der vorliegenden Anleitung nach.
ENGLISH
FRANÇAIS
Anmerkung: Damit Sie Ihre Fotos in guten Bedingungen handhaben können, sind die Blätter größer als die bedruckte
Oberfläche, und die beiden Seitenränder sind vorgestanzt.
Reißen Sie die Ränder nach dem Druck nicht sofort ab, sondern knicken Sie die Perforierung
mehrmals hin und her, um die Ränder behutsam zu lösen.
Tipp - Die Ränder können in kleinen Paketen ausgeschnitten werden, in dem man mehrere
Blätter aufeinanderlegt.
SCHNELLDRUCK
Wählen Sie die Nummer des gewünschten Fotos mit der Taste oder aus.
Drücken Sie zum Bestimmen der Kopienanzahl auf die Taste .
Drücken Sie zum Wählen des Druckformats auf die Taste .
• Sie können Ihre Fotos mit vordefinierten Formaten ausdrucken:
• Ihre Fotos im Vollformat 10 x 15 cm ohne Rand ausdrucken .
• Ihre Fotos im Format 10 x 15 cm mit weißem Rand ausdrucken .
• Ihre Fotos im Format 10 x 13 cm .
• 2 Fotos pro Seite ausdrucken.
• 4 Fotos pro Seite ausdrucken.
• 20 Fotos pro Seite ausdrucken (Übersichtsbogen oder Indexprint).
- 9 -
DEUTSCH
ESPAÑOL
ITALIANO
NEDERLANDS
Page 69

Drücken Sie am Ende der Auswahl auf die Taste , um den Ausdruck zu beginnen.
Wenn der Ausdruck durch fehlendes Papier, einen Papierstau oder eine leere Farbbandrolle
unterbrochen wird, kann der Ausdruck nach dem Ersetzen oder nach der Behebung der Störung
durch Drücken auf die Taste dort wieder aufgenommen werden, wo er unterbrochen
worden ist.
Idee - Die als Postkarte vorgedruckte Rückseite, um Ihre Fotos an Freunde, Familienangehörige usw.
zu verschicken.
Tipp - Durch Drücken auf die Taste (3 Sekunden) wird der Drucker neu initialisiert. Er kehrt
in den Ausgangsstatus zum Zeitpunkt der Karteneinführung zurück.
C
BEISPIEL FÜR DEN SCHNELLDRUCK VON EINER
SPEICHERKARTE AUS
Die Speicherkarte enthält beispielsweise 23 Fotos. Sie möchten das Foto 3 viermal auf demselben
Papierbogen ausdrucken.
Stellen Sie den Ein-/Aus-Schalter auf " I ".
Führen Sie die Speicherkarte in den entsprechenden Schlitz des Druckers ein.
Nach der Analyse- und Erkennungsphase wird die Menge gültiger Fotos und das Symbol der
Speicherkarte auf dem Display angezeigt. Die grüne LED leuchtet permanent.
Wählen Sie mit der Taste das Foto 3 aus.
- 10 -
Page 70

Drücken Sie auf die Taste , bis die Zahl 4 erscheint (d.h. 4 Exemplare).
Drücken Sie auf die Taste , bis das Symbol 4 Bilder/Seite erscheint.
Die für den Ausdruck erforderliche Kopienanzahl müssen Sie z.B durch die Wahl der Zahl 1
definieren.
Drücken Sie zum Starten des Ausdrucks auf die Taste .
ENGLISH
FRANÇAIS
DEUTSCH
EINEN ÜBERSICHTSBOGEN BZW. INDEXPRINT ERZEUGEN
Nach dem Einführen der Speicherkarte wird die Menge gültiger Fotos auf dem Display angezeigt,
und das Speicherkartensymbol leuchtet permanent.
- 11 -
ESPAÑOL
ITALIANO
NEDERLANDS
Page 71

Drücken Sie auf die Taste , bis ALL auf dem Display erscheint.
Wählen Sie mit der Taste das Format Fotos pro Bogen aus.
In dem oben veranschaulichten Beispiel verwenden Sie 2 Bögen für 23 druckbare Fotos.
Drücken Sie zum Starten des Ausdrucks auf die Taste .
Idee - Der Kontaktstreifen ist ein einfaches Mittel, um alle auf Ihrer Speicherkarte gespeicherten
Fotos anzuzeigen. Wählen Sie die Fotos, die ausgedruckt werden sollen nach der Nummer, die ihnen
jeweils zugeordnet ist.
- 12 -
Page 72

EINE FOTOSERIE FÜR DEN AUSDRUCK VORBEREITEN
(WARENKORB-MODUS)
Nach dem Einführen der Speicherkarte wird die Menge gültiger Fotos auf dem Display angezeigt,
und das Speicherkartensymbol leuchtet permanent.
Sie möchten das Foto 3 in vier Exemplaren, das Foto 8 in einem Exemplar und das Foto 16 in
zwei Exemplaren ausdrucken.
Anmerkung: Serienausdrucke erfolgen alle mit demselben Druckformat.
Wählen Sie mit der Taste das Foto 3 aus, und drücken Sie auf die Taste , bis die
Zahl 4 erscheint, d.h. die gewünschte Anzahl der Fotos.
ENGLISH
FRANÇAIS
DEUTSCH
Drücken Sie auf die Taste , um es im Warenkorb abzulegen. Das Symbol, welches die
Ablage des aktiven Fotos im Warenkorb angibt, leuchtet auf, genauso wie das Symbol
Warenkorb-Modus, welches auf das Vorhandensein von Fotos im Warenkorb hinweist.
- 13 -
ESPAÑOL
ITALIANO
NEDERLANDS
Page 73

Wählen Sie mit der Taste das Foto 8 aus, und drücken Sie auf die Taste , um es im
Warenkorb abzulegen (die Vorgabemenge ist 1).
Wählen Sie mit der Taste das Foto 16 aus, und drücken Sie auf die Taste , bis die Zahl
2 erscheint, d.h. die gewünschte Menge.
Drücken Sie auf die Taste , um es im Warenkorb abzulegen.
Die erforderliche Anzahl der Fotopapiermenge wird links vom Warenkorb-Symbol angezeigt.
Drücken Sie zum Starten des Ausdrucks auf die Taste .
Anmerkung: Falls Sie nach dem Bestätigen mit der Taste bemerken, dass Sie einen Fehler gemacht haben, können
Sie Ihre Auswahl durch erneutes Drücken der Taste annullieren. Dadurch wird nur die letzte Auswahl
aufgehoben Sie können alle Fotos aus dem Warenkorb löschen, indem Sie mit der Taste ALL
auswählen und dann zweimal mit der Taste bestätigen.
Tipp - Sie können schnell eine Serie aufeinanderfolgender Fotos im Warenkorb ablegen, indem Sie auf
das erste Foto der Serie gehen und länger auf die
solange automatisch im
Warenkorb abgelegt, bis Sie die Caddie-Taste wieder loslassen.
- 14 -
Warenkorb-Taste drücken. Die Fotos werden
Page 74

IM DPOF-MODUS AUSDRUCKEN
Mit dieser Funktion können Sie vorab mit Ihrer Digitalkamera auf der Speicherkarte die Fotos
auswählen, die Sie auf Ihrem Drucker SAGEM PHOTO EASY 150 ausdrucken wollen. Ihr
Fotoapparat muss dazu die Norm DPOF (Digital Print Order Format) erfüllen. Lesen Sie bitte in
der Dokumentation Ihres Digitalfotogerätesnach, ob er mit dieser Norm kompatibel ist.
Wählen Sie die gewünschten Fotos an Ihrer Digitalkamera aus, indem Sie vorgehen , wie in der
Bedienungsanleitung Ihres Fotoapparats beschrieben.
Stecken Sie die Speicherkarte in den entsprechenden Schlitz. Die Datenübertragung in Ihren
Drucker SAGEM PHOTO EASY 150 wird gestartet, das DPOF-Logo wird auf dem
Drucker-Display aktiviert und die Anzahl ausdruckbarer Fotos erscheint in der unteren linken
Ecke des Displays.
Achtung - Beispiel: Speicherkarte, die 15 für den Ausdruck ausgewählte Fotos enthält.
Starten Sie den Ausdruck durch Drücken auf die Taste .
ENGLISH
FRANÇAIS
DEUTSCH
Drücken Sie zum Verlassen des DPOF-Modus auf die Taste .
Zur Rückkehr in den DPOF-Modus drücken Sie auf die Taste , und halten Sie diese 3
Sekunden lang gedrückt.
C
C
VON EINEM FOTO-HANDY AUS AUSDRUCKEN
Mit dem Drucker SAGEM PHOTO EASY 150 können Sie die mit einem Foto-Handy
aufgenommenen Fotos ausdrucken. Die Übertragung des fotos erfolgt über die drahtlose
Infrarotverbindung zwischen den beiden Geräten in den Drucker übertragen.
Stellen Sie den Schalter am Drucker PHOTO EASY 150 auf " I ".
Tipp - Die Handys, die mit Photoapparat ausgestattet sind, arbeiten mit einer niedrige
Auflösung, damit Sie eine gute Qualität erzielen, empfehlen wir Ihnen 2 oder 4 Fotos pro Blatt
auszudrucken.
- 15 -
ESPAÑOL
ITALIANO
NEDERLANDS
Page 75

Legen Sie Ihr Handy in einer Entfernung zwischen 3 und 30 Zentimetern so vor den Drucker PHOTO
EASY 150, dass sich die beiden "Infrarotfenster" gegenüberliegen.
Achtung - Bei Umgebungen, die einer starken Beleuchtung ausgesetzt sind, wird ein Abstand von
maximal 10 cm zwischen den beiden Infrarot-Fenstern empfohlen.
Wählen Sie an Ihrem Handy ein Foto aus und übertragen Sie es über die Infrarotverbindung.Für die
genaue Vorgehensweise lesen Sie bitte in der Bedienungsanleitung Ihres Mobiltelefons nach.
Die Übertragung beginnt und während ihrer Dauer blinkt die Meldung " Ir " auf dem Display des
Druckers.
Am Ende der Übertragung werden die folgenden Informationen auf dem Display angezeigt:
Sie können:
• Entweder das übertragene Foto jetzt ausdrucken, nachdem Sie eventuell das Druckformat und die
Kopienanzahl geändert haben.
• Oder ein weiteres Foto aus Ihrem Handy übertragen. Dieses wird zu dem (den) bereits im Drucker
gespeicherten Foto(s) hinzugefügt. Nach jeder Übertragung wird die Gesamtanzahl gespeicherter
- 16 -
Page 76

Fotos auf dem Display des Druckers angegeben (das Foto mit der höchsten Nummer ist das
letzte übertragene Foto).
• Sie können jetzt die in den vorherigen Kapiteln beschriebenen Operationen durchführen,
bevor Sie den Ausdruck dieser Fotos starten (Auswahl der Nummern der zu druckenden
Fotos, Auswahl des Formats, Auswahl der Kopienanzahl).
Am Ende des Ausdrucks der vom Foto-Handy übertragenen Fotos zeigt das Display des Druckers
PHOTO EASY 150 erneut die Informationen an, die direkt vor dem Ausdruckstart angezeigt
worden sind. Die Einstellungen bleiben dabei erhalten.
Sie können:
• Entweder einen neuen Ausdruck starten, nachdem Sie eventuell andere Parameter ausgewählt haben (Fotonummer, Format, Kopienanzahl).
• Oder die Bearbeitungsphase der übertragenen Fotos beenden. Drücken Sie dazu zwei
Sekunden lang auf die Taste .
C
ENGLISH
FRANÇAIS
DEUTSCH
- 17 -
ESPAÑOL
ITALIANO
NEDERLANDS
Page 77

6VON EINEM PC (PERSONAL COMPUTER) AUS DRUCKEN
Ihr Kit umfasst eine Installations-CD-ROM des Druckertreibers, eine Bildbearbeitungssoftware sowie
eine Bedienungsanleitung.
Vergewissern Sie sich, dass Ihr PC mit den in den technischen Daten kompatibel ist (siehe Abschnitt
Technische Daten, Seite -24).
PC-Anforderungen:
Pentium oder gleichwertig,
OS: Windows 98 SE / 2000 / Me / XP,
128 MB RAM oder mehr,
150 MB freier Speicherplatz auf der Festplatte,
Freier USB-Port.
DIE SOFTWARE INSTALLIEREN
Die Software SAGEM PHOTO EASY 150 wird in drei Phasen installiert: Ausführung des
Installationsprogramms, Neustart des Computers und Abschluß der Installation des Druckers.
Schließen Sie den Drucker nicht an den PC an, solange der Druckertreiber noch nicht installiert
ist. Am Ende der Installation fordert Sie eine Meldung zum Neustart des PCs auf. Bitte schließen
Sie den Drucker erst nach dem Neustart an den PC an.
Legen Sie zu Beginn der Installation die CD-ROM in das Laufwerk ein. Es erscheint ein Befehlsfenster.
Befolgen Sie die Anweisungen, die auf dem Display erscheinen.
Wenn das Installationsprogramm nicht automatisch startet: Führen Sie das Installationsprogramm aus,
indem Sie auf die Datei "setup.exe" im Stammverzeichnis der CD-ROM doppelklicken.
Die CD-ROM enthält eine detaillierte Bedienungs- und Benutzeranleitung des Druckertreibers. Diese
Anleitung gibt Ihnen nähere Informationen über die Verwendung des Treibers.
Anmerkung: Die Option "Schwarz / Weiss Drucken" die Ihnen von dem Windows 98 Treiber angeboten wird, ist nicht verfüg-
bar.
- 18 -
Page 78

IHREN DRUCKER ANSCHLIEßEN
Wenden Sie beim Einstecken von Steckern an den Geräten niemals übermäßige Kraft auf;
eskönnten sowohl das Kabel als auch die Gerätebuchse beschädigt werden.
Schließen Sie das USB-Kabel an einen USB-Port Ihres PCs an.
Schließen Sie das andere Ende des USB-Kabels an den Drucker SAGEM PHOTO EASY
150 an.
Die Geräte erkennen sich gegenseitig automatisch.
ENGLISH
FRANÇAIS
DEUTSCH
- 19 -
ESPAÑOL
ITALIANO
NEDERLANDS
Page 79

7VERBRAUCHSMATERIALIEN
Die beim Drucker SAGEM PHOTO EASY 150 verwendeten Verbrauchsmaterialien, d.h. das
Farbband und das Papier, sind Produkte der Marke SAGEM. Sie erhalten Sie in Kaufhäusern
und größeren Geschäften im Foto- oder Druckerbereich oder aber über Internet auf unserer
Webseite www.sagem.com oder über den Stellcoupon für Verbrauchsgüter, der zu Ihrem
Drucker geliefert wurde.
Bitte verwenden Sie ausschließlich das Originalzubehör der Marke SAGEM. Andernfalls
riskieren Sie den Garantieverlust für Ihr Gerät.
Artikelnr. Verbrauchsmaterial - pack 40 (Band + Papier für 40 Fotos): 251 300 344
Artikelnr. Verbrauchsmaterial - pack 120 (3 Bänder + Papier für 120 Fotos):251 300 336
- 20 -
Page 80

8 WARTUNG
REINIGUNG DES DRUCKERKOPFS
Wenn Ihre Fotos einen durchgängigen Streifen über die gesamte Bogenlänge aufweisen, kleben
eventuell Fremdkörper am Druckkopf.
Verwenden Sie zur Reinigung Brennspiritus
Schalten Sie Ihren Drucker vom Stromnetz ab, ziehen Sie das entsprechende Kabel, und
warten Sie fünf Minuten, das sich der Druckerkopf evtl. aufgeheizt hat und Sie sich beim
Berühren verletzen könnten.
1 - Öffnen Sie die FarbbandKassettenklappe, drücken Sie auf den grünen Sperrhebel und ziehen
Sie die FarbbandKassette heraus.
2 - Ziehen Sie das Papierfach heraus.
3 - Drehen Sie das Gerät, um die untere Verschlussklappe zu entfernen.
4 - Reinigen Sie die Heizleitung des Druckerkopfes mit vorsichtig mit einem Wattestäbchen..
5 - Bringen Sie die untere Verschlussklappe wieder an, drehen Sie den Drucker wieder, stecken
Sie das Kabel wieder ein und schalten Sie Ihren Drucker mit dem Schalter wieder ein.
Achtung - Berühren Sie den Druckkopf niemals mit den Fingern oder mit Gegenständen,
die ihn zerkratzen könnten.
1
und handelsübliche Wattestäbchen.
ENGLISH
FRANÇAIS
DEUTSCH
1
4
2
3
5
Setzen Sie das Farbband wieder ein. Achten Sie darauf, dass das Band gespannt ist, bevor
Sie es wieder in die Aufnahme einführen. Überprüfen Sie, ob der Sperrhebel richtig
verriegelt ist, und schließen Sie die Klappe.
Schieben Sie das Papierfach wieder in seine Aufnahme, bis eseinrastet.
1. Verwenden Sie keine ätzenden Mittel; sie könnten Ihr Gerät beschädigen.
- 21 -
ESPAÑOL
ITALIANO
NEDERLANDS
Page 81

PAPIERSTAU
Sollte sich ein Blatt im Drucker eingeklemmt haben und sich nicht problemlos aus dem Gerät entfernen
lassen, gehen Sie bitte wie folgt vor:
Schalten Sie Ihren Drucker aus, indem Sie auf das " O " des Schalters an der Rückseite Ihres
Gerätes drücken, und ziehen Sie den Netzstecker.
Drehen Sie das Gerät um, damit die Unterseite des Druckers zugänglich wird.
Entfernen Sie die Abdeckung der Unterseite.
Ziehen Sie den verklemmten Bogen vorsichtig heraus. Berühren Sie dabei auf keinen Fall den
Druckkopf.
Setzen Sie die untere Abdeckung wieder ein und drehen Sie den Drucker um.
Schalten Sie Ihren Drucker wieder an und stecken Sie das Kabel wieder ein.
Achtung - Verwenden Sie niemals Objekte, die den Drucker beschädigen könnten (Scheren,
Schraubendreher, Brieföffner, Nagelfeilen usw).
STÖRUNGEN
Anmerkung: Für den Fall, dass Sie große Druckreihen mit Ihrem Gerät anfertigen, ist dieser mit einer automatischen Zeits-
S
Keine Versorgung mit
Netzstrom (Anzeige aus)
Die LED (Anzeige rot) • Siehe die Störungstabelle (siehe Abschnitt Fehlermeldungen, Seite -23).
Das Gerät ist während
eines Ausdrucks vom Netz
getrennt worden
Es wird kein Foto auf dem
Bogen ausgedruckt
Das Foto wird mit
Längsstreifen oder mit
vielen Flecken ausgedruckt
Kein Ausdruck vom PC • Ist das USB-Kabel korrekt angeschlossen?
chaltvorrichtung versehen, um eine Überhitzung des Gerätes zu vermeiden. Der Drucker geht automatisch mit
dem laufenden Druckvorgang weiter, sobald die Temperatur ausreichend abgekühlt ist.
TÖRUNGEN LÖSUNGEN
Prüfen Sie:
• Ist das Netzteil korrekt an eine Netzsteckdose angeschlossen ist?.
• Ist das Netzkabel korrekt an den Drucker angeschlossen?
• Führt die Stromsteckdose Spannung? (ggfs. Mit einem anderen Gerät z.B.
Tischlampe überprüfen)
• Stellen Sie den Netzschalter auf O und schließen Sie das Netzkabel wieder
an.
• Schalten Sie den Drucker ein und warten Sie das Ende der
Initialisierungsphase ab.
• Wenn ein Papierbogen blockiert ist (siehe Abschnitt Papierstau, Seite -22).
• Starten Sie den Ausdruck neu.
• Verwenden Sie Bögen, die mit den technischen Daten übereins timm en?
• Haben Sie die Bögen mit der glänzenden Seite nach oben eingelegt? (siehe
Abschnitt Technische Daten, Seite -24)
• Reinigen Sie den Druckkopf (siehe Abschnitt Reinigung des Druckerkopfs,
Seite -21).
• Haben Sie den Druckertreiber installiert?
- 22 -
Page 82

FEHLERMELDUNGEN
Um einen unterbrochenen Druckvorgang neu zu starten, betätigen Sie
bitte nach jedem Eingriff an Ihrem Drucker die -Taste.
ENGLISH
Angezeigter
Fehler
Err 01 Papier Papier fehlt Überprüfen Sie, ob das Papierfach Papier enthält
Err 02 Papier Papierstau Ziehen Sie das im Drucker blockierte Papier
Err 11 Farbband Farbband fehlt Legen Sie ein Farbband ein oder ersetzen Sie
Err 12 Farbband Farbbanddende Wechseln Sie das Farbband gegen ein neues
Err 13 Farbband Farbbandfehler Überprüfen Sie, ob das Farbband gut eingelegt
Err 14 Farbband Farbband fehlt
Err 21 Speicher-
Err 22 Speicher-
Err 23 Speicher-
Err 27 Speicher-
Err 72 Kein Infrarot-
Err 75 Kein Infrarot-
Err 76 Kein Infrarot-
Sonstige
Fehler-
nummer
Angezeigtes
Symbol
Kein Sonstiges Systemfehler Schalten Sie den Drucker 30 s lang aus und
Fehlertyp Bezeichnung Aktion
und ob dieses korrekt eingelegt ist
heraus (verwenden Sie diesen Papierbogen nicht
wieder)
das aktuelle Farbband
aus
ist. Wenn der Fehler anhält, tauschen Sie das
Farbband aus.
Überprüfen Sie, ob das Farbband korrekt
eingelegt und der Sperrhebel verriegelt ist
Die Datei ist nicht lesbar. Versuchen Sie die
anderen auszudrucken . Überprüfen Sie die
Quelle der Datei oder versuchen Sie es mit einer
anderen Quelle, wenn der Fehler weiter
fortbesteht.
Die Datei ist nicht lesbar. Versuchen Sie die
anderen auszudrucken . Überprüfen Sie die
Quelle der Datei oder versuchen Sie es mit einer
anderen Quelle, wenn der Fehler weiter
fortbesteht.
Die JPEG-Datei enthält ein nicht unterstütztes
Merkmal
Überprüfen Sie die Quelle der Karte oder
versuchen Sie es mit einer anderen Quelle.
Fehler während der Übertragung eines Fotos von
einem Foto-Handy. Starten Sie die Übertragung
am Foto-Handy neu. Überpr üfen Sie, ob sich di e
beiden Geräte genau gegenüberstehen
Zu übertragendes Foto zu groß oder nicht mehr
genug Platz, um das Foto im Drucker zu
speichern
Das zu übertragende Foto ist nicht im
JPEG-Format
schalten Sie ihn wieder ein. Wenden Sie sich an
Ihre Verkaufsstelle, wenn der Fehler weiter
fortbesteht.
karte
karte
karte
karte
verbindung
verbindung
verbindung
oder ist falsch
eingelegt
Datei beschädigt
oder falsch
JPEG-
Dekompressions
-fehler
Nicht
unterstütztes
JPEG-Merkmal
Lesefehler Die Karte oder die Datei ist nic ht lesbar.
Übertragungs-
fehler
Nicht genügend
Platz, um das
Foto zu
speichern
Nicht
unterstütztes
Dateiformat
- 23 -
FRANÇAIS
DEUTSCH
ESPAÑOL
ITALIANO
NEDERLANDS
Page 83

TECHNISCHE DATEN
PC-Anforderungen:
Pentium oder gleichwertig,
OS: Windows 98 SE / 2000 / Me / XP,
128 MB RAM oder mehr,
150 MB freier Speicherplatz auf der Festplatte,
Freier USB-Port.
-------------------------------------------------------------------------------------------------------------------
Gerätename : SAGEM PHOTO EASY 150
Ruckverfahren : Thermoübertragung
Auflösung : 300 x 300 dpi
Farbe : 16,7 Millionen durchgängig (ausser Dateiübertragung)
Druckgeschwindigkeit : unter 120 Sekunden pro Foto
Schnittstelle : Speicherkarte vom Typ: Compact Flash Card (Typ I & II
Speicherung der von einem
Foto-Handy übertragenen Fotos: bis 500 Kilobyte
Unterstützte Bildauflösung : bis 12 Millionen Pixel
Verbrauchsmaterialien : Fotopapier, dreifarbiges Farbband (gelb, magenta, cyan)
Papierzufuhr : über automatisches Fach mit einer Kapazität von
Netzstromversorgung : 230 VAC 50/60 Hz
Zulassung : CE
Verwendungsbereich : 10 bis 35 °C und 30 bis 85 % Luftfeuchtigkeit
Abmessungen in mm : 201 x 174 x 94 ohne Papierfach
Gewicht in kg : 1,5
Energieverbrauch : in Standby-Stellung: 7,6 W
unterstützt), SM / MS/ MMC / SD. USB-Port Version 1.1
und ein Siegellack, 40 Drucke pro Farbband
Papierformat: 101 x 152,4 mm verpackt in Paketen zu je
20 Bögen
20 Bögen
im Druckmodus: 60 W
- 24 -
Page 84

9GARANTIE
Im Falle eines Defektes wenden Sie sich bitte an Ihren Verkäufer, der
Sie beraten wird, und legen diesem den Kaufbeleg vor, den Sie zuvor
von diesem erhalten haben.
ENGLISH
G a r a n t i e
Haben Sie das Gerät direkt bei der SAGEM SA gekauft, so gelten die folgenden Bestimmungen:
A Für das Gerät gilt zunächs t einmal die vier und zwanzigmonatige gesetzliche Sachmängelgewährleistung, deren genauer
Inhalt und Umfang in den Allgemeinen Geschäftsbedingungen, die auf den mit Ihnen geschlossenen Vertrag anzuwenden
sind, näher geregelt ist. Nach Ablauf der gesetzlichen Sachmängelgewährleistungsfrist, d.h. also in d er Regel nach Ablau f
von sechs Monaten ab Lieferung, übernimmt die SAGEM SA bis zu maximal einem Jahr ab Lieferung die Garantie
(Ersatzteile und Reparatur) für die Freiheit des Geräts von Fabrikationsfehlern. Während dieses zusätzlichen Garantiezeitraumes wird das fehlerhafte Gerät kostenlos repariert. Der Kunde hat das fehlerhafte Gerät jedoch auf seine
Kosten an die ihm vom Kundendienst der SAGEM SA (die Telefonnummer steht auf dem Lieferschein) angegebene
Adresse zurückzuschicken. Die Reparatur erfolgt auf keinen Fall in den Räumlichkeiten des Kunden, es sei denn, er
daß mit diesem ein speziell Wartungsvertrag abgeschlossen wurde.
Hinweis: Nach Ablauf der gesetzlichen Sachmängelgewährleistungsfrist ist die SAGEM SA bis zu maximal zwei Jahren
ab Lieferung ausschließlich verpflichtet, das fehlerhafte Gerät zu den oben genannten Bedingungen kostenlos zu
reparieren. Ansprüche aus der gesetzlichen Sachmängel-gewährleistung bestehen in diesem Zeitraum nicht mehr.
Ausgeschlossen sind auch Schadensersatzansprüche aus sonstigem Rechtsgrund, es sei denn, die Schadensursache
beruht auf Vorsatz oder grober Fahrlässigkeit oder es wurde eine vertragswesentliche Pflicht verletzt. In le tzterem F a ll
beschränkt sich die Haftung jedoch auf den vorhersehbaren Schaden.
B Von der Garantie ausgeschlossen sind
• Defekte oder Funktionsstörungen, die auf eine Nichteinhaltung der Installations- und
Gebrauchsanweisungen, auf äußere Einwirkungen (Blitzschlag, Brand, Erschütterung,
Wasserschäden jeglicher Art usw.), auf einen von der SAGEM SA nicht schriftlich genehmig ten
Umbau der Geräte, au f eine unterlassene Wartung (gemäß Bedienungsanle itung), Überprüfung
oder Pflege der Geräte, a uf ungeeignete Umweltbedingungen für di e Geräte (insbesondere im
Zusammenhang mit ungeeigneten Temperatur- oder Luftfeuchtigkeitsbedingungen für die Geräte
und die Verbrauchsmaterialien) oder auf eine Reparatur oder ei ne Insta ndh altu ng zurüc kz uführe n
sind, die von einer von der SAGEM SA nicht ermächt i gten Person vorgenommen wurde,
• die normale Abnutzung der Geräte und die Abnutzung der Zubehörteile,
• Beschädigungen, di e auf eine unzureic hende oder schlechte Verpackung der an die SAGEM SA
zurückgesendeten G erä te zurückzuführen sind,
• die Lieferung neuer Soft w ar eve rsionen,
• Reparaturen eines ohne die schriftliche Zustimmung der SAGEM SA geänderten oder
hinzugefügten Gerätes oder Nachbesserungen einer ohne die schriftliche Zustimmung der
SAGEM SA geänderten oder hinzugefügten Software,
• Funktionsstörungen, die weder auf die Ausrüstung noch auf die Softwa re zurückzuführen sind,
die in den Benutzergeräten ve rwendet wird, um den Zugriff auf die von der Ausrüstung zur
Verfügung gestellten Dienste zu ermöglichen,
• Verbindungsprobleme, die auf ein ungünstiges Umfeld zurückzuführen sind, insbesondere:
- Probleme im Zusammenhang mit dem Zugang oder der Verbindung zum Internet wie z.B.
Unterbrechungen der Zugangsnetze, der Zusammen-bruch der Leitung de s Abonnenten oder
seines Gesprächspartners,
- Übertragungsprobleme (unzurei chende geographische Abdeckung des Gebietes durch die
radio-elektrischen Sender, Interferenzen, Störgeräusche, Zusammenbruch oder schlechte
Qualität der Telefon-leitungen...)
FRANÇAIS
DEUTSCH
ESPAÑOL
ITALIANO
- Fehler der örtlichen Leitungen (Verkabelung, Server, Benutzergeräte) bzw. Fehler des
Übertragungsnetzes,
- 25 -
NEDERLANDS
Page 85

• Arbeiten zwecks Generalüberholung der Geräte (so wie in dem den Geräten beigefügten
Benutzerhandbuch beschrieben) sowie Funktionsstörungen, die auf eine Unterlassung der
Generalüberholung zurü ckgehen, w obei darau f hinzuweisen i st, daß die Ko sten für die Arbei ten
zur Generalüberholung auf jeden Fall zu Lasten des Kunden gehen.
C In den oben unter B) genannten Fällen sowie nach Ablauf der Garantiefrist hat der Kunde von der SAGEM SA einen
Kostenvoranschlag einzuholen, den er vor der Rücksendung der Geräte an den Kundendienst der SAGEM SA akzeptieren
muß. Die Reparatur- und Versandkosten (hin und zurück) werden dem Kunden in Rechnung gestellt.
Die vorstehenden Bestimmungen gelten, soweit nicht mit dem Kunden eine schriftliche Sondervereinbarung
abgeschlossen worden ist und sind auf sämtliche in Deutschl and verkauften Geräte anzuwenden. Sollte eine dieser
Bestimmungen gegen eine zwingende Verbraucherschutzvorschrift des nationalen Rechts verstoßen, ist diese
Bestimmung nicht anzuwenden; die Wirksamkeit der übrigen Bestimmungen bleibt hiervon unberührt.
- 26 -
Page 86

1BIENVENIDO 1
2DESCUBRA SU IMPRESORA PHOTO EASY 150 2
3PREPARE SU IMPRESORA FOTO EASY 150 3
Alimentación eléctrica 3
Introduzca una cinta 4
Carga del papel 5
4 IMPRIMIR DESDE UNA TARJETA DE MEMORIA 6
Insertar una tarjeta de memoria 6
5INTERFAZ USUARIO 8
Imprima sus fotos 9
Impresión rápida 9
Ejemplo de impresión rápida desde
una tarjeta de memoria
Crear una plancha de contacto (índice) 11
Preparar una serie fotos para la impresión
(modo caddie)
Imprimir en modo DPO 15
Imprimir a partir de un GSM foto 15
10
13
6IMPRIMIR DESDE UN PC (PERSONAL COMPUTER) 18
Instale el software 18
Conectar su impresora 19
7SUSTITUCIÓN DE LOS CONSUMIBLES 20
8MANTENIMIENTO 21
Limpieza del cabezal de impresión 21
Atasco de papel 22
Incidentes 22
Mensajes de error 23
Características técnicas 24
ENGLISH
FRANÇAIS
DEUTSCH
ESPAÑOL
9 GARANTÍA 25
- I -
ITALIANO
NEDERLANDS
Page 87

- II -
Page 88

1BIENVENIDO
Acaba de adquirir una impresora PHOTO EASY 150 SAGEM y le agradecemos la confianza que
nos demuestra. Con esta impresora de alta calidad, disfrute plenamente de sus fotos digitales.
Mediante etapas muy sencillas, realizará impresiones con una calidad idéntica a las de los
laboratorios especializados para su uso personal, o para compartirlas con su familia, amigos o
compañeros.
Este folleto de uso le guiará por etapas simples:
1. Ponga en marcha su impresora PHOTO EASY 150 SAGEM.
2. Imprima las fotos almacenadas en una tarjeta de memoria.
3. Imprima las fotos transferidas desde un GSM foto.
4. Instale el software de tratamiento de imagen y el controlador de impresión en un
PC.
5. Mantenga y resuelva los problemas de su impresora PHOTO EASY 150.
Una documentación adicional relativa al uso del software de tratamiento de la imagen y el
controlador de impresión PC está disponible en el CD-Rom suministrado en la caja.
Recomendaciones y consignas de seguridad
• No instale su impresora PHOTO EASY 150 ni en una pieza húmeda (baño, lavandería,
cocina, etc..) a menos de 1,50 m de un punto de agua ni al exterior. Su impresora debe ser
usada a una temperatura ambiente que puede variar de 10 °C a 35 °C.
• No instale su impresora en un lugar que tenga polvo en suspensión en el aire, este polvo
podría reducir la calidad de impresión de sus fotos.
• Use exclusivamente el bloque para la red eléctrica suministrada, conéctelo a la red de
acuerdo con las instrucciones de instalación de este folleto y con las indicaciones inscritas
en la etiqueta de identificación pegada en él (tensión, corriente, frecuencia de la red eléc-
1
.
trica)
ENGLISH
FRANÇAIS
DEUTSCH
ESPAÑOL
• Nunca abra la tapa de la cinta durante la impresión, puede romper la película y oca-
sionar un funcionamiento inadecuado de su impresora.
• Utilizar únicamente los consumibles de marca SAGEM y exclusivamente éstos ya que de
no ser así, se podría dañar el aparato y perder la garantía. Para conocer las referencias de los
consumibles (Consulte el apartado Sustitución de los consumibles, página -20).
• La marca CE atesta la conformidad del producto con las exigencias esenciales de la direc-
tiva 1999/5/CE del Parlamento y del Consejo Europeo relativa a los equipos terminales de
telecomunicaciones, para la seguridad y la salud de los usuarios, para las perturbaciones
electromagnéticas.
1. Excluidas las instalaciones dadas en el esquema IT definidas en la norma EN60950.
- 1 -
ITALIANO
NEDERLANDS
Page 89

2DESCUBRA SU IMPRESORA PHOTO EASY 150
5
3
Coloque la caja frente a usted, abra el embalaje y verifique que se encuentren los elementos siguientes:
1 Impresora PHOTO EASY 150
2 Manual del usuario
3 CD ROM con sus aplicaciones
4Cinta*
5 Papel foto (2 paquetes de 20 hojas)*
6Cable USB
7 Bandeja de papel
8 Bloque de alimentación eléctrica
9 Cable de alimentación eléctrica
r
r
u
u
e
t
e
t
a
a
s
i
s
l
i
i
l
t
i
t
u
u
t
t
e
e
r
r
v
i
v
i
g
L
g
L
n
de
i
n
de
u
i
t
u
i
t
i
Gu
e
Gu
e
r
nl
r
e
nl
a
e
a
s
s
Us
g
Us
g
e
e
nt
nun
nt
e
t
e
enun
t
'u
l
'u
l
l
l
Bedie
Bedi
de
de
o
o
le
e
i
ri
l
r
a
a
a
a
u
u
s
s
u
u
l
Manu
l
Manu
g
de
g
n
de
l
i
l
in
a
z
a
nwijz
nwij
a
Manu
a
Manu
a
a
ks
i
ks
i
u
Gebru
9
8
1
Gebr
2
6
Suministro según modelo
*
- 2 -
Page 90

3PREPARE SU IMPRESORA FOTO EASY 150
ALIMENTACIÓN ELÉCTRICA
ENGLISH
Observación: Al instalar la impresora, todo muro u objeto cercano debe encontrarse al menos a 10 centímetros de la
parte posterior de la impresora, esto permite la circulación de la hoja de papel durante la impresión.
Antes de efectuar las conexiones, consulte las consignas de seguridad presentadas al inicio
del folleto de uso.
Conecte uno de los extremos del cable de alimentación al conector del bloque de
alimentación previsto con este fin.
Conecte el enchufe del bloque de alimentación a la impresora tal como se indica en la
ilustración siguiente.
A
Conecte el otro extremo del cable de alimentación del bloque de alimentación a un enchufe
de la red eléctrica mural.
Pulse " I " del interruptor Marcha/Parada situado en la parte trasera de la máquina, el
chivato verde y la pantalla de visualización LCD se encienden.
Su impresora dispone de un conector USB Mass storage SCSI (A). Para conocer la lista de
los periféricos compatibles con este puerto USB, consultar la Web www.sagem.com.
FRANÇAIS
DEUTSCH
ESPAÑOL
ITALIANO
- 3 -
NEDERLANDS
Page 91

INTRODUZCA UNA CINTA
Ponga en tensión la impresora. Espere 10 segundos que la cabeza de impresión se levante y proceda de
la manera siguiente:
1 - Abra la tapa exterior situada bajo la parte derecha de la impresora.
2 - Retire la espuma de protección.
3 - Sacar la cinta nueva de su embalaje y asegúrese de que el filme esté tenso después de haber retirado
la pieza de cartón (A).
4 - Presentar la cinta respetando su posición como se indica en la siguiente figura.
5 - Levante la palanca de cierre, introduzca la cinta a fondo en su alojamiento, es obligatorio que la
palanca de cierre quede cerrada después de la introducción.
6 - Cierre la tapa exterior.
A
6
Atención - Nunca toque la película de la cinta con los dedos. Introduzca completamente el cartucho
en la impresora. Verifique que la palanca de cierre verde esté completamente abajo.
Observación: en caso de problema, verifique que ningún cuerpo extraño esté presente en el alojamiento de la cinta.
- 4 -
Page 92

CARGA DEL PAPEL
ENGLISH
hoja de protección
Punta de plástico
1 - Retire la bandeja de la impresora.
2 - Abra un paquete de hojas con la hoja de protección boca arriba. Insértelo en el cargador de
papel comprobando que el rectángulo previsto para el sello esté ubicado hacia el exterior del
cargador de papel, es decir, hacia usted.
Después de introducir el paquete de hojas, verifique que se encuentra bajo la punta de plástico
situada en la parte delantera izquierda de la bandeja de papel (vea la ilustración siguiente).
3 - Retire hoja de protección.
4 - Presente la bandeja delante de su alojamiento en la impresora. Introdúzcala lentamente hasta
que se accione el sistema de bloqueo.
Atención - Maneje las hojas de papel por los extremos precortados, nunca aplique los dedos
sobre la cara brillante antes de la impresión.
FRANÇAIS
DEUTSCH
ESPAÑOL
ITALIANO
Ahora, su impresora PHOTO EASY 150 SAGEM está lista para imprimir sus fotos digitales.
Atención - Proteja los consumibles contra una exposición prolongada a la luz, contra la
humedad, el calor y el polvo. Respete las condiciones de uso indicadas (Consulte el apartado
Características técnicas, página -24).Sólo use consumibles de marca SAGEM, previstos para
esta impresora. No ponga más de un paquete de 20 hojas a la vez en la bandeja de papel.
Atención - Verificar que una fotografía ya impresa no se haya colado de forma inadvertida en
un paquete de hojas blancas, ya que de no ser así se podría dañar la cinta de su impresora.
- 5 -
NEDERLANDS
Page 93

4 IMPRIMIR DESDE UNA TARJETA DE MEMORIA
Su impresora PHOTO EASY 150 SAGEM está prevista para ser usada con o sin ordenador. En este
capítulo describimos el uso de la impresora sin ordenador.
Consulte la tabla de las características técnicas al final del folleto para conocer la compatibilidad de su
tarjeta memoria con la impresora, en caso de incompatibilidad, use un ordenador y el software de
tratamiento de imagen proporcionado en el CD-Rom.
Atención - Las imágenes de dimensiones pequeñas, inferiores a 80 000 píxeles no se pueden
imprimir a partir de las tarjetas de memoria (ejemplo: una imagen de tamaño 320 x 240 equivalente a
76 800 píxeles no será indicada en el índice). En cambio estas fotos se pueden imprimir a partir de un
PC o por un enlace directo infrarrojo.
INSERTAR UNA TARJETA DE MEMORIA
En función del formato de su tarjeta memoria, introducirla en la ranura correspondiente, como se indica
en las siguientes figuras.
Atención - SmartMedia CONTACTOS HACIA ARRIBA.
Atención - Las tarjetas de memoria no entran completamente en la ranura de lectura.
EN NINGÚN CASO DEBE FORZARLAS.
Retire la tarjeta y verifique que la introduce en la ranura correcta y en el buen sentido.
Ranura de la izquierda
prevista para los formatos
Smart Media (SM),
Memory Stick (MS),
Standard Digital (SD)
o Multi Media Card (MMC)
- 6 -
Ranura de derecha
prevista para el
formato CompactFlash
Page 94

TARGETA RANURA REPRESENTACIÓN
Smart Media
(SM)
Izquierda
ENGLISH
Memory Stick
(MS)
Standard
Digital
(SD)
Multi Media
Card
(MMC)
CompactFlash Derecha
Izquierda
Izquierda
Izquierda
FRANÇAIS
DEUTSCH
ESPAÑOL
- 7 -
ITALIANO
NEDERLANDS
Page 95

5INTERFAZ USUARIO
1 - Añade la selección en el Caddie1 (carro)
2 - Selecciona la cantidad de copias por foto (de 1 a 20)
3 - Va al número de foto precedente (…, 3, 2, 1)
4 - Lanza la impresión
5 - Va al número de foto siguiente (1, 2, 3…)
6 - Selecciona el formato de impresión
7 - Anula
A - Número de ejemplares a imprimir
B - Número de la foto activa
C - Cantidad de hojas que se deben imprimir
D - Formato impreso
E - Modo caddie
F - Foto activa en el caddie
G - Error papel
H - Error cinta
I - Icono tarjeta de memoria
A
F
B
C
1
s
2
P
h
o
t
o
E
a
s
y
1
5
0
3
1. Caddie: función selección de fotografías a imprimir.
- 8 -
D
H
E
G
I
7
C
6
r
e
t
n
i
r
P
o
t
o
h
P
l
a
n
-
o
P
s
r
e
5
4
Page 96

IMPRIMA SUS FOTOS
Su impresora está en tensión, ha instalado una tarjeta de memoria, o ha transferido fotos desde un
GSM foto usando el enlace inalámbrico infrarrojo.
El LED verde parpadea mientras que la impresora carga los datos. Después de algunos segundos,
la cantidad de fotos leídas en la tarjeta de memoria, en el aparato foto digital o transferidas desde
el GSM foto aparece en la pantalla, el LED se enciende fijo.
La impresión de sus fotos se efectúa en 4 fases, primero la impresora imprime el amarillo , luego
el magenta, luego el cian y finalmente aplica una película protectora sobre la hoja de papel antes
de expulsar definitivamente la foto.
El color del LED se enciende en función del estado de su impresora:
Verde fijo: impresora lista y en espera.
Verde intermitente: carga de datos.
Rojo fijo: incidentes, consulte el final de este manual.
ENGLISH
FRANÇAIS
Observación: para permitirle manipular sus fotografías en buenas condiciones, el tamaño de las hojas de papel es supe-
rior a la superficie impresa y los dos bordes laterales están prerecortados.
Después de la impresión, no tire estos bordes de un solo golpe, efectúe varias veces el plegado en
el punteado a fin de separar delicadamente los bordes.
Astucia - Los bordes pueden ser recortados por pequeños paquetes superponiendo varias hojas.
IMPRESIÓN RÁPIDA
Seleccione el número de la foto deseada con las teclas o .
Pulse la tecla para definir la cantidad de copias.
Pulse la tecla para seleccionar el formato de impresión.
Puede imprimir sus fotos a partir de formatos predefinidos:
• Imprima su foto en el formato 10 x 15 cm plena página, sin borde .
• Imprima su foto en el formato 10 x 15 cm con borde blanco .
• Imprima su foto en el formato 10 x 13 cm .
• Imprima 2 fotos por página.
• Imprima 4 fotos por página.
• Imprima 20 fotos por página (plancha de contacto o de índice).
DEUTSCH
ESPAÑOL
ITALIANO
- 9 -
NEDERLANDS
Page 97

Al final de la selección, pulse la tecla para lanzar la impresión.
Si la impresión se interrumpe por falta de papel, un atasco de papel o un cartucho usado, después
de efectuar la sustitución o haber corregido el defecto, puede reanudar la impresión, donde
sedetuvo pulsando la tecla .
Idea - El dorso preimpreso de tarjeta postal, le permite enviar rápidamente su foto a sus amigos,
familia, etc.
Astucia - Si pulsa la tecla durante 3 segundos se inicializa la impresora y se vuelve al estado
por defecto existente antes de la introducción de una tarjeta.
C
EJEMPLO DE IMPRESIÓN RÁPIDA DESDE
UNA TARJETA DE MEMORIA
La tarjeta de memoria contiene 23 fotos. Deseamos imprimir la foto 3, 4 veces en la misma hoja de
papel.
Ponga el interruptor Marcha/Parada en " I ".
Introduzca la tarjeta de memoria en la ranura adecuada de la impresora.
Después de una fase de análisis y de reconocimiento, la cantidad de fotos válidas aparece en la pantalla
y el icono de la tarjeta de memoria y el LED verde se enciende fijo.
Seleccione la foto 3, con la tecla .
- 10 -
Page 98

Pulse la tecla hasta la visualización de la cifra 4 (es decir, 4 ejemplares).
ENGLISH
Pulse la tecla hasta obtener el gráfico 4 imágenes/página.
Debe obtener la cifra 1 en cantidad de hojas necesarias para la impresión.
Pulse la tecla para lanzar la impresión.
CREAR UNA PLANCHA DE CONTACTO (ÍNDICE)
Después de introducir la tarjeta de memoria, la cantidad de fotos válidas aparece en la pantalla y
el icono que representa la tarjeta de memoria está encendido fijo.
FRANÇAIS
DEUTSCH
ESPAÑOL
ITALIANO
- 11 -
NEDERLANDS
Page 99

Pulse la tecla , hasta la aparición de ALL en la pantalla.
Seleccione el formato fotos por hoja con la tecla .
En el ejemplo ilustrado anteriormente, usará 2 hojas para 23 fotos imprimibles.
Pulse la tecla para lanzar la impresión.
Idea - La plancha contacto es un medio simple para ver el conjunto de las fotografías almacenadas en
su tarjeta memoria. Elegir las fotografías a imprimir en función del número atribuido a cada una de
ellas.
- 12 -
Page 100

PREPARAR UNA SERIE FOTOS PARA LA IMPRESIÓN
(MODO CADDIE)
Después de introducir la tarjeta de memoria, la cantidad de fotos válidas aparece en la pantalla y
el icono que representa la tarjeta de memoria está encendido fijo.
Deseamos imprimir la foto 3 en 4 ejemplares, la foto 8 en 1 ejemplar y la foto 16 en 2 ejemplares.
Observación: las impresiones en serie se efectuarán todas con el mismo formato de impresión.
Seleccione la foto 3, con la tecla , pulse la tecla hasta la aparición de la cifra 4,
cantidad deseada.
ENGLISH
FRANÇAIS
DEUTSCH
Pulse la tecla para añadirla al caddie. El icono que indica que la foto activa está en el
caddie se enciende, así como el icono modo caddie para indicar la presencia de fotos en el caddie.
- 13 -
ESPAÑOL
ITALIANO
NEDERLANDS
 Loading...