

Page 1

User guide
Livret utilisateur
Bedienungsanleitung
Manual del usuario
Manuale dell'utente
Gebruiksaanwijzing
Page 2

1WELCOME 1
2DISCOVER YOUR PHOTO EASY 150 PRINTER 2
3PREPARE YOUR PHOTO EASY 150 PRINTER 3
Connect the mains supply 3
Insert a film cartridge 4
Loading paper 5
4PRINTING FROM A MEMORY CARD 6
Insert a memory card 6
5USER INTERFACE 8
Print your photographs 9
Rapid printing 9
Example of rapid printing from a memory card 10
Create a contact sheet (index) 11
Prepare a series of photographs for printing
(shopping trolley mode)
Print in DPOF (Digital Print Order Format) mode 15
Printing from a GSM mobile phone camera 15
13
6PRINT FROM A PC (PERSONAL COMPUTER) 18
Install the software 18
Connect your printer 19
7REPLACEMENT OF CONSUMABLES 20
8MAINTENANCE 21
Cleaning the print head 21
Paper jam 22
Problems 22
Error messages 23
Technical data 24
ENGLISH
FRANÇAIS
DEUTSCH
ESPAÑOL
9GARANTEE 25
- I -
ITALIANO
NEDERLANDS
Page 3

- II -
Page 4
1WELCOME
You have just acquired a SAGEM PHOTO EASY 150 printer, and we thank you for choosing our
product. With this high quality printer you can get the most out of your digital photos. In a few
simple steps you can produce photo prints identical to those from a professional developer, for
your personal use or to share with friends and family.
The easy-to-follow steps in this user guide will walk you through:
1. Switching on your PHOTO EASY 150 printer
2. Printing photographs stored on a memory card
3. Printing photographs transferred from a camera in a GSM mobile phone
4. Installing the image processing software and printer driver on a PC
5. Maintenance and troubleshooting of your PHOTO EASY 150 printer
The CD-ROM included with your kit contains an additional guide with instructions for using the
image processing software and printer driver on your PC.
Safety instructions and recommendations
• Do not install your PHOTO EASY 150 printer in a humid room (bathroom, laundry, kitchen, etc.), or within 1.50 m of a tap or water source, or outside. The printer should be operated within an ambient temperature range of 10 °C to 35 °C.
• Do not install your printer in a location where there is a noticeable amount of dust floating
in the air. Such dust can degrade the print quality of your photos.
• Only the power supply provided with the printer should be used. Connect this to the mains
in accordance with the installation instructions in this user guide and the information on the
identification label affixed to the power supply (voltage, current, mains frequency)
ENGLISH
FRANÇAIS
DEUTSCH
ESPAÑOL
1
.
• Never open the cover of the film cartridge compartment during printing. This could
break the film and cause printer malfunction.
• Only use SAGEM consumables, if not you are likely to damage the equipment and invalidate the guarantee. To obtain the references of the consumables (Refer to paragraph Repla-
cement of consumables, page -20).
• The EC marking certifies that the product meets the main requirements of the European Parliament and Council directive 1999/5/CE on telecommunications terminal equipment,
regarding safety and health of users, and regarding electromagnetic interference.
1. Excluding isolated neutral-type network installations as defined in the EN60950 standard.
- 1 -
ITALIANO
NEDERLANDS
Page 5
2DISCOVER YOUR PHOTO EASY 150 PRINTER
5
3
Place the box in front of you, open the packaging and check that you have received the items listed
below:
1 PHOTO EASY 150 printer
2 User manual
3 CD-ROM with its applications
4 Film cartridge *
5 Photo paper (2 packs of 20 sheets)*
6USB cable
7 Paper tray
8 Power supply unit
9 Mains cable
ur
ur
te
te
a
a
t utilis
t utilis
re
re
iv
iv
g
L
g
L
n
de
n
de
i
itu
itu
Gui
Gu
r
nle
r
e
nle
e
Us
gsa
Us
gsa
te
n
nte
te
te
u
'
u
'
ll
Bedienun
e
Bedienun
dell
d
o
o
le
ri
le
ri
a
a
a
a
u
u
s
s
l u
Manu
l u
Manu
de
g
de
l
l
a
a
wijzing
wijzin
n
n
a
Manu
a
Manu
a
a
ks
i
ks
i
Gebru
9
8
Gebru
2
1
6
depending on model
*
- 2 -
Page 6
3PREPARE YOUR PHOTO EASY 150 PRINTER
CONNECT THE MAINS SUPPLY
ENGLISH
Remark: When installing your printer near a wall or some other object, keep an open space of at least 4 inches at the
back of the printer, to make sure the movement of the sheet of paper being printed is not obstructed.
Please refer to the safety instructions at the beginning of this user guide before making any
connections.
Insert one end of the mains lead into the corresponding socket of the power supply.
Connect the power supply to the printer as shown in the illustration below.
A
Plug the other end of the power supply mains lead into a wall socket.
Switch on the printer by pressing the " I " on the on/off switch located at the back of the
printer. The green light on the upper cover of the printer and segments on the LCD screen
blink during the initialisation phase.
Your printer has a Master USB, Mass storage SCSI connector (A). To obtain the list of
peripherals compatible with this USB port, please visit our site www.sagem.com.
FRANÇAIS
DEUTSCH
ESPAÑOL
ITALIANO
- 3 -
NEDERLANDS
Page 7

INSERT A FILM CARTRIDGE
Switch on the printer. Wait 10 seconds for the printhead to lift, then:
1 - Open the external flap located on the right-hand side of the printer.
2 - Remove the protective foam.
3 - Take the new ribbon out of its packaging and make sure that the film is stretched after removing the
card (A).
4 - Install the ribbon in the position shown in the illustration below.
5 - Lift the locking lever and push in the film cartridge until it touches the back of the compartment the
locking lever must be locked after insertion.
6 - Close the external flap.
A
6
Warning - Never touch the film cartridge with your fingers. Make sure the cartridge is completely
inserted into the printer. Check that the green locking lever is correctly lowered.
Remark: In the event of any difficulty, check that there are no foreign objects in the film cartridge compartment.
- 4 -
Page 8
LOADING PAPER
ENGLISH
Protection sheet
Tab
1 - Pull the paper tray out of the printer.
2 - Open a pack of paper with the protection sheet on the top, insert it in the paper tray, making
sure the rectangle reserved for postage stamps is on the outside of the tray, that is, towards you.
Make sure that the package of sheets that you have inserted in the paper tray is held down
under the plastic tab located at the front left of the tray (see illustration after).
3 - Remove the protection sheet.
4 - Line up the tray with its compartment and push it in slowly until the locking system clicks.
Warning - handle paper sheets by their pre-cut edges, never allow your fingers to come into
contact with the shiny surface before printing.
FRANÇAIS
DEUTSCH
ESPAÑOL
Your SAGEM PHOTO EASY 150 printer is now ready to print your digital photographs.
Warning - protect consumable items against prolonged exposure to light, humidly, heat and
dust. Respect the operation conditions set out (Refer to paragraph Technical data,
page -24).Only use SAGEM brand consumable items designed for this printer. Make sure that a
previously printed photograph has not been slipped inadvertently into a packet of blank pages;
this could damage the ribbon of your printer.
Warning - Make sure that a previously printed photograph has not been slipped inadvertently
into a packet of blank pages; this could damage the ribbon of your printer.
- 5 -
ITALIANO
NEDERLANDS
Page 9
4PRINTING FROM A MEMORY CARD
Your SAGEM PHOTO EASY 150 printer is designed to be used with or without a computer. This
chapter describes printer operation without a computer.
Refer to the technical data table at the end of thi user manual to check whether your memory card is
compatible with the printer. In the event of incompatibility, use a computer and the image processing
software supplied on the CD-ROM.
Warning - Small sized images, less than 80,000 pixels, cannot be printed from memory cards (for
example: an image size 320 x 240, equivalent to 76,800 pixels, will not be included in the index). On
the other hand, these photographs may be printed from a PC or by means of a wireless IR link.
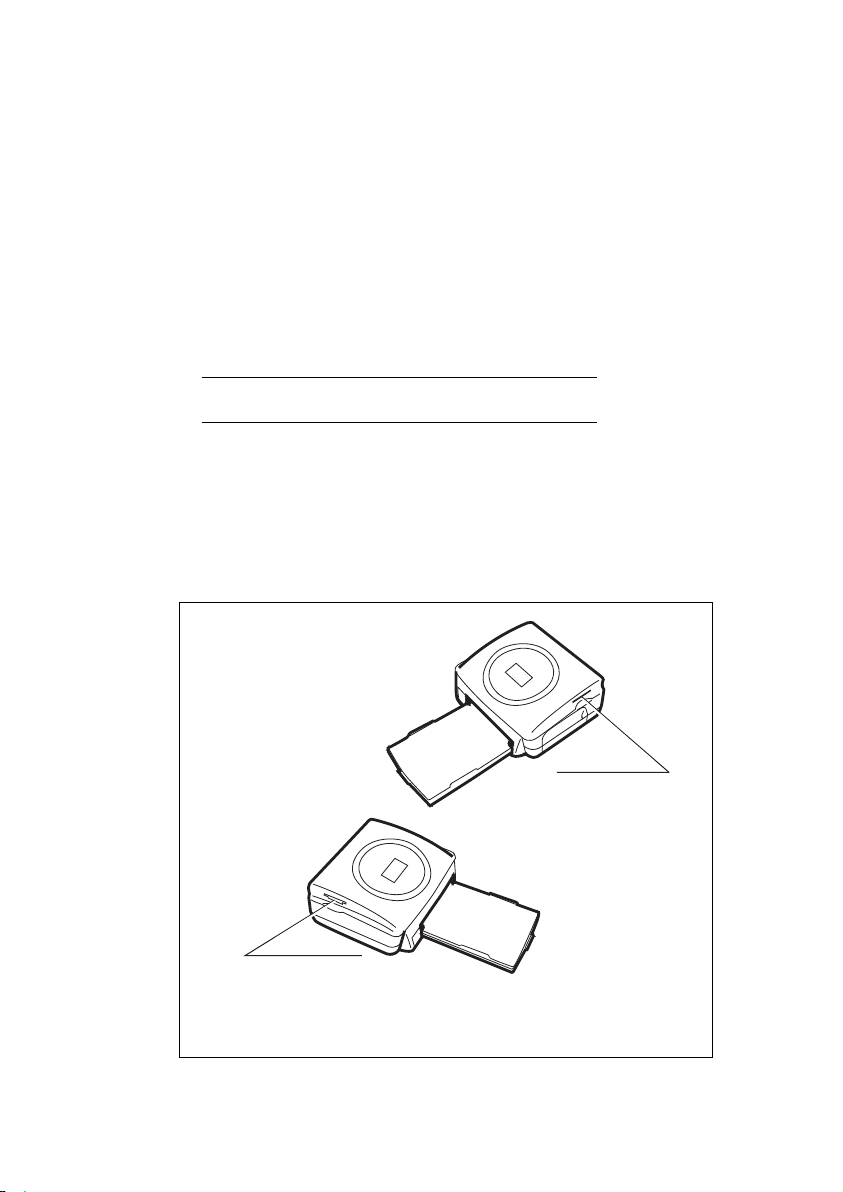
INSERT A MEMORY CARD
Insert your memory card into the corresponding slot, as shown in the illustrations below.
Warning - SmartMedia, CONTACTS FACING UPWARDS.
Warning - The memory cards do not enter fully in the reader slot.
DO NOT USE FORCE UNDER ANY CIRCUMSTANCES.
If a card does not enter properly, remove it and check that you are introducing it in the correct
slot and with the right orientation.
Slot compatible with
Smart Media (SM),
Memory Stick (MS),
Standard Digital (SD)
Multi Media Card (MMC) formats
or
- 6 -
Slot compatible with
Compact Flash format
Page 10

CARD SLOT LOCATION
Smart Media
(SM)
Left
ENGLISH
Memory Stick
(MS)
Standard
Digital
(SD)
Multi Media
Card
(MMC)
CompactFlash Right
Left
Left
Left
FRANÇAIS
DEUTSCH
ESPAÑOL
- 7 -
ITALIANO
NEDERLANDS
Page 11

5USER INTERFACE
1 - Add a selection to the shopping trolley
1
2 - Select the number of copies per photograph (between 1 and 20)
3 - Go to the previous photograph number (…, 3, 2, 1)
4 - Start printing
5 - Go to the next photograph number (1, 2, 3…)
6 - Select the print format
7-Cancel
A - Number of copies to be printed
B - Number of the active photo
C - Number of sheets that will be printed
D - Print format
E - Shopping trolley mode
F - Active photograph in the shopping trolley
G - Paper error
H - Ribbon error
I - Memory card icon
A
F
B
C
E
D
H
G
I
1
s
2
P
h
o
t
o
E
a
s
y
1
5
0
n
-
o
P
s
r
e
3
1. Shopping trolley: depending on the choice of photographs to be printed.
- 8 -
e
t
n
i
r
P
o
t
o
h
P
l
a
4
7
C
6
r
5
Page 12

PRINT YOUR PHOTOGRAPHS
Your printer is switched on, and you have inserted a memory card, or you have transferred
photographs from a GSM mobile phone camera using the IR (infrared) link.
The green light blinks while data are being transferred to the printer. After a few seconds, the
number of photographs found on the memory card or in the digital camera, or transferred from
the GSM mobile phone camera, is displayed on the screen. The light stops blinking.
Your photos are printed in four stages. The printer first prints the three colours: yellow, magenta
and cyan in that order, then deposits a protective film on the sheet of papier, and finally ejects the
photo.
The colour of the light shows the printer status:
Steady green: printer ready, on standby,
Blinking green: data being tranferred,
Steady red: incident: refer to the end of this user guide.
ENGLISH
FRANÇAIS
Remark: To enable you to handle your photographs under the right conditions, the size of the sheets of paper is
greater than the printed surface and the two lateral edges are pre-cut.
After printing, do not tear these edges abruptly, fold along the dotted line several times and then
gently tear off the edges.
Tips - The edges can be removed on a number of photos at a time by superimposing them on
each other.
RAPID PRINTING
Select the number of the photograph required using the or keys.
Press the key to set the number of copies.
Press the key to select print format.
You may select a predefined format to print the photographs:
· Print your photograph in format 10 x 15 cm full page, no border .
· Print your photograph in format 10 x 15 cm with a white border .
· Print your photograph in format 10 x 13 cm .
· Print 2 photographs per page.
· Print 4 photographs per page.
· Print 20 photographs per page (contact sheet or index).
- 9 -
DEUTSCH
ESPAÑOL
ITALIANO
NEDERLANDS
Page 13

Once the selection is made, press the key to start printing.
If printing is interrupted due to a lack of paper, paper jam or empty film cartridge, the printing
operation may be restarted where it was interrupted by pressing the key after the
necessary replacement or defect correction is performed.
Idea - Using the pre-printed reverse side postcard you can quickly send your photograph to friends,
family, etc.
Tips - Hold the key down for 3 seconds to reinitialise the printer and return to the default
status, such as when inserting a card.
C
EXAMPLE OF RAPID PRINTING FROM A MEMORY CARD
The memory card contains 23 photographs. We want to print photograph number 3, 4 times on the same
sheet of paper.
Put the On/Off switch to " I ".
Insert the memory card into the correct printer slot.
After the analysis and recognition phase, the number of valid photographs is displayed on screen and
the memory card icon and green LED stop blinking.
Select photograph 3, using the key.
- 10 -
Page 14

Press the key until the figure 4 is displayed (that is 4 copies).
ENGLISH
Press the key until the 4 images/page graphic is selected.
The figure 1 should be displayed as the number of sheets necessary for the printing operation.
Press the key to start printing.
CREATE A CONTACT SHEET (INDEX)
After inserting the memory card, the number of valid photographs is displayed on screen and the
icon representing the memory card stops blinking.
FRANÇAIS
DEUTSCH
ESPAÑOL
ITALIANO
- 11 -
NEDERLANDS
Page 15

Press the key until ALL is displayed on screen.
Select the format photographs per sheet format using the key.
In the example provided above, 2 sheets will be necessary to print 23 photographs.
Press the he key to initiate printing.
Idea - The contact plate is a simple way of displaying all the photographs on your memory card;
choose those to be printed using the number assigned to each of them
- 12 -
Page 16

PREPARE A SERIES OF PHOTOGRAPHS FOR PRINTING
(SHOPPING TROLLEY MODE)
After inserting the memory card, the number of valid photographs is displayed on screen and the
icon representing the memory card is lit up steadily.
This example describes how to print 4 copies of photograph 3, 1 copy of photograph 8 and 2
copies of photograph 16.
Remark: Printing format remains fixed for series printing.
Select photograph 3, using the , key; press the key until the figure 4, corresponding
to the quantity desired, is displayed.
ENGLISH
FRANÇAIS
DEUTSCH
Press the key to add the photograph to the "shopping trolley" (the series). The icon
indicating that the active photograph is in the shopping trolley is displayed, as well as the
shopping trolley mode icon to indicate the presence of photographs in the shopping trolley.
- 13 -
ESPAÑOL
ITALIANO
NEDERLANDS
Page 17

Select photograph 8, using the key, press key to add this to the shopping trolley (the
default number of copies is 1).
Select photograph 16, using the key, press key until the figure 2, corresponding to the
desired number of copies, is displayed.
Press the key to add this to the shopping trolley.
The number of sheets required is displayed to the left of the shopping trolley icon. Press the
key to start printing.
Remark: If you notice that you have made an error after having validated the selection with the key, press the
key again to cancel and redo the selection. This cancels only the most recent selection. It is also possible
to deselect all photographs by selecting ALL using the key and pressing the key twice.
Tips - To rapidly add a series of consecutive photographs to the shopping trolley, select the
photograph with the lowest number and press and hold down the shopping trolley key .
Photographs will be automatically added to the shopping trolley one by one until the shopping trolley
key is released.
- 14 -
Page 18

PRINT IN DPOF (DIGITAL PRINT ORDER FORMAT) MODE
This function lets you select the photographs to be printed on your camera, then print them on the
SAGEM PHOTO EASY 150 printer from a memory card. Your camera must comply with the
DPOF (Digital Print Order Format) standard. Refer to your camera documentation to find out if
it is compatible with this standard.
Select the required photographs on the camera (follow the instructions in the documentation of
your camera).
Remove the memory card from the camera and insert it into the correct slot of your SAGEM
PHOTO EASY 150 printer. This starts the data transfer. The DPOF logo on the printer screen is
activated and the number of printable photographs is displayed in the lower left-hand corner of
the screen.
Warning - Example: memory card that contains 15 photographs selected for printing.
Start printing by pressing the key.
ENGLISH
FRANÇAIS
DEUTSCH
To exit DPOF mode, press the key.
To switch back to DPOF mode, press and hold the key down for 3 seconds.
C
C
PRINTING FROM A GSM MOBILE PHONE CAMERA
Photographs taken with a GSM mobile phone equipped with a camera can be printed on the
SAGEM PHOTO EASY 150 printer. To do this, the photographs need to be transferred to the
printer via an IR (infrared) link between the 2 devices.
Switch on the SAGEM PHOTO EASY 150 printer (press " I " on the on/off switch).
Tips - GSM mobile phones with cameras work on low definition ; for a better quality of print
we suggest you print 2 or 4 photos per sheet.
Place your GSM mobile phone opposite the SAGEM PHOTO EASY 150 printer so that the IR
"windows" are facing each other and are not more than 30 centimetres apartPlace your GSM.
- 15 -
ESPAÑOL
ITALIANO
NEDERLANDS
Page 19

Warning - In an environment exposed to intense light, a distance of not more 10 centimetres
between the two infrared windows is recommended.
Select a photograph on your GSM mobile phone and start the IR ink transfer.
The message " Ir " blinks on the printer screen throughout the transfer operation.
When the transfer is complete, the following information is displayed on the screen:
You can now:
• Start printing the transferred photograph, after setting the print format and number of copies if
required.
• Transfer another photograph from your GSM mobile phone camera, which will be added to those
already stored in the printer. At the end of each transfer, the total number of photographs stored is
displayed on the printer screen (the one with the highest number being the last one transferred).
- 16 -
Page 20

• The same operations as described in the previous chapters can now be performed before
starting to print the photographs: (selecting the photographs to be printed, selecting the format, selecting the number of copies).
After all photographs transferred from your GSM mobile phone camera have been printed, the
SAGEM PHOTO EASY 150 printer screen displays the information that was on the screen just
before you started the print job.
You can now:
• Start another print job, after selecting different parameters (photograph number, format,
number of copies) if required.
• End the transferred photograph processing. To do this, hold the key down for 2
seconds.
C
ENGLISH
FRANÇAIS
DEUTSCH
- 17 -
ESPAÑOL
ITALIANO
NEDERLANDS
Page 21

6PRINT FROM A PC (PERSONAL COMPUTER)
Your kit includes an installation CD-ROM containing a printer driver, image processing software.
Make sure that your PC is compatible with the requirements as specified (Refer to paragraph Technical
data, page -24).
PC configuration required:
Pentium or equivalent,
OS : Windows 98 SE / 2000 / Me / XP,
128 MB DRAM or more,
150 MB available on hard disk,
USB port available.
INSTALL THE SOFTWARE
The SAGEM PHOTO EASY 150 software is installed in three steps: running the Install program,
restarting the computer, and performing the final printer installation.
Do not connect the printer to the PC before installing the printer driver. After you have installed
the software, a message will be displayed asking you to restart the PC. After restarting you can
connect the printer to the PC.
Insert the CD-ROM in the drive to start installation. A command window appears. Follow the
instructions displayed on the screen.
If the installation program does not start automatically, you can start it by double-clicking on the
"setup.exe" file located in the CD-ROM root directory.
The CD-ROM contains an installation manual which includes detailed operating instructions for the
printer driver. Refer to this manual for further information.
Remark: The B/W print option is not available in Windows 98.
- 18 -
Page 22

CONNECT YOUR PRINTER
Make sure that both the PC and the printer are switched on. Never apply force when plugging in
connectors into the equipment as this could damage both the cable and the connector.
Connect the USB cable to a USB port on your PC.
Connect the other end of the USB cable to the SAGEM PHOTO EASY 150 printer.
Recognition between the two devices is automatic.
ENGLISH
FRANÇAIS
DEUTSCH
- 19 -
ESPAÑOL
ITALIANO
NEDERLANDS
Page 23

7REPLACEMENT OF CONSUMABLES
The consumable items used with the SAGEM PHOTO EASY 150 printer (film cartridge, paper)
are SAGEM (PLC) brand products. Consumables may be purchased in all big stores in the
photography or printer sections but also on out internet site www.sagem.com or by using the
consumables order form supplied with your printer.
Use of any consumable items other than SAGEM (PLC) brand products may result in the loss of
the printer's guarantee.
SAGEM consumable item kit references:
• Film cartridge (ribbon + paper for 40 photos): ref. 251 300 334
• Film cartridges (3 ribbons + paper for 120 photos): ref. 251 300 336
- 20 -
Page 24

8MAINTENANCE
CLEANING THE PRINT HEAD
Continuous lines across the length of your photographs may be caused by dirt particles stuck to
the printhead.
You will need a methylated alcohol
tips ("Q-tips").
Switch off your printer, disconnect the main cables and wait for five minutes; since the
print head operates at a high temperature, there is a risk of burning if you touch it.
1 - Open the cartridge flap. Press on the locking lever and pull out the film cartridge.
2 - Pull out the paper tray.
3 - Turn the printer upside down to remove the lower hatch.
4 - Clean the heating line of the print head carefully using a cotton bud.
5 - Replace the lower hatch, turn the printer right side up, connect the mains cable and switch
on the printer.
Warning -
Never touch the print head with your fingers or any object that might scratch it.
1
based cleaning product and some off-the-shelf cotton
ENGLISH
FRANÇAIS
DEUTSCH
1
4
2
3
5
Replace the film cartridge. Take care that the film is taut before inserting the cartridge into
its compartment. Check that the locking lever is pushed down correctly and close the flap.
Push the paper tray back into place until the locking system clicks.
1. Do not use corrosive chemicals, they may damage your printer.
- 21 -
ESPAÑOL
ITALIANO
NEDERLANDS
Page 25

PAPER JAM
Follow this procedure if a sheet becomes stuck in the printer and cannot simply be pulled out:
Switch off your printer by pressing " O " on the switch behind the printer and disconnect the
mains cable .
Turn the printer upside down.
Remove the lower cover.
Gently and carefully remove the sheet causing the jam. Under no circumstances touch the
printhead.
Replace the lower cover and turn the printer right side up.
Switch on the printer and reconnect the mains cable.
Warning - Never use objects that could damage the printer (scissors, screwdriver, paper cutter, etc.)
PROBLEMS
Remark: The printer is fitted with an automatic time-out to prevent overheating, this can be tripped when performing large
print jobs. The printer automatically restarts the current print job as soon as the temperature drops back to normal.
PROBLEMS SOLUTIONS
No mains supply
(indicator lamp off)
The light (indicator lamp red) • Refer to the error table below (Refer to paragraph Error messages,
The printer was unplugged
during a print job
No photograph is printed on
a sheet
The photograph is marked
with a continuous line or a
lot of spots
No PC printing • Check that the USB cable is correctly connected.
• Check that the power supply block is correctly plugged into the mains.
• Check that the power supply connector is correctly plugged into the
printer.
• Checkthat the mains socket is live (check fuses and/or circuit breakers of
your installation as necessary).
page -23).
• Set the printer on/off switch to "o" and then reconnect the mains lead.
• Switch on the printer and wait for the initialisation phase to be completed.
• If a sheet of paper is jammed, carry out the procedure (Refer to paragraph
Paper jam, page -22).
• Restart printing.
• Are you using sheets that meet the technical specifications (Refer to
paragraph Technical data, page -24)
• Have the sheets been inserted shiny face up?
• Clean the printhead (Refer to paragraph Cleaning the print head, page -21).
• Is the printer driver installed?
- 22 -
Page 26

ERROR MESSAGES
After any intervention on your printer, do not forget to press the
key to restart the current print job.
ENGLISH
Error
displayed
Err 01
Err 02
Err 11
Err 12
Err 13
Err 14
Err 21
Err 22
Err 23
Err 27
Icon
displayed
Error
Type
Paper No paper Check that the paper has been correctly inserted
Paper Paper jam Remove any paper jammed in printer (do not
Film
cartridge
Film
cartridge
Film
cartridge
Film
cartridge
Memory
card
Memory
card
Memory
card
Memory
card
Description Action
in the loading tray.
reuse this sheet of paper)
No film
cartridge
End of film
cartridge
Film cartridge
error
Film cartridge
missing or
incorrectly
inserted
File damaged
or incorrect
JPEG
decompression
error
Unsupported
JPEG feature
Read error The card or file are illegible.
Insert a new film cartridge or repl ace the current
one.
Replace the film cartridge with a new one.
Check that the film cartridge is correctly inserted.
If error persists: replace the c artridge.
Check that the cartridge is correctly inserted and
that the locking lever is locked.
File illegible. Try to print others. If error persists:
check the file source, or try with a different
source.
The file cannot be read. Try printing the others. If
the error persists, check the source of the file or
try with another source.
The JPEG file contains an unsupported feature.
Check the card source or try with another source
FRANÇAIS
DEUTSCH
ESPAÑOL
Err 72
Err 75
Err 76
Other
error
number
None IR link transfer
None IR link Not enough
None IR link File format not
None
Other
error
space to store
photograph
supported
System error Switch off printer, wait 30 seconds and restart. If
- 23 -
Error during transfer of photographs from GSM
mobile phone camera. Restart transfer from the
GSM phone. Check that both devices are facing
each other.
Photograph to be transferred too big or
insufficient space to store photograph in printer.
Photograph to be transferred is not in JPEG
format.
error persists, contact your retailer.
ITALIANO
NEDERLANDS
Page 27

TECHNICAL DATA
PC configuration required:
Pentium or equivalent,
OS : Windows 98 SE / 2000 / Me / XP,
128 MB DRAM or more,
150 MB available on hard disk
USB port available.
-------------------------------------------------------------------------------------------------------------------
Device name : SAGEM PHOTO EASY 150
Print method : Dye-diffusion thermal transfer
Resolution : 300 x 300 dpi
Colours : 16.7 million continuous
Print speed : Less than 120 seconds per photo (not including data
Interface : Memory cards, type Compact Flash (support type I & II),
Storage of photographs
transferred from a GSM
phone camera : Up to 500 kilobytes
Image resolution supported : Up to 12 million pixels
Consumable items : Photo-quality paper. Film cartridge with three colours
Paper tray : By automatic loader, capacity 20 sheets
Mains supply : 230 V AC 50/60 Hz
Approval : EC
Operating conditions : 10 °C to 35 °C, 30 % to 85 % humidity
Size : 201 x 174 x 94 mm excluding paper tray
Weight : 1.5 kg
Power consumption : in standby: 7,6 W
transfer)
SM / MS / MMC / SD. USB port version 1.1
(yellow, magenta, cyan) and protective coating,
40 print operations per cartridge.
Paper size: 101 x 152.4 mm, available in packets of
20 sheets
in print mode: 60 W
All data are provided for reference purposes only. SAGEM (PLC) reserves the right to make any
changes without prior notice.
- 24 -
Page 28

9GARANTEE
GUARANTEE (UK Terms and Conditions)
In order to apply the guarantee, you should contact your dealer. Proof of purchase will be required. Should malfunctioning arise, the dealer will advise you
what to do.
If you bought your equipment from SAGEM directly, the following shall apply :
A SAGEM undertakes to remedy by repair, free of charge for labour and replacement parts, any defects in the equipment
during a period of twelve (12) months from the date of original delivery of the Equipment, where those defects are a result
of faulty workmanship.
During this twelve mo nth guar an tee pe rio d, the defect ive eq uip m ent w ill be repa ir ed free of c har ge; the
customer must however return the defec tive equipme nt at his/her own exp ense, to the add ress given by
SAGEM After Sales Department, the phone numbe r of which c an be f ound on t he del iver y slip. Unless
the customer has concluded with SAGEM a maintenance contract in respect of the equipment which
specifically provides for repairs to be carried out at the customer’ s premises, the repairs will not be carried
out on the equipment at the cu st o mer’s premises.
The following sentence applies to purchases of equipment for the customer’s trade, business or
profession. Except as otherwise expressly provided in this Document and to the extent permitted by law,
SAGEM makes no representations or warr an ti es, ex press or implied, statutory or otherwise, and to such
extent, all terms and condit ions implied by law are hereby excluded.
This guarantee does not affect the Cus tomer’s statutory rights.
B Exclusions From Guarantee
SAGEM shall have no liability under the guarantee in respect of :
• damage, defects breakdown or malfuncti on due to :
- failure to properly follow the installation proc e s s and instructions for use; or
- an external ca use to the equipment (incl uding but not limited to , lightening, fire, shoc k or
water damage of any nature); or
- modifications made without the written approval of SAGEM SA; or
- a failure or neglect to maintain the equipme nt or inappropriate mainte nance; or
- unsuitable operating conditions, particularly of temperature and humidity; or
- repair or maintenance of the equipment by persons not authori sed by SAGEM; or
• wear and tear from normal daily use of the equipmen t and i ts ac c essori e s
• damag e due to insufficient or bad packagin g of eq ui p men t whe n returned to SAGEM
• supply of new versions of software
• work on any equipment or software modified or ad ded without the prior written consent of
SAGEM
• malfunctions not resulting from the Equipment or from software installed in user workstations for
the purpose of use of the equipm e nt
• communication problems related to an unsuitable environment, including :
- problems relate d to access and/ or connectio n to the Inte rnet such as in terruption s by access
networks or malfunction of the line used by the subscriber or his correspondent
- transmission faults (for example poor geographical coverage by radio transmitters,
interference or poor line quality)
- the local network fault (wiring, servers, workstations) or the failure of the transmission
network
• the normal servicing (as defined in the user guide supplied with the equipment) as well as
malfunctioning due to servicing not being carr ied out, servicing costs are in any event always
C In the cases set forth in § B) as well as after expiry of the twelve month guarantee period, the customer must ask SAGEM
borne by the customer.
for an estimate, and he/she must accept the estimate and agree to pay the charges mentioned in it before ret urning the
equipment to SAGEM. The repair and delivery costs will be invoiced to the customer.
The foregoing shall apply unless othe rwise a greed in w riting with t he c ustomer and o nly for the UK. If
any provision of this gu arantee shall be held to be in wh ole or in part invalid or illegal d ue to an
obligatory rule applicable to consumers pursuant to their national legislation, such invalidity or
illegality shall not impair or affect the r emaining provisions or parts of this guarantee .
ENGLISH
FRANÇAIS
DEUTSCH
ESPAÑOL
ITALIANO
- 25 -
NEDERLANDS
 Loading...