

Page 1

English
USER MANUAL
Read carefully before using the machine.
Register your product and get support at
www.saeco.com/welcome
Type HD9712
EN
02
02
Page 2

IMPORTANT SAFEGUARDS
When using electrical appliances, basic safety precautions should always be
followed, including the following:
1. Read all instructions.
2. Do not touch hot surfaces. Use handles or knobs.
3. To protect against fire, electric shock and injury to persons do not immerse
cord, plugs, or appliance in water or other liquid.
4. Close supervision is necessary when the appliance is used by or near
children.
5. Unplug from outlet when not in use and before cleaning. Allow to cool
before putting on or taking off parts, and before cleaning the appliance.
6. Do not operate any appliance with a damaged cord or plug or after the
appliance malfunctions, or has been damaged in any manner. Return
appliance to the nearest authorized service facility for examination, repair
or adjustment.
7. The use of accessory attachments not recommended by the appliance
manufacturer may result in fire, electric shock or injury to persons.
8. Do not use outdoors.
9. Do not let cord hang over edge of table or counter, or touch hot surfaces.
10. Do not place on or near a hot gas or electric burner, or in a heated oven.
11. Always attach plug to appliance first, then plug cord into wall outlet. To
disconnect, turn any control to “off”, then remove plug from wall outlet.
12. Do not use appliance for other than intended use.
13. Save these instructions.
SAVE THESE INSTRUCTIONS
Page 3

CAUTION
This appliance is for household use only. Any servicing, other than cleaning
and user maintenance, should be performed by an authorized service center.
Do not immerse machine in water. To reduce the risk of fire or electric shock,
do not disassemble the machine. There are no parts inside the machine
serviceable by the user. Repair should be done by authorized service personnel
only.
1. Check voltage to be sure that the voltage indicated on the nameplate
corresponds with your voltage.
2. Never use warm or hot water to fill the water tank. Use cold water only.
3. Keep your hands and the cord away from hot parts of the appliance during
operation.
4. Never clean with scrubbing powders or harsh cleaners. Simply use a soft
cloth dampened with water.
5. For optimal taste of your coffee, use purified or bottled water. Periodic
descaling is still recommended every 2-3 months.
6. Do not use caramelized or flavored coffee beans.
INSTRUCTIONS FOR THE POWER
SUPPLY CORD
A. A short power-supply cord (or detachable power-supply cord) is to be
provided to reduce risks resulting from becoming entangled in or tripping
over a longer cord.
B. Longer detachable power-supply cords or extension cords are available
and may used if care is exercised in their use.
C. If a long detachable power-supply cord or extension cord is used,
1. The marked electrical rating of the detachable power-supply cord or
extension cord should be at least as great as the electrical rating of the
appliance
2. If the appliance is of the grounded type, the extension cord should be a
grounding-type 3-wire cord, and
3. The longer cord should be arranged so that it will not drape over the
counter top or table top where it can be pulled on by children or tripped
over.
Page 4

2
ENGLISH
Congratulations on your purchase of a Saeco Incanto Executive fully automatic co ee machine!
To fully bene t from the support that Saeco o ers, please
register your product at www.saeco.com/welcome.
This user manual applies to HD9712.
The machine is suitable for preparing espresso co ee using
whole co ee beans, and it is supplied with a milk carafe
to prepare a perfect Cappuccino or Latte Macchiato in a
quick and easy way. In this user manual you will nd all the
information you need to install, use, clean and descale your
machine.
CONTENTS
IMPORTANT..................................................................................................... 4
Safety Instructions ............................................................................................................................... 4
Warnings .............................................................................................................................................4
Cautions ..............................................................................................................................................6
Electromagnetic Fields.........................................................................................................................7
Disposal ...............................................................................................................................................7
INSTALLATION ................................................................................................. 8
Product Overview ................................................................................................................................8
General Description .............................................................................................................................9
PREPARING FOR USE .......................................................................................10
Machine Packaging............................................................................................................................10
Machine Installation .......................................................................................................................... 10
USING THE MACHINE FOR THE FIRST TIME ........................................................13
Automatic Rinse/Self-Cleaning Cycle ................................................................................................. 13
Manual Rinse Cycle ............................................................................................................................ 14
MEASURING AND PROGRAMMING WATER HARDNESS........................................16
"INTENZA+" WATER FILTER .............................................................................19
“INTENZA+” Water Filter Installation ................................................................................................. 19
Replacing the “INTENZA+” Water Filter..............................................................................................22
ADJUSTMENTS ................................................................................................23
Saeco Adapting System .....................................................................................................................23
Adjusting the Ceramic Co ee Grinder ................................................................................................23
Adjusting the Crema and Co ee Strength (Saeco Brewing System) ................................................... 25
Adjusting the Aroma (Co ee Strength) .............................................................................................. 25
Adjusting the Dispensing Spout ......................................................................................................... 26
Adjusting the Co ee Length ............................................................................................................. 27
Page 5

3
ENGLISH
BREWING ESPRESSO AND LONG ESPRESSO .......................................................28
Brewing Espresso and Long Espresso Using Co ee Beans .................................................................28
Brewing Espresso and Long Espresso Using Pre-Ground Co ee ......................................................... 30
MILK CARAFE..................................................................................................32
Filling the Milk Carafe ........................................................................................................................ 32
Inserting the Milk Carafe ...................................................................................................................33
Removing the Milk Carafe .................................................................................................................. 34
Emptying the Milk Carafe ..................................................................................................................35
BREWING A CAPPUCCINO ................................................................................36
Adjusting the Cappuccino Length ...................................................................................................... 38
DISPENSING LATTE MACCHIATO .......................................................................40
Adjusting the Latte Macchiato Length ............................................................................................... 42
DISPENSING HOT MILK ....................................................................................44
Adjusting the Hot Milk Length ........................................................................................................... 46
DISPENSING STEAM ........................................................................................47
DISPENSING HOT WATER .................................................................................49
BEVERAGE PROGRAMMING .............................................................................51
Cappuccino Programming .................................................................................................................51
Hot Water Programming ....................................................................................................................53
MACHINE PROGRAMMING ...............................................................................54
General Settings ................................................................................................................................55
Display Settings ................................................................................................................................. 56
Calendar Settings ..............................................................................................................................57
Water Settings ...................................................................................................................................59
Maintenance Settings ........................................................................................................................ 60
Factory Settings ................................................................................................................................. 60
CLEANING AND MAINTENANCE ........................................................................61
Daily Cleaning of the Machine ...........................................................................................................61
Daily Cleaning of the Water Tank........................................................................................................ 62
Daily Cleaning of the Milk Carafe: "CLEAN" Self-cleaning Cycle (After Each Use) ................................ 63
Weekly Cleaning of the Machine .......................................................................................................63
Weekly Cleaning of the Milk Carafe ................................................................................................... 65
Weekly Cleaning of the Brew Group ...................................................................................................67
Monthly Cleaning of the Milk Carafe ..................................................................................................70
Monthly Lubrication of the Brew Group ............................................................................................. 74
Monthly Cleaning of the Brew Group with “Co ee Oil Remover” ........................................................75
Monthly Cleaning of the Co ee Bean Hopper .................................................................................... 77
DESCALING .....................................................................................................78
ACCIDENTAL INTERRUPTION OF THE DESCALING CYCLE .....................................83
MEANING OF THE DISPLAY ...............................................................................84
TROUBLESHOOTING ........................................................................................86
ENERGY SAVING ..............................................................................................89
Stand-by ............................................................................................................................................89
TECHNICAL SPECIFICATIONS ............................................................................90
WARRANTY AND SERVICE ................................................................................90
Warranty ...........................................................................................................................................90
Service ............................................................................................................................................... 90
ORDERING MAINTENANCE PRODUCTS ..............................................................91
Page 6
4
ENGLISH
IMPORTANT
Safety Instructions
This machine is equipped with safety devices. Nevertheless,
read and follow the safety instructions carefully and only use
the machine properly as described in these instructions to
avoid accidental injury or damage due to improper use of the
machine. Keep this user manual for future reference.
The term WARNING and this icon warn against possible
severe injuries, danger to life and/or damage to the machine.
The term CAUTION and this icon warn against slight
injuries and/or damage to the machine.
Warnings
• Connect the machine to a wall socket with a voltage
matching the technical speci cations of the machine.
• Connect the machine to an earthed wall socket.
• Do not let the power cord hang over the edge of a table or
counter, or touch hot surfaces.
• Never immerse the machine, the mains plug or power cord
in water: Danger of electrical shock!
• Do not pour liquids on the power cord connector.
• Never direct the hot water jet towards body parts: Danger
of burning!
• Do not touch hot surfaces. Use handles and knobs.
• After switching o the machine by pressing the power
button on the back of the machine, remove the mains plug
from the wall socket:
- if a malfunction occurs;
Page 7

5
ENGLISH
5
- If the machine will not be used for a long time;
- before cleaning the machine.
• Pull on the mains plug, not on the power cord.
• Do not touch the mains plug with wet hands.
• Do not use the machine if the mains plug, the power cord
or the machine itself is damaged.
• Do not make any modi cations to the machine or its
power cord. Only have repairs carried out by a service
centre authorised by Philips to avoid any hazard.
• The machine should not be used by children younger than
8 years old.
• The machine can be used by children of 8 years and upwards
if they have previously been instructed on the correct use of
the machine and made aware of the associated dangers or if
they are supervised by an adult.
• Cleaning and maintenance should not be carried out by
children unless they are more than 8 years old and supervised by an adult.
• Keep the machine and its power cord out of reach of children under 8 years old.
• The machine may be used by persons with reduced physical, sensory or mental capabilities or lacking su cient
experience and/or skills if they have previously been
instructed on the correct use of the machine and made
aware of the associated dangers or if they are supervised
by an adult.
• Children should be supervised to ensure that they do not
play with the machine.
• Never insert ngers or other objects into the co ee
grinder.
Page 8

6
ENGLISH
Cautions
• The machine is for household use only. It is not intended
for use in environments such as canteens, sta kitchens of
shops, o ces, factories or other work environments.
• Always put the machine on a at and stable surface.
• Do not place the machine on hot surfaces, directly next to
a hot oven, heater units or similar sources of heat.
• Only put roasted co ee beans into the co ee bean hopper.
If ground co ee, instant co ee, raw co ee or any other
substance is put in the co ee bean hopper, it may damage
the machine.
• Let the machine cool down before inserting or removing
any parts. The heating surfaces may retain residual heat
after use.
• Never use warm or hot water to ll the water tank. Use
only cold non-sparkling drinking water.
• Never clean with scrubbing powders or harsh cleaners.
Simply use a soft cloth dampened with water.
• Descale your machine regularly. Not doing this will make
your appliance stop working properly. In this case, repair is
not covered under your warranty!
• Do not keep the machine at temperature below 0 °C.
Residue water in the heating system may freeze and cause
damage.
• Do not leave water in the water tank if the machine is
not used over a long period of time. The water can get
contaminated. Use fresh water every time you use the
machine.
Page 9
7
ENGLISH
7
Electromagnetic Fields
This appliance complies with all the applicable standards and
regulations relating to the exposure to electromagnetic elds.
Disposal
This symbol on a product indicates that the product is covered
by EU Directive 2012/19/EU. Please inform yourself about the
local separate collection system for electrical and electronic
products. Follow local regulations and do not dispose of the
product as household waste. Appropriate disposal of old products helps prevent negative consequences for the environment and human health.
Page 10
8
INSTALLATION
Product Overview
15/01/15
10:38
22
23
21
25
24
29
34
35
30
36
28
33
26
31
27
32
37
38
39
12
3
4
17
5
6
7
8
9
10
11
12
13
20
14
15 16
18
19
Page 11

9
ENGLISH
9
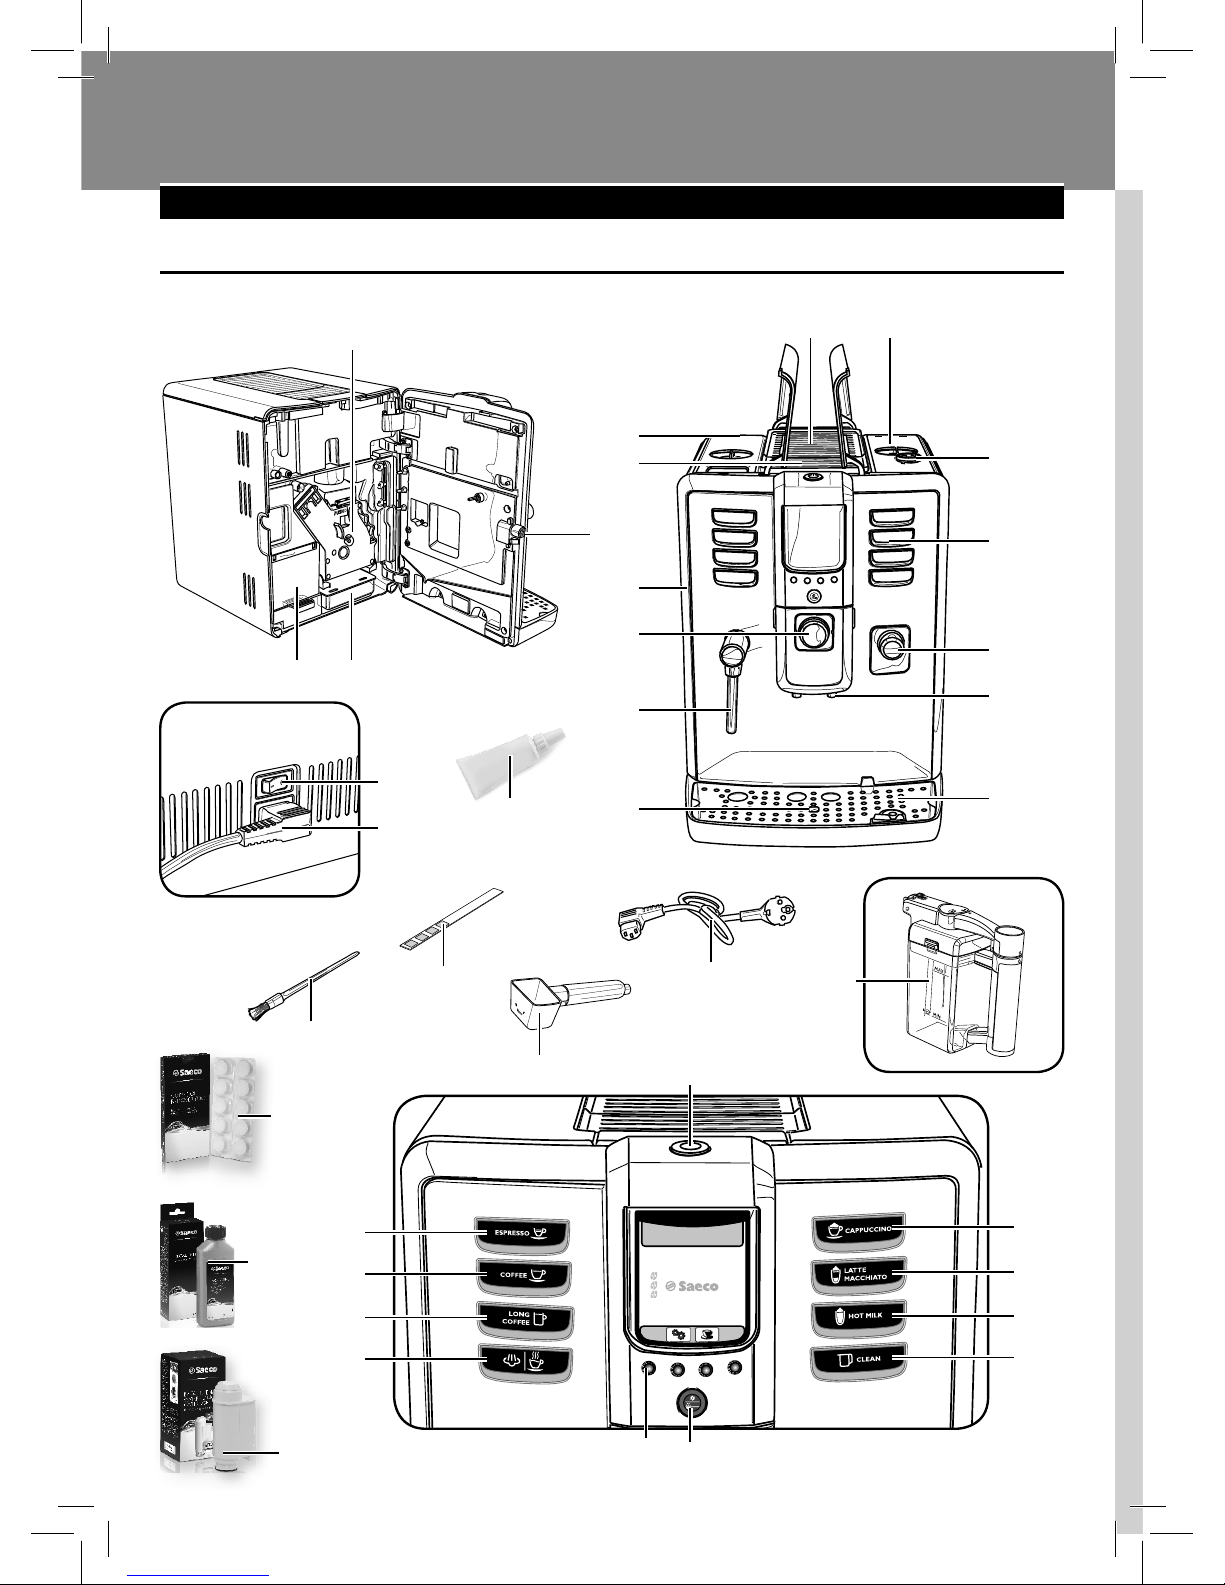
General Description
1. Cup-warming surface
2. Co ee bean hopper with lid
3. Water tank + lid
4. Pre-ground co ee compartment
5. Service door
6. Saeco Brewing System (SBS) dial
7. Steam/hot water wand
8. Full drip tray indicator
9. Co ee grinder adjustment
10. Control panel
11. Carafe coupling cap
12. Co ee dispensing spout
13. Drip tray (external)
14. Brew group
15. Co ee grounds drawer
16. Drip tray (internal)
17. Service door button
18. Power button
19. Power cord socket
20. Milk carafe
21. Power cord
22. Pre-ground co ee measuring scoop
23. Grease for the brew group (optional)
24. Cleaning brush (optional)
25. Water hardness test (optional)
26. Espresso button
27. "Co ee" button
28. "Long co ee" button
29. Hot water/steam selection button
30. Stand-by button
31. Cappuccino button
32. Latte Macchiato button
33. Hot milk button
34. Carafe cleaning cycle activation button (Clean)
35. "Aroma" - Pre-ground co ee button
36. "Function" buttons
37. Co ee Oil Remover (to be purchased separately)
38. Descaling solution (to be purchased separately)
39. INTENZA+ water lter (to be purchased separately)
Page 12
10
ENGLISH
PREPARING FOR USE
Machine Packaging
The original packaging has been designed and constructed to protect the
machine during transport. We recommend keeping the packaging material
for possible future transport.
Machine Installation
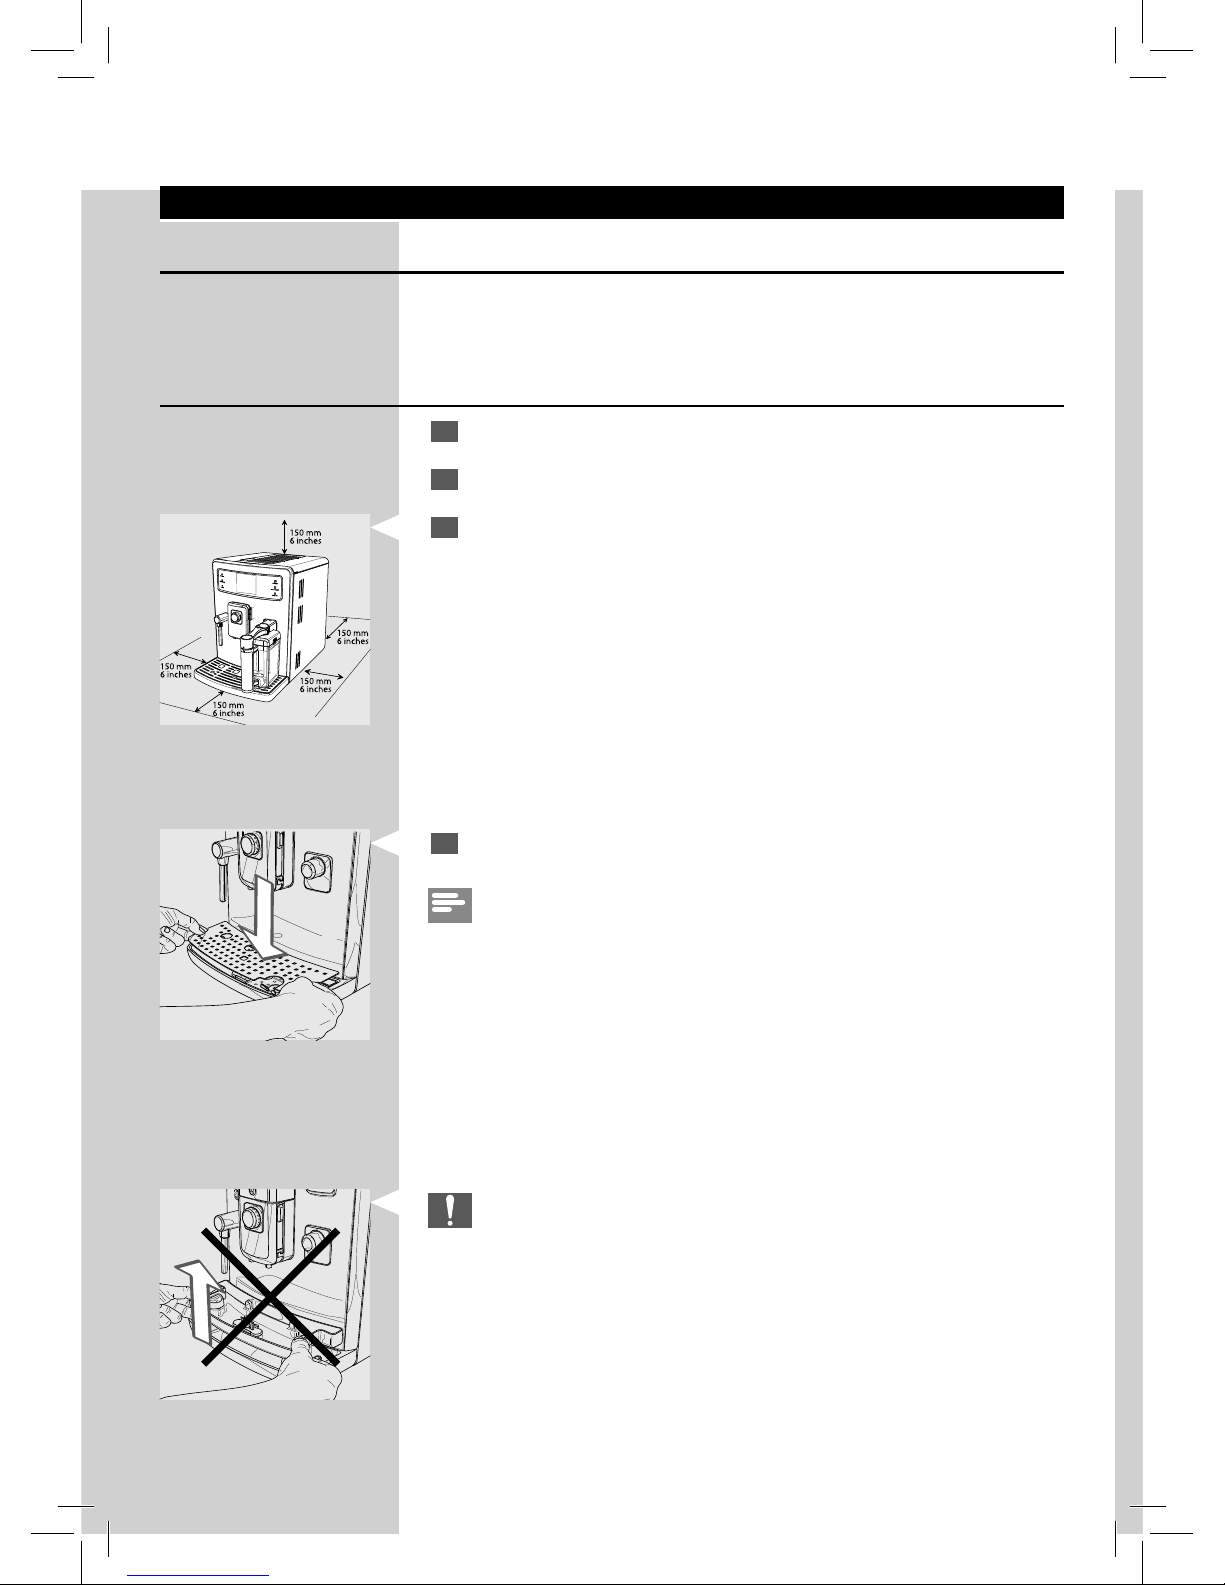
1
Remove the drip tray with grill from the packaging.
2
Remove the machine from the packaging.
3
For best use, it is recommended to:
• Choose a safe, level surface where there will be no danger of overturning the machine or being injured.
• Choose a location that is su ciently well-lit, clean and near an easily reachable socket.
• Allow for a minimum distance from the sides of the machine as
shown in the gure.
4
Make sure that the drip tray and the grill are correctly inserted.
Note:
The drip tray collects the water that comes out of the dispensing spout
during each rinse/self-cleaning cycle, as well as any co ee that might be
spilled during beverage preparation. Empty and wash the drip tray daily
and each time the full drip tray indicator is raised.
Caution:
NEVER remove the drip tray when the machine has just been turned
on. Wait a couple of minutes for the machine to carry out a rinse/selfcleaning cycle.
Page 13
11
ENGLISH
11
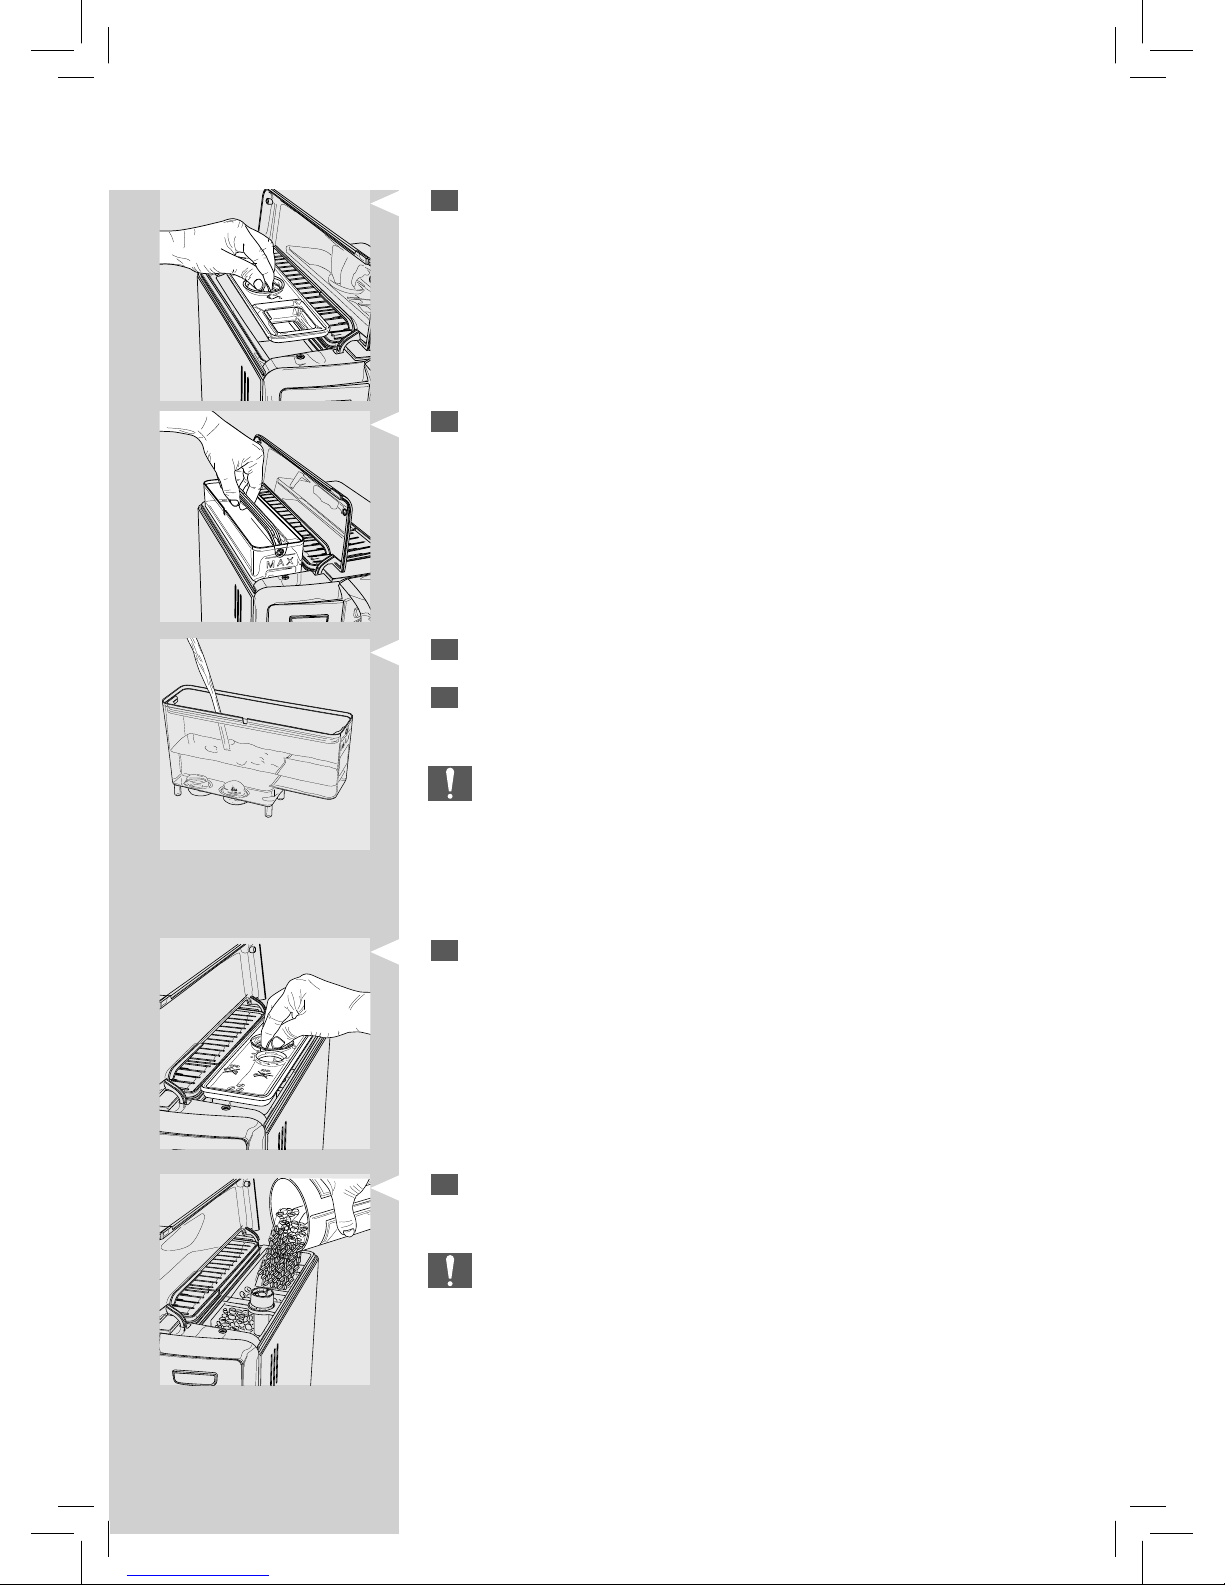
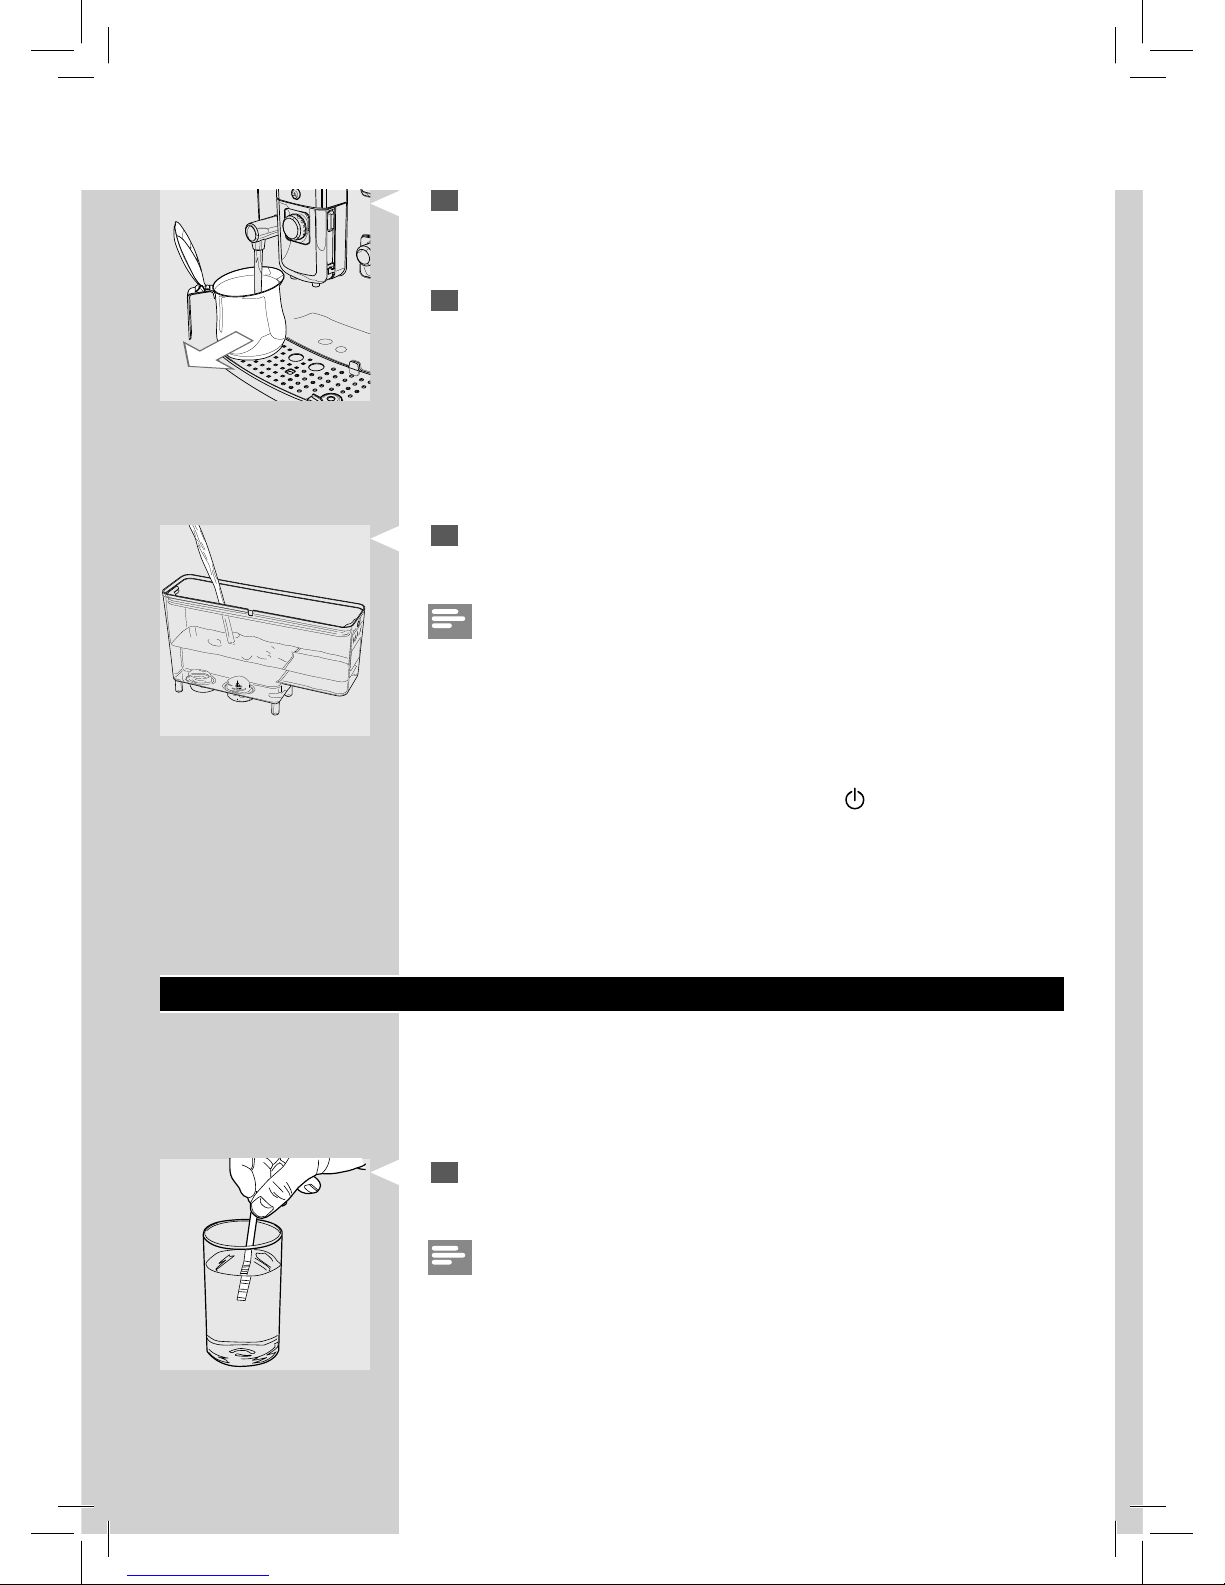
5
Lift the left outer lid and remove the inner lid.
7
Rinse the water tank with fresh water.
8
Fill the water tank with fresh water up to the MAX level and put it back
into the machine. Make sure it is fully inserted.
Caution:
Never ll the water tank with warm, hot, sparkling water or any other
liquid, as this may cause damage to the water tank and the machine.
9
Lift the co ee bean hopper lid and remove the inner lid.
10
Slowly pour the co ee beans into the hopper. Re t the inner lid and
close the outer one.
Caution:
Only put co ee beans into the co ee bean hopper. If ground co ee,
instant co ee, caramelized co ee, raw co ee beans or any other substance is put in the co ee bean hopper, it may damage the machine.
6
Remove the water tank by using the handle.
Page 14
12
ENGLISH
ITALIANO
ITALIANO CH
ENGLISH
DEUTSCH
FRANÇAIS
ESPAÑOL
PORTOGUÊS
ITALIANO
ITALIANO CH
ENGLISH
DEUTSCH
FRANÇAIS
ESPAÑOL
PORTOGUÊS
HEATING UP…
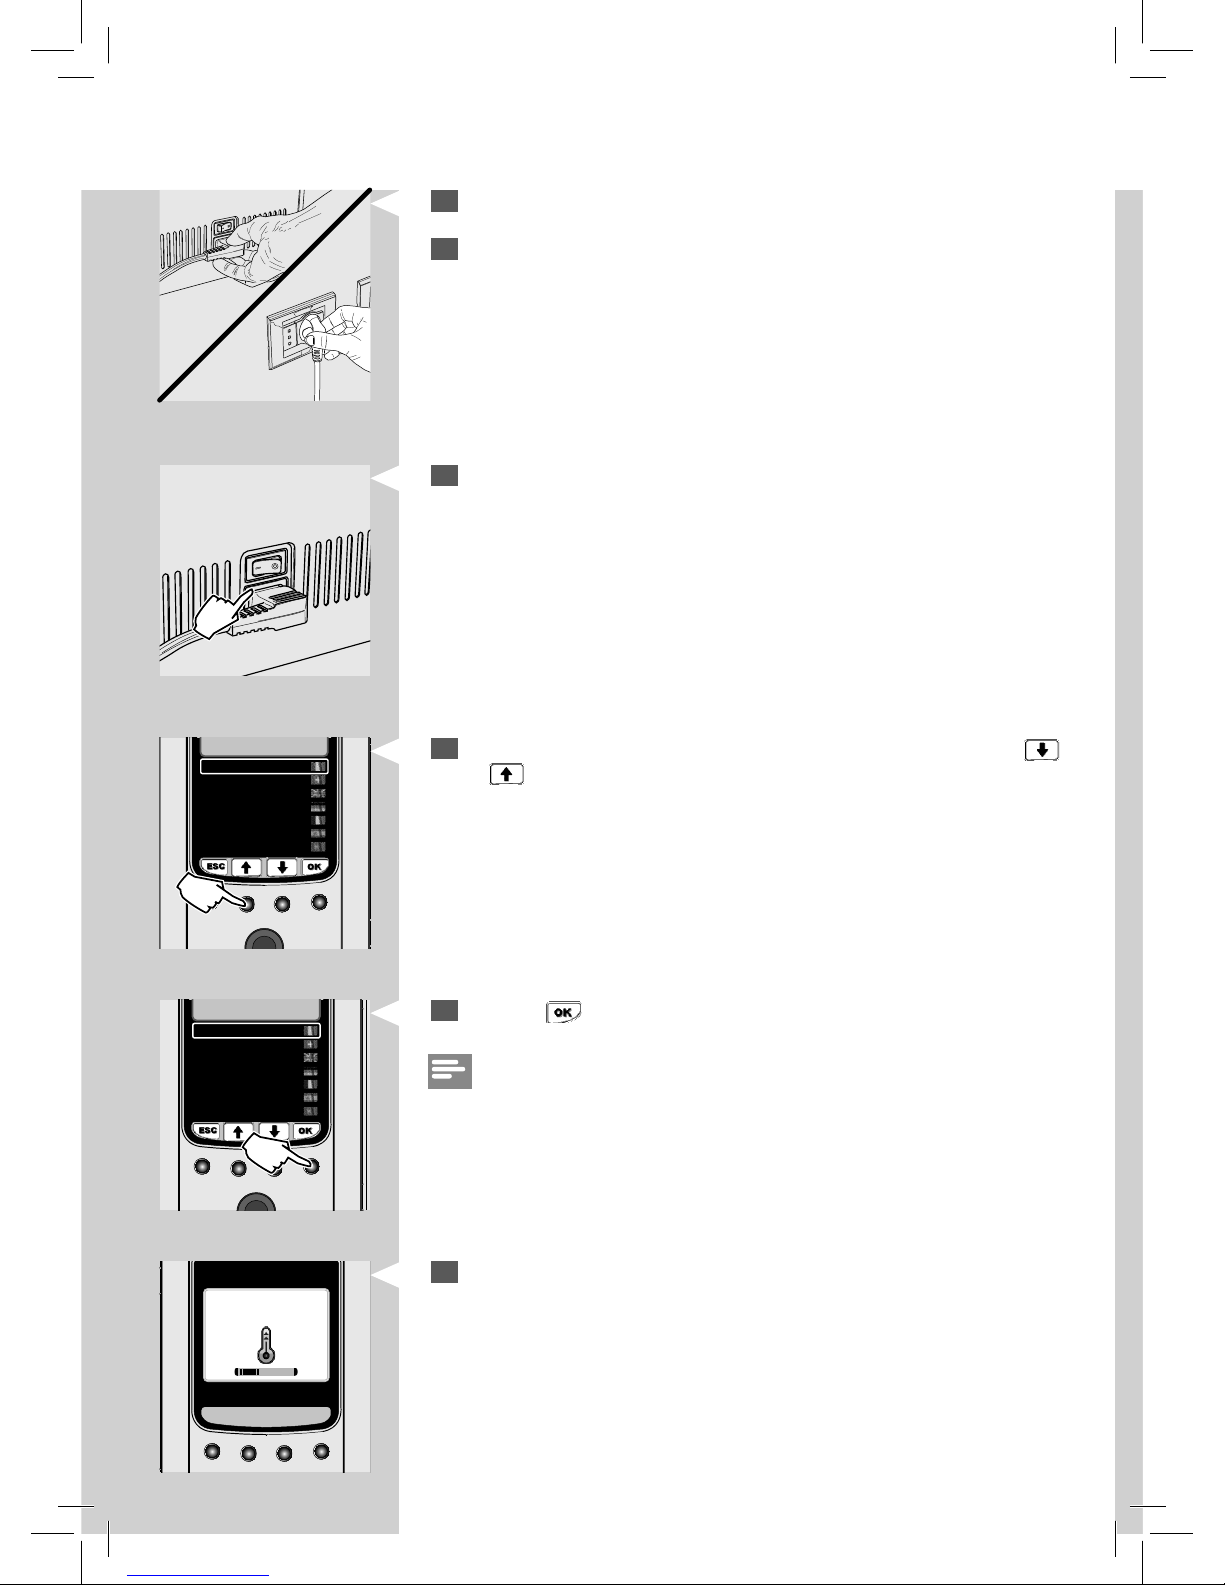
11
Insert the plug into the socket located on the back of the machine.
12
Insert the plug on the other end of the power cord into a wall socket
with suitable power voltage.
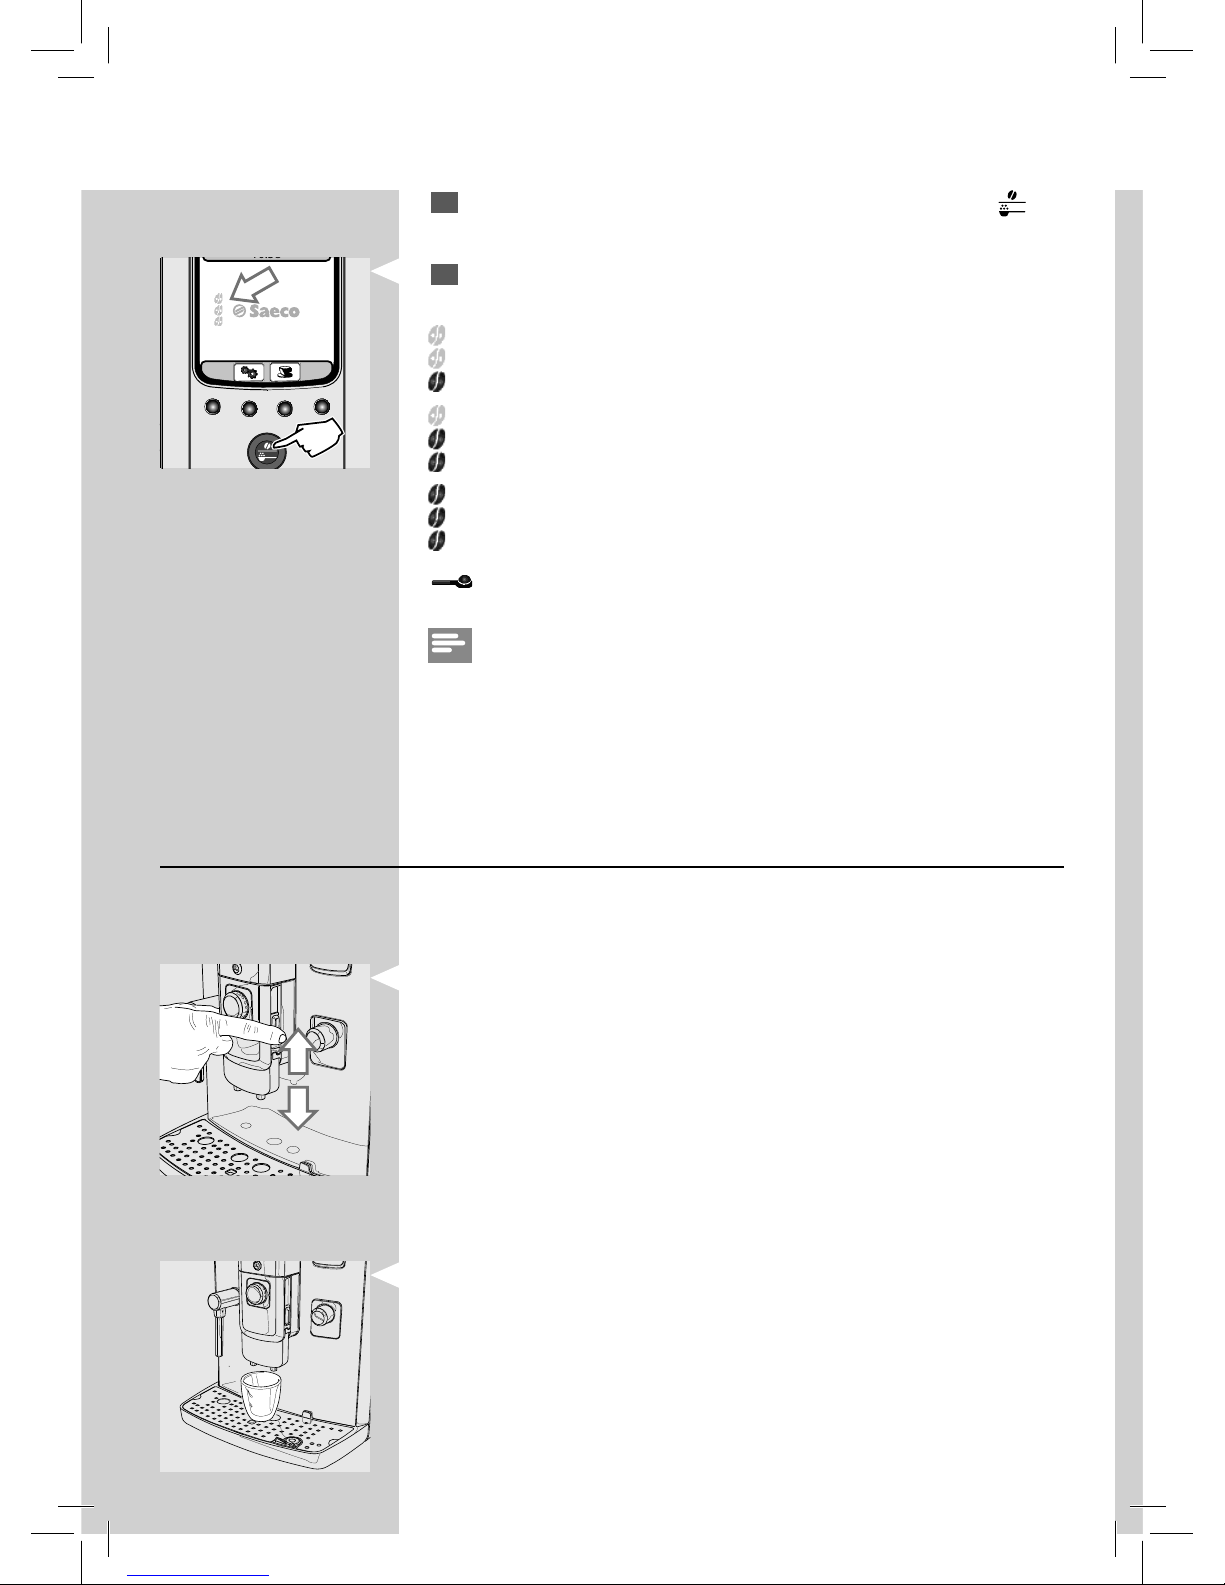
13
Switch the power button to “I” to turn on the machine.
14
This screen is displayed. Select the desired language by pressing the “ ”
or “
” scrolling button.
15
Press the
“ ”
button to con rm.
Note:
If no language is selected, you will be requested to select it the next time
the machine is started.
16
The machine is warming up.
Page 15

13
ENGLISH
13
RINSING
15/01/15
10:38
USING THE MACHINE FOR THE FIRST TIME
Automatic Rinse/Self-Cleaning Cycle
When warm-up has been completed, the machine automatically performs
a rinse/self-cleaning cycle of the internal circuits with fresh water. This
takes less than a minute.
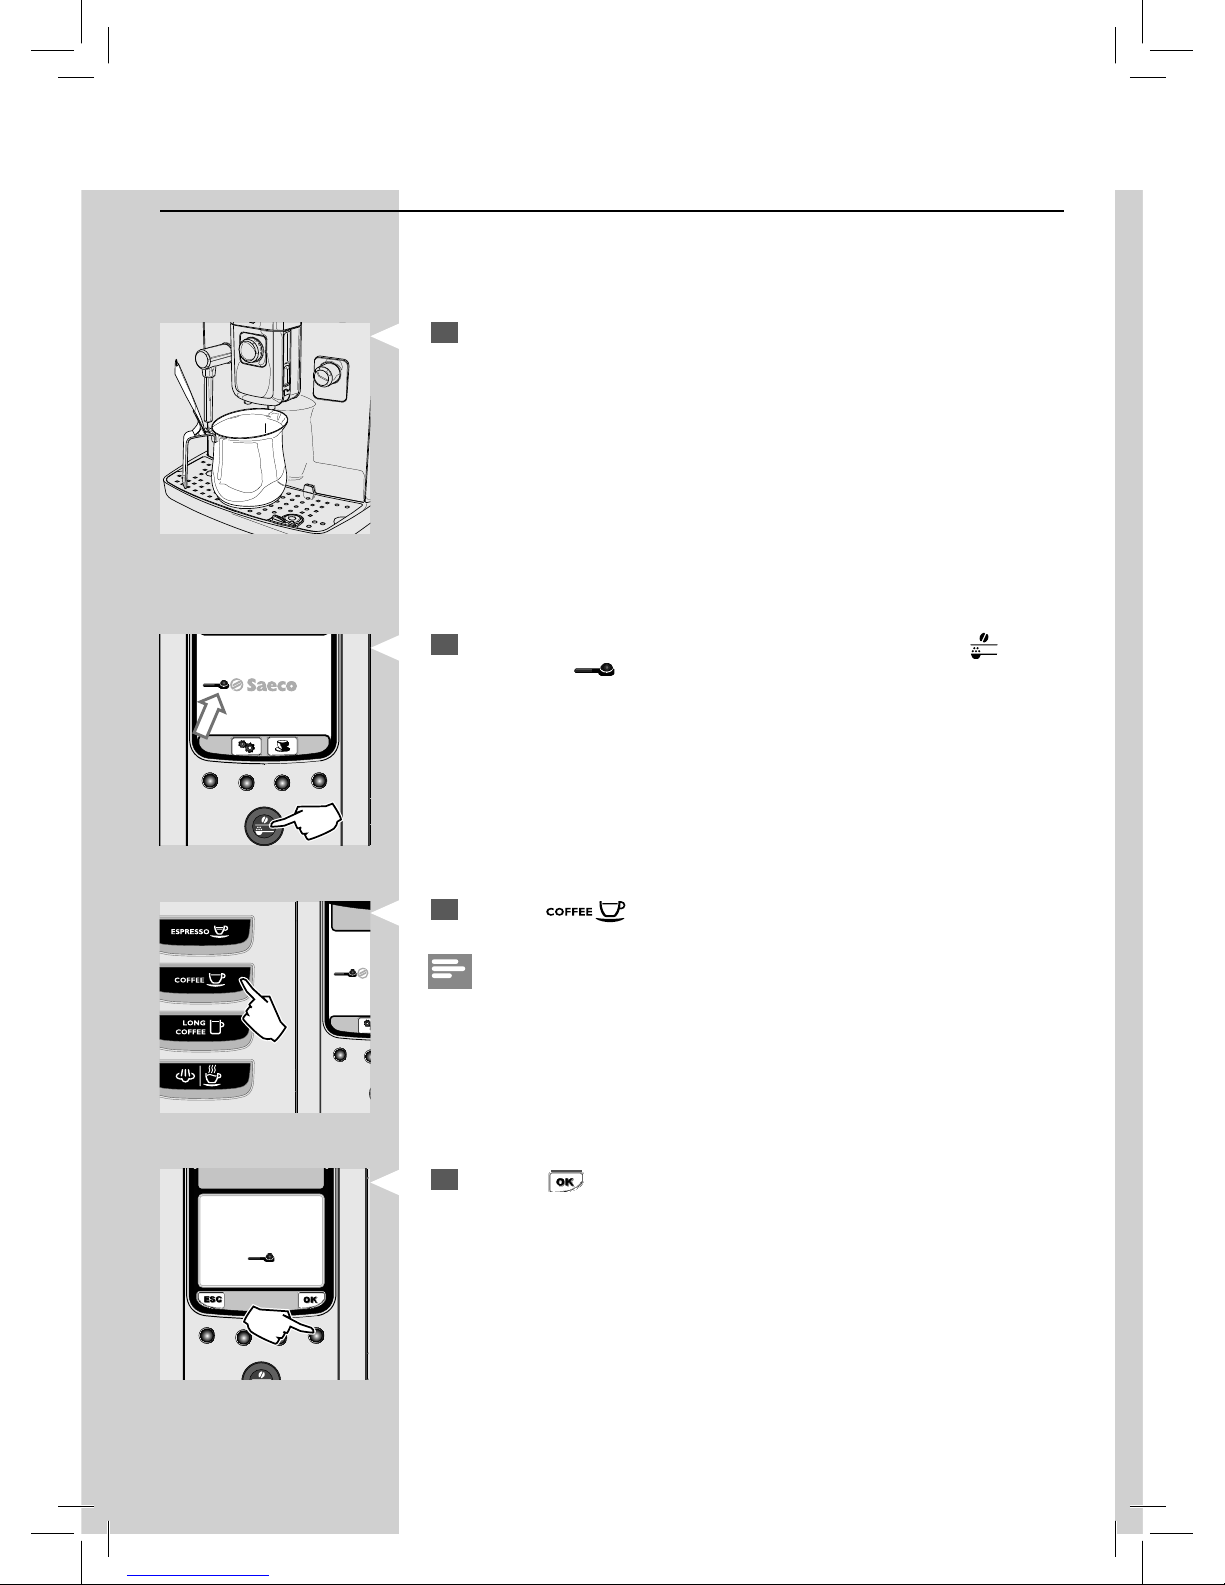
1
Place a container under the co ee dispensing spout to catch the small
amount of water which will be dispensed.
2
This screen is displayed. Wait for the cycle to nish automatically.
Note:
You can stop dispensing by pressing the
“ ”
button.
3
When the operations described above have been completed, the
machine shows this display.
Page 16
14
ENGLISH
1
INSERT GROUND COFFEE
AND SELECT OK
LONG COFFEE
2
To select the pre-ground co ee brewing function, press the
“ ”
but-
ton until the
“ ”
icon is displayed.
3
Press the
“ ”
button.
Note:
Do not add any pre-ground co ee into the compartment.
4
Press the
“ ”
button. The machine starts dispensing water.
Manual Rinse Cycle
You need to perform a rinse cycle when using the machine for the rst
time. During this process, the co ee brewing cycle is activated and fresh
water ows through the dispensing spout. This takes a few minutes.
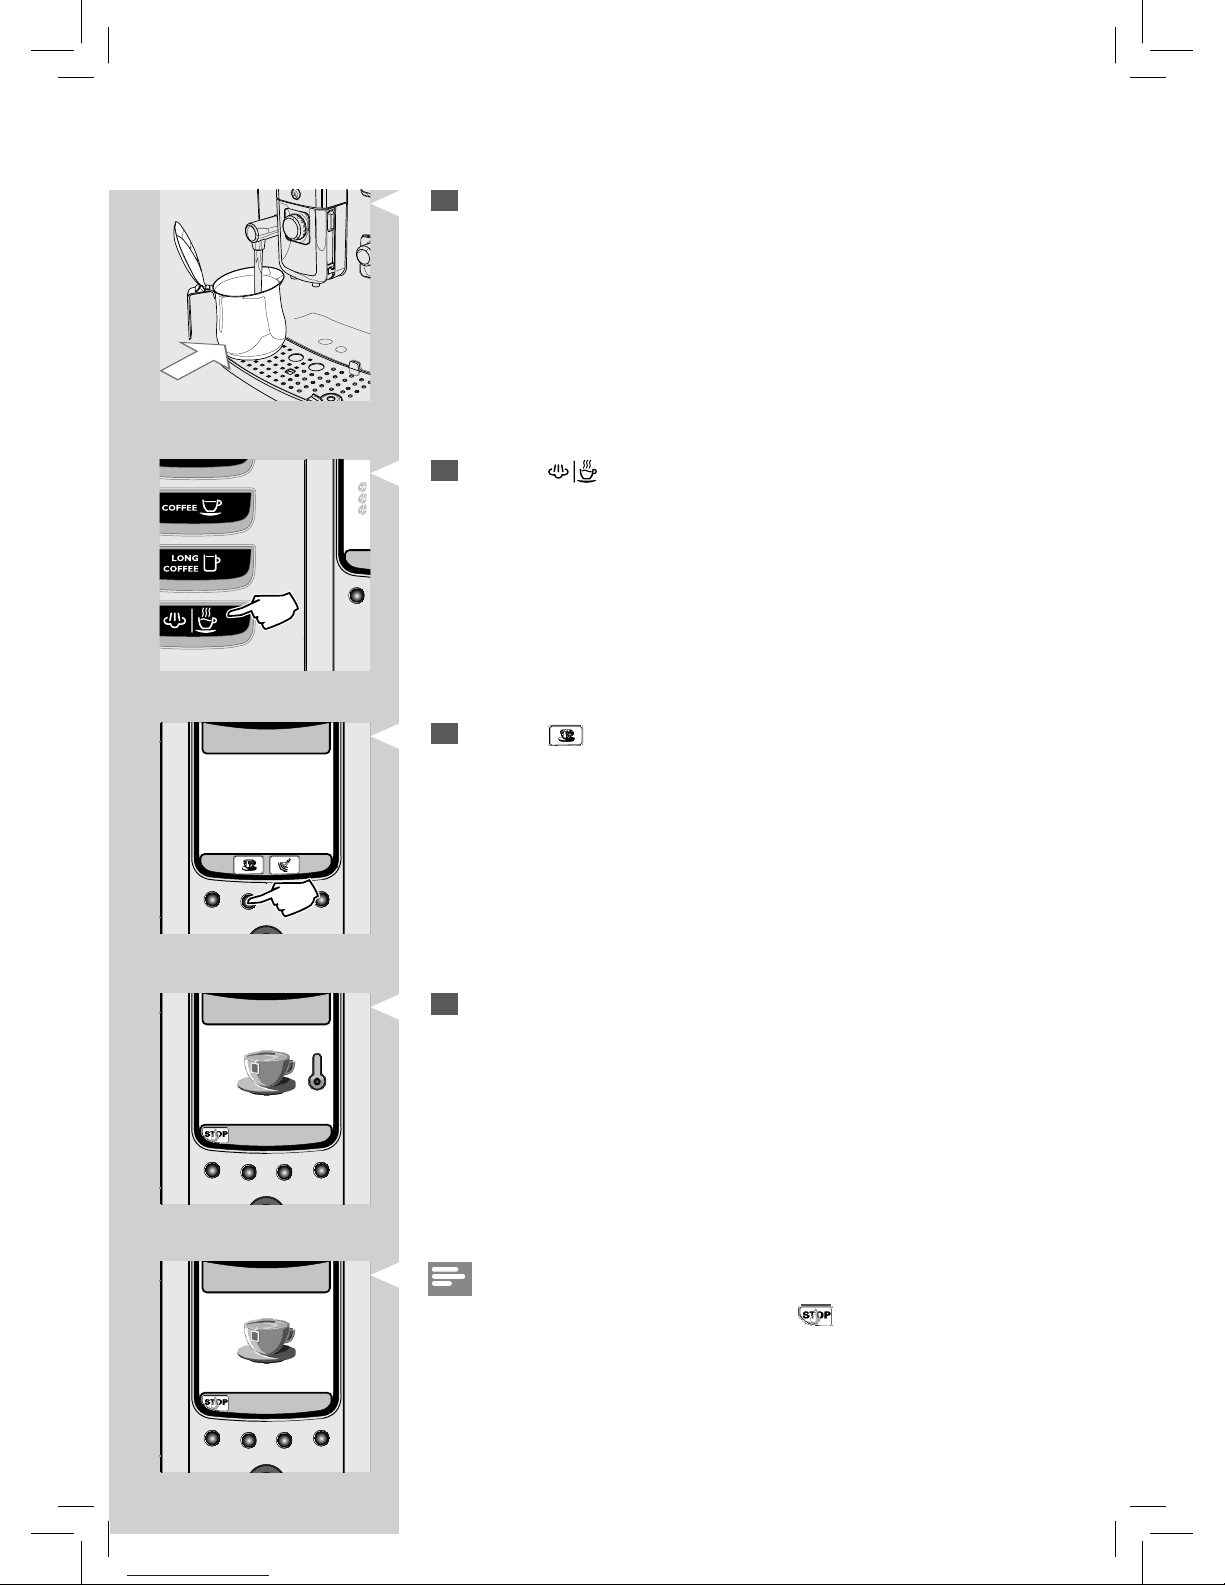
1
Place a container under the co ee dispensing spout.
Page 17
15
ENGLISH
15
SELECT
HOT WATER OR STEAM
15/01/15
10:38
HOT WATER
HOT WATER
5
When dispensing has been completed, empty the container and place
it back under the steam/hot water wand.
6
Press the “ ” button.
7
Press the “ ” button to start dispensing hot water.
8
This icon is displayed during the preheating time required by the
machine.
Note:
Dispensing can be stopped by pressing the
button.
Page 18
16
ENGLISH
MEASURING AND PROGRAMMING WATER HARDNESS
Water hardness measuring is very important in order to de ne the descaling frequency and to install the “INTENZA+” water lter (for more details on
the water lter, see next chapter).
To measure water hardness, follow the steps below.
1
Immerse the water hardness test strip supplied with the machine in
water for 1 second.
Note:
The test strip can only be used for one single measurement.
11
At the end of this operation, ll the water tank again up to the MAX
level. Now the machine is ready to brew co ee.
Note:
When you have not used the machine for two or more weeks, the machine
will perform an automatic rinse/self-cleaning cycle after you turn it on. Following this, you need to perform a manual rinse cycle as described above.
The automatic rinse/self-cleaning cycle is also initiated automatically when
starting up the machine (with a cold boiler), when the machine is preparing
to go into stand-by mode or after pressing the “
” button to turn o the
machine (after a co ee has been brewed).
9
After dispensing water, remove and empty the container.
10
Repeat the steps from 5 to 9 until the water tank is empty, then con-
tinue with step 11.
Page 19
17
ENGLISH
17
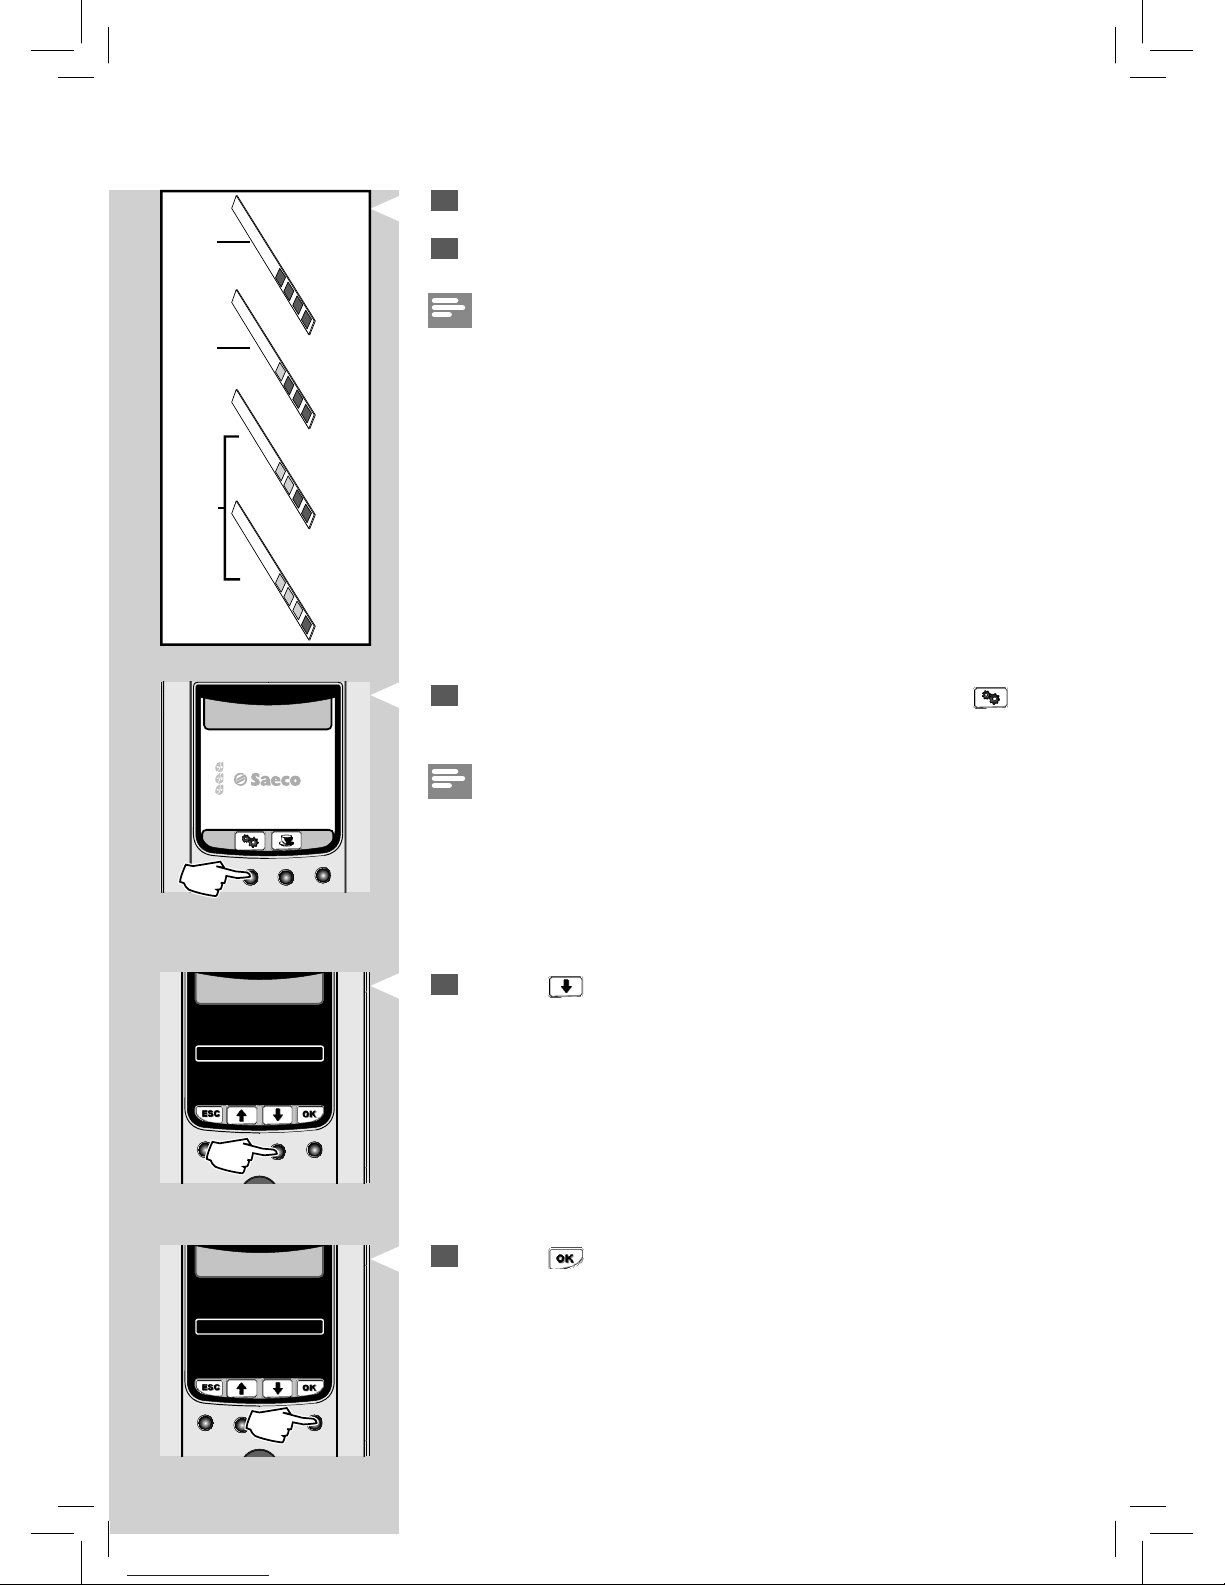
2
Wait for one minute.
3
Check how many squares have changed to red, then refer to the table.
Note:
The numbers on the water hardness test strip correspond to the water
hardness adjustment settings. More precisely:
1 = 1 (very soft water)
2 = 2 (soft water)
3 = 3 (hard water)
4 = 4 (very hard water)
The letters correspond to the references that are located at the base of the
“INTENZA+” water lter (see next chapter).
23 4
A
B
C
Intenza Aroma System
Machine Water Hardness Setting
1
4
You can now program the water hardness setting. Press the “ ” but-
ton to access the machine main menu.
Note:
The machine is supplied with a standard water hardness setting, suitable
for most types of water.
15/01/15
10:38
5
Press the “ ” button to select “WATER SETTINGS”.
GENERAL SETTINGS
DISPLAY SETTINGS
CALENDAR SETTINGS
WATER SETTINGS
MAINTENANCE SETTINGS
FACTORY SETTINGS
2. MACHINE SETTINGS
6
Press the
“ ”
button to con rm.
GENERAL SETTINGS
DISPLAY SETTINGS
CALENDAR SETTINGS
WATER SETTINGS
MAINTENANCE SETTINGS
FACTORY SETTINGS
2. MACHINE SETTINGS
Page 20
18
ENGLISH
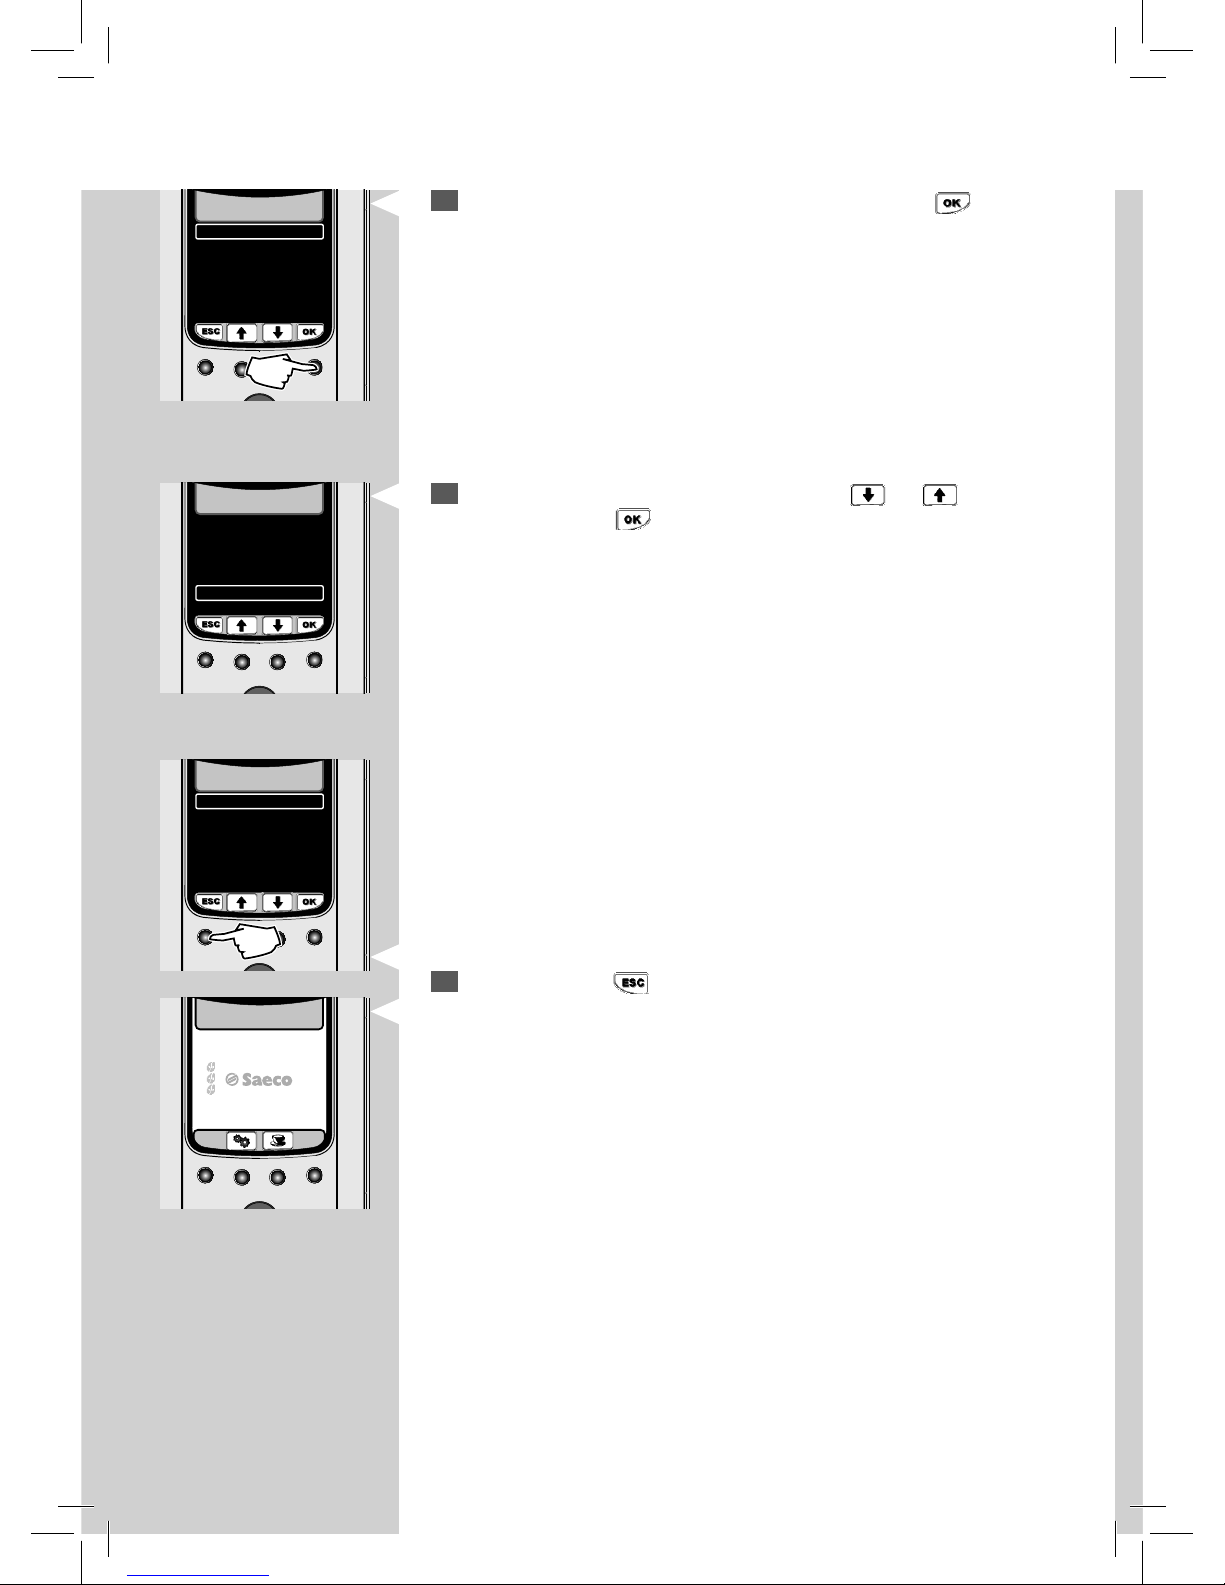
7
Select the “WATER HARDNESS” option by pressing the
“ ”
button to
access the menu.
WATER HARDNESS
ENABLE FILTER
ACTIVATE FILTER
4
OFF
2.4. WATER SETTINGS
15/01/15
10:38
WATER HARDNESS
ENABLE FILTER
ACTIVATE FILTER
4
OFF
2.4. WATER SETTINGS
2.4.1.
WATER SETTINGS
WATER HARDNESS
1
2
3
4
8
Set the water hardness value by pressing the “ ” or “ ” scrolling
button. Press the
“ ”
button to con rm.
9
To exit, press the
“ ”
button several times until the home page is
displayed.
Page 21
19
ENGLISH
19
"INTENZA+" WATER FILTER
“INTENZA+” Water Filter Installation
We recommend installing the “INTENZA+” water lter as this prevents limescale build-up and preserves a more intense aroma to your espresso.
The INTENZA+ water lter can be purchased separately. For further details,
please refer to the "Ordering Maintenance Products" chapter in this user
manual.
Water is a crucial part of every espresso, so it is very important to always
have it professionally ltered. Using the “INTENZA+” water lter will prevent
mineral deposits from building up and improve your water quality.
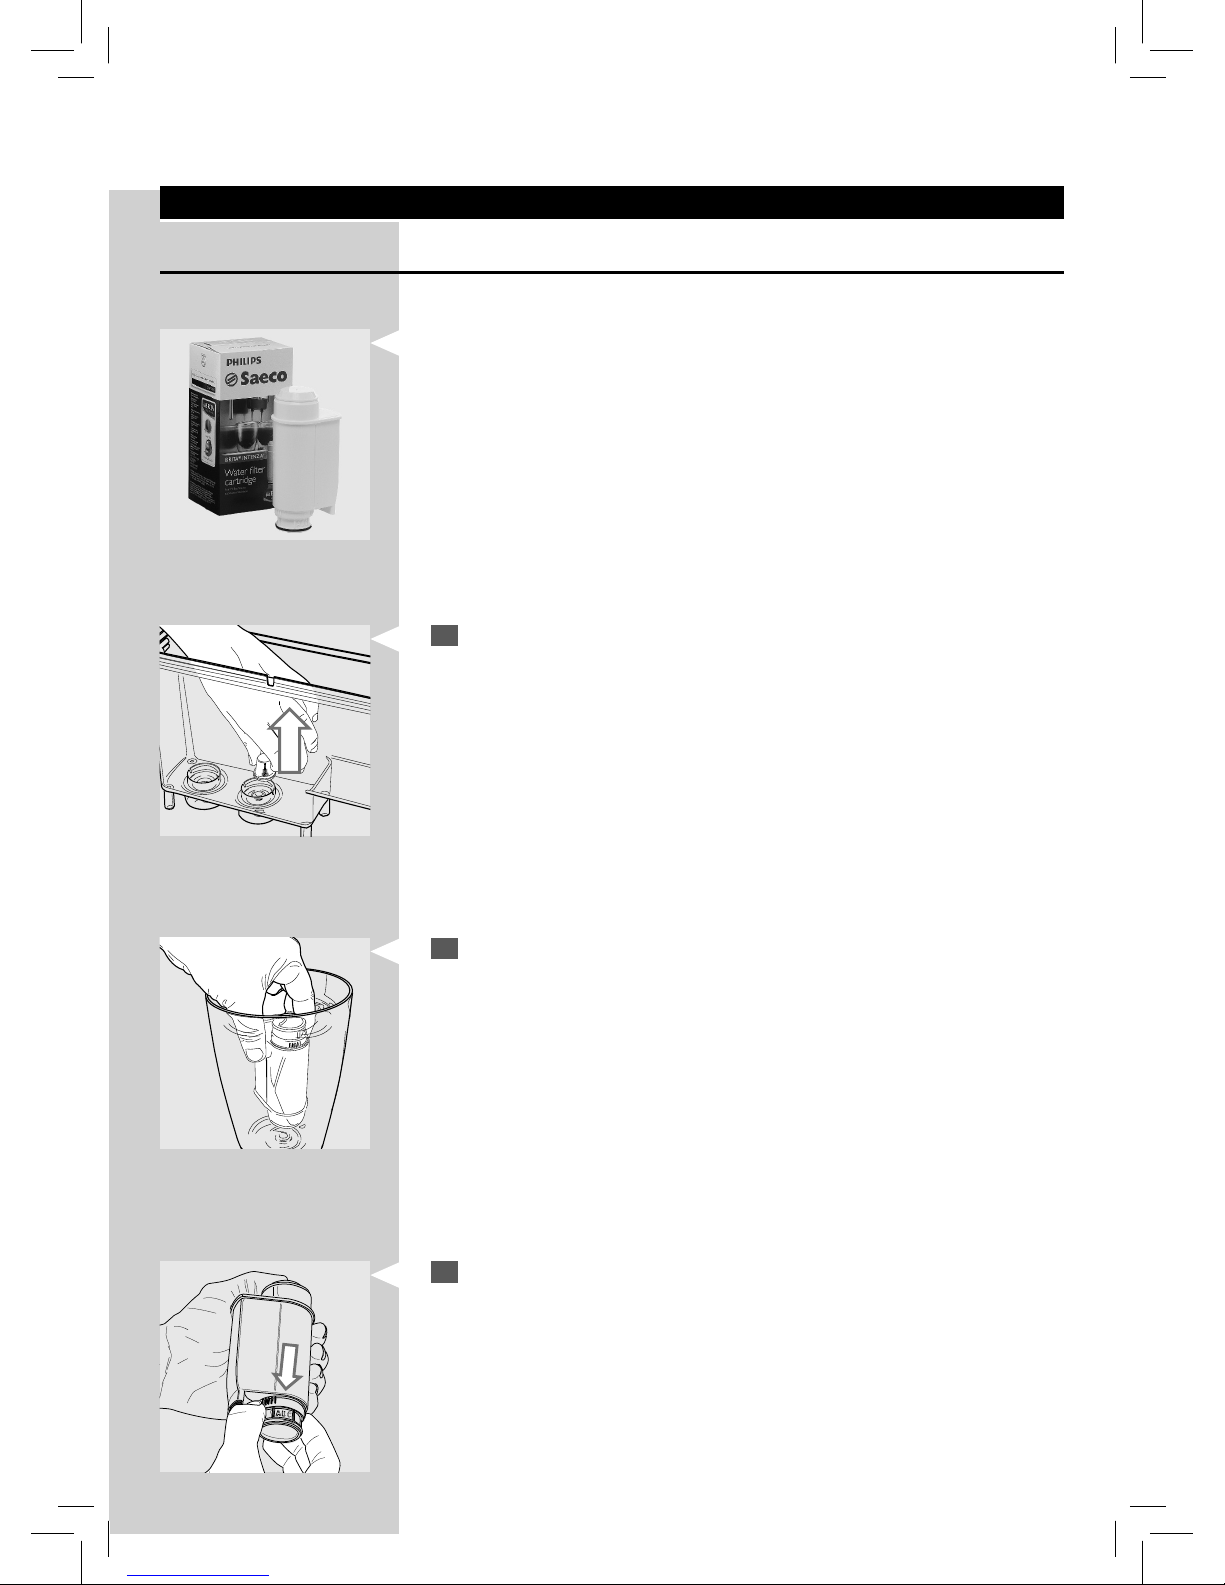
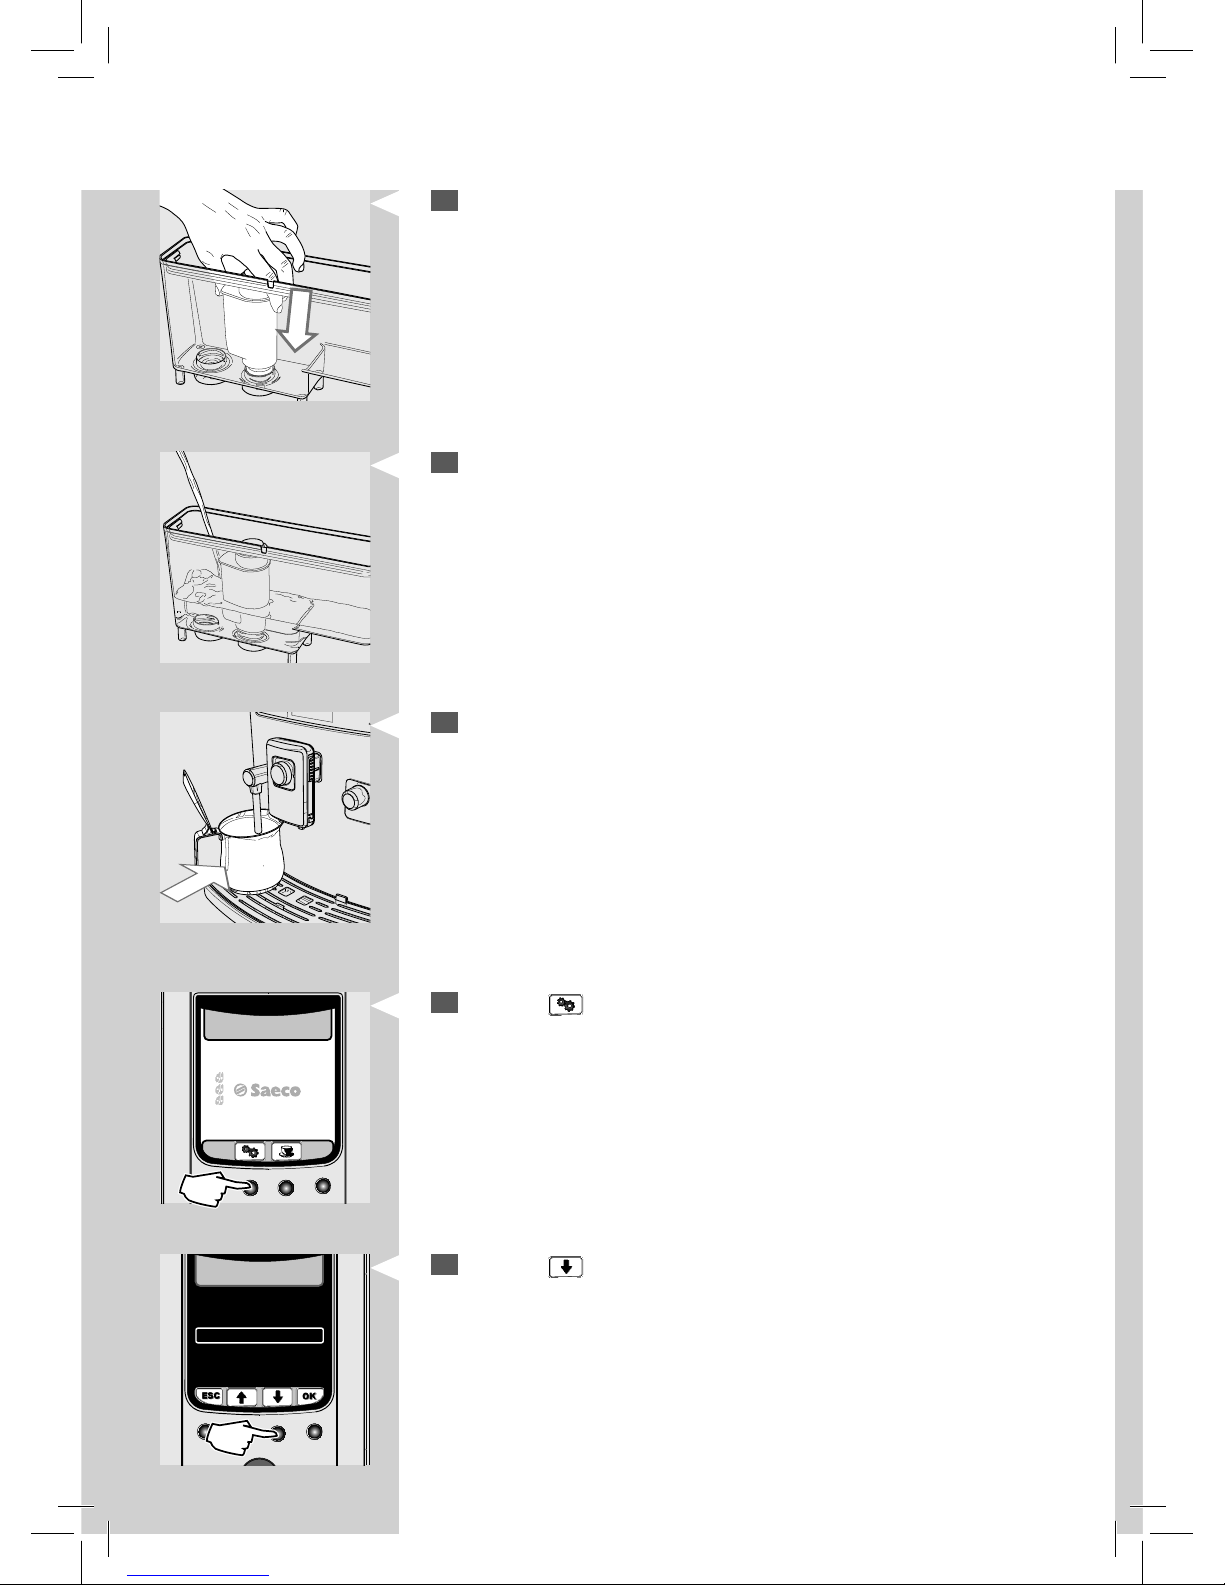
1
Remove the small white lter from the water tank and store it in a dry
place.
2
Remove the “INTENZA+” water lter from its packaging, immerse it ver-
tically (with the opening positioned upwards) in cold water and gently
press the sides so as to let the air bubbles out.
3
Set the lter according to the measurements performed (see previous
chapter) and indicated on the base of the lter:
A = soft water – equals 1 or 2 on the test strip
B = hard water (standard) – equals 3 on the test strip
C = very hard water – equals 4 on the test strip
Page 22
20
ENGLISH
5
Fill the water tank with fresh water up to the MAX level and put it back
into the machine.
6
Place a large container (1,5 l) under the steam/hot water wand.
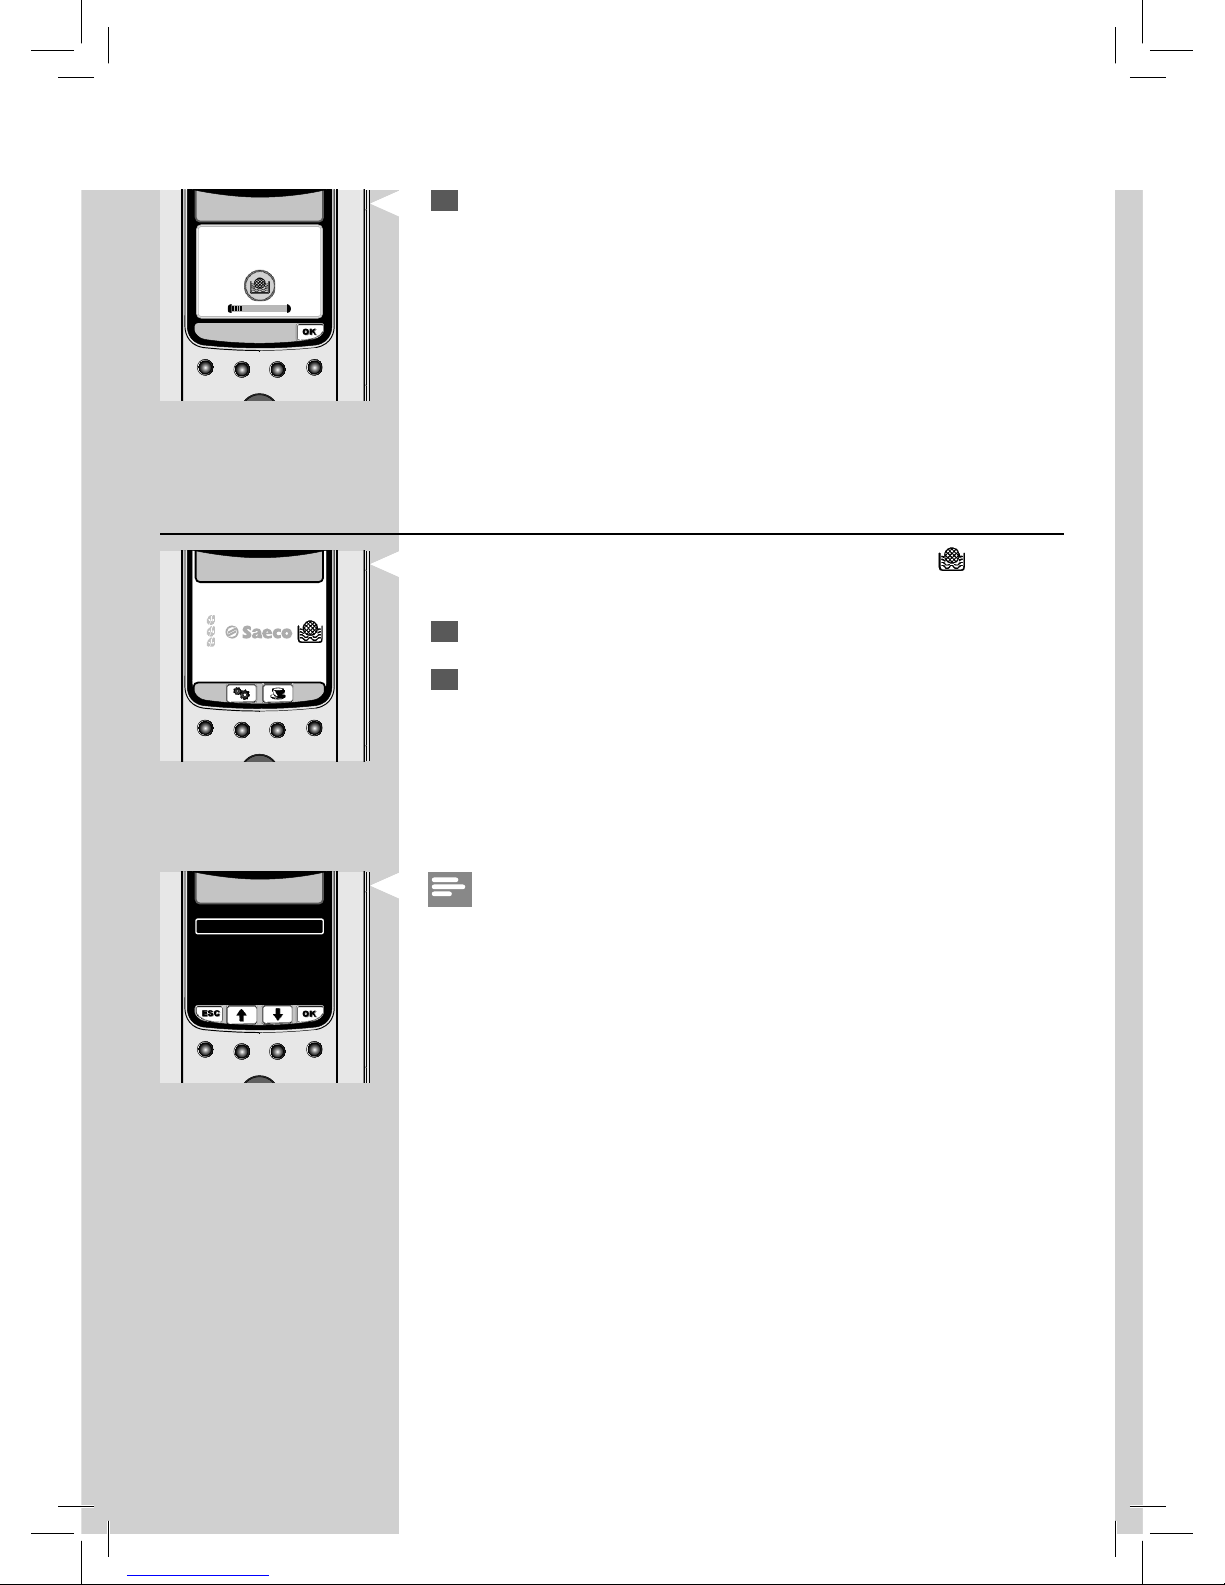
7
Press the “ ” button to access the machine main menu.
8
Press the “ ” button to select “WATER SETTINGS”.
4
Insert the lter into the empty water tank. Press it down until it cannot
move any further.
15/01/15
10:38
GENERAL SETTINGS
DISPLAY SETTINGS
CALENDAR SETTINGS
WATER SETTINGS
MAINTENANCE SETTINGS
FACTORY SETTINGS
2. MACHINE SETTINGS
Page 23

21
ENGLISH
21
9
Press the
“ ”
button to con rm.
10
Press the “ ” button to select “ACTIVATE FILTER” and press the
“ ”
button to con rm.
11
Press the
“ ”
button to con rm the lter activation procedure.
12
Press the
“ ”
button to con rm that you have inserted the water
lter and lled the water tank.
13
Press the
“ ”
button to con rm that a container is placed under the
water dispensing spout.
WATER HARDNESS
ENABLE FILTER
ACTIVATE FILTER
3
OFF
2.4. WATER SETTINGS
GENERAL SETTINGS
DISPLAY SETTINGS
CALENDAR SETTINGS
WATER SETTINGS
MAINTENANCE SETTINGS
FACTORY SETTINGS
2. MACHINE SETTINGS
2.4.3. WATER SETTINGS
ACTIVATE FILTER?
ACTIVATE FILTER
INSERT WATER FILTER
AND FILL THE WATER TANK
ACTIVATE FILTER
PLACE A CONTAINER UNDER
THE HOT WATER SPOUT
Page 24
22
ENGLISH
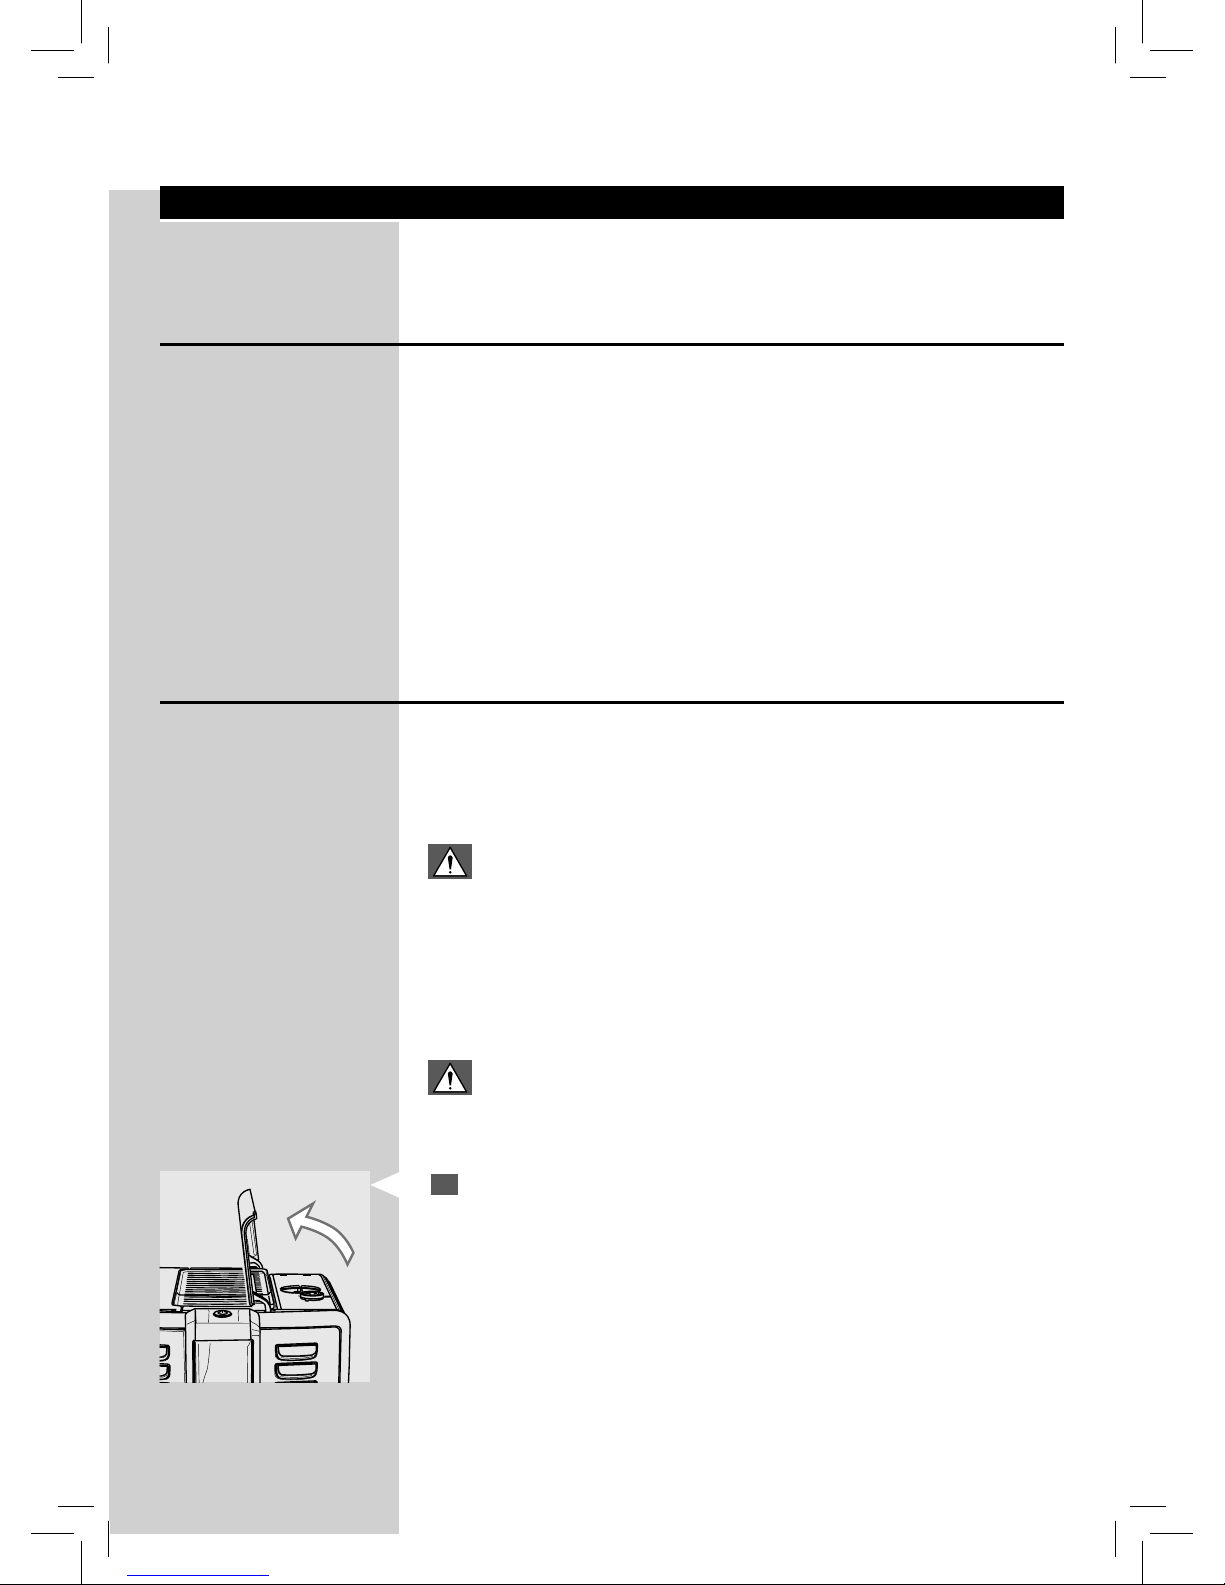
Replacing the “INTENZA+” Water Filter
When the “INTENZA+” water lter needs to be replaced, the “ ” icon is
displayed.
1
Replace the lter as described in the previous chapter.
2
The machine is now programmed to manage a new lter.
Note:
If the lter is already installed and you want to remove, but not replace it,
select the “ENABLE FILTER” option and set it on OFF.
If there is no “INTENZA+” water lter installed, insert the small white lter
previously removed into the water tank.
14
The machine starts dispensing water. This screen will be displayed. At
the end of the operation, remove the container.
ACTIVATE FILTER
15/01/15
10:38
3
OFF
WATER HARDNESS
ENABLE FILTER
ACTIVATE FILTER
2.4. WATER SETTINGS
Page 25
23
ENGLISH
23
ADJUSTMENTS
The machine allows for certain adjustments so that you can brew the best
tasting co ee possible.
Saeco Adapting System
Co ee is a natural product and its characteristics may change according to
its origin, blend and roast. The machine is equipped with a self-adjusting
system allowing you to use all types of co ee beans available on the market (except for caramelized beans).
The machine automatically adjusts itself after brewing several cups of
co ee in order to optimise extraction in relation to the compactness of
ground co ee.
Adjusting the Ceramic Co ee Grinder
Ceramic co ee grinders always guarantee accurate and perfect grinding
and coarseness for every co ee speciality.
This technology provides full aroma preservation, delivering a truly Italian
taste in every cup.
Warning:
The ceramic co ee grinder contains moving parts that may be dangerous. Do not insert ngers or other objects. Only adjust the ceramic
co ee grinder using the grinder adjustment key.
You can adjust the ceramic grinders to set co ee grinding to your personal
taste.
Warning:
You can only adjust the co ee grinder settings when the machine is
grinding co ee beans.
1
Lift the co ee bean hopper lid.
Page 26
24
ENGLISH
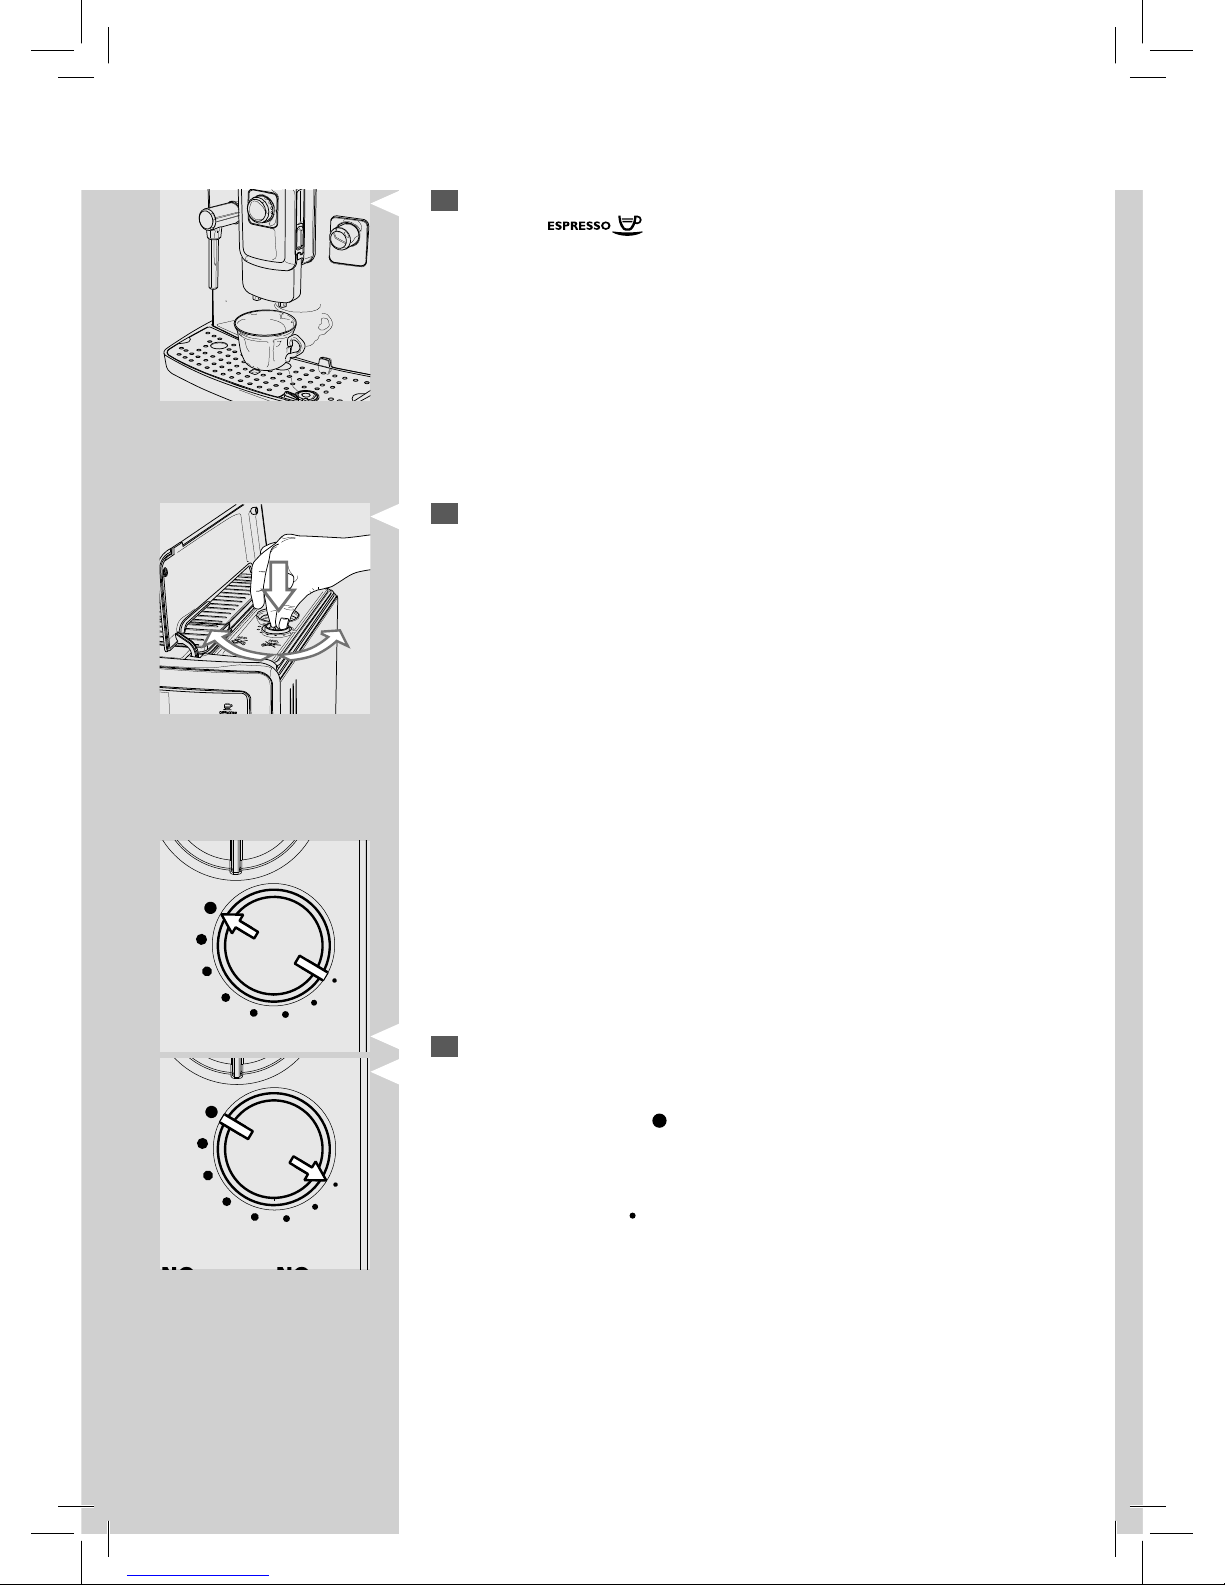
2
Place a cup under the dispensing spout.
Press the “
” button to brew an espresso.
3
Press and turn the grinder adjustment knob one notch at a time. You
will taste the di erence after brewing 2-3 cups of espresso.
4
The reference marks on the co ee bean hopper lid indicate the grind
setting. There are 8 di erent grind settings to choose from, from:
- very coarse grind (
): lighter taste, for dark roasted co ee blends;
to:
- very ne grind (
): stronger taste, for light roasted co ee blends.
When you adjust the ceramic co ee grinder to a ner setting, your co ee
will taste stronger. For a lighter co ee taste, adjust the ceramic co ee
grinder to a coarser setting.
Page 27
25
ENGLISH
25
Adjusting the Crema and Co ee Strength (Saeco Brewing System)
The Saeco Brewing System (SBS) allows you to customize the co ee crema
and avour intensity by adjusting the co ee brewing speed.
- Turn the knob counter-clockwise to increase the ow rate: co ee
becomes lighter and has less crema.
- Turn the knob clockwise to decrease the ow rate: co ee becomes
stronger and has more crema.
Note:
The ow rate can be adjusted while brewing co ee.
Adjusting the Aroma (Co ee Strength)
Choose your favourite co ee blend and adjust the amount of co ee to be
ground according to your own taste. You can also select the pre-ground
co ee function.
Note:
Selection must be made prior to selecting co ee.
The machine allows you to set the right quantity of ground co ee for each
product. The standard adjustment for each product can be set in the “BEV-
ERAGE MENU” (see the “Beverage Programming” chapter, “Co ee Amount”
option).
1.4. CAPPUCCINO
COFFEE AMOUNT
PREBREWING
COFFEE TEMPERATURE
COFFEE LENGTH
MILK LENGTH
MILK FOAM
RESTORE DEFAULT VALUES
Page 28
26
ENGLISH
Adjusting the Dispensing Spout
The height of the dispensing spout can be adjusted to better t the size of
the cups that you wish to use.
Move the dispensing spout up or down with your ngers to adjust its
height as shown in the gure.
The recommended positions are:
For small cups;
1
To temporarily change the amount of ground co ee, press the
“ ”
button on the control panel.
2
The aroma changes by one degree, according to the selected amount:
= mild dose
= medium dose
= strong dose
= the beverage is brewed using pre-ground co ee
Note:
This adjustment is not available for American co ee.
10:38
Page 29
27
ENGLISH
27
For large cups;
For Latte Macchiato cups.
Note:
The dispensing spout can also be removed to allow you to use large containers.
Two cups can be placed under the dispensing spout to brew two co ees at
the same time.
Adjusting the Co ee Length
The machine allows you to adjust the amount of brewed co ee or milk according to your taste and the size of your cups.
Each time the “ ”, “ ” and “ ” buttons are pressed,
the machine brews a pre-set amount of product. Each button may be
individually programmed for a speci c brew setting.
The following procedure describes how to program the “ ” button.
1
Place a cup under the dispensing spout.
Page 30

28
ENGLISH
3
When the
“ ”
icon is displayed, press the button as soon as the
desired amount of co ee is reached.
The “
” button is now programmed; each time it is pressed,
the machine will brew the same amount of espresso that was just programmed.
Note:
Follow the same procedure to program the “ ” and “ ” buttons.
Always use the
“ ”
button to stop brewing when the desired amount of
co ee is reached.
You can also adjust the beverage length through the “BEVERAGE MENU”
(see the “Beverage Programming” chapter, “Co ee Length” option).
2
Press and hold the “ ” button until the “ ” icon is displayed.
Then release the button. The machine is now in programming mode.
The machine starts brewing co ee.
BREWING ESPRESSO AND LONG ESPRESSO
Before brewing co ee, make sure that there are no warnings shown on the
display and that the water tank and the co ee bean hopper are lled.
Brewing Espresso and Long Espresso Using Co ee Beans
1
Place 1 or 2 cups under the dispensing spout.
Page 31

29
ENGLISH
29
2
Press the “ ” button for an espresso, the “ ” button for
a co ee or the “
” button for a long co ee.
3
To brew 1 espresso, 1 co ee or 1 long co ee, press the desired button
once. This screen will be displayed.
4
To brew 2 cups of espresso, 2 cups of co ee or 2 cups of long co ee,
press the desired button twice consecutively. This screen will be displayed.
Note:
In this operating mode, the machine automatically grinds and doses the
proper amount of co ee. Brewing two cups of espresso requires two grinding and brewing cycles, automatically carried out by the machine.
5
After the prebrewing cycle, co ee begins to pour out of the dispensing
spout.
6
Co ee brewing automatically stops when the set level is reached;
however, you can stop it earlier by pressing the
“ ”
button.
ESPRESSO
DOUBLE ESPRESSO
Page 32

30
ENGLISH
Brewing Espresso and Long Espresso Using Pre-Ground Co ee
This function allows you to use pre-ground and deca einated co ee.
With the pre-ground co ee function you can only brew one co ee at a
time.
1
To select the pre-ground co ee function, press the
“ ”
button until
the
“ ”
icon is displayed.
2
Place a cup under the dispensing spout.
3
Press the “ ” button for an espresso, the “ ” button
for a co ee or the “
” button for a long co ee. The brewing cycle
starts.
4
This screen is displayed.
INSERT GROUND COFFEE
AND SELECT OK
LONG COFFEE
Page 33

31
ENGLISH
31
5
Apply some pressure to open the pre-ground co ee compartment lid.
INSERT GROUND COFFEE
AND SELECT OK
LONG COFFEE
6
Add one measuring scoop of pre-ground co ee into the compartment.
Use only the measuring scoop supplied with the machine. Then close
the pre-ground co ee compartment lid.
Warning:
Add only pre-ground co ee to the pre-ground co ee compartment.
Other substances and objects may cause severe damage to the machine. This repair is not covered by your warranty!
7
Press
“ ”
to con rm and start brewing.
8
After the prebrewing cycle, co ee begins to pour out of the dispensing
spout.
9
Co ee brewing automatically stops when the set level is reached;
however, you can stop it earlier by pressing the
“ ”
button.
After brewing, the machine returns to the main menu.
Repeat the steps described above to brew more cups of co ee using preground co ee.
Note:
If the
“ ”
brew button is not pressed within 30 seconds, the machine will
return to the main menu and discharge any co ee into the co ee grounds
drawer.
If no pre-ground co ee is poured into the compartment, only water will be
dispensed.
If the dose is excessive or if 2 or more measuring scoops of co ee are used,
the machine will not brew the product. Any ground co ee is discharged
into the co ee grounds drawer.
Page 34

32
ENGLISH
MILK CARAFE
This chapter explains how to use the milk carafe to prepare a cappuccino, a
Latte Macchiato or hot milk.
Note:
Before using the milk carafe, clean it thoroughly as described in the “Cleaning and Maintenance” chapter.
We recommend lling it with cold milk (approx. 5°C). Put the carafe back
in the refrigerator after use. DO NOT leave milk out of the refrigerator for
more than 15 minutes.
Warning:
Only put milk or water for cleaning in the carafe.
Filling the Milk Carafe
The milk carafe must be lled before use.
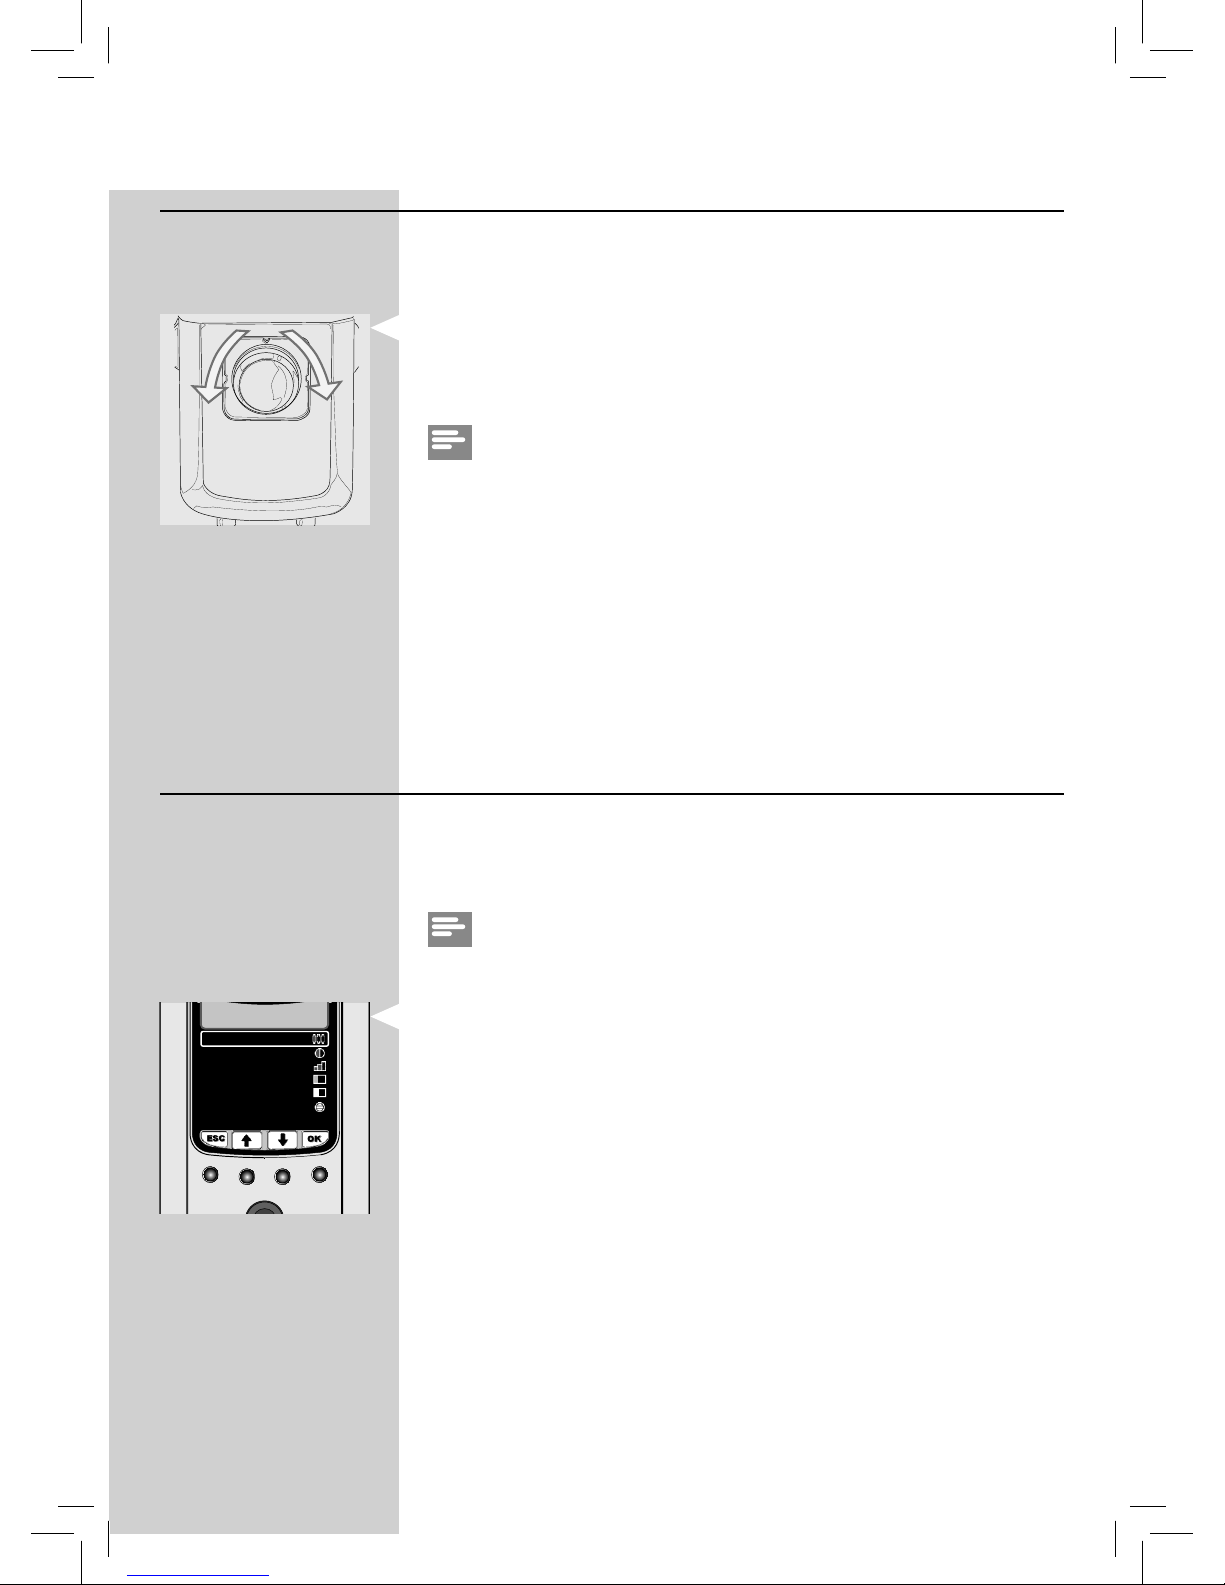
1
Open the milk carafe dispensing spout by turning it clockwise until it
locks into place.
2
Press the release buttons and lift the lid.
3
Pour milk into the carafe: the milk level must be between the minimum
(MIN) and maximum (MAX) level indicators shown on the carafe.
Page 35

33
ENGLISH
33
4
Re t the lid and close the milk carafe dispensing spout by turning it
counter-clockwise.
The milk carafe is now ready for use.
Inserting the Milk Carafe
1
Slightly tilt the milk carafe and insert its front part into the machine.
C
D
A
B B
2
At this stage, the carafe holes (A) are lower than the couplings (C). The
pins (B) are located at the same height as the guides (D).
Page 36

34
ENGLISH
3
Push the carafe towards the bottom while rotating it at the same time
until it is locked onto the (external) drip tray (E).
Caution:
Do not force the carafe while inserting it.
Removing the Milk Carafe
1
Close the milk carafe dispensing spout by turning it counter-clockwise.
Wait a few seconds. The machine starts the automatic cleaning cycle
(see the "Cleaning and Maintenance" chapter).
E
2
After the cleaning cycle, turn the milk carafe upwards until it is released
from the (external) drip tray (E).
3
Pull the carafe away from the machine until it is completely detached.
E
Page 37

35
ENGLISH
35
Emptying the Milk Carafe
1
Open the milk carafe dispensing spout by turning it clockwise.
3
Lift the lid. Empty the milk carafe and clean it properly.
Note:
After each use, clean the milk carafe as described in the “Cleaning and
Maintenance” chapter.
2
Press the release buttons.
Page 38

36
ENGLISH
BREWING A CAPPUCCINO
Warning:
Danger of burning! Dispensing may be preceded by jets of milk and
steam.
Never seize the carafe handle during the cleaning cycle: danger of
burning! Wait until the end of the cycle before removing the milk
carafe.
4
Open the milk carafe dispensing spout by turning it clockwise.
1
Fill the carafe with milk. The milk level must be between the minimum
(MIN) and maximum (MAX) level indicators shown on the carafe.
Note:
Use cold (~5 °C / 41°F) milk with a protein content of at least 3% to ensure
optimum results when preparing a cappuccino. Whole milk or skimmed
milk may be used, depending on individual taste.
2
Re t the lid and insert the milk carafe into the machine.
3
Place a cup under the co ee dispensing spout.
Page 39

37
ENGLISH
37
5
Press the “ ” button to start dispensing.
6
The machine is warming up.
Note:
If the “ECOMODE” function is activated, the machine requires a longer
waiting time for warm-up.
If the
“ ”
button is pressed, the “ECOMODE” function is deactivated and
set to “OFF”. In this case, the system requires a shorter waiting time for
warm-up but has a higher energy consumption.
For further details, please refer to the “Machine Programming” chapter.
Note:
Milk dispensing can be increased by pressing the
“ ”
button. The extra
amount of hot milk dispensed has no froth.
7
When this screen is displayed, the machine starts dispensing milk froth.
Dispensing can be stopped earlier by pressing the
“ ”
button.
CAPPUCCINO
ECO MODE ON
CAPPUCCINO
CAPPUCCINO
Page 40

38
ENGLISH
Adjusting the Cappuccino Length
Each time the “ ” button is pressed, the machine dispenses a preset quantity of cappuccino into the cup.
The machine allows you to adjust the amount of cappuccino according to
your taste and the size of your cups.
1
Fill the carafe with milk and place it into the machine.
2
Place a cup under the dispensing spout and open the carafe dispens-
ing spout by rotating it clockwise.
3
Press and hold the “ ” button until the “ ” icon is displayed.
Then release the button.
The machine is now in programming mode.
9
Remove the cup and close the milk dispensing spout by turning it
counter clockwise.
10
Wait for a few seconds. The machine starts the automatic cleaning
cycle (see the "Cleaning and Maintenance" chapter).
11
Wait until the end of the cleaning cycle, remove the milk carafe and
place it in the refrigerator.
8
Once the milk froth has been dispensed, the machine brews co ee.
Brewing can be stopped earlier by pressing the
“ ”
button.
CAPPUCCINO
Page 41

39
ENGLISH
39
4
The machine is warming up.
CAPPUCCINO
CAPPUCCINO
ECO MODE ON
5
When this screen is displayed, the machine starts dispensing milk froth
into the cup. Press the
“
” button as soon as the desired amount of
milk is reached.
6
Once the milk froth has been dispensed, the machine starts brewing
co ee. When the desired amount of co ee is reached, press the
“ ”
button.
The “
” button is now programmed. Each time it is pressed, the
machine will brew the same amount that was just programmed.
Note:
You can also adjust the beverage length through the “BEVERAGE MENU”
(see the “Beverage Programming” chapter).
CAPPUCCINO
Page 42

40
ENGLISH
DISPENSING LATTE MACCHIATO
Warning:
Danger of burning! Dispensing may be preceded by jets of milk and
steam.
Never seize the carafe handle during the cleaning cycle: danger of
burning! Wait until the end of the cycle before removing the milk
carafe.
1
Fill the carafe with milk. The milk level must be between the minimum
(MIN) and maximum (MAX) level indicators shown on the carafe.
Note:
Use cold (~5 °C / 41°F) milk with a protein content of at least 3% to ensure optimum results when preparing a Latte Macchiato. Whole milk or
skimmed milk may be used, depending on individual taste.
2
Re t the lid and insert the milk carafe into the machine.
3
Place a cup under the co ee dispensing spout.
Page 43

41
ENGLISH
41
4
Open the milk carafe dispensing spout by turning it clockwise.
5
Press the “ ” button to start dispensing.
6
The machine is warming up.
Note:
If the ECOMODE function is activated, the machine requires a longer
waiting time for warm-up. If the
“
” button is pressed, the ECOMODE
function is deactivated and set to “OFF”. In this case, the system requires a
shorter waiting time for warm-up but has a higher energy consumption.
For further details, please refer to the “Machine Programming” chapter.
LATTE MACCHIATO
ECO MODE ON
LATTE MACCHIATO
7
When this screen is displayed, the machine starts dispensing milk froth.
Dispensing can be stopped earlier by pressing the
“ ”
button.
Page 44

42
ENGLISH
Note:
Milk dispensing can be increased by pressing the
“
” button. The extra
amount of hot milk dispensed has no froth.
8
Once the milk froth has been dispensed, the machine brews co ee.
Brewing can be stopped earlier by pressing the
“ ”
button.
9
Remove the cup and close the milk dispensing spout by turning it
counter clockwise.
10
Wait for a few seconds. The machine starts the automatic cleaning
cycle (see the "Cleaning and Maintenance" chapter).
11
Wait until the end of the cleaning cycle, remove the milk carafe and
place it in the refrigerator.
Adjusting the Latte Macchiato Length
Each time the “ ” button is pressed, the machine brews a pre-set
quantity of Latte Macchiato into the cup.
The machine allows you to adjust the amount of Latte Macchiato according to your taste and the size of your cups.
1
Fill the carafe with milk and place it into the machine.
2
Place a cup under the dispensing spout and open the carafe dispens-
ing spout by rotating it clockwise.
3
Press and hold the “ ” button until the
“ ” icon is displayed
.
Then release the button. The machine is now in programming mode.
LATTE MACCHIATO
LATTE MACCHIATO
Page 45

43
ENGLISH
43
4
The machine is warming up.
5
When this screen is displayed, the machine starts dispensing milk froth
into the cup. Press the
“
” button as soon as the desired amount of
milk is reached.
6
Once the milk froth has been dispensed, the machine starts brewing
co ee. When the desired amount of co ee is reached, press the
“ ”
button.
The “
” button is now programmed. Each time it is pressed, the
machine will brew the same amount that was just programmed.
Note:
You can also adjust the beverage length through the “BEVERAGE MENU”
(see the “Beverage Programming” chapter).
LATTE MACCHIATO
ECO MODE ON
LATTE MACCHIATO
LATTE MACCHIATO
Page 46

44
ENGLISH
DISPENSING HOT MILK
Warning:
Danger of burning! Dispensing may be preceded by jets of milk and
steam.
Never seize the carafe handle during the cleaning cycle: danger of
burning! Wait until the end of the cycle before removing the milk
carafe.
1
Fill the carafe with milk. The milk level must be between the minimum
(MIN) and maximum (MAX) level indicators shown on the carafe.
Note:
Use cold (~5 °C / 41°F) milk with a protein content of at least 3% to ensure
optimum results when preparing a hot milk. Whole milk or skimmed milk
may be used, depending on individual taste.
2
Re t the lid and insert the milk carafe into the machine.
3
Place a cup under the co ee dispensing spout.
Page 47

45
ENGLISH
45
4
Open the milk carafe dispensing spout by turning it clockwise.
5
Press the “ ” button to start dispensing.
6
The machine is warming up.
Note:
If the ECOMODE function is activated, the machine requires a longer
waiting time for warm-up. If the
“
” button is pressed, the ECOMODE
function is deactivated and set to “OFF”. In this case, the system requires a
shorter waiting time for warm-up but has a higher energy consumption.
For further details, please refer to the “Machine Programming” chapter.
7
When this screen is displayed, the machine starts dispensing milk.
Dispensing can be stopped earlier by pressing the
“ ”
button.
HOT MILK
ECO MODE ON
HOT MILK
Page 48

46
ENGLISH
Note:
Milk dispensing can be increased by pressing the
“ ”
button. The extra
amount of hot milk dispensed has no froth.
8
Remove the cup and close the milk dispensing spout by turning it
counter clockwise.
9
Wait for a few seconds. The carafe starts the automatic cleaning cycle
(see the "Cleaning and Maintenance" chapter).
10
Wait until the end of the cleaning cycle, remove the milk carafe and
place it in the refrigerator.
Adjusting the Hot Milk Length
Each time the “ ” button is pressed, the machine dispenses a preset quantity of hot milk into the cup.
The machine allows you to adjust the amount of hot milk according to your
taste and the size of your cups.
1
Fill the carafe with milk and place it into the machine.
2
Place a cup under the dispensing spout and open the carafe dispens-
ing spout by rotating it clockwise.
3
Press and hold the “ ” button until the “ ” icon is displayed.
Then release the button. The machine is now in programming mode.
HOT MILK
Page 49

47
ENGLISH
47
4
The machine is warming up.
5
The “ ” icon is displayed. When this screen is displayed, the machine
starts dispensing milk into the cup. Press the
“
” button as soon as
the desired amount of milk is reached.
The “
” button is now programmed. Each time it is pressed, the
machine will brew the same amount that was just programmed.
Note:
You can also adjust the beverage length through the “BEVERAGE MENU”
(see the “Beverage Programming” chapter).
HOT MILK
ECO MODE ON
HOT MILK
DISPENSING STEAM
Warning:
Danger of burning! Dispensing may be preceded by small jets of hot
water and steam. Do not touch the steam/hot water wand with bare
hands.
1
Place a container under the steam/hot water wand.
Page 50

48
ENGLISH
2
Press the “ ” button.
3
Press the “ ” button to start dispensing steam.
5
Steam dispensing starts. Dispensing can be stopped by pressing the “ ”
button.
6
After dispensing steam, remove the container with the heated bever-
age.
SELECT
HOT WATER OR STEAM
15/01/15
10:38
STEAM
STEAM
4
This icon is displayed during the preheating time required by the
machine.
Page 51

49
ENGLISH
49
DISPENSING HOT WATER
Warning:
Danger of burning! Dispensing may be preceded by small jets of hot
water. The steam/hot water wand may reach high temperatures: never
touch it with bare hands. Use the appropriate handle only.
Before dispensing hot water, make sure that the machine is ready to use
and that the water tank is lled.
1
Place a container under the steam/hot water wand.
2
Press the “ ” button.
SELECT
HOT WATER OR STEAM
15/01/15
10:38
3
Press the “ ” button to start dispensing hot water.
Page 52

50
ENGLISH
5
Dispense the desired amount of hot water. To stop hot water dispens-
ing, press the “
” button.
6
Remove the container.
HOT WATER
4
This icon is displayed during the preheating time required by the
machine.
HOT WATER
Page 53

51
ENGLISH
51
BEVERAGE PROGRAMMING
The machine can be programmed to tailor the co ee taste to your personal
preferences. Each beverage has its own adjustable settings.
1
Press the “ ” button to access the main beverage menu.
2
Press the “ ” or “ ” scrolling button and con rm by pressing “ ”
to select the beverage.
Cappuccino Programming
The following procedure describes how to program a cappuccino.
The settings of each submenu are explained below. You can select these by
pressing the “
” or “ ” scrolling button. Con rm the settings with “ ”.
Press “ ” to select CAPPUCCINO from the beverage menu.
COFFEE AMOUNT
This setting adjusts the amount of co ee to be ground.
= the beverage is brewed using pre-ground co ee
= mild dose
= medium dose
= strong dose
Press the “
” or “ ” scrolling button to select, then press the “ ”
button to con rm.
15/01/15
10:38
ESPRESSO
COFFEE
LONG COFFEE
CAPPUCCINO
LATTE MACCHIATO
HOT MILK
HOT WATER
1. BEVERAGE MENU
ESPRESSO
COFFEE
LONG COFFEE
CAPPUCCINO
LATTE MACCHIATO
HOT MILK
HOT WATER
1. BEVERAGE MENU
1.4. CAPPUCCINO
COFFEE AMOUNT
PREBREWING
COFFEE TEMPERATURE
COFFEE LENGTH
MILK LENGTH
MILK FOAM
RESTORE DEFAULT VALUES
Page 54

52
ENGLISH
PREBREWING
COFFEE TEMPERATURE
This setting enables the prebrewing function. During prebrewing, the coffee is slightly dampened to bring out the aroma in full.
: the prebrewing function is activated.
: the prebrewing function takes longer to enhance the co ee taste.
: the prebrewing function is not performed.
Press the “
” or “ ” scrolling button to select, then press the “ ”
button to con rm.
This setting allows you to adjust the co ee temperature.
: low temperature.
: medium temperature.
: high temperature.
Press the “
” or “ ” scrolling button to select, then press the “ ”
button to con rm.
COFFEE LENGTH
By adjusting the bar on the display with the “ ” or “ ” scrolling button,
you can choose the amount of water used for co ee brewing.
Press “ ” to con rm the adjustment.
By adjusting the bar on the display with the “
” or “ ” scrolling button,
you can choose the amount of milk to be used for the selected beverage.
Press “
” to con rm the adjustment.
Note:
The milk adjusting options are displayed for the milk-based beverages
only.
MILK LENGTH
COFFEE LENGTH
1.4.4
CAPPUCCINO
MILK LENGTH
1.4.4
CAPPUCCINO
Page 55

53
ENGLISH
53
You can reset the original factory settings for each beverage. Upon selection of this function, the customized settings are deleted.
To exit programming, press the “
” button at least once until the main
menu is displayed.
RESTORE DEFAULT VALUES
Hot Water Programming
The following procedure describes how to program hot water.
MILK FOAM
This section allows you to program the milk frothing method:
= minimum frothing
= medium frothing
= maximum frothing
= no frothing (only available for hot milk)
Press the “
” or “ ” scrolling button to select, then press the “ ”
button to con rm.
Note:
When the frothing option is disabled, the temperature of the dispensed
milk might be lower. Dispense steam from the steam wand to heat the
beverage.
1
Select “HOT WATER” from the beverage menu by pressing the “ ” or
“
” scrolling button. Press “ ” to con rm.
MILK FOAM
1.4.4
CAPPUCCINO
MINIMUM
NORMAL
MAXIMUM
COFFEE AMOUNT
PREBREWING
COFFEE TEMPERATURE
COFFEE LENGTH
MILK LENGTH
MILK FOAM
RESTORE DEFAULT VALUES
1.4. CAPPUCCINO
ESPRESSO
COFFEE
LONG COFFEE
CAPPUCCINO
LATTE MACCHIATO
HOT MILK
HOT WATER
1. BEVERAGE MENU
Page 56

54
ENGLISH
RESTORE DEFAULT VALUES
WATER LENGTH
By adjusting the bar on the display with the “ ” or “ ” scrolling button,
you can choose the amount of hot water to be dispensed.
Press “ ” to con rm the adjustment.
MACHINE PROGRAMMING
The machine allows you to customise the operating settings. These settings are applied to all user pro les.
1
Press the
“ ”
button to access the machine main menu.
Reset the original factory settings. Upon selection of this function, the
customized settings are deleted.
WATER LENGTH
1.7.1
HOT WATER
15/01/15
10:38
GENERAL SETTINGS
DISPLAY SETTINGS
CALENDAR SETTINGS
WATER SETTINGS
MAINTENANCE SETTINGS
FACTORY SETTINGS
2. MACHINE SETTINGS
Page 57

55
ENGLISH
55
General Settings
The general settings allow you to change the operation settings.
GENERAL SETTINGS
CUP WARMER
ECOMODE FUNCTION
ACOUSTIC TONE
This function allows you to activate/deactivate the heating of the cupwarming surface located on the upper part of the machine.
The ECOMODE FUNCTION allows you to save energy by keeping the
boiler activation level at one when starting up the machine. If you wish to
dispense more milk-based beverages, warm-up time may increase.
The function is set by default to ON.
This function allows you to activate/deactivate the acoustic alarms.
Page 58

56
ENGLISH
Display Settings
The display settings allow you to set the language and the display brightness.
DISPLAY SETTINGS
LANGUAGE
BRIGHTNESS
This setting is important to automatically adjust the machine parameters
according to the user's country.
This setting allows you to adjust the display brightness.
Page 59

57
ENGLISH
57
CALENDAR SETTINGS
TIME
DATE
STAND-BY SETTINGS
Calendar Settings
This function allows you to set the time, the calendar, the stand-by time
and the power-on timer.
To set the hour, minutes and time format (24h or AM/PM).
To set the year/month/day format.
The STAND-BY SETTINGS set the time lapse for the machine to go into
stand-by mode after the last brewing. The stand-by time ranges from 15,
30, 60 and 180 minutes.
The default time value is 15 minutes.
Page 60

58
ENGLISH
CALENDAR SETTINGS
POWER-ON TIMER
TIMER 1 00:00
TIMER 2 00:00
TIMER 3 00:00
HOUR 00
MINUTES 00
DAY OF THE WEEK
The power-on timer function automatically turns on the machine on the
day and time set by the user. The machine only performs this function if
the power button is in the “ON” position.
You can set 3 di erent power-on times, which can be managed independently.
Note:
The turn-o time can be set using the stand-by settings function.
This menu allows you to adjust and set the rst power-on time.
To set the hour for the power-on time.
To set the minutes for the power-on time.
To select the day of the week on which you wish to activate the
timer. Use the
“ ” or “ ”
button to select a day and press the
“
” button to con rm.
ON = time activated
OFF = time deactivated
This menu allows you to adjust and set the second power-on
time.
This menu allows you to adjust and set the third power-on time.
MONDAY
TUESDAY
WEDNESDAY
THURSDAY
FRIDAY
SATURDAY
SUNDAY
OFF
OFF
OFF
OFF
OFF
OFF
OFF
2.3.4.1.3. TIMER 1 00:00
Page 61

59
ENGLISH
59
Water Settings
The WATER SETTINGS function allows you to adjust the water parameters
for an optimal co ee.
WATER SETTINGS
WATER HARDNESS
ENABLE FILTER
ACTIVATE FILTER
Under WATER HARDNESS you can set the water hardness level.
For water hardness measuring, refer to the “Measuring and Programming
Water Hardness” chapter.
By enabling this lter, the machine noti es the user when the water lter
needs to be replaced.
OFF: warning disabled.
ON: warning enabled (this warning is automatically set when the lter is
activated).
To activate the lter after its installation or replacement. Refer to the “INTENZA+ Water Filter Installation” chapter.
Page 62

60
ENGLISH
Maintenance Settings
The MAINTENANCE SETTINGS function allows you to set all the functions
for proper machine maintenance.
MAINTENANCE SETTINGS
PRODUCT COUNTERS
DESCALING CYCLE
BREW GROUP CLEANING CYCLE
CARAFE WASH CYCLE
CARAFE AUTO CLEAN
The PRODUCT COUNTERS function shows how many products have been
brewed for every single type of co ee since the last reset.
The DESCALING CYCLE function activates the descaling cycle (see the
“Descaling” chapter).
The BREW GROUP CLEANING CYCLE function enables the monthly cleaning of the brew group (see the “Monthly Cleaning of the Brew Group with
Co ee Oil Remover” chapter).
The CARAFE WASH CYCLE function enables the monthly cleaning of the
milk carafe (see the “Monthly Cleaning of the Milk Carafe” chapter).
The CARAFE AUTO CLEAN function allows you to run the automatic selfcleaning cycle of the milk carafe. The function is set by default to ON.
Factory Settings
Activating the FACTORY SETTINGS option will restore all machine set-
tings to their default values. In this case, all customized parameters will be
deleted.
FACTORY SETTINGS
Page 63

61
ENGLISH
61
CLEANING AND MAINTENANCE
Daily Cleaning of the Machine
Caution:
Timely cleaning and maintenance of your machine is very important
as it prolongs the life of your machine. Your machine is continuously
exposed to moisture, co ee and limescale!
This chapter describes in detail which activities you need to perform
and how often you need to perform them. Not doing this will ultimately make your machine stop working properly. This repair is NOT
covered by warranty!
Note:
- Use a soft, dampened cloth to clean the machine.
- Do not wash any removable part in the dishwasher.
- Do not use alcohol, solvents and/or abrasive objects to clean the machine.
- Do not immerse the machine in water.
- Do not dry the machine and/or its components using a microwave
and/or standard oven.
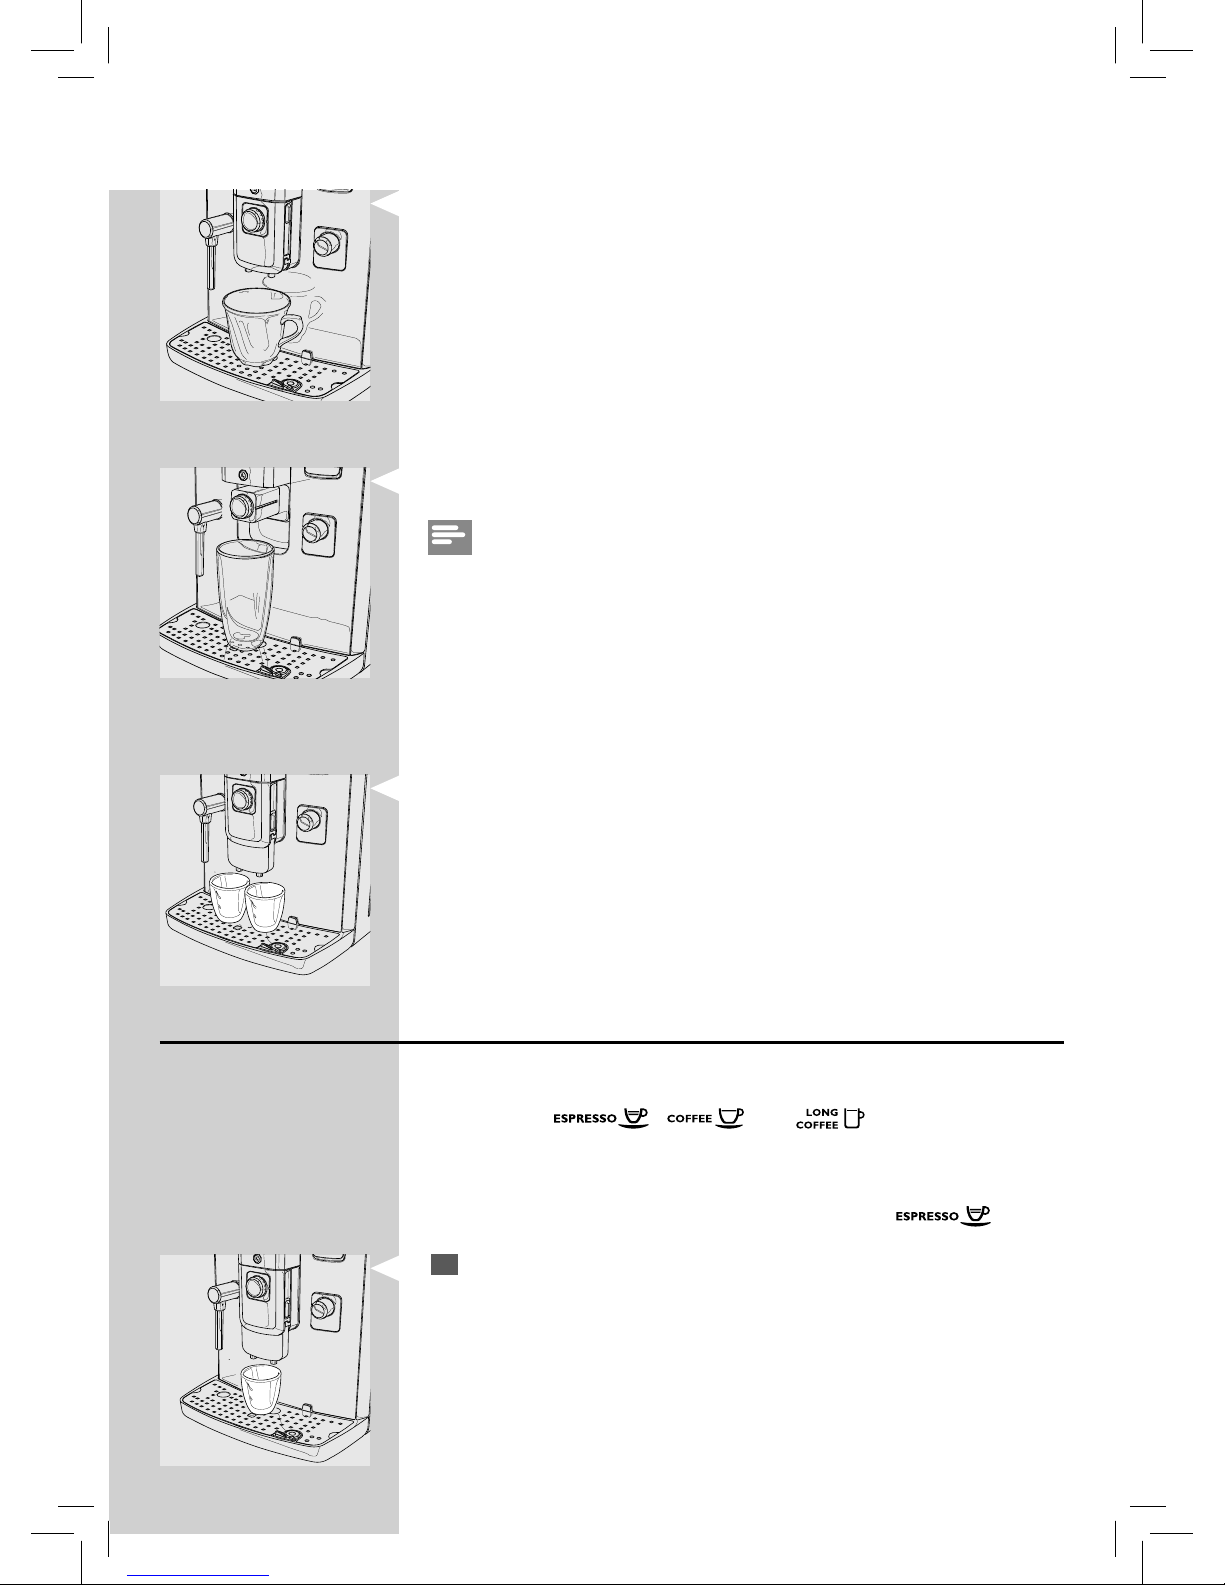
Empty and clean the co ee grounds drawer and the (internal) drip tray
every day with the machine turned on. Please follow the steps below:
1
Press the button and open the service door.
2
Remove the (internal) drip tray and co ee grounds drawer.
Page 64

62
ENGLISH
3
Empty the co ee grounds drawer and wash it with fresh water.
4
Empty the (internal) drip tray and the lid and wash them with fresh
water.
5
Correctly reinstall all the components.
6
Insert the drip tray and the co ee grounds drawer and close the ser-
vice door.
Note:
If the co ee grounds drawer is emptied when the machine is o , the co ee
grounds counter is not reset. In this case, the machine might display the
“EMPTY COFFEE GROUNDS DRAWER” message too soon.
Daily Cleaning of the Water Tank
1
Remove the small white lter or the “INTENZA+” water lter (if in-
stalled) from the water tank and wash it with fresh water.
2
Put the small white lter or the “INTENZA+” water lter (if installed)
back in its housing by gently pressing and turning it at the same time.
3
Fill the water tank with fresh water.
Page 65

63
ENGLISH
63
Daily Cleaning of the Milk Carafe: "CLEAN" Self-cleaning Cycle
(After Each Use)
After preparing a milk-based beverage, the machine performs an automatic cleaning cycle by releasing steam jets from the milk dispensing spout.
You can also activate this cycle manually by pressing the “
” button on
the control panel. You can perform this operation at any time.
1
Insert the milk carafe into the machine as described in the “Milk Carafe”
chapter. Close the milk dispensing spout.
2
Press the “ ” button to start the cleaning cycle.
Weekly Cleaning of the Machine
1
Turn o the machine and unplug it.
2
Remove the grill and wash it thoroughly.
Page 66

64
ENGLISH
3
Remove the support under the grill.
4
Remove the (external) drip tray. Wash the support and the drip tray.
5
Dry the grill, reassemble it and place it back in the machine.
6
Remove the dispensing spout and wash it with water.
7
Clean the steam/hot water wand and the display with a damp cloth.
Page 67

65
ENGLISH
65
Weekly Cleaning of the Milk Carafe
The weekly cleaning is more thorough as any milk residue is removed from
the carafe dispensing spout.
1
Before cleaning, remove the carafe from the machine and empty it.
2
Open the milk dispensing spout by turning it clockwise.
3
Press on the sides and lift the lid.
4
Rotate the handle counter-clockwise to the unlock position up to the
“
” icon.
Page 68

66
ENGLISH
5
Remove the connector which comes into contact with the machine.
6
Remove the handle with the suction tube.
7
Remove the suction tube.
Note:
Make sure that the suction tube is fully inserted. If it is not, the carafe may
not work correctly as it cannot draw up milk.
8
Remove the external tting.
9
Remove the internal tting.
10
Clean all the parts thoroughly with lukewarm water.
11
Reassemble the parts following the same procedure, but in reverse
order.
Caution:
Do NOT wash the carafe components in the dishwasher.
Page 69

67
ENGLISH
67
Weekly Cleaning of the Brew Group
The brew group should be cleaned every time the co ee bean hopper is
lled or at least once a week.
1
Press the button and open the service door.
2
Remove the (internal) drip tray and co ee grounds drawer.
3
To remove the brew group, press the «PUSH» button and pull it by the
handle.
4
Clean the co ee outlet duct thoroughly with a spoon handle or with
another round-tipped kitchen utensil.
Page 70

68
ENGLISH
8
Make sure that the brew group is in the o position; the two reference
marks must match. If they do no match, proceed as described in step
(9).
5
Thoroughly wash the brew group with fresh, lukewarm water and care-
fully clean the upper lter.
Caution:
Do not use any detergent or soap to clean the brew group.
6
Let the brew group air-dry thoroughly.
7
Thoroughly clean the inside of the machine using a soft, dampened
cloth.
9
Gently pull down the lever until it is in contact with the brew group
base and the two reference marks on the side of the brew group
match.
10
Press the “PUSH” button rmly.
Page 71

69
ENGLISH
69
11
Make sure that the hook which locks the brew group is in the correct
position. If it is still in the downward position, push it upward until it
locks correctly into place.
12
Insert the brew group back into its seat until it locks into place without
pressing the “PUSH” button.
13
Insert the (internal) drip tray and the co ee grounds drawer and close
the service door.
Page 72

70
ENGLISH
Monthly Cleaning of the Milk Carafe
In the monthly cleaning cycle we recommend using the “Saeco Milk Circuit
Cleaner” to keep the entire circuit clean of milk residues. The Milk Circuit
Cleaner can be purchased separately. For further details, please refer to the
maintenance products page.
Warning:
Danger of burning! Dispensing may be preceded by small jets of hot
water and steam. Danger of burning. Do not touch the steam/hot
water wand with bare hands.
3
Press the “ ” button to con rm.
4
Fill the water tank with fresh water up to the MAX level. Press the “ ”
button.
1
Select the “MAINTENANCE SETTINGS” option from the “MACHINE
SETTINGS” menu.
2
Select “CARAFE WASH CYCLE” and press the “ ” button to con rm.
PRODUCT COUNTERS
DESCALING CYCLE 118(l)
BREW GROUP CLEANING CYCLE
CARAFE WASH CYCLE
CARAFE AUTO CLEAN ON
2.5. MAINTENANCE SETTINGS
2.5.4. MAINTENANCE SETTINGS
START MILK CARAFE
WASH CYCLE?
REFILL WATER TANK
CARAFE WASH CYCLE
Page 73

71
ENGLISH
71
5
Fill the milk carafe with fresh drinking water up to the MAX level. Pour
one milk cleaner bag into the milk carafe and let it dissolve completely.
6
Put the lid back on.
7
Rotate the milk dispensing spout counter-clockwise to the lock posi-
tion.
8
Insert the milk carafe into the machine.
Page 74

72
ENGLISH
9
Place a large container (1.5l) under the dispensing spout. Open the
milk dispensing spout by turning it clockwise.
10
Press the “ ” button to start the cycle. The machine starts dispensing
the solution through the milk dispensing spout.
11
This icon is displayed. The bar shows the cycle progress.
Warning:
Never drink the solution dispensed during this step.
12
When the machine stops dispensing, ll the tank with fresh water up to
the MAX level. Press the “
” button to con rm.
13
Remove the milk carafe and the container from the machine.
POUR THE DETERGENT INTO
THE CARAFE AND FILL THE
CARAFE WITH FRESH WATER
CARAFE WASH CYCLE
REFILL WATER TANK
CARAFE WASH CYCLE
STEP 1/2
WASH CYCLE…
CARAFE WASH CYCLE
Page 75

73
ENGLISH
73
14
Wash the milk carafe thoroughly and ll it with fresh water. Insert the
milk carafe into the machine. Press the “
” button to con rm.
15
Empty the container and place it back under the co ee dispensing
spout. Open the milk dispensing spout by turning it clockwise.
FILL THE MILK CARAFE
WITH FRESH WATER
CARAFE WASH CYCLE
STEP 2/2
RINSING CYCLE...
CARAFE WASH CYCLE
16
The machine starts dispensing water from both the co ee dispensing
spout and the milk dispensing spout. The bar shows the cycle progress.
17
At the end of the cycle, the machine returns to the product brewing
menu.
18
Disassemble and wash the milk carafe as described in the “Weekly
Cleaning of the Milk Carafe” chapter.
Page 76

74
ENGLISH
Monthly Lubrication of the Brew Group
Lubricate the brew group after approximately 500 cups of co ee or once a
month.
You can purchase the Saeco grease to lubricate the brew group separately.
For further details, please refer to the maintenance products page in this
user manual.
Caution:
Before lubricating the brew group, clean it with fresh water and dry it
as described in the “Weekly Cleaning of the Brew Group” chapter.
1
Apply the lubricant evenly on both side guides.
2
Also lubricate the shaft.
3
Insert the brew group into its seat until it locks into place (see the
“Weekly Cleaning of the Brew Group” chapter).
4
Insert the (internal) drip tray and the co ee grounds drawer and close
the service door.
Page 77

75
ENGLISH
75
Monthly Cleaning of the Brew Group with “Co ee Oil Remover”
Besides weekly cleaning, we recommend performing a cleaning cycle
with “Co ee Oil Remover” after approximately 500 cups of co ee or once
a month. This operation completes the maintenance process for the brew
group.
You can purchase the “Co ee Oil Remover” and the “Maintenance Kit” separately. For further details, please refer to the maintenance products page.
Caution:
The “Co ee Oil Remover” tablets are to be used for cleaning only and
do not have a descaling function. For descaling, use the Saeco descaling solution and follow the procedure described in the “Descaling”
chapter.
1
Select the “MAINTENANCE SETTINGS” option from the “MACHINE
SETTINGS” menu.
2
Select “BREW GROUP CLEANING CYCLE”. Press the “ ” button.
PRODUCT COUNTERS
DESCALING CYCLE 118(l)
BREW GROUP CLEANING CYCLE
CARAFE WASH CYCLE
CARAFE AUTO CLEAN ON
2.5. MAINTENANCE SETTINGS
2.5.3. MAINTENANCE SETTINGS
PERFORM BREW GROUP
CLEANING CYCLE?
REFILL WATER TANK
BREW GROUP CLEANING CYCLE
3
Press the “ ” button to con rm.
4
Fill the water tank with fresh water up to the MAX level. Press the “ ”
button.
Page 78

76
ENGLISH
5
Put a “Co ee Oil Remover” tablet in the pre-ground co ee compart-
ment. Press the “
” button.
6
Place a container (1.5 l) under the co ee dispensing spout.
Press the “
” button to start the cleaning cycle.
Note:
Turn the SBS dial counter-clockwise to the left before starting the cycle.
7
This icon is displayed. The bar shows the cycle progress.
Warning:
Never drink the solution dispensed during this step.
INSERT BREW GROUP
CLEANING TABLET
BREW GROUP CLEANING CYCLE
Page 79

77
ENGLISH
77
8
When the machine stops dispensing, remove and empty the container.
9
Clean the brew group as described in the “Weekly Cleaning of the Brew
Group” chapter.
Monthly Cleaning of the Co ee Bean Hopper
Clean the co ee bean hopper once a month when it is empty with a damp
cloth to remove co ee oil. Then re ll it with co ee beans.
Page 80

78
ENGLISH
DESCALING
When the icon is displayed, you need to descale the machine.
The descaling cycle takes approx. 25 minutes.
Caution:
Not doing this will ultimately make your machine stop working properly. In this case, repair is NOT covered by warranty.
Warning:
Use the Saeco descaling solution only. Its formula has been designed
to ensure better machine performance. The use of other products may
damage the machine and leave residues in the water.
The Saeco descaling solution can be purchased separately. For further
details, please refer to the maintenance products page in this user manual.
Warning:
Never drink the descaling solution or any products dispensed until the
cycle has been carried out to the end. Never use vinegar as a descaling
solution.
Note:
Do not remove the brew group during the descaling process.
To perform the descaling cycle, follow the steps below.
1
Select the “MAINTENANCE SETTINGS” option from “MACHINE SET-
TINGS” and con rm by pressing “
”.
2
Select “DESCALING CYCLE” and con rm by pressing “ ”.
Note:
If you press the “
” button by mistake, press the “ ” button to quit.
15/01/15
10:38
PRODUCT COUNTERS
DESCALING CYCLE 118(l)
BREW GROUP CLEANING CYCLE
CARAFE WASH CYCLE
CARAFE AUTO CLEAN ON
2.5. MAINTENANCE SETTINGS
Page 81

79
ENGLISH
79
3
Press the “ ” button to con rm.
2.5.2. MAINTENANCE SETTINGS
START DESCALING
CYCLE?
REFILL WATER TANK
WITH DESCALING SOLUTION
DESCALING CYCLE
EMPTY DRIP TRAY PLACED
UNDER THE BREW GROUP
DESCALING CYCLE
6
Empty the drip tray (internal) / (external).
Press the “
” button.
4
Remove the water tank and the “INTENZA+” water lter (if any).
5
Pour in the entire content of the Saeco descaling solution. Fill the water tank with fresh water up to the MAX level. Press the
“ ”
button.
Page 82

80
ENGLISH
9
The machine will start dispensing the descaling solution at regular
intervals. The bar on the display shows the cycle progress.
Note:
Press the “
” button to empty the container during the process and to
pause the descaling cycle. To resume the cycle, press the “
” button.
10
The message indicates the end of the rst step. The water tank needs
to be rinsed. Fill the water tank with fresh water up to the MAX level.
Press the “
” button.
7
Fill half the milk carafe with fresh water. Insert the carafe and open the
milk dispensing spout by turning it clockwise. Press the “
” button.
8
Place a large container (1.5l) under both the steam/hot water wand
and the milk carafe dispensing spout. Press the “
” button.
FILL THE CARAFE HALFWAY
WITH FRESH WATER AND
INSERT IT IN BREWING
POSITION
DESCALING CYCLE
PLACE A CONTAINER UNDER
HOT WATER & CARAFE
DISP. SPOUTS
DESCALING CYCLE
STEP 1/2
DESCALING CYCLE...
DESCALING CYCLE
STEP 1/2
DESCALING CYCLE...
DESCALING CYCLE
Page 83

81
ENGLISH
81
11
Empty the (internal) drip tray and place it back. Then press the “ ”
button.
12
Empty the milk carafe and ll it with fresh water. Put it back into the
machine. Press the “
” button.
13
Empty the container and place it back under both the steam/hot water
wand and the milk carafe dispensing spout. Press the “
” button.
14
The rinse cycle starts. The bar shows the cycle progress.
EMPTY DRIP TRAY PLACED
UNDER THE BREW GROUP
DESCALING CYCLE
FILL THE CARAFE HALFWAY
WITH FRESH WATER AND
INSERT IT IN BREWING
POSITION
DESCALING CYCLE
PLACE A CONTAINER UNDER
HOT WATER & CARAFE
DISP. SPOUTS
DESCALING CYCLE
STEP 2/2
RINSING CYCLE...
DESCALING CYCLE
Note:
To empty the container during the process and to pause the rinse cycle,
press the “
” button. To resume the cycle, press the “ ” button.
Page 84

82
ENGLISH
20
The descaling cycle has been completed.
Note:
At the end of the descaling cycle, wash the brew group as described in the
“Weekly Cleaning of the Brew Group” chapter.
The rinse cycle is performed in order to have the circuit cleaned with a
preset amount of water to ensure proper machine performance. If the
water tank is not lled up to MAX level, the machine could require two or
more cycles.
15
When the amount of water needed for the rinse cycle has been
completely dispensed, the machine automatically ends the descaling
process by showing this display after a short warm-up phase.
16
Remove and empty the container.
17
Disassemble and wash the milk carafe as described in the “Weekly
Cleaning of the Milk Carafe” chapter.
18
Empty the (internal) drip tray and place it back.
19
Place the “INTENZA+” water lter (if installed) back into the water tank.
15/01/15
10:38
Page 85

83
ENGLISH
83
ACCIDENTAL INTERRUPTION OF THE DESCALING CYCLE
Once the descaling process has started, it must be completed; do not turn
o the machine mid-cycle.
If the machine stops, you can quit the cycle by pressing the ON/OFF button.
1
If this occurs, empty and rinse carefully the water tank, then ll it up to
the MAX level.
2
Follow the instructions provided in the "Manual Rinse Cycle" chapter
before brewing any beverage.
Note:
If the cycle was not completed, the machine will require another descaling
cycle to be performed as soon as possible.
Page 86

84
ENGLISH
MEANING OF THE DISPLAY
Displayed message Meaning of the message
CLOSE HOPPER DOOR
Close the co ee bean hopper inner lid.
ADD COFFEE
Fill the co ee bean hopper.
INSERT BREW GROUP
The brew group must be inserted into the machine.
INSERT GROUNDS DRAWER
AND DRIP TRAY
Insert the co ee grounds drawer and the internal drip tray.
EMPTY DRIP TRAY
AND COFFEE
GROUNDS DRAWER
Empty the co ee grounds drawer and the internal drip tray.
Note:
The co ee grounds drawer must be emptied only when the machine
requires it and with the machine on. If the drawer is emptied with the
machine turned o , the machine will not record the emptying operation.
CLOSE FRONT DOOR
Close the service door.
REFILL WATER TANK
Remove the water tank and ll it.
ROTATE THE MILK CARAFE
DISPENSING SPOUT
INTO BREWING POSITION
Open the milk carafe dispensing spout to brew products.
Press the “ESC” button to exit.
Page 87

85
ENGLISH
85
Displayed message Meaning of the message
ROTATE THE MILK CARAFE
DISPENSING SPOUT INTO
RINSING POSITION
Close the milk carafe dispensing spout to start the carafe cleaning cycle.
Press the “ESC” button to exit.
PLACE MILK CARAFE
IN ITS HOUSING
Insert the milk carafe to start dispensing. Press “ESC” to exit.
15/01/15
10:38
You need to descale the machine. Follow the steps described in the “Descaling” chapter of this manual.
Please note that not descaling your machine will ultimately make it stop
working properly. In this case, repair is NOT covered under your warranty.
15/01/15
10:38
The machine needs the “INTENZA+” water lter to be replaced.
The red light ashes. Press the “ ” button to exit the stand-by mode.
RESTART TO SOLVE
THE PROBLEM
E XX
Take note of the code (E xx) displayed in the right bottom corner.
Turn o the machine. Turn it back on after 30 seconds. Repeat the
procedure 2 or 3 times.
If the machine does not start, contact the Philips SAECO hotline in your
country and quote the code shown on the display.
Contact details can be found in the warranty booklet packed separately
or at www.philips.com/support.
Page 88

86
ENGLISH
TROUBLESHOOTING
This chapter summarizes the most common problems you could encounter with your machine. If you are unable to solve the problem with the
information below, visit www.saeco.com/support for a list of frequently
asked questions or contact the Philips Saeco hotline in your country. Contact details can be found in the warranty booklet packed separately or at
www.saeco.com/support.
Machine actions Causes Solutions
The machine does not
turn on.
The machine is not connected to
the electric network.
Connect the machine to the electric
network.
The power button is on position
"0".
Check that the power button is set to
"I".
The drip tray gets lled
although no water is
drained.
Water is sometimes drained automatically by the machine into the
drip tray to manage the rinsing of
the circuits and ensure optimum
machine performance.
This is a normal behaviour of the
machine.
Co ee is not hot enough. The cups/mugs are cold. Preheat the cups/mugs with hot water
or use the hot water dispensing spout.
The beverage temperature in the
programming menu is set on Low.
Make sure that the temperature in the
programming menu is set on Normal
or High.
You added cold milk to the co ee. Cold milk lowers the temperature of
the nal product. Preheat milk before
adding it to the beverage.
No hot water is dispensed. The steam/hot water dispensing
spout is clogged or dirty.
Clean the steam/hot water wand
(see the "Cleaning and Maintenance"
chapter).
Inspect the spout to check that the
dispensing spout is not clogged. Make
a hole in the limescale using a pin or a
needle.
The machine does not ll
the cup/mug.
The machine has not been programmed.
Access the beverage programming
menu and adjust the co ee length setting according to your personal taste
for each type of beverage.
Co ee does not have
enough crema (see note).
The blend is unsuitable, co ee is
not freshly roasted or the grind is
too coarse.
Change co ee blend or adjust grinding as explained in the “Adjusting the
Ceramic Co ee Grinder” chapter.
The co ee beans or the preground co ee are too old.
Make sure that you use fresh co ee
beans or pre-ground co ee.
Milk does not froth. The carafe is dirty or not inserted
correctly.
Ensure that the carafe is clean and has
been correctly inserted.
Page 89

87
ENGLISH
87
Machine actions Causes Solutions
The machine takes a
long time to warm up or
the amount of water dispensed from the wand is
too little.
The machine circuit is clogged by
limescale.
Descale the machine.
The brew group cannot
be removed.
The brew group is out of place. Turn on the machine. Close the ser-
vice door. The brew group automatically returns to the initial position.
The co ee grounds drawer is
inserted.
Remove the co ee grounds drawer
before removing the brew group.
The brew group cannot be
inserted.
The brew group is not in the o
position.
Make sure that the brew group is in the
o position. The arrows must face each
other. To this purpose, see the “Monthly
Lubrication of the Brew Group” chapter.
The gear is not in the initial position.
Insert the drip tray and the co ee
grounds drawer and close the service
door. Turn on the machine. The gear
automatically returns to the initial
position. You can now insert the brew
group.
There is too much ground
co ee under or over the
brew group.
The co ee used may not be suitable for automatic machines.
It may be necessary to change the type
of co ee or the co ee grinder settings
(see the “Adjusting the Ceramic Co ee
Grinder” chapter).
The machine is adjusting the co ee
grinder for a new kind of co ee
beans or pre-ground co ee.
The machine automatically adjusts
itself after brewing several cups of
co ee in order to optimise extraction in
relation to the compactness of ground
co ee.
It may be necessary to brew 2 or 3
products to fully adjust the co ee
grinder.
This is not a machine malfunction.
The co ee grounds produced by the machine are
too humid or too dry.
Adjust the co ee grinder. Adjusting the ceramic co ee grinder
a ects the quality of residues.
If the residues are too humid, set a
coarser grind.
If the residues are too dry, set a ner
grind.
Refer to the “Adjusting the Ceramic Coffee Grinder” chapter.
Page 90

88
ENGLISH
Machine actions Causes Solutions
The machine grinds the
co ee beans but no co ee
is brewed (see note).
There is no water. Fill the water tank and prime the circuit
(see the "Manual Rinse Cycle" chapter).
The brew group is dirty. Clean the brew group (see the "Weekly
Cleaning of the Brew Group" chapter).
This might occur when the machine is automatically adjusting
the dose.
Brew some cups of co ee as described
in the “Saeco Adapting System” chapter.
The dispensing spout is dirty. Clean the dispensing spout.
The co ee is too weak (see
note).
This might occur when the machine is automatically adjusting
the dose.
Brew some cups of co ee as described
in the “Saeco Adapting System” chapter.
The ground co ee is too coarse. Change co ee blend or adjust grind-
ing as explained in the “Adjusting the
Ceramic Co ee Grinder” chapter.
Co ee is brewed slowly
(see note).
The co ee grind is too ne. Change co ee blend or adjust grind-
ing as explained in the “Adjusting the
Ceramic Co ee Grinder” chapter.
The circuits are clogged. Perform a descaling cycle.
The brew group is dirty. Clean the brew group (see the “Weekly
Cleaning of the Brew Group” chapter).
Co ee leaks out of the
dispensing spout.
The dispensing spout is clogged. Clean the dispensing spout and its
holes.
Note:
These problems can be considered normal if the co ee blend has been
changed or if the machine has just been installed. In this case, wait until
the machine performs a self-adjusting operation as described in the “Saeco
Adapting System” chapter.
Page 91

89
ENGLISH
89
ENERGY SAVING
Stand-by
The Saeco fully automatic espresso co ee machine is designed for energy
saving, as proven by the Class A energy label.
After a certain time of inactivity that can be set by the user (see the
“Machine Programming” chapter), the machine turns o automatically. If a
product has been brewed, the machine performs a rinse cycle.
In stand-by mode, the energy consumption is below 1Wh.
To turn on the machine, press the “
” button (if the power button on the
back of the machine is set to “I”). If the boiler is cold, the machine performs
a rinse cycle.
The machine status can be manually changed to stand-by mode by keeping the STAND-BY button pressed for 3 seconds.
Note:
1
The machine will not go into stand-by mode if the service door is open.
2
When the stand-by mode is activated, the machine may perform a
rinse cycle. The cycle can be interrupted by pressing the “STOP” button.
The machine can be reactivated by:
1
Pressing any button on the control panel.
2
Opening the service door (when closing the door, the machine goes
back to stand-by mode).
The red indicator light on the “
” button ashes when the machine is in
stand-by mode.
Page 92

90
ENGLISH
TECHNICAL SPECIFICATIONS
The manufacturer reserves the right to make changes to the technical
speci cations of the product.
Nominal Voltage - Power Rating See data plate on the appliance
Housing material Plastic-Steel
Size (w x h x d) 280 x 385 x 430 mm
Weight 17 kg
Power cord length 800-1200 mm
Cup size up to 165 mm
Water tank 1.7 litres - Removable type
Co ee bean hopper capacity 350 g
Co ee grounds drawer capacity 15
Pump pressure 15 bar
Boiler Stainless Steel
Safety devices Boiler pressure safety valve – Dou-
ble safety thermostat
WARRANTY AND SERVICE
Warranty
For detailed information on your warranty and related conditions, please
read the warranty booklet supplied separately.
Service
We want to ensure that you remain satis ed with your machine. If you
have not already done so, please register your purchase at www.saeco.
com/welcome. This will enable us to stay in contact with you and send you
cleaning and descaling reminders.
For service or support, please visit the Philips website at www.
saeco
.
com/support or contact the Philips Saeco hotline in your country.
The contact details can be found in the warranty booklet supplied
separately or at www.
saeco
.com/support.
Page 93

91
ENGLISH
91
ORDERING MAINTENANCE PRODUCTS
For cleaning and descaling, use Saeco maintenance products only.
You can
purchase the products at the Philips online shop at www.shop.philips.com/
service, from your local dealer or at authorised service centres.
If you have any di culties obtaining maintenance products for your machine, please contact the Philips Saeco hotline in your country.
Contact details can be found in the warranty booklet packed separately or
at www.saeco.com/support.
Overview of maintenance products
- Descaling solution CA6700
- INTENZA+ Water Filter CA6702
- Grease HD5061
Page 94

92
ENGLISH
- Maintenance Kit CA6706
- Milk Circuit Cleaner CA6705
- Co ee Oil Remover CA6704
Page 95

Page 96

www.philips.com/saeco
The manufacturer reserves the right to make changes without prior notice.
Rev.00 del 15-01-15
IT02
02
 Loading...