

Page 1
D/A GB PL
Herzlich Willkommen bei
Bedienungsanleitung und Garantie
für Cafissimo LATTE
Page 2

Page 3

Experience the world of coffee with Cafissimo
We are delighted that you have chosen Cafissimo. The Cafissimo LATTE
perfectly combines the years of experience and passion of Tchibo‘s coffee
experts with Saeco‘s outstanding technical knowledge and its intuition for
Italian lifestyle.
You can now enjoy your coffee whenever and however you like – with
perfect espresso, caffè crema, filter coffee and delicious milk specialities
like cappuccino and latte macchiato.
Just press a button and your Cafissimo LATTE by Saeco will take care of
the rest.
Thank you for your confidence.
Your Cafissimo Team
Page 4
Enjoy perfect coffee at the push of a button
With the Cafissimo LATTE, you can easily prepare perfect espresso, caffè
crema and filter coffee at the push of a button. Here at Cafissimo we have
developed a three pressure level system so that each coffee speciality
can best unfold its full taste and aroma. This allows us to guarantee the
optimal preparation of your coffee speciality at the ideal brewing pressure.
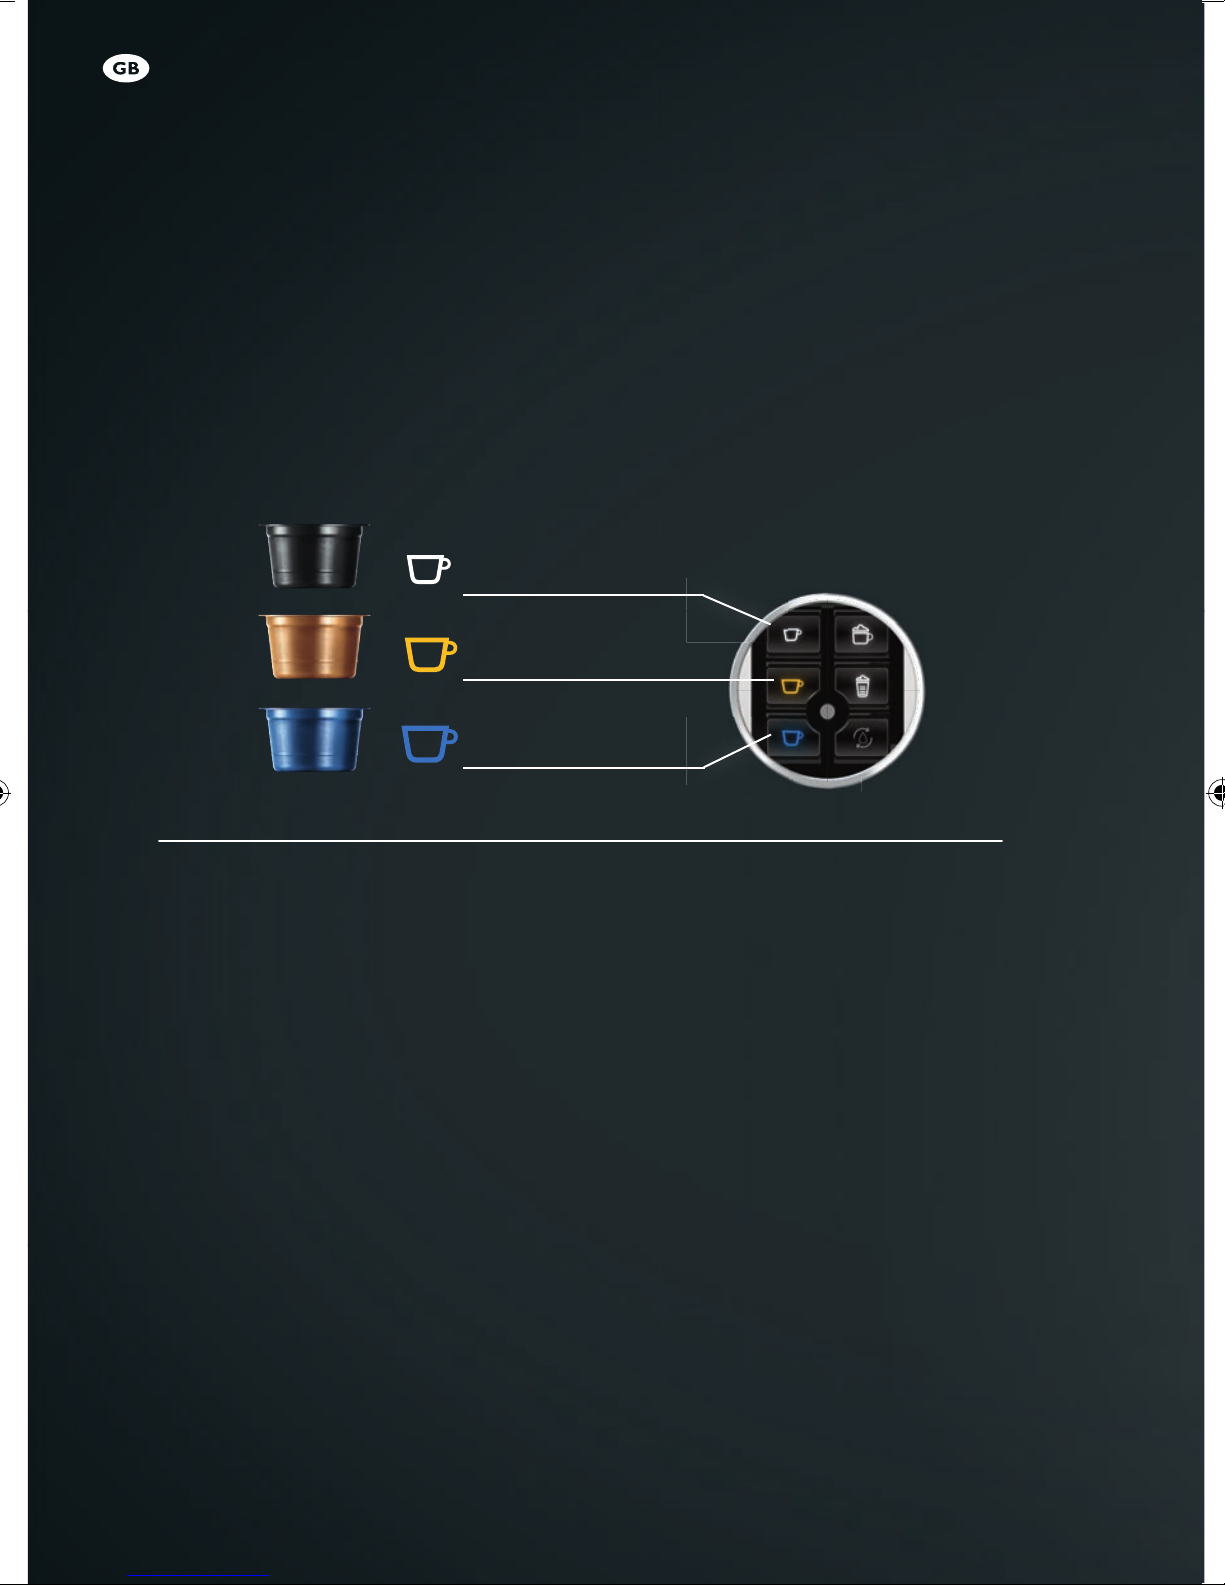
The espresso, caffè crema and filter coffee buttons on your Cafissimo
LATTE are colour-coordinated with the capsules for easy and simple
operation. This lets you see by the colour of the capsule which button you
need to press to prepare your beverage.
White cup / Espresso
Yellow cup / Caffè crema
Blue cup / Filter coffee
A great variety of Cafissimo aroma capsules
Drawing from many years of Tchibo coffee expertise, we at Cafissimo only
select the best arabica beans, which are slowly ripened and then refined
through Tchibo‘s individual roasting process. In order to guarantee the
utmost enjoyment for you, each capsule is sealed at the height of its
aroma – thus releasing the perfect aroma in your cup.
Experience the unique diversity of the Cafissimo capsule system.
Choose from our twelve exquisite varieties of espresso, caffè crema and filter
coffee, and discover our Cafissimo country coffees from the best agricultural
regions of Brazil, Ethiopia, Colombia and India. We regularly supplement our
capsule variety with our limited Grand Classé editions.
Also enjoy a perfect cup of tea with Cafissimo Teatime: Made from the best
ingredients and carefully selected by our experts at Tchibo.
You can obtain Cafissimo capsules at all Tchibo locations and online at
www.tchibo.de or www.tchibo.at
Page 5
The features of your Cafissimo LATTE at a glance
Easy to use
Thanks to the simple design of the control panel, you can easily and neatly
prepare all coffee specialities at the push of a button.
Height-adjustable coffee spout
The height-adjustable coffee spout and adjustable drip tray make it easy to use
cups of all sizes.
Used capsule drawer
With automatic capsule ejection for convenient capsule disposal.
Unique three pressure level system
Through the intelligent interaction between the machine and capsules,
each type of coffee is automatically prepared at the right brewing pressure.
Integrated milk solution
Thanks to the integrated milk system, milk specialities can be quickly and easily
prepared at the push of a button.
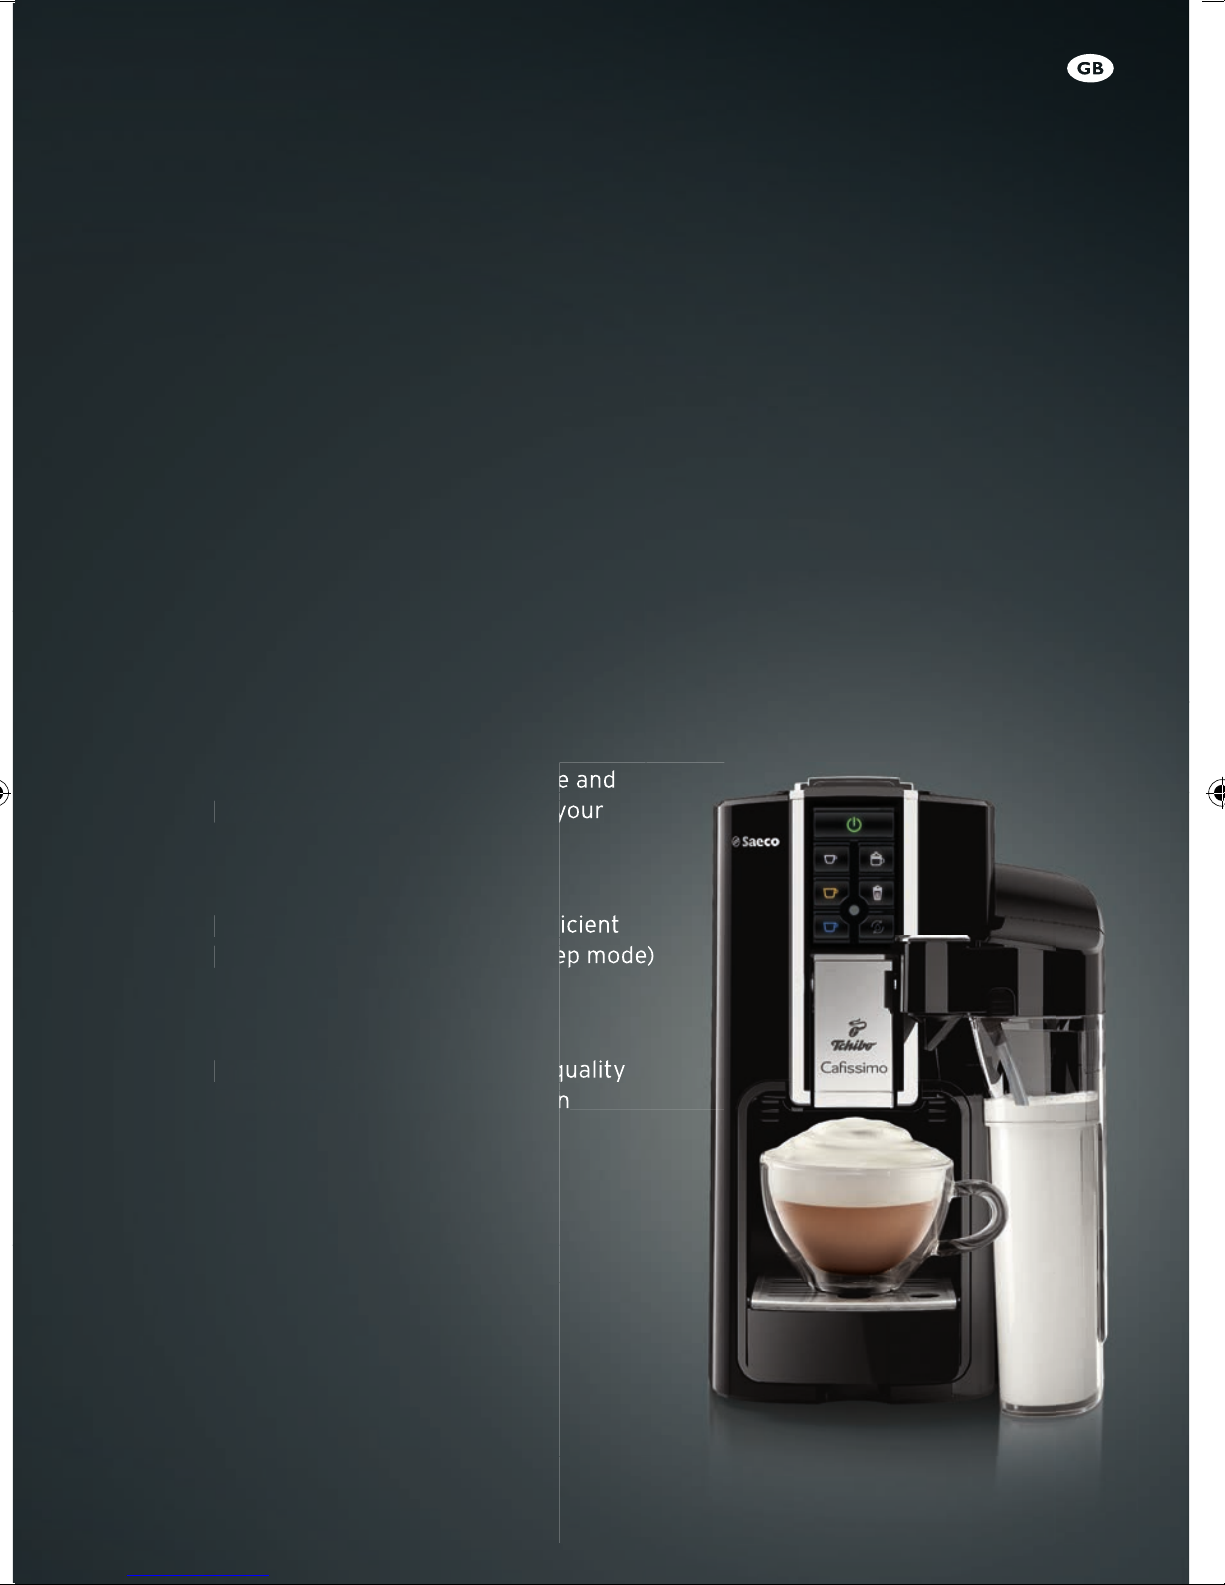
Individually programmable beverage size
Adjust the strength of the coffee and
your desired amount of milk to your
own personal taste.
Energy efficiency
Your LATTE is highly energy-efficient
thanks to its standby mode (sleep mode)
and its descaling reminder.
40-month warranty
To prove our confidence in the quality
of our products, we grant you an
extra-long 40-month warranty.
Page 6
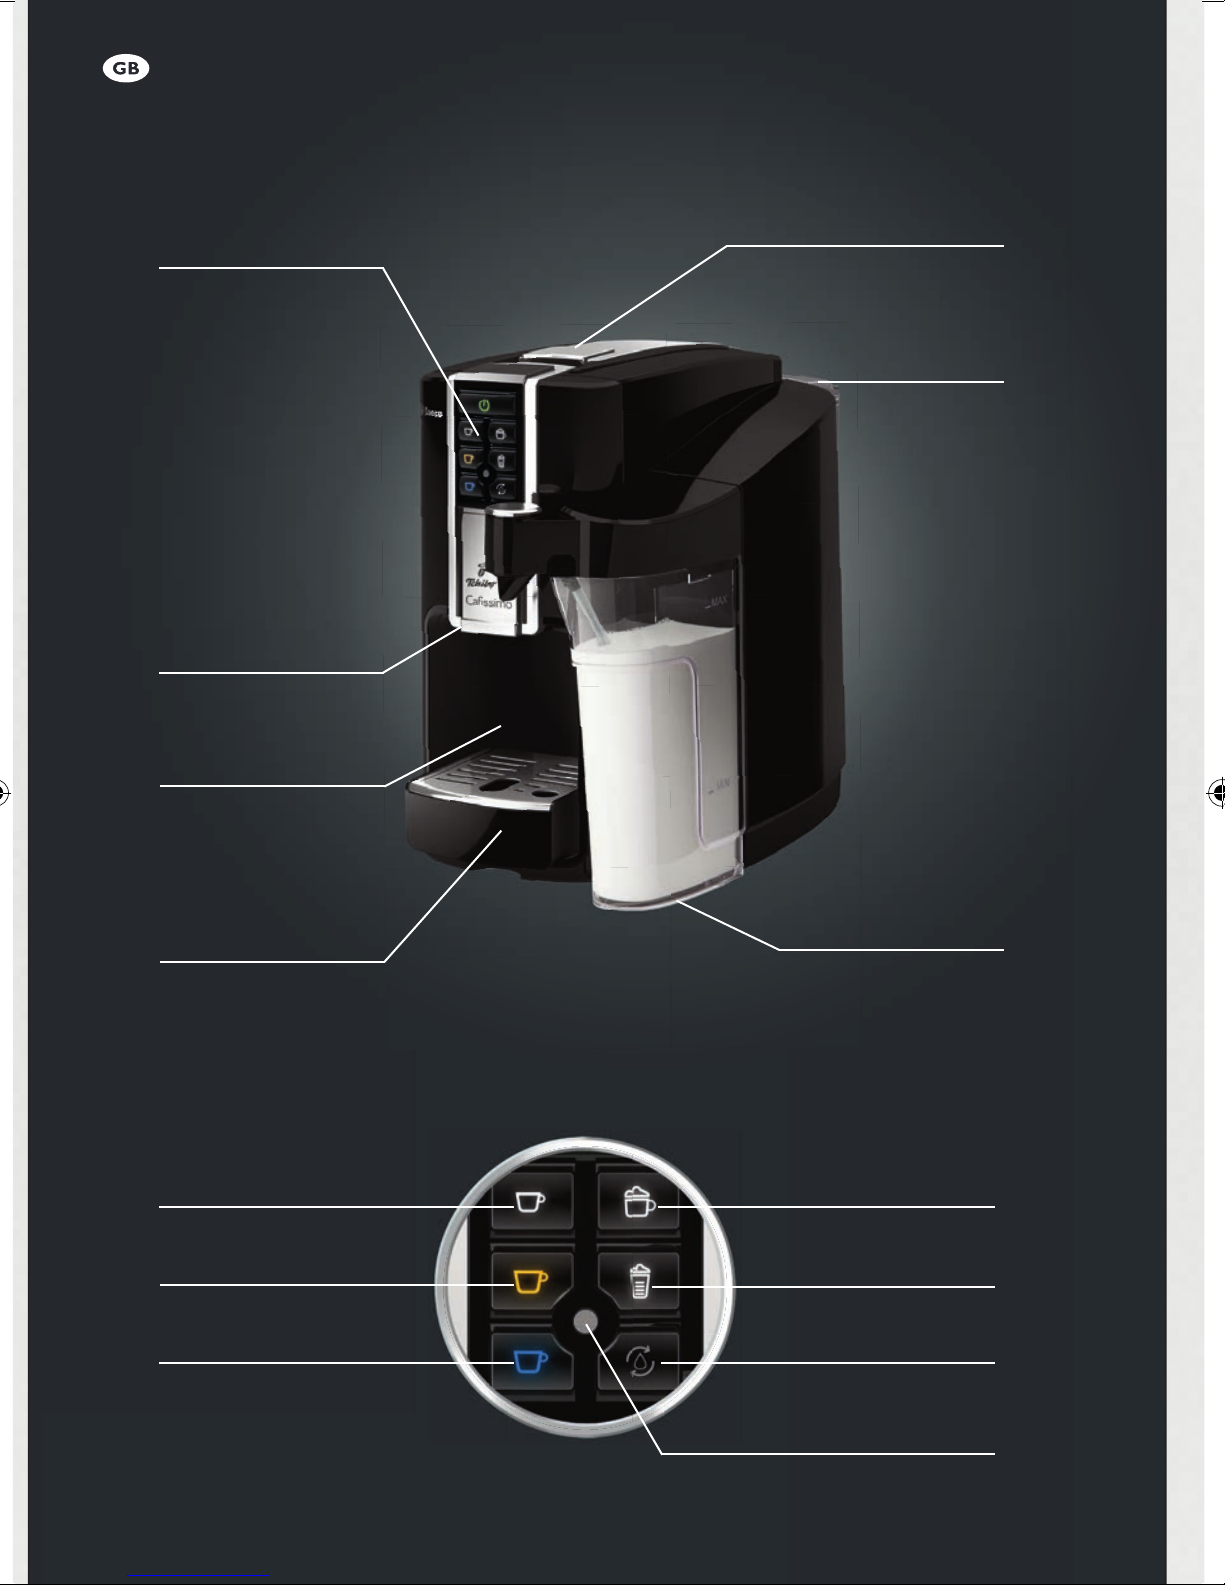
The Cafissimo LATTE Professional at a glance
Control
panel
Adjustable coffee
spout
Inside:
Used capsule drawer
Capsule compartment
Removable
water tank
Removable milk carafe
Adjustable and removable
drip tray
ideal for storing in the
f r i d g e
Control panel in detail — button functions
Espresso (white) Cappuccino (white)
Caffè crema (yellow)
Filter coffee (blue)
Frothed milk (white)
Rinse milk circuit
Service indicator light
Page 7
TABLE OF CONTENTS
HD8603
English
OPERATING INSTRUCTIONS
READ THE INSTRUCTIONS CAREFULLY
IMPORTANT..................................................................20
Safety instructions .................................................................................... 20
Warning .................................................................................................... 20
Caution ..................................................................................................... 21
Compliance with standards ....................................................................... 21
PRODUCT OVERVIEW ....................................................22
INSTALLATION ..............................................................23
Preparing for use .......................................................................................23
Preparing the machine for use .................................................................. 23
Using the machine for the rst time or after a period of inactivity ............ 23
Automatic switch-o ................................................................................ 23
Adjusting the dispensing height ............................................................... 23
BREWING COFFEE .........................................................24
Co ee preparation .................................................................................... 24
Adjusting the co ee quantity .................................................................... 24
Restoring the preset quantities ................................................................. 25
MILK CARAFE................................................................25
Filling the carafe ....................................................................................... 25
Inserting / removing the carafe ................................................................. 25
CAPPUCCINO / FROTHED MILK / LATTE MACCHIATO..........25
Cappuccino................................................................................................ 25
Adjusting the amount of cappuccino......................................................... 26
Restoring the preset quantities ................................................................. 26
Frothed milk ..............................................................................................26
Adjusting the amount of frothed milk .......................................................26
Restoring the preset quantities ................................................................. 27
Latte macchiato ........................................................................................27
Rinsing the milk circuit.............................................................................. 27
CLEANING AND MAINTENANCE ......................................28
General cleaning ....................................................................................... 28
Drip tray and used capsule drawer ............................................................ 28
Water tank ................................................................................................ 29
Weekly cleaning of the co ee circuit ......................................................... 29
Weekly cleaning of the milk carafe............................................................ 29
Monthly cleaning of the milk carafe .......................................................... 30
DESCALING ...................................................................31
MACHINE WARNING LIGHTS ..........................................32
DISPOSAL .....................................................................32
TROUBLESHOOTING ......................................................33
TECHNICAL SPECIFICATIONS ..........................................33
AUTHORISED SERVICE CENTRES AND WARRANTY ............34
Page 8

• 20 •
IMPORTANT
Safety instructions
This machine is equipped with safety features. Nevertheless, read the safety instructions carefully and
only use the machine as described in these instructions to avoid accidental injury or damage. Keep this
user manual for future reference. If you give the machine to someone else, remember to give them these
instructions as well.
The term WARNING and this icon warn against possible severe injuries, danger to life and/or
damage to the machine.
The term CAUTION and this icon warn against slight injuries and/or damage to the machine.
Warning
• Plug the machine into a suitable earthed wall socket with a voltage matching the technical
specications of the machine.
• Connect the machine to an earthed wall socket.
• Do not let the power cord hang over the edge of a table or counter, or touch hot surfaces.
• Never immerse the machine, the plug or the power cord in water: danger of electric shock!
• Do not touch hot surfaces.
• Do not lift the machine by the lever that opens the capsule compartment. To move the machine, hold
it by the outer casing.
• Never leave the machine to operate while unattended.
• The machine is equipped with non-slip feet. Work surfaces often have varnished or plastic nishes
and are treated with a variety of care products. Some of these products may contain substances that
react adversely with the non-slip feet and soften them. Place a non-slip mat under the machine if
necessary.
• Remove the plug from the wall socket:
- if a malfunction occurs;
- if the machine will not be used for a long time;
- before cleaning the machine.
Pull on the plug, not the power cord. Do not touch the plug with wet hands.
• Do not use the machine if the plug, the power cord or the machine itself are damaged.
• Do not make any modications to the machine or its power cord. All repairs must be carried out by a
service centre authorised by Saeco to avoid any hazards.
• The machine must not be used by children younger than 8 years old.
• The machine may be used by children of 8 years and upwards if they have previously been instructed in the
correct use of the machine and made aware of the associated dangers, or if they are supervised by an adult.
• Cleaning and maintenance should not be carried out by children unless they are aged 8 or above and
are supervised by an adult.
Page 9

• 21 •
• Keep the machine and its power cord out of the reach of children under 8 years old.
• The machine may be used by persons with reduced physical, mental or sensory capacities or lacking
sucient experience and/or knowledge if they have previously been instructed in the correct use
of the machine and made aware of the associated dangers, or if they are supervised by an adult.
Children should be supervised to ensure that they do not play with the machine.
• Never insert ngers or objects into the capsule compartment.
Caution
• The machine is designed only for household use and is not intended for use in environments such as
sta kitchens in shops or canteens, oces, farms or other work environments.
• Always put the machine on a level, at and stable surface.
• Do not place the machine on hot surfaces or next to a hot oven, heater unit or similar heat source.
• Only use original Tchibo Cassimo capsules. Neither use capsules from other manufacturers, nor
damaged or misshapen capsules, and never ll capsules or the machine with ground coee or instant
coee, as this would damage the machine. In these cases, any necessary repairs due to damage are
not covered by the warranty.
English
• Allow the machine to cool before inserting or removing components.
• Never use carbonated, warm or hot water to ll the water tank. Use cold water only.
• Never clean with caustic or abrasive cleaning products. Simply use a soft cloth dampened with water.
• Descale your machine regularly. The machine will indicate when descaling is needed. Not doing this
may make your machine stop working properly. In this case, repairs are not covered by your warranty!
• Do not subject the machine to temperatures below 0°C. Water left in the heating system may freeze
and cause damage.
• Do not leave water in the water tank if the machine will not be used over a long period of time. The
water could become dirty. Always use fresh water when you operate the machine.
• Always ensure the drip tray and the used capsule drawer are inserted when using the machine.
Compliance with standards
This machine complies with European Directive 2012/19/UE on waste of electrical and electronic equipment and with European Directive 2011/65/EU on restriction of use for certain hazardous substances in
electrical and electronic equipment.
Page 10

• 22 •
PRODUCT OVERVIEW
On/O button
(green)
Espresso button
(white)
Caè crema button
(yellow)
Filter coee button
(blue)
Service indicator light (orange)
Capsule compartment
Capsule compartment
Cappuccino button
(white)
Frothed milk button
(white)
Rinse milk circuit button
(orange)
Water tank lid
opening lever
Removable water tank
Control panel
Coee dispensing spout
Used capsule drawer
Drip tray
Steam outlets
Milk carafe attachment point
Milk carafe
Milk carafe lid
Milk dispensing
spout
Milk container
Power cord
Page 11

• 23 •
INSTALLATION
Preparing for use
Remove the coee machine from the packaging and position it
in a suitable place.
Preparing the machine for use
1- Remove the water tank from its base.
2- Remove the lid from the water tank.
Rinse the water tank and rell it with
fresh, cold, still drinking water. Do not
exceed the level (MAX) indicated on
the water tank.
1- Rinse the tank and ll it again with
fresh drinking water.
2- Place a cup below the coee dispens-
ing spout as shown in the gure.
3- Press the caè crema button
(yellow)
without inserting a
capsule.
4- When the cup is full, press the caè
crema button
process, then empty the cup.
5- Repeat steps 2 to 4 until all the water in the tank has been
dispensed.
6- When all the water has been dispensed, rell the tank and
repeat steps 2 to 5.
7- Rell the water tank; the machine is now ready to be used.
to stop the brewing
English
3- Replace the lid on the water tank.
4- Replace the water tank on its base.
Hot water or any other liquids may damage the tank
and/or the machine. Do not operate the machine
without water. Always make sure that there is enough water
in the tank.
5- Insert the plug into an earthed wall socket with suitable power
voltage.
6- To turn the machine on, simply press the On/O button on the
control panel.
7-
The service indicator light (orange) will ash until the water
tank is lled. Proceed as described in the next section.
Using the machine for the rst time or after a
period of inactivity
The simple operation described below ensures optimal brewing and
must be performed:
- when using the machine for the rst time;
- when the machine has been inactive for a long time (more
than 2 weeks). In this case, make sure that any remaining used
capsules in the used capsule drawer have been disposed of.
Automatic switch-o
The machine automatically turns o after 9 minutes of inactivity.
To reactivate the machine, simply press the
The machine can be turned o manually by pressing the
button
.
On/O button
.
On/O
Adjusting the dispensing height
The machine can be used with a variety of cup sizes in which to
dispense your beverage.
The coee dispensing spout and drip tray can be moved to create
various dispensing positions.
Follow these simple instructions to use your desired cup or glass:
Espresso cup or caè crema cup :
coee dispensing spout lowered and drip
tray in the middle position.
Page 12

• 24 •
Cup for lter coee or cappuccino
: coee dispensing spout raised and
drip tray in the outer position.
Glass for frothed milk
ing spout raised and drip tray in the inner
position.
Espresso
Caè crema
Filter coee
Cappuccino
Frothed milk
: coee dispens-
(white) = "black capsule"
(yellow) = ''yellow capsule''
(blue) = "blue capsule"
(white) = "black capsule"
(white) = no capsule
BREWING COFFEE
Coee preparation
Before brewing a coee, check that the On/O button
and beverage buttons are constantly lit and that
there is enough water in the tank.
Fig. 1 Fig. 2 Fig. 3
1- Place an espresso cup, coee cup or glass underneath the
coee dispensing spout as indicated in paragraph “Adjusting the
dispensing height”.
2- Lift the capsule compartment opening lever (Fig. 1).
3- Insert a capsule as shown in the gure (Fig. 2).
4- Lower the lever to close the capsule compartment (Fig. 3).
If the compartment does not close easily, check that
the capsule is correctly inserted and that the used
capsule drawer is not full.
5- Press the
button for a caè crema or the
coee.
6- Coee brewing stops automatically when the set level is
reached. However, it is possible to stop the dispensing process early by pressing the same button as the beverage being
dispensed.
7- Lift the lever to eject the used capsule into the used capsule
drawer.
8- Remove the cup or glass from the grille.
With every coee brewed a small amount of excess
water runs into the drip tray. Therefore, empty the
drip tray regularly.
(white) button for an espresso, the (yellow)
(blue) button for a lter
Never insert ngers or any other objects into the
capsule compartment. Single-portion capsules brew
a single coee. DO NOT use capsules more than once.
When preparing an espresso or caè crema, the machine
performs a prebrewing cycle. There is an audible pause in the
brewing process between the prebrewing and brewing cycles.
We recommend emptying the used capsule drawer
every day. Before inserting a capsule, make sure that
the used capsule drawer is not full.
Tip to get the best espresso from your Cassimo Latte:
If the machine has not been used for a while and/or
the cup is cold, place the cup below the spout and press the
espresso button without inserting a capsule. This will warm
up the cup and the machine. Then empty the cup and proceed
with the instructions from step 1 as follows.
If the machine stops during the brewing process and
the service indicator light slowly flashes orange,
there is no more water in the water tank. Proceed as follows:
ll the tank with water and push the button of the beverage
that was being dispensed. As soon as the desired quantity
has been reached, stop dispensing by pressing the beverage
button again.
Adjusting the coee quantity
Each capsule is portioned for one cup of lter coee, caè crema or
espresso and optimally adjusted regarding avour.
The machine allows you to adjust the amount of coee brewed
according to your taste and the size of your cup or glass.
Each time the espresso
buttons are pressed, the machine brews a preset amount of coee.
, caè crema or lter coee
Page 13

Preset quantities:
Espresso approx. 40 ml
Caè crema approx. 125 ml
Filter coee approx. 125 ml
This quantity can be reprogrammed according to your preference for
each beverage.
Minimum quantity that can be set: approx. 30 ml
Maximum quantity that can be set: approx. 250 ml
(lter coee)
Maximum quantity that can be set: approx. 300 ml
(caè crema, espresso)
The procedure for setting the quantity of espresso is shown as an
example below.
Before brewing a coee, check that the On/O button
and beverage buttons are constantly lit and that
there is enough water in the tank.
Proceed as follows to reprogram the quantity of espresso
1- Place an espresso cup under the coee dispensing spout,
changing the height of the spout or the position of the tray if
necessary (see section “Adjusting the dispensing height”).
Insert a new capsule as described in the previous paragraph.
2- Press and hold the espresso button
ashes in brief intervals. Then release the button.
3- Press the espresso button
in the cup reaches the desired level.
again when the amount of coee
for 3 seconds until it
:
• 25 •
To make a good quality cappuccino, use cold milk
(~5°C / 41°F) with a fat content of at least 1.5 %.
English
Fig. 1 Fig. 2 Fig. 3
1- Remove the carafe lid (Fig. 1).
2- Pour the milk into the carafe; the quantity should be between
the MIN and MAX levels (Fig. 2).
3- Replace the carafe lid and ensure that it is properly tted
(Fig. 3).
Inserting / removing the carafe
Do not hold the carafe by the lid as it can come o.
Insert and/or remove the assembled carafe as described in the
following instructions.
At this point the espresso button
the machine will brew the same amount of coee that was just programmed.
For the other beverages, follow the same procedure
by pressing the caè crema
coee
(blue) buttons.
is set. Each time it is pressed,
(yellow) or lter
Restoring the preset quantities
To reset beverages to their factory settings, with the machine o,
press and hold the On/O
for 5 seconds. All buttons will ash twice in conrmation.
and lter coee (blue) buttons
MILK CARAFE
The machine has a carafe for brewing cappuccino, frothed milk and
other beverages containing milk.
Filling the carafe
The carafe must be cleaned before being used. Follow steps 1 to 7 as
described in the section “Weekly cleaning of the milk carafe”.
Fig. 1 Fig. 2 Fig. 3
1- Move the carafe alongside the machine, keeping it slightly raised
(Fig. 1).
2- Attach the carafe to the machine by pushing down gently until it
clicks into place (Fig. 2).
3- To remove the carafe, lift it and carefully pull away from the
machine (Fig. 3).
CAPPUCCINO / FROTHED MILK / LATTE
MACCHIATO
Warning! Dispensing may be preceded by small jets
of hot water: danger of scalding! If the carafe is ab-
sent, products requiring milk should not be selected.
Cappuccino
Before preparing a cappuccino, check that the On/O
button
and that there is enough water in the tank.
and beverage buttons are constantly lit
Page 14

• 26 •
1- To prepare a cappuccino, insert an espresso capsule (black) as
described in the section “Brewing coee”.
2- Insert the carafe into the machine and ensure that the milk is
above the MIN level.
3- Adjust the machine to t the cup into which your cappuc-
cino will be dispensed (see section “Adjusting the dispensing
height”).
4- Insert a cup below the coee and milk
dispensing spouts.
5- Press the cappuccino button
6-
The
cappuccino button ashes;
the machine is warming up.
7- When it has nished warming up, the
machine dispenses the frothed milk
directly into the cup. The machine will
stop dispensing when it reaches the
preset quantity. The dispensing process can be stopped early by
pressing the cappuccino button
8-
When it has nished dispensing the milk, the machine automatically dispenses the espresso coee directly into the cup.
dispensing process can be stopped early by pressing the cappuccino button
When the cappuccino has nished brewing, the rinse
button
circuit must be rinsed; see section “Rinsing the milk circuit”
in this chapter.
.
will light up to remind you that the milk
.
.
The
Adjusting the amount of cappuccino
The machine allows you to adjust the amount of cappuccino brewed
according to your taste and the size of your cup.
Before preparing a cappuccino, check that the On/O
button
and that there is enough water in the tank.
Proceed as follows to set the desired quantity of cappuccino
1- Insert an espresso capsule into the capsule compartment.
2- Insert the carafe into the machine and ensure that the milk is
above the MIN level.
3- Press and hold the cappuccino button
ashes in brief intervals. Then release the button.
4- Press the cappuccino button
milk in the cup reaches the desired level. The machine has saved
the desired amount of milk and will start to brew the espresso.
5- Press the cappuccino button
coee in the cup reaches the desired level. The machine has
saved the desired amount of espresso.
At this point the cappuccino button
each time it is pressed, the machine will dispense the same amount
of milk and espresso that was just programmed.
and beverage buttons are constantly lit
:
for 3 seconds until it
again when the amount of
again when the amount of
has been reprogrammed;
Minimum quantity of espresso that can be set: approx. 30 ml
Maximum quantity of espresso that can be set: approx. 300 ml
Minimum quantity of milk that can be set: approx. 50 ml
Maximum quantity of milk that can be set: approx. 300 ml
Preset quantities:
Cappuccino approx. 90 ml milk
approx. 40 ml espresso
Restoring the preset quantities
To reset beverages to their factory settings, with the machine o,
press and hold the On/O
for 5 seconds. All buttons will ash twice in conrmation.
and lter coee (blue) buttons
Frothed milk
Before preparing frothed milk, check that the On/O
button
and that there is enough water in the tank.
Remember, it is not necessary to insert a coee
capsule in order to prepare frothed milk.
1- Insert the carafe into the machine and ensure that the milk is
above the MIN level.
2- Adjust the machine to t the glass
into which your frothed milk will be
dispensed (see section
dispensing height
3- Place a glass under the milk dispensing
spout.
4- DO NOT insert a coee capsule into the
capsule compartment.
5- Press the frothed milk button
6-
The
frothed milk button ashes; the machine is warming up.
7- When it has nished warming up, the machine dispenses the
frothed milk directly into the glass. The machine will stop
dispensing when it reaches the preset quantity. The dispensing process can be stopped early by pressing the frothed milk
button
When the machine has nished preparing the frothed
milk, the rinse button
that the milk circuit must be rinsed; see section “Rinsing the
milk circuit“ in this chapter.
and beverage buttons are constantly lit
“
Adjusting the
“
).
.
.
will light up to remind you
Adjusting the amount of frothed milk
The machine allows you to adjust the amount of frothed milk
prepared according to your preference and the size of your glass.
Before preparing the frothed milk, check that the
On/O button
stantly lit and that there is enough water in the tank.
and beverage buttons are con-
Page 15

Proceed as follows to set the desired quantity of frothed milk :
1- Insert the carafe into the machine and ensure that the milk is
above the MIN level.
2- Place a glass underneath the milk dispensing spout as indicated
in the section “Adjusting the dispensing height”.
3- Press and hold the frothed milk button
ashes in brief intervals. Then release the button.
4- Press the frothed milk button
milk in the glass reaches the desired level.
for 3 seconds until it
again when the amount of
• 27 •
Make sure there is enough space in the glass for the
coee when dispensing the milk.
English
At this point the frothed milk button
Each time it is pressed, the machine will prepare the same amount
of frothed milk that was just programmed.
Minimum quantity of milk that can be set: approx. 50 ml
Maximum quantity of milk that can be set: approx. 300 ml
Preset quantities:
Frothed milk: approx. 110 ml
has been reprogrammed.
Restoring the preset quantities
To reset beverages to their factory settings, with the machine o,
press and hold the On/O
for 5 seconds. All buttons will ash twice in conrmation.
and lter coee (blue) buttons
Latte macchiato
Before preparing a latte macchiato, check that the
On/O button
stantly lit and that there is enough water in the tank.
We recommend approx. 130 ml frothed milk and 40 ml
espresso for a latte macchiato. If necessary, you can reset
the quantity of milk as described in the section “Adjusting
the amount of frothed milk” before preparing the beverage.
1- Insert the carafe into the machine and ensure that the milk is
above the MIN level.
2- Adjust the machine to t the glass into which your latte mac-
chiato will be dispensed (see section “Adjusting the dispensing
height“).
3- Place a glass under the coee and milk
dispensing spouts.
4- DO NOT insert a coee capsule into the
capsule compartment.
5- Press the frothed milk button
6-
The
frothed milk button ashes; the
machine is warming up.
7- When it has nished warming up, the
machine dispenses the frothed milk
directly into the glass. The machine
will stop dispensing when it reaches the preset quantity. The
dispensing process can be stopped early by pressing the frothed
milk button
.
and beverage buttons are con-
.
Fig. 1 Fig. 2 Fig. 3
8- Lift the capsule compartment opening lever (Fig. 1).
9- Insert the capsule as shown in the gure (Fig. 2).
10- Lower the lever to close the capsule compartment (Fig. 3).
11- Press the (white) button for an espresso, the (yellow)
button for a caè crema or the
coee.
12- The dispensing process stops automatically when the set
level is reached. However, it is possible to stop the dispensing
process early by pressing the same button as the beverage being
dispensed.
13- Lift the lever to eject the used capsule into the used capsule
drawer.
14- Remove the glass from the grille.
(blue) button for a lter
Rinsing the milk circuit
To always ensure optimal hygiene, the milk circuit must be quickly
rinsed after use.
The user is reminded to do this by the rinse button
It remains on until the circuit has been rinsed or the machine has
been turned o.
To rinse the milk circuit, proceed as follows:
1- Ensure that the milk carafe is in the machine.
2- Place a glass under the milk dispensing spout.
3- Press the rinse button
The machine dispenses a quantity of water sucient to rinse the
milk circuit. Once nished, remove the glass.
Caution: The rinsing water is hot!
Finally, always remember to put the carafe with the remaining milk
in the refrigerator.
The rinse milk circuit function helps the machine to
maintain optimal hygiene conditions and service,
but in no case should it be considered sucient as the only
way of cleaning the carafe and milk circuit.
Always clean the carafe as described in the chapter “Cleaning
and maintenance“.
.
lighting up.
Page 16

• 28 •
When preparing milk/cappuccino, steam may issue
from the steam outlets. This is not a malfunction.
CLEANING AND MAINTENANCE
General cleaning
1- The machine can only be cleaned once it has cooled down and
been unplugged from the mains supply.
2- Do not immerse the machine in liquids.
3- The only removable components that are dishwasher safe
are: the drip and cup tray, the grille and the internal parts of
the frothing system (see section
carafe
“
).
4- Do not use sharp objects or harsh chemical products (solvents)
for cleaning.
5- Use a soft, dampened cloth to clean the machine.
6- Do not dry the machine and/or its components using a micro-
wave and/or standard oven.
Drip tray and used capsule drawer
“
Weekly cleaning of the milk
3- Push the sliding lock on the left side of
the used capsule drawer upwards and
pull out the drip tray.
4- Empty out the liquid in the drip tray.
5- Empty the used capsule drawer.
6- Rinse out and dry the drip tray and
used capsule drawer.
7- Wash out the inner compartment of
the machine.
The used capsule drawer must be emptied after approximately every
8-10 coees brewed.
Check periodically that the used capsule drawer is
not full so as to avoid malfunctions and damage to
the machine.
1- Pull out the drip tray as shown in the
gure.
2- Remove the used capsule drawer by
pulling out the drip tray as far as it
goes.
8- Once all parts have been washed
and dried, reinsert the used capsule
drawer.
9- Subsequently reinsert the drip tray.
Make sure that the used capsule
drawer is pushed all the way into the
machine. It must perfectly align with
the outer edge of the machine.
As previously described,
always insert the used capsule
drawer before the drip tray. Do not
push both parts into the machine at
once!
NO
Page 17

Water tank
Rinse your water tank daily under running
water. This prevents limescale deposits and
other particles from clogging the lter at
the bottom of the water tank.
• 29 •
The components of the milk frothing system can now be carefully
cleaned by following these steps:
8-
Remove the tube attached to the carafe
lid.
English
Weekly cleaning of the co ee circuit
The co ee circuit must be cleaned weekly in order to maintain the
high quality of your co ee.
To perform this simple cleaning operation, proceed as follows:
1- Place a cup or glass underneath the co ee dispensing spout as
indicated in section “Adjusting the dispensing height”.
2- Lift the lever for opening the capsule compartment in order to
remove any capsule there and do not insert a capsule.
3- Press the button
4- Once the dispensing has nished, empty the cup or glass.
The machine is ready for use.
(yellow) for a ca è crema.
Weekly cleaning of the milk carafe
The milk carafe must be cleaned weekly if used. This cleaning - in
addition to the normal rinse - is to be performed after preparing any
product with milk.
1- Remove the milk carafe lid and wash the lid and the milk carafe
in lukewarm running water.
2- Fill the carafe up to the MAX level with fresh, cold drinking water
and replace the lid.
3- Insert the carafe into the machine and place a container under
the milk dispensing spout.
9-
Push in the sides of the milk dispensing
spout (1) and remove it by pulling outwards (2).
10-
Remove the dispensing spout from the
tting.
11-
Remove the tting from the rubber tube.
2
1
1
Warning! Dispensing may be preceded by small jets
of hot water: danger of scalding! If the carafe is ab-
sent, products requiring milk should not be selected.
4- With the machine turned on, press the frothed milk button
Wait until it has nished dispensing.
5-
Press the
dispensing.
6-
Empty the container and remove the carafe.
7-
Remove the lid and empty out the remaining water in the carafe.
rinse button (orange)
. Wait until it has nished
.
12-
Wash the carafe lid with lukewarm
running water.
Do not place the carafe lid in the
dishwasher to prevent the part
from discolouring.
Page 18

• 30 •
13-
Open the dispensing spout lid.
14-
Remove the lower part of the dispensing
spout.
15-
Clean all the components under lukewarm running water. The internal parts
of the frothing system are dishwasher
safe. When all components have been
cleaned, reassemble them following the
same procedure, but in reverse order.
19-
Push the milk dispensing spout onto the
tting.
20-
Fit the milk dispensing spout back into its
housing. You should hear and feel it click
into place.
NO
21-
Insert the tube into the opening in the
milk dispensing spout.
Assembly procedure of the milk jug:
16- Connect the bottom and top parts
of the milk dispensing spout as
illustrated
17- Make sure that the two parts are
correctly tted together. No gaps
should be visible. Then close the milk
dispensing spout lid.
Insert the tting into the rubber tube as
18-
illustrated.
.
Monthly cleaning of the milk carafe
In order to keep the entire circuit free of milk residue and to
guarantee the best and long-lasting performance of the carafe, we
advise performing a monthly cleaning cycle with “Saeco Milk Circuit
Cleaner“, which is sold separately.
Before starting the cleaning cycle, check that the
On/Off button
stantly lit and that there is enough water in the tank.
1- Remove the milk carafe lid and wash both components in luke-
warm running water.
2- Fill the carafe up to the MAX level with fresh, lukewarm water.
3- Pour the detergent product into the milk carafe and let it dissolve
fully.
4- Replace the lid on the carafe, insert it into the machine and place
a container under the milk dispensing spout.
and product buttons are con-
Warning! Dispensing may be preceded by small jets
of hot water: danger of scalding! If the carafe is
absent, products requiring milk should not be selected.
Page 19

Never drink the solution dispensed during this
procedure.
5- With the machine turned on, press the frothed milk button
Wait until it has nished dispensing.
6-
Empty the container and place it back under the milk dispensing
spout.
7-
Repeat steps 5 to 6 until the milk carafe is empty, then proceed to
step 8.
8-
Remove the carafe from the machine and wash thoroughly with
fresh water.
9-
Fill the milk carafe with fresh drinking water up to the MAX level
and then place it back in the machine.
10- With the machine turned on, press the frothed milk button
Wait until it has nished dispensing.
11-
Press the
pensing.
12-
Empty the container and place it back under the milk dispensing
spout.
13-
Repeat steps 10 to 12 until the milk carafe is empty, then proceed
to step 14.
14-
Remove and wash the milk carafe as described in the section
“Weekly cleaning of the milk carafe”.
(even if the tank has been emptied).
rinse button (orange)
The machine must not be exposed to temperatures
lower than 0°C as the water in the circuits may freeze
. Wait until it has nished dis-
DESCALING
Warning! Never drink the descaling solution or any
products dispensed until the cycle has been com-
pleted. Never use vinegar as a descaling solution.
.
1- Turn the machine o by pressing the On/O button
2- Check that the carafe is correctly inserted and lled with water
up to the MIN level, that there is no capsule in the compartment
and that the lever is lowered.
3- Remove and empty the water tank, drip tray and used capsule
drawer.
4- Pour the required amount of descaling solution into the water
tank and ll it with fresh water up to the MAX level.
5- Put the tank back into the machine.
.
6- Push the drip tray all the way into the machine and raise the
coee dispensing spout.
7- Place a container with a minimum capacity of 1 litre under the
the coee and milk dispensing spouts.
8- At the same time, press the On/O button
cappuccino button
9- The machine indicates that the process has started when the
service indicator light (orange)
button
(white) will also be constantly lit to indicate the rst
phase of the descaling operation.
During descaling, the On/O button (green) will not
operate. If the power cord is removed, the machine will
continue the descaling cycle from the phase in which it was
interrupted the next time it is turned on.
(white) for 3 seconds, then release.
is constantly lit; the espresso
.
(green) and the
• 31 •
English
A step-by-step video explaining the descaling process can be found
at www.tchibo.de/cassimo-entkalkung.
The descaling process takes approx. 25 minutes and is split between
the descaling itself and a rinse cycle. Do not under any circumstance
interrupt or switch o the machine during either of these cycles.
Limescale builds up inside the machine during normal use. It needs
to be removed regularly as it may clog the water and coee circuit of
your machine. The machine automatically indicates when it needs
descaling when the service indicator light
lit.
Not doing this may ultimately make your machine
stop working properly, and in this case repairs are NOT
covered by your warranty.
We recommend using Saeco descaling solution (sold
separately), whose formula has been designed to
respect the technical specifications of the machine, thus
ensuring its continued service in the long term and for its safe
and risk-free use. The descaling solution is to be disposed of
according to the manufacturer’s instructions and/or the
regulations in force in the country of use. The Durgol descaling
solution also respects the technical specifications of the
machine.
(orange) is constantly
10- Press the espresso button (white)
descaling solution.
The machine dispenses the descaling solution at regular inter-
vals via the coee dispensing spout and via the milk carafe.
espresso button
The cycle can be temporarily suspended by pressing
the rinse button
the descaling process.
11- The service indicator light
descaling solution has been dispensed.
12- Empty the container into which the descaling solution was collect-
ed and reposition it under the milk and coee dispensing spouts
after the drip tray has been emptied and replaced.
The cappuccino button
13- Empty the water tank and rinse it thoroughly. Then ll it up to the
MAX level with fresh drinking water. Place the tank back in the
machine.
14- Press the
The machine dispenses the rinsing water alternately via the
coee dispensing spout and milk carafe, with the
ton
cappuccino button
ashing throughout this phase.
(white)
ashes throughout this rst phase.
. Press it again to continue with
(orange) starts to ash once all the
will light up automatically.
to start dispensing the
The
to start the rinse cycle.
cappuccino but-
Page 20

• 32 •
If the tank is not lled up to the MAX level, the service
indicator light
machine will require another cycle to be performed; repeat
the process from step 13.
15- When the second rinse cycle has nished, all the lights will ash
ve times and the machine will turn o .
16- Empty the container in which the rinsing water was collected.
17-
Empty the drip tray.
18- Rinse and re ll the water tank up to the MAX level.
19- Rinse the milk carafe.
20- When the machine is turned back on it will be ready to prepare
beverages again.
(orange) continues to ash and the
MACHINE WARNING LIGHTS
- Slow ashing
The machine is in the warm-up phase.
- Constantly lit
Perform a milk carafe rinse cycle.
If the water runs out while a beverage is being dis-
pensed, ll the tank and press the beverage button
again without replacing the capsule. Manually stop dispensing upon reaching the desired quantity by pressing the beverage button again.
All lights ash simultaneously
Contact the Ca ssimo service team. Please
refer to the service centres and warranty
chapter of this manual to obtain further contact information.
DISPOSAL
Pursuant to directive 2012/19/EU on electrical and electronic
equipment waste (WEEE), and speci cally Annex IX:
The icon of the crossed-out wheeled bin on
the appliance or its packaging indicates that
new appliance of a similar type. Separating this product for subsequent recycling, treatment and environmentally-friendly disposal
will help prevent potential environmental and health risks, and allow the materials which make up the appliance to be re-used and/
or recycled. Speci c administrative sanctions provided for by current
regulations will be applied for illicit disposal of the product by the
user.
the product must be disposed of separately
from other waste at the end of its operational life. The user must therefore take the
appliance to be disposed of to a suitable
recycling centre for electronic and electrotechnical equipment, or alternatively hand
it over to the vendor when purchasing a
- Constantly lit
The machine needs to be descaled. See the
“Descaling” chapter in this manual.
- Slow ashing
Fill the water tank with fresh drinking water
and select the desired beverage.
The circuit is primed automatically and the
service indicator light turns o .
Page 21

• 33 •
TROUBLESHOOTING
Machine actions Causes Solutions
The machine does not turn on. The machine is not connected to the mains supply. Connect the machine to the mains supply.
Contact an authorised service centre.
The machine needs a lot of time to warm
up.
The pump is noisy. Not enough water in the tank. Fill the water tank with fresh drinking water.
The lever cannot reach the dispensing
position.
The lever does not open completely. Used capsule drawer full. Empty the used capsule drawer.
The coee is brewed too fast or the brewed
coee is not creamy.
Coee is not dispensed or is only dispensed
in drops.
Dispensing of the beverage is interrupted. Not enough water in the tank. Fill the water tank with fresh drinking water. Press
Coee granules present in the coee cup. A small amount of coee granules always remain
There is no milk froth. Unsuitable milk. Use fresh milk with at least 1.5% fat.
The machine does not dispense milk. The components of the carafe are not assembled
Water under the machine. The used capsule drawer and the drip tray are
The machine is full of limescale. Descale the machine.
Tank not inserted correctly. Insert the tank correctly and push it downwards.
Used capsule drawer full. Empty the used capsule drawer. Insert the capsule
again.
The capsule is not inserted correctly. Insert the capsule again, checking that it is correctly
inserted.
Capsule stuck. Open and close the lever fully a couple of times with
moderate force to remove the capsule.
The used capsule is unsuitable for the selected
product.
Tank not inserted correctly. Insert the tank correctly and push it downwards.
Not enough water in the tank. Fill the water tank with fresh drinking water.
in the bottom of the cup.
The milk is too hot. Use milk at fridge temperature.
The milk carafe is dirty or not inserted correctly. Clean the carafe and insert it correctly.
correctly.
incorrectly inserted.
Insert a new capsule and repeat the operation or check
the colour of the capsule.
the corresponding button of the interrupted beverage
without replacing the capsule. Stop dispensing upon
reaching the desired quantity by pressing the beverage
button again.
This is normal and not a defect.
Check that the components of the carafe have been
assembled correctly.
Reinsert both parts in the machine. First insert the used
capsule drawer as far as it will go, then slide the drip
tray back in place.
English
Please contact an authorised service centre for any problems not covered in the above table or if the suggested solutions do not solve the
problem.
TECHNICAL SPECIFICATIONS
The manufacturer reserves the right to make changes to the technical specications of the product.
Nominal voltage - Power rating - Power supply . . . . . . . . . . . . . . . . . . . . . . . . . . . . . . . . . . . . . . . . . . . . . . . . . . . . . . . . . . . . See plate located under the machine.
Housing material ..........................................................................................................Thermoplastic
Size (width x depth x height) (mm) .........................................................................................200 x 410 x 290
Weight ......................................................................................................................... 5.2 kg
Power cord length .................................................................................................................0.8 m
Control panel ........................................................................................................On front of machine
Water tank ......................................................................................................... 1.0 litre - Removable
Used capsule drawer capacity ....................................................................................................... 8-10
Boiler ...................................................................................................................Stainless steel
Safety devices ............................................................................................................. Thermal fuse
Page 22

• 34 •
AUTHORISED SERVICE CENTRES AND WARRANTY
Saeco International Group S.p.A., a company with its registered
o ce in Via Torretta 240, Gaggio Montano (BO), Italy, as manufacturer of the co ee maker and Tchibo GmbH, with its registered
o ce in Überseering 18, 22297 Hamburg, Germany, hereby grant
a 40-month warranty for the Ca ssimo co ee maker in the
European Union territory. The warranty period is calculated from
the date of purchase of the Ca ssimo co ee maker by its rst user.
The date indicated on the original proof of purchase shall prevail.
The warranty is issued in the country where the machine was
purchased in accordance with local regulations. This warranty is
valid for 40 months from the date of puchase within the European
Union.
We will remedy any defects detected in this appliance at no
additional charge and within a reasonable amount of time after
being noti ed of the defects. The warranty service is subject to
delay if servicing is performed in a country other than the one
in which the appliance was purchased, due to variable product
distribution timing in di erent countries, and a speci c version may
be sold in a given country.
If it will be needed to send the product to an authorised service
centre of Philips Germany, please ll in the service form, which you
will nd in the last pages of this user manual and, together with
the original proof of purchase and the carefully packed product,
forward it to the address given by the Ca ssimo service team.
The warranty does not cover:
• damages due to improper use or use di erent than described in
the user manual
• mechanical damages, including transport damages due to
insu cient packaging by the customer
• damages due to product modi cation or unauthorised repairs
• damages due to failure to clean/descale
Free of charge warranty repairs do not cover product maintenance
and cleaning as described in the user manual, or worn parts and
consumables.
Repairs that are not covered by the warranty can also be carried out
at cost price by an authorised service centre of Philips Germany. If
needed please contact the Ca ssimo service team.
Saeco International Group S.p.A. informs that its representative in
the territory of Germany is Philips Germany with its registered o ce
in Hamburg, address Lübeckertordamm 5, 20099 Hamburg.
The Ca ssimo co ee maker was manufactured using the latest
production techniques and has undergone thorough quality control
inspection. Saeco International Group S.p.A. and Tchibo GmbH
therefore guarantee that the product will be free of defects in the
above mentioned warranty period. A defect constitutes any fault
that signi cantly impairs or limits the value or working e ciency
of the appliance.
All defects in workmanship or materials within the warranty
period will be remedied by an authorised service centre of Philips
Germany. In case the remedy will not be possible, the defective
Ca ssimo co ee maker will be replaced with a defect-free product.
If the replacement is not possible the customer will be refunded
the purchase price (as con rmed on the original proof of purchase).
The prerequisite for receiving the warranty is that all claims must
be accompanied by the original proof of purchase together with
the correctly lled in service form, which you can nd in the last
pages of this user manual. The list and addresses of the authorised
service centres of Philips Germany are available on the website
www.philips.de or by e-mail from the Ca ssimo service team.
In all countries outside the European Union, the warranty conditions
speci cally provided under the respective national laws will apply.
Warranty on consumer goods sold does not exclude, limit or
suspend the rights of the buyer arising from local applicable law.
A
Please have both of the product numbers shown above at hand
when contacting the Ca ssimo service team - see plate located
under the machine. These will be needed to identify the machine.
In case of a defect please contact our Ca ssimo service team.
E-mail: ca ssimo-service@tchibo.de
Our consultants will be pleased to advise you on the procedure to
be followed.
Page 23

SERVICE FORM
Please ll in the form in block capitals and send it together with the product.
Product
number:
(please ll in)
Name
Street, No.
City, post code
Country
Daytime tel. no.
(You can nd your Cassimo machine’s product number under
the machine.)
If repair is not covered by the
warranty:
(please check)
Please return the product
without repair.
Please provide an estimate of
costs.
Information about defect
Date of purchase Date/Signature
 Loading...