

Page 1
Owner’s manual
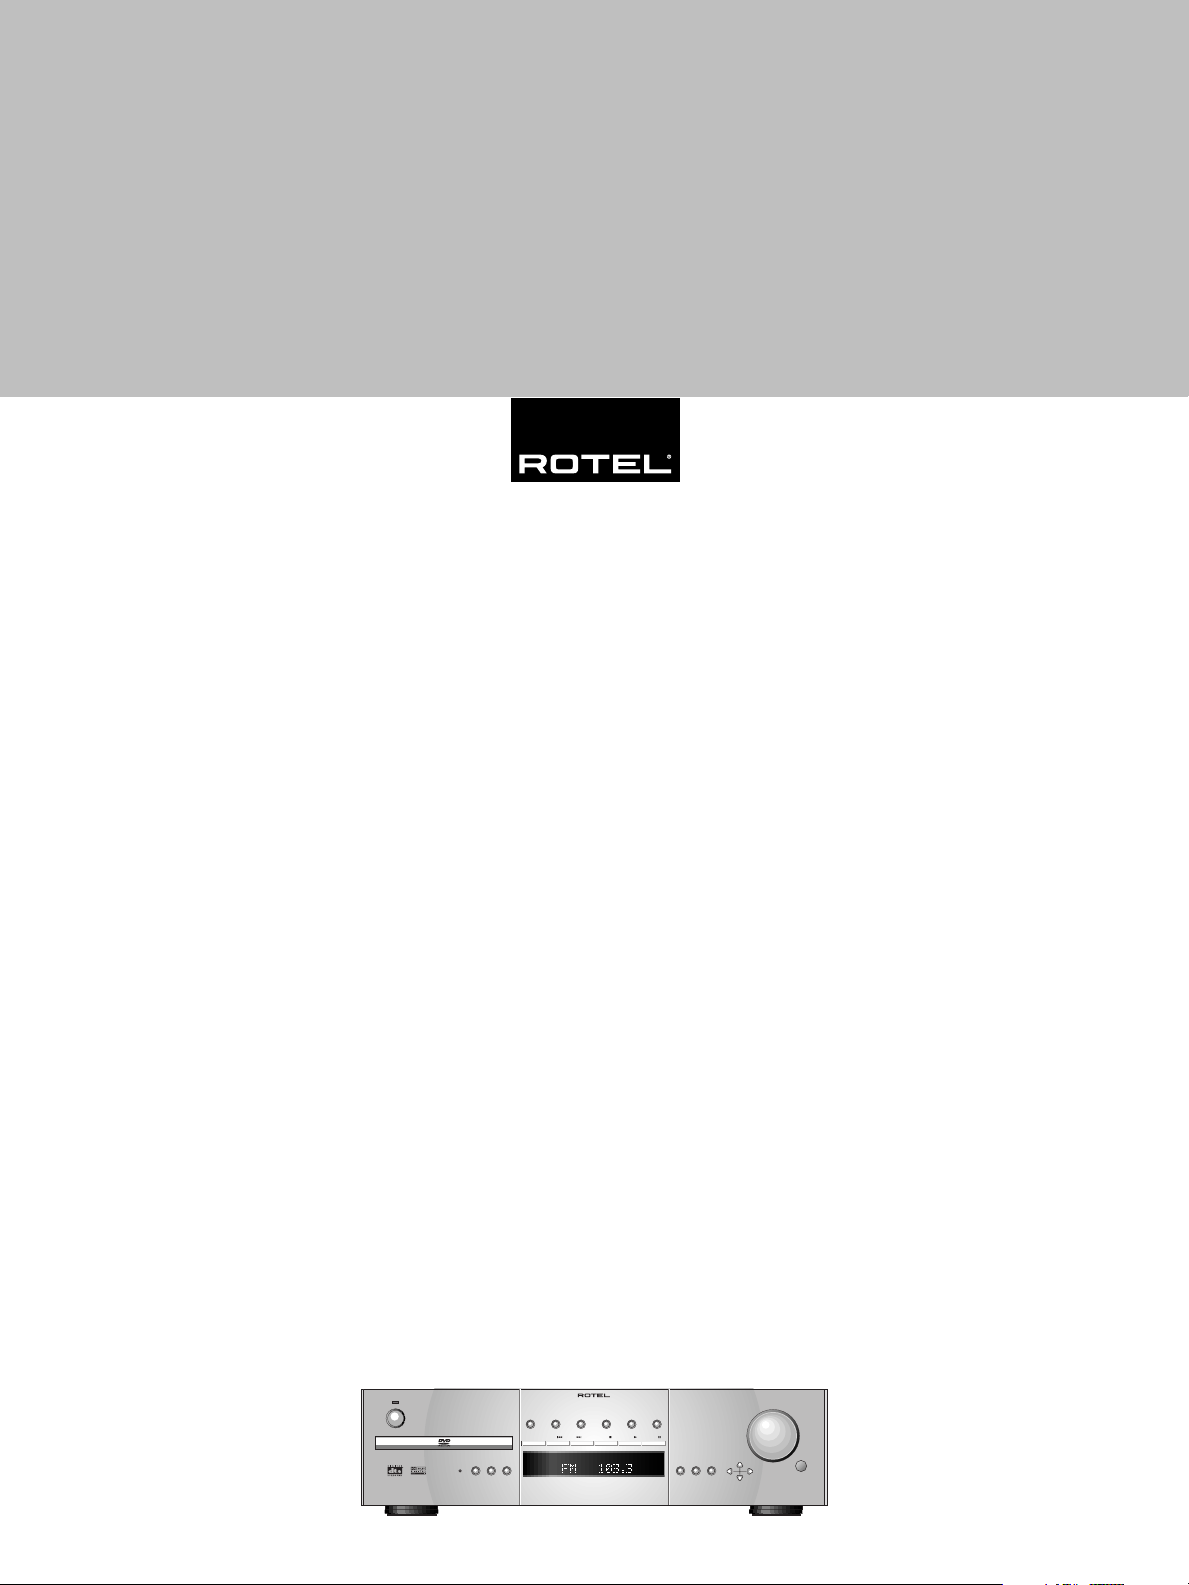
RSDX-02
DVD Receiver
RSDX-02
STANDBY
INPUT SURROUND
DVD
MODE
ON/OFFAG/DG
AUDIO
REC MODE
ATT.
FM/AMTAPE/CDR
TVVCRDBSDVD
SOURCE NAME
STOP PAUSEPLAYTRACKOPN/CLS
ADJUSTSETTING
MASTER VOLUME
CONTROL
MEMORY
Page 2
RSDX-02
2
Page 3

3
Notice
The COMPUTER I/O connection should be handled by authorized person
only.
FCC Information
This equipment has been tested and found to comply with the limits for a
Class B digital device, pursuant to Part 15 of the FCC Rules. These limits
are designed to provide reasonable protection against harmful interference
in a residential installation. This equipment generates, uses and can radiate radio frequency energy and, if not installed and used in accordance
with the instruction, may cause harmful interference to radio communications.
However, there is no guarantee that interference will not occur in a particular installation. If this equipment does cause harmful interference to radio
or television reception, which can be determined by turning the equipment
off and on, the user is encouraged to try to correct the interference by one
or more of the following measures:
• Reorient or relocate the receiving antenna.(TV, radio, etc.)
• Increase the separation between the equipment and receiver
• Connect the equipment to an outlet on circuit different from that to which
the receiver is connected.
• Consult the dealer or an experienced radio/TV technician for additional
help.
Caution
This device complies with part 15 of the FCC Rules operation is subject to
the following to conditions: (1) This device may not cause harmful interference, and (2) this device must accept any interference received, including
interference that may cause undesired operation.
Important Safety Instructions
DANGER: Visible and invisible laser radiation when open and interlock failed
or defeated. Avoid direct exposure to beam.
WARNING: There are no user serviceable parts inside. Refer all servicing
to qualified service personnel.
WARNING: To reduce the risk of fire or electric shock, do not expose the
unit to moisture or water. Do not allow foreign objects to get into the enclosure. If the unit is exposed to moisture, or a foreign object gets into the
enclosure, immediately disconnect the power cord from the wall. Take the
unit to a qualified service person for inspection and necessary repairs.
Read all the instructions before connecting or operating the component.
Keep this manual so you can refer to these safety instructions.
Heed all warnings and safety information in these instructions and on the
product itself. Follow all operating instructions.
Clean the enclosure only with a dry cloth or a vacuum cleaner.
You must allow 10 cm or 4 inches of unobstructed clearance around the
unit. Do not place the unit on a bed, sofa, rug, or similar surface that could
block the ventilation openings. If the unit is placed in a bookcase or cabinet, there must be ventilation of the cabinet to allow proper cooling.
Keep the component away from radiators, heat registers, stoves, or any
other appliance that produces heat.
The unit must be connected to a power supply only of the type and voltage
specified on the rear panel. (AC 110-240 V, 50/60 Hz)
Connect the component to the power outlet only with the supplied power
supply cable or an exact equivalent. Do not modify the supplied cable. Do
not defeat grounding and/or polarization provisions. The cable should be
connected to a 2-pin polarized wall outlet, matching the wide blade of the
plug to the wide slot of the receptacle. Do not use extension cords.
Do not route the power cord where it will be crushed, pinched, bent, exposed to heat, or damaged in any way. Pay particular attention to the power
cord at the plug and where it exits the back of the unit.
The power cord should be unplugged from the wall outlet during a lightning storm or if the unit is to be left unused for a long period of time.
Immediately stop using the component and have it inspected and/or serviced by a qualified service agency if:
• The power supply cord or plug has been damaged.
• Objects have fallen or liquid has been spilled into the unit.
• The unit has been exposed to rain.
• The unit shows signs of improper operation
• The unit has been dropped or damaged in any way
Page 4
RSDX-02 DVD Receiver
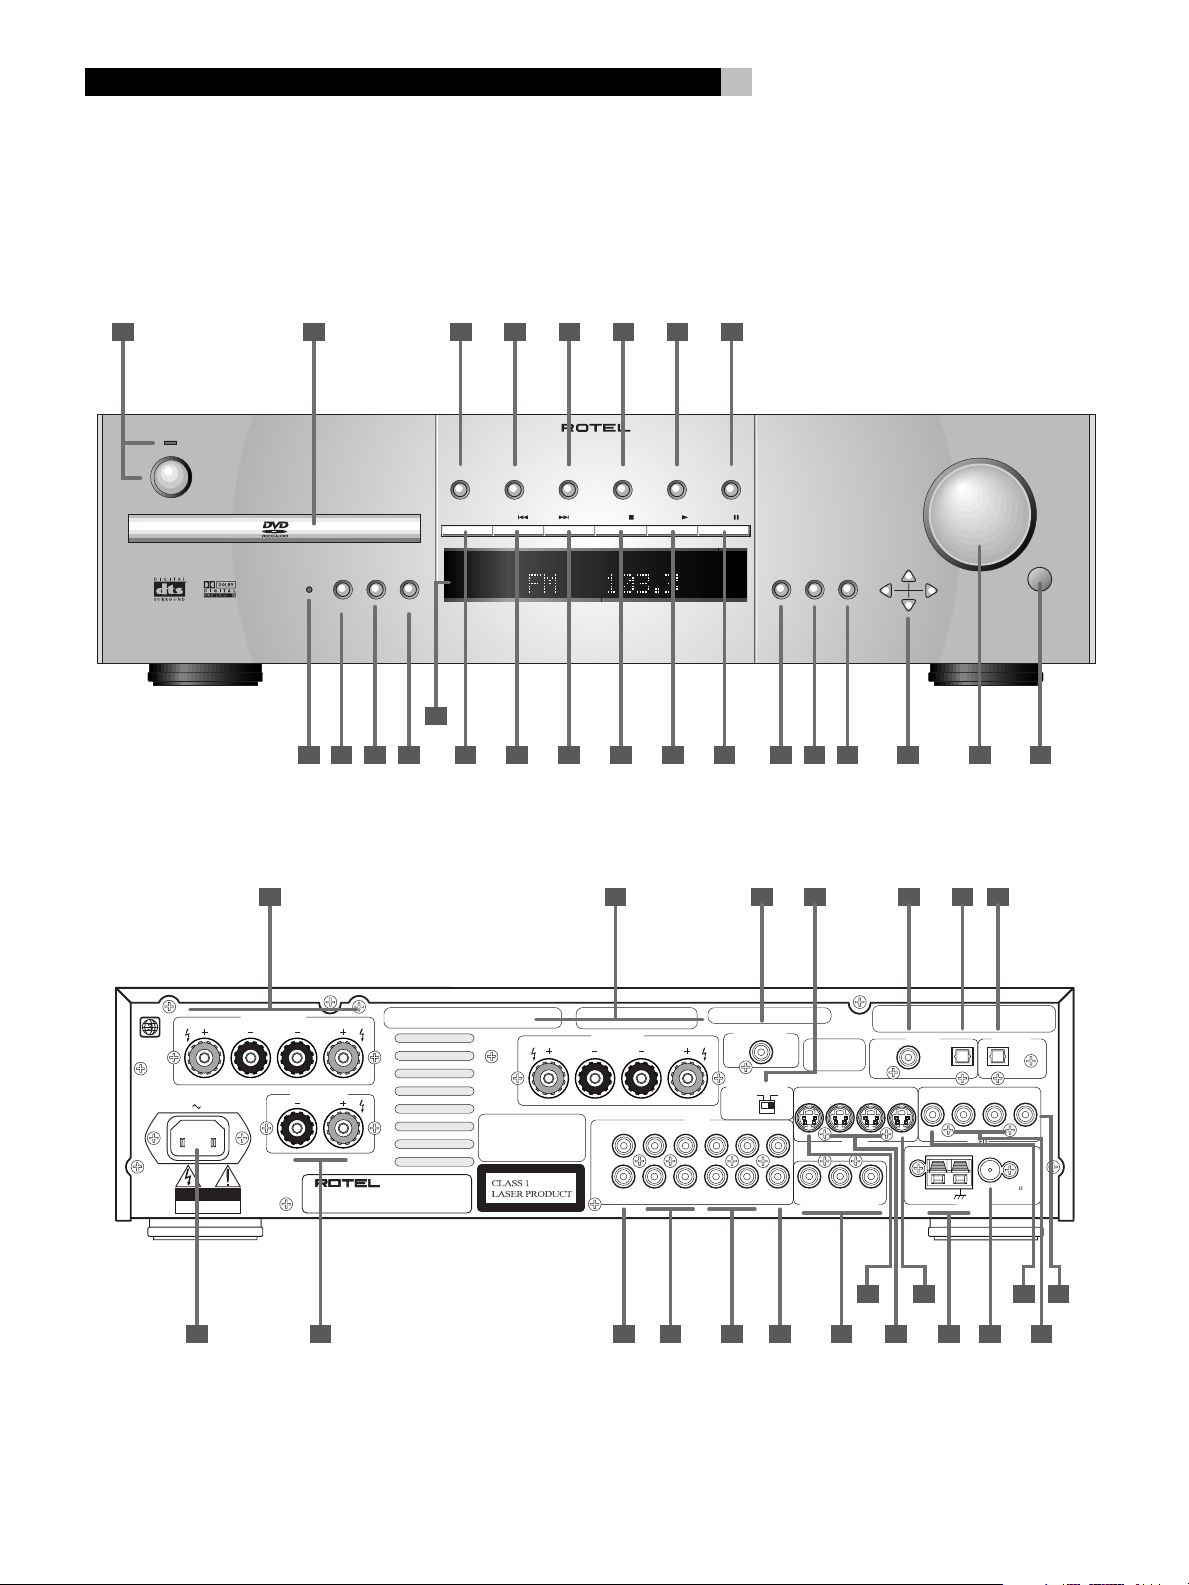
1: Controls and Connections
4
3 4 86 751 2
RSDX-02
STANDBY
STOP PAUSEPLAYTRACKOPN/CLS
INPUT SURROUND
DVD
AUDIO
ATT.
MODE
ON/OFFAG/DG
REC MODE
13
16 17 18 19 23
26 27
MASTER VOLUME
TVVCRDBSDVD
SOURCE NAME
FM/AMTAPE/CDR
MEMORY
ADJUSTSETTING
CONTROL
24 25109 11 20 222112 1514
28 29 30 31 32
RIGHT LEFT
CAUTION
RISK OF ELECTRIC SHOCK
DO NOT OPEN
SURROUND SPEAKER
CENTER SPEAKER
WARNING: SHOCK HAZARD DO NOT OPEN
AVIS:
RISQUE DE CHOC ELECTRIQUE–NE PAS OUVRIR
DVD RECEIVER
MODEL NO. RSDX-02
POWER CONSUMPTION: 180W
SPEAKER IMPEDANCE: 8 ~ 16 OHMS
Manufactured under license from Digital
Theater Systems, Inc. US Pat. No. 5,451,942,
5,956674, 5,974,380, 5,978,762, and other
world-wide patents issued and pending.
"DTS" and "DTS Digital Surround" are
registered trademarks of Digital Theater
Systems, Inc. Copyright 1996, 2000 Digital
Theater Systems, Inc. All rights reserved.
Manufactured under license from Dolby Laboratories.
"Dolby", "Pro Logic", "MLP Lossless", and the double-D
symbol are trademarks of Dolby Laboratories.
FRONT SPEAKER
RIGHT LEFT
TV
LEFT
RIGHT
OUT OUT
IN IN IN IN
PRODUCT COMPLIES WITH DHHS RULES 21 CFR
SUBCHAPTER JIN EFFECT AT DATE OF MANUFACTURE.
SUBWOOFER OUT
VIDEO OUT SELECTOR
PAL NTSC
AUDIO
DBSTAPE/CDR
VCR
Apparatus Claims of U.S.
Patent Nos. 4,631,603,
4,577,216, 4,819,098, and
4,907,093, licensed for
limited viewing uses only.
VCR
DBS
OUT
IN
YPB
DVD COMPONENT VIDEO OUT
IN
S-VIDEO
PR
40 42
33 34 4339 41
373635 38 44
THIS DEVICE COMPLIES WITH PART 15 OF THE FCC RULES. OPERATION IS SUBJECT
TO THE FOLLOWING TWO CONDITIONS: (1) THIS DEVICE MAY NOT CAUSE HARMFUL
INTERFERENCE, AND (2) THIS DEVICE MUST ACCEPT ANY INTERFERENCE RECEIVED,
INCLUDING INTERFERENCE THAT MAY CAUSE UNDESIRED OPERATION.
DIGITAL 1
(DBS)
MONITOR
OUT
DIGITAL IN
DIGITAL 2
(TV)
DBS
IN
AM EXT
AM LOOP
OUT
VIDEO
ANTENNA
VCR
DIGITAL OUT
PCM/STREAM
IN
FM 75
COAXIAL
MONITOR
OUT
45 47
46
Page 5

2: RR-1070 Remote Control
5
English
P1-A
A
P1-B
P1-C
P1-D
P1-E
PAGE 1 PAGE 2 PAGE 3
PAGE 6 PAGE 5 PAGE 4
P2-A
P2-B
P2-C
P2-D
P2-E
P2-F
P2-G
P2-H
PP P
P3-A
P3-B
P3-C
P3-D
P3-E
P3-F
P3-G
B
C
D
E
F
G
P6-A
P6-B
P6-C
P6-D
P6-E
P6-F
P
P5-A
P5-B
P5-C
P5-D
P5-E
P5-F
P4-A
P4-B
P4-C
P4-D
P4-E
P4-F
P4-G
P
P
Page 6
RSDX-02 DVD Receiver
3: Connecting the Speakers
6
RIGHT LEFT
CAUTION
RISK OF ELECTRIC SHOCK
DO NOT OPEN
SURROUND SPEAKER
CENTER SPEAKER
WARNING: SHOCK HAZARD DO NOT OPEN
AVIS:
RISQUE DE CHOC ELECTRIQUE–NE PAS OUVRIR
DVD RECEIVER
MODEL NO. RSDX-02
POWER CONSUMPTION: 180W
SPEAKER IMPEDANCE
: 8 ~ 16 OHMS
Manufactured under license from Digital
Theater Systems, Inc. US Pat. No. 5,451,942,
5,956674, 5,974,380, 5,978,762, and other
world-wide patents issued and pending.
"DTS" and "DTS Digital Surround" are
registered trademarks of Digital Theater
Systems, Inc. Copyright 1996, 2000 Digital
Theater Systems, Inc. All rights reserved.
Manufactured under license from Dolby Laboratories.
"Dolby", "Pro Logic", "MLP Lossless", and the double-D
symbol are trademarks of Dolby Laboratories.
FRONT SPEAKER
RIGHT LEFT
TV
LEFT
RIGHT
OUT OUT
IN IN IN IN
PRODUCT COMPLIES WITH DHHS RULES 21 CFR
SUBCHAPTER JIN EFFECT AT DATE OF MANUFACTURE.
SUBWOOFER OUT
VIDEO OUT SELECTOR
PAL NTSC
AUDIO
DBSTAPE/CDR
VCR
THIS DEVICE COMPLIES WITH PART 15 OF THE FCC RULES. OPERATION IS SUBJECT
TO THE FOLLOWING TWO CONDITIONS: (1) THIS DEVICE MAY NOT CAUSE HARMFUL
INTERFERENCE, AND (2) THIS DEVICE MUST ACCEPT ANY INTERFERENCE RECEIVED,
Apparatus Claims of U.S.
Patent Nos. 4,631,603,
4,577,216, 4,819,098, and
4,907,093, licensed for
limited viewing uses only.
DBS
IN
INCLUDING INTERFERENCE THAT MAY CAUSE UNDESIRED OPERATION.
DIGITAL 1
(DBS)
VCR
OUT
IN
S-VIDEO
YP
B
P
DVD COMPONENT VIDEO OUT
R
MONITOR
OUT
DIGITAL IN
DIGITAL 2
AM EXT
DBS
(TV)
IN
AM LOOP
OUT
VIDEO
ANTENNA
SUBWOOFER
INPUT
DIGITAL OUT
VCR
IN
COAXIAL
PCM/STREAM
MONITOR
OUT
FM 75
Page 7
4: Connecting the TV
7
English
RIGHT LEFT
CAUTION
RISK OF ELECTRIC SHOCK
DO NOT OPEN
SURROUND SPEAKER
CENTER SPEAKER
WARNING: SHOCK HAZARD DO NOT OPEN
AVIS:
RISQUE DE CHOC ELECTRIQUE–NE PAS OUVRIR
DVD RECEIVER
MODEL NO. RSDX-02
POWER CONSUMPTION: 180W
SPEAKER IMPEDANCE: 8 ~ 16 OHMS
RIGHT LEFT
AUDIO OUTPUTS
Manufactured under license from Digital
Theater Systems, Inc. US Pat. No. 5,451,942,
5,956674, 5,974,380, 5,978,762, and other
world-wide patents issued and pending.
"DTS" and "DTS Digital Surround" are
registered trademarks of Digital Theater
Systems, Inc. Copyright 1996, 2000 Digital
Theater Systems, Inc. All rights reserved.
Manufactured under license from Dolby Laboratories.
"Dolby", "Pro Logic", "MLP Lossless", and the double-D
symbol are trademarks of Dolby Laboratories.
FRONT SPEAKER
RIGHT LEFT
TV
LEFT
RIGHT
OUT OUT
IN IN IN IN
PRODUCT COMPLIES WITH DHHS RULES 21 CFR
SUBCHAPTER JIN EFFECT AT DATE OF MANUFACTURE.
SUBWOOFER OUT
VIDEO OUT SELECTOR
PAL NTSC
AUDIO
DBSTAPE/CDR
VCR
THIS DEVICE COMPLIES WITH PART 15 OF THE FCC RULES. OPERATION IS SUBJECT
TO THE FOLLOWING TWO CONDITIONS: (1) THIS DEVICE MAY NOT CAUSE HARMFUL
INTERFERENCE, AND (2) THIS DEVICE MUST ACCEPT ANY INTERFERENCE RECEIVED,
Apparatus Claims of U.S.
Patent Nos. 4,631,603,
4,577,216, 4,819,098, and
4,907,093, licensed for
limited viewing uses only.
DBS
IN
INCLUDING INTERFERENCE THAT MAY CAUSE UNDESIRED OPERATION.
DIGITAL 1
(DBS)
VCR
IN
OUT
S-VIDEO
YPB
DVD COMPONENT VIDEO OUT
YPB PR
PR
DIGITAL IN
MONITOR
OUT
VIDEO INPUTS
DIGITAL 2
(TV)
DBS
IN
AM LOOP
AM EXT
S-VIDEOCOMPONENT VIDEO
OUT
VIDEO
ANTENNA
VCR
DIGITAL OUT
PCM/STREAM
IN
FM 75
COAXIAL
COMPOSITE
MONITOR
OUT
VIDEO
5: Connecting a Cable, Satellite, or HDTV set-top box
RIGHT LEFT
CAUTION
RISK OF ELECTRIC SHOCK
DO NOT OPEN
SURROUND SPEAKER
CENTER SPEAKER
WARNING: SHOCK HAZARD DO NOT OPEN
AVIS:
RISQUE DE CHOC ELECTRIQUE–NE PAS OUVRIR
DVD RECEIVER
MODEL NO. RSDX-02
POWER CONSUMPTION: 180W
AUDIO OUTPUTS
SPEAKER IMPEDANCE
RIGHT LEFT
ANALOGDIGITAL
: 8 ~ 16 OHMS
Manufactured under license from Digital
Theater Systems, Inc. US Pat. No. 5,451,942,
5,956674, 5,974,380, 5,978,762, and other
world-wide patents issued and pending.
"DTS" and "DTS Digital Surround" are
registered trademarks of Digital Theater
Systems, Inc. Copyright 1996, 2000 Digital
Theater Systems, Inc. All rights reserved.
Manufactured under license from Dolby Laboratories.
"Dolby", "Pro Logic", "MLP Lossless", and the double-D
symbol are trademarks of Dolby Laboratories.
RIGHT LEFT
FRONT SPEAKER
TV
LEFT
RIGHT
IN IN IN IN
AUDIO
OUT OUT
PRODUCT COMPLIES WITH DHHS RULES 21 CFR
SUBCHAPTER JIN EFFECT AT DATE OF MANUFACTURE.
SUBWOOFER OUT
VIDEO OUT SELECTOR
DBSTAPE/CDR
PAL NTSC
VCR
DBS
IN
YP
DVD COMPONENT VIDEO OUT
Apparatus Claims of U.S.
Patent Nos. 4,631,603,
4,577,216, 4,819,098, and
4,907,093, licensed for
limited viewing uses only.
OUT
THIS DEVICE COMPLIES WITH PART 15 OF THE FCC RULES. OPERATION IS SUBJECT
TO THE FOLLOWING TWO CONDITIONS: (1) THIS DEVICE MAY NOT CAUSE HARMFUL
INTERFERENCE, AND (2) THIS DEVICE MUST ACCEPT ANY INTERFERENCE RECEIVED,
INCLUDING INTERFERENCE THAT MAY CAUSE UNDESIRED OPERATION.
DIGITAL IN
DIGITAL 1
DIGITAL 2
(DBS)
(TV)
S-VIDEO
B
VCR
IN
P
S-VIDEO
DBS
MONITOR
OUT
R
IN
AM EXT
COMPOSITE
VIDEO
OUT
AM LOOP
ANTENNA
VIDEO OUTPUTS
VIDEO
VCR
DIGITAL OUT
PCM/STREAM
IN
FM 75
COAXIAL
MONITOR
OUT
Page 8
RSDX-02 DVD Receiver
6: Connecting a VCR
8
RIGHT LEFT
CAUTION
RISK OF ELECTRIC SHOCK
DO NOT OPEN
SURROUND SPEAKER
CENTER SPEAKER
WARNING: SHOCK HAZARD DO NOT OPEN
AVIS:
RISQUE DE CHOC ELECTRIQUE–NE PAS OUVRIR
DVD RECEIVER
MODEL NO. RSDX-02
POWER CONSUMPTION: 180W
RIGHT LEFT
LINE IN
AUDIO
SPEAKER IMPEDANCE
RIGHT LEFT
OUT
: 8 ~ 16 OHMS
Manufactured under license from Digital
Theater Systems, Inc. US Pat. No. 5,451,942,
5,956674, 5,974,380, 5,978,762, and other
world-wide patents issued and pending.
"DTS" and "DTS Digital Surround" are
registered trademarks of Digital Theater
Systems, Inc. Copyright 1996, 2000 Digital
Theater Systems, Inc. All rights reserved.
Manufactured under license from Dolby Laboratories.
"Dolby", "Pro Logic", "MLP Lossless", and the double-D
symbol are trademarks of Dolby Laboratories.
FRONT SPEAKER
RIGHT LEFT
TV
LEFT
RIGHT
OUT OUT
IN IN IN IN
PRODUCT COMPLIES WITH DHHS RULES 21 CFR
SUBCHAPTER JIN EFFECT AT DATE OF MANUFACTURE.
SUBWOOFER OUT
VIDEO OUT SELECTOR
PAL NTSC
AUDIO
DBSTAPE/CDR
VCR
THIS DEVICE COMPLIES WITH PART 15 OF THE FCC RULES. OPERATION IS SUBJECT
TO THE FOLLOWING TWO CONDITIONS: (1) THIS DEVICE MAY NOT CAUSE HARMFUL
INTERFERENCE, AND (2) THIS DEVICE MUST ACCEPT ANY INTERFERENCE RECEIVED,
Apparatus Claims of U.S.
Patent Nos. 4,631,603,
4,577,216, 4,819,098, and
4,907,093, licensed for
limited viewing uses only.
DBS
IN
INCLUDING INTERFERENCE THAT MAY CAUSE UNDESIRED OPERATION.
DIGITAL 1
(DBS)
VCR
OUT
IN
S-VIDEO
YP
B
P
DVD COMPONENT VIDEO OUT
R
LINE IN OUT
S-VIDEO
MONITOR
OUT
DIGITAL IN
VIDEO
DIGITAL 2
(TV)
DBS
IN
AM LOOP
AM EXT
VCR
OUT
VIDEO
ANTENNA
LINE IN OUT
COMPOSITE
DIGITAL OUT
PCM/STREAM
IN
FM 75
COAXIAL
MONITOR
OUT
7: Connecting a CD Player/CDR Recorder
RIGHT LEFT
CAUTION
RISK OF ELECTRIC SHOCK
DO NOT OPEN
SURROUND SPEAKER
CENTER SPEAKER
WARNING: SHOCK HAZARD DO NOT OPEN
AVIS:
RISQUE DE CHOC ELECTRIQUE–NE PAS OUVRIR
DVD RECEIVER
MODEL NO. RSDX-02
POWER CONSUMPTION: 180W
SPEAKER IMPEDANCE
RIGHT LEFT
LINE IN
AUDIO
RIGHT LEFT
OUT
: 8 ~ 16 OHMS
Manufactured under license from Digital
Theater Systems, Inc. US Pat. No. 5,451,942,
5,956674, 5,974,380, 5,978,762, and other
world-wide patents issued and pending.
"DTS" and "DTS Digital Surround" are
registered trademarks of Digital Theater
Systems, Inc. Copyright 1996, 2000 Digital
Theater Systems, Inc. All rights reserved.
Manufactured under license from Dolby Laboratories.
"Dolby", "Pro Logic", "MLP Lossless", and the double-D
symbol are trademarks of Dolby Laboratories.
FRONT SPEAKER
RIGHT LEFT
TV
LEFT
RIGHT
OUT OUT
IN IN IN IN
PRODUCT COMPLIES WITH DHHS RULES 21 CFR
SUBCHAPTER JIN EFFECT AT DATE OF MANUFACTURE.
SUBWOOFER OUT
VIDEO OUT SELECTOR
PAL NTSC
AUDIO
DBSTAPE/CDR
VCR
THIS DEVICE COMPLIES WITH PART 15 OF THE FCC RULES. OPERATION IS SUBJECT
TO THE FOLLOWING TWO CONDITIONS: (1) THIS DEVICE MAY NOT CAUSE HARMFUL
INTERFERENCE, AND (2) THIS DEVICE MUST ACCEPT ANY INTERFERENCE RECEIVED,
Apparatus Claims of U.S.
Patent Nos. 4,631,603,
4,577,216, 4,819,098, and
4,907,093, licensed for
limited viewing uses only.
DBS
IN
INCLUDING INTERFERENCE THAT MAY CAUSE UNDESIRED OPERATION.
DIGITAL 1
(DBS)
VCR
OUT
IN
S-VIDEO
YP
B
P
DVD COMPONENT VIDEO OUT
R
MONITOR
OUT
DIGITAL IN
DIGITAL 2
(TV)
DBS
IN
AM LOOP
AM EXT
VCR
OUT
VIDEO
ANTENNA
OUT REC IN
DIGITAL
DIGITAL OUT
PCM/STREAM
MONITOR
IN
FM 75
COAXIAL
OUT
Page 9
9
8: Connecting an Analog Audio Tape Recorder
English
RIGHT LEFT
CAUTION
RISK OF ELECTRIC SHOCK
DO NOT OPEN
SURROUND SPEAKER
CENTER SPEAKER
WARNING: SHOCK HAZARD DO NOT OPEN
AVIS:
RISQUE DE CHOC ELECTRIQUE–NE PAS OUVRIR
DVD RECEIVER
MODEL NO. RSDX-02
POWER CONSUMPTION: 180W
RIGHT LEFT
LINE IN
AUDIO
SPEAKER IMPEDANCE
RIGHT LEFT
OUT
: 8 ~ 16 OHMS
Manufactured under license from Digital
Theater Systems, Inc. US Pat. No. 5,451,942,
5,956674, 5,974,380, 5,978,762, and other
world-wide patents issued and pending.
"DTS" and "DTS Digital Surround" are
registered trademarks of Digital Theater
Systems, Inc. Copyright 1996, 2000 Digital
Theater Systems, Inc. All rights reserved.
Manufactured under license from Dolby Laboratories.
"Dolby", "Pro Logic", "MLP Lossless", and the double-D
symbol are trademarks of Dolby Laboratories.
FRONT SPEAKER
RIGHT LEFT
TV
LEFT
RIGHT
OUT OUT
IN IN IN IN
PRODUCT COMPLIES WITH DHHS RULES 21 CFR
SUBCHAPTER JIN EFFECT AT DATE OF MANUFACTURE.
SUBWOOFER OUT
VIDEO OUT SELECTOR
PAL NTSC
AUDIO
DBSTAPE/CDR
VCR
THIS DEVICE COMPLIES WITH PART 15 OF THE FCC RULES. OPERATION IS SUBJECT
TO THE FOLLOWING TWO CONDITIONS: (1) THIS DEVICE MAY NOT CAUSE HARMFUL
INTERFERENCE, AND (2) THIS DEVICE MUST ACCEPT ANY INTERFERENCE RECEIVED,
Apparatus Claims of U.S.
Patent Nos. 4,631,603,
4,577,216, 4,819,098, and
4,907,093, licensed for
limited viewing uses only.
DBS
IN
INCLUDING INTERFERENCE THAT MAY CAUSE UNDESIRED OPERATION.
DIGITAL 1
(DBS)
VCR
OUT
IN
S-VIDEO
YP
B
P
DVD COMPONENT VIDEO OUT
R
MONITOR
OUT
DIGITAL IN
DIGITAL 2
(TV)
DBS
IN
AM LOOP
AM EXT
VCR
OUT
VIDEO
ANTENNA
DIGITAL OUT
PCM/STREAM
IN
FM 75
COAXIAL
MONITOR
OUT
9: Connecting AM and FM antennae
RIGHT LEFT
CAUTION
RISK OF ELECTRIC SHOCK
DO NOT OPEN
SURROUND SPEAKER
CENTER SPEAKER
WARNING: SHOCK HAZARD DO NOT OPEN
AVIS:
RISQUE DE CHOC ELECTRIQUE–NE PAS OUVRIR
DVD RECEIVER
MODEL NO. RSDX-02
POWER CONSUMPTION: 180W
SPEAKER IMPEDANCE: 8 ~ 16 OHMS
Manufactured under license from Digital
Theater Systems, Inc. US Pat. No. 5,451,942,
5,956674, 5,974,380, 5,978,762, and other
world-wide patents issued and pending.
"DTS" and "DTS Digital Surround" are
registered trademarks of Digital Theater
Systems, Inc. Copyright 1996, 2000 Digital
Theater Systems, Inc. All rights reserved.
Manufactured under license from Dolby Laboratories.
"Dolby", "Pro Logic", "MLP Lossless", and the double-D
symbol are trademarks of Dolby Laboratories.
FRONT SPEAKER
RIGHT LEFT
TV
LEFT
RIGHT
OUT OUT
IN IN IN IN
PRODUCT COMPLIES WITH DHHS RULES 21 CFR
SUBCHAPTER JIN EFFECT AT DATE OF MANUFACTURE.
SUBWOOFER OUT
VIDEO OUT SELECTOR
PAL NTSC
AUDIO
DBSTAPE/CDR
VCR
THIS DEVICE COMPLIES WITH PART 15 OF THE FCC RULES. OPERATION IS SUBJECT
TO THE FOLLOWING TWO CONDITIONS: (1) THIS DEVICE MAY NOT CAUSE HARMFUL
INTERFERENCE, AND (2) THIS DEVICE MUST ACCEPT ANY INTERFERENCE RECEIVED,
Apparatus Claims of U.S.
Patent Nos. 4,631,603,
4,577,216, 4,819,098, and
4,907,093, licensed for
limited viewing uses only.
DBS
IN
INCLUDING INTERFERENCE THAT MAY CAUSE UNDESIRED OPERATION.
DIGITAL 1
(DBS)
VCR
OUT
IN
S-VIDEO
YPB
DVD COMPONENT VIDEO OUT
PR
MONITOR
OUT
DIGITAL IN
DIGITAL 2
(TV)
DBS
IN
AM LOOP
AM EXT
VCR
OUT
VIDEO
ANTENNA
DIGITAL OUT
PCM/STREAM
IN
FM 75
COAXIAL
MONITOR
OUT
Page 10

RSDX-02 DVD Receiver
10: Parental Lock Country Codes
10
AD Andorra
AE United Arab Emirates
AF Afghanistan
AG Antigua and Barbuda
AI Anguilla
AL Albania
AM Armenia
AN Netherlands Antilles
AO Angola
AQ Antarctica
AR Argentina
AS American Samoa
AT Austria
AU Australia
AW Aruba
AZ Azerbaijan
BA Bosnia and Herzegovina
BB Barbados
BD Bangladesh
BE Belgium
BF Burkina Faso
BG Bulgaria
BH Bahrain
BI Burundi
BJ Benin
BM Bermuda
BN Brunei Darussalam
BO Bolivia
BR Brazil
BS Bahamas
BT Bhutan
BV Bouvet Island
BW Botswana
BY Belarus
BZ Belize
CA Canada
CC Cocos (Keeling) Islands
CF Central African Republic
CG Congo
CH Switzerland
CI Côte d’Ivoire
CK Cook Islands
CL Chile
CM Cameroon
CN China
CO Colombia
CR Costa Rica
CU Cuba
CV Cape Verde
CX Christmas Island
CY Cyprus
CZ Czech Republic
DE Germany
DJ Djibouti
DK Denmark
DM Dominica
DO Dominican Republic
DZ Algeria
EC Ecuador
EE Estonia
EG Egypt
EH Western Sahara
ER Eritrea
ES Spain
ET Ethiopia
FI Finland
FJ Fiji
FK Falkland Islands
(Malvinas)
FM Micronesia
(Federated States of)
FO Faroe Islands
FR France
FX France, Metropolitan
GA Gabon
GB United Kingdom
GD Grenada
GE Georgia
GF French Guiana
GH Ghana
GI Gibraltar
GL Greenland
GM Gambia
GN Guinea
GP Guadeloupe
GQ Equatorial Guinea
GR Greece
GS South Georgia and the
South Sandwich Islands
GT Guatemala
GU Guam
GW Guinea-Bissau
GY Guyana
HK Hong Kong
HM Heard Island and
McDonald Islands
HN Honduras
HR Croatia
HT Haiti
HU Hungary
ID Indonesia
IE Ireland
IL Israel
IN India
IO British Indian Ocean
Territory
IQ Iraq
IR Iran (Islamic Republic of)
IS Iceland
IT Italy
JM Jamaica
JO Jordan
JP Japan
KE Kenya
KG Kyrgyzstan
KH Cambodia
KI Kiribati
KM Comoros
KN Saint Kitts and Nevis
KP Korea, Democratic
People’s Republic of
KR Korea, Republic of
KW Kuwait
KY Cayman Islands
KZ Kazakhstan
LA Lao People’s Democratic
Republic
LB Lebanon
LC Saint Lucia
Page 11
11
English
LI Liechtenstein
LK Sri Lanka
LR Liberia
LS Lesotho
LT Lithuania
LU Luxembourg
LV Latvia
LY Libyan Arab Jamahiriya
MA Morocco
MC Monaco
MD Moldova, Republic of
MG Madagascar
MH Marshall Islands
ML Mali
MM Myanmar
MN Mongolia
MO Macau
MP Northern Mariana
Islands
MQ Martinique
MR Mauritania
MS Montserrat
MT Malta
MU Mauritius
MV Maldives
MW Malawi
MX Mexico
MY Malaysia
MZ Mozambique
NA Namibia
NC New Caledonia
NE Niger
NF Norfolk Island
NG Nigeria
NI Nicaragua
NL Netherlands
NO Norway
NP Nepal
NR Nauru
NU Niue
NZ New Zealand
OM Oman
PA Panama
PE Peru
PF French Polynesia
PG Papua New Guinea
PH Philippines
PK Pakistan
PL Poland
PM Saint Pierre and
Miquelon
PN Pitcairn
PR Puerto Rico
PT Portugal
PW Palau
PY Paraguay
QA Qatar
RE Runion
RO Romania
RU Russian Federation
RW Rwanda
SA Saudi Arabia
SB Solomon Islands
SC Seychelles
SD Sudan
SE Sweden
SG Singapore
SH Saint Helena
SI Slovenia
SJ Svalbard and Jan Mayen
SK Slovakia
SL Sierra Leone
SM San Marino
SN Senegal
SO Somalia
SR Suriname
ST Sao Tome and Principe
SV El Salvador
SY Syrian Arab Republic
SZ Swaziland
TC Turks and Caicos Islands
TD Chad
TF French Southern
Territories
TG Togo
TH Thailand
TJ Tajikistan
TK Tokelau
TM Turkmenistan
TN Tunisia
TO Tonga
TP East Timor
TR Turkey
TT Trinidad and Tobago
TV Tuvalu
TW
TZ
UA Ukraine
UG Uganda
UM
US United States
UY Uruguay
UZ Uzbekistan
VA Vatican City State
VC Saint Vincent and the
VE Venezuela
VG Virgin Islands (British)
VI Virgin Islands (U.S.)
VN Vietnam
VU Vanuatu
WF Wallis and Futuna
WS Samoa
YE Yemen
YT Mayotte
YU Yugoslavia
ZA South Africa
ZM Zambia
ZR Zaire
ZW Zimbabwe
Taiwan, Province of
China
Tanzania, United
Republic of
United States Minor
Outlying Islands
(Holy See)
Grenadines
Islands
Page 12
RSDX-02 DVD Receiver
12
Contents
Important Safety Instructions ................. 3
1: Controls and Connections ............................... 4
2: RR-1070 Remote Control ............................... 5
3: Connecting the Speakers ................................ 6
4: Connecting the TV .......................................... 7
5: Connecting a Cable, Satellite, or
HDTV set-top box........................................... 7
6: Connecting a VCR ........................................... 8
7: Connecting a CD Player/CDR Recorder ........... 8
8: Connecting an Analog Audio Tape Recorder .... 9
9: Connecting AM and FM antennae ................... 9
10: Parental Lock Country Codes ...................... 10
About Rotel .........................................14
Getting Started .................................... 14
Features .......................................................... 14
Audio Features................................................. 14
Other Features................................................. 14
Supplied Accessories......................................... 14
A Few Precautions ............................................ 14
Placement ....................................................... 14
CONNECTIONS 15
Notes on connections ............................15
Cable selection ................................................. 15
Video Connections ............................................ 15
Digital Audio ................................................... 15
Making Connections.............................. 16
Connecting Speakers ................... 16
Connecting a Subwoofer ............................ 16
Connecting the TV Monitor ........... 16
Setting the PAL/NTSC Switch ..................... 16
Connecting a Cable, Satellite, or
HDTV Set-top Box .......... 16
CD Player/CDR Recorder.................................. 17
Audio Tape Recorder ........................................ 17
AM Antenna .............................................. 17
FM Antenna .............................................. 18
AC Input ................................................... 18
OPERATING THE RSDX-02 18
Front Panel Overview ..........................18
STANDBY Button ....................................... 18
DVD Drawer .............................................. 18
Input Buttons .......... 18
VOLUME Control ........................................ 18
DVD Audio LED ......................................... 18
INPUT AG/DG Button ................................ 18
SURROUND ON/OFF Button ...................... 18
SURROUND MODE Button .......................... 18
LCD Display .............................................. 18
DVD Transport Buttons
................................ 19
SETTING Button ......................................... 19
ADJUST button .......................................... 19
MEMORY Button ........................................ 19
CONTROL Buttons ...................................... 19
Remote Sensor .......................................... 19
Remote Control Overview .................... 19
Programming the RR-1070
MENU Button ............................................ 19
Using the RR-1070
ROTEL Button ............................................ 19
Changing Pages
PAGE Buttons ............................................ 19
POWER Button .......................................... 19
VOLUME Buttons ....................................... 19
CHANNEL Buttons ...................................... 20
HOME Button ............................................ 20
MUTE Button ............................................. 20
Basic Operations .................................. 20
Power On/Off .................................... 20
SLEEP Timer
P6-F
.......................................... 20
Volume Adjustments ........................... 20
Muting the Sound ...................................... 20
Changing Display Brightness
P2-C
................. 20
Selecting Source Inputs .........................20
Selecting an Input from the Front Panel
................................ 20
Selecting an Input from the Remote
................................................... 20
Changing Input Name ............................... 20
Selecting Digital or Analog Inputs
Selecting the Digital Signal
P6-C
P6-D
... 21
...... 21
Attenuating Analog Inputs ......................... 21
Activating Record Mode ............................. 21
Surround Modes ...................................21
Dolby Surround
Dolby Pro Logic II ............................................ 21
Dolby Digital ................................................... 22
DTS 5.1 ........................................................... 22
All-Channel Stereo ........................................... 22
DSP ................................................................. 22
Surround Off ................................................... 22
Manually Selecting Surround Modes ......22
Surround Sound On/Off
Selecting a Surround Sound Mode
P2-G
................. 22
P2-F
... 22
Tuner Controls ......................................22
Selecting FM/AM ............................ 22
Tuning from the Front Panel ...................... 22
Tuning from the Remote
P4-E
................. 23
Storing/Tuning Station Presets
from the Front Panel .......................... 23
Storing/Tuning Station Presets
from the Remote
Changing the FM MODE
P4-D
........................ 23
P4-C
.................. 23
VCR or Digital Video Recorder
................................ 17
Page 13

13
English
DVD PLAYER 23
About Discs ..........................................23
Disc Formats .................................................... 23
DVD Region Codes ........................................... 23
Disc Structure .................................................. 24
Digital Audio Formats ...................................... 24
Playing DVDs .......................................24
Inserting a Disc
P3-G
.............................. 24
Playing a Disc ................................ 24
Stopping Disc Playback ................... 24
Pause/Still Frame .......................... 24
Skip forward/back
......................................... 24
High Speed Play .................................... 25
Slow Speed Play .................................... 25
On-Screen Display (OSD)
Time Display
P1-D
P1-D
............ 25
.............................. 25
Advanced Features ............................... 25
Progressive Scan
P2-E
(NTSC only) ..................................................... 25
P2-D P1-D
Zoom
......................................... 25
Selecting a Scene Angle ......................... 26
Selecting Subtitles
Selecting Audio Tracks
P3-C
................................. 26
P3-D
........................... 26
Program Play
P1-D
.................. 28
MP3 and JPEG files ..............................28
Control Menu ................................................... 28
Additional JPEG features .................................. 28
SETUP 28
Quick Setup.......................................... 28
Comprehensive Setup ........................... 29
Setup Procedure .............................................. 29
Subwoofer Setting
(SUBWFR) ....................................................... 29
Speaker Settings
(FRNT SP, CNTR SP, SURR SP)............................ 29
Delay Settings
(FRNT D, CNTR D, SURR D) .............................. 29
Crossover Frequency Setting
(CROSS)........................................................... 30
LFE Attenuation Setting
(LFE) ............................................................... 30
Dynamic Range Compression
(D.COMP) ........................................................ 30
Digital Input Assignment
(DGT) .............................................................. 30
Automatic Surround Mode
(AUTO SR) ....................................................... 30
Quick Setup ..................................................... 31
CHOICE MENU SYSTEM 32
Using the Choice Menus
P1-E P1-D
.............. 32
Language Menu ....................................33
Menu Language ............................................... 33
Audio Language............................................... 33
Subtitle ............................................................ 33
On Screen Language ........................................ 33
Picture Menu........................................ 33
Monitor Type ................................................... 33
Picture Source.................................................. 34
Screen Saver.................................................... 34
MP3/JPEG ....................................................... 34
Audio Menu ......................................... 34
L/R Balance .................................................... 34
Bass ................................................................ 34
Treble .............................................................. 34
LFE Attenuation ............................................... 34
Dynamic Range Compression ........................... 34
Speaker Setting Menu .......................... 35
Size ................................................................. 35
Level ............................................................... 35
Distance .......................................................... 35
Crossover ........................................................ 35
Setting Video Picture Adjustments (VFP)
P6-E P1-D
Still Pictures on DVD-A Disc
................................................... 26
P3-F
................... 26
Playing Specific Selections .................... 26
Find Scenes from a DVD Menu
P1-C P1-D
........................................ 26
Find a Scene from a Video CD/SVCD Menu
P4-F
................................................... 26
Selecting a Title/Group
P4-G
.... 27
Entering a Scene Number
P1-D
........................................ 27
Find a Location with Time Search
P1-D
........................................ 27
Repeat Play
Random Play
P1-D P3-E
P1-D
.............................. 28
..................... 27
Video Output Mode
(VOUT) ............................................................ 31
Sound Adjustments ...............................31
Setup Procedure .............................................. 31
Front Speaker Balance
(BAL)............................................................... 31
Tone Adjustments
(BASS and TREBLE) ..................... 31
Speaker Levels
(SUBWFR, CENTER, SURR L, SURR R)
P5-C P5-D P5-E
................... 32
DSP Effect LEVEL
(EFFECT)
P5-F
............................................... 32
Subwoofer Audio Position
(AUDIO POS)
P2-H P1-D
.............................. 32
Return to Initial ............................................... 35
Others Menu ........................................36
Resume ........................................................... 36
On-Screen Guide .............................................. 36
Auto Standby ................................................... 36
Parental Lock .................................................. 36
To Change Parental Lock Settings ..................... 37
Playback with Parental Lock
P1-D
....... 37
Specifications .......................................38
Page 14

RSDX-02 DVD Receiver
14
About Rotel
A family whose passionate interest in music
led them to manufacture high fidelity components of uncompromising quality founded Rotel
40 years ago. Through the years that passion
has remained undiminished and the family goal
of providing exceptional value for audiophiles
and music lovers regardless of their budget,
is shared by all Rotel employees.
The engineers work as a close team, listening to, and fine tuning each new product until
it reaches their exacting musical standards.
They are free to choose components from
around the world in order to make that product the best they can. You are likely to find
capacitors from the United Kingdom and
Germany, semi conductors from Japan or the
United States, while toroidal power transformers
are manufactured in Rotel’s own factory.
Rotel’s reputation for excellence has been
earned through hundreds of good reviews and
awards from the most respected reviewers in
the industry, who listen to music every day.
Their comments keep the company true to its
goal – the pursuit of equipment that is musical, reliable and affordable.
All of us at Rotel, thank you for buying this
product and hope it will bring you many years
of enjoyment.
Manufactured under license from Dolby Laboratories.
“Dolby”, “Pro Logic”, and the double-D symbol are
trademarks of Dolby Laboratories.
Manufactured under license from Digital Theater System, Inc.
US Pat. No. 5,451,942 and other world-wide patents issued
and pending. "DTS", "DTS Digital Surround", are trademarks
of Digital Theater Systems, Inc."
This product incorporates copyright protection technology
that is protected by method claims of certain U.S. patents
and other intellectual property rights owned by Macrovision
Corporation and other rights owners. Use of this copyright
protection technology must be authorized by Macrovision
Corporation, and is intended for home and other limited
viewing uses only unless otherwise authorized by
Macrovision Corporation. Reverse engineering or disassembly is prohibited.
Getting Started
Thank you for purchasing the Rotel RSDX-02
DVD Receiver. With its precision transport,
comprehensive digital processing, and Rotel’s
Balanced Design, the RSDX-02 ensures the highest level of audio performance. When used
in a high-quality audio system, your DVD receiver will provide years of enjoyment.
The RSDX-02 is a multipurpose receiver consisting of four components in one:
• DVD Player
• AM/FM Tuner
• Digital Surround Sound Processor
• 5-Channel Amplifier
equipped to handle video and audio discs in
a wide range of formats including DVD-Audio, DVD-Video, Audio CD, Video CD, and
SVCD.
Features
• DVD formats include DVD-Audio, DVDVideo, Audio CD, Video CD, SVCD, MP3,
and JPEG
• Progressive scan with reverse 3:2 pulldown
for film sources.
• Special playback functions such as frameby-frame, zoom, and variable slow-motion
and high-speed play.
• DVD-Video features include Multi-angle,
Multi-language subtitles, and Multi-language
audio.
Audio Features
• Supported audio formats include sampling
frequencies up to 192 kHz, linear PCM
encoding, up to 24-bit resolution, and MLP.
DVD-Audio supports up to 6 channels at
sample rates of 48, 96, or 192 kHz and
sample sizes of 16, 20, or 24 bits.
DVDVideo supports 2 channels at sample
rates of 48 and 96 kHz and sample sizes
of 16, 20, or 24 bits. Audio CD/Video
CD is limited to 2 channels, 44.1 kHz at
16 bits.
• Supports the following digital audio formats:
Dolby Digital
®
DTS® (Digital Theater Systems)
DVD-Audio
®
(Meridian Lossless Packing)
MLP
MP3 (MPEG 1, Layer 3)
Linear PCM
• Two digital inputs plus digital outputs
• Composite video, S-Video, and Component
Video outputs
• Composite video and S-Video inputs
Other Features
• User-friendly On-Screen Displays
• Full-featured touch-screen universal remote
control
• Parental lock
Supplied Accessories
• RR-1070 Remote Control Unit, with NiMH
Rechargable batteries, AC/DC Adaptor
and AC Cord (1)
• AM Antenna
• FM Antenna
• Instruction manual (1)
• AC Power Cord (1)
A Few Precautions
Please read this manual carefully. In addition
to installation and operating instructions, it will
help you get optimum performance from your
new DVD player. Please contact your authorized Rotel retailer for answers to any questions you might have. In addition, all of us at
Rotel welcome your questions and comments.
Save the RSDX-02 shipping carton and all enclosed packing material for future use. Shipping or moving the RSDX-02 in anything other
than the original packing material may result
in damage that is not covered by the warranty.
Placement
Use common sense when placing the RSDX-02
in a cabinet or when stacking other equipment.
Make sure that the shelf or cabinet can support its weight. Do not stack heavy components on top of the RSDX-02. Avoid placing
the unit where it may be subject to excessive
heat such as on top of a large power amplifier or near a heat register. For best performance, avoid placing the unit where it may
be subject to vibration, such as near a speaker.
Page 15

15
English
CONNECTIONS
Although, the RSDX-02’s rear panel looks
daunting, connecting the unit to your system
is straightforward.
There are connections for each of the five
speakers in a 5.1 channel surround system.
In addition, a subwoofer output is provided
for connecting an optional powered subwoofer.
Each of the source components (VCR, TV settop box, tape recorder, CD player) in the system is connected to the RSDX-02 inputs with
a pair of standard RCA cables for analog audio, a video connection (composite, S-Video,
or Component Video), and an optional digital audio cable (coax or optical).
The video signal from the RSDX-02 is sent to
the TV monitor using your choice of composite video, S-Video, or Component Video connections.
The supplied AM and FM antennae are connected to the antenna inputs.
Finally, the AC power cord is plugged into the
back panel of the RSDX-02 and then into an
AC wall outlet.
Notes on connections
There are many ways to configure and hookup a surround sound audio system. It is not
possible to cover every configuration in this
manual; therefore, we describe the typical
connections that will work well in a majority
of situations.
The following topics cover a variety of issues
that you might consider when deciding how
to configure your system.
NOTE
: Do not plug any system component
into an AC source until all connections have
been properly made.
Cable selection
Use standard audio cables with RCA connectors for all analog audio connections. Use the
following color code:
Left channel audio: white
Right channel audio: red
You can choose among three different types
of video cables. For composite video, use a
single 75 ohm video cable with an RCA connector at each end. For S-Video, use an S-Video
cable with a special multi-pin connector at each
end. For component video, use a set of three
matching 75 ohm video cables with RCA
connectors at each end. Use the following
standard color code:
Composite video: yellow
Component video (Y): green
Component video (P
Component video (P
NOTE
: Do not use standard audio cables in
B): blue
R): red
place of 75 ohm video cables. Audio cables
will usually pass the signal, but will degrade
the quality.
Use standard optical digital cables for optical digital signals. Be sure to remove the protective covers from the back-panel jacks and/
or from the ends of the cable. Use 75 ohm
digital audio cables with an RCA connector
on each end for coax digital audio.
Coax digital: orange
NOTE
: You can substitute a 75 ohm video cable
for a coax digital cable, but do not substitute
conventional audio interconnect cables for
digital signals.
When making signal connections, follow the
color codes carefully at both ends of each cable.
Video Connections
There are three types of video connections
which can be used to connect source components to the RSDX-02 or the RSDX-02 to your
TV set: composite video (good quality), S-Video
(better quality), and component video (best
quality). The RSDX-02 cannot convert one type
of video to another; therefore, if you use one
type of connection for a source component,
you must also use the same type of connection to the TV set.
To simply system configuration, determine which
type of video connection is available on
of your source components and then use that
type for every connection. For example, if
your VCR, cable box, and TV all have composite video connections, simplify your system
by using composite video connections everywhere.
This simple configuration may not be ideal in
every situation. For example, with a highdefinition TV set, you must use component video
connections in order to send a progressive scan
signal from the built-in DVD player to the TV
set. Since your VCR doesn’t have component
video connections, you will be forced to use
two different types of video connections. This
will require connecting the RSDX-02 to the TV
set with two different types of connections, one
to each of two inputs on the TV.
all
Digital Audio
Surround sound formats like Dolby Digital and
DTS are digital recordings. The RSDX-02 can
only decode them when a digital input signal
is available from the source component. A digital signal is automatically available from the
built-in DVD player so that you can enjoy 5.1
channel sound from Dolby Digital and DTS
encoded discs. In addition, the RSDX-02 provides connections for digital signals from two
more components, one using a digital coax
cable and one using an optical digital cable.
These digital inputs should be used for any
other components that can deliver a Dolby
Digital signal, such as HDTV receivers, DSB
satellite receivers, or digital cable boxes. You
might also use a digital connection for a CD
player/recorder.
The RSDX-02 has an optical digital output to
send the digital signal from any of the digital
inputs to a digital recorder. When a digital
input source signal is selected for listening, that
signal is automatically sent to both digital
outputs for recording.
NOTE
: When using digital connections, you
may also want to make the corresponding
analog audio input connections.
Page 16

RSDX-02 DVD Receiver
16
Making Connections
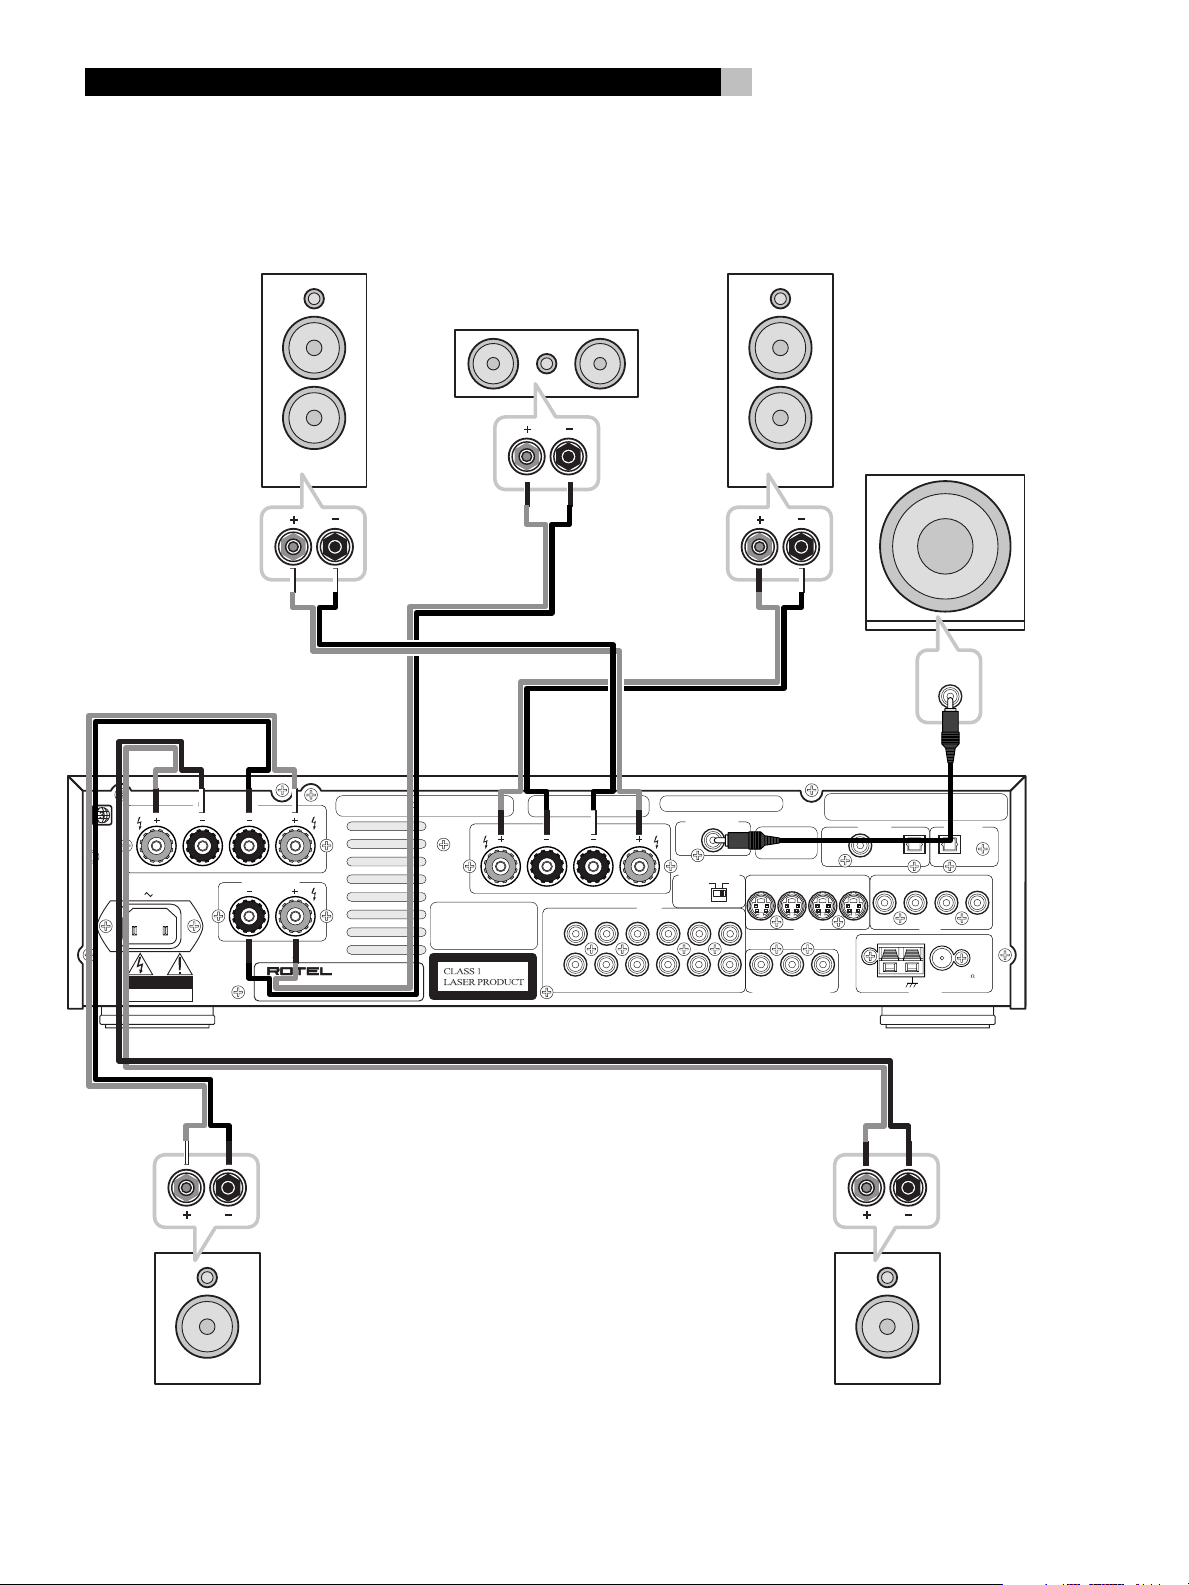
Connecting Speakers
See Figure 3
The RSDX-02 has built-in amplifiers to power
all five speakers in a 5.1 surround sound audio system: right/left front speakers, center
channel speaker, and right/left surround speakers. There are five pairs of binding post connections (one pair for each speaker) which
accept bare wire, spade lugs, or banana plug
connectors (in some markets).
NOTE
: Speakers should have an impedance
of 8 ohms or higher.
Each pair of connectors is color-coded for
polarity: red for positive and black for negative. Speakers and speaker wire are also
marked for polarity. For proper performance,
you must observe this polarity at all speaker
connections. Always connect the positive terminal of each speaker to the red speaker terminal on the RSDX-02 and the negative speaker
terminal to the corresponding black connector on the RSDX-02.
Route the wires from the RSDX-02 to the speakers. Leave enough slack so you can move the
components to allow access to the speaker connectors. If you are using banana plugs, connect them to the wires and then plug into the
backs of the binding posts. The collars of the
binding posts should be screwed in all the way
(clockwise). If you are using terminal lugs,
connect them to the wires. If you are attaching bare wires directly to the binding posts,
separate the wire conductors and strip back
the insulation from the end of each conductor. Be careful not to cut into the wire strands.
Unscrew the binding post collars. Place the
connector lug around the binding post shaft
or the bare wire through the hole in the binding post. Turn the collar clockwise to clamp
the connector lug or wire firmly in place.
1. Connect the front right speaker to binding
posts labeled FRONT SPEAKER RIGHT.
2. Connect the front left speaker to binding
posts labeled FRONT SPEAKER LEFT.
3. Connect the center channel speaker to
binding posts labeled CENTER SPEAKER.
4. Connect the surround right speaker to binding posts labeled SURROUND SPEAKER
RIGHT.
5. Connect the surround left speaker to binding
posts labeled SURROUND SPEAKER LEFT.
NOTE
: Be sure that no loose wire strands can
touch adjacent wires or connectors.
After you have connected the speakers, you
need to configure the RSDX-02 for the size and
style of speakers in your system and calibrate
the relative volume levels of the speakers using the built-in test tones. See the Setup section of this manual.
Connecting a Subwoofer
See Figure 3
To hook up a powered subwoofer, connect a
standard RCA audio cable from the SUBWOOFER OUT jack on the back panel of the
RSDX-02 to the RCA input on the subwoofer’s
power amp.
After you have connected the subwoofer, you
need to configure the RSDX-02 to use the subwoofer and calibrate the relative volume level
of the subwoofer using the built-in test tones.
See the Setup section of this manual.
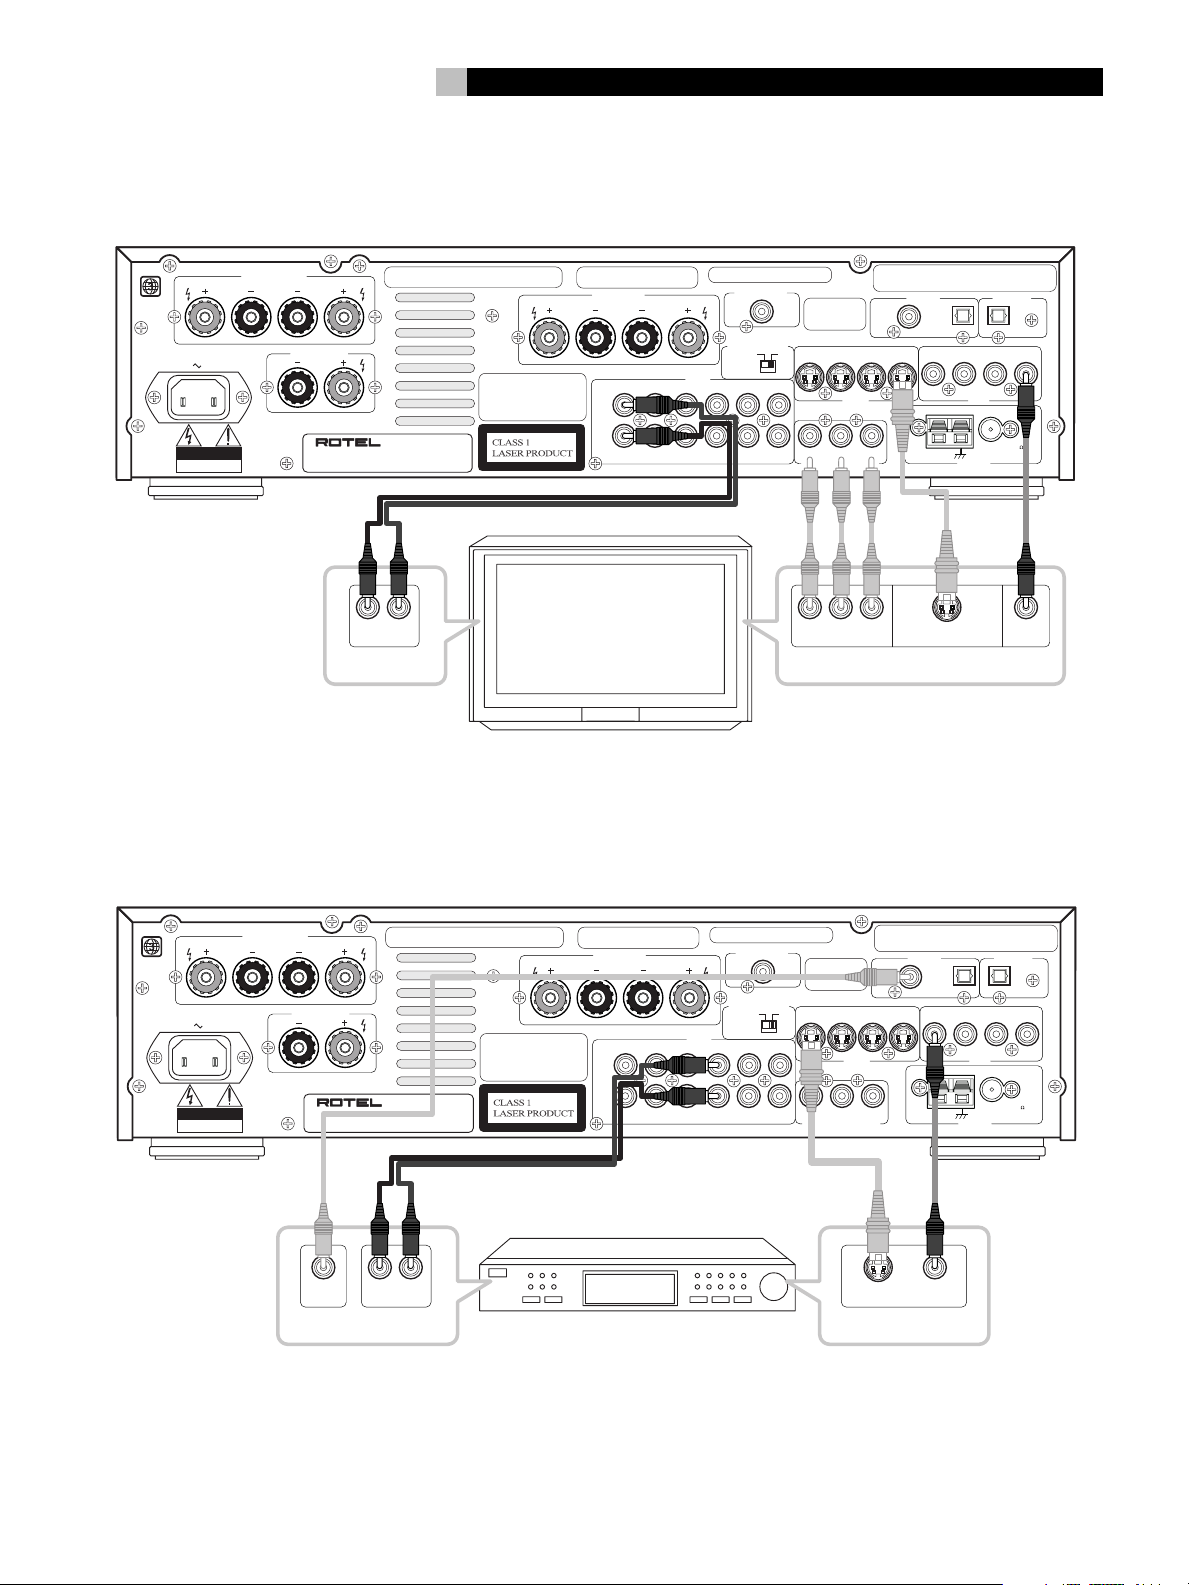
Connecting the TV Monitor
See Figure 4
You can connect the RSDX-02 to your TV set
with one or more of the following types of video
connection: composite video, S-Video, and/
or component video cables.
1. For composite video output, connect the
composite MONITOR OUT jack
back of the RSDX-02 to a composite video
input on the TV.
2. For S-Video output, connect the S-Video
MONITOR OUT jack
the RSDX-02 to an S-Video video input on
the TV.
3. For component video output, connect the
three component DVD COMPONENT
VIDEO OUT jacks
RSDX-02 to the corresponding jacks of the
component video input on the TV.
Select the appropriate input on the TV to view
the picture from the RSDX-02.
NOTE
: You must configure the RSDX-02 for
on the back of
on the back of the
operation with either an NTSC or PAL standard TV. See the following section.
on the
Setting the PAL/NTSC Switch
See Figure 1
Various regions of the world use two different video standards. The US and Japan use
the NTSC video standard; European countries
use the PAL standard. The output of the RSDX-02
must
be set to match the standard your TV
left
accepts. Put the switch in the
use with PAL TVs. Put it in the
for the use with NTSC TVs.
NOTE
: Do not change the PAL/NTSC switch
position for
right
position
when the RSDX-02 is turned on. The unit must
be unplugged, or in standby mode when
changing the setting.
This setting relates to the hardware configuration of your TV set and other components.
Regardless of the setting, the RSDX-02 can play
DVD discs encoded in either PAL or NTSC
formats, converting the signal to the output
selected with the NTSC/PAL switch.
Connecting a Cable, Satellite, or HDTV Set-top Box
See Figure 5
This section describes the hook-up of advanced
HDTV set-top boxes, digital/HDTV cable boxes,
and DBS satellite receivers. Older style cable
boxes that are connected with RF antenna
cables are connected directly to the TV, not
to the RSDX-02.
Video connections:
Your set-top box may have composite video
or S-Video outputs. Choose whichever type
of connection is appropriate for your system,
keeping in mind that there must be a corresponding connection of the same type from
the RSDX-02 to the TV.
1. For composite video, connect a composite video cable from the video output of
the set-top box to the DBS IN VIDEO input
on the RSDX-02.
2. For S-Video, connect an S-Video cable from
the video output of the set-top box to the
DBS IN S-VIDEO input
3. For component video HDTV signals, connect three component video cables from
the video output of the set-top box directly
to a corresponding input on the TV.
on the RSDX-02.
Page 17

17
English
Audio connections:
Connect the left and right analog audio outputs from the set-top box to the AUDIO DBS
IN LEFT & RIGHT jacks
using a standard RCA stereo audio cable.
Digital Audio connection:
If your set-top box has a digital audio output,
you should connect it to the RSDX-02 for playback of Dolby Digital broadcasts.
1. If the set-top box has a coax digital output, connect it to the DIGITAL 1 (DBS) in-
on the RSDX-02 using a coax digi-
put
tal cable. The RSDX-02 is pre-configured
to use this digital input for the set-top box.
2. If the set-top box only has an optical digital output, connect it to the DIGITAL 2 (TV)
on the RSDX-02 using an optical
input
digital cable. The RSDX-02 will need to be
reconfigured to associate this input with the
set-top box input. See the Setup section of
this manual.
on the RSDX-02
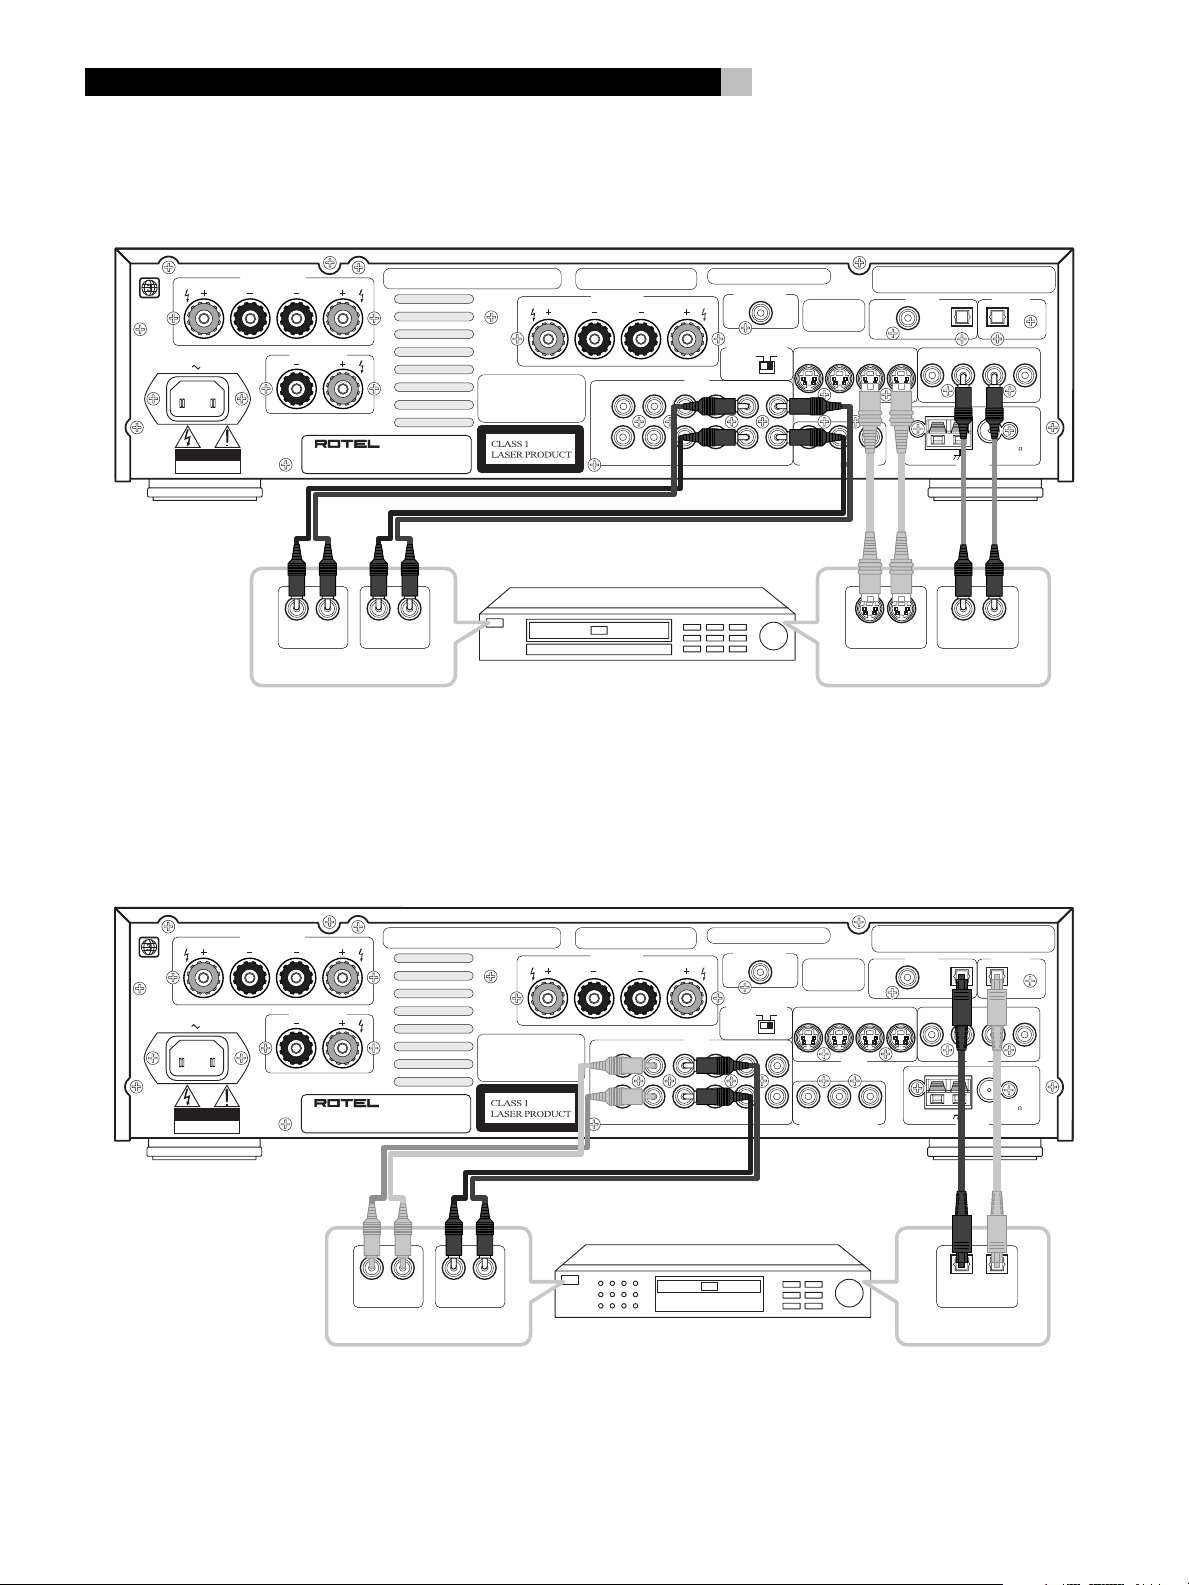
VCR or Digital Video Recorder
See Figure 6
This section describes the hook-up of hi-fi VCRs
with audio and video outputs. VCRs connected
with RF antenna cables are connected directly
to the TV, not to the RSDX-02.
Video connections:
Your VCR may have composite video or S-Video
outputs. Choose whichever type of connection
is appropriate for your system, keeping in mind
that there must be a corresponding connection of the same type from the RSDX-02 to the
TV.
1. For composite video, connect a composite video cable from the video output of
the VCR to the VIDEO VCR IN input
on the RSDX-02. Connect the VIDEO VCR
OUT output
posite video input on VCR
2. For S-Video, connect an S-Video cable from
the video output of the VCR to the S-VIDEO
VCR IN input
the S-VIDEO VCR OUT output
RSDX-02 to the S-Video input on VCR.
on the RSDX-02 to the com-
on the RSDX-02. Connect
on the
Audio connections:
Connect the left and right analog audio outputs from the VCR to the AUDIO VCR IN LEFT
& RIGHT jacks
dard RCA stereo audio cable. Connect the
AUDIO VCR OUT LEFT & RIGHT audio out-
on the RSDX-02 to the left and right
puts
audio inputs on the VCR.
Digital Audio connection
(for digital video recorders):
If your video recorder has a digital audio output,
you should connect it to the RSDX-02 for playback of Dolby Digital recordings.
1. If the video recorder has a coax digital output, connect it to the DIGITAL 1 (DBS) input
tal cable. The RSDX-02 will need to be
reconfigured to associate this input with the
VCR input. See the
manual.
2. If the video recorder has an optical digital output, connect it to the DIGITAL 2 (TV)
input
digital cable. The RSDX-02 will need to be
reconfigured to associate this input with the
VCR input. See the Setup section of this
manual.
3. Connect the DIGITAL OUT connector
on the RSDX-02 to the digital input on the
video recorder with an optical digital cable.
on the RSDX-02 using a stan-
on the RSDX-02 using a coax digi-
Setup
section of this
on the RSDX-02 using an optical
CD Player/CDR Recorder
See Figure 7
Audio Connections:
1. Connect the left and right analog audio
outputs from a CD/CDR to the LEFT/RIGHT
AUDIO TAPE/CDR IN jacks
RSDX-02 with a standard RCA stereo audio cable.
2. With a CDR recorder, connect the LEFT/
RIGHT AUDIO TAPE/CDR OUT jacks
to the audio inputs on the CDR.
on the
Digital Audio connections:
If your CD/CDR has digital audio connections,
you should connect them to the RSDX-02.
1. If the CD/CDR has a coax digital output,
connect it to the DIGITAL 1 (DBS) input
on the RSDX-02 using a coax digital cable.
The RSDX-02 will need to be reconfigured
to associate this input with the TAPE/CDR
Setup
input. See the
2. If the CD/CDR has an optical digital output, connect it to the DIGITAL 2 (TV) input
on the RSDX-02 using an optical digital cable. The RSDX-02 will need to be
reconfigured to associate this input with the
TAPE/CDR input. See the
this manual.
3. When using a CDR recorder, connect the
DIGITAL OUT connector
to the digital input on the CDR with an
optical digital cable.
NOTE
: No video connections are required for
section of this manual.
Setup
section of
on the RSDX-02
an CD player/CDR recorder.
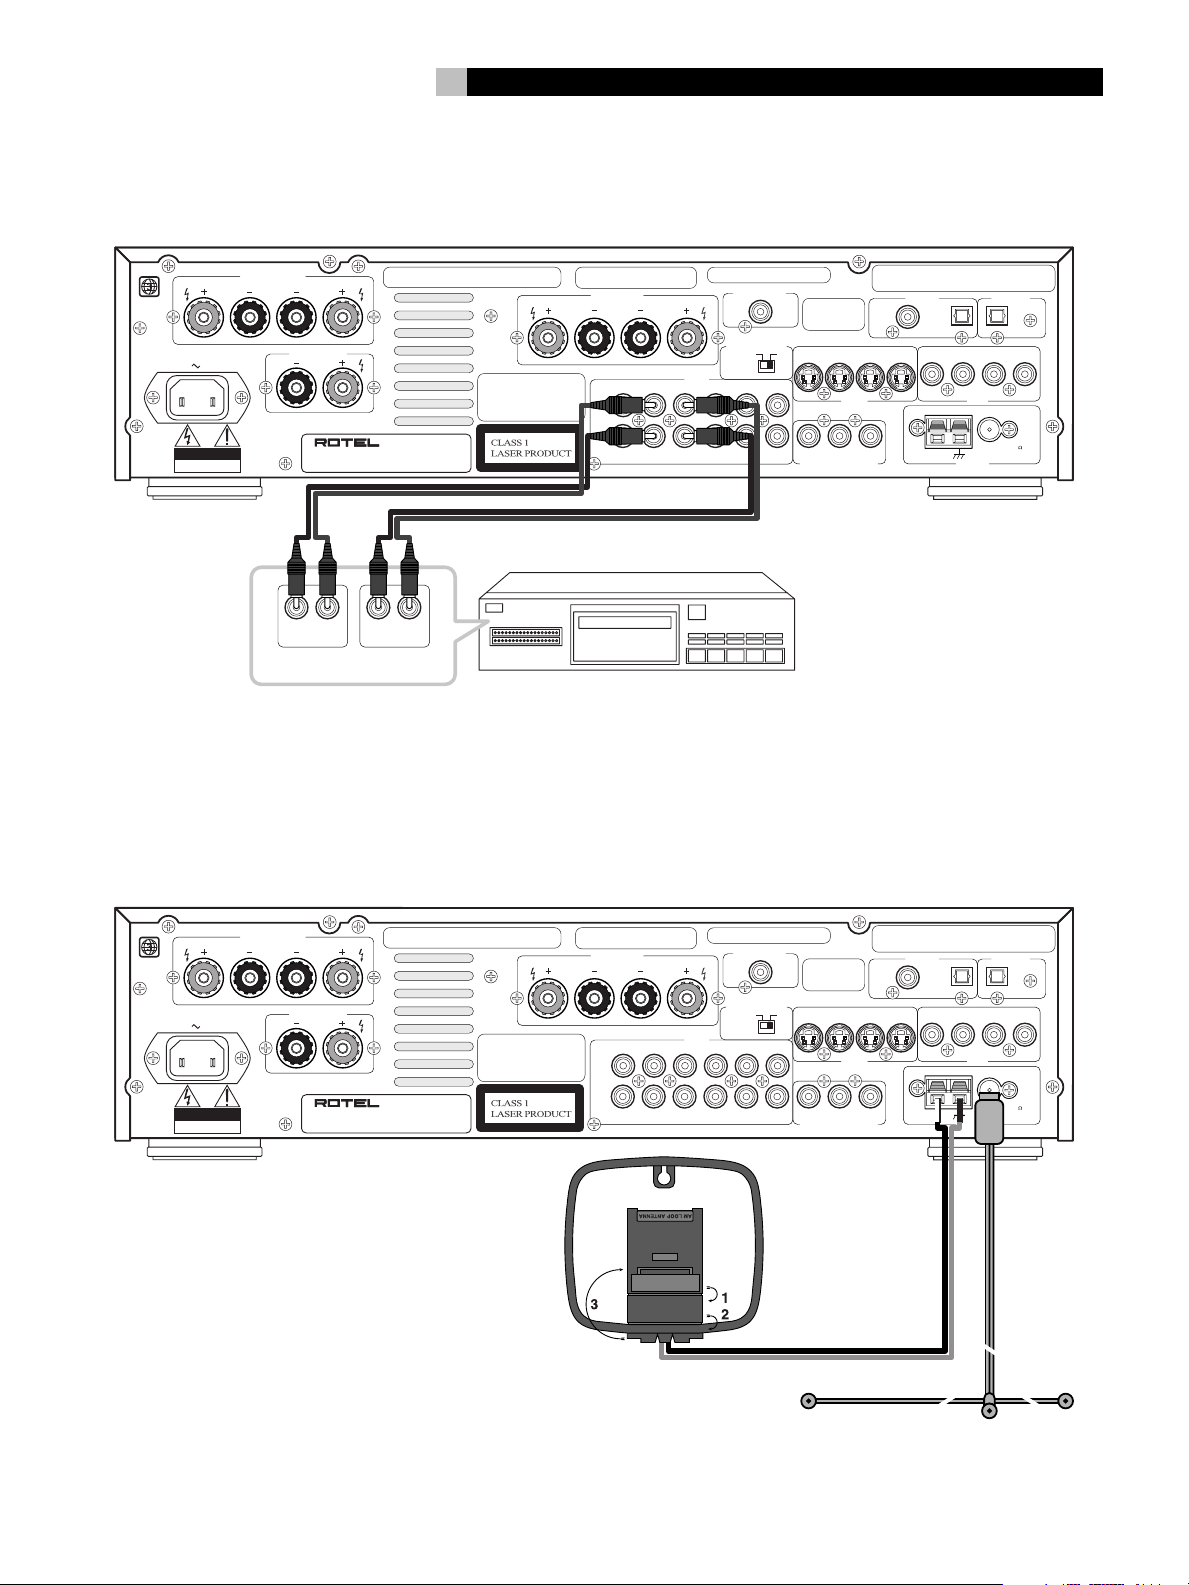
Audio Tape Recorder
See Figure 8
Audio Connections:
1. Connect the left and right analog audio
outputs from the audio recorder to the LEFT/
RIGHT AUDIO TAPE/CDR IN jacks
the RSDX-02 with a standard RCA stereo
audio cable.
2. Connect the LEFT/RIGHT AUDIO TAPE/
CDR OUT jacks
the tape recorder.
NOTE
: No video or digital connections are
to the audio inputs on
on
required for an audio tape recorder.
AM Antenna
See Figure 9
The RSDX-02 includes a plastic loop antenna
to receive AM radio signals. Remove this
antenna from the box and locate it near the
RSDX-02. It can be tacked to a wall, using the
mounting tab provided. Alternatively, you can
fold the center portion of the antenna to form
a tabletop stand.
Page 18

RSDX-02 DVD Receiver
18
Connect the 300 ohm twin-conductor wire from
the loop antenna to the push terminals labeled
AM LOOP, attaching one wire to each terminal. It does not matter which wire attaches to
which terminal, but make sure that the connections are solid and that the two wires do
not touch.
You may need to rotate or otherwise reorient
the antenna to find the best position.
NOTE
: To use an outdoor antenna, connect its
300 ohm twin-conductor wire to the terminals in place of the loop antenna.
FM Antenna
See Figure 9
The RSDX-02 is supplied with a T-shaped indoor
FM antenna. Connect the coax F-type plug to
the FM antenna connector on the RSDX-02. For
best reception, unfold the T-shaped antenna.
Eyelets at both ends of the T allow tacking the
antenna to a wall, if desired. Experiment with
positioning for best reception.
NOTE
: To use an outdoor antenna, connect its
75 ohm coax lead wire to the FM connector
instead of the indoor wire antenna, only after a professional contractor has installed the
antenna system in accordance with local electrical codes.
AC Input
Your RSDX-02 is configured at the factory for
the proper AC line voltage in the country where
you purchased it (USA: 115 volts/60Hz AC
or CE: 230 volts /50 Hz AC ). The AC line
configuration is noted on a decal on the back
of your unit.
Plug the supplied cord into the AC INPUT
receptacle on the back of the unit. Then, plug
the power cord into an AC wall outlet.
NOTE
: Memorized settings and video labels
are preserved indefinitely, even if the RSDX-02
is disconnected from AC power.
OPERATING THE RSDX-02
Considering its large number of features, the
RSDX-02 is easy to operate.
The RSDX-02 can be operated from the front
panel or the remote control. Front panel controls are simple to use, with just a few buttons,
some of which guide you through menu options. The remote control provides more complete control options.
This section of the manual starts with explaining the basic layout and function of the front
panel and the remote control. Then, we explain the basic operations such as turning the
unit on and off, adjusting volume, selecting a
source for listening, etc. Following this are
sections covering the operation of the built-in
DVD player and AM/FM tuner.
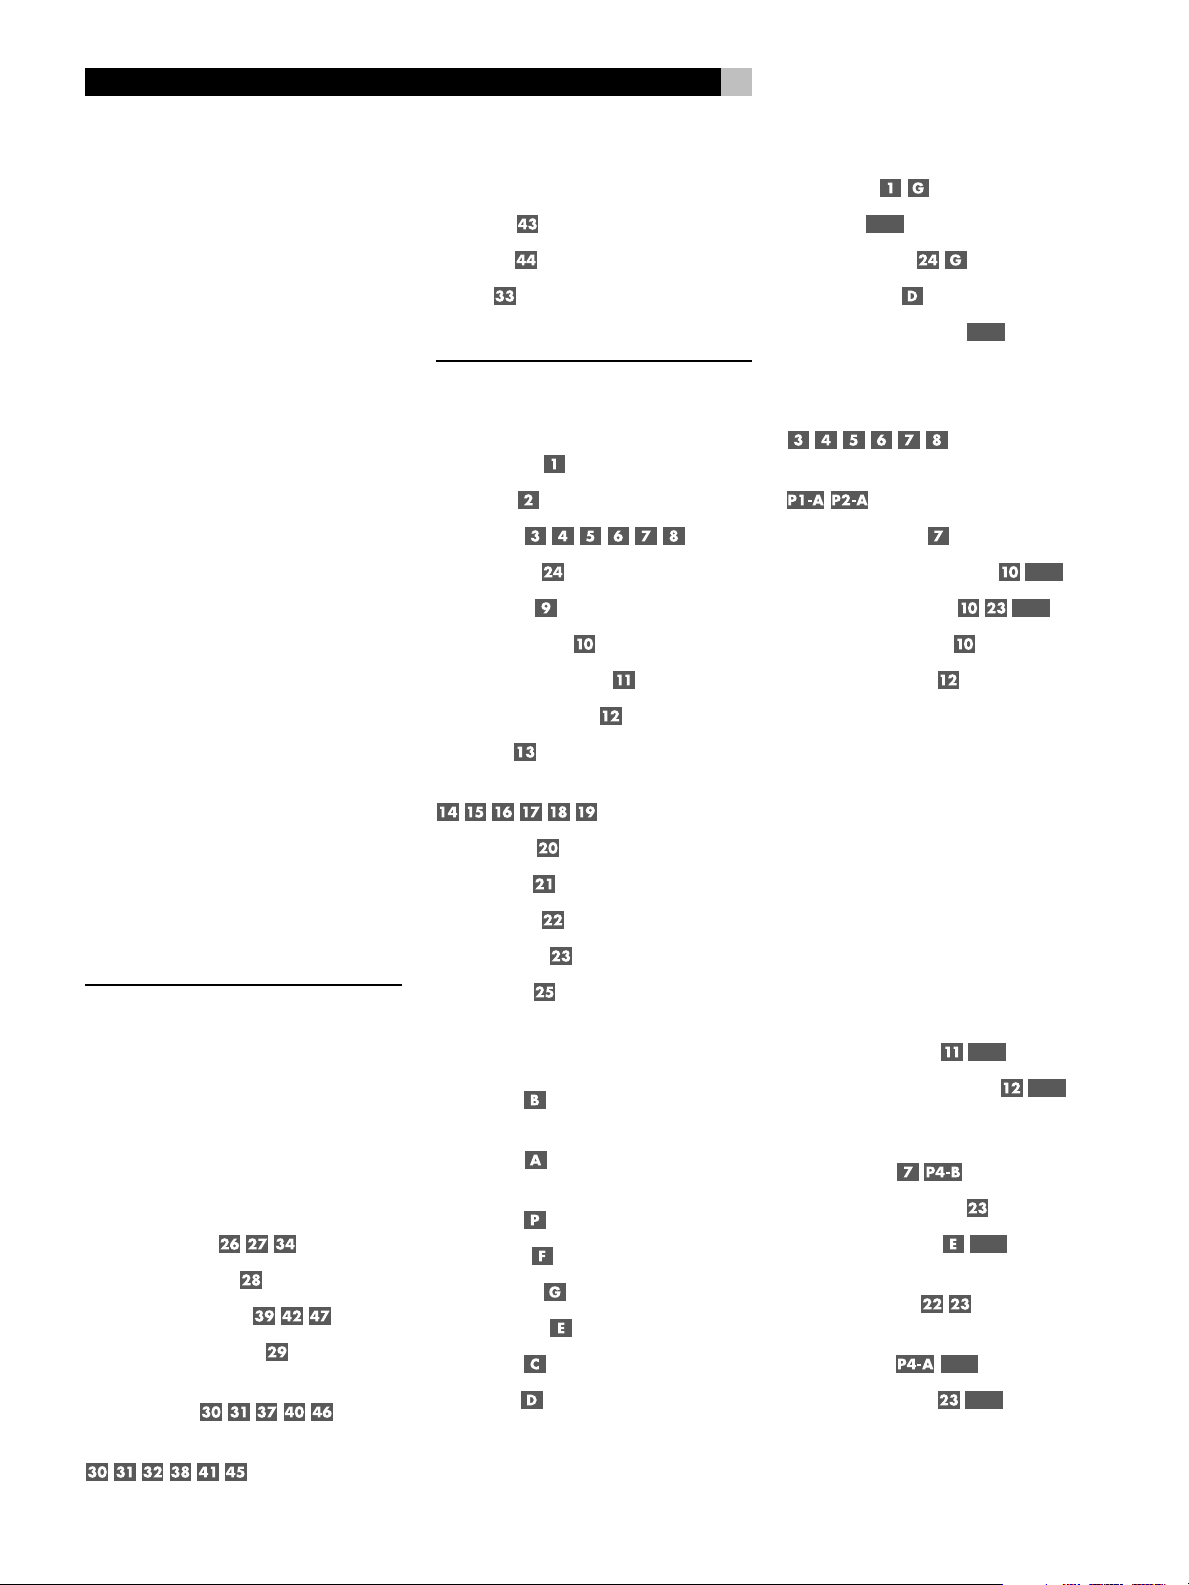
Throughout this manual, numbers in gray boxes
refer to the RSDX-02 illustration at the front of
this manual. Letters refer to the RR-1070 remote illustration. When both appear, the function is found on both the RSDX-02 and the remote. When only one appears, that function
is found only on the RSDX-02 or the remote.
Front Panel Overview
The following is a brief overview of the control and features on the front panel of the
RSDX-02. Details concerning the use of these
controls are provided in subsequent sections
of this manual describing various tasks.
STANDBY Button
The front panel STANDBY button works as a
power switch, activating the unit (ON) or putting
it into a standby mode (OFF).
DVD Drawer
A slide-out drawer for inserting DVDs.
Input Buttons
Press any of the six buttons to select and source
for listening/viewing: DVD, DBS, VCR, TV,
TAPE/CDR, or AM/FM.
VOLUME Control
The large knob at the right side of the front
panel is the master VOLUME control, adjusting the output level of all channels simultaneously.
DVD Audio LED
An LED indicator lights when a DVD Audio
disc is playing.
INPUT AG/DG Button
Selects either the digital input or the analog
audio input for the currently selected source.
Normally, this button can be left in the default
DIGITAL AUTO mode which will use the digital input, switching only to the analog input if
no digital signal is present.
NOTE
: The INPUT AG/DG button is also used
to reduce the input level for an analog input
to match the other input levels or reduce distortion.
SURROUND ON/OFF Button
Selects either 2-channel STEREO mode or multichannel SURROUND MODE for the currently
selected source.
NOTE
: The surround mode is memorized in-
dependently for each INPUT button.
SURROUND MODE Button
Sets the desired multi-channel surround mode
for 2-channel stereo inputs. Surround modes
for multichannel inputs (such as Dolby Digital
5.1 and DTS 5.1) are generally activated
automatically.
NOTE
: The SURROUND MODE button is also
used to activate a special record mode which
allows recording a 2-channel downmix from
multi-channel digital inputs.
LCD Display
In the center of the front panel is an LCD display. The display provides status information
while operating the unit.
NOTE
: The TAPE/CDR button is also used when
programming a custom name for an input
source.
Page 19

19
English
DVD Transport Buttons
Six rectangular buttons provide standard transport controls for the DVD player: OPEN/
CLOSE, TRACK UP/DOWN, STOP, PLAY, and
PAUSE.
SETTING Button
The SETTING button steps through various
configuration options which should be set after
initial installation of the RSDX-02, including the
number and size of the speakers, subwoofer
settings, etc.
ADJUST button
The ADJUST button steps through the available
adjustments that can be made while using the
RSDX-02.
MEMORY Button
Press the MEMORY button to store adjustments,
settings, or memorized AM/FM presets.
CONTROL Buttons
Four cursor buttons used in navigating settings
and adjustment s. Use the UP/DOWN buttons
to scroll through lists of options. Use the LEFT/
RIGHT buttons to change a setting.
For example, to tune a radio station while in
FM mode, press the UP/DOWN buttons until the word TUNING appears in the display.
Then, use the LEFT/RIGHT buttons to tune to
a new station frequency.
Remote Sensor
This sensor receives IR signals from the remote
control. Do not block this sensor.
Remote Control Overview
See Figure 2
The RSDX-02 includes a full-function touch
screen universal remote control that can operate the RSDX-02 and other audio/video
components.
A separate manual gives detailed instructions
on programming and using the RR-1070 to
replace all of the remote controls in your system. The RR-1070 manual covers many extra
features (such as custom labeling of remote
buttons that appear in its LCD display). To avoid
duplication, we provide only basic information about using the RR-1070 to operate the
RSDX-02 in this manual.
NOTE
: Some of the RSDX-02 functions appear
on the front panel and the remote. Throughout this manual, letters in gray boxes refers
to the labeled illustration of the remote at the
front of this manual; numbers in gray boxes
refer to the front panel illustration.
The remote control includes five hard buttons
POWER, CHANNEL UP/DOWN, and VOLUME UP/DOWN. The other remote control
commands are used by touching “virtual”
buttons appearing on the large touch screen
panel on the remote.
Programming the RR-1070 MENU Button
See Figure 2
Before using the the RR-1070, you may need
to program it to operate the RSDX-02. Detailed
programming instructions are contained in the
separate remote control owner’s manual. Or,
follow these simple instructions:
Using the RR-1070 ROTEL Button
See Figure 2
To use the RR-1070 remote with the RSDX-02,
press the ROTEL virtual button on the home
page of the remote control. The touch screen
display will change to the first of six pages of
commands for the RSDX-02. Each page is
identified by the name ROTEL at the top.
If you do not see one of the Rotel touch screen
pages, press the HOME virtual button on any
page to return to the home page where you
can press the ROTEL button.
Changing Pages PAGE Buttons
See Figure 2
There are six pages of touch screen commands
for the Rotel RSDX-02. From any of these pages,
press the up or down PAGE buttons at the
bottom of the touch screen to move forward
or back to the next page. Each page number
is displayed between the two PAGE buttons,
for example: PAGE 1/6 indicating the first of
six available pages.
Throughout this manual, remote control commands that are available on any of these pages
or on the remote’s hard buttons are indicated
with a single letter in a gray box, referring to
the remote illustration (Figure 2) at the front
of this manual. Commands which appear only
on of the six Rotel pages will be indicated with
the page number followed by a letter, for
example:
3. Again these indicators appear on the re-
mote illustration for easy reference.
indicating a command on Page
POWER Button
1. Touch the MENU command at the bottom
left of the touch-screen on the remote.
2. Touch the SETUP command on the touch
screen.
3. Touch the BRAND NAME command on the
touch screen.
4. Touch the ROTEL command on the screen.
5. Select and touch the RSDX-02 US command
on the touch screen and wait afew seconds.
6. Touch the OK command on the touch screen
and wait afew seconds.
7. Touch the HOME command at the bottom
center of the touch screen.
The POWER hard button on the remote provides the same function as the STANDBY button on the front panel. Press the button once
to activate the unit; press again to put the unit
into standby mode.
VOLUME Buttons
Two hard buttons on the remote, labeled VOL
+ and VOL –, control the master VOLUME,
adjusting the output level of all channels simultaneously.
Page 20

RSDX-02 DVD Receiver
20
CHANNEL Buttons
Two hard buttons on the remote control, labeled CH + and CH –, are used when operating the RSDX-02’s DVD player or AM/FM
Tuner. In DVD mode, these buttons are used
Track
to select the next
In AM/FM mode, the buttons tune up or down.
, backward or forward.
HOME Button
The HOME virtual button appears at the bottom of the touch-screen on every ROTEL or other
device page. Press HOME to return to the main
touch-screen page.
MUTE Button
The MUTE virtual button also appears at the
bottom of the touch-screen on every ROTEL
page. Press the MUTE command to temporarily
reduce the volume level to zero. Press the button
again to restore the volume to the previous
setting.
Basic Operations
This section covers the basic operating controls of the RSDX-02 and the remote.
Power On/Off
The RSDX-02 has a STANDBY button on the
front panel and a POWER hard button on the
remote. Press either button to turn the unit on.
The front panel LCD display lights up.
Press either button again to turn the unit off.
When turned off, the RSDX-02 remains in a
low current standby mode. The LED above the
STANDBY button the front panel lights when
the unit is in standby mode.
NOTE
: To completely power off the RSDX-02
when away from home for a long period of
time, unplug the unit from the AC wall outlet.
The RSDX-02 also has a sleep function which
turns the unit off after a specified amount of
time (see the following topic). There is also an
auto standby function that can automatically
turn the unit off (only when using the DVD
player) 30 or 60 minutes after the disc is
stopped.
SLEEP Timer
The RSDX-02 sleep function turns the unit off
automatically after a specified amount of time.
Press the SLEEP command on page 6 of the
remote to activate the sleep function. Each additional press of the button increases the length
of time before the unit turns off.
1st press: 10 minutes
2nd press: 20 minutes
3rd press: 30 minutes
4th press: 60 minutes
5th press: 90 minutes
6th press: 120 minutes
7th press: 150 minutes
8th press: 0 minutes (sleep timer cancelled)
A SLEEP indicator and with the amount of time
is shown in the front panel display. The time
remaining before the sleep timer turns the unit
off can be displayed with a single button press.
P6-F
Volume Adjustments
The listening volume of the RSDX-02 can be
adjusted from the front panel or the remote.
Front Panel: Rotate the front panel VOLUME
control clockwise to increase the volume, counterclockwise to decrease.
Remote: Press the VOL UP hard button to increase the volume; press the VOL DOWN hard
button to decrease.
When you adjust the volume, the setting is
shown on the front panel display.
Muting the Sound
The volume of the RSDX-02 can be temporarily
turned off or muted. Push the MUTE command
on the remote once to mute the sound. The word
MUTING appears in the front panel display.
Press the MUTE command again to restore previous volume levels.
NOTE
: Adjusting the VOLUME controls on ei-
ther the front panel or the remote also restores
the volume when the RSDX-02 is muted.
Changing Display Brightness
P2-C
There are two brightness settings for the front
panel display. Press the DIMMER command
on Page 2 of the remote to toggle between
the bright and dim display settings.
Selecting Source Inputs
Up to six source components, including the builtin DVD player and FM/AM tuner, can be selected for listening and/or viewing with the
RSDX-02. Selecting a source input can be done
from the front panel or the remote control.
Selecting an Input from the Front Panel
To select an input source from the front panel,
press any of the six input selector buttons. The
name of the selected input appears in the front
panel display.
NOTE
: When the TAPE/CDR button is pressed,
either TAPE or CDR appears in the front panel,
depending on which name is assigned to the
input. See Changing Input Name below.
Selecting an Input from the Remote
To select an input from the remote control, push
any of the input source commands on Page
1 or Page 2.
Four of the inputs (DVD, DBS, TV, CDR) are
available on Page 1 of the remote screens.
An additional three inputs (FM/AM, TAPE, VCR)
are available on Page 2.
The name of the selected source appears in
the front panel display.
NOTE
: Either the TAPE or the CDR input is avail-
able depending on which name has been
assigned to the input. See Changing Input
Name below.
Changing Input Name
The TAPE/CDR inputs can be used for a CDR
(compact disc recorder) or TAPE (analog tape
recorder). The correct name (TAPE or CDR)
should be correctly assigned to these inputs
so that the name appears in the display, so
that the INPUT buttons on the remote work as
expected, and so that digital inputs are available for use with a CDR. As delivered from
the factory, the RSDX-02 has the TAPE name
assigned to these inputs. To change the input
name to CDR:
1. Select the TAPE/CDR inputs by pressing
the TAPE/CDR input button.
2. Press and hold the TAPE/CDR button until
the words ASSIGN. CDR appear in the front
panel display.
Page 21

21
English
To change the input name back to TAPE, repeat Step 2, holding the button until ASSIGN.
TAPE appears in the display.
Selecting Digital
P6-C
or Analog Inputs
A digital source component can be connected
to the RSDX-02 using either for digital or analog
cables, allowing the selection of the digital or
analog signal for an input. There are two
available modes:
DIGITAL AUTO: The selection of digital or
analog inputs is automatic. If a digital signal
is available for the selected input, the RSDX-02
uses it. If a digital signal is not available, the
RSDX-02 will use the analog signal.
ANALOG: The RSDX-02 uses the analog signal, even if a digital signal is available.
By default, all of the inputs (except the DVD
input) are set at the factory for the ANALOG
mode. To change the mode:
1. Select the desired input by pressing an
INPUT select button on the front panel or
remote.
2. Press the INPUT AG/DG button on the front
panel or ANG/DIG command on Page 6
of the remote control to change the mode.
The selected mode, either ANALOG or
DGTL AUTO is shown in the front panel
display.
NOTE
: The built-in DVD input always uses digi-
tal signals and cannot be changed. This setting is memorized independently for all other
digital inputs.
Selecting the Digital Signal
P6-D
When the DIGITAL AUTO mode is selected
and a digital signal is detected, one of four
indicators appears in the display, depending
on the type of digital signal being received:
DOLBY DIGITAL: Dolby Digital signal is being
received.
DTS: DTS signal is being received.
LPCM: Linear PCM signal (such as a CD) is
being received.
PPCM: DVD AUDIO Packed PCM digital signal is being received.
In almost all cases, the correct type of digital
signal is detected and decoded automatically
in DIGITAL AUTO mode. However, when us-
ing the DVD input, you can manually force
the RSDX-02 into either Dolby Digital or DTS
modes if necessary.
From the front panel:
1. While using the DVD input, press the front
panel INPUT AG/DG button or ANG/DIG
command on Page 6 of the remote to
change the mode so that DGTL AUTO is
shown in the front panel display.
2. While DGTL AUTO is displayed, press the
CONTROL
to step through the three options: DGTL
AUTO, DGTL D.D, and DGTL DTS.
From the remote:
Press the DECODE button (on Page 6) repeatedly to step through the options.
If you select a mode that does not match the
incoming signal, the name of the digital mode
in the display flashes.
NOTE
: The selection of the Dolby Digital or
buttons on the front panel
DTS modes reverts automatically to DIGITAL
AUTO mode when the unit is turned off or a
different input is selected.
Attenuating Analog Inputs
In some systems, the signal level of an analog input may be too high relative to other inputs or even high enough to cause distortion.
To reduce the input level of an analog input:
1. Select the desired analog input.
2. Press and hold the AG/DG button (front
panel only), to toggle between no attenuation (ATT NORMAL appears in the display) and attenuation on (ATT ON appears
in the display).
NOTE
: This setting must be made individually
for each analog input and is memorized as
a permanent setting.
Activating Record Mode
Any analog input is available for recording
at the CDR/TAPE or VCR analog outputs.
However, these are 2-channel stereo outputs
that cannot record a multi-channel digital
source. The RSDX-02 has a special RECORD
MODE that downmixes multichannel inputs,
combining all of the channels into a 2-channel signal for recording.
To activate the RECORD MODE, press and hold
the REC MODE button (front panel only), to
toggle between RECORD MODE ON and
RECORD MODE OFF (normal mode) as shown
in the front panel display.
With RECORD MODE ON, only the front speakers are active and surround sound is disabled.
None of the surround sound settings are available. In addition, RECORD MODE ON prevents
the volume display, normally shown on the TV
monitor, from being recorded by the VCR.
NOTE
: This setting automatically reverts to the
normal RECORD MODE OFF setting when a
different source input is selected or when the
RSDX-02 is turned off.
Surround Modes
To get the best performance from your RSDX-02,
it helps to understand the surround sound formats available today, to know which decoding process to use for a particular recording,
and how to select it. This section provides basic
background information about surround sound
formats. The following sections provide detailed
operating instructions for automatic and manual
selection of surround modes.
Dolby Surround Dolby Pro Logic II
The most widely available surround sound
format for consumer audio/video is Dolby
Surround
cial VHS tapes, many television broadcasts,
and most DVDs. It is a matrix-encoding system that records front left, front center, front
right, and a mono surround channel into a 2channel stereo recording. During playback,
a Dolby Pro Logic
extracts each channel and distributes it to the
appropriate speakers.
Dolby Pro Logic II decoding should be used
for any analog recording labeled “Dolby Surround” or any Dolby Digital 2.0 soundtrack.
A “music mode” makes Pro Logic II an excellent choice for audio CDs.
Dolby Pro Logic Cinema or Music
modes can be selected for ANY 2-channel recording, analog or digital.
®
, available on nearly all commer-
®
or Pro Logic II decoder
Page 22

RSDX-02 DVD Receiver
22
Dolby Digital
Dolby Digital is the standard audio format for
DVDs and for digital television broadcasting
in the United States.
A Dolby Digital 2.0 soundtrack is a digital 2channel recording of a matrix encoded Dolby
Surround soundtrack. To play a Dolby Digital 2.0 recording, use Dolby Pro Logic II decoding as previously described.
A Dolby Digital 5.1 soundtrack has six discrete channels: front left, front center, front right,
surround left, surround right, and a Low Frequency Effects (LFE) channel containing bass
signals intended for a subwoofer.
Decoding of Dolby Digital 5.1 soundtracks is automatic.
NOTE
: Many DVDs have a Dolby Digital 2.0
matrix soundtrack as the default. The Dolby
Digital 5.1 soundtrack may have to be selected as an option from the setup menus at
the beginning of the DVD.
DTS 5.1
DTS® (Digital Theater Systems) is an alternative digital format competing with Dolby Digital
in both movie theaters and home theater
markets. The basic functions of the DTS system are similar to those of Dolby Digital (for
example, 5.1 discrete channels), however the
technical details of the compression and decoding processes differ somewhat.
Like Dolby Digital, DTS can only be used on
a digital recording and, therefore, is only
available for home use on LaserDiscs, DVDs,
or other digital formats.
Detection and proper decoding of DTS
5.1 signals is automatic.
NOTE
: DVDs with a DTS soundtrack almost
always have it configured as an option to the
standard matrix Dolby Surround format. To
use DTS, you may have to go to the setup
menus at the beginning of the DVD and select “DTS 5.1” instead of “Dolby Surround”
or “Dolby Digital 5.1”.
All-Channel Stereo
All-Channel stereo sends a stereo signal to fourspeaker or five-speaker systems.
All-Channel stereo can be selected for
any stereo input, analog or digital.
However, this option only available
for systems with 4 or 6 speakers.
DSP
This mode digital processing to synthesize the
ambience of four different concert venues (LIVE
CLUB, DANCE CLUB, HALL, PAVILION) using
only the front and rear speakers, but not the
center channel speaker.
DSP modes can be selected for any
stereo source input, analog or digital.
Surround Off
Turns off all surround sound processing for 2channel stereo. Even if connected, the center
channel and surround speakers are not used.
If the system is configured to route bass signals from the front speakers to the subwoofer,
this capability remains in effect.
Surround Off can be selected for ANY
input source.
Manually Selecting Surround Modes
For users who prefer a more active role in setting
surround modes, buttons on the remote and
the front panel provide manual selection of
surround modes that are not automatically detected or, in some cases, to override an automatic setting.
NOTE
: These settings are memorized indepen-
dently for each source input and will be used
as a default setting each time that source is
used.
Surround Sound On/Off
Press the SURROUND ON/OFF button on the
front panel or the S-ON/OFF button on Page
2 of the remote to switch between Surround
Sound On mode and Surround Sound Off (2ch stereo) mode.
P2-G
Selecting a Surround Sound
P2-F
Mode
When the Surround Sound is turned On (see
above), use the SURROUND MODE button on
the front panel or the SURR + button on Page
2 of the remote to select a surround mode for
stereo sources. Each press of the button steps
to the next available option:
PLII Movie: Dolby Pro Logic Movie
PLII Music: Dolby Pro Logic Music
LIVE CLUB: DSP mode for small music club
DANCE CLUB: DSP mode for larger club
LIVE HALL: DSP mode for large concert venue
PAVILION: DSP mode for large arena
ALL STEREO: Stereo signal sent to front and
rear speakers.
NOTE
for 2 speaker systems. PLII Movie and Music
are the only settings available for 3-speaker
systems.
: None of these settings are available
Tuner Controls
The RSDX-02 features a digital synthesized
AM/FM tuner. The unit offers manual tuning,
seek tuning, and preset station tuning (30 FM
and 15 AM).
Selecting FM/AM
Press the AM/FM button to select the AM/FM
tuner input. The tuner will be tuned to the last
station, AM or FM.
Press the FM/AM button to toggle between
AM and FM reception. An indicator in the frontpanel display confirms your choice and the
currently tuned station frequency is shown.
Tuning from the Front Panel
1. Repeatedly press the CONTROL buttons until the word TUNING appears in
the front panel.
2. Repeatedly press one of the CONTROL
buttons until the desired frequency appears
in the display.
3. For seek tuning, press and hold one of the
CONTROL buttons. When you release the
button, the tuner will continue increasing
or decreasing the frequency until the next
available station is found.
Page 23

23
English
Tuning from the Remote
1. Repeatedly press the CH +/– hard buttons
or the TUNING commands on Page 4 of
the remote until the desired frequency appears in the display.
2. For seek tuning, press and hold one of the
CH +/– or TUNING buttons. When you
release the button, the tuner will continue
increasing or decreasing the frequency until
the next available station is found.
P4-E
Storing/Tuning Station Presets from the Front Panel
The RSDX-02 can store 30 FM and 15 AM
presets.
To memorize presets:
1. Tune to the desired station.
2. Press the MEMORY button.
3. Press one of the CONTROL
until the desired PRESET NUMBER flashes
in the display.
4. Press the MEMORY button to store the
preset.
5. To memorize another station, press a CONTROL
tion and repeat steps 2 through 4.
NOTE
: There is a time limit for these steps. If
the time limit expires before memorizing a
station, repeat the process.
To tune to a preset station:
1. Select the FM/AM input.
2. Press one of the CONTROL
the word PRESET appears in the display.
3. Press or hold one of the CONTROL
buttons until the desired PRESET number
appears in the display.
button to tune to the desired sta-
buttons
buttons until
Storing/Tuning Station Presets
P4-D
from the Remote
To memorize presets:
1. Tune to the desired station.
2. Press the MEMORY button on Page 4 of
the remote.
3. Press the NUMERIC buttons on Page 4 of
the remote to enter the desired PRESET
NUMBER.
PRESET 5: Press: 5
PRESET 15: Press: +0 > 5
PRESET 25 Press: +0 > +0 > 5
4. Press the MEMORY button again to store
the preset.
5. To memorize another station, press the
TUNING buttons to tune to the desired station and repeat steps 2 through 4.
NOTE
: There is a time limit for these steps. If
the time limit expires before memorizing a
station, repeat the process.
To tune to a preset station:
1. Select the FM/AM input.
2. Press the NUMERIC buttons until the word
PRESET and the desired preset number
appears in the display.
PRESET 5: Press: 5
PRESET 15: Press: +0 > 5
PRESET 25 Press: +0 > +0 > 5
Changing the FM MODE
The FM MODE can be changed from the default AUTO MUTING to MONO reception. In
AUTO MUTING mode, a stereo signal will be
heard if the station is broadcasting a stereo signal
and there is sufficient signal strength. An ST indicator will light in the front-panel display. In
mono mode, a mono signal will be heard even
if the station is broadcasting a stereo signal.
NOTE
: Switching to mono mode can improve
the reception of weak or distant FM signals.
Less signal strength is required for clean mono
reception than for stereo reception.
To change the FM MODE from the front
panel:
1. While tuned to an FM station, press one
of the CONTROL
FM MODE appear in the display.
2. Press one of the CONTROL
to toggle between AUTO MUTING and
MONO modes as shown in the display.
To change the FM MODE from the remote:
While tuned to an FM station, press the FM
MODE button on Page 4 of the remote. Each
press of the button toggles between AUTO
MUTING and MONO modes.
buttons until the words
P4-C
buttons
DVD PLAYER
About Discs
This section covers basic information on the
types of discs that can be played in the
RSDX-02.
Disc Formats
The RSDX-02 can automatically detect and play
several different types of disc formats.
Look for the standard logo on the packaging
for each of the following types of disc the
RSDX-02 can play:
DVD Video
DVD Audio
Video CD
SVCD
Audio CD
NOTE
: The RSDX-02 can play recorded MP3
and JPEG files from most CD-R, CD-RW,
DVD-R, and DVD+R discs. The unit can only
play the audio content on CD-EXTRA, CDG, and CD-TEXT discs. The RSDX-02 cannot
play DVD-ROM, DVD-RAM, CD-ROM and
DVD+/–RW discs.
DVD Region Codes
DVD-Video discs are encoded with region
codes which also appear on the packaging:
ALL
A disc can only be played if its region code
matches the code printed on the back-panel
of the RSDX-02.
2
2
52
534
321
654
Page 24

RSDX-02 DVD Receiver
24
The RSDX-02 can play discs encoded in either the NTSC or PAL video formats, outputting the correct video signal as set by the backpanel NTSC/PAL switch.
Disc Structure
Each type of disc has its own organization,
allowing you to locate various portions of the
program recorded on the disc. Depending on
Titles
Chapters
Title
number,
Titles,
and
. For
the type of disc, these may be called
or
Groups, Chapters,
DVD-Video:
Title 1 Title 2
Chapter 1 Chapter 2 Chapter 1 Chapter 2
A DVD-Video disc is comprised of
each title may be divided into
example, a DVD-Video disc may contain several movies, each with its own
and each movie may be divided into several
Chapters
song usually has its own title number and does
not have
DVD-Audio:
. In a DVD-Video karaoke disc, each
Chapters
Tracks:
.
• Dolby Digital. A digital surround format
that may contain as many as five discrete
audio channels plus an LFE (low frequency
effects) channel (referred to as 5.1 channel surround). Particularly for older
soundtracks, Dolby Digital may be used
for a 2.0 channel stereo soundtrack with
Dolby Surround matrix encoding.
• DTS (Digital Theater Systems). Another 5.1 channel digital surround format
similar to Dolby Digital, but somewhat
different encoding characteristics. Also plays
the DTS 96/24 used on DTS music discs.
• MPEG. Another compressed digital format.
• DVD-Audio and MLP (Meridian Loss-
less Packing). A high quality digital
format for DVD-Audio with the compression ratio of about 2:1 supporting up to
192kHz sampling rate and 24-bit resolution, allowing the PCM signal to be recreated without loss. Some content may only
be available at the analog outputs.
• LPCM (Linear PCM). Uncompressed digital audio, the format used on CDs and most
studio masters.
The PLAY button usually starts play from the
beginning of the disc, except after the PAUSE
button has been pressed. In this case, the
disc will resume playing from the current location. The RSDX-02 also has a RESUME feature that restarts play at the current location
after pressing the STOP
during playback.
NOTE
: Pressing the PLAY button during DVD-
button one time
Video playback skips back about 10 seconds
and resumes playback.
Stopping Disc Playback
Press the STOP button to stop a disc that is
playing.
The first press of the STOP
rizes the point at which the disc stopped playing
as indicated by RESUME appearing in the front
panel display. Resume play at that point by
pressing the PLAY
tion remains in memory until the unit is turned
off, the disc drawer is opened, or the top menu
is selected.
The second press of the STOP
the RESUME position.
button. This stored posi-
button memo-
button clears
Group 1
Track 1 Track 2 Track 3 Track 1 Track 2
A DVD-Audio disc contains
group divided into
discs also contain a
be played back by entering a
password.
Most DVD-Audio discs include other information in addition to audio, such as still pictures,
movies and text.
Audio CD:
Track 1 Track 2 Track 3
An Audio CD, Video CD or SVCD simply
contains
Tracks
Tracks
Bonus Group
.
Group 2
Groups
, with each
. Some DVD-Audio
that can only
Key Number
Digital Audio Formats
DVD and CD discs can be encoded with several different digital audio formats. Generally,
the type of digital audio encoding is indicated
on the disc packaging.
• MP3 (MPEG 1, Layer 3). Compressed
2-channel digital audio, a format often used
for music on recordable CD-R and CD-RW
discs.
Playing DVDs
Inserting a Disc
A disc drawer slides out to accept a disc and
retracts for playback. Place the disc in the
drawer label-side up. Make sure the disc is
properly centered in the tray. The OPN/CLOSE
button on the front panel or the EJECT button
on Page 3 of the remote opens or closes the
drawer.
Playing a Disc
Press the PLAY button on the front panel or
Page 3 of the remote to start playing the disc
from the beginning. If the disc drawer is open,
it will close automatically.
NOTE
: Many DVDs either begin playing auto-
matically or display a start-up menu as soon
as the disc is inserted.
P3-G
Pause/Still Frame
Press the PAUSE button to temporarily suspend play. To resume playing the disc from
the current location, press the PLAY
Still-Frame: When playing a video disc, a
still-frame picture remains on the TV screen with
no sound when the PAUSE
Press the button again to advance to the next
still-frame picture. Each button press advances
one frame.
button is pressed.
button.
Skip forward/back
The TRACK buttons skip forward/
back to the beginning of the next selection.
During playback, pressing the right TRACK
button once advances to the beginning of the next
the left button returns to the beginning of the
current scene or song. Pressing twice in succession returns to the beginning of the previous track.
Press the button as many times as necessary
to find the desired scene or selection.
Title, Chapter, or Track
. Pressing
Page 25

25
English
NOTE
: The CH+/– hard buttons on the remote
duplicate the function of the TRACK
buttons when operating the DVD player.
With a DVD-Audio or Audio CD, this feature
also works to find a selection when playback
is stopped. This feature may not work with Video
CD/SVCD discs with the PBC function enabled.
NOTE
: There are other methods of locating
specific selections on a disc, including direct
access with the NUMERIC buttons and using
the On-Screen Menu features. See Playing
Specific Selections for details.
High Speed Play
The SEARCH buttons (remote only)
allow you to activate high speed play, either
forward or reverse.
During playback, press and release the
SEARCH
buttons to begin video and
audio playback at 2x normal speed, backwards or forwards. Each time you press the
button again, the playback speed increases
from to 5x, 10x, 20x, or 60x normal speed
(2x, 5x, 10x, 20x for DVD AUDIO/VCD/
SVCD/CD). Press PLAY
to resume normal
playback.
Alternatively, you can press and hold the TRACK
buttons to increase speed to 5x normal. If you continue holding the buttons, the
speed will eventually increase to 20x normal
speed. Release the button to return to normal
playback
Slow Speed Play
For slow motion play, press the PAUSE button. Then, press the SEARCH
remote to begin slow motion play. Each press
of the button steps through additional speed
options (1/32 speed, 1/16 speed, 1/8 speed,
1/4 speed, 1/2 speed). Press PLAY
sume normal playback. Slow motion reverse
play is only available on DVD-Video discs.
NOTE
: The sound is muted during slow-motion
play. Slow-motion is not available on Audio
CDs.
on the
to re-
On-Screen Display (OSD)
P1-D
1. When the DVD input is active, press the
OSD button on Page 2 of the remote to
display a status bar on the TV.
On the top line, the status bar shows the
type of disc being played, the bandwidth,
the current Title/Chapter/Group/Track info,
a time indicator and play status.
2. Press the OSD button a second time and
a new status bar appears with drop down
menu item, selectable by pressing the
CURSOR
tion arrow.
3. Once a drop down menu is selected, adjustments can be made using the CURSOR
buttons to step through the available
options.
4. Press the OSD button again to cancel the
status bar display
Time Display
The disc time indicators in the front panel display and the On-Screen Display can show
several different types of information for DVDAudio, Audio CD, and Video CD/SVCD discs.
Options include elapsed time or remaining time
for a single selection (chapter or track) or entire disc (or
the time display:
1. Press the OSD button on the remote twice.
A display window appears on the TV
screen.
2. Press the CURSOR
edly to select the TIME field.
3. Press the CURSOR
through the available options:
TOTAL: Elapsed disc time
T. REM: Remaining total disc time
TIME: Elapsed playing time of the current
Chapter/Track
REM: Remaining time of the current
ter/Track
buttons to move the selec-
.
P1-D
Title
for DVD-Video). To change
buttons repeat-
buttons to step
Chap-
Advanced Features
The RSDX-02 provides several advanced features for controlling the audio/video content
displayed during playback. These include progressive scan, zooming, changing the scene
angle on DVD-Video discs, selecting alternate
languages for the audio portion of DVD programs, and selecting subtitle languages on DVD
programs.
Progressive Scan (NTSC only)
The RSDX-02 can display either interlaced
(480i) or progressive scan (480p) video, depending on the setting of the Progressive Scan
button.
NOTE
: Progressive Scan only works with HDTV
monitors. Do not activate the Progressive Scan
feature with analog TV monitors. The Progressive Scan feature is only available when using
the Component Video (Y PR PB) outputs with
the RSDX-02 in NTSC mode.
To activate progressive scan, press the
P-SCAN button on Page 2 of the remote while
playback is stopped. The PROGRESSIVE indicator lights in the display. To return to normal video output, press the button again.
Zoom
When playing a video disc, the RSDX-02 can
zoom in to enlarge a section of the picture up
to 64 times its original size. The zoom feature is available for full-motion video during
playback or for still-frame pictures while the
unit is paused. While zoomed, you can move
the displayed image up, down, left, or right
to view the desired portion of the full image.
To zoom in, press the ZOOM button Page
2 of the remote. Each press of the ZOOM button
changes the size of the picture: 1.8x, 4x, 8x,
16x, 32x, 64x, and back to normal size. An
icon at the top left of the screen shows the current magnification.
To move the zoomed-in video image,
press the CURSOR
1 of the remote in the desired direction. The
zoomed image moves up, down, left, or right
to show the desired portion of the full image.
P2-D P1-D
P2-E
buttons on Page
Press PLAY
to resume normal playback.
Page 26

RSDX-02 DVD Receiver
26
Selecting a Scene Angle
Some DVD-Video discs have scenes that can
be viewed from multiple camera angles. Discs
with multiple angles may provide menu screens
for angle selection. Or, select different angles
(if available) by pressing the ANGLE button
on Page 3 of the remote. A pop-up window
appears on screen indicating which angle is
selected and how many angles are available.
Press the ANGLE button repeatedly to step
through the available angles.
Selecting Subtitles
Some DVD-Video, DVD-Audio, and Video CD/
SVCD discs can display subtitles in various languages during playback. Typically, you select
these subtitles with the disc’s setup menus.
In addition, you can change the subtitles during playback by pressing the SBTITLE button
on Page 3 of the remote. A pop-up display
shows the current subtitle language and its
number along with the total number of subtitle options. Press the SBTITLE button repeatedly until the desired subtitle is selected.
Selecting Audio Tracks
Some DVD-Video, DVD-Audio, and Video CD/
SVCD discs have audio tracks recorded in
alternate languages, alternate audio formats
(such as Dolby Digital 2.0, Dolby Digital 5.1,
or DTS) or with alternate content (such as
director’s commentary). Typically, these audio
tracks are selected with the disc’s setup menus,
which appear when you insert the disc or which
can be accessed during playback by pressing the MENU button.
In addition, you can change to an alternate
audio track during playback by pressing the
AUDIO button on Page 2 of the remote. A popup window shows the current audio track
number and description along with the total
number of audio tracks. Press the AUDIO button
repeatedly until the desired audio track is
selected.
P3-C
P3-D
Setting Video Picture Adjustments (VFP)
The VFP function allows you to select one of
four picture modes: Normal, Cinema, User 1,
and User 2. Each mode stores several picture
settings:
P6-E P1-D
GAMMA: adjusts the brightness of mid-tone
colors without changing bright or dark colors.
BRIGHTNESS: adjusts the black level, the
darkness of blacks.
CONTRAST: adjusts the white level, the brightness of white and near white colors.
SATURATION: adjusts the amount color saturation
TINT: adjusts the color balance
SHARPNESS: increases the sharpness of the
picture at the expense of making noise in the
picture more apparent
Y-DELAY: adjusts the timing of the luminescence and chroma to reduce ghosting.
Select the Normal mode for general viewing.
Select the Cinema mode for movie viewing.
Select one of the two User modes if you wish
to define and use two custom viewing modes.
To select a picture mode:
1. Press the VFP button on Page 6 of the remote to display the current VFP settings on
the TV screen.
2. Press the CURSOR
edly to select the desired picture mode.
3. Press the VFP button again to cancel the
display.
To change picture settings:
1. Repeat steps above, selecting either USER
1 or USER 2 modes to modify.
2. Press the CURSOR
edly to select the parameter you wish to
adjust.
3. Press OK. A pop-up window for that parameter appears.
4. Press the CURSOR
the selected parameter. Changes are saved
automatically.
5. Press the VFP button again to cancel the
display or the display will disappear after
10 seconds.
Still Pictures on DVD-A Disc
Many DVD-Audio discs contain still pictures
which can be viewed during playback. To view
the still pictures, press the PAGE button PAGE
3 of the remote. Press the button again to advance to the next picture.
buttons repeat-
buttons repeat-
buttons to adjust
P3-F
Playing Specific Selections
The RSDX-02 provides several methods for locating specific selections from a disc. The sim-
and
but-
topic.
Tracks
P4-F
plest method, using the TRACK
tons, is covered in the
This section details additional methods, such
as finding a selection with the disc menu, the
On-Screen Display, or the Digest (thumbnail
images of the disc’s content). Also covered is
the use of NUMERIC buttons to specify selections along with advanced features like random, program, and repeat play functions.
Please review the
manual to learn how various types of discs
are divided into
Finding selections on various disc formats may
require slightly different procedures as noted
in the following instructions.
Basic Features
About Discs
Titles, Chapters,
section of this
Find Scenes from a DVD Menu
P1-C P1-D
DVD-Video and DVD-Audio discs usually have
scene selection menus that display the selections on the disc on the TV screen.
To make selections from a disc menu:
1. Press the MENU or TP MENU button on
the remote if the disc’s menu is not already
displayed.
2. Press the CURSOR buttons to
highlight the scene selection option and
press the OK button.
3. Use the CURSOR
the desired scene, then press the OK button to begin playback.
buttons to find
Find a Scene from a Video CD/SVCD Menu
Some Video CD/SVCD discs have a feature
called PBC (PlayBack Control) which provides
a menu system similar to the DVD menus. With
a PBC-enabled disc in the player, the PBC menu
appears on the TV screen automatically when
the PLAY
button is pressed.
.
Page 27

27
English
To use the PBC menus:
1. Press the PLAY
appears on the TV screen, showing the
available selections.
2. Press the NUMERIC buttons on Page 4 of
the remote to select a scene. To select item
1, press the 1 button. To select item 14,
press the +0 button and then the 4 button.
Playback of the selected scene begins automatically.
3. Press the RETURN button on Page 4 of the
remote to display the menu again.
4. If NEXT or PREVIOUS appear on screen
during playback, use the TRACK
buttons to move to the next or previous
scene. This feature may differ on some discs.
To disable the PBC feature, start playback by entering the scene number using the
NUMERIC buttons instead of pressing PLAY
. See the next topic for direct access selec-
tion using the NUMERIC buttons.
To reactivate the PBC feature: If you have
disabled the PBC feature and want to reactivate it, press STOP
to display the PBC menu.
PLAY
button. A display window
to halt playback, then
Selecting a Title/Group
P4-G
DVD-Video or DVD-Audio discs:
On DVD-Video discs, this feature is available
at any time (except when a menu screen is
already displayed on the TV screen).
1. Press the TTL/GROUP button on the remote.
A display window appears on the TV
screen.
2. Press the TRACK buttons repeat-
Title
or
Group
edly to select desired
3. Or, enter the new selection number using
the NUMERIC buttons, For example, to
select the 10th track, press 1, then 0.
4. Press OK to begin play at the selected point.
.
Entering a Scene Number
P1-D
1. Press the OSD button on the remote twice.
A display window appears on the TV
screen.
2. Press the CURSOR
edly to select the CHAP ➪ or TRACK ➪
field.
3. Enter the new selection number using the
NUMERIC buttons, For example, to select
the 10th track, press 1, then 0.
4. Press OK to begin play at the selected point.
Audio-CD discs:
When playing an Audio CD, pressing the OSD
button is not necessary. Simply enter the desired track number with the NUMERIC buttons
and playback begins at the selected track. This
feature is available at any time, whether the
disc is playing or stopped.
buttons repeat-
Find a Location with Time
P1-D
Search
You can play a DVD-Video from a desired
location by specifying the elapsed time from
the beginning of the current
SEARCH function. This direct access time feature
is available at any time (except when a menu
screen is already displayed on the TV screen).
DVD-Video or DVD-Audio discs:
1. Press the OSD button on the remote twice.
A display window appears on the TV
screen.
2. Press the CURSOR
field.
the
3. Enter the desired time in the format
HOURS:MINUTES:SECONDS using the
NUMERIC buttons.
4. Press PLAY
point.
Repeat Play
The Repeat Play feature is available for DVDVideo, DVD-Audio, Audio CD, and Video CD/
SVCD disks. The feature continuously repeats
a single selection or a number of selections
until you stop play.
Title
using the TIME
buttons to select
to begin play at the selected
P1-D P3-E
To begin Repeat Play:
1. Press the OSD button on the remote twice.
A display window appears on the TV
screen.
2. Press the CURSOR
the REPEAT
3. Press the CURSOR
the REPEAT mode as follows.
DVD-Video:
CHAPTER ➪ TITLE ➪ A/B ➪ OFF
DVD-Audio:
TRACK ➪ ALL/GROUP ➪ A/B ➪ OFF
CD and Video CD/SVCD:
TRACK ➪ ALL ➪ A/B ➪ OFF
4. Press the OK button. Repeat play of the
desired selection begins and continues
indefinitely.
To stop Repeat play:
5. Press STOP
Video disc, the repeat mode is cancelled
entirely.
6. On all other discs, playback stops but repeat mode remains active. To cancel repeat mode, repeat the above steps, selecting the OFF mode.
For A-B Repeat:
A-B Repeat Play is available for all discs. During
playback, you specify a starting point (Point
A) and an ending point (Point B). The unit will
continuously repeat the marked passage.
To use A-B Repeat, follow the above steps,
selecting A-B Repeat mode. Then, press the
OK button at the point where A-B play should
begin and press OK a second time at the point
where A-B repeat should end.
Using REPEAT Button:
You can also select any repeat mode (except
A-B repeat) directly, by pressing the REPEAT
button on Page 3 of the remote repeatedly until
the desired mode is selected.
to stop playback. On a DVD-
buttons to select
field.
buttons to select
DVD-Video or DVD-Audio discs:
On DVD-Video discs, this direct access feature is available at any time (except when a
menu screen is already displayed on the TV
screen).
On a DVD-Video disc, you can repeat a single
Chapter
dio disc, a single
On other discs, a single
Repeat play is not available on Video CD/
SVCD discs with the PBC feature active.
or the whole
Track
Group
. On a DVD-Au-
or the entire
Track
or the entire disc.
Group
.
Page 28

RSDX-02 DVD Receiver
28
Random Play
The Random Play feature is available for DVDAudio, Audio CD, and Video CD/SVCD disks.
The feature plays all of the tracks once in random order.
To begin Random Play:
1. Press the OSD button on the remote twice.
A display window appears on the TV
screen.
2. Press the CURSOR
the RAND field.
3. Press OK to begin Random Play.
4. Press STOP
to stop Random Play.
Program Play
The Program Play feature is available for DVDAudio, Audio CD, and Video CD/SVCD disks.
The feature allows you to play up to 99 tracks
in any desired order
To begin Random Play:
1. Press the OSD button on the remote twice.
A display window appears on the TV
screen.
2. Press the CURSOR
the PROG field.
3. Enter a
4. Press the CURSOR
5. Press PLAY
6. Press STOP
Group
number or
number, for the first desired track, using
the NUMERIC buttons on the remote.
to the next field and enter the second selection. Continue programming up to 99
selections.
to begin Program play.
to stop Program Play.
P1-D
buttons to select
P1-D
buttons to select
Group
and
buttons to move
Track
MP3 and JPEG files
The RSDX-02 can play recorded MP3, VCD,
and JPEG files from most CD-R, CD-RW, DVD-R,
and DVD+R discs.
These discs, often recorded on computer drives,
have a file structure similar to computer discs,
with files stored in folders. Selecting files for
playback and other features are made using
a special Control menu.
Control Menu
Whenever a disc containing MP3, MPEG or
JPEG files is inserted in the RSDX-02 or when
the PLAY
menu appears.
On the left side of the menu is a list of folders
on the disc. When a folder is selected, the list
of files in that folder is displayed down the
right side of the screen.
To move between the two areas of the screen
(folder list, track list), repeatedly press the
CURSOR
in the desired area.
To select a folder: Use the CURSOR
buttons to move to the left side of the screen.
Then, use the CURSOR
the desired folder.
To select a track: Use the CURSOR
buttons to move to the left side of the screen.
Then, use the CURSOR
the desired track.
button is pressed, the CONTROL
until the selection highlight is
buttons to select
buttons to select
Additional JPEG features
When displaying JPEG photo images, the
following additional features are available:
SLIDE SHOW: Press the RESUME button repeatedly to select one of 11 slide show modes
that automatically display images. You can also
select RANDOM play or NONE (no slide
show).
ROTATE: Except in Zoom mode, press the CURSOR
wise or counterclockwise.
REPEAT: In addition to the repeat options described in the previous section, press the REPT
button to cycle through the available repeat
modes.
ZOOM: To zoom a displayed image, press
the ZOOM button. Then, press the SEARCH
age progressively smaller or larger. In zoom
mode, the CURSOR
the image in any direction to show the desired
area of the image.
buttons to rotate the image clock-
buttons repeatedly to make the im-
buttons move
SETUP
The RSDX-02 must be configured before use.
Some of the settings are essential for proper
operation and best performance. Others are
optional settings to maximize the convenience
of the system or tailor operation for individual
preferences.
The RSDX-02 has three groups of setup or
adjustment procedures:
1. Quick Setup: Simplified procedure for
the most important basic speaker settings
2. Comprehensive Setup: More detailed
group of settings allowing more precision
for the basic settings than the Quick Setup.
3. Sound adjustments: A group of audio
related adjustments such as speaker levels, balance, tone, etc.
4. Choice Menus: On-Screen Menu system
with additional features and options.
For the easiest basic setup, complete the Quick
Setup procedure before using the RSDX-02.
Later, you can return to the Comprehensive
Setup options and further customize your system. Or, experienced users can skip the Quick
Setup and complete the entire Comprehensive
Setup right away. The Choice Menus provide
additional settings to customize the system and
a menu-driven alternative to some of the Comprehensive Setup settings.
Quick Setup
The Quick Setup provides a simplified setup
procedure for the most basic system settings
including the number and size of speakers in
the system, their distance from the listener, and
whether the system has a subwoofer. Quick
Setup should be completed after all connections are made, but before the system is used.
NOTE
: Quick Setup must be done using only
the front panel buttons.
To begin the Quick Setup:
1. Press the SETTING button on the front panel.
2. Repeatedly press the CONTROL
tons on the front panel to step through the
available items until QUICK SETUP appears
in the front panel display.
but-
Page 29

29
English
3. Press the MEMORY button. ENTER THE
NUMBER OF SPEAKERS scrolls in the display followed by 5 SPEAKERS, indicating
the default setting for a five speaker system.
4. Use the CONTROL
panel to adjust the number of speakers to
match your system.
5 SPEAKERS: Select when you have front
speakers, surround speakers, and a center channel speaker.
4 SPEAKERS: Select when you have front
speakers, surround speakers, but no center channel speaker.
3 SPEAKERS: Select when you have front
speakers, a center channel speaker, but
no surround speakers.
5. Press the MEMORY button. ENTER USE OF
SUBWOOFER scrolls in the display followed
by SUBWFR USE, indicating the default
setting for a subwoofer in the system.
6. Use the CONTROL
panel to adjust the number of speakers to
match your system.
USE: Select if you have a powered subwoofer connected to the system.
NO: Select if you do not have a subwoofer.
7. Press the MEMORY button. ENTER ROOM
SIZE scrolls in the display followed by SMALL
ROOM, indicating the factory default setting for a smaller room.
8. Use the CONTROL
panel to adjust the number of speakers to
match your system.
SMALL: Select if your listening position
is 8ft (2.4m) from the front speakers and
5 ft (1.5m) from the surround speakers.
MEDIUM: Select if your listening position
is 9ft (2.7m) from the front speakers and
5 ft (1.5m) from the surround speakers.
LARGE: Select if your listening position is
10 ft (3.0m) from the front speakers and
from the surround speakers.
NOTE
: If your room doesn’t match one of these
options, custom settings are available in the
Comprehensive Setup procedure that follows.
8. Press the MEMORY button to complete the
procedure. SETUP END appears briefly in
the display and the RSDX-02 returns to normal
operation with the new settings.
buttons on the front
buttons on the front
buttons on the front
Comprehensive Setup
The Comprehensive Setup provides more
detailed setup procedure for configuring the
RSDX-02 to operate in your system.
Setup Procedure
The Comprehensive Setup uses the front panel
control buttons and the front panel display and
cannot be done from the remote control except where noted.
To begin the Comprehensive Setup:
1. Press the SETTING button on the front panel.
The first adjustment item appears in the front
panel display.
2. Use the CONTROL
panel to step through the available settings
in the Comprehensive Setup procedure,
Each press of a CONTROL
vances up or down to the next available
item as shown in the front panel display:
SUBWFR: Subwoofer setting
FRNT SP: Front speaker setting
CNTR SP: Center speaker setting
SURR SP: Surround speaker setting
FRNT D: Front speaker delay
CNTR D: Center speaker delay
SURR D: Surround speaker delay
CROSS: Crossover frequency setting
LFE: Surround Speaker setting
D.COMP: Dolby Digital dynamic range
compensation setting
DGT: Digital input assignment
AUTO SR: Automatic surround mode
QUICK SETUP: Quick Setup procedure
VOUT: Video output configuration
3. Use the CONTROL
panel to adjust the item currently shown
in the front panel display.
The following topics describe the settings for
each item.
Subwoofer Setting (SUBWFR)
The SUBWFR item configures the RSDX-02 for
use with or without a powered subwoofer. Use
the CONTROL
two settings:
• YES: Select this setting if you have connected a powered subwoofer.
• NO: Select this setting if your system does
not have a powered subwoofer.
buttons on the front
button ad-
buttons on the front
buttons to select one of
Speaker Settings (FRNT SP, CNTR SP, SURR SP)
The next three items configure the front speakers, center speaker, and surround speakers
in the system.
For each type of speaker, use the CONTROL
buttons to choose one of three options:
• LRG: Select the LARGE setting if the
speaker(s) for this item are capable of reproducing deep bass.
• SML: Select the SMALL setting to redirect
the deep bass from the speaker(s) for this
item to a powered subwoofer or to large
speakers in the system.
• NO: Select this setting if you do not have
speaker(s) for this item in the system. For
example, if you do not have surround
speakers, select NO for the SURR SP item.
NOTE
: The NO option is not available for the
front speakers. If you have previously selected
NO for the subwoofer, the front speakers are
automatically set to LARGE.
In the vast majority of systems with a powered
subwoofer, all speakers should be set to SMALL
so that their deep bass is redirected to the
subwoofer. This will almost always result in
better overall bass performance and a system
that will play louder and cleaner, even when
the front speakers are physically large.
Delay Settings (FRNT D, CNTR D, SURR D)
The next three items set the length of digital
delay for each type of speaker so that the sound
from all speakers arrives at your ear simultaneously. Thus, speakers that are closer to you
need longer delay than speakers that are farther away.
The actual delay times are calculated by the
RSDX-02. All you have to do is measure the
distance from your listening position to each
group of speakers and enter the setting here.
There are separate settings for front speakers,
center channel speaker, and surround speakers.
• For each type of speaker, use the CON-
TROL
the that speaker from your listening position (in feet). The range of options is from
1 ft. to 30 ft. in 1 foot increments.
buttons to enter the distance to
Page 30

RSDX-02 DVD Receiver
30
NOTE
: If you have previously selected NO for
either the center or surround speakers, there
will no corresponding Delay Setting item.
Crossover Frequency Setting (CROSS)
The deep bass intended for any speaker configured as SMALL is redirected to the powered
subwoofer or to LARGE speakers based on
the settings of the digital crossover in the RSDX-
02. This item determines the crossover frequency. Bass below the crossover frequency
is redirected; sounds above the crossover frequency are sent to the original speaker. One
crossover frequency is used for the entire system. Use the CONTROL
one of three crossover frequencies:
• 80Hz: Select this setting for an 80Hz cross-
over frequency.
• 100Hz: Select this setting for an 100Hz
crossover frequency.
• 120Hz: Select this setting for a 120Hz
crossover frequency.
The selection of a crossover point is largely
determined by the capabilities of your speakers.
Lower crossover points may improve blending of the subwoofer to the rest of the system.
Higher crossover points will increase the power
handling of the speakers and the ability of the
system to play loudly without less distortion.
As a starting point, we recommend the 80Hz
crossover if all of your speakers have a woofer
size of 6 inches or larger. Try the 100 Hz
crossover point if your smallest speakers have
5 inch woofers. If any of your speakers have
a woofer of 4 inches or smaller, the 125Hz
crossover will probably be the best choice.
The audible differences in the three crossover
points will be subtle.
NOTE
: If you have previously configured all of
your speakers as LARGE, the crossover frequency item will not appear.
buttons to select
LFE Attenuation Setting (LFE)
Dolby Digital and DTS recordings have a
special Low Frequency Effects channel used
exclusively for low bass and typically reproduced by a subwoofer. When played at its
standard level, this bass channel can place
great demands on a system. This setting gives
you the ability to reduce the level of the LFE
channel if you hear bass distortion. Use the
CONTROL
settings:
• 0dB: The normal setting, reproduces the
LFE channel at its full level.
• –10dB: Reduces the level of the LFE channel
by 10 decibels.
NOTE
: The LFE attenuation setting has no ef-
buttons to select one of two
fect with any input signal other than Dolby
Digital or DTS.
As a general recommendation, start with the
setting at 0dB (the factory default). If you hear
bass distortion during loud passages in Dolby
Digital or DTS soundtracks, try the –10dB
setting. The need for the LFE attenuation will
be more likely in less capable systems or systems without a subwoofer.
Dynamic Range Compression (D.COMP)
Dolby Digital recordings are capable of wide
dynamic range (the difference between the softest and loudest sounds). In some cases, this
may tax amplifiers and/or speakers. In other
cases, you may want to reduce the dynamic
range when listening at low volume levels.
Use the CONTROL
of three dynamic range settings:
• MID: slightly reduced dynamic range,
roughly comparable to the signal from a
compact disc
• MAX: more heavily reduced dynamic
range, but still comparable to the signal
from a typical VHS Hi-Fi recording.
buttons to select one
As a guideline, try the OFF setting for maximum performance with capable speaker systems. If you hear distortion or regularly reduce
the volume because loud action scenes are
too loud, try one of the other settings. By using dynamic range compression, you can
increase the overall volume level to better hear
dialog without the loudest action scenes being quite so loud.
Digital Input Assignment (DGT)
The RSDX--02 has two digital audio inputs on
the back panel. DIGITAL 1 accepts a coax
cable. DIGITAL 2 accepts an optical cable.
These digital inputs can be assigned to any
of three source inputs: the DBS button, the TV
button, or the CDR button to accommodate a
variety of systems and cabling options.
Use the CONTROL
input assignments:
• 1 DBS 2 TV: assigns Digital 1 to the DBS
input and Digital 2 to the TV input.
• 1 DBS 2 CDR: assigns Digital 1 to the
DBS input and Digital 2 to the CDR input.
• 1 TV 2 DBS: assigns Digital 1 to the TV
input and Digital 2 to the DBS input.
• 1 TV 2 CDR: assigns Digital 1 to the TV
input and Digital 2 to the CDR input.
• 1 CDR 2 DBS: assigns Digital 1 to the
CDR input and Digital 2 to the DBS input.
• 1 CDR 2 TV: assigns Digital 1 to the CDR
input and Digital 2 to the TV input.
NOTE
: If you assign a digital connection to
buttons to the digital
the CDR input, you should also change the
input name from TAPE to CDR. See the topic
Changing Input Name.
Automatic Surround Mode (AUTO SR)
The RSDX-02 can automatically activate the
proper surround sound mode for digital inputs.
• OFF: full dynamic range; no compression
NOTE
: The Dynamic Range Compression fea-
ture ONLY affects Dolby Digital signals.
When a Dolby Digital 5.1 soundtrack is received, DD 5.1 decoding is automatically
activated.
When a DTS 5.1 soundtrack is received, DTS
decoding is automatically activated.
Page 31

31
English
When a Dolby Digital 2.0 soundtrack with
matrix encoding is detected, Dolby Pro Logic
II Movie decoding is automatically activated.
When a 2-channel Dolby Digital or DTS source
is detected, Stereo mode is automatically activated.
Use the CONTROL
surround on or off:
• ON: enables auto surround.
• OFF: disables auto surround.
For most convenient operation of the system,
leave this setting in the default ON setting. You
can still temporarily choose a different surround
mode for an input by pressing the SURROUND
ON/OFF button.
NOTE
: The Auto Surround feature does not
have an effect on analog input signals or when
the DGTL DD or DGTL DTS are manually selected as a fixed surround mode for the DVD
player.
buttons to turn auto
Quick Setup
Selecting this item starts the quick setup procedure. See the previous Quick Setup topic
in this manual for details.
Video Output Mode (VOUT)
The video output of the RSDX--02 can be connected to the TV monitor with composite video,
an S-VIDEO, or component video connections.
Use the CONTROL
type of video connection used in your system:
• VIDEO: Select when using composite video
connections to the TV.
• S: Select when using S-Video connections
to the TV.
• COMPNT: Select when using component
video connections to the TV.
buttons to specify the
Sound Adjustments
The Sound Adjustments provide several settings for obtaining the best sound from your
system.
Setup Procedure
The Sound Adjustments procedure uses the front
panel control buttons and the front panel display. In addition, all of the adjustments can
also be made directly from the remote control except the front speaker balance adjustment.
To begin Sound Adjustments:
1. Press the ADJUST button on the front panel.
The first adjustment item appears in the front
panel display.
2. Use the CONTROL
panel to step through the available settings
in the Sound Adjustments procedure, Each
press of a CONTROL
up or down to the next available item as
shown in the front panel display:
BAL: Front speaker balance
BASS: Increase or decrease bass
TREBLE: Increase or decrease treble
SUBWFR: Subwoofer level
CENTER: Center speaker level
SURR L: Left surround speaker level
SURR R: Right surround speaker level
EFFECT: Adjust intensity of DSP effects
AUDIO POS: Reduce subwoofer level for
stereo surround modes
3. Use the CONTROL
panel to adjust the item currently shown
in the front panel display.
The following topics describe the settings for
each item.
Front Speaker Balance (BAL)
The BAL item allows you to adjust the left/right
balance of the front speakers. Use the CONTROL
or right:
buttons to shift the sound to the left
buttons on the front
button advances
buttons on the front
• L (–): Settings indicated by an L followed
by a negative number indicate that the
volume of the left speaker is reduced and
the sound shifted towards the right.
• R (–): Settings indicated by an R followed
by a negative number indicate that the
volume of the right speaker is reduced and
the sound shifted towards the left.
The adjustment range is from –1 to –21.
NOTE
: This setting is memorized independently
for each source input and becomes a permanent setting until it is changed.
Tone Adjustments (BASS and TREBLE)
These two items allow you to adjust the bass
and treble response of the system. Select the
BASS item to increase or decrease the low
frequency output. Select the TREBLE item to
increase or decrease the high frequency output. Use the CONTROL
each item:
• 0: The standard setting with no increase
or decrease.
• (–): Negative numbers indicate a decrease
in bass or treble.
• (+): Positive numbers indicate an increase
in bass or treble.
The adjustment range is from –10 to +10.
From the remote control:
• Press the BASS + or BASS – command on
page 6 of the remote to increase or decrease bass.
• Press the TREBLE + or TREBLE – command
on page 6 of the remote to increase or
decrease treble.
NOTE
: Tone adjustments are memorized inde-
pendently for each source input.
buttons to adjust
• CENTER: The standard setting with the
sound balanced equally between the two
front speakers.
Page 32

RSDX-02 DVD Receiver
32
Speaker Levels
(SUBWFR, CENTER, SURR L,
P5-C P5-D P5-E
SURR R)
These two items allow you to adjust the output levels of the subwoofer, center channel
speaker, left surround speaker, and right surround speaker. Use the CONTROL
tons to increase or decrease the output level
for the selected type of speaker:
• 0: The standard setting with no increase
or decrease relative to the front speakers.
• (+): Positive numbers indicate an increase
in output level.
• (+): Negative numbers indicate an increase
in bass or treble.
The adjustment range is from –10 to +10. In
a perfectly adjusted system, all of the speakers should be matched as closely as possible
in volume output.
NOTE
: Center and Surround speaker settings
can only be made while a multichannel surround mode is active.
From the remote control:
• Press the SUB + or SUB – command on page
5 of the remote to increase or decrease
the output level of the subwoofer.
• Press the CENTER + or CENTER – command
on page 5 of the remote to increase or
decrease the output level of the center
channel speaker.
• Press the SURR R + or SURR R – command
on page 5 of the remote to increase or
decrease the output level of the right surround speaker.
but-
To turn on the test tone, press the TEST
button on Page 5 of the remote. Press the button
again to turn off the test tone.
NOTE
: Speaker level and test tone adjustments
are also available from the Choice Menu system. These level settings are memorized independently for each source input.
DSP Effect LEVEL (EFFECT)
This adjustment changes the intensity of the
reverberation effects when using one of the
DSP surround modes for 2-channel input signals. Use the CONTROL
crease or decrease the intensity of the effect:
The range of settings is from 1 to 5 with 1 being
the least intense effect and 5 being the highest intensity. 3 is the standard setting.
NOTE
one of the DSP surround modes is active. This
setting is memorized independently for each
source input.
P5-F
buttons to in-
: This setting can only be made while
Subwoofer Audio Position (AUDIO POS)
Once the subwoofer level is set for multichannel
movie soundtracks, some listeners feel that the
subwoofer is too loud for stereo music sources.
Generally, this is an indication that the subwoofer level is set too high in the first place.
However, the RSDX-02 provides a feature,
called Audio Position, that will automatically
reduce the subwoofer level whenever the surround mode is set to 2-ch stereo. Use the CONTROL
the Audio Position setting:
P2-H P1-D
buttons to increase or decrease
CHOICE MENU SYSTEM
The Choice Menu system provides a number
of additional setup and configuration options.
The choice menus are available at any time
except when the AM/FM source is selected.
Most of the adjustments in the Choice Menus
are memorized independently for each source
input.
There are five Choice Menus:
1. LANGUAGE: default options for menus,
DVD subtitles, etc.
2. PICTURE: video options
3. AUDIO: audio options
4. SPK. SETTING: speaker configuration
options
5. OTHERS: miscellaneous settings
Using the Choice Menus
P1-E P1-D
The following procedure can only be done from
the remote control.
1. Select the source input you wish to adjust.
2. Press the CHOICE button on Page 1 of the
remote. The LANGUAGE Choice Menu
appears on the TV.
• Press the SURR L + or SURR L – command
on page 5 of the remote to increase or
decrease the output level of the left surround
speaker.
Test Tone
To make adjustments more accurate, the
RSDX-02 has a built-in pink noise test tone. Playing this calibrated test tone through each
speaker while making the adjustments to match
the speaker levels as closely as possible. Alternatively, you can use an SPL meter, held in
one place at the listening position to measure
the output of each speaker while playing the
test tones.
The range of settings is from 0dB to –6dB. A
setting of 0 is the normal setting, with the subwoofer at the same level for all surround modes.
A setting of –6 reduces the level of subwoofer
by 6dB in stereo surround mode.
NOTE
: This setting can only be made while
one of the DSP surround modes is active.
3. Press the CURSOR buttons in the
remote control to select the desired Choice
menu. Each button press changes to the
next menu. In this example, the PICTURE
menu is displayed.
Page 33

33
English
4. Press the CURSOR buttons to select
the item you wish to adjust on the menu
with the moving arrow. In this example, the
PICTURE SOURCE item is selected.
5. Press the OK button and a pop-up window appears with the available settings
for the item.
6. Press the CURSOR buttons to select
the desired setting from the pop-up window.
In this example, the FILM setting is highlighted.
7. Press the OK button to confirm the new
setting.
8. Repeat steps 3 through 7 to make additional settings or press the CHOICE button again to exit the menu system and return
to normal operation.
The following sections describe the settings on
each of the Choice Menus.
Language Menu
There are four items on the Language Menu
which determine default languages for DVDs
and on-screen menus.
Menu Language
Select a language as the preferred language
for DVD menus when it is available on the disc.
Audio Language
Select a language as the default audio language for DVD soundtracks when it is available on the disc. You can still select a different language when playing a specific disc.
Subtitle
Select a language as the default subtitle language for DVDs when it is available on the
disc. You can also select OFF so that DVDs
are played without subtitles as the default. You
can still select a different language when playing a specific disc.
On Screen Language
Select the language displayed in the Choice
Menus and other on-screen status screens
displayed by the RSDX-02.
Picture Menu
There are four items on the Picture Menu which
set various video options for DVD playback.
Monitor Type
There are two types of TVs: standard 4:3 aspect
ratio and new wide-screen 16:9 aspect ratio
monitors. Use this preference item to configure the video output to match the aspect ratio
of your TV.
With a standard aspect ratio TV, you also need
to tell the RSDX-02 how to adjust wide-screen
video images to fit.
16:9 NORMAL (Wide Screen Stretch)
Select this option for a wide-screen TV that always displays a wide-screen image regardless of the aspect ratio of the incoming video
signal. The RSDX-02 automatically adjusts the
aspect ratio to match the wide-screen TV. If
you play a normal 4:3 aspect program in this
mode, the RSDX-02 stretches the picture to fill
the wide-screen.
16:9 AUTO (Wide Screen)
Select this option for a wide-screen TV that automatically senses and adjusts the aspect ratio. All stretch modes are handled by the TV.
4:3 aspect ratio programs may be displayed
with black bars on the sides, depending on
the setting of the TV’s stretch mode.
Page 34

RSDX-02 DVD Receiver
34
4:3 LB (Letter Box)
Select this option for a standard aspect ratio
TV. 4:3 aspect ratio programs fill the screen.
Wide-screen video images are displayed fullwidth with black letterbox masks inserted top
and bottom.
4:3 PS (Pan/Scan)
Select this option for a standard aspect ratio
TV. 4:3 aspect ratio programs fill the screen.
Wide-screen video images enlarged to fill the
screen vertically, cutting off portions of the left
and right sides.
Picture Source
This setting optimizes the Progressive Scan deinterlacing/line doubling for film or video source
material. It has no effect unless the RSDX-02’s
Progressive Scan feature is activated.
VIDEO (Normal): Optimized for video
source material without rapid motion. It uses
“weave” de-interlacing that preserves as much
detail as possible at the expense of jagged
lines during fast motion.
VIDEO (Action): Optimized for video source
material with rapid motion. It uses a “bob”
line doubling that reduces jagged lines during fast motion at the expense of fine detail.
FILM: Activates reverse 3:2 pulldown de-interlacing and is optimized for film source images. It should only be used to force the progressive scanning into film mode.
AUTO: Automatically recognizes film or video
source material and uses the best possible deinterlacing. This is the default mode and provides the best overall performance for the widest
range of DVD material.
Screen Saver
TV Monitors can be easily damaged if a static
image is displayed for a long time. The Screen
Saver feature automatically darkens the screen
when a still image (such as a DVD menu) is
displayed for five minutes.
ON: Activates the automatic screen saver
function.
OFF: Disables the screen saver function.
MP3/JPEG
Some discs contain both MP3 audio and JPEG
images. This setting determines which of the
two is played.
MP3: Select this option to play MP3 files.
JPEG: Select this option to play JPEG files.
Audio Menu
There are five items on the Audio Menu to tailor
the audio performance of the system. These
adjustments can also be made from the front
panel and/or remote control as described in
the Comprehensive Setup and Sound Settings
sections of the manual.
L/R Balance
The BAL item allows you to adjust the left/right
balance of the front speakers with a range of
L –21 to Center and Center to R –21.
• CENTER: The standard setting with the
sound balanced equally between the two
front speakers.
• L (–): Settings indicated by an L followed
by a negative number indicate that the
volume of the left speaker is reduced and
the sound shifted towards the right.
• R (–): Settings indicated by an R followed
by a negative number indicate that the
volume of the right speaker is reduced and
the sound shifted towards the left.
Bass
Adjust the low frequency response of the system over a range of –10 to +10. A setting of
0 is flat response with no cut or boost.
Treble
Adjust the high frequency response of the system
over a range of –10 to +10. A setting of 0 is
flat response with no cut or boost.
LFE Attenuation
This setting provides an option to reduce the
level of the Dolby Digital and DTS Low Frequency Effects (LFE) channel from its normal
setting if you hear bass distortion.
• 0dB: The normal setting, reproduces the
LFE channel at its full level.
• –10dB: Reduces the level of the LFE channel
by 10 decibels.
NOTE
: The LFE attenuation setting has no ef-
fect with any input signal other than Dolby
Digital or DTS.
Dynamic Range Compression
Dolby Digital recordings are capable of wide
dynamic range (the difference between the softest and loudest sounds). In some cases, this
may tax amplifiers and/or speakers. In other
cases, you may want to reduce the dynamic
range when listening at low volume levels.
• MID: slightly reduced dynamic range,
roughly comparable to the signal from a
compact disc
• MAX: more heavily reduced dynamic
range, but still comparable to the signal
from a typical VHS Hi-Fi recording.
• OFF: full dynamic range; no compression
NOTE
: The Dynamic Range Compression fea-
ture ONLY affects Dolby Digital signals.
Page 35

35
English
Speaker Setting Menu
There are four items on the Speaker Setup Menu
to configure the RSDX-02 for proper operation with your system. These adjustments can
also be made from the front panel and/or
remote control as described in the Sound Settings section of the manual.
Size
Select this item for a sub-menu that configures
how many and what size speakers are in your
system.
FRONT SPEAKER
CENTER SPEAKER
SURROUND SPEAKER
For each type of speaker, choose one of three
options:
• LARGE: Select if the speaker(s) for this item
are capable of reproducing deep bass.
• SMALL: Select to redirect the deep bass
from the speaker(s) for this item to a powered subwoofer or to large speakers in the
system.
• NONE: Select if you do not have speaker(s)
for this item in the system. For example, if
you do not have surround speakers, select
NONE for the SURROUND SPEAKER item.
NOTE
: The NONE option is not available for
the front speakers. If you have selected NONE
for the subwoofer, the front speakers are automatically set to LARGE.
SUBWOOFER
Select one of two settings:
• USE: Select this setting if you have con-
nected a powered subwoofer.
• NONE: Select this setting if your system
does not have a powered subwoofer.
RETURN
When the adjustments are complete, select
RETURN to leave the sub-menu and return to
the Speaker Settings Menu.
NOTE
: In the vast majority of systems with a
powered subwoofer, all speakers should be
set to SMALL so that their deep bass is redirected to the subwoofer. This will usually result in better overall bass performance and a
system that will play louder and cleaner, even
when the front speakers are physically large.
Level
Select this item for a sub-menu that allows
matching the output level of all of the speakers in the system for proper surround sound
performance.
CENTER SPEAKER
SURROUND LEFT SPEAKER
SURROUND RIGHT SPEAKER
SUB WOOFER
Adjust each of these items to match the volume from that speaker as closely as possible
to the other speakers.
TEST TONE
Select this item to turn on or off a special pink
noise test tone that makes adjusting the levels
easier and more accurate.
RETURN
When the adjustments are complete, select
RETURN to leave the sub-menu and return to
the Speaker Settings Menu.
NOTE
: When NONE has been selected for a
type of speaker, the adjustment cannot be
made and the test tone will not be played by
that speaker. Level settings for Center and
Surround Speakers can only be made when
a multichannel surround sound mode is active.
Distance
Select this item for a sub-menu to set the digital delay for each speaker in the system so
that sounds arrive at your ear from all speakers simultaneously. The settings are made by
selecting the distance (in meters or feet) from
your listening location to each of your speakers. The RSDX-02 then calculates delay times
automatically.
FRONT SPEAKER
CENTER SPEAKER
SURROUND SPEAKER
Select the distance from each of these speakers to your listening position. The range is from
0.3m/1ft to 9.0m/30ft.
TEST TONE
Select this item to turn on or off the test tone.
RETURN
When the adjustments are complete, select
RETURN to leave the sub-menu and return to
the Speaker Settings Menu.
NOTE
: When NONE has been selected for a
type of speaker, the adjustment cannot be
made and the test tone will not be played by
that speaker.
Crossover
The deep bass intended for any speaker configured as SMALL is redirected to the powered
subwoofer or to LARGE speakers based on
the settings of the digital crossover in the RSDX-
02. This item selects the crossover frequency.
Bass below the crossover frequency is redirected; sounds above the crossover frequency
are sent to the original speaker. Select one of
three crossover frequencies:
• 80Hz: Select for an 80Hz crossover.
Recommended when all of the speakers
have woofer sizes of 6 inches or larger.
• 100Hz: Select for an 100Hz crossover.
Recommended when the smallest speakers have woofer sizes of 5 inches.
• 120Hz: Select for a 120Hz crossover.
Recommended when the smallest speakers have woofer sizes of 4 inches or smaller.
NOTE
: If you have previously configured all of
your speakers as LARGE, the crossover frequency item will not appear.
Return to Initial
Select this item to reset all speaker settings to
the factory defaults.
Page 36

RSDX-02 DVD Receiver
36
Others Menu
There are miscellaneous convenience items and
extra features on the Other Menu
Resume
The Resume feature stores the current location
when DVD playback is stopped; allowing
playback to be resumed from that point.
• ON: Select to enable the Resume feature.
• OFF: Select to disable the Resume feature.
Playback will always resume at the beginning of the disc.
On-Screen Guide
The built-in DVD player can display icons and
status indicators for several features on the TV
set. These icons alert you to the availability
of multi-view angles, multilingual subtitles, and
multilingual soundtracks on a DVD. Status
indicators show the play mode, rapid play
speed, etc. Generally, these icons are useful;
however, you may wish to turn them off when
recording a DVD. The ability to display the
On-Screen Status Bar at any time is not affected
by this selection.
Auto Standby
The RSDX-02 can automatically turn off when
DVD playback has finished and no additional
commands are received for a specified time.
This prevents a DVD from returning to a static
menu screen if it is left unattended. This feature is only available when the DVD source
input is active. There are three settings:
• 60: Auto Standby turns off the unit after
60 minutes of inactivity.
• 30: Auto Standby turns off the unit after
40 minutes of inactivity.
• OFF: Disables the Auto Standby feature.
NOTE
: If Auto Standby and the Sleep timer
are both set, the unit turns off at the earlier of
the two intervals.
Parental Lock
The RSDX-02 has a Parental Lock feature to
prevent children from watching inappropriate
DVD Video discs. The feature relies on ratings
systems (specific to each country) that set a
rating level for discs starting from material
suitable for viewing by children and increasing as the subject matter becomes more inappropriate. The Parental Lock feature sets the
restriction anywhere from Level 1 to Level 8.
A disc with a rating higher than the specified
level requires entry of a password for playback. Thus, if you specify a Level 5 restriction,
any discs rated Level 6 or higher require a
password.
Setting the Parental Lock
1. With playback stopped, select the PARENTAL LOCK item on the Others Menu. The
Parental Lock sub-menu appears.
2. Select the COUNTRY CODE field on submenu and press the OK button. A pop-up
window appears with the list of country
codes (see Figure 10 at the front of this
manual for a list of codes).
3. Press the CURSOR buttons to scroll
though the list of country codes and highlight a selection.
4 Press OK. The highlight cursor moves to
the SET LEVEL field.
• ON: Select to enable the Guide feature.
• OFF: Select to disable the Guide feature.
5. Press the CURSOR buttons to scroll
though the list of setting levels and make
a selection. The available options are:
NONE: no restriction
LEVEL 1: the most restrictive
LEVELS 2–7: progressively less restrictive
LEVEL 8: the least restrictive
Page 37

37
English
6. Press OK. The highlight cursor moves to
the PASSWORD field.
7. Enter a 4-digit password using the NUMERIC (0–9) buttons on the remote. If you
make a mistake, you can reenter a different password. Write down your password
for safe keeping!
8. Press OK. The highlight cursor moves to
the EXIT field. Press ENTER again to exit
the Parental Lock screen and return to the
Others Menu.
To Change Parental Lock Settings
Changing the Parental Lock settings follows
the same procedure, except that you must first
enter your 4-digit password before making any
changes on the Parental Lock sub-menu.
If you enter the wrong password, you cannot proceed. If you enter it wrong more than
three times, the cursor jumps to EXIT field.
NOTE
: If you forget your password, enter the
master password “8888”.
Playback with Parental Lock
P1-D
When you play a disc that has a rating less
than or equal to your specified Level, playback
proceeds normally. If you attempt to play a
disc that is rated above your specified Level,
the following display appears on the TV screen
asking if you want to temporarily override the
Parental Lock and play the disc:
1. To eject the disc, use the CURSOR
buttons on Page 1 of the remote to highlight the NOT RELEASE field, then press
the OK button. Eject the disc.
2. To play the disc, use the CURSOR
buttons to highlight the TEMPORARY RELEASE field, then press the OK button.
3. Enter the 4-digit password using the NUMERIC buttons on Page 4 of the remote.
If you enter the wrong password three times,
playback is prohibited. If you enter the correct password, the parental lock is temporarily removed and playback begins.
Page 38

RSDX-02 DVD Receiver
38
Specifications
Amplifier
Output Power, Stereo Operation:
80 W per ch, min. RMS, 8 ohms, 40 Hz – 20 kHz
with no more than 0.8% total harmonic distortion.
Output Power, Surround operation:
80 W per ch, min. RMS, 8 ohms at 1 kHz, with no
more than 0.8% total harmonic distortion.
Audio
Audio Input Sensitivity/Impedance (1 kHz):
TV, TAPE/CDR, DBS, VCR: 240 mV/47 kOhm
Audio Input (DIGITAL IN):
Coaxial: 0.5 V(p-p)/75 ohms
Optical: –21 dBm to –15 dBm (660 nm ±30 nm)
Digital formats:
Linear PCM, Dolby Digital, and DTS (with sampling
frequency–32 kHz, 44.1 kHz, 48 kHz)
Signal-to-Noise Ratio (’66 IHF/’78 IHF):
TV, TAPE/CDR, DBS, VCR: 87 dB/67 dB
Frequency Response:
TV, TAPE/CDR, DBS, VCR: 20 Hz to 20 kHz (±1 dB)
Tone Control:
Bass (100 Hz): ±10 dB
Treble (10 kHz): ±10 dB
General
Power Requirements:
AC 120 V , 60 Hz
Power Consumption:
200 W
2 W (in standby mode)
Dimensions (W x H x D):
435 mm x 118 mm x 415 mm
(17
3/16 in. x 4 5/8 in. x 16 3/8 in.)
Weight:
9.6 kg (21.2 lbs)
All specifications are accurate at the time of
printing.
Rotel reserves the right to make improvements
without notice.
Rotel and the Rotel HiFi logo are registered
trademarks of The Rotel Co, Ltd., Tokyo, Japan.
Video
Video Input Sensitivity/Impedance (1 kHz):
Composite video: 1 V(p-p)/75 ohm
S-Video: (Y:luminance): 1 V(p-p)/75 ohm
S-Video: (C:chrominance): 0.286 V(p-p)/75 ohm
Video Output Level/Impedance (1 kHz):
Composite video:1 V(p-p)/75 ohm
S-video (Y:luminance): 1 V(p-p)/75 ohm
S-video (C:chrominance): 0.286 V(p-p)/75 ohm
Component video (Y): 1.0 V(p-p)/75 ohm
Component video (P
Color System:
NTSC or PAL
Horizontal Resolution:
500 lines or more
Signal-to-Noise Ratio (S/N):
63 dB
Synchronize:
Negative
B/PR): 0.7 V(p-p)/75 ohm
FM tuner (IHF)
Tuning Range:
87.5 MHz to 108.0 MHz
AM tuner
Tuning Range:
530 kHz to 1 710 kHz
Page 39

The Rotel Co. Ltd.
10-10 Shinsen-Cho
Shibuya-Ku
Tokyo 150-0045
Phone: +81 3-5458-5325
Fax: +81 3-5458-5310
North Reading, MA 01864-2699
Phone: +1 978-664-3820
Fax: +1 978-664-4109
Worthing, West Sussex BN11 2BH
Phone: +44 (0)1903 221600
Fax: +44 (0)1903 221525
Phone: +49 05201-87170
Fax: +49 05201-73370
Japan
Rotel of America
54 Concord Street
USA
Rotel Europe
Dale Road
England
Rotel Deutschland
Kleine Heide 12
D-33790 Halle/Westf.
Germany
www.rotel.com
082 OM-RSDX-02 110603 English
 Loading...