

Page 1
Owner’s manual 6
Manuel de l’utilisateur 19
Bedienungsanleitung 34
Manuale di istruzioni 48
Manual de instrucciones 62
Gebruiksaanwijzing 78
CD
POWER
PAGE
OFF
TV
ENTER/SELECT
TUNER
AV1
AV1
AV2
VCR SAT CD DVD AV1 AV2 AV3
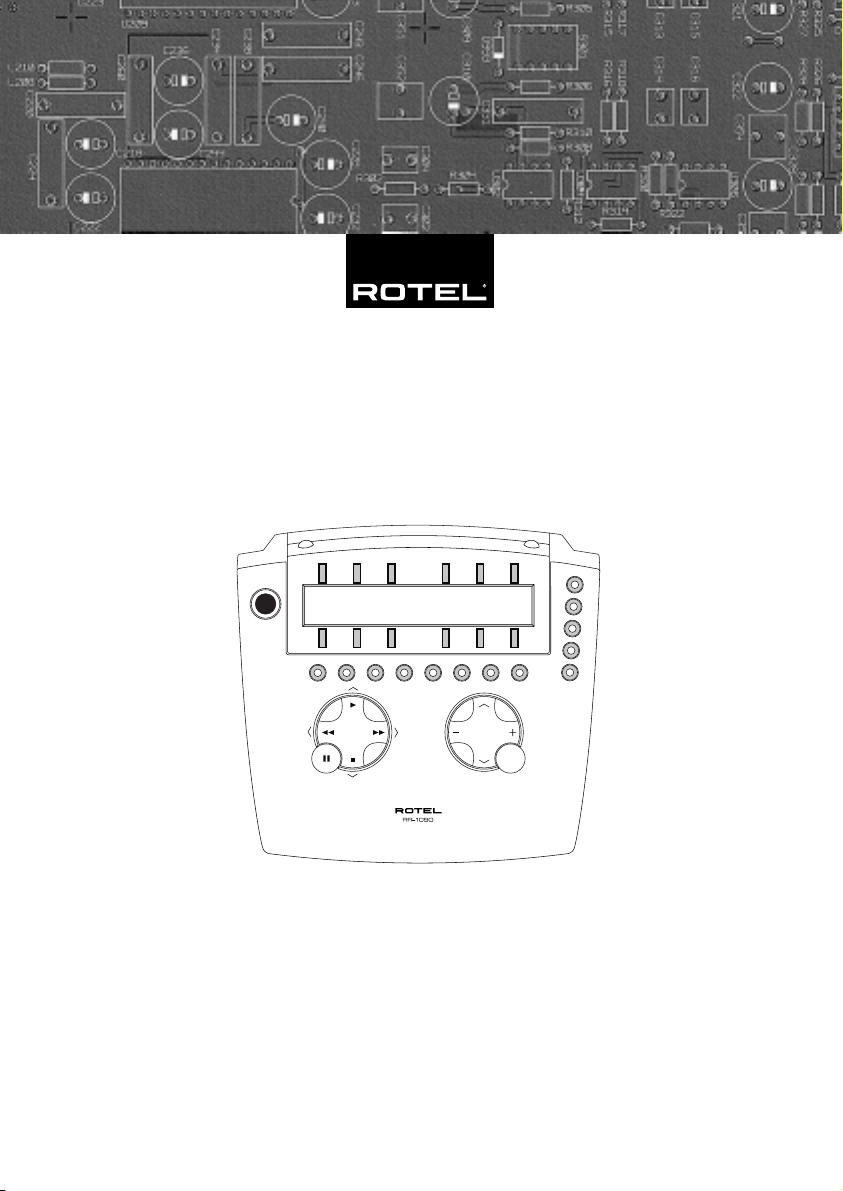
RR-1090
Universal Remote Control
Télécommande Universelle
Universalfernbedienung
Comando a Distanza Universale
Mando a Distancia Universal
Universele Afstandsbediening
PHONO
AV3
TAPE1
AV4
TAPE2
AV5
CH
VOL
MUTE
MENU
M1
M2
M3
M4
Page 2
2 RR-1090
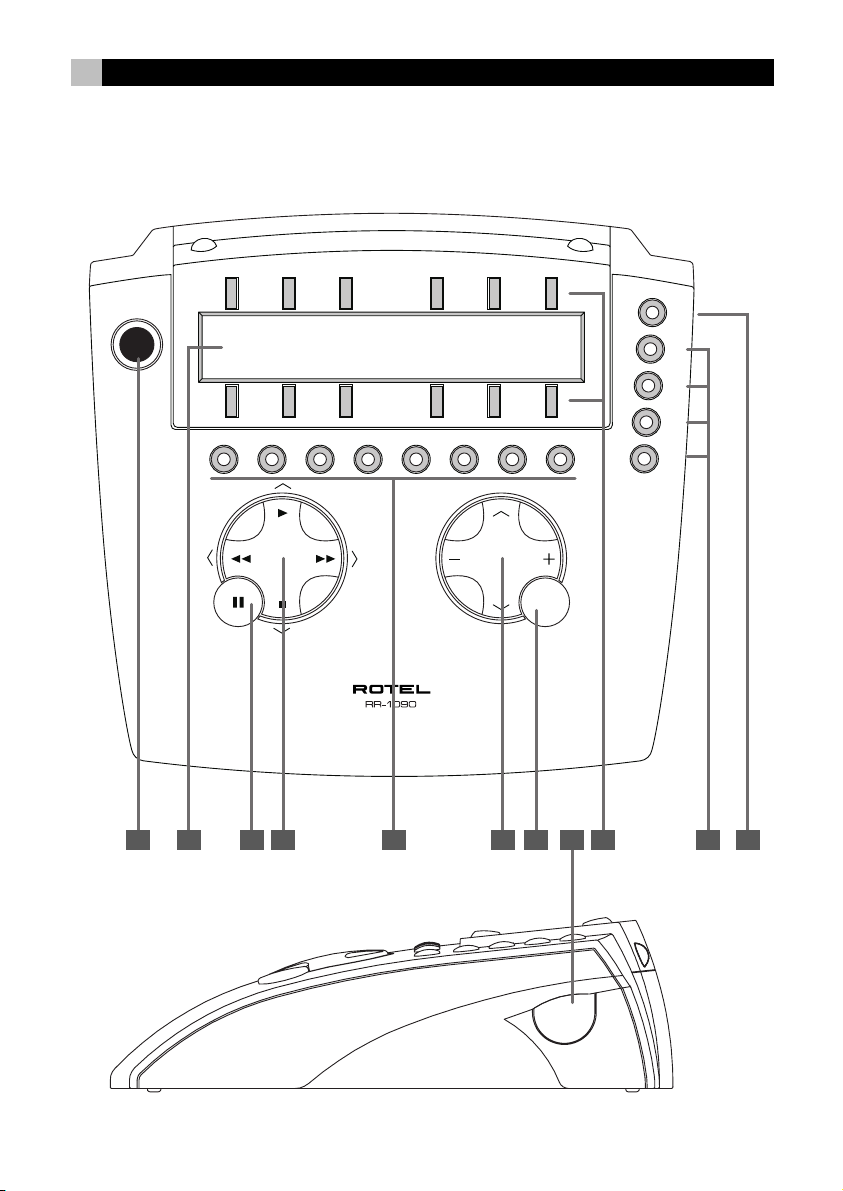
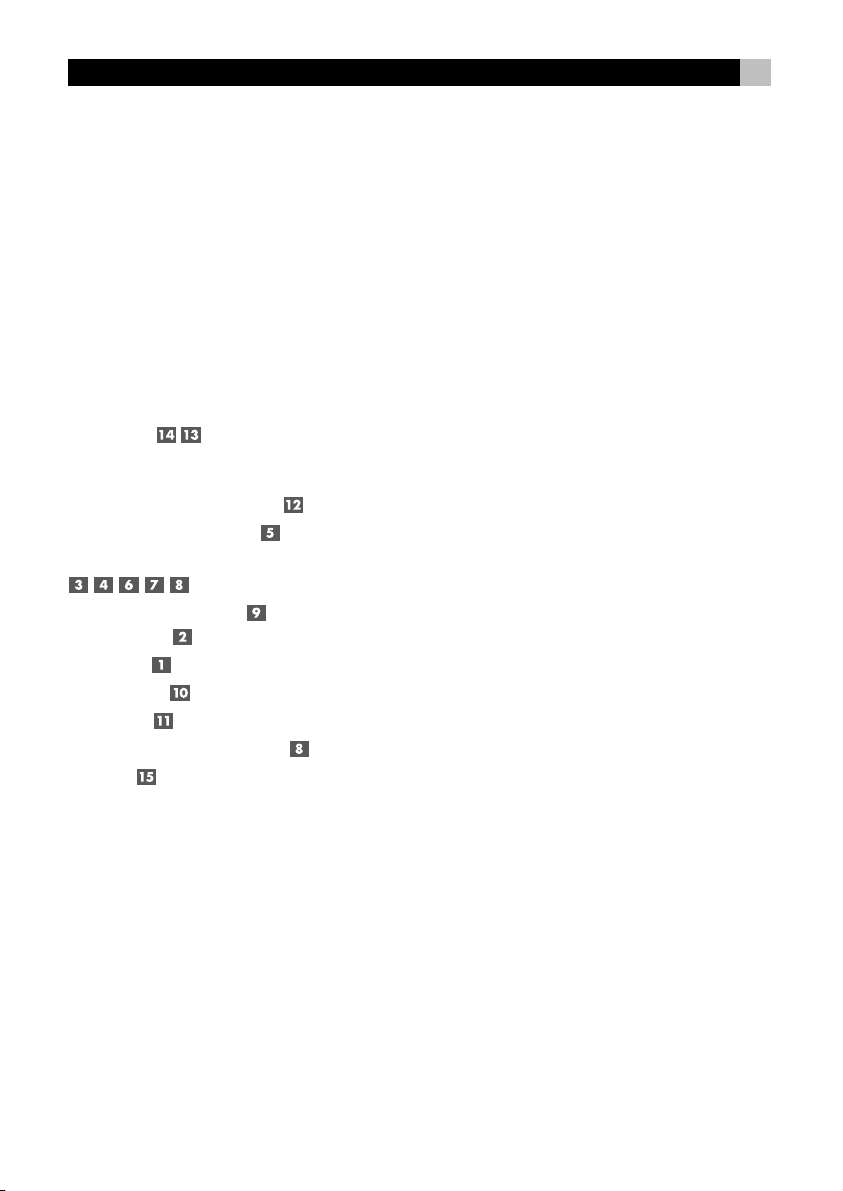
1. Layout • Vue générale • Aufbau • Disposizione
Distribución de los Botones • De Indeling
MENU
M1
M2
M3
M4
PAGE
POWER
OFF
TV
ENTER/SELECT
CD
TUNER
AV2
AV1
AV1
VCR SAT CD DVD AV1 AV2 AV3
PHONO
AV3
TAPE1
AV4
CH
TAPE2
AV5
VOL
MUTE
1 2 3 4 5 86 7 9 10 11
POWER
Page 3
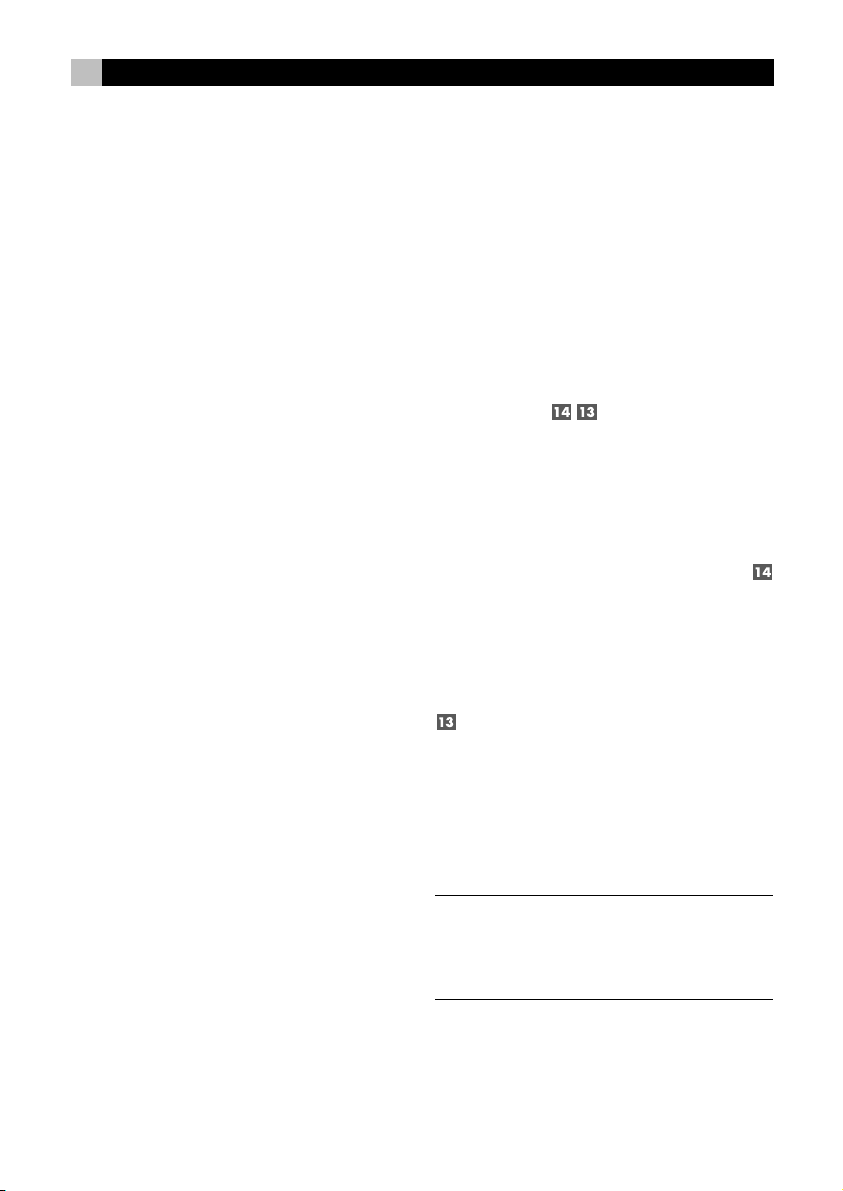
3
12 13 1514
Page 4
4 RR-1090
2. Learning
Apprentissage
Lernvorgang
Apprendimento
Proceso de Aprendizaje
Het leerproces
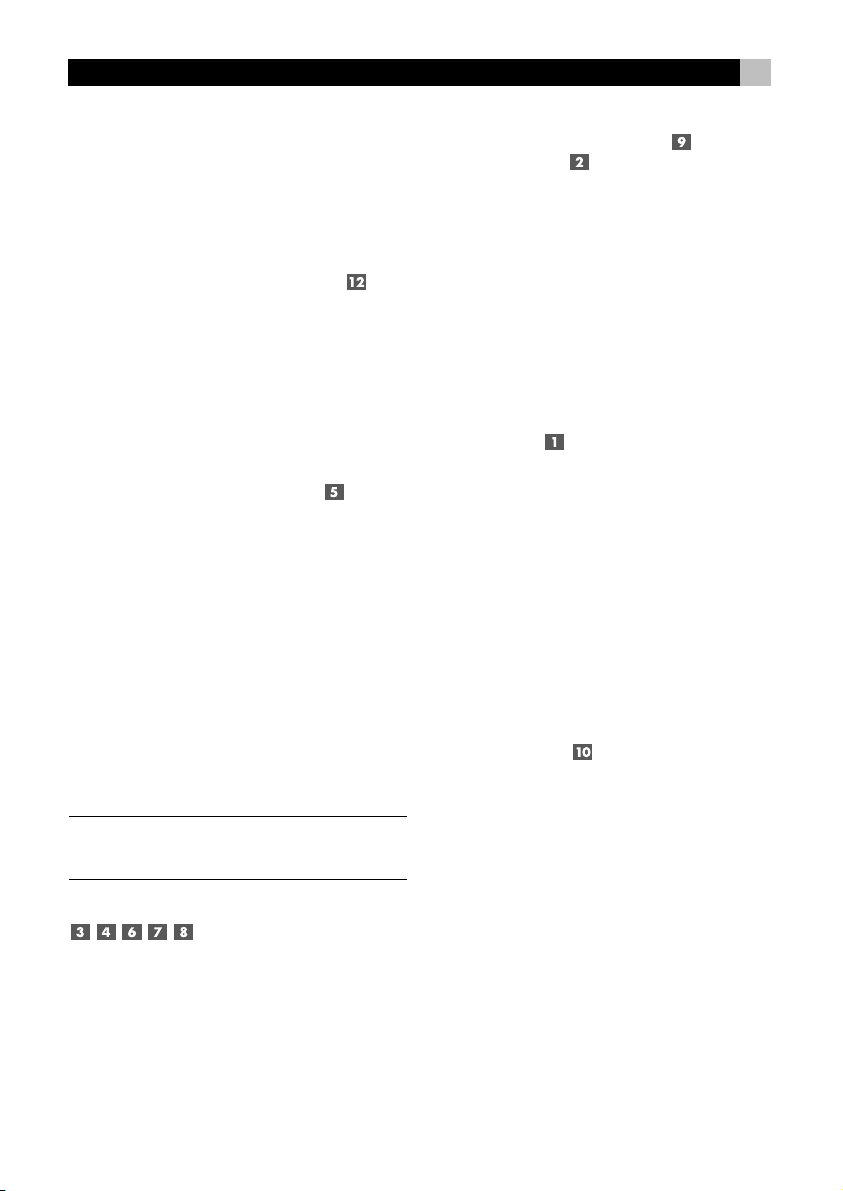
3. Sample Device Pages
Exemples d’affichages pour une source
Beispiel für die zu einem Gerät
gehörenden Befehlsseiten
Pagine Device Campione
Ejemplo de Páginas de Dispositivo
Apparaat voorbeeld pagina
CD
POWER
OFF
TUNER
AV1
AV1
AV2
172
0
6
8
AV1
PAGE
PAGE
PHONO
AV3
3
9
TAPE1
AV4
4
+105BAND
TAPE2
AV5
POWER
PAGE
OFF
TV
ENTER/SELECT
CD
TUNER
AV1
VCR SAT CD DVD AV1 AV2 AV3
TAPE1
TAPE2
PHONO
AV1
AV2
AV4
AV3
CH
VOL
MUTE
CENTR
MENU
MENU
M1
AV5
M2
M3
M4
BACK
PTY
SUBWF
ENTER
DSPLY
TA
AV1
FORWD
TP
PRSET
AV1
FILTR
PAGE
REAR
SHIFT
PSCAN
FRQDT
SUR+
ZONEUPDOWN
AUTUNONEXTIN
DIGIN
Page 5
4. PC-Link Software
Logiciel de programmation par PC
PC-Link Software
Software PC-Link
Software para la Conexión a un Ordenador Personal
Software voor verbinding met uw pc
5
Page 6
6 RR-1090
Contents
1. Layout 2
2. Learning 4
3. Sample Device Pages 4
4. PC-Link Software 5
Introduction .............................................. 7
Key Features 7
Sensible Precautions 7
Battery Installation
and Recharging 7
Getting Started ......................................... 7
IR Emitter/Sensor 7
Device Buttons 8
Basic Command Buttons 8
Menu Command Keys
and LCD Display 8
PAGE Button 8
MACRO Buttons 8
Menu Button 8
Power Button 8
Serial Connector 8
Learning Commands 11
Macro Programming 11
Custom Device Page 12
Deleting Stored Commands 12
Volume Punch-through 13
RESET Function 13
DUPLICATE Function 13
Custom Labels ......................................... 14
Edit a DEVICE Name 14
Edit a COMMAND Name 14
Move a COMMAND Name 14
Auto-arrange COMMAND Names 15
Other Configuration Options .................... 15
Backlighting 15
Beep Sound 15
Password 15
PC-Link Software .................................... 16
Installing PC-LINK Software 16
Loading and Saving Configuration Files 16
Uploading and Downloading Configuration Files 17
Modifying Configuration Files 17
Operating the RR-1090 ............................. 9
Activating the RR-1090 9
Sending IR Commands 9
Sending Macro Commands 9
Programming Command Codes ................... 9
4-Digit Code Programming 10
Search Code by Brand Name 10
Auto-Search Programming 10
4-Digit Codes .......................................... 92
A/V 92
TV 92
VCR 93
CD 93
DVD 94
LD 94
SAT/DSS 95
Page 7
English
7
Introduction
Thank you for purchasing the RR-1090 Universal
Remote Control. The RR-1090 can replace up to eight
infrared remote controls, operating audio or video
components from Rotel and other manufacturers. The
RR-1090 includes command sets for hundreds of audio/video components plus it can learn additional
commands from your existing remotes. Operation
of the RR-1090 is simple and intuitive using just a
few buttons and a large LCD menu display.
Key Features
• Simple programming using built-in command sets
for hundreds of components
• Pre-programmed to operate Rotel components.
• Teach the RR-1090 additional commands from
other remotes.
• LCD display provides simple menu-driven operation with customizable labels for every command.
• Backlighting for ease of use in dark rooms along
with optional beep whenever a button is pressed.
• Four MACRO keys send a sequence of up to 10
commands with the press of a button.
• Includes rechargeable batteries and charger.
• Serial cable and software for programming
RR-1090 from any Windows® 95/98 computer.
Sensible Precautions
• The RR-1090 is rugged, but it is not indestructible. So please don’t drop it!
• Do not expose the RR-1090 to moisture. To clean
the RR-1090, use a soft, lint-free damp cloth. Avoid
harsh cleaning solvents.
• Don’t try to take the RR-1090 apart. Disassembly will void the warranty.
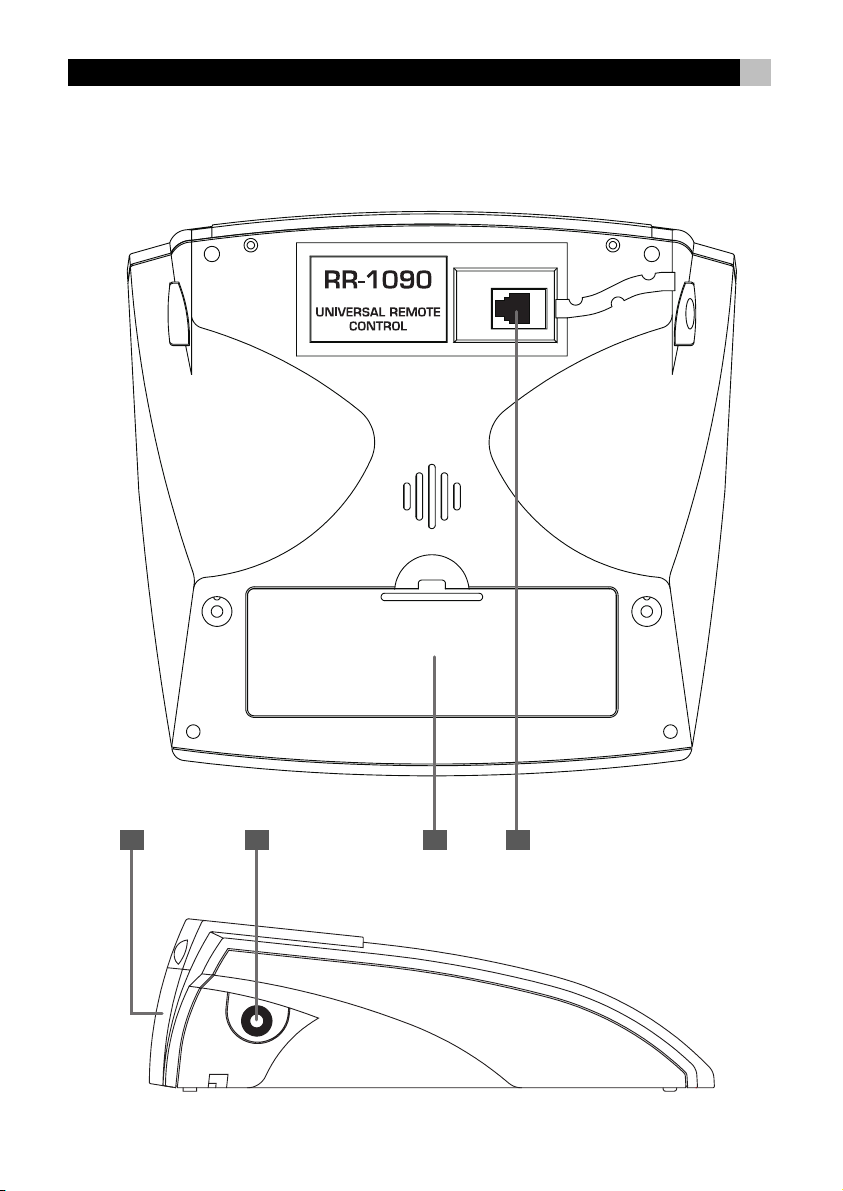
Battery Installation
and Recharging
The RR-1090 includes 4 AA rechargeable nickel hydride batteries and a 9V DC adaptor/recharger.
When the batteries are weak and need to be recharged, a “LOW BATTERY” indicator appears in
the display.
To install the batteries, turn the RR-1090 over
and lift the cover off the battery compartment
by pressing the release tab and lifting up. Place the
four AA batteries inside (follow the polarity illustrations on the bottom of the compartment) and replace
the cover.
To recharge batteries, insert the adaptor cable
into the connector on the left side of the RR-1090
. Plug the power adaptor/recharger into an AC
wall outlet (USA: 120V/60Hz or Europe: 230V/
50Hz). A “CHARGING” indicator appears in the
display while the adaptor is plugged in.
Leave charger operating overnight for a full charge.
The remote can be operated with the charger plugged
in while the batteries are charging.
NOTE
: You can use conventional alkaline AA batter-
ies instead of the rechargeable batteries shipped
with the RR-1090; however, do not use the power
adaptor/charger with alkaline batteries.
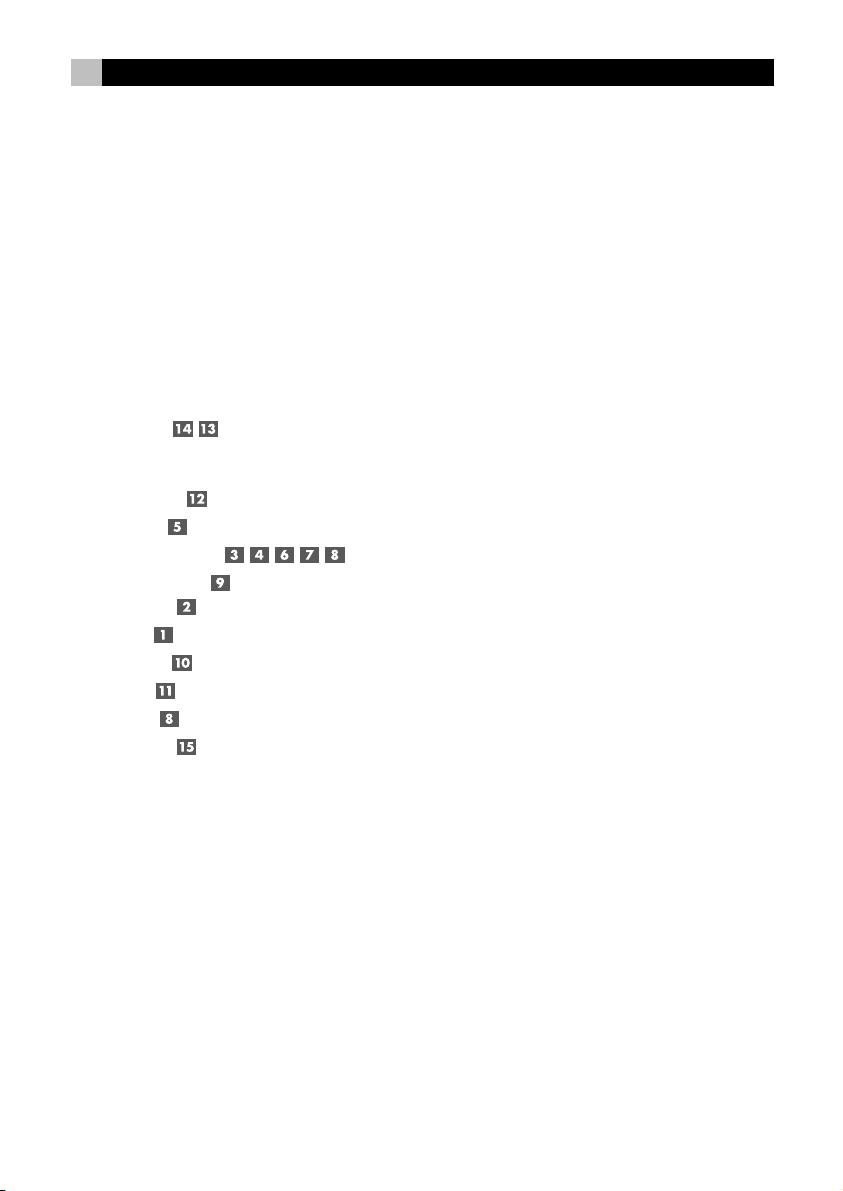
Getting Started
See Figure 1
Please review the following controls and features of
the RR-1090:
IR Emitter/Sensor
The IR Emitter/Sensor is located in the top edge of
the RR-1090. It sends the IR commands and must
be pointed at the desired component. It also receives
IR codes from your other remotes during the LEARNING process or when duplicating the configuration
settings from one RR-1090 to another.
Page 8

8 RR-1090
Device Buttons
Eight round buttons on the RR-1090 select which
command set is active and which component will
be controlled. For example, press the AV1 button
and the RR-1090 becomes the remote control for your
Rotel Surround Sound Processor. Press the TV button and the RR-1090 becomes the remote control
for your TV set.
To operate the RR-1090, first press the DEVICE key
for the desired component. Then, press basic or menu
COMMAND buttons to send the infrared commands
for that component.
NOTE
: The AV1, AV2, and AV3 DEVICE keys can be
used for any type of component.
Basic Command Buttons
The POWER button on the right side of the remote
plus two large round 4-way buttons and two smaller
round buttons in the center of the RR-1090 duplicate
the primary functions for your components – power,
volume, channel up/down, play, fast forward, pause,
etc. The commands for each button vary, depending on the selected DEVICE button.
Menu Command Keys
and LCD Display
At the top of the RR-1090 is a group of 12 rectangular buttons surrounding an LCD display. These
MENU COMMAND keys provide additional functions shown by menu labels appearing in the display adjacent to each button.
The function of these buttons varies depending on
the type of component selected by the DEVICE buttons and the menu page displayed.
MACRO Buttons
Four buttons labeled M1, M2, M3, and M4 provide
a special macro function – sending a sequence of
up to 10 commands. For example, a macro sequence
could turn on the TV set, select channel 5, turn on
the surround processor, and select the TV input.
Two of the MACRO buttons (M3 and M4) are also
used in customizing the RR-1090.
Menu Button
This button activates and selects between a series
of menu screens in the LCD display used for customizing the RR-1090. The MENU button is not used
during normal operation.
Power Button
In addition to serving as a basic command button,
the POWER button is also used during the SETUP
procedure when searching the database of IR command codes.
Serial Connector
This 4-pin modular connector on the back of the
RR-1090 can be used to connect the remote to a
standard DB-9 serial connector on a PC using the
supplied cable.
Using PC-LINK software supplied with the unit, codes
and commands can be uploaded and/or downloaded from a Windows® 95/98 computer to the
RR-1090 remote. This allows easy transfer of one
remote’s programming to other RR-1090 remotes as
well as simplified customization. See the section on
PC-LINK software in this manual.
PAGE Button
Each component selected by a DEVICE button can
have up to 48 menu commands. These commands
appear in the LCD display in groups (or pages) of
twelve. Press the PAGE button to advance to the next
page of commands, with new labels appearing in
the LCD display. Each press of the PAGE button jumps
to the next group for that component, eventually cycling back to the original page.
Page 9
English
9
Operating the RR-1090
This section of the manual explains the basic operation
of the RR-1090 and most of its standard features.
NOTE
: The RR-1090 is pre-programmed with the
codes for Rotel surround sound processors stored
under the AV1 device button. Rotel CD and DVD
codes are stored under the CD and DVD buttons.
Activating the RR-1090
To conserve battery power, the RR-1090 goes into
“sleep” mode following 60 seconds of inactivity. Press
any button to activate the remote. Labels appear in
the LCD display when the remote is active
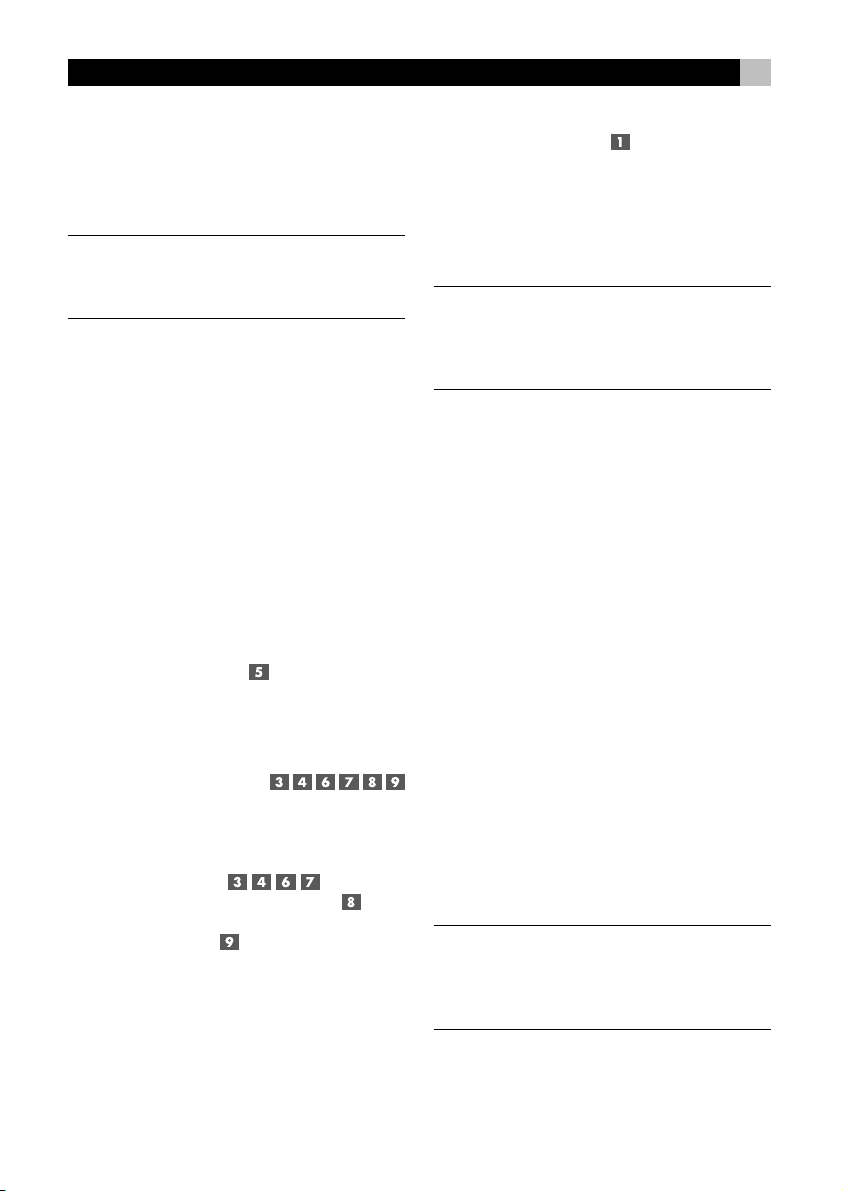
Sending IR Commands
Instead of using multiple remotes to operate your
system, you simply press a button on the RR-1090
to make it the remote control for your CD player or
the remote control for your TV set and send commands to operate the desired component. Here’s how:
1. Press any button on the RR-1090 to activate the
remote (if necessary).
2. Press a DEVICE button to activate the command set for the desired component. For example,
press the AV1 button for a Rotel surround processor. The label for your selected device appears
in the center of the display.
3. Press a COMMAND button
to send an IR command to the component you
have selected. For example, press the VOL+ command to increase the volume on a Rotel surround
processor. Basic commands are available on the
large round buttons in the center
of the remote and the POWER button . Additional commands are available on the 12 MENU
COMMAND keys at the top of the remote,
corresponding to the command labels visible in
the LCD display. While a COMMAND button
is being pressed, the label associated with that
command replaces the DEVICE name in the center
of the display.
4. Press the PAGE button to see the next page
of 12 available menu commands in the display.
Up to four “pages” of commands may be available for a particular component. Press the PAGE
button repeatedly to cycle through all available
groups of commands for that component.
Figure 3.
NOTE
: The COMMAND buttons duplicate controls
on many different types of components. Their function depends on the type of component selected.
Make sure that you have pressed the correct DEVICE button before sending IR commands.
Sending Macro Commands
Four buttons on the RR-1090 (labeled M1, M2, M3,
and M4) can store multiple command macro sequences – for example, a sequence that turns on the
TV set, selects channel 5, turns on the surround processor, and selects the TV input. A macro sequence
is sent by pressing the MACRO button where the
macro is stored.
See
Programming Command Codes
The RR-1090 contains hundreds of command sets
for components. Programming the remote involves
selecting the command sets that correspond to the
components in your system and assigning each of
them to one of the eight DEVICE buttons by entering the 4-digit code for that component. This need
only be done once during initial setup of the RR-1090.
The easiest way is to find your components and
corresponding 4-digit codes from the list of codes
at the end of this manual. If your component is not
listed, there are alternative search methods for finding
the right command set.
NOTE
: Programming the RR-1090 is done in a menu-
driven setup mode accessed by pressing the MENU
button. At any time during the process, you can exit
the setup mode and return to normal operation by
pressing the MENU button twice in succession.
Page 10

10 RR-1090
4-Digit Code Programming
Find your audio/video component in the code list
and note the 4-digit code(s):
1. Press the MENU button to reach the main menu.
2. Select SETUP from the LCD display menu by
pressing the MENU COMMAND key above the
first letter of the SETUP label.
3. Press one of the DEVICE buttons to select where
you wish to store this component’s codes. If you
choose the multipurpose AV1, AV2, or AV3 device buttons, you will be further prompted to select the type of component (CD, VCR, etc.)
4. Select ENTER CODE by pressing the MENU
COMMAND key above that label.
5. Input the 4-digit code using the MENU COMMAND keys corresponding to the digits in the
LCD display. Upon completion, the successfully
entered code will be confirmed in the display.
6. Once the code has been entered, the menu will
present two options. Press another DEVICE key
to program additional codes. Press the MENU
button to return to the main menu; press the MENU
button a second time to exit the setup mode and
return to normal operation.
Test the code by sending commands to the components (i.e. the POWER command). If the code does
not work properly, repeat the procedure using the
next 4-digit code listed for the brand of component.
Search Code by Brand Name
You can also use the following search method to find
and test the code numbers available for your brand
of component.
1. Press the MENU button to reach the main menu.
2. Select SETUP from the LCD display by pressing
the MENU COMMAND key above the first letter of the SETUP label.
3. Press one of the DEVICE buttons to select where
you wish to program this component’s codes. If
you choose AV1, AV2, or AV3, you will be further prompted to select the type of component
(CD, VCR, AMP, etc.).
4. Select BRAND NAME by pressing the MENU
COMMAND key above that label.
5. Select the first letter of your component’s brandname. If necessary, press the M4 button for the
next page of letters or the M3 button for the
previous page of letters.
6. Select your component’s brand name from the
list appearing in the display (pressing M4 or M3
for additional listings). The prompt “press POWER
key to test” appears in the display
7. Press the POWER button on the right side of the
RR-1090 to test the first available code for your
brand. The 4-digit code being tested is shown
in the display.
If the POWER command turns on or off the
desired component, you have found a code that
may work. You can test additional commands by
pressing MENU COMMAND keys corresponding
to commands for that 4-digit code shown in the display. If successful, press the DEVICE button to save
the code.
If the POWER command does not work, press
the POWER button to test the next available code
for that brand, with the new 4-digit code being tested
shown in the display. Continue pressing the POWER
button and testing codes until you have found a code
that works, saving it by pressing the DEVICE button.
If none of the available codes for that brand
work, you will be asked to search the entire library
of codes for that kind of component. Select YES to
jump to the search procedure (step 5 in the following section). Select NO to return to the main menu
Auto-Search Programming
To search for a code from the full list of available 4digit codes for a type of component:
1. Press the MENU button to reach the main menu.
2. Select SETUP from the LCD display menu by
pressing the MENU COMMAND key above the
first letter of the SETUP label.
3. Press one of the DEVICE buttons to select where
you wish to program this component’s codes. If
you choose AV1, AV2, or AV3, you will be further prompted to select the type of component
(CD, VCR, AMP, etc.).
Page 11

English
11
4. Select SEARCH by pressing the MENU COMMAND key below that label. The prompt “press
POWER key to test” appears in the display.
5. Press the POWER button on the right side of the
RR-1090 to test the first available code. The 4digit code being tested is shown in the display.
If the POWER command turns on or off the
desired component, you have found a code that
may work your component. You can test additional
commands by pressing MENU COMMAND keys
corresponding to commands for that 4-digit code
shown in the display. If successful, press the DEVICE
button to save the code.
If the POWER command does not work, press
the POWER button to test the next available code,
again with the 4-digit code being tested shown in
the display. Continue pressing the POWER button
and testing codes until you have found a code that
works, saving it by pressing the DEVICE button.
If none of the available codes work, a prompt
will tell you that you have tested all available codes.
Press the MENU button to return to the main menu.
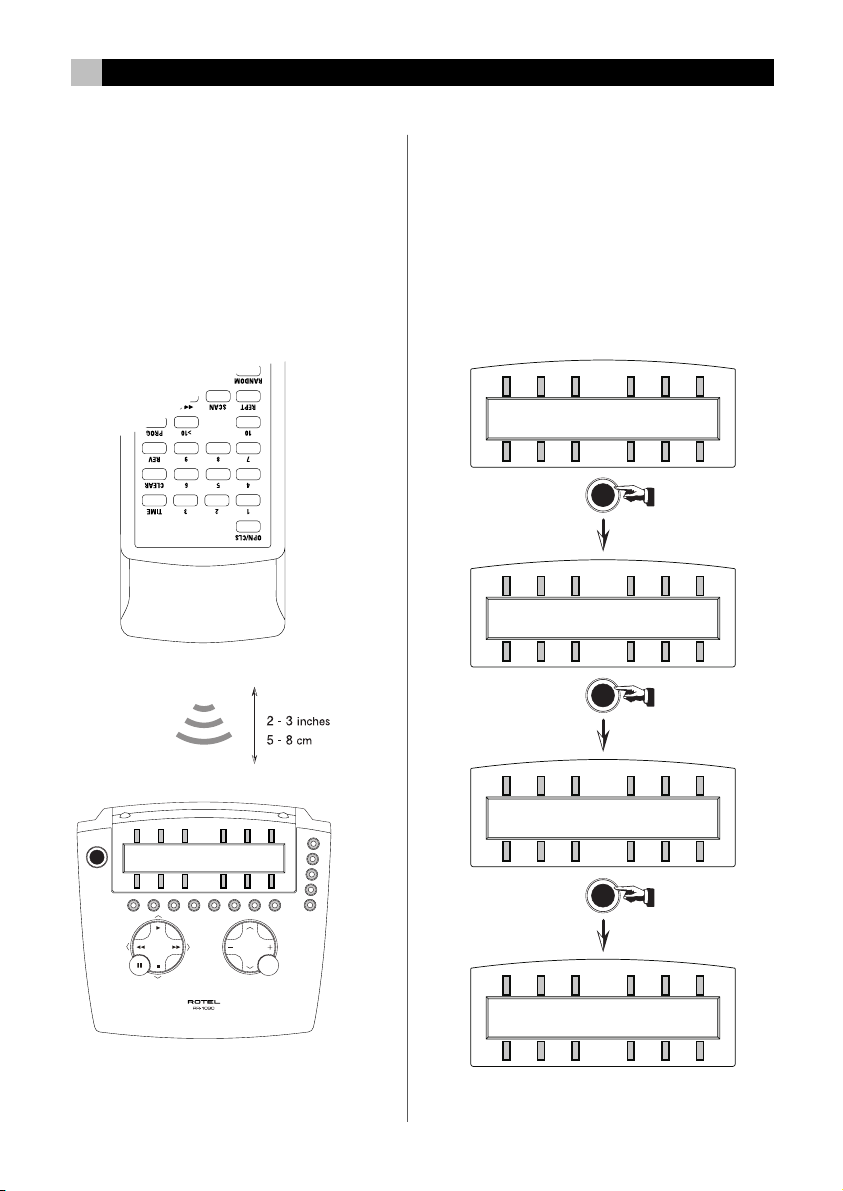
Learning Commands
If the programmed command sets for your component do not include functions you need, you can teach
the RR-1090 individual commands from your existing remotes:
1. Place the RR-1090 and the original remote control on a flat surface end to end as shown in Figure
2 at the front of this manual. The IR signals sent
by the other remote must be aimed at the IR emitter/sensor of the RR-1090.
2. Press the MENU button to reach the main menu.
3. Select LEARNING from the LCD display menu
by pressing the MENU COMMAND key above
the first letter of the LEARNING label.
4. Press one of the DEVICE buttons to select where
you wish to program this component’s codes.
5. Select the RR-1090 COMMAND key where you
wish to memorize the command. You can choose
one of the BASIC COMMAND buttons or one
of the MENU COMMAND keys (using the PAGE
button to advance to a new page of MENU
COMMANDS if necessary to find an unused key).
The LCD display will show “LEARNING”.
6. Press and hold the corresponding command button on the original remote to send the IR code
being learned to the RR-1090.
If the learning procedure fails, the RR-1090
will display “ERROR” and revert back to Step 5 above.
Reposition the two remotes and try again, starting
from Step 5.
When a code is successfully learned, the
RR-1090 will prompt you to edit the label it has assigned to the command. Select NO to keep the current
label. Select YES to edit the label and enter the desired
letters (using the M3 or M4 buttons to move to the
next page of letters). Labels can be up to 5 characters. Press the MENU button to store the new label.
To learn additional commands, repeat from
Step 5 above. To return to the main menu, press the
MENU button.
NOTE
: The RR-1090 has a capacity of 240 com-
mands. If capacity is reached, the remote will display COMMAND FULL and not allow you to learn
an additional command. See the section on deleting commands to clear command space.
Macro Programming
Four buttons on the RR-1090 (labeled M1, M2, M3,
M4) can store macro sequences of multiple commands
sent by pressing one button.
To program a macro sequence, first make sure that
all of the desired commands have been learned by
the RR-1090 – the macro feature simply records a
sequence of individual RR-1090 button commands.
1. Press the MENU button to reach the main menu.
2. Press the PAGE button for the next page of menu
options.
3. Select MACRO from the LCD display.
4. Press the MACRO button (M1, M2, M3, or M4)
where you wish to store the new macro sequence.
Page 12

12 RR-1090
5. Enter the new label for the macro by pressing
MENU COMMAND keys corresponding to the
letters in the display (using the M3 or M4 buttons to move to the next page of letters). Labels
can be up to 5 characters long. After entering
the label, press the MENU button to store it.
6. Memorize the first step in the macro. Press a
DEVICE button to change to the desired device
and individual COMMAND keys to memorize
commands from the selected device (press the
PAGE button to see additional pages of available commands).
7. To memorize additional commands, press the
selected MACRO button to confirm the previous
memorized command and then memorize the
next command. Repeat until the entire sequence
has been stored.
8. When the entire macro sequence has been entered, press the MENU button to store the macro
sequence.
NOTE
: A macro sequence can contain up to 10 com-
mands, not including any DEVICE button presses.
Custom Device Page
Generally, all commands stored under a DEVICE
button operate a single component. However, it is
possible to build one special command set, called
a CUSTOM PAGE, which includes individual commands copied from other devices. For example, you
could build a CUSTOM PAGE command set containing copies of the most used commands from all
devices, providing a simple-to-use subset of favorite commands. This CUSTOM PAGE command set
can be accessed by pressing the DEVICE button where
it is stored. To build a custom device page:
1. Press the MENU button to reach the main menu.
2. Select PREFERENCE from the LCD display.
3. Select CUSTOM PAGE from the LCD display.
4. Press the DEVICE button where you wish to store
the CUSTOM PAGE command set.
5. Enter the new label for the device by pressing
MENU COMMAND keys corresponding to the
letters in the display (using the M3 or M4 buttons to move to the next page of letters). Labels
can be up to 7 characters long. After entering
the label, press the MENU button to store it.
6. Press a DEVICE button to select the device where
the first command you wish to copy to the CUSTOM PAGE is located.
7. Press the COMMAND key for the first command
you wish to add to the CUSTOM PAGE.
8. Select the location in the CUSTOM PAGE where
you wish to store the command by pressing any
MENU COMMAND key. The label for that command appears in the selected location.
9. Repeat steps 6 - 8 for each additional command
you wish to copy to the CUSTOM PAGE.
If you wish to auto-arrange the commands, press the
M4 button. Press the MENU button to return to the
main menu.
NOTE
: To copy additional commands at any time,
repeat steps 1–3 and steps 6–10. Because you are
copying to an existing CUSTOM PAGE, steps 4
and 5 are not necessary and will be skipped.
Deleting Stored Commands
You can erase previously stored commands:
1. Press the DEVICE button containing the command
you wish to delete.
2. Press the MENU button to reach the main menu.
3. Select EDIT from the LCD display.
4. Select DELETE KEY from the LCD display.
5. Press the COMMAND key you wish to erase.
You can delete commands from BASIC COMMAND buttons or MENU COMMAND keys
(using the PAGE button to scroll through the available pages of commands).
6. Select YES or NO to confirm the deletion.
7. Repeat steps 5 and 6 to delete additional commands. If desired, press the M4 button to autoarrange the new commands in the display. Press
the MENU button to return to the main menu.
Page 13

English
13
Volume Punch-through
In many systems, the VOLUME is adjusted at the TV
set or the A/V processor. For convenience, the
RR-1090 has a VOLUME PUNCH-THROUGH feature that copies the volume commands from either
the TV device or any programmed A/V device to
device keys for other components such as CD players, VCRs, SAT receivers, and DVD players. After
enabling this feature, volume controls from either the
TV or A/V processor are available even when one
of these other DEVICE command sets is active.
To enable the VOLUME PUNCH-THROUGH feature:
1. Press the MENU button to reach the main menu.
2. Select PREFERENCE from the LCD display.
3. Select PUNCH THROUGH from the LCD display.
4. Select the volume commands (from either the TV
command set or an A/V command set) to copy
to another DEVICE by selecting either TV VOL
or AMP VOL from the LCD display. If you select
AMP VOL, you will need to select the A/V command set with the desired volume commands
(AV1, AV2, or AV3) from the next LCD display
menu by pressing a MENU COMMAND key.
5. Press a DEVICE button to select the target device
where you want the volume commands to be
copied. The VOLUME PUNCH THROUGH command cannot be copied to a TV device or any
A/V device. They can be copied to any other
kind of device (CD, SAT, LD, DVD, etc.). If you
select an improper DEVICE key, nothing happens.
After you have selected an allowable DEVICE
key, a confirmation PUNCH THROUGH OK
appears in the display.
6. Press the MENU button to return to the main menu.
RESET Function
You can return the RR-1090 to its original factory
programming at anytime by using the RESET function.
To reset the RR-1090:
1. Press the MENU button to reach the main menu.
2. Press the PAGE button to advance to the second
page of options.
3. Select REMOTE SETTINGS from the LCD display
by pressing the MENU COMMAND key above
the first letter of the REMOTE SETTINGS label.
4. Select RESET from the LCD display by pressing
the MENU COMMAND key below the first letter of the RESET label.
5. Select YES or NO to confirm. If you select YES,
the RR-1090 will erase all custom programming
and return to its original factory settings, displaying
a series of progress messages followed by the
final confirmation DEFAULT SETTING.
6. Press the MENU button to return to the main menu.
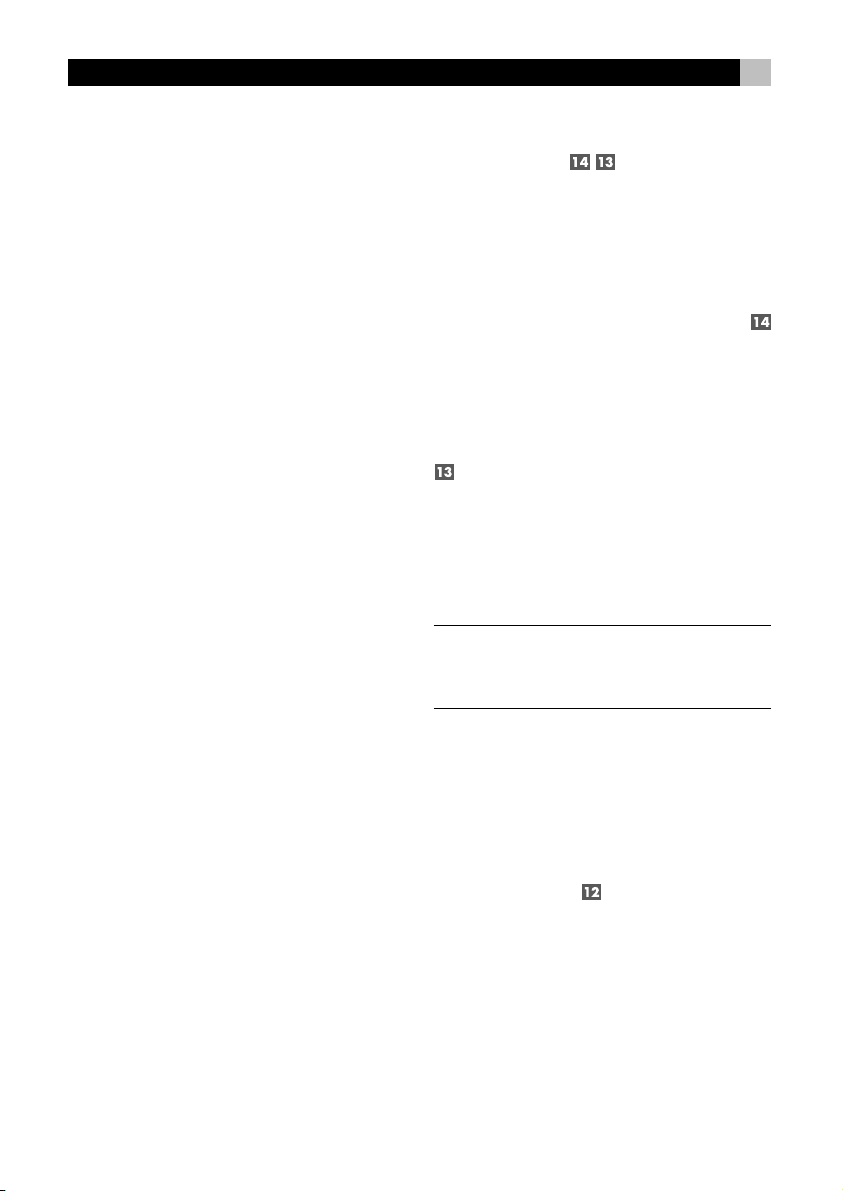
DUPLICATE Function
The DUPLICATE function transfers programming,
including learned commands and custom labels, from
one RR-1090 to a second RR-1090. You have the
option of transferring data from just a single DEVICE
key or from all eight DEVICE keys. To transfer the
programming, place two RR-1090 remotes with their
IR windows facing each other, then proceed as follows.
On the remote that will be receiving the
data:
1. Press the MENU button to reach the main menu.
2. Press the PAGE button to advance to the second
page of options.
3. Select DUPLICATE from the LCD display by pressing the adjacent MENU COMMAND key.
4. Select RECEIVE from the LCD display by pressing the adjacent MENU COMMAND key. A
READY TO RECEIVE INDICATOR appears in the
display.
NOTE
: Using the RESET function erases all learned
commands, labels, and configuration settings. Make
sure this is what you want to do!
Page 14

14 RR-1090
On the remote that will be sending the data:
1. Press the MENU button to reach the main menu.
2. Press the PAGE button to advance to the second
page of options.
3. Select DUPLICATE from the LCD display by pressing the adjacent MENU COMMAND key.
4. To transmit codes for all devices, select
the COPY ALL DEVICES menu option. To trans-
fer codes for just one device, select COPY
ONE DEVICE and then select the DEVICE button to be copied. This begins the data transfer
procedure with a SENDING prompt appearing
in the display.
At the completion of the transfer procedure a confirmation will appear on the sending RR-1090:
• If the data transfer is successful, “FINISH
SENDING” appears.
• If the data transfer fails, “SENDING ERROR” appears in the LCD and the unit reverts to
normal operating mode. Reposition the two
remotes and try again.
NOTE
: Do not attempt to use the DUPLICATE function
to transfer data from any remote other than another
Rotel RR-1090.
Custom Labels
The labels for DEVICE buttons and COMMAND keys
can be edited. Also, the location of the COMMAND
keys for a device can be moved from one position
in the LCD display to another.
Edit a DEVICE Name
To change the name that appears in the center of
the LCD display when you select a DEVICE button:
1. Press the DEVICE button you wish to rename.
2. Press the MENU button to reach the main menu.
3. Select EDIT from the LCD display.
4. Select DEVICE NAME from the LCD display.
5. Enter the new label for the device by pressing
MENU COMMAND keys corresponding to the
letters in the display (using the M3 or M4 buttons to move to the next page of letters). Labels
can be up to 7 characters long. After entering
the label, press the MENU button to store it.
Edit a COMMAND Name
To change the name that appears in the LCD display next to a MENU COMMAND key:
1. Press the DEVICE button containing the COMMAND key you wish to rename.
2. Press the MENU button to reach the main menu.
3. Select EDIT from the LCD display.
4. Select KEY NAME from the LCD display.
5. Press the BASIC COMMAND button or MENU
COMMAND key (using the PAGE button for
additional choices) that you wish to rename.
6. Enter the new label for the device by pressing
MENU COMMAND keys corresponding to the
letters in the display (using the M3 or M4 buttons to move to the next page of letters). Labels
can be up to 5 characters long. After entering
the label, press the MENU button to store it.
7. Repeat steps 5 and 6 to label additional COMMAND buttons or press the MENU button to return
to the main menu.
Move a COMMAND Name
To change the location of a MENU COMMAND key
in the LCD display:
1. Press the DEVICE button containing the COMMAND key you wish to move.
2. Press the MENU button to reach the main menu.
3. Select EDIT from the LCD display.
4. Select MOVE KEY from the LCD display.
5. Select the MENU COMMAND key to move.
6. Select the new location for the COMMAND key.
7. The two COMMAND keys exchange locations.
Page 15

English
15
Auto-arrange COMMAND Names
As an alternative to manually moving keys, you can
have the RR-1090 automatically arrange the MENU
COMMAND keys for a DEVICE.
1. Press the DEVICE button containing the COMMAND keys you wish to auto-arrange.
2. Press the MENU button to reach the main menu.
3. Select EDIT from the LCD display.
4. Select AUTO-ARRANGE from the LCD display.
Other Configuration Options
The RR-1090 features backlighting and a keytone
beep to assist in operation. Additionally, password
protection can be enabled to protect access to the
setup features.
Backlighting
Backlighting makes the LCD display visible in low
light conditions. There are three available settings:
• With Light Sense. Senses the lighting level
in the room and turns on the backlighting for 5
seconds with any key press when the room is
dark. (default setting)
• Always On. Backlighting will be turned on for
5 seconds with any key press regardless of the
room lighting.
• Always Off. Backlighting is disabled.
To configure the backlighting:
1. Press the MENU button to reach the main menu.
2. Press the PAGE button to advance to the second
page of menu options.
3. Select REMOTE SETTINGS from the LCD display.
4. Select BACKLIT from the LCD display.
5. Select one of three backlighting modes from the
LCD display.
Beep Sound
The RR-1090 has a keytone feature that beeps to
confirm each button press. This feature can be enabled (default) or disabled.
To configure the beep sound:
1. Press the MENU button to reach the main menu.
2. Press the PAGE button to advance to the second
page of menu options.
3. Select REMOTE SETTINGS from the LCD display.
4. Select BEEP SOUND from the LCD display.
5. Select SOUND ENABLE or SOUND DISABLE.
Password
A password can be defined and enabled to prevent
access to the setup menus. Once defined and enabled, the password will be required before access
to the setup menus is allowed.
The factory default password is “2000”, however
the password protection is disabled by default.
To enable or disable password protection:
1. Press the MENU button to reach the main menu.
2. Press the PAGE button to advance to the second
page of menu options.
3. Select REMOTE SETTINGS from the LCD display.
4. Select PASSWORD from the LCD display.
5. Select ENABLE or DISABLE.
6. If prompted, enter the password by pressing the
MENU COMMAND keys corresponding to the
characters shown in the display (using the M3
or M4 buttons to move to the next page of characters). After entering the password, press the
MENU button.
To change the password:
1. Press the MENU button to reach the main menu.
2. Press the PAGE button to advance to the second
page of menu options.
3. Select REMOTE SETTINGS from the LCD display.
4. Select PASSWORD from the LCD display.
Page 16

16 RR-1090
5. Select CREATE from the LCD display.
6. When prompted, enter the old password by pressing the MENU COMMAND keys corresponding to the characters shown in the display (using the M3 or M4 buttons to move to the next
page of characters). After entering the password,
press the MENU button.
7. Enter the new password by pressing the MENU
COMMAND keys corresponding to the characters shown in the display, using the M3 or M4
buttons to move to the next page of characters.
Passwords can be up to 4 characters in any
combination of letters or numbers. Press the MENU
button.
8. Re-enter the new password to confirm and press
the MENU button. A PASSWORD SET confirmation appears in the display. You can then select
ENABLE or DISABLE.
NOTE
: Once the password is changed, you cannot
access the setup menus if you forget the new password. Unless you have a need for extra protection,
we recommend leaving the default password
“2000” unchanged.
PC-Link Software
The Windows® 95/98 PC-LINK software provided
with the RR-1090 remote can be used to work with
complete configuration files for the RR-1090 remote.
These configuration files contain a complete set of
options, command sets, macros, and custom labels
to fully customize a RR-1090 remote. The configuration files can be saved to or opened from the hard
disk. They can also be uploaded from or downloaded
to the RR-1090 using the supplied serial cable. This
provides a convenient way to transfer the desired
programming to a number of RR-1090 remotes.
In addition, many of the configuration options for
the RR-1090 can be modified in the PC-LINK software, a procedure that may be more convenient than
using the RR-1090’s own setup menus.
Installing PC-LINK Software
To install and run the PC-LINK software on a Windows® 95/98 computer:
1. Insert DISK 1 in your disk drive.
2. Run the program SETUP.EXE, either by doubleclicking the filename in Windows® Explorer or
by clicking RUN from the START button menu and
typing A:SETUP.EXE.
3. Follow the steps in the setup program, accepting the default directory for the installation of the
program (C:\PROGRAMS\HT2000) or specifying a new location using the BROWSE button.
4. You will be prompted to insert DISK 2 during the
installation. When the files are installed, you will
be prompted to restart your computer to complete the installation.
5. Run the PC-LINK software either by double-clicking
the filename HT2000.EXE in Windows® Explorer
or by clicking RUN from the START button menu
and typing C:\PROGRAMS\HT2000.EXE.
Loading and Saving Configuration Files
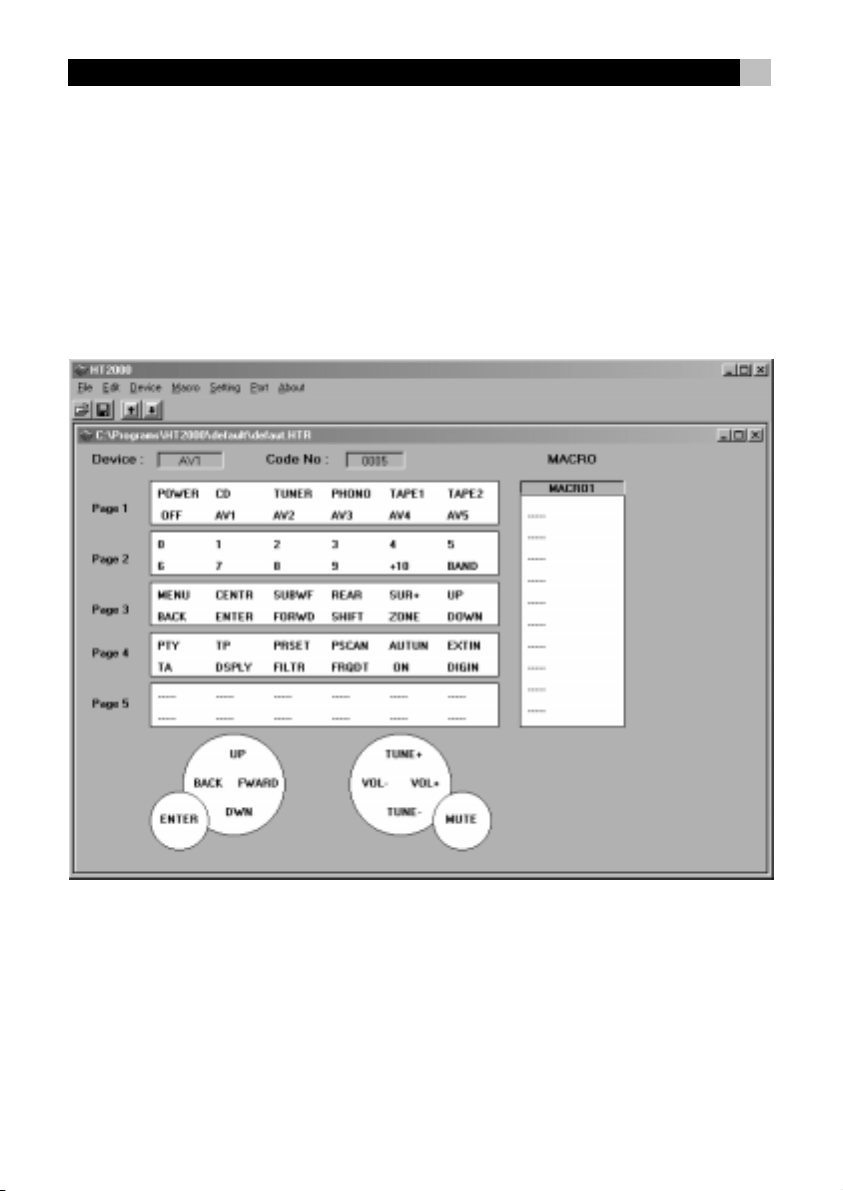
To use the PC-LINK software, you open a configuration file which appears in the main PC-Link screen
as shown in the illustration at the front of the manual.
These configuration files can be stored on your computer disk with the file extension “*.HTR”.
NOTE
: The factory default configuration file
“DEFAULT.HTR” is installed in the DEFAULT
subdirectory of the HT2000 installation directory.
To open a configuration file from a computer disk:
1. Select OPEN from the FILE menu.
2. Use the dialog box to find the DEFAULT.HTR
configuration file (or the file of your choice).
3. Click the OPEN button.
Page 17

English
17
To save a configuration file to a computer
disk:
1. To save a configuration file with the same name,
select SAVE from the FILE menu. The new file will
overwrite the old file.
2. To save a configuration file with a different name,
select SAVE AS from the FILE menu. Enter a new
file name in the dialog box (the .HTR extension
will be added automatically). Click the SAVE
button.
Uploading and Downloading
Configuration Files
Using the PC-LINK software and the supplied serial
cable, you can upload a configuration file from the
RR-1090 remote to your computer, modify it, and
then download the new configuration settings to the
remote.
To use the upload/download feature, you must configure your computer and put the remote in data
transfer mode.
Connect the RR-1090 to your computer:
1. Plug the 4-pin modular connector on the supplied
cable into the jack on the back of the remote.
2. Plug the other end of the cable into a DB-9 serial connector (COM1 or COM2) on your computer.
3. Start the PC-LINK software and select the port
you plugged the cable into (COM1 or COM2)
from the PORT menu.
Put the RR-1090 in DATA TRANSFER mode:
1. Press the MENU button to reach the main setup
menu.
2. Press the PAGE button to advance to the second
page of options.
3. Select PC LINK from the LCD display by pressing the adjacent MENU COMMAND key.
To upload a configuration file from the
RR-1090 to the computer:
1. Make sure the RR-1090 is in data transfer mode.
2. Select UPLOAD from the FILE menu in the PC-LINK
software. An “UPLOADING…” prompt appears
in the remote’s LCD screen during the transfer.
3. When the upload is complete, the configuration
file will be opened in the PC-LINK software, where
it can be modified, downloaded to another
RR-1090, or saved to the computer disk.
To download a configuration file from the
computer to the RR-1090:
1. Make sure the RR-1090 is in data transfer mode.
2. Open the desired file in the PC-LINK software.
3. Select DOWNLOAD from the FILE menu in the
PC-LINK software. A “DOWNLOADING…”
prompt appears in the remote’s LCD screen during
the transfer.
4. When the DOWNLOAD is complete, the new
configuration settings will be installed in the
RR-1090, overwriting any previous settings.
Modifying Configuration Files
The PC-LINK software can be used to see the current settings of an open configuration file and modify
many of them. The modified configuration file can
then be saved to a disk or downloaded to a RR-1090.
Here are the available options in the PC-LINK software:
To select a DEVICE to be viewed or modified, chose the device from the DEVICE menu. The
key names and other settings for that device are
displayed in the PC-LINK screen.
To rename a DEVICE, select DEVICE NAME from
the EDIT menu or double-click the DEVICE box on
the main screen. Type the new name in the dialog
box and click OK.
To rename a KEY, click the desired key in the
main screen and select KEY NAME from the EDIT
menu or double-click the desired key. Type the new
name in the dialog box and click OK.
Page 18

18 RR-1090
To delete a KEY, click the desired key in the main
screen and select DELETE KEY from the EDIT menu.
Click YES or NO to confirm.
To rearrange the KEYS for the current device, select ARRANGE KEY from the EDIT. You can
also manually move the page keys to another location by clicking the key name, holding the mouse
button, and dragging the label to a new location.
To view the steps in a MACRO, select the desired
macro from the MACRO menu. The steps recorded
in the macro are displayed down the right side of
the main screen.
To change the KEY TONE setting, select KEY
TONE from the SETTING menu. Click the desired
option in the dialog box.
To change the BACKLIGHT setting, select
BACKLIT from the SETTING menu. Click the desired
option in the dialog box.
To view the PASSWORD setting, select PASSWORD from the SETTING menu.
To view the VOLUME PUNCH-THROUGH
setting, select PUNCH THROUGH from the SET-
TING menu.
Page 19
19Français
Sommaire
1. Vue générale 2
2. Apprentissage 4
3. Exemples d’affichages pour une source 4
4. Logiciel de programmation par PC 5
Introduction ............................................ 20
Caractéristiques principales 20
Précautions 20
Installation et recharge
de la batterie 20
Démarrage .............................................. 21
Emetteur/récepteur infrarouge IR 21
Touches de sélection de source 21
Touches des commandes de base
21
Touches du menu Command
et afficheur LCD 21
Touche PAGE 21
Touches MACRO 21
Touche Menu 22
Touche de mise sous tension Power 22
Prise série 22
Fonctionnement de la RR-1090 ................ 22
Activation de la RR-1090 22
Envoi des commandes IR 22
Envoi des commandes Macro 23
Programmation des codes ........................ 23
Programmation d’un code à 4 chiffres 23
Programmation d’un code par marque d’appareil 23
Programmation par recherche automatique 24
Commandes d’apprentissage 25
Programmation Macro 25
Personnalisation d’une page 26
Effacement de commandes mémorisées 27
Généralisation du volume «Punch-through» 27
Fonction de remise à zéro RESET 28
Fonction de copie DUPLICATE 28
Noms personnalisés................................. 29
Editer le nom d’une source DEVICE 29
Editer le nom d’une commande COMMAND 29
Déplacer le nom d’une commande COMMAND 29
Arrangement automatique des noms
de commandes 30
Autres options de configuration ............... 30
Rétroéclairage 30
Bips sonores 30
Mot de passe 30
Programmation par logiciel PC ................. 31
Installation du logiciel PC-LINK 31
Chargement et sauvegarde de fichiers de
configuration 32
Retrouver ou stocker des fichiers de configuration 32
Modification des fichiers de configuration 33
Codes à 4 chiffres ................................... 92
A/V 92
TV 92
VCR 93
CD 93
DVD 94
LD 94
SAT/DSS 95
Page 20
20 RR-1090
Introduction
Nous vous remercions pour l’achat de cette
télécommande universelle RR-1090. La RR-1090 peut
remplacer jusqu’à huit télécommandes infrarouge
prévues pour piloter des appareils audio et vidéo,
de marque Rotel ou de très nombreuses autres
marques du marché mondial. La RR-1090 intègre
des jeux de commandes pour des centaines de
maillons audio-vidéo, et elle peut aussi apprendre
directement les codes de vos télécommandes actuelles.
Le fonctionnement de la RR-1090 est simple et intuitif,
grâce à l’utilisation de touches peu nombreuses et
d’un grand afficheur à cristaux liquides (LCD).
Caractéristiques principales
• Programmation simplifiée grâce aux jeux de
commandes intégrés, pour des centaines de
maillons.
• Préprogrammée pour tous les autres appareils
Rotel.
• Possibilité d’apprendre d’autres commandes
directement à partir des télécommandes
concernées.
• Afficheur LCD intégrant des menus de navigation,
avec noms personnalisables pour chaque appareil
commandé.
• Rétroéclairage pour utilisation facile dans
l’obscurité, avec bip sonore optionnel pour
confirmer la pression sur les touches.
• Quatre touches MACRO permettent d’envoyer
des séquences de pressions sur plusieurs touches
(jusqu’à dix) en appuyant simplement une fois
sur une seule touche.
• Batterie rechargeable et chargeur fournis
d’origine.
• Câble série et logiciel de programmation directe
de la RR-1090 sur un ordinateur PC Windows
95/98.
Précautions
• La RR-1090 est très solide, mais pas indestructible!
Maniez-la tout de même avec un minimum de
précautions.
• N’exposez pas la RR-1090 à l’humidité. Pour
la nettoyer, n’utilisez qu’un chiffon doux, propre
et sec. Evitez tous les nettoyants liquides, avec
solvant ou non.
• N’essayez pas d’ouvrir le coffret de la RR-1090.
Cela annule définitivement la garantie.
Installation et recharge
de la batterie
La RR-1090 utilise quatre piles rechargeables de type
nickel-hydride 4AA, et un adaptateur/chargeur
9 volts. Lorsque ces batteries deviennent trop faibles,
l’indication «LOW BATTERY» apparaît dans
l’afficheur.
Pour installer les batteries, éteignez la RR-1090
et soulevez le couvercle de protection des piles
en pressant légèrement sur la languette et en tirant
doucement vers vous. Placez les quatre batteries en
respectant leur polarité (voir le schéma gravé dans
le réceptacle), puis replacez le couvercle.
Pour recharger les batteries, insérez le câble du
chargeur dans la prise du côté gauche de la RR-1090
. Branchez la prise du chargeur dans une prise
secteur (230 V/50 Hz pour l’Europe). L’indication
«CHARGING» doit apparaître dans l’afficheur dès
que le chargeur est correctement branché.
Laissez la charge s’opérer pendant toute une nuit
pour bénéficier d’une charge complète des batteries.
La télécommande peut être utilisée pendant un cycle
de charge des batteries.
NOTE
: Vous pouvez utiliser des piles alcaline
traditionnelles à la place des batteries rechargeables
fournies avec la RR-1090; mais, dans ce cas,
n’utilisez surtout pas le chargeur secteur fourni
également avec la télécommande.
Page 21
21Français
Démarrage
Voir Figure 1
Veuillez s’il vous plaît soigneusement repérer les
commandes et fonctions suivantes sur la RR-1090:
Emetteur/récepteur infrarouge IR
L’émetteur/récepteur infrarouge est placé sur la partie
frontale de la RR-1090. Il envoie les codes de
commande vers les appareils, et doit donc être dirigé
vers ceux-ci. Il reçoit également les codes IR des autres
télécommandes pendant la procédure
d’apprentissage LEARNING ou lorsque l’on copie
une configuration donnée d’une télécommande sur
une autre.
Touches de sélection de source
Huit boutons ronds sur la RR-1090 permettent de
choisir pour quel appareil exactement un jeu de
commandes données est actif, et quel appareil est
donc piloté dans ce cas précis. Par exemple, une
pression sur la touche repérée AV1 permettra à la
RR-1090 de contrôle le processeur numérique
Surround Rotel. Une pression sur la touche repérée
TV permet par contre à la RR-1090 de devenir la
nouvelle télécommande de votre téléviseur.
Pour utiliser la RR-1090, toujours commencer par
presser la touche correspond à l’appareil que l’on
désire télécommander. Puis pressez les touches de
base ou du menu COMMAND (voir plus loin) pour
envoyer les codes infrarouge voulus vers cet appareil.
NOTE
: Les touches repérées AV1, AV2 et AV3 DEVICE
peuvent être utilisées avec n’importe quel type
d’appareil.
Touches des commandes de base
La touche POWER sur le côté droit de la télécommande,
les deux larges touches rondes à quatre directions et
deux boutons ronds plus petits au centre de la RR-1090
reprennent les fonctions principales de vos maillons
– mise sous tension Power, volume haut et bas, lecteur,
avance et retour rapide, pause, etc. Les fonctions réelles
de chaque touche varient, suivant la source (DEVICE)
préalablement sélectionnée.
Touches du menu Command
et afficheur LCD
Sur le dessus de la RR-1090 se trouve un groupe
de 12 touches rectangulaires entourant l’afficheur
LCD. Ces touches, baptisées MENU COMMAND
(commandes Menu) permettent d’accéder à des
fonctions supplémentaires directement indiquées par
les noms portés dans l’afficheur LCD, en face de
chaque touche.
Les fonctions réelles de chacune de ces touches varient
en fonction de la source préalablement sélectionnée
et de l’indication portée en regard de la touche
considérée.
Touche PAGE
Chaque maillon préalablement sélectionné via un
des boutons DEVICE (voir plus haut) peut posséder
jusqu’à 48 fonctions différentes via le groupe de
touches MENU COMMAND. Ces commandes
apparaissent dans l’afficheur par groupe de 12
(puisqu’il y a 12 touches), groupe également appelé
Page. La touche repérée PAGE permet donc d’accéder
à un nouveau groupe – ou page – de fonctions, de
nouvelles indications correspondantes apparaissant
alors dans l’afficheur LCD en face de chaque touche.
Chaque nouvelle pression sur PAGE permet de passer
jusqu’à la page suivante, avec retour à la fin sur la
première page, et ainsi de suite.
Touches MACRO
Quatre touches repérées M1, M2, M3 et M4
permettent d’accéder à des fonctions spéciales Macro.
Une fonction Macro permet d’envoyer par simple
pression sur une touche une séquence de commandes
infrarouge normalement envoyées par plusieurs
pressions successives sur diverses touches. Par
exemple, une séquence macro allumera le téléviseur,
choisira la chaîne 5, allumera le processeur Surround
en choisissant sur celui-ci l’entrée TV.
Deux des touches Macro (M3 et M4) peuvent
également être utilisées pour personnaliser la
RR-1090.
Page 22

22 RR-1090
Touche Menu
Cette touche active et sélectionne toute une série de
menus apparaissant dans l’afficheur LCD, permettant
de personnaliser la RR-1090. La touche MENU n’est
pas utilisée en fonctionnement normal.
Touche de mise sous tension Power
En plus de sa fonction de base pour la mise sous
tension, la touche POWER est également utilisée
pendant la procédure de paramétrage SETUP, lorsque
l’on effectue des recherches dans la base de données
des codes de commande infrarouge.
Prise série
La prise modulaire 4 broches sous la télécommande
RR-1090 peut être utilisée pour y brancher un câble
série traditionnel type DB-9 relié à un ordinateur PC
(câble fourni).
En utilisant le logiciel PC-LINK également livré avec
la télécommande, les codes et les commandes peuvent
être directement téléchargés (et éventuellement
récupérés, dans l’autre sens) à partir de l’ordinateur
fonctionnant sous système Windows® 95/98. Cela
permet aussi bien le transfert complet d’un programme
d’une RR-1090 vers une seconde qu’une grande
facilité dans le paramétrage de la télécommande.
Voir la section réservée à l’utilisation du logiciel PCLINK, dans ce même manuel d’utilisation.
Fonctionnement de la RR-1090
Ce chapitre explique le fonctionnement de base de
la RR-1090 et la majorité de ses caractéristiques.
NOTE
: La RR-1090 est préprogrammée avec les
codes des processeurs numériques Surround
Rotel mémorisés sous la source (DEVICE) repérée
AV1. Les lecteurs de CD et de DVD Rotel sont
respectivement mémorisés pour les touches «Device»
CD et DVD.
Activation de la RR-1090
Pour économiser ses batteries, la RR-1090 se met
automatiquement en veille au bout de 60 secondes
si elle est restée totalement inactive pendant cette
période. Une pression sur n’importe laquelle de ses
touches la remet automatiquement en fonctionnement:
les indications réapparaissent alors dans l’afficheur
LCD.
Envoi des commandes IR
Comme sur la plupart des commandes, il suffit
d’appuyer sur une touche pour piloter la commande
correspondante sur l’appareil voulu, qu’il s’agisse
du lecteur de DVD ou du téléviseur, par exemple.
Voici comment procéder:
1. Pressez une touche sur la RR-1090 pour la mettre
en activité (si nécessaire).
2. Pressez la touche DEVICE correspondant à
l’appareil que vous désirez télécommander. Par
exemple, pressez la touche AV1 pour un
processeur numérique Surround Rotel. Le nom
de l’appareil que vous avez ainsi sélectionné
apparaît alors au centre de l’afficheur.
3. Pressez une des touches COMMAND
pour envoyer la commande infrarouge
voulue à l’appareil que vous venez de choisir.
Par exemple, pressez la commande VOL + pour
augmenter le volume sur le processeur numérique
Surround Rotel. Toutes les fonctions de base sont
accessibles sur les grandes touches en croix
au centre de la télécommande, en
plus de la touche de mise sous tension POWER
. Des fonctions supplémentaires seront
accessibles grâce aux 12 touches MENU COMMAND sur le dessus de la télécommande, en
fonction des indications portées en regard de
ces touches, sur l’afficheur LCD. Lorsqu’une touche COMMAND est pressée, son rôle est
affiché au centre de l’écran en lieu et place du
nom du maillon contrôlé.
4. Pressez la touche PAGE pour afficher le second groupe de 12 fonctions supplémentaires dans
l’afficheur. Jusqu’à «quatre» pages de fonctions
peuvent ainsi être affichées pour un maillon donné.
Pressez plusieurs fois la touche PAGE pour afficher
successivement les pages de 12 fonctions, de
manière cyclique.
Voir Figure 3.
Page 23

23Français
NOTE
: Les touches COMMAND peuvent reprendre
les fonctions particulières d’un très grand nombre
de maillons. Ces fonctions dépendront donc du type
de maillon concerné. Vérifiez bien que vous avez
auparavant pressé la touche DEVICE correspondant
bien à ce maillon.
Envoi des commandes Macro
Quatre touches de la RR-1090 (repérées M1, M2,
M3 et M4) peuvent stocker de multiples séquences
macro de commandes – par exemple une séquence
qui permettra, par simple pression sur une de ces
quatre touches, d’allumer le téléviseur, de sélectionner
la chaîne 5, d’allumer le processeur Surround et de
choisir son entrée TV. Cette séquence macro est
envoyée en pressant simplement la touche MACRO
dans laquelle elle est mémorisée.
Programmation des codes
La RR-1090 intègre des centaines de codes de
commandes préprogrammées pour divers appareils.
La programmation de la télécommande sous-entend
que vous choisissiez les bons jeux de commandes
infrarouge pour les appareils que vous possédez,
et que vous assigniez un de ces jeux de commandes
à chacune des huit touches DEVICE. Pour ce faire,
vous devez simplement enter un code à 4 chiffres
pour chaque maillon. Cette étape n’est nécessaire
que lors de la première utilisation de la RR-1090.
La meilleure façon de trouver le code correspondant
à chacun des appareils que vous désirez
télécommander à partir de la RR-1090 consiste à
vous reporter à la fin de ce manuel, où les codes
des différentes marques, par type de maillon, sont
répertoriés. Mais si un maillon n’apparaît pas dans
cette liste, il existe des méthodes alternatives pour
trouver leur code spécifique.
NOTE
: La programmation (paramétrage) de la
RR-1090 se fait à partir d’un menu de réglage Setup
accessible en pressant la touche repérée MENU. A
n’importe quel moment de ce paramétrage, vous
pouvez revenir aux conditions normales de
fonctionnement de la télécommande en pressant à
nouveau cette touche MENU deux fois de suite.
Programmation d’un code à 4 chiffres
Trouvez le type et la marque de l’appareil désiré
dans les listes présentes à la fin de ce manuel. Notez
le code à 4 chiffres correspondant.
1. Pressez la touche MENU pour accéder au menu
de paramétrage principal.
2. Choisissez SETUP à partir du menu dans l’afficheur
LCD en pressant la touche MENU COMMAND
au-dessus du mot SETUP.
3. Pressez une des touches DEVICE, celle pour
laquelle vous souhaitez mettre en mémoire le jeu
de codes infrarouge que vous allez sélectionner.
Si vous choisissez une des touches pour maillons
multiples AV1, AV2 ou AV3, vous devrez ensuite
indiquer quel type de maillon est concerné (CD,
DVD, etc.).
4. Sélectionnez ENTER CODE (entrez le code) en
pressant la touche MENU COMMAND au-dessus
de l’inscription correspondante.
5. Entrez les quatre chiffres du code en utilisant les
touches MENU COMMAND correspondant
respectivement à ces quatre chiffres. Une fois
complété, ce code apparaît dans l’afficheur.
6. Une fois que le code a été entré, le menu propose
deux options. Pressez une autre touche DEVICE
permet de recommencer cette procédure pour
un deuxième appareil. Pressez une fois la touche
MENU permet de revenir au menu principal.
Pressez la touche MENU deux fois de suite sort
du mode de paramétrage de la télécommande
et permet de revenir au mode de fonctionnement
normal de celle-ci.
Testez le code en envoyant des commandes vers
l’appareil concerné (à commencer par son allumage
via la touche POWER). Si ces commandes ne
fonctionnent pas, recommencez la procédure en
utilisant un autre code indiqué pour la même marque
et le même type d’appareil.
Programmation d’un code par marque
d’appareil
Vous pouvez également utiliser la méthode suivante
pour entrer le code à 4 chiffres d’un appareil donné,
en fonction de sa marque (nom).
Page 24

24 RR-1090
1. Pressez la touche MENU pour accéder au menu
de paramétrage principal.
2. Choisissez SETUP à partir du menu dans l’afficheur
LCD en pressant la touche MENU COMMAND
au-dessus du mot SETUP.
3. Pressez une des touches DEVICE, celle pour
laquelle vous souhaitez mettre en mémoire le jeu
de codes infrarouge que vous allez sélectionner.
Si vous choisissez une des touches pour maillons
multiples AV1, AV2 ou AV3, vous devrez ensuite
indiquer quel type de maillon est concerné (CD,
DVD, etc.).
4. Sélectionnez BRAND NAME (nom de marque)
en pressant la touche MENU COMMAND audessus de l’inscription correspondante.
5. Entrez la première lettre du nom de marque de
l’appareil concerné. Si nécessaire, passez à la
page suivante en pressant la touche M4, ou la
touche M3 pour revenir à la page des lettres
précédentes.
6. Sélectionnez la marque de votre appareil dans
la liste apparaissant dans l’afficheur (pressez M4
ou M3 pour faire éventuellement défiler cette liste
vers l’avant ou l’arrière). L’indication «press
POWER key to test» (pressez la touche POWER
pour essai) apparaît alors dans l’afficheur.
7. Pressez la touche POWER sur le côté droit de
la RR-1090 pour tester le premier code à 4 chiffres
disponible pour cette marque. Ce code testé est
indiqué dans l’afficheur.
Si la commande POWER éteint et allume
bien le maillon désiré, vous avez trouvé le bon
code! Vous pouvez essayer d’autres fonctions
télécommandées en pressant les touches MENU
COMMAND correspondant aux commandes
intégrées dans le code que vous avez choisi. Si tout
fonctionne correctement, pressez la touche DEVICE
(la même qu’au début de la procédure) pour
sauvegarder ce code.
Si la commande POWER ne fonctionne pas,
pressez à nouveau la touche POWER pour passer
automatiquement au code à 4 chiffres suivant réser vé
à la même marque d’appareil, ce nouveau code
apparaissant dans l’afficheur. Continuez ainsi à
presser la touche POWER et à essayer différents codes
jusqu’à trouver celui qui fonctionne. Pressez alors
la touche DEVICE pour le sauvegarder.
Si aucun des codes disponibles pour la
marque concernée ne fonctionne, il vous sera
proposé de chercher parmi tous les codes
correspondant au type de maillon sélectionné.
Choisissez YES pour effectuer cette recherche, (et
passez directement à l’étape 5 du paragraphe suivant).
Choisissez NO pour revenir au menu principal.
Programmation par recherche
automatique
Pour rechercher un code parmi la liste complète
fournie pour un type de maillon donné:
1. Pressez la touche MENU pour accéder au menu
de paramétrage principal.
2. Choisissez SETUP à partir du menu dans l’afficheur
LCD en pressant la touche MENU COMMAND
au-dessus du mot SETUP.
3. Pressez une des touches DEVICE, celle pour
laquelle vous souhaitez mettre en mémoire le jeu
de codes infrarouge que vous allez sélectionner.
Si vous choisissez une des touches pour maillons
multiples AV1, AV2 ou AV3, vous devrez ensuite
indiquer quel type de maillon est concerné (CD,
DVD, AMP, etc.).
4. Sélectionnez SEARCH (rechercher) en pressant
la touche MENU COMMAND au-dessus de
l’inscription correspondante. L’indication «press
POWER key to test» (pressez la touche POWER
pour essai) apparaît alors dans l’afficheur.
5. Pressez la touche POWER sur le côté droit de
la RR-1090 pour tester le premier code à 4 chiffres
disponible pour cette marque. Ce code testé est
indiqué dans l’afficheur.
Si la commande POWER éteint et allume
bien le maillon désiré, vous avez trouvé le bon
code ! Vous pouvez essayer d’autres fonctions
télécommandées en pressant les touches MENU
COMMAND correspondant aux commandes
intégrées dans le code que vous avez choisi. Si tout
fonctionne correctement, pressez la touche DEVICE
(la même qu’au début de la procédure) pour
sauvegarder ce code.
Page 25

25Français
Si la commande POWER ne fonctionne pas,
pressez à nouveau la touche POWER pour passer
automatiquement au code à 4 chiffres suivant réser vé
à la même marque d’appareil, ce nouveau code
apparaissant dans l’afficheur. Continuez ainsi à
presser la touche POWER et à essayer différents codes
jusqu’à trouver celui qui fonctionne. Pressez alors
la touche DEVICE pour le sauvegarder.
Si aucun des codes disponibles pour la
marque concernée ne fonctionne, un signal
vous indiquera que vous avez essayé tous les codes
disponibles. Pressez la touche MENU pour revenir
au menu principal.
Commandes d’apprentissage
Si le jeu des commandes préprogrammées n’inclut
pas certaines fonctions dont vous avez besoin, vous
pouvez apprendre à la RR-1090 des commandes
individuelles à partir de vos télécommandes préexistantes:
1. Placez la RR-1090 et la télécommande d’origine
sur une surface plane, face à face, comme illustré
sur la Figure 2 au début de ce manuel. Les signaux
infrarouge envoyés par la première télécommande
doivent pouvoir être correctement captés par le
récepteur IR de la RR-1090.
2. Pressez la touche MENU pour accéder au menu
de paramétrage principal.
3. Choisissez LEARNING (apprentissage) à partir
du menu dans l’afficheur LCD en pressant la touche
MENU COMMAND au-dessus du mot
LEARNING.
4. Pressez une des touches DEVICE, celle pour
laquelle vous souhaitez mettre en mémoire le jeu
de codes infrarouge que vous allez sélectionner.
5. Sélectionnez la touche COMMAND de la
RR-1090 pour laquelle vous souhaitez mémoriser
la commande. Vous pouvez choisir une des
touches de fonctions de base ou une des touches
MENU COMMAND (en utilisant éventuellement
une nouvelle page de MENU COMMAND pour
utiliser une touche encore inexploitée). L’afficheur
doit faire apparaître le mot «LEARNING».
6. Pressez et maintenez la pression sur la touche
correspondante de la télécommande originale
pour envoyer le code IR devant être appris par
la RR-1090.
Si la procédure d’apprentissage échoue, la
RR-1090 affiche le mot «ERROR» et revient
automatiquement à l’étape 5. de la procédure cidessus. Repositionnez les deux télécommandes, et
recommencez en pressant et maintenant la pression
sur la touche voulue de la télécommande originale.
Lorsque le code est appris avec succès, la
RR-1090 vous demande immédiatement de donner
un nom à cette nouvelle commande. Choisissez NO
si vous désirez conserver le nom couramment affiché.
Choisissez YES pour choisir un nom personnalisé,
et entrez les lettres composant ce dernier (en utilisant
les touches M3 et M4 pour passer d’une liste de lettres
à une autre). Chaque nom peut comporter jusqu’à
cinq caractères. Pressez ensuite la touche MENU
pour mémoriser ce nom.
Pour apprendre d’autres commandes,
répétez la procédure ci-dessus à partir de l’étape
5. Pour retourner au menu principal, pressez la touche
MENU.
NOTE
: La RR-1090 possède une capacité de 240
commandes. Si cette capacité est atteinte, la
télécommande affiche les mots «COMMAND FULL»
et ne vous permet plus d’apprendre de commandes
supplémentaires. Voir la section concernant
l’effacement de certaines commandes pour libérer
éventuellement de l’espace mémoire dans la
télécommande.
Programmation Macro
Quatre touches sur la RR-1090 (repérées M1, M2,
M3 et M4) permettent de mettre en mémoire des
séquences de touches macro, pour envoyer de
multiples commandes en ne pressant qu’une seule
touche, une fois.
Pour programmer une séquence macro, la première
chose est de s’assurer que toutes les fonctions à
intégrer dans cette séquence sont bien déjà
mémorisées dans la RR-1090 – la séquence macro
n’effectue en fait qu’un enregistrement d’une séquence
de commandes par touches individuelles de la
RR-1090.
Page 26

26 RR-1090
1. Pressez la touche MENU pour atteindre le menu
principal.
2. Pressez la touche PAGE pour aller à la page
suivante du menu des options.
3. Sélectionnez «MACRO» dans l’afficheur LCD.
4. Pressez la touche MACRO (M1, M2, M3 ou M4)
à partir de laquelle vous souhaitez mettre en
mémoire la nouvelle séquence macro à
enregistrer.
5. Entrez le nouveau nom pour la macro en pressant
sur les touches MENU COMMAND correspondant aux lettres visibles dans l’afficheur
(en utilisant éventuellement les touches M3 et M4
pour naviguer dans les différentes listes de lettres
réellement affichées). Chaque nom peut comporter
jusqu’à cinq caractères. Pressez ensuite la touche
MENU pour mémoriser ce nom.
6. Mémorisez la première étape (première
commande) de la macro. Pour ce faire, pressez
une touche DEVICE pour changer éventuellement
l’appareil concerné par cette première
commande. Puis pressez une des touches
individuelles COMMAND concernant la fonction
à effectuer (pressez éventuellement la touche PAGE
pour accéder aux fonctions supplémentaires).
7. Pour mémoriser d’autres commandes, commencez
par presser la touche MACRO sélectionnée, afin
de confirmer la précédente commande puis de
mémoriser la commande (fonction) suivante.
Répétez cette procédure jusqu’à ce que toutes
les commandes – fonctions – aient été mémorisées.
8. Lorsque toute la séquence macro a été ainsi
enregistrée, pressez la touche MENU pour stocker
en mémoire cette séquence macro intégrale.
NOTE
: une macro séquence peut contenir jusqu’à
dix commandes individuelles et indépendantes, non
compris les éventuelles pressions nécessaires sur
plusieurs touches DEVICE.
Personnalisation d’une page
Généralement, toutes les fonctions mémorisées sous
un appareil «DEVICE» donné concerne le même
appareil, physiquement parlant. Cependant, il est
possible de concevoir une page personnalisée,
appelée «CUSTOM PAGE», qui inclura des fonctions
indépendantes copiées à partir d’autres appareils.
Par exemple, vous pouvez construire une page
«CUSTOM PAGE» personnalisée contenant toutes
les fonctions communes à tous les appareils de
l’installation, afin d’avoir rapidement à portée de
la main toutes les fonctions les plus couramment
utilisées. Cette page personnalisée sera ensuite
accessible en pressant la touche DEVICE sous laquelle
elle aura été mémorisée. Pour construire une telle
page personnalisée:
1. Pressez la touche MENU pour accéder au menu
de paramétrage principal.
2. Choisissez «PREFERENCE» à partir du menu dans
l’afficheur LCD.
3. Choisissez «CUSTOM PAGE» à partir du menu
dans l’afficheur LCD.
4. Pressez la touche DEVICE, sur laquelle vous
souhaitez mettre en mémoire le jeu de codes
infrarouge composant votre page personnalisée
CUSTOM PAGE.
5. Entrez le nouveau nom pour la touche DEVICE
concernée, en pressant les touches MENU
COMMAND correspondant aux lettres visibles
dans l’afficheur (en utilisant éventuellement les
touches M3 et M4 pour naviguer dans les
différentes listes de lettres réellement affichées).
Chaque nom peut comporter jusqu’à cinq
caractères. Pressez ensuite la touche MENU pour
mémoriser ce nom.
6. Pressez une touche DEVICE pour changer
éventuellement l’appareil concerné par la
première commande que vous souhaitez copier
dans votre page personnalisée.
7. Pressez la touche COMMAND de la première
fonction que vous souhaitez ajouter à la page
personnalisée CUSTOM PAGE.
8. Choisissez la position dans la page personnalisée
CUSTOM PAGE où vous souhaitez placer cette
fonction, en pressant n’importe quelle touche du
groupe MENU COMMAND. Le nom pour cette
commande apparaît alors à la position choisie.
9. Répétez les étapes 6 à 8 pour toutes les
commandes supplémentaires que vous désirez
ajouter à votre page personnalisée CUSTOM
PAGE.
Page 27

27Français
Si vous souhaitez réarranger les commandes, pressez
la touche M4. Pressez la touche MENU pour revenir
au menu principal.
NOTE
: Pour copier des commandes supplémentaires
à n’importe quel moment, répétez les étapes 1 à 3
et les étapes 6 à 10. Puisque vous les ajoutez à
une page personnalisée déjà existante, il n’est pas
nécessaire de reprendre les étapes 4 et 5, qui seront
ignorées.
Effacement de commandes mémorisées
Vous pouvez effacer des commandes précédemment
mémorisées:
1. Pressez la touche DEVICE contenant la commande
que vous souhaitez effacer.
2. Pressez la touche MENU pour atteindre le menu
principal
3. Choisissez «EDIT» dans l’afficheur LCD
4. Choisissez «DELETE KEY» dans l’afficheur LCD.
5. Pressez la touche COMMAND que vous
souhaitez effacer. Vous pouvez supprimer des
commandes régies par les touches de base BASIC
COMMAND ou par les touches MENU
COMMAND (en utilisant éventuellement la touche
PAGE pour passer d’une page de fonctions à
une autre).
6. Choisissez YES (oui) ou NO (non) pour confirmer
l’effacement.
7. Répétez les étapes 5 et 6 pour supprimer
éventuellement d’autres commandes. Si
nécessaire, pressez la touche M4 pour arranger
automatiquement les commandes conservées
dans l’afficheur. Pressez la touche MENU pour
revenir au menu principal.
Généralisation du volume «Punchthrough»
Dans la plupart des installations, la commande de
VOLUME est toujours réglée à partir du téléviseur
ou du préamplificateur-processeur audio-vidéo. C’est
pour cela que la RR-1090 propose une commande
appelée «VOLUME PUNCH-THROUGH», qui copie
le code de commande de réglage du volume du
téléviseur, ou du processeur numérique – à votre
convenance – pour tous les autres maillons du système
commandés via les autres touches DEVICE: lecteurs
de CD et de DVD, magnétoscopes VCR, récepteurs
satellite, etc. Après avoir activé cette fonction, le
réglage de volume du téléviseur ou du processeur
numérique est accessible quel que soit l’appareil
(DEVICE) choisi via les touches correspondantes.
Pour utiliser cette fonction VOLUME PUNCHTHROUGH:
1. Pressez la touche MENU pour accéder au menu
principal.
2. Pressez l’option (mot) PREFERENCE dans
l’afficheur LCD.
3. Pressez l’option PUNCH THROUGH dans
l’afficheur LCD.
4. Choisissez les codes de commande de réglage
du volume de l’appareil (téléviseur, processeur
numérique par exemple) à copier sur les autres
appareils (DEVICE) télécommandables. Vous
choisirez donc soit TV VOL, soit AMP VOL dans
l’afficheur LCD. Si vous choisissez AMP VOL, vous
devrez ensuite indiquer quel est l’appareil
concerné par cette option (AV1, AV2 ou AV3) à
partir de l’affichage LCD suivant, en pressant la
touche MENU COMMAND.
5. Pressez une touche DEVICE, celle correspondant
l’appareil cible sur lequel les codes de commande
de réglage de volume doivent être copiés. La
fonction VOLUME PUNCH THROUGH ne peut
toutefois être copiée sur un téléviseur ou un
appareil de gestion audio-vidéo. Elle peut par
contre être copiée sur toutes les sources (CD, DVD,
SAT, LD, etc.). Si vous choisissez un appareil
inadapté, rien ne se passe. Si vous sélectionnez
un appareil (DEVICE) convenable, l’inscription
«PUNCH THROUGH OK» apparaît dans
l’afficheur.
6. Pressez la touche MENU pour revenir au menu
principal.
Page 28

28 RR-1090
Fonction de remise à zéro RESET
Vous pouvez à tout moment revenir à tous les réglages
de sortie d’usine de la RR-1090, en utilisant la fonction
de remise à zéro RESET.
NOTE
: L’utilisation de la commande RESET a pour
effet d’effacer absolument tous les réglages,
apprentissages, éditions de noms précédemment
effectués. Soyez certain que c’est bien ce que vous
voulez faire !
Pour remettre à zéro la télécommande RR-1090:
1. Pressez la touche MENU pour atteindre le menu
principal.
2. Pressez la touche PAGE pour activer la deuxième
page des options.
3. Choisissez REMOTE SETTINGS dans l’afficheur
LCD en pressant la touche MENU COMMAND
placée au-dessus de la première lettre de
l’inscription «REMOTE SETTINGS».
4. Choisissez l’option RESET dans l’afficheur en
pressant la touche MENU COMMAND placée
au-dessous de la première lettre du mot «RESET».
5. Choisissez YES (oui) ou NO (non) pour confirmer
ou non la remise à zéro. Si vous choisissez YES,
la RR-1090 écrase instantanément toutes les
informations personnelles que vous avez entrées
dans la mémoire de la télécommande. Cela se
traduit par l’apparition dans l’afficheur de
plusieurs messages indiquant la progression de
l’effacement, puis par l’affichage de l’expression
«DEFAULT SETTING».
6. Pressez la touche MENU pour revenir au menu
principal.
Fonction de copie DUPLICATE
La fonction de copie DUPLICATE permet de transférer
la programmation d’une RR-1090 vers une seconde
RR-1090, y compris les codes de commandes appris
et les noms personnalisés. Vous pouvez également
ne copier que les codes concernant un seul appareil
(DEVICE), ou ceux des huit appareils (8 touches
DEVICE) simultanément. Pour effectuer cette copie,
commencez par placer les deux télécommandes
RR-1090 face à face, sur le même plan, puis procédez
comme suit:
Sur la télécommande qui recevra les
données:
1. Pressez la touche MENU pour atteindre le menu
principal.
2. Pressez la touche PAGE pour activer la deuxième
page des options.
3. Choisissez DUPLICATE dans l’afficheur LCD en
pressant la touche MENU COMMAND adjacente
à l’inscription DUPLICATE.
4. Choisissez l’option RECEIVE dans l’afficheur en
pressant la touche MENU COMMAND adjacente
à l’inscription RECEIVE. L’inscription «READY TO
RECEIVE» (Prêt à recevoir) apparaît alors dans
l’afficheur.
Sur la télécommande qui enverra les
données:
1. Pressez la touche MENU pour atteindre le menu
principal.
2. Pressez la touche PAGE pour activer la deuxième
page des options.
3. Choisissez DUPLICATE dans l’afficheur LCD en
pressant la touche MENU COMMAND adjacente
à l’inscription DUPLICATE.
4. Pour transmettre les données pour tous
les appareils DEVICE, choisissez l’option
«COPY ALL DEVICES» dans le menu. Pour ne
transmettre les données que d’un seul
appareil, choisissez l’option «COPY ONE
DEVICE», puis appuyez sur la touche DEVICE
de l’appareil dont vous voulez copier uniquement
les codes. Cela débute le transfert des données
correspondantes, l’indication «SENDING»
(transfert) apparaissant alors dans l’afficheur.
A la fin du transfert des données, une nouvelle
indication apparaît dans l’afficheur de la RR-1090:
• Si le transfert des données s’est
correctement passé, l’indication «FINISH
SENDING» (transfert terminé) apparaît.
• Si le transfert des données a échoué,
l’indication «SENDING ERROR» (erreur dans le
transfert) apparaît dans l’afficheur, et la
télécommande repasse à son mode de
fonctionnement normal. Repositionnez les deux
télécommandes et recommencez.
Page 29

29Français
NOTE
: Ne pas essayer d’utiliser cette fonction
DUPLICATE pour transmettre des données d’une
télécommande différente vers une télécommande
RR-1090.
Noms personnalisés
Les noms correspondant à chaque touche d’appareil
DEVICE et ceux des touches de fonctions COMMAND
peuvent être édités, c’est-à-dire modifiés par vous.
De même, la position d’une touche d’une commande
particulière COMMAND, pour un appareil donné,
peut être modifiée et échangée par rapport à une
autre commande.
Editer le nom d’une source DEVICE
Pour changer le nom qui apparaît au centre de
l’afficheur lorsque vous sélectionnez un appareil
DEVICE:
1. Pressez la touche DEVICE dont vous souhaitez
changer le nom.
2. Pressez la touche MENU pour atteindre le menu
principal.
3. Choisissez EDIT dans l’afficheur.
4. Choisissez l’option DEVICE NAME dans
l’afficheur LCD.
5. Entrez le nouveau nom de l’appareil DEVICE en
pressant les touches MENU COMMAND
correspondant aux lettres apparaissant dans
l’afficheur (utilisez éventuellement les touches M3
et M4 pour passer d’une page de lettres à une
autre). Les noms peuvent comporter jusqu’à
7 lettres maximum. Après avoir entré le nouveau
nom, pressez la touche MENU pour revenir au
menu principal.
Editer le nom d’une commande
COMMAND
Pour changer le nom d’une des touches COMMAND
apparaissant dans l’afficheur LCD près de celles-ci:
1. Pressez la touche DEVICE concernant l’appareil
dont vous souhaitez changer le nom des touches
COMMAND.
2. Pressez la touche MENU pour atteindre le menu
principal.
3. Choisissez EDIT dans l’afficheur.
4. Choisissez l’option KEY NAME dans l’afficheur
LCD.
5. Pressez la touche BASIC COMMAND ou MENU
COMMAND (en utilisant éventuellement la touche
PAGE pour les choix supplémentaires) que vous
souhaitez renommer.
6. Entrez le nouveau nom de la touche DEVICE en
utilisant les touches MENU COMMAND
correspondant aux lettres apparaissant dans
l’afficheur (utilisez éventuellement les touches M3
et M4 pour passer d’une page de lettres à une
autre). Les noms peuvent comporter jusqu’à
5 lettres maximum. Après avoir entré le nouveau
nom, pressez la touche MENU pour revenir au
menu principal.
7. Répétez les étapes 5 et 6 pour modifier d’autres
noms de touches si désiré. Pressez la touche
MENU pour revenir au menu principal.
Déplacer le nom d’une commande
COMMAND
Pour modifier la position d’une commande accessible
via les touches MENU COMMAND dans l’afficheur
LCD:
1. Pressez la touche DEVICE concernant l’appareil
commandé par la touche COMMAND que vous
souhaitez déplacer.
2. Pressez la touche MENU pour atteindre le menu
principal.
3. Choisissez EDIT dans l’afficheur.
4. Choisissez l’option MOVE KEY dans l’afficheur
LCD.
5. Sélectionnez la touche MENU COMMAND à
déplacer.
6. Sélectionnez la nouvelle position pour cette touche
COMMAND.
7. Les deux fonctions ont respectivement changé de
touches.
Page 30

30 RR-1090
Arrangement automatique des noms de
commandes
Comme alternative au déplacement manuel de
certaines touches, vous pouvez également demander
à la RR-1090 de réarranger automatiquement la
position des touches MENU COMMAND pour un
appareil DEVICE donné.
1. Pressez la touche DEVICE concernant l’appareil
commandé par les touches COMMAND que vous
souhaitez réarranger.
2. Pressez la touche MENU pour atteindre le menu
principal.
3. Choisissez EDIT dans l’afficheur.
4. Choisissez l’option AUTO-ARRANGE dans
l’afficheur LCD.
Autres options de configuration
La RR-1090 intègre aussi un rétroéclairage de son
affichage et des bips sonores pour faciliter, si désiré,
son utilisation. On peut enfin utiliser une protection
par mot de passe pour protéger l’accès aux fonctions
de programmation.
Rétroéclairage
Le rétroéclairage permet de voir l’afficheur LCD même
en très faible lumière extérieure. Il y a trois réglages
disponibles:
• Avec capteur de lumière. Le capteur mesure
la lumière ambiante et, si nécessaire, active le
rétroéclairage pendant cinq secondes dès qu’une
touche est pressée. (Réglage par défaut).
• En permanence. Quelle que soit la lumière
externe, le rétroéclairage est activé pendant cinq
secondes dès qu’une touche est pressée.
• Jamais. Le rétroéclairage est complètement
désactivé.
Pour configurer le rétroéclairage:
1. Pressez la touche MENU pour atteindre le menu
principal.
2. Pressez la touche PAGE pour activer la deuxième
page des options.
3. Choisissez REMOTE SETTINGS dans l’afficheur
LCD.
4. Choisissez l’option BACKLIT dans l’afficheur en
pressant la touche MENU COMMAND placée
au-dessous de la première lettre du mot «RESET».
5. Choisissez une des trois options présentes dans
l’afficheur LCD.
Bips sonores
La RR-1090 possède une option permettant
d’accompagner chaque pression sur une touche par
un bip sonore de confirmation. Cette fonction peut
être activée (choix par défaut) ou désactivée.
Pour configurer l’activation ou non des bips sonores:
1. Pressez la touche MENU pour atteindre le menu
principal.
2. Pressez la touche PAGE pour activer la deuxième
page des options.
3. Choisissez REMOTE SETTINGS dans l’afficheur
LCD.
4. Choisissez l’option BEEP SOUND dans l’afficheur
LCD.
5. Choisissez l’option SOUND ENABLE (bip activé)
ou SOUND DISABLE (bip désactivé).
Mot de passe
Un mot de passe peut être choisi puis activé pour
éviter l’accès à toutes les opérations de paramétrage
et de programmation de la RR-1090. Une fois défini
et activé, ce mot de passe devient nécessaire pour
accéder aux menus de réglage setup.
Le mot de passe défini en usine par défaut est «2000»,
mais la protection est désactivée par défaut.
Page 31

Français
31
Pour activer ou désactiver la protection par
mot de passe:
1. Pressez la touche MENU pour atteindre le menu
principal.
2. Pressez la touche PAGE pour activer la deuxième
page des options.
3. Choisissez REMOTE SETTINGS dans l’afficheur
LCD.
4. Choisissez l’option PASSWORD (mot de passe)
dans l’afficheur LCD.
5. Choisissez l’option ENABLE (activé) ou DISABLE
(désactivé).
6. Si demandé, entrez le mot de passe en pressant
les touches MENU COMMAND correspondant
aux caractères présents dans l’afficheur (en
utilisant éventuellement les touches M3 et M4 pour
changer les caractères affichés). Après avoir entré
le mot de passe, pressez la touche MENU.
Pour changer le mot de passe:
1. Pressez la touche MENU pour atteindre le menu
principal.
2. Pressez la touche PAGE pour activer la deuxième
page des options.
3. Choisissez REMOTE SETTINGS dans l’afficheur
LCD.
4. Choisissez l’option PASSWORD (mot de passe)
dans l’afficheur LCD.
5. Choisissez l’option CREATE (créer) dans l’afficheur
LCD.
6. Lorsque demandé, entrez l’ancien mot de passe
en pressant les touches MENU COMMAND
correspondant aux caractères présents dans
l’afficheur (en utilisant éventuellement les touches
M3 et M4 pour changer les caractères affichés).
Après avoir entré le mot de passe, pressez la
touche MENU.
7. Entrez maintenant le nouveau mot de passe en
pressant les touches MENU COMMAND
correspondant aux caractères voulus, et en utilisant
éventuellement les touches M3 et M4 pour
modifier la liste des caractères affichés. Les mots
de passe comportent quatre caractères, lettres
et/ou chiffres au choix, dans n’importe quelle
combinaison. Pressez la touche MENU.
8. Ré-entrez le nouveau mot de passe pour confirmer
et pressez la touche MENU. L’indication
«PASSWORD SET» de confirmation apparaît.
Vous pouvez ensuite l’activer (ENABLE) ou le
désactiver (DISABLE).
NOTE
: Une fois le mot de passe changé, vous ne
pourrez plus accéder aux menus de réglage si vous
oubliez ce nouveau mot de passe! A moins d’avoir
vraiment besoin d’une protection sérieuse, nous vous
conseillons de conserver le mot de passe par défaut
«2000».
Programmation par logiciel PC
Le logiciel PC-LINK pour ordinateur PC Windows
95/98 fourni avec la télécommande RR-1090 peut
être utilisé pour configurer complètement la
télécommande. Plusieurs fichiers de configuration
intègrent un jeu complet d’options, de commandes,
de macro séquences, et de noms personnalisés pour
personnaliser complètement la RR-1090. Ces fichiers
de configuration peuvent être sauvegardés et ouverts
à partir du disque dur. Ils peuvent également être
chargés ou récupérés directement sur ou dans la
RR-1090, en utilisant le câble série également fourni.
Cette technique permet également de programmer
précisément plusieurs télécommandes RR-1090.
En plus, la majorité des options de configuration de
la RR-1090 peut être modifiée via le logiciel PC-LINK,
procédure qui peut s’avérer beaucoup plus souple
que celle consistant à utiliser les menus de réglage
intégrés dans la RR-1090.
Installation du logiciel PC-LINK
Pour installer et lancer le logiciel PC-LINK sur un
ordinateur équipé de Windows 95/98 (uniquement):
1. Insérez la disquette 1 repérée DISK 1 dans votre
lecteur de disquette.
2. Lancez le programme d’installation SETUP.EXE
en double cliquant sur son icône dans Windows
Explorer ou en tapant A:SETUP.EXE dans le menu
de démarrage.
Page 32

32 RR-1090
3. Suivez les indications sur l’écran pendant la
procédure d’installation, en acceptant
l’emplacement par défaut du nouveau dossier
(C:\PROGRAMS\HT2000) ou en choisissant un
autre emplacement en cliquant sur BROWSE.
4. Pendant l’installation, il vous sera demandé
d’insérer la deuxième disquette repérée DISK 2.
Lorsque l’installation sera terminée, il vous sera
demandé de redémarrer l’ordinateur pour
compléter l’installation.
5. Démarrer le logiciel PC-LINK en double cliquant
sur son icône HT2000.
Chargement et sauvegarde de fichiers
de configuration
Pour utiliser le logiciel PC-LINK, vous devez ouvrir
un fichier de configuration qui apparaîtra sur l’écran
de l’ordinateur comme illustré au début de ce manuel.
De tels fichiers sont ensuite stockés dans votre
ordinateur avec l’extension «*.HTR».
NOTE:
La configuration en usine, par défaut, est
installée dans le sous-dossier DEFAULT du dossier
HT2000, sous le nom «DEFAULT.HTR».
Pour ouvrir un fichier de configuration à
partir du disque dur de l’ordinateur:
1. Choisissez OPEN dans le menu FILE.
2. Utilisez la boîte de dialogue pour trouver le fichier
DEFAULT.HTR (ou n’importe quel autre fichier de
votre choix).
3. Cliquez sur le bouton OPEN
Pour sauvegarder un fichier de configuration sur le disque dur de l’ordinateur:
1. Pour sauvegarder le fichier de configuration sous
le même nom que celui déjà ouvert, choisissez
simplement l’option SAVE du menu FILE.
2. Pour sauvegarder le fichier de configuration sous
un nouveau nom (donc en conservant l’ancien,
ouvert, inchangé), choisissez l’option SAVE AS
du menu FILE. Entrez le nouveau nom dans la
boîte de dialogue. (L’extension.HTR sera ajoutée
automatiquement). Cliquez sur le bouton SAVE.
Retrouver ou stocker des fichiers de
configuration
En utilisant le logiciel PC-LINK et le câble série fournis,
vous pouvez à tout moment sauvegarder ou charger
un fichier de configuration, de la télécommande RR-1090
au disque dur de l’ordinateur et vice-versa. Par exemple,
vous pouvez charger la configuration actuelle de votre
télécommande sur l’ordinateur. Puis la modifier via le
logiciel PC-LINK. Enfin, charger la nouvelle configuration
ainsi modifiée dans la télécommande.
Pour brancher la RR-1090 sur l’ordinateur:
1. Branchez la prise modulaire 4 broches du câble
fourni dans la prise correspondante sous la
télécommande.
2. Branchez l’autre extrémité du câble dans une prise
série 9 broches DB-9 de l’ordinateur (prise repérée
COM1 ou COM2).
3. Lancez le programme PC-LINK depuis l’afficheur
LCD en pressant la touche MENU COMMAND
correspondante.
Placez la télécommande en mode de
transfert de données DATA TRANSFER:
1. Pressez la touche MENU pour atteindre le menu
principal.
2. Pressez la touche PAGE pour passer sur la seconde
page d’option.
3. Choisissez l’option «PC LINK» dans l’afficheur
LCD en pressant la touche MENU COMMAND
correspondante.
Pour charger un fichier de configuration
depuis la télécommande sur l’ordinateur:
1. Assurez-vous d’abord que la télécommande est
bien en mode de transfert de données DATA
TRANSFER.
2. Choisissez UPLOAD (charger) dans le menu FILE
du logiciel PC-LINK. L’indication «UPLOADING…»
(chargement…) apparaît dans l’afficheur LCD
pendant ce transfert.
3. Lorsque le chargement est terminé, le fichier de
configuration correspondant s’ouvre dans le
logiciel PC-LINK. Il peut alors y être modifié,
envoyé vers une autre télécommande RR-1090,
ou simplement sauvegardé sur le disque dur.
Page 33

Français
33
Pour charger un fichier de configuration
depuis l’ordinateur vers la télécommande:
1. Assurez-vous d’abord que la télécommande est
bien en mode de transfert de données DATA
TRANSFER.
2. Choisissez DOWNLOAD (télécharger) dans le
menu FILE du logiciel PC-LINK. L’indication
«DOWNLOADING…» (téléchargement…)
apparaît dans l’afficheur LCD pendant ce transfert.
3. Lorsque le chargement est terminé, le fichier de
configuration correspondant s’ouvre dans le
logiciel PC-LINK. Il peut alors y être modifié,
envoyé vers une autre télécommande RR-1090,
ou simplement sauvegardé sur le disque dur.
4. Quand l’opération de téléchargement
DOWNLOAD est terminée, la nouvelle
configuration est installée dans la RR-1090,
«écrasant» les précédents paramètres qui
régissaient son fonctionnement.
Modification des fichiers de
configuration
Le logiciel PC-LINK peut être utilisé pour voir tous
les paramètres courants d’un fichier de configuration
ouvert, et modifier la plupart de ces paramètres. Ce
nouveau fichier de configuration ainsi modifié peut
ensuite être simplement sauvegardé sur le disque,
ou téléchargé sur la RR-1090 en remplacement du
précédent.
Voici les options de modifications du fichier permises
par le logiciel PC-LINK:
Pour sélectionner un appareil DEVICE, pour
visualisation simple de ses paramètres ou
modification, choisissez l’appareil via sa touche
DEVICE. Les noms de touches et autres paramètres
apparaissent en clair dans l’écran du logiciel.
Pour renommer un appareil DEVICE,
choisissez l’option DEVICE NAME (nom d’appareil)
dans le menu EDIT ou double-cliquez sur la boîte
DEVICE sur l’écran principal. Tapez simplement le
nouveau nom dans la boîte de dialogue puis cliquez
sur OK.
Pour renommer une touche KEY, cliquez sur
la touche désirée dans l’écran principal et choisissez
l’option KEY NAME (nom de touche) dans le menu
EDIT ou double-cliquez sur la touche désirée. Tapez
le nouveau nom et cliquez sur OK.
Pour effacer une touche, cliquez sur la touche
désirée dans l’écran principal et choisissez DELETE
KEY (effacer touche) dans le menu EDIT. Cliquez sur
YES ou NO pour confirmer.
Pour réarranger les touches d’un appareil
donné, choisissez l’option ARRANGE KEY dans
le menu EDIT. Vous pouvez également déplacer
manuellement n’importe quelle touche en cliquant
dessus, en maintenant la pression sur le bouton de
la souris, puis en déplaçant ainsi la touche vers
l’endroit voulu.
Pour voir les différentes étapes d’une macro
séquence, choisissez la séquence macro voulue
dans le menu MACRO. Les différentes étapes de cette
séquence sont alors affichées à droite et en bas de
l’écran principal.
Pour activer ou non le bip sonore KEY TONE,
choisissez l’option KEY TONE dans le menu SETTING
(réglages). Cliquez sur l’option désirée dans la boîte
de dialogue.
Pour modifier le fonctionnement du
rétroéclairage BACKLIGHT, choisissez l’option
BACKLIT dans le menu SETTING. Cliquez sur l’option
désirée dans la boîte de dialogue.
Pour voir le réglage du mot de passe
PASSWORD, choisissez l’option PASSWORD dans
le menu SETTING.
Pour voir le réglage de généralisation du
volume VOLUME PUNCH-THROUGH,
choisissez l’option PUNCH THROUGH dans le menu
SETTING.
Page 34

34 RR-1090
Inhaltsverzeichnis
1. Aufbau 2
2. Lernvorgang 4
3. Beispiel für die zu einem Gerät
gehörenden Befehlsseiten 4
4. PC-Link Software 5
Einleitung ................................................ 35
Wesentliche Merkmale 35
Einige Vorsichtsmaßnahmen 35
Einlegen und Aufladen der Akkus 35
Zu dieser Anleitung ................................. 36
Infrarot-Empfänger/-Sender 36
Gerätetasten 36
Tasten für die Grundbefehle 36
Menübefehlstasten und LCD-Display 36
PAGE-Taste 36
MACRO-Tasten 36
MENU-Taste 36
POWER-Taste 36
Serieller Anschluß 37
Macroprogrammierung 40
Custom Page 41
Löschen gespeicherter Befehle 41
Volume Punch-through 42
RESET-Funktion 42
DUPLICATE-Funktion 42
Tastenbezeichnungen ............................... 43
Ändern einer GERÄTEBEZEICHNUNG 43
Ändern einer BEFEHLSBEZEICHNUNG 43
Positionsänderung einer BEFEHLSBEZEICHNUNG 44
Automatische Positionierung von
BEFEHLSBEZEICHNUNGEN 44
Konfigurationsmöglichkeiten .................... 44
Hintergrund-Beleuchtung 44
Signalton 44
Passwort 45
PC-Link Software .................................... 45
Installation der PC-LINK Software 46
Laden und Speichern von Konfigurationsdateien 46
Up- und Downloaden von Konfigurationsdateien 46
Modifizieren von Konfigurationsdateien 47
Betrieb der RR-1090 ............................... 37
Aktivieren der RR-1090 37
Senden von Infrarotbefehlen 37
Senden von Macro-Befehlen 37
Programmieren der Befehlcodes ............... 38
Vierzifferncodierung 38
Suche eines Codes durch Eingabe
des Markennamens 38
Auto-Search-Verfahren 39
Lernen von Befehlen 39
Vierzifferncodes ...................................... 92
A/V 92
TV 92
VCR 93
CD 93
DVD 94
LD 94
SAT/DSS 95
Page 35

Deutsch
35
Einleitung
Vielen Dank, daß Sie sich für die Universalfernbedienung RR-1090 entschieden haben. Diese
Rotel-Fernbedienung kann bis zu acht Infrarot-Fernbedienungen ersetzen und zur Fernsteuerung von
Audio-/Videogeräten von Rotel und anderen
Herstellern genutzt werden. Die RR-1090 verfügt über
Befehlcodes für mehrere Hundert Audio-/Videogeräte
und kann darüber hinaus Befehle anderer
Fernbedienungen lernen. Der Betrieb der RR-1090
ist einfach. Wenige Tastendrücke genügen und über
das LCD-Display stehen Ihnen die erforderlichen
Informationen zur Verfügung.
Wesentliche Merkmale
• Einfache Programmierung dank vorhandener
Befehlcodes für mehrere Hundert Geräte.
• Die RR-1090 ist so vorprogrammiert, daß der
Betrieb von Rotel-Geräten nach Drücken der
betreffenden Gerätetaste sofort möglich ist.
• Die RR-1090 kann zusätzliche Befehle von
anderen Fernbedienungen lernen.
• Das LCD-Display ermöglicht einen einfachen,
menügeführten Betrieb.
• Alle Bezeichnungen können beliebig umbenannt
und somit auch der Sprache des Benutzers
angepaßt werden. Dies gilt sowohl für die
menügeführten Tasten im LCD-Display als auch
für die Tastenbezeichnungen, die bei Drücken
einer festen Taste im LCD-Display erscheinen.
• Hintergrund-Beleuchtung erleichtert den Betrieb
in dunklen Räumen; optional kann ein Signalton
aktiviert werden, der dann bei jedem Tastendruck
zu hören ist.
• Die RR-1090 verfügt über vier MACRO-Tasten,
über die auf Tastendruck bis zu zehn Befehle
gesendet werden können.
• Im Lieferumfang enthalten sind Akkus, Ladegerät,
ein serielles Kabel und Software zur
Programmierung der RR-1090 über jeden Windows® 95/98-Computer.
Einige Vorsichtsmaßnahmen
• Die RR-1090 ist zwar ausgesprochen
widerstandsfähig, jedoch auch nicht unzerstörbar.
Bitte nicht fallen lassen!
• Setzen Sie die RR-1090 keiner Feuchtigkeit aus.
Benutzen Sie zum Reinigen ein weiches,
fusselfreies Tuch. Verwenden Sie keine
aggressiven Reinigungsmittel.
• Das Gehäuse der Fernbedienung darf auf keinen
Fall auseinandergenommen werden. Dadurch
erlischt Ihr Garantieanspruch.
Einlegen und Aufladen der Akkus
Der RR-1090 liegen 4 Nickel-Hydrid-Akkus (Größe:
AA) sowie ein 9-V-Akku-Ladegerät bei. Werden die
Akkus schwach und müssen aufgeladen werden, so
erscheint im Display eine „LOW BATTERY“-Anzeige.
Zum Einlegen der Akkus drehen Sie die RR-1090
um und entfernen den Batteriefachdeckel , indem
Sie die Sperrvorrichtung lösen und den Deckel
abnehmen. Legen Sie die vier Akkus entsprechend
der auf dem Batteriefachboden angegebenen Polarität
ein und bringen Sie den Batteriefachdeckel wieder
in seine Position.
Zum Aufladen der Akkus stecken Sie das
Adapterkabel in die Anschlußbuchse an der linken
Seite der RR-1090 . Verbinden Sie das Netzkabel
des Akku-Ladegerätes mit einer Wandsteckdose
(Europa: 230 V/50 Hz, USA: 120 V/50 Hz). Im
Display erscheint die Anzeige „CHARGING“.
Laden Sie die Akkus über Nacht auf. Die
Fernbedienung kann auch während des
Ladevorganges genutzt werden.
HINWEIS
: Anstelle der zum Lieferumfang gehörenden
Akkus können Sie in die RR-1090 auch
herkömmliche Alkali-Batterien (Typ AA) einsetzen.
Versuchen Sie aber niemals, Alkalibatterien in das
Akku-Ladegerät einzulegen und aufzuladen.
Page 36

36 RR-1090
Zu dieser Anleitung
Siehe Abbildung 1
Im folgenden werden die Ausstattungsmerkmale der
RR-1090 beschrieben:
Infrarot-Empfänger/-Sender
Der Infrarot-Empfänger/-Sender befindet sich an der
vorderen Kante der RR-1090. Er sendet Infrarotbefehle
und muß direkt auf das fernzusteuernde Gerät
gerichtet werden. Ferner empfängt er beim Kopieren
die Konfigurationseinstellungen einer anderen
RR-1090 sowie während des Lernvorganges InfrarotCodes anderer Fernbedienungen.
Gerätetasten
Die acht runden Gerätetasten auf der RR-1090 legen
fest, welche Befehle aktiv sind. Drücken Sie z.B. die
AV1-Taste, so wird die RR-1090 zur Fernbedienung
für Ihren Rotel-Surround-Prozessor. Drücken Sie die
TV-Taste, und die RR-1090 wird zur Fernbedienung
für Ihr Fernsehgerät.
Aktivieren Sie die RR-1090, indem Sie zunächst die
GERÄTETASTE für das gewünschte Gerät drücken.
Anschließend drücken Sie zum Senden der
Infrarotsignale dieses Gerätes die Tasten für die Grundoder die Menübefehle.
HINWEIS
: Die GERÄTETASTEN AV1, AV2 und AV3
können für jeden beliebigen Gerätetyp genutzt
werden.
Menübefehlstasten und LCD-Display
Im oberen Bereich der RR-1090 sind rund um das
LCD-Display 12 rechteckige Tasten angeordnet. Diese
MENUBEFEHLSTASTEN bieten zusätzliche
Funktionen, die über Menübezeichnungen im LCDDisplay für jede Taste angezeigt werden.
Die Funktion dieser Tasten ändert sich abhängig von
der gewählten GERÄTETASTE und der angezeigten
Menüseite.
PAGE-Taste
Unter jeder GERÄTETASTE können für das angewählte
Gerät bis zu 48 Menübefehle gespeichert werden.
In einer Gruppe (oder auf einer Seite) befinden sich
jeweils 12 Befehle. Drücken Sie die PAGE-Taste, um
zur nächsten Befehlsseite zu springen. Im Display
erscheinen neue Bezeichnungen. Mit jedem Drücken
der PAGE-Taste wird die nächste Gruppe für dieses
Gerät aufgerufen oder zur ersten Seite zurückgekehrt.
MACRO-Tasten
Die vier mit M1, M2, M3 und M4 gekennzeichneten
Tasten bieten eine spezielle Macro-Funktion – mit
Drücken jeder dieser Tasten können bis zu zehn
Befehle aufgerufen werden. So können Sie beispielsweise über eine einzige Macro-Taste ein Fernsehgerät
einschalten, Kanal 5 auswählen, einen SurroundProzessor einschalten und den TV-Eingang auswählen.
Zwei der genannten MACRO-Tasten (M3 und M4)
werden auch beim Konfigurieren der RR-1090
genutzt.
Tasten für die Grundbefehle
Über die POWER-Taste an der rechten Seite der
RR-1090 sowie zwei große, runde Tasten mit 4
Funktionen und zwei kleinere, runde Tasten in der
Mitte der RR-1090 werden die wesentlichen
Funktionen Ihrer Geräte gesteuert – Power, Lautstärke,
Channel Up/Down, Schnellvorlauf, Pause usw. Die
durch Drücken dieser Tasten gesendeten Befehle
ändern sich abhängig von der gewählten
GERÄTETASTE.
MENU-Taste
Über diese Taste können im LCD-Display
Menübildschirme ausgewählt und aktiviert werden,
die beim Konfigurieren der RR-1090 helfen. Die
MENU-Taste wird während des normalen Betriebes
nicht genutzt.
POWER-Taste
Die POWER-Taste dient als Grundbefehlstaste und
wird darüber hinaus während des SETUPS genutzt.
Page 37

Deutsch
37
Serieller Anschluß
Dieser 4-Pin-Modularanschluß (RJ-45) an der Rückseite
der RR-1090 kann über das beiliegende Kabel mit
einem seriellen DB-9-Anschluß an einem Computer
verbunden werden.
Mit der zum Lieferumfang gehörenden PC-LINK
Software ist die Kommunikation zwischen der
RR-1090 und einem Windows® 95/98-Computer
und damit eine einfache und schnelle Übertragung
von Codes und Befehlen möglich. Siehe Abschnitt
„PC-Link Software“ in dieser Anleitung.
Betrieb der RR-1090
In diesem Abschnitt der Bedienungsanleitung werden
grundlegende Erläuterungen zum Betrieb der RR-1090
und zu einigen Standardfunktionen gegeben.
HINWEIS
: Unter der AV1-Speicherbank sind bei der
RR-1090 die Codes für Rotel-Surround-Prozessoren
vorprogrammiert. Die Codes für Rotel-CD-Player und
-DVD-Player sind unter den Gerätetasten CD und
DVD gespeichert.
Aktivieren der RR-1090
Um Energie zu sparen, schaltet die RR-1090 in den
„Sleep“-Modus, wenn 60 Sekunden lang keine
Eingaben gemacht wurden. Die RR-1090 kann durch
Drücken einer beliebigen Taste wieder aktiviert
werden. Im LCD-Display erscheinen bei aktivierter
Fernbedienung die entsprechenden Bezeichnungen.
Senden von Infrarotbefehlen
Mit der RR-1090 können Sie auf andere
Fernbedienungen verzichten. Sie drücken einfach
die entsprechende Gerätetaste und schon können
Sie die RR-1090 zur Fernbedienung Ihres CD-Players oder Fernsehgerätes nutzen und Befehle zum
gewünschten Gerät senden. Gehen Sie dabei
folgendermaßen vor:
1. Befindet sich die RR-1090 im „Sleep“-Modus,
drücken Sie eine beliebige Taste, um die
Fernbedienung zu aktivieren.
2. Drücken Sie eine GERÄTETASTE , um die
Befehle für das gewünschte Gerät zu aktivieren.
Für einen Rotel-Surround-Prozessor beispielweise
drücken Sie die AV1-Taste. In der Mitte des Displays erscheint eine entsprechende Anzeige.
3. Drücken Sie eine BEFEHLSTASTE
, so senden Sie einen Infrarotbefehl zu dem
von Ihnen ausgewählten Gerät. Drücken Sie
beispielsweise die Befehlstaste VOL+, um die
Lautstärke eines Rotel-Surround-Prozessors zu
erhöhen. Die Grundbefehle können über die
großen, runden Tasten in der Mitte
der Fernbedienung und die POWER-Taste
gesteuert werden. Zusätzliche Befehle stehen über
die im LCD-Display entsprechend gekennzeichneten 12 MENUBEFEHLSTASTEN im
oberen Bereich der Fernbedienung zur Verfügung.
Mit Drücken einer BEFEHLSTASTE wird die
GERÄTEBEZEICHNUNG in der Displaymitte
durch die zu diesem Befehl gehörende
Bezeichnung ersetzt.
4. Drücken Sie die PAGE-Taste , um sich die
nächste Seite mit 12 verfügbaren Menübefehlen
im Display anzusehen. Pro Gerät stellt die RR-1090
bis zu vier „Befehlsseiten“ zur Verfügung. Drücken
Sie mehrmals die PAGE-Taste, um nacheinander
alle verfügbaren Befehlsgruppen für dieses Gerät
aufzurufen (siehe Abbildung 3).
HINWEIS
: Die BEFEHLSTASTEN reproduzieren die
Funktionen vieler verschiedener Geräte. Ihre
Funktion hängt vom jeweils gewählten Gerätetyp
ab. Stellen Sie sicher, daß Sie die korrekte
GERÄTETASTE gedrückt haben, bevor Sie
Infrarotbefehle senden.
Senden von Macro-Befehlen
Vier Tasten auf der RR-1090 (mit M1, M2, M3 und
M4 gekennzeichnet) können mehrere Befehle als
Macro speichern – beispielsweise eine Reihe von
Befehlen, durch die das Fernsehgerät eingeschaltet,
Kanal 5 ausgewählt, der Surround-Prozessor
eingeschaltet und der TV-Eingang ausgewählt wird.
Ein Macro wird nach Drücken der MACRO-Taste
gesendet, unter der es gespeichert ist.
Page 38

38 RR-1090
Programmieren der
Befehlcodes
Die RR-1090 verfügt über Befehlcodes für mehrere
Hundert Geräte. Zum Programmieren der
Fernbedienung gehört es, die zu den einzelnen
Geräten gehörenden Befehle in Ihrem System
auszuwählen und sie durch Eingabe einer
Vierzifferncodierung dem entsprechenden Gerät
zuzuordnen. Dies ist während des Setups der RR-1090
nur einmal erforderlich.
Die Vierzifferncodes für Ihr Gerät können Sie der
entsprechenden Liste am Ende dieser Bedienungsanleitung entnehmen. Ist ein Gerät nicht aufgeführt, gibt
es alternative Suchverfahren, um die zu diesem Gerät
gehörenden Befehle zu finden.
HINWEIS
: Das Programmieren erfolgt in einem
menügeführten Setup-Modus, in den Sie durch
Drücken der MENU-Taste gelangen. Sie können den
Setup-Modus jederzeit verlassen und in den
Normalbetrieb zurückkehren. Dazu müssen Sie
zweimal hintereinander die MENU-Taste drücken.
Vierzifferncodierung
Die Vierzifferncodierung für Ihre Audio-/Videogeräte
finden Sie in der Liste am Ende dieser
Bedienungsanleitung. Gehen Sie wie folgt vor:
1. Drücken Sie die MENU-Taste, um in das
Hauptmenü zu gelangen.
2. Wählen Sie im LCD-Displaymenü SETUP, indem
Sie die MENUBEFEHLSTASTE über dem ersten
Buchstaben des Wortes SETUP drücken.
3. Drücken Sie die GERÄTETASTE, unter der Sie die
Codes dieses Gerätes speichern möchten.
Entscheiden Sie sich für die Gerätetasten AV1,
AV2 oder AV3, werden Sie darüber hinaus
aufgefordert, den Gerätetyp auszuwählen (CD,
Videorecorder usw.).
4. Wählen Sie den ENTER CODE, indem Sie die
MENUBEFEHLSTASTE über dieser Bezeichnung
drücken.
5. Geben Sie den Vierzifferncode ein, indem Sie
die MENUBEFEHLSTASTEN im LCD-Display
drücken, die dem Code entsprechen. Ist dieser
Vorgang abgeschlossen, wird der erfolgreich
eingegebene Code im Display bestätigt.
6. Ist der Code einmal eingegeben, haben Sie zwei
Möglichkeiten. Zum einen können Sie eine andere
GERÄTETASTE drücken, um zusätzliche Codes
zu programmieren. Sie können aber auch die
MENU-Taste drücken, um zum Hauptmenü
zurückzukehren. Drücken Sie die MENU-Taste
ein zweites Mal, um den Setup-Modus zu
verlassen und in den normalen Betriebsmodus
zurückzukehren.
Prüfen Sie, ob der eingegebene Code der richtige
ist. Senden Sie dazu Befehle zu den Geräten (z.B.
den POWER-Befehl). Funktioniert der eingegebene
Code nicht richtig, wiederholen Sie die oben
genannten Schritte mit dem nächsten in der Liste für
das Gerät angegebenen Vierzifferncode.
Suche eines Codes durch Eingabe des
Markennamens
Sie können die für ein Gerät zur Verfügung stehenden
Codes auch durch Eingabe des dazugehörigen
Markennamens finden.
1. Drücken Sie die MENU-Taste, um in das
Hauptmenü zu gelangen.
2. Wählen Sie im LCD-Display SETUP, indem Sie
die MENUBEFEHLSTASTE über dem ersten
Buchstaben des Wortes SETUP drücken.
3. Drücken Sie die GERÄTETASTE, unter der Sie die
Codes dieses Gerätes speichern möchten.
Entscheiden Sie sich für AV1, AV2 oder AV3,
werden Sie darüber hinaus aufgefordert, den
Gerätetyp auszuwählen (CD, Videorecorder
(VCR), Verstärker (AMP) usw.).
4. Wählen Sie den BRAND NAME (Markennamen),
indem Sie die MENUBEFEHLSTASTE über dieser
Bezeichnung drücken.
5. Wählen Sie den ersten Buchstaben des
Markennamens Ihres Gerätes. Falls erforderlich,
drücken Sie die Taste M4, um die nächste
Buchstabenseite aufzurufen, oder die Taste M3
zum Aufrufen der vorherigen Buchstabenseite.
Page 39

Deutsch
39
6. Wählen Sie den Markennamen Ihres Gerätes
aus der im Display erscheinenden Liste (drücken
Sie M4 bzw. M3, um zusätzliche Listen
aufzurufen). Im Display erscheint „press POWER
key to test“.
7. Drücken Sie die POWER-Taste an der rechten Seite
der RR-1090, um den ersten, für die Marke
angegebenen Code zu testen. Der erste
Vierzifferncode erscheint im Display.
Kann das gewünschte Gerät durch Drücken
der POWER-Taste ein- bzw. ausgeschaltet
werden, haben Sie einen Code gefunden, der
funktionieren kann. Prüfen Sie nun durch Drücken
der MENUBEFEHLSTASTEN für diesen Vierzifferncode, ob auch andere Befehle ordnungsgemäß
übertragen werden (mit welchem Befehl die einzelnen
Tasten belegt sind, können Sie dem LCD-Display
entnehmen). Werden die Befehle ordnungsgemäß
übertragen, drücken Sie die GERÄTETASTE, um den
Code zu speichern.
Funktioniert der POWER-Befehl nicht, drücken
Sie die POWER-Taste, um den nächsten für diese
Marke verfügbaren Code auszuprobieren. Dabei
erscheint der neue Vierzifferncode im Display.
Wiederholen Sie diesen Vorgang, bis Sie einen Code
gefunden haben, der funktioniert. Speichern Sie ihn
durch Drücken der GERÄTETASTE.
Funktioniert keiner der für die Marke
verfügbaren Codes, werden Sie gefragt, ob Sie
die gesamten Codes für den jeweiligen Gerätetyp
durchsuchen möchten. Wählen Sie YES, um zum
Suchverfahren zu springen (Schritt 5 im folgenden
Abschnitt). Wählen Sie NO, um zum Hauptmenü
zurückzukehren.
Auto-Search-Verfahren
Mit diesem Suchverfahren können Sie einen Code
aus der kompletten Liste aller Vierzifferncodes für
einen Gerätetyp herausfinden:
1. Drücken Sie die MENU-Taste, um in das
Hauptmenü zu gelangen.
2. Wählen Sie im LCD-Display SETUP, indem Sie
die MENUBEFEHLSTASTE über dem ersten
Buchstaben des Wortes SETUP drücken.
3. Drücken Sie die GERÄTETASTE, unter der Sie die
Codes dieses Gerätes speichern möchten.
Entscheiden Sie sich für AV1, AV2 oder AV3,
werden Sie darüber hinaus aufgefordert, den
Gerätetyp auszuwählen (CD, Videorecorder
(VCR), Verstärker (AMP) usw.).
4. Wählen Sie SEARCH, indem Sie die
MENUBEFEHLSTASTE unter diesem Wort drücken.
Im Display erscheint „press POWER key to test“.
5. Drücken Sie die POWER-Taste auf der rechten
Seite der RR-1090, um den ersten für das Gerät
angegebenen Code zu testen. Dieser
Vierzifferncode erscheint im Display.
Kann das gewünschte Gerät durch Drücken
der POWER-Taste ein- bzw. ausgeschaltet
werden, haben Sie einen Code gefunden, der
funktionieren kann. Prüfen Sie nun durch Drücken
der MENUBEFEHLSTASTEN für diesen
Vierzifferncode, ob auch andere Befehle
ordnungsgemäß übertragen werden (mit welchem
Befehl die einzelnen Tasten belegt sind, können Sie
dem LCD-Display entnehmen). Werden die Befehle
ordnungsgemäß übertragen, drücken Sie die
GERÄTETASTE, um den Code zu speichern.
Funktioniert der POWER-Befehl nicht, drücken
Sie die POWER-Taste, um den nächsten verfügbaren
Code auszuprobieren. Dabei erscheint der neue
Vierzifferncode im Display. Wiederholen Sie diesen
Vorgang, bis Sie einen Code gefunden haben, der
funktioniert. Speichern Sie ihn durch Drücken der
GERÄTETASTE.
Funktioniert keiner der für die Marke
verfügbaren Codes, wird Ihnen mitgeteilt, daß
Sie alle verfügbaren Codes ausprobiert haben.
Drücken Sie die MENU-Taste, um zum Hauptmenü
zurückzukehren.
Lernen von Befehlen
Sie haben die Möglichkeit, der RR-1090 die Befehle
anderer Fernbedienungen beizubringen. Führen Sie
dazu die folgenden Schritte durch:
1. Legen Sie die RR-1090 und die Originalfernbedienung so auf eine ebene Oberfläche,
daß die Frontseiten beider Fernbedienungen
zueinander zeigen (siehe Abbildung 2 am Anfang
dieser Bedienungsanleitung). Die Infrarotsignale
Page 40

40 RR-1090
der anderen Fernbedienung müssen direkt zum
Infrarotempfänger/-sender der RR-1090 gesendet
werden.
2. Drücken Sie die MENU-Taste, um zum Hauptmenü
zu gelangen.
3. Wählen Sie aus dem Menü im LCD-Display
LEARNING, indem Sie die MENUBEFEHLSTASTE
über dem ersten Buchstaben des Wortes LEARNING drücken.
4. Drücken Sie die GERÄTETASTE, unter der Sie die
Codes für dieses Geräte speichern möchten.
5. Wählen Sie die BEFEHLSTASTE der RR-1090 aus,
unter der Sie den Befehl speichern möchten. Sie
haben hierbei die Wahl zwischen
GRUNDBEFEHLS- oder MENUBEFEHLSTASTEN.
(Sollten Sie sich für eine der
MENUBEFEHLSTASTEN entscheiden, so können
Sie über die PAGE-Taste die nächsten Geräteseiten
mit MENUBEFEHLEN aufrufen, bis Sie eine
unbelegte Taste gefunden haben.) Im LCD-Display erscheint „LEARNING“.
6. Halten Sie die entsprechende Befehlstaste auf der
Originalfernbedienung gedrückt, um die
Infrarotsignale zur RR-1090 zu senden.
Ist der Lernvorgang nicht erfolgreich, zeigt
die RR-1090 „ERROR“ an und kehrt oben zu Schritt
5 zurück. Richten Sie die beiden Fernbedienungen
noch einmal aus und starten Sie erneut mit Schritt 5.
Ist ein Code erfolgreich gelernt worden,
fordert die RR-1090 Sie auf, die Bezeichnung, die
sie dem Befehl zugeordnet hat, zu prüfen. Wählen
Sie NO, um die bisherige Bezeichnung
beizubehalten. Wählen Sie YES, um die Bezeichnung
zu ändern und die entsprechenden Buchstaben
einzugeben (nutzen Sie die Tasten M3 bzw. M4,
um zur nächsten Buchstabenseite zu schalten.) Die
Bezeichnungen können bis zu fünf Stellen lang sein.
Drücken Sie die MENU-Taste, um die neue
Bezeichnung zu speichern.
Um der RR-1090 zusätzliche Befehle
beizubringen, wiederholen Sie die oben
genannten Schritte ab Schritt 5. Um zum Hauptmenü
zurückzukehren, drücken Sie die MENU-Taste.
HINWEIS
: Die RR-1090 kann bis zu 240 Befehle
speichern. Ist diese Grenze erreicht, erscheint
„COMMAND FULL“. Jetzt ist das Speichern weiterer
Befehle nicht mehr möglich. Siehe Abschnitt
„Löschen gespeicherter Befehle“, um Platz für
weitere Befehle zu schaffen.
Macroprogrammierung
Unter jeder der vier mit M1, M2, M3 und M4
gekennzeichneten Tasten können mehrere Befehle
als Macro gespeichert werden. Unter einem Macro
versteht man eine Reihe von einzelnen Befehlen, die
auf Tastendruck automatisch zur Verfügung stehen.
Stellen Sie vor der Programmierung von Macros sicher,
daß die RR-1090 alle Befehle gelernt hat, die zu dem
jeweiligen Macro gehören sollen. Gehen Sie nun bei
der Programmierung des Macros folgendermaßen vor:
1. Drücken Sie die MENU-Taste, um in das
Hauptmenü zu gelangen.
2. Drücken Sie die PAGE-Taste, um die nächste Seite
mit Menüoptionen aufzurufen.
3. Wählen Sie im LCD-Display MACRO.
4. Drücken Sie die MACRO-Taste (M1, M2, M3 oder
M4), unter der Sie das neue Macro speichern
möchten.
5. Geben Sie die neue Bezeichnung für das Macro
ein, indem Sie die MENUBEFEHLSTASTEN
entsprechend den Buchstaben im Display drücken
(benutzen Sie die Tasten M3 bzw. M4, um zur
nächsten Buchstabenseite zu springen). Die
Bezeichnungen können bis zu fünf Zeichen lang
sein. Nach Eingabe der Bezeichnung drücken
Sie die MENU-Taste, um diese zu speichern.
6. Geben Sie den ersten Schritt des Macros ein.
Drücken Sie eine GERÄTETASTE, um auf das
gewünschte Gerät zuzugreifen. Drücken Sie die
einzelnen BEFEHLSTASTEN, um die Befehle des
ausgewählten Gerätes zu speichern (möchten Sie
auf weitere Befehle zugreifen, drücken Sie die
PAGE-Taste).
7. Zur Speicherung zusätzlicher Befehle drücken
Sie die ausgewählte MACRO-Taste. Dadurch
bestätigen Sie den vorher eingegebenen Befehl
und können den nächsten Befehl in das Macro
Page 41

Deutsch
41
eingeben. Wiederholen Sie diese Schritte, bis
alle Befehle, die zu diesem Macro gehören sollen,
gespeichert sind.
8. Ist das gesamte Macro eingegeben, drücken Sie
die MENU-Taste, um es zu speichern.
HINWEIS
: Ein Macro kann aus bis zu 10 Befehlen
bestehen (das Drücken von GERÄTETASTEN wird
von der RR-1090 nicht als Befehlseingabe
gespeichert).
Custom Page
Im allgemeinen werden alle unter einer GERÄTETASTE
gespeicherten Befehle zur Fernbedienung eines
einzigen Gerätes genutzt. Die RR-1090 bietet aber
auch die Möglichkeit, eine sogenannte CUSTOM
PAGE einzurichten, die einzelne, von verschiedenen
Geräten kopierte Befehle enthält. Sie können
beispielsweise eine Seite mit den meistgenutzten
Befehlen aller Geräte zusammenstellen. Sie greifen
auf eine CUSTOM PAGE zu, indem Sie die
GERÄTETASTE drücken, unter der sie gespeichert
ist. So stellen Sie eine Custom Page zusammen:
1. Drücken Sie die MENU-Taste, um in das
Hauptmenü zu gelangen.
2. Wählen Sie im LCD-Display PREFERENCE.
3. Wählen Sie im LCD-Display CUSTOM PAGE.
4. Drücken Sie die GERÄTETASTE, unter der Sie die
zur CUSTOM PAGE gehörenden Befehle
speichern möchten.
5. Geben Sie die neue Bezeichnung für das Gerät
über die den Buchstaben im Display
entsprechenden MENUBEFEHLSTASTEN ein
(benutzen Sie die Tasten M3 bzw. M4, um zur
nächsten Buchstabenseite zu springen). Die
Bezeichnungen können bis zu 7 Stellen lang sein.
Nach Eingabe der Bezeichnung drücken Sie zur
Speicherung die MENU-Taste.
6. Drücken Sie eine GERÄTETASTE, um das Gerät
auszuwählen, unter dem der erste Befehl zu finden
ist, den Sie der CUSTOM PAGE hinzufügen
möchten.
7. Drücken Sie die BEFEHLSTASTE für den ersten
Befehl, den Sie der CUSTOM PAGE hinzufügen
möchten.
8. Weisen Sie dem Befehl durch Drücken einer
MENUBEFEHLSTASTE Ihrer Wahl seinen Platz auf
der CUSTOM PAGE zu. Die Bezeichnung für diesen
Befehl erscheint an der ausgewählten Position.
9. Wiederholen Sie die Schritte 6 – 8 für jeden
zusätzlichen Befehl, den Sie auf die CUSTOM
PAGE speichern möchten.
Sollen die Befehle automatisch positioniert werden,
drücken Sie die Taste M4. Drücken Sie die MENUTaste, um zum Hauptmenü zurückzukehren.
HINWEIS
: Möchten Sie später zusätzliche Befehle in
die Custom Page kopieren, wiederholen Sie die
Schritte 1 - 3 und 6 - 10. Da Sie auf eine bestehende
CUSTOM PAGE kopieren, können die Schritte 4
und 5 übersprungen werden.
Löschen gespeicherter Befehle
Möchten Sie gespeicherte Befehle löschen, so gehen
Sie folgendermaßen vor:
1. Drücken Sie die GERÄTETASTE, unter der der
zu löschende Befehl gespeichert ist.
2. Drücken Sie die MENU-Taste, um das Hauptmenü
aufzurufen.
3. Wählen Sie im LCD-Display EDIT.
4. Wählen Sie im LCD-Display DELETE KEY.
5. Drücken Sie die BEFEHLSTASTE, deren Befehl Sie
löschen möchten. Sie können die Befehle der
GRUNDBEFEHLS- oder der MENUBEFEHLS–
TASTEN löschen (verwenden Sie die PAGE-Taste,
um nacheinander die verfügbaren Befehlsseiten
aufzurufen).
6. Wählen Sie zur Bestätigung YES oder NO.
7. Wiederholen Sie die Schritte 5 und 6, um
zusätzliche Befehle zu löschen. Drücken Sie die
Taste M4, wenn Befehle von der RR-1090
automatisch im Display angeordnet werden sollen.
Drücken Sie die MENU-Taste, um zum Hauptmenü
zurückzukehren.
Page 42

42 RR-1090
Volume Punch-through
In vielen Systemen wird die LAUTSTÄRKE am
Fernsehgerät oder dem A/V-Prozessor eingestellt. Um
diesen Vorgang zu erleichtern, verfügt die RR-1090
über eine VOLUME PUNCH-THROUGH-Funktion, mit
der die RR-1090 Lautstärkebefehle von einem
Fernsehgerät oder jedem beliebigen programmierten
A/V-Gerät auf Gerätetasten für andere Geräte wie
z.B. CD-Player, Videorecorder, SAT-Receiver und DVDPlayer kopieren kann. Nach Aktivieren dieser Funktion
stehen die Lautstärkeeinstellungen von Fernsehgerät
oder A/V-Prozessor zur Verfügung, auch wenn eine
dieser anderen GERÄTE-Befehlsfolgen aktiv ist.
So aktivieren Sie die VOLUME PUNCH-THROUGHFunktion:
1. Drücken Sie die MENU-Taste, um das Hauptmenü
aufzurufen.
2. Wählen Sie im LCD-Display PREFERENCE.
3. Wählen Sie im LCD-Display PUNCH THROUGH.
4. Wählen Sie die Lautstärkebefehle (entweder die
TV-Befehlsfolge oder eine A/V-Befehlsfolge), um
diese auf ein anderes GERÄT zu kopieren, indem
Sie im LCD-Display entweder TV VOL oder AMP
VOL auswählen. Wählen Sie AMP VOL, müssen
Sie die A/V-Befehlsfolge mit den entsprechenden
Lautstärkebefehlen (AV1, AV2 oder AV3) aus dem
nächsten LCD-Displaymenü wählen, indem Sie
eine MENUBEFEHLSTASTE drücken.
5. Drücken Sie die GERÄTETASTE des Zielgerätes,
unter der Sie die zu kopierenden Lautstärkebefehle
speichern möchten. Der VOLUME PUNCH
THROUGH-Befehl kann nicht auf die Gerätetaste
eines Fernsehgerätes oder eines A/V-Gerätes
kopiert werden, jedoch ist das Kopieren auf
andere Gerätetasten (CD, SAT, LD, DVD usw.)
möglich. Wählen Sie eine ungeeignete
Gerätetaste, passiert nichts. Haben Sie sich für
eine geeignete GERÄTETASTE entschieden, so
erscheint die Bestätigung PUNCH -THROUGH
OK im Display.
6. Drücken Sie die MENU-Taste, um in das
Hauptmenü zurückzukehren.
RESET-Funktion
Über die RESET-Funktion können Sie die RR-1090
jederzeit wieder in die Original-Werksprogrammierung zurücksetzen.
HINWEIS
: Die RESET-Funktion löscht alle gelernten
Befehle, Bezeichnungen und Konfigurationseinstellungen. Machen Sie sich diese Tatsache
bewußt, bevor Sie diese Funktion nutzen.
So setzen Sie die RR-1090 zurück:
1. Drücken Sie die MENU-Taste, um in das
Hauptmenü zu gelangen.
2. Drücken Sie die PAGE-Taste, um zur zweiten Seite
mit Menüoptionen zu springen.
3. Wählen Sie im LCD-Display REMOTE SETTINGS,
indem Sie die MENUBEFEHLSTASTE über dem
ersten Buchstaben der Bezeichnung REMOTE
SETTINGS drücken.
4. Wählen Sie im LCD-Display RESET, indem Sie
die MENUBEFEHLSTASTE unter dem ersten
Buchstaben des Wortes RESET drücken
5. Wählen Sie zur Bestätigung YES oder NO.
Wählen Sie YES, löscht die RR-1090 alle
eingegebenen Programmierungen und kehrt in
ihren Originalzustand zurück. Zwischenzeitlich
werden eine Reihe von Zwischenmeldungen
gegeben, gefolgt von der Abschlußmeldung
DEFAULT SETTING.
6. Drücken Sie die MENU-Taste, um in das
Hauptmenü zurückzukehren.
DUPLICATE-Funktion
Mit Hilfe dieser Funktion können Sie Programmierungen, einschließlich gelernter Befehle und
eingegebener Bezeichnungen, von einer RR-1090
auf eine zweite RR-1090 zu kopieren. Sie haben
die Möglichkeit, Daten von einer einzigen
GERÄTETASTE oder von allen acht GERÄTETASTEN
zu übertragen. Legen Sie zwei RR-1090 einander
gegenüber, so daß die Frontseiten zueinander weisen.
Drücken Sie nun die folgenden Tasten der
Fernbedienung, die
Page 43

Deutsch
43
die Signale empfängt:
1. Drücken Sie die MENU-Taste, um in das
Hauptmenü zu gelangen.
2. Drücken Sie die PAGE-Taste, um die zweite Seite
mit Menüoptionen aufzurufen.
3. Wählen Sie im LCD-Display DUPLICATE, indem
Sie die benachbarte MENUBEFEHLSTASTE
drücken.
4. Wählen Sie im LCD-Display RECEIVE, indem Sie
die benachbarte MENUBEFEHLSTASTE drücken.
Im Display erscheint die Anzeige „READY TO
RECEIVE“.
die Signale sendet:
1. Drücken Sie die MENU-Taste, um in das
Hauptmenü zu gelangen.
2. Drücken Sie die PAGE-Taste, um die zweite Seite
mit Menüoptionen aufzurufen.
3. Wählen Sie im LCD-Display DUPLICATE, indem
Sie die neben diesem Wort liegende
MENUBEFEHLSTASTE drücken.
4. Um die Codes aller Geräte zu übertragen,
wählen Sie die Menüoption „COPY ALL DEVICES“. Um die Codes nur eines Gerätes
zu übertragen, wählen Sie „COPY ONE DEVICE“ und anschließend die zu kopierende
GERÄTETASTE. Dadurch wird die Signalübertragung aktiviert, und im Display erscheint
SENDING.
Nach Abschluß der Signalübertragung erscheint im
Display des Sendegerätes eine Bestätigung:
• War die Signalübertragung erfolgreich,
erscheint „FINISH SENDING“.
• War die Signalübertragung nicht
erfolgreich, erscheint im LCD-Display „SEND-
ING ERROR“. Die Fernbedienung schaltet in den
normalen Betriebsmodus. Richten Sie die beiden
Fernbedienungen neu aus und versuchen Sie es
noch einmal.
HINWEIS
: Nutzen Sie die DUPLICATE-Funktion
ausschließlich zur Signalübertragung zwischen zwei
RR-1090.
Tastenbezeichnungen
Die Bezeichnungen der GERÄTE- und BEFEHLSTASTEN können umbenannt werden. Ferner kann
die Position der MENUBEFEHLSTASTEN für ein Gerät
im LCD-Display geändert werden.
Ändern einer GERÄTEBEZEICHNUNG
1. Drücken Sie die GERÄTETASTE, die Sie
umbenennen möchten.
2. Drücken Sie die MENU-Taste, um in das
Hauptmenü zu gelangen.
3. Wählen im LCD-Display EDIT.
4. Wählen Sie die GERÄTEBEZEICHNUNG im LCDDisplay.
5. Geben Sie die neue Gerätebezeichnung ein,
indem Sie die MENUBEFEHLSTASTEN im LCDDisplay drücken, die den Buchstaben der
Bezeichnung entsprechen (verwenden Sie die
Tasten M3 bzw. M4, um zur nächsten
Buchstabenseite zu gehen). Die Bezeichnungen
können aus bis zu 7 Zeichen bestehen. Nach
Eingabe der Bezeichnung drücken Sie die MENUTaste, um sie zu speichern.
Ändern einer BEFEHLSBEZEICHNUNG
Um die im LCD-Display erscheinende Bezeichnung
einer MENUBEFEHLSTASTE zu ändern, gehen Sie
wie folgt vor:
1. Drücken Sie die Gerätetaste, unter der der BEFEHL
gespeichert ist, den Sie umbenennen möchten.
2. Drücken Sie die MENU-Taste, um das Hauptmenü
aufzurufen.
3. Wählen Sie im LCD-Display EDIT.
4. Wählen Sie im LCD-Display KEY NAME.
5. Drücken Sie die GRUNDBEFEHLS- oder
MENUBEFEHLSTASTE (über die PAGE-Taste
können Sie weitere Befehle aufrufen), die Sie
umbenennen möchten.
6. Geben Sie die neue Bezeichnung durch Drücken
der MENUBEFEHLSTASTEN entsprechend den
Buchstaben im LCD-Display ein (verwenden Sie
Page 44

44 RR-1090
die Tasten M3 bzw. M4, um zur nächsten
Buchstabenseite zu gehen). Bezeichnungen
können aus bis zu 5 Zeichen bestehen. Nach
Eingabe der Bezeichnung drücken Sie die MENUTaste, um sie zu speichern.
7. Wiederholen Sie die Schritte 5 und 6, um die
Bezeichnung zusätzlicher BEFEHLSTASTEN zu
verändern oder drücken Sie die MENU-Taste, um
zum Hauptmenü zurückzukehren.
Positionsänderung einer
BEFEHLSBEZEICHNUNG
Möchten Sie die Position einer MENUBEFEHLSTASTE
im LCD-Display ändern, gehen Sie folgendermaßen
vor:
1. Drücken Sie die Gerätetaste, zu der die
BEFEHLSTASTE gehört, deren Position Sie
verändern möchten.
2. Drücken Sie die MENU-Taste, um in das
Hauptmenü zu gelangen.
3. Wählen Sie im LCD-Display EDIT.
4. Wählen Sie im LCD-Display MOVE KEY.
5. Wählen Sie die MENUBEFEHLSTASTE, deren
Position Sie ändern möchten.
6. Wählen Sie die neue Position für die
BEFEHLSTASTE.
7. Die beiden BEFEHLSTASTEN tauschen ihre Position.
Automatische Positionierung von
BEFEHLSBEZEICHNUNGEN
Alternativ zur manuellen Positionsänderung können
die MENUBEFEHLSTASTEN auch automatisch von
der RR-1090 positioniert werden:
1. Drücken Sie die GERÄTETASTE, unter der die
BEFEHLSTASTEN, deren Position Sie verändern
möchten, gespeichert sind.
2. Drücken Sie die MENU-Taste, um in das
Hauptmenü zu gelangen.
3. Wählen Sie im LCD-Display EDIT.
4. Wählen Sie im LCD-Display AUTO-ARRANGE.
Konfigurationsmöglichkeiten
Zusätzliche Ausstattungsmerkmale der RR-1090 sind
die Hintergrund-Beleuchtung und ein Signalton bei
Tastendruck. Darüber hinaus kann ein Passwortschutz
aktiviert werden, um den Zugriff auf die Setup-Features zu verhindern.
Hintergrund-Beleuchtung
Bei schlechten Lichtbedingungen leuchtet das LCDDisplay. Es stehen drei Einstellungsmöglichkeiten zur
Verfügung:
• With Light Sense. Die RR-1090 erfaßt die
Lichtstärke im Raum und schaltet die Beleuchtung
in einem dunklen Raum nach Drücken einer
beliebigen Taste für 5 Sekunden ein (Einstellung
ab Werk).
• Always On. Ungeachtet der Lichtverhältnisse
wird die Beleuchtung mit jedem Tastendruck für
5 Sekunden eingeschaltet.
• Always Off. Beleuchtung ist deaktiviert.
Einstellen der Hintergrund-Beleuchtung:
1. Drücken Sie die MENU-Taste, um in das
Hauptmenü zu gelangen.
2. Drücken Sie die PAGE-Taste, um zur zweiten Seite
der Menüoptionen zu schalten.
3. Wählen Sie im LCD-Display REMOTE SETTINGS.
4. Wählen Sie im LCD-Display BACKLIT.
5. Wählen Sie im LCD-Display einen der drei
Beleuchtungsmodi.
Signalton
Die RR-1090 verfügt über einen Signalton, der zur
Bestätigung jedes Tastendrucks ertönt. Diese Funktion
kann aktiviert (Einstellung ab Werk) und deaktiviert
werden.
So konfigurieren Sie den Signalton:
1. Drücken Sie die MENU-Taste, um in das
Hauptmenü zu gelangen.
2. Drücken Sie die PAGE-Taste, um zur zweiten Seite
der Menüoptionen zu schalten.
Page 45

Deutsch
45
3. Wählen Sie im LCD-Display REMOTE SETTINGS.
4. Wählen Sie im LCD-Display BEEP SOUND.
5. Wählen Sie SOUND ENABLE oder SOUND
DISABLE.
Passwort
Sie können ein Passwort festlegen und aktivieren,
um den Zugriff zu den Setup-Menüs zu verhindern.
Einmal aktiviert, muß das Passwort jedes Mal
eingegeben werden, wenn Sie auf die Setup-Menüs
zugreifen möchten.
Im Werk wird das Passwort „2000“ eingegeben,
jedoch wird die Passwort-Schutzfunktion dort nicht
aktiviert.
Aktivieren bzw. Deaktivieren des Passwortschutzes:
1. Drücken Sie die MENU-Taste, um in das
Hauptmenü zu gelangen.
2. Drücken Sie die PAGE-Taste, um zur zweiten Seite
der Menüoptionen zu schalten.
3. Wählen Sie im LCD-Display REMOTE SETTINGS.
4. Wählen Sie im LCD-Display PASSWORD.
5. Wählen Sie ENABLE oder DISABLE.
6. Werden Sie dazu aufgefordert, geben Sie das
Passwort durch Drücken der MENUBEFEHLSTASTEN entsprechend den Buchstaben im
LCD-Display ein (verwenden Sie die Tasten M3
bzw. M4, um zur nächsten Buchstabenseite zu
gehen). Nach Eingabe des Passwortes drücken
Sie die MENU-Taste.
Ändern des Passwortes:
1. Drücken Sie die MENU-Taste, um in das
Hauptmenü zu gelangen.
2. Drücken Sie die PAGE-Taste, um zur zweiten Seite
der Menüoptionen zu schalten.
3. Wählen Sie im LCD-Display REMOTE SETTINGS.
4. Wählen Sie im LCD-Display PASSWORD.
5. Wählen Sie im LCD-Display CREATE.
6. Werden Sie dazu aufgefordert, geben Sie das
alte Passwort durch Drücken der MENUBEFEHLSTASTEN entsprechend den Buchstaben
im LCD-Display ein (verwenden Sie die Tasten
M3 bzw. M4, um zur nächsten Buchstabenseite
zu gehen). Nach Eingabe des Passwortes drücken
Sie die MENU-Taste.
7. Geben Sie das neue Passwort durch Drücken der
MENUBEFEHLSTASTEN entsprechend den
Buchstaben im LCD-Display ein (verwenden Sie
die Tasten M3 bzw. M4, um zur nächsten
Buchstabenseite zu gehen). Passwörter können
bis zu 4 Zeichen lang sein und aus beliebigen
Buchstaben- und Zahlenkombinationen bestehen.
Drücken Sie die MENU-Taste.
8. Geben Sie das neue Passwort noch einmal ein,
um es zu bestätigen. Drücken Sie die MENU-Taste.
Im Display erscheint die Bestätigung PASSWORD
SET. Anschließend können Sie zwischen ENABLE
und DISABLE wählen.
HINWEIS
: Ist das neue Passwort einmal geändert, so
haben Sie keinen Zugriff auf die Setup-Menüs, wenn
Sie dieses neue Passwort vergessen. Sollten Sie
keinen zusätzlichen Schutz benötigen, empfehlen
wir, das Standard-Passwort „2000“ unverändert zu
lassen.
PC-Link Software
Die der RR-1090 beiliegende PC-LINK-Software für
Windows® 95/98-Computer kann komplette
Konfigurationsdateien der RR-1090 bearbeiten. Diese
Konfigurationsdateien enthalten eine komplette
Auswahl an Menüoptionen, Befehlen, Macros und
einprogrammierten Bezeichnungen, wodurch die
perfekte Anpassung der RR-1090 an Ihren
Einsatzzweck möglich ist. Die Konfigurationsdateien
können auf Festplatte gespeichert oder von der
Festplatte gelesen werden. Das Uploaden von der
RR-1090 und das Downloaden auf die RR-1090 ist
mit Hilfe des beiliegenden seriellen Kabels möglich.
Viele Konfigurationsoptionen für die RR-1090 können
mit der PC-Link-Software modifiziert werden. Diese
Vorgehensweise ist teilweise bequemer, als die
eigenen Setup-Menüs der RR-1090 zu nutzen.
Page 46

46 RR-1090
Installation der PC-LINK Software
Installieren Sie die PC-LINK-Software wie folgt auf
einem Windows® 95/98-Computer:
1. Legen Sie DISK 1 in das Laufwerk Ihres Computers.
2. Laden Sie das Programm SETUP.EXE, indem Sie
mit einem Doppelklick im Windows®-Explorer den
Dateinamen aufrufen oder im Start-Menü auf
Ausführen gehen und A:SETUP.EXE eingeben.
3. Folgen Sie den Schritten des Setup-Programms.
Sie werden aufgefordert, den Zielordner für die
Installation festzulegen. Standardmäßig wird
hierfür C:\PROGRAMS\HT2000 vorgeschlagen.
Möchten Sie hingegen den Zielordner ändern,
steht hierfür die Schaltfläche „Durchsuchen“ zur
Verfügung.
4. Während der Installation werden Sie aufgefordert,
DISK 2 einzulegen. Sind die Dateien installiert,
werden Sie aufgefordert, Ihren Computer neu
zu starten, um die Installation abzuschließen.
5. Aktivieren Sie die PC-LINK Software mit einem
Doppelklick auf den Dateinamen HT2000.EXE
im Windows®-Explorer oder indem Sie im
Start-Menü auf Ausführen gehen und
C:\PROGRAMS\HT2000.EXE eingeben.
Laden und Speichern von
Konfigurationsdateien
Möchten Sie die PC-LINK Software nutzen, öffnen
Sie eine Konfigurationsdatei, die, wie in Abbildung
4 am Anfang der Bedienungsanleitung gezeigt, im
PC-Link-Hauptbildschirm erscheint. Diese
Konfigurationsdateien können vom Computer unter
„*.HTR“ gespeichert werden.
HINWEIS
: Die Standard-Konfigurationsdatei ab Werk
„DEFAULT.HTR“ ist im DEFAULT-Ordner des HT2000Zielordners installiert.
Öffnen einer Konfigurationsdatei vom
Computer aus:
1. Wählen Sie im Dateimenü „Öffnen“.
2. Verwenden Sie das Dialogfeld, um die
DEFAULT.HTR-Konfigurationsdatei (oder die Datei
Ihrer Wahl) zu finden.
3. Klicken Sie auf „Öffnen“.
So speichern Sie eine Konfigurationsdatei
im Computer
1. Um eine Konfigurationsdatei mit demselben
Namen zu speichern, wählen Sie im Dateimenü
„Speichern“. Die alte Datei wird von der neuen
überschrieben.
2. Um eine Konfigurationsdatei unter einem anderen
Namen zu speichern, wählen Sie im Dateimenü
„Speichern unter“. Geben Sie im Dialogfeld einen
neuen Dateinamen ein (die Erweiterung „.HTR“
wird automatisch hinzugefügt). Klicken Sie auf
„Speichern“.
Up- und Downloaden von
Konfigurationsdateien
Mit der PC-LINK Software und dem beiliegenden
seriellen Kabel ist das Uploaden einer
Konfigurationsdatei von der RR-1090 auf Ihren
Computer und das Downloaden einer
Konfigurationsdatei auf die RR-1090 möglich.
Beispielsweise können Sie eine Konfigurationsdatei
uploaden, sie modifizieren und anschließend die
neuen Konfigurationseinstellungen downloaden.
Um die Upload/Download-Funktion nutzen zu
können, müssen Sie Ihren Computer entsprechend
vorbereiten und die Fernbedienung in den
Datentransfermodus bringen.
Schließen Sie die RR-1090 an Ihren Computer an:
1. Verbinden Sie den 4-Pin-Modularstecker (RJ-45)
des beiliegenden Kabels mit der Buchse an der
Rückseite der RR-1090.
2. Verbinden Sie das andere Ende des Kabels mit
einem seriellen DB-9-Anschluß (COM1 oder
COM2) an Ihrem Computer.
3. Starten Sie die PC-LINK-Software und wählen Sie
im PORT-Menü den Port, der mit dem Kabel
verbunden ist (COM1 oder COM2).
Setzen Sie die RR-1090 in den DATENTRANSFER-Modus:
1. Drücken Sie die MENU-Tste, um in das HauptSetupmenü zu gelangen.
Page 47

Deutsch
47
2. Drücken Sie die PAGE-Taste, um die zweite Seite
mit Menüoptionen aufzurufen.
3. Wählen Sie PC LINK im LCD-Display, indem Sie
die benachbarte MENUBEFEHLSTASTE drücken.
Uploaden einer Konfigurationsdatei von der
RR-1090 auf den Computer:
1. Stellen Sie sicher, daß sich die RR-1090 im
Datentransfermodus befindet.
2. Wählen Sie im FILE-Menü (Dateimenü) der PCLINK Software UPLOAD. Im LCD-Display der
Fernbedienung erscheint während des Transfers
„UPLOADING...“.
3. Ist das Uploaden abgeschlossen, wird die
Konfigurationsdatei in der PC-LINK-Software
geöffnet. Dort kann sie modifiziert, auf eine andere
RR-1090 heruntergeladen oder vom Computer
gespeichert werden.
Downloaden einer Konfigurationsdatei vom
Computer auf die RR-1090:
1. Stellen Sie sicher, daß sich die RR-1090 im
Datentransfermodus befindet.
2. Öffnen Sie die gewünschte Datei in der PC-LINK
Software.
3. Wählen Sie im FILE-Menü (Dateimenü) der PCLINK Software DOWNLOAD. Im LCD-Display der
Fernbedienung erscheint während des
Datentransfers „DOWNLOADING...“.
1. Ist das Downloaden abgeschlossen, werden die
neuen Konfigurationen in der RR-1090 installiert
und vorherige Einstellungen überschrieben.
Modifizieren von Konfigurationsdateien
Mit Hilfe der PC-LINK Software können Sie sich die
aktuellen Einstellungen einer geöffneten
Konfigurationsdatei ansehen und viele Einstellungen
modifizieren. Die modifizierte Konfigurationsdatei
kann gespeichert oder auf die RR-1090
heruntergeladen werden. Die PC-LINK Software bietet
folgende Möglichkeiten:
Möchten Sie sich die Einstellungen eines
GERÄTES ansehen oder die Einstellungen
modifizieren, wählen Sie das Gerät aus dem DE-
VICE-Menü. Die Tastenbezeichnungen und sonstige
Einstellungen für dieses Gerät erscheinen im PC-LINKBildschirm.
Zur Umbenennung eines GERÄTES wählen Sie
im EDIT-Menü oder durch Doppelklick auf das DEVICEFeld im Hauptbildschirm den DEVICE(GERÄTE)NAMEN aus. Geben Sie den neuen Namen in das
Dialogfeld ein und klicken Sie auf OK.
Möchten Sie eine TASTE umbenennen, klicken
Sie auf die gewünschte Taste im Hauptbildschirm und
wählen den TASTENNAMEN aus dem EDIT-Menü
oder klicken zweimal auf die gewünschte Taste.
Geben Sie die neue Bezeichnung in das Dialogfeld
ein und klicken Sie auf OK.
Um eine TASTE zu löschen, klicken Sie das
gewünschte Tastenfeld im Hauptmenü an und wählen
im EDIT-Menü den Menüpunkt DELETE KEY (Taste
löschen). Klicken Sie zur Bestätigung auf YES oder NO.
Möchten Sie die TASTEN des gerade
aktivierten Gerätes neu anordnen, wählen
Sie im EDIT-Menü den Unterpunkt ARRANGE KEY
(Taste anordnen). Sie können die Tasten auf einer
Seite auch manuell an eine andere Stelle bewegen.
Klicken Sie dazu auf die Tastenbezeichnung, halten
Sie die Maustaste gedrückt und ziehen Sie den
Namen an eine neue Stelle.
Möchten Sie sich die zu einem MACRO
gehörenden Schritte ansehen, wählen Sie im
MACRO-Menü das gewünschte Macro. Die zum
gewählten Macro gehörenden Schritte erscheinen
rechts im Hauptbildschirm.
Die Einstellung des SIGNALTONS können
Sie verändern, indem Sie KEY TONE im SETTING-
Menü wählen. Klicken Sie im Dialogfeld die
gewünschte Option an.
Sie können die Einstellung der
HINTERGRUND-BELEUCHTUNG verändern,
indem Sie BACKLIT im SETTING-Menü wählen. Klicken
Sie im Dialogfeld die gewünschte Option an.
Sie können sich die Einstellung des
PASSWORTES ansehen, indem Sie im SETTING-
Menü PASSWORD wählen.
Sie können sich die Einstellung der VOLUME
PUNCH-THROUGH-Funktion ansehen, indem
Sie im SETTING-Menü PUNCH THROUGH wählen.
Page 48

48 RR-1090
Indice
1. Disposizione 2
2. Apprendimento 4
3. Pagine Device Campione 4
4. Software PC-Link 5
Introduzione............................................ 49
Caratteristiche essenziali 49
Precauzioni ragionevoli 49
Installazione delle pile e sostituzione 49
Per Cominciare ........................................ 49
Emettitore/sensore a raggi infrarossi 49
Pulsanti per i componenti 50
Pulsanti di comando base 50
Tasti di comando del menu
e Display LCD 50
Pulsante PAGE 50
Pulsanti MACRO 50
Pulsante MENU 50
Pulsante POWER 50
Connettore seriale 50
Funzionamento dell’RR-1090................... 51
Attivazione dell’RR-1090 51
Invio dei comandi a raggi infrarossi 51
Invio di comandi MACRO 51
Programmazione dei Codici ...................... 51
Programmazione del codice a 4 cifre 52
Ricerca del codice per nome del costruttore 52
Programmazione di auto-ricerca 53
Comandi intelligenti (learning) 53
Programmazione MACRO 54
Pagina personalizzata dell’apparecchio 54
Eliminazione dei comandi memorizzati 55
Volume “Punch-through” 55
Funzione RESET 56
Funzione DUPLICATE 56
Etichette Personalizzate........................... 57
Creazione di un nome di un componente
(DEVICE) 57
Creazione di un nome COMMAND 57
Spostamento di un nome COMMAND 57
Organizzazione automatica dei nomi COMMAND 57
Altre Opzioni di Configurazione ................ 58
Retro-illuminazione 58
Segnale acustico 58
Password 58
Software PC-Link .................................... 59
Installazione del software PC-LINK 59
Caricamento e memorizzazione dei file di
configurazione 59
Caricamento e scaricamento
dei file di configurazione 60
Modifica dei file di configurazione 60
Codice a 4 cifre ....................................... 92
A/V 92
TV 92
VCR 93
CD 93
DVD 94
LD 94
SAT/DSS 95
Page 49

Italiano
49
Introduzione
Grazie per aver acquistato il comando a distanza
intelligente universale RR-1090. L’RR-1090 può
sostituire fino a otto comandi a distanza a raggi
infrarossi, attivando componenti video o audio dalla
Rotel o altri produttori. L’RR-1090 comprende serie
di comandi per centinaia di componenti audio/video
in più può apprendere altri comandi dai vostri
comandi a distanza. Il funzionamento dell’RR-1090
è semplice e intuitivo grazie all’uso di solo pochi
comandi e di un ampio display di menu LCD.
Caratteristiche essenziali
• Semplice programmazione usando i vostri
comandi a distanza incorporati per centinaia di
componenti.
• Pre programmato per attivare i componenti Rotel.
• Apprende altri comandi da altri comandi a
distanza.
• Il display LCD fornisce un semplice funzionamento
pilotato dal menu con etichette personalizzabili
per ogni comando.
• Retroilluminazione per un facile uso in stanze
scure insieme a un suono facoltativo ogni volta
che viene premuto un pulsante.
• Quattro tasti MACRO inviano una sequenza di
fino a 10 comandi con la pressione di un pulsante.
• Comprende pile ricaricabili e caricabatterie.
• Un cavo seriale e software per programmare
l’RR-1090 da qualsiasi computer con Windows
95/98.
Precauzioni ragionevoli
• L’RR-1090 è robusto, ma non indistruttibile.
Pertanto vi preghiamo di non lasciarlo cadere!
• Non esponete l’RR-1090 a umidità. Per pulire
l’RR-1090 utilizzate una stoffa umida priva di
peli. Evitate solventi forti.
• Non cercate di aprire l’RR-1090. L’apertura
invaliderà la garanzia.
Installazione delle pile e sostituzione
L’RR-1090 comprende 4 pile al nichel ricaricabili
AA e un adattatore/caricatore da 9V. Quando le
pile sono scariche o hanno bisogno di essere
ricaricate, un indicatore “LOW BATTERY” appare
sul display.
Per installare le pile, rivoltate l’RR-1090 e sollevate
il coperchio dell’alloggiamento per le pile
premendo la linguetta e sollevandolo. Collocate le
4 pile all’interno (seguite le illustrazioni per la polarità
sul fondo dell’alloggiamento) e richiudete il coperchio.
Per ricaricare le pile, inserite il cavo dell’adattatore
nel connettore sul lato sinistro dell’RR-1090 . Inserite
l’adattatore/ricaricatore di alimentazione in una
presa a parete (230V/50Hz in Europa, 120V/60Hz
in USA). Una indicazione “CHARGING” apparirà
sul display mentre viene collegato l’adattatore.
Lasciatelo a ricaricare durante la notte per una ricarica
completa. Il comando a distanza può essere attivato
con il caricatore inserito mentre le pile si ricaricano.
NOTA
: Potete utilizzare pile alcaline comuni invece
che quelle ricaricabili fornite con l’RR-1090, ma in
tal caso non utilizzate l’adattatore/caricatore con
le pile alcaline.
Per Cominciare
Vedi figura 1
Siete pregati di rivedere i seguenti comandi e
®
caratteristiche dell’RR-1090:
Emettitore/sensore a raggi infrarossi
L’emettitore/sensore a raggi infrarossi è collocate
nell’estremità superiore dell’RR-1090. Invia gli ordini
a raggi infrarossi e deve essere rivolto verso il
componente desiderato. Riceve anche codici a raggi
infrarossi dai vostri altri comandi a distanza durante
il processo di apprendimento (LEARNING) o quando
duplica le regolazioni di configurazione da un
RR-1090 all’altro.
Page 50

50 RR-1090
Pulsanti per i componenti
Otto pulsanti rotondi sull’RR-1090 scelgono quale
serie di comandi è attiva e quale componente verrà
pilotato. Per esempio, premete il pulsante AV1 e
l’RR-1090 diventa il comando a distanza per il vostro
Processore sonoro surround Rotel. Premete il pulsante
TV e l’RR-1090 diventa il comando a distanza per
il vostro televisore.
Per far funzionare l’RR-1090, prima premete il tasto
DEVICE per il componente desiderato. Poi, premete
i pulsanti di base o COMMAND del menu per inviare
i comandi a raggi infrarossi per quel componente.
NOTA
: I tasti DEVICE AV1, AV2 e AV3 possono essere
utilizzati per qualsiasi tipo di componente.
Pulsanti di comando base
Il pulsante POWER alla destra del comando a distanza
insieme a due pulsanti rotondi a 4 vie e due tasti rotondi
più piccoli al centro dell’RR-1090 duplicano le funzioni
primarie per i vostri componenti – alimentazione,
volume, canale avanti/indietro, avvolgimento veloce,
pausa, ecc. I comandi per ogni pulsante variano a
seconda del pulsante DEVICE selezionato.
Tasti di comando del menu
e Display LCD
Nella parte superiore dell’RR-1090 c’è un gruppo
di 12 pulsanti rettangolari attorno al display LCD.
Questi tasti MENU COMMAND (controllo del menu)
forniscono altre funzioni mostrate da etichette di menu
che appaiono sul display accanto a ogni pulsante.
La funzione di questi pulsanti varia a secondo del
tipo di componente scelto dai pulsanti DEVICE e dalla
pagina di menu evidenziata.
Pulsante PAGE
Ogni componente scelto da un pulsante DEVICE può
avere fino a 48 comandi di menu. Questi comandi
appaiono sul display LCD in gruppi o pagine di
dodici. Premete il pulsante PAGE per andare alla
pagina successiva di comandi con nuove etichette
che appaiono sul display LCD. Ogni pressione del
pulsante PAGE salta al gruppo successivo per quel
componente per poi ritornare di nuovo alla pagina
iniziale.
Pulsanti MACRO
Quattro pulsanti contrassegnati M1,M2,M3 e M4
offrono una funzione macro speciale – inviando una
sequenza di fino a 10 comandi. Per esempio, una
sequenza macro potrebbe attivare il televisore,
scegliere Canale 5, attivare il processore surround
e scegliere l’ingresso TV.
Due dei pulsanti MACRO (M3 e M4) sono usati anche
per personalizzare l’RR-1090.
Pulsante MENU
Questo pulsante attiva e sceglie fra una serie di
schermi nel display LCD utilizzati per personalizzare
l’RR-1090. Il pulsante MENU non viene utilizzato
durante il normale funzionamento.
Pulsante POWER
Oltre a servire come pulsante di comando di base,
il tasto POWER viene utilizzato anche durante la
procedure di installazione per cercare i dati per i
codici di comando a raggi infrarossi.
Connettore seriale
Questo connettore modulare a 4 pin sul retro
dell’RR-1090 può essere utilizzato per collegare il
comando a distanza a un connettore seriale standard DB-9 su un PC usando il cavo fornito.
Utilizzando il software PC-LINK fornito insieme
all’apparecchio, i codici e i comandi possono essere
scaricati e/o caricati da un computer con Windows
95/98 sul comando a distanza RR-1090.
Questo permette un facile trasferimento del programma di un comando a distanza ad altri comandi
RR-1090 così come una personalizzazione
semplificata. Vedere la sezione sul software PC-LINK
in questo manuale.
®
Page 51

Italiano
51
Funzionamento dell’RR-1090
Questa sezione del manuale spiega il funzionamento
base dell’RR-1090 e la maggior parte delle
caratteristiche standard.
NOTA
: L’RR-1090 è pre-programmato con i codici
per processori sonori surround Rotel memorizzati
sotto il pulsante DEVICE AV1. I codici CD e DVD
della Rotel sono memorizzati sotto i tasti CD e DVD.
Attivazione dell’RR-1090
Per mantenere l’alimentazione alle pile, l’RR-1090
va in modalità “sleep” dopo 60 secondi di inattività.
Premete qualsiasi pulsante per attivare il comando
a distanza. Le etichette appaiono sul display LCD
quando il comando a distanza è attivo.
Invio dei comandi a raggi infrarossi
Invece di utilizzare più comandi a distanza per far
funzionare il vostro impianto, voi premete
semplicemente un pulsante sull’RR-1090 per
trasformarlo da comando a distanza per il vostro
lettore CD a comando a distanza per il vostro
televisore. Ecco come:
1. Premete qualsiasi pulsante sull’RR-1090 per
attivare il comando a distanza (se necessario).
2. Premete il pulsante DEVICE per azionare il
comando per il componente desiderato. Per
esempio, premete il pulsante AV1 per un
processore surround Rotel. L’etichetta per la vostra
selezione appare al centro del display.
3. Premete un tasto COMMAND
per inviare un comando a raggi infrarossi
al componente che avete selezionato. Per
esempio, premete il pulsante VOL+ per aumentare
il volume di un processore surround Rotel. I pulsanti
di base sono disponibili sui pulsanti tondi larghi
al centro del comando a distanza
e il pulsante POWER . Altri comandi sono
disponibili sui 12 tasti MENU COMMAND
nella parte superiore del comando a distanza,
corrispondenti alle etichette di comando visibili
sul display LCD. Mentre un pulsante COMMAND
viene premuto, l’etichetta abbinata a quel
comando sostituisce il nome DEVICE al centro
del display.
4. Premete il pulsante PAGE per vedere la pagina
successiva dei 12 comandi menu disponibili sul
display. Possono essere disponibili per un
particolare componente fino a quattro “pagine”
di comandi. Premete il pulsante PAGE
ripetutamente per scorrere attraverso i gruppi di
comandi disponibili per quel componente. Vedi
figura 3.
NOTA
: I pulsanti COMMAND duplicano i comandi
per molti diversi tipi di componenti. La loro funzione
dipende dal tipo di componente selezionata.
Assicuratevi di aver premuto il pulsante DEVICE
esatto prima di inviare i comandi a raggi infrarossi.
Invio di comandi MACRO
Quattro pulsanti sull’RR-1090 (contrassegnati M1,
M2, M3 e M4) possono memorizzare sequenze di
comando macro multiple – per esempio, una
sequenza che attiva il televisore, sceglie Canale 5,
attiva il processore surround e sceglie l’ingresso TV.
Una sequenza macro viene inviata premendo il
pulsante MACRO dove è memorizzato il macro.
Programmazione dei Codici
L’RR-1090 contiene centinaia di serie di comandi
per componenti. La programmazione del comando
a distanza comporta la scelta di una serie di comandi
che corrispondono ai componenti nel vostro impianto
e l’assegnazione di ognuno a uno degli otto pulsanti
DEVICE inserendo un codice a 4 cifre per quel
componente. Questo deve essere fatto solamente
una volta durante l’installazione iniziale dell’RR-1090.
Il modo più facile è di trovare i vostri componenti e
i codici a 4 cifre corrispondenti nella lista di codici
in fondo a questo manuale. Se il vostro componente
non è elencato, ci sono metodi di ricerca alternativi
per trovare la serie di comandi corretta.
Page 52

52 RR-1090
NOTA
: La programmazione dell’RR-1090 viene
effettuata in una modalità d ‘installazione a cui si
accede premendo il tasto MENU. In qualsiasi
momento durante il procedimento, potete uscire
dalla modalità d’ installazione e tornare alla
funzione normale premendo il pulsante MENU due
volte di seguito.
Programmazione del codice a 4 cifre
Trovate il vostro componente audio/video nell’elenco
di codici e annotate il codice a 4 cifre:
1. Premete il tasto MENU per raggiungere il menu
principale.
2. Scegliete SETUP dal menu del display LCD
premendo il tasto MENU COMMAND sopra la
prima lettera del contrassegno SETUP.
3. Premete uno dei pulsanti DEVICE per scegliere
dove desiderate immagazzinare i codici di questo
componente. Se scegliete i pulsanti device multiuso
AV1, AV2 o AV3, vi verrà anche richiesto di
scegliere il tipo di componente (CD, VCR, ecc.)
4. Scegliete ENTER CODE premendo il tasto MENU
COMMAND sopra quell’etichetta.
5. Inserite il codice a 4 cifre usando i tasti MENU
COMMAND corrispondenti alle cifre sul display
LCD. Una volta effettuata questa operazione, il
codice correttamente inserito verrà confermato
sul display.
6. Una volta che il codice è stato inserito, il menu
presenterà due opzioni. Premete un altro tasto
DEVICE per programmare altri codici. Premete
il pulsante MENU per tornare al menu principale;
premete il pulsante MENU una seconda volta
per uscire dalla modalità di installazione e tornare
al funzionamento normale.
Verificate il codice inviando comandi ai componenti
(es.: il comando POWER). Se il codice non funziona
correttamente, ripetete la procedura usando il codice
a 4 cifre successivo per il marchio del componente.
Ricerca del codice per nome del
costruttore
Potete anche utilizzare il seguente metodo di ricerca
per trovare e verificare i numeri di codice disponibili
per il marchio del vostro componente.
1. Premete il pulsante MENU per raggiungere il
menu principale.
2. Scegliete SETUP dal dispaly LCD premendo il
tasto MENU COMMAND sopra la prima lettera
dell’etichetta SETUP.
3. Premete uno dei pulsanti DEVICE per scegliere
dove desiderate programmare i codici di questo
componente. Se scegliete AV1, AV2 o AV3 vi
verrà chiesto nuovamente di scegliere il tipo di
componente (CD, VCR, AMP, acc.).
4. Scegliete il marchio di fabbrica BRAND NAME
premendo il tasto MENU COMMAND sopra
quell’etichetta.
5. Scegliete la prima lettera del nome del marchio
del vostro componente. Se necessario, premete
il pulsante M4 per la pagina successiva di lettere
o il pulsante M3 per la pagina precedente di lettere.
6. Scegliete il nome del marchio del vostro
componente dall’elenco che appare sullo schermo
(premendo M4 o M3 per ulteriori elenchi). Sul
display apparirà il avviso “press POWER key
to test” (premete il tasto POWER per verificare)
7. Premete il pulsante POWER sul lato destro
dell’RR-1090 per verificare il primo codice
disponibile per il vostro marchio. Sul display
apparirà il codice a 4 cifre che è stato verificato.
Se il comando POWER attiva o disattiva il
componente desiderato, avete trovato un codice
che potrebbe funzionare. Potete verificare altri
comandi premendo i tasti MENU COMMAND
corrispondenti ai comandi per quel codice a 4 cifre
mostrato sul display. Se funziona, premete il tasto
DEVICE per memorizzare il codice.
Se il comando POWER non funziona, premete
il tasto POWER per verificare il codice successivo
disponibile per quel marchio, con il nuovo codice
a 4 cifre verificato che apparirà sul display. Continuate
a premere il tasto POWER e a verificare i codici
fino a che avete trovato un codice che funziona,
memorizzatelo premendo il tasto DEVICE.
Page 53

Italiano
53
Se nessuno dei codici disponibili per quel
marchio funziona, vi verrà richiesto di scorrere
l’intera libreria dei codici per quel genere di
componente. Scegliete YES per saltare alla procedura
della ricerca (punto 5 nella sezione successiva).
Scegliete NO per tornare al menu principale.
Programmazione di auto-ricerca
Per ricercare un codice dall’elenco completo dei
codici a 4 cifre disponibili per un tipo di componente:
1. Premete il pulsante MENU per raggiungere il
menu principale.
2. Scegliete SETUP dal menu del display LCD
premendo il tasto MENU COMMAND sopra la
prima lettera dell’etichetta SETUP.
3. Premete uno dei pulsanti DEVICE per scegliere
dove desiderate programmare i codici di questo
componente. Se scegliete AV1, AV2 o AV3 vi
verrà anche richiesto di scegliere il tipo di
componente (CD, VCR, AMP, ecc.).
4. Scegliete SEARCH premendo il tasto MENU
COMMAND sotto quell’etichetta. Il suggerimento
“press POWER key to test” (premete il tasto
POWER per verificare) apparirà sul display.
5. Premete il tasto POWER sul lato destro
dell’RR-1090 per verificare il primo codice
disponibile. Una volta verificato il codice a 4
cifre verrà mostrato sul display
Se il comando POWER attiva o disattiva il
componente desiderato, avete trovato un codice
che potrebbe far funzionare il vostro componente.
Potete verificare altri comandi premendo i tasti MENU
COMMAND corrispondenti verso comandi per quel
codice a 4 cifre mostrati sul display. Se ha avuto
successo, premete il pulsante DEVICE per
memorizzare il codice.
Se il comando POWER non funziona, premete
il pulsante POWER per verificare il codice successivo
disponibile, nuovamente con il codice a 4 cifre
verificato evidenziato sul display. Continuate a
premere il pulsante POWER e a verificare i codici
fino a che avete trovato un codice che funziona,
memorizzandolo con la pressione del pulsante
DEVICE.
Se nessuno dei codici disponibili funziona,
un suggerimento vi dirà che avete verificato tutti i
codici disponibili. Premete il pulsante MENU per
tornare al menu principale.
Comandi intelligenti (learning)
Se le serie di comandi programmati per il vostro
componente non include le funzioni che desiderate,
potete insegnare all’RR-1090 comandi singoli per i
vostri comandi a distanza esistenti:
1. Ponete l’RR-1090 e il comando a distanza
originale su una superficie piatta con l’estremità
l’una contro l’altra come mostrato nella Figura
2 sulla parte anteriore di questo manuale. I segnali
a raggi infrarossi inviati dall’altro comando a
distanza devono essere rivolti verso l’emettitore/
sensore dell’RR-1090.
2. Premete il pulsante MENU per raggiungere il
menu principale.
3. Scegliete LEARNING dal menu sul display LCD
premendo il tasto MENU COMMAND sopra la
prima lettera dell’etichetta LEARNING.
4. Premete uno dei tasti DEVICE per scegliere dove
desiderate programmare i codici di questo
componente.
5. Scegliete il tasto COMMAND dell’RR-1090 dove
desiderate memorizzare il comando. Potete
scegliere uno dei comandi BASIC COMMAND
o uno dei tasti MENU COMMAND (usando il
pulsante PAGE per avanzare di una nuova pagina
dei MENU COMMAND se è necessario trovare
un tasto inutilizzato). Il display LCD mostrerà
‘LEARNING’.
6. Premete e mantenete premuto il pulsante del
comando corrispondente sul comando a distanza
originale per inviare il codice a raggi infrarossi
appreso all’RR-1090.
Se la procedura d’apprendimento (learning) fallisce, l’RR-1090 mostrerà “ERROR” e
ritornerà allo Stadio 5 precedente. Riposizionate i
due comandi a distanza e cercate nuovamente,
cominciando dallo Stadio 5.
Page 54

54 RR-1090
Quando un codice viene appreso con esito
positivo, l’RR-1090 vi suggerirà di emettere
l’etichetta che ha assegnato al comando. Scegliete
NO per mantenere l’etichetta corrente. Scegliete YES
per emettere l’etichetta e inserire le lettere desiderate
(usando i pulsanti M3 o M4 per passare alla pagina
successiva di lettere). Le etichette possono essere di
fino a 5 caratteri. Premete il pulsante MENU per
memorizzare la nuova etichetta.
Per apprendere nuovi comandi, ripetete dallo
Stadio 5. Per tornare al menu principale, premete
il pulsante MENU.
NOTA
: L’RR-1090 ha una capacità di 240 comandi.
Se viene raggiunta la capacità, il comando a
distanza mostrerà COMMAND FULL e non vi
permetterà di apprendere altri comandi. Vedere la
sezione sull’annullamento dei comandi per liberare
spazio per i comandi.
Programmazione MACRO
Quattro pulsanti sull’RR-1090 (contrassegnati M1,
M2, M3, M4) possono memorizzare sequenze macro
di comandi multipli inviati premendo un pulsante.
Per programmare una sequenza macro, prima
assicuratevi che tutti i comandi intelligenti siano stati
appresi dall’RR-1090 – la caratteristica MACRO
registra semplicemente una sequenza di comandi
singoli di pulsanti dell’RR-1090.
1. Premete il pulsante MENU per raggiungere il
menu principale.
2. Premete il pulsante PAGE per la pagina successiva
delle opzioni di menu.
3. Scegliete MACRO dal display LCD.
4. Premete il pulsante MACRO (M1, M2, M3 o M4)
dove desiderate memorizzare la nuova sequenza
macro.
5. Inserite la nuova etichetta per la nuova sequenza
macro i tasti MENU COMMAND corrispondenti
alle lettere sul display (usando i pulsanti M3 o
M4 per passare alla pagina successiva di lettere).
Le etichette possono essere lunghe fino a 5
caratteri. Dopo aver inserito l’etichetta, premete
il pulsante MENU per memorizzarlo.
6. Memorizzate il primo passo nel macro. Premete
un pulsante DEVICE per passare all’apparecchio
desiderato e singoli tasti COMMAND per
memorizzare i comandi dall’apparecchio
selezionato (premete il pulsante PAGE per vedere
altre pagine di comandi disponibili).
7. Per memorizzare altri comandi, premete il
pulsante MACRO selezionato per confermare
il comando memorizzato precedente e poi
memorizzare i comando successivo. Ripetete fino
a che l’intera sequenza è stata memorizzata.
8. Quando l’intera sequenza macro è stata inserita,
premete il pulsante MENU per memorizzare la
sequenza macro.
NOTA
: Una sequenza macro può contenere fino a
10 comandi, senza includere altre pressioni del
pulsante DEVICE.
Pagina personalizzata dell’apparecchio
In genere tutti i comandi memorizzati sotto un pulsante
DEVICE funzionano come un solo componente.
Tuttavia, è possibile costruire una serie di comandi
speciale, chiamata CUSTOM PAGE, che comprende
comandi individuali copiati da altri apparecchi. Per
esempio, potreste costruire una serie di comandi
CUSTOM PAGE che contenga copie dei comandi
più utilizzati da tutti gli apparecchi, che fornisca una
sott-serie di facile utilizzo di comandi preferiti. A questo
comando CUSTOM PAGE si può accedere premendo
il pulsante DEVICE dove questo si trova memorizzato.
Per costruire una pagina di apparecchio
personalizzata:
1. Premete il pulsante MENU per raggiungere il
menu principale.
2. Scegliete PREFERENCE dal display LCD.
3. Scegliete CUSTOM PAGE dal display LCD.
4. Premete il pulsante DEVICE dove desiderate
memorizzare la serie di comando CUSTOM
PAGE.
5. Inserite la nuova etichetta per l’apparecchio
premendo i tasti MENU COMMAND
corrispondenti alle lettere del display (usando i
pulsanti M3 o M4 per passare alla pagina di
lettere successiva). Le etichette possono essere
Page 55

Italiano
55
lunghe fino a 7 caratteri. Dopo aver inserito
l’etichetta premete il pulsante menu per
memorizzarlo.
6. Premete il pulsante DEVICE per scegliere
l’apparecchio su cui si trova il primo comando
che desiderate copiare sul CUSTOM PAGE.
7. Premete il tasto COMMAND che desiderate
copiare sulla CUSTOM PAGE.
8. Scegliete la collocazione nella CUSTOM PAGE
in cui desiderate memorizzare il comando
premendo un tasto MENU COMMAND.
L’etichetta per quel comando appare nella
collocazione desiderata.
9. Ripetete i punti da 6 a 8 per ogni comando in
più che desiderate copiare sulla CUSTOM PAGE.
Se desiderate una sistemazione automatica dei
comandi, premete il pulsante M4. Premete il pulsante
MENU per tornare al menu principale.
NOTA
: Per copiare in qualsiasi momento altri
comandi, ripetete dal punto 1 a 3 e da 6 a 10.
Poiché state copiando su una CUSTOM PAGE
esistente i punti 4 e 5 non sono necessari e pertanto
saranno saltati.
Eliminazione dei comandi memorizzati
E’ possibile annullare comandi precedentemente
memorizzati:
1. Premere il pulsante DEVICE contenente il comando
che desiderate eliminare.
2. Premete il pulsante MENU per raggiungere il
menu principale.
3. Scegliete EDIT dal display LCD.
4. Scegliete DELETE KEY dal display LCD.
5. Premete il tasto COMMAND che desiderate
eliminare. Potete eliminare comandi che vanno
da pulsanti di BASIC COMMAND a tasti MENU
COMMAND (usando il pulsante PAGE per scorrere
attraverso le pagine di comandi disponibili).
6. Scegliete YES o NO per confermare
l’annullamento.
7. Ripetete il punto 5 e 6 per eliminare altri comandi.
Se desiderato premere il pulsante M4 per
organizzare automaticamente i nuovi comandi
sul display.
8. Premete il pulsante MENU per tornare al menu
principale.
Volume “Punch-through”
In molti impianti, il VOLUME viene regolato sul televisore
o sul processore A/V. Per comodità, l’RR-1090 è
provvisto di una caratteristica VOLUME PUNCH
THROUGH che copia i comandi del volume o
dall’apparecchio TV o da qualsiasi apparecchio
programmato A/V su tasti DEVICE (componente) per
gli altri componenti come lettori CD, VCR, ricevitori
SAT e lettori DVD. Dopo aver abilitato questa
caratteristica, i controlli del volume sia dal televisore
sia dal processore A/V sono disponibili anche quando
una di queste altre serie di comandi DEVICE è attiva.
Per consentire la caratteristica VOLUME PUNCHTHROUGH:
1. Premete il pulsante MENU per raggiungere il
menu principale.
2. Scegliete PREFERENCE dal display LCD.
3. Scegliete PUNCH THROUGH dal display LCD.
4. Scegliete i comandi del volume ( sia dalla serie
di comandi TV sia dalla serie di comandi A/V)
per copiare su un altro DEVICE scegliendo o TV
VOL o AMP VOL dal display LCD. Se scegliete
AMP VOL, dovrete selezionare la serie di comandi
A/V con i comandi di volume desiderati (AV1,
AV2 o AV3) dal successivo menu del display LCD
premendo un tasto MENU COMMAND.
5. Premete un pulsante DEVICE per scegliere
l’apparecchio su cui desiderate copiare i comandi
del volume. Il comando VOLUME PUNCHTHROUGH non può essere copiato su un
apparecchio TVo qualsiasi altro tipo di apparecchio
(CD, SAT, LD, DVD, acc.). Se scegliete un tasto
device inadatto, non accade nulla. Dopo aver
scelto un tasto DEVICE corretto, sul display apparirà
una conferma PUNCH THROUGH OK.
6. Premete il pulsante MENU per tornare al menu
principale.
Page 56

56 RR-1090
Funzione RESET
Potete riportare il vostro RR-1090 alla sua
programmazione originale in qualsiasi momento
usando la funzione RESET.
NOTA
: Usando la funzione RESET si cancellano tutti
i comandi appresi, le etichette e le regolazioni di
configurazione. Assicuratevi che questo sia quello
che desiderate fare.
Per ridefinire l’RR-1090:
1. Premete il pulsante MENU per raggiungere il
menu principale.
2. Premete il pulsante PAGE per avanzare alla
seconda pagine delle opzioni.
3. Scegliete REMOTE SETTINGS dal display LCD
premendo il tasto MENU COMMAND sopra la
prima lettera dell’etichetta REMOTE SETTINGS.
4. Scegliete RESET dal display LCD premendo il tasto
MENU COMMAND sotto la prima lettera
dell’etichetta RESET.
5. Scegliete YES o NO per confermare. Se scegliete
YES, l’RR-1090 annullerà tutti i programmi
personalizzati e ritornerà alle regolazioni di
fabbrica originali, evidenziando una serie di
messaggi in progresso seguiti dalla conferma
finale DEFAULT SETTING.
6. Premete il pulsante MENU per tornare al menu
principale.
Funzione DUPLICATE
La funzione DUPLICATE trasferisce i programmi, i
comandi appresi e le etichette personalizzate, da
un RR-1090 a un secondo RR-1090. Avete la
possibilità di trasferire dati da un solo tasto DEVICE
o da tutti e otto i tasti DEVICE. Per trasferire la
programmazione, collocate due comandi a distanza
RR-1090 con le finestre a raggi infrarossi rivolte l’una
verso l’altra, poi continuate nel seguente modo.
Sul comando a distanza che riceverà i dati:
1. Premete il pulsante MENU per raggiungere il
menu principale.
2. Premete il pulsante PAGE per avanzare alla
seconda pagina di opzioni.
3. Scegliete DUPLICATE dal display LCD premendo
il tasto vicino MENU COMMAND.
4. Scegliete RECEIVE dal display LCD premendo
il tasto vicino MENU COMMAND. Sul display
apparirà un “READY TO RECEIVE INDICATOR”
Sul comando a distanza che invierà i dati:
1. Premete il pulsante MENU per raggiungere il
menu principale.
2. Premete il pulsante PAGE per avanzare alla
seconda pagina di opzioni.
3. Scegliete DUPLICATE dal display LCD premendo
il tasto vicino MENU COMMAND.
4. Per trasmettere codici da tutti gli
apparecchi, scegliete l’opzione di menu COPY
ALL DEVICES. Per trasferire codici per un
unico apparecchio, scegliete il pulsante
DEVICE da copiare. Questo attiva la procedura
di trasferimento dei dati con un messaggio SENDING che apparirà sul display.
Al termine di questa procedura di trasferimento
apparirà una conferma all’invio dell’RR-1090:
• Se il trasferimento dei dati ha avuto esito
positivo, apparirà ”FINISH SENDING’.
• Se il trasferimento dei dati fallisce apparirà
sull’LCD “SENDING ERROR” e l’apparecchio
ritornerà alla modalità di funzionamento normale.
Riposizionate i due comandi a distanza e provate
nuovamente.
NOTA
: Non cercate di usare la funzione DUPLICATE
per trasferire dati da un comando a distanza che
non sia un altro RR-1090 Rotel.
Page 57

Italiano
57
Etichette Personalizzate
Le etichette per i pulsanti DEVICE e i tasti COMMAND
possono essere create. Anche la collocazione dei
tasti COMMAND per un apparecchio può essere
spostata da una posizione sul display LCD a un’altra.
Creazione di un nome di un componente
(DEVICE)
Per cambiare il nome che appare al centro del display LCD quando scegliete un pulsante DEVICE:
1. Premete il pulsante DEVICE che desiderate
ridefinire.
2. Premete il pulsante MENU per raggiungere il
menu principale.
3. Scegliete EDIT dal display LCD.
4. Scegliete DEVICE NAME dal display LCD.
5. Inserite la nuova etichetta per l’apparecchio
premendo i tasti MENU COMMAND
corrispondenti alle lettere sul display (usando i
tasti M3 o M4 per passare alla pagina successiva
di lettere). Le etichette possono essere lunghe fino
a 7 caratteri. Dopo aver inserito l’etichetta,
premete il pulsante MENU per memorizzarla.
Creazione di un nome COMMAND
Per cambiare il nome che appare sul display LCD
accanto al tasto MENU COMMAND:
1. Premete il pulsante DEVICE che contiene il tasto
COMMAND che desiderate rinominare.
2. Premete il pulsante MENU per raggiungere il
menu principale.
3. Scegliete EDIT dal display LCD
4. Scegliete KEY NAME dal display LCD.
5. Premete il pulsante BASIC COMMAND o il tasto
MENU COMMAND (usando il pulsante PAGE
per altre scelte) che desiderate rinominare.
6. Inserite la nuova etichetta per l’apparecchio
premendo i tasti MENU COMMAND
corrispondenti alle lettere sul display (usando i
pulsanti M3 o M4 per passare alla pagina di
lettere successiva). Le etichette possono essere
lunghe fino a 5 caratteri. Dopo aver inoltrato
l’etichetta, premete il pulsante MENU per
memorizzarla.
7. Ripetete i punti 5 e 6 per etichettare altri pulsanti
COMMAND oppure premete il pulsante MENU
per tornare al menu principale.
Spostamento di un nome COMMAND
Per cambiare la posizione di un tasto MENU COMMAND sul display LCD:
1. Premete il pulsante DEVICE che contiene il tasto
COMMAND che desiderate spostare.
2. Premete il pulsante MENU per raggiungere il
menu principale.
3. Scegliete EDIT dal display LCD.
4. Scegliete MOVE KEY dal display LCD.
5. Scegliete il tasto MENU COMMAND per
spostarlo.
6. Scegliete la nuova posizione del tasto MENU
COMMAND.
7. I due tasti COMMAND scambiano posizione.
Organizzazione automatica dei nomi
COMMAND
Come alternativa ai tasti spostati manualmente, potete
fare in modo che l’RR-1090 organizzi automaticamente i tasti MENU COMMAND per un DEVICE.
1. Premete il pulsante DEVICE che contiene i tasti
COMMAND che desiderate organizzare
automaticamente.
2. Premete il pulsante MENU per raggiungere il
menu principale.
3. Scegliete EDIT dal display LCD.
4. Scegliete AUTO-ARRANGE dal display LCD.
Page 58

58 RR-1090
Altre Opzioni di Configurazione
L’RR-1090 è caratterizzato da una retro-illuminazione
e da un suono che aiuta durante il funzionamento.
Inoltre, è possibile attivare una password di protezione
per proteggere l’accesso alle caratteristiche
d’installazione.
Retro-illuminazione
La retroilluminazione rende il display LCD leggibile
in condizioni di luce soffusa. Ci sono tre regolazioni
disponibili:
• Sensibile alla luce. Percepisce il livello di luce
nella stanza e accende la retroilluminazione per
5 secondi con qualsiasi pressione di tasto quando
la stanza è scura. (regolazione di fabbrica).
• Sempre accesa. La retroilluminazione verrà
attivata per 5 secondi con la pressione di qualsiasi
tasto indipendentemente dall’illuminazione nella
stanza.
• Sempre disattiva. La retroilluminazione è
disattivata.
Per configurare la retro-illuminazione:
1. Premere il pulsante MENU per raggiungere il
menu principale.
2. Premere il pulsante PAGE per avanzare alla
seconda pagina delle opzioni di menu.
3. Scegliere REMOTE SETTINGS dal display LCD.
4. Scegliere BACKLIT dal display LCD.
5. Scegliere una delle tre modalità di
retroilluminazione dal display LCD.
Segnale acustico
L’RR-1090 ha la caratteristica di un segnale acustico
(beep) per confermare ogni pressione del pulsante.
Questa caratteristica può essere attivata o disattivata.
Per configurare il segnale di beep:
1. Premere il pulsante MENU per raggiungere il
menu principale.
2. Premere il pulsante PAGE per avanzare alla
seconda pagina delle opzioni di menu.
3. Scegliere REMOTE SETTINGS dal display LCD.
4. Scegliere BEEP SOUND dal display LCD.
5. Scegliere SOUND ENABLE o SOUND DISABLE.
Password
Una parola d’ordine può essere definita e abilitata
per impedire l’accesso ai menu di installazione. Una
volta definita e abilitata, la password verrà richiesta
prima di consentire l’accesso ai menu d’installazione.
La password impostata in fabbrica è “2000”, tuttavia
la protezione è disattivata in fabbrica.
Per abilitare o disabilitare la protezione della
password:
1. Premete il pulsante MENU per raggiungere il
menu principale.
2. Premete il pulsante PAGE per passare alla seconda
pagina delle opzioni di menu.
3. Scegliete REMOTE SETTINGS dal display LCD.
4. Scegliete PASSWORD dal display LCD.
5. Scegliete ENABLE o DISABLE.
6. Se richiesta, inserite la password premendo i tasti
MENU COMMAND corrispondenti ai caratteri
mostrati sul display (usando i tasti M3 o M4 per
passare alla pagina di caratteri successiva). Dopo
aver inserito la password, premete il pulsante
MENU.
Per cambiare la password:
1. Premete il pulsante MENU per raggiungere il
menu principale.
2. Premete il pulsante PAGE per passare alla seconda
pagina delle opzioni di menu.
3. Scegliete REMOTE SETTINGS dal display LCD.
4. Scegliete PASSWORD dal display LCD.
5. Scegliete CREATE dal display LCD.
6. Quando viene suggerito, inserite la vecchia
password premendo i tasti MENU COMMAND
corrispondenti ai caratteri mostrati sul display
(usando i tasti M3 o M4 per passare alla pagina
di caratteri successiva). Dopo aver inserito la password, premete il pulsante MENU.
Page 59

Italiano
59
7. Inserite la nuova password premendo i tasti
MENU COMMAND corrispondenti ai caratteri
mostrati sul display, usando i pulsanti M3 o M4
per passare alla pagina successiva di caratteri.
Le password possono lunghe fino a 4 caratteri
in qualsiasi combinazione di lettere e numeri.
Premete il pulsante MENU.
8. Inserite nuovamente la nuova password per
confermare e premete il pulsante MENU. Una
conferma PASSWORD SET apparirà sul display.
Poi potete scegliere ENABLE o DISABLE.
NOTA
: Una volta cambiata la password, non potete
accedere ai menu di installazione se dimenticate
la nuova password. A meno che abbiate la necessità
di un’altra protezione, vi raccomandiamo di lasciare
la password di fabbrica “2000” inalterata.
Software PC-Link
Il software PC-LINK Windows® 95/98 fornito con
il comando a distanza RR-1090 può essere utilizzato
per funzionare con file di configurazione completi
per l’RR-1090. Questi file di configurazione
contengono una serie completa di opzioni, di
comandi, macro e etichette per una personalizzazione completa dell’RR-1090. I file di configurazione possono essere salvati o aperti dall’ hard disk.
Possono anche essere caricati o scaricati sull’RR-1090
usando il cavo seriale fornito in dotazione. Questo
offre un comodo modo per trasferire la
programmazione desiderata a un numero di comandi
a distanza RR-1090.
Inoltre, molte delle opzioni di configurazione per
l’RR-1090 possono essere modificate nel software
PC-LINK, una procedura che potrebbe essere più
comoda dell’uso dei menu d’installazione propri
dell’RR-1090.
Installazione del software PC-LINK
Per installare e utilizzare il software PC-LINK su un
computer Windows 95/98:
1. Inserite il DISK 1 nel vostro disk drive.
2. Avviate il programma SETUP.EXE, o facendo clic
due volte sul file in Wondows Explorer o cliccando
RUN dal menu del pulsante START e scrivendo:
SETUP.EXE.
3. Seguite i passaggi nel programma d’installazione,
accettando la guida di fabbrica per le installazioni
del programma (C:/ PROGRAMS/HT 2000) o
specificando una nuova posizione usando il
pulsante BROWSE.
4. Vi verrà suggerito di inserire il DISK 2 durante
l’installazione. Quando i file sono installati, vi
verrà suggerito di riavviare il vostro computer
per completare l’installazione.
5. Scorrete il software PC-LINK o facendo un doppio
clic sul nome del file HT2000.EXE in Windows
Explorer o cliccando RUN dal menu dei pulsanti
START e scrivendo C:/PROGRAMS/HT2000.EXE.
Caricamento e memorizzazione dei file
di configurazione
Per usare il software PC-LINK, aprite un file di
configurazione che appare sullo schermo principale
PC-LINK come mostrato nell’illustrazione all’inizio
del manuale. Questi file di configurazione possono
essere memorizzati sul disco del vostro computer
con l’estensione di file “*.HTR”.
NOTA
: Il file di configurazione di fabbrica
“DEFAULT.HTR” è installato nel sottoelenco DEFAULT
del l’elenco di installazione HT2000.
Per aprire un file di configurazione da un
computer disk:
1. Scegliete OPEN dal menu FILE.
2. Usate la casella dialogo per trovare il file di
configurazione DEFAULT.HTR (o il file di vostra
scelta).
3. Fate clic sul pulsante OPEN.
Page 60

60 RR-1090
Per memorizzare un file di configurazione
su un computer disk:
1. Per memorizzare un file di configurazione con
lo stesso nome, scegliete SAVE dal menu FILE. Il
nuovo file sostituirà il vecchio.
2. Per memorizzare un file di configurazione con
un nome diverso, scegliete SAVE AS dal menu
FILE. Inserite un nuovo nome di file nella casella
di dialogo (l’estensione HTR verrà automaticamente aggiunta). Fate clic sul tasti SAVE.
Caricamento e scaricamento dei file di
configurazione
Usando il software PC-LINK e il cavo seriale in
dotazione potete caricare un file di configurazione
dal comando a distanza RR-1090 al vostro computer,
modificarlo e poi scaricare le nuove regolazioni di
configurazione al comando a distanza.
Per utilizzare la caratteristica caricamento/
scaricamento, dovete configurare il vostro computer
e mettere il comando a distanza in modalità di
trasferimento dei dati.
Collegate l’RR-1090 al vostro computer:
1. Collegate il connettore modulare a 4 pin sul cavo
in dotazione nella spina sul retro del comando
a distanza.
2. Inserite l’altra estremità del cavo in un connettore
seriale (COM1 o COM2) sul vostro computer.
3. Iniziate il software PC-LINK e scegliete l’apertura
in cui avete inserito il cavo (COM 1 o COM 2)
dal menu PORT.
Mettete l’RR-1090 in modalità DATA
TRANSFER:
1. Premete il pulsante MENU per raggiungere il
menu di installazione principale.
2. Premete il pulsante PAGE per passare alla seconda
pagina di opzioni.
3. Scegliete PC LINK dal display LCD premendo il
tasto vicino MENU COMMAND.
Per caricare un file di configurazione
dall’RR-1090 al computer:
1. Assicuratevi che l’RR-1090 sia in modalità di
trasferimento dei dati.
2. Scegliete UPLOAD dal menu FILE nel software
PC-LINK. L’informazione “UPLOADING...”
apparirà sullo schermo LCD del comando a
distanza durante il trasferimento.
3. Quando il caricamento è stato completato, il file
di configurazione verrà aperto nel software PCLINK, dove può essere modificato, scaricato a
un altro RR-1090, o memorizzato sul disco del
computer.
Per scaricare un file di configurazione dal
computer all’RR-1090:
1. Assicuratevi che l’RR-1090 sia in modalità di
trasferimento dei dati.
2. Aprite il file desiderato nel software PC-LINK
3. Scegliete DOWNLOAD dal menu FILE nel software PC-LINK. L’informazione “DOWNLOADING...” apparirà sullo schermo LCD del comando
a distanza durante il trasferimento.
4. Quando lo scaricamento è stato completato, le
nuove regolazioni di configurazione verranno
installate nell’RR-1090 annullando qualsiasi
regolazione precedente.
Modifica dei file di configurazione
Il software PC-LINK può essere utilizzato per vedere
le regolazioni correnti di un file di configurazione
aperto e modificare molte di esse. Il file di
configurazione modificato può poi essere
memorizzato su un disco scaricato su un RR-1090.
Ecco le opzioni disponibili nel software PC-LINK:
Per scegliere un DEVICE che deve essere visto
o modificato, scegliete l’apparecchio dal menu
DEVICE. I nomi essenziali e altre regolazioni per
quel apparecchio sono evidenziati sullo schermo PCLINK.
Page 61

Per dare un nuovo nome a un componente
(DEVICE), scegliete DEVICE NAME dal menu EDIT
oppure fate un doppio clic sulla casella DEVICE sullo
schermo principale. Scrivete il nuovo nome nella
casella di dialogo e date l’ok.
Per dare un nuovo nome a un tasto (Key),
fate un clic sul tasto desiderato sullo schermo
principale e scegliete KEY NAME dal menu EDIT
oppure fate un doppio clic sul tasto desiderato.
Scrivete il nome nuovo nella casella di dialogo e
date l’ok.
Per eliminare un tasto, fate un clic sul tasto
desiderato sullo schermo principale e scegliete DELETE
KEY dal menu EDIT. Fate clic su YES per confermare.
Per riorganizzare i tasti dall’apparecchio
in uso, scegliete ARRANGE KEY da EDIT. Potete
anche spostare manualmente i tasti della pagina in
un’altra posizione facendo un clic sul nome del tasto,
tenendo il tasto del mouse e trascinando l’etichetta
in una nuova posizione.
Per vedere i passaggi in una MACRO,
scegliete la macro desiderata dal menu MACRO. I
passaggi memorizzati nella macro sono evidenziati
sul lato destro dello schermo principale.
Per cambiare la regolazione KEY TONE,
scegliete KEY TONE dal menu SETTING. Fate clic
sull’opzione desiderata nella casella di dialogo.
Per cambiare la regolazione di
retroilluminazione (BACKLIGHT), scegliete
BACKLIT dal menu SETTING. Fate clic sull’opzione
desiderata nella casella di dialogo.
Per vedere l’impostazionePASSWORD,
scegliete PASSWORD dal menu SETTING.
Per vedere la regolazione VOLUME PUNCHTHROUGH, scegliete PUNCH THROUGH dal menu
SETTING.
Italiano
61
Page 62

62 RR-1090
Contenido
1. Distribución de los Botones 2
2. Proceso de Aprendizaje 4
3. Ejemplo de Páginas de Dispositivo 4
4. Software para la Conexión a un
Ordenador Personal 5
Introducción ............................................ 65
Funciones y Prestaciones Clave 65
Precauciones Importantes 65
Instalación y Recarga de las Baterías 65
Para Empezar .......................................... 66
Sensor/Emisor de Rayos Infrarrojos 66
Botones Device 66
Botones Correspondientes a las Ordenes
de Control Básicas 66
Teclas de Gestión por Menús
y Visualizador de Funciones LCD 66
Botón PAGE 66
Botones MACRO 66
Botón Menu 67
Botón Power 67
Conector Serie 67
Manejo del RR-1090 ............................... 67
Activación del RR-1090 67
Envío de Ordenes de Control
por Rayos Infrarrojos (IR) 67
Envío de Macros 68
Programación de Códigos ......................... 68
Programación de Códigos de 4 Dígitos 68
Búsqueda de Códigos por Nombre de la Marca 69
Programación por Búsqueda Automática 69
Aprendizaje de Instrucciones de Control 70
Programación de Macros 70
Página de Dispositivo Personalizado
(“Custom Device Page”) 71
Borrado de Instrucciones Memorizadas 72
Función de Transferencia del Control de Volumen
(“Volume Punch-Through”) 72
Función RESET (“REINICIALIZACION”) 73
Función DUPLICATE (“DUPLICAR”) 73
Etiquetas Personalizadas
(“Custom Labels”) .................................. 74
Edición de un Nombre de DISPOSITIVO 74
Edición del Nombre de una ORDEN DE CONTROL 74
Cambio de Ubicación de un Nombre
de ORDEN DE CONTROL 74
Reordenación Automática de los Nombres de
ORDENES DE CONTROL 75
Otras Opciones de Configuración .............. 75
Retroiluminación 75
Avisador Acústico 75
Contraseña (“Password”) 76
Software para la Conexión
a un Ordenador Personal ......................... 76
Instalación del Software PC-LINK 77
Carga y Memorización de los Archivos de
Configuración 77
Carga y Descarga de Archivos de Configuración 77
Modificación de los Archivos de Configuración 78
Códigos de 4 Dígitos................................ 92
A/V 92
TV 92
VCR 93
CD 93
DVD 94
LD 94
SAT/DSS 95
Page 63

Español
63
Introducción
Gracias por adquirir el mando a Distancia Universal
Rotel RR-1090. El RR-1090 puede reemplazar hasta
ocho mandos a distancia y controlar componentes
de audio o vídeo tanto de Rotel como de otros
fabricantes. El RR-1090 incluye grupos de
instrucciones de control para cientos de componentes
audiovisuales, pudiendo además memorizar
instrucciones procedentes de los mandos a distancia
de que usted disponga. El funcionamiento del
RR-1090 es simple e intuitivo gracias al empleo de
un reducido número de botones y un gran visualizador
de funciones de cristal líquido (LCD).
Funciones y Prestaciones Clave
• Fácil programación utilizando grupos de órdenes
de control memorizados correspondientes a
cientos de componentes.
• Preprogramado para gobernar componentes de
Rotel.
• Posibilidad de memorización de órdenes de
control procedentes de otros mandos a distancia.
• Un visualizador de funciones LCD incorporado
permite un sencillo manejo mediante menús con
nombres personalizables para cada orden de
control.
• Retroiluminación para facilitar el manejo en
habitaciones oscuras junto con un aviso acústico
opcional que acompaña la pulsación de cada
botón.
• Cuatro teclas MACRO envían una secuencia de
hasta 10 órdenes de control pulsando un solo
botón.
• Incluye baterías recargables y el cargador
correspondiente.
• Suministrado con cable de conexión serie y el
software necesario para su programación desde
cualquier ordenador personal que opere con
Windows® 95 ó 98.
Precauciones Importantes
• El RR-1090 es robusto pero no indestructible. Por
lo tanto, le rogamos que no lo tire de cualguier
manera ni lo deje caer al suelo.
• No exponga el RR-1090 a la humedad. Para
limpiarlo, utilice una gamuza suave libre de gasa.
Evite el uso de productos de limpieza agresivos.
• No intente desmontar el RR-1090 ya que ello
invalidará la garantía.
Instalación y Recarga de las Baterías
El RR-1090 incluye 4 pilas AA recargables de hidruro
de níquel y un adaptador/cargador de 9 V de
corriente continua. Cuando las baterías estén débiles
y necesiten ser recargadas, aparecerá un indicador
“LOW BATTERY” (“BATERIA BAJA”) en el visualizador
de funciones.
Para instalar las baterías, dé la vuelta al
RR-1090 y levante la tapa del compartimento
portabaterías pulsando la lengüeta de liberación
y levantándola. Coloque las cuatro baterías AA en
el interior (siga las ilustraciones referentes a la
polaridad que figuran en la parte inferior del
compartimento) y vuelva a colocar la tapa en su sitio.
Para recargar las baterías, inserte el cable del
adaptador en la parte izquierda del RR-1090 .
Enchufe el adaptador de alimentación/cargador a
una toma de corriente eléctrica alterna (120 V/60
Hz para EE.UU. o 230 V/50 Hz para Europa).
Mientras el adaptador esté conectado a la red
eléctrica, aparecerá un indicador “CHARGING”
(“CARGANDO”) en el visualizador de funciones.
Deje el cargador en funcionamiento durante toda
una noche para garantizar la plena recarga de las
baterías. Durante el proceso de recarga de las
baterías, el mando a distancia puede ser utilizado.
NOTA
: Pueden utilizarse pilas alcalinas AA
convencionales en vez de las baterías recargables
suministradas de serie con el RR-1090; sin embargo,
no debe utilizar nunca el adaptador de
alimentación/cargador con pilas alcalinas.
Page 64

64 RR-1090
Para Empezar
Ver Figura 1
Le rogamos que repase los siguientes controles y
funciones del RR-1090.
Sensor/Emisor de Rayos Infrarrojos
El sensor de rayos infrarrojos (IR) está ubicado en
el borde superior del RR-1090. Envía órdenes de
control por rayos infrarrojos y debe apuntar siempre
hacia el componente deseado. También recibe
códigos de infrarrojos procedentes del resto de
mandos a distancia de su equipo durante el proceso
de APRENDIZAJE (“LEARNING”) o cuando se
duplican los ajustes de configuración de un RR-1090
a otro.
Botones Device
Ocho botones circulares del RR-1090 seleccionan
cual es el conjunto de instrucciones de control activo
y cual es el componente que será controlado. Por
ejemplo, si pulsa el botón AV1 el RR-1090 se
convertirá en el mando a distancia de su Procesador
de Sonido Envolvente Rotel. Pulse el botón TV y el
RR-1090 se convertirá en el mando a distancia de
su televisor.
Para manejar el RR-1090, pulse en primer lugar la
tecla DEVICE correspondiente al componente
deseado y a continuación pulse cualquiera de los
botones COMMAND básicos o del menú para enviar
las órdenes de control memorizadas correspondientes
a dicho componente.
NOTA
: Los botones DEVICE AV1, AV2 y AV3 pueden
utilizarse con cualquier tipo de componente.
Botones Correspondientes a las Ordenes
de Control Básicas
El botón POWER situado en la zona derecha del
mando más dos grandes botones circulares de tipo
balancín doble (y por tanto con 4 direcciones de
funcionamiento) y dos botones circulares más
pequeños situados en el centro del RR-1090 duplican
las funciones básicas -puesta en marcha, ajuste del
nivel de volumen, paso al canal anterior/siguiente,
lectura, avance rápido, pausa, etc.- de los
componentes de su equipo. Las órdenes de control
correspondientes a cada botón variarán en función
de cual sea el botón DEVICE seleccionado.
Teclas de Gestión por Menús
y Visualizador de Funciones LCD
En la parte superior del RR-1090 hay un grupo de
12 botones rectangulares que rodean el visualizador
de funciones LCD. Estas teclas de GESTION POR
MENUS suministran funciones adicionales que son
indicadas por etiquetas de menú que aparecen en
el visualizador de funciones adyacente a cada botón.
La función de estos botones varía en función del tipo
de componente seleccionado por los botones DEVICE
y la página de menú visualizada.
Botón PAGE
Cada componente seleccionado por un botón
DEVICE puede tener un menú de hasta 48
instrucciones de control. Estas instrucciones aparecen
en el visualizador de funciones LCD organizadas
en grupos (o páginas) de doce. Pulse el botón PAGE
para avanzar a la siguiente página de instrucciones,
con nuevos nombres que aparecerán en el
visualizador de funciones LCD. Cada pulsación del
botón PAGE permite saltar al siguiente grupo de
órdenes de control para el componente seleccionado,
volviéndose de manera cíclica a la página original
después de llegar a la última página disponible.
Botones MACRO
Cuatro botones designados por M1, M2, M3 y M4
permiten acceder a una función macro especial
consistente en el envío, mediante una sola pulsación,
de una secuencia de hasta 10 instrucciones. Por
ejemplo, una secuencia macro podría poner en
marcha el televisor, seleccionar el canal 5, activar
el procesador de sonido envolvente y seleccionar
la entrada correspondiente al televisor.
Dos de los botones MACRO (M3 y M4) son también
utilizados para personalizar el RR-1090.
Page 65

Español
65
Botón Menu
Este botón activa una serie de pantallas de menú
en el visualizador de funciones LCD para personalizar
el RR-1090 y lleva a cabo selecciones en las mismas.
El botón MENU no es utilizado durante el
funcionamiento normal del mando a distancia.
Botón Power
Además de servir como botón de control básico,
el botón POWER también es utilizado en el
procedimiento de PUESTA A PUNTO (“SETUP”)
durante la búsqueda en la base de datos que contiene
los códigos de control por infrarrojos.
Conector Serie
Este conector modular de 4 patillas situado en el
panel posterior del RR-1090 puede utilizarse para
conectar este último a un conector serie DB9 estándar
de un ordenador personal con ayuda del cable
suministrado de serie.
Utilizando el software PC-LINK suministrado de origen
con el mando a distancia, los códigos y órdenes
de control pueden ser cargados y/o descargados
con un ordenador con sistema operativo Windows
95/98 al RR-1090. Esto permite la rápida
transferencia de la programación contenida en un
mando a distancia RR-1090 a otro, así como
simplificar el proceso de personalización. Para más
detalles, diríjase a la sección de este manual dedicada
al software PC-LINK.
Manejo del RR-1090
Esta sección del manual explica el funcionamiento
básico del RR-1090 y la mayoría de sus funciones
estándar.
NOTA
: El RR-1090 está preprogramado con los
códigos de control correspondientes a los
procesadores de sonido envolvente Rotel
memorizados en el botón de dispositivo (“device”)
AV1. Los códigos correspondientes a los
reproductores de CD y DVD de Rotel están
almacenados en los botones CD y DVD.
Activación del RR-1090
Con el fin de perder la menor cantidad de energía
posible de las baterías, el RR-1090 se desactiva
automáticamente (modo “sleep”) al cabo de 60
segundos de inactividad. Pulse cualquier botón para
activarlo. Las diferentes etiquetas aparecerán en el
visualizador de funciones LCD inmediatamente
después de activar el RR-1090.
Envío de Ordenes de Control
por Rayos Infrarrojos (IR)
En vez de utilizar varios mandos a distancia para
manejar su equipo, le bastará simplemente con pulsar
un botón del RR-1090 para convertir a este último
en el mando a distancia correspondiente a su
reproductor de discos compactos o su televisor y
enviar las órdenes necesarias para gobernar
cualquiera de dichos componentes. Le explicamos
a continuación cómo hacerlo:
1. Pulse un botón cualquiera del RR-1090 para
activarlo (en caso de que sea necesario).
2. Pulse un botón DEVICE para activar el conjunto
de instrucciones de control correspondiente al
componente deseado. Por ejemplo, pulse el botón
AV1 para un procesador de sonido envolvente
Rotel. El nombre (etiqueta) correspondiente al
dispositivo por usted seleccionado aparece en
el centro del visualizador de funciones.
3. Pulse un botón COMMAND
para enviar una orden de control por
infrarrojos al componente por usted seleccionado.
Por ejemplo, pulse el botón VOL+ para
incrementar el nivel de volumen de un procesador
de sonido envolvente Rotel. Las órdenes de control
básicas son accesibles a través de los botones
circulares de grandes dimensiones
situados en el centro del mando a distancia
y el botón POWER . Se dispone de órdenes
de control adicionales en las 12 teclas de
GESTION DE MENUS situadas en la parte
superior del mando a distancia, que se
corresponden con las etiquetas de control visibles
en el visualizador de funciones LCD. Mientras
se esté pulsando un botón COMMAND, la
etiqueta asociada a dicha orden de control
sustituye al nombre del DISPOSITIVO en el centro
del visualizador de funciones.
Page 66

66 RR-1090
4. Pulse el botón PAGE para ver en el
visualizador de funciones la siguiente página
de 12 órdenes de control disponible. Es posible
disponer de hasta cuatro “páginas” de órdenes
de control para un componente particular. Pulse
repetidamente el botón PAGE para conmutar
cíclicamente a través de todos los grupos de
órdenes de control disponibles para ese
componente.
NOTA
: Los botones COMMAND duplican controles
Diríjase a la Figura 3
.
de muchos tipos de componentes distintos. Su
función depende del tipo de componente
seleccionado. Asegúrese de haber pulsado el botón
DEVICE correcto antes de enviar órdenes de control
por infrarrojos.
Envío de Macros
En el RR-1090 hay cuatro botones (designados por
M1, M2, M3 y M4) que pueden almacenar macros,
es decir secuencias constituidas por varias
instrucciones (por ejemplo una secuencia que ponga
en marcha el televisor, seleccione el canal 5, active
el procesador de sonido envolvente y seleccione la
entrada TV de este último). Una secuencia macro
se envía pulsando el botón MACRO asignado a la
secuencia de órdenes de control memorizada.
Programación de Códigos
El RR-1090 contiene cientos de grupos de instrucciones
de control para un amplísimo número de componentes
audiovisuales disponibles en el mercado. La
programación del mando a distancia implica la
selección de los grupos de instrucciones
correspondientes a los componentes de su equipo y
asignar a cada uno de ellos uno de los ocho botones
DEVICE introduciendo el código de 4 dígitos de cada
componente. Este procedimiento debe ser llevado a
cabo únicamente durante el ajuste inicial del RR-1090.
La manera más fácil de realizar el proceso anterior
es buscar los códigos de 4 dígitos correspondientes
a los componentes de su equipo en la lista de códigos
que figura al final de este manual. Si alguno de sus
componentes no está en la lista, existen métodos
de búsqueda alternativos para encontrar el grupo
de órdenes de control correcto para los mismos.
NOTA
: La programación del RR-1090 se lleva a cabo
en un modo de ajuste gobernado por menús al
que se accede pulsando el botón MENU. En
cualquier momento del proceso, usted puede salir
del modo de ajuste y regresar al modo de
funcionamiento normal pulsando dos veces
seguidas el mencionado botón MENU.
Programación de Códigos de 4 Dígitos
Busque su(s) componente(s) de audio/vídeo en la
lista de códigos y anote el(los) código(s) de 4 dígitos:
1. Pulse el botón MENU para acceder al menú
principal.
2. Seleccione SETUP en el menú visualizado en la
pantalla LCD pulsando la tecla MENU
COMMAND situada encima de la primera letra
de la etiqueta SETUP.
3. Pulse uno de los botones DEVICE para seleccionar
dónde desea guardar los códigos correspondientes
a este componente. Si elige los botones de
dispositivo multiaplicación AV1, AV2 o AV3, más
adelante se le solicitará que seleccione el tipo de
componente (CD, VCR, AMP, etc.).
4. Seleccione ENTER CODE (“INTRODUCIR
CODIGO”) pulsando la tecla MENU
COMMAND situada encima de esta etiqueta.
5. Introduzca el código de 4 dígitos utilizando las
teclas MENU COMMAND correspondientes a
los dígitos en el visualizador de funciones LCD.
Una vez completado con éxito el proceso de
introducción, el visualizador de funciones lo
confirmará.
6. Cuando el código haya sido introducido, el menú
presentará dos opciones. Pulse otra tecla DEVICE
para programar códigos adicionales. Pulse el
botón MENU para volver al menú principal; pulse
una segunda vez el botón MENU para salir del
modo de ajuste y volver al funcionamiento normal.
Pruebe la validez del código introducido enviando
órdenes de control (por ejemplo la orden POWER)
a los componentes del equipo. Si el código no
funciona de modo adecuado, repita el procedimiento
utilizando el siguiente código de 4 dígitos de la lista
para la marca del componente implicado.
Page 67

Español
67
Búsqueda de Códigos por Nombre de la
Marca
Usted también puede utilizar el siguiente método
de búsqueda para encontrar y probar los números
de código disponibles para la marca de su
componente.
1. Pulse MENU para acceder al menú principal.
2. Seleccione SETUP en el menú visualizado en la
pantalla LCD pulsando la tecla MENU
COMMAND situada encima de la primera letra
de la etiqueta SETUP.
3. Pulse uno de los botones DEVICE para seleccionar
dónde desea guardar los códigos correspondientes
a este componente. Si elige AV1, AV2 o AV3, más
adelante se le solicitará que seleccione el tipo de
componente (CD, VCR, AMP, etc.).
4. Seleccione BRAND NAME (“NOMBRE DE LA
MARCA”) pulsando la tecla MENU COMMAND
situada encima de este etiqueta.
5. Seleccione la primera letra del nombre de la
marca de su componente. En caso de que sea
necesario, pulse el botón M4 para acceder a
la siguiente página de letras o el botón M3 para
acceder a la anterior.
6. Seleccione el nombre de la marca de su
componente en la lista que aparecerá en el
visualizador de funciones (pulse M4 o M3 para
obtener listados adicionales). La solicitud “press
POWER key to test” (“pulse la tecla POWER para
probar”) aparece en el visualizador de funciones.
7. Pulse el botón POWER situado en la parte derecha
del RR-1090 para probar el primer código
disponible para su marca. El código de 4 dígitos
en curso de prueba es mostrado en el visualizador
de funciones.
Si la orden de control POWER activa o
desactiva el componente deseado significa
que usted ha encontrado un código que puede
funcionar. Puede probar órdenes de control
adicionales pulsando teclas de GESTION DE MENUS
(“MENU COMMAND”) correspondientes a órdenes
de control para ese código de 4 dígitos mostrado
en el visualizador de funciones. Si tiene éxito, pulse
el botón DEVICE para memorizar el código.
Si la orden de control POWER no funciona,
pulse el botón POWER para probar el siguiente código
disponible para esa marca; el nuevo código de 4
dígitos en curso de evaluación aparecerá en el
visualizador de funciones. Continúe pulsando el botón
POWER y probando códigos hasta que encuentre
uno que funcione; cuando llegue a este punto, pulse
el botón DEVICE para memorizar dicho código.
Si ninguno de los códigos disponibles para esa marca
funciona, se le preguntará si desea buscar en toda
la biblioteca de códigos disponibles para ese tipo
de componente. Seleccione YES para saltar al
procedimiento de búsqueda (paso 5 en la siguiente
sección). Seleccione NO para regresar al menú
principal.
Programación por Búsqueda Automática
Para buscar un código en la lista que contiene todos
los códigos de 4 dígitos para un determinado tipo
de componente:
1. Pulse MENU para acceder al menú principal.
2. Seleccione SETUP en el menú visualizado en la
pantalla LCD pulsando la tecla MENU
COMMAND situada encima de la primera letra
de la etiqueta SETUP.
3. Pulse uno de los botones DEVICE para seleccionar
dónde desea guardar los códigos
correspondientes a este componente. Si elige AV1,
AV2 o AV3, más adelante se le solicitará que
seleccione el tipo de componente (CD, VCR, AMP,
etc.).
4. Seleccione SEARCH pulsando la tecla MENU
COMMAND situada debajo de este etiqueta.
En el visualizador de funciones aparece el
mensaje “press POWER key to test” (“pulse la
tecla POWER para probar”).
5. Pulse el botón POWER situado en la parte derecha
del RR-1090 para probar el primer código
disponible. El código de 4 dígitos en curso de
evaluación es mostrado en el visualizador de
funciones.
Page 68

68 RR-1090
Si la orden POWER activa o desactiva el
componente deseado, significa que usted ha
encontrado un código que puede funcionar con su
componente. Usted puede probar órdenes
adicionales pulsando teclas MENU COMMAND
correspondientes a órdenes del código de 4 dígitos
mostrado en el visualizador de funciones. Si la
operación se lleva a cabo con éxito, pulse el botón
DEVICE para memorizar el citado código.
Si la orden POWER no funciona, pulse el botón
POWER para probar el siguiente código disponible,
que aparecerá en el visualizador de funciones.
Continúe pulsando el botón POWER y probando
códigos hasta que encuentre un código que funcione,
que deberá memorizar pulsando el botón DEVICE.
Si ninguno de los códigos disponibles
funciona, se le aparecerá un mensaje para indicarle
que ha probado todos los códigos disponibles. Pulse
el botón MENU para volver al menú principal.
Aprendizaje de Instrucciones de Control
Si los grupos de órdenes preprogramados para su
componente no incluyen funciones que usted necesita,
usted puede “enseñar” al RR-1090 instrucciones de
control individuales desde los mandos a distancia
que ya posea:
1. Coloque el RR-1090 y el mando a distancia
“original” cara a cara sobre una superficie plana
tal y como se muestra en la Figura 2 incluida al
principio de este manual. Las señales de rayos
infrarrojos enviadas por el segundo mando deben
ser dirigidas al sensor/emisor de rayos infrarrojos
del RR-1090.
2. Pulse el botón MENU para ir al menú principal.
3. Seleccione LEARNING (“APRENDIZAJE”) en el
menú que aparece en el visualizador de funciones
LCD pulsando la tecla MENU COMMAND
situada encima de la primera letra de la etiqueta
LEARNING.
4. Pulse uno de los botones DEVICE para seleccionar
la posición en la que desea programar los nuevos
códigos del componente.
5. Seleccione la tecla COMMAND del RR-1090
en la que desee memorizar la instrucción. Puede
optar entre uno de los botones BASIC
COMMAND o una de las teclas MENU
COMMAND (utilizando, en caso de que sea
necesario, el botón PAGE para pasar a una nueva
página de MENU COMMAND y encontrar una
tecla no utilizada). El visualizador de funciones
LCD mostrará “LEARNING”.
6. Pulse y mantenga pulsado el botón
correspondiente del mando a distancia original
para enviar el código de rayos infrarrojos a
memorizar en el RR-1090.
Si el procedimiento de aprendizaje falla,
el RR-1090 mostrará “ERROR” y regresará al Paso
número 5. Vuelva a colocar en posición los dos
mandos a distancia y pruebe de nuevo empezando
por el Paso número 5.
Cuando un código es memorizado con éxito,
el RR-1090 le pedirá que edite (escriba) la etiqueta
por él asignada a la instrucción pertinente. Seleccione
NO para preservar la etiqueta seleccionada en ese
momento. Seleccione YES para escribir la etiqueta
e introducir las letras deseadas (utilizando los botones
M3 o M4 para desplazarse a la siguiente página
de letras). Las etiquetas pueden tener hasta 5
caracteres. Pulse el botón MENU para memorizar
la nueva etiqueta.
Para memorizar instrucciones adicionales,
repita el anterior proceso a partir del Paso número
5. Para volver al menú principal, pulse el botón
MENU.
NOTA
: El RR-1090 tiene capacidad para almacenar
hasta 240 instrucciones. Si se alcanza este límite,
el mando mostrará COMMAND FULL en su
visualizador de funciones y no le permitirá
memorizar ninguna orden adicional. Diríjase a la
sección dedicada al borrado de instrucciones para
optimizar el espacio disponible.
Programación de Macros
Cuatro botones del RR-1090 (designados por M1,
M2, M3 y M4) pueden almacenar macros, es decir
secuencias compuestas por varias instrucciones que
se activan pulsando un solo botón.
Para programar un macro, asegúrese antes que nada
de que todas las instrucciones implicadas en el mismo
hayan sido memorizadas en el RR-1090 (la función
Page 69

Español
69
macro se limita simplemente a grabar una secuencia
de instrucciones de control individuales previamente
grabadas en el RR-1090).
1. Pulse el botón MENU para llamar al menú
principal.
2. Pulse el botón PAGE para acceder a la siguiente
página de opciones de menú.
3. Seleccione MACRO en el visualizador de
funciones LCD.
4. Pulse el botón MACRO (M1, M2, M3 o M4) en
el que desee almacenar el nuevo macro.
5. Introduzca la nueva etiqueta para el macro
pulsando las teclas MENU COMMAND
correspondientes a las letras necesarias en el
visualizador de funciones (utilizando los botones
M3 o M4 para desplazarse a la siguiente página
de letras). Las etiquetas pueden tener una longitud
máxima de 5 caracteres. Una vez introducida
la etiqueta, pulse el botón MENU para
almacenarla.
6. Memorice el primer paso del macro. Pulse un
botón DEVICE para cambiar al dispositivo
deseado y teclas COMMAND individuales para
memorizar instrucciones del dispositivo
seleccionado (pulse el botón PAGE para ver
páginas adicionales de instrucciones disponibles).
7. Para memorizar instrucciones adicionales, pulse
el botón MACRO seleccionado para confirmar
la orden previamente memorizada y a
continuación memorice la siguiente orden. Repita
el proceso hasta que haya memorizado la
secuencia completa.
8. Cuando haya introducido la totalidad del macro
en el RR-1090, pulse el botón menú para
almacenar la secuencia correspondiente.
NOTA
: Una secuencia macro puede contener hasta
10 instrucciones sin incluir ninguna pulsación de
los botones DEVICE.
Página de Dispositivo Personalizado
(“Custom Device Page”)
Por lo general, todas las instrucciones almacenadas
en un botón DEVICE gobiernan un único componente.
No obstante, es posible construir un conjunto de
instrucciones especial denominado CUSTOM PAGE
(“PAGINA PERSONALIZADA”) que incluye
instrucciones individuales copiadas de otros
dispositivos. Por ejemplo, usted podría construir un
conjunto de instrucciones CUSTOM PAGE que
incluyese copias de las instrucciones más utilizadas
de todos los dispositivos disponibles, creando de
este modo un subconjunto de fácil acceso que agrupe
sus órdenes de control favoritas. Puede accederse
a este conjunto de instrucciones CUSTOM PAGE
pulsando el botón DEVICE correspondiente al lugar
en que haya sido memorizado. Para construir una
página de dispositivo personalizada:
1. Pulse el botón MENU para llegar al menú
principal.
2. Seleccione PREFERENCE en el visualizador de
funciones LCD.
3. Seleccione CUSTOM PAGE en el visualizador
de funciones LCD.
4. Pulse el botón DEVICE en el que usted quiera
memorizar el conjunto de instrucciones CUSTOM
PAGE.
5. Introduzca la nueva etiqueta del dispositivo
pulsando las teclas MENU COMMAND
correspondientes a las letras del visualizador de
funciones (utilizando los botones M3 o M4 para
desplazarse a la siguiente página de letras). Las
etiquetas pueden tener una longitud máxima de
7 caracteres. Después de introducir la etiqueta,
pulse el botón MENU para memorizarla.
6. Pulse un botón DEVICE para seleccionar el
dispositivo en el que está localizado la primera
instrucción que usted desea copiar en la CUSTOM
PAGE
7. Pulse la tecla COMMAND correspondiente a
la primera instrucción que usted quiera añadir
a la CUSTOM PAGE.
Page 70

70 RR-1090
8. Seleccione la ubicación de la CUSTOM PAGE
en la que desee memorizar la instrucción pulsando
cualquier tecla MENU COMMAND. La etiqueta
para este componente aparece en la ubicación
seleccionada.
9. Repita los pasos 6 a 8 para cada instrucción
adicional que desee copiar en la CUSTOM PAGE.
Si desea reordenar automáticamente las instrucciones,
pulse el botón M4. Pulse el botón MENU para volver
al menú principal.
NOTA
: Para copiar instrucciones adicionales en
cualquier momento, repita los pasos 1 a 3 y 6 a
10. Puesto que usted está copiando las instrucciones
a una CUSTOM PAGE ya existente, los pasos 4 y
5 no son necesarios y serán omitidos.
Borrado de Instrucciones Memorizadas
Usted puede borrar instrucciones previamente
memorizadas actuando del siguiente modo:
1. Pulse el botón DEVICE que contenga la instrucción
que desee borrar.
2. Pulse el botón MENU para llegar al menú
principal.
3. Seleccione EDIT en el visualizador de funciones
LCD.
4. Seleccione DELETE KEY (“BORRAR TECLA”) en
el visualizador de funciones LCD.
5. Pulse la tecla COMMAND que desee borrar.
Usted puede borrar instrucciones tanto de los
botones BASIC COMMAND como de las teclas
MENU COMMAND (utilizando el botón PAGE
para desplazarse a través de las páginas de
instrucciones disponibles).
6. Seleccione YES o NO para confirmar el borrado.
7. Repita los pasos 5 y 6 para borrar instrucciones
adicionales. En caso de que así lo desee, pulse
el botón M4 para reordenar automáticamente
las nuevas instrucciones en el visualizador de
funciones. Pulse el botón MENU para volver al
menú principal.
Función de Transferencia del Control de
Volumen (“Volume Punch-Through”)
En muchos sistemas, el NIVEL DE VOLUMEN es
ajustado en el televisor o el procesador de A/V. Por
comodidad, el RR-1090 incorpora una función de
TRANSFERENCIA DEL CONTROL DE VOLUMEN
que copia las instrucciones de control del nivel de
volumen tanto del televisor como de cualquier
dispositivo de A/V programado a las teclas de
dispositivo correspondientes a otros componentes
del equipo, como por ejemplo un reproductor de
CD, un grabador/reproductor de videocasetes (VCR),
un sintonizador de satélite y un reproductor de DVD.
Una vez activada esta función, los controles de
volumen tanto del televisor como del procesador de
A/V estarán disponibles incluso cuando haya sido
activado el conjunto de instrucciones de control
correspondiente a los DISPOSITIVOS mencionados.
Para activar la FUNCION DE TRANSFERENCIA DEL
CONTROL DE VOLUMEN:
1. Pulse el botón MENU para alcanzar el menú
principal.
2. Seleccione PREFERENCE en el visualizador de
funciones LCD.
3. Seleccione PUNCH-THROUGH en el visualizador
de funciones LCD.
4. Seleccione las instrucciones de control de volumen
(del conjunto de instrucciones del televisor o de
cualquier otro dispositivo audiovisual) a copiar
a otro DEVICE seleccionando TV VOL o AMP
VOL en el visualizador de funciones LCD. Si
selecciona AMP VOL, también necesitará
seleccionar el conjunto de instrucciones para
A/V con las instrucciones de control de volumen
deseadas (AV1, AV2 o AV3) en el siguiente menú
del visualizador de funciones LCD pulsando una
tecla MENU COMMAND.
5. Pulse un botón DEVICE para seleccionar el
dispositivo en el que desee copiar las órdenes
de control del nivel de volumen. La instrucción
VOLUME PUNCH-THROUGH no puede ser
copiada a un televisor o a un procesador de
A/V aunque sí a cualquier otro componente
audiovisual (CD, SAT, LD, DVD, etc.). Si usted
selecciona una tecla DEVICE inapropiada, nada
Page 71

Español
71
sucederá. Una vez que haya seleccionado una
tecla DEVICE válida, aparecerá PUNCH
THROUGH OK en el visualizador de funciones
para confirmarlo.
6. Pulse el botón MENU para volver al menú
principal.
Función RESET (“REINICIALIZACION”)
En cualquier momento, usted puede hacer que el
RR-1090 recupere su programación original (es decir
la establecida en fábrica) utilizando la función RESET.
NOTA
: El uso de la función RESET borra todas las
instrucciones, etiquetas y ajustes de configuración
memorizados. Asegúrese de que esto es realmente
lo que usted quiere hacer.
Para reinicializar el RR-1090:
1. Pulse el botón MENU para llegar al menú
principal.
2. Pulse el botón PAGE para avanzar a la segunda
página de opciones.
3. Seleccione REMOTE SETTINGS (“AJUSTES DEL
MANDO A DISTANCIA”) en el visualizador de
funciones LCD pulsando la tecla MENU
COMMAND situada encima de la primera letra
de la etiqueta REMOTE SETTINGS.
4. Seleccione RESET en el visualizador de funciones
LCD pulsando la tecla MENU COMMAND situada
debajo de la primera letra de la etiqueta RESET.
5. Seleccione YES o NO para confirmar la
operación. Si selecciona YES, el RR-1090 borrará
toda la programación personalizada y volverá
a sus ajustes originales, visualizando una serie
de mensajes relacionados con el progreso de
la operación seguidos por la confirmación final
DEFAULT SETTING (“AJUSTES POR DEFECTO”).
6. Pulse el botón MENU para volver al menú
principal.
de las teclas DEVICE como desde las ocho
disponibles. Para transferir la programación, coloque
dos mandos a distancia RR-1090 con sus ventanas
de emisión de rayos infrarrojos enfrentadas y a
continuación proceda como sigue.
En el mando a distancia que va a recibir
los datos:
1. Pulse el botón MENU para alcanzar el menú
principal.
2. Pulse el botón PAGE para avanzar a la segunda
página de opciones.
3. Seleccione DUPLICATE en el visualizador de
funciones LCD pulsando la tecla COMMAND
KEY adyacente.
4. Seleccione RECEIVE en el visualizador de
funciones LCD pulsando la tecla MENU
COMMAND adyacente. Aparece en pantalla
el mensaje READY TO RECEIVE (“PREPARADO
PARA RECIBIR”).
En el mando a distancia que enviará los
datos:
1. Pulse el botón MENU para alcanzar el menú
principal.
2. Pulse el botón PAGE para avanzar a la segunda
página de opciones.
3. Seleccione DUPLICATE en el visualizador de
funciones LCD pulsando la tecla COMMAND
KEY adyacente.
4. Para transmitir códigos para todos los
dispositivos, seleccione la opción de menú
COPY ALL DEVICES. Para transferir códigos
para un único dispositivo, seleccione COPY
ONE DEVICE y a continuación seleccione el botón
DEVICE que va a ser copiado. Esto inicia el
proceso de transferencia de datos con una
petición SENDING (“ENVIAR”) que aparece en
el visualizador de funciones.
Función DUPLICATE (“DUPLICAR”)
La función DUPLICATE transfiere la programación,
incluyendo las instrucciones de control y las etiquetas
memorizadas, desde un RR-1090 a otro. Usted tiene
la opción de transferir datos tanto desde una sola
Page 72

72 RR-1090
Una vez completado el proceso de transferencia,
aparecerá una confirmación en el RR-1090 que envíe
los datos:
• Si la transferencia de datos se lleva a
cabo con éxito, aparecerá “FINISH SENDING” (“ENVIO FINALIZADO”).
• Si la transferencia de datos fracasa,
aparecerá “SENDING ERROR” en el visualizador
de funciones LCD y el mando regresará a su modo
de funcionamiento normal. Recoloque los dos
mandos y empiece de nuevo.
NOTA
: No intente utilizar la función DUPLICATE para
transferir datos desde cualquier otro mando a
distancia que no sea el Rotel RR-1090.
Etiquetas Personalizadas
(“Custom Labels”)
Pueden editarse (escribirse) las etiquetas
correspondientes a los botones DEVICE y las teclas
COMMAND. Asimismo, la ubicación de las teclas
COMMAND correspondientes a un determinado
DEVICE puede desplazarse, en el visualizador de
funciones, desde una posición a otra.
Edición de un Nombre de DISPOSITIVO
Para cambiar el nombre que aparece en el centro
del visualizador de funciones LCD cuando usted
selecciona un botón DEVICE:
1. Pulse el botón DEVICE que quiera renombrar.
2. Pulse el botón MENU para alcanzar el menú
principal.
3. Seleccione EDIT en el visualizador de funciones
LCD.
4. Seleccione DEVICE NAME (“NOMBRE DEL
DISPOSITIVO”) en el visualizador de funciones
LCD.
5. Introduzca el nuevo nombre (etiqueta) para el
dispositivo pulsando las teclas MENU
COMMAND correspondientes a las letras del
visualizador de funciones (utilizando los botones
M3 o M4 para ir a la siguiente página de letras).
Las etiquetas pueden tener una longitud de hasta
7 caracteres. Una vez introducida la etiqueta,
pulse el botón MENU para memorizarla.
Edición del Nombre de una ORDEN DE
CONTROL
Para cambiar el nombre que aparece en el
visualizador de funciones LCD junto a una tecla
MENU COMMAND:
1. Pulse el botón DEVICE que contenga la tecla
COMMAND que usted desee renombrar.
2. Pulse el botón MENU para alcanzar el menú
principal.
3. Seleccione EDIT en el visualizador de funciones
LCD.
4. Seleccione KEY NAME (“NOMBRE DE LA
TECLA”) en el visualizador de funciones LCD.
5. Pulse el botón BASIC COMMAND o la tecla
MENU COMMAND (utilizando el botón PAGE
para acceder a opciones adicionales) que desee
renombrar.
6. Introduzca el nuevo nombre (etiqueta) para la
instrucción pulsando las teclas MENU
COMMAND correspondientes a las letras del
visualizador de funciones (utilizando los botones
M3 o M4 para ir a la siguiente página de letras).
Las etiquetas pueden tener una longitud de hasta
5 caracteres. Una vez introducida la etiqueta,
pulse el botón MENU para memorizarla.
7. Repita los pasos 5 y 6 para nombrar botones
COMMAND adicionales o pulse el botón MENU
para volver al menú principal.
Cambio de Ubicación de un Nombre de
ORDEN DE CONTROL
Para cambiar la ubicación de una tecla MENU
COMMAND en el visualizador de funciones:
1. Pulse el botón DEVICE que contenga la tecla
MENU COMMAND que quiera cambiar de
lugar.
2. Pulse el botón menú para alcanzar el menú
principal.
3. Seleccione EDIT en el visualizador de funciones.
Page 73

Español
73
4. Seleccione MOVE KEY en el visualizador de
funciones LCD.
5. Seleccione la tecla MENU COMMAND para
desplazarse.
6. Seleccione la nueva ubicación de la tecla
COMMAND.
7. Las dos teclas COMMAND intercambian sus
ubicaciones.
Reordenación Automática de los
Nombres de ORDENES DE CONTROL
Como alternativa al desplazamiento manual de las
teclas, usted puede hacer que el RR-1090 ordene
automáticamente las teclas MENU COMMAND
correspondientes a un determinado DEVICE.
1. Pulse el botón DEVICE que contenga las teclas
COMMAND que quiera reordenar
automáticamente.
2. Pulse el botón MENU para alcanzar el menú
principal.
3. Seleccione EDIT en el visualizador de funciones
LCD.
4. Seleccione AUTO-ARRANGE en el visualizador
de funciones LCD.
Otras Opciones de
Configuración
El RR-1090 incorpora retroiluminación y un tono de
aviso para asistirle durante su funcionamiento.
Adicionalmente, puede activarse una protección por
contraseña para proteger el acceso a las funciones
de ajuste.
Retroiluminación
La retroiluminación hace que el visualizador de
funciones LCD sea visible en condiciones de baja
iluminación. Tres son los ajustes disponibles:
• With Light Sense (“Con Detección de
Luz”). Detecta el nivel de iluminación de la
habitación y activa la retroiluminación durante
5 segundos con la pulsación de cualquier tecla
cuando la habitación está oscura (ajuste por
defecto).
• Always On (“Siempre Activada”). La
retroiluminación se activará durante 5 segundos
con la pulsación de cualquier tecla
independientemente de cual sea la iluminación
de la habitación.
• Always Off (“Siempre Desactivada”). La
retroiluminación es desactivada.
Para configurar la retroiluminación:
1. Pulse el botón MENU para alcanzar el menú
principal.
2. Pulse el botón PAGE para avanzar a la segunda
página de opciones de menú.
3. Seleccione REMOTE SETTINGS en el visualizador
de funciones LCD.
4. Seleccione BACKLIT en el visualizador de
funciones LCD.
5. Seleccione uno de los tres modos de
retroiluminación en el visualzador de funciones
LCD.
Avisador Acústico
El RR-1090 incorpora un tono de aviso que se activa
para confirmar la pulsación de cada tecla o botón
del mismo. Esta función puede activarse (posición
por defecto) o desactivarse.
Para configurar el avisador acústico:
1. Pulse el botón MENU para alcanzar el menú
principal.
2. Pulse el botón PAGE para avanzar a la segunda
página de opciones de menú.
3. Seleccione REMOTE SETTINGS en el visualizador
de funciones LCD.
4. Seleccione BEEP SOUND en el visualizador de
funciones LCD.
5. Seleccione SOUND ENABLE (“ACTIVAR”) o
SOUND DISABLE (“DESACTIVAR”).
Page 74

74 RR-1090
Contraseña (“Password”)
Puede definirse y activarse una contraseña para
prevenir el acceso a los menús de ajuste. Una vez
definida y activada, la contraseña será requerida
para permitir el acceso a los menús de ajuste.
La contraseña por defecto es “2000”. No obstante,
el RR-1090 se suministra de fábrica con la
correspondiente protección desactivada.
Para activar o desactivar la protección de
la contraseña:
1. Pulse el botón MENU para alcanzar el menú
principal.
2. Pulse el botón PAGE para avanzar a la segunda
página de opciones de menú.
3. Seleccione REMOTE SETTINGS en el visualizador
de funciones LCD.
4. Seleccione PASSWORD en el visualizador de
funciones LCD.
5. Seleccione ENABLE o DISABLE.
6. Si así se le solicita, introduzca la contraseña
pulsando las teclas MENU COMMAND
correspondientes a los caracteres mostrados en
el visualizador de funciones (utilizando los botones
M3 y M4 para desplazarse a la siguiente página
de caracteres). Una vez introducida la contraseña,
pulse el botón MENU.
Para cambiar la contraseña:
1. Pulse el botón MENU para alcanzar el menú
principal.
2. Pulse el botón PAGE para avanzar a la segunda
página de opciones de menú.
3. Seleccione REMOTE SETTINGS en el visualizador
de funciones LCD.
4. Seleccione PASSWORD en el visualizador de
funciones LCD.
5. Seleccione CREATE (“CREAR”) en el visualizador
de funciones.
6. Cuando le sea solicitado, introduzca la vieja
contraseña pulsando las teclas MENU
COMMAND correspondientes a los caracteres
mostrados en el visualizador de funciones
(utilizando los botones M3 y M4 para desplazarse
a la siguiente página de caracteres). Una vez
introducida la contraseña, pulse el botón MENU.
7. Introduzca la nueva contraseña pulsando las
teclas MENU COMMAND pulsando las teclas
MENU COMMAND correspondientes a los
caracteres mostrados en el visualizador de
funciones (utilizando los botones M3 y M4 para
desplazarse a la siguiente página de caracteres).
Las contraseñas pueden tener un máximo de 4
caracteres constituidos por cualquier combinación
posible de números y letras. Pulse el botón MENU.
8. Vuelva a introducir la nueva contraseña para
confirmar y pulse el botón MENU. Aparece una
confirmación PASSWORD SET en el visualizador
de funciones. A continuación, usted puede
seleccionar ENABLE o DISABLE.
NOTA
: Una vez que la contraseña haya sido
cambiada, le será imposible acceder a los menús
de ajuste si se olvida de la nueva contraseña. A
menos que necesite protección extra, le
recomendamos que no cambie la contraseña
“2000” establecida en fábrica.
Software para la Conexión a
un Ordenador Personal
El software PC-LINK para sistema operativo
Windows® 95/98 suministrado con el mando a
distancia RR-1090 puede ser utilizado para trabajar
con archivos de configuración completos del mismo.
Estos archivos de configuración contienen un conjunto
completo de opciones, grupos de instrucciones,
macros y etiquetas (nombres) para personalizar
completamente el RR-1090. Los archivos de
configuración pueden cargarse o descargarse
directamente en el disco duro. También pueden
cargarse o descargarse desde el RR-1090 utilizando
un cable de conexión serie suministrado de origen.
Esto proporciona una vía cómoda para transferir
la programación deseada a varios mandos a
distancia RR-1090.
Page 75

Español
75
Además, muchas de las opciones de configuración
para el RR-1090 pueden ser modificadas en el
software PC-LINK, un procedimiento que puede
resultar más cómodo que utilizar los propios menús
de ajuste del RR-1090.
Instalación del Software PC-LINK
Para instalar y poner en marcha el software PC-LINK
en un ordenador que trabaje con el sistema operativo
Windows® 95/98:
1. Inserte el DISK 1 en su disquetera.
2. Ponga en marcha el programa SETUP.EXE bien
haciendo clic dos veces en el nombre del archivo
en el Explorador de Windows o marcando
EJECUTAR en el menú INICIO y tecleando
A:SETUP.EXE.
3. Siga los pasos del programa de ajuste, aceptando
el directorio por defecto para la instalación del
programa (C:\PROGRAMS\HT2000) o
especificando una nueva ubicación utilizando
el botón BROWSE.
4. Durante la instalación, se le pedirá que inserte
el DISK 2. Cuando los archivos hayan sido
instalados, se le solicitará que reinicie su
ordenador para completar la instalación.
5. Ponga en marcha el software PC-LINK bien
haciendo clic dos veces en el nombre del archivo
HT2000.EXE en el Explorador de Windows o
marcando EJECUTAR en el menú INICIO y
tecleando C:\PROGRAMS\HT2000.EXE.
Carga y Memorización de los Archivos
de Configuración
Para utilizar el software PC-LINK, usted abre un
archivo de configuración que aparece en la pantalla
PC-Link principal, tal y como se muestra en la
ilustración que figura al principio de este manual.
Estos archivos de configuración pueden ser
guardados en el disco duro de su ordenador con
la extensión “*.HTR”.
NOTA
: El archivo de configuración por defecto
“DEFAULT.HTR” está instalado en el subdirectorio
DEFAULT del directorio de instalación del HT200.
Para abrir un archivo de configuración
desde un disco de ordenador:
1. Seleccione ABRIR en el menú ARCHIVO.
2. Utilice la caja de diálogos para encontrar el
archivo de configuración DEFAULT.HTR (o el
archivo que a usted le interese).
3. Haga “clic” en el botón ABRIR.
Para guardar un archivo de configuración
en un disco de ordenador:
1. Para guardar un archivo de configuración con
el mismo nombre, seleccione GUARDAR en el
menú ARCHIVO. El nuevo archivo se
sobreescribirá en el antiguo.
2. Para guardar un archivo de configuración con
un nombre diferente, seleccione GUARDAR
COMO en el menú ARCHIVO. Introduzca un
nuevo nombre de archivo en la caja de diálogos
(la extensión.HTR se añadirá automáticamente).
Haga “clic” en GUARDAR.
Carga y Descarga de Archivos de
Configuración
Con ayuda del software PC-LINK y el cable de
conexión serie suministrado, usted puede cargar un
archivo de configuración desde el mando a distancia
RR-1090 a su ordenador, modificarlo y a continuación
descargar los ajustes correspondientes a la nueva
configuración en el mando a distancia.
Para utilizar la función de carga/descarga, debe
configurar su ordenador y situar el mando a distancia
en el modo de transferencia de datos.
Conecte el RR-1090 a su ordenador:
1. Enchufe el conector modular de 4 patillas del
cable suministrado en la toma pertinente que
figura en la parte posterior del mando a distancia.
2. Enchufe el otro extremo del cable a un conector
serie DB-9 (COM1 o COM2) de su ordenador.
3. Ponga en marcha el software PC-LINK y seleccione
el puerto en el que usted conectó el cable (COM1
o COM2) desde el menú PORT (“PUERTO”).
Page 76

76 RR-1090
Ponga el RR-1090 en el modo de
TRANSFERENCIA DE DATOS
(“DATA TRANSFER”):
1. Pulse MENU para acceder al menú de ajuste
principal.
2. Pulse el botón PAGE para avanzar a la siguiente
página de opciones.
3. Seleccione PC LINK en el visualizador de
funciones LCD pulsando la tecla MENU
COMMAND adyacente.
Para cargar un archivo de configuración
desde el RR-1090 al ordenador:
1. Asegúrese de que el RR-1090 esté en el modo
de transferencia de datos.
2. Seleccione UPLOAD (“CARGAR”) en el menú FILE
(“ARCHIVO”) del software PC-LINK. Durante la
transferencia aparecerá el mensaje
“UPLOADING...” (“CARGANDO...”) en el
visualizador de funciones LCD del mando a
distancia.
3. Cuando la carga esté completada, se abrirá el
archivo de configuración en el software PC-LINK,
pudiendo el mismo ser modificado, descargado
en otro RR-1090 o guardado en el disco duro
del ordenador.
Para descargar un archivo de configuración
desde el ordenador al RR-1090:
1. Asegúrese de que el RR-1090 esté situado en
el modo de transferencia de datos.
2. Abra el archivo deseado en el software PC-LINK.
3. Seleccione DOWNLOAD (“DESCARGAR”) en
el menú FILE (“ARCHIVO”) del software PC-LINK.
Durante la transferencia aparecerá el mensaje
“DOWNLOADING...” (“DESCARGANDO...”)
en el visualizador de funciones LCD del mando
a distancia.
4. Cuando la descarga esté completada, los nuevos
ajustes de configuración serán instalados en el
RR-1090, sobreescribiéndose en los antiguos.
Modificación de los Archivos de
Configuración
El software PC-LINK puede ser utilizado para ver
los ajustes actuales de un archivo de configuración
abierto y modificar muchos de ellos. El archivo de
configuración modificado puede entonces ser
guardado en un disco o descargado en un RR-1090.
Estas son las opciones disponibles en el software
PC-LINK:
Para seleccionar el DISPOSITIVO a revisar
o modificar, elija el dispositivo en el menú DEVICE.
Los nombres de las teclas y otros ajustes
correspondientes a dicho dispositivo son visualizados
en la pantalla PC-LINK.
Para renombrar un DISPOSITIVO, seleccione
DEVICE NAME en el menú EDIT o haga “clic” dos
veces en la caja DEVICE de la pantalla principal.
Escriba el nuevo nombre en la caja de diálogos y
haga “clic” en OK.
Para renombrar una TECLA, haga “clic” en
la tecla deseada de la pantalla principal y seleccione
KEY NAME en el menú EDIT o haga “clic” dos veces
en la tecla deseada. Escriba el nuevo nombre en
la caja de diálogos y haga “clic” en OK.
Para borrar una TECLA, haga “clic” en la tecla
deseada de la pantalla principal y seleccione DELETE
KEY en el menú EDIT. Haga “clic”en YES o NO para
confirmar la operación.
Para reordenar las TECLAS correspondientes
al dispositivo seleccionado en ese momento,
seleccione ARRANGEMENT KEY en el menú EDIT.
Usted también puede desplazar manualmente las
páginas de teclas a otra ubicación marcando el
nombre de la tecla, manteniendo pulsado el botón
del ratón de su PC y llevando la etiqueta
correspondiente a otra ubicación.
Para ver los pasos de que se compone un
MACRO, seleccione el macro deseado en el menú
MACRO. Los pasos grabados en dicho macro se
muestran en la parte derecha de la pantalla principal.
Para cambiar el ajuste correspondiente al
AVISADOR ACUSTICO, seleccione KEY TONE
en el menú SETTING. Haga “clic” sobre la opción
deseada en la caja de diálogos.
Page 77

Para cambiar el ajuste correspondiente a
la RETROILUMINACION, seleccione BACKLIT en
el menú SETTING. Haga “clic” sobre la opción
deseada en la caja de diálogos.
Para cambiar el ajuste correspondiente a
la CONTRASEÑA, seleccione PASSWORD en el
menú SETTING.
Para cambiar el ajuste correspondiente a
la TRANSFERENCIA DEL CONTROL DE
VOLUMEN, seleccione PUNCH THROUGH en el
menú SETTING.
Español
77
Page 78

78 RR-1090
Inhoud
1. De Indeling 2
2. Het leerproces 4
3. Apparaat voorbeeld pagina 4
4. Software voor verbinding met uw pc 5
Inleiding.................................................. 79
De belangrijkste eigenschappen 79
Een paar zinnige waarschuwingen 79
Het plaatsen van de accu’s
en het opladen 79
Aan de slag met de RR-1090 ................... 79
De infraroodzender/ontvanger 79
De apparaattoetsen 79
De belangrijkste commandotoetsen
80
De menu commandotoetsen
en het infoscherm 80
De paginatoets 80
De macrotoetsen 80
De menutoets 80
De aan/uittoets “POWER” 80
De seriële aansluiting 80
Het werken met de RR-1090................... 80
Het actief maken van de RR-1090 80
Het zenden van infrarood commando’s 81
Het zenden van macro commando’s 81
Het programmeren van
de commandocodes .................................. 81
Het programmeren met de vier cijferige code 82
Het zoeken van de code d.m.v. de merknaam 82
Programmeren d.m.v. automatisch zoeken 83
De leercommando’s 83
Het programmeren van macro’s 84
Een pagina op maat maken 84
Het verwijderen van ingebrachte commando’s 85
Het doorschakelen van de volumeregeling 85
De herstelfunctie “RESET” 86
De dupliceerfunctie “DUPLICATE” 86
Het aanpassen van de labels .................... 87
Het veranderen van een commandonaam 87
Het verplaatsen van een commandonaam 87
Het automatisch verplaatsen van de
commandonamen 87
Configuratiemogelijkheden ....................... 88
De verlichting 88
De pieper 88
Het wachtwoord 88
Software voor de pc-verbinding ............... 89
Het installeren van de PC-LINK software 89
Het laden en bewaren van configuratiedossiers 89
Het “up- en downloaden” van configuratiedossiers 90
Het veranderen van configuratiedossiers 90
De 4 cijferige codes ................................. 92
A/V 92
TV 92
VCR 93
CD 93
DVD 94
LD 94
SAT/DSS 95
Page 79

Nederlands
79
Inleiding
Wij danken u dat u onze leerbare universele
afstandsbediening RR-1090 heeft aangeschaft. De
RR-1090 kan infrarood afstandsbedieningen van wel
8 audio- en video-apparaten vervangen, al dan niet
van Rotel komaf. In de RR-1090 hebben commando’s
ingebouwd van honderden audio en video apparaten,
daarbij kan hij ook nog commando’s leren van de
afstandsbedieningen die u al in uw bezit heeft. De
bediening is zeer eenvoudig en vanzelfsprekend.
De belangrijkste eigenschappen
• Eenvoudig programmeren door gebruikmaking
van de vele ingebouwde commando’s voor
honderden componenten.
• Voorgeprogrammeerd voor het bedienen van
Rotel apparatuur.
• Het vermogen om van andere afstandsbedieningen te leren.
• LCD infoscherm biedt u eenvoudige menugestuurde bediening voor eigen naamgeving van
commando’s
• Verlicht infoscherm voor gebruik in het donker
met daarbij gevoegd een piepje bij ieder gegeven
commando.
• Vier “MACRO” opdrachten voor het verzenden
10 opeenvolgende commando’s door de druk
op één toets.
• Inclusief accu en lader.
• Inclusief seriële kabel en software voor het
programmeren van de RR-1090 vanuit uw pc.
(Windows® 95/98)
Een paar zinnige waarschuwingen
• We hebben de RR-1090 stevig gemaakt, maar
hij is niet onvernietigbaar. Laat hem dus niet vallen.
• Hij kan ook niet zo tegen nattigheid. Gebruik
een zachte niet pluizende doek om de RR-1090
schoon te maken. Vermijdt ten allen tijden
oplosmiddelen.
• Probeer niet de RR-1090 te openen en uit elkaar
te halen. Uw garantie vervalt dan automatisch.
Het plaatsen van de accu’s en het
opladen
De RR-1090 heeft 4 AA oplaadbare accu’s en een 9
volts adapter/oplader. Wanneer “LOW BATTERY” in
het infoscherm verschijnt moet u de accu’s weer opladen.
Het plaatsen: Leg de afstandsbediening op z’n
kop en verwijder het batterijcompartimentklepje .
Plaats de vier batterijen zoals staat aangegeven en
doe het klepje weer op zijn plaats.
Het opladen: Doe het plugje van de adapter in
de aansluiting aan de linker kant van de RR-1090
. Doe de steker in het stopcontact (EU 220V. 50
Hz.). “CHARGING” verschijnt nu op het infoscherm.
Het laden doet er een hele nacht over. Tijdens het
laden kunt u de RR-1090 gewoon gebruiken.
EXTRA INFORMATIE
u ook gewone “penlight” batterijen gebruiken.
Probeert u echter deze nooit te laden.
: Heeft u haast met laden dan kan
Aan de slag met de RR-1090
Zie figuur 1
Bestudeer even de onderstaande bedieningsorganen
en eigenschappen van de RR-1090
De infraroodzender/ontvanger
De infraroodzender/ontvanger bevindt zich aan de
voorkant van de RR-1090. De RR -1090 moet dus
ook altijd op het te bedienen/programmeren
apparaat gericht worden.
De apparaattoetsen
Met de acht ronde toetsen van de RR-1090 bepaalt
u welke commandoset wordt geactiveerd en welk
apparaat wordt bediend. Voorbeeld: Druk op de
toets AV1 en u kunt met de RR-1090 uw Rotel
surroundprocessor gaan bedienen. Druk op TV en
u kunt uw TV bedienen.
Om met de RR-1090 te kunnen gaan werken moet
u dus eerst op één van de apparaattoetsen drukken
en vervolgens pas op een commandotoets.
EXTRA INFORMATIE
kunnen voor ieder type component gebruikt worden.
: De toetsen “AV1”, “AV2” en “AV3”
Page 80

80 RR-1090
De belangrijkste commandotoetsen
De toets “POWER”, de twee grote “4-weg” toetsen
en twee kleine ronde toetsen in het midden dupliceren
de belangrijkste functies van uw audio- en
videoapparatuur: aan/uit, volumeregeling, zender
hoger/lager, afspelen, snel vooruit enz. De
opdrachten kunnen iets verschillen afhankelijk van
de betreffende apparaattoets.
De menu commandotoetsen
en het infoscherm
Bovenin de RR-1090 ziet u 12 rechthoekige toetsen
gegroepeerd om een infoscherm. Met deze menu
commandotoetsen kunt extra functies geven welke
getoond worden op het schermpje.
De functies van deze toetsen variëren afhankelijk van
het gekozen apparaat en de getoonde menu-pagina.
De paginatoets
Ieder apparaat dat u kiest met één van de
apparaattoetsen kunt u indien nodig van 48
commando’s voorzien. Deze commando’s verschijnen
in het infoscherm in groepen (of pagina’s) van 12.
Druk op de toets “PAGE” om verder te gaan naar
de volgende pagina of commando, waardoor weer
nieuwe namen in het scherm verschijnen. Bij iedere
druk op de paginatoets komt er een nieuwe groep
tevoorschijn betreffende dat component. Aan het eind
verschijnt de eerste pagina weer.
De macrotoetsen
Met de vier toetsen met de namen “M1”, “M2”, “M3”
en “M4” kunt u aan uw afstandsbediening een speciale
“macro” functie geven: een opeenvolging van tot wel
10 commando’s. Voorbeeld van een set commando’s:
tv aanzetten, kiezen van kanaal 5, uw surroundinstallatie
aanzetten en daarop de tv ingang kiezen.
Met twee macrotoetsen (M3 en M4) kunnen ook gebruikt
worden om de RR-1090 naar uw hand te zetten.
De aan/uittoets “POWER”
Naast de eigenlijke functie van deze toets, wordt
deze ook gebruikt tijdens de “SETUP” procedure voor
het vinden van de data-informatie van andere
afstandsbedieningen.
De seriële aansluiting
De 4-pins modulaire aansluiting op de achterkant
van de RR-1090, kan middels de meegeleverde kabel
aangesloten worden op de DB-9 aansluiting van een
pc.
Middels de meegeleverde “PC-LINK” software kunnen
codes en commando’s ge-up- download worden van
een pc die bestuurd wordt met Windows 95/98.
Hiermee kunt u op eenvoudige wijze het
programmeren van nog een RR-1090, alsmede
eenvoudige aanpassingen, bewerkstelligen. Zie ook
het speciale hoofdstuk over de “PC-LINK” in deze
gebruiksaanwijzing.
Het werken met de RR-1090
Dit deel van de gebruiksaanwijzing legt de basis
bediening uit van de RR-1090 en de meeste van zijn
standaard mogelijkheden.
EXTRA INFORMATIE
zijn alle bedieningscommando’s ondergebracht van
de Rotel surroundapparatuur. De commando’s van
de Rotel cd- en dvd-spelers zijn ondergebracht onder
de toetsen CD en DVD.
Het actief maken van de RR-1090
Als de RR-1090 een minuut niet gebruikt wordt valt
hij om de accu te sparen automatisch in slaap. Om
de RR-1090 tot leven te wekken drukt u op een
willekeurige toets. Namen verschijnen nu in het
infoscherm.
: Onder de AV-1 apparatentoets
De menutoets
Met deze toets activeert u de verschillende schermen
van het LCD display waarmee u uw RR-1090 naar
uw hand kunt zetten. De “MENU” toets wordt niet
gebruikt tijdens het normaal bedienen.
Page 81

Nederlands
81
Het zenden van infrarood commando’s
Inplaats van het gebruiken van vele
afstandsbedieningen, drukt u simpel op een toets
van de RR-1090 om het gewenste apparaat aan te
zetten en hem te kunnen bedienen. Hieronder volgt
hoe u dat precies moet doen:
1. Indien nodig drukt u op één van de toetsen van
de RR-1090 om hem tot leven te wekken.
2. Druk op de APPARAAT-toets van het component welke u wenst te gebruiken. Voorbeeld: druk
op AV1 om een surround-processor van Rotel aan
te zetten. Het naampje van het gewenste apparaat
verschijnt nu middenin het infoscherm.
2. Druk nu op een commandotoets
om een opdracht te sturen naar het
geselecteerde apparaat. Voorbeeld: druk op “VOL
+” om het signaal van de surroundprocessor te
verhogen. Basis commando’s worden gedaan
met de toetsen , midden op de
afstandsbediening en de aan/uittoets .
Uitgebreidere commando’s zijn te vinden onder
de 12 toetsen van op de bovenkant van de
RR-1090. Deze corresponderen met de namen
die zichtbaar zijn in het infoscherm. Terwijl u op
een commandotoets drukt verschijnt het
betreffende commando in het infoscherm in plaats
van de betreffende apparaatnaam.
4. Druk op de toets “PAGE” om de eerstvolgende
pagina van de 12 beschikbare menu-opdrachten
te kunnen bekijken. Er kunnen zelfs tot 4 pagina’s
aan opdrachten voor een bepaald component
aanwezig zijn. Druk herhaaldelijk op “PAGE”
om alle pagina’s van een betreffend apparaat
te kunnen bekijken.
EXTRA INFORMATIE
afstandsbediening dupliceren de bedieningstoetsen
van verschillende soorten apparaten. De functies
zijn dus apparaat afhankelijk. Overtuig uzelf ervan
dat u het juiste component heeft gekozen voordat u
de commando’s verzendt.
: De commandotoetsen op de
Het zenden van macro commando’s
De vier toetsen op de RR-1090 genaamd M1, M2,
M3 en M4 zijn om macrocommando’s in onder te
brengen. Een macro is een serie van losse commando’s
die geactiveerd wordt door het indrukken van één
toets. Macro’s kunnen het bedienen van een complexe
installatie heel wat vereenvoudigen. Voorbeeldje: Wat
moet u niet allemaal doen om een videobandje af te
spelen: de TV aanzetten, de videorecorder aanzetten,
het videokanaal of de videoingang kiezen en tenslotte
de videorecorder laten afspelen. Dat zijn dus vier
commando’s en om deze uit te voeren moet u tenminste
zes verschillende toetsen indrukken. Een macro
vereenvoudigd deze procedure tot het indrukken van
slechts een toets.
Het programmeren van de
commandocodes
De RR-1090 heeft honderden ingebakken
commando’s voor de meest uiteenlopende audio en
video-apparaten. Het programmeren van de
afstandsbediening betekent dus niets anders dan het
kiezen van de juiste commando’s voor de acht
betreffende apparaten. Dit geschiedt d.m.v. het
toekennen van vier cijferige codes. Dit toekennen
hoeft slecht eenmaal bij het in gebruiknemen van
de RR-1090 te gebeuren en natuurlijk wanneer u
van apparatuur wisselt.
De makkelijkste manier om de RR-1090 te
programmeren is eerst de merken (en eventueel
typenummers) van uw op afstand te bedienen
apparaten te noteren en vervolgens daarbij de vier
cijferige code van ieder apparaat op te zoeken in
de lijst achterin deze gebruiksaanwijzing. Wanneer
u een apparaat heeft dat niet in de lijst wordt vermeld,
dan bestaat er een alternatieve methode om toch de
juiste codes van het betreffende apparaat toe te kennen.
EXTRA INFORMATIE
RR-1090 wordt gedaan in een menugestuurde opzet
waar u in kunt komen door de toets “MENU” in te
drukken. Tijdens de procedure kunt altijd het programma verlaten door tweemaal op de toets
“MENU te drukken.
: Het programmeren van de
Page 82

82 RR-1090
Het programmeren met de vier cijferige
code
Zoek het apparaat op in de lijst achterin deze
gebruiksaanwijzing en noteer de daarbij vermelde
code(s).
1. Druk op de toets “MENU” om in het hoofdmenu
te komen.
2. Kies SETUP van het infoscherm door op de toets
boven de eerste letter van SETUP te drukken.
3. Druk op één van de apparaattoetsen waaronder
u een bepaald component ondergebracht wenst
te hebben. Als u één van de ingangen AV1, AV2
of AV3 kiest zal u verder gevraagd worden wat
voor type apparaat het is (b.v. cd, vcr enz.).
4. Kies nu “ENTER CODE” door op de toets boven
deze naam te drukken.
5. Breng nu de gevonden code in het geheugen
door op de toetsen te drukken die corresponderen
met de cijfers in het infoscherm. Als u klaar bent
wordt het succesvol inbrengen van de code
bevestigd in het infoscherm.
6. Als de code eenmaal is ingebracht, geeft het menu
u twee mogelijkheden: Druk op een volgende
apparaattoets om nog meer codes in te brengen
of druk op “MENU” om terug te keren naar het
hoofdmenu. Druk nogmaals op “MENU” om op
normale bediening van de installatie over te gaan
Controleer even of de operatie geslaagd is door het
betreffende apparaat aan of uit te zetten met de
afstandsbediening. Herhaal bovenstaande procedure als deze opdracht mislukt.
Het zoeken van de code d.m.v. de
merknaam
Er is nog een andere methode om de codes voor
uw merk en type apparaten te zoeken.
1. Druk op de toets “MENU” om in het hoofdmenu
te komen.
2. Kies SETUP van het infoscherm door op de toets
boven de eerste letter van SETUP te drukken.
3. Druk op één van de apparaattoetsen waaronder
u een bepaald component ondergebracht wenst
te hebben. Als u één van de ingangen AV1, AV2
of AV3 kiest zal u verder gevraagd worden wat
voor type apparaat het is (b.v. cd, vcr enz.).
4. Kies nu “BRANDNAME” door op de toets boven
deze naam te drukken.
5. Kies nu de eerste letter van uw merk in de lijst
die verschijnt op het infoscherm. Indien nodig
druk dan op M4 voor de volgende lijst met letters of M3 voor de vorige lijst met letters.
6. Kies het merk dat u zoekt van de lijst die verschijnt
op het infoscherm, met eventueel gebruikmaking
van de toetsen M3 en M4. Er verschijnt nu een
opdracht in het scherm om de betreffende code
te testen: “press POWER key to test”.
7. Druk nu op de toets “POWER” aan de rechter
zijde van de RR-1090 om de eerst beschikbare
code van uw merk te testen. De geteste code
verschijnt nu in het infoscherm.
Als het betreffende apparaat nu aan of uit
gaat, kan u de juiste code gevonden hebben.
Probeer nog wat andere opdrachten uit, met de
“MENU COMMAND” toetsen. Werken deze dan
heeft u de juiste code te pakken. Druk dan op de
betreffende apparaattoets om de code op te slaan.
Als het betreffende apparaat nu niet aan
of uit gaat, probeer dan de volgende beschikbare
code van uw merk door weer op de toets “POWER”
te drukken deze volgende code verschijnt nu in het
infoscherm. Druk net zo lang op de toets “POWER”
tot u een code tegen komt die wel werkt.
Als geen van de codes die voor uw merk
beschikbaar zijn werkt, dan wordt u gevraagd
om alle codes die voor dat soort apparaat in het
bestand beschikbaar zijn te proberen. Kies “YES”
(ja) om de zoekprocedure te vervolgen (punt 5 in
het volgende hoofdstuk) of kies “NO” (nee) om weer
terug te keren naar het hoofdmenu.
Page 83

Nederlands
83
Programmeren d.m.v. automatisch
zoeken
Het zoeken naar de code van een bepaald soort
component uit het totale bestand van 4-cijferige codes:
1. Druk op de toets “MENU” om in het hoofdmenu
te komen.
2. Kies SETUP van het infoscherm door op de toets
boven de eerste letter van SETUP te drukken.
3. Druk op één van de apparaattoetsen waaronder
u een bepaald component ondergebracht wenst
te hebben. Als u één van de ingangen AV1, AV2
of AV3 kiest zal u verder gevraagd worden wat
voor type apparaat het is (b.v. cd, vcr enz.).
4. Kies nu “SEARCH” door op de toets onder deze
naam te drukken. Er verschijnt nu een opdracht
in het scherm: “press POWER key to test”.
5. Druk nu op de toets “POWER” aan de rechter
zijde van de RR-1090 om de eerst beschikbare
code te testen. De geteste code verschijnt nu in
het infoscherm.
Als het betreffende apparaat nu aan of uit
gaat,
kan
Probeer nog wat andere opdrachten uit, met de
“MENU COMMAND” toetsen. Werken deze dan
heeft u de juiste code te pakken. Druk dan op de
betreffende apparaattoets om de code op te slaan.
Als het betreffende apparaat nu niet aan
of uit gaat, probeer dan de volgende beschikbare
code van dat type apparaat door weer op de toets
“POWER” te drukken deze volgende code verschijnt
nu in het infoscherm. Druk net zo lang op de toets
“POWER” tot u een code tegen komt die wel werkt.
Als geen van de codes werkt, dan wordt u
“verteld” dat Rotel en u er alles aan gedaan hebben
om een code te vinden, maar dat deze niet in het
bestand staat. Druk op de toets “MENU” om weer
terug te gaan naar het hoofdmenu.
De leercommando’s
Wanneer de geprogrammeerde combinatie van
opdrachtmogelijkheden van de RR-1090 bepaalde
functies mist, dan kan de RR-1090 deze opdrachten
geleerd worden d.m.v. de bestaande afstandsbediening van dat betreffende apparaat.
u de juiste code gevonden hebben.
1. Leg de beide afstandsbedieningen tegenover
elkaar zoals getoond in figuur 2 voorin in deze
gebruiksaanwijzing. Het infraroodsignaal dat
uitgezonden wordt van eigenlijke afstandsbediening moet ontvangen kunnen worden door
het “oog” van de RR-1090.
2. Druk op de toets “MENU” om in het hoofdmenu
te komen.
3. Kies nu “LEARNING” door op de toets boven
deze naam te drukken.
4. Druk op één van de apparaattoetsen waaronder
u de code van dat bepaalde component
ondergebracht wenst te hebben.
5. Kies op de RR-1090 de opdrachttoets waaronder
u die bepaalde functie wilt onderbrengen. U kunt
kiezen uit één van de basis commandotoetsen
of één van de menu commandotoetsen (met
gebruikmaking van de “PAGE” toets om naar
een nieuwe pagina te gaan met menu
commando’s om een ongebruikte te vinden). Op
het infoscherm staat vermeld “LEARNING”.
6. Houdt nu de gewenste opdrachttoets op de
originele afstandsbediening gedurende langere
tijd ingedrukt, zodat de RR-1090 instaat wordt
gesteld hem te leren.
Als de opdracht faalt, staat er “ERROR” te lezen
in het infoscherm van de RR-1090 en verzoekt deze
u terug te gaan naar stap 5 van hierboven. Positioneer
de beide afstandsbedieningen nog beter en begin
weer met stap 5.
Als de opdracht slaagt, vraagt de RR-1090 u
de naam te veranderen die hij aan de opdracht
gegeven heeft. Kies “NO” wanneer u dat niet nodig
vindt en “YES” wanneer u dat wel nodig vindt en
breng dan (middels M3 en M4) de juiste letters aan.
De naam kan maximaal 5 karakters bevatten. Druk
vervolgens op “MENU” om de nieuwe naam in het
geheugen te plaatsen.
Nog meer commando’s kunt u de RR-1090 leren
door vanaf stap 5 te werken. Om naar het hoofdmenu
terug te gaan drukt u op de toets “MENU”.
Page 84

84 RR-1090
EXTRA INFORMATIE
: U kunt de RR-1090 240 opdrachten
leren. Als hij vol is zal er op het infoscherm “COMMAND FULL” komen te staan en kan u hem niets
meer leren. Zie het hoofdstuk “Het verwijderen van
ingebrachte commando’s” om geheugenruimte vrij
te maken.
Het programmeren van macro’s
Onder ieder van de vier toetsen M1, M2, M3 en
M4 kunt u een serie van meervoudige opdrachten
herbergen en laten uitvoeren door één druk op de
toets.
Om zo een streng van opdrachten te kunnen opslaan
moet u zich er eerst van overtuigen dat alle opdrachten
afzonderlijk door de RR-1090 geleerd zijn. De
MACRO opdracht is niet anders dan een
opeenvolging van achter elkaar gezette al
geleerde
opdrachten.
1. Druk op de toets “MENU” om in het hoofdmenu
te komen.
2. Druk vervolgens op de toets “PAGE” om de
volgende pagina van de menu-opties op te slaan.
3. Kies nu MACRO op het infoscherm.
4. Druk nu op één van de “MACRO” toetsen M1,
M2, M3 of M4 afhankelijk van onder welke toets
u de meervoudige opdracht wilt plaatsen.
5. Maak vervolgens een nieuw label aan met de
menu commandotoetsen (eventueel gebruikmakend van de toetsen M3 en M4 voor een
andere pagina met letters). De labels mogen 5
karakters bevatten. Nadat het label klaar is drukt
u op de toets “MENU” om het in het geheugen
vast te leggen.
6. Leg nu het eerste commando vast in het geheugen:
druk eerst op de toets van het gewenste apparaat
en daarna op het gewenste commando. Leg
daarna het volgende commando vast (gebruik
eventueel de paginatoets voor additionele
pagina’s met commando’s).
7. Om de volgende commando’s in het geheugen
te zetten drukt u eerst op de gekozen “MACRO”
toets om het voorgaande commando te bevestigen
en vervolgens bevestigt u het volgende commando. Herhaal deze stappen tot u de hele reeks
heeft vastgelegd.
8. Wanneer u de hele reeks heeft ingebracht drukt
u op de “MENU” om de commandostreng in het
geheugen vast te leggen.
EXTRA INFORMATIE
: Een meervoudige opdracht kan
10 commando’s bevatten, de apparaattoets niet
meegerekend.
Een pagina op maat maken
Normaal gesproken zitten onder een apparaattoets
de commando’s van één enkel apparaat verborgen.
Het is echter mogelijk een speciale set van opdrachten
samen te stellen op een op maat gemaakte pagina,
met losstaande opdrachten gekopieerd van andere
apparaten. Voorbeeld: U kunt een pagina maken met
de meest gebruikte opdrachten van alle apparaten.
Zo kunt u het zich eenvoudig maken met het bij elkaar
brengen op één pagina van de door u meest gebruikte
opdrachten. U kan op deze op maat gemaakte pagina
komen door op de apparaattoets te drukken waar u
de set commando’s heeft ondergebracht. Hoe maakt
u een pagina op maat:
1. Druk op de toets “MENU” om in het hoofdmenu
te komen.
2. Kies ver volgens “PREFERENCE” op het infoscherm.
3. Kies daarna “CUSTOM PAGE” op het infoscherm.
4. Druk dan op de betreffende apparatentoets waar
u de “CUSTOM PAGE” wenst onder te brengen.
5. Maak vervolgens een nieuw label aan met
de menu commandotoetsen (eventueel
gebruikmakend van de toetsen M3 en M4 voor
een andere pagina met letters). De labels mogen
5 karakters bevatten. Nadat het label klaar is
drukt u op de toets “MENU” om het in het
geheugen vast te leggen.
6. Druk nu op de apparatentoets van het apparaat
en zoek het commando dat u wenst te kopiëren
naar de op maat te maken pagina.
7. Druk nu op de betreffende commandotoets om
dit commando toe te voegen aan de “CUSTOM
PAGE”.
Page 85

Nederlands
85
8. Kies nu de plaats op de pagina waar u de opdracht
wilt hebben door op een menu commandotoets
(9) te drukken. De naam van het betreffende
commando verschijnt nu op de gekozen plaats.
9. Herhaal de stappen 6 t/m 8 voor ieder commando
welke u aan de pagina wenst toe te voegen.
Wilt u dat de afstandsbediening zelf de commando’s
opstelt, druk dan op M4. Druk weer op “MENU”
om naar het hoofdmenu terug te keren.
EXTRA INFORMATIE
: Om op een willekeurig moment
een commando toe te kunnen voegen herhaalt u de
stappen 1 t/m 3 en 6 t/m 10. Omdat u kopieert
naar een bestaande pagina zijn de stappen 4 en 5
niet nodig en worden dus uit de opdrachtenreeks
weggelaten.
Het verwijderen van ingebrachte
commando’s
Eerder ingebrachte commando’s kunt u op
onderstaande wijze verwijderen:
1. Druk op de toets van het apparaat waarvan u
een commando wenst te verwijderen.
2. Druk op de toets “MENU” om in het hoofdmenu
te komen.
3. Kies “EDIT” van het infoscherm.
4. Kies ver volgens “DELETE KEY” van het infoscherm.
5. Druk op het te wissen commando. U kunt zowel
basis commando’s als menu commando’s wissen
(gebruik daarbij de paginatoets “PAGE” om door
de pagina’s met opdrachten te bladeren).
6. Kies nu ja (“YES”) of nee (“NO”) om al dan niet
het wissen te bevestigen.
7. Herhaal de stappen 5 en 6 voor ieder commando
dat u wilt wissen. Wilt u dat de afstandsbediening
zelf de commando’s weer opstelt, druk dan op
M4. Druk weer op “MENU” om naar het
hoofdmenu terug te keren.
Het doorschakelen van de
volumeregeling
In de meeste audio/visuele systemen wordt het
geluidsniveau bepaald door de tv of de A/V processor/voorversterker. Om ten alle tijden de
volumeregeling ter beschikking te hebben ook als
één van de andere bronnen aanstaat, hebben we
een mogelijkheid gecreëerd de volumeregeling van
of de tv of de processor/voorversterker naar de
andere apparaatfuncties door te schakelen. Zo heeft
u altijd de mogelijkheid het volume van of de tv of
de a/v processor te regelen ook wanneer op het
infoscherm andere bron aanstaat.
Om de doorschakelfunctie van het volume mogelijk
te maken doet u het volgende:
1. Druk op de toets “MENU” om in het hoofdmenu
te komen.
2. Kies nu “PREFERENCE” van het infoscherm.
3. Kies vervolgens “PUNCH THROUGH” van het
infoscherm.
4. Kies nu het volumecommando van of de tv of
de a/v processor/voorversterker om naar een
ander apparaat te kopiëren, door of op “TV VOL”
of op “AMP VOL” te drukken. Kiest u voor AMP
VOL dan moet u kiezen uit de A/V commandoset
met de gewenste volumecommando’s (AV1, AV2
of AV3) van het volgende infoschermmenu door
op de “MENU COMMAND” toets te drukken.
5. Druk nu op een apparaattoets om de component
te kiezen waar u het commando naar toe wilt
kopiëren. De volumedoorschakelfunctie kan niet
worden gekopieerd naar een tv- of enige andere
a/v processorfunctie. De functie kan alleen
geschakeld worden naar een bron zoals cd,
satelliet, tuner, dvd enz. Probeert u te kopiëren
naar een onmogelijk apparaat dan gebeurt er
niets. Heeft u naar een correct apparaat
gekopieerd dan staat PUNCH THROUGH OK”
in het infoscherm te lezen.
6. Druk nu op de “MENU”toets om terug te gaan
naar het hoofdmenu.
Page 86

86 RR-1090
De herstelfunctie “RESET”
U kunt de RR-1090 weer terugbrengen in zijn “af
fabriek” toestand door gebruikmaking van de
“RESET”functie.
EXTRA INFORMATIE
: Als u de RESETfunctie wilt gebruiken
moet u zich realiseren dat u alle maar dan ook
alle geleerde functies, namen en configuraties wist.
Als u na onze waarschuwing toch wenst te “resetten”
dat doet u dat als volgt:
1. Druk op de toets “RESET” om in het hoofdmenu
terecht te komen.
2. Druk vervolgens op de toets “PAGE” om op de
tweede pagina van mogelijkheden terecht te
komen.
3. Kies nu “REMOTE SETTING” van het infoscherm
door op de menucommandotoets te drukken
boven de eerste letter van REMOTE SETTINGS.
4. Kies dan “RESET” van het infoscherm door op
de menucommandotoets te drukken onder de
eerste letter van het “RESET” label.
5. Kies nu “YES” OF “NO” om de opdracht al dan
niet te bevestigen. Kiest u ja (“YES”) dan wist
de RR-1090 al haar geleerde opdrachten en is
zij weer maagdelijk alsof ze zo van de fabriek
komt en toont tenslotte “DEFAULT SETTING” als
bewijs daarvan.
6. Druk nu op de “MENU”toets om terug te gaan
naar het hoofdmenu.
De dupliceerfunctie “DUPLICATE”
Met de dupliceerfunctie “DUPLICATE” kunt u het
gehele pakket geleerde informatie van de RR-1090
naar een andere RR-1090 overbrengen. U kunt kiezen
uit het overbrengen van de commando’s van slechts
één apparaat of van alle acht apparaten. Om de
data over te brengen legt u de beide RR-1090’s met
de infraroodvensters tegenover elkaar en handel dan
als volgt:
Op de ontvangende afstandsbediening:
1. Druk op de “MENU”toets om in het hoofdmenu
te komen.
2. Druk vervolgens op “PAGE” om naar de tweede
pagina te gaan.
3. Kies nu “DUPLICATE” van het infoscherm door
op de dichtst bijzijnde commandotoets te drukken.
4. Kies vervolgens “RECEIVE” van het infoscherm
door op de dichtst bijzijnde commandotoets te
drukken. In het scherm verschijnt nu “READY TO
RECEIVE INDICATOR”.
Op de verzendende afstandsbediening:
1. Druk op de “MENU”toets om in het hoofdmenu
te komen.
2. Druk vervolgens op “PAGE” om naar de tweede
pagina te gaan.
3. Kies nu “DUPLICATE” van het infoscherm door
op de dichtst bijzijnde commandotoets te drukken.
4. Om de codes van alle apparatuur te
verzenden, kies de optie “COPY ALL DEVICES”.
Om slechts de codes van één apparaat
over te zenden, kies dan “COPY ONE DE-
VICE” en kies vervolgens het apparaat waarvan
u de data wenst te kopiëren. Het verzenden start
nu, het infoscherm laat “SENDING” zien.
Nadat de data-verzending gedaan is komt de
onderstaande informatie in het infoscherm te staan:
• Als de verzending succesvol is verlopen:
“FINISH SENDING”
• Als de verzending minder succesvol is
verlopen: “SENDING ERROR” . Het apparaat
gaat weer terug naar normale werking. Leg nu
de beide afstandsbedieningen weer tegenover
elkaar en probeer het nog eens.
EXTRA INFORMATIE
: Probeer de informatie van de
RR-1090 niet over te brengen naar een andere
afstandsbediening dan een andere RR-1090.
Page 87

Nederlands
87
Het aanpassen van de labels
De namen voor de apparaat- en commandotoetsen
kunnen veranderd worden. Ook de plaats in het
infoscherm van een bepaalde commandotoets kan
veranderd worden.
Het veranderen van een apparaatnaam
Om de naam van een bepaald apparaat in het
infoscherm te veranderen, doet u het volgende:
1. Druk op de apparaattoets waarvan u de naam
wenst te veranderen.
2. Druk vervolgens op de “MENU” toets om in het
hoofdmenu te komen.
3. Kies daarna “EDIT” van het infoscherm.
4. Kies tenslotte de apparaatnaam van het
infoscherm.
5. Gebruik nu de diverse commandotoetsen om het
apparaat van een nieuwe naam te voorzien
(gebruik de M3 en M4 toetsen om eventueel op
de pagina’s met andere letters te komen). U kunt
een naam met maximaal 7 karakters geven.
Nadat u klaar bent met de naam, drukt u op de
toets “MENU” om de naam vast te leggen.
Het veranderen van een
commandonaam
Om de naam van een bepaald commando in het
infoscherm te veranderen, doet u het volgende:
1. Druk op de apparaattoets waarvan u een commando wenst te veranderen.
2. Druk vervolgens op de “MENU” toets om in het
hoofdmenu te komen.
3. Kies nu “EDIT” van het hoofdmenu.
4. Kies nu “KEY NAME” van het hoofdmenu.
5. Druk de “BASIC COMMAND” toets of “MENU
COMMAND” toets in (gebruik de “PAGE” toets
voor extra keuzes) om de gewenste verandering
van de commandonaam te realiseren.
6. Gebruik nu de diverse commandotoetsen om het
commando van een nieuwe naam te voorzien
(gebruik de M3 en M4 toetsen om eventueel op
de pagina’s met andere letters te komen). U kunt
een naam met maximaal 5 karakters geven.
Nadat u klaar bent met de naam, drukt u op de
toets “MENU” om de naam vast te leggen.
7. Herhaal de stappen 5 en 6 om andere
commandotoetsen van een nieuwe naam te
voorzien of druk op “MENU” om naar het
hoofdmenu terug te keren.
Het verplaatsen van een
commandonaam
Om de plaats van een commandonaam in het
infoscherm te verplaatsen, doet u het volgende:
1. Druk op de toets van een apparaat waarvan u
een commando wenst te verplaatsen.
2. Druk vervolgens op de “MENU” toets om in het
hoofdmenu te komen.
3. Kies daarna “EDIT” van het hoofdmenu.
4. Kies dan de “MOVE KEY” van het infoscherm.
5. Kies nu het menucommando welke u wenst te
verplaatsen.
6. Kies tenslotte de plaats in het infoscherm waar
u het betreffende commando wilt hebben.
7. De twee commando’s verwisselen nu van plaats.
Het automatisch verplaatsen van de
commandonamen
Als alternatief voor het handmatig verplaatsen van
commandonamen biedt de RR-1090 ook de
mogelijkheid alle namen automatisch te laten
rangschikken
1. Druk op de toets van een apparaat waarvan u
de commando’s wenst te verplaatsen.
2. Druk vervolgens op de “MENU” toets om in het
hoofdmenu te komen.
3. Kies daarna “EDIT” van het hoofdmenu.
4. Kies tenslotte “AUTO-ARRANGE” van het
infoscherm.
Page 88

88 RR-1090
Configuratiemogelijkheden
Om het leven met een gecompliceerde afstandsbediening wat te vereenvoudigen hebben we er een
verlichting en een pieptoon in aangebracht. Er zijn
drie instellingen mogelijk.
De verlichting
• Met lichtgevoeligheidsinstelling. (“With
Light Sense”) Met deze instelling wordt de
hoeveelheid licht in de kamer gemeten en gaat
de verlichting gedurende vijf seconden aan bij
iedere druk op een toets wanneer de kamer niet
verlicht is.
• Altijd aan. (“Always On”) De verlichting
gaat aan zodra u een toets indrukt, ongeacht
de verlichting van de kamer.
• Altijd uit. (“Always Off”). De verlichting is
altijd uitgeschakeld.
De verlichting configureren:
1. Druk op de “MENU” toets om in het hoofdmenu
te komen.
2. Druk dan op de toets “PAGE” om naar de tweede
pagina te gaan van de menumogelijkheden.
3. Druk vervolgens op “REMOTE SETTINGS” van
het infoscherm en
4. Kies dan “BACKLIT” uit het infoscherm en
5. Maak tenslotte uw keuze uit de drie
mogelijkheden.
De pieper
De RR-1090 laat een toontje horen bij ieder commando dat gegeven wordt. Deze piep kan aan -/
uitgezet worden.
Om de pieper aan/uit te zetten doet u het volgende:
1. Druk op de “MENU” toets om in het hoofdmenu
te komen.
2. Druk dan op de toets “PAGE” om naar de tweede
pagina te gaan van de menumogelijkheden.
3. Druk vervolgens op “REMOTE SETTINGS” van
het infoscherm .
4. Kies dan “BEEP SOUND” van het infoscherm .
5. Kies dan “SOUND ENABLE” of “SOUND DISABLE”.
Het wachtwoord
U kunt een wachtwoord verzinnen en inbrengen om
te voorkomen dat ingestelde menu’s ongewild door
anderen veranderd worden. Als een wachtwoord
eenmaal is ingebracht dan wordt bij iedere
verandering in de instellingsmenu’s om dit
wachtwoord gevraagd.
We hebben van de fabriek uit een wachtwoord
ingebracht (maar het staat niet aan): 2000.
Het in en buiten werking stellen van het
wachtwoord:
1. Druk op de “MENU” toets om in het hoofdmenu
te komen.
2. Druk dan op de toets “PAGE” om naar de tweede
pagina te gaan van de menumogelijkheden.
3. Druk vervolgens op “REMOTE SETTINGS” van
het infoscherm en.
4. Kies daarna “PASSWORD” van het infoscherm.
5. Kies vervolgens tussen “ENABLE” en “DISABLE”
6. Indien erom gevraagd wordt typ dan het
wachtwoord in met de “MENU COMMAND”
toetsen voorstellende de karakters die in het
infoscherm staan. (Gebruik ook de M3 en M4
toetsen om naar een andere pagina met karakters
te gaan.) Nadat u het wachtwoord heeft
ingebracht, drukt u op “MENU”.
Het wachtwoord veranderen:
1. Druk op de “MENU” toets om in het hoofdmenu
te komen.
2. Druk dan op de toets “PAGE” om naar de tweede
pagina te gaan van de menumogelijkheden.
3. Druk vervolgens op “REMOTE SETTINGS” van
het infoscherm en.
4. Kies daarna “PASSWORD” van het infoscherm en.
5. Kies vervolgens “CREATE” van het infoscherm.
Page 89

Nederlands
89
6. Indien erom gevraagd wordt typ dan het oude
wachtwoord in met de “MENU COMMAND”
toetsen voorstellende de karakters die in het
infoscherm staan. (Gebruik ook de M3 en M4
toetsen om naar een andere pagina met karakters
te gaan.) Nadat u het wachtwoord heeft
ingebracht, drukt u op “MENU”.
7. Breng nu het nieuwe wachtwoord in met de
“MENU COMMAND” toetsen voorstellende de
karakters die in het infoscherm staan. (Gebruik
ook de M3 en M4 toetsen om naar een andere
pagina met karakters te gaan.) Denk erom niet
meer dan vier karakters. Nadat u het paswoord
heeft ingebracht, drukt u op “MENU”.
8. Breng ter bevestiging nu nogmaals het
wachtwoord in en druk vervolgens op “MENU”.
“PASSWORD SET” verschijnt nu in het infoscherm
u kunt nu kiezen tussen “ENABLE” (aanzetten)
of “DISABLE” (uitzetten).
EXTRA INFORMATIE
: Als u een nieuw wachtwoord heeft
ingebracht en het vervolgens vergeet kunt u echt
niet meer in uw instellingsprogramma’s komen.
Tenzij u behoefte heeft aan extra bescherming bij u
thuis, adviseren wij u, ons makkelijke wachtwoord
“2000” te handhaven.
Software voor de pc-verbinding
Met de Windows® 95/98 PC-LINK software die we
bij de RR-1090 gedaan hebben kan de
afstandsbediening werken met complete configuratie
dossiers via uw pc. Deze configuratie dossiers bevatten
complete set met extra mogelijkheden, commando’s,
macro’s en aangepaste namen om de RR-1090 volledig
naar uw hand te kunnen zetten. U kunt de dossiers
op de harde schijf zetten en daarvan openen. Met
de bijgeleverde seriële kabel kan de informatie naar
de RR-1090 “downloaden”, maar ook “uploaden”
om andere RR-1090’s op een eenvoudige wijze van
dezelfde data te voorzien.
Daarbij kunnen vele configuratie mogelijkheden voor
de RR-1090 veranderd worden in de PC-LINK software, een procedure die wellicht makkelijker is dan
het werken met zijn eigen set-up menu’s.
Het installeren van de PC-LINK software
Het installeren en werken met de PC-LINK software
op een Windows® 95/98 computer:
1. Doe het eerste schijfje “DISK 1” in de drive.
2. Start nu het programma “SETUP.EXE” door dubbel
te klikken op de dossiernaam in Windows®
Explorer of door te klikken op “RUN” van het
START toetsmenu en te typen: A:SETUP.EXE.
3. Volg nu alle stappen van het set-up programma,
met het accepteren van de fabrieksinstructies voor
het installeren van het programma
(C:\PROGRAMS\HT2000) of door een nieuwe
locatie te specificeren middels de “BROWSE” toets.
4. Gedurende het installeren zal u gevraagd worden
het tweede schijfje “DISK 2” in de lade te doen.
Wanneer alle dossiers zijn geïnstalleerd zal u,
om de installatie te completeren, worden
gevraagd de computer te herstarten.
5. Start nu het programma door dubbel te klikken
op “HT2000.EXE” in Windows® Explorer of door
te klikken op “RUN” van het START toetsmenu
en te typen: (C:\PROGRAMS\HT2000.EXE).
Het laden en bewaren van
configuratiedossiers
Om de software te kunnen gebruiken, opent u een
configuratiedossier welke verschijnt in het
hoofdscherm van PC-LINK, zoals afgebeeld in figuur
4 voorin in deze gebruiksaanwijzing. U kunt deze
dossiers vastleggen in uw pc onder de naam “*.HTR”.
EXTRA INFORMATIE
: Het vanuit de fabriek aangemaakte
configuratiedossier “DEFAULT.HTR” bevindt zich in
de DEFAULT “subdirectory” van de HT2000
installatieïnstructies.
Het openen van een configuratiedossier van
een pc-schijf:
1. Kies “OPEN” van het “FILE” menu.
2. Gebruik de dialoogbox om het dossier
“DEFAULT.HTR” te vinden (of het dossier naar uw
keuze).
3. Klik vervolgens op “OPEN”.
Page 90

90 RR-1090
Het opslaan van een configuratiedossier
op een pc-schijf:
1. Om een configuratiedossier met dezelfde naam
op te slaan kiest u “SAFE” uit het “FILE” menu.
Het nieuwe dossier zal nu het oude overschrijven.
2. Om een configuratiedossier met een andere naam
op te slaan kiest u “SAFE AS” uit het “FILE” menu.
Typ nu een nieuwe naam in (de .HTR toevoeging
verschijnt automatisch). Klik tenslotte op “SAVE”.
Het “up- en downloaden” van
configuratiedossiers
Met de PC-LINK software kunt u data van en naar
de RR-1090 brengen. Waarom? Voorbeeld: U kunt
de configuratie-data van de RR-1090 weer brengen
naar uw pc, daar modificeren en gemodificeerd weer
terugbrengen naar de RR-1090.
Om de “UP/DOWNLOAD” functie te kunnen
gebruiken moet u uw pc eerst configureren en de
afstandsbediening in datatransfertoestand brengen.
Verbindt de RR-1090 aan uw pc:
1. Doe de 4-pins plug van de bijgeleverde kabel
in de aansluiting achterop de RR-1090.
2. Doe de 9-pins plug van de andere kant van de
kabel in de seriële aansluiting van uw pc (COM1
of COM2).
3. Start ver volgens de PC-LINK software en selecteer
de aansluiting welke u gekozen heeft (COM1
of COM2).
De RR-1090 in de datatransfertoestand
brengen:
1. Druk op de “MENU” toets om in het hoofdmenu
te komen.
2. Druk dan op de toets “PAGE” om naar de tweede
pagina te gaan van de menumogelijkheden.
3. Druk vervolgens op “PC-LINK” van het infoscherm
middels de dichtst bijzijnde “MENU COMMAND” toets.
Het laden (UPLOAD) van een configuratiedossier van de RR-1090 naar de pc:
1. Overtuig uzelf ervan of de RR-1090 zich in de
datatransfertoestand bevindt.
2. Kies nu “UPLOAD” van het “FILE” menu van de
PC-LINK software. “UPLOADING...” verschijnt
in het infoscherm van de RR-1090 tijdens de
overzetting van de data.
3. Wanneer het overzetten klaar is, wordt het
configuratiedossier in PC-LINK geopend. Nu kunt
u het veranderen, overbrengen naar een andere
RR-1090 of bewaren op de harde schijf.
Het terugbrengen (DOWNLOAD) van een
configuratiedossier van de pc naar de
RR-1090:
1. Overtuig uzelf ervan of de RR-1090 zich in de
datatransfertoestand bevindt.
2. Open het gewenste dossier in de “PC-LINK”
software.
3. Kies nu “DOWNLOAD” van het “FILE” menu van
de PC-LINK software. “DOWNLOADING...”
verschijnt in het infoscherm van de RR-1090 tijdens
de overzetting van de data.
4. Wanneer het terugbrengen klaar is, zullen de
nieuwe data in de RR-1090 geïnstalleerd zijn,
alle vooraf ingebrachte data zijn nu overschreven.
Het veranderen van configuratiedossiers
De PC-LINK software kan ook gebruikt worden om
de huidige instellingen van een openstaand
configuratiedossier te bekijken en ze te veranderen.
U kunt de veranderde instellingen bewaren op de
harde schijf en/of natuurlijk meteen overzetten naar
de RR-1090. Hieronder de verschillende
mogelijkheden van de PC-LINK software:
Om de instellingen van een component te
bekijken en te modificeren, kiest u het com-
ponent van het “DEVICE” menu. De commando’s
en instellingen voor dat betreffende component
worden nu op het scherm vertoond.
Page 91

Om een bepaald component een nieuwe
naam te geven, kiest u de componentnaam uit
het “EDIT” menu of u dubbelklikt op de “DEVICE”
box in het hoofdscherm. Typ nu de nieuwe naam in
deze box en klik “OK”.
Om een bepaalde toets een nieuwe naam
te geven, kiest u de toets uit het “EDIT” menu of u
dubbelklikt op de betreffende toets in het hoofdscherm.
Typ nu de nieuwe naam in de dialoogbox en klik
“OK”.
Om een toets te verwijderen, klikt u op de
betreffende toets in het hoofdscherm en selecteert
“DELETE KEY” uit het “EDIT” menu. Klik op “YES”
voor de bevestiging.
Om de toetsen van een bepaald apparaat
opnieuw te rangschikken, selecteert u “AR-
RANGE KEY” uit het “EDIT” menu. U kunt ook
handmatig de volgorde veranderen door op de
toetsnaam te drukken en ze met de muis naar een
nieuwe locatie te slepen.
De stappen van een meervoudige opdracht
bekijken doet u als volgt: Kies de gewenste
macro uit het “MACRO” menu. Alle stappen van
de macro-opdracht worden nu op de rechterkant van
het scherm getoond.
Het veranderen van de “KEY TONE”
instelling: selecteer “KEY TONE” uit het
instellingsmenu “SETTING”. Klik nu op de gewenste
optie in de dialoogbox.
Om de verlichtingsinstelling te wijzigen:
selecteer “BACKLIT” uit het instellingsmenu “SETTING”. Klik nu op de gewenste optie in de
dialoogbox.
Om het wachtwoord te bekijken, selecteer
“PASWORD” uit het instellingsmenu “SETTING”.
Om de doorschakelfunctie van de
volumeregeling te bekijken: selecteer “PUNCH
THROUGH” uit het instellingsmenu “SETTING”.
Nederlands
91
Page 92

92 RR-1090
RR-1090
4-Digit Codes • Codes à 4 chiffres • Vierzifferncodes
Codice a 4 cifre • Códigos de 4 Dígitos • De 4 cijferige codes
A/V
ROTEL 0005, 0015, 0025, 0035
YAMAHA 0045, 0055, 0065
TV
AKAI 0331
ALBA 0431
AMSTRAD 0481
ANAM 0251
AOC 0361
BAUER 0441
CANDLE 0351, 0361
CENTURION 0411
CITIZEN 0351, 0361
COLORTYME 0361
CONCERTO 0351
CRAIG 0251
CURTIS MATHES 0161, 0361
DAEWOO 0291, 0301, 0331
DECCA 0271
DIXI 0331
ELTA 0331
EMERSON 0021, 0061, 0071, 0081,
0091, 0101, 0111
ENVISION 0361
ETRON 0331
FISHER 0171
FORMENTI 0441
GE 0131, 0161, 0201
GEC 0271
GEMINI 0391
GENEXXA 0431
GOLDSTAR 0031, 0121, 0351, 0411
GOODMANS/TASHIKO 0271
HITACHI 0181, 0351
JENSEN 0311
JVC 0001, 0261, 0281
KENWOOD 0361
LOGIK 0381
LUXMAN 0351
MAGNASONIC 0031
MAGNAVOX 0341, 0391, 0401, 0411,
0421, 0581, 0591, 0601
MARANTZ 0221, 0351, 0361
MATSUI 0271, 0331
MEMOREX 0331, 0351, 0381, 0571
MGA 0361, 0561, 0571
MITSUBISHI 0221, 0321, 0561, 0571
MONTGOMERY 0351
MTC 0351, 0361
NAD 0551
NEC 0241, 0351, 0361
NIKKAI 0271, 0431
NIKKO 0031
OPTIMUS 0551
OPTONICA 0541
OSAKI 0271
PANASONIC 0191, 0251
PENNY 0161, 0351, 0361, 0521,
0531
PHILCO 0361, 0581, 0591, 0601
PHILIPS 0401
PIONEER 0511, 0551
PROTON 0351, 0501
PULSER 0351
QUASAR 0251
RADIO SHACK 0541
RCA 0051, 0141, 0151, 0181,
0411, 0491, 0531
REALISTIC 0541
SAISHO 0331
SAMPO 0361
SAMSUNG 0331, 0341, 0351, 0361
SANYO 0171, 0231, 0271
SEARS 0161, 0171, 0351, 0481,
0521
SHARP 0461, 0471, 0541, 0621
SIGNATURE 0351, 0381
SIMPSON 0581
SONY 0371, 0451, 0631
SQUAREVIEW 0481
SURPA 0351
SYLVANIA 0361, 0441, 0581, 0591,
0601
SYMPHONIC 0481
TANDY 0271, 0431
TATUNG 0271
TECHWOOD 0351
TEKNIKA 0351, 0381, 0571
TELETECH 0331
TERA 0501
TMK 0351
TOSHIBA 0351, 0521
VECTOR RESEARCH 0361
VIDIKRON 0211
Page 93

93
WARDS 0361, 0381, 0451, 0541,
0581, 0591, 0601
YAMAHA 0361
ZENITH 0011, 0041, 0381
VCR
AKAI 0262
AUDIO DYNAMICS 0202
BLAUPUNKT 0412
CANDLE 0342
CITIZEN 0342
CURTIS MATHES 0342
DBX 0202
DYNATECH 0342, 0472
EMERSON 0072, 0122, 0132, 0142,
0152, 0162, 0172, 0182,
0192, 0212, 0342
GOLDSTAR 0082
GOODMANS 0402
HITACHI 0102, 0562, 0572, 0582,
0592, 0602
JVC 0002, 0202, 0472, 0522,
0532, 0542, 0552
KENWOOD 0202, 0542
LXI 0022, 0342
MAGNAVOX 0342, 0482, 0492, 0502,
0512
MARANTZ 0202, 0402
MATSUSHITA 0342
MEI 0222
MEMOREX 0232, 0242, 0472, 0512
MINOLTA 0592, 0602
MITSUBISHI 0452, 0462, 0542
MONTGOMERY 0472
MOTOROLA 0472
NAD 0442
NEC 0202, 0292, 0422, 0432,
0542
OLYMPUS 0412
OPTIMUS 0442, 0472
OPTONICA 0402, 0472
ORION 0212
PANASONIC 0012, 0052, 0092, 0222,
0342, 0372, 0382, 0392,
0412
PENNY 0202, 0432, 0602
PENTAX 0592, 0602
PHILIPS 0282, 0342, 0420, 0492
PIONEER 0442, 0542
PULSAR 0512
QUARTZ 0272
QUASAR 0382, 0932
RADIO SHACK 0472
RCA 0112, 0382, 0392, 0482,
0592, 0602
REALISTIC 0402, 0472
RICOH 0352, 0362
SAISHO 0212, 0582
SAMSUNG 0212, 0312
SANKY 0472, 0512
SANSUI 0292, 0542
SANYO 0242
SBR 0282
SCOTT 0342
SEARS 0302, 0342, 0592, 0602
SHARP 0402, 0472
SONY 0032, 0332, 0352, 0362
STS 0602
SUNPAK 0352
SYLVANIA 0492, 0502
TEKNIKA 0322
TELEFUNKEN 0252
TMK 0212
TOSHIBA 0062, 0302, 0342
VECTOR RESEARCH 0202
VICTOR 0542, 0552
VIDEO CONCEPTS 0202, 0432
WARDS 0322, 0402, 0472, 0482,
0602
YAMAHA 0202
ZENITH 0042, 0362, 0512
CD
ACOUSTIC RESEARCH 1346
ADC 0076, 0116
ADCOM 0256, 0306, 1066
ADS 0316
AIWA 0346, 0996, 1086, 1106
AKAI 0226, 0536, 0586
ALPINE 1266, 1356
AUDIO TECHNICA 0596
BSR 0296, 0706, 0826
CALIFORNIA AUDIO LAB 0106
CAPETEONIC 1256
CARRERA 0296
CARVER 0336, 1186
CASIO 0396
CROWIN 0236
CURTIS MATHES 0396
DENON 0326, 0926, 0936
DUAL 0556
DYNAMIC BASS (H) 0606
EMERSON 0256, 0376, 1156
EROICA 1326
FISHER 0146, 0606, 0976, 1056
GARRARD 0416
Page 94

94 RR-1090
RR-1090
CENEXXA 0356, 0376, 1156
GOLDSTAR 1186, 1276, 1316, 1386
H/K 0156, 0226, 0516, 1046
HITACHI 0246, 0256, 0556, 0866
INKEL 0166, 0446
JVC 0366
KENWOOD 0096, 0146, 0456, 0636,
0776, 0786, 0796, 0806,
0946
KYOCERA 0076
LUXMAN 0126, 0476, 0726, 0756,
0766, 1036
MAGNAVOX 0216, 0266, 0696, 1006
MARANTZ 0266, 0286, 0426, 0836,
1396
MCLNTOSH 0406, 1136
MCS 0956, 1366
MEMOREX 0256, 0276, 0286, 0356,
0376, 1156
MGA 0186
MISSION 0266
MITSUBISHI 0186, 0496
MTC 1306
NAD 0086, 0666, 0763, 0746
NAKAMICHI 0176, 0486, 0566
NEC 0306, 0956, 1016
NIKKO 0596, 1056
ONKYO 0206, 0506, 0546, 0856,
1206
OPTIMUS 0276, 0296, 0606, 0646,
0896, 0906, 0916, 0946,
0986
PANASONIC 0106, 0876, 1146, 1176
PENNY 0956
PHILIPS 0216, 0266
PIONEER 0356, 0986, 1096
PROTON 0266, 1236
QUASAR 0106
RCA 0256, 0966, 1166
REALISTIC 0256, 0276, 0286, 0376,
0606, 0896
REVOX 1226
ROTEL 0006, 0016, 0026, 0036,
0046, 0266
SABA TELECOMMANDER 0556
SAE 0266
SAMSUNG 1336
SANSUI 0266, 0676, 1026, 1076,
1156
SANYO 0196, 0606, 0686, 0816
SCOTT 0376, 1156
SEARS 0396
SHARP 0286, 0716, 0946, 1116,
1126
SHERWOOD 0166, 0286, 0446, 0526
SIEMENS GARRARD 1296
SIGNATURE 0226
SONTEC 1216
SONY 0116, 0616, 0916, 1196
STARON 1286
STS 0076
SYLVANIA 0266
SYMPHONIC 0386
TANDY 0356
TANGBERG 1246
TEAC 0286, 0386, 0436, 0576,
0846, 0886, 1406
TECHNICS 0106, 0656, 1146
TECHWOOD 1376
TELEFUNKEN 0556
THOMSON 0556
TOSHIBA 0086, 0736
VECTOR RESEARCH 0116, 1186
VICTOR 0366
WARDS 0226
YAMAHA 0056, 0066, 0136, 0466,
0596, 0626, 1116
DVD
AKAI 0068
JVC 0098, 0188
ONKYO 0078
PANASONIC 0038
PHILIPS 0108
PIONEER 0118, 0128, 0198
ROTEL 0008
SAMSUNG 0088
SHARP 0048
SONY 0028
TOSHIBA 0058
YAMAHA 0018, 0138, 0148, 0158,
0168, 0178
LD
AIWA 0177
DENON 0167
DISCO VISION 0037
FUNAI 0177
HITACHI 0037
KENWOOD 0107, 0127
MAGNAVOX 0047
MARANTZ 0047
MITSUBISHI 0157
NAD 0157
PANASONIC 0097, 0197
Page 95

95
PHILIPS 0047
PIONEER 0037, 0057, 0157
RCA 0187
REALISTIC 0177
ROTEL 0007, 0017
SHARP 0147
SONY 0067, 0077, 0137
VICTOR 0117
YAMAHA 0027, 0087
SAT/DSS
ABC 0253, 0373
ALPHA STAR 0773
ANTORONIX 0133
ARCHER 0133, 0283
BBT 0073
CABLETIME 0163
CANAL + 0863
CLYDE CABLEVISION 0193
COLOUR VOICE 0303, 0343
COMTRONICS 0213, 0273
EAGLE COMTRONICS 0273
EASTERN 0063
ECHOSTAR 0783
ELECTRICORD 0203
ELECTUS 0263
GE 0113, 0123
GEC CABLE SYSTEM 0193
GENERAL INSTRUMENT 0793, 0803
HAMLIN H5 0633, 0643, 0653, 0663,
0673
HITACHI 0753
HUGHES NETWORK 0813
JERROLD 0253, 0433, 0593, 0603,
0613, 0602, 0803, 0823
MAGNAVOX 0003, 0413, 0423
MAMM 0293
MEMOREX 0003, 0383
MOVIE TIME 0143, 0203
NORTHCOAST 0013
NSC 0143
OAK 0103, 0533, 0543
PACE (ON DIGITAL) 0903
PANASONIC 0443, 0453, 0463, 0473
PARAGON 0383
PHILPS 0003, 0033, 0213, 0303,
0313, 0323, 0333, 0343,
0413, 0423, 0913
PIONEER 0083, 0553, 0693
PRIMESTAR 0803, 0823
PULSAR 0383
RCA DSS 0393, 0403, 0833
REALISTIC 0133
REGENCY/EASTERN 0683
RUNCO 0383
SAMSUNG 0273
SCIENTIFIC ATLANTA 0363, 0563, 0573, 0583
SIGNAL 0273
SKY 0893
SL MARX 0273
SONY 0843
SPECTAVISION 0233
STANDARD COMP 0183
STARCOM V 0253
STARGATE 0273
SYLVANIA/TEXSCAN 0373, 0493
TEKNIKA 0173
TELESERVICE 0053
TELEVIEW 0273
TEXSCAN 0183, 0373
TFC 0023
TOCOM 0223, 0353, 0503, 0513,
0523
TOSHIBA 0383, 0853
TPS 0873
TUDI 0043
UNIDEN 0003
UNIKA 0133
UNIVERSAL 0133, 0153, 0203, 0283
VIDEOWAY 0093
VIEWSTAR 0213
XSAT 0883
ZENITH 0243, 0383, 0483
Windows® 95/98 is a registered trademark of
Microsoft Corporation.
Windows® 95 und Windows® 98 sind eingetragene
Warenzeichen der Microsoft Corporation.
Windows® 95/98 es una marca registrada de
Microsoft Corporation.
Page 96

The Rotel Co. Ltd.
10-10 Shinsen-Cho
Shibuya-Ku
Tokyo 150-0045
Japan
Phone: +81 3-5458-5325
Fax: +81 3-5458-5310
Rotel of America
54 Concord Street
North Reading, MA 01864-2699
USA
Phone: +1 978-664-3820
Fax: +1 978-664-4109
Rotel Europe
Meadow Road
Worthing, West Sussex BN11 2RX
England
Phone: +44 (0)1903 524 813
Fax: +44 (0)1903 524 831
Rotel Deutschland
Kleine Heide 12
D-33790 Halle/Westf.
Germany
Phone: +49 05201-87170
Fax: +49 05201-73370
www.rotel.com
082 OM-RR-1090 012100
English • Français • Deutsch • Italiano • Español • Nederlands
 Loading...