

Roland TD-50X Owner’s Manual
Reference Manual
© 2021 Roland Corporation 01

Contents
Getting Ready
:An Overview of the TD-50X
Drum Kits .............................................. 4
Memories .............................................. 5
:Turning the Power On/O
Making the Power Automatically Turn O After a Time
(AUTO OFF) ............................................... 13
:Making Hi-Hat Settings
Performing
:Drum Kits and Instruments
:Selecting a Drum Kit
Selecting a Drum Kit from the List ......................... 16
Using a Cross-Stick Technique............................. 17
Stopping All Currently Played Sounds
:Using the Click
:Performing Along with a Song
Playing Along with a Song on an Audio Player .............. 18
Playing Along with the Songs on the TD-50X ............... 18
Repeatedly Playing a Specied Region
Changing the Settings for Each Song ...................... 20
Playing Back a Audio File as a Click
:Rhythm Training (Coach Mode)
Correctly Playing in Time with the Beat
Developing Internal Timing Sense
WARM UPS ............................................. 23
........................................ 4
........................... 4
............................ 12
............................... 13
............................................ 16
........................... 16
.................................. 16
(ALL SOUND OFF) ........ 17
........................................ 17
........................ 18
(A-B Repeat)............ 19
(Click Track)................ 21
.......................... 21
(TIME CHECK) .......... 21
(QUIET COUNT) ............. 22
:Registering/Recalling Your Favorite Drum
Kits (FAVORITE)
Recording
:Recording a Performance
Recording Your Performance Along with a Song............. 25
Deleting Your Recorded Data ............................. 26
Naming Your Recorded Data.............................. 26
Exporting the Recorded Data to an SD Card
Connecting and Recording to Your Computer............... 27
.......................................... 24
.............................................. 25
............................. 25
(SONG EXPORT) .... 26
Customizing the Kits
:Editing Instruments (INSTRUMENT)
Selecting the Instruments ................................ 28
Selecting the Pad to Set .................................. 29
Previewing the Pad Sounds
Listening Only to the Currently-Selected
Instrument
Adjusting the Attack and Release
Layering Instruments
Listening Only to the Currently-Selected
Instrument
(LAYER PREVIEW) ................................ 29
(LAYER PREVIEW) ................................ 31
................................ 28
...................... 28
([PREVIEW] Button) ................ 29
(TRANSIENT )................ 30
(SUB INSTRUMENT) ...................... 30
:Recreating the Reverberations of a Performance
Location
(AMBIENCE)
:Editing the Mixer (MIXER)
Setting the Volume and Pan for Each Pad................... 32
Applying Eects......................................... 33
Adjusting the Overall Sound of the Drum Kit
(MASTER COMP/MASTER EQ)................................... 34
.................................... 32
.............................. 32
:Comparing with or Reverting to the Unedited Drum
Kit (SNAPSHOT)
:Editing a Drum Kit (MENU)
Setting the Volume ...................................... 36
Setting the Illumination Colors for the [KIT] Button and Knobs 36
Changing a Drum Kit Name............................... 36
Playing with Brushes..................................... 37
Setting a Tempo for Each Drum Kit ........................ 37
Setting a Font for Each Kit ................................ 37
Controlling the Changes in the Sound ..................... 38
Making MIDI Transmit/Receive Settings for Each Pad......... 39
:Importing and Playing Audio Files (USER SAMPLE)
Importing an Audio File
Bulk Import of Audio Files Within a Folder
Assigning a User Sample to an Instrument and Playing It ..... 40
Listing the User Samples ................................. 41
Specifying How the User Sample Is Sounded................ 41
Specifying the Sounded Region of a User Sample ........... 41
Deleting a User Sample .................................. 41
Renaming a User Sample ................................. 42
Organizing User Samples................................. 42
.......................................... 35
............................. 36
....... 39
(IMPORT) ........................... 39
(IMPORT ALL) ........ 40
Using the Utilities
:Connecting to Your Computer
Installing/Setting Up the USB Driver ....................... 43
Conguring the Output for USB Audio ..................... 44
Specifying the Input for USB Audio ........................ 44
Conguring the Routing for USB Audio
:Copying Settings (COPY)
:Recalling Drum Kits Successively (SET LIST)
Creating a Set List ....................................... 47
Using Set Lists .......................................... 48
.................................... 43
........................ 43
(Audio Routing)......... 45
............................... 45
............. 47
2

Contents
Settings
................................................ 49
:Trigger Settings
...................................... 49
Specifying the Pad Type.................................. 49
Making Settings for Digitally-Connected Pads .............. 49
Adjusting the Sensitivity of Individual Pads ................. 50
Making Hi-Hat Settings .................................. 50
Making Detailed Trigger Settings.......................... 50
Making Detailed Settings for Digitally-Connected Pads ...... 51
Viewing Trigger Information for Each Pad .................. 51
Eliminate Crosstalk Between Pads
:Backing Up Data
...................................... 53
(Crosstalk Cancellation) ........ 52
Backing Up to an SD Card ................................ 53
Loading Backup Data from an SD Card ..................... 54
Backing Up Drum Kit to an SD Card
Loading Kit Backup Data from an SD Card
Deleting Backup Data from an SD Card
(1 KIT SAVE) ............... 54
(1 KIT LOAD)......... 55
(DELETE/1 KIT DELETE) .... 55
:Using a Connected Computer to Manage the SD Card
Checking the Usage Status of an SD Card
Formatting an SD Card
(FORMAT) ........................... 56
:Making Overall Settings for the TD-50X (SETUP)
Audio Output Assignments
Other Settings
(OPTION) ................................... 60
Assigning Functions to Footswitches or Pads
MIDI Settings
(MIDI) ...................................... 61
Viewing Information for the TD-50X Itself
(OUTPUT) ....................... 57
:Restoring the Factory Settings (FACTORY RESET)
Restoring All Settings
Defaults................................................ 62
(Including Roland Cloud License Data) to Factory
(INFO).............. 56
........ 57
(CONTROL) ....... 60
(INFO) ............. 61
......... 62
56
Appendix
:List of Displayed Messages
.............................................. 63
........................... 63
Error Message List . . . . . . . . . . . . . . . . . . . . . . . . . . . . . . . . . . . . . . . 63
Other Messages ......................................... 64
:Troubleshooting
:Main Specications
...................................... 65
................................... 67
3
Getting Ready
An Overview of the TD-50X
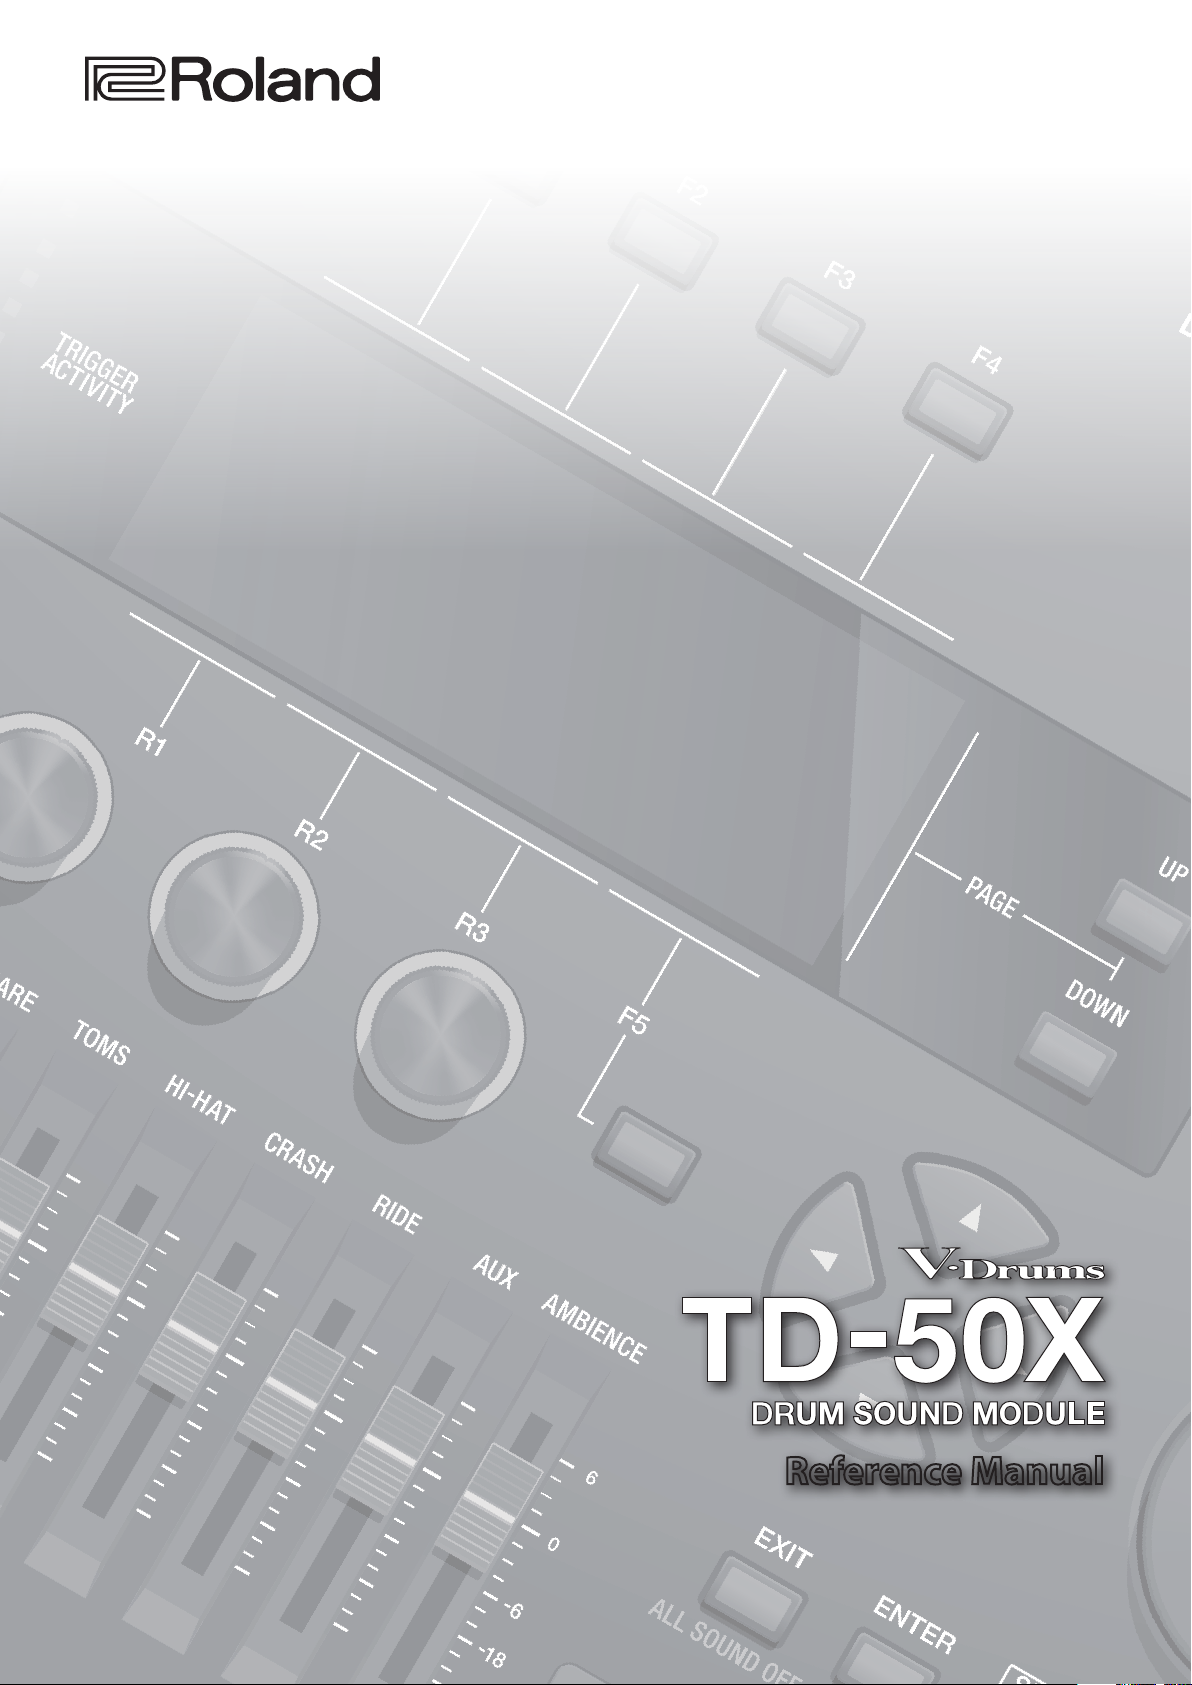
Drum Kits
On the TD-50X, the sounds that play when you strike each pad are called “instruments.” A set of instruments allocated to the respective pads is
called a “drum kit.”
Drum kit 100
Drum kit 1
Pads
Bass drum
(KICK)
HEAD
Floor tom
(TOM 4)
HEAD
RIM
Expansion 1
(AUX 1)
HEAD
RIM
Snare drum
(SNARE)
HEAD
Hi-hat cymbal
(HI-HAT)
HEAD (bow)
RIM (edge)
Expansion 2
(AUX 2)
HEAD
Ambience settings
Overhead mics for the drum kit overall,
performance location, etc.
RIM
RIM
High tom
(TOM 1)
HEAD
RIM
Crash cymbal 1
(CRASH 1)
HEAD (bow)
RIM (edge)
Expansion 3
(AUX 3)
HEAD
RIM
Middle tom
(TOM 2)
HEAD
RIM
Crash cymbal 2
(CRASH 2)
HEAD (bow)
RIM (edge)
Expansion 4
(AUX 4)
HEAD
RIM
Mixer settings
Multi-eect, master compressor, master
equalizer, etc.
Low tom
(TOM 3)
HEAD
RIM
Ride cymbal
(RIDE)
HEAD (bow)
RIM (edge)
BELL
Overall settings for the
entire drum kit
Overall drum kit volume, drum kit name,
MIDI settings, etc.
MEMO
When you change a drum kit setting, the changed setting is saved automatically.
5
For details on the parameter conguration of the drum kits, please refer to the “Data List” (PDF).
5
Pad settings
Pad compressor, etc.
Overall instrument settings (head)
Volume, pan, pad equalizer, how the sub-instrument is played, etc.
Instruments
Instrument sounds, transients, etc.
Sub-instruments
Instrument sounds, transients, etc.
Overall instrument settings (rim)
Instruments
(p. 28)
The snare drum, kick drum and other instrument sounds are referred
to as “instruments.”
You can allocate dierent instruments to the head, rim and other parts
of each pad.
Create the sound you like by modifying the settings of each
instrument. With the instruments, you can recreate the changes in
sound from dierent depths of drum shells, add transient eects and
change the sound in other ways.
Also, audio les that you created on your computer can be imported
from an SD card into the TD-50X, and played as instruments (with the
User Sample function).
Ambience
(p. 32)
“Ambience” is an eect that recreates the reverberations of a
performance space.
You can adjust the overhead mic sound (which picks up the overall
sound of the drum kit), the room ambience and the reverb (room type
and size, reverberation sound, etc.).
Ambience can be applied individually for each drum kit. You can also
set how much eect is applied for each pad.
4
(p. 32)
Mixer
This sets the volume balance, pan, eects and so on for each pad.
The TD-50X features the following eect types. Some of these can be
applied per pad, and some are applied to the entire drum kit.
Eects Explanation
Use the equalizer to adjust the sound balance for
each frequency range, divided into high, middle,
low range and so on.
Pad equalizer/
Pad compressor
(PAD EQ/PAD COMP)
Multi-eect
(MFX)
Master compressor/
Master EQ
(MASTER COMP/MASTER EQ)
Use the compressor to suppress peaks in volume
by adjusting the attack and sound pressure.
With the pad equalizer, you can apply the eect
dierently per pad zone; and with the pad
compressor, you can apply the eect for each
individual pad.
With the multi-eect, you can select and apply
three eects from a total of 38 eect types.
The multi-eect can be applied individually for
each drum kit. You can also set how much eect is
applied for each pad.
This lets you apply compressor and equalizer
eects to the entire drum kit.
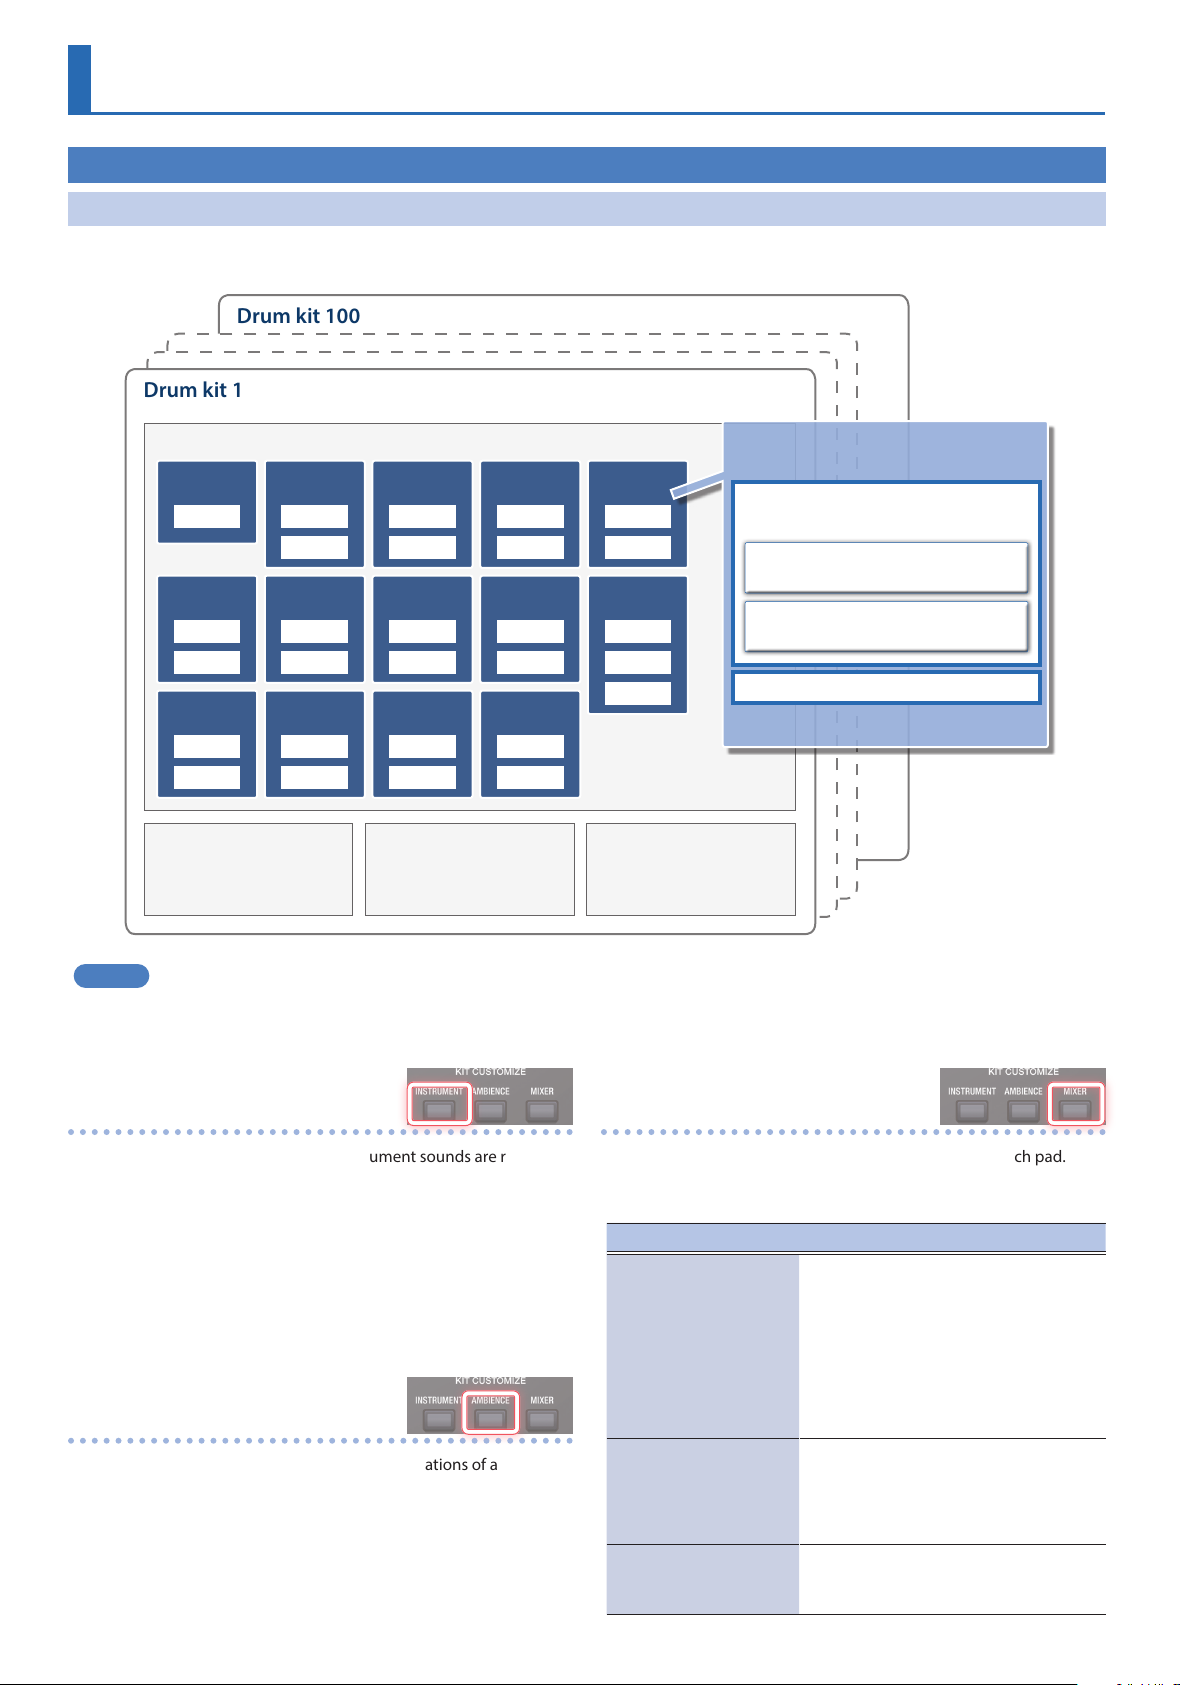
Memories
The settings for drum kits, triggers and so on are saved in “memories.”
TD-50X
Getting Ready
User memory
Preset memory
Drum kits
Set lists
Trigger settings
User samples
(presets)
COPY
Drum kits
Set lists
Trigger settings
Setup
User samples
Preset memory
This is where the factory default settings are saved.
You can copy the preset memory data to a user memory and restore
it to the default settings (p. 62).
The following settings are stored in preset memory.
Drum kits (p. 4)
5
Set lists (p. 47)
5
Trigger settings (p. 49)
5
User samples (presets) (p. 39)
5
* User samples (presets) cannot be copied. By executing a factory
reset, you can return the user samples in user memory to their
factory-set state.
User memory
The settings saved in user memory that are used when editing or
playing.
Data from SD card or preset memory can also be loaded or copied
into this area (p. 45).
The following settings are saved in user memory.
Drum kits (p. 4)
5
Set lists (p. 47)
5
Trigger settings (p. 49)
5
Setup (p. 57)
5
User samples (p. 39)
5
Temporary memory
(saved temporarily)
Recorded data
LOAD
SAVE
Temporary memory
The data (one song) recorded on the TD-50X is held in the unit’s
temporary memory.
You can copy the recorded data in temporary memory to an SD card
(p. 45), or export it as an audio le (WAV) or SMF to an SD card (p. 26).
* When you turn o the power, the data recorded in temporary
memory is erased.
COPY
(saved temporarily)
SD card
Recorded data
Backup
drum kit
(including kit backup data
downloaded from Roland
Cloud)
User sample
SD card
The settings saved in user memory can be saved as a set on an SD
card, allowing you to save (back up) up to 99 sets.
Separately from backups, 999 drum kits can also be saved.
Also, you can directly record what you play on the TD-50X to the SD
card.
MEMO
The data that is saved on an SD card can be loaded into user
5
memory, or copied. For details, refer to “Backing Up to an SD Card”
(p. 53).
For details on the folder structure of an SD card, refer to “SD card
5
folder structure” (p. 53).
5
Getting Ready
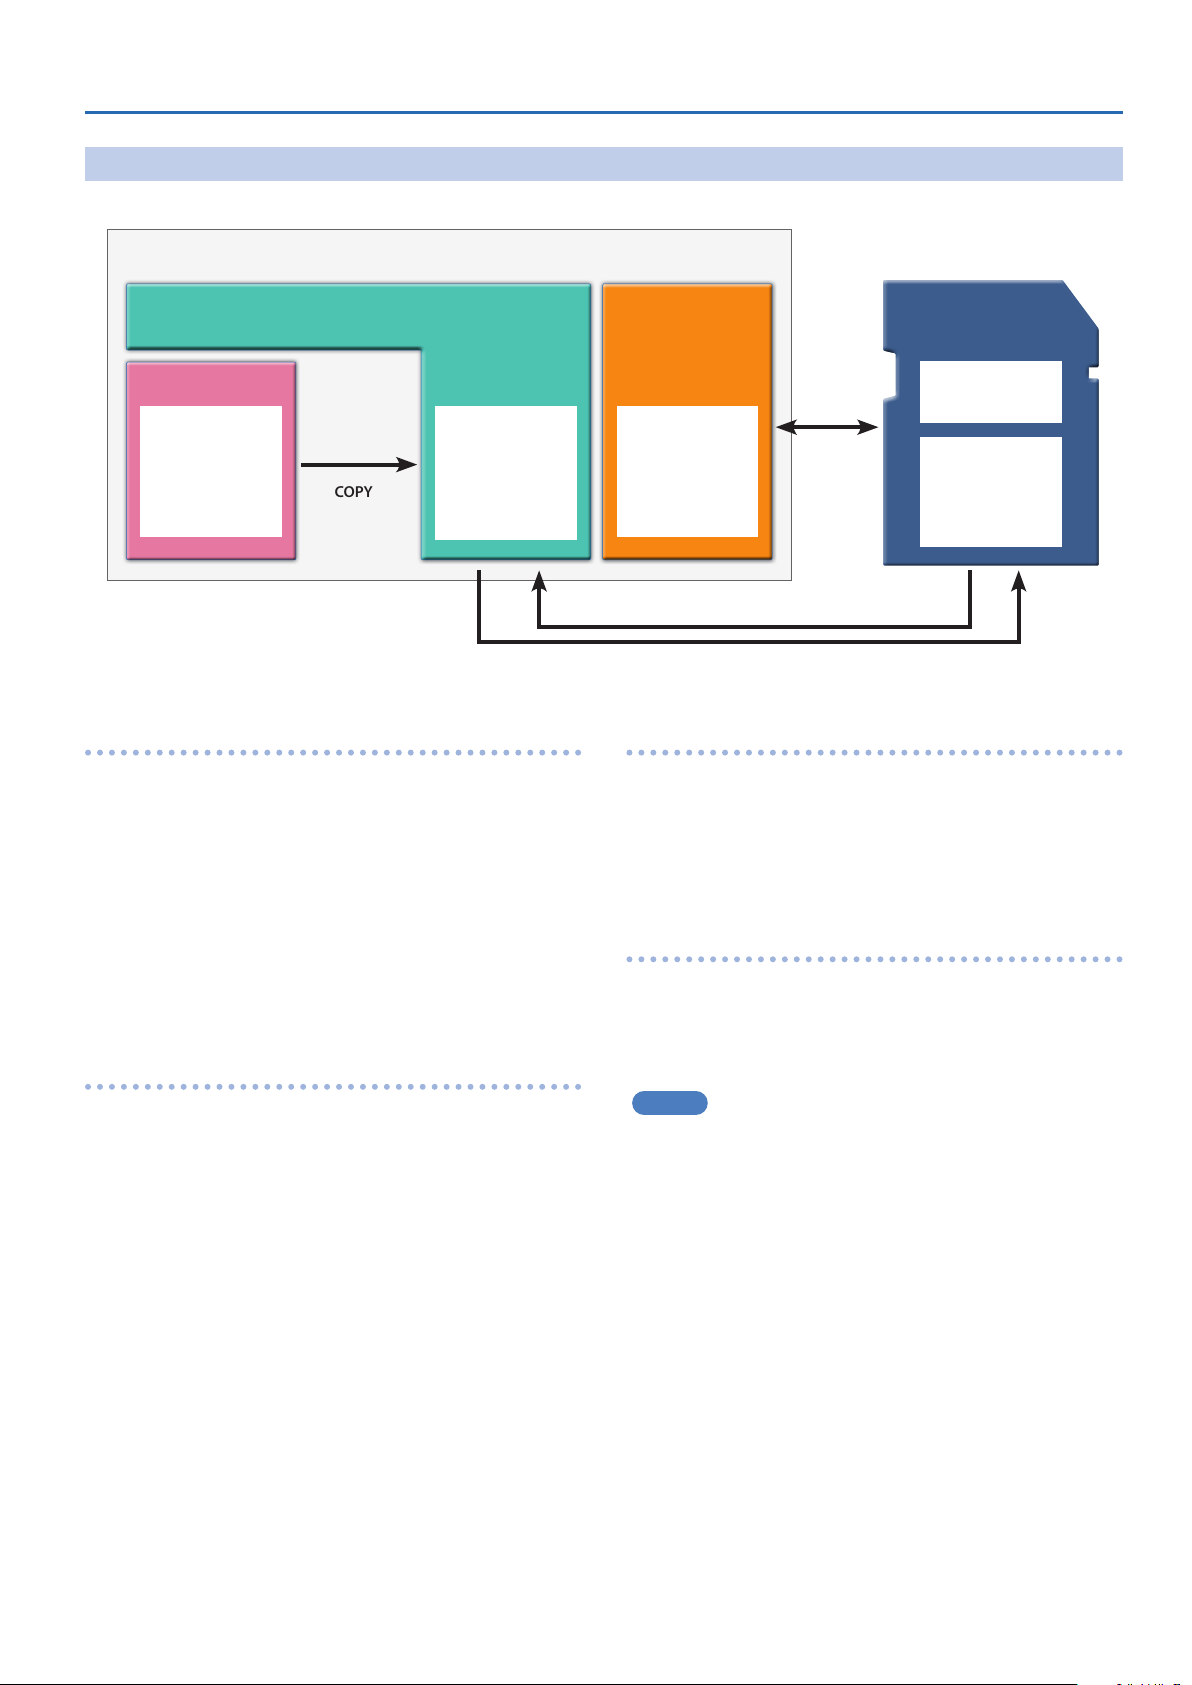
About Performance Techniques
As with an acoustic drum kit, the TD-50X supports a variety of playing techniques.
NOTE
Use only wooden or plastic sticks. Using carbon or metal sticks may cause the sensors to malfunction.
5
Use nylon brushes. Using metal brushes may cause the sensors to malfunction or damage the pads.
5
Pads
Head shot
Tone changes depending on
strike point
Rim shot
Cross stick
Playing with brushes
Hit only the head of the pad.
For a certain snare drum, the tone will
change naturally as you move the strike
location from the center of the head toward
the rim.
Strike the head and the rim of the pad
simultaneously.
A sound (rim sound) dierent than the head
shot will be heard.
Strike the rim while placing your hand on
the head.
Snare sounds can produce dierent sounds
in response to dierent playing techniques;
for example they can produce a rim sound
when played using a rim shot, or a crossstick sound when played using a cross-stick
technique.
Connect a pad that supports rim shot
techniques to the TRIGGER IN (2 SNARE)
jack, or connect a digitally-connected pad
(such as the PD-140DS) that supports crossstick techniques and assign the pad to the
snare drum.
For pads other than the PD-140DS, strike the
rim only—do not touch the head.
On some snare sounds, it might not be
possible to play separate sounds in this way.
You can use brushes to scrape the head
(brush sweep).
Connect a pad with a mesh head to the
TRIGGER IN (2 SNARE) jack, or connect a
digitally-connected pad (such as the PD140DS) that allows brush playing technique
and assign it to the snare.
Further, assign an instrument that supports
brush techniques to the head of the snare,
and turn the Brush Switch “ON.”
For details, refer to “Playing with Brushes” (p.
37).
Change the nuance of the rim shot
With certain snare and tom sounds, slight changes in the way you play
rim shots changes the nuance.
Normal rim shot
(Open rim shot)
Shallow rim shot
Strike the head and rim simultaneously.
Simultaneously strike the head near the
rim and the rim itself.
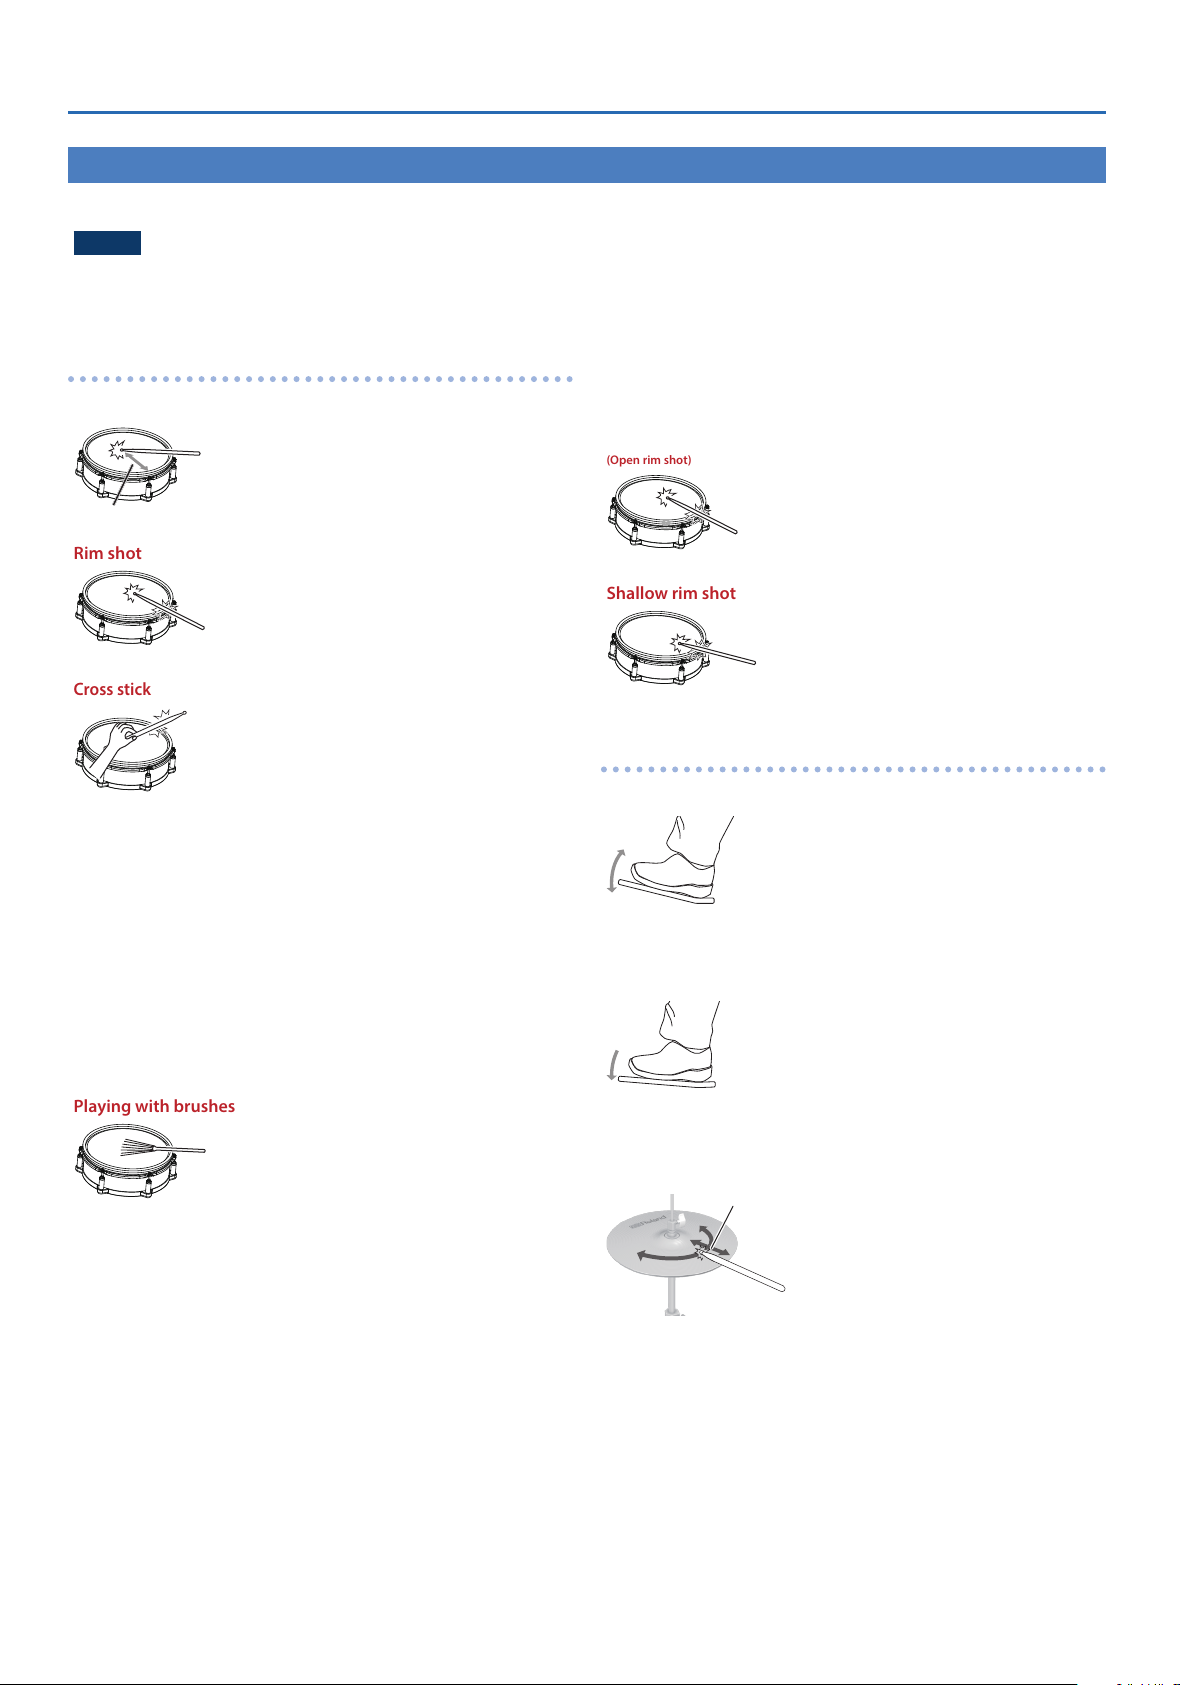
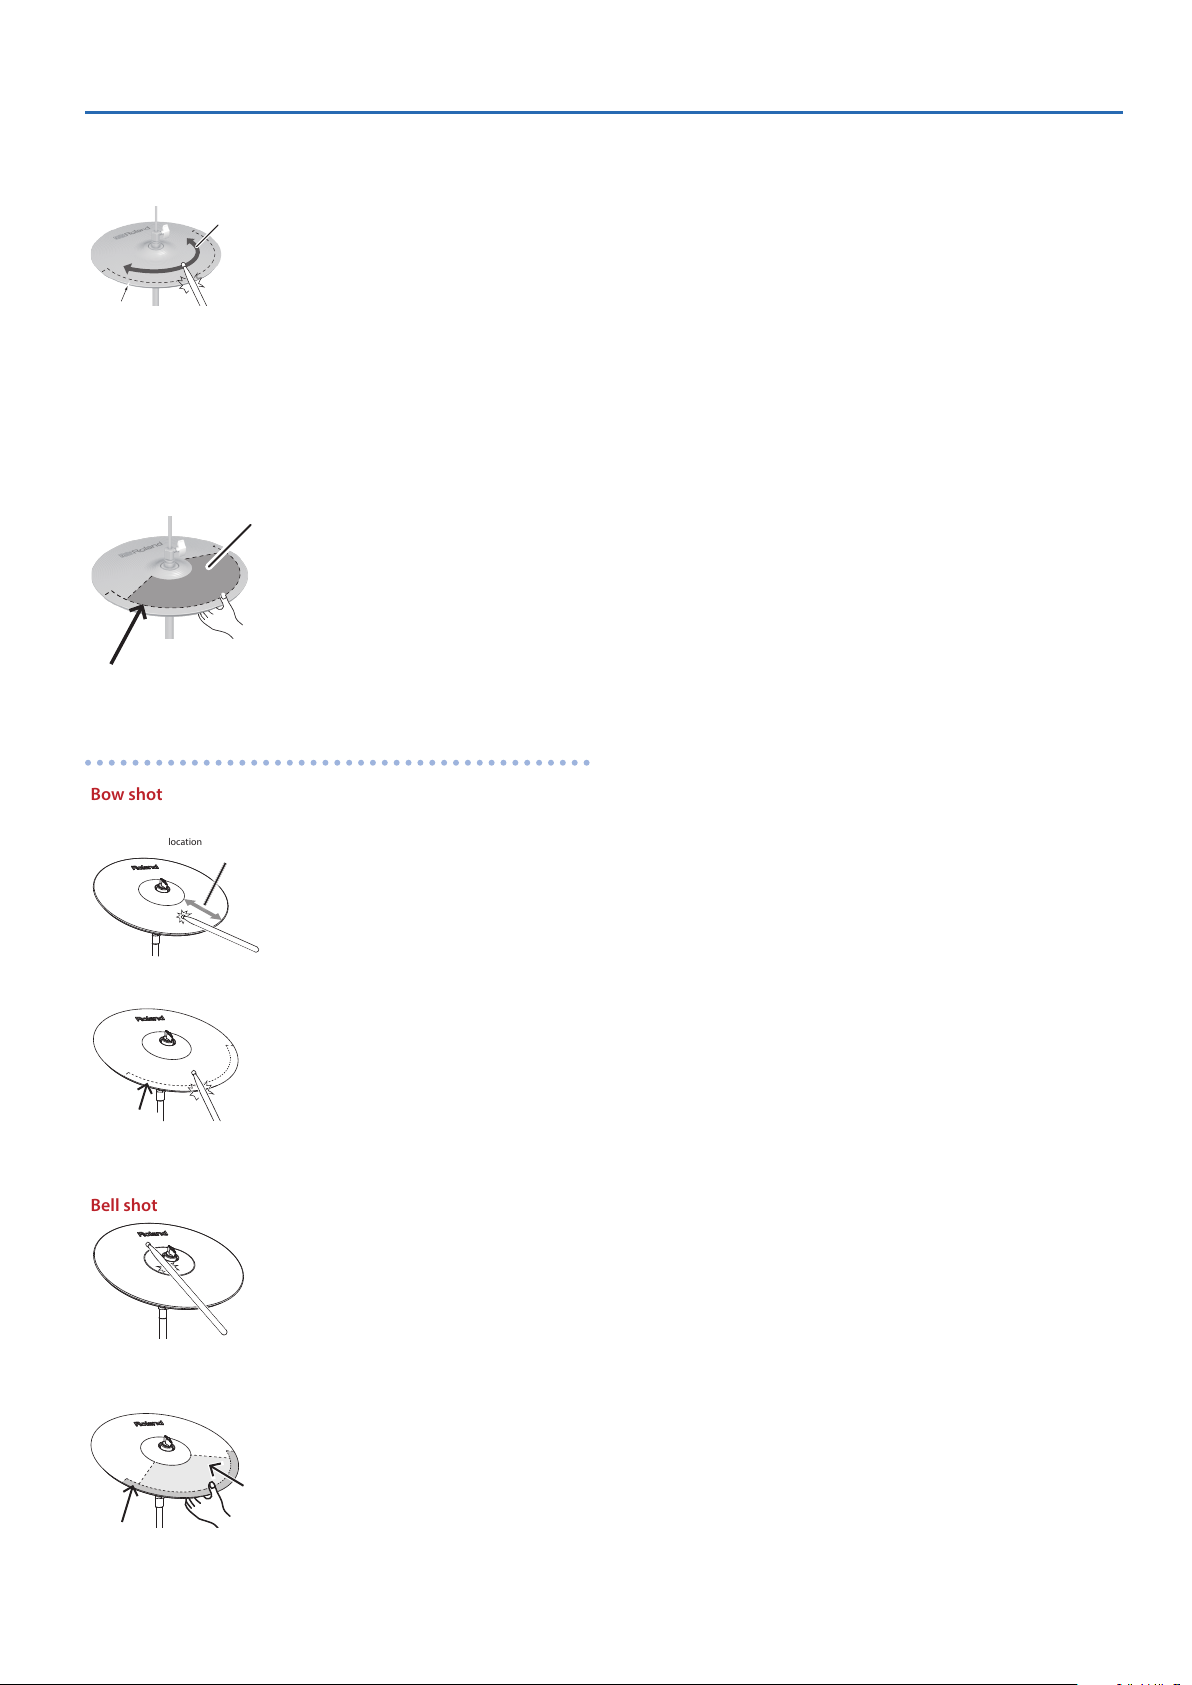
Hi-hat
Open/closed
Pressure
(VH-14D, VH-13)
Bow shot
Nuance changes
depending on the
strike location
The hi-hat tone changes continuously from
open to closed in response to how far the
hi-hat stand pedal is pressed.
You can also play a foot-close sound
by pressing the pedal, or a foot-splash
sound by pressing the pedal and then
immediately opening it.
When you strike the hi-hat while pressing
on the pedal with the hi-hat closed,
you can then change the closed tone in
response to the pressure you place on the
pedal.
The VH-11, VH-10, FD-9 and FD-8 do not
support pressure.
This is the technique used when
striking the surface of the top cymbal. It
corresponds to the sound of the “head-side”
of the connected trigger input.
If you are using a digitally-connected pad
that distinguishes between where you
strike it (such as the VH-14D), the nuances
of certain hi-hat sounds change depending
on where you strike the bow.
6
Getting Ready
Edge shot
Edge sensor
Choke play
Edge sensor
Nuance changes
depending on the
strike location
Sensor
This technique involves striking the edge
of the top cymbal with the shoulder of
the stick. When played as shown in the
illustration, the “rim-side” sound of the
connected trigger input is triggered.
Striking directly on the edge (i.e., exactly
from the side) will not produce the correct
sound. Strike the cymbal as shown in the
illustration.
If you are using a digitally-connected pad
that distinguishes between where you
strike it (such as the VH-14D), the nuances
of the sound change depending on where
you strike the edge.
If you use your hand to choke (grasp) the
edge sensor after striking the hi-hat, the
sound stops.
With the VH-14D, the sound stops (is
muted) even if you simply place your hand
on the sensor detection area.
The sound is shorter when you strike the
cymbal while it is choked or muted.
Cymbals
Bow shot
Edge shot
Edge sensor
Bell shot
Nuance changes
depending on the strike
location
This is the most common playing method,
playing the middle area of the cymbal. It
corresponds to the sound of the “head-side”
of the connected trigger input.
For specic ride sounds, the tonal nuance
changes depending on the point at which
you strike the bow.
This playing method involves striking the
edge with the shoulder of the stick. When
played as shown in the illustration, the
“rim-side” sound of the connected trigger
input is triggered.
Striking directly on the edge (i.e., exactly
from the side) will not produce the correct
sound. Strike the cymbal as shown in the
illustration.
This is the method of striking the bell area.
When the bell area shown in the illustration
is struck, the bell sound is heard.
Connect a pad that can be connected to
the TRIGGER IN (10 RIDE - BELL jack), or
connect a digitally-connected pad (such as
the CY-18DR) that lets you use the bell shot
playing technique, and assign it to the ride.
Choke play
Edge sensor
Sensor
If you use your hand to choke (grasp) the
edge sensor after striking the cymbal, the
sound stops (mutes).
With the CY-18DR, the sound stops even if
you simply place your hand on the sensor
detection area.
The sound is shorter when you strike the
cymbal while it is choked or muted.
7
Getting Ready
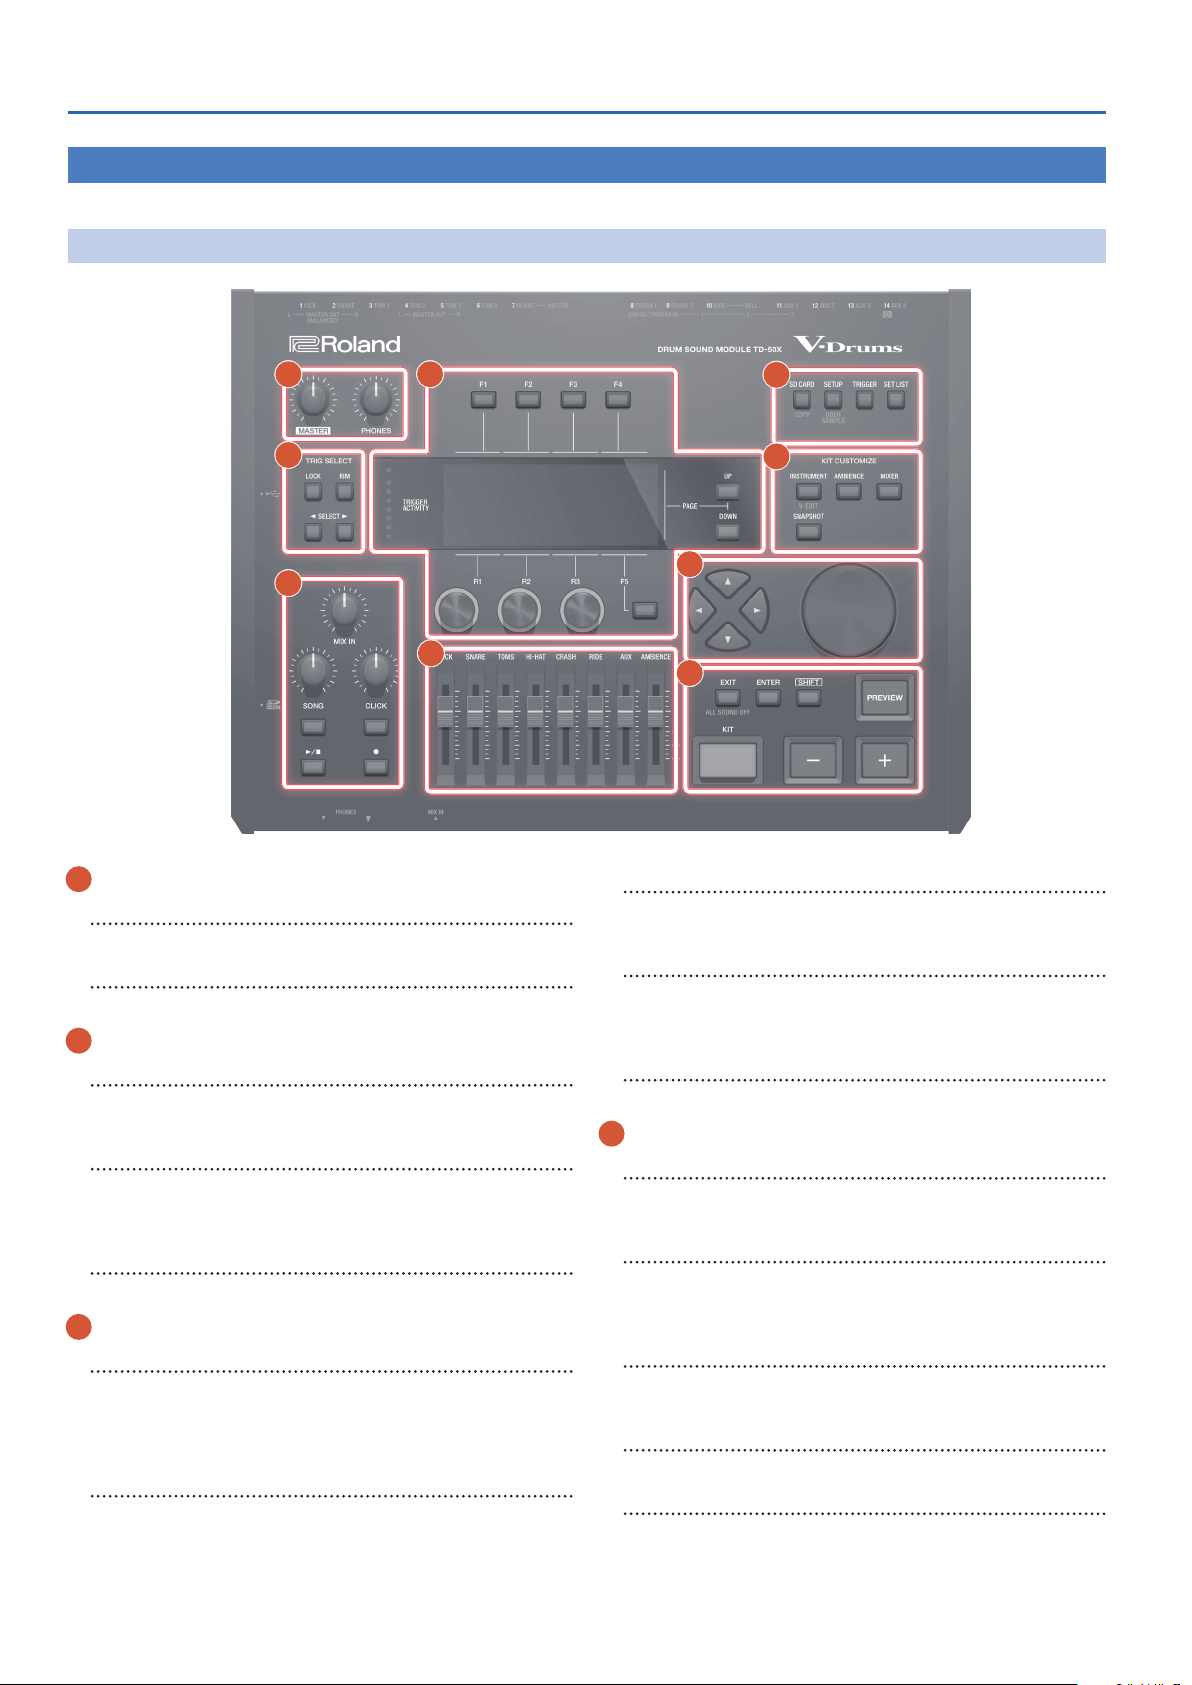
Panel Descriptions
Top Panel
1
2
4
1
[MASTER] knob
Adjusts the volume from the MASTER OUT jacks.
[PHONES] knob
Adjusts the volume of headphones connected to the PHONES jack.
2
TRIG SELECT
[LOCK] button
When you press the [LOCK] button to make it light up, the pad to
set does not switch to a dierent pad even if you strike it.
[RIM] button
When using a pad that supports rim playing, this selects whether to
set the head or the rim. For pads that support three-way triggering,
this switches between the head, rim and bell.
SELECT [K] [J] buttons
Selects the pad to congure (trigger input number).
3
[F1]–[F5] buttons (Function buttons)
The function of these buttons changes depending on what is
shown in the display. Use them to switch between the tabs shown
in the upper part of the display, or to set the functions in the upper
and lower parts of the display.
[R1]–[R3] knobs (rotary knobs)
The function of these knobs changes depending on what is shown
in the display. Use these controls to change the function values
shown in the lower part of the display.
3
5
9
8
7
6
PAGE [DOWN] [UP] buttons
Press these buttons when the PAGE [UP] [DOWN] buttons are lit to
switch between screen pages.
TRIGGER ACTIVITY indicator
These indicators light when a trigger signal (the signal outputted
from a pad when it is struck) is received. Use them to check whether
the pads are properly connected.
Display
Shows various information for the operation.
4
[MIX IN] knob
Adjusts the volume of the input sounds from the MIX IN jacks on
the front and rear panels.
[SONG] knob
Adjusts the volume of a song (audio le). Note that this has no
eect on the built-in drum performance sounds or the performance
sounds of recorded drums.
[SONG] button
Displays the SONG screen. Press this when you want to play back a
song or recorded data, or to make song-related settings.
[CLICK] knob
Adjusts the click volume.
[CLICK] button
This lets you play the click sound and make click or tempo-related
settings. You can also use this for training your sense of rhythm.
8
Getting Ready
[s] button
Plays/stops the song or recorded data.
[t] button
Press this to record your playing.
5
Faders
Use these to adjust the volume of the kick, snare, hi-hat and other
percussion, the ambience and so on.
6
[KIT] button
The DRUM KIT screen appears.
[-] [+] buttons
Use these buttons to switch between drum kits and change values.
[EXIT] button
Press this once to return to the next-higher level screen. When
you press this several times in a row, the display eventually returns
to the DRUM KIT screen. Also, when you press the [EXIT] button
while holding down the [SHIFT] button, this stops (mutes) all of the
sounds that are playing (ALL SOUND OFF). This is useful when you
want to stop several loop phrases all at once.
[ENTER] button
Press this button to conrm a value or operation.
[SHIFT] button
This is used in conjunction with other buttons. The function of
other buttons changes while you are holding down this button.
[PREVIEW] button
This button is for previewing instruments. Pressing the button
harder makes the volume louder.
If you use the SELECT [K] [J] buttons to select a trigger input
number, you can still hear sound even when the TD-50X is not
connected to a pad.
9
[SD CARD] button
Use this for operations related to the SD card, such as saving or
loading data. Also, you can copy settings such as drum kit and
instruments by pressing the [SD CARD] button while holding down
the [SHIFT] button.
[SETUP] button
This button is used for settings related to the TD-50X overall, such
as output destination (output assign), MIDI and so on. Press the
[SETUP] button while holding down the [SHIFT] button to use the
User Sample functions (p. 39) such as loading user samples and
so on.
[TRIGGER] button
Sets the trigger parameters.
[SET LIST] button
Use this button to create set lists, and to switch between drum kits
in the order specied in the set list. The [SET LIST] button lights
when the Set List function is on.
7
[H] [I] [K] [J] buttons (Cursor buttons)
Move the cursor.
Dial
This functions in the same way as the [-] [+] buttons. Use this dial
when you want to make broad changes to the drum kit or settings.
8
KIT CUSTOMIZE
[INSTRUMENT] button
Sets the instrument (sound). By pressing the [INSTRUMENT] button
while holding down the [SHIFT] button, you can go directly to the
instrument’s edit (V-EDIT) page.
[AMBIENCE] button
Sets the sound of the overhead mic that captures sound from the
entire kit, as well as the reverberation and sound of the place where
the drums are played.
[MIXER] button
Sets the volume, pan, multi-eects, equalizer, compressor and
other settings for each pad.
[SNAPSHOT] button
You can temporarily save the currently-edited drum kit, and
compare it with the current settings or revert back to it (Snapshot
function).
9
Getting Ready
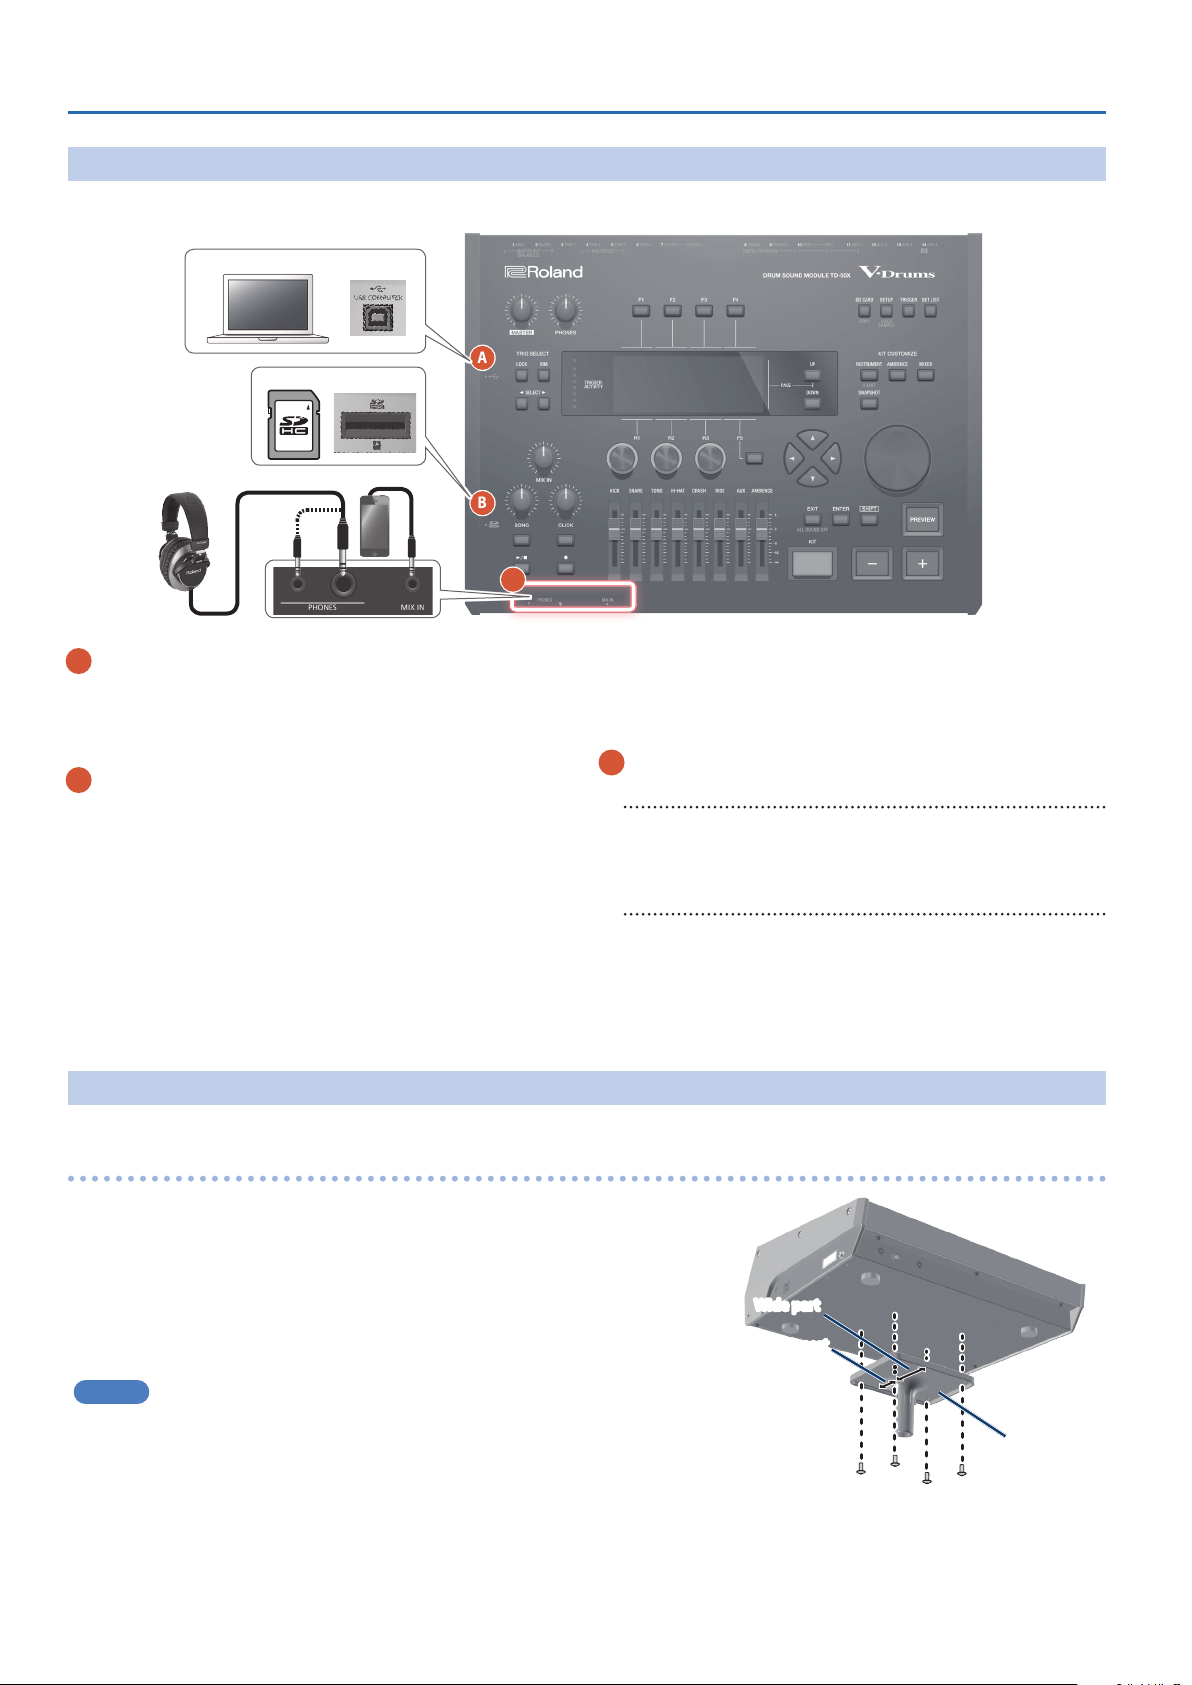
Side Panel/Front Panel
* To prevent malfunction and equipment failure, always turn down the volume, and turn o all the units before making any connections.
Computer
A
SD card
Audio player
B
C
Headphones
A
USB COMPUTER port
Connect your computer to the TD-50X’s USB port via USB
cable (p. 43). You can use DAW software to record a TD-50X
performance as audio or MIDI, or you can use the TD-50X to hear
sound that’s played back from the computer.
B
SD card slot
Insert a commercially available SD card (SDHC cards (up to 32 GB)
are supported).
You can save the songs and data from the TD-50X to an SD card.
You can also use an SD card to import user samples and export the
songs that you recorded, among other uses.
Before using an SD card for the rst time, you must format it on the
TD-50X (p. 56).
* Never turn o the power or remove the SD cards while the screen
indicates “Processing...”
* Some memory card types or memory cards from some
manufacturers may not record or play back properly on the unit.
C
PHONES jacks
Connect your headphones here.
Even if your headphones are connected, sound is still output from
each output jack.
MIX IN jack
Connect an audio playback device here, such as an audio player
(your smartphone).
Bottom Panel
Mounting on a stand
Use the included sound module mounting plate to attach the TD-50X to a drum stand (e.g.,
the MDS or PDS series; sold separately).
Use the screws at the bottom of the TD-50X to mount the sound module as shown in the
illustration.
* Do not use screws other than those on the bottom of the TD-50X. Using improper
screws may cause the unit to malfunction.
* When turning the unit over, be careful so as to protect the buttons and knobs from
damage. Also, handle the unit carefully; do not drop it.
MEMO
The All Purpose Clamp (APC-33; sold separately) can be attached in case you want to
mount the TD-50X on a cymbal stand or other such stand. The unit can be mounted on
a pipe with a diameter between 10.5 and 28.6 mm.
10
Wide part
Narrow part
Sound module
mounting plate
Getting Ready
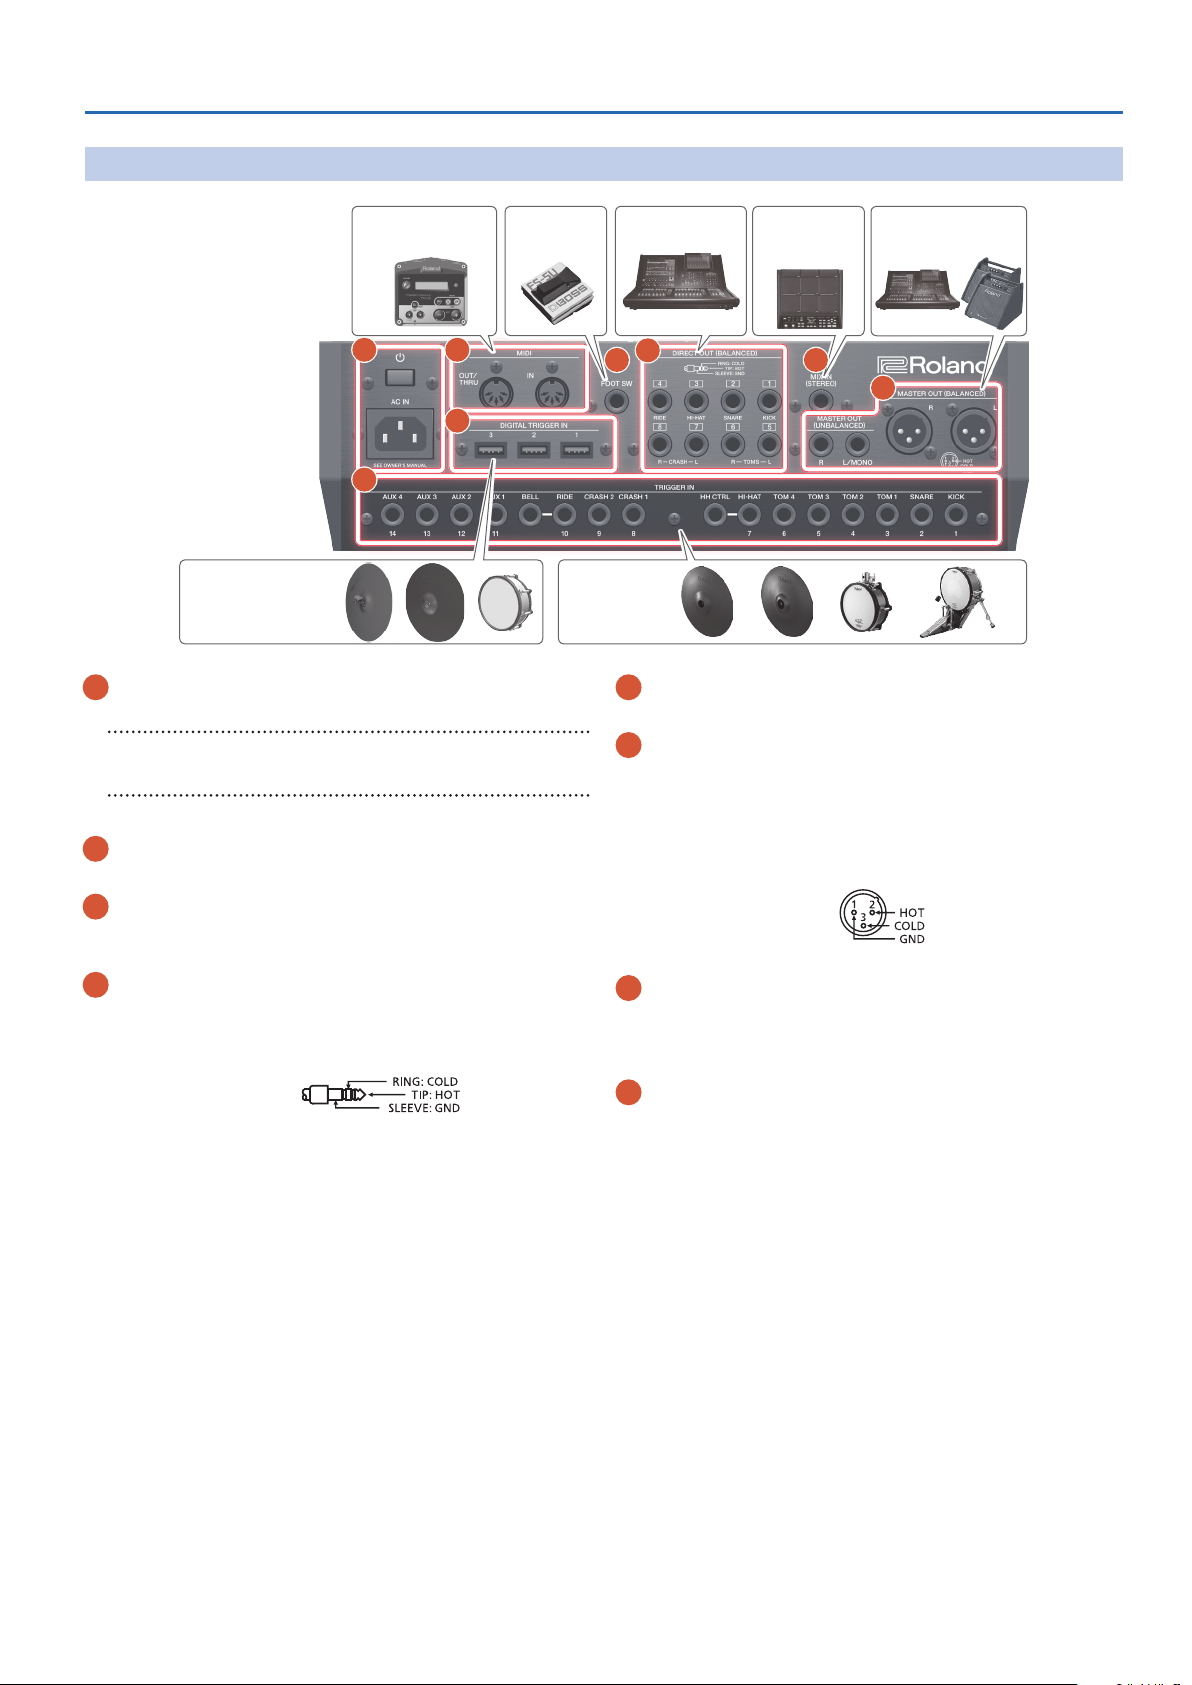
Rear Panel
(Connecting Your Equipment)
MIDI devices
(external sound module, etc.)
Footswitch Mixer
A B
H
G
Pads and other
triggerable instruments
(connected digitally)
A
[L] switch
Turns the power on/o.
AC IN jack
Connect the included power cord.
B
MIDI connectors
Connect an external MIDI device such as an external sound module.
C
FOOT SW jack
You can connect a footswitch (sold separately: BOSS FS-5U, FS-6)
and use it to control various things.
D
C
Pads and other
triggerable
instruments
E
MIX IN (STEREO) jack
Connect this to an electronic instrument such as a sampling pads.
F
MASTER OUT (BALANCED) jacks /
MASTER OUT (UNBALANCED) jacks
Connect this to your amplied speakers, mixer or recording
equipment.
To output in mono, connect only the L/MONO jack of the MASTER
OUT (UNBALANCED).
Electronic instruments
(sampling pads, etc.)
* Pin assignment of MASTER
OUTPUT (BALANCED) jacks
Mixer or
amplied speakers
E
F
D
DIRECT OUTPUT (BALANCED) jacks
Connect these to your mixer etc.
Use the [SETUP] button to set which of the DIRECT OUT 1–8 jacks
that the instruments or other sounds are outputted to.
* Pin assignment of DIRECT
OUTPUT (BALANCED) jacks
G
TRIGGER IN jacks
Connect these jacks to the cymbals, toms, kick drums and so on.
* Use a stereo type (TRS) cable when connecting a digitally-trigged
pad.
H
DIGITAL TRIGGER IN ports
Connect pads that support digital connection (e.g., PD-140DS, CY18DR, or VH-14D).
11
Getting Ready
Turning the Power On/O
* Once everything is properly connected (p. 11), be sure to
follow the procedure below to turn on their power. If you turn on
equipment in the wrong order, you risk causing malfunction or
equipment failure.
* Before turning the unit on/o, always be sure to turn the volume
down. Even with the volume turned down, you might hear some
sound when switching the unit on/o. However, this is normal and
does not indicate a malfunction.
Turning the power on
1. Minimize the volume of the devices connected to the
TD-50X.
2. Press the TD-50X’s [L] switch.
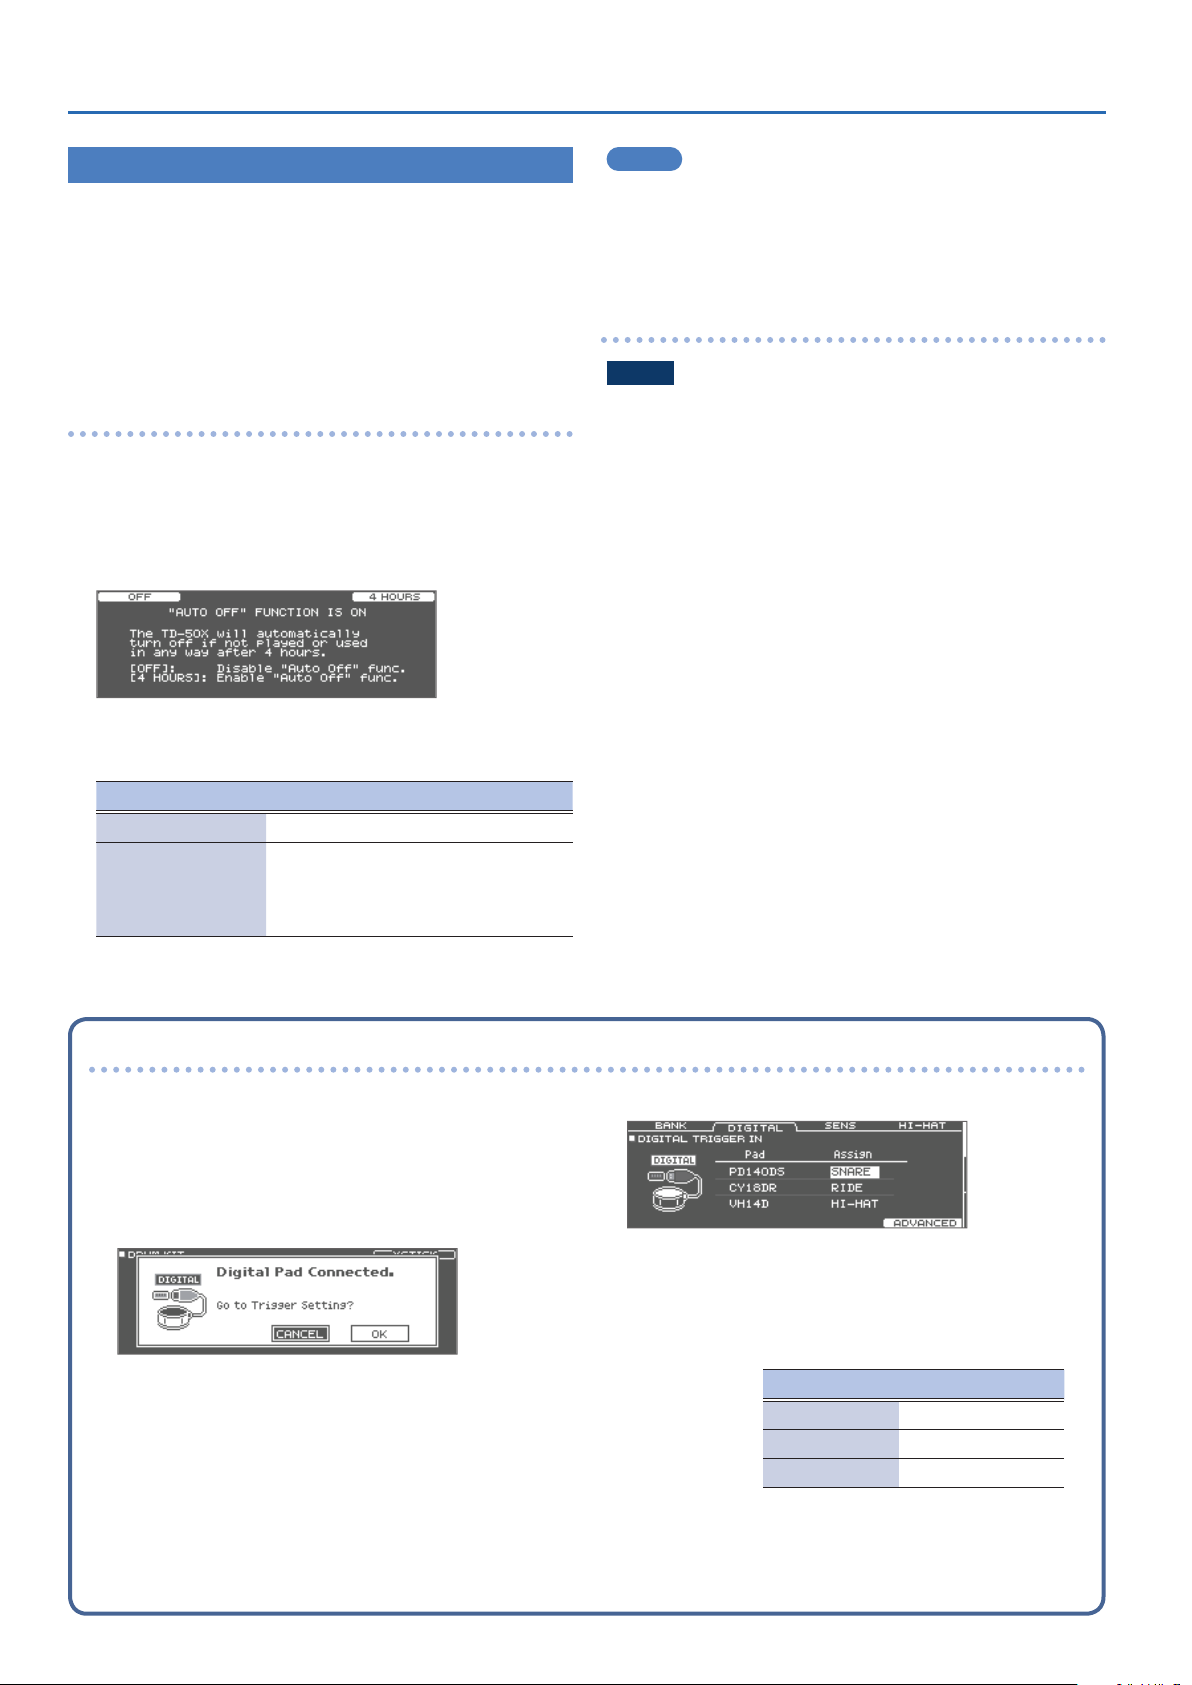
When you turn the unit on, the following screen appears.
You can set whether to enable or disable the Auto O function on
this screen.
MEMO
When connecting a digitally-connected pad, a settings screen
may appear for the pad. For details, refer to “Settings for pads that
support digital connection” (p. 12).
3. Turn on the connected devices and adjust the volume.
Turning the power o
NOTE
Settings that you edit on the TD-50X are saved when you turn o
the unit. You must turn o the power by pressing the [L] switch.
1. Minimize the volume of the devices connected to the
TD-50X.
2. Turn o the power of the connected devices.
3. Press the TD-50X’s [L] switch.
The screen will indicate “Please wait. Now saving...,” and the unit will
turn o when the settings have been saved.
* If you need to turn o the power completely, rst turn o the unit,
then unplug the power cord from the power outlet.
Button Explanation
[F1] (OFF) button The power does not turn o automatically.
When four hours have elapsed without
[F4] (4 HOURS) button
If the Auto O function is set to “OFF,” this screen won’t appear.
any pad being struck or any operation
being performed, the unit will turn o
automatically.
Settings for pads that support digital connection
The rst time you connect a pad that supports digital connection to
a DIGITAL TRIGGER IN port, the following screen appears.
Following the instructions in the screen, make settings to specify
the trigger input to which the connected pad should be assigned.
* If you assign the same trigger input used by a pad connected to
a TRIGGER IN jack, the pad that’s connected to that TRIGGER IN
jack does not output sound.
&
For details on the pad settings, refer to the “Specifying the Pad
Type” (p. 49).
1. Select “OK,” and press the [ENTER] button.
2. Use the cursor buttons to select the pad that you
want to congure, and use the [-] [+] buttons or the
dial to congure the assignment.
When you select a pad, its [FUNC] button blinks.
(Setting example)
Pad Assign
PD140DS SNARE
CY18DR RIDE
VH14D HI-HAT
12
* You can’t specify multiple instances of the same assignment.
3. Press the [KIT] button to return to the DRUM KIT
screen.

Getting Ready
Making the Power Automatically Turn O
After a Time
The power to this unit will be turned o automatically after
a predetermined amount of time has passed since it was
last used for playing music, or its buttons or controls were
operated (Auto O function).
If you do not want the power to be turned o automatically, disengage
the Auto O function.
* To restore power, turn the power on again (p. 12).
1. Press the [SETUP] button.
2. Use the PAGE [UP] [DOWN] and function buttons to
select “AUTO OFF.”
The AUTO OFF screen appears.
3. Use the [-] [+] buttons or the dial to set the Auto O
function.
Value Explanation
OFF The power does not turn o automatically.
4 HOURS
(AUTO OFF)
When four hours have elapsed without
any pad being struck or any operation
being performed, the unit will turn o
automatically.
Making Hi-Hat Settings
When using the VH-14D digital V-hi-hat or the VH-13, VH-11 or VH-10
V-hi-hats, adjust the oset on the TD-50X.
This is necessary in order to correctly detect open/close operations
and pedal movement.
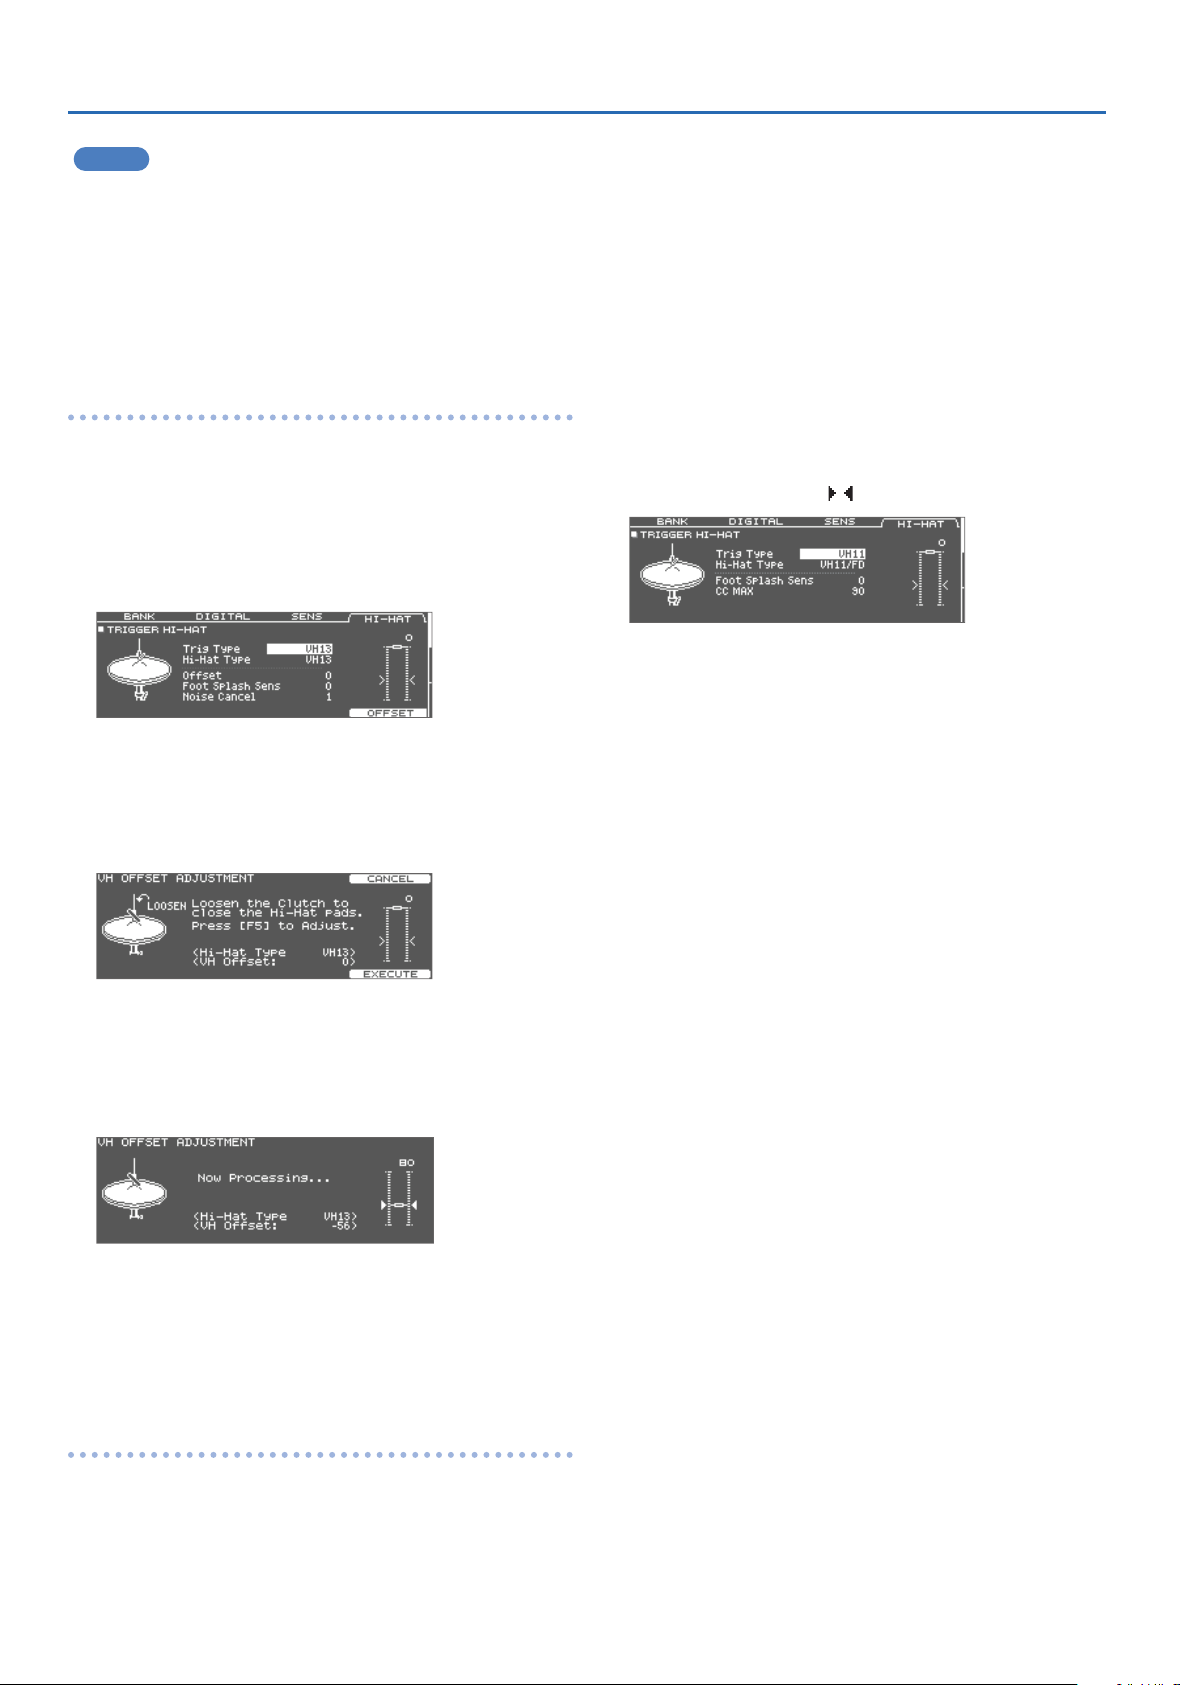
Settings for the VH-14D
1. Press the [TRIGGER] button.
2. Press the PAGE [UP] button several times to display the
topmost page.
3. Press the [F4] (HI-HAT) button.
The TRIGGER HI-HAT screen appears.
* “VH-14D” is not shown as a Trig Type when the VH-14D is not
connected or if it is not assigned as the hi-hat. In this case, connect
the VH-14D and assign it as the hi-hat (p. 12).
4. Press the [F5] (OFFSET) button.
The VH OFFSET ADJUSTMENT screen appears.
4. Press the [KIT] button to return to the DRUM KIT screen.
MEMO
If the AUTO OFF function is set to “4 HOURS,” the message
“WARNING: AUTO OFF, The TD-50X will turn o in 30 min.” appears
30 minutes before the power turns o.
5. Loosen the clutch screw of the VH-14D and let it sit on
the bottom hi-hat.
* Do NOT touch the hi-hats or the pedal.
Clutch screw
6. Press the [F5] (EXECUTE) button.
The “VH Oset” parameter is set automatically (approx. 3 seconds).
The [TRIGGER] button ashes and then remains lit.
7. Press the [KIT] button to return to the DRUM KIT screen.
Make detailed adjustments to the parameters as necessary.
&
“Data List” (PDF)
13
Getting Ready
MEMO
You can also press the [TRIGGER] button while holding down the
[KIT] button on the TD-50X to adjust the oset.
When rst connecting the VH-14D to the drum sound module,
the trigger parameters are set to the recommended values.
The trigger parameters may need to be adjusted depending on
the environment where the VH-14D is used, including how it is
mounted and the position in which it is set up.
&
“Data List” (PDF)
Settings for the VH-13
1. Press the [TRIGGER] button.
2. Press the PAGE [UP] button several times to display the
topmost page.
3. Press the [F4] (HI-HAT) button.
The TRIGGER HI-HAT screen appears.
2. Loosen the clutch screw of the VH-11, so that the hi-hat
naturally rests atop the motion sensor unit.
3. Press the [TRIGGER] button.
4. Press the PAGE [UP] button several times to display the
topmost page.
5. Press the [F4] (HI-HAT) button.
6. Use the [-] [+] buttons or the dial to set Trig Type to
“VH11.”
7. Turn the VH oset adjustment screw on the VH-11 while
watching the meter on the right side of the TD-50X’s
screen.
Adjust the oset so that the appear in the meter.
8. Press the [KIT] button to return to the DRUM KIT screen.
Make detailed adjustments to the parameters as necessary.
&
“Data List” (PDF)
4. Use the [-] [+] buttons or the dial to set Trig Type to
“VH13.”
5. Press the [F5] (OFFSET) button.
The VH OFFSET ADJUSTMENT screen appears.
6. Loosen the clutch screw of the VH-13 and let it sit on
the bottom hi-hat.
* Do NOT touch the hi-hats or the pedal.
7. Press the [F5] (EXECUTE) button.
The “VH Oset” parameter is set automatically (approx. 3 seconds).
The [TRIGGER] button ashes and then remains lit.
8. Press the [KIT] button to return to the DRUM KIT screen.
Make detailed adjustments to the parameters as necessary.
&
“Data List” (PDF)
Conguring the VH-11
This shows how to congure the VH-11. The steps are the same for the
VH-10, with only the model name being dierent.
(or VH-10)
1. With the hi-hat completely separated from the motion
sensor unit, power-on the TD-50X.
14

Basic Operations
Getting Ready
Adjusting the overall volume
([MASTER] knob or [PHONES] knob)
Use the [MASTER] knob to adjust the
volume output from the MASTER OUT
jack, and the [PHONES] knob to adjust the
headphone volume.
Switching between tabs
and setting functions
([F1]–[F5] buttons, [R1]–[R3] knobs)
You can use the [F1]–[F5] buttons to switch
between the tabs shown in the upper part of
the display, or to set the functions shown in
the upper and lower parts of the display. The
[R1]–[R3] knobs can be used to edit the values
shown at the bottom of the display.
F1
F2
?
=
R1
F3
?
?
=
=
R2
R3
F4
?
=
F5
Switching between pages
(PAGE [UP] [DOWN] buttons)
Use the PAGE [UP] [DOWN] buttons to switch
between screen pages.
On screens where you can switch between
pages, the PAGE [UP] [DOWN] buttons light;
and the right side of the display indicates
what part of the page you are looking at.
Moving the cursor
The cursor highlights the area of the screen
where you can change the settings. If there
are multiple items in the screen, press the
cursor buttons to move the cursor to the
desired item.
(cursor buttons)
Adjusting the volume balance
of the pads
Adjust the overall volume balance for the
TD-50X with the faders.
With the mixer (p. 16), you can adjust the
volume balance between the pads in a kit.
The mixer settings can be saved for each kit.
You can adjust the trigger inputs and volumes
as follows.
Fader Explanation
KICK KICK
SNARE SNARE
TOMS TOM1–4
HI-HAT HI-HAT
CRASH CRASH 1, 2
RIDE RIDE
AUX AUX1–4
AMBIENCE AMBIENCE
(faders)
Returning to the previous
screen
Press the [EXIT] button to return to the
previous screen.
([EXIT] button)
Conrming an operation
([ENTER] button)
Press this button to conrm a value or
operation.
Changing values
([-] [+] buttons or dial)
Use the dial or the [–] [+] buttons to edit the
value highlighted by the cursor. Hold down
the [SHIFT] button while using these controls
to change the value in larger increments.
MEMO
If you hold down the [+] button and press the
[-] button, the value increases quickly. If you
hold down the [-] button and press the [+]
button, the value decreases quickly.
15
Performing
Drum Kits and Instruments
On the TD-50X, the sounds that play when you strike each pad are
called “instruments.” A set of sounds (instruments) allocated to the
respective pads is called a “drum kit.”
Drum kits
Instruments
The drum kits are congured as shown below.
Drum kit 100
Drum kit 1
Pad settings
KICK
SNARE
TOM1
TOM2
TOM3
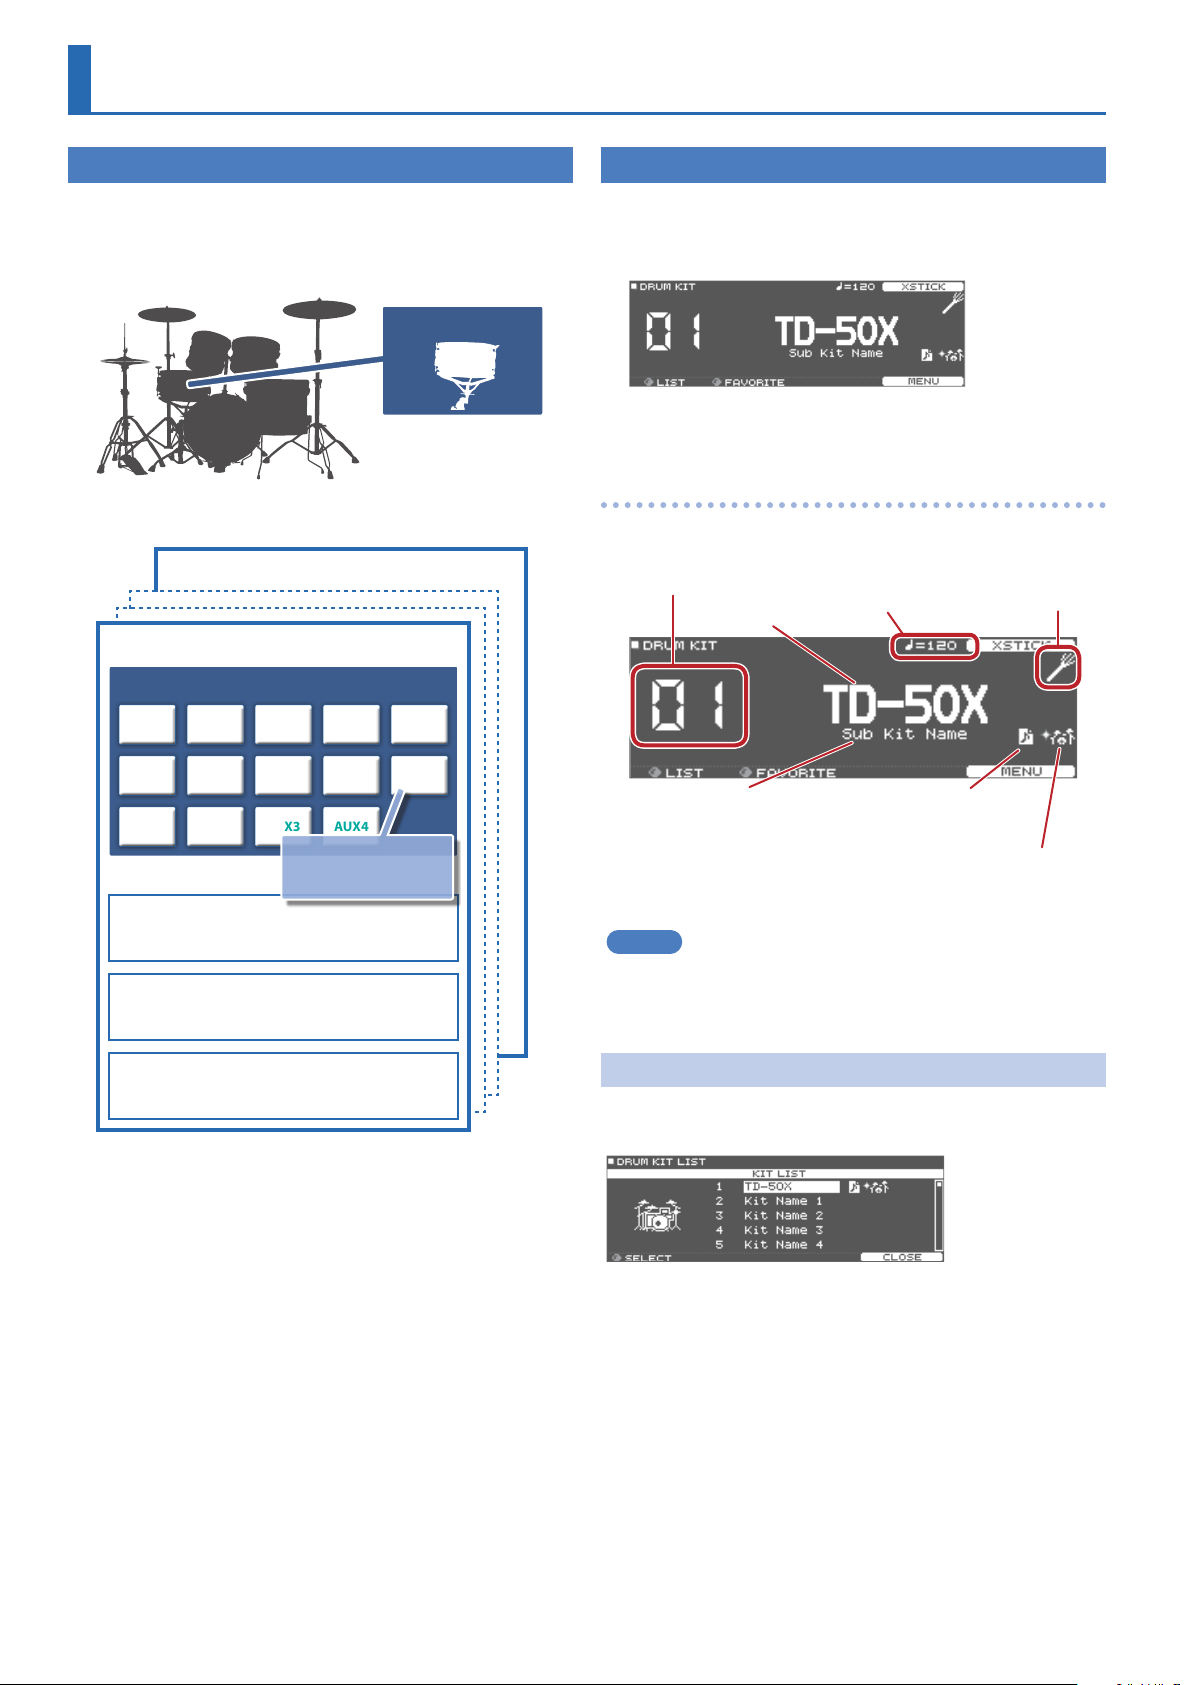
Selecting a Drum Kit
1. Press the [KIT] button.
The DRUM KIT screen appears.
2. Use the [-] [+] buttons or the dial to select a drum kit.
DRUM KIT screen
This is the main screen for the TD-50X, which appears when you press
the [KIT] button.
Drum kit number
Tempo
Shown only if the kit tempo is “ON.”
Kit name
Brush icon
Shown only if Brush Switch is “ON.”
TOM4
AUX1
HI-HAT
AUX2
CRASH1
AUX3
CRASH2
AUX4
RIDE
Instruments settings
Instrumental sounds, tuning, volume,
etc.
Ambience settings
Overhead mic sound, the reverberation of the location in which the drums are
played and related properties
Mixer settings
Volume, pan, multi-eect, equalizer, compressor and other settings for each pad
Overall settings for the entire drum kit
Volume, drum kit name, lit colors, etc.
Sub-kit name
User sample icon
Shown only if a drum kit that uses user samples
(p. 39) is selected.
Favorite icon
Shown only if a drum kit registered as a
favorite (p. 24) is selected
MEMO
You can change how the kit names (on the top row) shown on the
DRUM KIT screen look (the font used). For details, refer to “Data List”
(PDF).
Selecting a Drum Kit from the List
On the DRUM KIT screen, turn the [R1] (LIST) knob to display the kit list,
and select a drum kit from the list.
16

Performing
Using a Cross-Stick Technique
Using a pad that is connected to a TRIGGER IN jack
Each time you press the [F4] (XSTICK) button, you’ll switch between
sounding and not sounding the cross-stick sound (p. 6) from the
snare pad.
When playing using a pad that supports
digital connection and cross-stick technique
(such as the PD-140DS)
Assign a trigger input to the snare (p. 12) to always use the crossstick technique.
In this case, the XSTICK icon is not shown in the screen.
Stopping All Currently Played Sounds
(ALL SOUND OFF)
Stops the currently-sounding drum performance sound or user sample
(p. 39) playback.
* The eect reverberation, the song, and the click do not stop.
1. To stop a sound that’s still playing, hold down the
[SHIFT] button and press the [EXIT] button.
Reference
You can stop all sounds currently playing with a pad or footswitch
(p. 60).
Using the Click
Turning the click on/o
1. Press the [CLICK] button.
The CLICK screen appears.
2. Press the [F1] (TEMPO) button.
3. Press the [F5] button.
The click sounds.
You can adjust the volume of the click using the [CLICK] knob.
4. Press the [F5] button once again.
The click stops.
MEMO
You can also turn the click on/o by holding down the [SHIFT]
5
button and pressing the [CLICK] button.
You can also output the click only to headphones.
5
&
“Audio Output Assignments (OUTPUT)” (p. 57)
Changing the tempo
1. On the CLICK screen (TEMPO tab), turn the [R1] knob to
change the tempo.
Reference
You can specify a tempo for each drum kit (p. 37).
Changing the beat settings
1. On the CLICK screen (TEMPO tab), turn the [R2] knob to
change the beat.
2. Press the [KIT] button to return to the DRUM KIT screen.
Parameter
Tempo
([R1] knob)
Beat
([R2] knob)
Rhythm
([R3] knob)
Value Explanation
20–260 Tempo
1–9 Number of beats per measure
ˇ, ¸, ˙, ¯, ˜
Interval of the click
17
Performing
Editing the sound settings
1. On the CLICK screen (SOUND tab), use the knobs to
change the settings.
(parameter)
Knob
Sound
([R1] knob)
Level
([R2] knob)
LED Ref
([R3] knob)
Value Explanation
METRONOME,
CLICK, VOICE,
BEEP 1, BEEP 2,
TEK CLICK,
STICKS,
CLAVES,
WOOD BLOCK,
COWBELL,
AGOGO,
TRIANGLE,
TAMBOURINE,
MARACAS,
CABASA
-INF–+6.0dB Adjusts the click volume.
OFF, ON
Selects the metronome’s sound.
Species whether the [CLICK]
button blinks in time with the
click (ON) or does not blink
(OFF).
Performing Along with a Song
Playing Along with a Song on an Audio Player
Connect an audio player (your smartphone or other device) to the MIX
IN jack, and try playing along with some songs.
1. Connect the audio player to the MIX IN jack (p. 10,
p. 11).
2. Play back the song on your audio player.
3. Turn the [MIX IN] knob to adjust the volume of the
song.
Playing Along with the Songs on the TD-50X
The TD-50X features songs in a variety of genres.
Some of the built-in songs are provided as audio data, and others are
MIDI data recordings of drum performances. You can also play audio
les (WAV/MP3) stored on an SD card as songs.
Let’s try playing along with a song here.
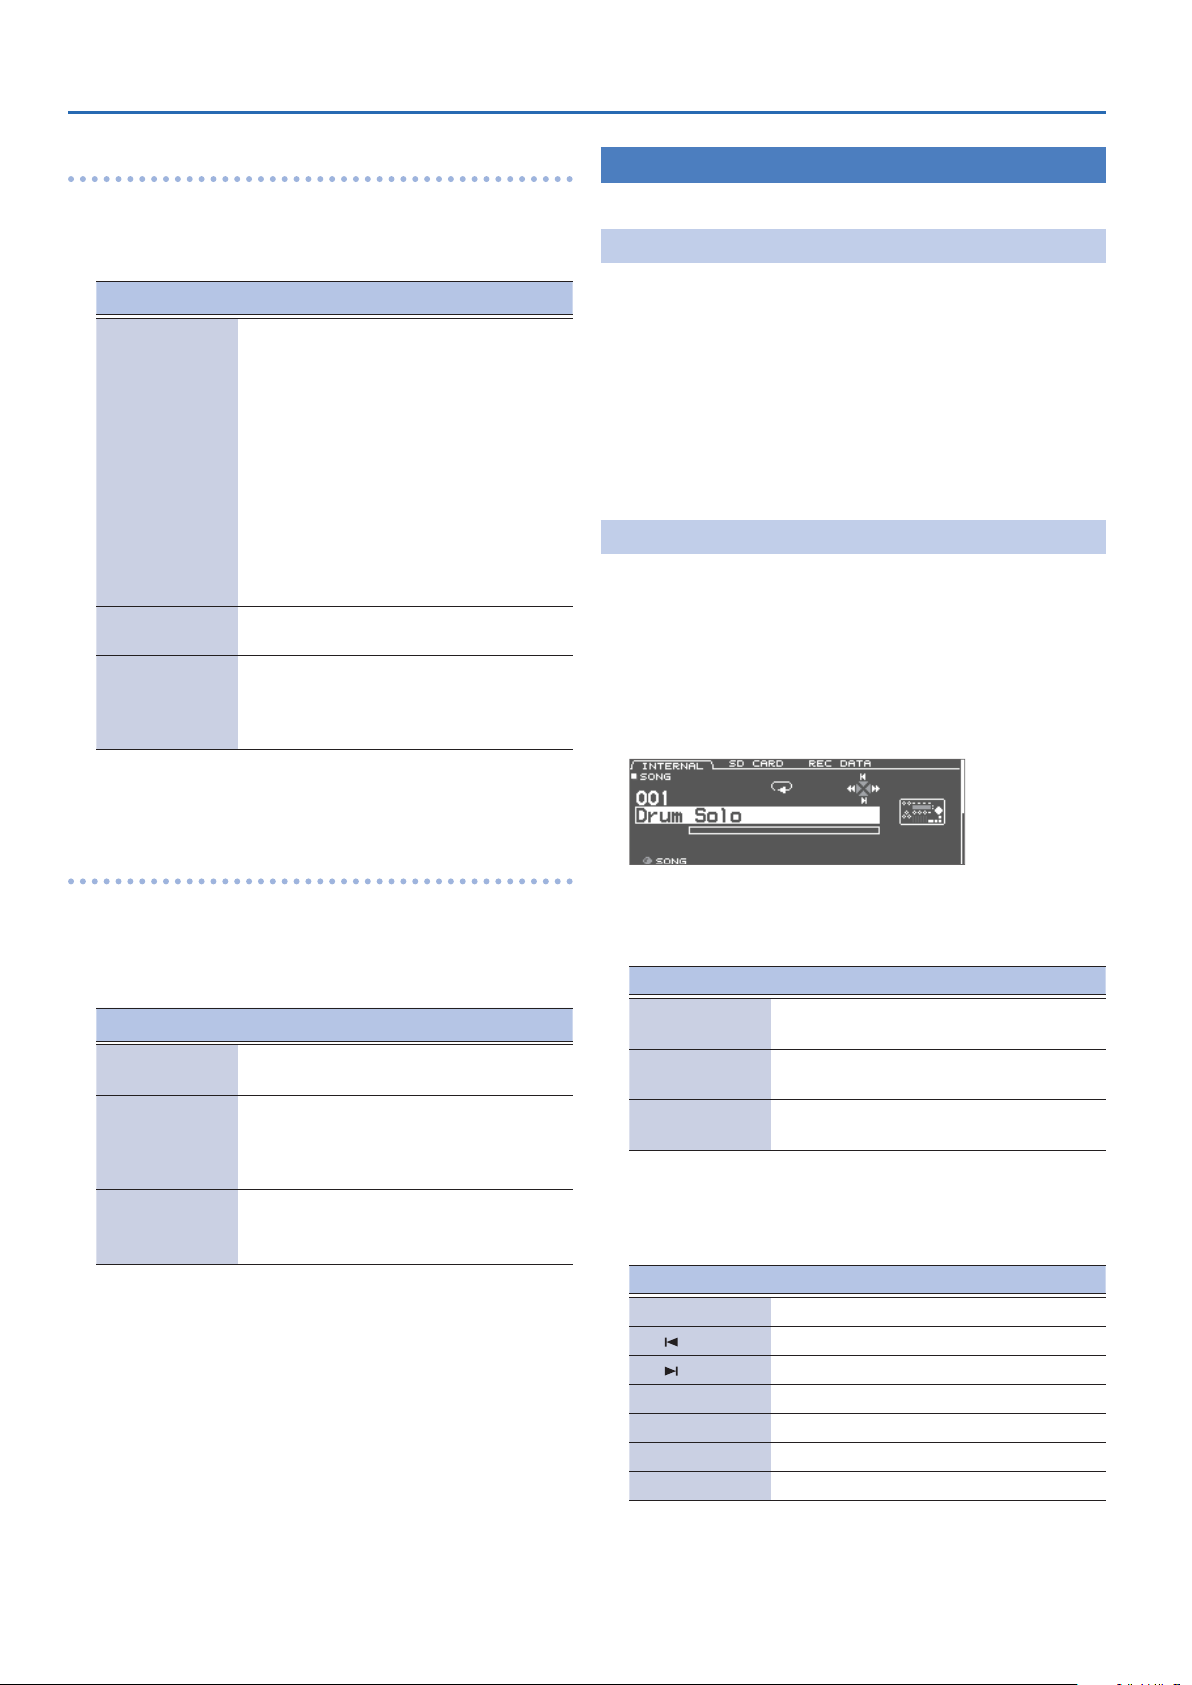
1. Press the [SONG] button.
The SONG screen appears.
2. Press the [KIT] button to return to the DRUM KIT screen.
Changing other settings
1. On the CLICK screen (OTHER tab), use the cursor [H]
[I] buttons to select a parameter, and use the [-] [+]
buttons or the dial to edit the setting.
Parameter Value Explanation
Pan
Tap Sw OFF, ON
Tap Pad
L30–CTR
(CENTER) –R30
KICK–
AUX4 (RIM),
PREVIEW
2. Press the [KIT] button to return to the DRUM KIT screen.
Adjusts the stereo location of
the click.
You can specify the tempo by
striking the pad specied by
Tap Pad or by pressing a button
(Tap Tempo).
Selects the pad (or the
[PREVIEW] button) to use to set
the tap tempo.
2. Use the [F1]–[F3] buttons, the [-] [+] buttons or the dial
to select a song.
Button Explanation
[F1] button
(INTERNAL)
[F2] button (SD
CARD)
[F3] button (REC
DATA )
3. Press the [
The selected song plays.
Controller Function
[s] button Plays/stops the song
( )
button Returns to the beginning of the song
[H]
( )
button Returns to the end of the song (*1)
[I]
[K] (x) button Rewinds the song (*1)
[J] (y) button Fast-forwards the song (*1)
[SONG] knob Adjusts the song (audio le) volume
[CLICK] knob Adjusts the volume of the click track (p. 21)
Built-in songs
Songs stored on SD card
Songs recorded on this unit or on the SD card
s
] button.
18
(*1) Depending on the type of song, this might be disabled.
Performing
MEMO
You can repeatedly play back an entire song or just one part.
5
You can make the click sound in time with the song by outputting
5
an audio le on the SD card as a click track (p. 21).
When transferring les from your computer to
an SD card
You can play back audio les that are saved either at the top
level or in a folder within the SD card.
* You can put up to 200 song les in a single folder.
* Keep the song length within one hour per le.
Reference
For details, refer to “SD card folder structure” (p. 53).
Audio les that can be played by the TD-50X
WAV le MP3
Format (extension) WAV (.wav) MP3 (.mp3)
Sampling frequency 44.1 kHz 44.1 kHz
Bit rate 16, 24-bit 64–320 kbps
* File names or folder names that contain more than 16
characters are not shown correctly. Files and folders using
double-byte characters are also not supported.
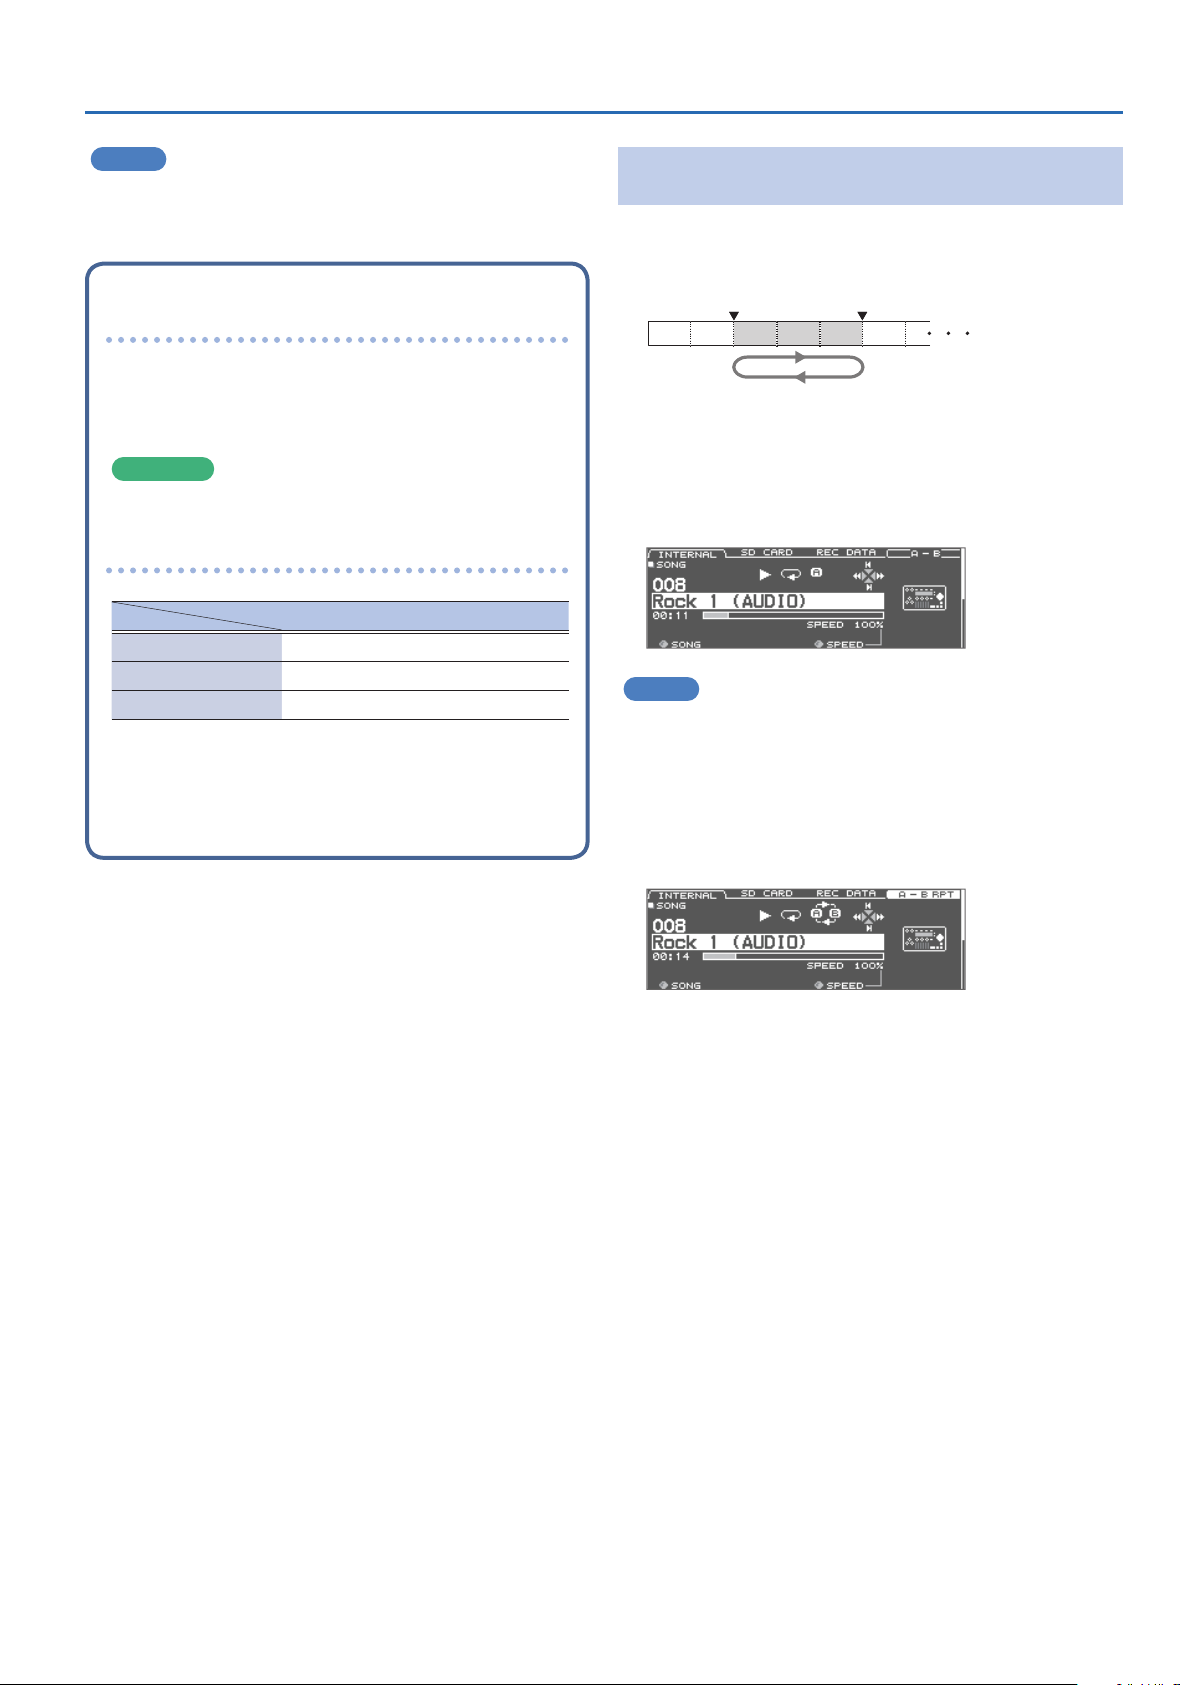
Repeatedly Playing a Specied Region
(A-B Repeat)
You can make a certain part of a song repeat.
* You cannot set the A-B repeat for the built-in songs of the drum
performances or the recorded songs (REC DATA).
A B
1. Select and play a song.
2. In the SONG screen, press the [F4] (A-B) button at the
location where you want to start repeating.
The character “A” appears.
MEMO
You can use the [K] (x) / [J] (y) buttons to move backward or
forward in ve-second steps. Hold down a button to fast-rewind or
fast-forward.
3. At the location where you want to stop repeating, press
the [F4] (A-B) button.
The character “B” appears, and the region of the song between “A”
and “B” plays repeatedly.
Press the [F4] (A-B RPT) button to return to normal playback.
19
Performing
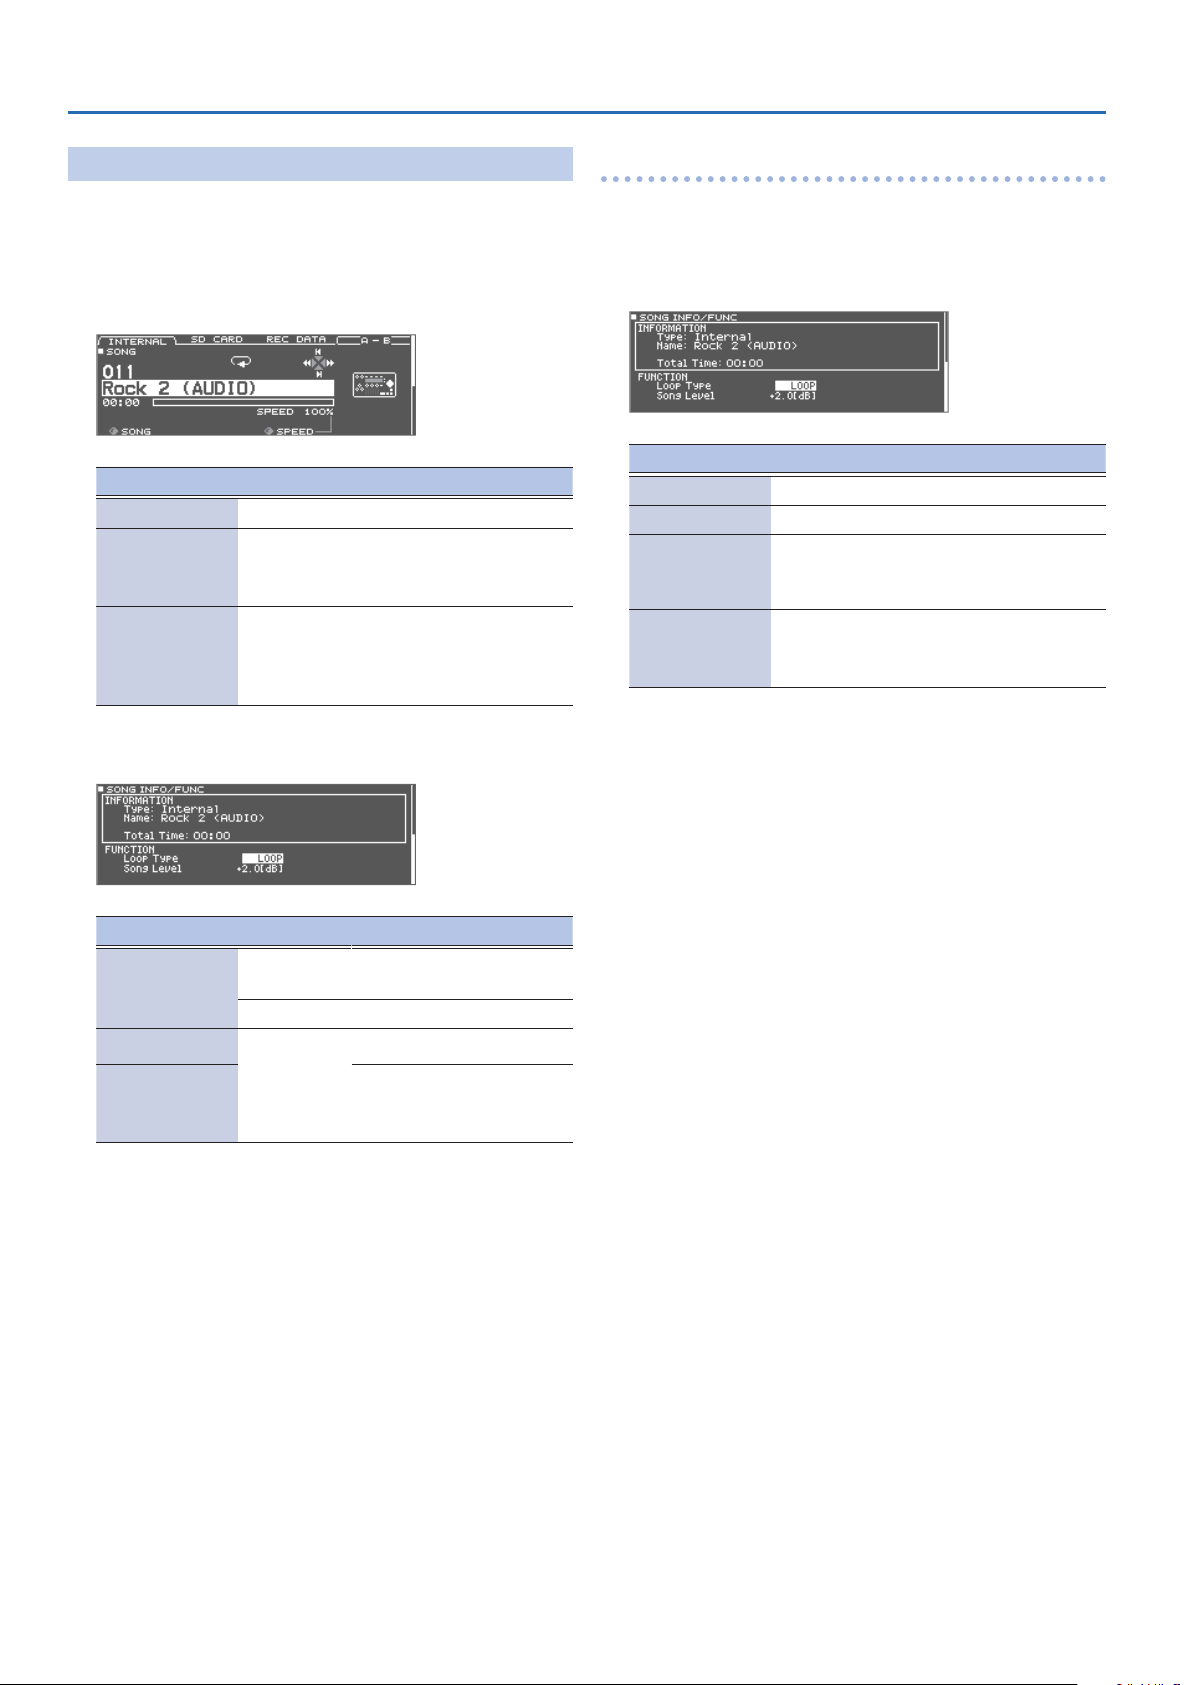
Changing the Settings for Each Song
You can set the volume, method of playback and playback speed for
each song.
1. Select a song on the SONG screen (p. 18).
2. Edit the settings of the song.
Knob Explanation
[R1] (SONG) knob Selects a song.
[R2] (FOLDER)
knob
[R3] (SPEED) knob
SONG INFO/FUNC screen
To play back a song from the SD card, select a
folder on the SD card (p. 18).
* The SD CARD tab is shown.
Changes the playback speed of the song.
* When you switch songs, this returns to 100%.
Depending on the type of song, this setting
might not be available.
(press the PAGE [DOWN] button)
View the information for a song
1. Select a song on the SONG screen (p. 18).
2. Press the PAGE [DOWN] button.
The SONG INFO/FUNC screen appears.
Indication Explanation
Type Types of song
Name Song name
Song save location
Folder
Total Time
3. Press the PAGE [UP] button to return to the SONG
screen.
For SD cards, this indicates where the song is
saved on the SD card.
Song playback time
* This is not shown for songs containing only a
drum performance.
Parameter
Loop Type
Song Level
Click Track Level
Value Explanation
ONE SHOT
LOOP The song plays repeatedly.
-INF–+6.0 [dB]
The song plays back only once
and then stops.
Volume of the song
Volume of the click track
* Only if there is a click track
corresponding to the song
20
Performing
Playing Back a Audio File as a Click
You can use an audio le (WAV) separate from the song for the click,
and play it back as the click (click track).
Since the click track plays simultaneously with the song, this is useful
when you want to play a click sound along with the songs you like.
* To play back a click track, you must prepare a song as well as an
audio le to use for the click, both in WAV format. MP3 les are not
supported.
(Click Track)
Getting the click track audio le ready
1. Have ready an audio le (WAV le) to play back as the
click track.
2. On your computer, edit the le name of the le that
you prepared in step 1.
Specify “song le name+_Click” as the name of the audio le to
play as the click track.
Example:
To play the click track along with a song named “TD-50X.wav,”
specify “TD-50X_Click.wav” as the name of the click audio le.
3. Save the click audio le in the same directory as the
song that’s on the SD card (p. 53).
In the example above, you would save “TD-50X.wav” and “TD-50X_
Click.wav” in the same directory.
Playing the click track along with the song
Rhythm Training
This unit features practice modes, collectively called “Coach Mode.”
These modes help you to practice as eectively as possible.
Three menus are available:
“TIME CHECK,” “QUIET COUNT,” and “WARM UPS.” These menus help you
improve your speed control, accuracy, and endurance. You can also
change the settings as appropriate for your level of performing skill.
(Coach Mode)
Selecting a practice menu
1. Press the [CLICK] button.
The CLICK screen appears.
2. Press the [F4] (COACH) button.
The COACH MENU screen appears.
3. Use the cursor buttons to select the coach menu, and
press [ENTER] button.
Correctly Playing in Time with the
(TIME CHECK)
Beat
1. On the SONG screen, press the [F2] (SD CARD) button
(p. 18).
2. Use the [R2] knob, [-] [+] buttons or the dial to select
the song that you want to play back along with the
click track.
In the example above, select the song “TD-50X.wav.”
3. Press the [F5] button to specify “CLICK ON.”
4. Press the [
The click track plays back together with the song.
To adjust the click track volume, turn the [CLICK] knob.
In the example above, use the [SONG] knob to adjust the volume
of “TD-50X.wav,” and use the [CLICK] knob to adjust the volume of
“TD-50X_Click.wav.”
MEMO
To mute the click track, press the [F5] button to specify “CLICK OFF.”
5
You can also output the click track only to headphones (p. 57).
5
s
] button.
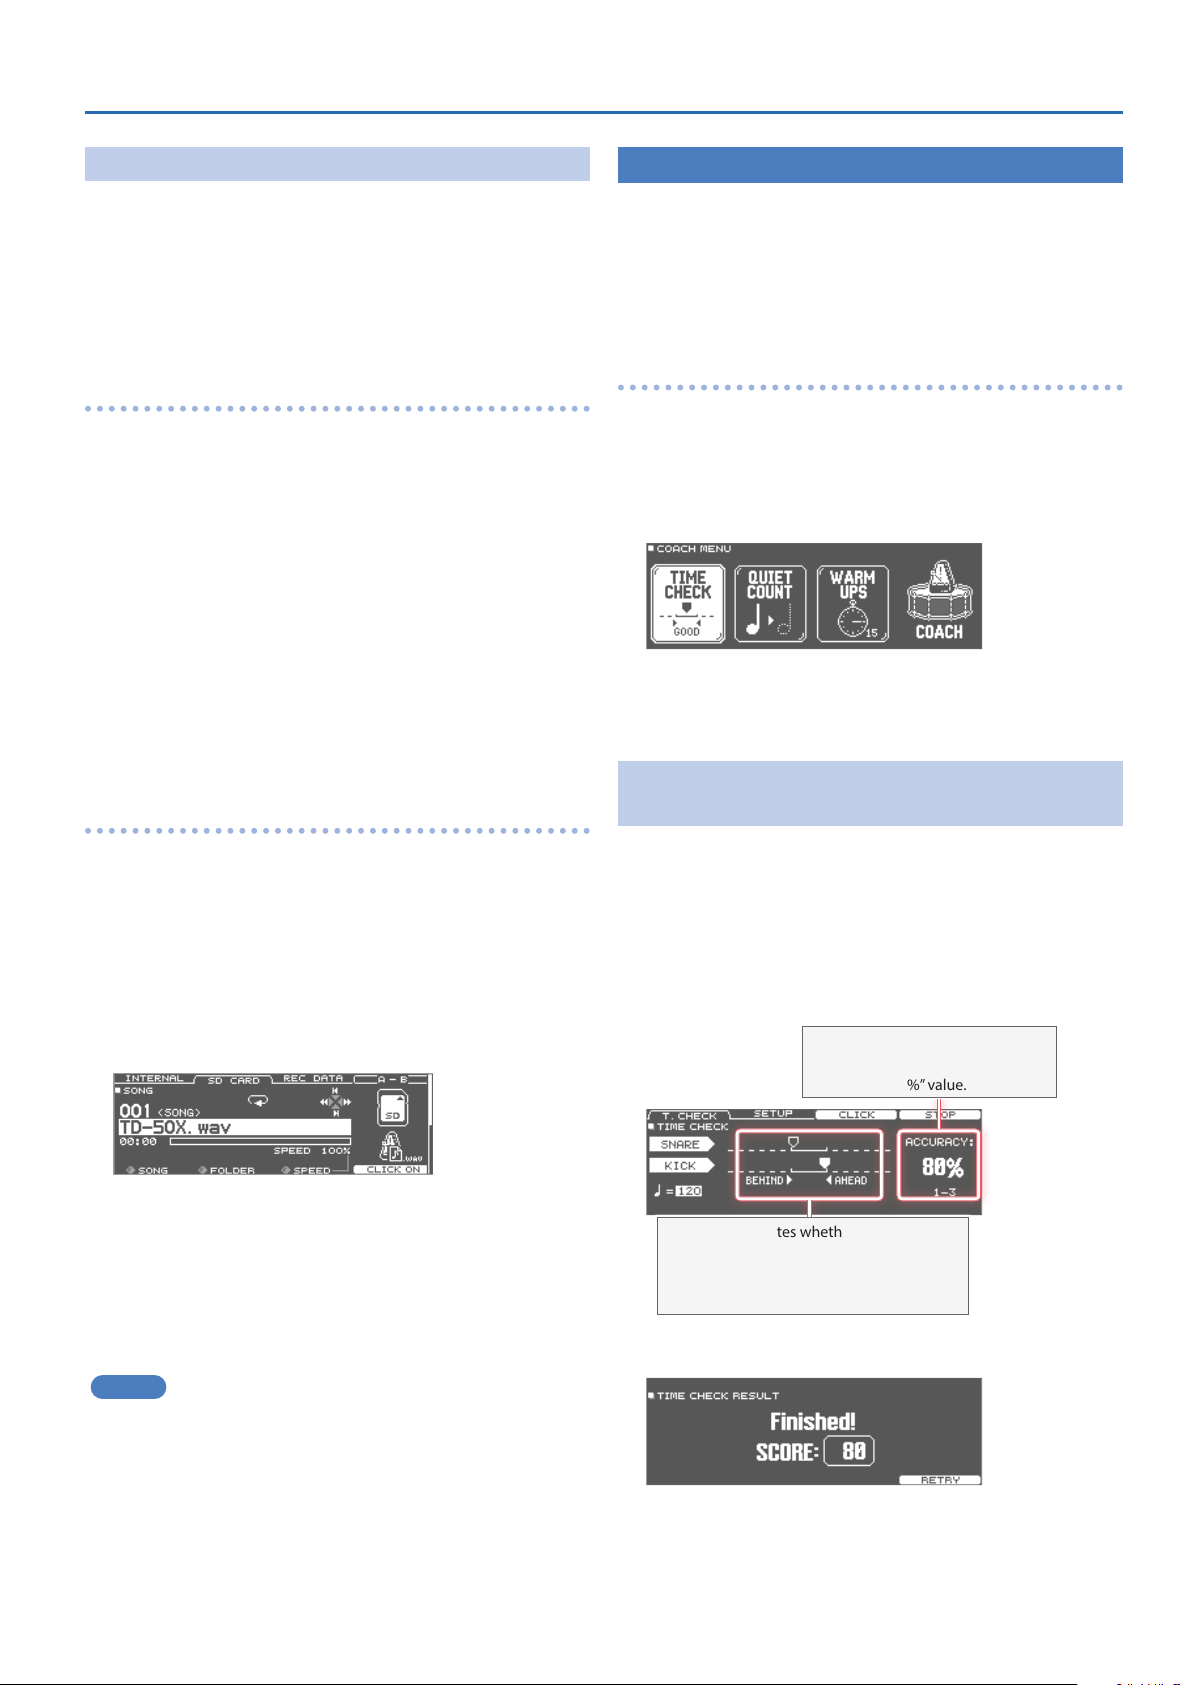
This lets you practice drumming in accurate time along with the click.
1. In the TIME CHECK screen, press the [F5] (START)
button.
If you decide to stop mid-way through practice, press the [F4] (STOP)
button.
2. Strike the pad in time with the click.
The percentage of your strikes that
were played with accurate timing is
displayed as a “%” value.
The screen indicates whether your pad strikes
match the beat sounded by the click.
BEHIND: Behind the beat
AHEAD: Ahead of the beat
Your strike timing is evaluated.
To resume practicing, press the [F5] (RETRY) button.
3. Press the [EXIT] button to nish.
21
 Loading...