

Owner’s Manual
Before using this unit, carefully read the sections entitled: “USING THE UNIT SAFELY”
and “IMPORTANT NOTES” (p. 2–3, p. 4). These sections provide important information
concerning the proper operation of the unit. Additionally, in order to feel assured that you
have gained a good grasp of every feature provided by your new unit, Owner’s manual
should be read in its entirety. The manual should be saved and kept on hand as a convenient reference.
Copyright © 2004 ROLAND CORPORATION
All rights reserved. No part of this publication may be reproduced in any form without the written
permission of ROLAND CORPORATION.
USING THE UNIT SAFELY
Used for instructions intended to alert
the user to the risk of death or severe
injury should the unit be used
improperly.
Used for instructions intended to alert
the user to the risk of injury or material
damage should the unit be used
improperly.
* Material damage refers to damage or
other adverse effects caused with
respect to the home and all its
furnishings, as well to domestic
animals or pets.
001
• Before using this unit, make sure to read the
instructions below, and the Owner’s Manual.
..........................................................................................................
002c
• Do not open (or modify in any way) the unit or its
AC adaptor.
..........................................................................................................
003
• Do not attempt to repair the unit, or replace parts
within it (except when this manual provides
specific instructions directing you to do so). Refer
all servicing to your retailer, the nearest Roland
Service Center, or an authorized Roland
distributor, as listed on the “Information” page.
..........................................................................................................
004
• Never use or store the unit in places that are:
• Subject to temperature extremes (e.g., direct
sunlight in an enclosed vehicle, near a heating
duct, on top of heat-generating equipment); or
are
• Damp (e.g., baths, washrooms, on wet floors);
or are
• Humid; or are
• Exposed to rain; or are
• Dusty; or are
• Subject to high levels of vibration.
..........................................................................................................
007
• Make sure you always have the unit placed so it is
level and sure to remain stable. Never place it on
stands that could wobble, or on inclined surfaces.
..........................................................................................................
008c
• Be sure to use only the AC adaptor supplied with
the unit. Also, make sure the line voltage at the
installation matches the input voltage specified on
the AC adaptor’s body. Other AC adaptors may
use a different polarity, or be designed for a
different voltage, so their use could result in
damage, malfunction, or electric shock.
The symbol alerts the user to important instructions
or warnings.The specific meaning of the symbol is
determined by the design contained within the
triangle. In the case of the symbol at left, it is used for
general cautions, warnings, or alerts to danger.
The symbol alerts the user to items that must never
be carried out (are forbidden). The specific thing that
must not be done is indicated by the design contained
within the circle. In the case of the symbol at left, it
means that the unit must never be disassembled.
The ● symbol alerts the user to things that must be
carried out. The specific thing that must be done is
indicated by the design contained within the circle. In
the case of the symbol at left, it means that the powercord plug must be unplugged from the outlet.
009
• Do not excessively twist or bend the power cord,
nor place heavy objects on it. Doing so can
damage the cord, producing severed elements and
short circuits. Damaged cords are fire and shock
hazards!
..........................................................................................................
010
• This unit, either alone or in combination with an
amplifier and headphones or speakers, may be
capable of producing sound levels that could
cause permanent hearing loss. Do not operate for
a long period of time at a high volume level, or at
a level that is uncomfortable. If you experience
any hearing loss or ringing in the ears, you should
immediately stop using the unit, and consult an
audiologist.
..........................................................................................................
011
• Do not allow any objects (e.g., flammable material,
coins, pins); or liquids of any kind (water, soft
drinks, etc.) to penetrate the unit.
..........................................................................................................
012b
• Immediately turn the power off, remove the AC
adaptor from the outlet, and request servicing by
your retailer, the nearest Roland Service Center, or
an authorized Roland distributor, as listed on the
“Information” page when:
• The AC adaptor, the power-supply cord, or the
plug has been damaged; or
• If smoke or unusual odor occurs
• Objects have fallen into, or liquid has been
spilled onto the unit; or
• The unit has been exposed to rain (or otherwise
has become wet); or
• The unit does not appear to operate normally or
exhibits a marked change in performance.
2
013
• In households with small children, an adult
should provide supervision until the child is
capable of following all the rules essential for the
safe operation of the unit.
..........................................................................................................
014
• Protect the unit from strong impact.
(Do not drop it!)
..........................................................................................................
015
• Do not force the unit’s power-supply cord to share
an outlet with an unreasonable number of other
devices. Be especially careful when using
extension cords—the total power used by all
devices you have connected to the extension
cord’s outlet must never exceed the power rating
(watts/amperes) for the extension cord. Excessive
loads can cause the insulation on the cord to heat
up and eventually melt through.
..........................................................................................................
016
• Before using the unit in a foreign country, consult
with your retailer, the nearest Roland Service
Center, or an authorized Roland distributor, as
listed on the “Information” page.
101b
• The unit and the AC adaptor should be located so
their location or position does not interfere with
their proper ventilation.
..........................................................................................................
102c
• Always grasp only the plug on the AC adaptor
cord when plugging into, or unplugging from, an
outlet or this unit.
..........................................................................................................
103b
• At regular intervals, you should unplug the AC
adaptor and clean it by using a dry cloth to wipe
all dust and other accumulations away from its
prongs. Also, disconnect the power plug from the
power outlet whenever the unit is to remain
unused for an extended period of time. Any
accumulation of dust between the power plug and
the power outlet can result in poor insulation and
lead to fire.
..........................................................................................................
104
• Try to prevent cords and cables from becoming
entangled. Also, all cords and cables should be
placed so they are out of the reach of children.
..........................................................................................................
106
• Never climb on top of, nor place heavy objects on
the unit.
..........................................................................................................
107c
• Never handle the AC adaptor or its plugs with
wet hands when plugging into, or unplugging
from, an outlet or this unit.
..........................................................................................................
108b
• Before moving the unit, disconnect the AC
adaptor and all cords coming from external
devices.
..........................................................................................................
109b
• Before cleaning the unit, turn off the power and
unplug the AC adaptor from the outlet (p. 10).
..........................................................................................................
110b
• Whenever you suspect the possibility of lightning
in your area, disconnect the AC adaptor from the
outlet.
3

IMPORTANT NOTES
291a
In addition to the items listed under “USING THE UNIT SAFELY” on page 2–3, please read and observe the following:
Power Supply
301
• Do not use this unit on the same power circuit with any
device that will generate line noise (such as an electric
motor or variable lighting system).
302
• The AC adaptor will begin to generate heat after long
hours of consecutive use. This is normal, and is not a
cause for concern.
307
• Before connecting this unit to other devices, turn off the
power to all units. This will help prevent malfunctions
and/or damage to speakers or other devices.
Placement
351
• Using the unit near power amplifiers (or other equipment
containing large power transformers) may induce hum.
To alleviate the problem, change the orientation of this
unit; or move it farther away from the source of interference.
352a
• This device may interfere with radio and television
reception. Do not use this device in the vicinity of such
receivers.
352b
• Noise may be produced if wireless communications
devices, such as cell phones, are operated in the vicinity of
this unit. Such noise could occur when receiving or initiating a call, or while conversing. Should you experience
such problems, you should relocate such wireless devices
so they are at a greater distance from this unit, or switch
them off.
354a
• Do not expose the unit to direct sunlight, place it near
devices that radiate heat, leave it inside an enclosed
vehicle, or otherwise subject it to temperature extremes.
Excessive heat can deform or discolor the unit.
355b
• When moved from one location to another where the
temperature and/or humidity is very different, water
droplets (condensation) may form inside the unit. Damage
or malfunction may result if you attempt to use the unit in
this condition. Therefore, before using the unit, you must
allow it to stand for several hours, until the condensation
has completely evaporated.
Maintenance
401a
• For everyday cleaning wipe the unit with a soft, dry cloth
or one that has been slightly dampened with water. To
remove stubborn dirt, use a cloth impregnated with a
mild, non-abrasive detergent. Afterwards, be sure to wipe
the unit thoroughly with a soft, dry cloth.
402
• Never use benzine, thinners, alcohol or solvents of any
kind, to avoid the possibility of discoloration and/or
deformation.
Repairs and Data
452
• Please be aware that all data contained in the unit’s
memory may be lost when the unit is sent for repairs.
Important data should always be backed up in another
MIDI device (e.g., a sequencer), or written down on paper
(when possible). During repairs, due care is taken to avoid
the loss of data. However, in certain cases (such as when
circuitry related to memory itself is out of order), we
regret that it may not be possible to restore the data, and
Roland assumes no liability concerning such loss of data.
Additional Precautions
551
• Please be aware that the contents of memory can be
irretrievably lost as a result of a malfunction, or the
improper operation of the unit. To protect yourself against
the risk of losing important data, we recommend that you
periodically save a backup copy of important data you
have stored in the unit’s memory in another MIDI device
(e.g., a sequencer).
552
• Unfortunately, it may be impossible to restore the contents
of data that was stored in another MIDI device (e.g., a
sequencer) once it has been lost. Roland Corporation
assumes no liability concerning such loss of data.
553
• Use a reasonable amount of care when using the unit’s
buttons, sliders, or other controls; and when using its jacks
and connectors. Rough handling can lead to malfunctions.
556
• When connecting / disconnecting all cables, grasp the
connector itself—never pull on the cable. This way you
will avoid causing shorts, or damage to the cable’s
internal elements.
558a
• To avoid disturbing your neighbors, try to keep the unit’s
volume at reasonable levels. You may prefer to use
headphones, so you do not need to be concerned about
those around you (especially when it is late at night).
559a
• When you need to transport the unit, package it in the box
(including padding) that it came in, if possible. Otherwise,
you will need to use equivalent packaging materials.
562
• Use a cable from Roland to make the connection. If using
some other make of connection cable, please note the
following precautions.
• Some connection cables contain resistors. Do not use
cables that incorporate resistors for connecting to this
unit. The use of such cables can cause the sound level
to be extremely low, or impossible to hear. For information on cable specifications, contact the manufacturer of the cable.
220
* All product names mentioned in this document are trade-
marks or registered trademarks of their respective owners.
4

Introduction
The GR-20 is a guitar synthesizer (guitar synth) which contains a high-quality sound generator and is
designed for easy operation.
The GR-20 carefully analyses the pitch and volume of each string as it tracks the signals being output by the
divided pickup (a pickup installed on your guitar which outputs a separate signal for each string), and uses
this information to trigger its built-in sound generator. At the same time, a data stream interpreting your
guitar performance can also be transmitted via the MIDI OUT connector, and used to play an external MIDI
device, such as a sound module.
Main Features
• You can play more than 450 different types of synth sounds in the same way as when playing your guitar
conventionally.
• In addition to playing the synth sounds by themselves, you can combine the normal guitar sound with the
synth sound.
• When applying an external effects unit to the normal guitar sound, you can use the Mix In jack to mix the
processed sound with the synth sound.
• The GR-20 can be used with any steel-string guitar on which a GK-3 or GK-2A (divided pickup; sold
separately) can be correctly installed.
• The GR-20 can also be used with a bass guitar on which a GK-3B or GK-2B (divided pickup for bass guitar;
sold separately) is installed.
• Built-in effects (reverb, delay, chorus) are provided for the synth sound, creating a rich and spacious
ambiance. (p. 20)
• You can adjust and store settings such as attack and decay time, and effect depth. (p. 20)
• You can use the GR-20's two foot pedals to apply a Hold effect or Glide effect. (p. 15)
• Use the built-in expression pedal to control parameters such as volume or filter. (p. 16)
• Since your guitar performance is output as MIDI data, you can use your guitar to play an external sound
module or as an input device for your MIDI sequencer. (p. 28)
• A guitar tuner is built-in for quick and accurate tuning. (p. 13)
5

Contents
USING THE UNIT SAFELY......................................................................2
IMPORTANT NOTES ...............................................................................4
Introduction .............................................................................................5
Main Features.............................................................................................................................................. 5
Names of Things and What They Do.....................................................8
Front Panel................................................................................................................................................... 8
Rear Panel.................................................................................................................................................. 10
Chapter 1 Play the Sounds! .................................................................11
Preparing Your Guitar............................................................................................................................. 11
Connections............................................................................................................................................... 11
Turning the Power On ............................................................................................................................. 12
Adjusting the Output Level .................................................................................................................... 12
Adjusting the Input Sensitivity (GK SENS)..........................................................................................12
Tuning Your Guitar (Tuner Function)................................................................................................... 13
Specifying the Output Device (OUTPUT SELECT)............................................................................. 14
Selecting a Sound (Patch) ........................................................................................................................ 14
Using the Knob to Select Patches................................................................................................14
Using the Switches of the GK Pickup to Select Patches .......................................................... 15
Using the Foot Pedals to Select Patches..................................................................................... 15
Using an External Device Via MIDI to Select Patches ............................................................. 15
Play the GR-20! ......................................................................................................................................... 15
Using the Foot Pedal to Change the Pitch (GLIDE) ............................................................................15
Using the Foot Pedal to Sustain the Sound (HOLD)...........................................................................16
Using the Expression Pedal to Modify the Sound (EXP PEDAL) ..................................................... 16
Turning the Power Off............................................................................................................................. 16
Chapter 2 Using the GR-20 with Guitar Effects..................................17
Connections............................................................................................................................................... 17
Switching between the Synth Sound and Guitar Sound ....................................................................18
Using the GR-20 with a Multi-effects Unit ...........................................................................................18
Channel (CH).................................................................................................................................18
Patch Link Setup (PATCH LINK SETUP) ................................................................................. 19
Chapter 3 Editing The Sounds.............................................................20
Selecting a Sound to Start From .............................................................................................................20
Use the Knobs to Adjust the Sound....................................................................................................... 20
Adjusting the Attack—ATTACK................................................................................................20
Adjusting the Release—RELEASE.............................................................................................. 20
Adjusting the Spaciousness of the Sound—CHORUS ............................................................20
Adjusting the Reverberation—DELAY/REVERB.................................................................... 20
Adjusting the Volume—LEVEL.................................................................................................. 20
6

Contents
Editing Other Parameters........................................................................................................................ 21
Adjusting the Brightness of the Sound—FREQ........................................................................21
Adding a Distinctive Character to the Tone—RESO ............................................................... 21
Adjusting the Pitch —TRANSPOSE........................................................................................... 21
Adjusting the Playing Feel—PLAY FEEL.................................................................................. 21
Selecting the Type of Glide Effect—GLIDE TYPE...............................................................................22
Selecting the Type of Hold Effect—HOLD TYPE................................................................................23
Selecting the Effect Controlled by the Expression Pedal—EXP PEDAL..........................................23
Storing the Sounds You Create (WRITE).............................................................................................. 24
Chapter 4 Other Functions...................................................................25
Copying Patches ....................................................................................................................................... 25
Exchanging Patches.................................................................................................................................. 25
Changing the function of the foot pedals (SW MODE) ......................................................................26
Switch Mode 1 ...............................................................................................................................26
Switch Mode 2 ...............................................................................................................................26
Saving Patches and System Parameter Settings on an External Device (BULK DUMP)............... 26
Loading Patches and System Parameter Settings From an External Device (BULK LOAD)
................ 27
Chapter 5
Connecting an External Sound Module or Sequencer ........................................................................ 28
Local Control Off...................................................................................................................................... 30
Connecting an External Sound Module or Sequencer
Setting the Transmission Mode...................................................................................................28
Setting the MIDI Channel (BASIC CHANNEL)....................................................................... 29
Specifying the Bend Range .......................................................................................................... 29
MIDI Messages Transmitted by the GR-20 ...............................................................................29
..............28
Chapter 6 Appendices ..........................................................................31
Restoring the Factory Settings (Factory Reset)..................................................................................... 31
Calibrating the Expression Pedal ........................................................................................................... 31
Regarding GR-20 bass guitar support ................................................................................................... 32
Switching the GR-20 between bass guitar and guitar operation............................................ 32
How the Bass Guitar and Guitar settings differ ....................................................................... 32
Troubleshooting........................................................................................................................................ 33
During Normal Performance Using the GR-20 Alone............................................................. 33
When Using the GR-20 with other MIDI devices..................................................................... 33
Other ...............................................................................................................................................34
Patch List.................................................................................................................................................... 35
User Patch List .......................................................................................................................................... 40
MIDI Implementation.............................................................................................................................. 41
MIDI Implementation Chart................................................................................................................... 48
Main Specifications ..................................................................................................................................49
INDEX ........................................................................................................................................................ 50
7
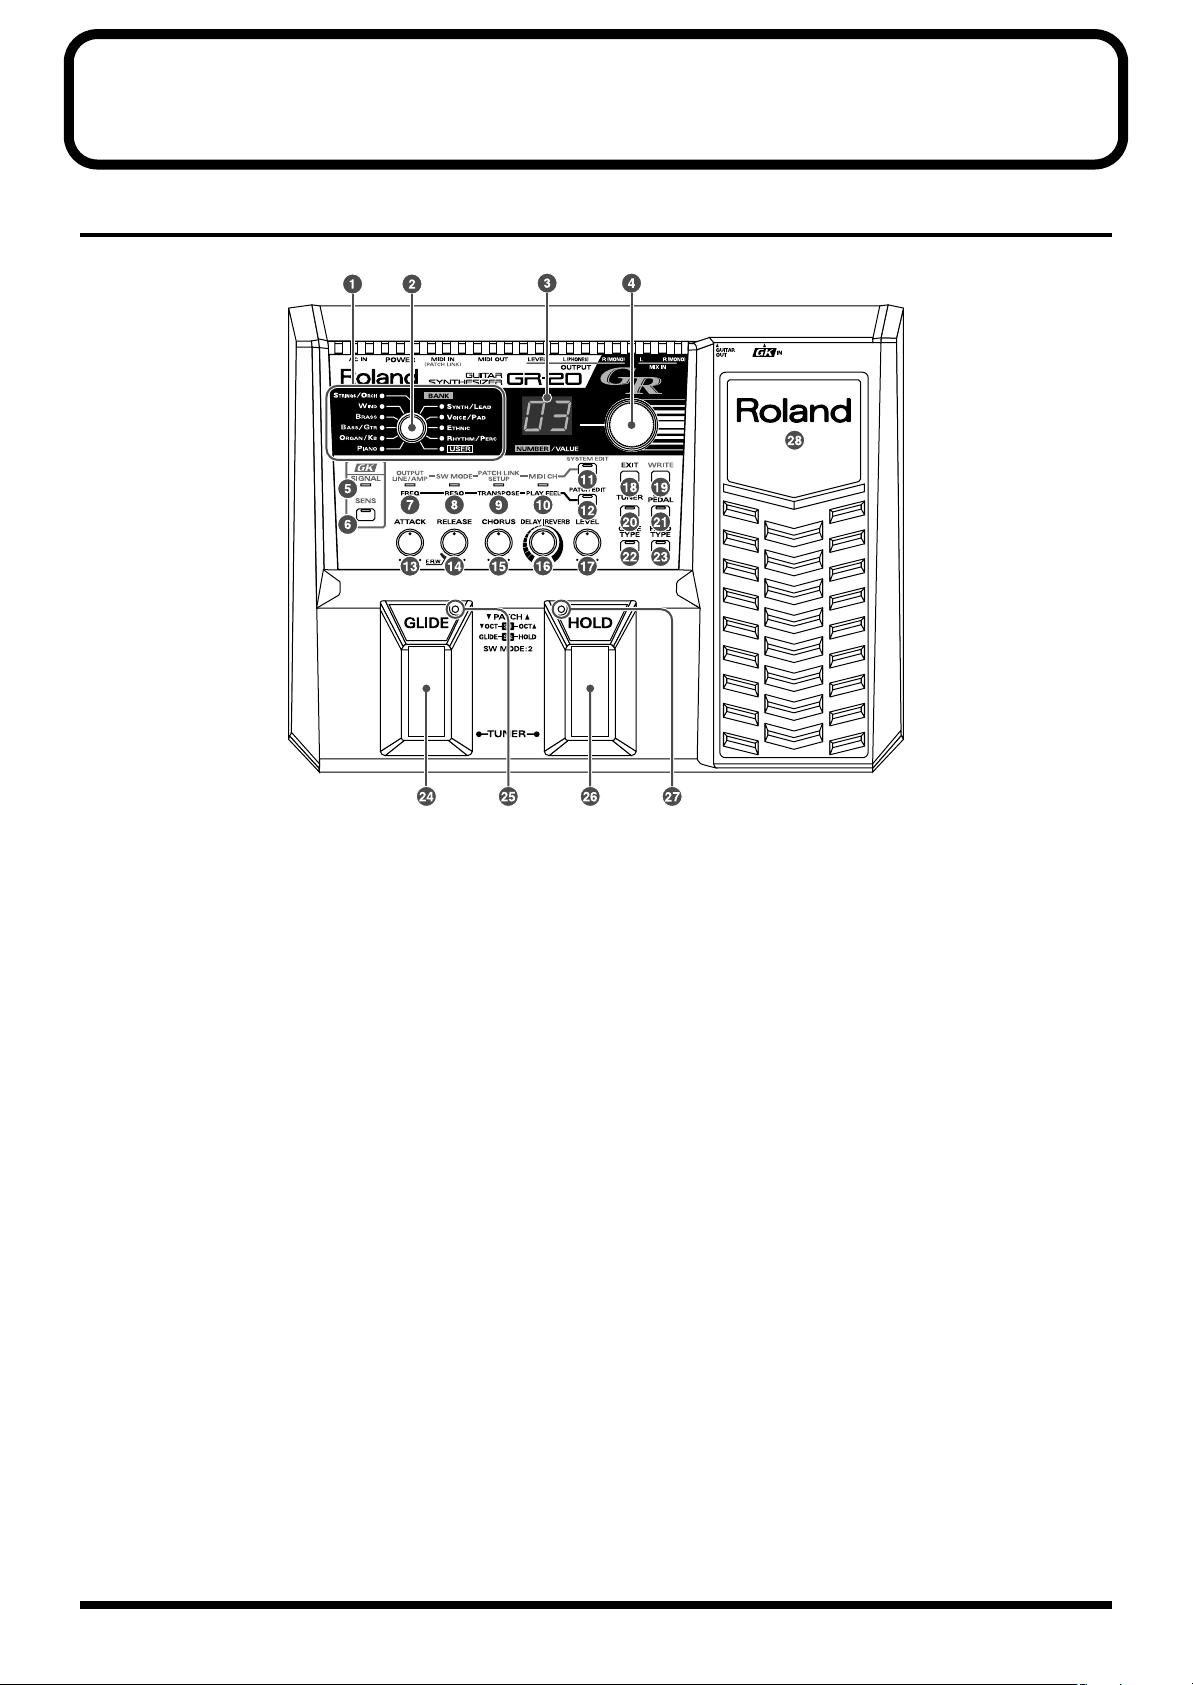
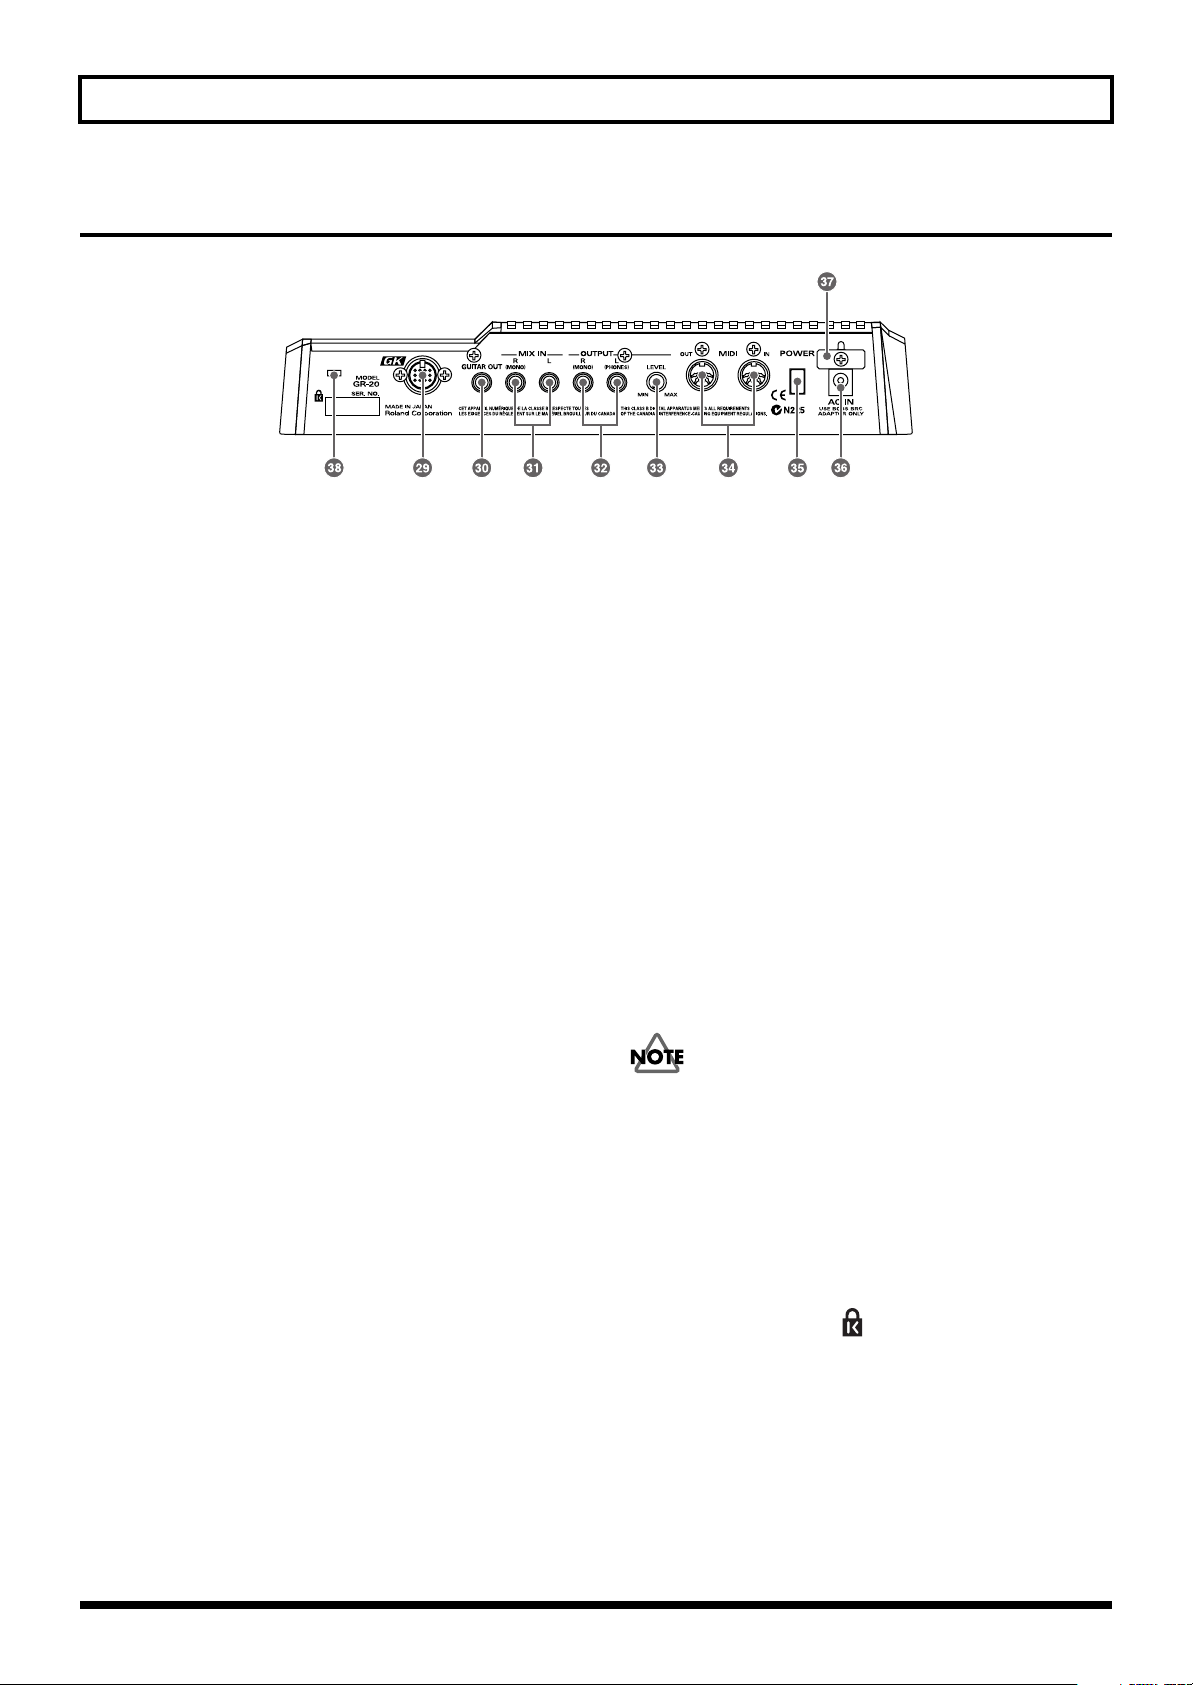
Names of Things and What They Do
Front Panel
fig.0-01 (Panel Descriptions1)
1. BANK indicators
These indicators light to indicate the currently selected
sound bank. If the bank has been switched from an
external device (such as via MIDI or by the switches of
your GK pickup), the indicator for the selected bank
will light regardless of the position of the BANK knob.
2. [BANK] knob
Selects the sound bank. The banks are organized into
ten categories of sound. Sounds you edit can be stored
in the User bank (p. 24).
3. Display
Indicates the currently selected sound number. When
you’re editing a parameter, the display indicates the
value.
If you’ve edited the sound, the dot will light (p. 20).
4. [NUMBER/VALUE] knob
Use this to select the number of the sound you want to
play. Use the [BANK] knob (2) to select a category of
sounds, and use this knob to select a sound within that
category.
This knob is also used to change the values of other
parameters.
5. GK SIGNAL indicator
This indicator lights when a signal is received from the
divided pickup.
6. [GK SENS] button
Press this button when you want to adjust the
sensitivity to match the output of the divided pickup.
The system may malfunction if this adjustment is not
made correctly. Please adjust this setting accurately to
match your guitar (p. 12).
7. OUTPUT/FREQ indicator
This indicator lights when you edit the System
parameter OUTPUT Select or the Patch parameter
FREQ (p. 14, p. 21).
8. SW MODE/RESO indicator
This indicator lights when you edit the System
parameter SW MODE or the Patch parameter RESO (p.
14, p. 21).
8

Names of Things and What They Do
9. PATCH LINK SETUP/TRANSPOSE
indicator
This indicator lights when you edit the System
parameter PATCH LINK SETUP or the Patch
parameter TRANSPOSE (p. 19, p. 21).
10. MIDI CH/PLAY FEEL indicator
This indicator lights when you edit the System
parameter MIDI CH or the Patch parameter PLAY
FEEL (p. 18, p. 21).
11. [SYSTEM EDIT] button
Press this when you want to edit System parameters (p.
14, p. 18, p. 19, p. 26, p. 27).
12. [PATCH EDIT] button
Press this when you want to edit Patch parameters (p.
21).
13. [ATTACK] knob
21. [EXP PEDAL] button
Press this button to select the function of the expression
pedal (p. 23).
22. [GLIDE TYPE] button
Press this button to select the function of the Glide
pedal (p. 22).
23. [HOLD TYPE] button
Press this button to select the function of the Hold
pedal (p. 23).
24. GLIDE pedal
Press this pedal to apply the Glide effect to the sound
(p. 15).
25. GLIDE indicator
This indicator will light or blink according to how you
operate the GLIDE pedal.
Adjusts the speed of the attack (p. 20).
14. [RELEASE] knob
Adjusts the length of the release (p. 20).
15. [CHORUS] knob
Adjusts the chorus depth (p. 20).
16. [DELAY/REVERB] knob
Adjusts the delay or reverb depth (p. 20).
17. [LEVEL] knob
Adjusts the volume of the synth sound for each patch
(p. 20).
18. [EXIT] button
Press this to cancel an operation, or to return to a
previous state.
19. [WRITE] button
Press this button to write (store) or copy a patch (p. 24,
p. 25).
26. HOLD pedal
Press this pedal to apply the Hold effect to the sound
(p. 16).
27. HOLD indicator
This indicator will light or blink according to how you
operate the HOLD pedal.
28. Expression pedal
Use this pedal to adjust the volume or to apply
continuous change to the sound (p. 16).
When you operate the expression pedal, please be
careful not to get your fingers pinched between the
movable part and the panel.
In households with small children, an adult should
provide supervision until the child is capable of
following all the rules essential for the safe operation of
the unit.
20. [TUNER] button
Press this button when you want to use the Tuner
function (p. 13).
9
Names of Things and What They Do
Rear Panel
fig.0-02 (Panel Descriptions2)
29. GK IN connector
Use the included GK cable (or GKC-3/5/10 (sold
separately) to connect this connector to your divided
pickup.
* For details on connections to a commercially available GK-
compatible guitar, refer to the guitar manufacturer or your
dealer.
30. GUITAR OUT jack
This jack outputs the sound from the normal pickup of
your guitar. Connect this jack to your guitar amp or
guitar effects unit.
31. MIX IN R (MONO)/L jacks
The sound that is input to these jacks is mixed with the
synth sound of the GR-20 and sent from the OUTPUT
jacks (32).
If you have connected the GUITAR OUT jack (30) to an
external effects unit, connect the output of your effects
unit to this jack; the synth sound and the sound
processed by the effects unit will be output together
from the OUTPUT jacks (32) (p. 17).
32. OUTPUT R (MONO)/L (PHONES)
jacks
These jacks output the GR-20’s synth sound combined
with the sound that is input to the MIX IN jacks (31). If
you’re making connections to a monaural amp, use R
(MONO) jack.
The L (PHONES) jack can also be used as a headphone
jack (stereo). (However, if headphones are connected to
L (PHONES) jack, you cannot simultaneously use R
(MONO) jack as an output.)
If nothing is connected to the GUITAR OUT jack (30) or
MIX IN jacks (31), the guitar’s normal pickup sound
will also be mixed into this output.
* This is available only if the output of your guitar is
connected to the normal pickup input jack of the divided
pickup.
33. [OUTPUT LEVEL] knob
Adjusts the volume that is sent from the output jacks.
34. MIDI IN/OUT connectors
These can be connected to external MIDI devices,
allowing the GR-20 to send and receive MIDI data.
35. [POWER] switch
Turns the power on/off.
36. AC Adaptor jack
Connect the included AC adaptor (BRC-series) here.
Use only the attached power-supply cord. Also, the
supplied power cord must not be used with any other
device.
37. Cable hook
Loop the AC adaptor cable around this hook to prevent
the cable from being accidentally disconnected.
38. Security Slot ( )
http://www.kensington.com/
10
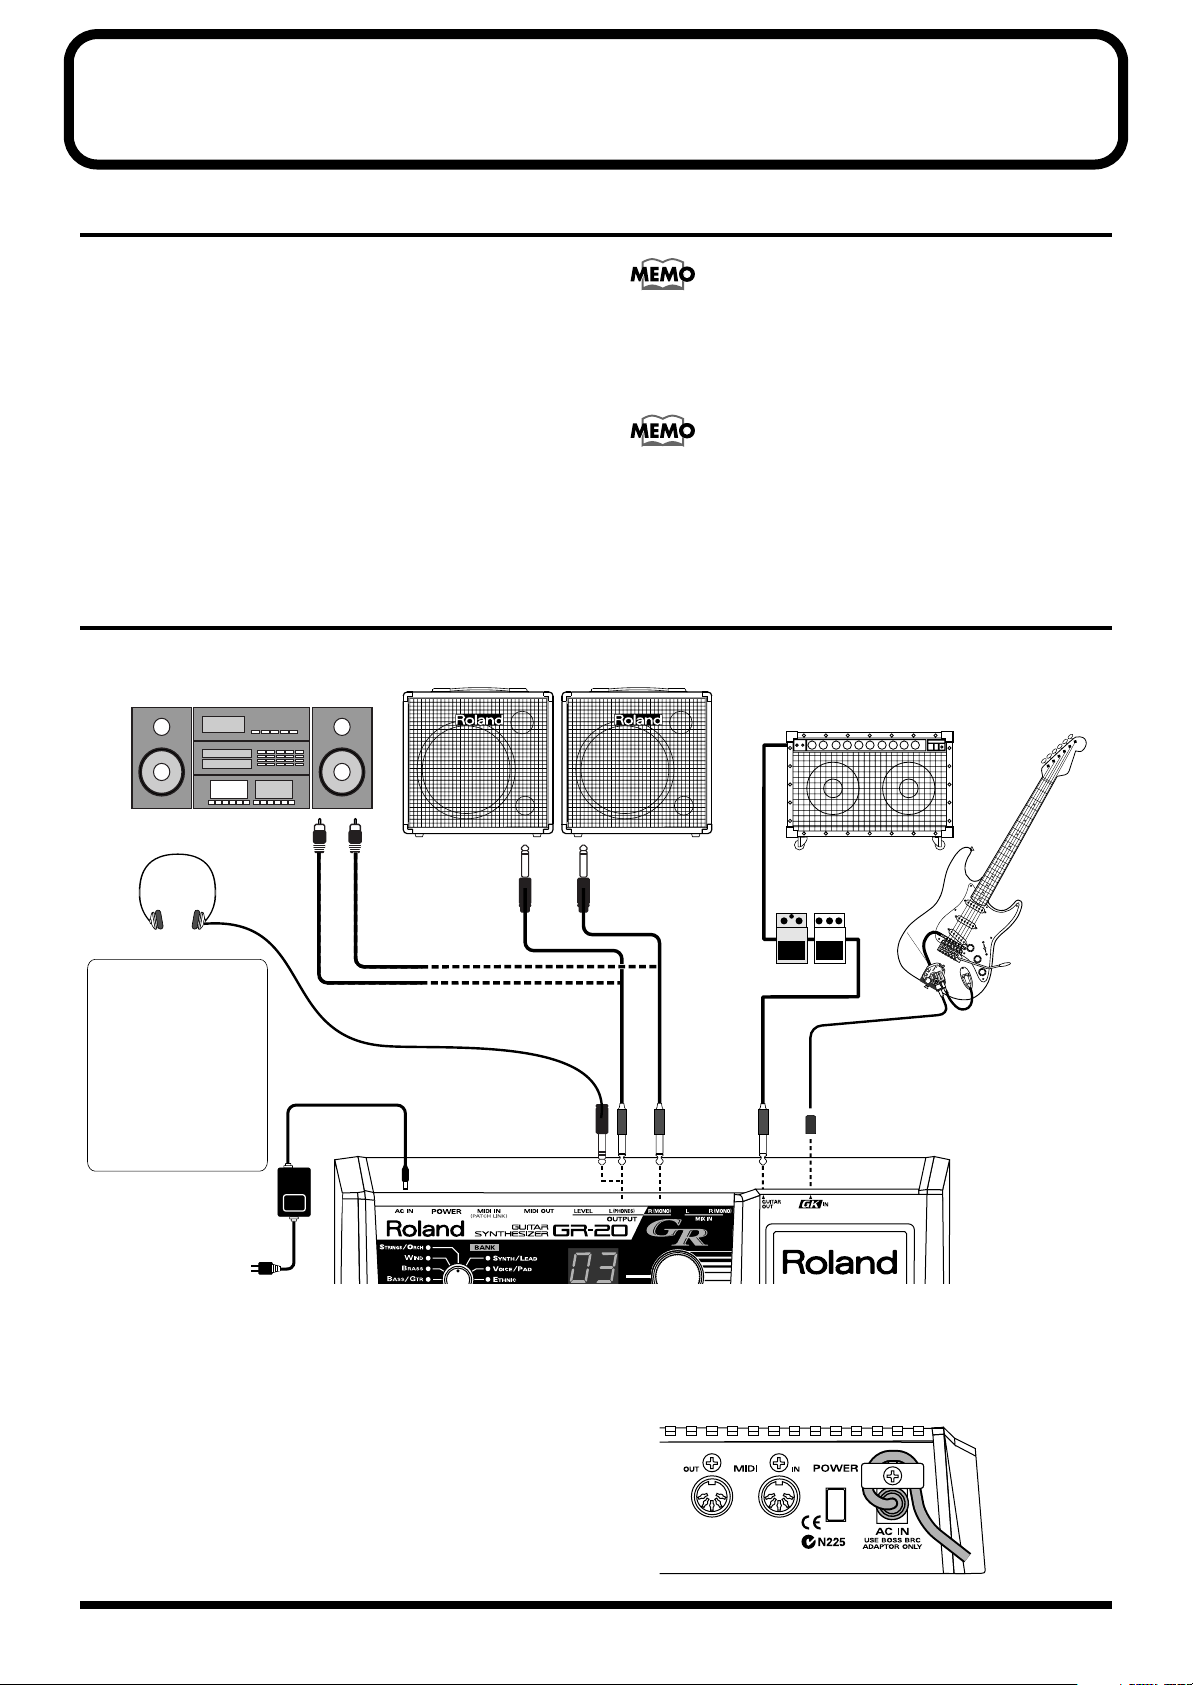
Chapter 1 Play the Sounds!
AC adaptor
(BRC series)
Guitar with GK-3 / GK-2A /
other GK-Compatible guitar
or
Bass guitar with GK-3B / GK-2B
Guitar amp /
guitar effects processors
L
R
To AUX, LINE IN
Stereo set,
radio-cassette player, etc.
Synthesizer amp (keyboard amplifier, PA system, etc.)
LR
Stereo headphones
The (L) MIX OUT jacks
can also be used as dual
stereo headphone jacks.
Also be aware that you
cannot simultaneously
use one jack as a LINE
OUT while using the
other as a headphone
jack – that is, you can't
use a monaural plug and
a stereo plug at the same
time.
Preparing Your Guitar
• In order to use the GR-20 you will need a guitar that has
a divided pickup (GK pickup) such as the Roland GK-3
or GK-2A, or a bass guitar that has a bass guitar divided
pickup such as the Roland GK-3B/GK-2B, which can
independently output a separate signal for each string.
• For details on installing the GK pickup, refer to the
manual that came with your GK pickup.
• Notes may be sounded incorrectly if there are string
buzzes due to improper neck curvature or buzzing frets,
or if the octave adjustment (intonation) is incorrect.
Connections
fig.1-01(Connection)
Various guitar manufacturers sell GK-Compatible guitars
that have a pre-installed GK pickup or contain equivalent
functionality. For details, contact your guitar dealer or a
guitar manufacturer.
In order to use the GR-20 with a bass guitar, follow the
procedure described in Chapter 6 Appendices “
the GR-20 between bass guitar and guitar operation
32)” to switch the GR-20 to bass guitar operation.
Switching
(p.
* To prevent malfunction and/or damage to speakers or other
devices, always turn down the volume, and turn off the power
on all devices before making any connections
* The volume of your amp should be raised only after you have
turned on the power of all your other equipment.
* If you’re outputting in monaural, connect the cable to the R
(MONO) OUTPUT jack.
* To prevent the inadvertent disruption of power to your unit
(should the plug be pulled out accidentally), and to avoid
applying undue stress to the AC adaptor jack, anchor the
power cord using the cord hook, as shown in the illustration.
fig.1-02(Cord Hook)
11
Chapter 1 Play the Sounds!
Turning the Power On
Once the connections have been completed, turn on power to
your various devices in the order specified. By turning on
devices in the wrong order, you risk causing malfunction
and/or damage to speakers and other devices.
1.
If you've connected a device to MIX IN, turn on the
power of that device.
2.
Turn on the power of the GR-20.
After you’ve turned on the power, you’ll be ready to play
when the panel indicators and the display reach the state
shown in the illustration. This state is called “Play mode.”
Before the GR-20 enters Play mode, it will indicate whether it
is currently in guitar mode or bass guitar mode.
• Guitar mode: “ ”
• Bass guitar mode: “ ”
* For details on how to switch between guitar mode and bass
guitar mode, refer to p. 32.
* This unit is equipped with a protection circuit. A brief interval
(a few seconds) after power up is required before the unit will
operate normally.
fig.1-03(Play Mode)
3.
Turn on the power of your amp.
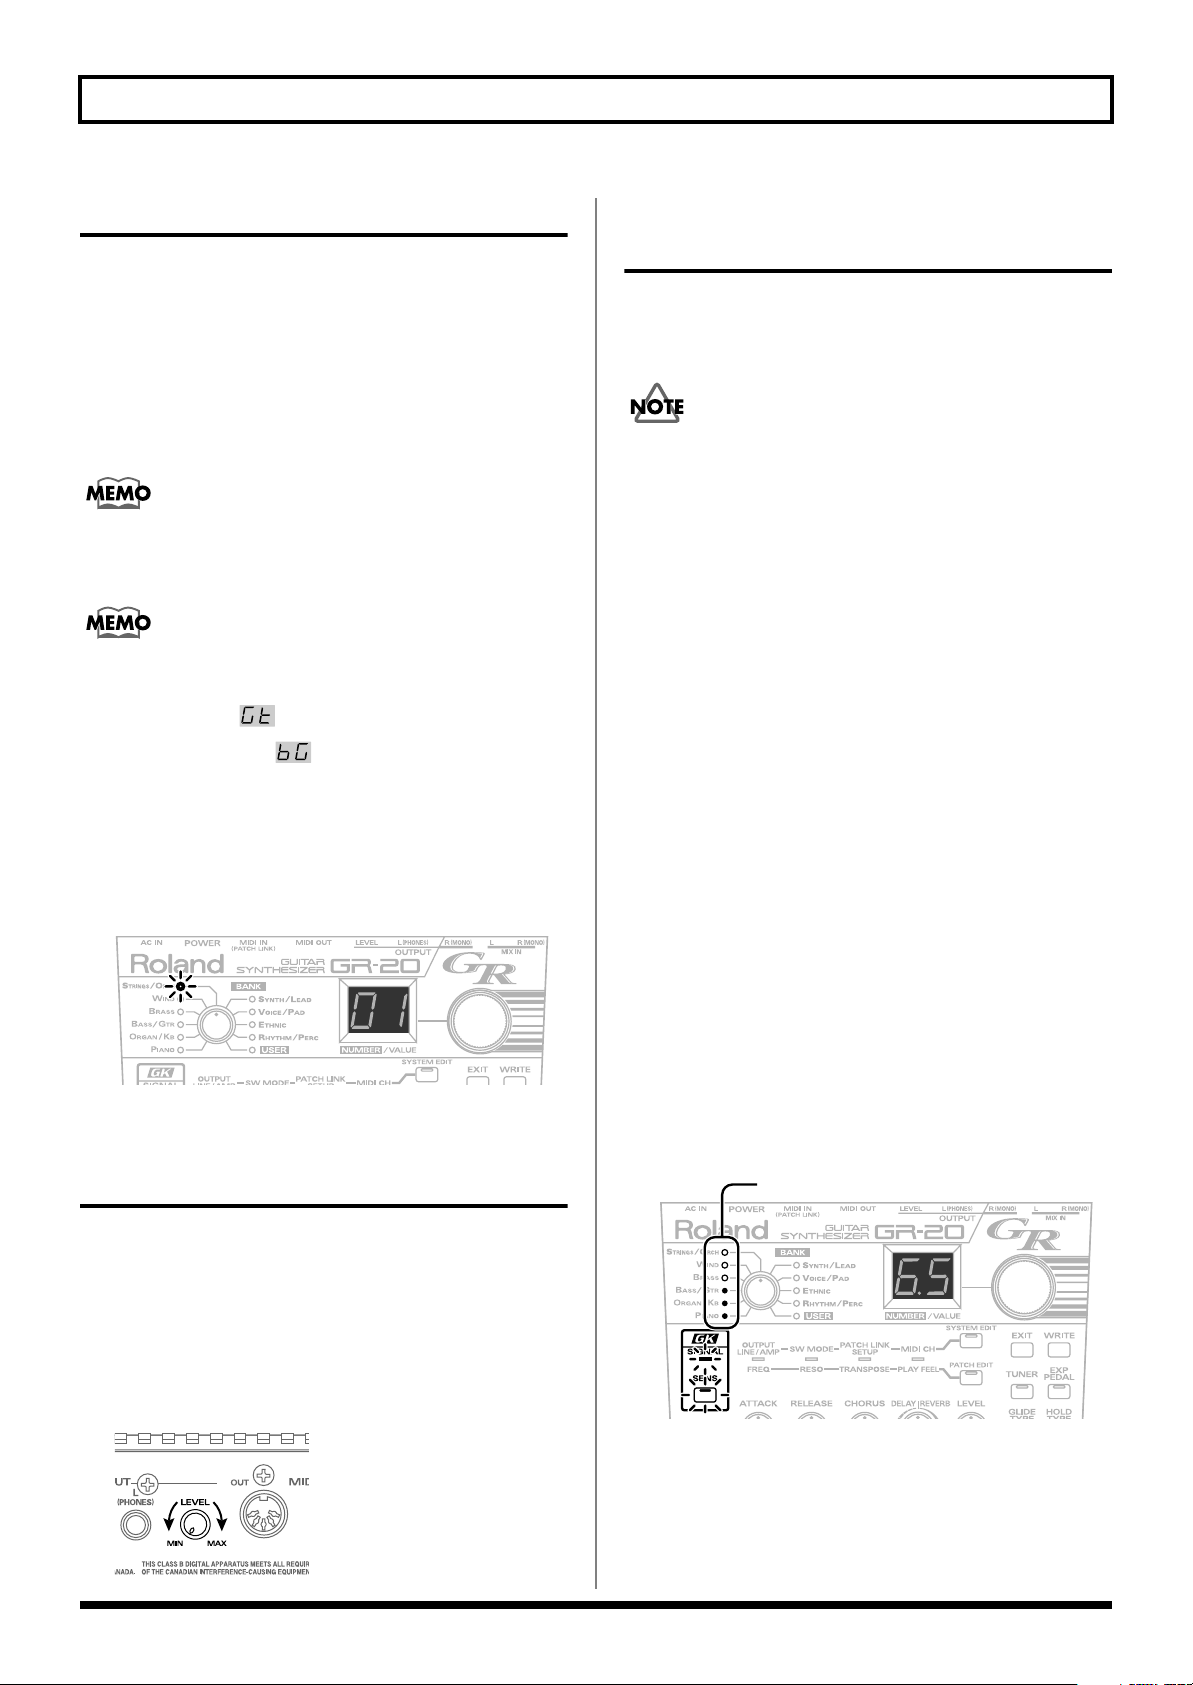
Adjusting the Output Level
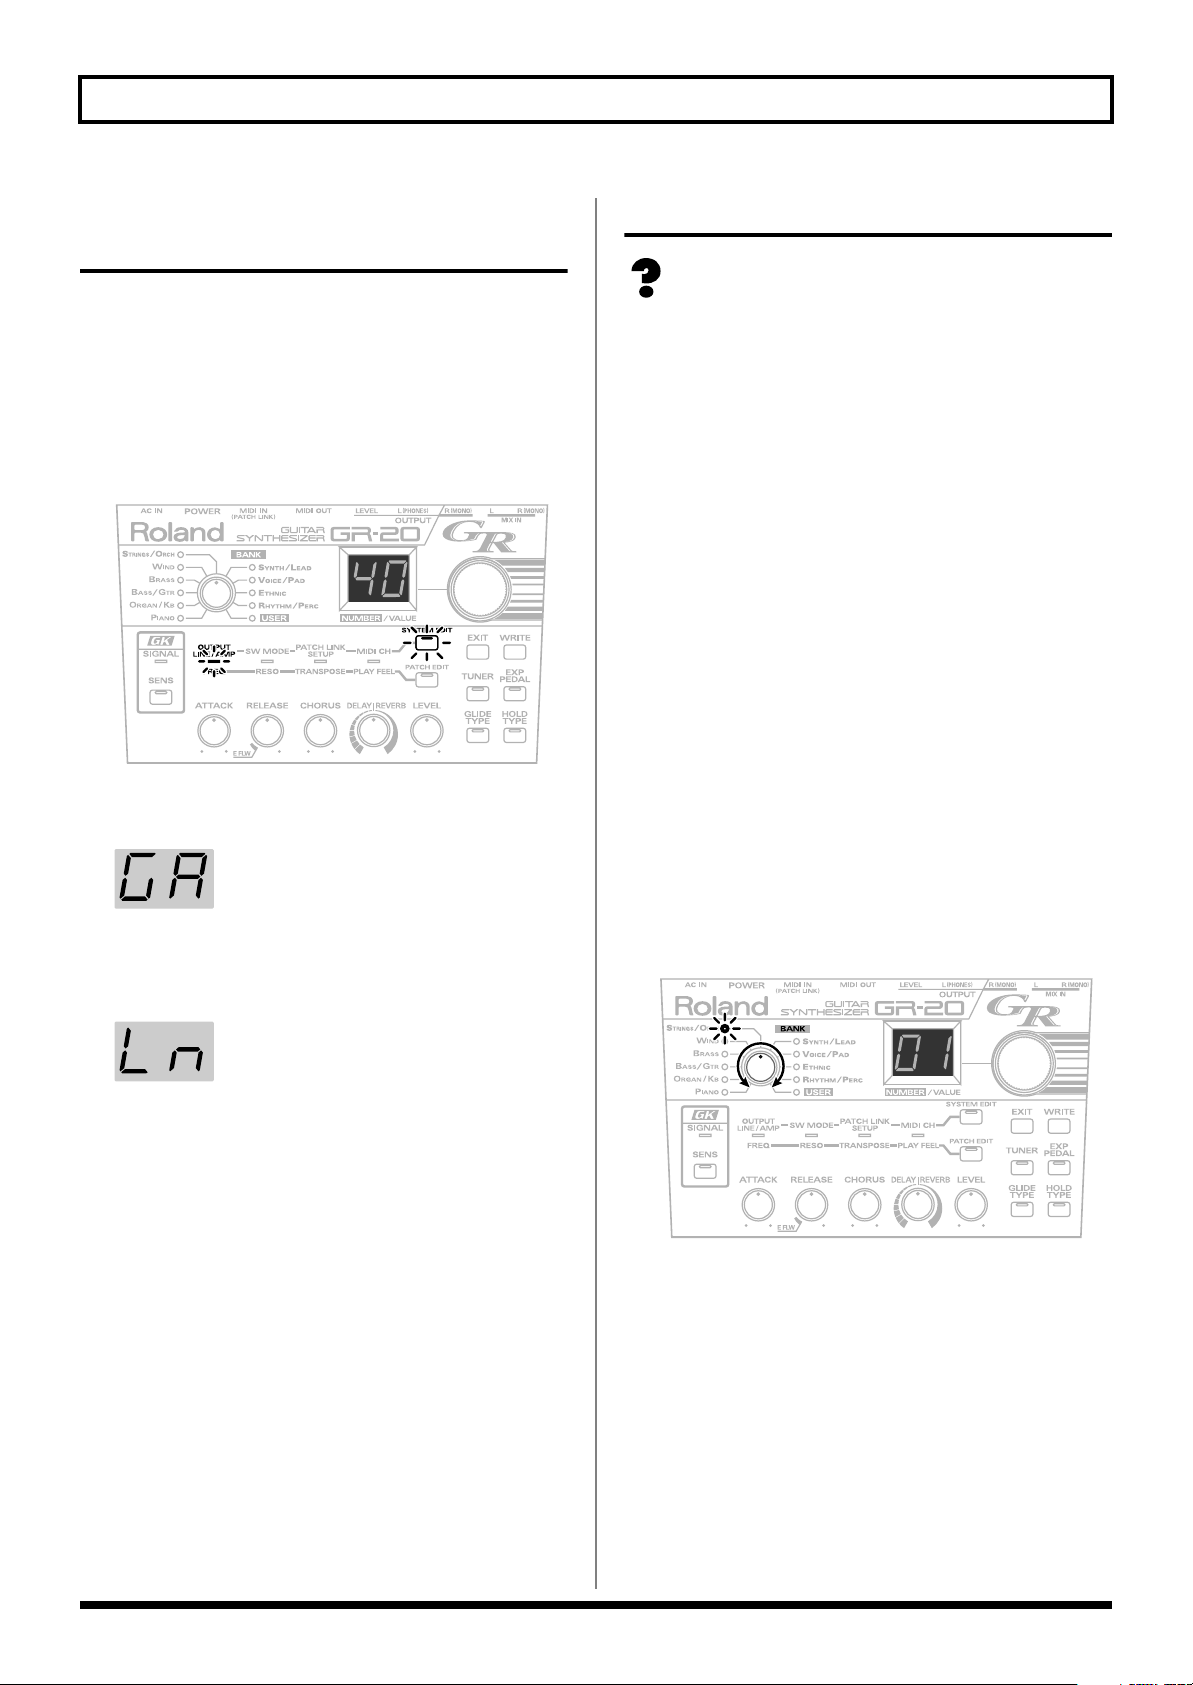
Adjusting the Input Sensitivity (GK SENS)
You’ll need to adjust the input sensitivity of each string
according to your picking strength and how the divided
pickup is installed.
If this adjustment is not made correctly, the system won’t
work properly. You must perform this adjustment to ensure
that you’re taking full advantage of the GR-20’s capabilities.
* Once you make this adjustment, it’s stored within the GR-20;
you won’t need to make it again. However, you should perform
the adjustment again after changing the strings or adjusting
the action of your guitar, or before using a different GK guitar.
* If you’re using a bass guitar, you can use the following table to
convert the string names and indications you see in the display
while performing the procedure below.
6th string → B string
5th string → E string
4th string → A string
3rd string → D string
2nd string → G string
1st string → C string
1.
Press the [GK SENS] button.
2.
Play only the 6th string.
The left side of the display will show “6,” indicating that
you played the 6th string.
The right digit will show the GK SENS setting. The
BANK indicators will function as a level meter and show
the strength of the guitar signal.
* If the left digit of the display does not show the number of the
string you played, press the HOLD pedal or GLIDE pedal
several times to make the desired string number appear.
fig.1-04(GK SENS)
(4th string on a conventional four-string bass)
(3rd string on a conventional four-string bass)
(2nd string on a conventional four-string bass)
(1st string on a conventional four-string bass)
Level Meter
Use the [OUTPUT LEVEL] knob on the rear panel to adjust
the output level of the GR-20.
Turning the knob toward the right (toward MAX) will
increase the volume. With the knob turned all the way to the
left (toward MIN), the volume will be zero.
* Normally, you should set this near the middle of the range.
fig.1-10(Level)
12
3.
Adjust the sensitivity.
Turn the [NUMBER/VALUE] knob to adjust the sensitivity.
The sensitivity will increase as the number in the right of
the display increases. Adjust the sensitivity so that all of
the level meter indicators light briefly when you pick a
note strongly.
Chapter 1 Play the Sounds!
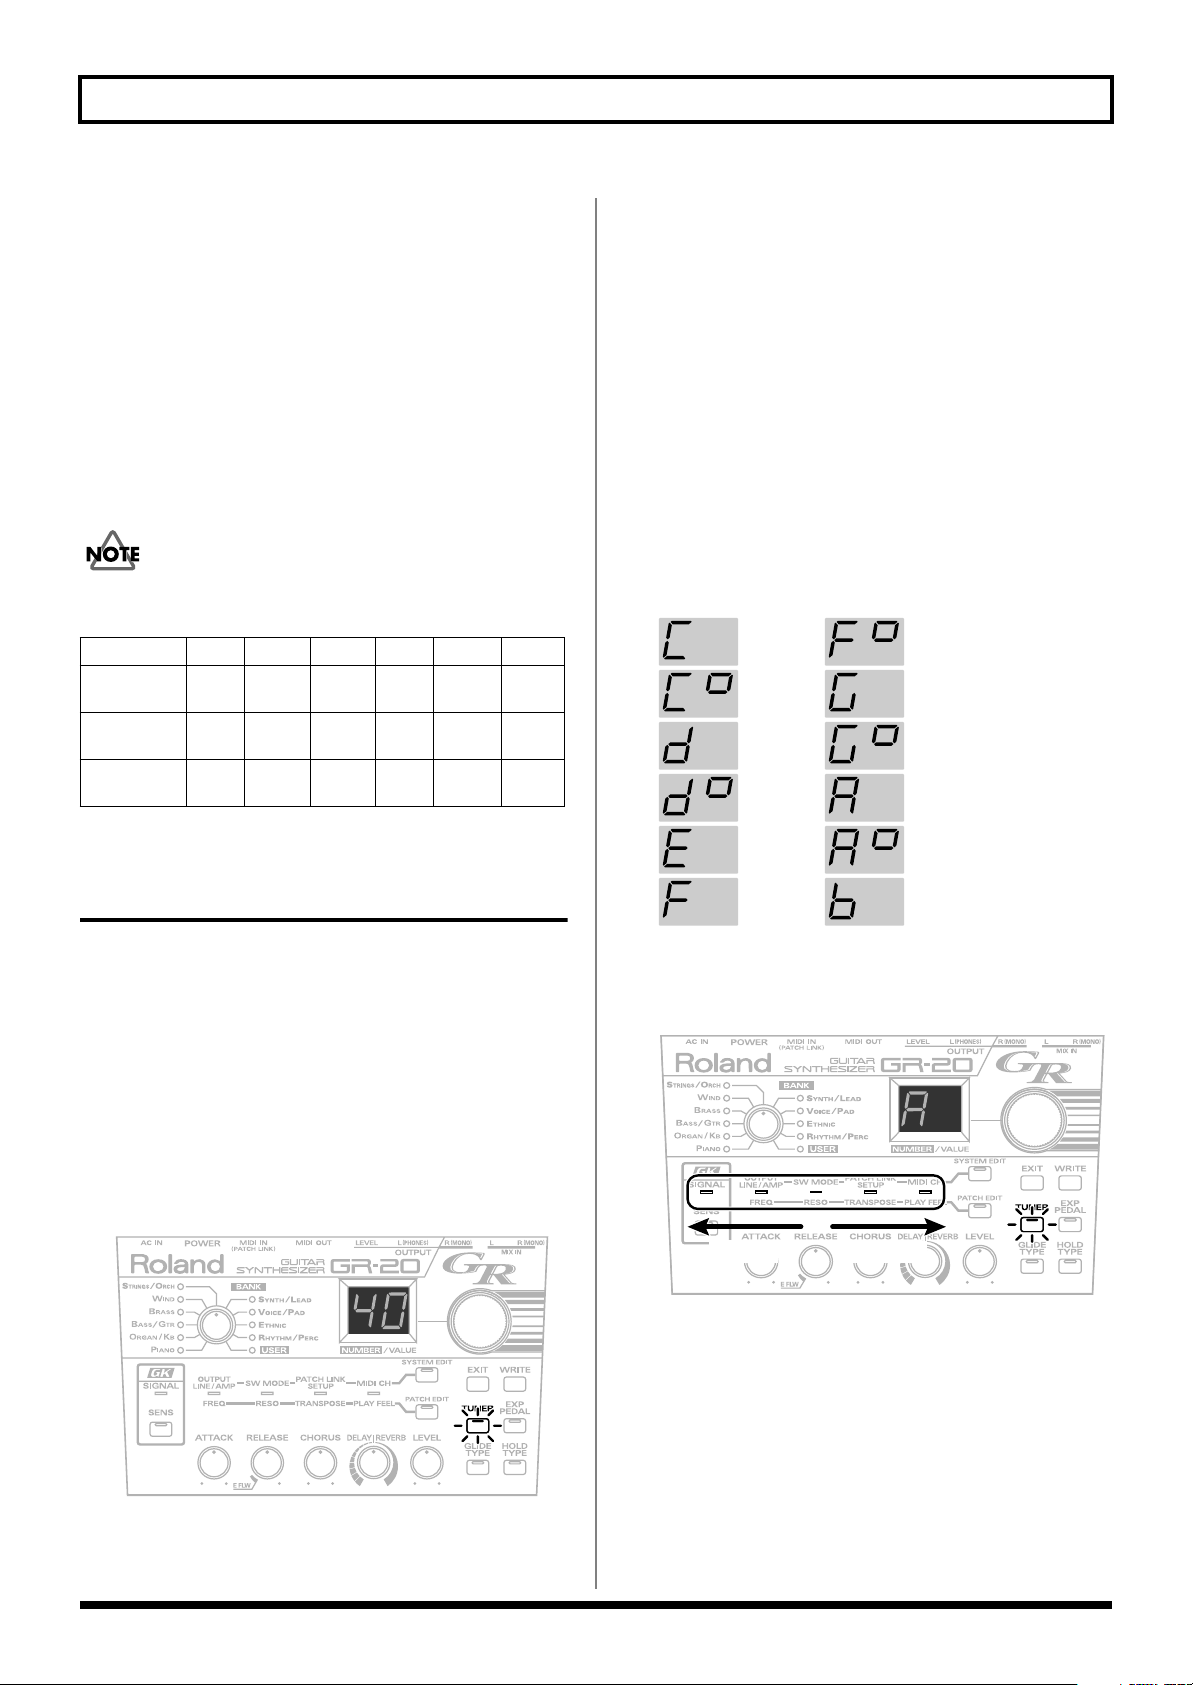
C
C#
D
D#
E
F
F#
G
G#
A
A#
B
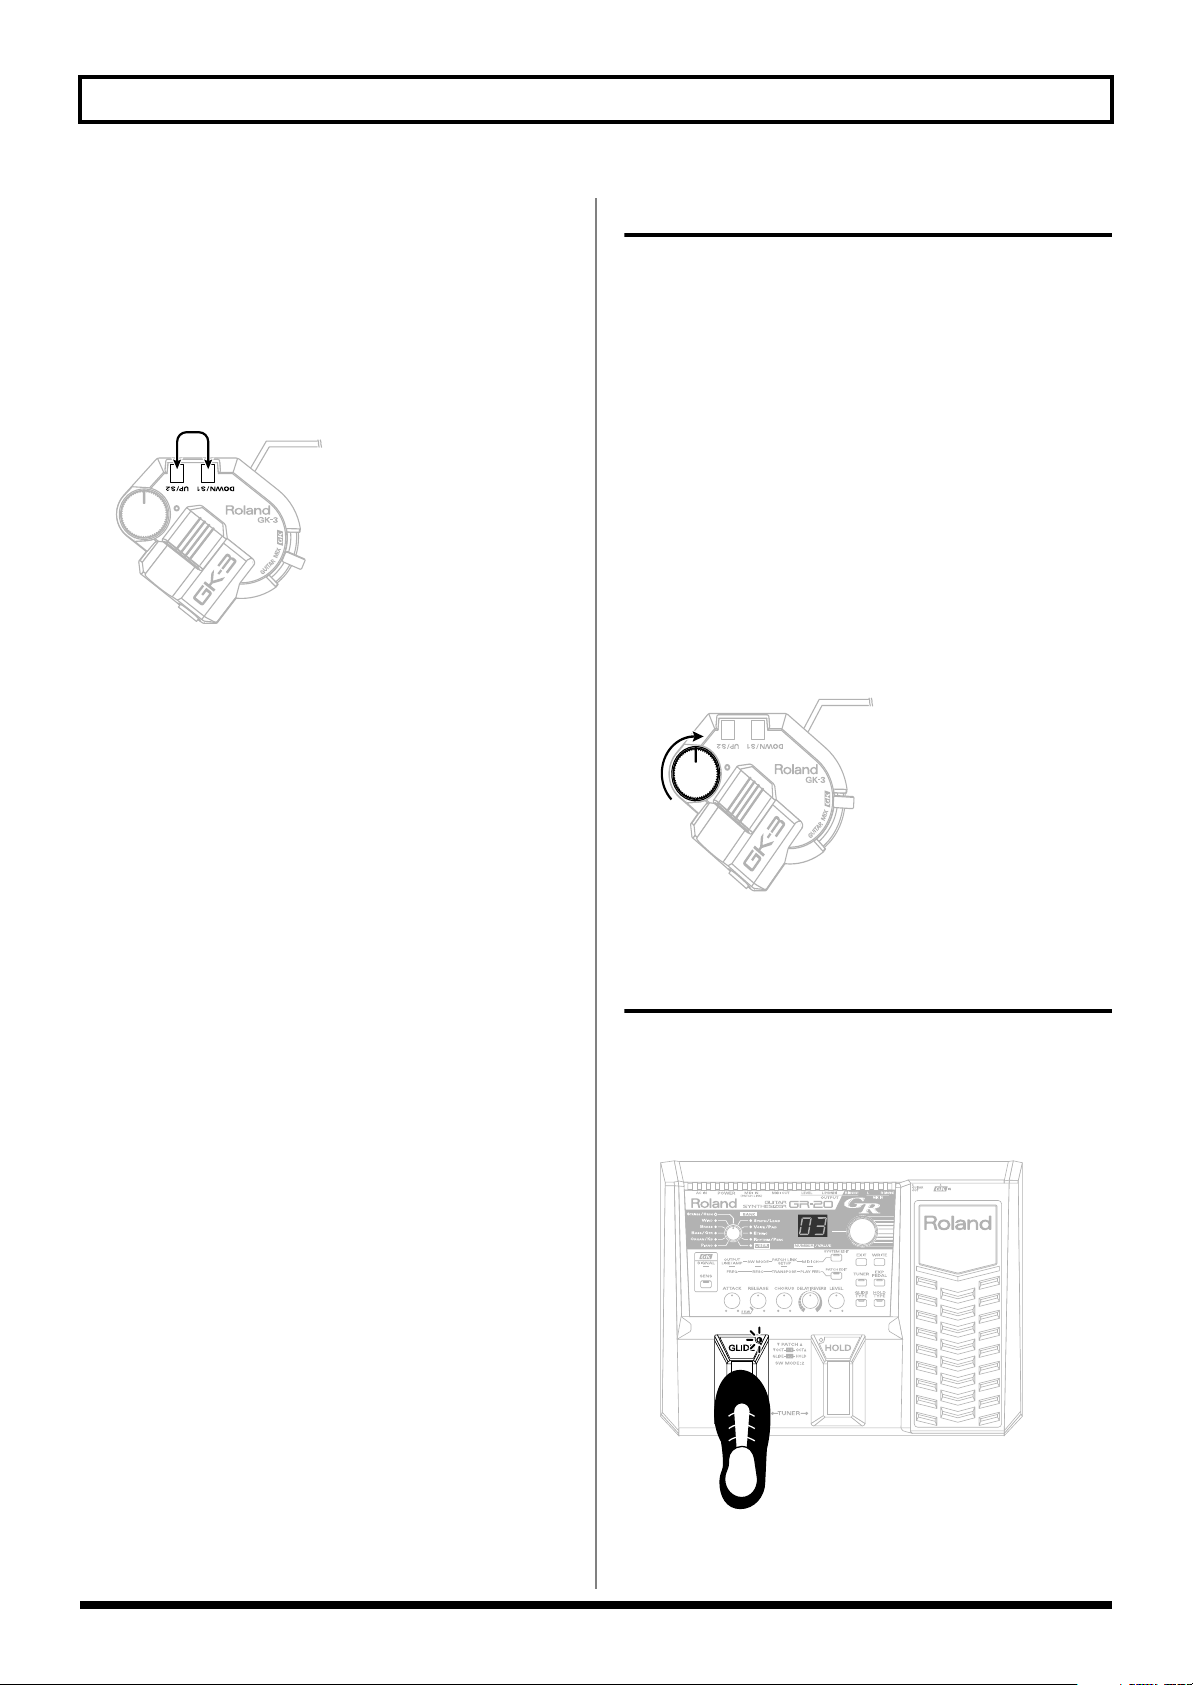
* You can also use your GK pickup's UP/S2 button and
DOWN/S1 button to adjust the sensitivity in the same way.
4.
Perform steps 2–3 for strings 5–1 to adjust the sensitivity
of all strings.
5.
Press the [GK SENS] button or [EXIT] button.
The GK SENS settings you made are stored in the GR-
20k, and you will return to Play mode.
* The decimal point in the display will blink while the setting is
being stored. Don't turn off the power during this time.
* If you turn off the power before returning to Play mode, the
settings you made will not be stored.
If you’re using a bass guitar, the number shown at the left
side of the display will be as shown in the following table.
Displayed No.
4-string
bass
5-string
bass
6-string
bass
2 3 4 5 6
1
1C
string
1G
string
1G
string
2G
string
2D
string
2D
string
3D
string
3A
string
3A
string
4A
string
4E
string
4E
string
5E
string
5B
string
6B
string
2.
Use the [NUMBER/VALUE] knob to adjust the reference
pitch.
If you turn the [NUMBER/VALUE] knob slightly, the
current reference pitch will be displayed for several
seconds. By turning the [NUMBER/VALUE] knob
during this time, you can adjust the reference pitch.
* You can adjust the reference pitch in a range of 427 Hz–452 Hz.
When the GR-20 is shipped from the factory, this is set to
440 Hz.
* The reference pitch you specify will be stored when you exit the
Tuner function. Be aware that the setting will not be stored if
you turn off the power before doing so.
3.
Cleanly play an unfretted note on the string that you
want to tune.
The display will indicate the note name.
fig.1-051
Tuning Your Guitar (Tuner Function)
Since the GR-20 analyzes the pitch of each string in order to
determine the sound it should produce, you must tune your
guitar accurately.
* If your guitar is mistuned, the sound produced will be out of
tune, and the system will not operate correctly.
1.
Press the [TUNER] button.
The [TUNER] button will light, and the Tuner function
will be on. The lower two digits of the current reference
pitch will be shown for approximately two seconds in
the display. Then you will be able to tune your guitar.
Example: When the pitch is set to 440Hz
fig.1-05(Reference pitch)
* You can also turn on the Tuner function by pressing the
HOLD pedal and GLIDE pedal simultaneously.
4.
Tune your guitar.
Watch the indicator in the panel, and tune your guitar so
that only the green indicator in the middle is lit.
fig.1-06(Tuning)
too hightoo low
5.
Repeat steps 3–4 to tune each string of your guitar.
6.
Press the [TUNER] or [EXIT] button to exit the Tuner
function.
The reference pitch you specified will be stored, and you
will return to Play mode.
* The decimal point in the display will blink while the reference
pitch is being stored. Don't turn off the power during this
time.
13
Chapter 1 Play the Sounds!
Specifying the Output Device (OUTPUT SELECT)
Here you can specify the type of system connected to the
OUTPUT jacks. This setting allows the GR-20 to internally
optimize its sound for the type of playback system you are
using.
* This does not affect the sound that is input to MIX IN.
1.
Press the [SYSTEM EDIT] button a number of times until
the OUTPUT/FREQ indicator lights.
fig.1-07(OUTPUT SELECT)
2.
Use the [NUMBER/VALUE] knob to change the setting.
Guitar amp
fig.1-071
Use this setting if you’ve connected the GR-20 to a guitar
amp.
Line
fig.1-072
Selecting a Sound (Patch)
What is a Patch
A “patch” is a sound you play on the GR-20; in addition to
the type of sound, a patch also contains settings for effects
such as reverb and chorus.
The GR-20’s patches are organized into ten banks by type,
with the patches numbered within each bank.
In Play mode, the BANK indicator and the display show the
patch that is currently selected.
You can edit the settings of a patch to your taste, and store
edited patches in the USER bank (p. 24).
You can use any of the following ways to select a patch.
Using the Knob to Select Patches
1.
Use the [BANK] knob to select the type of sound you
want.
From the ten sound banks and the user bank, select the
bank that contains the sound you want to use.
2.
Use the [NUMBER/VALUE] knob to select a sound
within the bank.
Turning the [NUMBER/VALUE] knob will change the
number shown in the display, letting you choose from
various sounds within the selected bank.
fig.1-08(Sound Select)
Use this setting if you’ve connected the GR-20 to a
keyboard amp, mixer, headphones, or recorder.
* If you’re using a bass amp, use the Line setting.
3.
Press the [EXIT] button.
The setting will be stored, and you will return to Play
mode.
* The decimal point in the display will blink while the setting is
being stored. Don't turn off the power during this time.
* If you turn off the power before returning to Play mode, the
setting you made will not be stored.
14
Chapter 1 Play the Sounds!
Using the Switches of the GK Pickup to Select Patches
In Play mode, you can use the UP/S2 button and DOWN/S1
button of the GK pickup to select the next or previous
number.
When you reach the upper or lower limit within a bank, you
will move to the next bank.
fig.1-09(S1/S2)
Using the Foot Pedals to Select Patches
When shipped from the factory, the GR-20’s two foot pedals
are assigned to the Hold function and Glide (Pitch Bend)
function respectively. You can change these assignments so
that the foot pedals will select patches.
For details, refer to
pedals (SW MODE)
Changing the function of the foot
(p. 26).
Play the GR-20!
Let’s get started playing the GR-20. Check the following
points.
1.
Make sure that the GR-20 is in Play mode (the state it’s
normally in immediately following power up).
In some cases, you won’t hear any sound if the GR-20 is
not in Play mode.
2.
Set the select switch of your GK pickup to the “GK”
position (on the GK-2A, the “SYNTH” position).
If this switch is set to “GUITAR,” the normal pickup
sound will be output. If this switch is set to “MIX,” the
synth sound and the guitar normal pickup sound will be
mixed and output.
3.
Turn the volume of the GK pickup to the right.
This volume controls the synth sounds of the GR-20.
fig.1-11(GK-3)
Using an External Device Via MIDI to Select Patches
You can connect an external device (e.g., multi-effects unit) to
the MIDI IN connector, and select patches on the GR-20 by
operating the external MIDI device.
For details, refer to
Unit
(p. 18).
Using the GR-20 with a Multi-effects
Using the Foot Pedal to Change the Pitch (GLIDE)
You can press the GLIDE pedal to change the pitch of the
currently playing synth sound smoothly.
The type of change will depend on the sound, and you can
also adjust the change to your taste (p. 22).
fig.1-12(GLIDE)
* The GLIDE indicator will blink while you are pressing the
pedal.
15
Chapter 1 Play the Sounds!
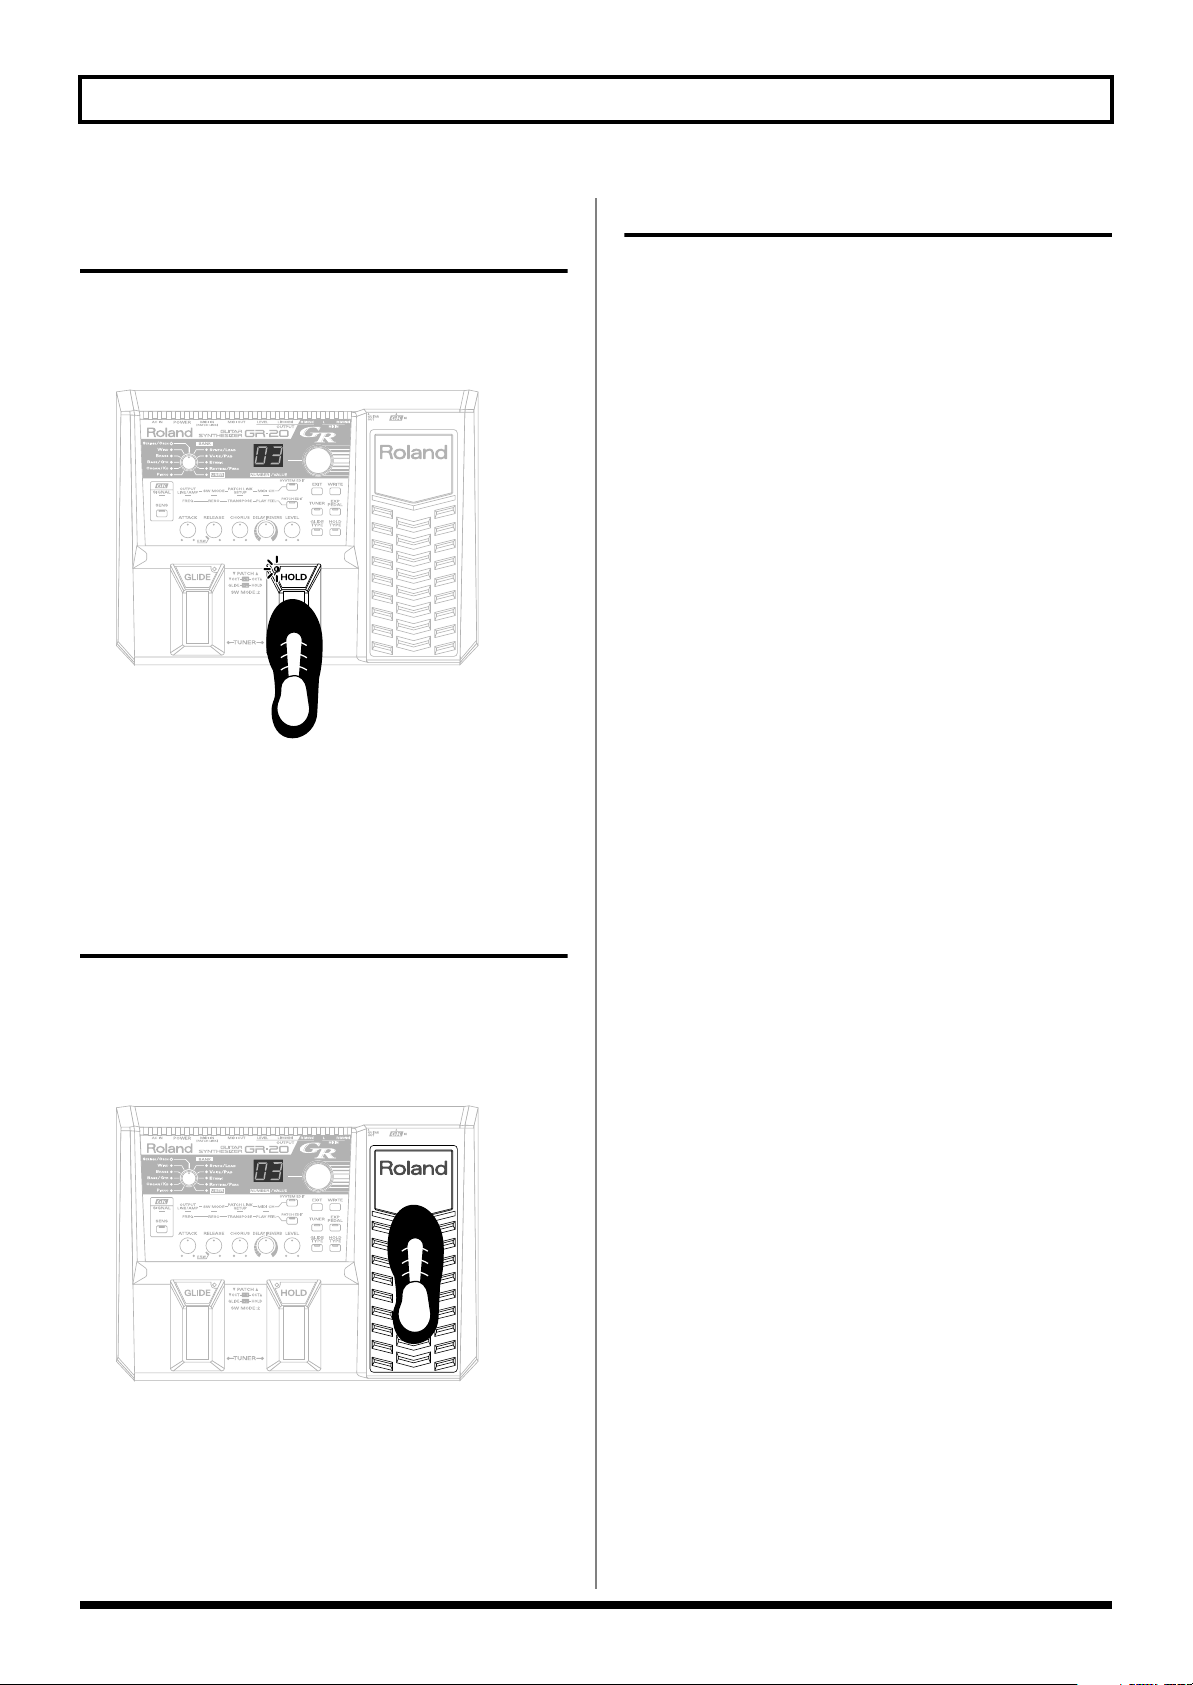
Using the Foot Pedal to Sustain the Sound (HOLD)
You can press the HOLD pedal to sustain the synth sound
you're playing. The effect will depend on the sound, and you
can also adjust the effect to your taste (p. 23).
fig.1-13(HOLD)
* The HOLD indicator will blink while you are pressing the
pedal.
Turning the Power Off
When you’re ready to turn off the power, be sure to do so in
the following order.
1.
Turn off the power of your amp.
2.
Turn off the power of the GR-20.
3.
Turn off the power of the device connected to MIX IN.
Using the Expression Pedal to Modify the Sound (EXP PEDAL)
You can use the expression pedal to continuously vary the
volume or tone of the synth sound.
The effect will depend on the sound, and you can also adjust
the effect to your taste (p. 23).
fig.1-14(EXP)
16
 Loading...