


GO:PIANO with Alexa Built-in
Setup Guide
This manual explains how to make initial settings for GO:PIANO with Alexa Built-in (this unit) using the
GO:PIANO Alexa Setup app and the Amazon Alexa app.
MEMO
5 This manual explains the procedure when using a smartphone. References in this manual to
“smartphone” should be read as indicating the mobile device that you’re using.
5 Depending on the mobile device that you’re using, there might be dierences in the design of the
screens or the steps of operation.
5 This document explains the specications of this unit at the time that the document was created. For
this reason, changes might occur in the design of the screens or the steps of operation.
Before using this unit, carefully read “USING THE UNIT SAFELY” and “IMPORTANT NOTES” (the leaet
“USING THE UNIT SAFELY” and the Owner’s Manual). After reading, keep the document(s) where it will be
available for immediate reference.
Amazon, Alexa and all related logos are trademarks of Amazon.com, Inc. or its aliates.
Company names and product names appearing in this document are registered trademarks or trademarks of their respective owners.
© 2019 Roland Corporation
02

Workow for Using Amazon Alexa with This Unit
Turn on the power of this unit (p. 3)
Connect the AC adapter, and turn on the power of this unit.
%
Check the wireless LAN settings of your smartphone
(p. 3)
Make sure that this unit can connect to the wireless network
that you’re using.
%
Install the app on your smartphone
In order to use Amazon Alexa with this unit, you’ll need to
install the following app.
5 “GO:PIANO Alexa Setup” App (p. 4)
5 “Amazon Alexa” App (p. 5)
%
Create accounts with internet services and log in
In order to use Amazon Alexa with this unit, you’ll need to
perform the following steps.
5 Creating a Roland Account (p. 7)
5 Logging In to Your Roland Account (p. 9)
5 Linking Your Roland Account with the Piano Partner 2 App
(p. 10)
5 Connecting this unit to the internet (p. 11, p. 12)
5 Creating an Amazon Account (p. 15)
5 Log In to Your Amazon Account (p. 15)
%
Check that Alexa works (p. 16)
Speak a basic command to Alexa, and conrm that Alexa is
working.
%
Try speaking a voice command
Enable the “GO:PIANO Skill” and use your voice to operate this
unit.
5 Enable the “GO:PIANO Skill” (p. 18)
5 Use Your Voice to Operate This Unit (p. 19)
“Ask GO:PIANO, play For Elise.”
2

1. Turn the Unit’s Power On
1 2 3 4
Once this unit is able to connect to the wireless network and can use
the Amazon Alexa app (described below), the following steps will not
be necessary next time.
5 “2. Check Your Smartphone’s Wireless LAN Settings” (p. 3)
5 “3. Installing the GO:PIANO Alexa Setup App” (p. 4)
5 “4. Installing the Amazon Alexa App” (p. 5)
5 “5. Preparing to Use Amazon Alexa” (p. 7)
If you have completed preparations, refer to “6. Using Voice
Commands” (p. 16).
5-2 5-3 5-4 5-5 5-6 5-7 6-1 6-2 6-35-1
1. Turn the Unit’s Power On
2. Check Your Smartphone’s Wireless LAN
Settings
You’ll use your smartphone to set up this unit. When doing so, this unit
must be connected to the same wireless network as your smartphone.
Before you begin setup, check the wireless network to which your
smartphone is connected.
1. Press the smartphone’s home button.
The smartphone’s home screen appears.
2. Tap the “settings” icon.
The setting screen appears.
3. Tap “Wi-Fi.”
iOS users
If the settings of this unit have not been completed, the indicator
slowly blinks orange.
MEMO
If this unit is being operated on batteries, it cannot be connected to a
wireless network (you cannot use the Amazon Alexa functionality). If
you want to connect to a wireless network, connect the AC adaptor to
a power supply.
Android users
The wireless networks near the smartphone are shown.
4. Verify that the smartphone is connected to a
wireless network.
If the smartphone is not connected to a wireless network, connect
it.
MEMO
The wireless network to which the smartphone is connected must
be the same as the wireless network to which you intend to connect
this unit. If there are two or more wireless networks that can connect
to the internet, make sure that the smartphone and this unit are
connected to the same wireless network.
3
3. Installing the GO:PIANO Alexa Setup App
1 2 3 4
5-2 5-3 5-4 5-5 5-6 5-7 6-1 6-2 6-35-1
Points to Check for the
Wireless LAN
5 Connect to a wireless LAN device (wireless
LAN router) that supports the IEEE
802.11b/g/n (2.4 GHz band) standards.
5 This unit’s wireless LAN function must
connect using the 2.4 GHz band (it does
not support the 5 GHz band). If your
wireless LAN router is set to the 5 GHz
band, change its settings so that the 2.4
GHz band can be used.
5 Make sure that your smartphone is
connected to the 2.4 GHz band wireless
LAN. If you don’t know the frequency band
to which your smartphone is connected,
check the settings of the wireless LAN
router, or use the name (SSID) of the
connected wireless network as a guide.
5 This unit cannot connect to an ad hoc
mode (or peer to peer type) wireless
network.
5 The range to which the radio signal
can reach will dier depending on your
wireless LAN router. Use your smartphone
or another device to verify that you are
within reach of the radio signal.
5 No fee arises from the use of this unit, but
any fees arising from your connection
to the internet or communication via
the internet are the responsibility of the
customer.
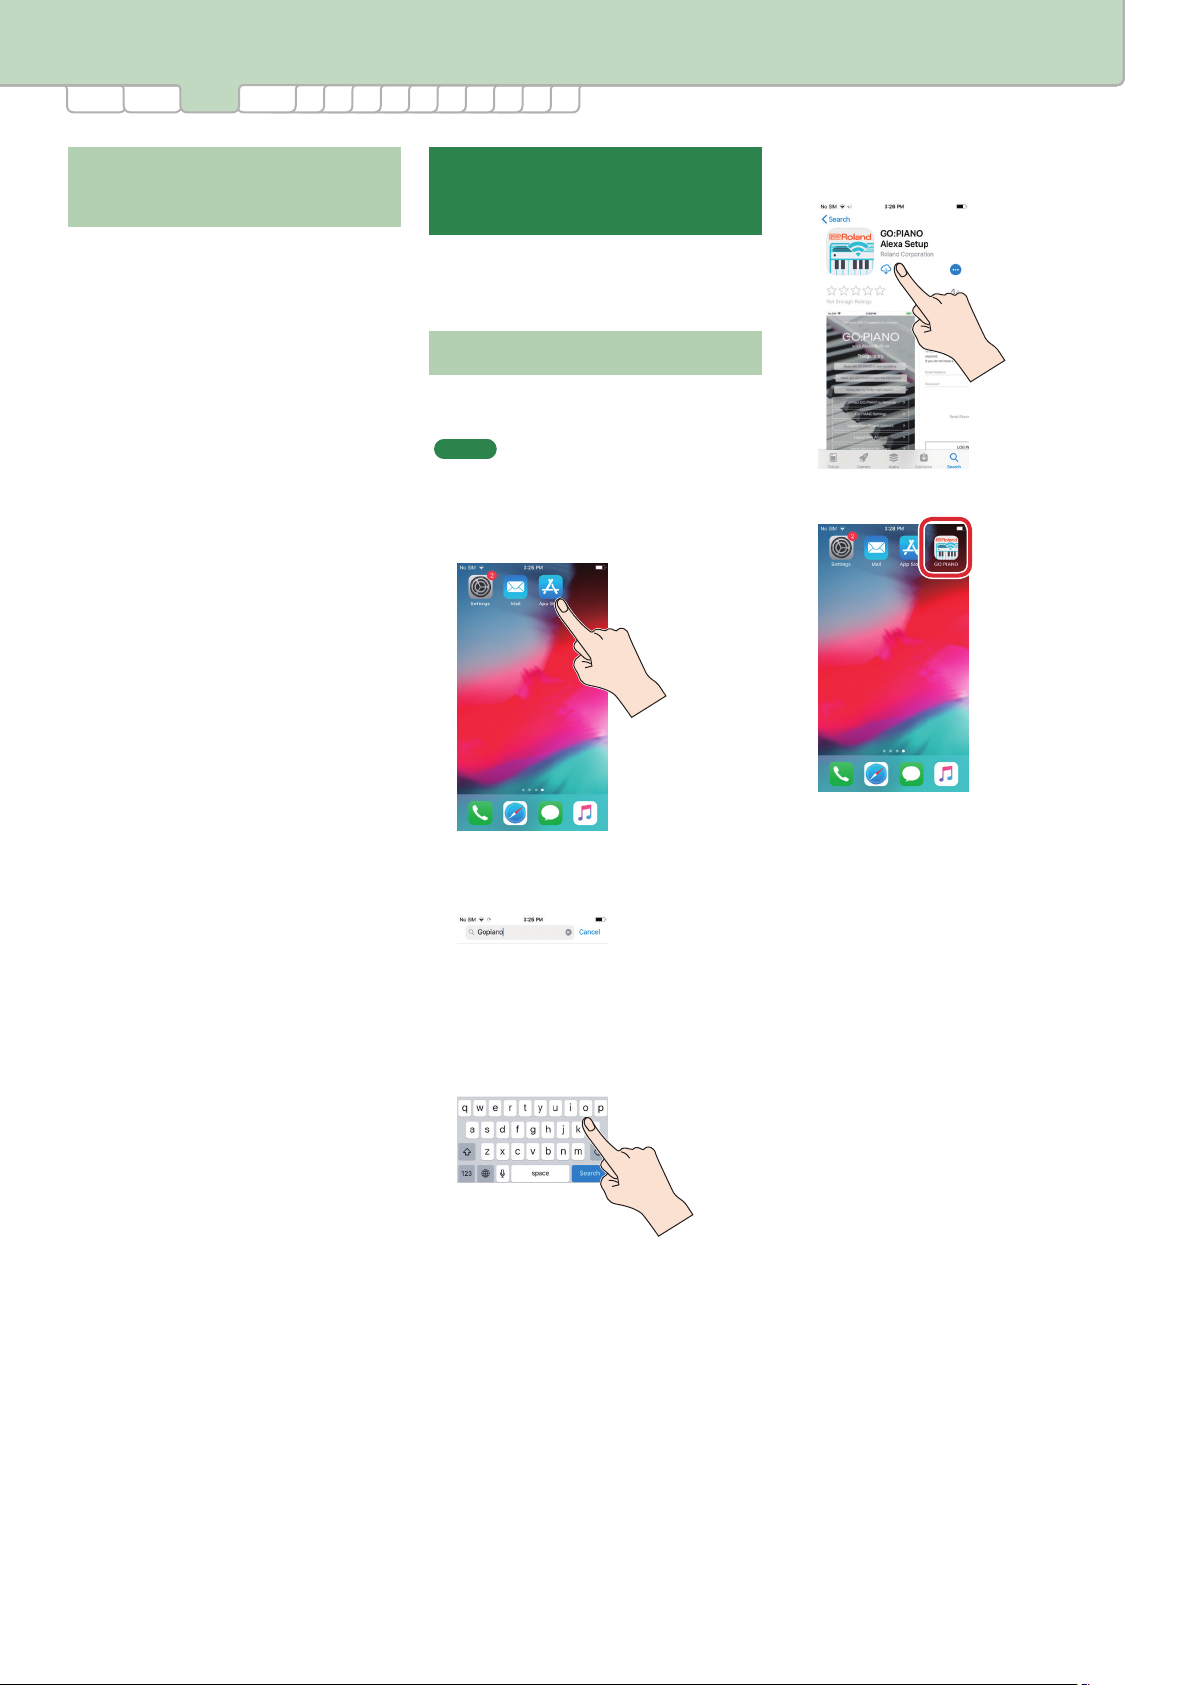
3. Installing the
GO:PIANO Alexa Setup App
In order to connect this unit to the internet,
install the “GO:PIANO Alexa Setup” app on
your smartphone.
If Using an iOS Smartphone
If you are using an iOS smartphone, install the
app as follows.
MEMO
iOS 11 or later must be installed on the iOS
smartphone that you’re using.
1. Tap the “App Store” icon.
2. Enter “gopiano” or “roland” as the
keyword, and search for the app.
3. Find and install the
“GO:PIANO Alexa Setup” app.
The app is installed.
4

4. Installing the Amazon Alexa App
1 2 3 4
5-2 5-3 5-4 5-5 5-6 5-7 6-1 6-2 6-35-1
If Using an Android
Smartphone
If you are using an Android smartphone,
install the app as follows.
MEMO
Android 7.0 or later must be installed on the
Android smartphone that you’re using.
1. Tap the “Google Play” icon.
The app is installed.
4. Installing the
Amazon Alexa App
If Using an iOS Smartphone
If you are using an iOS smartphone, install the
app as follows.
MEMO
iOS 11 or later must be installed on the iOS
smartphone that you’re using.
1. Tap the “App Store” icon.
2. Enter “gopiano” or “roland” as the
keyword, and search for the app.
3. Find and install the
“GO:PIANO Alexa Setup” app.
2. Enter “Alexa” as the keyword, and
search for the app.
3. Find and install the “Amazon
Alexa” app.
5

4. Installing the Amazon Alexa App
1 2 3 4
The app is installed.
5-2 5-3 5-4 5-5 5-6 5-7 6-1 6-2 6-35-1
The app is installed.
If Using an Android
Smartphone
If you are using an Android smartphone,
install the app as follows.
MEMO
Android 7.0 or later must be installed on the
Android smartphone that you’re using.
1. Tap the “Google Play” icon.
2. Enter “Alexa” as the keyword, and
search for the app.
3. Find and install the “Amazon
Alexa” app.
6
5. Preparing to Use Amazon Alexa
1 2 3 4 5-1
5-2 5-3 5-4 5-5 5-6 5-7 6-1 6-2 6-3
5. Preparing to Use Amazon
Alexa
Using the “GO:PIANO Alexa Setup” app, make
settings so that this unit can connected to the
internet.
MEMO
Here we explain the case when using an
iOS smartphone. If you’re using an Android
smartphone, the procedure is the same.
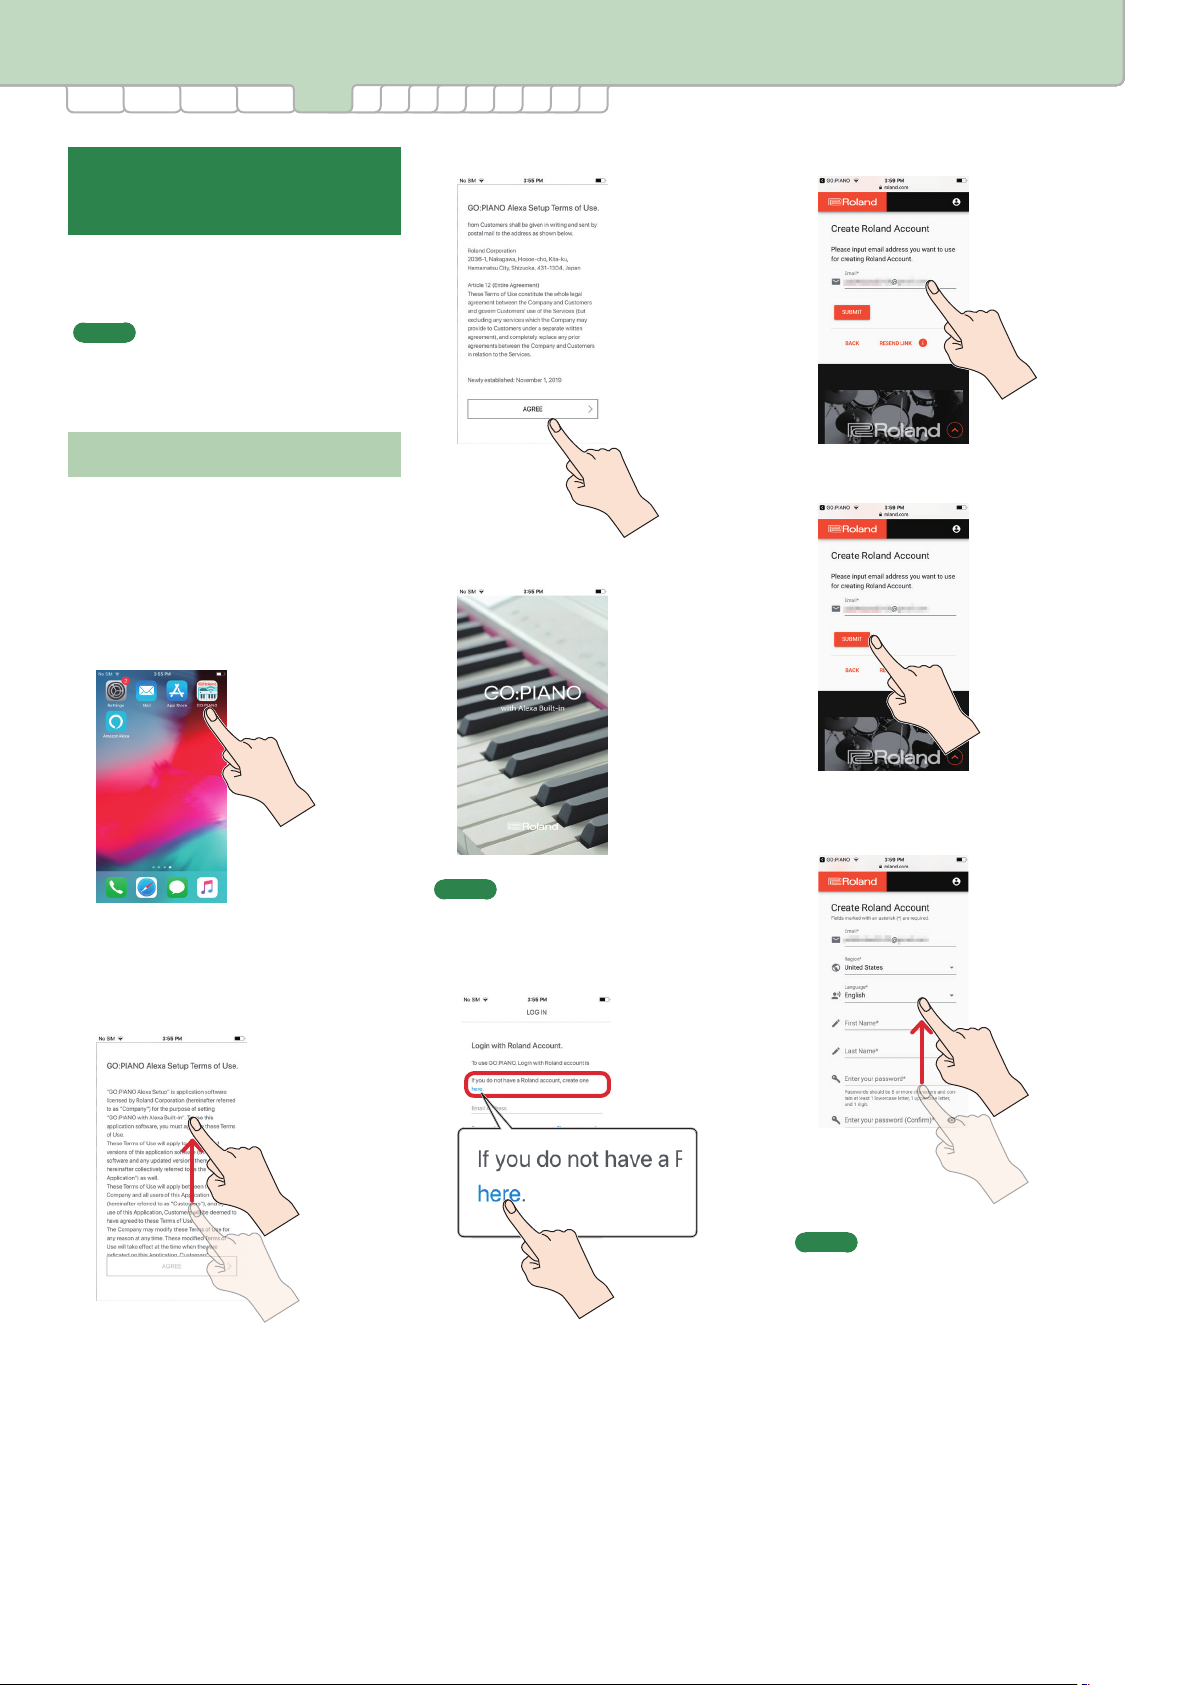
5-1. Creating a Roland Account
In the “GO:PIANO Alexa Setup” app you can
create the “Roland account” that you’ll need in
order to connect to the internet. If you don’t
have a “Roland account,” create an account as
follows.
1. Start “GO:PIANO Alexa Setup”
App.
3. Tap the [AGREE] button.
The “GO:PIANO Alexa Setup” app starts.
5. Enter your email address.
6. Tap the [SUBMIT] button.
The “GO:PIANO Alexa Setup Terms of Use”
appears.
2. Read “GO:PIANO Alexa Setup
Terms of Use.”
7. Enter the information required to
create an account.
MEMO
If you have a Roland account, proceed to “5-2.
Logging In to Your Roland Account” (p. 9).
4. Tap “here.”
MEMO
Items marked with an “*” in the screen are
required.
7

5. Preparing to Use Amazon Alexa
1 2 3 4 5-1
5-2 5-3 5-4 5-5 5-6 5-7 6-1 6-2 6-3
8. If you accept the “TERMS OF USE”
and “PRIVACY POLICY” in the app,
tap the check box to add a check
mark.
MEMO
When you tap [TERMS OF USE] or [PRIVACY
POLICY] in the screen, the respective content
appears.
9. Tap the [SIGN UP] button.
10.
Tap the [CLOSE] button.
11.
An email is sent to the mail address
you specied in step 7, instructing
you how to authenticate the
account. Open the email using
your email app.
The account is authenticated. Your browser
starts, and displays the Roland account
login screen.
13.
Enter the email address and
password that you registered in
step 7.
Account creation has been accepted. A screen
appears, explaining the steps you need to
take in order to authenticate the account.
12.
In the email, tap the [ACTIVATE
ACCOUNT] button.
14.
Tap the [LOG IN] button.
8

5. Preparing to Use Amazon Alexa
1 2 3 4 5-2
15.
Add a check mark to the product
categories in which you are
interested.
Product information will be sent to the
registered email address. Register for this
information as desired.
16.
Tap the [SAVE] button.
6-35-3 5-4 5-5 5-6 5-7 6-1 6-25-1
The display switches to the top page of the
Roland account.
The Roland account has been created.
5-2. Logging In to Your Roland
Account
Log in to the Roland account that you created.
1. Tap the “GO:PIANO Alexa Setup”
app.
The “GO:PIANO Alexa Setup” app starts.
Account registration is conrmed.
17.
Tap the [CLOSE] button.
2. Enter your login name (the email
address that you registered) and
your password.
9

5. Preparing to Use Amazon Alexa
1 2 3 4 5-3
5-2 6-35-4 5-5 5-6 5-7 6-1 6-25-1
3. Tap the [LOG IN] button.
The rst time that you log in to your
Roland account, information is shown on
how you can link your Roland account with
the Piano Partner 2 app.
What is Piano Partner 2?
When you create a Roland account,
space is provided in the cloud for
saving your performance data.
When you save performance data from
this unit to the cloud, it is saved in this
space.
Piano Partner 2 is an app that supports
your performance by wirelessly
connecting your smartphone and
piano. Performance data saved to the
cloud can also be played back from
Piano Partner 2.
You can use this unit’s functions and
the cloud storage functions even if
Piano Partner 2 is not installed on your
smartphone.
5-3. Linking Your Roland Account
with the Piano Partner 2 App
Make settings for linking your Roland account
with the Piano Partner 2 app’s account.
1. Using your email app, open
the email that was sent in the
previous step.
At this time, a linking code is sent by email
to the email address that you registered.
MEMO
This information is not shown if you have
already linked the account and app. Proceed
to “5-4. Connecting This Unit with Your
Smartphone” (p. 11).
2. Note the code that is included in
the email.
Note the code
Use the following space to make a
note of the code from the email.
10
5. Preparing to Use Amazon Alexa
1 2 3 4 5-4
5-2 5-3 6-35-5 5-6 5-7 6-1 6-25-1
3. Open the
“GO:PIANO Alexa Setup” app
once again, and enter the code
from the email.
4. Tap the [CONTINUE] button.
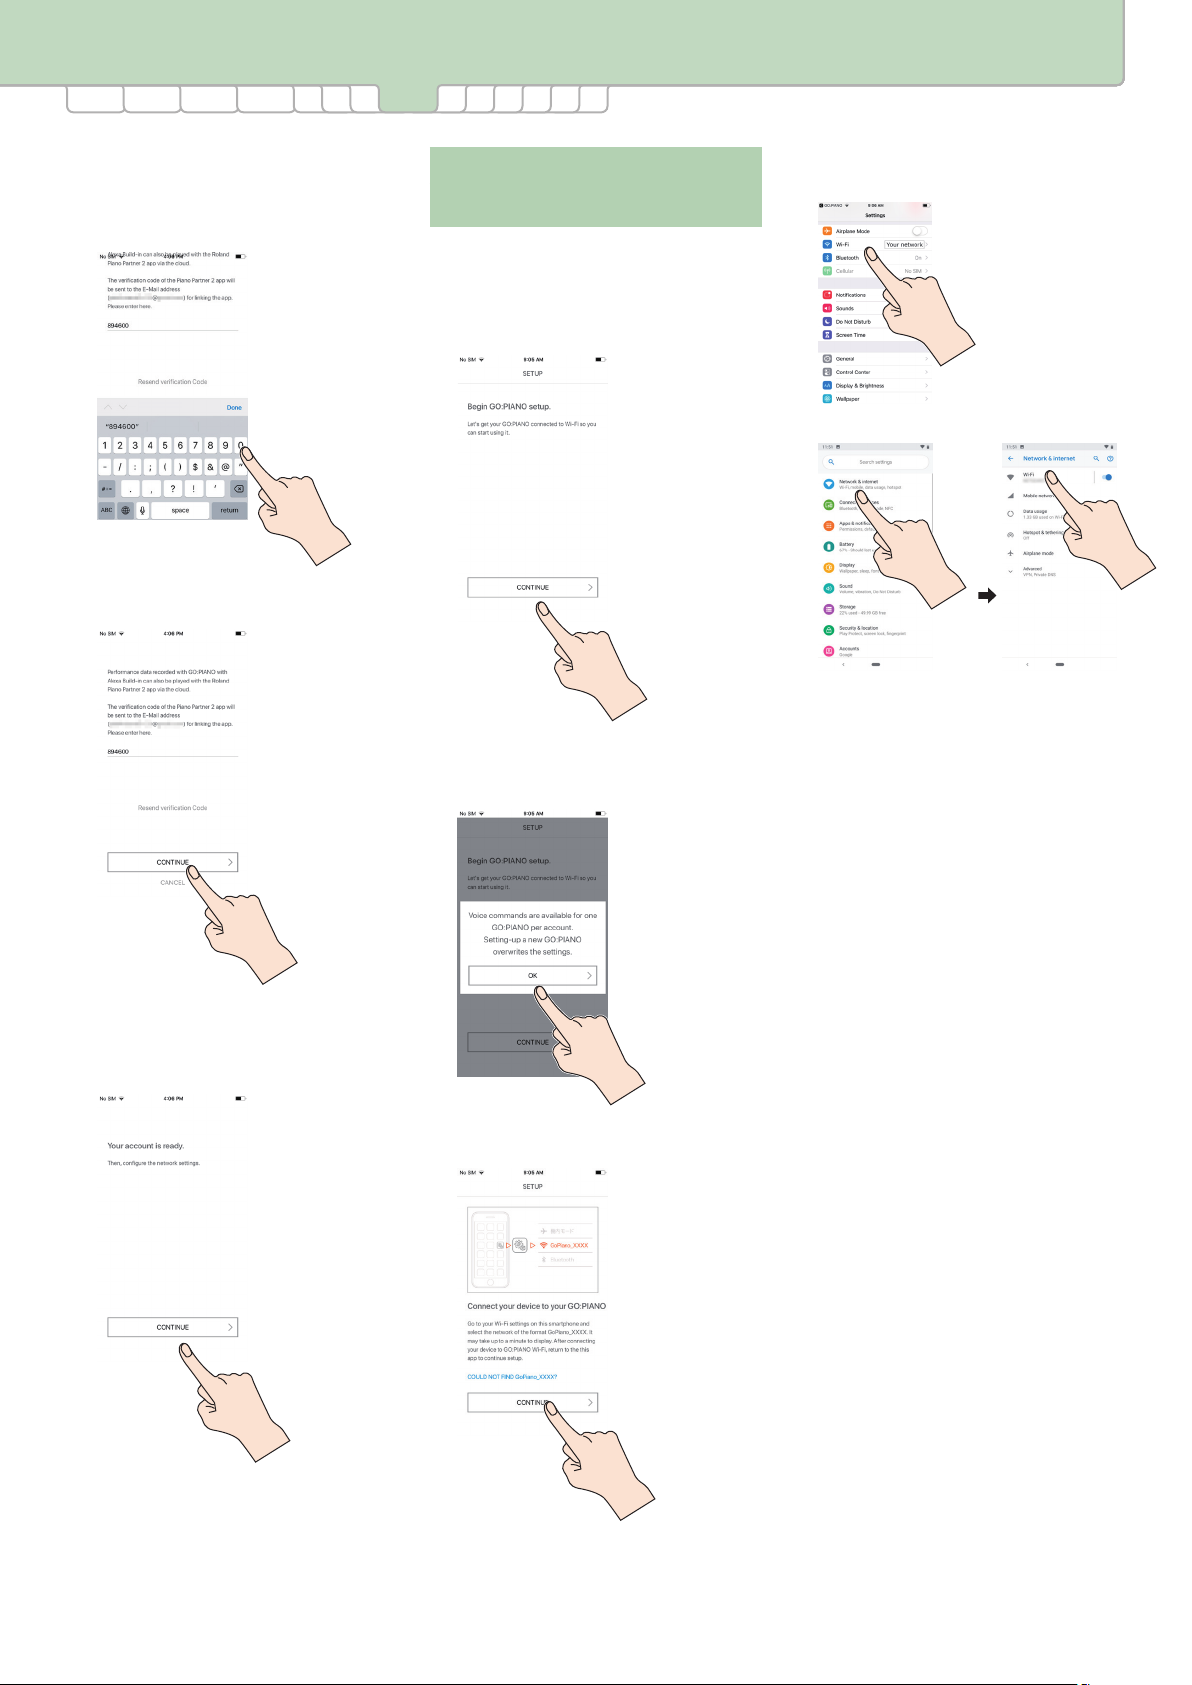
5-4. Connecting This Unit with
Your Smartphone
Connect this unit with your smartphone. You’ll
make network settings for this unit from your
smartphone.
1. Tap the [CONTINUE] button.
4. Tap “Wi-Fi.”
iOS users
Android users
Your Roland account and Piano Partner 2
app are linked.
5. Tap the [CONTINUE] button.
The wireless networks near the
smartphone are shown.
2. Read the message, and tap the
[OK] button.
3. Tap the [CONTINUE] button.
The setting screen appears.
11

5. Preparing to Use Amazon Alexa
1 2 3 4 5-5
5-2 6-35-45-3 5-6 5-7 6-1 6-25-1
5. Tap the wireless network that is
shown as “GoPiano_****.”
MEMO
5 Four alphanumeric characters are shown
in “****.”
5 If this unit’s Alexa indicator is not lit
orange, “GoPiano_****” is not shown in
the wireless networks. In this case, press
and hold this unit’s [Action] button for six
seconds or longer.
5-5. Connect This Unit to the
Network
1. Tap the [CONTINUE] button.
4. Tap the [CONNECT] button.
Connection to the wireless network
begins.
A check mark is shown for “GoPiano_****.”
MEMO
In some cases, an indication of “Not
connected to the internet” might be shown,
but this is not a problem.
6. Tap [<GO:PIANO] in the upper
left of the screen, or return to the
“GO:PIANO Alexa Setup” app.
2. Select the wireless network to
which you want to connect this
unit.
Connection to the wireless network has
occurred.
5. Tap the [CONTINUE] button.
3. Enter the password for the
wireless network.
12

5. Preparing to Use Amazon Alexa
1 2 3 4 5-6
5-2 6-35-45-3 5-5 5-7 6-1 6-25-1
5-6. Creating an Amazon
Account
In order to use Amazon Alexa functionality
on this unit, you’ll need an “Amazon” account.
If you don’t have an account, create one as
follows.
MEMO
This document explains the specications of
this unit at the time that the document was
created. For this reason, changes might occur
in the design of the screens or the steps of
operation.
1. Tap the [Get Started] button.
3. Enter the information required to
create an account.
4. Tap the [Create your Amazon
account] button.
5. Open the email using your email
app.
6. Note the code that is included in
the email.
2. Tap the [Create a new Amazon
account] button.
MEMO
If you have an Amazon account, enter your
login name (the registered email address) and
password, and tap the [Sign-In] button. Refer
to step 12 and following on p. 14.
The “Verify email address” screen appears.
An email is sent to the mail address you
specied in step 4, instructing you how to
authenticate the account.
Note the code
Use the following space to make a
note of the code from the email.
7. Open the
“GO:PIANO Alexa Setup” app
once again, and enter the code
from the email.
13

5. Preparing to Use Amazon Alexa
1 2 3 4 5-6
5-2 6-35-45-3 5-5 5-7 6-1 6-25-1
8. Tap the [Create your Amazon
account] button.
A message appears, asking you to allow
this unit to use Amazon services.
9. Tap the [Allow] button.
11.
Tap the [Next] button.
The Amazon account has been created.
12.
Tap the [CONTINUE SETUP] button.
14.
Tap the [DONE] button.
The following screen appears.
10.
Select the region in which you will
use Amazon services.
13.
Tap the [DONE] button.
14
5. Preparing to Use Amazon Alexa
1 2 3 4 5-7
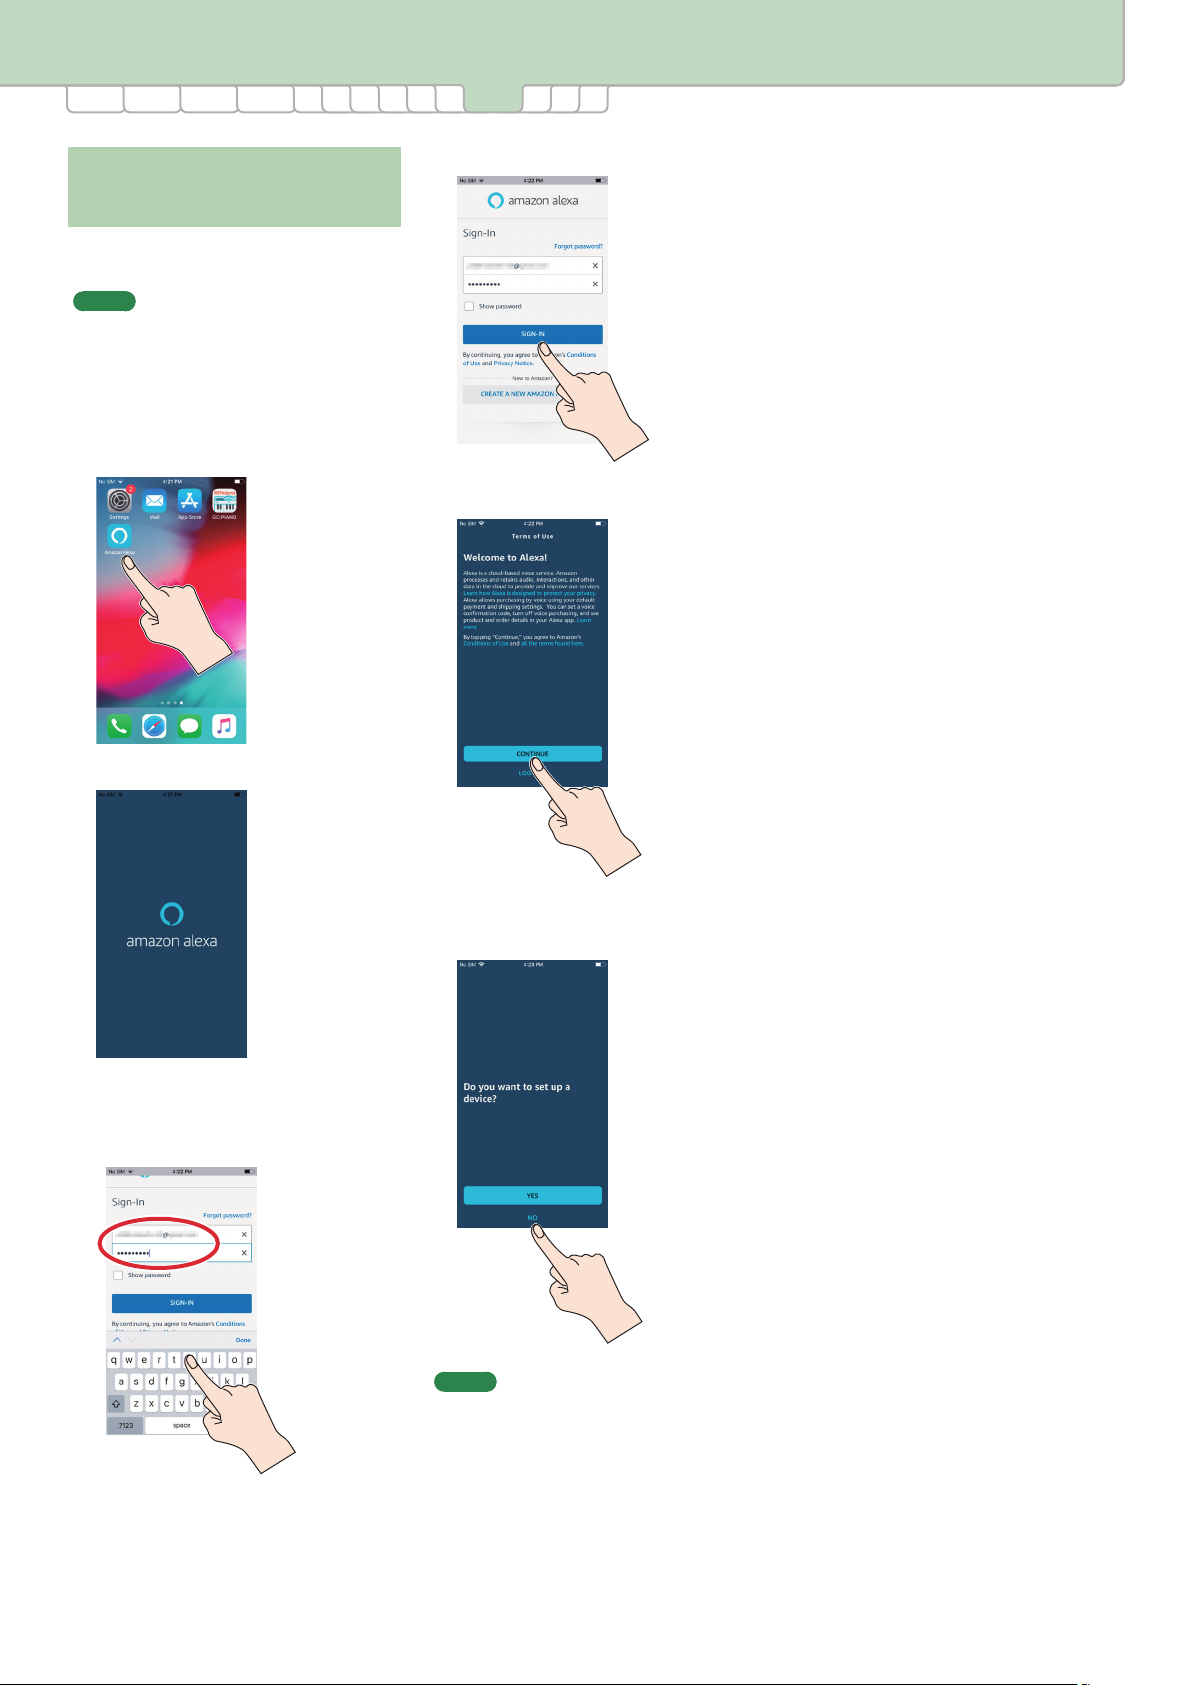
5-7. Log In to Your Amazon
5-2 6-35-45-3 5-5 5-6 6-1 6-25-1
3. Tap the [SIGN-IN] button.
Account
Using the Amazon account that you created,
sign in (log in) to Amazon.
MEMO
This document explains the specications of
this unit at the time that the document was
created. For this reason, changes might occur
in the design of the screens or the steps of
operation.
1. Tap the “Amazon Alexa” app.
4. Tap the [Next] button.
The “Amazon Alexa” app starts.
2. Enter your login name (the email
address that you registered) and
your password.
5. Tap the [NO] button.
In this screen, tap the [NO] button.
MEMO
The [YES] button is tapped when setting up
the Amazon Echo or a similar device.
6. Proceeding as directed by
the screen, enter the required
information.
15
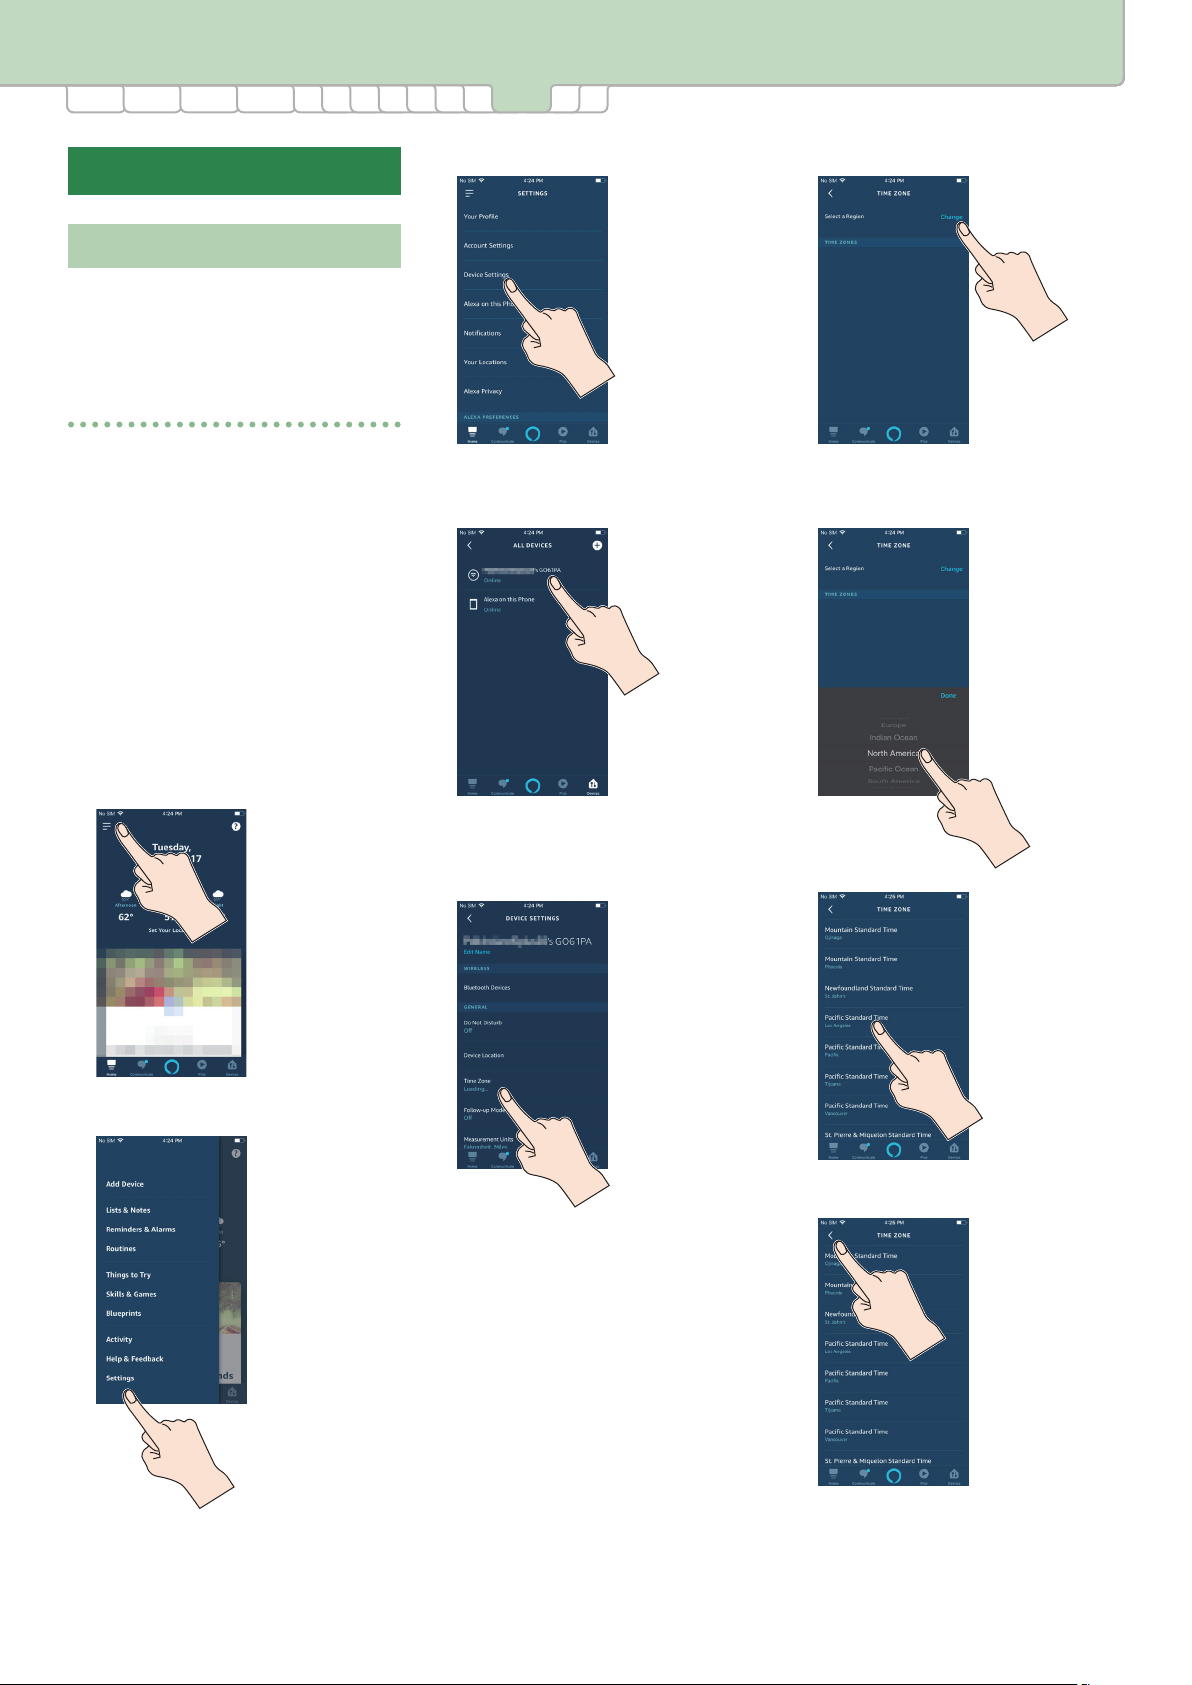
6. Using Voice Commands
1 2 3 4 6-1
5-2 5-3 5-4 5-5 5-6 5-7 6-36-25-1
3. Tap [Device Settings].
6. Using Voice Commands
6-1. Checking Operation
Alexa is Amazon’s cloud-based voice service.
To check whether your Amazon account is
working correctly, ask Alexa to tell you “the
time” or “the weather.”
Asking Alexa the time
1. Speaking toward this unit, say
“Alexa, what time is it?”
Alexa responds with the current time.
If the response was the correct time,
proceed to “Asking Alexa the weather” (p.
17).
If Alexa responded with the incorrect
time
In the Amazon Alexa app, specify the time
zone (standard time) of this unit.
4. Tap the piano for which you want
to make settings.
6. Tap [Change].
7. Select the region in which you
live.
1. In the Amazon Alexa app, tap [Ξ]
(menu).
2. Tap [Settings].
If the piano is powered-on, it is indicated
as “Online.”
5. Tap [Time Zone].
8. Tap [<].
If the time zone has not been specied, the
indication “Loading...” appears.
16
6. Using Voice Commands
1 2 3 4 6-1
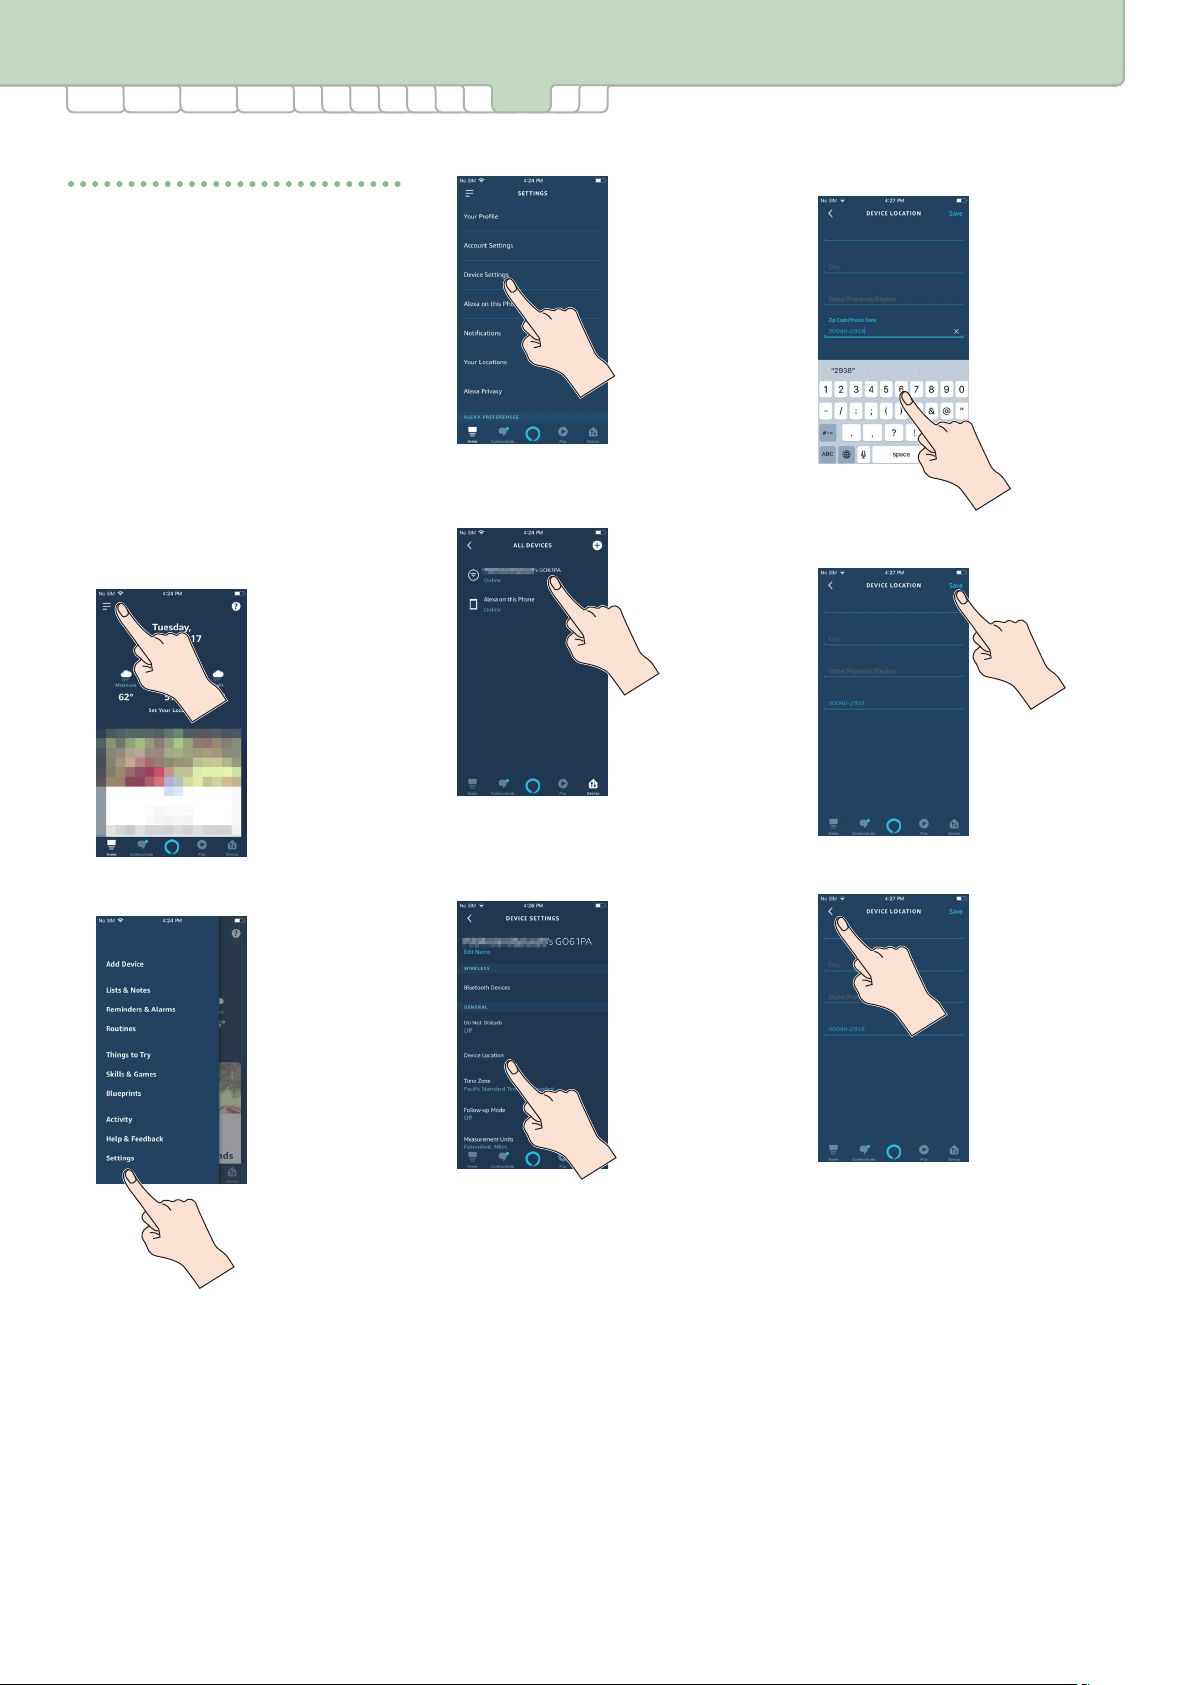
Asking Alexa the weather
5-2 5-3 5-4 5-5 5-6 5-7 6-36-25-1
3. Tap [Device Settings].
1. Speaking toward this unit, say
“Alexa, what’s the weather?”
Alexa tells you the weather forecast for
your region.
If the weather forecast was correct for
your region, proceed to “6-2. Enable the
“GO:PIANO Skill”” (p. 18).
If Alexa instructed you to specify your
address
In the Amazon Alexa app, specify the location
of this unit.
1. In the Amazon Alexa app, tap [Ξ]
(menu).
4. Tap the piano for which you want
to make settings.
6. Enter the address at which you
are living.
7. Tap [Save].
2. Tap [Settings].
If the piano is powered-on, it is indicated
as “Online.”
5. Tap [Device Location].
If the location has not been specied,
nothing is shown here.
8. Tap [<].
17
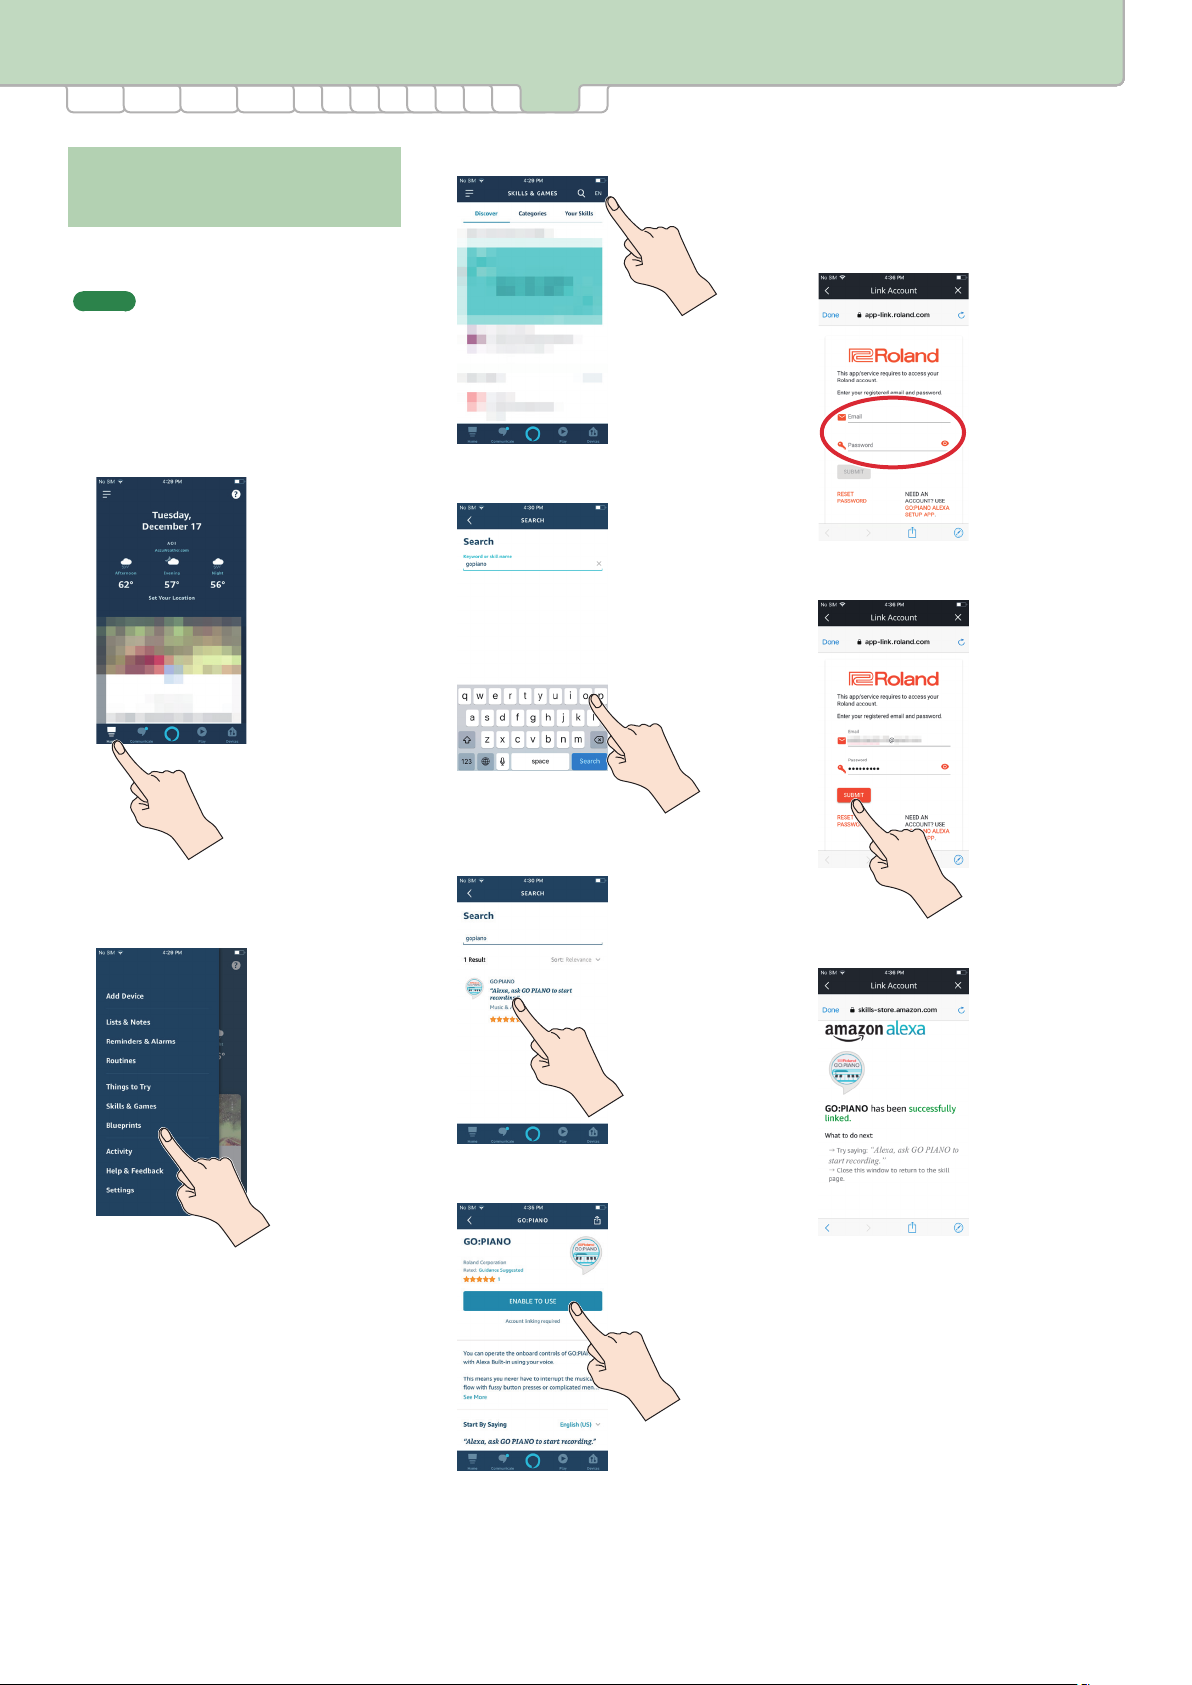
6. Using Voice Commands
1 2 3 4 6-2
6-2. Enable the “GO:PIANO
5-2 5-3 5-4 5-5 5-6 5-7 6-36-15-1
3. Tap the “magnifying glass” icon.
Skill”
If you enable Alexa’s “GO:PIANO skill,” you’ll be
able to operate this unit using your voice.
MEMO
This document explains the specications of
this unit at the time that the document was
created. For this reason, changes might occur
in the design of the screens or the steps of
operation.
1. Tap the “Home” icon.
4. Search for “gopiano.”
7. Enter your Roland account log-in
name (the email address that you
registered) and password.
The Roland account and Alexa skill are
linked (associated).
8. Tap the [SUBMIT] button.
2. Tap [Ξ] (Menu), and then tap
[Skills & Games].
5. Tap “GO:PIANO.”
The following screen appears.
6. Tap the [ENABLE TO USE] button.
This unit’s Alexa skill is now enabled.
18

6. Using Voice Commands
1 2 3 4 6-3
5-2 5-3 5-4 5-5 5-6 5-7 6-26-15-1
6-3. Use Your Voice to Operate This Unit
After enabling the skill, try talking to this unit to operate it.
MEMO
Alexa skill is available only in English and Japanese.
“Alexa,”
1. S ay “Alexa,”
At this time, this unit’s indicator is lit blue and light blue alternately.
2. S ay “Ask GO:PIANO, play For Elise.”
The built-in song “Für Elise” plays.
3. S ay “Alexa, ask GO:PIANO to stop.”
Song playback stops.
MEMO
The latest skills are listed on the GO:PIANO skills page.
In the skill page, tap [See More].
If GO:PIANO with Alexa Built-in with Alexa Built-In Won’t Connect to the Internet
Check the following points, and try the suggested actions.
Items to Check Action
Could the unit be operating on
batteries?
Could the Amazon Alexa indicator be
lit light blue?
Is the wireless network strong
enough?
Could there be a microwave oven or
other device nearby that might cause
electromagnetic interference?
Could the wireless network to which
your smartphone is connected be
dierent than the wireless network to
which this unit is connected?
Could you be connected to a wireless
LAN router on the 2.4 GHz band?
Are you signed in to your Amazon
account and your Roland account?
If the unit is operating on batteries, it cannot use a wireless network. Connect the AC adaptor, and turn
the power o and on again.
Immediately after this unit is powered-on, it will be in the process of connecting to the network, so
Amazon Alexa will not respond. Wait until the Amazon Alexa indicator is unlit.
Move your wireless LAN router closer to this unit, or remove the source of electromagnetic interference.
The wireless network to which the smartphone is connected must be the same as the wireless network
to which you intend to connect this unit. If there are two or more wireless networks that can connect to
the internet, make sure that the smartphone and this unit are connected to the same wireless network.
This unit’s wireless LAN function must connect using the 2.4 GHz band (it does not support the 5 GHz
band). If your wireless LAN router is set to the 5 GHz band, change its settings so that the 2.4 GHz band
can be used.
In order to operate the piano with your voice, you must sign into both your Amazon account and your
Roland account.
Use the GO:PIANO Alexa Setup app to log in to your Roland account, and sign in to your Amazon
account. Next, in order to use the Amazon Alexa app to enable the GO:PIANO skill, sign in to your
Amazon account and then sign into to your Roland account.
19
 Loading...