

Roland Go:Piano Owner’s Manual
Main features
5 This instrument features an ivory-feel keyboard with box-shaped keys for the
serious player. Your piano performances can utilize the full expressive range from
delicate pianissimo to dynamic fortissimo. There’s a full complement of highquality tones that include electric piano, organ, and voice.
5 Bluetooth functionality allows interoperation with your smartphone or tablet.
Music or the audio from a music video on your smartphone or tablet can be
played via this instrument while you perform along with the music. You can also
use this instrument’s keyboard to play a music app that supports Bluetooth MIDI,
such as Piano Partner 2.
5 The portable all-in-one design is compact and light-weight, featuring battery-
powered operation, built-in high-quality speakers, and a stylish shape that’s free
of protrusions.
Contents
Owner’s Manual
Operating Guide . . . . . . . . . . . . . . . . . . . . . . . . . . . . . . . . . . . . . . . . . 2
Selecting a Tone . . . . . . . . . . . . . . . . . . . . . . . . . . . . . . . . . . . . . . . 2
Adjusting the Overall Volume . . . . . . . . . . . . . . . . . . . . . . . . . . 2
Making Various Settings (Setting) . . . . . . . . . . . . . . . . . . . . . . . 2
Playing Internal Songs . . . . . . . . . . . . . . . . . . . . . . . . . . . . . . . . . 2
Changing the Pitch Range of the Keyboard in Octave
Steps . . . . . . . . . . . . . . . . . . . . . . . . . . . . . . . . . . . . . . . . . . . . . . . . . 2
Sounding the Metronome . . . . . . . . . . . . . . . . . . . . . . . . . . . . . 2
Recording Your Performance . . . . . . . . . . . . . . . . . . . . . . . . . . . 3
Display . . . . . . . . . . . . . . . . . . . . . . . . . . . . . . . . . . . . . . . . . . . . . . . 3
Edit a Value / Return to the Previous Screen / Reset the
Sound . . . . . . . . . . . . . . . . . . . . . . . . . . . . . . . . . . . . . . . . . . . . . . . . 3
Connecting Equipment . . . . . . . . . . . . . . . . . . . . . . . . . . . . . . . . 4
Installing Batteries . . . . . . . . . . . . . . . . . . . . . . . . . . . . . . . 4
Attaching the Music Rest . . . . . . . . . . . . . . . . . . . . . . . . . . . . . . . 4
Turning the Power On/O . . . . . . . . . . . . . . . . . . . . . . . . . . . . . . 4
Convenient Functions . . . . . . . . . . . . . . . . . . . . . . . . . . . . . . . . . . . 5
Loading a Song (SONG LOAD) . . . . . . . . . . . . . . . . . . . . . . . . . . 5
Deleting a Song (SONG DEL) . . . . . . . . . . . . . . . . . . . . . . . . . . . 5
Backing-Up or Restoring Songs and Settings . . . . . . . . . . . . 5
Backing Up (BACKUP) . . . . . . . . . . . . . . . . . . . . . . . . . . . . 5
Setting Various Functions (Setting) . . . . . . . . . . . . . . . . . . . . . . 6
Basic Operations in Setting . . . . . . . . . . . . . . . . . . . . . . . . . . . . . 6
Adjusting the Reverberation (REVERB LEVEL) . . . . . . . 6
Transposing the Pitch (TRANSPOSE) . . . . . . . . . . . . . . . 6
Matching the Pitch with Other Instruments
(MASTER TUNE) . . . . . . . . . . . . . . . . . . . . . . . . . . . . . . . . . . 6
Selecting How the Piano Tone is Sounded for
Internal Songs (SONG PIANO) . . . . . . . . . . . . . . . . . . . . . 7
Changing the Time Signature (BEATS) . . . . . . . . . . . . . 7
Specifying the Feel (Touch Response) of the
Keyboard (KEY TOUCH) . . . . . . . . . . . . . . . . . . . . . . . . . . . 7
Emitting an Operation Sound When You Press a
Button (TOUCH SOUND) . . . . . . . . . . . . . . . . . . . . . . . . . . 7
Muting the Speakers When Headphones Are
Connected (SP PHONES SW) . . . . . . . . . . . . . . . . . . . . . . 7
Making the Power Automatically Turn o After a
Time (AUTO OFF) . . . . . . . . . . . . . . . . . . . . . . . . . . . . . . . . . 7
Adjusting the Brightness of the Display (LCD
CONTRAST) . . . . . . . . . . . . . . . . . . . . . . . . . . . . . . . . . . . . . . 7
Restoring (RESTORE). . . . . . . . . . . . . . . . . . . . . . . . . . . . . . 6
Restoring the Factory Settings (FACTORY RST) . . . . . . . . . . . 6
Using the Bluetooth® Functionality . . . . . . . . . . . . . . . . . . . . . . 8
Here’s What You Can Do . . . . . . . . . . . . . . . . . . . . . . . . . . . . . . . . 8
Using Bluetooth Audio . . . . . . . . . . . . . . . . . . . . . . . . . . . . . . . . . 8
Registering a Mobile Device (Pairing) . . . . . . . . . . . . . . 8
Connecting an Already-Paired Mobile Device . . . . . . 8
Transferring MIDI Data . . . . . . . . . . . . . . . . . . . . . . . . . . . . . . . . . 9
Disabling the Bluetooth Functionality . . . . . . . . . . . . . . . . . . . 9
Troubleshooting . . . . . . . . . . . . . . . . . . . . . . . . . . . . . . . . . . . . . . . . . 10
USING THE UNIT SAFELY . . . . . . . . . . . . . . . . . . . . . . . . . . . . . . . . . 11
IMPORTANT NOTES . . . . . . . . . . . . . . . . . . . . . . . . . . . . . . . . . . . . . . 11
Placing This Unit on a Stand . . . . . . . . . . . . . . . . . . . . . . . 12
Main Specications. . . . . . . . . . . . . . . . . . . . . . . . . . . . . . . 12
Before using this unit, carefully read “USING THE UNIT SAFELY” and “IMPORTANT NOTES” (the leaet “USING THE UNIT SAFELY” and the Owner’s
Manual (p. 11)). After reading, keep the document(s) where it will be available for immediate reference.
Copyright © 2017 ROLAND CORPORATION
Operating Guide
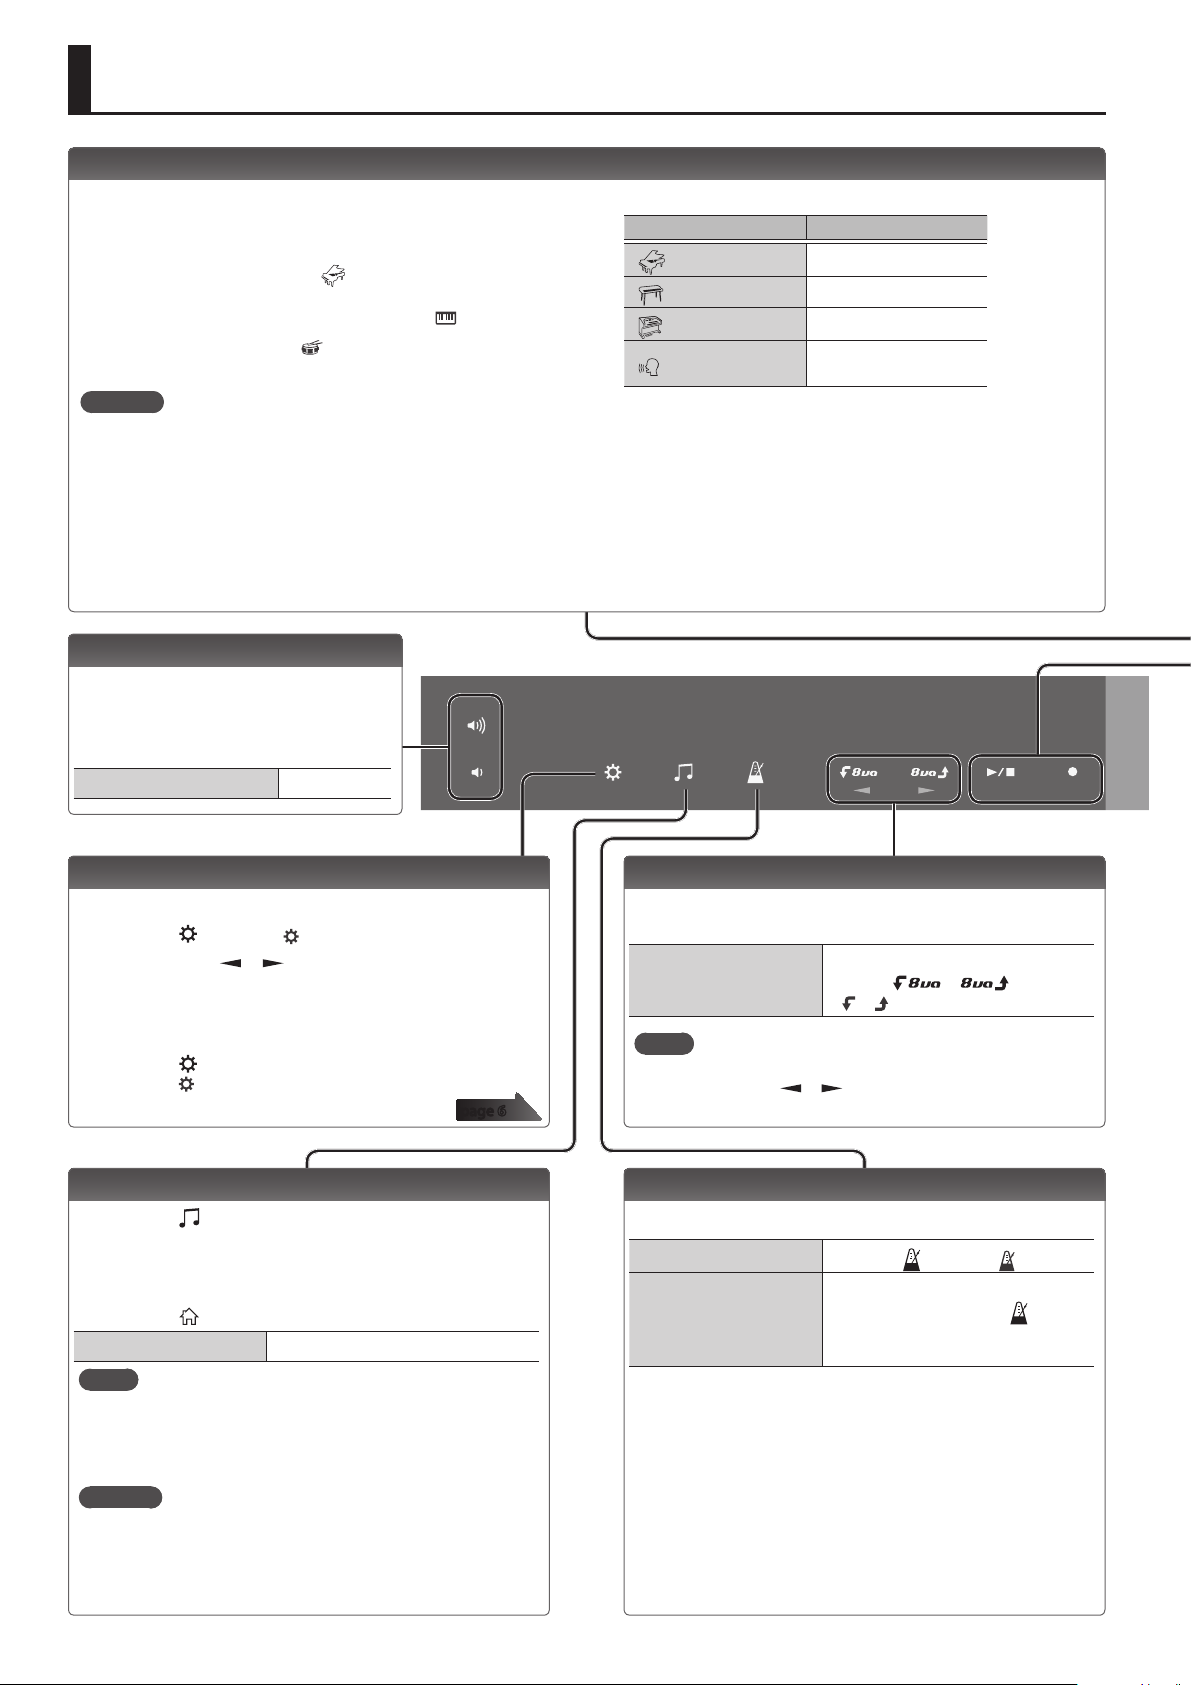
Selecting a Tone
This instrument lets you enjoy playing with a variety of tones.
The tones are organized into four groups, and are assigned to the
corresponding tone buttons.
1. Press a tone button such as [
buttons.
If a tone other than a drum tone is selected: “
If a drum tone is selected: “
Reference
For details on the tones, refer to “Tone List” at the end of this
manual.
Adjusting the Overall Volume
You can adjust the volume of the speakers
if you’re using the built-in speakers, or the
volume of the headphones if headphones
are connected.
Adjusting the volume 0–20
], and then use the [–] [+]
” is lit
” is lit
Tone groups
Button Explanation
[
[
[
[
] button
] button
] button
] button
Piano tones
Electric Piano tones
Organ tones
Voice, drum, and other
tones
Making Various Settings (Setting)
You can make various detailed settings for this instrument.
1. Press the [
2. Use the cursor [ ] [ ] buttons to select an item.
3. Use the [–] [+] buttons to change the value of the setting.
Depending on the item that is selected, proceed with the
operation by pressing a button such as [s].
4. Press the [
settings (“
] button (“ ” is lit).
] button when you’re nished making
” is unlit).
page 6
Playing Internal Songs
1. Press the [ ] button.
2. Use the [–] [+] buttons to select a song.
3. Press the [s] button to play (“J” is lit).
4. Press the [s] button to stop (“J” is unlit).
5. Press the [
Play/stop
MEMO
5 When selecting a song, you can long-press the [–] or [+] button
to rapidly switch between songs.
5 To change the tempo of an internal song, change the
metronome tempo.
Reference
5 For details on the internal songs, refer to “Song List” at the end
of this manual.
5 You can choose how the piano tone is sounded for internal
songs (p. 7).
] button to return to the play screen.
Press the [s] button.
Changing the Pitch Range of the Keyboard in Octave Steps
You can change the pitch range of the keyboard in steps of one
octave.
Changing the keyboard
pitch range
MEMO
When you’re making settings (p. 6), these buttons also operate
as cursor buttons [ ] [ ] to select parameters.
-3–0–3
Use the [
(“ ” “ ” are lit).
] [ ] buttons
Sounding the Metronome
Here’s how to sound the metronome.
Sound the metronome
Change the tempo
Press the [
5–300
While holding down the [
so that “TEMPO” is indicated, use the
[–] [+] buttons.
] button (“ ” is lit).
] button
2
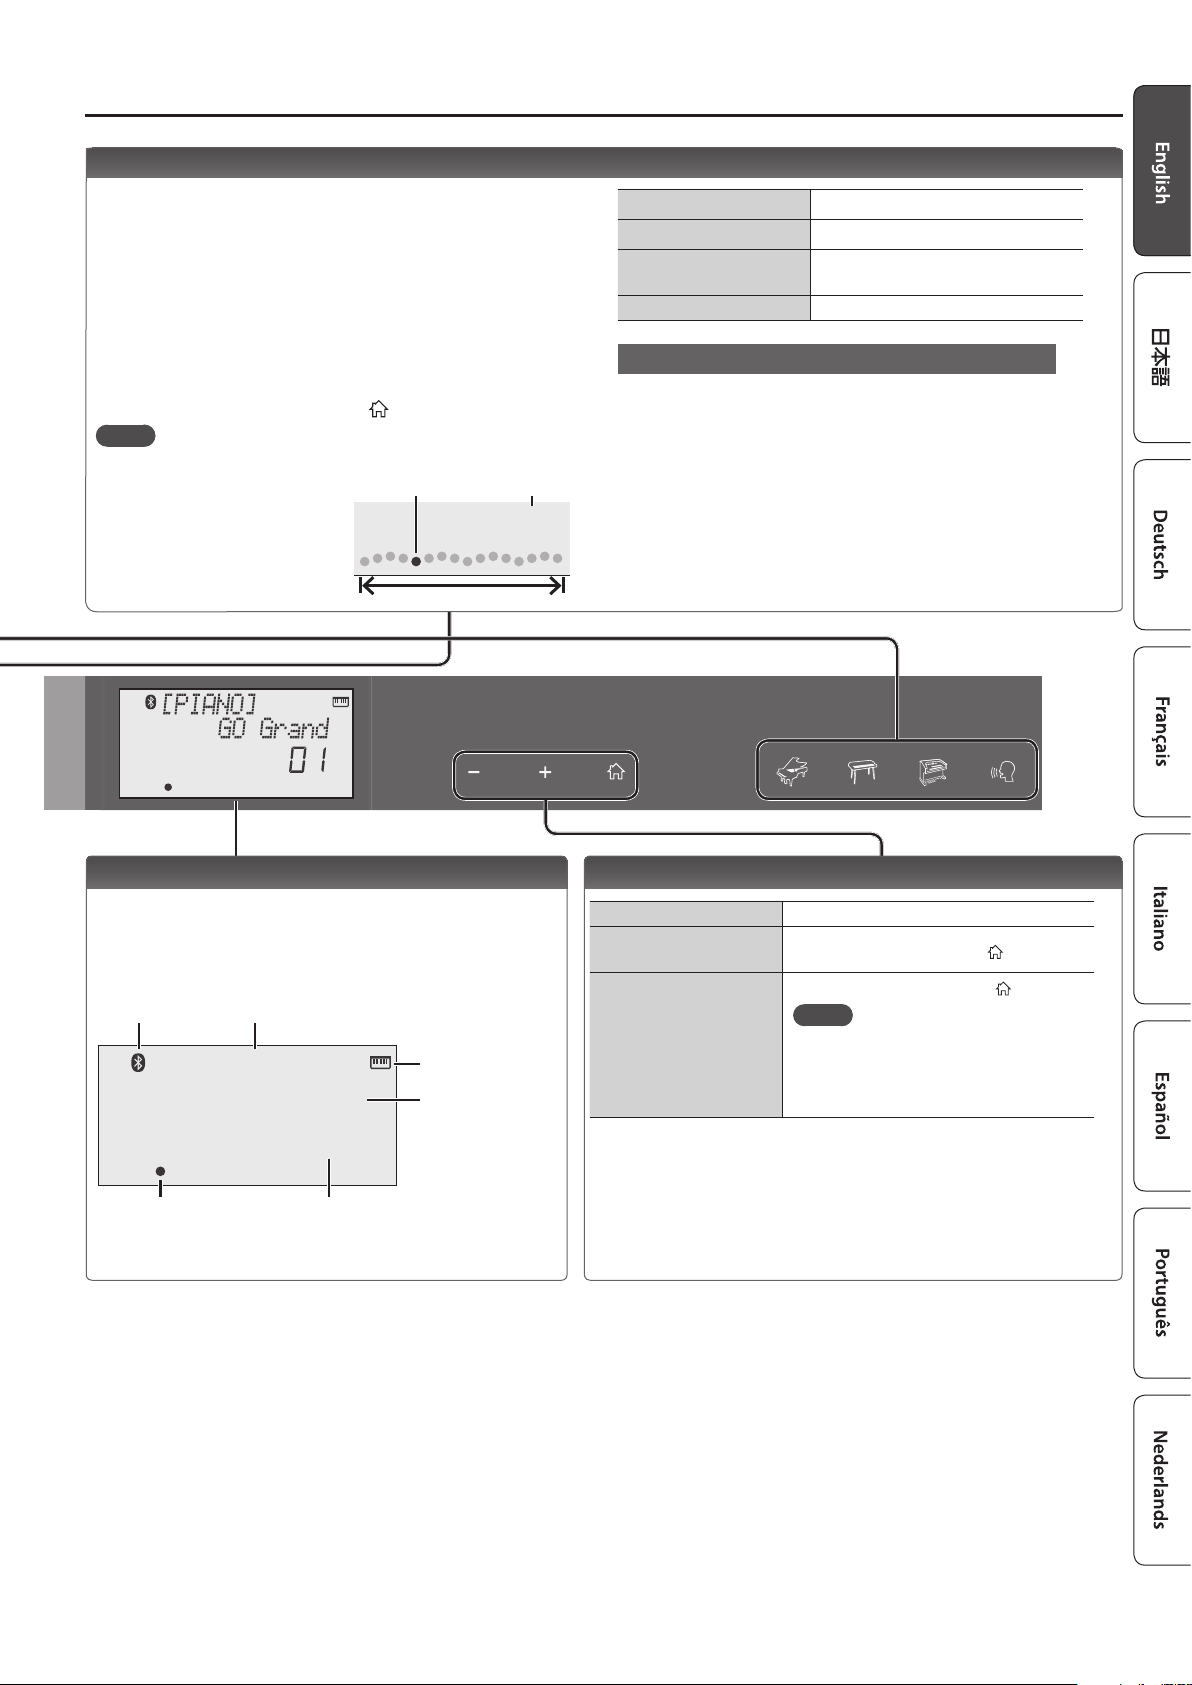
Recording Your Performance
Here’s how to record and play back your performance.
* It is not possible to overdub-record.
1. Select the sound that you want to record.
2. Press the [t] button (“t” blinks).
3. Press a key to start recording (“t” is lit).
4. Press the [s] button to stop (“t” is unlit).
A conrmation message appears.
5. To save, press the [s] button.
If you decide to cancel, press the [
MEMO
5 You can back up the recorded song to your computer (p. 5).
5 When playing back or
recording, the screen
shows the current measure,
and the status of play/
record progress within one
measure.
Play/record position
] button.
One measure
Current measure
001
Operating Guide
Play/stop
Record-standby
Record
Load a dierent song Loading a saved song (Load) (p. 5).
If you want to record along with the metronome
Start the metronome beforehand, and specify the time
signature and tempo (p. 2).
In step 2 (“t” is blinking) when you press the [s] button,
you’ll hear a two-measure count, and then recording starts.
Press the [s] button.
While stopped, press the [t] button.
From record-standby, press the
[s] button.
Display
This shows the sound group name, the sound name, and the
functions that are currently enabled.
Screen at startup (the Play screen)
Bluetooth
connection status
[PIANO]
Tone group name
GO Grand
A non-drum tone
is selected
Tone name
01
Playback/
recording position
Tone number
Current measure (only during
playback/recording)
Edit a Value / Return to the Previous Screen / Reset the Sound
Edit a value Use the [–] [+] buttons.
Return to the previous
screen
Reset the sound settings
In an edit screen, press the [
In the play screen, press the [ ] button.
MEMO
A piano sound (number 01) is selected,
and the sound settings are reset.
This is convenient if the sound settings
have been inadvertently changed.
] button.
3
Operating Guide
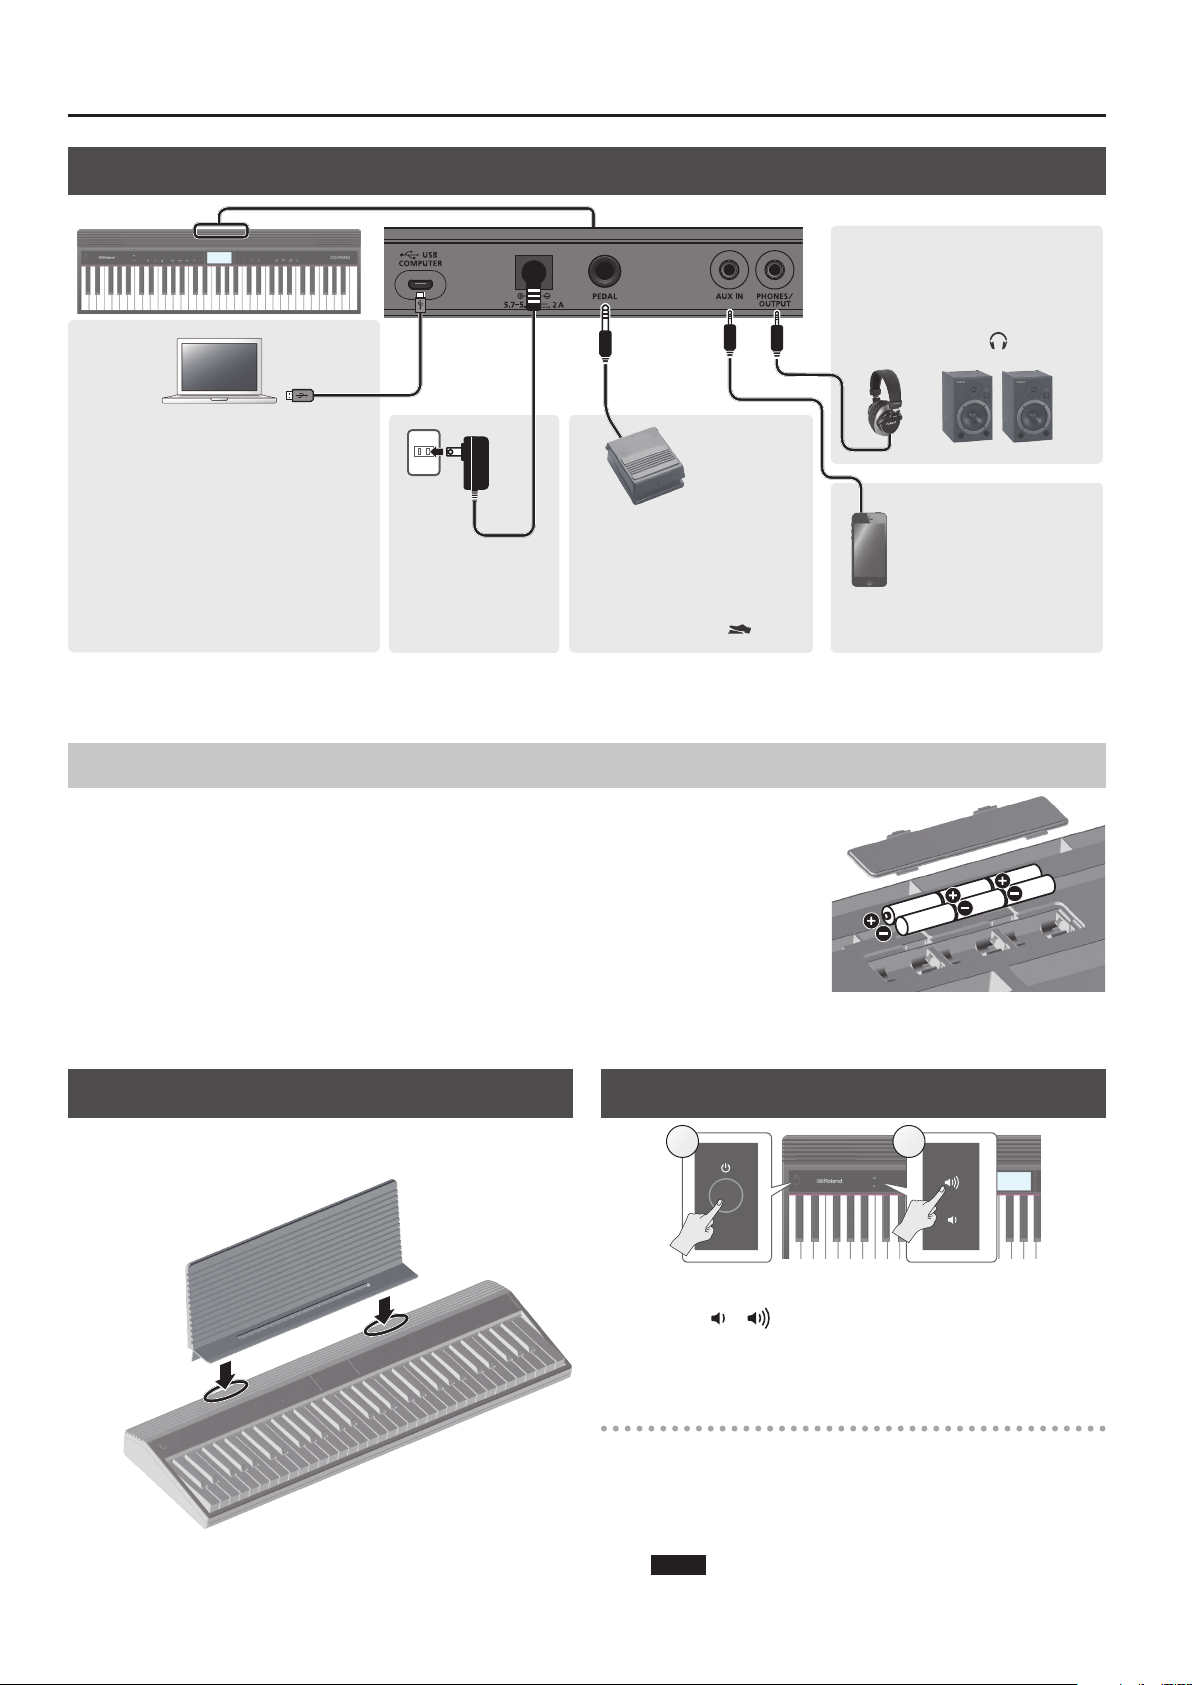
Connecting Equipment
USB COMPUTER port
You can connect this instrument to your
computer, and back up this instrument’s
song data and settings to the computer
(p. 5).
Use a commercially available micro USB
cable to make this connection.
* Do not use a micro USB cable that is
designed only for charging a device.
Charge-only cables cannot transmit
data.
DC IN jack
Connect the
included AC adaptor
here.
PEDAL jack
You can connect a pedal switch
(sold separately: DP series) and
use it as a hold pedal.
If this is connected, “
” is lit.
PHONES/OUTPUT jack
You can connect headphones
(sold separately) or an amplied
speaker here.
If this is connected, “
” is lit.
AUX IN jack
You can connect an
audio player (such as a
smartphone) or other
audio playback device
here.
* To prevent malfunction and equipment failure, always turn down the volume, and turn o all the units before making any connections.
Installing Batteries
If six commercially available nickel-metal hydride or alkaline AA batteries are installed, you can
perform without connecting an AC adaptor.
1. Remove the battery cover.
2. Install the batteries, making sure that they are oriented correctly.
3. Close the battery cover.
* If you handle batteries improperly, you risk explosion and uid leakage. Make sure that you
carefully observe all of the items related to batteries that are listed in “USING THE UNIT SAFELY” and
“IMPORTANT NOTES” (leaet “USING THE UNIT SAFELY” and Owner’s Manual p. 11).
* When the batteries run low, the display indicates “Battery Low!” When this occurs, install fresh batteries.
Attaching the Music Rest
Attach the included music rest to the instrument as shown in the
illustration.
Turning the Power On/O
1 2
Press the [L] (power) button to turn on the power.
1.
2. Use the [ ] [ ] buttons to adjust the volume.
3. To turn the power o, hold down the [
button for one second or longer.
L
](power)
Concerning the Auto O function
The power to this unit will be turned o automatically after a
predetermined amount of time has passed since it was last used for
playing music, or its buttons or controls were operated (Auto O function).
If you do not want the power to be turned o automatically, disengage
the Auto O function (p. 7).
NOTE
To restore power, turn the power on again.
4
 Loading...