


Introduction (A Message from the Developers) ....................2
Main Features ...................................................3
Getting Ready ...................................................4
Panel Descriptions ..............................................4
An Overview of This Unit ........................................8
Turning the Power On/O .......................................9
Playing the Demo Songs ........................................9
Basic Operation ................................................10
Synthesizer (Performing) ........................................11
Selecting a Tone ................................................11
Performance Settings ..........................................12
Using Performance Functions ...................................13
Modifying the Sound in Real Time ..............................14
Registering/Recalling Favorite Sounds (Favorites) ...............16
Synthesizer (Editing) ............................................17
Editing a Studio Set ............................................17
Editing a Tone ..................................................17
Editing the Eects ..............................................18
Saving a Studio Set, Tone, or Song ..............................18
Quick Start
Deutsch Français Italiano Español Português NederlandsEnglishEnglish
Sampler (Recording) ............................................19
Playing Samples ................................................19
Sampling ......................................................20
Sequencer (Creating Songs) .....................................21
Selecting/Playing a Song .......................................21
Recording a Performance (Realtime Recording) .................22
DAW Control ....................................................24
Loading a MIDI Track into a DAW Software ......................24
Using This Unit as a DAW Controller .............................25
Settings ........................................................26
Detailed Function Settings (Menu) ..............................26
Backing Up User Data (Backup/Restore) .........................26
Restoring the Factory Settings (Factory Reset) ...................26
USING THE UNIT SAFELY .........................................27
IMPORTANT NOTES .............................................27
Printed Manual
• Quick Start (this document)
This explains basic operation.
• Using the Unit Safely (separate leaet)
Read this rst. It contains precautions that you must observe in
order to use the unit safely.
To obtain the PDF manual
1.
Enter the following URL in your computer.
http://roland.cm/om
2. Choose “FA-06,” “FA-07,” or “FA-08” as the product
name.
Before using this unit, carefully read the sections entitled “USING THE UNIT SAFELY” and “IMPORTANT NOTES” (leaet “USING THE UNIT SAFELY” and Quick
Start (p. 27)). These sections provide important information concerning the proper operation of the unit. Additionally, in order to feel assured that
you have gained a good grasp of every feature of your new unit, read Quick Start in its entirety. This Quick Start should be saved and kept on hand as a
convenient reference.
Copyright © 2017 ROLAND CORPORATION
PDF Manual (download from the Web)
The PDF manual lets you quickly search for a term, and view a section of interest
simply by clicking a link.
• Reference Manual
This explains all functions of the unit.
• Parameter Guide
This explains parameters of the unit.
• Sound List
This lists the sounds that are built into the unit.
• Application Guide
This explains specic ways to play and use the unit.
• MIDI Implementation
This is detailed reference material regarding MIDI messages.
Introduction (A Message from the Developers)
Taking the “Work” Out of the Music Workstation
Workstations play an important role in a wide range of creative activity including performance on stage and music production in
the studio, and are used by numerous musicians and creative people.
Not content with simply making a convenient product that lets you do a variety of things, Roland has rethought and redesigned
a new workstation with a new philosophy: regardless of how times and technologies may change, deliver maximum support for
creating new music, with creativity as the top priority. That’s the FA-06/07/08.
In developing the FA-06/07/08, the rst thing we wanted to do was to shorten the start-up time. Even if you turn on the power the
moment you want to play, your musical ideas might disappear if it takes your instrument several minutes to get ready. If this has
ever happened to you, you’ll appreciate the value of quick startup.
The sampler is designed to read directly from the SD card, so you won’t have to wait for data to be loaded into memory. Operation
is simple; just tap a pad to play sounds. It’s an ideal match for most music scenes today.
The high-quality sounds inherited directly from the agship INTEGRA-7 sound module are ample for live performance or
production, and have expressive power that will spark your inspiration even during casual everyday playing. The SuperNATURAL
synth tones are compatible with the INTEGRA-7, allowing you to add sounds from the incredible variety available on the Axial
sound library site. Sounds in internal wave memory can also be replaced with your own favorites. By supporting a stupendous
library, our goal has been to create an instrument that you’ll use for years to come.
By simplifying the steps required for track-making, the non-stop recording feature is an indispensable sequencer function for
today’s workstation; it lets you immerse yourself in song production without interrupting your creative ow.
So that your musical ideas and phrases can be smoothly moved to your DAW, there’s a multi-track export function that lets you
individually export MIDI track as audio data. Of course you can also export as a two-channel mix or as SMF data.
To integrate smoothly into a DAW-based music production system, the FA-06/07/08 connects easily to your computer, and
provides a DAW controller function that lets you use it as a sound module, controller, and interface.
You want to be able to create new music from a blank slate. That’s why we’ve left behind the production workow of the past, and
redesigned this system for a new workow that integrates with your DAW.
The FA-06/07/08 is the workstation that’s been newly reborn from zero.
We hope that your inspirations born from zero will give birth to new music with your FA-06/07/08.
The FA-06/07/08 development team
*1 Axial is a sound library site from which you can download additional sounds for Roland synthesizers.
http://axial.roland.com/
2

Main Features
The Sound Engine of the Flagship Model
• A top-class sound engine is built in, providing the latest SuperNATURAL Acoustic, SuperNATURAL
Synth, and PCM sounds, as well as support for expansion slots to accommodate Wave expansion
sounds.
• The SuperNATURAL synth tones are completely compatible with the INTEGRA-7. Tone import is also
supported, and you can take advantage of an enormous sound library including sounds provided via
the Axial sound library site.
• The SuperNATURAL acoustic tones have been selected mainly from piano, electric piano, organ, bass, guitar, strings, and drums. They bring cuttingedge expressive power to your live performances and music productions.
Powerful Eect System with MFX on All Parts
• Giving you freedom for dynamic sound editing, MFX (multi-eect) is provided on all 16 parts.
• At the nal stage of the sound, there’s a “TFX” (total eect) that lets you enhance your performance by
adding an eect such as DJ FX Looper or Isolator.
• You can use the SOUND MODIFY knobs to control the versatile eects in real time.
Deutsch Français Italiano Español Português NederlandsEnglishEnglish
Use the Sample Pads to Freely Manipulate Vocals, Drums, Loops and Other Audio
• You can use the 16 pads to play audio samples.
• This is a great way to dramatically expand your possibilities for live performance or music production; you can
create remixes using vocal material, perform backed by audio loops, or include drum, guitar, or sound eects
in your performance.
• Use the clip board to rapidly rearrange your samples as needed for each live performance.
• Samples can also be triggered from the sequencer; this is a great way to use audio material for music
production as well as for performance.
• You can sample sound from a microphone or guitar. Sample editing is supported, and it’s easy to make quick
adjustments to the playback position or level of a sample.
• You can use existing audio material by importing WAV, AIFF, or MP3 data (for export, only WAV format is supported).
• In addition to sample playback, you can use the pads to control numerous functions. For example, you can use the pads as quick controllers to
mute specic parts while you perform, or to enter numeric values directly (PAD UTILITY).
New Sequencer Lets You Record Without Interrupting Your Imagination
• From any state of playing, you can press the record button to start recording the moment inspiration
strikes. This recording system ensures that your ideas will never be lost.
• Also provided is non-stop recording that minimizes the actions necessary for loop recording. This is a
fast way to create tracks that lets you generate ideas and phrases in rapid succession.
• Master eects such as reverb, chorus, and compressor are also provided, allowing you to bring your
song to an essentially complete state without needing to use any equipment other than this unit.
Music Production Linked with Your DAW; a Total Package of Sound Engine, Controllers, and Audio Interface
• You can control your DAW from this unit (DAW control maps are provided).
You can also use the keyboard and knobs to play a software synthesizer or the internal sound generator.
• MIDI tracks you’ve created on this unit can be quickly transferred to your DAW. You can also use multi-track export to convert
individual tracks to WAV format. Of course, this unit also lets you export as a two-track mix or as SMF data.
• This unit can be used as an audio interface; a microphone or guitar connected to this unit can be recorded into your DAW.
• Playback of the audio from your DAW is also supported.
3

Getting Ready
Panel Descriptions
Top Panel
1 2
9
11
Number
Area Name Explanation Page
By positioning your hand over the D-BEAM, you can apply various eects to the
sound.
Lets you play monophonic synthesizer sounds by moving your hand above the
D-BEAM controller.
Lets you register your favorite tones or studio sets to the [0]–[9] buttons.
Select tone category groups.
If the [FAVORITE] button or [BANK] button is lit, these buttons operate as [0]–[9]
buttons.
When executing functions that are displayed at the bottom of the screen, these
buttons operate as function buttons ([2]–[7] buttons).
Changes a value.
If you hold down the [SHIFT] button and turn the dial, the value changes more
greatly.
Changes a value.
If you press one of these buttons while holding down the other, the value changes
more rapidly. If you press one of these buttons while holding down the [SHIFT]
button, the value changes more greatly.
Move the cursor position up/down/left/right.
D-BEAM
1
SOUND MODIFY
2
3
Display
4
5
ARP/RHYTHM
6
D-BEAM controller
[SOLO SYNTH] button
[EXPRESSION] button Lets you use the D-BEAM controller to control the volume.
[ASSIGNABLE] button Lets you assign various parameters of functions that modify the sound in real time.
[1]–[6] knobs Control the parameters that you’ve selected by the [SELECT] button.
[SELECT] button Selects the group of parameters that is controlled by the [1]–[6] knobs.
[PREVIEW] button Auditions the currently selected tone while this button is held down.
[FAVORITE] button
FAVORITE [BANK] button
Tone buttons
([0]–[9])
Display Shows various information depending on operation.
Dial
[MENU] button Lets you make detailed settings for various functions.
[WRITE] button Saves a studio set, tone or song.
[DEC] [INC] buttons
] [ ] [ ] [ ] buttons
[
[SHIFT] button Accesses the corresponding edit screen when pressed together with another button.
[EXIT] button Returns to the previous screen or closes the open window.
[ENTER] button Used to conrm a value, execute an operation, or view lists of tones or other items.
[ARPEGGIO] button Turns the arpeggiator on/o.
[CHORD MEMORY] button Turns the chord memory function on/o.
[RHYTHM PATTERN] button Accesses the RHYTHM PAT TERN screen.
TEMPO indicator Indicates the tempo.
[TEMPO] knob Adjusts the tempo.
[TAP] button Sets the tempo to the interval at which you repeatedly press the button.
10
p. 14
p. 15
p. 11
p. 16
p. 11
–
p. 10
p. 26
p. 18
p. 10
p. 10
p. 10
p. 10
p. 10
p. 13
p. 13
p. 13
p. 13
4

3 5 6 7 84
Number
Area Name Explanation Page
[SEQUENCER] button Accesses the SEQUENCER screen.
[SONG SELECT] button Selects a song.
[LOOP] button Loops the song playback or overdubbing.
7
8
9
10
11
SEQUENCER
SAMPLER
KEYBOARD
Controller
] button
[
] [ ] buttons
[
[ ] button
[ ] button
[
] button
[PAD UTILITY] button
[SAMPLING] button Lets you sample.
[CLIP BOARD] button Lets you move or copy a sample from one pad to another.
[BANK] button Switches the pad bank.
[HOLD] button Causes the sample to continue playing.
Pads [1]–[16] Play the samples assigned to each pad.
[VOLUME] knob Adjusts the volume that is output from the MAIN OUTPUT jacks and the PHONES jack.
[DAW CONTROL] button Lets you use this unit as a DAW controller.
[SPLIT] button Turns the split function on/o.
[DUAL] button Turns the dual function on/o.
[TRANSPOSE] button
OCTAVE [DOWN] [UP] buttons Raise or lower the pitch range in steps of an octave.
[S1] [S2] buttons
Pitch bend/modulation lever Varies the pitch or applies vibrato.
Moves the song position to the beginning. If you press this button during playback,
the position returns to the beginning of the song and playback stops.
Moves the song position to the rst beat of the previous/next measure.
Stops song playback or recording.
Plays the song.
Enters the record-standby state.
Displays the status of the samples, and lets you edit or import them.
Functions other than the sampler can also be assigned.
Hold down this button and use the OCTAVE [DOWN] [UP] buttons to raise or lower
the pitch range in semitone steps.
Various parameters or functions can be assigned to these buttons.
Hold down the [SHIFT] button and press one of these buttons to access a screen that
lets you assign a function.
Deutsch Français Italiano Español Português NederlandsEnglishEnglish
p. 22
p. 21
p. 21
p. 21
p. 22
p. 19
p. 20
p. 19
p. 9
p. 25
p. 12
p. 12
p. 12
p. 12
p. 14
5

Getting Ready
Rear Panel (Connecting Your Equipment)
SD card slot
This unit is shipped from the factory with the
included SD card inserted and the SD card
protector secured with screws. To remove the SD
card, remove the screws.
The SD card stores various data of this unit (e.g.,
settings, sounds, samples).
MIDI connectors
Connect an external MIDI device here.
USB COMPUTER port
Use a commercially available USB
2.0 cable to connect this unit to your
computer.
FOOT PEDAL jacks
USB FOR UPDATE port
You can update the system program by connecting a USB ash
drive here.
* Use a commercially available USB ash drive or a USB ash
drive sold by Roland. However, we cannot guarantee that all
commercially available USB ash drives will work with this
unit.
* To prevent malfunction and equipment failure, always turn down the volume, and turn o all the units before making any connections.
* When connection cables with resistors are used, the volume level of equipment connected to the AUDIO INPUT jacks may be low. If this happens, use connection cables that do
not contain resistors.
HOLD jack
You can connect a pedal switch
(DP series; sold separately) and
use it as a hold pedal.
CTRL 1, CTRL 2 jacks
You can connect an expression pedal (EV-5; sold
separately) or pedal switch (DP series; sold separately)
here and use them to control various parameters or
functions.
* Use only the specied expression pedal (EV-5; sold
separately). By connecting any other expression
pedals, you risk causing malfunction and/or damage
to the unit.
6

MAIN OUTPUT jacks
1: GND2: HOT
1: GND 2: HOT
TIP: HOT
Connect your speakers here. If outputting in monaural,
connect the L/MONO jack.
* This instrument is equipped with balanced (TRS)
type jacks. Wiring diagrams for these jacks are shown
below. Make connections after rst checking the
wiring diagrams of other equipment you intend to
connect.
RING: COLD
SLEEVE: GND
DC IN jack, Cord hook
Connect the included AC adaptor here.
Indicator
AC outlet
* To prevent the inadvertent disruption of power to your unit (should the plug be pulled out
accidentally), and to avoid applying undue stress to the DC IN jack, anchor the power cord using the
cord hook, as shown in the illustration.
* Place the AC adaptor so the side with the indicator (see illustration) faces upwards and the side with
textual information faces downwards. The indicator will light when you plug the AC adaptor into an
AC outlet.
AUDIO INPUT jacks
GUITAR/MIC jack
Connect your guitar or microphone here.
Use the [LEVEL] knob to adjust the
input level.
LINE jack
Connect your digital audio
player or audio device here.
Use a stereo mini-plug cable
(commercially available)
to make connections.
Adjust the volume using the
controls of the device you’ve
connected.
[POWER] switch
Press this switch to turn it on/o.
Ground terminal
Depending on the circumstances of a particular setup, you
may experience a discomforting sensation, or perceive
that the surface feels gritty to the touch when you touch
this device, microphones connected to it, or the metal
portions of other objects, such as guitars. This is due to an
innitesimal electrical charge, which is absolutely harmless.
However, if you are concerned about this, connect the
ground terminal (see gure) with an external ground. When
the unit is grounded, a slight hum may occur, depending
on the particulars of your installation. If you are unsure of
the connection method, contact the nearest Roland Service
Center, or an authorized Roland distributor, as listed on the
“Information” page.
Unsuitable places for connection
• Water pipes (may result in shock or electrocution)
• Gas pipes (may result in re or explosion)
• Telephone-line ground or lightning rod (may be dangerous in the event of lightning)
PHONES jack
Connect you headphones (sold separately)
to this jack.
Deutsch Français Italiano Español Português NederlandsEnglishEnglish
Set this to “GUITAR” if you’ve
connected a guitar, or to “MIC” if
you’ve connected a microphone.
SUB OUTPUT jack
Connect separately sold headphones or speakers here.
Sounds such as the metronome or a specic part can be specied for
individual output.
Lets you synchronize your tempo with other players when performing
in a band.
* The top panel [VOLUME] knob does not adjust the volume of this output.
7
Getting Ready
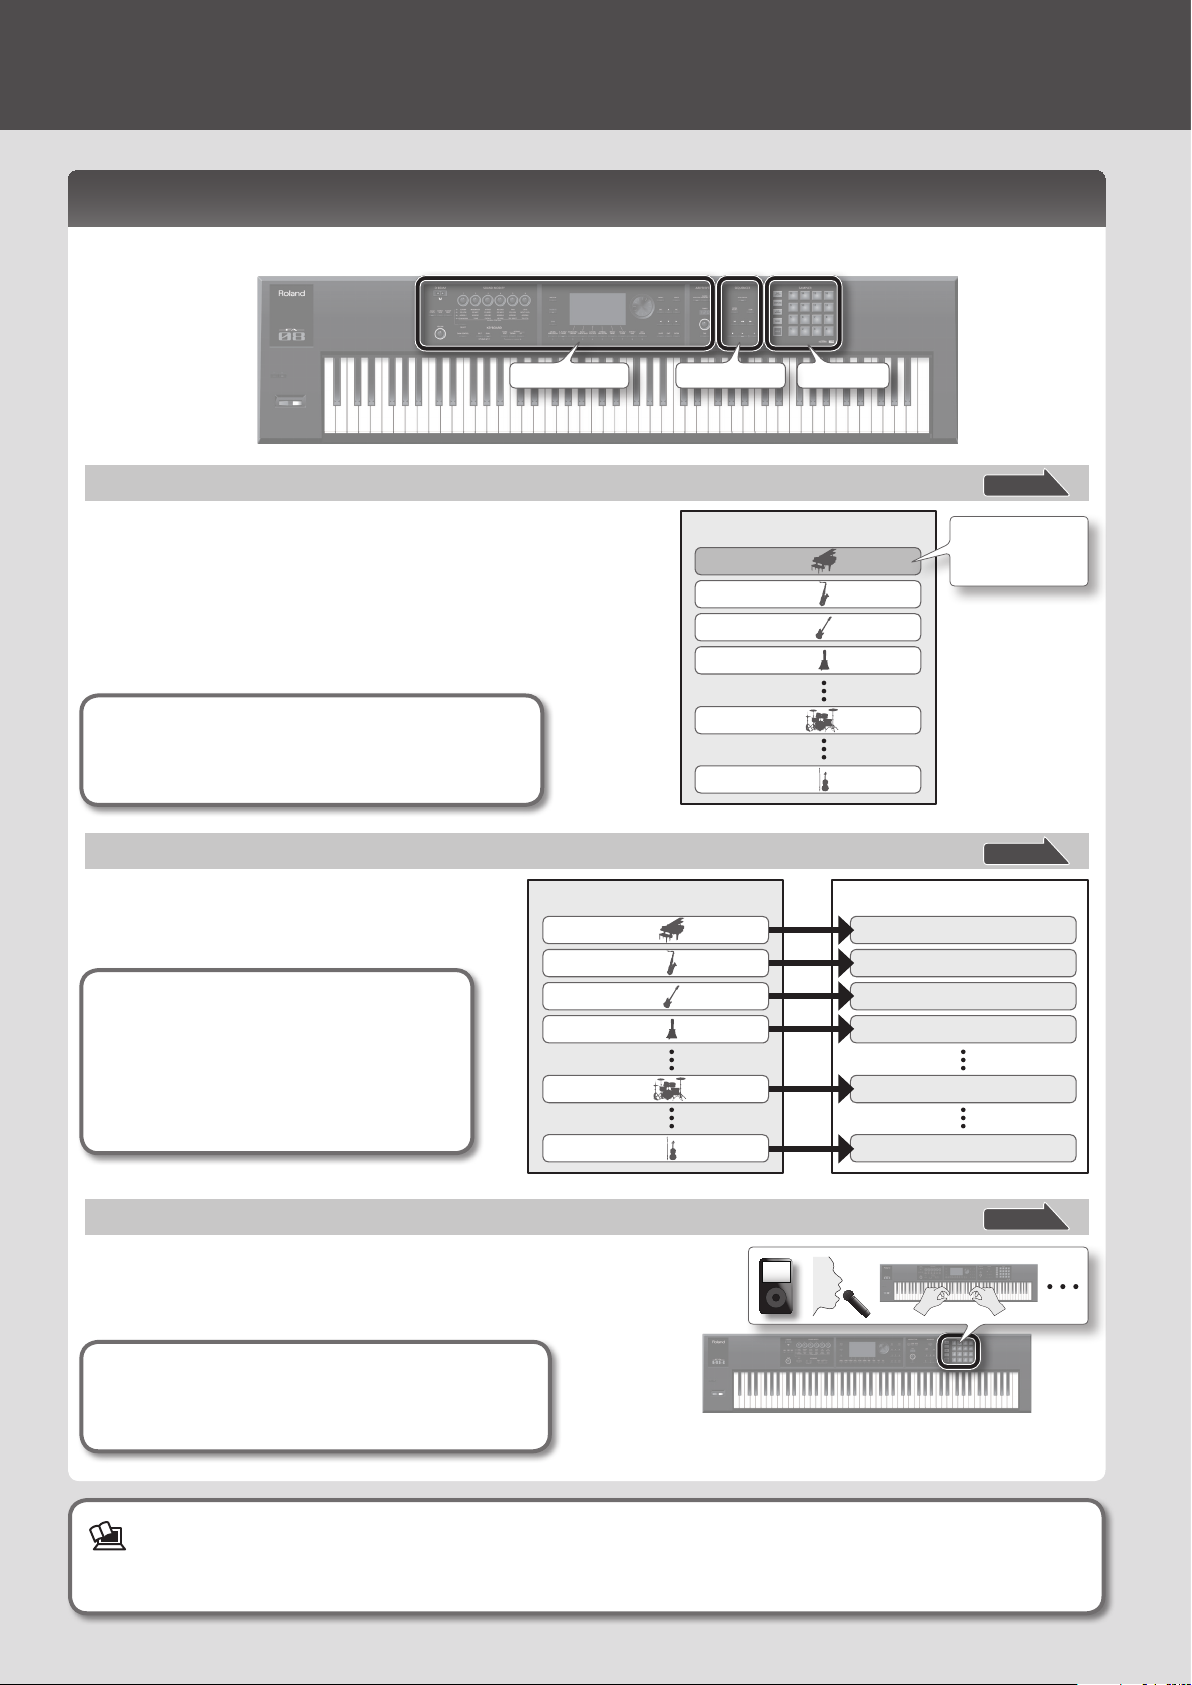
An Overview of This Unit
Broadly speaking, this unit consists of three sections: synthesizer, sequencer, and sampler.
SamplerSequencerSynthesizer
Synthesizer
This unit provides 16 parts, allowing you to play multiple tones
simultaneously. These 16 parts are collectively called a “studio set.” One tone
can be assigned to each part of a studio set.
Normally, you’ll perform using the tone of part 1 (single play).
When using the sequencer to create a song, you’ll use all 16 parts of the
studio set (multi part play).
You can also use the tones of part 1 and part 2 for dual play or split play.
What is a tone?
Each sound that you can play on this unit is called a
“tone.” Press a tone button to select a tone.
Sequencer
You can use the 16-track MIDI sequencer to create
songs.
You can record 16 tracks using the tones of the
studio set’s 16 parts.
Studio set
What is a song?
A “song” is performance data for one song.
A song contains the performance data, tempo
data, and the studio set that you used. Sample
banks are also remembered for each song.
Part 1
Part 2
Part 3
Part 4
Part 10
Studio set
Part 1
Part 2
Part 3
Part 4
Part 10
Part 16
* Part 10 is dedicated to drum tones.
Song
Track 1
Track 2
Track 3
Track 4
Track 10
page 11
Normally you’ll
play the tone that’s
assigned to part 1.
page 21
Sampler
Using the sampler section, the sound of your keyboard performance or the
sound that’s input from a connected audio device or microphone can be
recorded (sampled) to an SD card as audio.
Samples that you’ve sampled to an SD card can be played by pressing the pads.
What is a sample?
A sample is a sampled sound together with loop data and
other settings, that is assigned to one of the 16 pads.
For details, refer to “Reference Manual” (PDF)
For a more detailed explanation of this unit, refer to “Overview” in “Reference Manual” (PDF).
8
Part 16
Track 16
page 19

Turning the Power On/O
Once everything is properly connected (p. 6), be sure to follow the procedure below to turn on their power. If you turn on equipment in the
wrong order, you risk causing malfunction or equipment failure.
Turning the Power On
* Before turning the unit on/o, always be sure to turn the
volume down. Even with the volume turned down, you might
hear some sound when switching the unit on/o. However,
this is normal and does not indicate a malfunction.
1. Turn the power on in the following order: this unit
connected devices.
On
O
Concerning the Auto O function
The power to this unit will be turned o automatically
after a predetermined amount of time has passed since it
was last used for playing music, or its buttons or controls
were operated (Auto O function). If you do not want the
power to be turned o automatically, disengage the Auto
O function.
• Any settings that you are in the process of editing will
be lost when the power is turned o. If you have any
settings that you want to keep, you should save them
beforehand.
• To restore power, turn the power on again.
Making the power turn o automatically after
a certain time (Auto O)
1.
Press the [MENU] button.
Deutsch Français Italiano Español Português NederlandsEnglishEnglish
2. Turn the [VOLUME] knob to adjust the volume.
Turning the Power Off
1.
Turn the power o in the following order: connected
devices this unit.
Playing the Demo Songs
The SD card included with this unit contains demo songs.
1. Press the [ ] button.
2. Use the cursor buttons to select “System,” and
press the [ENTER] button.
3. Use the cursor [ ] [ ] buttons to choose the
“General” tab.
4. Move the cursor to “Auto O,” and use the dial to
change the setting.
Value Explanation
OFF The Auto O function is not used.
30 [min]
240 [min]
(factory setting)
The power turns o 30 minutes after this
unit was last played or operated.
The power turns o four hours after this
unit was last played or operated.
5. Press the [6] (System Write) button.
The setting is saved; the saved setting takes eect the next
time the power is turned on.
2. Press the [ ] button to stop.
Demo song playback starts.
MEMO
For details on how to select a demo song, refer to “Selecting/
Playing a Song” (p. 21).
* Use of the demo songs for any purpose other than personal
enjoyment without permission from the copyright holder is
prohibited by law.
9
 Loading...