

Page 1
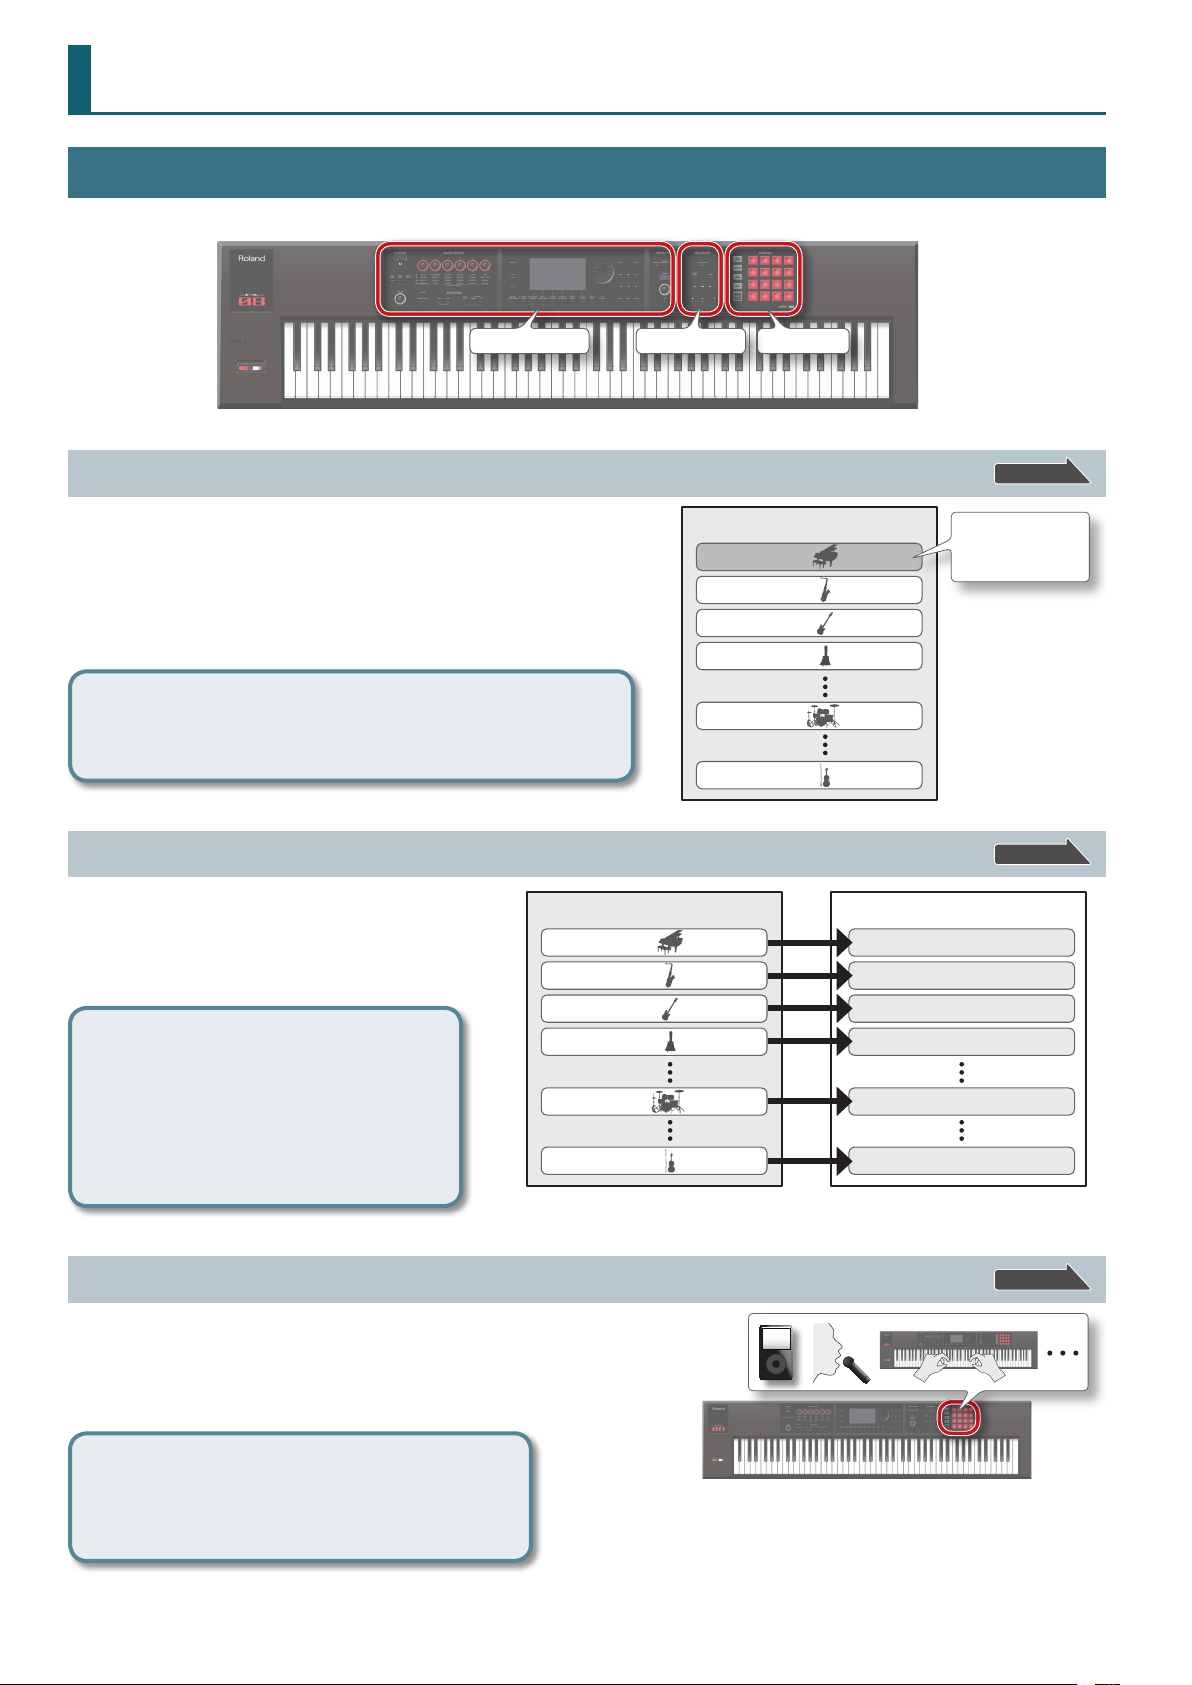
Overview Performing Settings
Overview
Describes the top and rear panels of the FA, and the
structure of its sound engine and memory.
Performance Functions
Explains convenient functions that you’ll use while
performing, such as modifying the sound in real time.
Editing
Explains how to edit studio sets, tones, and eects.
Sequencer (Creating Songs)
Explains how to use the sequencer to play, record and edit
songs.
Sampler
Explains sampling and sample editing.
DAW
Explains how to use the FA in conjunction with a computer
or DAW controller.
Settings
Explains convenient functions, and settings that apply to
the entire FA.
Appendix
Provides troubleshooting information and lists error
messages.
Performing
Explains basic performance operations, such as how to
select tones.
Pads
Explains how to use the pads.
Performance
Functions
Editing
(Creating Songs)
Sequencer
Sampler Pads DAW
Appendix
About the PDF manual
The PDF manual lets you quickly search for a term, or view an explanation simply by clicking a link.
Copyright © 2014 ROLAND CORPORATION
All rights reserved. No part of this publication may be reproduced in any form without the written permission of ROLAND CORPORATION.
* You’ll need Adobe Reader (a free download) in order to view the PDF manual.
Page 2
Contents
01: Overview 5
Panel Descriptions . . . . . . . . . . . . . . . . . . . . . . . . . . . . . . . . . . . . . . . . . . . . . .6
Top Panel . . . . . . . . . . . . . . . . . . . . . . . . . . . . . . . . . . . . . . . . . . . . . . . . . . . . . . 6
Rear Panel (Connecting Your Equipment) . . . . . . . . . . . . . . . . . . . . . . . 8
An Overview of the FA . . . . . . . . . . . . . . . . . . . . . . . . . . . . . . . . . . . . . . . . . 10
Overall Structure . . . . . . . . . . . . . . . . . . . . . . . . . . . . . . . . . . . . . . . . . . . . . . 10
Synthesizer . . . . . . . . . . . . . . . . . . . . . . . . . . . . . . . . . . . . . . . . . . . . . 10
Sequencer . . . . . . . . . . . . . . . . . . . . . . . . . . . . . . . . . . . . . . . . . . . . . . 10
Sampler . . . . . . . . . . . . . . . . . . . . . . . . . . . . . . . . . . . . . . . . . . . . . . . . . 10
How the Sound Engine Is Structured . . . . . . . . . . . . . . . . . . . . . . . . . . . 11
Tones . . . . . . . . . . . . . . . . . . . . . . . . . . . . . . . . . . . . . . . . . . . . . . . . . . . 11
Studio Sets . . . . . . . . . . . . . . . . . . . . . . . . . . . . . . . . . . . . . . . . . . . . . . 12
About the Eects . . . . . . . . . . . . . . . . . . . . . . . . . . . . . . . . . . . . . . . . . . . . . . 13
About Memory . . . . . . . . . . . . . . . . . . . . . . . . . . . . . . . . . . . . . . . . . . . . . . . . 14
About the Sequencer . . . . . . . . . . . . . . . . . . . . . . . . . . . . . . . . . . . . . . . . . . 15
Songs . . . . . . . . . . . . . . . . . . . . . . . . . . . . . . . . . . . . . . . . . . . . . . . . . . . 15
Tracks . . . . . . . . . . . . . . . . . . . . . . . . . . . . . . . . . . . . . . . . . . . . . . . . . . . 15
About the Sampler . . . . . . . . . . . . . . . . . . . . . . . . . . . . . . . . . . . . . . . . . . . . 16
Getting Ready . . . . . . . . . . . . . . . . . . . . . . . . . . . . . . . . . . . . . . . . . . . . . . . . 17
Placing This Unit on a Stand . . . . . . . . . . . . . . . . . . . . . . . . . . . . . . . . . . . 17
Turning the Power On/O . . . . . . . . . . . . . . . . . . . . . . . . . . . . . . . . . . . . . 19
Turning the Power On . . . . . . . . . . . . . . . . . . . . . . . . . . . . . . . . . . . 19
Turning the Power O . . . . . . . . . . . . . . . . . . . . . . . . . . . . . . . . . . . 19
Playing the Demo Songs . . . . . . . . . . . . . . . . . . . . . . . . . . . . . . . . . . . . . . 19
02: Performing 21
Playing One Tone (Single Play) . . . . . . . . . . . . . . . . . . . . . . . . . . . . . . . . . 22
Selecting a Tone . . . . . . . . . . . . . . . . . . . . . . . . . . . . . . . . . . . . . . . . . . . . . . . 22
Selecting a Tone from a List . . . . . . . . . . . . . . . . . . . . . . . . . . . . . . 23
Playing Two Tones Together (Dual) . . . . . . . . . . . . . . . . . . . . . . . . . . . . . 24
Changing the Tones . . . . . . . . . . . . . . . . . . . . . . . . . . . . . . . . . . . . . . . . . . . 24
Playing Dierent Tones in the Right and Left Hands (Split) . . . . . . . 25
Changing the Tones . . . . . . . . . . . . . . . . . . . . . . . . . . . . . . . . . . . . . . . . . . . 25
Changing the Split Point . . . . . . . . . . . . . . . . . . . . . . . . . . . . . . . . . . . . . . . 25
Playing Multiple Parts (Multi Part Play) . . . . . . . . . . . . . . . . . . . . . . . . . 26
Viewing the Part Settings (PART VIEW Screen) . . . . . . . . . . . . 26
Selecting the Parts that Sound (Keyboard Switch) . . . . . . . . 27
Switching Studio Sets . . . . . . . . . . . . . . . . . . . . . . . . . . . . . . . . . . . . . . . . . 27
Registering/Recalling Favorite Sounds (Favorites) . . . . . . . . . . . . . . . 28
Registering a Sound as a Favorite . . . . . . . . . . . . . . . . . . . . . . . . . . . . . . 28
Recalling a Favorite . . . . . . . . . . . . . . . . . . . . . . . . . . . . . . . . . . . . . . . . . . . . 28
Registering/Recalling/Editing Favorites in the List . . . . . . . . . . . . . . 28
03: Performance Functions 31
Playing Arpeggios . . . . . . . . . . . . . . . . . . . . . . . . . . . . . . . . . . . . . . . . . . . . . 32
Using the Arpeggiator . . . . . . . . . . . . . . . . . . . . . . . . . . . . . . . . . . . . . . . . . 32
Setting the Arpeggiator Tempo . . . . . . . . . . . . . . . . . . . . . . . . . . 32
Holding the Arpeggio (Hold) . . . . . . . . . . . . . . . . . . . . . . . . . . . . . 32
Arpeggiator Settings . . . . . . . . . . . . . . . . . . . . . . . . . . . . . . . . . . . . . . . . . . 33
Importing a Computer SMF File into an Arpeggio Style
(Import SMF) . . . . . . . . . . . . . . . . . . . . . . . . . . . . . . . . . . . . . . . . . . . . 34
Creating an Arpeggio Style from a Song (Import Song) . . . 34
Using Chord Memory . . . . . . . . . . . . . . . . . . . . . . . . . . . . . . . . . . . . . . . . . . 35
Performing with the Chord Memory Function . . . . . . . . . . . . . . . . . . 35
Chord Memory Settings . . . . . . . . . . . . . . . . . . . . . . . . . . . . . . . . . . . . . . . 35
Performing with Rhythm Patterns . . . . . . . . . . . . . . . . . . . . . . . . . . . . . . 36
Selecting/Playing Rhythm Patterns . . . . . . . . . . . . . . . . . . . . . . . . . . . . 36
Changing the Tempo of the Rhythm Pattern . . . . . . . . . . . . . . 37
Saving a Rhythm Group . . . . . . . . . . . . . . . . . . . . . . . . . . . . . . . . . . . . . . . 37
Importing SMF into a Rhythm Pattern . . . . . . . . . . . . . . . . . . . . . . . . . . 38
Creating a Rhythm Pattern from a Song . . . . . . . . . . . . . . . . . . . . . . . . 38
Modifying the Sound in Real Time . . . . . . . . . . . . . . . . . . . . . . . . . . . . . . 39
Using the SOUND MODIFY Knobs to Vary the Sound . . . . . . . . . . . . 39
Changing the Tonal Character of the Part
(CUTOFF, RESONANCE) . . . . . . . . . . . . . . . . . . . . . . . . . . . . . . . . . . 39
Changing How the Volume Will Vary of the Part
(ATTACK, RELEASE) . . . . . . . . . . . . . . . . . . . . . . . . . . . . . . . . . . . . . . 39
Changing the Stereo Position of the Sound of the Part
(PAN) . . . . . . . . . . . . . . . . . . . . . . . . . . . . . . . . . . . . . . . . . . . . . . . . . . . 39
Adjusting the Volume of the Part (LEVEL) . . . . . . . . . . . . . . . . . 39
Adjusting the Level of the Low, Mid, and High
Frequencies (EQ) . . . . . . . . . . . . . . . . . . . . . . . . . . . . . . . . . . . . . . . . 39
Adjusting the Input Volume (INPUT LEVEL) . . . . . . . . . . . . . . . 39
Applying an Assigned Function (ASSIGN 1–6) . . . . . . . . . . . . 39
Applying Eects Conveniently (GLOBAL CONTROL) . . . . . . . 40
Moving Your Hand to Vary the Pitch or Volume
(D-BEAM Controller) . . . . . . . . . . . . . . . . . . . . . . . . . . . . . . . . . . . . . . . . . . . 41
Changing the Pitch (Pitch Bend) . . . . . . . . . . . . . . . . . . . . . . . . . . . . . . . 41
Applying Vibrato or Dynamics (Modulation) . . . . . . . . . . . . . . . . . . . . 41
Using an Assigned Function to Vary the Sound ([S1] [S2] buttons) .41
Using a Pedal to Vary the Sound . . . . . . . . . . . . . . . . . . . . . . . . . . . . . . . 42
Sustaining the Notes (Hold Pedal) . . . . . . . . . . . . . . . . . . . . . . . . 42
Adding Expression to Your Performance (Control Pedal) . . 42
Performing with a Microphone (Vocoder) . . . . . . . . . . . . . . . . . . . . . . 42
Using the Vocoder . . . . . . . . . . . . . . . . . . . . . . . . . . . . . . . . . . . . . . . 42
Editing the Vocoder Settings . . . . . . . . . . . . . . . . . . . . . . . . . . . . . 42
Changing the Keyboard Settings . . . . . . . . . . . . . . . . . . . . . . . . . . . . . . . 29
Raising/Lowering the Key Range in Semitone Steps (Transpose) 29
Raising/Lowering the Key Range in Octaves (Octave Shift) . . . . . . 29
2
Page 3
Contents
04: Editing 43
Editing a Studio Set . . . . . . . . . . . . . . . . . . . . . . . . . . . . . . . . . . . . . . . . . . . 44
Overall Settings for the Studio Set . . . . . . . . . . . . . . . . . . . . . . . . . . . . . 44
Settings for Each Part . . . . . . . . . . . . . . . . . . . . . . . . . . . . . . . . . . . . . . . . . . 44
Saving a Studio Set . . . . . . . . . . . . . . . . . . . . . . . . . . . . . . . . . . . . . . . . . . . . 45
Initializing a Studio Set (Studio Set Init) . . . . . . . . . . . . . . . . . . . . . . . . 45
Initializing a Part (Part Init) . . . . . . . . . . . . . . . . . . . . . . . . . . . . . . . . . . . . . 45
Editing a Tone . . . . . . . . . . . . . . . . . . . . . . . . . . . . . . . . . . . . . . . . . . . . . . . . . 46
Basic Procedure for Tone Edit . . . . . . . . . . . . . . . . . . . . . . . . . . . . . . . . . . 46
SuperNATURAL Acoustic Tone (SN-A) . . . . . . . . . . . . . . . . . . . . . 46
SuperNATURAL Synth Tone (SN-S) . . . . . . . . . . . . . . . . . . . . . . . . 46
SuperNATURAL Drum Kit (SN-D) . . . . . . . . . . . . . . . . . . . . . . . . . 47
PCM Synth Tone (PCMS) . . . . . . . . . . . . . . . . . . . . . . . . . . . . . . . . . 47
PCM Drum Kit (PCMD) . . . . . . . . . . . . . . . . . . . . . . . . . . . . . . . . . . . 48
Saving a Tone/Drum Kit. . . . . . . . . . . . . . . . . . . . . . . . . . . . . . . . . . . . . . . . 48
Initializing a Tone (Tone Initialize) . . . . . . . . . . . . . . . . . . . . . . . . . . . . . . 48
Selecting the Partials That Sound (Partial Switch) . . . . . . . . . . . . . . . 49
Selecting the Partials to Edit (Partial Select) . . . . . . . . . . . . . . . . . . . . 49
Initializing a Partial (Partial Initialize) . . . . . . . . . . . . . . . . . . . . . . . . . . . 49
Copying a Partial (Partial Copy) . . . . . . . . . . . . . . . . . . . . . . . . . . . . . . . . 49
Editing a Pattern . . . . . . . . . . . . . . . . . . . . . . . . . . . . . . . . . . . . . . . . . . . . . . 50
Initializing a Pattern (Initialize) . . . . . . . . . . . . . . . . . . . . . . . . . . . . . . . . . 50
Specifying the Time Signature and Length (Setup) . . . . . . . . . . . . . . 50
Specifying the Grid Scale (Scale) . . . . . . . . . . . . . . . . . . . . . . . . . . . . . . . 50
Specifying the Note Type, Duration, and Loudness (Note Setup) 51
Entering Notes . . . . . . . . . . . . . . . . . . . . . . . . . . . . . . . . . . . . . . . . . . . . . . . . 51
Deleting Notes (Clear Step, Clear Note) . . . . . . . . . . . . . . . . . . . . . . . . . 51
Saving the Pattern . . . . . . . . . . . . . . . . . . . . . . . . . . . . . . . . . . . . . . . . . . . . . 51
Editing the Eects . . . . . . . . . . . . . . . . . . . . . . . . . . . . . . . . . . . . . . . . . . . . . 52
Turning Eects On/o . . . . . . . . . . . . . . . . . . . . . . . . . . . . . . . . . . . . . . . . . 52
Editing the Eects of the Studio Set . . . . . . . . . . . . . . . . . . . . . . . . . . . . 53
Editing the Eects of the Tone . . . . . . . . . . . . . . . . . . . . . . . . . . . . . . . . . 53
Editing the System Eects . . . . . . . . . . . . . . . . . . . . . . . . . . . . . . . . . . . . . 54
05: Sequencer (Creating Songs) 55
Playing Songs . . . . . . . . . . . . . . . . . . . . . . . . . . . . . . . . . . . . . . . . . . . . . . . . . 56
Selecting and Playing Songs . . . . . . . . . . . . . . . . . . . . . . . . . . . . . . . . . . . 56
Setting the Tempo of the Song . . . . . . . . . . . . . . . . . . . . . . . . . . . . . . . . 56
Looping the Song Playback . . . . . . . . . . . . . . . . . . . . . . . . . . . . . . . . . . . . 57
Recording the Song . . . . . . . . . . . . . . . . . . . . . . . . . . . . . . . . . . . . . . . . . . . 58
Recording Workow . . . . . . . . . . . . . . . . . . . . . . . . . . . . . . . . . . . . . . . . . . . 58
Prepare for Recording . . . . . . . . . . . . . . . . . . . . . . . . . . . . . . . . . . . . . . . . . 58
Realtime Recording . . . . . . . . . . . . . . . . . . . . . . . . . . . . . . . . . . . . . . . . . . . 59
Selecting the Performance Data to Record
(Recording Select) . . . . . . . . . . . . . . . . . . . . . . . . . . . . . . . . . . . . . . . 60
Removing Unwanted Data During Recording
(Realtime Erase) . . . . . . . . . . . . . . . . . . . . . . . . . . . . . . . . . . . . . . . . . 60
Auditioning Sounds or Phrases During Recording
(Rehearsal Function) . . . . . . . . . . . . . . . . . . . . . . . . . . . . . . . . . . . . . 60
Step Recording . . . . . . . . . . . . . . . . . . . . . . . . . . . . . . . . . . . . . . . . . . . . . . . . 61
Canceling a Recording or Edit (Undo/Redo) . . . . . . . . . . . . . . . . . . . . 62
Editing the Song . . . . . . . . . . . . . . . . . . . . . . . . . . . . . . . . . . . . . . . . . . . . . . 63
Specifying the Sound Engine Played by Each Track . . . . . . . . . . . . . 63
Muting a Part’s Performance (MUTE) . . . . . . . . . . . . . . . . . . . . . . . . . . . 63
Sounding One Part by Itself (SOLO) . . . . . . . . . . . . . . . . . . . . . . . . . . . . 63
Edit Performance Data for Entire Tracks (Track Modify) . . . . . . . . . . 64
Basic Procedure for Track Modify . . . . . . . . . . . . . . . . . . . . . . . . . 64
Correcting the Song’s Timing (Quantize) . . . . . . . . . . . . . . . . . 64
Erasing Unwanted Performance Data (Erase) . . . . . . . . . . . . . 65
Deleting Unwanted Measures (Delete) . . . . . . . . . . . . . . . . . . . 65
Copying Performance Data (Copy) . . . . . . . . . . . . . . . . . . . . . . . 65
Inserting Blank Measures (Insert) . . . . . . . . . . . . . . . . . . . . . . . . 66
Transposing (Transpose) . . . . . . . . . . . . . . . . . . . . . . . . . . . . . . . . . 66
Changing the Velocity (Change Velocity) . . . . . . . . . . . . . . . . . 66
Changing the Duration of the Notes (Change Duration). . . 67
Moving Performance Data Forward or Backward
(Shift Clock) . . . . . . . . . . . . . . . . . . . . . . . . . . . . . . . . . . . . . . . . . . . . . 67
Editing Individual Events of Performance Data (Microscope) . . . . 68
Selecting the Track to Edit / Viewing Specic
Performance Data (View) . . . . . . . . . . . . . . . . . . . . . . . . . . . . . . . . 69
Inserting Performance Data (Create) . . . . . . . . . . . . . . . . . . . . . 69
Erasing Performance Data (Erase) . . . . . . . . . . . . . . . . . . . . . . . . 69
Moving Performance Data (Move) . . . . . . . . . . . . . . . . . . . . . . . 70
Copying/Pasting Performance Data (Copy/Paste) . . . . . . . . . 70
Changing the Tempo During a Song . . . . . . . . . . . . . . . . . . . . . 71
Changing the Time Signature During a Song . . . . . . . . . . . . . 71
Adjusting the Pan and Volume Balance (Mixer) . . . . . . . . . . . . . . . . . 72
Erasing the Song in the Temporary Area (Song Clear) . . . . . . . . . . . 72
Assigning a Name to the Song (Song Name) . . . . . . . . . . . . . . . . . . . 72
Specifying the Song’s Time Signature (Time Signature) . . . . . . . . . 73
Deleting a Song (Delete Song) . . . . . . . . . . . . . . . . . . . . . . . . . . . . . . . . . 73
Overview Performing Settings
Functions
Editing
(Creating Songs)
Sampler Pads DAW
Performance
Sequencer
Saving/Exporting a Song . . . . . . . . . . . . . . . . . . . . . . . . . . . . . . . . . . . . . . 74
Save the Song . . . . . . . . . . . . . . . . . . . . . . . . . . . . . . . . . . . . . . . . . . . . . . . . . 74
Exporting Tracks as Individual WAV Format Files
(Multi-track Export) . . . . . . . . . . . . . . . . . . . . . . . . . . . . . . . . . . . . . . . . . . . . 74
Exporting a Two-Channel Mix in WAV Format . . . . . . . . . . . . . . . . . . . 75
Exporting the Song in SMF Format . . . . . . . . . . . . . . . . . . . . . . . . . . . . . 75
Exporting Samples in WAV Format . . . . . . . . . . . . . . . . . . . . . . . . . . . . . 76
Importing an SMF as a Song . . . . . . . . . . . . . . . . . . . . . . . . . . . . . . . . . . . 76
Appendix
3
Page 4
Contents
06: Sampler 77
Playing Samples . . . . . . . . . . . . . . . . . . . . . . . . . . . . . . . . . . . . . . . . . . . . . . 78
Selecting/Playing Samples. . . . . . . . . . . . . . . . . . . . . . . . . . . . . . . . . . . . . 78
Switching Banks . . . . . . . . . . . . . . . . . . . . . . . . . . . . . . . . . . . . . . . . . 78
Sampling . . . . . . . . . . . . . . . . . . . . . . . . . . . . . . . . . . . . . . . . . . . . . . . . . . . . . 79
Sampling Procedure . . . . . . . . . . . . . . . . . . . . . . . . . . . . . . . . . . . . . . . . . . . 79
Setting the Input Volume (Input Setting) . . . . . . . . . . . . . . . . . . . . . . . 80
Moving/Copying a Sample (Clip Board) . . . . . . . . . . . . . . . . . . . . . . . . 80
Moving a Sample . . . . . . . . . . . . . . . . . . . . . . . . . . . . . . . . . . . . . . . . 80
Copying a Sample . . . . . . . . . . . . . . . . . . . . . . . . . . . . . . . . . . . . . . . 80
Editing a Sample . . . . . . . . . . . . . . . . . . . . . . . . . . . . . . . . . . . . . . . . . . . . . . 81
Editing Procedure . . . . . . . . . . . . . . . . . . . . . . . . . . . . . . . . . . . . . . . . . . . . . 81
Renaming the Sample (Rename) . . . . . . . . . . . . . . . . . . . . . . . . . 81
Cutting Unwanted Regions from the Sample (Truncate) . . 81
Deleting a Sample (Delete) . . . . . . . . . . . . . . . . . . . . . . . . . . . . . . 81
Zooming the Sample Display (Zoom) . . . . . . . . . . . . . . . . . . . . 82
Auditioning the Edited Result (Preview) . . . . . . . . . . . . . . . . . . 82
Exporting the Sample in WAV Format (Export Sample) . . . . 82
Importing an Audio File (Sample Import) . . . . . . . . . . . . . . . . . 82
Switching the Sample Information Display
(Change Information) . . . . . . . . . . . . . . . . . . . . . . . . . . . . . . . . . . . 82
07: Pads 83
Using the Pads . . . . . . . . . . . . . . . . . . . . . . . . . . . . . . . . . . . . . . . . . . . . . . . . 84
Specifying the Function of the Pads (PAD UTILITY) . . . . . . . . . . . . . . 84
Playing Samples (SAMPLE PAD) . . . . . . . . . . . . . . . . . . . . . . . . . . 84
Selecting Parts (PART SELECT) . . . . . . . . . . . . . . . . . . . . . . . . . . . 84
Switching Part Mute (PART MUTE) . . . . . . . . . . . . . . . . . . . . . . . . 84
Switching the Soloed Part (PART SOLO) . . . . . . . . . . . . . . . . . . 84
Using the Pads as Numeric Keys (NUMERIC) . . . . . . . . . . . . . . 84
Selecting Partials and Turning Them On/O
(PARTIAL SW/SEL) . . . . . . . . . . . . . . . . . . . . . . . . . . . . . . . . . . . . . . . 84
Turning the Keyboard Switch On/O (KBD SW) . . . . . . . . . . . 85
08: DAW 87
Connecting to a Computer via USB . . . . . . . . . . . . . . . . . . . . . . . . . . . . . 88
Installing the USB Driver . . . . . . . . . . . . . . . . . . . . . . . . . . . . . . . . . . . . . . . 88
Making USB Driver Settings . . . . . . . . . . . . . . . . . . . . . . . . . . . . . . . . . . . . 88
Using the FA with DAW Software . . . . . . . . . . . . . . . . . . . . . . . . . . . . . . . 89
Using the FA as a DAW Controller . . . . . . . . . . . . . . . . . . . . . . . . . . . . . . 89
Using the FA to Control DAW Software . . . . . . . . . . . . . . . . . . . 89
Assigning Functions to Knobs and Buttons . . . . . . . . . . . . . . . 90
Using the FA as a MIDI Keyboard . . . . . . . . . . . . . . . . . . . . . . . . . . . . . . . 90
Playing the FA’s Sound Engine from DAW Software . . . . . . . . . . . . . 91
Using the FA as an Audio Interface . . . . . . . . . . . . . . . . . . . . . . . . . . . . . 91
Specifying the USB Audio Output . . . . . . . . . . . . . . . . . . . . . . . . 91
Saving the DAW CONTROL Settings . . . . . . . . . . . . . . . . . . . . . . . . . . . . 92
09: Settings 93
Useful Functions . . . . . . . . . . . . . . . . . . . . . . . . . . . . . . . . . . . . . . . . . . . . . . 94
Basic Procedure for Utility Operations . . . . . . . . . . . . . . . . . . . . . . . . . . 94
Backing Up User Data (Backup/Restore) . . . . . . . . . . . . . . . . . . . . . . . . 94
Backing Up to an SD Card (Backup) . . . . . . . . . . . . . . . . . . . . . . 94
Returning Backup Data to the FA (Restore) . . . . . . . . . . . . . . . 94
Importing a Studio Set or Tone (Import Studio Set/Tone) . . . . . . . 95
Importing from Backup Data . . . . . . . . . . . . . . . . . . . . . . . . . . . . 95
Importing Tones Downloaded from the Axial Site. . . . . . . . . 95
Restoring the Factory Settings (Factory Reset) . . . . . . . . . . . . . . . . . . 95
Initializing an SD Card (Format SD Card) . . . . . . . . . . . . . . . . . . . . . . . . 96
Backing-Up SD Card Data to a Computer . . . . . . . . . . . . . . . . . 96
Transmitting the Temporary Area’s Data to an External MIDI
Device (Bulk Dump) . . . . . . . . . . . . . . . . . . . . . . . . . . . . . . . . . . . . . . . . . . . 96
Settings for the Entire FA . . . . . . . . . . . . . . . . . . . . . . . . . . . . . . . . . . . . . . 97
Basic Procedure for System Settings . . . . . . . . . . . . . . . . . . . . . . . . . . . 97
Saving the System Settings . . . . . . . . . . . . . . . . . . . . . . . . . . . . . . . . . . . . 97
System Parameter . . . . . . . . . . . . . . . . . . . . . . . . . . . . . . . . . . . . . . . . . . . . . 97
About the Wireless LAN Function. . . . . . . . . . . . . . . . . . . . . . . . . . . . . . 104
What is Wireless LAN Function? . . . . . . . . . . . . . . . . . . . . . . . . . . . . . . .104
Basic Connection Method (Connect by WPS) . . . . . . . . . . . . . . . . . .104
Wireless LAN Function Settings . . . . . . . . . . . . . . . . . . . . . . . . . . . . . . .105
Status Indication (WIRELESS STATUS) . . . . . . . . . . . . . . . . . . . .105
Connecting to a Wireless LAN Access Point That You
Select (SELECT ACCESS POINT) . . . . . . . . . . . . . . . . . . . . . . . . . .105
Other Settings (WIRELESS OPTIONS) . . . . . . . . . . . . . . . . . . . .106
Checking the IP Address and MAC Address
(WIRELESS INFORMATION) . . . . . . . . . . . . . . . . . . . . . . . . . . . . . .106
10: Appendix 107
About SD Cards . . . . . . . . . . . . . . . . . . . . . . . . . . . . . . . . . . . . . . . . . . . . . . 108
Chord Memory List . . . . . . . . . . . . . . . . . . . . . . . . . . . . . . . . . . . . . . . . . . . 109
Block Diagram . . . . . . . . . . . . . . . . . . . . . . . . . . . . . . . . . . . . . . . . . . . . . . . 111
Error Message List . . . . . . . . . . . . . . . . . . . . . . . . . . . . . . . . . . . . . . . . . . . . 112
Troubleshooting . . . . . . . . . . . . . . . . . . . . . . . . . . . . . . . . . . . . . . . . . . . . . 113
MIDI Implementation Chart . . . . . . . . . . . . . . . . . . . . . . . . . . . . . . . . . . . 118
Main Specications . . . . . . . . . . . . . . . . . . . . . . . . . . . . . . . . . . . . . . . . . . . 120
4
Page 5
01: Overview
Describes the top and rear panels of the FA, and the structure of its sound engine and
memory.
Panel Descriptions . . . . . . . . . . . . . . . . . . . . . . . . . . . . . . . . . . . . . . . . . . 6
Overview Performing SettingsOverview
Performance
Functions
Editing
An Overview of the FA . . . . . . . . . . . . . . . . . . . . . . . . . . . . . . . . . . . . . 10
Getting Ready . . . . . . . . . . . . . . . . . . . . . . . . . . . . . . . . . . . . . . . . . . . . . 17
(Creating Songs)
Sequencer
Sampler Pads DAW
Appendix
Page 6
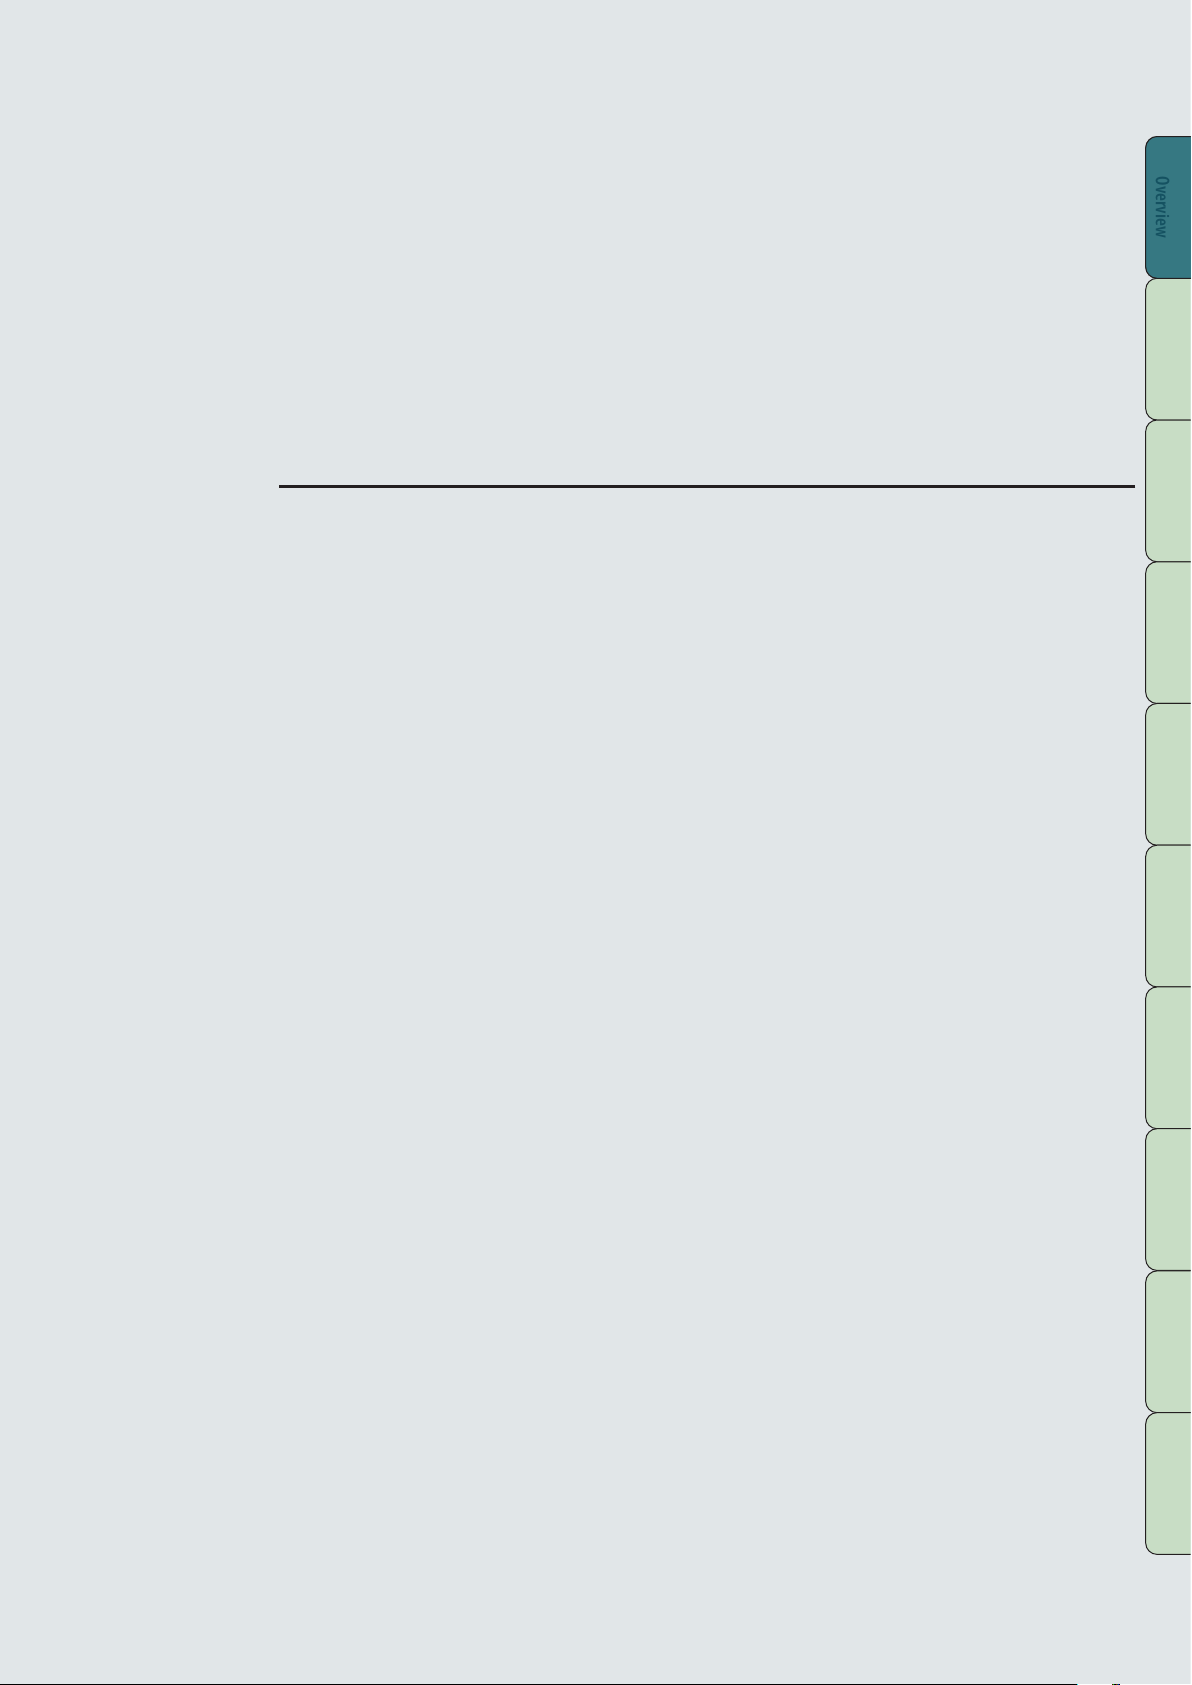
Panel Descriptions
Top Panel
1 2
9
11
Number Area Name Explanation Page
By positioning your hand over the D-BEAM, you can apply various eects to the
sound.
Lets you play monophonic synthesizer sounds by moving your hand above the
D-BEAM controller.
Lets you register your favorite tones or studio sets to the [0]–[9] buttons.
Select tone category groups.
If the [FAVORITE] button or [BANK] button is lit, these buttons operate as [0]–[9]
buttons.
When executing functions that are displayed at the bottom of the screen, these
buttons operate as function buttons ([2]–[7] buttons).
Changes a value.
If you hold down the [SHIFT] button and turn the dial, the value changes more
greatly.
Changes a value.
If you press one of these buttons while holding down the other, the value changes
more rapidly. If you press one of these buttons while holding down the [SHIFT]
button, the value changes more greatly.
Move the cursor position up/down/left/right.
1
2
3
4
5
D-BEAM
SOUND MODIFY
Display
D-BEAM controller
[SOLO SYNTH] button
[EXPRESSION] button Lets you use the D-BEAM controller to control the volume.
[ASSIGNABLE] button Lets you assign various parameters of functions that modify the sound in real time.
[1]–[6] knobs Control the parameters that you’ve selected by the [SELECT] button.
[SELECT] button Selects the group of parameters that is controlled by the [1]–[6] knobs.
[PREVIEW] button Auditions the currently selected tone while this button is held down.
[FAVORITE] button
FAVORITE [BANK] button
Tone buttons ([0]–[9])
Display Shows various information depending on operation.
Dial
[MENU] button Lets you make detailed settings for various functions.
[WRITE] button Saves a studio set, tone or song.
[DEC] [INC] buttons
] [ ] [ ] [ ] buttons
[
[SHIFT] button Accesses the corresponding edit screen when pressed together with another button.
[EXIT] button Returns to the previous screen or closes the open window.
[ENTER] button Used to conrm a value, execute an operation, or view lists of tones or other items.
10
p. 41
p. 39
p. 22
p. 28
p. 22
p. 45
p. 48
p. 74
–
–
–
–
–
–
–
–
6
Page 7
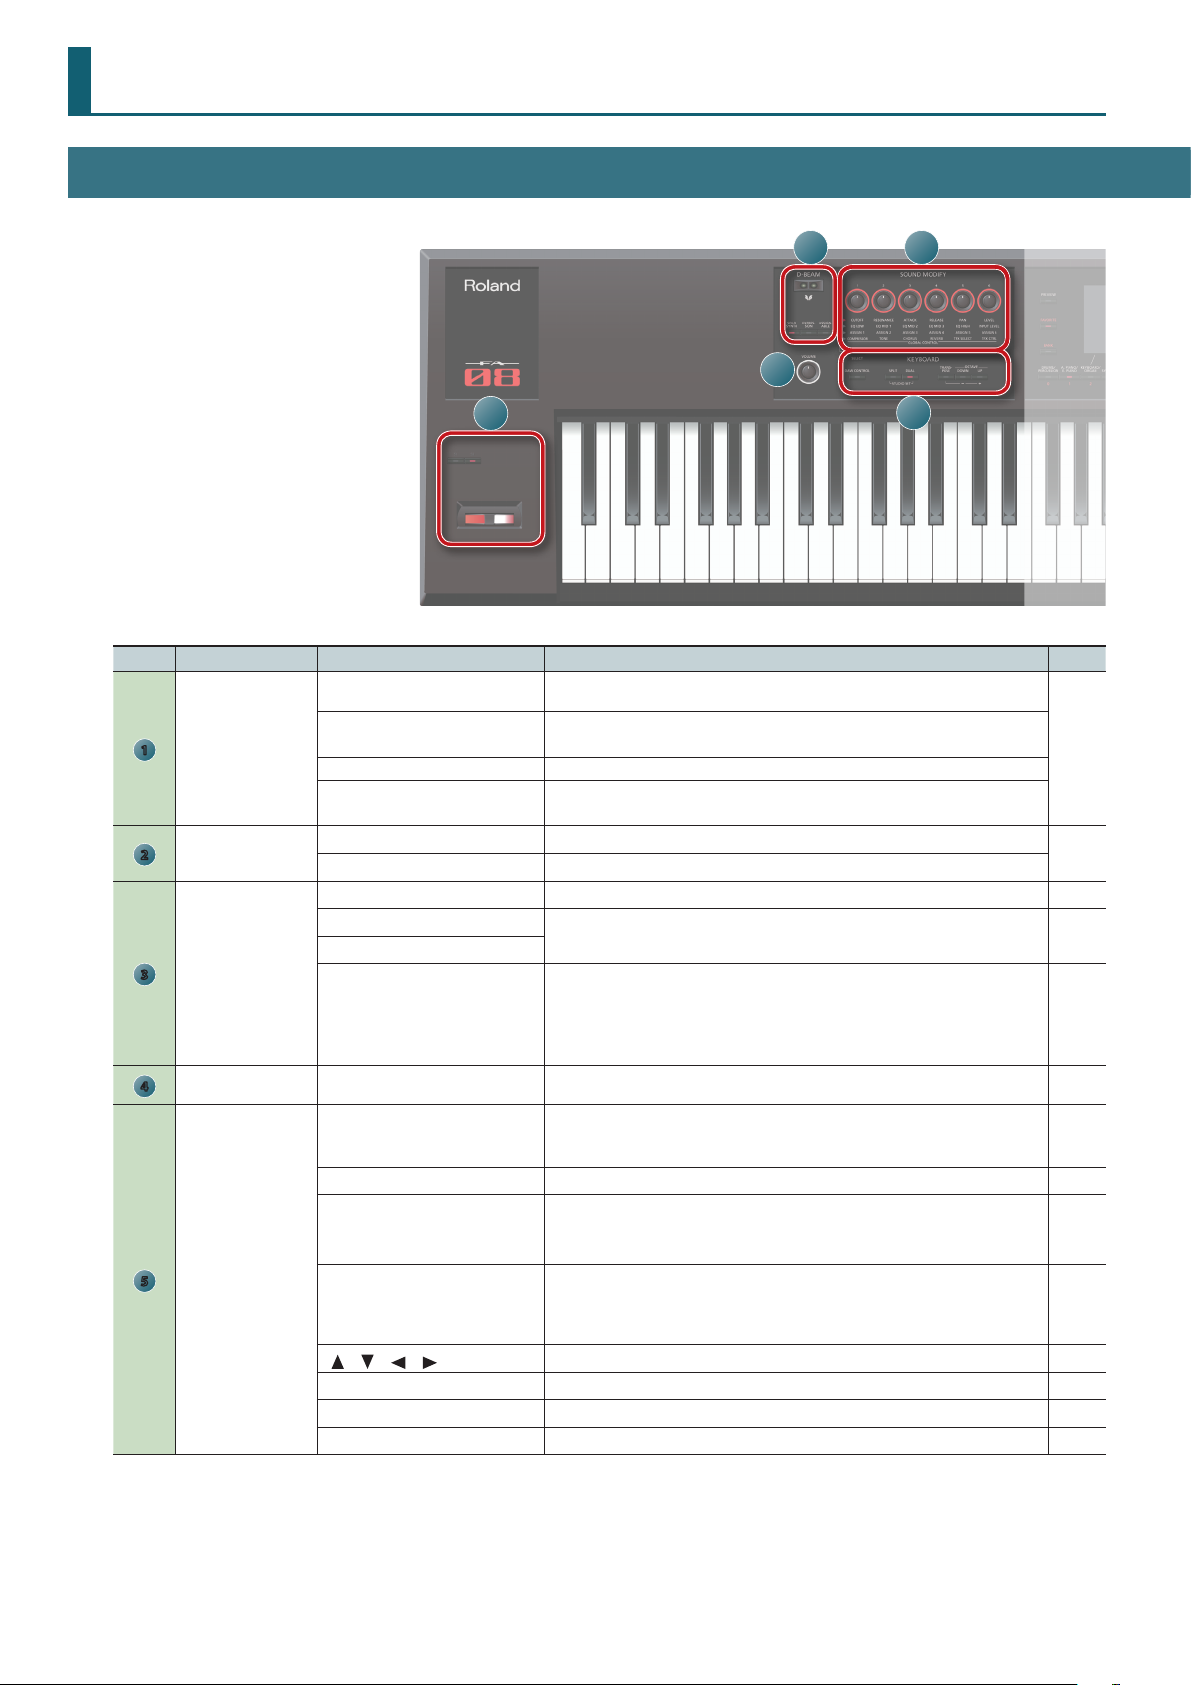
Panel Descriptions
3 5 6 7 84
Number Area Name Explanation Page
p. 32
p. 35
p. 36
p. 37
p. 58
p. 56
p. 57
p. 56
p. 59
p. 84
p. 79
p. 80
p. 78
p. 78
p. 78
p. 89
p. 25
p. 24
p. 29
6
7
8
9
10
ARP/RHYTHM
SEQUENCER
SAMPLER
KEYBOARD
[ARPEGGIO] button Turns the arpeggiator on/o.
[CHORD MEMORY] button Turns the chord memory function on/o.
[RHYTHM PATTERN] button Accesses the RHYTHM PATTERN screen.
TEMPO indicator Indicates the tempo.
[TEMPO] knob Adjusts the tempo.
[TAP] button Sets the tempo to the interval at which you repeatedly press the button.
[SEQUENCER] button Accesses the SEQUENCER screen.
[SONG SELECT] button Selects a song.
[LOOP] button Loops the song playback or overdubbing.
[
] button
] [ ] buttons
[
[ ] button
[
] button
[
] button
[PAD UTILITY] button
[SAMPLING] button Lets you sample.
[CLIP BOARD] button Lets you move or copy a sample from one pad to another.
[BANK] button Switches the pad bank.
[HOLD] button Causes the sample to continue playing.
Pads [1]–[16] Play the samples assigned to each pad.
[VOLUME] knob Adjusts the volume that is output from the MAIN OUTPUT jacks and the PHONES jack.
[DAW CONTROL] button Lets you use this unit as a DAW controller.
[SPLIT] button Turns the split function on/o.
[DUAL] button Turns the dual function on/o.
[TRANSPOSE] button
Moves the song position to the beginning. If you press this button during playback,
the position returns to the beginning of the song and playback stops.
Moves the song position to the rst beat of the previous/next measure.
Stops song playback or recording.
Plays the song.
Enters the record-standby state.
Displays the status of the samples, and lets you edit or import them.
Functions other than the sampler can also be assigned.
Hold down this button and use the OCTAVE [DOWN] [UP] buttons to raise or lower
the pitch range in semitone steps.
Overview Performing SettingsOverview
Performance
Functions
Editing
(Creating Songs)
Sequencer
Sampler Pads DAW
–
OCTAVE [DOWN] [UP] buttons Raise or lower the pitch range in steps of an octave.
[S1] [S2] buttons
Controller
11
Pitch bend/modulation lever Varies the pitch or applies vibrato.
Various parameters or functions can be assigned to these buttons.
Hold down the [SHIFT] button and press one of these buttons to access a screen that
lets you assign a function.
p. 29
Appendix
p. 41
7
Page 8

Panel Descriptions
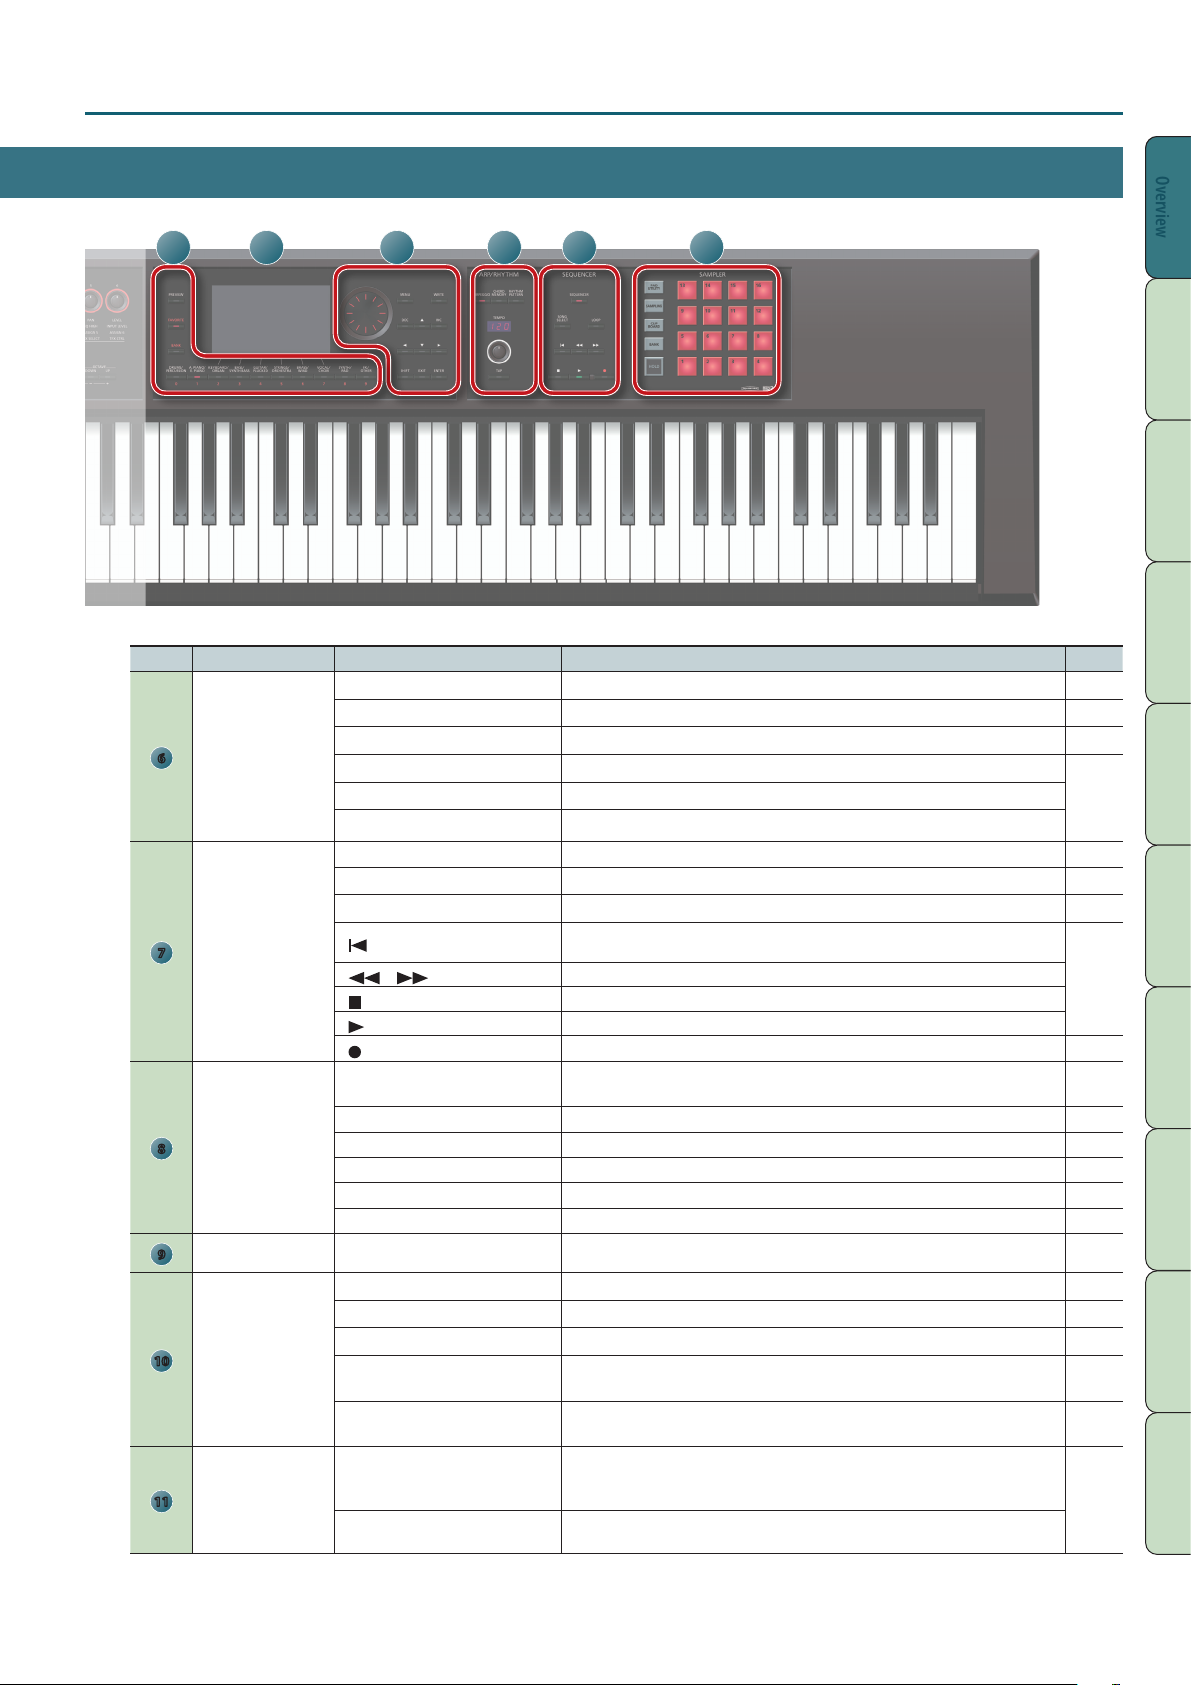
Rear Panel (Connecting Your Equipment)
SD card slot
This unit is shipped from the factory with the
included SD card inserted and the SD card
protector secured with screws. To remove the
SD card, remove the screws.
The SD card stores various data of this unit
(e.g., settings, sounds, samples).
MIDI connectors
Connect an external MIDI device here.
USB COMPUTER port
Use a commercially available USB
2.0 cable to connect this unit to
your computer.
FOOT PEDAL jacks
USB FOR UPDATE port
You can update the system program by connecting a USB ash
drive here.
You can also connect a wireless USB adapter (WNA1100-RL;
sold separately) here, and use wireless-enabled applications
(such as the iPhone app Air Recorder).
* Use USB Flash Memory (supports USB 2.0 Hi-Speed Flash
Memory) sold by Roland. We cannot guarantee operation if
other products are used.
* Carefully insert the USB ash drives all the way in—until it is
rmly in place.
* To prevent malfunction and equipment failure, always turn down the volume, and turn o all the units before making any connections.
* When connection cables with resistors are used, the volume level of equipment connected to the AUDIO INPUT jacks may be low. If this happens, use connection cables that do
not contain resistors.
* Acoustic feedback could be produced depending on the location of microphones relative to speakers. This can be remedied by:
• Changing the orientation of the microphone(s).
• Relocating microphone(s) at a greater distance from speakers.
• Lowering volume levels.
HOLD jack
You can connect a pedal switch
(DP series; sold separately) and
use it as a hold pedal.
CTRL 1, CTRL 2 jacks
You can connect an expression pedal (EV-5; sold
separately) or pedal switch (DP series; sold separately)
here and use them to control various parameters or
functions.
* Use only the specied expression pedal (EV-5; sold
separately). By connecting any other expression
pedals, you risk causing malfunction and/or damage
to the unit.
8
Page 9
Panel Descriptions
1: GND2: HOT
1: GND 2: HOT
TIP: HOT
Overview Performing SettingsOverview
MAIN OUTPUT jacks
Connect your speakers here. If outputting in
monaural, connect the L/MONO jack.
* This instrument is equipped with balanced (TRS)
type jacks. Wiring diagrams for these jacks are
shown below. Make connections after rst checking
the wiring diagrams of other equipment you intend
to connect.
RING: COLD
SLEEVE: GND
DC IN jack, Cord hook
Connect the included AC adaptor here.
Indicator
AC outlet
* To prevent the inadvertent disruption of power to your unit (should the plug be pulled out
accidentally), and to avoid applying undue stress to the DC IN jack, anchor the power cord using the
cord hook, as shown in the illustration.
* Place the AC adaptor so the side with the indicator (see illustration) faces upwards and the side with
textual information faces downwards. The indicator will light when you plug the AC adaptor into an
AC outlet.
[POWER] switch
Press this switch to turn it on/o.
Performance
Functions
Editing
(Creating Songs)
Sequencer
AUDIO INPUT jacks
GUITAR/MIC jack
Connect your guitar or microphone here.
Use the [LEVEL] knob to adjust
the input level.
Set this to “GUITAR” if you’ve
connected a guitar, or to “MIC” if
you’ve connected a microphone.
MEMO
You can adjust the overall input volume
(Audio Input Level: p. 80).
LINE jack
Connect your audio player or
audio device here.
Use a stereo mini-plug cable
(commercially available) to
make connections. Adjust
the volume using the
controls of the device you’ve
connected.
Sampler Pads DAW
Ground terminal
Depending on the circumstances of a particular setup, you
may experience a discomforting sensation, or perceive
that the surface feels gritty to the touch when you touch
this device, microphones connected to it, or the metal
portions of other objects, such as guitars. This is due to an
innitesimal electrical charge, which is absolutely harmless.
However, if you are concerned about this, connect the
ground terminal (see gure) with an external ground. When
the unit is grounded, a slight hum may occur, depending
on the particulars of your installation. If you are unsure of
the connection method, contact the nearest Roland Service
Center, or an authorized Roland distributor, as listed on the
“Information” page.
Unsuitable places for connection
• Water pipes (may result in shock or electrocution)
• Gas pipes (may result in re or explosion)
• Telephone-line ground or lightning rod (may be
dangerous in the event of lightning)
PHONES jack
Connect you headphones (sold separately)
to this jack.
Appendix
SUB OUTPUT jack
Connect separately sold headphones or speakers here.
Sounds such as the metronome or a specic part can be specied for
individual output.
Lets you synchronize your tempo with other players when performing
in a band.
* The top panel [VOLUME] knob does not adjust the volume of this
output.
9
Page 10
An Overview of the FA
Overall Structure
Broadly speaking, the FA consists of three sections: “synthesizer,” “sequencer,” and “sampler.”
SamplerSequencerSynthesizer
Synthesizer
The FA provides 16 parts, allowing you to play multiple tones simultaneously.
These 16 parts are collectively called a “studio set.” One tone can be assigned to
each part of a studio set.
Normally, you’ll perform using the tone of part 1 (single play).
When using the sequencer to create a song, you’ll use all 16 parts of the studio
set (multi part play).
You can also use the tones of part 1 and part 2 for dual play or split play.
What is a tone?
Each sound that you can play on the FA is called a “tone.” Press a tone
button to select a tone.
Sequencer
You can use the 16-track MIDI sequencer to create songs.
You can record 16 tracks using the tones of the studio set’s
16 parts.
You can also record the performance data that is produced
when you strike the pads to play samples.
What is a song?
A “song” is performance data for one song.
A song contains the performance data,
tempo data, and the studio set that you used.
Sample banks are also remembered for each
song.
Studio set
Part 1
Part 2
Part 3
Part 4
Part 10
Part 16
Studio set
Part 1
Part 2
Part 3
Part 4
Part 10
Part 16
page 21
Normally you’ll
play the tone that’s
assigned to part 1.
page 55
Song
Track 1
Track 2
Track 3
Track 4
Track 10
Track 16
Sampler
Using the sampler section, the sound of your keyboard performance or the sound
that’s input from a connected audio device or microphone can be recorded
(sampled) to an SD card as audio.
Samples that you’ve sampled to an SD card can be played by pressing the pads.
What is a sample?
A sample is a sampled sound together with loop data
and other settings, that is assigned to one of the 16
pads.
10
page 77
Page 11
An Overview of the FA
How the Sound Engine Is Structured
Tones
There are two types of tones: “SuperNATURAL tones” and “PCM tones.”
You can choose a tone from the sound library and assign it to a part. You can also edit a tone and save it to user memory (p. 14).
Sound library
TONE
ACOUSTIC SYNTH
PCM
SYNTH
SuperNATURAL tones
There are three types of SuperNATURAL tones: “SuperNATURAL acoustic tones,” “SuperNATURAL synth tones,” and “SuperNATURAL drum kits.”
Type Explanation
SuperNATURAL acoustic tones (SN-A)
SuperNATURAL synth tones (SN-S)
SuperNATURAL drum kits (SN-D)
These tones reproduce not merely the sounds of acoustic instruments, but also the dierences arising from the phrase,
chord, or melodic performances of the player, giving you the expressive power that is distinctive of that acoustic
instrument.
Each tone components: “OSC (oscillator),” “FILTER (lter),” and “AMP (amp).” Powerful synth sounds can be
produced by a single tone.
These are drum sounds that reproduce the natural tonal change from soft to strong strikes, and the way in which the
sound responds to repeated strikes.
DRUM KIT
DRUM KIT
Overview Performing SettingsOverview
Performance
Functions
Editing
(Creating Songs)
Sequencer
Sampler Pads DAW
PCM Tones
There are two types of PCM tones: “PCM synth tones” and “PCM drum kits.”
Type Explanation
PCM synth tones (PSMC)
PCM drum kits (PCMD)
* Each tone built into the FA includes multi-eect (MFX) settings specically for that tone.
These are sounds that were called “patches” on Roland synthesizers of the past, and have been tuned for this unit.
You can combine up to four partials (waves) in one PCM synth tone.
These are sounds that were called “rhythm sets” on Roland synthesizers of the past, and have been tuned for this
unit. A drum kit is a group containing multiple percussion instrument sounds so that dierent percussion instrument
sound are heard depending on the key (note number) you play.
Appendix
11
Page 12

An Overview of the FA
Studio Sets
A studio set contains 16 parts, with one tone assigned to each part.
Normally, you’ll play the tone that’s assigned to part one (single play). When using the sequencer to create a song, you’ll use all 16 parts of the studio
set (multi part play).
In a multi part play, you can assign a tone or drum kit to each part to create an ensemble, or layer sounds so that you can enjoy performing rich
textures.
Studio set
Part 16
Part 15
Part 14
Part 3
Part 2
Part 1
Tone
Part 10 (Drum part)
Drum kit
DRUM INST
INST/PARTIAL
62
DRUM INST
01
DRUM INST
OUTPUT
ASSIGN
MFX
MFX
EQ
EQ
LEVEL
LEVEL
IFX
Master Comp can be
switched to IFX.
Reverb
Chorus
Master
Comp
MAIN OUTPUT
COMP+EQ 6
COMP+EQ 5
COMP+EQ 4
COMP+EQ 3
COMP+EQ 2
COMP+EQ 1
* As an example here, part 10 is assigned as a drum part.
DRUM
COMP+EQ
OUTPUT
ASSIGN
12
Page 13
An Overview of the FA
About the Eects
The following eects are built into the FA, and you can make settings independently for each eect.
FA
Studio set
Part 1–9, 11–16
Tone
INST/PARTIAL
Part 10 (Drum tone)
Drum kit
DRUM INST 1–62
COMP+EQ
1–6
MFX
MFX
DRUM COMP+EQ
OUTPUT ASSIGN
EQ
EQ
IFX
Master Comp can be
switched to IFX.
Reverb
Chorus
Master
Comp
Master EQ
TFX
Overview Performing SettingsOverview
Performance
Functions
Editing
(Creating Songs)
Sequencer
AUDIO INPUT
Eect type Eect Explanation
This is a general-purpose multi-eect that transforms the sound itself, giving it an entirely dierent character.
You can choose from 68 types as appropriate for your needs.
These types include single eects such as distortion or anger, as well as a variety of other types. Each tone
has settings for one multi-eect.
A drum part lets you use six compressors and equalizers. Each drum instrument can be individually assigned
to these.
Although a drum kit can be assigned to each of the parts, the six sets of compressor+equalizer are available
only for one specied part (the part specied by the Drum Comp+EQ Assign setting).
This is an equalizer that can be applied to each part.
You can independently adjust the high, mid, and low-frequency ranges.
The compressor compresses sounds that exceed a specied volume level, making the volume more
consistent.
You can independently adjust the high, mid, and low-frequency ranges.
* The insert eect is unavailable while the master eect is being used.
This is a general-purpose insert eect that can transform the sound itself, giving it a completely dierent
character.
You can choose from 78 types as appropriate for your needs.
Use this when you want to apply an eect in addition to the multi-eect.
* The master compressor is unavailable while the insert eect is being used.
This is an equalizer that is applied to the overall sound of the entire FA.
You can independently adjust the high, mid, and low-frequency ranges.
The total eect can be controlled in real time using the SOUND MODIFY knobs.
You can choose from 29 types as appropriate for your needs.
The total eect can also be applied to the sound being input from the AUDIO INPUT jack (p. 52).
Tone eects
Studio set eects
System eects
Eects applied
to the AUDIO
INPUT jack
Multi-eect (MFX)
Compressor + equalizer
(COMP+EQ)
Equalizer (EQ)
Chorus Chorus is an eect that adds depth and spaciousness to the sound.
Reverb Reverb is an eect that produces the reverberation that is characteristic of sounds heard in a hall.
Master compressor (Master Comp)
Insert eect (IFX)
Master EQ
Total eect (TFX)
Noise suppressor (NS) The noise suppressor is an eect that suppresses noise during periods of silence.
Mic reverb This is a reverb that is applied to the sound being input from the GUITAR/MIC jack.
NS
Mic Reverb
MAIN OUTPUT
Sampler Pads DAW
Appendix
MEMO
• For details on how to edit the eects, refer to “Editing the Eects” (p.52).
• For details on the eect parameters, refer to “Parameter guide” (PDF).
13
Page 14
An Overview of the FA
About Memory
The area where studio sets, tones, and other settings are stored is called memory.
Memory can be classied into three types by its function: “temporary memory (the temporary area),” “rewritable memory (user memory,
system memory, an SD card),” and “non-rewritable memory (preset memory).”
FA
Temporary area (Temporary memory)
Preset memory
SuperNATURAL acoustic tone
SuperNATURAL synth tone
SuperNATURAL drum kit
PCM synth tone
Preset rhythm pattern
Preset arpeggio style
Studio set
PCM drum kit
Select
Select Write
User memory System memory
Studio set
SuperNATURAL acoustic tone
SuperNATURAL synth tone
SuperNATURAL drum kit
PCM synth tone
PCM drum kit
User rhythm pattern
User arpeggio style
BackupRestore
SD card
ROLAND folder
BACKUP folder
Backup
SONG folder
System
setting
Song data
Select Write
Sample
Temporary memory
The temporary area
This area temporarily holds the studio set,
tones, and song data that you select using
the panel buttons.
When you perform, the sounds are
produced according to the settings in the
temporary area. Likewise, when you edit
a studio set, tone, or song, your edits are
modifying the data that has been called
into temporary memory; you are not
directly modifying the data in the original
memory.
Settings in temporary memory are not
permanent; they will be lost when you
turn o the power or recall other settings.
If you want to keep the settings that are in
temporary memory, you must save them
to user memory or an SD card.
Rewritable memory
System memory
This area stores system settings for the
entire FA. To save system parameters,
execute the system save operation (p. 97).
User memory
Data that you save on the FA is held in this
memory. To save data, execute the Save
operation.
• Saving a studio set (p. 45)
• Saving a tone (p. 48)
• Saving a drum kit (p. 48)
• Saving a rhythm pattern (p. 51)
• Saving an arpeggio style (p. 45)
SD card
• The user memory data and the system
parameter settings can be backed up
together to an SD card (p. 94).
• Song data (including samples) is also saved
on an SD card. To save a song, execute the
Save operation (p. 74).
• Samples are automatically saved when
you stop sampling or when you exit the
SAMPLE EDIT screen.
Non-rewritable memory
Preset memory
Data in preset memory cannot be
rewritten.
However, you can call this data into the
temporary area, modify the settings, and
then save those modied settings in user
memory.
14
Page 15
An Overview of the FA
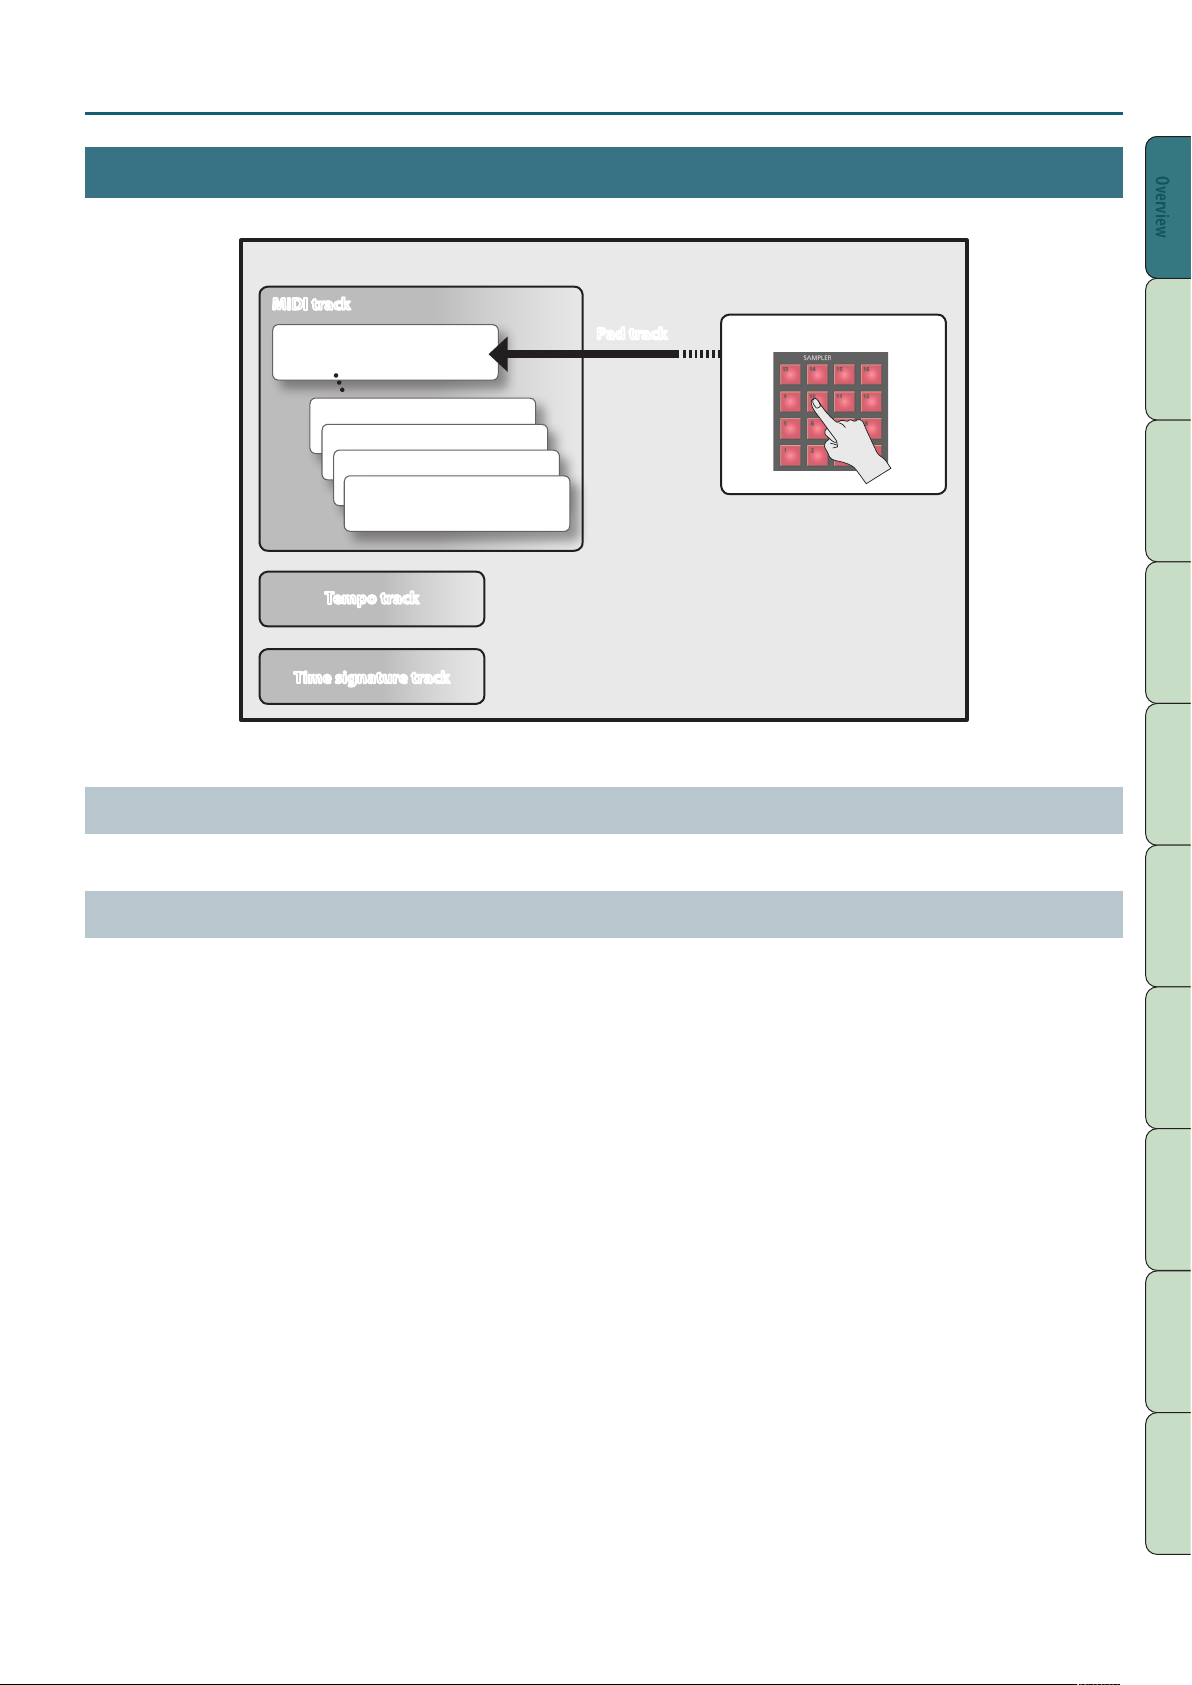
About the Sequencer
The sequencer is a function that records performance data from the keyboard and pads, allowing you to create a song.
Song
MIDI track
Track 16
Track 4
Track 3
Track 2
Track 1
Tempo track
Time signature track
* You can use one of the tracks 1–16 as the pad track. As an example here, we’ve assigned track 16 to be the pad track.
Pad track
Pad performance
Overview Performing SettingsOverview
Performance
Functions
Editing
(Creating Songs)
Sequencer
Songs
Performance data for one song is called a song. This contains the data for tracks 1–16, the tempo track, the time signature track, and the samples (p. 10).
Tracks
A track is an area that records performance data.
Tracks 1–16
MIDI tracks (MIDI)
These tracks record keyboard performance data.
Pad track (PAD)
This track records performance data for the samples that you play by striking the pads. You can use one of the tracks 1–16 as the pad track.
Tempo track
The tempo track records changes in the song’s tempo. Use it when you want the tempo to vary during the song.
Time signature track
The time signature track records the time signature of each measure in the song. You’ll make settings for this track when you newly record a song, or
when you want the time signature to change during the song.
Sampler Pads DAW
15
Appendix
Page 16
An Overview of the FA
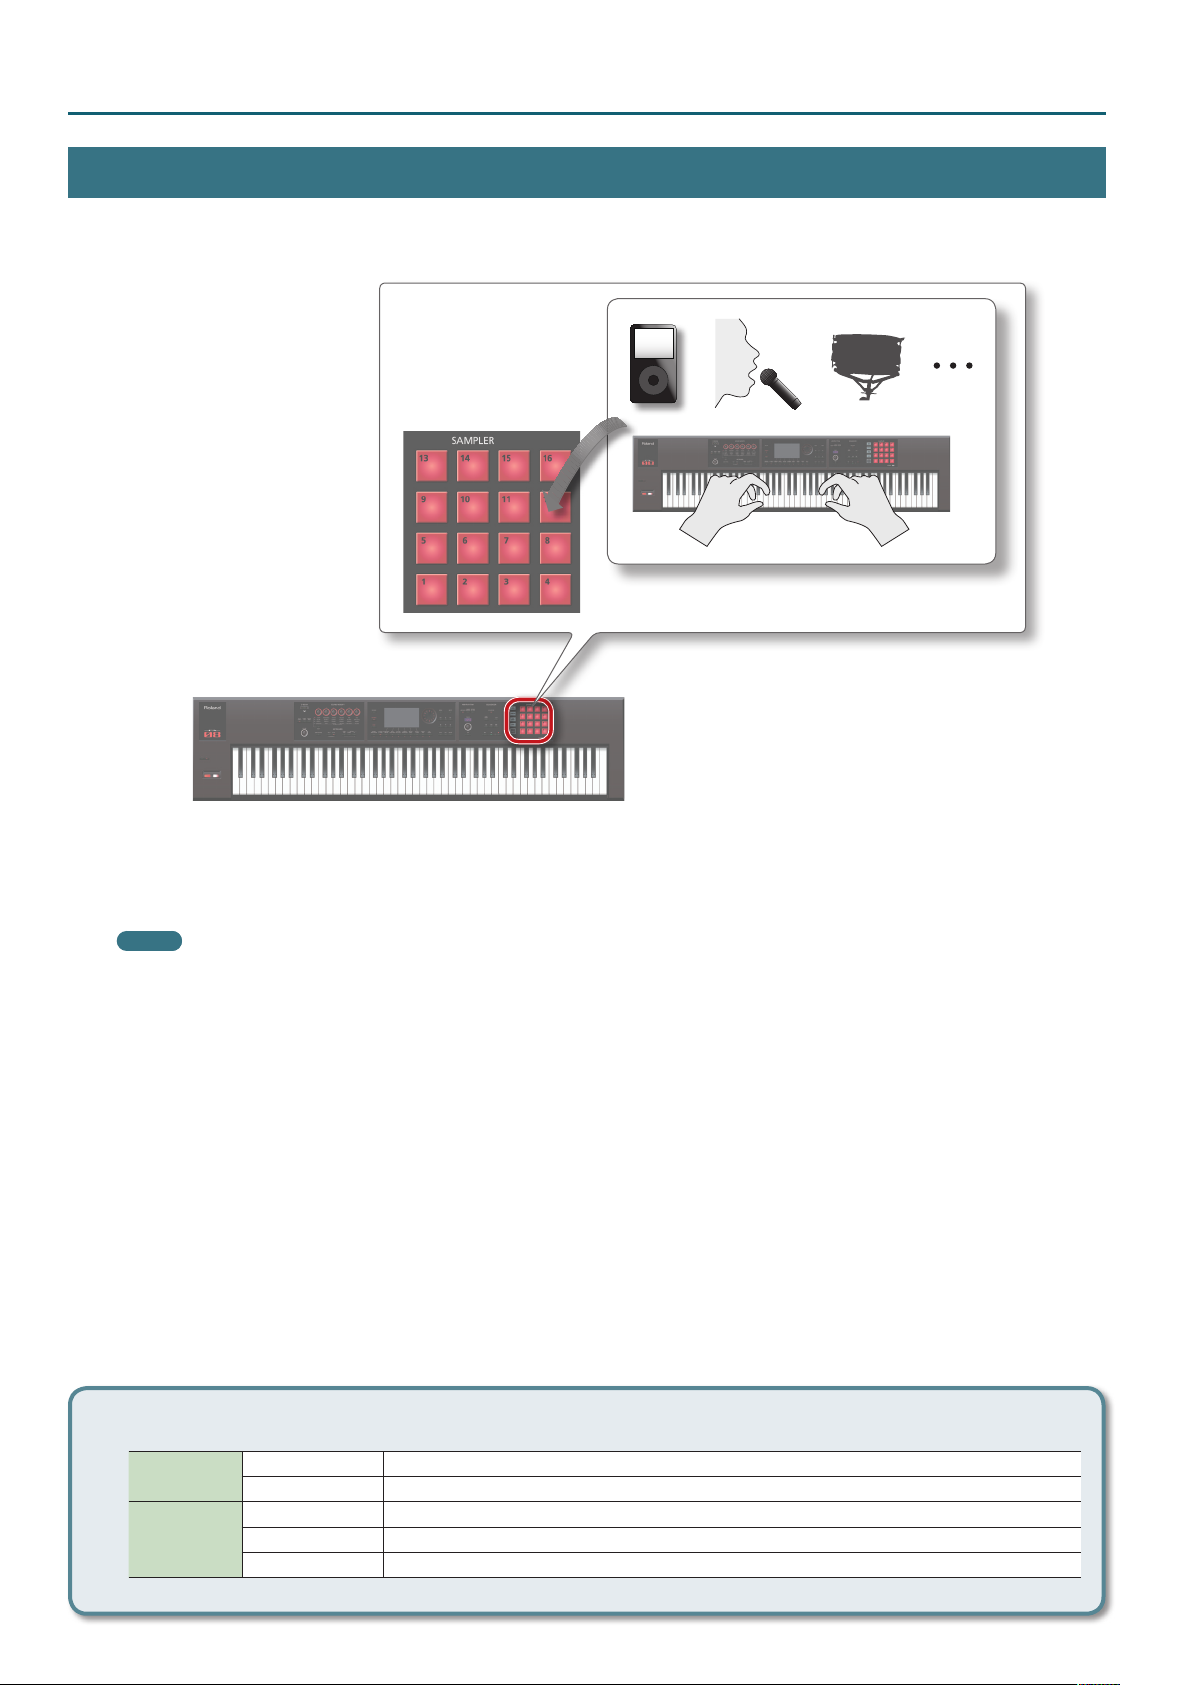
About the Sampler
Your keyboard performance or the sound that’s being input from an audio device or microphone can be sampled (recorded) by the sampler as audio
data.
You can play back the sampled sounds by pressing the pads. You can also import WAV/AIFF/MP3 format les and use them as samples.
Samples
A “sample” is a sampled (recorded) sound together with loop settings and other data, that is assigned to one of the 16 pads.
By pressing pads [1]–[16] you can play the sample that is assigned to each pad.
MEMO
Samples are automatically saved to the song data on the SD card when you stop sampling or when you exit the SAMPLE EDIT screen.
Audio les that can be imported
16
WAV/AIFF
MP3
Sampling frequency 44.1/48/96 kHz
Bit rate 8/16/24 bit
Format MPEG-1 audio layer 3
Sampling frequency 44.1 kHz
Bit rate 64/80/96/112/128/160/192/224/256/320 kbps, VBR (Variable Bit Rate)
Page 17
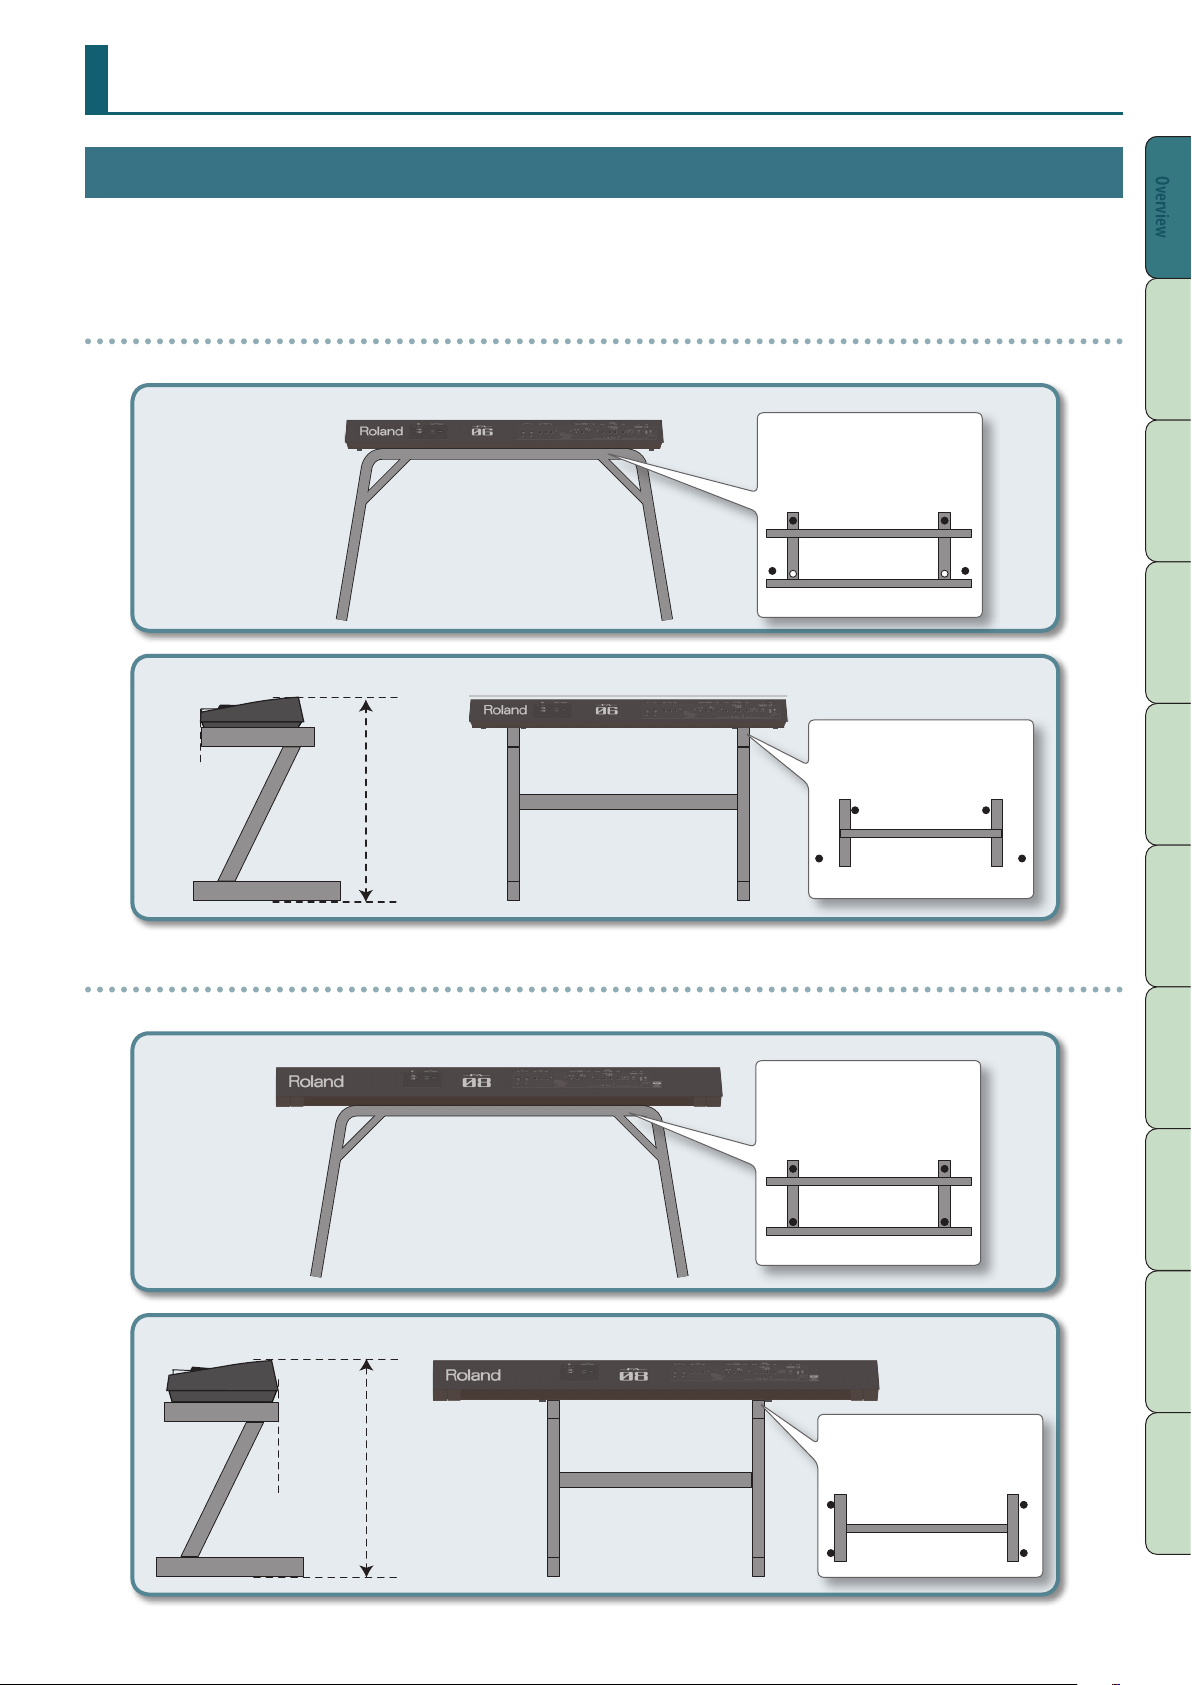
Getting Ready
Placing This Unit on a Stand
Be careful not to pinch your ngers when setting up the stand.
Place the instrument on the stand as follows.
* When using the KS-18Z and KS-J8, ensure that the height of the unit is one meter or lower.
If you’re using the FA-06
If you want to place the FA-06 on a stand, please use the KS-12 or KS-18Z stands manufactured by Roland.
KS-12
KS-18Z
Adjust so that the
Align the front of the
FA with the front of
the stand
height does not
exceed 1 meter
(Adjust the stand
to a level no
higher than the
fth level from
the bottom)
Adjust the width of the stand
so that the rubber feet on the
keyboard side of the bottom of
the keyboard t into the rubber
feet receptacles
Top view
Adjust the width of the stand
so that the rubber feet of the FA
straddle the stand
Top view
Overview Performing SettingsOverview
Performance
Functions
Editing
(Creating Songs)
Sequencer
Sampler Pads DAW
If you’re using the FA-08
If you want to place the FA-08 on a stand, please use the KS-12, KS-18Z, KS-J8, KS-G8, or KS-G8B stands manufactured by Roland.
KS-12
KS-18Z
Align the rear of the
FA with the rear of
the stand
Adjust so that the
height does not
exceed 1 meter
(Adjust the stand
to a level no
higher than the
fth level from the
bottom)
Adjust the width of the stand
so that the rubber feet of the
FA t into the rubber feet
receptacles
Top view
Adjust the width of the stand
so that the rubber feet of the FA
straddle the stand
Appendix
Top view
17
Page 18

Getting Ready
KS-J8
KS-G8, KS-G8B
Align the front of
the FA with the
rubber base of
the stand
Adjust so that
the height does
not exceed 1
meter (Adjust
the stand to a
level no higher
than the eighth
level from the
bottom)
Firmly insert the rubber
feet on the bottom of the
keyboard (at its front, beneath
the keys) into the rubber feet
receptacles on the arms
• Keep the rubber feet of
the FA on the inside of
the stand
• Ensure that the rubber
base of the stand does
not contact the screws
of the FA
Top view
18
Page 19
Getting Ready
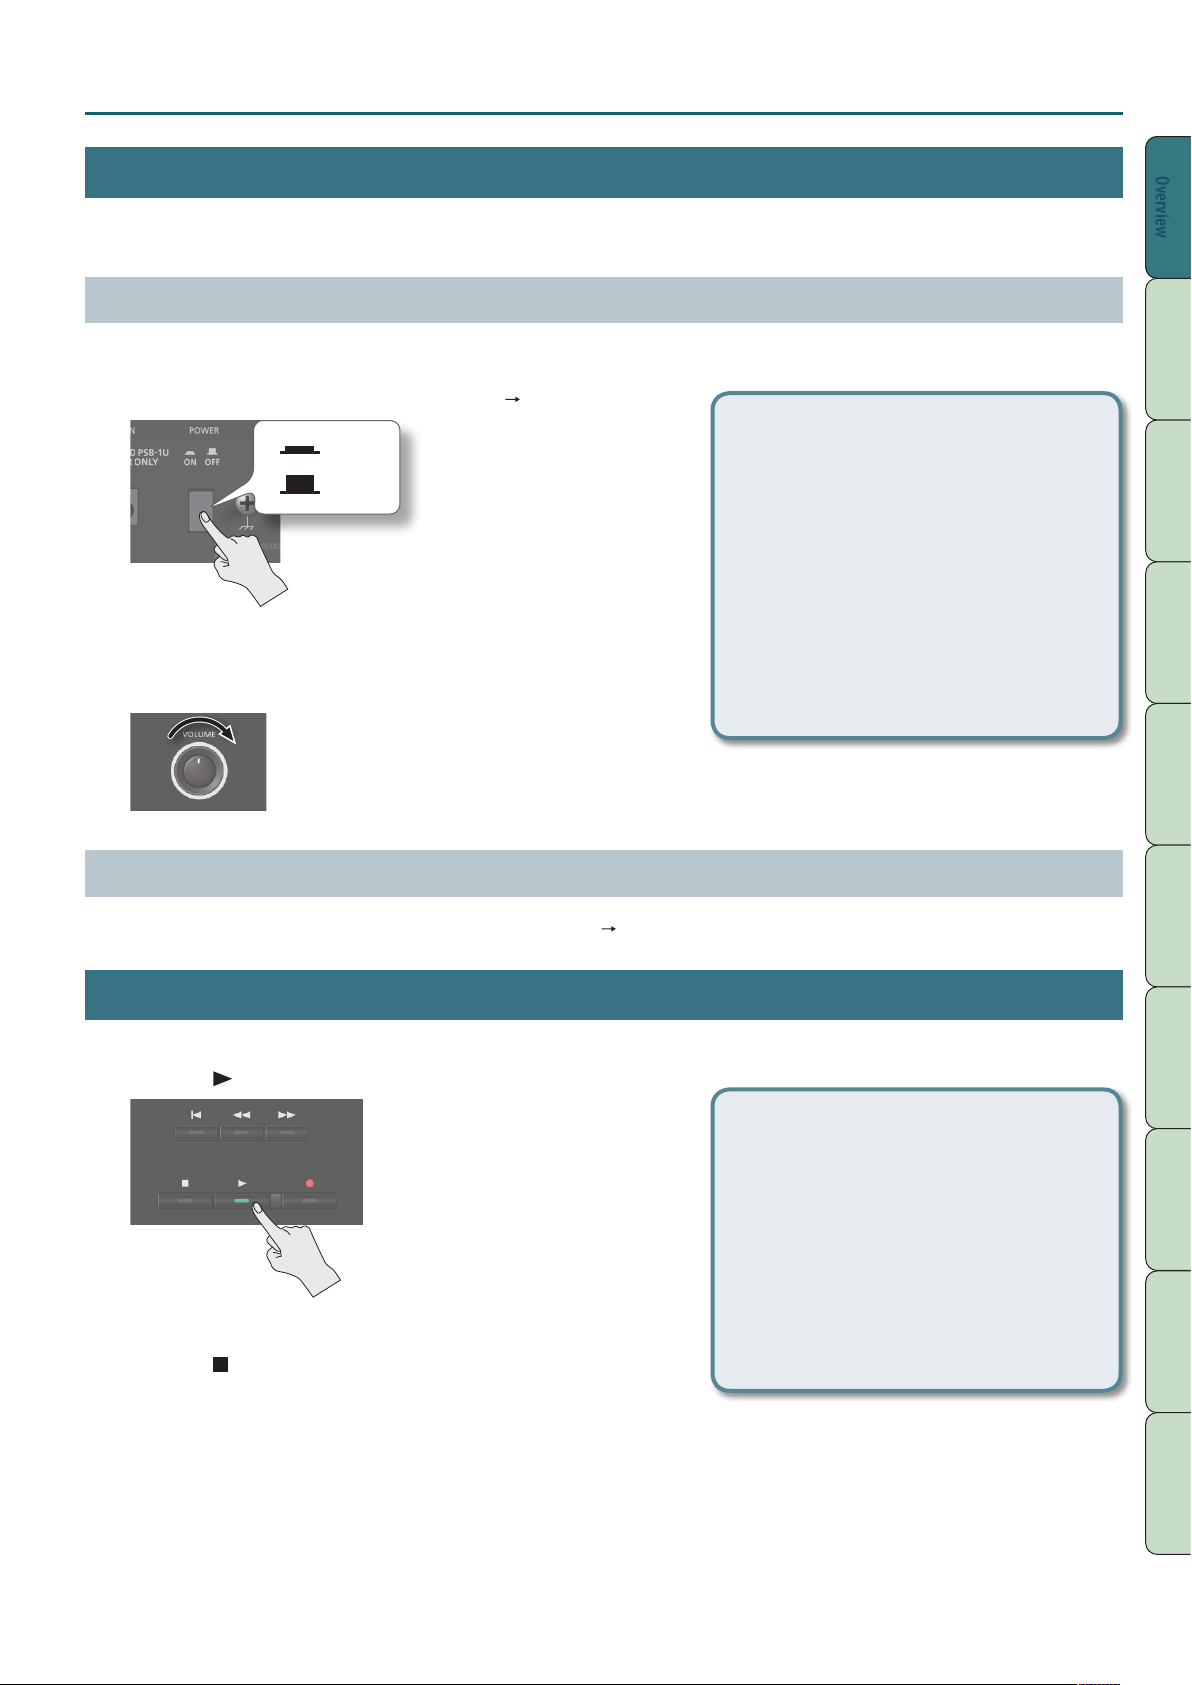
Turning the Power On/O
Once everything is properly connected (p. 8), be sure to follow the procedure below to turn on their power. If you turn on equipment in the wrong
order, you risk causing malfunction or equipment failure.
Turning the Power On
* Before turning the unit on/o, always be sure to turn the volume down. Even with the volume turned down, you might hear some sound when
switching the unit on/o. However, this is normal and does not indicate a malfunction.
1. Turn the power on in the following order: the FA connected devices.
Concerning the Auto O function
On
O
* This unit is equipped with a protection circuit. A brief interval (a few seconds) after
turning the unit on is required before it will operate normally.
2. Turn the [VOLUME] knob to adjust the volume.
The power to this unit will be turned o
automatically after a predetermined amount
of time has passed since it was last used for
playing music, or its buttons or controls were
operated (Auto O function). If you do not
want the power to be turned o automatically,
disengage the Auto O function.
• Any settings that you are in the process
of editing will be lost when the power is
turned o. If you have any settings that
you want to keep, you should save them
beforehand.
• To restore power, turn the power on again.
Overview Performing SettingsOverview
Performance
Functions
Editing
(Creating Songs)
Sequencer
Turning the Power O
1. Turn the power o in the following order: connected devices the FA.
Playing the Demo Songs
The SD card included with this unit contains demo songs.
1. Press the [ ] button.
Demo song playback starts.
2. Press the [ ] button to stop.
* Use of the demo songs for any purpose other than personal enjoyment without
permission from the copyright holder is prohibited by law.
Selecting a song
Press the [SONG SELECT] button.
1.
The SONG SELECT screen appears.
2. Turn the dial to select a song.
3. Press the [7] (Load) button.
A conrmation message appears.
4. Press the [6] (OK) button.
The song is selected.
Sampler Pads DAW
Appendix
19
Page 20

20
Page 21
02: Performing
Explains basic performance operations, such as how to select tones.
Playing One Tone (Single Play) . . . . . . . . . . . . . . . . . . . . . . . . . . . . . 22
Overview Performing SettingsPerforming
Performance
Functions
Editing
Playing Two Tones Together (Dual) . . . . . . . . . . . . . . . . . . . . . . . . . 24
Playing Dierent Tones in the Right and Left Hands (Split) . . . 25
Playing Multiple Parts (Multi Part Play) . . . . . . . . . . . . . . . . . . . . . . 26
Registering/Recalling Favorite Sounds (Favorites) . . . . . . . . . . . 28
Changing the Keyboard Settings . . . . . . . . . . . . . . . . . . . . . . . . . . . 29
(Creating Songs)
Sequencer
Sampler Pads DAW
Appendix
Page 22
Playing One Tone (Single Play)
When playing the FA, you’ll typically play the tone that’s assigned to
part 1 of the studio set (single play mode).
The tones are organized into the following banks.
Bank Explanation
PRST (preset)
USER (user) Tones you edit can be saved in this bank.
MEMO
For PCM synth tones and PCM drum kits, you can also select
from the GM2 bank.
These are non-rewritable tones, but you can edit a
tone and save the edited result in the user bank.
Selecting a Tone
1. Make sure that the [SPLIT] button and [DUAL] button are
unlit.
2. Press a tone button to select a category group.
About the screen
1
5
8
No. Explanation Page
Eect information and status p. 52
1
Song information p. 56
2
Bank, number, and name of the studio set p. 27
3
Tone number and name –
4
Type and bank of tone p. 11
5
2
3
4
7
6
Category group Explanation
DRUMS/PERCUSSION Rhythm instruments
A. PIANO/E. PIANO Piano
KEYBOARD/ORGAN Keyboard/organ
BASS/SYNTH BASS Bass
GUITAR/PLUCKED Guitar
STRINGS/ORCHESTRA Strings/orchestral
BRASS/WIND Brass/woodwinds
VOCAL/CHOIR Vocal/choir
SYNTH/PAD Synthesizer/pads
FX/OTHER Sound eects/other
3. Press a tone button.
MEMO
If you press a tone button twice in succession, a dierent
category in the same category group is selected.
4. Turn the dial to select a tone.
Play the keyboard and hear the sound.
MEMO
• For more about tones, refer to “Sound List” (PDF).
• If you hold down the [PREVIEW] button, the FA plays a demo
using a phrase that’s suitable for the selected tone.
• If you hold down the [SHIFT] button and press the [PREVIEW]
button, the phrase continues playing and the [PREVIEW]
button remains lit even after you release it. When you press the
[PREVIEW] button once again, the button goes dark and the
phrase playback stops.
• If desired, you can make the SOUND MODIFY knob settings be
reset when you switch tones (Auto Knob Reset: p. 99).
Tone level p. 44
6
Category name and lock –
7
Keyboard status (active region, dual, split, etc.) p. 44
8
Save your selection
Your selection of tone is temporary. If you turn o the
power or choose a dierent studio set, your tone selection
disappears. If you want this unit to remember the tone you
selected, save the studio set (p. 45).
Selecting tones by category (Category Lock)
If you move the cursor to the lock icon ( ) and use the dial
or the [DEC] [INC] buttons to select the “UNLOCK” setting,
you can select tones across categories.
If the “LOCK” setting is selected, tones can be selected within
the currently selected category.
You can add tones
A wide range of tones from the Axial sound library site can be
added to the FA.
For details, refer to the Axial site
http://axial.roland.com/
22
Page 23
Playing One Tone (Single Play)
Selecting a Tone from a List
You can view a list of tones and select one of them.
1. Make sure that the [SPLIT] button and [DUAL] button are
unlit.
2. Press a tone button to select a category group.
3. Press the [ENTER] button.
The TONE LIST screen appears.
MEMO
You can also access the TONE LIST screen by moving the cursor
to the tone and pressing the [ENTER] button.
4. Use the cursor [ ] [ ] buttons to select a category.
Overview Performing SettingsPerforming
Performance
Functions
Editing
(Creating Songs)
Sequencer
5. Use the dial or the [DEC] [INC] buttons to select a tone,
and press the [ENTER] button.
MEMO
For more about the tones, refer to “Sound List” (PDF).
Sampler Pads DAW
23
Appendix
Page 24
Playing Two Tones Together (Dual)
You can layer two tones so that they are played simultaneously by
the same key. This is called Dual performance mode.
In Dual mode, you’ll hear the tones of part 1 and part 2 of the studio
set.
Lower tone (part 2)
Upper tone (part 1)
1. Press the [DUAL] button to make it light.
Changing the Tones
Here’s how to change the tones that you’re playing in Dual mode.
1. Access the Dual screen.
2. Move the cursor to the tone of the part that you want to
change, and use the dial or the [DEC] [INC] buttons to
change the tone.
MEMO
• You can also select a tone by pressing a tone button.
• When you’re playing in Single mode or in Dual mode, you can
select two tones by simultaneously pressing two of the tone
buttons.
• If you want the Dual settings to be memorized, save the studio
set (p. 45).
The Dual screen appears. The upper tone and lower tone are heard
as a layer.
Upper tone
Lower tone
2. To cancel Dual mode, press the [DUAL] button to make it
go dark.
24
Page 25
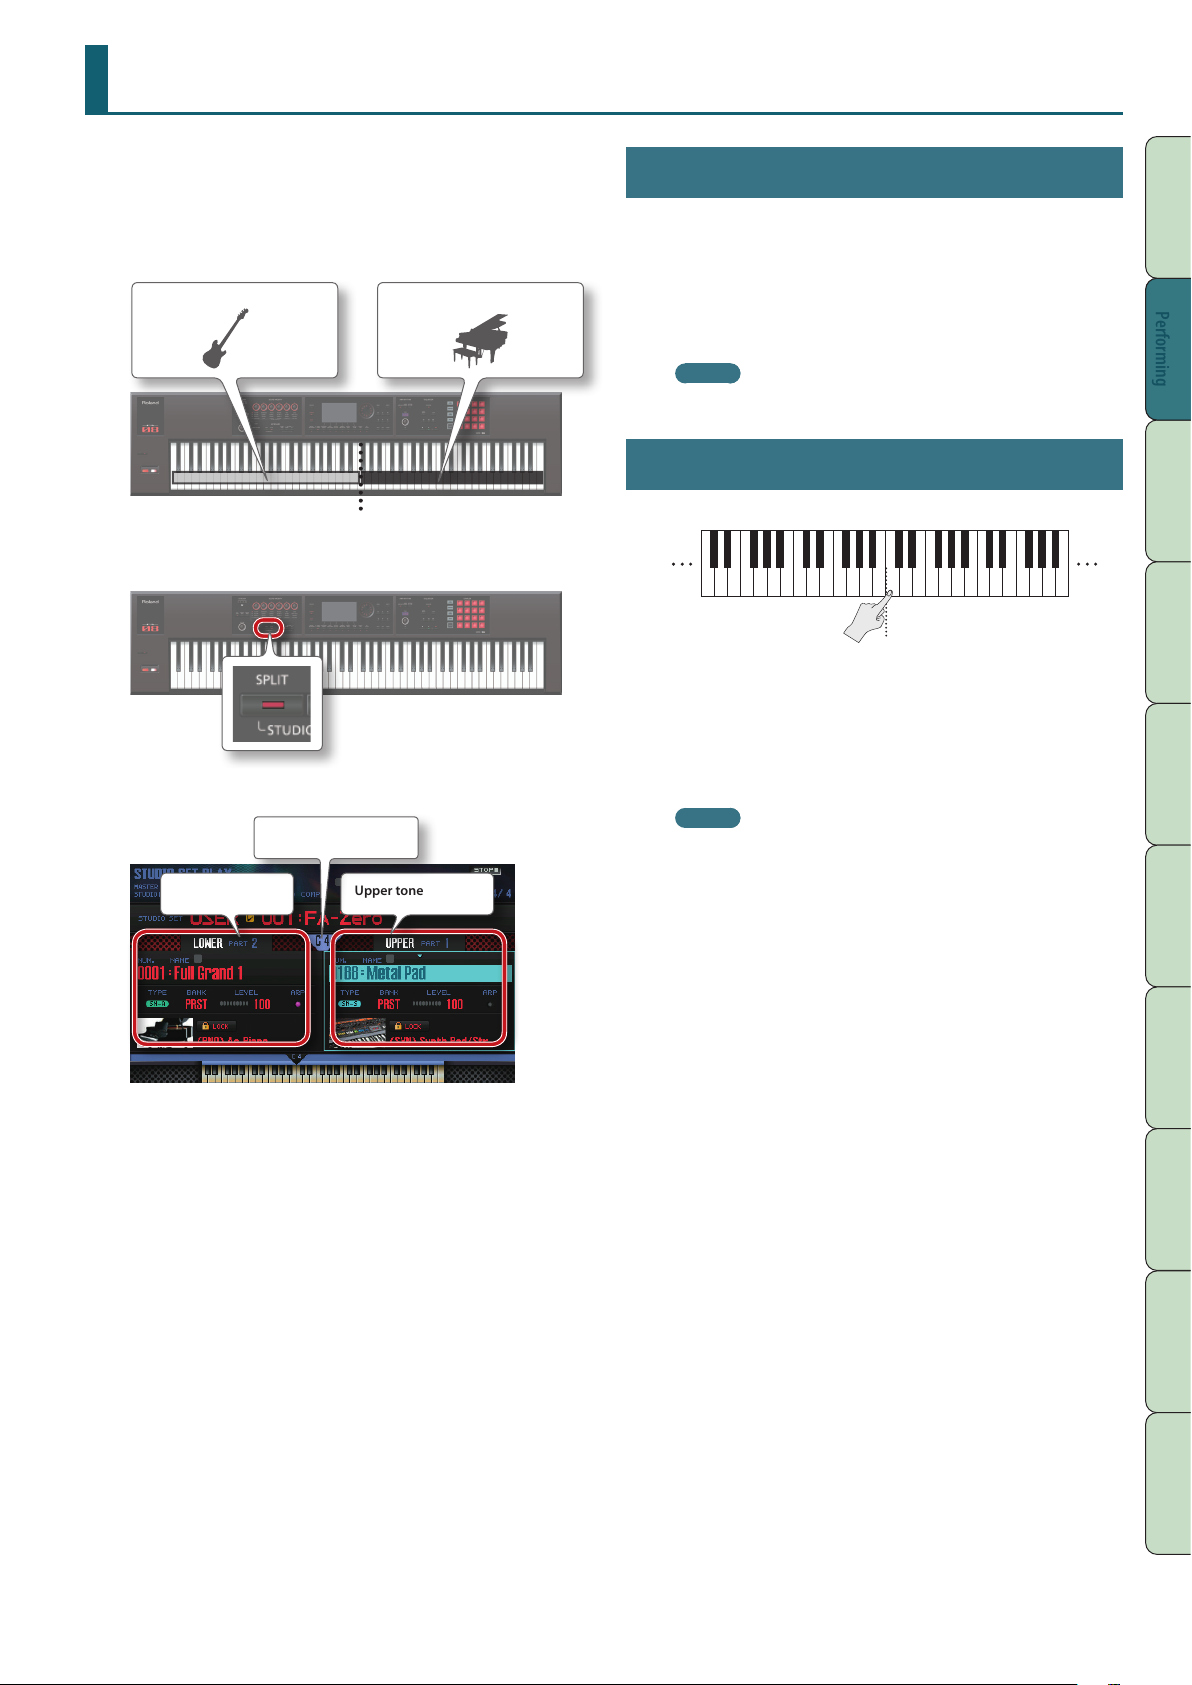
Playing Dierent Tones in the Right and Left Hands (Split)
You can divide the keyboard so that the right-hand and left-hand
regions each play a dierent tone.
This is called Split performance mode, and the location at which the
keyboard is split is called the “split point.”
In Split mode, you’ll hear the tones of part 1 and part 2 of the studio
set.
Lower tone (part 2)
Split point
Upper tone (part 1)
1. Press the [SPLIT] button to make it light.
The Split screen appears. The right-hand region of the keyboard
plays the upper tone, and the left-hand region plays the lower tone.
Split point
Upper toneLower tone
Changing the Tones
Here’s how to change the tones that you’re playing in Split mode.
1. Access the Split screen.
2. Move the cursor to the tone of the part that you want to
change, and use the dial or the [DEC] [INC] buttons to
change the tone.
MEMO
You can also select a tone by pressing a tone button.
Changing the Split Point
Here’s how to change the split point.
Split point
(included in the upper region)
1. Hold down the [SPLIT] button and press the key that you
want to assign as the new split point.
The key you press becomes the new split point.
MEMO
• You can also assign the split point in the following ways.
• In the Split screen, move the cursor to the split point and turn
the dial.
• With the cursor located at the split point, hold down the [SHIFT]
button and press the key that you want to assign as the split
point.
• If you want the Split settings to be memorized, save the studio
set (p. 45).
Overview Performing SettingsPerforming
Performance
Functions
Editing
(Creating Songs)
Sequencer
Sampler Pads DAW
2. To cancel Split mode, press the [SPLIT] button to make it
go dark.
Appendix
25
Page 26
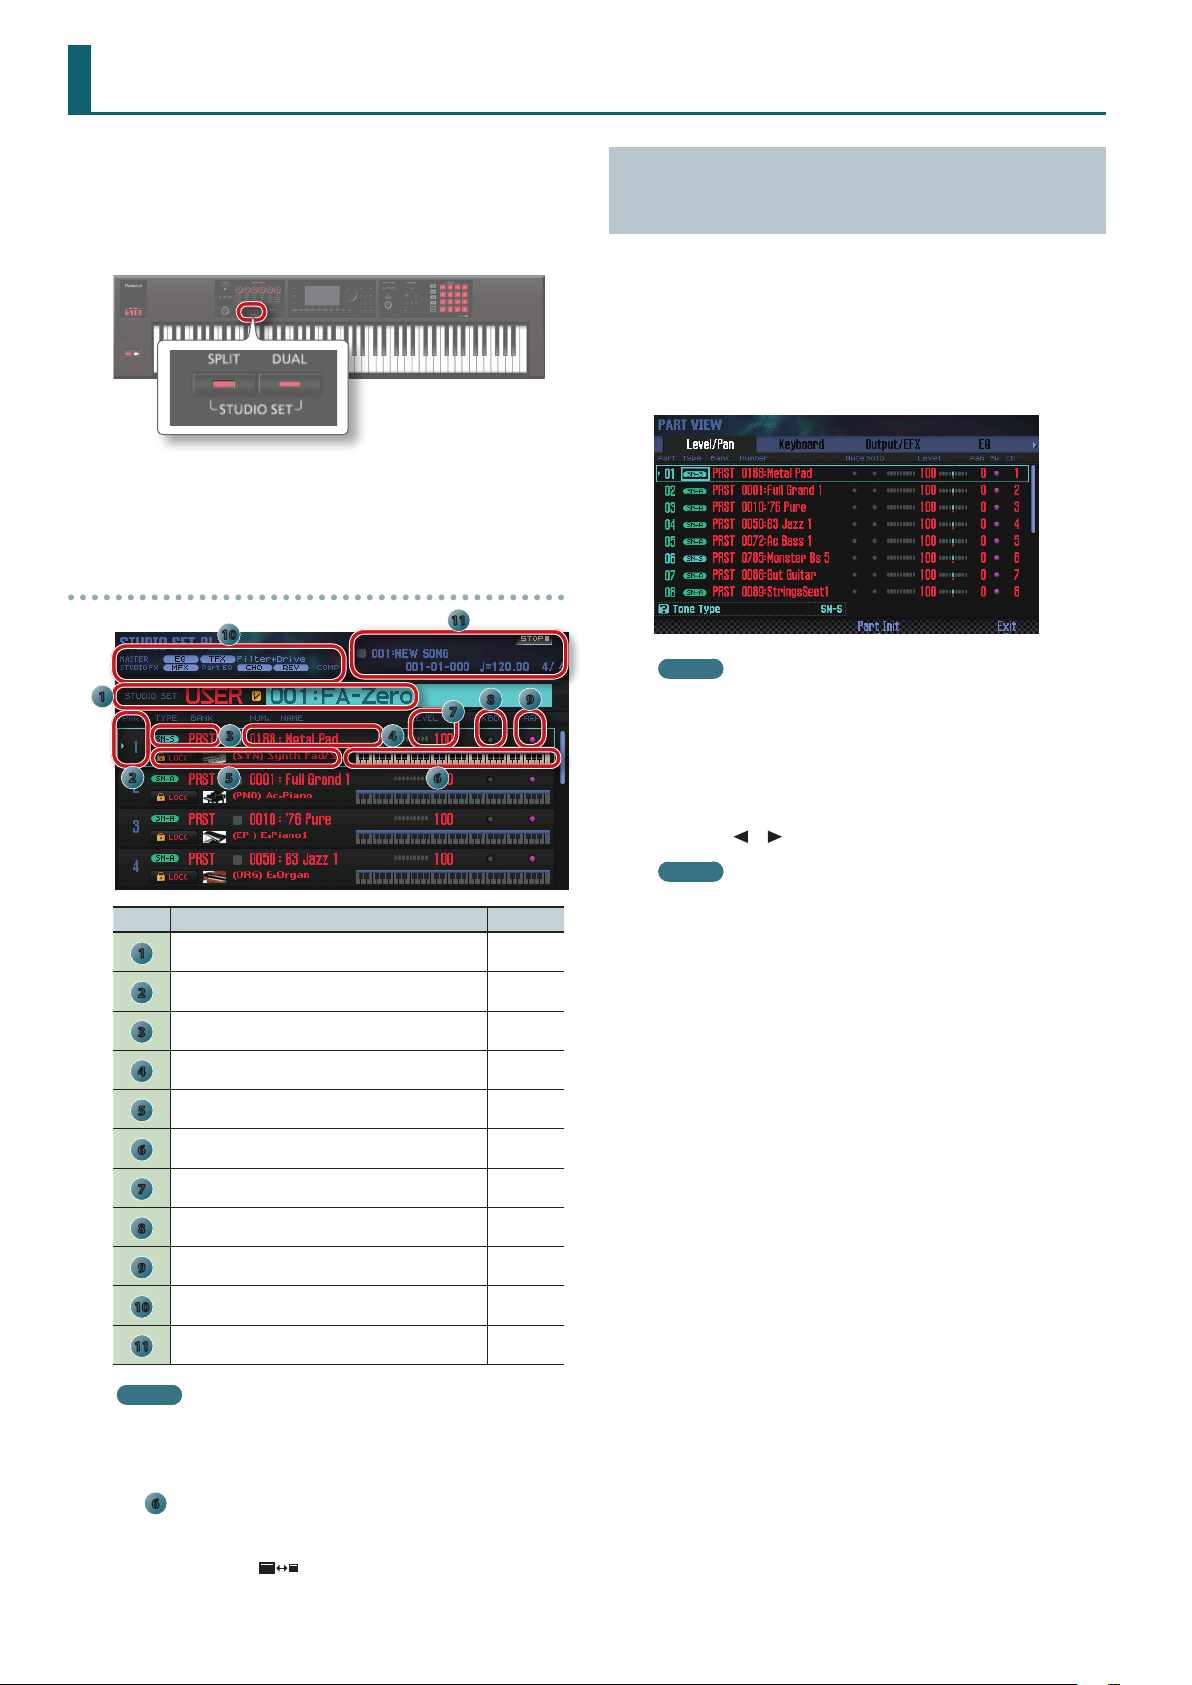
Playing Multiple Parts (Multi Part Play)
If you want to perform using three or more parts in a complex
combination, or if you’re using the sequencer to create a song,
you’ll use all 16 parts of the studio set (multi part play).
1. Press the [SPLIT] button and [DUAL] button
simultaneously.
The [SPLIT] button and [DUAL] button are both lit, and the FA is in
multi part play mode.
If you press the [SPLIT] button and [DUAL] button simultaneously
once again, you return to single play mode.
About the screen
Viewing the Part Settings (PART VIEW Screen)
In the PART VIEW screen you can view or edit a list of the part
settings.
1. Press the [MENU] button.
2. Move the cursor to “Part View” and press the [ENTER]
button.
The PART VIEW screen appears.
10
1
3 4
2
No. Explanation Page
1
2
3
4
5
6
7
5
Bank, number, and name of the studio set p. 27
Part number –
Type and bank of tone p. 11
Tone number and name –
Category name and lock –
Keyboard status (key range, etc.) p. 44
Tone level p. 44
11
7
6
8 9
MEMO
You can also access the PART VIEW screen from the STUDIO SET
PLAY screen by holding down the [SHIFT] button and pressing
the [4] (Part View) button.
3. Use the cursor buttons to select a parameter, and use the
dial to edit the value.
You can switch tabs by holding down the [SHIFT] button and using
the cursor [ ] [ ] buttons.
MEMO
For more about the part parameters, refer to “Parameter
Guide” (PDF).
Keyboard switch setting p. 27
8
Arpeggio switch setting p. 32
9
Eect information and status p. 52
10
Song information p. 56
11
MEMO
• To edit a setting, move the cursor to that value and turn the dial.
If you want to keep the edited settings, save the studio set in the
user bank (p. 45).
• To change the keyboard range, move the cursor to the keyboard
6
(
) and turn the dial, or press a key while holding down the
[SHIFT] button.
• To view all parts simultaneously, hold down the [SHIFT] button
and press the [7] (
) button.
26
Page 27
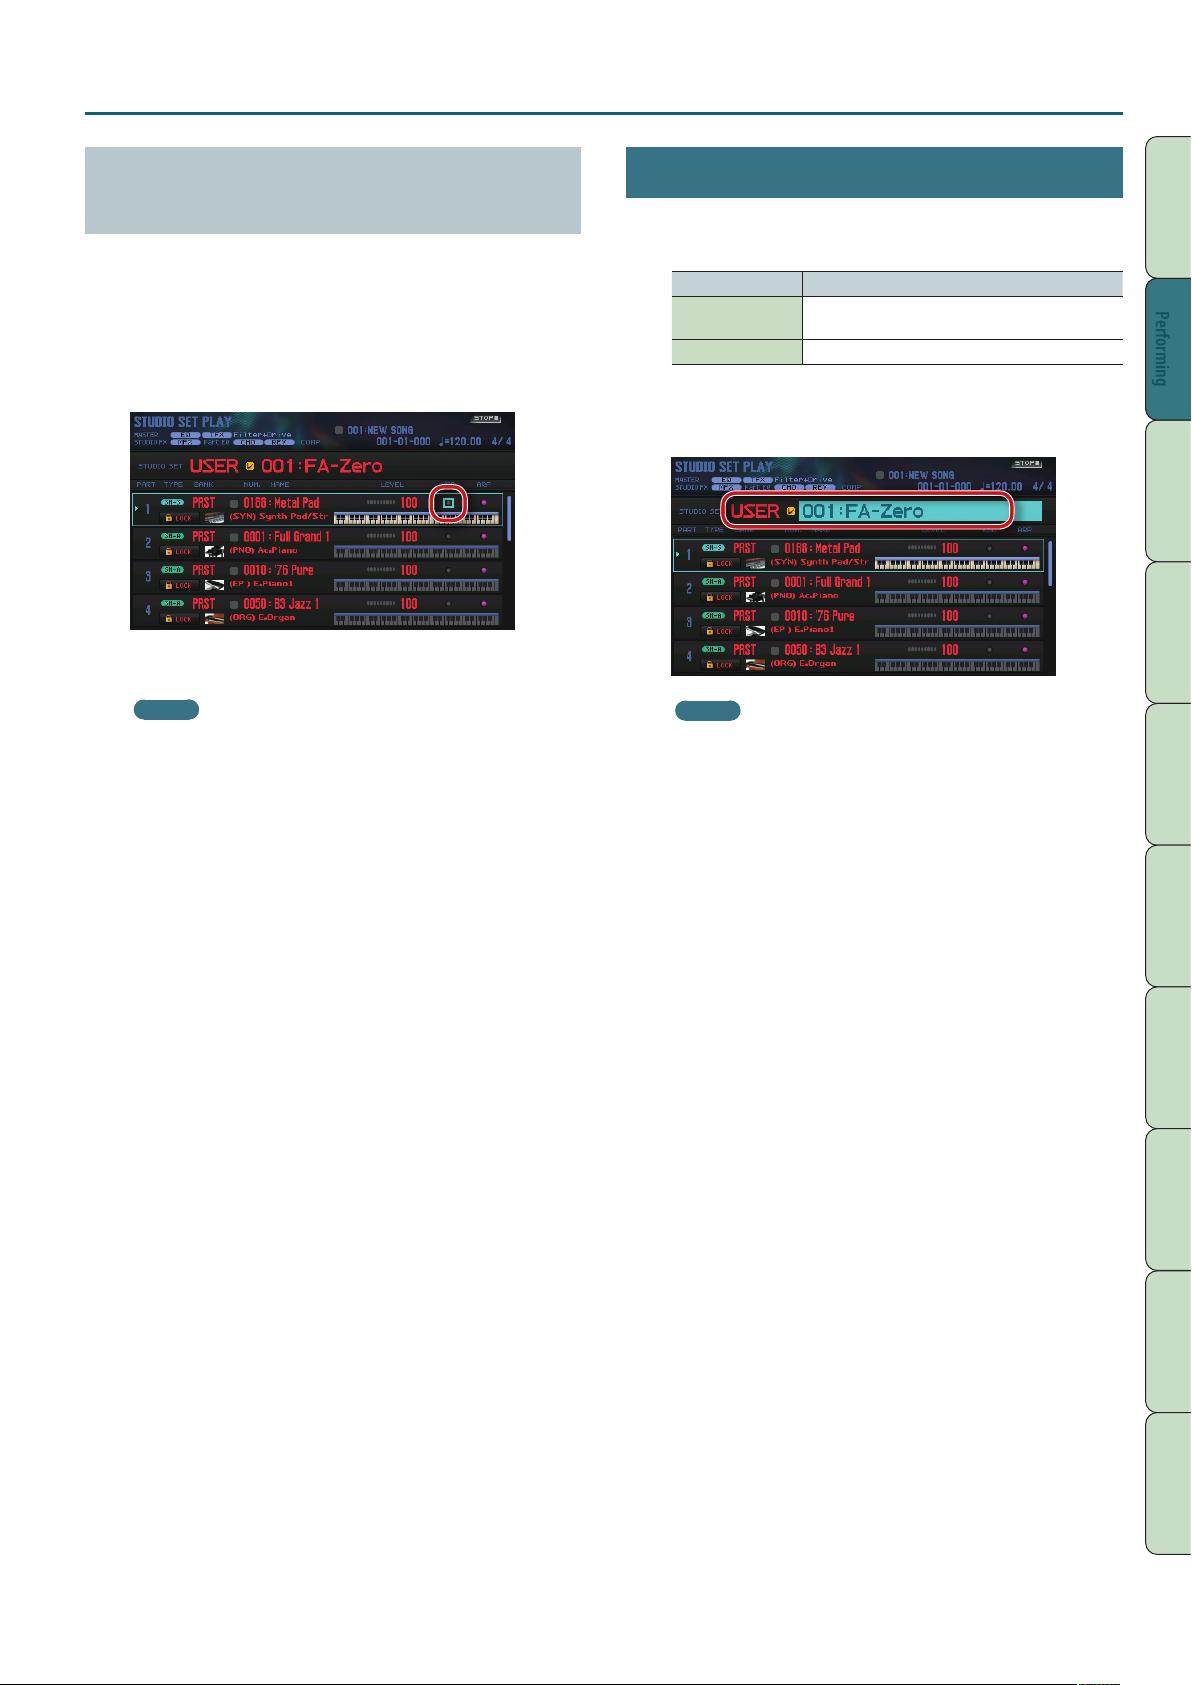
Playing Multiple Parts (Multi Part Play)
Selecting the Parts that Sound (Keyboard Switch)
Here’s how to select the parts that are heard when you play the
keyboard.
1. Put the FA in multi part play mode (p. 26).
2. Move the cursor to the “KBD” eld of the part whose
keyboard switch setting you want to change, and use the
dial or the [DEC] [INC] buttons to turn it on/o.
When you play the keyboard, you hear parts whose keyboard
switch is turned on.
MEMO
• If you want to play multiple parts as a layer, turn on the
keyboard switch of those parts. Also, ensure that one of the
parts whose keyboard switch is on is the current part (the
currently selected part).
• If a part whose keyboard switch is turned o becomes the
current part, you can play just the sound of that part by itself.
• The current part is memorized in the studio set.
• You can use the pads to turn the keyboard switch on/o (p. 85).
Switching Studio Sets
Here’s how to switch between studio sets.
There are two banks of studio sets, as follows.
Bank Explanation
PRST (preset)
USER (user) Studio sets you edit can be saved in this bank.
1. Move the cursor to “STUDIO SET,” and use the dial or the
[DEC] [INC] buttons to select a studio set.
MEMO
You can move the cursor to “STUDIO SET” and press the
[ENTER] button to access the STUDIO SET LIST screen. You can
also select a studio set from the list.
Non-rewritable studio sets. You can edit a studio set
and save the edited result in the user bank.
Overview Performing SettingsPerforming
Performance
Functions
Editing
(Creating Songs)
Sequencer
Sampler Pads DAW
27
Appendix
Page 28
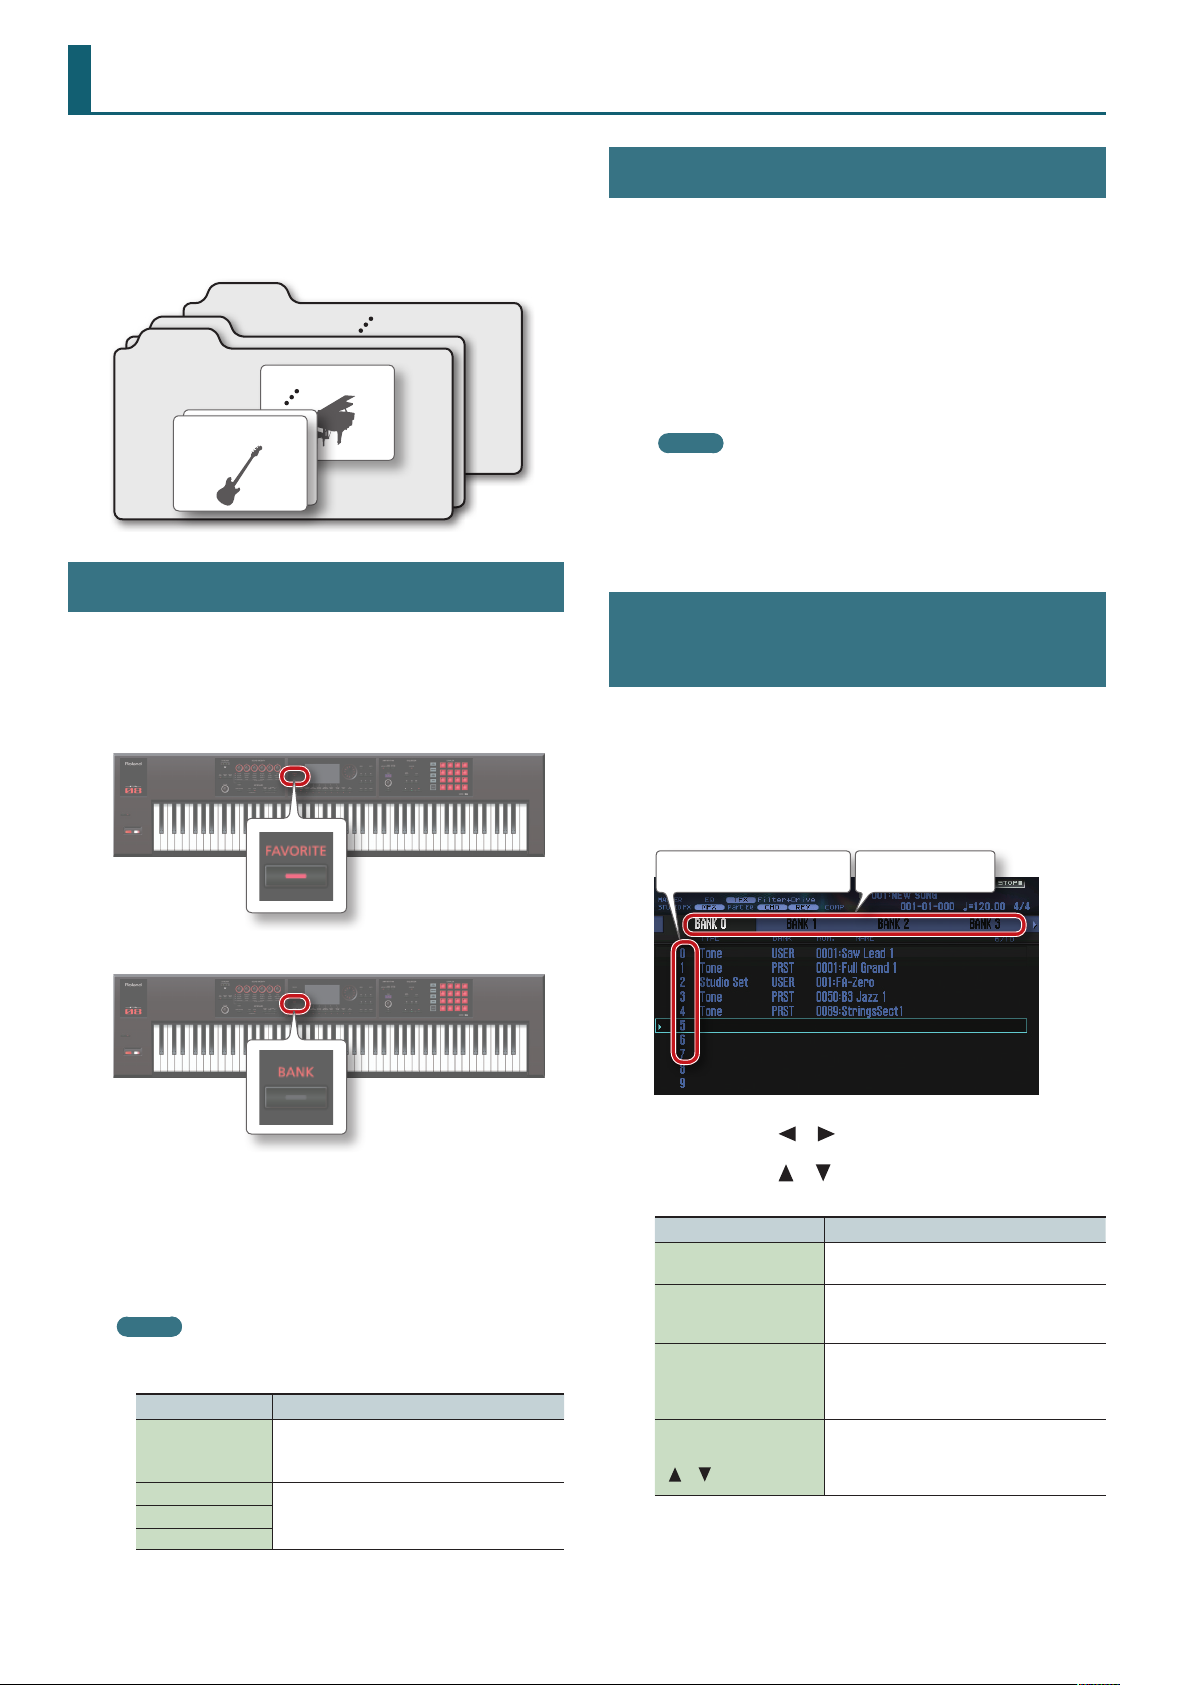
Registering/Recalling Favorite Sounds (Favorites)
If there are sounds that you use frequently in live performance, you
can register them as “favorites” for instant recall.
You can register ten sounds in each bank; ten such banks (0–9) can
be created.
For example, sounds for the songs you play in a live performance
could be registered in the order in which you’ll play them.
Bank 9
Recalling a Favorite
If you leave the [FAVORITE] button turned on, you can successively
recall favorites simply by pressing the [0]–[9] buttons.
1. Press the [FAVORITE] button to make it light.
Now you can use the [0]–[9] buttons to recall favorites.
Bank 0
Favorite 9
Favorite 0
Registering a Sound as a Favorite
Here’s how to register a sound as a favorite.
1. Select the sound (tones or studio sets) that you want to
register.
2. Press the [FAVORITE] button to make it light.
2. Select the bank you want to recall.
1. Press the FAVORITE [BANK] button.
2. Press the button ([0]–[9] buttons) of the bank number that you
want to select.
MEMO
You can change the favorite bank even when the [FAVORITE]
button is o.
3. Use the [0]–[9] buttons to select a favorite.
The favorite will be recalled.
Registering/Recalling/Editing Favorites in the List
Regardless of whether the [FAVORITE] button is on or o, you can
view a list of the registered favorites, and register or recall favorites.
You can also remove a registered favorite, or change its number.
1. Hold down the [SHIFT] button and press the [FAVORITE]
button.
The FAVORITE LIST screen appears.
Favorite number Bank number
3. Select the bank in which you want to register the favorite.
1. Press the FAVORITE [BANK] button.
2. Press a button ([0]–[9] button) to specify the bank number.
4. Hold down the [FAVORITE] button and press a button
([0]–[9] buttons) to specify the number in which the
favorite will be stored.
The sound has been registered.
MEMO
The content that is registered as a favorite will depend on the
performance state.
Performance state Registered content
The tone of part 1
Single play
Dual play
Split play
Multi part play
* The Octave Shift (p. 44) setting of part 1 is
recalled as “0.”
The studio set
2. Use the cursor [ ] [ ] buttons to choose the bank.
3. Use the cursor [ ] [ ] buttons or the [DEC] [INC]
buttons to choose a favorite.
Button Explanation
[ENTER] button or [7]
(Select) button
Hold down the [SHIFT]
button and press the [2]
(Remove) button
Hold down the [SHIFT]
button and press the [3]
(Regist) button
Hold down the [SHIFT]
button and use the
] [ ] buttons
[
Recalls the selected favorite.
Removes the selected favorite.
Registers the currently selected sound at
the selected favorite number. If a favorite is
already registered at the selected number, it is
replaced by the newly registered content.
Changes the registered number. If a favorite
is already registered in the destination
number, the selected favorite is inserted at the
destination number.
28
Page 29
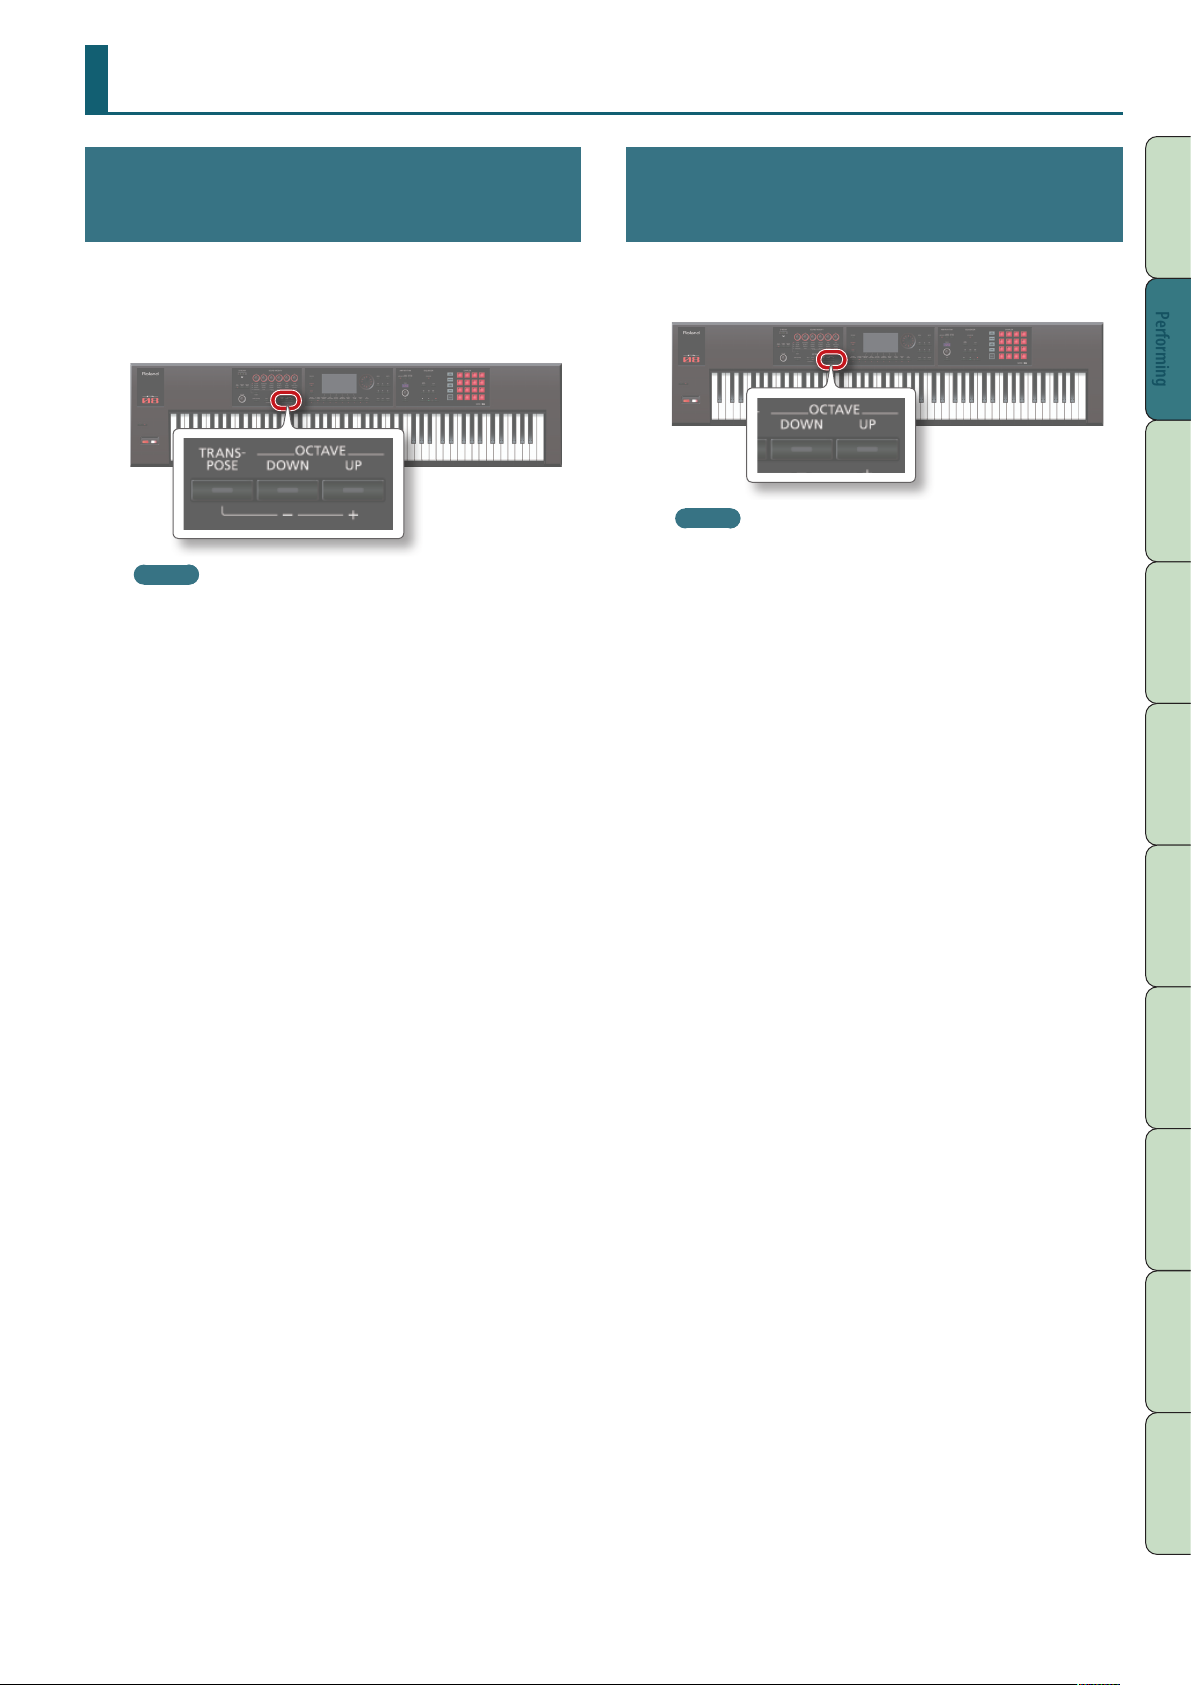
Changing the Keyboard Settings
Raising/Lowering the Key Range in Semitone Steps (Transpose)
You can transpose the pitch range of the keyboard in semitone
steps.
1. Hold down the [TRANSPOSE] button and press the [–]
button or [+] button.
MEMO
• You can transpose in a range of -5–+6 semitones.
• To return to the original setting, hold down the [TRANSPOSE]
button, and press the [–] button and [+] button simultaneously.
Raising/Lowering the Key Range in Octaves (Octave Shift)
You can shift the pitch range of the keyboard in steps of one octave.
1. Press the OCTAVE [DOWN] button or [UP] button.
MEMO
• You can shift the pitch in a maximum range of ±3 octaves.
• To return to the original range, press the OCTAVE [DOWN]
button and [UP] button simultaneously.
Overview Performing SettingsPerforming
Performance
Functions
Editing
(Creating Songs)
Sequencer
Sampler Pads DAW
Appendix
29
Page 30

30
Page 31

03: Performance Functions
Explains convenient functions that you’ll use while performing, such as modifying the
sound in real time.
Playing Arpeggios . . . . . . . . . . . . . . . . . . . . . . . . . . . . . . . . . . . . . . . . . 32
Overview Performing Settings
Performance
Performance
Functions
Functions
Editing
Using Chord Memory . . . . . . . . . . . . . . . . . . . . . . . . . . . . . . . . . . . . . . 35
Performing with Rhythm Patterns . . . . . . . . . . . . . . . . . . . . . . . . . . 36
Modifying the Sound in Real Time . . . . . . . . . . . . . . . . . . . . . . . . . . 39
(Creating Songs)
Sequencer
Sampler Pads DAW
Appendix
Page 32

Playing Arpeggios
Using the Arpeggiator
The FA has an arpeggiator that can automatically generate
arpeggios. When you use this function, an arpeggio is automatically
played according to the keys that you hold down.
MEMO
Arpeggio settings are saved in the studio set.
1. Press the [ARPEGGIO] button to make it light.
The arpeggiator turns on.
MEMO
If the FA is not in single play mode, make settings as follows
depending on the mode that you’re in.
Performance state Action
Dual play
Split play
Multi part play
Turn on the arpeggio switch (ARP in the Dual
screen or Split screen) for the part that you
want to arpeggiate.
• Turn on the arpeggio switch (ARP) for the
part that you want to arpeggiate. For details,
refer to “Parameter Guide” (PDF).
• Make the current part any part whose
keyboard switch (p. 27) is on.
Setting the Arpeggiator Tempo
You can set the tempo of the arpeggios.
1. Turn the [TEMPO] knob.
MEMO
• The tempo is saved in the studio set. If you set this to follow the
system tempo, the tempo will be maintained even if you switch
studio sets (Tempo Assign Source: p. 101).
• You can set the tempo by pressing the [TAP] button at the
desired interval (“tap tempo”). Press the button at least three
times, at quarter-note intervals of the desired tempo.
• When you press the [TAP] button, the Tempo window appears.
In this state, you can hold down the [SHIFT] button and turn the
dial to adjust the value below the decimal point. If you press the
[6] (Click) button, a click is sounded at the specied tempo. The
click turns on/o each time you press the button.
2. Play a chord on the keyboard.
An arpeggio is sounded by the part that is turned on, according to
the notes of the chord that you play.
3. To turn o the arpeggiator, press the [ARPEGGIO] button
once again to make the button go dark.
MEMO
By using the arpeggiator in conjunction with the chord memory
function (p. 35), you can easily produce a variety of arpeggio
sounds using just one nger.
Holding the Arpeggio (Hold)
Here’s how to make the arpeggio continue sounding even after you
release the keyboard.
1. Press the [ARPEGGIO] button.
The ARPEGGIO screen appears.
2. Press the [2] (Hold) button.
The hold function turns on.
3. Play a chord on the keyboard.
An arpeggio begins playing on the part for which the arpeggiator
is turned on.
If you play a dierent chord or key while the arpeggio is being held,
the arpeggio also changes.
4. To turn o the hold function, press the [2] (Hold) button
once again.
The hold function turns o.
Using a pedal switch
If you hold down a pedal switch (p. 42) while playing
a chord, the arpeggio continues playing even if
you release the keyboard.
1. Connect your pedal switch (e.g., DP series;
sold separately) to the HOLD jack.
32
2. Press the [ARPEGGIO] button.
3. Play a chord while holding down the pedal switch.
If you play a dierent chord or key while the arpeggio is being held,
the arpeggio also changes.
Page 33

Playing Arpeggios
Arpeggiator Settings
You can make detailed settings for the arpeggio’s performance
style, timing, and accent.
1. Press the [ARPEGGIO] button.
The ARPEGGIO screen appears.
2. Use the cursor buttons to select a parameter, and use the
dial to edit the value.
Parameter
Style
Hold OFF, ON Turn the hold function on/o (p. 42).
Variation 1–
Motif
Keyboard
Velocity
Value Explanation
Species the basic way in which the
arpeggio will be played.
P001–P128,
U001–U016
Sets the order in which notes of the chord will sound.
UP
DOWN
UP&DOWN
RANDOM
NOTE_ORDER
GLISSANDO
CHORD
AUTO1
AUTO2
PHRASE
REAL,
1–127
MEMO
You can create your own original
Arpeggio Style by importing SMF into an
arpeggio user style. For details, refer to
“Importing a Computer SMF File into
an Arpeggio Style (Import SMF)” (p.34).
The arpeggiator provides several variations
(performance patterns) for each arpeggio
style. This parameter selects the variation
number. The number of variations will dier
according to the arpeggio style.
Notes you press will be sounded, from low
to high.
Notes you press will be sounded, from high
to low.
Notes you press will be sounded, from low
to high, and then back down from high
to low.
Notes you press will be sounded, in random
order.
Notes you press will be sounded in the
order in which you pressed them. By
pressing the notes in the appropriate order
you can produce melody lines. Up to 128
notes will be remembered.
Each chromatic step between the highest
and lowest notes you press will sound
in succession, repeating upward and
downward. Press only the lowest and the
highest notes.
All notes you press will sound
simultaneously.
The timing at which keys will sound will be
assigned automatically, giving priority to
the lowest key that was pressed.
The timing at which keys will sound will be
assigned automatically, giving priority to
the highest key that was pressed.
Pressing a single key will sound the phrase
based on the pitch of that key. If multiple
keys are pressed, the last-pressed key will
be valid.
Species the loudness of the notes that
you play. If you want the velocity value of
each note to depend on how strongly you
play the keyboard, set this parameter to
“REAL.” If you want each note to have a
xed velocity regardless of how strongly
you play the keyboard, set this parameter
to the desired value (1–127).
Parameter
Octave
Range
Accent Rate 0–100 %
Shue Rate 0–100 %
Shue
Resolution
Value Explanation
-3–+3
,
Sets the key range in octaves over which
arpeggio will take place. If you want the
arpeggio to sound using only the notes
that you actually play, set this parameter to
“0.” To have the arpeggio sound using the
notes you play and notes 1 octave higher,
set this parameter to “+1.” A setting of “-1”
will make the arpeggio sound using the
notes you play and notes 1 octave lower.
Modies the strength of accents and the
length of the notes to adjust the “groove”
feel of the arpeggio. A setting of “100 %”
will produce the most pronounced groove
feel.
This setting lets you modify the note timing
to create shue rhythms. With a setting of
“50 %” the notes will be spaced evenly. As
the value is increased, the note timing will
have more of a “dotted” (shue) feel.
Shue Rate = 50 %
50 5050 50
Shue Rate = 90 %
90 10 90 10
Species the timing (as a note value) at
which the notes will be heard.
The note value can be specied as either a
sixteenth note or an eighth note.
Overview Performing Settings
Functions
Functions
Editing
(Creating Songs)
Sampler Pads DAW
Appendix
Performance
Performance
Sequencer
33
Page 34

Playing Arpeggios
Importing a Computer SMF File into an Arpeggio Style (Import SMF)
You can create an original arpeggio style by importing an SMF
(Standard MIDI File).
SMF that can be imported
• Only SMF format 0 is supported. If the data is incorrect,
a message of “Cannot Import SMF Format 1!” or
“Incorrect File!” appears.
• The following data can be imported into an arpeggio:
note data, control change data, channel pressure, and
pitch bend change.
• A maximum of 500 events of note data can be imported,
with each note-on/o message counting as one event.
• In addition to note events, a total of up to 500 events of
control change messages, channel pressure, and pitch
bend can be imported. If you try to import more than the
allowable number of events, the message “Too Much
Data!” appears.
MEMO
• Before you continue, copy an SMF from your computer to the
“IMPORT” folder of the SD card.
• A maximum of 200 les in the “IMPORT” folder can be
detected.
1. Press the [ARPEGGIO] button.
2. Press the [3] (Import SMF) button.
The ARPEGGIO SMF IMPORT screen appears.
Creating an Arpeggio Style from a Song (Import Song)
You can create an original arpeggio style by importing a track from
the currently selected song.
1. Press the [ARPEGGIO] button.
2. Press the [3] (Import Song) button.
The ARPEGGIO SONG IMPORT screen appears.
3. Use the dial or the [DEC] [INC] buttons to select the track
that you want to import, and then press the [7] (Import)
button.
MEMO
You can press the [6] (Preview) button to audition the selected
track.
4. Use the dial or the [DEC] [INC] buttons to select the
import-destination Style number (U001–U016).
5. Press the [2] (Rename) button and assign a name to the
arpeggio style (p. 45).
6. Press the [7] (Execute) button.
A conrmation message appears.
If you decide to cancel, press the [7] (Cancel) button.
7. Press the [6] (OK) button.
The track of the song is imported into the specied Style number.
3. Use the dial or the [DEC] [INC] buttons to select the SMF
that you want to import, and then press the [7] (Import)
button.
MEMO
You can audition the selected SMF by pressing the [6] (Preview)
button.
4. Use the dial or the [DEC] [INC] buttons to select the
import-destination Style number (U001–U016).
5. Press the [2] (Rename) button and assign a name to the
arpeggio style (p. 45).
6. Press the [7] (Execute) button.
A conrmation message appears.
If you decide to cancel, press the [7] (Cancel) button.
7. Press the [6] (OK) button.
The SMF is imported into the Style number you specied.
34
Page 35

Using Chord Memory
Performing with the Chord Memory Function
Chord memory is a function that lets you register chord forms and
then produce chords of that form simply by playing a single key.
MEMO
Chord form settings are saved in the studio set.
1. Press the [CHORD MEMORY] button to make it light.
The chord memory function turns on, and the CHORD MEMORY
screen appears.
MEMO
If the FA is not in single play mode, make settings as follows
depending on the mode that you’re in.
Chord Memory Settings
Here’s how to edit the chord memory settings.
1. Press the [CHORD MEMORY] button to make it light.
The chord memory function turns on, and the CHORD MEMORY
screen appears.
MEMO
By holding down the [SHIFT] button and pressing the [CHORD
MEMORY] button, you can access the “Chord Memory” screen
without changing the chord memory on/o status.
2. Use the cursor buttons to select a parameter, and use the
dial to edit the value.
Parameter Value Explanation
Selects the type of chord set that’s
Chord Form 01–17
Chord Key G–F# Changes the key of the chord.
Rolled Chord
Rolled Chord
Type
ON
OFF The notes sound as a chord.
UP
DOWN
ALTERNATE
assigned to the C–B keys.
For more about chord forms, refer to
”Chord Memory List” (p.109).
The notes of the chord sound
sequentially rather than simultaneously.
Since the speed of the performance
changes depending on the force with
which you play the keyboard, you can
produce a realistic simulation of guitar
playing just by varying your playing
dynamics.
Notes sound sequentially from low to
high.
Notes sound sequentially from high to
low.
The order in which the notes sound
alternates each time you play the
keyboard.
Overview Performing Settings
Functions
Functions
Editing
(Creating Songs)
Sampler Pads DAW
Performance
Performance
Sequencer
Performance state Action
Dual play Turn on the arpeggio switch (ARP in the Dual
Split play
Multi part play
screen or Split screen) for the part with which
you want to use the chord memory function.
• Turn on the arpeggio switch (ARP) for the
part with which you want to use the chord
memory function. For details, refer to
“Parameter Guide” (PDF).
• Make the current part any part whose
keyboard switch (p. 27) is on.
2. Play the keyboard.
A chord is sounded according to the currently selected chord form.
For more about chord forms, refer to ”Chord Memory List” (p.109).
3. To turn o the chord memory function, press the [CHORD
MEMORY] button once again to make it go dark.
Appendix
35
Page 36

Performing with Rhythm Patterns
The FA can sound a rhythm pattern while you perform.
The rhythm pattern plays the tone of part 10 of the studio set.
Selecting/Playing Rhythm Patterns
MEMO
Rhythm pattern settings are saved in the studio set.
What is a pattern?
The FA’s rhythm patterns consist of performance data called
“patterns.”
In a band, the drummer typically repeats xed sequences that
are one or two measures long. On the FA, each of these basic
sequences of performance data is called a “pattern.”
The FA contains preset patterns that are suitable for intro, verse, ll,
and ending. The pattern name indicates the type of pattern.
Pattern Explanation
Intro
Verse 1, 2
Fill-In 1, 2
Ending Performance pattern suitable for the end of the song.
The FA provides the following types of pattern.
Pattern Explanation
P (preset)
U (user) Patterns that you save in the FA.
Performance pattern suitable for the intro
(introduction).
The main performance patterns. 1 is the basic
pattern, and 2 is a more advanced form of 1.
More elaborate performance patterns typically
inserted between phrases. Choose either 1 or 2
depending on the pattern that will play following
the ll.
Preset patterns that cannot be rewritten.
Pattern settings that you’ve edited can be saved as a
user pattern.
Here’s how to play rhythm patterns.
Selecting rhythm patterns
1. Press the [RHYTHM PATTERN] button to access the
RHYTHM PATTERN screen.
2. Select a rhythm group and drum kit.
1. Move the cursor to “RHYTHM GROUP” or “DRUM KIT.”
2. Use the dial or the [DEC] [INC] buttons to select a rhythm
group or drum kit.
3. Move the cursor to the rhythm pattern, and use the dial or
the [DEC] [INC] buttons to select a rhythm pattern.
MEMO
• If you want to keep the rhythm group that you’ve edited, save
the rhythm group (p. 37).
• Rhythm patterns are shown in the order of P (preset) g U (user).
Playing rhythm patterns
MEMO
You can edit a pattern to create an original user pattern (p. 50).
What is a rhythm group?
A rhythm group is a set containing six rhythm patterns. You can
choose a rhythm pattern for each of Intro, Pattern A–Pattern D, and
Ending, and save your choices as a rhythm group.
Rhythm group Explanation
PRST (preset)
USER (user) Rhythm groups that you save in the FA.
Rhythm groups that cannot be rewritten.
Rhythm group settings that you’ve edited can be
saved as a user group.
What is a drum kit?
The drum sounds played by a pattern are called a “drum kit.”
You can store one drum kit in each studio set.
4. Press the [2] (Intro)–[7] (Ending) buttons to select the
rhythm pattern that you want to play.
The [RHYTHM PATTERN] button lights, and the rhythm pattern
plays.
5. To stop, once again press the button that you pressed in
step 4.
MEMO
If you play a rhythm pattern that’s assigned as Intro, playback
automatically switches to Pattern A when the Intro has nished
playing.
If you play a rhythm pattern that’s assigned as Ending, the
rhythm pattern automatically stops when the Ending has
nished playing.
36
Page 37

Performing with Rhythm Patterns
About the RHYTHM PATTERN screen
1
2
3
4
No. Explanation
Rhythm group, rhythm group number, rhythm group name
1
Drum kit type, bank, number, and name
2
PATTERN KEY TRIGGER settings
3
Rhythm pattern, number, name
4
Tempo and current position of the rhythm pattern
5
Saving a Rhythm Group
A rhythm group you’ve edited is temporary; it disappears if you turn
5
o the power or select a dierent rhythm group.
If you want to keep the rhythm group you’ve edited, save it to the
user group in the FA.
NOTE
When you execute the Save operation, the data previously in the
save-destination is overwritten.
Overview Performing Settings
1. In the RHYTHM PATTERN screen, hold down the [SHIFT]
button and press the [7] (Write) button.
Performance
Performance
Functions
2. Move the cursor to the save-destination, and use the dial
or the [DEC] [INC] buttons to select the save-destination.
Functions
3. Press the [2] (Rename) button and assign a name to the
rhythm group (p. 45).
4. Press the [7] (Write) button.
A conrmation message appears.
If you decide to cancel, press the [7] (Cancel) button.
Editing
5. Press the [6] (OK) button.
The rhythm group is saved.
NOTE
Never turn o the power while data is being saved.
(Creating Songs)
Sequencer
Changing the Tempo of the Rhythm Pattern
Here’s how to change the tempo of the rhythm pattern.
1. Turn the [TEMPO] knob.
MEMO
• You can set the tempo in a range of 5–300. You can use the
[TEMPO] knob to set the tempo in a range of 60–240.
• You can set the tempo by pressing the [TAP] button at the
desired interval (Tap Tempo). Press the button at least three
times at quarter-note intervals of the desired tempo.
• When you press the [TAP] button, the Tempo window appears.
In this state, you can hold down the [SHIFT] button and turn the
dial to adjust the value below the decimal point. If you press the
[6] (Click) button, a click is sounded at the specied tempo. The
click turns on/o each time you press the button.
Sampler Pads DAW
Appendix
37
Page 38

Performing with Rhythm Patterns
Importing SMF into a Rhythm Pattern
You can create an original rhythm pattern by importing SMF
(Standard MIDI File) data.
SMF that can be imported
• Set the rhythm part of the SMF to MIDI channel 10.
• Up to 4,000 events of MIDI data can be imported. If there
are more than 4,000 events, the message “Too Much
Data!” appears.
• The SMF being imported can be no longer than 32
measures.
MEMO
• Before you continue, copy the SMF from your computer into the
“IMPORT” folder of the SD card.
• A maximum of 200 les can be recognized in the “IMPORT”
folder.
1. Press the [RHYTHM PATTERN] button.
2. Hold down the [SHIFT] button and press the [4] (Import
SMF) button.
The RHYTHM PATTERN SMF IMPORT screen appears.
Creating a Rhythm Pattern from a Song
You can create an original rhythm pattern from track 10 of the
currently selected song.
1. Press the [RHYTHM PATTERN] button.
2. Hold down the [SHIFT] button and press the [5] (Import
Song) button.
The RHYTHM PATTERN SONG IMPORT screen appears.
3. Use the dial or the [DEC] [INC] buttons to select the
import-destination rhythm pattern number (U001–U120).
MEMO
You can audition the track by pressing the [5] (Preview) button.
4. Press the [2] (Rename) button and assign a name to the
rhythm pattern (p. 45).
5. Press the [7] (Execute) button.
A conrmation message appears.
If you decide to cancel, press [7] (Cancel).
6. Press the [6] (OK) button.
The data is imported as a rhythm pattern.
3. Use the dial or the [DEC] [INC] buttons to select the SMF
that you want to import, and then press the [7] (Import)
button.
4. Use the dial or the [DEC] [INC] buttons to select the
import-destination rhythm pattern number (U001–U120).
5. Press the [2] (Rename) button and assign a name to the
rhythm pattern (p. 45).
6. Press the [7] (Execute) button.
A conrmation message appears.
If you decide to cancel, press [7] (Cancel).
7. Press the [6] (OK) button.
The SMF is imported into the rhythm pattern.
38
Page 39

Modifying the Sound in Real Time
Using the SOUND MODIFY Knobs to Vary the Sound
You can use the SOUND MODIFY knobs to control the sound in real
time.
You can control a total of 24 parameters, organized as four groups
of six parameters.
Group that is controlled (lit)
1. Press the [SELECT] button to select the group of
parameters that you want to control.
2. Turn the [1]–[6] knobs.
The sound changes according to the knob that you turn.
MEMO
• If you like, you can make the SOUND MODIFY knob settings
be reset whenever you switch tones in Single play mode (Auto
Knob Reset: p. 99).
• For some sounds, certain knobs might not produce any eect.
For details, refer to “Parameter Guide” (PDF).
Changing the Tonal Character of the Part (CUTOFF, RESONANCE)
Changing the Stereo Position of the Sound of the Part (PAN)
You can adjust the stereo position (pan) of the part.
* This aects the current part.
MEMO
For details, refer to “Settings for Each Part” (p.44).
Adjusting the Volume of the Part (LEVEL)
You can adjust the volume of the part.
* This aects the current part.
MEMO
For details, refer to “Settings for Each Part” (p.44).
Adjusting the Level of the Low, Mid, and High Frequencies (EQ)
You can adjust the equalizer (EQ) that is applied to the overall
sound.
MEMO
For details, refer to “Parameter Guide” (PDF).
Adjusting the Input Volume (INPUT LEVEL)
You can adjust the input volume of the AUDIO INPUT jack (Audio
Input Level: p. 80).
When using sampling (p. 79) or the vocoder (p. 42), this is a convenient
way to adjust the input volume of the device that’s connected to
the AUDIO INPUT jack.
Overview Performing Settings
Functions
Functions
Editing
(Creating Songs)
Sampler Pads DAW
Performance
Performance
Sequencer
The lter is one of the things that determine the character of the
sound.
The lter modies the tonal character by cutting or boosting
dierent frequency regions of the sound.
* This aects the current part.
MEMO
For details, refer to “Settings for Each Part” (p.44).
Changing How the Volume Will Vary of the Part (ATTACK, RELEASE)
You can adjust the time over which the volume rises from note-on
to its peak, and the time over which the volume falls to silence after
you release the key.
* This aects the current part.
MEMO
For details, refer to “Settings for Each Part” (p.44).
Applying an Assigned Function (ASSIGN 1–6)
You can assign a variety of parameters to ASSIGN 1–6.
1. Hold down the [SHIFT] button and turn the [1]–[6]
(ASSIGN 1–6) knobs.
2. Use the cursor buttons to select a parameter, and use the
dial to change the value.
MEMO
For details on the parameters, refer to “Sound Modify Knob
1–6 Assign” (p.99).
Appendix
39
Page 40

Modifying the Sound in Real Time
Applying Eects Conveniently (GLOBAL
CONTROL)
The FA provides “global control” that lets you apply eects
conveniently.
“Global control” is technology that lets you optimize multiple
parameters of an eect simply by turning a single knob.
Knob Explanation
If you turn the knob all the way to the left, no
[1] (COMPRESSOR)
[2] (TONE)
[3] (CHORUS)
[4] (REVERB)
[5] (TFX SELECT)
[6] (TFX CTRL)
compressor eect will be applied.
Turning the knob toward the right will smooth
out the overall volume, making your sound more
consistent.
Turning the knob toward the left will boost the
mid-range, making the sound punchier. This is
appropriate when playing in a band.
Turning the knob toward the right will boost
the low and high-frequency ranges, producing a
more colorful sound. This is appropriate for solo
performances.
If you turn the knob all the way to the left, no chorus
eect will be applied.
Turning the knob toward the right will make the
chorus deeper.
If you turn the knob all the way to the left, no reverb
eect will be applied.
Turning the knob toward the right will make the
reverb deeper.
Selects the type of total eect.
You can choose one of 29 types of total eect to be
applied.
Controls the parameters of the total eect you
selected.
Total eect types
No. Type Explanation
01 FILTER+DRIVE
02 ISOLATOR
03 DJFX LOOPER
04 BPM LOOPER Loops the input sound over a short period.
05 BIT CRASH Produces an extreme lo- eect.
06 WAH Produces a wah eect.
07 REVERB Adds reverberation to the sound.
08 DELAY Repeats the sound.
09 TAPE ECHO Simulates a tape-type echo unit of the past.
10 PITCH Changes the pitch.
11 VOICE TRANS
12 FLANGER
13 SLICER+FLG Repeatedly cuts the sound. A anger is added.
14 PHASER
15 CHORUS Adds spaciousness and richness to the sound.
16 TREMOLO/PAN Cyclically varies the volume or panning.
17 OVERDRIVE Mildly distorts the sound.
18 DISTORTION Intensely distorts the sound.
19 FUZZ Adds overtones and intensely distorts the sound.
20 OCTAVE Adds a pitch at lower octaves.
21 SUBSONIC
22 RING MOD Gives the sound a metallic character.
23 CHROMATIC PS
24 C.CANCELLER
25 VINYL SIM Simulates sound heard from an analog record.
26 RADIO TUNING Simulates sound heard from a radio.
27 NOISE GEN
28 COMP Makes the sound more consistent.
29 EQUALIZER Adjusts the volume of each frequency region.
A low-pass lter with overdrive. It cuts the high
frequencies and adds distortion.
Isolates or removes the low, mid, or high
frequency ranges.
Loops a short portion of the input sound. You can
vary the playback direction and playback speed of
the input sound to add turntable-type eects.
Processes a human voice to create a variety of
characters.
Creates modulation reminiscent of a jet airplane
taking o and landing.
Creates modulation by adding a phase-shifted
sound.
Adds a low-frequency sine wave based on the
volume being input to the eect.
A two-voice pitch shifter that changes the pitch
in semitone steps.
Cancels the vocal or other sound located in the
center.
Applies a lo- eect, and also adds noises such as
white noise and record noise.
40
MEMO
For details on the parameters of the total eects, refer to
“Parameter Guide” (PDF).
Page 41

Modifying the Sound in Real Time
Moving Your Hand to Vary the Pitch or Volume (D-BEAM Controller)
The D-BEAM is a controller that you use simply by positioning your
hand above it. You can change the function that’s assigned, and use
this controller to apply a variety of eects.
1. Press one of the D-BEAM [SOLO SYNTH], [EXPRESSION],
or [ASSIGNABLE] buttons to turn on the D-BEAM
controller (the button lights).
Button Explanation
[SOLO SYNTH]
[EXPRESSION] Use the D-BEAM controller to control volume.
[ASSIGNABLE]
Play a monophonic synthesizer by moving your hand
above the D-BEAM controller.
Various parameters and functions can be assigned.
The eect that’s most appropriate for each tone is
applied.
Hold down the [SHIFT] button and press this button
to access a screen where you can assign a function.
You can also assign a parameter by holding down
the [ASSIGNABLE] button and turning the SOUND
MODIFY knob or pressing a pad.
Changing the Pitch (Pitch Bend)
While playing the keyboard, move the lever to the left to lower the
pitch, or toward the right to raise the pitch. This is called pitch bend.
Applying Vibrato or Dynamics (Modulation)
Move the lever away from yourself to apply vibrato or dynamics.
Using an Assigned Function to Vary the Sound ([S1] [S2] buttons)
You can assign performance-related functions to the [S1] [S2]
buttons. When you turn the [S1] [S2] buttons on/o, the assigned
function is switched or turned on/o.
Overview Performing Settings
Functions
Functions
Editing
(Creating Songs)
Sampler Pads DAW
Performance
Performance
Sequencer
MEMO
You can assign a performance-related function to the
[ASSIGNABLE] button. For details, refer to “D-Beam Assign”
(p.100).
2. While you play the keyboard, position your hand above
the D-BEAM controller.
The eect selected by the button you pressed is applied.
3. To turn o the D-BEAM controller, once again press the
button that you pressed in step 1 (the button goes dark).
Eective range of the D-BEAM controller
This illustration shows the eective range
of the D-BEAM controller. No eect will be
obtained if you position your hand outside the
eective range.
NOTE
The eective range of the D-BEAM
controller will change depending on the
lighting conditions. If the D-BEAM controller
does not work as you expect, readjust the sensitivity. For details
on readjusting the sensitivity, refer to “D-Beam Sens” (p.99).
MEMO
You can assign performance-related functions to the [S1] [S2]
buttons. For details, refer to “Switch S1 Assign/Switch S2
Assign“ (p. 98).
Appendix
41
Page 42

Modifying the Sound in Real Time
Using a Pedal to Vary the Sound
The FA allows you to connect hold pedals and control pedals.
If a pedal switch (DP series; sold separately) is connected to the
rear panel HOLD jack, notes will be sustained (held) while you hold
down the pedal even after you take your hands o the keyboard.
If an expression pedal (EV-5; sold separately) or pedal switch is
connected to the rear panel CTRL 1 or CTRL 2 jack, you can use the
pedal to vary the volume or control a variety of functions.
Sustaining the Notes (Hold Pedal)
While playing the keyboard, step on the pedal switch.
You can hold (sustain) the notes by stepping on the pedal switch.
Adding Expression to Your Performance (Control Pedal)
While playing the keyboard, raise or lower the expression pedal.
You can make your performance more expressive by varying the
volume.
Performing with a Microphone (Vocoder)
The FA uses MFX to provide a vocoder.
You can connect your microphone to the rear panel GUITAR/MIC
jack and apply a vocoder eect to it.
* The vocoder is available only for part 1.
Adjusting the microphone’s input volume
Use the rear panel [LEVEL] knob to adjust the volume.
If the volume is insucient, or if you’re unable to adjust the volume
successfully, refer to “Adjusting the Input Volume (INPUT LEVEL)”
(p.39).
Using the Vocoder
1. Select one of the SuperNATURAL synth tone presets
“1111 Vocoder Robt–1115 Vocoder Ens.”
For details on how to select a tone, refer to p. 22.
2. While you play the keyboard, vocalize into the
microphone.
* Sound is not produced if you simply play the keyboard without
vocalizing.
MEMO
Even with tones other than those listed above, you can apply a
vocoder eect by selecting “68: Vocoder” for MFX.
* Use only the specied expression pedal (EV-5; sold separately).
By connecting any other expression pedals, you risk causing
malfunction and/or damage to the unit.
MEMO
Performance-related functions can be assigned to the pedals
connected to the CTRL 1 and CTRL 2 jacks. For details, refer to
“Control Pedal 1 Assign/Control Pedal 2 Assign “ (p. 98).
Editing the Vocoder Settings
1. Select one of the SuperNATURAL synth tone presets
“1111 Vocoder Robt–1115 Vocoder Ens.”
2. Hold down the [SHIFT] button and press the [3] (Eects
Edit) button.
3. Press the [2] (MFX) button.
The TONE EDIT screen appears. In this case, “68: Vocoder” is
selected for MFX.
4. Use the cursor buttons to select a parameter, and use the
dial to edit the value.
Parameter Value Explanation
Mic Sens 0–127
Synth Level 0–127 Adjusts the instrument’s input level.
Mic Mix 0–127
Level 0–127
MFX Chorus
Send Level
MFX Reverb
Send Level
0–127
0–127
Adjusts the microphone’s input
sensitivity.
Adjusts the amount of microphone
audio that is added to the vocoder’s
output.
Adjusts the volume level of the signal
that has passed through the vocoder.
Adjusts the amount of chorus applied
to the sound that has passed through
the multi-eect.
Adjusts the amount of reverb applied
to the sound that has passed through
the multi-eect.
42
If you want to keep the settings, save the tone (p. 48).
Page 43

04: Editing
Explains how to edit studio sets, tones, and eects.
Editing a Studio Set . . . . . . . . . . . . . . . . . . . . . . . . . . . . . . . . . . . . . . . . 44
Overview Performing SettingsEditing
Performance
Functions
Editing
Editing a Tone . . . . . . . . . . . . . . . . . . . . . . . . . . . . . . . . . . . . . . . . . . . . . 46
Editing a Pattern . . . . . . . . . . . . . . . . . . . . . . . . . . . . . . . . . . . . . . . . . . . 50
Editing the Eects . . . . . . . . . . . . . . . . . . . . . . . . . . . . . . . . . . . . . . . . . 52
(Creating Songs)
Sequencer
Sampler Pads DAW
Appendix
Page 44

Editing a Studio Set
Overall Settings for the Studio Set
Here’s how to make settings that apply to the entire studio set.
1. Press the [MENU] button.
2. Move the cursor to “Studio Set Common” and press the
[ENTER] button.
The STUDIO SET COMMON screen appears.
MEMO
From the STUDIO SET PLAY screen, you can also access the
STUDIO SET COMMON screen by holding down the [SHIFT]
button and pressing the [5] (Studio Common) button.
3. Use the cursor buttons to select an item, and use the dial
to edit the setting.
NOTE
The edits you make to the studio set are temporary. They will be
lost if you turn o the power or select another studio set. If you
want to keep the changes, save the studio set (p. 45).
Common Parameters
MEMO
For details on the common parameters, refer to “Parameter
Guide” (PDF).
Tab Explanation
General
Control
Phase Lock
Pedal
S1/S2
Knob
D-Beam
Control Sw
Specify the play mode, pad part, and the drum part
to which Comp+EQ applies.
Specify the MIDI messages used to control
parameters when using tone control 1–4.
Turn this “on” if you want to minimize inconsistency
between the note-on timing of parts that are played
on the same MIDI channel.
Specify the MIDI messages used to control
parameters when using a pedal connected to the
CTRL 1 and CTRL 2 jacks.
Specify the MIDI messages used to control
parameters when using the [S1] [S2] buttons.
Specify the MIDI messages used to control
parameters when using the SOUND MODIFY knobs.
Specify the MIDI messages used to control
parameters when using the D-BEAM controller.
For each part, specify whether various controller
operations will be enabled (ON) or disabled (OFF).
Settings for Each Part
A studio set has 16 parts; each part has its own settings such as
volume (Level), equalizer (EQ), and key range (Keyboard).
1. Access the PART VIEW screen (p. 26).
2. Use the cursor buttons to select a parameter, and use the
dial to edit the value.
To switch tabs, hold down the [SHIFT] button and use the cursor
] [ ] buttons.
[
Part parameters
MEMO
For details on the part parameters, refer to “Parameter Guide”
(PDF).
Tab Explanation
Level/Pan
Keyboard
Output/EFX
EQ Edit the equalizer that is applied to each part.
Pitch Specify each part’s pitch and portamento setting.
Scale Tune Specify the scale tune settings of each part.
Vibrato Edit each part’s vibrato settings.
Oset
Mono/Poly/Legato Edit each part’s mono, poly, and legato settings.
Voice Reserve
MIDI Rx Filter
* Depending on the sound, some part parameters have no eect.
Specify each part’s tone, level, pan, and MIDI receive
settings.
Specify each part’s key range, and whether the
arpeggiator is applied.
Specify each part’s output destination, and the level
of signal that is sent to chorus and reverb.
Specify osets for parameters such as cuto and
resonance.
Specify the number of voices that are reserved for
each part.
Specify the MIDI messages that are received by each
part.
44
Page 45

Editing a Studio Set
Saving a Studio Set
Edits you make to a studio set are temporary. They are lost if you
turn o the power or select another studio set. If you want to keep
the changes you make, save the studio set.
NOTE
When you save the studio set, the data that was previously in
the save-destination is overwritten.
1. Press the [WRITE] button.
The WRITE MENU window appears.
2. Move the cursor to “Studio Set” and press the [ENTER]
button.
3. Use the dial or the [DEC] [INC] buttons to select the
save-destination.
4. Press the [2] (Rename) button and assign a name.
Initializing a Studio Set (Studio Set Init)
Here’s how to initialize the currently selected studio set.
1. Press the [MENU] button.
2. Move the cursor to “Studio Set Init” and press the
[ENTER] button.
3. Select the content that you want to initialize, and then
press the [7] (Select) button.
Parameter Explanation
Studio Set All settings of the studio set are initialized.
Each part’s vibrato and the following oset
parameters are initialized.
• Cuto Oset
• Resonance Oset
Sound Control
A conrmation message appears.
If you decide to cancel, press the [7] (Cancel) button.
• Attack Oset
• Decay Oset
• Release Oset
• Vibrato Rate
• Vibrato Depth
• Vibrato Delay
Overview Performing SettingsEditing
Performance
Functions
Editing
(Creating Songs)
Sequencer
Controller Explanation
Dial or [DEC] [INC] Specify the character that you want to enter.
] [ ]
[
] [ ]
[
[4] (Delete) Deletes the character at the cursor location.
[5] (Insert) Inserts a space (blank) at the cursor location.
[6] (Cancel) Cancels input and exits the naming screen.
[7] (OK) Conrms the name.
Move the cursor.
Switch between uppercase and lowercase
alphabetical characters.
5. Press the [7] (OK) button.
6. Press the [7] (Write) button.
A conrmation message appears.
If you decide to cancel, press the [7] (Cancel) button.
7. Press the [6] (OK) button.
The studio set is saved.
NOTE
Never turn o the power while data is being saved.
4. Press the [6] (OK) button.
The studio set is initialized.
NOTE
Never turn o the power while initialization is in progress.
Initializing a Part (Part Init)
Here’s how to initialize the part settings of the current part.
1. In the PART VIEW screen (p. 26), press the [5] (Part Init)
button.
A conrmation message appears.
If you decide to cancel, press the [7] (Cancel) button.
2. Press the [6] (OK) button.
The part is initialized.
* The Voice Reserve setting is not initialized.
NOTE
Never turn o the power while initialization is in progress.
Sampler Pads DAW
45
Appendix
Page 46

Editing a Tone
Here’s how to edit the tone that’s assigned to a part.
SuperNATURAL Synth Tone (SN-S)
Basic Procedure for Tone Edit
1. Select the part to which the tone is assigned.
2. Press the [MENU] button.
3. Move the cursor to “Tone Edit” and press the [ENTER]
button.
The TONE EDIT screen appears.
The TONE EDIT screen diers according to the type of tone that’s
selected for the part.
4. Use the cursor buttons to select an item, and use the dial
to edit the value.
NOTE
Edits you make to a tone are temporary. The changes you make
are lost when you turn o the power or select another tone. If
you want to keep the edited settings, save the tone (p. 48).
MEMO
• From the STUDIO SET PLAY screen, you can also access the TONE
EDIT screen by holding down the [SHIFT] button and pressing
the [2] (Tone Edit) button.
• In the TONE EDIT screen, you can also press the [6] (Part Select)
button to switch the part that you’re editing.
• For details on the tone parameters, refer to “Parameter Guide”
(PDF).
Partial 3
Partial 2
Partial 1
OSC Filter
LFO
Aftertouch
Modulation LFO
Modify
Amp
MFX
SuperNATURAL Acoustic Tone (SN-A)
Tab Explanation
Common Settings that apply to the entire tone.
Inst
MFX Settings for the multi-eect.
MFX Control Settings for controlling MFX via MIDI.
Settings for the INST assigned to the tone.
These are detailed settings for the INST that’s
assigned.
Tab Explanation
Common Settings that apply to the entire tone.
OSC
MFXInst
Pitch Settings related to pitch.
Filter Settings related to the lter.
Amp Settings related to the volume.
LFO Settings for the LFO that modulates the sound.
Modulation LFO Settings for the modulation applied to the sound.
Aftertouch
Misc Settings for envelopes and portamento time control.
MFX Settings for the multi-eect.
MFX Control Settings for controlling MFX via MIDI.
Settings for the waveform that is the basis of the
tone.
Settings related to aftertouch.
MEMO
To use aftertouch, assign it to a SOUND MODIFY
knob or the D-BEAM controller. For details on how
to make these settings, refer to “Overall Settings
for the Studio Set” (p.44) or “Settings for the
Entire” (p.97).
Partial
A “partial” is a unit of sound within a SuperNATURAL synth
tone, SuperNATURAL drum kit, PCM synth tone, or PCM drum
kit. These tones consist of multiple partials.
46
Inst
An “inst” is the smallest unit of sound within a
SuperNATURAL acoustic tone. Each SuperNATURAL acoustic
tone consists of a single “inst.”
Page 47

Editing a Tone
SuperNATURAL Drum Kit (SN-D)
Partial 62
Partial 1
DRUM Inst
Comp+EQ 1 Comp+EQ 4
Comp+EQ 2
Comp+EQ 3 Comp+EQ 6
Comp+EQ 5
MFX
PCM Synth Tone (PCMS)
Partial 4
Partial 3
Partial 2
Partial 1
LFO 1
Wave TVF
Pitch
Env
TVF Env TVA Env
LFO 2
Step LFO
TVA
MFX
Overview Performing SettingsEditing
Performance
Functions
Editing
(Creating Songs)
Sequencer
Tab Explanation
Common Settings that apply to the entire tone.
Instrument settings for each partial.
DRUM Inst
Comp
EQ
MFX Settings for the multi-eect.
MFX Control Settings for controlling MFX via MIDI.
MEMO
You can press a key to switch the partial number
that you’re editing.
Settings for the Drum Comp+EQ Assign part
compressor.
Settings for the Drum Comp+EQ Assign part
equalizer.
MEMO
The Drum Comp+EQ Assign part setting is located in the overall
settings for the studio set.
Tab Explanation
Common Settings that apply to the entire tone.
Wave
PMT (Partial Mix
Table)
Pitch Settings related to pitch.
Pitch Env Settings for the pitch envelope.
TVF Settings related to the lter.
TVF Env Settings for the TVF envelope.
TVA Settings related to volume.
TVA Env Settings for the TVA envelope.
Output Settings related to output.
LFO 1
LFO 2
Step LFO
Control Settings related to controllers.
Matrix Control1
Matrix Control2
Matrix Control3
Matrix Control4
MFX Settings for the multi-eect.
MFX Control Settings for controlling MFX via MIDI.
Settings for the waveform that is the basis of the
tone.
Settings for how partials are combined, and for key
range.
Settings for the LFO that modulates the sound.
Settings that specify how steps 1–16 will modulate
the sound.
Settings related to matrix controls 1–4.
Sampler Pads DAW
Appendix
MEMO
You can’t edit the sounds of the GM2 bank.
47
Page 48

Editing a Tone
PCM Drum Kit (PCMD)
Partial 88
Partial 1
WAVE TVF
Pitch
Env
TVF Env TVA Env
Comp+EQ 1
Comp+EQ 2 Comp+EQ 5
Comp+EQ 3 Comp+EQ 6
TVA
Comp+EQ 4
MFX
Saving a Tone/Drum Kit
Edits you make to a Tone/Drum Kit are temporary; they will be lost
when you turn o the unit or select another Tone/Drum Kit. If you
want to keep an edited Tone/Drum Kit, you must save it.
NOTE
When you execute the Write operation, the existing data at the
write destination will be overwritten.
1. Press the [WRITE] button.
The WRITE MENU window appears.
2. Move the cursor to “Tone” and press the [ENTER] button.
3. Use the dial or the [DEC] [INC] buttons to select the
save-destination.
Tab Explanation
Common Settings that apply to the entire tone.
Wave
WMT
(Wave Mix Table)
Pitch Settings related to pitch.
Pitch Env Settings for the pitch envelope.
TVF Settings related to the lter.
TVF Env Settings for the TVF envelope.
TVA Settings related to volume.
TVA Env Settings for the TVA envelope.
Output Settings related to output.
Comp
EQ
MFX Settings for the multi-eect.
MFX Control Settings for controlling MFX via MIDI.
MEMO
• You can press a key to switch the partial number that you’re
editing.
• The Drum Comp+EQ Assign part setting is located in the overall
settings for the studio set.
• You can’t edit the sounds of the GM2 bank.
Settings for the waveform that is the basis of the
tone.
Make settings for velocity-switching between tones.
Settings for the Drum Comp + EQ Assign part
compressor.
Settings for the Drum Comp + EQ Assign part
equalizer.
4. Press the [2] (Rename) button and assign a name to the
tone/drum kit (p. 45).
5. Press the [7] (Write) button.
A conrmation message appears.
If you decide to cancel, press the [7] (Cancel) button.
6. Press the [6] (OK) button.
The tone/drum kit is saved.
NOTE
Never turn o the power while data is being saved.
Initializing a Tone (Tone Initialize)
Here’s how to initialize the settings of the current tone.
1. In the TONE EDIT screen (p. 46), press the [5] (Tone Utility)
button.
2. Choose “Tone Initialize,” and press the [7] (Select) button.
A conrmation message appears.
If you decide to cancel, press the [7] (Cancel) button.
3. Press the [6] (OK) button.
The tone or drum kit is initialized.
NOTE
Never turn o the power while initialization is in progress.
48
Page 49

Editing a Tone
Selecting the Partials That Sound (Partial Switch)
You can select the partials/waves that are sounded by a
SuperNATURAL synth tone, PCM synth tone, or PCM drum kit.
1. In the TONE EDIT screen (p. 46), press the [2] (Partial Sw)
button.
2. Use the [4] (Sw 1)–[7] (Sw 4) buttons to select the partials/
waves that you want to sound, and then press the [2]
(Exit) button.
MEMO
• For a SuperNATURAL synth tone, you can use the [5] (Sw 1)–[7]
(Sw 3) buttons to select partials.
• You can use the pads to select partials (p. 84).
Selecting the Partials to Edit (Partial Select)
Here’s how to select the partials of a SuperNATURAL synth tone,
SuperNATURAL drum kit, PCM synth tone, or PCM drum kit.
1. In the TONE EDIT screen (p. 46), press the [3] (Partial Sel)
button.
2. Use the [4] (Select 1)–[7] (Select 4) buttons to select the
partials that you want to edit, and then press the [2] (Exit)
button.
* You can’t turn o all of the partials.
MEMO
• For a SuperNATURAL synth tone, you can use the [5] (Select
1)–[7] (Select 3) buttons to select partials.
• For a SuperNATURAL drum kit, you can select only one partial.
• You can use the pads to select partials (p. 84).
Initializing a Partial (Partial Initialize)
Here’s how to initialize a partial of a SuperNATURAL synth tone,
SuperNATURAL drum kit, PCM synth tone, or PCM drum kit.
1. In the TONE EDIT screen (p. 46), press the [5] (Tone Utility)
button.
2. Select “Partial Initialize” and press the [7] (Select) button.
3. Select the partial that you want to initialize, and press the
[7] (Select) button.
A conrmation message appears.
If you decide to cancel, press the [7] (Cancel) button.
4. Press the [6] (OK) button.
The partial is initialized.
NOTE
Never turn o the power while initialization is in progress.
Copying a Partial (Partial Copy)
Here’s how to copy the partial settings of a SuperNATURAL synth
tone, SuperNATURAL drum kit, PCM synth tone, or PCM drum kit.
1. In the TONE EDIT screen (p. 46), press the [5] (Tone Utility)
button.
2. Select “Partial Copy” and press the [7] (Select) button.
3. Select the copy-source partial and copy-destination
partial.
A conrmation message appears.
If you decide to cancel, press the [7] (Cancel) button.
4. Press the [6] (OK) button.
The partial is copied.
Overview Performing SettingsEditing
Functions
Editing
(Creating Songs)
Sampler Pads DAW
Performance
Sequencer
49
Appendix
Page 50

Editing a Pattern
In addition to using the preset patterns, you are also free to create
and use your own patterns.
You can save your edited content as a user pattern.
1. Select the pattern that you want to edit (p. 36).
Initializing a Pattern (Initialize)
Initialize the pattern if you want to create a pattern from scratch
rather than starting with an existing rhythm pattern.
2. In the RHYTHM PATTERN screen (p. 36), hold down the
[SHIFT] button and press the [6] (Ptn Edit) button.
The PATTERN EDIT screen appears.
About the PATTERN EDIT screen
Function button operations
Button Explanation Page
[2] (Setup)
[3] (Note Setup)
[4] (Clear Step)
[5] (Clear Note)
[6] (Scale) Species the scale of the grid. p. 50
[7] (Write) Saves the pattern. p. 51
[SHIFT] + [7]
(Initialize)
Species the pattern’s time signature
and length.
Species the note type, length and
loudness.
Deletes all notes from the vertical axis at
the cursor location.
Deletes all notes from the horizontal axis
at the cursor location.
Initializes the pattern. p. 50
p. 50
p. 51
p. 51
p. 51
1. In the PATTERN EDIT screen, hold down the [SHIFT]
button and press the [7] (Initialize) button.
A conrmation message appears.
If you decide to cancel, press the [7] (Cancel) button.
2. Press the [6] (OK) button.
The pattern is initialized.
Specifying the Time Signature and Length (Setup)
Here’s how to specify the time signature and length of the pattern.
1. In the PATTERN EDIT screen, press the [2] (Setup) button.
2. Use the cursor buttons to select a parameter, and use the
dial to edit the value.
Parameter Value Explanation
Time signature of
Pattern Time
Signature
Measure Length
2/4–7/4, 5/8–7/8, 9/8, 12/8,
9/16, 11/16, 13/16, 15/16, 17/16,
19/16
1–32 Pattern length
* This cannot be shorter than the number of measures
that contain data.
3. To close the setup window, press the [6] (Close) button or
the [EXIT] button.
the pattern
This can be specied
only for an empty
pattern.
Other controllers
Controller Explanation
Cursor
Keyboard
[ENTER]
[DEC] [INC]
[
]
]
[
Selects the location at which you want to input a
note.
Species the pitch (same as the cursor [
buttons).
Enters/deletes a note.
Plays the pattern.
Stops pattern playback.
] [ ]
Specifying the Grid Scale (Scale)
Here you can specify the scale of the grid.
1. In the PATTERN EDIT screen, press the [6] (Scale) button.
The scale of the grid changes each time you press the button.
Parameter Value
Scale
Sixteenth note, thirty-second note, eighth-note triplet, sixteenthnote triplet
50
Page 51

Editing a Pattern
Specifying the Note Type, Duration, and Loudness (Note Setup)
Here you can specify the type of notes to enter, as well as their
duration and loudness.
1. In the PATTERN EDIT screen (p. 50), press the [3] (Note
Setup) button.
2. Use the cursor buttons to select a parameter, and use the
dial to edit the value.
Parameter Value Explanation
Note Type
Gate Time 5–200 %
Velocity 1–127
Input by
Keyboard
Refer to “Note
values”
OFF, ON
Selects the rhythmic value of the notes
that you input.
Species the gate time (the length for
which the note will sound) of the notes
that you input, as a percentage of the
rhythm value specied by Note Type.
Species the velocity (volume) of the
note messages that you input.
If this is on, you can use the keyboard
to enter notes.
* Use the 16 right-most white keys
to enter notes (the black keys are
ignored).
* The velocity with which you actually
play the key is entered as the note-on
velocity.
Deleting Notes (Clear Step, Clear Note)
1. In the PATTERN EDIT screen (p. 50), move the cursor to the
location at which you want to delete notes.
2. Press one of the following buttons to delete notes.
Button Explanation
[DEC] or [ENTER]
[3] (Clear Step)
[4] (Clear Note)
Delete the note at the cursor location.
Deletes all notes from the vertical axis of the cursor
location.
Deletes all notes from the horizontal axis of the cursor
location.
Saving the Pattern
A pattern you create is temporary, and is lost if you turn o the
power or select another pattern.
If you want to keep the pattern that you created, save it on the FA as
a user pattern.
NOTE
The Save operation overwrites any data that was previously in
the save-destination.
Overview Performing SettingsEditing
Performance
Functions
Editing
(Creating Songs)
Sequencer
3. To close the editing window, press the [6] (Close) button
or the [EXIT] button.
Note values
1/32 ( )
1/16 ( )
1/8 ( )
1/4 ( )
1/1 ( )
Thirty-second note
Sixteenth note
Eighth note
Quarter note
Whole note
1/24( )
1/12 ( )
1/6 ( )
1/2 ( )
Sixteenth-note triplet
Eighth-note triplet
Quarter-note triplet
Half note
Entering Notes
1. In the PATTERN EDIT screen (p. 50), move the cursor to the
location at which you want to enter a note.
2. Press the [INC] or [ENTER] button; a note is entered.
MEMO
• You can also press a key to specify the pitch (the same operation
as the cursor [
• If you once again press the [ENTER] button at a location where a
note exist, the note is deleted.
• Notes are input according to the Note Set settings.
] [ ] buttons).
1. In the PATTERN EDIT screen (p. 50), press the [7] (Write)
button.
2. Move the cursor to the save-destination, and use the dial
or the [DEC] [INC] buttons to select the save-destination.
3. Press the [2] (Rename) button and assign a name to the
pattern (p. 45).
4. Press the [7] (Write) button.
A conrmation message appears.
If you decide to cancel, press the [7] (Cancel) button.
5. Press the [6] (OK) button.
The pattern is saved.
NOTE
Never turn o the power while data is being saved.
Sampler Pads DAW
51
Appendix
Page 52

Editing the Eects
Turning Eects On/o
Here’s how to turn eects on/o.
1. Press the [MENU] button.
2. Move the cursor to “Eects Edit” and press the [ENTER]
button.
The EFFECTS EDIT screen appears.
In the EFFECTS EDIT screen, you can edit the parameters in detail
while you view the eect routing.
Tone eect Studio set eect
Eect switch
MEMO
From the STUDIO SET PLAY screen, you can also enter the
EFFECTS EDIT screen by holding down the [SHIFT] button and
pressing the [3] (Eects Edit) button.
Eect applied to the entire unit
(System eect)
Parameters that can be edited in the EFFECTS
EDIT screen
In the EFFECTS EDIT screen, you can also make the following
settings.
Parameter Explanation
Studio set
System
Chorus Send
Level
Reverb Send
Level
M.COMP/IFX
Select
Audio Input
Level
TFX Location
Species the depth of chorus.
Species the depth of reverb.
Species whether to use the master
compressor (Master Comp) or the insert
eect (IFX).
Adjusts the input volume from the AUDIO
INPUT jack.
Selects whether the total eect is applied to
the sound you play on the keyboard (MAIN)
or on the input from the AUDIO INPUT jack
(Input).
3. Use the cursor buttons to select the eect switch, and use
the dial to turn it on/o.
MEMO
For details on the parameters, refer to “Parameter Guide”
(PDF).
NOTE
The eect settings that you edit are temporary. They will
disappear when you turn o the power, or select another studio
set or tone. If you want to keep the edited settings, save the
tone, studio set, or system settings respectively.
• Saving a studio set (p. 45)
• Saving a tone (p. 48)
• Saving system settings (p. 97)
52
Page 53

Editing the Eects
Editing the Eects of the Studio Set
Here’s how to edit the eects of the studio set.
1. Access the EFFECTS EDIT screen (p. 52).
2. Press the eect button.
The STUDIO SET EFFECTS screen appears.
Button Explanation
[3] (Chorus) Edits the chorus settings.
[4] (Reverb) Edits the reverb settings.
Species the output destination of the drum part’s
[SHIFT] + [3]
(Comp+EQ Output)
[SHIFT] + [7]
(Master Comp)
[SHIFT] + [7] (IFX)
3. Use the cursor buttons to select a parameter, and use the
dial to edit the value.
compressor and equalizer.
* This is valid only if the tone of the part specied by
Drum Comp+EQ Assign is either PCMD or SN-D.
Applies a nal adjustment (compression) to the
overall sound of the studio set.
* When M.COMP/IFX Select is set to “Master Comp.”
Edits the insert eect settings.
* When M.COMP/IFX Select is set to “IFX.”
Editing the Eects of the Tone
Here’s how to edit the MFX and the compressor/equalizer of the
drum part.
1. Access the EFFECTS EDIT screen (p. 52).
2. Press the eect button.
The TONE EDIT screen appears.
Button Explanation
[2] (MFX) Edits the MFX (multi-eect) settings.
Edits the compressor and equalizer of the drum part.
[SHIFT] + [2]
(Comp+EQ)
3. Use the cursor buttons to select a parameter, and use the
dial to edit the value.
MEMO
For details on the parameters, refer to “Parameter Guide”
(PDF).
* This can be edited only if the part 10 drum kit is
selected.
* This is valid only if the tone of the part specied by
Drum Comp+EQ Assign is either PCMD or SN-D.
Overview Performing SettingsEditing
Functions
Editing
(Creating Songs)
Sampler Pads DAW
Performance
Sequencer
MEMO
For details on the parameters, refer to “Parameter Guide”
(PDF).
Appendix
53
Page 54

Editing the Eects
Editing the System Eects
Here’s how to edit the system eects (eect applied to the entire
unit).
1. Access the EFFECTS EDIT screen (p. 52).
2. Press the eect button.
The SYSTEM EFFECTS screen appears.
Button Explanation
[5] (Master EQ)
[6] (TFX) Edits the TFX (total eect) settings.
[SHIFT] + [4]
(Input)
[SHIFT] + [5] (NS)
[SHIFT] + [6]
(MIC Reverb)
Edits the equalizer that is applied to the entire sound
engine of the FA.
Species the input volume from the AUDIO INPUT
jack.
Edits the noise suppressor settings.
Applies reverb to the microphone or other device
that’s connected to the AUDIO INPUT jack.
3. Use the cursor buttons to select a parameter, and use the
dial to edit the value.
MEMO
For details on the parameters, refer to “Parameter Guide”
(PDF).
54
Page 55

05: Sequencer (Creating Songs)
Explains how to use the sequencer to play, record and edit songs.
Playing Songs . . . . . . . . . . . . . . . . . . . . . . . . . . . . . . . . . . . . . . . . . . . . . 56
Overview Performing Settings
Performance
Functions
Editing
Recording the Song . . . . . . . . . . . . . . . . . . . . . . . . . . . . . . . . . . . . . . . . 58
Editing the Song . . . . . . . . . . . . . . . . . . . . . . . . . . . . . . . . . . . . . . . . . . . 63
Saving/Exporting a Song . . . . . . . . . . . . . . . . . . . . . . . . . . . . . . . . . . . 74
(Creating Songs)
(Creating Songs)
Sampler Pads DAW
Sequencer
Sequencer
Appendix
Page 56

Playing Songs
Selecting and Playing Songs
Here’s how to select and play a song.
1. Press the [SONG SELECT] button.
The SONG SELECT screen appears.
2. Turn the dial to select a song.
3. Press the [7] (Load) button.
A conrmation message appears.
4. Press the [6] (OK) button.
The song is selected.
Setting the Tempo of the Song
Here’s how to set the tempo of the song.
1. Turn the [TEMPO] knob.
MEMO
• You can set the tempo by pressing the [TAP] button at the
desired interval (tap tempo). Press the button three or more
times at quarter-note intervals of the desired tempo.
• When you press the [TAP] button, the Tempo window appears.
In this state, you can hold down the [SHIFT] button and turn the
dial to adjust the value below the decimal point. If you press the
[6] (Click) button, a click is sounded at the specied tempo. The
click turns on/o each time you press the button.
• The specied tempo is saved in the song.
5. Press the [ ] button.
The song starts playing.
Button operations
Button Explanation
[
]
]
[
[
]
[
]
MEMO
The screen shows information about the song.
Song number, song name
Returns the song position to the beginning.
Rewinds the song.
Fast-forwards the song.
Stops the song.
Song status (playing/
recording/stopped)
56
tick”
TempoCurrent location “measure-beat-
Time
signature
Page 57

Playing Songs
Looping the Song Playback
You can make the song play repeatedly over a specied region
(loop playback).
1. Hold down the [SHIFT] button and press the [LOOP]
button.
The Loop window appears.
2. Use the cursor buttons to select a parameter, and use the
dial to edit the value.
Overview Performing Settings
Performance
Functions
Editing
(Creating Songs)
(Creating Songs)
Sequencer
Sequencer
Parameter
Start Point
End Point
* You can’t set this beyond the length of the song.
You can use buttons to perform the following operations.
Button Explanation
[4] (Set Start)
[5] (Set End)
Value Explanation
001–
002–
Species the beginning measure of the
repeated region.
Species the end measure of the repeated
region.
The location you specify here is not included in
the repeated region.
Sets the current measure of the song as the start
measure.
Sets the current measure of the song as the end
measure.
3. Press the [EXIT] button.
4. Press the [LOOP] button to make it light.
5. Play back the song.
The playback repeats in the region you specied.
6. To cancel loop playback, press the [LOOP] button once
again to make it go dark.
Sampler Pads DAW
57
Appendix
Page 58

Recording the Song
The FA provides the following two ways for you to record a song.
Recording method Explanation
Realtime recording
Step recording
Recording Workow
Here’s the workow when recording a new song on this unit.
Prepare for Recording
1: Select the song that you want to record
2: Select the tone that you want to record
3: Specify the time signature of the song
4: Specify the tempo of the song
Record the Song
Realtime recording is a method in which your
keyboard performance and controller operations are
recorded just as you perform them.
Step recording is a method in which you can enter
notes and rests one by one. This method is typically
used when you need precise timing, such as when
entering notes for drums or bass.
page 59
Prepare for Recording
Make the following preparations for recording.
1: Select the song that you want to record
Select the song that you want to record (p. 56).
If you want to record a new song, select a blank song (INIT SONG).
2: Select the tone that you want to record
Edit the studio set so that the tones you want to use for recording
are selected on each track (p. 44).
So that the tones you selected for recording are remembered, it’s a
good idea to save the studio set (p. 45).
* If you don’t save the studio set at the time of recording, playback
will occur using the tones that were previously saved.
3: Specify the time signature of the song
The time signature is typically set to 4/4 time.
If you want to use any other time signature, set the desired time
signature (p. 73).
Realtime Recording (p. 59)
Step Recording (p. 61)
Edit the Song
Edit Performance Data for Entire Tracks (Track Modify)
page 63
(p. 64)
Edit Individual Items of Performance Data (Microscope) (p. 68)
Adjust the Pan or Volume Balance (Mixer) (p. 72)
Save the Song
Save the Studio Set if necessary.
page 74
4: Specify the tempo of the song
Specify the tempo of the song (p. 56).
About the SEQUENCER screen
43
No. Explanation Page
Track types
MIDI Records keyboard performance data.
1
2
PAD
Track number
Records pad performance data. One of the
tracks 1–16 can be used as the pad track.
51 2
6
–
–
58
Tone number, tone name
3
Mute and solo setting
4
Measure number
5
Recorded data
* Note-o messages are not shown.
6
MEMO
You can hold down the [SHIFT] button and press the
[7] (
Note messages and other messages exist
Messages other than note messages exist
Note messages exist
) button to magnify the track settings display.
–
p. 63
–
–
Page 59

Recording the Song
Realtime Recording
Here’s how to do realtime recording.
1. Prepare for recording (p. 58).
2. Press the [SEQUENCER] button.
The SEQUENCER screen appears.
3. Use the cursor [ ] [ ] buttons to select the track that
you want to record.
4. Press the [ ] button.
The [ ] button blinks; the FA is in the record-standby condition.
The Realtime Rec Standby window appears.
Parameter
INPUT
QUANTIZE
RESOLUTION
STRENGTH 0–100 %
Value Explanation
Quantize is a function that automatically corrects
inaccuracies in the timing at which you play the keyboard
or the pads, tightening-up the rhythmic accuracy.
You can apply the quantize function during realtime
recording. This setting species whether quantize will be
applied during recording.
OFF Quantize is not applied during recording.
GRID
SHUFFLE
Species the note timing value at which quantization is
applied.
GRID: 1/32 (
SHUFFLE: 1/16 (
Grid quantize is applied during
recording. Use this when you need
accurate timing, such as for drums or
bass.
Shue quantize is applied during
recording. Use this when you want a
bouncy rhythm such as shue or swing.
)–1/4 ( )
)–1/8 ( )
This setting is used with grid quantize.
It species the degree to which your
notes are moved to precise intervals
of the note values specied by the
RESOLUTION setting. If this is set to
“100 %,” the notes that you record are
moved all the way to exact intervals of
the specied RESOLUTION. With lower
percentages, less correction is applied.
If this is set to “0 %,” the timing is not
corrected at all.
This setting is used with shue quantize.
If this is set to “50 %,” the notes sound
at equal intervals. Raising the value
produces a bouncy feel as with dotted
notes.
Rate = 50 %
Overview Performing Settings
Functions
Editing
(Creating Songs)
(Creating Songs)
Sampler Pads DAW
Performance
Sequencer
Sequencer
5. Make settings for realtime recording.
Use the cursor buttons to select a parameter, and use the dial to
edit the value.
Parameter
COUNT IN
LOOP SWITCH OFF, ON
LOOP
LENGTH
Value Explanation
Selects the way in which recording is started.
OFF
1 MEAS
2 MEAS
WAIT NOTE
001–997
Recording begins immediately when you
press the [
When you press the [
count begins from one measure before
the recording start location; recording
begins when the recording start location
is reached.
When you press the [
count begins from two measures before
the recording start location; recording
begins when the recording start location
is reached.
Recording begins when you press the
[
press a pad, or press the hold pedal.
Species whether loop recording will
(ON) or will not (OFF) occur.
Species the length (number of
measures) over which the loop will
repeat.
] button.
] button, or when you press a key,
] button, a
] button, a
RATE 0–100 %
50 5050 50
Rate = 90 %
90 10 90 10
Species whether tempo changes are
(ON) or are not (OFF) recorded.
TEMPO REC OFF, ON
RHY PTN
SYNC START
OFF, ON
If you want the tempo to change during
the song, record those tempo changes
in the tempo track (tempo recording). If
tempo changes were already recorded,
they are rewritten.
Species whether the currently selected
rhythm pattern is automatically played
and recorded (ON) or not recorded (OFF)
when recording starts.
MEMO
• If you’re using loop play ([LOOP] button lit), the starting
measure specied by Start Point is the recording start location.
• If you press the [6] (Click) button, a click is heard at the specied
tempo. The click turns on/o each time you press the button.
Appendix
59
Page 60

Recording the Song
6. Press the [ ] button or the [7] (Start) button.
Recording starts, and the Realtime Rec window appears.
MEMO
You can close the Realtime Rec window by pressing the [7]
(Close) button or the [
To see it again, press the [
] button.
] button.
7. To stop recording, press the [ ] button.
The [ ] button goes dark, and recording ends.
MEMO
You can undo (cancel) the recorded result (p. 62).
Removing Unwanted Data During Recording (Realtime Erase)
Realtime erase is a function that erases unwanted data during
realtime recording. This function is particularly useful during loop
recording, since it lets you erase data without stopping recording.
1. Start realtime recording (p. 59).
2. Press the [5] (Erase) button.
The Realtime Erase window appears.
3. Erase unwanted data.
Selecting the Performance Data to Record (Recording Select)
You can select the performance data that is recorded by realtime
recording.
1. In the Realtime Rec Standby window (p. 59), press the [5]
(Rec Select) button.
The Recording Select window appears.
2. Use the cursor buttons to select a parameter, and use the
dial to edit the value.
Items with a check mark ( ) are recorded; items without a check
mark are not recorded.
For details on the recorded data, refer to “Performance data in a
track” (p.68).
Button Explanation
[3] (AllTrack O) Clears check marks from all tracks.
[4] (AllTrack On) Applies check marks to all tracks.
[5] (AllEvent O) Clears check marks from all event types.
[6] (AllEventk On) Applies check marks to all event types.
Operation Explanation
Erase system
exclusive messages
Erase all data
Erase notes of a
specic key
Erase notes of a
specic range of
keys
Press the [5] (Erase SysEx) button.
The data is erased while you hold down the button.
Press the [6] (Erase All) button.
The data is erased while you hold down the button.
Press the corresponding key.
The data is erased while you hold down the key.
Press the top and bottom key of the range.
The data is erased while you hold down the keys.
4. Press the [7] (Close) button.
The Realtime Erase window closes.
Auditioning Sounds or Phrases During Recording (Rehearsal Function)
During realtime recording, you can use the rehearsal function to
temporarily prevent recording from occurring. When you’re using
loop recording, this gives you a convenient way to practice the next
phrase you intend to play, before actually recording it.
1. Start realtime recording (p. 59).
2. Press the [6] (Rehearsal) button or the [ ] button.
The [REC] indicator blinks, indicating that the rehearsal function is
active. In this state, notes you play are not recorded.
3. Press the [6] (Rehearsal) button or the [ ] button.
Recording resumes.
3. Press the [7] (Exit) button.
The Recording Select window closes.
60
Page 61

Recording the Song
Step Recording
Here’s how to record using step recording.
1. Prepare for recording (p. 58).
2. Press the [SEQUENCER] button.
3. Use the cursor [ ] [ ] buttons to select the track that
you want to record.
4. In the SEQUENCER screen (p. 59), press the [ ] button.
The [ ] button blinks; the sequencer is in record standby
condition.
The Realtime Rec Standby window appears.
7. Press the [7] (Start) button.
The STEP RECORDING screen appears.
8. Make settings for the notes that you want to enter.
Use the cursor buttons to select a parameter, and use the dial to
edit the value.
Parameter
NOTE TYPE
GATE TIME 1–100 %
INPUT VELO REAL, 1–127
Value Explanation
Species the length of the notes you
1/64 ( )–
)
2/1 (
want to enter, as a note value symbol. The
note type is the length from one note-on
to the next note-on.
Species the gate time as a proportion of
the note type.
The gate time is the length from note-on
to note-o. Use a low value to produce
staccato, or a high value to produce
tenuto or slurs. Normally you’ll use a
setting of approximately “80 %.”
Species the force with which the key is
played. If you want the velocity of your
actual keystroke to be used, choose
“REAL.”
Otherwise specify the desired velocity,
using p (piano) = 60, mf (mezzo forte)
= 90, and f (forte) = 120 as approximate
guidelines.
Overview Performing Settings
Functions
Editing
(Creating Songs)
(Creating Songs)
Sampler Pads DAW
Performance
Sequencer
Sequencer
5. Press the [4] (Step Rec) button.
The Step Rec Standby window appears.
6. Use the dial or the [DEC] [INC] buttons to specify the start
location for step recording.
* If the song contains no recorded data at all, you can’t specify the
start location.
9. Enter notes.
1. Press the [6] ( Step) button or the [7] (Step ) button to
move to the location at which you want to enter a note.
2. Play a note on the keyboard or press a pad.
You can use buttons to perform the following operations.
Button Explanation
[2] (Step Back) Cancels the previously-entered note.
[3] (Tie)
[4] (Rest)
[5] (Untie) Cancels the previously-entered tie.
[6] (Step
[7] (Step
[
)
)
] [ ]
Extends the length of the previously-entered note by
the current note type setting (tie).
Enters a rest. Set the note type to the length of the
rest that you want to enter.
Moves the input location backward by the length of
the current note type.
Moves the input location forward by the length of
the current note type.
Shift the displayed pitch range up or down.
Appendix
61
Page 62

Recording the Song
10. Repeat steps 8 and 9 as necessary.
11. To stop recording, press the [ ] button.
The [ ] button goes dark, and step recording ends.
MEMO
You can undo (cancel) the recorded result (p. 62).
Canceling a Recording or Edit (Undo/ Redo)
You can cancel a recording or editing operation to return to the
previous state (Undo). You can also cancel an Undo operation
(Redo).
How note value and gate time are related
The following table shows how note value and gate time are
related.
On the FA’s sequencer, the TPQN (ticks per quarter note)
resolution is 480.
This means that a quarter note has a gate time of 480 ticks.
Note Gate time
30
40
45
60
80
90
120
160
180
MEMO
The gate time that is recorded during step recording is
the original gate time value multiplied by the GATE TIME
value. For example if GATE TIME is set to 80 % and you
enter a quarter note, the gate time is 480 x 0.8 = 384.
Note Gate time
240
320
360
480
640
720
960
1920
3840
Returning to the previous state (Undo)
1. In the SEQUENCER screen (p. 59), hold down the [SHIFT]
button and press the [6] (Undo) button.
The Undo operation is executed, cancelling the recording or editing
operation that you just performed.
Cancelling the Undo operation (Redo)
1. In the SEQUENCER screen (p. 59), hold down the [SHIFT]
button and press the [6] (Redo) button.
The Redo operation is performed, cancelling the Undo operation
that you just performed.
62
Page 63

Editing the Song
Here’s how to edit a song that you recorded.
Specifying the Sound Engine Played by Each Track
You can specify the output destination of each track. This lets you
play back a song using an external sound module in addition to the
FA’s internal sound engine.
1. In the SEQUENCER screen (p. 59), hold down the [SHIFT]
button and press the [3] (Song Util) button.
2. Move the cursor to “Track Settings” and press the [7]
(Select) button.
3. Use the cursor [ ] [ ] buttons and the dial to change
the settings.
Value Explanation
INT The internal sound engine of the FA is played.
EXT
BOTH
OFF The track does not output data.
An external sound module connected to the MIDI
OUT connector is played.
Both the internal sound engine and the external
sound module are played.
Sounding One Part by Itself (SOLO)
When playing back a song, here’s how you can listen to the current
part (the currently selected part) by itself.
1. Access the SEQUENCER screen (p. 59).
2. Use the cursor buttons to move the cursor to “SOLO” of
the track that you want to solo.
3. Use the dial or the [DEC] [INC] buttons to turn Solo on/o.
MEMO
You can use the pads to turn Solo on/o (p. 84).
Overview Performing Settings
Performance
Functions
Editing
(Creating Songs)
(Creating Songs)
Sequencer
Sequencer
4. Press the [7] (Exit) button.
Muting a Part’s Performance (MUTE)
When playing a song, you can mute (silence) the performance of a
specic part.
1. Access the SEQUENCER screen (p. 59).
2. Use the cursor buttons to move the cursor to “MUTE” of
the track that you want to mute.
3. Use the dial or the [DEC] [INC] buttons to turn Mute on/
o.
MEMO
You can use the pads to turn Mute on/o (p. 84).
Sampler Pads DAW
63
Appendix
Page 64

Editing the Song
Edit Performance Data for Entire Tracks (Track Modify)
Basic Procedure for Track Modify
Use the Track Modify functions to edit the performance data in specied regions of measures.
1. In the SEQUENCER screen (p. 59), hold down the [SHIFT] button and press the [4] (Track Modify) button.
The TRACK MODIFY MENU window appears.
2. Use the cursor buttons to select an item, and press the [ENTER] button.
3. Use the cursor buttons to select a parameter, and use the dial to change the setting.
4. Press the [7] (Execute) button.
A conrmation message appears.
If you decide to cancel, press the [7] (Cancel) button.
5. Press the [6] (OK) button.
The edit operation is executed.
MEMO
You can undo (cancel) the result of editing (p. 62).
Item Parameter Value Explanation
Correcting the Song’s Timing (Quantize)
This function quantizes an already-recorded song.
MEMO
Quantize corrects only the timing at which you press a key (note-on) and the timing at which you release a key (note-o ); it does not correct the timing
of other performance data. This means that you may experience unintended results if performance data such as pitch bend or modulation is shifted
away from the notes to which it originally applied.
Species the track(s) that will be quantized.
TRACK
MEASURE 001–END Species the range of measures that will be quantized.
Quantize
QUANTIZE TYPE
Track All Tracks 1–16
Track1–Track16 The specied track
Species how quantization will occur.
GRID
Grid quantization is applied during editing.
Use this when you want accurate timing,
such as for drums or bass.
64
Resolution
SHUFFLE
Species the quantization timing as a note value.
GRID: 1/32 (
SHUFFLE: 1/16 (
If you’re using grid quantize, choose the shortest note value that occurs in the region that you’re quantizing.
* If you apply shue quantize to performance data that has signicant discrepancies in timing, you might not obtain the result you
expect. In this case, rst apply grid quantize to the original performance data so that it is aligned according to the musical score,
and then apply shue quantize to obtain the desired eect.
Shue quantization is applied during editing. Use this when you want to give the rhythm a sense of shue
or swing.
)–1/4 ( )
)–1/8 ( )
Page 65

For details on the basic procedure for Track
Modify functions, refer to p. 64.
Editing the Song
Item Parameter Value Explanation
Use this setting when applying grid quantize. It species how greatly the notes will be moved toward
intervals of the note value specied by Grid Resolution.
If this is set to “100 %,” notes will be moved all the way to precise intervals of the Grid Resolution timing.
With lower values, less timing correction is applied to the notes. With a setting of “0 %,” no timing
correction is applied.
Quantize
Strength 0–100 %
Use this setting when applying shue quantize. If this is set to 50
Rate
RANGE MIN, RANGE
MAX
%, notes will sound at equal spacing. As this value is increased, you
obtain a bouncy eect as with dotted notes.
Specify the range of notes that are quantized.
Erasing Unwanted Performance Data (Erase)
This function erases all performance data from the specied region. Since the erased performance data is replaced by rests, the measures themselves
remain.
Species the track(s) from which data is erased.
TRACK
MEASURE 001–END Species the region of measures from which data is erased.
Erase
EVENT
Track All Tracks 1–16 and the tempo track
Track1–Track16 The specied track
Tempo The tempo track
Selects the performance data that is erased.
* “Tempo” can be selected only if TRACK is set to “Tempo.”
ALL All performance data
Note Note messages
Program Change Program change messages
Control Change Control change messages
Pitch Bend Pitch bend messages
Poly Aftertouch Polyphonic aftertouch
Channel Aftertouch
System Exclusive System aftertouch messages
Tempo Tempo data
If EVENT is set to “Note,” “Poly Aftertouch,” “Control Change,” or “Program Change,” you can specify the range of values. Range
Min species the minimum value of the range, and Range Max species the maximum value of the range.
Channel aftertouch messages
Rate = 50 %
50 5050 50
Rate = 90 %
90 10 90 10
Overview Performing Settings
Functions
Editing
(Creating Songs)
(Creating Songs)
Sampler Pads DAW
Performance
Sequencer
Sequencer
Delete
Copy
MEMO
Range Min, Range
Max
• If you want to erase all notes or all polyphonic aftertouch data, set Range Min to “C1” and Range Max to “G9.” If you want to erase
“C4,” set both Range Min and Range Max to “C4.” If you want to erase from “C3” through “C4,” set Range Min to “C3” and Range
Max to “C4.”
• If you want to erase all controller numbers, set Range Min to “0” and Range Max to “127.” If you want to erase all program
numbers, set Range Min to “1” and Range Max to “128.” If you want to erase number 4, set both Range Min and Range Max to
“4.” If you want to erase numbers 3 through 14, set Range Min to “3” and Range Max to “14.”
Deleting Unwanted Measures (Delete)
This function deletes the performance data from the specied region, moving subsequent measures toward the beginning of the song to close the gap.
The length of the song is shortened according to the number of measures in the deleted region.
Species the track(s) from which measures are deleted.
TRACK
MEASURE 001–END Species the range of measures that are deleted.
Track All Tracks 1–16, the time signature track, and the tempo track
Track1–Track16 The specied track
Tempo The tempo track
Copying Performance Data (Copy)
This function copies the performance data of the specied region. This is convenient when you want to use a certain phrase repeatedly.
Species the copy-source track(s).
SRC TRACK
SRC MEASURE 001–END Species the region of copy-source measures.
ALL Tracks 1–16, the time signature track, and the tempo track
Track1–Track16 The specied track
TEMPO The tempo track
Appendix
65
Page 66

Editing the Song
Item Parameter Value Explanation
Species the copy-destination track.
MEMO
• If SRC TRACK is set to “Track All,” the DEST TRACK is xed at “Track All.”
Copy
DEST TRACK
DEST MEASURE 001–END
COPY MODE
COPY TIMES 1–998 (maximum) Species the number of times that the data is copied.
EVENT Selects the performance data that is copied. For details, refer to “EVENT” (p.65).
Range Min, Range
Max
• If SRC TRACK is set to “Tempo,” the DEST TRACK is xed at “Tempo.”
Track All
Track1–Track16
Tempo The tempo track
Species whether you want the performance data at the copy-destination to be preserved.
MIX The copied data is combined with the performance data currently existing at the copy-destination.
REPLACE The performance data currently existing at the copy-destination is erased, and replaced by the copied data.
For details, refer to “Range Min, Range Max” (p.65).
Inserting Blank Measures (Insert)
This function inserts new, blank measures at the specied location. Since you can specify the time signature of the blank measures that are inserted, this is
a convenient way to insert phrases of an alternate time signature in the middle of a song.
Insert
TRACK
MEASURE 001–END Species the starting measure at which the measures are inserted.
LENGTH 001–ALL Species the length of measures at which the measures are inserted.
Species the track(s) into which blank measures are inserted.
Track All Tracks 1–16, the time signature track, and the tempo track
Track1–Track16 The specied track
Tempo
For details on the basic procedure for Track
Modify functions, refer to p. 64.
Tracks 1–16, the time signature track, and the tempo track
The specied track
Species the beginning measure of the copy-destination.
If you want the copy-destination to follow the last measure of the song, set this to “END.”
The tempo track
Transpose
Change
Velocity
Transposing (Transpose)
This function transposes the notes of the specied region in a range of ±24 semitones. Use this if you want to change key during the song, or to transpose
the entire song.
Species the track(s) that will be transposed.
TRACK
MEASURE 001–END Species the range of measures that are transposed.
NOTE MIN, NOTE
MAX
Track All Tracks 1–16 (Track 10 is not transposed.)
Track1–Track16 The specied track
Specify the range of notes that are transposed.
For example if you want to transpose notes in the range of C3 through C4, set NOTE MIN to “C3” and NOTE MAX to “C4.”
Changing the Velocity (Change Velocity)
This function changes the keyboard dynamics (velocity) in the specied region.
Species the track(s) in which velocity is changed.
TRACK
MEASURE 001–END Species the range of measures in which velocity is changed.
VALUE -99–+99 Species the amount by which the recorded velocity is changed.
NOTE MIN, NOTE
MAX
Track All Tracks 1–16
Track1–Track16 The specied track
Species the range of notes whose velocity is changed.
For example if you want to change the velocity of notes in the range of C3 through C4, set NOTE MIN to “C3” and NOTE MAX to “C4.”
66
Page 67

For details on the basic procedure for Track
Modify functions, refer to p. 64.
Editing the Song
Item Parameter Value Explanation
Changing the Duration of the Notes (Change Duration)
This function changes the duration (the time from note-on to note-o ) of the notes in the specied region. You can use this conversion to give the
performance a more staccato or tenuto feel.
Species the track(s) in which the note duration is changed.
Change
Duration
TRACK
MEASURE 001–END Species the range of measures in which the note duration is changed.
VALUE -960–+960 Species the amount by which the note duration is changed.
NOTE MIN, NOTE
MAX
Track All Tracks 1–16
Track1–Track16 The specied track
Species the range of pitches whose note duration is changed.
For example if you want to change the duration of notes in the range of C3 through C4, set NOTE MIN to “C3” and NOTE MAX to
“C4.”
Moving Performance Data Forward or Backward (Shift Clock)
This function moves the timing of performance data in the specied region forward or backward in units of ticks. By slightly moving the performance data
you can give the performance a “rushing” or “dragging” feel.
* If the Shift Clock function would cause data to be moved beyond the beginning of the song, such data is moved to the beginning of the song. If this
function causes data to be moved beyond the end of the song, the necessary number of measures are added. The added measures have the same time
signature as the immediately preceding measure.
Species the track(s) that are moved.
Shift Clock
TRACK
MEASURE 001–END Species the region of measures in which the performance data is shifted in units of ticks.
VALUE -960–+960 Species the number of ticks by which the data is shifted.
EVENT Selects the performance data that is shifted. For details, refer to “EVENT” (p.65).
Range Min, Range
Max
Track All Tracks 1–16 and the tempo track
Track1–Track16 The specied track
Tempo The tempo track
For details, refer to “Range Min, Range Max” (p.65).
Overview Performing Settings
Performance
Functions
Editing
(Creating Songs)
(Creating Songs)
Sequencer
Sequencer
Sampler Pads DAW
Appendix
67
Page 68

Editing the Song
Editing Individual Events of Performance Data (Microscope)
Microscope lets you edit individual events of performance data,
such as the MIDI messages or tempo data recorded in a song.
1. In the SEQUENCER screen (p. 59), hold down the [SHIFT]
button and press the [5] (Microscope) button.
The MICROSCOPE screen appears.
MEMO
You can Undo (cancel) the result of your editing (p. 62).
About the MICROSCOPE screen
1
No. Explanation
Location of the performance data
1
(Measure (Meas) – Beat (Beat) – Tick (Tick))
Performance data
2
Data for the parameter at the cursor location
3
Function button operations
Button Explanation Page
[2] (Create)
[3] (Erase) Erases data. p. 69
[4] (Move) Moves data. p. 70
[5] (Copy) Copies data.
[6] (Paste) Pastes previously-copied data.
[7] (View)
[SHIFT] +
[7] (
)
Inserts data.
Selects the track to edit. You can also
choose to view only specic performance
data.
Switches the piano-roll display type. –
2
3
p. 69
p. 70
p. 69
Other controllers
Controller Explanation
Cursor Selects the performance data or parameter to edit.
Dial
[DEC] [INC]
[ENTER]
Edits the value.
Transmits the selected performance data. In the case
of a note message, the note is sounded.
Performance data in a track
A track can record the following performance data.
Performance data Explanation
Note messages
These MIDI messages represent musical notes. From
the left, the parameters are the note number that
Note
Program Change
Control Change
Pitch Bend
Poly Aftertouch
Channel Aftertouch
System Exclusive
Tempo Change
Time Signature
indicates the name of the note (Note Number), the
on-velocity that species the force with which the
key is struck (On Velocity), the duration that species
the length of the note (Duration), and the o-velocity
that species how quickly the key was released (O
Velocity).
Program change messages
These MIDI messages switch sounds. Specify the
program number (PC#) to select a sound.
Control change messages
These MIDI messages apply various eects such
as modulation and expression. Use the controller
number (CC#) to select the function, and specify how
deeply it will apply (Value).
Pitch bend messages
These MIDI messages vary the pitch. The value
(Value) species the amount of pitch change.
Polyphonic aftertouch
These MIDI messages apply aftertouch to individual
keys. From the left, the parameters are the note
number that species the key (Note Number), and
the value that species how deeply aftertouch is
applied (Value).
Channel aftertouch messages
These MIDI messages apply aftertouch to an entire
MIDI channel. The value (Value) species how deeply
aftertouch is applied.
System exclusive messages
These MIDI messages control settings that are unique
to the FA, such as sound and tonal character. Insert
the data between “F0” and “F7.”
Tempo change
This is tempo data recorded in the tempo track. The
song plays back according to these tempo change
values (Value).
Time signature
This is time signature data recorded in the time
signature track.
68
Page 69

Editing the Song
Selecting the Track to Edit / Viewing
Specic Performance Data (View)
Here’s how you can select the track to edit, and view just the
performance data that you want to see.
1. In the MICROSCOPE screen (p. 68), press the [7] (View)
button.
The View Select window appears.
2. Use the cursor buttons to select a parameter, and use the
dial to edit the setting.
Selecting the track to edit
Move the cursor to “Track Select,” and select the track that you
want to edit.
Viewing specic performance data
Types of data with a check mark (
mark for data types that you don’t want to see.
For more about performance data, refer to “Performance data in
a track” (p.68).
) are shown; clear the check
Inserting Performance Data (Create)
Here’s how to insert new performance data at a desired location in
the track.
1. In the MICROSCOPE screen (p. 68), press the [2] (Create)
button.
The Create Event window appears.
2. Use the cursor [ ] [ ] buttons to select the
performance data that you want to insert.
MEMO
• For more about performance data, refer to “Performance data
in a track” (p.68).
• System Exclusive data can be inserted only into track 1.
3. Press the [7] (Execute) button.
The performance data is inserted.
4. Edit the values of the performance data.
Overview Performing Settings
Performance
Functions
Editing
(Creating Songs)
(Creating Songs)
Sequencer
Sequencer
Button Explanation
[5] (All O) Clears check marks from all types.
[6] (All On) Applies check marks to all types.
3. Press the [7] (Close) button.
The View Select window closes.
Erasing Performance Data (Erase)
Here’s how to erase a specic item of performance data.
* You can’t erase the time signature that’s at the beginning of the
time signature track.
1. Access the MICROSCOPE screen (p. 68).
2. Use the cursor [ ] [ ] buttons to move the cursor to the
performance data that you want to erase.
3. Press the [3] (Erase) button.
The performance data is erased.
Sampler Pads DAW
Appendix
69
Page 70

Editing the Song
Moving Performance Data (Move)
Here’s how to move a specic item of performance data.
* You can’t move data in the tempo track or the time signature
track.
1. Access the MICROSCOPE screen (p. 68).
2. Use the cursor [ ] [ ] buttons to move the cursor to the
performance data that you want to move.
MEMO
If you want to move multiple items of performance data, hold
down the [SHIFT] button and use the cursor [
3. Press the [4] (Move) button.
The Move Event window appears.
] [ ] buttons.
Copying/Pasting Performance Data (Copy/Paste)
Here’s how to copy and paste performance data to a specied
location. This is convenient when you want to use the same
performance data several times.
* You can’t copy data of the tempo track or time signature track.
1. Access the MICROSCOPE screen (p. 68).
2. Use the cursor [ ] [ ] buttons to move the cursor to the
performance data that you want to copy.
3. Press the [5] (Copy) button.
The performance data is copied.
4. Press the [6] (Paste) button.
The Paste Event window appears.
4. Specify the move-destination location.
Move the cursor to the value that you want to edit, and use the dial
to edit the value.
5. Press the [7] (Execute) button.
The performance data is moved.
5. Specify the copy-destination location.
Move the cursor to the value that you want to edit, and use the dial
to edit the value.
6. Press the [7] (Execute) button.
The performance data is pasted.
70
Page 71

Editing the Song
Changing the Tempo During a Song
If you want the tempo to change during a song, you can insert new
tempo change data into the tempo track. Following the location at
which you insert the tempo change, the song plays at that tempo.
MEMO
If you want to change the tempo gradually to create a
ritardando or accelerando, it is convenient to use tempo
recording (p. 59).
1. Select the tempo track (p. 69).
2. Press the [2] (Create) button.
The Create Event window appears, and “Tempo Change” is
selected.
3. Press the [7] (Execute) button.
4. Specify the insert-destination location.
Move the cursor to the value that you want to edit, and use the dial
to edit the value.
5. Press the [7] (Execute) button.
A tempo change is inserted.
6. Edit the tempo change value.
Changing the Time Signature During a Song
If you want the time signature to change during a song, you can
insert a new time signature. Following the location at which you
insert the time signature, the song plays at that time signature.
* You can’t change the time signature in the middle of a measure.
You must change the time signature at the beginning of a
measure.
1. Select the time signature track (p. 69).
2. Press the [2] (Create) button.
The Create Event window appears, and “Time Signature” is
selected.
3. Press the [7] (Execute) button.
4. Specify the insert-destination location.
Move the cursor to the value that you want to edit, and use the dial
to edit the value.
5. Press the [7] (Execute) button.
The time signature is inserted.
6. Edit the time signature value.
Overview Performing Settings
Functions
Editing
(Creating Songs)
(Creating Songs)
Sampler Pads DAW
Performance
Sequencer
Sequencer
71
Appendix
Page 72

Editing the Song
Adjusting the Pan and Volume Balance (Mixer)
In the MIXER screen you can adjust the song’s pan and volume
balance for each track.
* The parameters that you edit in the MIXER screen are saved in
the studio set. If you want to keep the changes you make in the
MIXER screen, save the studio set (p. 45).
1. In the SEQUENCER screen (p. 59), hold down the [SHIFT]
button and press the [2] (Mixer) button.
The MIXER screen appears.
MEMO
You can also access the MIXER screen by holding down the
[SHIFT] button and pressing the [SEQUENCER] button.
2. Use the cursor buttons to select a parameter, and use the
dial to edit the value.
About the MIXER screen
1
2
3
4
5
6
Erasing the Song in the Temporary Area (Song Clear)
Here’s how to erase the performance data that’s in the temporary
area (p. 14).
1. In the SEQUENCER screen (p. 59), hold down the [SHIFT]
button and press the [3] (Song Util) button.
The SONG UTIL MENU window appears.
2. Move the cursor to “Song Clear,” and press the [7] (Select)
button.
A conrmation message appears.
If you decide to cancel, press the [7] (Cancel) button.
3. Press the [6] (OK) button.
The performance data is erased.
Assigning a Name to the Song (Song Name)
No. Explanation Page
Part number –
1
Mute and solo settings p. 63
2
Chorus (Chorus Send Level) setting p. 52
3
Reverb (Reverb Send Level) setting p. 52
4
Pan setting p. 44
5
Volume (Level) setting p. 44
6
Here’s how you can assign a name to the song.
1. Access the SONG UTIL MENU window.
2. Move the cursor to “Song Name” and press the [7]
(Select) button.
The SONG NAME window appears.
3. Specify the desired name (p. 45).
MEMO
If you want to keep the song, save it on an SD card (p. 74).
72
Page 73

Editing the Song
Specifying the Song’s Time Signature (Time Signature)
Here’s how to specify the time signature of the song.
1. Access the SONG UTIL MENU window (p. 72).
2. Move the cursor to “Time Signature,” and press the [7]
(Select) button.
The Time Signature window appears.
3. Use the cursor buttons and the dial to specify the time
signature.
4. Press the [7] (Execute) button.
MEMO
You can also change the time signature during the song (p. 71).
Deleting a Song (Delete Song)
Here’s how to delete a previously-saved song.
1. Press the [SONG SELECT] button.
The SONG SELECT window appears.
2. Turn the dial to select the song that you want to delete.
3. Press the [2] (Delete Song) button.
A conrmation message appears.
If you decide to cancel, press the [7] (Cancel) button.
MEMO
If the song contains sample data, the Delete Song Menu
window appears.
Use the dial or the [DEC] [INC] buttons to select the data that
you want to delete, and press the [7] (Select) button.
Parameter Explanation
Song Only Deletes only the song data.
Song With Sample Deletes the song and sample data.
Overview Performing Settings
Functions
Editing
(Creating Songs)
(Creating Songs)
Sampler Pads DAW
Performance
Sequencer
Sequencer
4. Press the [6] (OK) button.
The song is deleted.
Appendix
73
Page 74

Saving/Exporting a Song
Save the Song
A song that you record is temporary. It disappears if you turn o the
power or select another song. If you want to keep a song that you
record, save the song to an SD card.
NOTE
• When you execute the Save operation, any existing data in the
save-destination is overwritten.
• In addition to the performance data, a song also contains
information about the studio set. This means that the song
playback is aected if you edit the studio set or the tones that
are used by a song.
1. Press the [WRITE] button.
The WRITE MENU screen appears.
2. Move the cursor to “Song” and press the [7] (Select)
button.
The SAVE SONG window appears.
Exporting Tracks as Individual WAV Format Files (Multi-track Export)
You can export all tracks as individual WAV format les in a single
operation.
* The pad track is not exported.
1. Access the SONG UTIL MENU window (p. 72).
2. Move the cursor to “Export Song” and press the [7]
(Select) button.
The SONG EXPORT MENU window appears.
MEMO
You can also access the SONG EXPORT MENU window from the
UTILITY screen (p. 94).
3. Move the cursor to “WAV (Multitrack)” and press the [7]
(Select) button.
The EXPORT WAV (MULTI TRACK) window appears.
3. Use the dial or the [DEC] [INC] buttons to specify the
save-destination.
MEMO
If you want to save the song and samples together, add a check
mark to “Save with sample.”
4. Press the [2] (Rename) button and assign a name to the
song (p. 45).
5. Press the [7] (Save) button.
A conrmation message appears.
If you decide to cancel, press the [7] (Cancel) button.
6. Press the [6] (OK) button.
The song is saved.
* If the song contains numerous samples, it may take several
minutes for saving to be completed.
74
4. Specify the “POST EXPORT TIME” as desired.
Value Explanation
0–30 sec
In some cases, the reverberant decay at the end of
the exported WAV les might be cut o. If so, increase
this value so that the decay will not be cut o.
6. Press the [2] (Rename) button and assign a name to the
le (p. 45).
7. Press the [7] (Execute) button.
A conrmation message appears.
If you decide to cancel, press the [7] (Cancel) button.
8. Press the [6] (OK) button.
The song plays back, and export begins.
The exported WAV les are saved in the SD card’s “EXPORT TRACK”
folder.
* If there is an identically-named le in the export-destination,
a message asks “Overwrite?” Press the [6] (OK) button if you
want to overwrite, or press the [7] (Cancel) button if you decide
to cancel.
NOTE
Never turn o the power while the export is in progress.
Page 75

Saving/Exporting a Song
Exporting a Two-Channel Mix in WAV Format
You can export a two-channel (stereo) mix in WAV format.
* The pad track is not exported.
1. Access the SONG UTIL MENU window (p. 72).
2. Move the cursor to “Export Song” and press the [7]
(Select) button.
3. Move the cursor to “WAV (STEREO MIX)” and press the [7]
(Select) button.
The EXPORT WAV (STEREO MIX) window appears.
4. Specify the “POST EXPORT TIME” as desired.
Value Explanation
0–30 sec
5. Press the [2] (Rename) button and assign a name to the
le (p. 45).
6. Press the [7] (Execute) button.
A conrmation message appears.
If you decide to cancel, press the [7] (Cancel) button.
7. Press the [6] (OK) button.
The song plays back, and export begins.
The exported WAV les are saved in the SD card’s “EXPORT STEREO
MIX” folder.
* If there is an identically-named le in the export-destination,
a message asks “Overwrite?” Press the [6] (OK) button if you
want to overwrite, or press the [7] (Cancel) button if you decide
to cancel.
In some cases, the reverberant decay at the end of
the exported WAV les might be cut o. If so, increase
this value so that the decay will not be cut o.
Exporting the Song in SMF Format
Here’s how to export the song in SMF format.
1. Access the SONG UTIL MENU window (p. 72).
2. Move the cursor to “Export Song” and press the [7]
(Select) button.
3. Move the cursor to “SMF” and press the [7] (Select)
button.
The EXPORT SMF window appears.
4. Press the [2] (Rename) button and assign a name to the
le (p. 45).
5. Press the [7] (Execute) button.
A conrmation message appears.
If you decide to cancel, press the [7] (Cancel) button.
6. Press the [6] (OK) button.
The exported SMF le is saved in the SD card’s “EXPORT SMF”
folder.
* If there is an identically-named le in the export-destination,
a message asks “Overwrite?” Press the [6] (OK) button if you
want to overwrite, or press the [7] (Cancel) button if you decide
to cancel.
NOTE
Never turn o the power while the export is in progress.
MEMO
You can also access the SONG EXPORT MENU window from the
UTILITY screen (p. 94).
Overview Performing Settings
Functions
Editing
(Creating Songs)
(Creating Songs)
Sampler Pads DAW
Performance
Sequencer
Sequencer
NOTE
Never turn o the power while the export is in progress.
MEMO
You can also access the SONG EXPORT MENU window from the
UTILITY screen (p. 94).
Appendix
75
Page 76

Saving/Exporting a Song
Exporting Samples in WAV Format
You can export all samples of the song in WAV format.
1. Access the SONG UTIL MENU window (p. 72).
2. Move the cursor to “Export Song” and press the [7]
(Select) button.
3. Move the cursor to “All Samples” and press the [7]
(Select) button.
A conrmation message appears.
If you decide to cancel, press the [7] (Cancel) button.
4. Press the [6] (OK) button.
The exported WAV les are saved in the SD card’s “EXPORT
SAMPLE” folder.
* If there is an identically-named le in the export-destination,
a message asks “Overwrite?” Press the [6] (OK) button if you
want to overwrite, or press the [7] (Cancel) button if you decide
to cancel.
NOTE
Never turn o the power while the export is in progress.
MEMO
• You can also access the SONG EXPORT MENU window from the
UTILITY screen (p. 94).
• You can export samples individually (p. 82).
Importing an SMF as a Song
You can import an SMF into a song, and handle the imported SMF
as a song.
MEMO
• Before you continue, copy the SMF from your computer into the
“IMPORT” folder of the SD card.
• A maximum of 200 les in the “IMPORT” folder can be
recognized.
1. Access the SONG UTIL MENU window (p. 72).
2. Move the cursor to “Import SMF” and press the [7]
(Select) button.
The SONG IMPORT screen appears.
MEMO
You can press the [6] (Preview) button to audition the selected
SMF.
3. Use the dial or the [DEC] [INC] buttons to select the
SMF that you want to import, and press the [7] (Import)
button.
A conrmation message appears.
If you decide to cancel, press the [7] (Cancel) button.
4. Press the [6] (OK) button.
The SMF is imported.
76
Page 77

06: Sampler
Explains sampling and sample editing.
Playing Samples . . . . . . . . . . . . . . . . . . . . . . . . . . . . . . . . . . . . . . . . . . . 78
Overview Performing Settings
Performance
Functions
Editing
Sampling . . . . . . . . . . . . . . . . . . . . . . . . . . . . . . . . . . . . . . . . . . . . . . . . . . 79
Editing a Sample . . . . . . . . . . . . . . . . . . . . . . . . . . . . . . . . . . . . . . . . . . . 81
(Creating Songs)
Sequencer
Sampler
Sampler Pads DAW
Appendix
Page 78

Playing Samples
Selecting/Playing Samples
You can play samples by pressing the pads. The FA lets you assign
samples to the 16 pads and play them.
1. Press a pad [1]–[16].
The sample plays.
That pad blinks while the sample plays.
MEMO
• You can press multiple pads simultaneously to make them play.
• You can use the pads to enter numeric values or select parts, or
you can assign other functions to the pads (p. 84).
Making samples continue playing (Hold)
Switching Banks
A bank is a set of 16 samples assigned to the pads. The FA provides
four banks: 1–4.
1. Press the [BANK] button.
The PAD BANK screen appears.
2. Press a pad [1]–[4] to select a bank.
1. While pressing a pad, press the [HOLD] button.
The sample continues playing even when you release the pad.
To stop the sample, press the pad again.
If you experience stuck notes!
Press the [HOLD] button four times in rapid succession. This
stops all sounds that are being played by the pads.
78
Page 79

Sampling
The FA can sample the following sounds. Samples that you’ve
recorded can be played back using the pads.
• Keyboard performance
• Input from the AUDIO INPUT jack (audio device, mic, guitar)
• Input from the USB COMPUTER port (USB audio)
MEMO
The sample data is saved on an SD card (within the song data).
Sampling Procedure
Preparing for sampling
1. To the AUDIO INPUT jack, connect the device (audio
device, mic, etc.) that you want to sample (p. 8).
2. Press the [SAMPLING] button to make it light.
Pads that don’t contain samples are blinking.
NOTE
If you record to a pad that already contains a sample, the
existing sample is overwritten.
3. Press the sampling-destination pad to make it light.
The SAMPLING STANDBY screen appears.
MEMO
You can also press the [BANK] button and select a pad in a
dierent bank.
4. Turn the dial to select the desired sampling mode.
5. Adjust the sampling volume.
Adjust the volume as high as possible without letting the level
meter reach full scale.
Level meter
Jack/Port Explanation
LINE jack Adjust the level on your audio device.
GUITAR/MIC jack Adjust the rear panel [LEVEL] knob.
USB COMPUTER
port
MEMO
If the volume is insucient, or if you’re unable to adjust the
volume successfully, refer to “Setting the Input Volume (Input
Setting)” (p.80).
Adjust the level on your computer.
6. Make settings for sampling.
Use the cursor buttons to select a parameter, and use the dial to
edit the setting.
Parameter Value Explanation
Choose “MONO” if you’re sampling in
STEREO SW
AUTO TRIGGER
LEVEL
Auto Trig OFF, ON
MONO,
STEREO
0–15
monaural, such as from a microphone
or guitar.
Choose “STEREO” if you’re sampling in
stereo, such as from an audio device.
If Auto Trig is “ON,” sampling starts when
a signal that exceeds this setting is input.
If this is “ON,” sampling starts when a
signal that exceeds the AUTO TRIGGER
LEVEL setting is input.
Overview Performing Settings
Performance
Functions
Editing
(Creating Songs)
Sequencer
Sampler
Sampler Pads DAW
Parameter Sound to be sampled
• Keyboard performance
KBD+INPUT
KBD
INPUT
• Sound input from the AUDIO INPUT jack
• Sound input from the USB COMPUTER port
Keyboard performance
MEMO
If USB Audio Input Destination is set to “TFX,” the
input from the USB COMPUTER port is processed
by the TFX and the result is sampled. For details,
refer to “Parameter Guide” (PDF).
• Sound input from the AUDIO INPUT jack
• Sound input from the USB COMPUTER port
Start sampling
7. Produce sound on the device that’s connected to the FA,
and press the [7] (Start) button when you want to start
sampling.
During sampling, the screen indicates “NOW SAMPLING!”
MEMO
If in step 6 you turned Auto Trig “ON,” sampling starts when the
input signal exceeds the level specied by AUTO TRIGGER LEVEL.
8. To stop sampling, press the [6] (Stop) button.
Sampling stops, and the sample is saved to the destination pad that
you specied.
Appendix
79
Page 80

Sampling
Setting the Input Volume (Input Setting)
Here’s how to set the input volume for the device that’s connected
to the AUDIO INPUT jack or the USB COMPUTER port.
1. In the SAMPLING STANDBY screen (p. 79), press the [2]
(Input Setting) button.
The SYSTEM EFFECTS screen appears.
2. Use the cursor buttons to select a parameter, and use the
dial to change the setting.
Tab Parameter Value
Audio Input Audio Input Level 0–127
USB Audio USB Audio Input Level 0–127
MEMO
You can also access the SYSTEM EFFECTS screen from the
EFFECTS EDIT screen (p. 52).
Moving/Copying a Sample (Clip Board)
You can move or copy a sample to another pad.
Moving a Sample
1. While holding down the pad that contains the sample you
want to move, press the [CLIP BOARD] button.
2. While holding down the [CLIP BOARD] button, press the
move-destination pad.
The sample is moved.
* If the move-destination pad contains a sample, the message
“Overwrite?” appears. If you want to overwrite, press the [6]
(OK) button; if you decide to cancel, press the [7] (Cancel)
button.
Copying a Sample
1. While holding down the [SHIFT] button and the pad that
contains the sample you want to copy, press the [CLIP
BOARD] button.
2. While holding down the [CLIP BOARD] button, press the
copy-destination pad.
The sample is copied.
* If the copy-destination pad contains a sample, the message
“Overwrite?” appears. If you want to overwrite, press the [6]
(OK) button; if you decide to cancel, press the [7] (Cancel)
button.
80
Page 81

Editing a Sample
Here’s how to edit a sample.
Editing Procedure
1. Press the [PAD UTILITY] button.
The SAMPLE PAD screen appears.
2. Press a pad to select the sample that you want to edit.
3. Press the [2] (Sample Edit) button.
The SAMPLE EDIT screen appears.
5. Press the [7] (EXIT) button.
The sample is saved.
MEMO
The sample is saved when you exit the SAMPLE EDIT screen.
Renaming the Sample (Rename)
Here’s how to change the name of the sample.
1. In the SAMPLE EDIT screen, press the [2] (Rename)
button.
2. Assign a name to the sample (p. 45).
Cutting Unwanted Regions from the Sample (Truncate)
Here’s how you can cut unwanted regions from the beginning and
end of the sample by specifying the desired portion (start point and
end point).
Region that will play
Overview Performing Settings
Performance
Functions
Editing
(Creating Songs)
Sequencer
4. Use the cursor buttons to select a parameter, and use the
dial to change the setting.
Parameter Value Explanation
This is the playback start point. Adjust
START POINT
([1] knob)
END POINT
([2] knob)
ZOOM HORZ
([3] knob)
ZOOM VERT
([4] knob)
GATE OFF, ON
LOOP OFF, ON
LEVEL
([6] knob)
EFFECT SW OFF, ON
000000000–
000001000–
1/1–1/65536
x1–x128
0–127 Adjusts the volume of the sample.
this to skip any unwanted portion
of the waveform at the beginning of
the sample, so that the desired sound
plays immediately.
This is the playback end point. Adjust
this to omit any unwanted portion
of the waveform at the end of the
sample, so that it does not play.
* The distance between the start
point and the end point cannot be
999 or less.
Changes the horizontal zoom (the
time axis of the waveform).
Changes the vertical zoom (the
amplitude axis of the waveform).
Species whether the sample will stop
playing when you release the pad
(ON) or will continue playing even
after you release the pad (OFF).
Species whether the sample will (ON)
or will not (OFF) play as a loop.
Species whether the eect will (ON)
or will not (OFF) be applied to the
sample.
MEMO
You can apply Master Comp, Master
EQ, and TFX to the sample.
Start point End point
1. In the SAMPLE EDIT screen, press the [3] (Truncate)
button.
A conrmation message appears.
If you decide to cancel, press the [7] (Cancel) button.
2. Press the [6] (OK) button.
The Truncate operation is executed.
Deleting a Sample (Delete)
Here’s how to delete a sample.
1. Press the [PAD UTILITY] button.
2. Press a pad to select the sample that you want to delete.
3. Press the [4] (Sample Delete) button.
A conrmation message appears.
If you decide to cancel, press the [7] (Cancel) button.
4. Press the [6] (OK) button.
The sample is deleted.
MEMO
You can also delete a sample from the SAMPLE EDIT screen (p. 81)
by using the [4] (Sample Utility) button.
81
Sampler
Sampler Pads DAW
Appendix
Page 82

Editing a Sample
Zooming the Sample Display (Zoom)
You can change the magnication at which the sample is displayed.
1. In the SAMPLE EDIT screen (p. 81), press the [5] (Zoom)
button.
2. Use the cursor buttons to change the display zoom.
Auditioning the Edited Result (Preview)
Here’s how to audition the result of your sample editing.
1. In the SAMPLE EDIT screen (p. 81), press the [6] (Preview)
button.
The sample plays.
Exporting the Sample in WAV Format (Export Sample)
Here’s how to export the sample in WAV format.
1. In the SAMPLE EDIT screen (p. 81), press the [4] (Sample
Utility) button.
2. Move the cursor to “Export Sample (WAV),” and press the
[7] (Select) button.
A conrmation message appears.
If you decide to cancel, press the [7] (Cancel) button.
Importing an Audio File (Sample Import)
You can import an audio le and play it as one of the FA’s samples.
1. Before you continue, place the audio le to be imported in
the “IMPORT” folder of the SD card.
2. Press the [PAD UTILITY] button.
3. Press the [5] (Sample Import) button.
4. Use the dial or the [DEC] [INC] buttons to select the audio
le that you want to import, and press the [7] (Select)
button.
MEMO
• By pressing the [4] (Auto Import) button you can import
samples to multiple vacant pads in a single operation. Proceed
to step 6. If there are no vacant pads, importing is not possible.
• You can change the import-source folder.
Press the [2] (Folder) button to access the Change Folder
window. When you select the import-source folder, the les in
the selected folder are shown in the SAMPLE IMPORT screen.
5. Press a pad to select the import-destination pad.
6. Press the [7] (Execute) button.
A conrmation message appears.
If you decide to cancel, press the [7] (Cancel) button.
7. Press the [6] (OK) button.
The WAV le is imported.
3. Press the [6] (OK) button.
The exported WAV le is saved in the SD card’s “EXPORT SAMPLE”
folder.
* If there is an identically-named le in the export-destination,
a message asks “Overwrite?” Press the [6] (OK) button if you
want to overwrite, or press the [7] (Cancel) button if you decide
to cancel.
NOTE
Never turn o the power while data is being exported.
MEMO
• You can export all samples of the song in a single operation (p.
76).
• If you execute Truncate before you export, the WAV between the
start point and end point is exported.
Audio les that can be imported
WAV/AIFF
MP3
Sampling frequency 44.1/48/96 kHz
Bit rate 8/16/24 bit
Format MPEG-1 audio layer 3
Sampling frequency 44.1 kHz
64/80/96/112/128/160/192/
Bit rate
224/256/320 kbps,
VBR (Variable Bit Rate)
Switching the Sample Information Display (Change Information)
You can switch the sample information that is shown in the SAMPLE
PAD screen.
1. In the SAMPLE PAD screen (p. 81), press the [3] (Change
Information) button.
The displayed information changes each time you press the button.
• Sample name
• GATE and LOOP on/o status
• EFFECT SW on/o status
82
• Sample name
• Stereo/mono
• Sample size
Page 83

07: Pads
Explains how to use the pads.
Using the Pads . . . . . . . . . . . . . . . . . . . . . . . . . . . . . . . . . . . . . . . . . . . . . 84
Overview Performing Settings
Performance
Functions
Editing
(Creating Songs)
Sequencer
Sampler Pads DAW
Pads
Appendix
Page 84

Using the Pads
In addition to using the FA’s pads to play samples, you can assign
the pads to perform a variety of other functions.
Specifying the Function of the Pads (PAD UTILITY)
Here’s how to specify the function of the pads.
Switching Part Mute (PART MUTE)
You can use the pads to mute (silence) the parts (1–16).
When you press a pad, the corresponding part switches between
mute (blinking) and play (lit).
MEMO
The pad number corresponds to the part number.
1. Press the [PAD UTILITY] button.
2. Press the [6] (Pad Mode) button.
3. Press a pad [1]–[7] to select the desired function.
A setting screen appears according to the function that you select.
Pad Function Explanation
[1] SAMPLE PAD The pads play samples.
[2] PART SELECT The pads select parts.
[3] PART MUTE The pads turn part mute on/o.
[4] PART SOLO The pads turn part solo on/o.
[5] NUMERIC The pads function as numeric keys.
[6] PARTIAL SW/SEL
[7] KBD SW The pads turn the keyboard switch on/o.
MEMO
You can also select the pad function by holding down the [PAD
UTILITY] button and pressing a pad [1]–[7].
The pads select partials and turn them
on/o.
Switching the Soloed Part (PART SOLO)
You can use the pads to switch the part that’s being soloed (p. 44, p. 63).
When you press the blinking pad once again, solo turns o.
MEMO
The pad number corresponds to the part number.
Using the Pads as Numeric Keys (NUMERIC)
You can use the pads as numeric keys.
This is convenient when entering numeric parameter values.
Pad Explanation
[1]–[9] 1–9
[10] 0
[11] –
[12] +
[HOLD] Conrm (same operation as the [ENTER] button)
[BANK] Cancel (same operation as the [EXIT] button)
Selecting Partials and Turning Them On/
Playing Samples (SAMPLE PAD)
The pads play samples.
MEMO
For details, refer to “Selecting/Playing Samples” (p.78).
Selecting Parts (PART SELECT)
You can use the pads to select parts (1–16).
* When you’re performing in the STUDIO SET PLAY screen, the
parts that you can select are limited by the performance mode.
If you’re using single play mode, only part 1 can be selected. If
you’re using Dual or Split performance mode, only parts 1 and 2
can be selected.
MEMO
• The pad of the selected part blinks.
• The pad number corresponds to the part number.
• When you’re using Split performance, pad [1] selects the lower
part (part 2), and pad [2] selects the upper part (part 1).
O (PARTIAL SW/SEL)
You can use the pads to select a partial to edit, and to turn it on/o.
Pad Explanation
[1] Select partial 1
[2] Select partial 2
[3] Select partial 3
[4] Select partial 4
[5] Turn partial 1 on/o
[6] Turn partial 2 on/o
[7] Turn partial 3 on/o
[8] Turn partial 4 on/o
* This is available only if you’ve selected a tone in which that
partial exists. If the tone’s type is SuperNATURAL synth tone,
partial 4 does not exist, so pads [4] and [8] cannot be used.
84
Page 85

Using the Pads
Turning the Keyboard Switch On/O
(KBD SW)
You can use the pads to turn the keyboard switch (p. 27) on/o.
When you press a pad, the keyboard switch of the corresponding
parts turns on (blinking) or o (lit).
* The keyboard switch is available only in multi part play mode.
MEMO
• The pad number corresponds to the part number.
• The keyboard switch settings are saved in the studio set.
Overview Performing Settings
Performance
Functions
Editing
(Creating Songs)
Sequencer
Sampler Pads DAW
Pads
Appendix
85
Page 86

86
Page 87

08: DAW
Explains how to use the FA in conjunction with a computer or DAW controller.
Connecting to a Computer via USB . . . . . . . . . . . . . . . . . . . . . . . . . 88
Overview Performing Settings
Performance
Functions
Editing
Using the FA with DAW Software . . . . . . . . . . . . . . . . . . . . . . . . . . . 89
(Creating Songs)
Sequencer
Sampler Pads DAW
DAW
Appendix
Page 88

Connecting to a Computer via USB
If you use a commercially available USB cable to connect a USB
port of your computer to the USB COMPUTER port located on the
rear panel of the FA, you can use MIDI-compatible software (DAW
software) to play back audio and MIDI data on the FA.
USB COMPUTER port
USB cable
Installing the USB Driver
The USB driver is software that exchanges data between the FA and
your computer software.
In order to use the FA’s dedicated USB driver, you must install the
USB driver.
MEMO
For details on downloading and installing the USB driver, refer to
the Roland website.
http://www.roland.com/support/
For details on operating requirements, refer to the Roland website.
Roland website
http://www.roland.com/support/
NOTE
• For some types of computer, this might not work correctly. Refer
to the Roland website for details on the operating systems that
are supported.
• A USB cable is not included. You can purchase one from the
dealer where you purchased the FA.
• Use a USB 2.0 cable.
• Your computer’s USB port must support USB 2.0 Hi-Speed.
• Turn on the power of the FA before you start the DAW software
on your computer. Don’t turn the FA’s power on/o while your
DAW software is running.
USB audio
FA g computer
If the FA is connected to your computer via a USB cable, the
audio output you’ve chosen in the FA can be recorded into your
computer’s DAW software.
Computer g FA
If the FA is connected to your computer via a USB cable, the
sound of your computer can be reproduced from an audio system
connected to the FA’s MAIN OUTPUT jacks.
Making USB Driver Settings
Here’s how to switch between the FA’s dedicated USB driver and the
generic driver provided by your operating system.
1. Press the [MENU] button.
The MENU screen appears.
2. Move the cursor to “System” and press the [ENTER]
button.
The SYSTEM SETUP screen appears.
3. Use the cursor [ ] [ ] buttons to select the “General”
tab.
4. Specify the USB Driver.
Driver Explanation
VENDOR
(MIDI+AUDIO)
GENERIC (MIDI
only)
MEMO
This system takes eect when the FA is powered-on following
System Write.
5. Press the [6] (Write) button to save the setting.
The dedicated driver provided by Roland specically
for the FA is used.
Both MIDI and audio are available.
The generic driver of the operating system is used.
Only MIDI is available.
USB MIDI
If the FA is connected to your computer via a USB cable, the FA’s
performance data (MIDI data) can be recorded into your DAW
software, and performance data (MIDI data) played back by your
DAW software can be sounded by the FA’s sound engine.
88
6. Turn the power o, and then on again.
Page 89

Using the FA with DAW Software
Using the FA as a DAW Controller
You can use the FA as a controller for your DAW software.
The FA provides various DAW control maps. Simply select the
appropriate control map to apply the appropriate settings for the
DAW software that you’re using.
MEMO
If you want to use the FA as a controller for your DAW software,
set the USB Driver setting to “VENDOR (MIDI+AUDIO).”
Using the FA to Control DAW Software
1. Use a USB cable to connect the FA to your computer.
A conrmation message appears.
MEMO
This message is not shown if you power-on the FA with it
already connected to the computer.
2. Press the [6] (OK) button.
DAW Control mode is on, and the DAW CONTROL screen appears.
MEMO
• You can also turn DAW Control mode on/o by pressing the
[DAW CONTROL] button.
• As necessary, make the synchronization settings “Sync Out”
and “Sync Mode” (p. 101).
3. Move the cursor to “CONTROL MAP” and use the dial to
select the DAW software that you’re using.
Value Explanation
LOGIC PRO When controlling Logic Pro.
SONAR When controlling SONAR.
CUBASE When controlling Cubase.
Choose “USER” if your system cannot use the Mackie
USER
Control control surface.
You’ll be able to choose the MIDI messages that are
transmitted when you press pads [1]–[8].
4. Use the cursor [ ] [ ] buttons to select the “Controller”
tab.
5. Turn the Local Switch “OFF” (p. 90).
6. In your DAW software, open the project le that you want
to control.
MEMO
Before you continue, select “FA-06 08” as the MIDI input device
and output device.
For details on how to do this, refer to the owner’s manual of your
DAW software.
7. Make the appropriate control surface settings for the
DAW software you selected (p. 90).
8. Operate the FA to control your DAW software.
Available controllers Explanation
] button
[
[
] button
[
] button
] button
[
[
] button
[
] button
] through [ ] buttons emulate the Mackie Control control
The [
surface.
Pad [1]–[8]
[1]–[6] knob
[S1] [S2] button
Start playback.
Start recording on record-standby tracks.
Return the current position to the beginning.
Rewind.
Fast-forward.
Stop recording or playback.
Emulate the Mackie Control control surface
Function buttons (F1–F8).
Control the function that’s assigned. (p. 90)
Overview Performing Settings
Functions
Editing
(Creating Songs)
Sampler Pads DAW
DAW
Performance
Sequencer
89
Appendix
Page 90

Using the FA with DAW Software
Settings in LOGIC PRO
This explanation describes the procedure when using Logic
Pro X. The procedure may dier for other versions.
1. From the Logic Pro X menu, choose [Logic Pro X] g
[Control Surfaces] g [Setup] to open the setting
screen.
2. From the menu, choose [New] g [Install].
3. From the list of Model, choose “Mackie Control” and
press “Add.”
4. As the input port and the output port, specify “FA-06
08 DAW CTRL.”
Settings in SONAR
This explanation describes the procedure when using SONAR
X2 Producer. The procedure may dier for other versions.
1. From the SONAR menu, choose [Edit] g
[Preferences] g [MIDI Devices] to open the input/
output device selection.
2. To the input devices and output devices, add “FA-06
08 DAW CTRL.”
3. In [Preferences], choose [MIDI Control Surfaces].
Assigning Functions to Knobs and Buttons
You can assign functions to the [1]–[6] knobs and the [S1] [S2]
buttons.
You can store sixteen sets of these assignments, with each set
containing the assignments of the [1]–[6] knobs and the [S1] [S2]
buttons.
1. In the DAW CONTROL screen, select the “Controller” tab.
2. Select the set of assignments that you want to edit.
MEMO
You can press the [ENTER] button and rename the set.
3. Use the cursor buttons to select a parameter, and use the
dial to edit the setting.
4. Press “Add new Controller/Surface” to access the
control surface settings dialog box.
5. Choose “Mackie Control” as the control surface,
choose “FA-06 08 DAW CTRL” as the input port and
output port, and then press “OK.”
Settings in CUBASE
This explanation describes the procedure when using the
Mac OS X version of Cubase 7. The procedure may dier for
other versions.
1. From the Cubase [Devices] menu, choose [Device
Setup].
2. Press the [+] button located in the upper left of the
dialog box, and choose “Mackie Control” from the
pulldown menu.
3. As the MIDI input and MIDI output for Mackie
Control, specify “FA-06 08 DAW CTRL.”
4. In the left side of the dialog box, choose “MIDI Port
Setup” to access the setting screen.
5. In “FA-06 08 DAW CTRL,” clear the check box from
“In ’ALL MIDI Inputs’.”
Parameter Explanation
Local Switch
Tx Channel
S1, S2
Knob 1–6
MEMO
If you want your settings to be remembered, save the DAW
CONTROL settings (p. 92).
Turns the Local switch (p. 100) on/o when in DAW
Control mode.
Species the MIDI transmit channel used when in
DAW Control mode.
Set this as desired.
Select the MIDI messages that are transmitted when
you press the [S1] [S2] buttons.
Select the MIDI messages that are transmitted when
you turn the [1]–[6] knobs.
Using the FA as a MIDI Keyboard
Your playing on the FA’s keyboard (MIDI data) can be recorded into
your DAW software, or used to play software instruments.
1. Connect the FA to your computer and turn on DAW
Control mode.
2. In the DAW CONTROL screen, select the “Controller” tab.
3. Turn the Local Switch “OFF.”
90
MEMO
Set the MIDI transmit channel as necessary (Tx Channel: p. 90).
Page 91

Using the FA with DAW Software
Playing the FA’s Sound Engine from DAW Software
Performance data (MIDI data) played back by your DAW software
can make the FA’s sound engine produce sound.
1. Connect the FA to your computer, and turn DAW Control
mode on.
2. Start your DAW software, and open the project le that
you want to play.
MEMO
Before you continue, select “FA-06 08” as the MIDI input device
and output device.
For details on how to make this setting, refer to the owner’s
manual of your DAW software.
3. In the DAW CONTROL screen, select the “Studio Set” tab.
Using the FA as an Audio Interface
The FA’s audio output you’ve specied can be recorded into DAW
software on your computer.
Sound from your computer can also be reproduced from a device
that’s connected to the FA’s MAIN OUTPUT jacks.
1. Connect the FA to your computer.
2. Start up your DAW software, and choose “FA-06 08” as
the audio input device and output device.
For details on how to make this setting, refer to the owner’s manual
of your DAW software.
Specifying the USB Audio Output
Here’s how to specify the USB audio that is output from the USB
COMPUTER port.
1. In the SYSTEM SETUP screen (p. 97), press the [3] (System
Eects) button.
The SYSTEM EFFECTS screen appears.
2. Use the cursor [ ] [ ] ] buttons to select the “USB
Audio” tab.
Overview Performing Settings
Performance
Functions
Editing
(Creating Songs)
Sequencer
* Depending on the channel settings of your DAW, messages that
switch studio sets may be transmitted on the channel of a part,
causing the tone to switch. If this occurs, check the channel
settings of your DAW.
4. Move the cursor to “RxCH” of the tone that you want to
play, and use the dial to specify the receive channel.
MEMO
If you turn RxSw o, MIDI messages are not received.
It is convenient to turn RxSw on/o if you temporarily want to
stop receiving MIDI messages.
5. In your DAW software, set the transmit channels of the
tracks that you’re playing back to match the receive
channel settings of the FA.
For details on how to make this setting, refer to the owner’s manual
of your DAW software.
6. Play back your DAW software.
You hear the playback sounded by the FA’s tones.
3. Move the cursor to “USB Audio Output Select” and use
the dial to change the setting.
Value Explanation
MAIN
INPUT
INPUT-EFX
The USB audio signal ow can be viewed in the EFFECTS EDIT
screen (p. 52).
The same sound as the output of the MAIN OUTPUT
jacks is output to the USB COMPUTER port.
The sound being input from the AUDIO INPUT jack is
output without change to the USB COMPUTER port.
The sound being input from the AUDIO INPUT
jack is processed by the noise suppressor (NS) and
microphone reverb (MIC Reverb) before being output
to the USB COMPUTER jack.
Sampler Pads DAW
DAW
91
Appendix
Page 92

Using the FA with DAW Software
Saving the DAW CONTROL Settings
The DAW CONTROL settings revert to their previous state when you
turn o the power. If you want the DAW CONTROL settings to be
remembered even after power-o, save them.
1. In the DAW CONTROL screen, press the [Write] button.
A conrmation message appears.
If you decide to cancel, press the [7] (Cancel) button.
2. Press the [6] (OK) button.
The DAW CONTROL settings are saved.
MEMO
When you save the DAW CONTROL settings, the system settings
are also saved.
NOTE
Never turn o the power while settings are being saved.
92
Page 93

09: Settings
Explains convenient functions, and settings that apply to the entire FA.
Useful Functions . . . . . . . . . . . . . . . . . . . . . . . . . . . . . . . . . . . . . . . . . . . 94
Overview Performing Settings
Performance
Functions
Editing
Settings for the Entire FA . . . . . . . . . . . . . . . . . . . . . . . . . . . . . . . . . . . 97
About the Wireless LAN Function . . . . . . . . . . . . . . . . . . . . . . . . . . 104
(Creating Songs)
Sequencer
Sampler Pads DAW
Settings
Appendix
Page 94

Useful Functions
Basic Procedure for Utility Operations
1. Press the [MENU] button.
The MENU screen appears.
2. Move the cursor to “Utility” and press the [ENTER]
button.
The UTILITY screen appears.
3. Select the function that you want to execute, and press
the [ENTER] button.
Function Explanation Page
Backup
Restore
Export Song
Import Studio Set/
Tone
Factory Reset
Format SD Card Initializes an SD card. p. 96
Bulk Dump
Writes the user memory and system
memory data to an SD card.
Loads backed-up data from an SD card
into the FA.
Exports a song in WAV/SMF format. Also,
exports samples in WAV format.
Imports a studio set or a tone from data
backed-up to an SD card.
You can also import INTEGRA-7 tones
that you download from the Axial site.
Returns the FA to the factory-set
condition.
Sends the studio set and tone settings of
the temporary area to an external MIDI
device.
p. 94
p. 74
p. 95
p. 95
p. 96
Backing Up User Data (Backup/ Restore)
The contents of the FA’s user memory and system memory (p. 14) can
be saved to an SD card (Backup) or returned to the FA (Restore).
Backing Up to an SD Card (Backup)
NOTE
If you back up with a le name that is identical to existing
backup data on the SD card, the existing data is overwritten. If
you want to save a new backup, assign it a dierent name.
1. In the UTILITY screen, select “Backup” and press the
[ENTER] button.
2. Press the [2] (Rename) button and assign a name to the
le that you want to back up (p. 45).
3. Press the [7] (Backup) button.
A conrmation message appears.
If you decide to cancel, press the [7] (Cancel) button.
4. Press the [6] (OK) button.
The data is backed up to the SD card.
NOTE
Never turn o the power while a backup is in progress.
Returning Backup Data to the FA (Restore)
1. In the UTILITY screen, select “Restore” and press the
[ENTER] button.
2. Use the cursor buttons to select the le that you want to
restore, and press the [7] (Restore) button.
A conrmation message appears.
If you decide to cancel, press the [7] (Cancel) button.
94
NOTE
When you execute the Restore operation, all settings currently
saved in the FA are lost. If you want to keep the current settings,
back them up with a dierent name.
3. Press the [6] (OK) button.
When the restore is complete, the message “Completed. Please
Power O!” appears.
NOTE
Never turn o the power during the Restore operation.
4. Turn the power o, and then on again.
Page 95

Useful Functions
Importing a Studio Set or Tone (Import Studio Set/Tone)
You can import a studio set or tone from data that you backed-up
on an SD card.
You can also import INTEGRA-7 tones that you download from the
Axial site.
Importing from Backup Data
1. In the UTILITY screen, select “Import Studio Set/Tone”
and press the [ENTER] button.
2. Use the cursor buttons to select the backup data, and
press the [7] (Select) button.
MEMO
You can change the import-source folder.
Press the [2] (Folder) button to access the CHANGE FOLDER
window. When you select the import-source folder, the les
within the selected folder appear in the IMPORT (SELECT FILE)
window. If you’re importing tones that you downloaded from
the Axial site, select the “IMPORT” folder.
3. Use the cursor buttons to select the studio sets or tones
that you want to import, and assign a check mark to them.
Button Explanation
[2] (Mark) Applies a check mark.
[3] (Mark All)
[4] (Search H)
[4] (Search I)
Applies check marks to all studio sets or tones in
the list.
In the list, jumps to the studio set or tone to which
you applied a check mark.
Importing Tones Downloaded from the Axial Site
You can import INTEGRA-7 tones that you download from the Axial
site.
1. Download INTEGRA-7 tones from Axial.
MEMO
For details on how to download tones, refer to the Axial site.
http://axial.roland.com/
2. Using your computer, copy the tone data to the “IMPORT”
folder of the SD card.
3. Import the tones as described in “Importing from Backup
Data” (p.95).
Axial is a sound library site from
which you can download
additional sounds for Roland
synthesizers.
Restoring the Factory Settings (Factory Reset)
Here’s how the settings stored in the FA can be restored to their
factory-set state (Factory Reset).
NOTE
When you execute the Factory Reset operation, all data saved
in the FA is lost. If you want to keep the data, back it up to an SD
card.
Overview Performing Settings
Functions
Editing
(Creating Songs)
Sampler Pads DAW
Performance
Sequencer
4. Press the [7] (Import) button.
5. Select the save-destination of the data that you want to
import, and press the [7] (Execute) button.
A conrmation message appears.
If you decide to cancel, press the [7] (Cancel) button.
6. Press the [6] (OK) button.
The selected le is imported.
1. In the UTILITY screen, select “Factory Reset” and press
the [ENTER] button.
A conrmation message appears.
If you decide to cancel, press the [7] (Cancel) button.
2. Press the [6] (OK) button.
The factory reset is executed.
NOTE
• Never turn o the power while the Factory Reset operation is in
progress.
• The data on the SD card will not return to the factory-set state.
Settings
Appendix
95
Page 96

Useful Functions
Initializing an SD Card (Format SD Card)
Here’s how to initialize (format) an SD card.
NOTE
• Do not format the SD card that is included with this product.
If you format the SD card that is included with this product, all of
the demo song data on the card is erased.
• Back up the data to your computer before formatting the
card.
When you format a card, all its data is lost. If the SD card
contains important data, back it up rst as described in
“Backing-Up SD Card Data to a Computer” (p.96).
1. In the UTILITY screen, select “Format SD Card” and press
the [ENTER] button.
A conrmation message appears.
If you decide to cancel, press the [7] (Cancel) button.
2. Press the [6] (OK) button.
The SD card is formatted.
Backing-Up SD Card Data to a Computer
1. Remove the SD card from the FA.
2. Insert the SD card into your computer.
If your computer does not have an SD card slot, use a commerciallyavailable SD card reader.
Transmitting the Temporary Area’s Data to an External MIDI Device (Bulk Dump)
Here’s how to transmit the studio set and tone settings to an
external MIDI device. This operation is called “bulk dump.” You
can use this operation when you want to connect another FA
unit and play it using identical settings, or when you want to save
your studio set and tone settings on an external MIDI device as a
precaution against data loss.
Connect the FA to your external MIDI device as shown in the
illustration before you proceed.
USB COMPUTER port
1. In the UTILITY screen, choose “Bulk Dump” and press the
[ENTER] button.
A conrmation message appears.
If you decide to cancel, press the [7] (Cancel) button.
2. Press the [6] (OK) button.
The bulk dump is executed.
USB cable
Sequencer
software such
as SONAR
3. Copy (drag and drop) all folders of the SD card into a
folder on your computer.
NOTE
You must copy all folders. The system will not work correctly if
you copy only some of the folders.
4. Stop the SD card connection, and remove the SD card
from your computer.
5. Insert the SD card into the FA.
Restoring Backed-Up Data to a SD Card
1. Remove the SD card from the FA.
2. Insert the SD card into your computer.
If your computer does not have an SD card slot, use a commerciallyavailable SD card reader.
3. Copy (drag and drop) all of the backed-up folders from
your computer to the SD card.
NOTE
• When you copy the backed-up data to an SD card, the data
previously stored on that SD card is lost.
• You must copy all folders. The system will not work correctly if
you copy only some of the folders.
4. Stop the SD card connection, and remove the SD card
from your computer.
5. Insert the SD card into the FA.
96
Page 97

Settings for the Entire FA
These settings apply to the FA as a whole
Basic Procedure for System Settings
1. Press the [MENU] button.
The MENU screen appears.
2. Move the cursor to “System” and press the [ENTER]
button.
The SYSTEM SETUP screen appears.
3. Use the cursor buttons to select a parameter, and use the
dial to change the value.
MEMO
You can make system eect settings by pressing the [3] (System
Eects) button.
For details on the system eect parameters, refer to “Parameter
Guide” (PDF).
Saving the System Settings
System settings will return to their previous state when you turn
o the unit. If you want these settings to be retained even after the
unit is turned o, you must save the system settings.
1. In the SYSTEM SETUP screen, press the [6] (System Write)
button.
The settings will be saved.
NOTE
Never turn o the unit while data is being saved.
System Parameter
The operations of the system parameters are explained below,
organized according to the structure of the parameters.
General settings (General)
Parameter Value Explanation
OFF,
Auto O
LCD Brightness 1–20
30 [min] ,
240 [min]
Species whether the unit will turn o
automatically after a certain time has
elapsed.
If you don’t want the unit to turn o
automatically, choose “OFF” setting.
Adjusts the brightness of the display.
The brightness will increase as the
value is raised.
Parameter Value Explanation
Screen Saver
Time
USB Driver
Startup
Startup Studio
Set
Startup Song
OFF, 30 [sec] ,
1–60 [min]
VENDOR
(MIDI+AUDIO)
GENERIC
(MIDI only)
SONG, (Studio set
number)
LAST-SAVED,
(Song name)
Keyboard settings (Keyboard)
Parameter Value Explanation
Species the velocity transmitted when a key is played.
Keyboard
Velocity
Keyboard
Velocity Curve
Keyboard
Velocity Curve
Oset
Arpeggio
Arpeggio
Trigger
Quantize
REAL
1–127
LIGHT
MEDIUM
HEAVY
-10–+9
Species how arpeggios will be triggered.
OFF
BEAT
MEASURE
The screen saver starts after a certain
time has elapsed.
If you don’t want the screen saver to
start, turn this “OFF.”
MEMO
You can view the displayed screen
by pressing the [5] (Scrn Saver)
button.
The dedicated driver provided by
Roland specically for the FA is used.
MIDI and audio are both available.
The generic driver provided by the
operating system is used.
Only MIDI is available.
Species the studio set that will be
loaded when the unit is turned on.
Choose “SONG” if you want to use the
studio set that is selected by the song.
Species the song that will be loaded
when the unit is turned on.
If you want the most recently saved
song to be loaded, choose “LAST-
SAVED.”
The transmitted velocity value will
correspond to the force with which
you strike the key.
The transmitted velocity value will
be xed, regardless of the force with
which you strike the key.
The keyboard will have a lighterfeeling touch. Since you’ll be able
to reach fortissimo () without
having to play as strongly as with the
“MEDIUM” setting, the keyboard
will feel lighter. This setting makes it
easier for people with reduced nger
strength to play the keyboard.
This is the standard keyboard touch
setting.
The key will have a heavier-feeling
touch. Since you’ll need to play more
strongly than with the “MEDIUM”
setting in order to reach fortissimo
(), the keyboard will feel heavier. This
setting allows you to use your playing
dynamics to add more expression to
your performances.
Adjusts the keyboard velocity curve.
Lower values make the keyboard feel
lighter.
Higher values make the keyboard feel
heavier.
The arpeggio starts the moment you
play the keyboard.
If you play the keyboard while the
sequencer or a rhythm pattern is
playing, the arpeggio automatically
starts at the beginning of the beat.
If you play the keyboard while the
sequencer or a rhythm pattern is
playing, the arpeggio automatically
starts at the beginning of the measure.
Overview Performing Settings
Functions
Editing
(Creating Songs)
Sampler Pads DAW
Settings
Appendix
Performance
Sequencer
97
Page 98

Settings for the Entire FA
For the basic procedure for system settings,
refer to p. 97.
Pedal settings (Pedal)
Parameter Value Explanation
Control Pedal
Pedal Assign
Source
Control Pedal 1
Assign
Control Pedal 2
Assign
Control Pedal 1
Polarity
Control Pedal 2
Polarity
Hold Pedal
Hold Pedal
Polarity
Continuous
Hold Pedal
SYSTEM, STUDIO
Specify the functions that are controlled by pedals
connected to the FOOT PEDAL CTRL 1 and 2 jacks.
OFF No function is assigned.
CC01–31,
32 (OFF), 33–95
BEND DOWN
BEND UP
AFTERTOUCH Aftertouch
START/STOP Start/stop the song.
TAP TEMPO
STUDIO SET
DOWN
STUDIO SET UP
FAVORITE DOWN
FAVORITE UP
PANEL-DEC
PANEL-INC
STANDARD,
REVERSE
STANDARD,
REVERSE
OFF, ON
Species whether the functions
controlled by the pedals connected to
the FOOT PEDAL CTRL 1 and 2 jacks
will be determined by the system
settings (SYSTEM) or by the studio set
settings (STUDIO).
Controller number 1–31, 33–95
The same eect as moving the pitch
bend lever to the right.
The same eect as moving the pitch
bend lever to the left.
The same eect as pressing the panel
[TAP] button.
Switch the studio set to the previous
number.
Switch the studio set to the next
number.
Switch the favorite to the previous
number.
Switch the favorite to the next
number.
The same eect as pressing the panel
[DEC] button.
The same eect as pressing the panel
[INC] button.
Selects the polarity of the pedals
connected to the FOOT PEDAL CTRL 1
and 2 jacks.
Depending on the model of pedal,
the result of depressing or releasing
the pedal might be the opposite of
what you expect. If so, choose the
“REVERSE” setting. If you’re using
a Roland pedal (that has no polarity
switch), choose the “STANDARD”
setting.
Selects the polarity of the pedal
connected to the FOOT PEDAL HOLD
jack.
Depending on the model of pedal,
the result of depressing or releasing
the pedal might be the opposite of
what you expect. If so, choose the
“REVERSE” setting. If you’re using
a Roland pedal (that has no polarity
switch), choose the “STANDARD”
setting.
If this is ON, the FOOT PEDAL HOLD
jack will support half-pedaling. If
half-pedaling is enabled, you can
connect a damper pedal (such as the
DP-10; available separately) and use
the pedal to control subtle nuances of
the piano sounds you play.
[S1] [S2] button settings (S1/S2)
Parameter Value Explanation
Species whether the functions
S1/S2 Assign
Source
Assignable
Switch S1
Assign
Switch S2
Assign
Switch S1
Assign Mode
Switch S2
Assign Mode
SYSTEM, STUDIO
Specify the functions that are controlled by the [S1] [S2]
buttons.
OFF No function is assigned.
CC01–31, 32
(OFF), 33–95
AFTERTOUCH Aftertouch
MONO/POLY Switch between mono/poly.
CHORUS SWITCH Turn the chorus on/o.
REVERB SWITCH Turn the reverb on/o.
MASTER EQ
SWITCH
TFX SWITCH Turn the total eect on/o.
MASTER KEY
DOWN
MASTER KEY UP
MOMENTARY,
LATCH
controlled by the [S1] [S2] buttons will
be determined by the system settings
(SYSTEM) or by the studio set settings
(STUDIO).
Controller number 1–31, 33–95
Turn the master EQ on/o.
Lower the keyboard range by a
semitone.
Raise the keyboard range by a
semitone.
Specify the operation of the [S1] [S2]
buttons.
98
Page 99

For the basic procedure for system settings,
refer to p. 97.
Settings for the Entire FA
SOUND MODIFY knob settings (Knob)
Parameter Value Explanation
Species whether the functions
Knob Assign
Source
Knob Mode DIRECT, CATCH
Auto Knob
Reset (for
Single)
Assignable
Sound Modify
Knob 1–6
Assign
SYSTEM, STUDIO
OFF, ON
Specify the functions that are controlled by the SOUND
MODIFY knobs.
OFF No function is assigned.
CC01–31,
32 (OFF), 33–95
PITCH BEND
AFTERTOUCH Aftertouch
TFX PARAM 1–3
controlled by the SOUND MODIFY
knobs will be determined by the
system settings (SYSTEM) or by the
studio set settings (STUDIO).
When you operate a knob, this
setting species whether control data
corresponding to the knob’s position
is always transmitted (DIRECT) or
whether control data is transmitted
only after the knob passes through
the current value of the parameter
(CATCH).
When you switch tones in Single play
mode, this setting species whether
the SOUND MODIFY knob settings are
reset (ON) or not reset (OFF).
If this is “ON,” the following
parameters are reset when you switch
tones.
• CUTOFF
• RESONANCE
• ATTACK
• RELEASE
• PAN
• LEVEL
• EQ LOW
• EQ MID1
• EQ MID2
• EQ MID3
• EQ HIGH
• COMPRESSOR
• TONE
• TFX SELECT
• ASSIGN 1, ASSIGN 2, ASSIGN 3,
ASSIGN 4, ASSIGN 5 (with the KNOB
ASSIGN settings in their factory-set
state)
Controller number 1–31, 33–95
Applies the same eect as when the
pitch bend lever is moved.
Controls parameters 1–3 of the Total
Eect.
D-BEAM controller settings (D-Beam)
Parameter Value Explanation
D-Beam Sens 0–127
D-Beam Assign
Source
SYSTEM, STUDIO
The higher the value you set for this
parameter, the more sensitive the
D-BEAM controller becomes.
Species whether the functions
controlled by the D-BEAM controller
will be determined by the system
settings (SYSTEM) or by the studio set
settings (STUDIO).
Parameter Value Explanation
Specify the functions that are controlled by the D-BEAM
controller.
OFF No function is assigned.
D-Beam Switch
Solo Synth
Level 0–127 Adjusts the volume of the solo synth.
Chorus Send
Level
Reverb Send
Level
Range 2–8OCT
Osc 1
Waveform
Osc 1 Pulse
Width
Osc 1 Coarse
Tune
Osc 1 Fine
Tune
Osc 2
Waveform
Osc 2 Pulse
Width
Osc 2 Coarse
Tune
Osc 2 Fine
Tune
Osc 2 Level 0–127 Adjusts the level of the Osc 2.
Osc Sync
Switch
Filter Type
Cuto 0–127
Resonance 0–127
LFO Rate 0–127
LFO Osc 1 Pitch
Depth
LFO Osc 2 Pitch
Depth
SOLO SYNTH
EXPRESSION
ASSIGNABLE
0–127 Adjusts the chorus send level.
0–127 Adjusts the reverb send level.
SAW, SQR
0–127
-48–+48
-50–+50
(same as Osc 1)
OFF, ON
Species the type of lter.
OFF No lter is used.
LPF
(Low Pass Filter)
BPF
(Band Pass Filter)
HPF
(High Pass Filter)
PKG
(Peaking Filter)
-63–+63
-63–+63
The D-BEAM controller operates as a
monophonic synthesizer.
The D-BEAM controller controls the
volume.
The D-BEAM controller controls the
function that you assign.
Adjusts the range in which the pitch of
the solo synth will vary.
Selects the waveform.
SAW (sawtooth wave), SQR (square
wave)
Species the pulse width of the
waveform. By cyclically modifying
the pulse width you can create subtle
changes in the tone.
Adjusts the pitch of the tone’s sound
(in semitones, +/-4 octaves).
Adjusts the pitch of the tone’s sound
(in 1-cent steps).
Turning this switch on produces a
complex sound with many harmonics.
This is eective when the Osc 1 pitch is
higher than the Osc 2 pitch.
This reduces the volume of all
frequencies above the cuto
frequency (Cuto).
This leaves only the frequencies in the
region of the cuto frequency, and
cuts the rest.
This cuts the frequencies in the region
below the cuto frequency.
This emphasizes the frequencies in the
region of the cuto frequency.
Frequency at which the lter begins
to have an eect on the waveform’s
frequency components.
Emphasizes the portion of the sound
in the region of the cuto frequency,
adding character to the sound.
Adjusts the modulation speed of the
LFO.
Species the depth to which the LFO
will modulate the Osc 1 pitch.
Species the depth to which the LFO
will modulate the Osc 2 pitch.
Overview Performing Settings
Functions
Editing
(Creating Songs)
Sampler Pads DAW
Settings
Appendix
Performance
Sequencer
99
Page 100

Settings for the Entire FA
For the basic procedure for system settings,
refer to p. 97.
Parameter Value Explanation
Species the depth to which the LFO
LFO Osc 1
Pulse Width
Depth
LFO Osc 2
Pulse Width
Depth
Assignable
D-Beam Assign
-63–+63
-63–+63
Specify the functions that are controlled by the
[ASSIGNABLE] button.
OFF No function is assigned.
CC01–31,
32 (OFF), 33–95
BEND DOWN
BEND UP
AFTERTOUCH Aftertouch
CUTOFF Adjusts the cuto frequency.
RESONANCE Adjusts the resonance.
ATTACK Adjusts the attack.
RELEASE Adjusts the release.
PAN Adjusts the pan.
LEVEL Adjusts the volume.
EQ LOW Adjusts the low frequency range.
EQ MID1 Adjusts the mid-1 frequency range.
EQ MID2 Adjusts the mid-2 frequency range.
EQ MID3 Adjusts the mid-3 frequency range.
EQ HIGH Adjusts the high frequency range.
INPUT LEVEL
KNOB ASSIGN1–6
COMPRESSOR Adjusts the compressor.
TONE Adjusts the tone.
CHORUS Adjusts the chorus.
REVERB Adjusts the reverb.
TFX SELECT Selects the total eect.
TFX CTRL Controls the total eect.
SAMPLE PAD Plays a sample.
will modulate the pulse width of the
Osc 1 waveform.
* The Pulse Width is activated when
“SQR” is selected with Osc 1
waveform.
Species the depth to which the LFO
will modulate the pulse width of the
Osc 2 waveform.
* The Pulse Width is activated when
“SQR” is selected with Osc 2
waveform.
Controller number 1–31, 33–95
The same eect as moving the pitch
bend lever to the right.
The same eect as moving the pitch
bend lever to the left.
Adjusts the input volume from the
AUDIO INPUT jack.
Adjust the [1] (ASSIGN 1)–[6]
(ASSIGN 6) knobs.
Species the upper limit of the
D-BEAM controller range.
Sound settings (Sound)
Parameter Value Explanation
Enables/disables the connection
between the controller section
(keyboard, pitch bend/modulation
lever, panel knobs and buttons,
Local Switch OFF, ON
Master Tune 415.3–466.2 [Hz]
Master Key
Shift
Master Level 0–127 Sets the FA’s overall volume.
Output Gain -12–+12 [dB] Adjusts the FA’s overall output gain.
Tone Remain OFF, ON
Sample Output
Assign
Wireless Audio
Level
Wireless
Output Assign
-24–+24
MAIN, SUB
0–127
MAIN, SUB
D-BEAM controller, pedals, etc.) and
the internal sound engine.
Normally you should leave this “ON.”
Choose the “OFF” setting if you want
operations on the FA to control only
an external sound module.
Sets the FA’s overall tuning (the
frequency of the A4 key).
Shifts the FA’s overall pitch range in
semitone steps.
Species whether the currently
sounding notes will remain (ON) or
not (OFF) when you select a dierent
sound.
* In some cases, the eect sound
might not remain.
* If you switch from an organ
SuperNATURAL acoustic tone, the
sound will not remain even if this
setting is “ON.”
Species whether the sample playback
sound is output from the MAIN
OUTPUT jacks (MAIN) or from the SUB
OUT jack (SUB).
Adjusts the volume that is output via
the wireless LAN function.
When using the wireless LAN function
to output the sound of the FA, this
setting chooses the sound of the MAIN
OUTPUT jacks (MAIN) or the sound of
the SUB OUT jack (SUB).
Using the Local Switch setting
If you’re using a DAW software with the FA’s keyboard
controller section and sound generator section, you should
turn the Local Switch “OFF.” Here’s why.
We need to connect these sections in the following order: the
FA’s keyboard
Since the FA’s keyboard section and sound generator section
are connected internally, such a connection order would
normally be impossible. However, if the Local Switch is “OFF,”
the FA’s keyboard section and its sound generator section
will be independent, allowing you to use a DAW software as
shown here in the illustration.
a DAW software the FA’s sound generator.
Range Max 0–127
Range Min 0–127
Beam Assign
Knob Polarity
Beam Assign
Sample Pad
Number
100
STANDARD,
REVERSE
1-1–4-16
MEMO
By setting the Range Max below
the Range Min, you can invert the
range of variation.
Species the lower limit of the
D-BEAM controller range.
STANDARD: The assigned parameter
changes in the positive (+) direction
when you move your hand closer to
the D-BEAM controller.
REVERSE: The assigned parameter
changes in the negative (-) direction
when you move your hand closer to
the D-BEAM controller.
Selects the sample that plays if
D-Beam Assign is set to “SAMPLE
PAD.”
Keyboard
Local O
DAW software
Sound
generator
 Loading...