

Page 1

LDL-Series Ironless Linear Servo
Motors
Catalog Numbers
LDL-N030xxx-xHT11, LDL-N050xxx-xHT11, LDL-N075xxx-xHT11,
LDL-T030xxx-xHT11, LDL-T050xxx-xHT11, LDL-T075xxx-xHT11,
LDL-N030xxx-xHT20, LDL-N050xxx-xHT20, LDL-N075xxx-xHT20,
LDL-T030xxx-xHT20, LDL-T050xxx-xHT20, LDL-T075xxx-xHT20,
LDL-N030xxx, LDL-N050xxx, LDL-N075xxx,
LDL-T030xxx, LDL-T050xxx, LDL-T075xxx User Manual
Page 2

Important User Information
Solid state equipment has operational characteristics differing from those of electromechanical equipment. Saf ety Guidelines
for the Application, Installation and Maintenance of Solid State Controls (publication SGI-1.1
Rockwell Automation sales office or online at http://literature.rockwellautomation.com
between solid state equipment and hard-wired electromechanical devices. Because of this difference, and also because of the
wide variety of uses for solid state equipment, all persons responsible for applying this equipment must satisfy themselves
that each intended application of this equipment is acceptable.
In no event will Rockwell Automation, Inc. be responsible or liable for indirect or consequential damages resulting from the
use or application of this equipment.
The examples and diagrams in this manual are included solely for illustrative purposes. Because of the many variables and
requirements associated with any particular installation, Rockwell Automation, Inc. cannot assume responsibility or liability
for actual use based on the examples and diagrams.
No patent liability is assumed by Rockwell Automation, Inc. with respect to use of information, circuits, equipment, or
software described in this manual.
Reproduction of the contents of this manual, in whole or in part, without written permission of Rockwell Automation, Inc., is
prohibited.
Throughout this manual, when necessary, we use notes to make you aware of safety considerations.
available from your local
) describes some important differences
WARNING
Identifies information about practices or circumstances that can cause an explosion in a
hazardous environment, which may lead to personal injury or death, property damage, or
economic loss.
IMPORTANT
ATTENTION
Identifies information that is critical for successful application and understanding of the product.
Identifies information about practices or circumstances that can lead to personal injury or death,
property damage, or economic loss. Attentions help you identify a hazard, avoid a hazard, and
recognize the consequence
SHOCK HAZARD
Labels may be on or inside the equipment, for example, a drive or motor, to alert people that
dangerous voltage may be present.
BURN HAZARD
Labels may be on or inside the equipment, for example, a drive or motor, to alert people that
surfaces may reach dangerous temperatures.
Allen-Bradley, Rockwell Automation, Kinetix, Ultra3000, LDL-Series Ironless Linear Servo Motors, RSLogix 5000, and TechConnect are trademarks of Rockwell Automation, Inc.
Trademarks not belonging to Rockwell Automation are property of their respective companies.
Page 3

Safety Considerations
Start
Table of Contents
Preface
About This Publication . . . . . . . . . . . . . . . . . . . . . . . . . . . . . 7
Who Should Use This Manual . . . . . . . . . . . . . . . . . . . . . . . . 7
Additional Resources. . . . . . . . . . . . . . . . . . . . . . . . . . . . . . . 7
Chapter 1
Introduction . . . . . . . . . . . . . . . . . . . . . . . . . . . . . . . . . . . . . 9
Labels. . . . . . . . . . . . . . . . . . . . . . . . . . . . . . . . . . . . . . . . . . 9
High Energy Magnets . . . . . . . . . . . . . . . . . . . . . . . . . . . . . 10
Unpacking and Handling . . . . . . . . . . . . . . . . . . . . . . . . 10
Air Freight Restrictions . . . . . . . . . . . . . . . . . . . . . . . . . 11
Vertical or Incline Installation . . . . . . . . . . . . . . . . . . . . . . . 12
Operational Guidelines . . . . . . . . . . . . . . . . . . . . . . . . . . . . 13
Chapter 2
Introduction . . . . . . . . . . . . . . . . . . . . . . . . . . . . . . . . . . . . 15
Catalog Number Explanation . . . . . . . . . . . . . . . . . . . . . . . 16
Linear Motor Components . . . . . . . . . . . . . . . . . . . . . . . . . . 17
Design Consideration . . . . . . . . . . . . . . . . . . . . . . . . . . . . . 18
Motor Air Gap . . . . . . . . . . . . . . . . . . . . . . . . . . . . . . . . 18
Bumpers, Shock Absorbers, or End Stops . . . . . . . . . . . . 18
Linear Encoder . . . . . . . . . . . . . . . . . . . . . . . . . . . . . . . 19
Carriage/Heat Sink. . . . . . . . . . . . . . . . . . . . . . . . . . . . . 19
Maintenance . . . . . . . . . . . . . . . . . . . . . . . . . . . . . . . . . . . . 19
Motor Storage . . . . . . . . . . . . . . . . . . . . . . . . . . . . . . . . . . . 19
Chapter 3
Installing the LDL-Series Linear
Motor
Introduction . . . . . . . . . . . . . . . . . . . . . . . . . . . . . . . . . . . . 21
Unpacking and Inspection. . . . . . . . . . . . . . . . . . . . . . . . . . 21
Installing the Linear Motor Components. . . . . . . . . . . . . . . . 22
Required Tools: . . . . . . . . . . . . . . . . . . . . . . . . . . . . . . . 22
Mount the Magnet Channel . . . . . . . . . . . . . . . . . . . . . . 22
Mount the Motor Coil. . . . . . . . . . . . . . . . . . . . . . . . . . . 25
Chapter 4
LDL-Series Linear Motor
Connector Data
3Publication LDL-UM001A-EN-P - March 2009 3
Introduction . . . . . . . . . . . . . . . . . . . . . . . . . . . . . . . . . . . . 27
Linear Motor Coil Connectors . . . . . . . . . . . . . . . . . . . . . . . 27
Power Connector. . . . . . . . . . . . . . . . . . . . . . . . . . . . . . 27
PTC Thermistor Connector . . . . . . . . . . . . . . . . . . . . . . . 28
Hall Effect Module Connectors. . . . . . . . . . . . . . . . . . . . . . . 28
Feedback Connector . . . . . . . . . . . . . . . . . . . . . . . . . . . 28
PTC Thermistor Connector . . . . . . . . . . . . . . . . . . . . . . . 29
Encoder Connector . . . . . . . . . . . . . . . . . . . . . . . . . . . . 29
Page 4

Table of Contents
Wiring the LDL-Series Linear
Motor
Configure and Start Up the
LDL-Series Linear Motor
Chapter 5
Introduction . . . . . . . . . . . . . . . . . . . . . . . . . . . . . . . . . . . . 31
Connect the Linear Motor Coil. . . . . . . . . . . . . . . . . . . . . . . 31
Signal and Wire Definitions for Flying Lead Components . . . 33
Linear Motor Coil. . . . . . . . . . . . . . . . . . . . . . . . . . . . . . 33
Hall Effect Module. . . . . . . . . . . . . . . . . . . . . . . . . . . . . 34
Making Your Own Extension Cables . . . . . . . . . . . . . . . . . . 34
Mounting and Wiring Two Identical Coils in Tandem . . . . . . 35
Cables Exit to the Right . . . . . . . . . . . . . . . . . . . . . . . . . 35
Chapter 6
Introduction . . . . . . . . . . . . . . . . . . . . . . . . . . . . . . . . . . . . 39
Before You Begin . . . . . . . . . . . . . . . . . . . . . . . . . . . . . . . . 39
Motor Direction Defined . . . . . . . . . . . . . . . . . . . . . . . . 39
What You Need . . . . . . . . . . . . . . . . . . . . . . . . . . . . . . . . . 40
Required Files . . . . . . . . . . . . . . . . . . . . . . . . . . . . . . . . . . 40
Follow These Steps. . . . . . . . . . . . . . . . . . . . . . . . . . . . . . . 41
Update Linear Motor Database. . . . . . . . . . . . . . . . . . . . . . . 41
Set Up Connection to Kinetix 6000 or Kinetix 2000 Drive . . . 42
Set Up the Connection to an Ultra3000 Drive . . . . . . . . . . . . 47
Verify Motor Encoder Direction . . . . . . . . . . . . . . . . . . . . . . 49
Verify Motor Encoder Resolution . . . . . . . . . . . . . . . . . . . . . 50
Verify Linear Motor Wiring and Function . . . . . . . . . . . . . . . 50
Specifications and Dimensions
Appendix A
Introduction . . . . . . . . . . . . . . . . . . . . . . . . . . . . . . . . . . . . 55
Performance Specifications . . . . . . . . . . . . . . . . . . . . . . . . . 56
Common Performance Specifications . . . . . . . . . . . . . . . 56
LDL-Series Ironless Linear Motor
Performance Specifications. . . . . . . . . . . . . . . . . . . . . . 57
General Specifications. . . . . . . . . . . . . . . . . . . . . . . . . . . . . 61
Weight Specifications. . . . . . . . . . . . . . . . . . . . . . . . . . . 61
Carriage Weight and Heat Sink Area Requirements . . . . . 62
Environmental Specifications . . . . . . . . . . . . . . . . . . . . . 62
Certifications . . . . . . . . . . . . . . . . . . . . . . . . . . . . . . . . . 62
Product Dimensions . . . . . . . . . . . . . . . . . . . . . . . . . . . . . . 63
Motor Coil Dimensions. . . . . . . . . . . . . . . . . . . . . . . . . . 64
Magnet Channel Dimensions . . . . . . . . . . . . . . . . . . . . . 66
4 Publication LDL-UM001A-EN-P - March 2009
Page 5

Interconnect Diagrams
Sin/Cos Linear Encoder and
Kinetix 6000 Drives
Table of Contents
Appendix B
Introduction . . . . . . . . . . . . . . . . . . . . . . . . . . . . . . . . . . . . 67
Wiring Examples. . . . . . . . . . . . . . . . . . . . . . . . . . . . . . . . . 67
Appendix C
Introduction . . . . . . . . . . . . . . . . . . . . . . . . . . . . . . . . . . . . 77
Kinetix 6000 Drive Feedback Connection. . . . . . . . . . . . . . . 77
Encoder Counting Direction . . . . . . . . . . . . . . . . . . . . . . . . 78
Set Up the Axis Properties. . . . . . . . . . . . . . . . . . . . . . . . . . 78
Index
Publication LDL-UM001A-EN-P - March 2009 5
Page 6

Table of Contents
Notes:
6 Publication LDL-UM001A-EN-P - March 2009
Page 7

Preface
About This Publication
This manual provides detailed installation instructions for mounting,
wiring, and maintaining your LDL-Series Ironless Linear Servo Motors.
Who Should Use This
This manual is intended for engineers or technicians directly involved
in the installation, wiring, and maintenance of LDL-Series ironless
Manual
linear motors.
If you do not have a basic understanding of linear motors, contact
your local Rockwell Automation sales representative for information
on available training courses before using this product.
Additional Resources
The following documents contain additional information conce rning
related Rockwell Automation products.
Resource Description
Kinetix 2000 Multi-axis Servo Drive User Manual, publication
2093-UM001
Kinetix 6000 Multi-axis Servo Drive User Manual, publication
2094-UM001
Ultra3000 Digital Servo Drives Installation Manual, publication
2098-IN003
How to install, setup, and troubleshoot a Kinetix 2000 drive
How to install, setup, and troubleshoot a Kinetix 6000 drive
How to install, setup, and troubleshoot an Ultra3000 drive
Ultra3000 Digital Servo Drives Integration Manual, publication
2098-IN005
Ultra3000 Digital Servo Drives User Manual, publication
2098-UM001
Motion Analyzer CD, download at http://ab.com/e-tools. Drive and motor sizing with application analysis software
Motion Modules in Logix5000 Control Systems User Manual,
publication
System Design for Control of Electrical Noise Reference Manual,
publication
Kinetix Motion Control Selection Guide, publication GMC-SG001 Information about Kinetix products
Safety Guidelines for the Application, Installation, and
Maintenance of Solid State Controls, publication
Allen-Bradley Industrial Automation Glossary, publication AG-7.1 A glossary of industrial automation terms and abbreviations
Rockwell Automation Product Certification Website, publication
available at
National Electrical Code. Published by the National Fire
Protection Association of Boston, MA.
LOGIX-UM002
GMC-RM001
SGI-IN001
http://www.ab.com
Instruction on configuring Ultra3000 and Ultra500 drives, creating and
configuring project, source, and header files and creating and running
programs.
Information on configuring and troubleshooting your ControlLogix and
CompactLogix SERCOS interface modules, and using the home to
torque-level sequence
Information, examples, and techniques designed to minimize system
failures caused by electrical noise
Characteristics, application, installation, and maintenance of solid
state controls
For declarations of conformity (DoC) currently available from Rockwell
Automation
An article on wire sizes and types for grounding electrical equipment
You can view or download publications at
http://literature.rockwellautomation.com. To order paper copies of
technical documentation, contact your local Rockwell Automation
distributor or sales representative.
7Publication LDL-UM001A-EN-P - March 2009 7
Page 8

Preface
Notes:
8 Publication LDL-UM001A-EN-P - March 2009
Page 9
Safety Considerations
Chapter
1
Introduction
Labels
Title Location Label Details
This chapter describes the safety issues encountered while using a
linear motor and the precautions you can take to minimize risk.
Potential hazards discussed here are identif ied by label s affixed to the
device.
Topic Page
Labels 9
High Energy Magnets 10
Vertical or Incline Installation 12
Operational Guidelines 13
Here you will find the safety and identification labels affixed to your
linear motor components. To prevent injury and damage to the linear
motor, review the safety label and its de tails and locati on before using
the linear motor.
Safety Label
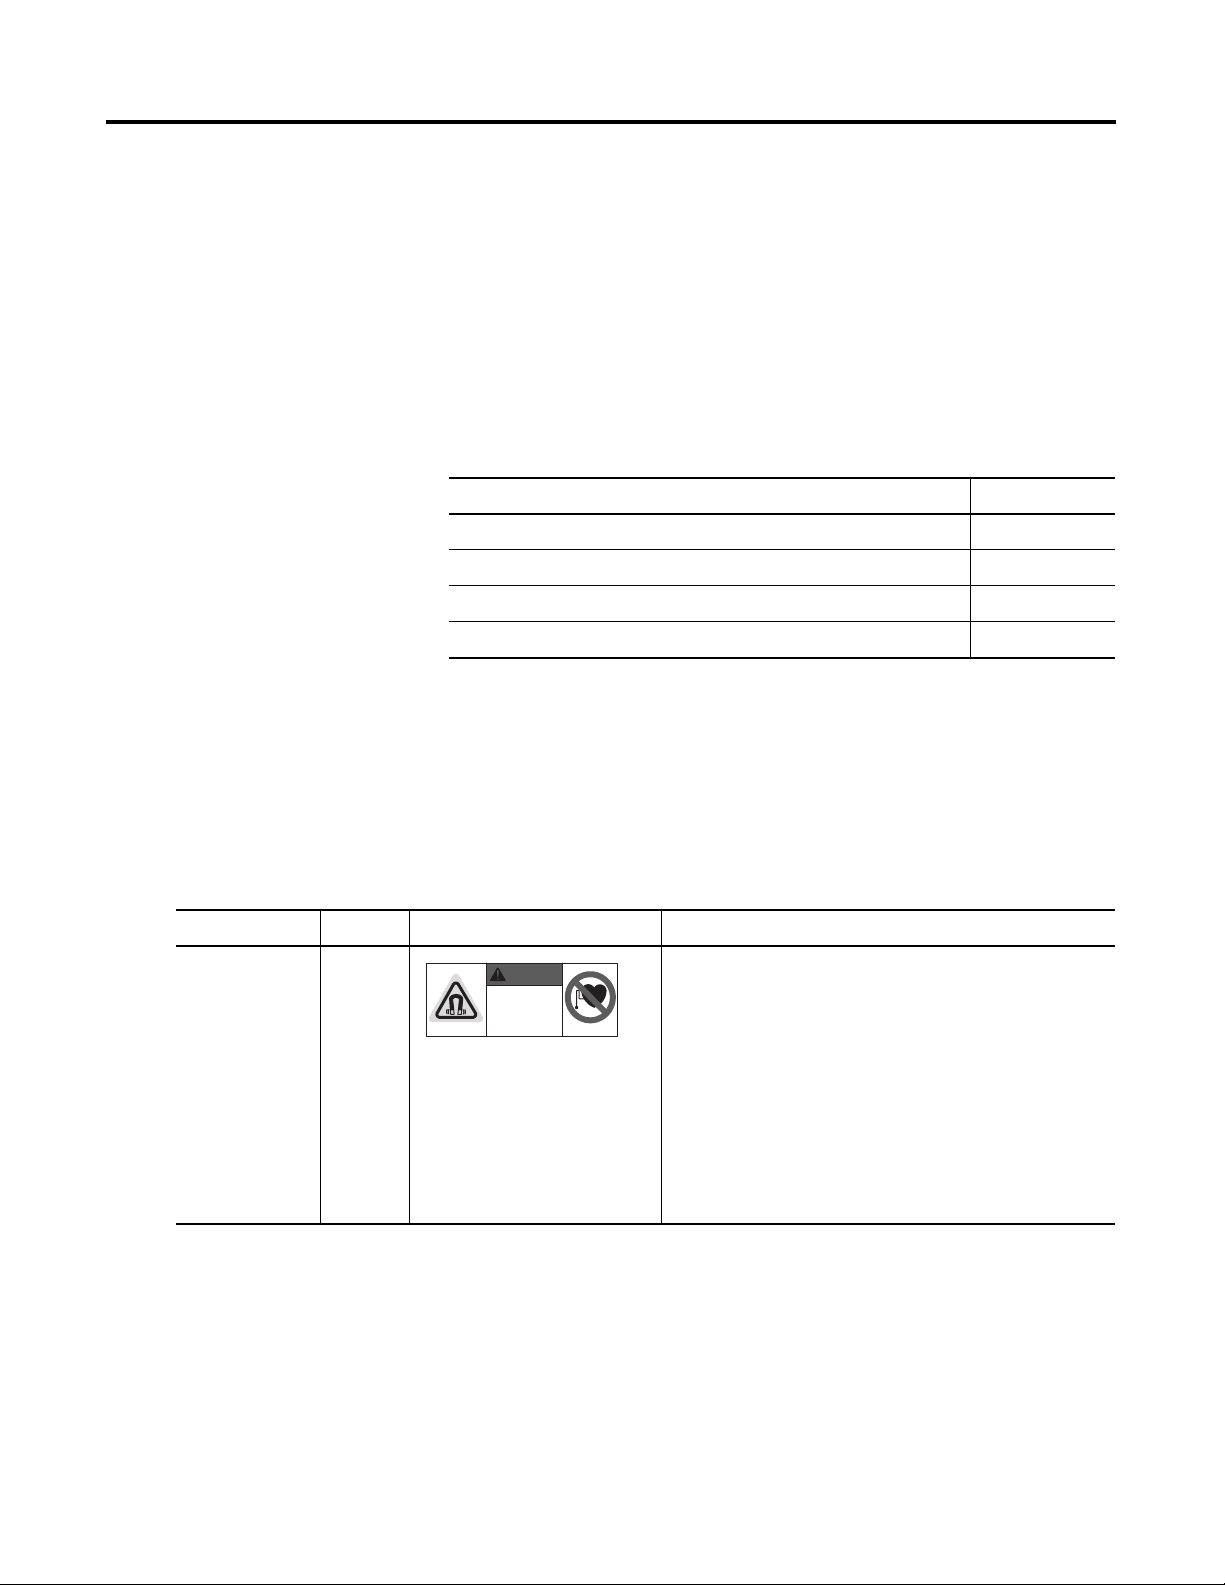
Magnetic Field
Danger
9Publication LDL-UM001A-EN-P - March 2009 9
A The Magnetic Fields label identifies non-ionizing radiation
DANGER
MAGNETIC FIELDS
LOCATED IN THIS AREA.
Can be harmfull to
pacemakers and other
sensitive equipment.
found in the magnet channels. Magnetic channels are
constructed with strong magnets. Strong magnets can
disrupt the functionality of automatic implantable
cardioverter defibrillators (AICD); people with a pacemaker
should not work near the magnet channels. Maintenance
personnel working near the magnet channels should avoid
the use of metallic tools and secure items such as badge clip
and other personal effects that could be attracted by the
strong magnets. Strong magnets can erase magnetic media.
Never let credit cards or electronic media contact or come
near the magnet channels.
Page 10
Chapter 1 Safety Considerations
Title Location Label Details
Coil Name Plate B This name plate shows the coil catalog number, serial
Identification Labels
www.ab.com
CAT. NO. LDL-XXXXXXX-XHTXX
SERIAL NO. XXXX-X-XXXX
CLASS B, 230 VAC, 0-167 Hz, 3Ø
E230241 MADE IN USA
number operating voltage and frequency.
Magnet Channel
Name Plate
RoHS Compliant D LDL-Series linear motor components are RoHS compliant.
C This name plate shows the magnet channel catalog number,
CAT. NO. LDL-XXXXXXXXX
SERIAL NO. XXXX-X-XXXX
www.ab.com
RoHS COMPLIANT
Directive 2002/95/EC
MADE IN USA
serial number.
Label Locations for LDL-Series Linear Motor
The coil shown here is upside down
relative to the magnet channel so the
MAGNETIC FIELDS
LOCATED IN THIS AREA.
Can be harmfull to
pacemakers and other
sensitive equipment.
D
DANGER
A
labels are seen.
B
CAT. NO. LDL-C050200-DHT11
SERIAL NO. XXXXX-X-XXXX
m
o
.c
b
w.a
w
w
IANT
L
P
OM
Directive 2002/95/EC
oHS C
R
z, 3Ø
H
A
-167
US
, 0
C
IN
E
VA
D
30
A
, 2
B
S
M
S
41
LA
02
C
23
E
MADE IN USA
CAT. NO. LDL-NM075600
SERIAL NO. XXXX-X-XXXX
SERIES A
w.ab.com
w
w
C
High Energy Magnets
Linear motor magnet channels contain high energy magnets that
attract ferrous metals from a considerable distance. Precautions must
be taken while unpacking, handling, and shipping by air.
Unpacking and Handling
Unpack magnet channels one at a time. Repack magnet channels after
inspection and before it is stocked or staged for installation. Leave
10 Publication LDL-UM001A-EN-P - March 2009
Page 11

Safety Considerations Chapter 1
protective wrapping, cardboard and flux containment plates in place
until magnet channel is installed. Clear the inspection and repacking
area of any ferrous metals that will attracted to or attract the magnetic
assembly. If magnet channels must be unpacked at the same time
maintain a distance of 1.5 m (5 ft) between assemblies.
Air Freight Restrictions
When air freighting linear motor special preparations and precautions
must be taken. The following information outlines the basic
requirements at the publication d at e of th is document. However,
regulations are subject to change and additional area or carrier
restrictions may be imposed. Always check with your carrier or
logistics specialist regarding current local, regional, and national
transportation requirements when ship ping this product.
Linear motor magnet channels contain magnetized material, as
classified by International Air Transport Association (IATA) Dangerous
Goods Regulations. An IATA trained individual must be involved
when shipping this product via domestic or international air freight.
Packing Instruction 902 provides information regarding the
preparation of this product for air transportation. Follow these
regulations for general marking and labeling requirements, the
application of specific Magnetized Material Handling Labels, and
instructions for preparing the Shipper's Declaration for Dangerous
Goods.
As a minimum, refer to the following IATA Dangerous Goods
Regulations:
• Subsection 1.5: Training
• Subsection 3.9.2.2: Classification as Magnetized Material
• Subsection 4.2: Identification as UN 2807, Magnetized Material,
Class 9, Packing Instruction 902
• Subsection 7.1.5: Marking
• Subsection 7.2: Labeling
• Subsection 7.4.1: Magnetized Material Label
• Section 8: Shipper's Declaration for Dangerous Goods
When shipped via ground in the United States, these products are not
considered a U.S. D.O.T. Hazardous Material and standard shipping
procedures apply.
Publication LDL-UM001A-EN-P - March 2009 11
Page 12

Chapter 1 Safety Considerations
Vertical or Incline Installation
A linear motor driven system mounted vertically or on an incline will
not maintain position when the power is removed. Under the
influence of gravity the motion platform and its payload will fall to the
low end of travel. Design engineers should allow for this by designing
in controlled power down circuits or mechanical controls to prevent
the linear motor driven system and its payload from being damaged
when the power fails.
ATTENTION
Linear motors are capable of high accelerations, sudden and
fast motion. Rockwell Automation is not responsible for
misuse, or improper implementation of this equipment.
ATTENTION
Linear motor driven systems must have end of travel bumpers.
They must be designed to take a large impact from uncontrolled
motion. The payload must be secured to the system such that it
will not sheer off in the event of an impact in excess of the
bumper ratings.
ATTENTION
The Hall effect module contains an electrostatic discharge
(ESD) sensitive devise. You are required to follow static-control
precautions when you install, test, service, or repair this
assembly. If you do not follow ESD control precautions,
components can be damaged. If you are not familiar with static
control precautions, refer to Guarding Against Electrostatic
Damage, publication 8000-4.5.2
, or any other applicable ESD
awareness handbook.
BURN HAZARD
When the linear motors are running at their maximum rating the
temperature of attached heat sink can reach 100 ºC (212 ºF).
SHOCK HAZARD
An assembled linear motor will generate power if the coil or
magnet channel is moved. Un-terminated power cables present
an electrical shock hazard. Never handle flying leads or touch
power pins while moving the motor.
12 Publication LDL-UM001A-EN-P - March 2009
Page 13
Safety Considerations Chapter 1
Operational Guidelines
Please read and follow the guidelines shown here to safely operate
the linear motor created from the these linear motor component s .
ATTENTION
Observe maximum safe speed. Linear motors are capable of
very high forces, accelerations, and speeds. The maximum
obtainable acceleration and speed is based on the drive output
(bus voltage and current settings). The allowable maximum
speed is application specific and partly based on the linear
motion mechanics supplied by others.
ATTENTION
Moving parts can cause injury. Before operating the linear
motor, make sure all components are secure and magnet
mounting hardware is below magnet surface. Remove all
unused parts from the motor travel assembly to prevent them
from jamming in the motor air gap and damaging the coil or
flying off and causing bodily injury.
IMPORTANT
You are responsible for making sure the servo control system
safely controls the linear motor with regards to maximum safe
force, acceleration, and speed, including runaway conditions.
ATTENTION
ATTENTION
A runaway condition can be caused by incorrect motor, hall
effect, and position feedback wiring resulting in violent
uncontrolled motion.
Keep away from the line of motor travel at all times. Always
have bumpers in place and securely fastened before applying
power to your linear motor.
High Voltage can kill. Do not operate with exposed wires. Do
not go near electrically live parts.
Publication LDL-UM001A-EN-P - March 2009 13
Page 14

Chapter 1 Safety Considerations
WARNING
Large Position Error Tolerances, such as those calculated
by the Auto Tune function in RSLogix 5000 programming
software, or when configuring a new axis with RSLogix
5000 software, can lead to undetected and repetitive
high energy impacts against axis end stops if proper
precautions are not in place. These tolerances can also
lead to undetected and repetitive high energy impacts
against unexpected obstructions. Such impacts can lead
to equipment damage and/or serious injury.
To identify the safety concerns that you have with
default Position Error Tolerance or after an Auto-Tune
Function go to the Rockwell Automation Knowlegebase
Click on Find Technical Support Answers and search for
Answer Id 55937.
.
14 Publication LDL-UM001A-EN-P - March 2009
Page 15
Start
Chapter
2
Introduction
Use this chapter to become familiar with the linear motor
components, their maintenance needs, and their configuration.
Topic Page
Catalog Number Explanation 16
Linear Motor Components 17
Design Consideration 18
Maintenance 19
Motor Storage 19
15Publication LDL-UM001A-EN-P - March 2009 15
Page 16

Chapter 2 Start
Catalog Number Explanation
An ironless linear motor is comprised of a coil and a magnet channel.
The following keys show the catalog definition for the linear motors.
LDL - x xxx xxx - x x x x x
Cable Termination
0 = Flying leads
1 = Circular DIN-Type connector
Cable Length
0 = 300 mm (12.45 in.)
1 = 600 mm (23.62 in.)
2 = 1000 mm (39.37 in.)
Thermal Protection
T = PTC Thermal Sensor
Feedback
N = No Feedback
H = Hall Effect (Trapezoidal)
Winding Code
D = D winding
E = E winding
Coil Length
120 = 120 mm (4.72 in.)
240 = 240 mm (9.45 in.)
360 = 360 mm (14.17 in.)
480 = 480 mm (18.90 in.)
Frame Size
030
050
075
Coil Designation
N = Standard Coil
T = Thick Coil
Bulletin Number
LDL - xx xxx xxx
Magnet Channel Length
120 = 120 mm (4.72 in.)
480 = 480 mm (18.90 in.)
Frame Size
030
050
075
Coil Designation
NM = Standard Coil
TM = Thick Coil
Bulletin Number
16 Publication LDL-UM001A-EN-P - March 2009
Page 17

Start Chapter 2
Linear Motor Components
6
5
4
3
Use the diagrams and descriptions to identify the uniq ue compo nents
of the linear motor .
Components of Ironless Linear Motor Coil and Magnet Channel
1
LDL-N075120-xHT11
7
CAT. NO. LDL-NM075600
SERIAL NO. XXXX-X-XXXX
SERIES A
.com
w.ab
w
w
Motor Coil Shown
MADE IN USA
MAGNETIC FIELDS
LOCATED IN THIS AREA.
Can be harmfull to
pacemakers and other
sensitive equipment.
DANGER
LDL- NM075480
2
Magnet Channel Shown
Component
Number
Component Description
1 Ironless motor coil Copper coils contained in an epoxy form. When powered,
the coil interacts with the magnet channel.
2 Magnet channel High powered static magnets create the flux field the
powered coil interacts with.
3 Encoder connector Connect your encoder here using connector kit, catalog
number LDC-ENC-CNCT.
4 Feedback connector Connect to your drive feedback using either catalog number
2090-CFBM4DF-CDAFxx (for moving coil) or
2090-XXNFMF-Sxx (for moving magnet).
5 Power connector Connect to your drive power using either catalog number
2090-CPWM4DF-xxAFxx (for moving coil) or
2090-XXNPMF-xxSxx (for moving magnet).
6 Thermistor connector Connects the PTC thermistor signal to the feedback
connector.
7 Hall effect module This module provides input signals for commutation
start-up. Replacement catalog numbers for the Hall effect
module are LDL-HALL-C for LDL-xxxxxxx-xHT11 and
LDL-HALL-F for LDL-xxxxxxx-xHT20.
Publication LDL-UM001A-EN-P - March 2009 17
Page 18
Chapter 2 Start
Design Consideration
The information provided here is critical to using linear motor
components. Design your system to comply with the following points
to run safe and successfully.
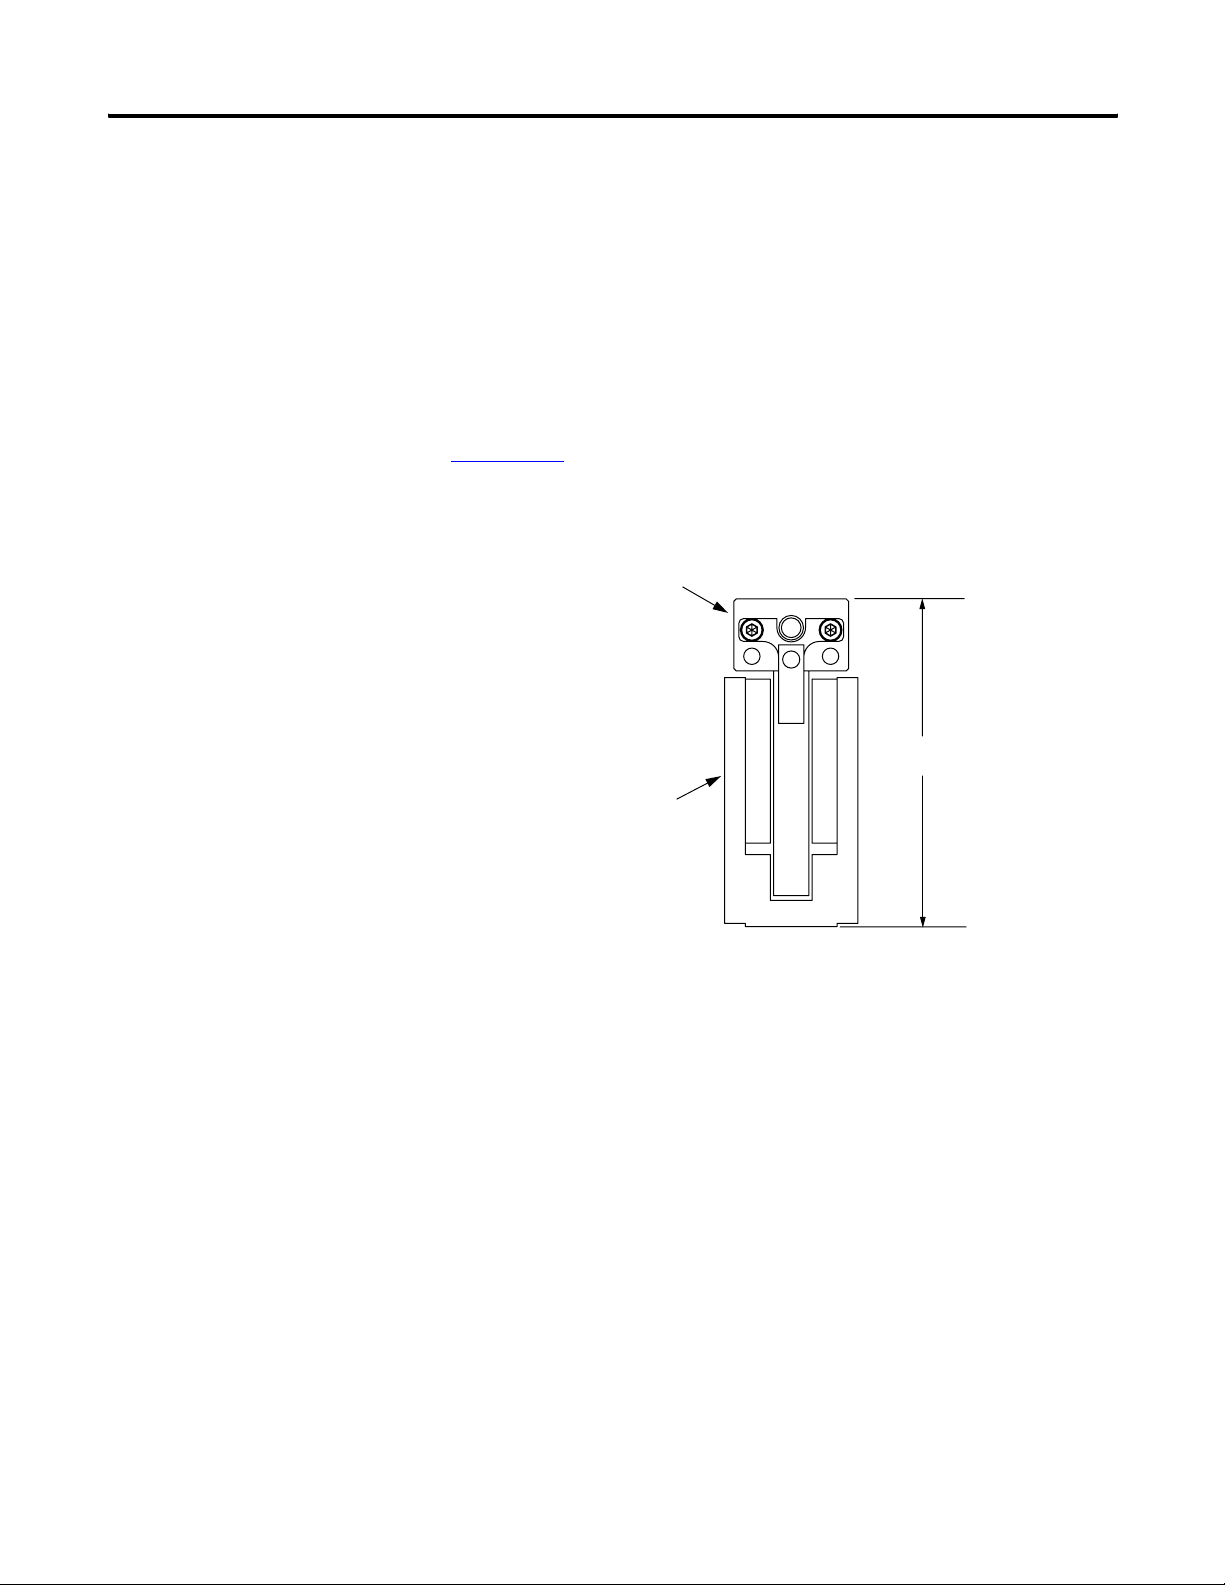
Motor Air Gap
Maintaining the air gap is critical to proper installation and operation
of the linear motor components. Use the coil, and magnet drawings in
Appendix A
maintaining installation envelope dimension in your design the
vertical air gap requirement will be met. The following diagram show s
the critical dimensions.
to calculate the installation envelope dimension. By
Coil
Overall dimension
Magnet Channel
Bumpers, Shock Absorbers, or End Stops
Always include in your design a mechanical stop at the ends of travel.
Designed them such that they can prevent the moving mass from
leaving its travel limits. Take into consideration the maximum speed
and inertia of your moving mass when designing your mechanical
18 Publication LDL-UM001A-EN-P - March 2009
Page 19
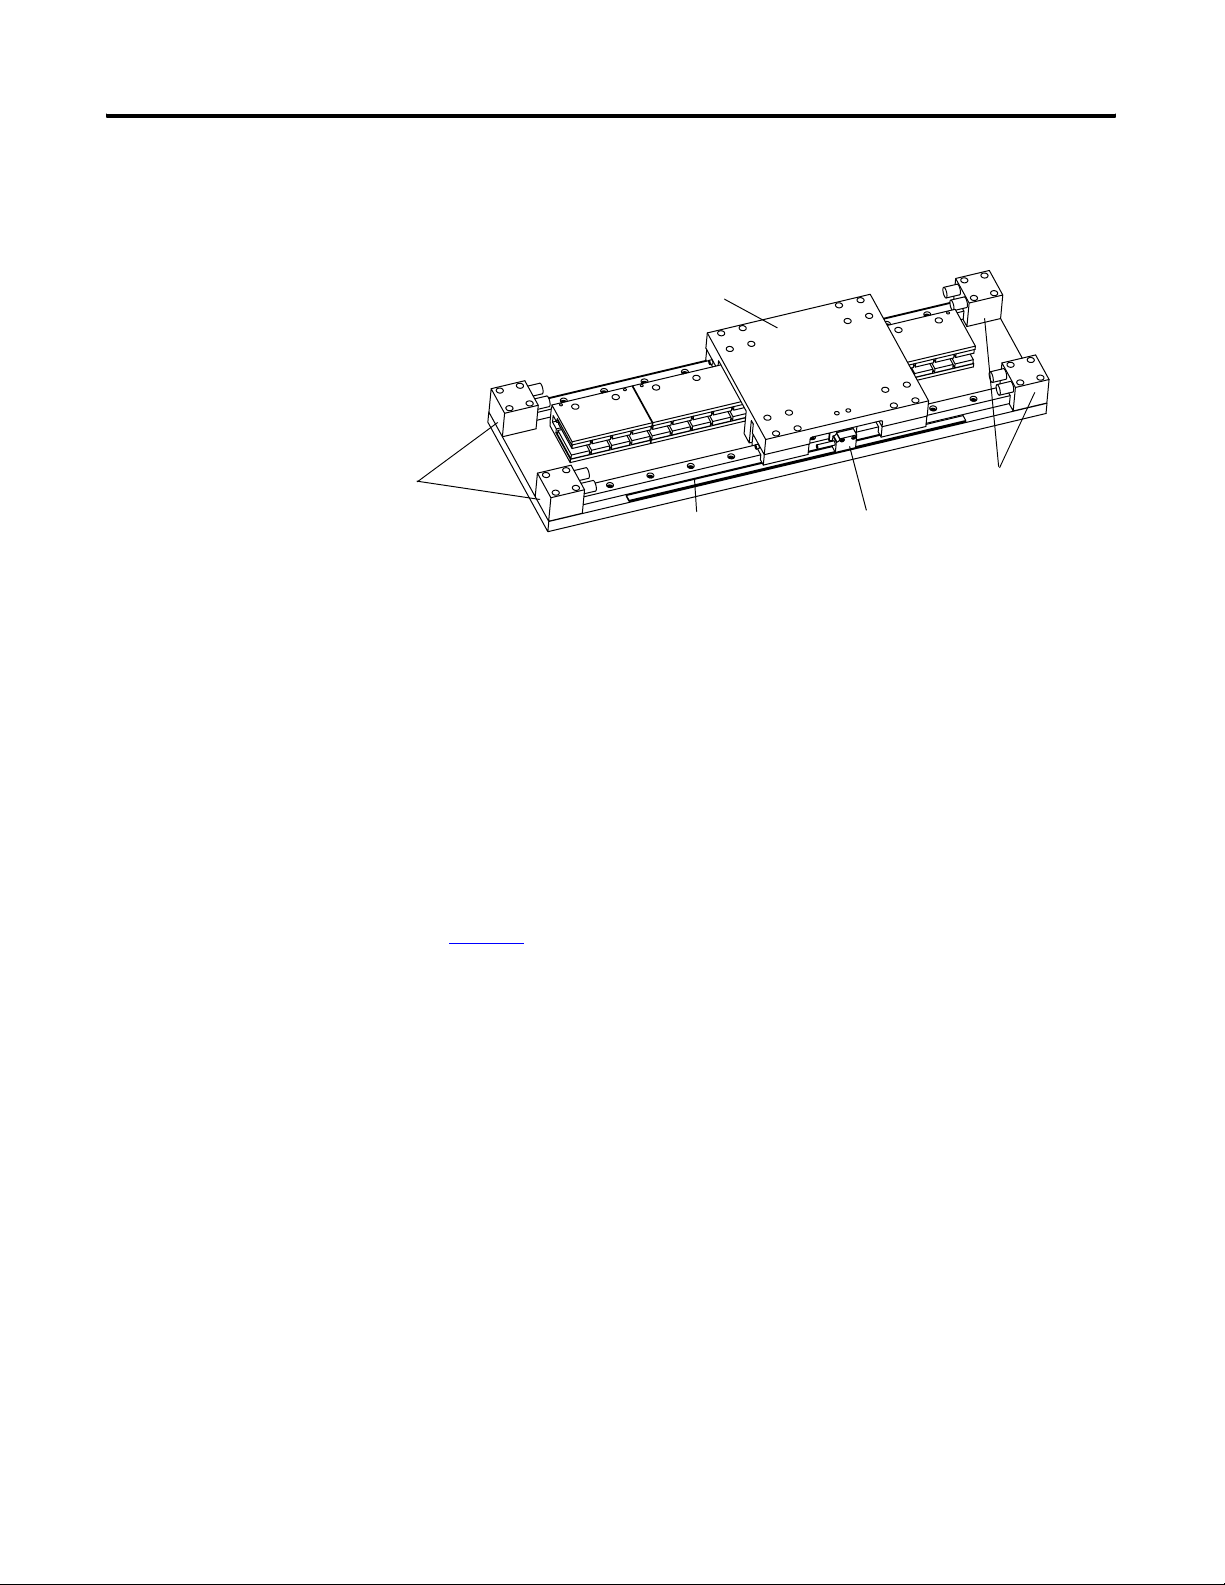
Start Chapter 2
stops. The following diagram shows a minimal system with
mechanical stops.
Carriage/Heat Sink
Mechanical Stops
Mechanical Stops
Encoder strip
Encoder readhead
Linear Encoder
Your linear motor components needs to be integrated with a linear
encoder purchased from a third party.
Carriage/Heat Sink
The linear motor coil requires a heat sink to maintain performance.
The heat sink requires a minimal mass and surface area as shown on
page 62
designed into the base in moving magnet system.
. It can as so serve as the carriage in moving coil system or be
Maintenance
Motor Storage
Publication LDL-UM001A-EN-P - March 2009 19
Linear motors require no maintenance when operated in a relatively
clean environments. For operation in harsh and dirty environments,
minimal cleaning is recommended every 6 months.
Clean the metallic debris and other contaminants from the air gap. Use
a strip of masking tape to effectively remove the metal debris. Apply a
strip of tape in the magnet channel and then remove it.
Motor storage area should be clean, dry, vibration free, and have a
relatively constant temperature. If a motor is stored on equipment, it
should be protected from the weather. All motor surfaces subject to
corrosion should be protected by applying a corrosion resistant
coating.
Page 20

Chapter 2 Start
Notes:
20 Publication LDL-UM001A-EN-P - March 2009
Page 21

Chapter
Installing the LDL-Series Linear Motor
3
Introduction
Unpacking and Inspection
The following section shows you how to safely unpack and install
your linear motor components.
Topic Page
Unpacking and Inspection 21
Installing the Linear Motor Components 22
Mount the Magnet Channel 22
Mount the Motor Coil 25
Inspect motor assemblies for damage that may have occurred in
shipment. Any damage or suspected damage should be immediately
documented. Claims for damage due to shipment are usually made
against the transportation company. Contact Rockwell Automation
immediately for further advise.
ATTENTION
Linear motors contain powerful permanent magnets which
require extreme caution during handling. When handing
multiple magnet channels do not allow the channels to come in
contact with each other. Do not disassemble the magnet
channels. The forces between channels are very powerful and
can cause bodily injury. Persons with pacemakers or Automatic
Implantable Cardioverter Defibrillator (AICD) should maintain a
minimum distance of 0.33 m (1 ft) from magnet assemblies.
Additionally, unless absolutely unavoidable, a minimum
distance of 1.5 m (5 ft) feet must be maintained between
magnet assemblies and other magnetic or ferrous composite
materials. Use only non-metallic instrumentation when
verifying assembly dimension prior to installation
• Compare the purchase order with the packing slip.
• Check the quantity of magnet channels received matches your
job requirements.
• Identify the options that came with your linear motor.
• Inspect the assemblies and confirm the presence of specified
options.
21Publication LDL-UM001A-EN-P - March 2009 21
Page 22
Chapter 3 Installing the LDL-Series Linear Motor
Installing the Linear Motor Components
Use the following procedures to install the magnet channel and the
motor coil.
Required Tools:
• Aluminum straight edge
• Non-magnetic M4 or M5 hex wrench
• Magnet channel alignment tool
IMPORTANT
TIP
The alignment tool is shipped attached to the cables next to the
Hall effect module. Remove before operating the linear motor.
Non-magnetic tools and hardware made of beryllium copper,
300 series stainless steel, and others should be used. If not
available, proceed carefully since magnetic and ferrous items
will be attracted to the magnet channel.
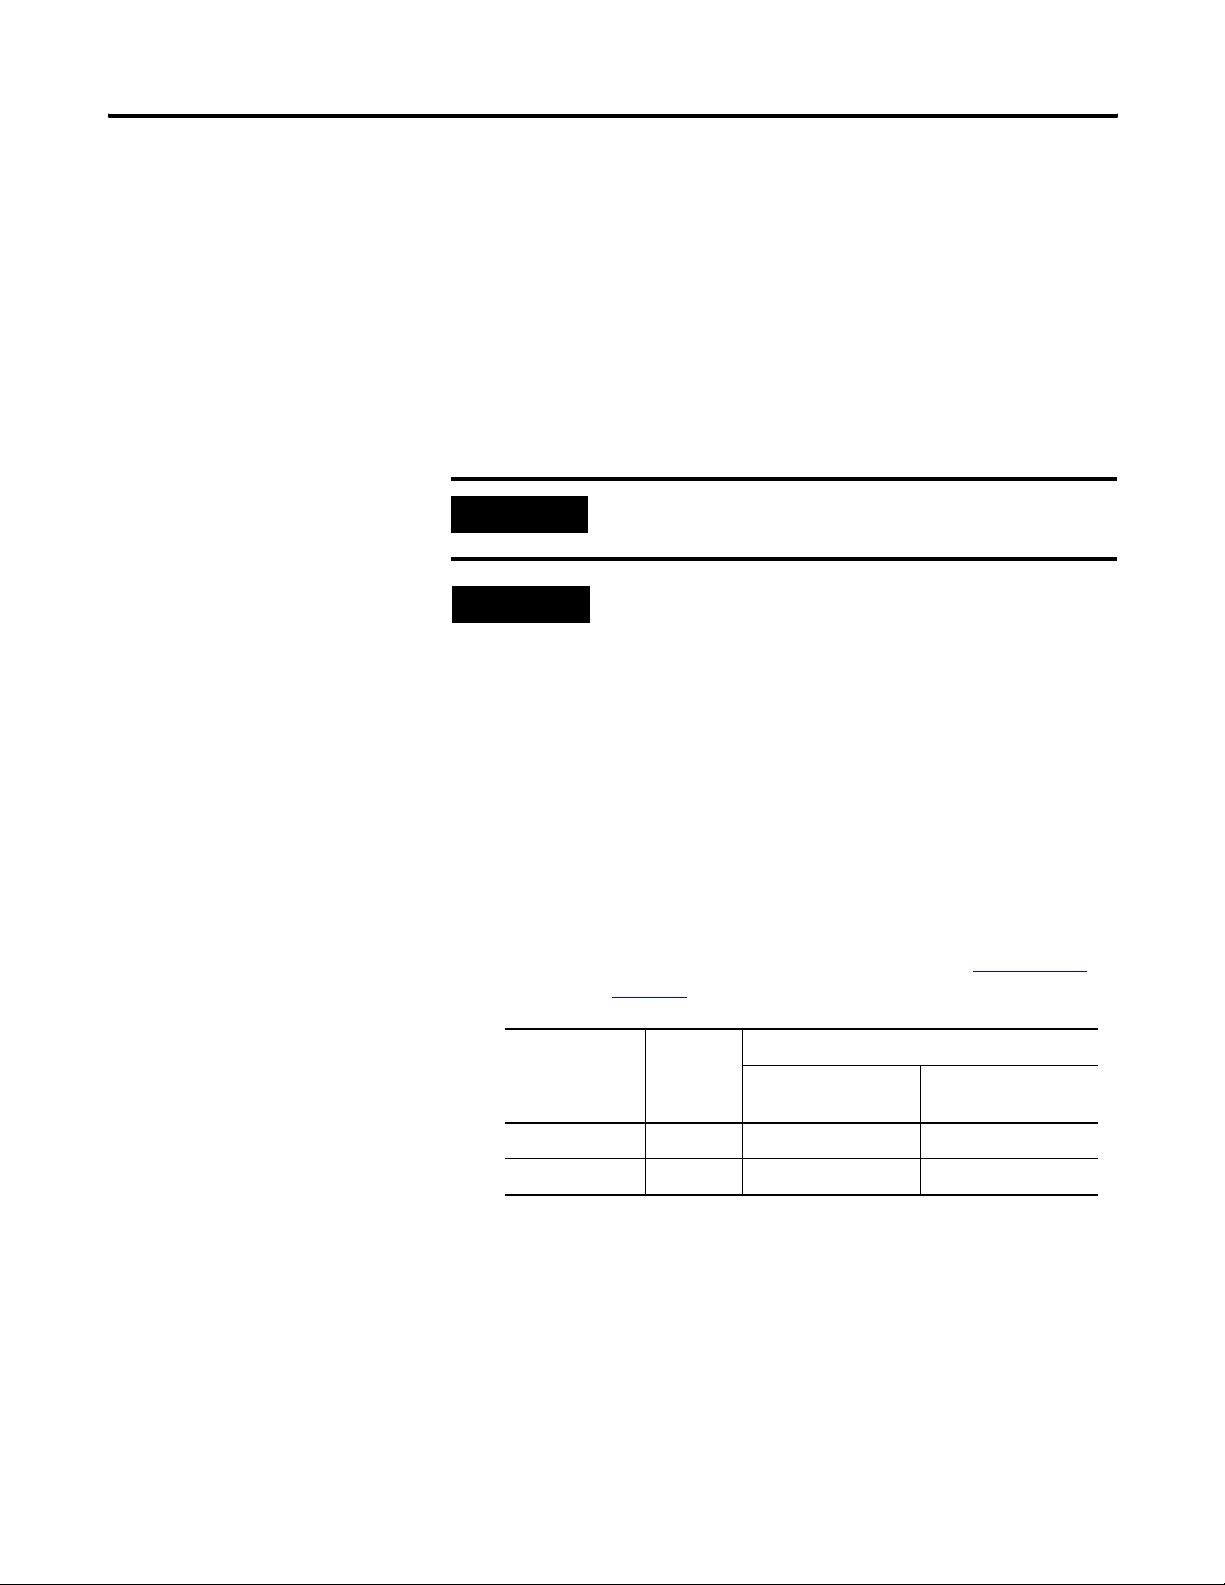
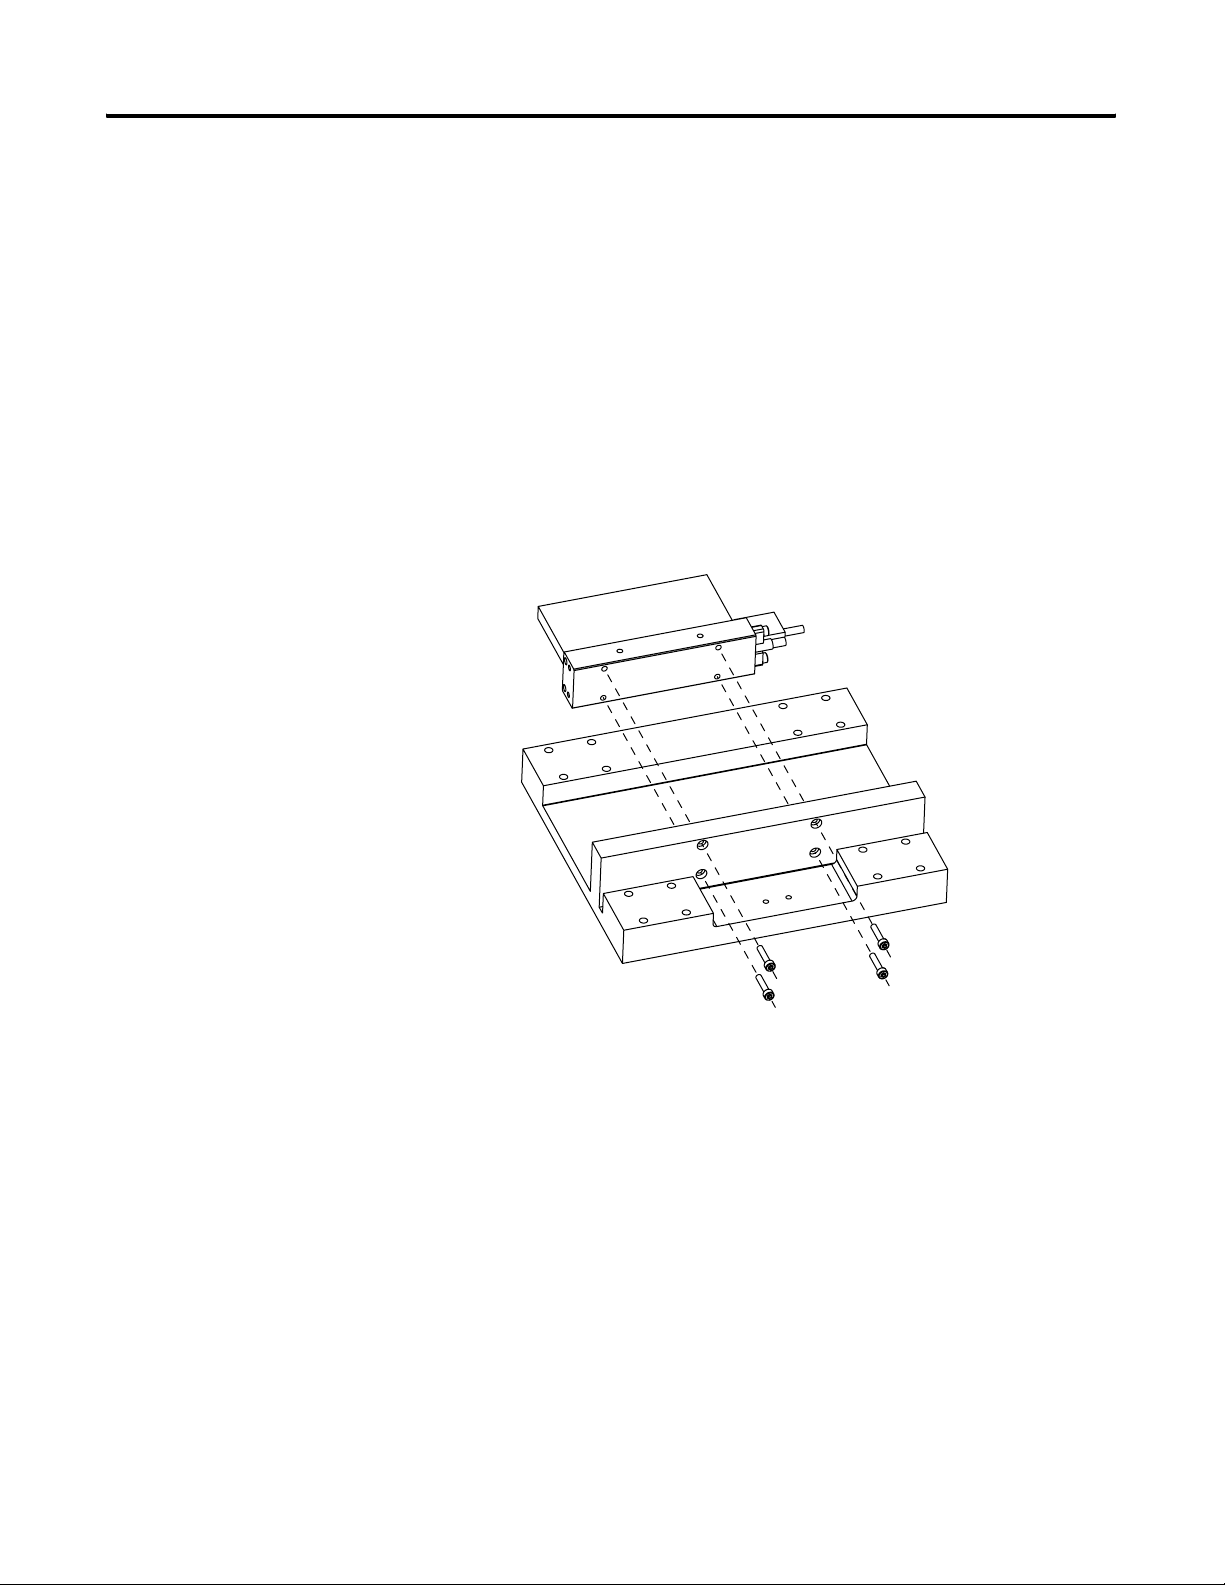
Mount the Magnet Channel
1. Select screw size and quantity.
The size of the Socket Head Cap Screw (SHCS) depends on
mounting configuration. The diagram shows three ways you can
mount your linear motor components. Mounting configuration B
de-rates the motor continuous force by 10%. See Appendix A
starting on page 66
Mounting
Configuration
A M6 16.0 (11.8) 10.8 (8.0)
B and C M5 9.5 (7.0) 6.36 (4.7)
for SHCS quantity.
Require
SHCS
SHCS Torque
Black Oxide Steel
N•m (lb•ft)
Stainless Steel
N•m (lb•ft)
22 Publication LDL-UM001A-EN-P - March 2009
Page 23
Installing the LDL-Series Linear Motor Chapter 3
2. Verify installation envelope dimensions.
See table on page 23.
Mounting Configuration A Mounting Configuration B Mounting Configuration C
J
Coil Cat. No. Dimension H
mm (in.)
LDL-x 030xxx-xxxxx 80.0 (3.15)
LDL-x 050xxx-xxxxx 100.0 (3.94)
LDL-x 075xxx-xxxxx 130.0 (5.12)
W1
0.83 ±0.30 mm (0.003 ±0.011 in.)
Magnet Channel
Cat. No.
LDL-NM030xxx
LDL-NM050xxx
LDL-TM030xxx
LDL-TM050xxx
LDL-NM075xxx 38.05 (1.50)
LDL-TM075xxx 39.35 (1.55)
0.10 mm (0.003 in.)
Dimension W
mm (in.)
36.4 (1.43)
37.7 (1.48)
3. Install the first magnet channel.
Tighten but do not torque screws.
Publication LDL-UM001A-EN-P - March 2009 23
Page 24

Chapter 3 Installing the LDL-Series Linear Motor
4
4. Install additional magnet channels.
Place a magnet channel on the mounting surface at a distance
from the previously installed magnet channel and slide it into
position.
2
3
5. Align the magnet channels with an aluminum straight edge and
the alignment tool and tighten the screws.
a. Place the alignment tool in the alignment hole at the butting
end of the first two magnet channels.
b. Align the edges of the magnet channel with the aluminum
straight edge and tighten the screws.
c. Repeat alignment between the fixed magnet channel and the
next magnet channels needing alignment until all the magnet
channels are tightened.
Alignment tool
Aluminum straight edge
6. Torque all the screws to values listed in the table on page 22
.
7. Remove the alignment tool.
24 Publication LDL-UM001A-EN-P - March 2009
Page 25
Installing the LDL-Series Linear Motor Chapter 3
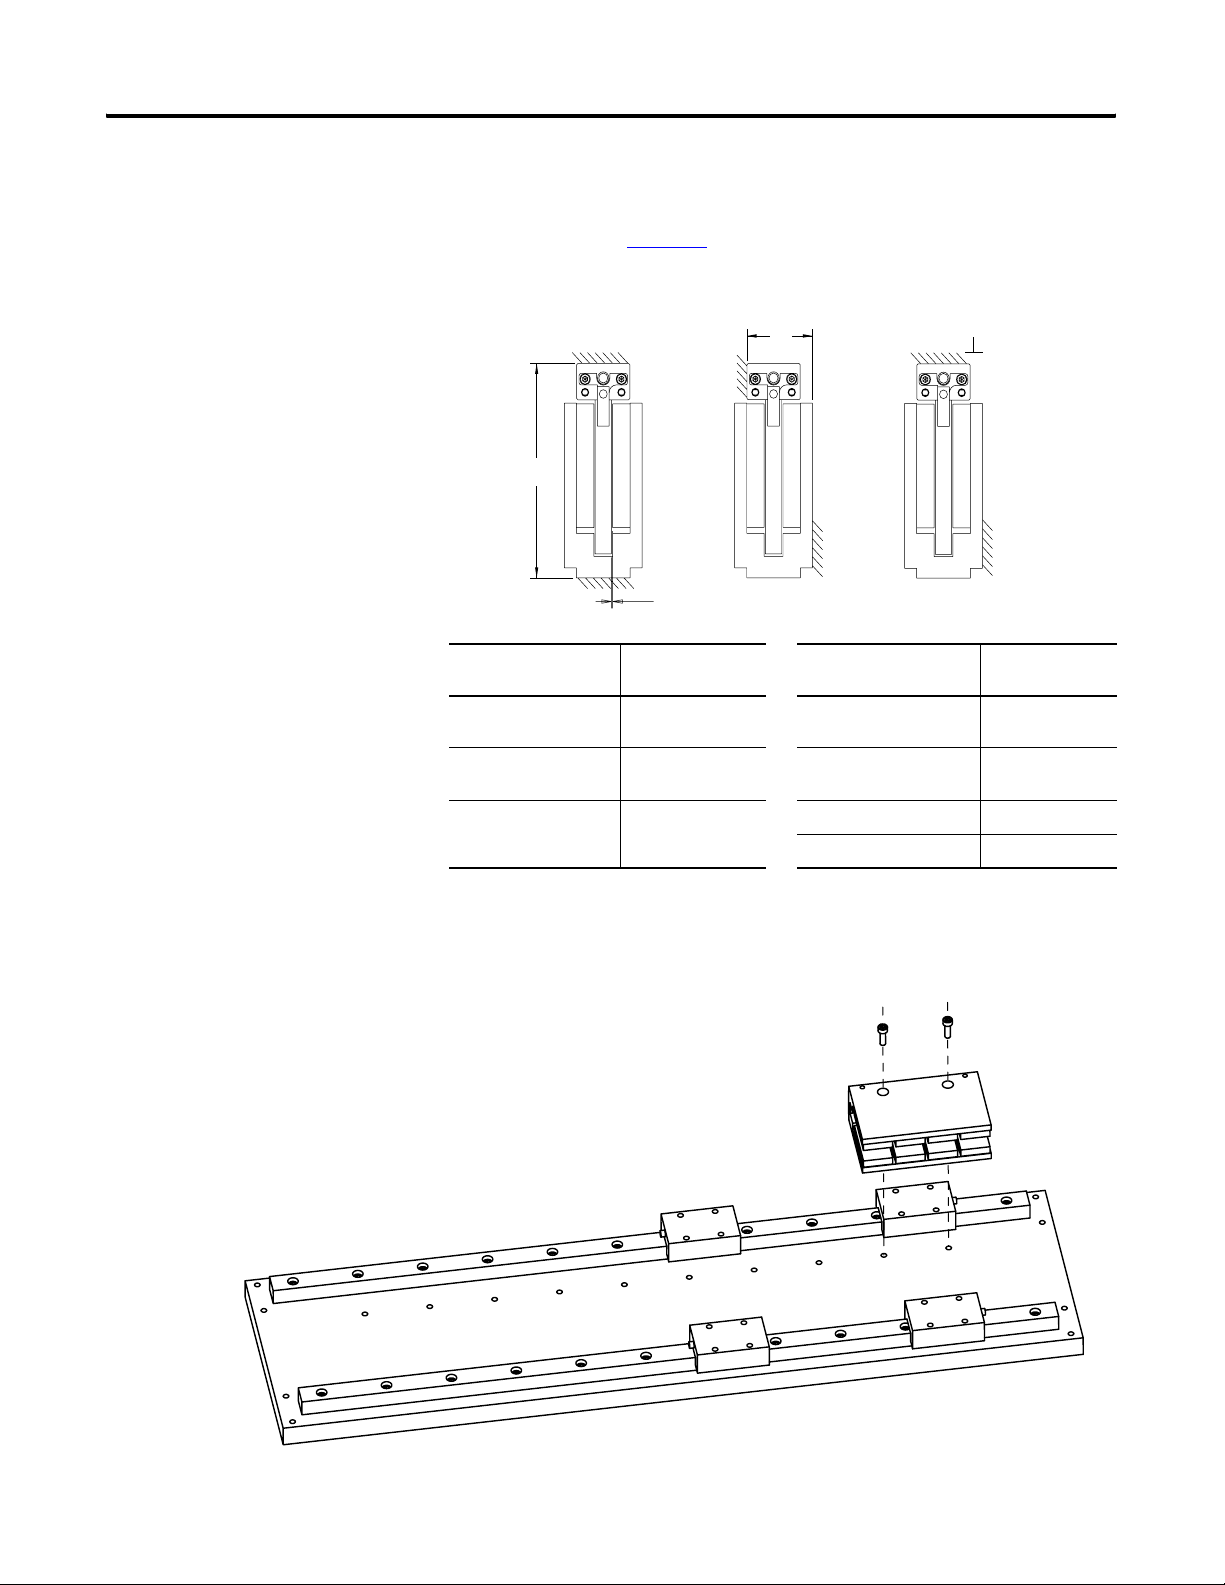
Mount the Motor Coil
Use M4 x 0.7 screws with a length that extends through the carriage
mounting surface by minimum of 5 mm (0.197 in.), but not more than
7 mm (0.276 in.).
Follow these steps to mount the motor coil.
1. Clean and remove burrs from the coil mounting surface.
2. Attach the motor coil to the carriage using M4 x 0.7 screw
Lightly tighten the screws.
.
3. Slide the assembly on to the bearings.
Publication LDL-UM001A-EN-P - March 2009 25
Page 26

Chapter 3 Installing the LDL-Series Linear Motor
Shim
4. Verify the gap between the motor and the magnet channel is
0.83
±0.30 mm (0.033 ±0.011 in.).
Use plastic shim stock and adjust as necessary.
5. Torque the M4 SCHS to 4.6 N•m (3.4 lb•ft) for black oxide steel
screw or 3.10 N•m (2.3 lb•ft) for stainless steel screws.
6. Install the bearing fasterners.
7. Secure the assembly using all the mounting holes.
26 Publication LDL-UM001A-EN-P - March 2009
Page 27

Chapter
A
CB
D
E
H
L
F
G
4
LDL-Series Linear Motor Connector Data
Introduction
Linear Motor Coil Connectors
This chapter provides power, thermistor, and Hall effect cable
connector information for the linear motor coil and Hall effect
module.
Topic Page
Linear Motor Coil Connectors 27
Hall Effect Module Connectors 28
There are two connectors on the linear motor coil, catalog number
LDL-xxxxxxxx-xxT11, the power and the Positive Temperature
Coefficient (PTC) thermistor.
Power Connector
The following tables identify the power signals for DIN style circular
connector.
Pin Color Signal
A Red U (A) Phase
B White V (B) Phase
C Black W (C) Phase
D Green/Yellow Ground
Case Shield Cable Shield
and GND
ATTENTION
Properly ground the coil as described in this manual and the
Intercontec P/N BKUA090NN00420220000
Mating Connector Kit Allen-Bradley 2090-KPBM4-12AA
drive manual.
27Publication LDL-UM001A-EN-P - March 2009 27
Page 28

Chapter 4 LDL-Series Linear Motor Connector Data
1
4
3
1
2
3
4
5
6
7
8
9
10
11
12
13
14
15
16
17
PTC Thermistor Connector
Pin Description Signal
Hall Effect Module Connectors
Pin Description Signal
1 A Quad B TTL (1 V p-p), + A Differential AM+ (SIN+)
2 A Quad B TTL (1 V p-p), - A Differential AM- (SIN-)
3 A Quad B TTL (1 V p-p), + B Differential BM+ (COS+)
4 A Quad B TTL (1 V p-p), - B Differential BM- (COS+)
5 TTL + Index Mark Differential IM+
1 Positive Temperature Coefficient (PTC)
TS+
thermistor +
3 Positive Temperature Coefficient (PTC)
thermistor -
4– Reserved
TS-
Mates with PTC thermistor
connector on Hall effect module.
The following tables show the pinouts the Hall effect module.
Feedback Connector
6 TTL - Index Mark Differential IM7 Reserved –
8
9 Encoder and Hall Sensor Power +5V DC
10 Common Common
11 Reserved –
12 Common Common
13
PTC Thermistor PTC Temp+
Intercontec P/N AKUA015NN00400220000
Mating Connector Kit Allen-Bradley 2090-KFBM4-CAAA
14 PTC Thermistor PTC Temp15 TTL - Trapezoidal Hall Commutation S1
16 TTL - Trapezoidal Hall Commutation S2
17 TTL - Trapezoidal Hall Commutation S3
Case Shield –
28 Publication LDL-UM001A-EN-P - March 2009
Page 29

PTC Thermistor Connector
4
31
4
1
3
6
9
7
LDL-Series Linear Motor Connector Data Chapter 4
Pin Description Signal
1 Positive Temperature Coefficient (PTC)
TS+
thermistor +
4 Reserved –
3 Positive Temperature Coefficient (PTC)
TS-
thermistor -
Encoder Connector
Pin Description Signal
1 A Quad B TTL, + A Differential AM+
2 A Quad B TTL, + B Differential BM+
3 TTL + Index Mark Differential IM+
4 A Quad B TTL, - A Differential AM5 A Quad B TTL, - B Differential BM6 TTL - Index Mark Differential IM7 5V DC Return Common
8 Encoder and Hall Sensor
Power
+5V DC
Mates with PTC thermistor
connector on linear motor coil.
Mating connector available a
part of encoder connector kit
catalog number LDC-ENC-CNCT.
Publication LDL-UM001A-EN-P - March 2009 29
9 Shield Drain –
Page 30

Chapter 4 LDL-Series Linear Motor Connector Data
Notes:
30 Publication LDL-UM001A-EN-P - March 2009
Page 31

Chapter
Wiring the LDL-Series Linear Motor
5
Introduction
Connect the Linear Motor Coil
This section shows you how to wire your LDL-Series linear motor.
Topic Page
Connect the Linear Motor Coil 31
Signal and Wire Definitions for Flying Lead Components 33
Making Your Own Extension Cables 34
Mounting and Wiring Two Identical Coils in Tandem 35
Use the following procedure to connect your linear motor, catalog
number LDL-xxxxxxx-xHT11.
1. Using the Encoder Connector Kit, catalog number
LDC-ENC-CNCT, and the connector data on page 29
encoder to the connector.
ATTENTION
Be sure that cables are installed and restrained to prevent
uneven tension or flexing at the cable connectors. Use Bulk
Head Connector Kit, catalog number LDC-BULK-HD, for
mounting these connectors.
, wire your
Excessive and uneven lateral force at the cable connectors may
result in the connector’s environmental seal opening and
closing as the cable flexes.
Failure to observe these safety precautions could result in
damage to the motor and its components.
2. Connect your encoder to the encoder connector on the Hall
effect module.
3. Attach the feedback and the power cables.
ATTENTION
d. Align flats on each connector.
31Publication LDL-UM001A-EN-P - March 2009 31
Do not connect or disconnect the motor feedback cable or the
power cable while power. It may result in unexpected motion or
cause damage to the components.
Page 32

Chapter 5 Wiring the LDL-Series Linear Motor
e. Do not apply excessive force when mating the cab le and
motor connectors. If the connectors do not go together with
light hand force, realign and try again.
Feedback
Power
Connector
Power Extension Cable
2090-CPWM4DF-xxAFxx or 2090-XXNPMF-xxSxx
Feedback Extension Cable
2090-CFBM4DF-CDAFxx or 2090-XXNFMF-Sxx
ATTENTION
Be sure that cables are installed and restrained to prevent
Connector
uneven tension or flexing at the cable connectors. Excessive
and uneven lateral force at the cable connectors may result in
the connector’s environmental seal opening and closing as the
cable flexes. Failure to observe these safety precautions could
result in damage to the motor or encoder.
Encoder
Connector
Connect your encoder using
Encoder Connector Kit, catalog
number LDC-ENC-CNCT.
To User Supplied Encoder
To Drive
f. Hand tighten the knurled collar with five to six turns to fully
seat the connector.
ATTENTION
Keyed connectors must be properly aligned and hand-tightened
the recommended number of turns.
Improper alignment is indicated by the need for excessive force,
such as the use of tools, to fully seat connectors.
Connectors must be fully tightened for connector seals to be
effective.
Failure to observe these safety precautions could result in
damage to the motor, cables, and connector components.
32 Publication LDL-UM001A-EN-P - March 2009
Page 33

Wiring the LDL-Series Linear Motor Chapter 5
Signal and Wire Definitions
For linear motors, catalog numbers LDL-xxxxxxx-xHT20, wire using
wiring diagram on page 70
for Flying Lead Components
here, for wire gauge information see page 65
Linear Motor Coil
The following shows the wire color and signals for the linear motor
coil power and PTC thermistor cables, catalog
number LDL-xxxxxxx-xxT20.
Power Signals
. Wire colors and signal types are shown
.
Color Signal Comments
Red Motor Phase U (A) • Observe maximum applied voltage
White Motor Phase V (B)
Black Motor Phase W (C)
Green Motor Ground • Terminate per drive manual instructions.
Shield Cable Shield
specification.
• Consult drive manual or supplier for specific
wiring instructions to the drive. Wiring is
phase/commutation sensitive.
• Shield is not connected to the motor frame.
ATTENTION
Disconnect input power supply before installing or servicing
motor.
Motor lead connections can short and cause damage or injury if
not well secured and insulated.
Insulate the connections, equal to or better than the insulation
on the supply conductors.
Properly ground the motor per selected drive manual.
PTC Thermistor Signals
Color Description Signal
Black Positive Temperature Coefficient (PTC)
thermistor +
Black Positive Temperature Coefficient (PTC)
thermistor -
TS+
TS-
Publication LDL-UM001A-EN-P - March 2009 33
Page 34

Chapter 5 Wiring the LDL-Series Linear Motor
Hall Effect Module
This table shows the signal and wire colors for Hall effect module
with flying leads, catalog number LDL-HALL-F.
Color Signal Signal Spec
Red +V 5…24V DC Hall supply, 20 mA.
Black VRTN Hall effect signal common.
Making Your Own Extension Cables
White S1
Blue S2
Orange S3
Silver braid Cable shield Terminate at drive end per drive
–
manual instructions.
Flying lead coil and Hall effect modules require circular DIN style
connectors to interface with Allen-Bradley extension cables. The
following connectors kits are available for terminating flying lead coils
and Hall effect modules.
Connector Kit Cat. No. Application
2090-KFBM4-CAAA Feedback flex extension cable
2090-KPBM4-12AA Power flex extension cable
2090-KFBE7-CAAA Feedback non-flex extension cable
2090-KPBE7-12AA Power non-flex extension cable
The cable length from the coil to drive should be limited to 10 m
(32.8 ft). If longer cables are necessary a 1321-3Rx-x series line reactor
is required. Refer to 1321 Power Conditioning Products Technical
Data, publication 1321-TD001
, to choose a line reactor for
applications requiring cable longer than 10 m (32.8 f t).
34 Publication LDL-UM001A-EN-P - March 2009
Page 35

Wiring the LDL-Series Linear Motor Chapter 5
Mounting and Wiring Two Identical Coils in Tandem
This type of installation requires custom motor database file which is
available upon request. Contact Application Engineering at
631.344.6600 to request this file.
The following tables and diagrams show the wiring and spacing for
(1)
two identical coils mechanically top mounted
to the same plate and
driven by one amplifier. There are three configurations shown here
for mounting motors in tandem: power and encoder cables exiting on
the right, the center, and on opposite ends.
ATTENTION
Coils must have identical part numbers. Using mis-matched
coils will cause a hazardous condition resulting in damage to
the equipment and a possible fire.
Cables Exit to the Right
If mounting coils in tandem, such that the power cables exit both of
the coils on right side as shown, use the following table to find
mounting distance and phase wiring.
L1
Coil #2
Phase Wiring for Right Exit Power Cables
L1
mm (in.)
80 (3.15) Red White U
120 (4.72) Red Black U
Coil # 1
(1)
Master
White Black V
Black Red W
White Red V
Black White W
Coil # 2
(2)
Slave
Coil #1 is the master
Coil #1
Hall Effect
Amplifier
Phase
(1) Contact Application Engineering (631.344.6600) for side mounting of the coils.
Publication LDL-UM001A-EN-P - March 2009 35
Page 36

Chapter 5 Wiring the LDL-Series Linear Motor
Phase Wiring for Right Exit Power Cables
L1
mm (in.)
Coil # 1
Master
(1)
Slave
(2)
Coil # 2
Amplifier
Phase
160 (6.30) Red Red U
White White V
Black Black W
(1) Master has Hall effect module.
(2) Slave has no Hall effect module.
Cables Exit in the Center
If mounting coils in tandem, such that the power cables exit in the
center, as shown, use the following table to find mounting distance
and phase wiring.
Coil #1 is the master
Coil #1
L1
Coil #2
Hall Effect
Phase Wiring for Center Exit Power Cables
L1
mm (in.)
90 (3.54)
or
150 (5.91)
Coil # 1
Master
(1)
Coil # 2
Slave
(2)
Red White U
White Red V
Black Black W
(1) Master has Hall effect module.
(2) Slave has no Hall effect module.
Amplifier
Phase
36 Publication LDL-UM001A-EN-P - March 2009
Page 37

Wiring the LDL-Series Linear Motor Chapter 5
Cables Exit on Opposite Ends
If mounting coils in tandem, such that the power cables exit opposite
to each other, as shown, use the following table to find mounting
distance and phase wiring.
Coil #1 is the master
Coil #2
Phase Wiring for Opposite End Exit Power Cables
L1
mm (in.)
90 (3.54)
or
150 (5.91)
Coil # 1
Master
(1)
Coil # 2
Slave
(2)
Red Red U
White Black V
Black White W
(1) Master has Hall effect module.
(2) Slave has no Hall effect module.
Coil #1
Hall Effect
Amplifier
Phase
Publication LDL-UM001A-EN-P - March 2009 37
Page 38

Chapter 5 Wiring the LDL-Series Linear Motor
Notes:
38 Publication LDL-UM001A-EN-P - March 2009
Page 39

Chapter
6
Configure and Start Up the LDL-Series Linear Motor
Introduction
Before You Begin
This section covers the setup and connection verification of a linear
motor with either Kinetix 6000, Kinetix 2000, or an Ultra3000 drive.
Topic Pages
Before You Begin 39
What You Need 40
Required Files 40
Follow These Steps 41
Update Linear Motor Database 41
Set Up the Connection to Kinetix 6000 or Kinetix 2000 Drive 42
Set Up the Connection to an Ultra3000 Drive 47
Verify Motor Encoder Direction 49
Verify Motor Encoder Resolution 50
Verify Linear Motor Wiring and Function 50
This chapter assumes you have wired your linear motor and
Allen-Bradley drive as shown on wiring diagrams in Appendix
starting on page 67
.
B
IMPORTANT
It is important that the motor be wired correctly to get positive
motion when commutated.
Please read and understand Motor Direction Defined
.
Motor Direction Defined
Positive motion is dependent on encoder o rient ation, encoder wiring,
and coil or magnet channel motion.
Most linear encoders are installed with the encoder cable facing the
same direction as the coil cable.
39Publication LDL-UM001A-EN-P - March 2009 39
Page 40

Chapter 6 Configure and Start Up the LDL-Series Linear Motor
Wire the linear encoder such that the position feedback is positive
(phase A+ leads phase B+) when the motor is moving in the positive
direction.
When the motor power and Hall sensor wiring is connected as sh own
in wiring diagrams in Appendix
defined as the motor coil moving toward its power cable. This
diagram shows positive motion for both a moving coil and a moving
magnet channel.
Motor Direction
B, the positive direction of motion is
Coil Motion
What You Need
Required Files
Stationary Magnet
Stationary Coil
Magnet Motion
You need a computer with RSLogix 5000 software installed and
internet access.
Firmware revisions and software versions required to support the
linear motors include the following:
• RSLogix 5000 software, version 16.00 or later
• Kinetix 2000 or Kinetix 6000 multi-axis drives
– Firmware revision 1.96 or later
– For RSLogix 5000 software, version 16.xx
use Motion Database file, version 4_17_0 or later
40 Publication LDL-UM001A-EN-P - March 2009
Page 41

Configure and Start Up the LDL-Series Linear Motor Chapter 6
– For RSLogix 5000 software, version 17.xx or later
use Motion Database file, version 5_8_0 or later
• Ultra3000 drives
– Firmware revision 1.52 or later
– Motor Database, motor_03_18_09.mdb or later
• Motion Analyzer software, version 4.7 or later
Follow These Steps
Download these files from http://support.rockwellautomation.com
.
Contact Rockwell Automation Technical Support at 440.646.5800 for
assistance.
The following flow chart illustrates the required steps.
Update Linear Motor Database
Kinetix 6000 Drive or
Kinetix 2000 Drive
Set-up Connection to
Kinetix 6000 or
Kinetix 2000 Drive
Drive Model?
Verify Motor
Encoder Direction
Ultra3000 Drive
Set up the
Connection to an
Ultra3000 Drive
Verify Motor
Encoder Resolution
Verify Linear
Motor Wiring
and Function
Update Linear Motor
Install the current Motion Database, as required, before
commissioning your linear motor. See the Required Files
on page 40.
Database
Publication LDL-UM001A-EN-P - March 2009 41
Page 42

Chapter 6 Configure and Start Up the LDL-Series Linear Motor
Set Up the Connection to Kinetix 6000 or Kinetix 2000 Drive
This procedure configures the Kinetix 6000 or Kinetix 2000 drive for
your linear motor and encoder combination.
For help using RSLogix 5000 software as it applies to setting up your
linear motor, refer to Additional Resources
on page 7. This procedure
assumes you are familiar with RSLogix 5000 software.
1. Click the Driver/Motor tab.
2. Click Change Catalog and select the appropriate Motor
Catalogue Number from the following list.
Cat. No.
LDL-N030120-DHTxx
LDL-N030240-DHTxx
LDL-N030240-EHTxx
LDL-T030120-DHTxx
LDL-T030240-DHTxx
LDL-T030240-EHTxx
LDL-N050120-DHTxx
LDL-N050240-DHTxx
LDL-N050240-EHTxx
LDL-N050360-DHTxx
LDL-N050360-EHTxx
LDL-N050480-DHTxx
LDL-N050480-EHTxx
LDL-T050120-DHTxx
LDL-T050240-DHTxx
LDL-T050240-EHTxx
LDL-T050360-DHTxx
LDL-T050360-EHTxx
LDL-T050480-DHTxx
LDL-T050480-EHTxx
LDL-N075480-DHTxx
LDL-N075480-EHTxx
LDL-T075480-DHTxx
LDL-T075480-EHTxx
42 Publication LDL-UM001A-EN-P - March 2009
Page 43

Configure and Start Up the LDL-Series Linear Motor Chapter 6
3. Using the screen image as a reference, configure the parameters
as shown in the Setting column.
Parameter Setting Comment
Loop Configuration Position Servo –
Drive Resolution 200 5 µm encoder
500 2 µm encoder
1000 1 µm encoder
2000 0.5 µm encoder
51200
25600 40 µm pitch Sin/Cos encoder
Drive Counts per Motor Millimeter –
Real Time Axis Information
Attribute 1 Position Feedback –
(1) Requires custom database file contact Application Engineering at 631.444.6600.
20 µm pitch Sin/Cos encoder
(1)
4. Click OK.
5. Click the Motor Feedback tab.
Publication LDL-UM001A-EN-P - March 2009 43
Page 44

Chapter 6 Configure and Start Up the LDL-Series Linear Motor
6. Using the screen image as a reference, configure the parameters
as shown in the Setting column.
Parameter Setting Comment
Feedback Type TTL or Sin/Cos For RSLogix 5000 software,V16
Cycles 50 5 µm encoder
per Millimeters –
Interpolation Factor 4 TTL
TTL with Hall or Sin/Cos with Hall For RSLogix 5000 software, V17
125 2 µm encoder
250 1 µm encoder
500 0.5 µm encoder
50
25 40 µm Sin/Cos encoder
1024 Sin/Cos
20 µm Sin/Cos encoder
(1)
(1) Requires custom database file contact Application Engineering at 631.444.6600.
RSLogix 5000 Software Version 15.00 and 16.00 TTL Encoder
RSLogix 5000 Software Version 15.00 and 16.00 Sin/Cos Encoder
44 Publication LDL-UM001A-EN-P - March 2009
Page 45

Configure and Start Up the LDL-Series Linear Motor Chapter 6
RSLogix 5000 Software Version 17.00 TTL Encoder
RSLogix 5000 Software Version 17.00 Sin/Cos Encoder
7. Click OK to set the values.
8. Click the Units tab.
9. Using the screen image as a reference, configure the parameters
as shown in the Setting column.
Parameter Setting
Position Units mm
Average Velocity Timebase 0.25 s
You can change position units to inches, or other units, on this
tab.
Example for a 5 µm resolution encoder:
200 drive cnts/mm x 25.4 mm/in.
Conversion Constant = 5080 drive cnts/in.
Publication LDL-UM001A-EN-P - March 2009 45
Page 46

Chapter 6 Configure and Start Up the LDL-Series Linear Motor
10. Click OK to set the values.
11. Click the Conversion tab.
12. Using the screen image as a reference, configure the parameters
as shown in the Setting column.
Parameter Setting Comment
Positioning Mode Linear –
Conversion Constant 200 5 µm encoder
500 2 µm encoder
1000 1 µm encoder
2000 0.5 µm encoder
51200
25600 40 µm pitch Sin/Cos encoder
(1) Requires custom database file contact Application Engineering at 631.444.6600.
20 µm pitch Sin/Cos encoder
13. Click OK.
(1)
46 Publication LDL-UM001A-EN-P - March 2009
Page 47

Configure and Start Up the LDL-Series Linear Motor Chapter 6
Set Up the Connection to an
This procedure configures the Ultra3000 drive for your linear motor
and encoder combination.
Ultra3000 Drive
For help using Ultraware software as it applies to setting up your
linear motor, refer to Additional Resource s
assumes you are familiar with Ultraware software.
on page 7. This procedure
1. Open your Motor Configurator Utility.
2. Select the linear motor catalog number.
3. From the Edit menu choose Duplicate.
4. Rename Model.
5. Click Encoder Type and select either Incremental or Sin/Cos .
6. Click Lines Per Meter and the enter value.
The following tables list typical values for lines per meter.
Incremental Sin/Cos
Resolution Value Encoder Scale Pitch Value
10 µm 25,000 100 µm 10,000
5 µm 50,000 40 µm 25,000
2 µm 125,000 20 µm 50,000
1 µm 250,000
0.5 µm 500,000
Incremental Encoder
Sin/Cos Encoder
7. Click Close.
Publication LDL-UM001A-EN-P - March 2009 47
Page 48

Chapter 6 Configure and Start Up the LDL-Series Linear Motor
8. Open your Ultraware software.
9. Configure for your Ultra3000 drive.
10. From Workspace select Motor.
11. Click Motor Model and choose the model yo u created from the
pull-down menu.
If using an incremental encoder, you are finished. For Sin/Cos
encoders continue with steps12 and 13.
12. From Workspace select Encoders.
13. Click Motor Encoder Interpolation and select a value from the
pull-down menu.
This tables shows the encoder resolutions that could be
achieved when using a 20 µ Sin/Cos encoder and different
interpolation values.
Value Encoder Resolution
X4 5 µm
X8 2.5 µm
X16 1.25 µm
X32 0.625 µm
X64 0.3125 µm
X128 0.15625 µm
X256 0.078125 µm
X512 0.0390 µm
X1024 0.01953125 µm
48 Publication LDL-UM001A-EN-P - March 2009
Page 49

Configure and Start Up the LDL-Series Linear Motor Chapter 6
Verify Motor Encoder Direction
In this section you select controller tag, and use the
motor_ActualPostion tag to evaluate the encoder installation.
1. Disable the drive.
2. Note the ActualPostion tag value.
3. Move the axis in the positive direction.
See page 39
for definition for positive direction.
4. Verify that the ActualPostion tag value increases as the axis
moves.
If the positive direction of travel does not match what has been
defined by the motor power and Hall Sensing wiring, then
change the direction by re-wiring the encoder using the
following table.
Move To
Encoder Phase Drive CN2, pin Encoder Phase Drive CN2, pin
A+ 1 B+ 3
A- 2 B- 4
B+ 3 A+ 1
B- 4 A- 2
Publication LDL-UM001A-EN-P - March 2009 49
Page 50

Chapter 6 Configure and Start Up the LDL-Series Linear Motor
Verify Motor Encoder Resolution
This test compares the physically measured distance to the distance
calculated by the software. It also verifies the encoder setting in the
RSLogix 5000 software.
1. Measure and mark a fixed distance of travel on the axis.
2. Record the ActualPosition tag value with carriage at the starting
position.
3. Move the carriage to the end position.
4. Record the ActualPosition tag value.
5. Calculate the distance moved using the record values.
6. Compare the actual distance and the calculated distance.
If the values do not match, verify resolution of installed encoder
and the values used in the Motor Feedback, Co nversion, and
Units tabs.
Verify Linear Motor Wiring and Function
The Homing and Hookup tabs in RSlogix 5000 software check the
motor power (U, V, W), Hall sensing signals (S1, S2, S3) and the
encoder wiring are correct.
IMPORTANT
Follow this steps to verify your motor wiring and function.
1. Click the Hookup tab.
2. Configure the parameters.
The following table shows the Suggested Settings.
Parameter Suggested Setting
The following components must be wired correctly for your
drive and linear motor to operate properly:
• Hall Effect Module
• Coil Power Wires
• Thermistor
• Encoder
Test increment 60.00 mm
Drive Polarity Positive
50 Publication LDL-UM001A-EN-P - March 2009
Page 51

Configure and Start Up the LDL-Series Linear Motor Chapter 6
3. Click OK.
4. Click Test Marker… to run the Test Marker test.
See your encoder user documentation for location and
frequency of markers.
5. Position the coil so that it can move 60 mm (2.36 in.) in the
forward or reverse direction.
6. Click Test Feedback… to run the Test Feedback test.
Move the axis by hand at least 60 mm (2.36 in.) when prompted.
When using Allen-Bradley servo drives match the counting
direction of your position feedback encoder to the directi on th e
motor moves when positive current is applied.
7. Click Test Command & Feedback… to run the Test Command &
Feedback test.
Follow the on-screen instructions.
IMPORTANT
IMPORTANT
Be sure all the tests on the Hookup tab have passed
before proceeding.
When using Kinetix 6000 and Kinetix 2000 drives, the
Test Command Feedback test may pass even though the
Hall Effect module is not wired correctly.
Publication LDL-UM001A-EN-P - March 2009 51
Page 52

Chapter 6 Configure and Start Up the LDL-Series Linear Motor
8. Click the Tune tab.
WARNING
Large Position Error Tolerances, such as those calculated
by the Auto Tune function in RSLogix 5000 programming
software, or when configuring a new axis with RSLogix
5000 software, can lead to undetected and repetitive
high energy impacts against axis end stops if proper
precautions are not in place. These tolerances can also
lead to undetected and repetitive high energy impacts
against unexpected obstructions. Such impacts can lead
to equipment damage and/or serious injury.
To identify the safety concerns that you have with
default Position Error Tolerance or after an Auto-Tune
Function, go to the Rockwell Automation Knowlegebase
Click Find Technical Support Answers and search for
Answer Id 55937.
9. Configure the parameters in the Tune tab as suggested in the
Initial Setting column. Leave all other tune options off for your
first pass. If necessary, reduce the Velocity Loop Proportional
Gain to maintain stability.
.
Parameter Initial Setting Units Note
Travel Limit 100 mm Suggested
Speed 250 mm/sec –
Torque/Force 50 % Rated –
Direction Forward Bi-directional – –
Damping Factor 0.8 – (default)
52 Publication LDL-UM001A-EN-P - March 2009
Page 53

Configure and Start Up the LDL-Series Linear Motor Chapter 6
10. Click the Homing tab.
11. Choose Sequence to Switch-Marker, or Torque Level-Marker
when a repeatable power-up position is desired.
Typical linear TTL and Sin/Cos encoders will home repeatability
to within one count of resolution when their inde x mark is used.
Publication LDL-UM001A-EN-P - March 2009 53
Page 54

Chapter 6 Configure and Start Up the LDL-Series Linear Motor
Notes:
54 Publication LDL-UM001A-EN-P - March 2009
Page 55

Specifications and Dimensions
Appendix
A
Introduction
This appendix provides product specifications and mounting
dimensions for your LDL-Series ironless linear motor components.
Topic Page
Performance Specifications 56
General Specifications 61
Product Dimensions 63
55Publication LDL-UM001A-EN-P - March 2009 55
Page 56

Appendix A Specifications and Dimensions
Performance Specifications
Attribute Value
Motor type
Operating speed, max 10 m/s (32.8 ft/s)
Operating voltage, (not for direct connection to AC line) 230V AC rms
Dielectric rating of motor power connections (U,V,W), to ground for 1.0 s
Cogging torque Zero
Applied bus voltage, max
Electrical cycle length 60 mm (2.36 in.)
Coil temperature, max 130 °C (266 °F)
Insulation class 130 °C (266 °F) Class B
Thermal time constant, Ref, winding to ambient 35 min
These tables provide performance specifications for the LDL-Series
ironless linear servo motors.
Common Performance Specifications
These performance specifications apply to all LDL-Series ironless
linear servo motors.
3 phase, wye winding, synchronous permanent magnet stator,
non-ventilated linear motor
(1)
1500V AC rms, 50/60 Hz
(2)
325V DC
Paint color Black
(1) Tested during manufacturing process, Do not re-apply test voltage. Contact Application Engineering (631.344.6600) for advice on testing coils post production.
(2) Maximum cable length is 10 m (32.8 ft). Contact Application Engineering (631.344.6600) for applications requiring longer cables.
56 Publication LDL-UM001A-EN-P- March 2009
Page 57

Specifications and Dimensions Appendix A
LDL-Series Ironless Linear Motor Performance Specifications
LDL-Series Ironless Linear Motor (Standard 30 mm frame size)
Attribute Units Symbol LDL-N030120-DxTxx LDL-N030240-DxTxx LDL-N030240-ExTxx
Force, continuous
Force, peak
(5)
(1) (2) (3) (4)
N (lbf)
N (lbf)
Thermal resistance °C/W
Force constant
(6) (7) (8)
N/A
(lbf/Apk)
pk
F
c
F
p
R
th
K
f
63 (14) 126 (28)
209 (47) 417 (94)
1.73 0.86
21.0
(4.7)
21.0
(4.7)
42.0
(9.4)
Back EMF constant p-p
Current, peak
(5) (7)
Current, continuous
(6) (7) (8)
(1) (2) (3) (4)
Resistance p-p @ 20 °C (68 °F)
Inductance p-p
(6) (8)
(6) (8)
Vp/m/s
(Vp/in/s)
A
pk
A
pk (Arms
Ohms
mH L 8.43 4.22 16.86
Magnetic attraction N (lbf)
(A
rms
K
e
)I
p
)I
c
R
20
F
a
24.8
(0.6)
24.8
(0.6)
49.6
(1.3)
9.9 (7.0) 19.9 (14.0) 9.9 (7.0)
3.0 (2.1) 6.0 (4.2) 3.0 (2.1)
5.41 2.70 10.82
0 (0)
LDL-Series Ironless Linear Motor (Thick 30 mm frame size)
Attribute Units Symbol LDL-T030120-DxTxx LDL-T030240-DxTxx LDL-T030240-ExTxx
Force, continuous
Force, peak
(5)
(1) (2) (3) (4)
N (lbf)
N (lbf)
Thermal resistance °C/W
Force constant
Back EMF constant p-p
Current, peak
Current, continuous
(6) (7) (8)
(5) (7)
(6) (7) (8)
(1) (2) (3) (4)
Resistance p-p @ 20 °C (68 °F)
Inductance p-p
(6) (8)
(6) (8)
N/A
(lbf/Apk)
Vp/m/s
/in/s)
(V
p
A
pk
A
pk (Arms
Ohms
mH L 13.40 6.70 26.80
pk
(A
)I
rms
)I
F
c
F
p
R
th
K
f
K
e
p
c
R
20
72 (16) 144 (32)
239 (54) 479 (108)
1.31 0.65
24.1
(5.4)
28.5
(0.7)
24.1
(5.4)
28.5
(0.7)
48.2
(10.8)
56.9
(1.4)
9.9 (7.0) 19.9 (14.0) 9.9 (7.0)
3.0 (2.1) 6.0 (4.2) 3.0 (2.1)
7.15 3.57 14.29
Magnetic attraction N (lbf)
(1) Coils at maximum temperature, 130 °C (266 °F), mounted to an aluminium heat sink whose area is noted in table on page 62, and at 40 °C (104 °F) ambient.
(2) Continuous force and current based on coil moving with all phases sharing the same load in sinusoidal commutation.
(3) For standstill conditions, multiply continuous force and continuous current by 0.9.
(4) Coil mountings on either of the two narrow sides reduces continuous force by 10%.
(5) Calculated at 11% duty cycle for 1.0 second max. Some applications may produce significantly higher peak forces. Call Applications Engineering (631.344.6600) for details.
(6) Winding parameters listed are measured line-to-line (phase-to-phase).
(7) Currents and voltages listed are measured 0-peak of the sine wave unless noted as rms.
(8) Specifications are ±10%. Phase-to-phase inductance is ±30%.
F
a
0 (0)
Publication LDL-UM001A-EN-P - March 2009 57
Page 58

Appendix A Specifications and Dimensions
LDL-Series Ironless Linear Motor (Standard 50 mm frame size)
Attribute Units Symbol
Force, continuous
Force, peak
(5)
(1) (2) (3) (4)
N (lbf)
N (lbf)
Thermal resistance °C/W
Force constant
Back EMF constant p-p
Current, peak
Current, continuous
(6) (7) (8)
(6) (7) (8)
(5) (7)
(1) (2) (3) (4)
Resistance p-p @ 20 °C (68 °F)
Inductance p-p
(6) (8)
N/A
(lbf/Apk)
Vp/m/s
/in/s)
(V
p
A
pk
A
pk (Arms
(6) (8)
Ohms
mH L 11.08 5.54 22.16
Magnetic attraction N (lbf)
pk
(A
)I
rms
)I
F
c
F
p
R
th
K
f
K
e
p
c
R
20
F
a
Attribute Units Symbol
Force, continuous
Force, peak
(5)
(1) (2) (3) (4)
N (lbf)
N (lbf)
Thermal resistance °C/W
Force constant
(6) (7) (8)
N/A
(lbf/Apk)
pk
F
c
F
p
R
th
K
f
LDL-N050120-DxTxx LDL-N050240-DxTxx LDL-N050240-ExTxx
96 (22) 191 (43)
317 (71) 635 (143)
1.58 0.79
35.0
(7.9)
41.3
(1.1)
35.0
(7.9)
41.3
(1.1)
70.0
(15.7)
82.7
(2.1)
9.1 (6.4) 18.1 (12.8) 9.1 (6.4)
2.7 (1.9) 5.5 (3.9) 2.7 (1.9)
7.11 3.56 14.22
0 (0)
LDL-N050360-DxTxx LDL-N050360-ExTxx LDL-N050480-DxTxx LDL-N050480-ExTxx
287 (65) 383 (86)
952 (214) 1269 (285)
0.53 0.39
35.0
(7.9)
105.0
(23.6)
35.0
(7.9)
70.0
(15.7)
(6) (8)
Vp/m/s
/in/s)
(V
p
A
(A
pk
A
pk (Arms
Ohms
)I
rms
)I
K
e
p
c
R
20
mH L 3.69 33.25 2.77 11.08
F
a
Back EMF constant p-p
Current, peak
(5) (7)
Current, continuous
(6) (7) (8)
(1) (2) (3) (4)
Resistance p-p @ 20 °C (68 °F)
Inductance p-p
(6) (8)
Magnetic attraction N (lbf)
(1) Coils at maximum temperature, 130 °C (266 °F), mounted to an aluminium heat sink whose area is noted in table on page 62, and at 40 °C (104 °F) ambient.
(2) Continuous force and current based on coil moving with all phases sharing the same load in sinusoidal commutation.
(3) For standstill conditions, multiply continuous force and continuous current by 0.9.
(4) Coil mountings on either of the two narrow sides reduces continuous force by 10%.
(5) Calculated at 11% duty cycle for 1.0 second max. Some applications may produce significantly higher peak forces. Call Applications Engineering (631.344.6600) for details.
(6) Winding parameters listed are measured line-to-line (phase-to-phase).
(7) Currents and voltages listed are measured 0-peak of the sine wave unless noted as rms.
(8) Specifications are ±10%. Phase-to-phase inductance is ±30%.
41.3
(1.1)
124.0
(3.2)
41.3
(1.1)
82.7
(2.1)
27.2 (19.2) 9.1 (6.4) 36.3 (25.6) 18.1 (12.8)
8.2 (5.8) 2.7 (1.9) 10.9 (7.7) 5.5 (3.9)
2.37 21.33 1.78 7.11
0 (0)
58 Publication LDL-UM001A-EN-P- March 2009
Page 59

Specifications and Dimensions Appendix A
LDL-Series Ironless Linear Motor (Thick 50 mm frame size)
Attribute Units Symbol
Force, continuous
Force, peak
(5)
(1) (2) (3) (4)
N (lbf)
N (lbf)
Thermal resistance °C/W
Force constant
Back EMF constant p-p
Current, peak
Current, continuous
(6) (7) (8)
(6) (7) (8)
(5) (7)
(1) (2) (3) (4)
Resistance p-p @ 20 °C (68 °F)
Inductance p-p
(6) (8)
N/A
(lbf/Apk)
Vp/m/s
(Vp/in/s)
A
pk
A
pk (Arms
(6) (8)
Ohms
mH L 18 9 35.31
Magnetic attraction N (lbf)
pk
(A
)I
rms
)I
F
c
F
p
R
th
K
f
K
e
p
c
R
20
F
a
Attribute Units Symbol
Force, continuous
Force, peak
(5)
(1) (2) (3) (4)
N (lbf)
N (lbf)
Thermal resistance °C/W
Force constant
(6) (7) (8)
N/A
(lbf/Apk)
pk
F
c
F
p
R
th
K
f
LDL-T050120-DxTxx LDL-T050240-DxTxx LDL-T050240-ExTxx
110 (25) 220 (49)
364 (82) 728 (164)
1.19 0.60
40.2
(9.0)
47.4
(1.2)
40.2
(9.0)
47.4
(1.2)
80.4
(18.1)
94.9
(2.4)
9.1 (6.4) 18.1 (12.8) 9.1 (6.4)
2.7 (1.9) 5.5 (3.9) 2.7 (1.9)
9.42 4.71 18.83
0 (0)
LDL-T050360-DxTxx LDL-T050360-ExTxx LDL-T050480-DxTxx LDL-T050480-ExTxx
329 (74) 439 (99)
1093 (246) 1457 (327)
0.40 0.30
40.2
(9.0)
120.5
(27.1)
40.2
(9.0)
80.4
(18.1)
(6) (8)
Vp/m/s
(Vp/in/s)
A
(A
pk
A
pk (Arms
Ohms
)I
rms
)I
K
e
p
c
R
20
mH L 5.88 52.96 4.41 17.65
F
a
Back EMF constant p-p
Current, peak
(5) (7)
Current, continuous
(6) (7) (8)
(1) (2) (3) (4)
Resistance p-p @ 20 °C (68 °F)
Inductance p-p
(6) (8)
Magnetic attraction N (lbf)
(1) Coils at maximum temperature, 130 °C (266 °F), mounted to an aluminium heat sink whose area is noted in table on page 62, and at 40 °C (104 °F) ambient.
(2) Continuous force and current based on coil moving with all phases sharing the same load in sinusoidal commutation.
(3) For standstill conditions, multiply continuous force and continuous current by 0.9.
(4) Coil mountings on either of the two narrow sides reduces continuous force by 10%.
(5) Calculated at 11% duty cycle for 1.0 second max. Some applications may produce significantly higher peak forces. Call Applications Engineering (631.344.6600) for details.
(6) Winding parameters listed are measured line-to-line (phase-to-phase).
(7) Currents and voltages listed are measured 0-peak of the sine wave unless noted as rms.
(8) Specifications are ±10%. Phase-to-phase inductance is ±30%.
47.4
(1.2)
142.3
(3.6)
47.4
(1.2)
94.9
(2.4)
27.2 (19.2) 9.1 (6.4) 36.3 (25.6) 18.1 (12.8)
8.2 (5.8) 2.7 (1.9) 10.9 (7.7) 5.5 (3.9)
3.14 28.25 2.35 9.42
0 (0)
Publication LDL-UM001A-EN-P - March 2009 59
Page 60

Appendix A Specifications and Dimensions
LDL-Series Ironless Linear Motor (Standard 75 mm frame size)
Attribute Units Symbol LDL-N075480-DxTxx LDL-N075480-ExTxx
Force, continuous
Force, peak
(5)
(1) (2) (3) (4)
N (lbf)
N (lbf)
Thermal resistance °C/W
Force constant
(6) (7) (8)
N/A
(lbf/Apk)
pk
F
c
F
p
R
th
K
f
519 (117)
1723 (387)
0.37
52.5
(11.8)
105.0
(23.6)
Back EMF constant p-p
Current, peak
(5) (7)
Current, continuous
(6) (7) (8)
(1) (2) (3) (4)
Resistance p-p @ 20 °C (68 °F)
Inductance p-p
(6) (8)
(6) (8)
Vp/m/s
/in/s)
(V
p
A
pk
A
pk (Arms
Ohms
mH L 3.60 14.40
Magnetic attraction N (lbf)
(A
)I
rms
)I
K
e
p
c
R
20
F
a
62.0
(1.6)
124.0
(3.2)
32.8 (23.2) 16.4 (11.6)
9.9 (7.0) 4.9 (3.5)
2.31 9.24
0 (0)
LDL-Series Ironless Linear Motor (Thick 75 mm frame size)
Attribute Units Symbol LDL-T075480-DxTxx LDL-T075480-ExTxx
Force, continuous
Force, peak
(5)
(1) (2) (3) (4)
N (lbf)
N (lbf)
Thermal resistance °C/W
Force constant
Back EMF constant p-p
Current, peak
Current, continuous
(6) (7) (8)
(5) (7)
(6) (7) (8)
(1) (2) (3) (4)
Resistance p-p @ 20 °C (68 °F)
Inductance p-p
(6) (8)
(6) (8)
N/A
(lbf/Apk)
Vp/m/s
/in/s)
(V
p
A
pk
A
pk (Arms
Ohms
mH L 5.74 22.97
Magnetic attraction N (lbf)
pk
(A
rms
F
c
F
p
R
th
K
f
K
e
)I
p
)I
c
R
20
F
a
596 (134)
1977 (444)
0.28
60.3
(13.5)
71.2
(1.8)
120.5
(27.1)
142.3
(3.6)
32.8 (23.2) 16.4 (11.6)
9.9 (7.0) 4.9 (3.5)
3.06 12.25
0 (0)
(1) Coils at maximum temperature, 130 °C (266 °F), mounted to an aluminium heat sink whose area is noted in table on page 62, and at 40 °C (104 °F) ambient.
(2) Continuous force and current based on coil moving with all phases sharing the same load in sinusoidal commutation.
(3) For standstill conditions, multiply continuous force and continuous current by 0.9.
(4) Coil mountings on either of the two narrow sides reduces continuous force by 10%.
(5) Calculated at 11% duty cycle for 1.0 second max. Some applications may produce significantly higher peak forces. Call Applications Engineering (631.344.6600) for details.
(6) Winding parameters listed are measured line-to-line (phase-to-phase).
(7) Currents and voltages listed are measured 0-peak of the sine wave unless noted as rms.
(8) Specifications are ±10%. Phase-to-phase inductance is ±30%.
60 Publication LDL-UM001A-EN-P- March 2009
Page 61

Specifications and Dimensions Appendix A
General Specifications
These tables provide weight, heat sink, environmental for LDL-Series
ironless linear motors.
Weight Specifications
Weight Specifications - Motor Coil with Flying Leads
Cat. No.
LDL-N030120-DHT20
LDL-T030120-DHT20
LDL-N030240-xHT20
LDL-T030240-xHT20
LDL-N050120-DHT20
LDL-T050120-DHT20
LDL-N050240-xHT20
Weight, Approx.
kg (lb)
0.63 (1.38)
0.74 (1.64)
1.14 (2.51)
1.37 (3.02)
0.75 (1.66)
0.91 (2.01)
1.39 (3.07)
Cat. No.
LDL-T050240-xHT20
LDL-N050360-xHT20
LDL-T050360-xHT20
LDL-N050480-xHT20
LDL-T050480-xHT20
LDL-N075480-xHT20
LDL-T075480-xHT20
Weight Specifications - Motor Coil with Connectors
Weight, Approx.
kg (lb)
1.71 (3.77)
2.03 (4.47)
2.50 (5.52)
2.67 (5.88)
3.30 (7.28)
3.32 (7.32)
4.16 (9.18)
Cat. No.
LDL-N030120-DHT11
LDL-T030120-DHT11
LDL-N030240-xHT11
LDL-T030240-xHT11
LDL-N050120-DHT11
LDL-T050120-DHT11
LDL-N050240-xHT11
Weight, Approx.
kg (lb)
0.83 (1.83)
0.94 (2.07)
1.34 (2.95)
1.57 (3.46)
0.95 (2.09)
1.01 (2.22)
1.41 (3.11)
Cat. No.
LDL-T050240-xHT11
LDL-N050360-xHT11
LDL-T050360-xHT11
LDL-N050480-xHT11
LDL-T050480-xHT11
LDL-N075480-xHT11
LDL-T075480-xHT11
Weight, Approx.
kg (lb)
1.91 (4.21)
2.23 (4.92)
2.70 (5.95)
3.50 (7.72)
4.36 (9.61)
3.52 (7.76)
4.36 (9.61)
Weight Specifications - Motor Magnet Channel
Cat. No.
LDL-NM030120 1.37 (3.02) LDL-TM050120 1.89 (4.17)
LDL-NM030480 5.51 (12.15) LDL-TM050480 7.57 (16.69)
LDL-TM030120 1.40 (3.08) LDL-NM075120 2.91 (6.42)
LDL-TM030480 5.60 (12.35) LDL-NM075480 11.64 (25.66)
LDL-NM050120 1.87 (4.12) LDL-TM075120 2.94 (6.48)
LDL-NM050480 7.48 (116.49) LDL-TM075480 11.76 (25.93)
Weight, Approx.
kg (lb)
Cat. No.
Weight, Approx.
kg (lb)
Publication LDL-UM001A-EN-P - March 2009 61
Page 62

Appendix A Specifications and Dimensions
Carriage Weight and Heat Sink Area Requirements
Required
Cat. No.
LDL-x030120-DHTxx 774 (120) 1.4 (3)
LDL-x030240-xHTxx 1160 (180) 2.0 (4.5)
LDL-x050120-DHTxx 774 (120) 2.7 (6)
LDL-x050240-DHTxx 1160 (180) 4.0 (9)
LDL-x050360-DHTxx 1680 (260) 5.9 (13)
LDL-x050480-DHTxx 2060 (320) 7.3 (16)
LDL-x075480-xHTxx 2060 (320) 7.3 (16)
Heat Sink Area
2
(in.2)
cm
Required
Carriage Plate Weight
kg (lb)
Environmental Specifications
Attribute Value
Temperature, operating ambient 0…40 °C (32…104 °F)
Temperature, storage ambient -30…70 °C (-22…158 °F)
Humidity, relative non-condensing 5…95%
Liquid/dust protection IP 65
Shock, max. 20 g peak, 6 ms duration
Vibration, max 30…2000 Hz, 2.5 g peak
Certifications
Certification
(when product is marked)
c-UL-us UL recognized to U.S. and Canadian safety standards (UL 1004-1 and 840 File E230241).
CE
(1) Refer to http://www.ab.com for Declarations of Conformity Certificates.
(1)
Standards
European Union 2004/108/EC EMC Directive compliant with EN 61800-3:2004: Adjustable Speed
Electrical Power Drive Systems - Part 3; EMC Product Standard including specific test methods.
European Union 2006/95/EC Low Voltage Directive compliant with:
• EN 60034-1:2004 Rotating Electrical Machines, Part I: Rating and Performance.
• EN 60204-1:2006 Safety of Machinery – Electrical Equipment of Machines, Part 1: General
Requirements.
62 Publication LDL-UM001A-EN-P- March 2009
Page 63

Specifications and Dimensions Appendix A
Product Dimensions
LDL-Series ironless linear motor components are designed to metric
dimensions. Inch dimensions are conversions from millimeters.
Untoleranced dimensions are for reference.
Publication LDL-UM001A-EN-P - March 2009 63
Page 64

Appendix A Specifications and Dimensions
Motor Coil Dimensions
Magnet channel
shown for reference.
J
0.83±0.30
T
Air Gap
(0.033±.011)
Feedback
Power
Connector
Connector
Dimensions are in mm (in.)
C
D
E
F
Thermistor Cable
Flying Leads
1000 mm (39.37 in.)
28.00
(1.102)
80.00
(3.150)
A
B
Power Cable
Flying Leads
1000 mm (39.37 in.)
8.5 (0.33),
Mounting holes
M4 x 0.7
22.00
38.00
60.00
quantity A1.
G
(0.866)
(1.496)
Typical
(2.362)
I
Hall Effect Module
Flying Leads
1000 mm (39.37 in.)
32.00
H
0.260 (0.010)
Coil Face Runout (T.I.R.)
(1.260)
350
(13.9)
(24)
600
Encoder
Connector
28.00
(1.102)
80.00
(3.150)
A
B
C
D
E
F
8.5 (0.33),
quantity A1.
M4 x 0.7
Mounting holes
26.00
35.00
(1.024)
(1.378)
L
4.50
(0.177)
LDL-Series Ironless Linear Motor Coil Dimension (LDL-xxxxxxx-xHT20) with Flying Leads
26.00
35.00
(1.024)
(1.378)
L
4.50
(0.177)
Refer to table on page 65 for coil mounting surface flatness requirement.
7 (0.28)
quantity A2.
Mounting holes
typical both sides,
M4 x 0.7
Dimensions for side view of linear motor coil with connectors is identical to this view with flying leads.
LDL-Series Ironless Linear Motor Coil Dimension (LDL-xxxxxxx-xHT11) with Connectors
64 Publication LDL-UM001A-EN-P- March 2009
Page 65

Specifications and Dimensions Appendix A
Flatness
mm/300 x 300 (in./12 x 12)
(AWG)
2
Power Cable Gauge
mm
A2
Qty
0.25 (0.010)
0.50 (20)
0.75 (18)
0.64 (0.025)
0.75 (18)
0.75 (18)
(9.685)
(7.087)
8.30 (0.33)
100.00
(3.937)
90.50
(3.563)
366.00
300.00
320.00
12 6 0.38 (0.015)
8.30 (0.33)
(14.409)
(11.811)
––
(12.598)
16 8
486.00
(19.134)
420.00
(16.535)
440.00
(17.323)
360.00
(14.173)
320.00
(12.598)
8.30 (0.33)
130.00
(5.118)
115.50
(4.547)
10.80 (0.43)
Static Bend Radius
mm (in.)
Cable Dia.
mm (in.)
A1
Qty
42
T
mm (in.)
8.30 (0.33)
(1)
mm (in.)
J
I
mm (in.)
126.00
H
mm (in.)
60.00
G
mm (in.)
F
mm (in.)
E
mm (in.)
D
mm (in.)
(4.961)
(2.362)
80.00
(3.149)
70.50
(2.776)
8.30 (0.33)
84
8.30 (0.33)
246.00
(9.685)
180.00
(7.087)
42
126.00
(4.961)
60.00
(2.362)
84
8.30 (0.33)
246.00
180.00
240.00
LDL-T050480-xHTxx 10.80 (0.43) 0.50 (20)
200
120.00
496.0
(9.449)
(7.874)
(4.724)
(19.53)
LDL-N075480-DHTxx
LDL-N075480-EHTxx 0.50 (20)
LDL-T075480-DHTxx
LDL-T075480-EHTxx 0.50 (20)
(1) Tolerance for J dimension is ±0.26 mm (0.010 in.).
Cable Specifications
Shield Type
(AWG)
2
Gauge
mm
Conductors
(1)
Cable
4 0.52 (20) Braid 6.4 (0.25) 17.0 (0.67)
4 0.82 (18) Braid 7.0 (0.28) 18.0 (0.70)
(2)
(2)
Thermistor 2 0.20 (26) None 4.0 (0.16) 10.0 (0.40)
Power
Power
Hall Module 6 0.13 (24) Foil 5.0 (0.20) 15.0 (0.59)
(1) All cables are non-flex.
(2) Power cable specification is dependent on coil used. See Power Cable Gauge column in the table on the top of this page.
C
mm (in.)
LDL-Series Ironless Linear Motor Coil Dimensions (LDL-xxxx-xHTxx)
B
mm (in.)
A
L
Cat. No.
––––––
mm (in.)
136.0
mm (in.)
LDL-N030120-DHTxx
––––
200.00
120.00
(5.35)
256.0
LDL-T030120-DHTxx 10.80 (0.43)
LDL-N030240-xHTxx
(7.874)
(4.724)
(10.08)
LDL-T030240-xHTxx 10.80 (0.43)
––––––
136.0
(5.35)
LDL-N050120-DHTxx
––––
200
(7.874)
120.0
(4.724)
256.0
(10.08)
LDL-T050120-DHTxx 10.80 (0.43)
LDL-T050240-xHTxx
240.00
(9.449)
200
(7.874)
120.00
(4.724)
376.0
(14.80)
LDL-N050480-DHTxx
LDL-N050360-xHTxx 10.80 (0.43)
LDL-T050360-xHTxx
LDL-N050240-xHTxx 10.80 (0.43)
LDL-N050480-EHTxx 0.50 (20)
Publication LDL-UM001A-EN-P - March 2009 65
Page 66

Appendix A Specifications and Dimensions
LDL
S
i
I
l
Li
M
t
M
t
Ch
l
Di
i
Magnet Channel Dimensions
Dimensions are in mm (in.)
G
25.00
Setup Dimension
(0.984)
H
T
W
- 0.00 (-0.000)
T DP Both Sides
Ø 4.00 (0.157) +0.06 (+0.002)
60.00
(2.362)
Mounting Hole Dimensions
60.00
(2.362)
Mounting Hole Dimensions
Flatness
(3)
Y
Hole
N
M
(2)
L
mm/300 x 300 (in./12 x 12)
mm (in.)
Qty
1 2 95.00 (3.740) 0.13 (0.005)
mm (in.)
mm (in.)
119.00 (4.685)
14.00 (0.551)
119.00 (4.685) 1 2 95.00 (3.740) 0.13 (0.005)
1 2 95.00 (3.74) 0.13 (0.005)
119.00 (4.685)
14.00 (0.551)
119.00 (4.685) 1 2 94.00 (3.740) 0.13 (0.005)
1 2 95.00 3.740) 0.13 (0.005)
119.00 (4.685)
19.00 (0.748)
119.00 (4.685) 1 2 95.00 (3.740) 0.13 (0.005)
D
mm (in.)
Gap will result from setting the
plates to setup dimension shown.
Ø10.00 (0.394)
See table for hole quantity.
(1)
G
mm (in.)
9.86 (0.388) 18.90 (0.744)
M6 x 1.0-6H thru
See table for hole quantity.
T
Refer to table for magnet channel mounting surface flatness requirement.
mm (in.)
9.86 (0.388) 18.90 (0.744)
9.86 (0.388) 20.55 (0.809)
ons
mens
anne
L
Y
Ø 5.00 (0.197) Thru
agne
or
o
60.00
(2.362)
near
N Places
60.00
ess
ron
9.50
es
er
-
66 Publication LDL-UM001A-EN-P- March 2009
(0.374)
M
17.50
29.5
(0.689)
(1.16)
29.5
D
(2.362)
N Places
(1.16)
H
mm (in.)
W
mm (in.)
Cat. No.
56.00 (2.205) 6.35 (0250)
37.80 (1.1488)
LDL-NM030120
LDL-NM030480 479.00 (18.858) 7 8 455.00 (17.913) 0.26 (0.010)
40.65 (1.600) 12.57 (0.494) 20.33 (0.800)
LDL-TM030120
LDL-TM030480 479.00 (18.858) 7 8 455.00 (17.913) 0.26 (0.010)
76.00 (2.992) 6.35 (0.250)
37.80 (1.488)
LDL-NM050120
LDL-NM050480 479.00 18.858) 7 8 455.00 (17.913) 0.26 (0.010)
40.65 (1.600) 12.57 (0.494) 20.33 (0.800)
LDL-TM050120
LDL-TM050480 479.00 (18.858) 7 8 455.00 (17.913) 0.26 (0.010)
LDL-NM075120
41.1 (1.62)
LDL-NM075480 479.00 (18.858) 7 8 455.00 (17.913) 0.26 (0.010)
106.0 (4.173) 8.00 (0.315)
43.7 (1.72) 12.57 (0.494) 21.85 (0.860)
LDL-TM075120
LDL-TM075480 479.00 (18.858) 7 8 455.00 (17.913) 0.26 (0.010)
) Tolerance for G dimension is +0.35 mm (+0.012 in.), -0.12 mm (-0.004 in.).
) Tolerance for L dimension is ±0.25 mm (±0.010 in.).
) Tolerance for Y dimension is ±0.05 mm (±0 in.002 in.).
Page 67

Interconnect Diagrams
Appendix
B
Introduction
Wiring Examples
This appendix provides wring examples to assist you in wring an
LDL-Series linear motors to an Allen-Bradley drive.
Topic Page
Kinetix 6000 or Kinetix 2000 Drives and LDL-xxxxxxx-xHT11 Linear Motor with
a TTL Encoder
Kinetix 6000 or Kinetix 2000 Drives and LDL-xxxxxxx-xHT11 Linear Motor with
a Sin/Cos Encoder
Kinetix 6000 or Kinetix 2000 Drives and LDL-xxxxxxx-xHT20 Linear Motor with
a TTL Encoder
Kinetix 6000 or Kinetix 2000 Drives and LDL-xxxxxxx-xHT20 Linear Motor with
a Sin/Cos Encoder
Ultra3000 Drives and LDL-xxxxxxx-xHT11 Linear Motor with a TTL Encoder 72
Ultra3000 Drives and LDL-xxxxxxx-xHT11 Linear Motor with a Sin/Cos Encoder 73
Ultra3000 Drives and LDL-xxxxxxx-xHT20 Linear Motor with a TTL Encoder 73
Ultra3000 Drives and LDL-xxxxxxx-xHT20 Linear Motor with a Sin/Cos Encoder 75
These notes apply to the wiring examples on the pages that follow.
68
69
70
71
Note Information
1
Use cable shield clamp in order to meet CE requirements. No external connection
to ground is required.
2
For motor cable specifications, refer to the Kinetix Motion Control Selection
Guide, publication GMC-SG001.
3
When using Sin/Cos encoder with Kinetix 6000 drives refer to Appendix C on
page 77
.
67Publication LDL-UM001A-EN-P- March 2009 67
Page 68

Appendix B Interconnect Diagrams
Wiring Example for Kinetix 6000 or Kinetix 2000 Drives and LDL-xxxxxxx-xHT11
Linear Motor with a TTL Encoder
Kinetix 2000 or Kinetix 6000
IAM (inverter) or AM
Module
Motor Power
(MP) Connector
Cable Shield
Clamp
Note 1
Motor Feedback
(MF) Connector
(IAM/AM) Module
Refer to low profile connector
illustration (lower left) for proper
grounding and shield termination
techniques.
Low Profile Connector
(Use 2090-K6CK-D15M for Kinetix 6000 Drives
and 2090-K2CK-D15M for Kinetix 2000 Drives.)
LDL-Series Linear Motor Coil
1
U
2
V
3
W
4
Brown
Black
Blue
Green/Yellow
2090-CPWM4DF-xxAFxx,
2090-XXNPMF-xxSxx
A
B
C
Three-phase
Motor Power
GND
Motor Power Cable
Note 2
N/C
2090-XXNFMF-Sxx or
2900-CFBM4DF-CDAFxx
N/C
WHT/Orange
Blue
WHT/Blue
Yellow
WHT/Yellow
WHT/Gray
Gray
White/Green
Green
WHT/Red
Red
WHT/Black
Black
11
12
13
8
6
14
10
5
4
3
2
1
TS+
TS-
S1
S2
S3
ECOM
+5V DC
IMIM+
BM-
BM+
AM-
AM+
13
14
15
16
17
10
9
6
5
4
3
2
1
Thermal
Switch
Feedback Cable
Note 2
AM+
AM-
BM+
BM-
IM+
IM+5VDC
ECOM
1
4
2
5
3
6
8
7
TTL Encoder
Ground techniques for
feedback cable shield.
Clamp
Exposed shield secured
under clamp.
Clamp screw (2)
Turn clamp over to hold
small cables secure.
68 Publication LDL-UM001A-EN-P- March 2009
Page 69

Interconnect Diagrams Appendix B
Wiring Example for Kinetix 6000 or Kinetix 2000 Drives and LDL-xxxxxxx-xHT11
Linear Motor with a Sin/Cos Encoder
Kinetix 2000 or Kinetix
6000 IAM (inverter) or
AM Module
Motor Power
(MP) Connector
U
V
W
Cable Shield
Clamp
Note 1
11
12
13
Motor Feedback
(MF) Connector
(IAM/AM) Module
8
6
14
10
5
4
3
2
1
Refer to low profile connector
illustration (lower left) for proper
grounding and shield termination
techniques.
Low Profile Connector
(Use 2090-K6CK-D15M for Kinetix 6000 Drives
and 2090-K2CK-D15M for Kinetix 2000 Drives.)
LDL-Series Linear Motor Coil
1
2
3
4
Brown
Black
Blue
Green/Yellow
2090-CPWM4DF-xxAFxx,
2090-XXNPMF-xxSxx
A
B
Three-phase
Motor Power
C
GND
Motor Power Cable
Note 2
TS+
TS-
S1
S2
S3
ECOM
+5V DC
IM-
IM+
COS-
COS+
SIN-
SIN+
13
14
15
16
17
10
9
6
5
4
3
2
1
Thermal
Switch
N/C
WHT/Orange
Blue
WHT/Blue
Yellow
WHT/Yellow
WHT/Gray
Gray
White/Green
Green
WHT/Red
Red
WHT/Black
Black
N/C
2090-XXNFMF-Sxx or
2900-CFBM4DF-CDAFxx
Feedback Cable
Note 2
SIN+
SINCOS+
COS-
IM+
IM-
+5VDC
ECOM
1
4
2
5
3
6
8
7
Sin/Cos Encoder
Note 3
Ground techniques for
feedback cable shield.
Clamp
Exposed shield secured
under clamp.
Clamp screw (2)
Turn clamp over to hold
small cables secure.
Publication LDL-UM001A-EN-P- March 2009 69
Page 70

Appendix B Interconnect Diagrams
Wiring Example for Kinetix 6000 or Kinetix 2000 Drives and LDL-xxxxxxx-xHT20
Linear Motor with a TTL Encoder
Kinetix 2000 or Kinetix 6000
IAM (inverter) or AM
Module
Note 3
Cable Shield
Clamp
Note 1
Motor Power
(MP) Connector
Motor Feedback
(MF) Connector
(IAM/AM) Module
W
V
U
11
12
13
8
1
2
3
4
5
10
14
6
Refer to low profile connector
illustration (lower left) for proper
grounding techniques.
LDL-Series Linear Motor Coil
4
3
2
1
Green/Yellow
W
V
U
TS+
TS -
Black
White
Red
Black
Black
W
V
U
GND
Three-phase
Motor Power
Thermal
Switch
Power
Red
White
S1
Blue
S2
Orange
S3
Black
COM
Hall Effect
Module
AM+
AM-
BM+
BM-
IM+
IM-
POWER
COM
Wire as shown here using
cable type appropriate for
Linear Encoder
TTL Encoder
your application.
Low Profile Connector
Ground techniques for
feedback cable shield.
(Use 2090-K6CK-D15M for Kinetix 6000 Drives
and 2090-K2CK-D15M for Kinetix 2000 Drives.)
Clamp
Exposed shield secured
under clamp.
Clamp screw (2)
Turn clamp over to hold
small cables secure.
70 Publication LDL-UM001A-EN-P- March 2009
Page 71

Interconnect Diagrams Appendix B
Wiring Example for Kinetix 6000 or Kinetix 2000 Drives and LDL-xxxxxxx-xHT20
Linear Motor with a Sin/Cos Encoder
Kinetix 2000 or Kinetix 6000
IAM (inverter) or AM
Module
Cable Shield
Clamp
Note 1
Motor Power
(MP) Connector
W
V
U
11
12
13
8
Motor Feedback
(MF) Connector
(IAM/AM) Module
3
4
5
10
14
6
Refer to low profile connector
illustration (lower left) for proper
grounding techniques.
LDL-Series Linear Motor Coil
4
3
2
1
Green/Yellow
W
V
U
TS+
TS -
Black
White
Red
Black
Black
W
V
U
Three-phase
GND
Motor Power
Thermal
Switch
Power
Red
White
S1
Blue
S2
Orange
S3
Black
COM
Hall Effect
Module
1
2
Wire as shown here using
cable type appropriate for
your application.
COS+
COS-
SIN+
SIN-
IM+
IM-
POWER
COM
Linear Encoder
Sin/Cos Encoder
Note 3
Low Profile Connector
Ground techniques for
feedback cable shield.
(Use 2090-K6CK-D15M for Kinetix 6000 Drives
and 2090-K2CK-D15M for Kinetix 2000 Drives.)
Clamp
Exposed shield secured
under clamp.
Clamp screw (2)
Turn clamp over to hold
small cables secure.
Publication LDL-UM001A-EN-P- March 2009 71
Page 72

Appendix B Interconnect Diagrams
Ultra3000 Drive
Wiring Example for Ultra Drive and LDL-xxxxxxx-xHT11 Linear Motor with a TTL
Encoder
LDL-Series Linear Motor Coil
LDL-Series Linear Motor Coil
Motor Power
(TB1) Connector
Cable Shield
Clamp
Note 1
Motor Feedback
(CN2) Connector
Refer to low profile connector
illustration (lower left) for proper
grounding and shield termination
techniques.
1
U
2
V
3
W
4
11
12
13
8
6
14
10
5
4
3
2
1
WHT/Orange
N/C
WHT/Yellow
White/Green
WHT/Black
Refer to low profile connector
illustration (lower left) for proper
grounding and shield termination
techniques.
Blue
WHT/Blue
Yellow
WHT/Gray
Gray
Green
WHT/Red
Red
Black
Brown
Black
Blue
Green/Yellow
2090-CPWM4DF-xxAFxx,
2090-XXNPMF-xxSxx
Motor Power Cable
Note 2
Motor Power Cable
Note 2
2090-XXNFMF-Sxx or
2900-CFBM4DF-CDAFxx
Feedback Cable
Feedback Cable
Note 2
Note 2
N/C
TS+
TS-
ECOM
+5V DC
IM-
IM+
COS-
COS+
SIN-
SIN+
SIN+
SINCOS+
COS-
IM+
IM+5VDC
ECOM
A
B
Three-phase
Three-phase
Motor Power
C
Motor Power
GND
13
S1
S2
S3
14
15
16
17
10
9
6
5
4
3
2
1
1
4
2
5
3
6
8
7
Thermal
Thermal
Switch
Switch
TTL Encoder
TTL Encoder
Wire color shown for Renishaw
RGH22 linear incremental encoder
Ground techniques for
feedback cable shield.
with its reference mark actuator
installed.
Exposed shield secured
under clamp.
2090-UXBB-DM15
Cable Tie
Motor Feed Breakout Board
72 Publication LDL-UM001A-EN-P- March 2009
Page 73

Interconnect Diagrams Appendix B
Wiring Example for Ultra3000 Drive and LDL-xxxxxxx-xHT11 Linear Motor with a
Sin/Cos Encoder
Ultra3000 Drive
Motor Power
(TB1) Connector
Cable Shield
Clamp
Note 1
Motor Feedback
(CN2) Connector
1
U
2
V
3
W
4
N/C
WHT/Orange
WHT/Blue
WHT/Yellow
WHT/Gray
White/Green
WHT/Black
11
12
13
8
6
14
10
5
4
3
2
1
Refer to low profile connector
illustration (lower left) for proper
grounding and shield termination
techniques.
Blue
Yellow
Gray
Green
WHT/Red
Red
Black
Brown
Black
Blue
Green/Yellow
2090-CPWM4DF-xxAFxx,
2090-XXNPMF-xxSxx
Motor Power Cable
Note 2
2090-XXNFMF-Sxx or
2900-CFBM4DF-CDAFxx
Feedback Cable
Note 2
N/C
ECOM
+5V DC
COS-
COS+
SIN-
SIN+
SIN+
SINCOS+
COS-
IM+
IM-
+5VDC
ECOM
TS+
TS-
S1
S2
S3
IM-
IM+
LDL-Series Linear Motor Coil
A
B
Three-phase
Motor Power
C
GND
13
14
15
16
17
10
9
6
5
4
3
2
1
1
4
2
5
3
6
8
7
Thermal
Switch
Sin/Cos Encoder
Ground techniques for
feedback cable shield.
Exposed shield secured
under clamp.
2090-UXBB-DM15
Cable Tie
Motor Feed Breakout Board
Wiring Example for Ultra3000 Drive and LDL-xxxxxxx-xHT20 Linear Motor with a
TTL Encoder
Publication LDL-UM001A-EN-P- March 2009 73
Page 74

Appendix B Interconnect Diagrams
Ultra3000 Drive
Cable Shield
Clamp
Note 1
Motor Power
(TB1) Connector
Motor Feedback
(CN2) Connector
W
V
U
11
12
13
8
1
2
3
4
5
10
14
6
Refer to low profile connector
illustration (lower left) for proper
grounding techniques.
LDL-Series Linear Motor Coil
4
3
2
1
Green/Yellow
W
V
U
TS+
TS -
Black
White
Red
Black
Black
W
V
U
GND
Three-phase
Motor Power
Thermal
Switch
Power
Red
White
S1
Blue
S2
Orange
S3
Black
COM
Hall Effect
Module
AM+
AM-
BM+
BM-
IM+
IM-
Linear Encoder
Wire as shown here using
cable type appropriate for
POWER
COM
TTL Encoder
your application.
Ground techniques for
feedback cable shield.
Exposed shield secured
under clamp.
2090-UXBB-DM15
Cable Tie
Motor Feed Breakout Board
74 Publication LDL-UM001A-EN-P- March 2009
Page 75

Interconnect Diagrams Appendix B
Wiring Example for Ultra3000 Drive and LDL-xxxxxxx-xHT20 Linear Motor with a
Sin/Cos Encoder
Ultra3000 Drive
Cable Shield
Clamp
Note 1
Motor Power
(TB1) Connector
Motor Feedback
(CN2) Connector
W
V
U
11
12
13
8
1
2
3
4
5
10
14
6
Refer to low profile connector
illustration (lower left) for proper
grounding techniques.
LDL-Series Linear Motor Coil
4
3
2
1
Green/Yellow
W
V
U
TS+
TS -
Black
White
Red
Black
Black
W
V
U
GND
Three-phase
Motor Power
Thermal
Switch
Power
Red
White
S1
Blue
S2
Orange
S3
Black
COM
Hall Effect
Module
COS+
COS-
SIN+
SIN-
IM+
IM-
Linear Encoder
Wire as shown here using
cable type appropriate for
POWER
COM
Sin/Cos Encoder
your application.
Ground techniques for
feedback cable shield.
Exposed shield secured
under clamp.
2090-UXBB-DM15
Cable Tie
Motor Feed Breakout Board
Publication LDL-UM001A-EN-P- March 2009 75
Page 76

Appendix B Interconnect Diagrams
Notes:
76 Publication LDL-UM001A-EN-P- March 2009
Page 77

Appendix
C
Sin/Cos Linear Encoder and Kinetix 6000 Drives
Introduction
Kinetix 6000 Drive Feedback Connection
This appendix guides you through commissioning a linear motor with
a Sin/Cos 1V peak-to-peak output linear encoder.
Topic Page
Kinetix 6000 Drive Feedback Connection 77
Encoder Counting Direction 78
Set Up the Axis Properties 78
For robust operation when interfacing your Sin/Cos 1V peak-to-peak
differential output linear encoder to a Kinetix 6000 drive, you should
terminate the sine and cosine signals as follows.
SIN+
SIN-
COS+
COS-
150 7
Resistor
1/4 W, 5%
150 7
Resistor
1/4 W, 5%
AM+
AM-
BM+
BM-
1
2
3
Feedback Connector
2090-K6CK-D15M
4
Low Profile Connector
1N5819,
(~5.1V DC)
Add a Shottky diode for cable
lengths less then 10 m (32.8 ft).
or equivalent
(5.4V DC)+5V DC
14
For systems where the cable length is less than 10 m (32.8 ft), the
encoder power supply from the Kinetix 6000 drive feedback
connector should be dropped from its nominal 5.4…5.1V DC volts
with the addition of a Shottky Diode, see schematic.
77Publication LDL-UM001A-EN-P - March 2009 77
Page 78

Appendix C Sin/Cos Linear Encoder and Kinetix 6000 Drives
Encoder Counting Direction
Set Up the Axis Properties
Normally, the encoder signals will output sine-leads-cosine (AM leads
BM) when the linear encoder head is moving towards its cable,
relative to the encoder scale. SERCOS drives count this in a negative
direction.
When installing a Sin/Cos linear encoder, setup the Axis Property tabs
by doing the following.
1. Click the Motor Feedback tab.
2. Enter the following parameter s.
Parameter Value Comment
Feedback Type Sin/Cos –
Cycles 25 per Millimeter For 40 µ pitch encoder scale.
50 per Millimeter For 20 µ pitch encoder scale.
Interpolation Factor 1024 –
78 Publication LDL-UM001A-EN-P - March 2009
Page 79

Sin/Cos Linear Encoder and Kinetix 6000 Drives Appendix C
3. Click the Drive/Motor tab.
4. Enter the following parameters.
Parameter Value Comment
Driver Resolution 25600 For 40 µ pitch encoder scale.
51200 For 20 µ pitch encoder scale.
Drive Counts per Motor Millimeter –
5. Click the Conversion tab.
6. Enter the following parameters.
Parameter Value Comment
Driver Resolution 25600 For 40 µ pitch encoder scale.
51200 For 20 µ pitch encoder scale.
Publication LDL-UM001A-EN-P - March 2009 79
Page 80

Appendix C Sin/Cos Linear Encoder and Kinetix 6000 Drives
Notes:
80 Publication LDL-UM001A-EN-P - March 2009
Page 81

Index
A
air gap 18, 26
alignment tool
aluminum straight edge
attraction
Automatic
automatic implantable cardioverter
22, 24
22
22
21
defibrillator (AICD)
9
B
beryllium copper 22
bulk head connector kit
bumper
burn hazard
bus voltage, applied
12, 18
12
31
56
C
carriage 19
certifications
cogging torque
17
coil
coil power connector
coil weight
connectorized
flying lead
commission
Kinetix 2000 drive
Kinetix 6000 drive
Ultra-3000 drive
common specification
connector
encoder
feedback
power
PTC thermistor
cycle length, electrical
62
56
27
61
61
42
42
47
56
27
17, 29
17, 28
17, 27
17, 28, 29
56
D
damaged parts 21
de-rate force
description
motor
design consideration
air gap
bumper
carriage design, heat sink
end of travel bumper
linear encoder
dielectric rating
22
17
18
18
19
12
19
56
dimensions
coil
64
magnet channel
direction
49
66
E
encoder 31
resolution
encoder connector
encoder connector kit
encoder sin/cos
end of travel bumpers
end of travel impact
end stop
envelope dimensions
environmental specifications
ESD components
Hall effect ESD
50
29
31
77
12
12
18
23
12
F
feedback connector 28
ferrous material
final alignment
firmware revision
flying leads
22
24
40
31
H
Hall effect module 17
hardware requirements
magnet channel
heat sink
19, 62
max temperature
22
12
I
inspection 21
installation
firmware
motor
motor coil
software
insulation class
interconnect diagrams
wiring example notes
21
40
22
25
40
56
67
L
label
identification
large impacts
10
12
62
Publication LDL-UM001A-EN-P - March 2009 81
Page 82

Index
length 16
linear encoder
19
M
magnet channel 16, 17, 22
alignment
alignment tool
maintenance
max. speed
max. temp
coil
motion analyzer version
motor
database
direction
storage
type
mounting
configuration
hardware
motor coil
multiple motors
power cable
screw length
24
24
19
13
56
40
49
19
56
23
25
coil
magnet channel
25
35
27
25
22
N
non-magnetic 22
O
operating
speed
56
56
voltage
P
perfomance 19
phase alignment
two motors
pinout
coil power
encoder
feedback
power connector
PTC thermistor
power connector
procedure
cleaning magent channel
connections
35
27
29
28
27
28, 29
17, 27
31
40
19
install magnet channel
install motor coil
power connection
verify encoder resolution
verify motor wiring
PTC thermistor connector
25
27
50
R
reference documents
A-B automation glossary
drive manuals
SERCOS interface
requirements
hardware requirements
coil
magnet channel
requirements heat sink
RSLogix software screen
conversion
drive/motor
motor feedback
45
units
7
7
25
22, 25
62
46
42
43
S
safety
9
burn
hazardous voltage
9
labels
strong magnets
sudden motion
screw quanitiy
SERCOS Drive
setup
Kinetix 2000 drive
Kinetix 6000 drive
Ultra-3000 drive
shipping
air freight restriction
dangerous goods declaration
form 902 instructions
shock absorber
software
required version
spacing
two motors
specifications
common
environment
standard 30 mm frame
standard 50 mm frame
standard 75 mm frame
56
9
9
12
22
77
42
42
47
11
11
18
40
35
62
22
50
28
7
11
57
58
60
82 Publication LDL-UM001A-EN-P - March 2009
Page 83

Index
thick 30 mm frame 57
thick 50 mm frame
thick 75 mm frame
storage
19
T
tandem motors 35
temperature
max heat sink
Thermal
thermal time constant
time constant
tools
torque
56
22
magnet channel
12
56
22
U
unpacking 21
V
59
60
56
verify
direction
motor wiring
resolution
49
50
50
W
warning
air freight restrictions
automatic implantable cardioverter
defibrillator (AICD)
powerful forces
weight
coil flying lead
magnet channel
31
wiring
wiring diagram
connectorized
Sin/Cos encoder
TTL encoder
flying lead
Sin/Cos encoder
TTL encoder
68, 72
11
9
61
61
69, 73
68, 72
71, 74, 75
70
9
Publication LDL-UM001A-EN-P - March 2009 83
Page 84

Rockwell Automation
Support
Rockwell Automation provides technical information on the Web to assist
you in using its products. At
find technical manuals, a knowledge base of Faqs, technical and application
notes, sample code and links to software service packs, and a MySupport
feature that you can customize to make the best use of these tools.
For an additional level of technical phone support for installation,
configuration, and troubleshooting, we offer TechConnect support programs.
For more information, contact your local di st ri buto r or Rockwe l l Aut oma ti on
representative, or visit
http://support.rockwellautomation.com, you can
http://support.rockwellautomation.com.
Installation Assistance
If you experience a problem within the first 24 hours of installation, please
review the information that's contained in this manual. Y ou can also contact a
special Customer Support number for initial help in getting your product up
and running.
United States 1.440.646.3434
Monday – Friday, 8 a.m. – 5 p.m. EST
Outside United
States
Please contact your local Rockwell Automation representative for any
technical support issues.
New Product Satisfaction Return
Rockwell Automation tests all of its products to ensure that they are fully
operational when shipped from the manufacturing facility. However, if your
product is not functioning and needs to be returned, follow these
procedures.
United States Contact your distributor. You must provide a Customer Support case
number (call the phone number above to obtain one) to your distributor
in order to complete the return process.
Outside United
States
Please contact your local Rockwell Automation representative for the
return procedure.
Publication LDL-UM001A-EN-P - March 2009 85 PN 814062
Copyright © 2009 Rockwell Automation, In c. All rights reserved. Printed in the U.S.A.
 Loading...