

Page 1

FlexPak 3000 Digital DC Drive
Hardware Reference, Installation
and Troubleshooting
Ver sion 4.3
Instruction Manual
D2-3404-2
Page 2

The information in this manual is subject to change without notice.
Throughout this manual, the following notes are used to alert you to safety considerations:
ATTENTION:Identifies information about practices or circumstances that can lead to personal
injury or death, property damage, or economic loss.
!
Important: Identifies information that is critical for successful application and understanding of the product.
The thick black bar shown on the outside margin of this page will be used throughout this instruction manual to
signify new or revised text or figures.
ATTENTION:Only qualified electrical personnel familiar with the construction and operation of
this equipment and the hazards involved should install, operate, or service this equipment. Read
!
and understand this manual in its entirety before proceeding. Failure to observe this precaution
could result in severe bodily injury or loss of life.
ATTENTION:380/415 VAC-rated FlexPak drives can be configured for either 380 VAC or 415
VAC input power. Before input power is applied to the drive, verify that the control transformer
taps are set to match the input power. Follow the instructions provided in chapter 3 of this manual
to set the control transformer taps. Failure to observe this precaution could result in damage to,
or destruction of, the equipment
Reliance, FlexPak, AutoMax, and E.S.P. are trademarks of Rockwell Automation.
Trademarks not belonging to Rockwell Automation are property of their respective companies.
©2004 Rockwell Automation. All rights reserved.
Page 3

Chapter 1 Introduction to the FlexPak 3000 Drive
1.1 Store the Drive................................................................................................. 1-1
1.2 Drive Identification Nameplate......................................................................... 1-1
1.3 Model Numbers ...............................................................................................1-2
1.4 Drive Description .............................................................................................1-2
1.5 Additional Information......................................................................................1-3
1.6 Optional Kits ....................................................................................................1-4
1.7 Getting Assistance from Reliance Electric.......................................................1-5
Chapter 2 Install and Wire the Drive
2.1 Install the Drive - Panel Layout........................................................................ 2-1
2.2 Install a Transformer .. ...... ....... ...... ...... ....... ...... ....... ...... ....... ...... ......................2-8
2.3 Install an Input Disconnect .............................................................................. 2-8
2.4 Install the Motor...................................................... ...... ....... ...... ....... ...... .........2-9
2.5 General Wiring Practices.................................................................................2-9
2.5.1 Ground the Drive and Enclosure, the Motor and the Operator's
Control Station.......................................................................................2-9
2.5.2 Recommended Lugs ...........................................................................2-17
2.5.3 Wire AC Power to the Drive................................................................ 2-18
2.5.4 Wire the DC Motor to the Drive........................................................... 2-22
2.5.4.1 Wire Motor Overload Protection............................................2-27
2.5.5 Wire the Stop Input ............................................................................2-28
2.5.5.1 Wire the COAST/STOP Digital Input .................................... 2-29
2.5.5.2 Compliance with EN 60204-1: 1992 .....................................2-29
2.5.6 Wire Optional Devices to the Drive .....................................................2-32
2.5.6.1 Logic Inputs...........................................................................2-33
2.5.6.2 Logic Outputs........................................................................ 2-33
2.5.6.3 Analog Inputs........................................................................2-33
2.5.6.4 Analog Outputs .....................................................................2-33
CONTENTS
Contents
Chapter 3 Drive Setup and Adjustment
3.1 Perform a Power Off Inspection ...................................................................... 3-1
3.2 Verify Control Transformer Tap Settings......................................................... 3-1
3.2.1 Converting a Drive for 380 VAC Input Power........................................ 3-1
3.2.2 Converting a Drive for 230 VAC Input Power........................................ 3-2
3.3 Perform a Motor Ground Check ...................................................................... 3-3
3.4 Set Jumpers .................................................................................................... 3-4
3.4.1 Set the Regulator Type (Jumper J15)................................................... 3-5
3.4.2 Setting Program Protection (Jumper J16).............................................3-6
3.4.3 Set Field Loss Detection (Jumper J20)................................................. 3-7
3.4.4 Set the Drive for the Enhanced Field Supply (Jumper J21) .................. 3-7
3.4.5 Set the Source for the Manual Mode Reference (Jumper J19)............. 3-7
3.4.6 Set the Voltage Range and Scale of an Analog Tachometer
(Jumpers J14 and J11)..........................................................................3-8
3.4.7 Set the Analog Auto Mode Reference (Jumpers J12 and J10).............3-9
3.4.8 Scale the Armature Current Feedback (Jumper 18) .............................3-9
3.4.9 Inspect Jumper J26.................. ....... ...... ....... ...... ....... ...... ....... ...... .........3-9
3.4.10Inspect the Spare 1 Jumper (J27).........................................................3-9
3.4.11Inspect the Filter Select Jumper (J28)...................................................3-9
3.4.13Inspect the Power Unit Jumper (J30)..................................................3-10
3.5 Power Up the Drive ................ ...... ...... ....... ...... ....... ...... .................................3-10
I
Page 4

3.6 Verify the Correct Direction of Motor Rotation ...............................................3-10
3.7 Determine the DC Tachometer Lead Polarity................................................3-11
3.8 Make Tachometer and Armature Feedback Zero Adjustments .....................3-11
3.9 Make Final Adjustments................................... ...... ........................................ 3 -12
Chapter 4 Troubleshooting/Diagnostics
4.1 Check for Wiring Errors....................................................................................4-1
4.2 Verify AC Line and Power Input.......................................................................4-1
4.3 Verify DC Motor Connections...........................................................................4-2
4.4 Verify Optional Kits...........................................................................................4-2
4.5 Check the Regulator LED Status.....................................................................4-3
Chapter 5 Replacement Parts
Appendix A Technical Specifications........................................................................................... A-1
Appendix B Compliance with European Union Electromagnetic Compatibility Standards..........B-1
Appendix C Recommended Parts for Integrator Drives...............................................................C-1
Appendix D Glossary Of Terms....... ...... ....... ...... ....... ...... ...... ....... ...... .........................................D-1
Index ...........................................................................................................................Index-1
II
FlexPak 3000 DC Drive Hardware Reference Version 4.3
Page 5

List of Figures
Figure 1.1 – Sample FlexPak 3000 Nameplates...................................................... 1-1
Figure 1.2 – Model Number Structure ......................................................................1-2
Figure 1.3 – FlexPak 3000 Functional Block Diagram..............................................1-3
Figure 2.1 – Enclosure Mounting Minimum Clearance Distances............................ 2-1
Figure 2.2 – Drive Mounting Dimensions (1.5 to 30 HP @ 230 VAC /
3 to 60 HP @ 460 VAC / 7 to 110 Amp Rated Output) ........................2-2
Figure 2.3 – Drive Mounting Dimensions (40 to 75 HP @ 230 VAC /75 to 150 HP @
460 VAC / 265 Amp Rated Output)...................................................... 2-3
Figure 2.4 – Drive Mounting Dimensions
(100 to 150 HP @ 230 VAC / 200 to 300 HP @ 460 VAC)....................2-4
Figure 2.5 – Drive Mounting Dimensions (400 to 600 HP @ 460 VAC)...................2-5
Figure 2.6 – Integrator Drive Mounting Dimensions (1.5 to 30 HP @ 230 VAC /
3 to 60 HP @ 460 VAC) ......................................................................... 2-6
Figure 2.7 – Integrator Drive Mounting Dimensions (40 to 75 HP @ 230 VAC / 75 to
150 HP @ 460 VAC) ............................................................................ 2-7
Figure 2.8 – Drive Control and Power Ground Point Locations (1.5 to 30 HP @ 230
VAC /3 to 60 HP @ 460 VAC / 7-110 Amp Rated Output)................. 2-11
Figure 2.9 – Drive Control and Power Ground Point Locations (40 to 75 HP @
230 VAC /75 to 150 HP @ 460 VAC / 265 Amp Rated Output)...........2-12
Figure 2.10 – Drive Control and Power Ground Point Locations
(100 to 150 HP @ 230 VAC / 200 to 300 HP @ 460 VAC)...............2-13
Figure 2.11 – Drive Control and Power Ground Point Locations (400 to 600 HP @
460 VAC) ............................................................................................ 2-14
Figure 2.12 – Integrator Drive Control and Power Ground Point Locations
(1.5 to 30 HP @ 230 VAC / 3 to 60 HP @ 460 VAC) .........................2-15
Figure 2.13 – Integrator Drive Control and Power Ground Point Locations
(40 to 75 HP @ 230 VAC / 75 to 150 HP @ 460 VAC) ......................2-16
Figure 2.14 – AC Line Connection Location (1.5 to 30 HP @ 230 VAC 3 to 60 HP
@ 460 VAC / 7-110 Amp Rated Output) ............................................. 2-20
Figure 2.15 – AC Line Connection Location (40 to 75 HP @ 230 VAC /75 to
150 HP @ 460 VAC / 265 Amp Rated Output)................................... 2-20
Figure 2.16 – AC Line Connection Locations (100 to 150 HP @ 230 VAC /
200 to 300 HP @ 460 VAC) ............................................................... 2-21
Figure 2.17 – AC Line Connection Locations (400 to 600 HP @ 460 VAC)...........2-21
Figure 2.18 – DC Drive Motor Field and Armature Connection Locations
(1.5 to 30 HP @ 230 VAC /3 to 60 HP @ 460 VAC / 7-110 Amp
Rated Output) .................................................................................... 2-22
Figure 2.19 – DC Motor Field and Armature Connection Locations
(40 to 75 HP @ 230 VAC /75 to 150 HP @ 460 VAC / 265 Amp
Rated Output) .................................................................................... 2-23
Figure 2.20 – DC Motor Field and Armature Connection Locations
(100 to 150 HP @ 230 VAC / 200 to 300 HP @ 460 VAC)...............2-24
Figure 2.21 – DC Motor Field and Armature Connection Locations
(400 to 600 HP @ 460 VAC) ..............................................................2-25
Figure 2.22 – DC Motor Connections (CCW Rotation Facing Commutator
End Shown)........................................................................................2-26
Figure 2.23 – Drive Cover Removal .......................................................................2-29
Figure 2.24 – Sample Regulator Board Terminal Strip Connection Diagram......... 2-30
Contents
III
Page 6

Figure 2.25 – Location of Regulator Board Terminal Strip......................................2-31
Figure 3.1 – Control Transformer Locations and Settings (380/415 VAC Drives) ....3-2
Figure 3.2 – Control Transformer Settings (230/460 VAC).......................................3-3
Figure 3.3 – Regulator Board Jumpers.....................................................................3-6
Figure 3.4 – AUTO REF Jumpers (J12 and J10)......................................................3-9
IV
FlexPak 3000 DC Drive Hardware Reference Version 4.3
Page 7

List of Tables
Table 1.1 – Drive Modification Kits...........................................................................1-4
Table 2.1 – Chassis Ground Torgue Requirements............................................... 2-10
Table 2.2 – Recommended Lug Model and Part Numbers ....................................2-17
Table 2.3 – AC Line Torque Recommendations.....................................................2-19
Table 2.4 – Armature Terminal Torqure Recommendations ..................................2-27
Table 2.5 – User Device Connections to the Regulator Board Terminal Strip........ 2-32
Table 3.1 – Jumper Settings.....................................................................................3-5
Contents
V
Page 8

VI
FlexPak 3000 DC Drive Hardware Reference Version 4.3
Page 9

Introduction to the FlexPak 3000 Drive
The products described in this instruction manual are manufactured by Reliance
Electric Industrial Company.
1.1 Store the Drive
After receipt inspection, repack the drive in its original shipping container until ready
for installation. To ensure satisfactory operation at startup and to maintain warranty
coverage, store the drive as follows:
• In its original shipping container in a clean, dry, safe place.
• In an ambient temperature that does not exceed 65°C (149°F) or go below -30°C
(-22°F).
• Within a relative humidity range of 5 to 95% without condensation.
• Away from a corrosive atmosphere. In harsh environments, cover the shipping/
storage container.
• At an altitude of less than 3,000 meters (10,000 ft.) above sea level.
CHAPTER 1
1.2 Drive Identification Nameplate
The FlexPak 3000 drive has a nameplate on the left side of the chassis that identifies
the specific model number design, applicable AC input power and DC output power
data. Refer to the sample nameplate in figure 1.1. All communication concerning this
product should refer to the appropriate model number information.
Figure 1.1 – Sample FlexPak 3000 Nameplates
Introduction to the FlexPak 3000 Drive
1-1
Page 10

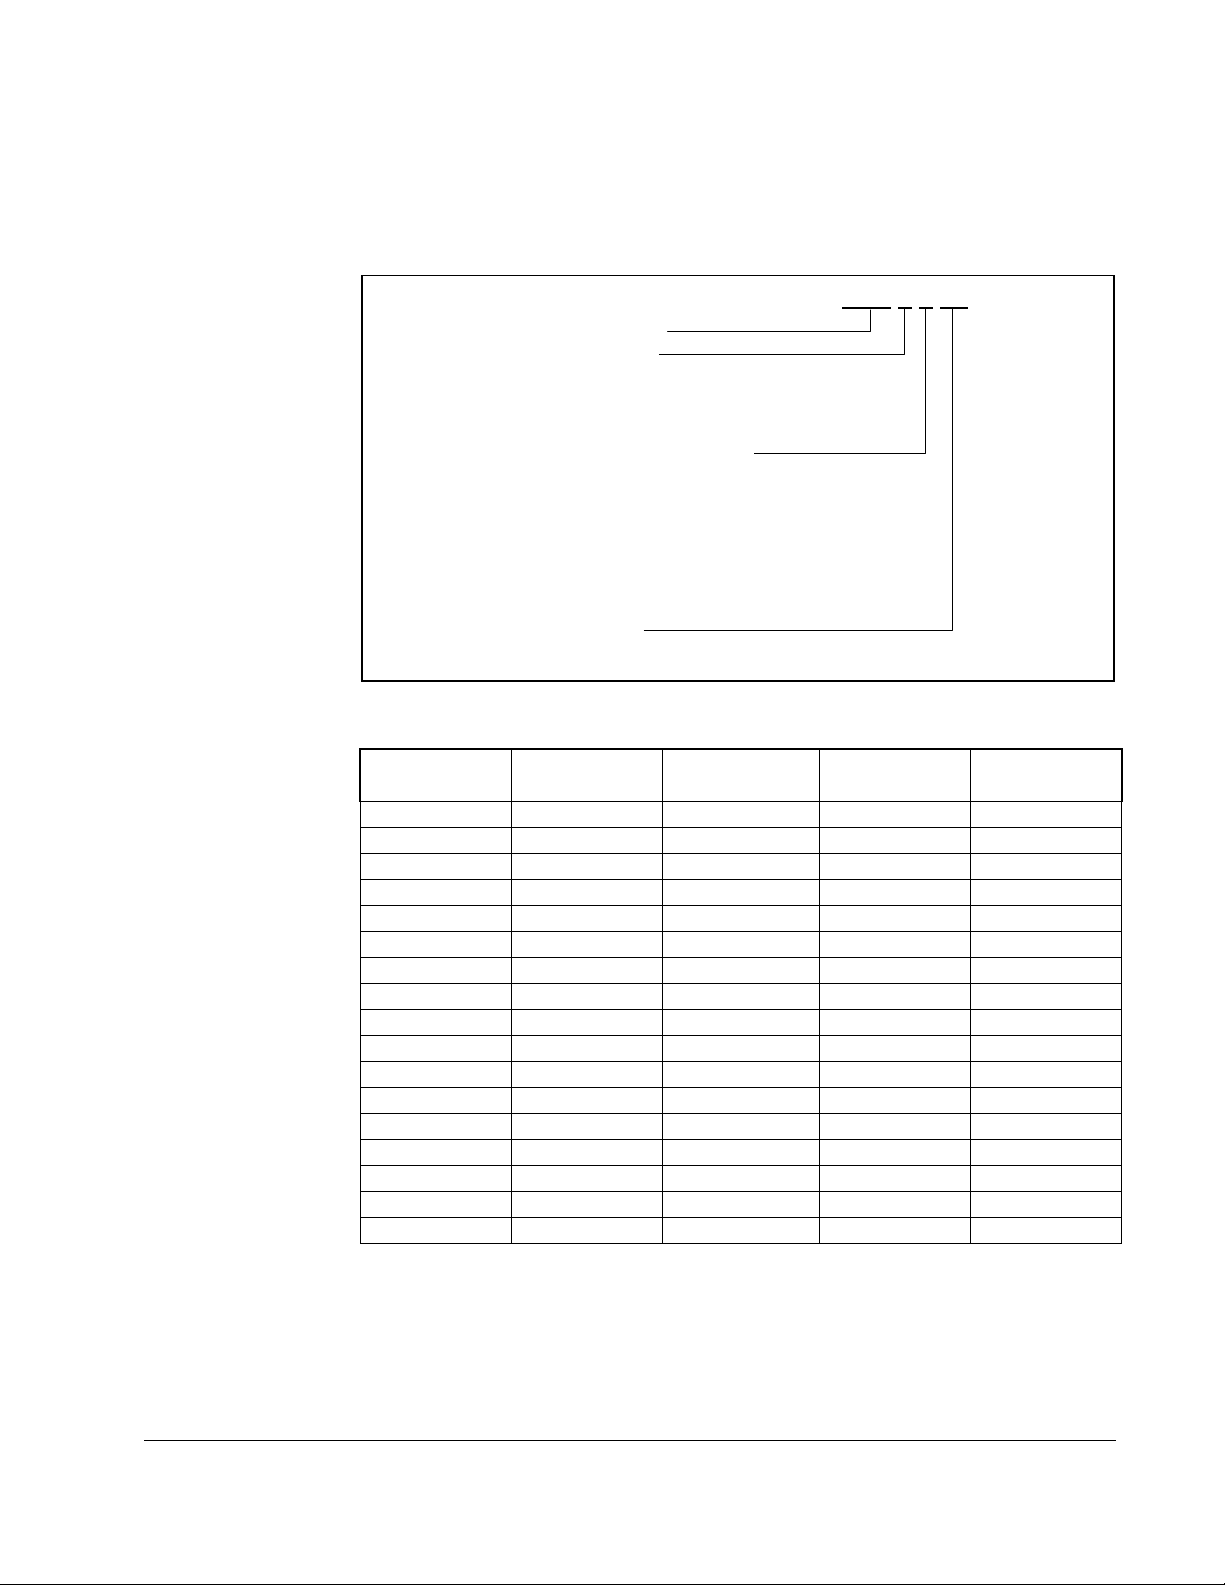
1.3 Model Numbers
Drive specific data, such as horsepower (or output current), regenerative or nonregenerative type, line voltage, chassis or enclosure type, software version and UL
certification, can be determined by the drive model number. The model number
structure is shown in figure 1.2.
Up to 300 HP, drives configured for 460 VAC input can be converted to 230 VAC input
at one half the 460 VAC horsepower rating by installing a 460 to 230 Volt Conversion
Kit (M/N 916FK0100, 1-60 HP, or M/N 916FK0200, 75-150 HP). Instruction manual
D2-3329, which is supplied with the kit, provides installation instructions. For drives
above 300 HP, contact your local Reliance Electric sales office for assistance.
For horsepower-rated drives:
Horsepower under 1000
For current-rated drives:
Rated output armature current
F = FlexPak 3000 product line
B = Regenerative drives with inverting fault breaker
R = Regenerative drives
N = Non-regenerative drives
K = Kits
150FR4042
2 = 230 volts
3 = 380/415 volts
4 = 460 volts
7 = Integrator
8 = European Power Module
0 = Chassis
7 = Integrator
Software version number 0-9, A-Z
0 = No listing
1 = U/L and C-U/L
2 = U/L, C-U/L, and CE
1.4 Drive Description
The drive is a full-wave power converter without back rectifier, complete with a digital
current minor loop and a digital major loop for armature voltage or speed regulation by
tachometer feedback. Figure 1.3 shows a block diagram of the drive.
Figure 1.2 – Model Number Structure
1-2
FlexPak 3000 DC Drive Hardware Reference Version 4.3
Page 11

The drive employs a wireless construction and uses a keypad for drive setup,
including parameter adjustments and unit selection, monitoring, and diagnostics.
Multiple language capability in English, French, German, Spanish, Italian and
‘Numeric Code' is available. Reference, feedback, and metering signals can be
interfaced to the drive. The drive can be controlled locally by the Operator Interface
Module (OIM) keypad or remotely by using the terminals at the regulator board
terminal strip. You can select one of the following active control sources using the
CONTROL SOURCE SELECT key:
•KEYPAD
• TERMBLK (regulator board terminal strip)
• NETWORK (if an optional network communication board is installed)
• SERIAL (CS3000).
1.5 Additional Information
Refer to the following publications as necessary for more information.
• D2-3405 FlexPak 3000 DC Drives Software Start-up and Reference Manual
• D2-3344 FlexPak 3000 Operator Interface Module (OIM) User Guide
• D2-3348 Control and Configuration Software (CS3000)
• D2-3412 DC Contactor Use with Integrator Drives
Introduction to the FlexPak 3000 Drive
Figure 1.3 – FlexPak 3000 Functional Block Diagram
1-3
Page 12

1.6 Optional Kits
Reliance offers modification kits that broaden the application range of the drive. A
summary of these kits is presented in table 1.1. Not all kits can be used with all drive
model numbers. Refer to the Standard Drives and Control Products catalog (D-406)
for more information.
Table 1.1 – Drive Modification Kits
Name Description
Model
Number I/M Number
115 VAC Control
Interface
460 VAC to 230 VAC
Conversion Kit
AC Line Disconnect
Kit
AC Tachometer
Feedback Kit
AutoMax Network
Communication Board
Blower Motor Starter
Kit
DeviceNet
Communication Board
Converts customer-supplied 115 VAC signals to
24 VDC for operating a FlexPak 3000. Mounts
separately on the panel or can be mounted in the
bottom of a NEMA 1 enclosed drive.
Allows conversion of the 460 VAC FlexPak 3000
to a 230 VAC FlexPak 3000 at one-half the 460
VAC horsepower rating.
Allows the three-phase line to be disconnected at
the drive. Molded case switch that mounts on the
chassis of the drive or NEMA 1 enclosure.
Allows the FlexPak 3000 to accept feedback
signals from AC tachometers to a maximum
voltage of 275 VAC RMS.
Allows the FlexPak 3000 to communicate on the
Reliance AutoMax Distributed Control System
(DCS).
Provides a fused AC starter with adjustable
overload and interlocking for control of the threephase blower motor used to cool the DC motor.
Allows a FlexPak 3000 to communicate over the
open protocol DeviceNet network. Mounts inside
the FlexPak 3000 and includes terminals for
network connections. You cannot use the
AutoMax Network Communication board when
using the DeviceNet board.
917FK0101 D2-3338
916FK series D2-3329
901FK series D2-3292,
D2-3365 or
D2-3395
907FK0301 D2-3297
915FK0101 D2-3318
902FK series D2-3295
915FK1100 n/a
Drive Control
Configuration
Software for FlexPak
3000
ControlNet Network
Communication
Board
1-4
Windows-based software that allows the user to
connect any personal computer running
Microsoft Windows version 3.1 or later to a
FlexPak 3000 drive. Allows you to create, store,
upload, and download drive configurations. You
can also start and stop the drive, monitor and
change parameters through the PC, and read
and reset the drive's fault log.
Allows a FlexPak 3000 to communicate over the
ControlNet network.
FlexPak 3000 DC Drive Hardware Reference Version 4.3
2CS3000 D2-3348
915FK2101 D2-3425
Page 13

Table 1.1 – Drive Modification Kits
Name Description
Model
Number I/M Number
Dynamic Braking Kit Provides the hardware, including braking grids,
needed to provide dynamic braking on stop.
Enhanced Field
Supply Kit
Field Current
Regulator Kit
I/O Expansion Board Mounts on the FlexPak 3000 chassis and gives
Inverting Fault Circuit
Breaker Kit
NEMA 1 Conversion
Kit
Operator Interface
Module (OIM) Remote
Mounting Kit
Provides electronic field trim, field economy , and
the ability to supply 240V field voltage and other
special voltages. This kit replaces the standard
field supply.
Provides field economy, as well as preweakening of the field using a fixed reference or
field weakening for above base speed operation.
Tachometer feedback is required with this kit.
This kit replaces the standard field supply.
the FlexPak 3000 additional analog, frequency,
and digital I/O capability.
This kit is an alternative to drives supplied with
inverting fault fuses.
Converts the standard chassis to a NEMA 1
enclosure.
Allows mounting of the OIM up to five meters
from the drive.
908FK,
909FK,
912FK, and
913FK series
923FK series D2-3413
911FK series D2-3336
914FK0101 D2-3301
906FK series D2-3300 or
904FK series D2-3299 or
905FK0101 D2-3294
D2-3313 or
D2-3374
D2-3330
D2-3331
Pulse Encoder
Feedback Kit
Allows for digital pulse encoder speed feedback. 907FK0101 D2-3302
1.7 Getting Assistance from Reliance Electric
If you have any questions or problems with the products described in this instruction
manual, con tac t y our local R elia nce Elec tric sale s off ice . F o r tech nic al assi sta nce , call
864-284-5444.
Introduction to the FlexPak 3000 Drive
1-5
Page 14

1-6
FlexPak 3000 DC Drive Hardware Reference Version 4.3
Page 15

Install and Wire the Drive
2.1 Install the Drive - Panel Layout
Minimum clearances must be maintained when the drive is mounted within a cabinet
as shown in figure 2.1. This allows adequate ventilation for the drive.
Regardless of these placement guidelines, the user is responsible for ensuring that
the drive's ambient temperature specification. See appendix A for more information.
Install the drive(s) in the cabinet. Refer to figures 2.2 through 2.7 for mounting
dimensions.
CHAPTER 2
Install and Wire the Drive
Figure 2.1 – Enclosure Mounting Minimum Clearance Distances
2-1
Page 16

Figure 2.2 – Drive Mounting Dimensions (1.5 to 30 HP @ 230 VAC /
3 to 60 HP @ 460 VAC / 7 to 110 Amp Rated Output)
2-2
FlexPak 3000 DC Drive Hardware Reference Version 4.3
Page 17

Figure 2.3 – Drive Mounting Dimensions (40 to 75 HP @ 230 V AC /
75 to 150 HP @ 460 VAC / 265 Amp Rated Output)
Install and Wire the Drive
2-3
Page 18

Figure 2.4 – Drive Mounting Dimensions (100 to 150 HP @ 230 VAC / 200 to 300 HP @ 460 VAC)
2-4
FlexPak 3000 DC Drive Hardware Reference Version 4.3
Page 19

Figure 2.5 – Drive Mounting Dimensions (400 to 600 HP @ 460 VAC)
Install and Wire the Drive
2-5
Page 20

Figure 2.6 – Integrator Drive Mounting Dimensions (1.5 to 30 HP @ 230 VAC / 3 to 60 HP @ 460 VAC
2-6
FlexPak 3000 DC Drive Hardware Reference Version 4.3
Page 21

Figure 2.7 – Integrator Drive Mounting Dimensions (40 to 75 HP @ 230 VAC / 75 to 150 HP @ 460 VAC)
Install and Wire the Drive
2-7
Page 22

2.2 Install a Transformer
ATTENTION:If an input transformer is installed ahead of the drive, a
power disconnecting device must be installed between the power line
!
Input transformers step up or step down input voltage and can be either auto or
isolation transformer types. Users should consider using an isolation transformer
instead of an auto transformer for the following advantages:
• AC power line disturbances and transients are minimized by an isolation
transformer, thus reducing or eliminating possible damage to solid state
components.
• An isolation transformer provides electrical isolation for the drive from plant power
system grounds. Damaging currents may be avoided in instances where the DC
output is accidentally grounded or where the DC motor circuits are grounded.
and the primary of the transformer. If this power disconnecting device is
a circuit breaker, the circuit breaker trip rating must be coordinated with
the inrush current (10 to 12 times full-load current) of the input
transformer. Distribution system capacity above the maximum
recommended system KV A requires using an isolation transformer , a line
reactor, or other means of adding similar impedance. Failure to observe
this precaution could result in damage to, or destruction of, the equipment
ATTENTION: Connection of a drive to a transformer with a primary rating
of 2300 VAC or more may require additional input line conditioning.
Contact your local Reliance Electric sales/service office for assistance
when this is required. Failure to observe this precaution could result in
damage to, or destruction of, the equipment.
Refer to tables A.1 and A.6 for more information. Reliance offers a series of isolation
transformers suitable for use with the drive. Call you local Reliance Electric sales
office for assistance.
2.3 Install an Input Disconnect
ATTENTION:The NEC/CEC requires that an input disconnect be
provided in the incoming power line and either be located within sight of
!
Any fused disconnect or circuit breaker in the incoming AC line must accommodate a
maximum symmetrical AC fault current as indicated in Appendix A of this instruction
manual. Size the disconnect to handle the transformer primary current as well as any
additional loads the disconnect may supply.
Step 1. Install an input disconnect in the incoming power line according to the NEC/
Step 2. Wire this disconnect in the primary circuit of the drive isolation transformer (if
the drive or have provisions for a padlock. Install an input disconnect in
the incoming power line that is located within sight of the drive or that
has provisions for a padlock. Failure to observe this precaution could
result in severe bodi ly injury or loss of life.
CEC if not provided with the drive. The disconnect switch should be within
clear view of machine operator and maintenance per s onn el for easy access
and safety. An open-type switch with provisions for a padlock is
recommended.
used).
2-8
FlexPak 3000 DC Drive Hardware Reference Version 4.3
Page 23

2.4 Install the Motor
Step 1. Verify that the motor is the appropriate rating to use with the drive.
Step 2. Install the DC motor in accordance with its installation instructions.
Step 3. Make sure that coupled applications have proper shaft alignment with the
driven machine or that belted applications have proper sheave/belt alignment
to minimize unnecessary motor loading.
Step 4. If the motor is accessible while it is running, install a protective guard around
all exposed rotating parts.
Step 5. Wire the motor to the drive. Refer to section 2.6.4, “Wire the DC Motor to the
Drive.”
2.5 Genera l Wiring Practices
ATTENTION:The user is responsible for conforming to the National
Electric Code (NEC/CEC) and all other applicable local codes. Wiring
!
The drive is designed for AC power entry and DC power exiting at the top and control
and signal wiring entering from the bottom.
practices, grounding, disconnects, and overcurrent protection are of
particular importance. Size and install all wiring in conformance with the
NEC/CEC and all other applicable codes. Failure to observe this
precaution could result in severe bodily injury or loss of life.
Reference signal wiring should be run in a separate conduit isolated from all AC and
DC power and control. Signal wires should not be run in parallel with high voltage or
electrically noisy conductors. Always cross such conductors at 90°. All reference
signals should be wired with either twisted double or twisted triple conductor wire, 2
twists per inch, stranded copper, AWG No. 16, 600 VAC rated, poly-vinyl chloride
insulation, with a temperature range of 40°C to 105°C (104°F to 221°F).
Tachometer feedback and other signal wiring should be run in a separate conduit
isolated from all AC and DC power and logic control. Wiring should be the same as for
the reference signals. For mounting with external contacts and solenoids, coils should
be suppressed to reduce noise.
Important: The maximum recommended wire length from the drive to the motor is
1000 feet.
2.5.1 Ground the Drive and Enclosure, the Motor and the Operator's
Control Station
You must ground both the control and power wiring.
Step 1. Locate the drive ground points as shown in figures 2.8 through 2.13.
Step 2. Run a suitable equipment grounding conductor unbroken from any drive
ground point (see step 1) to the plant ground (grounding electrode). A ring
lug is recommended at the ground point.
Install and Wire the Drive
Step 3. Connect a suitable grounding conductor from each conduit to this drive
ground point.
2-9
Page 24

Step 4. Connect a suitable equipment grounding conductor to the motor frame, the
transformer enclosure if used, and the drive enclosure. Run this conductor
unbroken to the grounding electrode.
Step 5. Connect the GND (green/ground) wire brought in with the incoming AC
power line to the drive ground point.
Step 6. Tighten chassis ground connections per table 2.1.
Table 2.1 – Chassis Ground Torgue Requirements
Hardware Size Tightening Torque
M5 18 lb/in (2 Nm)
M6 33 lb/in (3.7 Nm)
M8 100 lb/in (11.3 Nm)
M10 200 lb/in (23 Nm)
Lug with 14-10 AWG 35 lb/in (4 Nm)
Lug with 8 AWG 40 lb/in (4.5 Nm)
Lug with 6-4 AWG 45 lb/in (5.1 Nm)
2-10
FlexPak 3000 DC Drive Hardware Reference Version 4.3
Page 25

Figure 2.8 – Drive Control and Power Ground Point Locations (1.5 to 30 HP @ 230 VAC /
3 to 60 HP @ 460 VAC / 7-110 Amp Rated Output)
Install and Wire the Drive
2-11
Page 26

Figure 2.9 – Drive Control and Power Ground Point Locations (40 to 75 HP @ 230 VAC /
75 to 150 HP @ 460 VAC / 265 Amp Rated Output)
2-12
FlexPak 3000 DC Drive Hardware Reference Version 4.3
Page 27

Figure 2.10 – Drive Control and Power Ground Point Locations
(100 to 150 HP @ 230 VAC / 200 to 300 HP @ 460 VAC)
Install and Wire the Drive
2-13
Page 28

Figure 2.11 – Drive Control and Power Ground Point Locations (400 to 600 HP @ 460 VAC)
2-14
FlexPak 3000 DC Drive Hardware Reference Version 4.3
Page 29

Figure 2.12 – Integrator Drive Control and Power Ground Point Locations (1.5 to 30 HP @ 230 VA C / 3 to 60 HP @ 460 VAC)
Install and Wire the Drive
2-15
Page 30

Figure 2.13 – Integrator Drive Control and Power Ground Point Locations (40 to 75 HP @ 230 VAC / 75 to 150 HP @ 460 VAC)
2-16
FlexPak 3000 DC Drive Hardware Reference Version 4.3
Page 31
2.5.2 Recommended Lugs
g
The following describes how to interpret lug model numbers used in grounding the
drive. Refer to table 2.2 for a list of recommended lug model and part numbers.
Basic Catalog Number
Num ber of C onductors
1 = One conductor
2 = Two conductors
3 = Three conductors
Mounting H ole and Lug Material
1 = One m ounting hole, copper
2 = One m ounting hole, alum inum
3 = Two m ounting holes, copper
4 = Two m ounting holes, alum inum
5 = Four mopunting holes, copper
6 = four mounting holes. aluminum
Lug Version N um ber
01 throu
h 99
1LG 1 2 03
Table 2.2 – Recommended Lug Model and Part Numbers
Model
Number
1LG1101 68321-38AA 14 - 8 AWG M5 Copper
1LG1102 68321-38AB 14 - 8 AWG M6 Copper
1LG1103 68321-38AC 4 - 1/0 AWG M10 Copper
1LG1104 68321-38AD 1/0 - 4/0 AWG M12 Copper
1LG1105 68321-38AE 4/0 - 500 MCM M10 Copper
1LG1201 68321-38BA 14 - 1/0 AWG M6 Aluminum
1LG1202 68321-38BB 14 - 2/0 AWG M6 Aluminum
1LG1203 68321-38BC 6 - 250 MCM M8 Aluminum
1LG1204 68321-38BD 6 - 300 MCM M6 Aluminum
1LG1205 68321-38BE 6 - 350 MCM M10 Aluminum
1LG1206 68321-38BF 4 - 500 MCM M10 Aluminum
1LG1207 68321-38BG 300 - 800 MCM M12 Aluminum
1LG1208 68321-38BH 500 - 1000 MCM M12 Aluminum
1LG2401 68321-39BA 2 - 600 MCM M10 Aluminum
1LG2402 68321-39BB 350 - 800 MCM M10 Aluminum
1LG2403 68321-39BC 500 - 1000 MCM M12 Aluminum
1LG3601 68321-40BA 2 - 600 MCM M12 Aluminum
1.
Lugs are non-insulated screw type (solderless) for use with solid and stranded wire.
Reliance Part
Number Wire Size
Mounting
Hole Material
1
Install and Wire the Drive
2-17
Page 32

2.5.3 Wire AC Power to the Drive
ATTENTION:The user is responsible for conforming to the National
Electric Code (NEC/CEC) and all other applicable local codes. Wiring
!
Step 1. Size the AC line supply conductors for the specific drive rating and according
Step 2. Connect the AC line supply to the termination points located at the right top
Step 3. (Integrator drives only) Connect the line fuses (1FU, 2FU, 3FU), field fuses
practices, grounding, disconnects, and overcurrent protection are of
particular importance. Size and install wiring in conformance with the
NEC/CEC and all other applicable codes. Failure to observe this
precaution could result in severe bodily injury or loss of life.
ATTENTION:The drive requires a three-phase power source of either
230, 380, 415, or 460 VAC, 50 or 60 Hz. If the correct voltage is not
available, a transformer must be installed between the power source and
the drive. Do not connect the drive to a power source with available
symmetrical short circuit capacity in excess of the power source capacity
listed in Appendix A, tables A.6 and A.7. Failure to observe these
precautions could result in bodily injury or equipment damage.
to all applicable codes.
of the drive or to the disconnect. See figures 2.14 through 2.17.
(6FU, 7FU, 8FU), and the FN contactor to the drive as shown in figure 2.18.
Note that the line and field fuses must be wired as shown in figure 2.18 to
ensure proper phase relationships.
Step 4. (Integrator drives only) Connect the AC line supply to the line fuses (1FU,
2FU, 3FU).
Step 5. Tighten incoming AC line connections per table 2.3.
2-18
FlexPak 3000 DC Drive Hardware Reference Version 4.3
Page 33

Table 2.3 – AC Line Torque Recommendations
AC Input
Horsepower 230 VAC 460 VAC
1.5 55 lb-in (6.2 Nm) ---------2 55 lb-in (6.2 Nm) ---------3 55 lb-in (6.2 Nm) 55 lb-in (6.2 Nm)
5 55 lb-in (6.2 Nm) 55 lb-in (6.2 Nm)
7.5 55 lb-in (6.2 Nm) 55 lb-in (6.2 Nm)
10 55 lb-in (6.2 Nm) 55 lb-in (6.2 Nm)
15 120 lb-in (13.6 Nm) 55 lb-in (6.2 Nm)
20 120 lb-in (13.6 Nm) 55 lb-in (6.2 Nm)
25 120 lb-in (13.6 Nm) 55 lb-in (6.2 Nm)
30 120 lb-in (13.6 Nm) 120 lb-in (13.6 Nm)
40 200 lb-in (22 Nm) 120 lb-in (13.6 Nm)
50 200 lb-in (22 Nm) 120 lb-in (13.6 Nm)
60 200 lb-in (22 Nm) 120 lb-in (13.6 Nm)
75 200 lb-in (22 Nm) 200 lb-in (22 Nm)
100 200 lb-in (22 Nm) 200 lb-in (22 Nm)
125 350 lb-in (40 Nm) 200 lb-in (22 Nm)
150 350 lb-in (40 Nm) 200 lb-in (22 Nm)
200 ---------- 200 lb-in (22 Nm)
250 ---------- 350 lb-in (40 Nm)
300 ---------- 350 lb-in (40 Nm)
400 ---------- 350 lb-in (40 Nm)
500 ---------- 350 lb-in (40 Nm)
600 ---------- 350 lb-in (40 Nm)
Rated Output Amps AC Input
7A 55 lb-in (6.2 Nm)
29A 55 lb-in (6.2 Nm)
55A 120 lb-in (13.6 Nm)
110A 120 lb-in (13.6 Nm)
265A 200 lb-in (22 Nm)
Install and Wire the Drive
Important: The tightening torque in the table applies to the wiring device (stud or
terminal board) provided. When an input or an output device (breaker or
lug kit) is added, refer to the kit instructions for tightening specifications.
2-19
Page 34

Figure 2.14 – AC Line Connection Location (1.5 to 30 HP @ 230 VAC 3 to 60 HP @ 460 VAC / 7-110 Amp Rated Output)
Figure 2.15 – AC Line Connection Location (40 to 75 HP @ 230 VAC /75 to 150 HP @ 460 VAC / 265 Amp Rated Output)
2-20
FlexPak 3000 DC Drive Hardware Reference Version 4.3
Page 35

AC LINE
CONNECTION
AC LINE
CONNECTION
Shown Without Optional
AC Line Disconnect
Shown With Optional
AC Line Disconnect
Figure 2.16 – AC Line Connection Locations (100 to 150 HP @ 230 VAC / 200 to 300 HP @ 460 VAC)
Install and Wire the Drive
Figure 2.17 – AC Line Connection Locations (400 to 600 HP @ 460 VAC)
2-21
Page 36

2.5.4 Wire the DC Motor to the Drive
Step 1. Size the motor armature circuit conductors for the specific drive rating (see
Appendix A) and according to applicable codes. Use only copper wire rated
60/70°C or higher.
Step 2. Locate the DC motor armature and field supply leads on the drive. Refer to
figure 2.18 to 2.21.
Step 3. Connect the DC motor armature leads and the shunt field supply leads to the
drive. See figure 2.22.
Step 4. Tighten armature connections per table 2.4. Field connections should be
tightened to 9 lb-in (1.0 Nm). The tightening torque applies to the wiring
device (stud or terminal board) provided. When an input or output device
(breaker or lug kit) is added, refer to the kit instructions for tightening
specifications.
2-22
Figure 2.18 – DC Drive Motor Field and Armature Connection Locations
(1.5 to 30 HP @ 230 VAC /3 to 60 HP @ 460 VAC / 7-110 Amp Rated Output)
FlexPak 3000 DC Drive Hardware Reference Version 4.3
Page 37

Figure 2.19 – DC Motor Field and Armature Connection Locations
(40 to 75 HP @ 230 VAC /75 to 150 HP @ 460 VAC / 265 Amp Rated Output)
Install and Wire the Drive
2-23
Page 38

Figure 2.20 – DC Motor Field and Armature Connection Locations
(100 to 150 HP @ 230 VAC / 200 to 300 HP @ 460 VAC)
2-24
FlexPak 3000 DC Drive Hardware Reference Version 4.3
Page 39

Figure 2.21 – DC Motor Field and Armature Connection Locations (400 to 600 HP @ 460 VAC)
Install and Wire the Drive
2-25
Page 40

Figure 2.22 – DC Motor Connections (CCW Rotation Facing Commutator End Shown)
2-26
FlexPak 3000 DC Drive Hardware Reference Version 4.3
Page 41

Table 2.4 – Armature Terminal Torqure Recommendations
Horsepower
Rated Drives
1.5 8-9 lb-in (.9-1.0 Nm) ------------2 8-9 lb-in (.9-1.0 Nm) ------------3 8-9 lb-in (.9-1.0 Nm) 8-9 lb-in (.9-1.0 Nm)
5 8-9 lb-in (.9-1.0 Nm) 8-9 lb-in (.9-1.0 Nm)
7.5 55 lb-in (6.2 Nm) 8-9 lb-in (.9-1.0 Nm)
10 55 lb-in (6.2 Nm) 8-9 lb-in (.9-1.0 Nm)
15 55 lb-in (6.2 Nm) 55 lb-in (6.2 Nm)
20 150 lb-in (16.9 Nm) 55 lb-in (6.2 Nm)
25 150 lb-in (16.9 Nm) 55 lb-in (6.2 Nm)
30 150 lb-in (16.9 Nm) 55 lb-in (6.2 Nm)
40 200 lb-in (22 Nm) 150 lb-in (16.9 Nm)
50 200 lb-in (22 Nm) 150 lb-in (16.9 Nm)
60 200 lb-in (22 Nm) 150 lb-in (16.9 Nm)
75 200 lb-in (22 Nm) 200 lb-in (22 Nm)
100 350 lb-in (40 Nm) 200 lb-in (22 Nm)
125 350 lb-in (40 Nm) 200 lb-in (22 Nm)
150 350 lb-in (40 Nm) 200 lb-in (22 Nm)
200 ------------- 350 lb-in (40 Nm)
250 ------------- 350 lb-in (40 Nm)
300 ------------- 350 lb-in (40 Nm)
400 ------------- 350 lb-in (40 Nm)
500 ------------- 350 lb-in (40 Nm)
600 ------------- 350 lb-in (40 Nm)
230 VAC Input 460 VAC Input
Armature Terminal Torque
Current Rated Drives Armature Terminal Torque
7A 8-9 lb-in (.9-1.0 Nm)
29A 55 lb-in (6.2 Nm)
55A 55 lb-in (6.2 Nm)
110A 150 lb-in (16.9 Nm)
265A 200 lb-in (22 Nm)
2.5.4.1 Wire Motor Overload Protection
Install and Wire the Drive
A software (internal) overload is provided that meets NEC/CEC and UL/C-UL
requirements. In addition to the software (internal) overload function, a DC motor
thermostat can be used for motor thermal overload protection. The thermostat leads
are brought out through the motor terminal box as leads P1 and P2. These two leads
must be wired to the regulator board terminal strip terminals 13 and 14.
ATTENTION: The thermostat leads to regulator board terminal strip pins
13 and 14 should be routed through a separate conduit away from motor
!
armature, field and blower motor power wiring.Failure to observe this
precaution could result in regulator board damage due to improper wiring
practices.
NOTE: The drive will not start if the circuit between terminals 13 and 14 is not made.
See figure 2.24.
2-27
Page 42

2.5.5 Wire the Stop Input
ATTENTION:The user must provide an external, hardwired emergency
stop circuit outside of the drive circuitry. This circuit must disable the
!
The FlexPak 3000 drive can be stopped by the assertion of a stop input (which can be
configured as a ramp stop, a current limit stop, or a coast/DB stop), opening a
permissive input (coast/DB interlock or customer interlock), deassertion of the
input, or in the event of a fault. Depending on the type of stop, one of two different stop
sequences
Previous to software version 4.0, once a stop sequence began, it ran to completion,
ignoring any
To the sequencing algorithm, the drive is always in one of three states: armature not
active (main contactor open), in run mode, or in jog mode. The drive is considered to
be in “run mode” if it was started by the
until the completion of a stop sequence. Note that the drive can also enter the run
mode from the jog mode if the
considered to be in “jog mode” if it was started via the
in jog mode until the completion of a stop sequence or the
causing the drive to switch from jog mode to run mode. Note that the OIM “RUNNING”
status indicates that the armature is active, either in run mode or jog mode.
system in case of improper operation. Uncontrolled machine operation
may result if this procedure is not followed. Failure to observe this
precaution could resu lt in bodily inj ury.
are executed to provide an orderly method of deactivating the armature.
RUN or JOG requests received during the stop sequence.
JOG
RUN input. The drive will remain in run mode
RUN input is asserted while in jog mode. The drive is
JOG input. The drive will remain
RUN input is asserted
Important: Only drives using software version 4.0 (and later) have the ability to
terminate a ramp/current limit stop sequence. Drives using earlier
versions of the software do not have this feature, and will ramp to stop
before a
in chapter 3 of the FlexPak 3000 Software reference manual for more
information.
The FlexPak 3000 drive can be configured to provide a coast-to-rest operational stop
without physical separation of the power source from the motor. A coast-to-rest stop
turns off the thyristor power device drivers.
In addition to the operational stop, the user must provide an external, hardwired
emergency stop external to the drive. The emergency stop circuit must contain only
hardwired electromechanical components. Operation of the emergency stop must not
depend on electronic logic (hardware or software) or on the communication of
commands over an electronic network or link.
RUN or jog request will be executed. Refer to “Stop Sequencing”
2-28
FlexPak 3000 DC Drive Hardware Reference Version 4.3
Page 43
2.5.5.1 Wire the COAST/STOP Digital Input
The user must provide an external operator-accessible coast/stop pushbutton at
terminals 7 and 8 on the Regulator board to disable the machine in case of improper
operation. Uncontrolled machine operation might result if this is not done.
The customer interlock is a software-based stop function unless wired in series with
the coast/stop input. Any safety-related stops must be wired through the coast/stop
input. Use the following procedure to wire the coast/stop input.
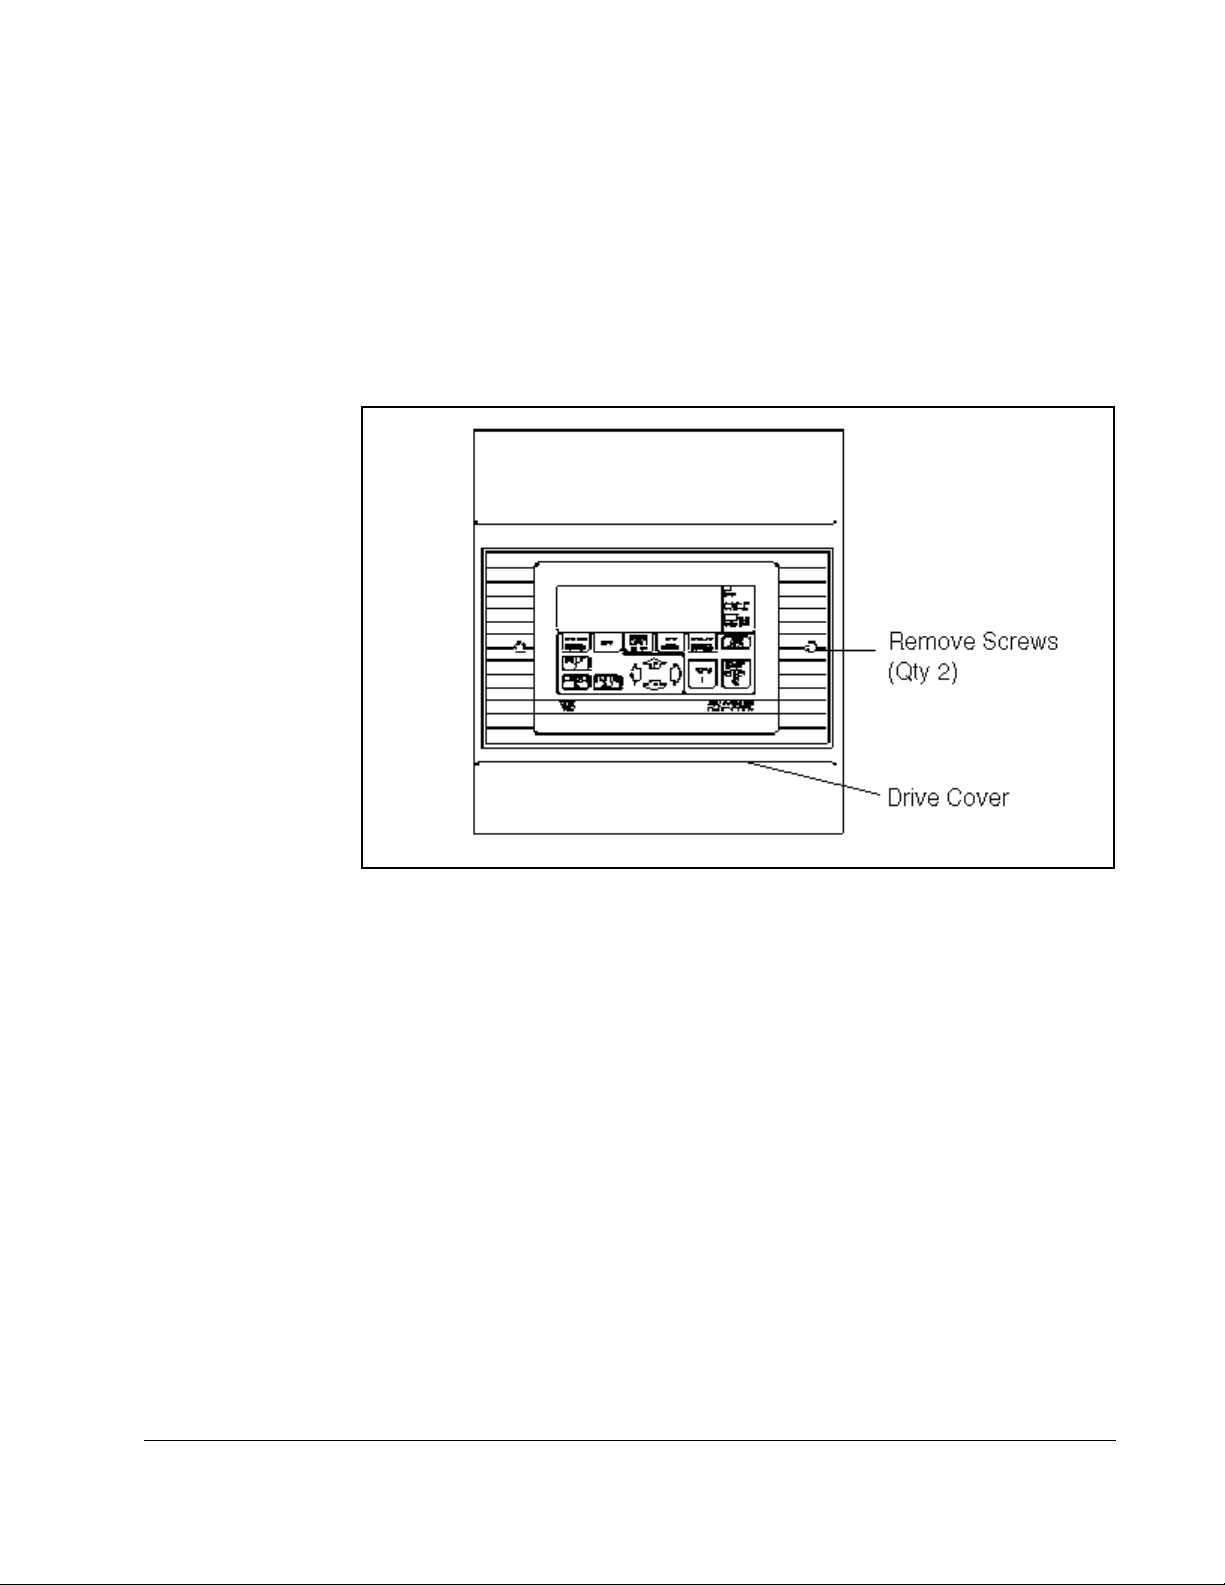
Step 1. Remove the two screws from the drive cover. See figure 2.23.
Figure 2.23 – Drive Cover Removal
Step 2. Locate the terminal strip (1 to 32) at the bottom of the regulator board. See
figure 2.25.
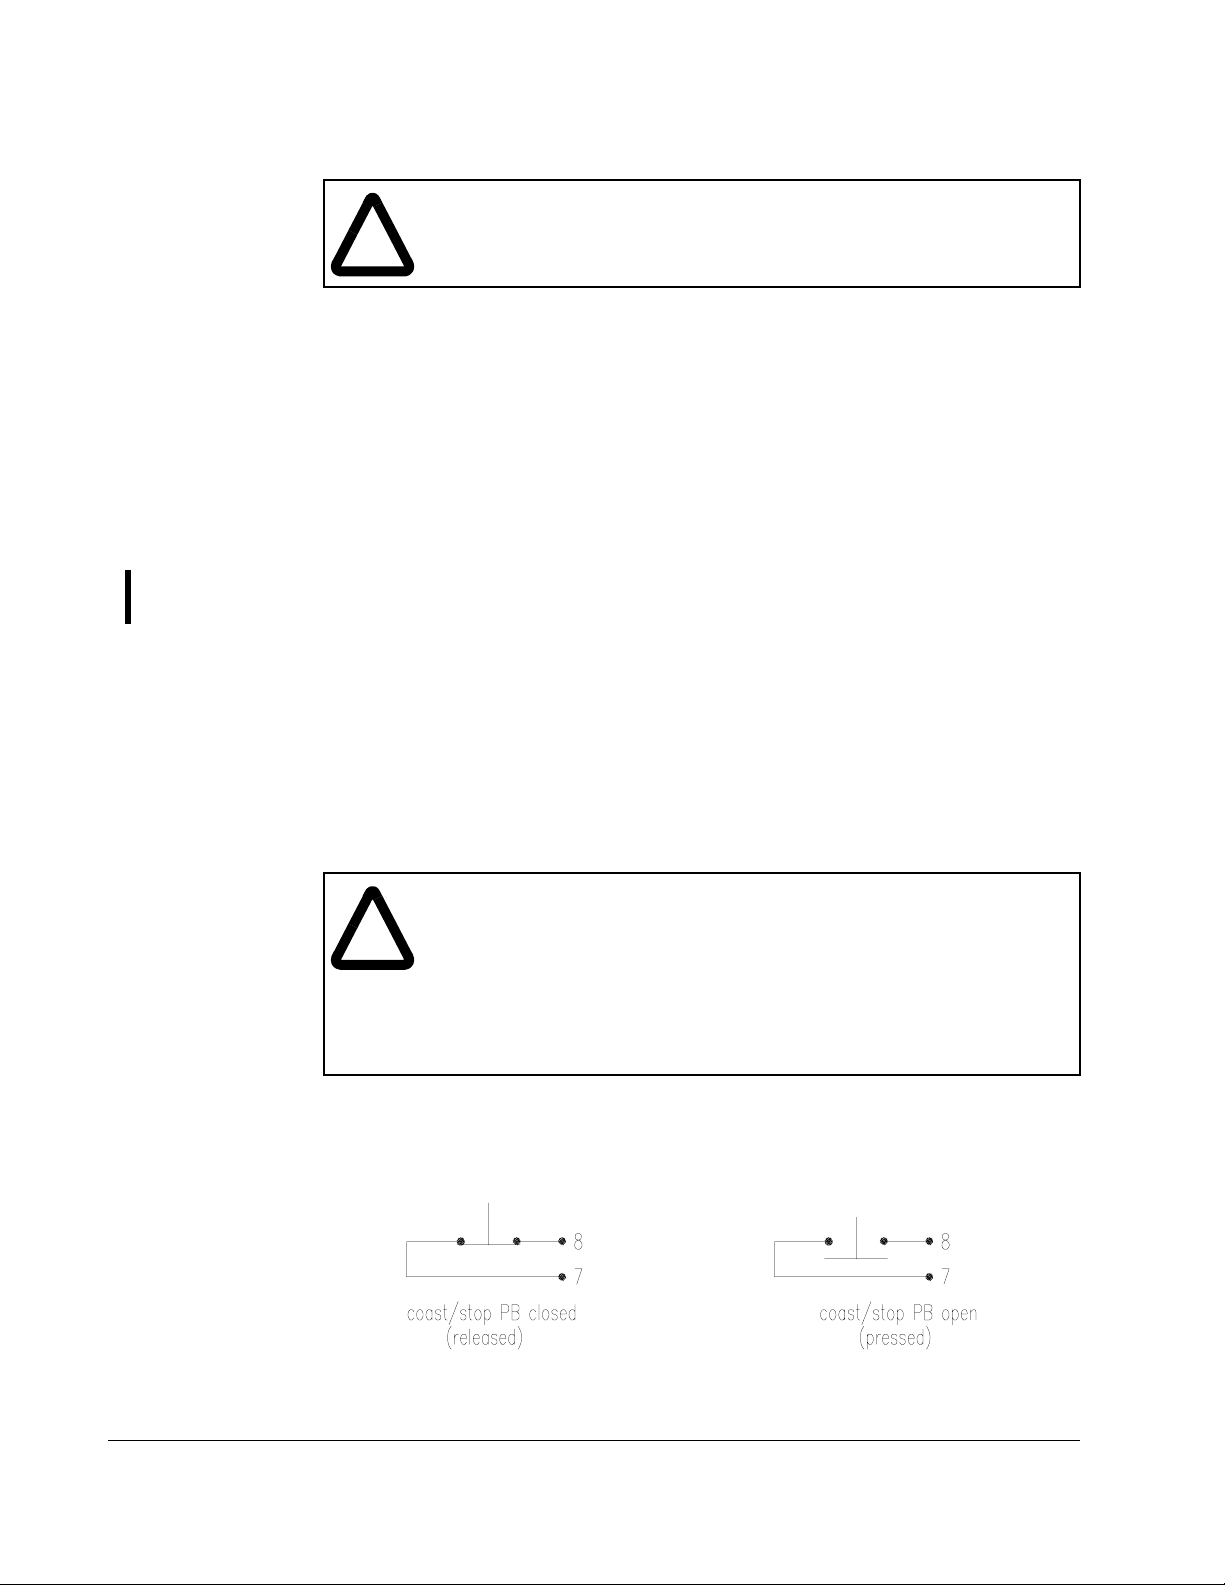
Step 3. Connect a normally closed Coast/Stop pushbutton to terminals 7 (+24V) and
8. See figure 2.24.
Step 4. Tighten these terminal connections to a torque not to exceed 7 lb-in (0.8
Nm).
2.5.5.2 Compliance with EN 60204-1: 1992
This section applies to users who must comply with EN 60204-1: 1992, part 9.2.5.4,
Emergency Stop.
In order to fully comply with EN60204-1: 1992, part 9.2.5.4, at least one of the stop
methods must be a category 0 stop. See section 2.6.5 for more information.
Install and Wire the Drive
2-29
Page 44

Optional Jog selector swi tc h
Start
Stop
Run
Jog
Optional Jog with
maintained contact
1
2
3
4
Run
Run
Jog
Jog
Start/Stop
1
2
3
4
2-30
Figure 2.24 – Sample Regulator Board Termin al Strip Connect ion Diagram
FlexPak 3000 DC Drive Hardware Reference Version 4.3
Page 45

RS-232
Connector
Figure 2.25 – Location of Regulator Board Terminal Strip
Install and Wire the Drive
2-31
Page 46

2.5.6 Wire Optional Devices to the Drive
ATTENTION:Do not route signal wiring with power wiring in the same
conduit. This might cause interference with drive operation. Route signal
!
Refer to figures 2.24 and 2.25 and table 2.5 when wiring optional devices to the drive.
Size and install all wiring in accordance with the NEC and all other applicable local
codes.
RUN 1 (+24V) and 2
STOP 1 (+24V) and 3
JOG 1 (+24V) and 4
REV/FWD 1 (+24V) and 5
AUTO/MAN 1 (+24V) and 6
INTERLOCK 9 and 11 (+24V)
FAULT/ALARM RESET 10 and 11 (+24V)
DIGITAL INPUT 0 12 and 14 (+24V)
MOTOR THERMOSTAT 13 and 14 (+24V)
SPEED REFERENCE
POTENTIOMETER:
AUTO REFERENCE:
(+)
(-)
TACHOMETER (Analog):
High Range
Low Range
Common
METER OUTPUT 1 24 and 25 (common)
METER OUTPUT 2 25 (common) and 26
RUNNING (Indicator) 27 and 28
ALARM (Indicator) 29 and 30
NO FAULT (Indicator) 31 and 32
1.
Analog tachometer must be rated between 18 and 200 Volts/1000 RPM. The output voltage must not
exceed 250 V for a DC tachometer or 275 RMS for AC tachometers when the motor is rotating at the
value set for the TOP SP EED parameter. To calcu late the output voltage at top speed:
Tachome ter Voltage at TOP SPEED = TOP SPEED
See section 3.4.7 for information on jumpers J14 and J11.
2.
When the maximum tach voltage at top speed is 62 VDC, use terminals 22 and 23 to connect the analog
tachometer. When the maximum tach voltage at top speed is 250 VDC, use terminals 21 and 23 to
connect the analog tachometer.
wiring and power wiring in separate conduits. Failure to observe this
precaution could result in damage to, or destruction of, the equipment.
Table 2.5 – User Device Connections to the Regulator Board Terminal Str ip
User Device
• High Side (+10 ISOL)
• Wiper (+ MAN REF)
• Low Side (-MAN REF)
1
2
2
2
1000 1000
Regulator Board
Terminal Strip Numbers
16
17
18
19
20
21
22
23
x ANALOG TACH VOLTS
2-32
FlexPak 3000 DC Drive Hardware Reference Version 4.3
Page 47

2.5.6.1 Logic Inputs
ATTENTION:Connecting an external power source to any of the +24
volt connections (terminals 1, 7, 11, and 14) on the Regulator board
!
The logic input circuits can be powered either from the internal +24 volt DC power
supply or from an external +24 volt DC power source. The internal +24 volt DC power
supply is available at the Regulator board terminal strip (see figure 2.16). If an
external power source is used, only the common must be connected to 24 V
COM on the Regulator board (terminal 15).
2.5.6.2 Logic Outputs
The logic output circuits are normally-open (when de-energized) relay contacts. When
energized (contacts closed) the three circuits indicate the following drive conditions.
Terminals are on the Regulator board terminal strip.
• Running Terminals 27 and 28
• Alarm Terminals 29 and 30
• No Fault Terminals 31 and 32
terminal strip will damage the drive. DO NOT connect the external power
source on the +24 volt connections on the Regulator board terminal strip.
Failure to observe this precaution could result in damage to, or
destruction of, the equipment.
2.5.6.3 Analog Inputs
The three customer analog inputs are Manual Mode Reference, Automatic Mode
Reference, and Analog Tachometer Feedback. At their full range, these inputs are
converted at 12 bits plus sign.
2.5.6.4 Analog Outputs
The two metering analog outputs are available at Regulator board terminals 24, 25,
and 26. Terminal 25 is the common connection for both output signals. The selected
signals for both meter outputs are averaged (filtered) over 100 msec to reduce meter
fluctuations.
Parameter
METER OUT 2 SELECT corresponds to terminals 25 and 26. Refer to these parameters
in Appendix B for additional drive test points that ban be configured to source Meter
Outputs 1 and 2.
METER OUT 1 SELECT corresponds to terminals 24 and 25. Parameter
Install and Wire the Drive
2-33
Page 48

2-34
FlexPak 3000 DC Drive Hardware Reference Version 4.3
Page 49

Drive Setup and Adjustment
ATTENTION:Only qualified electrical personnel familiar with the
construction of this equipment and the hazards involved should install,
!
3.1 Perform a Power Off Inspection
Inspect the drive and modification kits for possible physical damage or improper
connections.
Verify that the wiring of the operator's station and the wiring to the drive is made with
sufficient bare wire to make a good electrical connection. The removal of an excessive
length of insulation may needlessly expose conductors, resulting in the possibility of
shorts or safety hazards.
adjust, operate, and/or service this equipment. Read and understand
this section in its entirety before proceeding. Failure to observe this
precaution could result in severe bodily injury or loss of life.
CHAPTER 3
3.2 Verify Control Transformer Tap Settings
Before input power is applied to the drive, verify that the control transformer taps are
set to match the input power . Note that most FlexPak 3000 drives ship from the factory
configured for 460 VA C input power (or 415 VAC for current-rated drives). These
factory settings can be changed to configure the drive for 230 VAC or 380 VAC input
power. The conversion procedures are described in sections 3.2.1 and 3.2.2.
3.2.1 Converting a Drive for 380 VAC Input Power
ATTENTION:380/415 VA C-rated FlexP ak 3000 drives can be configured
for either 380 VA C or 415 VAC input power . Before input power is applied
!
380/415 VAC-rated drives are shipped from the factory configured for 415 VAC line
input. Wire 782 is connected to terminal H1 and wire 783 is connected to terminal H3.
To configure the drive for 380 VAC operation, perform the following steps:
Step 1. Disconnect and lock out all incoming power to the drive.
Step 2. Move wire 783 to terminal H2. See figures 3.1 and 3.2 for terminal locations.
Step 3. Through the OIM, perform the Nominal AC Line Volts Adjust procedure as
to the drive, verify that the control transformer taps are set to match the
input power. Failure to observe this precaution could result in damage
to, or destruction of, the equipment.
described in section 3.9.
Drive Setup and Adjustment
3-1
Page 50

Figure 3.1 – Control T ransformer Locations and Settings (380/415 VAC Drives)
3.2.2 Converting a Drive for 230 VAC Input Power
ATTENTION:230/460 VA C-rated FlexP ak 3000 drives can be configured
for either 230 VA C or 460 VAC input power . Before input power is applied
!
Most 230/460 VAC-rated drives are shipped from the factory configured for 460 VAC
line input. For drives rated at less than 200 HP, a conversion kit (M/N 916FK0100 or
916FK0200) is required to convert FlexPak 3000 drives for 230 VAC line input. Drives
rated at 200 HP to 300 HP can be converted to 230 VAC input power by performing
the following steps. After conversion, the drive will operate at one-half the rated
horsepower (200 HP @ 460 VAC will convert to 100 HP @ 230 VAC).
Important: The following procedure applies only to drives rated at 200 HP to 300 HP.
Step 1. Disconnect and lock out all incoming power to the drive.
Step 2. Disconnect the jumpers between H2 and H3 on the control transformer. See
Step 3. Use the jumpers that were removed to connect H1 to H3 and H4 to H2, as
to the drive, verify that the control transformer taps are set to match the
input power. Failure to observe this precaution could result in damage
to, or destruction of, the equipment.
Higher horsepower drives cannot be converted for 230 VAC input power.
figure 3.2 for the location of the control transformer and the terminal
positions.
shown in figure 3.2.
3-2
FlexPak 3000 DC Drive Hardware Reference Version 4.3
Page 51

Step 4. Re-connect power to the drive.
Step 5. Through the OIM, access the
the value to 230.
NOMINAL AC LINE VOLTS parameter (P.037). Set
3.3 Perform a Motor Ground Check
Drive Setup and Adjustment
Figure 3.2 – Control Transformer Settings (230/460 VAC)
ATTENTION:A megohmmeter can be used for this motor ground check,
but all conductors between the motor and the drive must be
!
The DC motor frame and conduit box should be connected to a good earth ground per
the motor instruction manual.
disconnected. The megohmmeter’s high voltage can damage the drive’ s
electronic circuits. Disconnect all conductors between the motor and the
drive before using a megohmmeter for this motor ground check. F ailure
to observe this precaution could result in damage to, or destruction of,
the equipment.
3-3
Page 52

V erify that there is no path to ground in either the DC motor armature circuit, the shunt
field circuit or the thermostat circuit. Connect one lead of an ohmmeter to the motor
frame and the other lead to the two armature leads, then to the two field leads and to
the two thermostat leads. If a reading of less than 100,000 ohms is observed, a
ground condition exists and MUST be corrected before power is applied.
3.4 Set Jumpers
ATTENTION:This equipment is at line voltage when AC power is
connected to the drive. Disconnect and lock out incoming power to the
!
The jumper settings for the FlexPak 3000 drive determine the regulator type, program
protection, field settings, references for automatic and manual modes, tachometer
voltage range, and armature feedback scaling.
There are a few guidelines for setting jumpers:
• Through the OIM, check the current jumper settings for J11, J14, and J18 in the
Correct Scaling Jumper Positions menu under Drive Information. Write down
these settings as displayed and make sure the actual settings match.
drive before proceeding. After power is removed, verify with a voltmeter
at power terminals 181, 182, and 183 that no voltage exists before
touching any internal parts of the drive. Failure to observe this precaution
could result in severe bodily injury or loss of life.
ATTENTION:Unless explicitly stated otherwise, power must be removed
before changing any jumper connection. Failure to observe this
precaution could result in damage to, or destruction of, the equipment.
• Through the OIM, check the current settings for J15, J20, and J21 in the Drive
Information menu. If these settings are correct for your system, you do not need to
change them.
Jumpers are read only on power-up, so power must be cycled for a change to a
jumper setting to be recognized by the drive.
To set the jumpers:
Step 1. Remove power from the drive.
Step 2. Remove the cover . Refer to figure 2.15 for cover remov al. You do not need to
remove the keypad.
Step 3. The jumpers are located on the Regulator board. See figure 3.3 for jumper
locations.
Step 4. Set the jumpers as described in secti ons 3.4.1 through 3.4.13. Record the
settings in table 3.1.
3-4
FlexPak 3000 DC Drive Hardware Reference Version 4.3
Page 53

Table 3.1 – Jumper Settings
DEFAULT
JUMPER
SETTING FINAL SETTING
J15 (REGULATOR TYPE) SPEED
J16 (OIM PROGRAM) ENABLE
J20 (FIELD LOSS DETECT) ENABLE
J21 (FIELD SUPPLY JUMPER) B-C
J19 (MANUAL REF) POT
J14 (TACH V RANGE) 62
J11 (TACH V SCALE) 16
J10 (AUTO REF) VOLTS
J12 (AUTO REF) VOLTS
J18 (ARM I FB RB) Position 4
J26 (not used)
J27 (SPARE 1) (not used)
J28 (FILTER SELECT) (not used)
J29 (SPARE 2) (not used)
J30 (POWER UNIT) LOW
3.4.1 Set the Regulator Type (Jumper J15)
J15 determines whether the drive uses speed/voltage or torque/current regulation.
When
CURRENT is selected, only the terminal strip, the DeviceNet Communication
Board, or the AutoMax Network Communication Board can be used as a control
source. When J15 is set to
changed.
Also note that speed/voltage parameters must be set to provide overspeed protection
for the drive.
CURRENT, the drive is fixed in auto mode and cannot be
Jxx is not used. Do not
install a shorting bar
across pins of this jumper.
Drive Setup and Adjustment
3-5
Page 54

Figure 3.3 – Regulator Board Jumpers
3.4.2 Setting Program Protection (Jumper J16)
The OIM program jumper (J16) determines whether or not parameter changes can be
made through the ke ypad (OIM). Only programming options are affected by the setting
of this jumper. The OIM drive control keys (such as RUN and JOG) and the manual
speed reference are not affected.
To allow keypad parameter changes, place the jumper on pins 1 and 2 (ENABLE).
To prevent parameter changes through the keypad, place the jumper on pins 2 and 3
(DISABLE). Parameters cannot be modified through the keypad. If an attempt to
modify a parameter is made, the message “Hardware Password Protection is
Enabled” is displayed on the keypad display.
3-6
FlexPak 3000 DC Drive Hardware Reference Version 4.3
Page 55
3.4.3 Set Field Loss Detection (Jumper J20)
The FIELD LOSS DETECT jumper (J20) determines whether or not a fault is
generated when a field loss occurs.
Important: Jumper J20 is ignored if the Field Current Regulator kit is installed.
Therefore, placing J20 in the DISABLE position will not disable field loss
detection. See I/M D2-3336 for more information on the Field Current
Regulator.
ATTENTION:The user must provide external field current loss detection
and inhibit drive operation via one of the drive interlocks when this jumper
!
To detect complete loss of field current, place the jumper on pins 1 and 2 (ENABLE).
When a complete loss is sensed, a fault is generated and the drive is stopped.
To ignore field loss, place the jumper on pins 2 and 3 (DISABLE). Any loss of field
current is ignored. Use the DISABLE option only when no field exists, such as with a
permanent magnet motor or when a separate field supply is used.
is positioned to DISABLE. Misapplication of this jumper can cause the
motor to run at dangerously high speeds. Provide external field current
loss detection and inhibit drive operation using one of the drive interlocks
if this jumper is positioned to disable. Failure to observe this precaution
could result in bodily injury
3.4.4 Set the Drive for the Enhanced Field Supply (Jumper J21)
Note that this jumper has no effect on the standard field supply or the optional Field
Current Regulator kit.
The FIELD SUPPLY JUMPER (J21) determines the voltage range that the drive
expects to see from the optional Enhanced Field Supply kit. Refer to I/M D2-3298 or
D2-3413 for more information on the Enhanced Field Supply.
The DC voltage range can be either from 45% to 90% or from 90% to 112.5% of AC
RMS line voltage.
To set the drive f o r a voltage range of 45% to 90%, place the jumper on pins 1and 2
(B-C).
To set the drive for a voltage range of 90% to 112.5%, place the jumper on pins 2 and
3 (A-C).
3.4.5 Set the Source for the Manual Mode Reference (Jumper J19)
ATTENTION:The drive will not operate at the correct speed if this jumper
is not set to the correct position. Failure to observe this precaution could
!
The MANUAL REF jumper (J19) determines whether the internal +10 V isolated
power supply or an external +10 V source is used for the manual mode reference.
result in damage to, or destruction of, the equipment.
Drive Setup and Adjustment
3-7
Page 56

To use the +10V power supply for the manual reference potentiometer, place the
jumper on pins 2 and 3 (POT). The supply at terminal 16 of the regulator board
terminal strip is used.
To use an external +10 V source, place the jumper on pins 1 and 2 (EXT). The
external reference is connected at terminals 17 and 18 of the regulator board terminal
strip.
Note that this input can be used as a trim on the auto mode speed reference by setting
the jumper on pins 1 and 2 (EXT).
3.4.6 Set the Voltage Range and Scale of an Analog Tachometer
(Jumpers J14 and J11)
The TACH V RANGE (J14) and TACH V SCALE (J11) jumpers set the voltage range
and scale of the analog tachometer.
Note: This jumper is ignored if an analog tachometer is not used and if FEEDBACK
SELECT is not set to DC TACH or AC TACH.
ATTENTION:The drive will not operate at the correct speed if these
jumpers are not set to the correct positions. Failure to observe this
!
precaution could result in damage to, or destruction of, the equipment.
During the quick start procedure, the drive calculates the value of the tachometer
voltage range based on the values of TOP SPEED and ANLG T A CH VOLTS/1000 and
the setting of FEEDBACK SELECT. The correct values are displayed on the Correct
Scaling Jumper Positions screen. Verify these jumper settings before performing the
self-tuning procedure.
The expected analog tachometer voltage range can be set to a maximum of 250 VDC
or 62 VDC. J11 selects the hardware circuitry to maximize the resolution over the
entire speed range.
Jumpers
Voltage J14 J11
Top Speed Tach Volts < 16 volts
Top Speed Tach Volts < 31 volts LOW 31/125
Top Speed Tach Volts < 62 volts LOW 62/250
Top Speed Tach Volts < 125 volts HI 31/125
Top Speed Tach Volts < 250 volts HI 62/250
1.
For proper operation, minimum tach voltage must be at least 18V/1000.
Note that the output voltage of the tachometer must not exceed 250 V for DC
tachometers or 275 RMS for AC tachometers when the motor is rotating at TOP
SPEED. To calculate the output voltage at top speed, multiply the two parameter
values:
1
LOW 16
3-8
Tachometer Voltage at TOP SPEED = TOP SPEED
1000 1000
See table 2.7 for tachometer connections to the Regulator board terminal strip.
FlexPak 3000 DC Drive Hardware Reference Version 4.3
x ANALOG TACH VOLTS
Page 57

3.4.7 Set the Analog Auto Mode Reference (Jumpers J12 and J10)
The AUTOREF jumpers (J12 and J10) select the type of analog auto reference to be
used when the AUTO mode is selected. J12 selects the type of signal (voltage or
milliamps). J10 selects the range. See figure 3.4 for the jumper settings.
Figure 3.4 – AUTO REF Jumpers (J12 and J10)
3.4.8 Scale the Armature Current Feedback (Jumper 18)
ATTENTION:The drive will not operate at the correct speed if this jumper
is not set to the correct position. Failure to observe this precaution could
!
The ARM I FB RB jumper (J18) scales the armature current feedback signal. The
drive calculates the value of the burden resistor needed to scale the armature current
feedback signal. The calculations are based on the values of MOTOR RATED ARM
AMPS, MAXIMUM CURRENT and CT Turns Ratio.
result in damage to, or destruction of, the equipment.
The OIM displays the correct position of the jumper during the quick start procedure.
Verify this jumper setting before performing the self-tuning procedure.
3.4.9 Inspect Jumper J26
ATTENTION:Jumper J26 is for Reliance use only. The user must not
change the status of this jumper . Misapplication of this jumper can cause
!
J26 is intended for use by Reliance factory personnel only . Verify that it is set as listed
in table 3.1.
the motor to run at dangerously high speeds. Failure to observe this
precaution could result in severe bodily injury or loss of life.
3.4.10 Inspect the Spare 1 Jumper (J27)
J27 is not used. The position of this jumper has no effect on the drive. Verify that it is
set as listed in table 3.1.
3.4.11 Inspect the Filter Select Jumper (J28)
J28 is not used. Do not install a jumper block on this jumper.
3.4.12 Inspect the Spare 2 Jumper (J29)
J29 is not used. The position of this jumper has no effect on the drive. Verify that it is
set as listed in table 3.1.
Drive Setup and Adjustment
3-9
Page 58
3.4.13 Inspect the Power Unit Jumper (J30)
ATTENTION:The drive can operate at excessive armature voltage and
speed if J30 is improperly set to the LOW position when it should be set
!
Important: An optional Power Interface module, f or drives which are powered from a
Jumper J30 must be set to “HI” if the drive nameplate indicates that the AC line input
voltage is 690 Vrms. Otherwise, J30 must be set to “LOW”.
Improper setting of jumper J30 can cause the drive to operate at the wrong speed if
configured as a voltage regulator, nuisance AC line voltage high/low alarms and
incorrect armature and AC line voltage displays. J30 is not supplied with U.S. Drives.
to HI.
690 Vrms AC line, is available only on drives manufactured by Reliance
Electric Dierikon, Switzerland. In order to operate properly with this new
power I/F module, a hardware jumper (J30) was added to the regulator
board. This jumper must be set according to the type of power interface
module installed in the drive. Jumper positions are labeled “LOW” and
“HI”.
3.5 Power Up the Drive
Apply AC power to the drive after you complete the power off inspection, motor ground
check, and drive setup procedures.
See the OIM instruction manual for the displays during power-up.
3.6 Verify the Correct Direction of Motor Rotation
ATTENTION:The user must provide an external operator-accessible
coast/stop pushbutton at terminals 7 and 8 on the Regulator board to
!
Step 1. Disconnect and lock out all incoming power to the drive.
Step 2. Verify the operation of the Coast/Stop pushbutton using an ohmmeter. When
disable t he machine in case of improp er operation. Uncon trolled machine
operation might result if this is not done. F ailure to observe this precaution
could result in severe bodily injury or loss of life.
ATTENTION:If tachometer rotation is incorrect, sudden and rapid
acceleration may result, which can cause overspeed of the drive. F ailure
to observe this precaution could result in bodily injury.
the pushbutton is pressed, the ohmmeter should read infinite ohms (open);
when released, it should read 0 (short).
3-10
Step 3. Turn power to the drive ON.
FlexPak 3000 DC Drive Hardware Reference Version 4.3
Page 59

Step 4. After power-up, select ARMATURE VOLT for FEEDBACK SELECT by taking
the following path from the main menu to access this parameter:
Speed/Voltage Loop (SPD)
Speed/Voltage Loop (SPD) Feedback
Refer to the FlexPak 3000 Software Reference manual for more information
on changing parameter values.
Step 5. Initiate a JOG command to verify that the motor is rotating in the desired
direction for the Forward command.
Step 6. If the direction of rotation is incorrect, stop the drive and then disconnect and
lockout or tag power to the drive.
Step 7. T o change the direction of motor rotation, re verse the connection of the motor
armature leads A1 and A2.
Important: Wrong rotation direction can be caused by incorrect wiring of the field (F1
and F2).
3.7 Determine the DC Tachometer Lead Polarity
Step 1. Turn power to the drive ON.
Step 2. After power-up, select ARMATURE VOLT for FEEDBACK SELECT by using
the following an OIM path from the main menu to access this parameter:
Speed/Voltage Loop (SPD)
Speed/Voltage Loop (SPD) Feedback
Refer to the FlexPak 3000 Software Reference manual for more information
on changing parameter values.
Step 3. Select the forward direction (as indicated above the Forward/Reverse key on
the OIM).
Step 4. Initiate a JOG command.
Step 5. Use a voltmeter on the tachometer leads to determine the lead polarity for
the forward direction of rotation. Label the tachometer leads accordingly (+
and -).
Step 6. Verify that the (+) tachometer lead is connected to terminal 21 or 22, and that
the (-) tachometer lead is connected to terminal 23. If the (+) tachometer lead
is not connected to terminal 21 or 22, stop the drive. Disconnect and lockout
or tag power to the drive. Reverse the connection of the tachometer leads.
3.8 Make Tachometer and Armature Feedback Zero
Adjustments
This section describes zero adjustments that compensate for signal drift when
tachometer or armature feedback is used. See the OIM instruction manual for
instructions on changing these parameter values.
Drive Setup and Adjustment
3-11
Page 60

ATTENTION:The incorrect setting of the parameters described below
can cause an overspeed condition. These parameters must be set by a
!
Step 1. Stop the drive.
Step 2. Check the value of the output parameter ARMATURE VOLTAGE (P.289).
Step 3. Adjust ARM VOLTAGE ZERO (P.205). If ARMATURE VOLTAGE was more
Step 4. Repeat steps 2 and 3 until ARMATURE VOLTAGE is zero.
Step 5. Record the final value of ARM VOLTAGE ZERO in table 3.1.
Step 6. Check the value of output parameter ANALOG TACH FEEDBACK (P.291).
Step 7. Adjust ANALOG TACH ZERO (P.202). If ANALOG TACH FEEDBACK was
Step 8. Repeat steps 2 and 3 until ANALOG TACH FEEDBACK is zero.
qualified person who understands the significance of setting them
accurately . V erify that the value of these parameters is accurate f or your
application. Failure to observe this precaution could result in bodily injury.
If the value is 0: Go to step 5.
If the value is not zero: Go to step 3.
than 0 (positive), adjust ARM VOLTAGE ZERO to a negative value. If it was
less than 0 (negative), adjust ARM VOLTAGE ZERO to a positive value.
If the value is 0: Go to step 9.
If the value is not zero: Go to step 7
more than 0 (positive), adjust ANALOG TACH ZERO to a negative value. If it
was less than 0 (negative), adjust ANALOG TACH ZERO to a positive value.
Step 9. Record the final value of ANALOG TACH ZERO in table 3.1.
3.9 Make Fin al Adjustments
Set the quick start parameters and perform drive self-tuning, as described in the OIM
instruction manual.
When Quick Start and self-tuning are complete, adjust the nominal AC line frequency
and volts as follows. See the OIM instruction manual for information on setting
parameters.
Step 1. The default value of parameter NOMINAL AC LINE FREQ ((P.306) is 60 Hz.
Adjust the frequency to the nominal value of the line frequency for your
application.
Step 2. The default value of parameter NOMINAL AC LINE VOLT (P.307) is 230 VAC .
Adjust the voltage to the nominal value of the line RMS voltage for your
application.
3-12
FlexPak 3000 DC Drive Hardware Reference Version 4.3
Page 61

Troubleshooting/Diagnostics
ATTENTION:Only qualified electrical personnel familiar with the
construction of this equipment and the hazards involved should install,
!
This chapter details troubleshooting and diagnostics information fro the FlexPak 3000
drive.
The OIM also provides fault and alarm detection. See the OIM instruction manual
(D2-3344) for information on the faults and alarms and possible corrective actions.
4.1 Check for Wiring Errors
adjust, operate, and/or service this equipment. Read and understand
this section in its entirety before proceeding. Failure to observe this
precaution could result in severe bodily injury or loss of life.
ATTENTION:This equipment is at line voltage when AC power is
connected. Disconnect and lock out all ungrounded conductors of the
AC power line before checking wiring. Failure to observe this precaution
could result in severe bodily injury or loss of life.
CHAPTER 4
Wiring errors and loose or grounded wiring are common problems that can inhibit
operation of a drive. Verify that the wiring has been correctly installed and that the
drive is free of loose terminations and grounded conductors.
4.2 Verify AC Line and Power Inpu t
Verify that the applied AC power is correct for the specific drive. If an isolation
transformer has been installed on the incoming AC power lines, verify its output
voltage and that it has been properly connected. Verify that the AC line fuses have
been correctly sized. The AC and DC power conductors should have been sized per
the National Electric Code (NEC) or Canadian Electric Code (CEC).
Troubleshooting/Diagnostics
4-1
Page 62

4.3 Verify DC Motor Connections
ATTENTION: A megohmmeter can be used for this motor ground check,
but all conductors between the motor and the drive must be
!
Verify that all DC motor connections are correct.
• Recheck all motor connections for tightness and correct identification.
• Verify that there is no path to ground in either the DC motor armature circuit, the
shunt field circuit or the thermostat circuit. Connect one lead of a standard ohm
meter to the motor frame and the other lead to the two armature leads; then
connect to the two thermostat leads, and then to the two field leads. If a reading of
less than 100,000 ohms is observed, a ground condition exists and MUST be
corrected before power is applied. Check that the field winding is not open or
shorted.
• Verify the continuity of the motor thermostat and its proper connection to
Regulator board terminals 13 and 14. If a motor thermostat has been installed,
verify that its circuit maintains continuity in the terminal 13 and 14 circuit.
disconnected. The megohmmeter’s high voltage can damage the drive’ s
electronic circuits. Disconnect all conductors between the motor and the
drive before using a megohmmeter for this motor ground check. F ailure
to observe this precaution could result in damage to, or destruction of,
the equipment.
4.4 Verify Optional Kits
Verify that each optional kit has been installed correctly according the appropriate
instructions. Refer to the appropriate instruction manuals.
4-2
FlexPak 3000 DC Drive Hardware Reference Version 4.3
Page 63

4.5 Check the Regulator LED Status
Two LEDs on the Regulator board indicate the operating status of the Regulator
board. The cover on the OIM must be removed to observe these LEDs. Check these
LEDs when the OIM is not communicating with the regulator. Typically, there will be no
fault indication on the display when the OIM is not communicating with the Regulator
board. If a fault can be displayed, the fault would be OIM COMMUNICATIONS
TIMEOUT (F00011).
The two LEDS are labeled CPU OK and OIM COMM OK. CPU OK will be on
whenever the inputs and outputs are being scanned (I/O is not scanned during powerup diagnostics and following certain faults). OIM COMM OK will be on whenever the
Regulator board and the OIM are communicating properly. The following table
summarizes the possible states of the two LED indicators.
CPU OK LED OIM COMM OK LED Indication(s) and Action(s)
Off Off • No power - verify that the drive power is on; check voltages at
the Regulator board.
• LED failure - cycle power and verify that both LEDs illuminate
briefly (lamp test).
• Power-up diagnostics failed - replace the Regulator board.
On • Combination not used.
Blink • Combination not used.
On Off • I/O is being scanned; the regulator is not communicating with
the OIM - check OIM cable; check voltages at the OIM.
On • I/O is being scanned; the regulator is communicating with the
OIM; no faults - this is the normal condition, no action is
required.
• I/O is being scanned; the regulator is communicating with the
OIM; diagnose/correct the fault condition and reset the fault
from the selected control source fault reset.
• Power-up diagnostics in progress (lamp test).
Blink • Combination not used.
Blink Off • I/O is not being scanned; the Regulator board is not
communicating with the OIM; check the OIM cable or cycle
power.
On • I/O is not being scanned; the Regulator board is
communicating with the OIM; record information on the fault,
press the OIM fault reset key.
Blink • I/O is not being scanned, the Regulator board is not
communicating with the OIM; record any information about the
fault and cycle power.
Troubleshooting/Diagnostics
4-3
Page 64

4-4
FlexPak 3000 DC Drive Hardware Reference Version 4.3
Page 65

CHAPTER 5
Replacement Parts
ATTENTION:Only qualified electrical personnel familiar with the
construction of this equipment and the hazards involved should install,
!
The spare or replacement parts for drives described in this manual are also listed in
Replacement Parts manual D2-3438, available on www.reliance.com at
http://www.reliance.com/prodserv/standriv/dc/flexpak/manuals.htm.
adjust, operate, and/or service this equipment. Read and understand
this section in its entirety before proceeding. Failure to observe this
precaution could result in severe bodily injury or loss of life
ATTENTION:.This equipment is at line voltage when AC power is
connected. Disconnect and lock out all ungrounded conductors of the
AC power line before checking wiring. Failure to observe this precaution
could result in severe bodily injury or loss of life.
ATTENTION:Replacing fuses with different ratings other than the ratings
supplied with the original equipment can cause damage to the
equipment. Replace fuses only with the same current, voltage, and class
rating as supplied with the original equipment. Failure to observe this
precaution could result in damage to, or destruction of, the equipment.
Replacement parts are available from your local Reliance Electric Distributor or direct
from Reliance Electric Company:
Order Entry Phone: 1-864-284-5202
Replacement Parts
5-1
Page 66

5-2
FlexPak 3000 DC Drive Hardware Reference Version 4.3
Page 67

APPENDIX A
Technical Specifications
Table A.1 – Voltage and Current Ratings
Input Voltage and Frequency Ratings
Nominal Voltage 230 VAC ± 10% or 460 VAC ± 10% (horsepower-
rated drives)
385 VAC ± 10% or 415 VAC ± 10% (current-rated
drives)
Nominal Line Frequency 50 Hz or 60 Hz
Frequency Variation 2 cycles of nominal
AC Line Fault Capacity
Maximum Sy mmetrica l F au lt
Current
AC Line Distribution
Capacity
Minimum Source KVA See table A.6
230 VAC Line:
Armature Voltage
Field Voltage
460 VAC Line:
Armature Voltage
Field Voltage
380 VAC Line:
Armature Voltage
Field Voltage
415 VAC Line:
Armature Voltage
Field Voltage
1
1
1
1
See table A.6
AC Line KVA
Maximum of 3 drives per transformer
DC Voltage Ratings
240 VDC
150 VDC
500 VDC
300 VDC
413 VDC
250 VDC
451 VDC
270 VDC
Technical Specifications
1
Field voltages shown are nominal values . DC field voltages up to 1.125 times AC l ine voltage are available
with the optional enhanced field supply, M/N series 923FKxxxx.
A-1
Page 68

Table A.2 – Service Conditions
Service Factor 1.0 continuous
Overload Capacity 150% of full load for 1 minute
Motor Overload Function Drive uses an internal inverse time thermal
overload based on motor amp measurement and
full load motor rated amps parameter entry.
Minimum Load 5% of rated load
Ambient Temperature:
Chassis (inside cabinet)
Cabinet (external)
0° to 55°C (32° to 131°F) maximum
0° to 40°C (32° to 104°F) maximum
Altitude: Chassis and Cabinet 3300 feet above sea level (Derate 3% for every
1000 ft above 3300 ft up to 10,000 ft)
Table A.3 – Drive Regulation
Speed
Change from
All Other
Variables
Kit
Model Number
Regulation
Arrangement
Armature Voltage w/ IR
Speed
Change with
95% Load
Change
2-3% 15% Not applicable
Compensation
Closed Loop
w/ RE-045 tach
w/ 5PY tach
w/ RD-120-1 tach
w/ RD-120-2 tach
w/ RD-62 tach
1
Optional AC Tachometer Feedback kit required (see instruction manual D2-3297)
2
Standard DC Tachometer (see section 2.8.6 if used)
3
Optional Pulse Encoder Feedback kit required (see instruction manual D2-3302)
1
2
3
3
3
1%
1%
0.01%
0.01%
0.01%
Table A.4 – Speed Range
2%
2%
0.01%
0.01%
0.01%
907FK0301
907FK011
907FK011
907FK011
Operator’s Speed Adjustment 0 to rated speed
Specification Speed Range 100:1 based on top speed and tachometer
A-2
Table A.5 – Drive Efficiency
Drive Only 98.6% (rated load and speed)
Drive and Motor 85% typical (depends on motor operating speed and frame size)
FlexPak 3000 DC Drive Hardware Reference Version 4.3
Page 69

Table A.6 – Power Ratings1 (230/460 VAC)
Maximum
Symmetrical AC
Fault Current
(Amperes)
Min.
Source
KVA
HP
Full Load Rated
RMS AC Line
Current
(Amperes)
230 VAC 460 VAC 240 VDC 500 VDC 150 VDC 300 VDC 230 VAC 460 VAC
Full Load Rated
DC Armature
Current
(Amperes)
Rated Field
Current
(Amperes)
1.5 10 — 7 — 10 — 5000 — 4
2 11 — 9 — 10 — 5000 — 5
3 13 10 12 6 10 10 5000 5000 6
5 19 12 20 10 10 10 5000 5000 7.5
7.5 26 15 29 14 10 10 5000 5000 11
10 33 18 38 19 10 10 5000 5000 15
15 48 24 55 27 10 10 5000 5000 20
20 63 31 73 35 15 10 10000 5000 27
25 80 39 93 45 15 10 10000 5000 34
30 94 45 110 52 15 10 10000 5000 40
40 125 63 146 73 15 15 25000 10000 51
50 154 74 180 86 15 15 25000 10000 63
60 186 86 218 100 15 15 25000 10000 75
75 226 110 265 129 15 15 25000 25000 93
100 307 143 360 167 15 15 30000 25000 118
125 370 177 434 207 15 15 30000 25000 145
150 443 213 521 250 15 15 30000 25000 175
200 — 281 — 330 — 15 — 30000 220
250 — 351 — 412 — 15 — 30000 275
300 — 421 — 495 — 15 — 30000 330
400 — 567 — 667 — 15 — 75000 440
500 — 680 — 800 — 15 — 75000 550
600 — 816 — 960 — 15 — 75000 660
1
When applying FlexPak 3000 drives to a power distribution system with KVA capacity in excess of 5 times the smallest drive rating, the
use of an isolation transformer or line reactors of similar impedance is required. Note also that the drives are designed for a maximum of
three units per transformer.
Technical Specifications
A-3
Page 70

Table A.7 – Power Ratings1 (380/415 VAC)
Maximum
Symmetrical
AC Fault
Current
(Amperes)
Min.
Source
KVA
Reference HP
@ 460 VAC
2
Input
Unit
Type
Input
Voltage
(VAC)
Full Load
Rated RMS
AC Line
Current
(Amperes)
Full Load
Rated DC
Armature
Current
(Amperes)
Rated
Field
Current
(Amperes)
7 A 380/415 10 7 10 5000 4/5 3
29 A 380/415 26 29 10 5000 16/18 15
55 A 380/415 48 55 10 5000 33/36 30
110 A 380/415 94 110 15 10000 62/68 60
265 A 380/415 226 265 15 25000 145/157 150
1
When applying FlexPak 3000 drives to a power distribution system with KVA capacity in excess of 5 times the smallest drive rating, the
use of an isolation transformer or line reactors of similar impedance is required. Note also that the drives are designed for a maximum of
three units per transformer.
2
This drive is not rated for 460 VAC input. Horsepower is provided for reference only and should not be used for rating or scaling purposes.
Table A.8 – Logic Inputs
Input Voltage +24 VDC
Turn On Voltage +8 VDC
Turn off Current 0.5 mA
Common All input circuits have the same common.
Table A.9 – Logic Outputs
Operating Voltage 250 VAC maximum
30 VDC maximum
Switching Curr ent 2 A maximum resistive
1 A maximum inductive
A-4
FlexPak 3000 DC Drive Hardware Reference Version 4.3
Page 71

Table A.10 – Analog Inputs
Manual Mode Reference
Potentiometer
External Voltage Source
5 KΩ minimum
±10 VDC (when used for analog trim reference)
0 to 10 VDC (when used for manual mode speed
reference)
Automatic Mode
Voltage Reference
Current Reference
±10 VDC
4 to 20 mA or 10 to 50 mA
Analog Tachometer Feedback
Tach Voltage at Top Speed 10 to 250 VDC
Table A.11 – Analog Outputs
Output Voltage ±10 VDC
Maximum Load 4 mA
Technical Specifications
A-5
Page 72

A-6
FlexPak 3000 DC Drive Hardware Reference Version 4.3
Page 73

APPENDIX B
Compliance with European Union
Electromagnetic Compatibility
Standards
This appendix provides information on installing FlexPak 3000 drives for compliance
with European Union Electromagnetic Compatibility (EMC) Standards. It covers:
• requirements for standards compliance.
• guidelines on installing the AC mains filter and inductor.
• instructions on how the drive must be installed, wired, and grounded for
compliance. These instructions are in addition to the normal installation
instructions.
Important: This appendix is not applicable to FlexPak 3000 drives rated above
300 HP @ 460 VAC. These drives are not designed to be CE-compliant.
B.1 EMC Compliance Requ ir emen ts
For the FlexPak 3000 drive to conform to the standards listed on the Declaration of
Conf ormity (DOC), the drive must:
• be accompanied by the DOC for that drive. If you need a copy of the DOC, call the
Autofax product information system at 440-646-7777 and request the FlexPak
3000 DOC.
• be specified by model number on the DOC.
• have a CE mark, which is below the drive nameplate.
• be mounted and wired on the conductive, non-coated back panel of an electrical
cabinet.
• include an AC mains filter and inductor as specified in this appendix.
• be installed according to the instructions in this appendix.
• be operated with the electrical cabinet doors closed.
Important: Conformity of the FlexPak 3000 Drive does not guarantee that the entire
installation will be in conformance.
Compliance with European Union Electromagnetic Compatibility Standards
B-1
Page 74

B.2 Selecting the Equi pme nt
In addition to the drive, you will need the following to install the drive for CE
compliance:
•AC mains filter
•AC mains inductor
• Electrical cabinet with back mounting panel
B.2.1 Selecting a Mounting Panel and Electrical Cabinet
The FlexPak 3000 drive, AC mains filter, AC mains inductor, and any other electronic
or electrical equipment must be mounted in an electrical cabinet. The back mounting
panel where this equipment is mounted must have a good electrically conductive
surface, such as aluminized cold-roll steel, Galvalume, or galvanized steel. It must be
free of any insulating coatings, such as varnish or paint. This establishes a good
ground plane for the mounted equipment.
The degree of enclosure does not play a significant role in the containment of RF
emissions. The cabinet can have ventilation louvers or openings for filters and fans.
None of these openings, however, can be located within a zone 10 inches above and
below the height of the drive, as shown in figure B.1.
B.2.2 Selecting an AC Mains Filter
AC mains filters limit the conducted electromagnetic emissions to the AC power mains
from the FlexPak 3000 drives.
Tables B.1 and B.2 list the FlexPak drives, full load amps, inductance, and the
Reliance AC Mains Filter model number required for each drive. The inductance is the
minimum input inductance for 2% impedance, assuming a 5 to 6% source impedance.
B.2.3 Selecting an AC Mains Inductor
An AC mains inductor must be installed between the mains filter and the AC power
input of the FlexPak 3000 drive. The inductor is user-supplied. The inductor provides
the impedance required by the mains filter, as shown in tables B.1 and B.2. This
inductor also limits the SCR line commutation notch to less than 80% when the drive
is connected to a 5 to 6% impedance source. This meets the requirements of DIN 160
Line Notching.
If the drive is to be used in an overload condition, an inductor must be chosen that is
rated for the resulting average RMS current and that will not saturate during overload.
B-2
FlexPak 3000 DC Drive Hardware Reference Version 4.3
Page 75

Table B.1 – AC Mains Filter Model Numbers for 1.5 to 150 HP @ 230 VAC FlexPak 3000 Drives
Minimum
Inductance
(in microhenries
(µH))
AC Mains Filter
Model Number
AC Mains
Inductor
HP
Rating
AC Full
Load
Amps
1.5 10 850 3DF4353 608895-63H
2 11 770 3DF4353 608895-63H
3 13 650 3DF4353 608895-63K
5 19 470 3DF4354 608895-63K
7.5 26 340 3DF4354 608895-63M
10 33 255 3DF4355 608895-63P
15 48 175 3DF4355 608895-63R
20 63 135 3DF4357 608895-63W
25 80 105 3DF4357 608895-63W
30 94 90 3DF4357 608895-63Y
40 125 67 3DF4359 608895-63AA
50 154 55 3DF4359 608895-63AC
60 186 45 3DF4359 608895-63AE
75 226 38 3DF4359 608895-63AG
100 307 27 3DF4359 608895-63AK
125 370 23 Two 3DF4359
608895-63AN
filters connected
150 443 19 608895-63AR
in parallel
Compliance with European Union Electromagnetic Compatibility Standards
B-3
Page 76

Table B.2 – AC Mains Filter Model Numbers for 3 to 300 HP @ 460 VA C FlexPak 3000 Drives
Minimum
Inductance
(in microhenries
(µH))
AC Mains Filter
Model Number
AC Mains
Inductor
HP
Rating
AC Full
Load
Amps
3 10 1680 3DF4353 608895-63H
5 12 1400 3DF4353 608895-63H
7.5 15 1125 3DF4353 608895-63K
10 18 1000 3DF4354 608895-63K
15 24 700 3DF4354 608895-63M
20 31 550 3DF4355 608895-63P
25 39 430 3DF4355 608895-63P
30 45 375 3DF4355 608895-63R
40 60 270 3DF4357 608895-63W
50 74 225 3DF4357 608895-63W
60 86 195 3DF4357 608895-63Y
75 110 150 3DF4359 608895-63AA
100 143 120 3DF4359 608895-63AC
125 177 95 3DF4359 608895-63AE
150 213 80 3DF4359 608895-63AG
200 281 60 3DF4359 608895-63AK
250 351 48 Two 3DF4359
300 421 40 608895-63AR
B.2.4 Selecting an Operator Control Station
If an operator control station is connected to the drive, its enclosure must be
conductive metal. The enclosure cover must be bonded to an internal ground point
with a braided strap across the hinge. Standard industrial operator devices, such as
pushbuttons, switches, and meters, can be used.
608895-63AN
filters connected
in parallel
B-4
FlexPak 3000 DC Drive Hardware Reference Version 4.3
Page 77
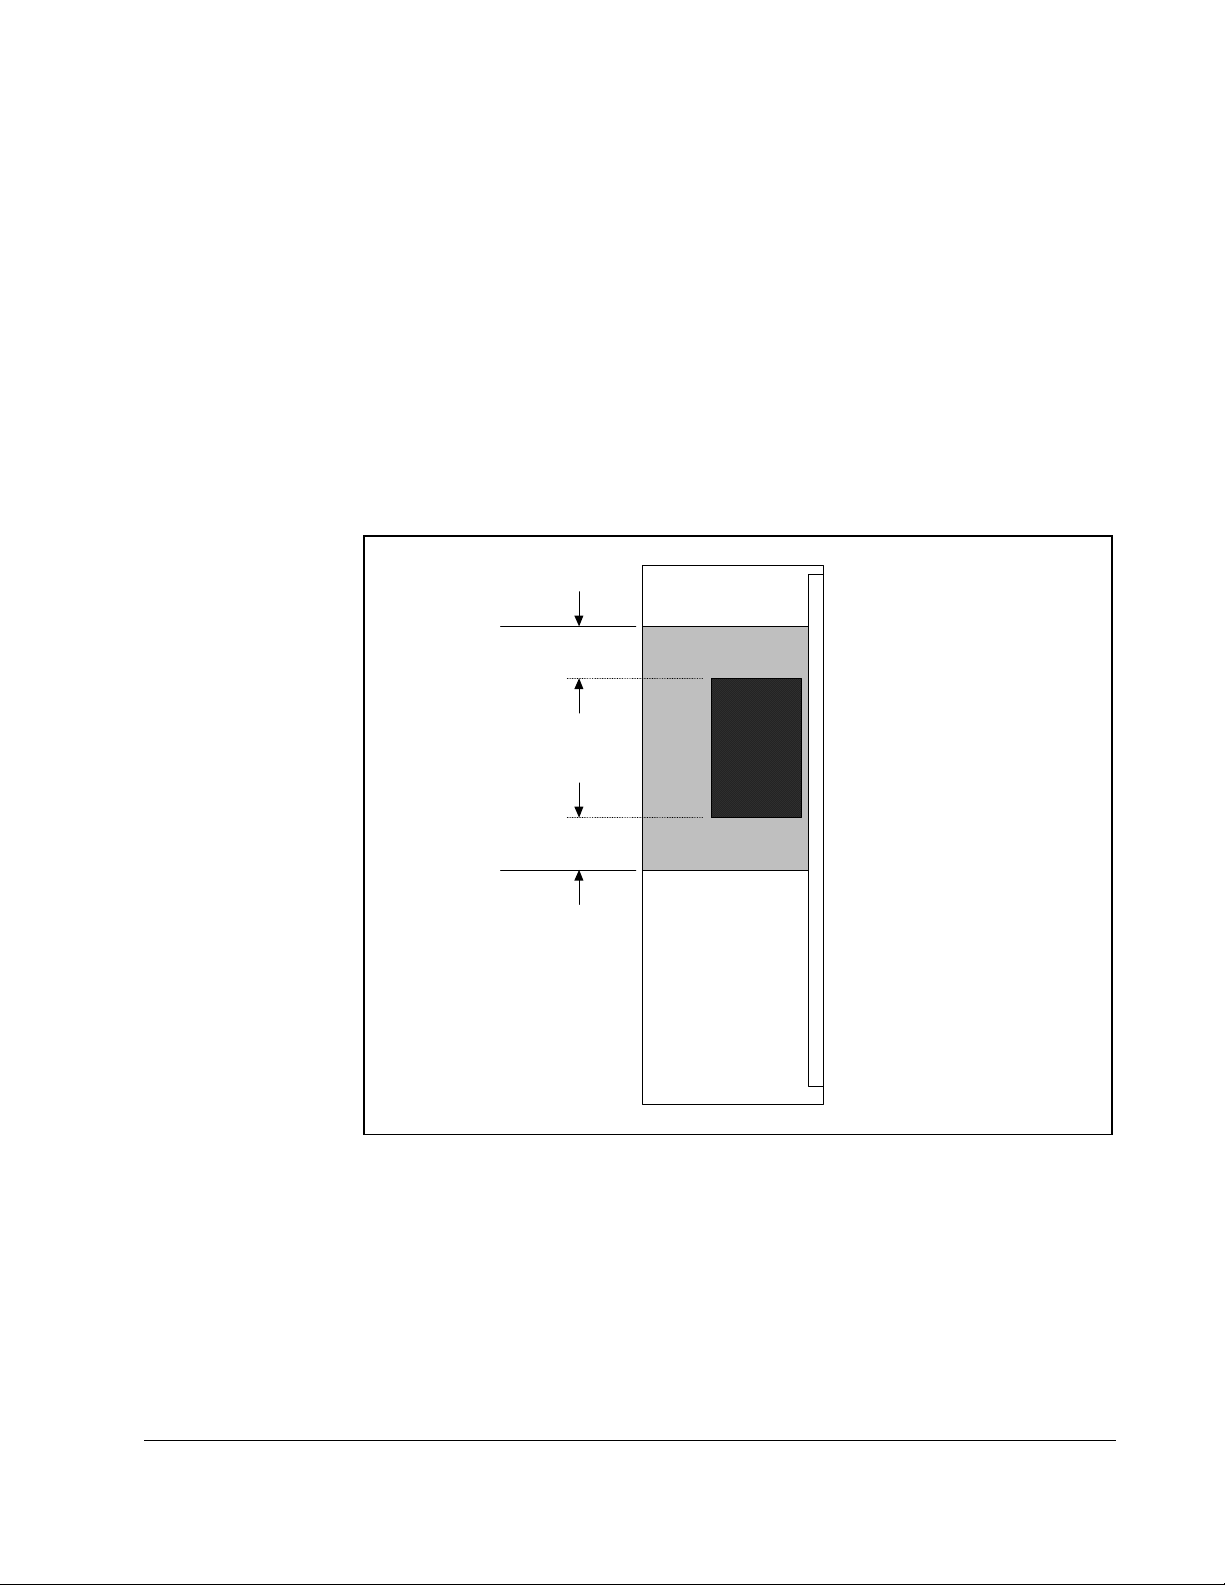
B.3 Mounting the Equipment
Mount all electronic and electromagnetic components, including the drive and the
mains filter, firmly to the base mounting panel. The mounting panel must have good
conductivity, as described in section B.2.1, Selecting a Mounting Panel and Electrical
Cabinet.
These sections provide more detail on mounting the drive, AC mains filter, and AC
mains inductor.
B.3.1 Mounting the Drive
If the cabinet includes ventilation louvers or filter and fan openings in the sides or door ,
the openings cannot be located within a zone 254 mm (10 inches) above and below
the height of the drive, as shown in figure B.1.
254 mm
(10 in)
254 mm
(10 in)
Figure B.1 – Prohibited Area for Cabinet Ventilation Openings
B.3.2 Mounting the AC Mains Filter
Refer to figures B.2 through B.5 for filter mounting dimensions. The filter can be
mounted either flat, with its back against the panel, or on its side, with either side
against the panel.
FlexPak
3000
Drive
No cabinet openings
in the doors or sides
are permitted in the
shaded area
If the 3DF4359 is mounted on its side, it must be mounted on the L bracket first.
(included with the filter). Mount the L bracket using 12 mm screws. See figure B.6 for L
bracket filter mounting.
Compliance with European Union Electromagnetic Compatibility Standards
B-5
Page 78

LINE
L1 L2 L3 E
LOAD
L1' L2' L3' E
Figure B.2 – 3DF4353 and 3DF4354 Filter Dimensions
B-6
LINE
LOAD
Figure B.3 – 3DF4355 Filter Dimensions
FlexPak 3000 DC Drive Hardware Reference Version 4.3
Page 79
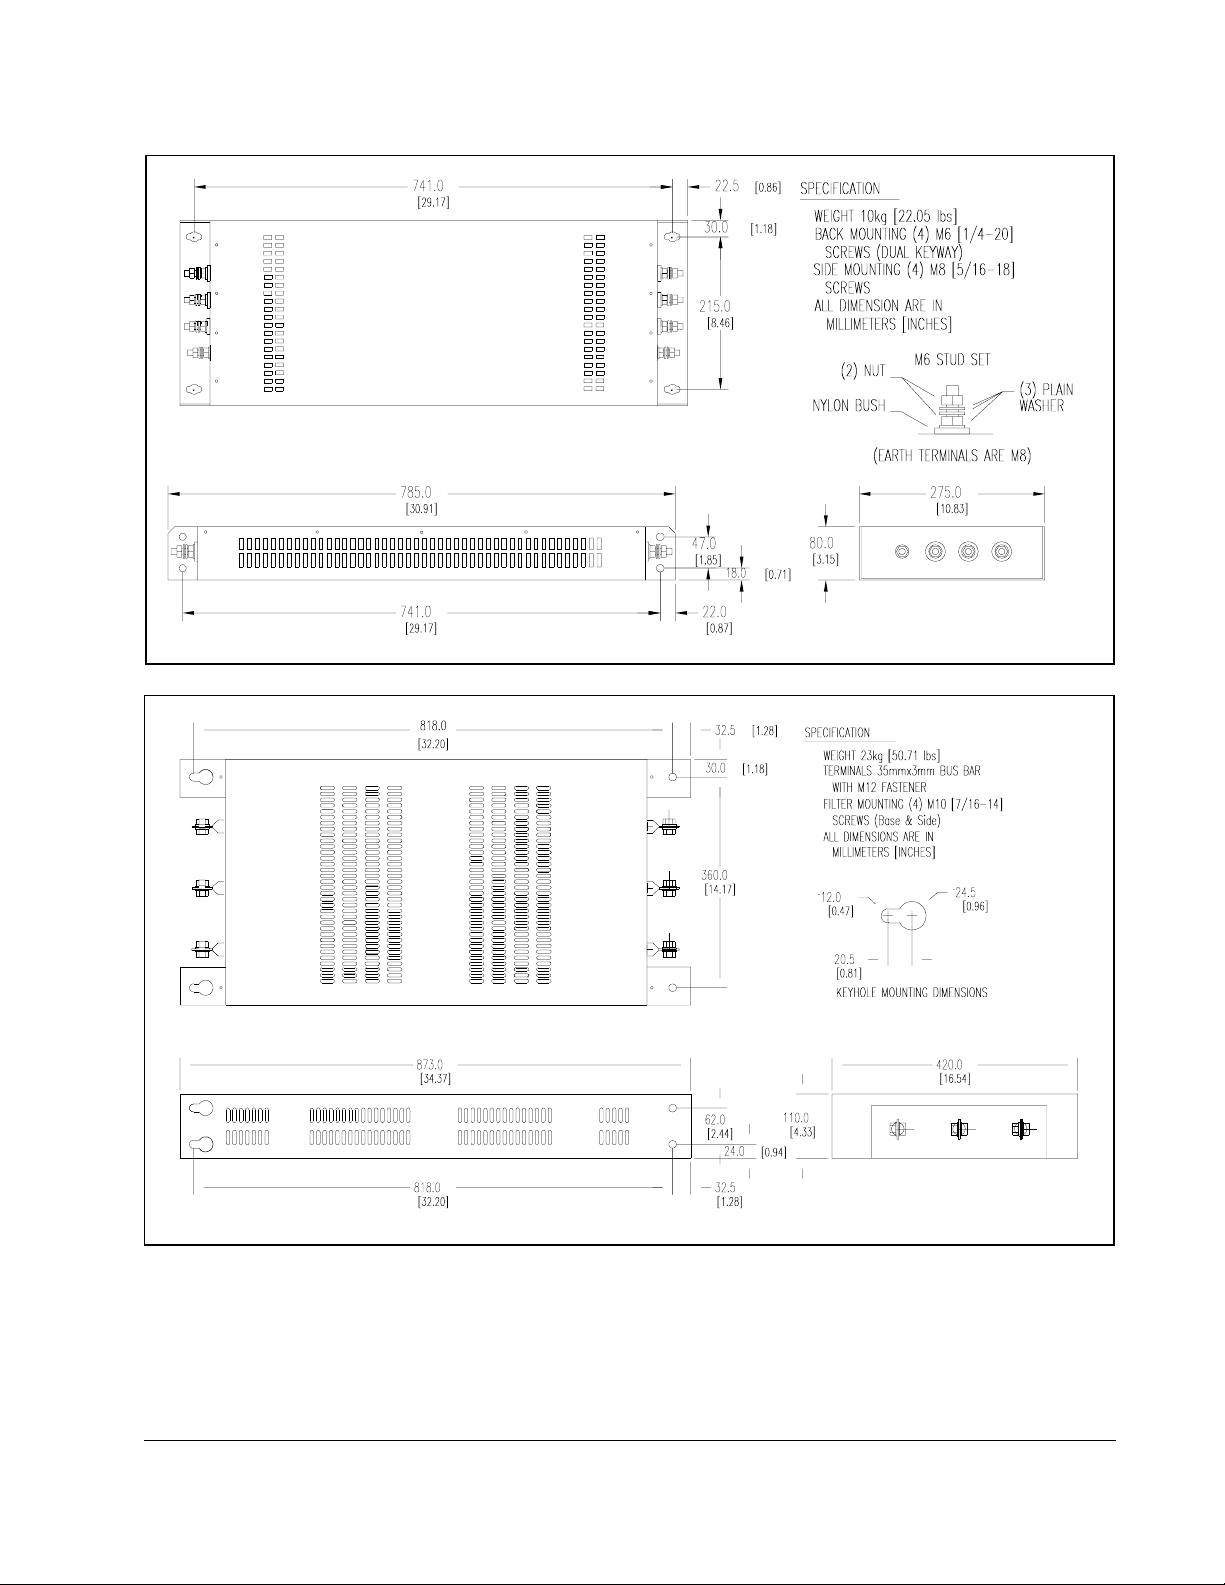
LINE
Figure B.4 – 3DF4357 Filter Dimensions
LOAD
Figure B.5 – 3DF4359 Filter Dimensions
Compliance with European Union Electromagnetic Compatibility Standards
B-7
Page 80

Figure B.6 – Side Mounting the 3DF4359 Filter in the L Bracket
B.3.3 Mounting the AC Mains Inductor
Important: Many inductors are coated with varnish. Any varnish on the inductor's
mounting area must be removed to ensure conductivity.
See the manufacturer's documentation for additional mounting instructions.
B-8
FlexPak 3000 DC Drive Hardware Reference Version 4.3
Page 81

B.4 Grounding Requirements
Star grounding must be used and must provide traditional product safety grounds,
such as high current, low frequency, and high frequency noise control.
B.4.1 System Power Ground
The common power distribution system found in European countries includes the
grounded neutral of the WYE transformer, as shown in figure B.7.
Local code determines whether this fourth wire may be used as the system ground. In
all installations, provide a good low impedance path from the electrical equipment
back to the power distribution transformer. Local code will determine the size of the
ground conductor.
U
V
W
Center of
Star
Distribution
Transformer
Figure B.7 – Typical Power Distribution In European Countries
B.4.2 Control System Ground
A star ground system must be provided. For convenience, the star ground can be
extended by using copper bus bar that is at least 10 times wider than it is thick.
All electronic and electromagnetic equipment on the panel must be connected to the
star system. Equipment that must be connected includes the FlexPak 3000 drive, the
AC mains filter, the AC mains inductor, the cabinet door, and all non-welded (side and
back) panels. To connect the equipment, use fine-wire braided strap. The strap should
be at least 3.2 mm x 12.7 mm (0.125" x 0.5") with 150 strands.
Provide a convenience termination ground for the connection of the screen of signal
and power screened cables. See figures B.8 and B.9 for proper termination of
screened cables. See chapter 2 for drive grounding point locations.
Control
Equipment
Compliance with European Union Electromagnetic Compatibility Standards
B-9
Page 82

Figure B.8 – Proper Termination of Screened Cables with a Termination Fitting
Figure B.9 – Proper Termination of Screened Cables with a T ermination Bracket
When using a conduit termination fitting to terminate the screen or rigid conduit, the
area around the entry hold must be free of paint and protected from corrosion.
B-10
System ground must be extended to all connected enclosures and components by
running a ground conductor with the power and signal conductors to these enclosures
and components, as shown in figure B.10. Follow the electrical cabinet guidelines
described in this appendix for all remote electrical enclosures.
FlexPak 3000 DC Drive Hardware Reference Version 4.3
Page 83

Main Electrical
Cabinet
Figure B.10 – Ground System and Conduit Screen Termination
Terminate ground wire to
ground at both ends
Screened Cable or Conductive Conduit
Terminate the screen to
ground at both ends
The minimum cross-sectional area of a copper ground conductor shall be per
EN60204-1: Safety of Machinery - Electrical equipment of machines - P art 1: General
requirements, section 5.2, Table 1.
The ground conductor must be secured at both ends in a good connection. Poor
connection of a ground connection is the single biggest source of EMC problems. For
connections, use fittings intended for good, long-term connections to a grounded
surface, or continue the screen or conduit beyond the cabinet barrier to a ground
terminal or copper bar extension. Fittings should be rust-resistant. It is preferred to
terminate the screen or conductive conduit to a system ground copper bar internal on
the back panel and not rely on the conduit fitting to maintain the ground circuit.
Shielded cable should use a drain wire for the electrical bonding of the shield to the
ground system.
B.5 Wiring the Equipment
Electrical Components,
such as remote operator
stations and motor.
Wiring guidelines are provided here for wiring that is external and internal to the
electrical cabinet. Information specific to components is also provided.
B.5.1 External Wiring Guidelines
External control, signal, and power wiring must be in screened cable or rigid
continuous conductive conduit.
If the system includes a remote operator station that is connected to the FlexPak 3000
drive, the operator station wiring must be in rigid continuous conductive conduit.
Screen cable cannot be used for the operator station.
Important: Many flexible metal conduit products have not been designed for RF
containment and are not adequate to maintain compliance.
B.5.2 Internal Wiring Guidelines
All cables and wires must be run as closely to the panel as possible. AC, DC and
control wires should be stacked and run as shown in figure B.11.
Compliance with European Union Electromagnetic Compatibility Standards
B-11
Page 84

Figure B.11 – Dressing Power and Control Wires
When the AC power leads must leave the ground plane of the mounting panel to make
connection to elevated device terminals, a ground wire should be run with that wire
bundle.
See figures B.13 and B.14 for typical panel electrical layouts.
B.5.3 Wiring the AC Mains Filter
The mains filter is connected in series from the AC supply line to the AC mains
inductor to the input terminals of the drive. See figure B.12.
AC power wiring from the electrical cabinet power entry to the mains filter must be:
• as short as possible.
• separated from any other wiring to prevent coupling high frequency noise back to
the filtered leads.
• run as close to the ground plane as possible.
B-12
Figure B.12 – AC Mains Filter, Inductor and FlexPak 3000 Drive Wiring
B.5.4 Wiring the AC Mains Inductor
Install the mains inductor between the mains filter and the AC power input of the
FlexPak 3000 drive as shown in figure B.12.
B.5.5 Wiring the Motor
Field and armature circuit wiring that is internal to the electrical cabinet must be:
• Separated from all other wiring on the panel.
• As close to the ground plane as possible. This is especially important if an
inverting fault breaker or dynamic braking circuit is part of the armature circuit.
FlexPak 3000 DC Drive Hardware Reference Version 4.3
Page 85

The external motor wiring must be run in a screened cable or continuous conductive
conduit. The motor shunt field and armature leads can be run together in the same
cable. A ground wire must be run that bonds the motor to the system star ground.
Refer to figure B.10 for proper connection of the conduit screen and bonding wire.
Motor cable length is a major contributor to common mode conducted emissions.
FlexPak mains filters are sized for up to 75 meters (250 feet) of screened motor power
cables (total installed length). If your installation requires a greater length, contact
Reliance Electric.
B.5.6 Wiring the Kits
The FlexPak 3000 has a number of option kits. The kits listed in table B.3 are EMC
benign - they have no impact on the EMC compliance of the product if properly
installed. See the appropriate kit I/Ms for installation and wiring information.
Instructions for wiring the I/O Expansion board, Dynamic Braking kit, and Pulse and
AC Tachometer Feedback kits for CE96 compliance follow.
115 VAC Control Interface 917FK0101
460 VAC to 230 VAC Fuse Conversion 916FK series
Table B.3 – FlexPak EMC-Benign Kits
Kit Name Model Number
AC Line Disconnect 901FK series
AutoMax Network Communication Board 915FK0101
Blower Motor Starter 902FK series
Drive Control Configuration Software for FlexPak 2CS3000
Enhanced Field Supply 923FK series
Field Current Regulator 911FK series
Inverting Fault Circuit Breaker 906FK series
B.5.6.1 I/O Expansion Board (Model Number 914FK0101)
Wiring connected to this board must be run in screened cable or continuous
conductive conduit.
B.5.6.2 Dynamic Braking Kit (Model Numbers 908FK, 909FK, 912FK, and 913FK)
The standard Reliance FlexPak dynamic braking resistor kits can be installed on the
top of the electrical cabinet either in an expanded sheet-metal enclosure or solid-plate
enclosure without impact on compliance. The kit enclosure can be used for the
resistors and dynamic braking circuit.
The DC motor armature leads to the resistor enclosure are to be dressed close to the
mounting panel as shown in figure B.11.
Compliance with European Union Electromagnetic Compatibility Standards
B-13
Page 86

B.5.6.3 Pulse Encoder and AC Tachometer Feedback Kits (Model Numbers 907FK0101
and 907FK0301)
The tachometer cables for these kits must be run as screened cable or in a continuous
conductive conduit. A ground wire must be run with the tachometer wires and
terminated to ground at both ends. The screen or conduit must be terminated at both
ends to ground as discussed above and shown in figure B.10.
B-14
FlexPak 3000 DC Drive Hardware Reference Version 4.3
Page 87

ELECTRICAL CABINET
F2 F1 A1 A2
FLEXPAK 3000
DRIVE
181 182
183
AC POW ER
ENTRY
V
W
U
PE
ENCLOSURE
DISCONNECT
DC MOTOR
ARMATU RE AND
FIELD CONDUIT
A1 F1A2 F2
TACHOMETER
CONDUIT
TO I/O
EXPANSION
TERMINALS
GROUNDING BUS BAR
REGULATOR BOARD TERMINALS
REGULATOR BOARD
CONVENIENCE TERMINALS
I/O EXPANSION BOARD
CONVENIENCE TERMINALS
CONTROL
CONDUIT
BRAIDED
STRAP
BRAIDED STRAP
ENCLOSURE SKIN
AND DOOR
TO GROUND BAR
GROUNDING BUS BAR
AC MAINS FILTER
AC MAINS INDUCTOR
Figure B.13 – Typical FlexPak 3000 Wiring for EMC Compliance with Optional I/O Expansion Board Installed
Compliance with European Union Electromagnetic Compatibility Standards
B-15
Page 88

DYNAMIC BRAKING EXPANDED METAL
RESISTOR ENCLOSURE
AC POWER
ENTRY
V
W
PE
U
F2 F1 A1 A2
FLEXPAK 3000
DRIVE
REGULATOR BOARD TERMINALS
DYNAMIC
BRAKING
CONTACTOR
181182
183
FUSE
CONT
XFMR
GROUNDING BUS BAR
ENCLOSURE
DISCONNECT
AC MAINS FILTER
B-16
REGULATOR BOARD
CONVENIENCE T ERMINALS
DC MOTOR
ARMATURE AND
FIELD CONDUIT
A1 F1A2 F2
TACHOMETER
CONDUIT
GROUNDING BUS BAR
CONTROL
CONDUIT
BRAIDED STRAP
FROM ENCLOSURE
SKIN AND DOOR
TO GROUND BAR
AC MAINS INDUCTOR
BRAIDED
STRAP
Figure B.14 – Typical FlexPak 3000 Wiring for EMC Compliance with Optional Dynamic Braking Kit Installed
FlexPak 3000 DC Drive Hardware Reference Version 4.3
Page 89

APPENDIX C
Recommended Parts for
Integrator Drives
Table C.1 lists the recommended parts that must be provided by the user and can be
mounted separately at the time of installation. These recommended parts or an
equivalent are necessary for the proper operation and functionality of the Integrator
drive. Section 2.5, General Wiring Practices, details how to electrically connect these
recommended parts for proper drive operation.
Table C.1 – Recommended Parts
Part Description Qty Reliance Part Number Rating
AC Line Fuse (1FU, 2FU, 3FU)1:
1.5 thru 5 HP @ 230 VAC/3 thru 10 HP @ 460 VAC 3 64676-120AMX 40A, 500V
7.5 thru 10 HP @ 230 VAC/15 thru 20 HP @ 460 VAC 3 64676-120ARX 80A, 500V
15 HP @ 230 VAC/30 HP @ 460 VAC 3 64676-120ASX 90A, 500V
20 thru 30 HP @ 230 VAC/40 thru 60 HP @ 460 VAC 3 64676-120AVX 150A,500V
75 HP @ 230 VAC/150 HP @ 460 VAC 3 64676-120BAX 350A, 500V
Field Fuse (6FU, 7FU, 8FU):
1.5 thru 30 HP @ 230 VAC/3 thru 60 HP @ 460 VAC 3 64676-30K 15A, 600V
75 HP @ 230 VAC/150 HP @ 460 VAC 3 64676-30M 25A, 500V
“FN” Contactor:
1.5 thru 2 HP @ 230 VAC/3 thru 4 HP @ 460 VAC 1
3 thru 5 HP @ 230 VAC/6 thru 10 HP @ 460 VAC 1 705310-60A or 100-A12ND3 600V, 22A
7.5 thru 10 HP @ 230 VAC/15 thru 20 HP @ 460 VAC 1 705310-63A or 100-A24ND3 600V, 35A
15 thru 20 HP @ 230 VAC/30 thru 40 HP @ 460 VAC 1 705310-65A or 100-A45ND3 600V, 80A
25 HP @ 230 VAC/50 HP @ 460 VAC 1 705310-65Aor 100-A45ND3 600V, 80A
30 HP @ 230 VAC/60 HP @ 460 VAC 1 705310-66Aor 100-A75ND3 600V, 100A
75 HP @ 230 VAC/150 HP @ 460 VAC 1 705310-70Aor 100-B180ND3 600V, 225A
3
AC Line Disconnect
1.5 thru 25 HP @ 230 VAC/3 thru 50 HP @ 460 VAC 1 65242-100NSX 600V, 100A
30 HP @ 230 VAC/60 HP @ 460 VAC 1 65242-100SSX 600V, 150A
:
705310-60A or 100-A12ND3
2
600V, 22A
75 HP @ 230 VAC/150 HP @ 460 VAC 1 65242-300FSX 600V, 400A
Recommended Parts for Integrator Drives
C-1
Page 90

Table C.1 – Recommended Parts
Part Description Qty Reliance Part Number Rating
Inverting Fault Breaker:
1.5 thru 2 HP @ 230 VAC/3 thru 5 HP @ 460 VAC
3 thru 5 HP @ 230 VAC/7.5 thru 10 HP @ 460 VAC 1 419035-100DSA Set at L 50A, 600V
7.5 thru 10 HP @ 230 VAC/15 thru 20 HP @ 460 VAC 1 419035-100HSA Set at 2 90A, 600V
15 thru 20 HP @ 230 VAC/25 thru 40 HP @ 460 VAC 1 419035-100NSA Set at L 150A, 600V
25 thru 30 HP @ 230 VAC/50 thru 60 HP @ 460 VAC 1 419035-100SSA Set at L 450A, 600V
75 HP @ 230 VAC/150 HP @ 460 VAC 1 419035-300FSA Set at 2 625A, 600V
4
1 77801-18DXA Set at A 40A, 600V
Armature Fuse (11FU, S6R ONLY)
1.5 HP @ 230 VAC/3 HP @ 460 VAC 1 64676-130AGX 15A, 700V
2 HP @ 230 VAC/4 HP @ 460 VAC 1 64676-130AHX 20A, 700V
3 HP @ 230 VAC/6 HP @ 460 VAC 1 64676-130AJX 25A, 700V
5 HP @ 230 VAC/10 HP @ 460 VAC 1 64676-130A LX 35A, 700V
7.5 HP @ 230 VAC/15 HP @ 460 VAC 1 64676-130AMX 40A, 700V
10 HP @ 230 VAC/20 HP @ 460 VAC 1 64676-130ANX 50A, 700V
15 HP @ 230 VAC/30 HP @ 460 VAC 1 64676-130AQX 70A, 700V
20 thru 25 HP @ 230 VAC/40 thru 50 HP @ 460 VAC 1 64676-130AUX 125A, 700V
30 HP @ 230 VAC/60 HP @ 460 VAC 1 64676-130AVX 150A, 700V
75 HP @ 230 VAC/150 HP @ 460 VAC 1 64676-130BAX 350A, 700V
1
Bussman series FWH or an equivalent part.
2
Vendor type AB equivalent part.
3
Square D Frame F type for an equivalent part.
4
Westinghouse part number HMCP025DOC for an equivalent part.
5
Bussman series FWP or an equivalent part.
5
:
C.1 Wire Inverting Fault Protection to the Drive (S6R,
Regenerative Drives Only)
C-2
The AFB terminal must be connected to the load (motor) side of the armature fuse or
inverting fault breaker. Failure to do so will cause a drive fault condition. See figure C.1
or C.2.
FlexPak 3000 DC Drive Hardware Reference Version 4.3
Page 91

4
321
6
5
F1
189
188
AFB
F2
583
582
581
Figure C.1 – Integrator Drive AC Line Connection Locations (1.5 to 30 HP @ 230 VAC / 3 to 60 HP @ 460 VAC)
Recommended Parts for Integrator Drives
C-3
Page 92

Figure C.2 – Integrator Drive AC Line Connection Locations (40 to 75 HP @ 230 VAC / 75 to 150 HP @ 460 VAC)
C-4
FlexPak 3000 DC Drive Hardware Reference Version 4.3
Page 93
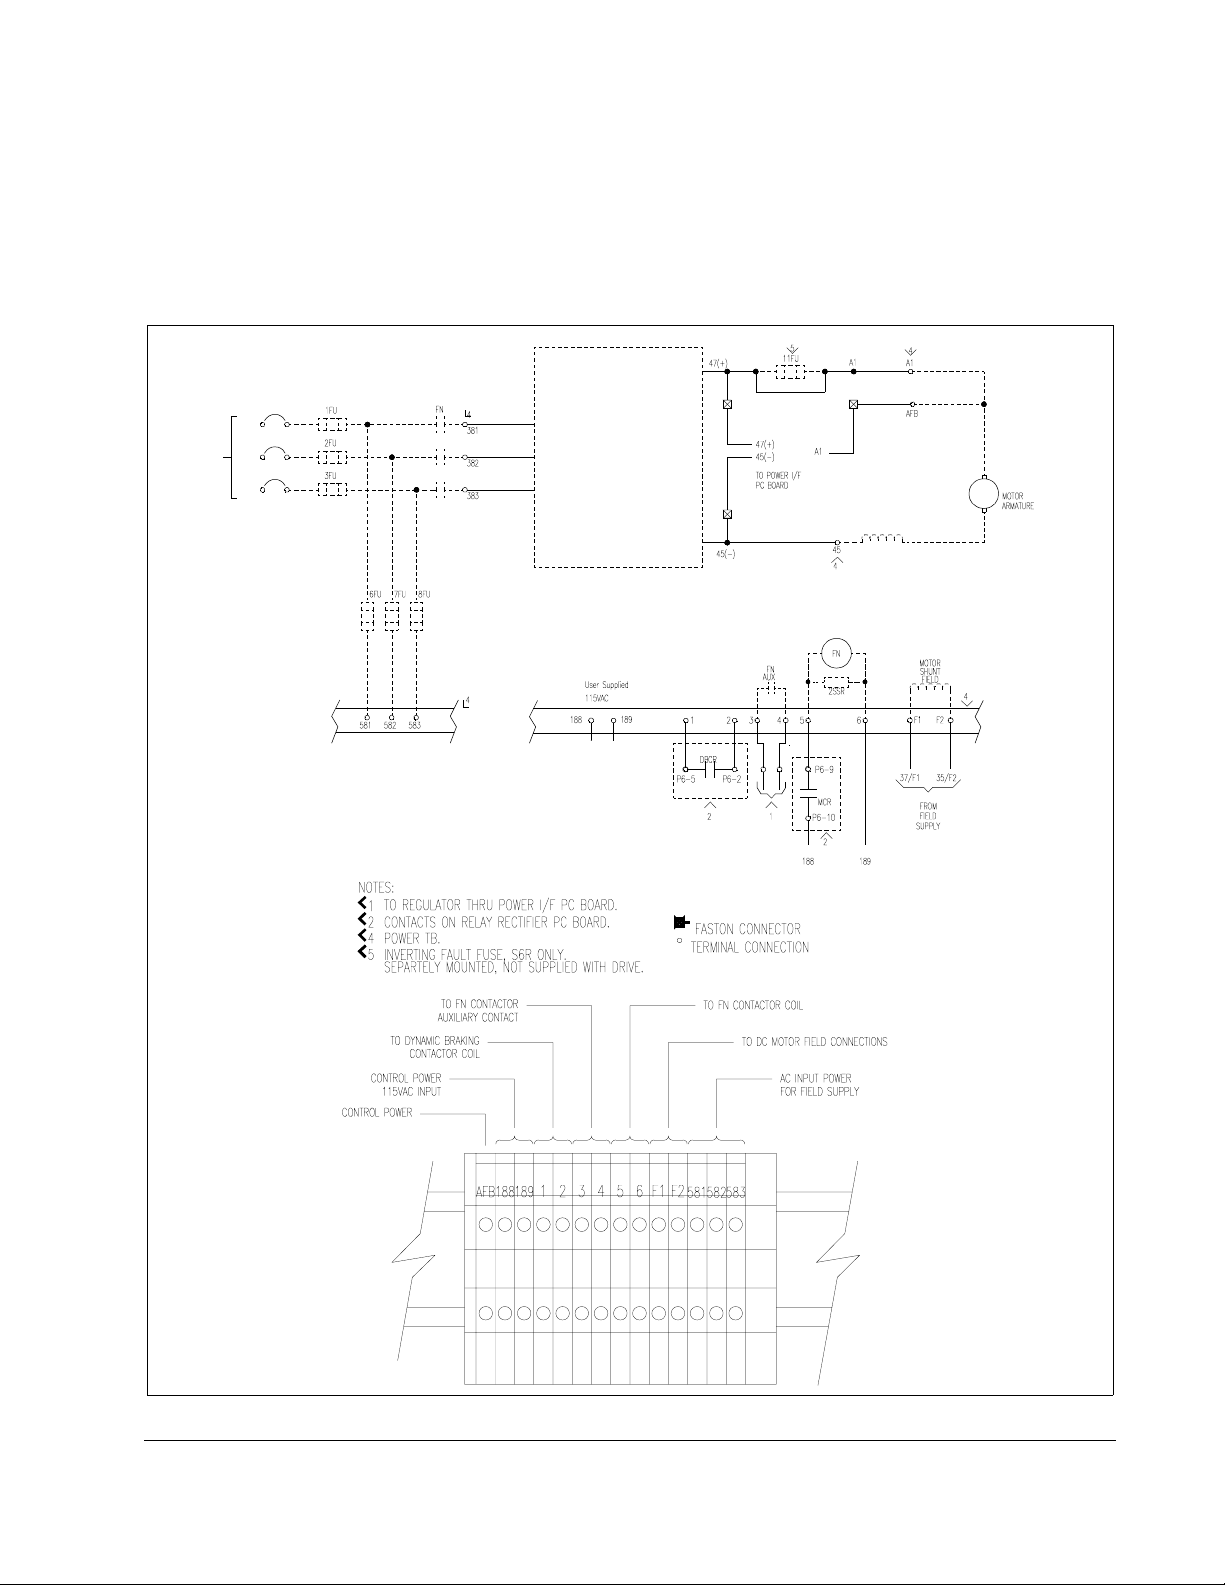
C.2 Wire Control Power to the Drive
Connect the user supplied 115 V A C supply to terminals 188 and 189 of the controller’s
power terminal block. This 115 VAC supply must be rated at 150VA minimum for 150
HP @ 460 V AC and be sized to handle the maximum inrush of the drive FN contactor.
The 189 terminal may be tied to protective earth ground if required. See figure C.3.
S6/S6R DC ARMATURE SUPPLY
SEE SHEETS 3, 8 AND 9
AC INPUT
FOR DETAILS.
P5-6
P5-5
Recommended Parts for Integrator Drives
Figure C.3 – Integrator Drive Wiring Diagram
C-5
Page 94

C-6
FlexPak 3000 DC Drive Hardware Reference Version 4.3
Page 95

APPENDIX D
Glossary Of Terms
altitude: The atmospheric altitude (height above sea lev el) at which the motor or drive
will be operating.
armature: The portion of the DC motor that rotates.
rated full load current: Armature current in amperes.
armature Resistance: Measured in ohms at 25 degrees Celsius (cold).
base speed: The speed which a DC motor develops at rated armature voltage and
rated field current with rated load applied. Typically nameplate data.
constant speed: Used to describe a motor which changes speed only slightly from a
no-load to a full-load condition.
DC motor: A motor using either generated or rectified DC power. A DC motor is
usually used when variable speed operation is required.
DB: Dynamic braking.
default value: Parameter values that are stored in the drive's Read Only Memory
(ROM).
direct current: A current that flows only in one direction in an electrical circuit. It may
be continuous or discontinuous and it may be constant or varying.
drive: Power converting equipment supplying electrical power to a motor.
efficiency: The ratio of mechanical output to electrical input. It represents the
effectiveness with which the motor converts electrical energy to mechanical energy.
field: A term commonly used to describe the stationary (stator) member of a DC
motor. The field provides the magnetic field with which the mechanically rotating
(armature or rotor) member interacts.
horsepower: The measure of the rate of work. One horsepower is equivalent to lifting
33,000 pounds to a height of one foot in one minute. The horsepower of a motor is
expressed as a function of torque and RPM. For motors, the following approximate
formula may be used:
HP = T x RPM / 5250;where HP = horsepower,
T = Torque (in lb/ft), and
RPM = revolutions per minute.
Glossary Of Terms
D-1
Page 96

inertial load: A load (flywheel, fan, etc.) which tends to cause the motor shaft to
continue to rotate after the power has been removed (stored kinetic energy). If this
continued rotation cannot be tolerated, some mechanical or electrical braking means
must be applied. This application may require a special motor due to the energy
required to accelerate the inertia. Inertia is measured in lb. ft. squared, oz. in.
squared, or mkg squared.
load RPM
Inertia reflected to the shaft of the motor load inertia
LCD: Liquid Crystal Display.
LED: Light Emitting Diode.
motor: A device that converts electrical energy to mechanical energy to turn a shaft.
motor electrical time constant: The ratio of electrical inductance to armature
resistance. Electrical time constant in seconds defined as:
T/C = La x Ia / Hot IR voltage drop
motor identification:
• Frame designation (actual frame size in which the motor is built)
• Horsepower, speed, design and enclosure
• Voltage, frequency and number of phases of power supply
• Class of insulation and time rating
•Application
motor nameplate: The plate on the outside of a motor which describes the motor, HP,
voltage, RPM, efficiency, design, enclosure, etc.
=
--------------------------- -
¥
motor RPM
2
D-2
motor thermostat: Unit applied directly to the motor's windings which senses winding
temperature and may automatically break the circuit in an overheating situation.
non-retentive: Information and/or data not retained while power to the drive is OFF.
power (P) in kW: The measure of the rate of work. One kilowatt (kW) is equivalent to
lifting 98 kg to a height of one meter in one second. The kW rating of a motor is
expressed as a function of torque and RPM. For motors, the following approximate
formula may be used:
P = M x RPM / 9550
where,
M = Torque in Nm
RPM = revolutions per minute
retentive: Information and/or data retained while power to the drive is OFF.
RPM: Revolutions per Minute - The number of times per minute the shaft of the motor
(machine) rotates.
FlexPak 3000 DC Drive Hardware Reference Version 4.3
Page 97

service factor (SF): When used on a motor nameplate, a number which indicates
how much above the nameplate rating a motor can be loaded without causing serious
degradation, (i.e., a 1.15 SF can produce 15% greater torque than a 1.0 SF rating of
the same motor).
tachometer: Normally used as a rotational sensing device. Tachometers are typically
attached to the output shaft of a motor requiring close speed regulation. The
tachometer feeds its signal to a control loop which adjusts its input to the motor
accordingly.
top speed: The highest speed a drive can achieve. Top speed equals base speed
when there is no field weakening.
torque: Turning force delivered by a motor or gearmotor shaft, usually expressed in
pounds-feet or newton-meters:
lbs.ft. = HP x 5250 / RPM = full load torque
Nm = P(kW) x 9550/RPM = full load torque
Glossary Of Terms
D-3
Page 98

D-4
FlexPak 3000 DC Drive Hardware Reference Version 4.3
Page 99

INDEX
A
AC line
connection location, 1-18 to 1-21
1.5 to 30 HP @ 230 VAC 3 to 60 HP @ 460
VAC / 7-110 Amp, 1-2 0
100 to 150 HP @ 230 VAC / 200 to 300 HP
@ 460 VAC, 1-21
40 to 75 HP @ 230 VAC / 75 to 150 HP @
460 VAC / 265 Amp, 1-20
400 to 600 HP @ 460 VAC, 1-21
distribution capacit y, 1-1
fault capacity, 1-1
fuses for Integrator drives, 1-1
KVA, 1-1
AC mains filter
dimensions
3DF4355, 1-6
3DF4357, 1-7
3DF4359, 1-7
3DF4363, 1-6
3DF4364, 1-6
EMC compliance requiremnts, 1-2
mounting, 1-5
wiring, 1-12
AC mains inductor
EMC compliance requirements, 1-2
mounting, 1-8
wiring, 1-12
analog
inputs, 1-33
outputs, 1-33
analog auto mode reference jumpers
(J12 and J1), 1-9
analog tach scale jumper ( J11), 1-8
analog tach voltage jumper (J14), 1-8
armature
current feedback jumper (J18), 1-9
feedback adjustments, 1-11
terminal torque, 1-27
wiring connection locations, 1-22 to 1-25
assistance, 1-5
C
chassis ground connections, hardware tightening
torque, 1-10
coast/stop wiring, 1-29
connection location, AC line
1.5 to 30 HP @230 VAC / 3 to 60 HP @ 460
VAC / 7-110 Amp, 1-20
100 to 150 HP @ 230 VAC / 200 to 300 HP @
460 VAC, 1-21
40 to 75 HP @ 230 VAC / 75 to 150 HP @ 460
VAC / 265 Amp, 1-20
400 to 600 HP @ 460 VAC, 1-21
control transformer settings
230/460, 1-3
380/415, 1-2
D
DC voltage ratings, 1-1
drives
description, 1-2 to 1-3
final adjustments, 1-12
ground point locations
1.5 to 30 HP @ 230 VAC / 3 to 60 HP @
460 VAC / 7-110 Amp, 1-11
100 to 150 HP @ 230 VAC / 200 to 300 HP
@ 460 VAC, 1-13
40 to 75 HP @ 230 VAC / 75 to 150 HP @
460 VAC / 265 Amp, 1-12
400 to 600 HP @ 460 VAC, 1-14
integrator drive, 1.5 to 30 HP @ 230 VAC /
3 to 60 HP @ 460 VAC, 1-15
integrator drive, 40 to 75 HP @ 230 VAC /
75 to 150 HP @ 460 VAC, 1-16
identification nameplate, 1-1
integrator
AC power, 1-3, 1-4
control power, 1-5
recommended parts, 1-1
model numbers, 1-2
Index
Index-1
Page 100

motor
wiring connections, 1-22 to 1-25
mounting, 1-1
EMC compliance requirements, 1-5
mounting dimensions
1.5 to 30 HP @ 230 VAC / 3 to 60 HP @
460 VAC / 7 to 110 Amp, 1-2
100 to 150 HP @ 230 VAC / 200 to 300 HP
@ 460 VAC, 1-4
40 to 75 HP @ 230 VAC / 75 to 150 HP @
460 VAC / 265 Amp, 1-3
400 to 600 HP @ 460 VAC, 1-5
power up, 1-10
setup and adjustment, 1-1
storage, 1-1
wiring
AC power, 1-18 to 1-21
optional devices, 1-32
E
electrical cabinet, EMC compl ia nce
requirements, 1-2
EMC compliance requirements
AC tachometer feedback kit, 1-14
CE compliance, 1-2
drive mounting, 1-5
dynamic braking kit, 1-13
electrical cabinet, 1-2
grounding, 1-9
I/O expansion board, 1-13
mounting equipment, 1-5
mounting panel, 1-2
operator control station, 1-4
pulse encoder kit, 1-14
selecting equipment, 1-2
wiring equipment, 1-11
emergency stop, EN 60204-1
1992 compliance, 1-29
enclosure
grounding, 1-9
mounting minimum clearan ce, 1-1
enhanced field supply jum per (J21) , 1-7
F
field loss detection jumper (J20), 1-7
filter select jumper (J28), 1-9
G
glossary, 1-1 to 1-3
grounding
chassis connections, 1-9 to 1-10
ground point lactions
100 to 150 HP @ 230 VAC / 200 to 300 HP
@ 460 VAC, 1-13
ground point locations
1.5 to 30 HP @ 230 VAC / 3 to 60 HP @
460 VAC /7-110 Amp, 1-11
40 to 75 HP @ 230 VAC / 75 to 150 HP @
460 VAC / 265 Amp, 1-12
400 to 600 HP @ 460 VAC, 1-14
integrator drives, 1.5 to 30 HP @ 230 VAC
/ 3 to 60 HP @ 460 VAC, 1-15
integrator drives, 40 to 75 HP @ 230 VAC /
75 to 150 HP @ 460 VAC, 1-16
lugs
part numbers, 1-17
tightening torques, 1-19
motor, 1-9 to 1-10
operator control station, 1-9 to ??
I
identification nameplate, 1-1
input disconnect install ati on, 1-8
installation
input disconnect, 1-8
motor, 1-9
transformer, 1-8
integrator
ground point locations, 1-15, 1-16
integrator drive
AC line connection location, 1-3, 1-4
control power, 1-5
mounting dimensions
1.5 to 30 HP @ 230 VAC / 3 to 60 HP @
460 VAC, 1-6
40 to 75 HP @ 230 VAC / 75 to 150 HP @
460 VAC, 1-7
Index-2
FlexPak 3000 DC Drive Hardware Reference Version 4.3
 Loading...