

Page 1

View Site Edition
INSTALLATION GUIDE
PUBLICATION VIEWSE-IN003L-EN-E–August 2014
Supersedes Publication VIEWSE-IN003K-EN-E
Page 2

Contacting Rockwell
February 7, 1997
Customer Support Telephone — 1-440-646-3434
Online support — http://support.rockwellautomation.com
Copyright Notice
Trademark Notices
Other Trad ema rk s
Warranty
© 2014 Rockwell Automation Technologies Inc. All rights reserved.
This document and any accompanying Rockwell Software products are copyrighted by Rockwell
Automation Technologies Inc. Any reproduction and/or distribution without prior written consent
from Rockwell Automation Technologies Inc. is strictly prohibited. Please refer to the license
agreement for details.
Allen-Bradley, ControlLogix, FactoryTalk, PLC-2, PLC-3, PLC-5, Rockwell Automation, Rockwell
Software, RSLinx, RSView , the Rockwell Software logo, and VersaView are registered trademarks of
Rockwell Automation, Inc.
The following logos and products are trademarks of Rockwell Automation, Inc.:
RSMACC, RSLogix, Data Highway Plus, DH+, RSView, FactoryTalk View, RSView Studio,
FactoryTalk View Studio, PanelBuilder, PanelView, RSView Machine Edition, RSView ME Station,
and WINtelligent.
FactoryTalk Activation, FactoryTalk Administration Console, FactoryTalk Alarms and Events,
FactoryTalk Automation Platform, FactoryTalk Services Platform, FactoryTalk Diagnostics,
FactoryTalk Directory, FactoryTalk Live Data, RSAssetSecurity, and FactoryTalk Security.
PanelView, RSLinx Classic, RSLinx Enterprise, SLC 5, and SLC 500
ActiveX, Microsoft, Microsoft Access, SQL Server, Visual Basic, Visual C++, Visual SourceSafe,
Windows, Windows ME, Windows NT, Windows 7 Professional, Windows Server 2003, Windows
Server 2008, Windows Vista, and Windows XP are either registered trademarks or trademarks of
Microsoft Corporation in the United States and/or other countries.
Adobe, Acrobat, and Reader are either registered trademarks or trademarks of Adobe Systems
Incorporated in the United States and/or other countries.
ControlNet is a registered trademark of ControlNet International.
DeviceNet is a trademark of the Open DeviceNet Vendor Association Inc. (ODVA)
Ethernet is a registered trademark of Digital Equipment Corporation, Intel, and Xerox Corporation.
OLE for Process Control is a registered trademark of the OPC Foundation.
Oracle, SQL*Net, and SQL*Plus are registered trademarks of Oracle Corporation.
Symbol Factory is a trademark of Software Toolbox.
All other trademarks are the property of their respective holders and are hereby acknowledged.
This product is warranted in accord with the product license. The product’s performance may be
affected by system configuration, the application being performed, operator control, maintenance,
and other related factors. Rockwell Automation is not responsible for these intervening factors. The
instructions in this document do not cover all the details or variations in the equipment, procedure, or
process described, nor do they provide directions for meeting every possible contingency during
installation, operation, or maintenance. This product’s implementation may vary among users.
This document is current as of the time of release of the product; however, the accompanying
software may have changed since the release. Rockwell Automation, Inc. reserves the right to change
any information contained in this document or the software at anytime without prior notice. It is your
responsibility to obtain the most current information available from Rockwell when installing or
using this product.
Version: 8.00.00 CPR9 Service Release 7
August 2014
Page 3

Contents
Preface • What’s in this Installation and Deployment Guide? .............. ix
About the FactoryTalk View documentation................................................................. ix
Finding information in the FactoryTalk View Installation...................................... x
What’s in this manual............................................................................................. xi
Other Documents.................................................................................................... xi
Opening the FactoryTalk View online manuals..................................................... xi
Contacting Rockwell Automation Technical Support .................................................. xii
When you call Rockwell Automation Technical Support..................................... xii
1 • FactoryTalk View basics......................................................................1
What is FactoryTalk View SE?....................................................................................... 1
About the architecture of your FactoryTalk View system ...................................... 2
FactoryTalk View Studio Enterprise....................................................................... 2
FactoryTalk View SE Server................................................................................... 3
FactoryTalk View SE Client.................................................................................... 3
FactoryTalk View SE Station.................................................................................. 4
Stand-alone RSLinx Enterprise Server.................................................................... 5
Stand-alone FactoryTalk Directory Server.............................................................. 5
FactoryTalk Services Platform........................................................................................ 5
FactoryTalk Administration Console...................................................................... 6
FactoryTalk Directory ............................................................................................. 6
FactoryTalk Alarms and Events.............................................................................. 6
FactoryTalk Security ............................................................................................... 6
FactoryTalk Live Data............................................................................................. 6
FactoryTalk Diagnostics .......................................................................................... 6
FactoryTalk Activation ............................................................................................ 7
Connectivity.................................................................................................................... 7
RSLinx Enterprise................................................................................................... 7
RSLinx Classic........................................................................................................ 7
Installation DVD......... ........................................................................... ... ...................... 8
2 • Hardware, operating system, and domain information.................... 9
What is in this chapter?................................................................................................... 9
What can I install and run on one server?....................................................................... 9
Review hardware requirements..................................................................................... 10
Review operating system requirements ........................................................................ 12
Operating system recommendations for application servers ................................. 13
iii
Page 4

ACTORYTALK VIEW SITE EDITION INSTALLATION GUIDE
F
• • • • •
Set up the Windows domain or workgroup................................................................... 14
Domain controller requirements............................................................................ 14
About synchronizing time on application computers............................................ 15
Windows workgroup requirements ....................................................................... 15
Set up computers with names to be used in production................................................ 16
3 • Pre-installation configuration...........................................................17
Checklist for preparing the computer for installation .................................................. 17
Disable automatic Windows updates ............................................................................ 17
Turn off simple file sharing in Windows XP................................................................ 18
Turn off fast user switching in Windows XP................................................................ 18
Disable operating system themes.................................................................................. 18
For Windows XP or Windows Server 2003.......................................................... 19
Manually configure NICs and switch ports .................................................................. 19
To set up the NIC link speed and duplex...................................... ......................... 20
To disable power saving for the NIC................................... .................................. 21
Disable or uninstall third-party firewalls ...................................................................... 21
Install Microsoft Internet Information Services............................................................ 21
Guidelines for different operating systems............................................................ 22
To finish installing IIS, follow the instructions in the wizard............................... 24
About uninstalling IIS ........................................................................................... 24
Remove Internet Explorer Enhanced Security Configuration ..................................... 24
Set up Internet Explorer for optimal access to components.......................................... 26
Work Offline setting.............................................................................................. 26
Check for newer versions with every visit to a page............................................. 26
Manage cache file folders...................................................................................... 27
Set up Data Execution Prevention................................................................................. 27
Remove unnecessary DCOM networking protocols............................ .. ....................... 28
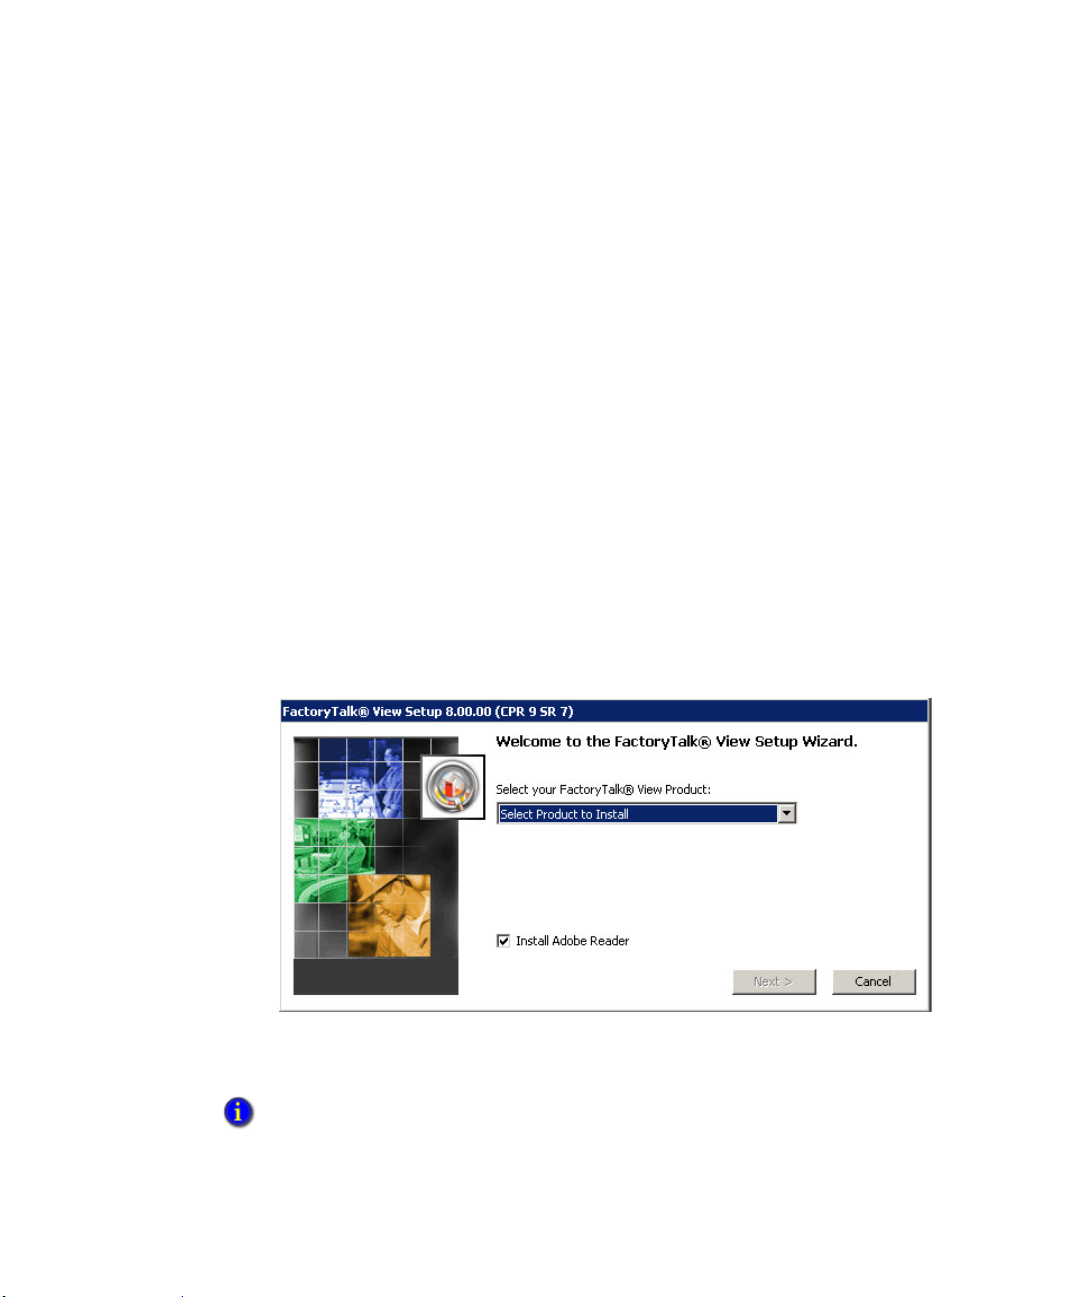
4 • Installing FactoryTalk View .............................................................. 29
Steps to install FactoryTalk View Site Edition (SE)..................................................... 29
Deciding which FactoryTalk View SE components to install ...................................... 29
Preparing for installation.................................................. .. ........................................ ... 31
Launching Setup Wizard and selecting what to install................................................. 31
Common setup and IIS install....................................................................................... 32
FactoryTalk Activation Warning........................................................................... 34
Microsoft Internet Information Services (IIS) check and installation................... 34
Dependent software process termination warning................................................. 36
Providing information for the install............................................................................. 37
End User License agreement.......... ....................................................................... 37
File Location for product installation.......... .......................................................... 39
iv
Page 5

ONTENTS
C
Select Setup Type.................................................................................................. 40
SQL Server sign-in or installation......................................................................... 41
Configuring Products............................................................................................. 44
Checking selections and starting the installation process ............................................. 46
Installation of selected software............................................................................ 47
Installation complete........ .. ........................................ ....................................... ............ 48
Installing SE clients in a distributed system ................................................................. 48
Post-installation procedures .......................................................................................... 50
Installing product updates...................................................................................... 50
Specifying the Network Directory server location................................................ 52
5 • Activating FactoryTalk View software..............................................55
About FactoryTalk Activation Manager....................................................................... 55
What happens if FactoryTalk View is not activated? ................................................... 56
Set up client computers to obtain floating activations .................................................. 56
Ensuring that network application components stay activated ..................................... 57
Borrow activations for development computers ........................................................... 57
Activation keys for FactoryTalk View software components....................................... 57
Sharing keys among multiple software components ............................................. 59
Read-write versus view-only activations............................................................... 59
• • • • •
6 • Deploying network distributed applications ...................................61
Overview of tasks: deploying network distributed applications................................... 61
Task checklist for deploying a network distributed application............................ 61
Back up the network distributed application................................................................. 62
Ensure that the FactoryTalk Network Directory is set up............................................. 66
Move the application’s HMI project files............................. .. ...................................... 66
Where HMI project files are stored....................................................................... 67
Restore the network distributed application.................................................................. 67
Specify the Network Directory location on application computers.............................. 69
Move the application’s data server files........................................................................ 70
Restoring RSLinx Enterprise configurations......................................................... 70
Backing up and restoring RSLinx Classic configurations.............................. .. ..... 70
Specify data server host computer names..................................................................... 71
Renew data server shortcuts, topics, and device paths .................................................. 73
Specify HMI server host computer names.................................................................... 73
Set up additional HMI server properties............................ .......................................... . 74
Synchronizing redundant HMI servers and projects ............................................. 76
Set up the FactoryTalk View SE Clients....................................................................... 77
Creating a new FactoryTalk View SE Client file .................................................. 78
Copying existing FactoryTalk View SE Client files ............................................. 78
v
Page 6

ACTORYTALK VIEW SITE EDITION INSTALLATION GUIDE
F
• • • • •
Locking operators into the run-time environment................................................. 79
Run the FactoryTalk View SE Clients.......................................................................... 79
About logging on to the FactoryTalk View SE Client .......................................... 80
7 • Deploying network station applications.......................................... 81
Overview of tasks: deploying network station applications ......................................... 81
Task checklist for deploying a network station application .................................. 81
Move the network station application........................................................................... 82
Specify the Network Directory location on application computers.............................. 83
Move the application’s data server files........................................................................ 83
Backing up and restoring RSLinx Classic configurations.............................. .. ..... 83
Specify data server host computer names..................................................................... 84
Renew data server shortcuts, topics, and device paths .................................................. 85
Specify when HMI server components start or stop..................................................... 86
How HMI server components start and stop......................................................... 86
Set up the FactoryTalk View SE Client .................................. .. .................................... 87
Creating a new FactoryTalk View SE Client file.................................................. 87
Locking operators into the run-time environment................................................. 88
Run the FactoryTalk View SE Client............................................................................ 88
Logging users on to the FactoryTalk View SE Client........................................... 89
Administering deployed network station applications.................................................. 90
8 • Deploying local station applications ................................................91
Overview of tasks: deploying local station applications............................................... 91
Task checklist for deploying a local station application........................................ 91
Move the local station application ................................................................................ 92
About restoring System information with the application..................................... 93
Move data servers and change their properties............................................................. 93
Backing up and restoring RSLinx Enterprise files................................................ 93
Backing up and restoring RSLinx Classic configurations.............................. .. ..... 94
Specify OPC data server host computer names ............................................................ 95
Specify when HMI server components start or stop..................................................... 95
How HMI server components start and stop......................................................... 96
Set up the FactoryTalk View SE Client .................................. .. .................................... 96
Creating a new FactoryTalk View SE Client file.................................................. 97
Locking operators into the run-time environment................................................. 97
Run the FactoryTalk View SE Client............................................................................ 98
Logging users on to the FactoryTalk View SE Client........................................... 98
vi
Page 7

ONTENTS
C
Administering deployed local station applications ....................................................... 99
9 • Upgrading an operating FactoryTalk View SE application ..........101
Finding out about features in the new product version ....................................... 103
Overview: Upgrading a redundant network distributed application ................... 103
About upgrading a non-redundant network application...................................... 104
Part 1: Prepare for the upgrade.................................................................................... 105
Step 1 – Upgrade Preparation.............................................................................. 105
Step 2 – Back up the deployed application.......................................................... 107
Part 2: Set up a temporary system and perform a partial upgrade.............................. 110
Step 3 – Set up a temporary upgrade system....................................................... 111
Step 4 – Upgrade software components on Server #2......................................... 115
Step 5 – Upgrade software components on Workstation #1 ............................... 116
Step 6 – Migrate the FactoryTalk View SE application............... .. ..................... 118
Step 7 – Upgrade software on selected run-time clients ..................................... 119
Step 8 – Test the migrated FactoryTalk View SE application ............................ 121
Part 3: Upgrade Server #1 and remaining clients........................................................ 122
Step 9 – Upgrade remaining client computers..................................................... 122
Step 10 – Upgrade software components on Server #1....................................... 123
Step 11 – Restore Server #1 as the primary application server........................... 123
Step 12 – Set up redundancy for the upgraded system........................................ 127
Step 13 – Restart the entire upgraded application............................................... 129
• • • • •
A• Common upgrade procedures........................................................ 131
Recreate SQL Server 2008 R2 Express instance ........................................................ 131
Installing product updates ........................................................................................... 132
B• FactoryTalk Tools and Utilities.......................................................135
FactoryTalk View tools............................................................................................... 135
FactoryTalk tools ........................................................................................................ 136
C• Install Microsoft Internet Informat ion Services.............................139
D• Use unattended installation............................................................ 145
Perform unattended installation .................................................................................. 145
Parameters................................................................................................................... 146
Examples..................................................................................................................... 148
Example 1............................................................................................................ 148
Example 2............................................................................................................ 149
vii
Page 8

ACTORYTALK VIEW SITE EDITION INSTALLATION GUIDE
F
• • • • •
I • Index.......................................................................................................i
viii
Page 9

P
REFACE
What’s in this Installation and
Deployment Guide?
This manual describes the FactoryTalk Vie w Product and System, the tasks to be
performed on a system before installation, the detailed installation steps, how to use
FactoryTalk Activation to license the installed product, tasks for deploying applications,
and how to upgrade an existing system.
The contents of this Installation and Deployment guide appear in the order you would use
during installation on new or existing systems:
FactoryTalk View basics describes the software components and layout of the
system (Chapter 1).
Hardware, operating system and domain information identifies requirements for
the computers and operating systems (Chapter 2)
Preparing for installation gives you the information you need to get your computer
systems ready for a new installation or an upgrade (Chapter 3).
Installation procedures walk you through the screens you will see during a complete
installation (Chapter 4).
Activating the software is required to get software license information onto all the
computers in your system (Chapter 5)
Deploying new applications covers several deployment types you may need
(Chapters 6, 7, and 8).
Upgrading existing applications if you already have an installed HMI application
and are upgrading to FactoryTalk View 8.0 (Chapter 9)
About the FactoryTalk View documentation
In addition to the FactoryTalk View Installatio n Guides, the FactoryTalk View
documentation set includes:
FactoryTalk View Site Edition User’s Guide
information about designing and developing FactoryTalk View SE applications.
The User’s Guide is available in PDF format, from the Help menu in FactoryTalk
View Studio, on the disc containing the Setup Wizard, and from the Rockwell
Automation Literature Library.
contains comprehensive
ix
Page 10
FACTORYTALK VIEW SITE EDITION INSTALLATION GUIDE
• • • • •
Release Notes
. Read the Release Notes before you begin installing or working with
FactoryTalk View and supporting software.
Release Notes for FactoryTalk View SE, RSLinx Enterprise, and RSLinx Classic are
available from the FactoryTalk View Installation DVD.
Release Notes for the FactoryTalk Services Platform are available from the Contents
page in the FactoryTalk Help. To open the Help, select Start > All Programs >
Rockwell Software > FactoryTalk Tools >
Help.
Procedures and reference information are available from the Help menu in
FactoryTalk View Studio, and from editors and dialog boxes used to develop
FactoryTalk View SE applications.
Finding information in the FactoryTalk View Installation
Most of the dialog boxes during the installation include the selection View Installation
Guide. Clicking View Installation Guide opens the Installation Guide PDF file.
You can also open the application release notes that contain the latest information about
updates and program features. Click View Release Notes for Selected Product.
FactoryTalk Help
.
x
Page 11

PREFACE •
What’s in this manual
The Installation Guide is available in PDF format from the FactoryTalk View
Installation DVD, from the Help menu in FactoryTalk View Studio, and from the
Rockwell Automation Literature Library.
In the Literature Library, to find the current version of the Installation Guide and the User’s Guide,
search for publication numbers containing the string VIEWSE.
Chapters in this manual describe how to:
Set up the computers that will run FactoryTalk View SE.
Install FactoryTalk View SE and supporting software.
Activate the FactoryTalk View SE software.
Deploy FactoryTalk View SE network and local applications.
Upgrade FactoryTalk Vi e w SE components.
Each chapter includes a task check list, which you can use to create customized
• • • • •
procedures suited to the needs of your application.
Other Documents
Document Description
FactoryT alk Alarms and Events
System Configuration Guide
Publication FTAE-RM-001
Describes the tasks to install, configure,
and use FactoryTalk Alarms and Events
services as part of a FactoryTalkenabled automation system.
Activation Instructions
Publication FTA-QS002
FT Security System Configuration
Guide
Publication FTSEC-QS001
Getting and installing activations for
all the computers in your system.
Walk through of configuring
FactoryTalk Security, creating
accounts and setting permissions.
Opening the FactoryTalk View online manuals
The FactoryTalk View Site Edition User’s Guide, Installation Guide, and the Release
Notes are available online, while you are working in FactoryTalk View Studio.
xi
Page 12

FACTORYTALK VIEW SITE EDITION INSTALLATION GUIDE
• • • • •
To open the online manuals
1. Open FactoryTalk View Studio.
2. From the Help menu, select
Online Books,
and then select the manual you want to
open.
During installation, Adobe Reader may be installed on the computer so that you can view
online manuals. For information about using Adobe Reader, see the product documentation.
Contacting Rockwell Automation Technical Support
If you cannot find the answer to your question in the documentation or on the Internet,
contact Rockwell Automation Technical Support, using any of these methods:
Telephone: 1-440-646-3434
Online: http://support.rockwellautomation.com
Support staff are available Monday to Friday from 8:00 a.m. to 5:00 p.m. local time
(North America only), except on statutory holidays.
When you call Rockwell Automation Technical Support
When you call, it is recommended that you be at your computer and ready to provide the
following information:
The product’s Serial Number and Product Key, which are printed on the Activation
Certificate enclosed with the product software DVD.
The FactoryTalk View product version number.
xii
FactoryTalk Services Platform version number.
The connectivity (RSLinx Enterprise or RSLinx Classic) version number.
The type of hardware you are using.
The names of other Rockwell Automation products installed on the computer.
The exact wording of any messages shown on the computer.
A description of what happened and what you were doing when the problem occurred.
A description of how you tried to solve the problem.
If you are running a FactoryTalk View SE network distributed application, also note:
How many computers are participating in the network application.
Page 13

PREFACE •
Whether computers on the network are connected using a Windows domain controller
or a workgroup.
Which FactoryTalk View SE components are installed on participating computers.
Which computers are running servers (the Network Directory server, HMI servers,
data servers, or tag alarm and event servers), and whether the servers are set up with
redundancy.
Which computers are running clients (FactoryTalk View SE Client or FactoryTalk
View Studio).
• • • • •
xiii
Page 14

FACTORYTALK VIEW SITE EDITION INSTALLATION GUIDE
• • • • •
xiv
Page 15

1
FactoryTalk View basics
FactoryTalk View, including FactoryTalk View SE (Site Edition) and FactoryTalk View
ME (Machine Edition), are HMI (human-machine interface) software products designed
with a common look, feel, and navigation to help speed HMI application development and
training time.
Supporting the Rockwell Automation Integrated Architecture, FactoryTalk View is part of
the scalable and unified suite of monitoring and control solutions designed to span standalone machine-level applications up through supervisory-level HMI applications across a
network. This suite offers you a common development environment, application reuse,
and architecture so you can increase productivity, reduce operation costs, and improve
quality.
FactoryTalk View includes the PC-based development tool FactoryTalk View Studio as
well as FactoryTalk View ME and FactoryTalk View SE.
What is FactoryTalk View SE?
FactoryTalk View SE is an integrated software package for developing and running HMI
applications that can involve multiple users, clients, and servers, distributed over a
network.
FactoryTalk View SE provides all the tools you need to create powerful, dependable
process monitoring and supervisory control applications.
A FactoryTalk View SE System is more than the HMI Server and Clients. It also includes
FactoryTalk Services Platform and Data Communication products such as RSLinx
Enterprise and RSLinx Classic.
1
Page 16

FACTORYTALK VIEW INSTALLATION GUIDE
• • • • •
About the architecture of your FactoryTalk View system
A network distributed FactoryTalk View SE system consists of several components as
shown below.
This example of a distributed system includes a FactoryTalk Directory Server,
FactoryTalk View SE Server and Client, RSLinx Enterprise Data Server, and FactoryTalk
View Studio for application development and configuration.
FactoryTalk View Studio Enterprise
FactoryTalk View Studio Enterprise is the configuration software for developing and
testing FactoryTalk View SE network distributed, network station, local station, and
FactoryTalk View ME applications.
2
Page 17
1 • FACTORYTALK VIEW BASICS
FactoryTalk View Studio contains editors for creating complete applications, and includes
client and server software for testing the applications you create. Use the editors to create
applications that are as simple or as complex as you need.
• • • • •
FactoryTalk View SE Server
FactoryTalk View SE Server, also called the HMI server, stores HMI project components
(for example, graphic displays) and supplies them to clients. The server also contains a
database of tags, and performs alarm detection and historical data logging.
The FactoryTalk View SE Server has no user interface. Once installed, it runs as a set of
headless Windows services that supply information to clients as they request it.
FactoryTalk View SE Client
FactoryTalk View SE Client is software for viewing and interacting with FactoryTalk
View SE local station, network station, and network distributed applications at run time.
Use the FactoryTalk View SE Client Wizard to create client configuration files that can be
deployed to client host computers. For details, see the FactoryTalk View SE Client Help.
3
Page 18
FACTORYTALK VIEW INSTALLATION GUIDE
• • • • •
FactoryTalk View SE Station
FactoryTalk View SE Station is a supervisory HMI software package for enterprise
solutions. SE Station is a single-computer HMI that can be operated in either a Local or a
Network FactoryTalk Directory. There are key differences between View SE Distributed
and View SE Station:
View SE Distributed can share HMI screens and data with multiple clients.
View SE Station does not allow sharing of HMI screens or data to other View SE
Stations.
A Network Station deployment (below) can include several HMI stations using a single
Directory server and a single RSLinx communication server. While each HMI station can
access the same controller data, through the shared RSLinx Enterprise server, and the
same Directory resources through the shared Directory server, they can only access their
own HMI data such as graphics, macros, and datalogs.
4
Page 19
1 • FACTORYTALK VIEW BASICS
A Local Station FactoryTalk View SE system (below) can include several HMI
computers, each with its own FactoryTalk Directory server and data server connection to
the controllers.
• • • • •
Stand-alo n e RSLinx Ente rp ris e Server
RSLinx Enterprise is a FactoryTalk Live Data server and can be enabled as a FactoryTalk
Alarms and Events server. Your applications use RSLinx Enterprise to communicate with
devices such as controllers and I/O scanners. This enables you to see values, such as
sensor readings and other controller data from your plant floor devices, on your desktop
computer or dedicated PanelView Plus terminal.
Stand-alone FactoryTalk Directory Server
FactoryTalk Directory provides a central lookup service for a FactoryTalk system so all
definitions do not have to exist in a single physical project file. References saved by
FactoryTalk Directory are used by FactoryTalk-enabled products and FactoryTalk services
to locate definitions when they are needed. It allows clients to locate key configuration
information such as system organization, server locations, and policy information.
FactoryTalk Directory provides a common address or phone book of factory resources
that are shared among FactoryTalk-enabled applications in a distributed system.
FactoryTalk Services Platform
FactoryTalk Services Platform provides a set of common services (such as diagnostic
messages, health monitoring services, and access to real-time data) for all the FactoryTalk
products and applications used in a control system.
5
Page 20

FACTORYTALK VIEW INSTALLATION GUIDE
• • • • •
FactoryTalk Services Platform is installed automatically with any FactoryTalk-enabled
product.
FactoryTalk Administration Console
FactoryTalk Administration Console is a stand-alone tool for developing, managing, and
securing multiple FactoryTalk View applications.
T o open the Administration Console, select Start > All Programs > Rockwell Software
> FactoryTalk Administration Console.
FactoryTalk Directory
The FactoryTalk Directory centralizes access to system resources and names for all
FactoryTalk products and components participating in an automated control system.
The FactoryTalk Network Directory manages resources for FactoryTalk View SE network
applications, and the FactoryTalk Local Directory manages resources for FactoryTalk
View SE local applications.
FactoryTalk Alarms and Events
FactoryTalk Alarms and Events, which installs behind the scenes during FactoryTalk
View SE installation, provides system-wide alarm monitoring and control centralized at
the FactoryTalk Directory.
T o distribute device- and tag-based alarms in a FactoryT alk View SE application, you can
set up FactoryTalk Alarms and Events servers in the application.
FactoryTalk Security
FactoryTalk Security centralizes user authentication and authorization at the FactoryTalk
Directory.
FactoryTalk Live Data
FactoryTalk Live Data manages connections between FactoryTalk products and data
servers.
FactoryTalk Diagnostics
FactoryTalk Diagnostics collects and provides access to activity , status, warning, and error
messages generated throughout a FactoryTalk system.
6
Page 21

FactoryTalk Activation
FactoryTalk Activation services provide a secure, software-based system for activating
Rockwell Software products and managing software activation files.
Connectivity
How you plan to obtain data for an application will determine which communications
software you install.
You can use the RSLinx Enterprise or RSLinx Classic software shipped with FactoryTalk
View SE, or use other software and devices that support OPC (OLE for Process Control)
communications.
RSLinx Enterprise is automatically installed for FactoryTalk View applications. You may also
choose to include RSLinx Classic during the installation procedure.
RSLinx Enterprise
RSLinx Enterprise is a communication server built around FactoryTalk technology to
assist in developing and running your FactoryTalk View SE applications.
• • • • •
1 • FACTORYTALK VIEW BASICS
For communications with Allen-Bradley local and remote devices, particularly with
Logix5000 controllers, RSLinx Enterprise is the recommended data communications
software for FactoryTalk View applications.
However, RSLinx Enterprise does not allow you to create alias topic shortcuts, or to
perform online tasks such as uploading and downloading RSLogix 5000 files. If you need
these capabilities, you may use RSLinx Classic as your data communications server
instead.
RSLinx Classic
RSLinx Classic is software that provides communications to a wide range of devices, such
as Logix5000 processors. RSLinx Classic is an OPC Data Access v2.05a-compliant data
server that can serve FactoryTalk Live Data tags from an HMI Tag database or RSLinx
Enterprise. RSLinx Classic is available for personal computers only
For example, install and use RSLinx Classic to serve data through DH+ (Data Highway +)
networks, to support complex bridging and routing, and to support unsolicited messaging
from a controller to RSLinx.
RSLinx Classic also allows you to create alias topic shortcuts, and to perform online tasks
such as uploading and downloading RSLogix 5000 files.
.
7
Page 22
FACTORYTALK VIEW INSTALLATION GUIDE
• • • • •
Installation DVD
The FactoryTalk View DVD provides all the software you need to develop and run local
applications confined to a single computer, or distributed control systems that involve
several computers, connected over a network.
Depending on needs, the architecture of a FactoryTalk View distributed application can
involve multiple clients and servers that represent different parts of your plant or process.
To accommodate those requirements, these FactoryTalk View programs are included in
this Setup Wizard :
Studio Enterprise
Server
Client
Station
Stand-alone RSLinx Enterprise Server
Stand-alone FactoryTalk Directory Server
Three other applications -- Studio for Machine Edition, Machine Edition Station for Windows, and
Stand-alone ME Transfer Utility -- can also be installed from this Setup Wizard for FactoryTalk
View ME applications.
8
Page 23

2
Hardware, operating system, and domain information
This section explains computer and Microsoft Windows support information for a
FactoryTalk View SE System.
What is in this chapter?
Determining what computers should be used
Review computer hardware requirements.
Review operating system requirements.
Determining Windows Domain or Workgroup usage
Set up the Windows domain or workgroup.
Determining Computer Names
Set up computers with names to be used in production.
What can I install and run on one server?
In a network application, it is possible for a single server computer that meets the listed
hardware requirements to host all of the following components:
One FactoryTalk View SE Server
One RSLinx Enterprise data server (which can also be set up as FactoryTalk Alarms
and Events device-based alarm server)
One RSLinx Classic OPC-DA server (or some other OPC data server)
One FactoryTalk Alarm and Event Tag based alarm Server
The FactoryTalk Network Directory
Running more than one HMI server on a single computer is not recommended.
9
Page 24

FACTORYTALK VIEW INSTALLATION GUIDE
• • • • •
If you plan to deploy a network distributed application that uses more than two servers (or two
pairs of redundant servers) and 20 clients, it is recommended that you contact your local
Rockwell Automation Sales office for architectural assistance. For information about setting up
redundant FactoryTalk View SE Servers, see Chapter 14, Setting up FactoryTalk system
availability in the FactoryTalk View User's Guide VIEWSE-UM006.
Review hardware requirements
The computer hardware you choose to install and operate your FactoryTalk View SE
System should be adequately sized for the demands of each component. These
specifications are based on the hardware that the FactoryTalk View product and its
supported operating systems require.
Typically, application servers such as FactoryTalk View SE Server, FactoryTalk Alarms
and Events, and RSLinx Enterprise will need to be sized with faster CPUs and more RAM
than operator or engineering workstations. The greater the demand, the more powerful a
system you need.
Y ou should also specify a hard drive that has enough disk space to provide virtual memory
that is at least twice the size of the physical RAM.
For FactoryTalk View software upgrades in this release, we recommend upgrading your
hardware to these levels.
10
Type Description CPU RAM
Operator
Workstation
FactoryTalk View SE Client
or
Intel Core 2
Duo and
greater
2 GB or more
FactoryTalk View SE Station
Engineering
Workstation
FactoryTalk View Studio Enterprise
RSLinx Classic
Intel Core 2
Duo and
greater
4 GB or more
RSLinx Enterprise
Studio 5000
Page 25

2 • HARDWARE, OPERATING SYSTEM, AND DOMAIN INFORMATION
Type Description CPU RAM
• • • • •
Application
Server
Do not run FactoryTalk Alarms and Events servers (Rockwell Automation Device Server or
T ag Alarm and Event Server) on the computers that meet only minimum server requirements.
FactoryTalk View SE Server
FactoryTalk View Studio Enterprise
FactoryTalk Alarms & Events Tag
Based Server
RSLinx Enterprise Data Server with
FactoryTalk Alarms and Events
enabled
Smaller
System: Intel
Core 2 Duo
and greater
Medium to
larger
systems:
Quad core
Intel Xeon
family or
greater
2 GB or more
4 GB or more
11
Page 26

FACTORYTALK VIEW INSTALLATION GUIDE
• • • • •
Review operating system requirements
FactoryTalk View SE software is designed to run on Microsoft Windows operating
systems, including:
Operating System 32-bit 64-bit
Windows 8.1 Professional
Windows 8.1 Enterprise
Windows 8 Professional
Windows 8 Enterprise
Windows 7 Professional
Windows 7 Professional with Service Pack 1
Windows 7 Enterprise with Service Pack 1
Windows 7 Ultimate with Service Pack 1
Windows Server 2012 R2 Standard
Windows Server 2012 Standard
Windows Server 2008 R2 Standard
Windows Server 2008 R2 Standard with Service Pack 1
Windows Server 2008 R2 Enterprise with Service Pack 1
Windows Server 2008 Standard with Service Pack 2
Windows Vista with Service Pack 2
Windows XP Professional with Service Pack 3
Yes Yes
Yes Yes
Yes Yes
Yes Yes
Yes Yes
Yes Yes
Yes Yes
Yes
Yes
Yes
Yes
Yes
Yes
Yes Yes
Yes
Yes
12
Windows Server 2003 R2 Standard with Service Pack 2
Y ou can only use Windows Vist a to either host stand-alone or distributed applications that run on
a single computer, or run the FactoryTalk View SE Client or FactoryTalk View Studio software,
which can connect to an application hosted on the same computer, or an application hosted on a
remote computer. You cannot use Windows Vista to host HMI servers that other clients connect
to. To host HMI servers, use another supported operating system instead.
Yes Yes
The choices you make will depend in part on whether the computer is to host an
Page 27

2 • HARDWARE, OPERATING SYSTEM, AND DOMAIN INFORMATION
application client or server. You might choose to run operator or engineering workstations
in a Windows Server operating system, but that is not required.
Recommended specifications for application servers are not as flexible, because server
computers are more likely to host critical components and to handle more of the
processing load in a FactoryTalk View SE application.
FactoryTalk View SE software is tested and supported on Windows operating systems installed
from original Microsoft media only. Using unsupported operating systems is not recommended.
Operating system recommendations for application servers
For computers hosting application servers (HMI servers, data servers, or Tag Alarm and
Event Servers), operating system requirements depend on whether the server will support
more or fewer than 10 client connections.
A client can be any of FactoryTalk Vi e w SE Client, FactoryTalk View Studio, the
FactoryTalk View SE Administration Console, a FactoryTalk Transaction Manager
connector, or another FactoryTalk View SE Server.
• • • • •
For application servers that support:
More than 10 client connections, the recommended operating systems (with the
appropriate number of CAL (client access licenses) installed)
Windows Server 2012 Standard Edition (64-bit)
Windows Server 2012 R2 Standard Edition (64-bit)
Windows Server 2008 Service Pack 2 (32-bit or 64-bit)
Windows Server 2003 R2 Standard Edition with Service Pack 2 (32-bit or 64-bit)
Windows Server 2008 R2 Standard Edition with Service Pack 1 (64-bit).
10 or fewer client connections, the minimum requirement is
Windows 8.1 Professional (32-bit or 64-bit)
Windows 8 Professional (32-bit or 64-bit)
Windows 7 Professional (32-bit or 64-bit)
Windows XP Professional with Service Pack 3 (32-bit).
13
Page 28

FACTORYTALK VIEW INSTALLATION GUIDE
• • • • •
Windows Vista cannot be used to host an application server with remote clients.
Do not run the primary and secondary servers in a redundant server pair on the computers that
have different operating systems. For example, do not run the primary server on a Windows
Server 2003 computer and the secondary server on a Windows 2008 Server computer.
Set up the Windows domain or workgroup
The number of computers participating in a FactoryTalk View SE network application
determines whether the computers can belong to a Windows domain or a workgroup.
Workgroups can be used only in applications that include 10 or fewer computers. Do not
use Windows Workgroups with more than 10 computers, a Windows domain is
recommended in that case.
For more information about setting up domains and workgroups, see the document,
FactoryTalk View SE Distributed System Design Considerations, attached to Rockwell
Automation Knowledgebase Answer ID 32549.
A domain controller makes it possible to administer the network and user accounts
from a central location. FactoryTalk Security, which manages centralized security
services, supports Windows-linked accounts that are managed and authenticated by
the Windows operating system, but have separate permissions for accessing the
automation system.
14
Name resolution is required for the computers to communicate with each other on the
network.
All computers participating in a single FactoryTalk system must be members of the
same Windows domain.
Do not locate the domain controller on the same computer as any FactoryTalk
software. Microsoft recommends against third party software being installed on a
domain controller.
Domain controller requirements
For network applications consisting of more than 10 computers, the use of a domain
controller is recommended.
The following domain controllers are supported:
Windows Server 2012 (Standard Edition)
Windows Server 2012 R2 (Standard Edition)
Windows Server 2008 with Service Pack 2 (Standard Edition)
Page 29

2 • HARDWARE, OPERATING SYSTEM, AND DOMAIN INFORMATION
Windows Server 2008 R2 with Service Pack 1 (Standard Edition)
Windows Server 2003 R2 with Service Pack 2 (Standard Edition, Native Mode)
For more information about Windows operating systems and Service Pack compatibility,
see Rockwell Automation Knowledgebase Answer ID 20450.
Do not install FactoryTalk Directory, FactoryTalk View SE Server, or any other application
software on the same computer as the Windows domain controller. This configuration is not
supported.
About synchronizing time on application computers
In a networked system, to ensure that time stamps on alarms, historical data, and
diagnostics are accurate, it is highly recommended that time synchronization be
configured on all application computers.
For more information about synchronizing application computer clocks to an authoritative
time server, see FactoryTalk View SE Design Considerations, attached to Rockwell
Automation Answer ID 32549.
• • • • •
Windows workgroup requirements
For network applications consisting of 10 or fewer computers, you can run FactoryTalk
View SE in a Windows workgroup network environment.
For workgroup applications running in Windows XP , you must turn off simple file sharing
and fast user switching on each computer in the workgroup.
Name resolution is required for the computers to communicate with each other on the
network.
Workgroups do not use a domain controller, so central network administration is not
available. This means that security and network communications (for example, name
resolution) must be handled at each individual computer in the workgroup.
Each workstation in a workgroup must have the same user accounts, with the same
user names and passwords on each machine, for all machines participating in a clientserver environment.
All users in a workgroup should have Administrative rights assigned to them.
FactoryTalk Directory provides centralized security services without requiring a
Windows Server and domain controller. When setting up centralized security in a
FactoryTalk Network Directory for Windows Workgroups, do not use Windowslinked accounts. Instead, create user accounts that are managed and authenticated by
FactoryTalk Security.
15
Page 30

FACTORYTALK VIEW INSTALLATION GUIDE
• • • • •
Set up computers with names to be used in production
When you install the FactoryTalk Services Platform with FactoryTalk View SE, the
program creates a FactoryTalk account for the current computer, under the Local and
Network FactoryTalk Directories.
As a result, if you rename the computer after installing FactoryTalk V iew SE or when you
deploy an application, the FactoryTalk Directory will not recognize the new name.
T o avoid this problem, it is recommended that you give the application client and server
host computers the names they will use in a production setting, before you install the
FactoryTalk View SE software.
If you must rename a computer and you encounter problems, for assistance, see Rockwell
Automation Answer ID 35169 (for FactoryTalk View SE network applications), or Answer ID
38775 (for FactoryTalk View SE local and Machine Edition applications).
16
Page 31

3
Pre-installation configuration
This section will guide you through the steps for preparing your computer for installation
of the FactoryTalk View SE product and supporting software.
Checklist for preparing the computer for installation
Disable automatic Windows updates
Turn off simple file sharing and fast user switching (Windows XP only)
Disable operating system themes
Manually configure NICs and switch ports
Disable or uninstall third-party firewalls
Install Microsoft Internet Information Services: Windows XP and Windows 2003
only.
Remove Internet Explorer Enhanced Security Configuration
Set up Internet Explorer for optimal access to components
Set up Data Execution Prevention if needed
Remove unnecessary DCOM networking protocols
Disable automatic Windows updates
When you install Microsoft Service Pack releases and other Windows operating system
updates, you introduce new software that could affect the operation of FactoryTalk
View SE components on the computer.
Windows updates should be disabled in all production computers. Updates can cause
unexpected behaviors, including shutting down running applications and automatic computer
reboots.
1. Open the Windows Update window:
(Windows 7, Windows vista, or Windows Server 2008)
Select Start > All Programs > W indows Update.
(Windows 8.1, Windows 8, or Windows Server 2012)
Press the Windows button+X, select Control Panel > Windows Update.
17
Page 32

FACTORYTALK VIEW INSTALLATION GUIDE
• • • • •
2. In the left column, select Change settings.
3. In the Important Updates drop down, select Never check for updates.
4. Select the check box, Give me recommended updates the same way I receive
important updates.
5. Clear the check box, Allow all users to install updates on this computer.
For Windows XP or Server 2003
1. Open the Windows Control Panel, and then double-click
System
.
2. In the Automatic Updates tab, select the option,
For more information about Windows operating systems and Service Pack compatibility,
see Rockwell Automation Knowledgebase Answer ID 20450.
Turn off simple file sharing in Windows XP
1. On the desktop or in Windows Explorer, right-click
Explore
2. From the Tools menu, select
.
Folder Options
.
3. In the View tab, under Advanced settings, clear the check box,
sharing
.
Turn off fast user switching in Windows XP
1. Open the Windows Control Panel, and then double-click
2. Click the link,
3. Clear the check box,
Change the way Users Log on and Off
Use Fast User Switching
, and then click
Disable operating system themes
Operating system themes, which allow for effects such as sounds, icons, and other
elements that personalize the computer, can cause heavy loads on the computer’s
processor when running some FactoryTalk Vie w SE graphic components, such as alarm
summaries.
Turn off Automatic Updates
My Computer
, and then select
Use simple file
User Accounts
.
.
Apply Options
.
.
18
For best performance, disable all themes. Follow the steps below.
1. Open Control Panel:
(Windows 7, Windows Vista, or Windows Server 2008)
Select Start > Control Panel.
Page 33

3 • PRE-INSTALLATION CONFIGURATION
(Windows 8.1, Windows 8, or Windows Server 2012)
Press the Windows button+X, select Control Panel.
• • • • •
2. In Control Panel, click
3. Under Personalization, click
On the Themes tab, in the Theme list, click
Appearance and Personalization
Change the theme
Windows Classic
For Windows XP or Windows Server 2003
1. Select
2. In Control Panel, double-click
3. On the Themes tab, from the Theme list, select
Start > Control Panel
OK
.
.
Displays
.
Windows Classic
Manually configure NICs and switch ports
The NIC (Network Interface Card) is the hardware in a computer that lets it connect to
other devices on the network. A switch manages traffic on the Ethernet network. Some
switches allow ports (physical connections) to be configured individually.
The link speed and duplex settings for network connections can be auto-negotiated (the
device determines the best way to communicate), or manually configured (settings are
hard coded).
.
.
, and then click OK.
, and then click
Many NICs also offer a power-saving feature that turns off the network card if it is not
being used. This setting sometimes interferes with the ability of the computer to receive
data, causing errors such as wireframes, stale data, and other failures. To prevent these
errors, disable power saving for your computer’s network interface cards. For details, see
“To disable power saving for the NIC”, on page 21.
For FactoryTalk View SE applications, it is recommended that you use managed switches
across the control system network and that you manually configure the same link speed
and duplex setting for all network connections into the managed switches.
It is also recommended that you manually configure the managed switch ports, using the
same settings. To learn how to configure switch ports, see the product documentation
provided with the switches you are using.
19
Page 34

FACTORYTALK VIEW INSTALLATION GUIDE
• • • • •
For an overview of best practices for connecting devices over a network, see the Ethernet
Design Considerations Reference Manual document in the Rockwell Automation
Literature Library. (Search for publication ENET-RM002.)
If you are using unmanaged switches, the NIC settings must remain auto-negotiated. Connecting
an auto-negotiated device to a manually configured device can result in network communication
errors and is not recommended.
To set up the NIC link speed and duplex
The steps for setting the NIC link speed and duplex vary slightly for some of the Windows
operating systems. See the sections that apply to the operating systems you are using.
Follow the steps below.
1. Open Windows Control Panel, and then click
2. From the list of categories, select
Network and Sharing Center
3. From the list of Tasks on the left, select
)
network connnections
.
4. From the list of network connections, right-click
Ethernet), and then select
5. In the Networking tab, click
Properties
Configure
Network and Internet
Change adapter settings
Local Area Connection
.
.
6. In the Properties dialog box for the device, click the
7. From the list of properties for the device, select
Duplex
).
Link Speed & Duplex
Advanced
.
(or
tab.
.
Manage
(or
(or Speed &
8. From the Value list, select the highest possible value for the connection, and then click
OK
.
For Windows XP or Windows Server 2003
1. Open the Windows Control Panel, and then double-click
2. Right-click
Local Area Connection
, and then select
3. In the General tab, beside the network device name, click
Network Connections
Properties
.
Configure
.
.
4. In the Properties dialog box for the device, click the Advanced tab, and then select
Speed & Duplex
.
20
5. In the Value list box, select the highest possible value for the connection—either
100 Mb Full
, or
1000 Mb without a duplex setting
.
Page 35

3 • PRE-INSTALLATION CONFIGURATION
To disable power saving for the NIC
The steps for disabling power saving for the NIC vary slightly for some of the Windows
operating systems. See the sections that apply to the operating systems you are using.
Follow the steps below.
• • • • •
1. Open Windows Control Panel, and then click
2. From the list of categories, select
3. From the list of Tasks on the left, select
)
network connnections
4. From the list of network connections, right-click
Ethernet), and then select
5. In the Networking tab, click
6. In the Properties dialog box for the device, click the
7. Clear the
and then click OK.
For Windows XP or Windows Server 2003
1. Open the Windows Control Panel, and then double-click
2. Right-click
3. In the General tab, beside the network device name, click
4. In the Properties dialog box for the device, click the
5. Clear the
and then click OK.
Allow the computer to turn off this device to save power
Local Area Connection
Allow the computer to turn off this device to save power
.
Network and Sharing Center
Change adapter settings
Properties
Configure
.
.
, and then select
Disable or uninstall third-party firewalls
Network and Internet
.
(or
Local Area Connection
Power Management
Network Connections
Properties
Power Management
.
Configure
.
Manage
(or
tab.
check box,
.
.
tab.
check box,
FactoryTalk View SE is compatible only with the built-in Windows firewall and should
not be used with third-party firewalls because this can cause unexpected results.
Before installing FactoryTalk View SE, disable or uninstall all third-party firewalls on the
computer. For details, see the documentation supplied with your firewall product.
Install Microsoft Internet Inf ormation Services
Microsoft IIS (Internet Information Services) is a critical service for a Distributed
FactoryTalk View SE System. Because of this, the Setup Wizard detects whether
Microsoft IIS is available on the computer and shows the status of that installation to the
user.
21
Page 36

FACTORYTALK VIEW INSTALLATION GUIDE
• • • • •
IIS is required on the following computers:
IIS required IIS not needed
FactoryTalk View SE Server
FactoryTalk View Studio that needs to
remotely connect to a Network
FactoryTalk View SE system.
Guidelines for different operating systems
Because of different versions and configurations for IIS, you may need to perform manual
steps for older operating systems before installing FactoryTalk View SE. Microsoft has
also changed its policy of including a key IIS component, WebDAV, in various operating
systems. This also will require manual steps to download and install WebDAV for older
operating systems.
Need to manually install and configure IIS for these operating systems (see steps
below):
Windows Server 2003
Windows XP
FactoryTalk View SE Client
FactoryTalk View Studio
Stand Alone RSLinx Enterprise Server
Stand Alone FactoryTalk Directory
Server
22
IIS is installed by FactoryTalk View Setup Wizard automatically in the other
supported operating systems.
If you have problems with the IIS setting, you can reference Appendix C, Install Microsoft
Internet Information Services.
Need to manually download WebDAV from Microsoft and install:
Windows Server 2008 with Service Pack 2
Y ou can only use Windows Vist a to either host stand-alone or distributed applications that run on
a single computer, or run the FactoryTalk View SE Client or FactoryTalk View Studio software,
which can connect to an application hosted on the same computer, or an application hosted on a
remote computer. You cannot use Windows Vista to host HMI servers that other clients connect
to. To host HMI servers, use another supported operating systems instead.
To install IIS on Windows Server 2003
1. Close all open Windows programs.
2. Place your Windows DVD in the computer ’s DVD drive.
Page 37

3 • PRE-INSTALLATION CONFIGURATION
• • • • •
3. Open the Windows Control Panel, and then double-click
Programs
.
4. On the left side of the Add or Remove Programs window, click
Windows Components
.
Add or Remove
Add/Remove
5. After the Windows Components Wizard starts, from the Components list, doubleclick
Application Server
6. In the Application Server dialog box, double-click
.
(IIS)
7. In the Internet Information Services (IIS) dialog box, select the check box,
Wide Web Service
.
Internet Information Services
World
.
(The Internet Information Services Manager and Common
Files check boxes should be selected already.)
8. Double-click
9. In the World Wide Web Service dialog box, select the check boxes, A
Pages
World Wide Web Service
and
WebDAV Publishing
.
ctive Server
. (The World Wi de Web Service check box should
be selected already.)
10. Click
until you return to the Windows Components Wizard, and then click
Next
OK
T o finish installing IIS, follow the instructions in the wizard.
To install IIS on Windo ws XP
.
1. Close all open Windows programs.
2. Place your Windows XP DVD in the computer’s DVD drive.
3. Open the Windows Control Panel, and then double-click
Programs
.
4. On the left side of the Add or Remove Programs window, click
Windows Components
.
5. After the Windows Components Wizard starts, select the check box,
Information Services (IIS)
, and then click
Details
Add or Remove
Add/Remove
Internet
.
6. In the Internet Information Services (IIS) dialog box, select the check boxes,
Common Files, Internet Information Services Snap-In
Server
.
OK
7. Click
, and then click
Next
.
, and
World Wide Web
23
Page 38

FACTORYTALK VIEW INSTALLATION GUIDE
• • • • •
T o finish installing IIS, follow the instructions in the wizard
About uninstalling IIS
If for some reason, you need to uninstall and then reinstall IIS, after reinstalling, you need
to re-create the virtual directories in IIS. To do this, run the RSViewWebManager
program installed with FactoryTalk View SE.
To recreate the virtual directories in IIS
In Windows Explorer, open c:\Program files\Rockwell Software\RSView Enterprise,
then double-click RSViewWebManager.exe.
Remove Internet Explorer Enhanced Security Configuration
Internet Explorer ESC (Enhanced Security Configuration) is a group of default security
settings for Windows Server 2003, Windows Server 2008 and W indows Server 2012 that
protects servers by limiting the ways users can browse Internet and Intranet Web sites on
the computer.
24
If installed on a computer with FactoryTalk View SE software components, the Internet
Explorer ESC can interfere with the ability of FactoryTalk View SE Clients to connect to
application servers.
T o avoid unexpected behavior, it is recommended that you remove the ESC from
computers running FactoryTalk View SE.
T o remove ESC in Windows Server 2003
1. Open the Windows Control Panel, and then double-click
Programs
2. On the left side of the Add or Remove Programs dialog box, click
Windows Components.
3. In the list of Components, clear the check box beside
Security Configuration
4. Follow the instructions in the wizard to finish turning off Internet Explorer ESC.
.
, and then click
Next
.
Add or Remove
Add/Remove
Internet Explorer Enhanced
Page 39

T o remove ESC in Windows Server 2008
• • • • •
3 • PRE-INSTALLATION CONFIGURATION
1. Select
2. In the Server Manager window, under
Start > Administrative Tools
ESC
.
>
Server Manager
Security Information
.
, click
Configure IE
3. In the Internet Explorer Enhanced Security Configuration dialog, select
turn off IE Enhanced Security for Administrators and for users, and then click
Off
to
OK
.
25
Page 40

FACTORYTALK VIEW INSTALLATION GUIDE
• • • • •
T o remove ESC in Windows Server 2012
1. On the Windows taskbar, select the Server Manager icon.
2. In the Server Manager Dashboard window, on the left side, click Local Server.
3. On the right side of the Local Server window, under Properties, locate IE Enhanced
Security Configuration and click On.
4. In the Internet Explorer Enhanced Security Configuration dialog, select
turn off IE Enhanced Security for Administrators and for users, and then click
Set up Internet Explorer for optimal access to components
For computers with Internet Exploer 9.0 or earlier, FactoryT alk View stores cached copies
of graphic displays and other HMI server components in the Temporary Internet Files
folder so the components load faster when application clients request them.
To optimize access to HMI server components, certain Internet Explorer settings are
recommended for all application client and server computers in Internet Exploer 9.0 or
earlier.
FactoryTalk View SE supports Internet Explorer 6.0 to 11.0.
If you are using Internet Explorer 10 or later, skip this section. Y ou can use the FactoryT alk V iew
SE Cache Management Tool to optimize access after FactoryTalk View Site Edition installation
completes.
Off
to
OK
.
26
Work Offline setting
To ensure that Internet Explorer detects updates to cached HMI server components, and
that FactoryTalk View SE Clients can load components that are not already in the cache,
make sure the Work Offline setting is turned off.
To turn off Work Offline
In Internet Explorer, from the File menu, if there is a check mark beside Work Offline,
select
Work Offline
to
clear the check mark.
Check for newer versions with every visit to a page
To ensure that FactoryTalk View SE Clie nts can always download and use the latest
versions of HMI server components, set Internet Explorer to check for newer versions of
stored pages with every visit to a page.
The steps vary slightly for some of the Windows operating systems. See the sections that
apply to the operating systems you are using.
1. In Internet Explorer, from the Tools menu, select
Internet Options
.
Page 41

3 • PRE-INSTALLATION CONFIGURATION
• • • • •
2. In the General tab, under Browsing history, click
3. In the Temporary Internet Files and History Settings dialog box, select
time I visit the webpage
.
Manage cache file folders
To ensure that FactoryTalk View Studio can open HMI projects, and that FactoryTalk
View SE Clients can open HMI server components, set the amount of cache files usable
size to twice the size of the HMI project folder.
1. In Internet Explorer, from the Tools menu, select
2. In the General tab, under Browsing history, click
3. In the T emp orary Internet Files and History Settings dialog box, under Disk space
to use, type a number that is at least twice the size, in MB, of the HMI project’ s folder.
If the application contains multiple HMI servers, add up the size of all the corresponding HMI
project folders, and multiply that number by two.
HMI project files are stored in the following location, on the computers hosting HMI servers in a
network application:
. . .\Users\Public\Documents\RSView Enterprise\SE\HMI Projects
(Windows XP or Windows Server 2003) .. .\Documents and Settings\All Users\Shared
Documents\RSView Enterprise\SE\HMI Projects
Set up Data Execution Prevention
Settings
.
Internet Options
Settings
.
Every
.
DEP (Data Execution Prevention) is a Microsoft Windows security feature in
Windows XP (with Service Pack 2 or later), Windows Server 2003 (with Service Pack 1
or R2), Windows 7 Professional, Windows Vista, and Windows Server 2008. DEP is
intended to protect programs and services from viruses and other security threats.
The DEP settings determine which programs and services are covered by DEP protection.
On computers running FactoryT alk View SE components, it is recommended that DEP be
turned on for essential Windows programs and services only.
The steps vary slightly for some of the Windows operating systems. See the sections that
apply to the operating systems you are using.
1. Open Windows
Maintenance
2. Click
System
Control Panel
.
.
3. From the list of tasks on the left, select
, select
Control Panel Home > System and
Advanced system settings
.
27
Page 42

FACTORYTALK VIEW INSTALLATION GUIDE
• • • • •
4. In the System Properties dialog box, click the
5. In the Advanced tab, under Performance, click
6. In the Performance Options dialog box, click the
7. Select the option,
, and then click OK.
only
Turn on DEP for essential Windows programs and services
Advanced
Settings
Data Execution Prevention
For Windows XP or Windows Server 2003
1. Open the Windows Control Panel, and then double-click
2. In the Advanced tab, under Performance, click
3. In the Performance Options dialog box, click the
4. Select the option,
, and then click
only
Turn on DEP for essential Windows programs and services
Apply
.
Settings
Data Execution Prevention
Remove unnecessary DCOM networking protocols
If multiple DCOM protocols are installed and configured on the computer, performance of
communications in a FactoryTalk View SE system can be adversely impacted. To ensure
that DCOM communications function correctly, and do not affect the performance of the
system, remove all protocols other than TCP/IP.
tab.
.
System
.
tab.
.
tab.
28
To remove unnecessary DCOM protocols
1. Select
2. In the Run dialog box, type
Start >
Run.
dcomcnfg
, and then click OK.
3. In the Component Services tool, expand Component Services, open the Computers
folder, right-click
My Computer
, and then select
Properties
.
4. Click the Default Protocols tab. If the DCOM Protocols list shows protocols in
addition to TCP/IP, remove those unnecessary protocols. For example, remove the
protocol Connection-oriented SPX.
Page 43

4
Installing FactoryTalk View
The FactoryTalk V iew installation DVD provides all the software you need to develop and
run distributed systems involving multiple computers on a network, or local applications
confined to a single computer using FactoryTalk View Site Edition (SE).
This chapter uses FactoryTalk View Studio Enterprise to illustrate the installation steps,
because it includes all mandatory and optional installation choices included with the other
selections on the welcome screen.
T o learn about upgrading an existing version of FactoryTalk View SE, see “Upgrading an
operating FactoryTalk View SE application” on page 101.
Steps to install FactoryTalk View Site Edition (SE)
FactoryTalk View supports two installation methods: Setup wizard installation and
unattended installation.
The unattended installation reduces user interaction and provides command line
parameters to install FactoryTalk View products. See “Use unattended installation” on
page 145.
This chapter uses the Setup wizard installation method to illustrate the steps. The overall
installation process includes:
1. Deciding which FactoryTalk View SE components to install
2. Preparing for installation
3. Launching Setup Wizard and selecting what to install
4. Common setup and IIS install
5. Providing information for the install
6. Checking selections and starting the installation process
7. Installation complete
8. Installing SE clients in a distributed system
9. Post-installation procedures
Deciding which
The FactoryTalk View Setup Wizard offers several options for installing the FactoryTalk
View Site Edition software. You can select:
FactoryTalk View SE components to install
29
Page 44

FACTORYTALK VIEW INSTALLATION GUIDE
• • • • •
Studio Enterprise
Site Edition Server
Site Edition Client
Site Edition Station
Stand-alone RSLinx Enterprise Server
Stand-alone FactoryTalk Directory Server
The option you choose depends on the type of FactoryTalk View Site Edition application
or software component you plan to run on the computer and on the design of your control
system.
For each selection on the Welcome Screen, the following table shows the mandatory,
recommended and optional software components to install.
Selected Application Mandatory Applications Recommended and Optional
Studio Enterprise
FactoryTalk View Studio Enterprise
FactoryTalk View SE Server
Site Edition Server
Site Edition Client
30
FactoryTalk Services Platform
FactoryTalk Activation Manager
FactoryTalk Alarms and Events
RSLinx Enterprise
FactoryTalk View SE Server
FactoryTalk Services Platform
FactoryTalk Activation Manager
FactoryTalk Alarms and Events
RSLinx Enterprise
FactoryTalk View SE Client
FactoryTalk Services Platform
FactoryTalk Activation Manager
FactoryTalk Alarms and Events
FactoryTalk View SE Client
Device Status and Diagnostics Faceplates
RSLinx Classic
FactoryTalk Historian Connectivity
FactoryTalk View SE Client
RSLinx Classic
FactoryTalk Historian Connectivity
Page 45

4 • INSTALLING FACTORYTALK VIEW
Selected Application Mandatory Applications Recommended and Optional
Site Edition Station
FactoryTalk View SE Server
FactoryTalk View Studio
• • • • •
Stand-alone RSLinx
Enterprise Server
Stand-alone
FactoryTalk
Directory Server
Preparing for installation
Ensure that the user installing the software has administrative rights in Windows.
If installing FactoryTalk View Studio Enterprise, locate the serial number because you
Schedule downtime for the system if you are upgrading operating applications or
FactoryTalk View SE Client
FactoryTalk Services Platform
FactoryTalk Activation Manager
Device Status and Diagnostics Faceplates
RSLinx Classic
FactoryTalk Historian Connectivity
FactoryTalk Alarms and Events
RSLinx Enterprise
RSLinx Enterprise
FactoryTalk Services Platform
FactoryTalk Alarms and Events
RSLinx Classic
FactoryTalk Activation Manager
FactoryTalk Services Platform
FactoryTalk Activation Manager
will be prompted for it during the installation. Serial numbers are generally on the
original packaging of the installation media.
replacing computers during the installation.
Launching Setup Wizard and selecting what to install
1. Close all open Windows programs.
2. Place the FactoryTalk Vie w Installation DVD in the computer’s DVD drive. The
installation should start automatically.
If the installation does not start, run D:\Setup.exe, where D:\ is the drive containing
the DVD.
After launching, the Setup Wizard automatically installs the necessary software and
prerequisites if needed:
Windows Installer 4.5
31
Page 46

FACTORYTALK VIEW INSTALLATION GUIDE
• • • • •
Microsoft XML 4.0 SP2
On Windows XP and Windows Server 2003, you must install a new driver certification for
DriverPkgx64.msi and the 32-bit USBCIP Driver. The installer automatically detects if the
system contains this certification. If not, the following message opens. Click Yes to continue.
In order to continue FactoryTalk® Services installation, this system must be updated with a
current software publisher root certificate. With this update your system will trust drivers from
Rockwell Automation, as well as other software publisher.
The welcome screen offers a pull down menu to select the products you would like to
install.
32
3. Select the appropriate product for the computer you are upgrading or installing.
Information about Studio for Machine Edition and Machine Edition Station for
Windows appears in FactoryTalk View Machine Edition Installation Guide VIEWMEIN007.
4. Adobe Reader will be installed unless you clear the check box. Adobe Reader is
required to open the Installation Guide, User Guide, and other documents.
5. After you make the selection from the list, the Setup Wizard will automatically offer
different choices for the software products to install. Make your choices and click
Next. The applications you have selected will determine the sequence of installation.
Follow the prompts for the product you have selected.
Common setup and IIS install
On the dialog box that prompts you to Please select Software Products to Install there
may be three different options displayed:
Page 47

4 • INSTALLING FACTORYTALK VIEW
Mandatory (greyed-out and checked) software that will be automatically installed as
part of the selected application.
If a product is already installed, it will be greyed out with an unchecked check box.
Recommended (check box with a green check) indicates software that Rockwell
recommends for the application. You may decide to uncheck the box so the software
does not install.
Optional (clear check box) indicates software that you may wish to include
depending on your system. Check the box to include the software during installation.
• • • • •
When a new product from the middle selection box is selected, version and upgrade
information is shown in the right text box. If applicable, information about the previous
version is also displayed in the right text box.
In the example above, Factory T alk Services Platform v2.70.00 is available to be installed.
Make any changes desired and click Next to proceed.
33
Page 48

FACTORYTALK VIEW INSTALLATION GUIDE
• • • • •
FactoryTalk Activation Warning
Some products require activation using FactoryTalk Activation Manager. Even if you
previously used a different method of activation, all FactoryTalk View software must be
activated using FactoryTalk Activation Manager. Click Next to proceed.
34
Microsoft Internet Information Services (IIS) check and installation
The Setup Wizard automatically installs Microsoft Internet Information Services (IIS) if
needed on all supported operating systems except Windows Server 2003 and Windows
XP. Click Install IIS to proceed.
For procedures to install IIS on Windows XP and Windows Server 2003 see “Install Microsoft
Internet Information Services” on page 21.
Page 49

• • • • •
4 • INSTALLING FACTORYTALK VIEW
After selecting Install IIS, you will see the text appear in this screen at the top:
Installing IIS - This may take several minutes, please wait…
Once the IIS installation is complete, the text will appear in this screen at the top:
IIS is installed correctly, please click Next to continue.
For Windows Server 2008 SP1 and SP2 running network applications, the WebDAV module
must be installed in IIS. Click on Download WebDAV to download and install the extension from
the Microsoft website.
After IIS and WebDAV are installed as needed, click Next to proceed.
35
Page 50

FACTORYTALK VIEW INSTALLATION GUIDE
• • • • •
Dependent software process termination warning
During the installation, the Setup Wizard identifies Rockwell Automation software that
will be replaced. The program automatically terminates the programs listed on the
following dialog box
This procedure could shut down your process applications! Depending on which
applications you are installing or upgrading, it is possible that your factory automation system will
become inoperable, shutting down your processes. Be certain you have prepared for this
downtime and all of your company’s systems are prepared for these applications to be
terminated.
Click Next to proceed.
.
36
Page 51

Providing information for the install
The Setup Wizard will only show this Serial Number entry page when FactoryTalk View
Studio Enterprise is selected for installation. All other product serial numbers will be
entered through the FactoryTalk Activation Manager after the installation is complete.
• • • • •
4 • INSTALLING FACTORYTALK VIEW
User name and organization are optional and not required for all installations. A serial
number reveals which edition of FactoryTalk® View you purchased. V alid serial numbers
are important to get activation keys and call Technical Support. If you do not enter a valid
serial number, you will be allowed to proceed with the installation. Serial number
information is available from the product packaging.
Enter the serial registration information and click Next.
End User License agreement
End-user license agreements (EULA) spell out your rights and responsibilities.
Depending on the applications being installed, it is possible that there may be more than
37
Page 52

FACTORYTALK VIEW INSTALLATION GUIDE
• • • • •
one license agreement on this page. The individual license agreements are listed above the
text box.
38
Some software products may be delivered or made available only after you agree to the
terms and conditions of each of the license agreements.
To accept the license agreements
1. Select an agreement at the top of the dialog box to read the license agreement.
2. Repeat for each license agreement.
3. When all license agreements have been read, click Accept All to agree with the terms
of all the listed license agreements and continue.
If you do not accept the terms of the license agreements click Decline. The Setup
Wizard will end.
Clicking Back returns to the previous screen.
Page 53

4 • INSTALLING FACTORYTALK VIEW
File Location for product installation
Select the location for Rockwell Automation software. If needed, select the pull down
menu to browse to another drive location.
• • • • •
Once the drive is selected, click Next.
39
Page 54

FACTORYTALK VIEW INSTALLATION GUIDE
• • • • •
Select Setup T ype
This dialog box allows you to select the most appropriate type of installation for your
applications.
40
Complete will install all the components available in the Setup Wizard.
Custom allows you to select optional components such as Help and demo
applications.
Select a setup type and click Next.
Page 55

4 • INSTALLING FACTORYTALK VIEW
SQL Server sign-in or installation
During the installation, the Setup Wizard determines whether a compatible SQL server is
available on the computer.
• • • • •
FactoryTalk View Site Edition tag database supports the following editions:
SQL Server 2008 R2 Express (32-bit or 64-bit)
SQL Server 2008 R2 Standard (32-bit or 64-bit)
SQL Server 2008 R2 Enterprise (32-bit or 64-bit)
If a supported edition of FTVIEWx64TagDB instance exists, the installer skips the SQL
configuration step.
If it is not already installed, the Setup Wizard will prompt for a new password and will ask
to verify the password as shown above.
To use other compatible SQL Server editions, you need to manually install it. Click Compatible
Editions for instructions or see “Install other compatible SQL Server editions” on page 42.
New passwords must be strong passwords. Click Guidelines to review the requirements
for strong passwords.
41
Page 56

FACTORYTALK VIEW INSTALLATION GUIDE
• • • • •
Enter and verify the password, then click Next.
The chosen password should be recorded and saved along with other administrator passwords
for system maintenance personnel.
Strong Password Guidelines
Strong passwords are not readily guessed by a person, and are not easily hacked using a
computer program. Strong passwords cannot use prohibited conditions or terms,
including:
A blank or NULL condition
Password
Admin
Administrator
sa
sysadmin
A strong password cannot be the following terms associated with the installation
computer:
42
The name of the user currently logged onto the machine
The computer name
A strong password must be more than 8 characters in length and satisfy at least three of
the following four criteria:
It must contain uppercase letters
It must contain lowercase letters
It must contain numbers
It must contain non-alphanumeric characters; for example, #, %, or ^
Install other compatible SQL Server editions
FactoryTalk View Site Edition provides a batch file that you can use to install the SQL
Server edition with minimal user intervention. Follow the steps below:
1. Close all open Windows programs, including FactoryTalk View setup program.
2. Open the Command Prompt window:
Page 57

4 • INSTALLING FACTORYTALK VIEW
(Windows Server 2012, Windows 8.1, and Windows 8) Press the Windows
button+R, and in the Open text box, input cmd and click OK.
(The other supported operating systems) From the Windows Start menu, select All
Programs > Accessories > Command Prompt.
3. In the Command Prompt window, navigate to the following directory where D:\ is
the drive containing the disk:
D:\Redist\SQLServerEXPR_2008R2SP2
In this example, type cd /D “D:\Redist\SQLServerEXPR_2008R2SP2” and press
Enter.
4. T ype a command line with the following syntax:
"Install Compatible SQL.bat" [SQL setup.exe path] [Product key] [SA
password]
All parameters are required.
[SQL setup.exe path] Specifies the full path of SQL Server setup.exe, for
example, E:\setup.exe.
• • • • •
[Product key] Specifies the SQL Server product key.
[SA password] Specifies the SQL Server System Administrator (SA) password.
Example:
If your SQL Server setup.exe is under the drive E:, the product key is 01234-56789ABCDE-FGHIJ-KLMNO, and the SA password is mySaPwd@123, type the following
command:
"Install Compatible SQL.bat" E:\setup.exe 01234-56789-ABCDE-FGHIJKLMNO mySaPwd@123
5. Press Enter. The installation starts. Follow the on-screen instruction to complete the
installation.
43
Page 58

FACTORYTALK VIEW INSTALLATION GUIDE
• • • • •
Configuring Products
If you selected the Custom setup, you can decide whether to install the demo applications
and help files when performing a FactoryTalk View Studio Enterprise installation.
44
Page 59

4 • INSTALLING FACTORYTALK VIEW
Under the FacotyrTalk View Site Edition Server application, you can also decide whether
to install the client install portal feature. The feature allows you to install Site Edition
Client through a web browser in a distributed system. For more information about the
feature, see “Installing SE clients in a distributed system” on page 48.
• • • • •
Make sure to select the Client Install Portal check box at the first time if you plan to use this
feature. Otherwise, you will not be able to add and install it in the Program Maintenance mode.
Some other applications may not provide any choices.
Click Next to continue.
45
Page 60

FACTORYTALK VIEW INSTALLATION GUIDE
• • • • •
Checking selections and starting the installation process
Once all the selections are made, the Setup Wizard displays the prerequisites and
Rockwell software that will be installed.
46
Configuration Summary indicates the software that will be included in the
installation process.
Prerequisite Software is required on the computer to support the Rockwell Software
applications.
Rockwell Software applications are the Rockwell applications queued for
installation.
This step shows you the list of software that will be installed based on the selections made
in the Setup Wizard.
Select the software names to show descriptions in the bottom text window.
T o make a different product selection, click Back.
If everything in the list looks okay, click Install to start the Installation process.
Page 61

4 • INSTALLING FACTORYTALK VIEW
Installation of selected software
After installing prerequisites, the installer automatically installs all the Rockwell Software
applications selected previously. Installation is automatic and does not require any input
from the user.
• • • • •
Installation status updates are provided at the bottom, just above the progress bar.
47
Page 62

FACTORYTALK VIEW INSTALLATION GUIDE
• • • • •
Installation complete
After the FactoryTalk View SE software finishes installing, the Setup Complete dialog
box opens.
48
T o proceed directly to activation of the installed components, click Finish. You can also
clear the check box for Activate products using FactoryTalk Activation to finish
without activation. See “Activating FactoryTalk View software” on page 55.
After you click Finish, you will be prompted to restart the computer. Click Yes to reboot
the computer. Click No to exit the popup.
Installing SE clients in a distributed system
In a distributed system, after installing the server computer with the client install portal
feature, you can install SE clients through the web browser.
To install the SE Client application:
1. On the client computer, open Internet Explorer.
2. In the Address field of Internet Explorer, type the following addess:
Page 63

4 • INSTALLING FACTORYTALK VIEW
http://servername/ftviewclient
where servername is the name of your FactoryTalk View SE server computer.
For example, if your FactoryTalk View SE server is called MYSERVER, type:
http://MYSERVER/ftviewclient
If you are using SSL, then begin with https:// instead.
3. Press Enter.
Internet Explorer displays a page from the server that allows you to install the
FactoryTalk View Site Edition Client application.
• • • • •
If Internet Explorer displays an error message that it cannot connect to the install web page,
try adding the FactoryTalk View Site Edition website (URL above) to your local intranet site
list.
To do this, in Internet Explorer, click Tools > Internet Options > Security tab > Local
intranet > Sites > Advanced, and add the website to the list. For more information about the
local intranet, refer to Windows Help and Support.
4. Microsoft .NET Framework 4.0 is required before you can install FactoryTalk View
Client. If it is not installed, click Install .NET Framework 4.0 on this computer. The
option is not shown if it is already installed.
5. Follow the on-screen instructions. If prompted to restart your computer, click Restart
Now.
6. Once the computer has restarted, repeat steps 1 to 4.
49
Page 64

FACTORYTALK VIEW INSTALLATION GUIDE
• • • • •
7. To install SE Client, click Install FactoryTalk View Site Edition Client on this
computer. Follow the on-screen instructions.If you are displaying data from
FactoryTalk Historian on trends, click Install FactoryTalk Historian Connectivity
tools. Follow the on-screen instructions to complete the installation.
FactoryTalk Historian Connectivity allows the TrendX object to retrieve data from a Historian SE
Server or Historian ME Module. It makes updates to FactoryTalk Administration Console and
FactoryTalk View SE Studio to display an Historian icon for both Historian SE and Historian ME
when they are registered. You can use it to create new Historian SE points from TrendX and
select existing Historian points from Historian SE or Historian ME.
Post-installation procedures
Now that FactoryTalk View product has been installed, there may be several final setup
steps that must be completed:
Installing product updates
Specifying the Network Directory server location
Installing product updates
After installing any of the FactoryTalk View components, you should locate and install
patches for the software products on your system. To locate patches, search the Rockwell
Automation Knowledgebase for Patch TOCs (Tables of Contents). The TOCs contain
lists of all available patches for your software. Go to
http://rockwellautomation.custhelp.com/ and select the Search Knowledgebase tab.
50
A Patch TOC describes updates released for a particular product and version, and
provides instructions for downloading and installing the updates on computers where the
software is installed.
To find Patch TOCs in the Rockwell Automation Knowledgebase
1. In your W eb browser’s address bar, type https://rockwellautomation.custhelp.com/,
then press Enter (you may be required to register or log in).
Page 65

4 • INSTALLING FACTORYTALK VIEW
2. On the Rockwell Automation Support Center page, click the down arrow on the
Search Knowledgebase tab. Select By Product.
3. Scroll down to Software and click on FactoryTalk View SE. In the Search box, type
Patch TOC and click Search.
• • • • •
51
Page 66

FACTORYTALK VIEW INSTALLATION GUIDE
• • • • •
In the search results, look for Patch TOCs related to all the products you installed from
the FactoryTalk View Site Edition DVD. If necessary, conduct additional searches
for other newly-installed applications, including:
SE Client
SE Server
SE Station
Studio Enterprise
FactoryTalk Services Platform
FactoryTalk Alarms and Events
RSLinx Enterprise
RSLinx Classic
Specifying the Network Directory server location
52
Use the FactoryTalk Directory Server Location Utility on all application server and client
computers to specify the computer that will host the FactoryTalk Network Directory
server.
To set up the local computer as the Network Directory server
1. On the Network Directory computer, click Start > All Programs > Rockwell
Software > FactoryTalk Tools, and then click Specify FactoryTalk Directory
Location.
You will have to log on as an administrator on the local computer.
2. If
localhost
is displayed in the field under Computer hosting directory server, the
computer is already specified as the Network Directory host. You can close the utility.
If localhost is not displayed, click the Browse button.
3. In the FactoryTalk Directory Server Configuration dialog box, click This
computer, and then click OK.
4. Click
OK
again, to close the FactoryTalk Directory Server Location Utility.
Page 67

4 • INSTALLING FACTORYTALK VIEW
To specify the Network Directory on client and server computers
1. On the Network Directory computer, click Start > All Programs > Rockwell
Software > FactoryTalk Tools, and then click Specify FactoryTalk Directory
Location.
You will have to log on as an administrator on the local computer.
2. If a remote computer is hosting the Network Directory server, click the Browse button
beside the field, Computer hosting directory server.
3. In the FactoryTalk Directory Server Configuration dialog box, click Remote
Computer
4. Type the name of the Network Directory server computer, or click the Browse button
to find and select the computer, and then click OK.
You will have to log on as an administrator on the remote computer.
OK
5. Click
again, to close the FactoryTalk Directory Server Location Utility.
Repeat steps 1 to 5 on all client and server computers that will participate in the same
network application.
• • • • •
53
Page 68

FACTORYTALK VIEW INSTALLATION GUIDE
• • • • •
54
Page 69

5
Activating FactoryTalk View software
For continuous use of FactoryTalk View SE and other Rockwell Software products,
computers running the software must have access to activation files.
T o manage and provide activations for FactoryTalk View SE software components, use
the FactoryTalk Activation Manager installed with FactoryTalk View.
About FactoryTalk Activation Manager
FactoryTalk Activation Manager provides a secure, software-based system for activating
Rockwell Software products and managing software activation files.
With FactoryTalk Activation Manager, there is no need for a physical master disk or any
physical media; instead, activation files are generated and distributed electronically.
FactoryTalk View SE products use two types of activations:
Floating
the network, and require a continuous network connection.
Borrowed
activation server on the network, and do not require a continuous network
connection.
For standard installations of the product software, FactoryTalk View SE supports only the
use of both types of
supported.
concurrent activations are checked out of an activation server located on
concurrent activations are time-expiring activations checked out of an
shared concurrent
activations. Node-locked activations are not
To learn about the types of activation that other Rockwell Automation products can use, see the
product documentation or contact your local Rockwell Automation Sales office.
Activating software on Windows Vista
You can use Windows Vista only to run the FactoryTalk View SE Client, develop standalone or distributed applications on a single computer, or to run FactoryTalk View Studio
and connect to remote HMI servers.
You cannot use Windows Vista to host HMI servers that other clients connect to. T o host
HMI servers, use another supported operating system instead.
When choosing activation keys for Windows Vista, bear in mind that although you can
install activation keys for Network applications, you cannot use them on Windows Vista.
For details about specific activation keys, see “Activation keys for FactoryTalk View
software components” on page 57.
55
Page 70

FACTORYTALK VIEW INSTALLATION GUIDE
• • • • •
What happens if FactoryTalk View is not activated?
If the FactoryTalk View components you have installed cannot be activated, for example,
because the activation server is unavailable or because borrowed activations have expired,
the software will continue to run for up to seven days.
The seven-day grace period allows time to correct the problem with acquiring activations
without disrupting critical applications. If activation is restored within seven days, normal
operations will resume.
If activation is not restored, the grace period will expire. After the grace period expires, if
you restart FactoryTalk View SE and activation remains unavailable, the software will run
for two hours in demo mode.
With a FactoryTalk V iew SE network distributed application, running in demo mode, you
can:
Create or load up to five HMI servers locally in FactoryTalk View Studio.
Create or load up to five graphic displays per HMI server.
Run a local station FactoryTalk View application for up to two hours. In demo mode,
remote clients cannot connect to a FactoryTalk View server.
In Symbol Factory, import only the first graphic in each category.
56
Set up client computers to obtain floating activations
Floating concurrent activations are assigned automatically to clients that need them, and
returned automatically to the activation server pool when FactoryTalk View SE stops
running on the client, or when the client computer shuts down.
Client computers must be set up to obtain floating activations from the activation server.
If you prefer to use borrowed activations for clients, skip to “Borrow activations for
development computers” on page 57.
After you set up the activation server (or servers), you can specify which server each
client computer will obtain activations from.
Once a client is connected to a server, all you have to do is to run the FactoryTalk View
software (for example, the FactoryTalk View SE Client), and the server will issue
available activations automatically.
A continuous network connection is required for an activation client to use floating
activations. After a client obtains a floating activation, when the activation server detects
that the client has been disconnected, the activation is returned to the server pool.
Page 71

5 • ACTIVATING FACTORYTALK VIEW SOFTWARE
T o ensure that critical software components (redundant HMI servers, for example) can
always obtain the necessary activations, set up an activation server on the computer where
the software is running.
Ensuring that network application components stay activated
T o ensure that critical software components in a network application using floating
activations can always obtain the necessary activations, even if the network is disrupted,
set up a FactoryTalk Activation server on every computer where the FactoryTalk View SE
software is running. This includes all clients and all servers, whether redundant or not.
For example, to ensure that a redundant FactoryTalk View SE Server remains activated,
install the activation server on both computers hosting the redundant server pair, and then
add the necessary activations to those computers.
Borrow activations for development computers
If it is not convenient for a development computer to remain connected to the network
where the activation server resides, you can connect to the activation server temporarily,
borrow a concurrent activation for a limited amount of time, and then disconnect. When
the time-limited activation expires, its associated software is no longer activated, and the
activation automatically becomes available again from the server's activation pool.
• • • • •
Only the FactoryTalk View Studio activation keys can be borrowed. While developing
Network applications disconnected from the network, the FactoryTalk V iew Studio
activation key is shared by any test clients and HMI servers in your application, allowing
all necessary components to run for development purposes.
To use borrowed activations, you must upgrade to FactoryTalk Activation Manager version 3.30
or later (included on any FactoryTalk CPR 9 SR 4 product’s DVD) on all server and client
computers where the borrowed activations will be used.
Activation keys for FactoryTalk View software components
The activation files you download from the Rockwell Software Activation Website
contain the activation keys you purchased, in encrypted form. The activation key is the
software that activates FactoryTalk View SE components. Following is a list of activation
keys used by the FactoryTalk View SE and ME products.
For information about the keys required to activate other Rockwell Automation products in your
application, see the product documentation.
57
Page 72

FACTORYTALK VIEW INSTALLATION GUIDE
• • • • •
To activate this software product or component Use this key
FactoryTalk View Studio*
*Includes software for developing and testing FactoryTalk View Site
Edition and Machine Edition applications
FactoryTalk View SE Server (network distributed applications), unlimited
displays
FactoryTalk View SE Server (network distributed applications),
250 displays
FactoryTalk View SE Server (network distributed applications),
100 displays
FactoryTalk View SE Server (network distributed applications), 25 displays RSVSESRV.25
FactoryTalk View SE Client (network distributed applications), read and
write
FactoryTalk View SE Client (network distributed applications), view only RSVSECLI.RO
FactoryTalk View SE Station (network station and local station
applications), unlimited displays
FactoryTalk View SE Station (network station and local station
applications), 250 displays
FactoryTalk View SE Station (network station and local station
applications), 100 displays
FactoryTalk View SE Station (network station and local station
applications), 25 displays
FactoryTalk View SE Station (network station and local station
applications), 15 displays
RSV.STUDIO
RSVSESRV.MAX
RSVSESRV.250
RSVSESRV.100
RSVSECLI.RW
RSVSE.MAX
RSVSE.250
RSVSE.100
RSVSE.25
RSVSE.15
58
Page 73

5 • ACTIVATING FACTORYTALK VIEW SOFTWARE
Sharing keys among multiple software components
Multiple FactoryTalk View SE software components can function using one activation
key in the following cases:
Multiple instances of FactoryTalk View Studio or the FactoryTalk View SE Client
running on the same computer can use a single key (RSV.STUDIO or RSVSECLI), as
long as the components are not running in a Terminal Services session.
In the network application of FactoryTalk View SE versions earlier than 6.10, for
development and testing purposes, one FactoryTalk View Studio key activates a
FactoryTalk View SE Client and SE Server on the same computer . Remote clients and
servers require component-specific activations.
Note: In version 6.10 or higher , one FactoryTalk Studio key can no longer activate the
local server or client to run in test run mode.
Local applications use a single key (RSVSE.*) to activate both the FactoryTalk View
SE Client and the FactoryTalk View SEServer at run time. These components running
together are also known as FactoryTalk View SE Station.
• • • • •
FactoryTalk View SE Server activations—known as capacity activations because they are based
on the number of displays in an application—cannot be shared.
Read-write versus view-only activations
In a network application, FactoryTalk View SE Clients can use two types of activation:
Read-write
View-only
Whether a FactoryTalk View SE Client runs in read-write or in view-only mode depends
on the type of activation key available for the client to use, and whether the client itself is
set up as read-write or view-only:
If the activation server can only provide view-only licenses, and a read-write client
obtains one of these licenses, then the activation overrides the client’s configuration,
and the client runs in view-only mode.
If the activation server can only provide read-write licenses, and a view-only client
obtains one of these licenses, then the client’s configuration overrides the activation,
and the client runs in view-only mode.
Do not rely on available activation keys to determine whether the FactoryTalk View
SE Client runs in read-write or view-only mode. Instead, to ensure that a client always
keys (RSVSECLI.RW) allow full read-write privileges.
keys (RSVSECLI.RO) allow view-only privileges.
59
Page 74

FACTORYTALK VIEW INSTALLATION GUIDE
• • • • •
runs in view-only mode, choose the view-only option when setting up the client’s
configuration file. For details, click Help in the FactoryTalk View SE Client wizard.
60
Page 75

6
Deploying network distributed applications
After developing and testing a FactoryTalk View Site Edition network distributed
application, you can deploy it to run in a live setting, such as the plant floor. Deploying a
network distributed application often involves installing FactoryTalk View SE software
components on multiple client and server computers.
For details about installing the software, see Chapter 4, Installing FactoryTalk View. For
information about upgrading a network distributed application that is already deployed,
see Chapter 9, Upgrading an operating FactoryTalk View SE application.
For details about the structure and content of network distributed applications, see
Chapter 6, Working with network distributed applications in the FactoryTalk View Site
Edition User’s Guide.
Overview of tasks: deploying network distributed applications
The checklist in this section summarizes the basic tasks involved in deploying a
FactoryTalk View SE network distributed application. Each task is described in detail in
the rest of this chapter. Add or remove steps as necessary to create a customized procedure
that reflects the design and content of your FactoryTalk View application. For example,
your application might include additional communications or database servers.
For details about deploying FactoryTalk Alarms and Events servers, see the FactoryTalk
Alarms and Events Configuration Guide. On the Windows Start menu, click
Programs > Rockwell Software > FactoryTalk Tools > FactoryTalk Alarms and
Events Configuration Guide
.
Start > All
Task checklist for deploying a network distributed application
Back up the network distributed application.
Ensure that the FactoryTalk Network Directory is set up.
Move the application’s HMI project files.
Restore the network distributed application.
Specify the Network Directory location on application computers.
Move the application’s data server files.
Specify data server host computer names.
61
Page 76

FACTORYTALK VIEW SITE EDITION INSTALLATION GUIDE
• • • • •
Renew data server shortcuts, topics, and device paths.
Specify HMI server host computer names.
Set up additional HMI server properties.
Set up the FactoryTalk View SE Clients.
Run the FactoryTalk View SE Clients to test the application.
Back up the network distributed application
Use the FactoryTalk Studio Enterprise to back up a FactoryTalk View SE network
distributed application. The back-up operation creates an application archive that includes
area names, server names, server properties, and application languages. You may also
need to backup RSLinx Enterprise shortcut names, For information, see “Backing up and
restoring RSLinx Classic configurations” on page 70.
If you include System information in the back-up operation, user and computer accounts
are also archived, along with other FactoryTalk system-level settings. For more
information, see the next section “About backing up System information with an
application.”
HMI server specific project components such as HMI project files, product activation, and
logged historical data (trends, alarms, and diagnostic messages), and RSLinx
configuration must be backed up and restored separately using the HMI Server Backup
and Restore utility.
62
For information about backing up and restoring files that belong to FactoryTalk Tag Alarm and
Event Servers, see the FactoryTalk Alarms and Events Help.
Page 77

6 • DEPLOYING NETWORK DISTRIBUTED APPLICATIONS
HMI project
components
and editors
Application
Area
FactoryTalk Network
Directory
(host computer name).
LOCALHOST means that
the application’s directory is
on the local computer.
HMI server
The System folder
stores FactoryTalk
settings for all the
applications that
belong to the
Network Directory
About backing up System information with an application
The following illustration shows what a FactoryTalk View SE network distributed
application looks like when opened in FactoryTalk View Studio.
• • • • •
The FactoryTalk Network Directory (also called the Network Directory) is represented at
the top of application hierarchy. One level down, the System folder stores settings that are
used by all the applications that belong to the same Network Directory.
For example, FactoryTalk user and computer accounts set up for each application are
stored in the System folder.
When you back up a network distributed application, System information for the
application is not archived automatically. To save the System information, for example, in
order to preserve user and computer accounts, you must select the check box, Backup
System in archive.
If you back up System information with a network distributed application, when you
restore the application, you can also choose whether to restore the archived System
information.
If you do, keep in mind that restored System information does not merge with existing
FactoryTalk System settings held at the current FactoryTalk Network Directory.
63
Page 78

FACTORYTALK VIEW SITE EDITION INSTALLATION GUIDE
• • • • •
For example, if you restore System information, and if the Network Directory on the local
computer is active, you will replace user and computer accounts set up for any other
application using the active directory.
RSLinx Enterprise device paths are also saved with System information, and might not be correct
for the computer where the application will be restored. For information about checking device
paths after restoring an application. see “Verify RSLinx Enterprise shortcuts” on page118.
To back up a network distributed application
Before backing up an application, record the user names and passwords of administrative users
set up for the application, in case you need this information after restoring the application.
1. Click Start > All Programs > Rockwell Software > FactoryTalk View, and then
FactoryTalk View Studio
click
2. In the Application Type Selection dialog box, select Network Distri buted, and then
OK
click
To back up a network distributed application, the logged on user must have FactoryTalk
administrative rights. If you receive a prompt to log on, check with your Syst em Admi nist rat or.
.
.
64
3. In the New/Open Site Edition (Network Distributed) Application dialog box, click
on the application you wish to back up.
Page 79

6 • DEPLOYING NETWORK DISTRIBUTED APPLICATIONS
4. In the Explorer window, right-click the application you want to back up, and then
click
Backup
.
• • • • •
5. Specify an archive name and location.
T o specify a location other than the default, type the path or click the Browse button to
find and select a location.
6. Select or clear the check box,
Backup System in archive
.
The back-up operation saves an application archive file with a .bak extension to the
specified location. The default locations are:
C:\Users\Public\Documents
(Windows XP and Windows Server 2003) C:\Documents and Settings\All
Users\Documents
If you select the check box, Backup System in archive, it is recommended that you do not
restore the archived System information with the application, as this will remove existing
computer accounts and prevent users from logging on successfully to the Network Directory.
Include System information in the restore operation only if there are no applications using the
current Network Directory, or if the effect on existing applications will be minimal.
65
Page 80

FACTORYTALK VIEW SITE EDITION INSTALLATION GUIDE
• • • • •
7. Select or clear the checkbox Encrypt File Contents. If you decide to encrypt file
contents, you must enter and confirm a passphrase. Then click OK.
Ensure that the FactoryTalk Network Directory is set up
On the computer that will host the FactoryTalk Network Directory, ensure that the
FactoryTalk Services Platform is installed, and that
Directory location.
To specify localhost as the Network Directory location
1. On the Network Directory computer, click Start > All Programs > Rockwell
Software > FactoryTalk Tools, and then click
localhost
.
is displayed in the field, Computer hosting directory server, the computer
Location
T o use the utility, you have to log on as a local administrator.
2. If
is already specified as the Network Directory host. You can close the utility.
If localhost is not displayed, click the Browse button.
localhost
Specify FactoryTalk Directory
is specified as the Network
66
3. In the FactoryTalk Directory Server Configuration dialog box, click
OK
and then click
4. Click
OK
again, to close the FactoryTalk Directory Server Location Utility.
.
Move the application’s HMI project files
Use the HMI Server Backup and Restore utility to back up HMI project files that belong
to HMI servers in the application you are deploying.
T o run the HMI Server Backup and Restore utility, click
Rockwell Software > FactoryTalk View > Tools > HMI Server Backup and
Restore
. For details about using the utility, click the
This computer
Start > All Programs >
Help
button.
,
Page 81

6 • DEPLOYING NETWORK DISTRIBUTED APPLICATIONS
After backing up the HMI project files, use Windows Explorer to move the backed-up
files manually, if necessary, from the development computer (or computers) to the
production computers that will run the HMI servers.
Then, use the HMI Server Backup and Restore utility again, to restore the HMI project
files in their new location.
If you are deploying an application that includes redundant HMI servers, for each redundant pair,
you must use the HMI Backup and Restore Utility to place a copy of the HMI project files on both
the primary and the secondary production computer.
Where HMI project files are stored
HMI project files are stored in the following location, on computers hosting HMI servers
in a network distributed application:
. . .\Users\Public\Documents\RSView Enterprise\SE\HMI Projects
(Windows XP and Windows Server 2003)
. . .\Documents and Settings\All Users\Shared Documents\RSView
Enterprise\SE\HMI Projects
• • • • •
Y ou can only use Windows Vist a to either host stand-alone or distributed applications that run on
a single computer, or run the FactoryTalk View SE Client or FactoryTalk View Studio software
which can connect to an application hosted on the same computer or an application hosted on a
remote computer. You cannot use Windows Vista to host HMI servers that other clients connect
to. To host HMI servers, use another supported operating system instead.
HMI project files are stored in folders that have the same names as their HMI servers. For
example, the files belonging to an HMI server named Water would be stored in:
. . .\RSView Enterprise\SE\HMI Projects\Water
Restore the network distributed application
After moving the application’s HMI project files to production computers on the Network
Directory server computer, use the FactoryTalk Studio Enterprise to restore the backed-up
FactoryTalk View SE network distributed application.
To restore a network distributed application
1. On the Network Directory server computer, click Start > All Programs > Rockwell
Software, and then click
FactoryTalk Administration Console
.
67
Page 82

FACTORYTALK VIEW SITE EDITION INSTALLATION GUIDE
• • • • •
2. Select
Network
To restore a network distributed application, the logged on user must have FactoryTalk
administrative rights. If you receive a prompt to log on, check with your Syst em Admi nist rat or.
, and then click OK.
3. In the Explorer window, right-click the Network icon at the top of the tree, and then
click
Restore
.
4. Type the path to the application archive’s location, or click the Browse button to find
Next
and select the archive, and then click
Application archive files have a .bak extension. The default location for application files is:
C:\Users\Public\Documents
(Windows XP and Windows Server 2003) C:\Documents and Settings\All
Users\Documents
.
5. In the Restore dialog box, if the Archive Type is:
Application
Application and System
, then the archive contains application information only.
, then the archive contains application and FactoryTalk
System information.
6. T o restore the application without archived System information, clear the
System
check box. The restore operation will add the application to the FactoryTalk
Restore
Network Directory on the computer:
68
Page 83

6 • DEPLOYING NETWORK DISTRIBUTED APPLICATIONS
Restoring archived System information replaces existing FactoryTalk System settings on the
computer. When deploying a FactoryTalk View SE network distributed application, it is
recommended that you do not restore System information with the application, as this will
remove existing computer accounts and prevent users from logging on to the Network
Directory
Include System information in the restore operation only if there are no applications using the
current Network Directory, or if the effect on existing applications will be minimal..
• • • • •
7. T o restore the application with its original name, clear the check box,
new application name
, and then click
Finish
. You may also need to enter a
Restore into a
passphrase if one was entered when the application was backed up.
T o restore the application under a new name, for example, to create a copy of the
original application that can be modified, select the check box, type the new name,
Finish
and then click
.
Specify the Network Directory location on application computers
After restoring the network distributed application, use the FactoryTalk Directory Server
Location Utility to specify the location of the FactoryTalk Network Directory server, on
all application client and server computers.
Performing this task might require more than one set of FactoryTalk security credentials:
T o use the FactoryTalk Directory Server Location Utility, you must have
administrative rights on the local computer.
T o specify a remote location for the Network Directory, you must have administrative
rights on the remote computer.
To specify the Network Directory on client and server computers
1. On the client or server computer, click S tart > All Pr ograms > Rockwell S oftware >
FactoryTalk Tools, and then click
2. Click the Browse button beside the field, Computer hosting directory server.
Specify FactoryTalk Directory Location
.
3. In the FactoryTalk Directory Server Configuration dialog box, click
computer
.
Remote
4. Type the name of the Network Directory server computer, or click the Browse button
OK
to find and select the computer, and then click
OK
5. Click
again, to close the FactoryTalk Directory Server Location Utility.
.
69
Page 84

FACTORYTALK VIEW SITE EDITION INSTALLATION GUIDE
• • • • •
Repeat steps 1 to 5 on all client and server computers that will participate in the deployed
network distributed application.
Move the application’s data server files
After specifying the FactoryTalk Network Directory location on application clients and
servers, ensure that the required communications software (RSLinx Enterprise, RSLinx
Classic, or other OPC software) is installed on computers that will run data servers.
Then, if necessary for the data servers you are deploying, move configuration files to the
production computers, and then specify the new host computer names.
For information about moving setup files for OPC data servers other than RSLinx Classic, see
the product documentation for the OPC server.
Restoring RSLinx Enterprise
configurations
When you back up a FactoryTalk View SE network distributed application, the archive
includes RSLinx Enterprise shortcut names, but does not include device path information.
After restoring the application, you must open the Communications Setup editor in
FactoryTalk View Studio, and re-apply the device path for each configured shortcut.
For details, see "Renew data server shortcuts, topics, and device paths" on page 73.
Backing up and restoring RSLinx Classic
configurations
RSLinx Classic configuration files are not included when you back up a network
distributed application. You have to back up, move, and restore the files manually.
If RSLinx Classic is installed on the development and production computers, you can use
the RSLinx Classic Backup/Restore tool to back up and restore configuration files.
You can also restore RSLinx Classic configuration files from the Wizard Completed window of
the RSLinx Classic software setup program.
To move RSLinx Classic configuration files
1. On the development computer, click Start > All Programs > Rockwell Software >
RSLinx, and then click
RSLinx Classic Backup Restore Utility
.
70
Page 85

6 • DEPLOYING NETWORK DISTRIBUTED APPLICATIONS
• • • • •
2. In the RSLinx Classic Backup/Restore tool, click
3. Select a folder for the backup file, type a file name, and then click
4. In Windows Explorer , copy the backup file (with .rsx extension), and then paste it into
a location on the data server production computer.
5. On the production computer, click Start > All Programs > Rockwell Software >
RSLinx, and then click
6. In the RSLinx Backup/Restore tool, click
RSLinx Classic Backup Restore Utility
Restore
7. Find and select the backup file you just pasted, and then click
Specify data server host computer names
After moving data server configuration files to production computers, use FactoryTalk
View Studio Enterprise to open the restored network distributed application. In the
Properties dialog box for each data server, specify the name of the server’s host computer.
Backup
.
.
Open
Save
.
.
.
Then, renew RSLinx shortcuts, topics, and device paths, as needed. For details, see
"Renew data server shortcuts, topics, and device paths" on page 73.
For information about setting up other data server properties, click Help in the server’s
Properties dialog box, or see the product documentation.
The first time you open an application after relocating a data server, if the server does not load,
you should still be able to open the Properties dialog box and change the host computer name.
After the computer name is updated, the server should load as expected.
To change the RSLinx Enterprise server computer name
1. Click Start > All Programs > Rockwell Software, and then click
Administration Console
.
2. In the Select FactoryTalk Directory dialog box, select Network, and then click
FactoryTalk
OK
.
71
Page 86

FACTORYTALK VIEW SITE EDITION INSTALLATION GUIDE
• • • • •
3. In the Explorer window, expand the name of the restored application, right-click the
RSLinx Enterprise server’s name, and then click
Properties
.
72
4. In the General tab, in the field, Computer hosting the RSLinx Enterprise server,
type the name of the production computer, or click Browse to find and select the
OK
computer, and then click
. Acknowledge the warning if needed by clicking OK.
To change the RSLinx Classic server computer name
1. Open the restored application in the FactoryTalk Administration Console. To learn
how to do this, see the previous task.
2. In the Explorer window, expand the name of the restored application, right-click the
RSLinx Classic server’s name, and then click
Properties
.
3. In the General tab, in the field, Computer that will run the OPC server, type the
name of the production computer, or click Browse to find and select the computer, and
OK
then click
.
Page 87

6 • DEPLOYING NETWORK DISTRIBUTED APPLICATIONS
Renew data server shortcuts, top ics, and device paths
After restoring RSLinx data servers in the application, and specifying the names of their
new host computers, renew or verify the topics, shortcuts, and device paths associated
with each data server, as needed.
If you are restoring redundant data servers, then the device paths must be confirmed and
reapplied for both the primary and the secondary servers.
To renew RSLinx Enterprise device paths
1. Open the restored application in the FactoryTalk Administration Console. To learn
how to do this, see “To change the RSLinx Enterprise server computer name” on the
previous page.
2. In the Explorer window, expand the data server (RSLinx Enterprise), and then double-
Communications Setup
click
3. In the Communications Setup editor, select each configured RSLinx Enterprise
shortcut, point the shortcut at the correct device, and then click
4. Save the configuration, and then close the Communications Setup editor.
.
Apply
• • • • •
.
To verify RSLinx Classic topics
1. On the data server computer, click
RSLinx
, and then click
RSLinx Classic
2. On the DDE/OPC menu, click
Start > All Programs > Rockwell Software >
.
Topic Configuration
3. In the Topic List, select each configured topic and confirm that the corresponding data
source updates correctly.
4. Click the
Advanced Communication
tab, confirm that there is a device path
specified for Remote Addressing, and then click
Specify HMI server host computer names
After updating data server computer names, in the Properties dialog box for each HMI
server, specify the name of the HMI server’s host computer.
T o specify the server computer name, and to set up other HMI server properties, you can
open the Properties dialog box from FactoryTalk View Studio. Use the tool that is
available on the computer.
The first time you open an application after relocating an HMI server, if the server does not load,
you should still be able to open the Properties dialog box and change the host computer name.
After the computer name is updated, the server should load as expected.
Done
.
.
73
Page 88

FACTORYTALK VIEW SITE EDITION INSTALLATION GUIDE
• • • • •
To change the HMI server computer name
1. Open the restored application in FactoryTalk View Studio Enterprise.
2. In the Explorer window, right-click the HMI server’s name, and then click
Properties
.
3. In the General tab, in the field, Computer hosting the server, type the name of the
production computer, and then click
You can also click Browse to find and select the production computer.
Set up additional HMI server properties
With the restored application open in FactoryTalk View Studio, in addition to specifying
the names of the production computers that will host the HMI servers, you can set up the
following HMI server properties:
OK
.
In the
General
tab, to determine when the HMI server will load, select a Startup Type.
You can specify that the HMI server will load when the first client attempts to connect
to it (On demand) or when the host computer starts up (Load and run startup
components when operating system initializes). The second option is recommended
74
Page 89

6 • DEPLOYING NETWORK DISTRIBUTED APPLICATIONS
for production HMI servers, and required for an HMI server that is part of a redundant
pair.
• • • • •
In the
Redundancy
tab, to set up redundancy for the HMI server, first select the check
box, Provide redundancy using a secondary server; then, specify the name the
computer that will host the secondary server, and select a switchover option.
Before you can specify the secondary server in a redundant pair, you must manually copy the
HMI project files to the secondary server computer. To do this, see "Move the application’s
HMI project files" on page 66.
75
Page 90

FACTORYTALK VIEW SITE EDITION INSTALLATION GUIDE
• • • • •
In the
Components
tab, select the application components that will start automatically
when the HMI server starts, and select the macro that will run when the server shuts
down. You can also start or stop components manually.
If the HMI server is redundant, you can also start and stop components for the primary
and the secondary server, and select On active and On standby macros.
76
You must set up the HMI server properties separately , for each serv er in the FactoryTalk
View SE network distributed application you are deploying. You can do this on the
computer running the HMI server, or from a remote computer.
For details about setting up HMI server properties, see Chapter 6, Working with
network distributed applications in the FactoryTalk View Site Edition User’s Guide. For
details about setting up redundant HMI servers, see Chapter 14, Setting up FactoryTalk
system availability in the FactoryTalk View Site Edition User’s Guide.
Synchronizing redundant HMI servers and projects
After setting up redundancy for an HMI server, to ensure that identical copies of the HMI
server and project files are running on the primary and the secondary computers, replicate
changes from the primary to the secondary server.
Page 91

6 • DEPLOYING NETWORK DISTRIBUTED APPLICATIONS
The replicate operation copies the primary server’s configuration files, including settings
in the Components tab, to the secondary server.
For example, if an On Active and a Shutdown macro are selected for the primary server,
the settings will be replicated to the secondary. This means that the same macros specified
for the primary server will run when the secondary server becomes active or shuts down.
Information that is not included in the replicate operation includes datalog files generated
at run time, the current value of HMI memory tags, retentive tags, and the HMI tag alarm
suppressed list.
For the replicate operation to succeed, a copy of the HMI project files must already exist on the
secondary server computer. In addition, the state of the primary server must be Active, and the
state of the secondary server must be Standby, for the duration of the operation. If you need to
copy the HMI project files, see "Move the application’s HMI project files" on page 66.
To replicate changes from the primary to the secondary server
1. Open the restored application in the FactoryTalk View Studio Enterprise.
2. In the Explorer window, right-click the HMI server’s name, and then click
Properties
.
• • • • •
3. Click the Redundancy tab, and then click
If a secondary server is not specified, the Replicate Primary to Secondary button will not be
available in the Redundancy tab.
Replicate Primary to Secondary
T o finish replicating, follow the on-screen instructions. After the replicate operation is
complete, the secondary server is restarted.
Set up the FactoryTalk View SE Clients
The FactoryTalk View SE Client provides a complete and secure run-time environment
for a local application. For example, operators can use the client to:
Load, view, and interact with graphic displays from any HMI server in the
application.
Monitor and control alarms (HMI tag alarms and FactoryTalk Alarms and Events).
View and interact with trends.
Adjust set points.
Start and stop server components.
.
77
Page 92

FACTORYTALK VIEW SITE EDITION INSTALLATION GUIDE
• • • • •
In a network distributed application, FactoryTalk View SE Clients, HMI servers, and data
servers can run on multiple computers, connected over a network.
If you have already set up FactoryTalk Vie w SE Client files for a network distributed
application, you can copy the files to the production computers. Otherwise, you can create
new client files.
Creating a new FactoryTalk View SE Client
file
FactoryTalk View SE Client configuration files specify the name of the application the
client will connect to, the components that start when the connection is made, and how the
client will behave at run time.
T o create a new client file, use the FactoryTalk View SE Client Wizard. You can also use
the wizard to modify or run an existing client file, or to remove a client from the list of
available files.
You do not have to start the HMI server (or servers) the client will connect to, in order to use the
FactoryTalk View SE Client Wizard, but it will need access to the FactoryTalk Directory.
To create a new FactoryTalk View SE Client file
1. On the desktop, click Start > All Programs > Rockwell Software > FactoryTalk
View, and then click
FactoryTalk View Site Edition Client
2. In the FactoryTalk View SE Client Wizard, click
New
, and then follow the on-screen
.
instructions. For details about options in the wizard, click Help.
The client file is created with a .cli extension, in the location you specified.
Copying existing FactoryTalk View SE Client
files
When setting up the FactoryTalk View SE Clients for a network distributed application,
you can copy existing client files from the development computer to the client production
computers.
78
To copy a FactoryTalk View SE Client file
Copy the .cli file from the development computer to the production run-time client
computer.
You can run the client configuration from the desktop, or from any other location on the
client computer.
By default, client configuration files are saved to these locations:
. . .\Users\Public\Documents\RSV iew Enterprise\SE\Client
Page 93

6 • DEPLOYING NETWORK DISTRIBUTED APPLICATIONS
(Windows XP and Windows Server 2003)
. . .\Documents and Settings\All Users\Shared Documents\RSView
Enterprise\SE\Client
Locking operators into the run-time env ironm en t
T o lock operators into the FactoryT alk View SE Client at run time, for example, to prevent
access to other programs on the computer, try one or more of the following methods:
Limit the ability to manipulate graphic displays
minimize and maximize buttons from selected displays.
T o do this, in the Display Settings dialog box, clear the check boxes Title Bar,
Minimize Button, and Maximize Button. For details, see Chapter 16, Creating
graphic displays in the FactoryTalk View Site Edition User’s Guide.
Limit the ability to manipulate the client window
minimize and maximize buttons from the client.
T o do this, in the FactoryTalk View SE Client wizard, clear the check boxes, Show
title bar, and Show system menu and close button. For details, click Help in the
FactoryTalk View SE Client wizard.
, by removing the title bar or
, by removing the title bar or
• • • • •
Prevent switching to other applications
SE Client wizard, select the check box, Disable switch to other applications.
For details, click Help in the FactoryTalk View SE Client wizard.
Restrict access to the desktop
, using the DeskLock tool.
T o open DeskLock, on the desktop click Start > All Programs > Rockwell Software
> FactoryTalk View > Tools, and then click
For details about using DeskLock, click Help within the tool.
Run the FactoryTalk View SE Clients
Once the network distributed application is fully deployed, test it by running the
FactoryTalk View SE Clients.
To connect a FactoryTalk V iew SE Client to a network distributed application, all client and server
computers in the application must point at the same FactoryTalk Network Directory server. For
details, see "Specify the Network Directory location on application computers" on page 69.
For tips to help you get communications working between clients and servers, see the
FactoryTalk View Site Edition Help.
. To do this, in the FactoryTalk View
DeskLock
.
79
Page 94

FACTORYTALK VIEW SITE EDITION INSTALLATION GUIDE
• • • • •
To run an SE Client using the .cli file
Double-click the client setup file (.cli), in the following default folder:
. . .\Users\Public\Documents\RSV iew Enterprise\SE\Client
(Windows XP and Windows Server 2003)
. . .\Documents and Settings\All Users\Shared Documents\RSView
Enterprise\SE\Client
To run an SE Client from FactoryTalk View Studio
1. In FactoryTalk View Studio, on the Tools menu, click
Launch SE Client
.
2. In the FactoryTalk View SE Client Wizard dialog box, select the client
configuration file from the list of most recently used files and click Run. T o search for
and select another file, click the browse button.
To run an SE Client when Windows starts
1. Create a shortcut to the.cli file (on the desktop, for example).
2. Move the shortcut to the Windows Startup folder.
For information about adding shortcuts to the Startup folder, see the Windows Help.
About logging on to the FactoryTalk View SE Client
T o start the FactoryTalk V iew SE Client, or to change users while the client is running, the
user logging on must have the necessary security permissions.
If not, the FactoryTalk View SE Client Login dialog box opens, to let another user log on.
80
Page 95

7
Deploying network station applications
After you finish developing and testing a FactoryTalk View Site Edition network station
application, you can deploy it to run in a live setting, such as the plant floor. Deploying a
network station application involves installing all FactoryTalk View SE software
components on the application’s host computer.
For details about installing the software, see Chapter 4, Installing FactoryTalk View.
For details about the structure and content of network station applications, see Chapter 8,
Working with local station applications in the FactoryTalk View Site Edition User’s
Guide.
Overview of tasks: deploying network st ation applications
The checklist in this section summarizes the basic tasks involved in deploying a
FactoryTalk View SE network station application. Use the checklist to guide you through
the tasks you need to perform. Each task is described in detail in the rest of this chapter.
If appropriate, add or remove details to create a customized procedure that reflects the
design and content of your FactoryTalk View application. For example, your application
might include additional communications or database servers so you may need to repeat
these steps accordingly.
If your application includes Tag Alarm and Event Servers, see the FactoryTalk Alarms and
Events Help for information about deploying these servers.
Task checklist for deploying a network station application
Move the network station application
Specify the Network Directory location on application computers if necessary
Move the application’s data server files
Specify data server host computer names
Renew data server shortcuts, topics, and device paths
Specify when HMI server components start or stop
Set up the FactoryTalk View SE Client
Run the FactoryTalk Vie w SE Client to test the application
81
Page 96

FACTORYTALK VIEW SITE EDITION INSTALLATION GUIDE
• • • • •
Move the network station application
There are two steps involved in moving a network station application: on the development
computer, back up the application; then, on the production computer, restore the
application archive.
You can perform both of these steps in the Application Manager tool. For details about
options in the Application Manager, click Help in the tool.
Before backing up an application, record the user names and passwords of administrative users
set up for the application, in case you need this information after restoring the application.
To back up a network station application
1. On the desktop, click Start > All Programs > Rockwell Software > FactoryTalk
View > Tools, and then click
Application Manager
.
2. In the Application Manager, select
Next
.
To back up a network station application, the logged on user must have FactoryTalk
administrative rights. If you receive a prompt to log on, check with your Syst em Admi nist rat or.
Site Edition (Network Station)
, and then click
3. Select the back up operation, and then follow the instructions in the Application
Manager to complete the operation.
4. Copy the .apa file to the new (production) computer.
To restore a network station application
If you are restoring a network station application on a computer that contains a copy of the
original application, ensure the application is not running, then use the Application Manager to
delete (or rename) the original application, before you begin the restore operation.
1. On the production computer, on the desktop, click St art > All Programs > Rockwell
Software > FactoryTalk View > Tools, and then click
2. Select
Site Edition (Network Station)
To restore a network station application, the logged on user must have FactoryTalk
administrative rights. If you receive a prompt to log on, check with your Syst em Admi nist rat or.
, and then click
Application Manager
Next
.
.
3. Select the restore operation, and then follow the instructions in the Application
Manager to complete the operation.
82
Page 97

7 • DEPLOYING NETWORK STATION APPLICATIONS
4. Copy the backed up application to the new (production) computer.
Specify the Network Directory location on application computers
If you have not done so already, use the FactoryTalk Directory Server Location Utility to
specify the location of the FactoryTalk Network Directory server.
Performing this task might require more than one set of FactoryTalk security credentials:
T o use the FactoryTalk Directory Server Location Utility, you must have
administrative rights on the local computer.
T o specify a remote location for the Network Directory, you must have administrative
rights on the remote computer.
To specify the Network Directory on application computers
1. On the client or server computer, click S tart > All Pr ograms > Rockwell S oftware >
FactoryTalk Tools, and then click
Specify FactoryTalk Directory Location
2. Click the Browse button beside the field, Computer hosting directory server.
.
• • • • •
3. In the FactoryTalk Directory Server Configuration dialog box, click
computer
.
4. Type the name of the Network Directory server computer, or click the Browse button
to find and select the computer, and then click
OK
5. Click
again, to close the FactoryTalk Directory Server Location Utility.
Move the application’s data server files
After specifying the FactoryTalk Network Directory location on application computers,
ensure that the required communications software (RSLinx Enterprise, RSLinx Classic, or
other OPC software) is installed on computers that will run data servers.
Then, if necessary for the data servers you are deploying, move configuration files to the
production computers, and then specify the new host computer names.
For information about moving setup files for OPC data servers other than RSLinx Classic, see
the product documentation for the OPC server.
Backing up and restoring RSLinx Classic
RSLinx Classic configuration files are not included when you back up a network station
application. You have to back up, move, and restore the files manually.
OK
Remote
.
configurations
83
Page 98

FACTORYTALK VIEW SITE EDITION INSTALLATION GUIDE
• • • • •
If RSLinx Classic is installed on the development and production computers, you can use
the RSLinx Classic Backup/Restore tool to back up and restore configuration files.
You can also restore RSLinx Classic configuration files from the Wizard Completed window of
the RSLinx Classic software setup program.
To move RSLinx Classic configuration files
1. On the development computer, click Start > All Programs > Rockwell Software >
RSLinx, and then click
RSLinx Classic Backup Restore Utility
.
2. In the RSLinx Classic Backup/Restore tool, click
3. Select a folder for the backup file, type a file name, and then click
4. In Windows Explorer, copy the backup file (.rsx file), and then paste it into a location
on the data server production computer.
5. On the production computer, click Start > All Programs > Rockwell Software >
RSLinx, and then click
6. In the RSLinx Backup/Restore tool, click
RSLinx Classic Backup Restore Utility
Restore
7. Find and select the backup file you just pasted, and then click
Specify data server host computer names
Backup
.
.
Open
Save
.
.
.
84
After moving data server configuration files to production computers, open the restored
network station application, and in the Properties dialog box for each data server, specify
the name of the server’s host computer.
Then, renew RSLinx shortcuts, topics, and device paths, as needed. For details, see
“Renew data server shortcuts, topics, and device paths” on 85.
Page 99

7 • DEPLOYING NETWORK STATION APPLICATIONS
For information about setting up other data server properties, click Help in the server’s
Properties dialog box, or see the product documentation.
The first time you open an application after relocating a data server, if the server does not load,
you should still be able to open the Properties dialog box and change the host computer name.
After the computer name is updated, the server should load as expected.
To change the RSLinx Enterprise server computer name
1. Click Start > All Programs > Rockwell Software, and then click
Administration Console
(you can also perform this procedure in Studio Enterprise).
FactoryTalk
• • • • •
2. In the Select FactoryTalk Directory dialog box, select Network, and then click
3. In the Explorer window, expand the name of the restored application, right-click the
RSLinx Enterprise server’s name, and then click
Properties
.
4. In the General tab, in the field, Computer hosting the RSLinx Enterprise server,
type the name of the production computer, or click Browse to find and select the
OK
computer, and then click
.
To change the RSLinx Classic server computer name
1. Open the restored application in the FactoryTalk Administration Console. To learn
how to do this, see the previous task.
2. In the Explorer window, expand the name of the restored application, right-click the
RSLinx Classic server’s name, and then click
Properties
.
3. In the General tab, in the field, Computer that will run the OPC server, type the
name of the production computer, or click Browse to find and select the computer, and
OK
then click
.
Renew data server shortcuts, top ics, and device paths
After restoring RSLinx data servers in the application, and specifying the names of their
new host computers, renew or verify the topics, shortcuts, and device paths associated
with each data server, as needed.
If you are restoring redundant data servers, then the device paths must be confirmed and
reapplied for both the primary and the secondary server.
OK
.
To renew RSLinx Enterprise device paths
1. Open the restored application in the FactoryTalk Administration Console. To learn
how to do this, see “To change the RSLinx Enterprise server computer name” above.
2. In the Explorer window, expand the data server (RSLinx Enterprise), and then double-
Communications Setup
click
.
85
Page 100

FACTORYTALK VIEW SITE EDITION INSTALLATION GUIDE
• • • • •
3. In the Communications Setup editor, select each configured RSLinx Enterprise
shortcut, point the shortcut at the correct device, and then click
4. Save the configuration, and then close the Communications Setup editor.
To verify RSLinx Classic topics
1. On the data server computer, click
RSLinx
, and then click
Start > All Programs > Rockwell Software >
RSLinx Classic
Apply
.
.
2. On the DDE/OPC menu, click
3. In the Topic List, select each configured topic and confirm that the corresponding data
source updates correctly.
4. Click the
specified for Remote Addressing, and then click
Advanced Communication
Topic Configuration
tab, confirm that there is a device path
Done
.
.
Specify when HMI server components start or stop
In FactoryTalk View Studio, open the Properties dialog box for the HMI server in the
application, to view the location of the HMI project files, the current number of displays
in the application, and the maximum number of displays allowed.
You can add a description for the HMI server and, in the Components tab, select
components that will start when the HMI server starts running.
To open the HMI Server Properties dialog box
1. Click
2. Select View
3. Click the
4. In the Explorer window, right-click the HMI server’s name, and then click
Start > All Programs > Rockwell Software
View Studio
Open
Properties
.
Site Edition (Network Station)
Existing
.
tab, select the network station application’s name, and then click
.
, and then click
, and then click
FactoryTalk
Continue
.
86
How HMI server components start and stop
Use the HMI Server Properties dialog box to specify which components in a network
station application will start automatically, when the HMI server starts running.
In a network station application, the HMI server loads and the specified components start
running when the FactoryTalk View SE Client connects to the application. When the
client stops running, the HMI server is unloaded, and the specified shutdown macro is run.
 Loading...