

Page 1

PROCESSBOOK USER GUIDE
PUBLICATION HSEPB-UM024A-EN-E–June 2012
Supersedes Publication HSEPB-UM023A-EN-E
Page 2

●
●
●
●
●
Copyright
Contact Rockwell Automation
Customer Support Telephone — 1.440.646.3434
Online Support — http://www.rockwellautomation.com/support
Copyright Notice
© 2012 Rockwell Automation Technologies, Inc. All rights reserved. Printed in USA.
© 2010 OSIsoft, Inc. All rights reserved.
This document and any accompanying Rockwell Software products are copyrighted by Rockwell Automation Technologies, Inc. Any reproduction and/or distribution
without prior written consent from Rockwell Automation Technologies, Inc. is strictly prohibited. Please refer to the license agreement for details.
Trademark Notices
FactoryTalk, Rockwell Automation, Rockwell Software, the Rockwell Software logo are registered trademarks of Rockwell Automation, Inc.
The following logos and products are trademarks of Rockwell Automation, Inc.:
FactoryTalk Historian Site Edition (SE), FactoryTalk Historian Machine Edition (ME), RSView, FactoryTalk View, RSView Studio, FactoryTalk ViewStudio, RSView
Machine Edition, RSView ME Station, RSLinx Enterprise, FactoryTalk Services Platform, FactoryTalk Live Data, and FactoryTalk VantagePoint.
The following logos and products are trademarks of OSIsoft, Inc.:
PI System, Sequencia, Sigmafine, gRecipe, sRecipe, and RLINK.
Other Trademarks
ActiveX, Microsoft, Microsoft Access, SQL Server, Visual Basic, Visual C++, Visual SourceSafe, Windows, Windows ME, Windows NT, Windows 2000, Windows Server
2003, and Windows XP are either registered trademarks or trademarks of Microsoft Corporation in the United States and/or other countries.
Adobe, Acrobat, and Reader are either registered trademarks or trademarks of Adobe Systems Incorporated in the United States and/or other countries.
ControlNet is a registered trademark of ControlNet International.
DeviceNet is a trademark of the Open DeviceNet Vendor Association, Inc. (ODVA).
Ethernet is a registered trademark of Digital Equipment Corporation, Intel, and Xerox Corporation.
OLE for Process Control (OPC) is a registered trademark of the OPC Foundation.
Oracle, SQL*Net, and SQL*Plus are registered trademarks of Oracle Corporation.
All other trademarks are the property of their respective holders and are hereby acknowledged.
Restricted Rights Legend
Use, duplication, or disclosure by the Government is subject to restrictions as set forth in subparagraph (c)(1)(ii) of the Rights in Technical Data and Computer Software
clause at DFARS 252.227-7013.
Warranty
This product is warranted in accordance with the product license. The product’s performance may be affected by system configuration, the application being performed,
operator control, maintenance, and other related factors. Rockwell Automation is not responsible for these intervening factors. The instructions in this document do not cover
all the details or variations in the equipment, procedure, or process described, nor do they provide directions for meeting every possible contingency during installation,
operation, or maintenance.
This product’s implementation may vary among users.
This document is current as of the time of release of the product; however, the accompanying software may have changed since the release. Rockwell Automation, Inc.
reserves the right to change any information contained in this document or the software at anytime without prior notice. It is your responsibility to obtain the most current
information available from Rockwell when installing or using this product.
ii
Page 3

Contents
Introduction ............................................................ 1
Recent History and Requirements for FactoryTalk Historian
ProcessBook ....................................................................... 1
What's New in FactoryTalk Historian ProcessBook 3.2 ............. 1
What's New in This Release ..................................................... 2
FactoryTalk Historian ProcessBook Essentials ................... 5
What Can You View with FactoryTalk Historian ProcessBook ............ 5
Start FactoryTalk Historian ProcessBook ..................................... 6
Servers and Connections .................................................... 6
Connect to a FactoryTalk Historian Server .......................... 6
FactoryTalk Historian Security ......................................... 8
Network Errors ............................................................ 8
Displays and Connection Failure ....................................... 9
Node Identifiers for Multiple FactoryTalk Historian Servers ..... 10
Workspace .................................................................... 10
ProcessBook (.piw) ...................................................... 10
Display ..................................................................... 11
Create a New ProcessBook or Display ............................... 11
Run Mode and Build Mode ................................................. 12
Add-Ins ............................................................................ 13
Add-In Manager .............................................................. 13
Menus and Toolbars ............................................................. 14
iii
Page 4

●
●
●
●
●
FactoryTalk Historian ProcessBook User Guide
Command Menus ............................................................. 14
Customize Toolbars ......................................................... 15
Toolbar Buttons .............................................................. 15
Add Buttons to Toolbars ............................................... 16
Browser Toolbar ................................................................. 16
Browse ProcessBooks and Displays ....................................... 16
View Browsing History ...................................................... 17
Set a Home Page ............................................................ 17
Bookmarks and Browser History .......................................... 18
Add/Edit Bookmarks .................................................... 19
Keyboard Shortcuts ............................................................. 20
Assign a Keyboard Shortcut ................................................ 21
Remove a Keyboard Shortcut ............................................. 22
Preference Settings ............................................................. 22
General Preferences ........................................................ 23
Table of Contents Preferences............................................ 26
Display Window .............................................................. 28
Trend Preferences .......................................................... 30
Trend Elements Preferences .............................................. 32
Print ............................................................................... 33
Page Setup for Printing..................................................... 34
Print Preview ................................................................. 35
Printer Setup ................................................................. 35
Change the Language Used for FactoryTalk Historian ProcessBook .... 36
About FactoryTalk Historian ProcessBook .................................. 36
Work with a ProcessBook ........................................... 39
Basic Steps to Build a ProcessBook ........................................... 39
Create a New ProcessBook .................................................... 39
Open an Existing ProcessBook ................................................ 40
Add ProcessBook Entries ....................................................... 41
iv
Work With Multiple ProcessBooks ........................................ 41
Page 5

● Contents
●
●
●
●
●
Create a Text or Display Entry ............................................ 43
Linked Display Entry ........................................................ 43
Create a Linked Display Entry ............................................. 44
Linked ProcessBook Entries ................................................ 46
Move Linked Entries ..................................................... 46
Operating System Command Entry ....................................... 46
Create an Operating System Command Entry .......................... 47
Working Directory for Operating System Commands .............. 49
Arrange ProcessBook Entries .................................................. 49
Book View..................................................................... 50
Turn Pages in Book View ............................................... 51
Resize a ProcessBook ................................................... 52
Entries in Book View .................................................... 52
Change the Name of an Entry in Book View ........................ 53
Change the Level of an Entry in Book View ......................... 53
Outline View ................................................................. 53
Collapse or Expand Outline View ..................................... 54
Rearrange Entries in Outline View ................................... 55
Change the Name of an Entry in Outline View ..................... 56
Change the Level of an Entry in Outline View ..................... 56
Copy and Paste an Entry ................................................... 57
Remove an Entry ............................................................ 57
Save a View of Your Displays .............................................. 57
Save and Close a ProcessBook ............................................ 58
Properties ........................................................................ 59
Summary Information in ProcessBook ................................... 59
FactoryTalk Historian ProcessBook File Properties .................... 60
Modify a ProcessBook Title ............................................ 61
FactoryTalk Historian ProcessBook Display Properties ............... 62
Import Files to a ProcessBook ................................................. 63
File Sharing Capability ......................................................... 64
Move a ProcessBook to Another PC .......................................... 65
v
Page 6

●
●
●
●
●
FactoryTalk Historian ProcessBook User Guide
Work with a Display .................................................. 67
Overview of Display Elements ................................................ 67
Static Symbols ............................................................... 67
Dynamic Symbols ............................................................ 68
Buttons ........................................................................ 68
OLE Objects .................................................................. 68
Manage Displays and Independent Display Files ........................... 69
Open a Display ............................................................... 69
Open Several Displays at One Time .................................. 70
Manage Multiple Open Displays ....................................... 70
Open Independent Display Files ...................................... 71
Browse a Display from Internet Explorer ................................ 71
Zoom Display Size ........................................................... 71
Full Screen Mode ............................................................ 72
Search for a Display ......................................................... 73
Reduce a Display to an Icon to Save Space ............................. 74
Save a Display ................................................................ 74
Display Settings .............................................................. 75
Display Scrolling Properties ............................................... 76
Status Bar Indicators ........................................................ 77
Drawing Tools .................................................................... 77
Organizing Symbols ......................................................... 78
Drawing Area ................................................................. 79
Drawing Grid ................................................................. 80
Set Grid Size and Grid Snap ........................................... 80
Formatting ........................................................................ 81
vi
Page 7

● Contents
●
●
●
●
●
Editable Formatting Attributes ........................................... 81
Font ............................................................................ 82
Line Color ..................................................................... 82
Fill Color ...................................................................... 83
Background Color ............................................................ 84
Line Weight ................................................................... 85
Line Style ..................................................................... 85
Line Ends ...................................................................... 86
Formatting Paintbrush ...................................................... 86
ToolTip Statistics ................................................................ 87
Time Range and Playback Toolbar ........................................... 88
Scroll Options Dialog Box .................................................. 91
Scroll Period .................................................................. 92
Scroll Period Constraints ............................................... 92
Scroll Period Time Format ............................................. 92
Change the Scroll Period ............................................... 93
Display Range ................................................................ 93
Change the Display Range ............................................. 93
The Change Display Range Dialog Box ............................... 94
Move the Display Range During Playback ........................... 94
Layers within Displays .......................................................... 95
Create Layers ................................................................ 95
Assign Symbols to Layers ................................................... 98
Layers and Composite Symbols ........................................... 98
Active Layers Status Bar ................................................... 99
Migrate Displays to Another FactoryTalk Historian Server ............. 100
Visualize Data with Symbols ...................................... 103
Trends ........................................................................... 103
vii
Page 8

●
●
●
●
●
FactoryTalk Historian ProcessBook User Guide
Create a Trend ............................................................. 104
Build a Trend with Multiple Plots ................................... 109
Move a Plot ............................................................. 109
Delete a Plot within a Trend ........................................ 110
Edit a Trend ................................................................ 110
Define Trend Dialog Box ................................................. 110
Display Format Tab ................................................... 112
Trace Format Tab ..................................................... 113
Layout Tab .............................................................. 115
Configure Trend Scale .................................................... 117
Trend Analysis Tools ...................................................... 118
Drag Zoom .............................................................. 119
Trend Zoom 2x In or Out ............................................. 119
Expand a Trend ........................................................ 120
Trend Cursor ........................................................... 120
Add a Trend Cursor ................................................... 121
Remove a Trend Cursor .............................................. 121
Change Time Range ....................................................... 122
How Trends Refresh ...................................................... 122
Trend Appearance ......................................................... 123
Grid Lines and Labels ................................................. 123
Grid Lines ............................................................... 123
Grid Line Labels ....................................................... 124
Value Scale Grid Lines ................................................ 124
Single and Multiple Scales for the Vertical Axis ................. 125
Time Scale Grid Lines ................................................ 126
Traces ................................................................... 127
Hide Traces ............................................................. 127
Markers .................................................................. 128
Ad Hoc Trends ............................................................. 129
Create an Ad Hoc Trend .............................................. 130
Save an Ad Hoc Trend Display ....................................... 130
OpenVMS Trends and Graphics .......................................... 131
Convert Trends ........................................................ 132
Convert Graphics ...................................................... 132
viii
Page 9

● Contents
●
●
●
●
●
XYPlots .......................................................................... 133
Draw an XYPlot ............................................................ 136
General Tab ............................................................ 137
Configure Pairings ..................................................... 139
Scale Box ................................................................ 141
Plot Time ............................................................... 142
Add a Data Set to an XYPlot ......................................... 142
Display Format Tab ................................................... 143
Plot Format Tab ....................................................... 145
Ad Hoc XYPlots ......................................................... 146
XYPlot Statistics ....................................................... 147
Linear Regression by Least Squares .................................... 150
Correlation Coefficient ................................................... 151
Interpreting an XYPlot .................................................... 152
Zoom/Revert Functions .................................................. 153
Change Time Range Feature ............................................ 156
XYPlot Cursors ............................................................. 156
Move the XYCursor from Point to Point ........................... 157
Bad Status Indicators ..................................................... 158
Out of Range Indicators .................................................. 158
Too Many Points ........................................................... 158
Examples of XYPlots ...................................................... 158
Example 1: Comparing Values for Two FactoryTalk Historian
Tags ...................................................................... 159
Example 2: Comparing Different Tags to Optimize Performance159
Example 3: Lab Comparisons ........................................ 160
Example 4: Comparing a Batch Run to a Standard .............. 161
Example 5: Comparing Two Time Ranges ......................... 161
Additional Dynamic Symbols ................................................ 162
ix
Page 10

●
●
●
●
●
FactoryTalk Historian ProcessBook User Guide
Values ....................................................................... 162
Add a Dynamic Value ................................................. 162
Button ....................................................................... 165
Add a Button ........................................................... 166
Bars .......................................................................... 168
Add a Dynamic Bar .................................................... 168
Bar Scales ............................................................... 171
Multi-State Symbols ....................................................... 174
Create Dynamic Multi-State Symbols .............................. 175
Static Symbols ................................................................. 177
Text Symbol ................................................................ 177
Add Text to a Display ................................................. 178
Edit a Text Box ........................................................ 178
Move a Text Block ..................................................... 179
Line Symbol ................................................................ 179
Draw a Line ............................................................. 179
Rectangle, Square, Arc, Ellipse, and Circle Symbol ................. 180
Polygon Symbol ............................................................ 181
Polyline Symbol ............................................................ 182
Graphic Symbol ............................................................ 183
Add a Graphic .......................................................... 185
Symbol Library ............................................................. 186
Use a Symbol from the Symbol Library ............................ 187
Symbol Library Options ................................................... 188
Change the Appearance of a Symbol .............................. 189
Symbol Properties ..................................................... 189
Work with Symbols ................................................. 191
Details and Annotations ...................................................... 191
Data Favorites ................................................................. 196
x
Details Window ............................................................ 191
Open Details Window ................................................. 194
FactoryTalk Historian Annotations Maintenance..................... 195
Add Annotations ....................................................... 196
Page 11

● Contents
●
●
●
●
●
Select a Default Symbol for Data Favorites .......................... 197
Search for Data Favorites ................................................ 198
Favorites Panel ............................................................ 199
Use Favorites ........................................................... 199
Import or Export Data Favorites .................................... 200
Process Drags Between FactoryTalk Historian ProcessBook and
Outside Applications .................................................. 200
Time Range Toolbar .......................................................... 201
Revert Time Range ........................................................ 201
Change the Time Range .................................................. 202
Use the Scrolling Time Range ........................................... 203
Time Forward and Back .................................................. 204
Set Time Range for Future Trends ..................................... 204
Select and Move a Symbol ................................................... 204
Select Multiple Symbols ...................................................... 205
Rotate a Symbol ............................................................... 206
Flip a Symbol ................................................................... 207
Delete a Symbol ............................................................... 207
Stacking Order ................................................................. 207
Move a Symbol Forward or Backward in the Stack .................. 208
Align Multiple Symbols ....................................................... 209
Group, Ungroup, or Regroup Symbols ..................................... 210
Connect Symbols .............................................................. 211
xi
Page 12

●
●
●
●
●
FactoryTalk Historian ProcessBook User Guide
Connector Symbol ......................................................... 211
Connect Two Symbols ................................................ 211
Attach a Symbol to a Connector .................................... 212
Connection Points ......................................................... 213
Add Connection Points ............................................... 214
Select Among Multiple Connection Points on One Symbol ..... 214
Delete Connection Points ............................................ 214
Move Connection Points .............................................. 214
Determine the Identifying Number of a Connection Point ..... 215
Connectors Dialog Box .................................................... 216
Connectors Dialog Box, Flow Tab ................................... 216
Configure the Flow Tab .............................................. 218
Connectors Dialog Box, Attachments Tab ......................... 219
Configure the Attachments Tab .................................... 220
Attach a Symbol as an Adjunct to a Connector ...................... 221
Attach a Symbol as an Adjunct to Another Symbol ................. 221
Move Attached Symbols Independently ........................... 223
Detect Connections and Attachments ................................. 223
Reroute a Connector Path ............................................... 224
Item Definition ................................................................ 225
Display or Change Item Definition ...................................... 225
Status Report for Dynamic Symbols ........................................ 226
Status Flags for Data.......................................................... 227
Data Streams ........................................................ 229
About FactoryTalk Historian Data .......................................... 229
FactoryTalk Historian Tags (Points) ........................................ 231
Element Relative Display (ERD) ............................................. 238
xii
FactoryTalk Historian Tag Search ...................................... 231
View Point Attributes ..................................................... 234
FactoryTalk Historian Server Data Types ............................. 235
Data from a FactoryTalk Historian System ........................... 237
FactoryTalk Historian Data Archive ................................ 237
Updates to FactoryTalk Historian Data ............................ 237
Page 13

● Contents
●
●
●
●
●
Connect to an AF Database .............................................. 239
Element Search ............................................................ 240
Add Element Relative Data to a Dynamic Symbol ................... 241
Context Path ............................................................... 243
Work with the Element Relative Display Window ................... 244
Data Sets ........................................................................ 246
PI Calculation Data Sets .................................................. 248
Create a PI Calculation Data Set ................................... 250
Intervals and Time Value ............................................ 253
Plot a Moving Average in a Trend .................................. 253
ODBC Data Sets ............................................................ 254
Create an ODBC Data Set ............................................ 255
Custom Data Sets .......................................................... 257
Placeholders................................................................ 257
Processing of Placeholder Queries ................................. 258
Design Placeholder Queries .......................................... 258
Add or Edit Placeholders ............................................. 259
Is a Data Set in Use? ...................................................... 261
Data Set Details ........................................................... 261
Add a Data Set to a Trend ............................................... 262
Time Intervals for Plotting Tags and Data Sets ...................... 264
Refresh a Trend Containing a Data Set ................................ 264
Add Data Sets to Bars or Values in a Display ......................... 265
Run FactoryTalk Historian ProcessBook When Data Sets Are
Included ..................................................................... 265
Edit a Data Set ............................................................. 266
Delete a Data Set ......................................................... 268
Copy a Data Set to Another ProcessBook ............................. 268
Loading Custom Data Sets ............................................... 269
Configure a Symbol with an AF Attribute ............................. 269
Configure the AF2.x DataSet ............................................ 271
ODBC ............................................................................ 271
xiii
Page 14

●
●
●
●
●
FactoryTalk Historian ProcessBook User Guide
ODBC Driver Manager ..................................................... 271
ODBC Drivers ............................................................... 271
ODBC Data Sources ........................................................ 272
ODBC Data Access ......................................................... 272
ODBC Data Source Administrator ....................................... 273
Prepare for ODBC ......................................................... 274
Configure the ODBC Data Source ....................................... 275
Use MSQuery to Build Data Sets ........................................ 275
Assumptions About Timestamps and Data Sets ...................... 276
Stored Procedures in Queries ........................................... 276
Troubleshoot ODBC Data Sets ........................................... 277
Trace ODBC Calls .......................................................... 277
Initiate Call Tracing ................................................... 278
Delete an ODBC Driver ................................................... 278
Delete an ODBC Data Source ............................................ 278
Edit an ODBC Data Source ............................................... 279
Embedding and Linking ............................................ 281
Overview of FactoryTalk Historian ProcessBook OLE Compound
Documents ...................................................................... 281
OLE Automation in FactoryTalk Historian ProcessBook ................. 282
Object Linking and Embedding ............................................. 283
Embedded Objects ........................................................ 283
Linked Objects ............................................................. 283
Should You Link or Embed? .............................................. 284
ActiveX Controls ............................................................... 285
Add a Control .............................................................. 285
Example of Embedded and Linked Objects in a ProcessBook Display 286
Icons vs. Graphics ............................................................. 287
Embed in FactoryTalk Historian ProcessBook ............................ 287
Embed an Existing File in a Display .................................... 288
Embed a New File in a Display .......................................... 289
Windows Drag and Drop ...................................................... 289
Link a File to a Display ....................................................... 290
Dynamic and Manual Updates of a Linked Object ....................... 291
xiv
Page 15

● Contents
●
●
●
●
●
Edit, Update, or Break Links ................................................ 291
How Links Are Stored ......................................................... 292
Select a New Source Link .................................................... 292
Edit the Appearance of an OLE Object .................................... 292
Commands That Ignore OLE Objects ....................................... 293
Placement of OLE objects ................................................... 293
OLE Object Colors ............................................................. 293
Edit the Contents of OLE objects........................................... 294
Edit the Contents of an Embedded Object ............................... 294
Edit the Contents of a Linked Object ...................................... 294
Edit Contents of OLE Objects ........................................... 295
Delete an OLE Object from a Display ...................................... 295
Display an OLE Object with an Icon ........................................ 295
Convert Objects to Icons ..................................................... 296
Share ProcessBook Displays with Other Applications ................... 297
Embed a New Display in Another OLE Application .................. 298
Embed an Existing Display in Another OLE Application ............. 298
Link a ProcessBook to Another Application ............................... 299
OLE Container/Server ........................................................ 299
Visual Basic for Applications in FactoryTalk Historian
ProcessBook ......................................................... 301
VBA Commands ................................................................ 301
ActiveX Automation ........................................................... 302
What You Can Do with ActiveX Automation in FactoryTalk Historian
ProcessBook .................................................................... 302
Automation Vocabulary ...................................................... 303
Installation ........................................................... 305
System Requirements......................................................... 305
64-bit Operating Systems .................................................... 305
Upgrade from a Previous Version of FactoryTalk Historian ProcessBook306
Other FactoryTalk Historian System Client Products ................... 306
Installation Test ............................................................... 307
xv
Page 16

●
●
●
●
●
FactoryTalk Historian ProcessBook User Guide
Installed Files .................................................................. 307
System Administrator Notes ...................................... 309
High Availability Configuration Settings................................... 309
Recommended Connection Preference Setting ...................... 310
MDB to AF Migration .......................................................... 311
Module Relative Display Add-in ......................................... 311
Multiple Versions of FactoryTalk Historian Server or FactoryTalk
Historian ProcessBook .................................................... 312
Playback Toolbar Setting Defaults ......................................... 313
FactoryTalk Historian ProcessBook Connection to Windows NT Servers313
DEP Security .................................................................... 313
Read/Write Data Access for Users ......................................... 314
Machine Address ............................................................... 315
PROCBOOK.INI ................................................................. 315
Startup Section ............................................................ 316
Startup Example ....................................................... 320
ProcessBook View Section ............................................... 321
Conversion Section ........................................................ 322
Data Manager Section .................................................... 322
Trend Definition Section ................................................. 323
Trend Definition Example ............................................ 325
Colors Section .............................................................. 326
Time Range Scroll Section ............................................... 326
ProcessBook Level Section ............................................... 327
Display Colors Section .................................................... 328
XYPlot Definition Section ................................................ 328
Macro Protection .......................................................... 330
View Only Mode............................................................ 331
IMPPIGP.INI ..................................................................... 332
xvi
Page 17

● Contents
●
●
●
●
●
Color Section ............................................................... 332
Line Style Section ......................................................... 333
Font Section ................................................................ 334
Marker Section ............................................................. 335
Display Section ............................................................. 335
SETUPProcessBook.LOG ...................................................... 336
Supplemental Information ........................................ 337
FactoryTalk Historian Time .................................................. 337
FactoryTalk Historian Time Abbreviations ........................ 337
FactoryTalk Historian Time Expressions ........................... 338
FactoryTalk Historian Time String Examples ..................... 339
Table of Format Values ...................................................... 340
FactoryTalk Historian Point Attributes ................................ 341
Troubleshooting Tips ......................................................... 343
Display Cannot Find Data ................................................ 343
Trend Cursor Does Not Appear .......................................... 344
Trend Legend Does Not Appear ......................................... 344
Cannot Change or Save a Display ....................................... 344
Is an XYPlot Updating? .................................................... 344
Is an OLE Object in a Display Linked or Embedded? ................ 345
Linked Object Data Is Not Updating ................................... 345
ODBC Problems ................................................................ 346
Missing ODBC Trace ....................................................... 346
Missing ODBC Data Sources .............................................. 346
Technical Support and Resources ............................... 349
Technical Support ............................................................. 349
xvii
Page 18

●
●
●
●
●
FactoryTalk Historian ProcessBook User Guide
Knowledgebase ............................................................ 349
Worldwide Support ........................................................ 350
Training Programs ......................................................... 350
Consulting Services ....................................................... 350
TechConnect Support ..................................................... 350
Find the Version and Build Numbers ................................... 351
View Computer Platform Information ................................. 352
Index .................................................................. 353
xviii
Page 19

Chapter 1
Introduction
As the easy-to-use graphical display interface to the Rockwell Automation
FactoryTalk Historian system, FactoryTalk Historian ProcessBook makes
it possible to efficiently display real-time and historical data residing in the
FactoryTalk Historian system and other sources. Process owners use
FactoryTalk Historian ProcessBook to create interactive graphical displays
that can be saved and shared with others. Users can quickly switch between
run and build modes to create dynamic, interactive displays and populate
them with live data. They also can write scripts that automate displays and
trends by using Microsoft Visual Basic for Applications, which is
seamlessly integrated into FactoryTalk Historian ProcessBook. Rockwell
Automation also produces add-ins that perform Batch and other types of
analyses.
Recent History and Requirements for FactoryTalk Historian ProcessBook
What's New in FactoryTalk Historian ProcessBook
3.2
Enhanced Support for FactoryTalk Historian Asset Framework
Support for Module Relative Displays is discontinued and support for
FactoryTalk Historian Asset Framework (AF) is enhanced.
FactoryTalk Historian ProcessBook 3.2 removes the MRD add-in
when it is installed. Enhanced AF support includes ToolTip statistics
and support for AF data references in the Details window.
1
Page 20

●
●
●
●
●
FactoryTalk Historian ProcessBook User Guide
Enhancements to FactoryTalk Historian ProcessBook Display
The Playback toolbar added for v3.2 is enhanced to provide more time
controls and synchronization across multiple displays for time range
changes only. The name of the toolbar is now Time Range and
Playback toolbar to reflect the enhanced functionality.
The Bar symbol now has a scale option.
Enhanced Language Support
A Language Selection tool is added to the FactoryTalk Historian
ProcessBook preference page. This tool allows users to switch among
languages installed using the FactoryTalk Historian ProcessBook MUI
Pack. This version of FactoryTalk Historian ProcessBook has
implemented Unicode and regionalization enhancements. These
features enable you to create displays in one language and use them in
environments with different language and regional settings.
VBA Enhancements
A newer version of Visual Basic for Applications (VBA) is installed,
which addresses some security issues. In addition, support handling
UTC times through automation has been added.
What's New in This Release
FactoryTalk Historian ProcessBook v3.2 is the last version to deliver MRD
functionality.
New in version 3.2:
The Element Relative Display (ERD) (page 238) add-in is provided to
Displays can now be played back to review a specific time period
2
replace Module Relative Display. Element relative displays provide a
re-useable display that can be shared across similarly configured
elements.
using DVR-like controls.
Page 21

1 ● Introduction
●
●
●
●
●
Display navigation is enhanced with browser-based navigation
controls (page 16) that traverse, open, and bookmark displays and
workbooks.
The FactoryTalk Historian sqc Statistical Quality Control symbol is
now included with FactoryTalk Historian ProcessBook.
3
Page 22

●
●
●
●
●
FactoryTalk Historian ProcessBook User Guide
4
Page 23

Chapter 2
FactoryTalk Historian ProcessBook Essentials
What Can You View with FactoryTalk Historian ProcessBook
A FactoryTalk Historian ProcessBook display entry may contain data
streams (page 229) from any or all of the following sources:
FactoryTalk Historian servers, including both point data (actual
instrument readings).
Calculations from FactoryTalk Historian data.
Other databases with ODBC connectivity.
Other databases with custom interfaces to FactoryTalk Historian
ProcessBook.
Spreadsheets, documents, schematics, graphics, photos, and other
Windows applications through OLE linking and embedding.
FactoryTalk Historian Asset Framework Servers.
VBA code.
ProcessBook displays may be linked to other displays within the same
ProcessBook, or to displays in a separate ProcessBook. You can also
include buttons that launch other applications.
5
Page 24

●
●
●
●
●
FactoryTalk Historian ProcessBook User Guide
Start FactoryTalk Historian ProcessBook
To begin using FactoryTalk Historian ProcessBook:
1. Launch the application.
2. Log in to a FactoryTalk Historian Server (page 6).
3. Open a ProcessBook file (page 10) or display (page 11).
Servers and Connections
FactoryTalk Historian ProcessBook is a visualization application designed
for displaying FactoryTalk Historian system data. See the PI SDK Controls
and Dialogs User Help to find comprehensive and up-to-date information
on connecting FactoryTalk Historian ProcessBook to a FactoryTalk
Historian server.
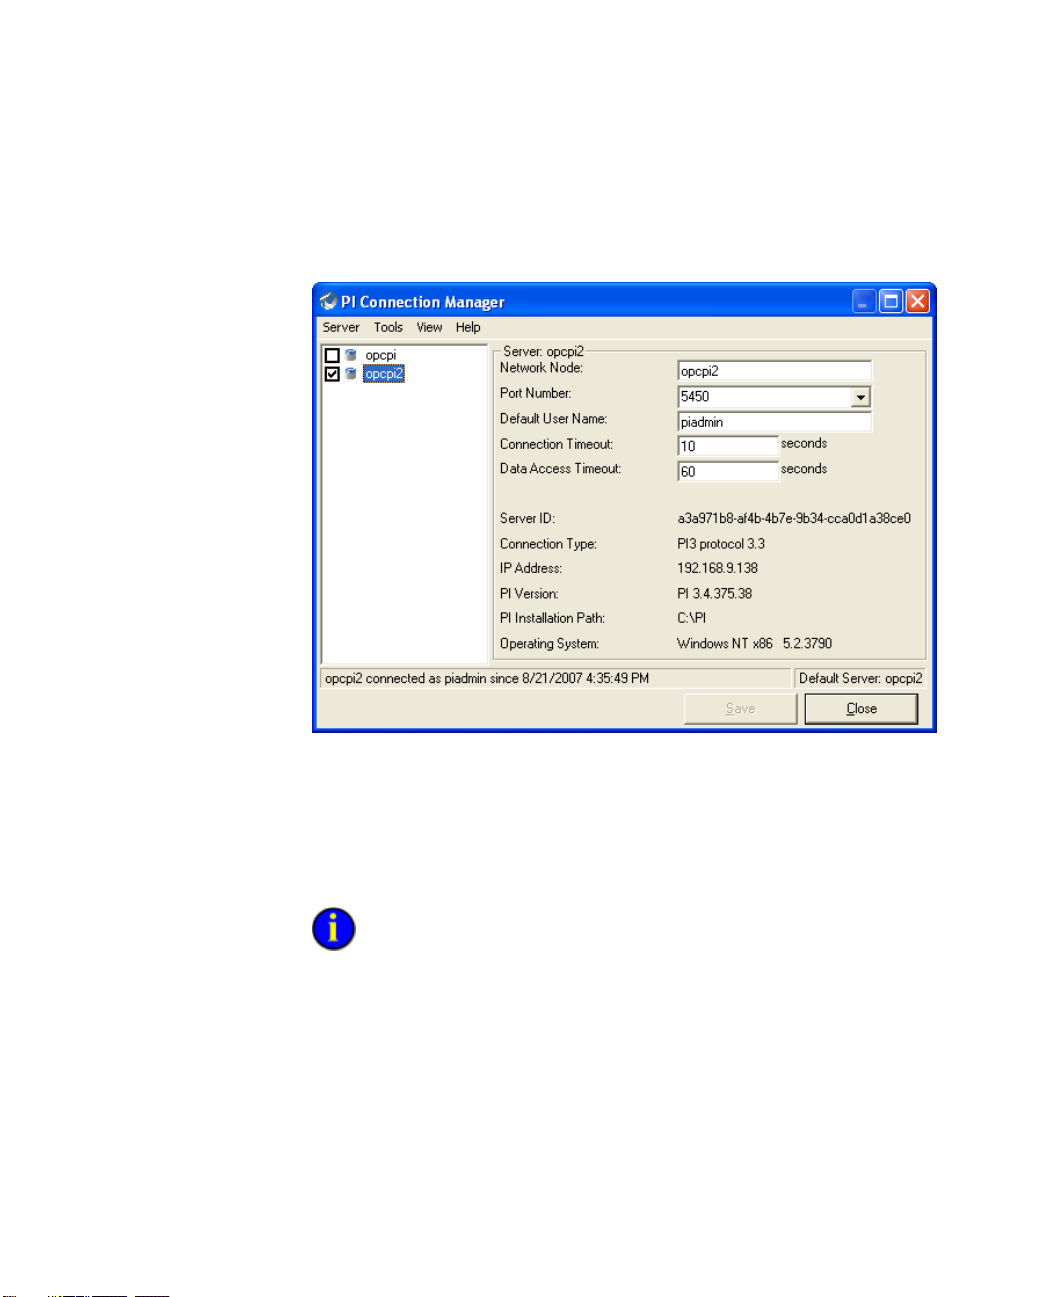
Connect to a FactoryTalk Historian Server
Use the Connection Manager to manage connections to FactoryTalk
Historian servers:
Click File > Connections. The PI Connection Manager dialog box
appears. The dialog box lists the configured servers to which you can
connect. It also shows the server you have chosen as the default server.
6
Page 25
2 ● FactoryTalk Historian ProcessBook Essentials
●
●
●
●
●
A selected check box next to a server name in the Connections dialog box
indicates an open connection to the FactoryTalk Historian server.
To manage connection settings:
Click to select a check box and open a connection to a FactoryTalk
Historian server in the list. Clear a check box to close a connection.
Select a FactoryTalk Historian server in the server pane to access
connection settings.
If you select more than one server, the application tries to connect to each
server using the same user ID and password. If it fails, a new FactoryTalk
Historian Server Login dialog box appears. If you already are logged in to the
server from a different FactoryTalk Historian application, such as FactoryTalk
Historian DataLink, the application uses the user ID and password with which you
logged in. See the
PI SDK Controls and Dialogs User Help
for more detail.
7
Page 26

●
●
●
●
●
FactoryTalk Historian ProcessBook User Guide
FactoryTalk Historian Security
FactoryTalk Historian ProcessBook is designed to support whatever
FactoryTalk Historian Security is configured on the FactoryTalk Historian
server.
1. When attempting to connect to a FactoryTalk Historian server, the
application first attempts to pass your FactoryTalk Security/Windows
log in credentials. The PI SDK will try to use them directly or find a
Trust for the user, domain, application or machine (per Trust
configurations).
2. If all attempts to login to the FactoryTalk Historian server using
FactoryTalk Security/Windows credentials or other machine-related
information fail, then you must have a FactoryTalk Historian ME
native security user account (not FactoryTalk Security/Windows
security-based). In this case, the PI SDK attempts to use the native
FactoryTalk Historian ME user account configured for the server.
3. If the default native FactoryTalk Historian ME user account does not
require a password, then you are automatically logged in. If the default
account does require a password, a login dialog box appears, which
expects the native FactoryTalk Historian ME user account and
password.
the
FactoryTalk Historian SE Installation and Configuration Guide
FactoryTalk Historian server.
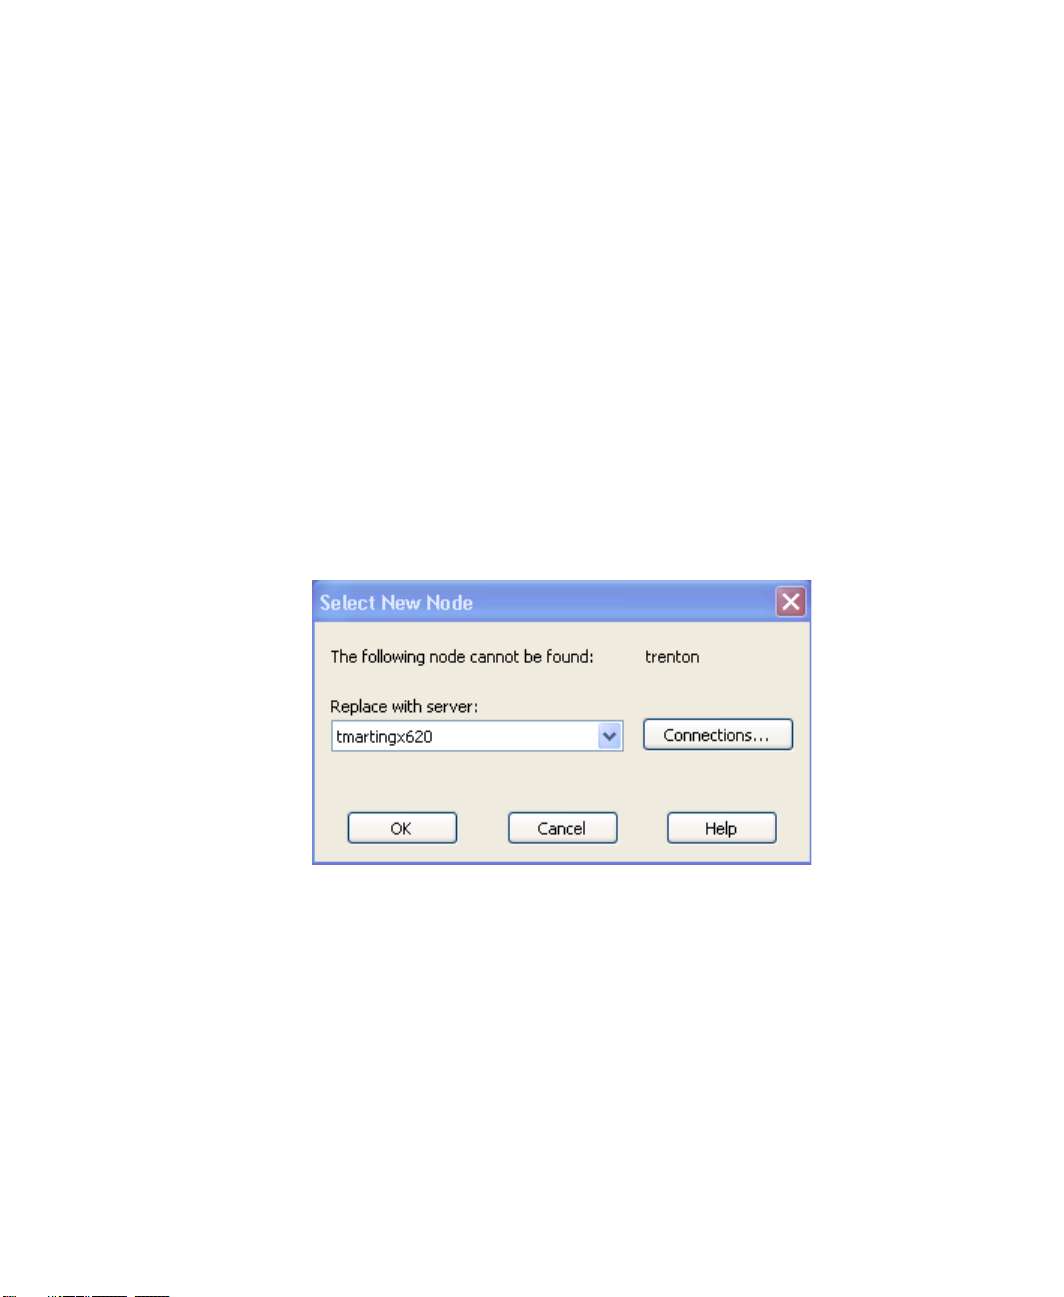
Network Errors
Network Errors update the Status Report (page 226) dialog box, rather
than displaying error messages on your monitor. When a display is opened
but the server is not available, only one Select New Node (page 9) dialog
box appears. The dialog box appears once for each server that is not
available.
8
For more detailed information on FactoryTalk Historian server security, see
, shipped with the
Page 27
2 ● FactoryTalk Historian ProcessBook Essentials
●
●
●
●
●
Displays and Connection Failure
If the connection to your data is not successful, the display (page 11) is still
drawn, but data in dynamic elements are replaced with indicators
signifying that no data is available.
Trends are labeled Invalid and no information is plotted.
Values are replaced with pound signs (###) and the message
Disconnected appears.
Bar graphs are drawn using hash marks (//////).
Multi-State symbols show the configured color for bad data.
If a server has been disconnected, and/or cannot be reached, the Select
New Node dialog box appears.
Click Connections to launch the PI Connection Manager dialog box.
From there you can choose a new server from the drop-down list of
connected servers.
9
Page 28

●
●
●
●
●
FactoryTalk Historian ProcessBook User Guide
Node Identifiers for Multiple FactoryTalk Historian Servers
A Node Identifier is stored with each tag name used in a display to point to
the correct server. If you define FactoryTalk Historian server nodes in the
PI Connection Manager dialog box, the identifiers are the same on each
PC on the network as long as the node names for the FactoryTalk Historian
system are the same.
Workspace
When you start FactoryTalk Historian ProcessBook, it appears as an open
window or workspace on the desktop. Depending on your settings, you
may initially see an empty workspace, or an open ProcessBook (page 10)
in either Book (page 50) or Outline (page 53) view.
Within the FactoryTalk Historian ProcessBook workspace you can open a
ProcessBook (page 10) or independent display (page 11).
ProcessBook (.piw)
In FactoryTalk Historian ProcessBook a ProcessBook is the container for
the information and analysis of the process you are monitoring. A
ProcessBook may appear as either a tabbed book - Book view (page 50), or
an outline - Outline view (page 53), and is saved as a separate file with a
.piw extension.
A ProcessBook is a collection of individual displays of data and analysis.
Use a ProcessBook to organize data from the FactoryTalk Historian system
and other sources so that you can analyze the processes you monitor or the
tasks you perform.
A ProcessBook and its displays are stored in a single file.
10
Page 29
2 ● FactoryTalk Historian ProcessBook Essentials
●
●
●
●
●
Display
The main unit for creating presentations of data in FactoryTalk Historian
ProcessBook is the display. A display may stand on its own (.pdi or.svg),
or it may be part of a ProcessBook (.piw) (page 10). A display contains all
the symbols used to represent an operational environment using real-time,
production data from FactoryTalk Historian as well as data from other
sources. In addition to containing this collection of data elements, the
display has its own set of features and properties that affect the collection
of data elements.
Displays can show a variety of elements, such as a schematic
representation of a production line, a plot of readings taken from a
production line, or a comparison of lab data and batch specifications.
Displays can also be linked to other ProcessBooks, displays in other
ProcessBooks, or other applications.
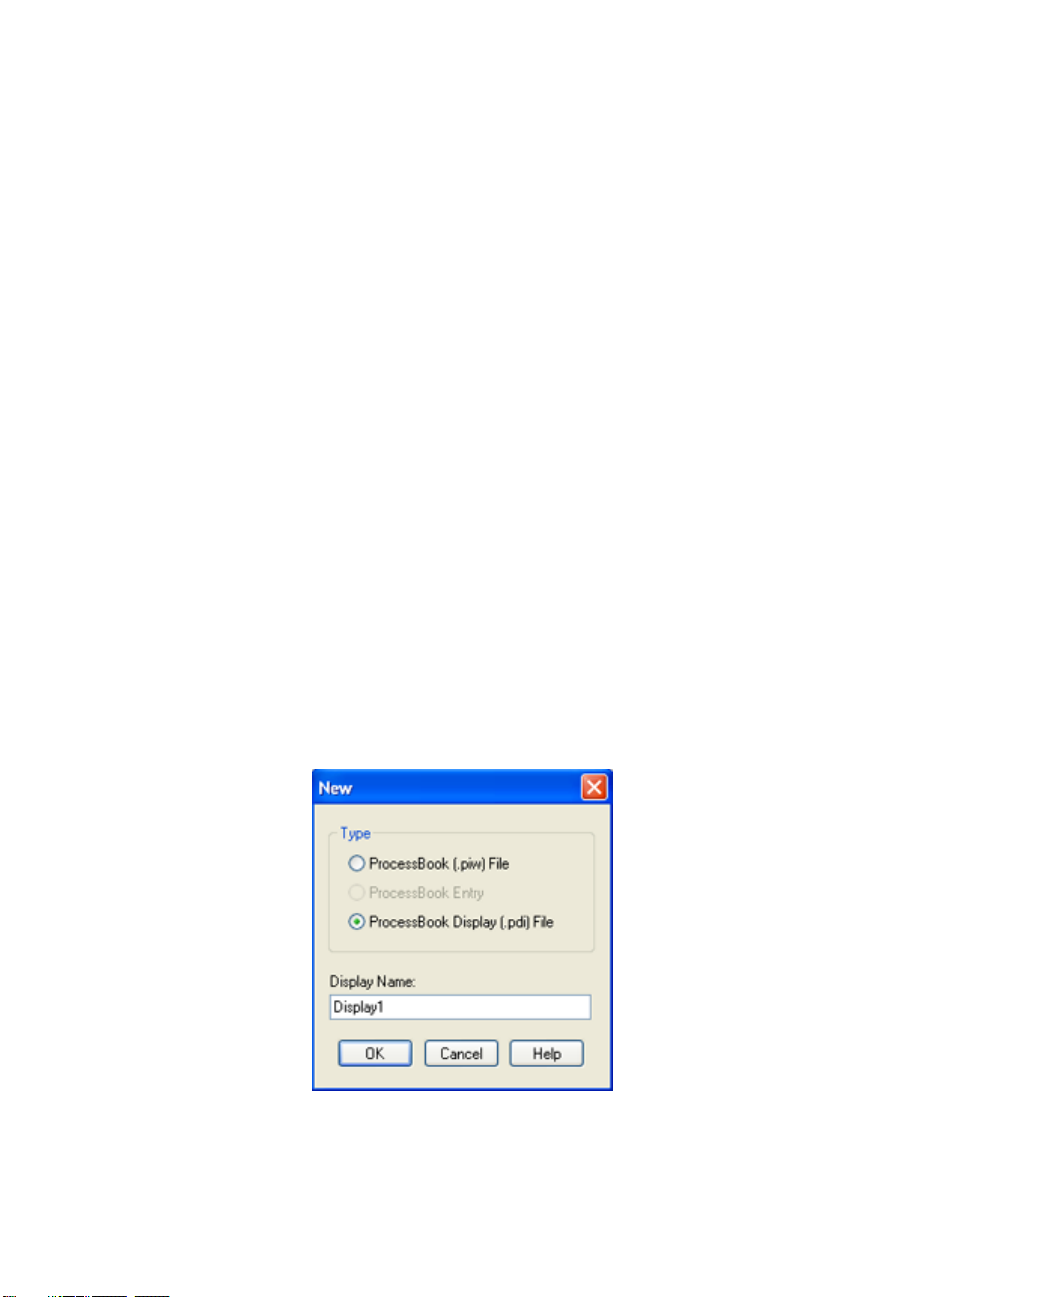
Create a New ProcessBook or Display
Use the New dialog box to create a new ProcessBook (page 39), add
ProcessBook entries (page 41), or create an independent display (page 69).
Click File > New to launch the New dialog box.
11
Page 30
●
●
●
●
●
FactoryTalk Historian ProcessBook User Guide
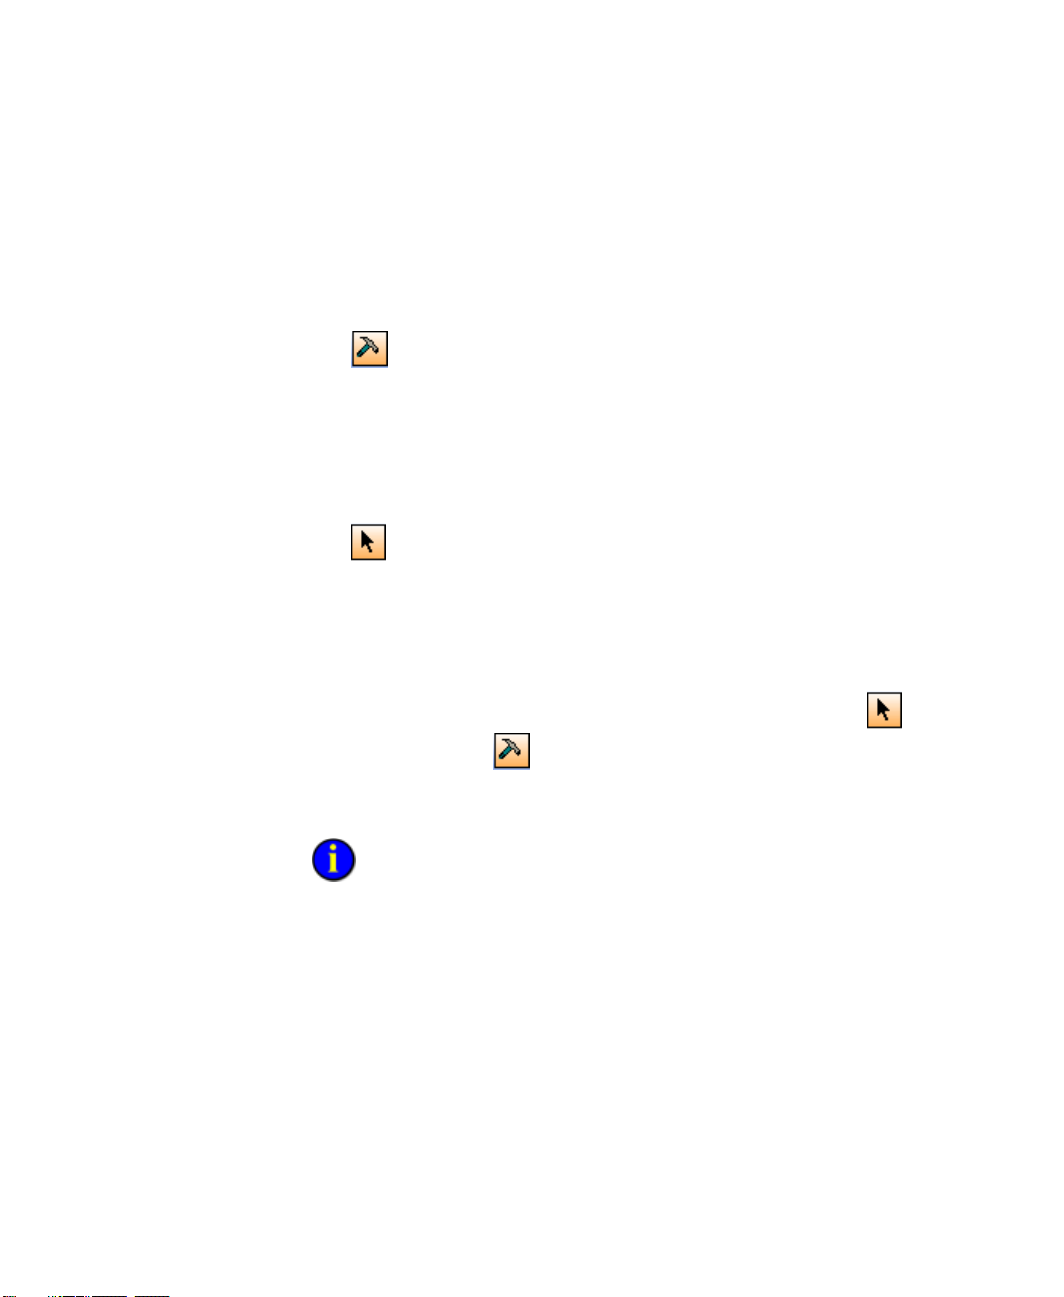
Run Mode and Build Mode
When you work with a ProcessBook or an independent display, you work
in one of two operating modes, Run mode or Build mode.
Build mode.
Most of the functions that you use when you create or modify a
ProcessBook require the Build mode pointer. Use Build mode to add,
remove, or move symbols on a display, to add, remove, or organize
entries in a ProcessBook, and for access to symbol definitions and
formatting tools.
Run mode.
It is used to open entries and execute commands once a ProcessBook
is built. You can make some changes to a display while in Run mode;
however, working in Run mode keeps you from accidentally making
permanent changes to items in a display.
You switch between modes by clicking the Run mode pointer or the
Build mode pointer , which are located on the Tools menu and the
Drawing toolbar. Your preferred mode of operation is set as a default in
your Preference settings.
clearing or selecting the Prefer Run Mode check box in the
of the ProcessBook Preferences dialog box. This is a helpful preference if you
spend most of your time building or editing displays.
12
You can choose Build or Run mode as your preferred mode of operation by
General tab
(page 23)
Page 31

2 ● FactoryTalk Historian ProcessBook Essentials
●
●
●
●
●
Add-Ins
By default, FactoryTalk Historian ProcessBook installs with the following
add-in components. You can load or unload these and other add-in
components by using the Add-In Manager (page 13).
AF 2.x Data Set.
Browser toolbar (page 16).
Data Favorites (page 196).
Details (page 191).
Element Relative Displays (ERD) (page 238).
ProcessBook SVG File Converter - enables you to save displays as
SVG files, which can then be used by FactoryTalk Historian
WebParts.
Time Range and Playback toolbar (page 88).
ToolTip Statistics (page 87).
FactoryTalk Historian BatchView.
You can install other add-ins with FactoryTalk Historian ProcessBook, but
they don't become available until you add additional applications:
FactoryTalk Historian BatchView
Add-In Manager
The Add-In Manager lists the Add-Ins (page 13) available in your
FactoryTalk Historian ProcessBook installation. Use this dialog box to
control whether the add-ins are loaded whenever you use FactoryTalk
Historian ProcessBook.
1. Click Tools > Add-in Manager. The Add-In Manager dialog box
appears.
13
Page 32

●
●
●
●
●
FactoryTalk Historian ProcessBook User Guide
Menu Bar
Function
Default
Displays when no documents are active
2. Click an available add-in from the Available Add-Ins list.
3. A description of what the add-in does appears in the Description box.
4. Under Load Behavior, select the appropriate check boxes:
Loaded/Unloaded
Loads or unloads the selected add-in. The add-in's current status
appears in the Load Behavior column at the top.
Load on Startup
Loads the selected add-in on startup of FactoryTalk Historian
ProcessBook. The add-in's current status appears in the Load
Behavior column at the top.
Command Line
Loads the selected add-in when FactoryTalk Historian
ProcessBook is started from the command prompt or from a
script.
5. Click OK to complete the action and close the dialog box.
If the add-in is unloaded and then reloaded, you must click the Revert
toolbar button to re-synchronize any symbols using the add-in.
Menus and Toolbars
Command Menus
The active components of menu bars change depending on the active
window and current selections. There are five different collections of menu
commands.
14
Page 33

2 ● FactoryTalk Historian ProcessBook Essentials
●
●
●
●
●
Menu Bar
Function
Book
Displays when a FactoryTalk Historian ProcessBook workbook is active
Display
Displays when a FactoryTalk Historian ProcessBook display document
is active
View-Only Book
Displays when FactoryTalk Historian ProcessBook is running in no-edit
mode and a FactoryTalk Historian ProcessBook workbook is active.
View-Only Display
Displays when FactoryTalk Historian ProcessBook is running in no-edit
mode and a display or workbook document is active.
Customize Toolbars
Toolbars may be displayed or omitted as follows:
1. Click View > Toolbars. The Toolbars tab of the Customize dialog
box appears.
2. Check the toolbars you wish to display, and click OK.
Click the Commands tab to see what buttons appear on each toolbar.
3. To move a toolbar, click the double vertical bar at the left end and
drag to the new location. If the toolbar has no move handle, click the
title bar instead.
4. To reshape a floating toolbar (one without move handles), grab one of
its edges and drag to a new shape.
Toolbar Buttons
Many of the menu commands in FactoryTalk Historian ProcessBook can
be selected by clicking a button on a toolbar. To determine the use of a
button on a toolbar, hover the mouse pointer over the button to display a
ToolTip.
15
Page 34

●
●
●
●
●
FactoryTalk Historian ProcessBook User Guide
You can configure toolbars to display as view-only to omit unnecessary
buttons. View-only toolbars and others can be specified in procbook.ini
(page 315).
Add Buttons to Toolbars
You can change the icons that appear on the toolbars or create your own
custom toolbar.
1. Click View > Toolbars.
2. From the Commands tab of the Toolbars dialog box, you can select a
particular toolbar in the dialog box and drag buttons to existing
toolbars in your FactoryTalk Historian ProcessBook window.
3. While the Commands tab is open, you can also drag buttons off of a
toolbar to remove them from your window.
Browser Toolbar
The Browser add-in provides a toolbar that resembles the controls of a
typical web browser. The toolbar is automatically loaded when you install
FactoryTalk Historian ProcessBook, and allows you to navigate recentlyused ProcessBooks and displays.
Browse ProcessBooks and Displays
1. To use the Browser and Playback toolbar:
2. Click View > Toolbar Manager. The Browser and Playback
16
toolbars appear.
These toolbars are open by default when you first launch FactoryTalk
Historian ProcessBook.
Page 35

2 ● FactoryTalk Historian ProcessBook Essentials
●
●
●
●
●
3. From the Browser toolbar (page 16), click either the Forward or
Back buttons to view previously opened ProcessBooks or
displays. Only displays opened during the current session of
FactoryTalk Historian ProcessBook are included in this navigation.
You can also use the Address box to open ProcessBooks and displays.
1. Click the arrow to the right of the Address box to see the last ten valid
file paths you entered. The last entry in the list is Browse.
2. Click Browse to launch an Open File dialog box where you can
browse for a file. You can also enter a URL to open a file.
View Browsing History
To view the browsing history:
1. Click the small black arrow to the right of the Back or Forward
buttons to see a drop-down box that lists the last ten
ProcessBooks and/or displays that you visited during the current
session.
2. Click an entry to return to that item.
The final entry in the list is History. Click History to open the
History tab of the Organizer window (page 18) from where you can
find an alphabetical list of all ProcessBooks and displays visited
during the current session.
Set a Home Page
The Home Page is the startup file that is defined in FactoryTalk Historian
ProcessBook preferences. It can be a .pdi (display), .piw (ProcessBook), or
a display entry.
17
Page 36

●
●
●
●
●
FactoryTalk Historian ProcessBook User Guide
1. On the Browser toolbar (page 16), click the small arrow next to the
Home button .
2. From the drop-down menu, select one of the following:
1. Use Default to make PIDemo.piw your default file.
2. Use Current to set the start file to the current, active
ProcessBook or display.
Bookmarks and Browser History
The Organizer is a docking window that allows you to organize and use
bookmarks and the current session's history. By default this window is
hidden. Click the Bookmarks button on the Browser toolbar (page 16) to
make it appear.
The Organizer window has two tabs:
18
Page 37

2 ● FactoryTalk Historian ProcessBook Essentials
●
●
●
●
●
Bookmarks
New bookmarks are automatically added to the root level of the
bookmarks tree. You can organize the entries into a hierarchical tree
structure by dragging and dropping entries. Right-click the Bookmarks
tab to select one of the following from the context menu:
New Folder inserts a new folder at the top level of the tree or as
a subfolder of a selected folder.
Rename makes the entry name of the selected entry editable.
Edit opens a dialog box where you can enter a new name and file
path for the selected bookmark.
Select All selects every entry.
Deselect All clears every entry.
Send To File opens a Save File dialog box for the location to
store the list of bookmarks. Bookmarks are saved as XML and can
be subsequently imported. Only files/folders that are selected
(checked) in the tree are exported.
Send To E-Mail opens a pre-populated Outlook email with the
selected bookmarks ready to be sent as an attachment with the
same format as the Send to File option. Only files/folders that are
selected (checked) in the tree are exported.
Note: The Send To options are only visible if at least one
entry is checked or when right-clicking an item.
Import opens an Open File dialog box where you can select a
bookmarks file to import.
History
The tab contains an alphabetical list of all ProcessBooks and displays
you have visited during the current session. From there you can click
an entry to return to that item.
The icon of the entry indicates its file type. Hover over an entry to see
its full path in a ToolTip.
Add/Edit Bookmarks
1. On the Browser toolbar (page 16) click the Bookmark button to
open the Bookmark tab of the Organizer (page 18) window.
From there you can browse, modify, or delete stored file locations.
2. Click to add a bookmark.
19
Page 38

●
●
●
●
●
FactoryTalk Historian ProcessBook User Guide
3. Click to edit a bookmark.
If the active file is already bookmarked, the same icon appears as the Edit
Bookmark icon. Click this button to edit the bookmark's label and file
path.
Keyboard Shortcuts
A keyboard shortcut is a combination of keystrokes to use for frequent
actions. Several of these are already assigned in FactoryTalk Historian
ProcessBook. They appear to the right of the corresponding menu
command on the drop-down menus.
FactoryTalk Historian ProcessBook lets you assign new combinations of
keystrokes or change existing ones.
For example you can:
Assign a keyboard shortcut for inserting symbols with one command.
Assign more than one keyboard shortcut to a specific action.
Change an existing shortcut, such as Ctrl+S, to another sequence you
prefer.
20
Page 39

2 ● FactoryTalk Historian ProcessBook Essentials
●
●
●
●
●
Assign a Keyboard Shortcut
To assign a keyboard shortcut:
1. Click View > Assign Shortcuts. The Shortcut Keys dialog box
appears.
2. Under Select a macro, click the appropriate macro (menu item). The
description for that item and its assigned shortcuts, if any, appears.
3. Click Create Shortcut. The Assign Shortcut dialog box appears.
21
Page 40

●
●
●
●
●
FactoryTalk Historian ProcessBook User Guide
4. Under Press new shortcut key, type the key you wish to use for the
shortcut.
If you choose a combination already in use, the current assignment
appears in the dialog box. If you click OK, the previous assignment is voided.
5. Click OK.
The new shortcut appears in the Assigned shortcuts box.
If you want to reset all the keyboard shortcuts to their original positions
when FactoryTalk Historian ProcessBook was installed, click the Reset All,
and then OK.
Remove a Keyboard Shortcut
To remove a keyboard shortcut:
1. In the Shortcut Keys dialog box, under Select a macro, select the
appropriate macro (menu item command). The description for that
item and its assigned shortcuts, if any, appears.
2. Under Assigned shortcuts, select the shortcut you want to remove,
and then click Remove.
3. Click OK.
Preference Settings
You can reach the ProcessBook Preferences dialog box by clicking Tools
> Preferences. Preference settings determine how the ProcessBook entries
look, what colors are available when you draw, and whether your
ProcessBook opens in Book View (page 50) or Outline View (page 53).
22
Page 41

2 ● FactoryTalk Historian ProcessBook Essentials
●
●
●
●
●
Preference settings are stored in the file
procbook.ini
. Before you change the
Preference settings, consider creating a back-up copy of procbook.ini so that you
can restore FactoryTalk Historian ProcessBook to the original settings.
General Preferences
Click Tools > Preferences > General tab to configure application-wide
settings. These settings are stored in and retrieved from the [STARTUP]
section of your procbook.ini (page 315) file.
23
Page 42

●
●
●
●
●
FactoryTalk Historian ProcessBook User Guide
Author
Determines the name used as the creator of new files and the person
who last edited the file. See
Summary Information in ProcessBook
(page 59) for more information. This field is blank by default when
FactoryTalk Historian ProcessBook is first installed on a computer.
Startup File
The file name and path in this field determine which, if any, file is
automatically opened when the application is launched. The default
value when FactoryTalk Historian ProcessBook is first installed is
<installation path>\procbook\pidemo.piw.
Library File
The file name and path in this field determine which, if any, file is
opened when the original symbol library command is used. The
default value when FactoryTalk Historian ProcessBook is first installed
is <installation path>\procbook\symlibry.piw.
Prefer Run Mode
Determines whether ProcessBook starts up in Run mode or Build
mode by default. By default, this option is enabled when FactoryTalk
Historian ProcessBook is first installed on a computer.
Create Backup
Files
Determines whether backup files (with a .bak extension) are
automatically created when a FactoryTalk Historian ProcessBook file is
opened. By default, this option is turned off when FactoryTalk
Historian ProcessBook is first installed on a computer.
Retain snapshot
values on updating
plots
Determines whether the archive event pipe is used for updating
trends, discarding any snapshot values between stored, archive
values. This setting is stored as PB2TraceCompatibility in the
[STARTUP] section of your procbook.ini. By default, this option is
turned off when FactoryTalk Historian ProcessBook is first installed on
a computer.
Review the following for additional information:
24
Page 43

2 ● FactoryTalk Historian ProcessBook Essentials
●
●
●
●
●
Date and Time
Format
Settings in this area determine how time is displayed in FactoryTalk
Historian ProcessBook. Previews of each format are shown to help
you select the desired option.
The Use local Windows format option uses the current Regional
Options settings in the Windows Control Panel on the client
machine to determine how dates and times are displayed. Dates
are shown using the currently configured Short Date format and
Times are shown using the current time format settings.
The Use FactoryTalk Historian Time Format option displays
timestamps in the default FactoryTalk Historian format of ddmmm-yy HH:mm:ss.ssss, where dd is the day of the month, mmm
is a the short text abbreviation of the month name (e.g., Jan for
January), yy is the two digit year, HH is the hour in 24-hour
format, mm is the minute and ss.sss is the second, including subseconds, if present.
Default Time Zone
Determines whether timestamps reflect the time zone of the
FactoryTalk Historian server used to retrieve data (FactoryTalk
Historian server time zone), or the time zone of the local
computer (Client machine time zone), when a new display is
created. By default, the FactoryTalk Historian server option is selected
when FactoryTalk Historian ProcessBook is first installed on a
computer. This setting can also be changed and is stored with each
display.
25
Page 44

●
●
●
●
●
FactoryTalk Historian ProcessBook User Guide
Table of Contents Preferences
Click Tools > Preferences > Table of Contents tab to configure the
default view of Table of Contents windows for ProcessBook (PIW) files,
as well as the font applied to each level of entry in those files. These
settings are stored in and retrieved from your procbook.ini (page 315) file.
26
Page 45

2 ● FactoryTalk Historian ProcessBook Essentials
●
●
●
●
●
Default View
Settings in this area determine how ProcessBook entries are displayed
by default. The default is Book view.
Font Settings
The controls in this area determine the font settings applied to each
entry level in a ProcessBook. The font settings control the display of
entry names in Table of Contents windows.
The Entry level field allows you to select the level to configure.
You can only select one level at a time.
The Font field lists all the fonts installed on the computer running
FactoryTalk Historian ProcessBook.
The Size field determines the size of the text. The first time
ProcessBook is installed, the current Windows system font
determines the default font settings to use.
The Font style group determines whether text is shown in bold or
italic.
Preview
This read-only field displays font settings for each level in a
ProcessBook. Each of the 10 possible entry levels is listed and
displayed with its current font name, and style settings.
Review the following for additional information:
27
Page 46

●
●
●
●
●
FactoryTalk Historian ProcessBook User Guide
Display Window
Click Tools > Preferences > Display Window tab to set options that apply
to display windows. These settings are stored in and retrieved from your
procbook.ini (page 315) file.
28
Page 47

2 ● FactoryTalk Historian ProcessBook Essentials
●
●
●
●
●
Preserve Aspect
Ratio on resize
Determines whether display element sizes change in proportion to the
window size when a window is resized. When the check box contains
a check mark (is selected), the aspect ratio is preserved and the
display element sizes change in proportion to the window size.
Show Symbol
ToolTips
Determines whether ToolTips are displayed on display symbols.
ToolTips appear for toolbar buttons regardless of this setting's value.
By default, this option is turned on when FactoryTalk Historian
ProcessBook is first installed on a computer.
Show Value
Attributes
Determines whether icons are displayed for Value Attribute flags
(Questionable, Substituted or Annotated) on FactoryTalk Historian
data. This option is turned on when FactoryTalk Historian
ProcessBook is first installed on a computer.
Run mode scrolling
Determines the scroll bar behavior of display windows in Run mode.
Build mode
scrolling
Determines the scroll bar behavior of display windows in Build mode.
On
Display contains scroll bars all the time.
Off
Scroll bars never appear.
Automatic
Scroll bars appear when needed (this is the default setting).
Color Palette
These fields present the 16 colors selected for use throughout the
application as the basic colors for the color well control.
Use the Modify button to launch the Color dialog box, where you
can select additional colors.
Use the Reset button to return the Color Palette to system
default values.
Default Display
Background Color
Determines the default color used for new displays. The color well
control is used to select a color. This color is also set when the
Background color of the current display is changed.
Symbol Defaults
Contains fields to set the default formatting values for new symbols.
These defaults are also changed when the Formatting controls are
used and no symbols are selected.
Review the following for additional information:
29
Page 48

●
●
●
●
●
FactoryTalk Historian ProcessBook User Guide
Trend Preferences
Click Tools > Preferences > Trend tab to set default settings for new
trend symbols. These settings also apply to instant trends.
30
Page 49

2 ● FactoryTalk Historian ProcessBook Essentials
●
●
●
●
●
Display
Check or clear these options to configure what information a trend
displays by default.
AutoScale
Select this check box if you want trends to be scaled as tag values
change over time. If you do not select this check box, then trends
use the Database scale for each tag.
Plot Title
Select this check box if you want a title to display.
Value Scale Inside Axis
Select this check box to display the numeric scale inside the axis.
If you do not select this check box the scale displays outside the
axis. Note that the value scale is drawn horizontally when the
trend orientation is vertical.
Grids
Select to display
grid lines
(page 123).
Multiple Scales (page 125)
Add a value scale for each data point when selected. When the
check box is cleared, only a single value scale appears.
Markers
Select the check box if you want markers to indicate data points
on the trend. If you do not select the Markers check box three
markers display on each line. These markers help you match a line
to a tag.
Legend
Select or clear these options to configure what information appears in
the trend legends. The information that can fit in the legend is
determined by the size of the trend. Consequently, not all of the
information in the legend may be visible:
If the width of the legend is more than the width of the trend the
legend does not appear.
If the height of the text in the legend is longer than the total
height of the trend, items are removed in this order: engineering
units, tag name, then value.
Options include:
Tag Name
Server Name (for FactoryTalk Historian tags)
Value
Description
Eng Units
Review the following for additional information:
31
Page 50

●
●
●
●
●
FactoryTalk Historian ProcessBook User Guide
Sample
Use this display area to view a preview of selected trend preferences.
Trend Elements Preferences
Click Tools > Preferences > Trend Elements tab to set what colors, line
styles, etc. are used in individual traces gridlines, text, or the background.
These settings also apply to instant trends.
32
Page 51

2 ● FactoryTalk Historian ProcessBook Essentials
●
●
●
●
●
Multi-State on Ad
Hoc
Select this check box to include data from multi-stated symbols when
creating an ad hoc (instant) trend. When this option is cleared, data
from a multi-state configuration is not included on instant trends.
Traces per Ad Hoc
Trend
Select the number of traces to have per plot on an ad hoc (instant)
trend. The default is 3, the maximum is 8. Once this number is
reached, additional plots are created to show the remaining tags
selected for the instant trend.
Plot Element
Use the drop down list to select from pens, text, grids, and
background.
For each plot element, select a Marker Type, Line Style, Line
Weight, and Color.
Note: You may select one of several line styles for each
trace. You can also specify the line thickness. Select none to
omit a grid line.
Sample
See your changes previewed in the Sample area at the bottom of the
dialog box.
Review the following for additional information:
When you print from a ProcessBook, you can:
In Outline view, print a list of the ProcessBook contents or selected
displays.
In Book view, print a list of the entire book or a selected tab section.
Print the entire contents of a display or selected items from that
window.
You can also set various printing options, such as the number of copies.
33
Page 52

●
●
●
●
●
FactoryTalk Historian ProcessBook User Guide
Each topic in the help file may be printed separately or you can print them
all at once.
The Print command is accessible from the File menu, CTRL+P, or the
print button. You can print the contents of the active window or if you
select items within a display before you open the Print dialog box, then
you can choose to print only those items.
On a non-color printer, symbols are printed in shades of gray, but trends are
printed in black and white.
On some printers, when you print a trend with cursors, the value and time
stamp boxes of the cursor does not hide the information beneath them.
However, other trend cursors and the trend time scale may show through
the trend cursor boxes, making the values hard to read.
Page Setup for Printing
You can select the particular printer, the orientation of the paper, the paper
size, and the source within the printer of the paper. Use the Properties
button to fine-tune the quality of output or the performance of the printer.
The settings you choose in Page Setup become the defaults for all your
printing.
Postscript, and color printers. However, all Windows print drivers may not be
compatible. If you are not sure if your printer is supported or you observe any
printing problems, contact Rockwell Automation Customer Support.
34
FactoryTalk Historian ProcessBook supports dot matrix, HP PCL (LaserJet),
Page 53

2 ● FactoryTalk Historian ProcessBook Essentials
●
●
●
●
●
Print Preview
Print Preview displays your selection as it will look when it is printed.
Note that the Print Preview shows colors even though you may be using a
black and white printer.
Once you select the item you want to preview, click File > Print Preview.
Zoom in or out of the selection by clicking on the selection with the
magnifier cursor or by clicking the Zoom buttons. To print the selection,
click the Print button.
Printer Setup
Select Print Setup to choose a printer, page orientation, and paper size. In
addition, you can fine-tune the quality of output or the performance of your
printer. The settings you choose in Print Setup become the defaults for all
your printing.
1. Click File > Page Setup. The Print Setup dialog box appears.
2. Select the printer, orientation, and paper size and source.
FactoryTalk Historian ProcessBook supports dot matrix, HP PCL
(LaserJet), Postscript, and color printers. However, all Windows print drivers
may not be compatible. If you are not sure if your printer is supported or you
observe any printing problems, contact Rockwell Automation Customer
Support.
3. Click the Properties button to select printer-specific options. Refer to
your printer documentation for additional information about these
options.
35
Page 54

●
●
●
●
●
FactoryTalk Historian ProcessBook User Guide
Change the Language Used for FactoryTalk Historian ProcessBook
You can change the language for the application on your machine if you
have a FactoryTalk Historian ProcessBook Language Pack and the desired
language resources installed. The language setting is per user locale, so if
others want to use the application on the same machine under a different
login, they can use different language resources, if they are available.
To change the application language:
1. Run the FactoryTalk Historian ProcessBook Language Pack and select
the language resources you want to install, if they are not already
available.
2. Click Tools > Preferences. The ProcessBook Preferences dialog box
appears.
3. On the General tab, click the Language Settings to launch the
language selection tool. This button is only active if you have
language resources installed.
4. Select the target language and click OK.
5. Quit and restart the application.
FactoryTalk Historian ProcessBook now appears in the specified language.
Note that users who log in with the same account see the same language,
but the language does not change for those logging in to the machine with
different accounts.
About FactoryTalk Historian ProcessBook
You can launch the About FactoryTalk Historian ProcessBook dialog
box by clicking Help > About FactoryTalk Historian ProcessBook. The
dialog box provides detailed version and build information.
36
Page 55

2 ● FactoryTalk Historian ProcessBook Essentials
●
●
●
●
●
Click Copy Info to copy the contents of the list to your Windows
clipboard where it can be pasted into a spreadsheet or text editor. This
can be useful to share with Rockwell Automation Technical Support
engineers if you have a problem.
Click System Info to launch the Microsoft System Information
dialog box. This information can also be useful when troubleshooting
issues through Technical Support.
37
Page 56

●
●
●
●
●
FactoryTalk Historian ProcessBook User Guide
38
Page 57

Chapter 3
Work with a ProcessBook
Basic Steps to Build a ProcessBook
There are five basic steps to creating a ProcessBook (page 39):
1. Create and save a ProcessBook.
2. Add, organize, and edit entry titles.
3. Design a detailed display for each display entry title, using the
drawing tools to create schematics or other drawings with trends, bars,
and values. To import outside data, add OLE objects and values from
data set queries.
4. Format trends and make other adjustments to each display to present
your data in the most useful manner.
5. Save the completed ProcessBook and install it wherever it is needed.
In some installations, the System Administrator may set your FactoryTalk
Historian ProcessBook to
save new ProcessBooks.
View Only
(page 331) mode. If so, you cannot create and
Create a New ProcessBook
Before you create a ProcessBook, you should consider planning an
organizational structure and a naming convention for the ProcessBook and
the entries within it.
39
Page 58

●
●
●
●
●
FactoryTalk Historian ProcessBook User Guide
When you create and save a new ProcessBook, the application initially
gives it the title Book1, where 1 represents the number of ProcessBooks
created during the current session.
FactoryTalk Historian ProcessBook also creates a file name for the new
ProcessBook. It suggests the first word from your title and an extension of
.piw. For example, FactoryTalk Historian ProcessBook may suggest
Filtrat1.PIW. If you plan to build an entire set of ProcessBooks, you
might choose to modify it in Windows Explorer to sort your set of
ProcessBooks in some meaningful order, such as 05FiltrP.PIW.
1. In Build mode, click File > New. The New dialog box appears.
2. Select ProcessBook (.piw) File.
3. Under ProcessBook Name, type a name for the new book.
4. Click OK.
A new ProcessBook appears.
If you typed a name in the ProcessBook Name box, then the name appears
on the ProcessBook title bar. If you did not type a name, then the default title
Book1
appears on the title bar.
Open an Existing ProcessBook
To open an existing ProcessBook:
1. Click File > Open, or
2. Click the specific ProcessBook file (.piw) you want to open.
3. Click OK.
40
On the standard toolbar, click Open. The Open dialog box appears.
Page 59

3 ● Work with a ProcessBook
●
●
●
●
●
Depending on the settings in the ProcessBook Preferences dialog box, a
default ProcessBook may open automatically when you start FactoryTalk Historian
ProcessBook.
FactoryTalk Historian ProcessBook keeps track of the four most recently
opened ProcessBooks or independent display files. Instead of using File >
Open, you may select a file name from the bottom of the File menu.
Work With Multiple ProcessBooks
You can work in multiple ProcessBooks and/or independent display files at
the same time. Open additional ProcessBooks using the File menu.
Use the Windows menu to select the ProcessBook title and switch
among them.
Click inside a ProcessBook window to make it active.
Switch among the open windows by pressing CTRL+F6.
Add ProcessBook Entries
After creating a ProcessBook, the next step is to add individual entries. By
arranging and combining displays and other entry types, you can create a
complete working environment for plant personnel.
You can add entry titles to a ProcessBook and then complete the detailed
design of the entries later.
There are five specific types of entries:
Text (page 43) - provides headings or static information.
Display (page 43) - opens a display.
Linked displays (page 43) - links to an independent display file.
41
Page 60
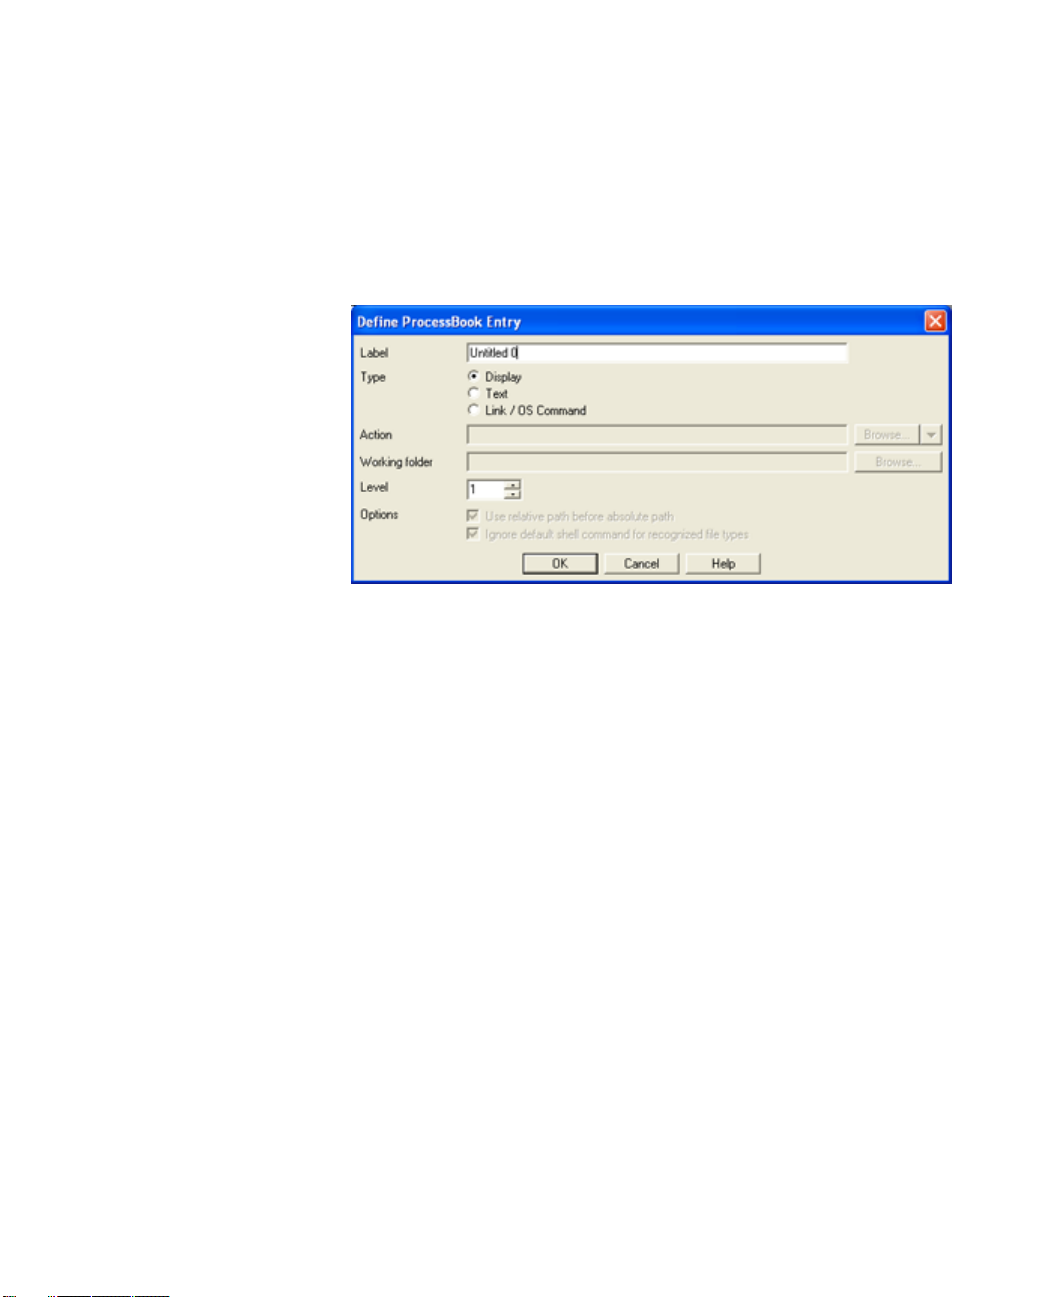
●
●
●
●
●
FactoryTalk Historian ProcessBook User Guide
Linked ProcessBook (page 46) - links to an entry in another
ProcessBook.
Operating system command (page 46) - opens another application.
When you add entries to a ProcessBook in either Outline or Book View,
the entries are arranged hierarchically. Subentries are indented under main
entries. The name you give each new entry is the name that shows in the
ProcessBook.
When you create a new entry, it is placed in the ProcessBook just before
the selected entry. If no entries are selected, the new entry appears at the
end of the current tab section in Book View or at the end of the Outline
View.
The first entry on a book tab is normally a Level 2 item (Level 1 is used as
the tab label). All Level 3 through 10 items are listed below a level 2 item
and indented the same. In Outline View, all levels are indented according
to their level.
42
Page 61

3 ● Work with a ProcessBook
●
●
●
●
●
Create a Text or Display Entry
Use text entries to add labels and clarify text in a ProcessBook table of
contents. Display entries represent a display in a ProcessBook.
1. Click File > New. The New dialog box appears.
2. Under Type, select ProcessBook Entry.
3. Click OK. The Define ProcessBook Entry dialog box appears.
4. In the Label dialog box, type a name.
5. For the Type, select Text or Display.
6. In the Level list, click the level at which you want to position the entry
in the ProcessBook hierarchy of entries, or type a number between 1
and 10.
If you are creating the first entry in the ProcessBook, the level is
automatically set to 1 and cannot be changed. This entry is used as the first
tab label.
7. Click OK. The entry is added to the ProcessBook. If the entry is at
Level 1 and you are in Book view, a tab is created using the name of
the entry.
8. Click the Save button on the toolbar, or click File > Save.
Linked Display Entry
A linked display allows you to use a display name to link to an entry
elsewhere in the ProcessBook or in another ProcessBook or independent
display file. This means that you create and store only one copy of the
display.
You can then access the same entry from several different locations in one
ProcessBook. Or, while you are in one ProcessBook, you can open an entry
from another one without having to close the first ProcessBook.
43
Page 62

●
●
●
●
●
FactoryTalk Historian ProcessBook User Guide
The linked entry is not a copy; it is a way of opening the original, similar to
using a Windows shortcut. The Book View or Outline View shows the title
of the linked entry, but the actual display window shows the title of the
original entry.
If you edit the original from any linked entry, the original is updated and
automatically appears updated in all the ProcessBooks that are linked to it.
To prevent unexpected updates, you can restrict access to an entry so that
only the original entry can be edited and all others to which it is linked are
read-only. If the entry resides on a server, you can write-protect the file on
the server. If you need more information on restricting access to files, see
your System Administrator.
Before you create a link to an original entry in a different ProcessBook, the
ProcessBook that contains the original (target) entry must be open. Once
the link is established, you only need to open the ProcessBook with the
Linked Entry.
If you want to link to an entry in a second ProcessBook, open the second
book or use the Display Search dialog box. If you want to link to an entry
in the current ProcessBook, create the original display entry first, save the
file, and then create the linked entry. The target display must be in a file
that has been saved so that its path can be determined.
Create a Linked Display Entry
To create a linked display entry:
1. Click File > New. The New dialog box appears.
2. Under Type, select ProcessBook Entry.
3. Click OK. The Define ProcessBook Entry dialog box appears.
4. In the Label dialog box, type a name.
5. For the Type, select Link/OS Command.
44
Page 63

3 ● Work with a ProcessBook
●
●
●
●
●
6. Click the Browse button, or click the Browse arrow to see more
search options. The Open dialog box appears.
To link to an independent display file, locate and select the
display file (.pdi) to which you want to link and then click the
Open button. The display name appears in the Action box.
To link to another ProcessBook, locate and select the processbook
file (.piw) to which you want to link and click the Open button.
The file name appears in the Action box.
To link to a display in a ProcessBook, select the Display Search
option from the Browse drop-down and enter criteria to locate the
display you want within the open files. If the display you want is
not in a file that is open, select a different option in the Look in
field. When the display is listed in the Display Search dialog box,
select it and click OK. The name appears in the Action box.
7. In the Level list, click the level at which you want to position the entry
in the ProcessBook hierarchy of entries, or type a number between 1
and 10.
If you are creating the first entry in the ProcessBook, the level is
automatically set to 1 and cannot be changed.
8. Clear the Options check box if you want the absolute path to the file
checked first.
By default, ProcessBook attempts to open a linked display from its
relative path first. If the relative path fails, then the absolute path is checked.
Clearing the Use relative path check box reverses the order in which the
paths are resolved. For new displays, this option is checked by default.
9. Click OK. A linked display entry icon is added to the outline and book
view of the ProcessBook you are developing.
10. Click Save.
45
Page 64

●
●
●
●
●
FactoryTalk Historian ProcessBook User Guide
If you need to move the original entry to another directory or
ProcessBook, you must redefine the link between the ProcessBooks. If you
move both the original and the linked item and the relationship between the
two file paths is unchanged, you do not need to relink.
Linked ProcessBook Entries
Similar to a Linked Display, a Linked ProcessBook entry is a link to a
different ProcessBook. When you open a linked ProcessBook entry,
another ProcessBook is opened. You may open any of the entries in that
ProcessBook. Using a Linked ProcessBook entry is the same as opening a
ProcessBook using the Open command on the File menu.
The same rules apply to Linked ProcessBook entries as to Linked entries.
Move Linked Entries
If you move a linked pair of displays or ProcessBooks to another location
and if this move changes the relationship of the two file paths, you need to
relink the items.
Operating System Command Entry
An operating system command is used to start another application, such as
Microsoft Excel, in addition to FactoryTalk Historian ProcessBook.
Essentially, any command that you can successfully execute with the
Windows Run command can be used as an Operating System Command
entry in a ProcessBook.
For example, you can use an operating system command to link to
FactoryTalk Historian DataLink reports or calculations. You can also
create links to CAD drawings, modeling packages, or statistics packages.
Links to displays saved as SVG files are treated as Operating System
Command entries.
46
Page 65

3 ● Work with a ProcessBook
●
●
●
●
●
When you have reports created on a different system, you can convert them
to ASCII and, using an operating system command, create a link to
Notepad to read the reports.
If your company has online Help files for certain procedures, you can
create a link to those help files or other documents.
Your computer must have enough memory to run the applications you
want to use in addition to FactoryTalk Historian ProcessBook. The
applications also must be installed on your system. If you do not know
whether or not your computer has enough memory, contact your System
Administrator.
Create an Operating System Command Entry
To create an operating system command entry:
1. Click File > New. The New dialog box appears.
2. Under Type, select ProcessBook Entry.
3. Click OK. The Define ProcessBook Entry dialog box appears.
4. Under Label, type a name.
5. For the Type, select Link/OS Command.
6. Click Browse to the right of the Action box, or click the Browse
arrow and then click Applications. The Open dialog box appears.
7. Browse and locate the file to which want to link, and then click the
Open button. The application's path/name is displayed in the Action
box.
If you know the name of the .exe file for the application, such as
C:\excel\Excel.exe for Excel or the path and name of a data file, such as
C:\document\report.xls, then you can type the path directly in the Action
box. You can use most commands that execute successfully in the Windows
Start menu Run dialog box.
47
Page 66

●
●
●
●
●
FactoryTalk Historian ProcessBook User Guide
8. If you need to specify the location of the executable for the
application, click the Browse button to the right of the Working
folder box. The Browse for Folder dialog box appears.
1. Locate and select the folder that you want to specify for this
operating system command, and click OK.
If you know the name of the working folder for this application,
then you can type it directly in the Working folder box.
9. In the Level list, click the level at which you want to position the entry
in the ProcessBook hierarchy of entries, or type a number between 1
and 10.
If you are creating the first entry in the ProcessBook, the level is
automatically set to 1 and cannot be changed.
10. If the file specified in the Action box is associated with one
application and you want to open it with another, select the Ignore the
default shell command for recognized file types check box. This
option is normally only used with files such as displays saved as SVG
so that they can be opened in FactoryTalk Historian ProcessBook
instead of the associated Viewer application.
11. Click OK. An icon for the program you are launching is added to the
12. Click Save.
48
If the file type is supported by ProcessBook (either natively or through
an add-in), then it is opened directly when this option is selected for a Link or
OS command entry. For example, an .svg file is opened using the .svg File
Converter in ProcessBook, even if you have Adobe SVG Viewer installed.
Clearing this check box disables this behavior, so the default shell command is
used to open the file instead.
outline and book view of the ProcessBook and the application opens.
Close the application.
Page 67

3 ● Work with a ProcessBook
●
●
●
●
●
If you need to move the original entry to another directory or
ProcessBook, you must redefine the link between the ProcessBooks. If you
move both the original and the linked item and the relationship between the
two file paths is unchanged, you do not need to relink.
Working Directory for Operating System Commands
The Define ProcessBook Entry dialog box has a text box where you can
enter the working directory. The command line recognizes file extension
associations.
For example, in the past you needed to enter a command like:
C:\EXCEL\EXCEL.EXE C:\MYWORK\MINE.XLS
Now you can use a command like:
C:\MYWORK\MINE.XLS
In other words, if the string works for the Run command under the File
menu of the Program Manager, it will work in FactoryTalk Historian
ProcessBook.
Some applications that you can access with an operating system command,
such as MS Excel, allow only one copy of the application to open, even if
you execute the command several times.
Arrange ProcessBook Entries
Once you have created your entry titles, it is a good idea to consider how
they are arranged in your ProcessBook. Each ProcessBook gives two
possible views of your entry titles, Book View (page 50) and Outline View
(page 53).
49
Page 68

●
●
●
●
●
FactoryTalk Historian ProcessBook User Guide
Whether you are in Outline View or Book View, you can edit and
rearrange entries, or delete entries altogether. Some functions are
performed the same regardless of the view in which you are working.
Book View is a useful organizational tool when your ProcessBook has only
a few dozen displays. If your ProcessBook is large and contains many
displays, Outline View is faster and easier to use.
If there is no ProcessBook or independent display selected in your
Preference settings, click File > Open or File > Create to open or initiate
a file.
Book View
In Book View , the ProcessBook displays as a loose-leaf binder.
Tabs indicate major divisions in the ProcessBook. Each tab section has a
heading, which may be any ProcessBook entry. The entry title is used as
the tab name. A tab section may contain several pages of entries
representing different types of information. There is no limit to the number
of tabs you may have in a Book. However, as you add tabs or reduce the
size of the ProcessBook, the tabs are stacked to the right of the Book. This
might make the ProcessBook difficult to read in Book View.
When you create a first-level entry in Book View, the name becomes the
label for the section tab. If the entry is the first entry you have added to the
ProcessBook, the entry level is automatically set at 1. Subsequent subentries are listed below the main entry. When you select another first level
entry, a new page is created with a new tab. You can have up to 10 levels
of entries in a ProcessBook, but levels 3 to 10 are displayed in Book View
as though they were at the same level.
Displays within a tab section are typically arranged in a hierarchical
fashion. For example, a display that includes a boiler, a condenser, and a
pump may be at the top level of a tab section. The boiler, the condenser,
and the pump may be separate displays that are arranged underneath the
50
Page 69

3 ● Work with a ProcessBook
●
●
●
●
●
summary display. Each of these displays can have several displays for their
components.
Turn Pages in Book View
To turn pages in the Book view:
1. Click View > Book to view a ProcessBook in Book View (page 50).
Notice the top right corner of the page is divided into two small
triangles .
51
Page 70

●
●
●
●
●
FactoryTalk Historian ProcessBook User Guide
2. Click the upper triangle to move forward one page, or click the lower
triangle to move backward a page.
A dark gray triangle indicates there are no more pages in that
direction.
3. Click the tabs along the right-hand side to move quickly between
sections of a ProcessBook.
Resize a ProcessBook
To resize a ProcessBook:
1. Click and drag on the frame of a ProcessBook until the window is the
size you want.
As you make a window smaller, the ProcessBook is resized so you can
still see all of the tabs. If the window becomes too small to display all
the members of a group of displays, the displays are moved to new
pages.
2. If the ProcessBook window becomes too small, all the tabs behind the
first tab are collapsed into one tab labeled More. Click the More tab
to display a pop-up list of the other tab sections.
Entries in Book View
When you create a first level entry in Book View, the name becomes the
label for the section tab. If the entry is the first entry you have added to the
ProcessBook, the entry level is automatically set at 1. Subsequent subentries are listed below the main entry. When you select another first level
entry, a new page is created with a new tab.
52
Page 71

3 ● Work with a ProcessBook
●
●
●
●
●
Change the Name of an Entry in Book View
To change the name of an entry in the Book view:
1. Click View > Book to view a ProcessBook in Book View (page 50).
2. In Build mode, double-click the entry you want to change. The Define
ProcessBook Entry dialog box appears.
3. Under Label, type a new name.
4. Click OK.
Change the Level of an Entry in Book View
To change the level of an entry in the Book view:
1. Click View > Book to view a ProcessBook in Book View (page 50).
2. In Build mode, double-click the entry you want to change. The Define
ProcessBook Entry dialog box appears.
3. Under Level, click the level at which you want to reposition the entry
in the ProcessBook hierarchy of entries, or type a number between 1
and 10.
4. Click OK.
Outline View
In Outline View , ProcessBook displays are arranged hierarchically on
a page.
Click View > Outline to display a ProcessBook as an outline. When you
are in Outline View, a set of buttons is added to the active ProcessBook
window to collapse or expand the outline. You may need to resize the
window so all the buttons are visible. Use the horizontal and vertical scroll
bars to see all entries in the outline.
53
Page 72

●
●
●
●
●
FactoryTalk Historian ProcessBook User Guide
Hierarchies of entries may be revised by dragging entries from one location
to another, or by promoting and demoting entries.
Collapse or Expand Outline View
You can collapse or expand sections of the outline to view the list of
displays in a meaningful manner.
54
Page 73

3 ● Work with a ProcessBook
●
●
●
●
●
Promote the highlighted entry.
Demote the highlighted entry.
Move the highlighted entry up.
1. Click View > Outline to view a ProcessBook in Outline View (page
53).
2. Click the black plus sign to the left of an entry to expand it. This
shows additional displays that are subordinate to the selected display.
Collapsed View:
-orClick the transparent plus sign to collapse the list of subordinate
displays.
Expanded View:
You can change the font for each level in Outline View in the
ProcessBook Preferences
(page 22) dialog box.
Rearrange Entries in Outline View
In Build mode, click and drag the entry name up or down (not sideways) to
a new location. A dotted line indicates the location of the entry you are
moving.
Alternatively, you can use the four buttons at the top left of the window as
follows:
55
Page 74

●
●
●
●
●
FactoryTalk Historian ProcessBook User Guide
Move the highlighted entry down.
Change the Name of an Entry in Outline View
To change the name of an entry in the Outline view:
1. Click View > Outline.
2. In Build mode, click the entry you want to change.
3. Click Edit > Selected Item. The Define ProcessBook Entry dialog
box appears.
4. Under Label, type a new name.
5. Click OK.
Change the Level of an Entry in Outline View
To change the level of an entry in the Outline view:
1. Click View > Outline.
2. In Build mode, click the entry you want to change.
3. Click Edit > Selected Item. The Define ProcessBook Entry dialog
4. Under Level, click the level at which you want to reposition the entry
5. Click OK.
56
box appears.
in the ProcessBook hierarchy of entries or type a number between 1
and 10.
Page 75

3 ● Work with a ProcessBook
●
●
●
●
●
Copy and Paste an Entry
To copy and paste an entry:
1. Click the Build mode pointer and select the entry.
2. Click the Copy button. This copies the selection to the clipboard.
3. If it is not already open, open the ProcessBook where you want to
paste the entry.
4. Click the Paste button. This copies the contents of the clipboard to
your ProcessBook. A copy of the original entry is created, not a link to
the original.
If you highlight an entry first, the new entry is placed above the
highlighted entry.
Remove an Entry
To remove an entry:
1. In Build mode, select an entry title in either Book View or Outline
View.
2. Press the DELETE key. The entry is removed from the ProcessBook.
If you accidentally delete the wrong entry choose Edit > Undo.
Save a View of Your Displays
If you frequently work with several specific displays in a ProcessBook,
open the displays and arrange them in the workspace as you would like
them. Save the ProcessBook. When you reopen the displays, they will be in
the same position as when you closed them.
57
Page 76

●
●
●
●
●
FactoryTalk Historian ProcessBook User Guide
Save and Close a ProcessBook
After creating a ProcessBook, it is a good idea to name the file and save it
immediately. It is also important to save a ProcessBook periodically while
you are working in it.
When you save a ProcessBook, all changes to all entries and to the
organizational structure are stored permanently. The ProcessBook remains
open in your workspace so you can continue working.
1. To save a ProcessBook for the first time, click File > Save or Save As.
The Save As dialog box appears.
2. Type a name for the ProcessBook file. A .piw extension is
automatically added.
3. Select the drive and directory where you want to save it.
4. Click OK.
58
Page 77

3 ● Work with a ProcessBook
●
●
●
●
●
Field Name
Description
Author
Extracted from the Author field on the General tab in the
ProcessBook Preferences dialog box at the time the ProcessBook
is first saved.
Note: You can change the Author field in either the Summary
Information dialog box or the ProcessBook Preferences dialog
box.
Title
Name of the ProcessBook (extracted from the original creation of the
ProcessBook).
Subject
May be used to explain the title more fully.
Properties
Summary Information in ProcessBook
Click File > Properties to display the Summary Information dialog box
for a file. The Summary Information dialog box you see is the same for
the ProcessBook as a whole or for the individual displays.
Review the following for additional information:
59
Page 78

●
●
●
●
●
FactoryTalk Historian ProcessBook User Guide
Field Name
Description
Keywords
May be added at any time.
Comments
May be used for any text entry. You can revise this field at any time.
Properties button
Clicking the Properties button displays the FactoryTalk Historian
ProcessBook Properties (page 60) dialog box, which gives
information about the view currently in the active window.
FactoryTalk Historian ProcessBook File Properties
To view file properties:
1. Click File > Properties to display the Summary Information (page
59) dialog box.
2. Click the Properties button. The Display Properties dialog box
appears.
If you click the Properties button while a display is open, you launch the
Display Properties dialog box.
Review the following for additional information:
60
Page 79

3 ● Work with a ProcessBook
●
●
●
●
●
Field Name
Description
Title
Extracted from the Summary Information dialog box.
Created
Original date and time the ProcessBook was saved.
Note: If the ProcessBook file is moved to another machine,
the original date and time will be preserved, however
Windows Explorer shows the date and time the file arrived on
the present machine.
Created By
Extracted from the Author field on the General tab in the
ProcessBook Preferences dialog box. Shows the original author,
unless the author’s name has been modified in the Summary
Information dialog box.
Last Saved
Most recent revision date and time.
Last Saved By
Name of the person who saved the ProcessBook most recently.
(Extracted from the Author field on the General tab in the
ProcessBook Preferences dialog box.) If this field is blank, the PC
login name of the author is used. This is useful for tracking who made
which revisions.
Revision
Number of times the ProcessBook has been revised and saved.
Displays
Total number of entries in the ProcessBook.
System Commands
Total number of operating system command entries in the
ProcessBook.
Modify a ProcessBook Title
You can change the name of a ProcessBook at any time.
1. In either Build mode or Run mode, click File > Properties. The
Summary Information (page 59) dialog box appears.
2. Under Title, type a new title.
The ProcessBook title is different from the file name established in the
New dialog box when you created the new ProcessBook. The title bar on the
61
Page 80

●
●
●
●
●
FactoryTalk Historian ProcessBook User Guide
Field Name
Description
Title
Extracted from the Summary Information dialog box.
Created
Original date and time the ProcessBook was saved.
Note: If the ProcessBook file is moved to another machine,
ProcessBook window displays the file name, which ends in .piw, rather than
the title.
3. Click OK.
FactoryTalk Historian ProcessBook Display Properties
To view the display properties:
1. With a display window selected, click File > Properties to display the
Summary Information (page 59) dialog box for a display.
2. Click Properties. The Display Properties dialog box appears.
Review the following for additional information:
62
Page 81

3 ● Work with a ProcessBook
●
●
●
●
●
Field Name
Description
the original date and time will be preserved, however
Windows Explorer shows the date and time the file arrived on
the present machine.
Created By
Extracted from the Author field on the General tab in the
ProcessBook Preferences dialog box. Shows the original author,
unless the author’s name has been modified in the Summary
Information dialog box.
Last Saved
Most recent revision date and time.
Last Saved By
Name of the person who saved the ProcessBook most recently.
(Extracted from the Author field on the General tab in the
ProcessBook Preferences dialog box.) If this field is blank, the PC
login name of the author is used. This is useful for tracking who made
which revisions.
Revision
Number of times the ProcessBook has been revised and saved.
Total Symbols
Total number of symbols in the display.
Tags
Total number of unique FactoryTalk Historian points used in the
display.
Dynamic Symbols
The number of display symbols that are dynamic symbols.
Static Symbols
The number of display symbols that are static symbols.
Servers Required
The number of different FactoryTalk Historian servers referenced in
the display.
Import Files to a ProcessBook
To import PIDisDiff or PI-Graphics files into a ProcessBook:
1. Open a ProcessBook (page 40) into which you want to import the files
or create a new ProcessBook.
2. In Build mode, click File > Import. The Import Files dialog box
appears.
63
Page 82

●
●
●
●
●
FactoryTalk Historian ProcessBook User Guide
3. Select the file type.
4. Select the drive and directory where the file resides, or type the path
and file name in the File Name box. You can select more than one file
at a time.
5. Click the Open button.
The status bar displays each file as it is imported. When completed, a
message displays the number of files successfully imported. If errors
occurred during the import process, a message box is displayed at the
end of the import process showing the number of errors. You can
check the message log from the Status Report icon at the bottom of
your display.
Depending on the size, some files may take several minutes to import.
When a trend is successfully imported, a new Text display showing the full
file name is added to the ProcessBook. Each trend is added as a
subordinate display and retains its original trend name. For graphics, the
VAX display name becomes the Display name. Once converted, graphics
and trends can be edited like any other display.
File Sharing Capability
Several users may access the same ProcessBook file at the same time.
However, if one person makes changes to a particular display entry and
saves the changes, then other users are blocked from saving changes in that
display. This protects against accidental saving conflicts.
If a user has already changed a display, the second user who wishes to
make changes to the display receives an error message explaining that
someone else has already edited and saved the display. The second user
then has two options:
Save the changes under a different ProcessBook name, thus creating
64
two ProcessBooks,
Page 83

3 ● Work with a ProcessBook
●
●
●
●
●
-or-
Close the ProcessBook and reopen it so that the new version of the
display is shown. Then make changes and save again.
Open the Summary Information (page 59) dialog box to view the name
of the person who has made changes and saved the file most recently.
Move a ProcessBook to Another PC
If you decide to move a ProcessBook to another PC, you may experience
some differences in display entry appearance on the new PC:
When the number of colors is different between the original PC and
new PC, FactoryTalk Historian ProcessBook uses the closest color
when drawing an entry. This is true for any graphics you may have
included in an entry.
If an entry calls for a font that is not available on the new PC,
FactoryTalk Historian ProcessBook substitutes a similar font.
If a ProcessBook includes links to other entries, ProcessBooks, or
applications, FactoryTalk Historian ProcessBook may not be able to
locate them if the path on the new PC is not the same as the old one.
Node names (for FactoryTalk Historian servers) must be identical.
Different monitors have different resolutions, which may distort the
appearance of an existing ProcessBook.
FactoryTalk Historian ProcessBook records both the absolute and relative
paths for Linked displays and Linked ProcessBooks. This means you can
copy ProcessBooks to new directories without breaking links as long as
either all the linked files are placed in a similar directory tree or all the
drive, directory, and file names remain the same.
65
Page 84

●
●
●
●
●
FactoryTalk Historian ProcessBook User Guide
66
Page 85

Chapter 4
Work with a Display
FactoryTalk Historian ProcessBook provides tools for manipulating and
analyzing the information shown in a display. For example, you can:
Display the point attributes of a tag.
Change the time range that is used for values, bars, trends, XYPlots,
SQC plots, and Multi-State symbols.
Use a Trend Cursor to see the value of plotted tags at a specific point
in time.
Create an instant trend.
Overview of Display Elements
Displays contain a variety of individual items, including static elements,
buttons, OLE objects, and dynamic elements.
Static Symbols
Static symbols are symbols that do not automatically change as time
passes, such as an image, process diagram, or descriptive text.
Static symbols include all items in a display that do not connect to the
FactoryTalk Historian server or other application to retrieve data, and do
not start any application. Text labels and flow lines are examples of static
symbols. Other types include rectangles, circles, arcs, and images.
67
Page 86

●
●
●
●
●
FactoryTalk Historian ProcessBook User Guide
Dynamic Symbols
Dynamic symbols are values, bars, trends, XYPlots, SQC charts, and
multi-state symbols (such as a pump image tied to temperature data) that
change over time, and are based on the value of a tag in the FactoryTalk
Historian Archive. If you wish to see how a dynamic symbol was defined,
select it and click the Item Definition button on the Drawing toolbar.
Dynamic symbols may also report data from outside databases through
queries.
If you rest your mouse on a dynamic symbol, you can see a ToolTip
with the current value, tag name, and time stamp.
Icons for questionable, substituted, and annotated FactoryTalk
Historian data can also appear on your displays.
Most point types (page 235) can be used with any dynamic symbol.
There are some restrictions on string and timestamp data.
Buttons
Buttons are elements that create a link to other applications, such as a
calculator or word processor, or other ProcessBooks or displays. You can
also use buttons to execute a script.
For example, if you find you work in a particular display and frequently
need to update a report with the information you are monitoring, you can
add a button that automatically opens a spreadsheet program. You also can
use a button to perform common actions using a script, like printing a
display, or connect to related displays, ProcessBooks, or Web sites.
OLE Objects
OLE objects include information from outside applications, such as text,
spreadsheets, or graphics. This information may be configured to update
dynamically. OLE objects may be either linked (page 290) or embedded
(page 287) into displays.
68
Page 87

4 ● Work with a Display
●
●
●
●
●
Manage Displays and Independent Display Files
Open a Display
Use any of these procedures to open a display from either Book View (page
50) or Outline View (page 53) of a ProcessBook:
Click the display title, then on the New button to open the selected
display in a new window.
Click the display title, then on the Open button to open the display
into the last display window you used. If none are open, a display
window opens.
With the Run Mode pointer, double-click the display. The display
opens and appears within an existing window, if possible.
Click and drag the display title to an unused area in the application
workspace and release the mouse. This opens a new display in
addition to already opened displays. If you drag the display on top of
an open display, it closes that display while opening the dragged
display.
To use the keyboard instead of the mouse, use CTRL+F6, to select the
ProcessBook, then use the up or down arrow keys to select the display
title. Press Enter. If you have more than one display open, it replaces
the open display with the new display. Pressing CTRL+N is the same
as clicking the New button.
If the display is a Display, Linked Display, or Linked ProcessBook, the
display is opened and the contents are displayed on your workspace. If the
display is an Operating System Command, the command is executed or the
application is started.
69
Page 88

●
●
●
●
●
FactoryTalk Historian ProcessBook User Guide
If you click an Operating System Command more than once in the same
session, it may run the application repeatedly. This depends on the application and
how it has been set up.
Displays re-open in the same position, size, and shape as when they were
last saved.
Open Several Displays at One Time
In addition to the procedures for opening a display, you can also open
multiple displays simultaneously. Press SHIFT while highlighting the
displays you want to open in Outline view. Click the New button at the
bottom of the list of displays. Each display or linked display is opened in
your workspace.
Manage Multiple Open Displays
Just as you can work with multiple ProcessBooks, you can have multiple
displays open in the work area.
To make a display active, click in the display window or press CTRL+F6
to toggle between open displays.
To improve viewing when there are multiple open displays, choose:
Window > Cascade
Window > Tile
Window > <display title>
70
The titles of all open displays and ProcessBooks appear in a cascaded
list down the screen.
All open displays and ProcessBooks appear in a tiled view.
The selected display is active.
Page 89

4 ● Work with a Display
●
●
●
●
●
Open Independent Display Files
Independent Display Files use a .pdi extension in the file name.
When you double-click a display file in Windows Explorer, a copy of the
FactoryTalk Historian ProcessBook application installed on your PC
opens, just as it would if you double-clicked on a .piw file. The
independent display appears inside the application.
Browse a Display from Internet Explorer
You can select a .pdi file and look at it in Internet Explorer. FactoryTalk
Historian ProcessBook menus and toolbars appear in the Internet Explorer
window. This is similar to embedding a display in Excel, except that the
display becomes the entire Internet Explorer document.
The display is updated as it would be within a ProcessBook.
Zoom Display Size
Use the Zoom command to change the size of the drawing within a display
window.
1. Click View > Zoom . The Zoom dialog box appears.
2. Click a percentage, or type a number in the Custom text box to
enlarge or reduce the drawing. The Custom text box displays the
current Scale Factor. Typing a number greater than the current Scale
Factor enlarges the drawing; typing a number less than the current
Scale Factor reduces it.
3. Select Fit all symbols to resize all the symbols in a display to fit
within the window.
If you want only specific symbols to fit within the display window,
select the symbols, and then select Fit Selected Symbols. The items in
71
Page 90

●
●
●
●
●
FactoryTalk Historian ProcessBook User Guide
the display resize and take up the entire window. OLE objects are not
included.
4. Click OK.
You must save the display before closing it for your zoom settings to
appear the next time you open it.
To resize the window:
Use the Maximize and Minimize buttons in the upper right hand
corner of your display window to adjust your display size. When you
maximize a display, all open display windows are maximized. You
can also drag the edge or corner of the window to the desired size.
If you have your Preference setting for Preserve Ascpect Ratio check
box selected, the contents of the display resize as you resize the window. If
this option is not enabled, the size of each element in the display does not
change as you change the window size.
Full Screen Mode
To use the full screen mode:
1. Click the Full Screen button on the Full Screen toolbar . Other
2. Click the Full Screen button again to restore your toolbars. A default
72
toolbars vanish and the display enlarges to fit the screen.
keyboard shortcut of F11 also toggles between Full Screen and
Normal presentations.
You can customize the Full Screen toolbar to contain other buttons to
use with a Full Screen display.
Page 91

4 ● Work with a Display
●
●
●
●
●
Search for a Display
To search for a display:
1. Open the ProcessBooks (page 40) you want to search.
2. Click Tools > Display Search & Run. The Display Search dialog
box appears.
3. Under Name, type one or more of the letters of the display name.
4. In the Look in, click the location you want to search.
-orIn the drop-down list, click Browse, and then locate the appropriate
folder.
5. Select Look in subfolders (optional).
6. Click Search. The search results are displayed under Results.
7. Under Filename, click the display you want to open and then click
OK.
73
Page 92

●
●
●
●
●
FactoryTalk Historian ProcessBook User Guide
.pdi
Display file. If you select this format your display becomes an
independent file that updates under certain circumstances.
.svg
SVG file for Web use. If you select this format it becomes the default file
type when saving files later. FactoryTalk Historian ProcessBook 3.0 or
higher only supports version 3.0 or higher of the SVG add-in. See the SVG
add-in release notes for more information.
The last four file types are graphics formats and do not update. If you
choose one of the graphic formats, the display in focus is unchanged by
the Save-As operation. The display is left open and remains in the same
mode (Run or Build).
.jpg
JPG-JPEG-JFIF compliant.
.bmp
32-bit Bitmap.
.wmf
Windows Metafile.
.png
CompuServe Portable Network Graphics.
Reduce a Display to an Icon to Save Space
If you find your work area cluttered with many open displays, you can
reduce a display to an icon by clicking its Minimize button. Even though
the display is minimized, it continues to be updated with information from
the FactoryTalk Historian server, however the results are not shown until
the window is restored. When you want to use the display, double-click the
icon.
Save a Display
A display may be saved within a ProcessBook or as an independent file
(.pdi).
1. Click File > Save or Save As.
2. From the Save as type drop-down box, select one of the following six
formats. The default is .pdi:
74
Page 93
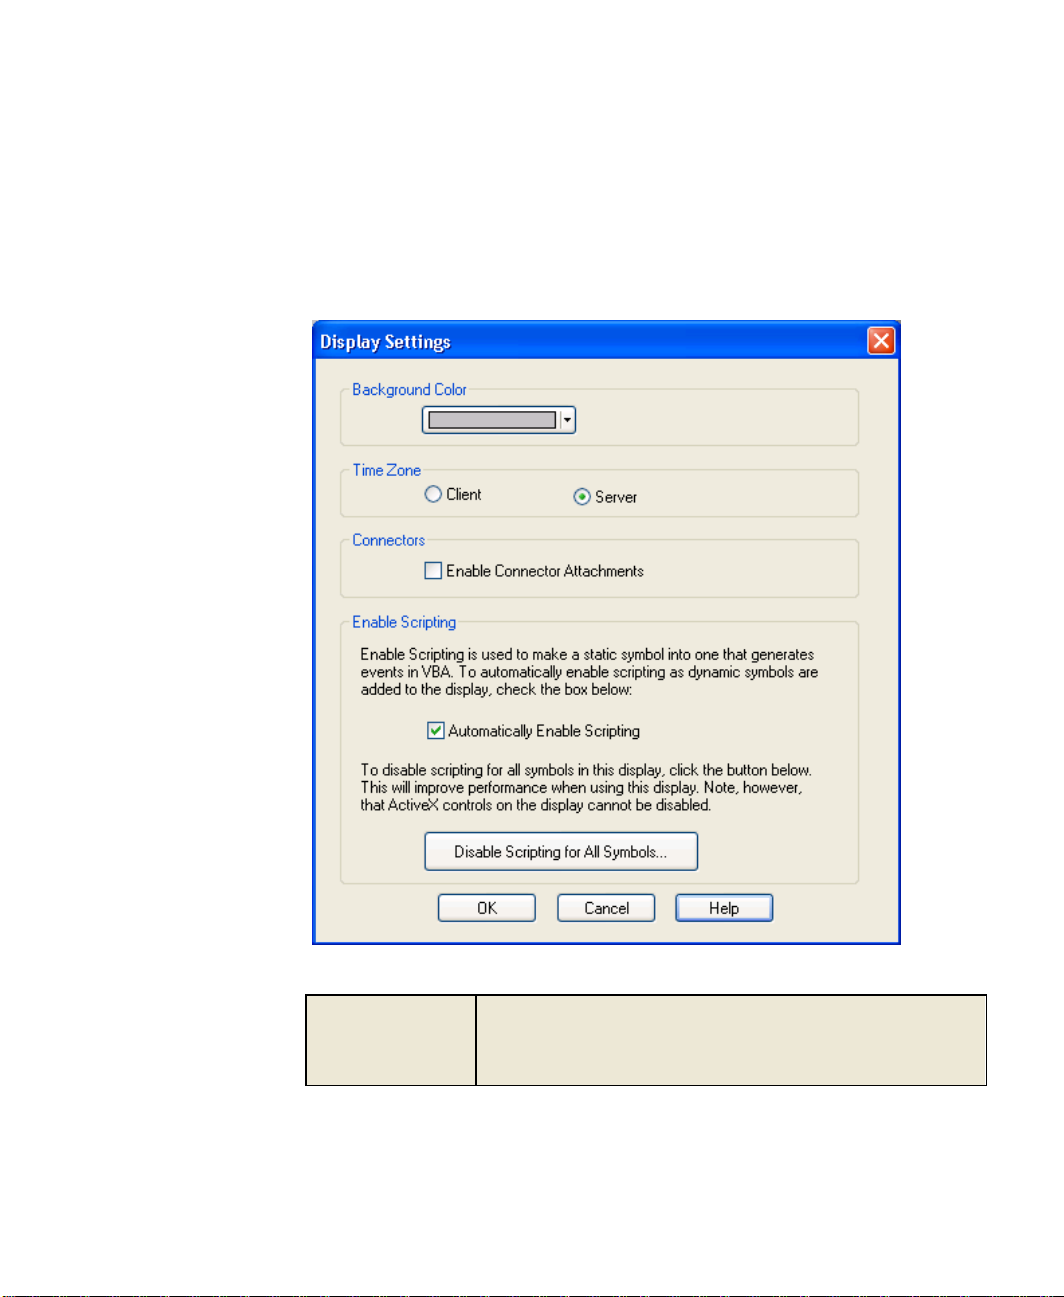
4 ● Work with a Display
●
●
●
●
●
Background Color
The color applied to the area of the display where there are no
symbols. This field uses a color well control to provide color choices.
The color selected in this field also becomes the default background
color for new displays.
Display Settings
To edit display properties, click Edit > Display, or double-click the Time
Zone setting in the Status bar. The Display Settings dialog box appears.
Review the following for additional information:
75
Page 94

●
●
●
●
●
FactoryTalk Historian ProcessBook User Guide
Time Zone
This field determines whether the local computer or FactoryTalk
Historian server time zone is used for interpreting dates and times for
this particular display.
Connectors
The Enable Connector Attachments check box allows a symbol
dragged and dropped on a Connector symbol to be attached to that
Connector. Clearing the check box disables this functionality for the
Display. Note that even if this feature is disabled for the Display, you
can still use the Connectors dialog box to attach Symbols to
Connectors.
Enable Scripting
When displays have many symbols on them, the performance of
FactoryTalk Historian ProcessBook may be affected. One way to
improve the situation is to disable the ability to code the majority of
those symbols. In order to disable scripting and improve performance,
you can take the following actions:
In the Enable Scripting section, clear the Automatically Enable
Scripting check box. This adds new symbols to the display
without the overhead of enabling scripting if it isn't needed.
If the display already has many enabled symbols on it, click the
Disable Scripting for All Symbols button in the Enable
Scripting section. This button removes the scripting capability for
all existing symbols to help improve performance.
OK
Click this button to accept the changes made and closes the dialog
box. These settings are saved as part of the Display object.
Display Scrolling Properties
76
Review the following for additional information:
Page 95

4 ● Work with a Display
●
●
●
●
●
Run Mode
Determines the scroll bar behavior of display windows in Run mode.
Build Mode
Determines the scroll bar behavior of display windows in Build mode.
On
Display contains scroll bars all the time.
Off
Scroll bars never appear.
Automatic
Scroll bars appear when needed (this is the default setting for new
displays).
Time Zone
(page 75)
Layers
(page 95)
Troubleshooting Icon
(page 226)
Keyboard Numeric Lock is on.
Keyboard Scroll Lock is on.
Status Bar Indicators
The following appear on the FactoryTalk Historian ProcessBook status bar:
Drawing Tools
FactoryTalk Historian ProcessBook includes a drawing environment with
features that allow you to create symbols and graphics within an entry.
77
Page 96

●
●
●
●
●
FactoryTalk Historian ProcessBook User Guide
You can use the drawing tools to:
Create ellipses, polygons, rectangles, arcs, lines, and polylines.
Add dynamic elements such as values, bars, trends, buttons, and
graphic files.
Add ActiveX controls.
The Drawing toolbar contains a set of buttons used for creating drawings
and the Draw menu contains the corresponding commands.
To use the drawing tools, click the appropriate button.
When you draw a line or other shape, the tool uses the current formatting
attribute (page 81) preferences.
Each of these objects is considered a symbol by FactoryTalk Historian
ProcessBook. In Build mode, when you select a symbol by clicking it with
your mouse, you see small squares around the bounding rectangle of the
symbol. These are called selection handles and allow you to resize the
symbol. For arcs, polygons, and polylines, there are also reshaping handles
at the intersection of the line segments.
Each symbol has a name, reflecting the order in which it was added to the
display, such as Rectangle1, Rectangle2, etc.
In Build mode (or VBA Design mode), an identifying ToolTip (page 87)
appears whenever your mouse hovers over a symbol.
drawing tool. This lets you continue to work with that tool until you select a
different tool.
Organizing Symbols
FactoryTalk Historian ProcessBook provides several tools to help you
organize your drawings. These tools include a drawing grid, flip and rotate
capabilities, and the ability to change the order in which objects overlap
78
If you are drawing multiple objects, press the CTRL key while selecting the
Page 97

4 ● Work with a Display
●
●
●
●
●
each other. You can move and resize drawing objects. You can also divide
a display into layers so that you can segregate various elements. For
example, you might separate HVAC elements from Electrical elements in a
display.
Any of these functions can be performed on a single screen element or
group of them. For information on grouping objects, see Grouping Symbols
(page 210).
Make sure you have selected the item or items with the Build Mode
pointer.
OLE objects behave somewhat differently; their behavior is discussed
under Commands that Ignore OLE Objects (page 293).
Drawing Area
The drawing area of a display is actually much larger than your monitor.
There are scroll bars on the display window for moving around this area.
You should plan to set a few options before you begin drawing:
Consider turning on snap-to grid and setting the grid size, font style,
and default colors of lines, backgrounds, and fills before you begin. It
is usually easier to work with a grid when laying out a display.
Symbols in your drawing automatically align themselves with the grid
lines or the intersections of grid lines. Grid lines not only make it
easier to place objects in the drawing, but it helps keep the objects
proportional. You can start with one grid size and then modify it as
your work gets more detailed.
Select a font and font size for any values, trends, or text boxes you
might add to the drawing.
Select colors for lines, fills, and backgrounds that are easy on the eyes.
For example, if you are projecting on a large video screen, a black
background with colored lines is better, but if you are printing, a white
background is better.
79
Page 98

●
●
●
●
●
FactoryTalk Historian ProcessBook User Guide
While you are drawing, you can use the zoom feature to zoom in on an
area that requires more attention. Zoom out if the drawing is larger than
your monitor.
Drawing Grid
The grid is a system of vertical and horizontal lines spaced at regular
intervals on the drawing area. Dots are placed at the intersection of the grid
lines. The grid helps you align drawing objects.
When you move an object to a location on the drawing area, the corners or
edges of the object are aligned with the closest grid intersection. This is
called snap-to-grid or grid snap. When you turn off grid snap, you can
move an object to any location within the drawing area.
You determine the interval at which you want the grid lines to be spaced
by setting the grid size.
Set Grid Size and Grid Snap
To set the grid size and the grid snap:
1. In Build mode, open a display.
2. On the Arrange menu, click Grid Size. The Grid Size dialog box
3. Under Lines per Screen Unit, type or select the number of grid lines
4. Select Snap to Grid. Once grid snap is on, any symbols you draw are
80
appears.
per unit of drawing space.
The size of a unit as displayed on your monitor varies according to the
monitor's resolution and driver software.
automatically aligned to the grid.
The Snap to Grid command also appears on the Arrange menu.
Page 99

4 ● Work with a Display
●
●
●
●
●
Colors
Line Styles
Line
Fill
Background
Style
Weight
Ends
Line
X
X X X
Rectangle
X
X X X
Text
X X
Ellipse
X
X X X
Arc X X X X
Value
X X
Polygon
X
X X X
Polyline
X X X
Bar X X X X
Trend
X X X X
5. Click OK.
Formatting
Each symbol you draw and place on a display has attributes that determine
how the symbol looks. The fill and line attributes that are currently selected
on the Display Window (page 28) tab of the ProcessBook Preference
dialog box are applied to any new drawing symbol. You may configure
these attributes for individual symbols or for all selected symbols as a
group.
The Symbol Formatting toolbar contains buttons for formatting fonts,
colors, and line styles. FactoryTalk Historian ProcessBook also includes
the older Formatting toolbar to support backwards compatibility
Editable Formatting Attributes
The following table shows the editable attributes for each symbol.
81
Page 100

●
●
●
●
●
FactoryTalk Historian ProcessBook User Guide
Font
To determine what type of formatting is applicable for each symbol, refer to
the table of
To configure fonts:
1. In Build mode, open a display, and click the symbol(s) whose font you
2. On the Symbol Formatting toolbar, click a font name in the list
3. Type or click a point size in the Font Size box .
editable formatting attributes
(page 81).
want to change.
.
When choosing fonts, plan to use fonts that other FactoryTalk Historian
ProcessBook users are likely to have. If another user does not have the fonts
you used, FactoryTalk Historian ProcessBook attempts to match the font to an
existing font. However, the match may make it difficult for another user to
read the entry.
Line Color
the table of
To configure line colors:
1. In Build mode, open a display, and click the symbol(s) whose line
2. On the Symbol Formatting toolbar, click the Line Color button
82
To determine what type of formatting is applicable for each symbol, refer to
editable formatting attributes
(page 81).
color you want to change.
.
 Loading...