

Page 1

Administrator Guide
F
actoryTalk Batch
Material Manager
Administrator Guide
FactoryTalk Batch Components 14.00
Rockwell Automation Publication BWMTR-UM011E-EN-P - October 2020
Supersedes Publication BWMTR-UM011D-EN-P - February 2017
Original Instructions
Page 2
FactoryTalk Batch Material Manager
personal injury or death, property damage, or economic loss.
Identifies information about practices or circumstances that can lead to personal injury or death, property damage, or economic loss.
Attentions help you identify a hazard, avoid a hazard, and recognize the consequence.
IMPORTANT
Identifies information that is critical for successful application and understanding of the product.
Labels may be on or inside the equipment, for example, a drive or motor, to alert people that surfaces may reach dangerous
temperatures.
Labels may be on or inside the equipment, for example, a motor control center, to alert people to potential Arc Flash. Arc Flash
for Personal Protective Equipment (PPE).
Important User Information
Read this document and the documents listed in the additional resources section about installation, configuration, and
operation of this equipment before you install, configure, operate, or maintain this product. Users are required to familiarize
themselves with installation and wiring instructions in addition to requirements of all applicable codes, laws, and standards.
Activities including installation, adjustments, putting into service, use, assembly, disassembly, and maintenance are required to
be carried out by suitably trained personnel in accordance with applicable code of practice.
If this equipment is used in a manner not specified by the manufacturer, the protection provided by the equipment may be
impaired.
In no event will Rockwell Automation, Inc. be responsible or liable for indirect or consequential damages resulting from the use
or application of this equipment.
The examples and diagrams in this manual are included solely for illustrative purposes. Because of the many variables and
requirements associated with any particular installation, Rockwell Automation, Inc. cannot assume responsibility or liability for
actual use based on the examples and diagrams.
No patent liability is assumed by Rockwell Automation, Inc. with respect to use of information, circuits, equipment, or software
described in this manual.
Reproduction of the contents of this manual, in whole or in part, without written permission of Rockwell Automation, Inc., is
prohibited.
Throughout this manual, when necessary, we use notes to make you aware of safety considerations.
WARNING: Identifies information about practices or circumstances that can cause an explosion in a hazardous environment, which may lead to
ATTENTION:
Labels may also be on or inside the equipment to provide specific precautions.
SHOCK HAZARD: Labels may be on or inside the equipment, for example, a drive or motor, to alert people that dangerous voltage may be present.
BURN HAZARD:
ARC FLASH HAZARD:
will cause severe injury or death. Wear proper Personal Protective Equipment (PPE). Follow ALL Regulatory requirements for safe work practices and
2
Page 3

About this manual
Preface
This manual provides administrator instructions for the FactoryTalk Batch
Material Manager components. It is one of a set of related manuals that
describe installing, programming, and operating the FactoryTalk Batch
system.
To review FactoryTalk Batch release notes and latest information regarding
product compatibility refer to the
Center (PCDC).
Product Compatibility and Download
3
Page 4

Preface
Legal Notices
Rockwell Automation publishes legal notices, such as privacy policies, license
agreements, trademark disclosures, and other terms and conditions on the
Legal Notices
page of the Rockwell Automation website.
End User License Agreement (EULA)
You can view the Rockwell Automation End User License Agreement (EULA)
by opening the license.rtf file located in your product's install folder on your
hard drive.
The default location of this file is:
C:\Program Files (x86)\Common Files\Rockwell\license.rtf
Open Source Software Licenses
The software included in this product contains copyrighted software that is
licensed under one or more open source licenses.
You can view a full list of all open source software used in this product and
their corresponding licenses by opening the oss_license.txt file located your
product's OPENSOURCE folder on your hard drive. This file is divided into
these sections:
• Components
Includes the name of the open source component, its version number,
and the type of license.
• Copyright Text
Includes the name of the open source component, its version number,
and the copyright declaration.
• Licenses
Includes the name of the license, the list of open source components
citing the license, and the terms of the license.
The default location of this file is:
C:\Program Files (x86)\Common Files\Rockwell\Help\<product
name>\Release Notes\OPENSOURCE\oss_licenses.txt
You may obtain Corresponding Source code for open source packages
included in this product from their respective project web site(s).
Alternatively, you may obtain complete Corresponding Source code by
contacting Rockwell Automation via the Contact form on the Rockwell
Automation website:
http://www.rockwellautomation.com/global/aboutus/contact/contact.page. Please include "Open Source" as part of the request
text.
4
Page 5

Following is a comprehensive list of documentation for the FactoryTalk®
Resource
Description
FactoryTalk Batch View Quick Start Guide
Provides information about using FactoryTalk Batch View
FactoryTalk Batch Material Manager Getting
(BWMTR-GR011)
Introduces the basics of FactoryTalk Batch Material
Resource
Description
reference for the formulator.
Recipe Editor, View, and Phase Simulator.
Additional resources
Batch products from Rockwell Automation.
Installation, Quick Start, and Getting Results Guides
Preface
FactoryTalk Batch Components Installation and
Upgrade Guide
(BATCH-IN002)
(FTBVS-QS001)
FactoryTalk Batch View HMI Controls Quick Start
Guide
(BATCH-QS001D)
FactoryTalk Batch eProcedure® Getting Results
Guide
(BWEPRO-GR011)
FactoryTalk Batch Getting Results Guide
(BATCH-GR011)
Results Guide
Provides information and procedures for FactoryTalk
Batch system installation. Includes information for
FactoryTalk Batch Material Manager, FactoryTalk Event
Archiver, and associated FactoryTalk Batch Client and
Server components.
to create, view, and command control recipes,
acknowledge prompts and signatures, view equipment
phases and diagnostic information, and view profile
information.
Provides a general overview of FactoryTalk Batch View
HMI Controls.
Explains the basics of FactoryTalk Batch eProcedure.
Introduces the basics of automated batch manufacturing
and the FactoryTalk Batch product components.
Manager.
User Guides
FactoryTalk Batch ActiveX Controls User Guide
(BATCH-UM013)
FactoryTalk Batch Material Editor User Guide
(BWMTR-UM001)
FactoryTalk Batch Equipment Editor User Guide
(BATCH-UM004)
Provides information and instructions for using the
FactoryTalk Batch ActiveX Custom Controls.
Provides access to information and procedural
instructions required to configure materials and the
containers to hold them. The material data is stored in the
material database, which is used to create materialbased recipes. This information is intended as a
Provides information on creating and maintaining an
equipment database (area model). The area model is
stored in a file with a .cfg file extension and is available
to all other FactoryTalk Batch programs, including the
5
Page 6

Preface
Resource
Description
FactoryTalk Batch PhaseManager™ User Guide
Describes the integration of the FactoryTalk Batch
FactoryTalk Batch Recipe Editor User Guide
Provides instructions on using FactoryTalk Batch Recipe
FactoryTalk Batch View HMI Controls User Manual
Provides details about using FactoryTalk Batch View HMI
FactoryTalk Batch Server.
reference information by the operator.
FactoryTalk Batch View User Guide (legacy)
Provides information and instructions on how to use
Resource
Description
FactoryTalk Batch Administrator Guide
Provides instructions for configuring security and
the FactoryTalk Batch Server.
(BATCHX-UM011)
(BATCH-UM006)
(FTBVS-UM003)
FactoryTalk Batch View User Manual
(FTBVS-UM002)
software with the Studio 5000 Logix Designer®
application and the Logix 5000™ family of controllers.
The integration simplifies the configuration and
maintenance of the FactoryTalk Batch automation
system, provides better communication between the
FactoryTalk Batch Server and the Logix 5000 controller,
and significantly reduces the programming effort
required to develop the phase logic code that resides in
your Logix 5000 controller.
Editor to create and configure master recipes for use in
batch automation. The interface is based on IEC 61131-3
sequential function charts to graphically organize recipes
into procedures, unit procedures, operations, and phases.
Build recipes using either the SFC format or a table-based
format.
Controls to monitor and interact with the production
process within a FactoryTalk View SE Display Client.
Provides information and procedural instructions for
using FactoryTalk Batch View in a modern and intuitive
portal into a comprehensive batching solution for
effective operations, leveraging its own web server using
HTML5 technology to provide native connectivity into a
FactoryTalk eProcedure Client User Guide
(BWEPRO-UM001)
FactoryTalk Event Archiver User Guide (BATCHUM012)
(FTBVS-UM001)
Administrator Guides
(BATCH-UM003)
Provides information and procedural instructions
required to create and command batches using the
FactoryTalk eProcedure Client, and can be used as a
Provides information and instructions specific to the
FactoryTalk Event Archiver. Intended for use by the
system administrator and production supervisor.
FactoryTalk Batch View to initiate and execute
FactoryTalk Batch automation processing. FactoryTalk
Batch View secured objects are located in the FactoryTalk
Diagnostics and are modified using the FactoryTalk
Administration Console. A system administrator can
customize FactoryTalk Batch View security to meet the
needs of the facility. FactoryTalk Batch View is used in
conjunction with a Human-Machine Interface (HMI).
services, and implementation and use of components not
typically accessed or used by batch operators, such as
6
Page 7

Preface
Resource
Description
FactoryTalk Batch eProcedure Administrator Guide
Provides procedures specific to FactoryTalk Batch
(BWEPRO-UM011)
Resource
Description
(BATCH-RM001)
FactoryTalk Batch PCD Programming Reference
Provides information and instructions about the
engineers and the system administrator.
reference by the instruction file author.
(BWEPRO-UM011)
FactoryTalk Batch Material Manager Administrator
Guide
Reference Guides
FactoryTalk Batch ActiveX Controls Library
Reference Guide
FactoryTalk Batch Material Server API Technical
Reference
(BWMTR-RM001)
eProcedure, such as implementing security and
configuring the user-defined area Active Server Page.
Included are instructions for tasks specific to FactoryTalk
Batch, such as configuring security and services to
support FactoryTalk Batch eProcedure. Provides
instructions on the implementation and use of
components not typically accessed or used by batch
operators, such as the FactoryTalk Batch Server.
Provides information and instructions specific to
FactoryTalk Batch Material Manager. Intended for use by
the system administrator and database administrator.
Provides reference information and procedural
instructions for the FactoryTalk Batch ActiveX Custom
Controls.
Provides access to information regarding the interface
between the FactoryTalk Batch Material Server and the
FactoryTalk Batch Material Editor and FactoryTalk Batch.
It is intended to be used as a reference information by
those who want to develop custom interfaces.
Manual
(BATCH-RM004)
FactoryTalk Batch Server API Reference Manual
(BATCH-RM003)
FactoryTalk Batch System Files Reference Manual
(BATCH-RM005)
FactoryTalk Batch eProcedure Instruction File
Design Reference Manual
(BWEPRO-RM001)
FactoryTalk Batch PCD interface design. It is intended to
be used as a reference guide.
Provides information regarding the interface between the
FactoryTalk Batch Server and FactoryTalk Batch View —
the Server Application Programming Interface (API). It is
intended to be used as a reference guide by those who
want to develop custom interfaces.
Provides the technical information for configuration and
maintenance of a FactoryTalk Batch system. It can be
used as a reference information for implementation
Includes information about the building of instruction
files for use in equipment database creation and recipe
development. This information is intended to be used as a
View or download publications at
http://www.rockwellautomation.com/literature. To order paper copies of
technical documentation, contact your local Allen-Bradley® distributor or
sales representative.
7
Page 8

Page 9

Table of Contents
Preface
Configuring Material Manager
Implementing security
Using the material activity
Network Editor
About this manual ....................................................................................... 3
Legal Notices ............................................................................................... 4
Additional resources ................................................................................... 5
Chapter 1
Identify the material database .................................................................. 11
Setting the Material Server options ......................................................... 11
Enable the automatic deletion of lots with no remaining sublots.......... 12
Chapter 2
Security settings......................................................................................... 16
Material Manager Security .................................................................. 17
Using workgroup security ......................................................................... 18
Using domain security ............................................................................... 18
Configuring the domain server .......................................................... 18
Setting security on folders or files ............................................................ 19
Adding users and user groups............................................................. 19
Change permissions on the BATCHCTL share .................................. 19
journal
Chapter 3
Enable material journaling ...................................................................... 22
Chapter 4
Open the Network Editor ..........................................................................23
Network Editor interface ..........................................................................23
Hierarchy pane .................................................................................... 24
Detail pane ........................................................................................... 24
Results pane ......................................................................................... 25
Menu bar .............................................................................................. 25
Network Editor toolbar....................................................................... 26
Status bar ............................................................................................. 26
Configure your network ........................................................................... 27
Select a network model ....................................................................... 27
Add a server ......................................................................................... 27
Remove a server................................................................................... 28
Synchronize network models ............................................................. 28
User Preferences dialog box ..................................................................... 28
User Preferences dialog box - General tab ........................................ 28
Edit colors ............................................................................................ 29
Edit the application font ..................................................................... 30
9
Page 10

Table of Contents
Troubleshooting
Change the FactoryTalk Batch
Index
Edit information tips .......................................................................... 30
User Preferences dialog box - Views tab ............................................ 31
Set report preferences ......................................................................... 31
Report printing formats ............................................................................32
Preview reports .................................................................................... 33
Print reports ......................................................................................... 33
Chapter 5
Automatic repair of batch component installation fails ......................... 35
Error: No containers match material container specification ............... 35
Error: Unable to retrieve the Promise ID ................................................. 35
Operating without a Material Server ........................................................ 35
Losing communication ........................................................................ 36
Switching to manual ........................................................................... 38
Restoring communication ................................................................. 38
Starting the FactoryTalk Batch server ................................................ 39
server user account
Chapter 6
New user account requirements for the FactoryTalk Batch Server ....... 41
Configure your FactoryTalk Batch system ............................................... 41
Server account password change locations ...................................... 42
Change the server user account for the FactoryTalk Batch Server
service ................................................................................................... 43
Change the server user account in FactoryTalk Batch COM+
applications .......................................................................................... 43
Change the server user account in My Computer properties .......... 44
10
Page 11

IMPORTANT
opens and reads the databases.
Identify the material
database
Setting the Material Server
Chapter 1
Configuring Material Manager
This chapter contains instructions for configuring FactoryTalk® Batch
Material Manager. This chapter assumes that the FactoryTalk Batch system is
configured and working properly and that Material Manager is installed.
Configure the FactoryTalk Batch Material Manager Server with the location of
the SQL database that contains the materials for the recipes.
To identify the material database
1. Navigate to Rockwell Software > Network Editor.
he Network Editor window opens with the Material Server selected
T
by default.
options
2. Select Configure. The Configure MaterialTrack dialog box opens. The
default database is materialbasedrecipe.
3. In the MaterialTrack Database box, enter the name of the database,
and select OK.
The Network Editor does not verify database names. Changes
made to the database name are immediate for the clients and
servers. If the database name is invalid, the Material Editor
will not open.
Before changing the database name, check the spelling of the
database name and synchronize the Network Editor. After
changing the database name, confirm that the Material Editor
4. Select Synchronize.
5. Select File > Exit, and then select Yes to exit the Network Editor.
et the options for the Material Server in the FactoryTalk Batch Equipment
S
Editor module.
To identify the material database
1. Click Start > Rockwell Software > Equipment Editor.
2. From the Options menu, select Server Options. The Server Options
dialog box opens to the Project Settings tab.
11
Page 12
Chapter 1 Configuring Material Manager
Enable the automatic
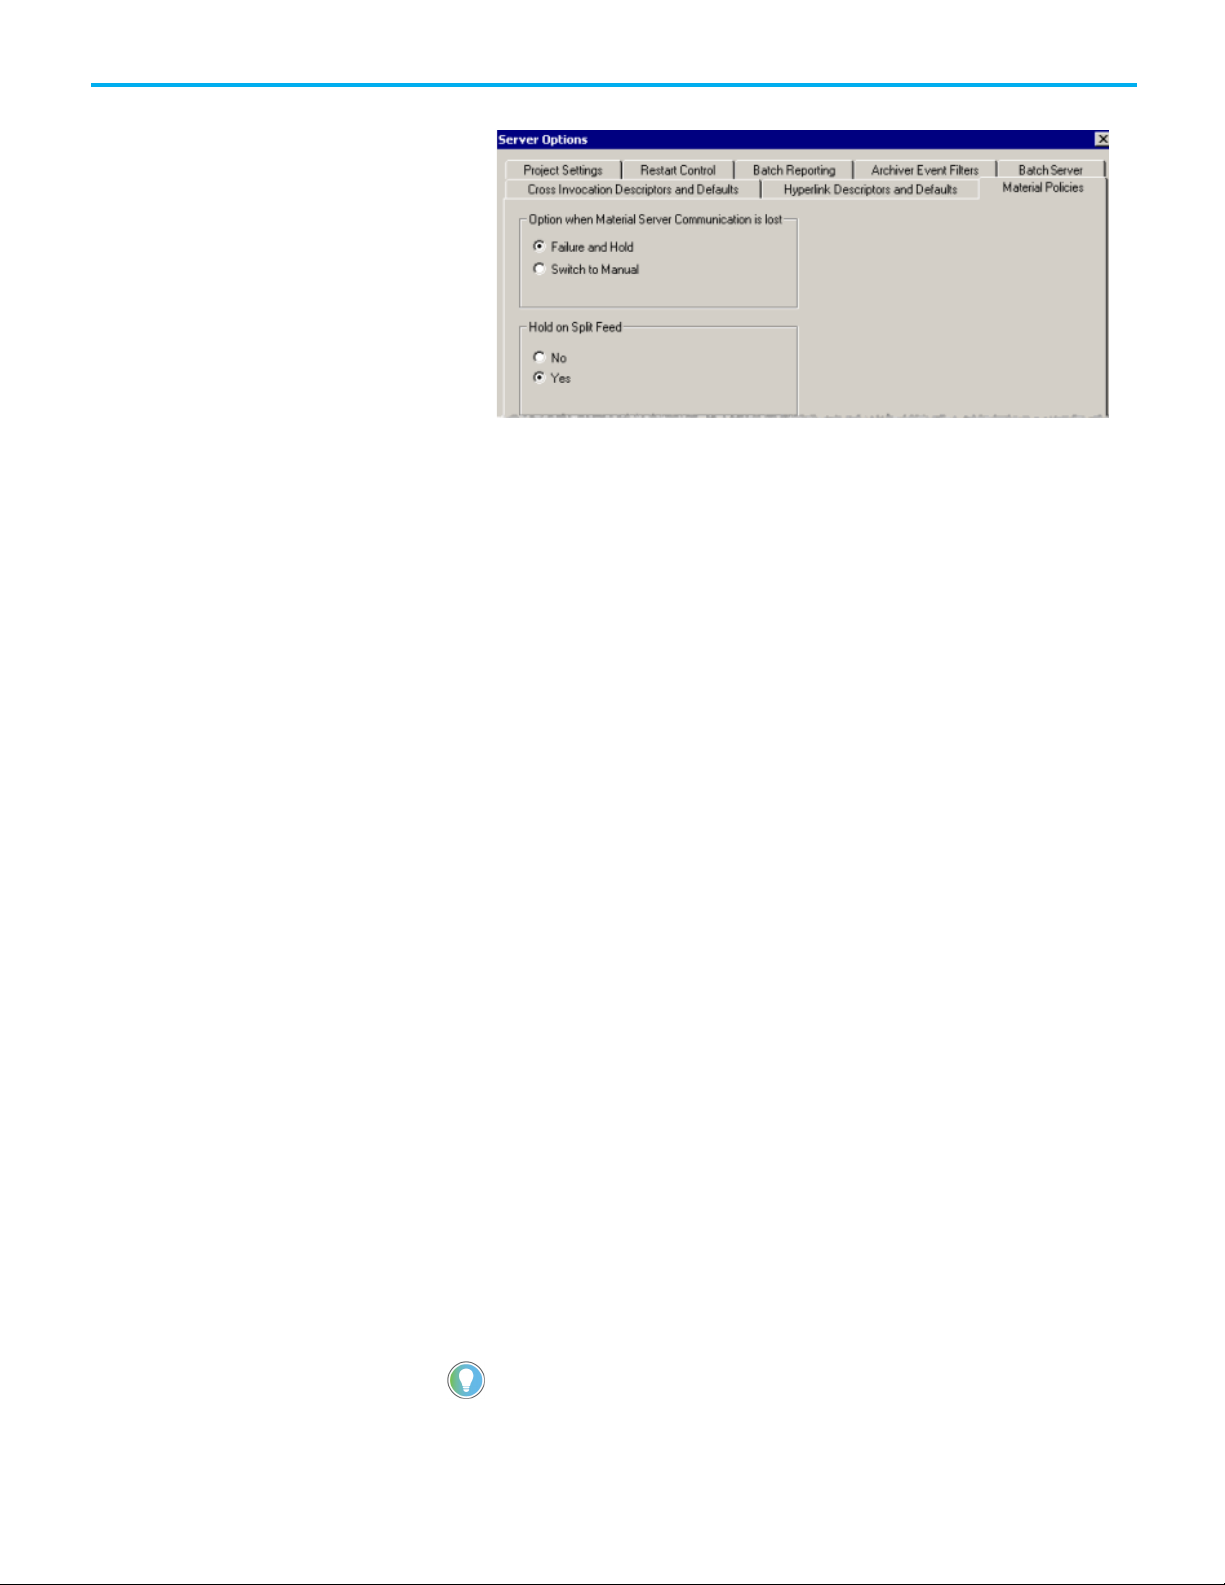
3. Select the Material Polices tab.
• Option when Material Server Comm is lost
When communication is lost between the FactoryTalk Batch and
Material Servers, you can choose to fail and hold the batch or switch
the batch to Manual mode.
• Failure and Hold indicates the FactoryTalk Batch Server places the
batch in the HELD state.
• Switch to Manual indicates the FactoryTalk Batch Server continues
to run the batch prompting the operator for decisions regarding
information normally supplied by the Material Server. (See
"Troubleshooting" for more information.)
• Hold on Split Feed
Split feeds occur when a material phase step does not add or
distribute all of the material configured by the step.
• No directs the FactoryTalk Batch Server to continue processing a
batch when a split feed occurs. If you select this option, add a
material loop to the recipe so that the binding process can select
another container for material additions. (See the FactoryTalk Batch
Recipe Editor User Guide for more information on material loops.)
• Yes directs the FactoryTalk Batch Server to hold the batch when a
split feed occurs. The Material Server calculates and sends new
AMOUNT parameters to the FactoryTalk Batch Server. To resume
processing, the operator must perform an active step change away
from the unfinished step, manually rebind the unfinished step,
perform an active step change back to the unfinished step, and then
restart the batch.
deletion of lots with no
remaining sublots
12
4. Make your selections, and then click OK.
Use the following procedure to enable the automatic deletion of lots with no
remaining sublots to free up space in the material database.
Tip: Sublots are identified as labels in Material Editor and FactoryTalk Batch View.
Page 13

Chapter 1 Configuring Material Manager
To enable the automatic deletion of lots with no remaining sublots
1. On the Material Manager Server machine, create a registry key.
• 32 bit system Registry Editor location:
[HKEY_LOCAL_MACHINE\SOFTWARE\MaterialTrack\Material
Recipe\Setup
• 64 bit system Registry Editor location:
[HKEY_LOCAL_MACHINE\SOFTWARE\Wow6432Node\MaterialTr
ack\Material Recipe\Setup
2. Create a new string value
Value to TRUE.
DeleteLotOnZeroSubLots and set the
13
Page 14

Page 15

Chapter 2
Implementing security
FactoryTalk® Batch Material Manager security controls who has permissions
for certain actions, such as viewing, adding, removing, and changing an item.
Security is set using COM+ role-based security and Windows user groups and
users.
Through the use of COM+ role-based security, administration of security for
Material Manager is greatly simplified. COM+ role-based security allows an
application to have preset user categories called roles. These roles have preset
permissions and have preset Windows user groups added to them. To
implement security, an administrator must create the preset user groups and
add the appropriate user accounts to these groups.
15
Page 16

Chapter 2 Implementing security
Security settings
This flowchart is an example of how security works for Material Manager.
16
The setup program creates a default user group and preset COM+ roles.
Domain user groups and accounts created prior to installation are added to
the roles during the installation process. Security is then implemented using
Windows user groups and users.
Tip: If you want to customize security, contact Rockwell application support
.
Page 17

client computers if you want them to be able to reference the logged messages.
Material Manager Security
Chapter 2 Implementing security
The local user group installed with Material Manager is MTUsers. This group
is assigned permissions to the MaterialBasedRecipe database in SQL Server.
The domain user account specified during the installation is added to this
group role to allow the Editor to access the database using COM+.
To use domain security, create the following user groups and accounts on the
domain prior to installation. These groups and accounts are added to the
appropriate COM+ roles during the installation and inherit the permissions of
those roles.
• MTBatchServer
User Group & COM+ Role
Add the FactoryTalk Batch user account under which the FactoryTalk
Batch Server service is running to the MTBatchServer group. The
MTBatchServer group is added to the MTBatchServer role during
installation. This is the role that the FactoryTalk Batch Server uses to
access the material database. All FactoryTalk Batch Servers have
unlimited access to Material Manager.
• MTGeneral
COM+ Role
The MTGeneral role is used internally by the Material Server to check
security and communication between clients and the server.
• MTLotAuthor
User Group & COM+ Role
The MTLotAuthor role has permission to add, edit, and delete lots. The
MTLotAuthor group is added to the MTLotAuthor role during
installation.
• MTMaterialAuthor
User Group & COM+ Role
The MTMaterialAuthor role has permission to add, edit, and delete
materials and containers. The MTMaterialAuthor group is added to
the MTMaterialAuthor role during installation.
• MTMaterialViewer
User Group & COM+ Role
The MTMaterialViewer role has permission to view items in the
Editor. The MTMaterialViewer group is added to the
MTMaterialViewer role during installation.
• Domain user account for the server
User
The domain user account specified during the installation is added to
the local group, MTUsers. This is the account under which the server
runs.
Tip: The
MaterialServer.log
computer. You must share the \Program Files\Rockwell Software\Batch folder with the
file on the Material Server cannot be viewed from a client
17
Page 18

Chapter 2 Implementing security
Tip: Services with blank passwords are not supported.
Using workgroup security
Using domain security
Configuring the domain
When FactoryTalk Batch Material Manager is installed for a workgroup, the
local user accounts, local user groups, and COM+ Roles are created and
assigned default permissions. You must customize the security settings to
meet your facility’s unique requirements as outlined in the following the
steps:
Configuring the FactoryTalk Batch Material Manager Workgroup
Server and Client Nodes
• You must define Windows user accounts and passwords on all
computers that communicate with the Material Server. You need to
configure membership in FactoryTalk Batch Material Manager user
groups on the Material Server computer only.
• Create Windows User Accounts
If you are not using the existing Windows user accounts, create new
user accounts with the appropriate rights.
• Add Windows User Accounts to Windows User Groups
Add the appropriate Windows user accounts to the FactoryTalk Batch
Material Manager user groups on the Material Server computer. The
user accounts inherit the rights and permissions of the user group to
which they are added.
server
Perform the following steps to customize the security settings and implement
domain security. This is only one possible implementation of domain
security; you may find that your specific security requirements involve other
steps.
• Create Domain User Accounts
If you are not using existing user accounts, create domain user
accounts that meet your facility’s specific security requirements. For
Domain user accounts that need access to Batch client applications,
you must add the Windows user accounts to the appropriate
FactoryTalk Directory. (See FactoryTalk Help for more information.)
• Create Domain User Groups
Create the following groups on the domain prior to installation of
FactoryTalk Batch Material Manager:
• MTBatchServer
• MTLotAuthor
• MTMaterialAuthor
• MTMaterialViewer
• MTGeneral
18
Page 19

IMPORTANT
FactoryTalk Batch Server continues writing information to log files and event journals
been written to the event journal or log file while the file is open is lost.
IMPORTANT
IMPORTANT
Setting security on folders
or files
Adding users and user
Change permissions on the
Chapter 2 Implementing security
• Add Domain User Accounts to the Appropriate Domain User Groups
Add the appropriate domain user accounts to the domain user groups.
The user accounts will inherit the rights and permissions of the user
group to which they are added.
Tip: Services with blank passwords are not supported.
You should limit log file and e vent journal (.evt) access to prevent data from
being lost. Setting security on the folders or files is one suggested method. Set
the security according to your company’s requirements.
Use Notepad to open log files. If a log file is opened with a program other than
Notepad, the FactoryTalk Batch Server may not run due to an access error.
(.
evt
) even when they are open. If a file is opened and then saved, data that may have
groups
To add Windows security on folders or files in Windows Explorer
complete the following steps.
1. In Windows Explorer, locate the folder or file.
2. Right-click the folder or file, and then select Properties.
3. Select the Security tab, and then click the Add button.
4. From the Select Users, Computers, or Groups dialog box, click
Advanced and then click Find Now.
5. Select a User or Group from the Search results: list, and then click OK.
6. Repeat for each User or Group that requires access to the folder or file.
Be sure to add the FactoryTalk Batch Server user account and then configure
the account with Full Control permissions.
7. Click OK to return to the Properties dialog box.
8. From the Group or user name: list, select a User or Group, and then
select the permissions in the Permissions area. Repeat for each User or
Group.
9. Click OK.
Change the permissions on the BATCHCTL share to tighten security by
BATCHCTL share
removing the Everyone group and adding a new group that contains all the
Windows users that need to access the share.
Include these user types in the group:
19
This new group allows applications to access the BATCHCTL share while locking out
non-domain users.
Page 20

Chapter 2 Implementing security
• The FactoryTalk Batch Server and FactoryTalk Event Archiver user.
• Windows users logged in when the FactoryTalk Batch Equipment
Editor, FactoryTalk Batch Recipe Editor and FactoryTalk Batch View
are launched.
To change permissions on the BATCHCTL share
1. In Windows Explorer, locate the Batch folder. The default location is
C:\Program Files (x86)\Rockwell Software\Batch.
2. Right-click the Batch folder, and then select Properties.
3. Select the Security tab and do the following:
a. Select Edit, select the Everyone group, and then select Remove.
b. After removing the Everyone group, select Add.
4. From the Select Users, Computers, Service Accounts, or Groups dialog
box, select Advanced and then click Find Now.
5. Select a group from the Search results list, and then select OK.
6. Select OK to return to the Properties dialog box.
7. From the Group or user name list, select a user or group, and then
select the permissions in the Permissions area. Repeat for each user or
group.
8. Select OK.
20
Page 21

Tip: You must first enable the material logging service. See Enable material journaling in the
FactoryTalk Batch Components Installation and Upgrade Guide
.
Chapter 3
Using the material activity journal
The material activity journal (MaterialBasedRecipe_MAJ) is an SQL database
that captures events specific to FactoryTalk® Batch Material
Manageroccurring during a batch run of a material-based recipe. This
Material Manager-specific data is stored in the tbActivityJournal table and is
found also in the FactoryTalk Batch event journal (.evt) file along with the
other non-Material Manager events.
Batch Event Journal Entry
Material Activity Journal Entry
When the FactoryTalk Batch Server is able to communicate with the Material
Server, the Material Manager-specific data is sent to the material activity
journal by way of a COM+ queued component that uses features of Microsoft
Message Queuing (MSMQ). This queued component enables journaling even
when lapses in database communication occur. If the Material Server is not
ready to receive data for the material activity journal, this queued component
holds the data until the Material Server is ready.
21
Page 22

Chapter 3 Using the material activity journal
IMPORTANT
Enable material journaling
If for some reason the queued component cannot pass the Material Managerspecific data to the material activity journal, the data is stored as messages in
a dead queue. If the FactoryTalk Batch Server loses communication with the
Material Server, the Material Manager-specific data appears only in the Batch
event journal (.evt) file.
Recording activity to the Material Activity Journal is off by default. To record
activity to the MaterialBasedRecipe_MAJ database, change the default value
in the Registry on the Material Server computer.
To enable material journaling
This procedure is for Material Manager users only.
1. Select Start > Run.
2. In Run, enter regedt32 and select OK. The Registry Editor opens.
3. Expand HKEY_LOCAL_MACHINE and then Software.
4. For a 64-bit computer, expand Wow6432node.
5. Navigate to the MaterialTrack > Material Recipe > Logging subkey.
22
6. Double-click the JournalActive subkey to open the Edit String dialog
box.
7. To enable material logging, in Value data, enter True and select OK.
8. Close the Registry Editor.
Page 23

IMPORTANT
Open the Network Editor
Network Editor interface
Chapter 4
Network Editor
The Network Editor is a utility that allows you to indicate where other
FactoryTalk® Batch and/or FactoryTalk Batch Material Manager Servers are
located on the network. This network configuration information simplifies
integration with other FactoryTalk products and the process of reconfiguring
a multi-computer system.
During installation, the network configuration information is completed
based on your responses. If you have multiple servers in your network, use the
Network Editor to update the location of all your servers.
The Network Editor is installed automatically with the FactoryTalk Batch and
Material Servers.
Open the Network Editor to configure your network.
Administrator privileges are required to perform this procedure.
To open the Network Editor:
• Select Start > Rockwell Software > Network Editor. The Network
Editor window opens.
The Network Editor interface has the following areas:
• Hierarchy pane
• Detail pane
• Results pane
• Toolbar
23
Page 24

Chapter 4 Network Editor
Item
Description
system was last synchronized.
Apply Changes
Saves changes made to the FactoryTalk Batch system information.
Hierarchy pane
Detail pane
• Status bar.
The Hierarchy pane provides a hierarchical view of the application servers in
your FactoryTalk Batch system. The Network Model is the parent item in the
hierarchy list, with the following application servers listed as Network Model
members: Material Server, and FactoryTalk Batch Server 1 through Batch
Server 10. The following indicators appear next to each server listed:
Indicates the server is recognized on the network
Indicates the server is not defined or recognized
Indicates there is a problem with the server or the server’s configuration
The Detail pane provides information specific to the item selected in the
Hierarchy pane.
Network Model Information
The following items are available when Network Model is selected in the
Hierarchy pane.
System Name Allows you to name your FactoryTalk Batch system. The default is
Network Model.
Network Model from Displays the name of the computer from which the FactoryTalk Batch
24
Time Stamp Displays the time of the last synchronization.
User Name Displays the Windows user ID of the person who performed the last
synchronization.
Undo Changes Undoes changes made to the FactoryTalk Batch system information that
are not applied.
Page 25

Item
Description
Item
Description
Computer Name
Displays the computer name for the selected server.
IMPORTANT
the Material Editor opens and can read the database.
Error
Indicates an error message.
Warning
Indicates a warning message.
Results pane
Menu bar
Chapter 4 Network Editor
Synchronize All Application
Servers
Initiates the synchronization of the application servers.
Application Server Information
The following items are available when a server or Undefined is selected in the
Hierarchy pane.
Alias Displays a user-defined alias for the selected application server.
Configure Allows you to specify the name of the material database when using
FactoryTalk Batch Material Manager. The default database is
MaterialBasedRecipe.
The Network Editor does not verify database names. Changes made to the database
name are immediate for the clients and servers. If the database name is invalid, the
Material Editor will not open. Before changing the database name, check the spelling
and synchronize the Network Editor. After changing the database name, confirm that
The Results pane provides information messages regarding the results of the
last synchronization. Included in the list is an icon indicating the type of
message listed, the name of the computer that performed the
synchronization, and the message generated by the synchronization process.
The table below shows icons used in the messages and explains what types of
messages they represent.
Information Represents an information message.
The menu bar contains the menus for File, Edit, View, and Help.
• File menu
From the File menu, you can select a Network Model, synchronize all
servers, print, and exit the Network Editor application.
25
• Edit menu
Page 26

Chapter 4 Network Editor
Synchronize: Allows you to synchronize your application servers.
Network Editor toolbar
Status bar
From the Edit menu, you can add or remove a server from the Network
Editor.
• View menu
From the View menu, you can show or hide the toolbar/status bar, and
refresh the Network Editor. You can also specify how data is viewed in
the panes as well as setting other user preferences.
The Network Editor includes a toolbar which allows you to perform various
functions. The buttons are enabled based on the item currently selected in the
Network Editor. As you move your cursor over a button, a tool tip displays the
button name and a detailed functional description displays in the status bar.
The Network Editor Toolbar buttons are:
Select Network Model: Allows you to select a network model from another computer.
Add Server: Allows you to add a previously undefined server.
Remove Server: Allows you to remove a server.
Up One Level: Moves you up one level in the Hierarchy pane.
Print: Prints a report for the selected item.
Print Preview: Allows you to view a report on the selected item.
Help: Opens the Network Editor help.
The status bar at the bottom of the window displays text messages on the left
side. In addition, the status bar displays one or more icons on the right side,
representing the status of the application and data.
The list of states that can be displayed in the status bar:
Database: The Network Editor is accessing data.
Server: The Network Editor is accessing other servers.
26
Printing: A report is being printed or previewed.
Processing: The Network Editor is processing data.
Waiting: The Network Editor is busy.
Page 27

Configure your network
Select a network model
Add a server
Chapter 4 Network Editor
The Network Editor allows you to configure your FactoryTalk Batch system.
You can add or remove application servers, print reports, and synchronize
your network model with another computer.
This section provides instructions for performing each of these functions.
When you select a network model, you are retrieving an existing network
model from another computer and using it as the network model for the local
computer. You must do this if you add, remove, or rename a server in your
system and need to update your network model with your existing system, or
if you want to use the network model from another computer.
To select a network model
1. Open the Network Editor.
2. In the Network Editor toolbar, click the Select Network Model button.
3. Type the computer name in the "Enter the object name to select" area,
or click the Advanced button to search for a computer.
4. Click OK.
Use the Network Editor to add a previously undefined server.
To add a server
1. Open the Network Editor.
2. In the Hierarchy pane, select the type of server to add.
3. Click Add Server.
4. In the Alias box, type an alias name. This is the name that displays in
the Network Editor.
5. In the Computer Name box, type the computer name, or use the
browse button to locate and select the computer from the list of
computers on your domain.
6. Click the Synchronize button.
7. Click OK.
27
Page 28

Chapter 4 Network Editor
Tip: It is a good idea to synchronize after adding or removing a server from the network model.
Remove a server
Synchronize network
User Preferences dialog
User Preferences dialog
Use the Network Editor to remove a server from your network model.
To remove a server
1. On the main FactoryTalk Batch server open the Network Editor and
navigate to the root network model.
2. In the Hierarchy pane, select the server to remove.
3. Click the Remove Server button.
4. Click the Synchronize button. The servers listed in the model are
updated with the new member server list.
The server you removed is not updated.
5. Log in to the server you removed and open Network Editor.
6. Repeat steps 2 through 4 to remove the server manually.
models
box
The synchronization process copies the network model data from your
computer to each of the computers included in your FactoryTalk Batch
system.
Click the Synchronize button. The Network Editor refreshes and the results of
the synchronization process display in the Results pane.
The User Preferences function allows you to customize the behavior and
appearance of the various panes and views within the Network Editor.
You can turn on information tips, change the application text/background
colors, configure the various views, and set up reports used for printing.
box - General tab
28
Page 29

Edit colors
Chapter 4 Network Editor
The General tab is used to configure the basic behavior and appearance of the
Network Editor views and dialog boxes. The selections on the General tab are
used in conjunction with other sections of the User Preferences dialog box.
In the Options area, you have the following selections:
• Use application colors: Select to assign colors, other than the current
Windows colors, to the background and text in the views.
• Use application font: Select to change the font, font style, and size
from the default Windows style.
• Information tips: Select to enable single line tips that appear when you
move the cursor over a button or field.
• Animate dialogs: Select to have dialog boxes fly out from the location
from which they are opened.
• Confirm deletion: Select to display an "Are you sure?" message when
you delete an item. Leave disabled to delete an item immediately
without confirmation.
• Confirm exit: Select to have the application ask if you want to exit.
Leave disabled to exit without a confirmation message.
29
The Network Editor defaults to the current Microsoft Windows color scheme.
You can change the color of the text and background.
To edit colors
1. Open the Network Editor.
2. From the View menu, select User Preferences.
3. On the General tab in the User Preferences dialog box, select Use
application colors.
4. Select the Colors tab.
Page 30

Chapter 4 Network Editor
Edit the application font
Edit information tips
5. Disable Use Windows colors to enable the Background color and Text
color lists.
6. Select the desired colors from the appropriate list, and then click
Apply.
The Network Editor defaults to the current Windows fonts. You can change
the display font.
To edit the application font
1. Open the Network Editor.
2. From the View menu, select User Preferences.
3. On the General tab in the User Preferences dialog box, select Use
application font.
4. Select the Font tab.
5. Select the desired font, style, and size from the appropriate lists, and
then click OK.
6. Click Apply.
7. Click OK.
Information tips appear when you move the cursor over a button or field. You
can change the font and colors of tips, and set tip timing, which determines
how soon a tip displays.
To edit information tips
1. Open the Network Editor.
2. From the View menu, select User Preferences.
3. On the General tab in the User Preferences dialog box, select
Information tips.
4. Select the Tips tab.
5. To enable the Background color and Text color lists, disable Use
Windows colors.
6. To change the tip color, select the text and background colors from the
appropriate lists, and then click OK.
7. To change the tip font, click the Change Font button. The Font dialog
box opens. Select the desired font, style, and size from the appropriate
list, and then click OK.
30
Page 31

menu, select Print Setup, select Landscape in the Orientation area, and then click OK.
User Preferences dialog
box - Views tab
Set report preferences
Chapter 4 Network Editor
8. To change the timing of information tips, use the Up and Down arrows
to change the settings in the Timing area.
• Delay determines how soon a tip displays when the cursor stops on
an area with a tip.
• Visible duration determines how long the tip is visible before
closing.
9. Click Apply.
10. Click OK.
To configure properties that are specific to each view and list in the Network
Editor, use the Views tab. For all list views, you can enable information tips,
alter the behavior of drag and drop, change the appearance of scroll bars, and
set selection options. On selected views, you can change the font style and
color, as well as the background color.
You can define a footer to print on each report page and select the font and
color (if your printer supports color printing) for the various report sections.
To set report preferences
1. From the View menu, select User Preferences. The User Preferences
dialog box opens to the General tab.
2. Select the Reports tab. The default report style for most views is
Formatted.
3. To change the type of printed report, select either List or Formatted to
the right of the appropriate report.
31
Tip: If you select the List format, set the page orientation to landscape. From the File
Page 32

Chapter 4 Network Editor
Report printing formats
4. Where available, you can select Include Related Data, and any
additional data associated with the selected item (single items only –
not lists or groups) also prints on the report.
5. In the Footer Text box, type a word or phrase to appear centered at the
bottom of each page.
6. Click Apply.
The Network Editor report printing feature allows you to print network,
server, or result pane information, in a report formatted with headers, footers
and column headings (in list reports). There are two report formats available:
formatted and list. The header (at the top of the page) consists of the report
name, while the footer (at the bottom of the page) contains the printing
date/time and the page count.
A formatted report presents the information down the page, with bold field
names as shown in this figure.
32
A list report presents the data in a columnar, spreadsheet format, with one
line per data item. The field names become column headings as shown in this
figure.
You can customize the reports by setting margins, changing font styles, and
selecting text colors. In addition, you can enter custom text that is also
included in the footer. (See "Set report preferences" for more information.)
Page 33

report preferences for instructions.
Preview reports
Print reports
Chapter 4 Network Editor
The Print Preview function of the Network Editor allows you to see how a
printed report looks before you send it to the printer.
To preview reports
1. Click the Print Preview button. The Print Preview window opens,
displaying the report as it will look when printed. The following
options are available from the Print Preview window:
• Next Page – If there is more than one page in the report, click Next
Page to view the next page of the report.
• Prev Page – Click to view the previous report pages (if there is more
than one page in the report).
• Two Page – Allows you to view two pages of a report in the same
window.
• One Page – Returns to the default preview setting of one page per
window.
• Zoom In/Out – Click Zoom In to magnify the preview page. Click
Zoom Out to reduce the size of the page in the preview window.
• Close – Closes the preview window.
2. Click Close to return to the Network Editor. You can either print the
report or make additional report configuration changes.
The Network Editor report printing feature allows you to print network,
server, or result pane information, in a report formatted with headers, footers
and column headings (in list reports).
To print reports
1. In the Network Editor’s Hierarchy pane, select the list or item(s) that
you want to print.
2. From the File menu, click Print. You could also click the Print button
or press ctrl+p to display the Print dialog box.
3. Ensure that the correct printer is selected, and click OK.
Tip: To configure heading and footer fonts and add a custom footer to your reports, see Set
33
Page 34

Page 35

Material Server in the
PCD Programming Reference Manual
.)
Automatic repair of batch
component installation fails
Error: No containers match
Error: Unable to retrieve the
Operating without a
Chapter 5
Troubleshooting
This chapter contains information specific to troubleshooting the
FactoryTalk® Batch Material Server. (See the FactoryTalk Batch Administrator
Guide for information on troubleshooting the FactoryTalk Batch Server.)
This can happen if one or more necessary folders were unintentionally moved
(in Windows explorer). For example, if the Schema folder gets moved away
from its original install path, the install package starts up automatically and
tries to ‘repair’ the problem. This ‘repair’ can clear out the Model and Server
keys in the registry, which can make the Batch client editors generate warning
dialogs because they are not able to find the Network Model.
If this happens, completely uninstall the application and then reinstall it.
material container
specification
Promise ID
This error can appear for several reasons. Here are a few things to check when
this message appears:
• The container’s state is not marked Ready to Use.
• The lot state of the sublot in the container is not marked Ready to Use.
• The material specification of the step does not match the material
specification of a sublot.
If Material Manager offers the equipment ID of container to a recipe (A) and
that container already has a Promise ID issued to another recipe (B), the
recipe (A) trying to use that container goes into Hold. The operator receives
the error: "Unable to retrieve the Promise ID". This prevents the inadvertent
dumping of two materials into the same empty container, thus (possibly)
destroying both materials.
Material Server
35
There may be a time when communication between the FactoryTalk Batch
Server and the Material Server is lost. If this occurs during a batch run, the
operator can complete the batch without the Material Server.
Tip: To run material-based recipes without the Material Server, use the upper range request codes
(11000-18000) in the phase logic. (For more information, see Unable to Communicate with
Page 36

Chapter 5 Troubleshooting
ATTENTION: If the FactoryTalk Batch Server is configured to Switch to Manual and
Losing communication
Because the Material Server cannot provide the FactoryTalk Batch Server with
information necessary for automatic binding, the operator is prompted to
select the containers/equipment modules for binding. Also, since the Material
Server populates the material database with material additions and
distributions, this task must be performed manually when the batch is
complete.
communication is lost with the Material Server, the FactoryTalk Batch Server switches to
prompt binding and presents an unfiltered list of container/equipment module pairs from
which to select binding candidates. The operator must select the container/equipment module
pair to supply the correct material to continue processing the batch.
Failure to select the correct container/equipment module pair could result in a hazardous
situation depending on the material.
When communication is good between the FactoryTalk Batch and Material
Servers, the Failed Material Server Indicator in the FactoryTalk Batch View
status bar displays
a green MT-G.
When the FactoryTalk Batch Server loses communication with the Material
Server, The Failed Material Server Indicator in the FactoryTalk Batch View
status bar displays a red MT-B.
If the FactoryTalk Batch Server is configured to Failure and Hold when
communication is lost with the Material Server, the batch is held until
communication resumes and the operator clears the failure.
If the FactoryTalk Batch Server is configured to Switch to Manual when
communication is lost with the Material Server, the batch continues to run
and the following occurs:
• All binding switches to prompt binding. Because the FactoryTalk Batch
Server cannot access the information in the material database, the lists
of equipment modules and containers are generated from the area
model. Any other information provided by the material database, such
as capacity, engineering unit, lot, and label, does not display. The
36
Page 37

Chapter 5 Troubleshooting
operator must select the equipment module and container that can
add material to or distribute material from the batch.
• The FactoryTalk Batch Server begins to use a default invalid promise
ID since the Material Server cannot send a valid promise ID, which is
used to update the inventory in the Material Editor. The actual
amounts added or distributed in the recipe must be manually updated
in the material database. In split feed situations, the FactoryTalk Batch
Server continues to update the setpoint so processing can continue.
• The FactoryTalk Batch Server records Loss of Material Tracking and
Loss of Material Server in the event journal. When the batch is
complete, the additions and distributions must be updated manually
into the material database.
(See the FactoryTalk Batch View User Guide for information on the status bar
and event journal. See the FactoryTalk Material Editor User Guide for
information on updating the material database manually.)
Possible Failure and Hold Errors
When using a Failure and Hold configuration, and a break in communication
happens after the Promise ID is required and the reporting is the first
communication that fails, the Promise ID given by the Material Server may
still exist in the material database. These "orphaned" Promise IDs can be a
problem for several reasons.
37
Page 38

Chapter 5 Troubleshooting
Loss of Material Tracking are enabled.
Switching to manual
Restoring communication
1. A distribution type promise is limited to 1 per container. An orphaned
promise of this type locks the container to other distributions.
2. Over-consumption also can be affected by this — The FactoryTalk
Batch Server may assume there are active addition promises when in
actuality this promise is no longer attached to a running phase.
Reporting only happens once the phase transitions to a STOPPED, ABORTED
or COMPLETED state.
To solve this problem, open the event journal and look for the event
description "Material Distribution Database Reporting Failed - Event Type
Material Tracking." Go to the tbPromise table and delete the Promise ID
record that was noted in the event journal entry.
Upon installation, the FactoryTalk Batch Server is configured to fail and hold
a batch when communication with the Material Server is lost. If you want to
run batches even when communication is lost, configure the FactoryTalk
Batch Server to switch to Manual mode. In Manual mode, the FactoryTalk
Batch Server prompts the operator for information normally supplied by the
Material Server.
1. Click Start > Rockwell Software > Equipment Editor.
2. From the Options menu, select Server Options. The Server Options
dialog box opens to the Project Settings tab.
3. Select the Material Policies tab.
4. Select Switch to Manual, and then click OK.
Tip: If you are using the FactoryTalk Event Archiver, select the Archiver Event Filters tab
while you are in the Server Options dialog box to verify that Loss of Material Server and
5. Exit the FactoryTalk Batch Equipment Editor.
38
When communication between the FactoryTalk Batch and Material Servers
becomes available, the action of the FactoryTalk Batch Server depends on the
setting selected on the Material Policies tab of the Server Options dialog box
in the Equipment Editor.
Page 39

Tip: If you want to limit security on the Failed Material Server Indicator dialog box, disable
FactoryTalk Batch View Security in the
FactoryTalk Batch Administrator Guide
.)
IMPORTANT
Starting the FactoryTalk
Chapter 5 Troubleshooting
• If the FactoryTalk Batch Server is configured to Failure and Hold, the
Failed Material Server Indicator in the FactoryTalk Batch View status
bar displays a green MT-G when the Material Server becomes available.
The operator must clear the failure for the batch to continue
processing. (See the FactoryTalk Batch View User Guide for more
information.)
• If the FactoryTalk Batch Server is configured to Switch to Manual, the
Failed Material Server Indicator in the FactoryTalk Batch View status
bar displays a yellow MT-S when the Material Server becomes
available. The operator must restore communication manually when
appropriate.
the Material Server Control button for specified users or groups. (See Configure
1. Double-click the Failed Material Indicator in the FactoryTalk Batch
View. The Failed Material Server Indicator dialog box opens.
2. Click the Material Server Control button. The Material Server Control
dialog box opens.
3. Select Reestablish Communication with Material Server, and then
click OK.
Be aware that the material database is not synchronized with the FactoryTalk
Batch Server and the data in the material database must be updated
manually. (See the
updating the material database manually.)
FactoryTalk Material Editor User Guide
for information on
A cold boot requires communication between the FactoryTalk Batch and
Batch server
Material Servers. If the Material Server is unavailable, the FactoryTalk Batch
Server will not start. During a cold boot, the container, material, and material
class enumerations are created based on the information in the material
39
Page 40

Chapter 5 Troubleshooting
database. Once this information becomes resident in the FactoryTalk Batch
Server, it can process a batch without the Material Server.
This material data (container, material, and material class enumerations)
resident in the FactoryTalk Batch Server is referred to as persisted data. A cold
boot refreshes this data by downloading new data from the material database
via the Material Server. A warm or warm-all boot does not refresh this data.
If you need to restart the FactoryTalk Batch Server when the Material Server is
unavailable, use either the warm or warm-all boot method. Both of these
methods ensure that the container, material, and material class enumerations
resident in the FactoryTalk Batch Server prior to the restart are restored.
(See the FactoryTalk Batch Administrator Guide for more information on the
FactoryTalk Batch Service Manager.)
40
Page 41

Tip: The user account for the FactoryTalk Batch server, Batch Archiver, eProcedure server services
and the Batch COM+ Application must be identical.
Configure your FactoryTalk
Chapter 6
Change the FactoryTalk Batch server user
account
Depending on your facility’s security requirements you may need to change
the FactoryTalk Batch server user name and password periodically. If you
change the server’s user account after installing the FactoryTalk Batch
components you must configure your FactoryTalk Batch system to use the
new server user account.
New user account requirements for the FactoryTalk Batch Server
Batch system
When creating a new user account for the FactoryTalk Batch Server, the
following requirements must be met.
• The password must be configured never to expire--if the password ever
expires, the service eventually fails to log on.
• The user account must never be disabled or deleted--if this account is
ever disabled/deleted, the service eventually fails to log on.
• The domain user account must have a unique name--if the user
account is a domain account, remove any local user accounts with the
same name.
• The user account/user group must exist on all workgroup computers--
if you want a local account to have access to resources on other
computers in a workgroup environment, you must create accounts
with the same name and password on each computer in the
workgroup.
After you create a new user account for the FactoryTalk Batch Server,
configure your FactoryTalk Batch system.
To configure your FactoryTalk Batch system
1. Configure the FactoryTalk Batch Server computer:
41
a. Add the new server user account to the batchsvr_group and
administrators group. By adding the new account to the
Page 42

Chapter 6 Change the FactoryTalk Batch server user account
Server account password
batchsvr_group it inherits all the required user rights and access
permissions.
b. If FactoryTalk Batch Material Manager is part of your system, add
the new FactoryTalk Batch Server user account to the
MTBatchServer group on the Material Server computer.
c. Add the new FactoryTalk Batch Server user account to the
FactoryTalk Batch Server service.
d. If you are running FactoryTalk Event Archiver in incremental mode,
add the new FactoryTalk Batch Server user account in the Batch
Archiver service.
e. If FactoryTalk eProcedure is part of your system, add the new
FactoryTalk Batch Server user account to the eProcedure Server
service.
f. Add the new FactoryTalk Batch Server user account to the Batch
COM object in Component Services > My Computer > COM+
Applications.
change locations
2. Configure the FactoryTalk Batch Client computer(s):
a. If you are using workgroup security, create the new FactoryTalk Batch
Server user account on all FactoryTalk Batch Client computers in the
workgroup.
b. Add the new FactoryTalk Batch Server user account to Component
Services > My Computer > Properties > COM Security on all remote
FactoryTalk Batch View computers. Configure the account with
Access Permissions: Local Access and Remote Access.
c. If eProcedure is part of your system, add the new FactoryTalk Batch
Server user account to Component Services > My Computer >
Properties > COM Security on all remote eProcedure Client
computers. Configure the account with Access Permissions: Local
Access and Remote Access.
If you change the password for the existing FactoryTalk Batch Server user
account, change the password in these locations:
• If you are using Workgroup security, change the password for the
FactoryTalk Batch Server user account on all FactoryTalk Batch
computers in the workgroup.
• Change the password for the FactoryTalk Batch Server user account in
the FactoryTalk Batch server service.
42
Page 43

Change the server user
account for the FactoryTalk
Change the server user
Batch Server service
• If you are running FactoryTalk Event Archiver in incremental mode,
change the password for the FactoryTalk Batch Server user account
to the Batch Archiver service.
• If eProcedure is part of your system, change the password for the
FactoryTalk Batch Server user account in the eProcedure Server
service.
• Change the password for the FactoryTalk Batch Server account in the
Batch COM object in Component Services > My Computer > COM+
Applications.
Chapter 6 Change the FactoryTalk Batch server user account
To change the user account for the FactoryTalk Batch Server service, complete
these steps on the server computer.
To change the server user account for the FactoryTalk Batch Server
account in FactoryTalk
service
1. Select Start > Windows Administrative Tools > Services. The Services
dialog box opens.
2. Right-click FactoryTalk Batch Server, and then click Properties. The
FactoryTalk Batch Server Properties dialog box opens.
3. On the Log On tab, select This Account and type the new user and/or
password.
4. Click OK.
• If you are using FactoryTalk Event Archiver in incremental mode,
change the user account name and/or password for the Batch
Archiver service.
• If eProcedure is part of your system, change the user account name
and/or password for the eProcedure Server service.
5. Close Services.
To change the FactoryTalk Batch Server user account in Batch COM+
applications, complete these steps on the FactoryTalk Batch Server computer.
Batch COM+ applications
43
To change the server user account in FactoryTalk Batch COM+
applications
1. Select Start > Windows Administrative Tools > Component Services.
Page 44

Chapter 6 Change the FactoryTalk Batch server user account
Tip: The new permissions are applied the next time the FactoryTalk Batch Server is started
on the computer.
Change the server user
2. Expand Component Services, Computers, My Computer and COM+
Applications.
3. Right-click Batch, and then select Properties. The Batch Properties
dialog box opens.
4. On the Identity tab, select This user and type the new FactoryTalk
Batch Server user name and/or password.
5. Click OK.
To change the FactoryTalk Batch Server user account in My Computer
properties, complete these steps on the FactoryTalk Batch Client computers.
account in My Computer
properties
To change the server user account in My Computer properties
1. Select Start > Windows Administrative Tools > Component Services.
2. Expand Component Services and Computers.
3. Right-click My Computer, and then click Properties. The My
Computer Properties dialog box opens.
4. On the COM Security tab, click the Edit Default button in the Access
Permissions area. The Access Permission dialog box opens.
5. Click the Add button to open the Select Users, Computers, or Groups
dialog box.
6. Type the new FactoryTalk Batch Server user account name and then
click OK.
7. In the Access Permission dialog box, select the new FactoryTalk Batch
Server account. In the Permissions list, select Allow for Local Access
and Remote Access.
8. Click OK twice.
9. Close Component Services.
10. Restart the computer.
44
Page 45

Index
Index
disable
Material Server Control button 38
domain
security 18
F
A
Archiver
service 41
B
Batch Server
starting 39
switching to manual mode 38
boot
cold 39
warm 39
warm-all 39
C
change
colors 29, 31
fonts 31
list view properties 31
report margins 31
view properties 31
cold boot 39
colors
change 29, 31
COM+ 15
communication
configuring Material Server 11
restoring with Material Server 38
without Material Server 35
configure
formatted reports 32
list reports 32
Network Editor 11
report footings 31
report headings 31
user preferences 28
workgroup server nodes 18
D
Failed Material Server Indicator 36
failure and hold 36
failure and hold errors 36
formatted report 32
L
list report 32
list view properties
change 31
M
manual mode
switching the Batch Server 38
material database
changing names 11
configuring Network Editor 11
Material Server
configuring communication mode 11
configuring split feeds 11
losing communication 35
restoring communication 38
Material Server Control button
disabling 38
MT-B 36
MTBatchServer 17
MT-G 36, 38
MTGeneral 17
MTLotAuthor 17
MTMaterialAuthor 17
MTMaterialViewer 17
MT-S 38
MTUsers 17
N
Network Editor
configuring material database 11
network model
synchronize 27
database
changing names 11
45
orphaned promise ID 36
O
Page 46

Index
P
U
print preview 33
promise ID
orphaned 36
prompt binding, losing communication 36
R
report preferences
set 31
reports
change margins 31
column and row preferences 31
configure footings 31
configure headings 31
S
security
Batch Server 17
domain 18
user accounts 18
user groups 18
role-based 15
roles
MTBatchServer 17
MTGeneral 17
MTLotAuthor 17
MTMaterialAuthor 17
MTMaterialViewer 17
MTUsers 17
user groups
MTBatchServer 17
MTLotAuthor 17
MTMaterialAuthor 17
MTMaterialViewer 17
workgroup 18
set
report preferences 31
user preferences 28
split feed
configuring Material Server 11
starting
Batch Server 39
synchronize 27
User Preference dialog box
change colors 29, 31
change fonts 31
change view properties 31
column and row preferences 31
edit information tips 30
list view properties 31
set 28
V
view properties 31
W
warm boot 39
warm-all boot 39
workgroup
configuring server nodes 18
security 18
T
troubleshoot
failure and hold errors 36
46
Page 47

Rockwell Automation support
Technical Support Center
Find help with how-to videos, FAQs, chat, user forums, and product notification
rok.auto/support
Knowledgebase
Access Knowledgebase articles.
rok.auto/knowledgebase
Local Technical Support Phone Numbers
Literature Library
Find installation instructions, manuals, brochures, and technical data publications.
rok.auto/literature
Product Compatibility and Download Center
Get help determining how products interact, check features and capabilities, and
rok.auto/pcdc
Use these resources to access support information.
updates.
Locate the telephone number for your country. rok.auto/phonesupport
(PCDC)
find associated firmware.
Documentation feedback
Your comments help us serve your documentation needs better. If you have any suggestions on how to improve our content, complete the form at
rok.auto/docfeedback
.
Waste Electrical and Electronic Equipment (WEEE)
At the end of life, this equipment should be collected separately from any unsorted municipal waste.
Rockwell Automation maintains current product environmental information on its website at rok.auto/pec.
Allen-Bra dley, expanding human possibility, Logix, Rockwell Aut omation, and Rockwell S oftware are trad emarks of Rockwell Au tomation, Inc.
EtherNet/IP is a trademark of ODVA, Inc.
Trademarks not belonging to Rockwell Automation are property of their respective companies.
Rockwell O tomayson Ticaret A.Ş. Kar P laza İş Merk ezi E Bl ok Kat:6 347 52, İçere nkÖy, İstan bul, Tel: + 90 (216) 5698400 E EE YÖne tmeliğine Uygundur
Rockwell Automation Publication# BWMTR-UM011E-EN-P - October 2020 Copyright © 2020 Rockwell Automation Technologies, Inc . All Rights Reserved. Printed in the U.S.A.
Supersedes Publication# BWMTR-UM011D-EN-P
 Loading...