

Page 1

Getting Results Guide
Original Instructions
actoryTalk Batch
F
Material Manager
Getting Results Guide
FactoryTalk Batch Components 14
.00
Rockwell Automation Publication BWMTR-GR011E-EN-P - October 2020
Supersedes Publication BWMTR-GR011D-EN-P - February 2017
Page 2
FactoryTalk Batch Material Manager
personal injury or death, property damage, or economic loss.
Attentions help you identify a hazard, avoid a hazard, and recognize the consequence.
IMPORTANT
Identifies information that is critical for successful application and understanding of the product.
temperatures.
for Personal Protective Equipment (PPE).
Important User Information
Read this document and the documents listed in the additional resources section about installation, configuration, and
operation of this equipment before you install, configure, operate, or maintain this product. Users are required to familiarize
themselves with installation and wiring instructions in addition to requirements of all applicable codes, laws, and standards.
Activities including installation, adjustments, putting into service, use, assembly, disassembly, and maintenance are required to
be carried out by suitably trained personnel in accordance with applicable code of practice.
If this equipment is used in a manner not specified by the manufacturer, the protection provided by the equipment may be
impaired.
In no event will Rockwell Automation, Inc. be responsible or liable for indirect or consequential damages resulting from the use
or application of this equipment.
The examples and diagrams in this manual are included solely for illustrative purposes. Because of the many variables and
requirements associated with any particular installation, Rockwell Automation, Inc. cannot assume responsibility or liability for
actual use based on the examples and diagrams.
No patent liability is assumed by Rockwell Automation, Inc. with respect to use of information, circuits, equipment, or software
described in this manual.
Reproduction of the contents of this manual, in whole or in part, without written permission of Rockwell Automation, Inc., is
prohibited.
Throughout this manual, when necessary, we use notes to make you aware of safety considerations.
WARNING: Identifies information about practices or circumstances that can cause an explosion in a hazardous environment, which may lead to
ATTENTION: Identifies information about practices or circumstances that can lead to personal injury or death, property damage, or economic loss.
Labels may also be on or inside the equipment to provide specific precautions.
SHOCK HAZARD: Labels may be on or inside the equipment, for example, a drive or motor, to alert people that dangerous voltage may be present.
BURN HAZARD: Labels may be on or inside the equipment, for example, a drive or motor, to alert people that surfaces may reach dangerous
ARC FLASH HAZARD: Labels may be on or inside the equipment, for example, a motor control center, to alert people to potential Arc Flash. Arc Flash
will cause severe injury or death. Wear proper Personal Protective Equipment (PPE). Follow ALL Regulatory requirements for safe work practices and
2
Page 3

Table of Contents
Preface
Introducing Material Manager
Introducing the Material Editor
About this manual ....................................................................................... 7
Legal Notices ............................................................................................... 7
Additional resources ................................................................................... 8
Chapter 1
What is Material Manager? ....................................................................... 11
FactoryTalk Batch Components ............................................................... 12
FactoryTalk Batch Server ..................................................................... 12
FactoryTalk Batch Recipe Editor ......................................................... 13
FactoryTalk Batch Equipment Editor ................................................. 14
FactoryTalk Event Archiver ................................................................. 14
FactoryTalk Batch Network Editor ..................................................... 15
FactoryTalk eProcedure Client ............................................................ 15
FactoryTalk eProcedure Server ........................................................... 15
FactoryTalk Batch Material Manager ................................................. 15
FactoryTalk Batch View ....................................................................... 16
Material data ............................................................................................... 17
Introduction to the Material Server ........................................................... 17
Looking at the Material Server .................................................................. 17
Set up the sample demonstrations ........................................................... 19
Configure the Network Editor ............................................................ 19
Add sample FactoryTalk Security users ............................................. 20
Configure sample permissions for FactoryTalk Security users ...... 22
Configure the sample FactoryTalk Batch Server .............................. 24
Rebuild the recipe directory ............................................................... 27
Start the FactoryTalk Batch and Material Manager Servers .................. 27
Start the sample FactoryTalk Batch Phase Simulator ............................ 29
Verify PCD communications .................................................................... 30
Summary .................................................................................................... 30
Chapter 2
Start the Material Editor ........................................................................... 31
Adding material states ...............................................................................32
Adding material types ................................................................................ 34
Adding a material class .............................................................................. 35
Adding a material ....................................................................................... 37
Adding containers ..................................................................................... 38
Associating materials with containers .................................................... 40
Creating lots................................................................................................ 41
Distributing lots to containers ................................................................. 42
3
Page 4

Table of Contents
Introducing material-enabled
phases
Introducing material-based
Running material-based recipes
Using custom code insertion
recipes
Exiting the Material Editor ........................................................................ 43
Summary ..................................................................................................... 43
Chapter 3
Open the area model .................................................................................. 45
Naming the area ....................................................................................... 46
Viewing enumeration sets ....................................................................... 46
Creating material-enabled phases ............................................................ 47
Adding material-enabled phase parameters ..................................... 50
Adding material-enabled phase report parameters ......................... 52
Defining equipment modules ............................................................ 52
Restart the FactoryTalk Batch server ........................................................ 53
Setting material container priorities ........................................................ 54
Programming a material-enabled phase .................................................. 54
Summary ..................................................................................................... 55
Chapter 4
Create a material-based operation ........................................................... 57
Creating recipe formula parameters ........................................................ 59
Assigning formula values .......................................................................... 59
Creating a unit procedure ......................................................................... 61
Enabling dynamic unit allocation ............................................................ 62
Create a procedure .................................................................................... 62
Linking phase groups ................................................................................ 68
Verifying the recipe ................................................................................... 69
Summary .................................................................................................... 70
points
4
Chapter 5
Run in simulation mode ............................................................................ 71
Running a material-based recipe ............................................................. 71
Checking inventory levels .......................................................................... 73
Using manual phase control ...................................................................... 74
Binding a material-enabled phase manually ........................................... 75
Handling split feeds ................................................................................... 76
Summary ..................................................................................................... 77
Chapter 6
When would I customize an insertion point? ......................................... 79
What library can be customized? .............................................................. 79
Creating a custom ramscustom.dll ......................................................... 80
Material manager insertion points ........................................................... 81
Page 5

Developing an implementation
plan
Binding material-based recipes
Index
Table of Contents
OnGenerateCustomLotName ................................................................... 81
OnGenerateCustomLabelName ............................................................... 82
AfterSubLotInsert ..................................................................................... 83
AfterSubLotDelete ..................................................................................... 84
AfterLotInsert ............................................................................................ 85
AfterCombinedLotInsert .......................................................................... 86
Chapter 7
Determining the system requirements ................................................... 87
Configuration requirements .............................................................. 87
Hardware and operating systems requirements .............................. 87
Security requirements ........................................................................ 88
Questions to ask about system requirements ......................................... 88
Questions to ask about the material database ........................................ 88
Questions to ask about equipment data .................................................. 89
Questions to ask about master recipe data ............................................. 89
Appendix A
Unit binding .............................................................................................. 92
Static binding ...................................................................................... 92
Creation binding ................................................................................. 92
Dynamic unit allocation ...................................................................... 93
Manual binding ................................................................................... 94
Material requirements ........................................................................ 94
Material requirements: material .................................................. 95
Material requirements: material and lot ..................................... 96
Container type ................................................................................ 97
Distributions ................................................................................. 98
Recipe phase binding ................................................................................ 99
Container binding type .................................................................... 100
Feed type ............................................................................................. 101
Automatic container binding process .............................................. 101
Summary ................................................................................................... 103
5
Page 6

Page 7

About this manual
Legal Notices
Preface
This manual introduces the basics of FactoryTalk Batch Material Manager. It
is one of a set of related manuals that describe installing, programming, and
operating the FactoryTalk Batch system.
To review FactoryTalk Batch release notes and latest information regarding
product compatibility refer to the
Center (PCDC).
Rockwell Automation publishes legal notices, such as privacy policies, license
agreements, trademark disclosures, and other terms and conditions on the
Legal Notices
page of the Rockwell Automation website.
End User License Agreement (EULA)
You can view the Rockwell Automation End User License Agreement (EULA)
by opening the license.rtf file located in your product's install folder on your
hard drive.
Product Compatibility and Download
The default location of this file is:
C:\Program Files (x86)\Common Files\Rockwell\license.rtf
Open Source Software Licenses
The software included in this product contains copyrighted software that is
licensed under one or more open source licenses.
You can view a full list of all open source software used in this product and
their corresponding licenses by opening the oss_license.txt file located your
product's OPENSOURCE folder on your hard drive. This file is divided into
these sections:
• Components
Includes the name of the open source component, its version number,
and the type of license.
• Copyright Text
Includes the name of the open source component, its version number,
and the copyright declaration.
• Licenses
Includes the name of the license, the list of open source components
citing the license, and the terms of the license.
7
The default location of this file is:
C:\Program Files (x86)\Common Files\Rockwell\Help\<product
name>\Release Notes\OPENSOURCE\oss_licenses.txt
Page 8

Preface
Resource
Description
Resource
Description
reference for the formulator.
Additional resources
You may obtain Corresponding Source code for open source packages
included in this product from their respective project web site(s).
Alternatively, you may obtain complete Corresponding Source code by
contacting Rockwell Automation via the Contact form on the Rockwell
Automation website:
http://www.rockwellautomation.com/global/aboutus/contact/contact.page. Please include "Open Source" as part of the request
text.
Following is a comprehensive list of documentation for the FactoryTalk®
Batch products from Rockwell Automation.
Installation, Quick Start, and Getting Results Guides
FactoryTalk Batch Components Installation and
Upgrade Guide
(BATCH-IN002)
FactoryTalk Batch View Quick Start Guide
(FTBVS-QS001)
FactoryTalk Batch View HMI Controls Quick Start
Guide
(BATCH-QS001D)
FactoryTalk Batch eProcedure® Getting Results
Guide
(BWEPRO-GR011)
FactoryTalk Batch Getting Results Guide
(BATCH-GR011)
FactoryTalk Batch Material Manager Getting
Results Guide
(BWMTR-GR011)
Provides information and procedures for FactoryTalk
Batch system installation. Includes information for
FactoryTalk Batch Material Manager, FactoryTalk Event
Archiver, and associated FactoryTalk Batch Client and
Server components.
Provides information about using FactoryTalk Batch View
to create, view, and command control recipes,
acknowledge prompts and signatures, view equipment
phases and diagnostic information, and view profile
information.
Provides a general overview of FactoryTalk Batch View
HMI Controls.
Explains the basics of FactoryTalk Batch eProcedure.
Introduces the basics of automated batch manufacturing
and the FactoryTalk Batch product components.
Introduces the basics of FactoryTalk Batch Material
Manager.
8
User Guides
FactoryTalk Batch ActiveX Controls User Guide
(BATCH-UM013)
FactoryTalk Batch Material Editor User Guide
(BWMTR-UM001)
Provides information and instructions for using the
FactoryTalk Batch ActiveX Custom Controls.
Provides access to information and procedural
instructions required to configure materials and the
containers to hold them. The material data is stored in the
material database, which is used to create materialbased recipes. This information is intended as a
Page 9

Preface
Resource
Description
Recipe Editor, View, and Phase Simulator.
your Logix 5000 controller.
reference information by the operator.
system administrator and production supervisor.
conjunction with a Human-Machine Interface (HMI).
FactoryTalk Batch Equipment Editor User Guide
(BATCH-UM004)
FactoryTalk Batch PhaseManager™ User Guide
(BATCHX-UM011)
FactoryTalk Batch Recipe Editor User Guide
(BATCH-UM006)
FactoryTalk Batch View HMI Controls User Manual
(FTBVS-UM003)
Provides information on creating and maintaining an
equipment database (area model). The area model is
stored in a file with a .cfg file extension and is available
to all other FactoryTalk Batch programs, including the
Describes the integration of the FactoryTalk Batch
software with the Studio 5000 Logix Designer®
application and the Logix 5000™ family of controllers.
The integration simplifies the configuration and
maintenance of the FactoryTalk Batch automation
system, provides better communication between the
FactoryTalk Batch Server and the Logix 5000 controller,
and significantly reduces the programming effort
required to develop the phase logic code that resides in
Provides instructions on using FactoryTalk Batch Recipe
Editor to create and configure master recipes for use in
batch automation. The interface is based on IEC 61131-3
sequential function charts to graphically organize recipes
into procedures, unit procedures, operations, and phases.
Build recipes using either the SFC format or a table-based
format.
Provides details about using FactoryTalk Batch View HMI
Controls to monitor and interact with the production
process within a FactoryTalk View SE Display Client.
FactoryTalk Batch View User Manual
(FTBVS-UM002)
FactoryTalk eProcedure Client User Guide
(BWEPRO-UM001)
FactoryTalk Event Archiver User Guide (BATCHUM012)
FactoryTalk Batch View User Guide (legacy)
(FTBVS-UM001)
Provides information and procedural instructions for
using FactoryTalk Batch View in a modern and intuitive
portal into a comprehensive batching solution for
effective operations, leveraging its own web server using
HTML5 technology to provide native connectivity into a
FactoryTalk Batch Server.
Provides information and procedural instructions
required to create and command batches using the
FactoryTalk eProcedure Client, and can be used as a
Provides information and instructions specific to the
FactoryTalk Event Archiver. Intended for use by the
Provides information and instructions on how to use
FactoryTalk Batch View to initiate and execute
FactoryTalk Batch automation processing. FactoryTalk
Batch View secured objects are located in the FactoryTalk
Diagnostics and are modified using the FactoryTalk
Administration Console. A system administrator can
customize FactoryTalk Batch View security to meet the
needs of the facility. FactoryTalk Batch View is used in
9
Page 10

Preface
Resource
Description
(BWEPRO-UM011)
Resource
Description
(BATCH-RM001)
(BATCH-RM004)
engineers and the system administrator.
reference by the instruction file author.
Administrator Guides
FactoryTalk Batch Administrator Guide
(BATCH-UM003)
FactoryTalk Batch eProcedure Administrator Guide
(BWEPRO-UM011)
FactoryTalk Batch Material Manager Administrator
Guide
Reference Guides
FactoryTalk Batch ActiveX Controls Library
Reference Guide
FactoryTalk Batch Material Server API Technical
Reference
(BWMTR-RM001)
FactoryTalk Batch PCD Programming Reference
Manual
FactoryTalk Batch Server API Reference Manual
(BATCH-RM003)
Provides instructions for configuring security and
services, and implementation and use of components not
typically accessed or used by batch operators, such as
the FactoryTalk Batch Server.
Provides procedures specific to FactoryTalk Batch
eProcedure, such as implementing security and
configuring the user-defined area Active Server Page.
Included are instructions for tasks specific to FactoryTalk
Batch, such as configuring security and services to
support FactoryTalk Batch eProcedure. Provides
instructions on the implementation and use of
components not typically accessed or used by batch
operators, such as the FactoryTalk Batch Server.
Provides information and instructions specific to
FactoryTalk Batch Material Manager. Intended for use by
the system administrator and database administrator.
Provides reference information and procedural
instructions for the FactoryTalk Batch ActiveX Custom
Controls.
Provides access to information regarding the interface
between the FactoryTalk Batch Material Server and the
FactoryTalk Batch Material Editor and FactoryTalk Batch.
It is intended to be used as a reference information by
those who want to develop custom interfaces.
Provides information and instructions about the
FactoryTalk Batch PCD interface design. It is intended to
be used as a reference guide.
Provides information regarding the interface between the
FactoryTalk Batch Server and FactoryTalk Batch View —
the Server Application Programming Interface (API). It is
intended to be used as a reference guide by those who
want to develop custom interfaces.
10
FactoryTalk Batch System Files Reference Manual
(BATCH-RM005)
FactoryTalk Batch eProcedure Instruction File
Design Reference Manual
(BWEPRO-RM001)
Provides the technical information for configuration and
maintenance of a FactoryTalk Batch system. It can be
used as a reference information for implementation
Includes information about the building of instruction
files for use in equipment database creation and recipe
development. This information is intended to be used as a
View or download publications at
http://www.rockwellautomation.com/literature. To order paper copies of
technical documentation, contact your local Allen-Bradley® distributor or
sales representative.
Page 11

What is Material Manager?
Chapter 1
Introducing Material Manager
FactoryTalk® Batch Material Manager is an integral part of the FactoryTalk
Batch suite of software components. As part of the FactoryTalk family, the
FactoryTalk Batch components increase overall plant efficiency by delivering
the visibility, control, and reporting you need to optimize manufacturing.
With coordinated execution, you can reduce scrap and rework and improve
product quality and consistency. Through real-time management of
equipment utilization, you can maximize your return on assets. By
implementing optimized recipes and procedures, you can increase your plant
capacity. By using electronic, paperless operations, you can improve your
productivity. You also reduce compliance costs by using electronic batch
record implementation, paperless manufacturing, and quality sign-offs. By
lifting the compliance burden from manufacturing, you reduce inventory
levels and cycle times, which greatly improves customer service.
The FactoryTalk Batch components ensure that plant floor operations are
optimized, giving you quick return on your net assets. New product
definitions are deployed quickly into manufacturing. Production order
information is accurate. Business and plant-level control systems are tightly
coordinated and multiple sites operate as a team. Our completely open,
configurable set of products helps you define, manage, monitor, and control
manufacturing at local, remote, or contractor plants. Best of all, you can
deploy any of the FactoryTalk Batch components wherever you need them —
one at a time or all at once — to improve productivity and plant control.
The FactoryTalk Batch components include:
• FactoryTalk Batch
• FactoryTalk eProcedure®
• FactoryTalk Batch Material Manager
As one of the FactoryTalk Batch components, Material Manager provides
plant-level material management and tracking that is tied to corporate
material management systems. Material Manager manages and tracks the use
of materials by material type, lot, and sublot. It manages and tracks vessels,
containers and pallets, as well as permanent and transient storage. It also
provides automatic support for bulk containers with multiple lots either as
composites or plug flow separated.
11
Material Manager adds material definitions to the recipes, significantly
reducing the number of recipes needed for flexible storage facilities. Material
consumption, production, and association of materials to containers and
Page 12
Chapter 1 Introducing Material Manager
FactoryTalk Batch
FactoryTalk Batch Server
vessels are automatically logged, providing complete information for forward
and backward material tracking within and across process cells.
The material recipes, called material-based recipes, allow you to define recipes
in terms of materials used, not just by plant equipment. A material-based
recipe uses material-enabled phases, which are configured in the Equipment
Editor and stored in the area model. Material-enabled phases support the
specification of a material as a means to find appropriate equipment and bind
to that equipment in a control recipe.
The following figure is a conceptual diagram of the elements of the materialbased recipe function and illustrates the relationships among the functional
components.
Components
FactoryTalk Batch comes with several components that interact with each
other to design, create, configure and run batch recipes.
See also
FactoryTalk Batch Server on page 12
FactoryTalk Batch Recipe Editor on page 13
FactoryTalk Batch Equipment Editor on page 14
FactoryTalk Event Archiver on page 14
The FactoryTalk Batch Server is the engine that runs FactoryTalk Batch. It is
the component that controls system information, phases and recipes. The
server allows integration with process-connected devices (PCDs) and thirdparty software packages. Prior to opening FactoryTalk Batch View, the
FactoryTalk Batch Server must be running and remain active during all batch
functions.
12
Page 13

Chapter 1 Introducing Material Manager
The FactoryTalk Batch Server operates as a Windows service, which means
that the FactoryTalk Batch Server can be configured to start automatically and
that control of the FactoryTalk Batch Server can be given to the Windows
Service Manager. Because the FactoryTalk Batch Server runs as a service, it
does not require an operator to log on to run. Therefore, logging on or off
Windows during operation does not disrupt the performance of the
FactoryTalk Batch Server.
See also
FactoryTalk Batch Components on page 12
FactoryTalk Batch Recipe Editor
The FactoryTalk Batch Recipe Editor is used to graphically create and
configure recipes.
• The interface is based on IEC 61131-3 sequential function charts (SFC)
that graphically organizes recipes into procedures, unit procedures,
operations and phases along with any applicable comments.
• In addition to the SFC view, the FactoryTalk Batch Recipe Editor offers
a table view. Table-based recipes provide a mechanism for creating
simple recipes that do not require a complex recipe structure or
elaborate transition expressions. Additionally, you can view tablebased recipes and edit all recipe parameters without having to navigate
between steps.
• The FactoryTalk Batch Recipe Editor allows you to specify sequences of
phases. The actual phase logic must be configured in the processconnected device (PCD) while the interface to the PCD must be
configured in the FactoryTalk Batch Equipment Editor.
• Recipe reports can be generated in SFC and/or descriptive format.
• If Recipe Approvals are enabled in the underlying area model, approval
signoffs are executed in the FactoryTalk Batch Recipe Editor.
• When Recipe Version Control is enabled, a version of a recipe (a read-
only, numbered snapshot of a recipe) can be saved and protected from
further editing. New work-in-progress (WIP) copies of a version allow
the recipe author to continue to make changes and updates to a recipe.
When a versioned recipe no longer matches the underlying area
model, or references a deleted or non-existent sub-recipe, it is marked
as obsolete.
See also
FactoryTalk Batch Components on page 12
13
Page 14

Chapter 1 Introducing Material Manager
FactoryTalk Batch
FactoryTalk Event Archiver
Equipment Editor
The FactoryTalk Batch Equipment Editor is a graphical interface through
which a database of process equipment is defined and maintained (an area
model).
• Components defined in the FactoryTalk Batch Equipment Editor are
used to interface with process-connected devices (PCDs) in the facility.
During recipe configuration, the area model provides a list of available
units and phase classes.
• Configure phases and commands to trigger an electronic signature
request when a report or recipe parameter is out of range (parameter
deviation), or when specific commands are executed on a batch (such
as Abort Batch or Active Step Change).
• During recipe verification, the area model confirms that the
designated equipment is capable of executing the procedures.
• During recipe execution, resource arbitration functions use the area
model to allocate equipment based on recipe and operator requests.
• The area model is available to all other FactoryTalk Batch applications.
In addition to the area model, the FactoryTalk Batch Equipment Editor allows
configuration of the following:
• Communication functions
• Electronic signatures
• Enumeration sets
• Data servers
• Recipe approvals
• Recipe version control
• FactoryTalk Event Archiver functions
See also
FactoryTalk Batch Components on page 12
The FactoryTalk Event Archiver’s purpose is to translate the FactoryTalk Batch
tab-delimited ASCII electronic batch record files to a user-specified file type.
These electronic batch record files are maintained separately for each batch
created and viewed with a word processor or spreadsheet. Many plants have
standardized on one of the many commercially available Relational Database
Management System (RDBMS) software packages. We recommend using a
high-performance database, such as SQL Server, due to their better
robustness and performance. The Archiver collects data from each electronic
batch record file and stores it in the specified RDBMS database format.
14
See also
FactoryTalk Batch Components on page 12
Page 15

FactoryTalk Batch Network
Editor
FactoryTalk eProcedure
FactoryTalk Batch Material
Chapter 1 Introducing Material Manager
The FactoryTalk Batch Network Editor is a utility that indicates where other
FactoryTalk Batch and FactoryTalk Batch Material servers are located on the
network. This network configuration allows for ease of integration with other
FactoryTalk Batch components and simplifies the process of reconfiguring a
multi-computer system. If FactoryTalk Batch Material Manager is also
installed the FactoryTalk Batch Network Editor is also used to indicate the
location of the material database.
See also
FactoryTalk Batch Components on page 12
FactoryTalk eProcedure Client
Server
Manager
The FactoryTalk eProcedure Client computer uses Internet Explorer to enable
operators to run batch recipes.
See also
FactoryTalk Batch Components on page 12
The FactoryTalk eProcedure Server provides the services to the FactoryTalk
Batch Server to enable the use of HTML instruction files. Prior to opening
FactoryTalk eProcedure Client, FactoryTalk eProcedure Server must be
running and remain active during all batch functions.
See also
FactoryTalk Batch Components on page 12
FactoryTalk Batch Material Manager is used to track material consumption in
batch recipes. It consists of two components: Material Server and Material
Editor.
15
The Material Editor provides an interface to help you create the material
database, which consists of material, lot, sublot, container, and storage
location data. The Material Server provides the communication between the
material database and the FactoryTalk Batch Server. During a batch run,
information about available containers is presented to the operator for
binding decisions. Binding is the process of mapping steps within a control
recipe to actual equipment in a plant. After a batch is run, quantities
consumed or distributed are updated in the material database for use in
inventory tracking.
Page 16

Chapter 1 Introducing Material Manager
The Material Server consists of a group of components that work together to
service various applications. The primary applications that the Material Server
services are the Material Editor, FactoryTalk Batch Server, FactoryTalk Batch
Recipe Editor, and FactoryTalk Batch Equipment Editor. Any third-party
application can also use custom solutions based on the exposed Material
Object Model (MOM).
See also
FactoryTalk Batch Components on page 12
FactoryTalk Batch View
This topic describes FactoryTalk Batch View on a Windows desktop system.
Tip: The modern FactoryTalk Batch View is an innovative and intuitive user interface for your
comprehensive batch solution. It leverages state-of-the-art web technologies with scalable
graphics for consistent visualization across all devices and form factors. The zero-install browser
simplifies administration and maintenance. As the only native client application that supports the
new features in FactoryTalk Batch and eProcedure, it is the client of the future for modern batch
solutions.
For more information about the new FactoryTalk Batch View mobile solution, view the FactoryTalk
Batch View User Manual (FTBVS-UM002).
FactoryTalk Batch View is the batch recipe initiation and execution program
used by the operator of the FactoryTalk Batch Automation Solution system to:
• Initiate and control the batch process
• Display a graphical representation of a running batch and its
associated data
Typically, FactoryTalk Batch View is intended to be used in conjunction with
an HMI.
Each FactoryTalk Batch View window can be customized to suit the needs of a
specific station:
• Specify the columns to display
• Specify the size of columns and rows
• Sort and filter on one field in certain windows
• Set the font for each FactoryTalk Batch View window
If the security is enabled for FactoryTalk Batch View, a system administrator
can use the password protection option to:
• Limit the information that is displayed
• Specify the commands that are allowed at a particular station
Using FactoryTalk Batch View, an operator can respond to electronic
signature requests that have been generated by report and recipe parameter
deviations or by a command execute request.
16
Page 17

you follow the directions for using this demonstration step by step.
Material data
Introduction to the Material
Chapter 1 Introducing Material Manager
To implement material-based recipes, you must configure three types of data:
• Material Data
Use the Material Editor to add the materials, lots, sublots, and the
containers that hold them. This data is stored in the material database.
• Equipment Data
Use the FactoryTalk Batch Equipment Editor to create materialenabled phases and then associate the resultant equipment module
with a container.
• Recipe Data
Use the FactoryTalk Batch Recipe Editor to define the materials and
amounts to use in a recipe.
There are two stages to configuring material data. First is the initial system
configuration which is the process of adding elements, such as material types,
materials, material storage containers, and storage locations that are unique
to the given installation. Once these initial elements are defined, configured,
and tested, the process of initial system configuration is considered complete.
The second stage is the on-going system upkeep, which is the process of dayto-day activities that keep the material-based recipe system current and
operational. An example of the upkeep process is the addition or distribution
of a new lot of a given material to the database.
Server
Looking at the Material Server
For ease of understanding, and for tutorial purposes, this guide refers to
configuring and using the sample files that are installed with FactoryTalk®
Batch. The SampleDemo folders contain complete area models and recipes
for a simulated plant. Before running the demonstrations:
• Configure the Network Editor to recognize the material database
• Add a FactoryTalk Security user
• Configure the FactoryTalk Batch Server to recognize the required
project directories
• Select the initialization path and file name
• Start the FactoryTalk Batch Server and the FactoryTalk Batch Phase
Simulator
Tip: This guide outlines the configuration and use of the SampleDemo2 demonstration files.
Because these files are used as an example throughout the guide, it is recommended that
The FactoryTalk Batch Material Server is a group of components that work
together to service various client applications. The primary clients that the
Material Server services are the Material Editor, FactoryTalk Batch Server,
Storage Container ActiveX control, FactoryTalk Batch Recipe Editor, and
FactoryTalk Batch Equipment Editor. Also, any third-party application can use
custom solutions based on the exposed Material Object Model (MOM). The
17
Page 18
Chapter 1 Introducing Material Manager
r
Material Client
(Client Interface)
Material Server
(Server Interface)
Material
Database
(SQL Server)
FactoryTalk Batch
Material Editor
FactoryTalk Batch
Recipe Editor &
Equipment Editor
FactoryTalk
Batch Server
Third-Party
Solutions
Material Server also interacts with SQL Server to read to and write from the
material database.
The Material Server runs with the context of a COM+ component, which is an
extension to the Component Object Model (COM). This component resides on
the client workstations and provides a rich programming model. See the
FactoryTalk Batch Material Server API Technical Reference for more information
about the material object model.
The Material Server coordinates the following functions:
Material Server Communications
• Records actions to the material database that occur during
configuration and run-time in the Activity Journal.
• Loads the material and container lists from the material database to
the Batch Server at startup for population of the area model material
and container enumeration sets.
• Loads the equipment module/container associations from the area
model into the material database.
• Communicates with the FactoryTalk Batch Server during binding.
• During Unit Binding, the FactoryTalk Batch Server communicates
with the Material Server to determine if the required materials can be
satisfied by the containers within a unit.
• During Phase Binding, the FactoryTalk Batch Server communicates
with the Material Server to get a list of containers and equipment
modules based on the material to add or distribute in the step. In
Prompted Phase Binding, the Operator selects the binding solution
18
Page 19

IMPORTANT
IMPORTANT
Chapter 1 Introducing Material Manager
from a list of container-equipment pairs. In Automatic Phase Binding,
phases are selected based on current container priority.
• In Manual Phase Binding, the FactoryTalk Batch Server communicates
with the Material Server to obtain a list of containers, lots and
equipment modules that support the required material. The list is
presented to the operator for selection of the equipment module to
bind to the material step.
• Updates the material database with actual amounts consumed or
distributed during a batch run. During an addition or distribution,
when the Feed Complete is true, the FactoryTalk Batch Server
communicates the actual amount to the Material Server. When the
Feed Complete is not true, the FactoryTalk Batch Server communicates
the actual amount to the Material Server, which in turn calculates the
difference between the promise amount and the actual amount and
sends this back to the FactoryTalk Batch Server. The FactoryTalk Batch
Server uses this difference to update the setpoint for the split feed.
This guide also describes the different binding methods and how to handle
split feeds.
Set up the sample demonstrations
Configure the Network Editor
The installation process placed the SampleDemo1 and SampleDemo2 folders in
the BATCHCTL share on your hard drive. Within each of these SampleDemo
folders are four subfolders that contain the files for the area model. To run the
sample demonstrations, configure the Network Editor to locate the material
database, add a FactoryTalk Security user, configure the FactoryTalk Batch
Server to locate the area model, and then verify the recipes in the area model.
The default databases MaterialBasedRecipe and SAMPLE2_Materials cannot be
removed from SQL Server. You are free to add another database and use it for
production or test, but you must keep the originally installed databases intact even
though they are not being used.
Configure the Material Server with the location of the SQL database that
contains the materials for the SampleDemo2 recipes.
1. Select Start > Rockwell Software > Material Manager, and then select
Network Editor. The Network Editor window opens.
Administrator privileges are required to perform this procedure.
19
Page 20
Chapter 1 Introducing Material Manager
IMPORTANT
Add sample FactoryTalk
2. Select the Material Server.
3. Select Configure. The Configure MaterialTrack dialog box opens.
4. In the MaterialTrack Database box, type SAMPLE2_MATERIALS, and
then select OK.
5. Select Synchronize.
6. Select File > Exit, and then click Yes to exit the Network Editor.
Security users
See also
Set up the sample demonstrations on page 19
For the sample demonstrations file, create FactoryTalk user accounts for an
operator and an engineer. Create these user accounts in the FactoryTalk
Directory.
To add sample FactoryTalk Security users:
1. Select Start > Rockwell Software > FactoryTalk Administration
Console. The Select FactoryTalk Directory dialog box opens.
Administrator privileges are required to perform this procedure.
20
Page 21
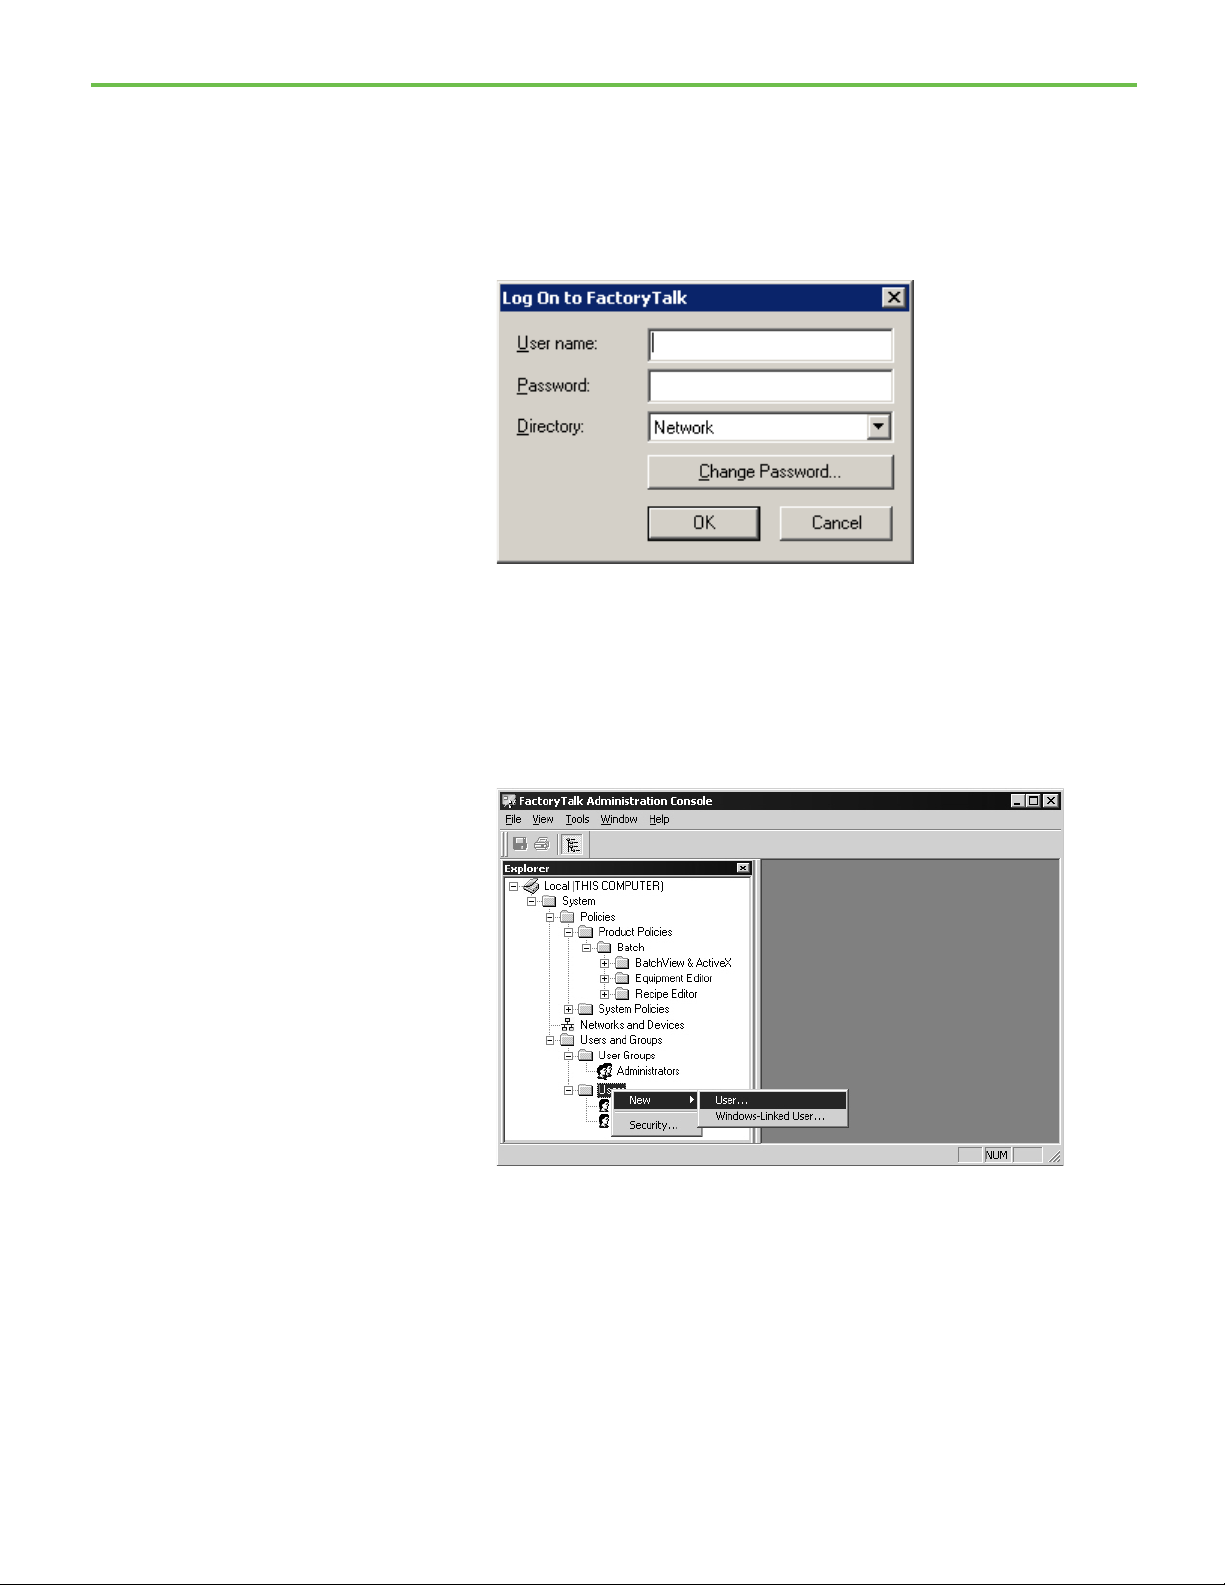
2. Select Network to add this user account to the FactoryTalk Network
Directory, and select OK.
3. If not already logged on to the FactoryTalk Network Directory, the Log
On to FactoryTalk dialog box opens. In User name, type the user name
for the Administrator that was configured when the FactoryTalk
Services Platform was installed.
4. In Password, type the password for the Administrator.
5. Verify the Directory and select OK. The FactoryTalk Administration
Console window opens and displays the specified FactoryTalk
Directory.
6. Expand Users and Groups.
7. Right-click the Users folder, and select New > User to create a new
FactoryTalk Security user account in FactoryTalk Directory.
Chapter 1 Introducing Material Manager
21
Page 22
Chapter 1 Introducing Material Manager
Configure sample
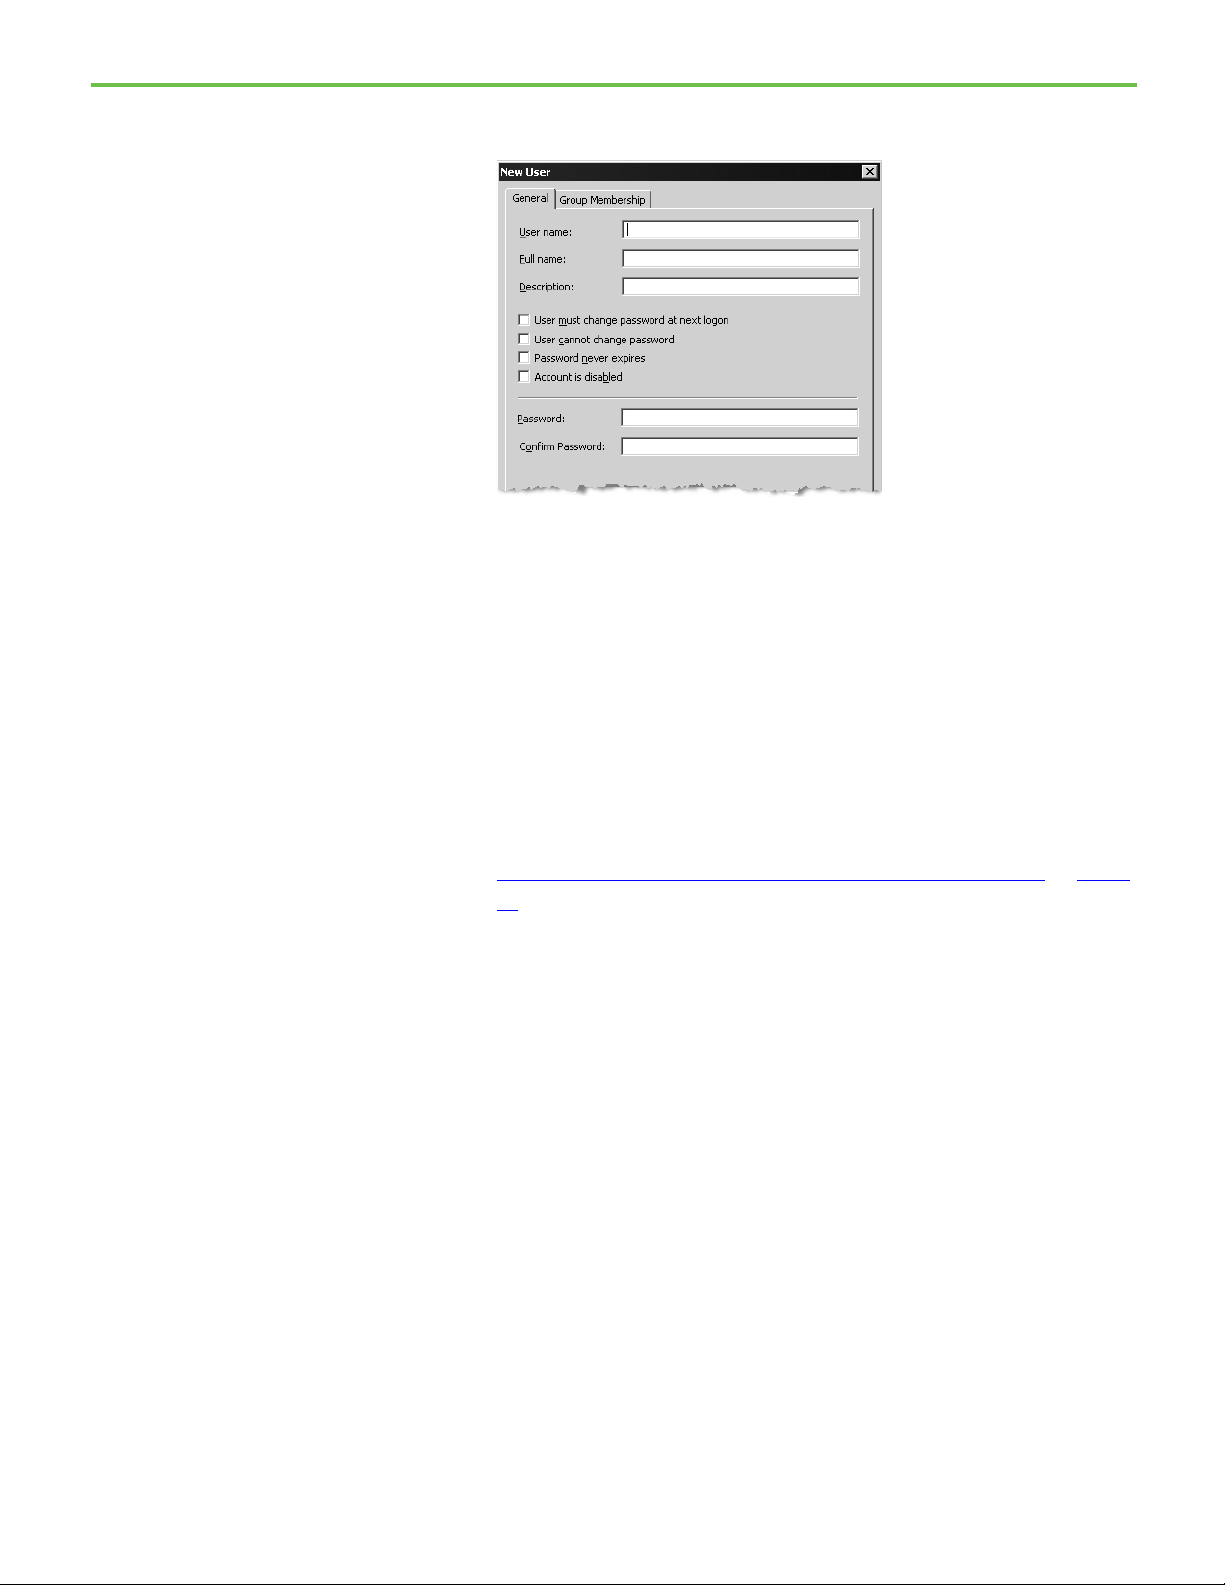
8. The New User dialog box opens and displays the General tab. In the
User name box, type OPER.
9. In Full name, type Operator.
10. In Password, type password, and confirm it by re-entering password
in the Confirm Password box.
11. Select Create.
12. Repeat steps 7-11, but this time in the User Name field, enter ENG and
in the Full Name field, enter Engineer.
13. Keep the FactoryTalk Administration Console open to configure
permissions for these FactoryTalk Security users in the next exercise.
permissions for
FactoryTalk Security users
See also
Configure sample permissions for FactoryTalk Security users on page 22
After creating the FactoryTalk security users, set up access modes for each
FactoryTalk Batch component to specify which users are permitted to view or
perform actions. Configure security settings in the FactoryTalk
Administration Console. To tighten security in the eProcedure Client, remove
the All Users group from the Full Edit policy setting.
To configure sample permissions for FactoryTalk Security users:
1. In the FactoryTalk Administration Console Explorer pane, navigate to
System > Policies > Product Policies > Batch > Equipment Editor >
Access Modes.
22
Page 23

2. Right-click Access Modes, and then select Properties. The Access
Modes Properties dialog box opens.
Chapter 1 Introducing Material Manager
3. In the Full Edit row, select the Configure Security browse button. The
Configure Securable Action dialog box opens.
4. Select Add. The Select User and Computer dialog box opens.
5. In the Filter Users box, select Show All.
6. In Users, select ENG.
23
Page 24

Chapter 1 Introducing Material Manager
Configure the sample
7. Select OK. The Configure Securable Action dialog box is updated,
showing ENG in the list of Users with the Allow checkbox selected.
8. Select OK to close the Configure Securable Action dialog box.
9. In the Access Modes Properties dialog box, select View Only.
10. In the View Only row, select the Configure Security browse button.
The Configure Securable Action dialog box opens.
11. Select Add. The Select User and Computer dialog box opens.
12. In the Filter Users box, select Show All.
13. In Users, select OPER.
14. Select OK. The Configure Securable Action dialog box is updated,
showing OPER in the list of Users with the Allow checkbox selected.
15. Select OK to close the Configure Securable Action dialog box.
16. Select OK to close the Access Modes Properties dialog box.
FactoryTalk Batch Server
24
See the FactoryTalk Batch Administrator Guide for more information on security.
See also
Configure the sample FactoryTalk Batch Server on page 24
To set up the sample demonstrations, configure the FactoryTalk Batch Server
to locate the folders that contain the demonstration files and to the \Restart
and bin folders where the FactoryTalk Batch Server writes data upon system
failure. Configure the FactoryTalk Batch Server in the FactoryTalk Batch
Equipment Editor.
Page 25
IMPORTANT
IMPORTANT
instructions on defining instruction-based phases.)
Chapter 1 Introducing Material Manager
To configure the sample FactoryTalk Batch Server:
1. Select Start > Rockwell Software > Equipment Editor. The FactoryTalk
Batch Equipment Editor opens (log on to FactoryTalk if prompted).
Administrator privileges are required to perform this procedure.
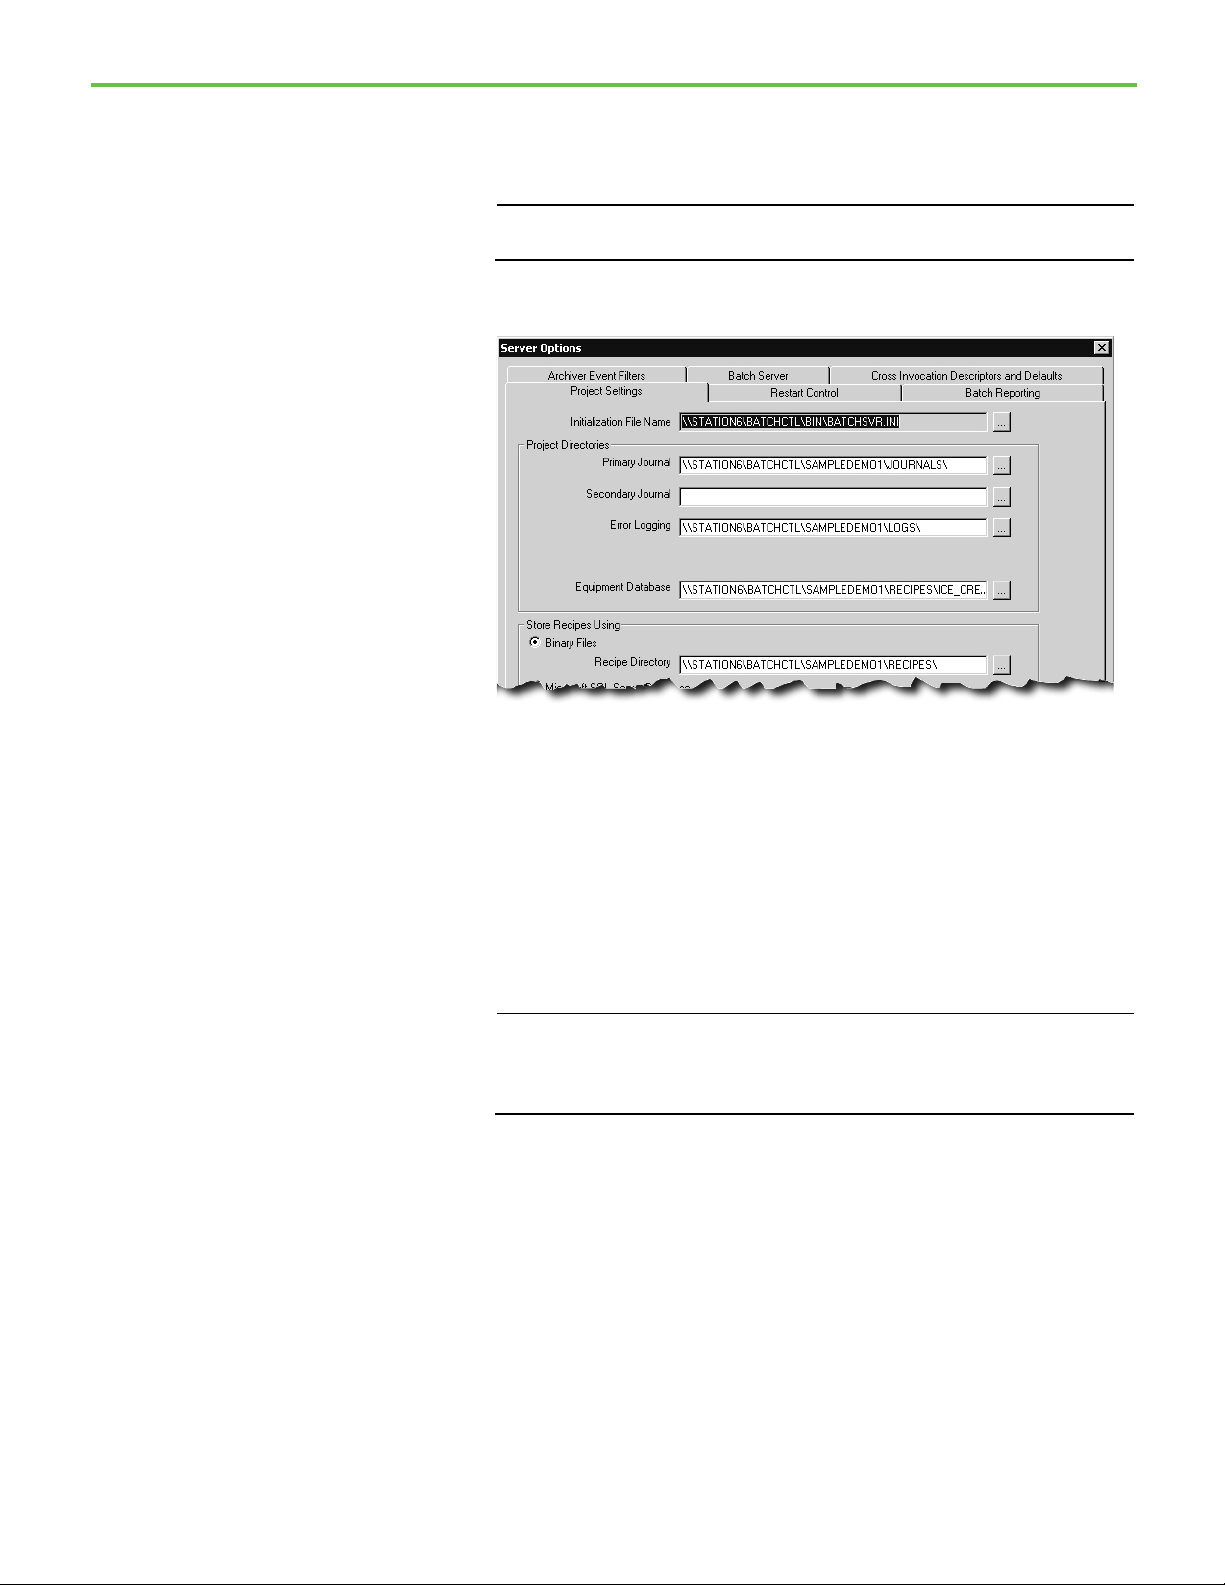
2. Select Options > Server Options. The Server Options dialog box opens
to the Project Settings tab.
3. In the Project Directories area, select the Primary Journal browse
button. The Select Directory dialog box opens.
4. From the Look in list, select the SampleDemo1\Journals folder, and
then select Open.
5. Select the Error Logging browse button. The Select Directory dialog
box opens.
6. From the Look in list, select the SampleDemo1\Logs folder, and then
select Open.
7. Click the Instructions browse button. The Select Directory dialog box
opens.
In order for the eProcedure Server to start, you must define the instruction
path and an instruction file for each instruction-based phase in the area
model. (See the FactoryTalk Batch Equipment Editor User Guide for
8. Select the Equipment Database browse button. The Select Equipment
Database dialog box opens.
9. From the Look in list, open the SampleDemo1\ Recipes folder, select
the ice_cream1.cfg file, and then select Open.
10. In the Store Recipes Using area, select Binary Files, and then select the
Recipe Directory browse button. The Select Directory dialog box
opens.
11. From the Look in list, select the SampleDemo1\Recipes folder, and
then select Open.
25
Page 26

Chapter 1 Introducing Material Manager
Options dialog box.)
12. Select the Restart Control tab.
13. Select the Primary Path browse button. The Select Directory dialog
box opens.
14. From the Look in list, select the SampleDemo1\Restart folder, and
then select Open.
15. Select the Secondary Path browse button. The Select Directory dialog
box opens.
16. From the Look in list, select the Bin folder.
17. Select the Batch Reporting tab. Leave Never (No Queue) as the default
reporting application.
18. Select OK to close the Server Options dialog box.
19. Select File >Exit to exit the FactoryTalk Batch Equipment Editor.
Tip: These steps set up the FactoryTalk Batch Server to run the tutorial steps in this
manual. There are many other settings to consider when setting up the FactoryTalk Batch
system. (See the FactoryTalk Batch Administrator Guide for more information on the Server
See also
Rebuild the recipe directory on page 27
26
Page 27

IMPORTANT
privileges.
for more information.
IMPORTANT
Rebuild the recipe directory
Start the FactoryTalk Batch
Chapter 1 Introducing Material Manager
To run the demonstration recipes, you must rebuild the recipe directory and
verify the recipes in the area model using the FactoryTalk Batch Recipe
Editor.
Administrator privileges are required to perform this procedure.
To rebuild the recipe directory:
1. Select Start > Rockwell Software > Recipe Editor. The FactoryTalk
Batch Recipe Editor reads the area model.
Tip: If you are logged in with an account that does not have administrator privileges, rightclick Recipe Editor and select More > Run as administrator to run under elevated
2. If prompted, log on to FactoryTalk. If a message displays asking you to
verify the recipes, select Cancel.
3. Select File > Rebuild Recipe Directory. When the rebuild is complete,
select OK, and then select Yes to verify the recipes.
4. When the recipe verification is complete, select Accept to save the
recipes, and then select Close.
5. Select File > Exit to exit the FactoryTalk Batch Recipe Editor.
and Material Manager
Servers
See also
Set up the sample demonstrations on page 19
The FactoryTalk Batch and Material Manager Servers may start automatically
when the computer starts. By default, the FactoryTalk Batch Server starts in
production mode. If FactoryTalk Batch has not been activated, the tutorial can
run in demo mode. While in demo mode, the FactoryTalk Batch Server runs
for a two-hour period and then stops.
Tip: The FactoryTalk Batch Server does not start in production mode without activation. The
Material Manager Server starts automatically when the FactoryTalk Batch Server starts. See
Activating Material Manager
To start or restart the FactoryTalk Batch Server:
1. Select Start > Rockwell Software > Batch Service Manager.
If you are logged in with an account that does not have administrator
privileges, right-click Batch Service Manager and select More > Run as
administrator to run under elevated privileges.
27
2. In the FactoryTalk Batch Service Manager, select the FactoryTalk
Batch Server if it is not listed in the Service box.
Page 28
Chapter 1 Introducing Material Manager
displays.
Guide for installation instructions.
Cold Boot
Warm Boot
on the batch list when the server previously terminated.
Warm All Boot
3. If the FactoryTalk Batch Server is running, select Stop.
4. If the name of the computer where the FactoryTalk Batch Server is
installed does not display in the Computer box, select the Select
Computer button.
5. In the Select Computer dialog box under Enter the object name to
select, type the name of the computer where the Batch Server is
installed (or select Advanced to search for a computer). Select OK.
Tip: The FactoryTalk Batch Service Manager must communicate with the Windows Service
Manager of the selected computer to determine what services are available. There may be
a noticeable delay when establishing communications. If the Service Manager cannot
communicate with the Windows Service Manager of the selected computer, a message
28
6. From the Service list, select FactoryTalk Batch Server.
Tip: If No Batch Services displays in the list, the FactoryTalk Batch Server is not installed
on the selected computer. See the FactoryTalk Batch Components Installation and Upgrade
7. To start the FactoryTalk Batch Server in Demo mode, select Allow
Demo Mode.
8. Select the method to use for booting the server.
Restarts the FactoryTalk Batch Server in a cold state. All journal data or
recipe content is erased upon startup.
Restarts the FactoryTalk Batch Server, restoring the set of batches that were
Restarts the FactoryTalk Batch Server only if it is able to restore all of the
batches to the batch list.
9. Select the Start/Continue button. The Service State area changes from
STOPPED to START PENDING. After a few moments, RUNNING
displays and the light changes to green. The Material Server starts
automatically with the FactoryTalk Batch Server.
Page 29

Phase Simulator for more information.
see if the Phase Simulator is started.
IMPORTANT
Start the sample
FactoryTalk Batch Phase
Simulator
Chapter 1 Introducing Material Manager
The FactoryTalk Batch Phase Simulator starts automatically. Minimize
the window.
10. Select Close to close the FactoryTalk Batch Service Manager.
Tip: If conversation becomes LOST while running in Demo mode, make sure that the
Simulator is running and try starting the server(s) again. See Starting the FactoryTalk Batch
FactoryTalk Batch comes with a phase logic simulation program, referred to
as the FactoryTalk Batch Phase Simulator used to simulate the batch process
without connecting to a PCD. The Phase Simulator imitates the functionality
of a data server and can communicate with the FactoryTalk Batch Server
using OPC communication protocol. The Phase Simulator is a powerful tool
for testing, experimentation and demonstration purposes. In this guide, run
the sample demonstration using the Phase Simulator.
Tip: If the Phase Simulator is required and OPC protocol is used for communications, the
FactoryTalk Batch Server automatically starts the Phase Simulator. Check the Windows taskbar to
To run the sample demonstration correctly, open the ice_cream1.sim file in
the Phase Simulator.
To start the sample FactoryTalk Batch Phase Simulator:
1. If the Phase Simulator is already running, maximize it from the
Windows taskbar. If the Phase Simulator is not running, select Start >
Rockwell Software > Simulator. The FactoryTalk Batch Phase
Simulator opens.
Administrator privileges are required to perform this procedure.
2. Select File > Open. The Open Simulator Configuration File dialog box
opens.
3. From the Look in list, open the Program Files > Rockwell Software >
Batch > SampleDemo1 > Recipes folder. Select the ice_cream1.sim file,
and then select Open.
4. Minimize the FactoryTalk Batch Phase Simulator window.
See also
Verify PCD communications on page 30
29
Page 30

Chapter 1 Introducing Material Manager
IMPORTANT
Verify PCD communications
Use the following instructions to verify PCD communications.
Administrator privileges are required to perform this procedure.
To verify PCD communications:
1. Select Start > Rockwell Software > Batch Service Manager. The
FactoryTalk Batch Service Manager opens.
2. Make sure FactoryTalk Batch Server is selected in the Service box.
3. Select Server Details. The FactoryTalk Batch Server Details dialog box
opens.
4. Select the PCD Communications tab. The Data Server Status area
displays the status of the conversation with the OPC_SIM data server
(Phase Simulator), which should be PHASES GOOD.
5. In the Tag Verify area, select Start to begin the verify process. The tag
verification process takes several minutes.
6. When the Status box shows COMPLETED, select OK to close the
FactoryTalk Batch Server Details dialog box.
Summary
In this chapter, you:
• Set up the Network Editor and the FactoryTalk Batch Server to run the
sample demonstration
• Started the FactoryTalk Batch Server in demo mode
• Opened the .sim file in the FactoryTalk Batch Simulator to run the
sample demonstration
This chapter provided a brief overview of the capabilities of the Material
Server. (See the FactoryTalk Batch Administrator Guide for more information
about the FactoryTalk Batch Server. See the FactoryTalk Batch Material Manager
Administrator Guide for more information about the Material Server.)
The rest of this document is designed to give you a tour through Material
Manager using the sample demonstration. Follow the step-by-step
instructions to learn how to define and run material-based recipes using
Material Manager and FactoryTalk Batch software.
30
Page 31

IMPORTANT
Start the Material Editor
Chapter 2
Introducing the Material Editor
The FactoryTalk® Batch Material Editor provides an interface to help you
create the material database, which consists of several tables of data that are
stored in your Microsoft SQL Server database. The Material Editor presents
the material database as two types of data:
• Material configuration data, which defines the materials, consists of
items such as the material name, description, properties, minimum
and maximum quantity, and the default quantity.
• Material storage configuration data, which defines the containers that
hold the materials, consists of items such as the container name,
description, type, properties, and capacity.
You also use the Material Editor to create relationships between the material
and container data by assigning materials to containers and distributing lots
to the containers.
In this chapter you add new data to the SAMPLE2_MATERIALS.mdf database
that was created automatically when you installed Material Manager.
Click the Start > Rockwell Software > Material Manager > Material Editor.
Administrator privileges are required to perform this procedure.
1. Expand the Materials folder. The list of materials in the
SAMPLE2_MATERIALS material database displays in the left pane.
2. Click the Materials folder. The detailed list of materials displays in the
right pane.
31
Page 32

Chapter 2 Introducing the Material Editor
Adding material states
A material is the logical representation of a recipe ingredient, such as
cream or sugar. For each material, you create lots, which are physical
instances of a material. For example, when a new shipment of cream
arrives at the factory you add a new lot to uniquely identify that
shipment of cream. When you distribute a lot to containers, the
distributed portions become sublots, which are the physical inventory
that is stored in a container. For example, your lot of cream may be
divided into two sublots that are stored in two separate containers.
3. Collapse the Materials folder, expand the Locations folder, and then
expand the Independent Containers folder. The lists of storage
locations in the SAMPLE2_MATERIALS material database display. The
detailed list of materials remains in the right pane until you click
another folder.
The Independent Containers folder displays a list of containers, which
are repositories for inventory. In Material Manager you define
associations between materials and containers. In the area model, you
define associations between containers and equipment modules. The
FactoryTalk Batch Server uses these associations at runtime to find the
container holding the appropriate material and its associated
equipment module to bind to a material-enabled phase step.
The Locations folder contains storage locations, which are a grouping
of containers. Normally, containers assigned to a storage location have
a short life span; they might be created by one recipe and deleted by
the next. This is a common activity for a pre-weigh recipe that
distributes measured amounts of material onto pallets and then a
mixing recipe that uses the pallets as its source of material.
4. Collapse the Locations and Independent Containers folders.
To be used in a batch, both the container and the materials within the
container must be in a Ready to Use state. Any other state prevents the
material and container from being used and provides you a means to identify
offline equipment and materials. For example, you could create a lot state
called QATest and assign it to a material lot to keep it from being used while it
is being tested. To put the lot and container into use again, you would change
the state to Ready to Use.
32
Page 33

Chapter 2 Introducing the Material Editor
In this exercise, you create a container state called Maintenance so you can
keep a container from being used while it’s being repaired.
1. From the Edit menu, select States. The States Configuration dialog
box opens to the Lot tab, which shows the lot states defined in the
SAMPLE2_MATERIALS.mdf material database.
2. Select the Container tab. The container states defined in the
SAMPLE2_MATERIALS.mdf material database display.
3. Click the New State button. The Create Container State dialog box
opens.
4. In the Name box, type Maintenance.
5. In the Description box, type Out of service for maintenance.
33
Page 34

Chapter 2 Introducing the Material Editor
Adding material types
6. Click OK. The new state is added to the list. Because you didn’t assign a
controller ID, the Material Editor automatically assigned the next
available number.
Controller IDs are used throughout the Material Editor to uniquely
identify items in the material database. A PCD programmer can use
these controller IDs to access pieces of data in the material database.
7. Click Close.
Material types are used for informational and organization purposes and do
not affect the building or execution of material-based recipes. The material
types appear in a selection list when you define a material.
In this exercise, you create two new material types: Dry and Liquid.
1. From the Edit menu, select Material Types. The Material Types dialog
box opens.
34
The types defined in the SAMPLE2_MATERIALS.mdf material database
are finished, intermediate, and raw, which are the defaults (indicated
by the blue information icon) and not editable. You can add more
material types, which are editable.
2. Click the Add button. The Edit Material Type dialog box opens.
3. In the Name field, type Dry.
Page 35

Adding a material class
Chapter 2 Introducing the Material Editor
4. In the Description field, type Raw material in dry state.
Leaving Controller ID at zero forces the Material Editor to assign the
next available number.
5. Click OK. The Dry material type displays in the list.
6. Click the Add button. Add another type, Liquid, with the description
Raw material in liquid state.
7. Click OK, and then click Close.
A material class defines a group of materials that are similar. For example, a
material class called Sweetener could contain materials such as Granulated
Sugar and Corn Syrup. Material classes are used for organizational purposes
and do not affect the execution of material-based recipes.
You can use material classes to simplify the assignment of materials to storage
containers. When you define a storage location, you must indicate the
material(s) that can be stored in the container. Using material classes, you can
assign all of the members of a class of materials to a container, instead of
assigning the materials individually.
In this exercise you create a new material class for nonfat frozen yogurt
products and define properties to define the class of materials.
35
Page 36

Chapter 2 Introducing the Material Editor
1. From the Edit menu, select Material Classes. The Material Classes
dialog box opens displaying the material classes defined in the
SAMPLE2_MATERIALS.mdf material database.
The material classes display in alphabetical order. Ungrouped is the
system default, indicated by the blue information icon, and therefore
not editable.
2. Click Add. The Create Material Class dialog box opens to the General
tab.
3. In the Name box, type ICE_MILK_NON_FAT.
4. In the Description box, type Ice Milk Products - Non Fat Frozen
Yogurt.
Leaving Controller ID at zero forces the Material Editor to assign the
next available number.
5. Click Apply. The Edit Material Class dialog box opens to the General
tab.
6. Select the Properties tab, and then click the New Property button.
7. In the Material Class Property box, type butterfat_content.
8. In the Minimum box, type 2.
9. In the Maximum box, type 7.
36
Page 37

Adding a material
Chapter 2 Introducing the Material Editor
10. In the Default Value box, type 5.
11. In the EUs box, type Percent.
12. Click Apply, then select the Synchronize checkbox.
13. Click OK, click Yes to propagate the change, and then click Close.
A material is an ingredient in a recipe. For each material, you specify lots,
which are instances of a material. When you distribute a lot to containers, the
distributed portions of the lot become sublots. A sublot is physical inventory
that is stored in a container.
You are going to add a new product to your line — Chocolate Hazelnut Ice
Cream. There is already a recipe for Triple Chocolate Ice Cream that uses the
same materials you need so you only have to add Hazelnuts (raw) and
Chocolate Hazelnut Ice Cream (finished) as materials.
1. Right-click the Materials folder, and then select New Material. The
Create Material dialog box opens to the General tab.
2. In the Name box, type HAZELNUT.
3. In the Description box, type Hazelnut pieces.
4. In the Engineering Units box, type KG.
5. From the Type list, select Raw, if necessary.
6. From the Class list, select NUT.
37
Page 38

Chapter 2 Introducing the Material Editor
Adding containers
7. From the Default Lot State list, select Ready to Use, if necessary.
You can use Inventory Key to interface the material inventory with
your plant production processes. Leave Inventory Key blank for this
exercise. Leaving Controller ID at zero forces the Material Editor to
assign the next available number.
8. Click OK.
9. In the same manner, add:
• Name = IC_CHOCOLATE_HAZELNUT
• Description = Chocolate Hazelnut Premium Ice Cream
• Engineering Units = KG
• Type = Finished
• Class = ICE_CREAM_PREMIUM
• Default Lot State = Ready To Use
Containers are repositories for inventory. In the Material Editor, you create
containers and then distribute lots of materials to them. When you run a
batch, the FactoryTalk Batch Server asks the Material Server to look for
containers that meet the material requirements of the step. That container is
then selected for binding to the batch if the total inventory of the container is
greater than the defined heel property. The type of container you associate
with a material also affects the binding process, which you will read more
about in a later chapter.
Material Manager supports three different types of containers:
38
• Composite Containers hold only one material and lot at a time. As new
sublots are created and linked to a composite container, the sublots are
combined within the container. An example of a composite container
is a tank that holds multiple sublots of milk. As each sublot is added to
the container they blend together making it impossible to distinguish
Page 39

Chapter 2 Introducing the Material Editor
between the sublots. During binding the entire content of the
container is considered.
• Plug-Flow Containers hold only one material, but can hold multiple
sublots. Each sublot remains distinct when added to the plug-flow
container. Sublots that are added to a plug-flow container are available
for use in a first-in/first-out fashion. The first sublot placed in the
container is the first sublot used, then the second sublot is used, and so
on. Material Manager tracks the usage of each sublot, and recognizes
when each lot is exhausted. During binding only the first-out sublot is
considered.
• Pallet Containers hold many different materials and many sublots of
each material. Each sublot can have a label, which is the only property
unique to a sublot. All other sublot properties are inherited from the lot
properties. You can use labels to distinguish between sublots that are
unique. All sublots added to a pallet container are available at any time.
During binding, each sublot on the pallet is considered.
In this exercise, you create two new independent containers to hold
hazelnuts.
1. Expand the Material Storage Configuration folder, right-click the
Independent Containers folder, and then select New Material
Storage Container. The Create Material Storage Container dialog box
opens.
2. In the Name box, type NUT_BIN3.
3. In the Description box, type Hazelnut storage.
4. In the Capacity box, type 10000.
5. In the Heel box, type 200.
6. In the Engineering Unit box, type KG.
7. In the Container Type area, select Plug Flow.
39
Page 40

Chapter 2 Introducing the Material Editor
Associating materials with
containers
Leave the State at the default of Ready to Use and Controller ID at 0
(zero). Leaving Controller ID at zero forces the Material Editor to
assign the next available number.
8. Click OK.
9. Add a second independent container:
• Name: NUT_BIN4
• Description: Hazelnut storage
• Capacity: 10000
• Heel: 200
• Engineering Units: KG
• State: Ready_to_Use
• Container Type: Plug Flow
10. Click OK.
Now that you have defined the two new materials and containers, you need to
associate them with each other.
In this exercise you associate the HAZELNUT material with two independent
containers and the IC_CHOCOLATE_HAZELNUT material with all the
containers in a storage location.
1. Expand the Materials folder, right-click HAZELNUT, and then select
Properties. The Edit Material dialog box opens to the General tab.
2. Select the Containers tab, expand the Independent Containers folder,
select NUT_BIN3, and then click the Add button.
3. Add NUT_BIN4 in the same manner.
4. Click OK.
5. Double-click IC_CHOCOLATE_HAZELNUT. The Edit Material dialog
box opens to the General tab.
6. Select the Containers tab, select the DEEP_FREEZE storage location,
and then click the Add Location button. All the containers in the
40
Page 41

Creating lots
Chapter 2 Introducing the Material Editor
Deep_Freeze storage location are added to the Configured Containers
area.
7. Click OK.
The material that you created is merely a logical definition of a material. The
actual physical material is a lot. Each lot inherits the characteristics and
properties of the material and also includes a physical quantity and a
controller ID to identify the lot. There can be multiple lots of a single material.
Each lot is uniquely identified by its lot name.
In this exercise, you create a lot for the latest shipment of hazelnuts, which is
10,000 KG.
1. Expand the Materials folder, right-click HAZELNUT, and then select
Properties. The Edit Material dialog box opens to the General tab.
2. Select the Lots tab, and then click the New Lot button.
3. In the Lot Name box, type Hazelnut100.
4. In the Quantity box, type 10000.
Leave State at the default of Ready to Use and Controller ID at 0 (zero).
Leaving Controller ID at zero forces the Material Editor to assign the
next available number.
41
5. Click Apply.
Page 42

Chapter 2 Introducing the Material Editor
Distributing lots to
containers
Now that you’ve defined the containers and the lots, you need to distribute
the lots to the containers. When you distribute a lot, you create a sublot that is
identified by a label.
• A sublot is a quantity of a lot stored in a container. Sublots inherit the
properties and values from lots. The sublot is the basis for tracking all
material movement, production and consumption.
• A label is the only property unique to a sublot. Generally a label is
thought of as a barcode, assigned to a specific sublot. The concept is
easy to follow on a pallet that holds many pre-measured bags (sublots)
of a material, each with an identifying barcode (label).
In this exercise, you distribute the lot of hazelnuts into two sublots that are
stored in two separate containers.
1. With the Edit Material dialog box still open, select the Inventory tab.
The lot you added in the previous exercise displays as undistributed.
2. Click the row number to select the lot record, and then click the
Distribute button. The Distribute Lot dialog box opens.
3. In the Label box, type Hazelnut100_1.
4. In the Quantity box, type 5000.
5. Expand the Independent Containers folder. All independent
containers that are possible storage locations for hazelnuts display.
6. Select NUT_BIN3.
42
7. Click OK. One-half of the lot is distributed and the remainder appears
on a new line as undistributed.
Page 43

Exiting the Material Editor
Summary
Chapter 2 Introducing the Material Editor
8. Distribute the remaining lot of hazelnuts to NUT_BIN4 with the label
of Hazelnut100_2.
9. Click OK.
You have entered the information necessary to build your new recipe, so exit
the Material Editor. From the File menu, select Exit. Click Yes to confirm the
exit.
In this chapter, you:
• Started the Material Editor
• Added Material States
• Added Material Types
• Added a Material Class
• Added a Material
• Added Containers
• Associated Materials with Containers
• Created Lots
• Distributed Lots to Containers
• Exited the Material Editor
This chapter provided a brief overview of the capabilities of the Material
Editor. See the FactoryTalk Batch Material Editor User Guide for more
information on the Material Editor.
43
Page 44

Page 45

IMPORTANT
Open the area model
Chapter 3
Introducing material-enabled phases
After you define the material and either the container or storage location
information, you are ready to reconfigure your area model to accommodate
material-enabled phases. A material-enabled phase is a phase that is enabled
to support the specification of a material as a means to find the appropriate
equipment and then bind to that equipment in a control recipe.
In this chapter you modify the icecream_2.cfg file to accommodate the new
containers you added.
1. Select Start > Rockwell Software > Equipment Editor.
Administrator privileges are required to perform this procedure.
2. Select File > Open.
3. From the Open dialog box, navigate to SampleDemo2\Recipes, select
ice_cream2.cfg, and then click Open. The area model opens with the
WEST_PARLOR and NORTH_PARLOR process cells displayed.
45
• The WEST_PARLOR process cell is a standard FactoryTalk Batch
configuration with recipes that create different flavors of ice cream.
• The NORTH_PARLOR process cell demonstrates the application of
material tracking to create the same ice cream flavors.
Page 46

Chapter 3 Introducing material-enabled phases
IMPORTANT
material database to require as little maintenance as possible.
Naming the area
Viewing enumeration sets
At startup, the FactoryTalk Batch Server clears the information in the
Material Server database according to the Area name specified for the area
model that is selected in the Server Options dialog box. If there are multiple
FactoryTalk Batch Servers in your system, it is very important that you assign
unique Area names.
The default Area name is AREA1, you need to change it to a unique name.
1. From the Edit menu, select Area. The Edit Area dialog box opens.
2. In the Name field, type ICECREAM_1.
3. Click OK.
If you have duplicate Area names in a system with multiple FactoryTalk Batch Servers,
you could experience batch failures. Each Area name must be unique.
Material Manager automatically creates three enumeration sets: MATERIALS,
CONTAINERS, and MATERIAL CLASSES that represent the configured
materials, containers, and material classes and their respective controller IDs
within the material database. The Material Server populates these
enumeration sets when you start the FactoryTalk Batch Equipment Editor,
FactoryTalk Batch Recipe Editor and FactoryTalk Batch Server.
You can view the MATERIALS, CONTAINERS, and MATERIAL CLASSES
enumeration sets from within the Equipment Editor but you must use the
Material Editor to make any changes.
Tip: Some changes to the area model requires that you validate all recipes and then restart the
FactoryTalk Batch Server, especially if it is set to Cold Restart. Since the MATERIALS, CONTAINERS,
and MATERIAL CLASSES enumeration sets originate from data in the material database, any change
you make in the Material Editor that affects the enumeration sets also requires that you validate all
recipes and then restart the Batch Server. For this reason, it is very important that you design your
1. From the Edit menu, select Enumeration Sets. The Create
Enumeration Sets and Enumerations dialog box opens.
2. Select MATERIALS. The list of materials displays in the Enumerations
box in numerical order by Controller ID.
46
Page 47

the ice_cream2.cfg area model.
Creating material-enabled
Chapter 3 Introducing material-enabled phases
3. Scroll down to see the two materials you added in the Material Editor.
Tip: The NULL_CONTAINER and NULL_MATERIAL enumerations are default values assigned
to each enumeration set by the Equipment Editor. The other listed enumerations belong to
phases
4. Select CONTAINERS. The list of containers displays in the
Enumerations box.
The CONTAINERS enumeration set contains only independent
containers and storage locations, not containers within storage
locations. In this way changes made to containers within storage
locations do not change the area model.
5. Select MATERIAL_CLASSES. The list of material classes displays in
the Enumerations box.
6. Click OK to close the dialog box.
Without Material Manager, you need to create a phase for each material in a
recipe. In this example, phases are needed for each material used in the
recipe: ADD_CREAM, ADD_EGG, ADD_SUGAR, and ADD_MILK.
47
Page 48

Chapter 3 Introducing material-enabled phases
It is even more complicated if there is more than one container for each
material. For example, if cream is stored in five different containers, you
would need five phases, five equipment modules, and five recipes to get cream
from the appropriate container. The operator then has to choose the recipe to
run based on where the cream is stored. Imagine the permutations of recipes
required when sugar, eggs and milk are stored in different containers as well.
With Material Manager, you can replace all of these phases with one materialenabled phase. In this case, these material-enabled phases move material into
the process cell and are therefore designated as material additions. The other
type of material-enabled phase moves material away from the process cell and
are therefore designated as material distributions. It is possible for a
material-enabled phase to support both actions.
Tip: Material Manager currently tracks the transfer of materials on Addition and Distribution Feeds.
Material enabled phases do not track material transfers between units or phases.
1. Double-click NORTH_PARLOR. The unit level displays. The
NORTH_PARLOR process cell contains two units, which are identical.
Units that contain material-enabled phases are configured the same
as standard units — create a unit class and then create instances of
the unit class.
48
Page 49

Chapter 3 Introducing material-enabled phases
2. Double-click NP_MIXER1. The equipment phases and modules
display.
3. Select NP_ADDDAIRY_M1, select NP_ADDSWEET_M1, and then
select NP_ADDEGG_M1. Notice how the MBR_ADD phase is selected
for each instance.
With Material Manager, you can create multiple equipment modules
from a single phase. Notice that the phases ADD_CREAM,
ADD_SUGAR, ADD_EGG and ADD_MILK from the previous example
are replaced by a single material-enabled phase, MBR_ADD. The
selection of the correct equipment module is determined as the batch
runs, based on the configuration of the step in the recipe.
49
Page 50

Chapter 3 Introducing material-enabled phases
Adding material-enabled
4. In the Phases list, double-click MBR_ADD. The Edit Phase dialog box
opens to the General tab.
phase parameters
Selecting Material Based Recipes marks the phase as supporting
materials and automatically configures the parameters and reports
needed to run a material-enabled phase. It also implies that equipment
modules based on this phase must be programmed to follow a protocol
so the FactoryTalk Batch and Material Servers can track material
usage. (See: Programming a material-enabled phase on page 54
).
Material Manager automatically adds two parameters to each materialenabled phase: MATERIAL and AMOUNT. There are three optional
parameters built in to Material Manager: CONTAINER, LOT, and LABEL.
Custom parameters can also be created and used.
1. Select the Parameters tab.
50
Page 51

Chapter 3 Introducing material-enabled phases
• The MATERIAL parameter defines the minimum material
specification required to query the material database for containers
to consider as binding candidates for a material-enabled phase.
• The AMOUNT parameter is the set point, or target, for the quantity
of MATERIAL for the equipment module. Material additions are
expressed as zero or a positive value. Material distributions are
expressed as zero or a negative value. The minimum/maximum
range of valid values should reflect the possible use of the phase. If
the phase is to handle both a material addition and distribution, the
range should span positive and negative values.
2. Select Add Optional Material Parameters, and then click Yes. The
optional material parameters display.
• The CONTAINER parameter has the FactoryTalk Batch Server store
the container to which a material phase step is bound at run time,
which makes the container value available for downloading to the
phase logic.
• The LOT parameter for material additions is part of the material
specification used to query the material database for containers to
be considered as binding candidates for a material phase. For
material distributions, it is the name of the lot assigned to the
inventory to be distributed.
• The LABEL parameter for material additions is part of the material
specification used to query the material database for containers to
be considered as binding candidates for a material phase. For
material distributions, it is the name of the label assigned to the
inventory to be distributed.
• The MATERIAL_CLASS parameter has the FactoryTalk Batch Server
present a dialog box to the operator when a batch is added to the
batch list so the operator can select the material to use in the recipe.
• All Material Manager parameters support the Automatic
Upload/Download functionality.
51
Page 52

Chapter 3 Introducing material-enabled phases
Adding material-enabled
Defining equipment
phase report parameters
3. Disable Add Optional Material Parameters, and then click Yes.
Each material-enabled phase has two required material report parameters:
ACTUAL_AMOUNT and FEED_COMPLETE. You also can create custom
report parameters.
1. Select the Reports tab.
• The ACTUAL_AMOUNT report parameter holds the amount of
material the equipment module consumed (material addition) or
produced (material distribution). Material additions are expressed
as zero or a positive value. Material distributions are expressed as
zero or a negative value.
• The ACTUAL_AMOUNT does not have to equal the AMOUNT
parameter value but should have a sign that agrees with the feed
type of the recipe phase step.
• The FEED_COMPLETE report parameter is a signal to the
FactoryTalk Batch Server that the addition or distribution
completed successfully. A lack of material, lack of storage capacity,
phase failure, or stopping a phase could all result in the interruption
of a material addition or distribution. When this occurs, the phase
logic sets FEED_COMPLETE to false, so that batch execution is held
until the phase can rebind to another container.
modules
All Material Manager report parameters support the Automatic
Upload/Download functionality.
2. Click Cancel.
You can create multiple equipment modules from a single material-enabled
phase. The material specification, material, and optionally, the lot and label
are configured on a material-enabled phase step in the FactoryTalk Batch
Recipe Editor. The FactoryTalk Batch Server uses this information to find
containers and the associated equipment modules to bind to a recipe.
In this exercise, you associate the two new containers with the existing
NP_ADDNUT_F1 and NP_ADDNUT_F2 equipment modules.
1. Click the Go Up button to return to the unit level.
2. Double-click NP_FREEZER1. The equipment phases and modules
display.
3. Double-click NP_ADDNUT_F1. The Edit Equipment Module dialog box
opens to the General tab.
4. Select the Containers tab, and then expand the Containers folder. The
Containers and Storage Location Associations box lists the containers
52
Page 53

IMPORTANT
Restart the FactoryTalk
Chapter 3 Introducing material-enabled phases
in the material database. The area on the right displays the containers
associated with the phase.
5. Select NUT_BIN3, and then click the ADD button.
6. To indicate this container adds material to the recipe, select the check
box in the Addition column.
7. Add NUT_BIN4 in the same manner.
Now the NP_ADDNUT_F1 equipment module is associated with the
four containers that hold nuts in this plant. If any of these containers
is holding inventory that matches the material specification of an
MBR_ADD phase in a recipe, the equipment module could then be
bound as the means for getting that inventory added to the batch.
Batch server
8. Click OK.
9. Click the Go Up button.
10. Add NUT_BIN3 and NUT_BIN4 with addition feed types to the
NP_ADDNUT_F2 equipment module in NP_FREEZER2.
11. Save the ice_cream2.cfg file, and then exit the Equipment Editor. If you
are prompted to enter comments for auditing, type Updated material
containers, and click OK.
Since you have made modifications to the area model, you must restart the
FactoryTalk Batch Server.
1. Select Start > Rockwell Software > Batch Service Manager. The
FactoryTalk Batch Service Manager opens.
Administrator privileges are required to perform this procedure.
2. From the Service list, select FactoryTalk Batch Server.
3. Click the Stop button. Wait until the Service State areas displays
STOPPED.
4. Click the Start/Continue button. The Service State area changes from
STOPPED to START IS PENDING. After a few moments, RUNNING
displays and the light changes to green.
5. Click Close to close the FactoryTalk Batch Service Manager.
53
Page 54

Chapter 3 Introducing material-enabled phases
Setting material container
Programming a material-
priorities
Container priorities define the order in which containers are considered as
candidates for binding a specific material. For example, a container holding
the oldest material may need to be used before containers with newer
quantities.
You want hazelnuts added to the batch from NUT_BIN3 as long as there is
enough material to fulfill the material requirements. Only when the inventory
in NUT_BIN3 is depleted should the batch pull from NUT_BIN4. To achieve
this configuration, set the priority for NUT_BIN3 to a smaller number than
NUT_BIN4 to indicate that NUT_BIN3 has a higher priority.
1. Start the Material Editor.
2. Expand the Materials folder, and then double-click HAZELNUT. The
3. Select the Priorities tab. The containers you added to the area model
4. In the Priority boxes for NUT_BIN3, type 10.
5. In the Priority boxes for NUT_BIN4, type 20.
Edit Material dialog box opens.
display.
enabled phase
6. Click OK.
To maintain inventory levels within the material database and record
inventory in the Batch Event Journal, follow this protocol when writing phase
logic.
• The phase logic must request a download of the AMOUNT parameter
from the FactoryTalk Batch Server.
• The phase logic must upload the ACTUAL_AMOUNT and
FEED_COMPLETE report parameters to the FactoryTalk Batch Server
before entering a terminal state (COMPLETE, STOPPED or ABORTED)
You can use the Automatic Upload/Download functionality in
FactoryTalk Batch to meet this protocol requirement. The FactoryTalk
Batch Server downloads the AMOUNT parameter before the
equipment module is commanded to start and uploads the
ACTUAL_AMOUNT and FEED_COMPLETE report parameters after
the phase logic runs to a terminal state.
54
Page 55

Summary
Chapter 3 Introducing material-enabled phases
• The sign of the value in the ACTUAL_AMOUNT report parameter must
match the configured feed type. Additions are positive or zero.
Distributions are negative or zero
This figure illustrates the sequence of events that occur when a materialenabled phase is executed within a recipe.
In this chapter, you:
• Opened an area model
• Named an area model
• Viewed enumeration sets
• Created a material-enabled phase
• Restarted the FactoryTalk Batch Server
• Set container priorities
This chapter provided a brief overview of the capabilities of the Equipment
Editor. (See the FactoryTalk Batch Equipment Editor User Guide for more
information.)
55
Page 56

Page 57

IMPORTANT
Create a material-based
operation
Chapter 4
Introducing material-based recipes
Once you have defined your material data and modified your area model, you
can begin to modify your master recipes in the FactoryTalk Batch Recipe
Editor. The process of creating material-based recipes is not too different
than creating standard recipes. In fact, material-enabled phase steps are
added to an operation as standard phase steps.
In this chapter, you create a new material-based operation that adds cocoa
and hazelnuts to the sweetcream mixture, which is the basis for all the ice
cream produced in the plant.
1. Select Start > Rockwell Software > Recipe Editor. If the Recipes
Requiring Verification dialog box opens, click Cancel.
Administrator privileges are required to perform this procedure.
2. Select File > New Top Level. The New dialog box opens.
3. Select Operation, and then click OK. The Unit Requirement dialog box
opens.
57
Page 58

Chapter 4 Introducing material-based recipes
You want the recipe to run on both units in the process cell.
4. Select Class-Based, select MBR_FREEZER_CLS, and then click OK.
The initial and final steps of the new operation display in the SFC
View.
5. Select the initial step, and then click the Add Step button, select
MBR_ADD, and then click OK.
6. Click the Add Parallel button, select RECIRC, and then click OK.
7. Select the last transition, click the Add Step button, select TEMP_CTL,
and then click OK.
8. Click the Add Parallel button, select RECIRC, and then click OK.
9. Select the last transition, click the Add Step button, select MBR_ADD,
and then click OK.
10. Click the Add Parallel button, select RECIRC, and then click OK.
11. Select the last transition, click the Add Step button, select
MBR_DUMP, and then click OK.
58
Page 59

Creating recipe formula
parameters
Assigning formula values
Chapter 4 Introducing material-based recipes
12. Select Recipe > Header Data, and then enter the following:
• Procedure Identifier: MCLS_CHOCOLATE_HAZELNUT_OP
• Author: Your Name
• Product Name: CHP-100
• Batch Size Default: 5000
• Batch Size Max: 10000
• Units of Measure: KG
• Estimated Duration: 55
• Procedure Description: Chocolate Hazelnut Premium Ice Cream
13. Click OK, and then click Proceed. If prompted, enter auditing
comments, if desired, and then click OK.
Because you want to defer the amounts of the materials at this level in the
recipe, you need to add formula parameters. You will enter default amounts
at the procedure level and the operator will have an opportunity to change the
amount when the batch is added to the batch list.
1. From the Recipe menu, select Recipe Parameters/Reports. The
Procedure Properties dialog box opens.
2. Click the Add Parameter button.
3. In the Name box, type COCOA_AMT.
4. In the Max box, type 500.
5. In the Enum/EU box, type KG.
6. Select Scalable.
7. Click the New button, and then add HAZELNUT_AMT with the same
values.
59
8. Click OK.
For this recipe, you defer the actual amounts of the materials and enable
automatic binding.
1. Select MBR_ADD:1, and then click the Value Entry button. The
Parameter Value Entry/Report Limit Entry dialog box opens.
2. For AMOUNT, select Defer from the Origin list, and then select
COCOA_AMT from the Value list.
Page 60

Chapter 4 Introducing material-based recipes
Step
Parameter
Origin
Value
Display
3. For MATERIAL, select COCOA from the Value list, and enable Display.
Container Binding is set to Automatic, which is the default. You set
the Feed Type to Addition in the Equipment Editor.
4. Click OK. The SFC is updated to show COCOA MATERIALS for
MBR_ADD:1.
5. Enter formula parameters for the remaining steps as indicated in this
table. Use the default values for all other entries.
RECIRC:1 RECIRC_RATE Value 50 Yes
TEMP_CTL:1 HOLD_TIME Value 5 No
TEMP_SP Value 25 Yes
RECIRC:2 RECIRC_RATE Value 30 Yes
MBR_ADD:2 AMOUNT Defer HAZELNUT_AMT No
MATERIAL Value HAZELNUT Yes
RECIRC:3 RECIRC_RATE Value 20 Yes
MBR_DUMP:1 AMOUNT Value -5000 Yes
MATERIAL Value IC_CHOCOLATE_HAZELNUT No
6. From the View menu, select Table. Your finished operation should be
similar to this.
60
Page 61

Creating a unit procedure
Chapter 4 Introducing material-based recipes
7. From the View menu, select SFC.
8. Save the operation.
The next step to creating the chocolate hazelnut recipe is to create a unit
procedure, which is going to have only one operation.
1. From the File menu, select New Top Level. The New dialog box opens.
2. Select Unit Procedure, and then click OK. The Unit Requirement
dialog box opens.
3. Select Class Based, select MBR_FREEZER_CLS, and then click OK.
The initial and final steps of the new unit procedure display in the SFC
View.
4. Select the initial step, and then click the Add Step button. The
Operation Select dialog box opens.
5. Select MCLS_CHOCOLATE_HAZELNUT_OP, and then click OK.
6. From the Recipe menu, select Recipe Parameters/Reports. The
Procedure Properties dialog box opens. Enter recipe formula
parameters as indicated in this figure.
7. Select MCLS_CHOCOLATE_HAZELNUT_OP, click the Formula
Values button, and then enter formula values as shown in this figure.
8. From the Recipe menu, select Header Data, and then enter the
following:
• Procedure Identifier: MCLS_CHOCOLATE_HAZELNUT_UP
• Author: Your Name
• Product Name: CHP-100
• Batch Size Default: 5000
• Batch Size Max: 10000
• Units of Measure: KG
• Estimated Duration: 55
• Procedure Description: Chocolate Hazelnut Premium Ice Cream
61
Page 62

Chapter 4 Introducing material-based recipes
Enabling dynamic unit
Create a procedure
To support the flexibility of the two units within NORTH_PARLOR process
allocation
cell, you want to enable dynamic unit allocation, which will provide more
binding options.
9. Click OK, and then click Proceed. If prompted, enter auditing
comments, if desired, and click OK.
10. Save the unit procedure. If prompted, enter auditing comments, if
desired, and click OK.
1. From the View menu, select Options. The Options dialog box opens.
2. If necessary, enable Support Dynamic Unit Allocation, and then click
Apply.
3. Save the unit procedure. If prompted, enter auditing comments, if
desired, and click OK.
The last step in building your recipe is to create a procedure. Because
Dynamic Unit Allocation is enabled, you must define the equipment
requirements and binding method before you can build the recipe procedure.
1. Select File > New Top Level. The New dialog box opens.
62
Page 63

Chapter 4 Introducing material-based recipes
2. Select Procedure, and then click OK. The Procedure - Unit
Requirements dialog box opens.
3. Click the Add Unit Requirement button. The Add Unit Requirement
dialog box opens.
4. In the Name box, type FREEZER.
The unit requirement Name is a label and acts like a lookup table for
the FactoryTalk Batch Server. When a recipe is put on the Batch List
and the FactoryTalk Batch Server encounters the unit requirement
name, the Server looks up all the unit classes or instances that are
mapped to the unit requirement name.
North_Parlor has two units that can make chocolate hazelnut ice
cream. In the area model, there are two unit instances (NP_MIXER_1
and NP_MIXER_2) based on the MBR_MIXER_CLS unit class and two
unit instances (NP_FREEZER_1 and NP_FREEZER2) based on the
MBR_FREEZER_CLS unit class. You want the operator to select which
mixer and freezer to use when the batch is created. To achieve this, you
need to create a unit requirement name (MIXER) that is configured to
the MBR_MIXER_CLS unit class and a unit requirement name
(FREEZER) that is configured to the MBR_FREEZER_CLS unit class.
You also want to select the batch creation binding method.
5. If the Class Based section is not enabled, select the Class Based option.
6. From the Class Based area, select MBR_FREEZER_CLS from the Unit
Class list, and then click OK.
7. Select Alias_MIXER_CLS from the Procedure - Unit Requirements
dialog box, and then click the Edit Unit Requirement button.
63
Page 64

Chapter 4 Introducing material-based recipes
8. In the Name box, type MIXER.
9. From the Class Based list, select MBR_MIXER_CLS.
10. In the Available Downstream Units box, select FREEZER, and then
click the right-arrow button.
11. Click OK.
When the recipe is put on the Batch List, the FactoryTalk Batch Server
encounters the MIXER unit requirement name, which specifies the
equipment required for the recipe, looks for all unit instances of the
unit class with the MIXER unit requirement name, and then prompts
the operator to select either NP_MIXER_1 or NP_MIXER_2. The same
process occurs for the FREEZER unit requirement name.
12. Click Close.
13. From the Recipe menu, select Header Data, and then enter the
following:
• Procedure Identifier: MCLS_CHOCOLATE_HAZELNUT
• Author: Your Name
• Product Name: Chocolate Hazelnut Premium
• Product Code: CHP-100
64
Page 65

• Batch Size Min: 3000
• Batch Size Default: 5000
• Batch Size Max: 7000
• Units of Measure: KG
• Estimated Duration: 55
• Procedure Description: Chocolate Hazelnut Premium - class
based/material based
14. Enable Released to Production so this recipe displays when adding a
batch to the batch list in the FactoryTalk Batch View.
15. Click OK.
16. Enter recipe formula parameters as indicated in this figure.
Chapter 4 Introducing material-based recipes
These default values are presented to the operator during batch
creation. Since the formula values are deferred, the operator can
change the default values.
65
Page 66

Chapter 4 Introducing material-based recipes
17. Select the initial step, and then click the Add Step button. The Unit
Procedure Select dialog box opens.
18. From the Unit Requirements Name list, select MIXER.
19. From the Recipe Name list, select MCLS_SWEETCREAM_UP, and
then click OK.
20. Add MCLS_TRANSFER_OUT_UP in the same manner.
So far you have placed the ingredients into the mixer to produce the
sweet cream base for the ice cream and added the step to transfer the
mixture out of the mixer. Next, add the step to transfer the
sweetcream base into the freezer.
21. Click the Add Parallel button. The Unit Procedure Select dialog box
opens.
22. From the Unit Requirements Name list, select FREEZER.
23. From the Recipe Name list, select MCLS_TRANSFER_IN_UP, and
then click OK.
24. Select the final transition, click the Add Step button, and then add
MCLS_CHOCOLATE_HAZELNUT_UP with FREEZER as the
equipment requirement.
66
Page 67

Your recipe should be similar to the following figure.
Chapter 4 Introducing material-based recipes
25. Select MCLS_SWEETCREAM_UP:1, click the Formula Values button,
add formula values as shown in this figure, and then click OK.
26. Select MCLS_CHOCOLATE_HAZELNUT_UP:1, click the Formula
Values button, and then add formula values as shown in this diagram.
67
Page 68

Chapter 4 Introducing material-based recipes
Linking phase groups
Use phase link groups to identify phases that communicate and work
together, such as the XFR_OUT and XFR_IN phases that transfer the
sweetcream mixture from the mixer to the freezer. In the Equipment Editor,
both the XFR_OUT and XFR_IN phases are configured with one message
partner, which indicates that these phases must communicate with one other
phase to work properly.
The origin of the formula values is deferred so the parameters display
when a batch is added to the batch list to give the operator a chance to
enter the values.
27. Save the procedure. If prompted, enter auditing comments, if desired,
and click OK.
68
Equipment Editor: Phase Message Partners
In the Recipe Editor, you must create a phase link group at the procedure level
to complete the association.
Page 69

Verifying the recipe
Chapter 4 Introducing material-based recipes
1. Select XFR_IN:1 in either the Procedure Hierarchy or the SFC view.
2. From the Link menu, select Link Groups. The Phase Link Group dialog
box opens.
3. Click the Group 1 column heading to select the Group 1 column, and
then click the Add button.
69
4. Click OK.
5. Click XFR_OUT:1.
6. From the Link menu, select Link Groups. The Phase Link Group dialog
box opens.
7. Select the Group 1 column, click the Add button, and then click OK.
Once you have added all the material-enabled phases to the recipe, verify the
recipe before the recipe is ready to run.
1. From the File menu, select Verify All Recipes.
If you are prompted to save, click Yes.
2. When the verification is complete, click Accept, and then click Close. If
prompted, enter auditing comments, if desired, and click OK.
3. Exit the FactoryTalk Batch Recipe Editor.
Page 70

Chapter 4 Introducing material-based recipes
Summary
In this chapter, you:
This chapter provided a brief overview of the capabilities of the Recipe Editor
when used with Material Manager. (See the FactoryTalk Batch Recipe Editor User
Guide for more information on creating material-based recipes, unit binding,
and linking phase groups.)
• Created a material-based operation
• Created recipe formula parameters
• Assigned formula values
• Created a unit procedure
• Linked phase groups
70
Page 71

IMPORTANT
IMPORTANT
Running a material-based
Chapter 5
Running material-based recipes
Running a material-based control recipe offers more flexibility in the binding
process and the capability to track inventory. The FactoryTalk Batch Server
and FactoryTalk Batch Material Server work together to pull the necessary
information from the material database so either FactoryTalk Batch or the
operator can select the appropriate containers to supply materials to the
recipe.
In this chapter, you run a material-based recipe using the FactoryTalk Batch
Phase Simulator. The Phase Simulator supplies the ACTUAL_AMOUNT and
FEED_COMPLETE parameters to enable the batch to run. This data normally
is supplied by the phase logic in the process-connected device (PCD).
Run in simulation mode
recipe
Running a recipe in simulation mode is a good way to test the recipe. In this
section, you use the .sim file for the ice_cream2.cfg file, which is already
configured to run the Chocolate Hazelnut recipe.
1. Select Start > Rockwell Software > Simulator.
Administrator privileges are required to perform this procedure.
2. Select File > Open. The Open Simulator Configuration File dialog box
opens.
3. From the Look in list, open the c:\Program Files\RockwellSoftware\
Batch\SampleDemo2\ Recipes folder. Select the ice_cream2.sim file, and
then click Open.
4. Minimize the Phase Simulator window.
1. Select Start > Rockwell Software > View.
Administrator privileges are required to perform this procedure.
71
Page 72

Chapter 5 Running material-based recipes
2. Click the Add Batch button, select MCLS_CHOCOLATE_HAZELNUT,
and then click OK. The Batch Creation dialog box opens.
The deferred the formula parameters display in the Batch Creation
dialog box with the default settings. You can change the values if you
need to adjust the recipe.
In the Unit Binding area, the two alias names you defined are
displayed. You can select which units to bind to the recipe. Because
there is enough material in all the containers you are presented with
both units.
3. In Unit Binding area, select NP_MIXER1 and NP_FREEZER1 if not
already selected.
4. In the Batch ID box, type BATCH101, and then click the Create button.
5. Select the batch, click the Start Batch button, and then click Yes to
start the batch.
6. Click the Procedure as SFC button. Adjust the panes, if necessary so
you can see the Container column to watch as the FactoryTalk Batch
Server binds to containers.
72
Page 73

Checking inventory levels
Chapter 5 Running material-based recipes
7. When the recipe reaches MBR_ADD:2 under
MCLS_CHOCOLATE_HAZELNUT_OP:1 notice that the batch binds to
NUT_BIN3 and the priority of 10 shows in the Index column. After the
phase is complete, the Container setting changes to
NULL_CONTAINER.
8. Let the batch run to completion.
When a batch is complete, the FactoryTalk Batch Server sends the inventory
consumed or distributed to the Material Server where it is then added to the
material database. You can view the inventory levels in the Material Editor. If
the Material Server goes down and you are forced to run a material-based
recipe without it, you must update the inventory in the material database
manually.
In this exercise you view the inventory consumed during a batch and then
verify that consumption in the Material Editor.
1. When the batch is complete, click the Event Journal button, and then
click the Journal button. The Event Data Files dialog box opens.
2. Select BATCH101, and then click OK.
3. In the Column 1 box, select Description, type Material Addition in the
Filter 1 box, and then click Refresh.
You have to collapse a few columns to get this display, otherwise you
can scroll left and right to see which containers were selected for
binding for each material and how much was consumed.
4. Start the Material Editor, expand the Materials folder, double-click
Hazelnut, and then select the Inventory tab. The Material Editor
shows that 250 KG was consumed out of NUT_BIN3.
73
To update the inventory levels manually, select the lot, and then click
the Edit Distribution button. The View Lot Distribution dialog box
opens. Change the inventory level in the Quantity box, and then click
OK.
Page 74

Chapter 5 Running material-based recipes
Using manual phase control
You can use manual phase control to test your material-enabled phases. Select
and acquire the phase, and then start the phase. You are prompted to indicate
the feed type, select a material, and select a container. The material selection
is not limited to valid materials for the phase so you must know the correct
material. You run the manual phase like any standard phase.
1. Back in FactoryTalk Batch View, click the Phase Control button. The
Phase Control view opens and displays the process cell.
2. Double-click the NORTH_PARLOR icon to view the units within the
NORTH_PARLOR process cell.
3. Click the NP_FREEZER1 icon. A list of the phases in NP_FREEZER1
display in the Phases section. You may need to move the vertical split
bars to the right or left so your window appears as shown in step 4.
4. Select the NP_ADDNUT__F1 icon, and then click the Acquire
command button. Click Yes to confirm the acquisition of the phase.
Notice the green operator (Opr) light, which indicates that the
NP_ADDNUT__F1 phase is now owned by the operator.
74
5. Click the Start command button, and then click Yes to start the
NP_ADDNUT_F1 phase. The Phase Control Feed Type and Material
Selection dialog box opens.
6. From the Material list, select HAZELNUT.
Page 75

Binding a material-enabled
Chapter 5 Running material-based recipes
7. Click OK. The Phase Control dialog box opens.
8. In the Enter Batch ID box, type TEST_1, and then select NUT_BIN4 as
the container to bind to the phase.
9. Click OK. After running for a few seconds, the Unacknowledged
Prompts button on the toolbar starts flashing yellow
10. Click the Unacknowledged Prompts button; AMOUNT HAZELNUT
displays in the Unacknowledged Prompts list.
11. Double-click the AMOUNT HAZELNUT row. The Acknowledge dialog
box opens showing the default value as 0. The allowable range of values
is 0 to 5000.
12. Type 40, and then click the Acknowledge button. The phase continues
to run.
phase manually
As the phase runs, you can use the command buttons to Hold, Restart,
Abort, Stop, Pause, or Resume the phase.
13. When the phase completes, click the Reset command button, and then
click Yes to confirm the reset.
14. You can run this phase as many times as necessary to test it. When you
are done testing, release control back to FactoryTalk Batch so the phase
can run as part of a recipe.
15. Click the Release command button, and then click Yes to confirm the
release.
You set up your system to pull hazelnuts from NUT_BIN3 before NUT_BIN4
by setting the container priorities. If for some reason you want to pull
material from NUT_BIN4 you can accomplish this easily by manually binding
a phase when the recipe is running. This is the same procedure you follow to
handle a split feed situation.
1. Add another batch of MCLS_CHOCOLATE_HAZELNUT, and then
switch to SFC view.
2. Select MBR_ADD:2 at the bottom of the Procedure Hierarchy under
MCLS_CHOCOLATE_HAZELNUT_OP:1
75
Page 76

Chapter 5 Running material-based recipes
first bind the phase manually using this procedure.
Handling split feeds
3. Click the Bind command button, and then click Yes. The Prompt to
Bind a Material Phase Step dialog box opens.
4. Select NUT_BIN4, and then click OK. NUT_BIN4 displays in the
Container column. The other MBR_ADD phases display NULLCONTAINER since they are bound as the recipe executes.
5. Switch to Batch List view, and then start the batch. The batch runs to
completion and pulls material from NUT_BIN4 instead of NUT_BIN3.
Tip: If you need to perform an active step change on a material-enabled phase, you must
6. Send all completed batches to the Trash, and then exit the FactoryTalk
Batch View.
Split feeds occur when a material phase step does not add or distribute all of
the material configured by the step. By default, the batch is HELD and the
Material Server calculates and sends new AMOUNT parameters to the
FactoryTalk Batch Server. To resume processing, the operator must perform
an active step change away from the unfinished step, manually rebind the
unfinished step, perform an active step change back, and then restart the
batch.
If you want the batch to automatically process a split feed, change Hold on
Split Feed on the Material Policies tab in the Server Options dialog box (in the
Equipment Editor) to No and create a loop in the recipe so that the binding
process can select another container for material additions. You can easily add
a material loop to your recipe with the Create Material Loop button in the
FactoryTalk Batch Recipe Editor.
76
Page 77

Chapter 5 Running material-based recipes
For material distributions, the Material Server does not attempt to decide
whether or not a container might be full. To use the same recipe loop, you
need an independent application to update the container selection priority so
that a full container is not selected again.
Summary
In this chapter, you:
• Ran a material-based recipe
• Checked inventory levels
• Used manual phase control
• Bound a phase manually
(See Binding material-based recipes on page 91
in this guide, or the
FactoryTalk Batch View User Guide for more information on running materialbased recipes.)
77
Page 78

Page 79

When would I customize an
insertion point?
What library can be
Chapter 6
Using custom code insertion points
Insertion points are function calls that a product makes into a customizable
function library. FactoryTalk Batch Material Manager uses insertion points to
support customization by making the standard processing call code, which
users can change.
For material tracking, insertion points are provided in three general areas of
processing performed by the Material Server:
• Combining sublots inside a composite container
• Updating inventory quantities
• Initializing lots as they are created
Combining sublots inside a composite container can require customization.
Without customization, sublots added into a composite container already
holding a sublot of a different lot will become part of that other lot. Often it is
more appropriate for a new lot to be created. If this is the case, how should a
new lot name be selected? This question can be applied to the label of the
sublots as well as the attributes of the sublots. The correct processing can be
dependent on many factors that are specific to a plant or process.
Updating inventory quantities can require customization. As sublots are
produced and consumed, customers can find it useful to trigger other
applications to perform processing. Insertion points provide a place for users
to create points of integration between applications. For example, insertion
points added around inventory quantity updates are used by one application
to help manage container selection priorities for binding. When a sublot
within a container is changed, the container selection priorities get
recalculated.
Initializing lots as they are created can require customization. Creation of a
new lot can involve standard operating procedures that are specific to one
site. Insertion points allow for custom initialization of lot attributes and the
calculation of a lot state.
customized?
79
The RAMSCustom.dll is the compiled version of the insertion point DLL for the
Material Server and is where custom rules are defined. RAMSCustom.dll is
required for operation of the Material Server, resides in the Batch\bin
directory, and is registered during the installation of Material Manager.
Page 80

Chapter 6 Using custom code insertion points
IMPORTANT
FactoryTalk Batch Material Manager.
Creating a custom
A Visual Basic project is provided on the FactoryTalk Batch Material Manager
installation CD, in a folder called Custom, so you can create a custom version
of the RAMSCustom.dll.
ramscustom.dll
1. Copy the entire Custom folder, including all subdirectories, to the local
hard drive, leaving the structure intact.
The following files are contained in the Custom folder:
• Ramscustom.vbp
The Visual Basic project file.
• Ramaterialservercustom.cls
The Visual Basic class module that implements the custom
interface. Located in the Custom\Classes folder.
2. Open Ramaterialservercustom.cls using a text Editor such as NotePad.
3. Modify the code as needed. (See Material manager insertion points
on
page 81).
4. Save the file and then exit the text editor.
5. Double-click RAMSCustom.vbp. The Visual Basic project opens. If you
see message boxes, click Yes through all until you see the message that
Visual Basis is unable to set the version compatible component. Click
OK.
6. From the Project menu, select References. The References dialog box
opens.
7. There are several files that are required for references used in the
Visual Basic project. These references must be set manually within the
Visual Basic IDE.
8. From the Available References list, select the following references:
80
• COM+ Services Type Library
The COM+ Runtime library, COMSVCS.dll, that is needed for COM+
functionality. If this file is not on your system use MTXAS.dll.
• Microsoft ActiveX Data Objects 2.0 Library
The Microsoft Active Data Object support DLL, MSADO20.tlb, that is
used for any database functionality implemented in the insertion
DLL.
• OLE Automation
The OLE Automation support DLL, STDOLE32.tlb, which is usually a
standard Visual Basic reference.
9. Click OK.
10. From the Project menu, select RAMSCustom Properties. The Project
Properties dialog box opens.
11. Select the Component tab, and then select Binary Compatibility.
Not selecting Binary Compatibility in this step could break compatibility and
cause issues with creating custom code. If this option is not selected, you
may need to recover and update ramscustom.dll and/or uninstall and reinstall
Page 81

OnGenerateCustomLotName
Chapter 6 Using custom code insertion points
12. Click the browse button, locate Program Files/Rockwell
Software/Batch/bin/RAMSCustom.dll, and then click Open.
13. Click OK.
14. From the File menu, select Make RAMSCustom.dll. The Make Project
dialog box opens.
15. Click OK. A message box displays a compile error stating the userdefined type is not defined. For the project to compile successfully, you
need to select one other reference that was not available previously
when you selected references.
16. Click OK, and then close the project window.
17. From the Project menu, select References. The References dialog box
opens.
18. From the References list, select materialserverinsertion 1.0 Type
Library, and then click OK. Your project should now compile
successfully.
19. From the File menu, select Make RAMSCustom.dll. The Make Project
dialog box opens.
20. Click OK.
Material manager insertion points
The following sections present the customizable FactoryTalk Batch Material
Manager insertion points. Each section explains why you might want to
customize that routine. Information on how and when the routine is used by
the Material Server is included.
• OnGenerateCustomLotName on page 81
• OnGenerateCustomLabelName on page 82
• AfterSubLotInsert on page 83
• AfterSubLotDelete on page 84
• AfterLotInsert on page 85
• AfterCombinedLotInsert on page 86
Problem to be solved
Composite containers can hold only one sublot at a time. If the composite
container holds a sublot of LOT_A and a sublot of LOT_B is added to the
container, the sublots are assumed to be mixed together and become a single
sublot. What lot should the mixture belong to?
81
This insertion point allows you to define the lot to which a sublot formed by
combining sublots of different lots will belong. This can be an existing lot or a
new lot.
Page 82

Chapter 6 Using custom code insertion points
Param Name
Data Type
Direction
Description
StepName
String
In
Step Name
UnitName*
String
In
Unit Name
EqModule
String
In
Equipment Module
OnGenerateCustomLabelNa
Specifics about this routine
This insertion point is only called when sublots of different lots are being
combined by a composite container. These are the parameters for this
function:
DistributionAmount Double In Amount of the distribution
MaterialName String In Name of Material
DistributionLotName String In Lot name given to the distribution
AreaName String In Area Name
ProcessCell* String In Process Cell
BatchID String In Batch ID
RecipePath String In Recipe Path
ContainerName String In Container name of the distribution
ExistingLotName String In Lot name that exists in the Container
CustomLotName String Out Returned value from the event
This value represents what the custom Lot name will be
based on in the insertion code.
me
Related insertion points
Other insertion points that could work with this function include:
• OnGenerateCustomLabelName
• AfterSublotDelete
• AfterSublotInsert
• AfterCombinedLotInsert
Problem to be Solved
Composite containers can hold only one sublot at a time. If the composite
container holds a sublot with the label "LABEL_1" and a sublot with the label
"LABEL_2" is added to the container, the sublots are assumed to be mixed
together and become a single sublot. What label should the mixture be
assigned?
This insertion point allows the customer to define the label to be assigned to a
sublot when two sublots with different labels are combined by a composite
container.
82
Page 83

Param Name
Data Type
Direction
Description
MaterialName
String
In
Material Name
StepName
String
In
Step Name
UnitName*
String
In
Unit Name
ExistingLabelName
String
In
Label name that exists in the Container
AfterSubLotInsert
Specifics About this Routine
This insertion point is only called when sublots with different labels are being
combined by a composite container. These are the parameters to this
function:
DistributionAmount Double In Amount of the distribution
DistributionLabelName String In Label name given to the distribution sublot
AreaName String In Area Name
ProcessCell* String In Process Cell Name
BatchID String In Batch ID
EqModule String In Equipment Module
RecipePath String In Recipe Path Name
ContainerName String In Container name of the distribution
Chapter 6 Using custom code insertion points
CustomLabelName String Out Returned value from the event
This value represents what the custom Label name will be
based on the business rules in the insertion code.
Related insertion points
Other insertion points that could work with this function include:
• OnGenerateCustomLotName
• AfterSublotDelete
• AfterSublotInsert
Problem to be solved
How can an external application be notified that a new sublot has been
created?
This insertion point is a signal that a new sublot has been created and has
been inserted into the database. Customers can code any notifications they
need to their own applications within this insertion point.
83
For example, an application that could use this insertion point is a service that
monitors inventory levels and characteristics and adjusts container selection
priorities. A new sublot added to a container is a trigger to reevaluate the
current priorities.
Page 84

Chapter 6 Using custom code insertion points
Param Name
Data Type
Description
Unit
String
Unit Name
MaterialID
Long
Material ID of the Material this SubLot is derived from
ContainerID
Long
Container ID of the Container this SubLot is stored in
Param Name
Data Type
Description
ProcessCell
String
Process Cell Name
AfterSubLotDelete
Specifics about this routine
This insertion interface is called after the insertion of a new sublot into the
database. These are the parameters to this function:
Area String Area Name
ProcessCell String Process Cell Name
SubLotID Long Pkid of the SubLot record in the database
The values Area, ProcessCell, and Unit will not be attainable in every instance
from which these insertion calls are made. If these values are not available, a
wildcard value (represented by %ALL%) is substituted for any solid value.
This is provided so the customer can retrieve the record by ID for further
processing.
Related insertion points
Other insertion points that could work with this function include:
• AfterSublotDelete
Problem to be solved
How can an external application be notified that a new sublot has been
deleted?
This insertion point is a signal that a sublot has been deleted from the
database. For example, an application that could use this insertion point is a
service that monitors inventory levels and characteristics and adjusts
container selection priorities. A sublot being deleted from a container is a
trigger to reevaluate the current priorities.
Specifics about this routine
This insertion interface is called after the deletion of a sublot from the
database. These are the parameters to this function:
84
Area String Area Name
Unit String Unit Name
MaterialID Long Material ID of the Material this SubLot is derived from
Page 85

Param Name
Data Type
Description
SubLotID
Long
Pkid of the SubLot record in the database
Param Name
Data Type
Description
CreationDate
Date
Creation Date of the Lot
MaterialID
Long
Material ID for the Material this Lot is derived
LotID
Long
Pkid of the Lot record in the database
AfterLotInsert
ContainerID Long Container ID of the Container this SubLot is stored in
Chapter 6 Using custom code insertion points
The values Area, ProcessCell, and Unit will not be attainable in every instance
from which these insertion calls are made. If these values are not available, a
wildcard value, represented by %ALL%, is substituted for any solid value.
Related insertion points
Other insertion points that could work with this function include:
• AfterSublotInsert
Problem to be solved
This insertion point provides a way for the customer to initialize properties
and attributes of a new lot. For example, the assignment of an initial lot state
could involve a calculation of several variables. This insertion point provides a
place to do this calculation to assign the correct lot state.
Specifics about this routine
This insertion interface is called after a new lot is created in the database, with
the exception of a new lot created as the result of combining sublots of
different lots in a composite container. These are the parameters to this
function:
LotName String Lot Name
This event is not fired for the insertion of a lot when a lot combination event
occurs. In that event the AfterCombinedLotInsert event is fired. This event is
only called when a plain generic insertion of Lot is performed.
Related insertion points
Other insertion points that could work with this function include:
85
• AfterCombinedLotInsert
Page 86

Chapter 6 Using custom code insertion points
Param Name
Data Type
Description
ExistingLotName
String
Lot Name of existing Lot in the Composite Container
AfterCombinedLotInsert
Problem to be solved
A composite container can only hold one sublot at a time. When two different
sublots of two different lots are combined within this type of container the
OnGenerateCustomLotName on page 81
a new lot name is returned. The Material Server will create a new lot, but how
should the lot attributes and custom properties be initialized?
A different insertion point is provided for initializing this new lot to provide
an initialization routine that has access to the data of the two lots being
combined.
Specifics about this routine
This insertion point is called when sublots of different lots are combined
within a composite container and the name of the lot for the new sublot does
not exist within the database.
insertion point is called. Assume that
These are the parameters for this function:
DistributedLotName String Lot Name specified for the distribution
CombinedLotName String Custom Lot Name derived from the OnGenerateCustomLotName insertion call
LotMaterialName String Material Name that the Lot is derived from
LotMaterialID Long Material ID for the Material
This is provided so the insertion code author has the fully qualified key to
retrieve the Lot information (LotName + MaterialID).
This event is fired only during the execution of the DistributeSubLot and
MaterialDistributionComplete methods. These are the only two places within
the Material Server that a combination of Lot and/or Label can occur.
Related insertion points
86
Other insertion points that could work with this function include:
• OnGenerateCustomLotName
• AfterLotInsert
Page 87

Configuration requirements
Hardware and operating
Chapter 7
Developing an implementation plan
Planning is crucial to the success of the FactoryTalk Batch Material Manager
implementation. This section provides an overview of the subjects that can be
included within a Material Manager implementation plan. Use this as a
starting point for your own implementation plan, adding and/or removing
sections as required.
You should address the following subjects in your Material Manager
implementation plan:
• System Requirements
• Configuring Material Manager
• Configuring FactoryTalk Batch
Determining the system requirements
The system requirements for a Material Manager implementation are
determined by the FactoryTalk Batch system configuration. A FactoryTalk
Batch system is a group of networked computers on which one or more
FactoryTalk Batch components run. Material Manager can be implemented in
a number of different configurations: with FactoryTalk Batch, with
eProcedure, and with various combinations of each of these. Each of these
configurations represents a FactoryTalk Batch system.
The system requirements will include the number and type of computers you
need, operating systems required on each computer, and the security scheme
to be implemented.
There are some constraints in the way the FactoryTalk Batch components can
be combined in a FactoryTalk Batch system. For example, you cannot install
the Material Manager Server components on the FactoryTalk Batch Server
computer, but you can install the Material Client components on the
FactoryTalk Batch Server computer. You need to review the configuration
constraints and decide on the most appropriate configuration for your
purpose.
systems requirements
87
There are restrictions on the hardware and operating systems that can be
used in a FactoryTalk Batch system. For more information, see the FactoryTalk
Batch Components Installation and Upgrade Guide.
Page 88

Chapter 7 Developing an implementation plan
Security requirements
Questions to ask about
Questions to ask about the
The FactoryTalk Batch components have been developed to take advantage of
Windows’ built-in security features. Material Manager supports two types of
security schemes – Domain or Workgroup. Each of these schemes are also
supported in the security defined within the Material Server’s database
security scheme. There are a number of procedures involved in the
implementation of Material Manager security, some of which must be
performed prior to the installation and implementation of Material Manager.
Review your facility’s security requirements and determine the most
appropriate security scheme for your implementation. You should include a
detailed list of security requirements within your implementation plan. (Refer
to the FactoryTalk Batch Material Manager Administrator Guide for complete
information on supported security schemes.)
Some of the questions you will want to answer before you move forward in
the planning phase are:
system requirements
1. Which FactoryTalk Batch components will be included in the Material
Manager implementation?
material database
• FactoryTalk Batch
• FactoryTalk eProcedure
2. How many computers will be required to support the selected
FactoryTalk Batch system configuration?
3. Do you already own the computers, or will you need to buy more?
4. Which operating systems will need to be installed on each computer?
5. On which computers will you install each of the FactoryTalk Batch
components?
6. What security scheme will be used?
• Domain
• Workgroup
7. Which Users and/or User Groups need to be added to the new Material
Manager User Groups?
Some of the questions you will want to answer before you move forward in
the planning phase are:
1. Does the current material data include the following characteristics?
• States
• Types
• Classes
• Materials
• Properties
• Lots/Sublots
• Locations
• Independent containers
88
Page 89

Questions to ask about
equipment data
Questions to ask about
Chapter 7 Developing an implementation plan
2. How will the data fields be mapped from the existing data to the
material database?
3. In what form is the material data?
• Doesn’t exist
• Paper
• Electronic
4. Will the data be entered manually or programmatically?
5. What method of synchronization will be used?
1. Are there phases that move inventory into or out of a process cell?
These could be modeled as material-enabled phases.
2. Do you have the need for people to manually add or distribute
inventory? These could be instruction-based equipment modules and
Material Manager can be used to tell them what container to be
drawing materials from or moving materials into.
3. Will your phase logic need to be able to download an identifier for the
container that a material addition or distribution is working with? If
so, you will want to add the optional Material Manager parameters to
that phase.
4. Will you ever need to specify the exact lot or barcode of some inventory
that will be used in a batch? If so, you will want to add the optional
Material Manager parameters to that phase.
5. What are the associations between containers and equipment
modules?
6. What feed type, addition (adding inventory to a batch) or distribution
(moving inventory out of a batch) will the equipment module be
supporting for each container with which it is associated?
master recipe data
89
1. What material will be used by each material-enabled phase step?
2. What feed type, if selectable, is required for each material-enabled
phase step?
3. What type of binding will each material-enabled phase step require?
Page 90

Page 91

Rules for Selecting Binding Candidates
Rule
Applied To
Rule Description
Appendix A
Binding material-based recipes
Before running a material-based recipe, we should review the binding process
that FactoryTalk Batch uses to find equipment and materials to use in a batch.
When a material-based recipe is placed on the batch list, the FactoryTalk
Batch Server makes a request to the Material Server for containers that can
support the material requirement. The Material Server then returns a list of
binding candidates based upon the following rules for binding. If any rule
fails, the container is not selected as a binding candidate.
1 Containers The container must have a state of READY_TO_USE.
2 Containers The material specification of an appropriate sublot within a container must match the
material specification of a recipe phase step’s material requirement.
For composite containers, the appropriate sublot is the only sublot in the container.
For plug-flow containers, the appropriate sublot is the lowest ordinal sublot in the container.
For pallet containers, the appropriate sublot can be any sublot in the container.
3 Lot The lot and sublot must have a state of READY_TO_USE.
4 Containers For material additions, the total quantity of inventory in a container must exceed the heel
property value of the container. For example, if the heel property value for a plug flow
container is 100 gallons and the total inventory of the container is 85 gallons, the container is
considered empty and is not considered as a binding candidate.
5 Rules All rules for selecting a binding candidate must be true.
Together the FactoryTalk Batch and Material Servers apply these rules in a
two-step process to bind a material-based recipe automatically or to prepare
the list of binding candidates from which the operator can select.
91
1. Unit Binding
The type of unit binding you select affects how units are selected for
binding. Also the FactoryTalk Batch Server analyzes the material
requirements presented by the Material Server to select a unit that
can satisfy all the requirements. The material requirement is based
upon the material, the feed type (addition or distribution) and,
optionally, the lot and label.
Page 92

Appendix A Binding material-based recipes
Unit binding
Static binding
Creation binding
2. Recipe Phase Binding
Once a unit is selected, the FactoryTalk Batch Server further analyzes
the status of the containers and equipment modules available within
the unit to determine which containers and equipment modules can
supply the material to satisfy the recipe’s material requirements.
The type of unit binding that you select can affect which units are selected for
running a recipe. There are four types of unit binding: Static, Creation,
Dynamic Unit Allocation, and Manual.
If when creating a new operation or unit procedure in the Recipe Editor you
select Instance Based in the Unit Requirement dialog box, you must specify a
specific unit to use. During binding, the recipe must bind to that unit. Since
the North_Parlor process cell has two units, you don’t want to restrict the
batch to only one unit so this would not be a good type of unit binding to use.
92
If you select Class Based, then you can select a class of units from which a unit
may be selected for binding. In the North_Parlor process cell there are two
units. Selecting MBR_FREEZER_CLS enables the FactoryTalk Batch Server or
the operator to choose from either NP_FREEZER1 or NP_FREEZER2.
Page 93

Dynamic unit allocation
Appendix A Binding material-based recipes
If you enable dynamic unit allocation (also referred to as Late Binding) in the
Recipe Editor, there are more options available for unit binding when you
create a procedure. First you will assign a unit requirement name to all unit
instances of a specific unit class. When a recipe is put on the Batch List and
the server encounters the unit requirement name, it looks up all the unit
classes or instances that are mapped to the unit requirement name. You
assign a binding type that applies to each unit instance assigned to the unit
requirement.
93
Page 94

Appendix A Binding material-based recipes
capability of meeting the material requirement must exist.
Manual binding
Material requirements
• First Available
While the batch is running the FactoryTalk Batch Server allocates the
first available legal unit to the recipe. Binding occurs when the first
unit procedure mapped to the unit requirement name is ready to run.
For material phases, if there are multiple equipment modules
associated with a container, the first available equipment module is
selected. If multiple equipment modules are available, the one with the
lowest controller ID is selected. First available binding is also
dependent on any binding requirements or preferences in the recipe.
• Prompt
While the batch is running the operator is prompted to bind to a
specific unit when the first unit procedure mapped to the unit
requirement name is ready to run. For material-based recipes, the
operator is prompted to select a material or lot when a recipe phase is
about to run.
• At Batch Creation
When the batch is created the operator binds the recipe to a specific
unit.
• Operator Choice
When the batch is created, the operator can choose to bind the recipe
to a specific unit or choose either the Prompt or First Available binding
method.
Manual binding is the process of binding a unit or rebinding a previously
bound unit to a step within a class-based recipe without the operator being
prompted. Manual binding is done in the Procedure as SFC or Table window
in the FactoryTalk Batch View while a batch is running.
With material-based recipes, the operator can direct a material-based recipe
phase to:
• Bind to a material source or a material destination
• Rebind to a different material source or material destination
• Unbind from a material source or material destination
When using material-based recipes, the FactoryTalk Batch Server also looks at
the material requirements when selecting equipment to bind to a recipe. For
example, if there are two units (Unit_1 and Unit_2) in the area model and only
Unit_1 can draw from a container that holds vanilla, then the FactoryTalk
Batch Server selects Unit_1 over Unit_2 for any recipe requiring vanilla.
Tip: If dynamic unit allocation is enabled, the actual material does not have to exist but the
The following examples use the class-based recipe and area model shown in
this diagram to explore the different factors that help the FactoryTalk Batch
Server determine if material is available.
94
Page 95

vastly important that the AREA name be unique in each .cfg file.
Material requirements:
Tip: In the following examples, all lots and containers are in a Ready to Use state and the
container priorities are all equal. Also, it is assumed that there is only one area model. If
there is more than one FactoryTalk Batch Server interacting with the Material Server, it is
Appendix A Binding material-based recipes
material
The unit selected to run the recipe can vary depending on the material
requirement.
Example
• MBR_ADD:1 requires an addition of Material_1.
• MBR_ADD:2 requires an addition of Material_2.
• MBR_DUMP:1 has no material requirements.
Since Unit_2 does not have the ability to make an addition of Material_2,
Unit_1 is selected to bind to the batch.
95
Page 96

Appendix A Binding material-based recipes
Equipment
Module 1
Equipment
Module 5
Equipment
Module 4
Equipment
Module 3
Equipment
Module 2
Area Model
Unit 1
Unit 2
Container_1
Material_1
Container_2
Material_2
Container_3
Material_3
Container_4
Material_1
Container_5
Material_1
Material_3
Container_6
Material_3
1
3
8
5
Container_7
Empty
Material requirements:
material and lot
The use of lots in the material requirement further narrows down the unit
and equipment modules selected for binding.
Example
• MBR_ADD:1 requires an addition of Material_1, Lot_5.
• MBR_ADD:2 requires an addition of Material_3, Lot_4.
• MBR_DUMP:1 has no material requirements.
Unit 1 is selected because it can draw from the specified lots. Unit_2 can
satisfy the materials but not the specified lots.
Container_3 is a plug-flow container so the controller IDs determine which
sublot is drawn from the container. Lot_4 has a smaller controller ID than
Lot_8 so Lot_4 must be used first.
96
Page 97

Equipment
Module 1
Equipment
Module 5
Equipment
Module 4
Equipment
Module 3
Equipment
Module 2
Area Model
Unit 1
Unit 2
Container_1
Material_1
Container_2
Material_2
Container_3
Material_3
Container_4
Material_1
Container_5
Material_1
Material_3
Container_6
Material_3
1
3
8
5
Container_7
Empty
Container type
Appendix A Binding material-based recipes
The container type can limit the unit and equipment modules selected for
binding. Plug-flow containers can hold multiple lots of the same material but
lots must be used in the order they were added to the container (first-in/firstout order). Pallet containers also can hold multiple lots of the same material
but the order they were added to the container is not considered.
Example
• MBR_ADD:1 requires an addition of Material_1.
• MBR_ADD:2 requires an addition of Material_3, Lot_3.
The recipe binds to Unit_2 because it’s the only unit capable of drawing Lot 3.
Container_6 is not selected because it is a plug-flow container and Lot_1 must
be depleted before Lot_3 can be used. Container_5 is selected because it is a
pallet container and lots are available regardless of the order they were added
to the pallet. Material_1 is pulled from Container_6 because Equipment
Module 4 is pulling material from Container_5.
97
Page 98

Appendix A Binding material-based recipes
Equipment
Module 1
Equipment
Module 5
Equipment
Module 4
Equipment
Module 3
Equipment
Module 2
Area Model
Unit 1
Unit 2
Container_1
Material_1
Container_2
Material_2
Container_3
Material_3
Container_4
Material_1
Container_5
Material_1
Material_3
Container_6
Material_3
Lot_9
Lot_6
Lot_5
1
3
8
5
Container_7
Empty
Lot_1
Lot_3
Lot_8
Lot_4
Distributions
If a lot and label are specified in the material requirement for a distribution,
the values of the lot and label specification are ignored at unit binding but are
assigned to the distributed sublot.
Example
• MBR_ADD:1 requires an addition of Material_1, Lot_5.
• MBR_ADD:2 requires an addition of Material_3, Lot_4.
• MBR_DUMP:1 requires a distribution of Material_6, Lot_1, Label_234.
Unit 1 is selected because it can draw the materials with the specified lots. The
lot and label for MBR_DUMP:1 are ignored until the material is distributed to
Container_7. The lot and label are then assigned to the material.
98
Page 99

Equipment
Module 1
Equipment
Module 5
Equipment
Module 4
Equipment
Module 3
Equipment
Module 2
Area Model
Unit 1
Unit 2
Container_1
Material_1
Container_2
Material_2
Container_3
Material_3
Container_4
Material_1
Container_5
Material_1
Material_3
Container_6
Material_3
13
8
5
Container_7
Empty
Recipe phase binding
Appendix A Binding material-based recipes
After a unit is selected for binding, the FactoryTalk Batch Server looks for
more material specifications to select which container and equipment
module to use for binding. This level of binding is referred to as Recipe Phase
Binding.
In this area model example, you can see that each container is linked to more
than one equipment module. The recipe phase binding process involves
identifying a container that can supply or receive the material identified in
the recipe, and then selecting an equipment module that is linked to the
container and satisfies the recipe. Material Phases can bind to an equipment
module/container pair automatically or the operator can be prompted to
make a selection.
The material database keeps track of the container used given the unit,
material and whether you are adding or distributing material.
99
Page 100

Appendix A Binding material-based recipes
Equipment
Module 1
Equipment
Module 3
Equipment
Module 2
Area Model
Container_1
Material_1
Container_2
Material_1
Container_3
Material_1
Container binding type
The type of container binding is configured in the Recipe Editor on each
material-enabled phase of a recipe. There are two types of container binding,
Automatic and Prompt.
• If Prompt container binding is selected, the operator is prompted just
before the phase runs to select from a list of all containers that meet
the material requirement.
• If Automati c container binding is selected, the FactoryTalk Batch
Server selects the container based on several criteria just before the
phase runs.
100
 Loading...