

Page 1

Installation Instructions
IMPORTANT: SAVE THESE INSTRUCTIONS FOR FUTURE USE.
IMPORTANT
Ultrasonic Single Analog Output Sensors
Specifications
Model 873P-D18-400-D4 873P-D18-900-D4 873P-D18-2200-D4 873P-D30-2500-D4 873P-D30-3500-D4 873P-D30-6000-D4
Certifications cULus Listed and CE Marked for all applicable directives
Rated Sensing Distance
Teachable Sensing Range
Blind Zone
Beam Angle ±8° ±7° 14° ±1° 15° ±2°
Sensitivity Adjustment Push button
Linearity <1% of full scale value
Resolution 1 mm (0.04 in.) 2 mm (0.08 in.) 3 mm (0.12 in.) 2 mm (0.08 in.) 4 mm (0.16 in.) 6 mm (0.24 in.)
Accuracy 0.1% of sensing range
Hysteresis <1% of full scale value
Ripple 5%
Current Cons umption ≤50 mA
Output Type
Transducer Frequency 300 kHz 200 kHz 150 kHz 112 kHz 75 kHz
Response Time 500 ms 600 ms
Time Delay before Availability ≤900 ms ≤1400 ms
Electrical Protection Polarity reversal, transient noise, short circuit, overload
Minimum Load (analog voltage) 3 kΩ
Maximum Current (analog voltage output) 40 mA
Temperature Range -20…+60° C (-4…+140° F) -20…+70° C (-4…+158° F)
Temperature Compensation Yes
Temperature Drift ±5%
Housing Material Plastic—PBT
Active Head Material Epoxy—glass resin
Ingress Protection Rating IP67 (EN 60529)
AV–Analog voltage (0…10V DC) or AI–Analog current (4…20 mA)
Metallic target 100 x 100 mm (3.94 x 3.94 in.)
Metallic target 200 x 200 mm (7.87 x 7.87 in.)
Metalic target 400 x 400 mm (15.75 x 15.75 in.)
50…400 mm
(1.97…15.7 in.)
100…400 mm
(3.94…15.7 in.)
0…50 mm
(0…1.97 in.)
AV or AI
100…900 mm
(3.94…35.4 in.)
100…900 mm 200…2200 mm 200…2500 mm 250…3500 mm 350...6000 mm
0…100 mm
(0…3.94 in.)
200…2200 mm
(7.87…88.6 in.)
0…200 mm 0…200 mm 0…250 mm 0...350mm
200…2500 mm
(7.87…98.4 in.)
250…3500 mm
(9.87…137.8 in.)
350…6000 mm
(13.8…236.2 in.)
Operating Volt age Catalog Numbers
12…30V DC 873P-D30AI-2500-D4, 873P-D30AI-3500-D4, 873P-D30AI-6000-D4
873P-D18AV-400-D4, 873P-D18AI-400-D4,
15…30V DC
873P-D18AV-900-D4, 873P-D18AI-900-D4,
873P-D18AV-2200-D4, 873P-D18AI-2200-D4, 873P-D30AV-2500D4, 873P-D30AV-3500-D4, 873P-D30AV-6000-D4
The 873P sensor is a one set point mode with a
maximum sensing range from the factory.
Rockwell Automation 873P-IN005A-EN-P—October 2014
Page 2
2 873P Ultrasonic Single Analog Output Sensors
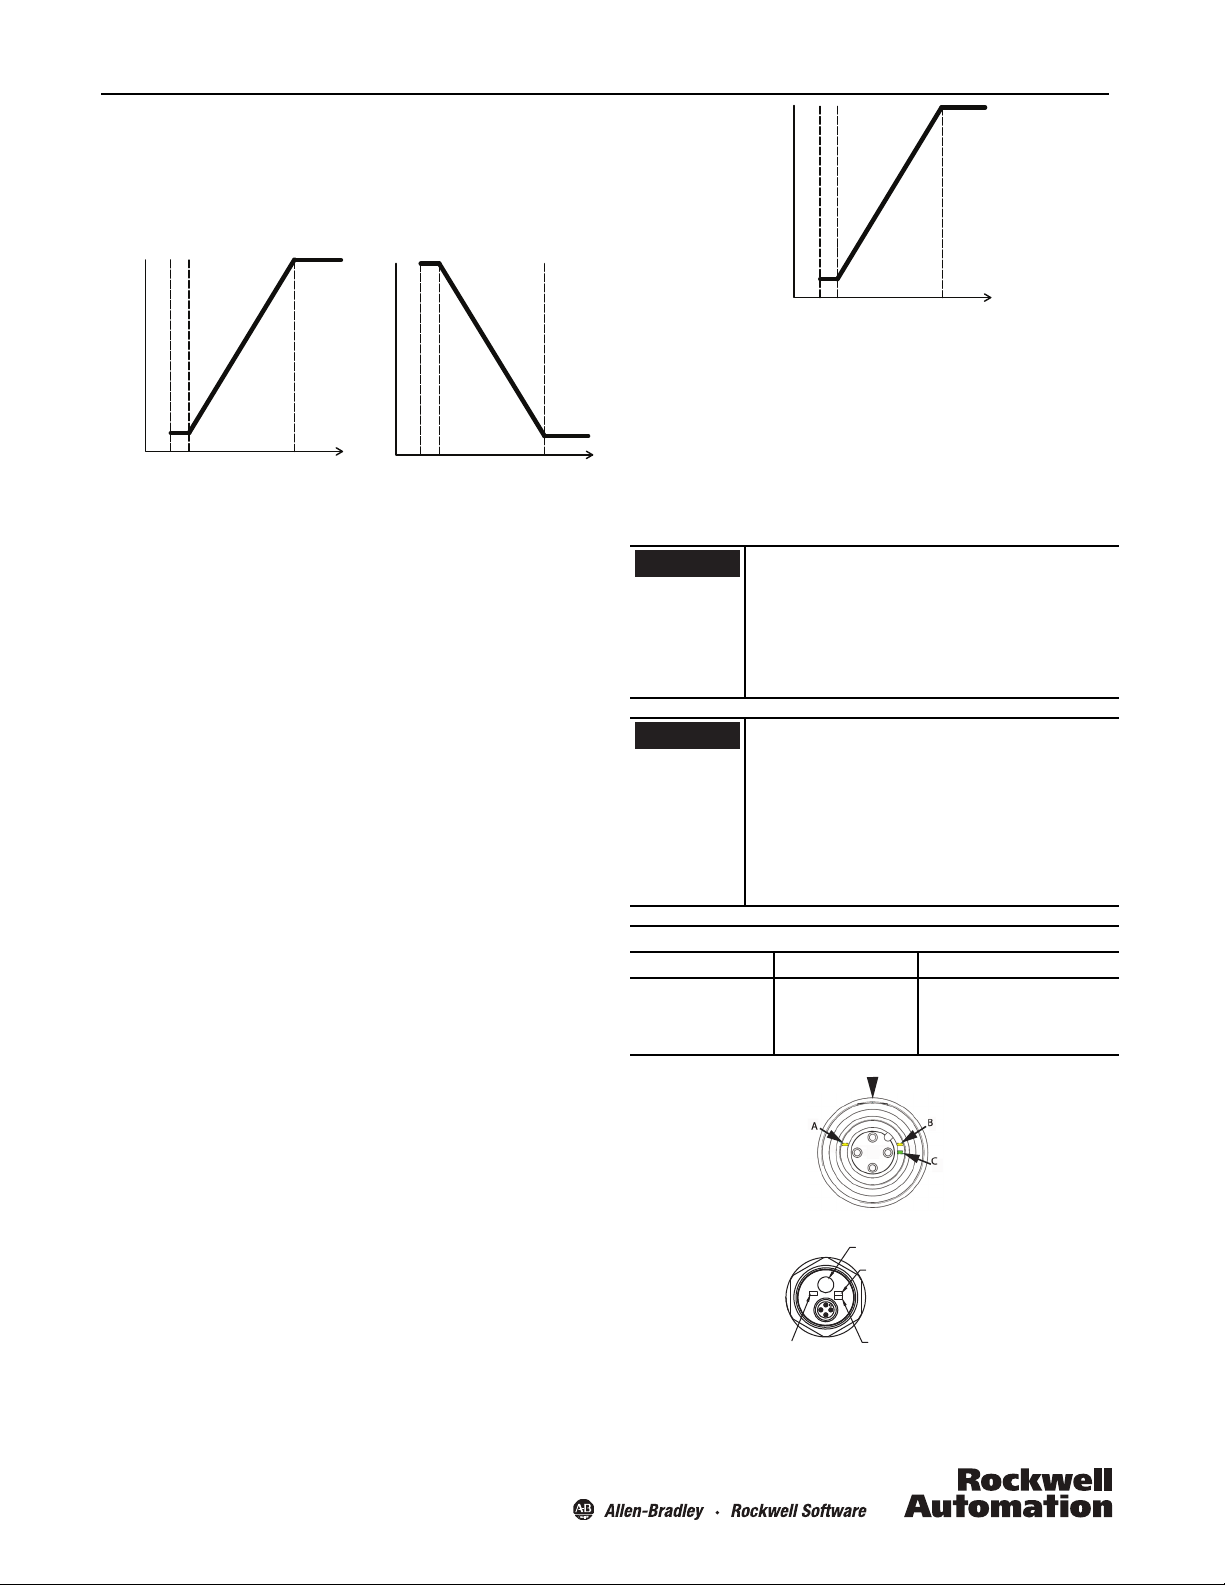
20 mA/
10V DC
Rising
Ramp
Pin 4
(BK)
Blind Zone
4 mA/
0V DC
mmP2P1BZ
20 mA/
10V DC
Falling
Ramp
Pin 4
(BK)
Blind Zone
4 mA/
0V DC
mmP1P2BZ
20 mA/
10V DC
Rising
Ramp
Pin 4
(BK)
Blind Zone
4 mA
0V DC
mmP1=P2Minimum
Sensing
Distance
BZ
Window Mode
In this sensing mode, you teach the sensor a near set point and far
set point within the defined sensing range of the sensor. P1 and
P2 define the analog output slope. P1 determines the 4 mA/0V DC
position and P2 determines the 20 mA/10V DC position. The
analog output is scaled between the two taught set points.
Rising ramp: current or voltage values increase as the target
distance increases from the sensor.
1. Place the target at the desired set point.
2. Press and release the teach button. The yellow and green LEDs
flash simultaneously, indicating that the sensor has learned the
set point.
3. Keeping the target in the same position, press and release the
teach button. The yellow LED blinks twice to indicate that the
sensor is ready for use. The minimum sensing distance is
indicated in the Specifications table.
Falling ramp: current or voltage values decrease as the target
distance increases from the sensor.
Set Point 1 (P1)
1. Place target at the desired near/far set point.
a. The near set point first yields a rising ramp.
b. The far set point first yields a falling ramp.
2. With the target still in place, press the teach button, then
release.
The yellow and green LEDs flash simultaneously, indicating that
the first set point P1 is now set. The sensor is waiting for the last
set point.
Set Point 2 (P2)
1. Place the target at the desired far/near set point.
2. Press the teach button and release. The sensor is ready to
operate.
One Set Point Mode
In this sensing mode, a set point is taught in the defined sensing
range. The working range of the sensor becomes the minimum
sensing distance to a user-taught set point. Depending on where
the set point is taught, the output will turn ON when the target
passes between the minimum sensing distance of the sensor and
the taught set point. The analog output is scaled between those
two set points. When using the One Set Point mode, it is only
possible to configure the sensor for rising ramp analog
output. It is not possible to configure the sensor for a falling
ramp.
IMPORTANT
When configuring the sensor for One Set Point
mode, it is very important that the target is at the
exact same distance for both the first and second
push of the teach button. If the target (or sensor)
has moved even slightly, the detected ranges will
be different for the two pushes of the teach
button, and the sensor will be configured for
Window Mode.
IMPORTANT
The green and yellow LEDs flash asynchronously
for about two seconds indicating there is no
target present within the sensing range of the
sensor and therefore no set point to teach. When
this happens, the 873P ignores this teach
attempt and restores its previous settings. By
comparison, when an object is detected during
the teach, the yellow and green LEDs flash
synchronously and continue flashing until the
second push of the teach button.
Single Analog Output Indicator LED Functions
LED Color Function
AYellow Output state
B Yellow Teach function
C Green ECHO LED/ Teach function
M18 LEDs
(Yellow)
Output state
Teach button
4
(Yellow)
Teach
123
(Green)
Echo/teach
Yellow LED A
output state
Rockwell Automation 873P-IN005A-EN-P—October 2014
M30 LEDs
Teach button
Yellow LED B
Teach function
AB
C
Green LED C
Echo LED/teach function
Page 3

873P Ultrasonic Single Analog Output Sensors 3
Single Analog Output
Operating Mode
Green LED
(Alignment)
Yellow LED A
(Output) Yellow LED B (Teach)
Standard Operation
Target present ON ONor OFF OFF
Target absent ON/OFF ON or OFF OFF
Green LED indicates that an echo is reflected back to the
sensor by an object, not necessarily the target. Its primary use
if for alignment.
If rising ramp
If falling ramp
Other Functions
Hold Function
The Hold function inhibits sensor operation and holds the output
to its present state.
Analog Output: If the HOLD pin is connected to the NEG, the
ultrasonic wave emission is stopped and the analog output is
frozen in the present state. If the SYNC pin is connected to the
POS or not connected, the sensor operates normally.
Lockout Feature for Teach Button
The lockout feature locks the push button to prevent unwanted
teaching of the sensor.
Lock Teach Button: Press the teach button for eight seconds,
until the yellow LEDs A and B flash alternately with the green LED
C. Release the teach button. The push button is now locked.
Unlock Teach Button: Press the teach button for eight seconds,
until the yellow LEDs A and B flash alternately with the green LED
C. Release the teach button. It is once again possible to teach the
sensor.
Synchronization of Ultrasonic Sensors
In this mode, all sensors are connected to a same output on the
PLC. A SYNC pulse simultaneously drives all sensors connected to
the output on the PLC. When mounting the sensors, attention
must be paid to a minimum distance between the sensors; said
distance varies depending on the type(s) of sensors used (see
below). The target must be positioned at the same distance from
each synchronized sensor; the target position should overall be
flat. When mounted correctly, the synchronized sensors perform
like a single sensor with an extended detection angle.
How it Works:
Connect Pin 2 (white) to all the sensors you want to synchronize.
All sensors will trigger at the same time. Any eventual crosstalk
signal related to a longer sensing distance will be ignored. An
external synchronization pulse controls the sensors.
All minimum distances depend on target distance and material.
“T” is the pulse time period applied on the SYNC wire; “Width”
refers to the pulse width.
• 400 mm Sensing Range Sensors
T ≥ 4 msec
500 μsec ≤ Width ≤ 1 msec
Minimum distance between sensors: 50
• 900 mm Sensing Range Sensors
T ≥ 7.5 msec
500 μsec ≤ Width ≤ 1 msec
Minimum distance between sensors: 30
…100 mm.
…50 mm.
• 2200 mm Sensing Range Sensors
T ≥ 17.5 msec
500 μsec ≤ Width ≤ 1 msec
Minimum distance between sensors: 30
…40 mm.
• 2500 mm Sensing Range Sensors
T ≥ 25 msec
500 μsec ≤ Width ≤ 5 msec
Minimum distance between sensors: 100 mm for working
distances up to 1.5 m, and 50 mm for distances greater than
1.5 m. Target material also affects these distances.
• 3500 mm Sensing Range Sensors
T ≥ 35 msec
500 μsec ≤ Width ≤ 5 msec
Minimum distance between sensors: 100 mm for working
distances up to 1.5 m, and 50 mm for distances greater than
1.5 m. Target material also affects these distances.
• 6000 mm Sensing Range Sensors
T >=60 ms
500 usec<=Width<= 1 msec
Minimum distance between sensors is 200 mm. Target material
also affects these distances.
Beam Diagrams
50…400 mm Sensing Range
150
100
50
-50
Parallel displacement [mm]
-100
-150
300
250
200
150
100
-100
Parallel displacement [mm]
-150
-200
-250
-300
200…3500 mm
400
350
300
250
200
150
100
-50
-100
-150
Parallel displacement [mm]
-200
-250
-300
-350
-400
0
0 100
50
0
-50
0 500
50
0
0 1000
Target 100*100 mm
Target 25 mm dia.
Target 100*100 mm
Target 25 mm dia.
Target 100*100 mm
(3.93)
(7.87)
Distance [mm (in.)]
Target 25 mm dia.
Target 25 mm dia.
(19.68)
Distance [mm (in.)]
Target 25 mm dia.
Target 25 mm dia.
(39.3)
200
1000
(39.3)
300
(11.8)
Target 200*200 mm
Target 200*200 mm
Target 200*200 mm
1500
(59.0)
Target 200*200 mm
Target 200*200 mm
Target 200*200 mm
2000
(78.7)
Distance [mm (in.)]
3000
(118.1)
(15.7)
400
2000
(78.7)
100…900 mm Sensing Range
-100
Parallel displacement [mm]
-150
-200
500
(19.6)
200…2500 mm Sensing Range200…2200 mm Sensing Range
Parallel displacement [mm]
2500
(98.4)
6000 mm
600.0
500.0
400.0
300.0
200.0
100.0
-100.0
-200.0
Parallel displacement [mm]
-300.0
-400.0
-500.0
-600.0
4000
(157.4)
200
150
100
50
0
-50
300
250
200
150
100
50
0
-50
-100
-150
-200
-250
-300
0.0
0 200
0 500
1000
0
(39.4)
400
(7.87)
(15.7)
Distance [mm (in.)]
Target 25 mm dia.
Target 25 mm dia.
1000
(19.6)
(39.3)
Distance [mm (in.)]
Target 200*200 mm
Target 200*200 mm
2000
(78.7)
Distance [mm (in.)]
3000
(118.1)
1500
(59.0)
Target 200*200 mm
Target 25 mm dia.
Target 200*200 mm
Target 25 mm dia.
Target 200*200 mm
600
800
(23.6)
(31.4)
Target 200*200 mm
Target 200*200 mm
Target 200*200 mm
2000
(78.7)
Target 400*400 mm
Target 400*400 mm
5000
4000
(196.8)
(157.5)
2500
(98.4)
(236.2)
1000
(39.3)
3000
(118.1)
7000
6000
(275.6)
Rockwell Automation 873P-IN005A-EN-P—October 2014
Page 4

Power, Control and Information Solutions Headquarters
Americas: Rockwell Automation, 1201 South Second Street, Milwaukee, WI 53204-2496 USA, Tel: (1) 414.382.2000, Fax: (1) 414.382.4444
Europe/Middle East/Africa: Rockwell Automation NV, Pegasus Park, De Kleetlaan 12a, 1831 Diegem, Belgium, Tel: (32) 2 663 0600, Fax: (32) 2 663 0640
Asia Pacic: Rockwell Automation, Level 14, Core F, Cyberport 3, 100 Cyberport Road, Hong Kong, Tel: (852) 2887 4788, Fax: (852) 2508 1846
www.rockwel lautomation.com
4 873P Ultrasonic Single Analog Output Sensors
Solid-state devices can be susceptible to radio
frequency (RF) interference depending on the
power and the frequency of the transmitting
source. If RF transmitting equipment is to be
used in the vicinity of the solid-state devices,
thorough testing should be performed to assure
that transmitter operation is restricted to a safe
operating distance from the sensor equipment
and its wiring.
ATTENTION
If a hazardous condition can result from
unintended operation of this device, access to
the sensing area should be guarded.
3
(0.12)
M12x1
14
(0.55)
93.2
(3.67)
19.2
(0.76)
2.5
(0.098)
57.5
(2.26)
M18x1)
8.3
(0.33)
3
(0.12)
M12x1
10
(0.39)
99.8
(3.93)
18.2
(0.72)
2
(0.08)
69.6
(2.74)
M30x1.5)
10
(0.39)
8.5
(0.33)
3
(0.12)
M12x1
10.4
(0.41)
100
(3.94)
19.5
(0.77)
1
(0.04)
38.8
(1.53) dia.
M30x1.5)
Wiring Diagrams
HOLD/
SYNC
2
3
1
4
4-20 mA
LOAD
-+
-+
Analog Current
IMPORTANT
Dimensions [mm (in.)]
HOLD/
SYNC
2
3
1
4
0-10 VDC
LOAD
-+
-+
Analog Voltage
M18
M30
M38
Rockwell Automation maintains current product environmental information on its website at
http//www.rockwellautomation.com/rockwellautomation/about-us/sustainability-ethics/product-environmental-compliance.page
Allen-Bradley and Rockwell Automation are trademarks of Rockwell Automation, Inc. Trademarks not belonging to Rockwell Automation are property of their respective companies.
.
Publication 873P-IN005A-EN-P—10000678913 Ver 01—October 2014
Copyright © 2014 Rockwell Automation, Inc. All rights reserved. Printed in the USA.
 Loading...