

Page 1
QUICK START
ARMORSTART® DISTRIBUTED
MOTOR CONTROLLER —
SAFETY VERSION
Getting Started
BULLETIN 280G/281G
Introduction This guide provides the basic information required to start up your
®
ArmorStart
and information regarding installing, programming, and DeviceNet™
Node Commissioning are described here. For detailed information on
specific product features or configurations, refer to the ArmorStart
user manual, publication 280G-UM001*.
This guide is intended for qualified service personnel responsible for
setting up and servicing these devices. You must have previous
experience with and a basic understanding of electrical terminology,
configuration procedures, required equipment, and safety precautions.
You should understand DeviceNet network operations, including how
slave devices operate on a network and communicate with a
DeviceNet master. You should also be familiar with RSNetWorx™
for DeviceNet. You must use RSNetWorx for DeviceNet Revision
3.21 Service Pack 2 or later. This software package is referred to
often in this manual. Rockwell Automation product EDS files are
available on the internet at: http://www.ab.com/networks/eds
Note: The Bulletin 280G/281G Safety ArmorStart is suitable for
Distributed Motor Controller. Factory default settings
safety applications up to Safety Category 4PL e (T
assessment per ISO 13849-1:2008). T
available upon request.
ÜV compliance letter is
.
ÜV
Page 2
2
Installation The ArmorStart Distributed Motor Controller is convection cooled.
Operating temperature must be kept between -20…40°C (-4…104°F).
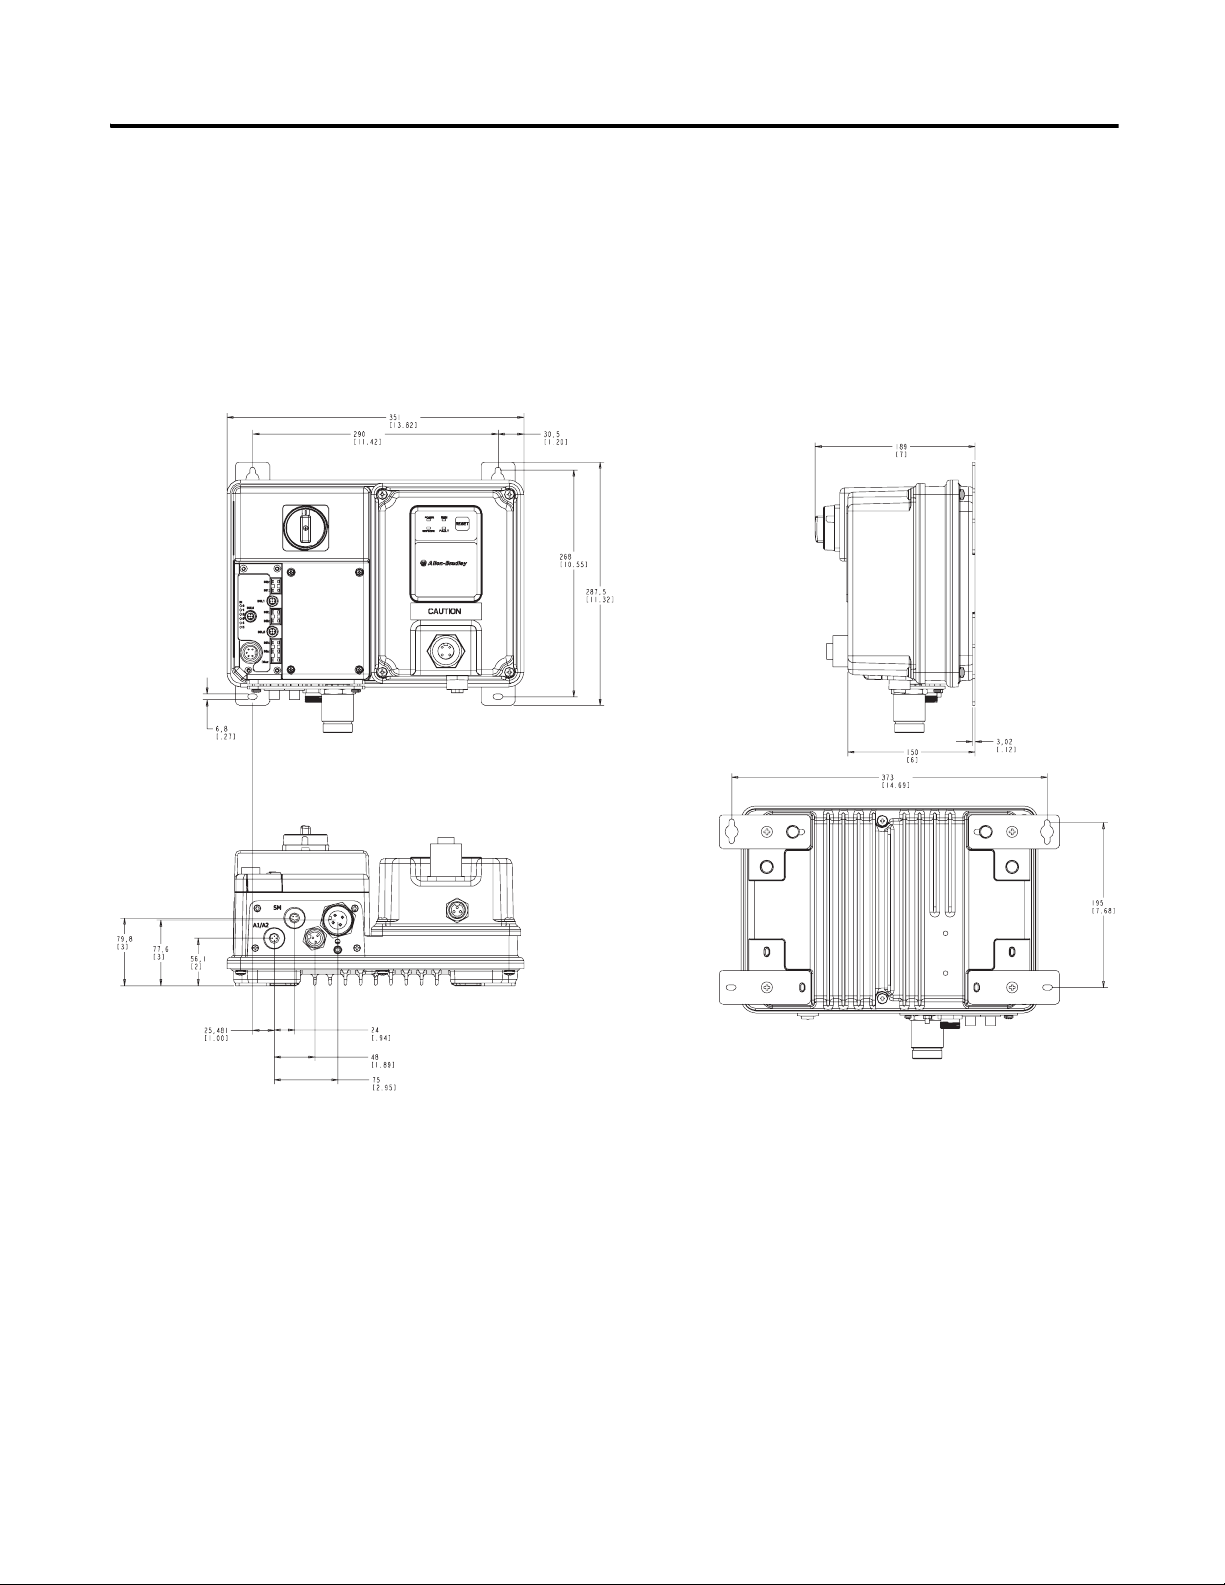
Dimensions Dimensions are shown in millimeters (inches). Dimensions are not intended
to be used for manufacturing purposes. All dimensions are subject to
change.
Figure 1 Dimensions for Bulletin 280G Safety Product
Publication 280GS-QS001A-EN-P - May 2009
Page 3
3
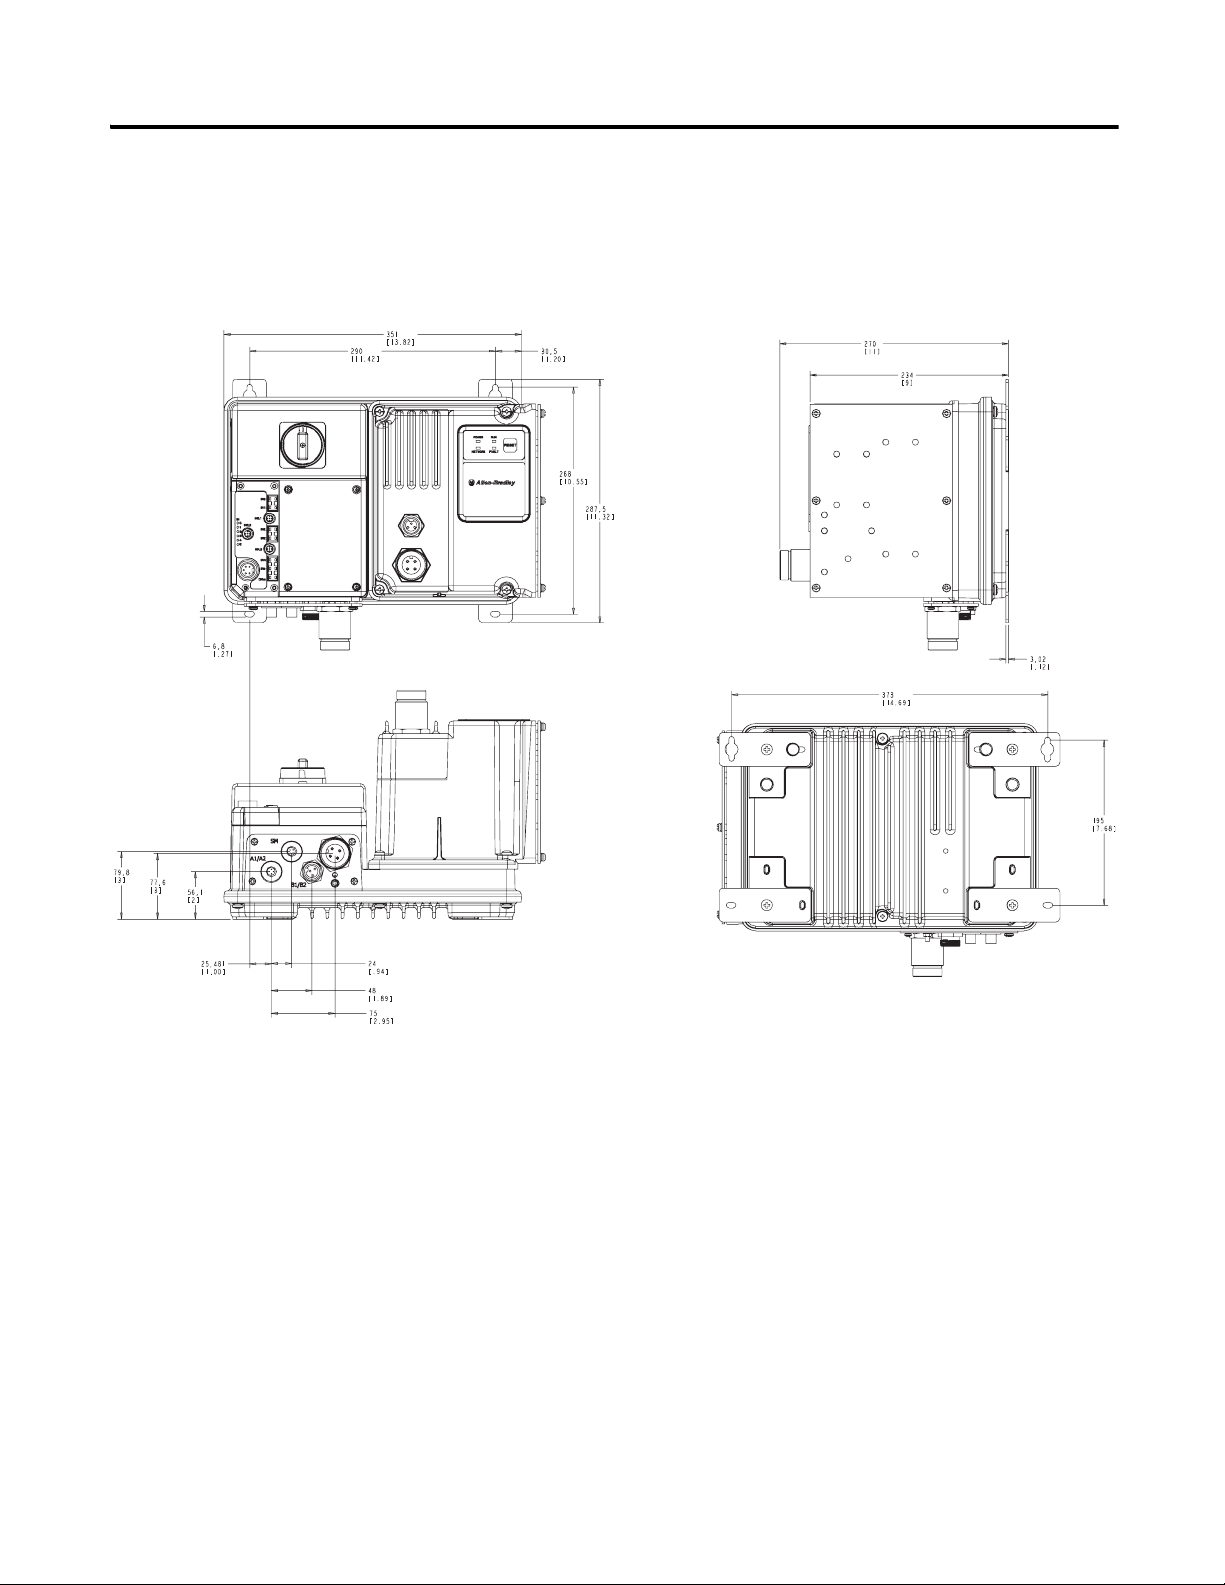
Dimensions, Continued Dimensions are shown in millimeters (inches). Dimensions are not intended
to be used for manufacturing purposes. All dimensions are subject to
change.
Figure 2 Dimensions for Bulletin 281G Safety Product
Publication 280GS-QS001A-EN-P - May 2009
Page 4

4
Wiring Power, Control, Safety Monitor Inputs, and Ground Wiring
Table 1 provides the power, control, safety monitor inputs ground wire
capacity, and the tightening torque requirements. The power, control, and
ground terminals will accept a maximum of two wires per terminal.
Table 1 Power, Control, Safety Monitor Inputs, Ground Wire Size, and Torque
Specifications
Terminals Wire Size Torque Wire Strip Length
Three-phase
Power
and
Ground
Control Power and
Safety Monitor Inputs
Primary/Secondary
Terminal:
1.5…4.0 mm
(#16 …#10 AWG)
1.0…4.0 mm
(#18…#10 AWG)
2
2
Primary Terminal:
10.8 lb•in. (1.2 N•m)
Secondary Terminal:
4.5 lb•in (0.5 N•m)
6.2 lb•in (0.7 N•m) 0.35 in. (9 mm)
0.35 in. (9 mm)
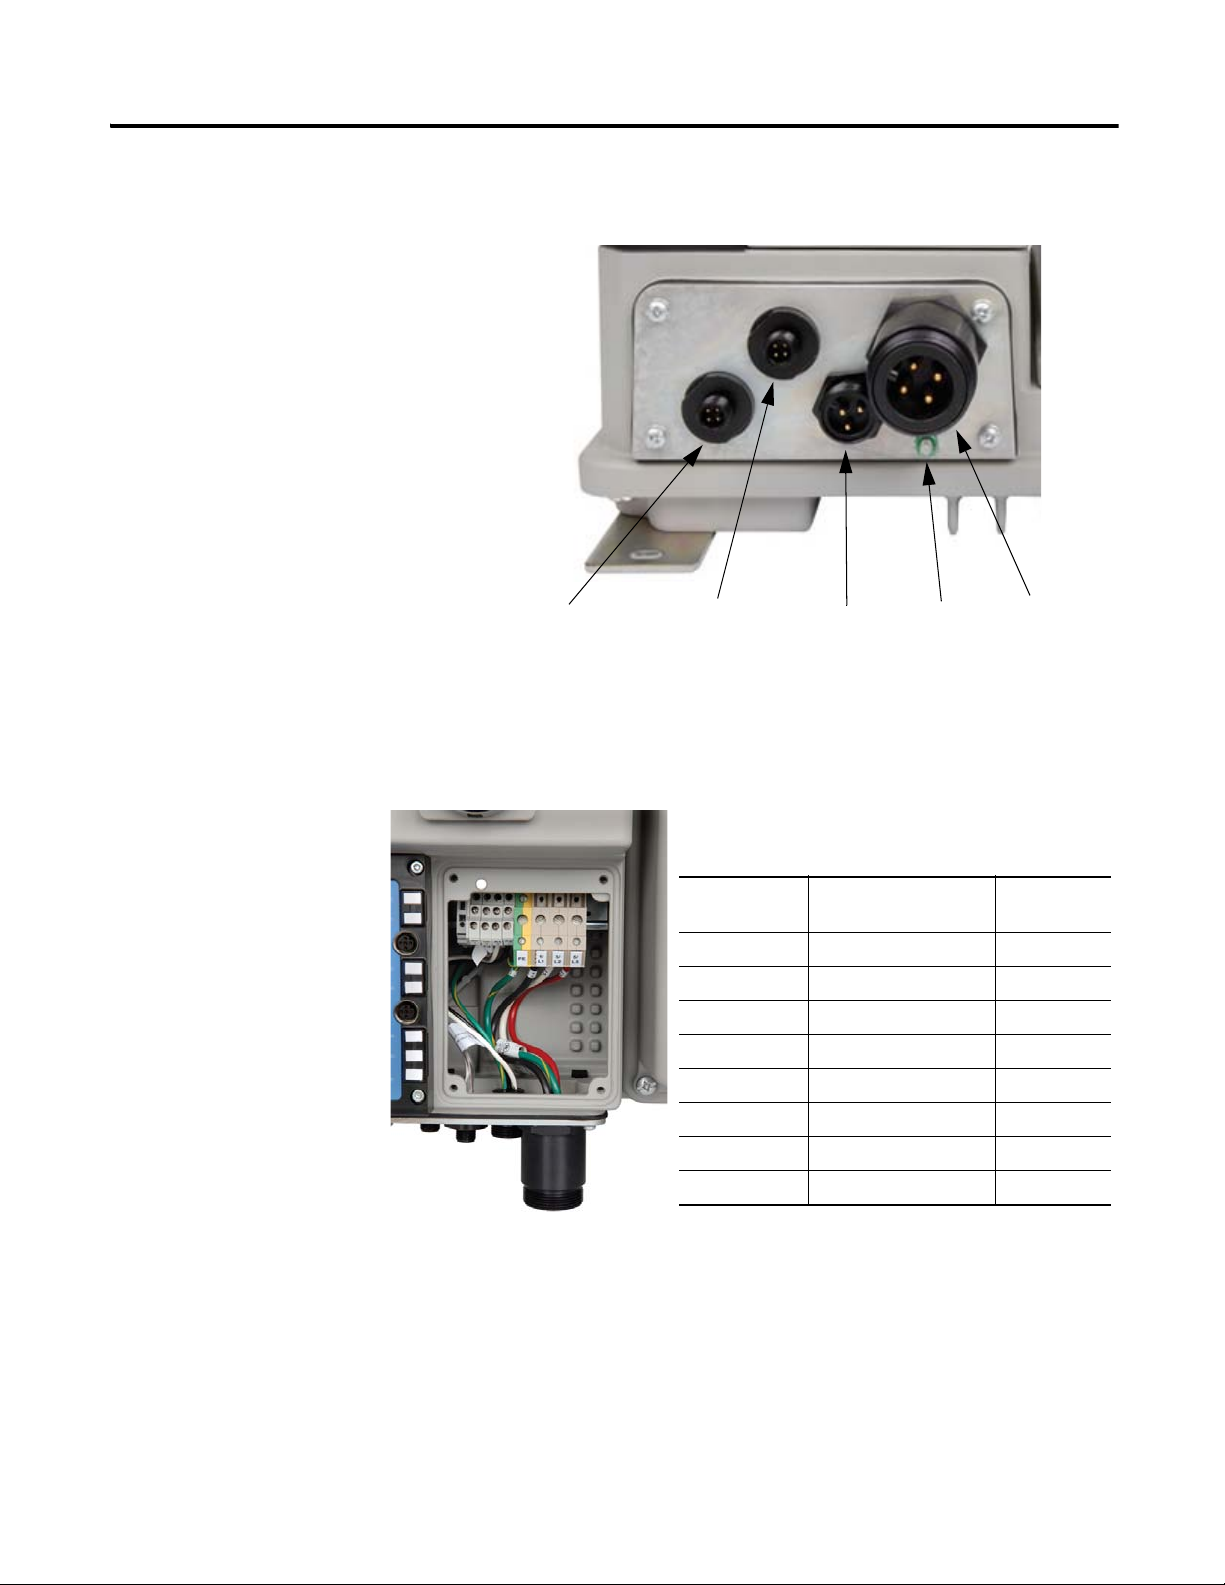
Terminal Designations As shown in Figure 3, the ArmorStart Distributed Motor Controller contains
terminals for power, control, safety monitor inputs, and ground wiring.
Access can be gained by removing the terminal access cover plate.
Figure 3 ArmorStart Power, Control, Safety Monitor Inputs, and Ground Terminals
Publication 280GS-QS001A-EN-P - May 2009
Table 2 Power, Control, and Ground Terminal Designations
Terminal Designations No. of Poles Description
SM1 2 Safety I/O Input
SM2 2 Safety I/O Input
A1 (+) 2 Control Power Input
A2 (-) 2 Control Power Common
PE 2 Ground
1/L1 2 Line Power Phase A
3/L3 2 Line Power Phase B
5/L5 2 Line Power Phase C
Page 5
ArmorConnect Power Media Description
Encl
The ArmorStart Power Media offers both three-phase and control power
cable system of cordsets, patchcords, receptacles, tees, reducers and
accessories to be utilized with the ArmorStart Distributed Motor Controller.
These cable system components allow quick connection of ArmorStart
Distributed Motor Controllers and reduce installation time. They provide
for repeatable, reliable connection of the three-phase and control power to
the ArmorStart Distributed Motor Controller and motor by providing a plug
and play environment that also avoids system mis-wiring. When specifying
power media for use with the ArmorStart Distributed Motor Controllers
(Bulletins 280, 281, and 284) use only Bulletin 280 ArmorConnect™ power
media.
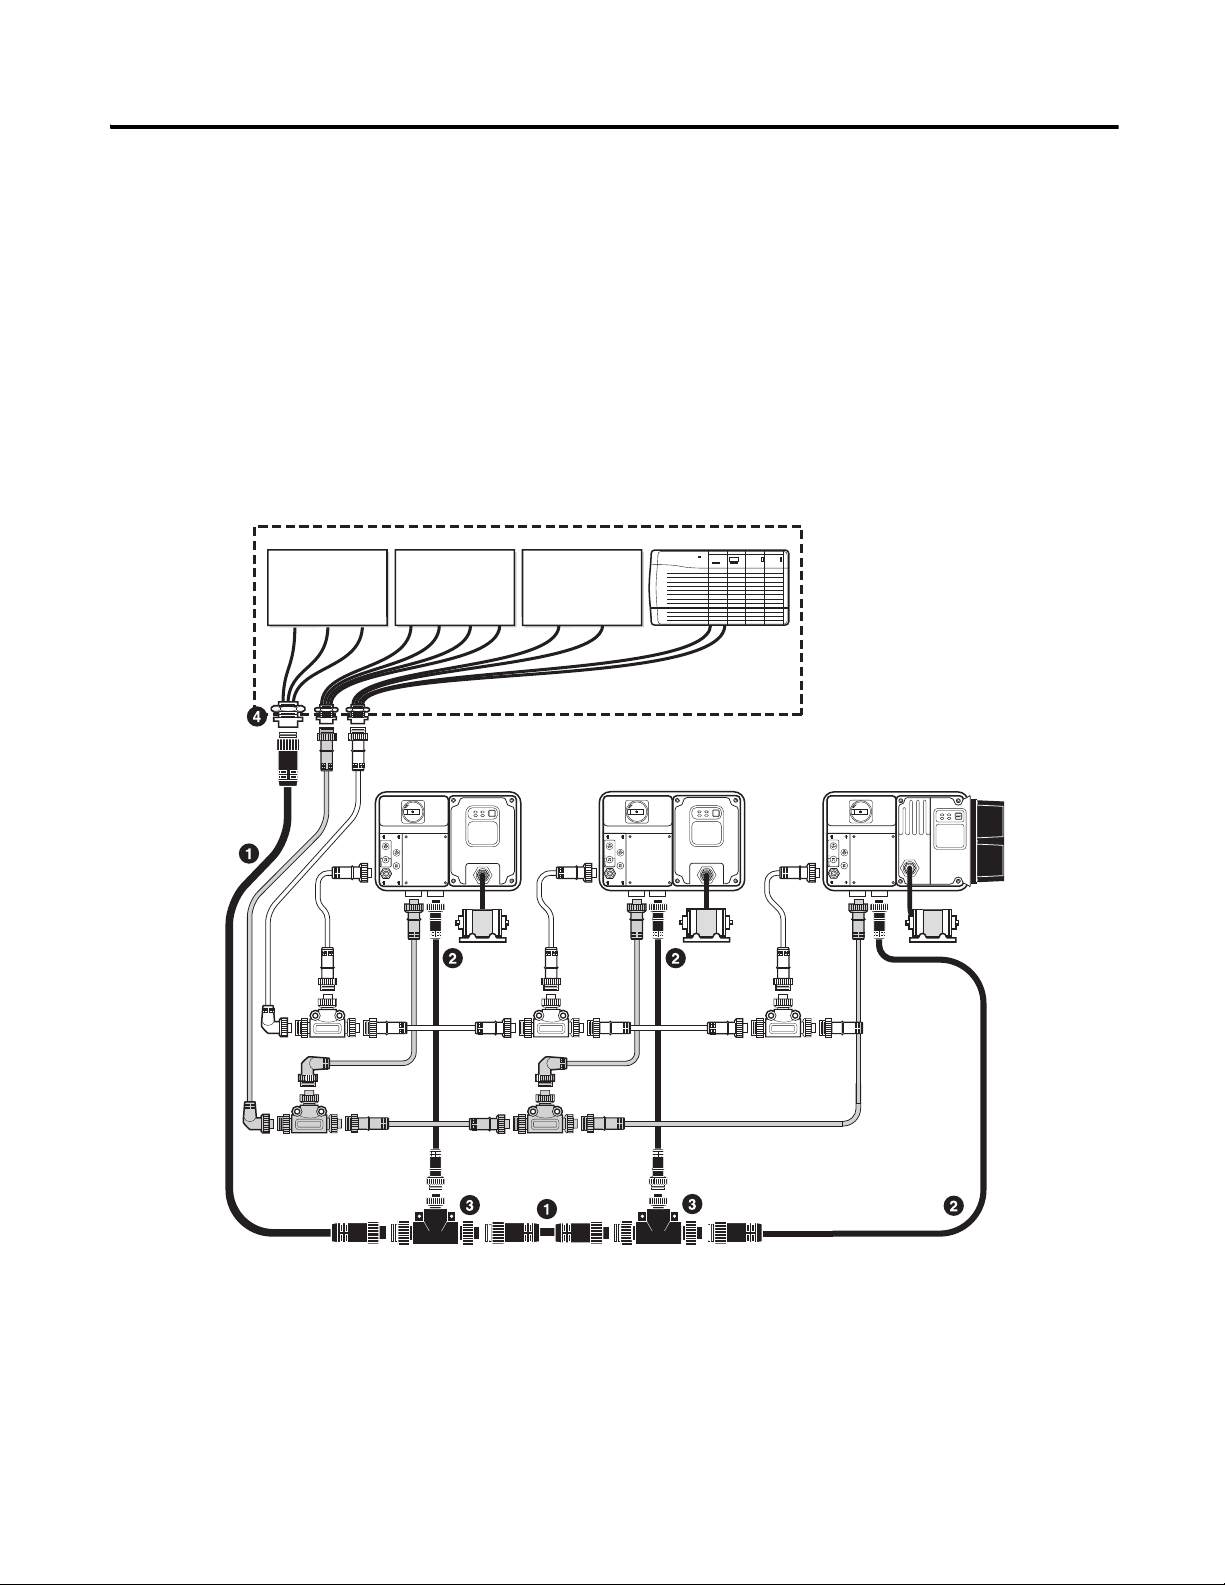
Figure 4 Three-Phase Power System Overview
osure
Branch Circuit
Protective Device
120V AC
Control Power
1606-XLSDNET4
Power Supply
5
PLC
DeviceNet
Bulletin 280/281
ArmorStart
RESET
Bulletin 280/281
ArmorStart
RESET
➊ Three-Phase Power Trunk- PatchCord cable with integral female or male connector on each end
Example Part Number: 280-PWR35A-M*
➋ Three-Phase Drop Cable- PatchCord cable with integral female or male connector on each end
Example Part Number: 280-PWR35A-M*
➌ Three-Phase Power Tee -
Tee connects to a single drop line to trunk with quick change connectors – Part Number: 280-T35
➍ Three-Phase Power Receptacles -
Female receptacles are a panel mount connector with flying leads – Part Number: 280-M35F-M1
Bulletin 284
ArmorStart
Publication 280GS-QS001A-EN-P - May 2009
Page 6

6
RESET
Bulletin 280/281
ArmorStart
Bulletin 284
ArmorStart
RESET
Bulletin 280/281
ArmorStart
PLC
Bulletin 1492FB
Branch Circuit
Protective Device
Enclosure
Bulletin 1606
Power Supply
1606-XLSDNET4
DeviceNet
Power Supply
Figure 5 Control Power Media System Overview
➏ Control Power Media Patchcords - PatchCord cable with integral female or male connector on each end
Example Part Number: 889N-F3AFNU-*F
➐ Control Power Tees - The control power tee (Part Number: 898N-33PB-N4KF) is used to connect to the ArmorStart Distributed Motor Controller using a
control power media patchcord.
➑ Control Power Receptacles - Female receptacles are a panel mount connector with flying leads –
Part Number: 888N-D3AF1-*F
Publication 280GS-QS001A-EN-P - May 2009
Page 7
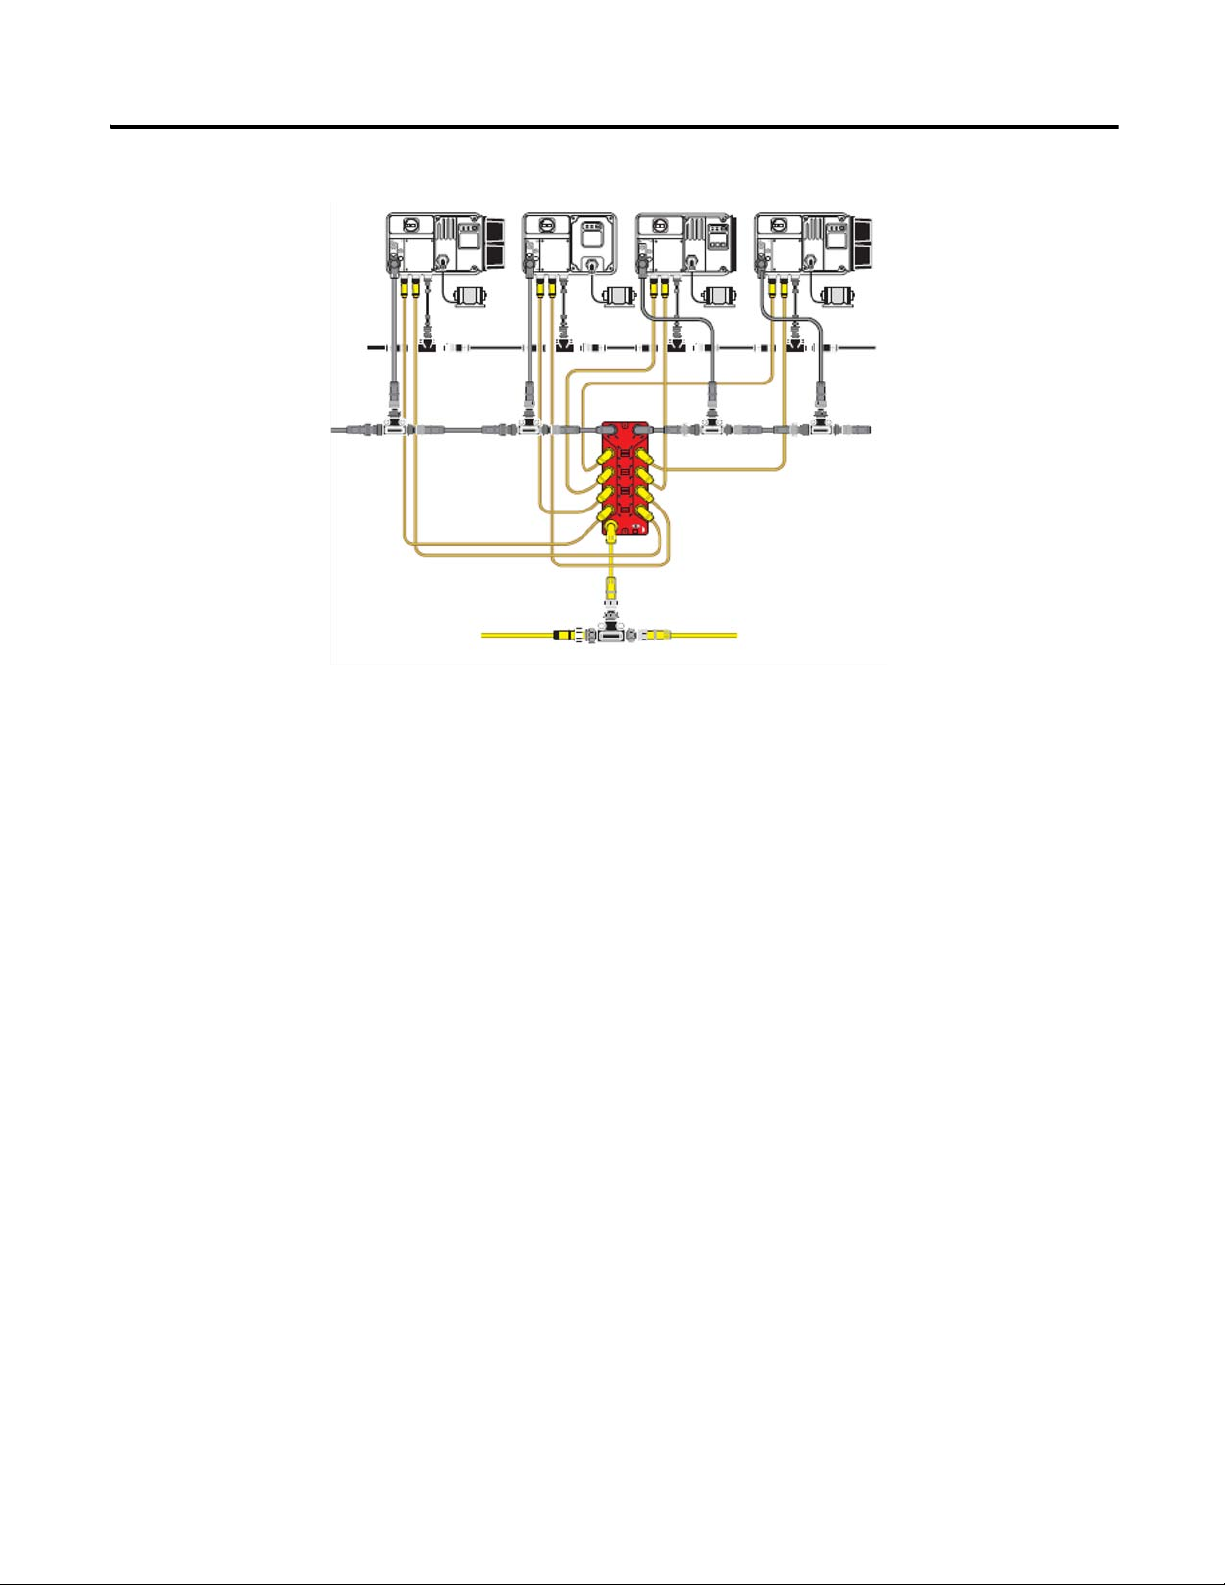
Figure 6 Safety System Overview
DeviceNet Media
I/O input
I/O output
Aux. Power
Three-Phase Power Media
The 1732DS Safety I/O module outputs to
provided 24V DC power for control power
to the ArmorStart - A1/A2 control power
The 1732DS Safety I/O module inputs will monitor the status of the safety-rated contactors inside the ArmorStart -SM safety monitor input.
input
7
Configuration of the
1732DS-IBXOBV4 Safety I/O
Note: To comply with TÜV, the 1732DS-IBXOBV4 Safety I/O module
must be configured as indicated below:
Configure the output that is connected to the I/O output cable assembly for:
• Dual (bipolar mode)
• Safety Pulse Test
Configure the input that is connected to the I/O Input cable assembly as
follows:
• Channel = Single
• Mode = Pulsed Test Input from test output X
• Source = Pulsed output from X
Safety PLC Program The program must:
• Force the output contactors to the open state when a safety-related stop
is demanded.
• Force the output contactors to remain in the open state if the SM
feedback is open after a safety-related stop is executed (see Notes).
Note: The program must inhibit the contactor closure to satisfy safety
Note: The SM feedback logic should be implemented only after a
Category 4 of 13849-1.
safety-related stop for the Bulletin 280G/281G controllers. It
should be ignored during normal operation. One of the series
contactors is used for the normal stop/start function for these
controllers. Therefore, a malfunctioning contactor circuit cannot be
distinguished from a normal running state.
Publication 280GS-QS001A-EN-P - May 2009
Page 8
8
Ground
Termina l
Three-Phase
Power
Receptacle
120V AC
Aux. Power
for
Control Brake
Safety Monitor
Input from
1732DS Safety
I/O Module Input
A1/A2 -24V DC
Control Power from
1732DS Safety
I/O Module Output
Termi na l
Designations
Description Color Code
SM1 Safety Monitor Input Brown
SM2 Safety Monitor Input White
A1 (+) Control Power Input Brown
A2 (-) Control Power Common Blue
PE Ground Green/Yellow
1/L1 Line Power - Phase A Black
3/L2 Line Power - Phase B White
5/L3 Line Power - Phase C Red
ArmorStart Safety with
ArmorConnect Connectivity
Terminal Designations
Publication 280GS-QS001A-EN-P - May 2009
Page 9

ArmorConnect Cable Ratings The ArmorConnect Power Media cables are rated per UL Type TC
600V 90 °C Dry 75 °C Wet, Exposed Run (ER) or MTW 600V 90 °C or
STOOW 105 °C 600V - CSA STOOW 600V FT2. For additional
information regarding ArmorConnect Power Media see the ArmorStart
User Manual.
9
Branch Circuit Protection
Requirements for
ArmorConnect™ Three-Phase
Power Media
Group Motor Installations for
USA and Canada Markets
Wiring and Workmanship
Guidelines
When using ArmorConnect Three-Phase Power Media, fuses can be used
for the motor branch circuit protective device, for the group motor
installations. The recommended fuse types are the following: Class CC, T,
or J type fuses, (100 A max.). A circuit breaker can be used for the motor
branch protective device, for the group motor installations when using only
the following ArmorConnect power media components: 280-M35M-M1,
280-M35F-M1, 280-T35, and 280-PWRM35*-M*. For additional
information, see the ArmorStart User Manual.
The ArmorStart Distributed Motor controllers are listed for use with each
other in group installations per NFPA 79, Electrical Standard for Industrial
Machinery. When applied according to the group motor installation
requirements, two or more motors, of any rating or controller type, are
permitted on a single branch circuit. Group Motor Installation has been
successfully used for many years in the USA and Canada.
In addition to conduit and seal-tite raceway, it is acceptable to utilize cable
that is dual rated Tray Cable, Type TC-ER and Cord, STOOW, for power
and control wiring on ArmorStart installations. In the USA and Canada
installations, the following guidance is outlined by the NEC and NFPA 79.
In industrial establishments where the conditions of maintenance and
supervision ensure that only qualified persons service the installation, and
where the exposed cable is continuously supported and protected against
physical damage using mechanical protection, such as struts, angles, or
channels, Type TC tray cable that complies with the crush and impact
requirements of Type MC (Metal Clad) cable and is identified for such use
with the marking Type TC-ER (Exposed Run)* shall be permitted between
a cable tray and the utilization equipment or device as open wiring. The
cable shall be secured at intervals not exceeding 1.8 m (6 ft) and installed in
a “good workman-like” manner. Equipment grounding for the utilization
equipment shall be provided by an equipment grounding conductor within
the cable.
*Historically cable meeting these crush and impact requirements were
designated and marked “Open Wiring”. Cable so marked is equivalent to the
present Type TC-ER and can be used.
Publication 280GS-QS001A-EN-P - May 2009
Page 10

10
While the ArmorStart is intended for installation in factory floor
environments of industrial establishments, the following must be taken into
consideration when locating the ArmorStart in the application: Cables,
including those for control voltage including 24V DC and communications,
are not to be exposed to an operator or building traffic on a continuous
basis. Location of the ArmorStart to minimize exposure to continual traffic
is recommended. If location to minimize traffic flow is unavoidable, other
barriers to minimize inadvertent exposure to the cabling should be
considered. Routing cables should be done in such a manner to minimize
inadvertent exposure and/or damage.
Additionally, if conduit or other raceways are not used, it is recommended
that strain relief fittings be utilized when installing the cables for the control
and power wiring through the conduit openings.
The working space around the ArmorStart may be minimized as the
ArmorStart does not require examination, adjustment, servicing or
maintenance while energized. In lieu of this service, the ArmorStart is
meant to be unplugged and replaced after proper lockout/tag-out procedures
have been employed.
DeviceNet Network Installation The ArmorStart Distributed Motor Controller contains the equivalent of
30 in. (0.76 m) of DeviceNet drop cable's electrical characteristics and
therefore 30 in. of drop cable must be included in the DeviceNet drop cable
budget for each ArmorStart in addition to actual drop cable required for the
installation.
Other DeviceNet System Design
Considerations
The separation of the control power and DeviceNet power is recommended
as a good design practice. This minimizes the load on the DeviceNet supply,
and prevents transients which may be present on the control power system
from influencing the communication controls.
Publication 280GS-QS001A-EN-P - May 2009
Page 11

11
LED Status Indication The LED Status Indication provides 4 status LEDs and a Reset button. The
LEDs provide status indication for the following:
• POWER LED
The LED is illuminated solid green when control power is present and
with the proper polarity
• RUN LED
This LED is illuminated solid green when a start command and control
power are present
•NETWORK LED
This bi-color (red/green) LED indicates the status of the
communication link
•FAULT LED
Indicates Controller Fault (trip) condition
The “Reset Button” as a local trip reset.
Figure 7 LED Status Indication and Reset
DeviceNet Node Commissioning Establishing a DeviceNet Node Address
The ArmorStart is shipped with a default node address of 63 and Autobaud
enabled. Each device on a DeviceNet network must have a unique node
address or MAC ID which can be set to a value from 0…63. Keep in mind
that most DeviceNet systems use address 0 for the master device (Scanner)
and node address 63 should be left vacant for introduction of new slave
devices. The ArmorStart offers two methods for node commissioning as
shown in the following pages.
Node Commissioning using Software
To set the node address of the ArmorStart using software or other handheld
tools, leave the hardware rotary switches in their default position (99) or
insure that they are set to something greater then (63). With the hardware
switches set, use the software or handheld tool to change the address.
When using software to node commission a device, it may be necessary to
have the EDS file stored on the computer. The EDS file defines how the
software such as RSNetWorx for DeviceNet will communicate to the
ArmorStart. You must use RSNetWorx for DeviceNet Revision 3.21
Service Pack 2 or later.
Publication 280GS-QS001A-EN-P - May 2009
Page 12
12
LSD
MSD
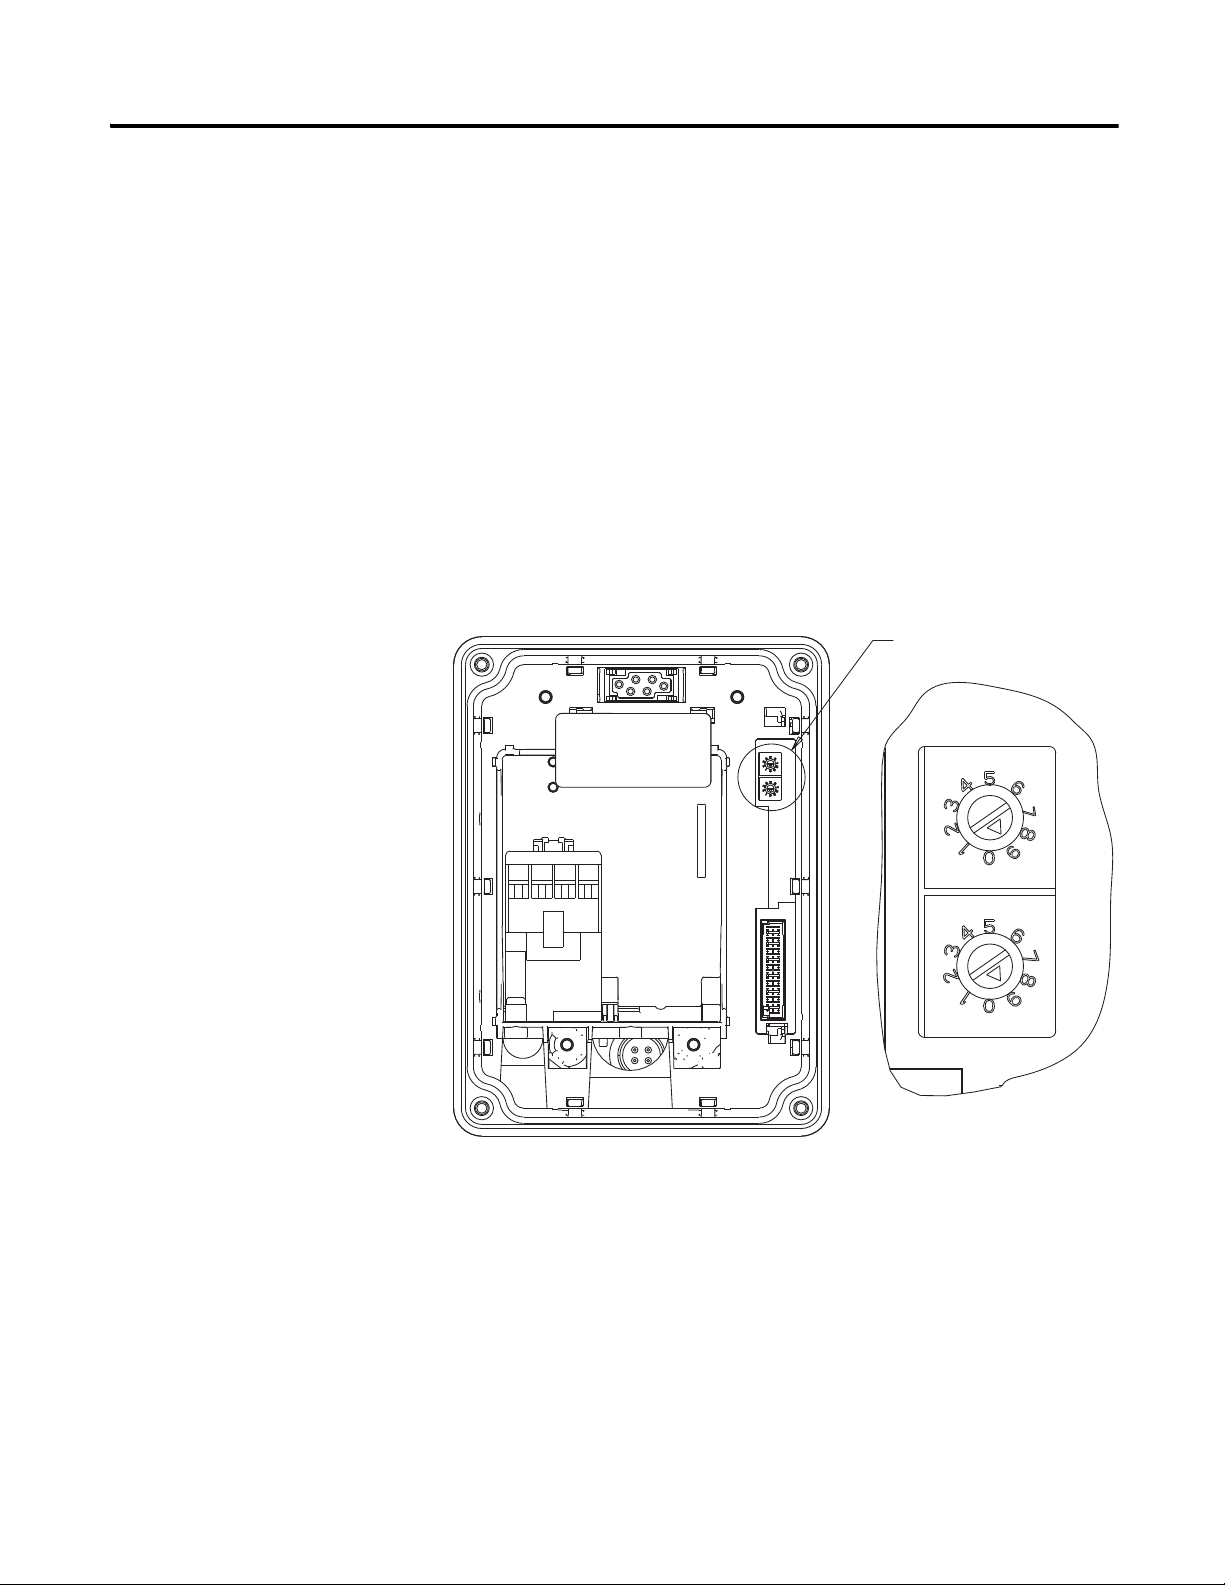
Node Commissioning using Hardware
The ArmorStart is shipped with the hardware rotary switches set to a value
of (99). If the switches are set to a value of (64) or above, the device will
automatically configure itself to the software node address. If the switches
are set to a value of (63) or less, the device will be at the node address
designated by the switch configuration.
To set an address using the hardware rotary switches, simply set the
switches to the desired node address. To access the node address rotary
switches, three-phase and control power should be turned off. Then remove
the starter module from the base unit. The rotary node address switches are
located on the back side of the starter module. Change the switches to the
desired node address. Re-install the starter module to the base unit. Reapply
power and the device will re-start at the new address.
Figure 8 Rotary Node Address Configuration
See Detail A
System Configuration
Information
Detail A
The following information is provided to identify the default method for
setting up communication to the ArmorStart. Additional configuration
information and advanced settings help can be found in the
ArmorStart User Manual, Publication 280G-UM001*.
LSD
MSD
Publication 280GS-QS001A-EN-P - May 2009
Page 13

13
Using Automap feature with default Input and Output (I/O) assemblies
The Automap feature available in all Rockwell Automation scanners will
automatically map the information as shown below. If manual mapping is
required, the information below can be used to map a device based on the
default configuration.
Table 3 Default I/O Messaging Data
Default
Message type Polled
Consumed data size 1 byte (Rx)
Produced data size 2 bytes (Tx)
Default Input and Output (I/O) Assembly Formats
The I/O assembly formats for the ArmorStart are identified by the value in
parameter 11 (Consumed IO Assy.) and parameter 12 (Produced IO Assy.).
These values determine the amount and arrangement of the information
communicated to the master scanner. The tables below identify the default
information produced and consumed by DOL (Bulletin 280) and Reversing
(Bulletin 281) devices. For additional formats and advance configurations
please reference the user manual:
Defaults for Standard Distributed Motor Controllers
Table 4 Instance 160 - Default Consumed data for Standard Distributed Motor
Controller Output information arrangement (1 byte)
Byte Bit 7 Bit 6 Bit 5 Bit 4 Bit 3 Bit 2 Bit 1 Bit 0
0
Not
Used
Table 5 Instance 161 - Default Produced data for Standard Distributed Motor
Controller Input information arrangement (2 bytes)
Byte Bit 7 Bit 6 Bit 5 Bit 4 Bit 3 Bit 2 Bit 1 Bit 0
0
1
Not
Used
Not
Used
Not
Used
140M OnNot
Not
Used
Not
Used
Used
User In 5 User In 4 User In 3 User In 2 User In 1 User In 0
Not
Used
Ready
Not
Used
Running
Rev
Fault
Reset
Running
Fwd
Run Rev Run Fwd
Warning Tripped
Publication 280GS-QS001A-EN-P - May 2009
Page 14

14
Setting the Motor FLA and Overload Trip Class
The product should now be configured and communicating on the network.
The last step is to program the proper motor FLA setting (parameter #106)
and overload trip class (parameter #107). This can be accomplished by
using software such as RSNetWorx for DeviceNet or a handheld DeviceNet
tool.
Use the software to access the device parameters screen. By default the
motor FLA is set to the minimum FLA setting for the device and the
overload trip class is set to 10. Set these parameters to the desired values
and download to the device.
Select FLA setting (parameter #106) and enter a value that corresponds to
the FLA of the motor connected to the ArmorStart. Make sure the Single
radio button is selected and then select Download to Device.
Select Overload Class (parameter #107) and choose the overload trip class
to be used with the motor connected to the ArmorStart. The ArmorStart can
be set up for trip class 10, 15, or 20. Make sure the Single radio button is
selected and then select Download to Device.
The proper motor protection is now in place.
Figure 9 RSNetWorx Parameter Screen
Publication 280GS-QS001A-EN-P - May 2009
Page 15

15
Quick Reference
Troubleshooting
There are four LEDs on the front of the ArmorStart that can provide an
indication as to the health of the device. The following is a brief explanation
of the operation of each LED.
Table 6 LED Status Indication
LED Definition
Power
Run
Network
Fault
Table 7 Network LED Status Indication
Network Status LED Definition Possible Causes
Off The device has not completed the initialization, is not on an
active network, or may not be powered up.
Flashes green-red-off While waiting to detect the network baud rate, the LED will
flash this pattern about every 3 seconds.
Solid Green The device is operating in a normal condition, and is
communicating to another device on the network.
Flashing Green The device is operating in a normal condition, is on-line, but
with no connection to another device. This is the typical
state for new devices.
Flashing Red Recoverable fault has occurred. Check to make sure the PLC and scanner are operating
Solid Red The device has detected a major error that has rendered it
incapable of communicating on the network (Duplicate
MAC ID, Bus-off, media issue).
Flashing Red and Green The device is in a communication faulted state. Power cycling the device may resolve the problem;
This LED will be illuminated solid green when control power is present and
with the proper polarity.
This LED will be illuminated solid green when a start command and control
power is present.
This bi-color LED is used to indicate the status of the DeviceNet network. See
the Network Status LED table below for additional information.
This LED is used to indicate the fault status of the ArmorStart. When the unit is
faulted, the unit will respond with a specific blink pattern to identify the fault.
See the Fault LED table below for additional information.
Check to make sure the product is properly wired and
configured on the network.
If the product stays in this state it means that there is no set
baud rate. Insure that at least one device on the network
has a set baud rate.
No action required.
The device may need to be mapped to a master scanner,
placed in a scanlist, or have another device communicate to
it.
correctly and that there are no media/cabling issues. Check
to see if other networked devices are in a similar state.
Troubleshooting should be done to ensure that the network
is correct (terminators, lengths, etc.) and there is not a
duplicate node problem. If other devices on the network
appear to be operating fine and power cycling the device
does not work, contact Technical Support.
however, if the problem continues, it may be necessary to
contact Technical Support.
Publication 280GS-QS001A-EN-P - May 2009
Page 16

16
Fault LED indications for
Bulletin 280G and 281G
ArmorStart Distributed Motor
Controllers
Table 8 Controller Fault LED Definitions
Blink
Pattern
1 Short Circuit
2 Overload trip
3 Phase Loss
4 Reserved Not Used
5 Reserved Not Used
6 Control Power
7I/O Fault
8 Over Temperature This fault is generated when the operating temperature has been exceeded. This fault cannot be disabled.
9 Phase Imbalance
10 DNet Power Loss
11 Reserved Not Used
12 Reserved Not Used
13 EEPROM Fault
14 Hardware Fault
Definitions Possible Causes or Remedies
The motor circuit protector has tripped, or the internal wiring protection algorithm has detected an unsafe
current range. Try to reset the protector if tripped. If the condition continues, check the power wiring. This
fault cannot be disabled.
The load has drawn excessive current and based on the trip class selected, the device has tripped. Verify
that the load is operating correctly and the ArmorStart is properly set-up. This fault cannot be disabled.
The ArmorStart has detected a missing phase. Verify that three-phase voltage is present at the line side
connections. This fault can be disabled and is disabled by default.
The ArmorStart has detected a loss of the control power voltage. Check control voltage, wiring, and proper
polarity. Also, check and replace the control voltage fuse ,if necessary. This fault can be disabled and is
disabled by default.
This error indicates a shorted sensor, shorted input device, or wiring input mistakes. If this fault occurs, the
offending problem should be isolated or removed prior to restarting the system. This fault can be disabled
and is disabled by default.
The ArmorStart has detected a voltage imbalance. Check the power system and correct if necessary. This
fault can be disabled and is disabled by default.
DeviceNet power has been lost or has dropped below the 12V threshold. Check the state of the network
power supply and look for DeviceNet media problems. This fault can be disabled and is disabled by default.
This is a major fault, which renders the ArmorStart inoperable. Possible causes of this fault are transients
induced during EEprom storage routines. If the fault was, initiated by a transient, power cycling should
clear the problem otherwise replacement of the ArmorStart may be required. This fault cannot be disabled.
This fault indicates that a serious hardware problem exists. Check for a base/starter module mismatch. If
no mismatch exists, the Armor Start may need to be replaced. (Hdw Flt is the factory-enabled default
setting.) This fault cannot be disabled.
Publication 280GS-QS001A-EN-P - May 2009
Page 17

Bulletin 280G/281G Parameters
Table 9 Starter Display and Parameter Settings
Parameter Name String Path (hex) Min Max Dflt Type Value
Starter Display
101 Phase A Current 002C – 01 – 08 0 32767 — INT xxx.x Amps
102 Phase B Current 002C – 01 – 09 0 32767 — INT xxx.x Amps
103 Phase C Current 002C – 01 – 0A 0 32767 — INT xxx.x Amps
104 Average Current 002C – 01 – 05 0 32767 — INT xxx.x Amps
105 % Therm Utilized 002C – 01 – 07 0 100 — USINT xxx %
Starter Settings
106 FLA Setting 002C – 01 – 03 See Table 10 below Min I INT xxx.x Amps
107 OL Trip Class 002C – 01 – 04 0 3 1 BYTE
108 OL Reset Level 0029 – 01 – 131 0 100 75 BYTE xxx %
17
1 = 10
2 = 15
3 = 20
Table 10 FLA Setting Ranges and Default Values (with indicated setting precision)
FLA Current Range (A)
Minimum Value Maximum Value
0.5 2.5 0.5
1.1 5.5 1.1
3.2 16.0 3.2
Default Value
Publication 280GS-QS001A-EN-P - May 2009
Page 18

18
Motor
Connection
DeviceNet
Connection
(Mini/M18)
Local Disconnect
6 Inputs
(Micro/M12)
A1/A2
Control Brake
Aux. Power
3-Phase Power
SM
LED Status
Indication
Figure 10 Bulletin 280G Safety ArmorStart
Publication 280GS-QS001A-EN-P - May 2009
Page 19

Figure 11 Bulletin 281G Safety ArmorStart
Motor
Connection
DeviceNet
Connection
(Mini/M18)
Local Disconnect
6 Inputs
(Micro/M12)
3-Phase Power
LED Status
Indication
A1/A2
Aux. Power
SM
Control Brake
19
Publication 280GS-QS001A-EN-P - May 2009
Page 20

20
Table 11 DeviceNet Media ➊
Description Length m (ft) Cat. No.
Sealed
KwikLink pigtail drops are Insulation
Displacement Connector (IDC) with integral Class
1 round cables for interfacing devices or power
supplies to flat cable
1 m (3.3)
2 m (6.5)
3 m (9.8)
6 m (19.8)
1485P-P1E4-B1-N5
1485P-P1E4-B2-N5
1485P-P1E4-B3-N5
1485P-P1E4-B6-N5
DeviceNet Mini- T-Port Tap
Right Keyway
Left Keyway
Connector
Mini Straight Female
Mini Straight Male
Mini Straight Female
Gray PVC Thin Cable
Mini Right Angle Male
Mini Right Angle Female
Mini Straight Male
Mini Right Angle Female
Mini Straight Male
Mini Straight Female
Mini Straight Male
Mini Straight Female
Thick Cable
Mini Right Angle Male
Mini Right Angle Female
Mini Straight Male
Mini Right Angle Female
Mini Straight Male
➊
See publication M116-CA001A-EN-P for complete cable selection information.
➋
Replace symbol with desired length in meters (Example: 1485G-P1N5-M5 for a 1 m cable). Standard cable lengths: 1 m, 2 m, 3 m, 4 m, 5 m, and 6 m.
➌
Replace symbol with desired length in meters (Example: 1485C-P1N5-M5 for a 1 m cable). Standard cable lengths: 1 m, 2 m, 3 m, 4 m, 5 m, 6 m, 8 m, 10 m, 12 m,
18 m, 24 m, and 30 m.
1485P-P1N5-MN5NF
1485P-P1N5-MN5KM
Cat. No.
1485G-P➋N5-M5
1485G-P➋W5-N5
1485G-P➋M5-Z5
1485G-P➋W5-Z5
1485C-P➌N5-M5
1485C-P➌W5-N5
1485C-P➌M5-Z5
1485C-P➌W5-Z5
Publication 280GS-QS001A-EN-P - May 2009
Page 21
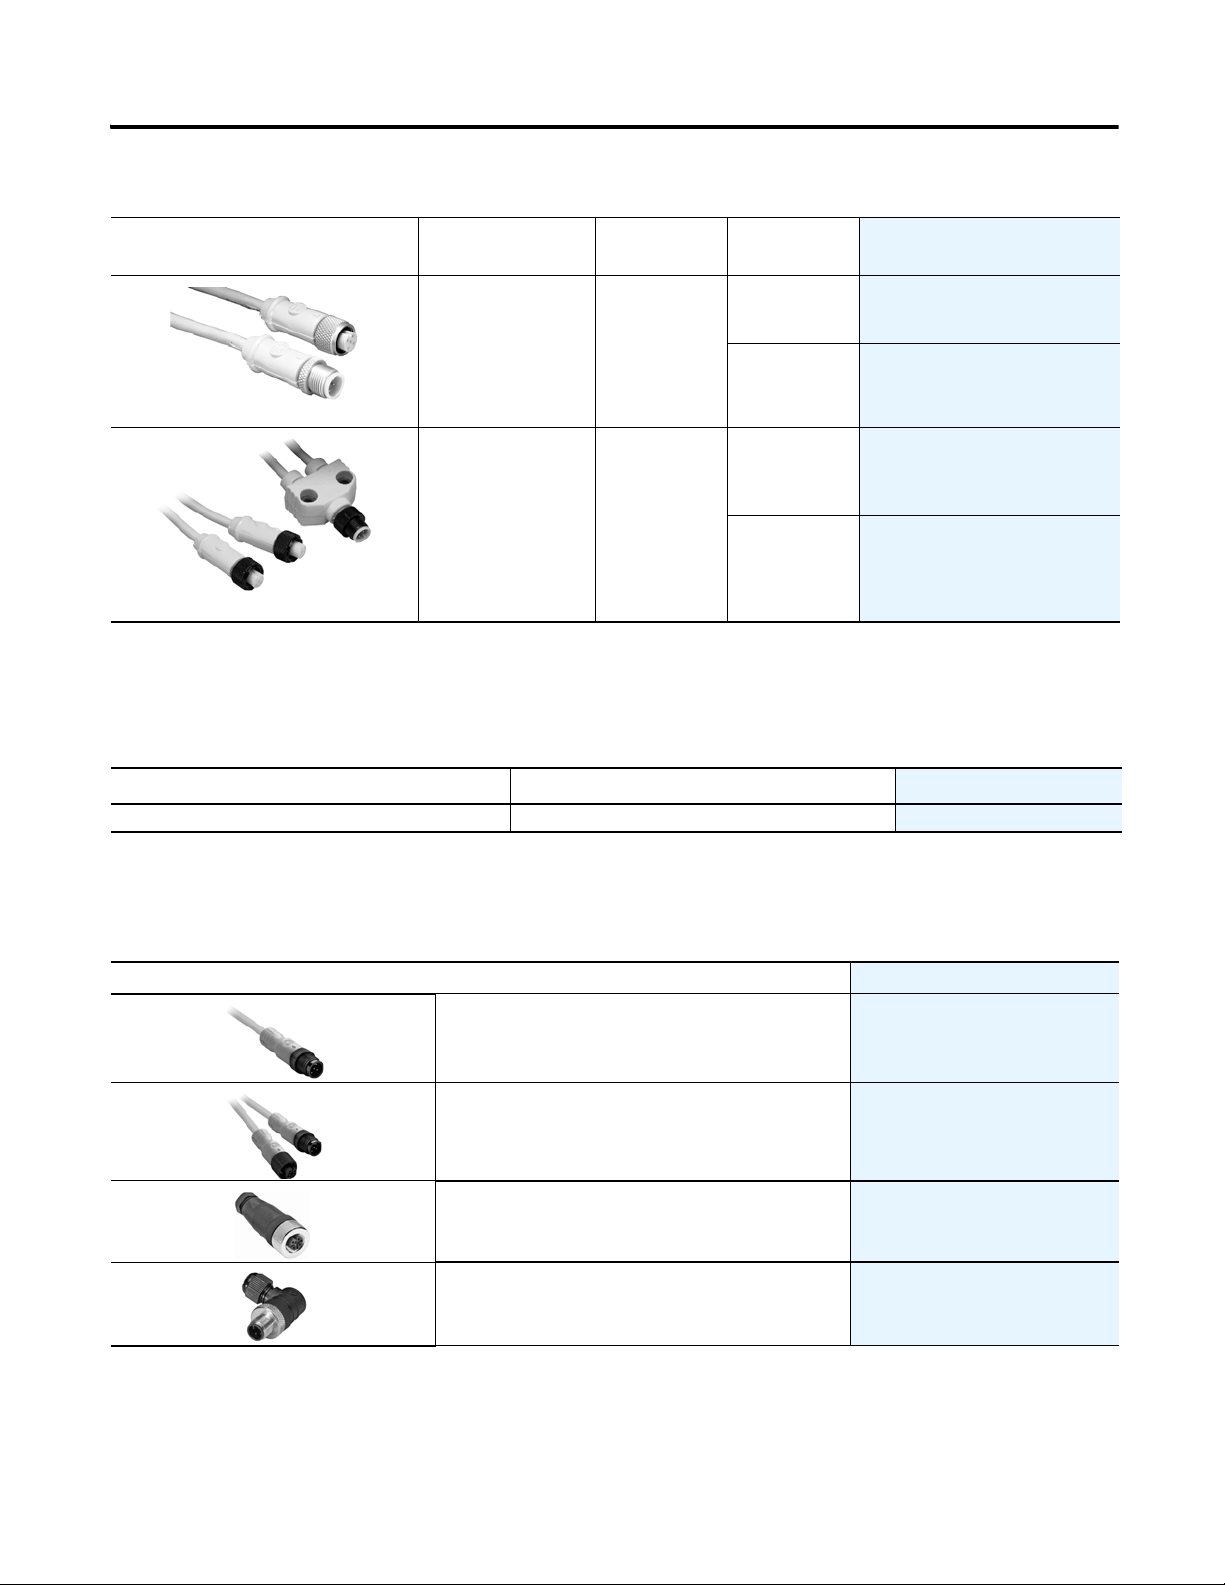
Table 12 Sensor Media ➊
DC Micro Patchcord
DC Micro V-Cable
21
Description
0
ArmorStart I/O
Connection
Pin Count Connector Cat. No.
Straight Female
Straight Male
Input 5-Pin
Straight Female
0
0
Right Angle Male
Straight Female
Input 5-pin
Right Angle Male
0
See the On-Machine Connectivity catalog for complete cable selection information.
➊
Replace symbol with desired length in meters (Example: 889D-F4ACDM-1 for a 1 m cable). Standard cable lengths: 1 m, 2 m, 5 m, and 10 m.
➋
Table 13 Sealing Caps
➌
Description Used on I/O Connection Catalog Number
Plastic Sealing Cap (M12) Input
To achieve IP67 rating, sealing caps must be installed on all unused I/O connections.
➌
889D-F4ACDM-
889D-F4AACDE-
879D-F4ACDM-
879D-R4ACM-
1485A-M12
➋
➋
➋
➋
Table 14 ArmorBlock Guard I/O Recommended Compatible Cables and Connectors
Description Cat. No.
DC Micro (M12) Male Cordset
DC Micro Style Patchcord 889D-F4HJDM-➊
M12 Terminal Chamber, Straight Male 871A-TS4-DM
M12 Terminal Chamber, Right Angle Male
➊ Replace symbol with 1 (1 m), 2 (2 m), 5 (5 m), or 10 (10 m) for standard cable length.
889D-F4HJ-➊
871A-TR4-DM
Publication 280GS-QS001A-EN-P - May 2009
Page 22

22
Notes:
Publication 280GS-QS001A-EN-P - May 2009
Page 23

Notes:
23
Publication 280GS-QS001A-EN-P - May 2009
Page 24

Registerd Trademark List
ArmorPoint and ArmorStart are registered trademarks of Rockwell Automation, Inc.
Tr ademark List
ArmorConnect, RSLogix5000, PLC, RSNetWorx, and SLC are trademarks of Rockwell Automation, Inc. DeviceNet and the DeviceNet logo are trademarks
of the Open Device Vendors Association (ODVA).
Publication 280GS-QS001A-EN-P — May 2009 PN-29251
Copyright ©2009 Rockwell Automation, Inc. All Rights Reserved. Printed in USA.
 Loading...