

Page 1
Installation Instructions
300 W Active Shunt Regulator
The 300 W Active Shunt Regulator is used in systems that see significant dc
voltage regeneration from large inertial load applications. The Allen-Bradley
Ultra3000, Ultra5000, and ULTRA 100 drives (see table below) do not have
internal shunt circuitry to dissipate excess energy, resulting in overvoltage
faults. For the smooth braking of large inertial loads, the use of a shunt
regulator is recommen ded.
The active shunt (catalog number 2090-UCSR-A300
or 1398-SR3AF) can be
used with the following drive products.
Drive Family Cat. No.
Ultra3000 Drives
Ultra5000 Drives 2098-IPD-005, -005-DN, -010, -010-DN, -020, and -020-DN
ULTRA 100 Drives
2098-DSD-005, -005-SE, -005-DN, -010, -010-SE, -010-DN, -020, -020-SE,
-020-DN, -005X, -005X-DN, -010X, -010X-DN , -020X and -020X-DN
1398-DDM-005, -005-DN, -009, -009-DN, -019, -019-DN, -005X, -005X-DN,
-009X, -009X-DN, -01 9 X, and -019X-DN
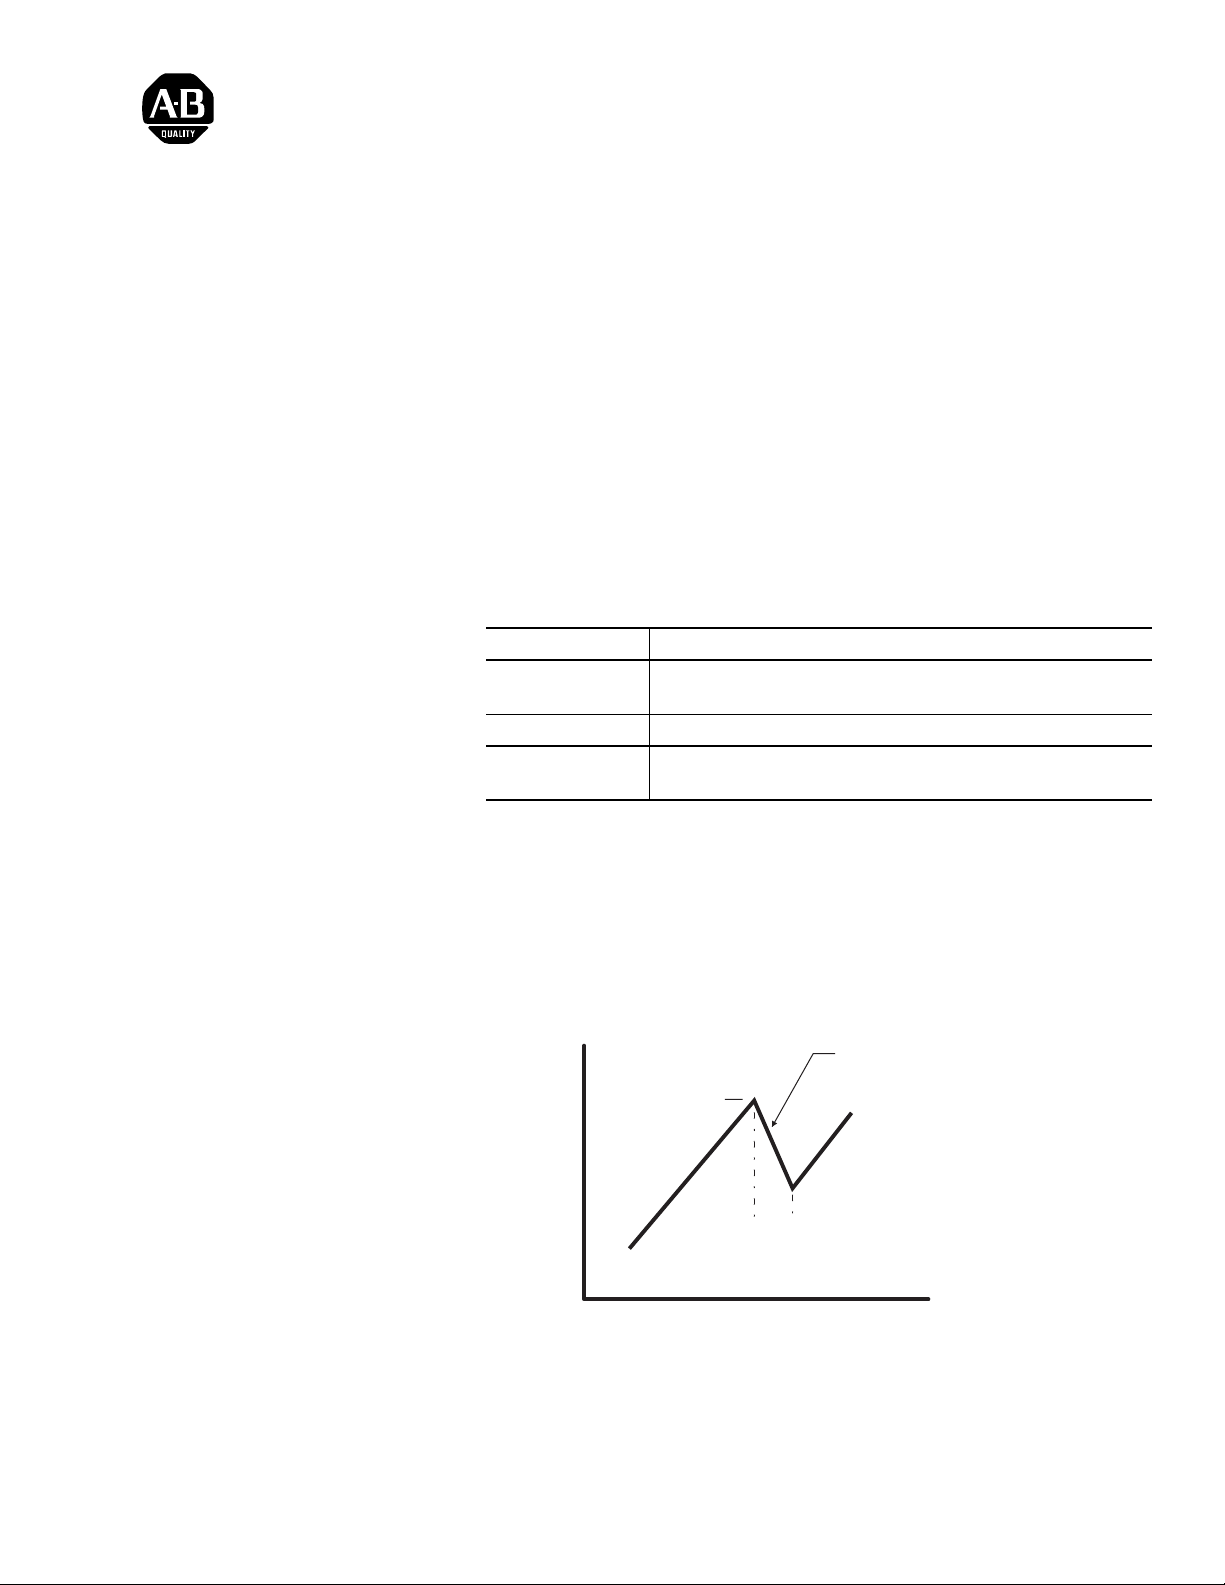
The active shunt monitors the dc bus voltage of the drive. If the voltage
reaches activation level, the shunt drops the dc bus voltage and dissipates the
energy as heat. Figure 1 illustrates the drop in dc bus voltage.
Figure 1
Shunt Activation on DC Bus Voltage
Voltage Drop for 1.0 ms, min
Activation Level
Bus Voltage
Actual Shunt Time
Time
1 Publication 2090-IN002C-EN-P — June 2007
Page 2
2 300 W Active Shunt Regulator
Performance
The peak shunting capability is a direct result of using a 36 Ω shunt resistor.
The peak shunt power can be calculated by dividing bus voltage squared, by
36. For example, if the bus voltage is 380V when the shunt is energized, the
shunt power is 4,011 W.
2
380V
4011 W
36 Ω
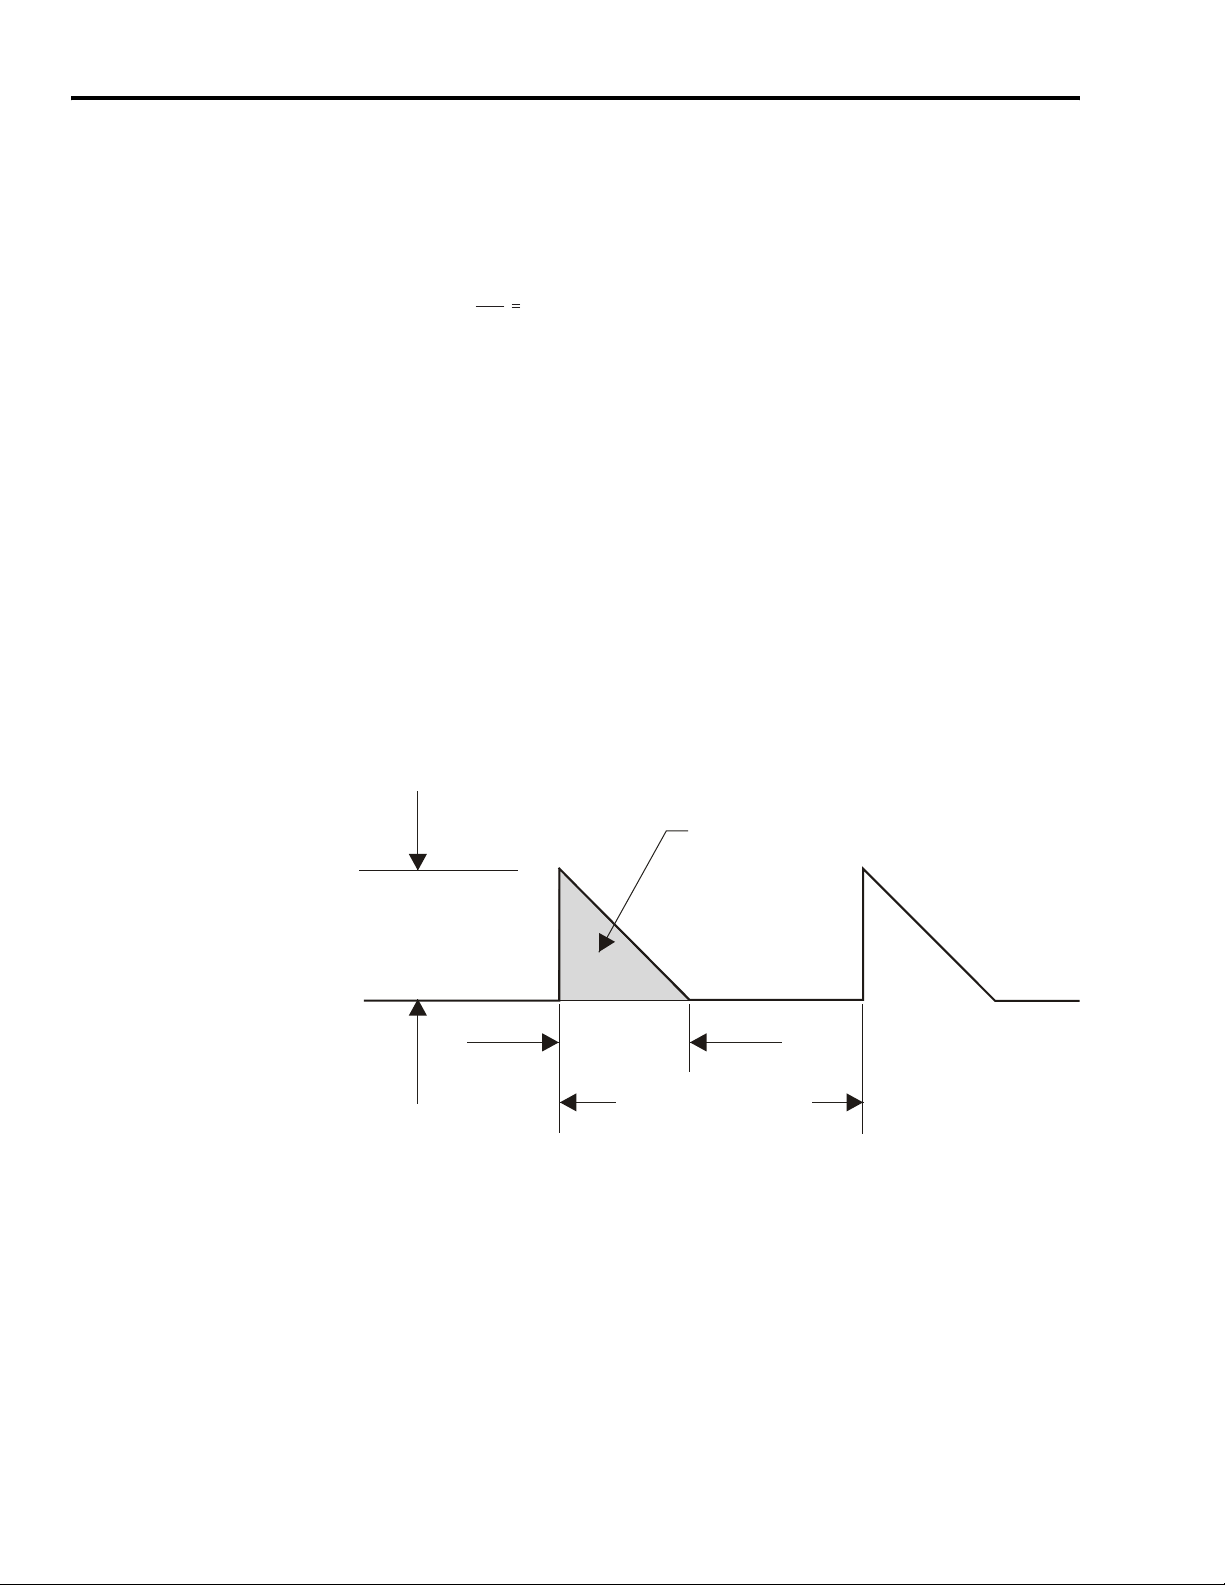
Continuous Shunt Capability
A shunt regeneration profile is defined by shunt time, cycle time, and peak
power level. Figure 2 illustrates a profile of regeneration during a machine
cycle.
• Shunt power is the peak shunt power during the shunt time.
• Shunt time is the time the power pulse is dissipated by the shunt.
• Cycle time is the time from the beginning of one shunt time to the
beginning of the next shunt time.
Figure 2
Shunt Regeneration Profile
Shunt Power
(watts)
Area = Shunt Energy (joule s)
Shunt Time
(seconds)
Cycle Time or
Machine Cycle
Publication 2090-IN002C-EN-P — June 2007
Page 3
300 W Active Shunt Regulator 3
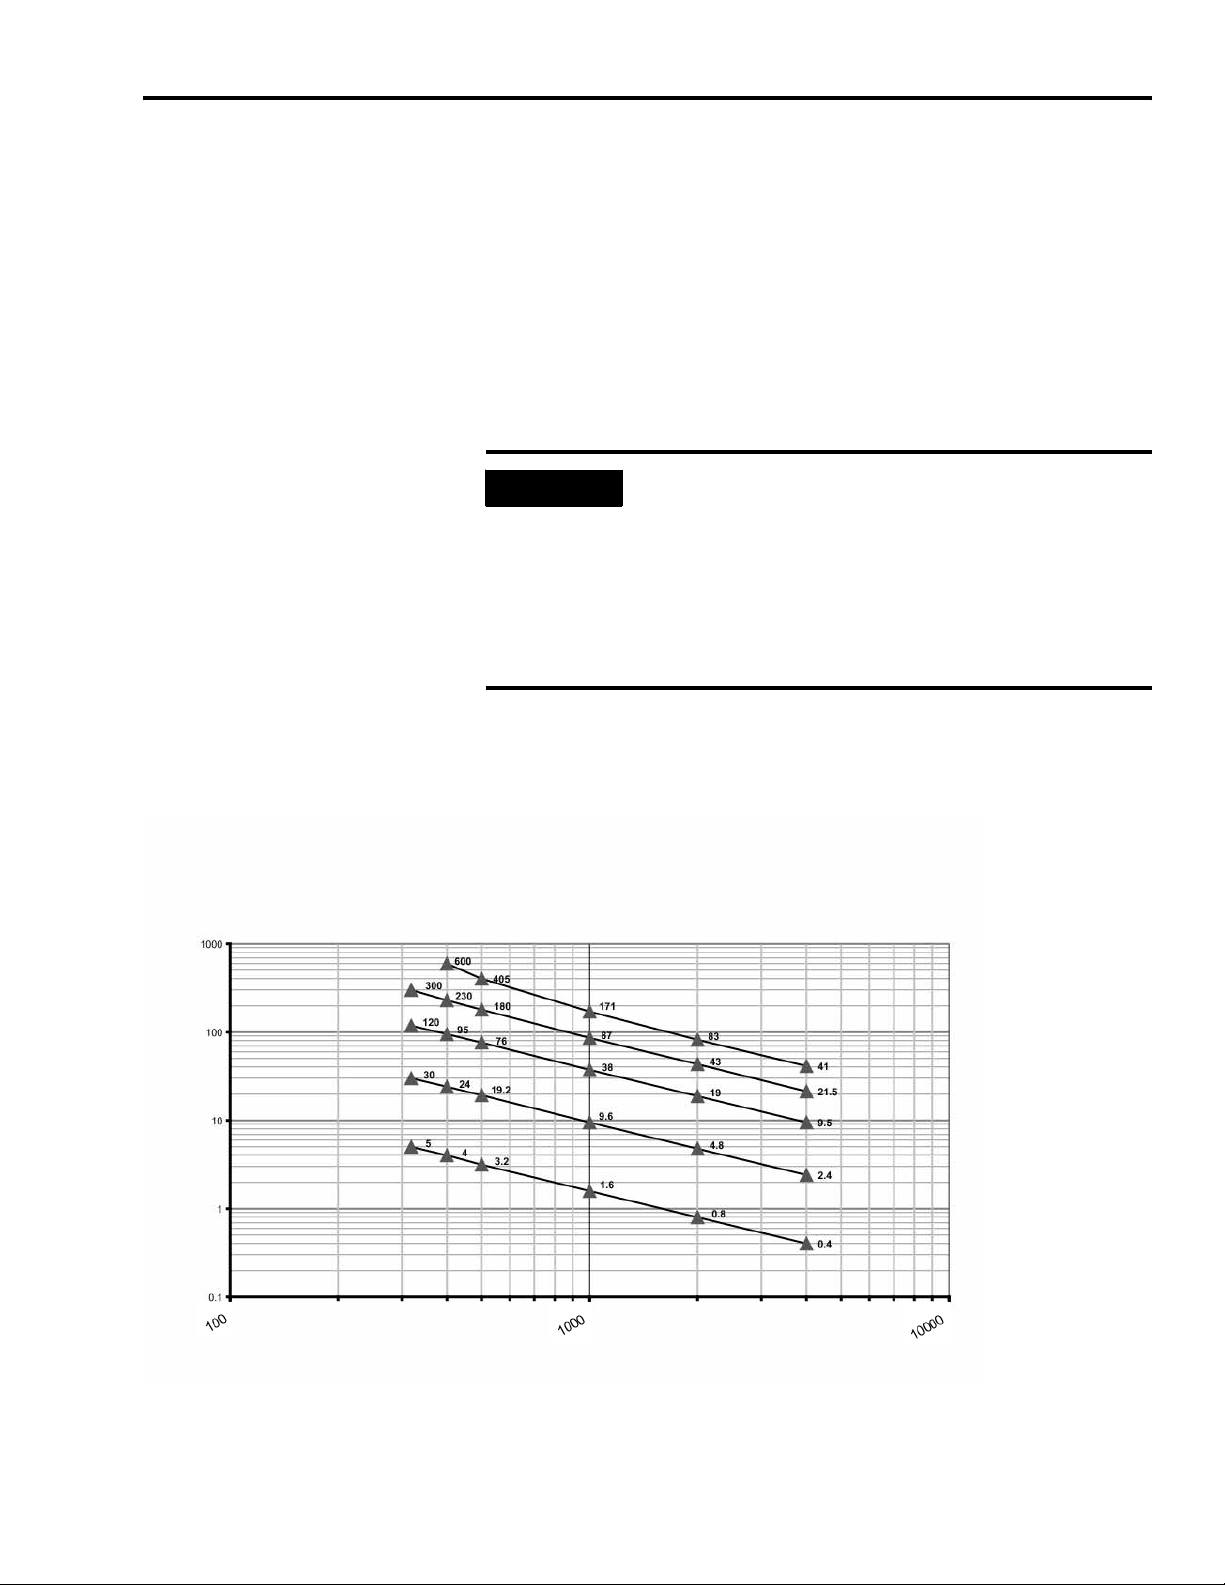
If the required average shunt power over the machine cycle is ≤ 300 W and t he
cycle time is ≤ 300 seconds, the active shunt can handle the application. Figure
3 illustrates the capability of an active shunt at
40 ºC (104 ºF) ambient temperature. The different lines represent different
cycle times (rates). The x-axis is the shunt power during the shunt time and the
y-axis is the maximum shunt time for that power and cycle time. For example,
the bottom line is a 5 second cycle time (meaning the shunt pulse comes every
5 seconds) and it intersects the 800 W pulse for 2 seconds every five seconds
in a 40 ºC (104 ºF) or less environment. This means that the shunt can handle
an 800 W pulse lasting for two seconds, every 5 seconds if the ambient
temperature is not above 40 ºC (104 ºF).
IMPORTANT
The limiting factor on how much average power can
be dissipated is temperature. The shunt power
capability increases approximately 5.5 W for every
1.0 ºC drop in ambient temperature (3.1 W/ ºF).
Increasing the air flow across the heat sink can
increase the continuous shunt capability significantly,
although obstructing air flow can decrease it
significantly.
Figure 3
Active Shunt Module Thermal Capacity
Pulse Time versus Pulse Power
Different Cycle Ti mes for the Active Shunt
Lower left of lines is safe, upper ri ght is unsafe.
Graph assumes 40 ºC (104 ºF) ambient.
Shunt Cycle Times
One-Shot
5 Minute Cycle
2 Minute Cycle
(showing seconds)
30 Second Cycle
Shunt Time (seconds)
5 Second Cycle
Shunt Power (watts)
Publication 2090-IN002C-EN-P — June 2007
Page 4
4 300 W Active Shunt Regulator
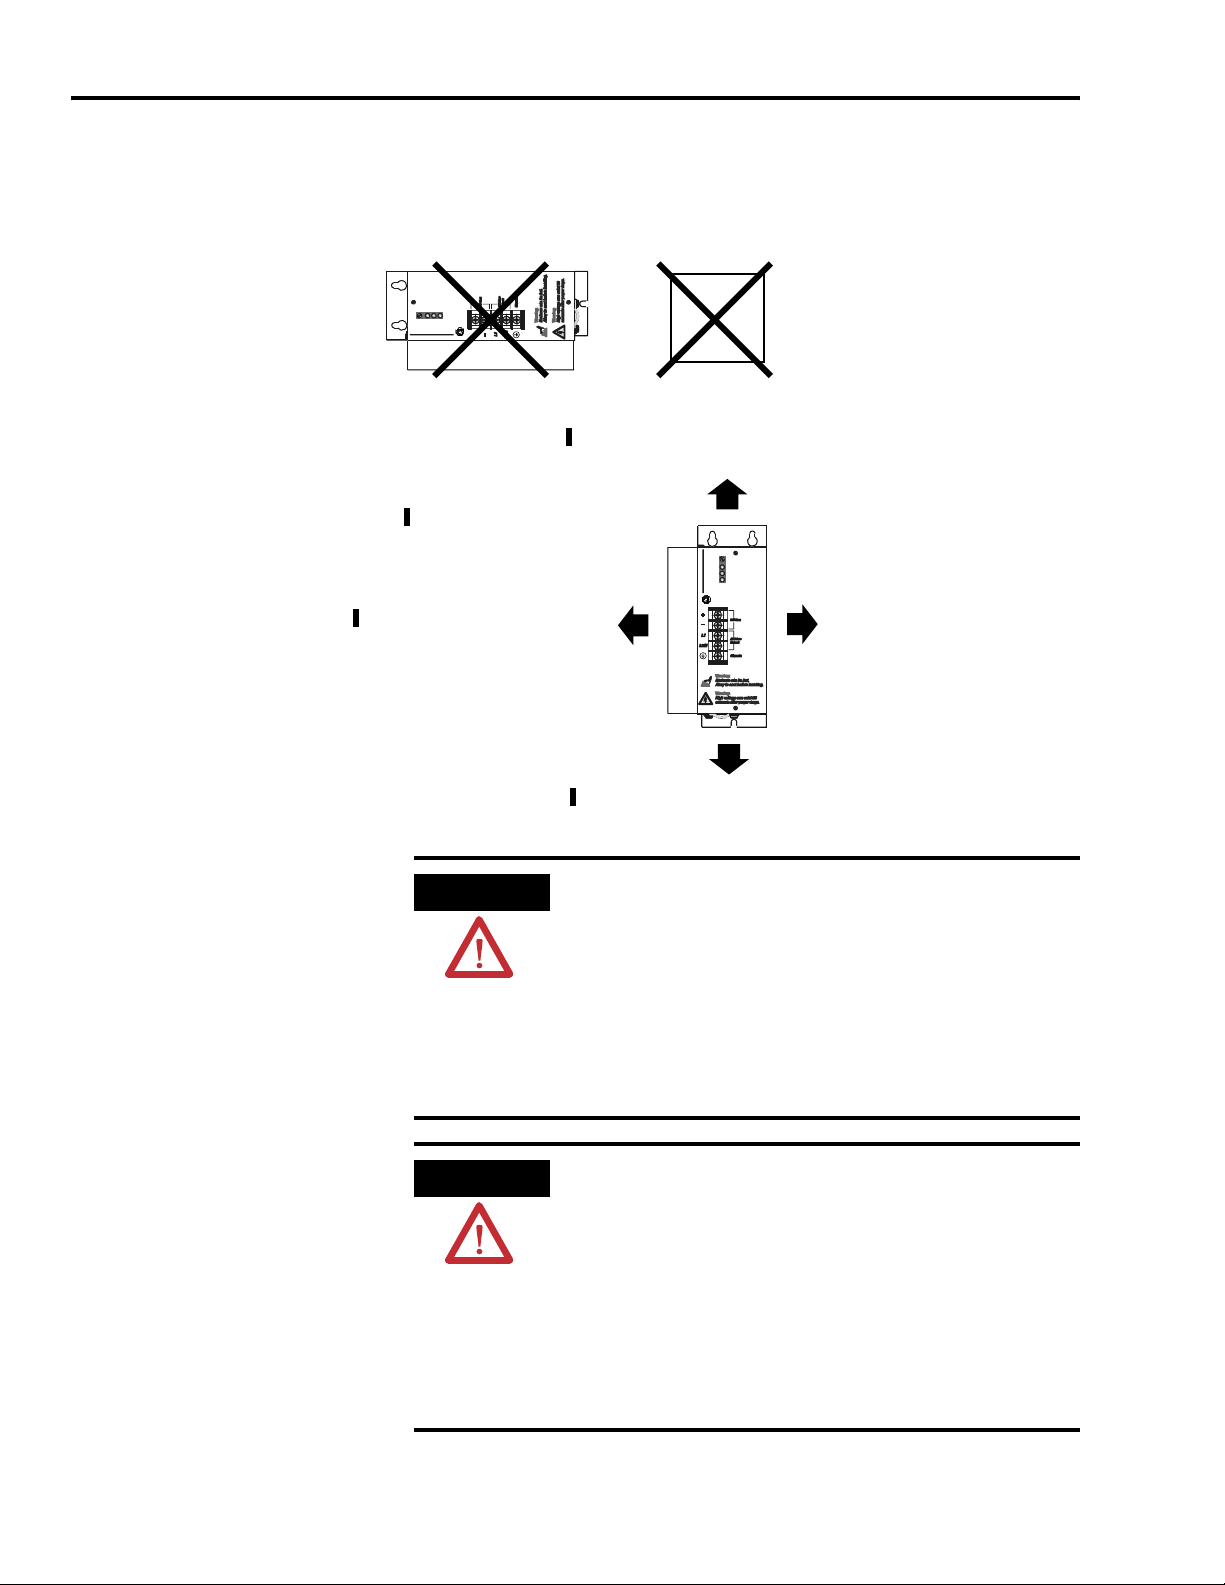
Install the Shunt
Do not mount shunt
module on its side.
Refer to Figure 4 for shunt module spacing requirements.
Figure 4
Shunt Module Spacin g Requirements within an Enclosure
Active Shunt
Adjust
Overtemp
DC Bus
Active
t
l
r
U
r
e
a
S
e
i
s
A
le
B
ra
y
d
n
lle
25 mm (1.0 in.) min clearance in
front of the shunt module.
12.5 mm (0.5 in.) min clearance on
each side of the shunt module.
50 mm (2.0 in.) min clearance
above the shunt module.
Adjust
y
le
Overtemp
d
DC Bus
ra
s
B
e
i
Active
r
n
e
S
a
r
lle
t
l
U
A
Do not mount temperature
sensitive components above
the shunt module.
Active Shunt
12.5 mm (0.5 in.) min clearan c e on
each side of the shunt module.
ATTENTION
ATTENTION
50 mm (2.0 in.) min clearance
below the shunt module.
The shunt module can release a large amount of heat
over time.
Any materia ls above the shunt mo dule or its
enclosure may need the protection of a metal plate
to keep from deteriorating.
Failure to observe this precaution could result in
damage to surrounding materials, possibly leading to
fire.
The shunt module can release a large amount of heat
inside an enclosure.
Be sure there is enough ventilation so as the
maximum ambient temperature of 40 °C (104 °F) is
not exceeded. Power performance must be
decreased 5.5 W for every 1.0 °C (3.1 °F) of
increasing ambient temperature.
Publication 2090-IN002C-EN-P — June 2007
Failure to observe this precaution could result in
damage to the shunt module.
Page 5

300 W Active Shunt Regulator 5
If the work environment dictates, the shunt module should be in an enclosure
providing protection against dust and splashing water (IP54), or dust free and
protection against water jets (IP65).
ATTENTION
Avoid contaminating electronic components.
Provide a quality air source to cabinets: free of
debris, oil, corrosives, or electrically conductive
contaminates. All cabinets should have scheduled
inspections and be cleaned as needed.
Failure to observe these safety procedures could
result in breakdown and damage to equipment.
Many National Electrical Manufacturers Association (NEMA) Type 4 cabinets
provide this level of protection.
ATTENTION
If you mount the shunt module inside a cabinet, you
must make sure that the ambient temperature inside
the cabinet does not exceed 40 °C (104 °F). Power
performance must be dec reas ed 5.5 W for every
1.0 °C (3.1 °F) of increasing ambient temperature.
Mount the Active Shunt Module
To mount the shunt module on a flat, solid, grounded surface:
1. Install the top mounting fasteners on the subpanel for the shunt module.
Refer to Product Specifications on page 7 for fastener, wire, and terminal
torque specifications.
2. Mount the shunt module on the two fasteners.
3. Install the lower fasteners.
4. Tighten all mounting fasteners.
Publication 2090-IN002C-EN-P — June 2007
Page 6

6 300 W Active Shunt Regulator
Wire the Active Shunt Module to a Drive
It is recommended to use shielded, high temperature (75 °C, 600V), 4.0 to 2.5
2
mm
(12 to 14 AWG) copper wire, or run the wire through shielded conduit.
The maximum length of each wire should be 3.05 m (10 ft) with the shield
grounded at both ends. Unshielded wiring should be kept as short as possible.
1. Locate the terminal block on your active shunt.
2. Wire the +DC Bus connection to the positive (+) bus connection of the
drive, and the -DC Bus connection to the negative (-) bus connection of
the drive.
IMPORTANT
The dc bus connections should only be used to
connect a single drive to the active shunt module.
Contact your Allen-Bradley representative for further
assistance if your application requires additional dc
power connections.
3. Wire the AC Line Detect to the respective terminals (L1, L2/N) of the
drive or its ac power source.
The shunt module will actively sense when ac power is lost to the drive
and after 0.25/s, it will drop the dc bus.
4. Wire the Chassis ground to earth ground.
5. Tighten the terminal block screws to 1.2 Nm (11 lb-in).
6. Gently pull on each wire to make sure it does not release from its terminal.
Publication 2090-IN002C-EN-P — June 2007
7. Reinsert and tighten any loose wires.
Page 7

300 W Active Shunt Regulator 7
Product Specifications
Specifications for the activ e shunt module ar e provided in the follo wing tables.
Physical measurements are shown in 300 W Active Shunt Re gulat or Mountin g
Dimensions on page 8.
General Specifications Value
Weight 1.51 kg (3.34 lb)
Vibration 2 g at 10...2000 Hz
Shock 15 g 11 ms half sine
Altitude 1500 m (5000 ft)
Humidity 5...95% noncondensing
Ambient operating temperatu r e
Air flow clearances 50 mm (2.0 in.) above and below unit for air fl ow
(1)
Power performance increases/decreases approximately 5.5 W for every 1.0 °C (3.1 W/ °F) drop/rise in ambient
temperature.
Mounting Hardwar e Size
Metal screws #10
Hex cap screws 1/4 in.-20
Hex cap screws (metric) M5
(1)
0...40 °C (32...104 °F)
Wiring Size
2
(12 AWG) or
75 °C copper wire
Terminal Block Screws Torque
Chrome plated brass 1.2 Nm (11 lb-in)
4.0 mm
2.5 mm
2
(14 AWG)
Publication 2090-IN002C-EN-P — June 2007
Page 8

8 300 W Active Shunt Regulator
65.1
(2.5)
38.1
(1.5)
18.6
6.35
(0.25)
(0.7)
Active Shunt
Adjust
y
le
Overtemp
d
DC Bus
ra
s
B
e
i
Active
r
n
e
S
a
r
lle
t
l
U
A
Figure 5
300 W Active Shunt Regulator Mounting Dimensions
13.21
(0.5)
Clearance holes for #10 (M5) screws.
129
(5.0)
Dimensions are in m m (i n. )
186.7
(7.3)
5.6
(0.22)
198
(7.8)
97.3
(3.8)
143
(5.6)
Publication 2090-IN002C-EN-P — June 2007
Page 9

300 W Active Shunt Regulator 9
ULTRA 100 Radiated Emissions CE Compliance
In order for the ULTRA 100 drive to comply with the CE radiated emissions
standards, ferrites mu st be a d ded to th e ends o f the t wisted dc bus wires when
using an active shunt. Route both wires through the ferrites. Ferrites with an
impedance at 100 MHz between 100 to 200 Ω wer e fo un d to b e eff e ct i v e. The
following table lists some readily available ferrites with effective impedance
ratings.
Figure 6
DC Bus Wiring Layout Using Ferrites with Shielded Cable
Ferrites for CE Radiated Emissions Compliance
Mfg. Part/No. D E Impedance
SS28B2034 0.250 0.120
SS28B2037 0.350 0.200
SS28B2032 0.500 0.200
Box-shaped ferrite assembly in ful ly enclosed
nylon case. End ports are surrounded with
flexible spring flutes to grip a range of cable
diameters from 3.2...12.7 mm (0.125...0.500 in .).
FerriShield, Inc.
350 Fifth Avenue, Suite 7310
New York, NY 10118-7591
125
Ω
154 Ω
230 Ω
Active Shunt
Adjust
y
le
Overtemp
d
DC Bus
ra
s
B
e
i
Active
r
n
e
S
a
r
lle
t
l
U
A
2
2
• Place shunt in metal enclosure providing EMI noise
reduction.
• For ULTRA 100 drive only:
Install a 100 to 200 W ferrite RFI suppressor at both ends
of the dc bus wires to comply with CE radiated
emissions standard.
• Some drive terminals are marked R, S, and T instead of
U, V, and W.
Publication 2090-IN002C-EN-P — June 2007
Page 10

10 300 W Active Shunt Regulator
Maintain the Active Shunt
Figure 7 shows information relating to the adjust screw and the LEDs that
show shunt activity. Refer to Troubleshoot on page 11 for more information.
Figure 7
Shunt Module Adjustment Screw and LEDs
Adjust (screw)
Adjust
Overtemp
DC Bus
Active
Active Shunt
The Adjust screw sets the activati on level of the shunt. It is set at
the factory and ordinarily wil l not need adjustment.
Overtemp (LED)
The Overtemp (yellow) LED illuminates when the unit’s thermostat
has tripped. While the ther mostat is tripped, the unit will not shunt
excess voltage (but the dc bus drop fea tu re wil l st il l function) and
this will usually cause the host drive to fault on overvoltage. Once
this LED turns on, power must be removed bef ore it will shut off,
even if the active shunt unit has cooled and is functioning agai n.
DC Bus (LED)
The DC Bus (green) LED illuminates when there is sufficient bus
voltage. The higher the bus voltage, the brighter the LED wi ll glow.
Active (LED)
The Active (green) LED illuminates while the shunt is dissipat ing
power. This LED indicates not only that the shunt is functioning, but
shows how often the shunt is energized.
Publication 2090-IN002C-EN-P — June 2007
Page 11

Troubleshoot
Adjust
Overtemp
DC Bus
Active
Active Shunt
300 W Active Shunt Regulator 11
If this fault appears Then
The internal thermostat in the shunt unit is
getting too hot. To fix this problem:
• reduce the average shunt power,
• reduce the ambient temperature of the air
Overtemp light is on
Drive registers Bus Overvoltage faul t s , but the
active shunt is functioning and the Overtemp light
is off.
• increase the amount of air passing over the
Once this LED turns on, only removing power will
shut it off; even when the active shunt unit has
cooled and is functioning again.
There are two situations where this can happen.
• First, if the Bus Overvoltage trip level on the
• Second, if the regenerat ion power exceeds
around the shunt, or
heat-sink fins.
drive is too low. Since this is not adjustable
on the drive, the solution is to reduce the
turn-on threshold level of th e act ive shunt.
This is done by turning the Adjust po t
counter-clockwise.
the shunt power for too long. It is po ssible
for the drive to generate more power than
the active shunt can handle. There are tw o
possible solutions to this situation.
• Adjust the regeneration profile so that
the drive generates less power fo r a
longer time. The drive current l imit
parameters may be useful here.
• Reduce the turn-on threshold level of
the active shunt, which turns on the
shunt earlier in the regeneration
profile.
Publication 2090-IN002C-EN-P — June 2007
Page 12

Rockwell Automation Support
Rockwell Automation provides technical information on the web to assist you in using
its products. At http://support.rockwellautomation.com, you can find technical
manuals, a kno w ledge ba se of FA Qs, technical and applicat io n no tes, sample code and
links to software service packs, and a MySupport feature that you can customize to
make the best use of these tools.
For an additional level of technical phone suppor t for installation, configuration and
troubleshooting, we o ffer TechConnect Support programs. For more information,
contact your local distributor or Rockwell Automation representative, or visit http://
support.rockwellautomation.com.
Installation Assist an ce
If you experience a problem with a hardware module within the first 24 hours of
installation, please review the information that's contained in this manual. Y ou can also
contact a special Customer Support number for initial help in getting your module up
and running:
United States
Outside United
States
1.440.646.3223
Monday – Friday, 8am – 5pm EST
Please contact your local Rockwell Automation representative for any
technical support issues.
New Product Satisfaction Return
Rockwell tests all of its products to ensure that they are fully operational when shipped
from the manufacturing facility. Howev er , if your product is not functioning and needs
to be return ed:
Contact your distributor. You must provide a Customer Support case number
United States
Outside United
States
Allen-Bradley, Ultra3000, Ultra5000, ULTRA 100, and Rockwell Automation are trademarks of Rockwell Automation, Inc.
Trademarks not belonging to Rockwell Automation are property of their respective companies.
(see phone number above to obtain one) t o your distributor in order to
complete the return process.
Please contact your local Rockwell Automation representative for return
procedure.
Publication 2090-IN002C-EN-P — June 200712 PN 0013-1091-003
Supersedes Publication 2090-IN002B-EN-P — February 2007 Copyright © 2006 Rockwell Automation, Inc. All rights reserved. Printed in the U.S.A.
 Loading...